

Page 1

Owner’s Manual
Mode d’emploi
Manual de instrucciones
ES
FR
EN
EnglishFrançaisEspañol
Page 2

FCC INFORMATION (U.S.A.)
1. IMPORTANT NOTICE: DO NOT MODIFY THIS UNIT!
This product, when installed as indicated in the instructions contained in this manual, meets FCC requirements. Modifications not
expressly approved by Yamaha may void your authority, granted by
the FCC, to use the product.
2. IMPORTANT: When connecting this product to accessories and/
or another product use only high quality shielded cables. Cable/s
supplied with this product MUST be used. Follow all installation
instructions. Failure to follow instructions could void your FCC
authorization to use this product in the USA.
3. NOTE: This product has been tested and found to comply with the
requirements listed in FCC Regulations, Part 15 for Class “B” digital
devices. Compliance with these requirements provides a reasonable level of assurance that your use of this product in a residential
environment will not result in harmful interference with other electronic devices. This equipment generates/uses radio frequencies
and, if not installed and used according to the instructions found in
the users manual, may cause interference harmful to the operation
of other electronic devices. Compliance with FCC regulations does
* This applies only to products distributed by YAMAHA CORPORATION OF AMERICA. (class B)
not guarantee that interference will not occur in all installations. If
this product is found to be the source of interference, which can be
determined by turning the unit “OFF” and “ON”, please try to eliminate the problem by using one of the following measures:
Relocate either this product or the device that is being affected by
the interference.
Utilize power outlets that are on different branch (circuit breaker or
fuse) circuits or install AC line filter/s.
In the case of radio or TV interference, relocate/reorient the
antenna. If the antenna lead-in is 300 ohm ribbon lead, change the
lead-in to co-axial type cable.
If these corrective measures do not produce satisfactory results,
please contact the local retailer authorized to distribute this type of
product. If you can not locate the appropriate retailer, please contact Yamaha Corporation of America, Electronic Service Division,
6600 Orangethorpe Ave, Buena Park, CA90620
The above statements apply ONLY to those products distributed by
Yamaha Corporation of America or its subsidiaries.
COMPLIANCE INFORMATION STATEMENT
(DECLARATION OF CONFORMITY PROCEDURE)
Responsible Party : Yamaha Corporation of America
Address : 6600 Orangethorpe Ave., Buena Park, Calif. 90620
Telephone : 714-522-9011
Type of Equipment : PORTABLE PA SYSTEM
Model Name : STAGEPAS 600BT, STAGEPAS 400BT
This device complies with Part 15 of the FCC Rules.
Operation is subject to the following two conditions:
1) this device may not cause harmful interference, and
2) this device must accept any interference received including interference
that may cause undesired operation.
See user manual instructions if interference to radio reception is suspected.
* This applies only to products distributed by
YAMAHA CORPORATION OF AMERICA.
2 STAGEPAS 600BT/STAGEPAS 400BT Owner’s Manual
(FCC DoC)
This device complies with Part 15 of the FCC Rules.
Operation is subject to the following two conditions:
(1) this device may not cause harmful interference,
and (2) this device must accept any interference
received, including interference that may cause
undesired operation.
(fcc_sengen)
FCC CAUTION
Changes or modifications not expressly approved by
the party responsible for compliance could void the
user’s authority to operate the equipment.
이 기기는 가정용(B급) 전자파적합기기로서 주로
가정에서 사용하는 것을 목적으로 하며, 모든
지역에서 사용할 수 있습니다.
(class b korea)
Page 3

English
PRECAUTIONS
PLEASE READ CAREFULLY
BEFORE PROCEEDING
Please keep this manual in a safe place for
future reference.
WARNING
Always follow the basic precautions listed below to
avoid the possibility of serious injury or even death
from electrical shock, short-circuiting, damages, fire
or other hazards. These precautions include, but are
not limited to, the following:
Power supply/power cord
• Do not place the power cord near heat sources such as
heaters or radiators, and do not excessively bend or
otherwise damage the cord, place heavy objects on it, or
place it in a position where anyone could walk on, trip
over, or roll anything over it.
• Only use the voltage specified as correct for the mixer.
The required voltage is printed on the name plate of the
mixer.
• Use only the supplied power cord.
If you intend to use the device in an area other than in the
one you purchased, the included power cord may not be
compatible. Please check with your Yamaha dealer.
• Check the electric plug periodically and remove any dirt
or dust which may have accumulated on it.
• When setting up the device, make sure that the AC outlet
you are using is easily accessible. If some trouble or
malfunction occurs, immediately turn off the power switch
and disconnect the plug from the outlet. Even when the
power switch is turned off, as long as the power cord is
not unplugged from the wall AC outlet, the device will not
be disconnected from the power source.
• Remove the electric plug from the outlet when the device
is not to be used for extended periods of time, or during
electrical storms.
• Be sure to connect to an appropriate outlet with a
protective grounding connection.
Do not open
• This device contains no user-serviceable parts. Do not
open the device or attempt to disassemble the internal
parts or modify them in any way. If it should appear to be
malfunctioning, discontinue use immediately and have it
inspected by qualified Yamaha service personnel.
Water warning
• Do not expose the device to rain, use it near water or in
damp or wet conditions, or place on it any containers
(such as vases, bottles or glasses) containing liquids
which might spill into any openings. If any liquid such as
water seeps into the device, turn off the power
immediately and unplug the power cord from the AC
outlet. Then have the device inspected by qualified
Yamaha service personnel.
• Never insert or remove an electric plug with wet hands.
Hearing loss
• Avoid setting all equalizer controls and level controls to
their maximum. Depending on the condition of the
connected devices, doing so may result in feedback that
can cause hearing loss and damage the speakers.
• Before connecting the device to other devices, turn off the
power for all devices. Also, before turning the power of all
devices on or off, make sure that all volume levels are set
to the minimum. Failing to do so may result in hearing loss,
electric shock, or device damage.
• When turning on the AC power in your audio system,
always turn on the device LAST, to avoid hearing loss and
speaker damage. When turning the power off, the device
should be turned off FIRST for the same reason.
Fire warning
• Do not place any burning items or open flames near the
device, since they may cause a fire.
Wireless unit
• Do not use this device near medical devices or inside
medical facilities. Radio waves from this device may affect
electro-medical devices.
• Do not use this device within 15 cm (6 in) of persons with
a heart pacemaker implant or a defibrillator implant. Radio
waves from this device may affect electro-medical
devices, such as a heart pacemaker implant or
defibrillator implant.
If you notice any abnormality
• If any of the following problems occur, immediately turn off
the power switch and disconnect the electric plug from
the outlet.
- The power cord or plug becomes frayed or damaged.
- Unusual smells or smoke are emitted.
- Some object has been dropped into the device.
- There is a sudden loss of sound during use of the
device.
- Cracks or other visible damage appear on the device.
Then have the device inspected or repaired by qualified
Yamaha service personnel.
• If this device should be dropped or damaged,
immediately turn off the power switch, disconnect the
electric plug from the outlet, and have the device
inspected by qualified Yamaha service personnel.
STAGEPAS 600BT/STAGEPAS 400BT Owner’s Manual 3
Page 4
CAUTION
Always follow the basic precautions listed below to
avoid the possibility of physical injury to you or others,
or damage to the device or other property. These
precautions include, but are not limited to, the following:
Power supply/power cord
• When removing the electric plug from the device or an
outlet, always hold the plug itself and not the cord. Pulling
by the cord can damage it.
Connections
• For the SPEAKERS jacks of the mixer, use only the
included MODEL 600S or MODEL 400S speakers and
speaker cables. Use of other types of speakers and
cables may result in damage, or even fire.
Maintenance
• Remove the power plug from the AC outlet when cleaning
the device.
Handling caution
Location
• Do not place the device in an unstable position where it
might accidentally fall over and cause injuries.
• Do not block the vents. This mixer has ventilation holes at
the top and sides to prevent the internal temperature from
becoming too high. In particular, do not place the mixer on
its side or upside down. Inadequate ventilation can result
in overheating, possibly causing damage to the mixer, or
even fire.
• If you install the mixer apart from the speakers:
- Do not cover it with any cloth.
- Make sure the top surface faces up; do not install on its
sides or upside down.
- Do not use the device in a confined, poorly-ventilated
location.
Inadequate ventilation can result in overheating, possibly
causing damage to the device(s), or even fire. Make sure
that there is adequate space around the device: at least
30 cm above, 30 cm at the sides and 30 cm behind.
• If you lay the speaker flat on its side or like a stage
monitor, make sure to remove the mixer first.
• Do not use the speaker’s handles for suspended
installation. Doing so can result in damage or injury.
• Do not hold the bottom of the speaker when transporting
or moving it. In doing so, you may pinch your hands under
the speaker, and result in injury.
• Do not place the device in a location where it may come
into contact with corrosive gases or salt air. Doing so may
result in malfunction.
• Before moving the device, remove all connected cables.
• Do not insert your fingers or hands in any gaps or
openings on the vents or panel of the mixer, and the ports
of the speaker.
• Avoid inserting or dropping foreign objects (paper,
plastic, metal, etc.) into any gaps or openings on the vents
or panel of the mixer, and the ports of the speaker. If this
happens, immediately turn off the power of the mixer,
unplug the power cord from the AC outlet, and have the
device inspected by qualified Yamaha service personnel.
• Do not rest your weight on the device or place heavy
objects on it. Avoid applying excessive force to the
buttons, switches or connectors to prevent injuries.
• Do not operate the device if the sound is distorting.
Prolonged use in this condition could cause overheating
and result in fire.
• Avoid pulling the cables such as microphones to prevent
injuries or damage to the speakers and mixer by causing
them to fall.
Yamaha cannot be held responsible for damage caused
by improper use or modifications to the device.
4 STAGEPAS 600BT/STAGEPAS 400BT Owner’s Manual
Page 5

English
NOTICE
To avoid the possibility of malfunction/ damage to the
product, damage to data, or damage to other
property, follow the notices below.
■ Handling and maintenance
• Do not expose the device to excessive dust or vibration,
or extreme cold or heat (such as in direct sunlight, near a
heater, or in a car during the day), in order to prevent the
possibility of panel disfiguration, unstable operation, or
damage to the internal components.
• Do not place vinyl, plastic or rubber objects on the device,
since this might discolor the panel.
• When cleaning the device, use a dry and soft cloth. Do not
use paint thinners, solvents, cleaning fluids, or chemicalimpregnated wiping cloths.
• Condensation can occur in the device due to rapid,
drastic changes in ambient temperature—when the
device is moved from one location to another, or air
conditioning is turned on or off, for example. Using the
device while condensation is present can cause damage.
If there is reason to believe that condensation might have
occurred, leave the device for several hours without
turning on the power until the condensation has
completely dried out.
• Protection Circuit: This speaker system has an internal
protection circuit that shuts off the speaker unit when an
excessive input signal is applied. If the speaker unit emits
no sound, reduce the volume level of the amplifier
immediately. The sound will return automatically in several
seconds.
• When placing the speaker face down, always place it on a
flat surface.
• Do not touch the speaker driver unit.
• The rubber feet included in this package can be attached
to the speaker to prevent slippage when it is to be used on
a slippery surface.
• Air blowing out of the bass reflex ports is normal, and
often occurs when the speaker is handling program
material with heavy bass content.
• Always turn the power off when the device is not in use.
■ Connectors
• XLR-type connectors are wired as follows (IEC60268
standard):
pin 1: ground
pin 2: hot (+)
pin 3: cold (–).
Information
■ About this manual
• The illustrations as shown in this manual are for
instructional purposes only.
• The company names and product names in this manual
are the trademarks or registered trademarks of their
respective companies.
■ About disposal
• This product contains recyclable components.
When disposing of this product, please contact the
appropriate local authorities.
The Bluetooth
trademarks owned by Bluetooth SIG, Inc. and any use of
such marks by Yamaha Corporation is under license.
The model number, serial number, power requirements, etc., may be
found on or near the name plate, which is at the bottom of the unit.
You should note this serial number in the space provided below and
retain this manual as a permanent record of your purchase to aid identification in the event of theft.
Model No.
Serial No.
®
word mark and logos are registered
(bottom_en_01)
STAGEPAS 600BT/STAGEPAS 400BT Owner’s Manual 5
Page 6

Features
Thank you for purchasing the Yamaha STAGEPAS 600BT/400BT Portable PA System! The STAGEPAS is an all-in-one portable PA system,
consisting of two dedicated speakers and a powered mixer. It is designed to amplify music or speeches at live events or during other
productions.
This owner’s manual explains how to set up and operate the STAGEPAS for use as a loudspeaker for music and speeches by individuals,
companies, or schools. To get the most out of your new STAGEPAS and its sophisticated functions, we suggest that you read through this
manual thoroughly, and keep it in a safe place for future reference.
Table of Contents
PRECAUTIONS . . . . . . . . . . . . . . . . . . . . . . . . . . . . . . . . . . . . . 3
NOTICE . . . . . . . . . . . . . . . . . . . . . . . . . . . . . . . . . . . . . . . . . . .5
Information . . . . . . . . . . . . . . . . . . . . . . . . . . . . . . . . . . . . . . . . .5
Features . . . . . . . . . . . . . . . . . . . . . . . . . . . . . . . . . . . . . . . . . . . 6
Model description . . . . . . . . . . . . . . . . . . . . . . . . . . . . . . . . . . . . 7
Attaching a speaker to a speaker stand . . . . . . . . . . . . . . . . . . . 7
Attaching non-skid pads . . . . . . . . . . . . . . . . . . . . . . . . . . . . . . . 7
Controls and Functions. . . . . . . . . . . . . . . . . . . . . . . . . . . . . . . .8
Quick Start Guide . . . . . . . . . . . . . . . . . . . . . . . . . . . . . . . . . . . 11
®
Using a Bluetooth
Troubleshooting . . . . . . . . . . . . . . . . . . . . . . . . . . . . . . . . . . . . 16
Specifications . . . . . . . . . . . . . . . . . . . . . . . . . . . . . . . . . . . . . . 17
device . . . . . . . . . . . . . . . . . . . . . . . . . . . . 15
Features
• High-output power amplifier for versatility in a wide variety of performance
applications.
• Two-way bass-reflex type speakers for high-quality, powerful sound.
• Multi-channel mixer supports a wide range of inputs.
• Bluetooth input for wireless high-quality sound from smartphones or tablets.
• Yamaha’s high-quality SPX reverb, which provides optimum processing for
instruments or vocals.
• Feedback Suppressor, which automatically cuts and prevents undesirable feedback
noise.
• Independent equalizer on each channel for tonal adjustment and sound control.
Package Contents (Please confirm that all items are included.)
• Main unit
(Dedicated speakers (STAGEPAS 600BT: MODEL 600S,
STAGEPAS 400BT: MODEL 400S) x 2, powered mixer x 1)
• Power cord (2m) x 1
• Speaker cables (6m) x 2
• Non-skid pads x 12
• Ferrite core x 2
• Cable tie x 2
• Owner’s Manual (this book)
6 STAGEPAS 600BT/STAGEPAS 400BT Owner’s Manual
Page 7
English
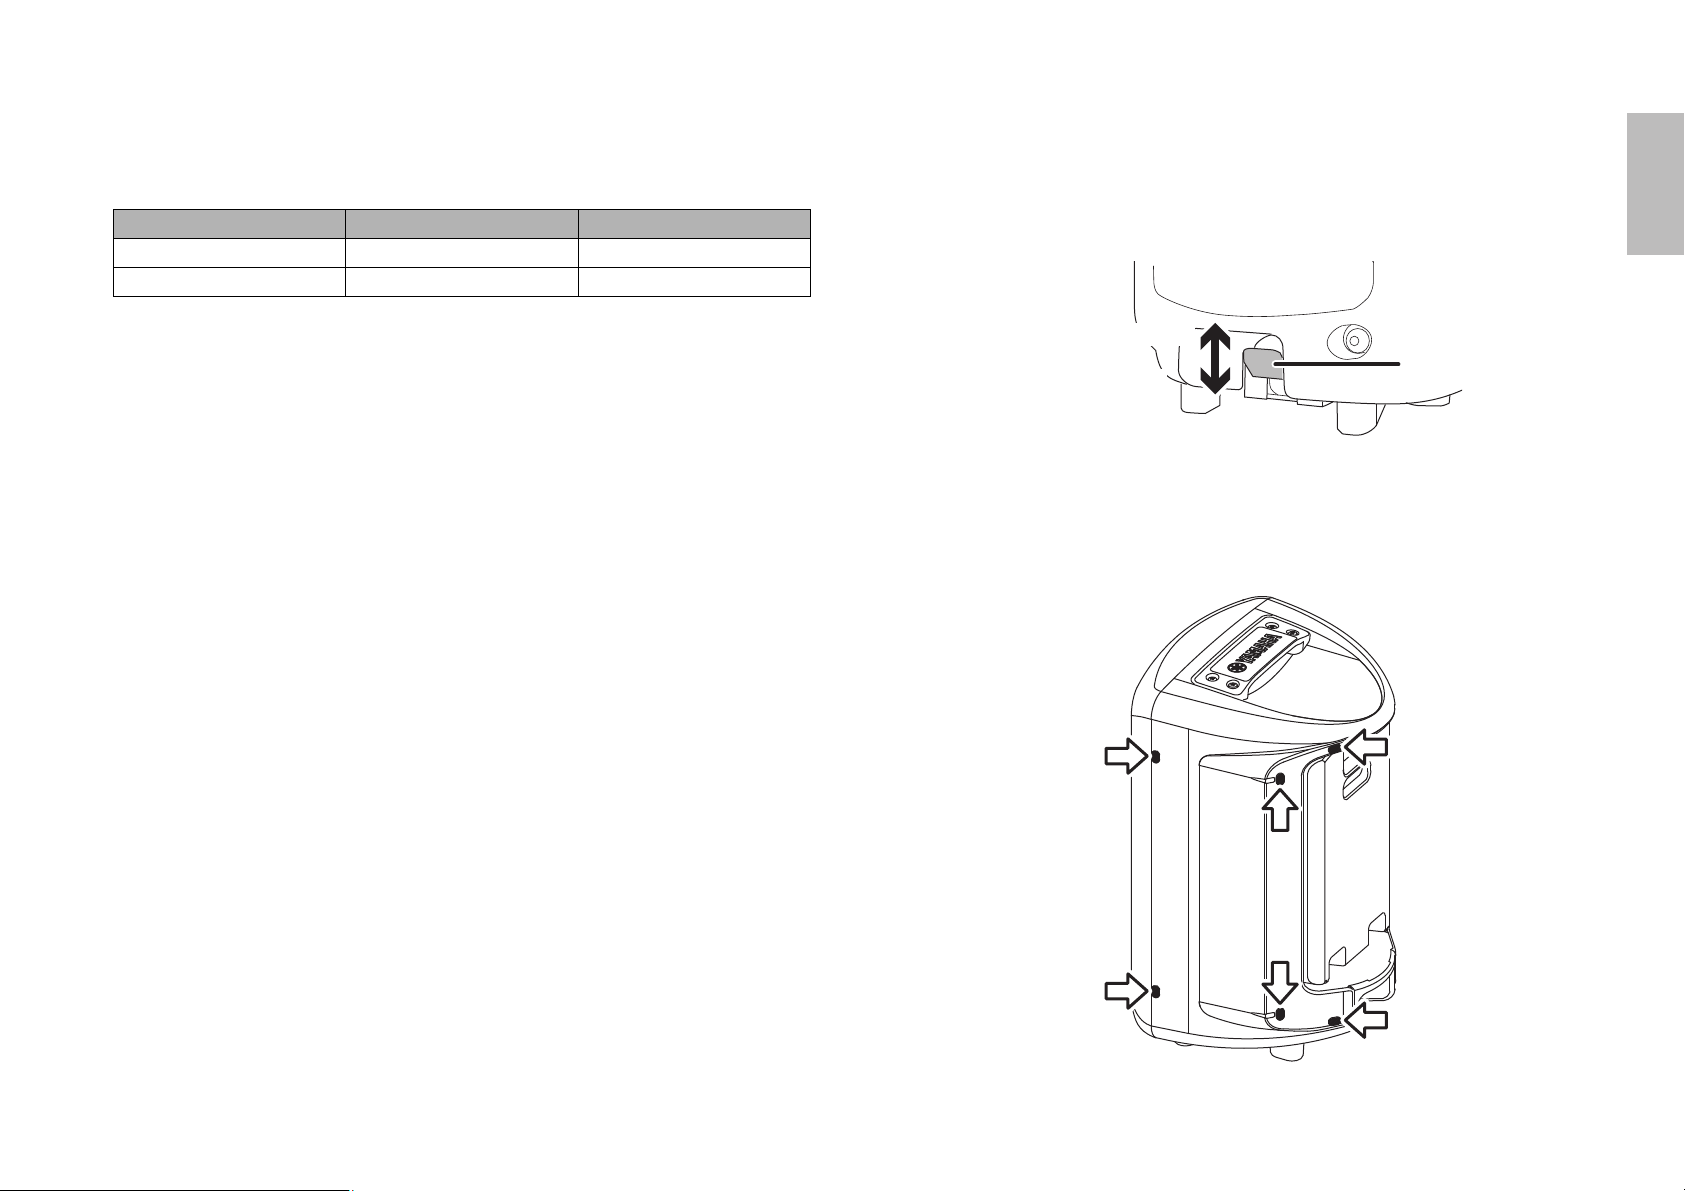
Model description
Lock lever
1. Release
2. Lock
Model description
There are two models of Bluetooth-enabled STAGEPAS. The following table describes
the differences in mixer functions between these models.
Model name Line-in channels Equalizer
STAGEPAS 600BT CH 5/6, CH7/8, CH9/10 HIGH, MID, LOW
STAGEPAS 400BT CH 5/6, CH7/8 HIGH, LOW
NOTE
This manual primarily uses the STAGEPAS 600BT for purposes of explanation.
Attaching a speaker to a speaker stand
1.
Attach the speaker to the speaker stand with the lock lever moved up (release
position).
2. Move the lock lever down to lock to the stand.
Attaching non-skid pads
If you plan to lay the speaker flat on its side, attach the included non-skid pads in the
locations indicated by arrows in the figure below.
STAGEPAS 600BT/STAGEPAS 400BT Owner’s Manual
7
Page 8
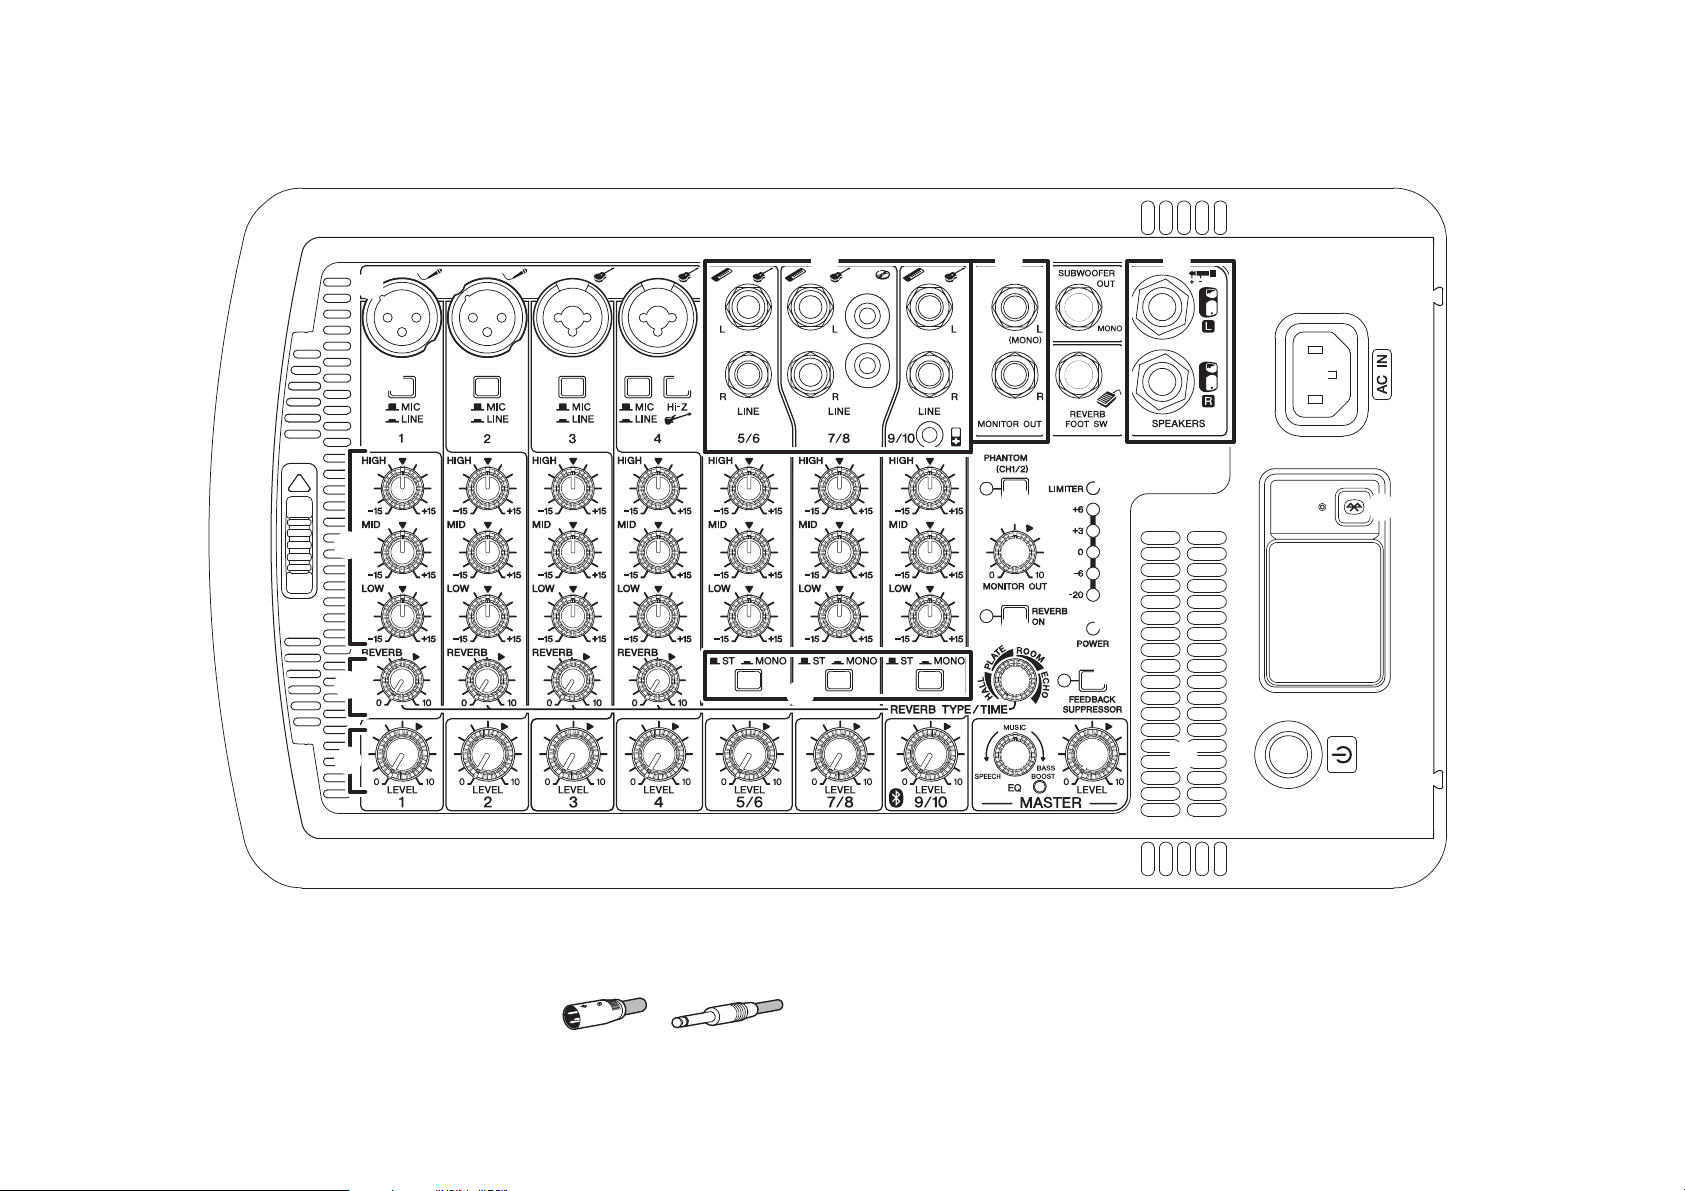
Controls and Functions
32
1
B
E
J
4 5 8
6
9
A
C
H
I
G
0
D
K
L
M O
N
F
7
XLR Phone
Controls and Functions
1 Mic/Line input jacks (channels 1-4)
Connect microphones, guitars, electronic musical
instruments or audio equipment.
Channels 3 and 4 provide combo jacks that
support both XLR and phone plugs.
8 STAGEPAS 600BT/STAGEPAS 400BT Owner’s Manual
2 MIC/LINE switches (channels 1-4)
For low-level signals (including microphones), set the switch to the MIC (N)
position. For high-level signals (including electronic instruments and audio
equipment), set the switch to the LINE (O) position.
Page 9

English
Controls and Functions
RCA Pin Stereo Mini
3 Hi-Z switch (channel 4)
This switch is used when connecting a device directly to the mixer without a DI
(direct box) — for example, instruments with passive pickups, such as an
acoustic-electric guitar or electric bass without a battery. This function is effective
only for the phone jack input.
4 Line (stereo) input jacks
STAGEPAS 600BT (channels 5/6, 7/8, 9/10)
STAGEPAS 400BT (channels 5/6, 7/8)
Connect line-level devices such as electronic
instruments, acoustic-electric guitars, CD
players, and portable audio players. These
jacks support phone, RCA-pin, and stereo-mini
plugs.
NOTE
For the channel 7/8 input (STAGEPAS 600BT), or for the channel 5/6 input (STAGEPAS
400BT), if both phone and RCA-pin jacks are used at the same time, the phone jack will take
priority. For the channel 9/10 input (STAGEPAS 600BT), or the channel 7/8 (STAGEPAS
400BT), if both phone and stereo mini jacks are used at the same time, the stereo mini jack
will take priority. The signal from the device connected to another jack will be muted. The
signals from the Bluetooth device specified by the Bluetooth button
channels 9/10 (STAGEPAS 600BT) or channels 7/8 (STAGEPAS 400BT).
9 are always mixed to
5 MONITOR OUT jacks
These connect to powered speakers for monitoring purposes, and output a mix of
the signals from channels 1 to 9/10 (STAGEPAS 600BT) or channels 1 to 7/8
(STAGEPAS 400BT). You can adjust the output level using the MONITOR OUT
A. If only the L (MONO) jack is used, the signals from the L and R
control
channels are mixed and output.
9 Bluetooth button/LED
This button switches the Bluetooth function on or off. It is also used to pair
(register) a Bluetooth device (page 15). The Bluetooth LED indicates the following
status:
LED Status
Off Bluetooth off
Lit steadily Bluetooth connected
Flashing slowly Waiting for Bluetooth connection
Flashing fast Pairing a Bluetooth device
NOTE
The STAGEPAS enables you to pair (register) up to eight Bluetooth devices. Once the ninth
Bluetooth device has been paired successfully, the pairing information for the Bluetooth
device that was connected earliest will be deleted.
0 PHANTOM (CH1/2) switch /LED
When this switch is on, the LED lights up, indicating that phantom power is
available for channels 1 and 2. Turn this switch on to supply power to condenser
microphones or a DI (direct box).
Notice
Follow the important precautions below to prevent noise and possible damage to external
devices and the unit when you operate this switch.
• Be sure to leave this switch off if you do not need phantom power, or when you connect a
device that does not support phantom power to channels 1 or 2.
• Do not connect/disconnect a cable to/from channels 1 and 2 while this switch is on.
• Turn the LEVEL control of the channels 1 and 2 to the minimum before operating this
switch.
6 SUBWOOFER OUT jack
This connects to a powered subwoofer, and outputs a mono signal. If this jack is in
use, the low frequencies below 120Hz to the SPEAKERS L/R jacks will be cut. The
output level is linked to that of the MASTER LEVEL control
7 REVERB FOOT SW jack
This connects to an unlatched-type footswitch, such as the Yamaha FC5. This can
be useful for solo performers, since you can toggle the reverb on and off as
needed with your foot.
8 SPEAKERS L/R jacks
Use the included speaker cables to connect the dedicated speakers.
L.
A MONITOR OUT control
Determines the signal level output from the MONITOR OUT jacks
The MASTER LEVEL control does not affect the MONITOR OUT signal.
5.
B Equalizer controls (HIGH, MID*, LOW) *Only for STAGEPAS 600BT
This three-band equalizer adjusts the channel’s high, mid*, and low frequency
bands. Setting the control to the “D” position produces a flat response in the
corresponding band. Turning the control clockwise boosts the selected band. If
you start getting feedback, turn the control back slightly.
C REVERB switch/LED
When this switch is on, the LED lights up, indicating that you can apply reverb.
This switch is off when you turn on the unit. (Unlike other switches, this switch
cannot be locked.)
STAGEPAS 600BT/STAGEPAS 400BT Owner’s Manual
9
Page 10

Controls and Functions
D REVERB TYPE/TIME control
Determines the reverb type and length. Turning the control to the right lengthens
the time of the selected reverb type.
HALL: Simulated reverb of a large space, such as a concert hall.
PLATE: Simulated metal plate reverb, producing a more hard-edged and bright
sound.
ROOM: Simulated acoustic ambience of a small room.
ECHO: Echo effect suitable for vocals.
E REVERB controls (channels 1-4)
Determines the amount of reverb for each channel when the REVERB switch
on.
F ST/MONO switches
STAGEPAS 600BT (channels 5/6, 7/8, 9/10)
STAGEPAS 400BT (channels 5/6, 7/8)
Setting the switch to ST (STEREO) (N) will assign the signals from the L and R
channels to each left and right speaker and output each signal. Setting the switch
to MONO (O) will mix the output of different L and R sources to output the same
signal to both the left and right speakers. For keyboards with mono output, guitars,
or other non-stereo sound sources, when the switch is set to MONO (O), the stereo
input jacks can be conveniently used as multiple mono jacks.
G LEVEL meter
The LEVEL meter shows the level of output signal from the SPEAKERS L/R jacks.
Notice
If the unit is operated at a sufficiently high volume to make the LIMITER LED flashes
continuously, the internal power amplifier section is being excessively overloaded and may
malfunction. Reduce the output level with the MASTER LEVEL control so that the indicator
flashes only briefly on the highest transient peaks.
C is
K MASTER EQ (equalizer) control
Use this control to adjust the overall sound frequency balance. The center position
“MUSIC” is a basic setting. If you turn the control counterclockwise, it will create an
optimum setting for speech, cutting unneeded low range frequencies. If you turn
the control clockwise, it will create an optimum setting for playback of sound
sources, since the low range is boosted. If you turn the control further clockwise,
the LED will light up, indicating that the bass boost function turns on, giving you an
even more powerful bass tone.
L MASTER LEVEL control
Determines the volume of the signal output from the SPEAKERS L/R jacks. This
allows you to adjust the overall volume without changing the relative volume
balance among the various channels.
M Vents
These are the vents for the cooling fan inside the mixer.
Do not block the vents when in use.
N AC IN jack
Connect the included power cord here.
O P (power) switch
For turning the power of the mixer on (O) and off (N).
NOTE
Rapidly turning the unit on and off in succession may cause it to malfunction. After turning the
unit off, wait for about 5 seconds before turning it on again.
H POWER LED
This LED lights when the power is turned on by pressing the power switch.
I FEEDBACK SUPPRESSOR switch/LED
When this switch is on, the LED lights up, indicating that feedback is automatically
suppressed. (This configuration utilizes a seven-band notch filter. When this switch
or the power switch is off, the notch filter will be reset.)
J LEVEL controls
Use these controls to adjust the volume for each channel. To reduce noise, set any
LEVEL controls on unused channels to the minimum.
10 STAGEPAS 600BT/STAGEPAS 400BT Owner’s Manual
Page 11

English
Quick Start Guide
Accessory
compartment
Cover panel
Input jack
SPEAKERS jack
Quick Start Guide
Connecting the speakers and the mixer
1.
Slide the mixer’s lock in the direction of the arrow (shown below), and then
remove it from the speaker.
2. Open the cover panel attached to the other speaker, and then remove the box
from inside the accessory compartment.
Two speaker cables and one power cord are included in the box.
3. Connect the speakers and the mixer.
Connect the mixer’s SPEAKERS jacks (red) to the speakers’ input jacks (red) using
the included speaker cables. As shown in the illustration below, be sure to insert
the speaker cables all the way inside until secure.
NOTE
After the box is removed, loose items, such as the included power cord, speaker cables, and
an optional microphone can be conveniently stored in the accessory compartment.
Notice
Use only the included speaker cables. Use of other cables may result in heat generation, or
short circuiting.
STAGEPAS 600BT/STAGEPAS 400BT Owner’s Manual
11
Page 12

Quick Start Guide
Equalizer
Connecting microphones, instruments, and audio
devices to the mixer
4. Connect desired devices, such as a microphone, or an instrument to the input
jack of the mixer.
Refer to the illustration on the mixer shown below or the connection example of the
cover panel of the accessory compartment.
Getting sound out of the system
5. Connect the included power cord as described in the steps below: Before
connecting the power cord, make sure that the power to the STAGEPAS is
turned off.
5-1 Connect the plug on the included power cord to the AC IN jack on
the rear panel of the unit.
Warning
The STAGEPAS has been designed for grounded use. To avoid electrical shock and damage
to devices, be sure to ground the unit using the included power cord. If you have any
questions regarding connections, contact your nearest Yamaha dealer.
Warning
Use only the included power cord. Otherwise, heat may be generated or electrical shock may
be caused.
Notice
Even when the power switch is turned off, a minimal amount of electric current is still flowing
to the unit. If you plan not to use the unit for an extended period of time, be sure to unplug the
power cord from the AC outlet.
6. Turn the mixer’s LEVEL controls (white knobs) and MASTER LEVEL control
(red knob) to the minimum (zero).
Also, set the equalizer controls (green knobs) to the center “D” or “MUSIC”
position.
5-2 Connect the other end of the power cord to a power outlet.
NOTE
To disconnect the power cord, reverse these steps.
12 STAGEPAS 600BT/STAGEPAS 400BT Owner’s Manual
Page 13

English
Quick Start Guide
7. Set the MIC/LINE switch to the MIC (N) position to connect a microphone, and
to the LINE (O) position to connect a musical instrument or audio device.
8. Turn on the power of the connected sound source (if applicable), then the
mixer.
The POWER LED lights.
9. Set the MASTER LEVEL control to the “D” position.
11. Use the MASTER LEVEL control to adjust the overall volume.
If you hear the sound and the volume seems appropriate, setup is complete. If not,
please refer to the checklist in the “Troubleshooting” section.
NOTE
To avoid loud, unexpected noise from the speaker, first turn off the power to the mixer, then
the connected sound source (such as a musical instrument or audio device).
Adjusting the volume
I When the volume is too loud
Turn the LEVEL control to the minimum (zero). Set the MIC/LINE
switch to the LINE (O) position, then slowly raise the LEVEL control
until the desired volume is reached.
I When the volume is too soft
Turn the LEVEL control to the minimum (zero). Set the MIC/LINE
switch to the MIC (N) position, then slowly raise the LEVEL control
until the desired volume is reached.
10. While playing your instrument or singing into the microphone, use the LEVEL
control to adjust the volume of the corresponding channel.
STAGEPAS 600BT/STAGEPAS 400BT Owner’s Manual
13
Page 14

Quick Start Guide
1
2
Longer
Shorter
Applying Reverb
The STAGEPAS features a built-in reverb processor that is in the same league as our
famed SPX effect processor series. This reverb lets you simulate the acoustics of
different performance environments, such as concert halls and small clubs, and add a
warm, natural ambience to your vocals or instrumental performance.
The following reverb types are included:
Type Description
HALL
PLATE Simulated metal plate reverb. Adds bright reverb to vocals.
ROOM
ECHO Articulated echo effect suitable for vocals.
1.
Press down the REVERB switch to turn it on.
The LED lights when REVERB is on.
Simulated reverb of a large space, such as a concert hall. Suitable for
acoustic guitars, strings, woodwind instruments, etc.
Simulated acoustic ambience of a small space. Suitable for percussive
instruments with a strong attack.
3. Use the REVERB control to adjust the reverb amount of the corresponding
channel.
If necessary, repeat steps 2 and 3 to determine the optimum reverb setting.
2. Position the REVERB TYPE/TIME control to the desired reverb type and time
(length).
Turning the control to the right lengthens the time of the selected reverb type.
14 STAGEPAS 600BT/STAGEPAS 400BT Owner’s Manual
Page 15

English
Using a Bluetooth® device
Using a Bluetooth® device
You can use the STAGEPAS to play audio files stored in Bluetooth devices, such as a
mobile device.
Pairing a Bluetooth® device
Before you can connect a Bluetooth device for the first time, you need to “pair” the device.
“Pairing” refers to registering a Bluetooth device to another Bluetooth device.
Once pairing is complete, you will be able to reconnect those devices easily after you
terminate a Bluetooth connection.
1.
Make sure that the Bluetooth LED is turned off. If the LED is lit steadily or
flashing, press the Bluetooth button to switch off the Bluetooth function.
2. Press and hold down the Bluetooth button for three seconds or longer.
The Bluetooth LED will flash rapidly, indicating that the unit is ready for pairing.
3. Turn on the Bluetooth function on the Bluetooth device that you want to pair.
For more information, refer to the owner’s manual for the Bluetooth device.
4. Once the Bluetooth device displays a list of other Bluetooth devices that are
available for connection, select STAGEPAS 600BT or STAGEPAS 400BT.
When the pairing process is complete, the Bluetooth connection will be
established and the Bluetooth LED will light up.
NOTE
• The STAGEPAS enables you to pair (register) up to eight Bluetooth devices. Once the ninth
Bluetooth device has been paired successfully, the pairing information for the Bluetooth
device that was connected earliest will be deleted.
• You must complete the pairing process on the Bluetooth device within two minutes.
Connecting a Bluetooth® device
1.
Press and hold down the Bluetooth button for one second.
The Bluetooth LED will flash slowly, indicating that the unit is ready for connection.
2. Turn on the Bluetooth function on the Bluetooth device that you want to
connect.
Select STAGEPAS 600BT or STAGEPAS 400BT from the list of Bluetooth devices
displayed on your Bluetooth device. When the connection is made, the Bluetooth
LED will light up.
Playing audio files stored in a Bluetooth® device
Play an audio file on your Bluetooth device.
Signals from the Bluetooth device are input to channels 9/10 (STAGEPAS 600BT)
or channels 7/8 (STAGEPAS 400BT).
We recommend that you set the volume on the Bluetooth device a little higher than
normal, and then adjust the volume for each channel using the LEVEL controls.
If you receive a call or text message while playing audio files on your Bluetooth device such
as a smartphone, the audio file playback might be paused momentarily.
To avoid this interruption, enable Airplane Mode, and then set Bluetooth to ON on your
smartphone.
Disconnecting the Bluetooth® device
To disconnect the Bluetooth device, do one of the following:
• Use the Bluetooth device to disconnect. (The Bluetooth LED on the unit will flash
slowly, indicating that the unit is disconnected and waiting for connection.)
• Press the Bluetooth button on the unit to turn off the Bluetooth function. (The
Bluetooth LED will turn off.)
Notice
Before you turn off the power to the unit, make sure that the Bluetooth function is turned off
(The Bluetooth LED is turned off). If you turn off the power to the unit while the Bluetooth
function remains enabled, the unit might lose the pairing information.
NOTE
After turning the Bluetooth function off, wait for at least 6 seconds before turning it on again.
The Bluetooth function will not turn on even if you press the Bluetooth button immediately
after you turn the function off.
STAGEPAS 600BT/STAGEPAS 400BT Owner’s Manual
15
Page 16

Troubleshooting
Troubleshooting
Power does not turn on.
Did you firmly and securely connect the power cord?
Power shuts down suddenly.
Are the vents of the mixer blocked?
Since inadequate ventilation can result in overheating the
mixer, the power may be turned off automatically to
protect the system from overheating. Arrange the
ventilation for cooling, then turn on the power again.
No sound is heard.
Did you connect the mixer’s SPEAKERS jacks and the
speakers’ input jacks using the proper speaker cables?
Did you firmly and securely connect the speaker
cables?
Is a speaker other than the included speaker
connected to the mixer’s SPEAKERS jacks?
Please connect the included speaker (STAGEPAS 600BT:
MODEL 600S; STAGEPAS 400BT: MODEL 400S).
Did you use the included speaker cables?
If you use a commercially-available speaker cable with a
metal-housing connector, the cable will be shorted when
the connector touches other metal, resulting in no sound
being produced.
Is the POWER LED flashing at intervals?
There may be a short in the speaker cable or the
connection may be faulty. Check that the speaker cable
is not scratched and is connected properly to the mixer,
then reapply the power.
For channels 7/8 (STAGEPAS 600BT) or channels 5/6
(STAGEPAS 400BT), are both phone and RCA-pin
jacks connected at the same time?
Or, for channels 9/10 (STAGEPAS 600BT) or channels
7/8 (STAGEPAS 400BT), are both phone and stereo
mini jacks connected at the same time?
For channels 7/8 (STAGEPAS 600BT), or channels 5/6
(STAGEPAS 400BT), the phone jack takes priority. For
channels 9/10 (STAGEPAS 600BT), or channels 7/8
(STAGEPAS 400BT), the stereo mini jack takes priority.
Is the POWER LED flashing continuously?
If the internal power amplifier section is excessively
overloaded, the amplifier will be muted for protection. The
mixer will automatically reset itself after a while.
Sound is distorted or noise is produced
Are the LEVEL controls of all relevant channels and/or
the MASTER LEVEL control set too high?
Is the MIC/LINE switch of the corresponding channel
set to MIC?
If the input level from the source is high, setting the MIC/
LINE switch to MIC may result in a distorted sound. Set
the switch to LINE position.
Is the volume of the connected device too high?
Lower the volume of the external device.
Is the speaker cable or the power cord located near the
input cables?
Please keep it away from the input cables.
Sound is not loud enough
Are the LEVEL controls of all relevant channels and/or
the MASTER LEVEL control set too low?
Is the MIC/LINE switch of the corresponding channel
set to LINE?
Turn the LEVEL control to the minimum (zero). Set the
switch to the MIC position, then slowly raise the LEVEL
control.
Is the volume of the connected device too low?
Raise the volume of the external device.
Is the PHANTOM switch set to On when using a
microphone that requires phantom power?
The high sounds and low sounds are
unbalanced.
Are the equalizer controls raised or lowered too much?
Set the equalizer controls to the center position.
Is the speaker properly outputting high-frequency
range signals?
If not, check the “Protective circuit (poly switch)” note in
the Notice section.
Cannot connect Bluetooth / Bluetooth audio
sound cuts intermittently
The unit may be connected to a different Bluetooth
device.
Cut the current Bluetooth connection, and then connect
to the desired Bluetooth device.
The STAGEPAS may be located too far away from the
Bluetooth device.
The maximum distance between the STAGE PAS and a
Bluetooth device should be 10 meters. Locate the
Bluetooth device closer to the STAGEPAS.
Your Bluetooth device may not support the A2DP
profile.
Use a Bluetooth device that supports A2DP.
The unit may be located in the vicinity of a device that
emits electro-magnetic waves at a frequency of 2.4
GHz (such as a microwave oven, wireless LAN device,
etc.).
Locate the STAGEPAS away from any device that emits
electro-magnetic waves.
If your Bluetooth device also features a wireless LAN
function, turn off the function, and use only the Bluetooth
function.
If a problem persists, please contact your Yamaha dealer.
16 STAGEPAS 600BT/STAGEPAS 400BT Owner’s Manual
Page 17

English
Specifications
Specifications
General Specifications
STAGEPAS 600BT STAGEPAS 400BT
System Type Powered mixer with 2 passive speakers
340 W+340 W/4 Ω
Maximum Output Power
(SPEAKERS L/R)
Frequency Response
Total Harmonic Distortion
Hum & Noise
(Rs= 150 Ω,
MIC/LINE switch=MIC)
Crosstalk (1 kHz) -70 dB between input channels
Phantom Voltage +30 V (CH1, 2)
Outputs
Weight
Power Requirement 100V–240V 50Hz/60Hz
Power Consumption 35 W (Idle), 100 W (1/8 Power) 30 W (Idle), 70 W (1/8 Power)
Input Channel Equalization
@Dynamic at 1 kHz
280 W+280 W/4Ω
@10 % THD at 1 kHz
230 W+230 W/4Ω
@1 % THD at 1 kHz
-3 dB, +1 dB @ 40 Hz-20 kHz,
1 W Output/4Ω (without EQ and SP EQ) (SPEAKERS L/R)
-3 dB, +1 dB @ 40 Hz-20 kHz, +4 dBu 10 kΩ Load
(MONITOR OUT)
0.5 % @20 Hz-20 kHz,
+11 dBu 10 kΩ (MONITOR OUT)
-113 dBu Equivalent input
noise (CH1–4)
-58 dBu Residual output
noise (SPEAKERS L/R)
SPEAKERS OUT (L, R), MONITOR OUT (L/MONO, R),
SUBWOOFER OUT (MONO) with auto HPF
26.0 kg (57.3 lbs)
(Speaker 10.9 kg x 2 +
Mixer 3.8 kg)
±15 dB ±15 dB
HIGH 8 kHz shelving HIGH 8 kHz shelving
MID 2.5 kHz peaking —
LOW 100 Hz shelving LOW 100 Hz shelving
200 W+200 W/4 Ω
@Dynamic at 1 kHz
180 W+180 W/4Ω
@10 % THD at 1 kHz
125 W+125 W/4Ω
@1 % THD at 1 kHz
-113 dBu Equivalent input
noise (CH1–4)
-60 dBu Residual output
noise (SPEAKERS L/R)
18.0 kg (39.7 lbs)
(Speaker 7.7 kg x 2 +
Mixer 2.9 kg)
STAGEPAS 600BT STAGEPAS 400BT
Bluetooth Connection
Bluetooth Version Bluetooth Ver.4.1
Supported Profile A2DP v1.2
Supported Codec SBC, AAC
Supported Content
Protection
Wireless Output Bluetooth class 2
Maximum
communication range
Transmission
Frequencies
Maximum output power
(EIRP)
Main unit (includes two
MODEL 600S Speakers and a
Powered Mixer),
Package Contents
Power Cord (2m),
two Speaker Cables (6m),
12 Non-Skid Pads,
two Ferrite Cores,
2 x Cable ties
Owner’s Manual (this booklet)
SCMS-T content protection method
10m (3.3ft) (without interference)
2402–2480 MHz
4 dBm (2.5 mW)
Main unit (includes two
MODEL 400S Speakers and a
Powered Mixer),
Power Cord (2m),
two Speaker Cables (6m),
12 Non-Skid Pads,
two Ferrite Cores,
2 x Cable ties
Owner’s Manual (this booklet)
J Dedicated Speaker
MODEL 600S MODEL 400S
Enclosure 2 way bass-reflex type
LF: 10" (25 cm) Cone
Speaker Unit
Crossover Frequency 2.8 kHz 3.2 kHz
Frequency R ange 55 Hz–20 kHz (-10 dB)
Maximum Output Level
Coverage Angle 90° (Horizontal) / 60° (Vertical)
HF: 1.4" (3.56 cm) Compression
Driver
129 dB SPL
(Measured peak IEC noise@1m)
LF: 8" (20 cm) Cone
HF: 1" (2.54 cm) Compression
Driver
125 dB SPL
(Measured peak IEC noise@1m)
STAGEPAS 600BT/STAGEPAS 400BT Owner’s Manual
17
Page 18

Specifications
Input Characteristics
J STAGEPAS 600BT
Input Level
Input Terminals MIC/LINE Input Impedance Source Impedance
CH IN 1-2 XLR
XLR
CH IN 3-4
Phone
CH IN 5/6 Phone — 10 kΩ 150 Ω Lines -24 dBu -3 dBu +22 dBu Phone*
CH IN 7/8
CH IN 9/10
Phone — 10 kΩ 150 Ω Lines -24 dBu -3 dBu +22 dBu Phone*
Pin — 10 kΩ 150 Ω Lines -24 dBu -3 dBu +22 dBu RCA Pin
Phone — 10 kΩ 150 Ω Lines -18 dBu +3 dBu +28 dBu Phone*
mini — 10 kΩ 150 Ω Lines -18 dBu +3 dBu +28 dBu Stereo Mini
MIC
LINE -30 dBu -9 dBu +16 dBu
MIC
LINE -30 dBu -9 dBu +16 dBu
MIC
LINE -24 dBu -3 dBu +22 dBu
3 kΩ 150 Ω Mics
3 kΩ 150 Ω Mics
10 k Ω
(Hi-Z 1 MΩ)
150 Ω Lines
(Hi-Z 10 kΩ)
Sensitivity Nominal
-56 dBu -35 dBu -10 dBu
-56 dBu -35 dBu -10 dBu
-50 dBu -29 dBu -4 dBu
Max. before
Clipping
Connector Type
XLR-3-31
XLR Combo
J STAGEPAS 400BT
Input Terminals MIC/LINE Input Impedance Source Impedance
CH IN 1-2 XLR
XLR
CH IN 3-4
Phone
CH IN 5/6
CH IN 7/8
Phone — 10 kΩ 150 Ω Lines -24 dBu -3 dBu +22 dBu Phone*
Pin — 10 kΩ 150 Ω Lines -24 dBu -3 dBu +22 dBu RCA Pin
Phone — 10 kΩ 150 Ω Lines -18 dBu +3 dBu +28 dBu Phone*
mini — 10 kΩ 150 Ω Lines -18 dBu +3 dBu +28 dBu Stereo Mini
MIC
LINE -30 dBu -9 dBu +16 dBu
MIC
LINE -30 dBu -9 dBu +16 dBu
MIC
LINE -24 dBu -3 dBu +22 dBu
(Hi-Z 1 MΩ)
18 STAGEPAS 600BT/STAGEPAS 400BT Owner’s Manual
3 kΩ 150 Ω Mics
3 kΩ 150 Ω Mics
10 kΩ
150 Ω Lines
(Hi-Z 10 kΩ)
Input Level
Sensitivity Nominal
-56 dBu -35 dBu -10 dBu
-56 dBu -35 dBu -10 dBu
-50 dBu -29 dBu -4 dBu
Max. before
Clipping
Connector Type
XLR-3-31
XLR Combo
Page 19

English
Output Characteristics
J STAGEPAS 600BT
Specifications
Output Terminals
SPEAKERS OUT [L,R] <0.1 Ω 4 Ω Speakers 62.5 W 230 W 280 W 340 W Phone*
MONITOR OUT [L,R] 600 Ω 10 kΩ Lines +4 dBu +20 dBu — — Phone*
SUBWOOFER OUT 150 Ω 10 kΩ Lines -3 dBu +17 dBu — — Phone*
Output
Impedance
Load Impedance
Nominal
Max. before
Clipping
Output Level
Typ at THD+N 10% Dynamic
Connector Type
J STAGEPAS 400BT
Output Terminals
SPEAKERS OUT [L,R] <0.1 Ω 4 Ω Speakers 37.5 W 125 W 180 W 200 W Phone*
MONITOR OUT [L,R] 600 Ω 10 kΩ Lines +4 dBu +20 dBu — — Phone*
SUBWOOFER OUT 150 Ω 10 kΩ Lines -3 dBu +17 dBu — — Phone*
0 dBu=0.775 Vrms, 0 dBV=1 Vrms
Phone*: Unbalanced
Output
Impedance
Load Impedance
Nominal
Max. before
Clipping
Output Level
Typ at THD+N 10% Dynamic
Connector Type
Descriptions in this manual are based on specifications available at the time of publication. The latest version of the manual can be downloaded from the Yamaha website.
STAGEPAS 600BT/STAGEPAS 400BT Owner’s Manual
19
Page 20

Specifications
110.5
96
115 2
135
348
197
335
34.8 - 35.2
545
319
144
50°
354
Mixer
Dedicated Speaker
Screw holes for the Mic Stand Adapter
BMS-10A (optional)
Pole diameter
289
472
275
133
50°
304
180
308
81
2
95.5
100
116
34.8 - 35.2
Mixer
Dedicated Speaker
Pole diameter
Screw holes for the Mic Stand Adapter
BMS-10A (optional)
Dimensions
J STAGEPAS 600BT J STAGEPAS 400BT
20 STAGEPAS 600BT/STAGEPAS 400BT Owner’s Manual
Unit: mm
Page 21

English
HA
+
-
LEVEL
BA
MIC/LINE(-26dB)
LOW
HIGH
EQ
INPUT
(CH1-2)
L
R
REVERB
HA
+
-
BA
INPUT
(CH3)
BA
INPUT
(CH7/8)
BA
BABA
LEVEL
LEVEL
ON/OFF
PAIRING SW
REVERB
BA
BA
LEVEL
SUM
SUM
SUM
AD
DA
AD
DA
AD
AMP
AMP
L
R
ST/MONO
L
L
R
R
SUM
BA
BA
MONITOR OUT
SUBWOOFER OUT
(MONO)
MONITOR OUT
L(MONO)
R
SUM
SUM
HA
+
-
BA
INPUT
(CH4)
LEVEL
Hi-Z
Hi-Z(1MΩ)
MASTER LEVEL
COMBO
COMBO
BA
INPUT
(CH5/6)
BA
BABA
LEVEL
ST/MONO
R
MID
LOW
HIGH
EQ
MID
LOW
HIGH
EQ
MID
LOW
HIGH
EQ
EQ
MID
INPUT
(CH9/10)
L
REVERB
REVERB
DA
DA
SPEAKERS OUT
FEEDBACK
SUPPRESSOR
MASTER EQ
SP EQ (FIXED)
LIMITER
MASTER LEVEL
REVERB
MIC/LINE(-26dB)
MIC/LINE(-26dB)
PHANTOM (+30V)
(-1)
L/R
REVERB ON/OFF
FOOT SWITCH
REVERB
ON/OFF
L
R
ST/MONO
LOW
HIGH
EQ
EQ
MID
LOW
HIGH
EQ
EQ
MID
DSP
BLUETOOTH
MODULE
Specifications
Block Diagram
J STAGEPAS 600BT
STAGEPAS 600BT/STAGEPAS 400BT Owner’s Manual
21
Page 22

LEVEL
BA
MIC/LINE(-26dB)
LOW
HIGH
EQ
INPUT
(CH1-2)
L
R
REVERB
BA
INPUT
(CH3)
LEVEL
REVERB
BA
LEVEL
SUM
SUM
SUM
AD
DA
AD
DAAD
AMP
AMP
L
R
L
R
SUM
SUM
HA
+
-
BA
INPUT
(CH4)
LEVEL
Hi-Z
Hi-Z(1MΩ)
COMBO
COMBO
INPUT
(CH5/6)
BA
LEVEL
ST/MONO
R
LOW
HIGH
EQ
LOW
HIGH
EQ
LOW
HIGH
EQ
LOW
HIGH
INPUT
(CH7/8)
L
REVERB
REVERB
SPEAKERS OUT
MASTER EQ
SP EQ (FIXED)
LIMITER
MASTER LEVEL
REVERB
EQ
MIC/LINE(-26dB)
MIC/LINE(-26dB)
PHANTOM (+30V)
(-1)
L/R
REVERB ON/OFF
FOOT SWITCH
REVERB
ON/OFF
L
R
ST/MONO
SUM
BA
BA
MONITOR OUT
SUBWOOFER OUT
(MONO)
MONITOR OUT
L(MONO)
R
MASTER LEVEL
DA
DA
FEEDBACK
SUPPRESSOR
DSP
BA
HA
+
-
HA
+
-
BA
BA
EQ
EQ
BA
ON/OFF
PAIRING SW
BLUETOOTH
MODULE
Specifications
J STAGEPAS 400BT
22 STAGEPAS 600BT/STAGEPAS 400BT Owner’s Manual
Page 23

For U.S.A.
This transmitter must not be co-located or operated in conjunction with any other antenna or
transmitter.
For CANADA
This device complies with Industry Canada licence-exempt RSS standard(s). Operation is
subject to the following two conditions: (1) this device may not cause interference, and (2) this
device must accept any interference, including interference that may cause undesired
operation of the device.
Le présent appareil est conforme aux CNR d’Industrie Canada applicables aux appareils radio
exempts de licence. L’exploitation est autorisée aux deux conditions suivantes : (1) l’appareil
ne doit pas produire de brouillage, et (2) l’utilisateur de l’appareil doit accepter tout brouillage
radioélectrique subi, même si le brouillage est susceptible d’en compromettre le
fonctionnement.
CAN ICES-3 (B)/NMB-3(B)
(can_b_02)
For U.S.A. and CANADA
This equipment complies with FCC/IC radiation exposure limits set forth for an uncontrolled
environment and meets the FCC radio frequency (RF) Exposure Guidelines and RSS-102 of
the IC radio frequency (RF) Exposure rules. This equipment should be installed and operated
keeping the radiator at least 20cm or more away from person’s body.
Cet équipement est conforme aux limites d’exposition aux rayonnements énoncées pour un
environnement non contrôlé et respecte les règles les radioélectriques (RF) de la FCC lignes
directrices d’exposition et d’exposition aux fréquences radioélectriques (RF) CNR-102 de l’IC.
Cet équipement doit être installé et utilisé en gardant une distance de 20 cm ou plus entre le
radiateur et le corps humain.
STAGEPAS 600BT/STAGEPAS 400BT Owner’s Manual 63
Page 24

EN SIMPLIFIED EU DECLARATION OF CONFORMITY
Hereby, Yamaha Music Europe GmbH declares that the radio equipment type STAGEPAS 600BT,
STAGEPAS 400BT is in compliance with Directive 2014/53/EU. The full text of the EU declaration of
conformity is available at the following internet address:
https://europe.yamaha.com/en/support/compliance/doc.html
FR DECLARATION UE DE CONFORMITE SIMPLIFIEE
Le soussigné, Yamaha Music Europe GmbH, déclare que l’équipement radioélectrique du type
STAGEPAS 600BT, STAGEPAS 400BT est conforme à la directive 2014/53/UE. Le texte complet de la
déclaration UE de conformité est disponible à l’adresse internet suivante:
https://europe.yamaha.com/en/support/compliance/doc.html
DE VEREINFACHTE EU-KONFORMITÄTSERKLÄRUNG
Hiermit erklärt Yamaha Music Europe GmbH, dass der Funkanlagentyp STAGEPAS 600BT, STAGEPAS
400BT der Richtlinie 2014/53/EU entspricht. Der vollständige Text der EU-Konformitätserklärung ist
unter der folgenden Internetadresse verfügbar:
https://europe.yamaha.com/en/support/compliance/doc.html
SV FÖRENKLAD EU-FÖRSÄKRAN OM ÖVERENSSTÄMMELSE
Härmed försäkrar Yamaha Music Europe GmbH att denna typ av radioutrustning STAGEPAS 600BT,
STAGEPAS 400BT överensstämmer med direktiv 2014/53/EU. Den fullständiga texten till EU-försäkran
om överensstämmelse finns på följande webbadress:
https://europe.yamaha.com/en/support/compliance/doc.html
IT DICHIARAZIONE DI CONFORMITÀ UE SEMPLIFICATA
Il fabbricante, Yamaha Music Europe GmbH, dichiara che il tipo di apparecchiatura radio STAGEPAS
600BT, STAGEPAS 400BT è conforme alla direttiva 2014/53/UE. Il testo completo della dichiarazione di
conformità UE è isponibile al seguente indirizzo Internet:
https://europe.yamaha.com/en/support/compliance/doc.html
ES DECLARACIÓN UE DE CONFORMIDAD SIMPLIFICADA
Por la presente, Yamaha Music Europe GmbH declara que el tipo de equipo radioeléctrico STAGEPAS
600BT, STAGEPAS 400BT es conforme con la Directiva 2014/53/UE. El texto completo de la declaración
UE de onformidad está isponible en la dirección Internet siguiente:
https://europe.yamaha.com/en/support/compliance/doc.html
PT DECLARAÇÃO UE DE CONFORMIDADE SIMPLIFICADA
O(a) abaixo assinado(a) Yamaha Music Europe GmbH declara que o presente tipo de equipamento de
rádio STAGEPAS 600BT, STAGEPAS 400BT está em conformidade com a Diretiva 2014/53/UE. O texto
integral da declaração de conformidade está disponível no seguinte endereço de Internet:
https://europe.yamaha.com/en/support/compliance/doc.html
NL VEREENVOUDIGDE EU-CONFORMITEITSVERKLARING
Hierbij verklaar ik, Yamaha Music Europe GmbH, dat het type radioapparatuur STAGEPAS 600BT,
STAGEPAS 400BT conform is met Richtlijn 2014/53/EU. De volledige tekst van de EUconformiteitsverklaring kan worden geraadpleegd op het volgende internetadres:
https://europe.yamaha.com/en/support/compliance/doc.html
BG ОПРОСТЕНА ЕС ДЕКЛАРАЦИЯ ЗА СЪОТВЕТСТВИЕ
С настоящото Yamaha Music Europe GmbH декларира, че този тип радиосъоръжение STAGEPAS
600BT, STAGEPAS 400BT е в съответствие с Директива 2014/53/ЕС. Цялостният текст на ЕС
декларацията за съответствие може да се намери на следния интернет адрес:
https://europe.yamaha.com/en/support/compliance/doc.html
CS ZJEDNODUŠENÉ EU PROHLÁŠENÍ O SHODĚ
Tímto Yamaha Music Europe GmbH prohlašuje, že typ rádiového zařízení STAGEPAS 600BT, STAGEPAS
400BT je v souladu se směrnicí 2014/53/EU. Úplné znění EU prohlášení o shodě je k dispozici na této
internetové adrese: https://europe.yamaha.com/en/support/compliance/doc.html
DA FORENKLET EU-OVERENSSTEMMELSESERKLÆRING
Hermed erklærer Yama ha Music Europe G mbH, at ra diouds tyrst ypen STAGEPAS 6 00BT, STAGEPAS 400 BT
er I overensstemmelse med direktiv 2014/53/EU. EU-overensstemmelseserklæringens fulde tekst kan
findes på følgende internetadresse:
https://europe.yamaha.com/en/support/compliance/doc.html
ET LIHTSUSTATUD ELI VASTAVUSDEKLARATSIOON
Käesolevaga deklareerib Yamaha Music Europe GmbH, et käesolev raadioseadme tüüp STAGEPAS
600BT, STAGEPAS 400BT vastab direktiivi 2014/53/EL nõuetele. ELi vastavusdeklaratsiooni täielik tekst
on kättesaadav järgmisel internetiaadressil:
https://europe.yamaha.com/en/support/compliance/doc.html
EL ΑΠΛΟΥΣΤΕΥΜΕΝΗ ΔΗΛΩΣΗ ΣΥΜΜΟΡΦΩΣΗΣ ΕΕ
Με την παρούσα ο/η Yamaha Music Europe GmbH, δηλώνει ότι ο ραδιοεξοπλισμός STAGEPAS 600BT,
STAGEPAS 400BT πληροί την οδηγία 2014/53/ΕΕ. Το πλήρες κείμενο της δήλωσης συμμόρφωσης ΕΕ
διατίθεται στην ακόλουθη ιστοσελίδα στο διαδίκτυο:
https://europe.yamaha.com/en/support/compliance/doc.html
HR POJEDNOSTAVLJENA EU IZJAVA O SUKLADNOSTI
Yamaha Music Europe GmbH ovime izjavljuje da je radijska oprema tipa STAGEPAS 600BT, STAGEPAS
400BT u skladu s Direktivom 2014/53/EU. Cjeloviti tekst EU izjave o sukladnosti dostupan je na sljedećoj
internetskoj adresi: https://europe.yamaha.com/en/support/compliance/doc.html
LV VIENKĀRŠOTA ES ATBILSTĪBAS DEKLARĀCIJA
Ar šo Yamaha Music Europe GmbH deklarē, ka radioiekārta STAGEPAS 600BT, STAGEPAS 400BT atbilst
Direktīvai 2014/53/ES. Pilns ES atbilstības deklarācijas teksts ir pieejams šādā interneta vietnē:
https://europe.yamaha.com/en/support/compliance/doc.html
LT SUPAPRASTINTA ES ATITIKTIES DEKLARACIJA
Aš, Yamaha Music Europe GmbH, patvirtinu, kad radijo įrenginių tipas STAGEPAS 600BT, STAGEPAS
400BT atitinka Direktyvą 2014/53/ES. Visas ES atitikties deklaracijos tekstas prieinamas šiuo interneto
adresu:
https://europe.yamaha.com/en/support/compliance/doc.html
HU EGYSZERŰSÍTETT EU-MEGFELELŐSÉGI NYILATKOZAT
Yamaha Music Europe GmbH igazolja, hogy a STAGEPAS 600BT, STAGEPAS 400BT típusú
rádióberendezés megfelel a 2014/53/EU irányelvnek. Az EU-megfelelőségi nyilatkozat teljes szövege
elérhető a következő internetes címen: https://europe.yamaha.com/en/support/compliance/doc.html
64 STAGEPAS 600BT/STAGEPAS 400BT Owner’s Manual
Page 25

PL UPROSZCZONA DEKLARACJA ZGODNOŚCI UE
Yamaha Music Europe GmbH niniejszym oświadcza, że typ urządzenia radiowego STAGEPAS 600BT,
STAGEPAS 400BT jest zgodny z dyrektywą 2014/53/UE. Pełny tekst deklaracji zgodności UE jest
dostępny pod następującym adresem internetowym:
https://europe.yamaha.com/en/support/compliance/doc.html
RO DECLȚIA ARAUE DE CONFORMITATE SIMPLIFICATĂ
Prin prezenta, Yamaha Music Europe GmbH declară că tipul de echipamente radio STAGEPAS 600BT,
STAGEPAS 400BT este în conformitate cu Directiva 2014/53/UE. Textul integral al declarației UE de
conformitate este disponibil la următoarea adresă internet:
https://europe.yamaha.com/en/support/compliance/doc.html
SK ZJEDNODUŠENÉ EÚ VYHLÁSENIE O ZHODE
Yamaha Music Europe GmbH týmto vyhlasuje, že rádiové zariadenie typu STAGEPAS 600BT, STAGEPAS
400BT je v súlade so smernicou 2014/53/EÚ. Úplné EÚ vyhlásenie o zhode je k dispozícii na tejto
internetovej adrese: https://europe.yamaha.com/en/support/compliance/doc.html
SL POENOSTAVLJENA IZJAVA EU O SKLADNOSTI
Yamaha Music Europe GmbH potrjuje, da je tip radijske opreme STAGEPAS 600BT, STAGEPAS 400BT
skladen z Direktivo 2014/53/EU. Celotno besedilo izjave EU o skladnosti je na voljo na naslednjem
spletnem naslovu: https://europe.yamaha.com/en/support/compliance/doc.html
FI YKSINKERTAISTETTU EU-VAATIMUSTENMUKAISUUSVAKUUTUS
Yamaha Music Europe GmbH vakuuttaa, että radiolaitetyyppi STAGEPAS 600BT, STAGEPAS 400BT on
direktiivin 2014/53/EU mukainen. EU-vaatimustenmukaisuusvakuutuksen täysimittainen teksti on
saatavilla seuraavassa internetosoitteessa:
https://europe.yamaha.com/en/support/compliance/doc.html
TR BASİTLEŞTİRİLMİŞ AVRUPA BİRLİĞİ UYGUNLUK BİLDİRİMİ
İşbu belge ile, Yamaha Music Europe GmbH, radyo cihaz tipinin STAGEPAS 600BT, STAGEPAS 400BT,
Direktif 2014/53/AB’ye uygunluğunu beyan eder. AB uyumu beyanının tam metni aşağıdaki internet
adresinden edinilebilir: https://europe.yamaha.com/en/support/compliance/doc.html
STAGEPAS 600BT/STAGEPAS 400BT Owner’s Manual 65
Page 26

Information for users on collection and disposal of old equipment:
This symbol on the products, packaging, and/or accompanying documents means
that used electrical and electronic products should not be mixed with general
household waste.
For proper treatment, recovery and recycling of old products, please take them to
applicable collection points, in accordance with your national legislation.
By disposing of these products correctly, you will help to save valuable resources
and prevent any potential negative effects on human health and the environment
which could otherwise arise from inappropriate waste handling.
For more information about collection and recycling of old products, please contact
your local municipality, your waste disposal service or the point of sale where you
purchased the items.
For business users in the European Union:
If you wish to discard electrical and electronic equipment, please contact your
dealer or supplier for further information.
Informations concernant la collecte et le traitement des déchets d’équipements
électriques et électroniques
Le symbole sur les produits, l'emballage et/ou les documents joints signifie que les
produits électriques ou électroniques usagés ne doivent pas être mélangés avec
les déchets domestiques habituels.
Pour un traitement, une récupération et un recyclage appropriés des déchets
d’équipements électriques et électroniques, veuillez les déposer aux points de
collecte prévus à cet effet, conformément à la réglementation nationale.
En vous débarrassant correctement des déchets d’équipements électriques et
électroniques, vous contribuerez à la sauvegarde de précieuses ressources et à la
prévention de potentiels effets négatifs sur la santé humaine qui pourraient advenir
lors d'un traitement inapproprié des déchets.
Pour plus d'informations à propos de la collecte et du recyclage des déchets
d’équipements électriques et électroniques, veuillez contacter votre municipalité,
votre service de traitement des déchets ou le point de vente où vous avez acheté
les produits.
Information on Disposal in other Countries outside the European Union:
This symbol is only valid in the European Union. If you wish to discard these items,
please contact your local authorities or dealer and ask for the correct method of
disposal.
(weee_eu_en_02)
Pour les professionnels dans l'Union européenne :
Si vous souhaitez vous débarrasser des déchets d’équipements électriques et
électroniques, veuillez contacter votre vendeur ou fournisseur pour plus
d'informations.
Informations sur la mise au rebut dans d'autres pays en dehors de l'Union
européenne :
Ce symbole est seulement valable dans l'Union européenne. Si vous souhaitez
vous débarrasser de déchets d’équipements électriques et électroniques, veuillez
contacter les autorités locales ou votre fournisseur et demander la méthode de
traitement appropriée.
(weee_eu_fr_02)
66 STAGEPAS 600BT/STAGEPAS 400BT Owner’s Manual
Page 27

Información para usuarios sobre la recogida y eliminación de los equipos
antiguos
Este símbolo en los productos, embalajes y documentos anexos significa que los
productos eléctricos y electrónicos no deben mezclarse con los desperdicios
domésticos normales.
Para el tratamiento, recuperación y reciclaje apropiados de los productos antiguos,
llévelos a puntos de reciclaje correspondientes, de acuerdo con la legislación
nacional.
Al deshacerse de estos productos de forma correcta, ayudará a ahorrar recursos
valiosos y a impedir los posibles efectos desfavorables en la salud humana y en el
entorno que de otro modo se producirían si se trataran los desperdicios de modo
inapropiado.
Para obtener más información acerca de la recogida y el reciclaje de los productos
antiguos, póngase en contacto con las autoridades locales, con el servicio de
eliminación de basuras o con el punto de venta donde adquirió los artículos.
Para los usuarios empresariales de la Unión Europea:
Si desea desechar equipos eléctricos y electrónicos, póngase en contacto con su
vendedor o proveedor para obtener más información.
Información sobre la eliminación en otros países fuera de la Unión Europea:
Este símbolo solo es válido en la Unión Europea. Si desea desechar estos
artículos, póngase en contacto con las autoridades locales o con el vendedor y
pregúnteles el método correcto.
(weee_eu_es_02)
STAGEPAS 600BT/STAGEPAS 400BT Owner’s Manual 67
Page 28

68 STAGEPAS 600BT/STAGEPAS 400BT Owner’s Manual
Page 29

MEMO
STAGEPAS 600BT/STAGEPAS 400BT Owner’s Manual 69
Page 30

MEMO
70 STAGEPAS 600BT/STAGEPAS 400BT Owner’s Manual
Page 31

ADDRESS LIST
NORTH AMERICA
CANADA
Yamaha Canada Music Ltd.
135 Milner Avenue, Toronto, Ontario,
M1S 3R1, Canada
Tel: +1-416-298-1311
U.S.A.
Yamaha Corporation of America
6600 Orangethorpe Avenue, Buena Park, CA 90620,
U.S.A.
Tel: +1-714-522-9011
CENTRAL & SOUTH AMERICA
MEXICO
Yamaha de México, S.A. de C.V.
Av. Insurgentes Sur 1647 Piso 9, Col. San José
Insurgentes, Delegación Benito Juárez, México, D.F.,
C.P. 03900, México
Tel: +52-55-5804-0600
BRAZIL
Yamaha Musical do Brasil Ltda.
Rua Fidêncio Ramos, 302 – Cj 52 e 54 – Torre B – Vila
Olímpia – CEP 04551-010 – São Paulo/SP, Brazil
Tel: +55-11-3704-1377
ARGENTINA
Yamaha Music Latin America, S.A.,
Sucursal Argentina
Olga Cossettini 1553, Piso 4 Norte,
Madero Este-C1107CEK,
Buenos Aires, Argentina
Tel: +54-11-4119-7000
PANAMA AND OTHER LATIN
AMERICAN COUNTRIES/
CARIBBEAN COUNTRIES
Yamaha Music Latin America, S.A.
Edif. Torre Banco General, Piso 7, Urbanización
Marbella, Calle 47 y Aquilino de la Guardia,
Ciudad de Panamá, República de Panamá
Tel: +507-269-5311
EUROPE
THE UNITED KINGDOM/IRELAND
Yamaha Music Europe GmbH (UK)
Sherbourne Drive, Tilbrook, Milton Keynes,
MK7 8BL, U.K.
Tel: +44-1908-366700
GERMANY
Yamaha Music Europe GmbH
Siemensstrasse 22-34, 25462 Rellingen, Germany
Tel: +49-4101-303-0
SWITZERLAND/LIECHTENSTEIN
Yamaha Music Europe GmbH, Branch
Switzerland in Thalwil
Seestrasse 18a, 8800 Thalwil, Switzerland
Tel: +41-44-3878080
AUSTRIA/BULGARIA/
CZECH REPUBLIC/HUNGARY/
ROMANIA/SLOVAKIA/SLOVENIA
Yamaha Music Europe GmbH
Branch Austria
Schleiergasse 20, 1100 Wien, Austria
Tel: +43-1-60203900
POLAND
Yamaha Music Europe GmbH
Sp.z o.o. Oddział w Polsce
ul. Wielicka 52, 02-657 Warszawa, Poland
Tel: +48-22-880-08-88
MALTA
Olimpus Music Ltd.
Valletta Road, Mosta MST9010, Malta
Tel: +356-2133-2093
NETHERLANDS/BELGIUM/
LUXEMBOURG
Yamaha Music Europe Branch Benelux
Clarissenhof 5b, 4133 AB Vianen, The Netherlands
Tel: +31-347-358040
FRANCE
Yam a h a M us i c E uro p e
7 rue Ambroise Croizat, Zone d'activités de Pariest,
77183 Croissy-Beaubourg, France
Tel: +33-1-6461-4000
ITALY
Yamaha Music Europe GmbH, Branch Italy
Via Tinelli N.67/69 20855 Gerno di Lesmo (MB),
Italy
Tel: +39-039-9065-1
SPAIN/PORTUGAL
Yamaha Music Europe GmbH Ibérica, Sucursal
en España
Ctra. de la Coruña km. 17,200, 28231
Las Rozas de Madrid, Spain
Tel: +34-91-639-88-88
GREECE
Philippos Nakas S.A. The Music House
19th klm. Leof. Lavriou 190 02 Peania – Attiki,
Greece
Tel: +30-210-6686168
SWEDEN/FINLAND/ICELAND
Yamaha Music Europe GmbH Germany filial
Scandinavia
JA Wettergrensgata 1, 400 43 Göteborg, Sweden
Tel: +46-31-89-34-00
DENMARK
Yamaha Music Denmark,
Fillial of Yamaha Music Europe GmbH, Tyskland
Generatorvej 8C, ST. TH. , 2860 Søborg, Denmark
Tel: +45-44-92-49-00
NORWAY
Yamaha Music Europe GmbH Germany Norwegian Branch
Grini Næringspark 1, 1332 Østerås, Norway
Tel: +47-6716-7800
CYPRUS
Yamaha Music Europe GmbH
Siemensstrasse 22-34, 25462 Rellingen, Germany
Tel: +49-4101-303-0
RUSSIA
Yamaha Music (Russia) LLC.
Room 37, entrance 7, bld. 7, Kievskaya street,
Moscow, 121059, Russia
Tel: +7-495-626-5005
OTHER EUROPEAN COUNTRIES
Yamaha Music Europe GmbH
Siemensstrasse 22-34, 25462 Rellingen, Germany
Tel: +49-4101-3030
AFRICA
Yam a ha M us i c G u lf F ZE
JAFZA-16, Office 512, P.O.Box 17328,
Jebel Ali FZE, Dubai, UAE
Tel: +971-4-801-1500
MIDDLE EAST
TURKEY
Yamaha Music Europe GmbH
Merkezi Almanya Türkiye İstanbul Şubesi
Maslak Meydan Sodak, Spring Giz Plaza Bagimsiz
Böl. No:3, Sariyer Istanbul, Turkey
Tel: +90-212-999-8010
OTHER COUNTRIES
Yam a ha M us i c G u lf F ZE
JAFZA-16, Office 512, P.O.Box 17328,
Jebel Ali FZE, Dubai, UAE
Tel: +971-4-801-1500
ASIA
THE PEOPLE’S REPUBLIC OF CHINA
Yamaha Music & Electronics (China) Co.,Ltd.
2F, Yunhedasha, 1818 Xinzha-lu, Jingan-qu,
Shanghai, China
Tel: +86-400-051-7700
INDIA
Yamaha Music India Private Limited
P-401, JMD Megapolis, Sector-48, Sohna Road,
Gurgaon-122018, Haryana, India
Tel: +91-124-485-3300
INDONESIA
PT. Yamaha Musik Indonesia (Distributor)
Yamaha Music Center Bldg. Jalan Jend. Gatot
Subroto Kav. 4, Jakarta 12930, Indonesia
Tel: +62-21-520-2577
KOREA
Ya m a ha M us i c K o re a L td .
8F, Dongsung Bldg. 21, Teheran-ro 87-gil, Gangnamgu, Seoul, 06169, Korea
Tel: +82-2-3467-3300
MALAYSIA
Yamaha Music (Malaysia) Sdn. Bhd.
No.8, Jalan Perbandaran, Kelana Jaya, 47301
Petaling Jaya, Selangor, Malaysia
Tel: +60-3-78030900
SINGAPORE
Yamaha Music (Asia) Private Limited
Block 202 Hougang Street 21, #02-00,
Singapore 530202, Singapore
Tel: +65-6740-9200
TAIWA N
Yamaha Music & Electronics Taiwan Co.,Ltd.
2F., No.1, Yuandong Rd., Banqiao Dist.,
New Taipei City 22063, Taiwan (R.O.C.)
Tel: +886-2-7741-8888
THAILAND
Siam Music Yamaha Co., Ltd.
3, 4, 15, 16th Fl., Siam Motors Building,
891/1 Rama 1 Road, Wangmai,
Pathumwan, Bangkok 10330, Thailand
Tel: +66-2215-2622
VIETNAM
Yamaha Music Vietnam Company Limited
15th Floor, Nam A Bank Tower, 201-203 Cach Mang
Thang Tam St., Ward 4, Dist.3,
Ho Chi Minh City, Vietnam
Tel: +84-8-3818-1122
OTHER ASIAN COUNTRIES
http://asia.yamaha.com/
OCEANIA
AUSTRALIA
Yamaha Music Australia Pty. Ltd.
Level 1, 80 Market Street, South Melbourne,
VIC 3205, Australia
Tel: +61-3-9693-5111
COUNTRIES AND TRUST
TERRITORIES IN PACIFIC OCEAN
http://asia.yamaha.com/
PA5 0
Head Office/Manufacturer: Yamaha Corporation 10-1, Nakazawa-cho, Naka-ku, Hamamatsu, 430-8650, Japan
(For European Countries) Importer: Yamaha Music Europe GmbH Siemensstrasse 22-34, 25462 Rellingen, Germany
Page 32

Published 12/2017 IPES-A0
© 2017 Yamaha Corporation
Manual Development Group
ZZ03660
Yamaha Downloads
http://download.yamaha.com/
Yamaha Pro Audio global website
http://www.yamaha.com/proaudio/
 Loading...