

Quick Start Guide
Sound Bar
Thank you for purchasing this Yamaha product.
• To use this product properly and safely, read this Quick Start
Guide and the supplied booklet “Safety Brochure” before using
the unit.
• After reading this document and the Safety Brochure, be sure to
keep them in a safe place where they can be referenced at any
time.
About this Quick Start Guide
This document provides step-by-step instructions for installation and
playback. Refer to the User Guide on the Yamaha website for more
information.
Visit the following website to see the latest User Guide.
EN
https://manual.yamaha.com/av/20/src20a/
En 1
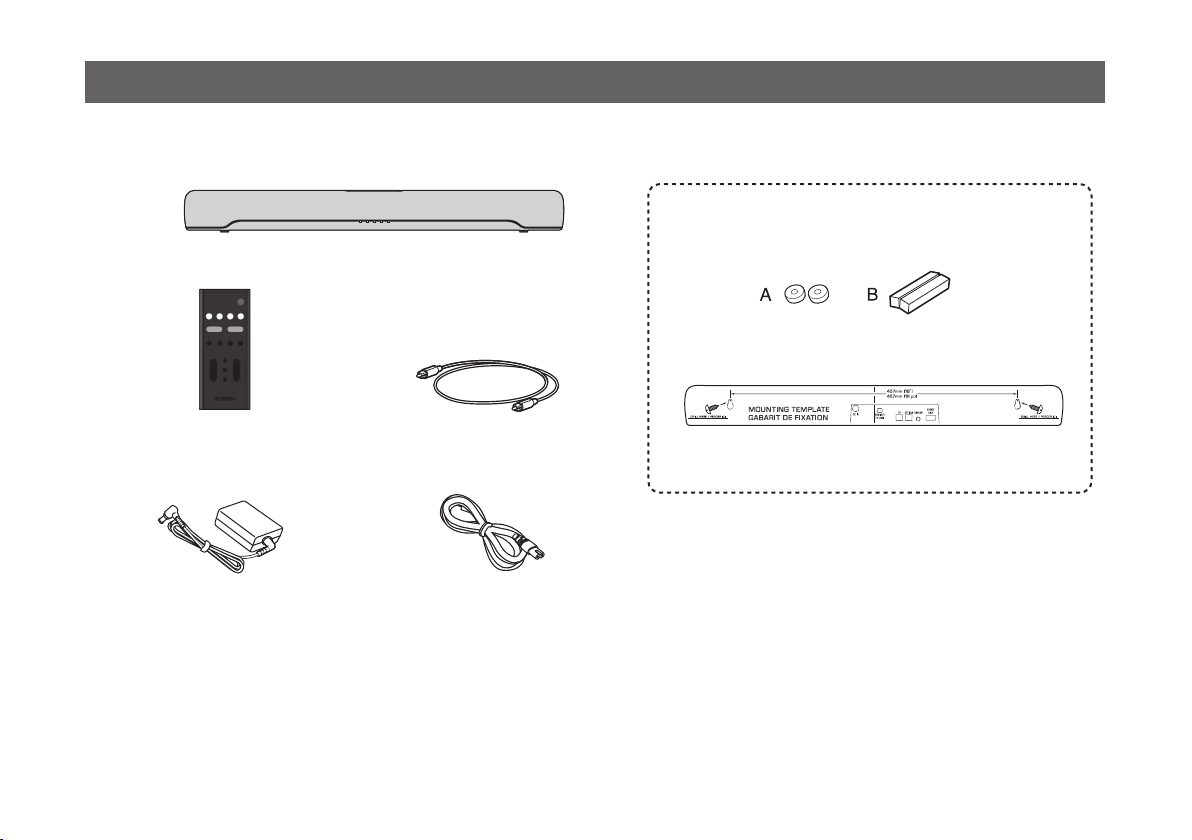
Supplied accessories
Make sure you have received all of the following accessories:
Sound bar (SR-C20A)
Use when mounting the sound bar on a wall.
Spacers (A: ×2, B: ×2 on 1 sheet)
2 En
Remote control
AC adaptor
(model number: ANAD-420FIOT-B
or ANAD-420FIOT-W)
• Quick Start Guide (this booklet)
• Safety Brochure
Digital optical audio cable
Power cord
Mounting template
NOTE
An HDMI cable is not included with this sound bar. Please
consider length when purchasing this cable separately.
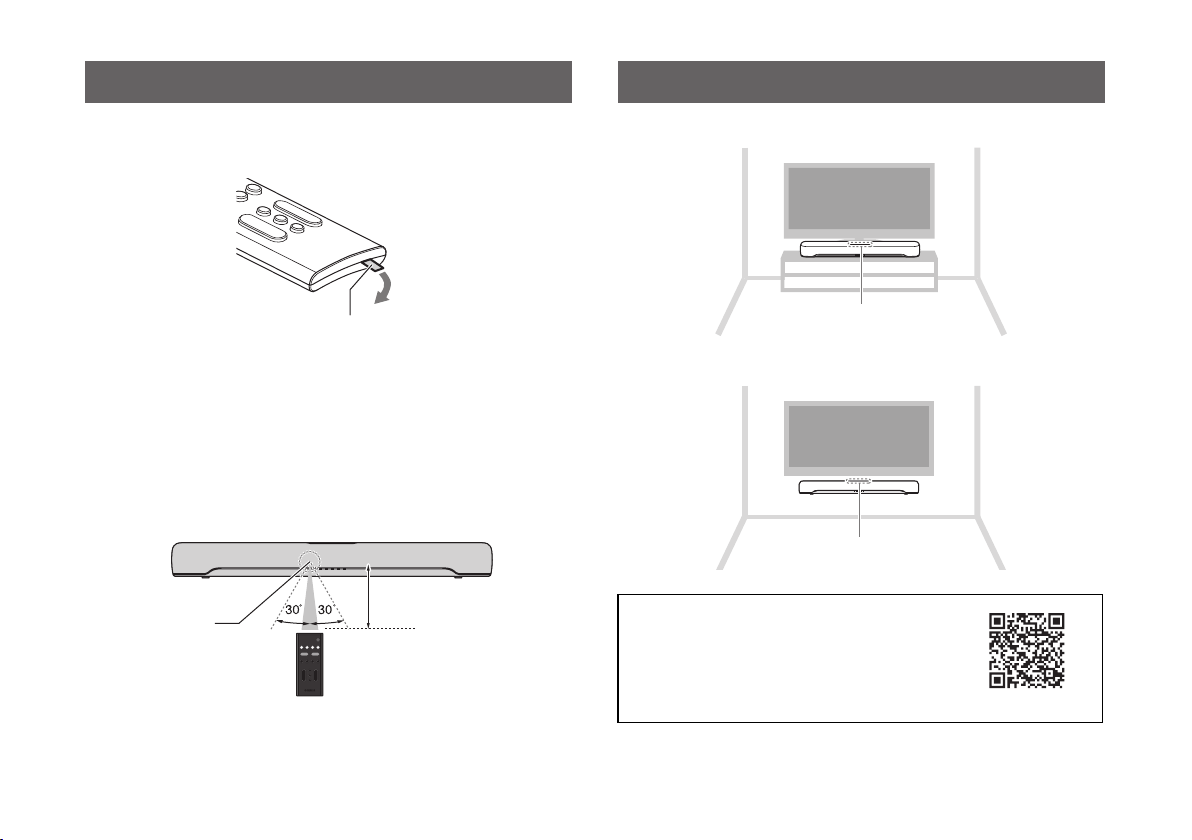
Preparing the remote control
Installing the sound bar
Remove the battery insulating strip before attempting to use the
remote control.
Battery insulating strip
NOTE
A Lithium battery (CR2025) has already been inserted into the remote
control.
Operating range of the remote control
Use the remote control within the range shown in the following
illustration:
Within 6 m (20 ft)
Remote control
sensor
Installed on a TV stand
Controls
Wall-mounted
Controls
Refer to the User Guide. When installation
and all connections are complete, power off
sound bar and hold down BASS EXT on the
sound bar's remote control for at least five
seconds. The frequency characteristics are
configured for wall mount installation.
User Guide
En 3

Connecting a TV
Depending on the type of TV, connect the TV to the sound bar as follows:
Is your TV equipped with an HDMI jack labeled as “ARC?”
Yes No
Connect the TV using an ARC-compatible HDMI cable (sold
separately).
ARC
ARC-compatible TV
HDMI
HDMI
Sound bar (rear)
4 En
HDMI INOPTICAL
ARC-compatible
HDMI input
HDMI OUT/
TV (ARC)
input
Connect the TV using an HDMI cable (sold separately) and digital
optical audio cable (supplied). Be sure to use both cables to connect
the TV.
HDMI INOPTICAL
Audio output
TV
1. Remove the cap.
2. Check the orientation
of the plug.
Sound bar (rear)
(Digital
optical audio)
O
OO
O
TV input
HDMI
HDMI input
HDMI
HDMI
OUT/TV
(ARC)
input

NOTE
• When the sound bar is connected to a TV via HDMI cable, confirm
that the TV’s settings are properly configured as follows:
– The TV's HDMI Control function is enabled.
– The TV’s audio output is set to ARC. (When an ARC-compatible
TV is used.)
• The TV’s HDMI Control function allows for controlling the following
functions using the TV’s remote control:
– Turn the power on and off
Both the TV and the sound bar turn on/off at the same time.
– Volume adjustment
The sound bar’s volume can be adjusted when the TV’s audio
output is set to the sound bar.
Connecting the TV using only the digital
optical audio cable (supplied)
When the HDMI Control function is not used or the TV is not
equipped with an HDMI input jack, connect the TV as follows:
TV
1. Remove the cap.
2. Check the orientation
of the plug.
Sound bar (rear)
OPTICAL
O
OO
O
Audio output
(Digital optical audio)
TV input
En 5

Connecting to power
After all connections are complete, connect the sound bar to power
as follows:
Playing TV sound through the
sound bar
Sound bar (rear)
AC adaptor (supplied)
Power cord (supplied)
To an AC wall outlet
z
TV
VOLUME (+/−)
1 Turn on the TV.
When the TV is connected to the sound bar using an HDMI
cable and the HDMI Control function of the TV is enabled, the
sound bar will also turn on. In this case, go to Step 4.
2 Turn on the sound bar.
Press the z button on the remote control, or touch z on the
sound bar.
3 Press TV.
4 Press VOLUME (+/−) to adjust the volume.
6 En

Adjusting the sound to your preference
b
c
a
a Listening modes based on video
or audio content (Sound mode)
The following sound modes allow you to
further enhance audio performance.
Select the sound mode according to your
content and individual preference:
STANDARD
This sound mode is the best suited
for general content, such as sports,
sitcoms, and reality shows. Surround
playback is performed.
MOVIE
This sound mode is the best suited
for movies. Surround playback is
performed.
GAME
This sound mode is the best suited
for video games. Surround playback
is performed.
STEREO
2-channel stereo playback.
b Enhance human voices (Clear
Voice)
Human voices can be easier to hear
when Clear Voice is enabled.
The function is recommended for movies
or dramas that use a lot of background
music and sound effects.
Press CLEAR VOICE to enable or
disable this feature.
Flashes three times: enabled
Flashes one time: disabled
c Enjoying enhanced bass sound
(Bass Extension)
Bass sound is enhanced and becomes
more powerful when the Bass Extension
feature is enabled.
Press BASS EXT to enable or disable
this feature.
Flashes three times: enabled
Flashes one time: disabled
NOTE
The default settings are as follows:
Sound mode: STANDARD
Clear Voice: Disabled
Bass Extension: Enabled
En 7

Listening to audio from a
Bluetooth® device
Controlling the sound bar with the
app
Audio content from a Bluetooth device (such as a smartphone) can
be played through the sound bar.
Bluetooth device
1 Press BLUETOOTH to switch the input source to
Bluetooth.
2 On the Bluetooth device, enable the Bluetooth
function.
3 Select your product displayed within the list.
“Yamaha SR-C20A” or “YamahaAV” is displayed within the list.
4 Play audio content on the Bluetooth device.
The sound bar will begin playing audio from the Bluetooth
device.
NOTE
• The sound bar can be connected to two Bluetooth devices
simultaneously (multipoint connection).
• Two Bluetooth devices cannot be played simultaneously. You will
need to stop playback on the Bluetooth device and then start
playback on the other Bluetooth device.
8 En
By installing the free dedicated app “Sound Bar
Remote” on a mobile device (such as a smartphone),
the sound bar can also be controlled from the mobile
device.
Search for “Sound Bar Remote” on the App Store or
Google Play and install it on the mobile device.
The main app functions are as follows:
• Turn the power on/off, select an input source, adjust the volume,
and adjust subwoofer volume
• Switch between sound modes
• Enable or disable the Bass Extension and Clear Voice features
• Change the brightness of the indicators on the front of the sound
bar (Dimmer)
NOTE
• To control the sound bar using the app, configure the settings on your
mobile device as follows:
– Enable the Bluetooth function.
– For Android devices, configure the settings to allow location information
to be obtained.
The Sound Bar Remote app only uses location information from the
Android device to detect the sound bar. Your personal information will not
be collected.
• This sound bar is only compatible with the Sound Bar Remote app. The
sound bar cannot be controlled using other apps (such as Sound Bar
Controller).
Manual Development Group
© 2020 Yamaha Corporation
Published 06/2020
AV19-0344
10-1 Nakazawa-cho, Naka-ku, Hamamatsu, 430-8650 Japan10-1 Nakazawa-cho, Naka-ku, Hamamatsu, 430-8650 Japan
KSOD-A0
URAB
 Loading...