

Page 1
Page 2

Page 3
Page 4

IMPORTANT ! PLEASE READ BEFORE PROCEEDING !
PRECAUTIONS
The RY8 is a powerful electronic music device featuring sensitive high
technology. To ensure many years of trouble-free use, please take the
important precautions below seriously.
LOCATION
■ In order to avoid causing serious damage to the RY8, do not expose the
instrument to direct sunlight, high temperatures, excessive humidity,
excessive dust or strong vibration.
POWER SUPPLY
■ Turn the power switch off when the RY8 is not in use.
■ The AC power adaptor should be unplugged from the AC outlet if the RY8
is not to be used for an extended period of time.
■ Unplug the RY8 during electrical storms.
■ Avoid plugging the RY8 into the same AC outlet as appliances with high
power consumption such as electric heaters or ovens. Also, avoid using
multiple-plug adaptors, since these can result in reduced sound quality and
possibly even damage to the RY8.
TURN OFF POWER WHEN MAKING CONNECTIONS
■ To avoid causing damage to the RY8 and other devices to which it is
connected (such as a sound system or MIDI instruments), turn off the
power of all related devices prior to connecting or disconnecting audio and
MIDI cables.
ELECTRICAL INTERFERENCE
■ Avoid using the RY8 near televisions, radios or other devices which
generate electromagnetic fields, since this may cause the RY8 to malfunction,
and may possibly generate interference noise in the other devices.
I
Page 5

HANDLING AND TRANSPORT
■ Handle the RY8 with care. Physical shocks caused by dropping or jostling
the instrument, or placing heavy objects upon it, can result in serious damage
to the RY8.
■ Never apply excessive force to the controls, pads, or connectors of the
instrument.
■ Disconnect all cables before moving the instrument. Always unplug cables
by gripping the plug firmly, and not by pulling on the cable itself.
CLEANING
■ Never use chemical solvents or thinners to clean the RY8, since these will
damage the finish or the rubber pads. Wipe the instrument clean with a soft,
dry cloth. If necessary, use a soft, clean cloth slightly moistened with a
diluted, mild detergent. Then wipe the instrument thoroughly with a dry cloth.
Avoid placing vinyl objects on the top of the instrument. Vinyl can stick to and
discolor the surface.
DATA BACK-UP AND STORAGE
■ Yamaha recommends that you regularly save your music data using an
external MIDI data storage device (such as the Yamaha MDF2 MIDI Data
Filer), and storing the floppy disks in a safe, cool, dry place. YAMAHA
CANNOT BE HELD RESPONSIBLE FOR THE ACCIDENTAL LOSS OF
IMPORTANT MUSIC DATA! Regarding the User memory, as long as fresh
batteries are inserted in (or an AC power adaptor is connected to) the RY8, the
User pattern, song and drum kit data will be retained, even when the power is
turned off. It will also be retained long enough to exchange an old set of
batteries for a new set. If you have important data in the RY8 which you don’t
want to lose, please take care to keep fresh batteries inserted in (or keep an
AC power adaptor connected to) the RY8, and to regularly save it to an
external MIDI data storage device.
SERVICE AND MODIFICATION
■ The RY8 contains no user serviceable parts, so never open the case
or tamper with the internal circuitry in any way. Doing so may result in
electrical shock or damage to the instrument. Refer all servicing to
qualified Yamaha service personnel.
YAMAHA CANNOT BE HELD RESPONSIBLE FOR DAMAGE TO THE RY8
RESULTING FROM IMPROPER HANDLING OR OPERATION !
II
Page 6

THANK YOU FOR PURCHASING
THE YAMAHA RY8 RHYTHM PROGRAMMER.
The Yamaha RY8 is a full-featured, high quality, low-priced, hand-held stereo
rhythm programmer with accompaniment backing and guitar input that’s the
perfect “pocket pal” for the guitarist on the go.
With its compact size, friendly user interface, wide variety of preprogrammed
patterns and songs, user programming capabilities, versatile MIDI features and
more, the handy RY8—which easily slips into a guitar case or gig bag—is
ready to plug and play anytime and anywhere. It’s the ideal music practicing
companion and composing sketch pad.
Whether you’re a professional or amateur guitarist, a serious songwriter or
simply a music hobbyist, you’ll find the RY8 a unique and powerful addition to
your arsenal of music tools. You’ll be surprised by its full, dynamic stereo
sound quality when played through a high quality audio monitoring system.
You’ll also appreciate being able to plug in a guitar and headphones and work
in privacy without disturbing others—or better yet, without others disturbing
you!
To take full advantage of the RY8’s many features and music making
capabilities, please read this owner’s manual carefully to familiarize yourself
with the proper operating procedures. Also, keep this manual in a safe place
for future reference.
III
Page 7

CONVENTIONS USED IN THIS MANUAL.
In order to keep confusion to a minimum, there are a few basic conventions
used in the feature explanations in this manual, as follows:
■ Names of key features are written in the cap-low style; e.g., Pattern Mode,
Song Record Mode, System Mode Sync function, User patterns, etc.
■ Names of controls and connectors are written in all-caps within brackets;
e.g., [EXT IN] jack, [VOLUME] slider, [DELETE] button, etc.
■ Special prompts or words which appear on the LCD screen during operation
are written in quotes; e.g., “NEXT”, “CHAIN”, “accnt”, “COPY SURE?”, etc.
■ Everything else will be written in the lower case style.
PLEASE KEEP THIS MANUAL IN A SAFE PLACE FOR FUTURE
IV
Page 8

HOW TO USE THIS MANUAL.
BEFORE YOU BEGIN
GETTING STARTED
MODES & FUNCTIONS
APPENDIX
INDEX
The RY8 Owner’s Manual is designed to travel alongside the RY8 itself. It
includes information about all the RY8’s features and operation procedures,
organized in such a way as to permit quick and easy access to any feature you
need to locate. The main sections of the Owner’s Manual are as follows:
A brief overview of the RY8’s capabilities and system structure, as well as
descriptions of all panel features—everything you need to know before you
begin using the RY8 in order to put its many features and capabilities into
proper context.
A step-by-step guide through setting up the RY8, turning on the power, playing
the demo songs and performing basic pattern, song and drum kit operations—
everything you need to get started enjoying the RY8 right away.
An extensive feature reference of the various modes and functions of the
RY8—everything you need to know about all operating procedures.
A collection of technical charts and lists including display messages,
troubleshooting, drum voice and pattern lists, MIDI implementation chart and
more.
An alphabetical list of topics which gives you quick and easy access to any
subject in the manual you want to locate.
V
Page 9
REFERENCE !
TABLE OF CONTENTS
BEFORE YOU BEGIN
GETTING STARTED
MODES & FUNCTIONS
APPENDIX
INDEX
..............................................................................................................2
1. THE RY8......................................................................2
2. RY8 SYSTEM STRUCTURE.......................................4
3. TOP PANEL.................................................................7
4. SIDE & REAR PANELS.............................................10
..............................................................12
5. SETUP & POWER-ON..............................................12
6. PLAYING THE DEMO SONG....................................18
7. PLAYING THE DRUM PADS ....................................19
8. PLAYING THE PRESET PATTERNS .......................21
9. PLAYING THE PRESET SONGS..............................26
....................................................30
10. PATTERN MODE....................................................30
11. SONG MODE ..........................................................41
12. DRUM KIT MODE....................................................54
13. EXTERNAL IN MODE .............................................61
14. SYSTEM MODE......................................................67
15. TEMPO MODE........................................................73
16. MUTE MODE...........................................................74
17. BALANCE MODE....................................................75
18. TRANSPOSE MODE...............................................76
................................................................................77
19. RECALLING THE FACTORY
DEFAULT SETTINGS.............................................77
20. DISPLAY MESSAGES ............................................78
21. TROUBLESHOOTING.............................................79
22. SPECIFICATIONS...................................................81
23. LISTS & CHARTS....................................................82
..........................................................................................94
1
Page 10
1. THE RY8
BEFORE YOU BEGIN
The RY8 is an easy-to-use yet powerful rhythm programmer with automatic
bass and chord accompaniment backing, an external input for playing along
using a guitar, versatile MIDI capabilities and much more.
Featuring Yamaha’s exclusive AWM (Advanced Wave Memory) tone
generation technology—where voices are high quality digital samples of actual
instruments—the RY8 has a large capacity waveform ROM filled with 128
“drum” voices for the rhythms, and 50 “normal” voices for the backings, plus
200 Preset rhythm patterns with matching accompaniment backing
encompassing many different popular music styles, and 50 Preset songs and
12 Preset drum kits suitable for any type of music situation. The RY8 also
features powerful programming capabilities that let you do the following:
Create Your Own Rhythm Patterns
Record your own one-measure User patterns in step-time or real-time. You can
assign any of the preprogrammed backing accompaniments—consisting of
Bass, Chord 1 and Chord 2 tracks—to your rhythm.
Create Your Own Songs
String together a series of Preset and User patterns to create your own User
song—complete with chord progressions as you specify.
Create Your Own Drum Kits
Assign drum voice sounds to the pads to create your own User drum kits—
complete with drum voice pan positioning, pitch tuning and more.
2
Page 11

The RY8’s many other features include song chaining and loop repeating,
rhythm “swing” function for a realistic human feeling, guitar tuner and guitar
synthesizer, 28-note polyphony, stereo outputs, headphone jack, and a large
LCD screen which always lets you know what mode and status you’re currently
in. Hence, the RY8 is the ideal music tool that’s useful in practically any music
situation. You can use it as:
A Practicing Companion
Plug a guitar directly into the RY8 and play along with the patterns and songs.
Mute one or more of the accompaniment tracks, or turn the backing off entirely
and play along with the rhythm only. The RY8 provides just the music you need
for a hot practice session.
A Music Sketch Pad
String together a series of Preset and User rhythm patterns, designate a
backing accompaniment, and specify the chord progressions for a song idea.
Creating your own songs is quick and easy with the RY8’s user-friendly
interface.
A Powerful Drum Machine
Program professional sounding rhythm patterns by Step or Realtime recording,
complete with accent dynamics and “swing” factor for a realistic human feel.
Whether you modify a preset or create your own rhythm pattern from scratch,
the RY8’s auto-quantizing makes sure your rhythms are always on the beat.
A Guitar Synthesizer
Plug a guitar directly into the RY8 and “trigger” AWM normal voices (including
acoustic piano, strings, brass, synth pad sounds and more) in real-time with the
notes you play on the guitar. You can specify the RY8 to “synthesize” any of
the 50 normal voices as single notes, octaves, harmonies and more—in order
to create interesting and unique sound textures.
A MIDI Tone Generator
Connect an external MIDI keyboard or sequencer in order to play the RY8’s
AWM drum voices. You can specify the note table by which the different voices
will be sounded.
3
Page 12
2. RY8 SYSTEM STRUCTURE
The RY8 is primarily a powerful rhythm programmer, but with the added
dimension of automatic backing accompaniment, song programming capability
and a guitar synthesizer.
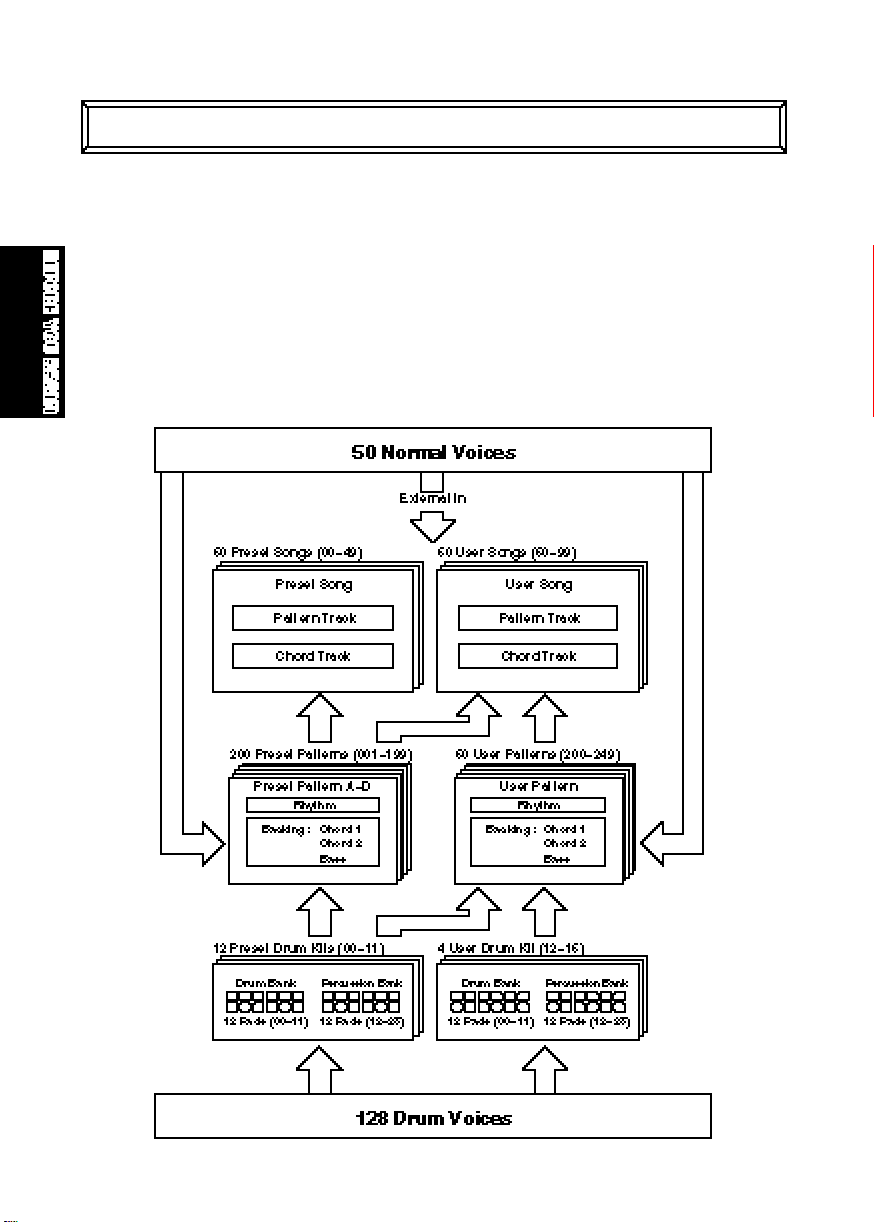
The key components that make up the RY8’s operating system are the AWM
voices, the drum kits, the patterns, and the songs. The main operating modes
are Pattern Mode and Song Mode, each of which are made up of several
“functions”. Additional modes include Drum Kit Mode, External In Mode,
System Mode, Tempo Mode, Mute Mode, Balance Mode and Transpose Mode.
4
Page 13
THE AWM VOICES.
There are 128 “drum” voices and 50 “normal” AWM voices. The drum voices
are assigned to the drum kits. The normal voices are assigned to the backing
accompaniments and to the guitar synthesizer.
THE DRUM KITS.
There are 12 Preset drum kits and 4 User drum kits. Although there are only 12
pads on the top panel of the RY8, each drum kit is made up of 24 drum voices,
organized in two “Pad Banks”—a “Drum Pad Bank” and a “Percussion Pad
Bank”—with 12 drum voices assigned to each Pad Bank. (You can switch
freely back and forth between Pad Banks by pressing the [PAD BANK] button.)
The various Preset drum kits are designed for different styles of music. You
can create your own User drum kits by assigning any drum voice you want to
the pads, and specifying output and accent levels, as well as pan positioning
and pitch tuning, for each pad.
THE PATTERNS.
There are 200 Preset patterns and 50 User patterns, each comprised of a onemeasure rhythm pattern. The Preset patterns are organized in 50 music styles
with “A”, “B”, “C” and “D” Sections for each style—representing both “main” and
“fill-in” type Sections.
The Preset rhythm patterns also have special Bass, Chord 1 and Chord 2
backing accompaniment tracks—matched to the music style of each respective
pattern—assigned to them. Each backing track can be turned off, or “muted”, at
will, and you can adjust the volume balance of each. If you want, you can
switch the backing off entirely.
You can create your own User rhythm patterns, and assign one of the backing
accompaniments to it.
THE SONGS.
There are 50 Preset songs and 50 User songs. The Preset songs are made up
of the Preset patterns, complete with preprogrammed chord progressions, and
are intended as music style ideas to get you started or to play along with as
they are.
You can create your own songs using Preset and/or User patterns, complete
with chord progressions that you can record in the “chord track”.
5
Page 14

THE MODES AND FUNCTIONS.
The RY8’s features are for the most part organized into nine modes accessible
by holding [MODE] and pressing one of the drum pads (the names of the
modes are printed on the various pads).
All modes except Tempo Mode and Transpose Mode contain several pages of
functions which you can select by holding [MODE] and pressing [PAGE-] and
[PAGE+].
Most routine operations can be performed from either within Pattern Mode or
Song Mode.
■ To enter Pattern Mode, hold [MODE] and press [PATTERN].
■ To enter Song Mode, hold [MODE] and press [SONG].
6
Page 15
3. TOP PANEL
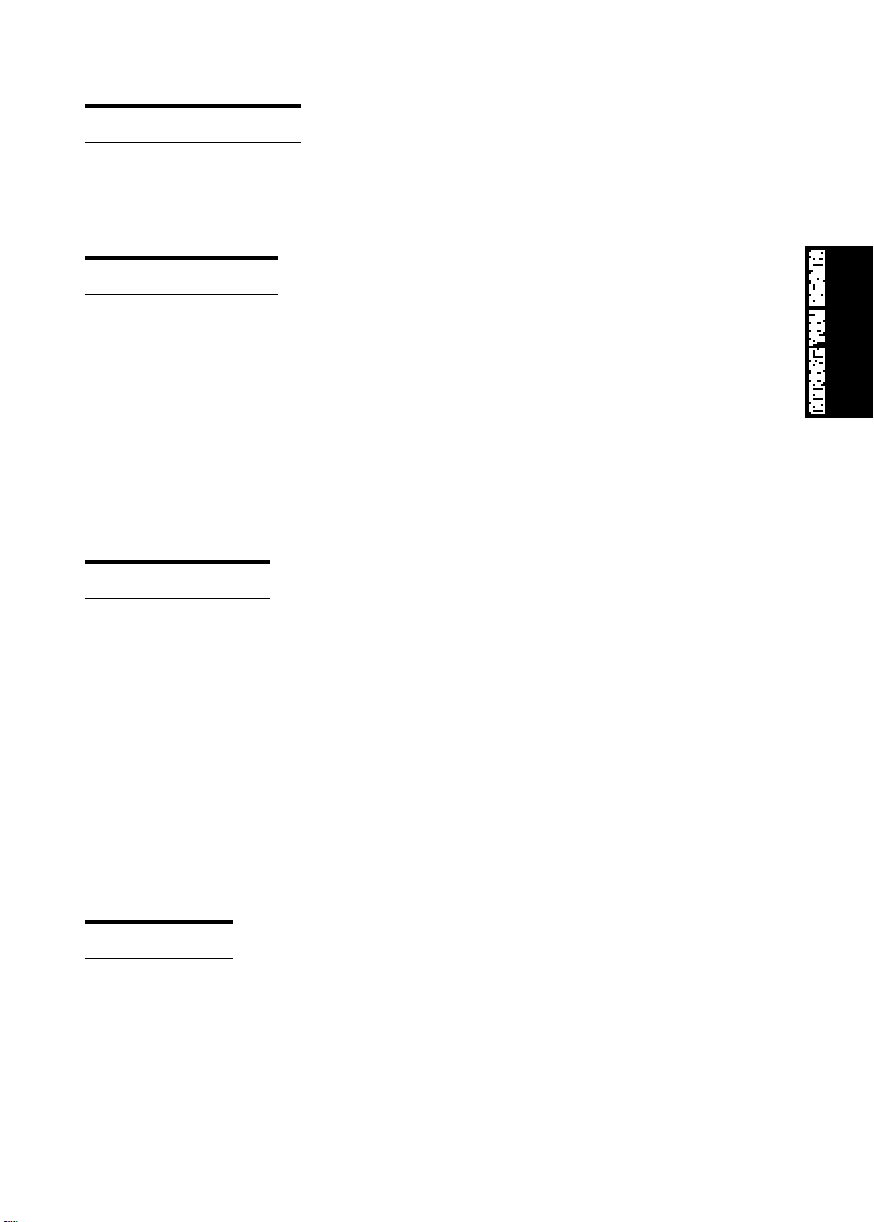
1 LCD SCREEN
High contrast, easy-to-read Liquid Crystal Display (LCD) provides large-content
visual feedback to always let you know exactly what mode and status you’re
currently in.
2 PATTERN AND KIT LISTS
List of rhythm pattern and drum kit types arranged logically for quick reference
and easy access.
3 [REC] BUTTON
For entering and exiting Pattern Record Mode and Song Record Mode. Both
Step and Realtime recording are possible.
4 [TOP] BUTTON
For returning the song or pattern location to the top, or the first measure, when
the playback is stopped.
5 [BWD] BUTTON
For rewinding the song through a series of measures when the song playback
is stopped. Pressing [BWD] in Pattern Play Mode returns the pattern measure
location to the top, or the first measure. Pressing [BWD] in Pattern Record
Mode lets you select the clock position.
7
Page 16
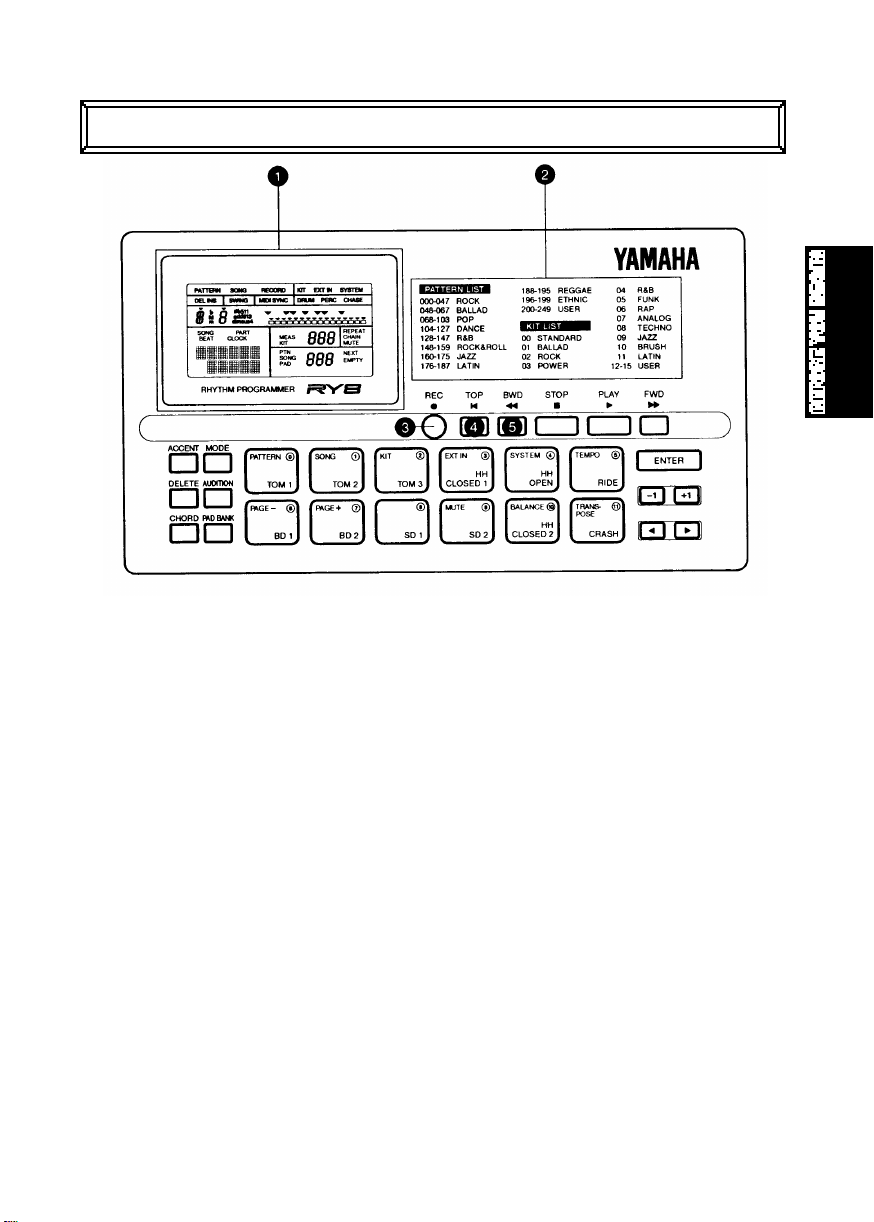
6 [STOP] BUTTON
For stopping the song or pattern playback or realtime recording.
7 [PLAY] BUTTON
For starting song or pattern playback or realtime recording from the current
measure location. Pressing [PLAY] immediately after pressing [STOP] will
continue the song or pattern playback from the stop location. To start the song
or pattern from the beginning, or the top, press [TOP] before pressing [PLAY].
8 [FWD] BUTTON
For fast-forwarding the song through a series of measures when the song
playback is stopped. Pressing [FWD] in Pattern Play Mode returns the pattern
measure location to the top, or the first measure. Pressing [FWD] in Pattern
Record Mode lets you select the clock position.
9 [ACCENT] BUTTON
For adding an accent to a drum beat, by pressing and holding [ACCENT] while
hitting a drum pad. In Pattern Step Record Mode, you can record an accent by
simply pressing [ACCENT] at the desired drum beat clock location. You can
assign the accent level for each drum pad of a User drum kit in Drum Kit Mode.
0 [MODE] BUTTON
For accessing the various modes, by pressing and holding down [MODE] while
pressing a mode button, and for accessing the various functions within each
mode, by holding down [MODE] while pressing [PAGE-] and [PAGE+].
8
Page 17

q [DELETE] BUTTON
For deleting individual drum beats in Pattern Record Mode. Simply hold
[DELETE] and press [ENTER] or the appropriate drum pad to delete the drum
voice at the current cursor location. When Chord Assign is active, holding
[DELETE] and pressing [ENTER] will delete the chord at the current cursor
location.
w [AUDITION] BUTTON
For “auditioning”, or checking, drum sounds in Pattern Step Record Mode
before you record a drum beat. While pressing and holding [AUDITION], press
the drum pad you want to audition and the drum voice will sound but data will
not be input.
e [CHORD] BUTTON
For accessing Chord Assign, which lets you specify the chord root and chord
type for the backing.
r [PAD BANK] BUTTON
Although there are only 12 drum pads on the top panel, each drum kit has 24
sounds, organized in two Pad Banks of 12 voices per bank. Pressing [PAD
BANK] toggles between each bank of 12 “Drum” and 12 “Percussion” voices.
t DRUM PADS/MODE BUTTONS
Double-function controls which act as drum pads for playing the drum voices
during playback or recording, and act as mode and function select buttons
when the [MODE] button is pressed and held. The names of the various modes
are printed on the pads. The [PAGE+] and [PAGE-] buttons let you access the
various functions within each mode. Although the drum pads are not touch
sensitive, you can apply accents to drum beats using the [ACCENT] button.
y [ENTER] BUTTON
For “confirming” or executing certain data entry operations.
u [-1] AND [+1] BUTTONS
For specifying data, or modifying the currently selected parameters.
i [2] AND [1] BUTTONS
For moving the “flashing cursor” around the LCD screen to select the various
parameters.
9
Page 18

4. SIDE & REAR PANELS
1 [VOLUME] SLIDER
For setting the master volume output level from the [OUTPUT] and [PHONES]
jacks.
2 [PHONES] MINI JACK
For plugging in a pair of headphones with a mini stereo plug for private listening.
3 [OUTPUT] JACKS
For connecting the RY8 to a mixer, or a stereo amplifier, or amplified speakers.
In the case of mono output, use the [L/MONO] jack.
4 [MIDI] JACKS
For connecting the RY8 to other MIDI devices such as a synthesizer or music
sequencer, or to a MIDI data storage device (or another RY8) for bulk dumping
of User song, pattern and kit data.
10
Page 19

5 [EXT IN] JACK
For plugging in a guitar to play along with the song or pattern playback, or for
using the guitar tuner feature, or for “triggering” any of the 50 AWM backing
instrument voices in various ways.
6 [DC IN] JACK
For connecting an AC power adaptor to supply power to the RY8.
7 [POWER] SWITCH
For switching the RY8 on and off. Be sure to switch the power off when the
RY8 is not in use.
8 BATTERY COMPARTMENT
For inserting six 1.5 volt AA-size (SUM-3 or R6P) batteries to supply power to
the RY8. Be sure to remove the batteries when the RY8 is not to be used for
an extended period of time.
11
Page 20

5. SETUP & POWER-ON
GETTING STARTED
WARNING
The RY8 can be powered by either an optional AC adaptor or six
batteries. Follow the instructions below based on the power source you
intend to use.
USING A POWER ADAPTOR.
Plug the DC output cable from an optional Yamaha PA-3 or PA-1B AC Adaptor
(available from your Yamaha dealer) snugly into the [DC IN] jack on the rear
panel, then plug the adaptor into a convenient wall AC power outlet.
Do not attempt to use an AC adaptor other than the Yamaha PA-3 or PA-1B. The use of an
incompatible adaptor may cause irreparable damage to the RY8, and may even pose a serious
shock hazard! ALWAYS UNPLUG THE AC ADAPTOR FROM THE AC POWER OUTLET WHEN
THE RY8 IS NOT IN USE.
When the AC adaptor plug is inserted into the RY8’s [DC IN] jack, the batteries are automatically
disconnected.
12
Page 21

USING BATTERIES
Install six 1.5 volt AA-size (SUM-3 or R6P) or equivalent manganese or
alkaline batteries into the battery compartment.
Open the battery compartment cover.
1.
Open the battery compartment cover—located on the bottom panel of the RY8—
by carefully pressing down on the grooved area of the cover and sliding it
outward, in the direction of the arrow as indicated on the cover itself, and as
shown below.
Insert the batteries.
2.
Insert the six batteries, being careful to position them according to the polarity
markings as indicated on the bottom panel of the RY8.
3.
Replace the cover.
Carefully replace the compartment cover, making sure that it locks snugly into
place.
13
Page 22

WHEN TO REPLACE THE BATTERIES.
When the batteries run down and are no longer able to operate the RY8, the
sound may become distorted, the output volume level will decrease
automatically, and the words “BATT LOW” will appear in the LCD.
When this happens, replace the batteries with a complete set of six new
batteries WARNING!. NEVER MIX OLD AND NEW BATTERIES, AND NEVER
MIX DIFFERENT TYPES OF BATTERIES (SUCH AS ALKALINE AND
MANGANESE)!
To prevent possible damage due to battery leakage, remove the batteries from the RY8 if the
instrument is not to be used for an extended period of time.
CONNECTING EXTERNAL DEVICES.
Depending on your individual requirements, there are a variety of ways to
connect external devices to the RY8.
Monitoring by Headphones
The simplest way to monitor the RY8’s sound is to plug a set of headphones
with a miniature stereo phone plug into the RY8’s [PHONES] jack, and adjust
the [VOLUME] slider.
14
Page 23

Monitoring by an Audio System
Another simple setup for monitoring the RY8’s sound is to plug a pair of audio
cables from the RY8’s [OUTPUT] jacks to the inputs of either a mixer, or a
stereo amplifier, or a pair of amplified keyboard speakers. Carefully adjust the
RY8’s [VOLUME] slider in relation to the input and output levels on the mixer
and volume level on the amplifier.
MAKE SURE BOTH THE RY8 AND YOUR SOUND SYSTEM ARE TURNED
OFF WHEN MAKING CONNECTIONS !
Connecting a MIDI Device
The RY8 has a variety of MIDI capabilities, and the type of external MIDI
device you connect to it depends on your particular requirements. For example,
you may want to connect a MIDI data storage device (such as the Yamaha
MDF2 MIDI Data Filer) to save User patterns, songs and drum kits, or you may
want to connect an external MIDI keyboard to use the RY8 as a “slave” tone
generator and play its AWM drum voices, or you may want to connect a music
sequencer and control the RY8’s sync clock. In general, you should plug a
MIDI cable from the RY8’s [MIDI OUT] jack to the MIDI IN jack of the external
device, and plug another MIDI cable from the RY8’s [MIDI IN] jack to the MIDI
OUT jack of the external device. Depending on your required application, you
may need to make specific MIDI settings on both devices. (For details about
MIDI and sync clock settings, see “System Mode”, page 67.)
15
Page 24

MIDI settings
Connecting a Guitar
One of the RY8’s most unique features is its [EXT IN] jack, which lets you plug
a guitar directly into the RY8 and play along with the patterns and songs, or
use the RY8 as a guitar tuner, or even use the RY8 as a guitar synthesizer to
“trigger” one of the 50 AWM normal voices by the notes you play on the guitar.
Turn down the volume of both the guitar and RY8, then plug a guitar cable from
the guitar’s output jack to the RY8’s [EXT IN] jack. Next, raise the RY8’s
volume level, then turn up the guitar’s volume knob. (For details about the EXT
IN features, see “External In Mode”, page 61.)
16
Page 25

POWER-ON PROCEDURE.
There is actually a correct process for switching the various components in an
electronic music system on and off. The rules are simple but important.
BEFORE TURNING ANYTHING ON:
■ Be sure that all components are actually plugged in, and check to make sure
that all volume controls are turned down to their zero positions.
■ Always turn the RY8 on first (followed by any additional devices which may
be connected).
■ Always turn the sound system on last.
■ Raise the sound system volume to a reasonable level.
■ Gradually raise the RY8 volume while playing the drum pads to set the
desired listening level.
When turning the various components off, simply reverse the process. The
reason for turning the RY8 on first and off last is to avoid the possibility of
sending a power surge through the sound system which could damage the
amplifier or speakers.
17
Page 26

6. PLAYING THE DEMO SONG
Before you begin using the RY8 or diving into its many features, you might
want to hear the preprogrammed demo song which will give you an idea of just
how powerful the RY8 is. To select the demo song, first you must enter Song
Mode.
■ To enter Song Mode, press and hold the [MODE] button, then press [SONG].
■ To select the demo song, in the Song Select function, press and hold [+1] to
scroll the song numbers all the way to the end—until the word “DEMO”
appears in the lower left area of the LCD.
■ To start the demo song playback, press [PLAY].
■ To stop the demo song playback, press [STOP]. Pressing [PLAY] again will
continue the demo song from the song stop location.
18
Page 27

7. PLAYING THE DRUM PADS
At power-on, you can start hitting the drum pads right away. Try
listening to the sounds of the currently selected drum kit.
The Drum Voice List and Drum Kit List are provided or page 82 and 84.
SELECTING THE PAD BANKS.
Each of the twelve drum pads has two drum voices assigned to it. These are
organized in “Drum” and “Percussion” Pad Banks.
■ To switch back and forth between the two Pad Banks, press [PAD BANK].
■ Either the word “DRUM” (for Drum Pad Bank) or the word “PERC” (for
Percussion Pad Bank) will appear in the LCD screen as you switch back and
forth between each.
19
Page 28
SELECTING THE DRUM KITS.
When the Chase function is on, the currently selected drum kit will depend on
which pattern is selected. There are 16 drum kits—12 Preset drum kits and 4
User drum kits. To select a different kit, you must first enter Drum Kit Mode.
■ To enter Drum Kit Mode, hold [MODE] and press [KIT]. (To access the Kit
Select function, you may need to hold [MODE] and press [PAGE-] several
times; the Kit Select function is the first function in Drum Kit Mode.)
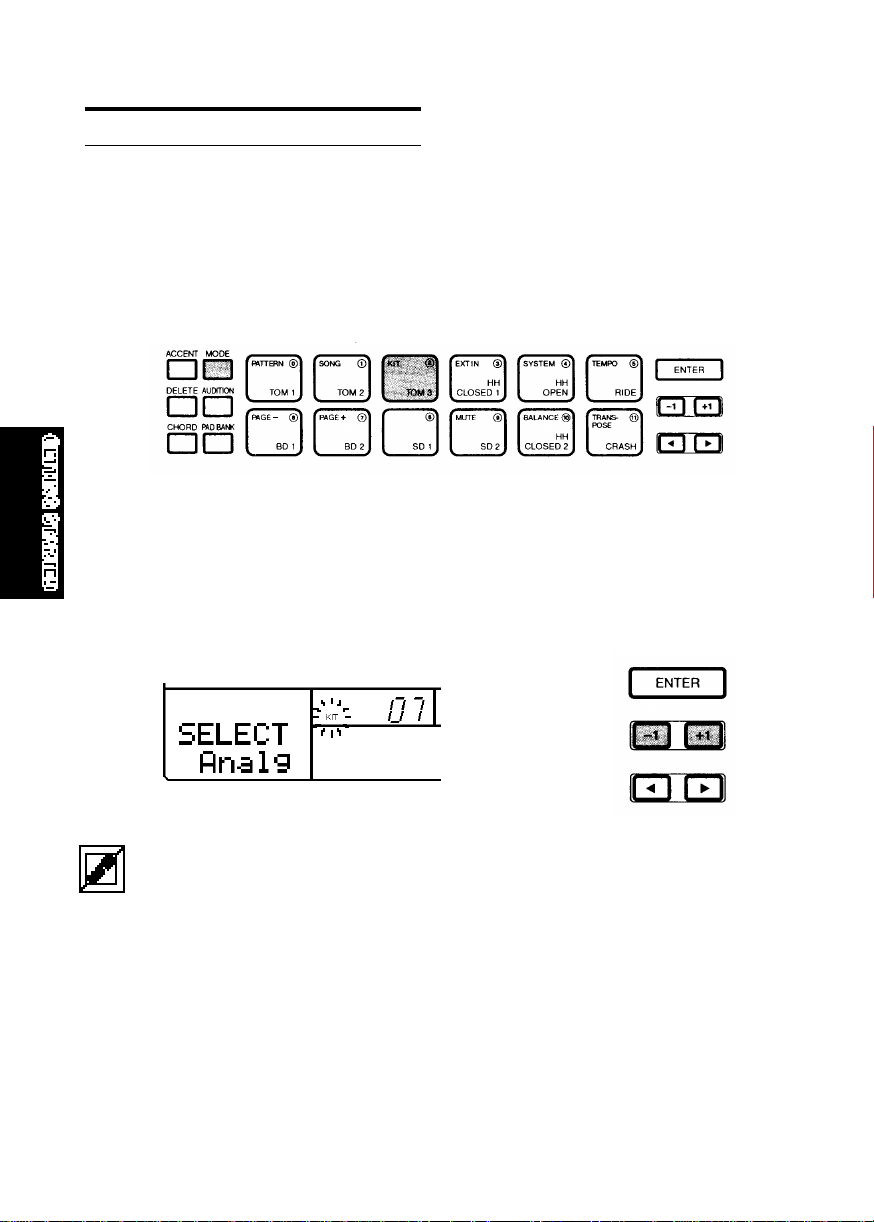
■ The word “SELECT” will appear on the LCD, as will the name of the currently
selected drum kit. The kit number (00 ~ 15) will also display in the LCD.
■ To select a different drum kit, press [-1] and [+1]. Kits #00 ~ #11 are Preset
drum kits, and kits #12 ~ #15 are User drum kits.
When shipped, the Preset drum kits #00 ~ #03 are assigned to User drum kits #12 ~ #15, respectively.
For a listing of the 16 drum kits and respective drum pad voice assignments, see page 84.
20
Page 29

8. PLAYING THE PRESET PATTERNS
The RY8 comes filled with 200 Preset one-measure rhythm patterns (#000 ~
#199). Each Preset pattern is accompanied by a special backing part,
preprogrammed in a specific music style. The automatic backing consists of
Bass, Chord 1 and Chord 2 tracks. There are 200 backings, covering many
different popular styles of music. (For a list of the RY8’s pattern, see page 86.)
The Preset rhythm patterns are organized in 50 music styles with four Sections
for each style. A Section is simply a “Main A” or “Main B” part, or a “Fill AB”
part (a fill-in that leads the Main A part naturally into the Main B part), or a “Fill
BA” part (a fill-in that leads the Main B part naturally into the Main A part).
You can change the backings independently of the rhythm (see page 32), as
well as change the chord (see page 32). You can mute the various backing
tracks (see page 74), or turn the backing off entirely and just hear the rhythm
(see page 32).
All changes made to Preset patterns, except for the Swing setting, are temporary. When you select a
different pattern or switch to another mode and then return to Pattern Mode, the default settings will be
reinstated.
■ To select a Preset pattern, first enter Pattern Mode by holding [MODE] and
pressing [PATTERN].
(It may be necessary to hold [MODE] and press [PAGE-] several times to
access the Pattern Select function; Pattern Select is the first function in Pattern
Mode.)
21
Page 30

■ The word “PTN” (located next to the number of the currently selected pattern) will be
flashing, indicating that you can change the pattern number.
■ Press [-1] and [+1] to select a Preset pattern (between #000 ~ #199). (The
pattern numbers between #200 ~ #249 are for User patterns, i.e., patterns
you create yourself; the User patterns for a new RY8 will contain no data.)
■ To play the selected Preset pattern, press [PLAY]. The selected pattern will
play repeatedly until you press [STOP]. To continue the pattern playback
from the stop position, press [PLAY] again. To start the pattern again from
the beginning, or top, before pressing [PLAY], you must press [TOP], [BWD]
or [FWD] to return the pattern to the top.
SELECTING “NEXT” PATTERNS.
While a pattern plays back, you can designate the “Next” pattern to play
immediately after the current pattern finishes.
■ To select the Next pattern, while the current pattern is playing, simply press
[-1] and [+1] to designate the Next pattern. (This is a good opportunity to
step through each Preset pattern and hear each one!)
22
Page 31

CHANGING THE TEMPO.
You can change the tempo whether the pattern is playing or stopped. Each
Preset pattern is programmed with an “initial tempo”. When you select a
pattern, the pattern’s initial tempo will be loaded.
■ To change the current tempo setting, hold [MODE] and press [TEMPO] to
enter Tempo Mode.
The word “TEMPO” will display in the lower left area of the LCD, and the current tempo
value will be flashing. Press [-1] and [+1] to specify a new tempo value. The playback
tempo can be set to an
y value from 40 to 250 beats per minute.
■ To exit Tempo mode hold [MODE] and press [PATTERN].
CHANGING THE BACKING CHORD.
You can change the chord root and chord type for the backing while the pattern
is stopped or while it is playing. All backing tracks will automatically change to
play in the designated chord.
■ To change the backing chord, you must first select Chord Assign by pressing
[CHORD]. A small, flashing black inverted triangle indicator will appear
above the Chord Root in the upper left area of the LCD.
23
Page 32

■ To select Chord Root or Chord Type, press [2] and [1]. The flashing indicator
will be positioned above the currently selected one.
■ To change the backing Chord Root or Chord Type, press [+1] and [-1],
followed by [ENTER] to lock in the new chord.
Chord Type
Chord Root
■ To exit Chord Assign, press [CHORD] again.
SELECTING THE BACKING ACCOMPANIMENT.
The backing accompaniments consist of Bass, Chord 1 and Chord 2 tracks,
preprogrammed to match the relevant Preset patterns. You cannot modify a
backing, but you can select a different backing to temporarily play with the
currently selected pattern.
■ To select a backing accompaniment, within the Pattern Mode Pattern Select
function, press [2] to move the flashing cursor over the backing name in the
LCD; the backing name will begin flashing, indicating that you can select a
different backing accompaniment to play with the currently selected rhythm.
(This is a good opportunity to hear how the different backings sound with
different rhythms!)
24
Page 33

■ When the backing name is flashing, press and hold [-1] or [+1] to scroll
through all the backings; the very last backing selection will be the “Backing
Off” status.
■ To turn the backing accompaniment off, choose the very last backing
selection, indicated by the words “BKOFF” in the LCD. (To turn the backing on again,
press [-1] and specify a desired backing.)
MUTING THE BACKING TRACKS.
You can mute (i.e., switch off) any or all of the backing tracks. You must first
enter Mute Mode by holding [MODE] and pressing [MUTE].
■ To select and mute the Bass, Chord 1 or Chord 2 track, hold [MODE] and
press [PAGE-] or [PAGE+].
25
Page 34

Bass Track Mute (“B”) is the first function, Chord 1 Track Mute (“C1”) is the
second function, and Chord 2 Track Mute (“C2”) is the third function in Mute
Mode. The words “MUTE B (or C1 or C2) OF” will appear on the LCD to indicate
that you have accessed the desired Track Mute function, and that it is turned
off. To turn it on, press [+1]. The word “ON” will appear in the LCD, and the track
will stop playing. (To turn the track Mute function off again, press [-1].)
■ To exit Mute mode, hold [MODE] and press [PATTERN].
9. PLAYING THE PRESET SONGS
The Preset songs are intended as music style ideas to get you started, or to
play along with as is. There are 50 Preset songs (#00 ~ #49), covering many
different popular styles of music.
■ To select a Preset song, first enter Song Mode by holding [MODE] and
pressing [SONG]. Next, hold [MODE] and press [PAGE-] once or more to
access the Song Select function; Song Select is the first function in Song
Mode.
■ The word “SONG” (located above a two-digit number in the lower left area of
the LCD) will be flashing, indicating that you can change the song number.
26
Page 35

■ Press [-1] and [+1] to select a Preset song (between #00 ~ #49). (The song
numbers between #50 and #99 are for User songs, i.e., songs you create
yourself; the User songs for a new RY8 will contain no data.)
■ To play the selected Preset song, press [PLAY]. (If the Repeat function is on;
see page 43), the song will continuously play until you press [STOP].
■ To stop the playback in the middle of a song, press [STOP]. To continue the
song playback from the stop position, press [PLAY] again. To start the song
playback from the top, press [TOP] before pressing [PLAY].
■ To specify a starting measure, before pressing [PLAY], press [BWD] or [FWD]
to designate a specific measure to start the song from.
The RY8 has 28-note polyphony, which means the maximum number of notes that can sound at one
time is 28. In some cases, some of the voices may be “truncated”, or cut off, or may not sound at all.
27
Page 36

CHANGING THE PATTERNS AND BACKING ACCOMPANIMENT.
You can easily change the patterns and backing accompaniment of the
selected song—either while the song is stopped or while it is playing.
After you’ve switched into the Song Mode Song Select function and selected a
song, when you press [PLAY] to start the song playback, the flashing cursor
position will change from “SONG” (in the lower left area of the LCD) to “PTN”
(Pattern; in the lower right area of the LCD). This indicates that you can change
the pattern.
When you change the pattern number, the pattern will change, and the
accompaniment backing will change accordingly.
■ To change the pattern, either start the playback or press [1] once or more to
position the flashing cursor over the word “PTN” (Pattern). Then press [-1]
and [+1] to select a rhythm pattern.
28
Page 37

■ To change the backing accompaniment, press [2] or [1] to position the
flashing cursor over the name of the backing accompaniment. The backing
name will begin flashing, indicating that you can select a different
accompaniment backing to play with the currently selected rhythm. Then
press [-1] and [+1] to select a backing accompaniment.
The pattern and backing changes you make in the Preset song will only remain active as long as the
current Preset song is selected, or until you select a different measure by pressing [TOP], [BWD] or
[FWD]. When you select another song, the Preset default patterns will be reinstated.
29
Page 38

10. PATTERN MODE
MODES & FUNCTIONS
Pattern Mode is one of the two main operating modes of the RY8 (the other
being Song Mode). It consists of both Pattern Play and Pattern Record Modes.
The Preset Pattern List is provided on page 86.
PATTERN PLAY MODE.
In Pattern Play Mode, you can select and play Preset and User patterns, as
well as assign a Swing factor to a pattern, clear a User pattern, copy a Preset
or User pattern into a User pattern location, and assign a backing to a User
pattern.
■ ENTERING PATTERN PLAY MODE - Hold [MODE] and press [PATTERN] to
enter Pattern Play Mode.
■ SELECTING A FUNCTION - Hold [MODE] and press [PAGE+] and [PAGE-] to
step through the various functions. The LCD will display information about
the status of each function as you step
through them.
30
Page 39

THE BEAT/CLOCK POSITION INDICATORS
The pattern beat/clock position indicators appear in the upper right area of
the LCD, where large inverted triangles represent each beat in the
measure, and small inverted triangles represent each clock where rhythm
data may exist. (The number of beat and clock position triangles in the
measure depends on the designated meter of the pattern.)
Beat Position Indicators
Clock Position Indicators
During playback, each beat position indicator flashes according to the
current beat location, with all beat positions flashing on the first beat of the
measure. Each clock position indicator flashes according to the current
clock location.
■ SELECTING A PATTERN - Position the flashing cursor over the word “PTN”,
then press [+1] and [-1] to select a Preset (#000 ~ #199) or User (#200 ~
#249) pattern.
■ STARTING AND STOPPING THE PATTERN PLAYBACK - Press [PLAY] to start
the pattern playback. Press [STOP] to stop the pattern playback. Pressing
[PLAY] again will continue the pattern playback from the stop position.
■ DESIGNATING THE TOP OF THE PATTERN - When the playback is stopped,
press [TOP], [BWD] or [FWD] to designate the top of the measure. Then,
pressing [PLAY] will start the pattern playback from the top.
31
Page 40

■ SELECTING A “NEXT” PATTERN - To specify the “Next” pattern to play
immediately after the current pattern finishes, press [+1] and [-1] while the
current pattern is playing to specify the Next pattern number. The word
“NEXT” will display in the LCD until the Next pattern is engaged.
■ CHANGING THE BACKING - To temporarily select a different backing to hear
how it sounds with the current rhythm pattern (either while the pattern is
playing or is stopped), press [2] once to position the flashing cursor over the
backing name. Then press [+1] and [-1] to select one of the 200 backing
accompaniments. The very last selection on the list is “BKOFF”, which lets
you turn the backing off.
■ CHANGING THE CHORD - To temporarily specify a different chord for the
backing, press [CHORD] to activate Chord Assign. Press [2] to place the
cursor over the Chord Root display, and press [+1] and [-1] to specify the
chord root. Press [1] to place the cursor over the Chord Type display, and
press [+1] and [-1] to specify the chord type. Then, press [ENTER] to register
the chord type change. Press [CHORD] again to exit Chord Assign. (For a list
of the Chord types, see page 51.)
Chord Root
Chord Type
32
Page 41

■ ASSIGNING A SWING FACTOR TO THE PATTERN - Hold [MODE] and press
[PAGE-] or [PAGE+] once or more to access the Swing function. The word
“SWING” will appear in the LCD, as will the current Swing setting (OFF, E1 ~
E9, S1 ~ S5). To assign a Swing factor to the currently selected pattern,
press [-1] or [+1]. The Swing setting also affects the backing accompaniment. When
a Swing setting is assigned to a pattern, whenever the pattern is
selected, the word “SWING” will appear in the upper area of the LCD.
There are two types of Swing factors. “E” factors represent 8-beat, and “S” factors represent 16-beat.
Depending on the selected Swing type or selected patterns, the Swing function may not produce an
apparent effect.
■ CLEARING A USER PATTERN - When the pattern is stopped, hold [MODE]
and press [PAGE-] or [PAGE+] to access the Pattern Clear function. The words
“CLEAR SURE?” will appear in the LCD. Press [-1] and [+1] to select a User
pattern number (#200 ~ #249). Then, press [ENTER] to clear the data from
the pattern. The word “EMPTY” will appear beside the pattern number in the
LCD. (To exit the Clear function, hold [MODE] and press [PAGE-].)
If the word “PRESET” temporarily appears in the LCD when
you press [ENTER], this means
you are attempting to clear a Preset pattern. If this happens, simply select a User pattern number (#200
~ #249) and try again.
33
Page 42
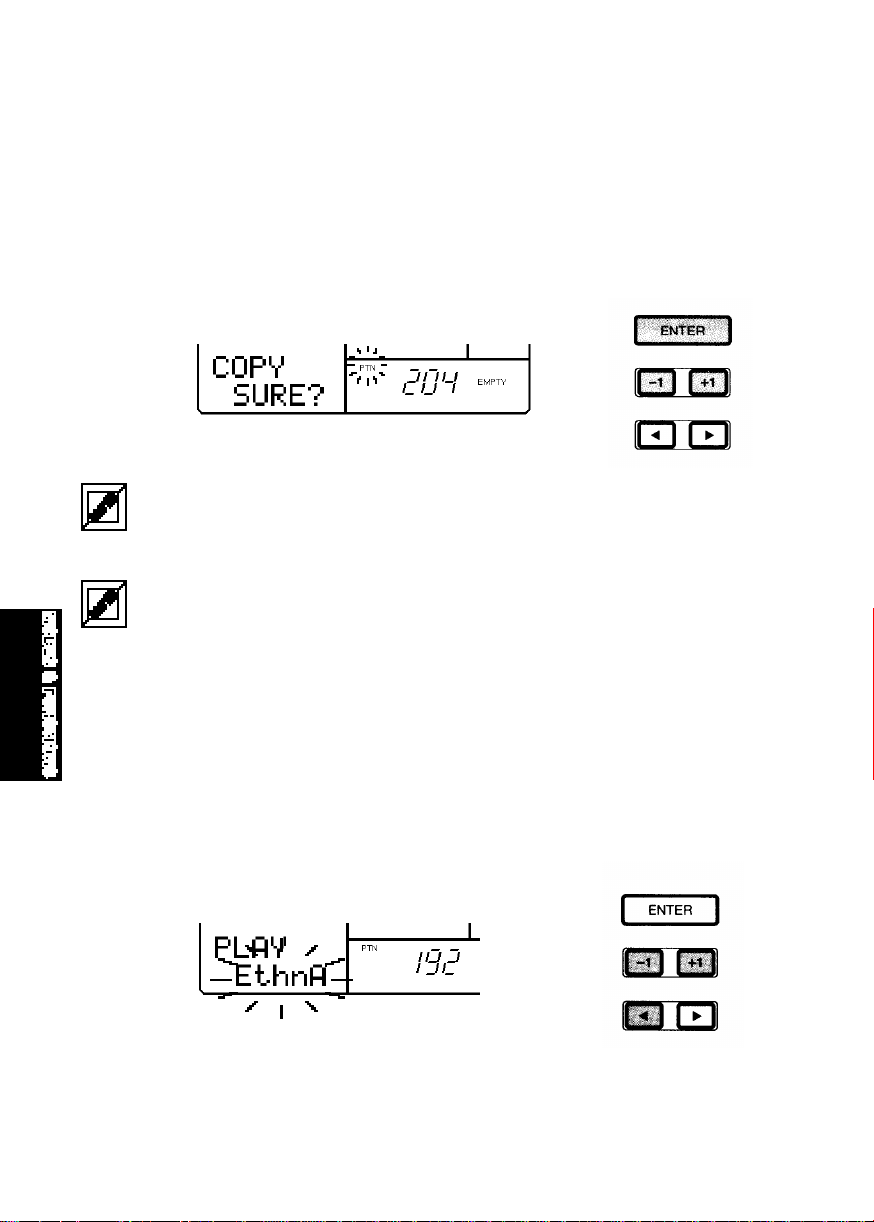
■ COPYING THE CURRENTLY SELECTED PATTERN - When the pattern is
stopped, first select a source pattern to copy from. Then, hold [MODE] and
press [PAGE+] once or more to access the Pattern Copy function. The words
“COPY SURE?” will appear in the LCD. Press [-1] and [+1] to select a
destination User pattern number (#200 ~ #249) where the currently selected
Preset or User pattern will be copied to. Then, press [ENTER] to copy the
pattern. (To exit the Copy function, hold [MODE] and press [PAGE-].)
The data which is copied into the destination User pattern includes the initial tempo, the Swing setting,
the drum kit, and the backing. If there is a pattern in the destination User pattern location which has a
different meter than the pattern you are copying to, you cannot copy, and the words “TS NOT MATCH”
will briefly appear in the LCD when you press [ENTER]. If this happens, clear the destination User
pattern and then try the copy operation again.
If the LCD displays the words “MEMORY FULL”, you must free up memory by clearing any unwanted
User patterns or songs. (Be sure to save any important User data first, offloading it to an external
storage device such as the Yamaha MDF2 MIDI Data Filer.)
■ ASSIGNING A BACKING TO A USER PATTERN - You can assign any of the
200 backing accompaniments to play with a User pattern. Hold [MODE] and
press [PAGE-] once or more to access the Pattern Select function. Press [2]
to position the cursor over the backing name, then press [-1] and [+1] to select the
backing you want. (You may also turn the backing off for the User
pattern, by selecting
“BKOFF”).
34
Page 43

PATTERN RECORD MODE.
In Pattern Record Mode, you can select and record a User pattern in either
step-time or real-time, as well as designate the meter (time signature) for the
pattern before recording, and record accents to achieve realistic playing
dynamics. You may copy a Preset pattern to a User pattern location and
modify it, or you may clear a User pattern (or select an empty User pattern)
and create your own pattern from scratch.
If the LCD displays the words “MEMORY FULL”, you cannot record a User pattern. To free up memory,
clear any unwanted User patterns or songs. (Be sure to save any important User data first, offloading it
to an external storage device such as the Yamaha MDF2 MIDI Data Filer.)
■ ENTERING PATTERN RECORD MODE - First hold [MODE] and press
[PATTERN] to enter Pattern Mode. Then press [REC] to enter Pattern Record
Standby Mode, which means the RY8 will be standing by ready to record—by
either the Step or Realtime recording process—with the pattern beat/clock
location conveniently cued up at the first beat of the measure. The LCD will
display the current chord, the current beat, the current clock, the drum voice
name of the currently selected drum pad, and the currently selected pad
number. (To exit Pattern Record Mode, press [REC] again.)
You cannot enter Pattern Record Mode when a Preset pattern (#000 ~ #199) is selected. If you press
[REC] when a Preset pattern is selected, the word “PRESET” will appear briefly in the LCD to remind
you to select a User pattern and then try again.
35
Page 44
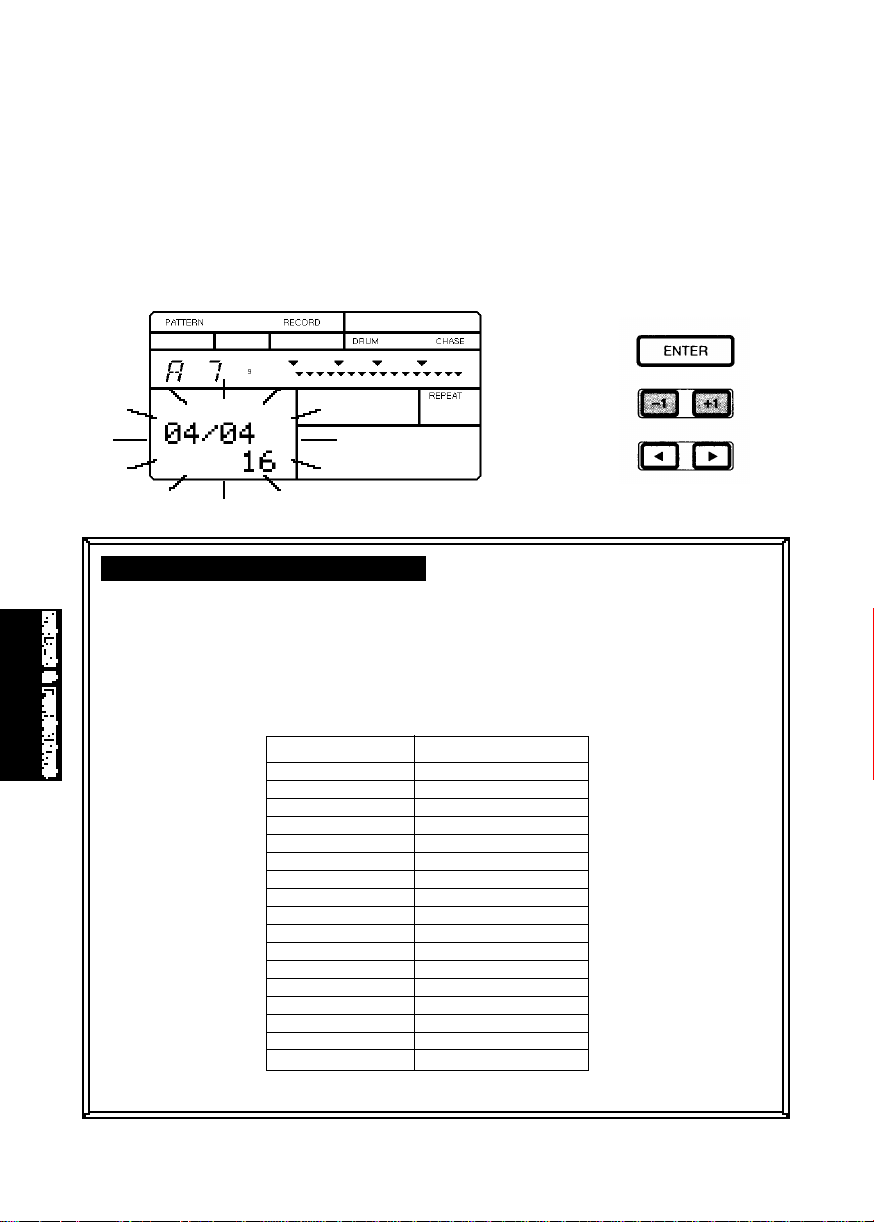
■ DESIGNATING THE METER - If you want to create a pattern from scratch with
a specific time signature, you must first designate the meter for an empty
User pattern while still in Pattern Record Standby Mode—i.e., before initiating the
Step or Realtime recording operation. Hold [MODE] and press [PAGE+].
The default meter setting will be flashing. To designate a different meter,
press [-1] and [+1]. To return to Record Standby Mode, hold [MODE] and
press [PAGE-].
ASSIGNING THE TIME SIGNATURE
You cannot change the time signature for an existing pattern. You can only
assign a time signature to an empty User pattern. You can designate both
time signature and quantization factors according to the following table:
Time Signature Quantization Factors
01/04 12, 16, 24, 32
02/04 12, 16, 24, 32
03/04 12, 16
04/04 12, 16
05/04 12
01/08 16, 24, 32
03/08 16, 24, 32
05/08 16, 24
07/08 16
01/16 16, 32
03/16 16, 32
05/16 16, 32
07/16 16, 32
09/16 16
11/16 16
13/16 16
15/16 16
36
Page 45
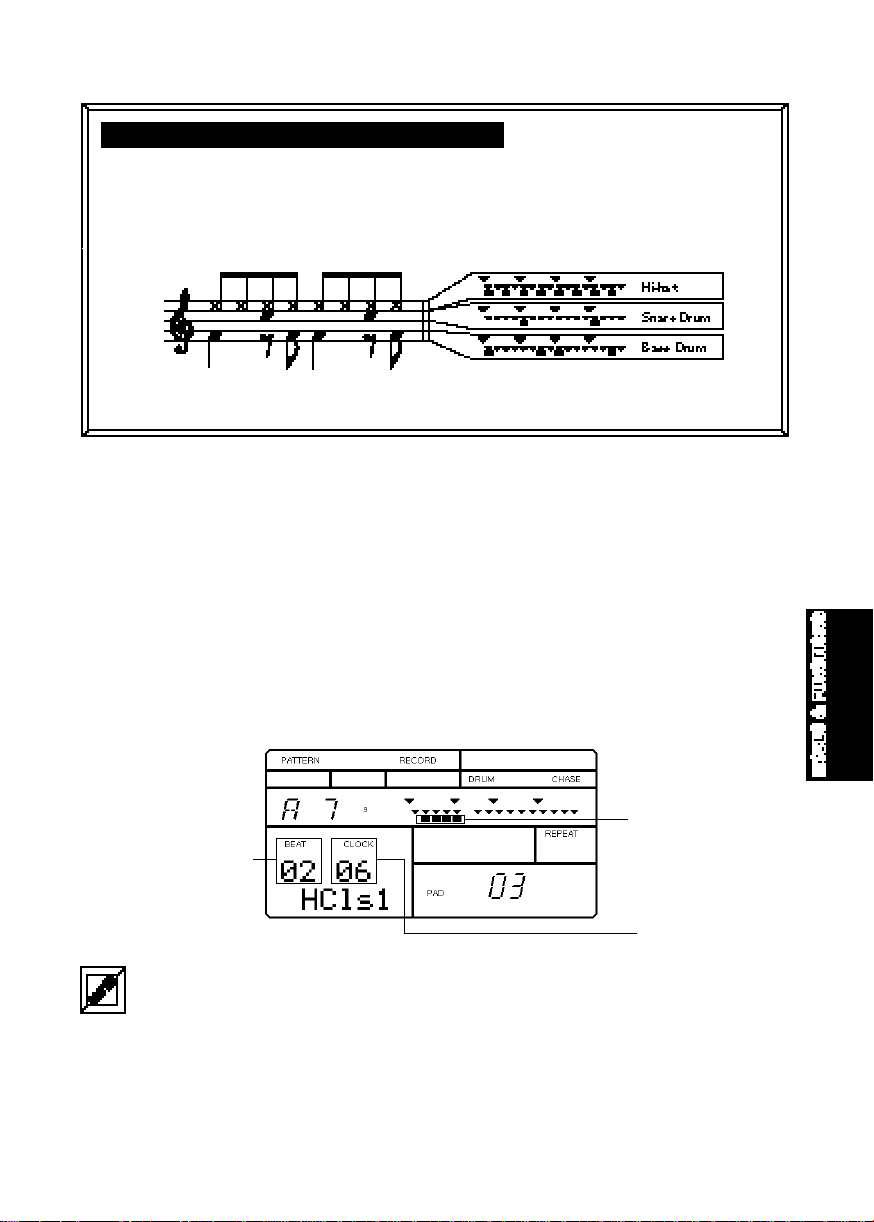
EXAMPLE DRUM SCORE: 8 BEAT PATTERN
When an 8 beat pattern is recorded, the LCD will display as follows.
■ ENTERING STEP RECORD MODE - From within Pattern Record Standby Mode,
simply pressing one of the drum pads or the [ACCENT] button will initiate the
step recording operation. (To exit Step Record Mode, press [REC] again.)
■ RECORDING IN STEP-TIME - Step recording is simply locating the clock
position indicator at a specific clock by pressing [FWD], [BWD] or [TOP], and
then entering a drum beat in that location by pressing the desired drum pad.
When you enter pad data, a small black square will display beneath the clock
position to indicate data exists in that location
for the currently selected pad,
and the location of the clock position indicator will advance by one clock.
Data Indicators
Current Clock Location
Current Beat Location
The RY8 automatically prevents the sounding of illogical drum notes—such as a closed and open highhat playing at the same time. The drum voice assigned to the higher pad number will always take
precedence.
37
Page 46
■ ENTERING REALTIME RECORD MODE - From within Pattern Record Standby
Mode, simply pressing [PLAY] will initiate the realtime recording operation. A
count-in metronome click will begin (the number of count-in beats will appear
on the screen, and will depend on the designated meter), after which realtime
recording will commence. (To exit Record Mode, press [STOP], then press
[REC] again.)
■ RECORDING IN REALTIME - Realtime recording is simply hitting the desired
drum pads after the count-in, in time with the metronome click. You can keep
adding drum beats as the measure loops continuously. As you play, a small
black square will display beneath the clock position indicator to indicate that
data exists in that location for the currently selected pad. To stop the
realtime recording procedure, press [STOP].
■ AUDITIONING DRUM PADS - In either Step or Realtime Record Mode, you
can “audition” the drum pads without entering data. Hold [AUDITION] and
press a drum pad to “select” it, or hear it.
The small black squares under the clock position indicators will not appear unless you have selected a
drum pad with pattern data in it.
When pressing [FWD] and [BWD] to step through the clock positions, all data existing in each clock
position will sound.
■ DELETING PAD DATA - In either Step or Realtime Record Mode, you can
delete an unwanted drum beat. Hold [DELETE] and press the relevant drum
pad at the desired clock location.
In Step Record Mode, there’s also another way to delete an unwanted drum beat. First, audition the
desired pad so that the black data squares for the pad appear beneath the clock position indicators in
the LCD. Next, place the clock position indicator at the desired location. Then, hold [DELETE] and
press [ENTER].
38
Page 47
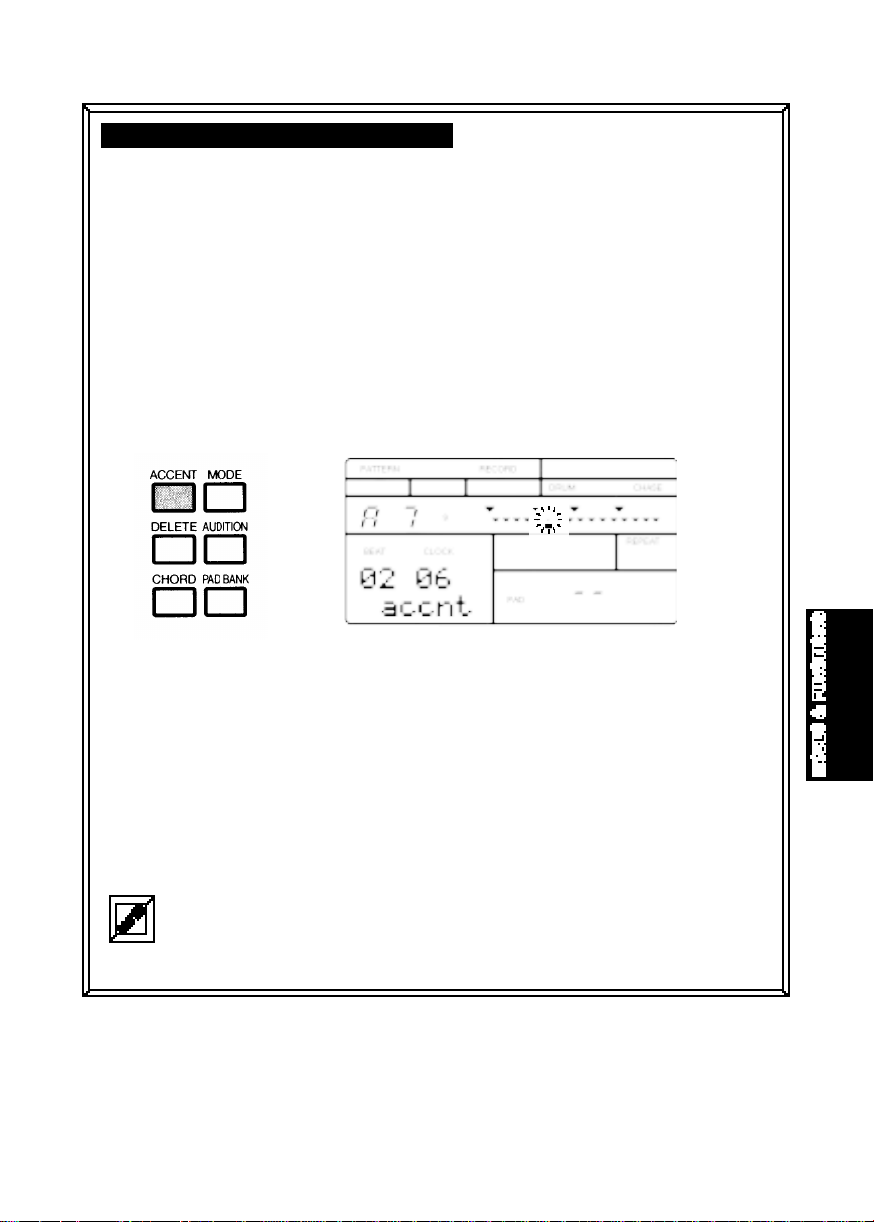
ADDING ACCENTS TO THE RHYTHM
You can record and delete accents the same way as recording and
deleting drum beats—by using the [ACCENT] button. (You can assign
accent levels to the pads for User drum kits. For details, see page 59.)
■ ADDING AN ACCENT - In Pattern Play Mode, you can add an accent as
you play the pads in realtime, by holding [ACCENT] and pressing a drum
pad. In Record Mode, pressing [ACCENT] will record an accent at the
current clock position. The word “accnt” will appear on the LCD, indicating that
you have accessed Accent Assign. (To exit Accent Assign, hold
[AUDITION] and press any
■ AUDITIONING ACCENTS - In either Step or Realtime Record Mode, you
can audition the accents without entering accent data. Hold [AUDITION]
and press [ACCENT] to visibly confirm the accentuated voices.
drum pad.)
■ DELETING ACCENT DATA - In either Step or Realtime Record Mode, you
can delete an unwanted accent by holding [DELETE] and pressing
[ACCENT] at the desired clock location.
In Step Record Mode, there’s also another way to delete an unwanted accent. First, audition the
accent by holding [AUDITION] and pressing [ACCENT]. The black data squares representing the
accent locations will appear beneath the clock position indicators in the LCD. Next, place the clock
position indicator at the desired location. Then, hold [DELETE] and press [ENTER].
39
Page 48

■ ASSIGNING A BACKING - You can assign any of the 200 backing
CAUTION
accompaniments to play with a User pattern. (For details, see page 34.)
■ EXCEEDING THE MAXIMUM NOTE POLYPHONY - The RY8 has 28-note
polyphony, which means the maximum number of notes that can sound at
one time is 28. Depending on the pattern you have created, several drum
beats may fall on a specific location where many bass and chord notes exist.
Any drum beats that would exceed the 28-note capacity will be “truncated”,
or cut off, or will not play.
Turning the power off while Pattern Record Mode is active, or while the pattern Copy or Clear
function is being executed, may cause the irretrievable loss of all User data.
40
Page 49

11. SONG MODE
Song Mode is one of the two main operating modes of the RY8 (the other
being Pattern Mode). It consists of both Song Play and Song Record Modes.
SONG PLAY MODE.
In Song Play Mode, you can select and play Preset and User songs, as well as
turn the Repeat and Chain functions on and off, clear a User song, and copy a
Preset or User song to a User song location.
■ ENTERING SONG PLAY MODE - Hold [MODE] and press [SONG] to enter Song
Play Mode.
Chord Type
Chord Root
Part Number
Song Number
Backing Name
Measure Number
Pattern Number
The LCD will display information about the Song Select function, including
current song and part number, the backing name, pattern number, measure
number and Chord.
When a User song is empty, dashes (– – –) will be displayed in the LCD areas for the current backing
name and pattern number.
41
Page 50

■ SELECTING A FUNCTION - Hold [MODE] and press [PAGE+] and [PAGE-] to
step through the various functions. The LCD will display information about the status
of each function as you step through them.
■ SELECTING A SONG - When you enter Song Play Mode, you can go ahead and
select a song. Otherwise, you must position the flashing cursor over the word
“SONG” by pressing [2]. Then, press [+1] and [-1] to select a Preset (#00 ~
#49) or User (#50 ~ #99) song, or the Demo song. (While the song is
stopped, you can press [2] and [1] to position the flashing cursor over the
song number, backing name or pattern number.)
■ STARTING AND STOPPING THE SONG PLAYBACK - Press [PLAY] to start the
song playback. Press [STOP] to stop the song playback. Pressing [PLAY]
again will continue the song playback from the stop position.
■ DESIGNATING THE SONG START MEASURE - When the song playback is
stopped, press [TOP] to designate the top of the song, or press [BWD] or
[FWD] to designate a particular measure. Then, pressing [PLAY] will start the
song playback from the designated measure.
To step through each measure one-by-one, press [BWD] or [FWD] once or more. To scroll through a
series of measures, press and hold [FWD] or [BWD], respectively.
■ CHANGING THE BACKING - To temporarily select a different backing to hear
how it sounds with the current rhythm pattern (even while the song is
playing), press [2] or [1] to position the flashing cursor over the backing name.
Then press [+1] and [-1] to select one of the 200 backing
accompaniments. The very last selection on the list is “BKOFF”, which lets
you turn the backing
off.
42
Page 51

■ CHANGING THE PATTERN - To temporarily specify a different pattern to hear
how it sounds with the song, press [2] or [1] to position the flashing cursor
over the abbreviation “PTN” (Pattern). Then press [+1] and [-1] to specify the
pattern number.
Any changes made to the pattern or backing in Song Play Mode will only be effective temporarily.
When you press [TOP] to locate the top of the song, or press [FWD] or [BWD] to select a starting
measure, the original patterns and backings for the song will be reinstated. Likewise, if you exit Pattern
Mode, when you return to Pattern Mode or select another song, the original patterns and backings for
the particular song will be reinstated.
■TURNING THE REPEAT FUNCTION ON AND OFF- When the Repeat function is
turned on, the currently selected song will play continuously until you press
[STOP]. Hold [MODE] and press [PAGE-] or [PAGE+] to access the Repeat
function. The word “REPEAT” will appear in the lower left area of the LCD, along
with the current Repeat status—“ON” or “OFF”. Press [+1] to turn the Repeat
function on. Press [-1] to turn it off.
■ TURNING THE CHAIN FUNCTION ON AND OFF - The Chain function is handy
for setting up a series of User songs to play one after another. When the
currently selected User song reaches the end, the subsequent User songs
will automatically play—one after the other, in numeric order—until an empty
User song is encountered, or until the last song is finished, or until you press
[STOP]. Hold [MODE] and press [PAGE-] or [PAGE+] to access the Chain
function. The word “CHAIN” will appear in the lower left area of the LCD,
along with the current Chain status—“ON” or “OFF”. Press [+1] to turn the
Chain function on. Press [-1] to turn it off.
43
Page 52

If you turn both the Repeat and Chain functions on and then press [PLAY], the User songs will play
from the top to the end repeatedly, until you press [STOP].
■ CLEARING A USER SONG - When the song is stopped, hold [MODE] and
press [PAGE-] or [PAGE+] to access the Song Clear function. The words
“CLEAR SURE?” will appear in the LCD. Press [-1] and [+1] to select a User
song number (#50 ~ #99). Then, press [ENTER] to clear the data from the
song. When the song is cleared, the word “EMPTY” will appear beside the
song number in the LCD. (To exit the Clear function, hold [MODE] and press
[PAGE-].)
If the word “PRESET” temporarily appears on the LCD when you press [ENTER], this means you are
attempting to clear a Preset song. If this happens, simply select a User song number (#50 ~ #99) and
try again.
44
 Loading...