

Yamaha RCX142 User Manual

User’s Manual
ENGLISH
E
YAMAHA 4-AXIS ROBOT CONTROLLER
E92-Ver. 1.09
RCX142


1
2
Introduction
Our sincere thanks for your purchase of this YAMAHA robot controller.
This manual explains how to install and operate the robot controller. Be sure to read this
manual carefully as well as related manuals and comply with their instructions for using
the YAMAHA robot controllers safely and correctly.
Refer to the "Programming Manual" for detailed information on robot programs.

2
2
Safety precautions (Be sure to read before using)
Before using the YAMAHA robot controller, be sure to read this manual and related manuals, and follow their instructions to use the robot controller safely and correctly.
Warning and caution items listed in this manual relate to YAMAHA robot controllers.
When this robot controller is used in a robot controller system, please take appropriate
safety measures as required by the user’s individual system.
This manual classifies safety caution items and operating points into the following le vels,
along with symbols for signal words “WARNING”, “CAUTION” and “NOTE”.
w
WARNING
"WARNING" indicates a potentially hazardous situation which, if not avoided, could
result in death or serious injury.
c
CAUTION
"CAUTION" indicates a potentially hazardous situation which, if not avoided, could result in
minor or moderate injury or damage to the equipment or software.
n
NOTE
Explains key points in the operation in a simple and clear manner.
Note that the items classified into “CAUTION” might result in serious injury depending
on the situation or environmental conditions. So always comply with CAUTION and
WARNING instructions since these are essential to maintain safety.
Keep this manual carefully so that the operator can refer to it when needed. Also make
sure that this manual reaches the end user.
When installing the RCX142 series robot controller, please take into account all the instructions and precautions described in Chapter 3, "Installation".

3
2
[System design safety points]
w
WARNING
• Refer to this manual for details on the operating status of the robot controller and
to related instruction manuals. Design and configure the system including the
robot controller so that it will always work safely.
• The robot controller has an emergency stop terminal to trigger emergency stop.
Using this terminal, prepare a physical interlock circuit so that the system
including the robot controller will work safely.
c
CAUTION
• Do not bundle control lines or communication cables together or in close contact with the
robot controller main circuit or power lines. As a general rule, separate them by at least
100mm. Noise in the main circuit or power lines may cause faulty operation or malfunctions.
• Data (programs, point data, etc.) stored in the robot controller is not guaranteed to be
unchanged, so be sure to back it up onto an external storage device.
[Installation safety points]
w
WARNING
• Securely install the connectors into the robot controller, and when wiring the
connectors, make the crimp, press-contact or solder connections correctly using
the tool specified by the manufacturer.
• Always shut off all phases of the power supply externally before starting
installation or wiring work. Failure to shut off all phases could lead to electrical
shocks or product damage.
c
CAUTION
• Use the robot controller within the environment specifications listed in this manual.
Using the controller in an environment outside the specification range could lead to electrical
shocks, fires, malfunctions, product damage or lower performance.
•Tighten the screws on the robot controller firmly to make secure connections.
•Never directly touch the conductive sections or electronic components other than the rotary
switches and DIP switches on the outside panel of the robot controller.
• Securely attach each connector cable connector into the receptacles or sockets. Poor
connections will cause faulty operation or malfunctions.
[Wiring safety points]
w
WARNING
• Always shut off all phases of the power supply externally before starting
installation or wiring work. Failure to shut off all phases could lead to electrical
shocks or product damage.
• Always attach the terminal cover (supplied) before turning on the power to the
robot controller after installation and wiring work are complete. Failure to attach
the terminal cover could lead to fire, electrical shock, product damage or
malfunctions.
c
CAUTION
•Tighten the terminal screws within the specified torque ranges. A loose terminal screw could
lead to short-circuit, faulty operation or malfunctions. However, if the terminal screw is too
tight, short-circuit, faulty operation or malfunctions could also occur due to screw damage.
• Make sure that no foreign matter such as cutting chips or wire scraps do not enter the robot
controller.
•Always store the cables connected to the robot controller in a conduit or clamp them securely
in place. If the cables are not stored in a conduit or properly clamped, excessive play or
movement or mistakenly pulling on the cable might damage the connector or cables, and poor
cable contact may lead to faulty operation or malfunctions.
•When disconnecting the cable, detach by gripping the connector itself and not by tugging on
the cable. Loosen the screws on the connector (if fastened with the screws), and then
disconnect the cable. Detaching by pulling on the cable itself may damage the connector or
cables, and poor cable contact may lead to faulty operation or malfunctions.

4
2
[Start-up and maintenance safety points]
w
WARNING
• Only personnel trained in safety and robot operation may operate it.
• Never allow anyone to enter the robot movement range when the robot controller
is turned on. Serious accidents including fatal injury or death might otherwise
result.
• This robot controller is not designed to be explosion-proof. Do not use it in
locations exposed to inflammable gases, gasoline or solvent that could cause
explosion or fire.
• Do not touch any electrical terminal while power is supplied to the robot
controller. This might cause electrical shocks, faulty operation or malfunctions.
• Always shut off all phases of the power supply externally before cleaning or
tightening the terminal screws. Failure to shut off all phases could lead to
electrical shocks, product damage or malfunctions. A loose screw could lead to
parts dropping out, short circuits or malfunctions. If the screw is too tight, short
circuits or malfunctions could also occur due to screw damage.
• Never disassemble or modify the robot controller. This may lead to breakdowns,
malfunctions, injury or fire.
• Always shut off all phases of the power supply externally before installing or
removing an option board. Failure to shut off all phases could lead to breakdowns
or malfunctions.
• When using ferrite cores for noise elimination, fit them to the power cable as close
to the robot controller as possible to prevent faulty operation or malfunctions due
to noise.
• When performing maintenance of the robot controller under instructions from the
YAMAHA or YAMAHA sales dealer, turn off the robot controller and wait for at least
30 minutes. Some components in the robot controller may be hot or still retain a
high voltage shortly after operation, so burns or electrical shocks may occur if
those parts are touched.
[Precautions for disposal]
c
CAUTION
• When disposing of absolute batteries used in this product, comply with local regulations or
contact our sales office.
•When disposing of this product (except for absolute batteries), discard it as industrial waste.
[Other precautions]
c
CAUTION
• Please note that the state of California USA has legal restrictions on the handling of
manganese dioxide lithium batteries. See the following website for more information:
http://www.dtsc.ca.gov/hazardouswaste/perchlorate
This manual does not constitute a concession of rights or a guarantee of
industrial rights. Please acknowledge that we bear no liability whatsoever
for conflicts with industrial rights arising from the contents of this manual.
2008 YAMAHA MOTOR CO., LTD.

5
2
Before using the robot controller
(Be sure to read the following notes.)
Please be sure to perform the following tasks before using the robot controller.
Failing to perform these tasks will require absolute reset for setting the origin position
each time the power is turned on or may cause abnormal operation (vibration, noise).
[1] When connecting the power supply to the robot controller
Always make a secure connection to the ground terminal on the robot controller to
ensure safety and prevent malfunctions due to noise.
[2] When connecting the battery cable to the robot controller
The absolute battery is fully charged when the robot controller is shipped to the
customer. Ho wever , it is left disconnected to prev ent battery discharge. After installing
the controller, always be sure to connect the absolute battery while referring to “9.
Connecting the absolute battery” in Chapter 3 before connecting the robot cables.
An error (relating to absolute settings) is always issued if the robot controller power is
turned on without connecting the absolute batteries, so the origin position cannot be
detected. This means the robot connected to this controller cannot be used with absolute
specifications.
[3] When connecting robot cables to the robot controller
Be sure to keep robot cables separate from the robot controller power connection
lines and other equipment power lines. Using in close contact with lines carrying
power may cause malfunctions or abnormal operation.
Reference
Absolute reset is always required when
the robot controller power is first
turned on after connecting the robot
cable to the robot controller. Perform
absolute reset while referring to “11.8
Absolute reset” in Chapter 4,
“Operation”.
Absolute reset is also required after the
robot cable was disconnected from the
robot controller and then reconnected.
Reference
Refer to “4. Connecting to the power”
in Chapter 3, “Installation”.

6
2
Overview of the RCX series
The YAMAHA RCX series robot controllers were developed based on years of
YAMAHA experience and proven achievements in robotics and electronics. These
controllers are specifically designed to operate YAMAHA industrial robots efficiently
and accurately.
Despite their compact size, the RCX series controllers operate efficiently as multi-axis
controllers with a variety of functions.
Major features and functions are:
1. Multi-task function
Up to 8 tasks* can be run simultaneously in a specified priority. (Low priority tasks
are halted while high priority tasks are run.)
I/O parallel processing and interrupt processing are also available, so that operational
efficiency of the total robot system including peripheral units is greatly improved.
(*: Refer to the programming manual for more details on multi-tasking.)
2. Robot language
The RCX series controller comes with a BASIC-like high-level robot language that
conforms to the industrial robot programming language SLIM*1. This robot language
allows easy programming ev en of comple x mov ements such as multi-task operations
and uses a compiling method*2 for rapid execution of programs.
(*1: Standard Language for Industrial Manipulators)
(*2: This compiling method checks the syntax in a robot language program, conv erts
it into intermediate codes, and creates an execution file (object file) before actuall y
performing the program.)
3. Movement command
• Arch motion
Spatial movement during pick-and-place work can be freely set according to the
work environment. This is effective in reducing cycle time.
• Three-dimensional CP control
Allows three-dimensional interpolation control of linear and circular movements.
4. Maintenance
Software servo control provides unit standardization. This allo ws connection to most
YAMAHA robot models and simplifies maintenance.
5. CE marking*
As a YAMAHA robot series product, the RCX series robot controller is designed to
conform to machinery directives, low-voltage directives and EMC (Electromagnetic
compatibility) directives. In this case, the robot controller is set to operate under SAFE
mode. (* For CE marking compatibility, see the CE marking supplement man ual.)
This manual explains how to handle and operate the YAMAHA robot controllers correctly
and effectively, as well as I/O interface connections.
Read this manual carefully before installing and using the robot controller. Also refer to
the separate “Programming Manual” and “Robot User's Manual” as needed.

i
Contents
Chapter 1 Safety
1. Safety .........................................................................................1-1
1.1 Safety precautions during robot operation ........................................... 1-2
1.2 Safety precautions during maintenance ............................................... 1-2
1.3 Motor overload precautions ................................................................ 1-2
1.4 Warning labels.................................................................................... 1-3
1.5 Warning marks.................................................................................... 1-3
2. Warranty ...................................................................................1-4
3. Operating environment .............................................................1-5
Chapter 2 System overview
1. System overview ........................................................................2-1
1.1 Main system configuration .................................................................. 2-1
1.2 Axis definition for the RCX142 series .................................................. 2-3
2. Part names and functions...........................................................2-4
2.1 RCX142 (Maximum number of axes: 4 axes) ....................................... 2-4
2.2 RCX142-T ........................................................................................... 2-4
3. Controller system ......................................................................2-5
3.1 RCX142 .............................................................................................. 2-5
3.2 RCX142-T ........................................................................................... 2-6
4. Optional devices........................................................................ 2-7
4.1 MPB programming box ....................................................................... 2-7
4.2 Expansion I/O board ........................................................................... 2-7
4.3 Regenerative unit ................................................................................ 2-7
5. Basic sequence from installation to operation ...........................2-8
Chapter 3 Installation
1. Unpacking .................................................................................3-1
1.1 Packing box ........................................................................................ 3-1
1.2 Unpacking .......................................................................................... 3-1
2. Installing the robot controller.................................................... 3-2
2.1 Installation .......................................................................................... 3-2
2.2 Installation methods ............................................................................ 3-3
3. Connector names....................................................................... 3-5
4. Connecting to the power ...........................................................3-6
4.1 AC200 to 230V single-phase specifications......................................... 3-6
4.2 Power capacity ................................................................................... 3-6
4.3 Installing an external leakage breaker ................................................. 3-8
4.4 Installing a circuit protector ................................................................ 3-8
4.5 Installing a current control switch ....................................................... 3-8
5. Connecting the robot cables ......................................................3-9

ii
6. Connecting the MPB programming box ...................................3-10
7. I/O connections....................................................................... 3-11
8. Connecting a host computer.................................................... 3-12
9. Connecting the absolute battery ..............................................3-13
10. Replacing the absolute battery ................................................ 3-16
11. Connecting a regenerative unit ................................................3-17
12. Precautions for cable routing and installation .........................3-18
12.1 Wiring methods ................................................................................ 3-18
12.2 Precautions for installation ................................................................ 3-19
12.3 Methods of preventing malfunctions ................................................. 3-19
13. Checking the robot controller operation .................................3-20
13.1 Cable connection.............................................................................. 3-20
13.2 Emergency stop input signal connection ........................................... 3-21
13.3 Operation check ............................................................................... 3-22
Chapter 4 Operation
1. Operation overview................................................................... 4-1
2. The RCX robot controller ..........................................................4-2
2.1 Part names .......................................................................................... 4-2
2.2 Main functions .................................................................................... 4-2
3. MPB programming box ..............................................................4-3
3.1 Part names .......................................................................................... 4-3
3.2 Main functions .................................................................................... 4-4
3.3 Connection to the robot controller ...................................................... 4-5
4. Turning power on and off .......................................................... 4-6
5. Operation keys ..........................................................................4-7
5.1 MPB screen......................................................................................... 4-7
5.2 Operation key layout .......................................................................... 4-8
5.3 Basic key operation............................................................................. 4-9
5.4 Function keys.................................................................................... 4-10
5.5 Control keys ...................................................................................... 4-12
5.6 Data keys .......................................................................................... 4-14
5.7 Other keys ........................................................................................ 4-14
6. Emergency stop .......................................................................4-15
6.1 Emergency stop reset ........................................................................ 4-16
7. Mode configuration .................................................................4-18
7.1 Basic operation modes ...................................................................... 4-18
7.2 Other operation modes ..................................................................... 4-19
7.3 Mode hierarchy ................................................................................. 4-20
8. “SERVICE” mode .....................................................................4-24
8.1 Operation device .............................................................................. 4-24
8.2 Prohibition of “AUTO” mode operation ............................................ 4-24
8.3 Hold-to-Run function ........................................................................ 4-24
8.4 Limitations on robot operating speed ................................................ 4-24

iii
9. “AUTO” mode......................................................................... 4-25
9.1 Automatic operation ......................................................................... 4-27
9.2 Stopping the program........................................................................ 4-28
9.3 Resetting the program ....................................................................... 4-29
9.4 Switching task display ....................................................................... 4-32
9.5 Switching the program ...................................................................... 4-33
9.6 Changing the automatic movement speed......................................... 4-34
9.7 Executing the point trace................................................................... 4-34
9.7.1 PTP motion mode ........................................................................................... 4-36
9.7.2 ARCH motion mode ....................................................................................... 4-38
9.7.3 Linear interpolation motion mode ................................................................... 4-40
9.8 Direct command execution............................................................... 4-42
9.9 Break point ....................................................................................... 4-43
9.9.1 Setting break points ........................................................................................ 4-43
9.9.2 Deleting break points ...................................................................................... 4-44
9.10 Executing a step ................................................................................ 4-45
9.11 Skipping a step.................................................................................. 4-45
9.12 Executing the next step ..................................................................... 4-45
10. “PROGRAM” mode .................................................................4-46
10.1 Scrolling a program listing ................................................................ 4-47
10.2 Program editing ................................................................................ 4-48
10.2.1 Cursor movement ........................................................................................... 4-50
10.2.2 Insert/Overwrite mode switching .................................................................... 4-50
10.2.3 Inserting a line ................................................................................................ 4-51
10.2.4 Deleting a character ....................................................................................... 4-51
10.2.5 Deleting a line ................................................................................................ 4-52
10.2.6 User function key display ............................................................................... 4-52
10.2.7 Quitting program editing ................................................................................ 4-53
10.2.8 Specifying the copy/cut lines .......................................................................... 4-53
10.2.9 Copying the selected lines .............................................................................. 4-53
10.2.10 Cutting the selected lines ................................................................................ 4-54
10.2.11 Pasting the data ............................................................................................... 4-54
10.2.12 Backspace ...................................................................................................... 4-54
10.2.13 Line jump ....................................................................................................... 4-55
10.2.14 Searching a character string ............................................................................ 4-56
10.3 Directory .......................................................................................... 4-57
10.3.1 Cursor movement ........................................................................................... 4-58
10.3.2 Registering a new program name ....................................................................4-58
10.3.3 Directory information display ......................................................................... 4-59
10.3.4 Copying a program ......................................................................................... 4-60
10.3.5 Erasing a program ........................................................................................... 4-61
10.3.6 Renaming a program ...................................................................................... 4-62
10.3.7 Changing the program attribute ...................................................................... 4-63
10.3.8 Displaying object program information ........................................................... 4-63
10.3.9 Creating a sample program automatically ....................................................... 4-64
10.4 Compiling ......................................................................................... 4-66
10.5 Line jump and character string search ............................................... 4-67
10.6 Registering user function keys ........................................................... 4-67
10.7 Resetting an error in the selected program ........................................ 4-70

iv
11.“MANUAL” mode ................................................................... 4-71
11.1 Manual movement ............................................................................ 4-74
11.2 Displaying and editing point data ..................................................... 4-77
11.2.1 Point data input and editing ............................................................................4-78
11.2.1.1 Restoring point data ........................................................................................ 4-79
11.2.2 Point data input by teaching ........................................................................... 4-80
11.2.3 Point data input by direct teaching.................................................................. 4-84
11.2.4 Point jump display ..........................................................................................4-84
11.2.5 Copying point data ......................................................................................... 4-85
11.2.6 Erasing point data ........................................................................................... 4-86
11.2.7 Point data trace ............................................................................................... 4-87
11.2.8 Point comment input and editing ....................................................................4-88
11.2.8.1 Point comment input and editing ..................................................................... 4-89
11.2.8.2 Point data input by teaching ............................................................................4-89
11.2.8.3 Jump to a point comment ................................................................................ 4-90
11.2.8.4 Copying a point comment ............................................................................... 4-91
11.2.8.5 Erasing point comments ................................................................................... 4-92
11.2.8.6 Point comment search ..................................................................................... 4-93
11.2.9 Point data error reset ....................................................................................... 4-94
11.3 Displaying, editing and setting pallet definitions ............................... 4-95
11.3.1 Editing pallet definitions ................................................................................. 4-97
11.3.1.1 Point setting in pallet definition ....................................................................... 4-98
11.3.1.1.1 Editing the point in pallet definition ................................................................... 4-99
11.3.1.1.2 Setting the point in pallet definition by teaching ................................................ 4-99
11.3.2 Pallet definition by teaching ..........................................................................4-100
11.3.3 Copying a pallet definition ............................................................................ 4-102
11.3.4 Deleting a pallet definition ........................................................................... 4-103
11.4 Changing the manual movement speed .......................................... 4-104
11.5 Displaying, editing and setting shift coordinates.............................. 4-105
11.5.1 Editing shift coordinates ................................................................................4-108
11.5.1.1 Restoring shift coordinates .............................................................................4-109
11.5.2 Editing the shift coordinate range ..................................................................4-109
11.5.2.1 Restoring a shift coordinate range ..................................................................4-111
11.5.3 Shift coordinate setting method 1 .................................................................. 4-111
11.5.4 Shift coordinate setting method 2 .................................................................. 4-113
11.6 Displaying, editing and setting hand definitions .............................. 4-115
11.6.1 Editing hand definitions ................................................................................ 4-121
11.6.1.1 Restoring hand definitions ............................................................................. 4-122
11.6.2 Hand definition setting method 1 .................................................................. 4-122
11.7 Changing the display units .............................................................. 4-124
11.8 Absolute reset ................................................................................. 4-125
11.8.1 Checking absolute reset ................................................................................ 4-126
11.8.2 Absolute reset on each axis ........................................................................... 4-127
11.8.3 Absolute reset on all axes ............................................................................. 4-132
11.9 Setting the standard coordinates...................................................... 4-136
11.9.1 Setting the standard coordinates by 4-point teaching .................................... 4-139
11.9.2 Setting the standard coordinate by 3-point teaching ...................................... 4-141
11.9.3 Setting the standard coordinates by simple teaching ..................................... 4-143
11.10 Executing the user function keys ..................................................... 4-145
12. “SYSTEM” mode ....................................................................4-146
12.1 Parameters ...................................................................................... 4-148
12.1.1 Robot parameters .......................................................................................... 4-150
12.1.2 Axis parameters ............................................................................................ 4-155
12.1.3 Other parameters ..........................................................................................4-171
12.1.4 Parameters for option boards......................................................................... 4-181
12.1.4.1 Option DIO setting ........................................................................................4-182
12.1.4.2 Serial I/O setting ............................................................................................4-183
12.1.4.3 Setting the network parameters ......................................................................4-185

v
12.2 Communication parameters ............................................................ 4-187
12.3 OPTION parameters ....................................................................... 4-193
12.3.1 Setting the area check output ........................................................................4-194
12.3.2 Setting the “SERVICE” mode ......................................................................... 4-199
12.3.2.1 Saving the “SERVICE” mode parameters ........................................................ 4-204
12.3.2.2 Help display in “SERVICE” mode................................................................... 4-204
12.3.3 SIO settings ................................................................................................... 4-205
12.3.4 Double-carrier setting ................................................................................... 4-208
12.3.4.1 Before using a double-carrier ........................................................................ 4-208
12.3.4.2 Setting the double-carrier parameters ............................................................ 4-209
12.4 Initialization.................................................................................... 4-212
12.4.1 Initializing the parameters ............................................................................. 4-213
12.4.2 Initializing the memory .................................................................................4-214
12.4.3 Initializing the communication parameters ................................................... 4-215
12.4.4 Clock setting .................................................................................................4-216
12.4.5 System generation ......................................................................................... 4-217
12.5 Self diagnosis .................................................................................. 4-218
12.5.1 Controller check ........................................................................................... 4-218
12.5.2 Error history display ...................................................................................... 4-219
12.5.3 Displaying the total operation time ............................................................... 4-220
12.5.4 System error details display ........................................................................... 4-220
12.6 Backup processes............................................................................ 4-221
12.6.1 Internal flash ROM ....................................................................................... 4-221
12.6.1.1 Loading files ..................................................................................................4-222
12.6.1.2 Saving files .................................................................................................... 4-223
12.6.1.3 Initializing the files ........................................................................................ 4-223
13. “MONITOR” mode ............................................................... 4-224
14. “UTILITY” mode....................................................................4-227
14.1 Canceling emergency stop; Motor power and servo on/off .............. 4-228
14.1.1 Canceling emergency stop ............................................................................4-228
14.1.2 Motor power and servo on/off ....................................................................... 4-229
14.2 Enabling/disabling the sequence execution flag .............................. 4-230
14.3 Changing the arm type .................................................................... 4-231
14.4 Resetting the output ports................................................................ 4-232
14.5 Changing the execution level .......................................................... 4-233
14.5.1 Changing the execution level ........................................................................ 4-234
14.5.2 Displaying the Help message ........................................................................4-235
14.6 Changing the access level (operation level) ..................................... 4-236
14.6.1 Entering the password ...................................................................................4-236
14.6.2 Changing the access level .............................................................................4-237
14.6.3 Displaying the Help message ........................................................................4-237
Chapter 5 Two-robot setting
1. Explanation of two-robot setting................................................5-1
1.1 Two-robot setting ................................................................................ 5-1
1.2 System configuration example ............................................................ 5-2
2. Operations and data when using the two-robot setting .............5-3
2.1 "AUTO" mode..................................................................................... 5-3
2.1.1 Changing the automatic movement speed ........................................................ 5-3
2.1.2 Executing the point trace .................................................................................. 5-4
2.2 "MANUAL" mode ............................................................................... 5-5
2.2.1 Current position ................................................................................................5-5
2.2.2 Manual movement ............................................................................................ 5-6
2.2.3 Point data ......................................................................................................... 5-8

vi
2.2.3.1 Point data input by teaching .............................................................................. 5-9
2.2.3.2 Input by point data direct teaching .................................................................. 5-10
2.2.4 Pallet definition ............................................................................................... 5-10
2.2.4.1 Setting the point in pallet definition by teaching ..............................................5-11
2.2.4.2 Pallet definition by teaching............................................................................. 5-11
2.2.5 Changing the manual movement speed .......................................................... 5-12
2.2.6 Shift coordinates ............................................................................................. 5-13
2.2.6.1 Shift coordinates setting method 1 ...................................................................5-15
2.2.6.2 Shift coordinates setting method 2 ...................................................................5-16
2.2.7 Hand definition .............................................................................................. 5-17
2.2.7.1 Hand definition setting method 1 .................................................................... 5-17
2.2.8 Absolute reset ................................................................................................. 5-19
2.2.8.1 Checking absolute reset status ......................................................................... 5-19
2.2.8.2 Absolute reset on each axis (Mark Method) ..................................................... 5-20
2.2.8.3 Absolute reset on each axis (Stroke end method / sensor method).................... 5-21
2.2.8.4 Absolute reset on all axes ................................................................................ 5-22
2.3 "SYSTEM" mode ................................................................................ 5-24
2.3.1 "SYSTEM" mode initial screen format .............................................................. 5-24
2.3.2 Robot parameters screen format ...................................................................... 5-25
2.3.3 Axis parameters screen format ........................................................................ 5-25
2.3.4 Setting the area check output ..........................................................................5-26
2.3.5 Double-carrier collision prevention ................................................................ 5-27
2.4 Error message displays ...................................................................... 5-31
3. Programming ...........................................................................5-32
3.1 Robot languages used in the two-robot setting .................................. 5-32
Chapter 6 Parallel I/O interface
1. Standard I/O interface overview ...............................................6-1
1.1 Power supply ...................................................................................... 6-1
1.2 Connector I/O signals ......................................................................... 6-2
1.3 Connector pin numbers ...................................................................... 6-3
1.4 Typical input signal connection .......................................................... 6-4
1.5 Typical output signal connection ........................................................ 6-5
1.5.1 Dedicated outputs ............................................................................................ 6-5
1.5.2 General-purpose outputs .................................................................................. 6-6
1.6 Dedicated input signal description ...................................................... 6-7
1.7 Dedicated output signal description .................................................... 6-9
1.8 Dedicated I/O signal timing chart ..................................................... 6-11
1.8.1 Controller power ON, servo ON and emergency stop..................................... 6-11
1.8.2 Absolute reset ................................................................................................. 6-12
1.8.3 Switching to AUTO mode, program reset and execution ................................. 6-13
1.8.4 Stopping due to program interlocks ................................................................ 6-14
1.9 General-purpose I/O signals.............................................................. 6-15
1.9.1 General-purpose input signals ........................................................................ 6-15
1.9.2 General-purpose output signals ...................................................................... 6-15
1.9.3 General-purpose output signal reset (off) ......................................................... 6-15
2. Option I/O interface overview ................................................6-16
2.1 ID settings ......................................................................................... 6-17
2.2 Power supply .................................................................................... 6-17
2.3 Connector I/O signals ....................................................................... 6-18
2.4 Connector pin numbers .................................................................... 6-19
2.5 Typical input signal connection ........................................................ 6-20
2.6 Typical output signal connection ...................................................... 6-20
2.7 General-purpose I/O signals.............................................................. 6-20

vii
2.7.1 General-purpose input signals ........................................................................ 6-20
2.7.2 General-purpose output signals ...................................................................... 6-20
2.7.3 General-purpose output signal reset (off) ......................................................... 6-21
3. Ratings .....................................................................................6-22
4. Caution items ..........................................................................6-23
Chapter 7 SAFETY I/O interface
1. SAFETY I/O interface overview .................................................7-1
1.1 Power ................................................................................................. 7-1
1.2 Connector I/O signals ......................................................................... 7-1
1.3 Connector terminal numbers............................................................... 7-2
1.4 Emergency stop input signal connections ............................................ 7-3
1.4.1 RCX142 ............................................................................................................ 7-3
1.4.2 RCX142-T .........................................................................................................7-6
1.5 Dedicated input signal connections .................................................... 7-9
1.6 Input signal description ..................................................................... 7-10
Chapter 8 RS-232C interface
1. Communication overview.......................................................... 8-1
2. Communication function overview............................................8-2
3. Communication specifications ...................................................8-3
3.1 Connector ........................................................................................... 8-3
3.2 Transmission mode and communication parameters ........................... 8-4
3.3 Communication flow control .............................................................. 8-5
3.3.1 Flow control during transmit .............................................................................8-5
3.3.2 Flow control during receive .............................................................................. 8-5
3.4 Other caution items ............................................................................ 8-6
3.5 Character code table ........................................................................... 8-8
3.6 Connecting to a PC ............................................................................. 8-9
Chapter 9 Specifications
1. Controller basic specifications ...................................................9-1
1.1 RCX142 basic specifications ............................................................... 9-1
1.2 RCX142-T basic specifications ............................................................ 9-2
2. Controller basic functions..........................................................9-3
3. Robot controller external view ..................................................9-4
3.1 RCX142 external view ........................................................................ 9-4
3.2 RCX142-T external view ..................................................................... 9-5
4. MPB basic specifications and external view...............................9-6
Chapter 10 Troubleshooting
1. Error Messages......................................................................... 10-1
1.1 Robot controller error messages ........................................................ 10-1
[ 0] Warnings and messages .......................................................................................... 10-3
[ 1] Warnings (error history entry).................................................................................. 10-5
[ 2] Robot operating area errors..................................................................................... 10-5

viii
[ 3] Program file operating errors................................................................................... 10-9
[ 4] Data entry and edit errors ..................................................................................... 10-11
[ 5] Robot language syntax (compiling) errors ............................................................. 10-11
[ 6] Robot language execution errors .......................................................................... 10-19
[ 9] Memory errors ......................................................................................................10-24
[10] System setting or hardware errors ......................................................................... 10-26
[12] I/O and option board errors .................................................................................. 10-28
[13] MPB errors ........................................................................................................... 10-32
[14] RS-232C communication errors ............................................................................10-33
[15] Memory card errors .............................................................................................. 10-35
[17] Motor control errors.............................................................................................. 10-37
[21] Major software errors ............................................................................................ 10-44
[22] Major hardware errors .......................................................................................... 10-45
1.2 MPB Error Messages........................................................................ 10-49
2. Troubleshooting .....................................................................10-51
2.1 When trouble occurs ...................................................................... 10-51
2.2 Acquiring error information ............................................................ 10-52
2.2.1 Acquiring information from the MPB ............................................................ 10-52
2.2.2 Acquiring information from the RS-232C ...................................................... 10-52
2.3 Troubleshooting checkpoints........................................................... 10-53

Chapter 1 Safety
Contents
1. Safety ............................................................................................... 1-1
1.1 Safety precautions during robot operation ............................................... 1-2
1.2 Safety precautions during maintenance ................................................... 1-2
1.3 Motor overload precautions .................................................................... 1-2
1.4 Warning labels ........................................................................................1-3
1.5 Warning marks ........................................................................................ 1-3
2. Warranty .......................................................................................... 1-4
3. Operating environment .................................................................... 1-5

MEMO

1-1
1
Safety
1. Safety
Please observe all safety rules and cautions to ensure safe and correct use of the YAMAHA robot.
Also, bear in mind that not all safety items can be listed in detail, so that accurate judgment by the
operator or service personnel is essential for operating the robot and controller safely.
Industrial robots are highly programmable, mechanical devices that provide a large deg ree
of freedom for performing various manipulative tasks. To ensure safe and correct of
YAMAHA industrial robots, carefully read this manual and FOLLOW THE WARNINGS,
CAUTIONS AND INSTRUCTIONS in this chapter. Failure to take necessary safety
measures or mishandling may result in trouble or damage to the robot and injury to
personnel (robot operator or service personnel) including fatal accidents.
Particularly important safety items and operation points are identified in this manual by
the following symbols and signal words.
w
WARNING
"WARNING" indicates a potentially hazardous situation which, if not avoided, could
result in death or serious injury.
c
CAUTION
"CAUTION" indicates a potentially hazardous situation which, if not avoided, could result in
minor or moderate injury or damage to the equipment or software.
n
NOTE
Explains key points in the operation in a simple and clear manner.
To install, operate or adjust the YAMAHA robot or controller safely and correctly, always
follow the instructions explained in this manual by using either of the following methods.
1. Install, operate or adjust the robot or controller while referring to the contents of this
manual.
2. Install, operate or adjust the robot or controller while vie wing the contents of the CDROM version manual on your computer screen.
3. Install, operate or adjust the robot or controller while referring to a printout of the
necessary pages from the CD-ROM version manual.

1-2
Safety
1
1. Safety
1.1 Safety precautions during robot operation
a. The robot must be operated by a person who has received the proper training on safety
and operation from YAMAHA or an authorized YAMAHA sales dealer.
b. During operation of the robot, be sure to stay out of the work area of the robot
manipulator. Install a safeguard enclosure to keep others away from the work area or
provide a gate interlock using an area sensor that triggers emergency stop when someone
enters the work area.
c. This robot controller is not designed to be explosion-proof. Do not use the controller
and robot in locations exposed to inflammable gases, gasoline or solvent that could
cause explosion or fire.
1.2 Safety precautions during maintenance
a. Never disassemble the robot or controller . In cases where you hav e to replace or repair
parts used in the robot or controller, first consult with us and then follo w the instructions
we provide.
b. Before beginning maintenance for the robot or controller, be sure to turn off the power
to the controller. Even after turning off the controller, there are some parts in the
controller which are still hot or at a high voltage. Always wait for at least 30 minutes
after the controller is turned off.
1.3 Motor overload precautions
Since abnormal operation (such as overload) of the motor is detected by software, the
controller parameters must be set correctly to match the motor type used in the robot
connected to the controller.
Prior to shipping, the controller parameters are preset to match the robot model to be
used. However, please check the robot model again when connecting it to the controller.
If any abnormality is found during operation, stop the controller and contact us for
corrective action.
1-3
1
Safety
1. Safety
1.4 Warning labels
The warning labels shown below are af fix ed to the controller. To use the YAMAHA robot
and controller safely and correctly , be sure to observ e the instructions and caution on the
labels.
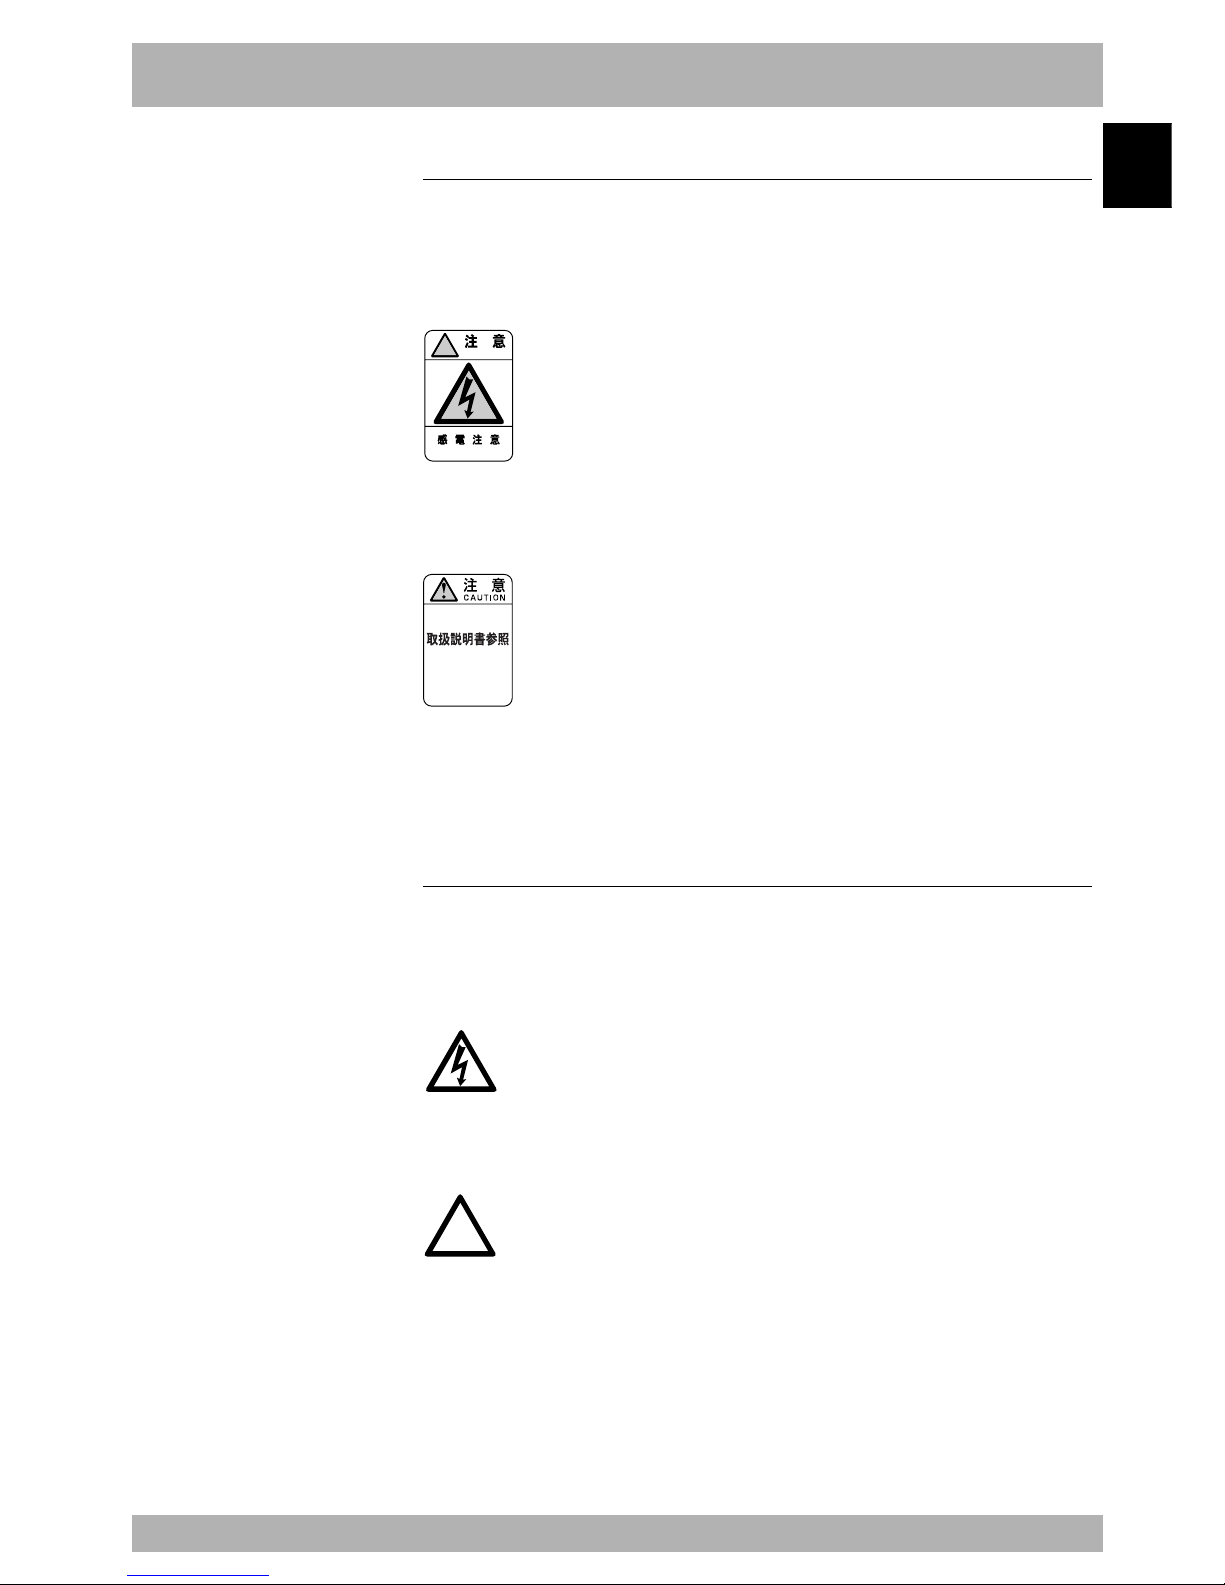
a. “Electric Hazard” label
!
CAUTION
ELECTRIC HAZARD
■ This label warns you of possible electrical shock. Do not touch the terminal strip and
connectors to avoid electrical shock.
b. “Read Instruction Manual” label
READ INSTRUCTION
MANUAL
■ This label means that important information you must kno w is described in the manual.
When in particular connecting a power supply to the robot controller, read this manual
carefully and follow the instructions. Connectors have a particular orientation, so insert
each connector in the correct direction.
1.5 Warning marks
The following warning marks are shown on the controller. To use the YAMAHA robot
and controller safely and correctly, be sure to observe the instructions and caution of the
marks.
a. “Electric Hazard” mark
■ This mark warns you of possible electrical shock. Do not touch the terminal block and
connectors to avoid electrical shock.
b. “CAUTION” mark
!
■ This mark indicates that important information you must know is descr ibed in the
manual.
When in particular connecting a power supply to the robot controller, read this
manual carefully and follow its instructions. Connectors have a particular
orientation, so insert each connector in the correct direction.

1-4
Safety
1
2. Warranty
The YAMAHA robot and/or related product you have purchased are warranted against the defects or
malfunctions as described below.
Warranty description:
If a failure or breakdown occurs due to defects in materials or workmanship in the genuine
parts constituting this YAMAHA robot and/or related product within the warranty period,
then YAMAHA will repair or replace those parts free of charge (hereafter called "warranty
repair").
Warranty Period:
The warranty period ends when any of the following applies:
(1) After 18 months (one and a half year) have elapsed from the date of shipment
(2) After one year has elapsed from the date of installation
(3) After 2,400 hours of operation
Exceptions to the Warranty:
This warranty will not apply in the following cases:
(1) Fatigue arising due to the passage of time, natural wear and tear occurring during
operation (natural fading of painted or plated surfaces, deterioration of parts subject
to wear, etc.)
(2) Minor natural phenomena that do not affect the capabilities of the robot and/or
related product (noise from computers, motors, etc.).
(3) Programs, point data and other internal data that were changed or created by the
user.
Failures resulting from the following causes are not covered by warranty repair.
1) Damage due to earthquakes, storms, floods, thunderbolt, fire or any other natural or
man-made disasters.
2) Troubles caused by procedures prohibited in this manual.
3) Modifications to the robot and/or related product not approved by YAMAHA or
YAMAHA sales representatives.
4) Use of any other than genuine parts and specified grease and lubricants.
5) Incorrect or inadequate maintenance and inspection.
6) Repairs by other than authorized dealers.
YAMAHA MOTOR CO., LTD. MAKES NO OTHER EXPRESS OR IMPLIED
WARRANTIES, INCLUDING ANY IMPLIED WARRANTY OF MERCHANTABILITY
OR FITNESS FOR ANY PARTICULAR PURPOSE. THE WARRANTY SET FORTH
ABOVE IS EXCLUSIVE AND IS IN LIEU OF ALL EXPRESSED OR IMPLIED
WARRANTIES, INCLUDING WARRANTIES OF MERCHANTABILITY, FITNESS
FOR A PARTICULAR PURPOSE, OR WARRANTIES ARISING FROM A COURSE
OF DEALING OR USAGE OF TRADE.
YAMAHA MOTOR CO., LTD. SOLE LIABILITY SHALL BE FOR THE DELIVERY
OF THE EQUIPMENT AND Y AMAHA MO T OR CO., LTD. SHALL NOT BE LIABLE
FOR ANY CONSEQUENTIAL DAMAGES (WHETHER ARISING FROM
CONTRACT, WARRANTY, NEGLIGENCE OR STRICT LIABILITY). YAMAHA
MOTOR CO., LTD. MAKES NO WARRANTY WHATSOEVER WITH REGARD TO
ACCESSORIES OR PARTS NOT SUPPLIED BY YAMAHA MOTOR CO., LTD.

1-5
1
Safety
3. Operating environment
Operating temperature
The ambient temperature should be maintained within a range of 0 to 40°C during
operation. This is the range in which continuous operation of the robot controller is
guaranteed according to the initial specifications. If the robot controller is installed in a
narrow space, then heat generated from the controller itself and from peripheral equipment
may drive the temperature above the allowable operating temperature range. This may
result in thermal runaway or malfunctions and may lower component performance along
with shortening their useful service life. So be sure to install the controller in locations
with a vent having a natural air flow . If this pr oves insuff icient, provide forced air-cooling.
Storage temperature
The controller should be stored in a location at an ambient temperature between -10 and
+65°C when not being used. If the robot controller is stored in a location at high
temperatures for extended periods, deterioration of the electronic components may occur
and the memory backup time may decrease.
Operating humidity
The ambient humidity of the robot controller should be 35% to 85% RH (no condensation)
in order to guarantee continuous operation within the initial specifications. Installing the
robot controller inside an air-conditioned or cooled housing is recommended when the
ambient humidity is higher than 85% or when condensation occurs.
Storage humidity
The controller should be stored in a location at an ambient humidity below 95% RH (no
condensation) when not being used. If the robot controller is stored in a location at high
humidity for an extended period of time, rust may form on the electronic components.
Vibration and shock
Do not apply excessive shocks to the robot controller. Install the robot controller in a
location that is not subject to vibrations.
Atmosphere (gas, etc.)
Do not install the robot controller in locations where conductive dust particles, hydrogen
sulfide gas or sulfurous acid gas are present. Such an atmosphere may cause the components
to erode or poor installation. If such dust particles or gases are generated at the current
location, then installing the robot controller in an air-conditioned or cooled housing is
recommended.
Installation location
Always install the robot controller indoors, at a height of less than 1000 meters above sea
level.
This robot controller is neither dust-proof nor water-proof. Do not install it in locations
exposed to oil mist, cutting fluids or cleaning agents.

1-6
MEMO

Chapter 2 System overview
Contents
1. System overview .............................................................................. 2-1
1.1 Main system configuration ...................................................................... 2-1
1.2 Axis definition for the RCX142 series ...................................................... 2-3
2. Part names and functions ................................................................. 2-4
2.1 RCX142 (Maximum number of axes: 4 axes) ........................................... 2-4
2.2 RCX142-T ............................................................................................... 2-4
3. Controller system ............................................................................. 2-5
3.1 RCX142 .................................................................................................. 2-5
3.2 RCX142-T ............................................................................................... 2-6
4. Optional devices .............................................................................. 2-7
4.1 MPB programming box ........................................................................... 2-7
4.2 Expansion I/O board ............................................................................... 2-7
4.3 Regenerative unit .................................................................................... 2-7
5. Basic sequence from installation to operation .................................. 2-8

MEMO
2-1
2
System overview
1. System overview
The RCX series controllers are designed for use with a SCARA robot or Cartesian robot, mainly for
assembly and pick-and-place applications. Applications also include various inspection instruments,
sealers and spray equipment utilizing linear and circular interpolation functions.
1.1 Main system configuration
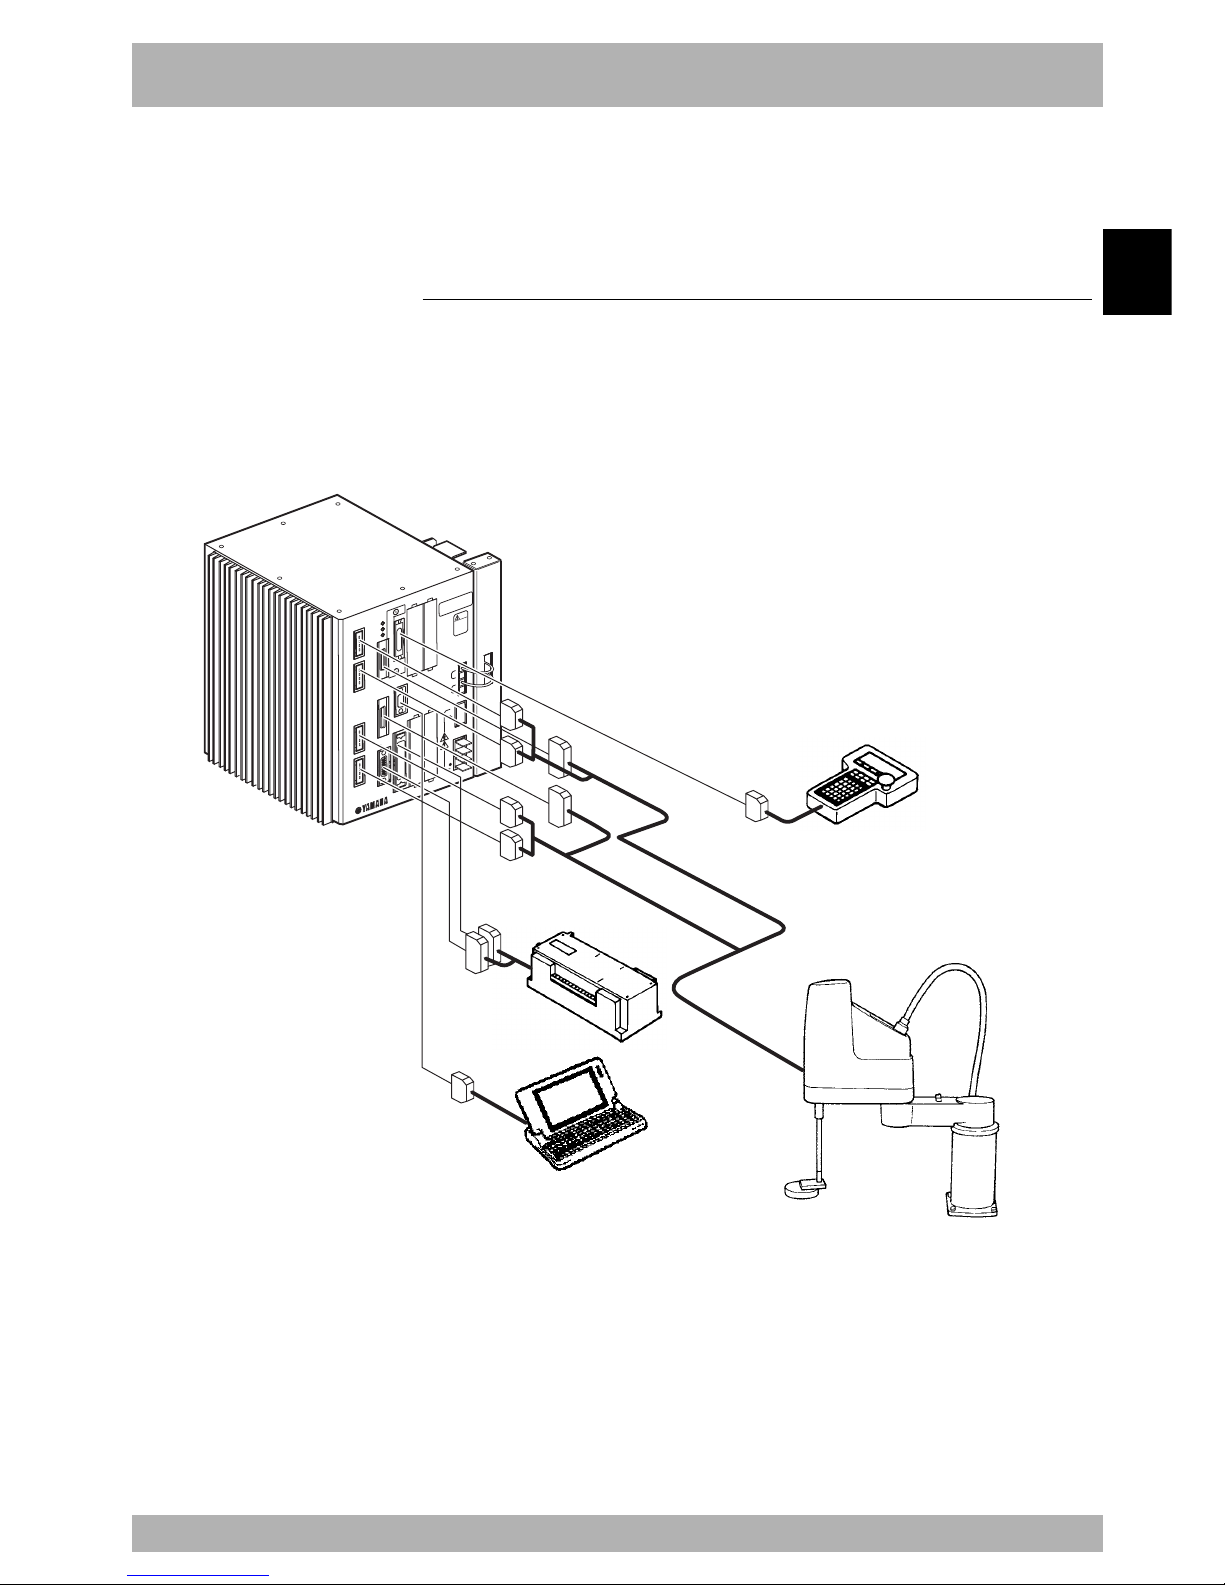
Configuration 1: System for controlling one robot
Example :YK500X
All the axes on the robot controller are used as the main robot axes.
Fig. 2-1-1 System for controlling one robot
RCX142
MOTO
R
XM
YM
ZM
RM
PWR
SRV
ERR
SAFETY
MPB
COM
STD.DI
O
RGEN
AC
IN
P
N
L
N
ROB
I/O
XY
ROB
I/O
ZR
OP.1 OP.3
OP.2 OP.4
2
00-
2
30V~
50-60Hz
MAX.2500VA
M
O
DEL.
SER. NO.
M
ANUF
A
CTURED
F
A
CT
O
RY AUT
O
M
ATION EQUIPMENT MAD
E
IN JAPAN
注意
CAUTION
取扱説明書参照
READ INSTRUCTION
MANUAL
BATT
ZR
XY
PC
PLC
MPB
YAMAHA robot
2-2
System overview
2
1. System overview
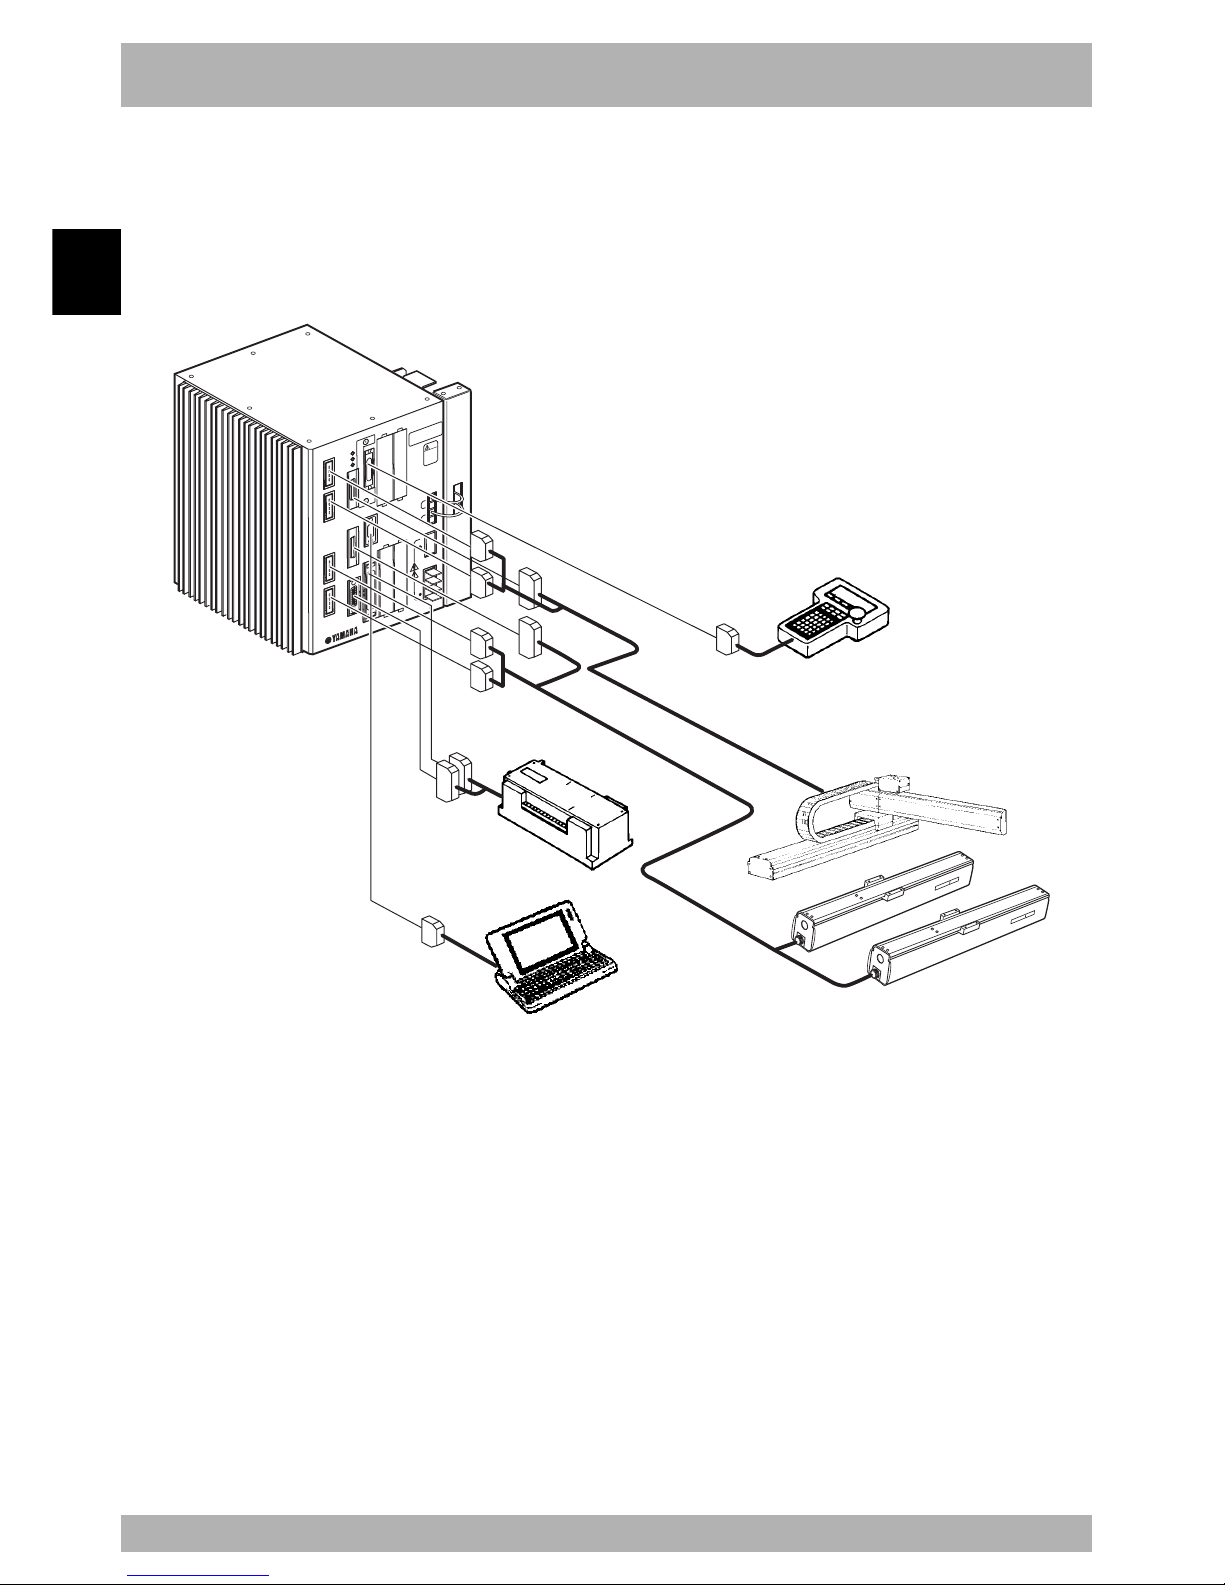
Configuration 2: System for controlling one robot and auxiliary axes
Example: MXYx+T9+T9
Axes 1 and 2 on the robot controller are used as the main robot axes and
axes 3 and 4 are used as the main auxiliary axes.
Fig. 2-1-2 System for controlling one robot and auxiliary axes
RCX142
MOTO
R
XM
YM
ZM
RM
PWR
SRV
ERR
SAFETY
MPB
COM
S
T
D.DI
O
RGEN
ACIN
P
N
L
N
ROB
I/O
XY
ROB
I/O
ZR
OP.1 OP.3
OP.2 OP.4
2
00-2
30V~
50-60Hz
MAX.2500VA
M
ODEL.
SER. NO.
MANUF
A
CTURED
FACTOR
Y
AUTO
M
ATION EQ
UIPMENT
MADE IN JAPAN
注
意
CAUTION
取扱説明書参照
READ INSTRUCTION
MANUAL
BATT
ZR
XY
PLC
MPB
PC
YAMAHA robot

2-3
2
System overview
1. System overview
1.2 Axis definition for the RCX142 series
Axis definitions for the YAMAHA RCX142 series robot controller are shown below.
Robot
controller (RC)
Main robot axis (M?)
Main robot auxiliary axis (m?)
Sub robot axis (S?)
Sub robot auxiliary axis (s?)
Main robot (MR)
Sub robot (SR)
Main group (MG)
Subgroup (SG)
Robot controller ................ Indicates the entire robot controller and controls a
maximum of 4 axes.
The letters “RC” are displayed on the MPB.
Main group ........................ Indicates the main robot and main auxiliary axes and has a
maximum of 4 axes.
The letters “MG” are displayed on the MPB.
Main robot ......................... Indicates the robot name specified as a main robot, and
includes all axes of the main robot.
The letters “MR” are displayed on the MPB.
Main robot axes................. Indicate the axes composing the main robot.
These can be moved with the robot language MOVE
command.
The letters “M?” are displayed on the MPB. (?=1 to 4)
Main auxiliary axes ........... Are the single axes composing the main group.
These cannot be moved with the robot language MOVE
command. Use the DRIVE command to move these axes.
The letters “m?” are displayed on the MPB. (?=1 to 4)
Sub group .......................... Indicates the sub robot and sub auxiliary axes, and has a
maximum of 2 axes.
The letters “SG” are displayed on the MPB.
Sub robot ........................... Indicates the robot name specified as a sub robot, and
includes all axes of the sub robot.
The letters “SR” are displayed on the MPB.
Sub robot axes ................... Indicate the axes composing the sub robot.
These can be moved with the robot language MOVE2
command.
The letters “S?” are displayed on the MPB. (?=1 to 2)
These cannot be moved with the robot language MOVE2
command. Use the DRIVE2 command to move these axes.
The letters “s?” are displayed on the MPB. (?=1 to 2)
Only the main robot axes are usually specified. Auxiliary ax es and sub group settings ar e
for options made at the time of shipment.
2-4
System overview
2
2. Part names and functions
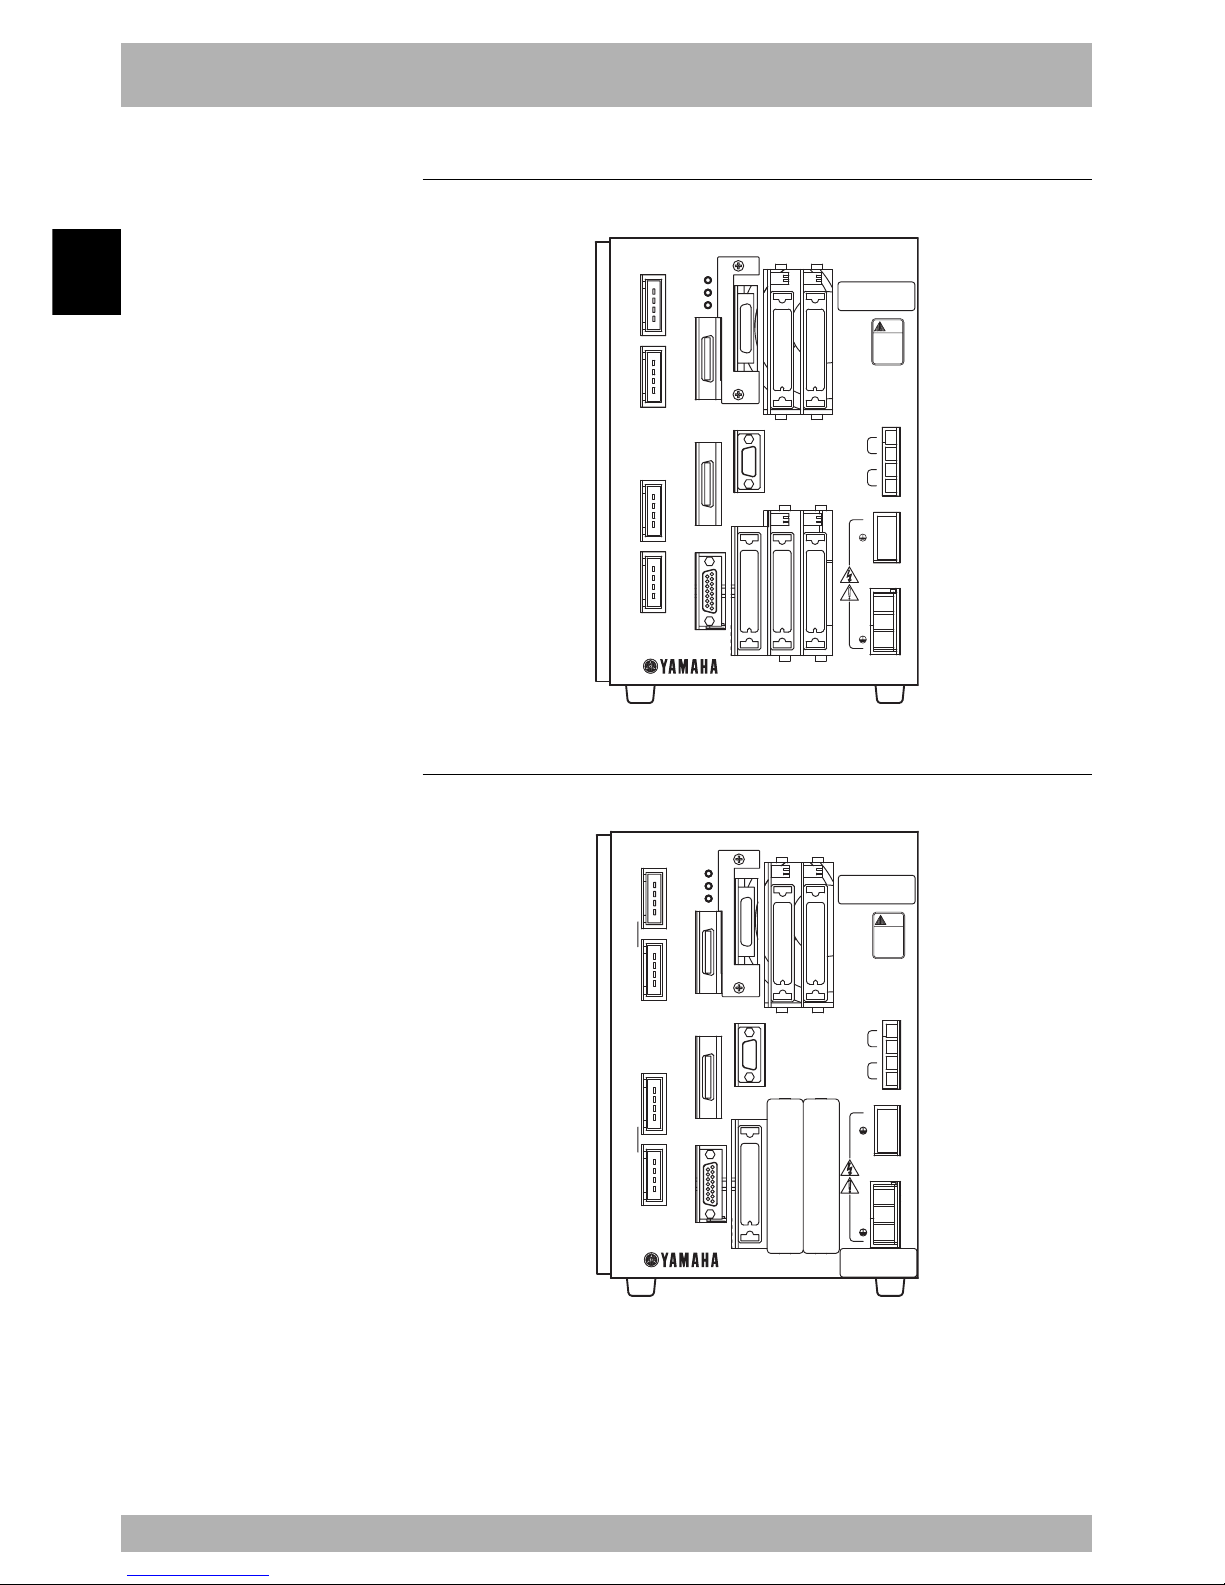
2.1 RCX142 (Maximum number of axes: 4 axes)
Fig. 2-2-1
RCX142
MOTOR
XM
YM
ZM
RM
PWR
SRV
ERR
SAFETY
MPB
COM
STD.DIO
RGEN
ACIN
P
N
L
N
ROB
I/O
XY
ROB
I/O
ZR
OP.1 OP.3
OP.2 OP.4
200-230V~
50-60Hz
MAX.2500VA
BATT
ZR
XY
MODEL.
SER. NO.
MANUFACTURED
FACTORY AUTOMATION EQUIPMENT MADE IN JAPAN
注意
CAUTION
取扱説明書参照
READ INSTRUCTION
MANUAL
2.2 RCX142-T
Fig. 2-2-2
MOTOR
XM
YM
ZM
RM
PWR
SRV
ERR
SAFETY
COM
STD.DIO
RGEN
ACIN
P
N
L
N
ROB
I/O
XY
ROB
I/O
ZR
OP.1 OP.3
OP.2 OP.4
BATT
ZR
XY
注意
CAUTION
取扱説明書参照
READ INSTRUCTION
MANUAL
MODEL.
SER. NO.
MANUFACTURED
FACTORY AUTOMATION EQUIPMENT MADE IN JAPAN
RCX142T
RCX142
200-230V~
50-60Hz
MAX.300VA
 Loading...