

Page 1

YA MA H A
Owner's Guide
Sedienungsanfertung
Manuei tfinstructions
Manuai dd Propietario
0 YAMAHA
Page 2
Thank you for purchasing a Yamaha
PortaTone PCR-800. It’s a revolutionary
product that lets you enjoy playing
and learning keyboard music in a variety
of waya You can quickly learn melodies
and chords with the Playcard system.
And with the Auto Bass Chord system
you can start playing professional-like
accompaniments — using just one
finger — today! You can also use your
PCR-800 as a 49-note portable keyboard
— a keyboard that gives you multiple
choices of instrument voices and rhythm
accompaniments, too. The PortaTone
PCR-800, with its broad range of great
features, introduces you to a new world
of musical fun and pleasure. To be sure
you get maximum satisfaction, we
suggest you follow the steps in this
manual carefully while actually playing
the instrument.
Wir bedanken uns für den Kauf der
einmanualigen Yamaha PortaTone PCR-800.
Es handelt sich hier um ein vollkommen
neues Produkt, das mit einer Vielfalt von
interessanten Spielmöglichkeiten ausgestattet
ist und mit dem Sie mühelos lernen, auf
einer Tastatur zu spielen. Zum schnellen
Erlernen von Melodien ist ein ,,Playcard“System vorgesehen, und dank der BaßAkkord-Automatik können Sie gleich vom
ersten Tag an mit einem einzigen Finger
professionell klingende Musik spielen—
sogar mit Begleitung! Weiterhin können
Sie das PCR-800 auch als portable 49-TöneTastatur verwenden—mit verschiedenen
Instrumentalstimmen und mit RhythmusBegleitung. Sie werden sicher bald an den
vielen Sonderfunktionen Freude finden.
Um alle gebotenen Spielmöglichkeiten aus
schöpfen zu können, gehen Sie zunächst
die Anleitung sorgfältig durch. Probieren
Sie dabei gleich alle Punkte direkt aus, um
sich mit dem Instrument vertraut zu machen.
Tout d’abord merci pour la confiance
que vous témoignez à Yamaha pour son
PortaTone PCR-800. Il s’agit d’un modèle
révolutionnaire qui vous permet d’ap
précier la musique et d’en jouer, au
clavier, de bien des manières.
Vous pouvez — dès aujourd’hui —
apprendre rapidement des mélodies
grâce au Système “Playcard”. Quant au
Système Basses/Accords Automatiques,
il vous permet — sur la pression d’un
seul doigt — d’exécuter des accom
pagnements professionnels. Enfin, vous
pouvez utiliser toutes les ressources de
votre PCR-800 comme clavier portatif à
49 notes offrant un choix étendu de
sonorités d’instruments et d’accom
pagnements rythmés. Le PortaTone
PCR-800 — grâce à sa riche gamme de
possibilités — vous ouvre un champ
étendu de divertissements musicaux, en
fait un nouveau monde fertile en sensa
tions musicales. Afin d’utiliser pleine
ment les ressources de votre PCR-800,
nous vous conseillons vivement de
suivre scrupuleusement les instructions
du Manuel, au cours de l’utilisation de
votre instrument.
Gracias por haber adquirido un PortaTone
PCR-800 Yamaha. Es un producto revolu
cionario que le permite disfrutar tocando y
aprendiendo música de teclado en una
diversidad de maneras. Puede aprender
melodías rápidamente con el sistema Playcard
(tarjetas musicales), y con el sistema de
Acorde y Bajo Automático puede empezar a
tocar con acompañamiento profesionalizado
—utilizando un solo dedo—¡Hoy mismo!
También puede utilizar su PCR-800 como
teclado portátil de 49 notas—un teclado que le
ofrece múltiples selecciones de voces instru
mentales y acompañamientos de ritmo
también.
El PortaTone PCR-800, con su amplia gama
de posibilidades, le introduce a un nuevo
mundo de placer y diversión musical. Para
sacar el máximo provecho, le sugerimos siga
las indicaciones del Manual del Propietario
cuando toque el instrumento.
Contents
Before playing
1. Nomenclature
2. Starting to play
3. Playcard system
4. How to use all the other 4. Verwendung der anderen
features.....................................
5. Memory system
6. External jacks
7. Optional accessories
8. About MIDI
9. Taking care of the PCR-800
and Playcards
10. Specifications.............................
11. Playcard Library.........................
..................................
.............................
...........................
.........................
..........................
.............................
..................
.................................
...........................
.....
.....
.....
.....
....11
....18 5. Memory-System
.... 23
.... 24 7. Sonderzubehör........................
.... 25 8. MIDI.........................................
.... 27
.... 29 11. Playcard-Bibliothek
.... 30 11.
Inhalt Table des matières
1 Vor dem Spielen............................
1. Bezeicnung der Tfeils
2
4
2. Spielbeginn
5
3. „Playcfiurd-‘System
Funktionen
6. Anschlußmöglichkeiten
9. Nützliche Hinweise
10. Tfechnische Daten
.............................
.................
............................
......................
..................
..................
.................
.............
...........
........
........
........
........
.......11
......
18
......
23
......
24
......
25
......
27
......
29
......
30
1
Avant de jouer
2
1. Nomenclature
4
5
Début de lOexécution.................
2.
Système “Playcard”
3.
Exploitation des autres
4.
fonctions
Système mémoire........................... 18 5. Sistema de Memoria
5.
Prise extérieures
6.
7. Accessoires en option
Interface MIDI................................ 25
8.
Entretien du PCR-800 et des
9.
“Playcards”
Spécifications
10.
Fichier de “Playcards”
...................................
.............................
....................
.....................................
........................
................
................................
.............................
................
....
....
....
....
... 11
... 23 6. Contactos externos
... 24
... 27
... 29
... 30 11. Biblioteca de tarjetas Playcard...
Indice
1 Antes de tocar
2
4 2. Comenzando a tocar
5
1. Nomenclatura...............................
3. Sistema de tarjetas
4. Utilización de las demás
funciones
7. Accessorios opcionales
8. Explicación de MIDI........................ 25
9. Cmdados del PCR-800 y de las
tarjetas Pleycard............................ 27
10. Especificaciones..........................
....................................
.....................................
....................
......................
...........
......................
.........
...............
.... 1
.... 2
....4
.... 5
.. 11
.. 18
23
.. 24
.. 29
.. 30
Page 3

Before playing
Vor dem Spielen
Avant de jouer
Antes de tocar
Inserting batteries
Remove the battety compartment cover on
the bottom of the instrument and insert six
1.5V SUM-1, “D” size, R-20, or equivalent
alkaline batteries (sold separately), making
sure that the polarities are placed as
directed inside the compartment. Replace
the cover, ensuring that it locks securely in
place.
Optional power adaptors
Household current: Power Adaptor PA-4 is
available for household current. No
other adaptor is usable, so when you
purchase a power adaptor please
ensure that it is model PA-4.
Car battery: Car Battery Adaptor CA-1
plugs into a car cigarette lighter socket.
Handling the Playcards
Included with your PCR-800 are 12
Playcards and one head cleaning card.
Care should be taken in handling the
Playcards, as described on page 28.
Einsetzen der Batterien
Nehmen Sie den Batteriefachdeckel am Boden
des Instrumentes ab, und legen Sie sechs
1,5-V-Monozellen (nicht mitgeliefert, mög
lichst Alkali-Batterien) unter Beachtung der
im Inneren angegebenen Polarität ein. Bringen
Sie den Deckel wieder an, und achten Sie
darauf, daß er einrastet.
Als Sonderzubehör erhältliche Adapter
Für Netzstrom: Verwenden Sie für Netzbetrieb
ausschließlich den Netzadapter PA-4.
Für Betrieb über die Autobatterie: Verwenden
Sie zum Anschluß an die Zigaretten
anzünderbuchse Ihres Wagens den
Autobatterieadapter CA-1.
Behandeln der Playcards
Bei der PCR-800 werden 12 Playcards und
eine Reinigungskarte mitgeliefert. Beachten
Sie die auf Seite 28 befindlichen Hinweise
zum Umgang mit den Playcards.
Insertion des piles
Retirer le couvercle du compartiment des
piles se trouvant sous l’appareil et insérer
6 piles, 1,5V, SUM-1, format “D”, R-20, ou
des piles alcalines équivalentes (vendues
séparément), en s’assurant que les
polarités sont bien correctes et conformes
aux indications figurant à l’intérieur du
compartiment. Remettre le couvercle en
place, en s’assurant de son parfait
verrouillage.
Adaptateurs en option
Courant secteur: L’adaptateur PA-4 est
disponible pour le courant secteur.
Aucun autre adaptateur ne convient.
Lors de l’acquisition de l’adaptateur,
s’assurer qu’il s’agit bien du modèle
PA-4.
Batterie automobile: L’adaptateur CA-1,
prévu pour batterie automobile, se
branche sur l’allume-cigare du tableau
de bord.
Maniement des “Piaycards’’
Votre PCR-800 est doté de 12 Playcards et
d’une carte de nettoyage de tête. Le manie
ment des “Playcards” doit s’effectuer
méticuleusement, conformément aux
instructions de la Page 28.
Inserción de las baterías
Extraer la cubierta del compartimiento de
baterías de la parte inferior del instrumento e
insertar seis baterías alcalinas de 1,5V SUM-1,
de tamaño “D”, R-20 o equivalentes (vendi
das por separado), asegurándose de que las
polaridades sean correctas, como se indica
dentro del compartimiento. Volver a colocar
la cubierta, asegurándose de que se fije firme
mente en su posición.
Adaptadores de potencia opcionales
Corriente doméstica: El Adaptador de Poten
cia PA-4 está disponible para corriente
doméstica. No debe utilizarse ningún otro
adaptador, de manera que cuando
adquiera un adaptador de potencia,
asegúrese de que sea el modelo PA-4.
Batería de automóvil: El Adaptador para
Batería de Automóvil CA-1 se conecta a la
clavija del encendedor de cigarrillos del
automóvil.
Manejo de las Playcards
Con su PCR-800 se incluyen 12 Playcards y
una tarjeta limpiadora de cabeza. Tomar las
precauciones convenientes al manejar las
Playcards, como se describe en la página 28.
Page 4
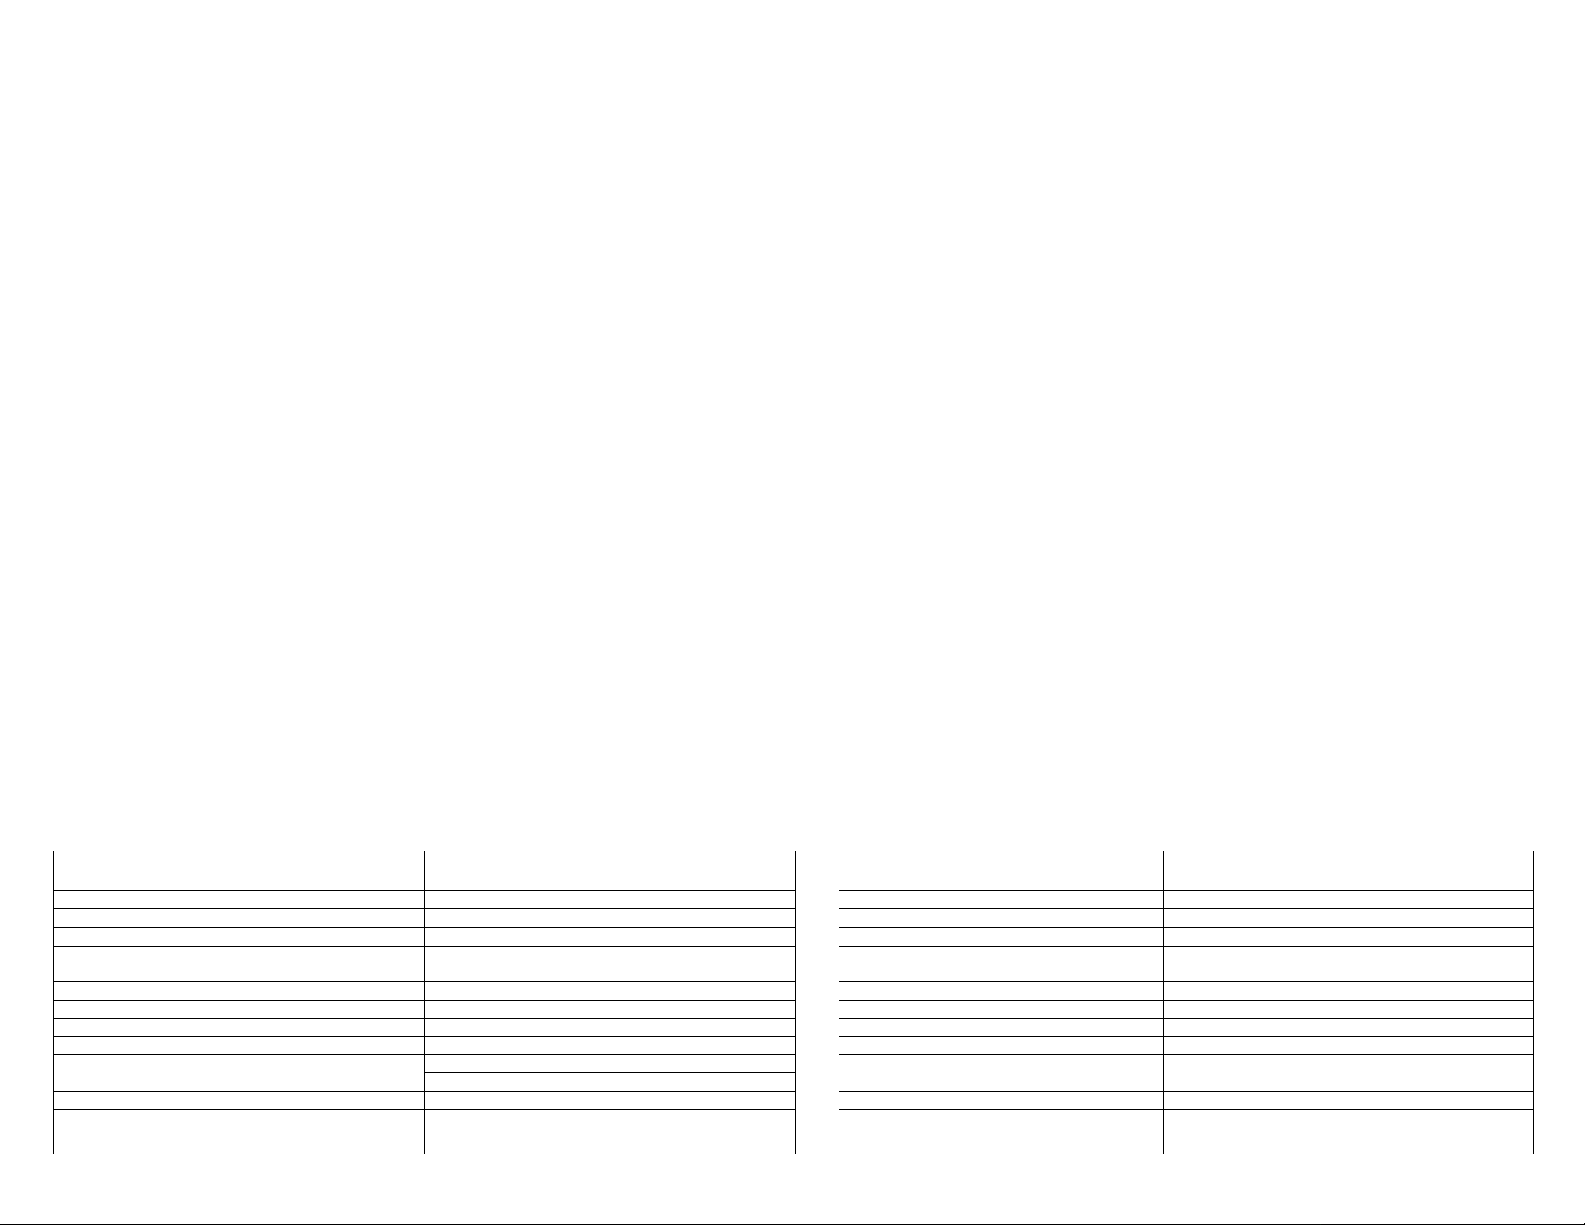
1
Nomenclature
Bezeichung der Teile | Nomenclature
Auto Bass Chord Section Rhythm Section
BaB-Akkord-Automatik-Teil Rhythmus-Teil
Section Basses/Accords Automatiques Section Rhythmique
Sección de Accorde y Bajo Automático Sección de Ritmo
Orchestra Section
Orchester-Teil
Section Orchestrale
Sección de Orquesta
Nomenclatura
Page 5

® Power Switch ® Ein/Aus-Schalter
® Master Volume
® Transposer (D Transposerregler
Auto Bass Chord Section
® Auto Bass Chord Selectors
® Variation
d) Auto Bass Chord Volume
(7) Auto Bass Chord Key Section
Rhythm Section
® Rhythm Selectors
® Rhythm Volume
® Tempo ® Temporegler
Orchestra Section Orchester-Teil
® Orchestra Voice Selectors
(g! Duet
g) Orchestra Sustain
® Stereo Symphonic
® Music Programmer
® Playcard System Selectors
® Playcard Groove
® MIDI Mode Selector
® Fill-in Selector
Synchro Start & Start
® Stop
@ Intro/Endlng
d) Hauptlautstärkeregler
Baß-Akkord-Automatik-Teil
® Baß-Akkord-Automatik-Schalter
CD Variationsschalter
® Baß-Akkord-Automatik-Lautstärkeregler
® Baß-Akkord-Automatik-Tastenbereich
Rhythmus-Ibil
CD Rhythmus-Schalter
CD Rhythmus-Lautstärkeregler
@ Orchesterstimmen-Schalter
® Duettschalter
® Orchester-Sustain-Schalter
® Stereo-Symphonic-Schaiter
© Musik-Programmierer
® Playcard-System-Teil
® Playcard-Schlitz
® MIDI-Betriebsartenschalter
® Fill-in-Schalter
© Synchro-Start- und Start-Schalter
@ Stoppschalter
® Intro/Finale-Schalter
® Interrupteur d’alimentation
@ Volume principal
(D Transpositeur
Section Basses/accords automatiques
® Sélecteurs basses/accords
automatiques
(D Variation
CD Volume Basses/Accords Automatiques
® Section Touches de Basses/Accords
Automatiques
Section Rh^hmique
® Sélecteurs de rythme
® Volume de rythme
® Tempo
Section orchestraie
® Sélecteurs de voix orchestre
® Duo
® Soutien orchestre
© Symphonique stéréo
© Programmeur de musique
© Sélecteurs de Système Playcard
© Rainure Playcard
© Sélecteur de mode MIDI
© Sélecteur de remplissage
© Départ synchronisé et départ
® Arrêt
g) Introduction/Fin
® Interruptor de Conexión
(D Volumen Principal
® Transpositor
Sección de Acorde y Bajo Automático
® Selectores de Acorde y Bajo Automático
® Variación
® Volumen del Acorde y Bajo Automático
@ Sección de Teclas de Acorde y Bajo
Automático
Sección de Ritmo
® Selectores de Ritmo
® Volumen del Ritmo
® Tempo
Sección de Orquesta
@ Selectores de Voces de Orquesta
® Dúo
® Sostenido de la Orquesta
® Sinfónico Estéreo
® Programador Musical
® Selectores del Sistema Playcard
® Hendidura para las tarjetas
® Selector de Modalidad MIDI
® Selector de Relleno
Arranque y Arranque Sincronizado
@ Parada
© Introducción/Terminación
Page 6

2
Starting to play
If you are going to use battery power,
first insert the batteries in the com
partment as described earlier. Before
using with household current or a
car battery, ensure that the optional
adaptor is safely connected.
Slide the POWER switch ® to the
2.
“ON” position. The Power-on light
will then illuminate. If the light flickers
when you’re using batteries, this
indicates that the batteries need
replacing.
Spielbeginn
1. Soll das Instrument mit Batterien betrieben
werden, setzen Sie diese wie zuvor
beschrieben ein. Bei Betrieb mit Netzstrom
oder an einer Autobatterie überprüfen
Sie, daß der Adapter (Sonderzubehör)
richtig angeschlossen ist.
2. Schieben Sie den Ein/Aus-Schalter
(POWER) (D auf ON. Der Schalter
leuchtet dann. Blinkt er bei Batteriebe
trieb, so müssen die Batterien ersetzt
werden.
rr-n
OFF J *-ON
Début de l’exécution
1. Si vous décidez d’utiliser des piles,
insérez tout d’abord les piles dans le
compartier selon la description
antérieure. Avant toute utilisation sur
le courant secteur ou sur une batterie
automobile, assurez-vous que l’adap
tateur en option a été dûment
branché.
Déplacer l’interrupteur d’Alimentation
2.
(POWER) (D sur la position de marche
(ON). Le clignotant d’alimentation
s’allume alors. Si ce voyant lumineux
s’allume et s’éteint alternativement,
en cas de fonctionnement sur piles,
ce signal indique qu’il convient de
remplacer les piles.
POWER
Comenzando a tocar
1. Si va a utilizar las baterías como fuente de
potencia, inserte antes las baterías en el
compartimiento como se ha descrito antes.
Antes de utilizar el instrumento con co
rriente doméstica o con la batería del auto
móvil, asegúrese de que el adaptador
opcional esté bien conectado.
2. Deslice el Interruptor de Potencia
(POWER) (D a la posición “ON”.
Entonces se iluminará la luz de conexión
de potencia. Si la luz parpadea cuando esté
utilizando baterías, esto indicará que las
baterías necesitan ser cambiadas.
3. Adjust the overall volume using the
MASTER VOLUME control CD.
3. Regeln Sie die Gesamtlautstärke mit dem
Hauptlautstärkeregler (MASTER
VOLUME) CD ein.
MASTER VOLUME
MIN I I I I I I t I I MAX
3. Réglez le volume global en utilisant
le contrôle de Volume Principal
(MASTER VOLUME)
(D .
3. Ajuste el volumen general utilizando el
control de Volumen Principal (MASTER
VOLUME) (D.
Page 7
Playcard system
, ,Playcard“-System
Système “Playcard”
Sistema de tarjetas
In addition to its full range of voices,
rhythms and other functions, the PCR-800
has the Playcard system, which enables
you to listen to or sing along with a piece
of music, or to practice playing the
melody and chord accompaniment.
Playcards
Each Playcard has a music score
together with a magnetic strip on one
side, and instructions for use on the
other. The magnetic strip has musical
data recorded on it. This data comprises
a melody, obbligato, chords, rhythm
accompaniment, drum fill-ins, bass line,
instrument voices, program instructions,
and, when appropriate, arpeggios. The
PCR-800 memorizes all this information
when you slide the Playcard across the
instrument’s reading head.
Zusätzlich zu ihrer reichhaltigen Aus
drucksmöglichkeit besitzt die PCR-800 ein
,,PIaycard“-System {Notenkarten). Damit
sind Sie in der Lage, zu wählen, ob Sie der
Musik nur zuhören, die Gesangsbegleitung
machen oder Melodie bzw. die Begleitak
korde ganz selbst spielen wollen.
0 AUTO 0 free O melody O lamp
PLAY TEMPO CANCEL CANCEL
STOP O CHORD O BASS/ 0 PHRASE
„Playcards“ (Notenkarten)
Auf der einen Seite dieser ,,Playcards“
befinden sich die Partitur und ein Magnet
streifen, auf der anderen die Anleitung. Auf
dem Magnetstreifen sind die Musik-Daten
abgespeichert. Diese Daten enthalten die
Melodie, die obligaten Stimmen, die
Akkorde, die Rhythmus-Begleitung, den
Schlagzeug-Einsatz, die Baßlinie, die Instru
mentalstimmen, Programmanweisungen und
gegebenenfalls auch die Arpeggien. Alle
diese Information werden im PCR-800 abge
speichert, wenn eine ,,Playcard“ über den
Lesekopf des Instruments gleitet.
Outre ses fonctions d’expression, le
PCR-800 offre un système “Playcard”
qui permet d’écouter et d’accompagner
en chantant un morceau de musique,
de s’exercer à jouer une mélodie ou
d’accompagner les accords soi-même.
LESSON CHORD REPEAT
CANCEL
“Playcards”
Chaque “Playcard” comporte, d’un côté,
une partition musicale associée à une
piste magnétique; de l’autre, les instruc
tions relatives à son utilisation. La piste
musicale contient des données musica
les dûment enregistrées. Ces données
comportent une mélodie, une partie
obligée, des accords, un accompagne
ment rythmé, des passages de batterie,
une suite de basses, des voix instrumen
tales, et des instructions programmées.
Le PCR-800 met en mémoire l’ensemble
de ces données, lors de l'insertion de
la “Playcard” dans la tête de lecture
de l’instrument.
Además de sus coiiH)letisimas funciones de
expresión, el PCR-800 ofrece un sistema de
tarjetas musicales que le permitirán escuchar
y acompañar con su voz las melodías, o bien
practicar tocando la melodía y los acordes
de acompañamiento.
Tarjetas Playcard
Cada tarjeta tiene un patrón musical junto
con una franja magnética en un lado, y las
instrucciones para su uso en el otro. La franja
magnética lleva grabada información
musical. Esta información comprende una
melodía, obligado, acordes, acompaña
miento de ritmo, batería, línea de bajo,
voces instrumentales e instrucciones de
programa. El PCR-800 memoriza toda esta
información cuando Ud. desliza la tarjeta
Playcard por la cabeza lectora del instru
mento.
-Melody
-Obbligato (decorative solo
passages)
•Chords
-Rhythm accompaniment
with drum fill-ins
Bass line
■Instrument voices
Program instructions
Melodie
Obligate Stimmen
Akkorde
Rhythmus-Begleitung mit
Schlagzeug-Einsätzen
Baßlinie
Instrumentalstimmen
Programmanweisungen
Mélodie
Partie obligée (fioritures
exécutées en solo)
Accords
Accompagnement rythmé à
la batterie
Basses
Voix instrumentales
instructions programmées
Melodía
Obligado (partes con solos
decorativos)
Acordes
Acompañamiento de ritmo
con inclusión de batería
Línea de bajo
Voces instrumentales
Instrucciones de programa
Page 8

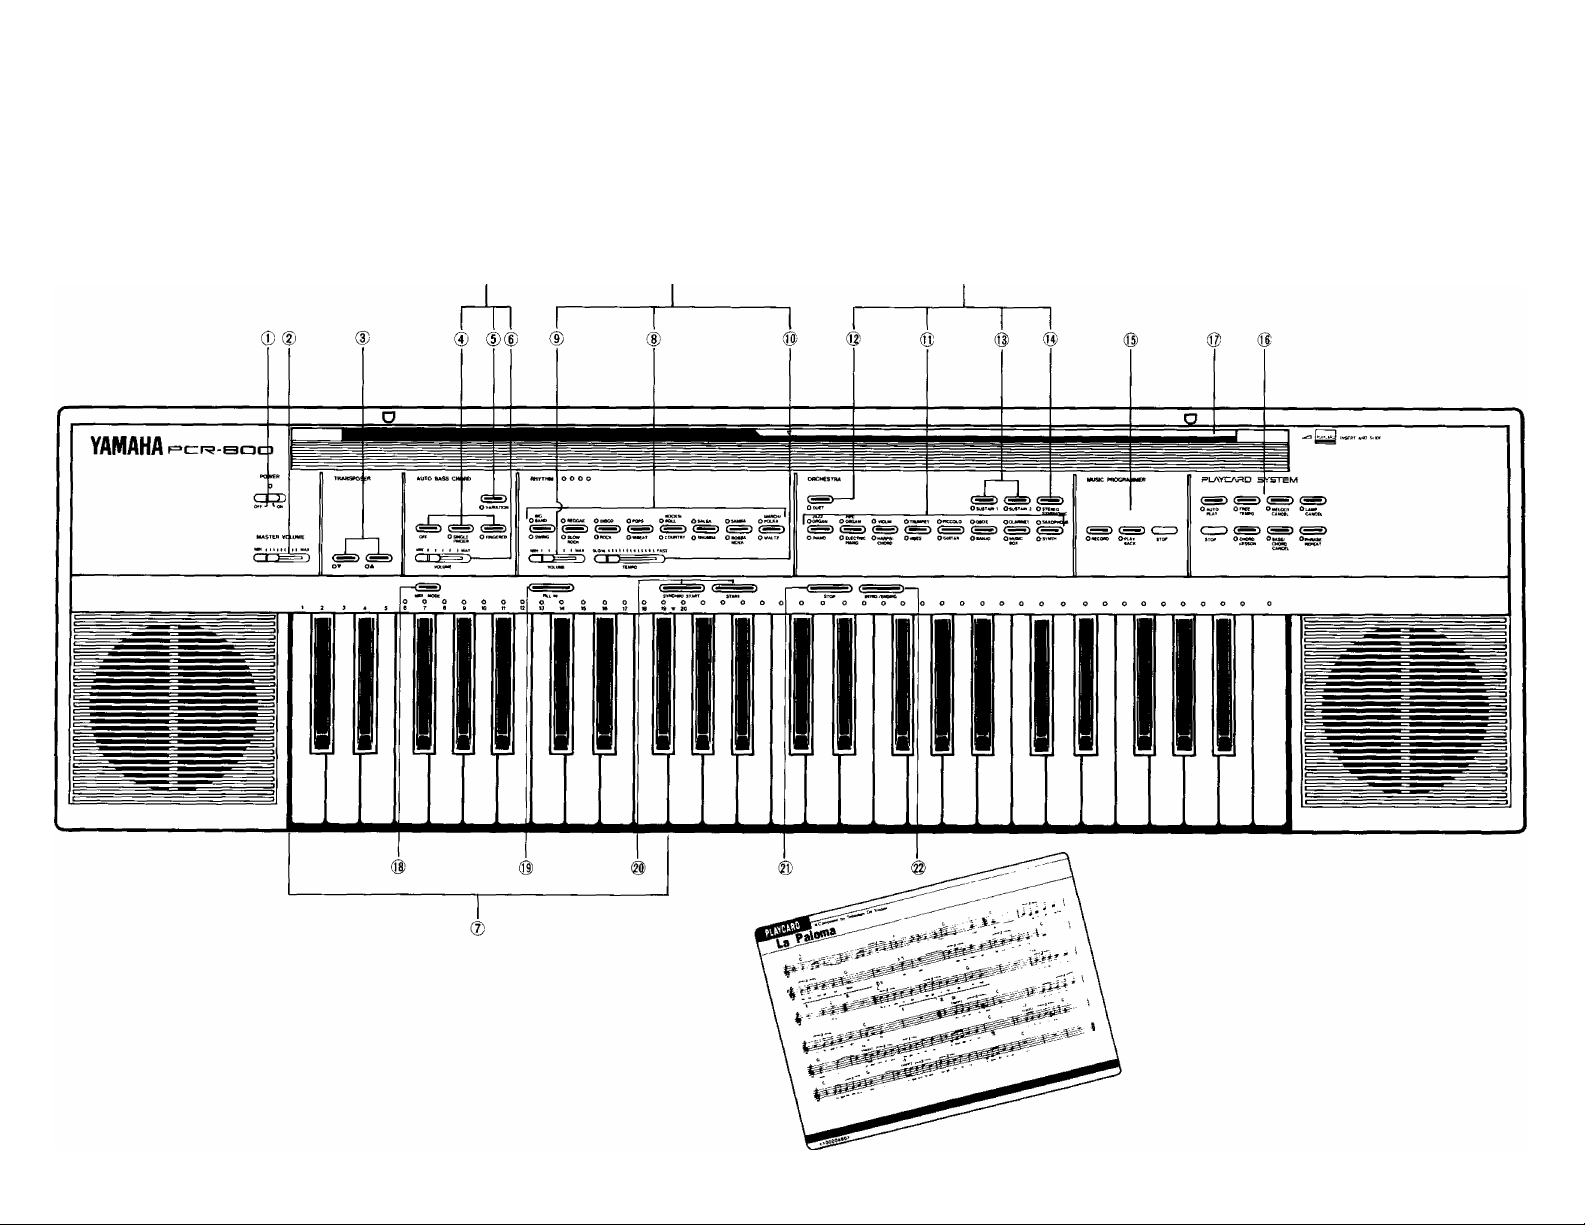
Insert a Playcard
Select a Playcard, remove it from the
protective envelope, and place it In the
groove ® so that its leading edge is levei
v\/ith the arrow designating the insertion
position (see figure). Then slide the
Playcard firmly along the groove in one
action from right to left until it reaches the
end of the groove. If the PCR-800’s head,
which is located in the groove, has read
the magnetic strip correctly, the Melody
Lamps will light up momentarily and a
single tone will be heard. Repeat the pro
cedure if the Melody Lamps do not illumi
nate. If you slide the Playcard too slowly,
the head will not read the data; the sliding
action should take from one to two
seconds. Try several times to familiarize
yourself with the correct speed.
Reading of the Playcard is completed,
and your PCR-800 immediately starts to
play the Playcard music automatically. At
the same time the Melody Lamps light up
to show you the progression of the
melody notes. If you want to stop the
music at any time, press the STOP button.
Playcard eínschieben
Wählen Sie eine Playcard aus, nehmen Sie
sie aus ihrer Schutzhülle und stecken Sie sie
so in den Playcard-Schlitz ®, daß ihr
vorderer Rand an dem die Einschiebungs
position markierenden Pfeil liegt (siehe Abb.).
Schieben Sie dann die Playcard gleich
mäßig ohne Unterbrechung von rechts nach
links bis zum Ende des Schlitzes. Hat der im
Schlitz befindliche Lesekopf alle Daten des
Magnetstreifens richtig gelesen, leuchten die
Melodie-Lampen kurz auf. Leuchten diese
Lampen nicht, so muß der Vorgang wieder
holt werden. Wenn die Playcard zu
langsam durch den Schlitz geschoben wird,
kann der Lesekopf die Daten nicht lesen. Der
Schiebevorgang sollte ein bis zwei Sekunden
dauern. Üben Sie einige Male, um ein Gefühl
für die richtige Geschwindigkeit zu bekommen.
Das Einlesen der Playcard ist damit be
endet, und das PCR-800 beginnt sofort mit der
Wiedergabe der Playcard-Musik. Gleich
zeitig wird die Melodie an den MelodieLampen angezeigt. Durch Drücken des STOPSchalters können Sie die Musik an einer
beliebigen Stelle abbrechen.
Insérer une “Playcard”
Retirer la “Playcard” choisie de l’envelop
pe protectrice et la placer dans la rainure
en veillant à ce que le bord principal
soit au niveau de la flèche désignant la
position d’insertion (se référer au schéma).
Dépiacer ensuite ia “Piaycard” fermement
ie iong de ia’rainure d’un seui mouvement
de droite à gauche jusqu’à ce qu’elle par
vienne au bout de la rainure.
Si la tête du PCR-800 — située dans la
rainure — a procédé correctement à ia
lecture de la piste magnétique, les
Lampes de Mélodie du clavier s’allu
meront et on entendra un signal sonore. Il
conviendra de répéter l’opération si ies
Lampes de Mélodie ne s’allument pas. SI
le déplacement de la “Playcard”
s’effectue trop lentement, la lecture des
données informatiques ne se fera pas; il
conviendra donc de procéder au
dépiacement de la “Playcard” en une ou 2
secondes maximum. Effectuez l’opération
plusieurs fois, de manière à vous
familiariser avec la vitesse qui convient.
Les données de la Playcard ont été
lues, et votre PCR-800 commence immé
diatement et automatiquement à en jouer
la musique. Simultanément, les Lampes
de Mélodie s’allument pour vous indiquer
la progression des notes de la mélodie.
Pour arrêter la musique quand vous le
désirez, appuyez sur le bouton STOP.
Insertar una tarjeta Playcard
Seleccionar una tarjeta, sacarla de su sobre
protector y colocarla en la hendidura ® de
manera que su borde principal esté nivelado
con la flecha que señala la posición de inser
ción (ver figura). Luego, deslizar firmemente
la tarjeta por la hendidura con un solo
movimiento hasta que alcance el final de la
hendidura, de derecha a izquierda. Si la cabeza
del PCR-800, localizada en la hendidura, ha
leído correctamente la franja magnética, las
Luces de Melodía se iluminarán por unos
segundos y se escuchará un tono simple.
Repetir el procedimiento si las Luces de
Melodía no se encienden. Si desliza la tarjeta
Playcard demasiado despacio, la cabeza no
leerá la información; la acción de deslizar debe
llevar de uno a dos segundos. Inténtelo varias
veces para famiharizarse con la velocidad
correcta.
Se ha completado la lectura de la tarjeta y su
PCR-800 comienza a tocar inmediatamente la
música Playcard de forma automática, y al
mismo tiempo las Luces de Melodía se ilumi
narán para mostrarle la progresión de las
notas de melodía. Si desea parar la música en
cualquier momento, pulse el botón STOP.
/Votes:
1} The music will be played repeatedly until you
press the STOP button.
2) If the Tempo is set at an unusually fast speed
(MAX.), the melody and rhythm accompaniment
may sound incorrect. Use the appropriate fempo.
Hinweise:
I) Die Musik wird so lange wiederholt, bis die STOP-Taste
gedrückt wird.
2) Wenn das Tempo extrem schnell eingestellt wird (MAX.),
so passen Melodie und Rhythmusbegleitung nicht
zueinander. Stellen Sie deshalb das Tempo richtig ein.
Hold Playcard tn both hands
Die Playcard mit beiden Händen festhtüten
Tenez la "Playcard” avec les deux mains
Sujete la tarjeta con ambas manos
Remarques;
1) La musique rejouera continuellement jusqu’à ce
que vous appuyiez sur le bouton STOP.
2) Si le Tempo est réglé à une vitesse anormale
ment rapide (MAX.), l’accompagnement mélodi
que et rythmique peut sembler incorrect. Utilisez
un tempo approprié.
Notas:
1) La música se tocará repetidamente hasta que pulse el
botón STOP.
2) Si se fija el tempo a una velocidad extremadamente
ràpida (MAX.), puede que la melodía y el acompaña
miento de ritmo suenen incorrectamente. Utilice el
Tempo apropiado.
Page 9

3} Once the PCR-800 has memorized the Playcard
data, you can remove the Playcard if you wish; for
safety’s sake, return it to its protective envelope.
4) The memory will not be erased when you switch
off the PCR-800.
5) When you change from one Playcard to another,
the PCR-800 automatically wipes the memory
clean and records the fresh data.
3) Sind die Playcard-Daten erst einmal im PCR-800
abgespeichert, so kann die Playcard herausgenom
men werden. Stecken Sie die Playcard dann wieder in
ihre Schutzhülle zurück, um sie vor Beschädigungen
zu bewahren.
4) Der Speicher wird beim Ausschalten des PCR-&X)
gelöscht.
5) Auch beim Einlesen neuer Playcard-Daten wird der
Speicher vorher gelöscht.
3) Une fois que le PCR-800 a mémorisé les données
de la Playcard, vous pouvez la retirer. Mettez-la
en lieu sûr, dans son enveloppe de protection.
4) Les données ne s’effacent pas lorsque vous
éteignez le PCR-800.
5) Quand vous passez d’une Playcard à une autre,
le PCR-800efface automatiquement les données
en mémoire et les remplace par les données
nouvelles.
3) Una vez que el PCR-8(X)ha memorizado la información
de la Playcard, Ud. puede guardaría si lo desea; para
mayor seguridad, vuelva a meterla en su sobre protector.
4) La memoria no se borrará cuando desconecte el PCR-8(X}.
5) Cuando cambia de una tarjeta Playcard a otra, el
PCR-800 borra automáticamente el contenido de su
memoria y graba la nueva información.
Playcard System Functions
1. For Automatic playing AUTO PLAY
If you have halted the Playcard music by
pressing the STOP selector, and you wish
it to be played again, press the AUTO
PLAY selector. The music will be played
from the beginning. To stop the music at
any time, press the STOP selector.
Notes:
1) The suggested instrument voice and rhythm have
been preset on the Playcard’s magnetic strip. If
you wish, you can change the melody voice and
rhythm during a performance. However, waltz
music should not be switched to a 4/4-beat.
2) When you press the Duet button®, the melody
automatically emerges as a duet.
3) The Stereo Symphonic selector® gives a deeper,
more expansive sound.
4) You can enjoy singing along with the PCR-SOOby
connecting an ordinary microphone to the MIC IN
jack (see page 23 about external jacks).
2. To play the melody by yourself
FREE TEMPO
The FREE TEMPO function helps you
learn melodies at your own playing
speed—there’s no need to search hur
riedly for the correct keys to keep up with
the accompaniment because the accom
paniment always waits for you to lead it.
Press the FREE TEMPO selector. You’ll
hear the introductory music phrase, then
the Melody Lamp corresponding to the
first note of the melody will light up. The
PCR-800 will wait until you start playing
the melody. As you speed up or slow
down your melody playing, the accom
paniment will stay right with you. Because
the PCR-800 waits for you when you can’t
find the next note to play, or when you
Funktionen des PlaycardSystems
1. Automatisches Spielen AUTO PLAY
Wenn die Musik mit Hilfe des STOP-Schalters
unterbrochen haben, können Sie sie erneut
spielen, indem Sie den AUTO PLAY-Schalter
drücken. Die Musik wird wieder von vorne
gespielt. Mit dem STOP-Schalter drücken,
können Sie den Spielvorgang zu jeder
beliebigne Zeit abbrechen.
Hinweise:
1) Die vorgesehene Instrumentalstimme und der Rhythmus
ist durch Einlesen der Playcard-Daten bereits auto
matisch eingestellt. Wenn gewünscht, kann aber die
Melodie-Stimme und der Rhythmus noch während des
Spielvorgangs geändert werden. Jedoch sollte bei Walzer
kein 4/4-Takt verwendet werden.
2) Wird der Duett-Schalter ® gedrückt, beginnt die
Melodie automatisch als Duett.
3) Der Stereo-Symphonic-Schalter ® liefert einen tieferen,
volleren Klang,
4) Wird ein normales Mikrofon an die MIC IN-Buchse
angeschlossen (siehe Seite 23,Anschlußmöglichkeiien),
so können Sie zur gespielten Melodie mitsingen.
2. Freies Spielen der Melodie
FREE TEMPO
Mit dieser Tempoautomatik (FREE TEMPO)
können Sie Melodien mit Ihrer eigenen
Spielgeschwindigkeit erlernen. Sie brauchen
sich beim Anschlägen der richtigen Taste nicht
zu beeilen, da die Begleitung sich automatisch
nach Ihrem Spieltempo richtet. Drücken Sie
den FREE TEMPO-Schalter. Sie hören dann
das Einführungs-Musikstück, und anschlie
ßend leuchtet die Melodie-Lampe des ersten
Tons der zu spielenden Melodie auf. Das
PCR-800 wartet nun darauf, daß Sie die erste
Note spielen. Wird das Spieltempo erhöht
oder verringert, so ändert sich auch automa
tisch das Tempo der Begleitung. Da das
PCR-800 auch wartet, bis Sie die als nächstes
zu spielende Taste gefunden haben oder einen
Fonctions du Système
“Playcard”
1. Exécution Automatique des
‘*Pldyc8ftis”
AUTO PLAY (Exécution Automatique)
Quand la lecture de la carte musicale
a été interrompue par poussée
sur la touche d’Arrêt (STOP) et que l’on
désire la jouer de nouveau, appuyer sur la
touche d’Exécution Automatique (AUTO
PLAY). La lecture de la carte se déclen
chera à son début. Pour interrompre la
musique à n’importe quel moment,
appuyer sur la touche d’Arrêt (STOP).
Remarques
1) Les voix instrumentales et rythmes suggérés ont
été pré-réglés sur la piste magnétique de ta
"Playcard”. Vous pouvez, si vous le désirez,
modifier la ligne mélodique et le rythme au cours
de l’exécution du morceau. Une musique de
valse ne saurait, toutefois, être associée à un
rythme 4/4.
2) Lorsque vous appuyez sur le bouton de Duo
(DUET)®, la mélodie est automatiquement inter
prétée en duo.
3) Le sélecteur STEREO SYMPHONIC @ produit un
son plus profond, plus riche.
4) Vous pouvez vous donner le plaisir de chanter
accompagné par votre PCR-800en raccordant un
micro ordinaire dans la prise d’entrée MIC IN
(voir page 23 pour les prises externes).
2. Exécution de ia mélodie par le
musicien
FREE TEMPO (Tempo Libre)
Grâce à la fonction Tempo Libre (FREE
TEMPO) vous pouvez apprendre l’exécu
tion d’une mélodie à l’allure qui est la
vôtre. Vous n’aurez pas à chercher à la
hâte les notes correspondant à l’accom
pagnement: celui-ci, en effet, vous suit
docilement.
Appuyez sur la touche Tempo Libre (FREE
TEMPO). Vous entendrez alors la phrase
musicale d’introduction, puis la Lampe de
Mélodie correspondant à la première note
de la mélodie s’allumera. LePCR-SOOat-
tendra le début de votre exécution de la
mélodie. Que vous accélériez ou que vous
ralentissiez votre jeu, l’accompagnement
Funciones del Sistema Playcard
1. Toque automático AUTO PLAY (Toque Automático)
Si interrumpe la música de la tarjeta,
presionando el botón STOP, y si deseara que
tocara otra vez, presione el selector AUTO
PLAY. Se tocará la música desde el princi
pio. Presione el botón STOP cuando desee
interrumpir la música.
Notas:
1) El ritmo y la voz instrumental sugeridos han sido
preseleccionados en la franja magnética de la melodía.
Si lo desea, puede cambiar la voz de melodía y el ritmo
durante la interpretación. De todas maneras, la música
de vals no deberá disponerse a un compás 4 por 4.
2) Cuando pulsa el botón de Dúo®, la melodía suena
automáticamente como un dúo.
3) El selector de Sinfónico Estéreo (Q) ofrece un sonido
más profundo y expansivo.
4) Ud. puede disfrutar cantando Junto al РСЕ-8(Ю,
conectando un micrófono extra al contacto MIC IN
(consulte la página 23 en torno a los contactos externos).
2. Ejecución personal de la melodia FREE TEMPO (Tempo Libre)
Esta función de FREE TEMPO, le ayuda a
aprender melodías a su propia velocidad de
toque — no hay necesidad de buscar apresura
damente las teclas correctas para seguir el
acompañamiento porque el acompañamiento
siempre espera a que Ud. lo dirija. Oprima el
botón FREE TEMPO. Escuchará la frase
musical de introducción y entonces, la Luz de
Melodía correspondiente a la primera nota de
la melodía se iluminará. El PCR-800esperará
hasta que Ud. empiece a tocar la melodía.
A medida que acelera o retrasa su toque de
melodía, el acompañamiento le seguirá. Como
el PCR-8001e espera cuando Ud. no puede
encontrar la siguiente nota a tocar, o cuando
se equivoca, si desea detener la música en
Page 10

make a mistake, you can learn the correct
melody at your own pace. If you want to
stop the music at any time, press the
STOP selector.
3. To play the melody at the regular
tempo
MELODY CANCEL
Press the MELODY CANCEL selector, and
you will hear the accompaniment only.
You can then play the melody, following
the Melody Lamps. If the tempo is too
fast, use the TEMPO control ® to slow it
down so you can practice comfortably. If
you want to stop the music at any time,
press the STOP selector.
Note:
Once you have mastered playing in the MELODY
CANCEL mode, try recording your melody with the
MUSIC PROGRAMMER ©(see page J8 for details).
Fehler korrigiert haben, sind Sie beim Erlernen
der Melodie stets Ihr eigener Schrittmacher.
Durch Drücken des STOP-Schalters kann der
Spielvorgang zu jeder beliebigen Zeit abge
brochen werden.
3. Spielen der Melodie mit Normal
geschwindigkeit
MELODY CANCEL
Drücken Sie den MELODY CANCELSchalter. Sie hören dann nur noch die
Begleitung und können versuchen, die Melodie
durch Anschlägen der Taste, deren MelodieLampe gerade leuchtet, zu spielen. Ist das
Tempo zu hoch, so schieben Sie den TEMPORegler ® nach links, um ein Ihren Fähigkeiten
angepaßtes Tempo einzustellen. Durch
Drücken des STOP-Schalters kann der Spiel
vorgang zu jeder beliebigen Zeit abgebrochen
werden.
Hinweis:
Wenn Sie erst einmal mit dem Spielen in der MELOD Y
CANCEL-Funktion vertraut sind, versuchen Sie einmal die
Melodie mit dem Music-Programmer @ aufzunehmen
(genaueres siehe Seite 18).
ralentissiez votre eu, l’accompagnement
vous suivra fidèlement. Etant donné que le
PCR-800 “vous attend” pendant que vous
cherchez la note suivante à jouer ou à
l’occasion d’une erreur, vous avez toute
latitude pour apprendre la mélodie à votre
gré et selon votre humeur. Si vous désirez
arrêter la musique à un moment donné,
appuyez sur la touche d’Arrêt (STOP).
3. Exécution de la mélodie au tempo
normal
MELODY CANCEL (Annulation de la
Mélodie)
Sur la pression de la touche Annulation
de la Mélodie (MELODY CANCEL), seul
l’accompagnement sera exécuté. Vous
pouvez alors jouer la mélodie, en suivant
les Lampes de Mélodie. Si le tempo est trop
rapide, utilisez le contrôle Tempo (TEMPO)
@ pour le ralentir et vous permettre ainsi
de jouer plus aisément. Si vous désirez
suspendre, à un moment donné, l’exécu
tion du morceau, il vous suffit d’appuyer
sur la touche d’Arrêt (STOP).
Remarque:
Une fois que vous avez maîtrisé l’exécution en mode
Annulation de Mélodie (MELODY CANCEL), essayez
d’enregistrer votre mélodie avec le Programmeur de
Musique (© (pour plus de détails, voir page 18).
cualquier momento, oprima el selector STOP.
3. Para tocar la melodía con el tempo normal
MELODY CANCEL
(Anulación de Melodía)
Oprima el botón MELODY CANCEL y sólo
escuchará el acompaañamiento. Entonces Ud.
puede tocar la melodía, siguiendo las Luces de
Melodía. Si el tempo es demasiado rápido,
utilice el control TEMPO @ para bajar la
velocidad y poder tocar más a gusto. Si desea
parar la mùsica en cualquier momento, oprima
el botón STOP.
Nota:
Una vez que domine el toque en la modalidad de MELODY
CANCEL, pruebe a grabar su melodía con el PROGRA
MADOR MUSICAL © (consulte la pág. 18 para más
detalles).
4. To play the chords by yourself CHORD LESSON
By using the CHORD LESSON function,
you can practice playing chords. The
PCR-800 will always stop playing the
music and wait until you press the cor
rect chord keys. So you can take your
time looking for the correct keys.
After inserting a Playcard, press the
CHORD LESSON button. The Chord
Lamps will light up to indicate the posi
tions of the notes which make up the
first chord. When the correct keys for the
chord are pressed, the music will con
tinue until a chord change is necessary.
When this occurs, the music again
stops and waits for you to press the
correct keys as indicated by the Chord
Lamps. As the PCR-800 stops playing
when you cannot find a chord or you
make a mistake, you can learn correct
chord constructions at your own ipace.
To stop the music at any time, press
the STOP selector.
4. Eigenes Spielen der Akkorde
CHORD LESSON (Akkordübung)
Mit Hilfe der Akkordübungsfunktion
(CHORD LESSON) können Sie Akkorde
üben. Das PCR-800 unterbricht die Wieder
gabe der Musik und wartet, bis Sie die
richtigen Akkordtasten gedrückt haben.
Sie haben daher genug Zeit, den richtigen
Akkord zu suchen. Nach dem Abspeichern
einer ,,Playcard“ drücken Sie den Akkord
übungsschalter (CHORD LESSON). Die
Akkordlampen leuchten nun auf und zeigen
Ihnen die Lage der Töne, aus denen der
Akkord besteht. Wenn Sie die richtigen
Tasten für den Akkord gedrückt haben,
spielt das Instrument weiter, bis ein anderer
Akkord für die Musik erforderlich ist.
Das PCR-800 unterbricht das Spiel wieder,
wenn es auf einen neuen Akkor stößt
und wartet, bis Sie die richtigen Tasten
für diesen Akkord, die mit den Akkord-
Lampen angezeigt werden, gedrückt haben.
Da das PCR-800 wartet, bis Sie den als
nächstes zu spielenden Akkord gefunden
oder einen Fehler korrigiert haben, sind
Sie beim Erlernen der Akkordfolge stets
Ihr eigener Schrittmacher. Durch Drücken
4. Exécution d’un accord par le musicien
CHORD LESSON (Apprentissage
d’Accord)
L’exploitation de la fonction CHORD
LESSON permet de s’exercer à exécuter
des accords. Le PCR-800 arrêtera de
jouer et attendra le musicien jusqu’à ce
qu’il ait actionné les touches d’accord
qu’il convient. On aura donc tout son
temps pour rechercher l’accord appro
prié. Insérer une carte musicale et
appuyer sur la touche d’Apprenstissage
d’Accord (CHORD LESSON). Les voyants
d’Accord s’allumeront pour indiquer les
positions des notes qui composent
l’accord. Quand les touches appropriées
sont actionnées, la lecture reprendra
jusqu’à ce qu’un autre accord soit
sollicité dans la musique. A l’apparition
d’un nouvel accord, le PCR-800 s’arrête
de jouer jusqu’à ce que le musicien
appuie sur les touches appropriées qui
composent l’accord et qui sont indi
quées par les voyants d’Accord. Comme
le PCR-800 s’arrêtera chaque fois qu’on
ne pourra pas trouver l’accord suivant
ou qu’on commettra une erreur, on aura
4. Ejecución personal de los acordes
CHORD LESSON (Lección de Acorde)
Utilizando esta función puede practicar
tocando con los acordes. El PCR-800 dejará
de tocar la música para esperar a que Vd.
toque las teclas correctas del acorde. Así le
permite tiempo suficiente para encontrar el
acorde correcto.
Presione el botón CHORD LESSON después
de insertar la tarjeta; se iluminarán las
Lámparas de Acorde para indicarle las posi
ciones de las notas que forman el acorde.
Al presionar las teclas del acorde correcto,
la música continuará hasta que sea necesario
un cambio de acorde. Cuando ocurre esto, se
detiene de nuevo para esperarle a que
presione las teclas correspondientes al nuevo
acorde, indicadas por las lámparas.
Dado que el PCR-800 deja de tocar siempre
que no encuentre el siguiente acorde, o se
equivoque, puede aprender los acordes
correctos a su propio paso. Presione el
botón STOP cuando desee interrumpir la
música.
Page 11

des Stop-Schalters (STOP) kann der Spiel
vorgang zu jeder Zeit abgebrochen werden,
werden.
tout le loisir d’apprendre l’accord
convenable à son propre rythme. Pour
interrompre la musique à n’importe quel
moment, appuyer sur la touche d’Arrêt
(STOP).
BASS/CHORD CANCEL
After inserting a Playcard, press the
BASS/CHORD CANCEL selector. The
bass and chord accompaniment will be
excluded from the Playcard music
performance, and only the melody,
obbligato and rhythm will be reproduced.
You can then play the chords, following
the Chord Lamps. Unlike with the CHORD
LESSON mode, the music will continue to
be played. Therefore, adjust the TEMPO
control so that you can practice
comfortably.
5. Learning through repetition PHRASE REPEAT
The best way to learn how to play is to
practice repeatedly, and the PCR-800 has
a very convenient feature for this purpose.
During the Playcard performance, a
phrase, or an entire music selection can
be repeatedly produced using the
PHRASE REPEAT function.
1. On the score printed on each Play
card, every phrase is indicated by a
number. Choose the phrase or phrases
you wish to repeat.
2. Starting from the left of the keyboard,
the keys are numbered 1 to 20.
After inserting a Playcard, press the
keys whose numbers correspond to
the first and last phrase numbers of
the passage you wish to have repeat
ed, while depressing the PHRASE
REPEAT button. For example, if you
wish to repeat phrase 3 through
phrase 5, press keys 3 and 5 while
depressing the PHRASE REPEAT
button. When you wish to have the
entire piece of music repeated, press
the white key, which is indicated by an
asterisk {*), while depressing the
PHRASE REPEAT button.
BASS/CHORD CANCEL (Baß/ Akkord-Löschung)
Drücken Sie nach dem Einlesen einer
„Playcard” den BAß/Akkord-LöschSchalter (BASS/CHORD CANCEL). Die
Baß-und Akkord-begleitung wird dann aus
der Wiedergabe der „Playcard’’-Musik
ausgeblendet. Nur die Melodie, die obligaten
Stimmen, und der Rhythmus werden wieder
gegeben. Sie können nun die Akkord
begleitung selber spielen, indem Sie der
Abfolge der Akkord-Lampen folgen. Anders
als bei der Betriebsart für Akkord-Übung
(CHORD LESSON) wird die Musik hier
nicht unterbrochen. Stellen Sie daher den
Tempo-Regler (TEMPO) so ein, daß Sie
dem Ablauf bequem folgen können.
5. Lernen durch Wiederholen
PHRASE REPEAT (Phrasenwiederholung)
Der beste Weg, um spielen zu lernen, ist
ständige Wiederholung. Das PCR-800 hat
zu diesem Zweck eine sehr nützliche
Einrichtung. Während der ,,Playcard”Wiedergabe können Sie mit Hilfe der
Phrase-Wiederholungsfunktion (PHRASE
REPEAT) eine Phrase oder den gesamten
Musikabschnitt mehrfach wiedergeben.
1. Auf der Partitur, die sich auf jeder
,,Playcard” befindet, ist jede Phrase
mit einer Zahl gekennzeichnet. Wählen
Sie bitte die Phrase oder Phrasen zur
Wiederholung aus.
2. Direkt unter den Tasten des PCR-800
sind Tasten mit den Zahlen 1-20
angeordnet. Nach dem Einlesen einer
,,Playcard” drücken Sie die erste und die
letzte Zahl des Teils, den Sie wiederholen
möchten, und drücken Sie dabei die
Phrasen-Wiederholungschalter (PHRASE
REPEAT). Wenn Sie z.B. den Teil
zwischen Phrase 3 bis Phrase 5
wiederholen möchten, drücken Sie
zunächst den Phrasen-Wiederholungs
schalter (PHRASE REPEAT) und dann
die Tasten 3 und 5. Zur Wiederholung
des gesamten Stücks drücken Sie zunächst
den Phrasen-W iederholungsschalter
(PHRASE REPEAT) und dann die Taste
mit dem (*) Zeichen.
BASS/CHORD CANCEL (Annulation
de Basse/Accord
Insérer une “Playcard” et appuyer sur la
touche BASS/CHORD CANCEL. Les
basses et accords d’accompagnement
seront exclus de la performance musicale
de la carte et seule la mélodie, et la
partie obligée, l’accord rythmique seront
reproduits. Il sera possible alors de jouer
les accords en suivant les indications de
l’ordre de séquence des voyants d’Accord.
Contrairement au mode d’Apprentissage
d’Accord (CHORD LESSON) la musique
continuera lorsque l’instrument est réglé
sur ce mode. Cependant, il conviendra
d’ajuster le réglage de Tempo (TEMPO)
de manière à faciliter la pratique.
5. Initiation musicaie par ia répétition
PHRASE REPEAT (Répétition de Phrase)
La meilleure façon d’apprendre à jouer,
c’est de répéter. Et le РСР-8СЮ est équipé
d’une fonction idéale pour ce type
d’apprentissage.
Au cours d’une performance sur
“Playcard”, il est possible de répéter à
plusieurs reprises une phrase, un groupe
de phrases ou encore une partition
musicale complète au moyen de la
fonction PHRASE REPEAT.
1. Sur le chiffrage de chaque carte
musicale, chaque phrase est indiquée
par un nombre. Il sera donc facile de
choisir la ou les phrases dont on
souhaite la répétition.
2. Les touches de 1 à 20 sont situées
juste au-dessous du clavier du
PCR-800.
Insérer la carte musicale de son choix
et appuyer sur le premier et le dernier
chiffre de la sélection que l’on désire
répéter tout en enfonçant la touche
PHRASE REPEAT. Si l’on souhaite, par
exemple, répéter de la phrase 3 à la
phrase 5, appuyer sur la touche 3 et
sur la touche 5 tout en enfonçant la
touche REPEAT. Si l’on veut répéter la
partition complète, appuyer sur la
touche identifiable par sa petite étoile
(*) tout en enfonçant la touche
PHRASE REPEAT.
BASS/CHORD CANCEL (Anulación del Bajo y Acorde)
Presione el botón BASS/CHORD CANCEL
tras insertar una tarjeta. Se excluirá el
acompañamiento de bajo y acordes de la
música Playcard, tocándose solamente la
melodía, obligado y ritmo. Puede tocar los
acordes siguiendo después la secuencia
indicada por las lámparas correspondientes.
A diferencia de la modalidad CHORD
LESSON, la música continúa siendo tocada.
Por lo tanto, regule el tempo (TEMPO)
para practicar a su gusto.
5. Aprendiendo por repetición
PHRASE REPEAT (Repetición de Frases)
La mejor manera de aprender a tocar es la
práctica repetida, y para ello, el РСР-8(Ю
posee una función muy conveniente.
Durante la ejecución de una tarjeta musical,
pueden repetirse una o varias frases, o todo
un tema musical, utilizando la función
PHRASE REPEAT (repetición de frases
musicales).
1. Cada frase queda indicada por un
número en la partitura de las tarjetas
musicales. Elija la frase o frases que
desee repetir.
2. Comenzando por la izquierda del teclado,
las teclas están numeradas del 1 al 20.
Presione el primero y el último número
de la parte que desea repetir, después de
insertar la tarjeta, presionando el botón
PHRASE REPEAT. Por ejemplo, si
desea repetir de la frase 3 la 5, presione
las teclas 3 y 5 mientras presiona el botón
PHRASE REPEAT. Cuando desee
repetir todo el tema, presione la tecla
marcada* mientras presiona el botón
PHRASE REPEAT.
Page 12

3. Press either AUTO PLAY, FREE
TEMPO, MELODY CANCEL, CHORD
LESSON, or BASS/CHORD CANCEL
selector. The music will start.
Note:
Whenever you slide in a Playcard, the entire
music wili be automaticaliy programmed to
repeat and the PHRASE REPEAT iamp will
light up.
To cancel PHRASE REPEAT, press the
PHRASE REPEAT selector once again.
The lamp will go out and PHRASE REPEAT
will be cancelled.
3. Drücken Sie einen der Spiel-Schalter
(AUTO PLAY, FREE TEMPO,
MELODY CANCEL, CHORD LESSON
und BASS/CHORD CANCEL) den Sie
gewält haben. Die Orgel beginnt dann zu
spielen.
Hinweis:
Nach Einschieben einer Playcard wird das gesamte
Musikstück automatisch wiederholt und die
PHRASE REPEAT-Lampe leuchtet auf.
Um die Phrasen-Wiederholungsfunktion
aufzuheben, drücken Sie den PHRASE
REPEAT-Schalter noch einmal. Die
Lampe erlischt.
3. Appuyer sur celle des touches de
lecture AUTO PLAY, FREE TEMPO,
MELODY CANCEL, CHORD LESSON
et BASS/CHORD CANCEL qui a été
sélectionnée.
Remarqua;
Chaque fois que vous insérez une Playcard,
l’ensemble de la musique est programmé
automatiquement pour être répété, et le
voyant PHRASE REPEAT s'allume.
Pour annuler la Répétition de Phrase,
appuyez à nouveau sur le sélecteur
PHRASE REPEAT. Les lampes s’éteindront
et la fonction PHRASE REPEAT sera
annulée.
3. Presione cualquiera de los botones
AUTO PLAY, FREE TEMPO,
MELODY CANCEL, CHORD
LESSON, y BASS/CHORD CANCEL;
se iniciará la reproducción.
Nota:
Cada vez que deslice una Playcard, toda la música
se programará automáticamente para repetir, y la
luz de PHRASE REPEAT se encenderá.
Para cancelar PHRASE REPEAT, pulse de
nuevo el selector PHRASE REPEAT. La luz
se apagará y PHRASE REPEAT quedará
cancelado.
6. Playing without Melody Lamps LAMP CANCEL
When you have learned the melody, you
no longer need the Melody Lamps to
guide you. You can switch them off by
pressing the LAMP CANCEL selector.
6, Spielen ohne Melodie-Lampen
LAMP CANCEL
Wenn Sie im Spielen der Melodie sicher ge
worden sind, brauchen Sie keine Hilfestellung
durch die Melodie-Lampen mehr. Schalten
Sie die Lampen dann durch Drücken des
LAMP CANCEL-Schalters aus.
6. Exécution sans Lampes de Mélodie LAMP CANCEL (Annulation des lampes)
Lorsque vous avez appris une mélodie,
vous n’avez plus besoin des Lampes de
Mélodies pour vous guider. Vous pouvez
les éteindre en appuyant sur le sélecteur
LAMP CANCEL.
6. Tocando sin Luces de Melodía
LAMP CANCEL
Cuando se haya aprendido la melodía, ya no
necesita las Luces de Melodía para guíarle.Ud.
puede apagarlas pulsando el selector LAMP
CANCEL.
10
Page 13

How to use all the
Verwendung der
Exploitation des
Utilización de las
other features
Various voices and rhythms can be freely
selected by simply pressing selectors.
With the Auto Bass Chord function,
musical accompaniment can be per
formed with just a single finger. Now, play
the PCR-800 by yourself without using a
Playcard.
First, switch on by sliding the POWER
switch CD. Then slide the MASTER
VOLUME (2) to the desired position.
Orchestra Section
anderen Funktionen
Mit einem einfachen Schalterdruck können
Sie verschiedene Klangfarben und Rhythmen
frei wählen. Mit Hilfe der Baß-Akkord-
Automatik können Sie mit einem Finger die
Begleitung Ihrer Musik spielen. Spielen Sie
nun das PCR-800 selbst, ohne die Playcard
zu verwenden.
Schalten Sie zunächst-das Instrument am
POWER-Schalter (D ein, und stellen Sie dann
den MASTER VOLUME-Regler @ in die
gewünschte Position.
Orchester-Teil
ORCHESTRA
autres fonctions
Divers tonalités et rythmes peuvent être
librement sollicités par simple poussée
des touches correspondantes. Au moyen
de la fonction Auto Bass Chord,des
airs d’accompagnement pourront être exé
cutés avec un seul doigt. Il convient dès à
présent que le musicien joue lui-même sur
le PCR-800 sans l’aide d’une “Playcard”.
Tout d’abord, mettez l’instrument en
marche en appuyant sur l’Interrupteur
d’alimentation (POWER)©. Déplacez
ensuite le contrôle Volume Principal
(MASTER VOLUME) (© sur la position
désirée.
Section orchestrale
OsuSTA(Ni o SUSTAIN z OsTEREO
OCLARINET o SAXOPHONE
o guitar Osanjo
SYMPHONIC
o SYNTH
demás funciones
Simplemente presionando botones pueden
elegirse a voluntad, varias voces y ritmos.
Con la función Auto Bass Chord
(Acorde y Bajo Automático), puede ejecutar
los acompañamientos con un solo dedo.
Toque el PCR-800 Ud. solo, sin utiliza
tarjetas musicales.
Primero, conecte deslizando el Interruptor
de Potencia (POWER) ©. Luego deslice el
Volumen Principal (MASTER VOLUME)
(2) a la posición deseada.
Sección de orquesta
1. Choose the voice you want
Select the desired voice by pressing one
of the ORCHESTRA voice selectors (0).
The lamps indicate which voice is
selected. A different voice name is
indicated on each side of the selectors.
To change the voice from one side to the
other (e.g., from JAZZ ORGAN to PIANO),
press the selector next to an illuminated
lamp again.
Note:
Be sure to press the OFF selection in the AUTO
BASS CHORD section. When the SINGLE FINGER
CHORD or FINGERED CHORD selector is depressed,
the keys in the Auto Bass Chord Key Section
cannot be used for playing melodies.
1. Gewünschte Instrumentalstimme wählen
Drücken Sie zur Wahl der Instrumen
taistimme den gewünschten ORCHESTRA-
Schalter ® . Ein Indikator zeigt die gewählte
Stimmen an. Jeder Schalter ist mit zwei
Instrumentennamen gekennzeichnet (z.B.
JAZZ ORGAN und PIANO). Zum
Umschalten zwischen diesen beiden Stimmen
muß der neben dem leuchtenden Indikator
liegende Schalter erneut gedrückt werden.
Hinweise:
Achen Sie darauf, den OFF-Schaiter der Baß-AkkordAutomatik immer zu drücken. Ist der SINGLE FINGER
CHORD-Schalter oder der FINGERED-Schalter
gedrückt, so können die Tasten im Baß-Akkord-
Automatik-Bereich nicht zum Spielen einer Melodie
verwendet werden.
1. Sélection de la voix souhaitée
Choisissez la voix désirée en appuyant
sur l’un des sélecteurs de voix
d’Orchestre (ORCHESTRA) ®. Un voyant
lumineux indique la voix sélectionnée
(dont la désignation anglaise est visible
en face de chaque sélecteur). On peut
passer d’une voix à l’autre (de JAZZ
ORGAN à PIANO, par exemple), en
pressant le sélecteur correspondant au
voyant allumé.
Remarque:
Veiller à appuyer sur le sélecteur de la Section
Basses/Accords Automatiques (AUTO BASS
CHORD). Lorsque le sélecteur Accord à Un Seul
Doigt (SINGLE FINGER CHORD) ou Accord à
Plusieurs Doigts (FINGERED CHORD) est en position
abaissée, les touches de la section touches de
cordes basses automatique (Auto Bass Chord Key
Section) ne peuvent pas être utilisées pour
l'exécution de mélodies.
1. Escoja la voz que desee
Seleccione la voz deseada presionando uno
de los selectores de voces de Orquesta ® .
Las luces indicarán qué voz es la selec
cionada. A cada lado de los selectores se
indica un nombre de voz diferente, para
cambiar la voz de un lado a otro (por
ejemplo, de JAZZ ORGAN a PIANO),
pulse de nuevo el selector próximo a la luz
encendida.
Nota:
Asegúrese de pulsar el selector de OFF de la sección de
ACORDE Y BAJO AUTOMATICO. Cuando está
pulsado el selector SINGLE FINGER CHORD o el
FINGERED CHORD, ¡as teclas de ¡a sección de teclas
de A CORDE Y BAJO A UTOMA TICO no pueden
utilizarse para tocar melodía.
11
Page 14

2. Adding sustain
The Sustain effect, which makes notes
linger after you lift your fingers from the
keys, can be added to each of the voices.
Press SUSTAIN selector 1 ® for concert
hall-like sustain and SUSTAIN selector 2
for an effect similar to that provided by a
piano’s damper pedal.
2. Hinzuschalten von Sustain
Durch den Sustain-Effekt können Sie die Töne
nachklingen lassen, nachdem Sie Ihre Finger
von den Tasten genommen haben. Dieser
Effekt läßt sich allen Stimmen hinzufügen.
Wird der SUSTAIN-Schalter 1 ® gedrückt,
erhält man einen Konzertsaal-ähnlichen
Sustain-Effekt, wird der SUSTAIN-Schalter 2
gedrückt, ergibt sich ein ähnlicher Effekt, wie
er auch durch Betätigen des Pedals an einem
Klavier erzeugt werden kann.
o SUSTAIN 1 O SUSTAIN 2
2. Effet de prolongement
L’effet de prolongement (SUSTAIN) permet
de prolonger la sonorité d’une note après
que le doigt a lâché la touche. Cet effet
peut être employé pour toutes les voix
instrumentales. La pression du sélecteur
® SUSTAIN 1 permet d’obtenir un maintien
identique à celui provoqué dans une salle
de concert, le sélecteur SUSTAIN 2 offre un
effet similaire à celui de la pédale de
sourdine d’un piano.
o G 0
2. Añadiendo Sostenido
El efecto de Sostenido, que hace que las notas
se prolonguen después de separar sus dedos
de las teclas, puede añadirse a cada una de las
voces. Pulse el selector SUSTAIN 1 ® para
un sostenido tipo sala de conciertos, y el se
lector SUSTAIN 2 para obtener un efecto
similar al que proporciona el pedal de
sostenido de un piano.
If’you press the STEREO SYMPHONIC
selector ®, you will hear a more expansive
sound.
Note:
If you switch from a voice with preset Symphonic
to one without, this effect will automatically be
cancell ed.
Rhythm section
Now let’s add a dynamic rhythm accom
paniment to your melody.
1. Choose a rhythm
Pick the rhythm that best suits the music
you’re going to play and press the selector.
To change the rhythm from one side to the
other (e.g. from BIG BAND to SWING), press
the selector next to an illuminated lamp
again.
3 Stereoeffekt
Durch Drücken des STEREO SYMPHONICSchalters @ erhält man ein breiteres Klangfeld.
Hinweis:
IVenn man von einer Stimme mit voreingestelltem
Symphonie-Effekt auf eine Stimme ohne SymphonieEffekt schaltet, wird dieser Effekt automatisch
abgeschaltet.
Rhythmus-Teil
Ergänzen Sie nun eine dynamische Rhyth
musbegleitung zu Ihrer Melodie.
1. Wahl des Rhythmus
Wählen Sie den Rhythmus, der am besten
zu Ihrer Musik paßt durch Drücken des
betreffenden Schalters. Um von den oben
angegebenen Rhythmen auf die unteren (z.B.
von BIG BAND auf SWING) zu schalten,
drücken Sie den betreffenden Schalter erneut.
3. Effet stéréo
Si Гоп enfonce le sélecteur STEREO
SYMPHONIC ®, on pourra entendre un
son plus ample.
Remarque:
Si vous passez d’une voix où l’effet symphonique
est préréglé à une voix où il ne l’est pas, cet effet
sera annulé automatiquement.
Section du rythme
A présent, ajoutons un rythme d’accom
pagnement dynamique à votre mélodie.
1. Choisissez un rythme
Choisissez le rythme qui convient le mieux
à la mélodie que vous allez jouer et en
foncez le sélecteur. Pour passer d’un
rythme à l’autre (par exemple, pour passer
de “BIG BAND” à “SWING”) enfoncer de
nouveau le sélecteur le plus proche d’une
lampe illuminée.
3. Efecto estéreo
Si presiona el selector STEREO SYMPHO-
NIC ®, escuchará un sonido mas expansivo.
Nota:
Si cambia de una voz con Sinfónico preseleccionado a
una que no lo tiene, este efecto quedará cancelado
automáticamente.
Sección de ritmo
Añadamos ahora un acompañamiento de
ritmo dinámico a su melodía.
1. Escoja un ritmo
Escoja el ritmo más apropiado para la
música que vaya a tocar y pulse el selector.
Para cambiar el ritmo de un lado a otro (por
ejemplo, de BIG BAND a SWING), pulse de
nuevo el selector próximo a la luz encendida.
12
Page 15

2. Start the rhythm
After selecting a rhythm, press the START
selector
• Intro/Ending
Instead of using START, you can have
the rhythm begin by using INTRO/
ENDING®. When this selector is pressed
the rhythm will start after a two-bar
drum count.
• Synchro Start
Use the SYNCHRO START selector ® if
you want the rhythm to begin from the
moment you first press a key. The 19
keys beginning at the left of the key
board will activate the rhythm sounds.
2. Start des Rhythmus
Drücken Sie nach der Rhythmuswahl den
START-Schalter
• Intro und Finale
Statt mit dem START-Schalter kann der
Rhythmus auch durch Drücken des
INTRO/ENDING-Schalters ® gestartet
werden. Der Rhythmus beginnt dann nach
einer zweitaktigen Schlagzeugeinleitung.
• Synchro-Start
Soll die Rhythmusbegleitung automatisch
beim Anschlägen der ersten Tasten einsetzen, so drücken Sie den SYNCHRO
START-Schalter @. Mit den 19 links befind
lichen Tasten des Keyboards kann dann die
Rhythmusbegleitung eingeschaltet werden.
2. Lancez le rythme
Après avoir choisi le rythme, enfoncez le
sélecteur START
• Introduction/Final
Vous pouvez tout aussi bien lancer le
rythme en utilisant le sélecteur INTRO/
ENDING ® au lieu de START. Lorsque
vous appuyez sur ce sélecteur, le rythme
démarre après deux mesures.
• Départ synchronisé
Utilisez le sélecteur SYNCHRO START
@1 si vous voulez lancer le rythme dès
le moment où vous enfoncez une touche.
Les 19 premières touches à la gauche
du clavier activeront les sons du rythme.
2. Arranque el ritmo
Después de seleccionar un ritmo, pulse el
selector de Arranque START @.
• Introducción/Terminación
En vez de utilizar START, puede hacer
que este ritmo comience utilizando el
selector INTRO/ENDING@. Al pulsar este
selector, el ritmo comenzará después de un
golpe de tambor de dos compases.
• Arranque Sincronizado
Utilice el selector SYNCHRO START ®
si desea que el ritmo comience desde el
momento en que pulse por primera vez
una tecla. Las 19 teclas comenzando por
la izquierda del teclado activarán los
sonidos del ritmo.
3. Adjustments
• Volume
The RHYTHM VOLUME control ® lets
you adjust the rhythm volume in relation
to the melody volume.
• Tempo
Use the TEMPO control ® to adjust the
speed of the rhythm.
4. Making use of the Beat Lamps
When the rhythm is playing, the Beat
Lamps flash in succession to show you
how fast the tempo is. When the SYNCHRO
START selector has been pressed but you
have not yet started the rhythm by pressing
a key, the Beat Lamp on the far left {red
illumination) flashes on and off to indicate
the speed of the tempo.
5. Getting more realism with drum
fill-ins
If you tap the FILL IN selector ®, the
rhythm being played will be interrupted by
a short drum solo.
SYNCHRO START
3. Einstellungen
• Lautstärke
Stellen Sie das Lautstärkeverhältnis
zwischen Rhythmus und Melodie am
RHYTHM VOLUME-Regler (D ein.
• Tempo
Stellen Sie die Rhythmusgeschwindigkeit
am TEMPO-Regler ® ein.
4. Verwendung der Takt-Lämpchen
Bei eingeschaltetem Rhythmus zeigen diese
Lämpchen das Tempo an. Wenn der
SYNCHRO START-Schalter gedrückt wurde,
der Rhythmus jedoch nicht durch Anschlägen
einer Taste gestartet wurde, so ist das Tempo
durch Aufblinken des ganz links befindlichen
Takt-Lämpchens (rot) zu erkennen.
RHYTHM O O O O
5. Realistischere Rhythmusbegleitung
durch Schlagzeug-soli
Durch Drücken des FILL IN-Schalters ®
kann der Rhythmus unterbrochen und ein
Schlagzeugsolo ausgelöst werden.
!) C
START
3. Réglages
• Volume
Le réglage RHYTHM VOLUME ® vous
permet de régler le volume du rythme en
relation avec le volume de la mélodie.
• Tempo
Utilisez le réglage TEMPO ® pour
ajuster la vitesse du rythme.
4. Utilisation des témoins de mesure
Lorsqu’un rythme est joué, les témoins de
mesure s’allument en succession pour
vous indiquer la rapidité du tempo. Si le
sélecteur SYNCHRO START a été enfoncé,
mais que vous n’avez pas encore lancé le
rythme en appuyant sur une touche, le
témoin de mesure situé à l’extrême gauche
{illumination rouge) clignote pour vous
indiquer la vitesse du tempo.
5. Encore du “réalisme” avec ies
solos de batterìe
Si vous frappez légèrement le sélecteur
Insertion {FILL IN) le rythme joué sera
interrompu par un bref solo de batterie.
3. Ajustes
• Volumen
El control RHYTHM VOLUME ® le
permite ajustar el volumen del ritmo en
relación al volumen de la melodiá.
• Tempo
Utilice el control de TEMPO ® para ajus
tar la velocidad del ritmo.
4. Utilizando las Luces de Ritmo
Cuando el ritmo está sonando, las Luces de
Ritmo se iluminan sucesivamente para
mostrarle la velocidad del tempo. Cuando se
haya pulsado el selector SYNCHRO START
pero todavía no haya iniciado Ud. el ritmo,
pulsando una tecla, la Luz de Ritmo del extre
mo izquierdo (iluminada en rojo), parpadeará
indicando la velocidad del tempo.
5. Obteniendo más realismo con
rellenos de batería
Si golpea ligeramente el selector FILL IN
®, el ritmo que está tocando se verá
interrumpido por un solo de batería corto.
13
Page 16

6. Using the INTRO/ENDING selector
for your musical finale
If you press the INTRO/ENDING selector
@, the rhythm will stop after the first
beat of the following bar. If you wish to
stop it immediately, press the STOP
selector ®.
6. Verwendung des INTRO/ENDINGSchalters für das „Finale’*
Durch Drücken des INTRO/ENDINGSchalters @ stoppt der Rhythmus automa
tisch nach dem ersten Schlag des folgenden
Taktes, Um den Rhythmus sofort zu
stoppen, drücken Sie den STOP-Schalter @
STOP
6. Utilisation du sélecteur
d’introduction de fin (INTRO/
ENDING) pour une finale musicale
Si l’on actionne le sélecteur INTRO/
ENDING le rythme s’arrêtera après le
premier battement de la mesure suivante.
Si l’on désire l’arrêter immédiatement,
appuyer sur le sélecteur STOP @.
J Q
INTRO./ENCHNG
6. Utilizando el selector de INTRODUCCION/TERMINACION para
su gran final musical
Si pulsa el selector de INTRODUCCION/
TERMINACION @ , el ritmo se detendrá
después del primer tiempo del siguiente
compás. Si desea detenerlo inmediatamente,
pulse el selector de PARADA @ .
Auto Bass Chord Section
The AUTO BASS CHORD section Is an
automatic accompaniment feature.
Baß-Akkord-Automatik-Bereich
Am Baß-Akkord-Automatik-Bereich können
Sie verschiedene automatische Begleitungs
funktionen wählen.
AUTO BASS CHORD
OFF
MIN 1 1
1 1 1 MAX
Section Basses/Accords Automatiques
La section Basses/Accords Automatiques
(AUTO BASS CHORD) assure l’accompa
gnement automatique.
О VARIATION
Osinole
FINGER
О FINGERED
= )
Sección de Acorde y Bajo Automático
La sección de Acorde y Bajo Automàtico es
una función de acompañamiento automático.
14
Page 17

If the OFF selector is depressed, the Auto
Bass Chord system does not function.
With the SINGLE FINGER CHORD
selector depressed, you can play threenote chords and bass notes using a
single finger if you press any of the 19
keys in the Auto Bass Chord key section.
The FINGERED CHORD selector
allows more experienced players to play
their own chords and continue getting the
bass and rhythm backup.
Durch Drücken des OFF-Schalters wird die
Baß-Akkord-Automatik ausgeschaltet.
Wird der SINGLE FINDER CHORDSchalter gedrückt, so brauchen Sie lediglich
eine der 19 Tasten im Baß-Akkord-AutomatikBereich anzuschlagen, und schon ertönt ein
Dreiklang.
Durch Drücken des FINGERED CHORDSchalters können erfahrene Spieler eigene
Akkorde mit Baß- und Rhythmusbegleitung
spielen.
ШИ НЕ
JF**,
Auto Bass Chord Key Section
BaB'Akkord-Automatikj Tastenbereich
Section de touches de basses/accords automatiques
Sección de teclas de Acorde y Bajo Automático
Si le sélecteur OFF est en position
engagée, le système Basses/Accords Auto
matiques ne fonctionne pas. Avec le
sélecteur Accord à Un Seul Doigt (SINGLE
FINGER CHORD) en position engagée, des
accords à trois notes peuvent être obtenus
en appuyant sur l’une des 19 touches de la
section Touches Basses/Accords Auto
matiques (AUTO BASS CHORD).
Le sélecteur Accord à Plusieurs Doigts
(FINGERED CHORD) permet aux
exécutants plus avancés de jouer leurs
propres accords tout en restant assurés
du soutien de la basse et du rythme.
Si se pulsa el selector OFF, no funcionará el
sistema de Acorde y Bajo Automático. Con
el selector SINGLE FINGER CHORD
pulsado, Ud. puede tocar acordes de tres
notas utilizando un solo dedo, si pulsa cual
quiera de las 19 teclas de la sección de teclas
de Acorde y Bajo Automático,
El selector FINGERED CHORD permite
que los intérpretes avanzados toquen sus
propios acordes y continúen obteniendo el
respaldo del bajo y del ritmo.
For one-finger accompaniment
1. Press the SINGLE FINGER CHORD
selector.
2. Select a itiythm
Choose the rhythm you want then
press the SYNCHRO START @ or
START @ selector.
3. Press a key
Press one of the 19 keys in the Auto
Bass Chord key section (z) on the left
side of the keyboard. You will hear the
corresponding chord with bass and
rhythm accompaniment. For instance,
when you press “C”, you’ll obtain a C
major chord that strums along with the
bass and rhythm.
Example
Mit einem Finger gespielte Begleitung
1. Drücken Sie den SINGLE FINGER
CHORD-Schalter
2. Wählen Sie den Rhythmus.
Nach der Wahl des Rhythmus drücken Sie
den SYNCHRO START-Schalter ® oder
den START-Schalter @.
3. Schlagen Sie eine Taste an.
Schlagen Sie eine der 19 Tasten im Baß-
Akkord-Automatik-Bereich ® auf der
linken Seite der Tastatur an. Der entspre
chende Akkord mit Baß- und Rhythmus
begleitung ertönt dann. Wird beispiels
weise die Taste ,,C“ angeschlagen,
ertönt ein C-Dur-Akkord zusaimnen mit
Baß- und Rhythmusbegleitung.
Beispiel
Accompagnement à un seul doigt
1. Appuyez sur le sélecteur Accord à Un
Seul Doigt (SINGLE FINGER CHORD)
2. Choisissez un rythme
Choisissez le rythme désiré, puis
appuyez sur le sélecteur Départ Synchro
(SYNCHRO START) @) ou Départ
(START)#.
3. Appuyez sur une touche
Appuyez sur l’une des 19 touches de la
section Touches Basses/Accords
Automatiques ® de la partie gauche du
clavier. Vous entendrez l’accord
correspondant avec basses et accom
pagnement rythmé. Ainsi, par exemple,
si vous appuyez sur “Do” (C), vous
obtiendrez un accord en Do majeur
agrémenté de la basse et du rythme.
Exemple
Рага acompañamiento con un dedo
1. Pulse el selector de Acorde de Un Solo
Dedo (SINGLE HNGER CHORD)
2. Seleccione un ritmo
Escoja el ritmo que desee y luego pulse el
selector de Arranque Sincronizado o
Arranque (SYNCHRO START ® o
START #).
3. Pulse una tecla
Pulse una de las 19 teclas de la sección de
teclas de Acorde y Bajo Automático ® del
lado izquierdo del teclado. Escuchará el
acorde correspondiente con acompaña
miento de bajo y ritmo. Por ejemplo,
cuando pulse “C” , obtendrá un
acorde de C mayor que sonará junto con el
bajo y el ritmo.
Ejemplo
15
Page 18

4. Set the volume
Adjust the volume to suit the overall
level using the Auto Bass Chord’s
independent VOLUME control
5. Set the tempo
Select the tempo you want using the
rhythm section’s TEMPO control
Obtaining minor, seventh and minor seventh chords.
• To get a C minor chord depress the C
key together with the next black key to
the left.
• To get a C seventh chord depress the C
key together with the next white key to
the left.
• To get a C minor seventh chord, simply
press the C key together with the next
black key and white key to the left.
4. Stellen Sie die Lautstärke ein.
Passen Sie die Lautstärke durch entspre
chendes Einstellen des VOLUME-Reglers
® im Baß-Akkord-Automatik-Teil an die
Gesamtlautstärke an.
5. Stellen Sie das Tempo ein.
Stellen Sie das gewünschte Tempo am
TEMPO-Regler ® im Rhythmus-Teil ein.
Moll- Septimen- und Moll-Septimen
akkorde.
• Für einen C-Moll-Akkord schlagen Sie die
Taste C zusammen mit der links daneben
liegenden schwarzen Taste an.
• Für einen Septimenakkord auf C schlagen
Sie die Taste C zusammen mit der links
danebenliegenden weißen Taste an.
• Für einen C-Moll-Septimenakkord
schlagen Sie einfach die Taste C zusammen
mit den links danebenliegenden schwarzen
und weißen Tasten an.
4. Réglage du volume
Régler le volume de manière adéquate
en utilisant le contrôle de VOLUME ®
indépendant du dispositif Basses/
Accords Automatiques.
5. Réglage du tempo
Pour obtenir le tempo désiré, utilisez le
contrôle de TEMPO © de la section
rythmique.
Accords mineurs, de septième et de
septième mineure
• Pour obtenir un accord en Do (C)
mineur, appuyez simultanément sur la
touche Do (C) et sur la touche noire
voisine de gauche.
• Pour obtenir un accord de Do (C) sep
tième, appuyez simultanément sur la
touche Do (C) et sur la touche blanche
voisine de gauche.
• Pour obtenir un accord de Do (C) sep
tième mineure, appuyez simultanément
sur la touche Do (C) et sur les touches
noire et blanche voisines de gauche.
4. Fije el volumen
Ajuste el volumen para acoplarse al nivel
general utilizando el control independiente de
Volumen (VOLUME) ® del Acorde y Bajo
Automático.
5. Fije el tempo
Seleccione el tempo que desee utilizando el
control de Tempo (TEMPO) ® de la sección
de ritmo.
Obtención de acorde de menor, séptima y
séptima menor
• Para obtener un acorde de C menor, pulse
la tecla C junto con la siguiente tecla negra
a su izquierda.
• Para obtener un acorde de C séptima,
pulse la tecla C junto con la siguiente tecla
blanca a su izquierda.
• Para obtener un acorde de C séptima
menor, simplemente pulse la tecla C junto
con la siguiente tecla negra y tecla blanca
a su izquierda.
Example
For automatic accompaniment based
on three-note or four-note chords
1. Press the FINGERED CHORD selector.
2. When a combination of keys located in
the Auto Bass Chord key section ® is
pressed, the resulting chord will be
played together with the automatic ac
companiment consisting of the bass
line and the selected rh>dhm.
Example
Variation
Press the VARIATION selector ® if you
want different bass and rhythmic chord
patterns. Alternative patterns are provided
for each of the rhythms.
Beispiel
Automatische Begleitung mit Akkorden
aus drei oder vier Tönen
1. Drücken Sie den nNGERED CHORDSchalter.
2, Werden mehrere Tasten im Baß-Akkord-
Automatik-Bereich ® angeschlagen, so
ertönt der entsprechende Akkord zusam
men mit einer automatischen Begleitung
aus Baßlinie und gewähltem Rhythmus.
Beispiel
AUTO BASS CHORD
AUTO BASS CHORD
Variation
Durch Drücken des VARIATION-Schalters
® erhalten Sie unterschiedliche Baßlinie und
Rhythmusbegleitung. Alle vorhandenen
Rhythmus Figuren können geändert werden.
Exemple
Cm?
Accompagnement automatique fondé sur accords à trois ou quatre notes
1. Appuyez sur le sélecteur Accord à Plu
sieurs Doigts (FINGERED CHORD)
2. Lorsqu’on appuie sur plusieurs touches
de la section Touches Basses/Accords
Automatiques ®, l’accord qui en
résulte sera joué avec l’accompagne
ment automatique comprenant basse
et rythme choisis.
Exemple
AUTO BASS CHORD
Variation
Appuyez sur le sélecteur VARIATION ® si
vous désirez une basse et un accompa
gnement rythmé différents. Diverses struc
tures peuvent être obtenues pour chacun
des rythmes.
Ejemplo
Para obtener acompañamiento
automático basado en acordes de tres
notas o cuatro notas
1. Pulse el selector de Acorde Digitado
(FINGERED CHORD)
2. Cuando se pulsa una combinación de teclas
localizadas en la sección de teclas de
Acorde y Bajo Automàtico ®, el acorde
resultante será tocado junto con el
acompañamiento automático consistente
en la línea de bajo y ritmo seleccionado.
Ejemplo
Variación
Pulse el selector de Variación (VARIATION)
® si desea una línea de bajo y un acompaña
miento diferentes. Existen patrones diferentes
para cada uno de los patrones de ritmo.
16
Page 19

Duet
This function works together with the
Auto Bass Chord feature. Press the DUET
selector ® then play a melody with your
right hand and chords with your left; a
harmonizing note will be added to every
melody note you play.
Transposer
The Transposer (D lets you adjust the
PortaTone’s pitch to suit either a singing
voice—so anyone can sing along as you
play—or an instrument such as a
trumpet, clarinet or saxophone. When
ever A is pressed, the pitch rises by a
semi-tone. When T is pressed, the pitch
decreases by a semi-tone. And when A
and T are simultaneously pressed, normal
pitch is obtained.
Duett-Funktion
Diese Funktion kann zusammen mit der
Baß-Akkord-Automatik eingesetzt werden.
Drücken Sie den DUET-Schalter ®. Spielen
Sie dann die Melodie mit Ihrer rechten und die
Akkorde mit Ihrer linken Hand. Zu jedem
gespielten Melodieton erhält man dann auto
matisch einen harmonisierenden Ton.
Transponieningsregler
Mit den TRANSPOSER-Schaltern CD kann
die Tonlage des PortaTone entweder an eine
Gesangsstimme — so daß eine beliebige Person
bei Ihrem Spiel mitsingen kann — oder an ein
Instrument wie z.B. eine B -Trompete, eine
Klarinette oder ein Es-Saxophon angepaßt
werden. Durch Drücken des A-Schalters
erhöht sich die Tonlage um einen Halbton und
durch Drücken des ▼-Schalters erniedrigt sie
sich um eine Halbton. Durch gleichzeitiges
Drücken beider Schalter kann auf normale
Tonlage zurückgeschaltet werden.
TRANSPOSER
Duo
Cette fonction s’utilise avec celle des
Accords/Basses Automatiques. Appuyez
sur le sélecteur de Duo (DUET) ®, et jouez
une mélodie de la main droite, et des
accords de la main gauche; une note
d’harmonisation est ajoutée à Chaque
note de mélodie que vous jouez.
Transpositeur
Le transposeur (D vous permet d’ajuster la
hauteur du PortaTone pour s’adapter à une
voix de chant, et tout le monde peut chanter
alors que vous jouez, ou encore s’adapter
à un instrument tel que la trompette en si
bémol, la clarinette, ou le saxophone en mi
bémol. Dès que A est enfoncé, la hauteur
s’élève d’un demi ton. Par contre, si T est
enfoncé, la hauteur diminue d’un demi ton.
Si A et T sont enfoncés simultanément,
la hauteur normale est obtenue.
Dúo
Esta función actúa juntamente con la función
de Acorde y Baj o Automático. Pulse el selector
DUET ®, y toque una melodía con su mano
derecha y los acordes con la izquierda; se
añadirá una nota armonizante a cada nota de
melodía que Ud. toque.
Transpositor
El Transpositor @ le permite ajustar el tono del
PortaTone para adaptarse bien a una voz
cantante—de manera que cualquiera pueda
cantar mientras Ud. toca—o a un instrumento
tal como una trompeta o clarinete enB^», o un
saxofón en E^. Cuando se pulse A, el tono se
aumenta en un semitono. Cuando se pulse T,
el tono disminuye en un semitono. Y cuando
se pulsan simultáneamente A y ▼, se obtiene
el tono normal.
OA
17
Page 20

5
Memory system
(Music Programmet)
With this feature you can have the
keyboard store in its memory the chords
and melodies that you play, then have
them played back in any tempo you like.
• The memory is non-volatile, meaning
that the memorized data is not immedi
ately lost when the power is turned off.
(Memorized data is stored for seven
days after the power is switched off. To
prolong the storage period, turn the
keyboard on every seven days.)
• Memorized data is automatically
cleared and replaced by new data
when music is played with Record
mode selected.
You can either enjoy the Music
Programmer by itself or in combination
with the Playcard system (using Melody
Cancel).
Memory-System
(Music-Programmer)
Diese Funktion gestattet ein Speichern der
gespielten Akkorde und Melodien sowie eine
spätere Wiedergabe mit beliebiger Ge
schwindigkeit.
• Das Memory ist nicht flüchtig, d.h. der
Speicherinhalt geht nicht sofort verloren,
wenn das Instrument ausgeschaltet wird.
Nach dem Ausschalten bleibt der Speicher
inhalt noch ca. sieben Tage erhalten. (Soll
der Speicherinhalt länger erhalten bleiben,
muß das Instrument aUe sieben Tage ein
mal eingeschaltet werden.)
• Wird bei eingeschalteter Speicher-Funktion
auf dem Instrument gespielt, so werden
die gespeicherten Daten gelöscht und
durch die neuen ersetzt.
Der Music-Programmer kann entweder
alleine oder auch zusammen mit dem Play
card-System (bei abgeschalteter Melodie)
verwendet werden.
Système mémoire
(Programmeur de musique)
Cette fonction vous permet de mettre en
mémoire dans l’instrument les accords et
mélodies que vous jouez, puis de les faire
rejouer au tempo que vous désirez.
• La mémoire est non-volatile, c’est-à-dire
que les données qui y sont stockées ne
s’effacent pas immédiatement lors
qu’on éteint l’instrument. (Elles sont en
fait conservées pendant sept jours.
Pour prolonger la période de stockage,
rallumer l’instrument tous les sept
jours.)
• Les données mises en mémoire sont
automatiquement effacées et rem
placées par les nouvelles données lors
qu’on joue en mode d’enregistrement
(RECORD).
Le Programmeur de Musique peut s’uti
liser avantageusement aussi bien seul
qu’avec le système Playcard (en “annulant
la mélodie” — MELODY CANCEL).
Sistema de Memoria
(Programador Musical)
Con esta fundón puede hacer que el teclado
almacene en su memoria los acordes y
melodías que Ud. toca, y luego reproducirlos
en cualquier tempo que lo desee.
• La memoria es no-volátil, lo que significa
que la información memorizada no se
pierde automáticamente cuando se des
conecta la alimentación, (la información
memorizada queda almacenada durante
siete días después de haber desconectado
el aparato. Para prolongar el período de
almacenamiento, conecte el teclado cada
siete días).
• Los datos memorizados se borran auto
máticamente y son sustituidos por nuevos
datos cuando la música se toca con la
modalidad de Record seleccionada.
Ud. puede disfrutar del Programador Musical
sólo o bien en combinación con el Sistema
Playcard (utilizando Melody Cancel).
A. Using the Music Programmer for
right-hand melody only
First, record a melody.
1. Choose any voice and rhythm you like
and press the selectors.
2. Set the TEMPO control at the appro
priate position. (Hint: it’s easier to play
at a slow tempo.)
3. Press the Music Programmer’s
RECORD selector, and you will hear
the rhythm accompaniment. Start
playing the melody.
Notes;
1) The melody is recorded monophonically.
2) The Auto Bass Chord key sectior} cannot be
used for playing the melody.
18
A. Um den Music-Programmer
ausschließlich für die mit der
rechten Hand gespielten Melodie zu
verwenden
Speichern Sie zunächt eine Melodie.
1. Wählen Sie eine beliebige Stimme und
einen beliebigen Rhythmus und drücken Sie
die Schalter.
2. Stellen Sie den TEMPO-Regler ent
sprechend ein (Tip: bei langsamem Tempo
kann leichter gespielt werden.)
3. Drücken Sie den RECORD-Schalter des
Music-Programmer. Die Rhythmusbe
gleitung ertönt dann, und Sie können mit
dem Spielen der Melodie beginnen.
Hinweise:
1) Die Melodie wird monophon gespeichert
2) Der Baß-Akkord-Automatik-Tastenbereich kann
nicht zum Spielen der Melodie verwendet werden.
A. Utilisation du Programmeur de
Musique pour mélodie main droite
seulement
Enregistrez tout d’abord une mélodie.
1. Choisissez la voix et le rythme que
vous désirez, et appuyez sur les sélec
teurs.
2. Réglez la commande de TEMPO à la
position voulue. (Un conseil: il est plus
facile de jouer à un tempo lent).
3. Appuyez sur le sélecteur d’enregistre
ment (RECORD) du Programmeur de
Musique: vous entendez l’accompagne
ment rythmique. Commencez à jouer la
mélodie.
Remarques:
1) La mélodie est enregistrée monophoniquement
2) La section des touches Basses/Accords Auto
matiques ne peut pas s’utiliser pour jouer la
méiodie.
A. Utilización del Programador Musical
para melodía con la mano derecha
solamente
Primero, grabe una melodía.
1. Escoja cualquier voz o ritmo que desee y
pulse los selectores.
2. Disponga el control de TEMPO en la
posición apropiada. (Consejo; es más fácil
tocar con un tempo lento).
3. Pulse el selector RECORD del Programa
dor Musical, y escuchará el acompaña
miento de ritmo. Comience a tocar la
melodía.
Notas:
1) La melodía se graba monofònicamente.
2) La sección de teclas de Acorde y Bajo Automático
no pueden utilizarse para tocar la melodía.
Page 21

MUSIC PROGRAMMER
As soon as you finish playing, press
the STOP selector.
5. Now play back the melody you have
just recorded by pressing the Music
Programmer’s PLAYBACK selector.
Adjust to the appropriate tempo.
Playback will stop automatically when
the recording ends.
O RECORD OplAV
F
4. Sobald Sie mit dem Spielen fertig sind,
drücken Sie den STOP-Schalter .
MUSJC PROGRAMMER
O RECORD O play stop
Geben Sie nun die soeben gespeicherte
Melodie wieder, indem Sie den
PLAYBACK-Schalter am MusicProgrammer drücken, und stellen Sie das
Tempo entsprechend ein. Am Ende der
Speicherung stoppt die Wiedergabe
automatisch.
BACK
BACK
STOP
4. Dès que vous avez fini de jouer,
appuyez sur le sélecteur STOP.
/
5. Faites rejouer maintenant la mélodie
que vous venez d’enregistrer en ap
puyant sur le sélecteur PLAYBACK du
Programmeur de Musique. Réglez le
tempo.
La reproduction en PLAYBACK s’arrê
tera automatiquement avec la fin de
l’enregistrement.
4. Tan pronto como acabe de tocar, pulse el
selector de STOP.
5. Ahora reproduzca la melodia que acaba de
grabar, pulsando el selector PLAYBACK
del Programador Musical. Ajuste el tempo
apropiado. La reproducción se detendrá
automáticamente al terminar la grabación.
MUStC PROGRAMMER
O RECORD O play
/
19
Page 22

B. Using the Music Programmer for
chords and melody
If you can use the AUTO BASS CHORD
system, you can record simultaneous
melody and chord playing—using both
hands—with the PCR-800. You can, of
course, record left-hand chord playing
only if you wish.
1. Select the desired voice, rhythm and
tempo.
2. Press the Music Programmer’s
RECORD selector, play the melody with
your right hand and the chords with
your left.
Note:
Play left-hand chords as fingered chords.
3. When you have finished playing, press
the STOP selector, then the PLAYBACK
selector in the Music Programmer
section.
Note:
If during playback you press the DUET selector, a
harmonizing note will be added to each melody
note, providing greater depth to the sound. Also,
by changing the rhythm or by pressing the AUTO
BASS CHORD section's Variation selector, you
can enjoy another style of playing.
B. Verwendung des Musìc-Programmers
für Akkorde und Melodie
Mit dem Baß-Akkord-Automatik-System
können Melodie und Akkorde auch gleich
zeitig — beim Spielen mit beiden Händen —
gespeichert werden. Wenn Sie wollen, können
Sie natürlich auch nur die mit der linken Hand
gespielten Akkorde speichern.
1. Wählen Sie die gewünschte Stimme, den
Rhythmus und das Tempo.
2. Drücken Sie den RECORD-Schalter des
Music-Programmer und spielen Sie dann
die Melodie mit der rechten und die
Akkorde mit der linken Hand.
Hinweis:
Spielen Sie linkshändige Akkorde in der Betriebsart
FINGERED CHORD.
3. Am Ende des Spielens drücken Sie den
STOP-Schalter und dann den
PLAYBACK-Schalter des Music-
Programmer.
Hinweis:
Wird während der Wiedergabe der DUET-Schalter
gedrückt, ertönt zu jedem Ton der Melodie ein
harmonisierender Ton, so daß sich eine größere Klang
tiefe ergibt. Durch Umstellen der RhythmusSchalter oder des Variationsschalters im Baß-AkkordAutomatik-Teil kann der Musikstil auch bei der Wieder
gabe noch geändert werden.
B. Utilisation du Programmeur de
Musique pour les accords et la
mélodie
Si vous êtes à même d’utiliser le système
Basses/Accords Automatiques, vous
pouvez enregistrez avec le PCR-800 l’exé
cution simultanée des accords et de la
mélodie — à deux mains (ou, bien sûr, si
vous le désirez, uniquement l’exécution
des accords de la main gauche).
1. Choisissez la voix, le rythme et le
tempo voulus.
2. Appuyez sur le sélecteur d’enregistre
ment (RECORD) du Programmeur de
Musique, jouez la mélodie de la main
droite et les accords de la main gauche.
Remarque:
Jouez les accords de la main gauche en mode
Fingered Chord.
3. Une fois que vous avez fini de jouer,
appuyez sur le sélecteur STOP, puis
sur le sélecteur PLAYBACK du
Progammeurde Musique.
Remarque:
Si, pendant la reproduction en PLAYBACK, vous
appuyez sur le sélecteur de duo (DUET), cela
ajoute une note d’harmonisation à chaque note
de mélodie pour donner plus de profondeur au
son. Vous pouvez aussi changer de rythme ou
utiliser le sélecteur de VARIATION des Basses/
Accords Automatiques pour modifier le style à
votre goût.
B. Utilización del Programador Musical
para acordes y melodía
Si puede usar el sistema de Acorde y Bajo
Automátieo, podrá grabar simultáneamente el
toque de melodía y de acordes — usando
ambas manos — con el PCR-800. Por
supuesto, Ud. puede grabar sólo el toque de
acordes de la mano izquierda si lo desea.
1. Seleccione la voz, el ritmo y el tempo
deseados.
2. Pulse el selector RECORD del Programa
dor Musical, toque la melodía con su
mano derecha y los acordes con la izquierda.
Nota:
Toque los acordes de la mano izquierda en el modo
FINGERED CHORD.
3. Cuando haya terminado de tocar, pulse el
selector de STOP , y luego el selector de
PLAYBACK de la sección del
Programador Musical.
Nota:
Si pulsa el selector DUET durante la reproducción, se
añadirá una nota armonizante a cada nota de melodía,
proporcionando una mayor profundidad al sonido.
Además, cambiando el ritmo o pulsando el selector
de Variación de la sección de Acorde y Bajo Automá
tico, podrá disfrutar de otro estilo de toque.
Capacity of memory
• Up to 912 notes ( >) in full tenuto can
be stored. However, since melodies are
often played in stacatto and the
intervals between notes are considered
as rests, 464 to 912 notes can in fact
be recorded.
• If the number of notes and rests
exceeds the memory capacity, the
extra notes will be neither heard nor
recorded when the keys are played.
• Chord changes in each measure can
be recorded in quarter notes.
• About 340 chord changes are possible.
This means that it is possible to record
the chords for a piece consisting of
340 measures if one measure contains
one chord on average.
20
Speicherkapazität
• Maximal 912 voll ausgehaltene Töne ( J))
lassen sich speichern. Da die Melodien
jedoch manchmal staccato gespielt
werden und die Intervalle zwischen den
Tönen dann als Pausen gewertet werden,
erhält man in Wirklichkeit nur eine
Speicherkapazität von 464 bis 912 Tönen.
• Wenn die Anzahl der Töne und Pausen
die Speicherkapazität übersteigt, sind
beim Anschlägen von Tasten die Töne
weder zu hören, noch werden sie
gespeichert.
• Die Akkordwechsel können im
Viertelnoten-Abstand gespeichert werden.
• Ca. 340 Akkordwechsel sind möglich. Das
bedeutet, daß ein Stück aus 340 Takten
gespeichert werden kann, wenn jeder
Takt im Schnitt einen Akkord Wechsel
enthält.
Capacité de la mémoire
• La mémoire peut stocker jusqu’à 912
notes ( >) “tenues” pleinement.
Toutefois, du fait que les mélodies
sont souvent jouées stacatto, et que
les intervalles entre les notes sont
considérés comme des pauses, le
stockage effectif varie entre 464 et 912
notes.
• Si le nombre de notes et de pauses
excède la capacité de la mémoire, on
n’entendra pas les notes en surnombre
lors de l’exécution et elles ne seront
pas enregistrées.
• Les changements d’accord de chaque
mesure peuvent être enregistrés en
noires.
• Environ 340 changements d’accords
sont possibles. Cela signifie qu’on
peut enregistrer les accords d’un
morceau d’environ 340 mesures, si
chaque mesure contient en moyenne
un accord.
Capacidad de la memoria de melodía
• Se pueden almacenar hasta 912 notas ( )
en tenuto completo en las memorias. Sin
embargo, como las melodía a menudo se
tocan en stacatto y ios intervalos a
menudo se consideran como pausas, de
hecho pueden grabarse entre 464 y 912
notas.
• Si el número de notas y pausas excede
la capacidad de la memoria, las notas
sobrantes no serán ni escuchadas ni
grabadas cuando se toquen las teclas.
• Los cambios de acordes en cada medida
pueden grabarse en cuartos de nota.
• Son posibles unos 340 cambios de acorde.
Esto significa que es posible grabar ios
acordes para un pieza consistente de 340
medidas, si una medida contiene una
media de un acorde.
Page 23

Note:
The remaining memory space can be confirmed
during recording by the Melody and Chord Lamps.
Immediately after recording starts, the two lamps (at
keys 19 and 20} on both sides of the ▼ mark light up.
These two lamps move towards the left and right
sides as melodies and chords are recorded,
indicating the remaining memory space. Memory
space for recording remains until either tamp reaches
the edge.
Hinweis:
Die verbleibende Speicherkapazität wird während der
Aufnahme von den Melodie- und Akkord-Lampen
bestätigt. Sofort nach Aufnahmebeginn leuchten die
beiden Lampen links und rechts der ▼ Markierung (bei
den Tasten 19 und 20) auf. Die Anzeige wird sich
während der auf nähme von Melodien und Akkorden
nach links bzw. rechts weiterbewegen, wodurch die
verbleibende Speicherkapazität angezeigt wird. Die
Speicherkapazität nähert sich dem Ende, wenn die
Anzeige den linken bzw. rechten Rand erreicht.
Remarque:
L’intervalle de mémoire restant peut être confirmé
durant l’enregistrement par les lampes témoins de
mélodie et corde. Immédiatement apres que
l’enregistrement commence, les deux lampes
témoins (touches 19 et 20} de chaque côté du repère
▼ s’allument. Les indications de ces deux lampes
témoins se déplacent vers la gauche et la droite lors
de l’enregistrement de mélodies et cordes indiquant
l’intervalle de mémoire restant. Un intervalle de
mémoire de l’enregistrement est disponible jusqu’à
ce qu’une de ces lampes témoins atteigne sa marge.
Nota:
El espacio remanente de memoria puede confirmarse
durante la grabación mediante las lámparas de melodía y
de acorde. Inmediatamente después de comenzar la
grabación, se iluminarán las dos lámparas (en las teclas
19 y 20) a ambos lados de la marca ▼. Estas dos
lámparas se moverán a derecha e izquierda a mediada
que las melodías y acordes sean grabados, indicando el
espacio remanente en la memoria. Queda espacio en la
memoria hasta el momento en que una de las lámparas
ilegua al borde.
C. Combination with Melody Cancel
Once you are able to play the music on a
Playcard using Melody Cancel (see
page 8), you can enjoy recording and
playback of that music together with the
Playcard accompaniment. This is almost
like playing with a professional ensemble
in a recording studio.
1. Slide in the Playcard you want to play.
The PCR-800 is thus programmed; then
press the STOP selector immediately.
2. Press the Music Programmer’s
RECORD selector and the Playcard
system’s MELODY CANCEL selector at
the same time.
C. Spielen einer eigenen Melodie zur
Playcard-Begleitung
Wenn Sie erst einmal in der Lage sind, die
Playcard-Musik bei abgeschalteter Melodie
(siehe Seite 8) zu spielen, können Sie die
selbst gespielte Musik zusammen mit der
Playcard-Begleitung aufnehmen und wieder
geben. Genau wie in einem richtigen Auf
nahmestudio werden Sie von einem profes
sionellen Ensemble beim Spielen bereitet.
1. Schieben Sie die gewünschte Playcard ein.
Wenn die Programmierung des PCR-800
beendet ist, decken Sie den STOPSchalter.
2. Drücken Sie den RECORD-Schalter des
Music-Programmer und gleichzeitig den
MELODY CANCEL-Schalter des Play
card-Sy stem-Teils .
C. Combinaisons avec l’Annulation de
Mélodie
Une fois que vous êtes à même de jouer la
musique d’une Playcard en “annulant la
mélodie” (MELODY CANCEL) (voir page 8),
vous pouvez passer à l’enregistrement et
à la reproduction de cette musique avec
l’accompagnement Playcard. C’est pres
que comme de jouer avec un ensemble
professionnel dans un studio d’enre
gistrement!
1. Faites glisser la Playcard que vous
désirez jouer. Une fois que le PCR-800
est programmé, appuyez sur le sélec
teur STOP.
2. Appuyez en même temps sur le sélec
teur d’enregistrement (RECORD) du
Programmeur de Musique et sur le
sélecteur MELODY CANCEL du
système Playcard.
Pi_‘vr”ARiZ! SY=T=é«
PLAY
O FREE
O CHORO O BASS/
O MELODY O LAMP
TEMPO
LESSON CHORO
CANCEL CANCEL
OPHRASE
CANCEL
O AUTO
C. Combinación con Melody Cancel
Una vez que sea capaz de tocar la música de
una Playcard utilizando Melody Cancel (ver
pág. 8), Ud. podrá disfrutar grabando y
reproduciendo esa música junto con el acom
pañamiento de la Playcard. Esto es casi como
tocar con un conjunto profesional en un
estudio de grabación.
1, Deslice la Playcard cuando desee tocar.
Cuando esté programado el PCR-800,
pulse el selector de STOP.
2. Pulse el selector RECORD del Programdor Musical y el selector MELODY
CANCEL del sistema Playcard al mismo
tiempo.
21
Page 24

3. You will hear the accompaniment only,
as with the ordinary Melody Cancel
function. Play the melody, either by
following the Melody Lamps or by
reading the Playcard music score.
Note:
If you are a more advanced player, you might like
to practice melody improvisations.
3. Genau wie beim Abschalten der Melodie
hören Sie dann nur die Begleitung. Sie
können nun die Melodie spielen, indem Sie
die Tasten der leuchtenden MelodieLämpchen drücken oder die Noten auf
der Playcard lesen.
Hinweis:
Fortgeschrittene Spwier können auch eine Melodie
improvisieren.
3. Vous n’entendrez que l’accompagne
ment, comme avec la fonction
d’Annulation de Mélodie ordinaire.
Jouez la mélodie en suivant les
Lampes de Mélodie ou la partition de
la Playcard.
Remarque:
Si vous êtes d’un niveau plus avancé, vous
pouvez vous exercer en improvisant la mélodie.
3. Escuchará solamente el acompañamiento,
como con la función Melody Cancel.
Toque la melodía, bien siguiendo las Luces
de Melodía o leyendo la partitura musical
de la tarjeta.
Nota:
Si Ud. es un intégrete avanzado, puede que desee
practicar improvisando la melodía.
4. Recording will stop at the end of the
Playcard music.
Note:
If the length of a piece of music is greater than
the Music Programmer’s memory capacity,
recording may stop before you finish playing.
Also, if you play your melody improvisations
extremely quickly, you may exceed the memory
capacity.
5. Now play the melody back together
with the Playcard accompaniment.
Press the Music Programmer’s
PLAYBACK selector and the Playcard
system’s MELODY CANCEL selector
simultaneously. Your melody and the
Playcard accompaniment will be
played back together.
6. When the music ends, playback is
automatically cancelled. It you want to
stop the music before it ends, press
the STOP selector.
4. Am Ende der Playcard-Musik stoppt die
Aufnahme.
Hinweis:
Übersteigt die Länge des Musikstückes die Speicher
kapazität des Music-Programmers, so stoppt der
Ajifnahmevorgang bereits, wenn Sie noch nicht zu
Ende gespielt haben. Auch beim Improvisieren einer
etwas komplizierteren Melodie kann die Speicher
kapazität überschritten werden.
5. Nun körmen Sie die Melodie zusammen
mit der Playcard-Begleitung wiedergeben.
Drücken Sie dazu den PLAYBACKSchalter des Music-Programmer und
gleichzeitig den MELODY CANCEL-
Schalter des Playcard-System-Teils. Ihre
Melodie und die Playcard-Begleitung
werden dann gleichzeitig wiedergegeben.
MUSIC PROGRAMMER
O RECORD OplAV
/
6. Am Ende der Musik wird die WiedergabeFunktion automatisch abgeschaltet. Zum
vorzeitigen Abbrechen der Musik drücken
Sie den STOP-Schalter.
4. L’enregistrement s’arrêtera avec la fin
de la musique de la Playcard.
Remarque:
Si la longueur d’un morceau de musique excède
la capacité de mémoire du Programmeur de
Musique, l’enregistrement peut s’interrompre
avant que vous ayez fini de Jouer. De plus, si vous
improvisez des mélodies très raffinées, vous
risquez de dépasser la capacité de la mémoire.
5. Faites passer maintenant la mélodie
avec l’accompagnement Playcard.
Appuyez en même temps sur le sélec
teur PLAYBACK du Programmeur de
Musique et sur le sélecteur MELODY
CANCEL du système Playcard. Votre
mélodie et l’accompagnement Playcard
seront reproduits ensemble.
SYSTEM
ir
0 AUTO 0 FREE O MELODY O LAMP
PLAY TEMPO CANCEL CANCEL
O CHORD O BASS/ O PHRASE
LESSON CHORD REPEAT
6. La reproduction s’annule automatique
ment avec la fin de la musique. Si vous
désirez interrompre la musique avant la
fin, appuyez sur le sélecteur STOP.
CANCEL
4. La ^abación se detendrá al final de la
música Playcard.
Nota:
Si la duración de urm pieza musical es mayor que la
capacidad de memoria del Programador Musical,
puede que la grabación se detenga antes de que termine
de tocar. Además, si toca sus improvisaciones en
stacatto, puede que exceda la capacidad de memoria.
5. Ahora, reproduzca la melodía junto con el
acompañamiento de Playcard. Pulse el
selector PLAYBACK del Programador
Musical y el selector MELODY CANCEL
del sistema Playcard simultáneamente.
Entonces se reproducirá su melodía junto
con el acompañamiento de Playcard.
6. A1 terminar la música, se cancela auto
máticamente la reproducción. Si desea
parar la música antes de que termine,
pulse el selector STOP .
22
Page 25

e
External jacks
Several jacks are provided at the back of
the keyboard for connecting a variety of
optional accessories. There is also a
headphone jack at the front.
A. MIDI In/Out jacks
For details concerning MIDI jacks, refer to
page 25.
B. Foot switch jack (Sustain)
This jack allows connection of the optional
Sustain Pedal FC-5, allowing ON/OFF
foot-control.
C. Microphone In jack
An ordinary microphone can be con
nected to the MIC IN jack. The volume can
be adjusted using the independent
VOLUME control next to the jack.
D. Expression pedal jack
The EXP. PEDAL jack is for connecting the
Expression Pedal (EP-1), which lets you
control the overall volume level using your
foot.
E. Aux Out jacks (L & R)
You can channel sound through your stereo
system using these jacks. Use the optional
connecting cord PSC-3.
• Impedance 6000
• Output level (7 notes sounding
simultaneously at maximum volume
with Jazz Organ voice) - 7 ±2dB
F. External power source jack (DC IN)
• AC power
Connect the optional AC Power Adaptor
PA-4 to the DC IN jack.
• Car battery
The Car Battery Adaptor CA-1 plugs into
the DC IN jack and a cigarette lighter
socket.
Anschlußmöglichkeiten
An der Rückseite des Instrumentes können
verschiedene Zubehörteile angeschlossen
werden. Außerdem ist an der Vorderseite eine
Kopfhörerbuchse vorhanden.
A. MIDI-Eingangs/Ausgangs buchsen
Genaueres zu diesen Buchsen finden Sie auf
Seite 25.
B. Sustain-Fußschalterbuchse
Zum Anschluß des als Sonderzubehör liefer
baren Sustain-Pedals FC-5. Das Pedal
ermöglicht eine fußgesteuerte Ein/AusSchaltung.
C. Mikrofonbuchse (MIC IN)
Jedes normale Mikrofon kann hier ange
schlossen werden. Der Mikrofonpegel kann an
dem getrennten VOLUME-Regler, der sich
direkt neben der Buchse befindet, eingestellt
werden.
D. Fußschwellerbuchse (EXP. PEDAL)
Die mit EXP. PEDAL bezeichnete Buchse
dient zum Anschließen des Fußschwellers
EP-1, mit dem sich die Gesamtlautstärke
regeln läßt.
E. Ausgangsbuchsen (AUX OUT L/R)
Mit diesen Buchsen ist auch eine Klang
wiedergabe über Ihre Stereoanlage möglich.
Verwenden Sie zum Anschließen das als Son
derzubehör lieferbare Anschlußkabel PSC-3.
• Impedanz 600Q
• Ausgangspegel (7 Töne polyphon gespielt
bei maximaler Lautstärke mit Jazz Organ
Stimme) -7±2dB
F. Außenstromversorgungsbuchse
(DC IN)
• Netzadapter
Der Netzadapter PA-4 (Sonderzubehör)
kann hier angeschlossen werden.
• Autobatterieadapter
Zur Versorgung von einer Autobatterie
kann hier der Autobatterieadapter CA-1
angeschlossen werden.
Prise extérieures
Plusieurs prises sont fournies au dos du
clavier, destinées au branchement de
divers accessoires. Sur la partie antérieure,
se trouve aussi une prise pour casque
d’écoute.
A. Prises MIDI
Pour les prises MIDI, voir page 25.
B. Prise de sélecteur au pied
(SUSTAIN)
Cette prise sert au raccordement de la
pédale de soutien (SUSTAIN) FC-5 en
option, qui vous permet de fournir ou de
couper l’alim entation (ON/OFF) au pied.
C. Prise d’entrée micro
Cette prise (MIC IN) permet de raccorder
un micro ordinaire. Le volume peut se
régler avec la commande de VOLUME
placée à côté de la prise.
D. Prise de pédale d’expression
Celle prise (EXP.PEDAL) sert au branche
ment de la Pédale d’expression (EP-1);
grâce à celle-ci, il vous est possible de
contrôler—au pied —le volume global.
E. Prises Aux Out (L & R)
Ces prises permettent la reproduction
sonore par le biais de votre système stéréo.
Utilisez le cordon de branchement en
option PSC-3.
• Impédance 600a
• Niveau de sortie (7 notes audibles
simultanément au volume maximum
avec voix Orgue Jazz) -7±2dB
F. Prise d’alimentation extérieure
(DC IN)
• Alimentation secteur
Connectez l’adaptateur d’alimentation
secteur PA-4 à la prise DC IN.
• Batterie de voiture
L’adaptateur de batterie de voiture
CA-1 se branche dans la prise DC IN et
la douille d’allume-cigare.
Contactos externos
Se proveen varios contactos en la parte
posterior del teclado, para conectar una
variedad de accesorios opcionales. También
hay un contacto para auriculares en la parte
delantera.
A. Contactos MIDI IN/OUT
Para más detalles en torno a los contactos
MIDI, consulte la página 25.
B. Contacto de conmutador de pie
(SUSTAIN)
Este contacto le permite conectar el Pedal de
Sostenido opcional (FC-5), posibilitando el
control de ON/OFF con el pie.
C. Contacto para micrófono
Puede conectarse un micrófono corriente al
contacto MIC IN. El volumen puede ajustarse
usando el control de Volumen independiente
que hay al lado de este contacto.
D. Contacto para Pedal de Expresión
El contacto EXP. PEDAL es para conectar el
Pedal de Expresión (EP-1), que le permite
controlar el nivel de volumen general utili
zando el pie.
E. Contactos Aux Out (Iz. y Der.)
Ud. puede canalizar el sonido a través de su
equipo stereofònico utilizando estos contactos.
También puede conectar directamente con un
deck de cassette para grabar. Utilice el cable
de conexión opcional PSC-3.
• Impedancia 600fì
• Nivel de salida (7 notas sonando simul
taneamente a máximo volumen con voz
JazzOrgan) -7±2dB
F. Contacto Aux In
El contacto AUX IN permite canalizar el
sonido de un tocadiscos o de otro componente
de audio a través de los altavoces del PortaTone. Utilice este contacto cuando toque
junto con otras fuentes musicales.
23
Page 26

T
Optional accessories
• AC Power Adaptor (PA-4)
Transforms AC voltage to DC voltage.
• Car Battery Adaptor (CA-1)
Enables you to provide power to the
instrument from a car battery using the
cigarette lighter socket.
• Soft Carrying Case (SCC-11)
For convenient transportation.
• Headphones (YH series)
Specially designed lightweight dynamic
headphones with extra-soft ear pads.
• Connecting Cord (PSC-3)
For connecting the keyboard to a stereo
hi-fi system.
• Keyboard Stand (L-2)
• Expression Pedal (EP-1)
Lets you add more feeling to music by
enabling subtle control of the overall
volume level.
• Sustain Pedal (FC-5)
This pedal enables on/off control of
effects by foot.
Some optional accessories may not be available
in every region.
Sonderzubehör
•Netzadapter (PA-4)
Dieser Adapter wandelt Netzspannung in 12V
Gleichspannung um.
•Autobatterieadapter (CA-1)
Dieser Adapter kann an die Zigarettenan
zünderbuchse Ihres Wagens angeschlossen
werden, um das Instrument von der Auto
batterie zu versorgen.
•Weiche Tragetasche (SCC-11)
Für bequemes Tragen.
•Kopfhörer (YH-Serie)
Speziell entwickelter, leichter, dynamischer
Kopfhörer mit besonders weichen Ohrpolstern.
•Anschlußkabel (PSC-3)
Zum Anschluß des Instruments an eine
Stereoanlange.
•Keyboardständer (L-2)
•Fußschweller (EP-1)
Mit diesem Pedal läßt sich die Gesamtlaut
stärke individuell regeln, um Musik aus
drucksvoller wiederzugeben.
•Sustain-Pedal (FC-5)
Mit diesem Pedal können Sie Effekte mit
Ihrem Fuß ein- und ausschalten.
Möglicherweise sind in einigen Gebieten nicht alle Sonder
zubehörteile erhältlich.
Accessoires en option
• Adaptateur courant alternatif (PA-4)
Transforme le voltage CA en voltage CC.
• Adaptateur batterie automobile
(CA-1)
Assure l’alimentation de l’instrument à
partir d’une batterie automobile, en
utilisant l’allume-cigare du tableau de bord.
• Etui de transport souple (SCC-11)
Pour un transport aisé de l’appareil.
• Casque d’écoute (série YH)
Un casque “dynamique”, spécialement
conçu, léger et doté de coussinets
extra-doux.
• Cordon de branchement (PSC-3)
Permet le branchement du clavier à un
système stéréo haute fidélité.
• Support de clavier (L-2)
• Pédale d’expression (EP-1)
Grâce à un contrôle subtil du volume
global, elle permet de nuancer l’expression
musicale.
• Pédale “Sustain” (FC-5)
Elle permet le contrôle marche/arrêt—au
pied.
Certains des accessoires en option peuvent ne pas
être disponibles dans tous les pays.
Accessoríos opcionales
•Adaptador de potencia CA (PA-4)
Transforma el voltaje CA en voltaje CC.
•Adaptador para batería de automóvil
(CA-1)
Le permite proporcionar potencia al instru
mento desde la batería del automóvil utilizando
el contacto del encendedor de cigarrillos.
•Estuche de transporte blando (SCC-11)
Conveniencia del transporte
•Auriculares (Serie YH)
Auriculares dinámicos ligeros, especialmente
diseñados con almohadillas extrasuaves.
•Cable de Conexión (PSC-3)
Para conectar el teclado a un sistema estéreo
hi-fi.
•Soporte del teclado (L-2)
•Pedal de Expresión (EP-1)
Le permite añadir más sentimiento a la
música permitiéndole un control más sutil del
nivel de volumen general.
•Pedal de Sostenido (FC-5)
Este pedal permite el control on/off de los
efectos con el pie.
Puede que algunos de (os accesorios opcionales no estén
disponibles en todas las áreas.
24
Page 27
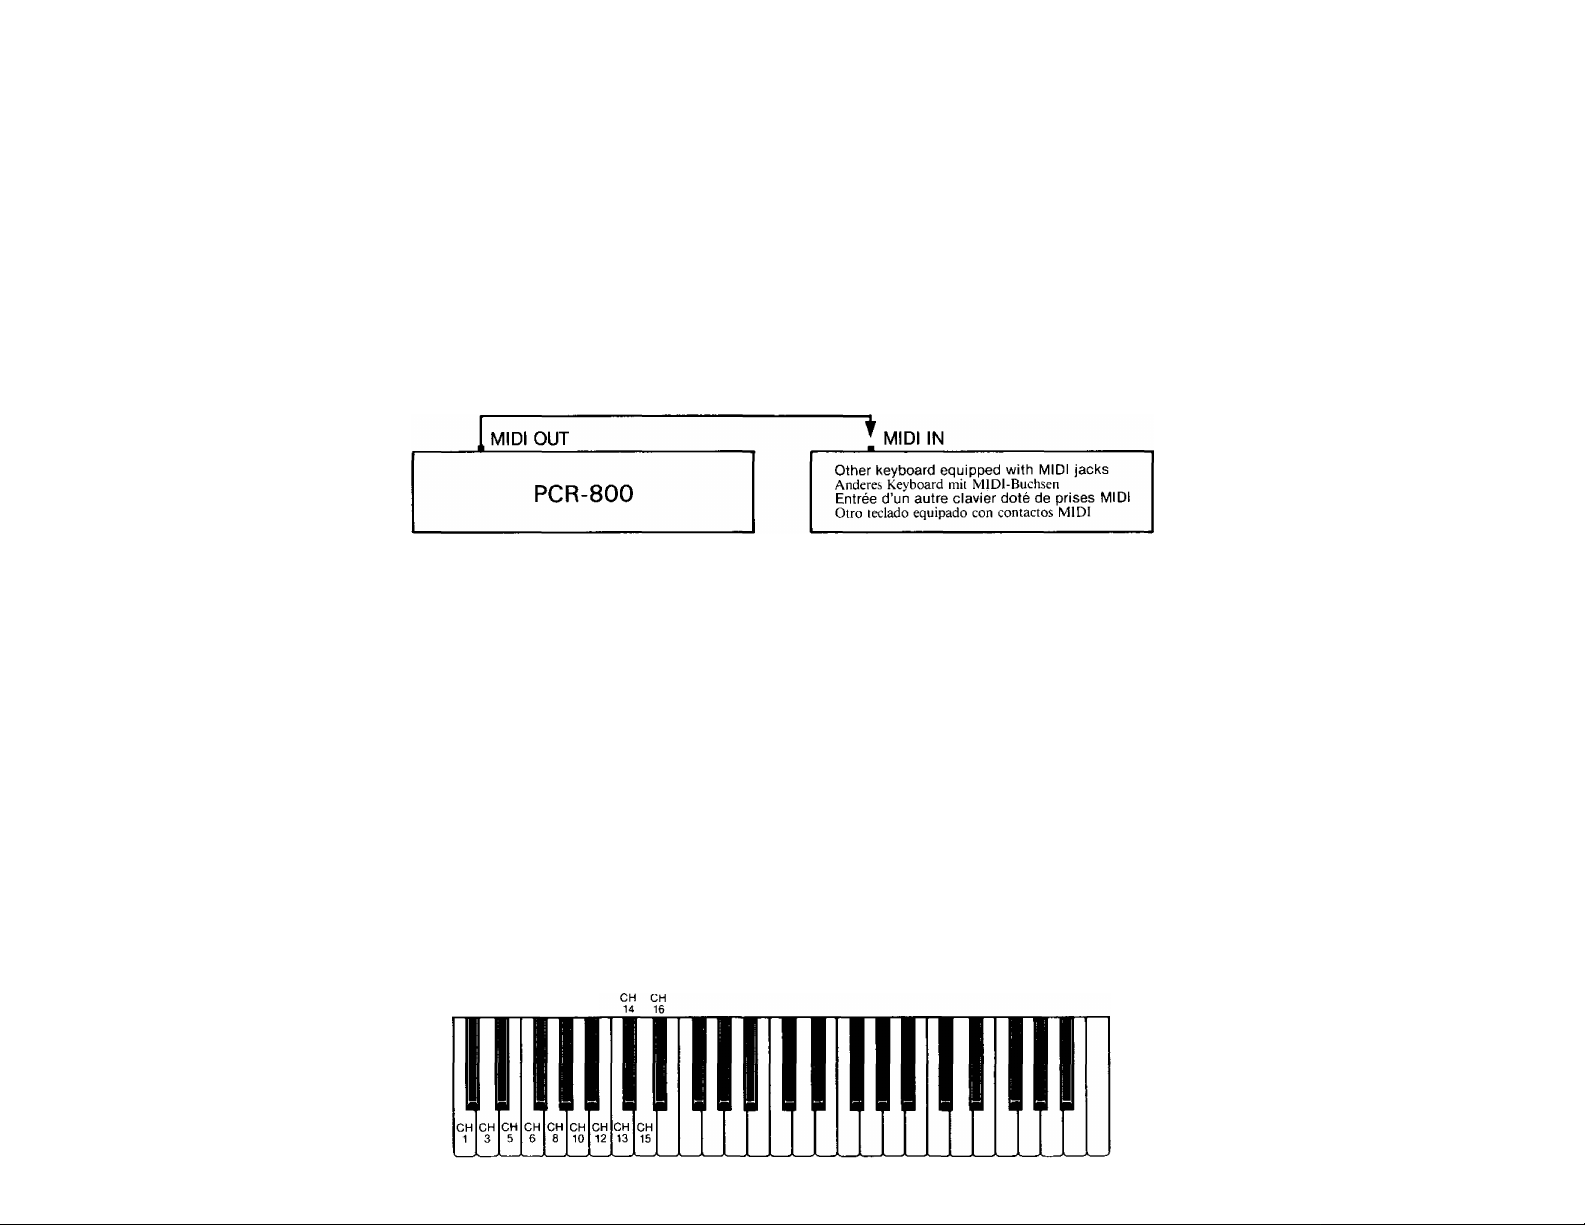
8
About MIDI
MIDI is an acronym standing for Musical
Instrument Digital Interface, which is a
standard interface for connecting
keyboards and other devices.
The PortaTone is equipped with MIDI
jacks (IN and OUT), thus enabling
connection of the PortaTone to another
PortaTone or to some other keyboard
equipped with MIDI jacks (e.g. the Yamaha
DX synthesizer), for synchronized
performances.
(Example)
• When the power is turned on, the mode
is: LOCAL ON, OMNI ON, POLY
• Contents of transmission/recognition in
normal mode
1) KeyON/OFF
2) Orchestra voice change
3) Orchestra Volume
4) Orchestra Sustain
1. Assigning MIDI channels
The channel for receiving/sending can
be assigned by the following operation.
1) Press the JAZZ ORGAN/PIANO selector
in the Orchestra section while pressing
the MIDI Mode selector®. (JAZZ
ORGAN is designated as the sending
channel, and PIANO as the receiving
channel.)
2) Depress one of the sixteen black and
white keys from the left of the keyboard,
which are assigned for the channels.
(Channels 1 to 16 from the left). The four
Beat Lamps indicate the channel
designations by binary method.
MIDI
Bei MIDI (Musical Instrument Digital Inter
face) handelt es sich um einen genormten
Anschluß zur Zusammenschaitung von Key
boards mit anderen Geräten.
Das PortaTone ist mit einem MIDI-Eingang
und einem MI DI-Ausgang ausgestattet. Zum
gleichzeitigen Spielen kann das PortaTone an
ein weiteres PortaTone oder auch an jedes
andere Keyboard, das mit MIDI-Buchsen aus
gestattet ist (z.B. Yamaha DX-Synthesizer),
angeschlossen werden.
(Beispiel)
• Nach dem Einschalten erhält man zunächst
folgenden Betriebszustand:
LOCAL ON, OMNI ON, POLY
• Übertragung/Empfangs-Zustand bei
Normalbetrieb
1) Tasten Ein/Aus
2) Orchesterstimmen-Umschaltung
3) Orchester-Lautstärke
4) Orchester-Sustain
1. Zuordnung der MIDI-Kanäle
Die Kanäle zum Empfang/Senden können
wie folgt zugeteilt werden.
1) Halten Sie den MIDI-Betriebsartenschalter
® gedrückt und drücken Sie gleichzeitig
den JAZZ ORGAN/PIANO-Schalter im
Orchester-Teil. (JAZZ ORGAN ist dem
Sende- und PIANO dem Empfangskanal
zugeordnet.)
2) Drücken Sie eine der 16 schwarzen und
weißen Tasten an der linken Seite des Key
boards, die die Kanäle 1 bis 16 festlegen.
Die vier Takt-Lämpchen zeigen dabei die
16 Kanäle binär an.
CH CH
2 4
CH CH CH
7 9 11
Interface MIDI
L’interface MIDI (de l’anglais: Musical
Instrument Digital Interface) est une
interface numérique standard servant à
raccorder le calvier à d’autres instruments.
Le PortaTone est doté de prises MIDI
d’entrée/sortie (IN/OUT) permettant de le
raccorder à un autre PortaTone ou à
d’autres claviers musicaux dotés aussi de
prises MIDI (le synthétiseur Yamaha DX,
par exemple) pour des exécutions
synchronisées.
(Exemple)
• Lorsque l’alimentation est fournie, le
mode est: LOCAL ON, OMNI ON, POLY
• Contenu de la transmission/reconnaissance en mode normal
1) Touche ON/OFF
2) Changement de voix orchestrale
3) Volume d’orchestre
4) Soutien d’orchestre
1. Désignation des canaux MIDI
Les canaux destinés à la réception/
envoi peuvent être désignés par les
démarches suivantes.
1) Appuyez sur le sélecteur JAZZ ORGAN/
PIANO de la section orchestrale tout en
appuyant sur le sélecteur de mode MIDI
® (JAZZ ORGAN est désigné comme
cani d’envoi et PIANO, comme canal de
réception).
2) Enfoncer une des 16 touches blanches
et noires à partir de la gauche du clavier,
touches assignées aux canaux (canaux
de 1 à 16 à partir de la gauche). Les
quatre témoins de mesure indiquent
les désignations des 16 canaux de
manière binaire.
Explicación de MIDI
MIDI es una contracción de Interfaz Digital
de Instrumentos Musicales, que es un interfaz
estándar para conectar teclados y otros
dispositivos.
El PortaTone está equipado con contactos
MIDI (ÍN y OUT), permitiendo la conexión
del PortaTone a otro PortaTone o a otro
teclado equipado con contactos MIDI (Por
ejemplo, el sintetizador Yamaha DX), para
interpretaciones simultáneas.
(Ejemplo)
• Cuando se conecta el aparato, la modalidad
es: LOCAL ON, OMNI ON, POLY
• Contenido de transmisión/reconocimiento
en modalidad normal
DTecla ON/OFF
2) Cambio de voz de Orquesta
3) Volumen de Orquesta
4) Sostenido de Orquesta
L Asignación de canales MIDI
El canal para recepción/envio puede
asignarse con la siguiente operación.
1) Pulse el selector JAZZ ORGAN/PIANO
de la sección de Orquesta mientras pulsa
el selector de Modalidad MIDI ®. (JAZZ
ORGAN es designado como el canal de
envió y PIANO como el canal de recepción).
2) Pulse una de las dieciséis teclas negras y
blancas de la izquierda del teclado, que
están asignadas a los canales. (Canales del
1 al 16 desde la izquierda). Las cuatro Luces
de Ritmo indican binariamente la designa
ciones de los 16 canales.
25
Page 28

• -Й- •
CH1
•
CH2
•
CH3
•
2. Receiving external MIDI Timing Clock
An external MIDI timing clock can be
received and rhythms can therefore be
synchronized.
• Select SAXOPHONE in the Orchestra
section while pressing the MIDI Mode
• If you cancel SAXOPHONE while
pressing the MIDI Mode Selector, the
external timing clock will not be
received.
3w Transmission of Playcard data
Synchronized performance of Playcard
music is possible when connected to
other PortaTones (models PSR-50/
60/70).
-0- -o- -o-
/ \ /4 r\
• • •
2. Empfang eines externen MIDIl^timpulses: Ein MIDI-Tbktimpuls
kann empfangen und der Rhythmus
damit synchronisiert werden.
• Drücken Sie den MI DI-Betriebsarten
schalter ® und wählen Sie SAXO
PHONE im Orchester-Teil.
• Wird SAXOPHONE abgeschaltat,
während der MIDI-Betriebsartenschalter
gedrückt wird, so erfolgt kein Empfang
des externen Taktimpulses.
3. Übertragung von Playcard-Daten
Bei Anschluß an andere Portatone-
Modelle (PSR-50/60/70) kann PlaycardMusik synchron gespielt werden.
HEADPHONES
.MIDI OUT
PCR-800
PLAY .
CARD
CH15
CH16
•
2. Branchement d’un chronorupteur MIDI
externe
Vous pouvez brancher un chrono
rupteur MIDI externe et par
conséquent, vous êtes à même de
synchroniser les rythmes.
• Choisir SAXOPHONE de la section
orchestrale tout en appuyant sur le
sélecteur de mode MIDI ®.
• Si Ton annule la fonction
SAXOPHONE, tout en appuyant sur
le sélecteur de mode MIDI, le chrono
rupteur externe ne fonctionnera pas.
3. Transmission de données Playcard
Une performance synchronisée de
musique Playcard est possible lorsque
connecté à d’autres Portatones
(Modèles PSR-50/60/70).
[midi in
J PSR-50/60/70
2. Recepción de un Reloj de Medición MIDI
externa Puede recibirse un reloj de
medición MIDI externo y por lo tanto,
pueden sincronizarse los ritmos.
• Seleccióne SAXOPHONE en la sección
de Orquesta mientras pulsa el selector de
modalidad MIDI ®.
• Si cancela SAXOPHONE mientras pulsa
el selector de modalidad MIDI, el Reloj
de Medición externo no será recibido.
3. Transmisión de los datos de la tarjeta
Playcard
Es posible la interpretación sincronizada
de la música contenida en las Playcards,
conectando la unidad con otros
Portatones (modelos PSR-50/60/70).
Procedure:
1) Press the MARCH/POLKA selector
while pressing the MIDI Mode
selector ® . This selects the
Playcard data transmission mode.
2) Start performance by pressing the
Auto Play button of the PCR-800.
/Votes:
1. It is better to connect headphones to the PCR-800
as the sounds and rhythms of the two units will be
heard simultaneously otherwise.
2. Obbligato is not played when connected to the
PSR-50.
3. Other voices and rhythms will be selected when
the voices and rhythms specified by Playcard are
not covered by the other unit’s functions.
26
Vorgang;
1) Drücken Sie den MARCH/POLKASchalter und den MIDI-Betriebsarten-
schalter ® gleichzeitig. Hierdurch wird
die Playcaid-Datenübertragungsbetriebsart angewählt.
2) Drücken Sie danach den AUTO PLAYSchalter des PCR-800, um mit dem
Spielen zu beginneiL
Hinweise:
1. Hierbei ist der Anschluß eines Kopßiörers an das
PCR-800 empfehlenswert, da Ton und Rhythmus
beider Geräte andernfalls gleichzeitig gehört werden.
2. Bei Anschluß an das PSR-50 werden keine obligaten
Stimmen gespielt.
S. Wenn die von der Playcard bestimmten Stimmen und
Rhythmen nicht den Funktionen des anderen Gerätes
entsprechen, werden andere Stimmen und Rhythmen
angewählt.
Procédure:
1) Appuyez sur le sélecteur
MARCH/POLKA tout en pressant
le sélecteur de mode MIDI ® .
Cette opération sélectionne le
mode de transmission de données
Playcard.
2) Commencez votre performance en
appuyant sur la touche de repro
duction automatique du PCR-800.
Remarques:
1. Il vaut mieux connecfer un casque au PCR-800 car
sinon les sons et rythmes des deux uinités seront
audibles simultanément.
2. La partie obligée n’est pas jouée lorsque connecté
au PSR-50.
3. D’autres voix et rythmes seront sé/ecfionnés
lorsque les voix et rythmes spécifiés par la
Playcard ne sont pas effectuables avec les
fonctions des autres unités.
Procedimiento:
1) Presione el selector MARCH/POLKA
mientras mantiene oprimido el selector
de mode MIDI ®. La unidad entrará
en el modo de transmisión de datos de
la tarjeta Playcard.
2) Presione el botón de interpretación
automática del PCR-800.
Notas:
1. Es preferible conectar los audífonos al PCR-800, pues
de lo contrario las melodías y ritmos de ambas
unidades se oirían simultáneamente.
2. Si se conecta la unidad con el PSR-50, no será
interpretado el obligatto.
3. Cuando las voces y los ritmos especificados en la
Playcard no sean cubiertas por las funciones de la
otra unidad, serán reemplazadas por otras voces y
ritmos.
Page 29

Taking care of the
PCR-800 and
Playcards
Nützliche Hinweise
a
Entretien du PCR-800
et des “Playcards”
Cuidados del PCR-800 y de las tarjetas Playcard
Your PortaTone PCR-800 and Playcards
will remain in excellent condition if care
is taken concerning the following.
PCR-800
1. Occasionally clean the reading head
located in the groove by sliding the
head cleaning card (included) along
the Playcard groove several times.
2. Keep the Playcard groove free of dust
and other foreign matter, otherwise
damage to the head may occur.
S.When you use AC power, be sure to
use the optional PA-4 adaptor.
Before use, read the adaptor instruc
tions carefully. In particular, please
note that in some cases the PA-4 is
provided with a voltage selector, so
confirm that this selector is correctly
set.
4. The optional Car Battery Adaptor
CA-1 is only for use with a negative
ground 12V battery. Ensure that this
is the case before connecting the
adaptor.
5. Connections made between the
PortaTone PCR-800 and any other
device should be made with both
units turned off.
6. Do not set the MASTER VOLUME at
MAX when you connect the Porta
Tone PCR-800 to a stereo system.
Use the stereo system’s volume
control to adjust the sound level.
7. Avoid placing the instrument in exces
sively humid areas.
8. Do not subject the unit to physical
shock, and avoid placing anything
heavy on it.
9. The PortaTone PCR-800 should not
be placed in direct sunlight for a
long time.
10. Do not place the instrument near
any heating appliance, or leave it
inside a car in direct sunlight for
any length of time. Direct sunshine
can raise the interior temperature of
a car with closed doors and windows
to as high as SO'^C (176°F=). Tempera
tures in excess of 60°C (140°F) can
cause physical and/or electrical
damage not covered by warranty.
Damit Sie immer Freude an Ihrem Porta
Tone PCR-800 haben, beachten Sie bitte
die folgenden Punkte.
PCR-800
1. Reinigen Sie gelegentlich den im „Play
card “-Schlitz befindlichen Lesekopf,
indem Sie die Reinigungskarte (mitgelie
fert) mehrmals in den Schlitz schieben.
2.Schützen Sie den ,,Playcard“-Schlitz vor
Staub und fremden Gegenständen, da es
sonst zu einer Beschädigung des Kopfes
kommen kann.
3. Verwenden Sie für Netzbetrieb aus
schließlich den als Sonderzubehör liefer
baren Adapter PA4, und lesen Sie vor
der Verwendung die Bedienungsan
leitung durch. In einigen Ländern ist
der PA4 mit einem Spannungswähler
ausgestattet. Achten Sie dann besonders
darauf, daß dieser richtig eingestellt ist.
4. Der als Sonderzubehör erhältliche Auto
batterieadapter CA-1 ist nur für eine
negativ geerdete 12V-Batterie geeignet.
Vergewissern Sie sich vor dem An
schließen des Adapters, ob dies bei Ihrer
Wagenbatterie der Fall ist.
5. Beim Anschließen von PortaTone
PCR-800 an andere Geräte sollten alle
Geräte ausgeschaltet sein.
ó.Stellen Sie den Hauptlautstärkeregler
(MASTER VOLUME) nicht auf MAX,
wenn das PortaTone PCR-800 an eine
HIFIanlage angeschlosssen ist. Verwenden
Sie zur Lautstärkeeinstellung den Laut
stärkeregler der HIFIanlage.
7.Halten Sie das Instrument von extrem
feuchten Plätzen fern.
8.Schützen Sie das Instrument vor
mechanischen Stößen, und stellen Sie
keine schweren Gegenständen darauf.
9.Setzen Sie das PortaTone PCR-800 nicht
längere Zeit direktem Sonnenlicht aus.
10. Halten Sie das PortaTone PCR-800 von
Heizungen fern, und lassen Sie es nicht
in einem Auto, das direkt in der Sonne
geparkt ist. Bei einem mit geschlossenen
Türen und Fenstern in der prallen
Sonne geparkten Wagen kann die
Innentemperatur bis auf 80°C ansteigen.
Bei extrem hohen Temperaturen (60 °C
oder höher) können die mechanischen
Votre PortaTone PCR-800 restera en
excellente condition, si les points suivants
sont observés.
PCR-800
1. Procédez de temps en temps au netto
yage de la tête de lecture située dans
la rainure, en déplaçant la carte de
nettoyage de tête (comprise) le long de
la rainure plusieurs fois.
2. Veillez à ce que la rainure ne contienne
ni poussière ni corps étranger, suscep
tible d’endommager la tête.
3. En cas d’utilisation du courant alter
natif, veillez à utiliser l’adaptateur PA4
en option. Avant l’utilisation de ce
dernier, lire soigneusement les
instructions s’y rapportant. Il convient
de noter, en particulier, que, dans
certains cas, le PA4 est fourni avec
un sélecteur de voltage; veillez, dans
cette hypothèse, à ce que le sélecteur
soit correctement réglé.
4. L’adaptateur batterie automobile CA-1
en option ne doit être utilisé qu’avec
une batterie négative de 12V. Assurezvous que cette condition est remplie
avant le branchement de l’adaptateur.
5. En cas de branchements entre le
PortaTone et tout autre appareil,
assurez-vous que les deux blocs sont
bien en position d’arrêt.
6. Lors du branchement du PortaTone
PCR-800 à un système stéréo, ne
réglez pas le Volume Principal
(MASTER VOLUME) sur la position
MAX. Utilisez le contrôle de volume
du système stéréo pour le réglage du
niveau sonore.
7. Evitez de placer l’instrument dans des
lieux où l'humidité est excessive.
8. Ne pas soumettre l’instrument à
des chocs. Veillez aussi à ne pas
placer d’objet pesant sur l’instrument.
9. Evitez d’exposer directement au soleil
votre PortaTone PCR-800 pour une
longue durée.
10. Ne pas placer l’instrument à proximité
d’une source de chaleur quelconque.
Evitez aussi de le laisser dans une
voiture, exposé directement au soleil
pour une longue durée. Le rayonne-
Su PortaTone PCR-800 permanecerá en
excelente condición si se toman los cuidados
siguientes.
PCR-800
1. Limpiar de vez en cuando la cabeza
lectora localizada en la hendidura, desli
zando la tarjeta limpiadora de cabeza
(incluida) por la hendidura varias veces.
2. Mantener la hendidura de tarjetas Play
card limpia de polvo y materias extrañas,
ya que pueden ocasionar daños a la cabeza.
3. Cuando utilice potencia CA, asegúrese
de utilizar el adaptador opcional PA4.
Antes de usarlo, lea detenidamente las ins
trucciones del adaptador. Sírvase notar
que en algunos casos el PA4 está
provisto de un selector de voltaje, con
firmando que este selector esté dispuesto
correctamente.
4. El adaptador opcional para batería de
automóvil CA-1 es para utilizarse única
mente con batería de tierra negativa de
12V. Asegúrese de que éste sea el caso
antes de conectar el adaptador.
5. Las conexiones entre el PortaTone
PCR-800 y cualquier otro dispositivo
deberán hacerse con ambas unidades*
apagadas.
6. No ajuste el Volumen Principal
(MASTER VOLUME) a MAX cuando
conecte el PortaTone PCR-800 a im
equipo estereofónico. Utilice el control de
volumen del equipo estereofónico para
ajustar el nivel de sonido.
7. Evite dejar el instrumento en áreas
excesivamente húmedas.
8. Evite los impactos fisicos a la unidad, y
no coloque nada pesado sobre ella.
9. El PortaTone PCR-800 no deberá
dejarse durante largo tiempo expuesto
directamente a la luz del sol.
10. No coloque el instrumento cerca de fuentes
de calor, ni lo deje dentro del auto
móvil al sol. La luz solar directa puede
elevar la temperatura interior de un auto
móvil con las puertas y ventanas cerradas
hasta 80°C. A temperaturas superiores
a 60°C se pueden originar daños fisicos
y/o eléctricos, que no cubrirá la
garantía.
11. Utilice un paño seco o humedecido con
27
Page 30

11. Use a dry or damp cloth for cleaning. und/oder elektrischen Teile des Instru
mentes beschädigt werden. Derartige
Schäden werden nicht von der Garantie
gedeckt.
11. Verwenden Sie zur Reinigung ein
trockenes oder leicht angefeuchtetes Tuch,
ment solaire direct peut, en effet,
élever la température à l’intérieur
d’une voiture fermée jusqu’à 80°C.
Soumis à des températures
de plus de 60°C, l’instrument
risque d’être endommagé et/ou de
présenter des défaillances électriques
non couvertes par la garantie.
11.Pour le nettoyage utilisez un morceau
d’étoffe sec ou humide.
agua para limpiarlo.
Playcards
1. Handle the Playcards carefully so
that the magnetic strips do not
become damaged in any way, and
ensure that you insert them in the
correct direction (see page 6).
2. Don’t place Playcards on tbe speaker
since the speaker’s magnet may
affect the recorded data. For the
same reason, do not put the Play
cards near a TV, amplifier or other
product having a magnetic field.
3. It is better not to touch the magnetic
strip with your fingers.
4. If water of alcohol is spiiied on a Piay-
card, wipe it off immediateiy and ailow
the Playcard to dry before using it.
5. Ciean the Piaycards with a soft cioth
when they become dirty.
6. Never put cieaning agents such as
thinner or benzine on the magnetic
strip.
7. Avoid piacing the Playcards in exces
sively humid and high-temperature
areas.
8. Do not leave the Playcards in direct
sunlight.
9. When you aren’t using the Playcards,
keep them in their protective enve
lopes.
„Playcards“ (Notenkarten)
1. Gehen Sie vorsichtig mit den ,, Play
cards“ um, damit der Magnetstreifen
nicht beschädigt wird. Stecken Sie die
Karten nicht seitenverkehrt ein (Seite 6).
2. Legen Sie die „Playcards“ nicht auf
einen Lautsprecher, da sonst die aufge
zeichneten Daten durch den Lautspre
chermagneten gelöscht werden können.
Aus dem gleichen Grund müssen die
,,Playcard“ auch von anderen Geräten
mit starken Magnetfeldern wie z.B.
Fernseher und Verstärker ferngehalten
werden.
3. Berühren Sie den Magnetstreifen
möglichst nicht mit den Fingern.
4. Sollten Wasser oder alkoholische
Getränke auf die ,,Playcard“ gelangen,
wischen Sie sie sofort ab, und lassen
Sie sie trocken, bevor Sie sie wieder
benutzen.
5. Verwenden Sie zur Reiningung einer
verschmutzten ,,Playcard“ ein trockenes
Tuch.
6. Verwenden Sie zur Säuberung des
Magnetstreifens niemals Reinigungs
flüssigkeiten wie Verdünner oder Benzin.
7. Halten Sie die ,»Playcards“ vor extrem
feuchten und heißen Plätzen fern.
8. Legen Sie die „Playcards“ nicht
längere Zeit die pralle Sonne.
9. Bewahren Sie die ,,Playcards“ stets in
ihren Schutzhüllen auf, wenn sie nicht
verwendet werden.
“Playcards”
1. II est recommandé de manier les
“Playcards” soigneusement, afin de
ne pas endommanger les pistes
magnétiques. Veillez, par ailleurs, à
les insérer dans la direction appro
priée (voir P.6).
2. Ne pas placer les “Playcards” sur le
haut-parleur: l’aimant du haut-parleur
pourrait, en effet, avoir une incidence
fâcheuse sur les données enregistrées.
Pour la même raison, ne pas placer
les “Playcards” à proximité d’un
téléviseur, d’un amplificateur ou quel
conque appareil possédant un champ
magnétique.
3. Il est recommandé de ne pas toucher
la piste magnétique avec les doigts.
4. Au cas où de l’eau ou de l’alcool
serait renversé (e) sur une “Playcard”,
essuyez immédiatement le liquide et
assurez-vous que la “Playcard” est
parfaitement sèche avant son utilisa
tion.
5. Nettoyez les “Playcards” — lorsque
cela s’avère nécessaire — avec une
étoffe douce.
6. Veillez à ne jamais mettre de produits
nettoyants — tels que dissolvant ou
benzine — sur la piste magnétique.
7. Evitez de placer les “Playcards” dans
des lieux excessivement humides ou
chauds.
8. Evitez d’exposer les “Playcards” au
rayonnement solaire direct.
9. Quand vous n’utilisez pas les “Play
cards”, il est recommandé de les
laisser dans leurs enveloppes
protectrices.
Tarjetas Playcard
1. Manejar las tarjetas Playcard cuidadosa
mente para que las franjas magnéticas no
resulten dañadas, y asegúrese de inser
tarlas en la dirección correcta (ver pág.6).
2. No coloque las tarjetas sobre el altavoz ya
que el imán de éste puede afectar a la
información grabada. Por la nüsma razón,
no coloque las tarjetas cerca de un
televisor, amplificador u otro producto
que tenga campo magnético.
3. Es mejor no tocar la franja magnética
con los dedos.
4. Si se deja caer alcohol o agua sobre la
tarjeta Playcard, limpiarla inmediatamen
te y dejar que se seque antes de usarla.
5. Limpie las tarjetas Playcard con un paño
suave cuando se ensucien.
6. No poner nunca agentes limpiadores
como acetona o bencina sobre la franja
magnética.
7. Evite colocar las tarjetas en áreas excesi
vamente húmedas o calurosas.
8. No deje las tarjetas bajo la acción directa
de la luz solar.
9. Cuando no utilice las tarjetas, guárdelas
en sus sobres protectores.
28
Page 31

Specifications
Keyboard
49 keys (C1-C5)
Playcard System
Auto Play, Free Tempo, Melody Cancel,
Chord Lesson, Bass/Chord Cancel, Lamp
Cancel, Phrase Repeat, Melody & Chord
Lamps
Orchestra Section
Jazz Organ, Pipe Organ, Violin, Trumpet,
Piccolo, Oboe, Clarinet, Saxophone, Piano,
Electric Piano, Harpsichord, Vibes, Guitar,
Banjo, Music Box, Synth
Effects
Sustain 1, 2, Stereo Symphonic, Duet
Rhythm Section
Big Band, Reggae, Disco, Pops, Rock’n’Roll,
Salsa, Samba, March/Polka, Swing, Stow
Rock, Rock, 16 Beat, Country, Rhumba,
Bossanova, Waltz
Controls: Fill-In, Start, Synchro Start, Stop,
Intro/Ending, Tempo, Volume
Auto Bass Chord Section
Fingered Chord, Single Finger Chord, Off,
Variation, Volume
Music Programmer
Record, Playback, Stop
Transposer
1/2 octave high and low
Pitch Control
± 50 cents
Other Controls And Indicators
Power Switch, Power-on Light, Master
Volume, MIDI Mode, Mic Volume
Auxiliary Jacks
Headphones, Expression Pedal, Mic in, MlDi
(Out, In), Aux Out (L and R), Sustain,
DC 9-12V in
Amplifiers
2.4Wx2
Speakers
12cm (40) X 2
Power Source
DC 9V (six 1.5V SUM-1, “D” size, R-20 or
equivalent batteries), AC Power Adaptor
(PA-4) or Car Battery Adaptor (CA-1)
Accessories Included
12 Playcards, Head Cleaning Card
Dimensions (W x D x H)
982mm x 281 mm x 94mm
(38-3/4"x11"x3-3/4")
Weight
6.3kg (13.9 ibs.)
Technische Daten
Tastatur
49 Tasten (Ci-Cg)
Playcard-System
Automatische Wiedergabe, freie Tempowahl,
Abschalten der Melodie, Akkordübung, BaßAkkord-Löschung, Abschalten der Lämpchen,
Phrasenwiederholung, Melodie-Lampen,
Akk ord- Lampen
Orchester-Teil
Jazzorgel, Pfeifenorgel, Violine, Trompete,
Piccolo, Oboe, Klarinette, Saxophon, Piano,
Elektrisches Piano, Cembalo, Vibraphon,
Gitarre, Banjo, Music-Box, Synthesizer
Effekte
Sustain 1, 2, Stereo-Symphonic, Duett
Rhythmus-Teil
Big-Band, Reggae, Disco, Pops, Rock’n’Roll,
Salsa, Samba, Marsch/Polka, Swing,
Langsamer Rock, Rock, 16 Beat, Country,
Rhumba, Bossanova, Walzer
Bedienungselemente: Fill-In, Start, SynchroStart, Stopp, Intro/Ending, Tempo, Lautstärke
Baß-Akkord-Automatik-Teil
Fingerakkord, Einfingerakkord, Aus,
Variation, Lautstärke
Music-Programmer
Aufnahme, Wiedergabe, Stopp
Transposer
1/2 Oktave höher und niedriger
Tonhöhenregler
± 50 Cent
Weitere Bedienungselemente und Indikatoren
Ein/Aus-Schalter, Einschalt-Indikator,
Hauptlautstärke, MIDI-Betriebsart, MikrofonLautstärkeregler
Zusatzbuchsen
Kopfhörer, Fußschweller, Mikrofon, MIDI
(Ein/Ausgang), Ton-Ausgang (L u.R),
Sustain, 9-12 V Gleichspannungseingang
Verstärker
2,4 Wx2
Lautsprecher
12 cm (4 S2)x2
Nennspannung
9 V Gleichspannung (6 1,5-V-Babyzellen),
Netzadapter PA-4 oder Autobatterieadapter
CA-1
Mitgeliefertes Zubehör
12 Playcards, Kopf-Reinigungskarte
Abmessungen (B x T x H)
982 mm X 281 mmx94 mm
Gewicht
6,3 kg
Spécifications
Clavier
49 touches (C1-C5)
Système Playcard
Exécution automatique, Tempo libre, Annula
tion de mélodie. Apprentissage d’Accord,
Annulation de basse/accord, Annulation de
lampes, Répétition de phrase, Lampes de
Mélodie, Lampes d’Accord
Section orchestrale
Orgue jazz, Grandes orgues, Violon,
Trompette, Piccolo, Hautbois, Clarinette,
Saxophone, Piano, Piano électrique.
Clavecin, Vibraphone, Guitare, Banjo,
Boite à musique, Synth
Effets
Soutien 1, 2, Stéréo symphonique, Duo
Section rythme
Big band, Reggae, Disco, Pops, Rock’n’Roll,
Salsa, Samba, Marche/Polka, Swing, Rock
lent, Rock, 16 mesures, Country, Rhumba,
Bossanova, Valse
Contrôles: Insertion (Fill-in), départ, Départ
synchro. Arrêt, Introduction/Final, Tempo,
Volume
Section basses/accords automatiques
Accord à plusieurs doigts, Accord à un seul
doigt, Arrêt, Variation, Volume
Programmeur de musique
Enregistrement, Playback, Arrêt
Transposeur
Elévation et descente d’un demi octave
Régulateur de hauteur
±50 centièmes
Autres contrôles et indicateurs
Interrupteur d’alimentation, Voyant de
marche, Volume principal. Mode MIDI,
Volume micro
Prises auxiliaires
Casque d’écoute. Pédale d’expression,
Entrée micro, MIDI (sortie, entrée),
Sortie auxiliaire (gauche et droite), Soutien,
Entrée 9-12V CC
Amplificateurs
2,4Wx2
Haut-parleurs
12cm (4 Q)x2
Tension nominale
CC 9V (six plies SUM-1 de 1,5V, format D,
R20 ou équivalentes), adaptateur d’alimenta
tion secteur (PA-4), ou adaptateur de
batterie de voiture (CA-1)
Accessoires compris
12 Playcards, Carte nettole-tête
Dimensions (I x H x D)
982mm x 281 mm x 94mm
Poids
6,3kg
Especificaciones
Teclado
49 teclas (Ci-Cg)
Sistema Playcard
Toque Automático, Tempo Libre, Anulación
de Melodía, Lección de Acorde, Anulación del
Acorde y Bajo, Anulación de Luces, Repetición
de Frase, Luces de Melodia, Luces de Acorde
Sección de Orquesta
Organo de Jazz, Organo de Tubos, Violin,
Trompeta, Pícolo, Oboe, Clarinete, Saxofón,
Piano, Piano Eléctrico, Clavicordio, Vibràfono,
Guitarra, Banjo, Music Box, Sintetizador
Efectos
Sostenido 1, 2, Sinfónico, Dúo
Sección de Ritmo
Big Band, Reggae, Disco, Pops, Rock’n’Roll,
Salsa, Samba, Marcha/Polka, Swing, Rock
Lento, Rock, 16 Beat, Country, Rumba,
Bossanova, Vals
Controles: Relleno, Arranque, Arranque
Sincronizado, Stop, Introducción/
Terminación, Tempo, Volumen
Sección de Acorde y Bajo Automático
Acorde Digitado, Acorde de Un Solo Dedo,
Off, Variación, Volumen
Programador Musical
Grabación, Reproducción, Stop
Transpositor
1/2 octava alta y baja
Control de Tono
± 50 cents
Otros Controles e Indicadores
Interruptor de Conexión, Luz de Conexión,
Volumen Principal, Modalidad MIDI,
Volumen de Mic
Contactos Auxiliares
Auriculares, Pedal de Expresión, Micrófono
In, MIDI (Out, In), Aux Out (Iz y Der),
Sostenido, CC 9-12V In
Amplificadores
2,4 Wx2
Altavoces
12cm (4 ÍÍ)x2
Tensión nominal
CC 9V (seis pilas de 1,5V SUM-1, tamaño
“D”, R-20 o equivalentes), Adaptador de
Potencia CA (PA-4) o Adaptador para Batería
de Automóvil (CA-1)
Accesorios incluidos
12 Thrjetas Playcard, Tarjeta limpiacabeza
Dimensiones (An x Fondo x Al)
982mm x 281 mm x 94mm
Peso
6,3kg
29
Page 32

11
Playcard Library
There are numerous pieces of music in
the Playcard Library, so by the time you've
mastered them all you will have a very big
repertoire!
The selection is diverse. There are
popular hits, standards, screen music,
Latin numbers, classical music, Walt
Disney favorites, and the music of Paul
McCartney, Billy Joel, Barry Manilow, and
other popular artists. Each Playcard
Library package contains six Playcards.
POPULAR Arthur’s Theme
HITS 1 Antonio’s Song
tA-f cjiTv Can’t Smile Without You
(17*547) Good-Bye Girl
POPULAR Bette Davis Eyes
HITS 2 Guilty
tA-r cco\ Makin’ Love
(17*552) 1 Write The-Songs
POPULAR Don’t Cry Out Loud
HITS 3 Heartbreaker
CM\ Shadows In The Moonlight
(17-553) Woman In Love
POPULAR Endless Love
|-||7S 4 ^or Your Eyes Only
/17 Physical
(1 /*554) Private Eyes
GREAT Night And Day
STANDARDS 1 Days Of wine And Roses
tAt cMc\ ’Roiiiid Midnight
(17*545) Theme From Summer Of ’42
GREAT Ebb Tide
STANDARDS 2 Over Tjie Rainbow
/■IT cjicv Somewhere My Love
(17*546) It Was A Good Time
Him
Upside Down
You Needed Me
Breezin’
Making Love
Modern Girl
This Masquerade
Just The Way You Are
As Time Goes By
Softly As In A Morning Sunrise
The Shadow Of Your Smile
Singin’ In The Rain
Playcard-Bìblìothek
Die Playcard-Bibiiothek enthält eine Viel
zahl von Musikstücken, so daß Sie sich ein
großes eigenes Repertoir aneignen können.
Das Angebot ist vielfältig; aktuelle Schlager,
Evergreens, Filmmusik, lateinamerikanische
Musik, Klassik, Walt Disney Melodien, Stücke
von Paul McCartney, Billy Joel, Barry
Manilow und vieles mehr. Jeder PlaycardBibliothek-Satz enthält sechs Playcards.
GREAT In The Mood
STANDARDS 3 Charge
(1 /-555) By The Time 1 Get To Phoenix
GREAT Sunny
STANDARDS 4 Love is Blue
(17-562) Try To Remember
MIXED The Dock Of The Bay
POPS 1 Give Me The Night
.An Old Fashioned Love Song
(17-570) Windy
GOSPEL 1 Peace In The Valley
/■IT cTo\ How Great Thou Art
(17-572) Whither Thou Goest
SWING Honeysuckle Rose
TIME 1 I’m Beginning To See The Light
/■i7C7c\ Moonglow
(1 /-5/5) You Turned The Tables On Me
SING ALONG Brother John
FAVORITES Auld Lang Syne
, [■^A\ Bill Bailey, Won’t You Please
(1/-5/I) Come Home
Fly Me To The Moon
This Guy’s In Love With You
Jambalaya
People
The Third Man Theme
1 Am Woman
1 Go To Rio
He
Turn Your Radio On
Wings Of A Dove
It’s Only A Paper Moon
All Of Me
Happy Birthday To You
You Are My Sunshine
Michael, Row The Boat Ashore
Pichler de
“Playcards”
Le Fichier de ‘‘Playcards” contient une
variété impressionnante de morceaux de
musique. Quand vous les connaîtrez tous,
vous aurez un répertoire enviable! Le
choix est varié; succès populaires,
chansons courantes, musique de films,
airs latins, classiques, airs de Walt Disney,
mélodies de Paul McCartney, Billy Joel,
Barry Manilow et autres artistes populaires.
Chaque Fichier ‘‘Playcard” contient six
“Playcards”.
FAVORITE Someday My Prince Will Come
DISNEY 't’s A Small World
(DISNEY’S Mickey Mouse March
COLLECTION) When You Wish Upon A Star
(17*550)
SCREEN Star Trek
THEMES 1
(17-544) A Time For Us
Best of Dancing Queen
ABBA Songs SP®
iA-wirAn\ The Winner Takes It All
(17*542) Tiger
Best of Band On The Run
p/^UL Ebony And Ivory
McCartney
/17CCQ\ My Love
(17-559) Silly Love Songs
Best of t Won’t Last A Day Without You
JHE Only Yesterday
r^ADDCMTE=DC Rainy Days And Mondays
CAHHtIV 1 jQp Of The World
M-7 ccc\ We’ve Only Just Begun
(17*565) Yesterday Once More
The Birds
Qhim chim Cher-ee
Moon River
Theme From Godfather
Ready To Take A Chance Again
That’s Me
Summer Night City
Biblioteca de tarjetas Playcard
Hay numerosas piezas musicales en la Biblio
teca Playcard, de manera que cuando ya las
domine todas, Ud. tendrá un gran repertorio.
La selección es muy variada. Hay éxitos
populares, temas estándar, música de películas,
temas latinos, música clásica, canciones de
Walt Disney, y la música de Paul McCartney,
Billy Joel, Barry Manilow y otros conocidos
artistas. Cada paquete de la Biblioteca
Playcard contiene seis tarjetas.
Best of Cold, Cold Heart
|-|Д^К 1 Saw The Light
u/it 1 lAMQ I’m So Lonesome 1 Could Cry
WILLIAMS Hey, Good Lookin’
/At стл\ You Win Again
(17-574) Your Cheatin’ Heart
Best of Don’t Ask Me Why
BILLY Honesty
irTci It’s Still Rock And Roll To Me
Л7сео\ Piano Man
(i /-5oa) She’s Always A Woman
Best of Copacabana
BARRY Even Now
MANILOW * Made It Through The Rain
/At Weekend In New England
(17-568) When 1 Wanted You
Best of Back Home Again
JOHN Follow Me
rtEMUCQ Leaving On A Jet Plane
ucnvcn Rocky Mountain High
/17 ccö\ Sunshine On My Shoulders
(1 /-55o) Take Me Home, Country Roads
Best of Ail Shook Up
ELVIS Can’t Help Falling In Love
DDPCI PV Crying In The Chapel
rncöLCT 1 yygnt You, 1 Need You, 1 Love
/At cMv Jailhouse Rock
(17-563) Love Me Tender
My Life
You
30
Page 33

Best of California Girls
BEACH
Rnvc 1 Good Vibrations
DUTO 1 Help Me Rhonda
Л -7 rtsA\ ' Around
(17-5b4) Wouldn’t It Be Nice
Best of Ballade Pour Adeline
RICHARD Lyphard Melodie
AvncDKSAu Concerto Pour Une Jeune Fille
ULAYUtKMAN Nommee “Je T’aime"
ыт сло\ Voyage а Venise
\ 1 Serendade de L’etoile
Souvenirs D’enfance
CHRISTMAS Silent Night
SONGS 1 Bells
i-t -7 r c-7\ To The World
(17-057) 0 Come, Alt Ye Faithful
CHRISTMAS The Christmas Song
SONGS 2 Frosty The Snowman
HT Campagne
\ 1 f-oo 1) OTannenbaum
EASY Chim Chim Cher-ee
PLAYCARD Little Brown Jug
M -7 CI A\ Dancing Queen
(1 i-DI Ц) Londonderry Air
LATIN LaCucaracha
FAVORITES 1 Lf Chapanecas
iA-r сло\ Besame Mucho
(17-54o) La Paloma
Rudolph, The Red-nosed
Reindeer
Santa Claus Is Cornin’ To Town
Have Yourself A Merry Little
Christmas
Here Comes Santa Claus
Les Anges Dans Nos
Moon River
When The Saints Go Marchin’ In
Maria Elena
Aquarela Do Brasil
LATIN El Reloi
FAVORITES 2 Adoro
M7CAO\ LaCumparsita
(17-549) EiChocIo
EASY On The Beautiful Blue Danube
CLASSICS 1 Dance Of The Hours
(17-551) Cradlesong
La Bamba
Quien Sera
Symphony No. 40, G min, K550
Swan Lake
Menuett
JAZZ Tenderly
STANDARDS Body And Soul
/A-r cem Les Feuilles Mortes (Autumn
(17-550) Leaves)
BROADWAY Get Me To The Church On Time
MUSICAL 1 The Rain In Spain
y..« I’ve Grown Accustomed To Her
(MY FAIR LADY)
/-17 ceev With A Little Bit Of Luck
(17-555) Wouldn’t It Be Lovely
BROADWAY Easy Street
MUSICAL 2 1 Think I’m Gonna Like It Here
(ANNIE)
/-17 ccTv You’re Never Fully Dressed
(17-567) Without A Smile
COUNTRY Nobody Likes Sad Songs
^ Release Me
/.17 C70V Don’t It Make My Brown Eyes
(17-573) Blue
COUNTRY Any Time
My Funny Valentine
1 Left My Heart In San Francisco
You’d Be So Nice To Come
Home To
On The Street Where You Live
It’s The Hard-Knock Life
Tomorrow
^ Ruby, Don’t Take Your Love To
Little Green Apples
Crazy
Bouquet Of Roses
WESTERN 2
yj - C77\ 1 Really Don’t Want To Know
(1 f-of f) Green Green Grass Of Home
HAWAIIAN Now Is The Hour
FAVORITES 1 The Hawaiian Wedding Song
/-17 C7CV Tiny Bubbles
(17-575) Quiet Village
Best of Let It Be
THE Michelle
pCATl cc Here, There And Everywhere
¡AT CAA\ The Long And Winding Road
(17-541) Lady Madonna
POLKA 1 Liechtensteiner Polka
(17-578) Village Tavern Polka
Sleepy Lagoon
Pearly Shells
There Is A Tavern In The Town
Pennsylvania Polka
Peanuts Polka
Beer Barrel Polka
STEP-BY-STEP
Learning Playcard 1 (17-674)
STEP-BY-STEP
Learning Playcard2 (17-675)
STEP-BY-STEP
Learning PlaycardS (17-688)
Some Playearás may not be available in every region.
Ptaycard jacket designs and the contents of some
Playcard packages may be changed without notice.
In einigen Gebieten sind möglicherweise nicht alle
,,Playcards” lieferbar. Änderungen des Designs der
,,Playcard'‘-Hülle oder der „Playcard” selbst bleiben
Vorbehalten.
Certaines “Playcard” du fichier peuvent ne pas être
disponibles dans chaque région. La présentation des
“Playeards” et le contenu de certains fichiers
“Playeards” peuvent faire l’objet de modifications
sans préavis.
Algunas tarjetas Playcard no se podrán adquirir en todas
las regiones. Los diseños de las tarjetas Playcard y el
contenido de algunos paquetes de tarjetas, podrán ser
cambiados sin previo aviso.
FCC INFORMATION
Attention users in the U.S.A.
PortaTone PCR’800 prepared in
accordance with FCC rules.
The PortaTone PCR-800 users frequencies that appear in the
radio frequency range, and if installed in the immediate
proximity (within three meters) of some types of audio or
video devices interference may occur.
The PortaTone PCR-800 has been type tested and found
to comply with the specifications set for a Class B
computing device in accordance with those specifications
listed m Subpart J of Part 15 of the FCC rules. These rules
are designed to provide a reasonable measure of protection
against such interference. However, this does not guarantee
that interference will not occur. If your PortaTone PCR-800
should be suspected of causing interference with other
electronic devices, verification can be made by turning your
PortaTone PCR-dOO off and on. If the interference continues
when your PortaTone PCR-800 is off, PortaTone PCR-800 is
not the source of the interference. If your PortaTone PCR-800
does appear to be the source of the interference, you should
try to correct the situation by using one or more of the
following measures:
Relocate either the PortaTone PCR-800 or the electronic
device that is being affected by the interference.
Utilize power outlets for the PortaTone PCR-800 and the
device being affected that are on different branch (circuit
breaker or fuse) circuits, or install AtC line filters.
In the case of radio-TV interference, relocate the
antenna or, if the antenna lead-in is a 300 ohm ribbon lead,
change the lead-in to a co-axial type cable.
if these corrective measures do not produce satisfactory
results, please contact your Authorized Yamaha dealer for
suggestions and/or corrective measures. If you cannot locale
an Authorized Yamaha dealer in your general area, contact
the Service Division, Music Marketing Group, Yamaha
international, 6600 Orangethorpe Ave., Buena Park, CA
90620.
if for any reason you should need additional information
relating to radio or TV interference, you may find a booklet
prepared by the Federal Communications Commission
helpful: "How to Identify and Resolve Radio-TV Interference
Problems ". This booklet is available from the U.S.
Government Printing Office. Washington D.C. 20402—Stock
№004-000-345-4.
Wichtiger Hinweis für die Benutzung in der Bundesrepublik Deutschland,
Bescheinigung des Herstellers/Importeurs
Hiermit wird bescheinigt, daB der/die/das
Elektronische Orgel Typ PCR-800
(Gerät, Typ, Bezeichnung)
in Übereinstimmung mit den Bestimmungen der
VERFÜGUNG
(Amtsblatt Verfügung)
funk-entstört ist.
Der Deutschen Bundespost wurde das Inverkehrbringen dieses Gerätes
angezeigt und die Berechtigung zur Überprüfung der Serie auf Einhaltung
der Bestimmungen eingeräumt.
Vàmafta Europa GmbH
Name des Importeurs
EASY Ode To Joy
CLASSICS 2 The Wave Of The Danube
H7 Plume In The Summer Wind
(1 /-550) Slavonic March
Nocturne
Air From Orchestral Suite No. 3
FEMALE Blessed Are The Believers
VOPAI Deja Vu
u ITC -1 Leave Me Alone (Ruby Red Dress)
nll^ 1 Somebody’s Knockin’
^-.7 What Kind Of Fool
(17-579) My Heart Belongs To Me
31
Page 34

[ PCR-800 MIDI Implementation Chart ]
Transmitted
Recognized
Function
Basic Default
Channel Change
Default
Mode Messages X Omni, Mono/Poly
Altered
1 1
1-16
Mode 3
1-16
Mode 1
X
Date: 1985. 07. 16
Version: 1.0
Remarks
Note
Number ;
True voice 36-84
Velocity Note on
Note off
36-84
X 90H, v = 64 X
X 90H, v=0 X
After Key’s X
Touch Ch’s X
Pitch Bender
Control
64
Change
Program
Change : True #
* ^ 4« 4c
System Exclusive
System
Common :
Song Pos X
Song Sel
True X
System : Clock
Real Time:
Aux
Messages:
Commands
Local ON/OFF X
All Notes OFF
Active Sense
Reset X
Notes
0
0-15
O
X
O
O
X
0
36-84
X
X
X
X
O
Sustain
0-127
0-15
O
X
X
X
O
O
0
o
0
0
Mode 1 : OMNI ON, POLY
Mode 3 : OMNI OFF, POLY
32
Mode 2 : OMNI ON,
MONO
Mode 4 : OMNI OFF, MONO
O: Yes
X : No
Page 35

0 YAMAHA
NIPPON GAKKI CO., LTD. HAMAMATSU, JAPAN
The serial number of this product may be found on
the inside of the keyboard cover. You should note
this serial number in the space provided below and
retain this manuai as a permanent record of your
purchase to aid identification in the event of theft.
Model No. PCR-800
Serial No.
Concerning Wan-anty
This product was made for international distribution,
and since the warranty for this type of product varies
from marketing area to marketing area, please
contact the selling agency for information
concerning the applicable warranty and/or service
policies.
Die Seriennummer befindet sich an der Innenseite der
Keyboard-Abdeckung. Wir empfehlen, diese Nummer
sicherheitshalber an der unten vorgesehenen Stelle einzu
tragen, um sie auch im Falle eines Diebstahls jederzeit zur
Hand zu haben.
ModellNr. PCR-800
Serien-Nr. Série N“
Hinweis zur Garantie
Dieses Produkt vrird international vertrieben, und die
Garantiebedingungen sind von Vertriebsland zu Vertriebs
land verschieden. Ihr Händler gibt Ihnen gerne ganauere
Informationen zu den in Ihrem Land gültigen Garantieund/oder Servicebedingungen,
Le numéro de série de ce produit figure à l’intérieur
du couvercle de l’instrument. Il conviendra de noter
ce numéro de série dans l’espace réservé au-dessous
et de conserver ce manuel: celui-ci constitue le
document permanent de votre achat et permet l’iden
tification en cas de voi.
Modèle № PCR-800
Remarque relative à la garantie
Ce modèle est destiné à être distribué à l’échelle
internationale. Etant donné que les conditions de
garantie pour ce type de produit varient en fonction
des zones de commercialisation, prière de prendre
contact avec l’agence chargée des ventes pour tous
renseignements relatifs aux conditions de garantie et
de service après-vente.
EI número de serie de este producto se encuentra en la parte
interioi de la cubierta del teclado. Sírvase anotar este número
de serie en el espacio proporcionado debajo y guarde este
manual como comprobante de compra para ayudar a la
identificación en caso de robo.
№ de modelo PCR-800
№ de serie
Concerniente a la garantía
Este producto ha sido fabricado para ser distribuido inter
nacionalmente y, como la garantía para este tipo de producto
varia en relación a su área de comercialización, sírvase
consultar con el agente de ventas sobre la información en
torno a la garantía aplicable y/o politicas de servicio.
@ (T' 3K 508 Printed in Japan
 Loading...