

Yamaha NS-SW300, NS-SW200 Users manual
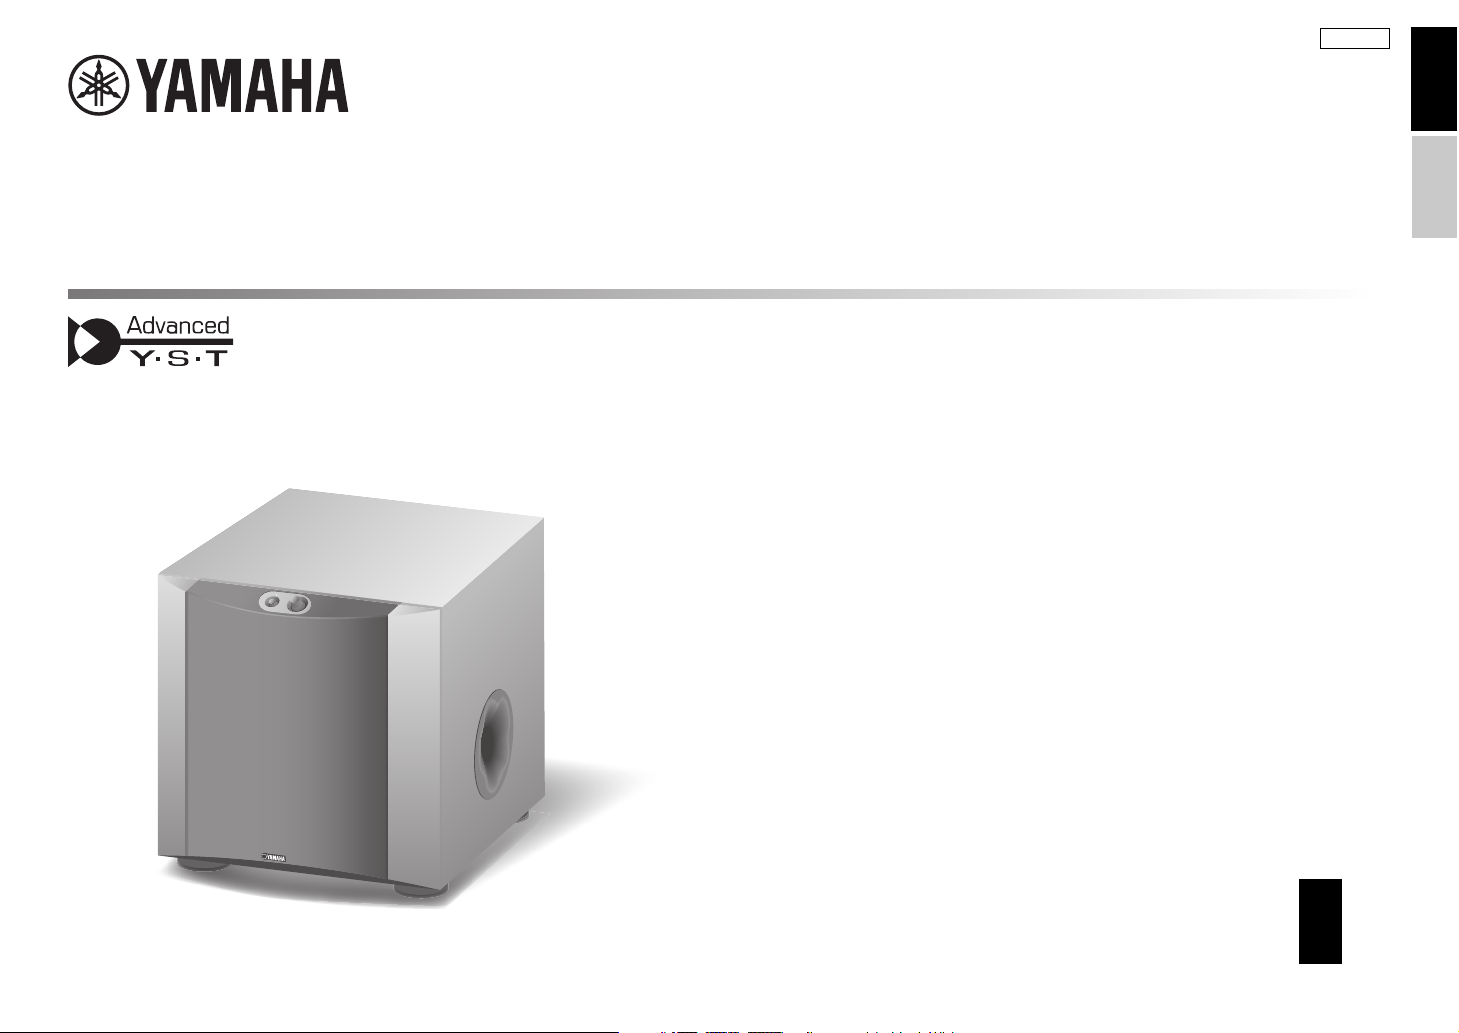
Subwoofer
NS-SW300
NS-SW200
URABLH
EnglishEspañol
Owner’s Manual
Manual de instrucciones
EN
ES

IMPORTANT SAFETY INSTRUCTIONS
CAUTION
RISK OF ELECTRIC SHOCK
DO NOT OPEN
CAUTION: TO REDUCE THE RISK OF ELECTRIC
SHOCK, DO NOT REMOVE COVER (OR BACK).
NO USER-SERVICEABLE PARTS INSIDE. REFER
SERVICING TO QUALIFIED SERVICE PERSONNEL.
• Explanation of Graphical Symbols
The lightning flash with arrowhead symbol,
within an equilateral triangle, is intended to alert
you to the presence of uninsulated “dangerous
voltage” within the product’s enclosure that
may be of sufficient magnitude to constitute a
risk of electric shock to persons.
The exclamation point within an equilateral
triangle is intended to alert the user to the
presence of important operating and
maintenance (servicing) instructions in the
literature accompanying the product.
IMPORTANT
Please record the serial number of this unit in the space below.
Model:
Serial No.:
The serial number is located on the rear of the unit.
Retain this Owner’s Manual in a safe place for future reference.
FCC CAUTION
Change or modifications not expressly approved by the party
responsible for compliance could void the user’s authority to
operate the equipment.
WARNING
TO REDUCE THE RISK OF FIRE OR ELECTRIC SHOCK, DO
NOT EXPOSE THIS APPLIANCE TO RAIN OR MOISTURE.
CAN ICES-3 (B)/NMB-3(B)
i En
FCC INFORMATION (for US customers)
1. Read these instructions.
2. Keep these instructions.
3. Heed all warnings.
4. Follow all instructions.
5. Do not use this apparatus near water.
6. Clean only with dry cloth.
7. Do not block any ventilation openings. Install in
accordance with the manufacturer’s instructions.
8. Do not install near any heat sources such as radiators, heat
registers, stoves, or other apparatus (including amplifiers)
that produce heat.
9. Do not defeat the safety purpose of the polarized or
grounding-type plug. A polarized plug has two blades
with one wider than the other. A grounding type plug has
two blades and a third grounding prong. The wide blade
or the third prong are provided for your safety. If the
provided plug does not fit into your outlet, consult an
electrician for replacement of the obsolete outlet.
10. Protect the power cord from being walked on or pinched
particularly at plugs, convenience receptacles, and the
point where they exit from the apparatus.
11. Only use attachments/accessories specified by the
manufacturer.
12. Use only with the cart, stand, tripod,
bracket, or table specified by the
manufacturer, or sold with the apparatus.
When a cart is used, use caution when
moving the cart/apparatus combination
to avoid injury from tip-over.
13. Unplug this apparatus during lightning
storms or when unused for long periods of time.
14.
Refer all servicing to qualified service personnel. Servicing
is required when the apparatus has been damaged in any
way, such as power-supply cord or plug is damaged, liquid
has been spilled or objects have fallen into the apparatus,
the apparatus has been exposed to rain or moisture, does
not operate normally, or has been dropped.
COMPLIANCE INFORMATION STATEMENT (Supplier’s declaration of conformity procedure)
Responsible Party: Yamaha Corporation of America This device complies with Part 15 of the FCC Rules.
Address: 6600 Orangethorpe Avenue, Buena Park
Telephone: CA 90620 714-522-9011
Type of Equipment: Subwoofer
Model Name: NS-SW300
1. IMPORTANT NOTICE: DO NOT MODIFY THIS UNIT!
This product, when installed as indicated in the instructions
contained in this manual, meets FCC requirements.
Modifications not expressly approved by Yamaha may void
your authority, granted by the FCC, to use the product.
2. IMPORTANT: When connecting this product to accessories
and/or another product use only high quality shielded cables.
Cable/s supplied with this product MUST be used. Follow all
installation instructions.
Failure to follow instructions could void your FCC
authorization to use this product in the USA.
3. NOTE: This product has been tested and found to comply
with the requirements listed in FCC Regulations, Part 15 for
Class “B” digital devices. Compliance with these
requirements provides a reasonable level of assurance that
your use of this product in a residential environment will not
result in harmful interference with other electronic devices.
This equipment generates/uses radio frequencies and, if not
installed and used according to the instructions found in the
users manual, may cause interference harmful to the operation
of other electronic devices.
Compliance with FCC regulations does not guarantee that
interference will not occur in all installations. If this product is
found to be the source of interference, which can be determined
by turning the unit “OFF” and “ON”, please try to eliminate the
problem by using one of the following measures:
Relocate either this product or the device that is being affected
by the interference.
Utilize power outlets that are on different branch (circuit breaker
or fuse) circuits or install AC line filter/s.
In the case of radio or TV interference, relocate/reorient the
antenna. If the antenna lead-in is 300 ohm ribbon lead, change
the lead-in to coaxial type cable.
If these corrective measures do not produce satisfactory results,
please contact the local retailer authorized to distribute this type
of product. If you can not locate the appropriate retailer, please
contact Yamaha Corporation of America, 6600 Orangethorpe
Avenue, Buena Park, CA 90620, USA.
The above statements apply ONLY to those products distributed
by Yamaha Corporation of America or its subsidiaries.
Operation is subject to the following conditions:
1) this device may not cause harmful interference, and
2) this device must accept any interference received
including interference that may cause undesired operation.

PRECAUTIONS
PLEASE READ CAREFULLY BEFORE
USE.
BE SURE TO FOLLOW THESE
INSTRUCTIONS.
The precautions listed below are to prevent risk of harm
to the user and others, as well as to prevent property
damage, and to help the user use this unit properly and
safely. Be sure to follow these instructions.
After reading this manual, be sure to keep it in a safe place where
it can be referenced at any time.
This content indicates “risk of serious injury or death.”
If you notice any abnormality
• If any of the following abnormalities occur, immediately turn
• Be sure to request inspections or repairs from the dealer where
you purchased the unit or from qualified Yamaha service
personnel.
• Yamaha cannot be held responsible for injury to you or
damage of the products caused by improper use or
modifications to the unit.
• This product is for ordinary homes. Do not use for applications
requiring high reliability, such as managing lives, health care
or high-value assets.
WARNING
off the power and disconnect the power plug.
– The power cord/plug is damaged.
– An unusual smell or smoke is emitted from the unit.
– Foreign material gets into the interior of the unit.
– There is a loss of sound during use.
– There is a crack or damage in the unit.
Continued use could cause electric shocks, a fire, or
malfunctions. Immediately request an inspection or repair from
the dealer where you purchased the unit or from qualified
Yamaha service personnel.
Power supply
• Do not do anything that could damage the power cord.
– Do not place it near a heater.
– Do not bend it excessively or alter it.
– Do not scratch it.
– Do not place it under a heavy object.
Using the power cord with the core of the cord exposed could
cause electric shocks or a fire.
• Do not touch the power plug or cord if there is a chance of
lightning. Failure to observe this may cause electric shocks.
• Use this unit with the power supply voltage printed on it. Failure
to connect to an appropriate AC outlet may cause a fire, electric
shocks, or malfunctions.
• Check the electric plug periodically and remove any dirt or dust
which may have accumulated on it. Failure to observe this may
cause a fire or electric shocks.
• When setting up the unit, make sure that the AC outlet you are
using is easily accessible. If some trouble or malfunction occurs,
immediately turn off the power switch and disconnect the plug
from the AC outlet. Even when the power switch is turned off,
as long as the power cord is not unplugged from the wall AC
outlet, the unit will not be disconnected from the power source.
• If you hear thunder or suspect approaching lightning, quickly
turn off the power switch and pull the power plug from the AC
outlet. Failure to observe this may cause a fire or malfunctions.
• If not using the unit for long periods of time, be sure to pull the
power plug from the AC outlet. Failure to observe this may
cause a fire or malfunctions.
Installation
• Always fix the speaker cable to a wall or similar. If you catch
your feet or hands on the cable, the speakers may fall or
overturn, causing malfunctions or injuries.
Do not disassemble
• Do not disassemble or modify this unit. Failure to observe this
may cause a fire, electric shocks, injury, or malfunctions.
Water warning
• Do not expose the unit to rain, use it near water or in damp or
wet conditions, or place on it any containers (such as vases,
bottles or glasses) containing liquids which might spill into any
openings or places where water may drop. A liquid such as
water getting into the unit may cause a fire, electric shocks, or
malfunctions.
• Never insert or remove an electric plug with wet hands. Do not
handle this unit with wet hands. Failure to observe this may
cause electric shocks or malfunctions.
Fire warning
• Do not place any burning items or open flames near the unit,
since they may cause a fire.
Handling
• Be careful not to drop or apply strong impact to this unit. Failure
to observe this may cause electric shocks, a fire, or
malfunctions.
CAUTION
This content indicates “risk of injury.”
Power supply
• Do not use an AC outlet where the power plug fits loosely when
inserted. Failure to observe this may cause a fire, electric
shocks, or burns.
• When disconnecting the power plug, always hold the plug itself
and not the cord. Pulling by the cord can damage it and cause
electric shocks or a fire.
• Insert the power plug firmly all the way into the AC outlet.
Using the unit when it is not plugged in sufficiently can cause
dust to accumulate on the plug, causing a fire or burns.
English
ii En

Installation
• Do not place the unit in an unstable position where it might
accidentally drop or fall over and cause injuries.
• When installing this unit, do not obstruct heat dissipation.
– Do not cover it with any cloth.
– Do not block this unit’s ventilation holes (cooling slits).
– Do not install the unit in other ways than indicated.
– Do not use the device in a confined, poorly-ventilated location
Failure to observe the above may trap heat inside the unit,
causing a fire or malfunctions. Ensure that there is adequate
space around the unit: at least 20 cm (8 in) on top, 20 cm (8 in)
on the sides, and 20 cm (8 in) on the rear.
• Do not install the unit in places where it may come into contact
with corrosive gases or salt air or places that have excessive
smoke or steam. Doing so may result in malfunction.
• Avoid being near the unit during a disaster, such as an
earthquake. Since the unit may turn over or fall and cause injury,
quickly move away from the unit and go to a safe place.
• When transporting or moving the unit always use two or more
people. Attempting to lift the unit by yourself may damage your
back, result in other injury, or cause damage to the unit itself.
• Before moving this unit, be sure to turn off the power switch
and disconnect all connection cables. Failure to observe this
may damage the cables or cause you or someone else to trip and
fall.
Hearing loss
• Do not use the unit for a long period of time at a high or
uncomfortable volume level, since this can cause permanent
hearing loss. If you experience any hearing loss or ringing in the
ears, consult a physician.
• Before connecting the unit to other devices, turn off the power
for all devices. Also, before turning the power of all devices on
or off, make sure that all volume levels are set to the minimum.
Failing to do so may result in hearing loss, electric shock, or
device damage.
• When turning on the AC power in your audio system, always
turn on the unit LAST, to avoid hearing loss and speaker
damage. When turning the power off, the unit should be turned
off FIRST for the same reason. Failure to observe the above
may cause hearing impairment or speaker damage.
Maintenance
• Remove the power plug from the AC outlet before cleaning the
unit. Failure to observe this may cause electric shocks.
Handling
• Do not touch the surface having this label. Doing
so may cause burns. The label on the device
indicates that the surface to which the label is
attached may become hot during operation.
• Do not insert your hand or fingers into the bass reflex located on
the right side of this unit. Failure to observe this may cause
injury.
• Do not insert foreign materials such as metal or paper into the
bass reflex located on the right side of this unit. Failure to
observe this may cause a fire, electric shocks, or malfunctions.
• Do not do the following:
– Stand on or sit on the equipment.
– Put heavy items on top of the equipment.
– Place the equipment in a stack.
– Apply unreasonable force to buttons, switches, input/output
terminals, etc.
Failure to observe this may cause injuries or damage to the
equipment.
• Avoid pulling the connected cables to prevent injuries or
damage to the unit by causing it to fall.
• Do not operate the unit if the sound is distorting. Prolonged use
in this condition could cause overheating and result in fire.
Notice
Indicates points that you must observe in order to
prevent product failure, damage or malfunction and data
loss.
Power supply
• If not using the unit for a long period of time, be sure to pull the
power plug from the outlet. Even if this unit is turned of by
(Standby/On), a minute current is still flowing.
[A]
Installation
• Do not use this unit in the vicinity of other electronic
equipment, such as a TV, radio, or mobile phone. Failure to
observe this may cause this unit or the TV or radio to produce
noise.
• Do not use this unit in a location that is exposed to direct
sunlight that becomes extremely hot, such as near a heater, or
extremely cold, or that is subject to excessive dust or vibration.
Failure to observe this may cause the unit’s panel to become
deformed, the internal components to malfunction, or for
operation to become unstable.
Connections
• If connecting external units, be sure to thoroughly read the
manual for each unit and connect them in accordance with the
instructions. Failure to properly handle a unit in accordance
with the instructions could cause malfunctions.
Handling
• Do not place vinyl, plastic, or rubber products on this unit.
Failure to observe this may cause discoloration or deformation
in the panel of this unit.
• If the ambient temperature changes drastically (such as during
unit transportation or under rapid heating or cooling) and there
is a chance condensation may have formed in the unit, leave the
unit for several hours without turning on the power until it is
completely dry before use. Using the unit while there is
condensation can cause malfunctions.
Maintenance
• If the temperature or humidity changes drastically, water
droplets (condensation) may form on the unit surface. If water
droplets form, immediately wipe them off with a soft cloth. If
water droplets are left on the unit, they may be absorbed into the
wooden parts, causing deformation.
• When cleaning the unit, use a dry, soft cloth. Using chemicals
such as benzine or thinner, cleaning agents, or chemical
scrubbing cloths can cause discoloration or deformation.
iii En
Information
WARNING
CAUTION
NOTICE
NOTE
1
2
About functions and data included in the
unit
• Air may be blown out from the bass reflex port. This is not a
malfunction. This occurs particularly often when outputting
music with heavy bass.
About content in this manual
• This manual is for the following readers:
– the users of the unit
• This manual uses the following signal words for the important
information:
This content indicates “risk of serious injury or death.”
This content indicates “risk of injury.”
Indicates points that you must observe in order to prevent product
failure, damage or malfunction and data loss, as well as to protect
the environment.
Indicates notes on instructions, restrictions on functions, and
additional information that may be helpful.
• The illustrations in this manual are for instructional purposes
only.
Information for users on collection and disposal of
old equipment:
This symbol on the products, packaging, and/or
accompanying documents means that used
electrical and electronic products should not be
mixed with general household waste.
For proper treatment, recovery and recycling of
old products, please take them to applicable
collection points, in accordance with your
national legislation.
By disposing of these products correctly, you
will help to save valuable resources and prevent
any potential negative effects on human health
and the environment which could otherwise arise
from inappropriate waste handling.
For more information about collection and
recycling of old products, please contact your
local municipality, your waste disposal service
or the point of sale where you purchased the
items.
For business users in the European Union:
If you wish to discard electrical and electronic
equipment, please contact your dealer or supplier
for further information.
Information on Disposal in other Countries
outside the European Union:
This symbol is only valid in the European Union.
If you wish to discard these items, please contact
your local authorities or dealer and ask for the
correct method of disposal.
The model number, serial number, power requirements, etc.,
may be found on or near the name plate, which is at the rear of
the unit. You should note this serial number in the space
provided below and retain this manual as a permanent record of
your purchase to aid identification in the event of theft.
CONTENTS
ADVANCED YAMAHA ACTIVE SERVO
TECHNOLOGY II .........................................................1
TWISTED FLARE PORT .............................................1
FEATURES......................................................................2
SUPPLIED ACCESSORY .............................................2
PLACEMENT .................................................................2
Subwoofer orientation ................................................2
CONTROLS AND THEIR FUNCTIONS.....................3
CONNECTIONS.............................................................5
Connecting to line output (pin jack) terminal(s)
of the amplifier ......................................................5
Connecting to speaker output terminals
of the amplifier ......................................................7
Connecting to the INPUT1/OUTPUT terminals of the
subwoofer
System connections ..................................................10
Plugging the subwoofer into an AC outlet
AUTOMATIC POWER-SWITCHING FUNCTION
Setting the AUTO STANDBY switch ......................10
ADJUSTING THE BALANCE....................................11
Subwoofer frequency characteristics........................13
TROUBLESHOOTING ...............................................14
SPECIFICATIONS.......................................................15
....................................................................9
......................10
.........10
English
Model No.
Serial No.
(rear_en_01)
iv En
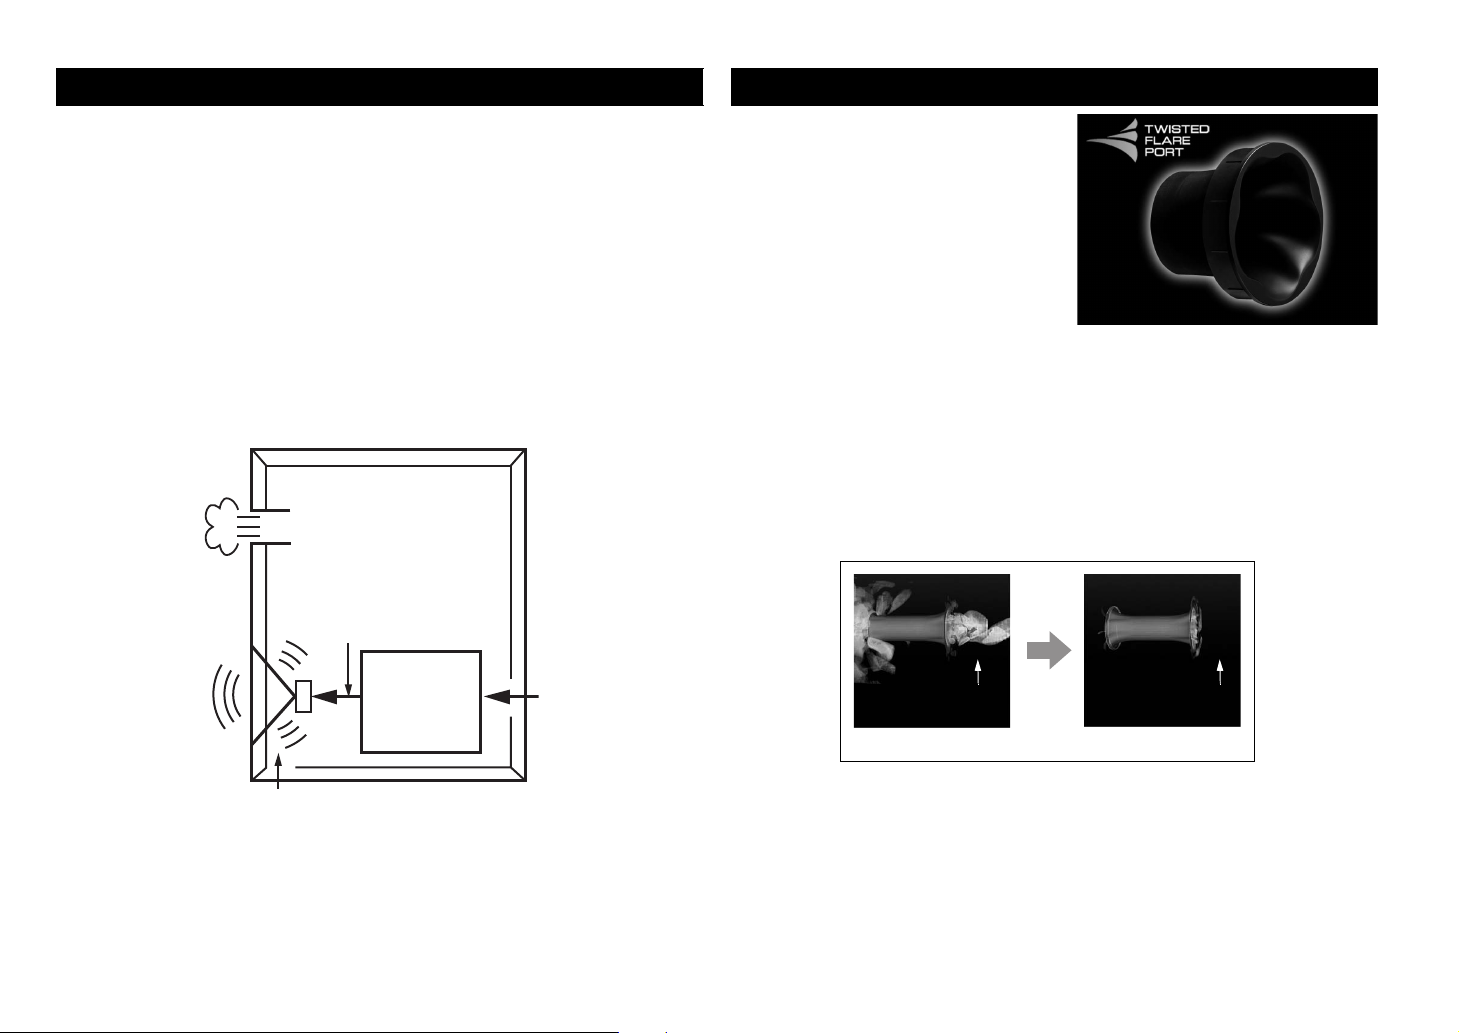
ADVANCED YAMAHA ACTIVE SERVO TECHNOLOGY II
High-amplitude
heavy bass sound
Por t
Cabinet
Advanced impedance
Converter
Active Servo
Processing
Amplifier
Air woofer
(Helmholtz resonator)
Signals
(Inaudible) signals of ultra-low amplitude
Bass sound
(audible sound
pressure radiated
from diaphragm)
Conventional Port
Air turbulence on both ends of the port creates noise
Air turbulence is
produced.
Turbulence is
diffused, air flow
becomes smooth.
Twisted Flare Port
In 1988, Yamaha brought to the marketplace speaker systems utilizing YST (Yamaha
Active Servo Technology) to give powerful, high quality bass reproduction. This technique
uses a direct connection between the amplifier and speaker, allowing accurate signal
transmission and precise speaker control.
As this technology uses speaker units controlled by the negative impedance drive of the
amplifier and resonance generated between the speaker cabinet volume and port, it creates
more resonant energy (the “air woofer” concept) than the standard bass reflex method. This
allows for bass reproduction from much smaller cabinets than was previously possible.
Yamaha’s newly developed Advanced YST II adds many refinements to Yamaha Active
Servo Technology, allowing better control of the forces driving the amplifier and speaker.
From the amplifier’s point of view, the speaker impedance changes depending on the sound
frequency. Yamaha developed a new circuit design combining negative-impedance and
constant-current drives, which provides a more stable performance and clear bass
reproduction, without any murkiness.
TWISTED FLARE PORT
Today’s bass reflex speakers use a Helmholtz
resonator to improve their bass reproduction.
However when reproducing bass that is in the
frequency region of this Helmholtz
resonator, air moves violently in and out
through the port between the interior and
exterior of the speaker, sometimes producing
noise due to the turbulent air flow at the end
of the port.
The port and the cabinet resonate at a
frequency that is determined by their
dimensions and shape. On the other hand,
turbulence in the air flow at the end of the port contains a broad range of frequency
components that are not present in the input signal. This noise occurs because the broad
range of frequency components includes components that match the resonant frequencies
of the port and cabinet, causing strong resonance.
The Twisted Flare Port developed by Yamaha changes the way in which the port widens
toward its end, and also adds a “twist” to suppress airflow turbulence at each end of the port
and thus prevent noise from occurring.
This substantially reduces the “muddy sound” and “wind noise” that until now have been
characteristic of bass reflex speakers, allowing bass to be reproduced clearly.
1 En
FEATURES
System control cable (5 m x 1)
A
B
C
AorBorC
NOTE
The placement shown in the figure below is also possible.
However, if the subwoofer system is placed directly facing a wall,
the bass effect may suffer due to phase cancellation caused by
the interference between the direct and reflected sounds.
To prevent this from happening, place the
subwoofer system at an angle.
(Figures , , and )
ABC
There may be a case that you
cannot obtain enough super-bass
sound from the subwoofer due to
standing waves.
• This subwoofer system employs Advanced Yamaha
Active Servo Technology II, which Yamaha has
developed for the production of higher quality, superbass sound. This super-bass sound adds a more realistic,
theater-in-the-home effect to your stereo system.
• This subwoofer can easily be added to your existing audio
system by connecting to either the speaker terminals or the
line output (pin jack) terminals of the amplifier.
• For effective use of the subwoofer, the subwoofer’s
super-bass sound should be matched to the sounds of
your front speakers. You can create the best sound
quality for various listening conditions by using the
HIGH CUT control and the PHASE switch.
• The Automatic power-switching function saves you the
trouble of pressing the STANDBY/ON button to turn the
power on and off.
• The subwoofer can be linked to a Yamaha component for
simultaneous power on/off operation.
Use the supplied system control cable to connect the
subwoofer to a Yamaha component that features a
system connector jack. When you turn on or off the
power to the connected component, the subwoofer will
also be turned on or off.
• The flared, gently twisting shape diffuses the vortex of
air generated around the edge of the port, creating a
smooth flow of air. This reduces extraneous noise not
present in the original input signal, and provides clear,
accurate low frequency reproduction.
• The subwoofer can also reproduce a bass sound that is
appropriate for the source. (NS-SW300 only)
It features a B.A.S.S. switch that enables you to select a
bass effect that is suitable for the source.
SUPPLIED ACCESSORY
After unpacking, check
that the following
accessory is contained.
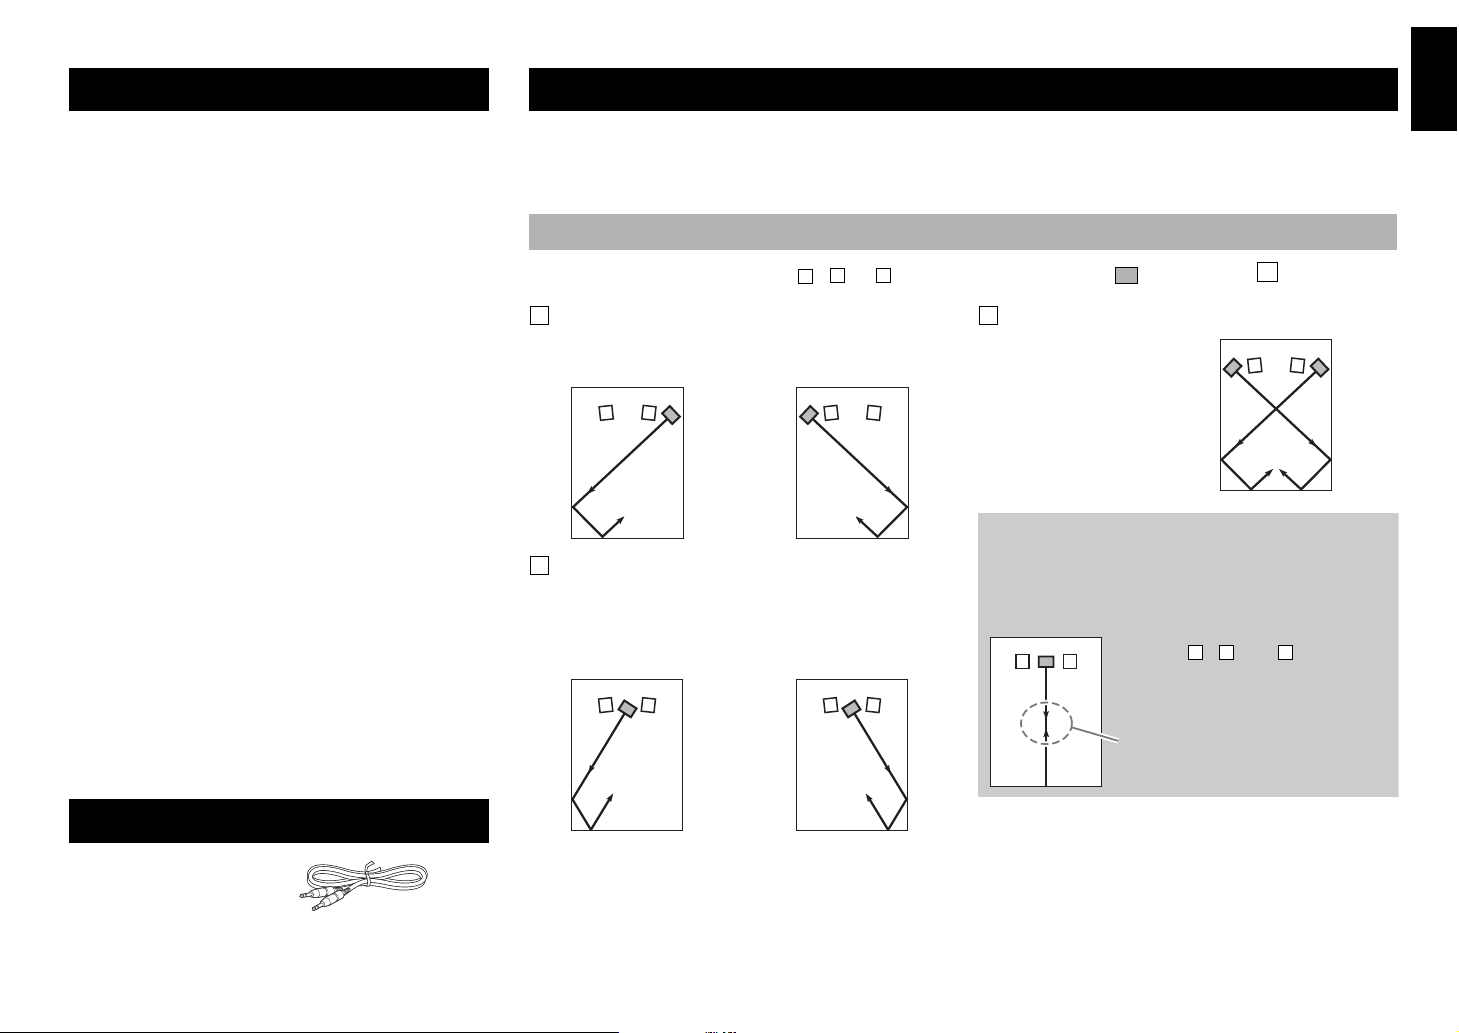
PLACEMENT
English
Since the low-end frequencies of audio signals feature long wavelengths, they are almost non-directional to human ears.
The super-bass range does not create a stereo image. Therefore, a single subwoofer may be enough to produce a highquality super-bass sound. However, using two subwoofers (similarly to L and R front speakers) can enhance your acoustic
experience.
Subwoofer orientation
Place the subwoofer as shown in fig. , or for the optimum effect. : subwoofer : front speaker
Using one subwoofer
Place the subwoofer on the outside of either the left or right
front speaker.
Using two subwoofers
Place them on the outside of
each front speaker.
Placing the subwoofer in between the left and
right front speakers
If you are placing the subwoofer in between the left and
right front speakers, position it slightly at an angle toward
the wall for better effect.
NOTE
• This unit features a magnetically shielded design. However, there is still a chance that placing it too close to a CRT-type TV set
might impair picture color. Should this happen, move this unit away from the TV set.
• If the speaker volume is very loud, furniture or window glass may resonate and the subwoofer itself may vibrate. In this case,
lower the volume level. To limit resonance, use a thick curtain or similar cloth that tends to absorb sound vibrations effectively.
Also, changing the subwoofer position may be helpful.
2 En
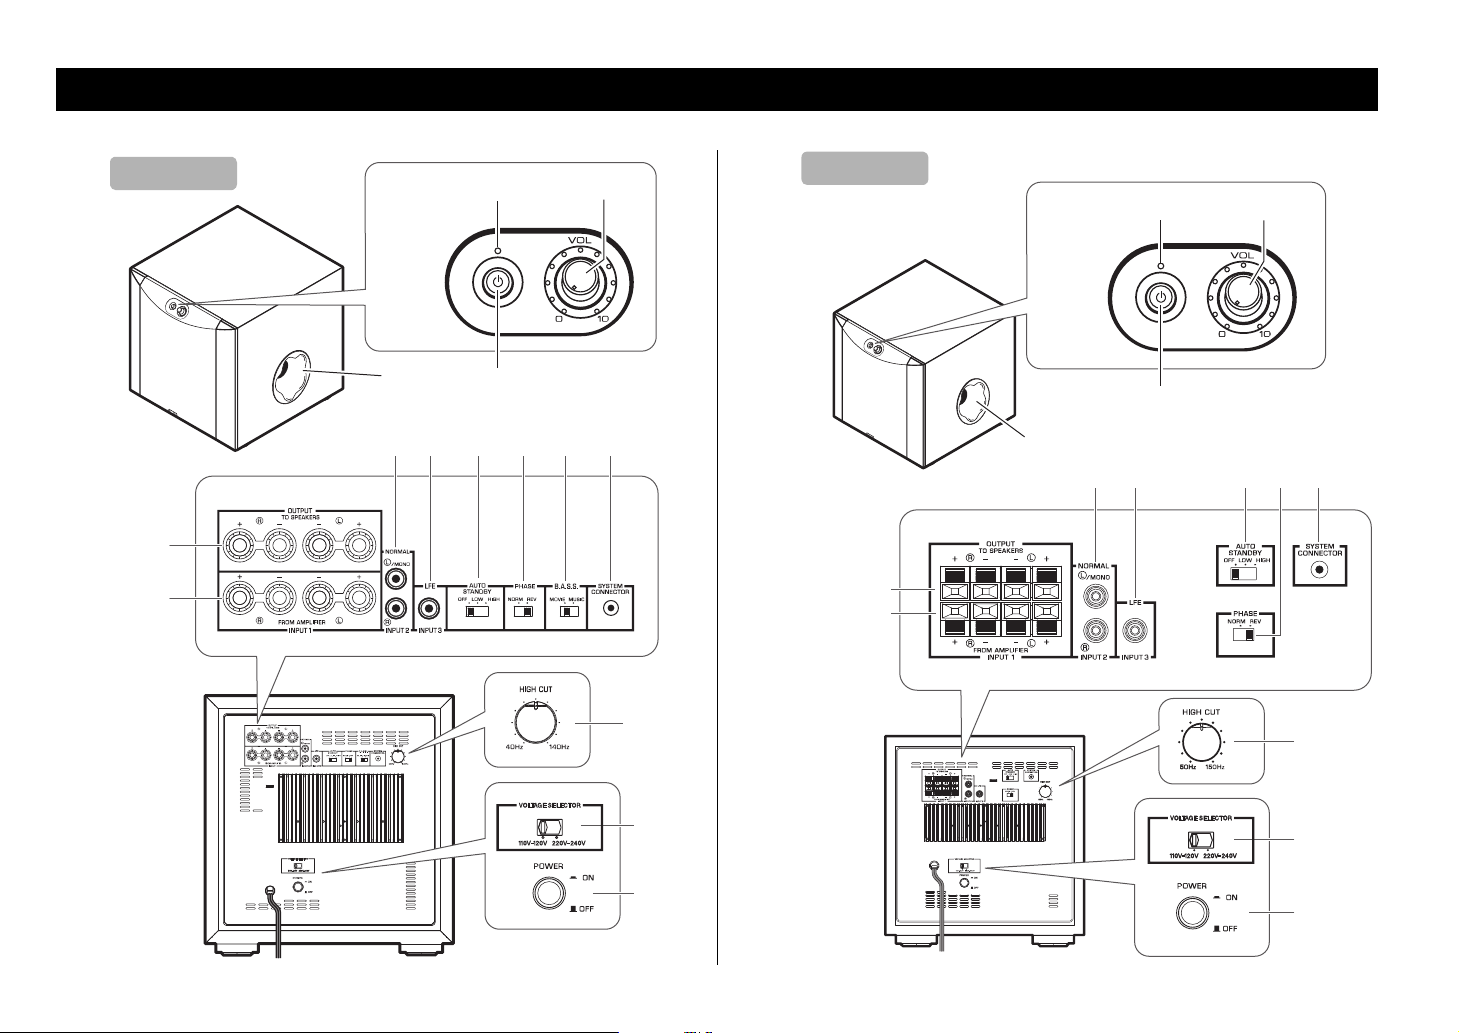
CONTROLS AND THEIR FUNCTIONS
Top
C
E
D
A
B
56 7 8 9 <
Rear
NS-SW300
Front
C
D
E
A
B
678<5
1
2
3
4
Front
Rear
Top
NS-SW200
Check the model number of your subwoofer on the label on the rear panel.
4
1
3
2
3 En
CONTROLS AND THEIR FUNCTIONS
* One graduation
of this control
represents 10 Hz.
1 Indicator
Green:
Red:
The subwoofer is turned on.
The Automatic power-switching function has activated, and the subwoofer
is in standby mode.
Off:
The subwoofer is turned off.
2 VOLUME control ( page 11)
Adjusts the volume level. Turn the control clockwise to increase the volume, and
counterclockwise to decrease the volume.
3 STANDBY/ON switch
While the POWER switch is ON, press this switch to turn on the power to the
subwoofer. The indicator will light up green. Press the switch again to turn off the
power to the subwoofer. The indicator will turn off.
The subwoofer uses a small amount of power in standby mode.
4 Port ( page 1)
Outputs super-bass sound.
5 INPUT2 (NORMAL) terminals ( page 5)
Used to input line level signals from the amplifier.
6 INPUT3 (LFE) terminal ( page 6)
If your amplifier (or receiver) can cut off high frequencies from signals sent to the
subwoofer, connect the amplifier to the subwoofer’s INPUT3 (LFE) terminal.
The HIGH CUT control m has no effect on signals input to the INPUT 3 LFE terminal.
7 AUTO STANDBY (HIGH/LOW/OFF) switch ( page 10)
This switch is originally set to the OFF position. By setting this switch to the HIGH or
LOW position, the subwoofer’s automatic power-switching function operates. If you
do not need this function, leave this switch in the OFF position.
NOTE
Be sure to set the POWER switch to OFF before you set the AUTO STANDBY switch.
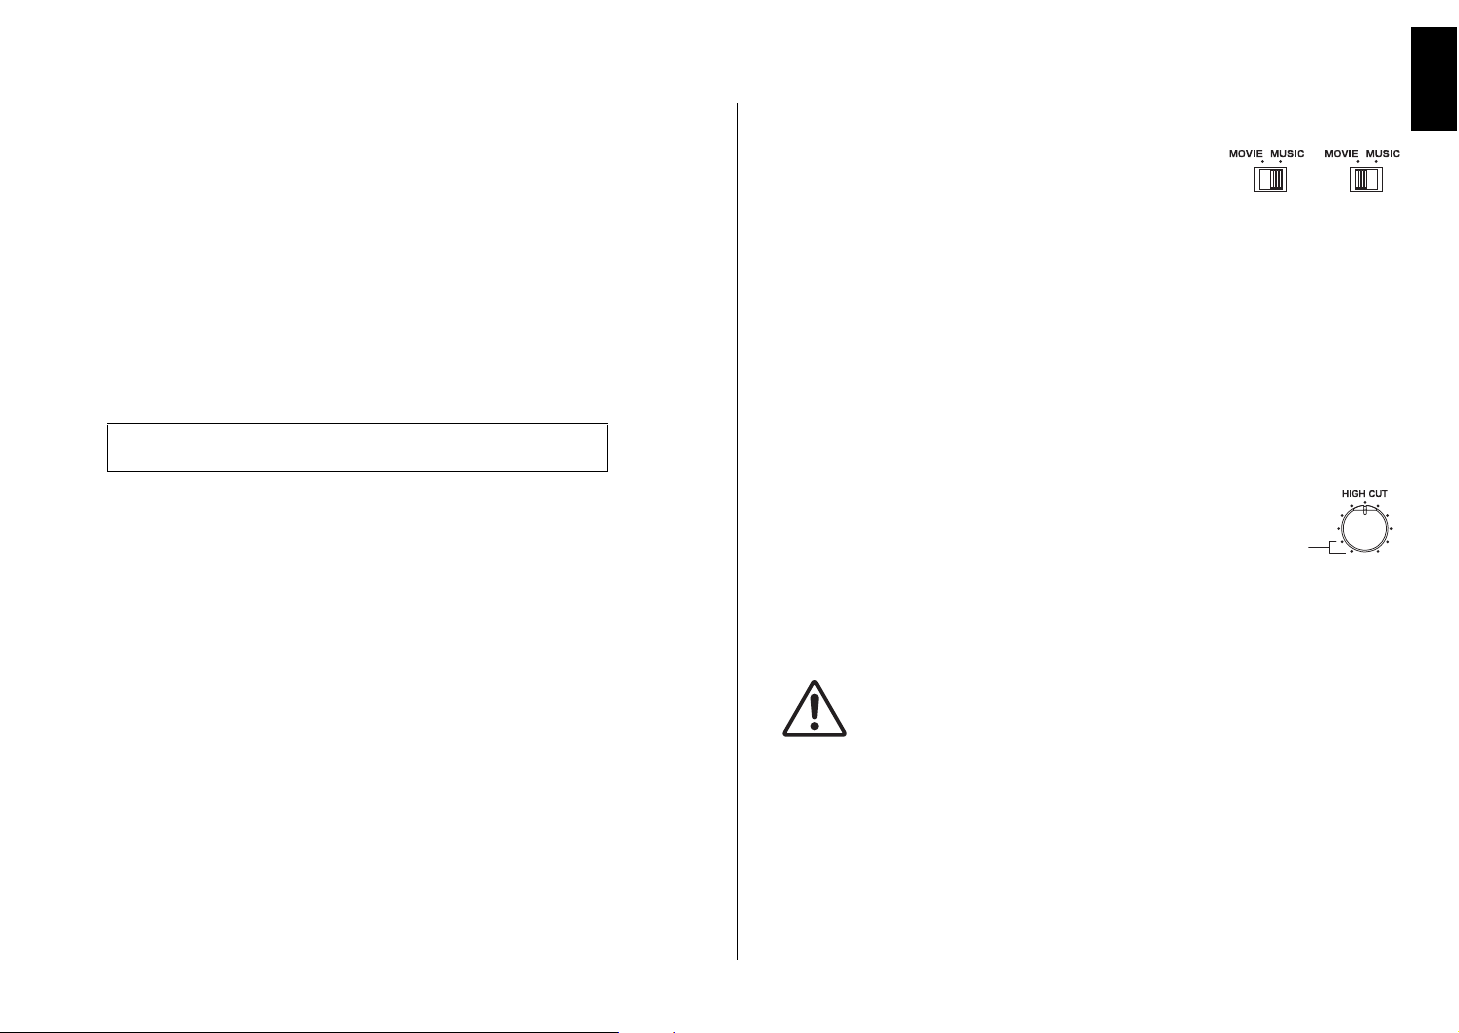
9 B.A.S.S. (Bass Action Selector System) switch (NS-SW300 only)
( page 11)
When this switch is set to MUSIC, the bass sound in audio
software is well reproduced. When the switch is set to
MOVIE, the bass sound in video software is well reproduced.
j SYSTEM CONNECTOR jack ( page 10)
Connect the supplied system control cable here. If you use the system control cable to
connect a subwoofer to a Yamaha component (that features a system connector jack),
turning on or off the power to the connected component automatically turns the
subwoofer on or off.
k OUTPUT (TO SPEAKERS) terminals ( page 7)
Can be used for connecting to the main speakers. Signals at the INPUT1 terminals are
sent to these terminals.
l INPUT1 (FROM AMPLIFIER) terminals ( page 7)
Used to connect the subwoofer with the speaker terminals of the amplifier.
m HIGH CUT control ( page 11)
Adjusts the high frequency cut off point.
Frequencies higher than the frequency selected by this
control are all cut off (and not output).
n VOLTAGE SELECTOR switch
(Asia, General and Brazil models only)
Make sure you set VOLTAGE SELECTOR of the unit BEFORE plugging the power
cable into an AC wall outlet. Improper setting of VOLTAGE SELECTOR may cause
damage to the unit and create a potential fire hazard.
WARNING
Before plugging in the power cable
Set the switch position of VOLTAGE SELECTOR according to your local voltage.
Voltages are AC 110–120/220–240 V, 50/60 Hz.
o POWER switch
During normal usage, set this switch to ON. If you plan not to use the subwoofer for a long
period of time, set the switch to OFF.
English
8 PHASE switch ( page 11)
This switch is to be set to the REV (reverse) position. However, depending on your speaker
system or listening conditions, there may be a case when better sound quality is obtained by
setting this switch to the NORM (normal) position. Select the best position by ear.
4 En
CONNECTIONS
1
2
1
1
2
1 Mono pin cable
2 Audio pin cable
Subwoofer
Amplifier or
receiver
NS-SW300
1
2
1
Mono pin cable
2 Audio pin cable
Subwoofer
Amplifier or
receiver
NS-SW200
Choose one of the following connection methods most suitable for your audio system.
Choose this method if your amplifier has line output (pin jack) terminal(s).
( page 5, 6)
Choose this method if your amplifier has no line output (pin jack)
terminals. ( page 7, 8)
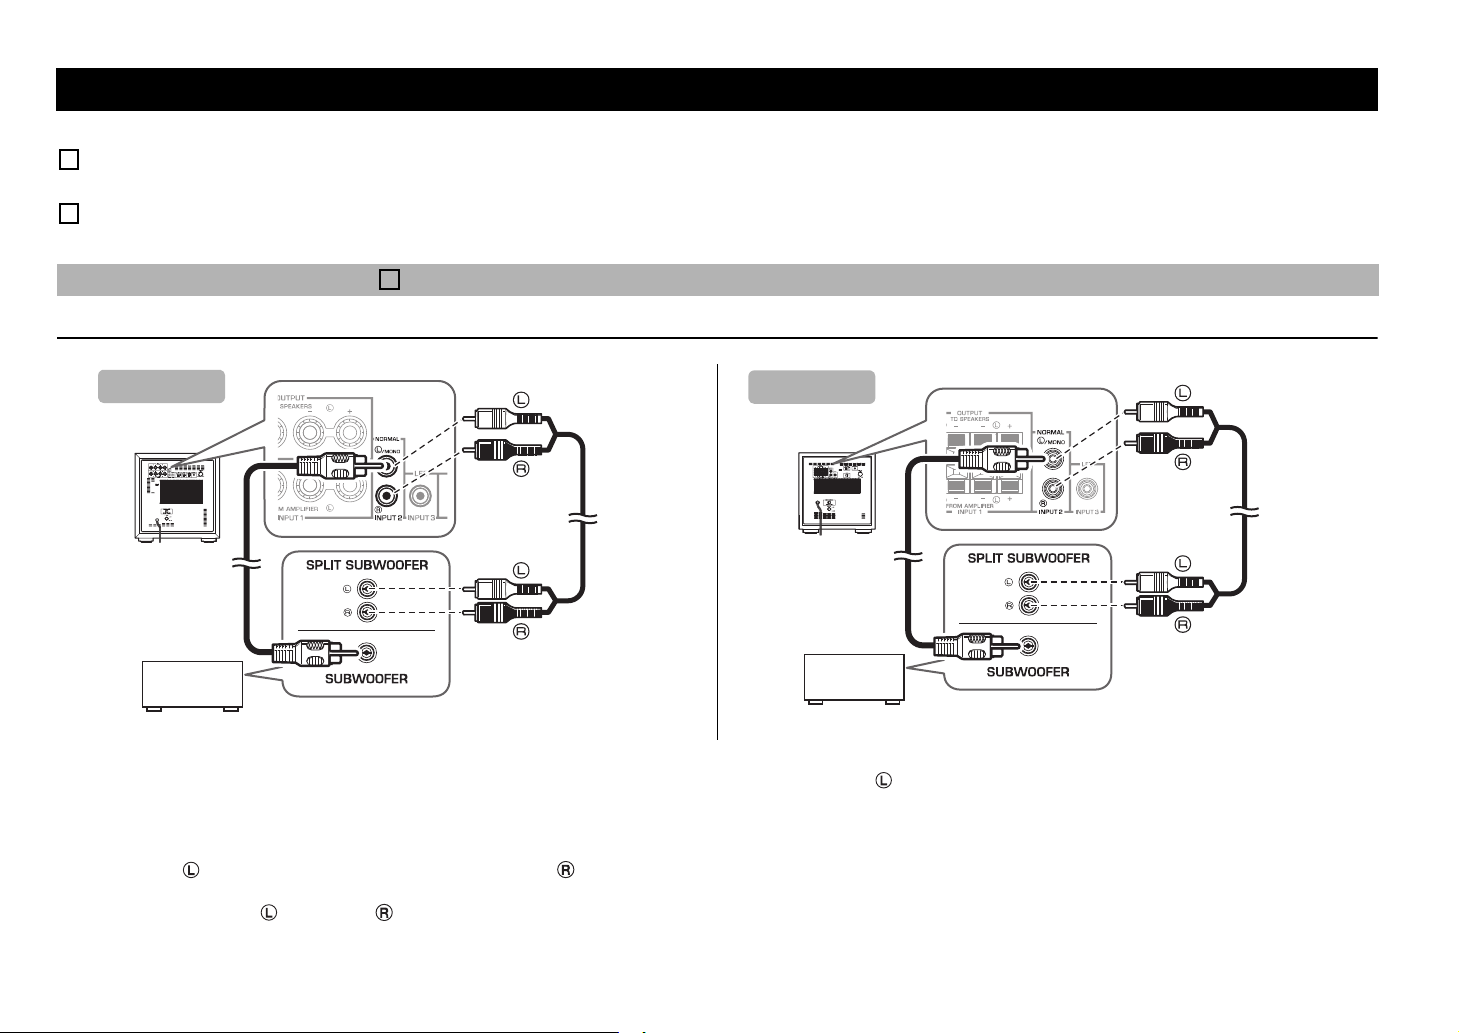
Connecting to line output (pin jack) terminal(s) of the amplifier
Example: Connecting one subwoofer
NOTICE
• Unplug the subwoofer and other audio/video components before making connections, and do
not plug them in until all connections are completed.
• Connecting methods and terminal names on your component (such as an amplifier or receiver)
may be different from those used in this book. Please refer to the owner’s manual that came
with your component.
• All connections must be correct, that is to say L (left) to L; R (right) to R; “+” to “+” and “–” to “–”.
Use a commercially-available Mono pin cable (1) or a commercially-available Audio pin cable (2) to make the connections.
• Connect the SUBWOOFER (or LOW PASS, etc.) terminal on the rear of the amplifier (or AV receiver) to the /MONO INPUT2 terminal of the subwoofer using a commerciallyavailable Mono pin cable (1).
Alternatively,
•
When connecting the subwoofer to the SPLIT SUBWOOFER terminals (
to connect the
NOTE
Audio signals input from the /MONO and INPUT 2 terminals on the subwoofer will not be output from the OUTPUT (TO SPEAKERS) terminals.
5 En
/MONO INPUT2 terminal to the “L” side, and the INPUT2 terminal to the “R” side of the SPLIT SUBWOOFER terminals.
featuring L and R channels) on the rear panel of the amplifier, use a commercially-available Audio pin cable (2)
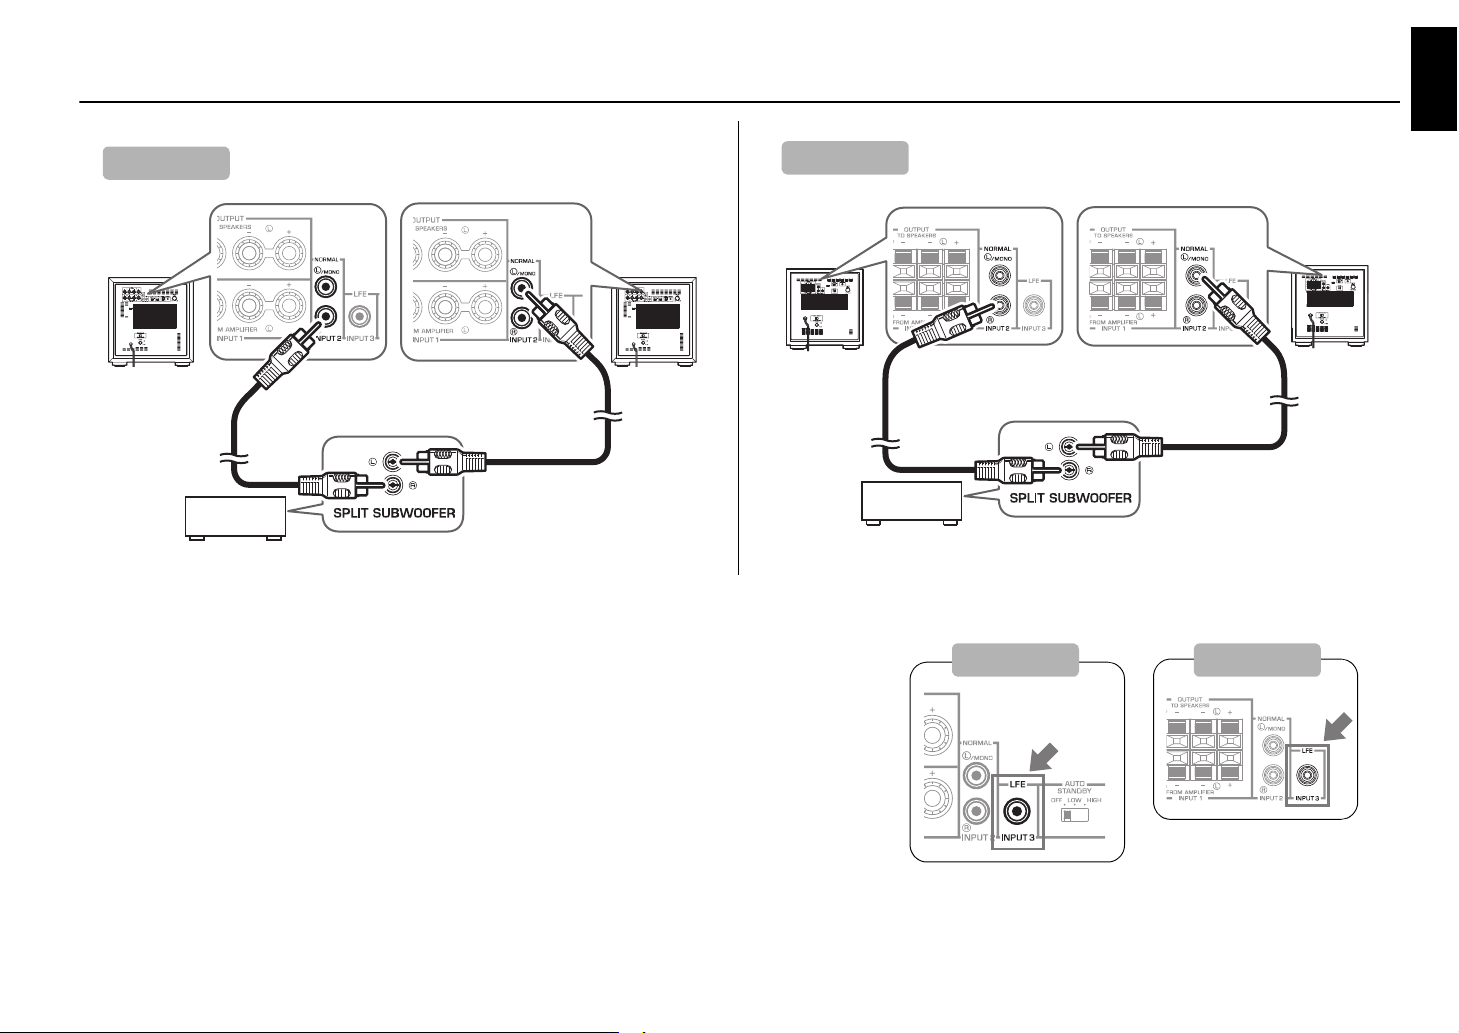
Example: Connecting two subwoofers
1
1 Mono pin cable
1
Subwoofer
Subwoofer
Amplifier or
receiver
NS-SW300
1 Mono pin cable
1
1
Subwoofer
Subwoofer
Amplifier or
receiver
NS-SW200
NS-SW300 NS-SW200
Connecting to the INPUT3 (LFE) terminal
If your amplifier (or receiver) can cut off high frequencies from signals sent to the subwoofer, connect the
amplifier to the subwoofer’s INPUT3 (LFE) terminal.
This will promote higher sound quality because the signal routing in the subwoofer is shortened by bypassing
the built-in HIGH CUT circuit.
English
6 En

Connecting to speaker output terminals of the amplifier
2
Right front
speaker
Subwoofer
Amplifier or
receiver
Speaker output
terminals
Left front
speaker
NS-SW300
Right front
speaker
Left front
speaker
Speaker output
terminals
Amplifier or
receiver
Subwoofer
NS-SW200
° Example: Connecting the subwoofer to an amplifier that features one set of speaker output terminals
Use speaker cables to connect the speaker output terminals of the amplifier to the subwoofer’s INPUT 1 (FROM AMPLIFIER) terminals. Connect the front speakers to the subwoofer’s
OUTPUT (TO SPEAKERS) terminals. Although the subwoofer is connected between the front speakers and the amplifier, the sound volume or quality will not be affected.
Connecting one subwoofer
7 En
 Loading...