

Yamaha NS-SW300, NS-SW200 Users guide
Subwoofer
Caisson de grave
Сабвуфер
NS-SW300
NS-SW200
GS
EnglishFrançaisDeutschSvenskaItalianoEspañolNederlandsPortuguêsРусский
Owner’s Manual
Mode d’emploi
Benutzerhandbuch
Bruksanvisning
Manuale di istruzioni
Manual de instrucciones
Gebruikershandleiding
Manual do Proprietário
Руководство пользователя
EN
FR
DE
SV
IT
ES
NL
PT
RU

PRECAUTIONS
PLEASE READ CAREFULLY BEFORE
USE.
BE SURE TO FOLLOW THESE
INSTRUCTIONS.
The precautions listed below are to prevent risk of harm
to the user and others, as well as to prevent property
damage, and to help the user use this unit properly and
safely. Be sure to follow these instructions.
After reading this manual, be sure to keep it in a safe place where
it can be referenced at any time.
• Be sure to request inspections or repairs from the dealer where
you purchased the unit or from qualified Yamaha service
personnel.
• Yamaha cannot be held responsible for injury to you or
damage of the products caused by improper use or
modifications to the unit.
• This product is for ordinary homes. Do not use for applications
requiring high reliability, such as managing lives, health care
or high-value assets.
WARNING
This content indicates “risk of serious injury or death.”
If you notice any abnormality
• If any of the following abnormalities occur, immediately turn
off the power and disconnect the power plug.
– The power cord/plug is damaged.
– An unusual smell or smoke is emitted from the unit.
– Foreign material gets into the interior of the unit.
– There is a loss of sound during use.
– There is a crack or damage in the unit.
Continued use could cause electric shocks, a fire, or
malfunctions. Immediately request an inspection or repair from
the dealer where you purchased the unit or from qualified
Yamaha service personnel.
Power supply
• Do not do anything that could damage the power cord.
– Do not place it near a heater.
– Do not bend it excessively or alter it.
– Do not scratch it.
– Do not place it under a heavy object.
Using the power cord with the core of the cord exposed could
cause electric shocks or a fire.
• Do not touch the power plug or cord if there is a chance of
lightning. Failure to observe this may cause electric shocks.
• Use this unit with the power supply voltage printed on it. Failure
to connect to an appropriate AC outlet may cause a fire, electric
shocks, or malfunctions.
• Check the electric plug periodically and remove any dirt or dust
which may have accumulated on it. Failure to observe this may
cause a fire or electric shocks.
• When setting up the unit, make sure that the AC outlet you are
using is easily accessible. If some trouble or malfunction occurs,
immediately turn off the power switch and disconnect the plug
from the AC outlet. Even when the power switch is turned off,
as long as the power cord is not unplugged from the wall AC
outlet, the unit will not be disconnected from the power source.
• If you hear thunder or suspect approaching lightning, quickly
turn off the power switch and pull the power plug from the AC
outlet. Failure to observe this may cause a fire or malfunctions.
• If not using the unit for long periods of time, be sure to pull the
power plug from the AC outlet. Failure to observe this may
cause a fire or malfunctions.
Installation
• Always fix the speaker cable to a wall or similar. If you catch
your feet or hands on the cable, the speakers may fall or
overturn, causing malfunctions or injuries.
Do not disassemble
• Do not disassemble or modify this unit. Failure to observe this
may cause a fire, electric shocks, injury, or malfunctions.
Water warning
• Do not expose the unit to rain, use it near water or in damp or
wet conditions, or place on it any containers (such as vases,
bottles or glasses) containing liquids which might spill into any
openings or places where water may drop. A liquid such as
water getting into the unit may cause a fire, electric shocks, or
malfunctions.
• Never insert or remove an electric plug with wet hands. Do not
handle this unit with wet hands. Failure to observe this may
cause electric shocks or malfunctions.
Fire warning
• Do not place any burning items or open flames near the unit,
since they may cause a fire.
Handling caution
• Be careful not to drop or apply strong impact to this unit. Failure
to observe this may cause electric shocks, a fire, or
malfunctions.
CAUTION
This content indicates “risk of injury.”
Power supply
• Do not use an AC outlet where the power plug fits loosely when
inserted. Failure to observe this may cause a fire, electric
shocks, or burns.
• When disconnecting the power plug, always hold the plug itself
and not the cord. Pulling by the cord can damage it and cause
electric shocks or a fire.
• Insert the power plug firmly all the way into the AC outlet.
Using the unit when it is not plugged in sufficiently can cause
dust to accumulate on the plug, causing a fire or burns.
English
i En
Installation
• Do not place the unit in an unstable position where it might
accidentally drop or fall over and cause injuries.
• When installing this unit, do not obstruct heat dissipation.
– Do not cover it with any cloth.
– Do not block this unit’s ventilation holes (cooling slits).
– Do not install the unit in other ways than indicated.
– Do not use the device in a confined, poorly-ventilated location
Failure to observe the above may trap heat inside the unit,
causing a fire or malfunctions. Ensure that there is adequate
space around the unit: at least 20 cm (8 in) on top, 20 cm (8 in)
on the sides, and 20 cm (8 in) on the rear.
• Avoid being near the unit during a disaster, such as an
earthquake. Since the unit may turn over or fall and cause injury,
quickly move away from the unit and go to a safe place.
• When transporting or moving the unit always use two or more
people. Attempting to lift the unit by yourself may damage your
back, result in other injury, or cause damage to the unit itself.
• Before moving this unit, be sure to turn off the power switch
and disconnect all connection cables. Failure to observe this
may damage the cables or cause you or someone else to trip and
fall.
Hearing loss
• Do not use the unit for a long period of time at a high or
uncomfortable volume level, since this can cause permanent
hearing loss. If you experience any hearing loss or ringing in the
ears, consult a physician.
• Before connecting the unit to other devices, turn off the power
for all devices. Also, before turning the power of all devices on
or off, make sure that all volume levels are set to the minimum.
Failing to do so may result in hearing loss, electric shock, or
device damage.
• When turning on the AC power in your audio system, always
turn on the unit LAST, to avoid hearing loss and speaker
damage. When turning the power off, the unit should be turned
off FIRST for the same reason. Failure to observe the above
may cause hearing impairment or speaker damage.
Maintenance
• Remove the power plug from the AC outlet before cleaning the
unit. Failure to observe this may cause electric shocks.
Handling
• Do not touch the surface having this label. Doing
so may cause burns. The label on the device
indicates that the surface to which the label is
attached may become hot during operation.
• Do not insert your hand or fingers into the bass reflex located on
the right side of this unit. Failure to observe this may cause
injury.
• Do not insert foreign materials such as metal or paper into the
bass reflex located on the right side of this unit. Failure to
observe this may cause a fire, electric shocks, or malfunctions.
• Do not do the following:
– Stand on or sit on the equipment.
– Put heavy items on top of the equipment.
– Place the equipment in a stack.
– Apply unreasonable force to buttons, switches, input/output
terminals, etc.
Failure to observe this may cause injuries or damage to the
equipment.
• Avoid pulling the connected cables to prevent injuries or
damage to the unit by causing it to fall.
• Do not operate the unit if the sound is distorting. Prolonged use
in this condition could cause overheating and result in fire.
Notice
Indicates points that you must observe in order to
prevent product failure, damage or malfunction and data
loss.
Power supply
• If not using the unit for a long period of time, be sure to pull the
power plug from the outlet. Even if this unit is turned of by
[A] (Standby/On), a minute current is still flowing.
Installation
• Do not use this unit in the vicinity of other electronic
equipment, such as a TV, radio, or mobile phone. Failure to
observe this may cause this unit or the TV or radio to produce
noise.
• Do not use this unit in a location that is exposed to direct
sunlight that becomes extremely hot, such as near a heater, or
extremely cold, or that is subject to excessive dust or vibration.
Failure to observe this may cause the unit’s panel to become
deformed, the internal components to malfunction, or for
operation to become unstable.
Connections
• If connecting external units, be sure to thoroughly read the
manual for each unit and connect them in accordance with the
instructions.
• Failure to properly handle a unit in accordance with the
instructions could cause malfunctions.
Handling
• Do not place vinyl, plastic, or rubber products on this unit.
Failure to observe this may cause discoloration or deformation
in the panel of this unit.
• If the ambient temperature changes drastically (such as during
unit transportation or under rapid heating or cooling) and there
is a chance condensation may have formed in the unit, leave the
unit for several hours without turning on the power until it is
completely dry before use. Using the unit while there is
condensation can cause malfunctions.
Maintenance
• If the temperature or humidity changes drastically, water
droplets (condensation) may form on the unit surface. If water
droplets form, immediately wipe them off with a soft cloth. If
water droplets are left on the unit, they may be absorbed into the
wooden parts, causing deformation.
• When cleaning the unit, use a dry, soft cloth. Using chemicals
such as benzine or thinner, cleaning agents, or chemical
scrubbing cloths can cause discoloration or deformation.
ii En
Information
WARNING
CAUTION
NOTICE
NOTE
1
2
About functions and data included in the
unit
• Air may be blown out from the bass reflex port. This is not a
malfunction. This occurs particularly often when outputting
music with heavy bass.
About content in this manual
• This manual is for the following readers:
– the users of the unit
• This manual uses the following signal words for the important
information:
This content indicates “risk of serious injury or death.”
This content indicates “risk of injury.”
Indicates points that you must observe in order to prevent product
failure, damage or malfunction and data loss, as well as to protect
the environment.
Indicates notes on instructions, restrictions on functions, and
additional information that may be helpful.
• The illustrations in this manual are for instructional purposes
only.
Information for users on collection and disposal of
old equipment:
This symbol on the products, packaging, and/or
accompanying documents means that used
electrical and electronic products should not be
mixed with general household waste.
For proper treatment, recovery and recycling of
old products, please take them to applicable
collection points, in accordance with your
national legislation.
By disposing of these products correctly, you
will help to save valuable resources and prevent
any potential negative effects on human health
and the environment which could otherwise arise
from inappropriate waste handling.
For more information about collection and
recycling of old products, please contact your
local municipality, your waste disposal service
or the point of sale where you purchased the
items.
For business users in the European Union:
If you wish to discard electrical and electronic
equipment, please contact your dealer or supplier
for further information.
Information on Disposal in other Countries
outside the European Union:
This symbol is only valid in the European Union.
If you wish to discard these items, please contact
your local authorities or dealer and ask for the
correct method of disposal.
The model number, serial number, power requirements, etc.,
may be found on or near the name plate, which is at the rear of
the unit. You should note this serial number in the space
provided below and retain this manual as a permanent record of
your purchase to aid identification in the event of theft.
CONTENTS
ADVANCED YAMAHA ACTIVE SERVO
TECHNOLOGY II .........................................................1
TWISTED FLARE PORT .............................................1
FEATURES......................................................................2
SUPPLIED ACCESSORY .............................................2
PLACEMENT .................................................................2
Subwoofer orientation ................................................2
CONTROLS AND THEIR FUNCTIONS.....................3
CONNECTIONS.............................................................5
Connecting to line output (pin jack) terminal(s)
of the amplifier ......................................................5
Connecting to speaker output terminals
of the amplifier ......................................................7
Connecting to the INPUT1/OUTPUT terminals of the
subwoofer
System connections ..................................................10
Plugging the subwoofer into an AC outlet
AUTOMATIC POWER-SWITCHING FUNCTION
Setting the AUTO STANDBY switch ......................10
ADJUSTING THE BALANCE....................................11
Subwoofer frequency characteristics ........................13
TROUBLESHOOTING ...............................................14
SPECIFICATIONS.......................................................15
....................................................................9
......................10
.........10
English
Model No.
Serial No.
(rear_en_01)
iii En
ADVANCED YAMAHA ACTIVE SERVO TECHNOLOGY II
High-amplitude
heavy bass sound
Por t
Cabinet
Advanced impedance
Converter
Active Servo
Processing
Amplifier
Air woofer
(Helmholtz resonator)
Signals
(Inaudible) signals of ultra-low amplitude
Bass sound
(audible sound
pressure radiated
from diaphragm)
Conventional Port
Air turbulence on both ends of the port creates noise
Air turbulence is
produced.
Turbulence is
diffused, air flow
becomes smooth.
Twisted Flare Port
In 1988, Yamaha brought to the marketplace speaker systems utilizing YST (Yamaha
Active Servo Technology) to give powerful, high quality bass reproduction. This technique
uses a direct connection between the amplifier and speaker, allowing accurate signal
transmission and precise speaker control.
As this technology uses speaker units controlled by the negative impedance drive of the
amplifier and resonance generated between the speaker cabinet volume and port, it creates
more resonant energy (the “air woofer” concept) than the standard bass reflex method. This
allows for bass reproduction from much smaller cabinets than was previously possible.
Yamaha’s newly developed Advanced YST II adds many refinements to Yamaha Active
Servo Technology, allowing better control of the forces driving the amplifier and speaker.
From the amplifier’s point of view, the speaker impedance changes depending on the sound
frequency. Yamaha developed a new circuit design combining negative-impedance and
constant-current drives, which provides a more stable performance and clear bass
reproduction, without any murkiness.
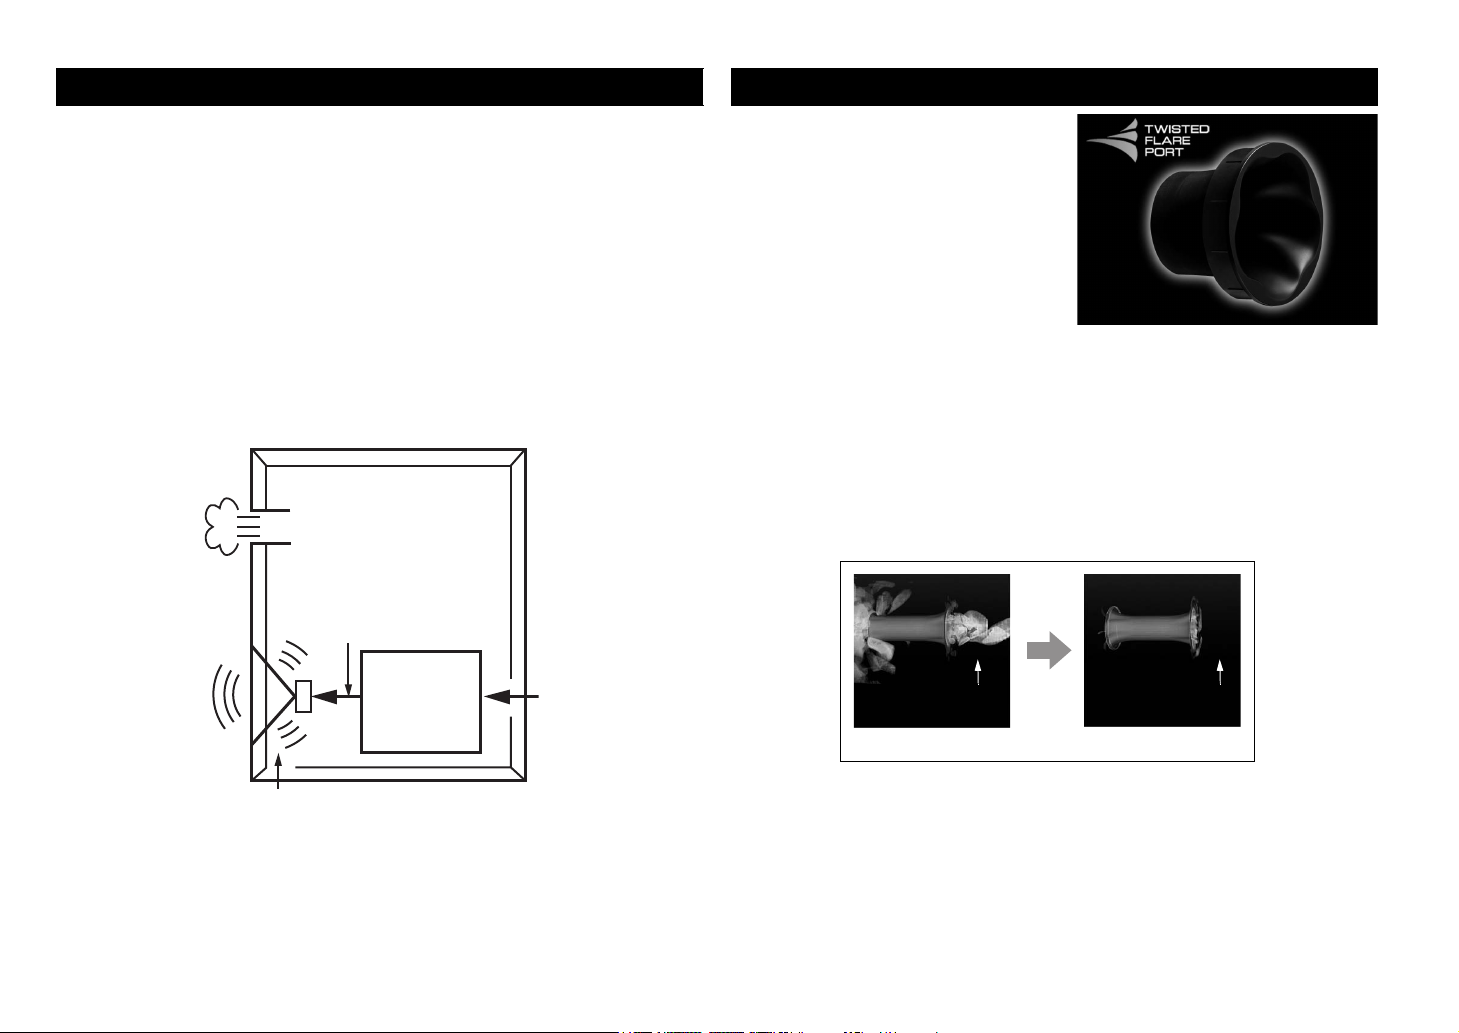
TWISTED FLARE PORT
Today’s bass reflex speakers use a Helmholtz
resonator to improve their bass reproduction.
However when reproducing bass that is in the
frequency region of this Helmholtz
resonator, air moves violently in and out
through the port between the interior and
exterior of the speaker, sometimes producing
noise due to the turbulent air flow at the end
of the port.
The port and the cabinet resonate at a
frequency that is determined by their
dimensions and shape. On the other hand,
turbulence in the air flow at the end of the port contains a broad range of frequency
components that are not present in the input signal. This noise occurs because the broad
range of frequency components includes components that match the resonant frequencies
of the port and cabinet, causing strong resonance.
The Twisted Flare Port developed by Yamaha changes the way in which the port widens
toward its end, and also adds a “twist” to suppress airflow turbulence at each end of the port
and thus prevent noise from occurring.
This substantially reduces the “muddy sound” and “wind noise” that until now have been
characteristic of bass reflex speakers, allowing bass to be reproduced clearly.
1 En
FEATURES
System control cable (5 m x 1)
A
B
C
AorBorC
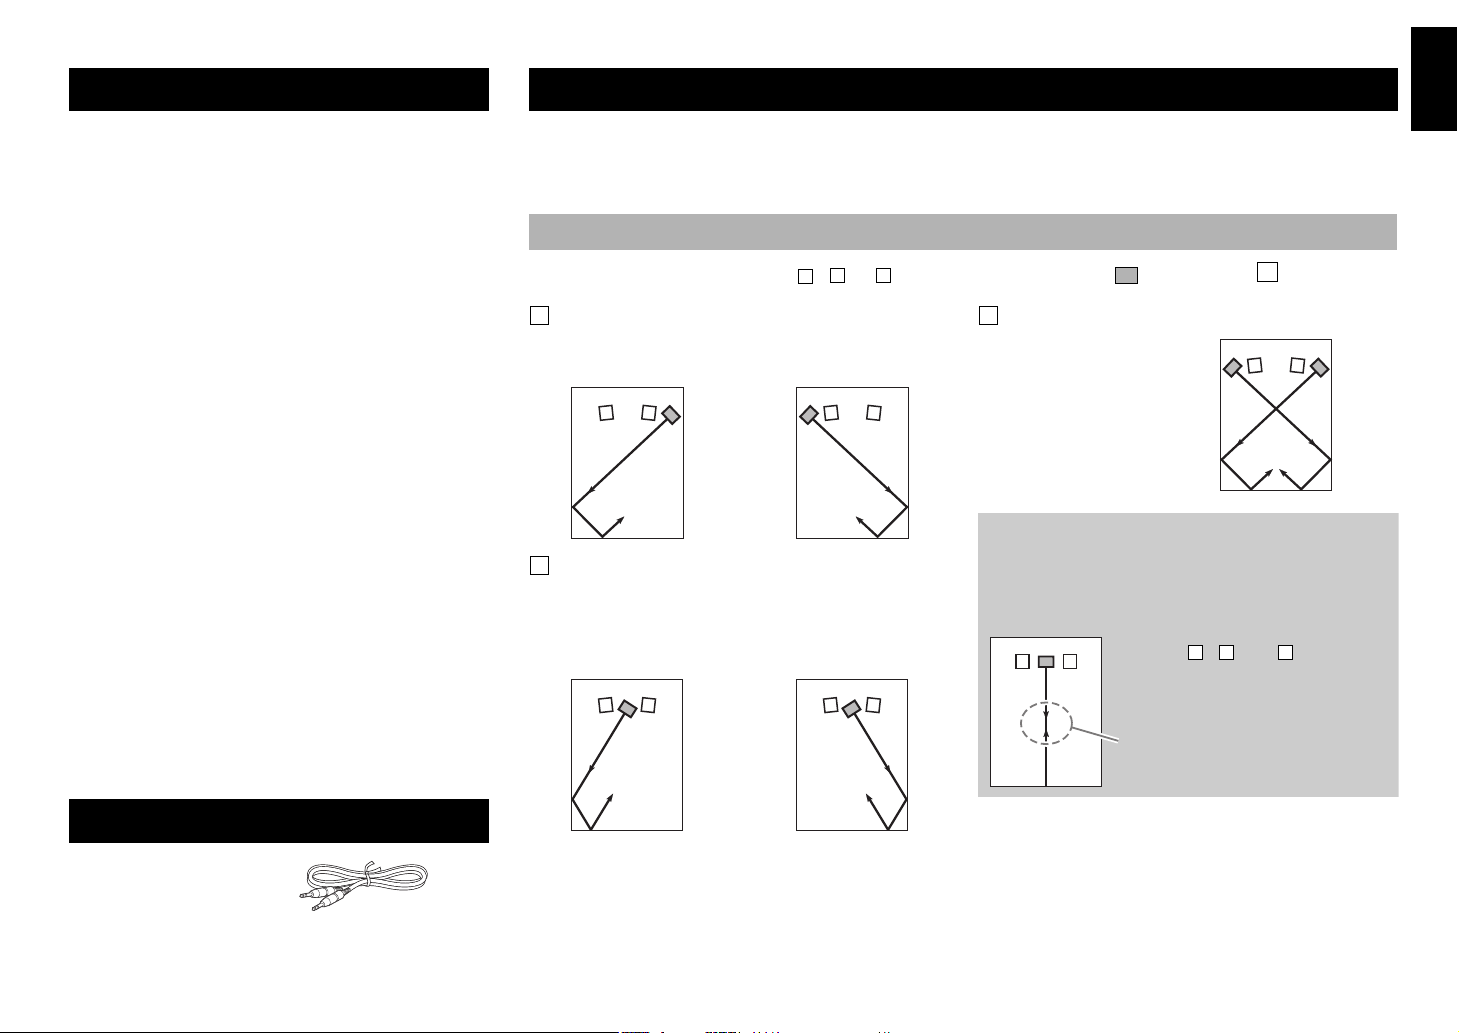
NOTE
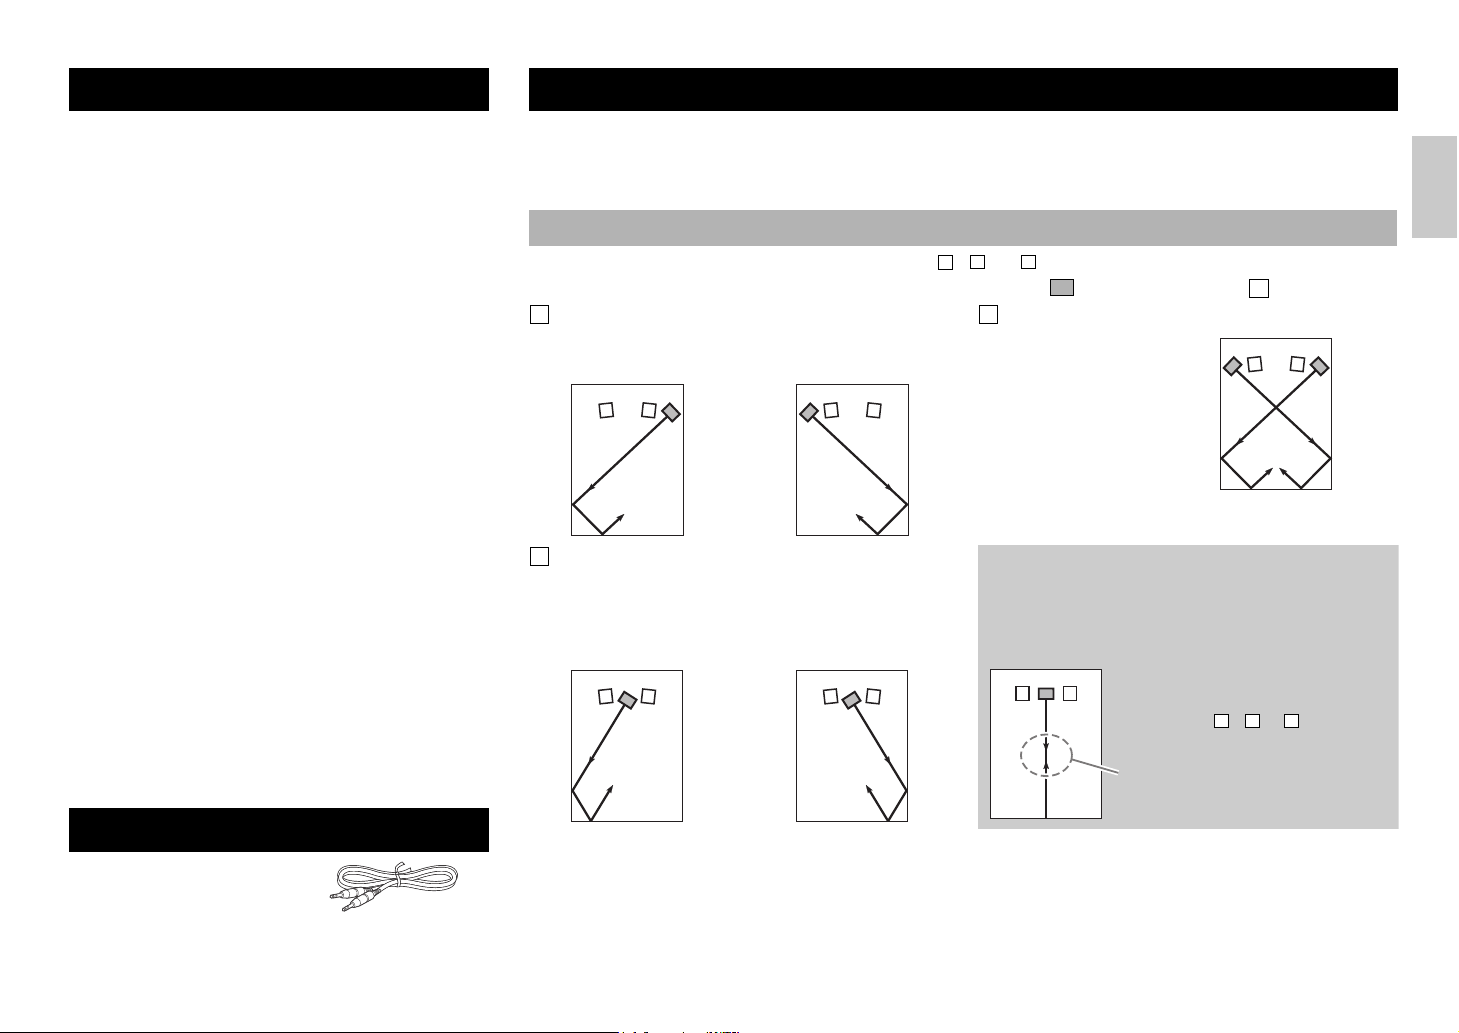
The placement shown in the figure below is also possible.
However, if the subwoofer system is placed directly facing a wall,
the bass effect may suffer due to phase cancellation caused by
the interference between the direct and reflected sounds.
To prevent this from happening, place the
subwoofer system at an angle.
(Figures , , and )
ABC
There may be a case that you
cannot obtain enough super-bass
sound from the subwoofer due to
standing waves.
• This subwoofer system employs Advanced Yamaha
Active Servo Technology II, which Yamaha has
developed for the production of higher quality, superbass sound. This super-bass sound adds a more realistic,
theater-in-the-home effect to your stereo system.
• This subwoofer can easily be added to your existing audio
system by connecting to either the speaker terminals or the
line output (pin jack) terminals of the amplifier.
• For effective use of the subwoofer, the subwoofer’s
super-bass sound should be matched to the sounds of
your front speakers. You can create the best sound
quality for various listening conditions by using the
HIGH CUT control and the PHASE switch.
• The Automatic power-switching function saves you the
trouble of pressing the STANDBY/ON button to turn the
power on and off.
• The subwoofer can be linked to a Yamaha component for
simultaneous power on/off operation.
Use the supplied system control cable to connect the
subwoofer to a Yamaha component that features a
system connector jack. When you turn on or off the
power to the connected component, the subwoofer will
also be turned on or off.
• The flared, gently twisting shape diffuses the vortex of
air generated around the edge of the port, creating a
smooth flow of air. This reduces extraneous noise not
present in the original input signal, and provides clear,
accurate low frequency reproduction.
• The subwoofer can also reproduce a bass sound that is
appropriate for the source. (NS-SW300 only)
It features a B.A.S.S. switch that enables you to select a
bass effect that is suitable for the source.
SUPPLIED ACCESSORY
After unpacking, check
that the following
accessory is contained.
PLACEMENT
Since the low-end frequencies of audio signals feature long wavelengths, they are almost non-directional to human ears.
The super-bass range does not create a stereo image. Therefore, a single subwoofer may be enough to produce a highquality super-bass sound. However, using two subwoofers (similarly to L and R front speakers) can enhance your acoustic
experience.
Subwoofer orientation
Place the subwoofer as shown in fig. , or for the optimum effect. : subwoofer : front speaker
Using one subwoofer
Place the subwoofer on the outside of either the left or right
front speaker.
Placing the subwoofer in between the left and
right front speakers
If you are placing the subwoofer in between the left and
right front speakers, position it slightly at an angle toward
the wall for better effect.
NOTE
• This unit features a magnetically shielded design. However, there is still a chance that placing it too close to a CRT-type TV set
might impair picture color. Should this happen, move this unit away from the TV set.
• If the speaker volume is very loud, furniture or window glass may resonate and the subwoofer itself may vibrate. In this case,
lower the volume level. To limit resonance, use a thick curtain or similar cloth that tends to absorb sound vibrations effectively.
Also, changing the subwoofer position may be helpful.
Using two subwoofers
Place them on the outside of
each front speaker.
2 En
English
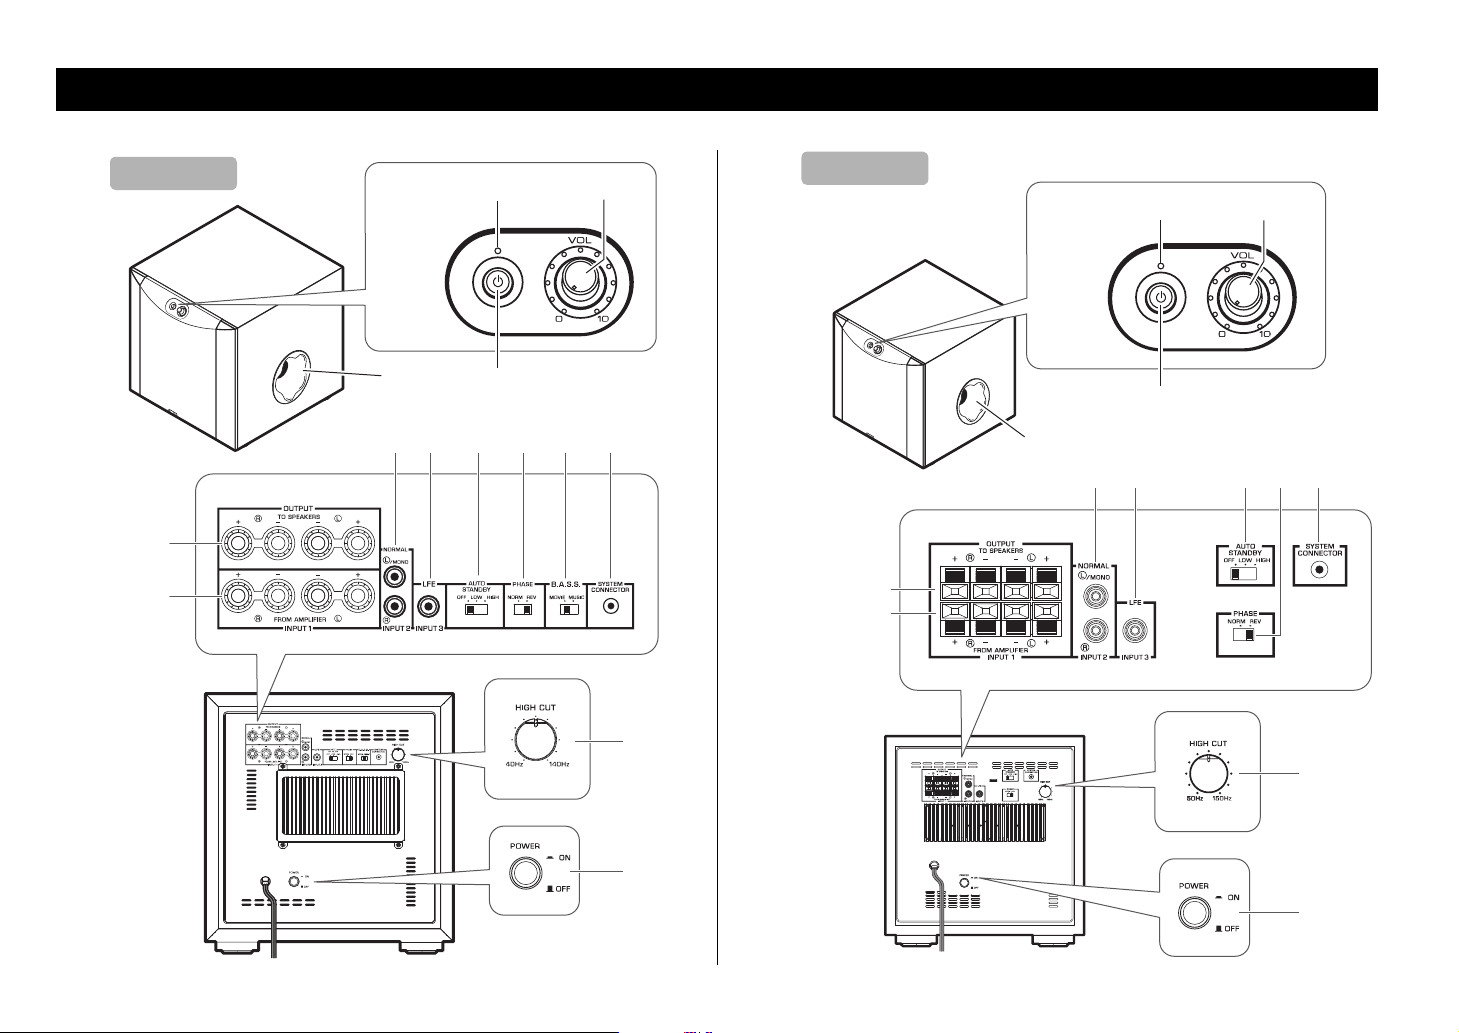
CONTROLS AND THEIR FUNCTIONS
Top
A
B
56 7 8 9 <
C
D
Rear
NS-SW300
Front
C
D
A
B
678<5
1
2
3
4
Front
Rear
Top
NS-SW200
Check the model number of your subwoofer on the label on the rear panel.
4
1
3
2
3 En
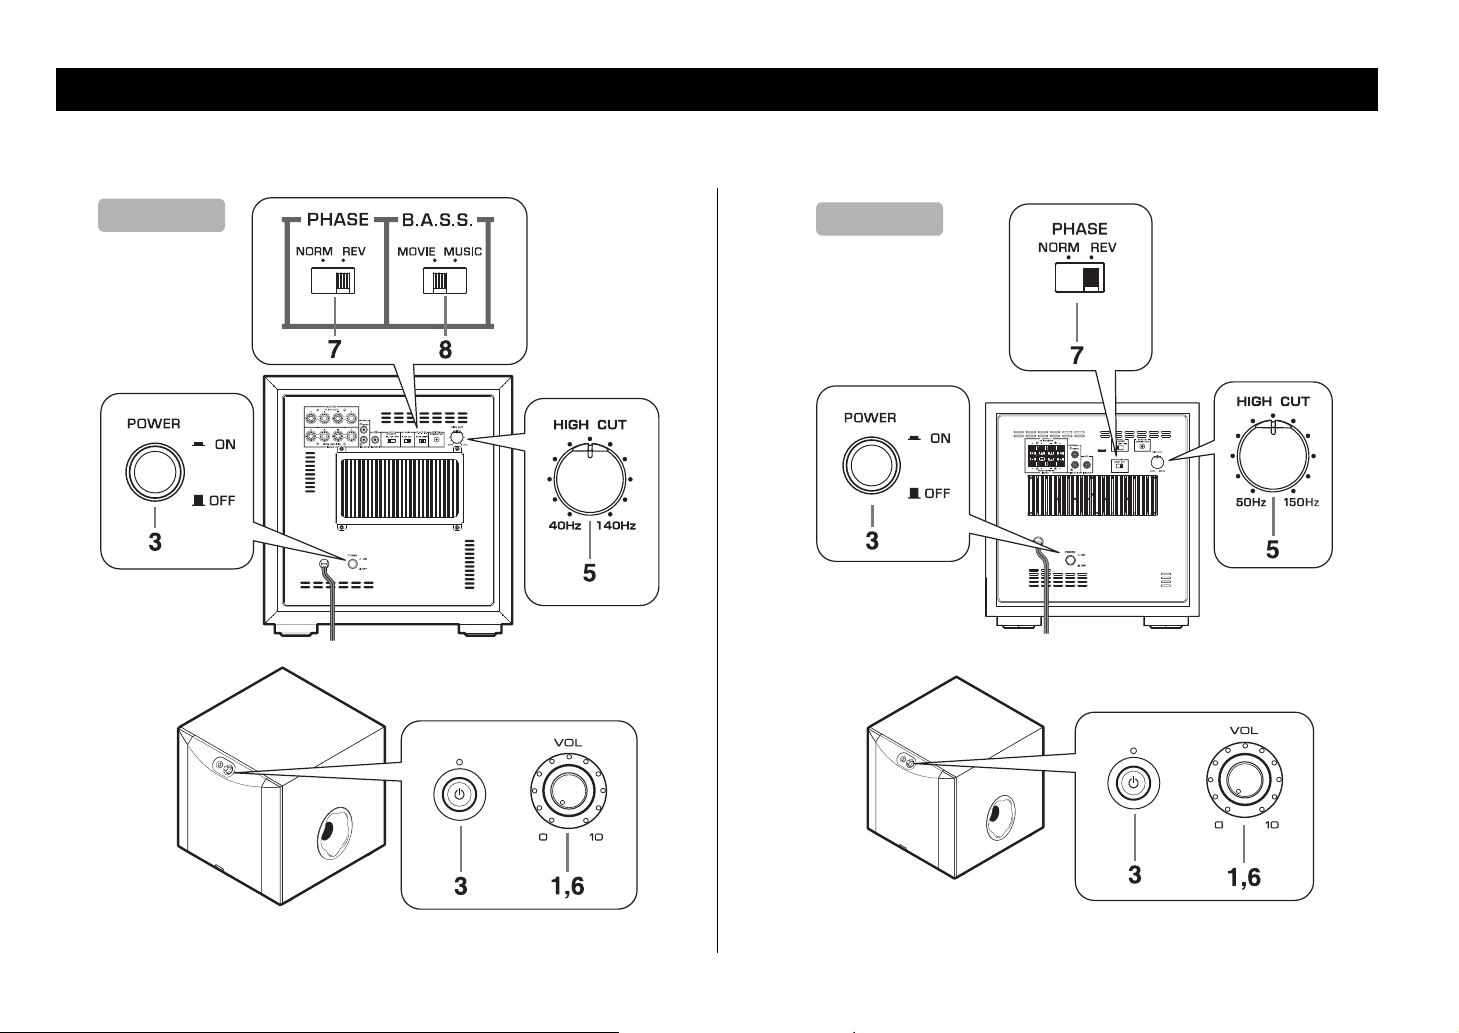
CONTROLS AND THEIR FUNCTIONS
* One graduation
of this control
represents 10 Hz.
1 Indicator
Green:
Red:
The subwoofer is turned on.
The Automatic power-switching function has activated, and the subwoofer
is in standby mode.
Off:
The subwoofer is turned off.
2 VOLUME control ( page 11)
Adjusts the volume level. Turn the control clockwise to increase the volume, and
counterclockwise to decrease the volume.
3 STANDBY/ON switch
While the POWER switch is ON, press this switch to turn on the power to the
subwoofer. The indicator will light up green. Press the switch again to turn off the
power to the subwoofer. The indicator will turn off.
The subwoofer uses a small amount of power in standby mode.
4 Port ( page 1)
Outputs super-bass sound.
5 INPUT2 (NORMAL) terminals ( page 5)
Used to input line level signals from the amplifier.
6 INPUT3 (LFE) terminal ( page 6)
If your amplifier (or receiver) can cut off high frequencies from signals sent to the
subwoofer, connect the amplifier to the subwoofer’s INPUT3 (LFE) terminal.
The HIGH CUT control m has no effect on signals input to the INPUT 3 LFE terminal.
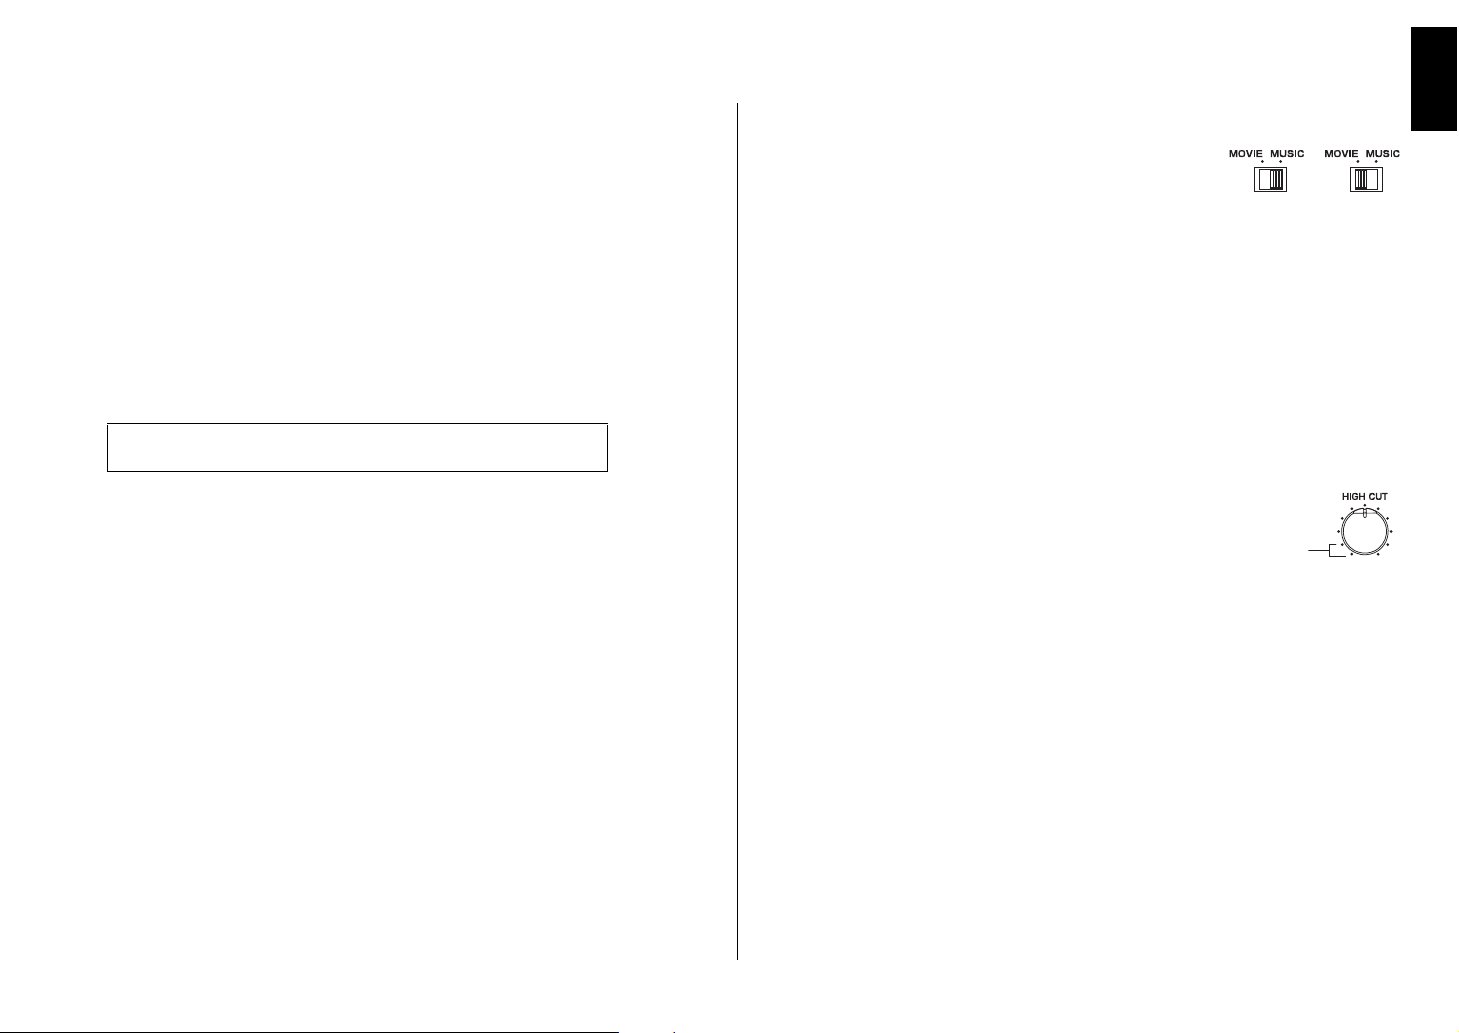
9 B.A.S.S. (Bass Action Selector System) switch (NS-SW300 only)
( page 11)
When this switch is set to MUSIC, the bass sound in audio
software is well reproduced. When the switch is set to
MOVIE, the bass sound in video software is well reproduced.
j SYSTEM CONNECTOR jack ( page 10)
Connect the supplied system control cable here. If you use the system control cable to
connect a subwoofer to a Yamaha component (that features a system connector jack),
turning on or off the power to the connected component automatically turns the
subwoofer on or off.
k OUTPUT (TO SPEAKERS) terminals ( page 7)
Can be used for connecting to the main speakers. Signals at the INPUT1 terminals are
sent to these terminals.
l INPUT1 (FROM AMPLIFIER) terminals ( page 7)
Used to connect the subwoofer with the speaker terminals of the amplifier.
m HIGH CUT control ( page 11)
Adjusts the high frequency cut off point.
Frequencies higher than the frequency selected by this
control are all cut off (and not output).
n POWER switch
During normal usage, set this switch to ON. If you plan not to use the subwoofer for a long
period of time, set the switch to OFF.
English
7 AUTO STANDBY (HIGH/LOW/OFF) switch ( page 10)
8 PHASE switch ( page 11)
This switch is originally set to the OFF position. By setting this switch to the HIGH or
LOW position, the subwoofer’s automatic power-switching function operates. If you
do not need this function, leave this switch in the OFF position.
NOTE
Be sure to set the POWER switch to OFF before you set the AUTO STANDBY switch.
This switch is to be set to the REV (reverse) position. However, depending on your speaker
system or listening conditions, there may be a case when better sound quality is obtained by
setting this switch to the NORM (normal) position. Select the best position by ear.
4 En
CONNECTIONS
1
2
1
1
2
1 Mono pin cable
2 Audio pin cable
Subwoofer
Amplifier or
receiver
NS-SW300
1
2
1
Mono pin cable
2 Audio pin cable
Subwoofer
Amplifier or
receiver
NS-SW200
Choose one of the following connection methods most suitable for your audio system.
Choose this method if your amplifier has line output (pin jack) terminal(s).
( page 5, 6)
Choose this method if your amplifier has no line output (pin jack)
terminals. ( page 7, 8)
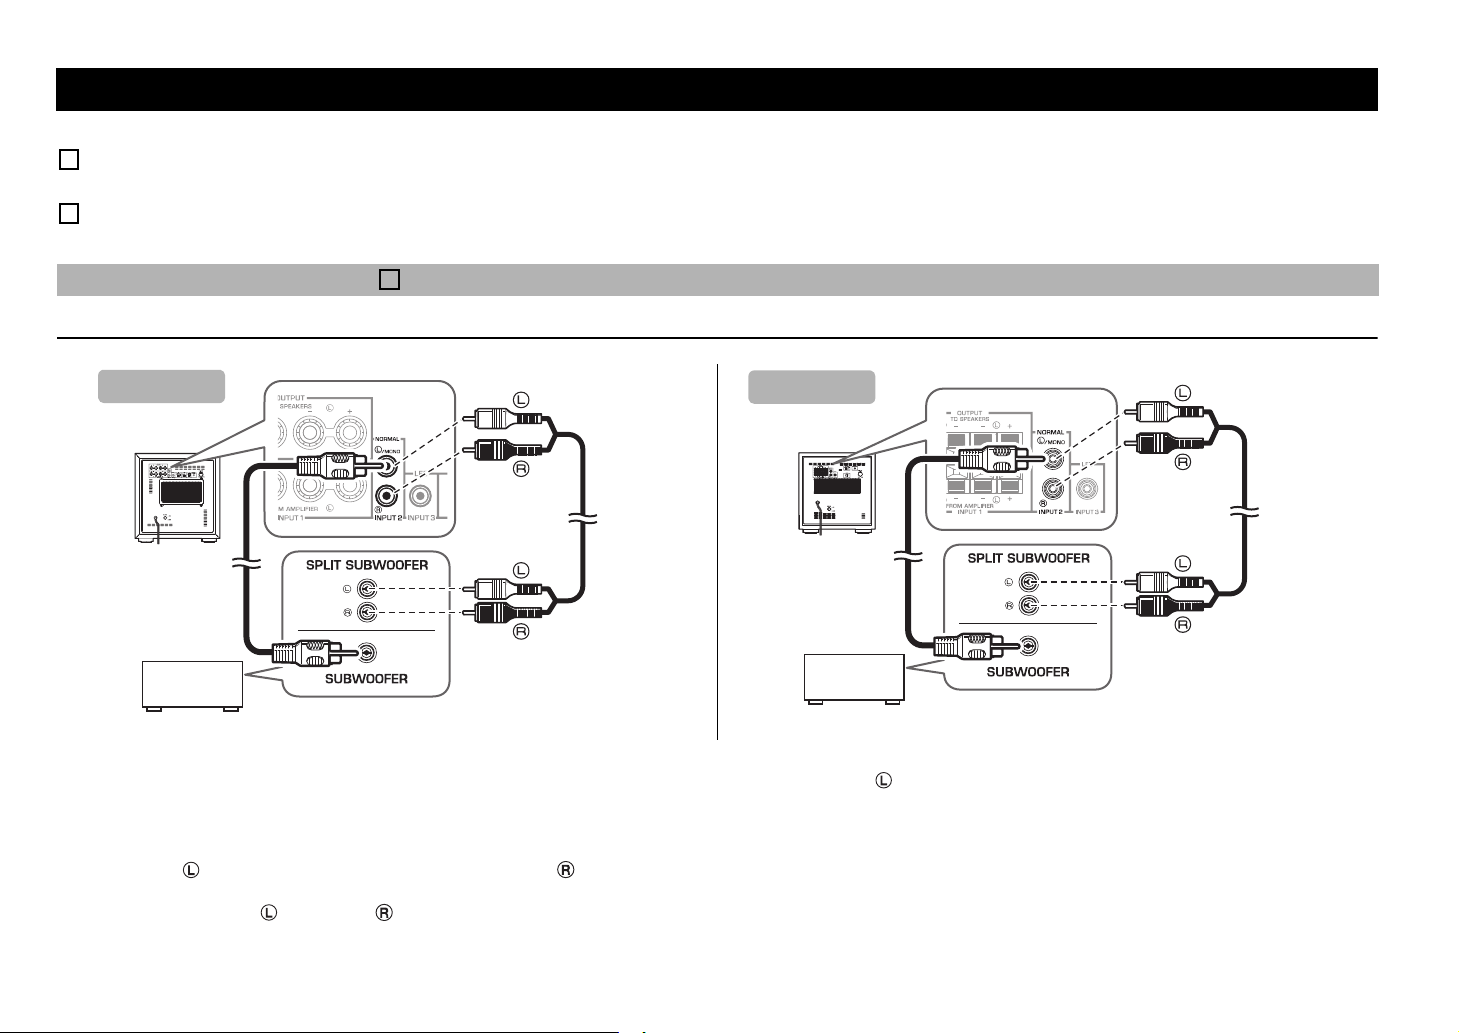
Connecting to line output (pin jack) terminal(s) of the amplifier
Example: Connecting one subwoofer
NOTICE
• Unplug the subwoofer and other audio/video components before making connections, and do
not plug them in until all connections are completed.
• Connecting methods and terminal names on your component (such as an amplifier or receiver)
may be different from those used in this book. Please refer to the owner’s manual that came
with your component.
• All connections must be correct, that is to say L (left) to L; R (right) to R; “+” to “+” and “–” to “–”.
Use a commercially-available Mono pin cable (1) or a commercially-available Audio pin cable (2) to make the connections.
• Connect the SUBWOOFER (or LOW PASS, etc.) terminal on the rear of the amplifier (or AV receiver) to the /MONO INPUT2 terminal of the subwoofer using a commerciallyavailable Mono pin cable (1).
Alternatively,
•
When connecting the subwoofer to the SPLIT SUBWOOFER terminals (
to connect the
NOTE
Audio signals input from the /MONO and INPUT 2 terminals on the subwoofer will not be output from the OUTPUT (TO SPEAKERS) terminals.
5 En
/MONO INPUT2 terminal to the “L” side, and the INPUT2 terminal to the “R” side of the SPLIT SUBWOOFER terminals.
featuring L and R channels) on the rear panel of the amplifier, use a commercially-available Audio pin cable (2)
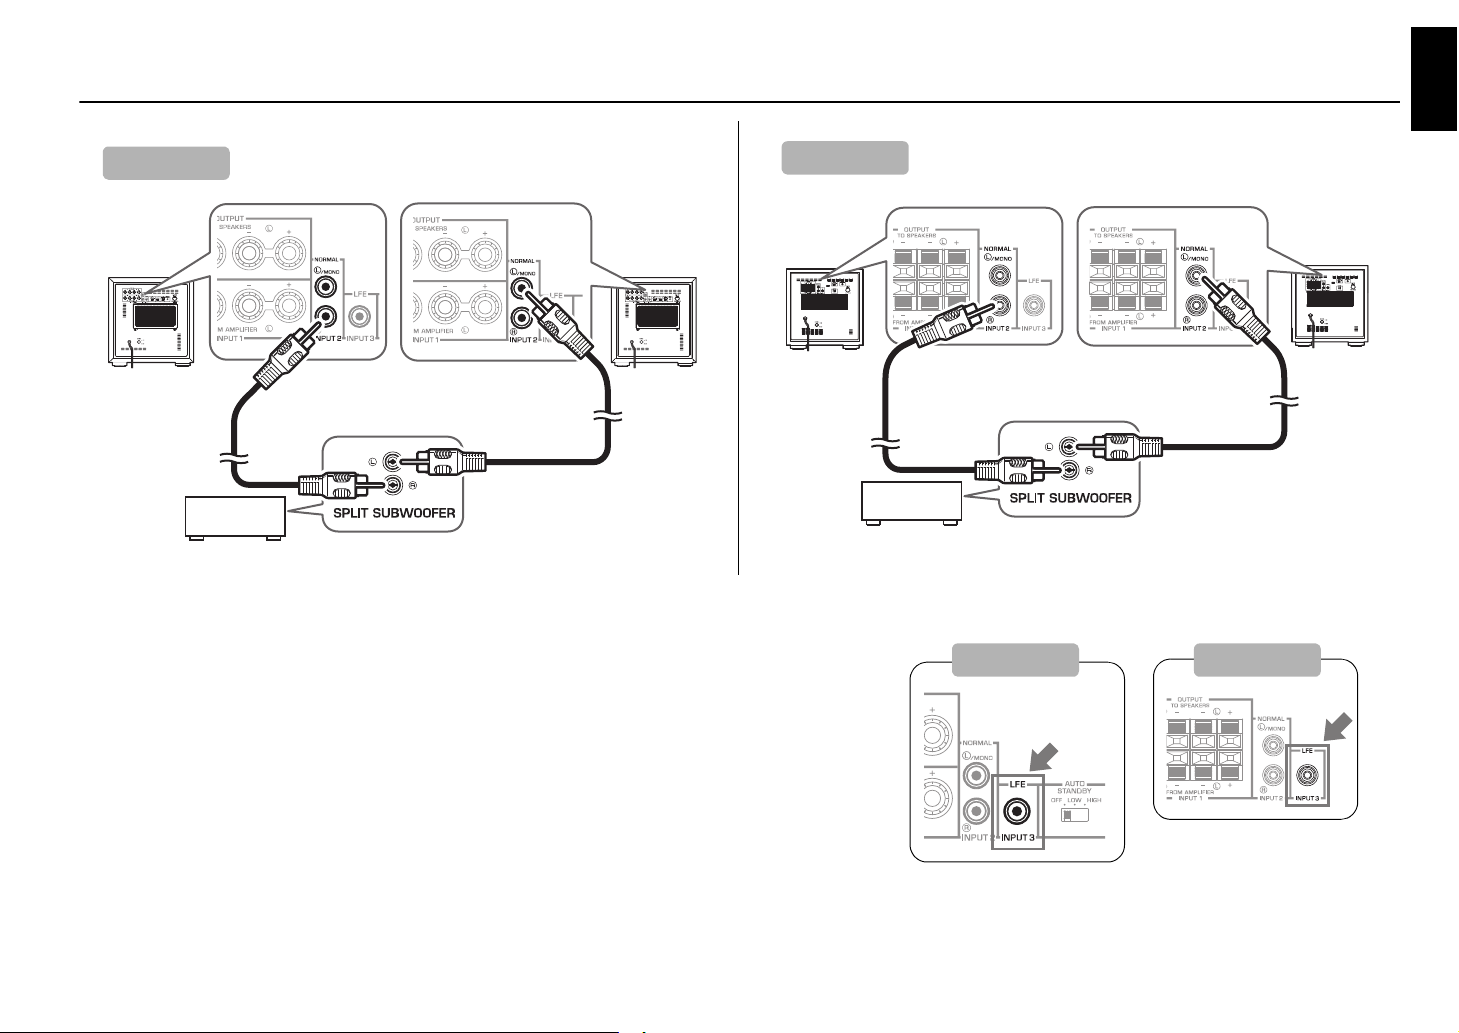
Example: Connecting two subwoofers
1
1 Mono pin cable
1
Subwoofer
Subwoofer
Amplifier or
receiver
NS-SW300
1 Mono pin cable
1
1
Subwoofer
Subwoofer
Amplifier or
receiver
NS-SW200
NS-SW300 NS-SW200
Connecting to the INPUT3 (LFE) terminal
If your amplifier (or receiver) can cut off high frequencies from signals sent to the subwoofer, connect the
amplifier to the subwoofer’s INPUT3 (LFE) terminal.
This will promote higher sound quality because the signal routing in the subwoofer is shortened by bypassing
the built-in HIGH CUT circuit.
English
6 En
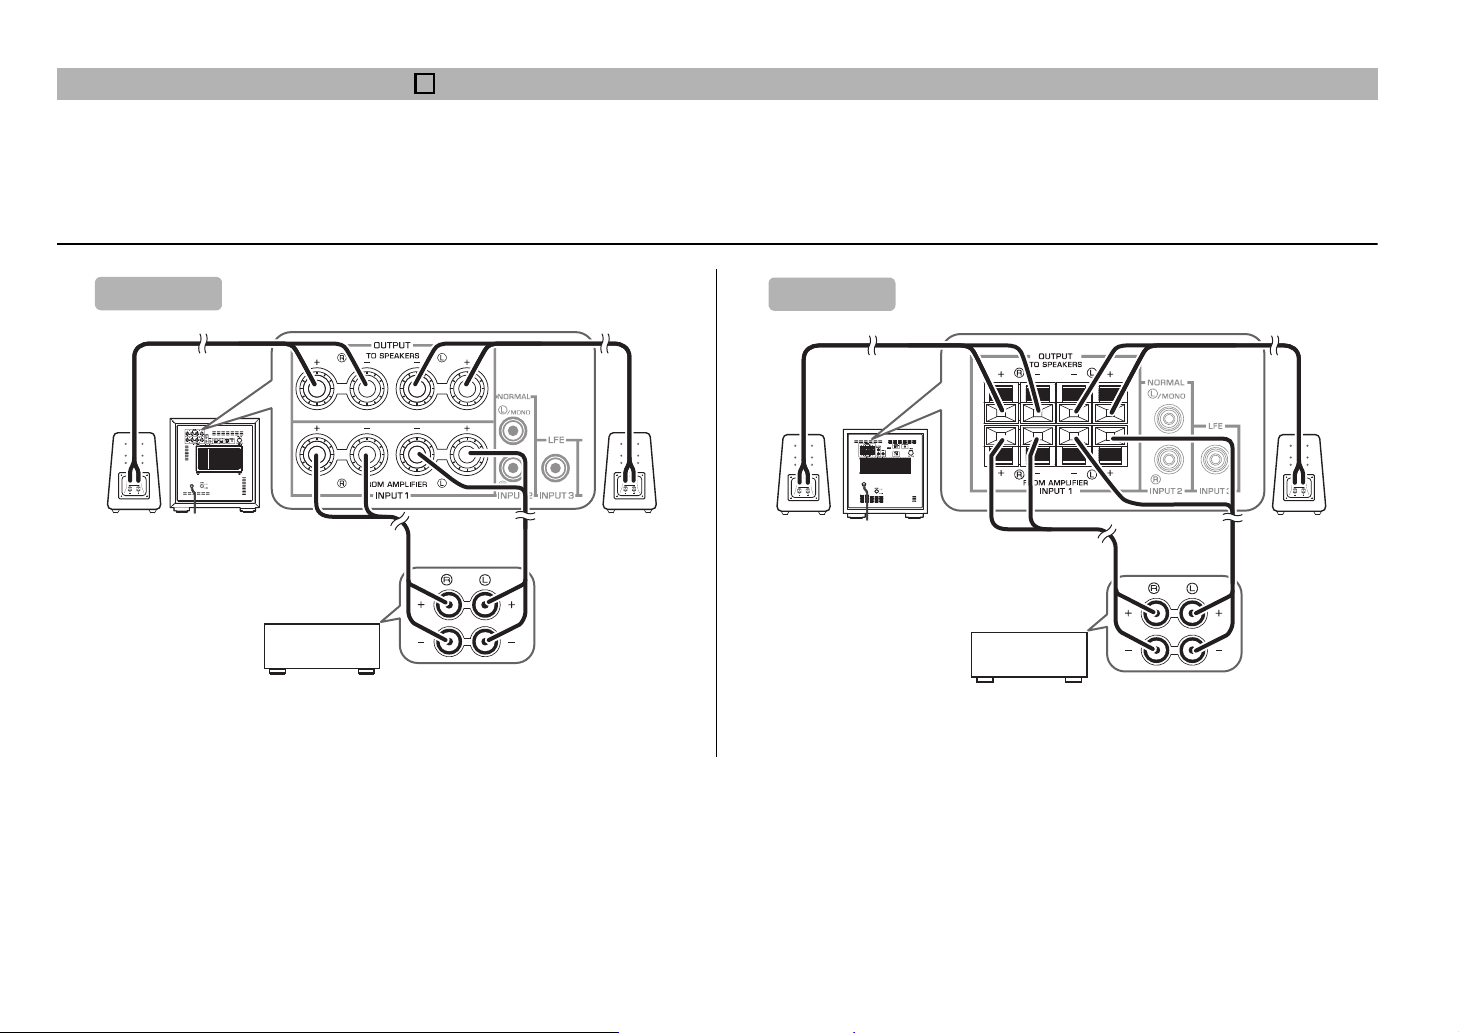
Connecting to speaker output terminals of the amplifier
2
Right front
speaker
Subwoofer
Amplifier or
receiver
Speaker output
terminals
Left front
speaker
NS-SW300
Right front
speaker
Left front
speaker
Speaker output
terminals
Amplifier or
receiver
Subwoofer
NS-SW200
° Example: Connecting the subwoofer to an amplifier that features one set of speaker output terminals
Use speaker cables to connect the speaker output terminals of the amplifier to the subwoofer’s INPUT 1 (FROM AMPLIFIER) terminals. Connect the front speakers to the subwoofer’s
OUTPUT (TO SPEAKERS) terminals. Although the subwoofer is connected between the front speakers and the amplifier, the sound volume or quality will not be affected.
Connecting one subwoofer
7 En
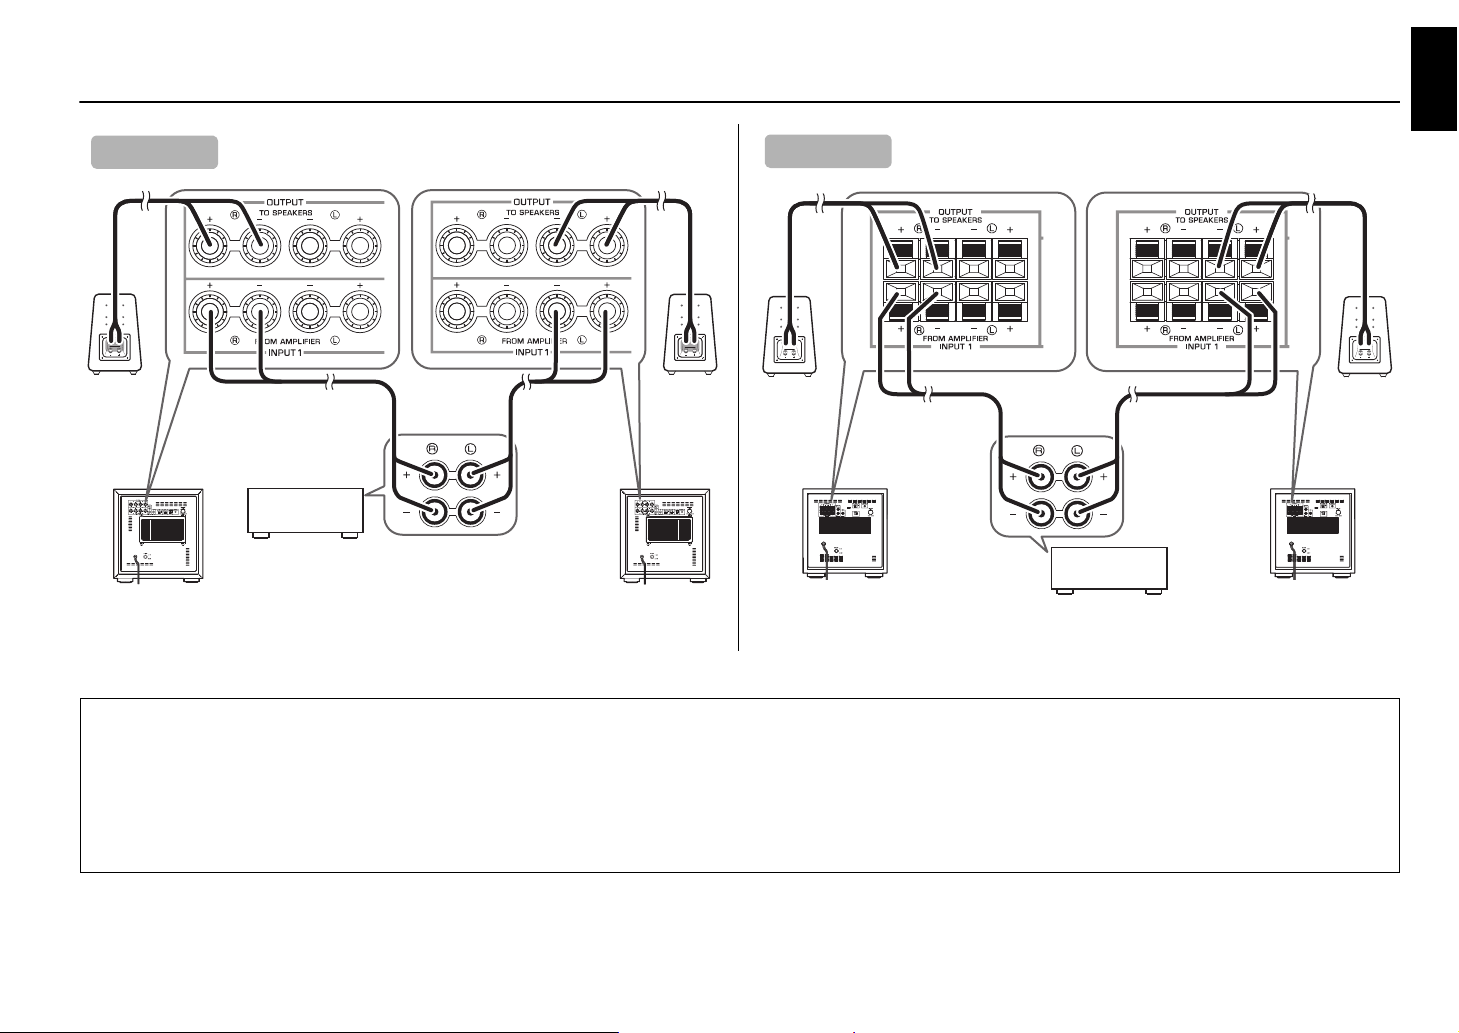
Connecting two subwoofers
Right front
speaker
Left front
speaker
Subwoofer
Speaker output
terminals
Amplifier or
receiver
Subwoofer
NS-SW300
Right front
speaker
Left front
speaker
Subwoofer Subwoofer
Speaker output
terminals
Amplifier or
receiver
NS-SW200
English
° Example: Connecting the subwoofer to an amplifier featuring two sets of speaker output terminals (A and B) that can output sound signals
simultaneously
Set the amplifier so that both sets of speaker output terminals (A and B) will output sound signals simultaneously. Then, connect the front speakers to terminals A, and connect the
subwoofer to terminals B.
NOTE
If your amplifier features two sets of speaker output terminals that do NOT output sound signals simultaneously, please refer to the example for connecting an amplifier that has only one set of
speaker output terminals (see the figure on the left).
8 En
Connecting to the INPUT1/OUTPUT terminals of the subwoofer
15 mm /
10 mm
Good No Good
NS-SW300
NS-SW200
2
1
3
Red:
positive (+)
Black:
negative (
–)
NS-SW300
2
1
NS-SW200
3
1
2
° How to connect
To avoid accidents resulting from tripping over loose speaker cables, fix them to the floor.
WARNING
Always fix the speaker cable to a wall or similar. If you catch your feet or hands on the cable,
the speakers may fall or overturn, causing malfunctions or injuries.
NOTE
• Make sure that the “+” and “–” polarity markings of the speaker cables are observed and set
correctly. If these cables are reversed, the sound will be unnatural and lack bass.
• Do not let the bare speaker wires touch each other, because this could damage the subwoofer
or the amplifier.
• If the connections are faulty, no sound will be heard from the subwoofer or the speakers. Do
not insert the insulation into the hole. Sound may not be produced.
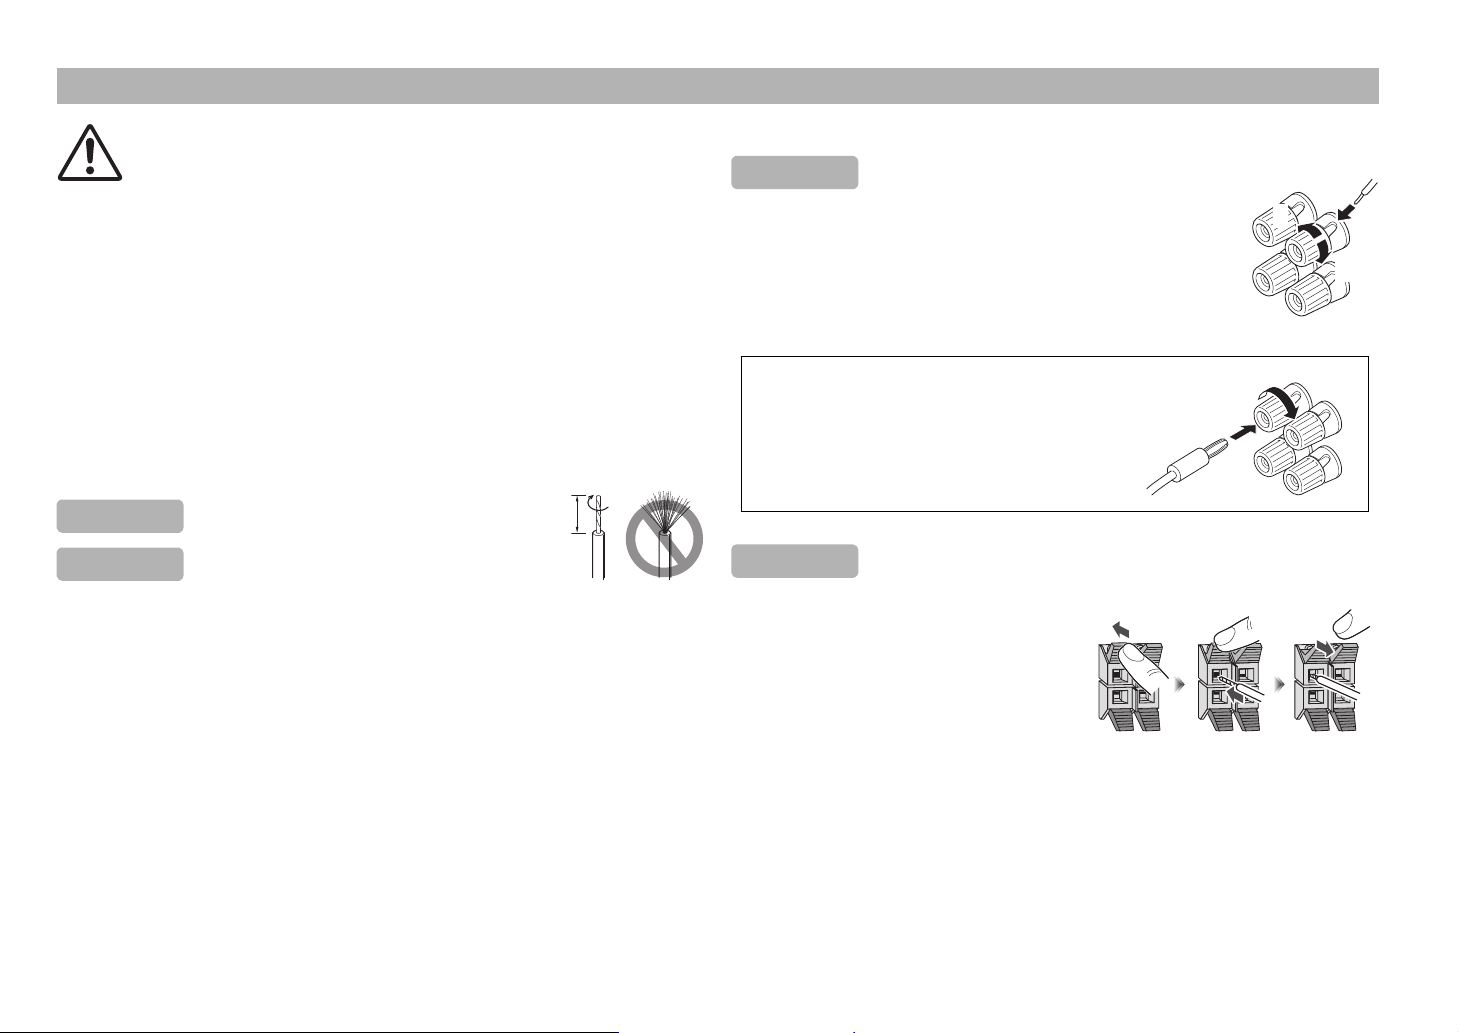
° Before connecting
Remove the insulation at the tip of the speaker cable, then twist the core wires together so
that they will not become disarrayed and short-circuited.
Remove about 15 mm (5/8") of insulation.
Remove about 10 mm (3/8") of insulation.
1. Loosen the terminal’s knob, as shown in the figure.
2. Insert the bare wire.
3. Tighten the knob.
4. Test the firmness of the connection by pulling lightly
on the cable at the terminal.
° NS-SW300 (U.S.A., Canada and Australia
models only)
Connecting the banana plug
1. Tighten the terminal knob.
2. Simply insert the banana plug into the terminal.
1. Press and hold the terminal’s tab, as shown
in the figure.
2. Insert the bare wire.
3. Release your finger from the tab to allow it
to lock securely on the cable’s wire end.
4. Test the firmness of the connection by
pulling lightly on the cable at the terminal.
9 En
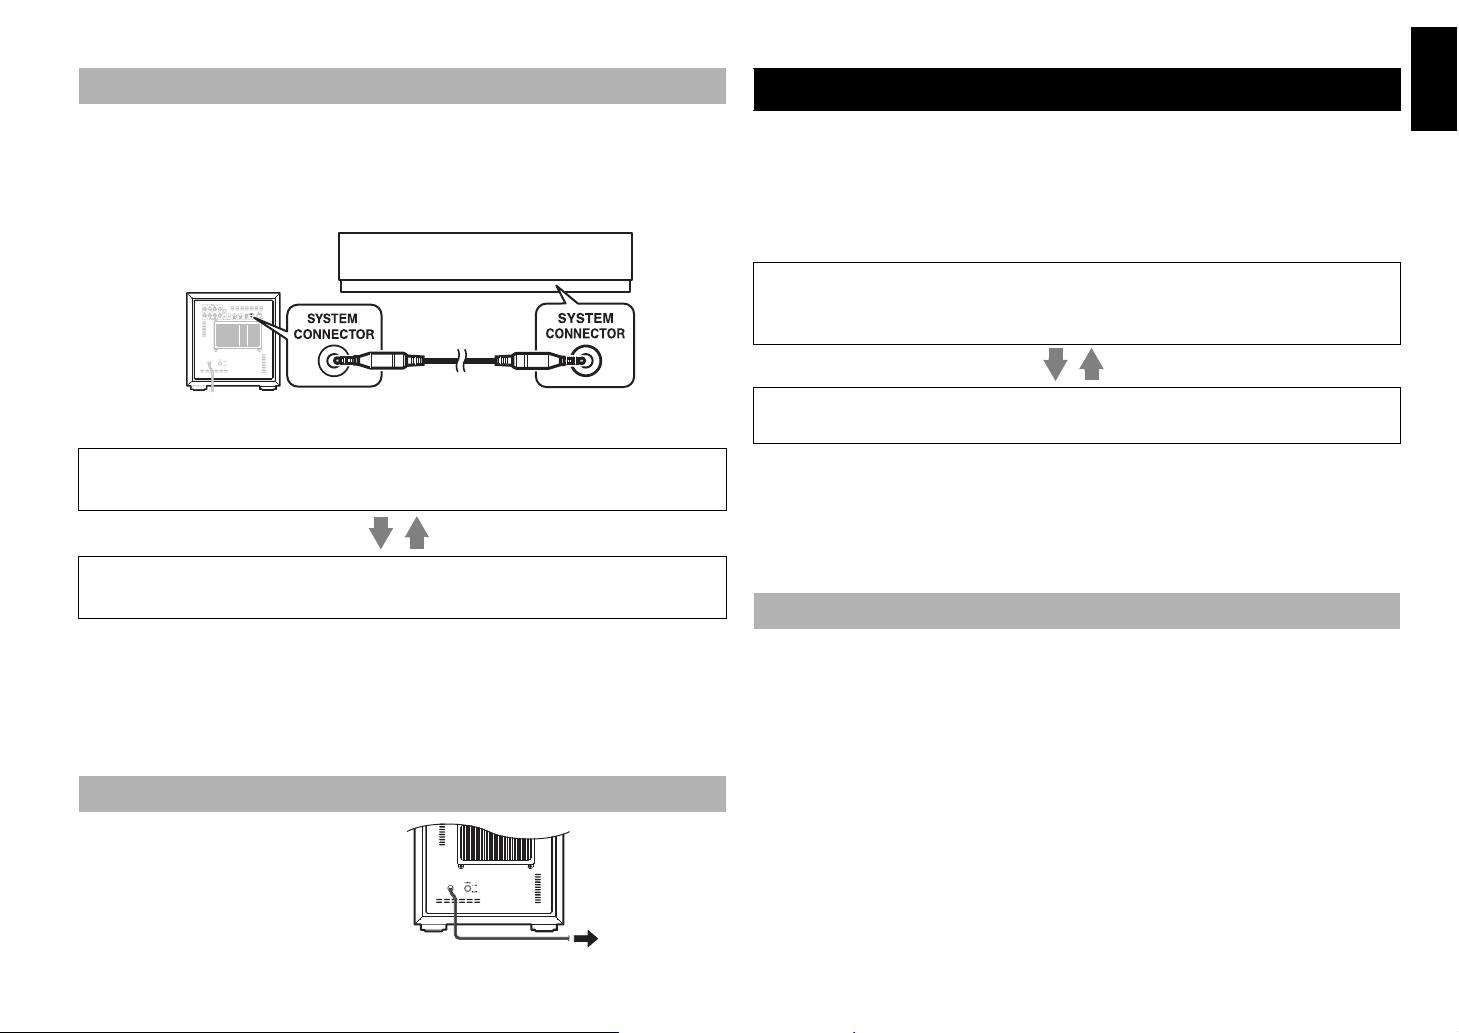
System connections
Subwoofer
Supplied system
control cable
Yamaha YSP series component or receiver
To AC outlet
If you use the included system control cable to connect a subwoofer to a Yamaha
component (that features a system connector jack such as a YSP series component or
Yamaha receiver), turning on or off the power to the connected component automatically
turns the subwoofer on or off.
Connection example
How the System Connection works
Turning on the power to the connected component will automatically turn on the subwoofer.
* The indicator lights green.
Turning off the power to the connected component will automatically turn off the subwoofer.
* The indicator turns off.
NOTE
• For this feature to be available, the POWER switch on the rear panel and the STANDBY/ON
switch on the top panel ( page 3) must be set to ON.
• Powering on/off via the system connection takes priority over the Automatic power-switching
function. (While the unit is turned on, the Automatic power-switching function is enabled.)
• To modify the settings of the connected components, please refer to the owner’s manual that
came with the respective component.
Plugging the subwoofer into an AC outlet
After all connections are completed, plug
the subwoofer and other audio/video
components into AC outlets.
AUTOMATIC POWER-SWITCHING FUNCTION
This function automatically places the subwoofer in standby mode if the subwoofer does
not detect a signal from the amplifier for a certain period of time. The subwoofer
automatically turns on as soon as it detects a signal from the amplifier.
The Automatic power-switching function works as follows when the AUTO STANDBY
(HIGH/LOW/OFF) switch is set to LOW or HIGH. (Normally, set the switch to LOW.)
How the Automatic power-switching function works
The subwoofer automatically enters standby mode if it does not receive an input signal
(*1) from the amplifier for 7 or 8 minutes (*2).
* The indicator color changes from green to red.
When the subwoofer detects an input signal (*1) from the amplifier, the subwoofer
automatically turns on. * The indicator color changes from red to green.
*1
When the Automatic power-switching function is enabled, the subwoofer will detect a bass signal input of
below 200Hz (such as sound effects of explosion in action movies, bass guitar or bass drum sound, etc.).
*2
This value may vary depending on the system environment. For example, it may be affected by noise
generated from other equipment.
NOTE
For this feature to be available, the POWER switch on the rear panel and the STANDBY/ON
switch on the top panel ( page 3) must be set to ON.
Setting the AUTO STANDBY switch
NOTE
Be sure to set the POWER switch to OFF before you set the AUTO STANDBY switch.
LOW: The Automatic power-switching function activates at a certain level of input signal.
To enable the function, select this position.
HIGH:If the Automatic power-switching function does not work well when the AUTO
STANDBY switch is set to LOW, select this position. If the function still does not
work, slightly raise the LFE LEVEL on the amplifier.
OFF:
The Automatic power-switchingy function may unexpectedly activate due to the
system environment, for example, if the subwoofer detects noise generated from the
peripheral components. In this case, select this position to disable the Automatic powerswitching function, and manually turn the unit on or off by using the POWER switch.
NOTE
• The subwoofer uses a small amount of power in auto-standby mode.
• If you plan not to use the subwoofer for a long period of time, set the POWER switch on the
rear panel to OFF, or unplug the power cable from the AC outlet.
English
10 En
ADJUSTING THE BALANCE
Rear panel
NS-SW300
Front panel
Rear panel
NS-SW200
Front panel
To achieve natural sound with an effective super-bass component, you must adjust the volume and tone balance between the subwoofer and the front speakers. Follow the procedure
described below. If your amplifier or other component connected to the system features subwoofer settings, make the appropriate settings on that component.
11 En

ADJUSTING THE BALANCE
1. Set the VOLUME control to minimum (0).
2. Turn on the power to the component(s) connected to the subwoofer.
If the component is connected to the subwoofer’s SYSTEM CONNECTOR jack, turn
on the power to that component.
3. Make sure that the POWER switch is set to the ON position, then set the STANDBY/
ON switch to ON.
* The indicator lights green.
4. Play a source that contains low-frequency components and adjust the output level of
the front speakers using the amplifier’s volume control to the desired listening level.
(Set all tone controls to flat.)
5. Adjust the HIGH CUT control to the position where the desired response can be
obtained.
Normally, set the control to a level a little higher than the front speaker’s rated
minimum reproducible frequency*.
* The front speaker’s rated minimum reproducible frequency can be looked up in the speakers’ catalog
or owner’s manual.
* The HIGH CUT control has no effect on signals input to the INPUT 3 LFE terminal. ( page 6)
6. Increase the volume gradually to adjust the volume balance between the subwoofer and
the front speakers.
Normally, set the control to a level where you can obtain a little more bass effect than
when the subwoofer is not used.
7. Set the PHASE switch to the position which yields the more natural (or preferable)
phasing.
8. Set the B.A.S.S. switch to “MOVIE” or “MUSIC” according to the played source.
(NS-SW300 only)
MOVIE:
When a movie type source is played, the low-frequency effects are enhanced to allow
listeners to enjoy a more powerful sound. (The sound will be richer and deeper.)
MUSIC:
When an ordinary music source is played, the excessive low-frequency components are
cut off to make the sound clearer. (The sound will carry less bass and reproduce the
melody line more clearly.)
NOTE
Once the volume balance between the subwoofer and the front speakers is adjusted, you can
adjust the volume of your entire sound system by using the amplifier’s volume control.
However, if you replace the front speakers, you will need to make this adjustment again.
PHASE switch
In most situations, set this switch to select the reverse mode. However, depending
on your speaker systems or listening condition, there may be a case when better
sound quality is obtained by selecting the normal mode. Select the better mode by
monitoring the sound.
English
12 En
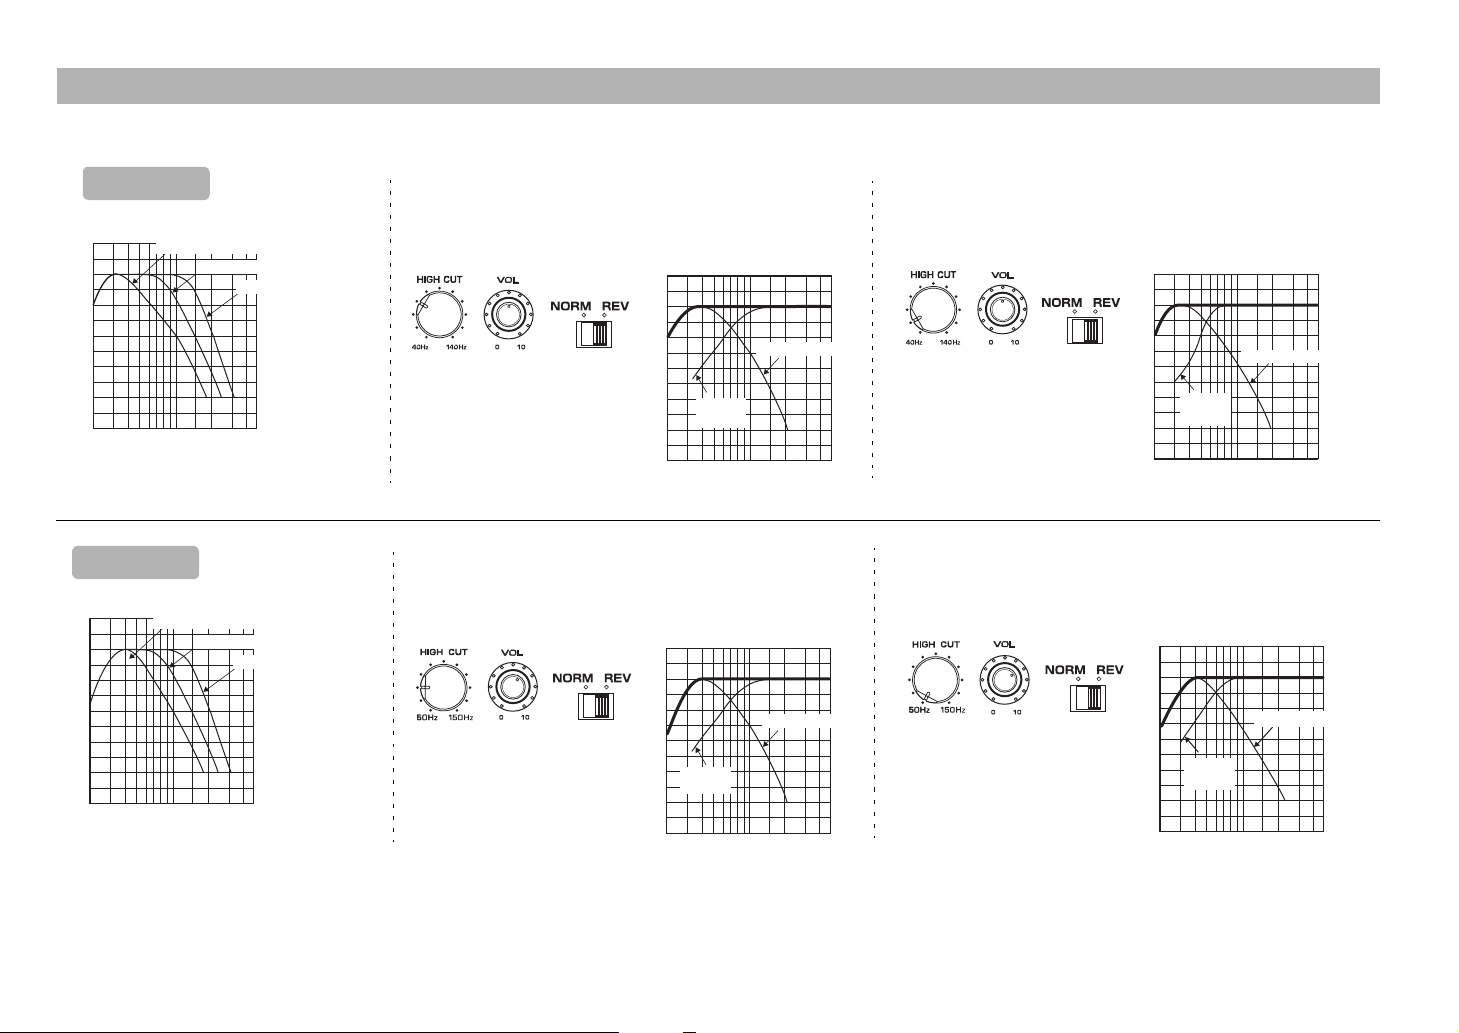
Subwoofer frequency characteristics
° When combined with 10 cm (
4"
) or 13 cm (5")
acoustic suspension, 2-way system front
speakers
PHASE
Frequency response graph*
(70 Hz) (REV)
Front
speaker
° When combined with 20 cm (8") or 25 cm (10")
acoustic suspension, 2-way system front
speakers
20 50 100 200 500Hz
40
50
60
70
80
90
dB
NS-SW300
Frequency response graph*
PHASE
Front
speaker
(50 Hz) (REV)
NS-SW300
20 50 100 20 0 500Hz
40
50
60
70
80
90
dB
HIGH CUT 50 Hz
HIGH CUT 100 Hz
HIGH CUT 150 Hz
° When combined with 10 cm (
4"
) or 13 cm (5")
acoustic suspension, 2-way system front
speakers
20 50 100 200 500Hz
40
50
60
70
80
90
dB
NS-SW200
PHASE
Frequency response graph*
(70 Hz) (REV)
Front
speaker
° When combined with 20 cm (8") or 25 cm (10")
acoustic suspension, 2-way system front
speakers
Frequency response graph*
PHASE
Front
speaker
(50 Hz) (REV)
NS-SW200
The figures below show the optimum adjustment of each control and the frequency characteristics when the subwoofer is combined with a typical front speaker system.
dB
90
80
70
60
50
40
20 50 100 200 500Hz
13 En
HIGH CUT 40 Hz
HIGH CUT 90 Hz
HIGH CUT 140 Hz
dB
90
80
70
60
50
40
20 50 100 200 500Hz
NS-SW300
dB
90
80
70
60
50
40
20 50 100 200 500Hz
NS-SW200
* These diagrams do not depict actual frequency response characteristics.
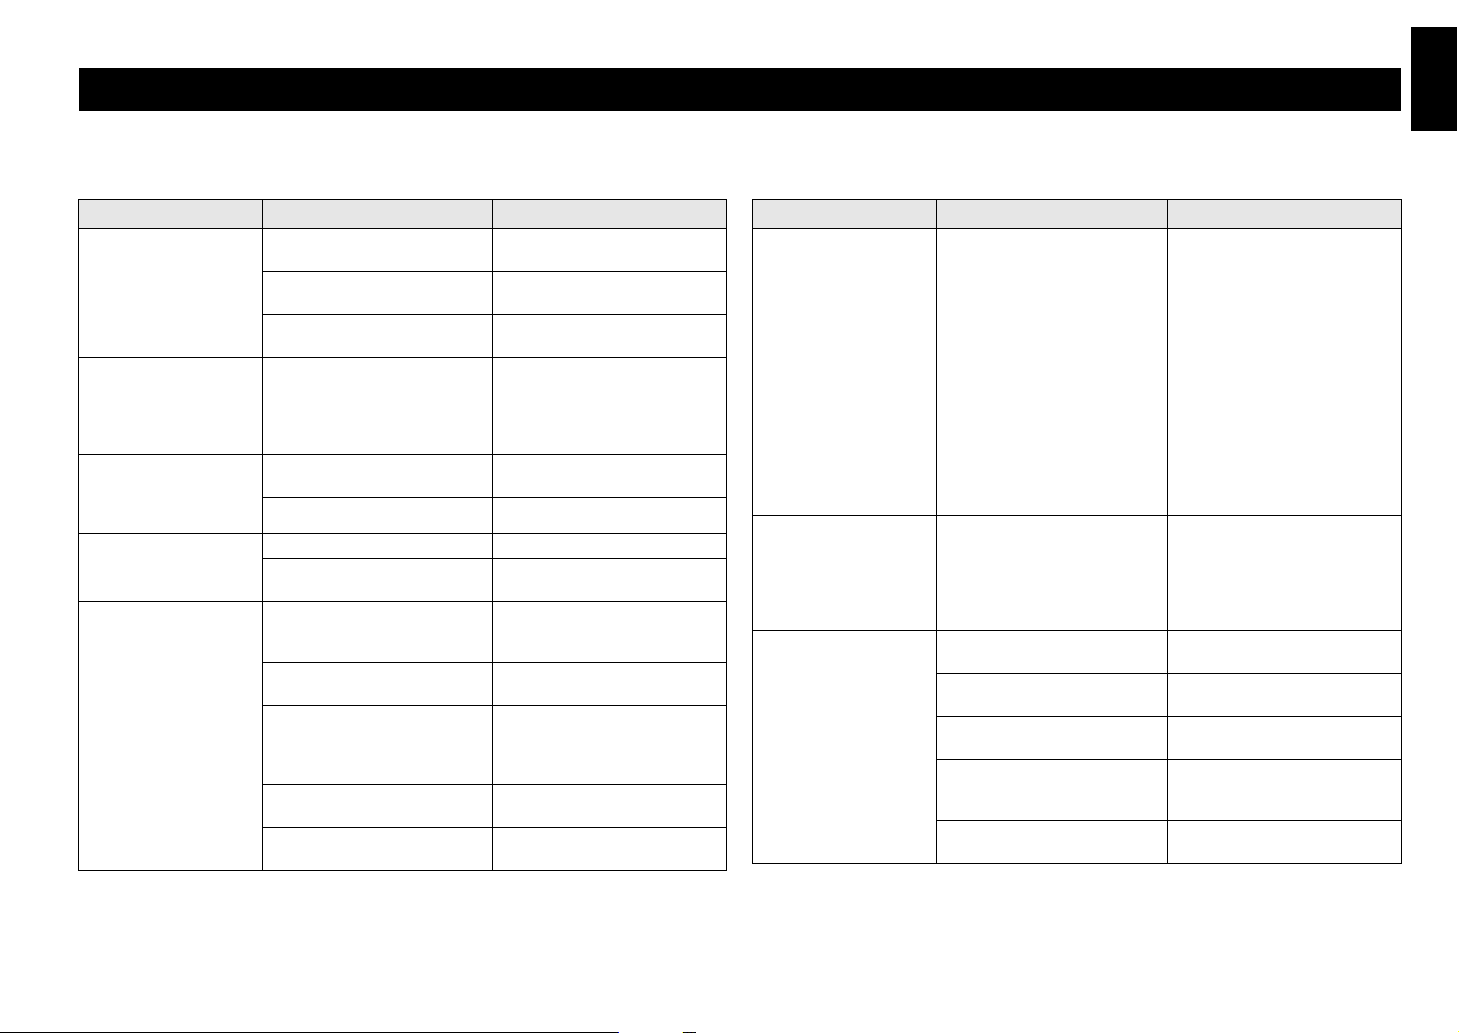
TROUBLESHOOTING
Refer to the chart below if this unit does not function properly.
If the instructions given below do not help, or if the problem you are experiencing is not listed below, turn off the power to the unit, disconnect the power cord and contact an authorized
Yamaha dealer or service center.
English
Problem Cause What to Do
Power is not supplied
even though the
STANDBY/ON switch
is set the ON position.
The unit cannot be
operated.
The subwoofer does not
turn on automatically
via the system
connection.
No sound.
Low range sound is too
soft or not heard.
The power plug is not securely
connected.
The POWER switch is set to the
OFF position.
A system connected component is
turned off.
Electric shock (such as a lightning
strike or excessive static
electricity) or power supply
voltage drop has caused the
internal microcomputer to freeze.
The system control cable is not
connected properly or securely.
The POWER switch is set to OFF. Set the POWER switch to ON.
The volume is set to minimum. Increase the volume.
Speaker cables are not connected
securely.
Speaker cables are not connected
correctly.
The PHASE switch is not set
correctly.
A source sound with little bass
frequency content is being played.
The sound is influenced by
standing waves.
No bass frequency content is
being output from the amplifier.
Connect it securely.
Set the POWER switch to the ON
position.
Turn on the system connected
component.
Once set the POWER switch to the
OFF position and then set the
POWER switch to the ON
position.
Connect the system control cable
properly.
Connect speaker cables securely.
Connect them correctly, that is L
(left) to L; R (right) to R; “+” to
“+” and “–” to “–”.
Set the PHASE switch to the other
position.
Play a source sound with bass
frequencies.
Set the HIGH CUT control to a
higher position.
Relocate the subwoofer or change
its positioning angle.
Check the bass output setting of the
amplifier.
Problem Cause What to Do
The volume
automatically
decreases, or the unit
turns off.
Even though the
STANDBY/ON switch
is pressed to turn on the
unit, the indicator
simply flashes red and
does not turn on.
The subwoofer does not
turn on automatically.
The temperature of the unit has
abnormally increased due to the
following causes.
• The unit is used continuously
at a high volume.
• The unit is used in a location
with a high temperature.
• The unit is set up and used in a
poorly ventilated location.
The protection circuit was
activated due to an internal failure.
The POWER switch is set to the
OFF position.
The STANDBY/ON switch is set
to the STANDBY position.
The AUTO STANDBY switch is
set to the OFF position.
The level of input signal is too
low.
No bass frequency content is
being output from the amplifier.
• Decrease the volume. If the
problem does not improve, turn
off the unit, wait until it cools
down, and then turn it on again.
• Do not set up the unit in a
location exposed to direct
sunlight or where the
temperature becomes
extremely high (for example,
near a heater).
• Turn off the unit, and when the
temperature of the unit has
sufficiently decreased, set up
the unit in a well-ventilated
location and turn it on again.
Unplug the power cable from the
AC outlet, and then plug it in
again. If the problem does not
improve, contact an authorized
Yamaha dealer or service center.
Set the POWER switch to the ON
position.
Set the STANDBY/ON switch to
the ON position.
Set the AUTO STANDBY switch
to the HIGH or LOW position.
Set the AUTO STANDBY switch
to the HIGH position, and increase
the output level of the amplifier.
Check the bass output setting of the
amplifier.
14 En
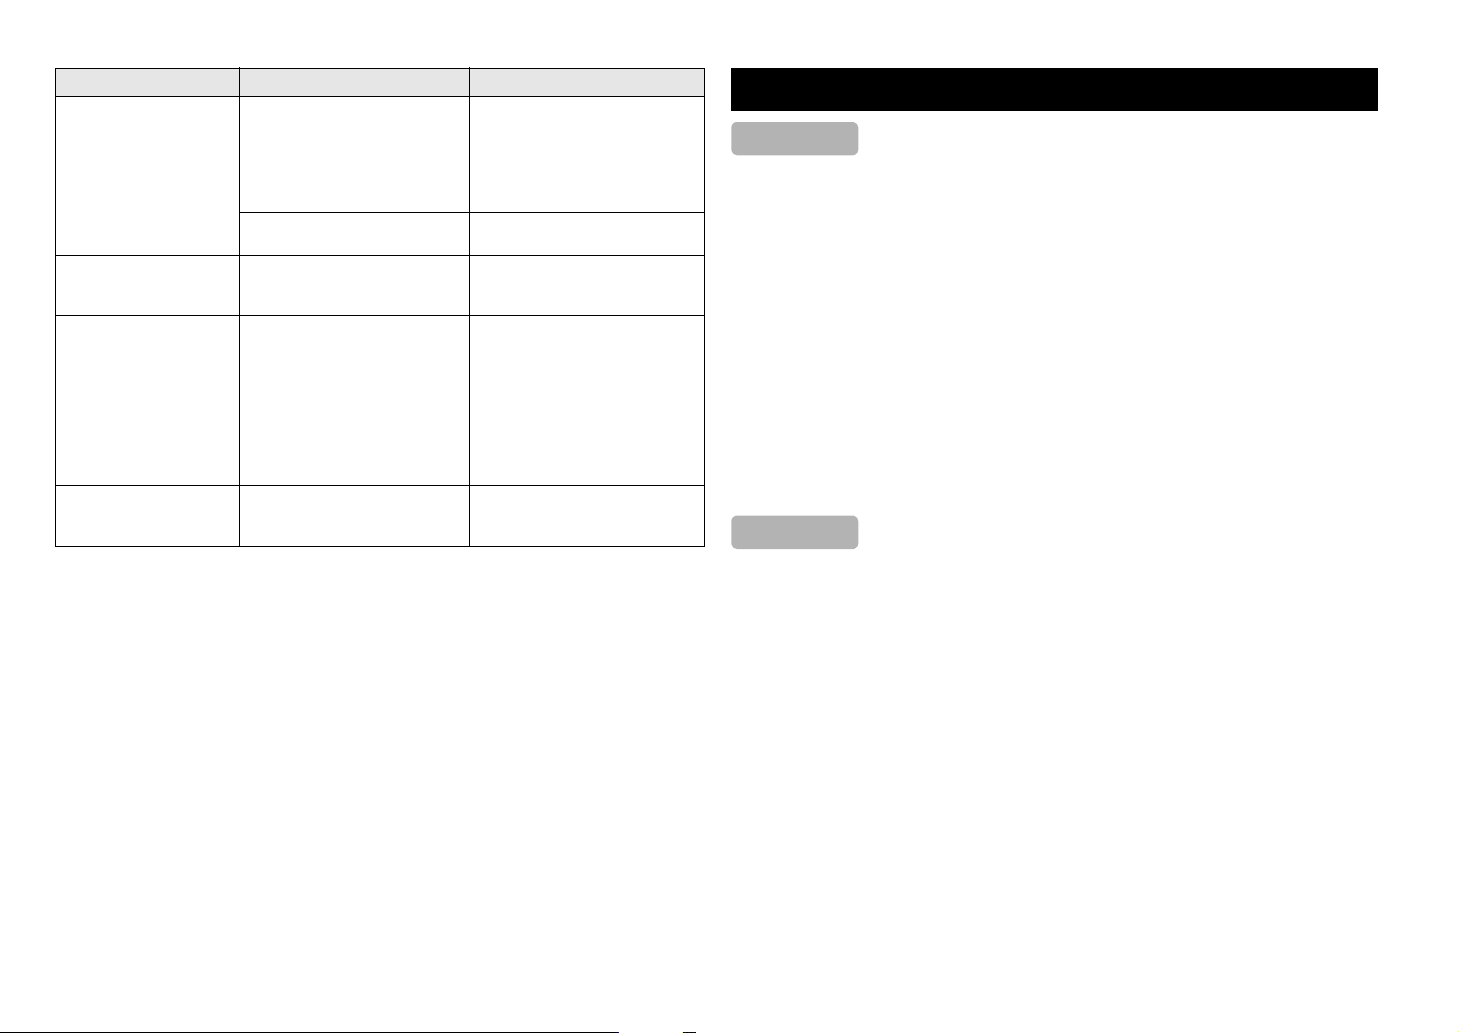
Problem Cause What to Do
NS-SW300
NS-SW200
The subwoofer does not
enter standby mode
automatically.
The subwoofer enters
standby mode
unexpectedly.
The subwoofer turns on
unexpectedly.
An object has fallen
into the port.
Noise generated from external
appliances etc., is activating the
subwoofer.
The AUTO STANDBY switch is
set to the OFF position.
The level of input signal is too
low.
Noise generated from external
appliances etc., is activating the
subwoofer.
Do not try to remove the object.
Attempting to remove the object
may cause a malfunction.
Move the subwoofer farther away
from such appliances, and/or
reposition the connected speaker
cables.
Set the AUTO STANDBY switch
to the HIGH or LOW position.
Set the AUTO STANDBY switch
to the HIGH or LOW position.
Set the AUTO STANDBY switch
to the HIGH position, and increase
the output level of the amplifier.
Move the subwoofer farther away
from such appliances, and/or
reposition the connected speaker
cables.
If the AUTO STANDBY switch is
set to HIGH, set it to LOW.
Alternatively, set the AUTO
STANDBY switch to the OFF
position.
Contact an authorized Yamaha
dealer or service center.
SPECIFICATIONS
Type..........................................................Advanced Yamaha Active Servo Technology II
Driver ...........................................................................................25 cm (10") cone woofer
Magnetic shielding type
Amplifier Output (100 Hz, 5 ohms, 10% THD) .................................................... 250 W
Frequency Response.....................................................................................20 Hz–160 Hz
Power Supply
U.S.A. and Canada models .................................................................. AC 120 V, 60 Hz
Taiwan, Brazil, and Central and South America models
..................................................................................AC 110–120/220–240 V, 50/60 Hz
Australia model .................................................................................... AC 240 V, 50 Hz
U.K., Europe, Russia, and Middle East models .................................. AC 230 V, 50 Hz
Asia and General models ........................................................AC 220–240 V, 50/60 Hz
Power Consumption................................................................................................... 80 W
Standby Power Consumption........................................................................0.3 W or less
Dimensions (W × H × D)...................350 × 366 × 420 mm (13-3/4" × 14-3/8" × 16-1/2")
Weight .....................................................................................................18.0 kg (39.7 lbs.)
Type..........................................................Advanced Yamaha Active Servo Technology II
Driver .............................................................................................20 cm (8") cone woofer
Magnetic shielding type
Amplifier Output (100 Hz, 5 ohms, 10% THD) .................................................... 130 W
Frequency Response.....................................................................................28 Hz–200 Hz
Power Supply
U.S.A. and Canada models .................................................................. AC 120 V, 60 Hz
Taiwan, Brazil, and Central and South America models
..................................................................................AC 110–120/220–240 V, 50/60 Hz
Australia model .................................................................................... AC 240 V, 50 Hz
U.K., Europe, Russia, and Middle East models .................................. AC 230 V, 50 Hz
Asia and General models ........................................................AC 220–240 V, 50/60 Hz
Power Consumption................................................................................................... 67 W
Standby Power Consumption........................................................................0.3 W or less
Dimensions (W × H × D)......................... 290 × 306 × 351 mm (11-3/8" × 12" × 13-7/8")
.....................................................................................................11.2 kg (24.7 lbs.)
Weight
15 En
The contents of this manual apply to the latest specifications as of the publishing date.
To obtain the latest manual, access the Yamaha website then download the manual file.
PRÉCAUTIONS D’USAGE
LISEZ ATTENTIVEMENT AVANT DE
PROCÉDER À TOUTE UTILISATION.
VEILLEZ À SUIVRE CES INSTRUCTIONS.
Les mises en garde énumérées ci-dessous sont
destinées à prévenir les risques pour l’utilisateur et les
tiers, à éviter les dommages matériels et à aider
l’utilisateur à se servir de l’appareil correctement et en
toute sécurité. Assurez-vous de suivre ces instructions.
Après avoir consulté ce manuel, conservez-le dans un endroit sûr
de façon à pouvoir vous y reporter facilement.
• Veillez à faire inspecter ou réparer l’appareil par le revendeur
auprès duquel vous l’avez acheté ou par un technicien Yamaha
qualifié.
• Yamaha ne peut être tenu responsable des dommages corporels
et matériels causés par une mauvaise manipulation de
l’instrument ou par des modifications apportées à l’appareil.
• Ce produit est conçu pour un usage courant dans les résidences
standard. Ne l’utilisez pas pour des applications nécessitant
une haute fiabilité, telles que la gestion des gestes essentiels à
la vie, des soins de santé ou des biens de grande valeur.
AVERTISSEMENT
Ce contenu indique « un risque de blessures graves ou
de mort ».
En cas d’anomalie
• Si l’un des problèmes suivants se produit, coupez
immédiatement l’alimentation et retirez la fiche d’alimentation.
– Le cordon/la fiche d’alimentation est endommagé(e).
– Une odeur inhabituelle ou de la fumée se dégage de l’appareil.
– Un corps étranger a pénétré à l’intérieur de l’appareil.
– Une brusque perte de son est survenue durant l’utilisation de
l’appareil.
– L’appareil est fissuré ou endommagé.
En continuant d’utiliser l’appareil dans ces conditions, vous
risquez de provoquer des chocs électriques, un incendie ou des
dysfonctionnements. Faites immédiatement inspecter ou réparer
l’appareil par le revendeur auprès duquel vous l’avez acheté ou
par un technicien Yamaha qualifié.
Alimentation
• Ne faites rien qui pourrait endommager le cordon
d’alimentation.
– Ne le placez pas à proximité d’un radiateur.
– Évitez de le plier excessivement ou de le modifier.
– Évitez de l’érafler.
– Ne placez pas dessus d’objets lourds.
L’utilisation du cordon d’alimentation en ayant le conducteur du
cordon exposé pourrait provoquer des chocs électriques ou un
incendie.
• En cas de risque d’impact de foudre à proximité de l’appareil,
évitez de toucher la fiche et le cordon d’alimentation. Le nonrespect de cette consigne peut entraîner des chocs électriques.
• Assurez-vous d’utiliser l’appareil avec la tension d’alimentation
appropriée, telle qu’imprimée sur l’appareil. L’absence de
raccordement à une prise secteur appropriée pourrait provoquer
un incendie, des chocs électriques ou des dysfonctionnements.
• Vérifiez périodiquement l’état de la prise électrique,
dépoussiérez-la et nettoyez-la en prenant soin de retirer toutes
les impuretés qui pourraient s’y accumuler. Le non-respect de
cette consigne peut entraîner un incendie ou des chocs
électriques.
• Lors de l’installation de l’appareil, assurez-vous que la prise
secteur que vous utilisez est facilement accessible. En cas de
problème ou de dysfonctionnement, désactivez immédiatement
l’interrupteur d’alimentation et retirez la fiche de la prise
secteur. Même lorsque l’interrupteur d’alimentation est en
position désactivée, l’appareil n’est pas déconnecté de la source
d’électricité tant que le cordon d’alimentation reste branché à la
prise murale.
• Si vous entendez le tonnerre gronder ou suspectez l’imminence
d’un éclair, mettez immédiatement l’appareil hors tension et
débranchez la fiche d’alimentation de la prise secteur. Le nonrespect de cette consigne peut entraîner un incendie ou des
dysfonctionnements.
• Si vous prévoyez de ne pas utiliser l’appareil pendant une
longue période de temps, assurez-vous de retirer la fiche
d’alimentation de la prise secteur. Le non-respect de cette
consigne peut entraîner un incendie ou des dysfonctionnements.
Installation
• Fixez toujours les câbles d’enceinte à un mur ou un support
similaire. Si vous trébuchez sur ou vous prenez la main dans un
câble d’enceinte, l’enceinte pourrait tomber ou se renverser,
causant des dommages ou des blessures.
Démontage interdit
• Ne tentez pas de démonter ou de modifier l’appareil. Le nonrespect de cette procédure risque d’entraîner un incendie, des
chocs électriques, des blessures ou des dysfonctionnements.
Avertissement relatif à la présence d’eau
• N’exposez pas l’appareil à la pluie, ne l’utilisez pas près d’une
source d’eau ou dans un milieu humide et ne déposez pas dessus
des récipients (tels que des vases, des bouteilles ou des verres)
contenant des liquides qui risqueraient de s’infiltrer par les
ouvertures ou de dégouliner. Toute infiltration de liquide tel que
de l’eau à l’intérieur de l’appareil risque de provoquer un
incendie, des chocs électriques ou des dysfonctionnements.
• N’essayez jamais de retirer ou d’insérer une fiche électrique
avec les mains mouillées. Ne manipulez pas l’appareil en ayant
les mains mouillées. Le non-respect de cette procédure risque
d’entraîner des chocs électriques ou des dysfonctionnements.
Prévention contre les incendies
• Ne placez pas d’objets brûlants ou de flammes nues à proximité
de l’appareil, au risque de provoquer un incendie.
Précautions d’utilisation
• Veillez à ne pas faire tomber l’appareil et à ne pas lui appliquer
une pression excessive. Le non-respect de cette procédure
risque d’entraîner des chocs électriques, un incendie ou des
dysfonctionnements.
ATTENTION
Ce contenu indique « un risque de blessures ».
Alimentation
• N’utilisez pas une prise secteur dans laquelle la fiche
d’alimentation ne peut pas s’insérer fermement. Le non-respect
de cette consigne peut entraîner un incendie, des chocs
électriques ou des brûlures.
• Veillez à toujours saisir la fiche elle-même, et non le câble, pour
la débrancher. Si vous tirez sur le cordon, vous risquez de
l’endommager et de provoquer des chocs électriques ou un
incendie.
• Introduisez complètement la fiche d’alimentation dans la prise
secteur. L’utilisation de l’appareil alors que la fiche
d’alimentation n’est pas complètement insérée dans la prise peut
entraîner une accumulation de poussière sur la fiche et
provoquer un incendie ou des brûlures.
Français
i Fr
Installation
• Ne placez pas l’appareil dans une position instable afin d’éviter
qu’il ne tombe ou se renverse accidentellement et ne provoque
des blessures.
• Lors de l’installation de l’unité, veillez à ne pas bloquer la
dissipation thermique.
– Évitez de couvrir l’appareil avec un tissu.
– Évitez d’obstruer les orifices de ventilation (fentes de
refroidissement) de l’appareil.
– N’installez pas l’appareil de toute manière autre que spécifiée.
– N’utilisez pas l’appareil dans un lieu clos, mal aéré.
Le non-respect de ce qui précède risque d’entraîner une rétention
de chaleur à l’intérieur de l’appareil, susceptible de provoquer un
incendie ou des dysfonctionnements. Veillez à laisser
suffisamment d’espace libre autour de l’appareil : au moins 20
cm à la surface, 20 cm sur les côtés et 20 cm à l’arrière.
• Évitez d’être à proximité de l’appareil en cas de catastrophe
naturelle telle qu’un tremblement de terre. Compte tenu du
risque de renversement ou de chute de l’appareil pouvant
entraîner des blessures, pensez à vous éloigner rapidement de
l’appareil et à vous réfugier dans un lieu sûr.
• Veillez à toujours vous faire aider d’au moins une personne pour
transporter ou déplacer l’unité. N’essayez jamais de soulever
l’unité sans vous faire aider car vous risqueriez de vous blesser
le dos, de subir d’autres blessures ou d’endommager l’unité.
• Avant de déplacer l’appareil, veillez à désactiver l’interrupteur
d’alimentation et à déconnecter tous les câbles de connexion. Le
non-respect de cette consigne peut entraîner l’endommagement
des câbles ou provoquer le trébuchement et la chute de
l’utilisateur ou d’autres personnes.
Perte de capacités auditives
• N’utilisez pas l’appareil de manière prolongée à un niveau
sonore trop élevé ou inconfortable pour l’oreille, au risque
d’endommager irrémédiablement votre ouïe. Si vous constatez
une baisse d’acuité auditive ou que vous entendez des
sifflements, consultez un médecin.
• Avant de raccorder l’appareil à d’autres appareils, mettez tous
les appareils concernés hors tension. Et, avant de mettre tous les
appareils sous/hors tension, vérifiez que tous les niveaux de
volume sont réglés sur la position minimale. Le non-respect de
ces mesures peut provoquer une perte d’acuité auditive,
entraîner un risque d’électrocution ou endommager l’appareil.
• Lorsque vous mettez le système audio sous tension, allumez
toujours l’appareil en DERNIER pour éviter d’endommager
votre ouïe et les haut-parleurs. Lors de la mise hors tension,
vous devez éteindre l’appareil en PREMIER pour la même
raison. Le non-respect des consignes précédentes risque
d’entraîner une déficience auditive ou d’endommager le casque.
Entretien
• Retirez la fiche d’alimentation de la prise secteur avant de
procéder au nettoyage de l’appareil. Le non-respect de cette
consigne peut entraîner des chocs électriques.
Manipulation
• Ne touchez pas la surface avec cette étiquette. Cela
pourrait provoquer des brûlures. L’étiquette sur
l’appareil indique que la surface sur laquelle
l’étiquette est attachée peut devenir chaude
pendant le fonctionnement.
• N’introduisez pas vos mains ou vos doigts à l’intérieur de
l’évent bass-reflex situé sur la droite de l’appareil. Le nonrespect de cette consigne peut provoquer des blessures.
• N’insérez pas de corps étranger tel que du métal ou du papier à
l’intérieur de l’évent bass-reflex situé sur la droite de l’appareil.
Le non-respect de cette procédure risque d’entraîner un
incendie, des chocs électriques ou des dysfonctionnements.
• Évitez de faire ce qui suit :
– vous mettre debout ou vous assoir sur l’appareil.
– placer des objets lourds sur l’appareil.
– disposer l’appareil en pile.
– appliquer une force excessive sur les boutons, les
commutateurs, les bornes d’entrée/sortie, etc.
Le non-respect de ces consignes pourrait causer des blessures ou
un endommagement de l’appareil.
• Évitez de débrancher les câbles connectés afin de ne pas causer
de blessures ou de dommages matériels qui pourraient résulter
de la chute de l’appareil.
• N’utilisez pas l’appareil si le son comporte de la distorsion. Une
utilisation prolongée dans cet état pourrait provoquer une
surchauffe et causer un incendie.
Avis
Indique les points que vous devez respecter afin d’éviter
toute défaillance, dommage ou dysfonctionnement du
produit et toute perte de données.
Alimentation
• Si vous prévoyez de ne pas utiliser l’appareil pendant une
longue période de temps, assurez-vous de retirer le cordon
d’alimentation de la prise secteur. Même quand cet appareil est
mis hors tension avec [A] (STANDBY/ON), une faible quantité
de courant continue de l’alimenter.
Installation
• N’utilisez pas l’appareil à proximité d’autres équipements
électroniques, tels qu’un téléviseur, une radio ou un téléphone
mobile. Si vous ne respectez pas cette consigne, l’appareil, le
téléviseur ou la radio risquent de provoquer des interférences.
• N’utilisez pas l’appareil dans un emplacement exposé à la
lumière directe du soleil, à une température très élevée (à
proximité d’un appareil de chauffage) ou très basse, à un dépôt
de poussière excessif ou à de fortes vibrations. Le non-respect
de cette consigne peut entraîner la déformation du panneau de
l’appareil, le dysfonctionnement de ses composants internes ou
l’instabilité de ses opérations.
Raccordements
• En cas de connexion d’unités externes, assurez-vous de lire
attentivement le mode d’emploi de l’appareil concerné et reliezle conformément aux instructions fournies.
• La non-conformité aux instructions de manipulation peut
provoquer le dysfonctionnement de l’appareil.
Manipulation
• Ne placez pas de produits en vinyle, en plastique ou en
caoutchouc sur l’appareil. Le non-respect de cette consigne peut
provoquer une décoloration ou une déformation du panneau de
cet appareil.
• Si la température ambiante change radicalement (comme
pendant le transport de l’appareil ou dans des conditions de
surchauffe ou de refroidissement rapides) et que de la
condensation se forme dans l’appareil, laissez-le hors tension
pendant plusieurs heures jusqu’à ce qu’il soit complètement sec
avant de le réutiliser. L’utilisation de l’appareil en cas de
formation de condensation peut entraîner son
dysfonctionnement.
Entretien
• Si la température ou le degré d’humidité change radicalement,
des gouttelettes d’eau (de la condensation) pourrait se former
sur la surface de l’appareil. En cas de formation de
condensation, essuyez immédiatement la surface de l’appareil
avec un chiffon doux et sec. Si la condensation n’est pas
éliminée de la surface de l’appareil, elle risque d’être absorbée
par les composants en bois, causant leur déformation.
• Utilisez un chiffon doux et sec pour le nettoyage de l’appareil.
L’utilisation de produits chimiques tels que de la benzène ou du
diluant, de produits d’entretien ou de chiffons de lavage
chimique peut causer la décoloration ou la déformation de
l’appareil.
ii Fr
Informations
AVERTISSEMENT
ATTENTION
AVIS
NOTE
1
2
Au sujet des fonctions et données incluses
dans l’appareil
• De l’air pourrait s’échapper de l’évent bass-reflex. Cela n’a rien
d’anormal. Ce phénomène se produit en particulier dans le cas
de la lecture de musique au grave prédominant.
À propos du contenu de ce manuel
• Ce manuel s’adresse aux personnes suivantes :
– les utilisateurs de l’appareil
• Dans ce manuel, les informations importantes sont repérées par
les intitulés suivants:
Ce contenu indique « un risque de blessures graves ou de mort ».
Ce contenu indique « un risque de blessures ».
Indique les points que vous devez respecter afin d’éviter toute
défaillance, dommage ou dysfonctionnement du produit, perte de
données mais aussi pour protéger l’environnement.
Indique des remarques liées à l’utilisation, à certaines restrictions
des fonctions et d’autres informations utiles.
• Les illustrations figurant dans ce manuel servent uniquement à
expliciter les instructions.
Informations aux utilisateurs sur la collecte et la mise
au rebut des vieux appareils:
Ce symbole imprimé sur les produits, leur
emballage et/ou la documentation fournie indique
que ces produits électriques et électroniques
usagés ne peuvent pas être mis au rebut avec les
déchets ménagers.
Afin de garantir le traitement, la récupération et le
recyclage corrects des appareils usagés, mettezles au rebut dans les centres de collecte adéquats,
conformément aux réglementations dans votre
pays ou région.
La mise au rebut correcte de ces produits contribue
à la sauvegarde de ressources précieuses et permet
de prévenir les risques d’effet néfaste sur la santé
publique et l’environnement observés dans le cas
de la mise au rebut incorrecte de tels appareils.
Pour plus d’informations sur la collecte et le
recyclage des appareils usagés, veuillez prendre
contact avec les autorités locales, le centre de
collecte des déchets de votre région ou le point de
vente où vous avez acheté l’appareil.
Avis aux utilisateurs commerciaux dans
l’Union européenne:
Si vous souhaitez vous débarrasser d’appareils
électriques et électroniques, adressez-vous au
revendeur ou au fabricant de ces appareils pour
plus d’informations.
Informations sur la mise au rebut dans les pays
en dehors de l’Union européenne:
Ce symbole est uniquement d’application dans
l’Union européenne. Avant de mettre de tels
appareils au rebut, prenez contact avec les autorités
locales de votre région ou un revendeur et informezvous sur la mise au rebut correcte de ces appareils.
Le numéro de modèle, le numéro de série, l’alimentation
requise, etc., se trouvent sur ou près de la plaque signalétique du
produit, située à l’arrière de l’unité. Notez le numéro de série
dans l’espace fourni ci-dessous et conservez ce manuel en tant
que preuve permanente de votre achat afin de faciliter
l’identification du produit en cas de vol.
N° de modèle
INDEX
ADVANCED YAMAHA ACTIVE SERVO
TECHNOLOGY II .........................................................1
TWISTED FLARE PORT .............................................1
CARACTÉRISTIQUES .................................................2
ACCESSOIRE FOURNI................................................2
DISPOSITION ................................................................2
Orientation du caisson de graves .................................2
PRÉSENTATION DES COMMANDES
ET DE LEURS FONCTIONS........................................3
BRANCHEMENTS ........................................................5
Branchement aux bornes de sortie de ligne
(fiches RCA) de l’amplificateur
..............................5
Branchement aux bornes de sortie d’enceintes de
l’amplificateur.........................................................7
Branchement aux bornes INPUT1/OUTPUT
du caisson de graves ....................................................9
Connexions système ..................................................10
Branchement du caisson de graves au secteur
FONCTION DE COMMUTATION D’ALIMENTATION
AUTOMATIQUE
.............................................................10
Réglage du commutateur AUTO STANDBY
RÉGLAGE DE BALANCE..........................................11
Caractéristiques de fréquence du caisson
de graves ....................................................................13
DÉPANNAGE................................................................14
CARACTÉRISTIQUES TECHNIQUES
..................10
...................10
.......................15
Français
N° de série
(rear_fr_01)
iii Fr

ADVANCED YAMAHA ACTIVE SERVO TECHNOLOGY II
Graves pleins
de clarté et de
punch
Évent
Coffret
Convertisseur
d’impédance avancé
Amplificateur
de traitement
Active Servo
Enceinte à air
(résonateur acoustique)
Signaux
Signaux (inaudibles) de très faible amplitude
Son de basse fréquence
(pression sonore audible
émise depuis le
diaphragme)
Évent classique
Les turbulences d’air aux deux extrémités de l’évent créent du bruit
Des turbulences
d’air surviennent.
Les turbulences sont
diffusées, le flux d’air
circule mieux.
Twisted Flare Port
En 1988, Yamaha lance sur le marché des enceintes dotées de la technologie YST (Yamaha
Active Servo Technology), un système assurant une restitution puissante et de haute qualité
des basses fréquences. Grâce à une connexion directe entre l’amplificateur et l’enceinte,
cette technologie garantit une transmission fidèle du signal et un réglage précis des
enceintes.
Les enceintes étant pilotées par les circuits de commande par impédance négative de
l’amplificateur, ainsi que par la résonance générée entre le volume de l’enceinte et l’évent,
lénergie résonante produite (concept d’enceinte à air) est supérieure à celle des enceintes
bass reflex standard. Ceci permet aux enceintes de taille inférieure de restituer les basses
frquences.
Le nouveau système Advanced YST II de Yamaha ajoute de nombreuses améliorations à
la technologie YST (Yamaha Active Servo Technology) et permet un meilleur contrôle de
la puissance qui commande l’amplificateur et l’enceinte. Au niveau de l’amplificateur,
l’impédance de l’enceinte varie en fonction de la fréquence du son. Les nouveaux circuits
créés par Yamaha, qui associent une commande par impédance négative à un pilotage à
courant constant, offrent une plus grande stabilité des performances et une restitution nette
des basses fréquences sans aucune opacit.
TWISTED FLARE PORT
Les enceintes bass-reflex actuelles
incorporent un résonateur acoustique destiné
à améliorer la restitution du grave.
Cependant, lors de la reproduction de graves
situés dans la plage de fréquence de ce
résonateur acoustique, de l’air sous pression
sort de l’enceinte et pénètre celle-ci par
l’évent, produisant parfois du bruit dû aux
turbulences d’air au bout de l’évent.
L’évent et l’enceinte résonnent à une
fréquence déterminée par leurs dimensions et
forme.
Par contre, les turbulences causées par ces brusques déplacements d’air au bout de l’évent
contiennent une vaste plage de composants de fréquence absents du signal original. Ce
bruit s’explique par le fait que la vaste plage de composants de fréquence comprend des
composants correspondant aux fréquences de résonance de l’évent et de l’enceinte,
entraînant une forte résonance.
L’évent évasé et tordu conçu par Yamaha innove la manière dont l’évent s’élargit à son
extrémité et incorpore une “torsion” permettant de supprimer les turbulences du flux d’air
de chaque côté de l’évent et donc d’éliminer le bruit.
Cela permet de réduire considérablement aux problèmes de “son trouble” et de “bruit de
déplacement d’air” – jusqu’à présent typiques des enceintes bass-reflex – et d’obtenir une
clarté supérieure de restitution du grave.
1 Fr
CARACTÉRISTIQUES
Câble de commande système
(5 m x 1)
A
B
C
A
ou
B
ou
C
NOTE
Vous pouvez aussi placer et orienter le caisson de graves de la
manière illustrée ci-dessous. Néanmoins, si le caisson de graves
est placé face au mur, la restitution des graves pourrait être
affectée en raison d’un phénomène d’annulation de phase
provoqué par l’interférence entre le son
direct et le son réfléchi.
Pour éviter ce problème, placez le
caisson de graves dans un angle.
(Graphiques , et )
ABC
Dans certains cas, la présence
d’ondes stationnaires peut nuire à
la perception des sons ultra graves
produits par le caisson de graves.
• Cette enceinte à caisson de graves utilise la technologie
Advanced Yamaha Active Servo Technology II mise au
point par Yamaha pour la reproduction de basses
fréquences de haute qualité. Ces basses fréquences
confèrent un effet “cinéma à la maison” plus réaliste au
son de votre chaîne stéréo.
• Ce caisson de graves peut être facilement raccordé à votre
chaîne actuelle soit aux bornes d’enceintes, soit aux
bornes de sortie de ligne (fiche RCA) de l’amplificateur.
• Pour une utilisation efficace de ce caisson de graves, les
basses fréquences doivent correspondre au type de son de
vos enceintes avant. Il est en outre possible d’optimiser la
qualité sonore suivant les conditions d’écoute au moyen
de la commande HIGH CUT et du commutateur PHASE.
• La fonction de commutation d’alimentation automatique
vous évite d’appuyer sur la touche STANDBY/ON pour
mettre le caisson de grave sous et hors tension.
• Vous pouvez relier le caisson de graves à un élément
Yamaha et bénéficier de la fonction de mise sous
tension/hors tension simultanée.
Le câble de commande système fourni permet de connecter
le caisson de graves à un élément Yamaha équipé d’une
prise pour câble de commande système. Quand vous mettez
l’élément connecté sous tension/hors tension, le caisson de
graves est simultanément mis sous tension/hors tension.
• La forme évasée et légèrement tordue diffuse le
tourbillon d’air généré sur la circonférence de l’évent et
produit un flux d’air régulier. Cela réduit les bruits
étrangers perturbant le signal de la source et offre une
restitution nette et précise du grave.
• Le caisson de graves permet en outre d’adapter la
reproduction des graves à la source lue. (NS-SW300
uniquement) Il comporte un commutateur B.A.S.S. qui
permet de sélectionner un effet de reproduction des
graves adapté à la source lue.
ACCESSOIRE FOURNI
Ouvrez l’emballage et vérifiez
qu’il contient l’accessoire
suivant.
DISPOSITION
Vu que les fréquences graves des signaux audio comportent des longueurs d’onde étendues, elles sont perçues comme
quasi non directionnelles par l’oreille humaine. La plage des très basses fréquences ne produit pas d’image stéréo. Un seul
caisson de graves suffit donc pour produire des sons très graves de haute qualité. Toutefois, l’utilisation de deux caissons
de graves (comme pour les enceintes avant G et D) peut contribuer à intensifier votre plaisir acoustique.
Orientation du caisson de graves
Placez le caisson de graves comme décrit sur le schéma , ou pour obtenir un rendement optimal.
: caisson de graves : enceinte avant
Utilisation d’un seul caisson de graves
Placez le caisson de graves à droite ou à gauche des
enceintes avant.
Placement du caisson de graves entre les
enceintes avant
Si vous placez le caisson de graves entre les enceintes
avant gauche et droite, orientez-le légèrement vers le mur
pour optimaliser la restitution.
NOTE
• Cet appareil bénéficie d’un blindage magnétique. Toutefois, évitez de le placer trop près d’un téléviseur de type CRT, car cela
pourrait détériorer les couleurs. Le cas échéant, éloignez l’appareil du téléviseur.
• Si vous utilisez le caisson de graves à un volume extrême, les meubles ou surfaces en verre dans la pièce pourraient résonner et
le caisson lui-même pourrait en outre vibrer. Le cas échéant, réduisez le volume. Pour limiter la résonance, utilisez un rideau
épais ou un tissus similaire afin d’absorber les vibrations sonores. Vous pouvez aussi résoudre le problème en déplaçant le
caisson de graves.
Utilisation de deux caissons de graves
Placez les deux caissons de
graves à gauche et à droite des
enceintes avant.
2 Fr
Français

PRÉSENTATION DES COMMANDES ET DE LEURS FONCTIONS
1
2
3
4
Dessus
A
B
56 7 8 9 <
C
D
Arrière
NS-SW300
Avant
1
2
3
4
Avant
Arrière
Dessus
NS-SW200
Vérifiez le numéro de modèle de votre caisson de graves; il est imprimé sur l’étiquette en face arrière.
678<5
A
B
3 Fr
C
D

PRÉSENTATION DES COMMANDES ET DE LEURS FONCTIONS
*Chaque graduation
sur cette
commande
représente 10 Hz.
1 Témoin
Vert:
Rouge:
Éteint:
2 Commande VOLUME ( page 11)
Ajuste le niveau sonore. Tournez cette commande dans le sens des aiguilles d’une
montre pour augmenter le volume, et dans le sens inverse des aiguilles d’une montre
pour baisser le volume.
3 Commutateur STANDBY/ON
Quand le commutateur POWER est sur ON, le commutateur STANDBY/ON permet
de mettre le caisson de graves sous tension. Le témoin s’allume en vert. Une nouvelle
pression sur ce commutateur met le caisson de graves hors tension. Le témoin s’éteint.
4 Évent ( page 1)
Produit les sons très graves.
5 Bornes INPUT2 (NORMAL) ( page 5)
Ces bornes permettent de recevoir les signaux de niveau de ligne transmis par
l’amplificateur.
6 Borne INPUT3 (LFE) ( page 6)
Si votre amplificateur (ou récepteur) est capable de couper les hautes fréquences des
signaux transmis au caisson de graves, connectez l’amplificateur à la borne INPUT3
(LFE) du caisson de graves.
La commande HIGH CUT
LFE.
7 Commutateur AUTO STANDBY (HIGH/LOW/OFF) ( page 10)
En règle générale, ce commutateur est placé sur OFF. Si vous placez ce commutateur
sur HIGH ou LOW, la fonction de commutation d’alimentation automatique du caisson
de graves est activée. Si vous ne souhaitez pas activer cette fonction, laissez le
commutateur en position OFF.
NOTE
Veillez à régler le commutateur POWER sur OFF avant de régler le commutateur AUTO
STANDBY.
Le caisson de graves est sous tension.
La fonction de mise sous/hors tension automatique est active et le caisson de
graves est en veille.
Le caisson de graves est hors tension.
Le caisson de graves consomme une faible quantité d’énergie en mode de veille.
m n’a pas d’effet sur les signaux reçus à la borne INPUT 3
8 Commutateur PHASE ( page 11)
Ce commutateur doit être placé sur REV (inverse). Cependant, selon les enceintes utilisées
ou les conditions d’écoute, vous obtiendrez une meilleure qualité sonore en plaçant ce
commutateur sur NORM (normal). Faites des essais pour sélectionner la position la mieux
adaptée.
Français
9 Commutateur B.A.S.S. (Bass Action Selector System)
(NS-SW300 uniquement) ( page 11)
Placez ce commutateur sur MUSIC pour reproduire les
graves de supports audio. Placez ce commutateur sur
MOVIE pour reproduire les graves de supports vidéo.
j Prise SYSTEM CONNECTOR ( page 10)
Branchez le câble de commande système fourni à cette prise. Si vous reliez le caisson
de graves à un élément Yamaha (doté d’une prise de connexion système) avec le câble
de commande système, le caisson de graves est automatiquement mis sous/hors tension
quand vous allumez/éteignez l’élément en question.
k Bornes OUTPUT (TO SPEAKERS) ( page 7)
Ces bornes permettent de connecter les enceintes principales. Les signaux provenant
des bornes INPUT1 sont transmis à ces bornes.
l Bornes INPUT1 (FROM AMPLIFIER) ( page 7)
Ces bornes permettent de connecter le caisson de graves aux bornes d’enceintes de
l’amplificateur.
m Commande HIGH CUT ( page 11)
Ajuste le point de coupure des hautes fréquences.
Les fréquences supérieures à la fréquence sélectionnée
avec cette commande sont toutes coupées (et ne sont
pas reproduites).
n Commutateur POWER
En temps normal, ce commutateur doit être placé sur ON. Si vous ne comptez pas utiliser
le caisson de graves pendant une période prolongée, réglez ce commutateur sur OFF.
4 Fr
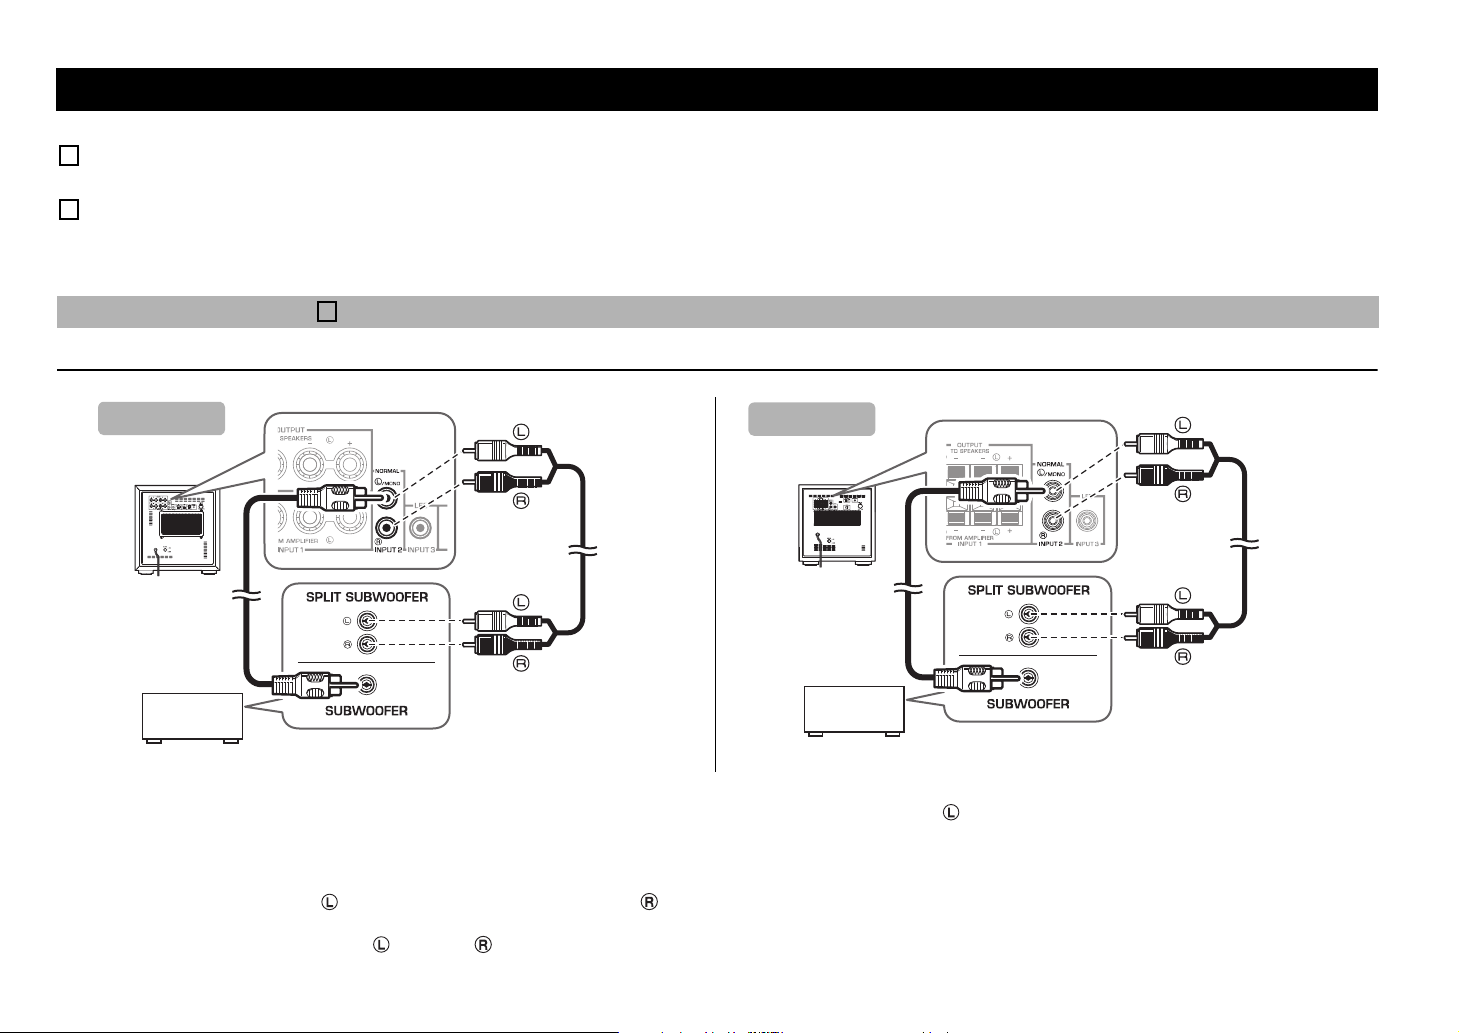
BRANCHEMENTS
1
2
1
1
2
1
Câble Cinch (RCA) mono
2 Câble Cinch (RCA) stéréo
Caisson de
graves
Amplificateur ou
récepteur
NS-SW300
1
2
1
Câble Cinch (RCA) mono
2 Câble Cinch (RCA) stéréo
Caisson de
graves
Amplificateur ou
récepteur
NS-SW200
Choisissez la méthode de connexion la mieux adaptée à votre système audio.
Choisissez cette méthode de connexion si votre amplificateur dispose de
bornes de sortie de ligne (fiche RCA). ( page 5, 6)
Choisissez cette méthode de connexion si votre amplificateur ne dispose
pas de bornes de sortie de ligne (fiche RCA). ( page 7, 8)
Branchement aux bornes de sortie de ligne (fiches RCA) de l’amplificateur
Exemple: connexion d’un caisson de graves
AVIS
• Débranchez le caisson de graves et tous les autres éléments audio/vidéo du secteur avant
d’effectuer les connexions, et ne les branchez au secteur qu’après avoir terminé tous les
branchements.
• Les méthodes de connexion et le nom des prises de votre élément (un amplificateur ou un
récepteur, par exemple) peuvent différer des descriptions figurant dans ce mode d’emploi.
Veuillez donc consulter le mode d’emploi fourni avec votre élément.
• Tous les branchements doivent être effectués correctement, c’est-à-dire entre G (gauche) et G, D
(droite) et D, “+” et “+”, et “–” et “–”.
Procurez-vous un câble Cinch (RCA) mono (1) ou un câble Cinch (RCA) stéréo (2) disponibles dans le commerce pour effectuer les connexions.
• Reliez la borne SUBWOOFER (ou LOW PASS, etc.) au dos de l’amplificateur (ou du récepteur AV) à la borne INPUT2 /MONO du caisson de graves avec un câble Cinch (RCA)
mono (1) disponible dans le commerce.
Autre méthode:
•
Si vous branchez le caisson de graves aux bornes SPLIT SUBWOOFER (
(2) pour relier la borne INPUT2
NOTE
Les signaux audio reçus aux bornes INPUT 2 /MONO et du caisson de graves ne sont pas transmis aux bornes OUTPUT (TO SPEAKERS).
5 Fr
/MONO au canal “G” et la borne INPUT2 au canal “D” des bornes SPLIT SUBWOOFER.
dotées de canaux G et D) au dos de l’amplificateur, utilisez un câble RCA stéréo disponible dans le commerce
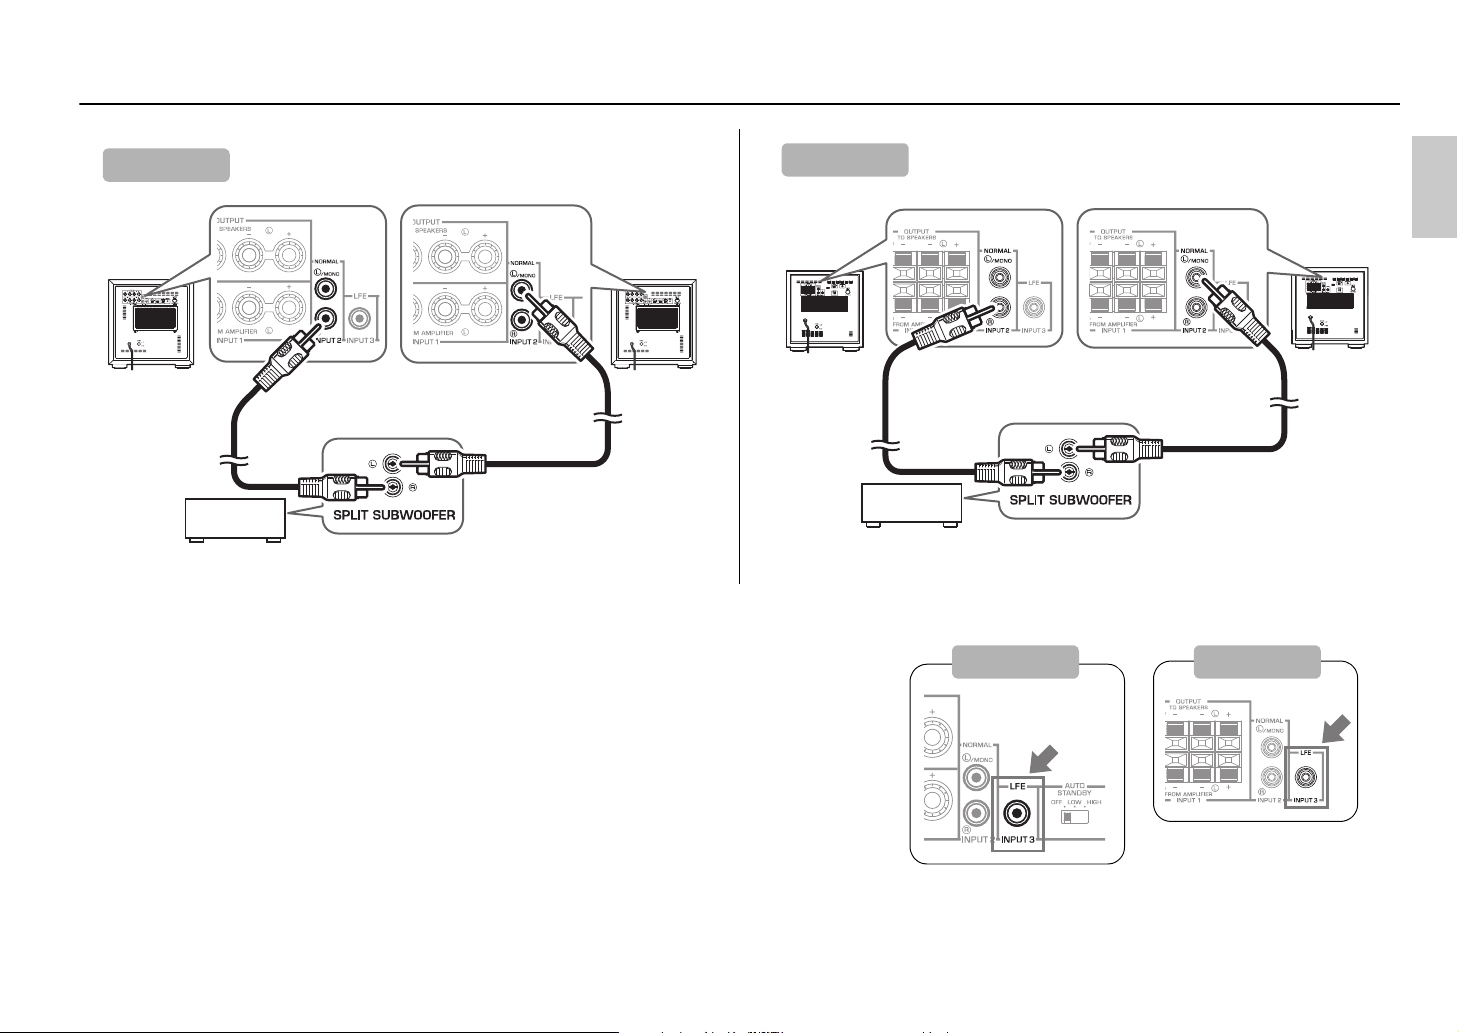
Exemple: connexion de deux caissons de graves
1
1 Câble Cinch (RCA) mono
1
Caisson de
graves
Caisson de
graves
Amplificateur ou
récepteur
NS-SW300
1 Câble Cinch (RCA) mono
1
1
Caisson de
graves
Caisson de
graves
Amplificateur ou
récepteur
NS-SW200
NS-SW300 NS-SW200
Raccordement à la borne INPUT3 (LFE)
Si votre amplificateur (ou récepteur) est capable de couper les hautes fréquences des signaux transmis au
caisson de graves, connectez l’amplificateur à la borne INPUT3 (LFE) du caisson de graves.
Vous obtiendrez ainsi une qualité sonore optimale, car le trajet du signal dans le caisson de graves est
raccourci lorsqu’il contourne le circuit intégré HIGH CUT.
Français
6 Fr
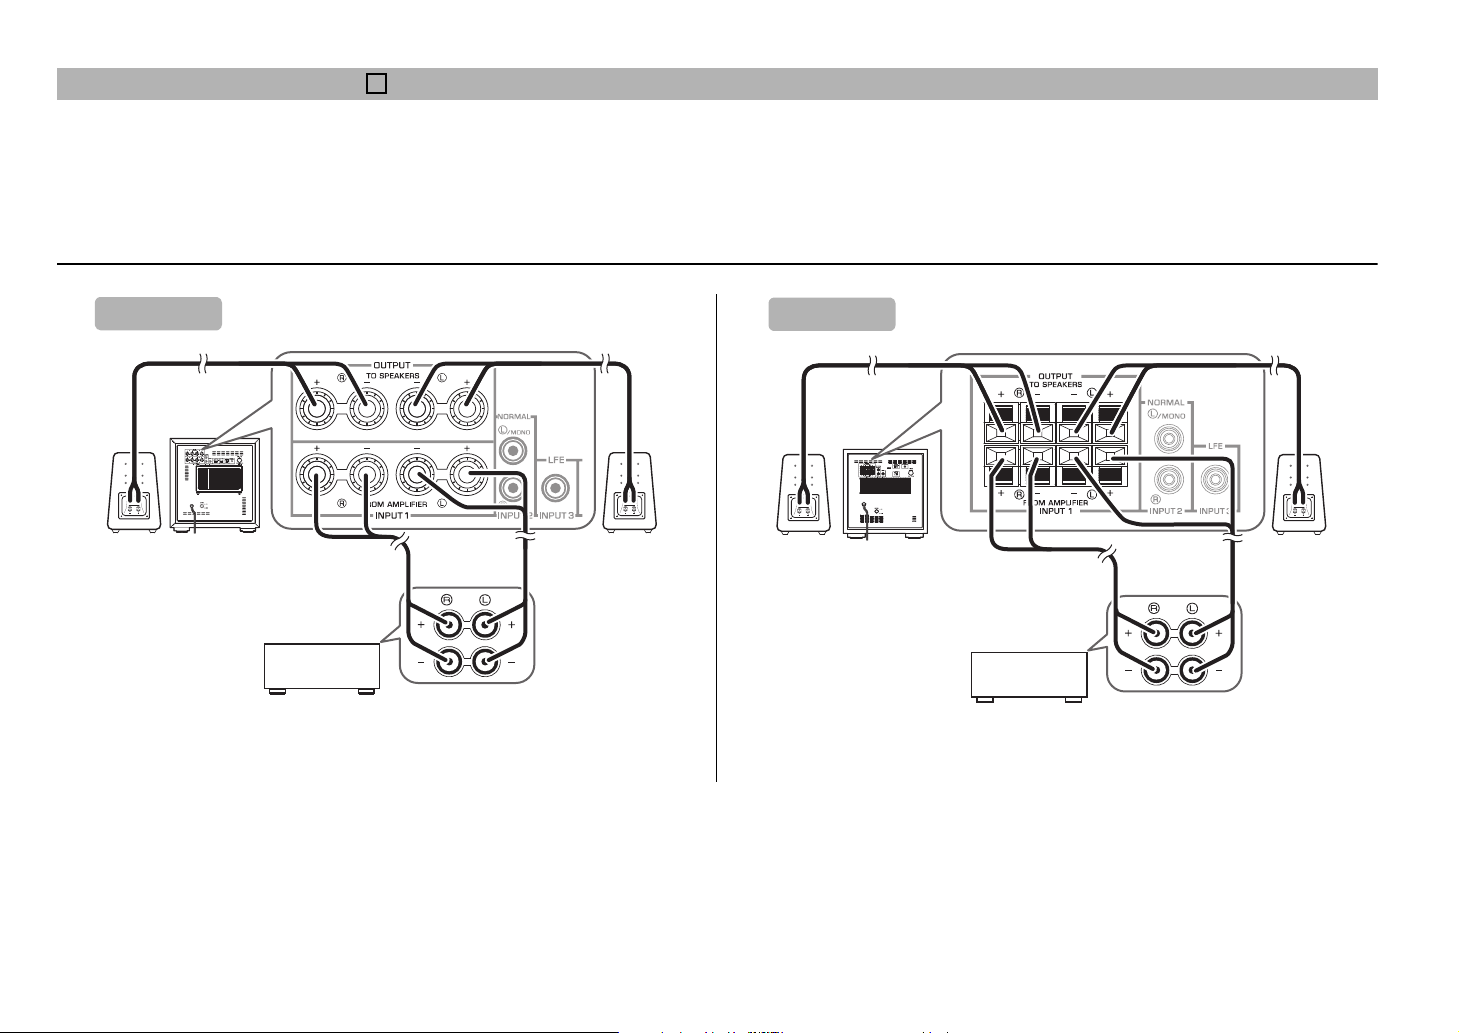
Branchement aux bornes de sortie d’enceintes de l’amplificateur
2
Enceinte avant
droite
Caisson de
graves
Amplificateur ou
récepteur
Bornes de sortie
d’enceintes
Enceinte
avant gauche
NS-SW300
Enceinte avant
droite
Enceinte
avant gauche
Bornes de sortie
d’enceintes
Amplificateur ou
récepteur
Caisson de
graves
NS-SW200
° Exemple: branchement du caisson de graves à un amplificateur doté d’une seule paire de bornes de sortie
Reliez les bornes de sortie d’enceintes de l’amplificateur aux bornes INPUT 1 (FROM AMPLIFIER) du caisson de graves avec des câbles pour haut-parleurs. Branchez les enceintes
avant aux bornes OUTPUT (TO SPEAKERS) du caisson de graves. Cette connexion du caisson de graves entre les enceintes avant et l’amplificateur n’affecte ni le volume ni la qualité
du son.
Connexion d’un caisson de graves
7 Fr
 Loading...