


mLAN EXPANSION BOARD
mLAN16E
Owner’s Manual
English
Bedienungsanleitung
Mode d’emploi
DeutschFrançais
Introduction
Thank you for purchasing the Yamaha mLAN16E.
The mLAN16E is an expansion board that features an mLAN interface. mLAN is a digital
network designed for music and is based on the IEEE1394 high performance serial bus
and data communication protocol. mLAN makes it easy to construct sophisticated networks for IEEE1394 (FireWire/i.LINK) audio and MIDI signals without having to re-configure the cabling, as was necessary in older, conventional systems.
The mLAN16E adds two mLAN connectors to an mLAN16E-compatible device, such as
English
the Yamaha MOTIF ES music production synthesizer.
In order to take full advantage of the mLAN16E’s functionality, please read this manual
carefully. After reading this manual, please keep it available for future reference.
Safety Precautions
Before using the mLAN16E, be sure to read those sections in the owner’s manual
for your mLAN16E-compatible device on “Precautions” and “Installing Optional
Hardware.”
Installing the mLAN16E
For information on installing the mLAN16E, refer to the section in the owner’s
manual for your mLAN16E-compatible device on “Installing Optional Hardware.”
Package Contents
• mLAN16E unit
• Flat cable
• Tools for i88X/mLAN16E (CD-ROM)
• Owner’s Manual (this document)
• Tools for i88X/mLAN16E Installation Guide
About the included CD-ROM
The mLAN16E is shipped with a CD-ROM that contains software that is useful when
used in conjunction with the mLAN16E. This software includes drivers that are
required to connect the mLAN16E to a computer. It also includes “mLAN Graphic
Patchbay,” which enables you to route audio and MIDI signals between mLAN
devices. For more information, refer to the separate “Tools for i88X/mLAN16E Installation Guide” and the mLAN Graphic Patchbay PDF manuals.
2

Yamaha is not held responsible for damage caused by improper use of or modifications to the device or for data that is lost or destroyed.
• The illustrations and LCD screens shown in this Owner’s Manual are for instructional
purposes only and may appear somewhat different from those on your device.
• MIDI is a registered trademark of the Association of Musical Electronics Industry
(AMEI).
• mLAN is a trademark of Yamaha Corporation.
• Company names and product names in this Owner’s Manual are the trademarks or
registered trademarks of their respective owners.
Features
■ Fast data transfer via mLAN
mLAN is a digital network designed for music. It uses the IEEE1394 high performance
serial bus and allows you to construct systems that are more sophisticated yet simpler
than ever before. The mLAN16E can transmit data at a transfer rate of up to 400Mbps
(S400).
■ Intuitive mLAN connection setup and management via GUI
(Graphic User Interface)
The mLAN Graphic Patchbay software application enables you to establish connections
between mLAN devices using a computer graphic user interface, and simplifies the
routing and synchronization of audio/MIDI signals between mLAN devices.
English
■ Up to 16 audio channel I/Os and six MIDI connector I/Os
Connecting mLAN16E-equipped mLAN devices allows for data transmission via up to
16 audio channel Ins and Outs, and 8 MIDI connector Ins and Outs.
NOTE
The number of audio and MIDI connectors used for data transfer varies
depending on the mLAN16E device. MOTIF ES can provide up to 4 Stereo In/
16 Mono (8 Stereo) Out audio channels and 4 In/4 Out MIDI connectors.
■ Additional options for the wordclock setting
You can set the operational sampling frequency of an mLAN16E-compatible device that
features a limited number of sampling frequencies as a wordclock master. Alternatively,
you can set it as a wordclock slave machine that runs at 44.1 kHz, 48 kHz, 88.2 kHz, or
96 kHz.
3
Table of Contents
Introduction............................................................................. 2
Safety Precautions.................................................................... 2
Installing the mLAN16E............................................................ 2
Package Contents .................................................................... 2
Features ................................................................................... 3
English
Fundamentals of mLAN............................................................ 4
Operational Flow for Sound Output ......................................... 5
Names and Functions .............................................................. 6
Connections ............................................................................ 7
System Examples .....................................................................8
Making mLAN Connections ................................................... 12
Troubleshooting .................................................................... 13
Specifications......................................................................... 17
Fundamentals of mLAN
mLAN is a digital network for music that was developed based on IEEE1394, an industry-standard high-performance data communications protocol.
Digital music environments that do not feature mLAN require dozens of cables for various devices and purposes, including MIDI cables and audio cables to route MIDI and
audio signals. If you wish to make changes to such systems, you must physically disconnect and re-connect these cables.
For example, adding another synthesizer to a system requires two MIDI cables and two
or more cables for audio (for stereo equipment). Making the appropriate connections
may require special knowledge of inputs, outputs, stereo settings, and perhaps connec-
tor impedance.
4

The larger the system, the more complicated and expensive these connections
become, increasing the likelihood of errors and difficulties. It takes time and effort to
investigate such errors and their underlying causes. You may have already experienced
the unpleasantness of tracking various cables through a spider’s web of connections.
mLAN simplifies cable connections by using only one type of IEEE1394 cable, thus
enabling you to configure extremely sophisticated systems. There is no need to repatch cables to change routings of MIDI and audio signals between mLAN devices.
Operational Flow for Sound Output
1. Install Tools for i88X/mLAN16E.
..............See “Installing the Software” in the Installation Guide.
2. Connect the computer and mLAN devices using the IEEE1394 cables.
..............See page 7.
3. Turn on mLAN Manager (Windows only).
..............See “Confirming the installation” in the Installation Guide.
4. To connect a computer to a single mLAN device directly, first start mLAN
Auto Connector. To connect a computer to multiple mLAN devices, start
mLAN Graphic Patchbay.
..............See page 12
5. Configure connections in mLAN Auto Connector or mLAN Graphic Patchbay.
..............Using Auto Connector: See “Connecting a Computer to an mLAN
device via mLAN” in the Installation Guide.
..............Using Graphic Patchbay: See “mLAN Connection Settings” in the
Graphic Patchbay Online Manual.
6. Specify the audio and MIDI inputs and outputs, following the owner’s manual
for your DAW, audio sequencer and connected devices.
English
For subsequent steps, refer to the owner’s manual for the software and connected
devices.
NOTE
In this manual, setting up audio, MIDI, and wordclock routings is referred as
“mLAN connection.”
5
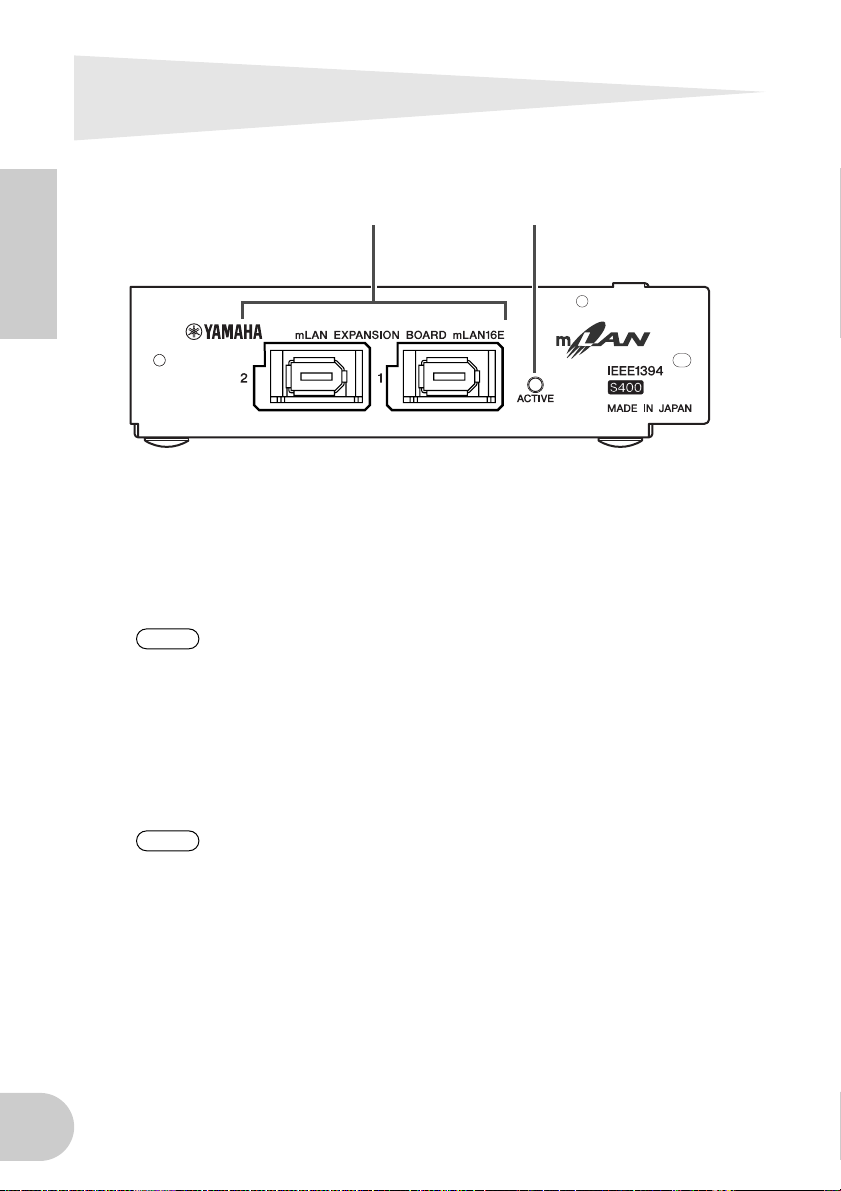
Names and Functions
1 2
English
A mLAN (IEEE1394) jacks
These 6-pin IEEE1394 standard jacks enable you to connect mLAN devices or
IEEE1394-compatible (FireWire/i.LINK) computers.
If the connecting device features a 6-pin IEEE1394 jack, use a standard 6-pin to 6pin IEEE1394 cable. If it features a 4-pin IEEE1394 jack, use a standard 6-pin to 4-pin
IEEE1394 cable. Do not connect the cables in a loop. (See page 15).
NOTE
B ACTIVE indicator
This indicator lights up when the mLAN16E is operating.
The indicator turns off when an error occurs during an operation.
When you click the [ID] button in mLAN Auto Connector or mLAN Graphic Patch-
bay (page 12) to identify the corresponding mLAN device in the network, the indicator flashes.
NOTE
Yamaha recommends that you use an IEEE1394 cable with a length of 4.5
meters or less.
The indicator also lights up if an mLAN cable is not connected to the unit.
6
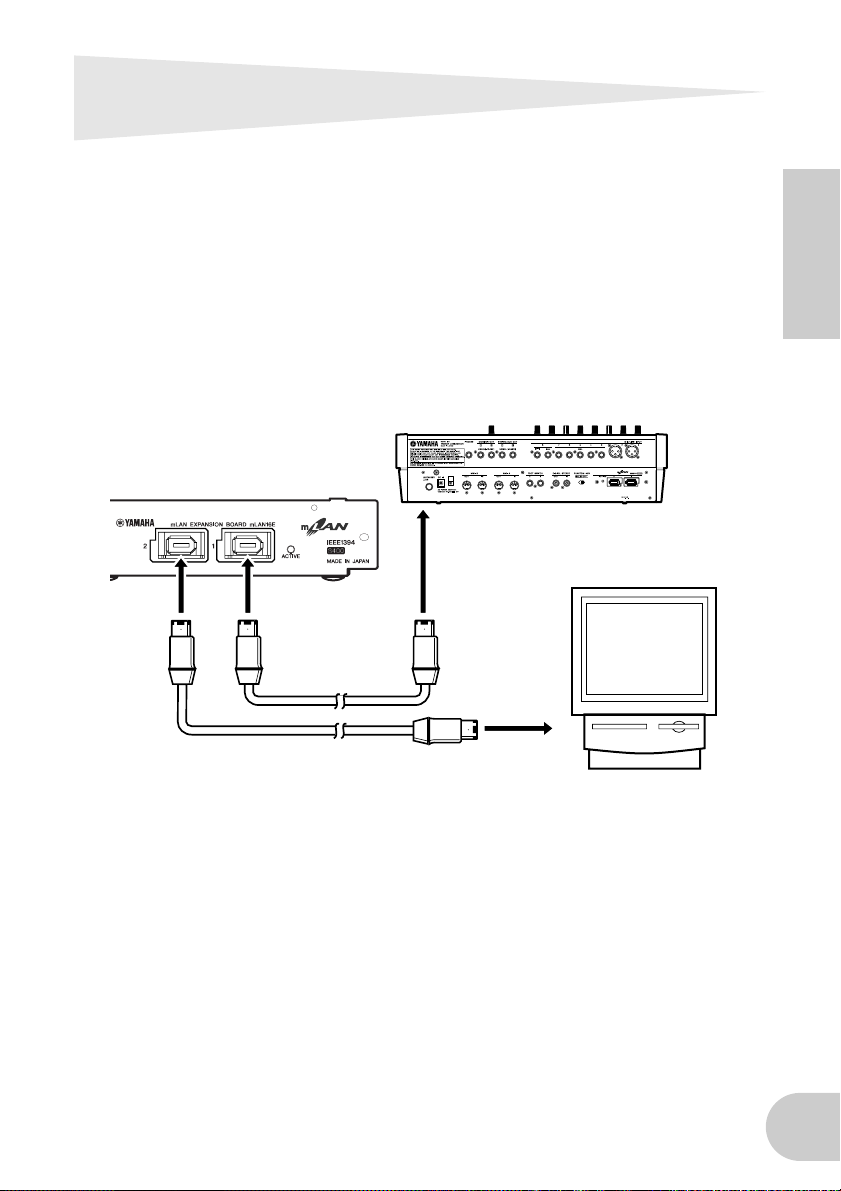
Connections
This section explains how to connect the mLAN16E to other mLAN devices and to your
computer.
Connecting an mLAN (IEEE1394) device
Connect the mLAN (IEEE1394) connector on the mLAN device and IEEE1394-compatible computer to the mLAN connector on the mLAN16E using IEEE1394 (FireWire/
i.LINK) cables. At this time, you do not have to turn off the power to the mLAN device
or the mLAN16E-equipped device.
mLAN (IEEE1394) device
mLAN16E
IEEE1394-compatible computer
IEEE1394
cable
English
IEEE1394 cable
7
System Examples
This section introduces typical system examples that feature the mLAN16E. Refer to
these examples for information on connecting external devices, such as microphones,
musical instruments, and computers.
For information on installing the mLAN16E, refer to the section in the
English
NOTE
Connecting a MOTIF ES to a computer
Use an IEEE1394 cable to connect the IEEE1394 connector on an IEEE1394-compatible
computer to the mLAN connector on an mLAN16E-equipped MOTIF ES. Use the mLAN
Auto Connector or mLAN Graphic Patchbay (See page 12) software application on the
computer to patch the audio and MIDI signals and to set up the wordclock. Connecting the MOTIF ES to the computer via mLAN enables you to do the following:
• Transfer data of multiple audio channels between the MOTIF ES and the computer
• Simultaneously record in the sequence software (a) your performance on the MOTIF
ES and (b) the performance of the computer sequence software that uses the MOTIF
ES as a MIDI tone generator
• Monitor via the MOTIF ES the audio output from the computer and the audio output from the MOTIF ES
NOTE
NOTE
NOTE
owner’s manual for your mLAN16E-compatible device on “Installing
Optional Hardware.”
The number of audio channels and MIDI connectors used for data transfer
varies depending on the mLAN16E-compatible device. MOTIF ES can provide
up to 4 Stereo In/16 Mono (8 Stereo) Out audio channels and 4 In/4 Out MIDI
connectors.
If you select “Normal Voice” or “Plug-in Voice” in Voice mode on the MOTIF
ES, audio signals are output only from OUTPUT L/R.
For more information on the MOTIF ES inputs and outputs and corresponding
mLAN IN/OUT, refer to the “Connections,” “Quick Guide–Computer applications” and “Audio Input Part (AUDIO IN)” sections of the MOTIF ES Owner’s
Manual.
Use Auto Connector or Graphic Patchbay to change the number of audio
channels that communicate with the computer. To minimize the load on the
computer, do not make mLAN connections in Auto Connector or Graphic
Patchbay using any unused channels.
8
NOTE
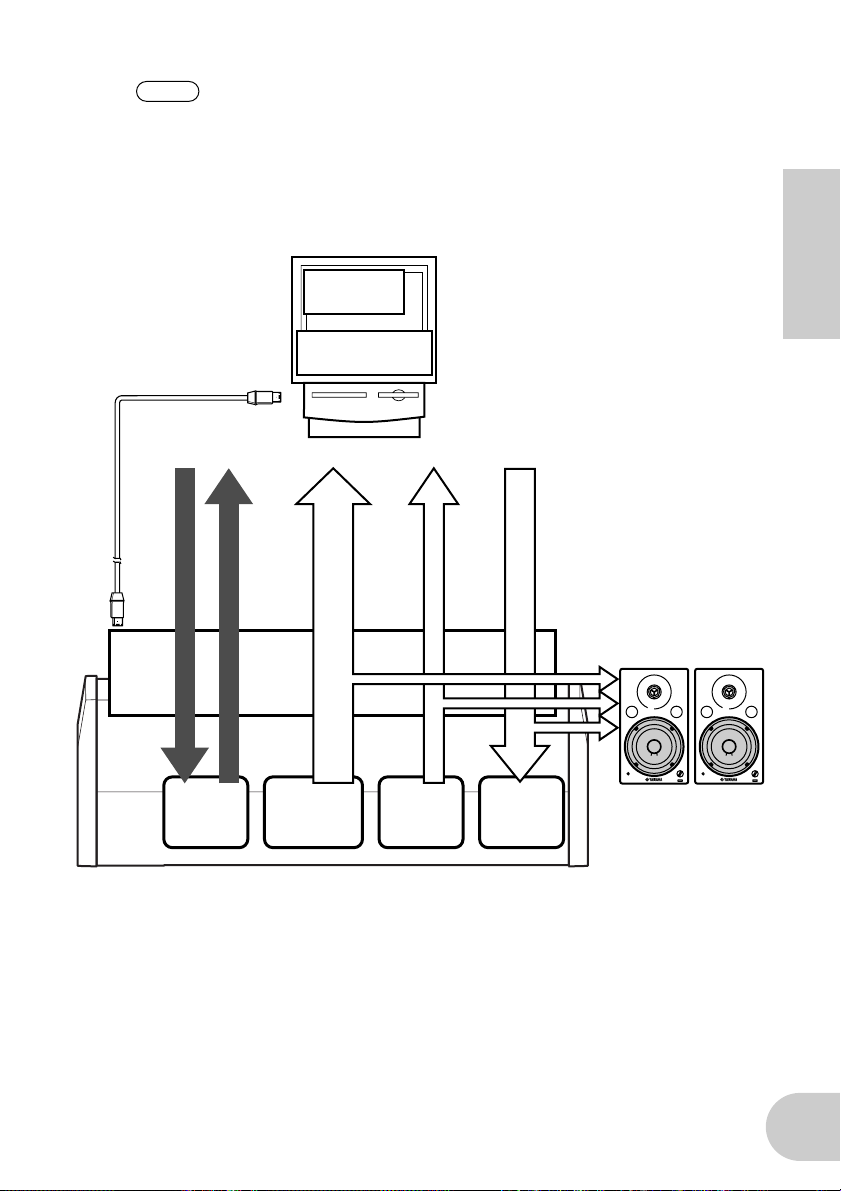
In the following diagram, an mLAN16E-equipped MOTIF ES is connected to
the computer. The relationship between each audio output from the
mLAN16E-equipped devices and the corresponding mLAN audio channel
may vary depending on the devices. For more information, refer to the owner’s
manuals for the corresponding devices.
IEEE1394-compatible computer
IEEE1394 cable
mLAN
IN
1-4
Por ts
mLAN
16E
MIDI
MIDI
*1
mLAN
OUT
1-4
Por ts
MIDI
Sequence
software
mLAN Auto Connector
/Graphic Patchbay
mLAN
OUT
1-14ch
AUDIO
*5
ASSIGNA-
BLE OUT
*2
1-14
AUDIO
OUTPUT
*3
L/R
mLAN
OUT
15-16ch
AUDIO
AUDIO
*4
IN
mLAN
IN
1-8ch
(Stereo 4ch)
*5
English
Monitor system
VOL VOL
MOTIF ES
*1 Refer to the MOTIF ES Owner’s Manual to set parameters for each connector.
*2 Set the MOTIF ES OutputSel parameter to ASSIGNABLE OUT 1-14.
*3 OUTPUT L and R correspond to mLAN OUT channels 15 and 16. You do not need to change
the setting on the MOTIF ES.
*4 Set up each channel using the MOTIF ES AUDIO IN feature.
*5 To monitor the ASSIGNABLE OUT 1-14 and AUDIO IN signals, set the MOTIF ES mLAN Mon-
itorSw parameter to On.
9

System configured around Yamaha 01X Digital Mixing Studio
Use IEEE1394 cables to connect an mLAN16E-equipped MOTIF ES, 01X, IEEE1394compatible computer, and an i88X mLAN-compatible audio/MIDI interface. Use mLAN
Graphic Patchbay (See page 12) on the computer to patch the audio and MIDI signals
and to set up the wordclock. Configuring an mLAN system around the 01X enables
you to do the following:
• Transfer audio and MIDI data between mLAN devices simply by connecting them via
IEEE1394 cables
• Set up and modify audio and MIDI signal patches between mLAN devices in various
English
situations using mLAN Graphic Patchbay, without physically re-patching cables
Sequence
software
mLAN Graphic
IEEE1394-compatible
computer
01X
Patchbay
IEEE1394
cable
IEEE1394
cable
Monitor system
mLAN i88X
IEEE1394
cable
VOL VOL
ADAT recorder/Mixer
mLAN16E
MOTIF ES
10
Microphone Guitar/Bass Synthesizer
NOTE
Wordclocks
In a system that features multiple digitally-connected devices, all digital devices
must be synchronized when digital audio signals are transferred from one device to
another.
Even if the devices use matching sampling frequencies, if their audio processing timing is not synchronized, they might not receive signals correctly, and audible noise,
glitches or clicks may occur. Synchronization is achieved using a wordclock
(a clock signal that synchronizes all digital audio signals in a system).
In a typical digital audio system, one device operates as the wordclock “master” and
transmits a wordclock signal. The other devices operate as wordclock “slaves,” synchronizing to the wordclock master. To connect the mLAN16E to external devices
via mLAN, in mLAN Auto Connector or mLAN Graphic Patchbay, select a device to
be the master, then set the other devices as slaves. If the mLAN16E is used as a
wordclock slave, it can operate at a sampling frequency of 44.1 kHz, 48 kHz,
88.2 kHz or 96 kHz. If the mLAN16E is used as the wordclock master, it will operate
at the wordclock used by the mLAN16E-equipped device.
The number of available input and output channels may vary depending on
the specific mLAN devices connected. For the best performance, it is
recomended that you connect up to four mLAN devices (including a computer)
in a network. If the network contains an mLAN device that is only compatible
with a low transfer rate (200 Mbps (S200)), the number of devices and channels available for connection will be reduced.
English
For information on setting the sampling frequency and wordclock, refer to the
Installation Guide, or to the mLAN Graphic Patchbay Online Manual, or the owner’s
manual for your device.
11
Making mLAN Connections
In an mLAN system, you can easily configure and maintain the system, connect or disconnect the mLAN connectors on the computer and each mLAN device (virtual audio /
MIDI input and output connectors), and make various mLAN connection settings (such
as synchronization) by using the mLAN Graphic Patchbay and mLAN Auto Connector
software applications. There is no need to re-patch audio and MIDI cables to accommodate various music production environments.
English
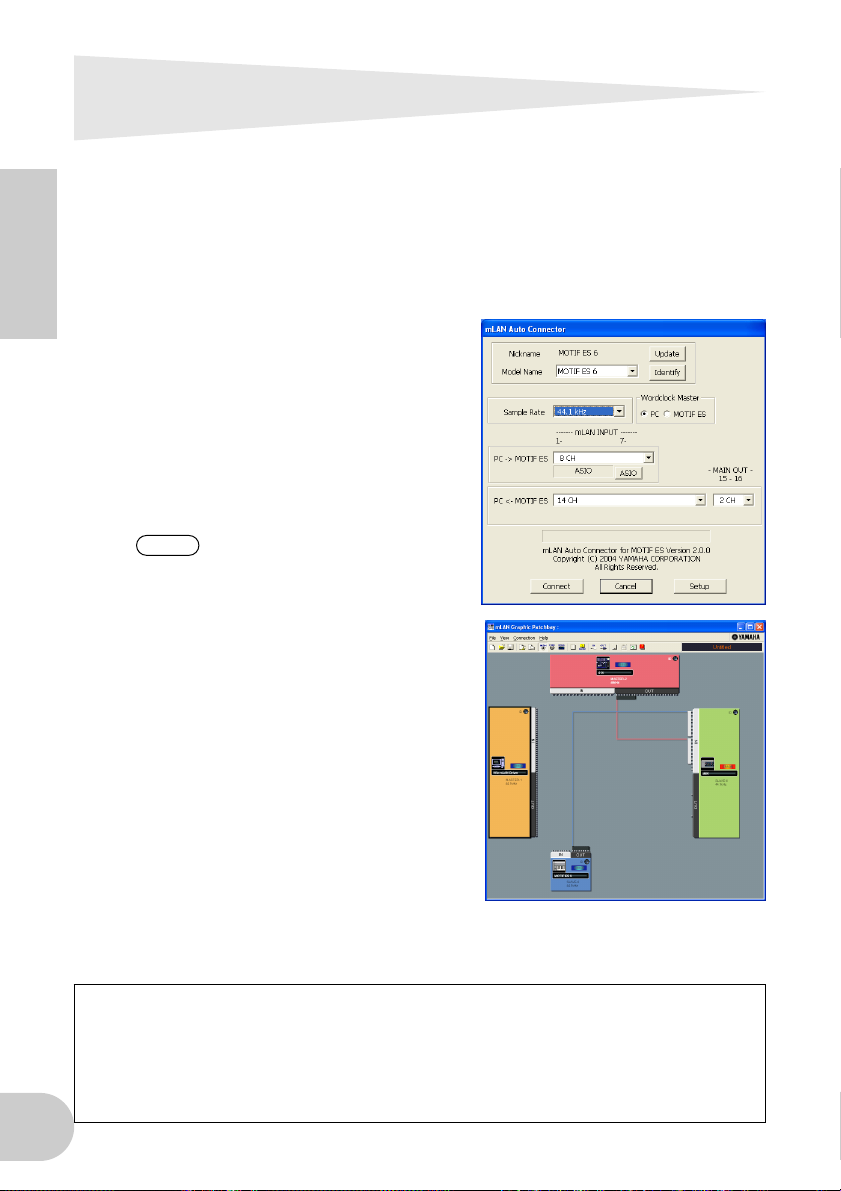
mLAN Auto Connectors
This software application enables you to
connect a computer to a single mLAN
device.
It enables you to easily select wordclock and
audio input and output channels.
For information on installing and using the
software, refer to the separate Installation
Guide.
NOTE
mLAN Graphic Patchbay
This graphic software application enables
you to manage mLAN connection settings
for the connected computer and multiple
mLAN devices. You can immediately grasp
connections in their entirety by viewing displayed mLAN system configuration graphics. You can also intuitively modify
wordclock settings and audio and MIDI signal routing, much as if you were connecting
physical cables.
For information on installing and using the
software, refer to the separate Installation
Guide and the mLAN Graphic Patchbay
Online Manual.
You can also use mLAN Graphic
Patchbay to connect a computer
to a single mLAN device.
12
Saving mLAN connection settings to the corresponding mLAN device
When you make mLAN connections on the computer, the connection settings will be automatically saved in the corresponding mLAN devices. Therefore, if you used mLAN Graphic Patchbay to configure a network that excludes a computer, the next time you use the network, you
will be able to activate the network just by turning on the power to the network’s mLAN devices
(without starting the computer).

Troubleshooting
If you encounter a problem...
If you hear no sound or a strange sound, first check the items described below and take
appropriate action. If the problem persists, consult your Yamaha dealer.
■ No sound or very low volume level
• Are speakers or headphones connected correctly to the mLAN16E-equipped device?
• Are your amp and other external devices for the mLAN16E-equipped device turned on?
• Are all the level settings (of any tone generators, playback devices and the application itself)
appropriate?
• The connection cable from the external device to the mLAN16E-equipped device may be broken.
• Is the wordclock setting correct for both the mLAN16E and the external device(s)?
.......Refer to “Connecting a Computer to an mLAN device via mLAN” in the
Installation Guide, and “Wordclock Settings” in the mLAN Graphic Patchbay
Online Manual.
• (For Windows) Is mLAN (mLAN Driver) set to “ON”? From the task bar, right click on the
mLAN Manager (mLAN icon).
• Are the other settings of mLAN appropriate?
...................................... Refer to “Unable to communicate via mLAN (page 14).”
• If there are more than four devices (including a computer) on the network, the limit of the
IEEE1394 BUS bandwidth may be exceeded.
• The limit of the IEEE1394 BUS bandwidth may have been exceeded. Check the current bandwidth using mLAN Graphic Patchbay, and disconnect some devices if necessary.
.......Refer to “Menu Bar” in the mLAN Graphic Patchbay Online Manual.
• If there is an mLAN device that supports only S200 on the mLAN network, the IEEE1394 BUS
bandwidth may be reduced and its limit exceeded. Reduce the number of mLAN devices connected to the network, or disconnect some devices as necessary.
.......Refer to “Menu Bar” in the mLAN Graphic Patchbay Online Manual.
■ Distorted sound
• The connection cable from the external device may be broken.
• Is the wordclock setting correct for both the mLAN16E and the external device(s)?
.......Refer to “Connecting a Computer to an mLAN device via mLAN” in the
Installation Guide and “Wordclock Settings” in the mLAN Graphic Patchbay
Online Manual.
• Make sure audio data was recorded at an appropriate level.
■ Noise is audible
• Is the latency setting of the mLAN Driver appropriate?
.......Refer to “mLAN Driver Setup” and “ASIO mLAN Control Panel” in the Instal-
lation Guide.
• (For Windows) Setting Hyper Threading to off in the BIOS settings may solve the problem.
• Is the wordclock setting correct for both the mLAN16E and the external device(s)?
.......Refer to “Connecting a Computer to an mLAN device via mLAN” in the
Installation Guide and “Wordclock Settings” in the mLAN Graphic Patchbay
Online Manual.
• If the speed of your computer's hard disk is slow, problems may occur during recording and
playback.
English
13

• If you connect/disconnect the LAN, USB or the cables to the mini jacks terminals on the Macintosh you are using when using mLAN, some noise may be caused and/or data may be cut off.
Make sure that you do not insert or unplug any connections when using mLAN.
• Is the number of audio channels appropriate? The amount of audio channels that can be used
simultaneously differs depending on the computer capacity and speed.
.......Refer to “Connecting a Computer to an mLAN device via mLAN” in the
Installation Guide and “mLAN Connection Settings” in the mLAN Graphic
Patchbay Online Manual.
• Is the sampling rate (wordclock) appropriate? A high sampling rate can be the cause of the
noise depending on the computer capacity and speed.
English
• Make sure that the appropriate number of devices is connected to the computer. Connection
of too many devices may cause noise, depending on the capacity of the computer.
• Are there any noise-producing devices (such as those containing power inverters, etc.) near the
cables? Move all cables away from any possible noise sources.
• Make sure the mLAN cable is not damaged. Cables that do not satisfy IEEE1394 standards may
cause noise.
• Do not run applications, such as anti-virus software, in the background. While using the mLAN
system, turn off all applications that run in background. If these applications remain on, driver
operation may become unstable and cause noise. If you do not plan to use the mLAN system,
you can turn these applications on. (You can turn the mLAN driver on and off using mLAN
Manager.)
.......Refer to “Connecting a Computer to an mLAN device via mLAN” in the
Installation Guide and “mLAN Connection Settings” in the mLAN Graphic
Patchbay Online Manual.
■ Insufficient tracks for recording or playback
• Is the number of channels for mLAN audio receiving/sending (set on the mLAN Auto Connector and mLAN Graphic Patchbay) appropriate?
.......Refer to “Connecting a Computer to an mLAN device via mLAN” in the
Installation Guide and “mLAN Connection Settings” in the mLAN Graphic
Patchbay Online Manual.
■ Unable to transfer MIDI data or Program Changes
• Make sure the correct connectors have been selected.
...........................Refer to the owner’s manual for the mLAN16E-equipped device.
• Are the mLAN cables connected correctly?
• An mLAN cable may be broken.
• Is the power turned on for the transmitting and receiving devices?
• Make sure the transmission and reception channels match.
■ Incorrect pitch
• Is the unit operating on the same sampling frequency as the synchronized external device?
.......Refer to “Connecting a Computer to an mLAN device via mLAN” in the
Installation Guide and “Wordclock Settings” in the mLAN Graphic Patchbay
Online Manual.
• Is the master device operating in a stable way?
■ Unable to communicate via mLAN
• Has the driver been installed? ................................................... Refer to the Installation Guide.
• Is the mLAN cable properly connected? Check the connection; disconnect the mLAN cable
once, then insert it again.
• (For Windows) Is mLAN set to “ON”? From the task bar, right click on the mLAN Manager
icon. .............................Refer to “Confirming the installation” in the Installation Guide.
14
• (For Windows) When adding a new IEEE 1394 card, right click on the mLAN Manager icon in
the task bar and select “ON”.
.............................Refer to “Confirming the installation” in the Installation Guide.
• Is the ACTIVE lamp on the rear panel of the mLAN16E lit (in blue)? If it is not lit, check the followings:
- In mLAN Driver Setup, is the Status indicator blue? If not, restart the mLAN16E-equipped
device and re-enable connection by using mLAN Auto Connector or mLAN Graphic Patch-
bay. .......Refer to “Changing settings after installation” in the Installation Guide and
the mLAN Graphic Patchbay Online Manual.
• Has connection been enabled with mLAN Auto Connector and/or Graphic Patchbay? Reenable connection if necessary.
.......Refer to “Connecting a Computer to an mLAN device via mLAN” in the
Installation Guide and “mLAN Connection Settings” in the mLAN Graphic
Patchbay Online Manual.
• Have you changed the device? Even if the model is the same, if the actual device is different, it
is necessary to re-enable connection by using Auto Connector and/or Graphic Patchbay.
.......Refer to “Connecting a Computer to an mLAN device via mLAN” in the
Installation Guide and “mLAN Connection Settings” in the mLAN Graphic
Patchbay Online Manual.
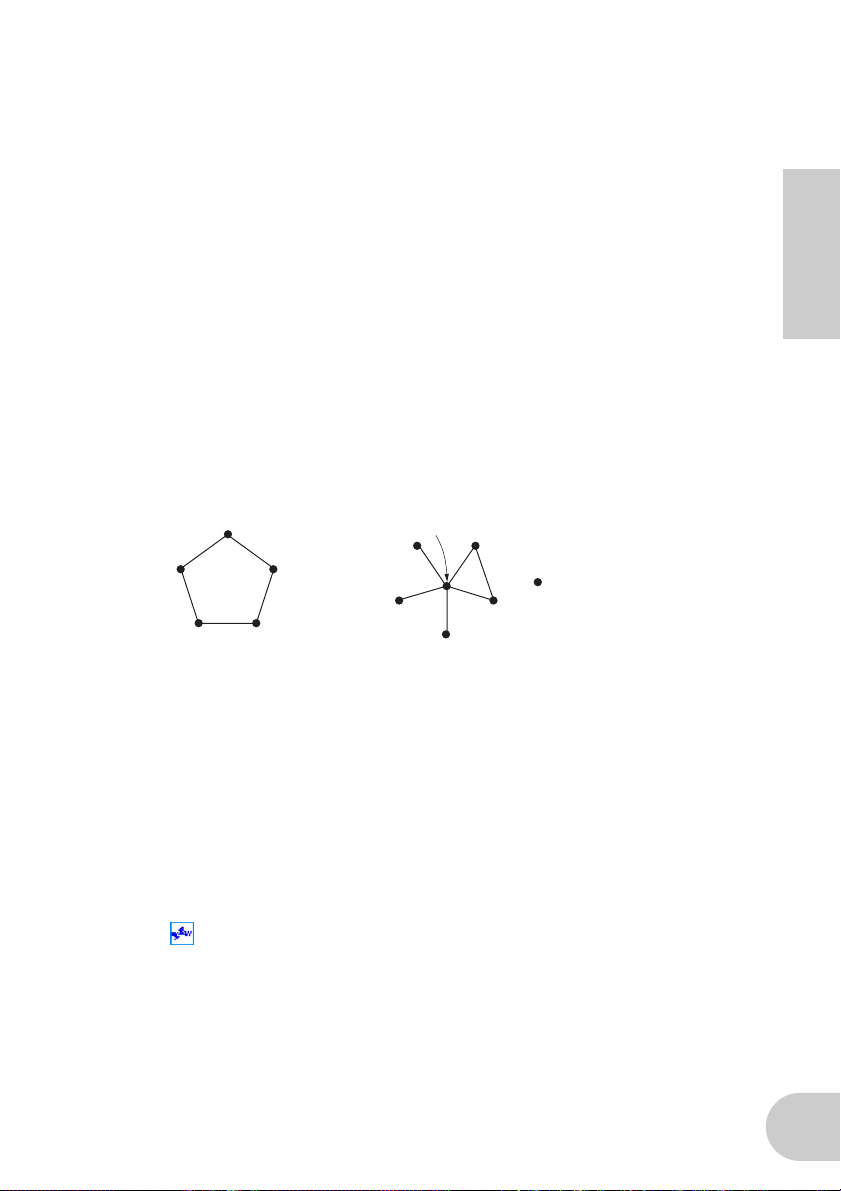
• Is there a loop connection? Check the cabling and make sure none of the devices are connected in a loop.
Computer
mLAN device
• There may be a limit on the IEEE 1394 interface of your computer as to the number of ports
that can be used simultaneously. Check how many ports can be used simultaneously.
.......Refer to “Maximum Number of Connected Node” in the mLAN Graphic
Patchbay Online Manual.
•Turn off all devices on the mLAN network (except the computer) and re-connect each device
one-by-one until the device causing the problem is found.
• (For Windows) (When removing the mLAN bus from the [Safely Remove Hardware] setting of
the task bar.) Restart the computer when using mLAN again.
•With Macintosh notebook computers such as the iBook and PowerBook, always first connect
the mLAN16E-equipped device and mLAN cable then turn on the power of the mLAN16Eequipped device, before starting up the computer.
Computer
mLAN device
: IEEE 1394-equipped device
■ An application, such as a DAW, fails to recognize the mLAN driver (MIDI/audio).
• (For Windows) Make sure mLAN has not been turned off. On the task bar, right-click mLAN
Manager ( ), then select ON.
.......Refer to “Confirming the installation” in the Installation Guide and “mLAN
Connection Settings” in the mLAN Graphic Patchbay Online Manual.
• Make sure the mLAN16E is connected to the mLAN cable and is powered on. Start mLAN Auto
Connector or mLAN Graphic Patchbay, then re-connect the device.
.......Refer to “Confirming the installation” in the Installation Guide and “mLAN
Connection Settings” in the mLAN Graphic Patchbay Online Manual.
• (For Macintosh) To use an iBook or PowerBook in the system, connect the mLAN16E-equipped
device to the Macintosh using an mLAN cable, turn on the power to the mLAN16E-equipped
device, then start the Macintosh.
• Make sure the mLAN settings are correct.
.................................. Refer to “Unable to communicate via mLAN” on page 14.”
English
15

■ The computer processing speed is too slow.
■ The computer’s CPU meter indicates a heavy processing load.
■ Playback response is delayed.
• Make sure your computer satisfies the system requirements.
.....................................Refer to “System Requirements” in the Installation Guide.
• (For Windows) If you do not use the mLAN system, on the task bar right-click mLAN Manager
( ), then select OFF (mLAN quits).
.............................Refer to “Confirming the installation” in the Installation Guide.
•Try reducing the number of audio channels in mLAN Auto Connector or Graphic Patchbay.
.......Refer to “Connecting the Computer and mLAN devices via mLAN” in the
English
•Try increasing the latency value.
• (For Macintosh) If a dual-CPU model awakes from Sleep or Suspend mode, processing speed
may be slowed. In this event, restart the computer.
• (For Windows) Refer to “Hints when using audio data (Windows).”
• (For Windows) The condition may improve if you set “Hyper Threading” to “Disable.”
• Using mLAN Graphic Patchbay, try reducing the number of devices connected to the com-
puter. .......Refer to “mLAN Connection Settings” in the mLAN Graphic Patchbay Online
• (For Macintosh) Turn off virtual memory.
• (For Macintosh) Disable Apple Talk.
Installation Guide and “mLAN Connection Settings” in the mLAN Graphic
Patchbay Online Manual.
..........Refer to “Changing the Settings after Installation” in the Installation Guide.
.......Refer to the Installation Guide.
Manual.
■ Inconsistency in wordclock, or unable to exit from Auto Connector
• (For Windows) Mobile computers with Intel CPU
SpeedStep™ technology is applied for some CPU’s (CPU for notebook PC). Please disable the
SpeedStep™ technology when mLAN is employed. SpeedStep™ technology changes CPU
clock dynamically depending on the loading on the CPU to save the power consumption.
- How to disable the SpeedStep™ technology;
In almost all of the PC’s, BIOS has a function to select enabling or disabling the SpeedStep™
technology. Please refer to the PC’s operating manual, or make inquiry to the PC manufacturer.
■ Unable to close the application or operating system
■ Unable to change the mLAN settings
■ Unable to uninstall mLAN Applications for Yamaha or mLAN Tools 2.0
• (For Windows) Is the mLAN (WDM) driver selected as the default audio device for the system?
- Select [Start | Control Panel | Sounds and Audio Devices | Voice].
Make sure that something other than “mLAN Audio 01” is selected for the [Voice playback]
and [Voice recording] settings.
- Select [Start | Control Panel | Sounds and Audio Devices | Audio].
Make sure that something other than “mLAN Audio 01” is selected for the [Sound playback] and [Sound recording] settings.
- In “MIDI music playback,” select any option other than the range of options from “mLAN
MIDI Out” through “mLAN MIDI Out (8).”
• (For Windows) Select [Start | Control Panel | Sounds and Audio Devices | Sounds]. And select
“No sounds” in the [Sound scheme], then execute again.
• (For Windows) If you cannot quit mLAN (by selecting “OFF” after right clicking the mLAN icon
in the task bar), end the processes listed below manually. ([Ctrl] + [Alt] + [Delete] → [Processes]
→ select process → [End process]) When finished, start mLAN Manager to change the mLAN
16
settings again.
 Loading...