

Page 1

GUITAR EFFECTS PROCESSOR
What’s New And Improved in the MK2
[Deep Edit]
The MK2’s “Deep Edit” function lets you edit all effect parameters that make up the patch, set the
parameters that are controlled by the unit’ s three control knobs, and save these settings to memory.
With the original MAGICSTOMP, full editing and control knob assignment was perfor med using a
computer running the “Sound Editor for MAGICSTOMP” application. With the MAGICSTOMP MK2,
the same operations can be performed on the MAGICSTOMP MK2 unit itself.
→ Refer to page 2 in this book for more information.
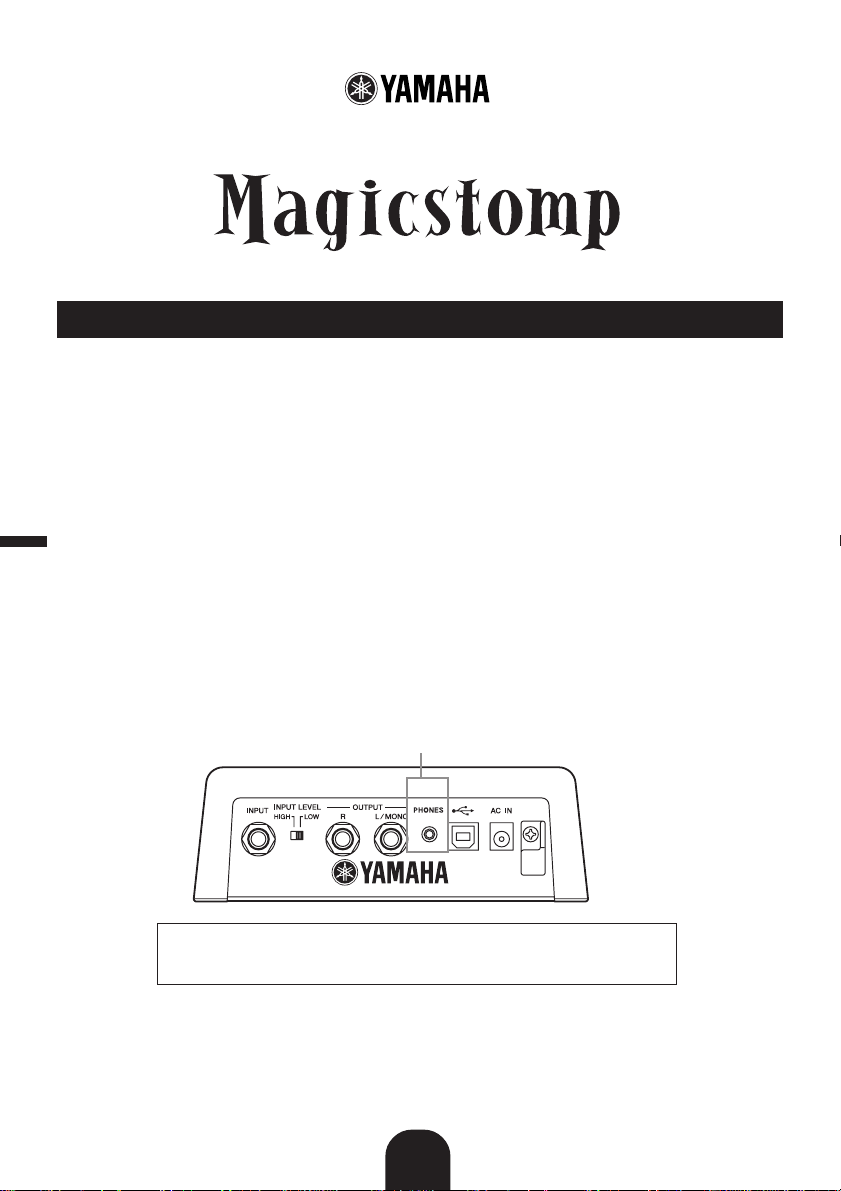
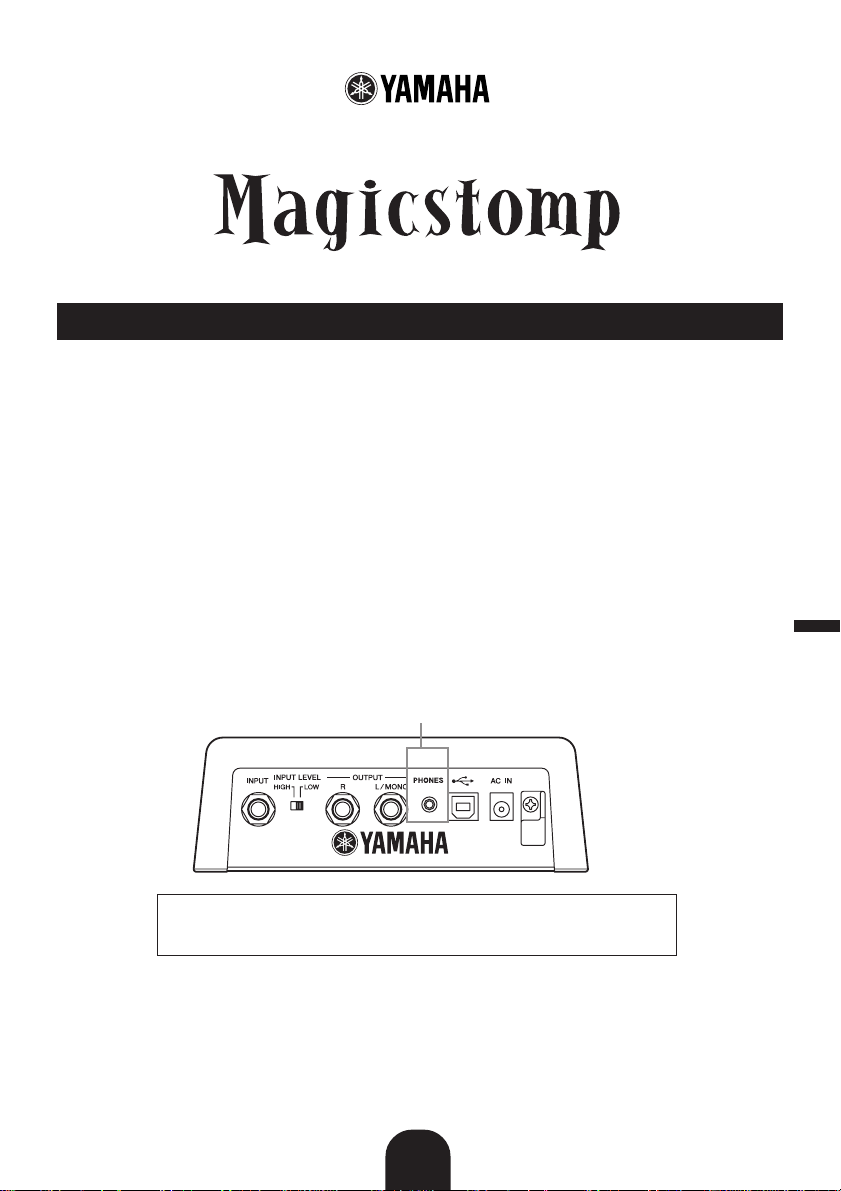
[PHONES Jack]
The PHONES Jack (stereo mini) lets you practice or edit patches while monitoring the MA GICSTOMP’ s
sound output through a pair of headphones. (Output level/Impedance: –10dBm/150Ω)
* Use the Volume Knob to adjust the volume.
* Output is still delivered from the OUTPUT jack when a pair of headphones is connected to the PHONES jack.
PHONES jack
English
Français
Deutsch
Español
When monitoring through a pair of headphones, make sure you
properly adjust the volume so as not to damage your hearing.
[Auto Feedback Reduction Function]
Availab le in the “AcousticMulti” effect, the Auto Feedbac k Reduction (AFR) function can be oper ated
in real-time to neutralize problem feedback (howling).
→ Refer to page 4 in this book for more information.
1
Italiano
Nederlandse
中文
Page 2
Deep Edit
Any of the parameters in the currently selected patch can be edited. You can use this, along with the
ability to select a different effect type, to create original patches.
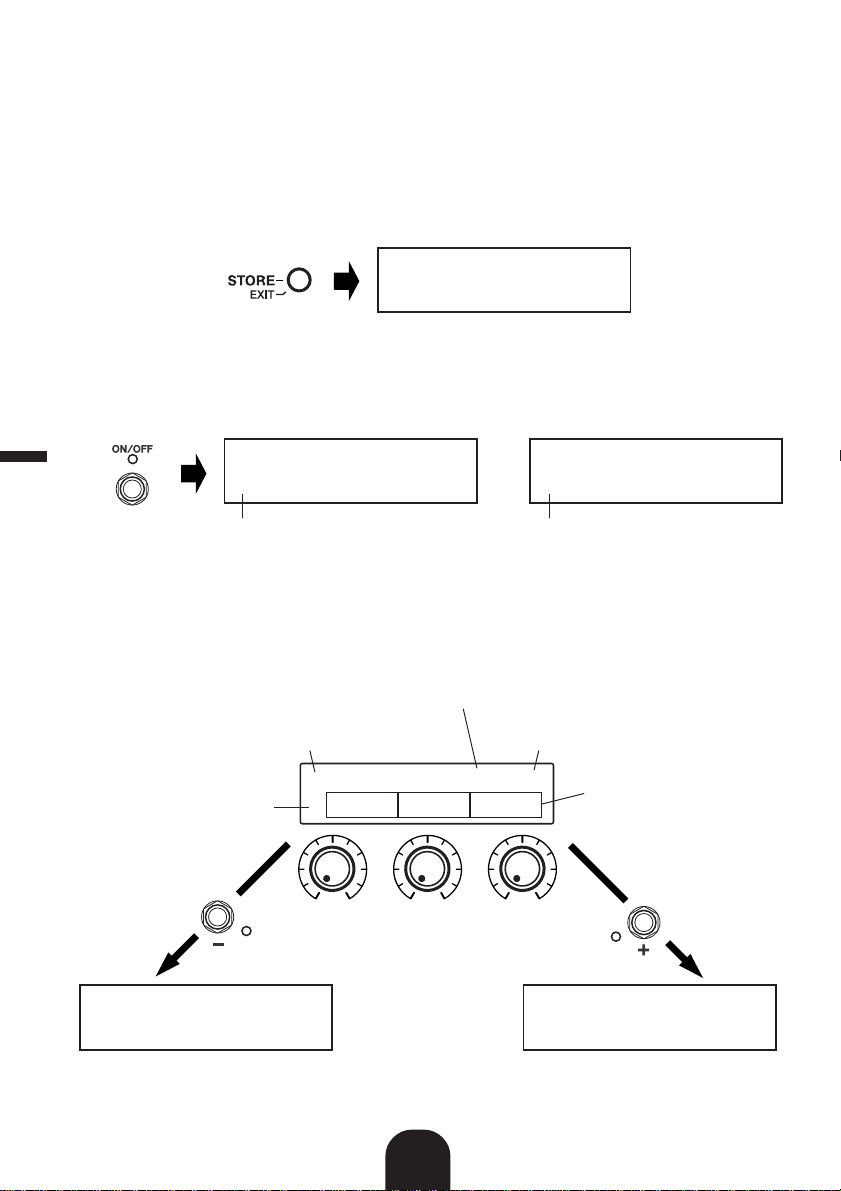
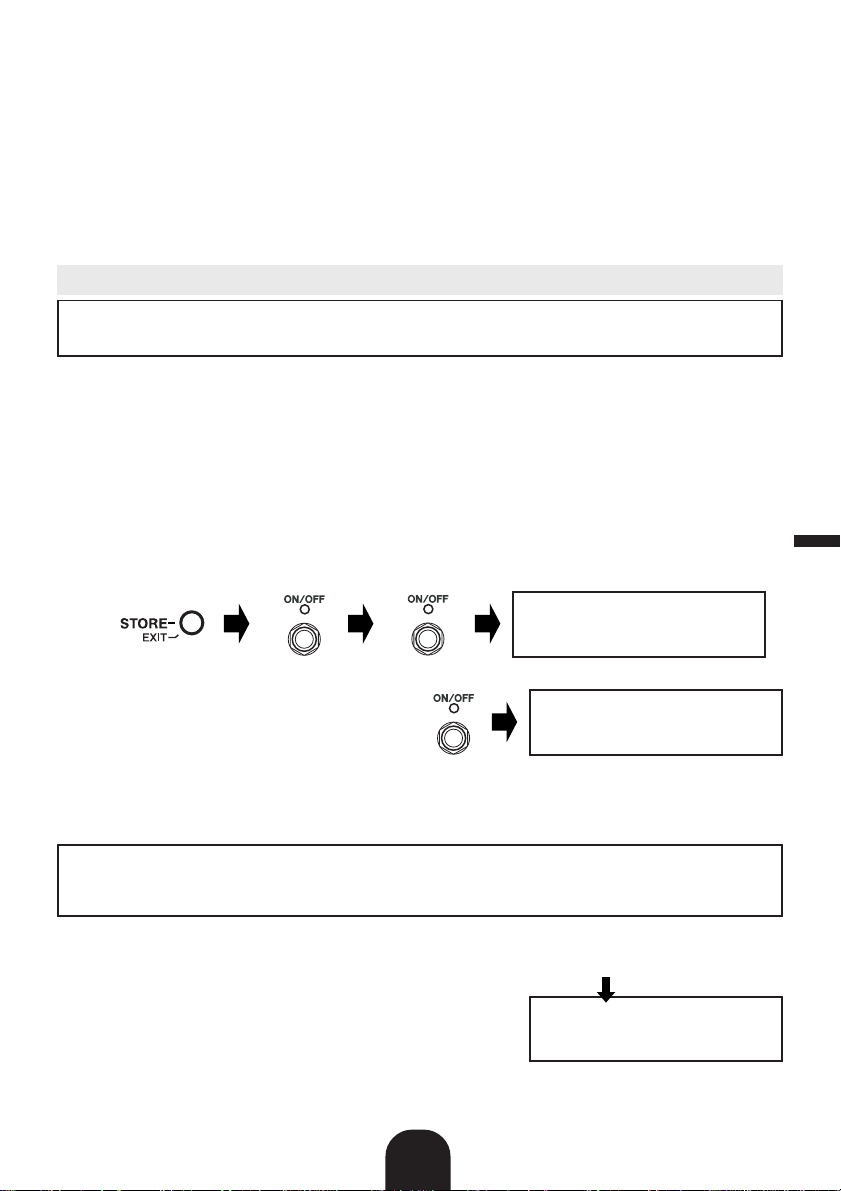
q Press the [STORE/EXIT] button.
“PRESS[STORE]1sec” will appear on the lower half of the display.
* If you press the [ST ORE/EXIT] b utton when a Pr eset Patch is selected, the corresponding User Patch number will
automatically be selected as the destination patch number for storing.
U01:DIST1
PRESS[STORE]1sec
w Press the ON/OFF switch once and release quickly (within one second).
You are now in the Deep Edit Mode and the display should appear as shown below.
* If you press the ON/OFF switc h for mor e than 1 second , you will enter the Name Edit Mode (→ Owner’s Manual:
page 18)
English
0EDIT-KNOB0TYPEŸ
؇KNB1fiKNB2áKNB3
ÿEDIT-PRM:02/07Ÿ
or
؇MID0fiTRE0áPRE0
Deep Edit Icon
Deep Edit Icon
e Use the +/– switches to select the parameter setting display.
Parameters for the currently selected patch are arranged on several pages. Use the “+” or “–”
switches to view the next or previous page on the display.
* For more information on individual parameters, refer to the separate “Effect List” sheet.
Parameter Setting Display Page
Shown is page 3 of 7
This icon indicates a previous page exists
Use the “–“ switch to view the previous page
ÿEDIT-PRM:03/07Ÿ
Deep Edit Icon
Previous page Next page
؇VOL0fiSTE0áBASF
ÿEDIT-PRM:02/07Ÿ
؇MID0fiTRE0áPRE0
This icon indicates a following page exists
Use the “+” switch to view the next page
Parameter
Use the knobs located below
the display to make settings
ÿEDIT-PRM:04/07Ÿ
؇MIDFfiTREFáPREF
2
Page 3
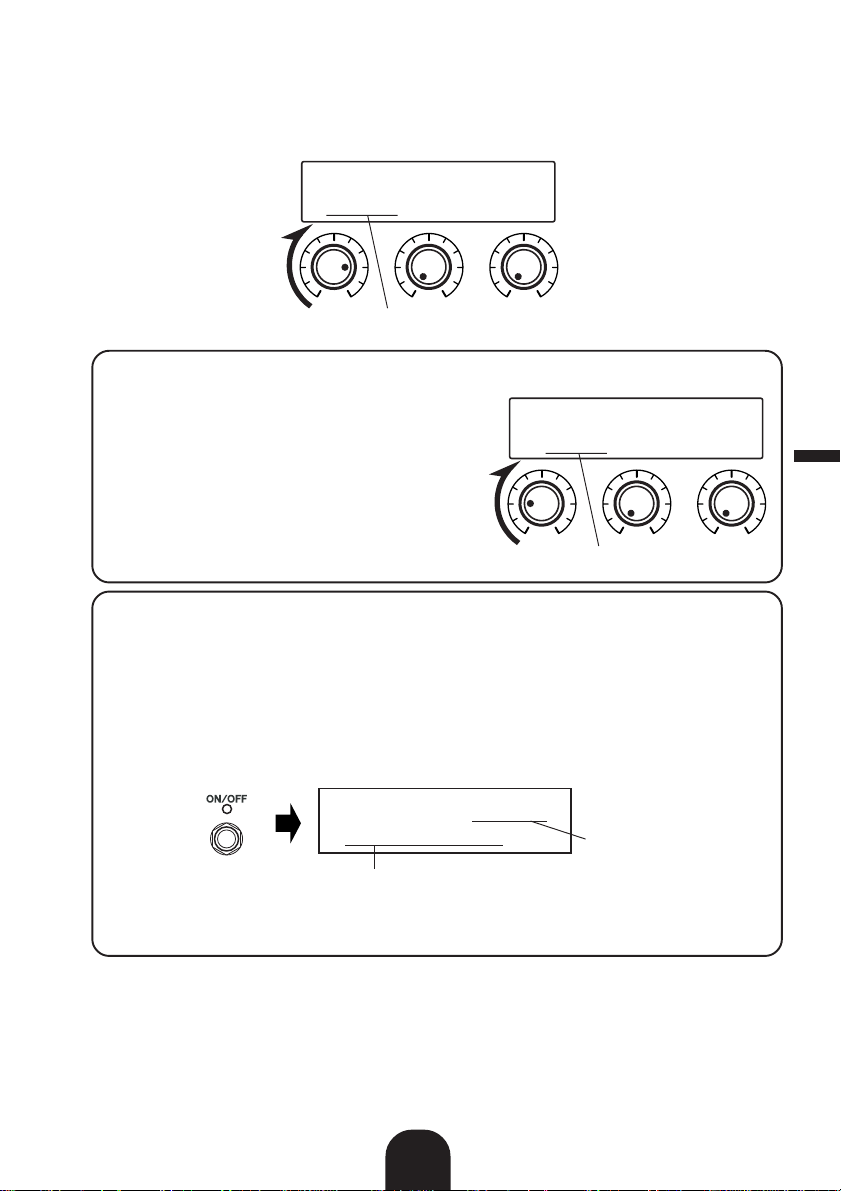
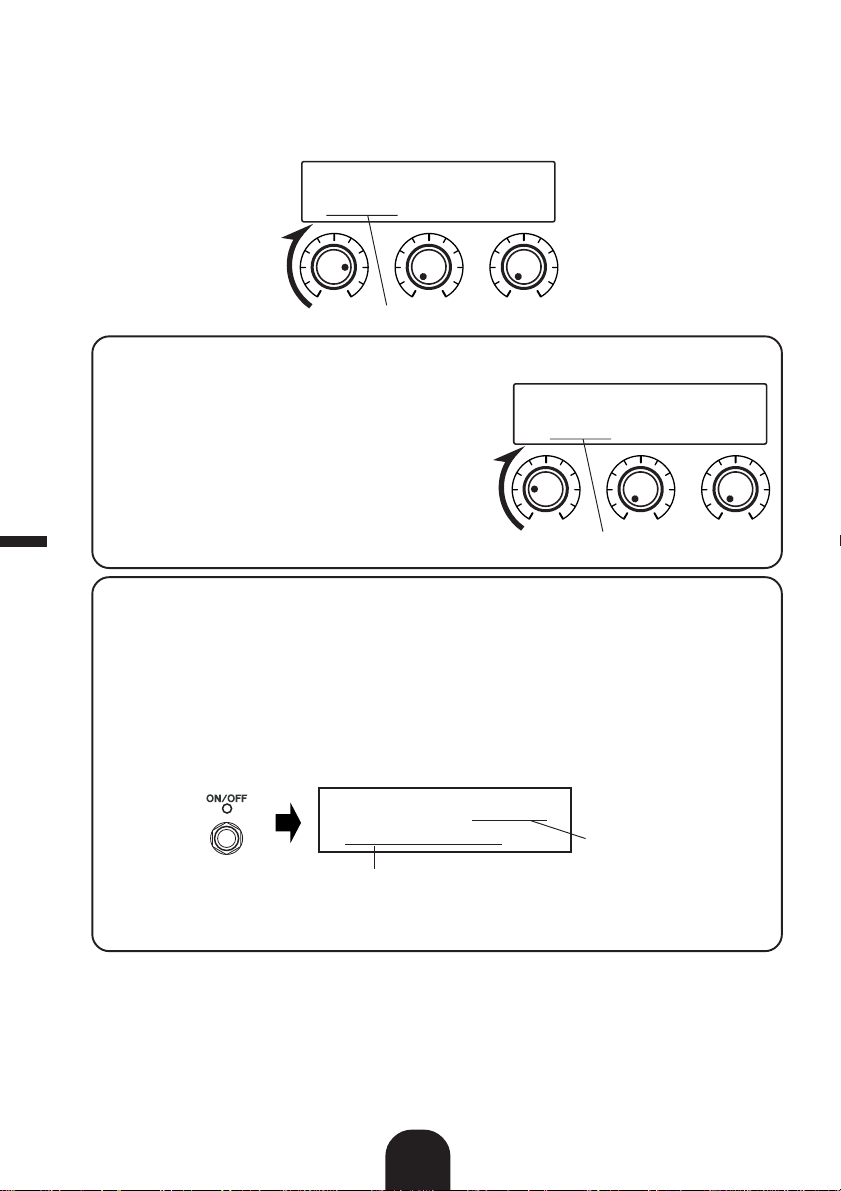
r Rotate the knobs to edit their corresponding parameters.
After viewing the parameters you want to edit, use the knobs located below the display to edit the
parameters. If the knob’s position does not match the parameter’s value, you’ll need to rotate the
knob until it matches the position that corresponds to the parameter value before you can change
the setting (→ Owner’s Manual : page 14).
ÿEDIT-PRM:03/07Ÿ
؇08.2fiSTE0áBASF
Parameter value
● Assigning parameters to the unit’s control knobs
Parameters that are controlled by the unit’s control
knobs during normal operation are assigned to the
control knobs in the upper portion of the parameter
page display (shown on the right: the page before
01/??). Select the parameter for the knob by rotat-
ing the knob.
* For more information on individual parameters, refer to
the separate “Effect List” sheet.
● Changing the Effect Type
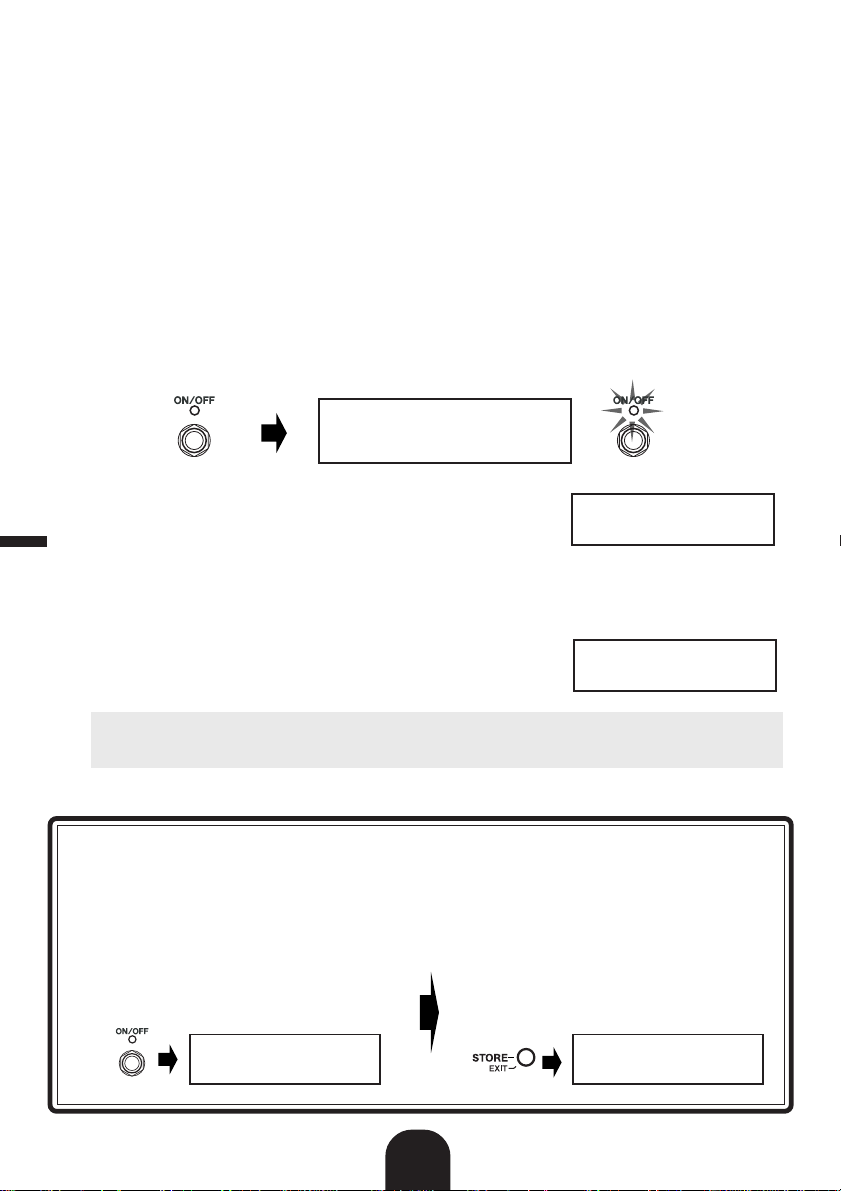
Pressing the ON/OFF switch when the Deep Edit icon is displayed accesses the Effect Type
Select display shown below.
Use the +/– switches to select the effect type.
* When the effect type is changed, any data that has been edited will be cleared and default values for the
new effect type will be set.
* For more information on individual parameters, refer to the separate “Effect List” sheet.
0EDIT-KNOB0TYPEŸ
؇MSTRfiKNB2áKNB3
Parameter Name
English
ÿEDIT-FXT:23/63Ÿ
ØStereoDelay
Effect Type
After selecting the effect type, press the [STORE/EXIT] button to return to the display for setting parameters and assigning parameters to the unit’s control knobs.
t When you are finished editing, save your data in the MAGICSTOMP at this point.
At this point, pressing the [STORE/EXIT] button is the same as pressing the [STORE/EXIT] button
in procedure q of the Store Operation (→ Owner’ s Manual : page 16). From here you can f ollow the
remaining steps in the Store Operation.
* To return the data to its original condition, cancel the Store Operation at this point then select another patch.
3
23rd effect type out of a
total of 63 effect types
Page 4

Auto Feedback Reduction (AFR) Function
The MAGICSTOMP is equipped with a highly sophisticated Auto Feedback Reduction function (AFR) to
eliminate feedback (howling).
* In this case, “Feedback” is when a specific frequency produced by the amplifier causes the guitar to resonate uncon-
trollably, creating a howling sound.
The MAGICSTOMP’s AFR function uses a notch filter, which cuts the frequency that is causing the
feedback, to eliminate feedback. A maximum of five notch filters can be set and operating at the same
time.
The AFR function is only available in patches that have their effect type set to
“AcousticMulti”.
CAUTION
Be careful. Constant feedback at loud levels can cause damage to equipment.
■ Switching the AFR Function ON
English
The MAGICSTOMP MK2 is shipped from the factory with its AFR Function switched OFF (the function is
inactive). First, use the procedure described below to set the AFR Function ON (activate the function).
q After pressing the [STORE/EXIT] button, press the ON/OFF switch two times to
select the “Effect Type Select” display in the Deep Edit Mode.
* When pressing the switch two times, make sure the switch is released within one second both times.
ÿEDIT-FXT:63/63Ÿ
ØAcousticMulti
w Until the following display appears,
press and hold (for about four seconds) the ON/OFF switch.
The display shown above will appear for one second and then retur n to the display that was selected before the [STORE/EXIT] button was pressed.
* To switch the AFR Function OFF again, follow steps q and w described above once again.
The procedure described above only has an effect on patches that have their effect
type set to “AcousticMulti”. Also, the AFR function’s ON/OFF setting effects all patches,
it can not be set in individual patches.
ÿEDIT-FXT:63/63Ÿ
AFR0FUNCTION0ON
■ Using the AFR Function
After you have switched ON (activated) the AFR function using
the procedure described on the previous page, the “«” edit icon
will appear for patches that can use the AFR function (patches
that have their effect type set to “AcousticMulti”).
* The normal “¤” edit icon appears when the AFR function is set OFF (inactive), or when a patch is selected that uses
an effect type other than “AcousticMulti”.
4
U011«Natural
ó‡BASSfiMID0áTRE
Page 5

After selecting a patch in which the AFR function is active, follow the instructions below to use the AFR
function.
* The AFR function’s switch operation differs in the Up/Down Mode and Performance Mode.
q When feedback occurs in the Up/Down Mode press the ON/OFF switch, and when
in the Performance Mode press the switch that corresponds to the currently selected patch (–, ON/OFF, +).
* The switches in the procedure described above (–, ON/OFF, +) can not be used to switch effects ON/OFF in
patches that have the AFR function active.
The MAGICSTOMP will automatically identify the frequency causing the feedback and activate an
unused notch filter. When the filter identifies the problem frequency, the display will appear similar
to that shown below and then return to its previous condition.
To indicate that the AFR function is active, the ON/OFF switch’s lamp will flash when in the Up/
Down Mode, while in the Performance mode, the switch’s lamp (–, ON/OFF, +) for the currently
selected patch will flash.
U96«Natural
AFR10F=00221Hz
* If the filter fails to be set, the following display is shown before returning
to its previous condition.
w If the application of a single band filter does not take care of the feedback, press
the switch as described in step q and set a second filter. A maximum of 5 band
filters can be set.
* The following display will appear if all 5 filters have been set.
The AFR Function’s settings are not saved along with patch data. And the AFR
Function’s settings are cancelled when another patch is selected.
[STORE/EXIT Button]
In the original MAGICSTOMP, the ON/OFF switch used in step r of the “Giving the Patch a
Name” section on page 19 in the original MAGICSTOMP Owner’s Manual, is now the [STORE/
EXIT] button (refer to the example below).
r After you’ve changed the name, press the
ON/OFF switch.
The MAGICSTOMP is now in store standby mode.
r After you’ve changed the name, press the
[STORE/EXIT] button.
The MAGICSTOMP is now in store standb y mode .
U96«Natural
00CAN'T0DETECT
U96«Natural
0AFR0BAND0FULL!
English
Press
U01:TUBE0DRIVE1
PRESS[STORE]1sec
U01:TUBE0DRIVE1
PRESS[STORE]1sec
Press
5
Page 6
GUITAR EFFECTS PROCESSOR
Nouveautés et améliorations du modèle MK2
[Édition complète]
La fonction « Édition complète » du modèle MK2 vous permet de modifier n’importe quel paramètre
d’un patch, de définir les paramètres commandés par les trois potentiomètres de l’appareil, et de
mémoriser ces réglages. Sur le modèle d’origine du MA GICST OMP, l’édition complète et l’affectation
des paramètres aux potentiomètres n’étaient possibles que par l’intermédiaire d’un ordinateur utilisant
l’application « Sound Editor for MAGICSTOMP ». Avec le MAGICSTOMP MK2, toutes ces opérations
peuvent être effectuées directement sur l’appareil.
Français
→ Pour plus de précisions, reportez-vous à la page 7 de ce document.
[Jack PHONES]
La prise PHONES (mini-jack stéréo) vous permet de travailler ou de modifier des patches tout en
écoutant le son émis par le MAGICSTOMP via un casque stéréophonique. (Niveau/impédance de
sortie : –10dBm/150Ω)
* Utilisez le potentiomètre de volume pour régler le volume.
* La sortie sur les jacks OUTPUT n’est pas modifiée par le branchement d’un casque sur le jack PHONES.
Jack PHONES
Lors de l’écoute au casque, réglez soigneusement le niveau sonore
pour ne pas blesser votre ouïe.
[Fonction de réduction automatique des larsens]
Dans le cadre de l’effet « AcousticMulti », la fonction AFR (Auto Feedback Reduction) peut être
utilisée en temps réel pour neutraliser les effets de Larsen.
→ Pour plus de précisions, reportez-vous à la page 9 de ce document.
6
Page 7

Édition complète (Deep Edit)
N’importe quel paramètre du patch actuellement sélectionné peut être modifié. Vous pouvez employer
cette possibilité, et le fait qu’un autre type d’effet puisse également être choisi, pour composer des
patches originaux.
q Appuyez sur le bouton [STORE/EXIT].
Le message “PRESS[STORE]1sec” apparaît sur la ligne du bas de l’afficheur.
* Si vous appuyez sur le bouton [STORE/EXIT] alors qu'un patch prédéfini est sélectionné, le numéro de patch
utilisateur correspondant est automatiquement retenu comme numéro de sauvegarde de patch.
U01:DIST1
PRESS[STORE]1sec
w
Appuyez une fois, très brièvement, sur le commutateur ON/OFF (moins d’une seconde).
Le mode Édition complète (Deep Edit) est désormais adopté et l’afficheur doit présenter les indications qui suivent.
* Si vous appuyez sur le commutateur ON/OFF pendant plus d'une seconde, c'est le mode Édition de nom qui est
adopté (→ Mode d’emploi: page 44).
0EDIT-KNOB0TYPEŸ
؇KNB1fiKNB2áKNB3
Icône Édition complète
ÿEDIT-PRM:02/07Ÿ
ou
؇MID0fiTRE0áPRE0
Icône Édition complète
e Utilisez les commutateurs +/- pour sélectionner l’affichage des éléments des para-
mètres.
Les paramètres du patch sélectionné sont présentés sur plusieurs pages. Utilisez les commutateurs + et – pour passer d’une page à l’autre.
*
Pour de plus amples détails concernant les paramètres de chaque effet, r eportez-vous au feuillet séparé “Liste des effets”.
La page de réglage des paramètres
Ce symbole indique qu’in existe
une page précédente.
Utilisez le commutateur – pour
accéder à cette page.
Icône d'Édition complète
Page précédente Page suivante
ÿEDIT-PRM:02/07Ÿ
؇MID0fiTRE0áPRE0
affichée est la page 3 de 7.
ÿEDIT-PRM:03/07Ÿ
؇VOL0fiSTE0áBASF
Ce symbole indique qu’in existe une
page suivante.
Utilisez le commutateur + pour
accéder à cette page.
Paramètre
Utilisez le bouton situé immédiatement en dessous l’afficheur pour
effectuer les réglages.
ÿEDIT-PRM:04/07Ÿ
؇MIDFfiTREFáPREF
Français
7
Page 8
r Tournez les boutons pour modifier les paramètres correspondants.
Après avoir accédé aux paramètres à modifier , utilisez les boutons situés sous l’afficheur pour modifier les valeurs des paramètres. Si la position du bouton ne correspond pas à la valeur du paramètre,
vous devez tourner le bouton jusqu’à ce que sa position corresponde à la v aleur du paramètre , av ant
d’être en mesure de modifier la valeur du paramètre (→ Mode d’emploi : page 40).
ÿEDIT-PRM:03/07Ÿ
؇08.2fiSTE0áBASF
Valeur du paramètre
● Attribution des paramètres aux boutons de commande de l’appareil
Français
Les paramètres qui, dans les conditions normales de
fonctionnement, sont réglés par les boutons de commande de l’appareil sont attribués à ces boutons via la
ligne du haut de l’afficheur (ci-contre illustrée: la page
avant 01/??). Sélectionnez le paramètre à attribuer
au bouton en faisant tourner ce bouton.
* Pour de plus amples détails concernant les paramètres de cha-
que effet, reportez-vous au feuillet séparé “Liste des effets”.
● Changement du type d’effet
Une pression sur le commutateur ON/OFF alors que l’icône d’Édition complète est affichée,
provoque l’affichage de la page de sélection du type d’effet.
Utilisez les commutateurs +/– pour sélectionner le type de l’effet.
* Lorsque le type de l’effet est changé, les données modifiées sont ef facées et remplacées par les valeurs par
défaut pour le nouveau type d’effet.
* Pour de plus amples détails concernant les paramètres de chaque effet, reportez-vous au feuillet séparé
“Liste des effets”.
0EDIT-KNOB0TYPEŸ
؇MSTRfiKNB2áKNB3
Nom du paramètre
ÿEDIT-FXT:23/63Ÿ
ØStereoDelay
Type d’effet
Après sélection du type d’effet, appuyez sur le bouton [STORE/EXIT] pour revenir à la page
des paramètres et attribuer des paramètres aux boutons de commande de l’appareil.
t
Lorsque vous avez terminé les modifications, sauvegardez les données dans MAGICSTOMP.
Maintenant, une pression sur le bouton [STORE/EXIT] a le même effet qu’une pression sur le bouton
[STORE/EXIT] au cours de l’opération q d’Enregistrement des patches (→ Mode d’emploi: page
42). À partir d'ici, vous pouvez procédez aux opérations suivantes d’Enregistrement des patches.
* Pour rétablir les données initiales, annulez maintenant l’opération d’Enregistrement des patches et sélectionnez
un autre patch.
8
23e type d’effet sur un total
de 63 types d’effet
Page 9
Fonction de réduction automatique des couplages (AFR)
Le MAGICSTOMP est doté d’une fonction très performante de réduction des couplages permettant de
supprimer l’effet Larsen (hurlement).
* Le “couplage” se produit lorsqu’une fréquence donnée produite par l’amplificateur provoque une mise en résonance
de la guitare jusqu’à créer un son puissant et désagréable ressemblant à un hurlement.
La fonction AFR du MAGICSTOMP fait appel à un filtre coupe-bande qui supprime la fréquence à l’origine du couplage pour rendre ce dernier impossible. Au total 5 filtres coupe-bande peuvent être réglés et
fonctionner en même temps.
La fonction AFR n’est disponible que pour les patches dont le type d’effet est «AcousticMulti».
ATTENTION
Soyez prudent. Un couplage permanent et à forte puissance peut endommager les appareils.
■ Activation de la fonction AFR
Le MAGICSTOMP MK2 est livré a v ec f onction AFR désactivée (OFF). Procédez d’abord comme indiqué
ci-dessous pour activer la fonction AFR (ON).
q
Après avoir appuyé sur le bouton [ST ORE/EXIT], appuyez deux fois sur le commutateur
ON/OFF pour sélectionner la page “Effect Type Select” du mode d’Édition complet.
* Appuyez et relâchez sur le commutateur en moins d’une seconde chaque fois.
ÿEDIT-FXT:63/63Ÿ
ØAcousticMulti
Français
w
Maintenez la pression d’un doigt sur le commutateur ON/OFF jusqu’à ce que la page
suivante s’affiche (environ 4 secondes).
La page illustrée ci-dessus apparaît pendant
une seconde puis est remplacée par la page sélectionnée avant d’appuyer sur le bouton [STORE/
EXIT].
* Pour désactiver à nouveau la fonction AFR, suivez à nouveau les instructions q et w ci-dessus.
La procédure décrite ci-dessus n’opère que sur les patches dont le type d’effet est «AcousticMulti».
Par ailleurs, la fonction AFR s’active et se désactive globalement pour tous les patches ; elle ne
peut pas être activée individuellement pour un patch et désactivée pour les autres.
ÿEDIT-FXT:63/63Ÿ
AFR0FUNCTION0ON
■ Utilisation de la fonction AFR
Après que vous avez activé la f onction AFR en procédant comme
indiqué en page précédente, l’icône d’édition “«” s’affiche pour
les patches compatibles avec la fonction AFR (ceux dont le type
d’effet est « AcousticMulti »).
* C’est l’icône d’édition normale “¤”, qui s’affiche lorsque la fonction AFR est désactivée ou lorsque le patch sélec-
tionné utilise un autre type d'effet que le type « AcousticMulti ».
9
U011«Natural
ó‡BASSfiMID0áTRE
Page 10
Après sélection d’un patch pour lequel la fonction AFR est active, suivez les instructions ci-dessous pour
utiliser cette fonction.
* Les commandes de la fonction AFR diffèrent selon que vous êtes en mode Avance/Recul ou en mode Performance.
q Lorsque se produit un couplage tandis que l’appareil est en mode Avance/Recul,
ou bien en mode Performance, appuyez sur le commutateur qui correspond au
patch actuellement sélectionné (–, ON/OFF, +).
* Les boutons utilisés dans la pr océdure décrite ci-dessus (–, ON/OFF, +) ne peuvent pas être utilisés pour activer
(ON) ou désactiver (OFF) des patches pour lesquels la fonction AFR est active.
Le MAGICSTOMP identifie automatiquement la fréquence qui est la cause du couplage et met en service
un filtre coupe-bande jusqu’alors inutilisé. Lorsque le filtre a identifié la fréquence qui pro v oque l’anomalie ,
une page semblable à celle illustrée ci-dessous s’affiche puis la page initiale d’affichage est rétablie .
Pour signaler que la fonction AFR est activ e, le témoin du commutateur ON/OFF clignote si l’appareil est en mode Avance/Recul, tandis que s’il est en mode Performance, c’est le témoin (–, ON/
OFF, +) du patch présentement sélectionné qui clignote.
U96«Natural
AFR10F=00221Hz
Français
* Si le réglage du filtre échoue, la page suivante s’affiche avant que l’affi-
chage initial ne soit rétabli.
U96«Natural
00CAN'T0DETECT
w Si l’emploi d’un filtre coupe-bande ne permet pas de supprimer le couplage, ap-
puyez sur le commutateur dont il est question à l’opération q pour mettre en service un deuxième filtre. Au maximum, 5 filtres peuvent ainsi être introduits.
* La page suivante s’affiche lorsque les 5 filtres ont été mis en service.
U96«Natural
0AFR0BAND0FULL!
Les réglages pour la fonction AFR ne sont pas sauvegardés en même temps que les données du
patch. Les réglages de la fonction AFR sont abandonnés lorsqu’un autre patch est sélectionné.
[Bouton STORE/EXIT]
Alors que sur le MAGICSTOMP d’origine, c’est le bouton ON/OFF qui était utilisé à l’étape r de la section «
Affectation d’un nom à un patch », en page 45 du mode d’emploi de ce modèle d’origine, c’est maintenant le bouton
[STORE/EXIT] qui doit être utilisé à cet effet sur le modèle MK2 (voir ci-après la correction de ce passage).
r Une fois le nom modifié, appuyez sur le
commutateur ON/OFF.
LE MAGICSTOMP revient en mode d’attente
d’enregistrement.
U01:TUBE0DRIVE1
PRESS[STORE]1sec
Appuyez
r Une fois le nom modifié, appuyez sur le
bouton [STORE/EXIT].
LE MAGICSTOMP revient en mode d’attente
d’enregistrement.
U01:TUBE0DRIVE1
PRESS[STORE]1sec
Appuyez
10
Page 11
GUITAR EFFECTS PROCESSOR
Was ist neu und besser im MK2?
[Deep Edit]
Die “Deep Edit”-Funktion des MK2 ermöglicht die Bearbeitung aller Parameter eines Patch-Programms,
die Zuordnung von Parametern zu den drei Reglern und das Speichern der vorgenommenen Einstellungen. Beim früheren MA GICSTOMP war die umfassende Bearbeitung und die Zuordnung von Parametern
nur mit dem Anwendungsprogramm “Sound Editor f or MA GICST OMP” auf einem Computer möglich. Beim
MAGICSTOMP MK2 können diese Bearbeitungsvorgänge direkt am Gerät durchgeführt werden.
→ Mehr zu diesem Thema finden Sie auf Seite 12 in diesem Heft.
[PHONES-Buchse]
Über die PHONES-Buchse (Stereo-Miniklinke) können Sie das Tonsignal beim Üben oder beim Bearbeiten von Patches mit Kopfhörern mithören. (Ausgangspegel/Impedanz: –10 dBm/150 Ω)
* Die Lautstärke wird dabei mit dem VOLUME-Regler eingestellt.
* Das Ausgangssignal liegt auch dann an der OUTPUT-Buchse an, wenn Kopfhörer an der PHONES-Buc hse ange-
schlossen sind.
PHONES-Buchse
Deutsch
Achten Sie beim Mithören über Kopfhörer auf angemessene
Lautstärke, um Ihr Gehör nicht zu schädigen.
[Automatische Feedback-Unterdrückung]
Die AFR-Funktion (Automatic Feedback Reduction], die bei "AcousticMulti"-Effekten zur Verfügung
steht, kann zur Unterdrückung problematischer Feedback-Frequenzen (Heulgeräusch) in Echtzeit
eingesetzt werden.
→ Mehr zu diesem Thema finden Sie auf Seite 14 in diesem Heft.
11
Page 12

Deep Edit
In diesem Modus können alle Parameter des gegenwärtig gewählten Patch-Programms bearbeitet werden. Zusammen mit der Fähigkeit, einen anderen Effekttyp zu wählen, bietet Ihnen diese Funktion die
Möglichkeit, eigene Patches zu programmieren.
q Drücken Sie die [STORE/EXIT]-Taste.
“PRESS[STORE]1sec” wird in der unteren Hälfte des Displays angezeigt.
* Wenn Sie beim Auswählen eines Patch-Programms die [STORE/EXIT]-Taste drücken, wird automatisch die ent-
sprechende User-Patch-Nummer als Ziel-Speicherplatz vorgegeben.
U01:DIST1
PRESS[STORE]1sec
w Drücken Sie einmal auf den ON/OFF-Schalter und lassen Sie ihn sofort (innerhalb 1
Sekunde) wieder los.
Sie befinden sich nun im Deep Edit-Modus, und die Display anzeige sollte wie unten abgebildet aussehen.
* Wenn Sie den ON/OFF-Schalter länger als 1 Sekunde gedrückt halten, wird der Name Edit Mode aufgerufen (→
Bedienungsanleitung: Seite 70).
0EDIT-KNOB0TYPEŸ
؇KNB1fiKNB2áKNB3
Deep Edit-Symbol
e Rufen Sie mit Hilfe der Schalter + und – die Parameter-Einstellanzeige auf.
Deutsch
Die Parameter des gegenwärtig gewählten Patch-Programms sind auf mehreren Seiten angeordnet. Mit dem Schalter “+” bzw. “–” können Sie zur nächsten bzw. vorangehenden Seite blättern.
* Weitere Informationen zu individuellen Parametern finden Sie auf dem separaten Blatt mit der "Effektliste".
Seite der Parameter-Einstellanzeige
Die Abbildung zeigt Seite 3 (von 7 Seiten)
Dieses Symbol macht darauf aufmerksam,
dass es eine vorangehende Seite gibt
Mit dem Schalter “–” können Sie zur
vorangehenden Seite zurückblättern
ÿEDIT-PRM:03/07Ÿ
Deep Edit-Symbol
Vorangehende Seite Nächste Seite
؇VOL0fiSTE0áBASF
ÿEDIT-PRM:02/07Ÿ
؇MID0fiTRE0áPRE0
ÿEDIT-PRM:02/07Ÿ
oder
؇MID0fiTRE0áPRE0
Deep Edit-Symbol
Dieses Symbol macht darauf aufmerksam,
dass es eine nachfolgende Seite gibt
Mit dem Schalter “+” können Sie zur
nächsten Seite vorblättern
Parameter
Nehmen Sie die Einstellungen
mit den Reglern unter dem
Display vor
ÿEDIT-PRM:04/07Ÿ
؇MIDFfiTREFáPREF
12
Page 13

r Bearbeiten Sie die Parameter, indem Sie die zugehörigen Regler verstellen.
Sobald die zu bearbeitenden Parameter angezeigt w erden, nehmen Sie die Einstellungen mit den zugehörigen Reglern unter dem Display vor. Sollte die aktuelle Reglerposition nicht mit dem angezeigten
Parameterwert übereinstimmen, müssen Sie den Regler zunächst bis zu der Position verstellen, die
Parameterwert entspricht, bevor Sie die Einstellung ändern können (→ Bedienungsanleitung : Seite 66).
ÿEDIT-PRM:03/07Ÿ
؇08.2fiSTE0áBASF
Parameterwert
● Zuordnen von Parametern zu den Reglern am Gerät
Sie haben die Möglichkeit, Parameter, die Sie während des normalen Einsatzes mit den Reglern am
Gerät steuern möchten, im oberen Teil der Parameter-Seitenanzeige (in der rechten Abbildung Seite
01/??) zuzuordnen. Wählen Sie den gewünsch-
ten Parameter, indem Sie den Regler drehen.
* Weitere Informationen zu individuellen Parametern fin-
den Sie auf dem separaten Blatt mit der “Effektliste”.
0EDIT-KNOB0TYPEŸ
؇MSTRfiKNB2áKNB3
Parametername
● Ändern des Effekttyps
Während das Deep Edit-Symbol angezeigt wird, können Sie mit dem ON/OFF-Schalter die
unten abgebildete Effekttyp-Auswahlanzeige aufrufen.
Der Effekttyp wird mit den Schaltern + und – ausgewählt.
* Beim Auswählen eines ander en Effekttyps werden vorgenommene Änderungen gelöscht und die Standard-
werte für den neuen Effekttyp vorgegeben.
* W eitere Informationen zu individuellen Parametern finden Sie auf dem separaten Blatt mit der “Effektliste”.
ÿEDIT-FXT:23/63Ÿ
ØStereoDelay
Effekttyp
Drücken Sie nach der Auswahl des Effekttyps die [STORE/EXIT]-Taste, um die ParameterEinstellanzeige wieder aufzurufen und den Reglern des Geräts Parameter zuzuordnen.
t
Sobald Sie mit der Bearbeitung fertig sind, speichern Sie Ihre Daten im MAGICSTOMP.
Die [STORE/EXIT]-Taste hat zu diesem Zeitpunkt die in Schritt q des Speichervorgangs → Bedienungsanleitung : Seite 68) beschriebene Funktion. Folgen Sie nach Drücken der Taste den übrigen
Schritten des dort beschriebenen Speichervorgangs.
* Zum Rückversetzen der Daten in den ursprünglichen Zustand brechen Sie den Speichervorgang an dieser Stelle
ab und wählen dann ein anderes Patch.
13
23. von insgesamt 63
Effekttypen
Deutsch
Page 14

AFR-Funktion (Auto Feedback Reduction)
Der MAGICSTOMP bietet eine hochentwic k elte AFR-Funktion, die eine Unterdrückung problematischen
Feedbacks (Heulen) ermöglicht.
* Der Begriff “Feedback” bezieht sich hier auf den bei bestimmten Verstärkerfrequenzen auftretenden unkontrollierba-
ren Resonanzeffekt der Gitarre, durch den ein Heulgeräusch erzeugt wird.
Die AFR-Funktion des MAGICSTOMP arbeitet mit einer Notch-Filterschaltung, die spezifische Störfrequenzen wegfiltert und so das Feedback beseitigt. Bis zu fünf Notch-Filter können gleichzeitig eingerichtet sein und arbeiten.
Die AFR-Funktion steht nur in Patches zur V erfügung, deren Effekttyp auf “AcousticMulti”
gesetzt ist.
VORSICHT
Kontinuierliches starkes Feedback kann Geräteschäden zur Folge haben.
■ Einschalten der AFR-Funktion
Die AFR-Funktion ist als Werksvoreinstellung bei der Auslieferung ausgeschaltet (nicht aktiv). Sie müssen die AFR-Funktion daher zunächst einschalten (aktivieren), wie im Folgenden beschrieben.
q Drücken Sie die [STORE/EXIT] Taste und betätigen Sie dann zweimal den ON/OFF-
Schalter, um die Effekt-Auswahlanzeige des Deep Edit-Modus aufzurufen.
* Bei der zweimaligen Betätigung muss der Schalter jeweils innerhalb einer Sekunde wieder losgelassen werden.
Deutsch
ÿEDIT-FXT:63/63Ÿ
ØAcousticMulti
w Halten Sie den ON/OF-Schalter ge-
drückt (etwa vier Sekunden lang), bis
die folgende Anzeige erscheint.
Die obige Anzeige erscheint zwei Sekunden lang auf dem Display, wonach wieder die Anzeige zu
sehen ist, die vor dem Drücken des [STORE/EXIT]-Schalters vorlag.
* Zum Ausschalten der AFR-Funktion wiederholen Sie die obigen Schritte q und w.
Die obige Einstellung ist nur bei Patch-Pr ogrammen wirksam, deren Effekttyp auf “AcousticMulti”
gesetzt ist. Beachten Sie auch, dass der Aktivierungszustand (EIN/AUS) der AFR-Funktion alle
Patches betrifft und eine Einstellung für individuelle Programme nicht möglich ist.
ÿEDIT-FXT:63/63Ÿ
AFR0FUNCTION0ON
■ Gebrauch der AFR-Funktion
Nachdem Sie die AFR-Funktion wie vorangehend beschrieben
eingeschaltet haben, sind AFR-taugliche Patches (Programme
mit dem Effekttyp “AcousticMulti”) durch das Bearbeitungssymbol
“«” gekennzeichnet.
* Das normale Bearbeitungssymbol “¤” wird angezeigt, wenn die AFR-Funktion deaktiviert (ausgeschaltet) oder ein
Patch-Programm mit einem anderen Effekttyp als “AcousticMulti” gewählt ist.
14
U011«Natural
ó‡BASSfiMID0áTRE
Page 15

Nachdem Sie ein Patch mit aktivierter AFR-Funktion ausgewählt haben, folgen Sie zur Einrichtung den
nachstehenden Anweisungen.
* Die Bedienung der AFR-Funktion ist im UP/DOWN MODE und im PERFORMANCE MODE unterschiedlich.
q Im UP/DOWN MODE drücken Sie beim Auftreten von Feedbac k den ON/OFF-Schalter ,
im PERFORMANCE MODE den Schalter (–, ON/OFF oder +), der dem gegenwärtig
gewählten Patch zugeordnet ist.
* Die obengenannten Schalter (-, ON/OFF, +) können in Patches mit aktivierter AFR-Funktion nicht zum Ein- und
Ausschalten von Effekten verwendet werden.
Der MAGICSTOMP identifiziert die Störfrequenz automatisch und richtet zur Unterdrückung ein freies
Noch-Filter ein. Bei der Ermittlung der problematischen Frequenz erscheint eine entsprechende Anzeige
auf dem Display (siehe unten abgebildetes Beispiel), wonach die frühere Anzeige wieder zu sehen ist.
Der aktive Zustand der AFR-Funktion wird durch eine Anzeigelampe bestätigt: Im UP/DO WN MODE
blinkt die Anzeigelampe des ON/OFF-Schalters und im PERFORMANCE MODE die Anzeigelampe
des Schalters (–, ON/OFF oder +), der dem gegenwärtig gewählten Patch zugeordnet ist.
U96«Natural
AFR10F=00221Hz
* Falls die Einrichtung des Filters fehlschlägt, erscheint vorübergehend die
folgende Anzeige auf dem Display.
U96«Natural
00CAN'T0DETECT
w Sollte ein einzelnes Filter keine Abhilfe schaffen, drücken Sie den Schalter erneut
wie in Schritt q beschrieben, um ein zweites Filter einzurichten. Es können maximal 5 Filter eingerichtet werden.
* Die folgende Anzeige erscheint, wenn alle 5 Filter eingerichtet sind.
U96«Natural
0AFR0BAND0FULL!
Die Einstellungen der AFR-Funktion werden nicht zusammen mit den Patch-Daten
gespeichert und beim Auswählen eines anderen Patch-Programms wieder aufgehoben.
[STORE/EXIT]-Taste
Der ON/OFF-Schalter des früheren MAGICSTOMP, auf in Schritt r des Abschnitts “Benennen
eines Patch-Programms” auf Seite 71 der früheren Bedienungsanleitung verwiesen wurde, ist
jetzt die [STORE/EXIT]-Taste (siehe folgendes Beispiel).
r Drücken Sie nach dem Ändern des Namens
den ON/OFF-Schalter.
Der MAGICSTOMP befindet sich nun im SpeicherBereitschaftszustand.
U01:TUBE0DRIVE1
PRESS[STORE]1sec
Drücken
r Drücken Sie nach dem Ändern des Na-
mens den [STORE/EXIT]-Taste.
Der MAGICSTOMP befindet sich nun im SpeicherBereitschaftszustand.
U01:TUBE0DRIVE1
PRESS[STORE]1sec
Drücken
Deutsch
15
Page 16

GUITAR EFFECTS PROCESSOR
Qué hay de nuevo y de mejorado en el MK2
[Edición profunda]
La función de “Edición profunda” del MK2 le permite editar los parámetros de todos los ef ectos de los
que consta el parche, ajustar los parámetros que se controlan con los tres mandos de control de la
unidad, y guardar estos ajustes en la memoria. En el MAGICSTOMP original, toda la edición y la
asignación de los mandos de control se efectuaba empleando un ordenador ejecutando la aplicación “Sound Editor for MAGICSTOMP”. Con el MAGICSTOMP MK2, las mismas operaciones pueden efectuarse en la misma unidad del MAGICSTOMP MK2.
→ Para encontrar más información al respecto, consulte la página 17 de este manual.
[Toma de auriculares (PHONES)]
La toma PHONES (mini estéreo) le permitirá ensayar o editar parches mientras escucha el sonido
del MAGICSTOMP por los auriculares. (Nivel/impedancia de salida: –10 dBm/150 Ω)
* Emplee el mando de volumen para ajustar el volumen.
Español
* El sonido sigue saliendo por la toma OUTPUT cuando se conectan unos auriculares a la toma PHONES.
Toma de auriculares (PHONES)
Cuando escuche el sonido con unos auriculares, asegúrese de haber
ajustado adecuadamente el volumen para que no le dañe los oídos.
[Función de reducción automática de la realimentación]
La función de reducción automática de la realimentación acústica (AFR), disponible en el efecto
“AcousticMulti”, puede operarse en tiempo real para neutralizar el problema de la realimentación
(aullido).
→ Para encontrar más información al respecto, consulte la página 19 de este manual.
16
Page 17

Edición profunda
Podrá editar cualquier parámetro del parche actualmente seleccionado, Podrá emplear esta función,
junto con la posibilidad de seleccionar un tipo de efecto distinto, para crear parches originales.
q Presione el botón [STORE/EXIT].
Aparecerá “PRESS[STORE]1sec” en la mitad inferior del visualizador.
* Si presiona el botón [STORE/EXIT] cuando ha seleccionado un parche preajustado, se seleccionará
automáticamente el número de parche de usuario correspondiente como número de parche de destino para su
almacenamiento.
U01:DIST1
PRESS[STORE]1sec
w Presione una vez el interruptor ON/OFF y suéltelo con rapidez (antes de un segundo).
Así establecerá el modo de Edición profunda y el visualizar deberá mostrar lo siguiente.
* Si presiona el inter ruptor ON/OFF durante más de 1 segundo, se establecerá el modo de edición del nombre (→
Manual del usuario: página 96).
0EDIT-KNOB0TYPEŸ
؇KNB1fiKNB2áKNB3
Icono de edición profunda
ÿEDIT-PRM:02/07Ÿ
o
؇MID0fiTRE0áPRE0
Icono de edición profunda
e Emplee los interruptores +/– para seleccionar la visualización de ajuste de
parámetros.
Los parámetros del parche actualmente seleccionado estarán dispuestos en varias páginas. Emplee los interruptores “+” o “–” para ver la página siguiente o la anterior en el visualizador.
* Para encontrar más información sobre los parámetros individuales, consulte la hoja de la “Lista de efectos” que
se incluye por separado.
La página de visualización de ajuste de parámetros
mostrada es la página 3 de 7
Este icono indica que existe una página anterior
Emplee el interruptor “–” para ver la página anterior
ÿEDIT-PRM:03/07Ÿ
Icono de edición profunda
Página anterior Página siguiente
؇VOL0fiSTE0áBASF
Este icono indica que existe una página siguiente
Emplee el interruptor “+” para ver la página siguiente
Parámetro
Emplee los mandos situados
debajo del visualizador para
realizar los ajustes
Español
ÿEDIT-PRM:02/07Ÿ
؇MID0fiTRE0áPRE0
ÿEDIT-PRM:04/07Ÿ
؇MIDFfiTREFáPREF
17
Page 18

r Gire los mandos para editar sus parámetros correspondientes.
Después de haber visto los parámetros que desea editar, emplee los mandos situados debajo del
visualizador para editar los parámetros. Si la posición del mando no corresponde con el valor del
parámetro, deberá girar el mando hasta que la posición corresponda con el valor del parámetro
antes de poder cambiar el ajuste (→ Manual del usuario : página 92).
ÿEDIT-PRM:03/07Ÿ
؇08.2fiSTE0áBASF
Valor del parámetro
● Asignación de parámetros a los mandos de control de la unidad
Los parámetros que se controlan con los mandos de
control de la unidad durante el funcionamiento normal
están asignados a los mandos de control de la parte
superior del visualizador de páginas de parámetros (a la
derecha se muestra: la página anterior a 01/??). Seleccione el parámetro para el mando girando el mando.
* P ar a encontrar más información sobre los parámetros in-
dividuales, consulte la hoja de la “Lista de efectos” que
se incluye por separado.
0EDIT-KNOB0TYPEŸ
؇MSTRfiKNB2áKNB3
Nombre del parámetro
● Cambio del tipo de efecto
Presionando el interruptor ON/OFF, cuando se visualice el icono de Edición profunda, accederá a la visualización de selección del tipo de efecto mostrada a continuación.
Español
Emplee los interruptores +/– para seleccionar el tipo de efecto.
* Cuando se cambia el tipo de efecto, todos los datos que habían sido editados se borrarán y se establecerán
su lugar los valores predeterminados para el nuevo tipo de efecto.
* Para encontrar más información sobre los parámetros individuales, consulte la hoja de la “Lista de efec-
tos” que se incluye por separado.
ÿEDIT-FXT:23/63Ÿ
ØStereoDelay
Tipo de efecto
Después de haber seleccionado el tipo de efecto, presione el botón [STORE/EXIT] para volver a la
visualización de ajuste de parámetros y asignar los parámetros a los mandos de control de la unidad.
t
Cuando haya terminado la edición, guarde los datos en el MAGICSTOMP en este momento.
Ahora, la presión el botón [STORE/EXIT] será lo mismo que la presión del botón [ST ORE/EXIT] en
el paso q de la operación de almacenamiento (→ Manual del usuario : página 94). A partir de
ahora, podrá seguir los pasos restantes de la operación de almacenamiento.
* Para devolver los datos a su estado original, cancele en este punto la operación de almacenamiento y luego
seleccione otro parche.
18
El tipo de efecto 23 de un
total de 63 tipos de efectos
Page 19

Función de reducción automática de la realimentación (AFR)
El MAGICSTOMP está provisto de una función muy sofisticada de reducción automática de la
realimentación acústica (AFR) que elimine la realimentación (aullido).
* En este caso, la “realimentación” se produce cuando una frecuencia específica producida por el amplificador hace
que resuene la guitarra de forma descontrolada, creando un sonido de aullido.
La función AFR del MAGICSTOMP emplea un filtro de banda eliminada, que corta la frecuencia que
causa la realimentación acústica para eliminar la realimentación. Pueden ajustarse un máximo de cinco
filtros de banda eliminada y pueden funcionar al mismo tiempo.
La función AFR sólo está disponible para parches que tienen el tipo de efecto ajustado
a “AcousticMulti”.
PRECAUCIÓN
Tenga cuidado. La realimentación acústica constante a altos niveles puede causar
daños en el equipo.
■ Activación de la función AFR
Cuando el MAGICSTOMP sale de la fábrica, la función AFR está desactiv ada (OFF). Primero, emplee el
procedimiento que se describe a continuación para activar (ON) la función AFR.
q
Después de presionar el botón [STORE/EXIT], presione dos veces el interruptor ON/OFF para
seleccionar la visualización de “Selección del tipo de efecto” en el modo de edición profunda.
* Cuando presione el interruptor dos veces, asegúrese de soltar el interruptor antes de un segundos las dos veces.
ÿEDIT-FXT:63/63Ÿ
ØAcousticMulti
w
Hasta que aparezca la visualización siguiente,
presione y mantenga presionado (durante unos
cuatro segundos) el interruptor ON/OFF.
La visualización arriba mostrada aparecerá durante un segundo y luego volverá a la visualización
que se había seleccionado antes de presiona el botón [STORE/EXIT].
* Para volver a desactivar (OFF) la función AFR, efectúe de nuevo los pasos q y w descritos arriba.
El procedimiento arriba descrito sólo tiene efecto en parches que tienen su tipo de efecto
ajustado a “AcousticMulti”. Además el ajuste de la activación/desactivación (ON/OFF) de la
función AFR afecta a todos los parches, y no puede ajustarse en parches individuales.
ÿEDIT-FXT:63/63Ÿ
AFR0FUNCTION0ON
■ Empleo de la función AFR
Después de haber activado (ON) la función AFR con el procedimiento descrito anteriormente, aparecerá el icono “«” para los
parques que puedan utilizar la función AFR 8los parques que
tienen su tipo de efecto ajustado en “AcousticMulti”).
* El icono de edición normal “¤” aparecerá cuando la función AFR esté desactivada (OFF), o cuando se seleccione un
parche que emplee un efecto que no sea el “AcousticMulti”.
19
U011«Natural
ó‡BASSfiMID0áTRE
Español
Page 20

Después de haber seleccionado un parche en el que la función AFR esté activada, siga las instrucciones
siguientes para emplear la función AFR.
* La operación del interruptor de la función AFR es distinta en el modo de incremento/reducción y en el modo de
interpretación.
q Cuando se produzca realimentación en el modo de incremento/reducción, presio-
ne el interruptor ON/OFF, y cuando ocurra en el modo de interpretación, presione
el interruptor que corresponda al parche actualmente seleccionado (–, ON/OFF, +).
* Los interruptores del pr ocedimiento arriba descrito (–, ON/OFF, +) no pueden utilizarse cambiar activar/desactivar
los efectos en parches que tengan activada la función AFR.
El MAGICSTOMP identificará automáticamente la frecuencia que causa la realimentación y activará un
filtro de banda eliminada que no se esté utilizando. Cuando el filtro identifica la frecuencia que causa el
problema, el visualizador aparece de forma similar a la que se muestra abajo y luego a su estado anterior .
Para indicar que la función AFR está activada, la luz del interruptor ON/OFF parpadeará en el modo de
incremento/reducción, y en el modo de interpretación parpadeará la luz del interruptor (–, ON/OFF, +) del
parche actualmente seleccionado.
U96«Natural
AFR10F=00221Hz
* Si no puede ajustarse el filtro, se mostrará la visualización siguiente antes
de volver al estado anterior.
U96«Natural
00CAN'T0DETECT
w Si la aplicación de un solo filtro de banda eliminada no es suficiente para eliminar
la realimentación, presione el interruptor como se ha descrito en el paso q y ajuste un segundo filtro. Podrá ajustar un máximo de 5 filtros de banda eliminada.
* Si se han ajustado todos los 5 filtros, aparecerá la visualización siguiente.
U96«Natural
0AFR0BAND0FULL!
Español
Los ajustes de la función AFR no se almacenan junto con los datos del parche. Los
ajustes de la función AFR se cancelan cuando se selecciona otro parche.
[Botón STORE/EXIT]
En el MAGICSTOMP original, el interruptor ON/OFF usado en el paso r del apartado “Asignación de un nombre a un parche”, en la página 97 del manual del usuario, es ahora el botón
[STORE/EXIT] (consulte el ejemplo siguiente).
r Después de haber cambiado el nombre,
presione el botón ON/OFF.
El MAGICSTOMP está ahora en el modo de espera.
U01:TUBE0DRIVE1
PRESS[STORE]1sec
Presione
r Después de haber cambiado el nombre,
presione el botón [STORE/EXIT].
El MAGICSTOMP está ahora en el modo de espera.
U01:TUBE0DRIVE1
PRESS[STORE]1sec
Presione
20
Page 21

GUITAR EFFECTS PROCESSOR
Cosa c’è di nuovo e di migliorato nell’MK2
[Deep Edit]
La funzione “Deep Edit” dell’MK2 permette di editare tutti i parametri degli effetti che compongono un
patch, impostare i parametri controllati dalle tre manopole dell’unità e salvare queste modifiche in
memoria. Nel MAGICSTOMP or iginale, l’editing completo e l’assegnazione delle manopole di controllo veniva fatto con un computer e l’applicativo “Sound Editor for MAGICSTOMP”. Con
MAGICSTOMP MK2, l’unità stessa è in grado di eseguire le stesse operazioni.
→ Per maggiori dettagli, consultare pagina 22 di questo libro.
[Presa PHONES]
La presa PHONES (mini stereo) permette di provare o editare dei patch mentre si controlla il suono
prodotto dal MAGICSTOMP attraverso una cuffia (livello/impedenza di uscita: –10 dBm/150 Ω).
* Utilizzare la manopola del volume per regolare il volume.
* L’uscita è ancora presente sulla presa OUTPUT anche quando le cuffie sono collegate alla presa PHONES.
PHONES jack
Quando si esegue il monitoraggio con un paio di cuffie, accertarsi di regolare
in modo appropriato il volume in modo da non danneggiare l’udito.
[Funzione di riduzione automatica degli effetti di feedback]
Disponibile all’interno dell’effetto “AcousticMulti”, la funzione di riduzione automatica degli effetti di
feedback (AFR) che può venire utilizzata in tempo reale per neutralizzare il feedback (urlio).
→ Per maggiori dettagli, consultare pagina 24 di questo libro.
21
Italiano
Page 22

Deep Edit
Qualsiasi parametro del patch correntemente selezionato può essere editato. Ciò può essere utilizzato,
assieme alla capacità di selezionare un tipo di effetto diverso, per creare dei patch originali.
q Premere il pulsante [STOR/EXIT].
L’indicazione “PRESS[STORE]1sec” appare nella metà inferiore del display.
* Se si preme il pulsante [ST ORE/EXIT] quando è selezionato un patch pr eimpostato, il numer o del pa tch dell’utente
corrispondente viene selezionato automaticamente come numero di patch di destinazione per la memorizzazione .
U01:DIST1
PRESS[STORE]1sec
w Premere una volta l’interruttore ON/OFF e rilasciare rapidamente (entro un secondo).
Siete ora nella modalità Deep Edit ed il display deve apparire come indicato in basso.
* Se si preme l’inter ruttore AFR/ON/OFF per più di un secondo si entrerà nella modalità Name Edit. (→ Manuale
di istruzioni: pagina 122)
0EDIT-KNOB0TYPEŸ
؇KNB1fiKNB2áKNB3
Icona Deep Edit
ÿEDIT-PRM:02/07Ÿ
o
؇MID0fiTRE0áPRE0
Icona Deep Edit
e Utilizzare gli interruttori +/– per selezionare il display di impostazione dei parametri.
I parametri per il patch correntemente selezionato sono disposti su diverse pagine. Utilizzare gli
interruttori “+” o “–” per passare alla pagina precedente o successiva del display.
* Per ulteriori informazioni sui parametri individuali, vedere il foglio separato “Effect List”.
La pagina del display di impostazione
dei parametri mostrata è pagina 3 di 7
Questa icona indica che esiste una pagina precedente.
Usare “–” per vedere la pagina precedente.
Italiano
Icona Deep Edit
Pagina precedente Pagina successiva
ÿEDIT-PRM:02/07Ÿ
؇MID0fiTRE0áPRE0
ÿEDIT-PRM:03/07Ÿ
؇VOL0fiSTE0áBASF
Questa icona indica che esiste una pagina successiva.
Usare “+” per vedere la pagina successiva.
Parametro
Usare le manopole sotto al
display per eseguire le
impostazioni.
ÿEDIT-PRM:04/07Ÿ
؇MIDFfiTREFáPREF
22
Page 23

r Ruotare le manopole per modificare i parametri corrispondenti.
Dopo aver visto i parametri che si desidera editare, utilizzare le manopole sotto al display per
modificare tali parametri. Se la posizione della manopola non corrisponde al v alore del par ametro,
è necessario ruotare la manopola fino alla posizione corrispondente al valore del parametro prima
di poter cambiare l’impostazione. (→ Manuale di istruzioni: pagina 118)
ÿEDIT-PRM:03/07Ÿ
؇08.2fiSTE0áBASF
Valore parametro
● Assegnazione di parametri alle manopole di controllo dell’unità
I parametri che vengono controllati dalle manopole di
controllo dell’unità durante il normale funzionamento
vengono assegnati alle manopole nella parte superiore del display della pagina dei parametri (sulla destra: la pagina prima di 01/??). Selezionare il parametro per la manopola ruotando la manopola stessa.
* P er ulterior i informazioni sui par ametri individuali, vede-
re il foglio separato “Effect List”.
0EDIT-KNOB0TYPEŸ
؇MSTRfiKNB2áKNB3
Parameter Name
● Cambio di Effect Type
La pressione di ON/OFF quando l’icona Deep Edit è visualizzata permette di accedere al
display Effect Type Select mostrato in basso.
Scegliere il tipo di effetto con gli interruttori +/–.
* Quando il tipo di effetto viene cambiato, qualsiasi dato modificato verrà cancellato e verranno impostati i
valori di default per il nuovo tipo di effetto.
* Per ulteriori informazioni sui parametri individuali, vedere il foglio separato “Effect List”.
ÿEDIT-FXT:23/63Ÿ
ØStereoDelay
Tipo effetto
Dopo aver selezionato il tipo di effetto, premere il pulsante [STORE/EXIT] per ritornare al
display per impostare parametri ed assegnare parametri alle manopole di controllo dell’unità.
23° tipo di effetto tra un
totale di 63 tipi
Italiano
t Al termine dell’editing, salvare i dati nel MAGICSTOMP.
A questo punto, la pressione del pulsante [ST ORE/EXIT] equivale a quella di [STORE/EXIT] nella
procedura q dell’operazione di memorizzazione (→ Manuale di istruzioni: pagina 120). Da qui è
possibile seguire le fasi rimanenti dell’operazione di memorizzazione.
* Per riportare i dati nelle loro condizioni originali, cancellare l’operazione di memorizzazione a questo punto e
selezionare un altro patch.
23
Page 24

Funzione Auto Feedback Reduction (AFR)
Il MAGICSTOMP è f ornito di una funzione A uto Feedbac k Reduction (AFR) estremamente sofisticata per
l’eliminazione del feedback (urlio).
* In questo caso “Feedback” indica il caso in cui una specifica frequenza prodotta dall’amplificatore causa una
incontrollabile risonanza della chitarra che crea un suono simile ad un urlo.
La funzione AFR del MAGICSTOMP utilizza un filtro che taglia la frequenza causa del feedback per
eliminare il feedback stesso. E’ possibile impostare e far lavorare fino a un massimo di cinque filtri alla
volta.
La funzione AFR è disponibile solo in patch il cui tipo di effetto è “AcousticMulti”.
ATTENZIONE
Fare attenzione. Un feedback costante a livelli elevati può danneggiare le apparecchiature.
■ Attivazione della funzione AFR
Il MAGICSTOMP MK2 viene spedito dalla f abbrica con la funzione AFR su OFF (disattiv ata). Per portarla
su ON (attivarla), usare la procedura che segue.
q Dopo aver premuto il pulsante [STORE/EXIT], premere due volte il pulsante ON/
OFF per selezionare il display “Effect Type Select” nella modalità Deep Edit.
* Se si preme il pulsante due volte, controllare che esso si sollevi in ambedue i casi entro un secondo.
ÿEDIT-FXT:63/63Ÿ
ØAcousticMulti
w Fino a che non appare il display
seguente, tenere premuto (per circa
due secondi) l’interruttore ON/OFF.
Il display mostrato sopra apparirà per un secondo e quindi ritornerà al display selezionato prima
che venisse premuto il pulsante [STORE/EXIT].
Italiano
* Per disattivare la funzione AFR, eseguire le fasi q e w viste qui sopra.
La procedura descritta è eseguibile solo in patch il cui tipo di effetto è “AcousticMulti”.
Inoltre, l’attivazione o disattivazione della funzione AFR influenza tutti i patch, e non
singoli patch.
ÿEDIT-FXT:63/63Ÿ
AFR0FUNCTION0ON
■ Uso della funzione AFR
Portata su ON (attivata) la funzione AFR con la procedura descritta
alla pagina precedente, l’icona di editing “_” appare per patch in
grado di fare uso della funzione AFR (quelle che hanno il tipo di
effetto regolato su “AcousticMulti”.
* L’icona di editing normale “¤” appar e se la funzione AFR viene portata su OFF (disattivata) o se viene scelto un patch
che fa uso di un effetto di tipo diverso da “AcousticMulti”.
24
U011«Natural
ó‡BASSfiMID0áTRE
Page 25

Scelto un patch la cui funzione AFR è attiva, seguire le istruzioni che seguono per usare la funzione
AFR.
* L’uso dei pulsanti con la funzione AFR differisce nelle modalità Up/Down e Performance.
q Quando si verifica del feedback nella modalità Up/Down, premere l’interruttore ON/
OFF mentre quando si verifica nella modalità Performance premere l’interruttore
corrispondente al patch correntemente selezionato (–, ON/OFF, +)
* I pulsanti descritti nella procedura qui sopra (–, ON/OFF, +) non possono venire usati per attivare o disattivare
effetti in patch per cui la funzione AFR è attiva.
Il MAGICSTOMP identifica automaticamente la frequenza che causa il feedback ed attiva un filtro
inutilizzato. Quando il filtro identifica la frequenza che causa il problema, il display apparirà simile a
quello mostrato in basso per ritornare quindi alla sua condizione precedente.
Per indicare che la funzione AFR è attiv a, la spia dell’interruttore ON/OFF lampeggia nella modalità
Up/Down mentre nella modalità Performance lampeggia la spia dell’interruttore (–, ON/OFF, +) per
il patch correntemente selezionato.
U96«Natural
AFR10F=00221Hz
* Se il filtro non viene impostato, il display diviene simile a quello seguente
per poi ritornare alla sua condizione precedente.
U96«Natural
00CAN'T0DETECT
w Se l’applicazione di un singolo filtro di banda non risolve il problema del feedback,
premere l’interruttore come descritto nella fase
E’ possibile impostare un massimo di 5 filtri di banda.
* Dopo aver impostato 5 filtri di banda appare il seguente display.
q ed impostare un secondo filtro.
U96«Natural
0AFR0BAND0FULL!
Le impostazioni della funzione AFR non vengono salvate assieme ai dati del patch. Inoltre, le
impostazioni della funzione AFR vengono cancellate quando si seleziona un altro patch.
[Pulsante EDIT/EXIT]
Nel MAGICSTOMP originale, l’interruttore ON/OFF usato nella fase r di “Dare un nome ad un
patch”(pagina 123) del manuale del MAGICSTOMP originale è ora il pulsante [STORE/EXIT]
(vedi l’esempio che segue).
r Cambiato il nome, premere il pulsante ON/
OFF.
Il MAGICSTOMP nella modalità di attesa di
memorizzazione.
U01:TUBE0DRIVE1
PRESS[STORE]1sec
Premere
r Cambiato il nome, premere il pulsante
[STORE/EXIT].
Il MAGICSTOMP nella modalità di attesa di
memorizzazione.
U01:TUBE0DRIVE1
PRESS[STORE]1sec
Premere
Italiano
25
Page 26

GUITAR EFFECTS PROCESSOR
Wat is er nieuw en verbeterd aan de MK2
[Deep Edit]
Met de zogenaamde “Deep Edit” functie van de MK2 kunt u alle effectparameters voor een patch
bewerken, u kunt instellen welke parameters worden geregeld door de drie knoppen op het toestel
en al deze instellingen opslaan in het geheugen. Met de oorspronkelijke MAGICSTOMP konden alle
bewerkingen en toewijzingen van bedieningsorganen op de computer gebeuren via het “Sound Editor
for MAGICST OMP” programma. Met de MAGICST OMP MK2 kunt u dez elfde handelingen uitv oeren,
maar dan op de MAGICSTOMP MK2 zelf.
→ Raadpleeg bladzijde 27 in dit boekwerkje voor meer informatie.
[PHONES aansluiting]
De PHONES aansluiting (stereo ministekker) stelt u in staat te oefenen of patches te bewerken
terwijl u het door de MAGICSTOMP geproduceerde geluid volgt via een hoofdtelefoon. (Uitgangsniveau/impedantie: –10 dBm/150 Ohm)
* Regel het volume met de volumeknop.
* Er wordt gewoon een signaal gepr oduceer d via de OUTPUT aansluiting wanneer er een hoofdtelefoon in de PHONES
aansluiting zit.
PHONES aansluiting
Nederlandse
Wanneer u de geluidsweergave volgt via een hoofdtelefoon moet
u het volume zo instellen dat uw gehoor niet beschadigd kan raken.
[Automatische Feedback Reductie functie]
Mogelijk bij “AcousticMulti” effecttypen kan de Automatische Feedback Reductie (AFR) functie onmiddellijk worden gebruikt om storende feedback (rondzingen) te neutraliseren.
→ Raadpleeg bladzijde 29 in dit boekwerkje voor meer informatie.
26
Page 27

Deep Edit
Alle parameters van de geselecteerde patch kunnen worden veranderd. Samen met de mogelijkheid een
ander soort effecttype te selecteren kunt u met deze functie uw eigen patches maken.
q Druk op de [STORE/EXIT] toets.
“PRESS[STORE]1sec” zal verschijnen in de onderste helft van het display.
*
Als u op [STORE/EXIT] drukt wanneer er een voorgeprogrammeerde patc h (Preset) is geselecteerd, zal het corresponderende gebruikersgeheugennummer (User Patch) automatisch worden geselecteerd om de gegevens onder op te slaan.
U01:DIST1
PRESS[STORE]1sec
w Druk kort op de ON/OFF toets (binnen één seconde loslaten).
U bent nu in de Deep Edit functie en het display ziet eruit zoals hieronder afgebeeld.
* Als u ON/OFF langer dan 1 seconde ingedrukt houdt, zult u de Name Edit functie inschakelen (→ Handleiding:
bladzijde 148).
0EDIT-KNOB0TYPEŸ
؇KNB1fiKNB2áKNB3
Deep Edit pictogram
ÿEDIT-PRM:02/07Ÿ
of
؇MID0fiTRE0áPRE0
Deep Edit pictogram
e Gebruik de +/– toetsen om het parameter insteldisplay te selecteren.
De parameters voor de geselecteerde patch staan vermeld op verschillende pagina’s (schermen).
Met de “+” en “–“ toetsen kunt u naar volgende, respectievelijk vorige schermen bladeren.
* Raadpleeg de aparte “Effectenlijst” voor meer informatie over de parameters voor individuele effecten.
Parameter insteldisplay pagina
Hier ziet u pagina 3 van 7
Dit pictogram geeft aan dat er hiervoor nog een
pagina bestaat.
Met “–“ kunt naar een voorgaande pagina gaan.
ÿEDIT-PRM:03/07Ÿ
Deep Edit pictogram
Vorige pagina Volgende pagina
؇VOL0fiSTE0áBASF
ÿEDIT-PRM:02/07Ÿ
؇MID0fiTRE0áPRE0
Dit pictogram geeft aan dat er hierna nog een
pagina bestaat.
Met “+“ kunt naar een volgende pagina gaan.
Parameter
Gebruik de knoppen onder het
display om de ingestelde
waarde te wijzigen.
ÿEDIT-PRM:04/07Ÿ
؇MIDFfiTREFáPREF
Nederlandse
27
Page 28

r Verdraai de knoppen om de bijbehorende parameters in te stellen.
Bekijk welke parameters u wilt veranderen en gebruik verv olgens de knoppen onder het displa y om
de ingestelde waarden te veranderen. Als de stand van de knop niet overeenkomt met de waarde
voor de bijbehorende parameter, moet u de knop ronddr aaien tot de stand wel o v ereenk omt met de
ingestelde waarde voor u deze kunt veranderen (→ Handleiding : bladzijde 144).
ÿEDIT-PRM:03/07Ÿ
؇08.2fiSTE0áBASF
Ingestelde waarde parameter
● Parameters toewijzen aan de knoppen van het toestel
De parameters die worden geregeld door de instelknoppen van het toestel bij normaal gebruik worden
toegewezen aan de knoppen die worden aangegeven in de bovenste helft van het display (hier rechts
afgebeeld: de pagina voor [01/??]). Selecteer de
parameter voor de knop door de knop te verdraaien.
* Raadpleeg de aparte “Effectenlijst” voor meer informa-
tie over de parameters voor individuele effecten.
● Veranderen van het effecttype
Als u op ON/OFF drukt wanneer het Deep Edit pictogram wordt weergegeven, kunt u het
hieronder afgebeelde Effecttype keuzedisplay openen.
Gebruik de +/– toetsen om het gewenste effecttype te selecteren.
* W anneer het ef fecttype w or dt ver anderd, zullen eventueel gewijzigde gegevens worden ge wist en worden de
standaardwaarden voor het nieuwe effecttype ingesteld.
* Raadpleeg de aparte “Effectenlijst” voor meer informatie over de parameters voor individuele effecten.
0EDIT-KNOB0TYPEŸ
؇MSTRfiKNB2áKNB3
Naam parameter
ÿEDIT-FXT:23/63Ÿ
ØStereoDelay
Nederlandse
Effecttype
Nadat u het gewenste effecttype heeft geselecteerd, kunt u met [ST ORE/EXIT] terugk eren naar het
parameter insteldisplay en kunt u parameters toewijzen aan de instelknoppen van het toestel.
t Wanneer u klaar bent met instellen, kunt u uw wijzigingen nu opslaan in het geheu-
gen van uw MAGICSTOMP.
Op dit moment heeft het indrukken van [STORE/EXIT] hetzelfde gevolg als wanneer u op [STORE/EXIT]
drukt bij stap q van de procedure voor het opslaan van gegevens (→ Handleiding : bladzijde 146).
Vanaf dit punt kunt u de resterende stappen van de procedure voor het opslaan van gegevens volgen.
* Om de gegevens terug te brengen in de oorspronkelijke toestand, kunt u op dit punt het opslaan annuleren en een
andere patch selecteren.
28
23e effecttype van in totaal
63 effecttypes
Page 29

Automatische Feedback Reductie (AFR) functie
Uw MAGICSTOMP is uitgerust met een zeer verfijnde Automatische Feedback Reductie functie (AFR)
om storende feedback (rondzingen) tegen te gaan.
* Onder “feedback” verstaan we in dit geval de situatie waarin een bepaalde door de ver sterker ge produceerde frequen-
tie oncontroleerbare resonanties veroorzaakt in de gitaar, waardoor het geluid gaat ‘rondzingen’.
De AFR functie van de MAGICSTOMP maakt gebruik van een filter dat de frequentie dat de feedback
veroorzaakt verzwakt om zo de feedback tegen te gaan. Er kunnen maximaal vijf van dergelijke filters
tegelijkertijd ingesteld en in werking zijn.
De AFR functie is alleen beschikbaar voor patches waarvan het eff ecttype is ingesteld
op “AcousticMulti”.
LET OP
Wees voorzichtig. Doorlopende feedback (rondzing en) bij hoge volumes kan uw
apparatuur beschadigen.
■ Inschakelen van de AFR functie
De MAGICSTOMP MK2 wordt af fabr iek geleverd met de AFR functie uit (OFF; de functie is niet in
werking). Gebruik eerst de procedure hieronder om de AFR functie in te schakelen (ON; de functie is in
werking).
q Nadat u op [STORE/EXIT] heeft gedrukt, dient u twee keer op ON/OFF te drukken
om het “Effect Type Select” display in de Deep Edit functie te selecteren.
* Wanneer u de toets twee keer indrukt moet u deze beide keren direct, althans binnen één seconde, weer loslaten.
ÿEDIT-FXT:63/63Ÿ
ØAcousticMulti
w Tot het volgende display verschijnt
dient u de ON/OFF toets ingedrukt te
houden (ongeveer vier seconden lang).
Het bovenstaande display zal ongeveer één seconde getoond worden, waarna het display dat was
geselecteerd voor er op [STORE/EXIT] werd gedrukt zal terugkeren.
* Volg de stappen q en w hierboven nog een keer om de AFR functie weer uit te schakelen.
De hierboven beschreven procedure geldt alleen voor patches van het effecttype
“AcousticMulti”. Bovendien geldt de ON/OFF instelling van de AFR functie voor alle
patches, en is dus niet apart instelbaar voor individuele patches.
ÿEDIT-FXT:63/63Ÿ
AFR0FUNCTION0ON
■ Gebruiken van de AFR functie
Nadat u de AFR functie heeft ingeschakeld (ON) via de procedure op de vorige bladzijde, zal het “«” bewerkingspictogram v er-
schijnen voor patches die gebruik kunnen maken van de AFR
functie (patches met effecttype “AcousticMulti”).
* Het normale bewerkingspictogram “¤” verschijnt wanneer de AFR functie
is uitgeschakeld (OFF) of wanneer er een patch is geselecteerd van een ander effecttype dan “AcousticMulti”.
29
U011«Natural
ó‡BASSfiMID0áTRE
Nederlandse
Page 30

Nadat u een patch heeft geselecteerd waarvoor de AFR functie in werking is, kunt u de onderstaande
instructies volgen voor het gebruiken van de AFR functie.
* De werking van de AFR functieschakelaar is in de Up/Down selectiefunctie anders dan in de Uitvoeringsfunctie.
q Bij feedback in de Up/Down selectiefunctie dient u op ON/OFF te drukken, terwijl u
in de Uitvoeringsfunctie de toets die correspondeert met de op dit moment geselecteerde patch (–, ON/OFF, +) in dient te drukken.
* De hierboven beschreven bedieningsorganen (–, ON/OFF, +) kunnen niet worden gebruikt om effecten aan/uit te
zetten voor patches waarvoor de AFR functie in werking is.
De MAGICSTOMP zal automatisch de frequentie identificeren die de feedback veroorzaakt en een nog
ongebruikt filter inschakelen. Wanneer het filter de probleemfrequentie identificeert, zal er een display
verschijnen dat lijkt op het hieronder afgebeelde, waarna het display terugkeert naar de vorige toestand.
Ten teken dat de AFR functie in werking is, zal het ON/OFF lampje gaan knipperen in de Up/Down
selectiefunctie, terwijl in de Uitvoeringsfunctie het lampje van de toets (–, ON/OFF, +) voor de
geselecteerde patch zal gaan knipperen.
U96«Natural
AFR10F=00221Hz
* Als het instellen van het filter mislukt, zal het volg ende display verschijnen
voor er wordt teruggekeerd naar de vorige toestand.
U96«Natural
00CAN'T0DETECT
w Als een enkel filter niet genoeg is om de feedback tegen te gaan, druk dan op de
toets zoals beschreven bij stap q en stel een tweede filter in. Er kunnen maximaal
5 van dergelijke filters worden ingesteld.
* Het volgende display zal verschijnen wanneer alle 5 de filters in gebruik
zijn.
De AFR instellingen worden niet samen met de patchgegevens opgeslagen. Bovendien
worden de AFR instellingen geannuleerd wanneer u een andere patch selecteert.
[STORE/EXIT] toets
Nederlandse
De ON/OFF schakelaar gebruikt bij stap r van “Een nieuwe naam geven aan een patch” op
bladzijde 149 in de handleiding van de oorspronkelijke MAGICSTOMP, is nu gewijzigd in de
[STORE/EXIT] toets (zie ook het voorbeeld hieronder).
r Nadat u de naam heeft veranderd, dient u
op de ON/OFF te drukken.
De MAGICSTOMP staat nu klaar voor de opslagfunctie.
U01:TUBE0DRIVE1
PRESS[STORE]1sec
Druk in
r Nadat u de naam heeft veranderd, dient u
op de [STORE/EXIT] toets.
De MAGICSTOMP staat nu klaar voor de opslagfunctie.
Druk in
U96«Natural
0AFR0BAND0FULL!
U01:TUBE0DRIVE1
PRESS[STORE]1sec
30
Page 31

GUITAR EFFECTS PROCESSOR
MK2的新功能和改进
[精细编辑]
MK2的精细编辑功能可以让您对组成插曲的所有效果参数进行编辑,设置由本机的3个控制旋钮所控制
的参数,并且把这些设置存入存储器中。对原来的MAGICSTOMP而言,全部的编辑和控制旋钮参数指
定在运行“Sound Editor for MAGICSTOMP”的电脑执行,而对MAGICSTOMP MK2而言,所有这些操作
都可以由MAGICSTOMP MK2完成。
→ 更多信息,参阅本手册的第32页。
[PHONES插口]
PHONES插口(立体声微型插口)能够让您通过头戴式耳机在监听MAGICSTOMP的声音输出时练习或编
辑插曲。(输出电平/阻抗: –10dBm/150Ω)
* 使用音量旋钮调节音量。
* 将一付头戴式耳机连接到PHONES插口时,仍然通过OUTPUT插口输出。
PHONES插口
使用一付头戴式耳机监听时,请务必适当地调节音量,以免损坏您的听
力。
[自动反馈抑制功能]
可以在“AcousticMulti”效果下使用自动反馈抑制功能,实时抵消反馈带来的振鸣。
→ 更多信息,请参看本手册第34页。
31
Page 32

精细编辑
可以对当前所选插曲的任何参数加以编辑。您可以使用精细编辑,同时选择一个不同的效果,来创建原创
插曲。
q 按[STORE/EXIT](存储/退出)钮。
“PRESS[STORE]1sec”将显示在显示屏的下半部。
* 如果选择了一首预置插曲时按[STORE/EXIT](存储/退出)钮,那么相应的用户插曲号码就被自动选择为
要存储的指定插曲号。
U01:DIST1
PRESS[STORE]1sec
w 按一次ON/OFF开关,然后迅速释放(在1秒内)。
您现在处于精细编辑模式,显示屏将如下显示。
* 如果您按ON/OFF开关超过1秒,则将进入曲名编辑模式。(→用户手册∶参看174页)
0EDIT-KNOB0TYPE
‡KNB1fiKNB2áKNB3
精细编辑图标
或
EDIT-PRM:02/07
‡MID0fiTRE0áPRE0
精细编辑图标
e 使用+/- 开关选择参数设置显示
当前选择的插曲参数列在数页上。使用“+”或“–”开关在显示屏上查看下一页或上一页。
* 每一参数的更多信息,请参考单独的效果清单。
显示的参数设置显示页
是全部7页中的第3页
该图标表示还有上一页
使用“–”开关来查看上一页
精细编辑图标
上一页 下一页
EDIT-PRM:02/07
‡MID0fiTRE0áPRE0
EDIT-PRM:03/07
‡VOL0fiSTE0áBASF
该图标表示还有下一页
使用“+”开关来查看下一页
参数
使用位于显示屏下方的旋钮进
行参数设置
EDIT-PRM:04/07
‡MIDFfiTREFáPREF
32
Page 33

r 转动旋钮编辑相应的参数
查看了想要编辑的参数后,可以使用位于显示屏下方的旋钮对参数进行编辑。如果旋钮的位置和参
数值不匹配,则在改变参数设置之前,必须转动旋钮,直至它和相应的参数值位置相匹配。(→用
户手册∶170页)
EDIT-PRM:03/07
‡08.2fiSTE0áBASF
参数值
● 给本机控制旋钮指定参数值
正常操作时,本机控制旋钮控制的参数指定给参数页
显示上方的控制旋钮(如右图所示:01/??的前
页)。转动旋钮选择旋钮参数。
* 每一参数的更多信息,请参考单独的效果清单。
● 更改效果
显示精细编辑图标时,按ON/OFF开关就可进入如下所示的效果选择显示。
请使用+/-开关选择效果。
* 更改效果时,将清除编辑过的任何数据并设置新效果的默认值。
* 每一参数的更多信息,请参考单独的效果清单。
0EDIT-KNOB0TYPE
‡MSTRfiKNB2áKNB3
参数名称
EDIT-FXT:23/63
StereoDelay
效果
选择效果后,按[STORE/EXIT](存储/退出)钮返回到参数设置屏幕显示,并将参数指定给控制
旋钮。
t 完成编辑后,此时要记得把数据存入MAGICSTOMP。
此时按[STORE/EXIT](存储/退出)钮的效果与在执行存储操作的步骤 q 时按[STORE/EXIT](存储/退
出)钮的效果相同(→ 用户手册∶172页)。接下来按存储操作的剩余步骤进行操作。
* 如要把数据恢复到原来的状态,请在此时取消存储操作,并选择另一首插曲。
33
共63个效果中的第23个
Page 34

自动反馈抑制(AFR)功能
MAGICSTOMP配有非常先进的自动反馈抑制功能(AFR),用以消除反馈(振鸣)。
* 在这里,“反馈”是指当放大器产生一个特定频率的信号时,引起吉他产生不可控制的谐振,从而产生振鸣
的现象。
MAGICSTOMP的AFR功能采用一种陷波滤波器,该滤波器用来滤掉产生反馈的频率,从而消除反馈。最多
可以设置同时运行5个陷波滤波器。
只有将插曲的效果设为“AcousitcMulti”时,才能使用AFR功能。
注意
请注意:经常性的高音量反馈会对设备造成损坏。
■ 打开AFR功能
从工厂出货时,MAGICSTOMP MK2的AFR功能设为OFF(该功能未激活),请按下述步骤打开AFR功能(激
活该功能)。
q 按[STORE/EXIT](存储/退出)钮后,再按两次ON/OFF开关在精细编辑模式下选择“Effect
Type Select”屏幕显示。
* 按两次该开关时,务必每次都在1秒内释放该开关。
EDIT-FXT:63/63
AcousticMulti
w 按住ON/OFF开关(约4秒钟),直到如
下显示。
上述屏幕显示将显示1秒钟,然后返回到按[STORE/EXIT](存储/退出)钮之前选择的屏幕显示。
* 如要再次打开ARF功能,请按上述步骤
上述步骤只有对效果设为“AcousticMulti”的插曲产生影响。另外,AFR功能的ON/OFF设置对所
有的插曲产生影响,不能对每首插曲单独设置AFR功能。
q 和 w
再重新操作一次。
EDIT-FXT:63/63
AFR0FUNCTION0ON
■ 使用AFR功能
当您按上一页所述的步骤打开(激活)AFR功能时,对于能够使
用AFR功能的插曲(效果已设为“AcousticMulti”),将显示 “ ”
编辑图标。
* 当AFR功能设为OFF(未激活)时,或者选择一首使用非“AcousticMulti”效果的插曲时,则显示
标。
34
U011 Natural
ó‡BASSfiMID0áTRE
“¤”
编辑图
Page 35

在AFR功能激活时选择一首插曲后,请按下文的说明使用AFR功能。
* AFR功能开关的操作因增/减模式和演奏模式而异。
q 在增/减模式下显示反馈时,按ON/OFF开关,或者在演奏模式下按与当前选择插曲相应的开
关(–,ON/OFF,+)时:
* 上述步骤(–,ON/OFF,+)开关不能使用于转变AFR功能处于激活状态中的插曲的ON/OFF效果的开关。
MAGICSTOMP将自动识别引起反馈的频率,同时激活一个空闲的陷波滤波器。当滤波器识别出有问题
的频率后,显示屏将显示类似下图所示的内容,然后返回到原来的状态。
为了表示AFR功能处于激活状态,当处于增/减模式时,ON/OFF开关的灯闪烁,当处于演奏模式时,
当前所选插曲相应开关的灯(–,ON/OFF,+)闪烁。
U96 Natural
AFR10F=00221Hz
* 如果没有设置陷波滤波器,在返回原来的状态前,显示屏将会显
示如下内容。
U96 Natural
00CAN'T0DETECT
w 如果使用一个带通滤波器不能有效地处理反馈问题,请按步骤 q 所述按下开关并设置第
二个滤波器。最多可以设置5个带通滤波器。
*如果5个滤波器都已设置完毕,显示屏将会显示如下内容。
U96 Natural
0AFR0BAND0FULL!
AFR功能的设置并不和插曲数据一同保存。选择另一首插曲时, AFR的设置被取消。
[STORE/EXIT钮]
原MAGICSTOMP用户手册第175页中的“给插曲取名”部分的步骤 r 中所使用的ON/OFF开关,相
当于现在的[STORE/EXIT](存储/退出)钮。(参看以下的例子)。
r 更改了名称之后,按ON/OFF(通/关)开关。
MAGICSTOMP这就进入存储待机模式。
U01:TUBE0DRIVE1
PRESS[STORE]1sec
按下
r 更改了名称之后,按[STORE/EXIT](存储/退
出)钮。
MAGICSTOMP这就进入存储待机模式。
U01:TUBE0DRIVE1
PRESS[STORE]1sec
按下
35
Page 36

WE43060 Printed in China
 Loading...