

Page 1
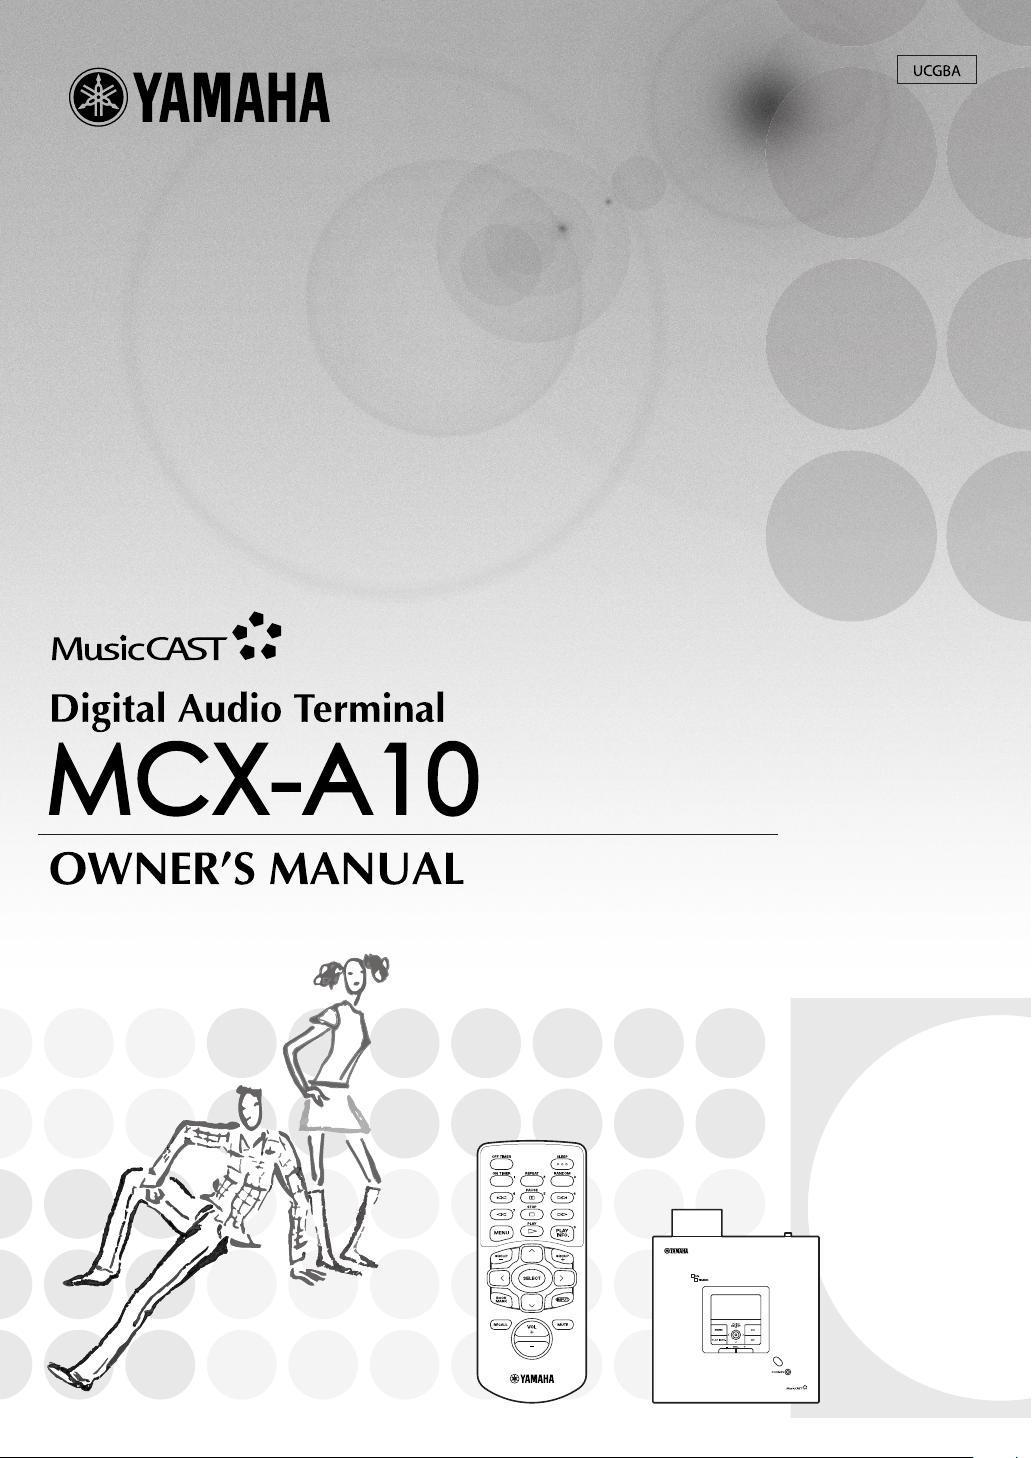
DIGITAL AUDIO TERMINAL MCX–A10
Page 2

IMPORTANT SAFETY INSTRUCTIONS
1 Read these instructions.
2 Keep these instructions.
3 Heed all warnings.
4 Follow all instructions.
5 Do not use this apparatus near water.
6 Clean only with dry cloth.
7 Do not block any ventilation openings. Install in
accordance with the manufacturer’s instructions.
8 Do not install near any heat sources such as radiators,
heat registers, stoves, or other apparatus (including
amplifiers) that produce heat.
9 Do not defeat the safety purpose of the polarized or
grounding-type plug. A polarized plug has two blades
with one wider than the other. A grounding type plug has
two blades and a third grounding prong. The wide blade
or the third prong are provided for your safety. If the
provided plug does not fit into your outlet, consult an
electrician for replacement of the obsolete outlet.
FCC INFORMATION (for US customers only)
IMPORTANT NOTICE : DO NOT MODIFY
1.
THIS UNIT!
indicated in the instructions contained in this
manual, meets FCC requirements. Modifications
not expressly approved by Yamaha may void your
authority, granted by the FCC, to use the product.
2. IMPORTANT : When connecting this product to
accessories and/or another product use only high
quality shielded cables. Cable/s supplied with
this product MUST be used. Follow all
installation instructions. Failure to follow
instructions could void your FCC authorization to
use this product in the USA.
3. NOTE : This product has been tested and found
to comply with the requirements listed in FCC
Regulations, Part 15 for Class “B” digital devices.
Compliance with these requirements provides a
reasonable level of assurance that your use of this
product in a residential environment will not
result in harmful interference with other
electronic devices.
This equipment generates/uses radio frequencies
and, if not installed and used according to the
instructions found in the users manual, may cause
interference harmful to the operation of other
electronic devices.
This product, when installed as
10 Protect the power cord from being walked on or pinched
particularly at plugs, convenience receptacles, and the
point where they exit from the apparatus.
11 Only use attachments/accessories specified by the
manufacturer.
12 Use only with the cart, stand, tripod,
bracket, or table specified by the
manufacturer, or sold with the apparatus.
When a cart is used, use caution when
moving the cart/apparatus combination to
avoid injury from tip-over.
13 Unplug this apparatus during lightning storms or when
unused for long periods of time.
14 Refer all servicing to qualified service personnel.
Servicing is required when the apparatus has been
damaged in any way, such as power-supply cord or plug
is damaged, liquid has been spilled or objects have fallen
into the apparatus, the apparatus has been exposed to rain
or moisture, does not operate normally, or has been
dropped.
Compliance with FCC regulations does not
guarantee that interference will not occur in all
installations. If this product is found to be the
source of interference, which can be determined
by turning the unit “OFF” and “ON”, please try to
eliminate the problem by using one of the
following measures:
Relocate either this product or the device that is
being affected by the interference.
Utilize power outlets that are on different branch
(circuit breaker or fuse) circuits or install AC line
filter/s.
In the case of radio or TV interference, relocate/
reorient the antenna. If the antenna lead-in is 300
ohm ribbon lead, change the lead-in to coaxial
type cable.
If these corrective measures do not produce
satisfactory results, please contact the local
retailer authorized to distribute this type of
product. If you can not locate the appropriate
retailer, please contact Yamaha Electronics Corp.,
U.S.A. 6660 Orangethorpe Ave, Buena Park, CA
90620.
The above statements apply ONLY to those
products distributed by Yamaha Corporation of
America or its subsidiaries.
3
Page 3

Caution: read this before operating this unit
• To assure the finest performance, please read this manual
carefully. Keep it in a safe place for future reference.
• Install this unit in a well ventilated, cool, dry, clean place –
away from direct sunlight, heat sources, vibration, dust,
moisture, and/or cold. Avoid ventilation space of at least 30 cm
on the top, 20 cm on the left and right.
• Locate this unit away from other electrical appliances, motors,
or transformers to avoid humming sounds.
• Do not expose this unit to sudden temperature changes from
cold to hot, and do not locate this unit in a environment with
high humidity (i.e. a room with a humidifier) to prevent
condensation inside this unit, which may cause an electrical
shock, fire, damage to this unit, and/or personal injury.
• Avoid installing this unit where foreign objects may fall onto
this unit and/or this unit may be exposed to liquid dripping or
splashing. On the top of this unit, do NOT place:
• Other components, as they may cause damage and/or
discoloration on the surface of this unit.
• Burning objects (i.e. candles), as they may cause fire,
damage to this unit, and/or personal injury.
• Containers with liquid in them, as they may fall and liquid
may cause electrical shock to the user and/or damage to
this unit.
• Do not cover the rear panel of this unit with a newspaper,
tablecloth, curtain, etc. in order not to obstruct heat radiation.
If the temperature inside this unit rises, it may cause fire,
damage to this unit, and/or personal injury.
• Do not plug this unit in to a wall outlet until all connections
are complete.
• Do not operate this unit upside-down. It may overheat,
possibly causing damage.
• Do not use force on switches, knobs and/or cords.
• When disconnecting the power cord from the wall outlet, grasp
the plug; do not pull the cord.
• Do not clean this unit with chemical solvents; this might
damage the finish. Use a clean, dry cloth.
• Only the voltage specified on this unit must be used. Using this
unit with a higher voltage than specified is dangerous and may
cause fire, damage to this unit, and/or personal injury.
YAMAHA will not be held responsible for any damage
resulting from use of this unit with a voltage other than
specified.
• To prevent damage by lightning, disconnect the power cord
from the wall outlet during an electrical storm.
• Do not attempt to modify or fix this unit. Contact qualified
YAMAHA service personnel when any service is needed. The
cabinet should never be opened for any reasons.
• When not planning to use this unit for long periods of time (i.e.
vacation), disconnect the AC power plug from the wall outlet.
• Be sure to read the “TROUBLESHOOTING” section on
common operating errors before concluding that this unit is
faulty.
• Before moving this unit, press STANDBY/ON to place the
unit in standby mode, and disconnect the AC power plug from
the wall outlet.
• Be sure to use the AC adaptor (LSE0107A1240) supplied with
this unit. Otherwise, you might cause a fire or damage to this
unit.
• This unit is designed for home use only. Never use this unit in
a car, etc., otherwise it may cause a malfunction of this unit.
This unit is not disconnected from the AC power source as
long as it is connected to the wall outlet, even if this unit
itself is turned off. This state is called the standby mode. In
this state, this unit is designed to consume a very small
quantity of power.
WARNING
TO REDUCE THE RISK OF FIRE OR ELECTRIC
SHOCK, DO NOT EXPOSE THIS UNIT TO RAIN OR
MOISTURE.
IMPORTANT!
Please record the serial number of this unit in the space
below.
Model:
Serial No.:
The serial number is located on the rear of the unit.
Retain this Owner’s Manual in a safe place for future
reference.
SPECIAL INSTRUCTIONS FOR U.K. MODEL
IMPORTANT
The wires in this mains lead are colored in accordance with
the following code:
GREEN-and-YELLOW:Earth
BLUE:Neutral
BROWN:Live
As the colors of the wires in the mains lead of this apparatus
may not correspond with the colored markings identifying
the terminals in your plug proceed as follows: The wire
which is colored GREEN-and-YELLOW must be connected
to the terminal in the plug which is marked by the letter E or
by the safety earth symbol or colored GREEN or GREENand -YELLOW. The wire which is colored BLUE must be
connected to the terminal which is marked with the letter N
or colored BLACK. The wire which is colored BROWN
must be connected to the terminal which is marked with the
letter L or colored RED.
For U.K. customers
If the socket outlets in the home are not suitable for the plug
supplied with this appliance, it should be cut off and an
appropriate 3 pin plug fitted. For details, refer to the instructions
described above.
Note: The plug severed from the mains lead must be destroyed,
as a plug with a bared flexible cord is hazardous if engaged in a
live socket outlet.
For Canadian Customers
To prevent electric shock, match wide blade of plug to wide
slot and fully insert.
This Class B digital apparatus complies with Canadian
ICES–003.
4
Page 4
Caution: read this before operating this unit
For US customers
This equipment complies with FCC radiation exposure limits
set forth for uncontrolled equipment. This equipment should
be installed and operated with a minimum distance of at least
20cm between the radiator and the persons body (excluding
extremities: hands, wrists, feet, and legs) and must not be colocated or operated with any other antenna or transmitter.
For Canadian customers
Operation is subject to the following two conditions: (1) This
device may not cause interference, and (2) this device must
accept any interference received, including interference that
may cause undesired operation of the device.
The installer of this radio equipment must ensure that the
antenna is located or pointed such that it does not emit RF
field in excess of Health Canada limits for the general
population; consult Safety Code 6, obtainable from Health
Canada’s website www.hc-sc.gc.ca/rpb
For U.K. and European customers
We, the manufacturer YAMAHA hereby declare that the
MCX-A10 is in compliance with the essential requirements
and other relevant provisions of Directive 1999/5/EC.
Vi, tillverkaren YAMAHA, betygar härmed att MCX-A10 är i
överensstämmelse med de erforderliga krav och andra
tillämpliga bestämmelser som anges i direktivet 1999/5/EC.
Allen voor klanten in
Nederland
Bij dit product zijn batterijen
geleverd.
Wanneer deze leeg zijn, moet u ze
niet weggooien maar inleveren als
KCA.
CAUTION
Danger of explosion if battery is incorrectly replaced.
Replace only with the same or equivalent type.
ADVARSEL!
Lithiumbatteri-Eksplosionsfare ved fejlagtig håndtering.
Udskiftning må kun ske med batteri af samme fabrikat og
type. Levér det brugte batteri tilbage til leverandøren.
VARNING
Explosionsfara vid felaktigt batteribyte. Använd samma
batterityp eller en ekvivalent typ som rekommenderas av
apparattillverkaren. Kassera använt batteri enligt fabrikantens
instruktion.
VAROITUS
Paristo voi räjähtää, jos se on virheellisesti asennettu. Vaihda
paristo ainoastaan laitevalmistajan suosittelemaan tyyppiin.
Hävitä käytetty paristo valmistajan ohjeiden mukaisesti.
Noi, il fabbricante YAMAHA, con questo dichiariamo che
MCX-A10 si trova in osservanza dei requisiti essenziali e
delle altre normative pertinenti della direttiva 1999/5/EC.
Nosotros, el fabricante YAMAHA, declaramos por el presente
testamento que el MCX-A10 cumple con los requisitos
esenciales y otras provisiones pertinentes de la Directiva
1999/5/EC.
YAMAHA verklaart hierbij dat de MCX-A10 voldoet aan de
essentiële vereisten en andere relevante voorzieningen van
Richtlijn 1999/5/EC.
MPEG Layer-3 audio coding technology licensed from
Fraunhofer IIS and Thomson
This product contains AVE-TCP from ACCESS CO.LTD.
Copyright © 1996-2002 ACCESS CO.,LTD
5
Page 5

Contents
About your MusicCAST client
The MusicCAST client.................................... 8
Features..................................................... 8
Supplied accessories ..................................... 9
Controls and functions ................................. 10
Front panel............................................... 10
Side panel ................................................ 11
Remote control ........................................ 12
Modes of operation of the MusicCAST client
................................................................. 14
To turn the MusicCAST client on from
STANDBY mode .................................. 14
Using the Graphical User Interface of the
MusicCAST client .................................... 15
MusicCAST client Top Menu ............... 15
The lock icon ....................................... 15
The MusicCAST client controller ......... 15
Play Info screen ................................... 16
Setting up the MusicCAST client
Before setup ................................................. 17
Attaching the stand .................................. 17
Mounting the MusicCAST client on a wall
................................................................. 17
Removing the side-panel cover ............... 18
Remote control ........................................ 18
Loading the battery for the remote control
............................................................. 18
Battery replacement ............................ 18
Notes on the lithium battery ................. 18
Remote control operation range .......... 19
Connecting the AC adaptor...................... 19
Checking MusicCAST client connections
................................................................. 20
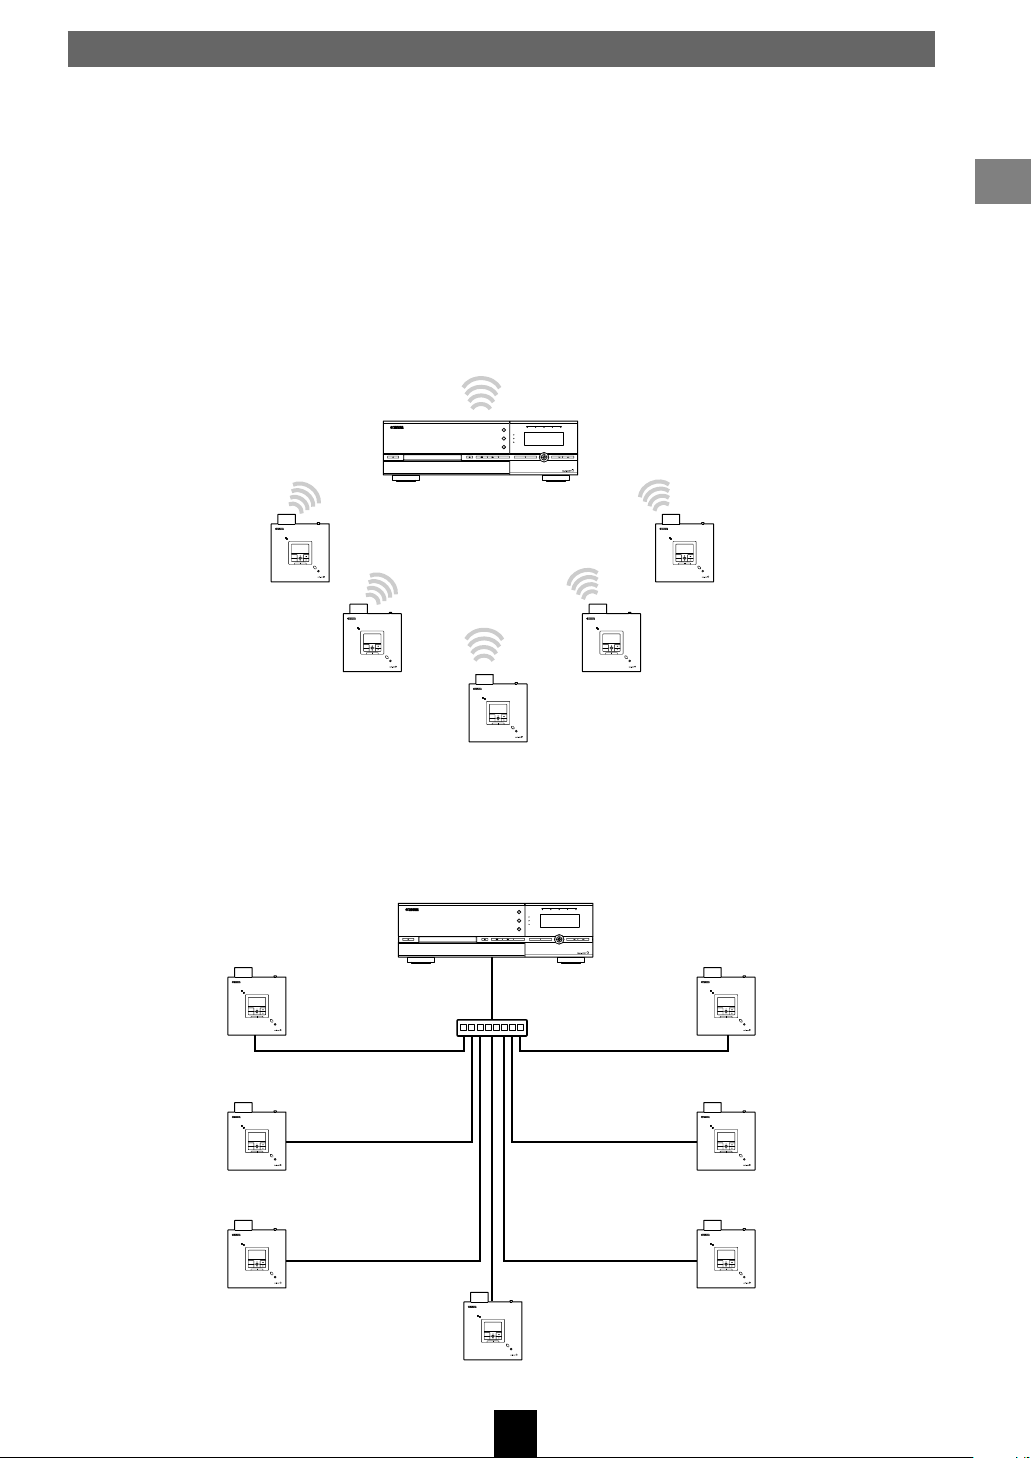
The MusicCAST network ............................. 21
Network addresses .............................. 22
Assigning IP addresses ....................... 22
Wireless network connections ................. 23
When and why should I use a wireless
connection? ......................................... 23
Wired network connections...................... 24
When should I use a wired connection?
............................................................. 24
What is a hub, and why do I need one?
............................................................. 24
Connecting to the network ........................... 25
Configuring your MusicCAST client ......... 25
Using the Auto Configuration function ..... 26
Configuring your MusicCAST client
manually .................................................. 28
Accessing the Manual Setup screen ... 29
Setting the Network Mode ................... 29
Setting the ESS ID............................... 30
Setting your MusicCAST client to act as a
DHCP client ......................................... 31
Setting the MusicCAST server Server ID
............................................................. 32
Setting the MusicCAST client IP Address
............................................................. 32
Setting the Subnet Mask Address ....... 33
Setting the WEP key for your MusicCAST
client .................................................... 33
Connection check ................................ 34
Playing back songs
Music playback on the MusicCAST client .... 35
Playback groups .................................. 35
During playback ................................... 36
To play a song from an artist .................... 37
To play a song from an album .................. 38
To play a song from a genre .................... 39
To select a song from the complete list of
songs ....................................................... 40
Using Playlists ......................................... 41
Accessing playlists with your MusicCAST
client .................................................... 41
Song Statistics ......................................... 42
To play a song in the list of bookmarks .... 43
Advanced playback options ......................... 45
Random Playback.................................... 45
To use the Random Playback function
............................................................. 45
To alter the limits of Random Playback
............................................................. 45
Repeat Playback...................................... 46
To use the Repeat Playback function .. 46
Changing the time display on the Play Info
screen ...................................................... 47
To alter the time display ....................... 47
Listening to an external source connected to
the MusicCAST server ............................. 48
To return to playback from the
MusicCAST server library .................... 49
Listening to a radio station with your
MusicCAST client .................................... 49
6
Page 6

Contents
Selecting a radio station ...................... 50
Listening to an external sound source ..... 51
To return to playback from the
MusicCAST server library .................... 51
Using the Bookmark function ....................... 52
Adding a song to the list of bookmarks .... 52
Adding a song using the Play Info screen
............................................................. 52
Adding a song using the menu ............ 52
Removing a song from the bookmark list
................................................................. 53
Removing a song using the Menu ....... 53
Copying the bookmark list to a playlist .... 54
Copying the bookmark list ................... 54
Erasing the bookmark list ........................ 55
Erasing the bookmark list .................... 55
Other functions
MusicCAST settings ..................................... 56
Default system settings ............................ 56
Using the OFF Timer function .................. 57
Using the menu to set the OFF Timer
function ................................................ 57
Using OFF TIMER on the remote control
to set the OFF Timer............................ 57
Using the ON Timer function.................... 58
Setting the timer .................................. 58
Using the ON TIMER key to activate the
ON Timer ............................................. 59
Using the Auto Play function .................... 59
Using the Auto Level Control function...... 60
Turning Auto Level Control on or off .... 60
Using the tone controls ............................ 61
Altering the tone settings ..................... 61
Using the contrast controls ...................... 62
Altering the contrast settings ............... 62
Using the Sleep function .......................... 63
Switching the unit to sleep mode ......... 63
Turning the MusicCAST client on again
............................................................. 63
System settings ............................................ 64
Displaying System Information on the
MusicCAST client .................................... 64
Accessing the System Information screen
............................................................. 64
Updating the MusicCAST client firmware
................................................................. 65
Resetting the MusicCAST client to default
settings .................................................... 66
Resetting your MusicCAST client ........ 66
Displaying Network Status Information on
the MusicCAST client .............................. 67
Accessing the Network Status screen
............................................................. 67
Appendix
Troubleshooting ........................................... 69
Terms used in this manual ........................... 72
Specifications ............................................... 74
Index ............................................................ 75
7
Page 7

The MusicCAST client
The MusicCAST client is designed to work in conjunction with the Yamaha MusicCAST server to allow
you to store and listen to your entire music collection. With multiple clients, you and others can
simultaneously access and listen to your music collection from up to seven different locations.
Features
◆ Wireless networking with the MusicCAST server
◆ Instant access to all music data stored on the MusicCAST server
◆ Simultaneous playback from multiple locations (for multiple clients)
◆ 128 x 64 dot LCD display and remote control for easy operation
◆ Internal Yamaha digital amplifier
◆ 2 x 17 W/4 Ω outputs
◆ Slim Desktop/Wall mountable design
This owner’s manual refers to the MCX-1000 DIGITAL AUDIO SERVER as the MusicCAST
server and the MCX-A10 DIGITAL AUDIO TERMINAL as the MusicCAST client.
We Want You Listening For A Lifetime
YAMAHA and the Electronic Industries Association’s Consumer Electronics Group want you to get the
most out of your equipment by playing it at a safe level. One that lets the sound come through loud and clear
without annoying blaring or distortion – and, most importantly, without affecting your sensitive hearing.
Since hearing damage from loud sounds is often undetectable until it is too late, YAMAHA and the
Electronic Industries Association’s Consumer Electronics Group recommend you to avoid prolonged
exposure from excessive volume levels.
8
Page 8
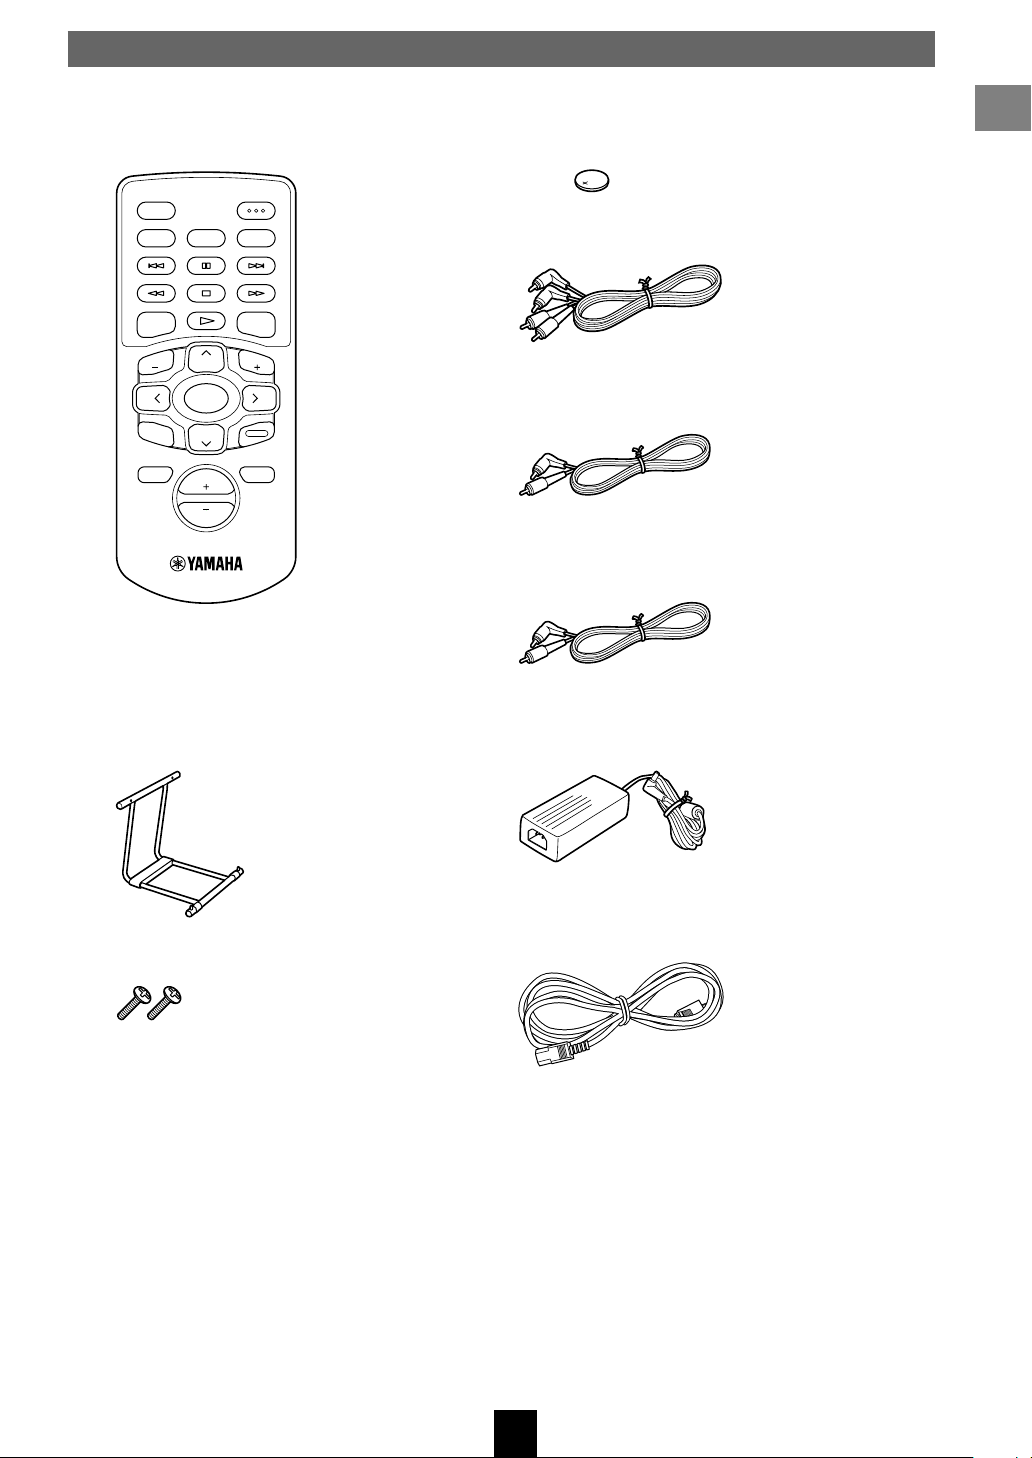
Supplied accessories
After unpacking, check that the following parts are included.
Remote control
OFF TIMER
ON TIMER
REPEAT RANDOM
I23
PAUSE
456
STOP
7
PLAY
MENU
GROUP GROUP
SELECT
BOOK
MARK
VOL
SLEEP
PLAY
INFO.
INPUT
MUTERECALL
Lithium battery
About your MusicCAST client
Audio pin cable
S
Subwoofer cable
Video pin cable
Stand
Screw x 2
AC adaptor (LSE0107A1240)
AC power cable
9
Page 9
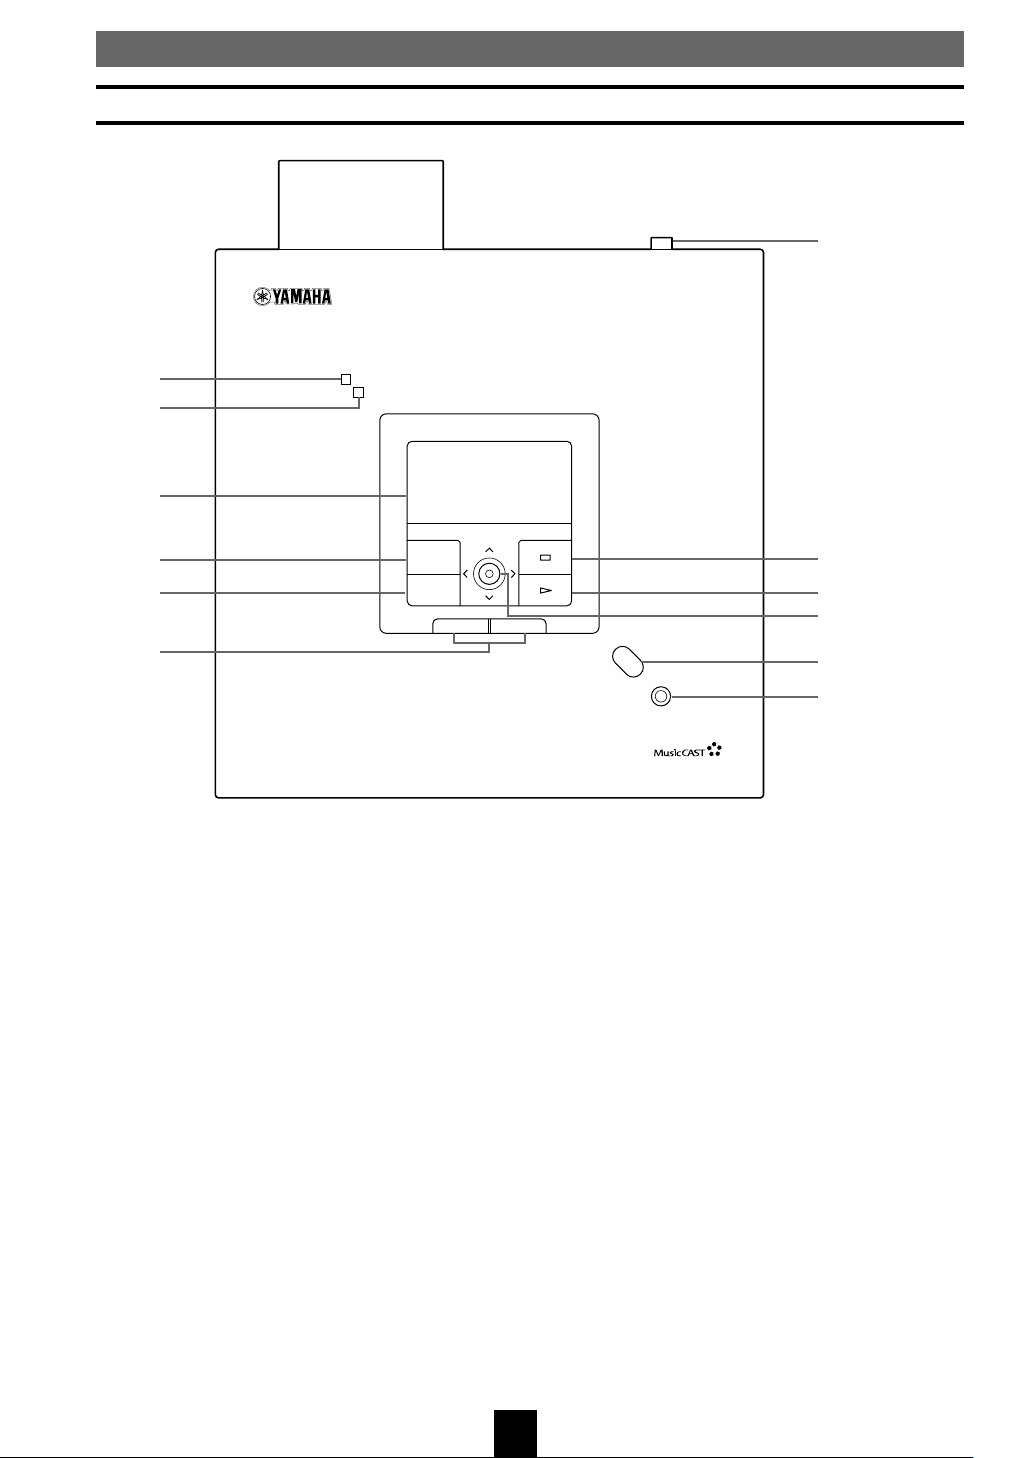
Front panel
Controls and functions
7
DIGITAL AUDIO TERMINAL MCX–A10
1
ON
TIMER
2
3
4
5
MENU
PLAY INFO.
–
6
1 POWER indicator
Lights when the MusicCAST client is active.
2 TIMER indicator
Lights when the timer function is activated (see
pages 57 – 59).
3 Front panel display
Displays information on the settings and songs
available in your MusicCAST network.
PUSH
SELECT
VOL
8
+
9
0
q
PHONES
w
8 s
Halts playback from the MusicCAST client.
9 p
Begins playback of the selected track.
0 Controller
Moves the on-screen cursor within the Graphical
User Interface, and enters, deletes, or selects the
selection highlighted on the front panel display.
4 MENU
Returns the on-screen display to the menu page.
5 PLAY INFO.
Displays information on the song you are currently
listening to on the front panel display.
6 VOL +/–
Adjust the volume of the MusicCAST client output.
7 STANDBY/ON
Switches the MusicCAST client between ON and
STANDBY modes.
q Remote control signal receiver
Receives signals from the MusicCAST client
remote control.
w PHONES jack
Insert your headphones plug here to listen to the
MusicCAST client through headphones. Output
from the S.WOOFER jack and SPEAKER OUT
terminals stops.
10
Page 10
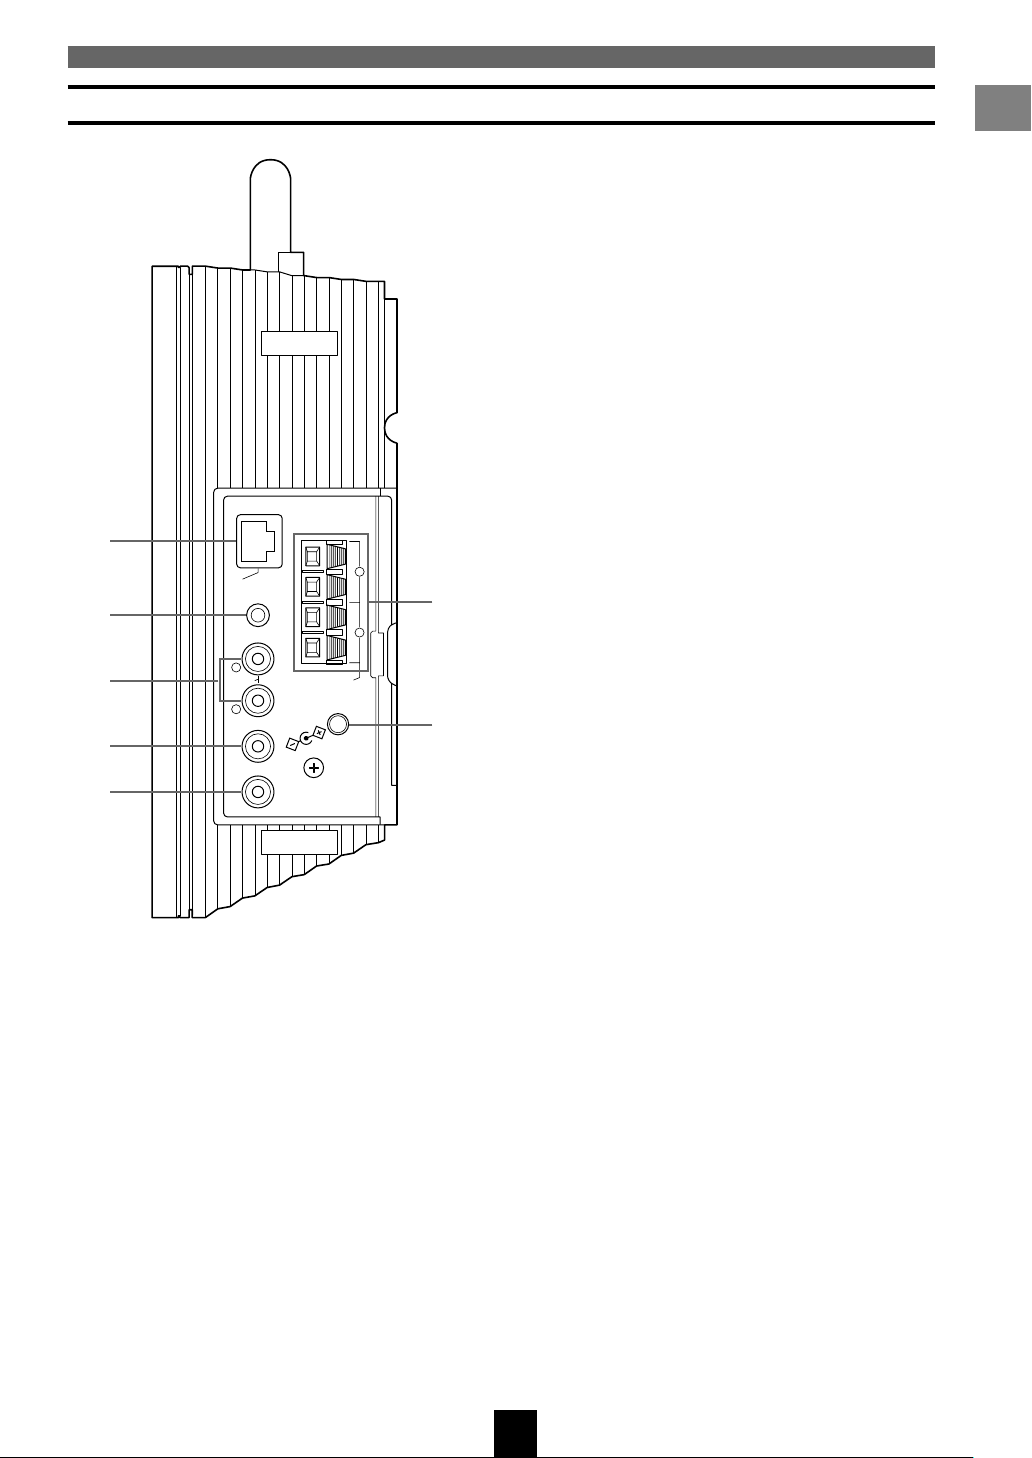
Side panel
Controls and functions
1
2
3
4
5
1 LAN port
About your MusicCAST client
Insert a LAN cable here to connect to a wired
network.
2 AUX IN jack
Connect an external sound source here.
3 LINEOUT L/R jacks
Use these jacks to connect the MusicCAST client to
an input on an external component.
4 S. WOOFER jack
Use this jack to connect the MusicCAST client to a
subwoofer to achieve a more powerful, better
defined bass sound.
5 VIDEO OUT jack
2
S
S
LA
G
C
IRIN
W
+–+
N
LA
IN
X
U
A
L
T
U
O
E
LIN
R
FER
O
O
.W
S
T
U
O
EO
ID
V
L
–
6
R
T
U
O
R
.
E
K
IN
A
M
PE
Ω
S
4
V
2
1
IN
C
D
D
N
G
7
Use this jack to connect the MusicCAST client to
an external view device, such as a monitor or
television. You can view the front panel display on
this device.
6 SPEAKER OUT terminals
Connect speaker cables to these terminals.
7 AC adaptor input
Connect the AC adaptor to this input.
11
Page 11
Controls and functions
Remote control
This section explains the function of each button on
the remote control.
1
2
3
4
5
6
7
8
OFF TIMER
ON TIMER
MENU
REPEAT RANDOM
I23
PAUSE
456
STOP
7
PLAY
SLEEP
PLAY
INFO.
u
i
o
p
a
S
s
9
0
GROUP GROUP
d
f
q
SELECT
g
w
e
BOOK
MARK
INPUT
h
r
t
VOL
MUTERECALL
j
y
1 Infrared emitter
Emits infrared control signals for the MusicCAST
client to receive. Aim the emitter at the
MusicCAST client when you want to operate it.
2 OFF TIMER
Activates the off timer function (see page 57) and
cycles through the available timer settings.
3 ON TIMER
Switches the ON TIMER function (see pages 58,
59) on and off.
4 REPEAT
Places the unit in repeat playback mode (see pages
46, 47).
5 b
Accesses the previous track in the group you are
listening to.
6 w
Searches back through the current song.
7 s (STOP)
Halts playback from the MusicCAST client.
8 MENU
Returns the on-screen display to the menu page.
9 p (PLAY)
Begins playback of the selected track.
0 GROUP –
Accesses the previous playback group.
q j
Moves the on-screen cursor to the left, and accesses
the previous menu page.
w SELECT
Enters, deletes, plays, or selects the selection
highlighted on the front panel display.
12
Page 12

e BOOKMARK
Attaches or removes a bookmark from a song (see
pages 52 – 55).
r d
Moves the on-screen cursor down.
t RECALL
This button and the corresponding Recall Play
menu in the MusicCAST client are reserved for
future functionality.
y VOL +/–
Adjust the volume of the MusicCAST client output.
u SLEEP
Switches the MusicCAST client between sleep and
on modes.
i RANDOM
Places the unit in random playback mode (see
pages 45, 46).
o a
Accesses the next song in the group you are
listening to.
Controls and functions
About your MusicCAST client
p e (PAUSE)
Pauses playback of the track you are currently
listening to.
a f
Searches forwards through the current song.
s PLAY INFO.
Displays information on the song you are currently
listening to on the front panel display.
d GROUP +
Accesses the next playback group.
f u
Moves the on-screen cursor up.
g i
Enters into menu items highlighted on the front
panel display, and moves the on-screen cursor to
the right.
h INPUT
Switches the input to the amplifier in the
MusicCAST client between the signal from the
MusicCAST server and signals received from the
AUX IN jack.
j MUTE
Mutes the output from the unit.
13
Page 13
Controls and functions
Modes of operation of the MusicCAST client
The MusicCAST client has three modes of operation.
• STANDBY: The MusicCAST client is connected to an AC outlet with STANDBY/ON on its top
surface in the STANDBY position (fully up).
• SLEEP: The MusicCAST client is connected to an AC outlet with STANDBY/ON on its top
surface in the ON position (fully down), the POWER indicator on its front panel lit, and
the time displaying on its front panel display.
• ON: The MusicCAST client is connected to an AC outlet with STANDBY/ON on its top
surface in the ON position (fully down), the POWER indicator on its front panel lit, and
information other than the time displaying on its front panel display.
■ To turn the MusicCAST client on from
STANDBY mode
1. Press STANDBY/ON.
The MusicCAST client turns on, displaying its
startup screen, then displays the Top Menu
screen.
Top Menu
Play
Recall
Edit Bookmark
Setup
Input
Play
2. The MusicCAST client attempts to
connect to the MusicCAST server,
displaying the following screen:
Top Menu
Play
3. If it is able to make a connection, the
MusicCAST client returns to the Top
Menu screen, displaying the network
connection icon in the top right corner
of the screen.
If it is not able to make a connecting, the
MusicCAST client continues displaying
the “Connecting...” message. Press any
of the controls on the MusicCAST client
to erase this message, and check the
MusicCAST client network connection
settings.
Note
• If you do not use the MusicCAST client for 30
minutes, it automatically places itself in sleep
mode. Press SELECT or SLEEP to reactivate it.
Connecting...
Input
14
Page 14
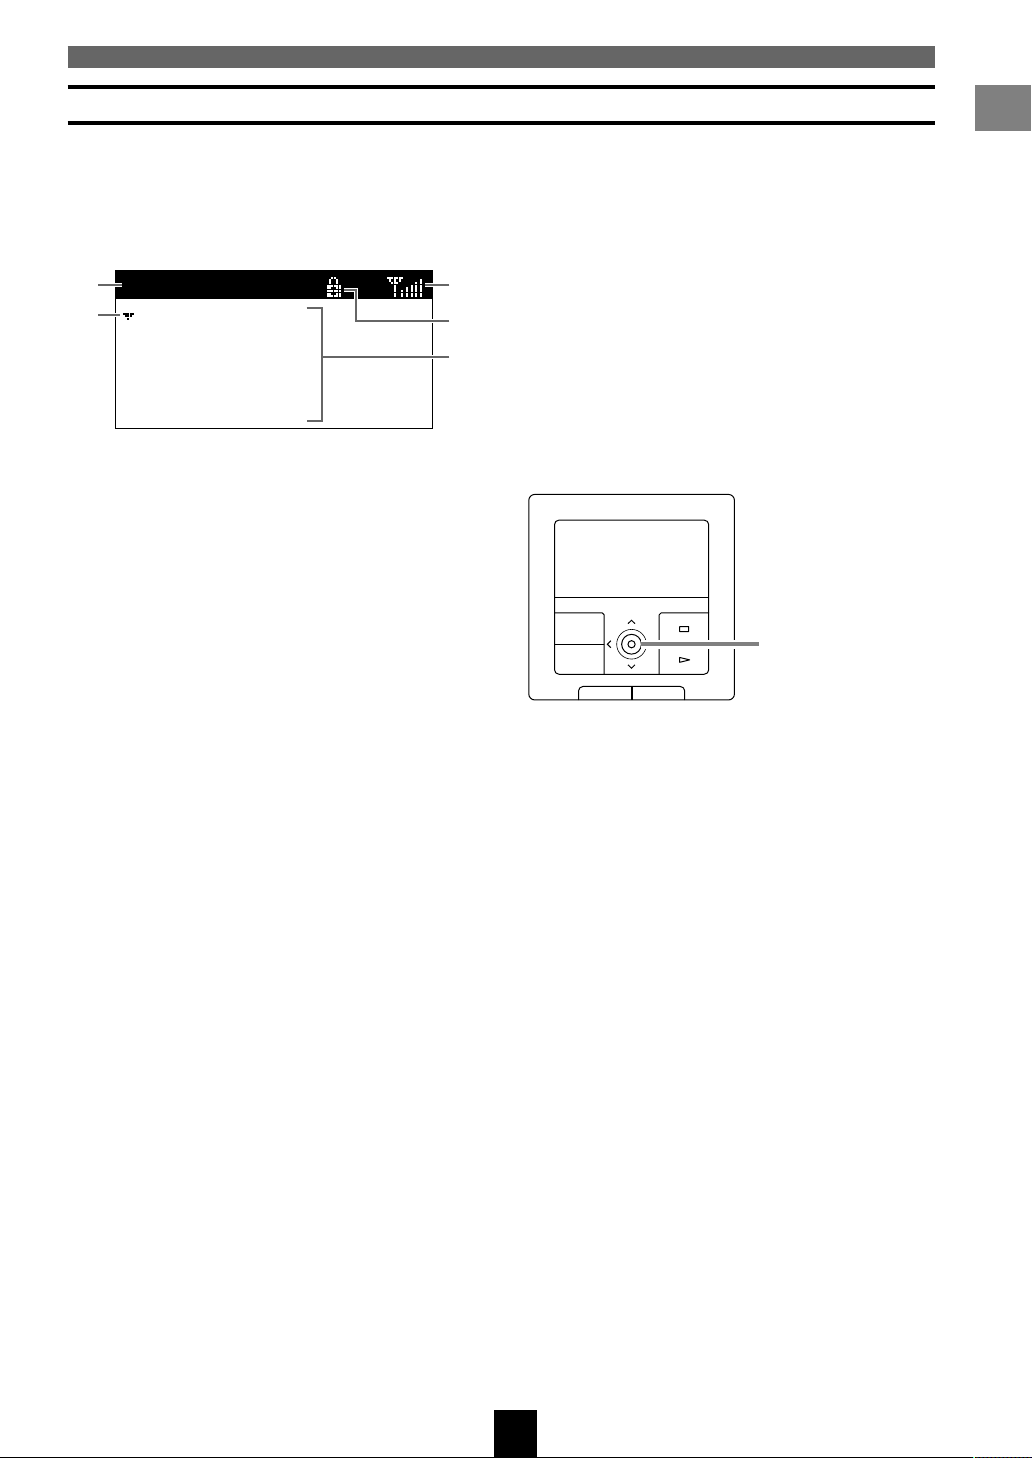
Using the Graphical User Interface of the MusicCAST client
Controls and functions
The MusicCAST client offers a wide variety of functions and parameters for your use. You can access all of
these through the Graphical User Interface (GUI) viewable from the front panel display on the MusicCAST
client itself. The interface, as laid out below, is simple and easy to understand.
■ MusicCAST client Top Menu
■ The MusicCAST client controller
Moving the controller in the directions indicated on
1
Top Menu
2
Play
Recall
Edit Bookmark
Setup
Input
1 Menu name
Play
3
4
5
the front panel of the MusicCAST client performs
the same actions as pressing the equivalent cursor
key on the remote control. For example, pushing
the MusicCAST client controller upwards produces
the same result as pressing u on the remote
control. Pushing the controller directly into the
front panel has the same effect as pressing SELECT
on the remote control.
2 Cursor
3 Connection icon
4 Lock icon
5 Menu
This is a typical screen from the GUI of the
MusicCAST client. All of the features indicated
PLAY INFO.
MENU
PUSH
SELECT
Controller
–
VOL
+
here are displayed on almost all of the screens you
encounter when using the MusicCAST client. Use
the cursor keys on the remote to move the cursor to
the desired position, and SELECT to perform an
action.
■ The lock icon
The MusicCAST server can lock MusicCAST
This manual explains how to use the various
functions of the MusicCAST client using the
remote control only. While many functions are
accessible from the main panel of the MusicCAST
client, some functions are only accessible from the
remote control.
clients so that you can only control the volume and
mute functions, or stop playback. When locked, the
MusicCAST client displays the lock icon in the
dark bar at the top of the on-screen display. You can
reset the lock by unlocking the MusicCAST client
from the MusicCAST server. Refer to the MCX1000 owner’s manual for more information on
locking clients.
About your MusicCAST client
15
Page 15

Controls and functions
Play Info
Artist name
Album name
Song name
Album
■ Play Info screen
Press PLAY INFO to display this screen on the onscreen display of the MusicCAST client.
Play Info
1
Artist name
2
3
Album name
Song name
Album
654
1 Artist name
2 Album name
3 Song name
4 Time counter
5 Current action mode icon
Indicates the current action being taken by the
MusicCAST.
s: Playback is stopped
p: Playing a song
e: Playback is paused
9
8
7
The Play Info screen displays information on the
song the MusicCAST is currently playing, or the
last song played if it is not currently playing a song.
Note
• MusicCAST clients can use the VIDEO OUT jack
on the MusicCAST client to display the on-screen
display on a TV/monitor.
6 Repeat icon
Indicates whether or not the MusicCAST client is
in repeat play mode.
7 Random play icon
8 Group skip target
Indicates the group within which the group skip
function is currently operating.
9 Mute icon
16
Page 16
Before setup
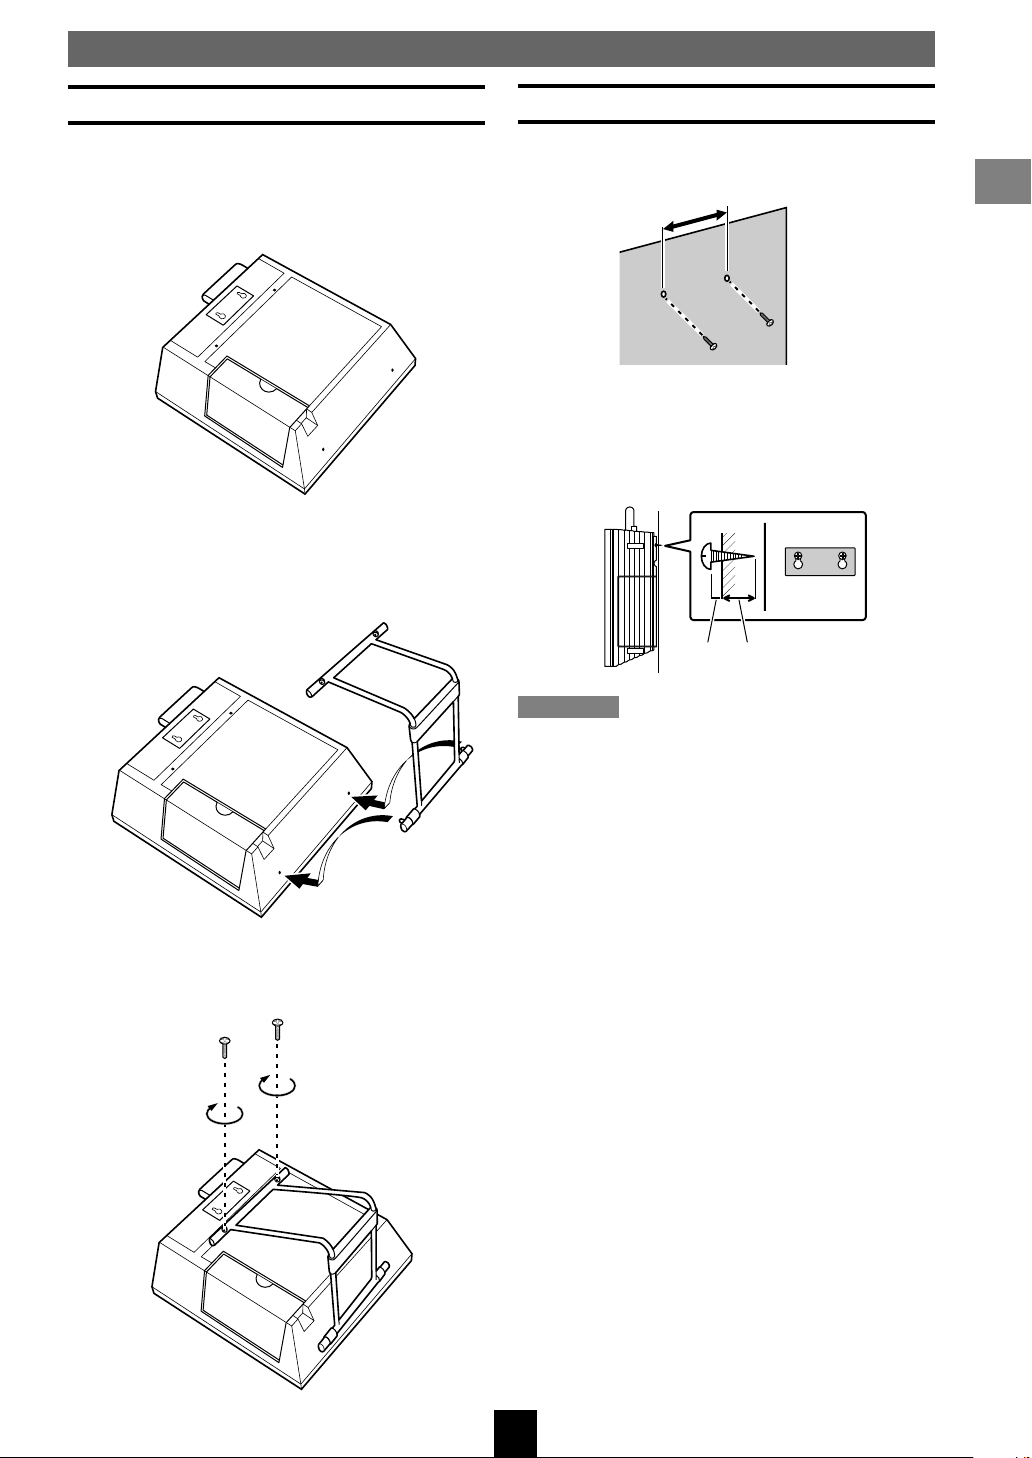
Attaching the stand
1.
Place the MusicCAST client so that its
front panel display faces down, taking
care not to scratch the front panel in the
process.
2. Place the stand so that the two pins on
the lower bar of the stand fit into the
holes on the lower surface of the
MusicCAST client.
Mounting the MusicCAST client on a wall
1. Insert 2 self-tapping screws (diameter:
3.5 to 4 mm) into the wall, 40 mm apart.
40mm
2. Mount the MusicCAST client on the
screws by positioning it so that the
screws on the wall fit snugly into the
holes on the mounting bracket.
4mm 20mm or more
Setting up the MusicCAST client
3. Using a screwdriver, attach the top bar
of the stand to the MusicCAST with the
provided screws.
Cautions
• The MusicCAST client weighs 2 kg (4 lbs 6 oz).
Do not mount it on thin plywood or a wall with
soft surface material. If mounted, the screws may
come loose from the flimsy surface and the
speaker may fall. This damages the MusicCAST
client and may cause personal injury.
• Do not use nails, adhesives, or other unstable
materials to mount the MusicCAST client. Longterm use and vibrations may cause it to fall.
• To avoid accidents resulting from tripping over
loose cables, fix it to the wall.
17
Page 17
Before setup
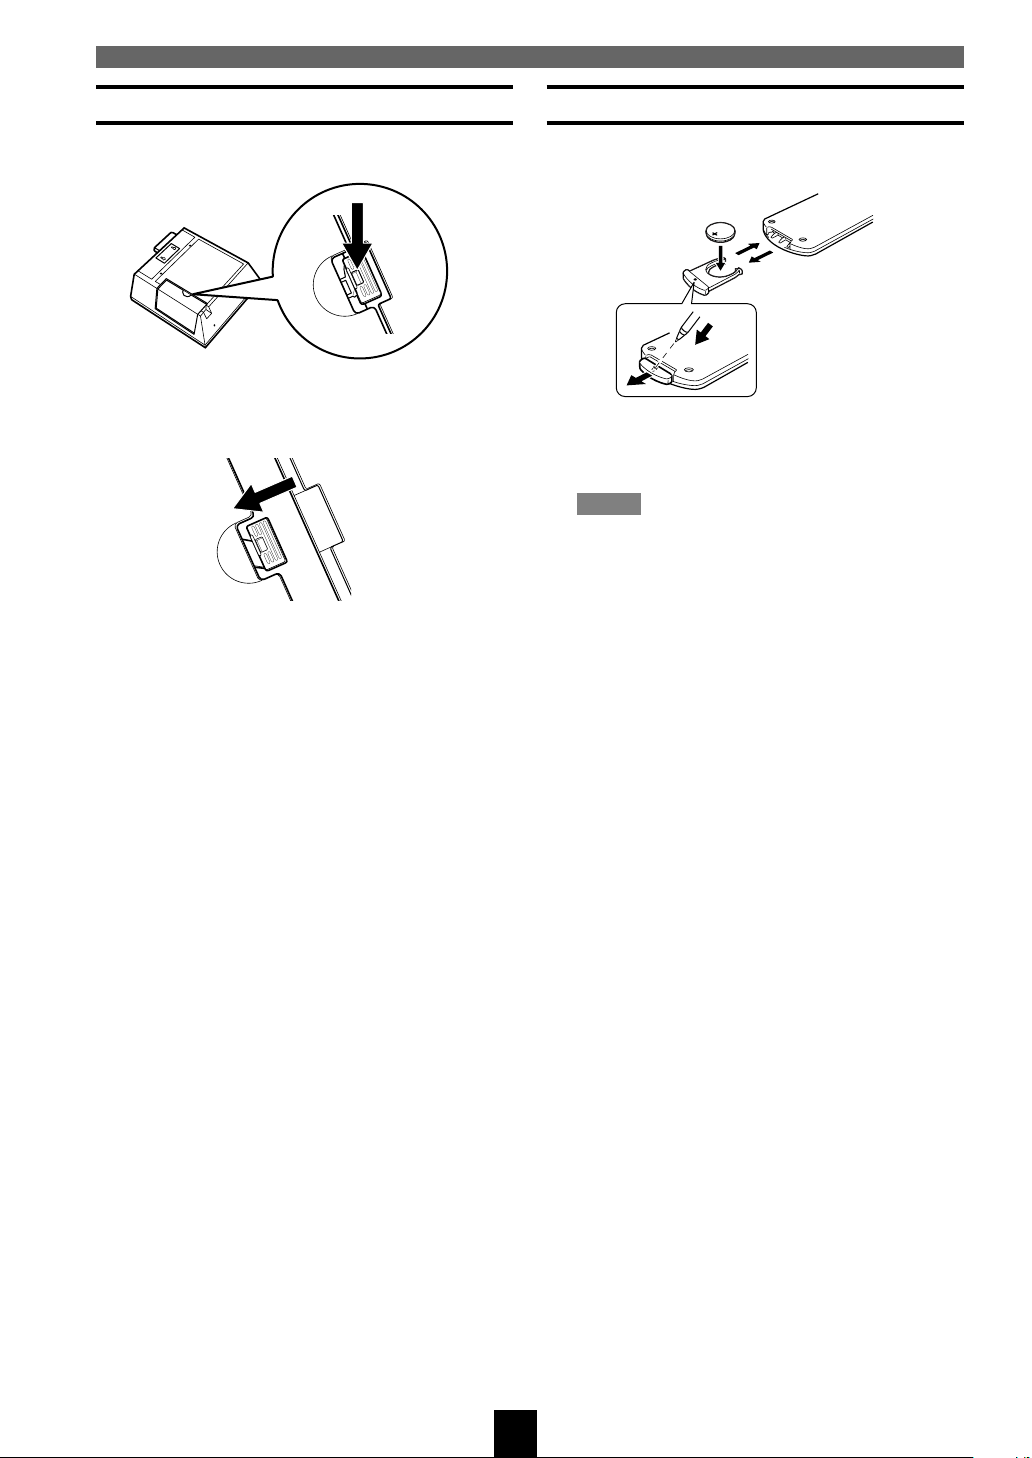
Removing the side-panel cover
1.
Push the tab down firmly.
2. Slide the cover away from the
MusicCAST client casing.
Remote control
■ Loading the battery for the remote
control
1. Slide out the battery holder from the
remote control by pushing into the hole
in the holder with a ball-point pen, etc.
Note
• The casing is very stiff, and may require
significant pressure to remove.
2. Place the battery in the holder, positive
side upward.
3. Slide the holder into the remote control.
■ Battery replacement
If you find that the remote control must be used
closer to the main unit than usual, the battery is
weak. Replace the battery with new one.
■ Notes on the lithium battery
Please take care when using the lithium battery as it
may explode if mistreated.
• Never abuse or disassemble the battery.
• Be sure the battery polarity is correct. If it is not
installed correctly, it may cause fire or explosion.
• Avoid placing the lithium battery and also the
remote control with the battery installed, in high
temperature such as direct sunlight.
• Do not recharge the battery.
• When replacing the battery, make sure to only use
a CR2025 battery.
• Keep the battery out of reach of children. If
swallowed, get immediate medical help.
• When disposing of the battery, insulate it with
tape, etc. Never dispose of it in fire. Also, dispose
of the battery according to local regulations.
• If the battery leaks, dispose of it immediately.
Avoid touching the leaked material or letting it
come in contact with clothing, etc. Skin contact
may cause a burn. If it occurs, wash the affected
area with water promptly and get medical
attention.
18
Page 18
Before setup
LINEOUT
S.WOOFER
L
SPEAKER OUT
4Ω MIN.
DC IN 12V
GND
R
VIDEO OUT
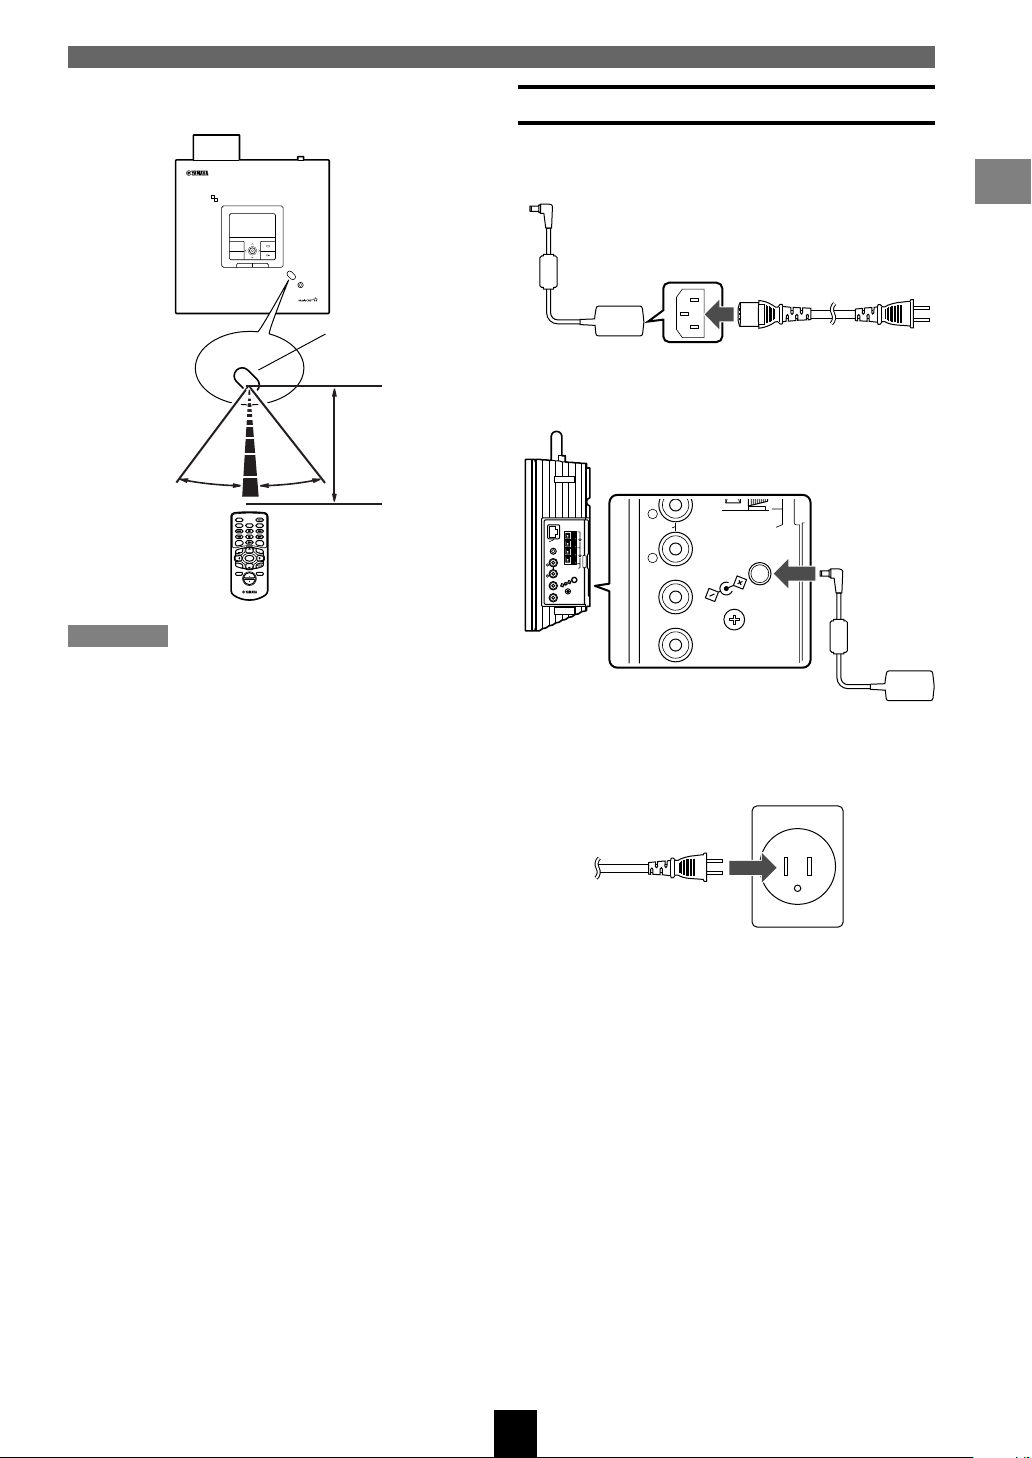
■ Remote control operation range
DIGITAL AUDIO TERMINAL MCX–A10
ON
TIMER
PUSH
SELECT
MENU
PLAY INFO.
–
VOL
+
PHONES
Remote control
signal receiver
Within 6m (20’)
30° 30°
OFF TIMER
SLEEP
ON TIMER
REPEAT RANDOM
I23
PAUSE
456
STOP
7
PLAY
S
PLAY
MENU
INFO.
GROUP GROUP
SELECT
BOOK
INPUT
MARK
MUTERECALL
VOL
Cautions
• If operation of this unit by the remote control
creates any malfunction in any other components,
change the placement of the component.
• Do not spill any liquid on or drop the remote
control. Do not place it near a heater or in the
bathroom where the temperature and humidity
become high.
• Make sure the remote control signal receiver is
not exposed to direct sunlight or strong lights.
Such exposure may inhibit the functioning of the
remote control.
Connecting the AC adaptor
1.
Insert the AC power cable into the AC
adaptor.
2. Connect the AC adaptor to the AC
adaptor input on the MusicCAST client.
2
S
S
A
L
G
C
N
I
IR
W
+–+
L
N
A
L
–
N
I
X
U
A
R
L
T
T
U
O
U
E
O
IN
R
.
L
E
K
IN
A
E
M
P
Ω
S
4
V
R
2
1
IN
C
D
R
E
F
O
O
W
.
S
T
U
O
O
E
ID
V
D
N
G
3. Plug in the AC power cable to an AC
outlet.
Setting up the MusicCAST client
This picture depicts the style of
AC outlet found in the United
States of America.
19
Page 19
Before setup
Checking MusicCAST client connections
Before you attempt to use the MusicCAST client to play music, check the following:
1 If you wish to listen to music with the MusicCAST client without using headphones, have you
connected it to an external receiver, or to speakers?
2 If you intend to connect to your MusicCAST server using the built in wireless network connection, have
you placed the MusicCAST client within an appropriate distance of the server? (see page 23)
3 If you intend to connect to your MusicCAST server using a wired network connection, have you
connected your MusicCAST client to the server with a LAN cable to a hub?
4 Is the MusicCAST server power turned on?
5 Is the MusicCAST client connected to an AC outlet?
6 Is the MusicCAST client power turned on?
3
1
12345
TIMER
LAN
STANDBY
ENCODING
BACK
SUB MENU PAGE
CLIENT STATUS
PUSH
SELECT
4
STANDBY/ON
DIGITAL AUDIO SERVER MCX-1000
TOP MENU
MENU
PLAY INFO.
CD AUTO STORE
6
2
CLASS 2
IRING
W
+–+
SPEAKER OUT
DC IN 12V
GND
L
–
R
IN.
M
4Ω
1
5
LAN
AUX IN
L
LINEOUT
R
OOFER
S.W
EO OUT
VID
20
Page 20
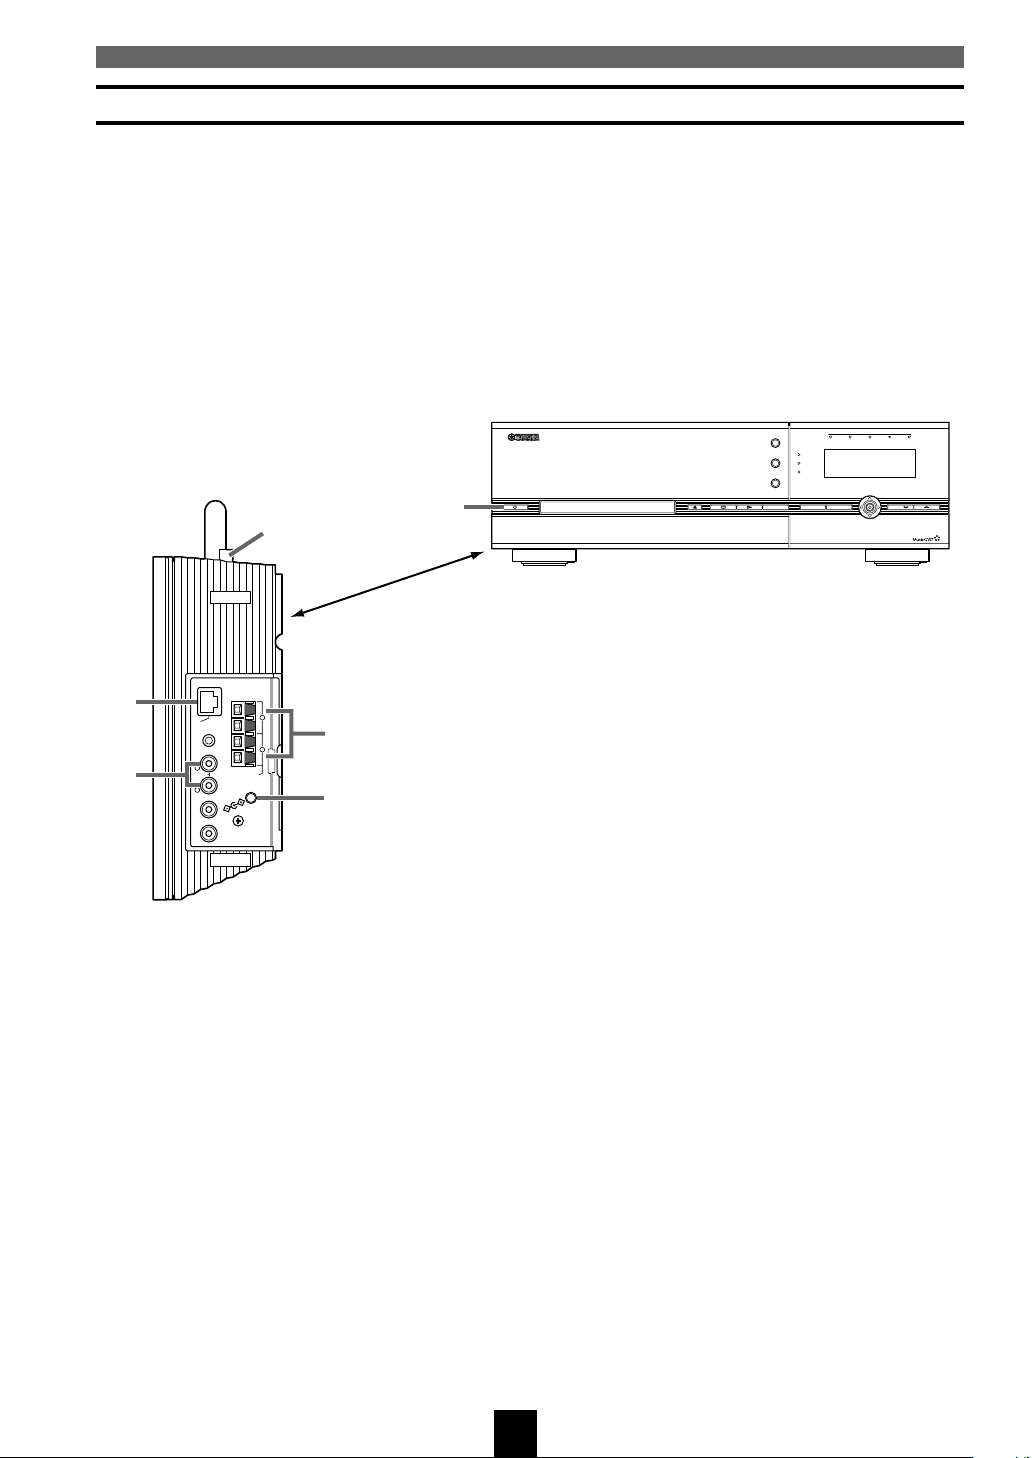
The MusicCAST network
The MusicCAST server stores all music data used in your MusicCAST system. The MusicCAST client does
not store or record any music data. Your MusicCAST client uses a Local Area Network (LAN) to transmit
and receive data from the MusicCAST server, which it then plays back as music.
The MusicCAST system can use both wired and wireless network connections to transmit music data. Both
types of connections transmit the same data.
The wireless network in your MusicCAST system uses high frequency radio signals to transmit data.
You do not need a physical connection between your MusicCAST server and clients to listen to music over
a wireless network, but you need to place all clients in fairly close proximity to the server for them to work
properly:
Setting up the MusicCAST client
DIGITAL AUDIO TERMINAL MCX–A10
ON
CLIENT STATUS
12345
TOP MENU
TIMER
LAN
MENU
STANDBY
ENCODING
PLAY INFO.
PUSH
SELECT
BACK
CD AUTO STORE
SUB MENU PAGE
ON
TIMER
PUSH
SELECT
MENU
PLAY INFO.
–
VOL
+
PHONES
DIGITAL AUDIO TERMINAL MCX–A10DIGITAL AUDIO TERMINAL MCX–A10
ON
TIMER
PUSH
SELECT
MENU
PLAY INFO.
–
VOL
+
PHONES
TIMER
PUSH
SELECT
MENU
PLAY INFO.
–
VOL
+
PHONES
DIGITAL AUDIO SERVER MCX-1000
STANDBY/ON
DIGITAL AUDIO TERMINAL MCX–A10 DIGITAL AUDIO TERMINAL MCX–A10
ON
TIMER
PUSH
SELECT
MENU
PLAY INFO.
–
VOL
+
PHONES
ON
TIMER
PUSH
SELECT
MENU
PLAY INFO.
–
VOL
+
PHONES
A wired network transmits data through a special type of cable, called a LAN cable. You must physically
connect each MusicCAST client and server to a network router or hub with one of these cables.
Connections using LAN cables functions without problems over much longer distances than connections
using the wireless network used in the MusicCAST system.
CLIENT STATUS
12345
TOP MENU
TIMER
LAN
MENU
STANDBY
ENCODING
PLAY INFO.
PUSH
SELECT
BACK
CD AUTO STORE
SUB MENU PAGE
Network hub or
switching hub
DIGITAL AUDIO TERMINAL MCX–A10
ON
TIMER
PUSH
SELECT
MENU
PLAY INFO.
–
VOL
+
PHONES
DIGITAL AUDIO TERMINAL MCX–A10
ON
TIMER
DIGITAL AUDIO SERVER MCX-1000
STANDBY/ON
PUSH
SELECT
MENU
PLAY INFO.
–
VOL
+
PHONES
DIGITAL AUDIO TERMINAL MCX–A10
ON
TIMER
DIGITAL AUDIO TERMINAL MCX–A10
ON
TIMER
DIGITAL AUDIO TERMINAL MCX–A10
ON
DIGITAL AUDIO TERMINAL MCX–A10
ON
TIMER
PUSH
SELECT
MENU
PLAY INFO.
–
VOL
+
PHONES
TIMER
PUSH
SELECT
MENU
PLAY INFO.
–
VOL
+
PHONES
PUSH
SELECT
MENU
PLAY INFO.
–
VOL
+
PHONES
PUSH
SELECT
MENU
PLAY INFO.
–
VOL
+
PHONES
DIGITAL AUDIO TERMINAL MCX–A10
ON
TIMER
PUSH
SELECT
MENU
PLAY INFO.
–
VOL
+
PHONES
21
Page 21
The MusicCAST network
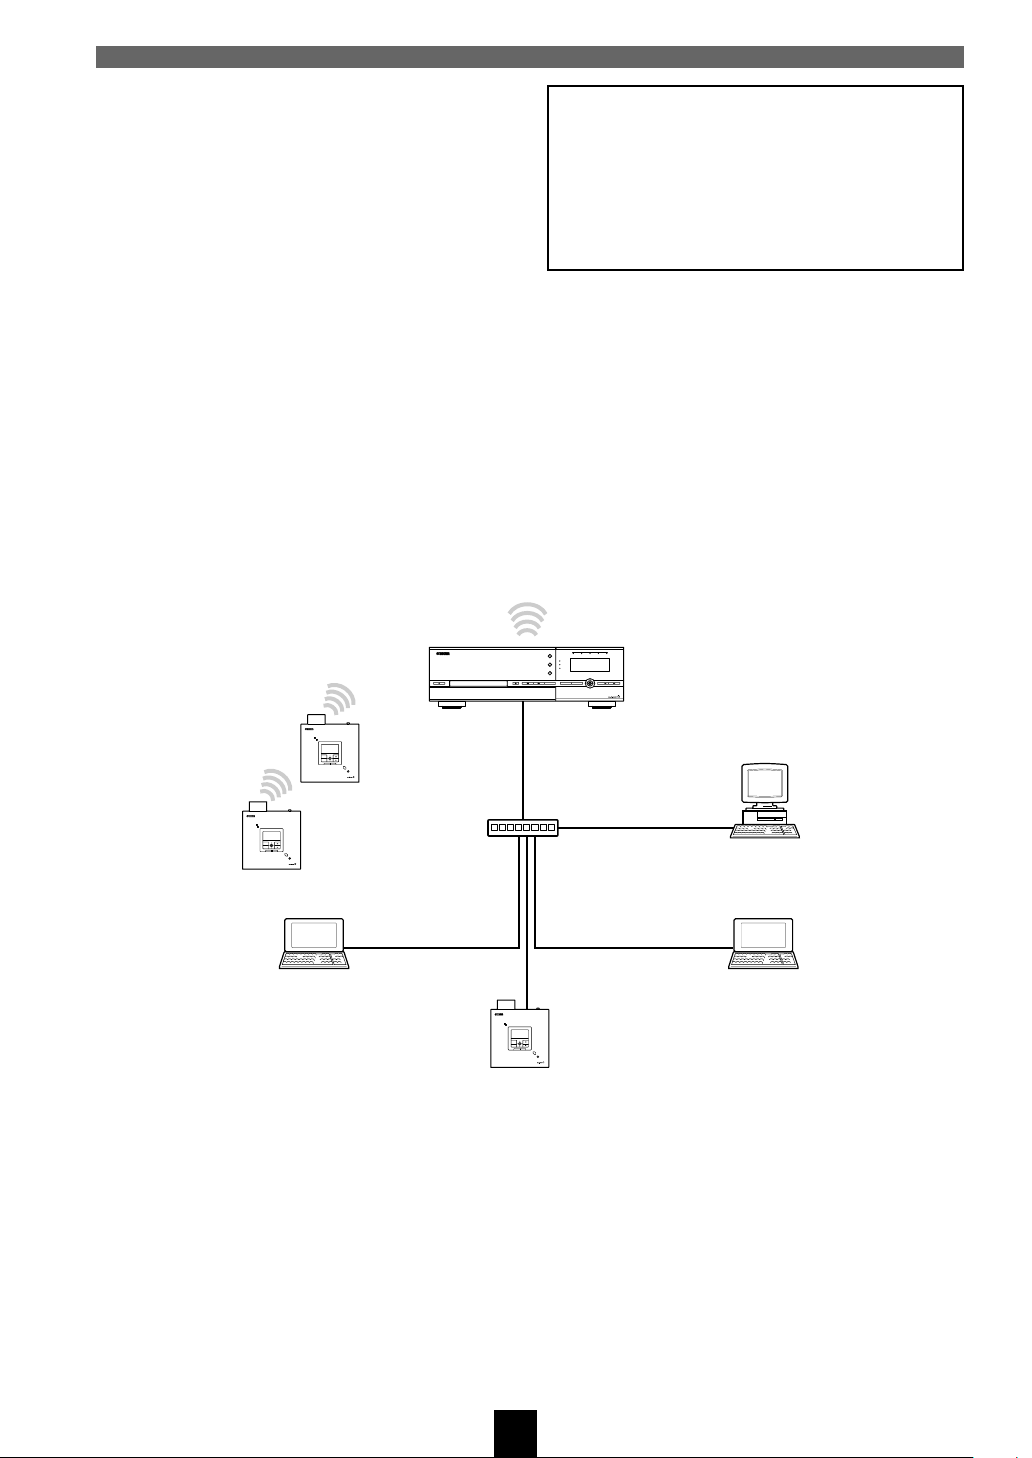
■ Network addresses
Each component on a network uses an address to
identify itself to other components on the same
network. The address consists of four numbers, and
looks like this:
192.168.1.1
This is called an IP address. Without these
addresses, the components on the network cannot
transmit data to each other, and you cannot play
music on your MusicCAST clients.
Look at the network diagram below to see an
example of network addresses.
■ Assigning IP addresses
Before you begin to use a MusicCAST client, you
must connect it to a MusicCAST server, assign it an
IP address, and set the server ID of the MusicCAST
server you wish to connect it to. Normally, you can
use the Auto Configuration function for this
connection process.
DIGITAL AUDIO SERVER MCX-1000
STANDBY/ON
DIGITAL AUDIO TERMINAL MCX–A10
ON
TIMER
PUSH
SELECT
MENU
PLAY INFO.
–
VOL
+
PHONES
192.168.1.4
MusicCAST components are equipped
with an Auto Configuration function
that will automatically set all
parameters necessary to make a
connection, however in some rare
cases you may need to configure the
network settings manually.
See pages 25 – 34 for an explanation of how to
configure a MusicCAST client to use a wireless
LAN connection.
See pages 25 – 34 for an explanation of how to
configure a MusicCAST client to use a wired LAN
connection.
CLIENT STATUS
12345
TOP MENU
TIMER
LAN
MENU
STANDBY
ENCODING
PLAY INFO.
PUSH
SELECT
CD AUTO STORE
BACK
SUB MENU PAGE
192.168.1.1
DIGITAL AUDIO TERMINAL MCX–A10
ON
TIMER
PUSH
SELECT
MENU
PLAY INFO.
–
VOL
+
PHONES
192.168.1.3
192.168.1.12
DIGITAL AUDIO TERMINAL MCX–A10
ON
TIMER
PUSH
SELECT
MENU
PLAY INFO.
–
VOL
+
PHONES
192.168.1.2
192.168.1.10
192.168.1.11
22
Page 22
Wireless network connections
The MusicCAST network
■ When and why should I use a wireless
connection?
The wireless network technology in the
MusicCAST system utilizes high frequency radio
signals to transmit data between the various
MusicCAST clients and the MusicCAST server.
You can place clients anywhere you wish without
physically connecting them to the MusicCAST
server, so long as they are within transmitting range
(approximately 30 meters if there are no
obstructions between the MusicCAST server and
client).
This means that you do not need to go to the effort
of laying and connecting cables and can change the
location of your MusicCAST clients at will.
Wireless connections are thus very convenient
when there is enough signal strength for the client
to transmit and receive data from the server
reliably. However, since wireless network
connections do not carry as much data as wired
networks, the MusicCAST server can only
distribute to five MusicCAST clients
simultaneously using the wireless network.
Note
• When using close to the maximum number of
MusicCAST clients, the surrounding environment
strongly affects the ability of the MusicCAST
components to make wireless connections. To
ensure stable playback in this situation, reduce the
bitrate at which the MusicCAST server stores
MP3 files before storing CDs (See page 121 in the
MCX-1000 owner’s manual).
Use wireless connections when:
• You do not want to install network cables
• You do not wish to use more than five
MusicCAST clients
• Your MusicCAST clients are located close to the
server
Note
• Walls, microwave ovens, and devices such as
cellular telephones that transmit radio signals may
interfere with or block the wireless network
signals from your MusicCAST system. In these
conditions, it is advisable to either relocate your
MusicCAST client, or use a wired network
connection to connect to the MusicCAST server.
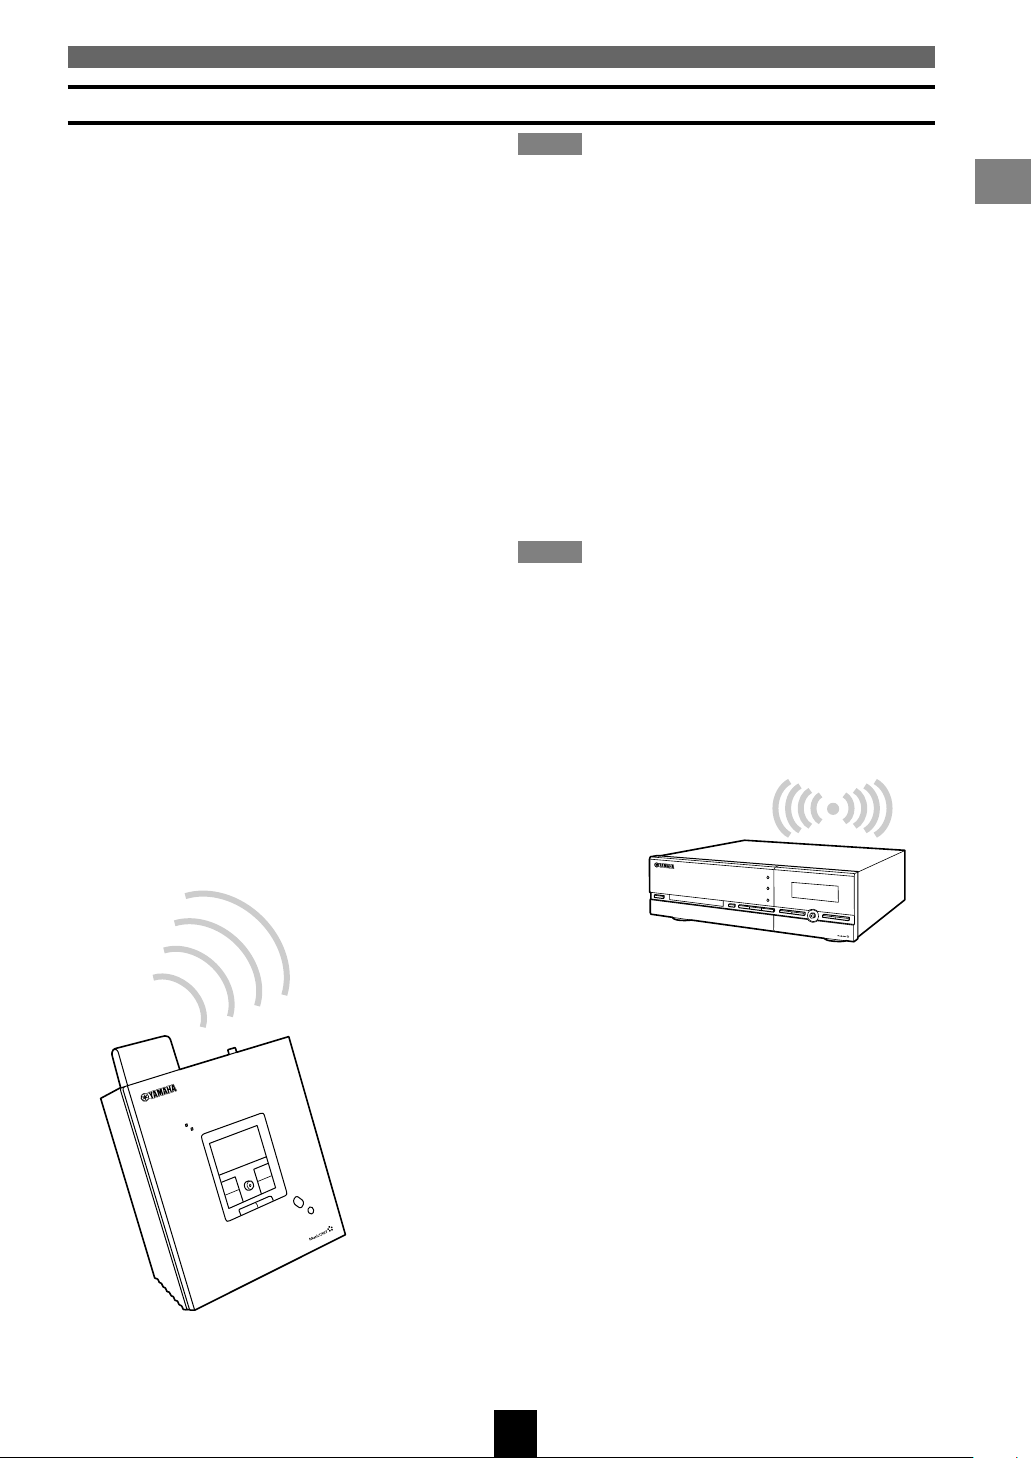
Setting up the MusicCAST client
–A10
CX
INAL M
DIGITAL AUDIO TERM
N
O
R
E
IM
T
N
O
H
P
MusicCAST client
D
I
G
I
T
A
L
A
U
D
I
O
S
E
R
V
E
R
M
C
X
1
0
0
0
MusicCAST server
S
E
23
Page 23
The MusicCAST network
Wired network connections
■ When should I use a wired connection?
Wired networks use cables (called a LAN cable)
connected between components to transfer data to a
central network component (network hub), which
then transfers the data on to the appropriate
destination. This means that you need to physically
connect your MusicCAST clients and servers to a
hub with LAN cables in order to use wired network
connections.
While installing a MusicCAST system using wired
network connections is more time consuming and
requires more effort, wired networks can carry
more data over a greater distance than wireless
networks. The MusicCAST server supports
simultaneous playback on seven MusicCAST
clients over a wired network.
■ What is a hub, and why do I need one?
A network hub receives signals from multiple
components on a network and sends directs them to
the correct destination. This enables many
components to transmit and receive data on the
same network. We recommend that you use a
broadband router if you wish to connect your
MusicCAST components to the Internet.
Use wired connections when:
• You wish to use more than five MusicCAST
clients simultaneously
• You wish to place a MusicCAST client at a
significant distance from the server (see page 23
for details)
• You wish to place a MusicCAST client in an
environment where there is a possibility of
electronic interference with a wireless network
signal (for example, close to a cellular phone
charger)
D
I
G
I
T
A
L
A
U
D
I
O
S
E
R
V
E
R
M
C
X
1
0
0
0
Note
• You cannot use MusicCAST system components
for any activity on a network that extends beyond
the router.
0
1
–A
X
C
L M
A
IN
M
IO TER
D
U
L A
ITA
IG
D
N
O
R
E
IM
T
S
E
N
O
H
P
MusicCAST client
MusicCAST server
Hub
24
Page 24

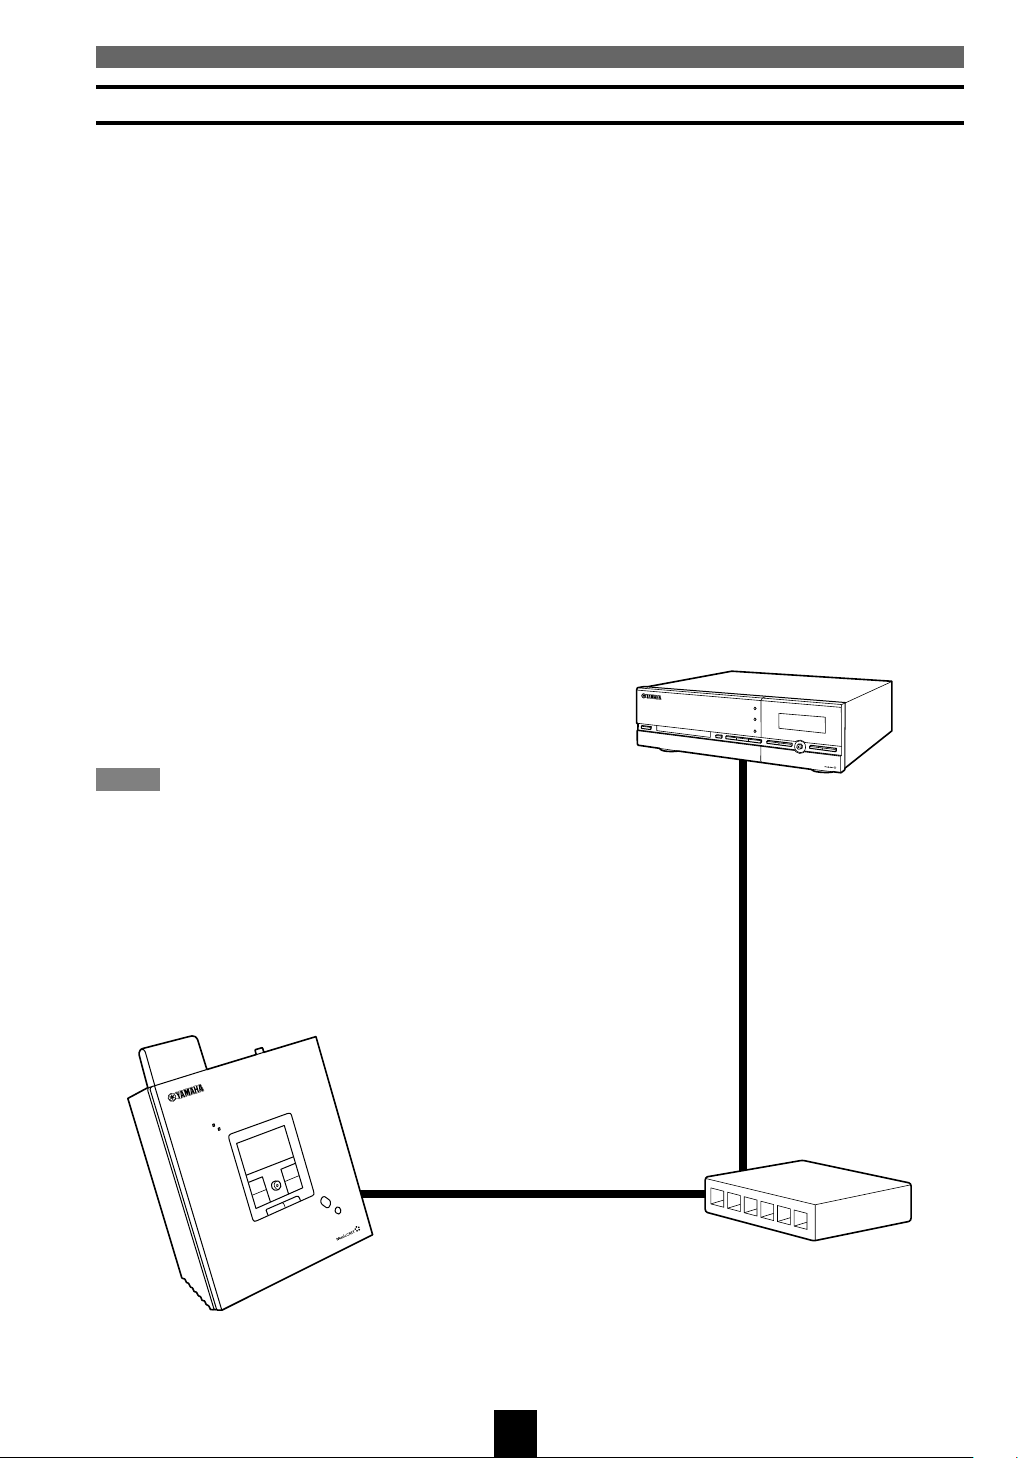
Connecting to the network
Place your MusicCAST client in a suitable location
(See pages 23, 24 for an explanation of how
location affects wired and wireless connections).
The MusicCAST client may function correctly even
if the location you choose does not fit all of the
requirements (described on pages 23, 24). However,
the MusicCAST client requires a strong network
signal to provide good quality playback, so it is
advisable to try to place it in a location that meets
the above definition as closely as possible.
Note
• Metal mounting racks may affect wireless
network signals. Use wired network connections
when mounting MusicCAST components in metal
racks.
Configuring your MusicCAST client
There are two methods you can use to configure
your MusicCAST client for wireless connection. In
almost all cases, the Auto Configuration function
will configure your MusicCAST client correctly
and automatically establish a connection. In some
specific cases, such as when you wish to use
specific IP addresses for each MusicCAST client,
you should configure the MusicCAST client
manually.
D
I
G
I
T
A
L
A
U
D
I
O
S
E
R
V
E
R
M
C
X
1
0
0
0
Setting up the MusicCAST client
DIGITAL AUDIO TERMINAL MCX
N
O
R
E
IM
T
30m or less
–A10
PHONES
25
Page 25

Connecting to the network
Network
Status
Auto Configuration
Manual Setup
Auto Configur...
Press PLAY to execute
auto configuration.
Auto Configur...
Searching ESSID...
Press STOP to cancel.
Auto Configur...
SV-B0002
SV-B0019
Using the Auto Configuration function
The Auto Configuration function automatically
connects your MusicCAST client to a MusicCAST
server. Before attempting to use the Auto
Configuration function, carry out the following
actions:
• Set the MusicCAST server in Auto Configuration
mode (see the MCX-1000 owner’s manual for
details).
• If you wish to connect to a MusicCAST server
over a wireless network, check that the
MusicCAST client is close enough to the server to
receive a wireless network signal (see page 23 for
details).
• Check that the MusicCAST client is connected to
an AC outlet.
Carry out the following procedure to configure the
MusicCAST client.
This explanation uses the controller on the
MusicCAST client.
3. Use the controller on the MusicCAST
client to move the cursor to “Network”,
then press the controller.
The Network screen appears on the display.
PUSH
SELECT
4. Use the controller on the MusicCAST
client to move the cursor to “Auto
Configuration”, then press the
controller.
The Auto Configuration prompt appears on the
display.
PUSH
SELECT
5. Press PLAY.
The Auto Configuration process begins.
SELECT
1. Press and hold MENU for two seconds
to return to the Top Menu screen.
MENU
2. Use the controller on the MusicCAST
client to move the cursor to “Setup”,
then press the controller.
The Setup screen appears on the display.
SELECT
MENU
u / d
PUSH
PUSH
SELECT
MENU
PLAY INFO.
–
VOL
+
Top Menu
Play
Recall
Edit
Play
Bookmark
Setup
Input
Setup
OFF Timer
ON Timer
Auto Play
Auto Level Control
Contrast
PLAY
26
If more than one MusicCAST server is in close
proximity AND in Auto Configuration mode,
check the on-screen display of the MusicCAST
server to verify that it is displaying the client ID
of your MusicCAST client (this may take a few
minutes).
PUSH
SELECT
Page 26

6. Press the controller on the MusicCAST
client.
The client attempts to connect to the server.
Connecting to the network
PUSH
SELECT
Auto Configur...
[CL-B0402]
Connecting...
Press STOP to cancel.
7. On the MusicCAST server, use u / d / j
/ i to move the cursor to “OK” and press
SELECT.
The following screen appears on the display of
the MusicCAST client.
Auto Configur...
Complete!
The MusicCAST server can only connect to seven
MusicCAST clients simultaneously, and does not
attempt to connect to other clients if it already has
seven clients registered. To remove unwanted
MusicCAST clients, use u / d / j / i to move the
cursor on the MusicCAST server on-screen display
to a client ID, then move the cursor to “CLR” and
press SELECT. When finished removing clients,
move the cursor to “OK” and press SELECT. Carry
out Auto Configuration again to connect the
MusicCAST to other MusicCAST clients.
Setting up the MusicCAST client
27
Page 27

Connecting to the network
Configuring your MusicCAST client manually
Usually, the Auto Configuration functions of the MusicCAST server and client will enable you to
successfully connect all of your MusicCAST components. However, you can also use the screens detailed in
this section to configure the MusicCAST network manually if necessary. This section of this manual (see
pages 25 – 34) explains how to set each network parameter in the MusicCAST client.
Carry out the following actions, before attempting to configure your MusicCAST client:
• If you wish to connect to a MusicCAST server over a wireless network, check that the MusicCAST client
is close enough to the server to receive a wireless network signal (see page 23 for details)
• Check that the MusicCAST client is connected to an AC adaptor that is connected to an AC outlet
• Turn the MusicCAST server power on
• Turn the MusicCAST client power on
Confirm that the following have been set on the MusicCAST server:
• The Client IDs of all of the MusicCAST clients that you wish to use on the network (See pages 67, 68 for
an explanation of how to check the Client ID of your MusicCAST client)
• The ESS ID of the wireless network, if you plan to use wireless network connections
• The Subnet Mask address
• The WEP key
To configure the client you must set the parameters listed below from the Network menu. The order
in which you set the parameters is unimportant, but you should ensure that you carry out each
procedure correctly.
• Network mode
• ESS ID
• Server ID
• IP Address (for the MusicCAST client) (This is not necessary if you are using the MusicCAST client in a
network with a component acting as a DHCP server, or if your MusicCAST server is set to act as a DHCP
server)
• WEP key
• Subnet Mask
Note
• The MusicCAST server and MusicCAST client only function correctly if they are under the same subnet
running under one or more network hubs.
28
Page 28

Connecting to the network
SELECT
Mode
Wireless
Auto
Mode
Press PLAY to system
restart, STOP to
cancel.
SELECT
Top Menu
Play
Recall
Play
Edit
Bookmark
Setup
Input
OFF TIMER
SLEEP
ON TIMER
DIGITAL AUDIO TERMINAL MCX–A10
ON
TIMER
MENU
PLAY INFO.
MENU
PUSH
SELECT
–
VOL
+
PHONES
u / j / d / i
SELECT
REPEAT RANDOM
I23
PAUSE
456
STOP
7
PLAY
MENU
GROUP GROUP
SELECT
BOOK
MARK
VOL
S
PLAY
INFO.
INPUT
MUTERECALL
■ Accessing the Manual Setup screen
1. Press and hold MENU for two seconds
to return to the Top Menu screen.
Top Menu
MENU
Play
Recall
Play
Edit Bookmark
Setup
Input
2. Use u / d to move the cursor to “Setup”
and press SELECT.
The Setup screen appears on the display.
Setup
SELECT
OFF Timer
ON Timer
Auto Play
Auto Level Control
Contrast
3. Use u / d to move the cursor to
“Network” and press SELECT.
The Network screen appears on the display.
■ Setting the Network Mode
1. From the Manual Setup menu, use u / d
to move the cursor to “Mode” and press
SELECT.
The Mode screen appears on the display.
Setting up the MusicCAST client
2. If you wish to configure the MusicCAST
client to use a wireless connection, use
u / d to move the cursor to “Wireless”
and press SELECT, then press PLAY at
the prompt.
The MusicCAST client restarts and returns to
the Top Menu screen.
If you wish to configure the MusicCAST
client to use a wired connection, use u /
d to move the cursor to “Auto” and
press SELECT, then press PLAY at the
prompt.
The unit selects a wired connection if one is
available, and returns to the default wireless
connection if one is not. The MusicCAST client
restarts and returns to the Top Menu screen.
SELECT
4. Use u / d to move the cursor to
“Manual Setup” and press SELECT.
The Manual Setup screen appears on the
display.
SELECT
Network
Status
Auto Configuration
Manual Setup
PLAY
Manual Setup
Mode
Server ID
DHCP
IP Address
Subnet Mask
29
Page 29

Connecting to the network
SELECT
ESS ID [MC1 ]
Save & Network restart
Cancel
ESS ID
SELECT
ESS ID [MC1 ]
Save & Network restart
Cancel
ESS ID
■ Setting the ESS ID
All wireless networks work by using weak high
frequency radio signals to transmit data between the
various components using the same “channel” on
the network. Each “channel” has an identification
code, called an ESS ID. Only items with the same
ESS ID transmit data to each other.
If you do not wish to use a wireless connection,
skip this section and move to the section on setting
the IP address.
1. If you wish to use a wireless connection,
from the Manual Setup menu, use the u
/ d to move the cursor to ESS ID and
press SELECT.
The ESS ID screen appears on the display.
ESS ID
SELECT
ESS ID [MC1 ]
Save & Network restart
Cancel
2. Press SELECT.
The cursor enters the ESS ID setting field.
You need to enter the same ESS ID you have set
on the MusicCAST server.
5. If you are satisfied with the settings you
have made, move the cursor to “Save &
Network restart” and press SELECT.
This confirms the settings and restarts the
network hardware on the MusicCAST client.
Alternatively, select “Cancel” to exit from the
menu without saving and confirmation.
3. Use u / d to select the desired
character, then press j / i to move the
cursor to the left or right.
4. When you finish entering the ID, press
SELECT to confirm the setting.
The cursor returns to the left of the “ESS ID”
parameter.
30
Page 30

Connecting to the network
■ Setting your MusicCAST client to act as
a DHCP client
If you set your MusicCAST client to act as a DHCP
client, it automatically receives a new IP address
from the network DHCP server each time you turn
it on. This is useful if you do not want to pre-set an
IP address for each MusicCAST client in your
system. The MusicCAST client is set to be a DHCP
client by default.
Notes
• The MusicCAST client must be connected to a
network with an active DHCP server if you wish it
to act as a DHCP. The MusicCAST server can act
as a DHCP server if you set it to so. See page 110
in the MCX-1000 owner’s manual for more
information.
• If you are using a DHCP server other than the
MusicCAST server when using the MusicCAST
client as a DHCP client, you may sometimes need
to reset the IP address the MusicCAST client is
receiving from the DHCP server. Stop all activity
on MusicCAST clients while doing this. For more
information see the section of your DHCP server’s
owner’s manual that deals with the expiration of
IP addresses.
3. Use u / d to scroll the cursor to the
appropriate setting and press SELECT.
OFF: The MusicCAST client does not act
as a DHCP client and only uses a
preset IP.
ON: The MusicCAST client attempts to
use DHCP to obtain a new IP
address from the MusicCAST server
each time you switch it on.
Setting up the MusicCAST client
1. From the Network Menu, use u / d to
move the cursor to “Manual Setup” and
press SELECT.
The Manual Setup screen appears on the
display.
Manual Setup
SELECT
Mode
Server ID
DHCP
IP Address
Subnet Mask
2. Use u / d to scroll the menu to “DHCP”
and press SELECT.
The DHCP screen appears on the display.
DHCP
SELECT
OFF
ON
31
Page 31

Connecting to the network
SELECT
[0.0.0.0]
Save & Network restart
Cancel
IP Address
SELECT
[0.0.0.0]
Save & Network restart
Cancel
IP Address
SELECT
[0.0.0.0]
Save & Network restart
Cancel
IP Address
■ Setting the MusicCAST server Server ID
1. From the Manual Setup menu, use u /
d to move the cursor to “Server ID” and
press SELECT.
The Server ID screen appears on the display.
Server ID
SELECT
[SV-0001]
Save & Network restart
Cancel
2. Press SELECT.
The cursor enters the Server ID setting field.
You need to enter the same address here as your
MusicCAST server has set as its Server ID. See
page 112 in the MCX-1000 owner’s manual for
an explanation of how to view the Server ID of
your MusicCAST server.
3. Use u / d to select the desired
character, then press j / i to move the
cursor to the left or right.
4. When you finish entering the ID, press
SELECT to confirm the setting.
The cursor returns to the left of the Server ID
setting field.
5. If you are satisfied with the settings you
have made, move the cursor to “Save &
Network restart” and press SELECT.
This confirms the settings and restarts the
network hardware on the MusicCAST client.
Alternatively, select “Cancel” to exit from the
menu without saving and confirmation.
Server ID
SELECT
[SV-0001]
Save & Network restart
Cancel
■ Setting the MusicCAST client IP Address
1. From the Manual Setup menu, use u / d
to move the cursor to “IP Address” and
press SELECT.
The IP Address screen appears on the display.
2. Press SELECT.
The cursor enters the IP address setting field.
Note
• This setting is only valid when the
MusicCAST client is not set to act as a DHCP
client (see page 31 for an explanation of how
to do this).
3. Use u / d to select the desired 3 digit IP
number, then press j / i to move to the
next number to set.
4. When you have set all four numbers,
press SELECT to confirm the setting.
The cursor returns to the left of the IP address
setting field.
5. If you are satisfied with the settings you
have made, move the cursor to “Save &
Network restart” and press SELECT.
This confirms the settings and restarts the
network hardware on the MusicCAST client,
returning the display to the Network menu.
Alternatively, select “Cancel” to exit from the
menu without saving and confirmation.
SELECT
Server ID
[SV-0001]
Save & Network restart
Cancel
32
Page 32

Connecting to the network
SELECT
[]
Save & Network restart
Cancel
WEP key
[MC1 ]
Save & Network restart
Cancel
WEP key
■ Setting the Subnet Mask Address
1. From the Manual Setup menu, use u / d
to move the cursor to “Subnet Mask”
and press SELECT.
The Subnet Mask screen appears on the display.
Subnet Mask
SELECT
[0.0.0.0]
Save & Network restart
Cancel
2. Press SELECT.
The cursor enters the IP address setting field.
You need to enter same subnet mask IP address
here that you have set on the MusicCAST
server. Refer to the “Status view” screens on the
MusicCAST server On Screen Display for the
correct address.
3. Use u / d to select the desired 3 digit IP
number, then press j / i to move to the
next number to set.
4. When you have set all four numbers,
press SELECT to confirm the setting.
The cursor returns to the left of the IP address
setting field.
5. If you are satisfied with the settings you
have made, move the cursor to “Save &
Network restart” and press SELECT.
This confirms the settings and restarts the
network hardware on the MusicCAST client,
returning the display to the Network menu.
Alternatively, select “Cancel” to exit from the
menu without saving and confirmation.
Subnet Mask
SELECT
[0.0.0.0]
Save & Network restart
Cancel
■ Setting the WEP key for your MusicCAST
client
In order for your MusicCAST client and server to
share data over a wireless network, you must give
them both the same encryption key (WEP key).
Refer to the MusicCAST server main manual for an
explanation of how to set this key on the
MusicCAST server.
1. From the Manual Setup menu, use u / d
to scroll the menu to “WEP key” and
press SELECT.
The WEP key screen appears on the display.
2. Press SELECT.
The cursor enters the WEP key setting field.
You need to enter the characters here as you
have set in the WEP key field on the
MusicCAST server.
3. Use u / d to select the desired
character, then press j / i to move the
cursor to the left or right.
SELECT
Note
• The MusicCAST network uses 128-bit
encryption, which requires a 13-digit WEP
key. If you enter less than 13 digits, the
MusicCAST client automatically adds zeroes
to the code you set to make up the difference.
Setting up the MusicCAST client
Subnet Mask
SELECT
Note
[0.0.0.0]
Save & Network restart
Cancel
• This setting is only valid when the
MusicCAST client is not set to act as a DHCP
client (see page 31 for an explanation of how
to do this).
4. When you finish entering the key, press
SELECT to confirm the setting.
The cursor returns to the left of the WEP key
setting field.
33
Page 33

Connecting to the network
5. If you are satisfied with the settings you
have made, move the cursor to “Save &
Network restart” and press SELECT.
This confirms the settings and restarts the
network hardware on the MusicCAST client,
returning the display to the Network menu.
Alternatively, select “Cancel” to exit from the
menu without saving and confirmation.
■ Connection check
If you have carried out the setting procedure
correctly and the MusicCAST client has achieved a
connection, the connection icon appears at the top
right of the on screen display:
For wired network connections
For wireless network connections
The bars on the right of the wireless network signal
icon indicate the strength of the network signal.
One bar indicates a weak signal, five bars indicates
a maximum strength signal.
The following icon indicates that the MusicCAST
client is not able to connect to the MusicCAST
server. Try the network setting procedure again, or
refer to the troubleshooting section on page 69.
34
Page 34

Music playback on the MusicCAST client
The MusicCAST client can playback music stored in a MusicCAST server over a wired or wireless
network. Two kinds of files are available for playback: MP3 (MPEG-1 Audio Layer 3), and PCM (Pulse
Code Modulation). PCM files give better sound quality, but can only be played back on one MusicCAST
client at a time. On some screens the MusicCAST client may display a “*” beside some song names. The
songs are not available for playback unless you have specifically designated your MusicCAST server to
distribute PCM files to this MusicCAST client. See page 125 in the MCX-1000 owner’s manual.
The MusicCAST system stores its music data as
follows:
Artists Genres
has only 1
can have
many
You can play songs stored in the MusicCAST
server by :
• Selecting a specific artist
• Selecting a specific album
• Selecting a genre
• Letting your MusicCAST client playback a
random selection of songs
• Selecting a pre-chosen list of songs (a playlist) to
listen to
• Playing songs from a bookmarked location on
your MusicCAST server
Albums
Song 1
Song 2
Song 3
Song 4
.
.
.
.
can have
many
has only 1
■ Playback groups
The selection criteria you use to choose a song for
playback also defines the playback group. For
example, selecting an album from the Album menu
for playback sets album as the playback group and
plays back all songs in the album. Playback
continues in the order the songs are registered, or in
alphabetical order depending on the playback group
setting. Playback group also defines the limits
within which the Random Playback, Repeat
Playback, and Song Skip functions operate.
Use GROUP+ to skip to the next item (for example,
“Album” in the playback group, or GROUP– to
skip to the previous item.
Note
• Sometimes GROUP– and GROUP+ appear to
have no effect on the MusicCAST client. This is
because there are no more items registered to the
playback group. For example, pressing GROUP+
when the playback group is “albums of artist” and
no other albums are registered to the artist has no
effect on the MusicCAST client.
Playing back songs
35
Page 35

Music playback on the MusicCAST client
■ During playback
The Play Info screen appears on the display when
the MusicCAST client is playing a song, unless you
perform an operation with the remote control. Press
PLAY INFO to return to this screen.
Play Info
PLAY
INFO.
Artist name
Album name
Song name
Album
Press i to access the available playback styles. To
alter the setting of a particular parameter, press
SELECT. Use u / d to change the setting, and
SELECT to confirm the setting you select. Press j
to exit from the Play Style screen. The parameters
available are:
• Repeat (OFF, SINGLE, ALL)
Depending on the setting of this parameter, the
MusicCAST client repeats playback of a selected
item.
OFF: No repeat
SINGLE: The MusicCAST client repeats
playback of the current song.
ALL: The MusicCAST client repeats
playback of the current group.
• Random (OFF, ON)
If this parameter is set to ON, the unit continuously
plays a random sequence of tracks until playback is
halted. The songs the MusicCAST client targets for
playback depend how you select the song you want
to listen to. If you select playback from an album,
then all tracks on that album are targeted for
playback, if you have selected an artist, then all
tracks from that artist are targeted, and so on.
• Bookmark (OFF, ON)
If this parameter is set to ON, the current song is
added to the bookmark list (see pages 52 – 55).
• Time (ELAP , REM )
These parameters alter the manner in which the
MusicCAST client displays time on the Play Info
screen.
ELAP: (Elapsed)
Displays the time elapsed since you
started playback of the current song.
REM: (Remaining)
Displays the time remaining until the
end of the current song.
Skipping to a different song
Press a to skip to the next song, or press b
once to return to the beginning of the currently
playing song or twice to skip to the beginning of
the previous song during playback.
Searching forward or backward within a
song
To search forward , press f, and to search
backward, press w, during playback. The
MusicCAST client does not output any sound
during these operations.
Note
• You cannot skip or search through songs when
playback is paused.
• Group (ALL, SINGLE)
Sets the group playback function (see pages 45,
46).
ALL: The MusicCAST client begins playback
of the next group when playback of the
present group finishes.
SINGLE: The MusicCAST client halts playback
when playback of the present group
finishes.
36
Page 36

Music playback on the MusicCAST client
SELECT
Stone Flower
Terra Brasilis
Tide
Urubu
Wave
Artist-Albums
SELECT
Wave
The Red Blouse
Look To The Sky
Batidinha
Triste
Artist-Songs
SELECT
Wave
The Red Blouse
Look To The Sky
Batidinha
Triste
Artist-Songs
SELECT
Play Info
Artist name
Album name
Song name
Album
To play a song from an artist
Use this option to directly access the songs by a
particular artist stored in your MusicCAST server.
All songs and albums assigned to this artist are
available for selection.
Carry out the following procedure to play a specific
song from albums assigned to a particular artist.
OFF TIMER
SLEEP
ON TIMER
DIGITAL AUDIO TERMINAL MCX–A10
ON
TIMER
MENU
PLAY INFO.
MENU
PUSH
SELECT
–
VOL
+
PHONES
u / d / j
SELECT
REPEAT RANDOM
I23
PAUSE
456
STOP
7
PLAY
MENU
GROUP GROUP
SELECT
BOOK
MARK
VOL
S
PLAY
INFO.
INPUT
MUTERECALL
1. Press and hold MENU for two seconds
to return to the Top Menu screen.
Top Menu
MENU
Play
Recall
Play
Edit Bookmark
Setup
Input
4. Use u / d to move the cursor to the
name of the artist you wish to select.
Moving the cursor to the bottom of the screen
causes the display to scroll upwards, while
moving it to the top of the screen makes the
display scroll downwards. Press SELECT to
display all the albums assigned to the artist, or
press p to begin playback of all songs from
the selected artist in alphabetical order.
5. Use u / d to move the cursor to the
name of the album you wish to open.
Press SELECT to display all the songs on the
album, or press p to begin playback of the
entire album.
Playing back songs
2. Use u / d to move the cursor to “Play”
from the Top Menu and press SELECT.
The Play Menu screen appears on the display.
Play Menu
SELECT
Artists
Albums
Genres
All Songs
Playlists
3. Use u / d to move the cursor to
“Artists” and press SELECT.
The display lists all artists currently stored in
the MusicCAST server, in alphabetical order.
Artists
SELECT
Antonio Carlos Jobim
Bic Runga
Bjork
Bonnie Raitt
Chick Corea
6. Use u / d to select a specific song to
listen to.
7. Press SELECT to begin playback of the
selected song.
The Play Info screen appears on the display.
Press j to return the list screen.
37
Page 37

Music playback on the MusicCAST client
SELECT
Artists
Albums
Genres
All Songs
Playlists
Play Menu
SELECT
Auberge
August & Everything Aft
Ballads
Beautiful Collision
Brilliant Corners
Albums
Top Menu
Play
Recall
Play
Edit Bookmark
Setup
Input
■ To stop playback
Press s.
■ To halt playback temporarily
Press e. Press e again to resume playback.
Note
• Once playback of the song is finished, the
MusicCAST client begins playback of the next
song stored as part of that album on the
MusicCAST server.
To play a song from an album
Use this option to directly access the songs on a
particular album stored in your MusicCAST server.
All songs assigned to this album are available for
selection.
Carry out the following procedure to playback a
specific song from a specific album.
OFF TIMER
SLEEP
ON TIMER
DIGITAL AUDIO TERMINAL MCX–A10
ON
TIMER
MENU
PLAY INFO.
MENU
PUSH
SELECT
–
VOL
+
PHONES
u / d / j
SELECT
REPEAT RANDOM
I23
PAUSE
456
STOP
7
PLAY
MENU
GROUP GROUP
SELECT
BOOK
MARK
VOL
S
PLAY
INFO.
INPUT
MUTERECALL
1. Press and hold MENU for two seconds
to return to the Top Menu screen.
MENU
2. Use u / d to move the cursor to “Play”
from the Top Menu screen and press
SELECT.
The Play Menu screen appears on the display.
3. Use u / d to move the cursor to
“Albums” and press SELECT.
The display lists all albums stored in the
MusicCAST server, in alphabetical order.
38
Page 38

Music playback on the MusicCAST client
SELECT
Artists
Albums
Genres
All Songs
Playlists
Play Menu
SELECT
Bossa Nova
Classical
Country
Electronica/Dance
Jazz
Genres
MENU
4. Use u / d to move the cursor to the
name of an album.
Moving the cursor to the bottom of the screen
causes the display to scroll upwards, while
moving it to the top of the screen makes the
display scroll downwards. Press SELECT to
display all the songs on the album, or press
PLAY to begin playback of the album.
Album-Songs
SELECT
Wave
The Red Blouse
Look To The Sky
Batidinha
Triste
5. Use u / d to select a song.
Album-Songs
SELECT
Wave
The Red Blouse
Look To The Sky
Batidinha
Triste
6. Press SELECT to begin playback of the
selected song.
The Play Info screen appears on the display.
Play Info
Artist name
SELECT
Press j to return the list screen.
Album name
Song name
Album
To play a song from a genre
Use this option to directly access the songs of a
particular genre stored in your MusicCAST server.
All songs and albums assigned this genre are
available for selection.
Carry out the following procedure to playback a
specific song from the albums assigned to a
particular genre.
OFF TIMER
SLEEP
ON TIMER
DIGITAL AUDIO TERMINAL MCX–A10
ON
TIMER
MENU
PLAY INFO.
MENU
PUSH
SELECT
–
VOL
+
PHONES
u / d / j
SELECT
REPEAT RANDOM
I23
PAUSE
456
STOP
7
PLAY
MENU
GROUP GROUP
SELECT
BOOK
MARK
VOL
S
PLAY
INFO.
INPUT
MUTERECALL
1. Press and hold MENU for two seconds
to return to the Top Menu screen.
Top Menu
Play
Play
Recall
Edit Bookmark
Setup
Input
2. Use u / d to move the cursor to “Play”
from the Top Menu screen and press
SELECT.
The Play Menu screen appears on the display.
Playing back songs
■ To stop playback
Press s.
■ To halt playback temporarily
Press e. Press e again to resume playback.
Note
• Once playback of the song you select is finished,
the MusicCAST client begins playback of the next
song stored as part of that album on the
MusicCAST server.
3. Use u / d to move the cursor to
“Genres” and press SELECT.
The display lists all genres stored in the
MusicCAST server, in alphabetical order.
39
Page 39

Music playback on the MusicCAST client
SELECT
Artists
Albums
Genres
All Songs
Playlists
Play Menu
SELECT
7 Seconds
9th & Hennepin
A Change is Gonna Come
A Felicidate
A Murder of One
All Songs
Top Menu
Play
Recall
Play
Edit Bookmark
Setup
Input
4. Use u / d to move the cursor to the
name of the genre you wish to select.
Moving the cursor to the bottom of the screen
causes the display to scroll upwards, while
moving it to the top of the screen makes the
display scroll downwards. Press SELECT to
display all the albums assigned to the selected
genre, or press PLAY to begin playback of all
songs from the selected genre in alphabetical
order.
Genre-Albums
SELECT
Stone Flower
Terra Brasilis
Tide
Urubu
Wave
5. Use u / d to move the cursor to the
name of the album you wish to open.
Press SELECT to display all the songs on the
album, or press PLAY to begin playback of the
album.
Genre-Songs
SELECT
Wave
The Red Blouse
Look To The Sky
Batidinha
Triste
To select a song from the complete list of
songs
Use this option to directly access all of the songs in
the MusicCAST database without selecting an
Artist, Album, or Genre first.
OFF TIMER
SLEEP
ON TIMER
DIGITAL AUDIO TERMINAL MCX–A10
ON
TIMER
MENU
PLAY INFO.
MENU
PUSH
SELECT
–
VOL
+
PHONES
u / d / j
SELECT
REPEAT RANDOM
I23
PAUSE
456
STOP
7
PLAY
MENU
GROUP GROUP
SELECT
BOOK
MARK
VOL
S
PLAY
INFO.
INPUT
MUTERECALL
Carry out the following procedure to select and
playback a song from the complete list of songs
stored in the MusicCAST server.
1. Press and hold MENU for two seconds
to return to the Top Menu screen.
MENU
6. Press SELECT to begin playback of the
selected song.
The Play Info screen appears on the display.
Play Info
Artist name
SELECT
Press j to return the list screen.
■ To stop playback
Press s.
■ To halt playback temporarily
Press e. Press e again to resume playback.
Note
• Once playback of the song you select is finished,
the MusicCAST client begins playback of the next
song in alphabetical order in the genre.
Album name
Song name
Album
2. Use u / d to move the cursor to “Play”
from the Top Menu screen and press
SELECT.
The Play Menu screen appears on the display.
3. Use u / d to move the cursor to “All
Songs” and press SELECT.
The display lists all songs stored in the
MusicCAST server, in alphabetical order.
40
Page 40

Music playback on the MusicCAST client
MENU
Top Menu
Play
Recall
Play
Edit Bookmark
Setup
Input
SELECT
Artists
Albums
Genres
All Songs
Playlists
Play Menu
SELECT
Playlists
Collections 1
Collections 2
Collections 3
Collections 4
Collections 5
4. Use u / d to move the cursor to the
name of a song.
Moving the cursor to the bottom of the screen
causes the display to scroll upwards, while
moving it to the top of the screen makes the
display scroll downwards.
All Songs
SELECT
7 Seconds
9th & Hennepin
A Change is Gonna Come
A Felicidate
A Murder of One
5. Press SELECT to begin playback of the
selected song.
The Play Info screen appears on the display.
Play Info
Artist name
SELECT
Press j to return the list screen.
■ To stop playback
Press s.
Album name
Song name
Song
Using Playlists
Playlists are collections of songs grouped together
and registered by the users of your MusicCAST
server. You cannot create or alter playlists from the
MusicCAST client, but you can access them for
playback. See page 41 in the MCX-1000 owner’s
manual for more information on playlists.
OFF TIMER
SLEEP
ON TIMER
DIGITAL AUDIO TERMINAL MCX–A10
ON
TIMER
MENU
PLAY INFO.
MENU
PUSH
SELECT
–
VOL
+
PHONES
u / d / j
SELECT
REPEAT RANDOM
I23
PAUSE
456
STOP
7
PLAY
MENU
GROUP GROUP
SELECT
BOOK
MARK
VOL
S
PLAY
INFO.
INPUT
MUTERECALL
■ Accessing playlists with your
MusicCAST client
Carry out the following procedure to access songs
in pre-existing playlists stored on your MusicCAST
server:
1. Press and hold MENU for two seconds
to return to the Top Menu screen.
Playing back songs
■ To halt playback temporarily
Press e. Press e again to resume playback.
Note
• Once playback of the song you select is finished,
the MusicCAST client begins playback of the
song that is stored next in alphabetical order on
the MusicCAST server.
2. Use u / d to move the cursor to “Play”
and press SELECT.
The Play Menu screen appears on the display.
3. Use u / d to move the cursor to
“Playlists” and press SELECT.
The Playlists screen appears on the display.
41
Page 41

Music playback on the MusicCAST client
Top Menu
Play
Recall
Play
Edit
Bookmark
Setup
Input
SELECT
Artists
Albums
Genres
All Songs
Playlists
Play Menu
4. Use u / d to move the cursor to
highlight the collection of playlists you
want to select and press SELECT.
The display changes to show the playlists
registered to this collection. Press p if you
want to playback all playlists in a collection.
5. Use u / d to move the cursor to
highlight the playlist you want to select
and press SELECT.
The display changes to show the tracks
registered to this playlist. The MusicCAST
client displays an “L” beside album , an “A”
beside artists, and a “G” beside genres that are
linked to the playlist. Press p if you want to
playback all songs in a playlist.
Playlist-List...
SELECT
Playlist (1)
Playlist (2)
Playlist (3)
Playlist (4)
Playlist (5)
6. Use u / d to move the cursor to the
name of a song.
Moving the cursor to the bottom of the screen
causes the display to scroll upwards, while
moving it to the top of the screen makes the
display scroll downwards.
Song Statistics
The Song Statistics screen is a display of
statistically significant data on the tracks and
albums stored in the MusicCAST server, which you
can access for playback.
• Times played:
Displays songs in order of the number of times
they have been played.
• Recently played songs:
Displays songs in order from the most recently
played.
• Recently stored albums:
Displays albums in order from the most recently
recorded.
OFF TIMER
SLEEP
ON TIMER
DIGITAL AUDIO TERMINAL MCX–A10
ON
TIMER
PUSH
SELECT
MENU
PLAY INFO.
–
VOL
+
PHONES
MENU
u / d
SELECT
To access the Song Statistics screen, carry out the
following procedure:
REPEAT RANDOM
I23
PAUSE
456
STOP
7
PLAY
MENU
GROUP GROUP
SELECT
BOOK
MARK
VOL
S
PLAY
INFO.
INPUT
MUTERECALL
7. Press SELECT to begin playback of the
selected song.
The Play Info screen appears on the display.
Play Info
Artist name
SELECT
Press j to return the list screen.
■ To stop playback
Press s.
■ To halt playback temporarily
Press e. Press e again to resume playback.
Notes
• Once playback of the song you select is finished,
the MusicCAST client begins playback of the next
song in the playlist.
• The MusicCAST client can only play playlists if
the MusicCAST server has registered playlists.
Album name
Song name
Song
1. Press and hold MENU for two seconds
to return to the Top Menu screen.
MENU
2. Use u / d to move the cursor to “Play”
and press SELECT.
The Play Menu screen appears on the display.
42
Page 42

Music playback on the MusicCAST client
MENU
Top Menu
Play
Recall
Play
Edit Bookmark
Setup
Input
3. Use u / d to move the cursor to “Song
Statistics” and press SELECT.
The Song Statistics screen appears on the
display.
Song Statisti...
SELECT
Times played
Recently played songs
Recently stored albums
4. Use u / d to move the cursor to the
criteria you want to use and press
SELECT.
Times played
SELECT
Wave
The Red Blouse
Look To The Sky
Batidinha
Triste
5. Use u / d to move the cursor to a song
on Album and press SELECT.
Playback of the song you select begins.
Note
• If you selected an album in step 4, you need to
select a song and press SELECT first.
To play a song in the list of bookmarks
The MusicCAST system can store a list of songs
for each MusicCAST client (see pages 52 – 55), for
easy access and playback. Carry out the following
procedure to access this list.
OFF TIMER
SLEEP
ON TIMER
DIGITAL AUDIO TERMINAL MCX–A10
ON
TIMER
MENU
PLAY INFO.
MENU
PUSH
SELECT
–
VOL
+
PHONES
u / d / j
SELECT
REPEAT RANDOM
I23
PAUSE
456
STOP
7
PLAY
MENU
GROUP GROUP
SELECT
BOOK
MARK
VOL
S
PLAY
INFO.
INPUT
MUTERECALL
1. Press and hold MENU for two seconds
to return to the Top Menu screen.
2. Use u / d to move the cursor to “Play”
and press SELECT.
The Play Menu screen appears on the display.
Play Menu
SELECT
Artists
Albums
Genres
All Songs
Playlists
Playing back songs
3. Use u / d to move the cursor to
“Bookmarks” and press SELECT.
The Bookmarks screen appears on the display.
Bookmarks
SELECT
Wave
The Red Blouse
Look To The Sky
Batidinha
Triste
4. Use u / d to move the cursor to the
name of a song.
Moving the cursor to the bottom of the screen
causes the display to scroll upwards, while
moving it to the top of the screen makes the
display scroll downwards.
43
Page 43

Music playback on the MusicCAST client
5. Press SELECT to begin playback of the
selected song.
The Play Info Screen appears on the display.
Press j to return the list screen.
■ To stop playback
Press s.
■ To halt playback temporarily
Press e. Press e again to resume playback.
Note
• Once playback of the selected song is complete,
the MusicCAST client begins playback of the next
song in the bookmark list.
44
Page 44

SELECT
Play Info
Play Style
Repeat OFF
Random OFF
Group ALL
Advanced playback options
Random Playback
When you utilize the Random Playback function,
the MusicCAST client plays tracks in random order
from the current playback group.
OFF TIMER
SLEEP
ON TIMER
DIGITAL AUDIO TERMINAL MCX–A10
ON
TIMER
MENU
PLAY INFO.
PUSH
SELECT
–
VOL
+
PHONES
RANDOM
MENU
u / j / d / i
SELECT
You can activate the Random Playback function by
pressing RANDOM on the remote control. The
MusicCAST client targets tracks for playback in
accordance with the current setting of the Group
parameter accessible by following the procedure on
this page.
To select an entire group for random playback,
begin playback from one level higher up the “Menu
tree” than you would otherwise. For example, to
playback all of the songs from an artist at Random
rather than from one particular album, press PLAY
with the cursor on the Artist name in the Artist
selection screen, then set the MusicCAST client in
Random Playback mode.
RANDOM
Play Info
Artist name
Album name
Song name
REPEAT RANDOM
I23
PAUSE
456
STOP
7
PLAY
MENU
GROUP GROUP
SELECT
BOOK
MARK
VOL
S
PLAY
INFO.
INPUT
MUTERECALL
Album
3. Use u / d to move the cursor to
“Random” and press SELECT.
The cursor moves so that it is displayed under
the “Random” parameter setting.
Playing back songs
4. Use u / d to change the Random
Playback parameter setting.
OFF: Random Playback disabled
ON: Random Playback enabled
5. Press SELECT to confirm your setting.
The cursor returns to the left of the
“Random” parameter.
6. Press j.
The display returns to the Play Info screen.
■ To alter the limits of Random Playback
1. Begin playback of a track (see pages 35
– 44).
The Play Info screen appears on the display.
2. Press i.
The Play Style screen appears on the display.
3. Use u / d to move the cursor to
“Group” and press SELECT.
The cursor moves so that it is displayed under
the “Group” parameter setting.
■ To use the Random Playback function
1. Begin playback of a track (see pages 35
– 44).
The Play Info screen appears on the display.
2. Press i.
The Play Style screen appears on the display.
SELECT
Play Info
Artist name
Album name
Song name
Play Info
Album
Play Style
Repeat OFF
Random OFF
Group ALL
45
SELECT
Play Info
Play Style
Repeat OFF
Random OFF
Group SINGLE
Page 45

Advanced playback options
Play Info
Artist name
Album name
Song name
Album
Play Info
Play Style
Repeat OFF
Random OFF
Group ALL
Play Info
Artist name
Album name
Song name
Album
4. Use u / d to change the Group
playback parameter setting.
SINGLE: The MusicCAST client targets
tracks in the currently selected group
(for example, album or genre) for
selection for random playback.
ALL: The MusicCAST client targets all
items in the currently selected group
(for example, album or genre) for
playback. When all songs in the
current group have been played
back, playback advances to the next
group.
To target an entire group for random playback,
you should press PLAY from the Albums,
Genres, Artists, or All songs menu.
5. Press SELECT to confirm your setting.
The cursor returns to the left of the “Group”
parameter.
6. Press j.
The display returns to the Play Info screen.
Repeat Playback
When you utilize the Repeat Playback function, the
MusicCAST repeats playback of the current song
or group.
OFF TIMER
SLEEP
ON TIMER
DIGITAL AUDIO TERMINAL MCX–A10
ON
TIMER
MENU
PLAY INFO.
PUSH
SELECT
–
VOL
+
PHONES
REPEAT
MENU
u / j / d / i
SELECT
You can activate the Repeat Playback function by
pressing REPEAT on the remote control. The
MusicCAST client repeats playback in accordance
with the current Repeat Playback setting parameter,
accessible by following the procedure on this page.
REPEAT
REPEAT RANDOM
I23
PAUSE
456
STOP
7
PLAY
MENU
GROUP GROUP
SELECT
BOOK
MARK
VOL
S
PLAY
INFO.
INPUT
MUTERECALL
■ To use the Repeat Playback function
1. Begin playback of a track (see pages 35
– 44).
The Play Info screen appears on the display.
2. Press i.
The Play Style screen appears on the display.
SELECT
3. Use u / d to move the cursor to
“Repeat” and press SELECT.
The cursor appears under the “Repeat”
parameter setting.
46
Page 46

Advanced playback options
Play Info
Artist name
Album name
Song name
Album
Play Info
Play Style
Repeat OFF
Random OFF
Group ALL
SELECT
Play Info
Play Style
Group SINGLE
Bookmark OFF
Time ELAP
4. Use u / d to change the Repeat
Playback parameter setting.
OFF: Repeat Playback disabled.
SINGLE: The MusicCAST client repeats
playback of the current group.
ALL: The MusicCAST client repeats
playback of all groups.
5. Press SELECT to confirm your setting.
The cursor returns to the left of the “Repeat”
parameter.
6. Press j.
The display returns to the Play Info screen.
Changing the time display on the Play Info
screen
You can change the time display on the Play Info
screen so that it displays either the time elapsed
since playback of the current song started, or the
time remaining to complete playback of the current
song.
OFF TIMER
SLEEP
ON TIMER
DIGITAL AUDIO TERMINAL MCX–A10
ON
TIMER
MENU
PLAY INFO.
REPEAT
MENU
PUSH
SELECT
–
VOL
+
PHONES
u / j / d / i
SELECT
REPEAT RANDOM
I23
PAUSE
456
STOP
7
PLAY
MENU
GROUP GROUP
SELECT
BOOK
MARK
VOL
S
PLAY
INFO.
INPUT
MUTERECALL
■ To alter the time display
1. Begin playback of a track (see pages 35
– 44).
The Play Info screen appears on the display.
Playing back songs
2. Press i.
The Play Style screen appears on the display.
SELECT
3. Use u / d to move the cursor to “Time”
and press SELECT.
The cursor moves so that is its displayed under
the “Time” parameter setting.
47
Page 47

Advanced playback options
Top Menu
Play
Recall
Play
Edit
Bookmark
Setup
Input
SELECT
Artists
Albums
Genres
All Songs
Playlists
Play Menu
4. Use u / d to change the display setting
ELAP: The timer displays the time elapsed
since playback of the current song
started
REM: The timer displays the time
remaining to complete playback of
the current song
5. Press SELECT to confirm your setting.
The cursor returns to the left of the “Time”
parameter.
6. Press j.
The display returns to the Play Info screen.
Listening to an external source connected
to the MusicCAST server
You can listen to audio from an external source
connected to the OPTICAL IN, COAXIAL IN, or
ANALOG IN jacks on the MusicCAST server.
Notes
• The MusicCAST server can only distribute one
source signal to MusicCAST clients. Changing
the external source selection on any MusicCAST
client changes the source external source selection
for all MusicCAST clients connected to your
MusicCAST server.
• The MusicCAST server cannot distribute signals
from external components or AV receivers in
PCM format. It distributes all such signals in MP3
format regardless of the PCM settings on the
Playback system setting screen of the
MusicCAST server (page 125, MCX-1000
owner’s manual).
OFF TIMER
SLEEP
ON TIMER
DIGITAL AUDIO TERMINAL MCX–A10
ON
TIMER
MENU
PLAY INFO.
MENU
PUSH
SELECT
–
VOL
+
PHONES
u / d
SELECT
REPEAT RANDOM
I23
PAUSE
456
STOP
7
PLAY
MENU
GROUP GROUP
SELECT
BOOK
MARK
VOL
S
PLAY
INFO.
INPUT
MUTERECALL
1. Press and hold MENU for two seconds
to return to the Top Menu screen.
MENU
2. Use u / d to move the cursor to “Play”
from the Top Menu and press SELECT.
The Play Menu screen appears on the display.
48
Page 48

Advanced playback options
3. Use u / d to move the cursor to
“External Inputs” and press SELECT.
The External Inputs menu appears on the
display.
External Inpu...
SELECT
Optical
Coaxial
Analog
AV Receiver
4. Use u / d to select “Optical”, “Coaxial”,
or “Analog”, depending on which input
on the MusicCAST server the device you
want to listen to is attached to. Press
SELECT.
Note
• See pages 49, 50 if you wish to select “AV
Receiver” from this menu.
5. The MusicCAST client outputs the audio
signal from the external component
connected to the MusicCAST server.
■ To return to playback from the
MusicCAST server library
Repeat steps 1, 2, and 3, selecting any option other
than “External Inputs” in step 3.
Listening to a radio station with your
MusicCAST client
You can listen to radio stations with your
MusicCAST client if you have a Yamaha receiver
connected to your MusicCAST server with a cross
type RS-232C cable. All of the preset stations on
the receiver are available for selection.
Notes
• This function is only available if your
MusicCAST server is connected to a correctly
configured tuner-equipped YAMAHA AV receiver
via a cross type RS-232C cable. See page 122 of
the MCX-1000 owner’s manual for an explanation
of how to configure the MusicCAST server and
AV receiver, or page 133 of the same manual for
an explanation of how to display a list of
controllable YAMAHA AV receivers on screen.
• The MusicCAST server can only distribute one
radio preset source signal to MusicCAST clients.
Changing the radio preset source selection on any
MusicCAST client changes the radio preset
source external source selection for all
MusicCAST clients connected to your
MusicCAST server. The MusicCAST server
automatically switches to external analog input.
• The MusicCAST server cannot distribute signals
from external components or AV receivers in
PCM format. It distributes all such signals in MP3
format regardless of the PCM settings on the
Playback system setting screen of the
MusicCAST server (page 125, MCX-1000
owner’s manual).
Playing back songs
Using the procedure described below changes the
Input setting on your AV receiver to tuner if it is
connected to the MusicCAST server via its REC
OUT jack.
OFF TIMER
DIGITAL AUDIO TERMINAL MCX–A10
ON
TIMER
MENU
PLAY INFO.
MENU
PUSH
SELECT
–
VOL
+
PHONES
u / d
SELECT
ON TIMER
I23
456
7
MENU
GROUP GROUP
BOOK
MARK
49
REPEAT RANDOM
PAUSE
STOP
PLAY
SELECT
VOL
SLEEP
S
PLAY
INFO.
INPUT
MUTERECALL
Page 49

Advanced playback options
SELECT
External Inpu...
Station 1
Station 2
Station 3
Station 4
Station 5
■ Selecting a radio station
Check that the MusicCAST server and connected
receiver are both switched on before carrying out
the following procedure:
1. Press and hold MENU for two seconds
to return to the Top Menu screen.
Top Menu
MENU
Play
Recall
Edit Bookmark
Setup
Input
Play
2. Use u / d to move the cursor to “Play”
and press SELECT.
The Play Menu screen appears on the display.
Play Menu
SELECT
Artists
Albums
Genres
All Songs
Playlists
3. Use u / d to move the cursor to
“External Inputs” and press SELECT.
The External Inputs screen appears on the
display.
6. Use u / d to move the cursor to the
station you want to access and press
SELECT.
The Play Info screen appears and playback of
the selected radio station begins.
4. Use u / d to move the cursor to “AV
Receiver” and press SELECT.
The display lists the preset groups available on
the receiver.
5. Use u / d to move the cursor to a
preset group and press SELECT.
The display lists the stations available within
the preset group.
SELECT
SELECT
SELECT
External Inpu...
Optical
Coaxial
Analog
AV Receiver
External Inpu...
Preset A
Preset B
Preset C
Preset D
Preset E
External Inpu...
Station 1
Station 2
Station 3
Station 4
Station 5
50
Page 50

Listening to an external sound source
You can listen to audio from an external source
connected to the AUX IN jack on your MusicCAST
client.
Carry out the following procedure to listen to an
external sound source using the MusicCAST client.
OFF TIMER
SLEEP
ON TIMER
DIGITAL AUDIO TERMINAL MCX–A10
ON
TIMER
MENU
PLAY INFO.
MENU
PUSH
SELECT
–
VOL
+
PHONES
u / d
SELECT
REPEAT RANDOM
I23
PAUSE
456
STOP
7
PLAY
MENU
GROUP GROUP
SELECT
BOOK
MARK
VOL
S
PLAY
INFO.
INPUT
MUTERECALL
1. Press and hold MENU for two seconds
to return to the Top Menu screen.
Top Menu
MENU
Play
Recall
Play
Edit Bookmark
Setup
Input
Advanced playback options
Playing back songs
2. Use u / d to move the cursor to “Input”
and press SELECT.
The Input screen appears on the display.
Input
SELECT
Server
Client AUX
3. Use u / d to move the cursor to “Client
AUX” and press SELECT.
Playback of any song you are currently
listening to stops.
4. The audio signal from the external
source is output from the MusicCAST
client speakers.
Alternatively, selecting a song from the
MusicCAST client menus returns this setting to
“Server”.
■ To return to playback from the
MusicCAST server library
Carry out the procedure as above, selecting
“Server” instead of “Client AUX” in step 3.
51
Page 51

Using the Bookmark function
SELECT
Artists
Albums
Genres
All Songs
Playlists
Play Menu
Wave
The Red Blouse
Look To The Sky
Batidinha
Triste
Artist-Songs
SELECT
Wave
The Red Blouse
Look To The Sky
Batidinha
Triste
Artist-Songs
The MusicCAST system can store a list of your favorite songs for easy access. You can access this list using
the bookmark function. Each client on your MusicCAST network has one such list, which you can access
but not alter from other clients. Each list can store up to 999 bookmarks, which you can copy to a playlist if
you wish. All songs that have been bookmarked appear with a check sign displayed beside them in all of the
song list menus.
Adding a song to the list of bookmarks
There are two methods you can use to add a song to your list of bookmarks.
OFF TIMER
SLEEP
ON TIMER
DIGITAL AUDIO TERMINAL MCX–A10
ON
TIMER
MENU
PLAY INFO.
MENU
PUSH
SELECT
–
VOL
+
PHONES
u / d
SELECT
REPEAT RANDOM
I23
PAUSE
456
STOP
7
PLAY
MENU
GROUP GROUP
SELECT
BOOK
MARK
VOL
S
PLAY
INFO.
INPUT
MUTERECALL
BOOKMARK
■ Adding a song using the Play Info screen
1. Follow through the steps described in
the “Playback” section (see pages 35 –
44) to start playback of a song.
The Play Info screen appears on the display.
Play Info
Artist name
Album name
Song name
Album
2. Press BOOKMARK.
A check sign appears beside the song name on
the on screen display.
Play Info
BOOK
MARK
Artist name
Album name
Song name
Album
2. Use u / d to move the cursor to “Play”
and press SELECT.
The Play Menu screen appears on the display.
3. Access the song list via the Artists,
Albums, Genres, or All Songs menus as
described on pages 35 – 44.
4. Use u / d to move the cursor to the
song you wish to add to the bookmark
list.
5. Press BOOKMARK.
A check sign appears beside the song you have
registered to the bookmark list.
BOOK
MARK
■ Adding a song using the menu
1. Press and hold MENU for two seconds
To remove the bookmark from the song, press
BOOKMARK again.
to return to the Top Menu screen.
Top Menu
MENU
Play
Recall
Play
Edit Bookmark
Setup
Input
Note
• Press BOOKMARK when the cursor is next to an
album to bookmark the entire album. You cannot
remove bookmarks in this manners. Remove
bookmarks for songs individually.
52
Page 52

Using the Bookmark function
Removing a song from the bookmark list
There are two methods you can use to remove a
song from the list of bookmarks.
OFF TIMER
SLEEP
ON TIMER
DIGITAL AUDIO TERMINAL MCX–A10
ON
TIMER
MENU
PLAY INFO.
MENU
PUSH
SELECT
–
VOL
+
PHONES
u / d
SELECT
REPEAT RANDOM
I23
PAUSE
456
STOP
7
PLAY
MENU
GROUP GROUP
SELECT
BOOK
MARK
VOL
S
PLAY
INFO.
INPUT
MUTERECALL
BOOKMARK
■ Removing a song using the Menu
1. Press and hold MENU for two seconds
to return to the Top Menu screen.
Top Menu
MENU
Play
Recall
Play
Edit Bookmark
Setup
Input
2. Use u / d to move the cursor to “Play”
and press SELECT.
The Play Menu screen appears on the display.
5. Press BOOKMARK.
The check sign displayed beside the
bookmarked song disappears.
Artist-Songs
BOOK
MARK
Note
• If the song was not previously bookmarked, this
action assigns the song to a bookmark list.
Wave
The Red Blouse
Look To The Sky
Batidinha
Triste
Playing back songs
Play Menu
SELECT
Artists
Albums
Genres
All Songs
Playlists
3. Access the song list via the Artists,
Albums, Genres, or All Songs menus as
described on pages 35 – 44.
All songs currently bookmarked have a check
symbol displayed beside them.
Artist-Songs
SELECT
Wave
The Red Blouse
Look To The Sky
Batidinha
Triste
4. Use u / d to move the cursor to the
song you wish to remove from the
bookmark list.
53
Page 53

Using the Bookmark function
Edit Bookmark
Copy to Playlist
Please wait.
Edit Bookmark
Copy to Playlist
Jan 3 9:21 ...
Playlist Name
Copying the bookmark list to a playlist
You can copy the contents of your MusicCAST
client bookmark list to a playlist. This makes your
client bookmark list readily available to all other
clients on your MusicCAST network as well as to
the MusicCAST server, and preserves the
bookmark list so that it is not affected by any
subsequent changes you make.
OFF TIMER
SLEEP
ON TIMER
DIGITAL AUDIO TERMINAL MCX–A10
ON
TIMER
MENU
PLAY INFO.
MENU
PUSH
SELECT
–
VOL
+
PHONES
PLAY
u / d
REPEAT RANDOM
I23
PAUSE
456
STOP
7
PLAY
MENU
GROUP GROUP
SELECT
BOOK
MARK
VOL
S
PLAY
INFO.
INPUT
MUTERECALL
SELECT
■ Copying the bookmark list
1. Press and hold MENU for two seconds
to return to the Top Menu screen.
Top Menu
MENU
Play
Recall
Play
Edit Bookmark
Setup
Input
4. Press PLAY to create a playlist.
The MusicCAST client creates a new playlist in
collection 1 on the MusicCAST server. The
display returns to the Edit Bookmark screen.
PLAY
2. Use u / d to move the cursor to “Edit
Bookmark” and press SELECT.
The Edit Bookmark screen appears on the
display.
Edit
Bookmark
SELECT
Copy to Playlist
Clear All
3. Use u / d to move the cursor to “Copy
to Playlist” and press SELECT.
Edit Bookmark
SELECT
Press PLAY to copy,
STOP to cancel.
54
Page 54

Erasing the bookmark list
To erase the bookmark list completely, carry out the
following procedure:
OFF TIMER
SLEEP
ON TIMER
DIGITAL AUDIO TERMINAL MCX–A10
ON
TIMER
MENU
PLAY INFO.
MENU
PUSH
SELECT
–
VOL
+
PHONES
u / d
SELECT
REPEAT RANDOM
I23
PAUSE
456
STOP
7
PLAY
MENU
GROUP GROUP
SELECT
BOOK
MARK
VOL
S
PLAY
INFO.
INPUT
MUTERECALL
■ Erasing the bookmark list
1. Press and hold MENU for two seconds
to return to the Top Menu screen.
Top Menu
MENU
Play
Recall
Play
Edit Bookmark
Setup
Input
Using the Bookmark function
Playing back songs
2. Use u / d to move the cursor to “Edit
Bookmark” and press SELECT.
The Edit Bookmark screen appears on the
display.
Edit
Bookmark
SELECT
Copy to Playlist
Clear All
3. Use u / d to move the cursor to “Clear
All” and press SELECT.
A configuration message appears on the display.
Edit Bookmark
SELECT
Press PLAY to clear,
STOP to cancel.
4. Press PLAY or STOP.
PLAY: Confirm the erase action and return
to the Edit Bookmark menu.
STOP: Cancel the action and return to the
Edit Bookmark menu.
55
Page 55

MusicCAST settings
Default system settings
The following table illustrates the default settings for all of the parameters described in this section.
Setting menu
Setup
Input
Tone
Volume level
Parameter group
OFF Timer
ON Timer
Auto Play
Auto Level Control
Contrast
Network
Treble
Bass
Parameter name
Manual Setup – Mode
Manual Setup – Server ID
Manual Setup – DHCP
Manual Setup – IP Address
Manual Setup – Subnet Mask
Manual Setup – ESS ID
Manual Setup – WEP key
Parameter setting
OFF
OFF
OFF
OFF
68 %
Auto
SV-00000
ON
192.168.1.2
255.255.255.0
MC
(none)
SERVER
±0dB
±0dB
–70dB
56
Page 56

MusicCAST settings
OFF Timer
OFF
120min
OFF Timer
30min
OFF Timer
OFF
30min
60min
90min
120min
Top Menu
Play
Input
OFF Timer
30min
Top Menu
Play
Input
OFF Timer
60min
Using the OFF Timer function
You can set the MusicCAST client to switch itself
off after a set period of time, which you can also
define. This function is called the OFF Timer. You
can use the ON and OFF timers simultaneously.
■ Using the menu to set the OFF Timer
function
Carry out the following procedure to set the OFF
timer from the menu of your MusicCAST client.
OFF TIMER
SLEEP
ON TIMER
DIGITAL AUDIO TERMINAL MCX–A10
ON
TIMER
MENU
PLAY INFO.
OFF TIMER
MENU
PUSH
SELECT
–
VOL
+
PHONES
u / d
SELECT
REPEAT RANDOM
I23
PAUSE
456
STOP
7
PLAY
MENU
GROUP GROUP
SELECT
BOOK
MARK
VOL
S
PLAY
INFO.
INPUT
MUTERECALL
1. Press and hold MENU for two seconds
to return to the Top Menu screen.
Top Menu
MENU
Play
Recall
Play
Edit Bookmark
Setup
Input
2. Use u / d to move the cursor to “Setup”
and press SELECT.
The Setup screen appears on the display.
Setup
SELECT
OFF Timer
ON Timer
Auto Play
Auto Level Control
Contrast
3. Use u / d to move the cursor to “OFF
Timer” and press SELECT.
The OFF Timer screen appears on the display.
OFF Timer
SELECT
OFF
30min
60min
90min
120min
4. Use u / d to select the time (in minutes)
for the MusicCAST to continue in the
power-on mode before switching itself
to the standby mode.
SELECT
5. Press SELECT to confirm the setting.
The confirmation screen appears on the display.
SELECT
6. The display returns to the Setup screen
after a small delay, and the TIMER
indicator lights.
■ Using OFF TIMER on the remote control
to set the OFF Timer
Carry out the following procedure to access the
OFF Timer function from any screen.
1. Press OFF TIMER.
The OFF Timer screen appears on the display.
OFF TIMER
2. Press OFF TIMER repeatedly to cycle
through the available settings.
The available OFF Timer settings are 30, 60,
90, 120 minutes, and OFF. Selecting any setting
other than OFF activates the OFF timer
function, and sets it to place the MusicCAST
client in sleep mode 30 – 120 minutes from the
time you activate it, depending on the setting
you select.
OFF TIMER
Other functions
3. The OFF Timer screen disappears after a
small delay.
57
Page 57

MusicCAST settings
SELECT
ON Timer
[ON 00:00 ]
ON Timer
ON 00:00
SELECT
ON Timer
[OFF ]
Save
Cancel
ON Timer
[ON 00:00 ]
Save
Cancel
Using the ON Timer function
The MusicCAST client has a timer function that
enables it to automatically switch on and begin
playback at a time you specify, rather like an alarm
clock. This is called the ON Timer function. You
can use the ON timer and OFF Timer
simultaneously.
OFF TIMER
SLEEP
ON TIMER
DIGITAL AUDIO TERMINAL MCX–A10
ON
TIMER
MENU
PLAY INFO.
ON TIMER
MENU
PUSH
SELECT
–
VOL
+
PHONES
u / j / d / i
SELECT
REPEAT RANDOM
I23
PAUSE
456
STOP
7
PLAY
MENU
GROUP GROUP
SELECT
BOOK
MARK
VOL
S
PLAY
INFO.
INPUT
MUTERECALL
■ Setting the timer
Carry out the following procedure to set the
MusicCAST client to power up at a specified time:
1. Press and hold MENU for two seconds
to return to the Top Menu screen.
Top Menu
MENU
Play
Recall
Play
Edit Bookmark
Setup
Input
4. Press SELECT.
The cursor enters the ON Timer setting field.
5. Use u / d to set the ON Timer setting to
ON and press i.
SELECT
6. Enter the time you wish the MusicCAST
client to switch on by pressing u / d to
cycle through the displayed characters,
and pressing j / i to move the cursor
left and right.
7. Press SELECT to confirm the setting.
8. If you are satisfied with the settings you
have made, move the cursor to “Save”
and press SELECT.
The confirmation screen appears.
2. Use u / d to move the cursor to “Setup”
and press SELECT.
The Setup screen appears on the display.
3. Use u / d to move the cursor to “ON
Timer” and press SELECT.
The ON Timer screen appears on the display.
SELECT
SELECT
Setup
OFF Timer
ON Timer
Auto Play
Auto Level Control
Contrast
ON Timer
[OFF ]
Save
Cancel
Alternatively, select “Cancel” to exit from this
screen without saving and confirmation.
9. Use the method described on page 63 or
the Off Timer function described on
page 57 to place the MusicCAST client
in Sleep mode.
The TIMER indicator lights.
58
Page 58

MusicCAST settings
MENU
Top Menu
Play
Recall
Play
Edit Bookmark
Setup
Input
SELECT
Setup
OFF Timer
ON Timer
Auto Play
Auto Level Control
Contrast
SELECT
Auto Play
OFF
ON
■ Using the ON TIMER key to activate the
ON Timer
Carry out the following procedure to activate the
ON Timer function from any screen.
1. Press ON TIMER
The ON Timer screen appears on the display.
ON TIMER
Top Menu
Play
ON Timer
ON 00:00
Input
2. Press ON TIMER repeatedly to turn the
ON Timer function on or off.
3. The ON Timer screen disappears after a
small delay.
4. Use the method described on page 63 or
the Off Timer function described on
page 57 to place the MusicCAST client
in Sleep mode.
The TIMER indicator lights.
Note
Using the Auto Play function
You can set the MusicCAST client to automatically
resume playback of the track it was playing at the
time it was last placed in Sleep mode, when you
return it to On mode.
Carry out the following procedure to configure your
MusicCAST client to use Auto Play:
OFF TIMER
SLEEP
ON TIMER
DIGITAL AUDIO TERMINAL MCX–A10
ON
TIMER
MENU
PLAY INFO.
MENU
PUSH
SELECT
–
VOL
+
PHONES
u / d
SELECT
REPEAT RANDOM
I23
PAUSE
456
STOP
7
PLAY
MENU
GROUP GROUP
SELECT
BOOK
MARK
VOL
S
PLAY
INFO.
INPUT
MUTERECALL
1. Press and hold MENU for two seconds
to return to the Top Menu screen.
Other functions
• Set the MusicCAST server to ON or LAN standby
mode when using the ON Timer to start playback
of music on a MusicCAST client.
2. Use u / d to move the cursor to “Setup”
and press SELECT.
The Setup screen appears on the display.
3. Use u / d to move the cursor to “Auto
Play” and press SELECT.
The Auto Play screen appears on the display.
4. Use u / d to move the cursor to “ON” if
you wish to use the Auto Play function,
or “OFF” if you wish to switch it off.
5. Press SELECT.
The MusicCAST client is now configured to
use your new settings for Auto Play.
59
Page 59

MusicCAST settings
SELECT
Auto Level Co...
OFF
ON
Top Menu
Play
Recall
Play
Edit Bookmark
Setup
Input
SELECT
Setup
OFF Timer
ON Timer
Auto Play
Auto Level Control
Contrast
Using the Auto Level Control function
The MusicCAST system allows you to store and
listen to multiple different albums from different
artists, without reference to the original sequence of
songs on the album. Because some albums are
recorded with different sound levels to others, you
may encounter large differences between the sound
levels of songs when playing back songs on your
MusicCAST client.
The Auto Level Control function on the
MusicCAST client automatically reduces or
increases the base volume level to a theoretical
average when it plays back songs, in order to
eliminate any large differences in the volume at
which the original songs were recorded.
Note
• The Auto Level Control Function may not always
produce the best results if you are listening to
different genres with very different base volume
levels sequentially. If you notice that the quality
of your listening experience decreases when you
turn Auto Level Control on, please turn it off.
■ Turning Auto Level Control on or off
1. Press and hold MENU for two seconds
to return to the Top Menu screen.
MENU
2. Use u / d to move the cursor to “Setup”
and press SELECT.
The Setup screen appears on the display.
3. Use u / d to move the cursor to “Auto
Level Control” and press SELECT.
The Auto Level Control screen appears on the
display.
DIGITAL AUDIO TERMINAL MCX–A10
ON
TIMER
MENU
PLAY INFO.
OFF TIMER
SLEEP
ON TIMER
REPEAT RANDOM
I23
PAUSE
456
STOP
7
PLAY
S
PLAY
MENU
MENU
PUSH
SELECT
–
VOL
+
PHONES
u / d
SELECT
GROUP GROUP
SELECT
BOOK
MARK
VOL
INFO.
INPUT
MUTERECALL
4. Use u / d to move the cursor to “ON” if
you wish to use the Auto Level Control
function, or “OFF” if you wish to switch
it off.
5. Press SELECT.
The MusicCAST client is now configured to
use your new settings for Auto Level Control.
60
Page 60

MusicCAST settings
SELECT
Tone
Treble
0.0dB
SELECT
Tone
Bass
0.0dB
Using the tone controls
The tone controls on the MusicCAST client allow
you to alter the nature of the sound being output.
You can change these settings to give a strong deep
bass, or a lighter treble to the sound.
OFF TIMER
SLEEP
ON TIMER
DIGITAL AUDIO TERMINAL MCX–A10
ON
TIMER
MENU
PLAY INFO.
MENU
PUSH
SELECT
–
VOL
+
PHONES
u / j / d / i
SELECT
REPEAT RANDOM
I23
PAUSE
456
STOP
7
PLAY
MENU
GROUP GROUP
SELECT
BOOK
MARK
VOL
S
PLAY
INFO.
INPUT
MUTERECALL
■ Altering the tone settings
1. Press and hold MENU for two seconds
to return to the Top Menu screen.
Top Menu
MENU
Play
Play
Recall
Edit Bookmark
Setup
Input
The relevant menu appears on the display:
Other functions
4. Use i or u to increase the value of the
setting, and j or d to decrease the value
of the setting.
5. Press SELECT or MENU to confirm the
value you have set and return to the
Tone screen.
2. Use u / d to move the cursor to “Tone”
and press SELECT.
The Tone screen appears on the display.
Tone
SELECT
Treble
Bass
3. Use u / d to move the cursor to the
desired parameter and press SELECT.
Treble: Increase the setting of this parameter
to increase the amount of treble in
the sound output by the MusicCAST
client.
Bass: Increase the setting of this parameter
to increase the amount of bass in the
sound output by the MusicCAST
client.
61
Page 61

MusicCAST settings
SELECT
Contrast
Contrast
Using the contrast controls
Depending on the location of the MusicCAST
client, You may need to alter the contrast of the
display for easier viewing. Darker settings make for
easier viewing at night, while you may find it easier
to view the display with brighter settings during the
daytime.
OFF TIMER
SLEEP
ON TIMER
DIGITAL AUDIO TERMINAL MCX–A10
ON
TIMER
MENU
PLAY INFO.
MENU
PUSH
SELECT
–
VOL
+
PHONES
u / j / d / i
SELECT
REPEAT RANDOM
I23
PAUSE
456
STOP
7
PLAY
MENU
GROUP GROUP
SELECT
BOOK
MARK
VOL
S
PLAY
INFO.
INPUT
MUTERECALL
■ Altering the contrast settings
1. Press and hold MENU for two seconds
to return to the Top Menu screen.
Top Menu
MENU
Play
Recall
Play
Edit Bookmark
Setup
Input
3. Use u / d to move the cursor to the
“Contrast” and press SELECT.
The Contrast screen appears on the display.
4. Use i or u to increase the value of the
setting, and j or d to decrease the value
of the setting.
5. Press SELECT or MENU to confirm the
value you have set and return to the
Setup screen.
2. Use u / d to move the cursor to “Setup”
and press SELECT.
The Setup screen appears on the display.
Setup
SELECT
OFF Timer
ON Timer
Auto Play
Auto Level Control
Contrast
62
Page 62

MusicCAST settings
SELECT
Please wait.
Using the Sleep function
You can set your MusicCAST client in Sleep mode
when you are not using it. Power consumption is
reduced in Sleep mode, but the MusicCAST client
still consumes a small amount of power to keep the
display and the remote control signal receiver in
operation.
You can place the unit in sleep mode by carrying
out the procedure below:
OFF TIMER
SLEEP
ON TIMER
DIGITAL AUDIO TERMINAL MCX–A10
ON
TIMER
MENU
PLAY INFO.
SLEEP
MENU
PUSH
SELECT
–
VOL
+
PHONES
u / d
SELECT
REPEAT RANDOM
I23
PAUSE
456
STOP
7
PLAY
MENU
GROUP GROUP
SELECT
BOOK
MARK
VOL
S
PLAY
INFO.
INPUT
MUTERECALL
■ Switching the unit to sleep mode
1. Press and hold MENU for two seconds
to return to the Top Menu screen.
Top Menu
MENU
Play
Recall
Play
Edit Bookmark
Setup
Input
2. Use u / d to move the cursor to “Sleep”
and press SELECT.
The Sleep prompt appears on the display.
Sleep
SELECT
Press SELECT to sleep.
3. Press SELECT.
The MusicCAST client switches to sleep mode,
and the current time appears on the display.
Other functions
You can also switch the unit to sleep mode by
pressing SLEEP on the remote control. The
time does not display correctly if the
MusicCAST client is not able to establish a
good connection with the MusicCAST server. If
the time displayed is not correct, alter the date
and time settings on the MusicCAST server to
display them correctly (See page 117 in the
MCX-1000 owner’s manual for an explanation
of how to do this).
■ Turning the MusicCAST client on again
Press SLEEP on the remote control or
SELECT on the MusicCAST client.
The MusicCAST client turns on.
Note
• The MusicCAST client automatically places itself
in sleep mode if you do not use it for 30 minutes.
63
Page 63

SELECT
Version:
Date:
Information
System settings
Displaying System Information on the
MusicCAST client
You can check the version of the system installed in
your MusicCAST client.
OFF TIMER
SLEEP
ON TIMER
DIGITAL AUDIO TERMINAL MCX–A10
ON
TIMER
MENU
PLAY INFO.
MENU
PUSH
SELECT
–
VOL
+
PHONES
u / d
SELECT
REPEAT RANDOM
I23
PAUSE
456
STOP
7
PLAY
MENU
GROUP GROUP
SELECT
BOOK
MARK
VOL
S
PLAY
INFO.
INPUT
MUTERECALL
■ Accessing the System Information
screen
1. Press and hold MENU for two seconds
to return to the Top Menu screen.
Top Menu
MENU
Play
Recall
Play
Edit Bookmark
Setup
Input
4. Use u / d to move the cursor to
“Information” and press SELECT.
The Information screen appears on the display.
2. Use u / d to move the cursor to “Setup”
and press SELECT.
The Setup screen appears on the display.
Setup
SELECT
OFF Timer
ON Timer
Auto Play
Auto Level Control
Contrast
3. Use u / d to move the cursor to
“System” and press SELECT.
The System screen appears on the display.
System
SELECT
Information
System Update
System Reset
64
Page 64

System settings
SELECT
System Update
Version:
Date:
Press PLAY to update.
System Update
Receiving...
System Update
Data Check...
System Update
Flash Erase...
System Update
Flash Write...
System Update
Verify...
System Update
Update O.K.
Updating the MusicCAST client firmware
At times Yamaha releases updates to the firmware
in either or both the MusicCAST client and server.
These updates are generally aimed at improving the
experience of using your MusicCAST equipment.
Follow the instructions provided with the update
carefully. Do not use the update procedure unless
specifically instructed to do so.
The procedure for updating the firmware is as
follows:
OFF TIMER
SLEEP
ON TIMER
DIGITAL AUDIO TERMINAL MCX–A10
ON
TIMER
MENU
PLAY INFO.
MENU
PUSH
SELECT
–
VOL
+
PHONES
PLAY
u / d
SELECT
REPEAT RANDOM
I23
PAUSE
456
STOP
7
PLAY
MENU
GROUP GROUP
SELECT
BOOK
MARK
VOL
S
PLAY
INFO.
INPUT
MUTERECALL
1. Place the update CD in the disc tray in
your MusicCAST server.
2. Update the firmware on your
MusicCAST server if necessary (see
page 128 of the MCX-1000 owner’s
manual).
6. Use u / d to move the cursor to
“System Update” and press SELECT.
The System Update prompt appears on the
display.
7. Press PLAY to begin the update
process.
The following screens appear in order:
Other functions
3. Press and hold MENU for two seconds
to return to the Top Menu screen.
4. Use u / d to move the cursor to “Setup”
and press SELECT.
The Setup screen appears on the display.
5. Use u / d to move the cursor to
“System” and press SELECT.
The System screen appears on the display.
SELECT
SELECT
MENU
Top Menu
Play
Recall
Edit
Play
Bookmark
Setup
Input
Setup
OFF Timer
ON Timer
Auto Play
Auto Level Control
Contrast
System
Information
System Update
System Reset
65
Page 65

System settings
Top Menu
Play
Recall
Play
Edit
Bookmark
Setup
Input
8. The MusicCAST automatically switches
itself off and then on again.
The update process is now complete. Carry out
the procedure described on page 64 to check the
version of the firmware.
Resetting the MusicCAST client to default
settings
At times it may be convenient to return your
MusicCAST client to the default state it was in
when you first purchased it. You may wish to do
this in cases such as the following:
• When your MusicCAST client appears to be
functioning incorrectly for no apparent reason,
and reference to the troubleshooting section (page
69) is of no assistance.
• When you have made multiple mistakes in setting
the parameters on your MusicCAST client and
wish to start again.
• When you wish to reset the MusicCAST
completely for use in a different MusicCAST
network.
Warning
• Resetting the MusicCAST client to its default
settings will not reverse any updates to the
MusicCAST software that you have made, or
erase any data stored in your MusicCAST
network. It resets all settable parameters to their
server settings, so you need to set them to suit
your requirements after performing the reset
procedure. Note that in resetting all the
parameters, the MusicCAST client also resets its
network parameters, and disconnects itself from
your MusicCAST network.
DIGITAL AUDIO TERMINAL MCX–A10
ON
TIMER
PUSH
SELECT
MENU
PLAY INFO.
–
VOL
+
PHONES
MENU
PLAY
u / d
SELECT
■ Resetting your MusicCAST client
1. Press and hold MENU for two seconds
to return to the Top Menu screen.
MENU
66
OFF TIMER
ON TIMER
REPEAT RANDOM
I23
PAUSE
456
STOP
7
PLAY
MENU
GROUP GROUP
SELECT
BOOK
MARK
VOL
SLEEP
S
PLAY
INFO.
INPUT
MUTERECALL
Page 66

System settings
MENU
Top Menu
Play
Recall
Play
Edit Bookmark
Setup
Input
SELECT
Setup
OFF Timer
ON Timer
Auto Play
Auto Level Control
Contrast
SELECT
Network
Status
Auto Configuration
Manual Setup
2. Use u / d to move the cursor to “Setup”
and press SELECT.
The Setup screen appears on the display.
Setup
SELECT
OFF Timer
ON Timer
Auto Play
Auto Level Control
Contrast
3. Use u / d to move the cursor to
“System” and press SELECT.
The System screen appears on the display.
System
SELECT
Information
System Update
System Reset
4. Use u / d to move the cursor to
“System Reset” and press SELECT.
The System Reset prompt appears on the
display.
System Reset
SELECT
Press PLAY to restore
to factory setting.
Displaying Network Status Information on
the MusicCAST client
Your MusicCAST client depends on its network
connection to obtain data from the MusicCAST
server. The Network Status screen provides you
with information on the quality of the network
connection your MusicCAST is currently using.
OFF TIMER
SLEEP
ON TIMER
DIGITAL AUDIO TERMINAL MCX–A10
ON
TIMER
MENU
PLAY INFO.
MENU
PUSH
SELECT
–
VOL
+
PHONES
u / d / j
SELECT
REPEAT RANDOM
I23
PAUSE
456
STOP
7
PLAY
MENU
GROUP GROUP
SELECT
BOOK
MARK
VOL
S
PLAY
INFO.
INPUT
MUTERECALL
■ Accessing the Network Status screen
1. Press and hold MENU for two seconds
to return to the Top Menu screen.
Other functions
5. Press PLAY to begin the resetting
process.
6. The MusicCAST automatically switches
itself off and then on again.
The resetting process is now complete.
2. Use u / d to move the cursor to “Setup”
and press SELECT.
The Setup screen appears on the display.
3. Use u / d to move the cursor to
“Network” and press SELECT.
The Network screen appears on the display.
67
Page 67

System settings
4. Use u / d to move the cursor to
“Status” and press SELECT.
The Status screen appears on the display.
Status
SELECT
IP Address
Wireless LAN
5. Use u / d to select the item you want to
display.
Select IP Address to display the following
information
IP Address
ID: [ ]
IP:[0.0.0.0]
Msk:[ 0. 0. 0. 0]
MAC:00:00:00:00:00:00
ID: The unique ID your MusicCAST
client uses for network configuration
(see pages 26, 27).
IP: The IP address your MusicCAST
client is using.
Msk: The subnet mask your MusicCAST
client is operating under.
MAC: The MAC address of your
MusicCAST client. The MAC
address is the unique identification
code your MusicCAST client uses in
the MusicCAST network.
6. Press j to return to the Status screen.
Select Wireless LAN to display the following
information:
Wireless LAN
Comm. Quality 100%
Signal Level 100%
BitRate 11Mbps
Comm. Quality: The quality of the network
signal your MusicCAST client
is receiving.
Signal Level: The strength of the signal your
MusicCAST client is
receiving.
BitRate: The speed at which your
MusicCAST client is receiving data
over the network connection,
measured in megabits per second.
68
Page 68

Troubleshooting
Refer to the chart below when this unit does not function properly. If the problem you are experiencing is
not listed below or if the instruction below does not help, set this unit to the standby mode, disconnect the
power cord, and contact the nearest authorized YAMAHA dealer or service center.
Problem
Auto Configuration
does not appear to
work correctly.
The MusicCAST client
does not output any
sound.
You cannot start
playback on the
MusicCAST client.
Cause
The network is not configured correctly.
The network signal is weak (for wireless
network connections only).
Either the MusicCAST server or the
MusicCAST client is not set to Auto
Configuration mode.
The MusicCAST server is storing songs
or recording.
The volume setting of the MusicCAST
client is low.
The MusicCAST client is not correctly
connected to speakers.
Auto Configuration is not complete.
The network is not configured correctly.
The MusicCAST server is turned off.
Remedy
Check the network settings of the MusicCAST client
and MusicCAST server.
Try changing the network channel or the location of
the MusicCAST client, or alternatively changing to a
wired network connection.
Check the configuration procedure and try again.
Stop recording and start the Auto Configuration
process again.
Increase the volume setting.
Check the connections between the MusicCAST
client and the speakers.
Run the Auto Configuration process.
Check the network settings of the MusicCAST client
and MusicCAST server.
Turn the MusicCAST server on.
Refer to
page
21 – 34
21 – 34
21 – 34
MCX-
1000
owner’s
manual,
page 21
10, 12, 13
11, 20
26, 27
21 – 34
20
Appendix
Playback from the
MusicCAST client
skips.
The hard disk drive in the MusicCAST
server does not contain any songs that
have been completely encoded to MP3
format.
When the MusicCAST server is set to
distribute MP3 files to your MusicCAST
client, the MusicCAST client displays a
“*” beside songs which the MusicCAST
server has not converted to MP3 format.
The network signal is weak (for wireless
network connections only).
The network signal is weak (for wireless
network connections only).
The network is extremely congested (for
wired network connections only).
Wait until the MusicCAST server completes
encoding songs to MP3.
Register songs stored from external components to
the library, or wait for the MP3 encoding process to
complete.
The “*” displayed beside PCM-only songs disappears
when encoding is complete.
Try changing the network channel or the location of
the MusicCAST client, or alternatively changing to a
wired network connection.
Try changing the network channel or the location of
the MusicCAST client, or alternatively changing to a
wired network connection.
Place your MusicCAST clients under an independent
subnet mask, or upgrade your network hardware.
MCX-
1000
owner’s
manual,
page 121
MCX-
1000
owner’s
manual,
page 121
21 – 34
21 – 34
21 – 34
69
Page 69

Troubleshooting
Problem
The MusicCAST client
does not play back
some songs
displayed in the song
selection menus.
You cannot select an
external input from
the MusicCAST client.
Playback from an
external component
cuts off for no reason.
None of the controls
other than the volume
control have any
effect on the
MusicCAST client.
Starting playback on
the MusicCAST client
produces interference
noise on nearly
radios.
The MusicCAST client
does not output any
sound when you
search forward or
backward through a
track.
Cause
You have not registered songs recorded
from an external component to the library.
The MusicCAST server is recording from
an external source.
The MusicCAST server is receiving signal
change requests from another source.
The MusicCAST server is locking the
MusicCAST client.
The MusicCAST client and the radio are
too close to each other.
This is normal when searching through a
track.
Remedy
Wait until the MusicCAST server completes
encoding songs to MP3.
Wait until the MusicCAST server finishes recording.
Stop the signal request changes from other
MusicCAST clients.
Use the MusicCAST server to remove the lock.
Place the MusicCAST client and the radio at least
one meter apart.
Continue to use this function in the same manner.
Refer to
page
MCX-
1000
owner’s
manual,
page 121
MCX-
1000
owner’s
manual,
page 21
48
MCX-
1000
owner’s
manual,
page 92
23
—
The message “Error:
Amp Protection
Active” appears on
the on-screen display
of MusicCAST client.
The side panel cover
does not reattach
correctly.
Playback on the
MusicCAST client
skips or pauses.
There is a significant
pause between
playback of songs on
the MusicCAST client.
The cables are not connected correctly.
You are using low-impedance speakers.
You are using audio or video cables other
than those supplied to connect the
MusicCAST client to an amplifier or TV/
monitor.
The rubber covering of the LAN cable is
blocking the panel cover.
You are using close to the maximum
number of MusicCAST clients and
simultaneously playing, storing, or editing
on the MusicCAST server.
This is normal when listening with the
MusicCAST client.
Connect the cables correctly.
Please use speakers with an impedance of at least 4
ohms.
The panel cannot close unless you use the audio or
video cable with the L shaped jacks supplied with the
MusicCAST client.
Remove the rubber covering from the LAN cable.
Reduce the number of MusicCAST clients to which
the MusicCAST server is distributing music, or stop
any operation you are performing on the MusicCAST
server.
11
—
—
—
23, 24
—
70
Page 70

Troubleshooting
Problem
You cannot access
the MusicCAST preset
tuner.
Playback cuts off or
switches to another
input when listening
to a tuner preset on
the MusicCAST client.
Cause
The ANALOG REC LEVEL on the front
panel of the MusicCAST server is set too
low.
The MusicCAST server AV receiver
parameters are configured incorrectly.
The AV receiver connected to the
MusicCAST server is not turned on.
The AV receiver is not correctly connected
to the MusicCAST server.
The AV receiver is not receiving a strong
radio signal.
Another MusicCAST component is
changing the tuner preset or external input
on the MusicCAST server.
Remedy
Increase the ANALOG REC LEVEL.
Configure the AV receiver parameters correctly.
Turn the AV receiver on.
Correctly connect the AV receiver to the MusicCAST
server.
Refer to the owner’s manual of your AV receiver.
Stop the other MusicCAST component from
changing input sources.
Refer to
page
MCX-
1000
owner’s
manual,
page 29
MCX-
1000
owner’s
manual,
page 122
—
MCX-
1000
owner’s
manual,
page 122
—
48 – 51
Appendix
Auto Configuration
does not appear to
work correctly.
There is more than one DHCP server
operation in the network trying to use the
same IP addresses.
Deactivate the MusicCAST server DHCP function.
MCX-
1000
owner's
manual
page 110
71
Page 71

Terms used in this manual
This manual uses a number of terms that, though not specific to the MusicCAST system, are not in general
everyday use. In addition, some terms are used in a slightly unusual context. These words are listed
alphabetically and in context below, along with an explanation of their meaning.
to store the same song. However, sound quality is
Playback
Album
A collection of songs in the MusicCAST database
assigned to a particular artist, and given a name.
Each album is assigned to an artist. By default, each
CD you store in the MusicCAST server is stored as
an Album.
Artist
The item in the MusicCAST database to which
albums are assigned. The artist of any CD you store
in the MusicCAST is stored as the artist to the
corresponding album (see album above).
Bookmark list
A list of songs you have designated for easy
retrieval using a MusicCAST client.
not as good as that of PCM files, and the
MusicCAST server cannot record MP3 files to a
CD-R.
PCM format
A data format used to store music on the hard disk
drive in the MusicCAST server. PCM files provide
CD-quality audio playback but require a lot of
space on the hard disk drive.
Network connections
Connections
The links between the components in your
MusicCAST system which allows them to
exchange information. MusicCAST components
can make both wired and wireless connections.
Genre
The music type to which the albums stored in the
MusicCAST server are assigned. Examples include
Jazz, Rock, and Classical.
Group
The category which you are operating your
MusicCAST component in. For example, if you
playback an album without selecting a song, then
you are operating within the “album” category. If
you playback a genre without selecting a song, you
are operating within the “genre” category.
Playlist
A list of songs you designate using the MusicCAST
server for playback in a given sequence.
Song
A single continuous track, equivalent to a single
track from a CD, cassette, or other source, stored on
the MusicCAST server.
Recording
MP3 Format
A data format used to store music on the Hard Disk
Drive in the MusicCAST server. MP3 files take
roughly one tenth of the space that PCM files need
DHCP
A system of automatically assigning IP addresses to
components in a LAN. A server component running
a DHCP service assigns an IP address to
components when they are switched on.
ESS ID
The ID of the channel that your MusicCAST
system uses to transmit data when using wireless
connections.
IP address
Four 3 digit numbers that together make up a
unique identity number used by a component
connected to a network.
LAN cable
A cable for connecting two components on a Local
Area Network (LAN).
Network
A network is a collection of electronic components
which share data and resources with one another.
Subnet mask
A number identifying the group within a network to
which a particular component belongs.
72
Page 72

Terms used in this manual
TCP/IP
An abbreviation of Transmission Control Protocol/
Internet Protocol, a system of coding information
that allows it to be shared efficiently on a network.
WEP
An abbreviation of Wired Equivalent Privacy. This
system encrypts data transferred between the
components on a wireless network. Components
with the same encryption key can share data with
each other, but components without this key cannot.
Wireless LAN
A network utilizing weak radio signals to share data
between components.
Wired LAN
A network utilizing LAN cables to share data
between components.
Hardware
CD
An abbreviation of Compact Disc. A small plastic
disc 12 cm (5”) in diameter encoded with prestored data.
storage capacity.
Hard disk
See “Hard disk drive”
MusicCAST client
The component in the MusicCAST system that
allows you to access songs stored in the
MusicCAST server for playback at a distance. Up
to seven MusicCAST clients can access the
MusicCAST server at once.
MusicCAST server
The component in the MusicCAST system that you
use to store and playback songs from CD. Other
components in the MusicCAST system obtain song
data from the MusicCAST server.
On-screen display
The LCD display on the MusicCAST client or the
display output to a TV or monitor connected to the
MusicCAST server.
Remote control
A handheld device for operating your MusicCAST
components at a distance.
Appendix
CD-R
An abbreviation of Compact Disc Recordable. A
small plastic disc identical to a CD in appearance,
onto which a device such as the MusicCAST server
can record data. The MusicCAST server can only
use Audio type CD-R media.
CD-RW
An abbreviation of Compact Disc Re-writable.
Controller
The device on the front panel of the MusicCAST
server and MusicCAST client used for entering data
and navigating through the menus contained in
these two components.
Front panel
The panel on the MusicCAST server and
MusicCAST client on which operational data is
displayed.
Hard disk drive
The component within your MusicCAST server
that allows it to store the audio material from your
CDs as data. Hard disk drive capacity is expressed
in megabytes, with a larger number denoting more
Software
Menu
A display consisting of a multiple choice style list
of options that you can choose from. Menus are
displayed on the on-screen display of the
MusicCAST client and server.
73
Page 73

Specifications
■ Audio performance
Frequency response (EIAJ)
...................................... 20 Hz to 20 kHz, ±0.5 dB
Signal to noise ratio (EIAJ) ............ 100 dB or more
Dynamic Range (EIAJ) .................... 90 dB or more
Total harmonic distortion + noise (EIAJ)
....................................................... 0.008 % or less
■ Input
AUX IN jack
Input sensitivity................................ 300 mVrms
■ Output
LINEOUT L/R
Output level..............................................2 Vrms
S. WOOFER jack
Output level (volume max.) ..................... 1 Vrms
PHONES jack
Output level (phones level max., 150 Ω, –20dB)
............................................................... 650 mV
SPEAKER OUT terminals
Maximum power (EIAJ, 4 Ω, 1kHz, 10 %THD)
....................................................... 17 W + 17 W
■ General
Playback data format .................. MP3, linear PCM
Power supply ................ AC 100 to 240 V, 50/60 Hz
Power consumption ......................................... 40 W
Standby power consumption
[U.S.A and Canada models] ......................... 0.7 W
[Europe and Australia models].....................1.1 W
Operating temperature ............................ +5 to 35˚C
Dimensions (W x H x D)
..
210 x 244.5 x 79 mm (8-5/16” x 9-1/4” x 3-1/8”)
Weight (without AC adaptor) ......... 2 kg (4 lbs 6 oz)
74
Page 74

Index
A
alarm clock ......................................................................58
Album ........................................................................35, 38
Artist ..........................................................................35, 37
Auto Configuration ........................................ 22, 25, 26, 28
Auto Play function ........................................................... 59
AUX IN ............................................................................ 11
AV receiver................................................................48, 49
B
Bitrate .............................................................................. 68
Bookmark ......................................................13, 36, 43, 52
Bookmarks ................................................................ 43, 52
C
collection ......................................................................... 41
Comm. quality ................................................................. 68
Contrast .......................................................................... 62
D
database ......................................................................... 40
DHCP ........................................................................28, 30
E
ESS ID ............................................................................ 30
F
firmware .......................................................................... 65
G
Genre .............................................................................. 39
Graphical user interface ..................................................15
Group .............................................................................. 36
H
Hub ........................................................................... 21, 24
I
IP Address .................................................................22, 32
P
PCM ................................................................................ 35
Play info screen ....................................................... 16, 36
playback group ........................................... 12, 13, 35, 45
playlist ........................................................ 35, 41, 52, 54
R
radio station .................................................................... 49
Random .......................................................................... 16
Random play ...................................................................16
Repeat ..................................................................... 12, 46
Repeat playback ............................................... 12, 35, 46
Resetting .........................................................................66
Router ...................................................................... 21, 24
RS-232C ......................................................................... 48
S
Server ID ........................................................... 22, 28, 32
Signal level ...................................................................... 68
Sleep ................................................................. 13, 14, 63
Song .......................................................................... 35, 40
Standby .............................................................. 10, 14, 57
Subnet mask ............................................................ 28, 33
System information ......................................................... 64
T
Time .......................................................................... 14, 35
Timer function ................................................... 10, 12, 57
Top menu .................................................................. 14, 15
U
Updating .......................................................................... 65
W
WEP key .................................................................. 28, 33
wired connection ............................................... 24, 25, 29
wireless connection .................................... 23, 25, 29, 30
wireless lan ............................................................... 22, 68
Appendix
L
LAN ..................................................................... 22, 23, 24
library .............................................................................. 49
Lock ................................................................................ 15
Lock icon .........................................................................15
M
MP3 ................................................................................. 35
MusicCAST client ......................................................10, 14
MusicCAST server .................................................... 20, 25
N
network ........................................................................... 21
network addresses ..........................................................22
network configuration ......................................................68
Network menu .......................................................... 28, 31
Network status ................................................................ 67
O
OFF Timer ................................................................12, 57
On-screen display ...................................... 12, 33, 34, 52
ON Timer ........................................................... 12, 58, 59
75
Page 75

This document is printed on chlorine free (ECF) paper with soy ink.
YAMAHA ELECTRONICS CORPORATION, USA 6660 ORANGETHORPE AVE., BUENA PARK, CALIF. 90620, U.S.A.
YAMAHA CANADA MUSIC LTD. 135 MILNER AVE., SCARBOROUGH, ONTARIO M1S 3R1, CANADA
YAMAHA ELECTRONIK EUROPA G.m.b.H. SIEMENSSTR. 22-34, 25462 RELLINGEN BEI HAMBURG, F.R. OF GERMANY
YAMAHA ELECTRONIQUE FRANCE S.A. RUE AMBROISE CROIZAT BP70 CROISSY-BEAUBOURG 77312 MARNE-LA-VALLEE CEDEX02, FRANCE
YAMAHA ELECTRONICS (UK) LTD. YAMAHA HOUSE, 200 RICKMANSWORTH ROAD WATFORD, HERTS WD18 7GQ, ENGLAND
YAMAHA SCANDINAVIA A.B. J A WETTERGRENS GATA 1, BOX 30053, 400 43 VÄSTRA FRÖLUNDA, SWEDEN
YAMAHA MUSIC AUSTRALIA PTY, LTD. 17-33 MARKET ST., SOUTH MELBOURNE, 3205 VIC., AUSTRALIA
Printed in Japan WB18780-1
 Loading...