

Page 1
MCX-2000
Digital Audio Server
UCABG
Setup Guide
Page 2
IMPORTANT SAFETY INSTRUCTIONS
1 Read these instructions.
CAUTION
RISK OF ELECTRIC SHOCK
DO NOT OPEN
2 Keep these instructions.
3 Heed all warnings.
4 Follow all instructions.
CAUTION: TO REDUCE THE RISK OF
ELECTRIC SHOCK, DO NOT REMOVE
COVER (OR BACK). NO USER-SERVICEABLE
PARTS INSIDE. REFER SERVICING TO QUALIFIED
SERVICE PERSONNEL.
• Explanation of Graphical Symbols
The lightning flash with arrowhead symbol,
within an equilateral triangle, is intended to
alert you to the presence of uninsulated
“dangerous voltage” within the product’s
enclosure that may be of sufficient magnitude
to constitute a risk of electric shock to persons.
The exclamation point within an equilateral
triangle is intended to alert you to the presence
of important operating and maintenance
(servicing) instructions in the literature
accompanying the appliance.
5 Do not use this apparatus near water.
6 Clean only with dry cloth.
7 Do not block any ventilation openings. Install in accordance
with the manufacturer’s instructions.
8 Do not install near any heat sources such as radiators, heat
registers, stoves, or other apparatus (including amplifiers) that
produce heat.
9 Do not defeat the safety purpose of the polarized or
grounding-type plug. A polarized plug has two blades with
one wider than the other. A grounding type plug has two
blades and a third grounding prong. The wide blade or the
third prong are provided for your safety. If the provided plug
does not fit into your outlet, consult an electrician for
replacement of the obsolete outlet.
10 Protect the power cord from being walked on or pinched
particularly at plugs, convenience receptacles, and the point
where they exit from the apparatus.
11 Only use attachments/accessories specified by the
manufacturer.
12 Use only with the cart, stand, tripod,
bracket, or table specified by the
manufacturer, or sold with the apparatus.
When a cart is used, use caution when
moving the cart/apparatus combination to
avoid injury from tip-over.
13 Unplug this apparatus during lightning storms or when unused
for long periods of time.
14 Refer all servicing to qualified service personnel. Servicing is
required when the apparatus has been damaged in any way,
such as power-supply cord or plug is damaged, liquid has been
spilled or objects have fallen into the apparatus, the apparatus
has been exposed to rain or moisture, does not operate
normally, or has been dropped.
We Want You Listening For A Lifetime
YAMAHA and the Electronic Industries Association’s Consumer Electronics Group want you to get the most out of your
equipment by playing it at a safe level. One that lets the sound come through loud and clear without annoying blaring or
distortion — and, most importantly, without affecting your sensitive hearing. Since hearing damage from loud sounds is
often undetectable until it is too late, YAMAHA and the Electronic Industries Association’s Consumer Electronics Group
recommend you to avoid prolonged exposure from excessive volume levels.
2
MCX-2000 Setup Guide
Page 3

COMPLIANCE INFORMATION STATEMENT
(DECLARATION OF CONFORMITY PROCEDURE)
Responsible Party:
Address:
Yamaha Electronics Corporation, U.S.A.
6660 Orangethorpe Avenue
Buena Park, CA 90620
Telephone:
Fax:
Type of Equipment:
Model Name:
714-522-9105
714-670-0108
Digital Audio Server
MCX-2000
This device complies with Part 15 of the FCC Rules.
Operation is subject to the following conditions:
1) this device may not cause harmful interference, and
2) this device must accept any interference received including interference that may cause undesired operation.
See the “TROUBLESHOOTING” section at the end of this manual if interference to radio reception is suspected.
FCC INFORMATION (for US customers only)
1 IMPORTANT NOTICE: DO NOT MODIFY THIS UNIT!
This product, when installed as indicated in the instructions
contained in this manual, meets FCC requirements. Modifications
not expressly approved by Yamaha may void your authority,
granted by the FCC, to use the product.
2 IMPORTANT: When connecting this product to accessories and/
or another product use only high quality shielded cables. Cable/s
supplied with this product MUST be used. Follow all installation
instructions. Failure to follow instructions could void your FCC
authorization to use this product in the USA.
3 NOTE: This product has been tested and found to comply with
the requirements listed in FCC Regulations, Part 15 for Class “B”
digital devices. Compliance with these requirements provides a
reasonable level of assurance that your use of this product in a
residential environment will not result in harmful interference
with other electronic devices.
This equipment generates/uses radio frequencies and, if not
installed and used according to the instructions found in the users
manual, may cause interference harmful to the operation of other
electronic devices.
Compliance with FCC regulations does not guarantee that
interference will not occur in all installations. If this product is
found to be the source of interference, which can be determined by
turning the unit “OFF” and “ON”, please try to eliminate the
problem by using one of the following measures:
Relocate either this product or the device that is being affected by
the interference.
Utilize power outlets that are on different branch (circuit breaker
or fuse) circuits or install AC line filter/s.
In the case of radio or TV interference, relocate/reorient the
antenna. If the antenna lead-in is 300 ohm ribbon lead, change the
lead-in to coaxial type cable.
If these corrective measures do not produce satisfactory results,
please contact the local retailer authorized to distribute this type of
product. If you can not locate the appropriate retailer, please
contact Yamaha Electronics Corporation, U.S.A. 6660
Orangethorpe Avenue, Buena Park, CA 90620.
The above statements apply ONLY to those products distributed
by Yamaha Corporation of America or its subsidiaries.
MCX-2000 Setup Guide
3
Page 4
CAUTION: READ THIS BEFORE OPERATING THIS UNIT
•To assure the finest performance, please read this manual carefully.
Keep it in a safe place for future reference.
• Install this unit in a well ventilated, cool, dry, clean place — a way from
direct sunlight, heat sources, vibration, dust, moisture, and/or cold.
Avoid ventilation space of at least 30 cm on the top, 20 cm on the left
and right, and 10 cm on the back of this unit.
• Locate this unit away from other electrical appliances, motors, or
transformers to avoid humming sounds.
• Do not expose this unit to sudden temperature changes from cold to
hot, and do not locate this unit in a environment with high humidity
(i.e. a room with a humidifier) to prevent condensation inside this unit,
which may cause an electrical shock, fire, damage to this unit, and/or
personal injury.
•Avoid installing this unit where foreign object may fall onto this unit
and/or this unit may be exposed to liquid dripping or splashing. On the
top of this unit, do NOT place:
• Other components, as they may cause damage and/or discoloration on
the surface of this unit.
• Burning objects (i.e. candles), as they may cause fire, damage to this
unit, and/or personal injury.
• Containers with liquid in them, as they may fall and liquid may
electrical shock to the user and/or damage to this unit.
• Do not cover the rear panel of this unit with a newspaper, tablecloth,
curtain, etc. in order not to obstruct heat radiation. If the temperature
inside this unit rises, it may cause fire, damage to this unit, and/or
personal injury.
• Do not plug in this unit to a wall outlet until all connections are
complete.
• Do not operate this unit upside-down. It may overheat, possibly causing
damage.
• Do not use force on switches, knobs and/or cords.
• When disconnecting the power cable from the wall outlet, grasp the
plug; do not pull the cord.
• Do not clean this unit with chemical solvents; this might damage the
finish. Use a clean, dry cloth.
• Only voltage specified on this unit must be used. Using this unit with a
higher voltage than specified is dangerous and may cause fire, damage
to this unit, and/or personal injury. YAMAHA will not be held
responsible for any damage resulting from use of this unit with a
voltage other than specified.
•To prevent damage by lightning, keep the power cord and outdoor
antennas disconnected from a wall outlet or the unit during a lightning
storm.
• Do not attempt to modify or fix this unit. Contact qualified YAMAHA
service personnel when any service is needed. The cabinet should never
be opened for any reasons.
• When not planning to use this unit for long periods of time (i.e.
vacation), disconnect the AC power plug from the wall outlet.
• Be sure to read the “TROUBLESHOOTING” section on common
operating errors before concluding that this unit is faulty.
• Before moving this unit, first check that there is no disc in the disc tray.
Finally, press STANDBY/ON to turn off this unit, and disconnect the
AC power plug from the wall outlet.
• Install this unit near the A C outlet and where the A C po wer plug can be
reached easily.
This unit is not disconnected from the AC power source as long as it is
connected to the wall outlet, ev en if this unit itself is turned off. In this
state, this unit is designed to consume a very small quantity of power.
WARNING
TO REDUCE THE RISK OF FIRE OR ELECTRIC SHOCK, DO
NOT EXPOSE THIS UNIT TO RAIN OR MOISTURE.
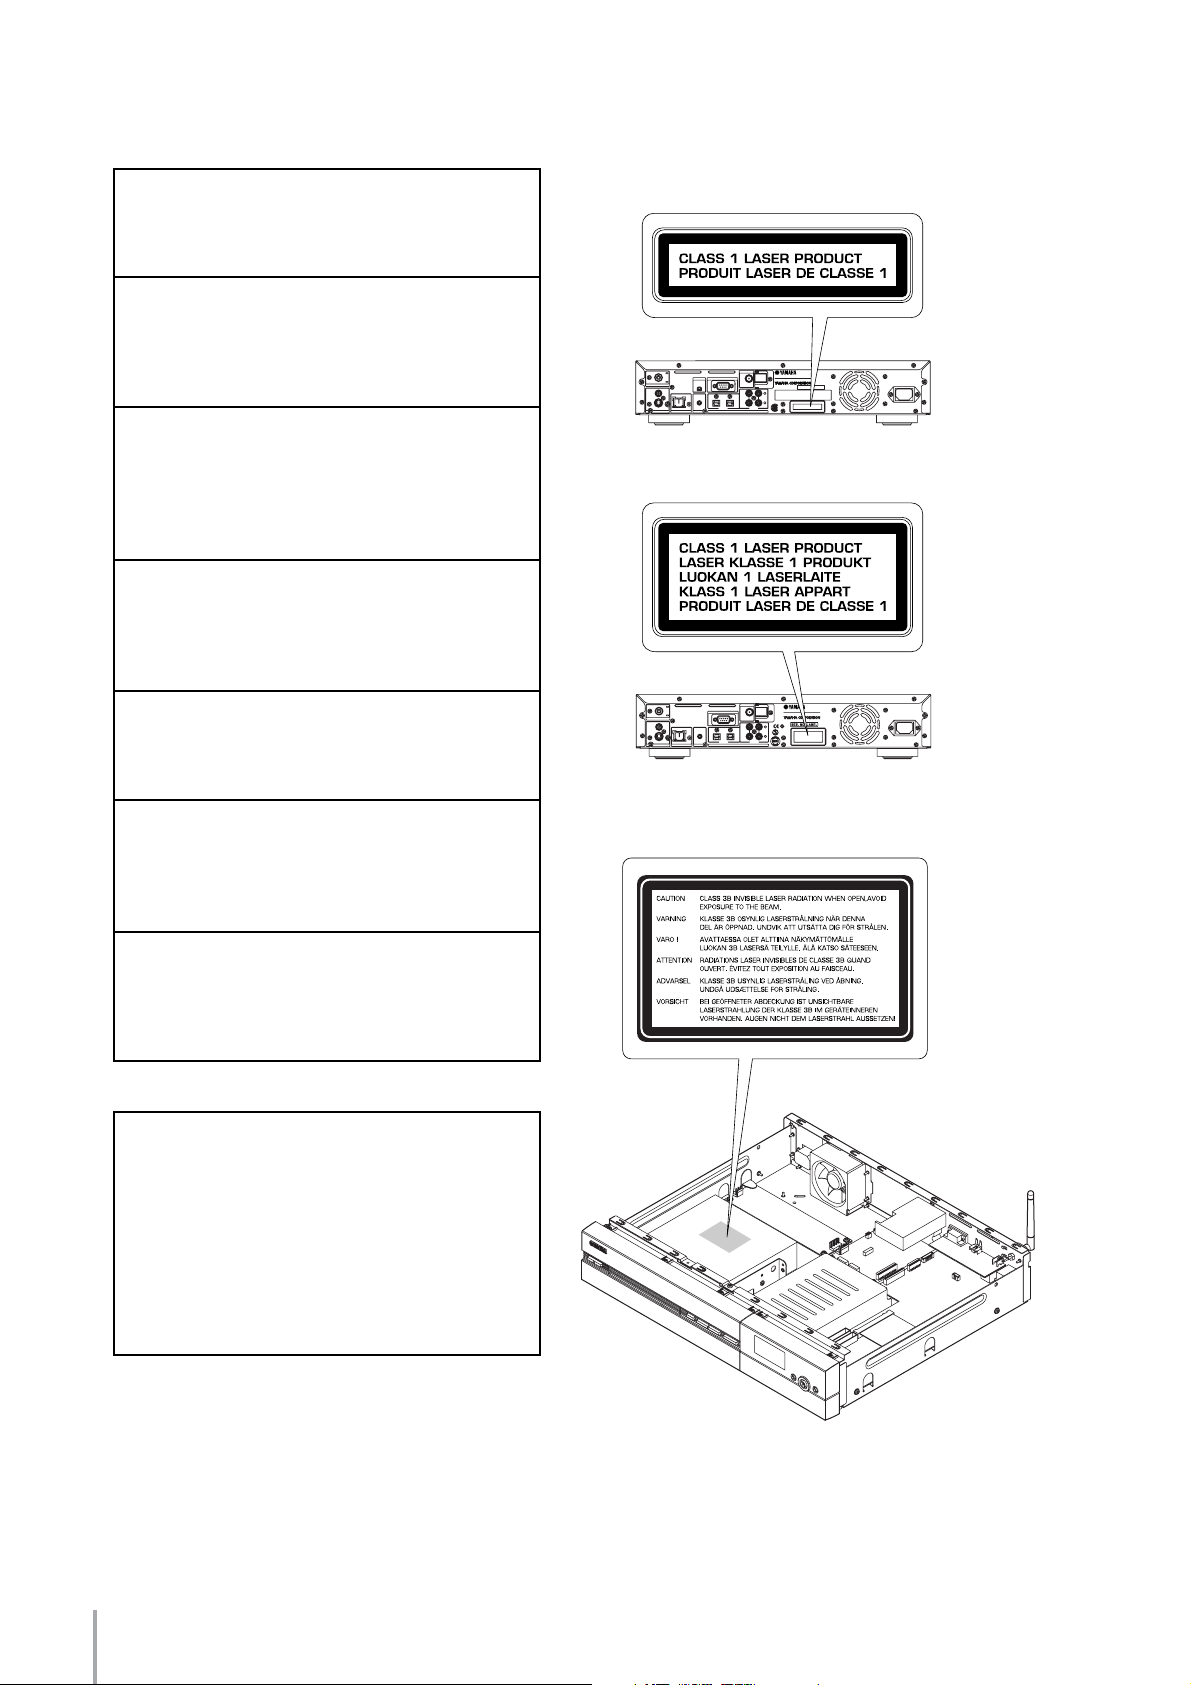
Laser component in this product is capable of emitting radiation
exceeding the limit for Class 1.
IMPORTANT!
Please record the serial number of this unit in the space below.
Model:
Serial No.:
The serial number is located on the rear of the unit.
Retain this Owner’s Manual in a safe place for future reference.
SPECIAL INSTRUCTIONS FOR U.K. MODEL
IMPORTANT
The wires in this mains lead are coloures in accordance with the
following code:
GREEN-and-YELLOW: Earth
BLUE: Neutral
BROWN: Live
As the colours of the wires in the mains lead of this apparatus may
not correspond with the coloured markings identifying the terminals
in your plug proceed as follows: The wire which is coloured GREENand-YELLOW must be connected to the terminal in the plug which is
marked by the letter E or by the safety earth symbol or coloured
GREEN or GREEN-and -YELLOW. The wire which is coloured
BLUE must be connected to the terminal which is marked with the
letter N or coloured BLACK. The wire which is coloured BROWN
must be connected to the terminal which is marked with the letter L
or coloured RED.
For U.K. customers
If the socket outlets in the home are not suitable for the plug supplied
with this appliance, it should be cut off and an appropriate 3 pin plug
fitted. For details, refer to the instructions described above.
Note: The plug sev ered from the mains lead must be destroyed, as a plug
with bared flexible cord is hazardous if engaged in a live socket outlet.
For Canadian Customers
To prevent electric shock, match wide blade of plug to wide slot and
fully insert.
This Class B digital apparatus complies with Canadian ICES-003.
Do not remove the connector of built-in antenna from the MCX-2000.
4
MCX-2000 Setup Guide
Page 5

For US customers
FCC WARNING
Change or modifications not expressly approved by the party
responsible for compliance could void the user’s authority to operate
the epuipment.
This equipment complies with FCC radiation exposure limits set
forth for uncontrolled equipment. This equipment should be installed
and operated with a minimum distance of at least 20cm between the
radiator and the persons body (excluding extremities: hands, wrists,
feet, and legs) and must not be co-located or operated with any other
antenna or transmitter.
For Canadian customers
Operation is subject to the following two conditions: (1) This device
may not cause interference, and (2), this device must accept any
interference received, including interference that may cause
undesired operation of the device.
The installer of this radio equipment must ensure that the antenna is
located or pointed such that it does not emit RF field in excess of
Health Canada limits for the general population: consult Safety Code
6, obtainable from Health Canada’s website www.hc-sc.gc.ca/rpb
For U.K. and European customers
CAUTION: READ THIS BEFORE OPERATING THIS UNIT
Allen voor klanten in Nederland
Bij dit product zijn batterijen geleverd.
Wanneer deze lee g zijn, moet u ze niet
weggooien maar inleveren als KCA.
Music recognition technology and related data are provided by Gracenote®.
Gracenote is the industry standard in music recognition technology and related
content delivery. For more information visit www.gracenote.com.
CD and music-related data from Gracenote, Inc., copyright © 2000-2005
Gracenote. Gracenote CDDB® Client Software, copyright 2000-2005
Gracenote. This product and service may practice one or more of the following
U.S. Patents: #5,987,525; #6,061,680; #6,154,773, #6,161,132, #6,230,192,
#6,230,207, #6,240,459, #6,330,593, and other patents issued or pending.
Services supplied and/or device manufactured under license for following Open
Globe, Inc. United States Patent 6,304,523.
Gracenote and CDDB are registered trademarks of Gracenote. The Gracenote
logo and logotype, and the “Powered by Gracenote” logo are trademarks of
Gracenote.
AT BE CY CZ DK
EE DE GR FI FR
HU IE IT LV LT
LU MT PL PT SK
SI ES SE NL GB
CH IS LI NO
We, the manufacturer YAMAHA hereby declare that the MCX-2000
is in compliance with the essential requirements and other relevant
provisions of Directive 1999 / 5 / EC.
Vi, tillverkaren YAMAHA, betygar härmed att MCX-2000 är i
överensstämmelse med de erforderliga krav och andra tillämpliga
bestämmelser som anges i direktivet 1999/5/EC.
Noi, il fabbricante YAMAHA, con questo dichiariamo che MCX2000 si trova in osservanza dei requisiti essenziali e delle altre
normative pertinenti della direttiva 1999 / 5 / EC.
Nosotros, el fabricante YAMAHA, declaramos por el presente
testamento que el MCX-2000 cumple con los requisitos esenciales y
otras provisiones pertinentes de la Directiva 1999/5/EC.
YAMAHA verklaart hierbij dat de MCX-2000 voldoet aan de
essentiële vereisten en andere relevante voorzieningen van Richtlijn
1999/5/EC.
MPEG Layer-3 audio coding technology licensed from Fraunhofer IIS and
Thomson.
Supply of this product does not convey a license nor imply any right to
distribute content created with this product in revenue-generating broadcast
systems (terrestrial, satellite, cable and/or other distribution channels),
streaming applications (via Internet, intranets and/or other networks), other
content distribution systems (pay-audio or audio-on-demand applications and
the like) or on physical media (compact discs, digital versatile discs,
semiconductor chips, hard drives, memory cards and the like). An independent
license for such use is required. For details, please visit http://mp3licensing.com
DigiOn and DiXiM are registered
trademarks or trademarks of DigiOn,
Inc.
The following fonts are used in the operational displays for this device.
NAGA10© Sadakazu NAGAO
This apparatus shall be connection of a MAINS SOCKET outlet with
aprotective earthing connection.
MCX-2000 Setup Guide
5
Page 6
CAUTION
Use of controls or adjustments or performance of
procedures other than those specified herein may
result in hazardous radiation exposure.
ATTENTION
L’emploi de commandes, de réglages ou un choix de
procédures différents des spécifications de cette
brochure peut entraîner une exposition à d’éventuelles
radiations pouvant être dangereses.
ACHTUNG
Die Verwendung von Bedienungselementen oder
Einstellungen oder die Durchführung von
Bedienungsvorgängen, die nicht in dieser Anleitung
aufgeführt sind, kann zu einem Kontakt mit
gefährlichen Laserstrahlen führen.
OBSERVERA
Användning av kontroller och justeringar eller
genomförande av procedurer andra än de som
specificeras i denna bok kan resultera i att du utsätter
dig för farlig strålning.
ATTENZIONE
Uso di controlli o regolazioni o procedure non
specificamente descritte può causare l’esposizione a
radiazioni di livello pericoloso.
W_LAN ANT
VIDEO
S
VIDEO
VIDEO LAN REMOTE
W_LAN ANT
VIDEO
S
VIDEO
VIDEO LAN REMOTE
XM RADIO
IN
IN
LINK/DATA 10/100
100–240V, 0.5–0.3A, 50/60Hz
MADE IN MALAYSIA
75ΩUNBAL.
OUT
IN
THIS CLASS B DIGITAL APPARATUS COMPLIES WITH
L
CANADIAN ICE-003.
CET APPAREIL NUMÉRIQUE DE LA CLASSE B EST CONFORME
À LA NORME NMB-003 DU CANADA.
R
OUT
OPTICAL
CLASS 1 LASER PRODUCT
LASER KLASSE 1 PRODUKT
®
ANALOG
AUDIO
WE87940–C–0
FM ANT
MODEL NO. MCX–2000
RS–
232C
(For Canada model)
WE87960–GB–0
FM ANT
232C
RS–
ININOUT
OPTICAL
IN
LINK/DATA 10/100
MODEL NO. MCX–2000
100–240V, 0.5–0.3A, 50/60Hz
75ΩUNBAL.
MADE IN MALAYSIA
OUT
L
CLASS 1 LASER PRODUCT
LASER KLASSE 1 PRODUKT
R
LUOKAN 1 LASERLAITE
KLASS 1 LASER APPART
PRODUIT LASER DE CLASSE 1
ANALOG
AUDIO
(For U.K. and Europe models)
: TO REDUCE THE RISK OF FIRE
WARNING
OR ELECTRIC SHOCK, DO NOT EXPOSE THIS
APPLIANCE TO RAIN OR MOISTURE.
AC IN
IC: 740B–MCX2000A
AC IN
PRECAUCIÓN
El uso de los controles o los procedimientos de ajuste
o utilización diferentes de los especificados en este
manual pueden causar una exposición peligrosa a la
radiación.
VOORZICHTIG
Gebruik van bedieningsorganen of instellingen, of
uitvoeren van handelingen anders dan staan
beschreven in deze handleiding kunnen leiden tot
blootstelling aan gevaarlijke stralen.
VAR O!
AVATTAESSA JA SUOJALUKITUS OHITETTAESSA
OLET ALTTIINA NÄKYMÄTTÖMÄLLE
LASERSÄTEILYLLE. ÄLÄ KATSO SÄTEESEEN.
VARNING!
OSYNLIG LASERSTRÅLNING NÄR DENNA DEL ÄR
ÖPPNAD OCH SPÄRREN ÄR URKOPPLAD.
BETRAKTA EJ STRÅLEN.
6
MCX-2000 Setup Guide
Page 7
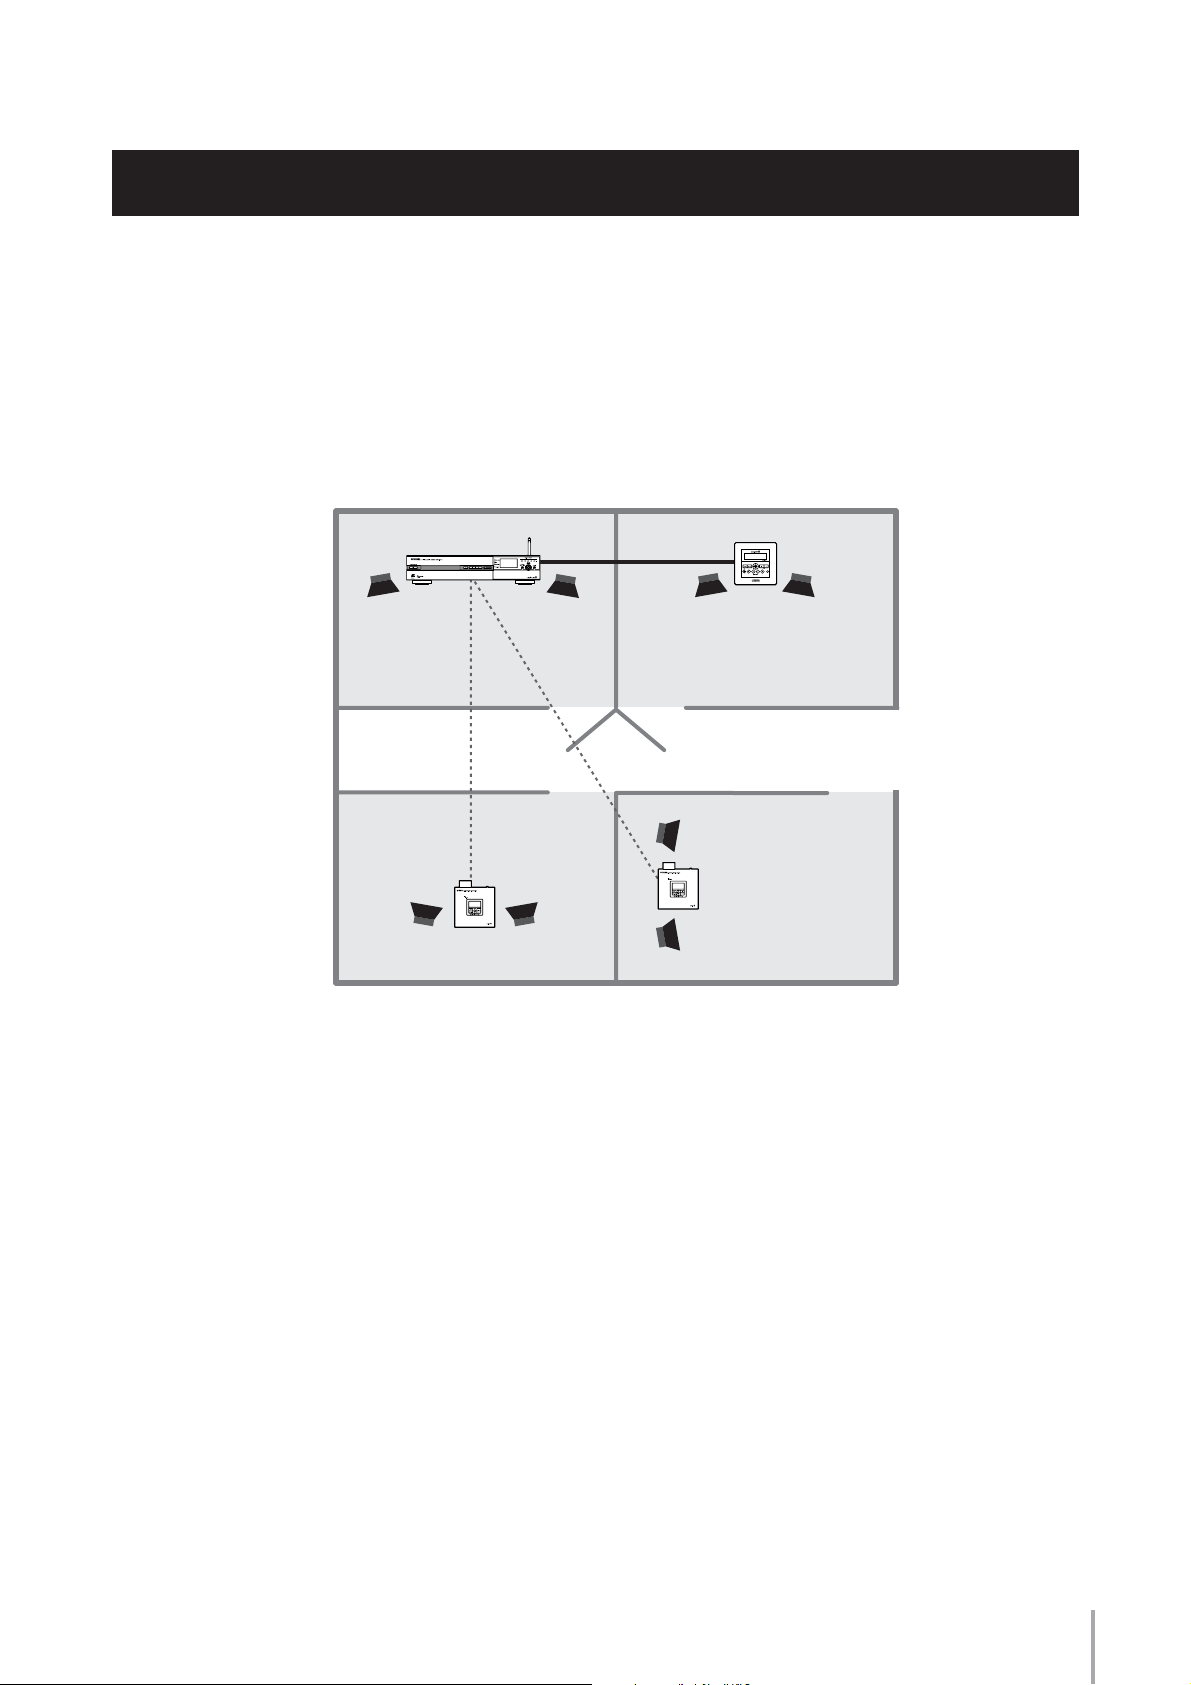
Welcome to MusicCAST
MusicCAST is a new, convenient home audio network featuring playback of digital music streams.
It
consists of a MCX-2000 music server and its dedicated clients (MCX-A10 or MCX-C15, sold separately).
With all your music sources—including CDs and radio broadcasts—brought together in a single server
unit, each person in the house can enjoy their own music, anytime, on demand.
MCX-2000
wireless
Wireless
MCX-A10
LAN
LAN
LAN
MCX-C15
MCX-A10
This guide helps you in quickly setting up your new MCX-2000 and client devices, building your
own MusicCAST network—and tapping into a whole new world of music listening enjoyment.
n
Each page number (page XX) in this guide indicates that you can see a detailed explanation on that page of the separate Owner’s Manual.
MCX-2000 Setup Guide
7
Page 8
Preparing Items
Find and take out the following items from the MusicCAST product packages. (See Owner’s Manual for a complete list of
supplied items.)
123
456
7
89
0
123
2 3 4
1
MCX-2000 unit (1)
Remote control (1)
Power cable (1)
Options
Video pin cable (RCA pin) (1)
Audio pin cable (1)
n If you’re using an MCX-C15, also prepare a network hub and two network cables (CAT5 straight cables) for connecting with the MCX-2000.
AA batteries (2)
MCX-A10
MCX-C15
MCX-CA15
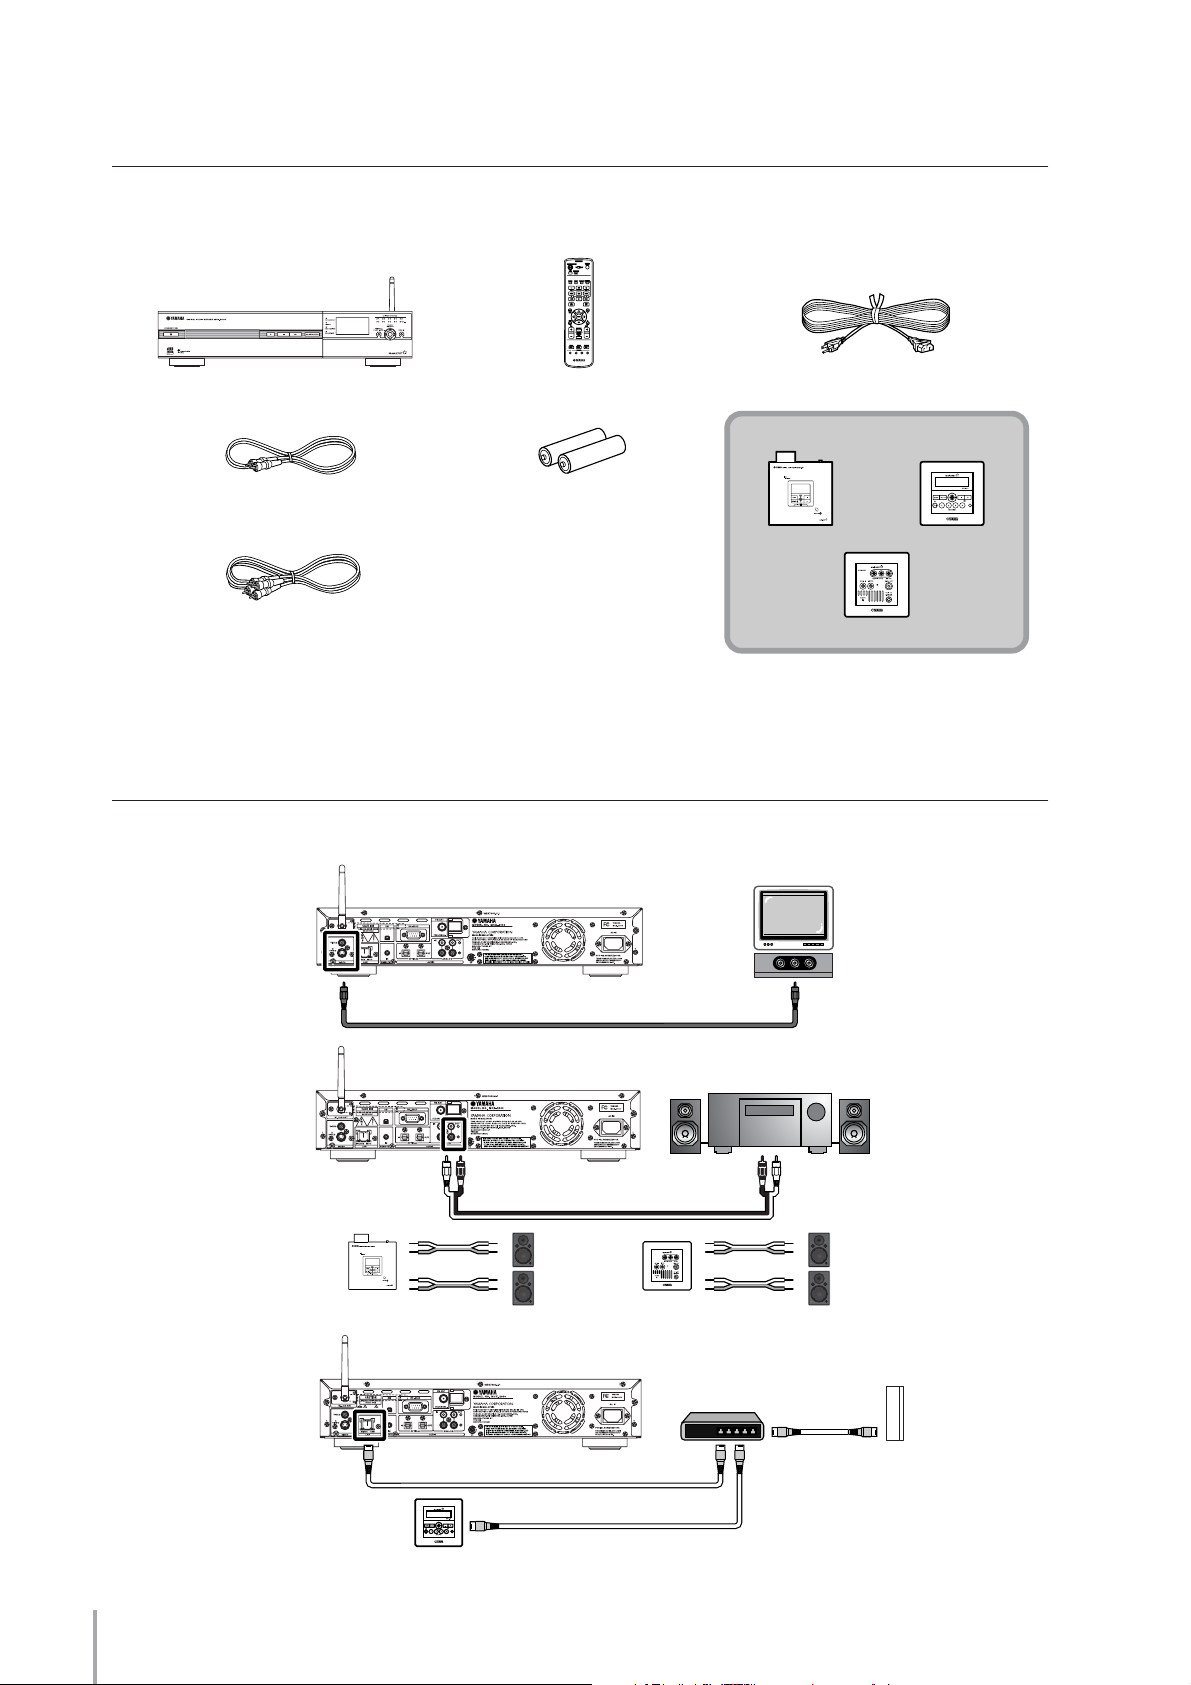
Connecting with Peripheral Devices
Connect the MCX-2000 and its clients, as well as any other desired peripherals as shown in the following illustrations.
MCX-2000
TV
Connecting the MCX-2000
to a TV
AUX
Connecting the MCX-2000
to an audio system
Connecting the MusicCAST
clients to speakers
Creating a MusicCAST
network
(network connections of
the MCX-2000 and
MusicCAST clients)
MCX-A10
Video pin cable (RCA pin)Video out
MCX-2000
Audio system
Audio pin cable
Speaker cables Speaker cables
Speaker
Speaker
MCX-CA15
MCX-2000
Network hub
Network cable
Network cable
MCX-C15
AUXAudio out
Speaker
Speaker
Router
Network cable
8
MCX-2000 Setup Guide
Page 9
Remote Control Features and Operations
You can use the supplied remote control to peform most of the MCX-2000 operations (such as selecting a menu item or
determining a setting value). Prepare the remote control before operations.
Setting Batteries
Set batteries inside the remote control as shown below.
3
2
1
1 Remove the bottom cover of the remote control.
2 Set two AA batteries (supplied) in appropriate directions, according to the illustration in the compartment.
3 Slide the cover until it snaps into place.
n If the remote control doesn’t work well, the batteries may be weak. Replace them with twe new AA batteries. Always handle batteries
appropriately, according to the safety precautions at the beginning of this manual.
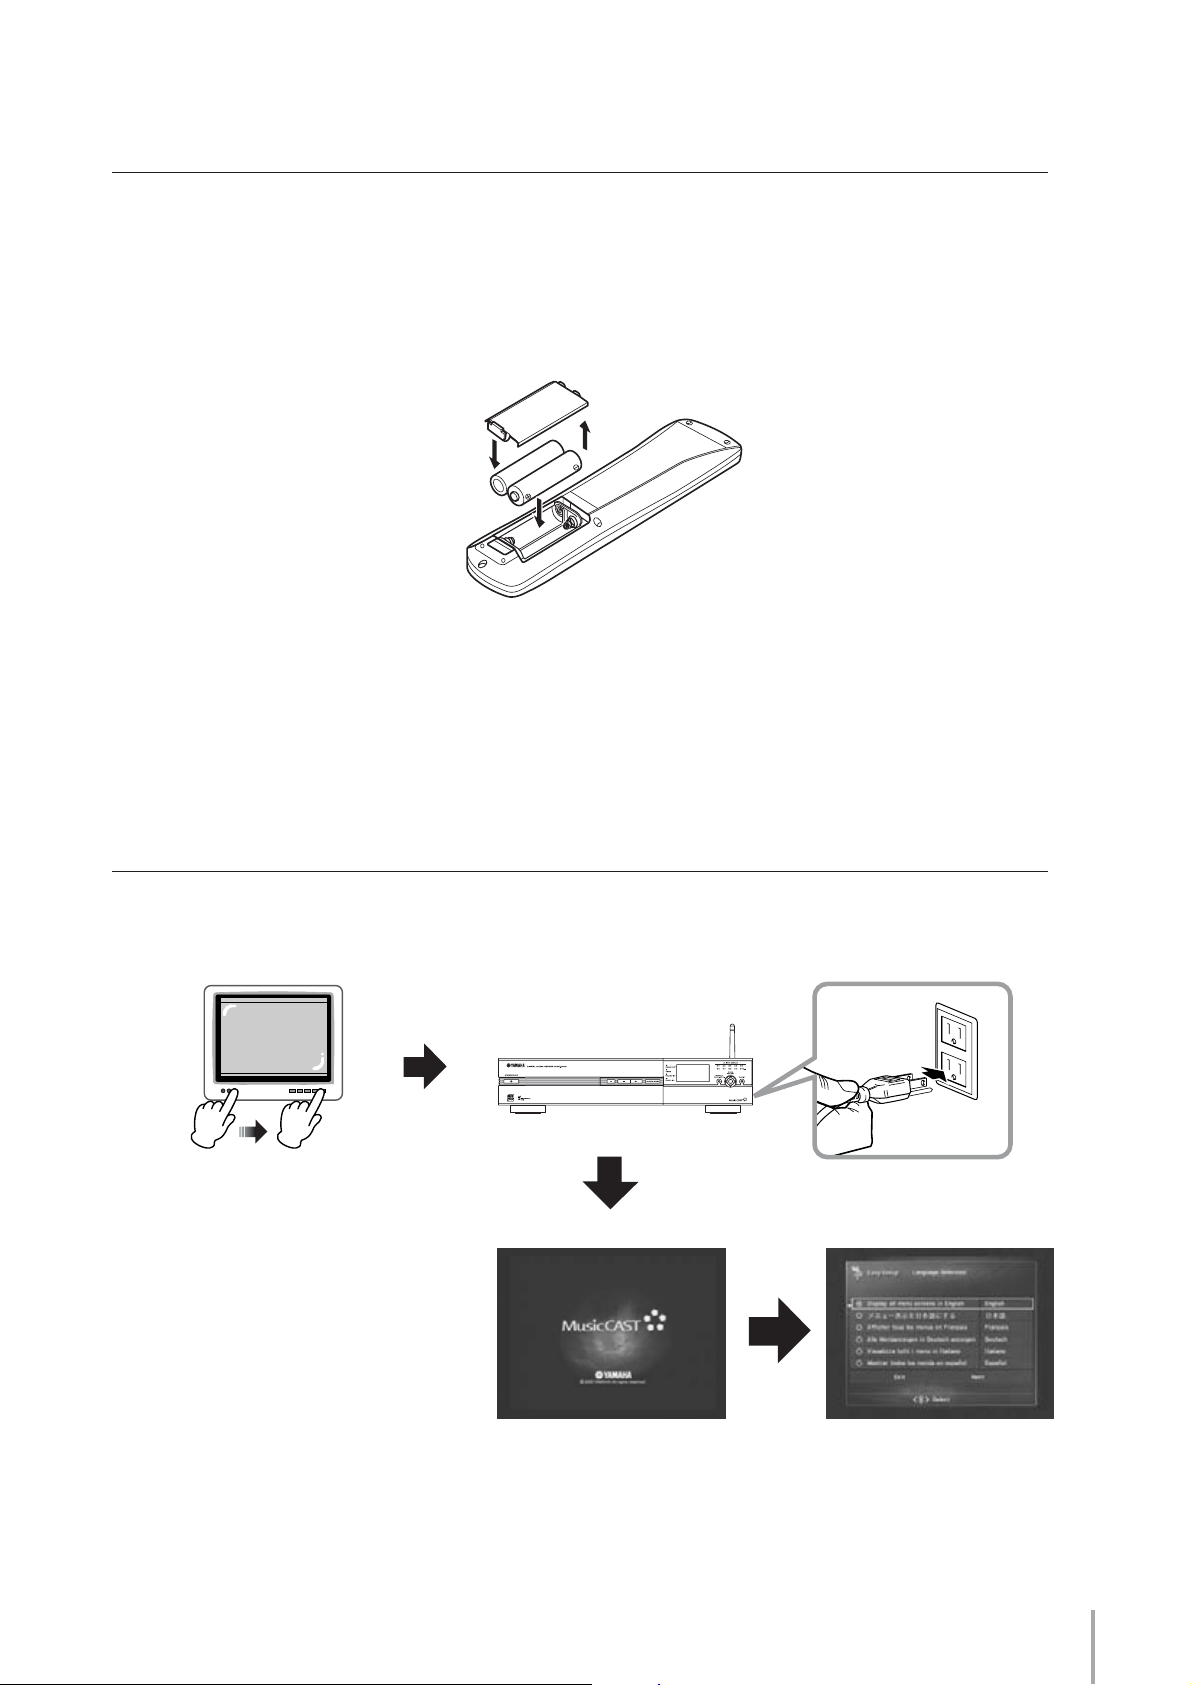
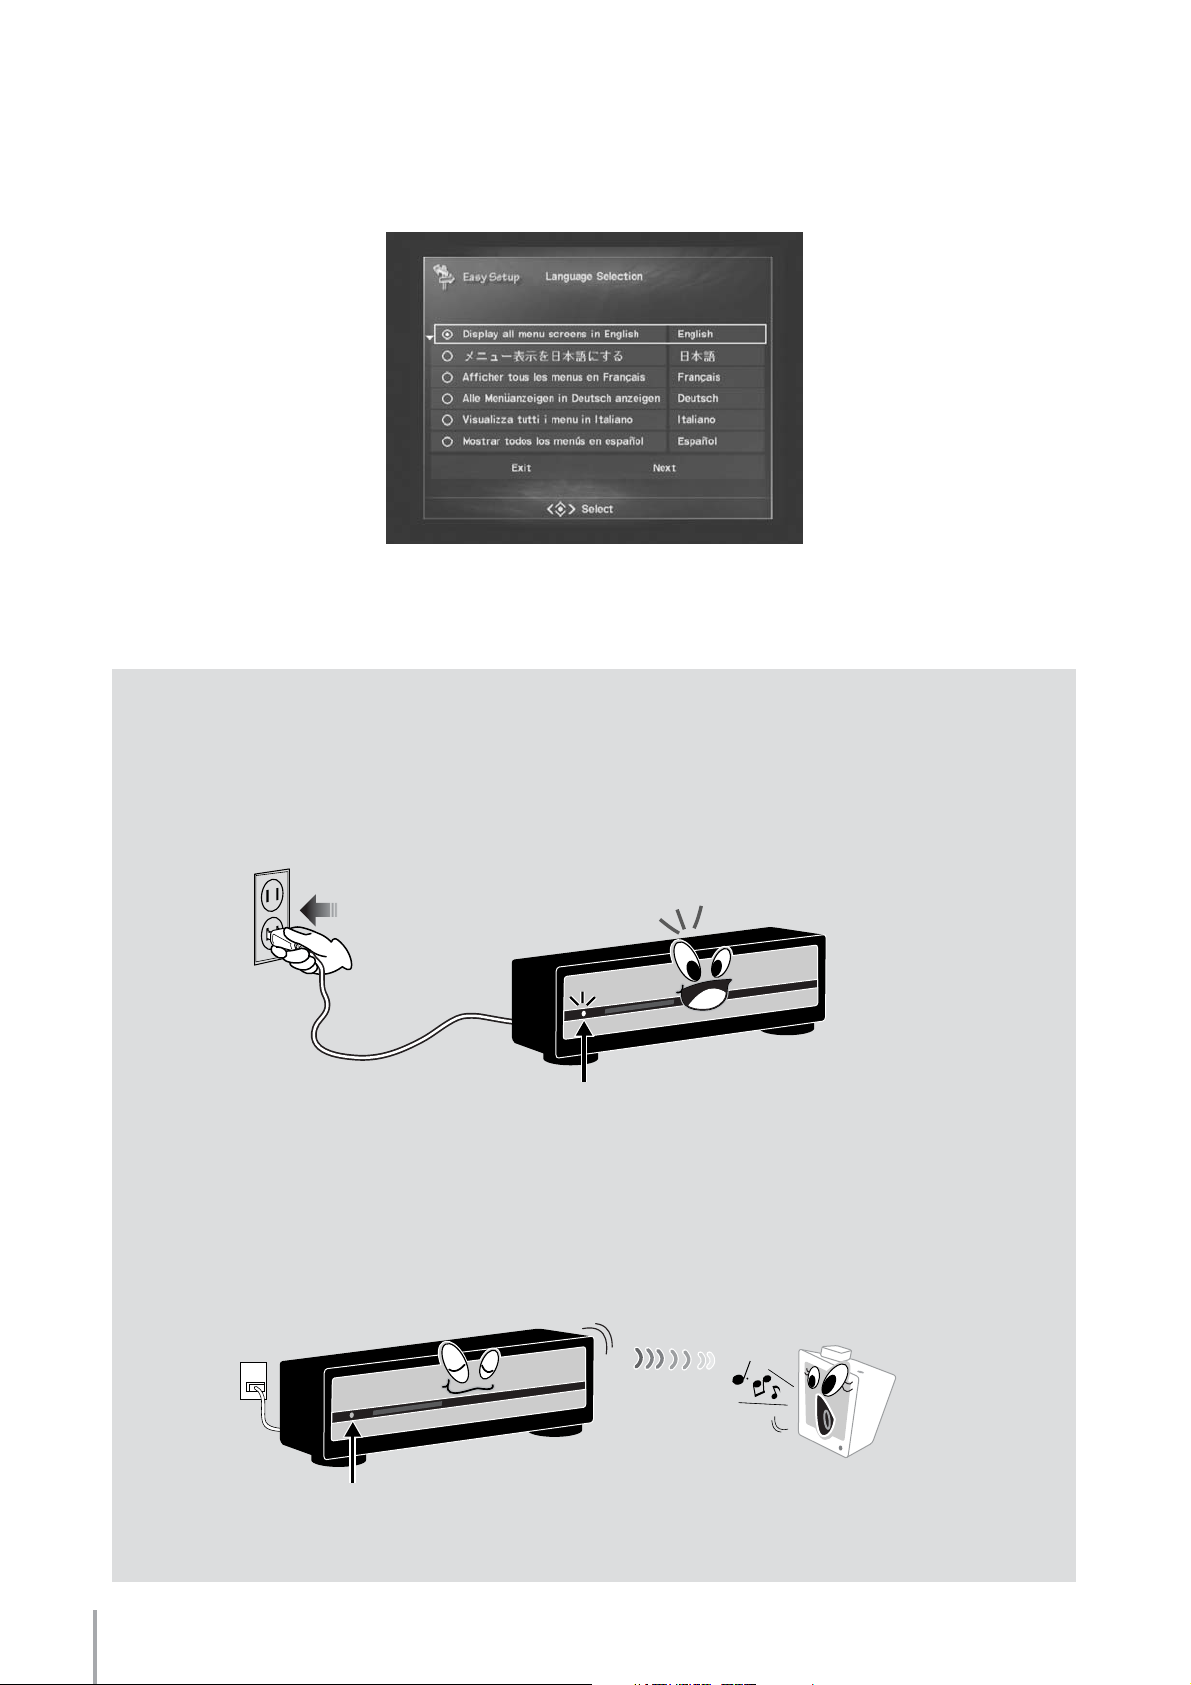
Powering Up
Turn on your TV and switch it to external input (connected to the MCX-2000 video output). When you turn on the MCX2000, your TV will show the initial “MusicCAST” splash screen, followed automatically by the Easy Setup screen.
TV
MCX-2000
1 Turn ON
2 Change to external input
n The MCX-2000 is designed to show the Easy Setup screen when you first turn on the unit (factory setting). If the Easy Setup screen doesn’t
appear, press the TOP MENU button on the remote control. When the Top Menu screen is shown on the TV, use the cursor controller (in the center
of the remote control) to move the highlighted selection down to Setup (the last item of Top Menu), and press the SELECT button. Then, from the
Setup menu screen, select Easy Setup. Scroll down in the display if it’s not visible.
AC plug and outlet for US model
MCX-2000 Setup Guide
9
Page 10
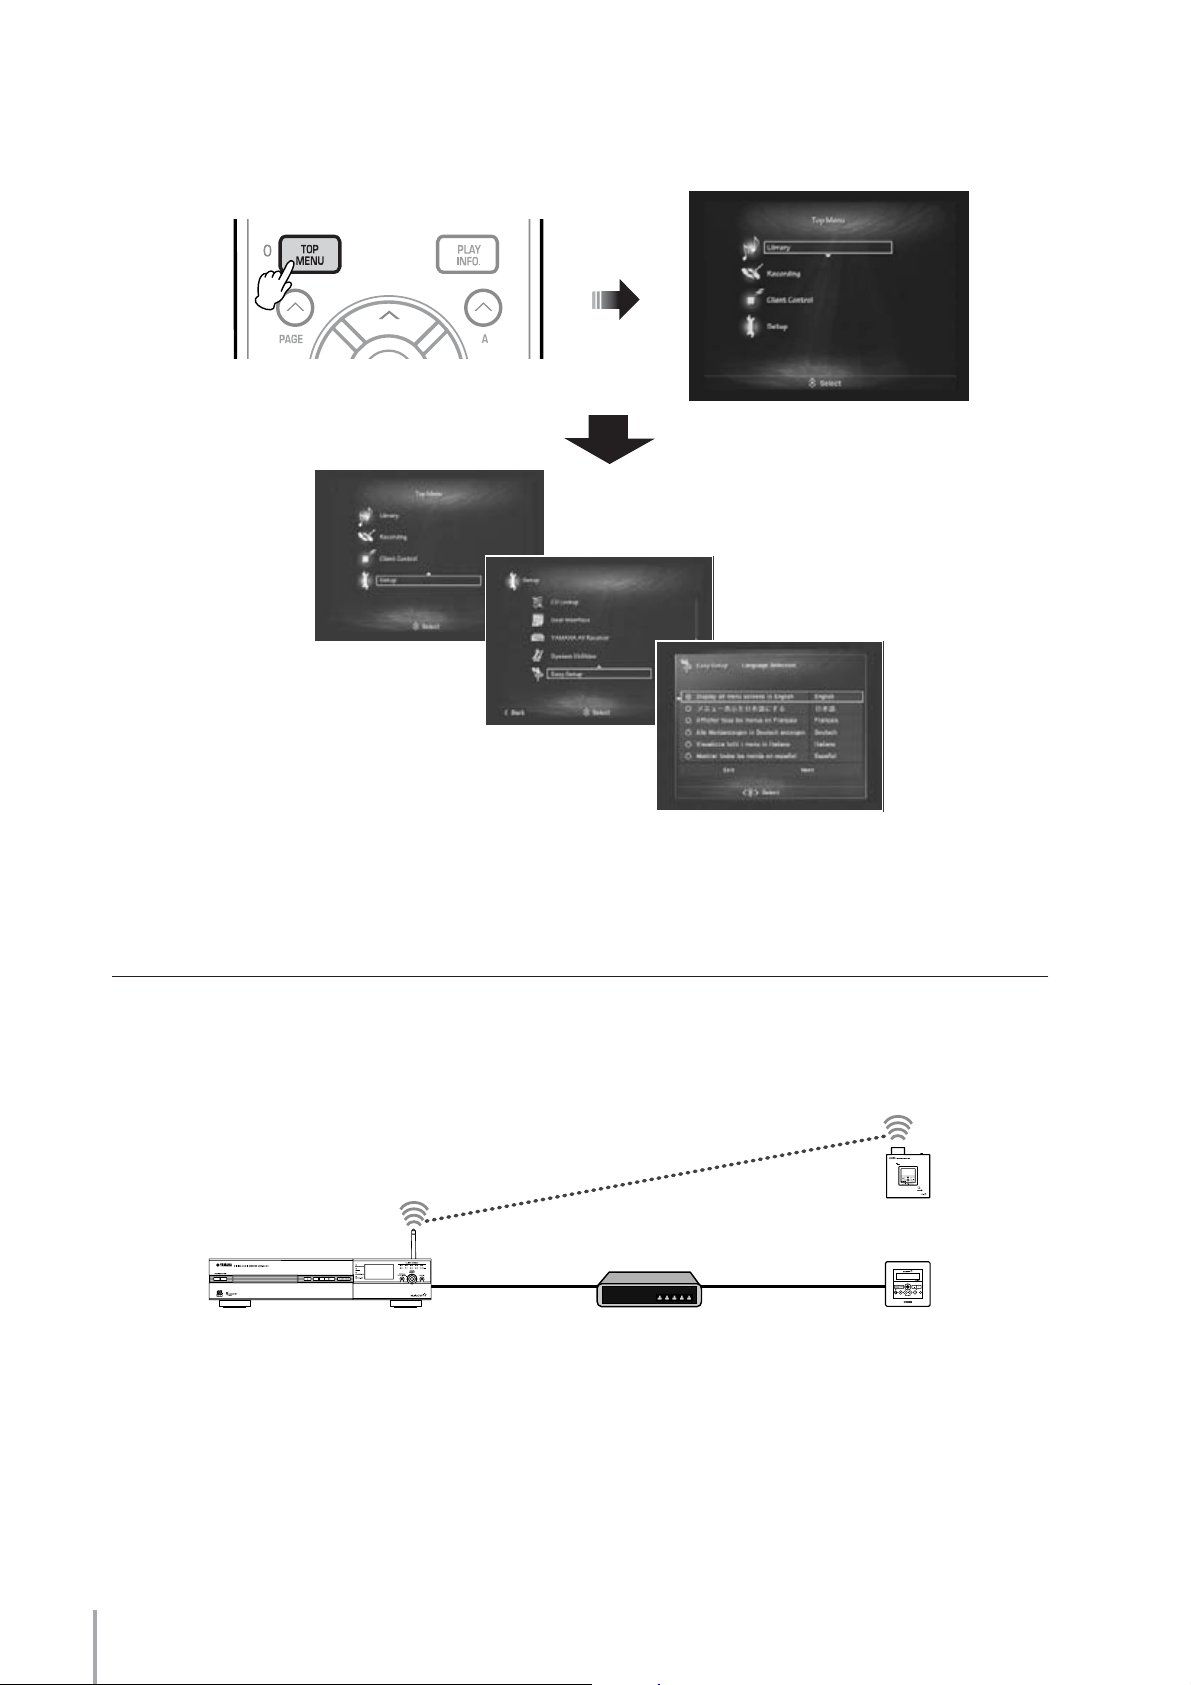
Creating a MusicCAST Network
Top Menu
Easy Setup
The Easy Setup feature lets you quickly create a MusicCAST network. There are several types of MusicCAST networks.
Here we explain how to configure the most basic network that’s comprised of a single MCX-2000 server and one or more
clients.
Wireless client
(MCX-A10)
MCX-2000 Network hub
n Your clients and network hub should be turned off at this point. Turn them on later when you’re asked to do so in the Easy Setup process.
Wired client
(MCX-C15)
10
MCX-2000 Setup Guide
Page 11
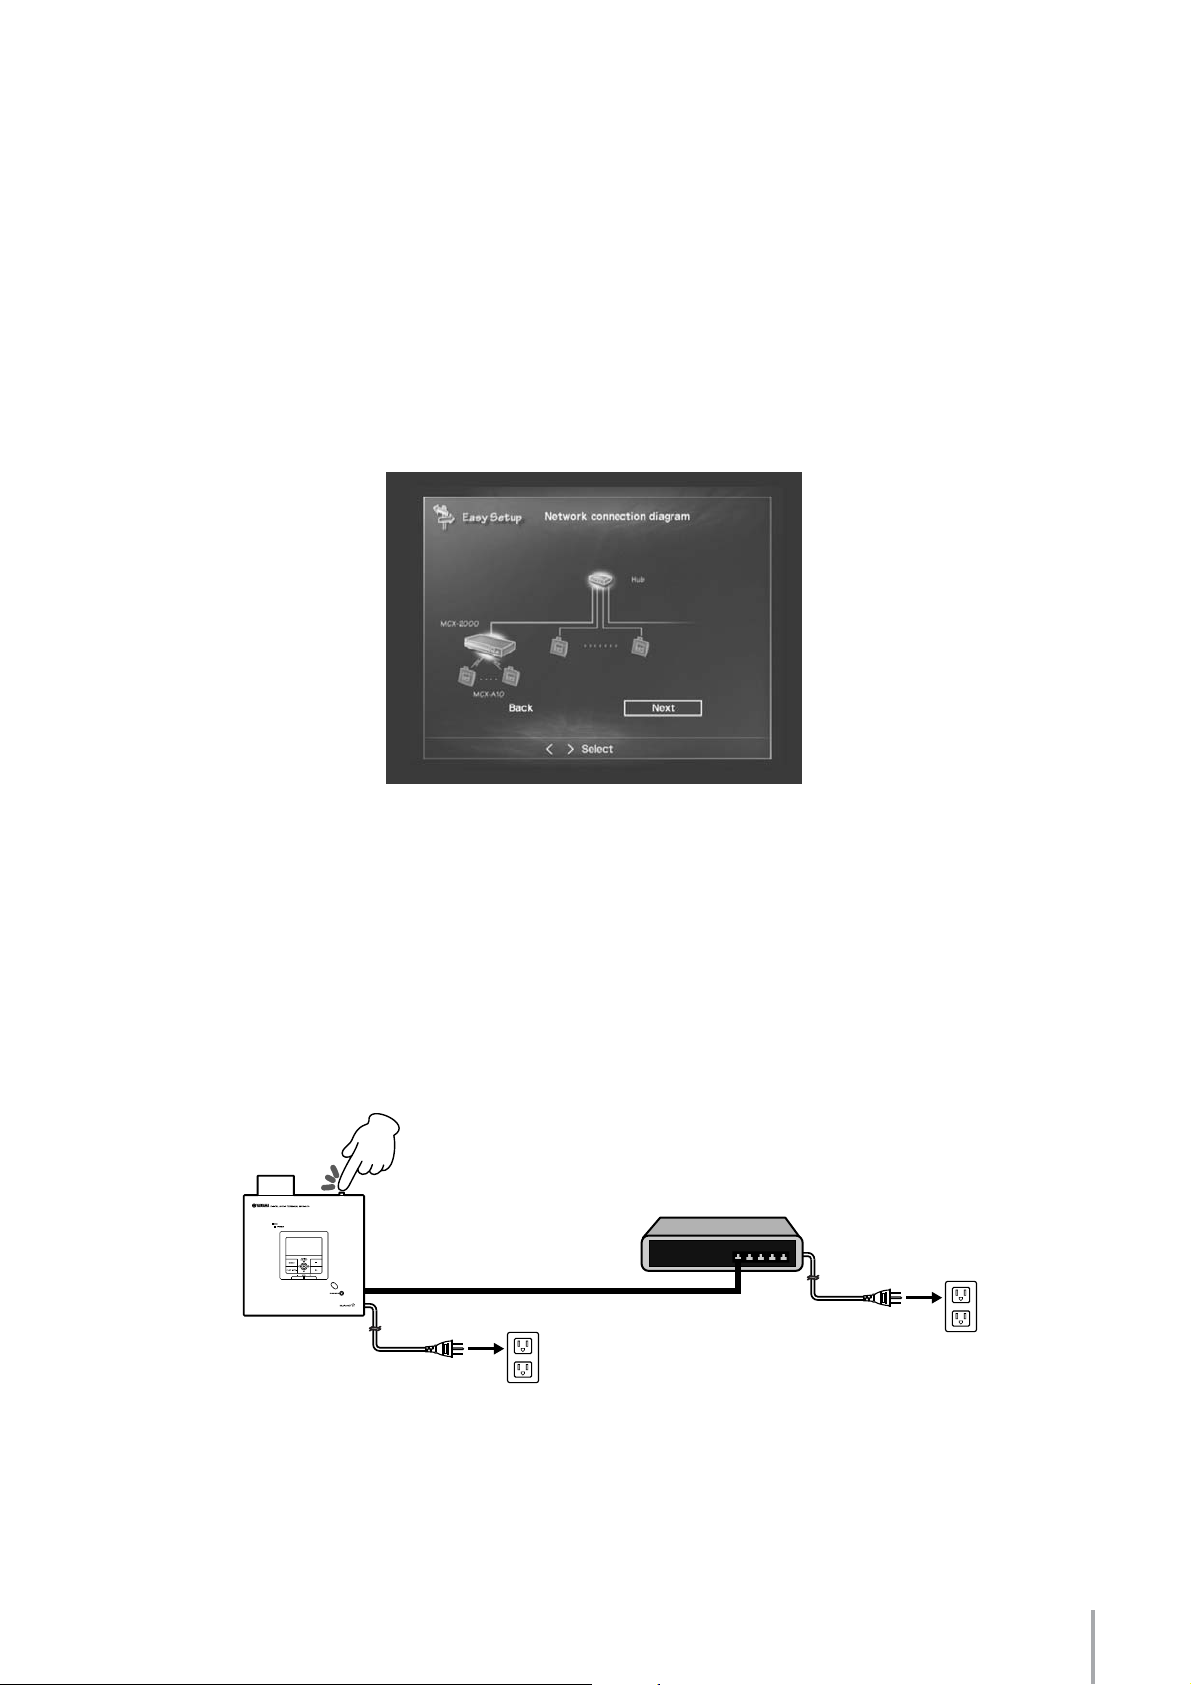
1
With Easy Setup, you can quickly and easily configure your desired MusicCAST network just by following the simple onscreen instructions (page 27). To create a network comprised of an MCX-2000 with clients, specify the options listed
below. When the proper settings have been made, a simple diagram of your system appears in the display.
Enter the following settings:
•
Language:
Date and Time:
•
•
System configuration selection:
Network connection selection:
•
•
Network settings configuration:
Select a language used for screen messages.
Set the current date and time.
Select “Use the MCX-2000 in conjunction with MCX-A10/C15 clients”.
Select “Connect to a network containing MusicCAST components only”.
Select “Automatic configuration”.
After you’ve made these settings, a diagram of the specified MusicCAST system (in this case, a MusicCAST-only network
with the MCX-2000 and clients) is shown in the display.
n To select a displayed item, move the highlight on it using the up or down arrow button, and then press the SELECT button. The SELECT button
also lets you alternately select and deselect a radio button. When you specify a value, use the up or down arrow button to display a desired value,
and then press the SELECT button (page 19).
From the next screen, you will need to operate the MCX-2000 and each client to configure the MusicCAST network.
2 Tu rn on each client as instructed in the on-screen message. If you’re using a network hub for wired clients, you should
turn on the hub at this time. When you’re ready, go to the next screen.
Powe r
MCX-A10
Network hub
MCX-2000 Setup Guide
11
Page 12

3 Following the screen message, start Auto Configuration on each client. Use the front-panel cursor controller to select
Top Menu > Setup > Network > Auto Configuration, and then press the PLAY button. The clients start searching for the
music server (MCX-2000).
PUSH
SELECT
PUSH
SELECT
PUSH
SELECT
PLAY
n You can use the cursor controller on a client’s front panel in the same way as the cursor controller on the MCX-2000 remote control. Push the
center stick upward, downward, leftward or rightward as you press the up, down, left or right arrow button on the remote control. When you
press this stick vertically, it works the same as pressing the SELECT button. In addition, you can go back to the previous screen by pushing the
stick leftward.
4 When you go to the next Easy Setup screen, the MCX-2000 starts searching for any available clients.
n Don’t touch or operate any clients until their IDs appear in the above screen and are successfully registered to the MCX-2000.
12
MCX-2000 Setup Guide
Page 13
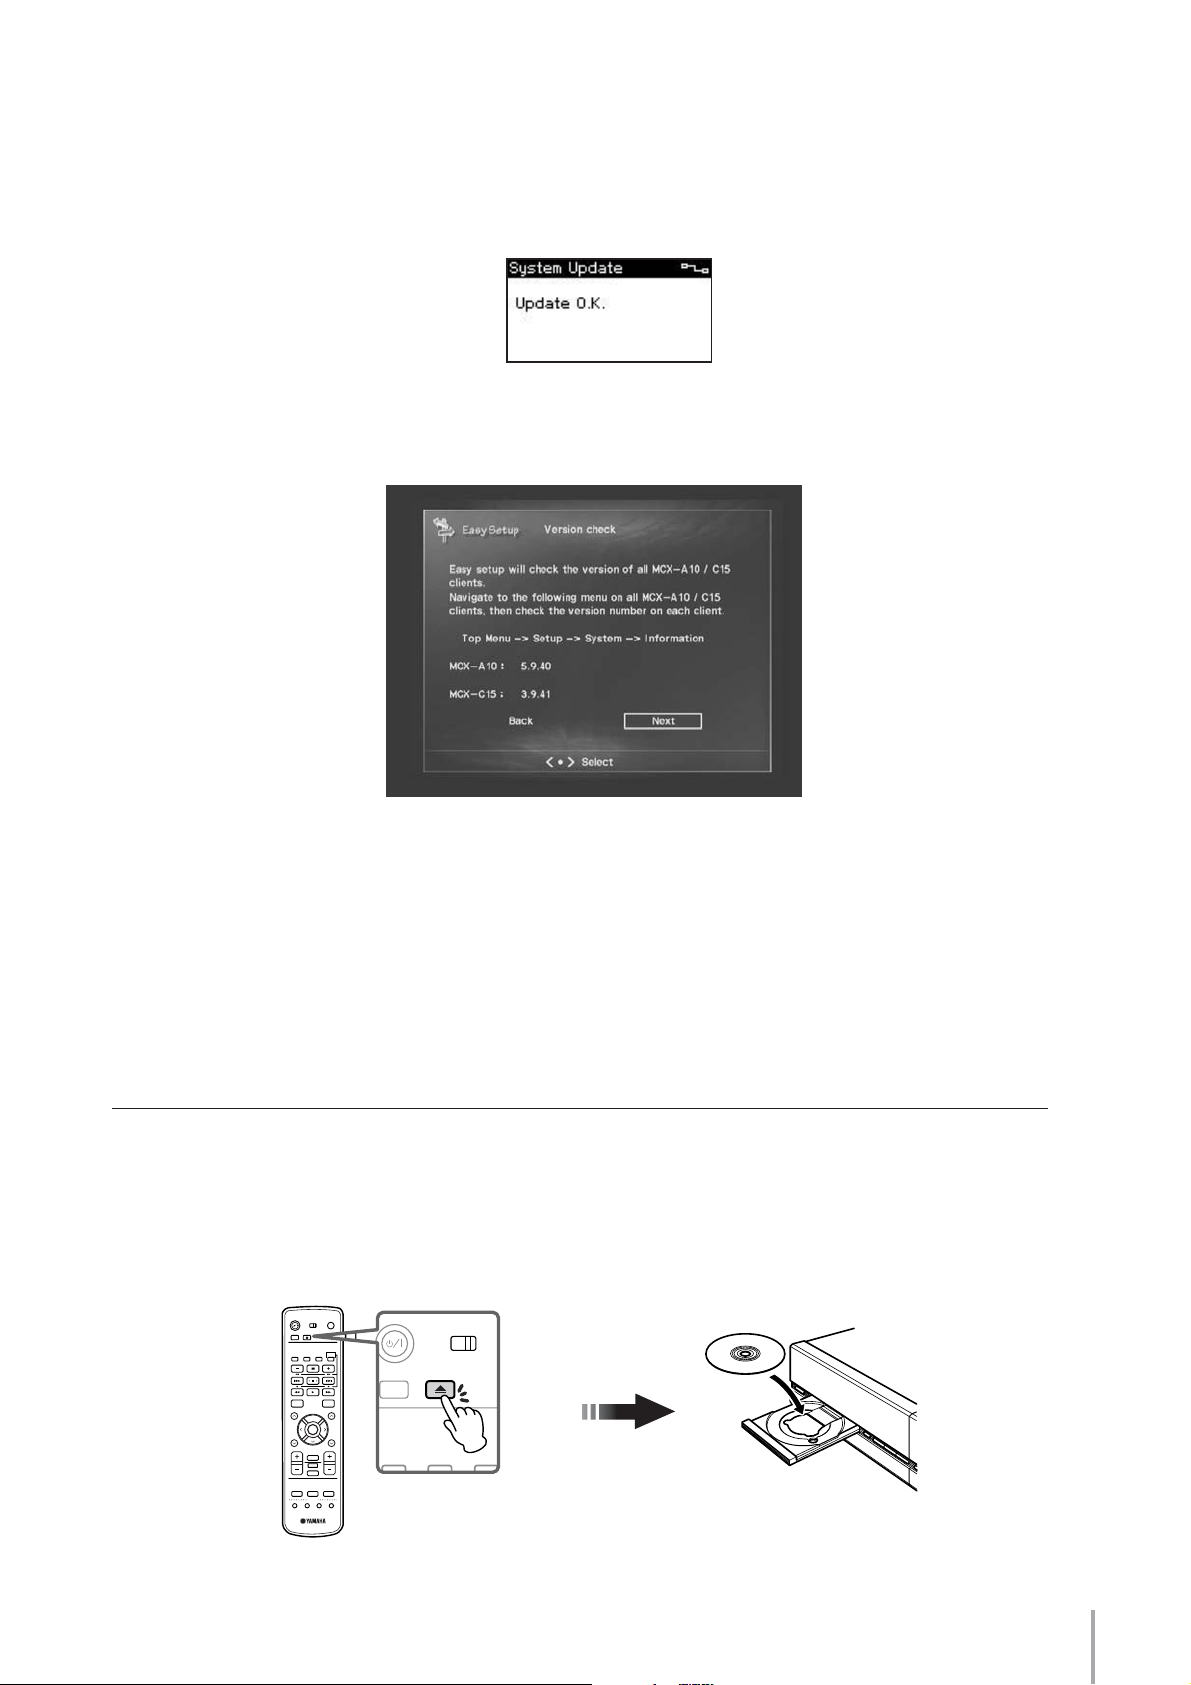
5 When the screen shows all clients (IDs) you are using, go to the next screen for updating their firmware. This process is
STAMDBY/ON
TV AMP
TIMER OPEN/CLOSE
RANDOM REPEAT BROADCA
necessary to use them with the MCX-2000. On each client, select Top Menu > Setup > System > System Update, and
then press the PLAY button.
When the firmware update is complete, each client displays the above message and automatically restarts itself. When
you go to the next screen, you can see the updated firmware version.
n The firmware version on your clients may be more recent than the one shown above. In addition, the client firmware version doesn’t always match
that of the MCX-2000.
n Each version number may be diffrent from your MCX-2000.
6 Go to the next screen, and select “Confirm” to complete the Easy Setup process. Your MusicCAST network has been
successfully created.
Streaming Music
To begin music streaming over the MusicCAST network, you’ll first need to prepare your audio sources (music) on the
MCX-2000 music server. The MCX-2000 can stream several types of audio sources to the clients. Here, we’ll explain
how to record songs from a music CD and deliver them to the clients.
1
Press the OPEN/CLOSE button on the remote control and open the CD tray. Set a music CD with its label side facing up.
POWER
STAMDBY/ON
AMP/TV
TV AMP
TIMER
OPEN/CLOSE
RANDOM REPEAT BROADCAST RADIO
123
456
789
TOP
PLAY
0
MENU
INFO.
A
PAGE
SELECT
PAGE
Z
VOL.
INPUT
BOOLMARK
AMP/TV
MUTE
LIBRALY AR TISTS
PLAYLISTS
123
MENU MENU MENU
FAVORITES
2 3 4
1
Remote control
MCX-2000 Setup Guide
13
Page 14
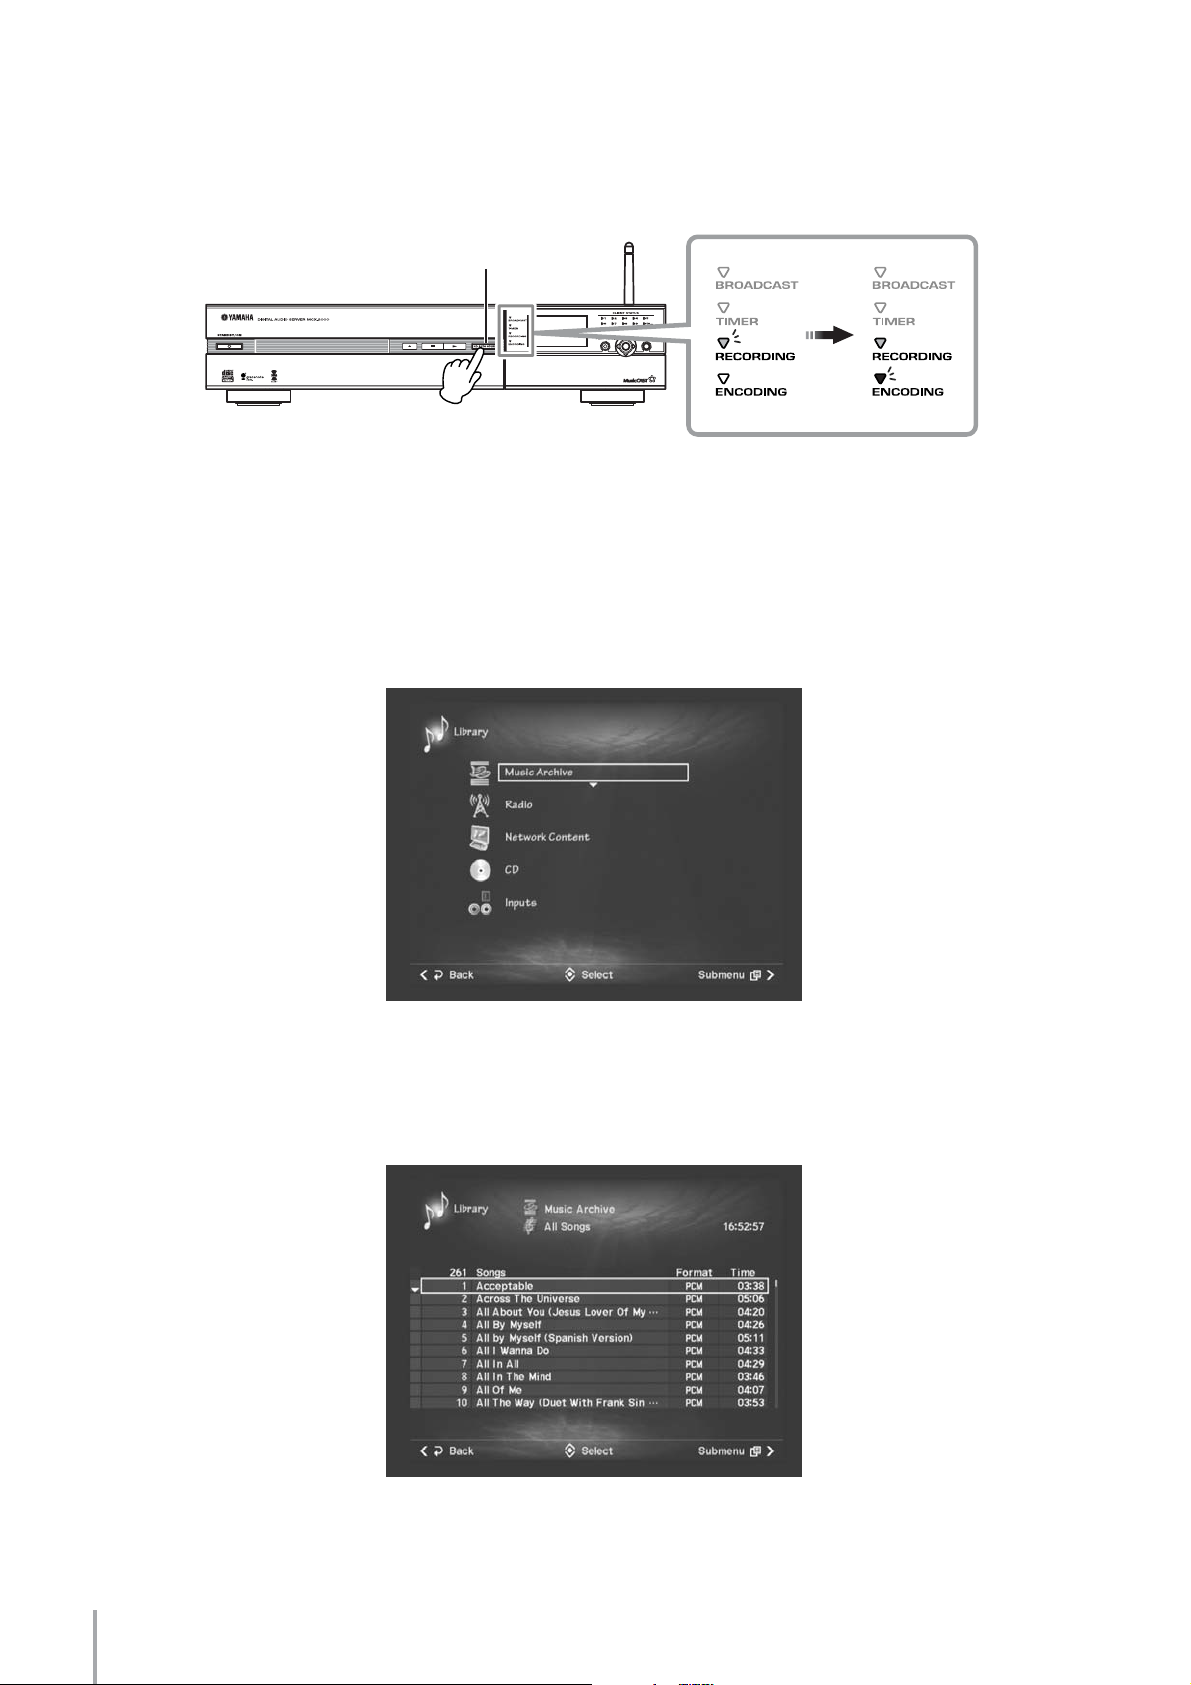
2
Press the CD AUTO STORE button on the MCX-2000 front panel (the tray will close automatically). The RECORDING
indicator (at the left of the front panel display) lights in red, followed by the ENCODING indicator lighting in gr een.
CD AUTO STORE button
MCX-2000
n The RECORDING indicator lights up while the MCX-2000 is importing CD songs in (uncompressed) PCM format. The ENCODING indicator
lights up while the MCX-2000 is encoding PCM songs to MP3 format. Naturally, these indicators go off a first-in, first-out basis during the
import process.
3 When the RECORDING indicator goes off, indicating that your CD songs have been successfully imported to the
MCX-2000, select Top Menu > Library > Music Archive.
When “All Songs” is selected:
4 Move the highlight to one of the first four menu items (Artists, Albums, Genres or All Songs) and press the SELECT
button. You can view the artist name, album title, genre or a list of songs from the music CD you just imported.
When “All Songs” is selected:
n If the music CD is a recent release or a private, self-made CD, generic song information may be shown (such as unknown artist, album, etc.).
If this happens, you can enter the relevant information manually (page 75).
14
MCX-2000 Setup Guide
Page 15

5 From one of your clients, select Top Menu > Library > Music Archive. You can see the same menu items — Artists,
Albums, Genres and All Songs as found in the MCX-2000 screen. Select one of them and confirm the client display
also shows the artist name, album title, genre or a list of songs from the music CD you just imported on the MCX-2000.
When “All Songs” is selected:
n If the display on a client is dimmed and shows the current time, press the controller stick. The client will ‘wake up’ and restart the network
connection with the MCX-2000 (page 14).
6 From the menu items in the client screens, select a song and start playback. (Move the triangle icon to the left of a
song title, and then press the controller stick or PLAY button.)
n You can adjust the playback volume using the VOL +/– buttons on the client front panel.
This is the basic procedure for music streaming over the MusicCAST network. If you have two or more clients, you can
play different songs on them. The MCX-2000 also supports multitasking, allowing you to continue importing other music
CDs by repeating steps 1 to 3 above, or select and play a different song on the MCX-2000, even while delivering different
music to each client.
MCX-2000 Setup Guide
15
Page 16

YAMAHA ELECTRONICS CORPORATION, USA 6660 ORANGETHORPE AVE., BUENA PARK, CALIF. 90620, U.S.A.
YAMAHA CANADA MUSIC LTD. 135 MILNER AVE., SCARBOROUGH, ONTARIO M1S 3R1, CANADA
YAMAHA ELECTRONIK EUROPA G.m.b.H. SIEMENSSTR. 22-34, 25462 RELLINGEN BEI HAMBURG, GERMANY
YAMAHA ELECTRONIQUE FRANCE S.A. RUE AMBROISE CROIZAT BP70 CROISSY-BEAUBOURG 77312 MARNE-LA-VALLEE CEDEX02, FRANCE
YAMAHA ELECTRONICS (UK) LTD. YAMAHA HOUSE, 200 RICKMANSWORTH ROAD WATFORD, HERTS WD18 7GQ, ENGLAND
YAMAHA SCANDINAVIA A.B. J A WETTERGRENS GATA 1, BOX 30053, 400 43 VÄSTRA FRÖLUNDA, SWEDEN
YAMAHA MUSIC AUSTRALIA PTY, LTD. 17-33 MARKET ST., SOUTH MELBOURNE, 3205 VIC., AUSTRALIA
© 2005 All rights reserved.
WF 37370
Printed in Malaysia
Page 17
MCX-2000
UCABG
Digital Audio Server
OWNER’S MANUAL
Page 18

Table of Contents
Table of Contents.................................................2
Preface ..................................................................3
What’s Included...................................................................................... 4
Feature Overview ................................................................................... 4
Audio Playback Functions........................................................................ 4
Audio Recording Functions...................................................................... 5
Music Archiving Functions ....................................................................... 5
CD Recording Functions.......................................................................... 5
Music Streaming Functions...................................................................... 6
Timer Function.......................................................................................... 6
Preparations and Setup.......................................7
Panel Descriptions: MCX-2000.............................................................. 7
Front Panel ............................................................................................... 7
Back Panel ............................................................................................... 9
Panel Descriptions: Remote Control.................................................. 11
Connecting External Devices.............................................................. 13
Connecting to the AC Power............................................................... 13
Remote Control Features and Operations......................................... 16
Setting Batteries ..................................................................................... 16
Operating on the Remote Control .......................................................... 16
Using as a Universal Remote Control .................................................... 17
Menu Operation Basics ....................................................................... 19
MCX-2000 Menu Tree ........................................................................... 22
Configuring Your MusicCAST Network ....................23
Network Basics ...................................................................................... 23
Configuring a MusicCAST-only Network ...........................................25
Configuring a MusicCAST Network for PC Network and
Internet Access..................................................................................... 26
Using Easy Setup .......................................................27
Easy Setup Overview........................................................................... 28
Date and Time........................................................................................ 28
MusicCAST System Configuration .........................................................28
Network Connection (stand-alone, without clients)................................ 28
Network Connection (with clients).......................................................... 29
Network Configuration............................................................................ 29
For the MCX-2000 to access the Internet via
an existing PC network........................................................................... 30
For automatic configuration of a MusicCAST network ........................... 30
Applications....................................................... 46
Playing Audio Sources........................................................................ 46
Playing Archived Music....................................................................... 46
Adding a Bookmark to a Song............................................................... 50
Play Information and Controls................................................................ 50
Playing a CD ......................................................................................... 51
Notes on Playing an MP3 CD................................................................. 52
Listening to a Radio Broadcast .......................................................... 54
Listening to FM Radio ............................................................................ 54
Listening to XM Radio (US model only) ................................................. 55
Listening to Internet Radio ..................................................................... 59
Using the Presets List ............................................................................ 59
Playing External Audio Signals .............................................................. 63
Playing Audio Content on the Computer ............................................... 64
Recording Audio Sources................................................................... 66
Recording Songs from a Music CD ....................................................... 66
Recording from FM Radio or External Audio Signals ............................ 69
Duplicating a Music CD ......................................................................... 71
Recording Archived Songs to a CD....................................................... 73
Editing the Library ............................................................................... 75
Typing Text Characters.......................................................................... 75
Editing Song Data .................................................................................. 77
Using a Playlist....................................................................................... 82
Registering an Internet Radio Station .................................................... 84
Renaming Items from the Radio Presets List......................................... 85
Operating a Client Remotely............................................................... 87
Selecting the Client Audio Source ......................................................... 88
Setting the Timer Playback .................................................................... 89
Other Features...................................................................................... 91
Setting Date and Time ........................................................................... 91
Using the Online CDDB Database......................................................... 93
Defining User Interface .......................................................................... 93
Selecting Playback Options................................................................... 95
Selecting Recording Options................................................................. 96
Using the Timer Playback ................................................................... 97
Using a Yamaha AV Receiver ............................................................. 98
Managing an Existing MusicCAST Network.................................... 100
Checking the Network Status............................................................... 100
Initializing Network Settings ................................................................. 100
Managing the MCX-2000 System...................................................... 101
Viewing System Information................................................................. 102
Resetting the MCX-2000 for Factory Settings...................................... 103
Updating the MCX-2000 Firmware ...................................................... 103
Limiting Local Operations on the MCX-2000 ....................................... 104
Automatic Configuration of a
MusicCAST Network...................................................31
Preparation on the MCX-2000................................................................ 32
Preparation on Each Client .................................................................... 33
Automatic Registration of Clients ........................................................... 34
Manual Configuration of a MusicCAST Network .....35
Checking Out Parameter Values............................................................ 35
Settings on the MCX-2000 ..................................................................... 36
IP Address.............................................................................................. 37
Wireless LAN.......................................................................................... 37
Settings on Each Client .......................................................................... 39
Mode ...................................................................................................... 40
Server ID ................................................................................................ 40
DHCP ..................................................................................................... 41
IP Address.............................................................................................. 41
Subnet Mask .......................................................................................... 41
ESS ID .................................................................................................... 42
WEP Key................................................................................................. 42
Manual Registration of Clients ............................................................... 43
Confirming Network Status................................................................. 44
Updating Client Firmware.................................................................... 45
2
MCX-2000 Owner’s Manual
Compatible Media (CD/CD-R/CD-RW)............ 105
About Digital Recording with MusicCAST.... 107
Troubleshooting.............................................. 108
Glossary........................................................... 111
Specifications.................................................. 113
The illustrations and operation screens as shown in this owner’s manual
are for instructional purpose only, and may appear somewhat different
from those on your products.
Page 19
Preface
Thank you and congratulations on your purchase of the Yamaha MCX-2000 Digital Audio Server!
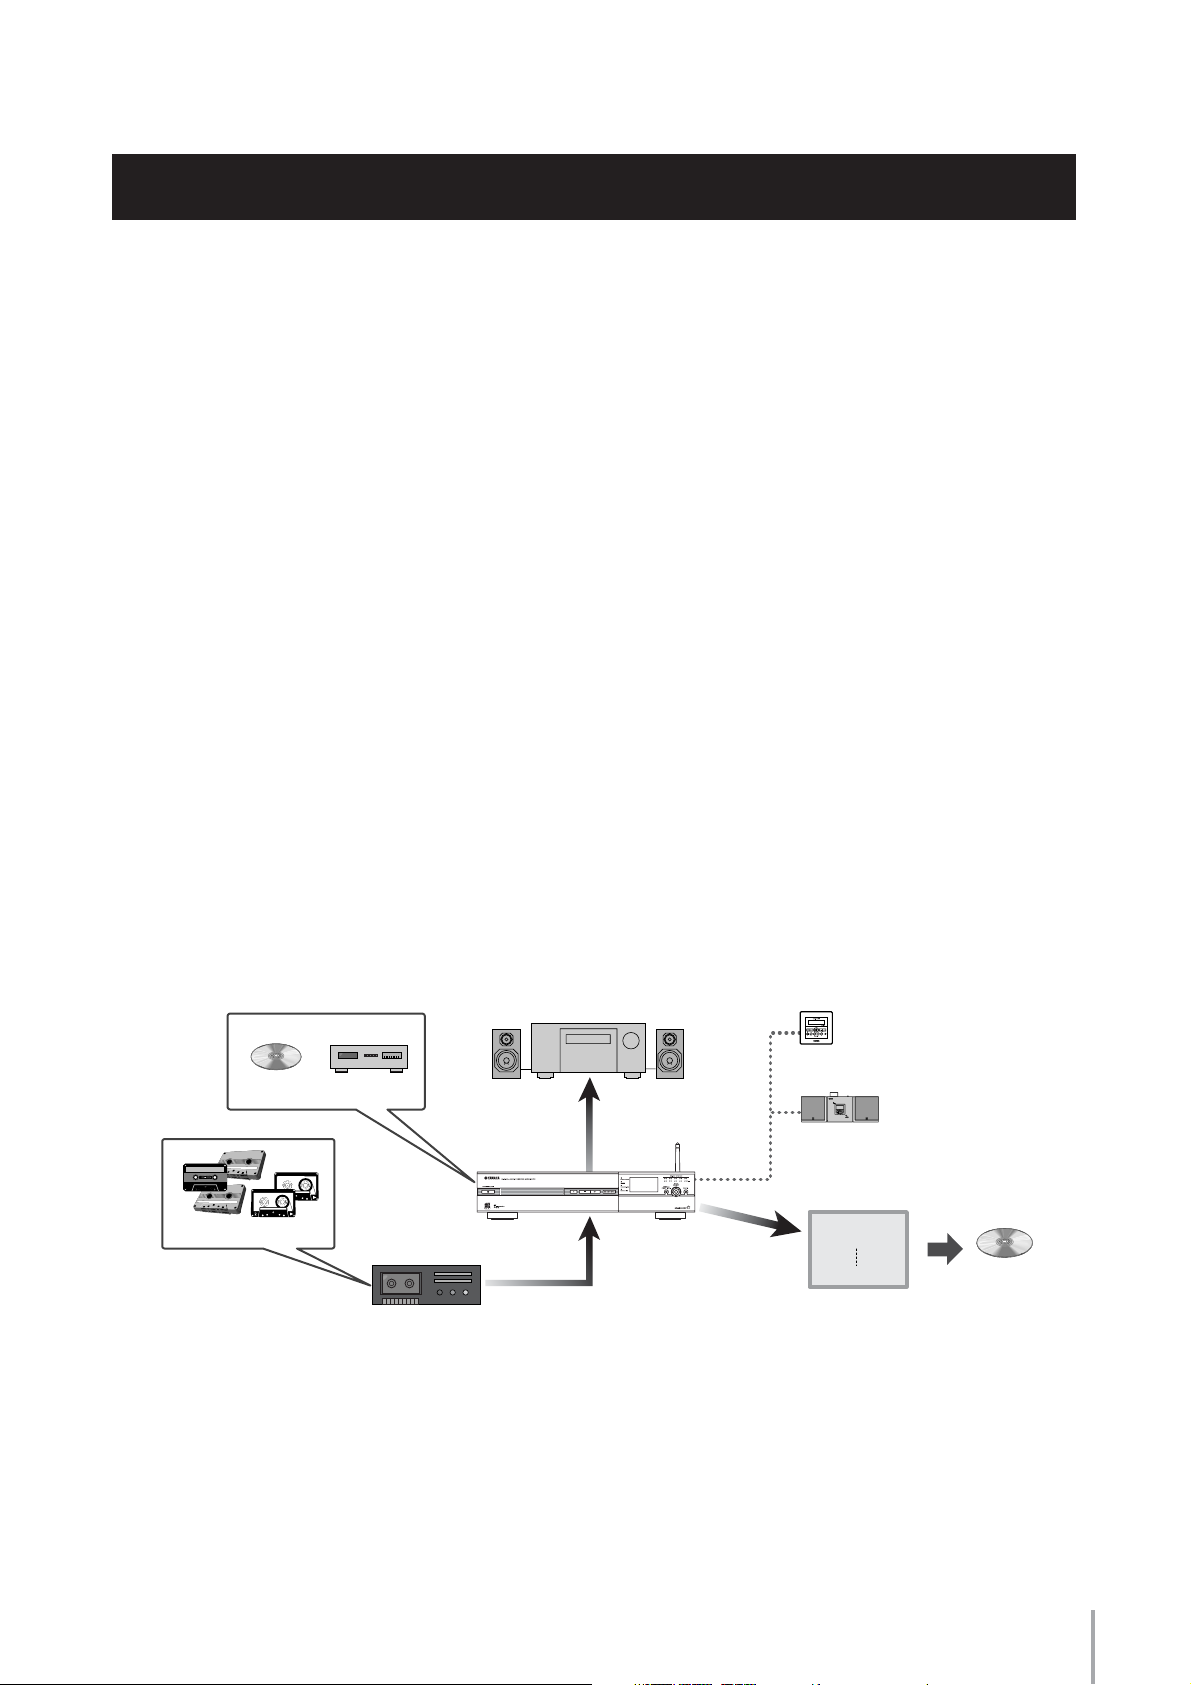
The MCX-2000 is a music server that enhances the concept of MusicCAST, a digital music delivery method over a
personal network.
MusicCAST delivers a new listening style for the digital era. It allows you to record various audio sources, including music
CDs, onto the music server, and enjoy streamed playback on a client device (MCX-A10 or MCX-C15, sold separately)
placed anywhere in your home, using wired and wireless computer networking technologies.
There are many ways to use the MusicCAST network and the MCX-2000 music server.
Use the MCX-2000 to collect and centralize all music sources in your home. Then, simply place a client device in every
room of your house—instead of buying a separate stereo or audio set for each of your family members. This setup lets
each member of the family enjoy their own favorite music—in any room at the same time. Naturally, the music server can
also be set to stream the same music to each client, so that you can walk around your house and have the same music
play no matter where you go.
The MCX-2000 has other great features. It can also stream music or audio programs from the built-in FM radio tuner
anywhere in your home via the MusicCAST network. Locally on the MCX-2000, you can also enjoy Internet radio
programs. You can also use the MCX-2000 to record audio content from old analog tapes. Once recorded, they can be
streamed via the MusicCAST network and burned onto CD-R/RW media for storage purposes, together with songs from
music CDs.
The above are just a few examples to show how you can use the MusicCAST network and the MCX-2000 music server.
You’ll find additional ones throughout this manual, too—so, keep the manual in a safe place and read it thoroughly in
order to get the most out of your new MCX-2000.
MCX-C15
Audio CD
A
Casette tapes
Tuner
Casette deck
Audio sysytem
MCX-2000
MCX-A10
with optional speakers
Song 01
Song 02
Song 24
Original CD
MCX-2000 Owner’s Manual
3
Page 20
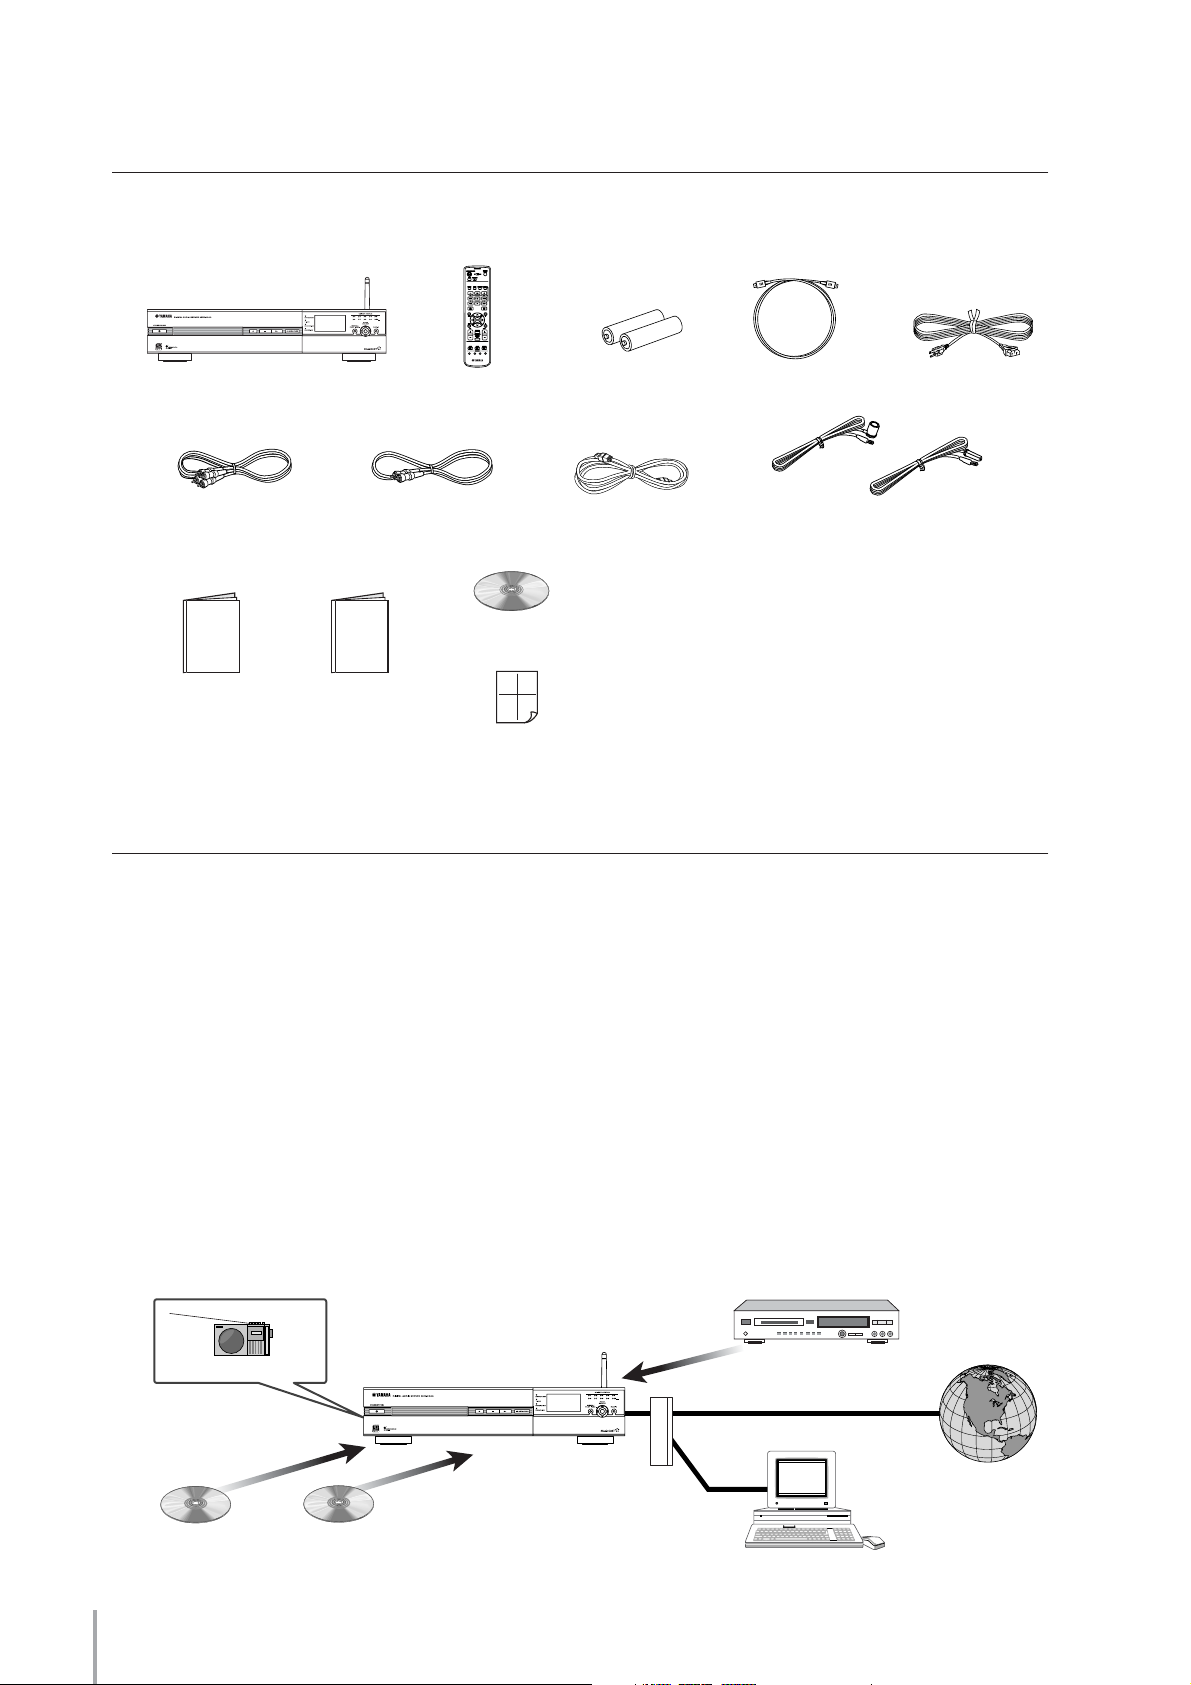
What’s Included
The MCX-2000 product package contains the following items. When you open the box, first check they have all been
included. If something is missing, please contact the dealer from whom you purchased the product.
123
456
89
7
0
123
2 3 4
1
MCX-2000 unit (1) Remote control (1) Optical cable (1)
AA batteries (2)
Power cable (1)
Audio pin cable (1) Video pin cable (1)
Network cable (1)
(For US and Canada)
Indoor FM antenna (1)
(For Europe, UK and Australia)
CD-ROM (1)
• DiXiM™ Media Server software
• MCX-A10/C15 client manuals (electronic documents; see these updated manuals
when operating each client together with the MCX-2000).
• GNU GPL/LGPL software license agreement (electronic documents)
• MCX-2000 program source code (based on GNU GPL/LGPL)
Setup Guide (1)
Owner’s Manual (1)
Installation Guide for “DiXiM Media Server” Software (1)
Feature Overview
Designed to be a comprehensive, ultimate audio center for your home, the MCX-2000 incorporates a wide variety of
features and functions. Here, we’ll take a look at some of ways you can use these features.
Audio Playback Functions
The MCX-2000 lets you play a wide variety of audio sources, including commercial music CDs, your own original MP3
CDs (CD-ROM), external audio signals, and radio programs from the built-in FM tuner. You can also listen to audio content
stored on your Windows computer if you connect the MCX-2000 to your computer network (LAN). Since the MCX-2000
can access the Internet through your computer network, you can even enjoy music from your favorite Internet radio
stations. When you play these audio sources on the main MCX-2000 itself, connect a speaker system (power amplifier
and speakers, or powered speakers) to the unit.
• Playing Archived Music (page 46)
• Playing a CD (page 51)
• Listening to FM Radio (page 54)
• Listening to Internet Radio (page 59)
• Playing External Audio Signals (page 63)
• Playing Audio Content on the Computer (page 64)
FM Radio
MCX-2000
Audio CD
4
MCX-2000 Owner’s Manual
MP3 CD
Router
AUX in
LAN
MD Player
PC
WAN
Internet
Radio
Page 21
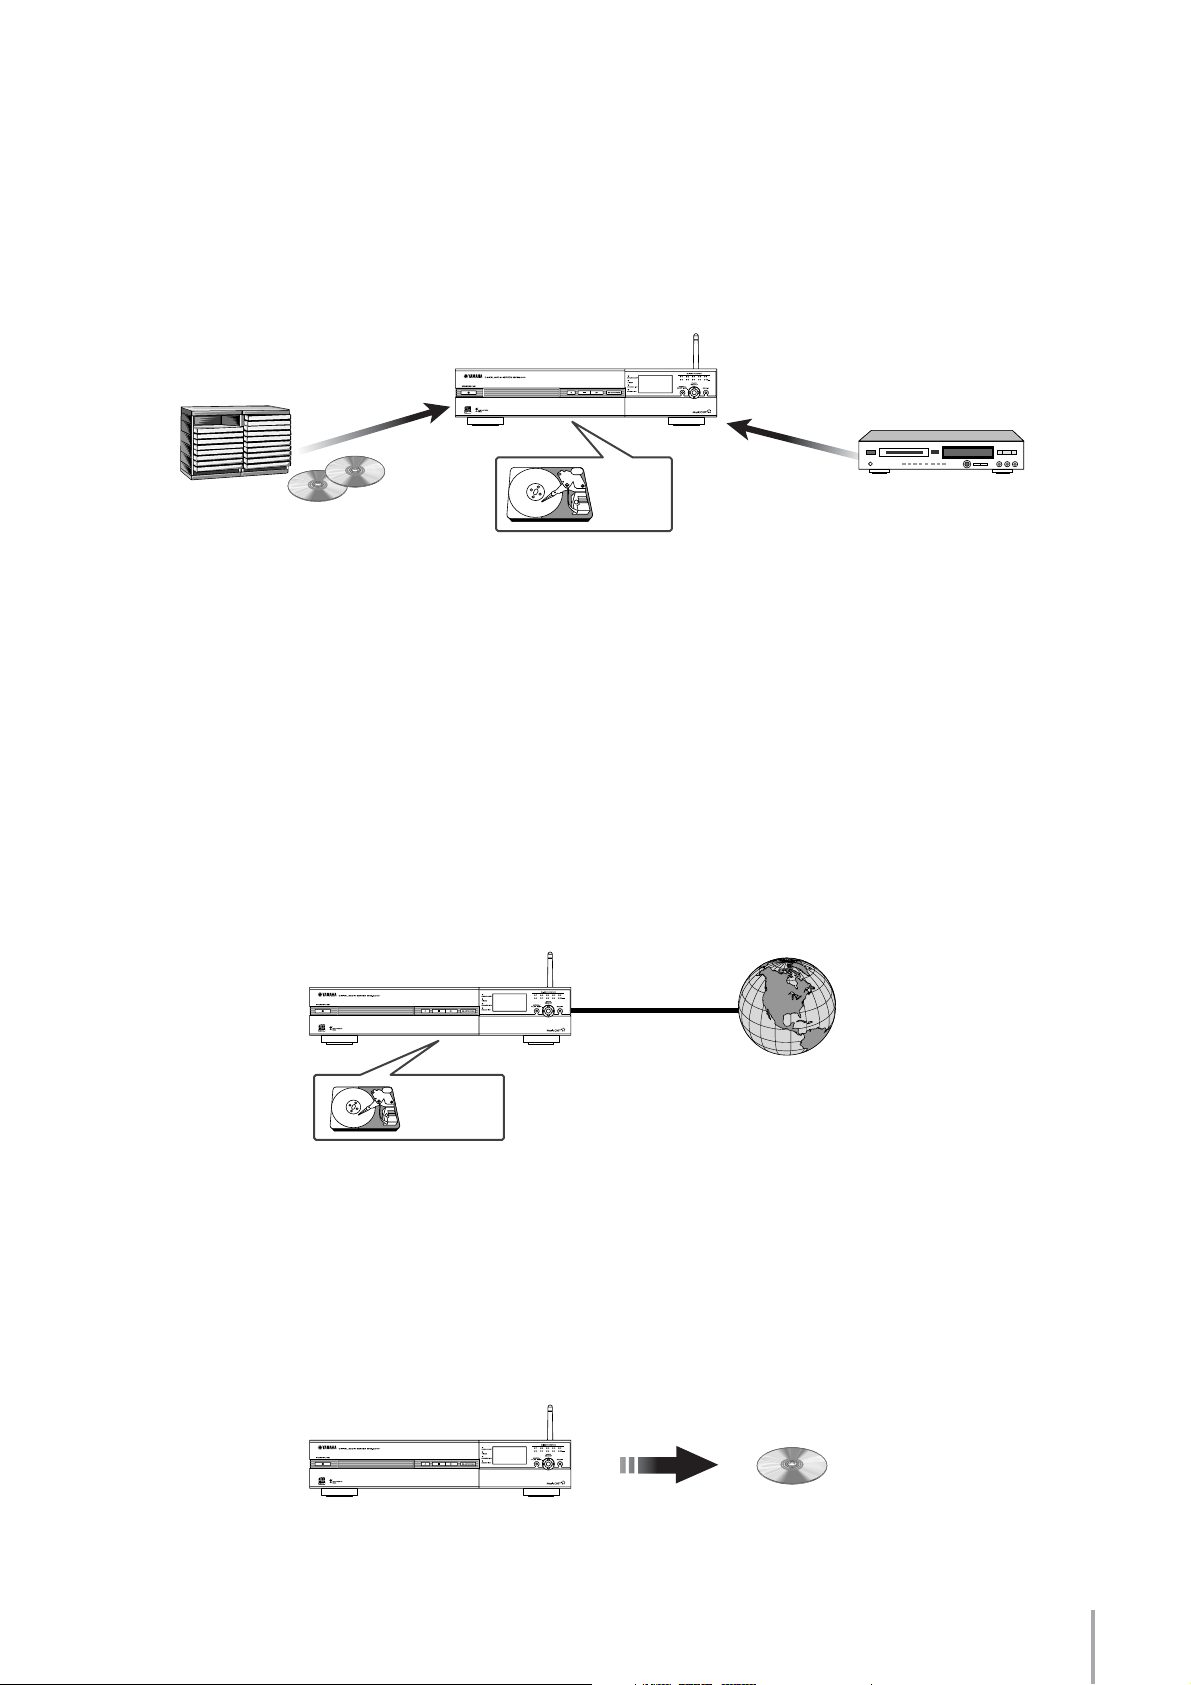
Audio Recording Functions
The MCX-2000 incorporates a large-capacity 160GB hard disk drive, allowing up to 200 hours of digital recording in linear
PCM format (16-bit/44.1kHz) or up to 2,000 hours in MP3 format (160kbps bit rate). Recordable audio sources include
commercial music CDs, external audio signals, and radio programs from the built-in FM tuner.
• Recording Songs from a Music CD (page 66)
• Recording from FM Radio (page 69)
• Recording External Audio Signals (page 69)
MCX-2000
160GB HDD
Music CD
AUX in
MD Recorder
Music Archiving Functions
When recording audio sources, you can add information to each song—such as the song title, artist name, album name
and genre—then store it to the music archive in the MCX-2000 hard drive. This information can then be used to find
specific songs you want to play. Because the MCX-2000 incorporates a special song database system (based on
Gracenote CDDB
functions include Playlist and Bookmark, letting you create custom song lists appropriate to specific occasions (such as
parties, morning ‘wake-up’ music, etc.) and allowing you to mark your favorite tunes for quick access.
• Adding a Bookmark to a Song (page 50)
•Typing Text Characters (page 75)
• Editing Titles (page 77)
• Changing Song Attributes (page 77)
• Using a Playlist (page 82)
• Registering an Internet Radio Station (page 84)
®
), this information will be set automatically if your songs are from popular music CDs. Other useful
HDD
(Internal CDDB)
MCX-2000
Internet (CDDB)
CD Recording Functions
This function lets you create a music mix CD of your own selections by arranging archived songs in your favorite order.
You can also use this function to duplicate existing music CDs, allowing you to copy your personal mixes to CD and give
it to your friends.
• Recording Archived Songs to a CD (page 73)
• Duplicating a Music CD (page 71)
MCX-2000 Original CD
MCX-2000 Owner’s Manual
5
Page 22
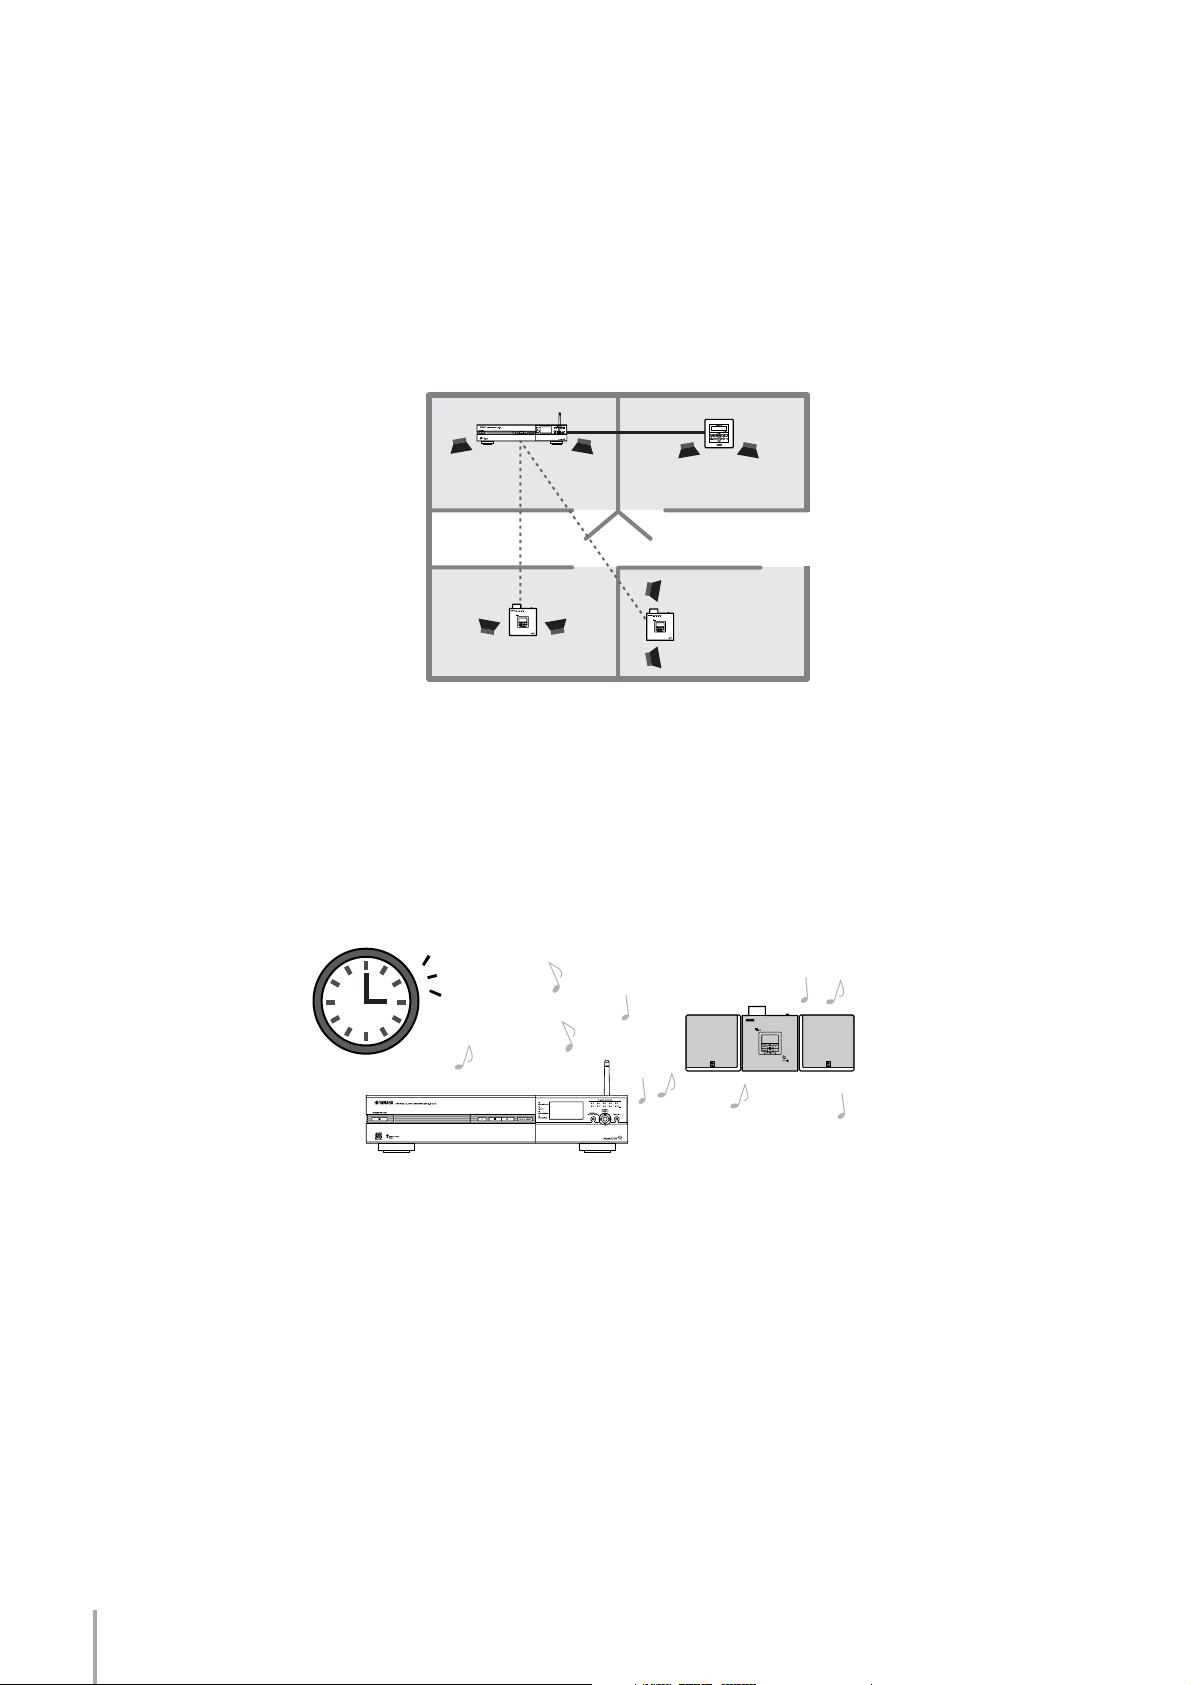
Music Streaming Functions
Once songs are archived (recorded) on the MCX-2000 hard drive, you can stream them to up to 15 clients via the
MusicCAST network. The MCX-2000 can deliver the same music to each client simultaneously (broadcast). It can also
deliver different songs to different clients at the same time, at the request of each client. In addition, the MCX-2000
supports remote control of clients via the MusicCAST network, allowing you to operate them without having to go to each
unit individually.
• MusicCAST as an Integrated Music Delivery System (page 89)
• Operating a Client Remotely (page 87)
MCX-2000
Wireless
wireless
Wireless
MCX-A10
LAN
LAN
LAN
LAN
MCX-C15
MCX-A10
Timer Function
The MCX-2000 and clients incorporate a timer that enables song playback at a specified time. You can program up to ten
playback timer instances for each MusicCAST device.
• Setting the Timer Playback (page 89)
• Using the Timer Playback (page 97)
MCX-2000
6
MCX-2000 Owner’s Manual
Page 23
Preparations and Setup
This section explains how to connect peripheral devices to your MCX-2000 and set it up as a
music server, and how to create a MusicCAST network in conjunction with clients (MCX-A10 or
MCX-C15, sold separately).
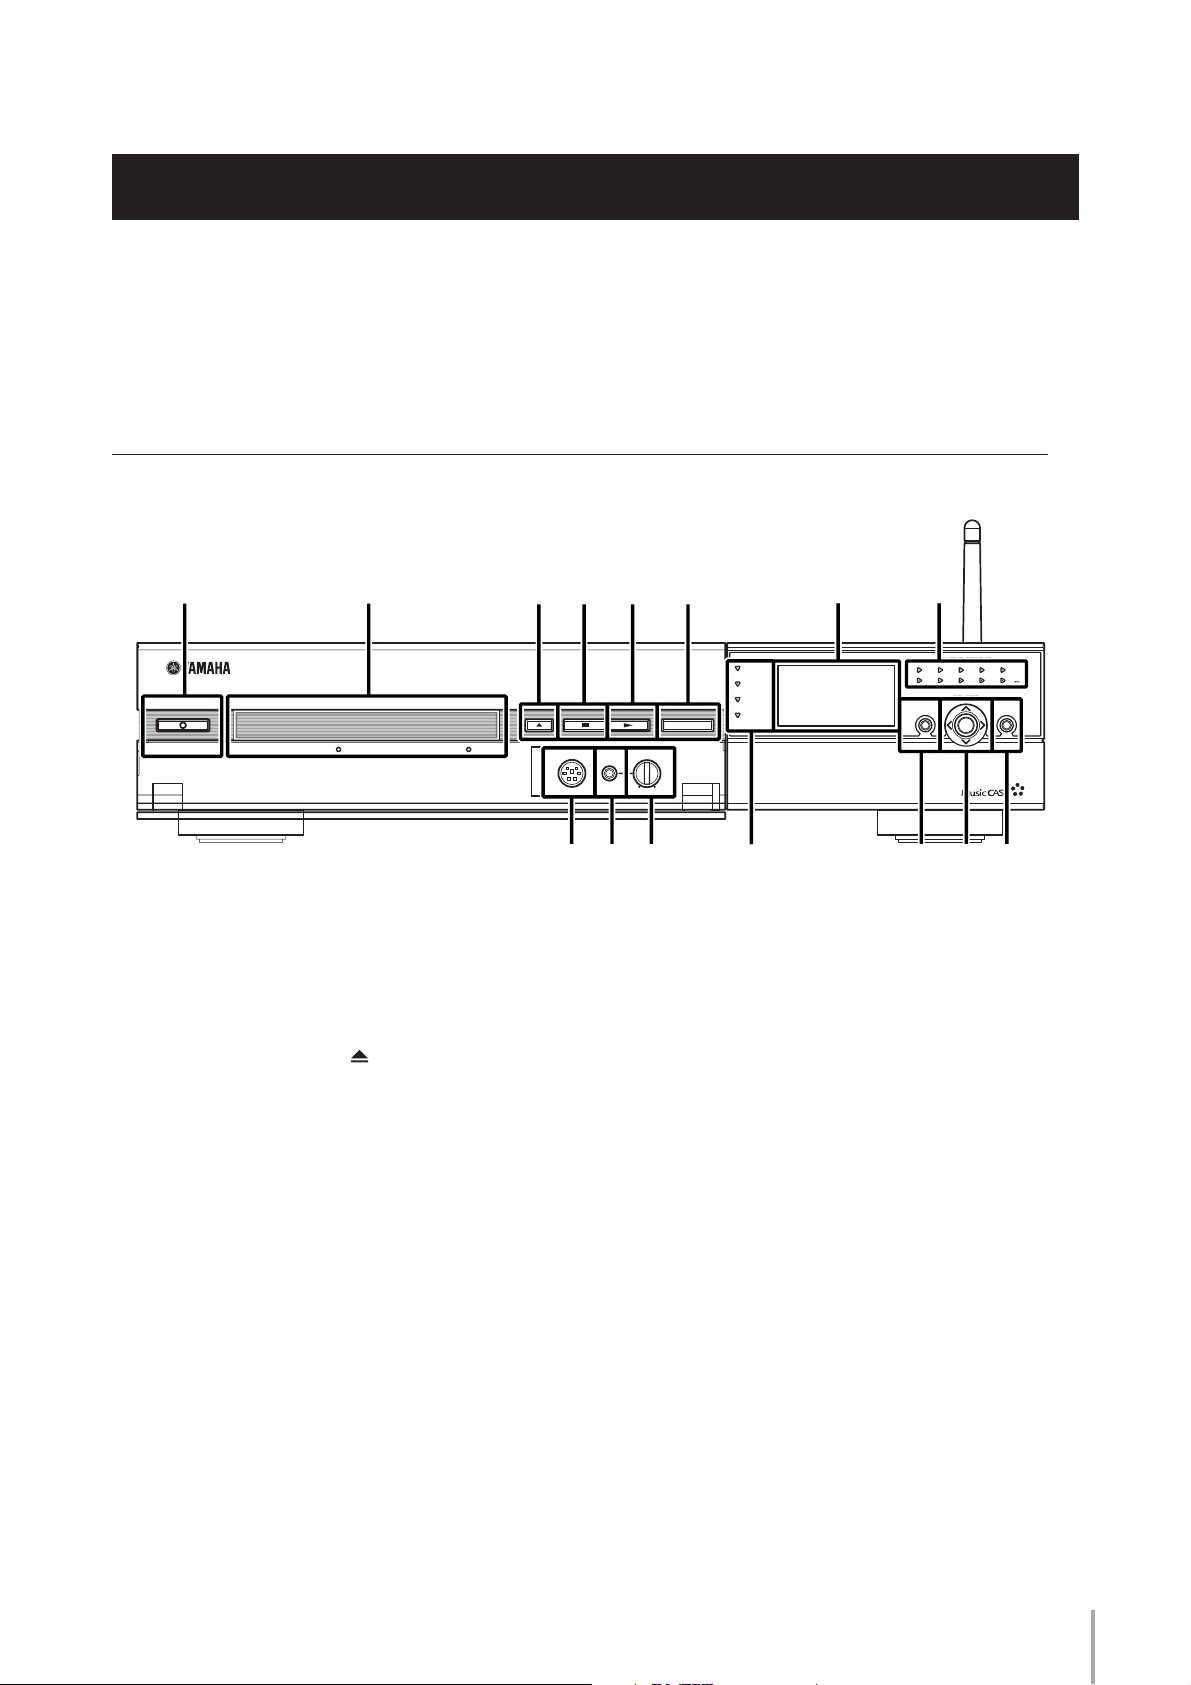
Panel Descriptions: MCX-2000
Front Panel
1 2
DIGITAL AUDIO SERVER MCX-2000
STANDBY/ON
3 4 5 6
CD AUTO STORE
PS/2 KEYBOARD PHONES LEVEL
LEVEL
MIN MAX
* & ^
BROADCAST
TIMER
RECORDING
ENCODING
7
@#$%
MENU/
PLAY INFO.
!
8
CLIENT STATUS
6
23451
789
PUSH
SELECT
) 9
1 STANDBY/ON button
Use this button when switching among the MCX-2000 operating modes. The button indicator light changes color, showing the
unit’s current operating mode (green: active mode, amber: sleep mode, red: standby mode).
•
Connecting to the AC Power (page 13)
2 Disc tray
3 Open/Close button ( )
Use these when setting a CD in the MCX-2000. Press this button to open the tray, set a CD with its label side facing up, and
press the button again to close the tray.
4 Stop button ( ss
5 Play button (
Press the Play button to start playback of the current song from the beginning. Press the Stop button to stop playback of the
current song that’s being played. These buttons similarly works with all other audio sources available on the MCX-2000 (CD,
archived songs, radios, external inputs).
ss
pp
pp
)
)
10
RADIO
6 CD AUTO STORE button
Use this button when recording (storing) all songs from a music CD at a time. Since importing an entire CD is possible with a
single click of the button, you can quickly store a number of songs from a pile of music CDs into the MCX-2000 music archive.
•
Importing a Music CD Automatically (page 68)
7 Display
Shows the current MCX-2000 status or menu screen.
8 CLIENT STATUS indicators (1~10)
Each indicator is associated with a client registered to the MCX-2000. A client whose indicator lights up in green is properly
connected, and can receive audio streams from the MCX-2000. The 10th indicator (10...) shows the operating status for the
10th and following clients all together. You can view detailed information of each client’s status in the Client Control screen.
MCX-2000 Owner’s Manual
7
Page 24

9 RADIO button
Press this button to fast access the last selected radio station. Every time you press this button, the radio type cycles through
FM, XM, Internet Radio and Presets (XM is for US model only).
) Cursor controller
Delivers the same functions with the center controller on the remote control. You can move the highlight (selection) onto a target
item by pushing the center stick upward, downward, leftward or rightward. When you press this stick vertically, it determines to
select the current item (PUSH SELECT).
! MENU/PLAY INFO. button
Press this button to toggle between the last selected menu screen and the Play Information screen for the current song.
Continue pressing this button for the Top Menu screen.
@ BROADCAST indicator
Lights up in blue while the MCX-2000 is broadcasting to clients.
# TIMER indicator
Lights up in amber while the MCX-2000 is waiting or operating in timer playback mode.
$ RECORDING indicator
Lights up in red while the MCX-2000 is recording (storing) an audio source or writing onto a CD-R/RW disc.
% ENCODING indicator
Lights up in green while the MCX-2000 is encoding recorded audio into MP3 format.
^ LEVEL knob
& PHONES jack
Connect a pair of headphones here to listen to sounds being played on the MCX-2000. You can adjust the playback volume
using the LEVEL knob.
* PS/2 KEYBOARD port
Connect a generic PS/2 keyboard designed for PC here. A connected PS/2 keyboard lets you control the MCX-2000 in the
same way as the supplied remote control. It also lets you type words (such as song titles) quickly when editing song information.
In addition, the MCX-2000 doesn’t support a PS/2 mouse. So, don’t connect a PS/2 mouse to this port.
•
Typing Text Characters (page 75)
8
MCX-2000 Owner’s Manual
Page 25
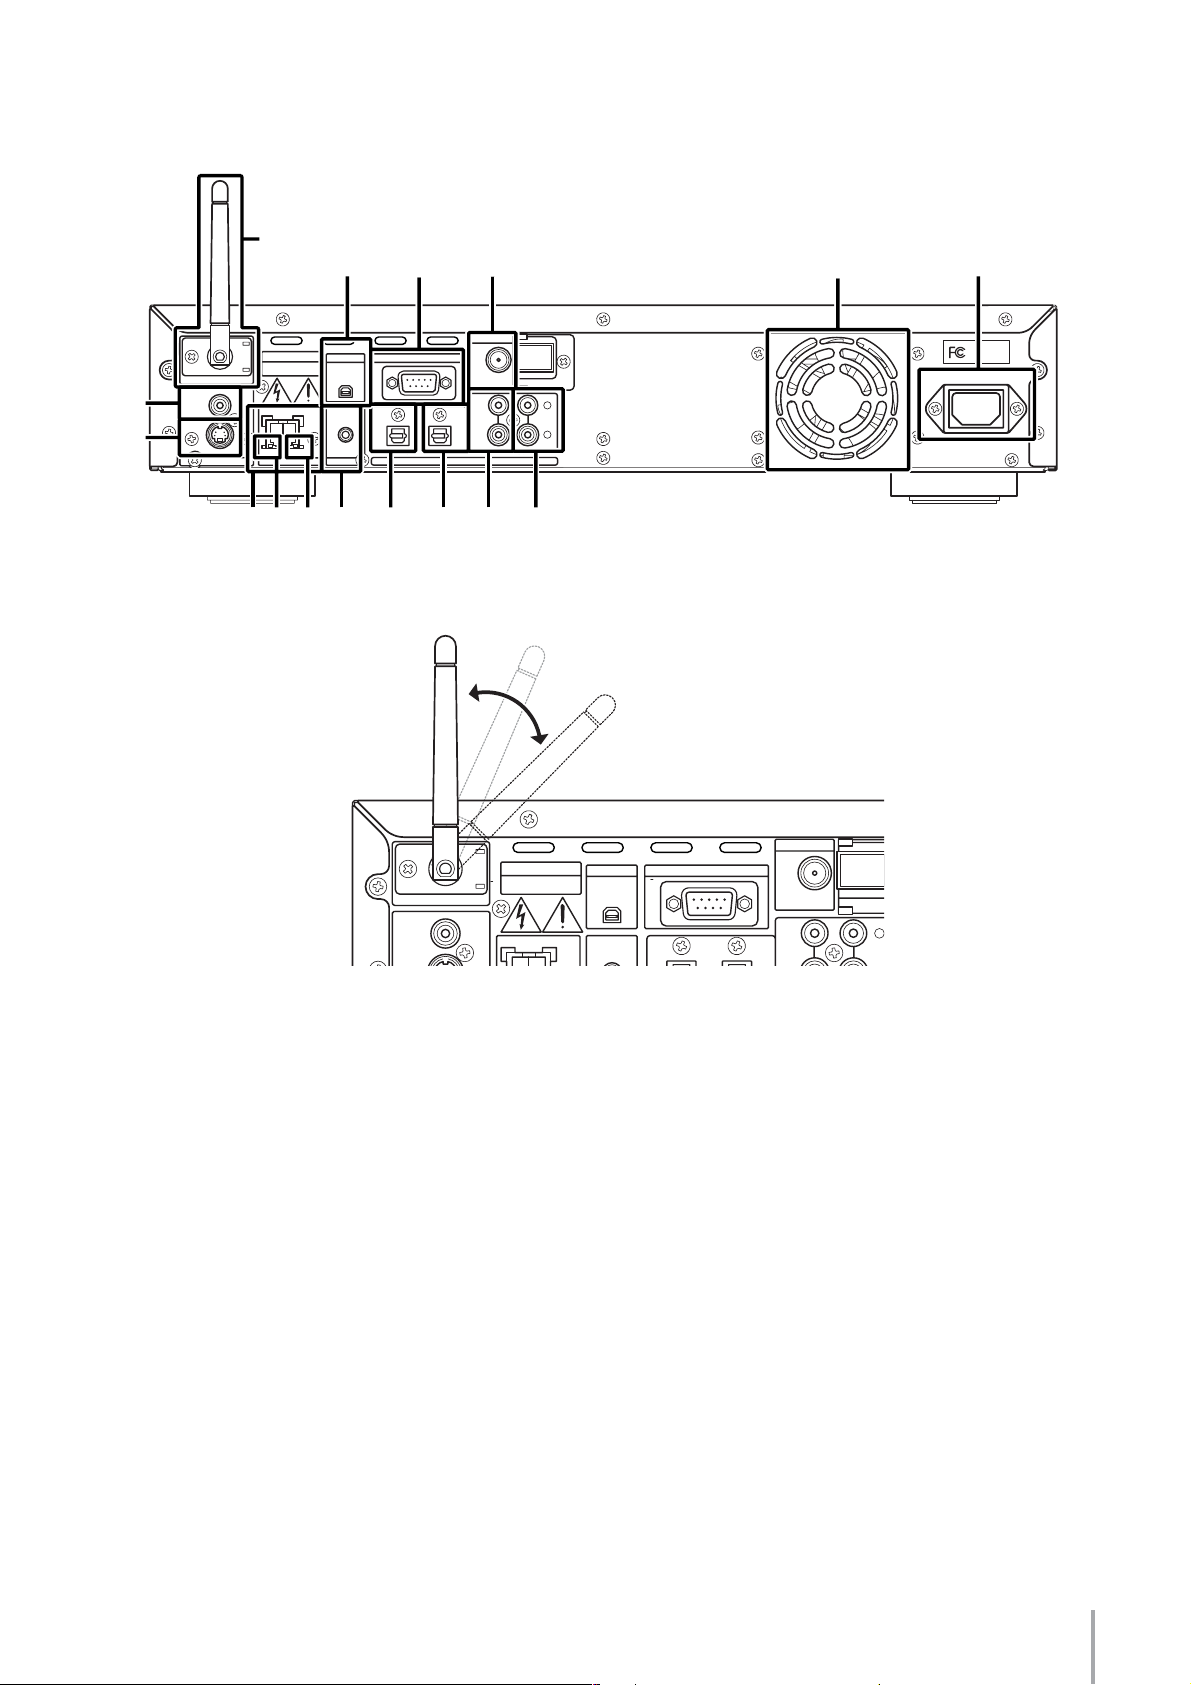
Back Panel
T
1
32
4
5
6
T
CAUTION
RISK OF ELECTRIC SHOCK
W_LAN ANT
^
%
VIDEO
T
S
VIDEO
VIDEO
DO NOT OPEN
LINK/DATA 10/100
LAN
REMOTE
XM
IN
$ # @ !
232C
RS–
IN
OPTICAL
)
9
OUT
AUDIO
FM ANT
75ΩUNBAL.
IN
ANALOG
8 7
T
WE87930-U-1
MODEL NO. MCX–2000
MADE IN MALAYSIA
THIS PRODUCT COMPLIES WITH DHHS RULES 21 CFR
SUBCHAPTER J APPLICABLE AT DATE OF MANUFACTURE
OUT
YAMAHA CORPORATION 10-1 NAKAZAWA-CHO,
L
HAMAMATSU-SHI, SHIZUOKA-KEN, JAPAN
MANUFACTURED BY
YEM (M)
MANUFACTURED:
R
THIS DEVICE COMPLIES WITH PART 15 OF THE FCC RULES.
OPERATION IS SUBJECT TO THE FOLLOWING TW O CONDITIONS:
®
(1) THIS DEVICE MAY NOT CAUSE HARMFUL INTERFERENCE, AND
(2) T HIS DEVICE MUST A CCEPT ANY INTERFERENCE RECEIVED,
INCLUDING INTERFERENCE THAT MAY CAUSE UNDE SIRED OPERATION
US
1 W_LAN ANT
A movable antenna for the wireless network. When you stream audio to clients over the wireless network, adjust the antenna
angle for best results.
Avoid using excessive force when moving the antenna.
T
FM ANT
CAUTION
RISK OF ELECTRIC SHOCK
W_LAN ANT
VIDEO
T
S
DO NOT OPEN
XM
RS–232C
75ΩUNBAL.
IN
OU
L
YAMAHA
MCX–2000
AC IN
FCC ID: A6RMCX2000A
THE XM NAME AND RELATED LOGOS
ARE REGISTERED TRADEMARKSOF
XM SATELLITE RADIO INC.
T
T
2 XM jack (US model only)
If you live in the United States and want to listen to XM Satellite Radio on the MCX-2000, connect your XM Connect-and-Play
antenna here (page 55).
3 RS-232C port
Use this port when connecting the MCX-2000 to a compatible Yamaha AV receiver using an RS-232C cross cable. With this
setup, you can synchronize both units’ power on/off timing or automatically select a surround program on the AV receiver to
match the genre of a song you select on the MCX-2000.
•
Using a Yamaha AV Receiver (page 98)
4 FM ANT terminal
Connect the supplied indoor FM antenna here when using the MCX-2000 built-in FM tuner.
5 Fan opening
To effectively cool down the inside of the MCX-2000, be sure not to shut off the airflow from this opening. When placing the
MCX-2000 near a wall, make sure there is enough room behind the back panel.
6 AC IN socket
Connect the supplied power cable here.
MCX-2000 Owner’s Manual
9
Page 26

7 ANALOG OUT jacks (stereo)
9 OPTICAL OUT jack (stereo)
Audio playback signals on the MCX-2000 are output from these jacks. Use the supplied optical digital cable (or one purchased
separately) to connect the OPTICAL OUT jack to a digital audio input on an external device. Use the supplied stereo pin cable
(or one purchased separately) to connect the ANALOG OUT jacks to analog audio input jacks on an external device.
8 ANALOG IN jacks (stereo)
) OPTICAL IN jack (stereo)
Audio sources called ‘external input’ in this manual are incoming audio signals via these jacks. Use the supplied optical digital
cable (or the one purchased separately) to connect the OPTICAL IN jack to a digital audio output on an external device. Use the
supplied stereo pin cable (or one purchased separately) to connect the ANALOG IN jacks to analog audio output jacks on an
external device.
! REMOTE terminal
This terminal is designed for professional expansion purposes, not for consumer use of the MCX-2000.
@ 10/100 indicator
# LINK/DATA indicator
$ LAN (Ethernet) port
Connect a network cable (CAT-5 straight cable) to the Ethernet port when creating a wired network with clients or connecting
the MCX-2000 to your home network. The LINK/DATA indicator lights up when the wired connection is properly working, and
flashes when data traffic over the network is being done. The Ethernet port is automatically configured to match the speed of a
connected network (10 or 100 Mbps); the 10/100 indicator lights up when the Ethernet port is configured for 100 Mbps, and is
unlit for 10 Mbps.
% S-VIDEO port
^ VIDEO port
These ports output the MCX-2000 operating screen displays (OSD) to an external TV monitor. Connect either port to your TV
monitor’s video input (yellow-coded composite port for VIDEO, or 4-pin S port for S-VIDEO). The VIDEO and S-VIDEO ports
output the same displays.
10
MCX-2000 Owner’s Manual
Page 27
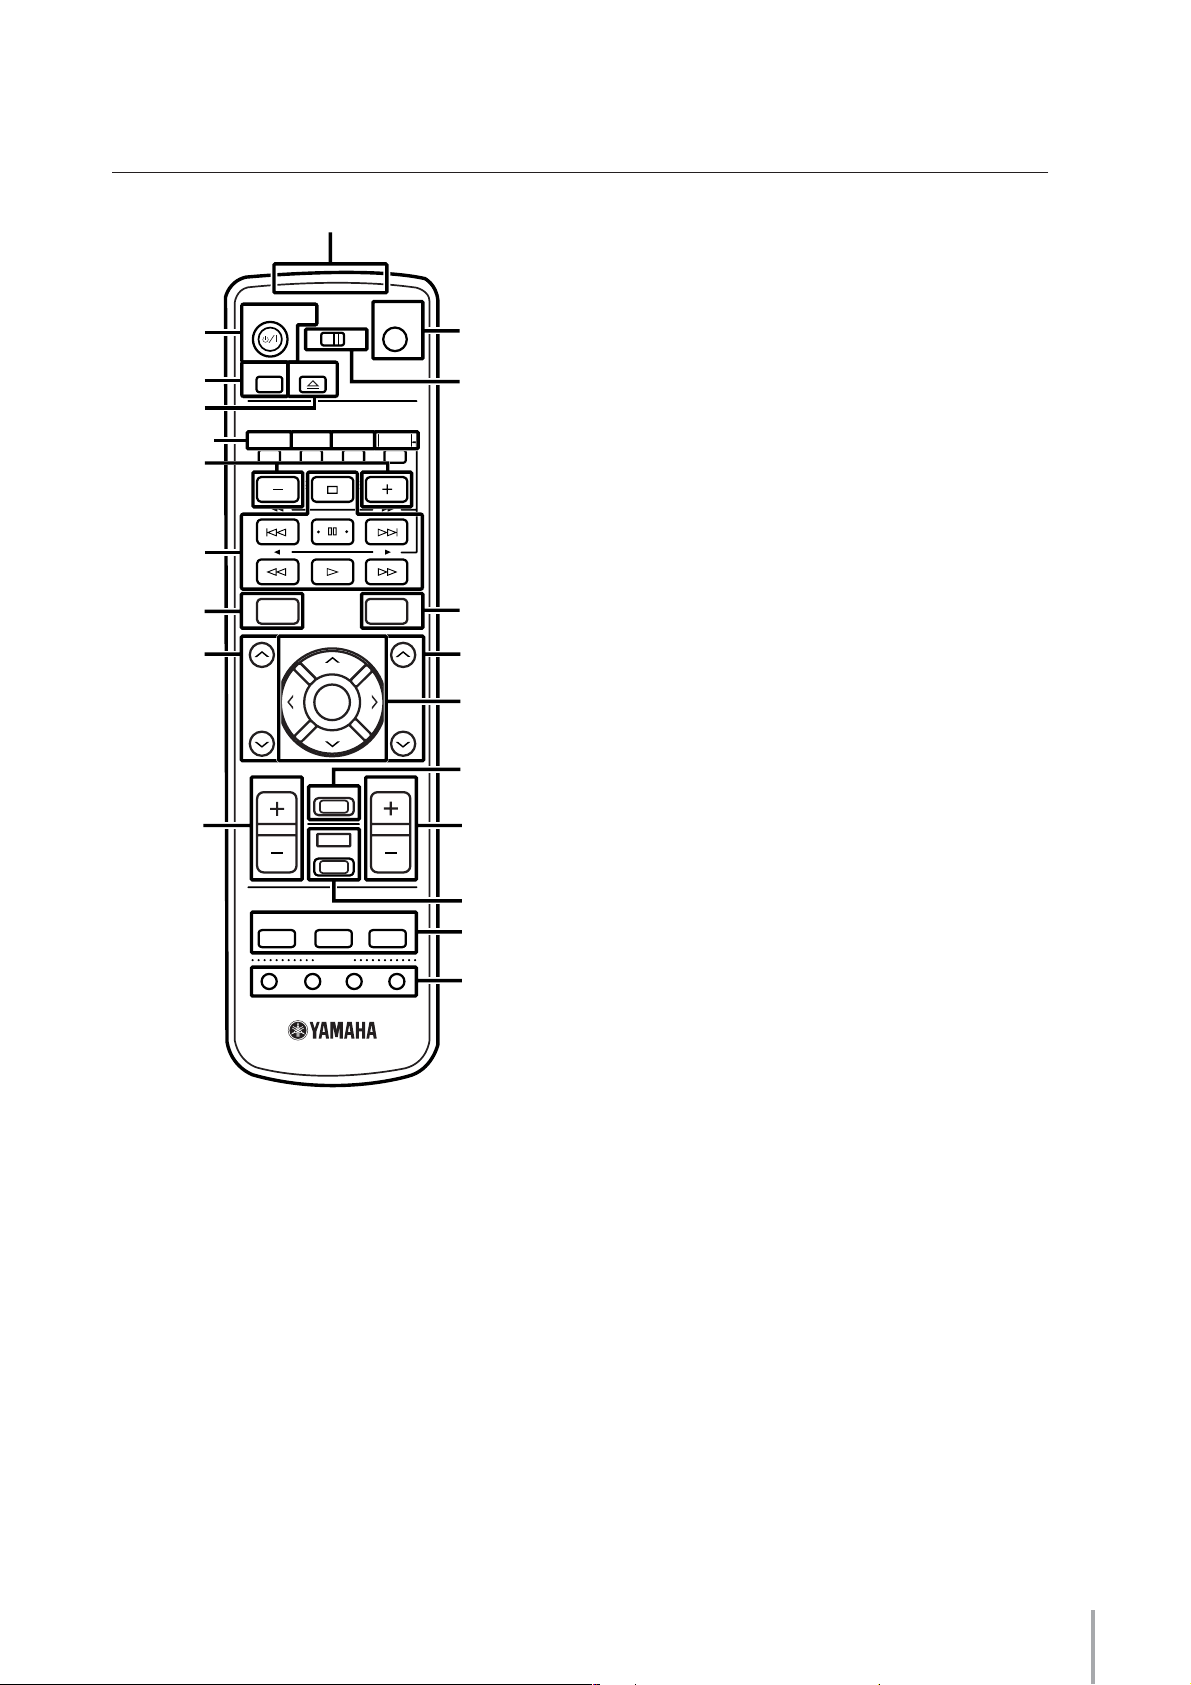
Panel Descriptions: Remote Control
1
£
™
STAMDBY/ON
TIMER
OPEN/CLOSE
TV AMP
¡
&*(º
RANDOM REPEAT BROADCAST RADIO
^
123
456
%
$
789
TOP
0
MENU
# 5
PAGE
SELECT
PAGE
VOL.
BOOKMARK
POWER
AMP/TV
PLAY
INFO.
INPUT
1 IR transmitter
Infrared (IR) remote control signals are transmitted from here. When
operating the remote control, point this part at the IR receiver on the
target unit.
2
4 PLAY INFO. button
Press this button to show the Play Information (song data) screen for the
3
current song on the TV monitor.
5 Alphabetical index search buttons ( uu
uu
/ dd
dd
)
You can find a recorded (archived) song from one of groups (artists,
albums, genres or all songs). Whichever group you select, its contents
(artist names, album titles, genres or song titles) are listed in alphabetical
order. You can then press either button to jump to the first item in each
alphabetical index. Use the down arrow button to jump in an A-to-Z
direction, or the up arrow button to jump in a Z-to-A direction.
•
Selecting a List Item (page 48)
4
6 Cursor controller
Provides the same functions as the controller on the MCX-2000 front
panel. Use the up, down, left and right arrow buttons to move the
A
6
Z
highlight (selection) onto a target item, and then press the center
SELECT button to select or determine it.
7 BOOKMARK button
7
Press this button to add or remove the bookmark to the current song.
•
Adding a Bookmark to a Song (page 50)
@ 8
AMP/TV
MUTE
LIBRARY AR TISTS
123
MENU MENU MENU
2 3 4
1
PLAYLISTS
FAVORITES
2 POWER AMP/TV button
3 TV/AMP switch
8 INPUT buttons ( +/– )
9
9 MUTE button
)
@ VOL. buttons ( +/– )
!
In addition to operating the MCX-2000, the supplied remote control also
lets you operate compatible Yamaha AV receivers and TV monitors from
other manufacturers (page 17). Slide the TV/AMP switch to TV to control
the TV monitor, or to AMP to control a Yamaha AV receiver. You can
then use the POWER AMP/TV button to turn the target device on or off,
the VOL. buttons to adjust the volume level of the target device, and the
MUTE button to temporarily turn off the target device volume. Press the
MUTE button again to cancel muting. The INPUT buttons let you switch
the input source on the target device. So, you can even route a different
audio source from the Yamaha AV receiver to the MCX-2000 external
input. In addition, directional switching with the INPUT +/– buttons only
works with Yamaha AV receivers. TV input will be switched in the same
direction with either INPUT button.
•
Using as a Universal Remote Control (page 17)
) MENU 1~3 buttons
Use the MENU 1~3 buttons to fast access the Library, Artists and Playlists menu screens.
! FAVORITES 1~4 buttons
The FAVORITES 1~4 buttons are reserved for future use (no functions).
uu
# PAGE scroll buttons ( uu
When a list of items (such as songs from a CD) cannot be displayed at a time, press either button for a scrolled view of the list.
/ dd
dd
)
$ TOP MENU button
Press this button to immediately access the Top Menu screen whatever screen is shown on the TV monitor.
MCX-2000 Owner’s Manual
11
Page 28

% Playback control buttons
You can control playback on the MCX-2000 using:
•
Pause button ( e ) to pause or resume playback of the current song
•
Skip backward button ( b ) to go to the beginning of the previous song (or the current song during playback)
•
Skip forward button ( a ) to go to the beginning of the next song
•
Stop button ( s ) to stop playback of the current song and rewind to its beginning
•
Backward button ( w ) to scrub playback toward the beginning of the current song
•
Forward button ( f) to scrub playback toward the end of the current song
•
Play button ( p) to start playback from the beginning of the current song
^ Group selection buttons (–/+)
Press this button to select the previous (–) or next (+) group within the currently selected group (album, artist, genre or the like).
& RANDOM button
Every time you press this button, you can change the playback order of songs from the current group (album, artist, genre or all
songs) as listed, or at random.
•
Play Information and Controls (page 50)
* REPEAT button
Every time you press this button, you can change how to repeat playback of the current song(s).
•
Play Information and Controls (page 50)
( BROADCAST button
Press this button to start or stop broadcasting to selected clients.
•
MusicCAST as an Integrated Music Delivery System (page 89)
º RADIO button
Press this button to fast access the last selected radio station. Every time you press this button, the radio type cycles through
FM, XM, Internet Radio and Presets (XM is for US model only).
¡ OPEN/CLOSE button
Like the Open/Close button on the MCX-2000 front panel, use this button when setting a CD in the MCX-2000. Press this
button to open the tray, set a CD with its label side facing up, and press the button again to close the tray.
™ TIMER button
Press this button to enable or disable the MCX-2000 Timer function.
•
Using the Timer Playback (page 97)
£ STANDBY/ON button
Use this button when switching the MCX-2000 operating modes.
•
Operation Modes on the MCX-2000 (page 14)
12
MCX-2000 Owner’s Manual
Page 29
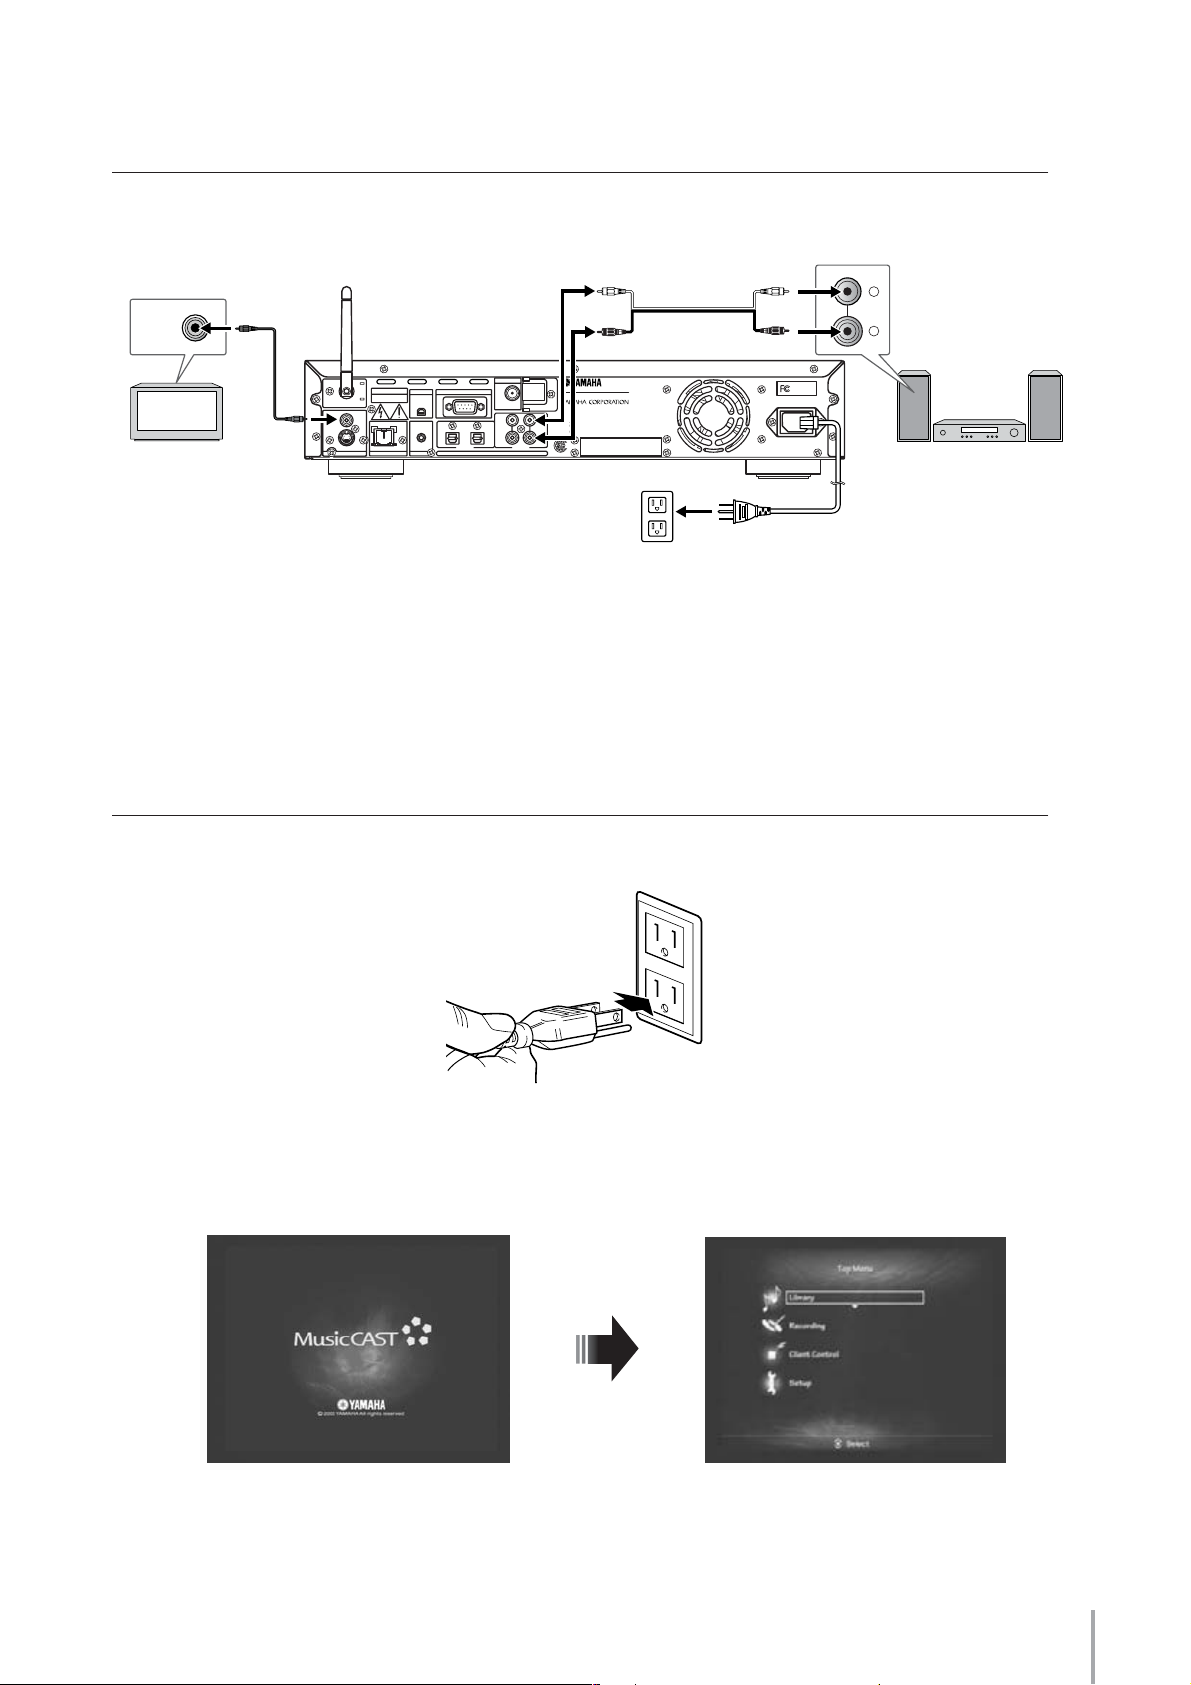
Connecting External Devices
Connect all relevant devices referring to the section “Panel Descriptions” (page 7) and the setup illustration below. Make
sure each device is turned off before making connections.
IN
Video pin cable
VIDEO
IN
(supplied)
T
CAUTION
XM
RISK OF ELECTRIC SHOCK
DO NOT OPEN
W_LAN ANT
VIDEO
T
S
VIDEO
LINK/DATA 10/100
VIDEO
IN
IN
LAN
REMOTE
RS–
OPTICAL
FM ANT
232C
75ΩUNBAL.
IN
OUT
AUDIO
OUT
ANALOG
T
WE87930-U-1
MODEL NO. MCX–2000
MADE IN MALAYSIA
THIS PRODUCT COMPLIES WITH DHHS RULES 21 CFR
SUBCHAPTER J APPLICABLE AT DATE OF MANUFACTURE
YAMAHA CORPORATION 10-1 NAKAZAWA-CHO,
L
HAMAMATSU-SHI, SHIZUOKA-KEN, JAPAN
MANUFACTURED BY
YEM (M)
MANUFACTURED:
R
THIS DEVICE COMPLIES WITH PART 15 OF THE FCC RULES.
OPERATION IS SUBJECT TO THE FOLLOWING TWO CONDITIONS:
®
(1) THIS DEVICE MAY NOT CAUSE HARMFUL INTERFERENCE, AND
(2) THIS DEVICE MUST A CCEPT ANY INTERFERENCE RECEIVED,
INCLUDING INTERFERENCE THAT MAY CAUSE UNDESIRED OPERATION
US
YAMAHA
MCX–2000
AC IN
FCC ID: A6RMCX2000A
THE XM NAME AND RELATED LOGOS
ARE REGISTERED TRADEMARKSOF
XM SATELLITE RADIO INC.
T
Audio pin cable (supplied)
AC plug and outlet for US model
• The MCX-2000 is designed to connect to a TV monitor for easy operation. Though you can still operate the unit while viewing its front
panel display, a large TV display offers more operation information at a time.
• The MCX-2000 accepts a generic PS/2 keyboard. This enables faster, more convenient operation than the remote control or front-panel
buttons, especially when you edit song information or other text data.
• The MCX-2000 is designed to become active immediately after the power cable is connected to the AC power source. Make sure to
connect to the AC power source only in the last step after all other devices are connected.
L
R
T
Power cable
(should be connected last)
Connecting to the AC Power
When relevant external devices are all connected, turn on these devices first, and then connect the MCX-2000 power
cable to the AC power source.
AC plug and outlet for US model
The front panel STANDBY/ON button indicator will light up in green. On the TV monitor, switch the video input source to
the MCX-2000 video output (VIDEO or S-VIDEO). If the following screen is shown on the TV display, connection to the TV
monitor has been successful.
Initial display Top menu
MCX-2000 Owner’s Manual
13
Page 30
You can call up any necessary operation by selecting a menu item from the Top Menu. In addition, when you turn on the
MCX-2000 for the first time after purchase, or after the system reset operation (page 103), the Easy Setup screen
(page 27) will appear instead of the Top Menu screen.
n If the indicator light of the STANDBY/ON button turns amber or red, press the button to continue working on the MCX-2000. The unit is designed
to automatically go into an energy saving mode if no operations have been performed for a while. Read the following column for more information.
Operation Modes on the MCX-2000
The MCX-2000 has no switch to completely turn the unit off. When you connect the MCX-2000 to the AC power source,
the front panel STANDBY/ON button indicator lights up in green and the MCX-2000 enters active mode. In this mode, you
can record or play an audio source while viewing the built-in display or the TV monitor.
MCX-2000
STANDBY/ON button: green
When you press the STANDBY/ON button on the remote control or the unit’s front panel, the front panel STANDBY/ON
button indicator light turns amber, and then the MCX-2000 enters sleep mode. In this mode, the MCX-2000 stops
showing a screen on the TV monitor and built-in display, waiting for a client request or your remote control operation.
14
MCX-2000
MCX-A10/MCX-C15
STANDBY/ON button: amber
MCX-2000 Owner’s Manual
Page 31

When you press the power switch on a client, it immediately establishes a network connection with the MCX-2000 and
enters active mode. (The corresponding CLIENT STATUS indicator lights up on the MCX-2000.) The client shows Top
Menu in the backlit display, and gets ready to play a streamed song from the MCX-2000.
As mentioned above, even in sleep mode, the MCX-2000 can still respond to a request from any registered client. This is
because the MCX-2000 maintains network connections with clients. As long as network connections are maintained, the
MCX-2000 can continue streaming music to clients. In fact, clients can continue playing a streamed song if the
MCX-2000 later enters sleep mode.
MCX-2000
MCX-A10/MCX-C15
STANDBY/ON button: amber
If you hold down the STANDBY/ON button for more than 3 seconds when the MCX-2000 is in active or sleep mode, the
indicator light turns red and the MCX-2000 enters standby mode, where the unit consumes less power. In standby mode,
network activities between the MCX-2000 and clients stop. (All CLIENT STATUS indicators go off on the MCX-2000.) In
this process, all active clients also enter sleep mode (Remote Sleep). They stop playing a streamed song (because of no
network connection with the MCX-2000), and show the current time in the display without backlight. In sleep mode,
clients wait for your operation and can awake the MCX-2000 to resume music streaming.
MCX-2000
MCX-A10/MCX-C15
STANDBY/ON button: red
Let’s say, standby mode is deep sleep. When a client sends a request, the MCX-2000 in standby mode notices it and
enters ‘lighter’ sleep mode. (The STANDBY/ON indicator light turns amber.) Otherwise, you can press the STANDBY/ON
button to completely awake the MCX-2000 and make it enter active mode. (The STANDBY/ON indicator light turns
green.) But, when the MCX-2000 directly enters active mode from standby mode, it first must re-establish network
connections with clients, taking more time to resume network activities or music streaming.
Active mode Sleep mode Standby mode
MCX-A10
or
MCX-C15
ON OFF
MCX-2000
Hold the STANDBY/ON button for more than 3 seconds to put the MCX-2000 in standby mode.
Automatically
enters sleep mode
TV
in 30 minutes if not
operated at all.
Press the
STANDBY/ON button.
MCX-A10
or
MCX-C15
OFF OFF
MCX-2000
Automatically
enters standby
mode in 5 minutes
TV
if the MCX-2000
and clients are not
operated at all.
When a client enters
active mode
OFF
MCX-A10
or
MCX-C15
MCX-2000
TV
Press the STANDBY/ON button to put the MCX-2000 in active mode.
n The MCX-2000 enters standby mode if it’s been idle (with no operation on the unit or no network activities) for one hour.
MCX-2000 Owner’s Manual
15
Page 32

Remote Control Features and Operations
You can use the supplied remote control to do most of the MCX-2000 operations (such as selecting a menu item or
determining a setting value). Prepare the remote control before operations.
Setting Batteries
Set batteries inside the remote control as shown below.
3
1
2
1 Remove the bottom cover of the remote control.
2 Set two AA batteries (supplied) in appropriate directions, according to the illustration in the compartment.
3 Slide the cover until it snaps into place.
n If the remote control doesn’t work well, the batteries may be weak. Replace them with generic two AA batteries. Always handle batteries
appropriately, according to the safety precautions at the beginning of this manual.
Operating on the Remote Control
When operating on the remote control, direct the IR transmitter to the IR receiver on the MCX-2000 front panel.
IR receiver
16
MCX-2000 Owner’s Manual
MCX-2000
30˚30˚
3
2
1
6
5
4
9
8
7
0
3
2
1
4
3
2
1
Remote control
6 meters
(approx.)
Page 33

Using as a Universal Remote Control
The supplied remote control can be used as a universal (multi-platform) remote control, letting you operate TV monitors
from other manufacturers. The remote control supports TV monitors from manufacturers (brands) in the following list.
So, if your TV monitor is applicable, select and register the corresponding preset setting to enable the universal control feature.
n The supplied remote control also supports a compatible Yamaha AV receiver that’s connected to the MCX-2000 using an RS-232C cross cable
(page 98). You can use the remote control for power on/off, volume adjustment (including mute) and input selection on the connected AV receiver.
ID
Yamaha 42 87 92 53
Admiral 16 92 93
Aiwa 76 83 94
Akai 95 96
Alba 96
AOC 97
Bell&Howell 92
Bestar 98
Blaupunkt 22 29
Blue sky 98
Brandt 23
Brocsonic 97
Bush 96
Clatronic 98
Craig 24
Croslex 25
Curtis Mathis 26 97
Daewoo 24 27 28 97 98
Daytron 39
Dual 98
Dwin 81 93
Emerson 24 32 39 97
Ferguson 23 65 66
First line 98
Fisher 33 95
Fraba 98
Fujitsu 89
Funai 77 78
GE 34 35 36 93 97
Goodmans 23 96 98
Grundig 29 49
Hitachi 39 42 43 97
ICE 96
Irradio 96
Itt/Nokia 44
JC Penny 34 37 93 97
JVC 46 47 96
Kendo 98
KTV 39 97
LG/Goldstar 37 39 97 98
Loewe 48 98
LXI 25 26 33 93 97
Magnavox 25 39 97
Marantz 10 98
Matsui 95
Memorex 16 97
Mitsubishi 59 87 97
Nad 26 55
NEC 52 82 97
Nokia 44
Nokia Oceanic 44
Nordmende 65 66
Onwa 96
Panasonic 34 35 36 53
Philco 25 39 97
MCX-2000 Owner’s Manual
17
Page 34

Philips 25
Pioneer 26 35 54 55 68
Portland 56 97
Proscan 21 31 41 51 93
Proton 50 60 70 97
Quasar 34 35
Radio Shack 87 93 97
RCA 21 34 56 57 58 93 97
Runco 20 30 71
SABA 23 65 66 69
Sampo 80 81 97
Samsung 39 48 62 75 97
Sanyo 33 73 79 95
Schneider 96
Scott 97
Sharp 32 39 92
Siemens 29
Signature 16 92
Sony 63
Sylvania 25 97
Symphonic 17 18 19
Telefunken 64 65 66 69
Thomson 23 66
Toshiba 26 67 92
Videch 42 97
Wards 16 32 39 97
Zenith 16 61 71
n Your TV monitor may not be fully controllable even when it’s from a manufacturer (brand) in the above list, depending on the model type or
production year. If this is the case, use the remote control for your TV monitor.
Registering Your TV Monitor to the MCX-2000
To enable universal operations from the supplied remote control, select the preset setting for your TV monitor brand.
1 Press the TOP MENU button on the remote control to show the Top Menu screen.
2 Input a 2-digit brand code for your TV monitor from the above list, using group selection, playback control and TOP
MENU buttons (these buttons work as numeric keys; see the corresponding number printed on the left of each button)
while holding down the POWER AMP/TV button.
MCX-2000
3
2
6
1
5
9
4
8
7
0
3
2
4
1
3
2
1
Remote control
3 If the brand code is successfully registered, a message will be shown telling it on the TV monitor and the MCX-2000
built-in display.
4 Set the AMP/TV switch to TV, and try operating your TV monitor. If the universal feature is fully working, you can remote
control of power on/off, switching of video inputs, volume and muting on your TV monitor.
n
If there are two or more brand codes available for TV monitor, register one at a time in the above steps. Use the one that best works for your TV monitor.
18
MCX-2000 Owner’s Manual
Page 35

Menu Operation Basics
The MCX-2000 has a menu tree that categorizes all commands, functions and settings relevantly. You can access them
by simply selecting a necessary menu item starting with Top Menu. For example, if you want to listen to a music CD,
select Library from Top Menu, and then select CD in the next screen.
1 Set a music CD in the MCX-2000 first, and then press the TOP MENU button on the remote control to view the Top
Menu screen.
For quick access to Top Menu
Remote control MCX-2000
Press and hold on
2 Select Library from Top menu.
To select a menu item, use the cursor controller on the remote control or the MCX-2000 front panel. Vertically move the
highlight (selection) by pressing the up or down arrow buttons on the remote control, or by pushing the center stick
upward or downward on the front panel, and then determine your selection by pressing the center SELECT button on
the remote control or by ‘vertically’ pushing the stick (PUSH SELECT) on the front panel.
Selecting a menu item
Remote control
MCX-2000
3 To return to the previous screen (Top Menu in this case), press the left arrow button on the remote control, or push the
center stick leftward on the front panel.
Returning to the previous screen
Remote Control
MCX-2000
MCX-2000 Owner’s Manual
19
Page 36

4 Now you learned how to go back and forth between screens. Re-select Library from Top Menu, and then select CD as
target audio source. Your TV monitor and the built-in display will show a list of songs from the music CD.
TV monitor:
Built-in display:
5 You can start playing the CD, from the first song in the list, by pressing the Play button on the remote control or on the
MCX-2000 front panel. Otherwise, you can first select your favorite song from the list using the cursor controller, and
then start playback from that song.
The MCX-2000 also offers Submenu. When the current screen shows “Submenu” in the lower right corner, try pressing
the right arrow button on the remote control, or try pushing the center stick rightward on the front panel cursor controller. For example, you can see the following Submenu commands from the CD song list screen.
20
MCX-2000 Owner’s Manual
Page 37

Submenu is context-sensitive, so available menu commands may change depending on which screen or item you
open the menu from. You can always do relevant operations to the current selection, such as song playback or recording when you open the Submenu from the CD song list screen. We urge you to check what commands are available
from which item or screen every time you find “Submenu” in the lower right corner of a screen. In addition, you can
always close the Submenu by pressing the left arrow button on the remote control, or by pushing the center stick leftward on the front panel cursor controller.
n Some screens offer a context-sensitive menu guided with a different name (such as Fix), depending on their functions. But, you can operate all
menu commands similarly.
You may see one or more guide icons at the bottom of each MCX-2000 screen. These allow you to perform certain operations
by pressing guided buttons on the cursor controller. In most cases, you can return to the previous screen (left arrow button),
open the
Submenu
(right arrow button) and move the highlight between items (up and down arrow buttons) on the cursor
controller.
Move the highlight
Previous screen Submenu
Move the highlight
If a screen has setting options or other configurations, the MCX-2000 will show OK and Cancel at the bottom of the screen,
asking your confirmation. In this case, you need to select either to exit from the screen. When you select OK (move your
selection to OK and press the SELECT button), the MCX-2000 saves the current settings, and then you will return to the
previous screen. When you select Cancel, setting changes (if any) are discarded, and then you will return to the previous screen.
Confirmation required
n Other special operations include typing text through a character palette (page 75).
In any case, you can perform most operations of the MCX-2000 using the cursor controller to simply move to a target
item and select it. Simple and easy!
In addition, this manual describes menu operations to access a specific item in the order of ‘what you select next’.
For example, menu operations to the CD song list screen are described as: Top Menu > Library > CD. You can also refer
to the MCX-2000 menu tree on the next page to locate each function.
MCX-2000 Owner’s Manual
21
Page 38

MCX-2000 Menu Tree
This helpful menu tree shows all of the operation screens of the MCX-2000 in hierarchical order. Page numbers are given
for convenient reference.
Top Menu Music Archive Artists
Library
Recording
Client Control Client 1
(page 87)
(page 46)
Radio FM
Network Content
(page 51)
CD
Inputs Digital Input
(page 63)
Store from CD
Store from Radio
Store from Inputs
Duplicate a CD
Create an Original CD
:
Client 15
Albums
Genres
All Songs
Playlists
Bookmarks
Statistics
XM
Internet Radio
Presets
(page 64)
Analog Input
(page 66)
(page 69)
(page 69)
(page 71)
(page 73)
(page 54)
(page 55)
(page 59)
(page 59)
(US model only)
Setup Timer
Network Client Configuration Auto Configuration
Date/Time Auto Setup
Playback
Recording
CD Lookup
User Interface Front Panel Display
YAMAHA AV Receiver
System Utilities System Information Version
Easy Setup
(page 97)
(page 95)
(page 96)
(page 93)
(page 27)
(page 98)
Status View Server IP Address
Advanced Settings IP Address
(page 91)
Manual Setup
Time Display
Page displayed at Power ON
Screen Saver
Language
PS/2 Keyboard
System Reset
System Update
Lock Function
(page 92)
(page 92)
(page 102)
(page 103)
(page 103)
(page 104)
Manual Configuration
Wireless LAN
Wireless LAN
Network Settings Reset
(page 94)
(page 94)
(page 94)
(page 95)
(page 95)
Hard Drive Capacity
MP3 Encode Schedule
Controlable YAMAHA AV Receivers
(page 31)
(page 35)
(page 100)
(page 100)
(page 37)
(page 38)
(page 100)
22
MCX-2000 Owner’s Manual
Page 39

Configuring Your MusicCAST Network
After connecting necessary devices and cables to the MCX-2000 music server and clients
(optional MCX-A10 or MCX-C15, or both), you can now configure a MusicCAST network
customized for your specific needs. The MusicCAST network uses standard wired and wireless PC
networking technologies, and the MCX-2000 allows both wired and wireless connections at the
same time. The unit can also connect to the Internet and an existing computer network, enabling
exceptionally flexible configuration of your MusicCAST network. In this section, we’ll explain some
network basics and give some configuration examples for different purposes. Examine these and
see which MusicCAST network is best for you.
n The MCX-2000 incorporates the Easy Setup feature (page 27) that helps you configure the best MusicCAST network for your environment. Since
configuring a MusicCAST network requires some knowledge about computer networking, we recommend using Easy Setup for optimum results.
When you configure a MusicCAST network for the first time, you need to manually operate the MCX-2000 and clients. For this reason, regardless
of where each client is finally to be placed, bring the MCX-2000 and all of its clients together in one place to make these processes easier.
Network Basics
You can easily configure a MusicCAST network using the built-in networking features of the MCX-2000 and clients.
The more you learn here about basic networking mechanism and terms, the more you will get out of your MusicCAST
systems. Take the time to read this section carefully before configuring your MusicCAST network.
The MCX-2000 finds each client (or each client finds the music server) using a unique address assigned to the companion.
This address is called IP address and is similar to the physical address of your house. We’ll take this analogy a little bit
farther and compare the server-client network relationship to the communication between you and your neighbor friend
living on the same street.
An IP address is comprised of a network address and a host address, which are comparable to your street address and
home address. The MCX-2000 can only communicate with clients that live on the same street (or have the same network
address). Naturally, they are separate entities, and so each has its own unique host address in the same network.
If the MCX-2000 and its clients have a slightly different network address (or, In other words, have a different street, town,
city or country name), they are no longer neighbors living on the same street.
Georgetown, Washington DC
George Town, Cayman Islands
George Town, Malaysia
All different places!
George Town, Tasmania
Fortunately, the MCX-2000 and its clients are designed to automatically have the same network address (factory settings).
So, the first step of configuring a MusicCAST network is easily cleared. In other words, they are designed to live on the
same street. The second step is to determine and assign a unique host address to each of them.
MCX-2000 Owner’s Manual
23
Page 40

During automatic configuration of a MusicCAST network, the MCX-2000 utilizes a technique called DHCP (Dynamic Host
Configuration Protocol) to assign a unique IP address to each client (DHCP server feature) and define where they are in
the MusicCAST network. Once the music server and clients have a unique address in the MusicCAST network, they can
find each other, and music streaming and other network communication becomes possible.
Configuration of a MusicCAST-only network
MCX-2000
Host Address
Host Address1Host Address
Host Address2Host Address
1
2
Host Address3Host Address
MCX-A10 MCX-A10MCX-A10MCX-A10
3
Host Address
4
4
If you want to use the MCX-2000 for listening to music stored on a Windows PC, or if you want to connect the MCX-2000
to the Internet, you need to set the same network address to the Windows PC, the MCX-2000 and its clients. Once you
do this, your MusicCAST network becomes integrated into your PC network.
You can easily create this integrated network. If your PC network is already connected to the Internet, simply connect the
MCX-2000 to the PC network hub using a standard network cable. In this configuration, the MCX-2000 and its clients are
automatically assigned a unique host address from the DHCP server in the PC network. As a result, your Windows PC,
the MCX-2000 and its clients all belong to the same LAN.
Configuration of a MusicCAST network for
PC network and Internet accessa
Host Address1Host Address
Host Address
1
PC
Router
Host Address2Host Address
2
Host Address
MCX-2000
3
3
MCX-A10
The DHCP server in your PC network might be a dedicated DHCP server (PC running DHCP server software). For most
customers, the easiest way to deploy a DHCP service for a personal network is to use an equivalent feature of a
commercial router product. (You may already have one for broadband Internet access.) The router is a dedicated device
that sends and receives necessary information between networks while limiting unnecessary information or blocking
unauthorized access from one network to another. Standard router products also offer a DHCP server feature.
Now perhaps you understand the basics of computer networks. The above two examples are typical (and among the easiest)
configurations of your MusicCAST network. Of course, you can create other configurations based on your networking needs.
In the following sections, we’ll explain how to configure your MusicCAST network based on the above two examples.
n You cannot set up the MCX-2000 (MusicCAST network) to directly connect to the Internet. Always use a router to bridge your MusicCAST network
and the Internet.
24
MCX-2000 Owner’s Manual
Page 41

Configuring a MusicCAST-only Network
The simplest and easiest way is to network the MCX-2000 and its clients in a wireless configuration. In a wireless
MusicCAST network, the MCX-2000 can stream music to up to five clients within a range of 30 meters from the server.
This is ideal for most houses, since the MusicCAST network can extend to any room without using a single network cable.
With the wireless setup, you don’t need to place the MCX-2000 and clients on the same floor. However, if there is an
obstacle that blocks radio signals between the MCX-2000 and clients, music streaming may fail even though the devices
are theoretically placed closely enough.
MCX-A10
2F
MCX-A10
MCX-A10
1F
MCX-2000
Wirreless
If you are planning to use the MusicCAST systems in a multi-floor shop (for example, in building larger than a family
house), you may want to connect more clients using network cables. In addition to the five wireless clients, the MCX-2000
can support up to ten wired clients at the same time. The server can stream a different song to each client, or broadcast
the same music to several clients. You can use these functions to create different moods in different rooms by streaming
separate music to clients on each floor, all the while broadcasting the same music to maintain a unified image for the
shop. You can even use the timer playback feature (page 97) to stream the same audio message to all clients at the
specified time while they normally play different music.
3F
2F
1F
MCX-A10
MCX-2000
Control Room
Wired
Wireless
These two MusicCAST networks are easily configured using Easy Setup (page 27).
MCX-2000 Owner’s Manual
25
Page 42

Configuring a MusicCAST Network for PC Network and Internet Access
Recently, many people are enjoying music using their computers. If you’re managing a music collection on a Windows
PC, you can also listen to songs from the collection on the MCX-2000. To enable this, just start networking between that
PC and the MCX-2000 (page 31). If you already have a home network, simply connect the MCX-2000 to that network
using a standard network cable. Next, install the supplied software application to the music PC, open the application, and
you’re ready to go. When you select “Network Content” for audio source on the MCX-2000, the unit automatically locates
the music PC in the network and displays a list of songs from the PC music collection. Simply select a song you want to
listen from the list, and start playback (page 64). Once the MCX-2000 and PC is networked, you can also edit song data
for the music archive on the MCX-2000 using a standard web browser on a computer in the PC network (page 76).
Hub
song01
MCX-2000
song01
PC
As a computer user, you’re maybe using the Internet, or maybe sharing a broadband Internet connection with two or
more computers in the same PC network. If this applies to you, we recommend to configure your MusicCAST network so
that the MCX-2000 can access the Internet via your PC network (page 31). In this configuration, you can broadcast an
Internet radio program to multiple clients (page 59), automatically get the latest song data from the online CDDB
database, and regularly set accurate time to the MCX-2000 and clients using a public time server (page 91).
12:00
CDDB database
Internet
12:00
Time infoSong info
12:00
MCX-A10
MCX-2000
These two MusicCAST networks are easily configured using Easy Setup (page 27).
26
MCX-2000 Owner’s Manual
Page 43

Using Easy Setup
You have many options to set up the MCX-2000 (setting parameters), and they serve as switch or
data to make the MCX-2000 the best music server for you. So, you need to understand what each
parameter does and set it up appropriately to create your MusicCAST network as purposed. You
can manually set up all parameters one by one, but it’s so painful. That’s why we’ve prepared the
Easy Setup feature as one of menu items. Using Easy Setup, you can set up the MCX-2000 quickly
and create a purposed MusicCAST network very easily.
n The front panel display doesn’t show the Easy Setup screens. Operate the MCX-2000 watching your TV monitor that’s connected to the
MCX-2000 video output.
1 Press the TOP MENU button on the remote control, and select Top Menu > Setup > Easy Setup.
n Skip this operation when you turn on the MCX-2000 for the first time after purchase, or after the system reset operation (page 103) because the
Easy Setup screen will appear instead of the Top Menu screen.
2 In the first screen, you’re asked to select a language used for menus and messages. Move the selection (highlight) to
your desired language and press the SELECT button. (Turn on its radio button.)
3
When you go the next screen, you can see notes on Easy Setup. Read notes and, if you’re ready, go to the next screen.
As above, Easy Setup lets you configure the MCX-2000 interactively. Simply continue selecting your preferred option(s) in
each screen. And, you’ll complete necessary settings for your MusicCAST network. We introduce several Easy Setup
screens on the following pages. For details, see the guide messages shown in each Easy Setup screen.
MCX-2000 Owner’s Manual
27
Page 44

Easy Setup Overview
Date and Time
Move the highlight to a parameter you want to edit, and press the SELECT button. Scroll and display a desired value, and
determine it using the SELECT button.
n The MCX-2000 can get an accurate time from a public time server on the Internet (page 91).
MusicCAST System Configuration
Select from Stand-alone (no MusicCAST network) or Together with Clients (to enable music streaming).
Network Connection (stand-alone, without clients)
Select from No Connection (no PC or Internet access) or Existing Network (to enable PC or Internet access).
n When using the MCX-2000 solely without clients, PC and Internet, Easy Setup finishes with this screen.
28
MCX-2000 Owner’s Manual
Page 45

Network Connection (with clients)
Select from MusicCAST Only (no PC or Internet access) or PC Network Integration (to enable PC or Internet access).
Network Configuration
Available network configuration options may vary according to your selections.
Select from Automatic (with Internet access), Automatic (without Internet access) or Manual. It’s recommended to select
one of the Automatic settings (depending on your need) if you’re unfamiliar with networking.
n If you select Manual, Easy Setup finishes with this screen. You need to set up your MCX-2000 and MusicCAST network parameters manually.
See “Manual Configuration of a MusicCAST Network” (page 35) for details.
While you answer these questions, Easy Setup determines network configurations you need. Unless you select to
manually configure network parameters, Easy Setup finally shows a diagram of required physical network connections.
(Your diagram may be different from the following ones.)
MCX-2000 Owner’s Manual
29
Page 46

For the MCX-2000 to access the Internet via an existing PC network
According to the diagram, connect the MCX-2000 Ethernet port to the network hub (or the one equipped with your
router) using a standard network cable (CAT5 straight cable). Also, connect all wired clients (using a network cable for
each) to the network hub connected to the MCX-2000.
n When you have specified to use the MCX-2000 as a stand-alone unit with PC or Internet access, Easy Setup finishes after setting up network
parameters.
For automatic configuration of a MusicCAST network
Consecutively, Easy Setup lets you register clients (page 32) and update their firmware (page 45). Easy Setup finishes
when these processes are all complete.
30
MCX-2000 Owner’s Manual
Page 47

Automatic Configuration of a MusicCAST Network
Your MusicCAST network is created when you register clients to the MCX-2000. Once this process
is complete, the MCX-2000 and clients can quickly resume network connections even after you
reconnect their power cable or awake the MCX-2000 from standby mode (page 14).
n This section describes the procedure of Client Registration that’s also available as a final step of Easy Setup (page 27). Though we explain here the
procedure starting from the menu item selection, the registration process is identical. So, read this section as supplemental information when using
Easy Setup.
Configuration examples:
MusicCAST-only network (without Internet access)
Hub
MCX-2000
MCX-A10
MCX-A10
MusicCAST network integrated into a PC network (with Internet access)
MCX-2000
MCX-A10
MCX-A10
MCX-C15 MCX-C15 MCX-C15
Router/hub
MCX-C15 MCX-C15
MCX-A10
xDSL Modem
Internet
PC
n When you configure a MusicCAST network for the first time, you need to manually operate the MCX-2000 and clients. For this reason, regardless
of where each client is finally to be placed, bring the MCX-2000 and all of its clients together in one place to make these processes easier.
MCX-2000 Owner’s Manual
31
Page 48

Preparation on the MCX-2000
1 Select Top Menu > Setup > Network.
2 From the Network menu, select Client Registration > Auto Configuration.
3 Open the Submenu in the Auto Configuration screen. Select Start from the menu.
MCX-2000 continues searching clients for 30 minutes
When the MCX-2000 starts searching available clients, register them within 30 minutes. With this screen shown on the
MCX-2000, go and prepare each client.
n When you see the “Cannot confirm IP address” message in the screen, there is no external DHCP server that assigns IP addresses to the
MCX-2000 and MusicCAST clients. In this case, the MCX-2000 automatically enters DHCP Server mode (page 37). Simply select OK in the dialog
box to continue auto configuration. Select Cancel if you want to set up an external DHCP server. Auto Configuration is canceled.
32
MCX-2000 Owner’s Manual
Page 49

Preparation on Each Client
1 Tu rn on the client.
The front panel display lights up, showing the initial screen, followed by a “Connecting...” message.
n If the client display shows the current time without backlight, it’s in sleep mode. If this is the case, press the center stick of the cursor controller.
The client wakes up and shows the above message.
2 The “Connecting...” message indicates the client is searching a MusicCAST server to establish a network connection.
At this point, however, we have not completed any network configuration. So, when the client display shows a network
icon, push the controller stick upward or downward to cancel the message. The client stops searching.
wireless network icon (no signal) wired network icon (disconnected)
n The wireless network icon doesn’t appear on the MCX-C15 that supports only wired networking.
3 From Top Menu, select Setup > Network > Manual Setup > DHCP. Make sure the DHCP is enabled (ON).
DHCP ON is selected (factory setting)
4 Push the controller stick leftward twice to go back to the Network screen. Select Auto Configuration (Top Menu >
Setup > Network > Auto Configuration).
With this screen shown on each client, you can start automatic configuration of a MusicCAST network.
MCX-2000 Owner’s Manual
33
Page 50

Automatic Registration of Clients
Before configuring a MusicCAST network through automatic Client Registration, be sure to connect any wired clients to
the network hub connected to the MCX-2000. (If you want to integrate your MusicCAST network into an existing PC
network, connect both the MCX-2000 and wired clients to the PC network hub.)
1 On each client, press the front panel Play button as the Auto Configuration screen is shown. Notice the client display
shows the following messages in a short period.
The wired network icon indicates
radio signal strength
The client is searching a wireless MusicCAST network...
The client found a MusicCAST network,
and continues searching an available MusicCAST server...
The client found a MusicCAST server, waiting to be registered...
2 As soon as the client display shows its ID (CL-XXXXX: a 5-digit unique number to each client), the MCX-2000 will also
show the same client ID in the registration screen.
Clients (ID) found in the process
n Each client display continues showing “Press STOP to cancel” during the registration process. If you press the Stop button, the registration
process for that client will be canceled. Normally, you don’t need to operate clients after you pressed the Play button in step 2.
34
3
When the MCX-2000 found all clients, open the Submenu (Fix) in the registration screen. Select OK from the menu.
The MCX-2000 shows “Saving...” and registers the clients it found. Each client display shows “Complete!” for a second.
Now that the MCX-2000 and each client recognized and memorized each other, your MusicCAST network is
successfully created. Go to Applications section (page 46) and enjoy MusicCAST.
n When networked with the MCX-2000 for the first time, your clients must be updated before actual use (page 45).
MCX-2000 Owner’s Manual
Page 51

Manual Configuration of a MusicCAST Network
There may be a case you need to assign a fixed IP address to the MCX-2000 and clients to
integrate a MusicCAST network into a PC network that has no DHCP server. You can solve it by
manually configure some or all of network parameters of the MCX-2000 and clients. We explain
here several points you should remember when configuring a MusicCAST network manually.
Configuration example:
MCX-2000
MCX-A10
MCX-A10
n Though the MCX-2000 has two physical network ports (wired and wireless), these ports internally share a single (identical) IP address. So, you
cannot use these ports for two separate network connections. In addition, the MCX-2000 doesn’t support music streaming to a remote client over
the router (Internet). Always use the MCX-2000, its clients and a PC that’s used to communicate with the MCX-2000 within the same network
(LAN).
Router/hub xDSL Modem
MCX-C15 MCX-C15
PC
Internet
PC
Checking Out Parameter Values
Before manually setting up the MCX-2000 and clients, check out the following values for MusicCAST and PC network
integration:
• IP addresses (unique values, not used with other devices in the PC network)
• Subnet mask (the same value as used with other devices in the PC network)
• Gateway (router IP address; essential to connect the MCX-2000 to the Internet)
• DNS server (name server IP address; at least one DNS server is necessary to specify an NTP server (page 91) with its domain name for
retrieving accurate time for the MCX-2000 date and time settings)
Network parameter values shown above are very important for successful networking. You must consider how your
MusicCAST network is configured for your specific need, and define each parameter value to set up your network as
purposed. It’s recommended to write down your network plan with appropriate values in the following chart.
MCX-2000 Owner’s Manual
35
Page 52

System Unique
Information
Server/Client ID
MCX-2000 Client
(1)
SV-_ _ _ _ _ CL-_ _ _ _ _ CL-_ _ _ _ _ CL-_ _ _ _ _ CL-_ _ _ _ _
Client
(2)
Client
(3)
Client
(4)
Network Settings
Wireless LAN
DHCP Server /
DHCP Client /
Setting Method
IP Address (when
DHCP is disabled) ... ... ... ... ...
Subnet Mask ... ... ... ... ...
Gateway Address ... ... ... ... ...
Primary DNS ... ————
Secondary DNS ... ————
NTP Server
(only when used)
(Server domain name
when DNS is specified;
Server IP address
when DNS is not
specified.)
ESS ID (up to 13
ASCII characters)
WEP Key (up to 13
ASCII characters)
Channel ————
Manual
(Specify a valid IP
address below
with Manual.)
...
DHCP Client /
Manual
(Specify a valid IP
address below
with Manual.)
————
————
DHCP Client /
Manual
(Specify a valid IP
address below
with Manual.)
DHCP Client /
Manual
(Specify a valid IP
address below
with Manual.)
DHCP Client /
Manual
(Specify a valid IP
address below
with Manual.)
n If you have more than 4 clients, copy the blank chart above and substitute the appropriate client numbers as needed.
Settings on the MCX-2000
1 Select Top Menu > Setup > Network > Advanced Settings.
Advanced Settings menu
2 From the above menu, select IP Address or Wireless LAN as needed, and set up the relevant parameters shown in the
screen.
n If you reconfigure your MusicCAST network because you have changed the target PC network configurations, you may want to clear existing
MCX-2000 network settings using the Network Settings Reset command from the above menu (page 100).
36
MCX-2000 Owner’s Manual
Page 53

IP Address
1
2
3
1 Setting Method
Specifies a DHCP operation of the MCX-2000. When the MCX-2000 has a ‘wired’ connection to a PC network and
finds a DHCP server there, it enters DHCP Client mode and gets an IP address from the server. (Accordingly, clients will
also get an IP address from the same server.) If the MCX-2000 finds no DHCP server in the connected network, it
automatically enters DHCP Server mode. (Clients will get an IP address from the MCX-2000.) Because of this scheme,
you normally don’t need to change this setting as long as you want to automatically configure a series of network
parameters. Select Manual if you really need them to set up manually.
n When you select Manual, you must assign each of the MCX-2000 and clients a unique IP address conforming to the connected PC network
(page 23).
2 IP Address, Subnet Mask, Default Gateway
When selecting DHCP Server or Manual for Setting Method, specify an IP address within the network address of the
connected PC network. Among these three parameters, only IP Address takes a ‘unique’ value to the MCX-2000.
Subnet Mask and Default Gateway should take the same values with a PC that’s manually configured to access the
Internet via the connected network. Default Gateway normally takes an IP address set to the router LAN port
(supposing the router WAN port is connected to a broadband modem).
3
DNS Server (P), DNS Server (S)
When selecting DHCP Server or Manual for Setting Method, specify IP addresses of primary (P) and secondary (S)
DNS servers provided from your Internet service provider. These values (at least one) are necessary if you use URL to
specify an Internet resource (server) available to the MCX-2000, such as a public NTP server to get accurate date and
time (page 91). If you specify such a resource using the IP address, you can leave these values blank.
When you complete necessary settings, select OK at the bottom of the screen. When the “Network rebooting...”
message is shown and your settings are stored, you will return to the Advanced Settings menu.
MCX-2000 Owner’s Manual
37
Page 54

Wireless LAN
1
2
3
1 Wireless LAN
If you use the wireless functions in your MusicCAST network (or you have a client wirelessly communicating with the
MCX-2000), specify ON to enable the wireless access point feature built into the MCX-2000.
2 ESS ID, WEP Key
ESS ID is a name of the wireless network configured by the MCX-2000 wireless access point feature, and WEP Key is a
password for clients to log onto the network. If you’re using a wireless access point for PC networking, MusicCAST
clients only connect to the wireless access point created by MusicCAST servers including the MCX-2000. Since each
MusicCAST server is preconfigured with unique ESS ID and WEP Key values, you normally don’t need to change them.
n The MCX-2000 supports a 104-bit WEP key (precisely, a 128-bit long key with initialization data), which is equivalent to 13 ASCII characters. If your
‘password’ is less than 13 characters, the MCX-2000 will internally complement it. In addition, the MCX-2000 doesn’t support hexadecimal WEP
keys.
3 Channel
The Channel parameter is used to avoid radio interference between the MCX-2000 and a device that uses the same
2.4 GHz radio signal range (such as microwave oven, wireless handset, or other wireless access point). You don’t need
to change the Channel value unless you’re experiencing a problem such as interrupted playback of streamed music or
unstable wireless networking.
When you complete necessary settings, select OK at the bottom of the screen. When the “Network rebooting...”
message is shown and your settings are stored, you will return to the Advanced Settings menu.
n If you want to access the MCX-2000 from a wireless computer to edit names or titles (page 76), install a wireless access point in your PC
network. The wireless access point feature built into the MCX-2000 is available only for MusicCAST clients registered to the MCX-2000
(through automatic or manual configuration).
38
MCX-2000 Owner’s Manual
Page 55

Settings on Each Client
1 Tu rn on the client.
The front panel display lights up, showing the initial screen, followed by a “Connecting...” message.
n If the client display shows the current time without backlight, it’s in sleep mode. If this is the case, press the center stick of the cursor controller. The
client wakes up and shows the above message.
2 The “Connecting...” message indicates the client is searching a MusicCAST server to establish a network connection.
At this point, however, we have not completed any network configuration. So, when the client display shows a network
icon, push the controller stick upward or downward to cancel the message. The client stops searching.
Wireless network icon (no signal)
Wired network icon (no connection)
n The wireless network icon doesn’t appear on the MCX-C15 that supports only wired networking.
3 From Top Menu, select Setup > Network > Manual Setup.
Manual Setup menu
From the above menu, select a parameter and set it up as needed.
n You may perhaps choose manual configuration of network parameters just because you want to get on top of your MusicCAST network. It’s,
however, not so practical with MusicCAST clients. They’re designed to get appropriate parameter values during automatic registration process
(page 31), so manual configuration should be done to ‘edit’ retrieved settings according to your special needs.
MCX-2000 Owner’s Manual
39
Page 56

Mode
Specify how this client can connect to a MusicCAST network. With Wireless, its wireless network port is only enabled,
disabling its wired (Ethernet) network port. With Auto, the client connects to the MCX-2000 via either active network port
(factory setting). When using the wireless port, the ESS ID and WEP Key parameters should be configured according to
the target MCX-2000 server.
When you select and determine a value, the “Press PLAY to system restart, STOP to cancel.” message is shown. If you
press the front panel Play button, the client will restart to enable the change. Press the front panel Stop button to abort
your change. Push the controller stick leftward to go back to the Manual Setup menu.
n Wired-only clients (MCX-C15) don’t have this parameter.
Server ID
Specify the target MCX-2000 with its ID (SV-XXXXX: a 5-digit unique number to each server). You can confirm the
MCX-2000 server ID on your TV monitor, by selecting Top Menu > Setup > Network > Client Configuration > Manual
Configuration. You can also confirm client IDs in the MCX-2000 screen if you previously performed the automatic
registration (page 34). Client IDs will be required later in manual registration process (page 43), so it’s recommended to
write them down in your setup chart (page 36) at this point.
Server ID
Client IDs
When you have finished, select and determine Save & Network Restart. When the “Please wait.” message is shown and
your setting is stored, you will go back to the Manual Setup menu. If you abort your change, select Cancel or push the
controller stick leftward.
40
MCX-2000 Owner’s Manual
Page 57

DHCP
Specify ON to automatically get an IP address from the MCX-2000 or a DHCP server (or an equivalent router function) in
your PC network (factory setting), or OFF to manually specify on this client. When you select OFF, you need to specify
appropriate values to the IP Address and Subnet Mask parameters.
When you select either value, the “Please wait.” message is shown. When your setting is stored, you will go back to the
Manual Setup menu.
IP Address
Specify an IP address within the same network address as the target MCX-2000. This value must be unique and
shouldn’t duplicate the one used for the MCX-2000, other MusicCAST clients or devices in the target PC network.
The specified IP address only works when the DHCP parameter is set to OFF (when this client doesn’t get an IP address
from the MCX-2000 or a DHCP server in your PC network).
When you have finished, select and determine Save & Network Restart. When the “Please wait.” message is shown and
your setting is stored, you will go back to the Manual Setup menu. If you abort your change, select Cancel or push the
controller stick leftward.
Subnet Mask
Specify the same subnet mask value as the target MCX-2000. The specified subnet mask value only works when the
DHCP parameter is set to OFF (when this client doesn’t get an IP address from the MCX-2000 or a DHCP server in your
PC network).
When you have finished, select and determine Save & Network Restart. When the “Please wait.” message is shown and
your setting is stored, you will go back to the Manual Setup menu. If you abort your change, select Cancel or push the
controller stick leftward.
MCX-2000 Owner’s Manual
41
Page 58

ESS ID
Specify the ESS ID for the wireless network created by the target MCX-2000. You can confirm the MCX-2000 ESS ID,
by selecting Top Menu > Setup > Network > Advanced Settings > Wireless LAN.
When you have finished, select and determine Save & Network Restart. When the “Please wait.” message is shown and
your setting is stored, you will go back to the Manual Setup menu. If you abort your change, select Cancel or push the
controller stick leftward.
n Wired-only clients (MCX-C15) don’t have this parameter.
WEP Key
Specify the WEP key for the wireless network created by the target MCX-2000. You can confirm the MCX-2000 WEP key,
by selecting Top Menu > Setup > Network > Advanced Settings > Wireless LAN. In addition, you can also view the WEP
key in hexadecimals (HEX) in the client display (just for confirmation).
When you have finished, select and determine Save & Network Restart. When the “Please wait.” message is shown and
your setting is stored, you will go back to the Manual Setup menu. If you abort your change, select Cancel or push the
controller stick leftward.
n Wired-only clients (MCX-C15) don’t have this parameter.
42
MCX-2000 Owner’s Manual
Page 59

Manual Registration of Clients
Unlike automatic registration (page 34), configuring a MusicCAST network through manual registration is completed with
setup on the MCX-2000 only.
1 Select Top Menu > Setup > Network.
2 From the Network menu, select Client Configuration > Manual Configuration.
3 Input each client ID to one of the Client 1 to Client 15 columns (up to 15 units), while viewing the setup chart.
You can input your client ID to any column. (Client numbers correspond to the front panel CLIENT STATUS indicators.)
MCX-2000 Owner’s Manual
43
Page 60

Move the highlight (selection) using the up and down arrow buttons on the cursor controller, press the SELECT button to
select a column. Input a 5-digit ID number after “CL-”. Use the left and right arrow buttons to move between digits, and
the up and down arrow buttons to select a character. When you’ve finished, press the SELECT button to determine it.
n While you’re moving the highlight (not actually editing), you can access the Submenu. The Reset this Client command lets you reset the ID number
in the current column to an initial value (CL-00000). The Reset all Clients command lets you clear all clients currently registered to the MCX-2000,
resetting all ID numbers at a time. You can also use the Change Client order command to arrange the order of listed clients. Changing the client
order resets each client name to the default (Client #). So, be sure if you’ve renamed them in the Client Control screen (page 87).
4 When you have finished specifying all of your clients, select OK at the bottom of the screen. After showing the
“Network rebooting...” message, the MCX-2000 restarts itself attempting to create a MusicCAST network with
registered clients. Confirm your manual registration has been successful in the next section.
Confirming Network Status
During and after manual registration, your MusicCAST clients don’t show any message like “Complete.” in automatic
registration. So, you need to confirm they’re successfully registered and able to communicate with the MCX-2000 over
the network.
1 Make sure each registered client is turned on.
2 On the MCX-2000, select Top Menu > Client Control for the following screen.
Wired clients
Wireless clients
Connected appropriately
Disconnected
Good communication
(strong signals)
Poor communication
(weak signals)
In this screen, you can view the current status of your MusicCAST network (connected clients). When the network icon in the
Status column is an appropriate one, the MCX-2000 and that client is well communicating over the MusicCAST network.
n If a wireless client is shown with weak signals, it might be caused by how and where you placed that client. If you start music streaming from the
MCX-2000 and experience a problem such as interrupted playback, consider relocating it or connecting to the MCX-2000 using a network cable.
If a client is obviously turned on (active), but shown with a ‘no signal’ wireless icon or a ‘disconnected’ wired icon, you might have misconfigured.
Check the network settings with your setup chart.
When the MCX-2000 and each client are well communicating, your MusicCAST network has successfully been created.
Go to Applications section (page 46) and enjoy MusicCAST.
n When networked with the MCX-2000 for the first time, your clients must be updated before actual use (page 45).
44
MCX-2000 Owner’s Manual
Page 61

Updating Client Firmware
To fully enjoy music streaming over a MusicCAST network, you must first update all of your MusicCAST clients to match
up to the latest features the MCX-2000 delivers. Update each client firmware in the following procedure. (You don’t need
to operate the MCX-2000.)
n If you already updated the client firmware using Easy Setup, this process isn’t necessary.
1 Select Top Menu > Setup > System > System Update.
Current firmware version and its creation date
2 With the above screen shown, press the front panel Play button.
Receiving the latest firmware
Your client receives the latest firmware from the MCX-2000, and then updates the content in its flash memory. During the
update process, the client display shows several messages. When the “Update OK” message is finally shown, your client
restarts itself.
3 When the client establishes a network connection with the MCX-2000 and shows the Top Menu screen, the update
process is complete. If you’re using two or more clients, repeat the above procedure.
n We endeavor to keep our products better. When a future version of the MCX-2000 firmware is available, first update your MCX-2000 with the
specified procedure (page 103), and then update your client firmware with the above procedure.
MCX-2000 Owner’s Manual
45
Page 62

Applications
Once you’ve finished setting up your MCX-2000
(and MusicCAST clients), you can start using it as
a music server. This section explains how you
can play and record audio sources on the
MCX-2000, and stream music to the clients over
the MusicCAST network.
Playing Audio Sources
The MCX-2000 supports playback of five different audio
sources, and they are accessible from the Library screen
opened from the Top Menu. Select Top Menu > Library for
the following screen.
CD
Select this when listening to a CD set in the MCX-2000.
Supported CDs are music CDs (CD-DA) and MP3 CDs (CD
ROM). Since the MCX-2000 can track the file hierarchy in an
MP3 CD (up to eight levels), you can play songs organized in
folders or directories.
Inputs
Select this when listening to incoming analog or digital audio
signals from an external device. Playback control for these
external inputs should be done from the external device.
n The MCX-2000 can play any one of the above audio sources while
streaming a different archived song to each client in your MusicCAST
network.
Playing Archived Music
To enjoy listening to songs from the music archive, you need
to record them beforehand onto the MCX-2000 (page 66).
You can add unique data to each song or audio pr ogram to
easily find it later in the music archive. In fact, the song data
gives a great help to categorize or group archived songs.
n Music streaming will start when you select and play (request) a song
on each client. While song selection and playback control of streamed
music are based on client operations, you can still control each client
remotely from the MCX-2000 (page 87).
Music Archive
Select this when listening to music recorded from sources
such as music CDs, radios or external audio signals. When
you record these audio sources, the MCX-2000 lets you add
information such as song title, artist name, album name and
genre to each song (or audio program), allowing you to
quickly find the music you want to listen to.
Radio
Select this when listening to a radio broadcast. You can
select one of main radio sources at any time: the built-in FM
tuner, XM Satellite Radio (US model only) and Internet radio.
Network Content
Select this to receive and play audio content from a
Windows PC in the network where the MCX-2000 is
connected. The supplied software program must be installed
beforehand on that computer (page 64).
1 Select Top Menu > Library > Music Archive to open the
following Music Archive menu screen.
Music Archive menu
46
MCX-2000 Owner’s Manual
Page 63

2
From this menu screen, you can select an archived song in a
specific category. Try tracking down each category from the
menu.
The first four categories (Artists, Albums, Genres and All
Songs) let you sift applicable songs out from the music
archive. For example, a song titled “Blue in Black” from the
“Chelsea” album of a jazz group called “Alley Cats” can be
found from any one of the first four categories (menu items).
42 Songs
1 Ancient Melodies
2 And I Love You
3 Autumn Leaves
4 Autumn Leaves #2
5 Blue in Black
6 Days of Roses
7 Funny Face
Artists
Genres
Playlists
Statistics
Albums
All Songs
Bookmarks
4 Artists
1 Alley Cats
2 Emotions
3 Pump & Dump
4 TKO Orchestra
#1#4
The other three categories provide additional methods to
enjoy more of your music archive. Use the Playlists menu to
create and play your own music program, where you can
collect archived songs based on your specific theme (such
as party songs). Use the Bookmarks menu to view and play
a list of songs you have set the bookmark (page 50), or save
the current bookmark list as a new playlist. The Statistics
menu lets you see or play a list of songs the MCX-2000
automatically collects based on different criteria, such as
songs with a large number of play count, songs recently
played, albums recently archived, and albums or songs yet
to be given appropriate song data.
#3
4 Genres
1 Classical
2 Electronic
3 Jazz
4 Rock
3 Albums
1 Autumn Winds
2 Bugs Dance
3 Chelsea
#2
10 Albums
1 17th Century Works
2 Autumn Winds
3 Bugs Dance
4 Chelsea
5 Days of Roses
6 Dice for Dime
7 Epitaph
8 ICQ2CU (REMIX)
2 Albums
1 Bugs Dance
2 Chelsea
8 Songs
1 Autumn Leaves
2 Sing, Sing, Sing
3 Softly As Morning
4 Blue in Black
5 Autumn Leaves #2
Route #1: Starting from Artists, select Alley Cats from the
musician list, next select Chelsea from the album list, and
then select Blue in Black from the song list.
Route #2: Starting from Albums, select Chelsea from the
album list, and then select Blue in Black from the song list.
Route #3: Starting from Genres, select Jazz from the genre
list, next select Chelsea from the album list, and then select
Blue in Black from the song list.
Route #4: Starting from All Songs, select Blue in Black from
the song list.
MCX-2000 Owner’s Manual
47
Page 64

3
Move the selection (highlight) to a list item from each
screen (artist, album, genre, playlist or statistic
information). If you press the Play button on the remote
control or the MCX-2000 front panel, you can start
playback with the first song in the current group.
Otherwise, press the SELECT button on the remote
control for further sifting.
Artists
Genres
Playlists
Statistics
All Songs
Bookmarks
4 Genres
1 Classical
2 Electronic
3 Jazz
4 Rock
Albums
SELECT
SELECT
Using the List View
Selecting a List Item
When a certain group in the music archive is listed, names or
titles of artists, albums or songs (list items) are sorted in
alphabetical order. You may easily find a target artist or song as
long as you have a small number of songs in your music archive.
But, as your archive grows, it may become more difficult to find a
target item. You can solve this problem by using the PAGE scroll
buttons on the remote control.
PAGE Scroll Buttons
If you select Artists for the search category, you will see a list of
artists whose songs are stored in your music archive. Since a total
count of artists is shown in the list header (in sky blue), you can
expect how many screens you must scroll through to see the
entire list.
5 Albums
1 Autumn Leaves
2 Bugs Groove
3 Cherokee
4 Days of Booze & Roses
5 Epitaph
8 Songs
1 Autumn Leaves
2 Sing, Sing, Sing
3 Softly As Morning Sun
4 Blue in Green
5 Autumn Leaves #2
n You can immediately start playback by pressing the Play button on
the remote control or the MCX-2000 front panel, or by selecting the
Play command from the Submenu in each screen. Use playback
control buttons on the remote control to pause, resume or stop
playback, or play the current song forward or backward, or skip
forward to the next song or backward to the previous song. Similar
playback controls are available from the Submenu in the Play
Information screen (page 50).
SELECT
SELECT
In the above screen, you know there are 13 artists in the list so
you can see all their names by scrolling down the list once. (The
monitor screen shows up to ten list items at a time.) Every time
you press a PAGE scroll button, you can see the next or previous
ten items in the list. If you press the down arrow button at the last
item, the list ‘wraps around’ back to the first item of the list.
Oppositely, you can quickly wrap around to the last item by
pressing the up arrow button at the first item of the list. When you
find a target artist name in the list, just move the selection
(highlight) there, using the up or down arrow buttons on the
cursor controller.
The PAGE scroll buttons work with any list view, regardless of
whether the list is sorted in alphabetical order or not. In addition
to searching in a list from your music archive, you can also use
the PAGE scroll buttons to easily search in a long song list from a
music CD or an MP3 CD.
48
MCX-2000 Owner’s Manual
Page 65

Alphabetical index search Buttons
Unlike the PAGE scroll buttons, the Alphabetical index search
buttons only work with lists that sort items in alphabetical order.
If you select All Songs for the search category, you will always
have an alphabetical list of all archived songs, and this list may
be long enough—spanning across multiple screens, depending
on how many songs you have.
n The alphabetical order of the MCX-2000 list view sorts items
according to the following order: ASCII-based English first,
followed by other Latin languages and Japanese Kana-Kanji
characters.
In the above screen, you know there are a total of196 songs and
you must scroll down the list no fewer than 19 times to see all
song titles, even if you use the PAGE scroll buttons. If you know
a target song’s title, however, you can conveniently use two
Alphabetical index search buttons to quickly find the song. Use
the down arrow button to jump in an A-to-Z direction, or use the
up arrow button to jump in a Z-to-A direction, to the first song in
each alphabetical index.
Move the selection (highlight) to your target item, and then select
Information from the Submenu. A dialog box appears, showing
detailed information of the current item. If it is an album, you can
see information including how many song the album contains, who
performed the album songs, which genre the album has been
categorized into, and when the album has been archived. If the
current item is a song, in addition to the album information, you will
see the audio format (data format for archiving the song) and how
many times it was played.
By confirming such detailed information, you can identify each
list item even though it has a duplicate name with others. You
don’t always need to play it just for identification.
You may also encounter a duplicate name if the MCX-2000
couldn’t get song data while importing a music CD into the music
archive. In this case, the MCX-2000 has given a generic name
“Unknown” to the album title, as well as “Track” to each song in the
album. As a result, you may have a number of “Unknown” albums
and “Track” songs in your music archive. To solve this problem,
move the selection (highlight) to a list item with a generic name,
and then select CDDB Info from the Submenu. If the CDDB
database has been updated since you archived the album, the
MCX-2000 will be able to retrieve appropriate song data and
update titles of the relevant album and songs.
Identifying an List Item
If there are two or more songs (or albums) that have a duplicate
name in your music archive, they might be confusing in a list
view of All Songs (or Albums). You must play them just for
identification? No. Simply use the Information command from the
Submenu in each list view screen.
n For quicker access of CDDB data, the MCX-2000 is designed
to keep song data for last 100 music CDs (maximum) retrieved
from the online CDDB database. However, you can ignore
existing data by retrieving the latest data using the CDDB Info
command available from the Submenu in several Music Archive
screens.
n Don’t worry if you still see generic names after executing the
CDDB Info command. The rest of the Submenu commands let
you manually edit the title or name of a list item currently
selected. But, be careful when using these commands. They
can break links in the song data—relationship among song title,
album title, artist name and categorized genre—or even delete
song audio data itself. See “Editing the Library” (page 75) on
how to use these Submenu commands.
MCX-2000 Owner’s Manual
49
Page 66

Adding a Bookmark to a Song
Starting from one of the four categories in the Music Archive
menu, you can continue sifting and finally reach a song-level
list view. Press the BOOKMARK button on the remote
control, or select Bookmark from the Tool menu. A sky-blue
arrow appears at the left of a song name that’s currently
selected. It’s the bookmark.
Play Information and Controls
When you start playback of archived music from a group list
(a list view of artists, albums, genres or all songs), a Play
Information screen appears. This screen provides the unique
song data of the current song, such as the song title, audio
format, source album, performing artist and genre, as well as
the group from which you started playback. (Song data will
be shown in a different order depending on where song
playback is started.)
4 5
3
6
You can use the bookmark to mark songs for your specific
purpose, such as ‘Theme Songs for My Life’ or ‘Songs for
the Next Party’ or anything you want. To remove the
bookmark, once again move the selection (highlight) to the
song and press the BOOKMARK button on the remote
control or select Bookmark from the Submenu.
You can see a list of bookmarked songs by selecting
Bookmarks from the Music Archive menu.
From this list, you can selectively play bookmarked songs.
The Submenu commands let you view detailed information
for the current song, open its source album, organize the
current bookmark list by removing the bookmark from the
current song (the current song will disappear from the list),
and even save the current list as a new playlist (by naming it
as ‘Theme Songs for My Life’ if you like). In addition, you can
arrange the song order by editing the stored playlist.
n Because you can also add or remove the bookmark using the
relevant Submenu command in the Play Information screen, you can
decide to add or remove it while listening to each archived song.
2
1
1 Playback methods
2 Stereo level indicators
3 Song title
4 Repeat mode
5 Random mode (ON)
6 Time display
7 Audio format
8 Category (or audio source) where playback started
9 Album title
) Artist name
! Categorized genre
7
8
9
)
!
The Submenu commands in the Play Information screen for
archived songs:
Playback: Provides the same playback control functions as
available on the remote control. So, you can control the song
playback simply using the cursor controller on the front panel
or from a PS/2 keyboard (only with cursor and enter keys).
Group selection buttons (+/–) only work when you can
access the next or previous group, such as other albums
from the same artist or genre. On-screen group selection
buttons turn gray and don’t work if you start playback from
All Songs.
Repeat: Select the repeat playback mode. Select Single
() to repeat a single song from the current group, or All
() to repeat all songs from the current group. Select OFF
to stop repeat playback.
Random: Turns the random playback mode on or off.
Group: Select Single to play only the current group, or All to
play all other groups in the same category.
50
Time view: Switches the playback time display between
elapsed or remaining time.
Bookmark: Adds or removes the bookmark to the current
song.
MCX-2000 Owner’s Manual
Page 67

Broadcast:
STAMDBY/ON
TV AMP
TIMER OPEN/CLOSE
RANDOM REPEAT BROADCA
Streams a song currently played on the
MCX-2000 to MusicCAST clients specified in a dialog box
(page 89).
Recall Play: Makes the MCX-2000 start ‘continued’
playback of a song currently playing on a client specified in a
dialog box (page 90).
n Create and enjoy a wide variety of playback patterns by combining
repeat, random and group playback modes. In addition, the Group
playback option isn’t available in the Submenu if you start playback
from All Songs (which is always the same with Group-All selected).
Repeat: OFF
Random: OFF
Group: Single
Repeat: Single
Random: ON/OFF
Group: Single/All
Playing a CD
The CD (compact disc) is one of the most basic and popular
media for listening to music. The MCX-2000 even enhances
the way you enjoy music from the CD. In addition to simply
playing a CD set on the tray, the unit lets you quickly import
marked songs to the music archive or start broadcasting any
CD song over the MusicCAST network (page 89).
1 When listening to a CD, select Top Menu > Library > CD.
A song list appears if you’ve already set a CD in the
MCX-2000. If not, your TV monitor will show “No disc
present” instead.
1 2 3 4 5 6
Repeat: OFF
Random: ON
Group: Single
RANDOM
Repeat: All
Random: OFF
Group: Single
1 2 3 4 5 6
Repeat: OFF
Random: OFF
Group: All
1 2 3 4 5 6
1 2 3 4 5
1 2 3 4 5 6
Repeat: All
Random: ON
Group: Single
RANDOM
Repeat: All
Random: ON
Group: All
RANDOM
RANDOM
2 Press the OPEN/CLOSE button on the remote control
and open the CD tray. Set a music CD with its label side
facing up. Press the same button again to close the tray.
POWER
STAMDBY/ON
AMP/TV
TV AMP
OPEN/CLOSE
TIMER
RANDOM REPEAT BROADCAST RADIO
123
456
789
TOP
PLAU
0
MENU
INFO.
A
PAGE
SELECT
PAGE
Z
INPUT
VOL.
BOOLMARK
AMP/TV
MUTE
LIBRALY ARTSTS
PLAULISTS
123
MENU MENU MENU
FAVORITES
2 3 4
1
Remote control
n Without the Play Information screen shown, you can still set the
1 2 3 4 5 6 7
1 2 3 4 5
RANDOM
RANDOM
= group (artist, album or genre)
repeat or random playback mode, or turn broadcast playback on or
off. Press the REPEAT, RANDOM or BROADCAST button on the
remote control for a relevant dialog box.
n Supported CD types are music CD (CD-DA) and MP3 CD (CD-ROM).
If you set other CD or DVD, the MCX-2000 will show “No Audio CD
present” after attempting to read it. For MP3 CDs, see “Notes on
Playing an MP3 CD” (page 52).
MCX-2000 Owner’s Manual
51
Page 68

3 When you set a music CD, a “Reading data” message
appears in the screen and the MCX-2000 starts querying
the CDDB database. (See the CDDB logo animation
shown in the upper left corner of the screen.) If
appropriate CD data is found, the MCX-2000 will present
a CD song list.
4
Move the selection (highlight) to a song you want, and
then press the SELECT or Play button on the remote
control, or select Play from the Submenu. The Play
Information screen appears, starting playback of the
current song.
1
2
3
5
7 86
4
1 Album title
2 Artist name
3 Categorized genre
4 Total playback time
5 Track count
6 Song title
7 Audio format (PCM)
8 Playback time
The Submenu commands in the song list screen for a music
CD:
Play: Starts playback from the currently selected song.
n The Play Information screen for CD provides similar information and
Submenu commands for the music archive. See “Play Information
and Controls” (page 50).
Notes on Playing an MP3 CD
When you insert an MP3 CD, the MCX-2000 will start
checking its directory structure and then show each folder
name in a hierarchical view, starting from Root.
2
1
Open REC page: Moves to the “Store from CD” screen
(page 66) to import the CD songs to the music archive.
CDDB Info.: Retrieves song data from the built-in or online
CDDB database.
CD-TEXT Info.: Displays song data using CD-TEXT
information (page 53) stored on the music CD (if available).
Clear CD Info.: Displays song data using generic names.
(You can use this when the retrieved song data is incorrect.)
34
1 Folder count (total of folders in the CD)
2 Volume name (MP3 CD)
3 Song count (total of songs in the folder)
4 Folder name
n The MCX-2000 handles each folder in the MP3 CD as a separate
album. If your MP3 CD contains 32 folders, think you have 32 albums
in the listed order. Ignore each folder’s hierarchical position.
52
MCX-2000 Owner’s Manual
Page 69

From the folder list view, you can press the Play button on
the remote control or select Play from the Submenu to start
playback from the first song in the current folder (album).
Otherwise, you can press the SELECT button on the cursor
controller to open the current folder (album) to see a list of
contained songs.
1
2
3
Retrieving Song Data
When you select “CD” for the playback source, the MCX-2000
automatically searches and displays song data such as song
title, artist name and album title. Here we introduce this
mechanism and relevant keywords.
What is Gracenote CDDB?
Gracenote CDDB is a database system you can use to retrieve
information on songs, albums, artists and genres for music CDs.
The MCX-2000 incorporates a part of CDDB licensed from
Gracenote. The unit attempts to retrieve song data for your
music CD from the built-in database. But, since the partial
database is limited, there may be cases you cannot retrieve
correct song data, especially when your CD has just been
released or is one from a private label. If this is the case, you can
attempt retrieving the latest or updated song data for your CD
from the online CDDB database over the Internet (page 93).
Even if it doesn’t work, don’t be disappointed. You can manually
edit any title or name in your music archive (page 75).
n Support for the online CDDB database may be discontinued
without prior notice.
54
1 Volume name (MP3 CD)
2 Current folder name
3 Song count (total of songs in the current folder)
4 Song name
5 Audio format (MP3)
Move the selection (highlight) to a song you want, and then
press the SELECT or Play button on the remote control, or
select Play from the Submenu. The Play Information screen
appears, starting playback of the current song.
What are ID3 Tags?
ID3 tags are various kinds of meta text data that can be
embedded into MP3 files. The MCX-2000 supports ID3v1.1, 2.2
though 2.4 tag standards and can display song titles in the list
view when you play an MP3 CD. The MCX-2000 supports an
MP3 CD that meets the following specifications:
Supported MP3 CD or Songs
Disc format: ISO 9660 level 1 or 2 multisession Juliet/Romeo
format (The MCX-2000 doesn’t support packet written CDs.)
File hierarchy: Up to eight folder levels; up to 300 files (with an
mp3 or MP3 extension)
File format: MPEG-1 Layer 3 standard; all bit rates between 32
to 320 kbps*
ID3 tag version: 1.1, 2.2 through 2.4
(*) The MCX-2000 also supports MP3 songs recorded using
Variable Bit Rate (VBR), but may not display the data rate or
playback time of such songs correctly.
What is CD-TEXT?
Some music CDs contain text information such as song and
album titles, artist names, and genre names. This information is
called CD-TEXT. The MCX-2000 can read and display CD-TEXT
data, and can import it together with song audio data to the
music archive. But, the MCX-2000 doesn’t import copyprohibited CD-TEXT data. In this case, retrieve your CD and
song data from the Gracenote CDDB.
While the Play Information screen is shown, you can skip to
the next or previous folder (in the folder list view) by pressing
a group selection button (+/–) because each folder is
handled as a separate album (group). You can also switch
the group playback mode (Single for the current folder; All for
all folders). There is one exception: if you start playback from
the Root folder, the MCX-2000 behaves as if you start
playback of archived songs by selecting Top Menu > Library
> All Songs.
n The Play Information screen for CD provides similar information and
Submenu commands for the music archive. See “Play Information
and Controls” (page 50).
MCX-2000 Owner’s Manual
53
Page 70

Listening to a Radio Broadcast
Before listening to the radio on the MCX-2000, you need to
do some preparation for each radio type—connecting the
supplied antenna for the FM radio (page 4), or making the
MCX-2000 accessible to the Internet, if you want to listen to
Internet radio broadcasts (page 31). In addition, if you’re a
US resident and want to listen to a radio program from XM
Satellite Radio, you also need to connect a third-party XM
‘Connect-and-Play’ antenna (sold separately) to an
MCX-2000 US model and become a subscription member
of XM radio (as described in the XM radio section). Once you
complete these preparations, you can start listening to a
radio broadcast, regardless of where it’s from—FM, Internet
or XM (US model only).
1 Select Top Menu > Library > Radio to open the following
Radio menu screen.
Radio menu
Listening to FM Radio
The FM tuner built into the MCX-2000 provides a set of
simple, yet comprehensive functions. You can select a
desired FM station in one of two ways: manual tuning and
auto scan tuning. Plus, you can even register your favorite
FM stations beforehand using the FM Auto Preset feature
(page 62), allowing you to directly select a station from the
Presets list.
1
From the Radio menu screen, select FM. The Play
Information screen appears and starts playing the last
selected radio station (or just the first FM frequency signals
available in your area; no sound if no station is assigned).
Signal format (mono or stereo)Current frequency
FM
Select this for an FM broadcast. Use the Submenu
command to directly play the current selection (the last
selected FM radio station).
XM (US model only)
Select this for an XM radio program. Use the Submenu
command to directly play the current selection (the last
selected XM radio station).
Internet Radio
Select this for an Internet radio broadcast. Use the Submenu
command to directly play the current selection (the last
selected Internet radio station).
Presets
Select this when you want to choose a preset radio station
from the list. The MCX-2000 lets you register up to 100 radio
stations in 10 groups (up to 10 stations per group). Use the
Submenu command to directly play the current selection (the
last selected preset radio station).
n You can directly start playing the last selected radio station from FM,
Internet Radio or XM (US model only) by pressing the RADIO button
on the remote control or on the MCX-2000 front panel. This operation
simply switches the playback source on the MCX-2000 to Radio, and
doesn’t affect playback source on each client (except while the
MCX-2000 is broadcasting). Every time you press the RADIO button,
the radio type cycles through FM, XM, Internet Radio and Presets
with the last selected station for each radio type.
n If you live in Europe and are using an MCX-2000 Europe model,
you can enjoy the Radio Data System feature while listening to the
FM radio. For details of the MCX-2000 Radio Data System
feature, see the following column.
2 Use the remote control to tune in to a desired FM station.
When you press either group selection button (–/+), the
MCX-2000 starts scanning available stations while
decreasing or increasing the frequency; the MCX-2000
automatically stops scanning if an radio station is tuned in;
you can also manually stop scanning by pressing either
group selection button.
auto tuning
54
MCX-2000 Owner’s Manual
Page 71

Every time you press the skip backward or forward button
O
P
(
b/a), you can manually decrease or increase the
frequency to search for an available station.
Manual tuning
The Submenu commands in the Play Information screen for
the FM radio:
Playback: Provides the same tuning and playback control
functions as available on the remote control. So, you can
control these functions using the cursor controller on the
front panel or from a PS/2 keyboard (only with cursor and
enter keys). On-screen buttons shown in gray provide no
function for the FM radio; the same buttons on the remote
control don’t work either.
Save to Preset: Registers the current radio station to the
Presets list in two steps (page 59).
Broadcast: Streams a radio program currently being
received on the MCX-2000 to MusicCAST clients specified in
a dialog box (page 89).
Listening to XM Radio (US model only)
The MCX-2000 U.S. model comes standard with an XM
Satellite Radio tuner. If you live in the United States and are a
subscriber of this paid radio service, you can simply attach a
third-party XM Connect-and-Play antenna (sold separately)
to your MCX-2000 and start enjoying a wide variety of
satellite radio programs.
What is XM Satellite Radio?
XM Satellite Radio is a satellite radio service with millions of
listeners across the United States, broadcasting live daily. XM’s
channel lineup includes more than 150 digital channels of
choice from coast to coast: 68 commercial-free music channels,
featuring hip hop to opera, classical to country, bluegrass to
blues; 33 channels of premier sports, talk, comedy, children’s
and entertainment programming; and more than 20 channels of
traffic and weather information for major metropolitan areas
nationwide.
Because XM Satellite Radio is a subscription service, you will
need to set up an account and activate service with XM using
your XM Satellite Radio ID number. To check your ID number,
see the instructions in “Activating Your XM Satellite Radio
Account.” For further information on XM Satellite Radio services,
see the XM Satellite Radio website (www.xmradio.com).
Information from XM Satellite Radio, Inc.
Hardware and required basic monthly subscription sold separately.
Premium Channel available at additional monthly cost. Installation costs
and other fees and taxes, including a one-time activation fee may apply.
Subscription fee is consumer only. All fees and programming subject to
change. Subscriptions subject to Customer Agreement available at
xmradio.com. Only available in the 48 contiguous United States.
© 2005 XM Satellite Radio Inc. All rights reserved. All other
trademarks are the property of their respective owners.
Recall Play: Makes the MCX-2000 start ‘continued’
playback of a song currently played on a client specified in a
dialog box (page 90).
Using Radio Data System Information
(Europe model only)
Radio Data System is a data transmission system used by FM
stations in many European countries. The MCX-2000 can
receive Radio Data System data including Program Service
Name (PS), Program Type (PTY) and Radio Text (RT) from Radio
Data System broadcasts, and provide Play Information for a
radio program currently being received.
Receiving a Radio Data System broadcast
1
2
3
Connecting an XM Connect-and-Play Antenna
To receive XM Satellite signals, you will need to use a thirdparty XM Connect-and-Play antenna. For more information
about available XM compatible antenna products, visit the
XM Satellite Radio website (www.xmradio.com) or your local
XM Ready products dealer. Connect your XM Connect-andPlay antenna to the XM jack on the MCX-2000 back panel.
For details, see the instructions provided with your XM
Connect-and-Play antenna.
T
_
LAN ANT
VIDEO
CAUTION
RISK OF ELECTRIC SHOCK
DO NOT OPEN
LINK/DATA 10/100
LAN
XM
IN
REMOTE
RS
XM jack
IN
O
n
1 FM station name (program service name)
2 Genre (program type)
3 Song data (radio text)
To ensure optimal reception of XM’s satellite signals, your XM
Connect-and-Play antenna should be placed at or near a window
facing south. Make sure that there is nothing obstructing radio signals
from the sky. The antenna may be mounted indoors or outdoors.
MCX-2000 Owner’s Manual
55
Page 72

Activating Your XM Satellite Radio Account
To sign up for an XM Satellite Radio service account, you
need to have your XM Satellite Radio ID number. Follow the
procedure below to check your ID number, and then access
the website (activate.xmradio.com) or call 1-800-XM-RADIO
(1-800-967-2346) to sign up for the service. (A major credit
card is required.)
1
Press the RADIO button several times on the remote control
or on the MCX-2000 front panel, until the MCX-2000 shows
the XM Play Information screen. You can also open this
screen from the menu (Top Menu > Library > Radio > XM).
Receiving XM Radio Broadcasts
Once you’ve activated your XM subscriber account, you can
start enjoying XM Satellite Radio as another radio source on
the MCX-2000. Follow the procedure below.
1 From the Radio menu screen (page 54), select XM. The
Play Information screen appears and starts playing the
radio station last selected. (You may hear no sound if the
selected channel has no radio station assigned.) It also
shows information of the music currently playing.
When you first access the XM radio function, Channel 1 is
automatically selected.
n If the “CHECK ANTENNA” message appears on the screen, your XM
Connect-and-Play antenna may not be connected to the XM jack on
the MCX-2000 back panel. Make sure the antenna is properly
connected.
2
Select Channel 0 using the skip backward or forward button
(
b/a
) on the remote control. Check your XM Satellite Radio
ID number shown in the screen and write it down. Now you can
activate your XM Satellite Radio account.
Your ID number
1
3
4
5
1 Song title
2 Channel number and radio station name
3 Search category mode (icon)
4 Artist name
5 Category name
2 Use the remote control to tune in to a desired radio
channel. Press either group selection button (–/+) to
select the previous or next category, or press the skip
backward or forward button (
b/a) to select the
previous or next radio channel. You can even select the
desired channel specifically using the relevant Submenu
commands.
2
n If you cannot change the channel, first select Search all channels
mode (page 57). Then attempt the above steps once again.
56
MCX-2000 Owner’s Manual
Page 73

The Submenu commands in the Play Information screen for
the XM radio:
Playback:
Provides the same tuning and playback control
functions as available on the remote control. So, you can
control these functions using the cursor controller on the front
panel or from a PS/2 keyboard (only with cursor and enter
keys). On-screen buttons shown in gray provide no function
for XM radio control; the same buttons on the remote control
don’t work either.
Direct Access: Lets you specify a radio station channel
number in a dialog box (page 58).
Channel Search and Direct Access
The MCX-2000 lets you search for the XM radio channel you
want to listen to. There are two different search modes you can
select from, depending on your preferences. You can also select
a desired channel by directly entering the relevant channel
number.
From the Submenu in the Play Information screen for XM radio,
locate Search Mode and select one of the following options:
Search Mode:
Switches how you can search a radio station
using the skip backward and forward buttons (see the
following column).
Save to Preset: Registers the current radio station to the
Presets list in two steps (page 59).
Broadcast: Streams a radio program currently being
received on the MCX-2000 to MusicCAST clients specified in
a dialog box (page 89).
Recall Play: Makes the MCX-2000 start ‘continued’
playback of a song currently playing on a client specified in a
dialog box (page 90).
Search all channels
With this option selected, you can use the skip backward and
forward buttons (
available channels.
Pressing either group selection button (–/+) lets you jump to the
previous or next category, so that you can skip multiple
channels at a time while searching for the desired station.
Previous Category Current Category Next Category
90ch 92ch 94ch 95ch 100ch 101ch 102ch 110ch 112ch
b/a) to search for a radio station from all
*current channel
Search category
With this option selected, the Search category mode icon
appears in the screen and you can use the skip backward and
forward buttons (
within the current category. Pressing either group selection
button (–/+) lets you jump to the previous or next category,
allowing you to perform a cycle search in another category.
Previous Category Current Category Next Category
90ch 92ch 94ch 95ch 100ch 101ch 102ch 110ch 112ch
b/a) to cycle through available channels
*current channel
MCX-2000 Owner’s Manual
57
Page 74

Also in the Submenu, you can select Direct Access if you know
the desired channel number.
Direct Access entry dialog
Specify the desired channel number by pressing the on-screen
numeric buttons, followed by OK. Press CLR to clear your entry.
Wait for a few seconds until the MCX-2000 automatically tunes in
to that channel.
n Pressing any buttons other than the numeric buttons cancels
Direct Access entry.
Screen Messages for XM Radio
The MCX-2000 may show one of the following messages in the Play Information screen for XM radio. Read each description
and handle each situation as recommended.
Message Description Action/Solution
CHECK ANTENNA Your XM Connect-and-Play antenna is not
UPDATING The XM user encryption code is being updated. Wait until the encryption code is completely updated.
NO SIGNAL The signal is too weak. Check the XM Connect-and-Play antenna connections
LOADING The audio or text data decoding process takes
OFF AIR The XM Satellite Radio channel you selected is
CHANNEL - - -
- - -
- - - No artist name/feature or song/program title is
- - - No channels are available for the selected
connected, or does not work properly.
longer than four seconds.
not currently broadcasting any signal.
The channel station ID (SID) is no longer
available.
available.
category.
Check that your XM Connect-and-Play antenna is
properly connected.
and position the antenna for the best reception.
Wait until the decoding process is finished.
Check the channel number or select another XM Satellite
Radio channel.
Check the channel number or select another XM Satellite
Radio channel.
Artist name is not sometimes available through a satellite
signal for display.
Category name is not sometimes available through a
satellite signal for display.
58
MCX-2000 Owner’s Manual
Page 75

Listening to Internet Radio
In addition to retrieving the latest CD information from the
online CDDB database (page 53) and accurate date and
time data from a public time server (page 91), the MCX-2000
can also receive online radio broadcasts by accessing to the
Internet. Since the MCX-2000 comes with several Internet
radio sites preassigned, you can enjoy listening to online
radio programs right away once you’ve set up the unit for
Internet access (page 31).
n The MCX-2000 only supports Internet radio stations that stream
music and audio in MP3 format.
The Submenu menu commands in the Play Information
screen for the Internet radio:
Playback:
Provides the same tuning and playback control
functions as available on the remote control. So, you can
control these functions using the cursor controller on the front
panel or from a PS/2 keyboard (only with cursor and enter
keys). On-screen buttons shown in gray provide no function for
Internet radio control; the same buttons on the remote control
don’t work either.
Save to Preset: Registers the current radio station to the
Presets list in two steps (page 59).
1 From the Radio menu screen (page 54), select Internet
Radio. A list of Internet radio sites is shown in the screen.
Radio station name
Site URL
2
Move the selection (highlight) to the desired Internet radio
station, and then press the SELECT or Play button on the
remote control or select the Play command from the Submenu
n Other Submenu commands, such as Edit Site title, Edit URL and
Clear this Site, let you newly register or edit an Internet radio site
(page 84).
3 The Play Information screen appears. The MCX-2000
accesses the specified Internet radio site and starts
receiving its radio stream. Use the skip forward or
backward button (
b/a) on the remote control to select
the next or previous radio station from the above site list.
Broadcast: Streams a radio program currently being
received on the MCX-2000 to MusicCAST clients specified in
a dialog box (page 89).
Recall Play: Makes the MCX-2000 start ‘continued’
playback of a song currently playing on a client specified in a
dialog box (page 90).
Using the Presets List
The Presets list is where you can store up to 100 radio
stations in 10 groups (up to 10 stations per group).
Once you’ve registered your favorite stations in the Play
Information screen, you can select and tune in to them right
away or manage the list by editing each group and station
name. In addition, you can use the Presets list to register
available FM stations through an auto scanning process for
your own FM Presets list.
.
n The timer playback feature lets you start playing a specific radio
station at a specific time (page 97). If you want to use this feature, first
register that radio station in the Presets list.
Registering a Radio Station to the Presets List
Regardless of the radio type, you can register your favorite
radio stations to the Presets list directly from each radio’s
Play Information screen. First, open the Play Information
screen with a radio station you want to register, following the
procedure explained in each radio section.
Radio station name
Site URL
n When you want to quickly register a number of FM stations, use the
FM Auto Preset command (page 62).
MCX-2000 Owner’s Manual
59
Page 76

1 Select the Save to Preset command from the Submenu.
A group selection dialog box appears, where you can
assign the current radio station into a specific group.
Current radio station (FM frequency, etc.)
n There are no limitations on which group and position the current radio
station should be registered to. You can register radio stations even at
random; however, unlike playlist songs, you cannot change the group
and position of radio stations after registration. For this reason, you
should consider beforehand how to categorize radio stations in the
Presets list.
2 Move the selection (highlight) to the desired group, and
then press the SELECT button on the cursor controller.
The second dialog box appears, where you can place the
current radio station into the selected group.
Current radio station
Selected group
(FM frequency, Internet URL, etc.)
3 Move the selection (highlight) to the desired position, and
then press the SELECT button on the cursor controller.
The selected position flashes several times with a station
code. When you return to the Play Information screen,
registration is complete.
Registered station code (FM frequency, XM channel, IR for Internet radio)
n Any existing station in the selected position is overwritten when you
press the SELECT button. You can edit group and station names later
in the Presets screen (page 85).
Playing a Radio Station from the Presets List
It’s exceptionally easy to select and play a radio station from
the Presets list.
1 From the Radio menu screen (page 54), select Presets.
A list of preset groups is shown in the screen. Move the
selection (highlight) to the desired group.
n
You can re-select another group if you go back to the previous dialog
box, by pressing the left arrow button on the cursor controller. If you
cancel the registration, simply press the right arrow button (Quit).
Preset groups
n When you press the Play button on the remote control or select the
Play command from the Submenu, the MCX-2000 starts receiving a
broadcast from the radio station last selected in the current group.
In addition, you can edit group names using the Edit title command
(page 85).
60
MCX-2000 Owner’s Manual
Page 77

2 Press the SELECT button to view a list of radio stations
registered in the selected group.
Preset radio stations
n In this screen, you can create a Presets list of FM radio stations using
the FM Auto Preset command from the Submenu (page 62). You can
also edit station names using the Edit title command (page 85).
3
Move the selection (highlight) to the desired station, and
then press the SELECT or Play button on the remote
control or select the Play command from the Submenu.
The MCX-2000 shows the Play Information screen and
starts playing a radio program from the station.
Getting the most out of the Presets List
Since the MCX-2000 remembers which radio station is last
played (selected) at multiple levels—for each group, and for the
entire Presets list, you can quickly access radio stations you
frequently listen to.
Group A
Station1Station2Station3Station4Station5Station6Station7Station8Station9Station
Group B
Station1Station2Station3Station4Station5Station6Station7Station8Station9Station
Group C
Station1Station2Station3Station4Station5Station6Station7Station8Station9Station
Group I
Station1Station2Station3Station4Station5Station6Station7Station8Station9Station
Group J
Station1Station2Station3Station4Station5Station6Station7Station8Station9Station
10
10
10
10
10
1
2
3
4
5
1 Preset code (group and position)
2 Radio station (FM frequency, etc.)
3 Radio type
4 Group name
5 Station name
The Submenu commands in the Play Information screen for
the Preset radio stations:
Playback:
Provides the same playback control functions as
available on the remote control. Group selection (–/+) and skip
backward and forward (
b/a
) buttons can be used to switch
radio stations registered in the Presets list (as explained in the
following column). On-screen buttons shown in gray provide
no function for the currently selected radio station; the same
buttons on the remote control don’t work either.
: Radio station last selected in the group
If you use groups (at least) to categorize radio stations with a
specific theme (such as genre), you can conveniently switch
themes using the group selection buttons (+/–) while selecting
radio stations categorized with each theme using the skip
backward and forward buttons (
b/a).
Broadcast: Streams a radio program currently being
received on the MCX-2000 to MusicCAST clients specified in
a dialog box (page 89).
Recall Play: Makes the MCX-2000 start ‘continued’
playback of a song currently playing on a client specified in a
dialog box (page 90).
MCX-2000 Owner’s Manual
61
Page 78

Registering FM Stations Automatically to the
Presets List
You can search for an FM radio station in the Play Information
screen, which is a basic radio tuning function. In the Preset
station list screen, you can use a similar scanning process to
locate all available stations within a specific frequency range
and register them all in the Presets list—in a single automatic
process. This lets you easily create your own FM preset list.
1 From the Radio menu screen (page 54), select Presets.
Consecutively press the SELECT button on the remote
control until you see a list of preset stations in the screen.
(You can select any preset group.)
Station list
4
Select Start in the dialog box to start automatic scanning and
registration of FM stations. The station list of the specified
group is shown with “Searching...” at the specified position.
Progress bar
Searching for an FM station to be registered at this position
The progress bar indicates the scanning is ongoing while
increasing the frequency. Each station that’s found is
automatically registered to the current position, and
“Searching...” moves to the next position.
n Any existing station in the “Searching...” position is overwritten when
a new station is registered. When registration reaches to the last
position (J10), the FM Auto Preset process finishes at that point. If you
want to cancel the process, press the Stop button or the left arrow
button on the cursor controller.
2 Select the FM Auto Preset command from the Submenu
for the following dialog box.
FM Auto Preset dialog box
3 Select and specify the Starting Frequency value where the
MCX-2000 starts scanning at, and the Starting Preset
position where you want FM stations found in the
scanning process to be registered from. Use the up and
down arrow buttons (
u/d) on the cursor controller to
change values, as well as the left and right arrow buttons
(
j/i) to move between group (A~J) and position (1~10).
5 When “Complete” is shown at the progress bar, the FM
Auto Preset process is finished. You will return to the
station list screen (the last registered station will be
highlighted).
n You can also edit station names using the Edit title command
(page 85).
62
MCX-2000 Owner’s Manual
Page 79

Playing External Audio Signals
As a music server designed to seamlessly integrate all of
your audio sources, the MCX-2000 comes standard with
analog and digital audio input connectors on the back panel
(ANALOG IN and OPTICAL IN). If you have already
connected them to the relevant audio output connectors on
external equipment (page 9), you can simply select and play
external audio signals as another audio source of the
MCX-2000. Of course, you can also record them into the
music archive (page 69).
1 Make sure that audio signals from the external device are
set to an appropriate line level, especially when the output
level can be controlled from the device (such as a mixer).
n If the external audio signals come from fixed-level output jacks (such
as AUX OUT or OPTICAL OUT on a tape deck), this step may not be
necessary.
3 Move the selection (highlight) to either option, and then
press the SELECT or Play button on the remote control,
or select the Play command from the Submenu. The Play
Information screen for external inputs appears.
Currently selected input
2 Select Top Menu > Library > Inputs to open the following
menu screen.
Inputs menu
■
Digital Input
Select this when playing audio signals from the OPTICAL IN
jack.
Analog Input
■
Select this when playing audio signals from the ANALOG IN
jacks.
4 Start playback on the external output device connected
to the currently selected input. For analog signals, you
can use the Input Level command to adjust the input
level. For optimum results, first adjust the output level
from the external device, and then adjust the input level
on the MCX-2000.
Adjustment of analog input levels
The Submenu commands in the Play Information screen for
external audio signals:
Playback: Provides the same playback control functions
(Play and Stop) as available on the remote control.
On-screen buttons shown in gray provide no function for
external audio signals; the same buttons on the remote
control don’t work either.
Input Level: Adjusts the level for the MCX-2000 to receive
external audio signals, within a range between –21 dB and
+24 dB (factory setting: 0 dB). The MCX-2000 receives
external digital audio signals as they’re output from the
external device (this command is unavailable.)
Broadcast: Streams external audio signals currently being
received on the MCX-2000 to MusicCAST clients specified in
a dialog box (page 89).
Recall Play: Makes the MCX-2000 start ‘continued’
playback of a song currently playing on a client specified in a
dialog box (page 90).
MCX-2000 Owner’s Manual
63
Page 80

Playing Audio Content on the Computer
If your MCX-2000 has network connectivity to a Windows PC
(page 26) that you’re using to manage music files, you
virtually have a ‘second’ music server. Your MCX-2000 works
as a client to your Windows PC and can search, select and
play MP3, WAV and Windows Media Audio (WMA) music files
and playlists (text files with the M3U extension) collected or
created on that PC over the network. The supplied CD-ROM
contains dedicated software named DiXiM™ Media Server
for this application.
1
Set the supplied CD-ROM to your Windows PC and install
the DiXiM Media Server software. You’re allowed to install the
software to a single computer.
Server selection dialog box
n For PC system requirements and explanation on how to install and
use the software, see the supplied manual titled Installation Guide for
DiXiM Media Server Software.
2 Once your PC is ready to stream music to the MCX-2000,
select Top Menu > Library > Network Content for the
following screen.
Network Content menu
When you attempt to select one of the main categories
(Artists, Albums, Genres and All Songs), the MCX-2000
shows a dialog box with a list of available Windows PC(s)
running the DiXiM Media Server software, prompting you to
select which computer you want to connect as a main PC
music server. You can also select the main server (or switch
to another DiXiM server) by opening the same dialog box
using the Submenu.
n The MCX-2000 remembers the specified main server. If you later
change its name (up to 64 characters) within the DiXiM Media Server
software, select again the server computer using the above dialog
box.
The Network Content menu provides a similar user interface
to the Music Archive menu, and lets you select music or
audio content from four main categories (Artists, Albums,
Genres and All Songs). You can use these categories to sift
out your target file(s) in the same manner as you select
songs from the Music Archive menu (page 46).
3
Move the selection (highlight) to a list item from each
screen (artist, album, genre, playlist information). You can
start playback with the first song in the current group by
pressing the Play button on the remote control or the
MCX-2000 front panel or by selecting the Play command
from the Submenu in each screen. Otherwise, press the
SELECT button on the remote control for further sifting.
n Albums that contain various artists and genres are categorized into
the first song’s artist or genre. If a song is stored without ID3 tag
information, the name of a folder (directory) where that song is placed
in becomes the album title for that song. In addition, the MCX-2000
can track the music file hierarchy up to two levels in depth.
64
MCX-2000 Owner’s Manual
Page 81

4 When you start playback of an MP3, WAV or WMA audio
file from the PC, the MCX-2000 shows the Play
Information screen as follows.
Notes on Playing the Network Content
When using the Network Content feature, you should
remember the following:
43
2
1
5 6
7
8
9
1 Playback methods
2 Stereo level indicators
3 Category where playback started
4 Song title
5 Audio format
6 Time display
7 Album title
8 Artist name
9 Categorized genre
The Submenu commands in the Play Information screen for
audio content from a networked PC:
• WMA audio files are shown as PCM in the Play
Information screen.
It’s because the DiXiM Media Server converts WMA audio into
PCM format before it’s streamed to the MCX-2000.
• Network content files cannot be accessed from
MusicCAST clients.
Use the Broadcast feature. The MCX-2000 can broadcast a
music or audio file from the DiXiM Media Server to multiple
clients, just as broadcasting an Internet radio program.
•You cannot view digital photo and movie files.
Though the DiXiM Media Server allows its PC clients to view
them over a local network, the MCX-2000 (another DiXiM
client) doesn’t support a viewing function.
• The DiXiM Media Server only serves local media files.
Since the DiXiM Media Server doesn’t support ‘relaying’
network files, you cannot play shared music and audio files
from other PCs. (You cannot add folders on a network volume
to the server.)
Playback: Provides the same playback control functions as
available on the remote control. So, you can control the song
playback simply using the cursor controller on the front panel
or from a PS/2 keyboard (only with cursor and enter keys).
Group selection buttons (+/–) only work when you can
access the next or previous group. On-screen group
selection buttons turn gray and don’t work if you start
playback from All Songs.
Repeat: Select the repeat playback mode. Select Single
() to repeat a single song from the current group, or All
() to repeat all songs from the current group. Select OFF
to stop repeat playback.
Random: Turns the random playback mode on or off.
Group: Selects Single to play only the current group, or All
to play all other groups in the same category.
Broadcast:
Streams a song currently playing on the
MCX-2000 to MusicCAST clients specified in a dialog box
(page 89).
Recall Play: Makes the MCX-2000 start ‘continued’
playback of a song currently playing on a client specified in a
dialog box (page 90).
n
You can create a wide variety of playback patterns by combining repeat,
random and group playback modes using the relevant Submenu
commands, just like when you play songs from the music archive
(page 51). You can also set the repeat or random playback mode, or
turn broadcast playback on or off using the relevant remote control
buttons (REPEAT, RANDOM and BROADCAST).
MCX-2000 Owner’s Manual
65
Page 82

Recording Audio Sources
STAMDBY/ON
TV AMP
TIMER OPEN/CLOSE
RANDOM REPEAT BROADCA
You can expand your music archive by recording (or
importing) songs and other audio programs from commercial
music CDs, external audio signals, and FM radio programs
from the built-in tuner. You can record these audio sources to
the MCX-2000 internal hard drive with up to 200 hours in
linear PCM format (16-bit/44.1kHz) or up to 2,000 hours in
MP3 format (160kbps bit rate) by default. You can adjust
recording options (page 96) balancing your preferred sound
quality and total recoding time. In addition, you can confirm
how long recording is possible now in a System Information
screen (page 102). When selecting Top Menu > Recording,
you will see the following screen.
Recording menu
Recording Songs from a Music CD
In general, music CDs are the easiest and simplest way to
create your music archive. Once CD songs are imported, the
MCX-2000 lets you manage them using playlists and other
editing features (page 75).
1 From the Recording menu screen, select Store from CD.
A song list will appear if you’ve already set an audio CD in
the MCX-2000. If not, the unit shows “No Audio CD
present” along with “Insert Audio CD” in yellow.
CD recording screen
Store from CD
Select this when importing songs from an audio CD (CDDA). For most commercial music CDs, the MCX-2000
automatically retrieves song data such as artist name, album
title and each song title from the CDDB database (page 53).
Store from Radio
Select this when you want to ‘air check’ an FM radio
program. You can adjust the recording level and select
recording modes such as Manual and Synchro (Full Auto or
Auto Track Marking) for your preferences.
Store from Inputs
Select this when recording incoming audio signals via the
MCX-2000 analog or digital input jacks. Using the same
recording interface as FM radio recording, you can easily
record songs or other audio programs from an old analog
tape or other media.
Duplicate a CD
Select this when you want to duplicate an existing audio CD
(CD-DA). For duplication, you need a CD-R/RW disc for
audio recording.
2
Press the OPEN/CLOSE button on the remote control and
open the CD tray. Set an audio CD with its label side
facing up. Press the same button again to close the tray
POWER
STAMDBY/ON
AMP/TV
TV AMP
OPEN/CLOSE
TIMER
RANDOM REPEAT BROADCAST RADIO
123
456
789
TOP
PLAU
0
MENU
INFO.
A
PAGE
SELECT
PAGE
Z
INPUT
VOL.
BOOLMARK
AMP/TV
MUTE
LIBRALY ARTSTS
PLAULISTS
123
MENU MENU MENU
FAVORITES
2 3 4
1
Remote control
n The MCX-2000 only supports audio CDs (CD-DA) for importing
songs. If you set any other CD or DVD, the unit will show “Insert Audio
CD” again after attempting to read it.
.
Create an original CD
This is a special feature that lets you create your original CD
from an album or a playlist in your music archive. To get the
most out of this feature, you may want to read “Editing the
Library” (page 75) after importing necessary songs (or
source audio materials) in PCM format.
66
MCX-2000 Owner’s Manual
Page 83

3 The MCX-2000 shows “Checking disc...” in yellow and
starts querying to the CDDB database. If appropriate CD
data is found, the MCX-2000 will present a list of song
names.
4 If there is a song you don’t want to import, move the
selection (highlight) to that song, and remove the check
mark by pressing the SELECT button on the remote
control. You can restore the mark by pressing the
SELECT button again. You can also use the Select all or
Clear command for your selection.
1
2
3
5
1 Album title
2 Artist name
3 Categorized genre
4 Total playback time
5 Track count
6 Song title
7 Playback time
76
4
If appropriate CD data is unavailable, the song list appears
with generic names such as “Track” and “Unknown”
(page 49). If your MCX-2000 is configured to be able to
access the Internet, you can set a CD Lookup option to use
the online CDDB database (page 93) and then, in the above
screen, try using the CDDB command as shown below to
retrieve the latest information from the online database. If
your audio CD contains CD-TEXT data (page 53), song data
can be retrieved from it using the CD-TEXT command. Feel
free to give generic names using the “Do not use” command.
Use this if the retrieved song data is incorrect. You can edit it
later after importing songs (page 75).
5 After selecting the songs you want to import, select the
Start command. You can stop recording at any time by
selecting the Stop command.
The MCX-2000 shows a progress bar for each of the
selected songs.
n Song data retrieved from copy-protected CD-TEXT data is only
temporary. The MCX-2000 cannot copy and store it for archived
songs.
MCX-2000 Owner’s Manual
67
Page 84

6 When all selected songs are imported, the MCX-2000
CD AUTO STORE
shows the following dialog box, asking what you want to
do next.
3 When the RECORDING indicator goes off, the MCX-2000
shows the following dialog box, asking what you want to
do next.
Open stored album page: Select this to automatically
locate the album you’ve just imported. You can browse and
play the songs from the album like other archived songs
(page 46).
Store another CD: Select this when importing another CD.
The MCX-2000 automatically opens the tray and lets you
repeat the above procedure from step 1.
Exit this screen: Select this to simply close the dialog box,
and perform any other operation you need to manually.
Importing a Music CD Automatically
If you have a large collection of music CDs and want them all
in the MCX-2000 music archive, you may want to skip
operating steps required in the CD recording screen in the
previous section. This method is just for you.
1 Have all the music CDs you want to import ready and
close by the MCX-2000. It’s important to save time and
efficiently import your CDs.
Open stored album page: Select this to automatically
locate the album you’ve just imported. You can browse and
play the songs from the album like other archived songs
(page 46).
Store another CD: Select this when you import another
CD. The MCX-2000 automatically opens the tray and lets
you repeat steps 2 to 3 above.
Exit this screen: Select this to simply close the dialog box,
and perform any other operation you need to manually.
You’ll find this operation extremely quick and easy. In
addition, since this CD import procedure has no operation
screen, you can continue playing audio sources (except for
CDs, of course) while importing your music CDs—without
interruption.
n If you need to change song data (artist name, album or song title,
etc.), see “Editing the Library” (page 75).
2 Use the Open/Close button on the unit’s front panel to
68
open the tray; set a music CD on the tray with its label
side facing up; press the CD AUTO STORE button on the
unit’s front panel (the tray closes by itself). After showing a
list of CD songs for a few seconds, the MCX-2000 starts
importing all songs on the CD.
MCX-2000 Owner’s Manual
Page 85

Recording from FM Radio or External Audio
Signals
Any incoming audio signals can serve as recordable audio
sources for the MCX-2000. If you’ve appropriately set up the
FM antenna (page 4) or connect external audio equipment to
the analog and/or digital input jacks (page 9), you can record
their sounds at any time using the same recording interface.
n You need to register desired FM stations to the Presets list before
recording (page 59).
1 From the Recording menu screen, select Store from
Radio if you want to record an FM radio program, or
select Store from Inputs if you want to record audio
signals from external equipment. In either case, the
MCX-2000 shows a similar recording screen as follows.
FM station selected from the Preset list
2 Press the SELECT button on the remote control at the
first parameter in the recording screen—Preset or Input,
then specify the target FM station or input. If you’re in the
FM recording screen, you can select an FM station from
the Presets list, through the group/station selection dialog
box.
n Internet or XM radio stations (US model only) are shown in gray in the
Presets list, indicating they’re unavailable for recording. If you select
one of these gray items, the MCX-2000 will show “–––––” at the
Preset column indicating no FM radio station is selected. (You cannot
start recording.)
Input selection
3
After selecting the target, move the selection (highlight) to
the next parameter in the recording screen, Track Marking.
Set your preferred recording method as needed.
The following parameters are common to both recording
screens.
1 Track Marking
Specify how you want to ‘divide’ the recording. Select
Manual if you want to divide the recording manually inserting
a track mark, or when you want to manage, for example, a
radio program or sounds from a live show as a single song in
the music archive. With Manual the MCX-2000 creates a
large song file at the point you stop recording. On the other
hand, if you want separated songs after the recording, select
SYNCHRO. With this option selected, the MCX-2000
automatically inserts a track mark at a predefined silent level
(track gap) to separate songs. In either case, you can
manually insert a track mark at any point using the Track
Marking command from the Submenu.
MCX-2000 Owner’s Manual
69
Page 86

2 SYNCHRO. Type
This parameter is only available when SYNCHRO. is selected
for Track Marking above. Select Full Auto if you want fully
automatic recording. With this option selected, the
MCX-2000 starts recording as soon as it detects the first track
gap from incoming signals, and inserts a track mark at the
second and following track gap points, then stops recording if
a level of silence is maintained for a predefined period. With
Full Auto selected, start playing from the ‘previous’ song on the
external audio equipment and the MCX-2000 automatically
starts recording at the beginning of the ‘next’ song—the first
song you want to record. When Auto Track Marking is
selected, the MCX-2000 only inserts track marks; hence, you
should start and stop recording manually.
n If you have no ‘previous’ song from the source audio, you may want
to select Auto Track Marking. Such cases include when you want to
record from the beginning of an analog tape played on external
equipment or when you want to record a talk program from FM
broadcast.
4 Open the Submenu to set REC Monitor to ON.
Simultaneously, REC Monitor becomes available.
6 When you’re ready, move the selection (highlight) to
Recording and select Start. If you’ve selected Full Auto in
step 3, the yellow “Ready to Record” message changes
to “Pause” and recording will start from the beginning of
the next song (Track 0001). Otherwise, the MCX-2000
immediately starts recording with Track 0001.
During recording, the track number is incremented every
time the MCX-2000 detects a track gap (in Full Auto or Auto
Track Marking mode), or when you manually insert a track
mark by ‘clicking’ the Mark button in the Submenu (in all
modes).
If you’re in the FM recording screen, you can hear a radio
broadcast from the selected FM station. If you’re in the
Inputs recording screen, start playback on the external
equipment connected to the selected input jack(s).
5 Adjust the recording level as required, using the bar graph
meter, accessible from REC Level in the Submenu. Use
the up or down arrow button on the cursor controller to
increase or decrease the recording level.
n You may want to adjust maximum recording levels to go between –3
dB to 0 dB, to gain the volume competing with an average
commercial CD.
n You can exit the recording screen and enjoy playing other audio
sources, unless you need to stay there to monitor recording or
manually insert track marks. You can still select the currently recorded
audio source from the Library menu; however, changing its settings
directly affects the recording.
70
MCX-2000 Owner’s Manual
Page 87

7 When the recording is finished automatically, or manually
using the relevant Submenu command, you can now exit
the recording screen to confirm the recorded results.
Select Top Menu > Library > Music Archive > Statistics >
Recently Stored Albums.
In this screen, you can locate and confirm what you’ve
recorded. It’s in the album named “Album Stored from (...)”
and you can select it to confirm the recorded tracks. Try
playing them using the relevant Submenu command.
Duplicating a Music CD
This function is useful when you want to make a backup
copy of your music CD (CD-DA). When you create an original
compilation CD, you can also create as many copies as you
want (page 73) ONLY during that creation process. This
duplication feature lets you make additional copies LATER
from an original CD.
1 From the Recording menu screen (page 66), select
Duplicate a CD for the following screen.
CD duplication screen
n Because the album name is generic, you can use the Information
command to see when the album was created. These albums and
tracks are also accessible from other categories in the Music Archive
menu (categorized under the “Unknown” artist and genre).
2 Set a music CD on the tray, with its label side facing up.
Use the OPEN/CLOSE button on the remote control for
tray operations. When the MCX-2000 recognizes it as an
audio CD (CD-DA), the screen message changes as
follows.
n You will not see any song data (album title, artist name, etc.) in the CD
duplication screen.
3
Open the Submenu to start CD duplication.
The MCX-2000 starts importing the audio data from the
CD and creates a temporary disc image file. Select Cancel
from the Submenu if you want to cancel the process.
MCX-2000 Owner’s Manual
71
Page 88

4 When the image file is created, the MCX-2000 shows the
following dialog box. To continue the process, open the
tray and set a CD-R/RW disc for audio recording with
“Change disc and proceed with recording” selected.
Select OK in the dialog box.
5 If you set a CD other than one specified, the MCX-2000
prompts you to set a blank disc. In addition, you cannot
record onto a CD-R disc that’s already been recorded.
If you set a CD-RW disc that’s already been recorded, the
MCX-2000 shows the following dialog box, asking your
answer.
6 When the MCX-2000 detects an appropriate blank disc, it
automatically starts writing the image file on that disc.
.
7 When the CD duplication process is finished, the
MCX-2000 shows the following dialog box, asking what
you want to do next.
Initialize Disc and proceed with recording
Quick Mode: Select this to quickly erase the current disc
content and continue the process.
Normal Mode: Select this to completely erase the
current disc content (which could take a long time) and
continue the process.
Change Disc: Select this if you want to replace the disc
with a blank CD-R/RW disc.
Cancel CD duplication: Select this to cancel the process.
Change discs if necessary, using the OPEN/CLOSE button
on the remote control for tray operations.
Open CD screen: Select this to finish the process, and
open the CD song list screen (page 52) to confirm a list of
songs on the duplicated CD.
Create another CD-R/RW: Select this if you want to
duplicate another music CD. The MCX-2000 automatically
opens the tray and lets you repeat the above procedure from
step 2.
Exit this screen: Select this to finish the process.
n When you cancel or finish the process, the original disc image file is
automatically erased.
72
MCX-2000 Owner’s Manual
Page 89

Recording Archived Songs to a CD
As long as you’re keeping PCM song data in the MCX-2000
internal hard drive (factory setting), you can create an original
music CD based on a playlist or an album from your music
archive at any time. It’s another great feature the MCX-2000
delivers as your music collection center.
1 From the Recording menu screen (page 66), select Create
an original CD for the following screen.
2 According to message shown in yellow, set a blank CD-R/
RW disc for audio recording on the tray, with its label side
facing up. Use the OPEN/CLOSE button on the remote
control for tray operations. When the MCX-2000
recognize it as an appropriate recordable disc, the yellow
screen message changes to “Audio CD-R/RW present”.
According to your selection, the MCX-2000 shows a dialog
box, where you can search for the desired album or playlist in
the same manner you search for a song in the music archive.
When Album is selected
Songs in the selected album or playlist
n The MCX-2000 continues showing the same messages above until
you set an appropriate disc. In addition, unlike when you duplicate an
audio CD (page 72), the MCX-2000 doesn’t let you initialize a CD-RW
disc that’s already recorded.
3 Specify a playlist or an album you want to record onto the
disc, by selecting either Album or Playlist from the
Submenu.
n When the selected album or playlist contains an MP3-only song
(because you selected NOT to keep its PCM song data or deleted it
using relevant Submenu commands), the MCX-2000 shows an alert
message and discards your selection.
MCX-2000 Owner’s Manual
73
Page 90

4 A list of songs will be shown in white (only when “Ready to
record” is shown). If you want, edit the album title and/or
artist name for the CD you’re going to create using the
following two commands from the Submenu.
6 When the CD recording process is finished, the
MCX-2000 shows the following dialog box, asking what
you want to do next.
Either command opens the character palette. So, you can
type necessary text characters using the palette, or using a
PS/2 keyboard connected to the MCX-2000 front panel
(page 75).
5 When you’re ready, start recording by selecting the
relevant command from the Submenu. The MCX-2000
writes the songs at 4x speed.
n Archived songs are analog recorded onto a CD-R/RW disc.
Open CD screen: Select this to finish the process, and
open the CD song list screen (page 52) to confirm a list of
songs on a music CD you’ve just created.
Create another CD-R/RW: Select this if you want to
make another CD. The MCX-2000 automatically opens the
tray and lets you repeat the above procedure from step 3.
Exit this screen: Select this to finish the process.
n If you cancel the process or exit the operation screen before
proceeding to step 5, you may see songs selected in the last session
the next time you open this screen. You can clear them by selecting
Clear content from the Submenu. You can easily replace songs by
selecting another playlist or album using the Select content command
from the Submenu (as in step 3 above).
74
MCX-2000 Owner’s Manual
Page 91

Editing the Library
RECORDI
N
As you collect more music and audio and expand your
MCX-2000 library, you may feel like arranging the content for
various purposes—for example, manually edit song data of
your favorite CD because it’s too new to retrieve correct data
from CDDB, or because it’s a homemade demo CD from
your musician friend. There may also be cases in which you
want to change attributes (album or artist) of specific songs
to compile your original CD, or you want to delete existing
PCM song data to open up space on the MCX-2000’s built-in
hard drive. In daily use, you may often create several playlists
for archived songs, or register a new Internet radio station to
the Presets list. This section explains how to customize your
music library to your own needs and preferences.
PS/2 Keyboard
Another way to type text characters is to use a PS/2
keyboard connected to the MCX-2000. If you’re familiar with
typing through a PC keyboard, this option is probably
quicker and easier than using the on-screen character
palette.
CD AUTO STORE
PS/2 KEYBOARD PHONES LEVEL
MIN MAX
ENCODI
Typing Text Characters
While editing song data from the music archive or while
configuring the MCX-2000, you may be asked to specify
items (parameter values) with typed text. To facilitate this,
the MCX-2000 allows you to type text using the on-screen
character palette or a PS/2 keyboard, according to your
preference.
Character Palette
When you select Submenu commands such as Edit or New
(target), or other parameters that require a text-based value
such as Internet URL, you’re prompted with a special dialog
box as shown below.
Text area
n Text characters shown on the character palette is determined with the
Language setting (page 95).
Insertion point
Character palette
n Always put the MCX-2000 in sleep or standby mode before
connecting or disconnecting the PS/2 keyboard. Otherwise, the unit
may be damaged.
Simply use the PS/2 keyboard when you’re prompted to
type characters, together with the character palette. Move
the insertion point in the text area using two arrow keys on
the character palette (you cannot move the insertion point
from the PS/2 keyboard), and then edit or type text
characters together with Shift, Caps Lock, Delete and
Backspace keys on the PS/2 keyboard. When typing is
complete, simply use cursor keys to move the selection
(highlight) to OK and press Enter key.
F1
F2
F3
F4
F5
F6
F7
F8
F9
F10
Delete
Page Up
Page Down
TOP MENU
LIBRARY
MUSIC ARCHIVE
PLAY INFO.
p PLAY
e PAUSE
s STOP
RADIO
(not present on the remote control)
Edit title
Clear (during title input)
(not present on the remote control)
Delete (not present on the remote control)
PAGE u
PAGE d
u / j / d / i (cursor)
This on-screen keyboard lets you type text only using the
cursor controller (arrow keys and SELECT keys). Simply
move the selection (highlight) to the character you want to
enter at the insertion point, and then press the SELECT key
while controlling using the six control keys:
←←←←: Moves the insertion point to the left.
→→→→: Moves the insertion point to the right.
bksp: Deletes a character on the left of the insertion point.
del : Deletes a character on the right of the insertion point.
clear: Deletes all characters in the text area at a time.
Modifies character key functions (uppercase, lowercase
A↔↔↔↔a :
and other symbols); currently available characters are
indicated in white.
Example of an English PS/2 keyboard
n The MCX-2000 doesn’t support text entry using any other keys not
mentioned here (such as Ctrl, Alt, Insert, Esc and function keys). In
addition, you can use Page Up and Page Down keys in a list view
instead of the PAGE scoll buttons on the remote control (page 48).
MCX-2000 Owner’s Manual
75
Page 92

Web Browser
If you’ve configured your MCX-2000 to be accessible from
your PC network, you can edit existing text information in
your music archive using a standard web browser that’s
running on a computer in the PC network. Text information
includes song data (artist name, album title, song title, etc.),
playlist name, Internet radio station name and URL, as well
as group and station names from the Presets radio list. This
feature is very useful when you need to edit a large amount
of text information.
To access the MCX-2000 music archive from a web browser,
confirm the MCX-2000 IP address in the Server IP Address
screen (page 100) and type that address in the URL area of
your web browser window and press Enter key on your
computer keyboard.
MCX-2000 IP address
■
Edit Title
This allows you to edit song data or other text information in
the MCX-2000 music archive. When you select a category
from a drop-down list, a list of items in that category is
shown in the pane. Click a list item to show it in the edit area.
From there, you can edit the title or name by typing text on
your keyboard. Click OK to determine your edits, or click
Cancel to discard them.
1
2
3
4
Always Click Log Off when you finish editing
1 Category selection (Artists, Albums, Genres, All Songs,
Playlists, URLs, Groups and Clients)
2 List of items in the current category
3 Current selection
4 Edit area
Edit Title web interface on the MCX-2000
From the web interface above, you can perform one of the
operations below.
If there are over 50 items included in the current category,
you can press the “Next 50” button to scroll down the list (or
“Prev. 50” button to scroll up the list). If you select Artists,
Albums, Genres or Groups for the category, you can track
down to ‘child’ items included in the current item, such as
albums in the current genre or artist, songs in the current
album, or radio stations in the current group, by clicking the
“Select” button. (You can go back to the parent item by
clicking the “Back” button.) When you select URLs for the
category, you have two edit areas for Internet radio station
name and its site URL.
n Library editing is possible for a single computer at a time. If you fail to
click “Log Off” when you finish editing, the MCX-2000 doesn’t allow
editing from a second computer within next 10 minutes.
■
Download Library Information (Artists - Albums Songs)
■ Download Library Information (Playlists - Links)
Each of these lets you download relevant text information
from the MCX-2000 music archive in the form of CSV files.
You can import these files to your spreadsheet application
for management purposes.
76
MCX-2000 Owner’s Manual
Page 93

Editing Song Data
Each archived song has unique song data—a series of
‘attributes’ including artist name, album title, genre name
and song title—and you can combine these attributes
together to use as keywords when finding a song from the
music archive. In that sense, song data (as a combined
result) is so important to identify a song, that you may need
to edit incorrect or generic names and titles to maintain the
MCX-2000 music archive as a truly valuable digital music
collection.
Editing Titles
When you set a music CD on the MCX-2000, it normally
attempts to retrieve song data from the built-in or online
CDDB database. If it’s successful, the MCX-2000 shows a
list of songs with their titles, artist name and original album
title. If the song list is occupied with generic names such as
“Track” and “Unknown” and the CDDB Info command from
the Submenu cannot update song data (page 93), you can
use the Edit title command from the Submenu after
importing these songs to the MCX-2000 music archive.
When you record songs or audio programs from radios or
external inputs, they’re also given a generic “Track” name
and sent to a generic album named “Album Stored from (...)”
that’s categorized in the “Unknown” genre. Though you
cannot retrieve their song data from the CDDB database,
you can still change their titles using the Edit title command.
In addition, you can even re-categorize renamed songs into
an existing or new album, artist and genre (see the next
section).
Changing Song Attributes
If you’re collecting songs performed by your favorite
drummer from a number of albums, you may only import his
or her songs to the music archive. This may often produce a
situation like too many albums, genres and original artists for
a number of songs, but without the drummer’s name at all.
More concretely, you have collected several songs performed
by your favorite drummer, say, Versatile Boss. Those songs
are released from three bands (artists) named Jazzy Rocks,
Jazzy Pops and Pop Rockers, and their albums are
categorized in three genres—Jazz, Rock and Pop. Your
songs are organized in the music archive as bellow.
Artist: Jazzy Rocks
Album 1
Genre: Jazz Genre: Rock
Artist: Jazzy Pops Artist: Pop Rockers
Songs
Album 3
Songs
Album 5
Songs
Album 2
Songs
Album 4
Songs
Album 6
Songs
Other
Albums
Songs
Genre: Pop
Song attributes BEFORE editing
If you see a generic-named item in a list view, just move the
selection (highlight) to that item and then select the Edit Title
command from the Submenu.
The character palette appears, prompting you to type a new
name or title. You can type characters using the palette in
the specified manner or using a PS/2 keyboard connected to
the MCX-2000, and then select OK in the character palette
(page 75).
n If you have a number of generic-named songs, it’s a good idea to
start off renaming operations from their album titles. Since the
MCX-2000 remembers which “Track 01” song is from which
“Unknown” album even after giving the same generic name, you can
easily differentiate one “Track 01” song from other “Track 01” songs
when opening a song list from Albums (Top Menu > Library > Music
Archive > Albums).
You can solve this problem by collecting the drummer’s
songs in a playlist (page 82), but it’s more convenient if you
can re-organize those songs with a ‘new’ album, artist or
genre created for that drummer as shown below.
Artist:
Jazzy Rocks
New Genre: Fusion
Album 5
Songs
Genre: Jazz
Artist:
Jazzy Pops
Album 3
Songs
Album 1
Songs
Artist:
Pop Rockers
New Genre: Pop & Rock
New Album:
VB Works
Album 2, 4 & 6
Songs
New Artist:
Versatile Boss
Genre: Rock
Song attributes AFTER editing
Genre: Pop
Other
Albums
Songs
For such purposes, the MCX-2000 even lets you change
song attributes—relationships among song, artist, album
and genre—to organize your music archive as you wish.
From the relevant list view screens, you can access several
Submenu commands to manage song attributes:
MCX-2000 Owner’s Manual
77
Page 94

Change Artist:
Lets you change the artist for the current
album (Music Archive > Artists > selected artist’s album list
view).
Change Album: Lets you change the album for the current
song (Music Archive > Albums > selected album’s song list
view; Music Archive > Artists > Albums > selected album’s
song list view; Music Archive > Genres > Albums > selected
album’s song list view).
2 Change the artist for Albums 1, 3 and 5 to Versatile Boss
you’ve just created.
• Album 1: Top Menu > Library > Music Archive > Artists
> artist list view > Jazzy Rocks > album list view –
Change Artist
• Albums 3 and 5: Top Menu > Library > Music Archive
> Artists > artist list view > Jazzy Pops > album list view
– Change Artist
Change Genre: Lets you change the genre for the current
album (Music Archive > Genres > selected genre’s album list
view).
New Artist:
New Album:
New Genre:
Lets you add a new artist to the music archive.
Lets you add a new album to the music archive.
Lets you add a new genre to the music archive.
Delete this Artist: Lets you delete the selected artist (and
its albums and contained songs).
Delete this Album: Lets you delete the selected album
(and contained songs).
Delete this Genre: Lets you delete the selected genre
(and its albums and contained songs).
Open source Album: Lets you show the album associated
with the current song (Music Archive > All Songs > song list
view).
Change Artist dialog box
In the Change Artist dialog box, move the selection (highlight)
to Versatile Boss and then press the SELECT button on the
remote control. Confirm the current album moved under
Versatile Boss.
■
Example: How to Organize the Music Archive
Here’s a sample procedure to re-organize your music
collection as shown in the previous two diagrams, using the
relevant Submenu commands.
1
Create three new items (artist, album and genre) using the
New (...) command from the Submenu in the relevant list view
screen.
• Versatile Boss: Top Menu > Library > Music Archive
> Artists > artist list view – New Artist
• Fusion: Top Menu > Library > Music Archive > Genre >
genre list view – New Genre
• VB Works: Top Menu > Library > Music Archive >
Albums > album list view – New Album
The character palette appears, prompting you to type the
name or title for the new item. Select OK after specifying the
name or title. Scroll through the current list view to check
whether or not each item has been successfully added.
n When you create a new album, you’re asked to specify a title and
then associate the new album with an ‘existing’ artist and genre.
Hence, in this case you should create Versatile Boss (artist) and
Fusion (genre) before VB Works (album).
3 Change the genre for Albums 1 and 5 to Fusion you’ve
just created.
• Album 1: Top Menu > Library > Music Archive >
Genres > genre list view > Jazz > album list view –
Change Genre
• Album 5: Top Menu > Library > Music Archive >
Genres > genre list view > Pop > album list view –
Change Genre
78
MCX-2000 Owner’s Manual
Page 95

Change Genre dialog box
Change Album dialog box
In the Change Genre dialog box, move the selection (highlight)
to Fusion and then press the SELECT button on the remote
control. Confirm the current album moved under Fusion.
Now, Albums 1, 3 and 5 are associated with the new artist
Versatile Boss and categorized in their corresponding
genres. (Album 3 is categorized in its original genre; only its
artist has been changed.)
4 Change the album for each song from Albums 2, 4 and 6
to VB Works you’ve just created. You can do this in a
song list view accessed from:
• Artists: Top Menu > Library > Music Archive > Artists
> artist list view (to select Jazzy Rocks or Pop Rockers)
> album list view (to select Album 2, 4 or 6) > song list
view – Change Album
• Albums: Top Menu > Library > Music Archive >
Albums > album list view (to select Album 2, 4 or 6) >
song list view – Change Album
• Genres: Top Menu > Library > Music Archive > Genres
> genre list view (to select Pop or Rock) > album list
view (to select Album 2, 4 or 6) > song list view –
Change Album
In the Change Album dialog box, you can select a target
album by navigating down from Artists, Albums or Genres. In
this case, you know the target album title (VB Works) so that
it’s easiest to navigate down from Albums and select VB
Works directly from an album list view. Move the selection
(highlight) to VB Works and then press the SELECT button
on the remote control. Confirm the current song moved to
the end of the VB Works song list.
Now, songs from Albums 2, 4 and 6 are compiled into the
new album VB Works (associated with Versatile Boss and
Pop & Rock). In addition, you can arrange the song order of
the VB Works album (or any other album) while showing its
song list view. Use the Change Song Order command from
the Submenu. You can move the current song to any
position in the song list.
Move to a desired position and press the SELECT button on the remote control.
n
You can confirm whether song attributes have been changed as you
intended, using the Information command from the Submenu in the
artist, album, genre or song list view screen (accessed from Top Menu
> Library > Music Archive > Artists, Albums or Genres), or the Open
source Album command from the Submenu in the song list view
screen (accessed from Top Menu > Library > Music Archive > All
Songs).
MCX-2000 Owner’s Manual
79
Page 96

5 When the above procedure is finished, select Top Menu >
Library > Music Archive > Artists for the artist list view
screen. Notice that the ‘previous’ artists, Jazzy Rocks,
Jazzy Pops and Pop Rockers, have no associated
albums or songs.
Empty — album and song counts are zero (0)
If you have no plan to add songs for these artists, you can
delete them one at a time using the Delete this Artist
command from the Submenu. Select OK in a confirmation
dialog box that appears, and the selected artist is deleted
from the list view.
Here, we’ve shown the general concepts of editing your
MCX-2000 music archive. Proper use of the Submenu
commands such as New, Change and Delete (...) help you
re-organize your music collection.
n Additional Submenu commands, Change Song Order and CDDB
Info, are available from the song list view of the “VB Works” album
that you’ve recently created. Though you can arrange the song order
using the Change Song Order command, the CDDB Info command
doesn’t work any longer because VB Works is your own ‘private’
album.
Deleting the PCM Data
When you record or import CD songs or other audio, the
MCX-2000 normally stores them both in PCM and MP3
formats (factory setting), since the unit currently supports
original CD creation by compiling PCM song data. If you have
no plan to create your original CD and want to save the space
on the built-in hard drive, you can use a recording option
(page 96) to set the MCX-2000 to import songs only in MP3
format. Keep in mind, however, that this setting change
doesn’t apply to existing songs (their PCM data still remains).
In other cases, you may need PCM data for songs recorded
from old analog tape, but not for CD songs. To ensure
flexibility for all these requirements, the MCX-2000 lets you
delete PCM data for each song individually.
Next, check the ‘previous’ genres, Rock and Pop, in the
genre list view by selecting Top Menu > Library > Music
Archive > Genres. Notice that Rock is empty, but Pop still
has albums from other artists. You can delete Rock using the
Delete this Genre command from the Submenu; but if
deleting Pop, you will lose other artists’ albums and songs.
1 Open a song list view screen.
n If you want to delete PCM data for songs from a specific album, open
its song list view from Top Menu > Library > Music Archive > Albums.
If you want to delete PCM data for any selected songs, open its song
list view from Top Menu > Library > Music Archive > All Songs.
2 If necessary, confirm which song has both PCM and MP3
data. Move the selection (highlight) to a target song, and
then select the Information command from the Submenu.
Both PCM and MP3 data are stored
80
MCX-2000 Owner’s Manual
Page 97

3
Select the Delete PCM data from the Submenu. A dialog
box appears, where you can specify target songs.
Delete PCM Data dialog box
4 Move the selection (highlight) to a song whose PCM data
you want to delete, and add a check mark by pressing
the SELECT button on the remote control. You can
remove the mark by pressing the SELECT button again, if
you want to keep the song’s PCM data.
■ Other Song Delete Options
You can selectively delete PCM song data in the above
procedure. If you want to delete all existing PCM song data
at a time, go to the Library menu screen (Top Menu >
Library). When you move the selection (highlight) to Music
Archive, the relevant Submenu commands become
available.
Select the Delete all PCM data command for this purpose.
Select OK in a confirming dialog box that appears, and the
MCX-2000 will delete all PCM song data. In addition, you
can delete all existing songs from the music archive using the
Delete all Songs command. It lets you delete both PCM and
MP3 data for all archived songs at a time—useful if you want
to renovate the music archive with a completely new set of
songs or a different MP3 data rate setting (page 96).
5 After you’ve selected or deselected songs, press the right
arrow button on the remote control (like when you open
the Submenu) and select OK. When a confirmation dialog
box appears, select OK if you’re sure.
6
A progress bar appears with a “Please wait a moment”
message. When the deleting operation is finished, you return
to the song list view. If you like, use the Information
command from the Submenu to confirm PCM data for the
specified songs has been deleted.
Now, only MP3 data is stored
You can also use the Delete Songs command that’s available
from the Submenu in a song list view screen, to delete both
PCM and MP3 data for one or more songs in the current
song list. Using a similar interface when you import songs
from a music CD (page 66), you can select or deselect target
songs by adding or removing the check mark using the
SELECT button on the remote control, or using the Select all
or Cancel all commands from a ‘mini’ Submenu. Finally
select OK from the ‘mini’ Submenu. Selected songs will be
deleted from the music archive right away.
MCX-2000 Owner’s Manual
81
Page 98

Using a Playlist
The playlists on the MCX-2000 give you new and creative
ways to enjoy the songs you’ve stored to your music archive.
Each playlist simply lets you combine and arrange archived
songs as you like, but a finished playlist can be used in many
ways. Not only can playlist songs be played on the
MCX-2000 itself, but they can also be streamed to any
MusicCAST client (page 88), if required, along with the timer
playback feature (page 89). You can even use playlists to
compile your own custom CDs (page 73). This section
shows you how to manage your playlists.
Creating a Playlist
You can create a playlist in one of two ways. The most
seamless way is to save a bookmark list as a playlist; you
can simply add the bookmark to songs in a song list view or
each song’s Play Information screen, and then go to the
Bookmarks screen and save the current bookmark list as a
playlist using the relevant Submenu command (page 50).
The other way is to create a ‘blank’ playlists first with a
suitable name, and then you can edit or compile it by adding
necessary songs later. Here, we explain how to create a
blank playlist.
3 Confirm the new playlist appears in the Playlists screen.
Other Submenu commands available from the Playlists
screen:
Play: Lets you play the selected playlist, from the first song
in the list. In the Play Information screen, you can select
other playlists using the group selection buttons (+/–). For
other playback controls, see “Play Information and Controls”
(page 50).
1 Select Top Menu > Library > Music Archive > Playlists for
the following screen.
Playlists screen
2
Select the New Playlist command from the Submenu. The
character palette appears, prompting you to type the name
for a new playlist. Specify the name using the palette or
using a PS/2 keyboard connected to the MCX-2000, and
then select OK in the character palette (page 75).
Information: Shows a dialog box that provides detailed
information about the selected playlist.
Add Link: Lets you add a song to the selected playlist. You
can search for the desired song by navigating down from a
‘mini’ Music Archive menu, in the same manner you search
for a song in the music archive.
Edit title: Lets you edit the selected playlist’s name using
the character palette or a PS/2 keyboard connected to the
MCX-2000 (page 75).
Delete this Playlist: Lets you delete the selected playlist
and its content (links). When you select this command, a
confirmation dialog box appears. Select OK if you’re sure.
Deleting a playlist doesn’t delete the original song data.
n Once created, each playlist shown in the Playlists screen is managed
in the same way. You can add or remove songs from a playlist, even
when it was ‘converted’ from a bookmark list.
82
MCX-2000 Owner’s Manual
Page 99

Editing a Playlist
Each song title in the playlist is simply a reference point (link)
to its original song data. In other words, the actual song data
is not affected when you add, remove or move songs to the
playlist; only the links are changed. The MCX-2000 even
allows you to add or remove links while playing the current
playlist, and the unit continues playing according to a
resulting playlist.
2 From the song list view, you can perform the following
operations using the relevant Submenu commands.
Play:
Lets you play the current playlist, starting from the
selected song. In the Play Information screen, you can select
other playlists using the group selection buttons (+/–). For
other playback controls, see “Play Information and Controls”
(page 50).
n You cannot edit a playlist that’s being used to create (record) your
original CD.
1
From the Playlists screen, select a playlist you want to edit.
If you move the selection (highlight) to an empty playlist
and press the SELECT button on the remote control, the
MCX-2000 prompts you to use the Add Link command
from the Submenu.
No other Submenu commands available
Information: Shows a dialog box that provides detailed
information about the selected song.
Add Link: Lets you add a song to the current playlist. You
can search for the desired song by navigating down from a
‘mini’ Music Archive menu, in the same manner you search
for a song in the music archive.
Remove Links: Lets you delete one or more links from the
current playlist. Select or deselect target links by adding or
removing the check mark using the SELECT button on the
remote control, or using the Select all or Cancel all
commands from a ‘mini’ Submenu. Finally select OK from
the mini Submenu. Selected links will be removed right away.
Deleting a link doesn’t affect the original song.
Change Link order: Lets you move the position of the
selected song in the current playlist. Move the song to the
desired position using the up or down arrow button on the
remote control, and then press the SELECT button.
Open source Album: Opens the album associated with
the selected song.
If the selected playlist is not empty, the MCX-2000 shows
songs linked from that playlist.
MCX-2000 Owner’s Manual
83
Page 100

Registering an Internet Radio Station
The MCX-2000 comes with five Internet radio stations
preassigned. But, not to mention, there’re hundreds of
thousands of online radio stations all over the Internet, and
you may already enjoy some of them on your computer. Now
you can even add your favorite online radio stations to the
MCX-2000 library, and enjoy them together with other audio
sources.
1 Select Top Menu > Library > Radio > Internet Radio, for
the list of Internet radio sites.
Radio station name
Site URL
3 Specify a new radio site using the following two Submenu
commands. Either command opens the character palette.
So, you can type necessary text characters using the
palette, or using a PS/2 keyboard connected to the
MCX-2000 front panel (page 75).
Edit Site title: Specify the radio station name here.
Edit URL: Specify the radio station site URL (server name)
or IP address here. In either case, this parameter value must
be specified starting with “http://” and ending with a slash (/),
even though the column accepts any text character (no alert
appears if text is invalid).
2 Move the selection (highlight) to a column where you want
to add a new Internet radio station. The site list can hold
up to 40 online radio stations, so scroll through the list as
required.
n You can overwrite an existing station. If the old station is registered to
the Presets list (page 59), the new station replaces it when you select
it from the Presets list.
Clear this Site: Select this if you want to delete an existing
Internet radio station registered at the current column. When
a confirmation dialog box appears, select OK if you’re sure.
The column becomes unregistered.
n When you specify a radio station site with a URL, you should also
specify at least one active DNS server for the MCX-2000 to
successfully find the specified site (page 37).
4 Repeat steps 2 to 3 as required.
In addition to the above procedure, Internet radio stations
can be registered or edited through a web browser (page 76).
When you find a new radio station on the web, simply copy
its URL and paste it to the site list opened in a web browser.
84
MCX-2000 Owner’s Manual
 Loading...