

Page 1
MCX-2000
Digital Audio Server
Owner’s Manual Addendum
for Version 2
Page 2

About This Manual
This manual describes the firmware update procedure and the information about the new features. Refer to
“MCX–2000 OWNER’S MANUAL”, “MCX–2000 Setup Guide”, or the instruction manuals of your MusicCAST
clients for details about the basic operations.
Functions, specifications, and designs of the screen are subject to change in part as a result of
improvements, etc. In case of differences between the manual and the product, the product has priority.
The illustrations and operation screens as shown in this firmware update manual are for instructional
purposes only, and may appear somewhat different from those of your products.
Table of Contents
General Information ............................................ 4
Updating the MusicCAST Server Firmware......... 4
Updating the MusicCAST Client Firmware .......... 5
MCX-2000 Menu Tree ............................................. 6
New Features in Version 2 ................................. 7
Using This Unit with
Microsoft Windows Media Connect 2.0 ............ 7
Connecting This Unit and Your PC
by Using Windows Media Connect 2.0 .................................... 7
Playing Back the Audio Contents on the PC
with Windows Media Connect 2.0 ............................................ 8
Selecting the Internet Radio Station
by Using vTuner Service.................................. 10
Selecting the Internet Radio Station .......................................... 10
Changing the Background
and Icons of the OSD ....................................... 12
Displaying Album Arts......................................... 13
Uploading the Album Arts onto This Unit ................................. 13
Deleting the Album Arts .............................................................. 15
Using the FAVORITES (1 – 4) Keys .................... 17
Assigning the Items to the FAVORITES (1 – 4) Keys ............... 17
Clearing the Preset Items of the FAVORITES (1 – 4) Key ........ 17
Customizing the MENU (1 – 3) Keys................... 18
Assigning the Items to the MENU (1 – 3) Keys ......................... 18
Resetting the MENU (1 – 3) Keys to the Default Setting .......... 18
The Available Items to Assign to the FAVORITES (1 – 4)
and MENU (1 – 3) Keys............................................................ 19
Backing Up and Restoring the Song Data......... 20
Setting Up the File Sharing of Your PC ..................................... 20
Backing up the Song Data of This Unit to Your PC .................. 22
Restoring the Song Data of This Unit from Your PC ................ 24
2
MCX-2000 Owner’s Manual Addendum for Version 2
Page 3
Features
Feature Description
Windows Media
Connect Compatibility
Directory Browse of
Internet Radio Stations
Look/Feel
Album Arts
FAVORITES (1 – 4) Keys
MENU (1 – 3) Keys
Song Data Backup and
Restore
n This firmware update also includes the MusicCAST client firmware update (See page 5 for details).
DigiOn and DiXiM are registered
trademarks or trademarks of DigiOn,
Inc.
Allows you to play the audio contents stored on your personal
computer with Windows Media Connect 2.0 installed.
Allows you to browse the Internet radio stations easily with the
database of the Internet radio stations provided by vTuner.
Allows you to change the background and icons of the on screen
display (OSD).
Allow you to display the album arts of the albums. MCX-2000
Allow you to assign the desired items (artists, radio stations, etc.)
to the FAVORITES (1 – 4) keys on the remote control.
Allow you to change the preset menu items of the MENU (1 – 3)
keys from the default settings.
Allow you to back up the song data stored on this unit to your
personal computer and restore the song data to this unit from your
personal computer.
Applied
Devices
MCX-2000
MCX-2000
MCX-2000
MCX-2000
MCX-2000
MCX-2000
Windows XP, Internet Explorer, Windows Media, Windows
Media Audio, and Windows Media Connect are either
registered trademarks or trademarks of Microsoft corporation
in the United States and/or other countries.
Other company names and product names mentioned in this
document may be either trademarks or registered trademarks
of their respective owners and are hereby acknowledged.
MCX-2000 Owner’s Manual Addendum for Version 2
3
Page 4
7
p
STANDBY/ON
TV AMP
TIMER OPEN/CLOSE
RANDOM REPEAT BROADCA
p
General Information
Updating the MusicCAST Server Firmware
CAUTION
Do not disconnect the power cable while this unit is in the firmware update procedure.
Follow the procedure below to update the firmware on this unit. You need to perform the firmware update in advance to
use the new features in the firmware update.
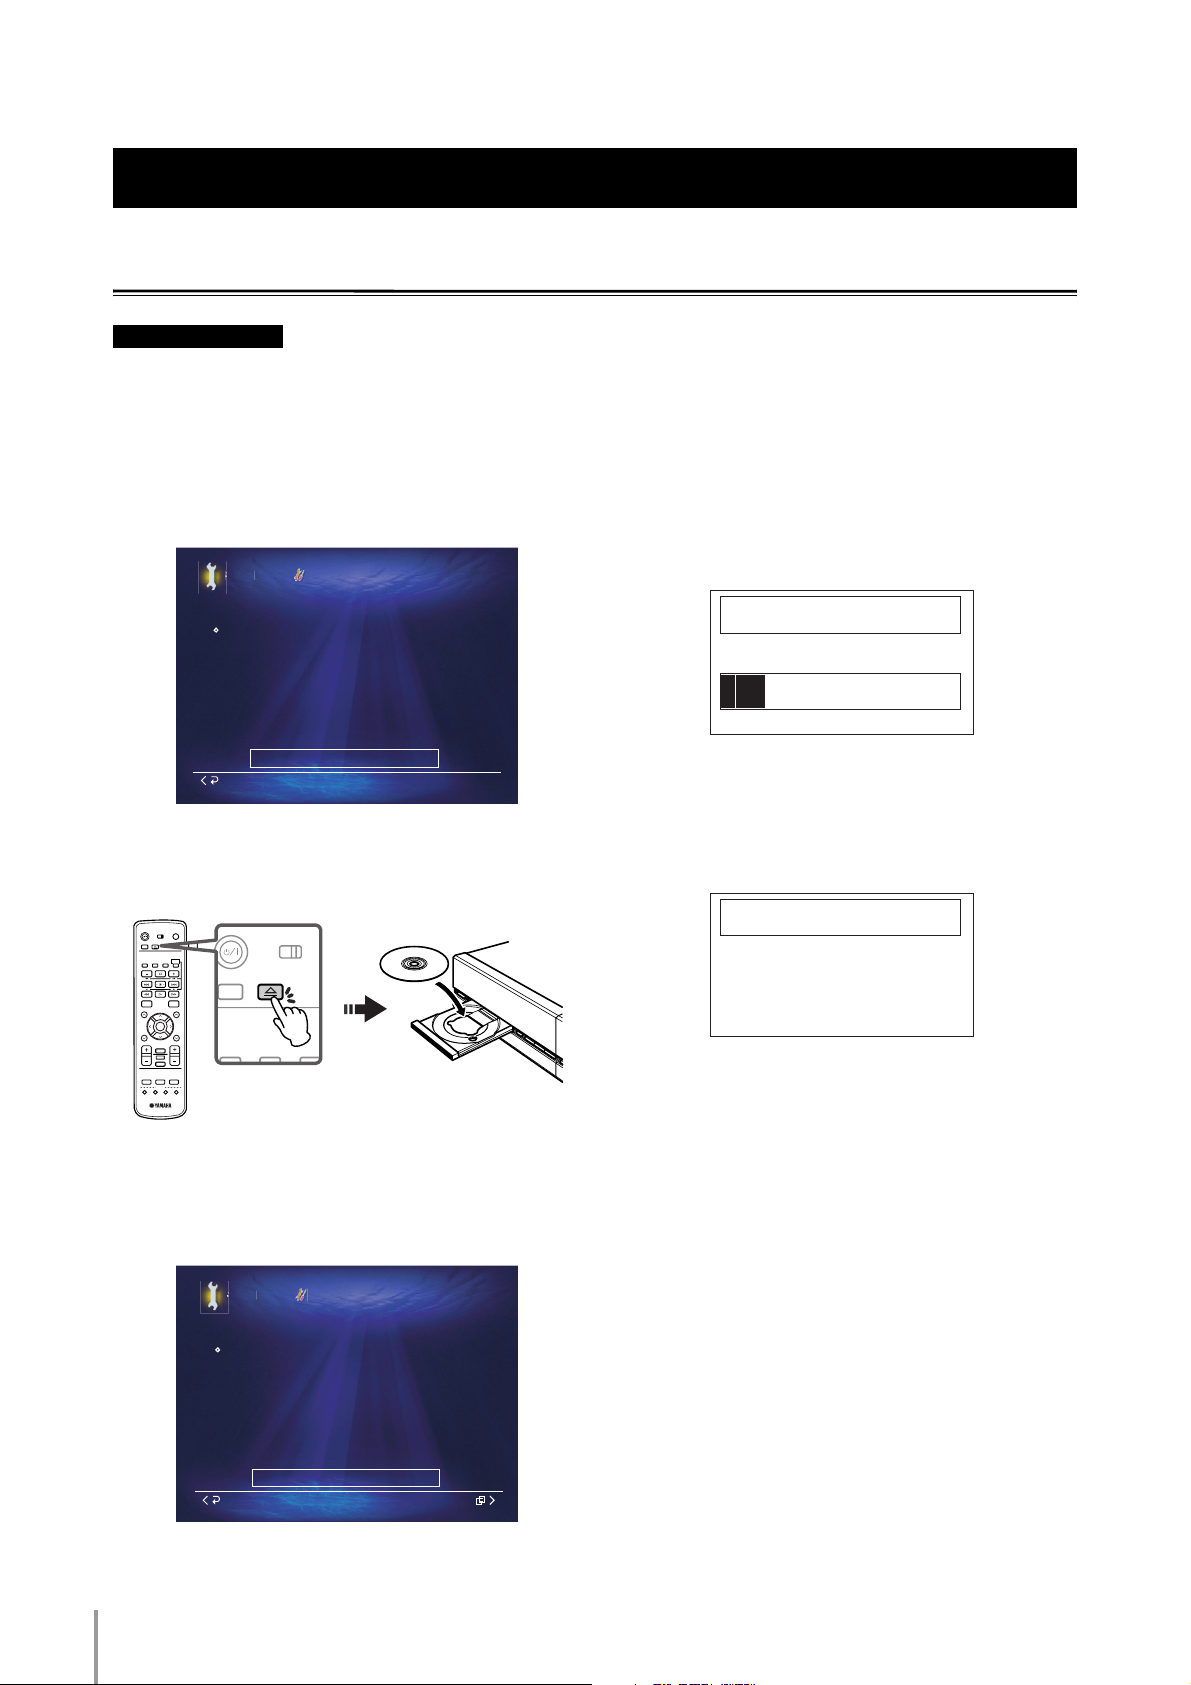
1 Select “Top Menu” > “Setup” > “System Utilities” >
“System Update”.
The following display appears in the OSD.
etu
Use this utility to update the MCX-2000 firmware.
Step 1 : Insert the system update CD
Step 2 : Push the > key to open the Submenu
Step 3 : Select "Start"
Cancel
System Utilities
System Update
No update CD present
2 Press OPEN/CLOSE on the front panel (or the remote
control), and then load the firmware update CD with
its label side facing up.
POWER
STAMDBY/ON
AMP/TV
TV AMP
TIMER
OPEN/CLOSE
RANDOM REPEAT BROADCAST RADIO
123
456
789
TOP
PLAU
0
MENU
INFO.
A
PAGE
SELECT
PAGE
Z
VOL.
INPUT
BOOLMARK
AMP/TV
MUTE
LIBRALY ARTSTS
PLAULISTS
123
MENU MENU MENU
FAVORITES
2 3 4
1
Remote control
4 Push the center stick rightward on the front panel (or
press > on the remote control) to open the Submenu,
and then select “Start”.
The OSD disappears, and the following screen
appears in the front panel display.
SYSTEM UPDATE
n It takes about 20 minutes to update the firmware of the server.
5 When the following message appears in the front
panel display, press OPEN/CLOSE on the front panel
(or the remote control) to open the CD tray, and then
unload the firmware update CD.
SYSTEM UPDATESYSTEM UPDATE
UPDATE OK
EJECT CD AND RESTART
6 Press STANDBY/ON on the front panel (or the remote
control) twice to reboot this unit.
4
3 Press OPEN/CLOSE on the front panel (or the remote
control) to close the CD tray.
This unit starts reading the data of the update CD,
and then the following display appears in the OSD.
etu
Use this utility to update the MCX-2000 firmware.
Step 1 : Insert the system update CD
Step 2 : Push the > key to open the Submenu
Step 3 : Select "Start"
Cancel
MCX-2000 Owner’s Manual Addendum for Version 2
System Utilities
System Update
Update CD is ready
Submenu
n Once this unit reboots, select “Top Menu” > “Setup” > “System
Utilities” > “System Information” > “Version” to make sure the
version of the firmware of this unit is 2.0 (or later).
n If the firmware update fails, an error message appears in the
front panel display. In such cases, try the firmware update
procedure again. If the same error message appears in the front
panel display again, consult with an authorized YAMAHA
service center.
Page 5
Updating the MusicCAST Client (MCX-A10 or MCX-C15) Firmware
CAUTION
Do not disconnect the power cable while the MusicCAST client in the firmware is in the firmware
update procedure.
At times YAMAHA releases updates to the firmware in either or both the client and the server. These updates are generally
aimed at improving the experience of using your MusicCAST equipment. Follow the instructions provided with the
firmware update carefully. Do not use the update procedure unless specifically instructed to do so.
1 Update the server firmware in advance.
See page 4 for details.
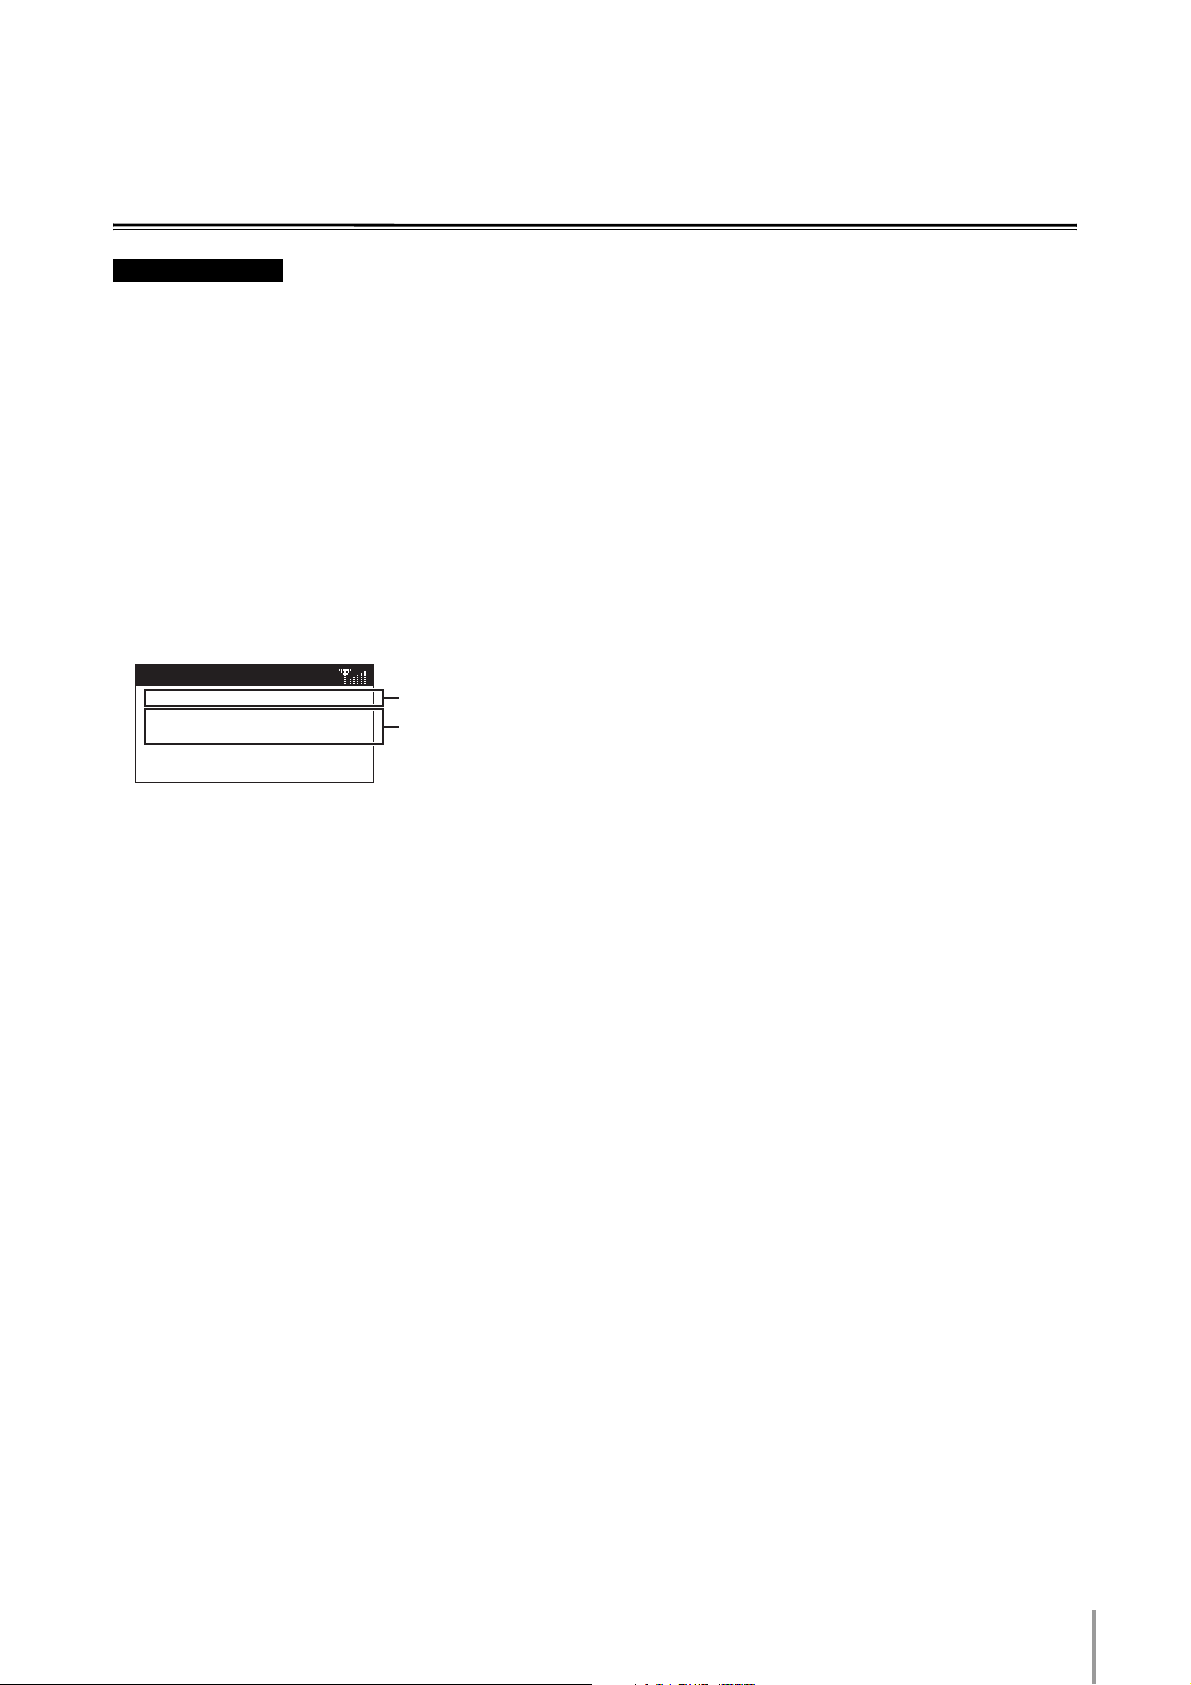
2 Select “Top Menu” > “Setup” > “System” > “System
Update”.
The following illustration is an example of the message
appears in the front panel display of MCX-A10.
System Update
Version: 10.0.3
Date: 2006/03/03
08:23:58
Press PLAY to update.
Client Firmware Version
Date and Time of the Firmware
Update for the Client
3 Press p on the front panel of the client (or p on the
remote control of the client) to start the firmware
update for the client.
The client receives the latest firmware from the server,
and then updates its own firmware. During the update
process, the client display shows several messages.
4 The client reboots automatically when the procedure
of the firmware update is complete.
n Once the client reboots, select “Top Menu” > “Setup” >
“System” > “Information” to make sure the version of the
firmware of the client is 10.2 (or later).
n If the firmware update fails, some functional defects in the client
may result. In such cases, try the firmware update procedure
again. If the same functional defects in the client persist,
contact with an authorized YAMAHA service center.
MCX-2000 Owner’s Manual Addendum for Version 2
5
Page 6
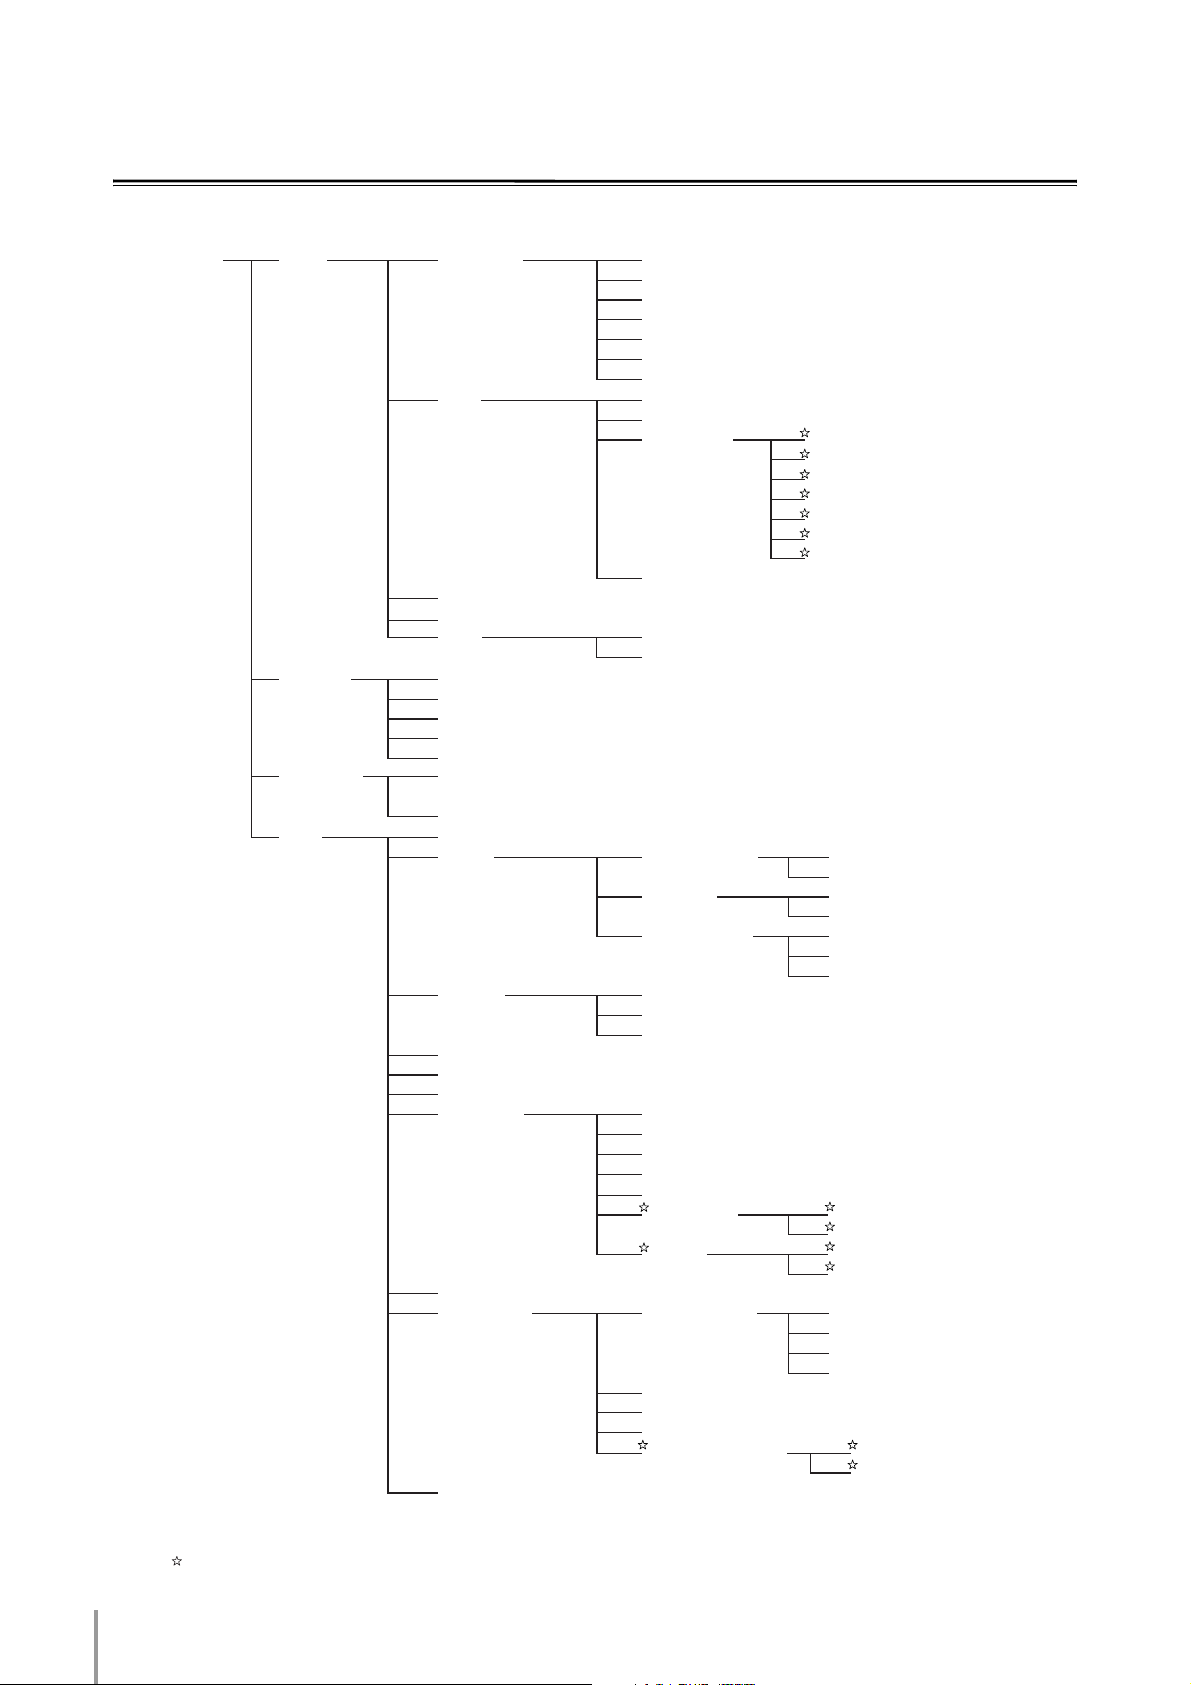
MCX-2000 Menu Tree
The following menu tree illustrates the structure of the menu with this unit of this version of the firmware.
Top Menu Music Archive Artists
Library
Radio FM
Network Content
CD
Inputs Digital Input
Recording
Client Control Client 1
Setup Timer
Store from CD
Store from Radio
Store from Inputs
Duplicate a CD
Create an Original CD
:
Client 15
Network Client Configuration Auto Configuration
Date/Time Auto Setup
Playback
Recording
CD Lookup
User Interface Front Panel Display
YAMAHA AV Receiver
System Utilities System Information
Easy Setup
(page 7)
Albums
Genres
All Songs
Playlists
Bookmarks
Statistics
XM (US model only)
(page 10)
Preset
Analog Input
Status View Server IP Address
Advanced Settings IP Address
Manual Setup
Time Display
Page displayed at Power ON
Screen Saver
Language
PS/2 Keyboard
Remote Control
Look/Feel
(page 12)
System Reset
System Update
Lock Function
Song Data Management
(page 20)
Direct Access URL ListInternet Radio
Locations
Genres
New Stations
Popular Stations
Podcasts
Recently Played Stations
Manual Configuration
Wireless LAN
Wireless LAN
Network Settings Reset
Favorite Key
Menu Key
Background
Icon
Version
Hard Drive Capacity
MP3 Encode Schedule
Controllable YAMAHA AV Receivers
(page 17)
(page 18)
Song Data Backup
Song Data Restore
(page 22)
(page 24)
n indicates the menu added by this firmware update.
6
MCX-2000 Owner’s Manual Addendum for Version 2
Page 7
New Features in Version 2
Using This Unit with Microsoft Windows Media Connect 2.0
Use this feature as an alternative to DiXiM Media Server (included in the MCX–2000 package) to access the shared music
files stored on your PC.
Microsoft Windows Media Connect is the technology that allows you to share the music files stored on your personal
computer (PC) with the digital media receivers (the AV components compatible with Windows Media Connect). When you
connect this unit to your PC with Windows Media Connect 2.0 installed, this unit acts as the digital media receivers, and
you can enjoy playing back the audio contents stored on your PC.
n Refer to the documents of Windows Media Connect 2.0 for details about the PC system requirements to this feature.
Connecting This Unit and Your PC by Using Windows Media Connect 2.0
To use this unit with Windows Media Connect 2.0, you
have to connect this unit to your PC and configure them
appropriately. The following procedure is a standard
example. Some details of the function may vary
according to your PC configuration and connection
environment.
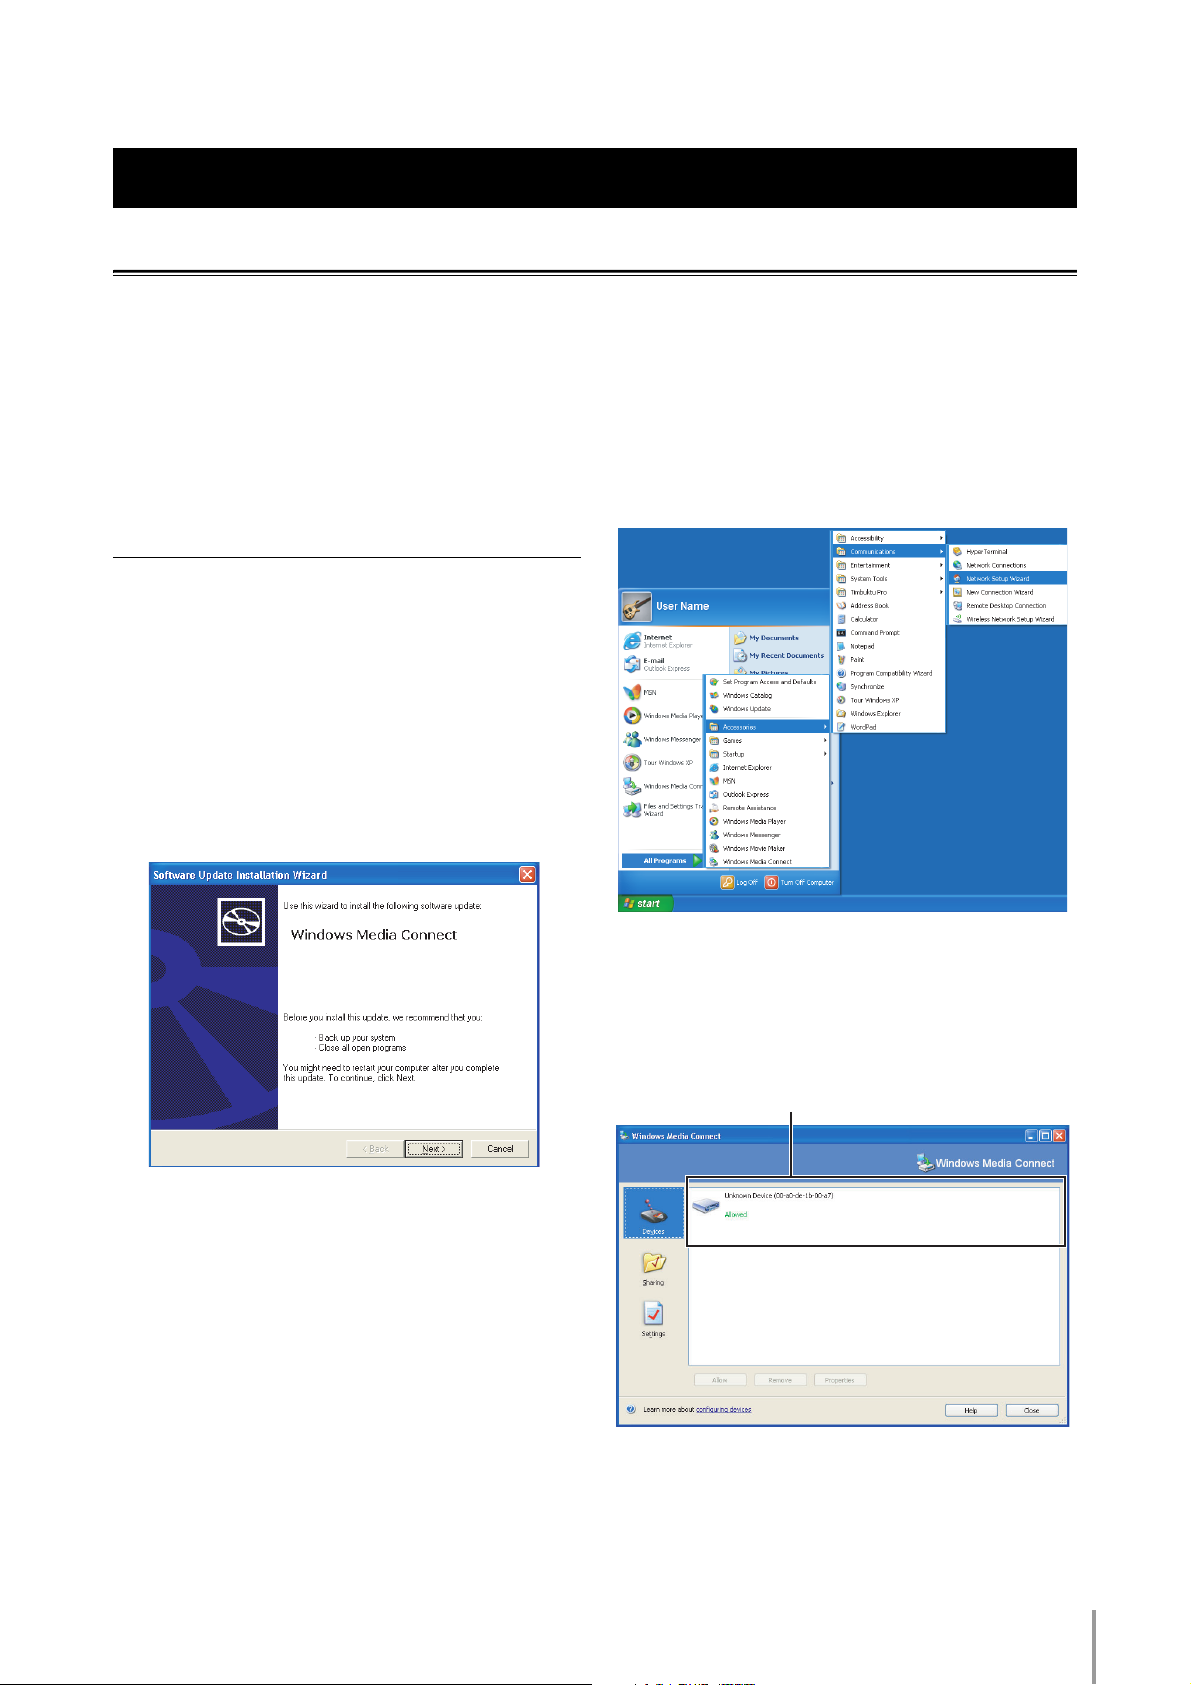
1 Install Microsoft Windows Media Connect 2.0 to your
PC.
You can download the installer of Microsoft Windows
Media Connect 2.0 from the Microsoft website.
2 Activate the Windows Media Connect 2.0 application.
3 Click on the “Devices” icon on the Windows Media
Connect 2.0 application window, and then confirm
that the server has been recognized.
Once this unit has been recognized, the name of the
server appears in the Windows Media Connect 2.0
application window as follows.
This unit (The MAC address is an example)
n Read the documents of Windows Media Connect 2.0 carefully
when you install Windows Media Connect 2.0 to your PC. The
documentations about Windows Media Connect 2.0 are on the
Microsoft website.
n When there are some digital media receivers in the same local
area network, the names, icons, or statuses appear in the
Windows Media Connect 2.0 application window.
MCX-2000 Owner’s Manual Addendum for Version 2
7
Page 8
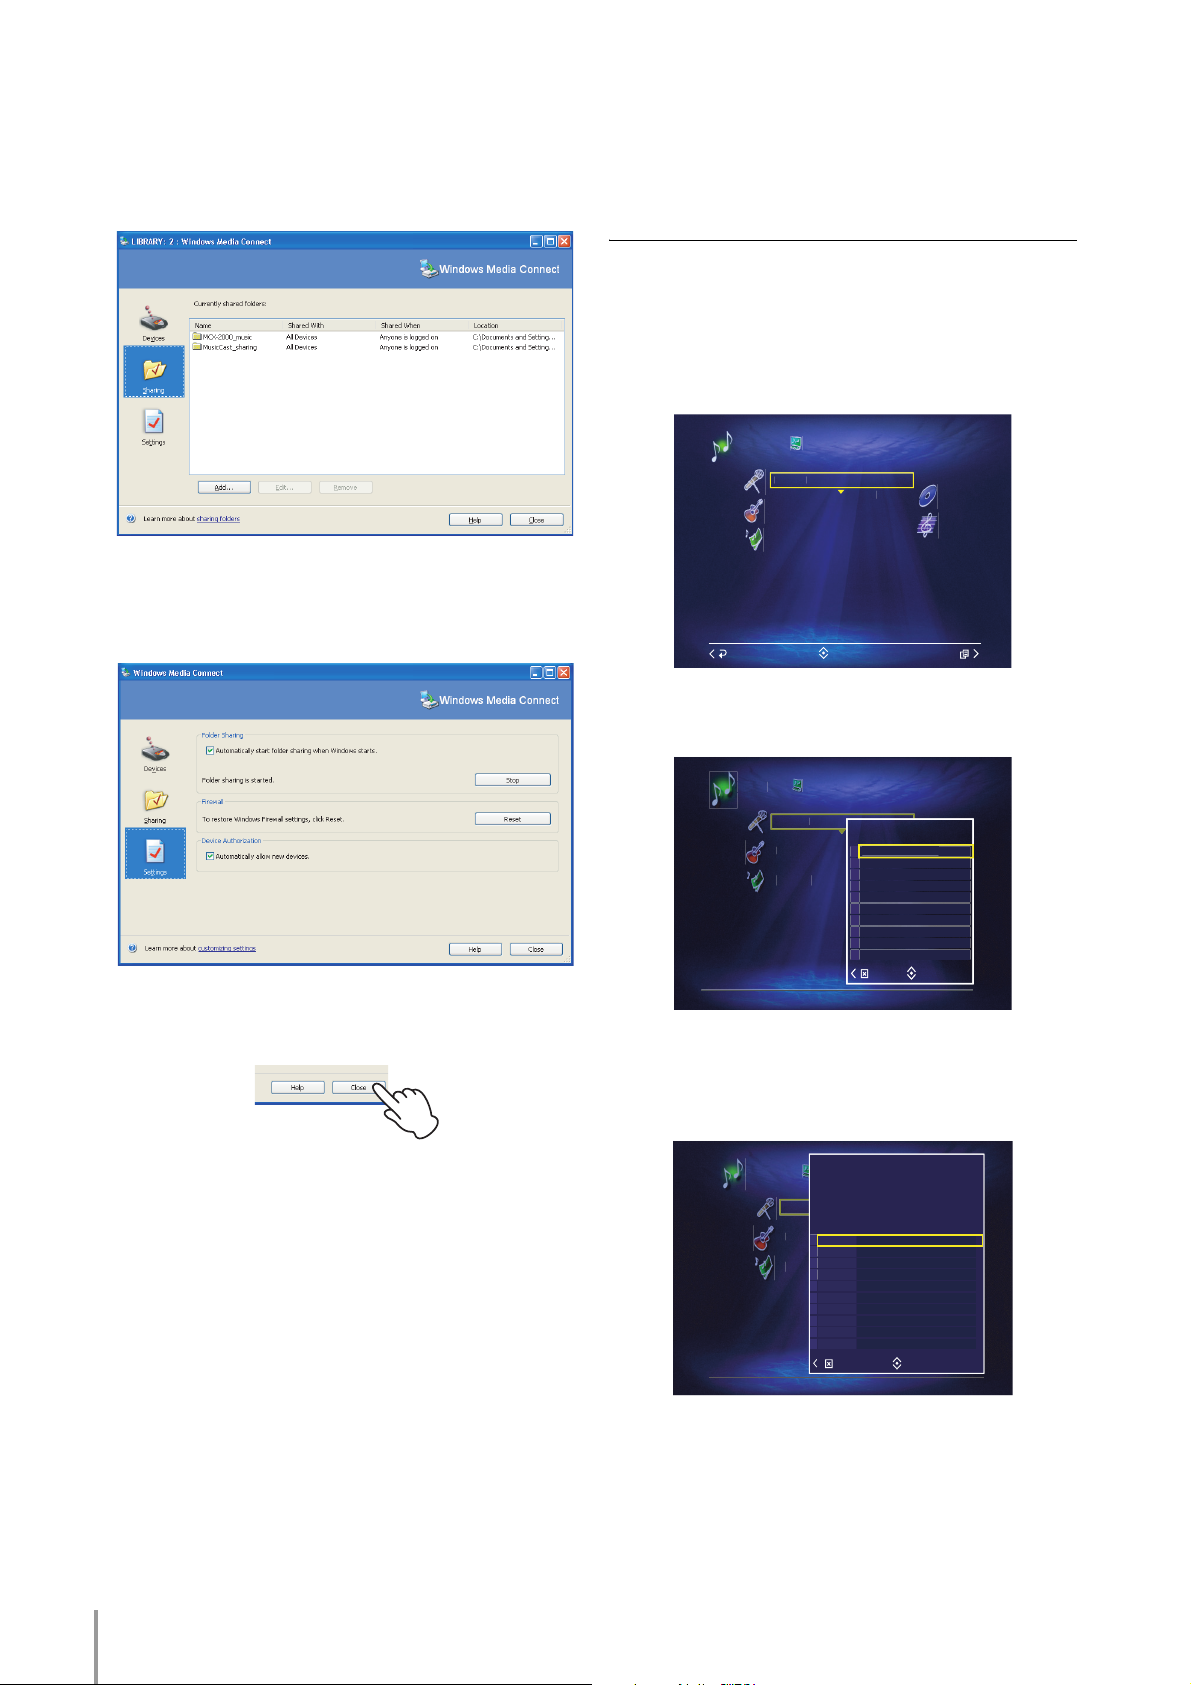
4 Click on the “Sharing” icon on the Windows Media
t
ms
s
gs
y
t
u
r
s
e
s
y
Connect 2.0 application window, and then select the
desired folders to be shared with this unit.
Playing Back the Audio Contents on the PC with Windows Media Connect 2.0
Use this feature to play the music contents stored on
your PC by using Windows Media Connect 2.0.
n When you use this feature, the PC where the desired contents
are stored must be activated.
1 Select “Top Menu” > “Library” > “Network Content”.
5 Click on the “Settings” icon on the Windows Media
Connect 2.0 application window, and then configure
the settings appropriately.
6 Click on the “Close” button on the Windows Media
Connect 2.0 application window to close it.
Librar
Back
Artist
Genres
Playlists
Network Conten
Select
Albu
All Son
Submenu
2 Select one of the categories (Artists, Albums, Genres,
All Songs, or Playlists), and then open the Submenu.
ubmen
elect PC Serve
elec
3 Select “Select PC Server”.
The list of the available PC servers (connected via
Windows Media Connect 2.0 or DiXiM Media Server)
appears in the OSD.
n Some security software installed on your PC (anti-virus
software, firewall software, etc.) may block the access of this
unit to your PC. In such cases, configure the security software
appropriately.
MCX-2000 Owner’s Manual Addendum for Version 2
8
Librar
Arti
enr
Playli
Select PC Server
Network Content
Server name2
1
LIBRARY: 2 : Windows Me...
1
LIBRARY: 1 : Windows Me...
Select server
Select
Page 9

4 Select the desired server, and then press SELECT on
t
s
gs
y
the remote control.
“PC Server Connecting...” appears in the OSD while
this unit is trying to establish the link to the server, and
then the selected server name and the categories to
select the shared music contents from appear once
this unit was established the link to the server and
obtained the list of the shared files.
Librar
Back
n When this unit cannot establish the link to the selected server,
“Cannot find PC Server” appears in the OSD.
Artist
Genres
Playlists
Network Conten
Select
Albums
All Son
Submenu
5 Proceed with the operation to play the music
contents in the PC as identical as in this unit.
See pages 46 to 51 of “MCX–2000 OWNER’S
MANUAL” for details about how to select the desired
music contents in the server.
Compatible File Formats to Play with This Unit
•WAV
•MP3
• Windows Media Audio (WMA)
n Windows Media Audio (WMA) with Digital Rights Management
(DRM) is not compatible with this unit.
n This unit indicates WAV and WMA format files as PCM format in
the OSD.
MCX-2000 Owner’s Manual Addendum for Version 2
9
Page 10

Selecting the Internet Radio Station by Using vTuner
y
y
Service
Use this feature to select the desired Internet radio
station easily. Internet radio station list uses “vTuner”, a
radio station database service. This database service is
edited and prepared for this unit.
You can select a station from the following directories:
Direct Access URL List
You can select a station directly by entering the URL of
the station.
n This function is the same as the Internet radio function in the
previous version of the firmware. See pages 54 and 84 of
“MCX–2000 OWNER’S MANUAL” for details.
Locations
Selects a station by continents and countries where the
stations are located.
After selecting a location, you can select a station within
the limit of a genre, or a station from the ones
recommended by vTuner.
Genres
Selects a station by genre.
After selecting a genre, you can select a station within
the limit of a location, or a station from the ones
recommended by vTuner.
New Stations
Selects a station from the ones that have recently started
the service.
Selecting the Internet Radio Station
The following description is an example of selecting an
Internet radio station. In this example, you will select a
station by genre.
n This service may be discontinued without notice.
n The following illustrations of the OSD are the sample images.
The name of the genres, countries, or stations may differ.
1 Select “Top Menu” > “Library” > “Radio” > “Internet
Radio”.
When you enter “Internet Radio”, this unit starts
connecting to the vTuner database service, and
“Accessing...” appears in the OSD. Once this unit is
connected to the vTuner database service, the
following menu appears in the OSD.
Librar
Direct Access URL List
Locations
Genres
New Stations
Popular Stations
Podcasts
Recently Played Stations
Back
Radio
Internet Radio
Select
Popular Stations
Selects a station from the list of popular stations.
Podcasts
Podcast is a type of “easy Internet radio service”. There
are many podcast services on the Internet, and some
podcast services are maintained by common people
called “bloggers”.
You can select and access a podcast service via the
vTuner database. There are two categories to select a
podcast service from: “by Location” (you can select a
service by locations) and “by Genre” (you can select a
service by genres).
n The podcast is not a continuous audio service. When you play
back a podcast to the end of an “episode”, this unit stops
playback.
Recently Played Stations
Selects a station from the list of the stations most
recently selected on this unit.
You can clear the history of the selection of the recently
selected stations by selecting “Clear” in the Submenu.
n You can select “Direct Access URL List” to select an Internet
radio service directly while this unit is connecting to the vTuner
database service.
n When this unit fails to connect to the vTuner database service
for some reason (this unit is cannot access Internet, the vTuner
database service is temporary unavailable, etc.), only “Direct
Access URL List” appears in the OSD.
2 After the vTuner database directories appear in the
OSD, select “Genres”.
The list of genres appears in the OSD.
(Example)
Librar
Genres
1
2
3
4
5
6
7
8
9
10
Back
n While this unit is connecting to the vTuner database service,
“Accessing...” appears in the OSD.
Radio
Internet Radio
Adult Contemporary
Alternative
Ambient
Big Band
Bluegrass
Blues
Celtic
Christian Contemporary
Christian Rock
Classic Rock
Select
MCX-2000 Owner’s Manual Addendum for Version 2
10
Page 11

3 Select a desired genre.
y
y
y
When you select a genre from the list, the following
menu appears in the OSD.
(Example)
Radio
Internet Radio
All Stations
By Location
Highlighted Stations
Select
Back
Librar
1
2
3
Blues
4 Select “By Location”.
The list of the countries where the Internet radio
services are released appears in the OSD.
(Example)
Librar
1
2
3
4
5
6
7
8
9
10
Blues
Radio
Internet Radio
Brampton ON Canada
Grant FL
Internet Only
Lansing MI
Lobos Argentina
New York NY
Normal IL
Salima KS
Switzerland
Washington DC
5 Select a country where the desired Internet radio
service is released.
The list of the Internet radio services appears in the
OSD.
(Example)
Librar
Blues
1
3 voor 12 ROOTS
AccuRadio - Blues
2
3
Bellyup4blues
Big Blue Radio
4
5
Blues Fest Radio
6
Blues on Air
7
Choiceradio - Blues
8
Emision Digital - Blues
9
Free Radio World - Blues
10
Houndog Radio
Back
Radio
Internet Radio
Select
160 kbps
128 kbps
128 kbps
192 kbps
Submenu
16 kbps
56 kbps
56 kbps
48 kbps
20 kbps
64 kbps
6 Select the desired Internet radio service, and then
play the Internet radio service.
See page 59 of “MCX–2000 OWNER’S MANUAL” for
details.
Back
Select
MCX-2000 Owner’s Manual Addendum for Version 2
11
Page 12

Changing the Background and Icons of the OSD
p
p
e
l
d
p
p
Use this feature to change the background and icons of the OSD. You can select the background and icons from the
following 4 backgrounds and 2 sets of icons.
n Some icons may be different from the following illustrations.
Background
Type 1
Type 2 Type 3 Type 4
1 Select “Top Menu” > “Setup” > “User Interface” >
“Look/Feel”.
The following display appears in the OSD.
etu
User Interface
Look/Feel
Background
Icon
Icons
3 Select the desired item.
Type 2Type 1
etu
Look/Fee
Backgroun
Type
OK Cancel
ser Interfac
Select
Back
Select
4 Select “OK” to confirm your selection.
“Please wait a moment” appears in the OSD, and
2 Select “Background” or “Icon”.
then this unit returns to the User Interface menu.
The following display is an example when you select
“Background”.
etu
MCX-2000 Owner’s Manual Addendum for Version 2
12
User Interface
Look/Feel
Background
Type 1
OK Cancel
Select
n If you want to cancel your selection, select “Cancel”.
etu
User Interface
Look/Feel
Please wait a moment
Select
Page 13

Displaying Album Arts
y
Use this feature to display the album arts in the OSD. To
display the album arts, you must access this unit with a
web browser, and then upload the graphic file you want
to display as the album art onto this unit. The album arts
appears in the album list screen and the Play Information
screen. The following displays are examples of the album
arts.
ibrar
Music Archive
Albums
Albums
23
Approximate
1
Adult Snakes
2
Broadway is the Easy Way
3
Burnt Winny
4
Chunga's Revenant
5
Cold Cats
6
Citar
7
Have I Been Sadistic?
8
9
Hot Dogs
10
Joe's Garakuta
Back Select
Songs Time
9
8
17
1:11:05
9
10
6
32
2:12:08
15
1:03:46
15
1:00:23
19
1:56:49
Submenu
31:55
36:15
41:10
40:23
47:13
Play Information
Crown of the peaches1.
Album
GP
Cold Cats
Frankie Zipper
Alternative & Punk
Close
PCM 44.1
Submenu
Uploading the Album Arts onto This Unit
1 Access this unit with a web browser, and then click
on “Upload Album Art”.
For details, see page 76 of “MCX-2000 OWNER’S
MANUAL”. The following display appears in your web
browser window.
2 Select a category to select the desired album from.
00:06
When you select “Albums”, you can select the desired
album directly. See step 4 and proceed with the
operation.
n We recommend using Microsoft Internet Explore 6.0 on
Windows XP Service Pack 2 to access this unit. When you use
other web browsers or operating systems to access this unit,
the details of the design displayed in the web browser window
or the function of this feature may vary.
n Make sure that this unit is not in the standby mode when you
use this feature. When this unit is in the standby mode, “Cannot
edit while MusicCAST server is in standby mode.” appears in
your web browser window.
3 Select the desired item and then click on the “Select”
button displayed in the web browser window.
MCX-2000 Owner’s Manual Addendum for Version 2
13
Page 14

4 Click on the name of the desired album, and then
click on the “Browse...” button displayed in the web
browser window.
The window where you can select the graphic file
appears in the display of your PC.
6 Click on the “View” button displayed in the web
browser window.
The illustration of the graphic file you selected
appears under “PC” in your web browser window.
5 Select the graphic file you want to upload onto this
unit.
The Compatible Graphic Format
120 Pixels (or smaller)
SAMPLE
120 Pixels
(or smaller)
File Format: Bitmap
Format: Windows 24 bit Bitmap format (BMP)
Maximum Size: 120 x 120 pixels
(proportional or not proportional)
n When you select a graphic file incompatible with this unit (the
graphic size is oversized, the format is incorrect, etc.), “Please
choose 24 bit bitmap file below 120x120 pixel.” appears in your
web browser window.
The new album art
When you select the album to which you already added
an album art, you can overwrite the album art with the
new one.
The new album art The previously uploaded album art
MCX-2000 Owner’s Manual Addendum for Version 2
14
Page 15

7 Click on the “OK” button displayed in the web
ms
s
s
gs
y
y
y
browser window to upload the graphic file onto this
unit.
Deleting the Album Arts
1 Select “Top Menu” > “Library” > “Music Archive”, and
then select a category.
8 Click on “Logoff” displayed in the web browser
window to log off from this unit.
Librar
Back
Artist
Genres
Playlists
Statistics
Music Archive
Select
Albu
All Son
Bookmark
Submenu
2 Select the album you want to delete the album art
from.
ibrar
23
1
2
3
4
5
6
7
8
9
10
Back Select
Music Archive
Albums
Albums
Approximate
Adult Snakes
Broadway is the Easy Way
Burnt Winny
Chunga's Revenant
Cold Cats
Citar
Have I Been Sadistic?
Hot Dogs
Joe's Garakuta
Songs Time
31:55
9
36:15
8
1:11:05
17
41:10
9
40:23
10
47:13
6
2:12:08
32
1:03:46
15
1:00:23
10
1:56:49
19
Submenu
3 Open the Submenu.
If you select an album with an album art, “Delete
“Album Art”” appears in the Submenu.
ibrar
23
1
2
3
4
5
6
7
8
9
10
n When you select the album without an album art, “Delete
“Album Art”” does not appear in the Submenu.
Music Archive
Albums
Albums
Approximate
Adult Snakes
Broadway is the Easy Way
Burnt Winny
Chunga's Revenant
Cold Cats
Citar
Have I Been Sadistic?
Hot Dogs
Joe's Garakuta
Submenu
Play
Information
Edit title
CDDB info.
Delete this Album
Delete PCM data
Delete "Album Art"
New Album
17
10
32
15
10
19
Select
9
8
9
6
31:55
36:15
1:11:05
41:10
40:23
47:13
2:12:08
1:03:46
1:00:23
1:56:49
MCX-2000 Owner’s Manual Addendum for Version 2
15
Page 16

4 Select “Delete “Album Art””.
y
y
The following message appears in the OSD.
Librar
23
1
2
3
4
5
6
7
8
9
10
Music Archive
Albums
Albums
Approximate
Are you sure you want to delete
Adult Snakes
"Album Art" ?
Broadway is the Easy Way
Burnt Winny
Chunga's Revenant
Cold Cats
Citar
Have I Been Sadistic?
Hot Dogs
Joe's Garakuta
Message
OK Cancel
5 Select “OK”.
The album art disappears from the OSD.
ibrar
23
1
2
3
4
5
6
7
8
9
10
Back Select
Music Archive
Albums
Albums
Approximate
Adult Snakes
Broadway is the Easy Way
Burnt Winny
Chunga's Revenant
Cold Cats
Citar
Have I Been Sadistic?
Hot Dogs
Joe's Garakuta
Songs Time
31:55
9
36:15
8
1:11:05
17
41:10
9
40:23
10
47:13
6
2:12:08
32
1:03:46
15
1:00:23
10
1:56:49
19
Songs Time
31:55
9
36:15
8
1:11:05
17
41:10
9
40:23
10
6
47:13
32
2:12:08
15
1:03:46
10
1:00:23
19
1:56:49
Submenu
You can also delete the album arts with the web browser
on your PC. Select the album you want to delete the
album art from, and then click on the “Delete” button in
the web browser window.
MCX-2000 Owner’s Manual Addendum for Version 2
16
Page 17

Using the FAVORITES (1 – 4) Keys
y
y
t
ack
p
l
e
y
y
l
p
y
l
e
"
u
.
u
p
p
Use this feature to access the desired music sources
easily. There are 4 FAVORITES (1 – 4) keys on the
remote control. To use the FAVORITE keys, you must
assign the desired items (artist, genre, preset station,
etc.) to the FAVORITES (1 – 4) keys in advance.
LIBRARY ARTISTS
123
MENU MENU MENU
2 3 4
1
PLAYLISTS
FAVORITES
Assigning the Items to the
FAVORITES (1 – 4) Keys
1 Select the desired item you want to assign to a
FAVORITES (1 – 4) key.
ibrar
Times Played
Recently Played Songs
Recently Stored Albums
Albums for CDDB Update
Music Archive
Statistics
Clearing the Preset Items of the
FAVORITES (1 – 4) Key
1 Select “Top Menu” > “Setup” > “User Interface” >
“Remote Control”.
etu
Favorite Ke
Menu Ke
B
2 Select “Favorite Key”.
etu
Use this utility to clear FAVORITES Key settings
Step 1 : Press the > key to open the Submen
Step 2 : Select "Clear
ser Interfac
Remote Contro
elec
ser Interfac
Remote Contro
Favorite Ke
Back
Select
Submenu
2 Press the FAVORITES (1 – 4) key to which you want
to preset the desired item for 2 seconds.
The following message appears on the OSD, and
then the icon of the FAVORITES (1 – 4) key appears
beside the item you have assigned to the FAVORITES
(1 – 4) key.
Librar
Times Played
Recently Played Songs
Recently Stored Albums
Albums for CDDB Update
Back
n When you reset this unit, the assigned memory of the
FAVORITES (1 – 4) keys is cleared.
n When you assign an item to the FAVORITES (1 – 4) key which is
already assigned another item, the old item is overwritten with
the new item.
Music Archive
Statistics
Assign to FAV 1
Select
Submenu
ance
ubmen
3 Open the Submenu, and then select the desired item.
etu
Use this utility to clear FAVORITES Key settings.
Step 1 : Press the > key to open the Submenu
Step 2 : Select "Clear"
When you select “Clear All”, you can clear all the
items assigned to the FAVORITES (1 – 4) keys.
4
Select “OK” when the following message appears in the OSD.
“Saving...” appears in the OSD, and then this unit
returns to “Remote Control” menu.
etu
Use this untility to clear FAVORITES Key settings.
Step 1 : Press the > key to open the Submenu
Step 2 : Select "Clear"
User Interface
Remote Control
Favorite Key
User Interface
Remote Control
Favorite Key
Message
Are you sure you want to clear
FAVORITE 1 ?
Submenu
Clear FAVORITE 1
Clear FAVORITE 2
Clear FAVORITE 3
Clear FAVORITE 4
Clear All
Select
OK Cancel
MCX-2000 Owner’s Manual Addendum for Version 2
17
Page 18

Customizing the MENU (1 – 3) Keys
e
ms
s
s
gs
y
ms
s
y
t
ack
p
l
e
y
y
l
p
y
e
"
u
.
u
p
p
Use this feature to change the preset settings of the
MENU (1 – 3) keys.
LIBRARY ARTISTS
123
MENU MENU MENU
2 3 4
1
PLAYLISTS
FAVORITES
Assigning the Items to the
MENU (1 – 3) Keys
The example below describes the procedure to preset
“Music Archive” menu screen to MENU 1 key.
1 Select the desired menu item to preset to the
MENU (1 – 3) key.
Librar
Artist
Genres
Playlists
Statistics
Music Archiv
Albu
All Son
Bookmark
Resetting the MENU (1 – 3) Keys
to the Default Setting
1 Select “Top Menu” > “Setup” > “User Interface” >
“Remote Control”.
etu
Favorite Ke
Menu Ke
B
2 Select “Menu Key”.
etu
Use this utility to reset MENU Key settings
Step 1 : Press the > key to open the Submen
Step 2 : Select "Reset
ser Interfac
Remote Contro
elec
ser Interfac
Remote Control
Menu Ke
Back
Select
Submenu
2 Press a MENU (1 – 3) key on the remote control
for 2 seconds.
The following message appears in the OSD.
Librar
Back
n When you reset this unit, the preset memory
of the MENU (1 – 3) keys is reset to the default settings.
Artist
Genres
Assign to MENU 1
Playlists
Statistics
Music Archive
Select
Albu
Submenu
ance
ubmen
3 Open the Submenu, and then select the desired item.
etu
Use this utility to reset MENU Key settings.
Step 1 : Press the > key to open the Submenu
Step 2 : Select
When you select “Reset All”, you can reset all
the MENU (1 – 3) keys to the default settings.
4
Select “OK” when the following message appears in the OSD.
“Saving...” appears in the OSD, and then this unit
returns to “Remote Control” menu.
Setu
Use this utility to reset MENU Key settings.
Step 1 : Press the > key to open the
Step 2 : Select
User Interface
Remote Control
Menu Key
Reset MENU 1
Reset MENU 2
Reset MENU 3
Reset All
User Interface
Remote Control
Menu Key
Are you sure you want to reset MENU
1 ?
Message
OK
Cancel
Submenu
Select
MCX-2000 Owner’s Manual Addendum for Version 2
18
Page 19

The Available Items to Assign to the FAVORITES (1 – 4) and MENU (1 – 3) Keys
FAVORITES (1 – 4) Keys
Top Menu Music Archive
Library
Radio
Network Content
CD
Inputs Digital Input
n indicates the available items that can be assigned to the FAVORITES (1 – 4) keys.
n The items in the shaded area vary in accordance with the corresponding category.
MENU (1 – 3) Keys
Top Menu Music Archive Artists (MENU 2 default)
Library (MENU 1 default)
Radio FM
Genres
All Songs
Playlists
Bookmarks
Statistics
Preset
Artists
Albums
Genres
All Songs
Playlists
Analog Input
Albums
Genres
All Songs
Playlists (MENU 3 default)
Bookmarks
XM (US model only)
Internet Radio
Preset
albumAlbums
genre
playlist
Times Played
Recently Played Songs
Group (A - J)
artist
album
genre
playlist
Times PlayedStatistics
Recently Played Songs
Recently Stored Album
Album for CDDB Update
Group (A - J)
albumartistArtists
album
Station (1 - 10)
Network Content
CD
Inputs
Recording
Client Control
Setup
Store from CD
Store from Radio
Store from Inputs
Duplicate a CD
Create an original CD
n indicates the available items that can be assigned to the FAVORITES (1 – 4) keys.
MCX-2000 Owner’s Manual Addendum for Version 2
19
Page 20

Backing Up and Restoring the Song Data
Use this feature to back up the song data stored on this unit to your PC and restore the backup song data from your PC.
You must configure the file sharing setting of your PC before using this feature.
n Use a PC with Windows XP to use this feature.
n It takes approximately 48 hours (when the song data is full of the hard disk drive of this unit) to complete the backup and restore of the stored song
data. Once this unit starts the backup or restore of song data, you cannot cancel the backup or restore and carry out any operation of this unit and
your PC until the backup or restore is finished.
n Log on to the local machine instead of the domain to use this feature.
n When you use the song data backup function, the PC must be equipped with a hard disk that was the same amount of free space as that of the
song data stored on this unit.
Setting Up the File Sharing of Your PC
When you back up the song data stored on this unit to your
PC, you must make a shared folder (directory) whose
shared name is “mc_backup” on your PC. The file sharing
setup procedure varies corresponding to the PC
environment. Read the instruction manual of your PC
operating system and the online help on your PC for details.
The following instruction is an example of setting up the
file sharing of the PC.
1 Open “Network Setup Wizard”.
3 Open the “Shared Documents” folder in “My
Computer”, and then create a new folder.
4 Name the new folder as you prefer.
In the following example, the new folder is named
“MCX-2000_songfiles”.
2 Select “Turn on file and printer sharing” in the
following screen.
Make configurations in other steps in “Network Setup
Wizard” so that all the items suit your PC
environment.
MCX-2000 Owner’s Manual Addendum for Version 2
20
n A shared folder has two names: the folder name and “Share
name” (shared name). When you back up the song data files to
your PC and restore the song data files from your PC, this unit
searches the folder whose “Share name” is “mc_backup”
without regard to the folder name.
Page 21

5 Select the new folder, and then open its “Properties”
window.
6 Select the “General” tab in the “Properties” window,
and then remove the check mark from the “Readonly” check box as shown below.
7 Select the “Sharing” tab in the “Properties” window,
and then place the check marks in the “Share this
folder on the network” and “Allow network users to
change my files” check boxes as shown below.
8 Make sure “Share name” is “mc_backup” as shown
below.
When you named this folder with a name other than
“mc_backup” in step 4, the folder name appears in
the “Share name” text box. In such cases, rename
“Share name” “mc_backup”.
mc_backup
9 Click on the “OK” button in the “Properties” window
to close it.
MCX-2000 Owner’s Manual Addendum for Version 2
21
Page 22

Backing up the Song Data of This
p
p
p
s
t
C
C.
e
o
p
"
p
t
u
t
l
p
5 Open the Submenu, and then select “Start”.
Unit to Your PC
n It takes approximately 48 hours (when the song data is full of
the hard disk drive of this unit) to complete the backup of the
stored song data. Once this unit starts the backup of song
data, you cannot cancel the backup and carry out any
operation of this unit and your PC until the backup is finished.
Do not shut down the power of this unit and the PC during the
backup of the song data.
1 Start the file sharing of “mc_backup” folder on your
PC. See pages 20 and 21 for details.
2 Select “Top Menu” > “Setup” > “System Utilities”.
etu
Back
System Utilities
System Information
System Reset
System Update
Lock Function
Song Data Management
Select
etu
Use this utility to restore M
data on the P
For detailed information, ref
You can start the backup pr
Step 1 : Press the > key to o
Step 2 : Select "Start
System Utilitie
Song Data Managemen
tar
ance
ubmen
elec
6 Select “OK” when the following message appears in
the OSD.
etu
Use PC.
For
You
Step
Step
System Utilities
Song Data Management
Song Data Back up
Message
The backup of song data begins.
CancelOK
3 Select “Song Data Management”.
etu
Back
System Utilities
Song Data Management
Song Data Backup
Song Data Restore
Select
4 Select “Song Data Backup”.
etu
Use this utility to backup MCX-2000 song data to the PC.
For detailed information, refer to User's Manual.
You can start the backup process when PC is ready.
Step 1 : Press the > key to open the Submenu
Step 2 : Select "Start"
System Utilities
Song Data Management
Song Data Backup
n Once this unit has been rebooted, the “MusicCAST” splash
screen appears in the OSD during the song data backup
procedure. Use the front panel display to perform the following
operations.
7 Once this unit has been rebooted and the following
message appears in the front panel display, select the
PC on which you want to store the backup data.
When more than one PC is connected to the LAN,
you can switch the PC in the LAN by selecting
“Cancel” in the front panel display. When the network
ID of the desired PC appears in the front panel
display, select “OK” in the front panel display to
confirm your selection.
SongData Backup
LIBRARY
CancelOK
Select
Computer name
Confirms the selection
Switches the PC
Cancel
MCX-2000 Owner’s Manual Addendum for Version 2
22
Submenu
Page 23

8 This unit starts the backup procedure.
When you select the PC where the previous song
data files are stored in the shared folder, “Are you
sure you want to delete all files in the folder?” appears
in the front panel display. Select “OK” to back up the
song data to the PC. This unit overwrites the previous
song data files with the new one. While this unit is
backing up the song data files, the backup progress
appears in the front panel display.
SongData Backup
MakingBackup Files...
1 /96
n When you select “Cancel” while the confirmation message is
being displayed in the front panel display, you can reboot this
unit without backing up the song data files.
n When you select the PC that has insufficient disk space to store
the all song data files stored on this unit, “Not enough space
available on PC HDD” appears in the front panel display. Select
“OK” in the front panel display to reboot this unit without
backing up the song data files.
n When the property of the shared file is not appropriate (for
example, the shared file is “Read-only”, etc.), “Error” appears in
the front panel display. Select “OK” in the front panel display to
reboot this unit without backing up the song data files.
n When you do not want to overwrite the previous song data files
stor ed on this un it with the o nes stored o n your PC, chang e the
folder (directory) of all the previous song data files from the
shared folder to another.
n This unit searches for the shared folder (directory) whose
“Share name” is “mc_backup”. When the shared folder does
not exist or “Share name” is incorrect, “Cannot connect PC”
appears in the front panel display. Select “OK” in the front panel
display to reboot this unit without backing up the song data
files.
9 When “Complete” appears in the front panel display,
select “OK” in the front panel display to reboot this
unit.
SongData Backup
Complete
OK
Select
10Once the backup is complete, open the “Properties”
window of the shared folder on the PC, and then
remove the check mark in the “Share this folder on
the network” check box as bellow.
The Contents of the Saved Data
This unit backs up the following information in each song
data file.
• The song data (the audio data of MP3, PCM, etc.)
• The name of the artist, genre, and album of each
song data
•Album arts
•Playlists
n This unit does not back up the parameters other than the ones
shown above.
n This unit creates an encrypted file (not compressed) for each
song in the shared folder on your PC. You cannot play back the
encrypted files on your PC.
n You cannot change the name of each song data file. This unit
avoids restoring the renamed song data files when you try to
restore them.
n You can restore the song data files only to the digital audio
server where the song data files were originally created.
MCX-2000 Owner’s Manual Addendum for Version 2
23
Page 24

Restoring the Song Data of This
p
p
p
p
p
5 Open the Submenu, and then select “Start”.
Unit from Your PC
n It takes approximately 48 hours (when the song data is full of
the hard disk drive of this unit) to complete the restore of the
stored song d ata. O nce th is u nit starts the restore of song data,
you cannot cancel the restore and carry out any operation of
this unit and your PC until the restore is finished. Do not shut
down the power of this unit and the PC during the backup of
the song data.
1 Start the file sharing of “mc_backup” folder on your
PC. See pages 20 and 21 for details.
2 Select “Top Menu” > “Setup” > “System Utilities”.
etu
Back
3 Select “Song Data Management”.
etu
Back
4 Select “Song Data Restore”.
System Utilities
System Information
System Reset
System Update
Lock Function
Song Data Management
Select
System Utilities
Song Data Management
Song Data Backup
Song Data Restore
Select
etu
Use this utility to restore MC
data on the PC.
For detailed information, ref
You can start the restore pro
Step 1 : Press the > key to o
Step 2 : Select "Start"
System Utilities
Song Data Management
Song Data Restore
Start
Cancel
Submenu
Select
6 Select “OK” when the following message appears in
the OSD.
etu
Use this utility to restore MCX
data on the PC.
For detailed information, refe
You can start the restore proc
Step 1 : Press the > key to op
Step 2 : Select "Start"
n Once this unit has been rebooted, the “MusicCAST” splash
screen appears in the OSD during the song data backup
procedure. Use the front panel display to perform the following
operations.
n When you select “Cancel”, this unit returns to the “Song Data
Management” menu without restoring the song data files.
System Utilities
Song Data Management
Song Data Restore
The restration of song data from the
backup data begins.
Message
CancelOK
7 Once this unit has been rebooted and the following
message appears in the front panel display, select the
PC on which have the song data files are stored.
When more than one PC is connected to the LAN,
you can switch the PC in the LAN by selecting
“Cancel” in the front panel display. When the network
ID of the desired PC appears in the front panel
display, select “OK” in the front panel display.
etu
Use this utility to restore MCX-2000 song data from backup
data on the PC.
For detailed information, refer to User's Manual.
You can start the restore process when PC is ready.
Step 1 : Press the > key to open the Submenu
Step 2 : Select "Start"
System Utilities
Song Data Management
Song Data Restore
SongData Restore
LIBRARY
CancelOK
Select
n When you select the PC on which has the song data files are
not stored, “No backup files found” appears in the front panel
display. Select “OK” in the front panel display to reboot this unit
Computer name
Confirms the selection
Switches the PC
without restoring the song data files.
Cancel
MCX-2000 Owner’s Manual Addendum for Version 2
24
Submenu
Page 25

8 Select “OK” in the front panel display to confirm your
©
selection when “Are you sure you want to delete all
songs in MCX–2000?” appears in the front panel
display.
SongData Restore
Are you sure you want t
CancelOK
Select
n When you do not want to delete the song data files stored on
this unit, select “Cancel” while the confirmation message is
being displayed in the front panel display to reboot this unit
without restoring the song data files, and then back up the
song data files stored on this unit to the PC.
9 This unit starts the restore procedure.
This unit deletes all the song data, and then restores
the song data files from the selected PC. During this
procedure, the restoration progress appears in the
front panel display.
SongData Restore
Restoring...
1 /96
11 Once the restore is complete, open the “Properties”
window of the shared folder on the PC, and then
remove the check mark in the “Share this folder on
this network” check box as below.
10When “Complete” appears in the front panel display,
select “OK” in the front panel display to reboot this
unit.
SongData Restore
Complete
OK
Select
2006 All rights reserved.
AMAHA ELECTRONICS CORPORATION, USA
AMAHA CANADA MUSIC LTD.
AMAHA ELECTRONIK EUROPA G.m.b.H.
AMAHA ELECTRONIQUE FRANCE S.A.
AMAHA ELECTRONICS (UK) LTD.
AMAHA SCANDINAVIA A.B.
AMAHA MUSIC AUSTRALIA PTY, LTD.
135 MILNER AVE., SCARBOROUGH, ONTARIO M1S 3R1, CANADA
J A WETTERGRENS GATA 1, BOX 30053, 400 43 VÄSTRA FRÖLUNDA, SWEDEN
6660 ORANGETHORPE AVE., BUENA PARK, CALIF. 90620, U.S.A.
SIEMENSSTR. 22-34, 25462 RELLINGEN BEI HAMBURG, GERMANY
RUE AMBROISE CROIZAT BP70 CROISSY-BEAUBOURG 77312 MARNE-LA-VALLEE CEDEX02, FRANCE
YAMAHA HOUSE, 200 RICKMANSWORTH ROAD WATFORD, HERTS WD18 7GQ, ENGLAND
17-33 MARKET ST., SOUTH MELBOURNE, 3205 VIC., AUSTRALIA
Rev.1
 Loading...