

Page 1
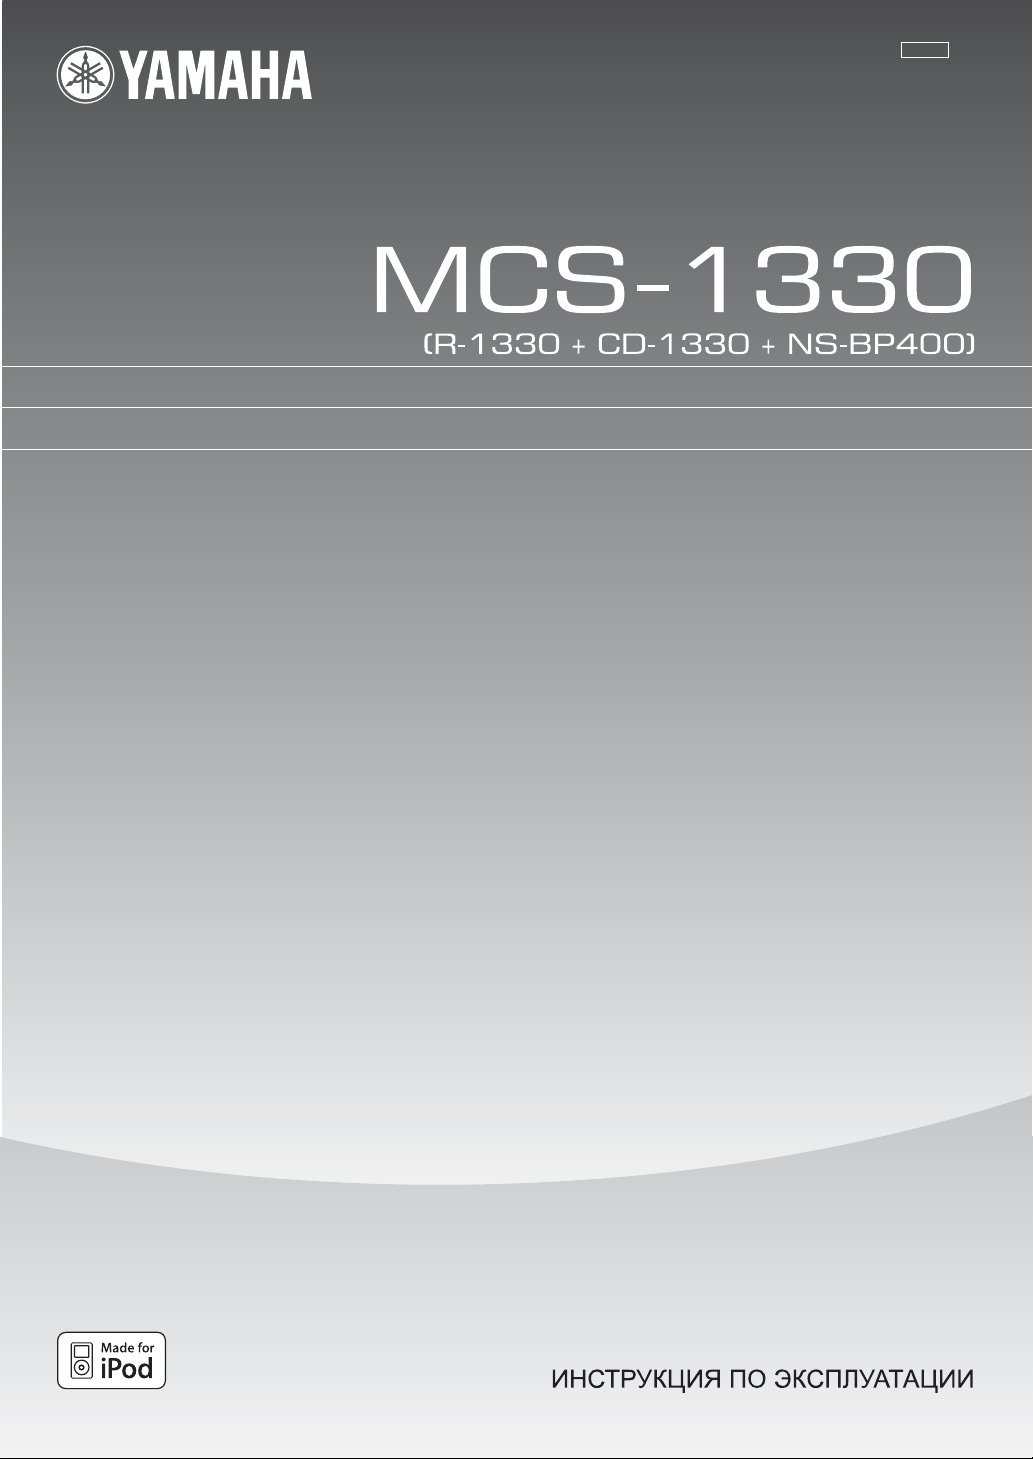
G
RECEIVER/CD PLAYER
AMPLI-TUNER/LECTEUR CD
OWNER'S MANUAL
MODE D'EMPLOI
BEDIENUNGSANLEITUNG
BRUKSANVISNING
MANUALE DI ISTRUZIONI
MANUAL DE INSTRUCCIONES
GEBRUIKSAANWIJZING
Page 2
CAUTION
Use of controls or adjustments or performance of procedures
other than those specified herein may result in hazardous
radiation exposure.
AVERTISSEMENT
L’utilisation de commandes et l’emploi de réglages ou de
méthodes autres que ceux décrits ci-dessous, peuvent
entraîner une exposition à un rayonnement dangereux.
VORSICHT
Die Verwendung von Bedienelementen oder die Einstellung
bzw. die Ausführung von anderen als in dieser Anleitung
beschriebenen Vorgängen kann zu Gefährdung durch
gefährliche Strahlung führen.
OBSERVERA
Användning av reglage eller justeringar eller utförande av
åtgärder på annat sätt än så som beskrivs häri kan resultera i
farlig strålning.
ATTENZIONE
L’uso di controlli, regolazioni, operazioni o procedure non
specificati in questo manuale possono risultare in esposizione
a radiazioni pericolose.
PRECAUCIÓN
El uso de los controles, los ajustes o los procedimientos que
no se especifican enste manual pueden causar una exposición
peligrosa a la radiación.
CD-1330
LET OP
Gebruik van bedieningsorganen, instellingen of procedures
anders dan beschreven in dit document kan leiden tot
blootstelling aan gevaarlijke stralen.
ПРЕДОСТЕРЕЖЕНИЕ
Использование органов управления или произведение
настроек или выполнение процедур, не указанных в
данной инструкции, может отразиться на выделении
опасной радиации.
i
Page 3

VAROITUS
Muiden kuin tässä esitettyjen toimintojen säädön tai asetusten
muutto saattaa altistaa vaaralliselle säteilylle tai muille
vaarallisille toiminnoille.
DK
Advarsel: Usynlig laserstråling ved åbning når
sikkerhedsafbrydere er ude af funktion. Undgå utsættelse for
stråling.
Bemærk: Netafbryderen er sekundært indkoblet og ofbryder
ikke strømmen fra nettet. Den indbyggede netdel er derfor
tilsluttet til lysnettet så længe netstikket sidder i stikkontakten.
N
Observer: Nettbryteren er sekundert innkoplet. Den
innebygdenetdelen er derfor ikke frakoplet nettet så lenge
apparatet er tilsluttet nettkontakten.
S
Klass 1 laseraparat
Varning! Om apparaten används på annat sättþän i denna
bruksanvisning specificerats, kan användaren utsättas för osynlig
laserstrålning, som överskrider gränsen för laserklass 1.
Observera! Strömbrytaren är sekundärt kopplad och inte
bryter inte strömmen från nätet. Den inbyggda nätdelen är därför
ansluten till elnätet så länge stickproppen sitter i vägguttaget.
SF
Luokan 1 laserlaite
Varoitus! Laitteen käyttäminen muulla kuin tässä käyttöohjeessa
mainitulla tavalla saattaa altistaa käyttäjän turvallisuusluokan 1
ylittävälle näkymättömälle lasersäteilylle.
Oikeus muutoksiin varataan. Laite ei saa olla alttiina tippu-ja
roiskevedelle.
Huom. Toiminnanvalitsin on kytketty toisiopuolelle, eikä se
kytke laitetta irti sähköverkosta. Sisäänrakennettu verkko-osa on
kytkettynä sähköverkkoon aina silloin, kun pistoke on
pistorasiassa.
VARO!
AVATTAESSA JA SUOJALUKITUS OHITETTAESSA
OLET ALTTIINA NÄKYMÄTTÖMÄLLE
LASERSÄTEILYLLE.
ÄLÄ KATSO SÄ TEESEEN.
VARNING!
OSYNLIG LASERSTRÅLNING NÄR DENNA DEL ÄR
ÖPPNAD OCH SPÄRREN ÄR URKOPPLAD. BETRAKTA
EJ STRÅLEN.
ii
Page 4
CAUTION: READ THIS BEFORE OPERATING YOUR UNIT.
1 To assure the finest performance, please read this manual
carefully. Keep it in a safe place for future reference.
2 Install this unit (R-1330) and (CD-1330) in a well ventilated,
cool, dry, clean place with at least 10 cm on the top (except for
CD-1330), 10 cm on the left and right, and 10 cm at the back of
this unit — away from direct sunlight, heat sources, vibration,
dust, moisture, and/or cold.
3 Locate this unit away from other electrical appliances, motors, or
transformers to avoid humming sounds.
4 Do not expose this unit to sudden temperature changes from cold
to hot, and do not locate this unit in an environment with high
humidity (i.e. a room with a humidifier) to prevent condensation
inside this unit, which may cause an electrical shock, fire,
damage to this unit, and/or personal injury.
5 Avoid installing this unit where foreign object may fall onto this
unit and/or this unit may be exposed to liquid dripping or
splashing. On the top of this unit, do not place:
– Other components, as they may cause damage and/or
discoloration on the surface of this unit.
– Burning objects (i.e. candles), as they may cause fire, damage
to this unit, and/or personal injury.
– Containers with liquid in them, as they may fall and liquid
may cause electrical shock to the user and/or damage to this
unit.
6 Do not cover this unit with a newspaper, tablecloth, curtain, etc.
in order not to obstruct heat radiation. If the temperature inside
this unit rises, it may cause fire, damage to this unit, and/or
personal injury.
7 Do not plug in this unit to a wall outlet until all connections are
complete.
8 Do not operate this unit upside-down. It may overheat, possibly
causing damage.
9 Do not use force on switches, knobs and/or cords.
10 When disconnecting the power cable from the wall outlet, grasp
the plug; do not pull the cable.
11 Do not clean this unit with chemical solvents; this might damage
the finish. Use a clean, dry cloth.
12 Only voltage specified on this unit must be used. Using this unit
with a higher voltage than specified is dangerous and may cause
fire, damage to this unit, and/or personal injury. Yamaha will not
be held responsible for any damage resulting from use of this unit
with a voltage other than specified.
13 To prevent damage by lightning, keep the power cord and
outdoor antennas disconnected from a wall outlet or this unit
during a lightning storm.
14 Do not attempt to modify or fix this unit. Contact qualified
Yamaha service personnel when any service is needed. The
cabinet should never be opened for any reasons.
15 When not planning to use this unit for long periods of time (i.e.
vacation), disconnect the AC power plug from the wall outlet.
16 Be sure to read the “TROUBLESHOOTING” section on
common operating errors before concluding that this unit is
faulty.
17 Before moving this unit, press ON/STANDBY, OFF to turn off
the system, and disconnect the AC power plug from the wall
outlet.
18 Condensation will form when the surrounding temperature
changes suddenly. Disconnect the power cable from the outlet,
then leave this unit alone.
19 When using this unit for a long time, this unit may become warm.
Turn the power off, then leave this unit alone for cooling.
20 Install this unit near the AC outlet and where the AC power plug
can be reached easily.
21 The batteries shall not be exposed to excessive heat such as
sunshine, fire or the like.
22 Excessive sound pressure from earphones and headphones can
cause hearing loss.
This unit is not disconnected from the AC power source as
long as it is connected to the wall outlet, even if this unit itself
is turned off by . This state is called the standby mode. In
this state, this unit is designed to consume a very small
quantity of power.
WARNING
TO REDUCE THE RISK OF FIRE OR ELECTRIC SHOCK,
DO NOT EXPOSE THIS UNIT TO RAIN OR MOISTURE.
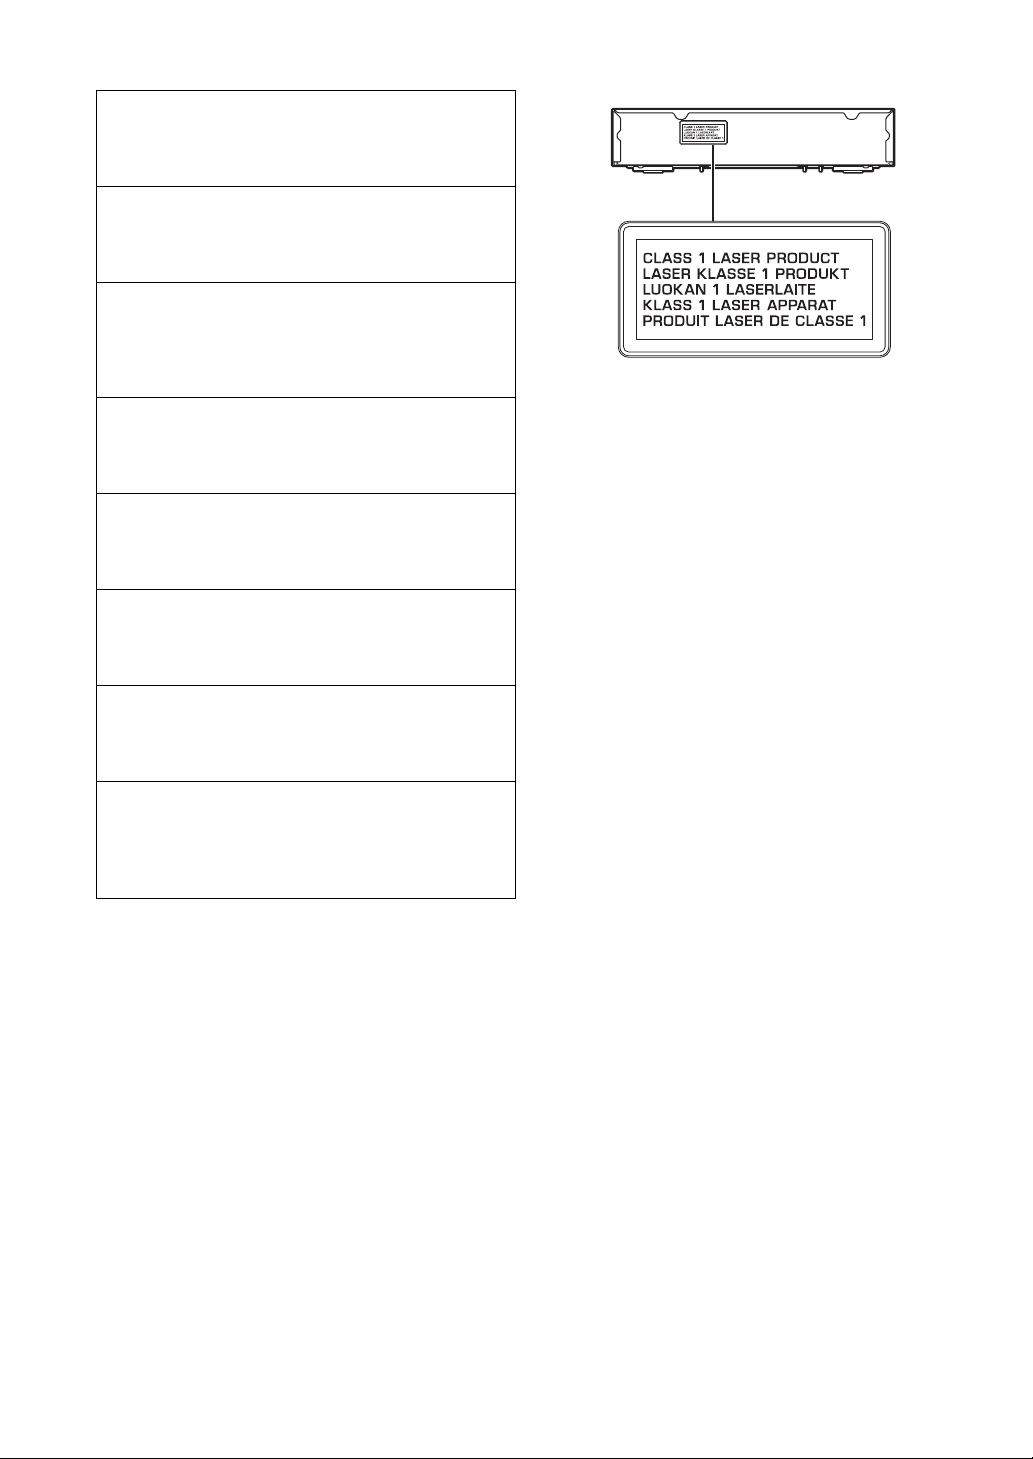
LASER SAFETY
This unit employs a laser. Due to possible eye injury, only a
qualified service person should remove the cover or attempt to
service this device.
DANGER
This unit emits visible laser radiation when open. Avoid direct
eye exposure to beam. When this unit is plugged into the wall
outlet, do not place your eyes close to the opening of the disc tray
and other openings to look into inside.
The laser component in this product is capable of emitting
radiation exceeding the limit for Class 1.
iii En
Page 5

CONTENTS
INTRODUCTION
FEATURES............................................................. 2
SUPPLIED ACCESSORIES ................................. 2
CONTROLS AND FUNCTIONS .........................3
Receiver (R-1330) ..................................................... 3
CD player (CD-1330)................................................ 4
Remote control........................................................... 5
PREPARATION
CONNECTING THE EXTERNAL
COMPONENTS WITH THE SYSTEM ..........9
CONNECTING ANTENNAS..............................10
Connecting the FM antenna..................................... 10
CONNECTING THE POWER CABLES .......... 10
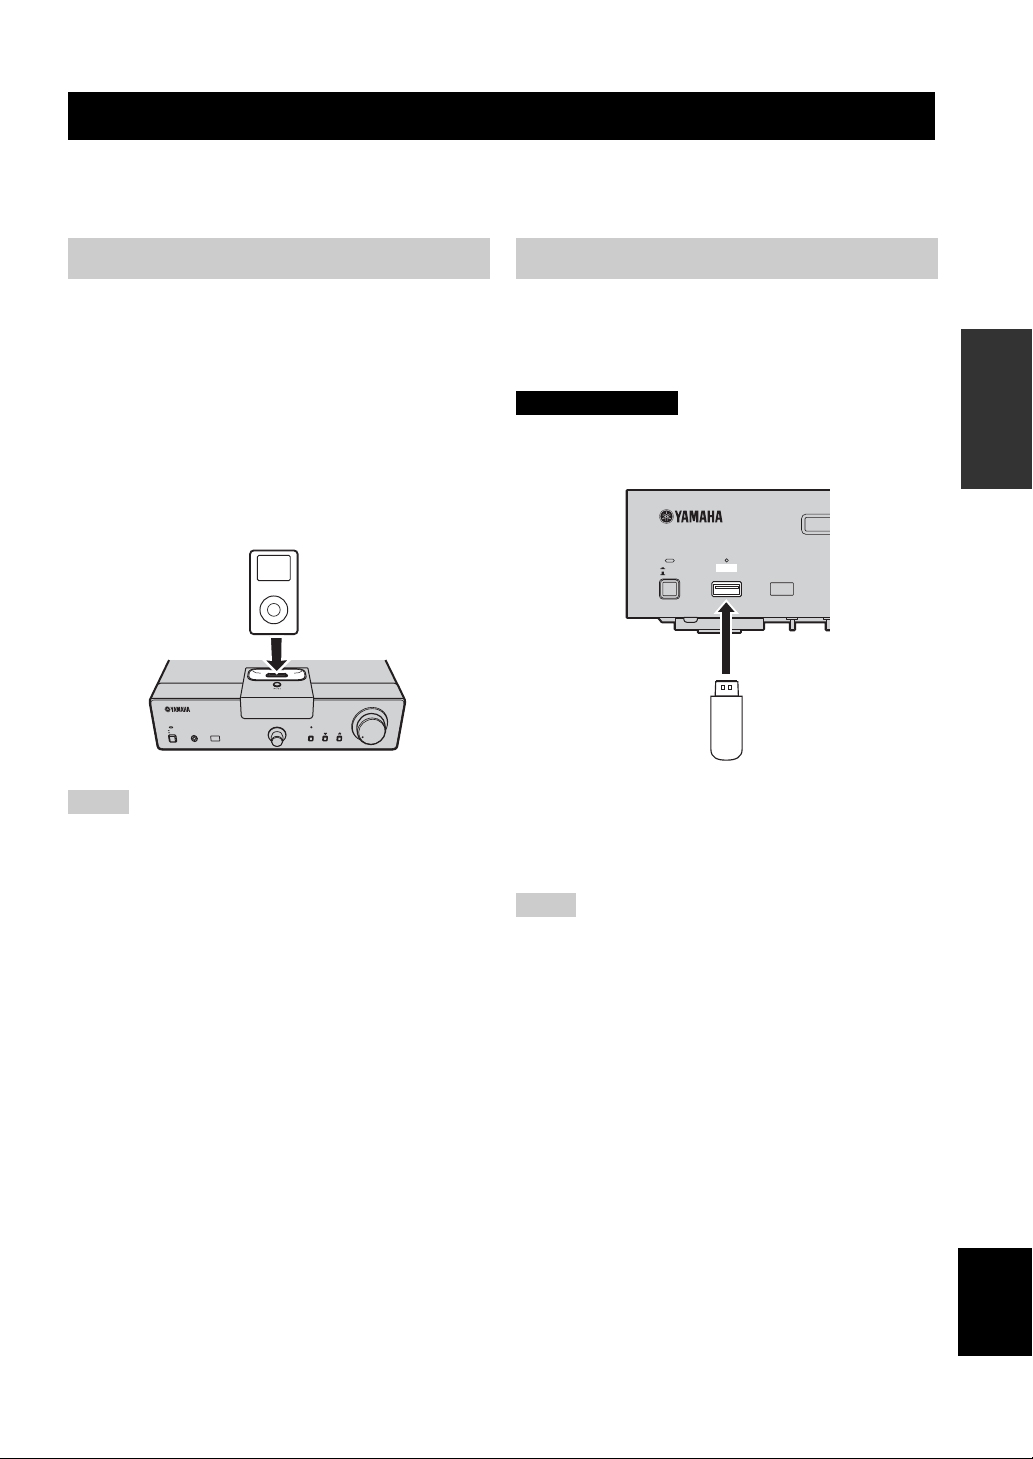
CONNECTING THE iPod
DEVICE............................................................. 11
Connecting an iPod™.............................................. 11
Connecting USB devices......................................... 11
™
AND THE USB
BASIC OPERATIONS
SYSTEM OPERATIONS .................................... 12
Basic system operations........................................... 12
Changing the brightness of the front panel display ..... 13
Setting the sleep timer .............................................13
To use headphones................................................... 13
DISC AND USB DEVICE OPERATIONS ........ 14
Playback operations................................................. 14
Switching the playback information display ........... 15
Repeating playback (Repeat Play)........................... 16
Playing back randomly (Random Play)...................16
OTHER OPERATIONS
CONTROLLING iPod™......................................20
Using iPod™ ........................................................... 20
ADDITIONAL INFORMATION
TROUBLESHOOTING .......................................21
Receiver (R-1330) ...................................................21
Remote control ........................................................ 22
CD player (CD-1330).............................................. 23
NOTES ABOUT DISCS/MP3, WMA FILES.....24
GLOSSARY...........................................................26
Audio information ................................................... 26
Copyright and logo marks ....................................... 26
SPECIFICATIONS...............................................26
PREPARATIONINTRODUCTION
OPERATIONS
BASIC
OPERATIONS
TUNER
TUNER OPERATIONS
FM TUNING......................................................... 17
Automatic tuning.....................................................17
Manual tuning..........................................................17
Automatic preset tuning...........................................17
Manual preset tuning............................................... 18
Selecting preset stations........................................... 18
RADIO DATA SYSTEM TUNING (EUROPE
MODEL ONLY) ...............................................19
Displaying the Radio Data System information...... 19
1 En
OPERATIONS
OTHER
INFORMATION
ADDITIONAL
English
Page 6
FEATURES
FEATURES
Receiver (R-1330)
• Minimum RMS output power per channel
60W + 60W (6Ω, 1 kHz, 0.5% THD)
• Maximum power per channel
70W + 70W (4Ω, 1kHz, 0.7% THD)
• 30-station FM preset tuning
• iPod playability (with rechargeable function)
• Pure Direct mode
CD player (CD-1330)
• Plays Audio CDs, MP3/WMA discs
• CD-R, CD-RW Disc Playability
• MP3/WMA file playability stored on USB
device
• Linked operation with the receiver such as
Pure Direct mode, Adjustable Display
Brightness and INPUT mode
• Adjustable Display Brightness
■ About this manual
• In this manual, “R-1330” is described as “receiver” and “CD-1330” is described as “CD player”.
• This manual describes how to operate the system using a remote control except when it is not available. Some of these operations are
also available using the front panel buttons.
• y indicates a tip for your operation.
• Notes contain important information about safety and operating instructions.
• This manual is printed prior to production. Design and specifications are subject to change in part as a result of improvements, etc. In
case of differences between the manual and the product, the product has priority.
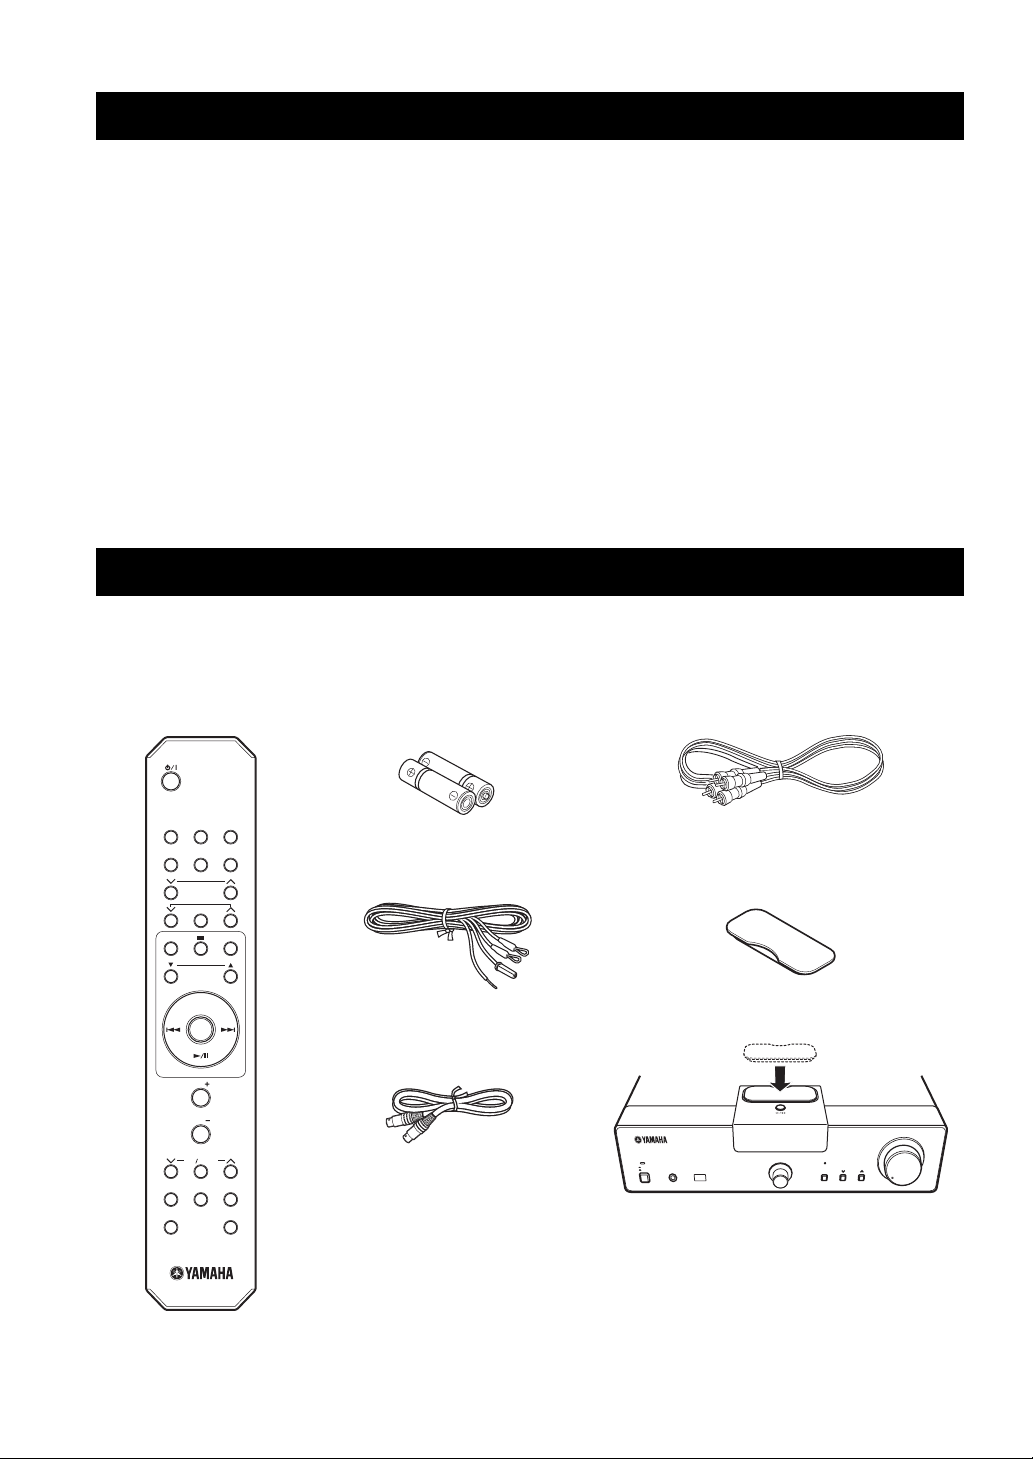
SUPPLIED ACCESSORIES
This product includes the following accessories. Before connecting this system, make sure you received all of the following parts.
Remote
control
Batteries (x2)
(AA, R6, UM-3)
RCA stereo
cable (1.0 m)
CDiPod
USB
FM
PHONO
AUX
PRESET
TUNING
MEMORY
RANDOM
REPEAT
iPod MENU SEL
MENU
ENTER
VOL
VOL
TONE BALANCE
DISPLAY DIMMER SLEEP
PURE DIRECT
MUTE
Indoor FM antenna
System control
cable (0.6 m)
Dock cover
iPod
ON/STANDBY
OFF
PHONES
INPUT
When the Dock cover is covered.
VOLUME
PURE
TUNER PRESET
DIRECT
MIN
MAX
2 En
Page 7
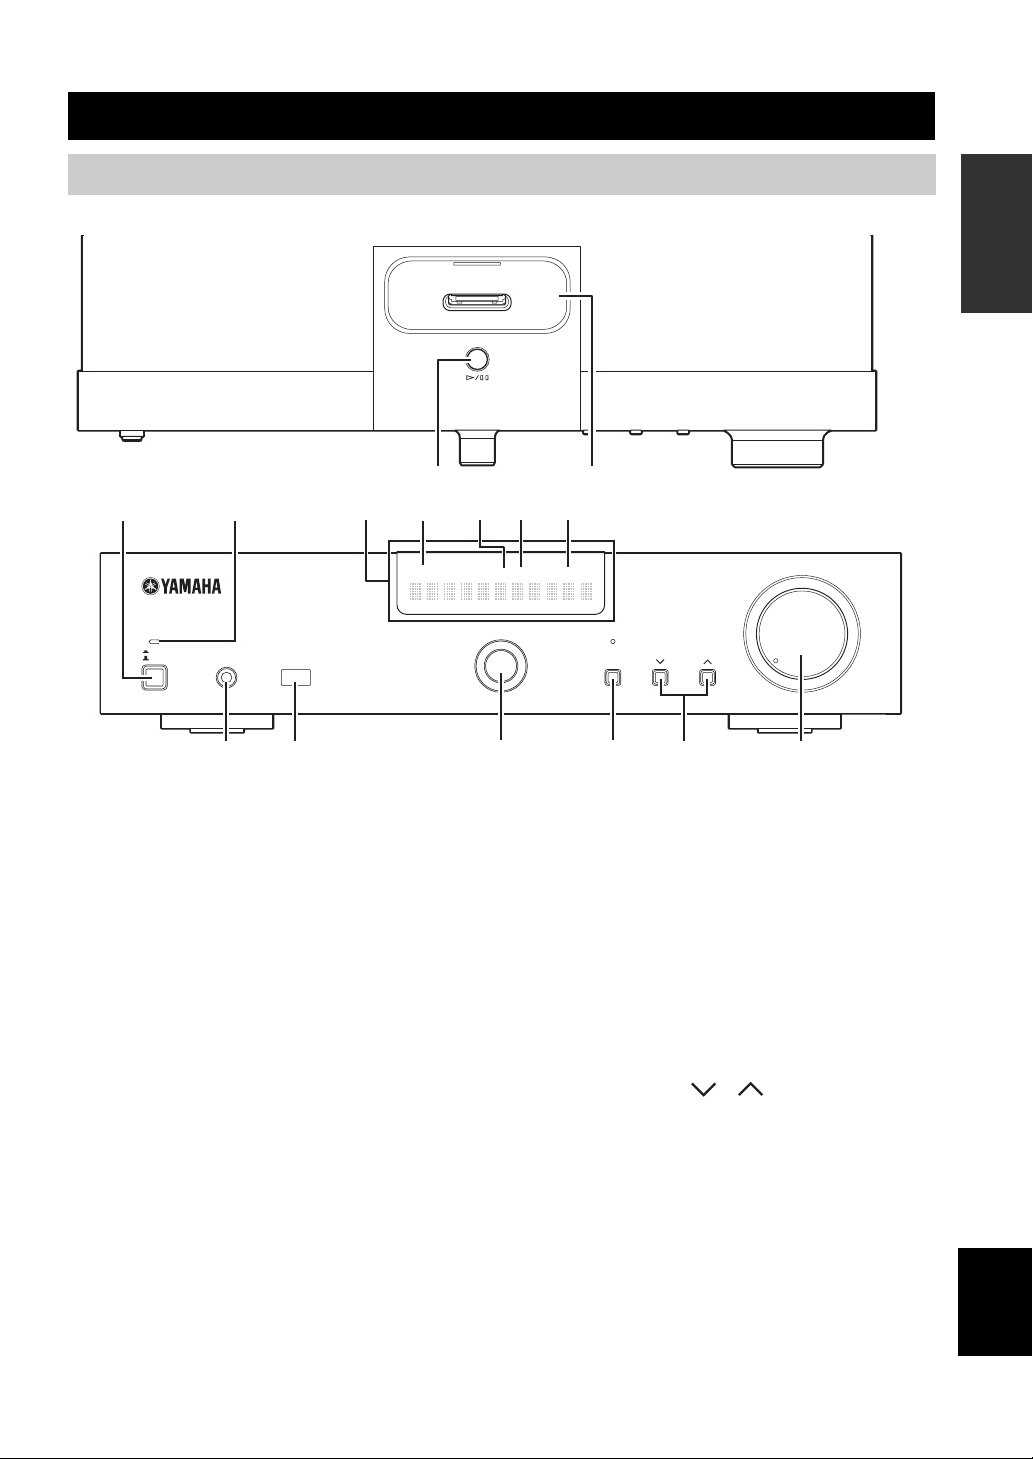
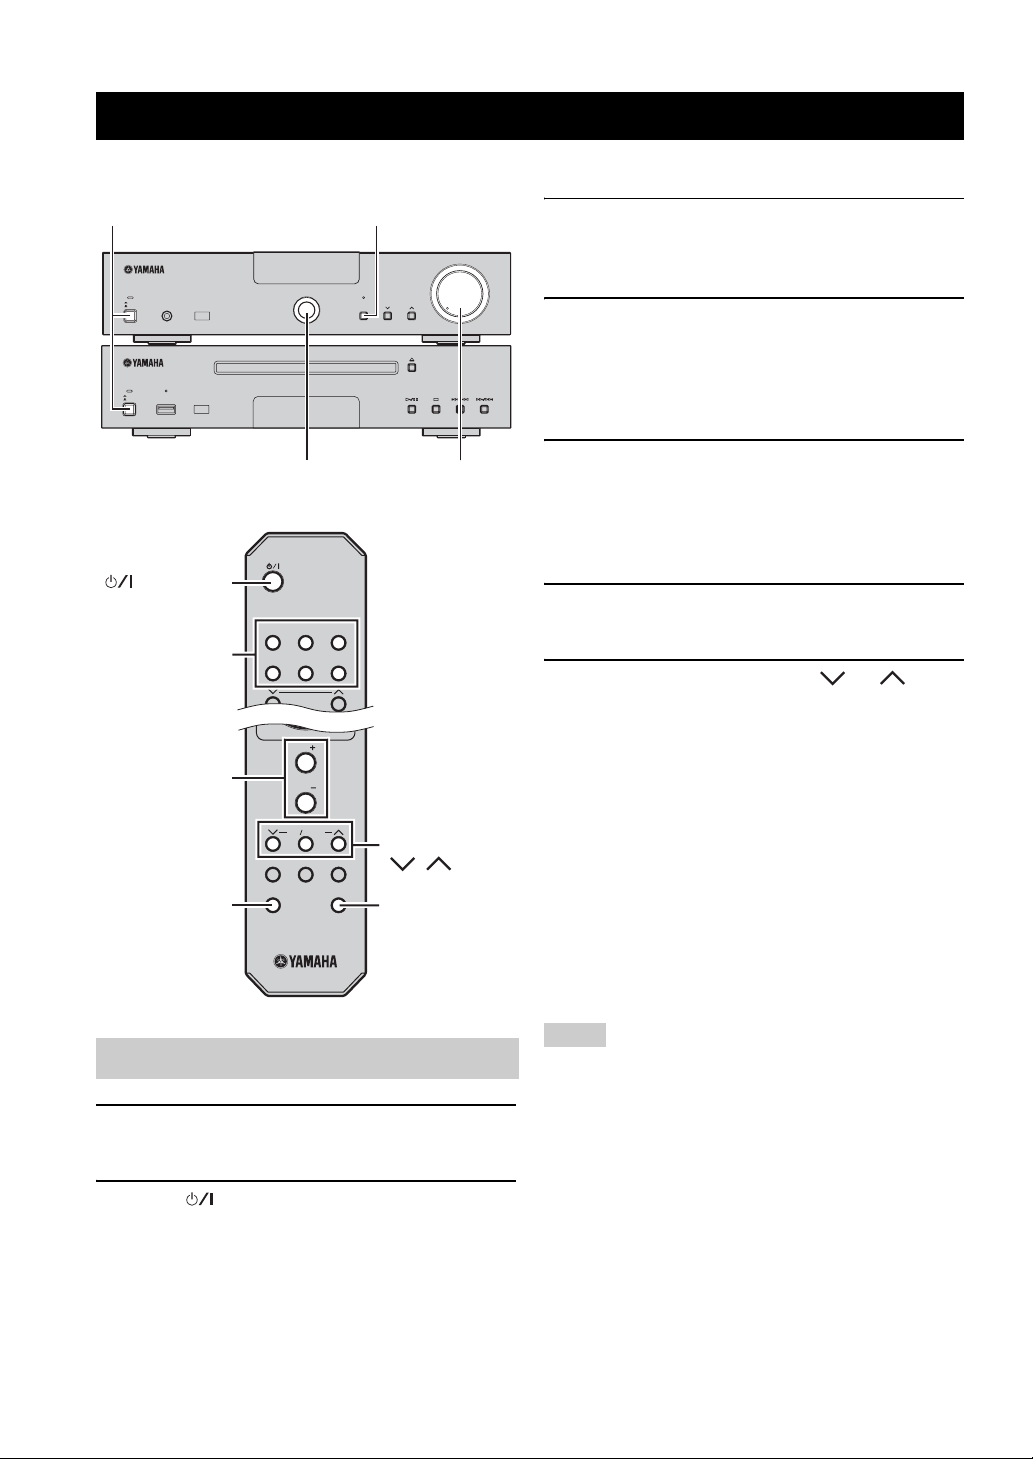
CONTROLS AND FUNCTIONS
Receiver (R-1330)
■ Front panel
1
ON/STANDBY
OFF
2
PHONES
3
4
PRESET
D
iPod
56
TUNED
STEREO SLEEP
INPUT PURE
7
kHz MHz
E
DIRECT
INTRODUCTION
Top view
VOLUME
TUNER PRESET
MIN MAX
8 9
1 ON/STANDBY, OFF
Turns the receiver to ON/STANDBY or OFF.
2 ON/STANDBY indicator
Lights up in green when the receiver is turned on. Lights
up in amber when the receiver is in standby mode.
The indicator goes off when the receiver is turned off.
3 Front panel display
Shows the various information such as the tuning
frequency.
4 PRESET indicator
Lights up when you select preset radio stations (see
page 18).
5 TUNED indicator
Lights up when the receiver is tuned into a station.
6 STEREO indicator
Lights up when the receiver is receiving a strong signal
from an FM stereo broadcast.
7 SLEEP indicator
Lights up when the sleep timer is on (see page 13).
0
A
B
C
Front view
8 PHONES
Outputs audio signals for private listening with headphones.
9 Remote control sensor
Receives signals from the remote control.
0 INPUT
Selects an input source.
A PURE DIRECT
Turns on or off the Pure Direct mode (see page 12).
When PURE DIRECT mode is on, the indicator above
lights up.
B TUNER PRESET /
The input source is changed to FM. Selects a preset station.
Operable even when the receiver is in standby mode.
C VOLUME
Adjusts the volume level.
D h / e
The input source is changed to iPod. Starts and pauses the
playback of iPod. Operable even when the receiver is in
standby mode.
E iPod terminal
Connect your iPod (see page 11).
English
3 En
Page 8
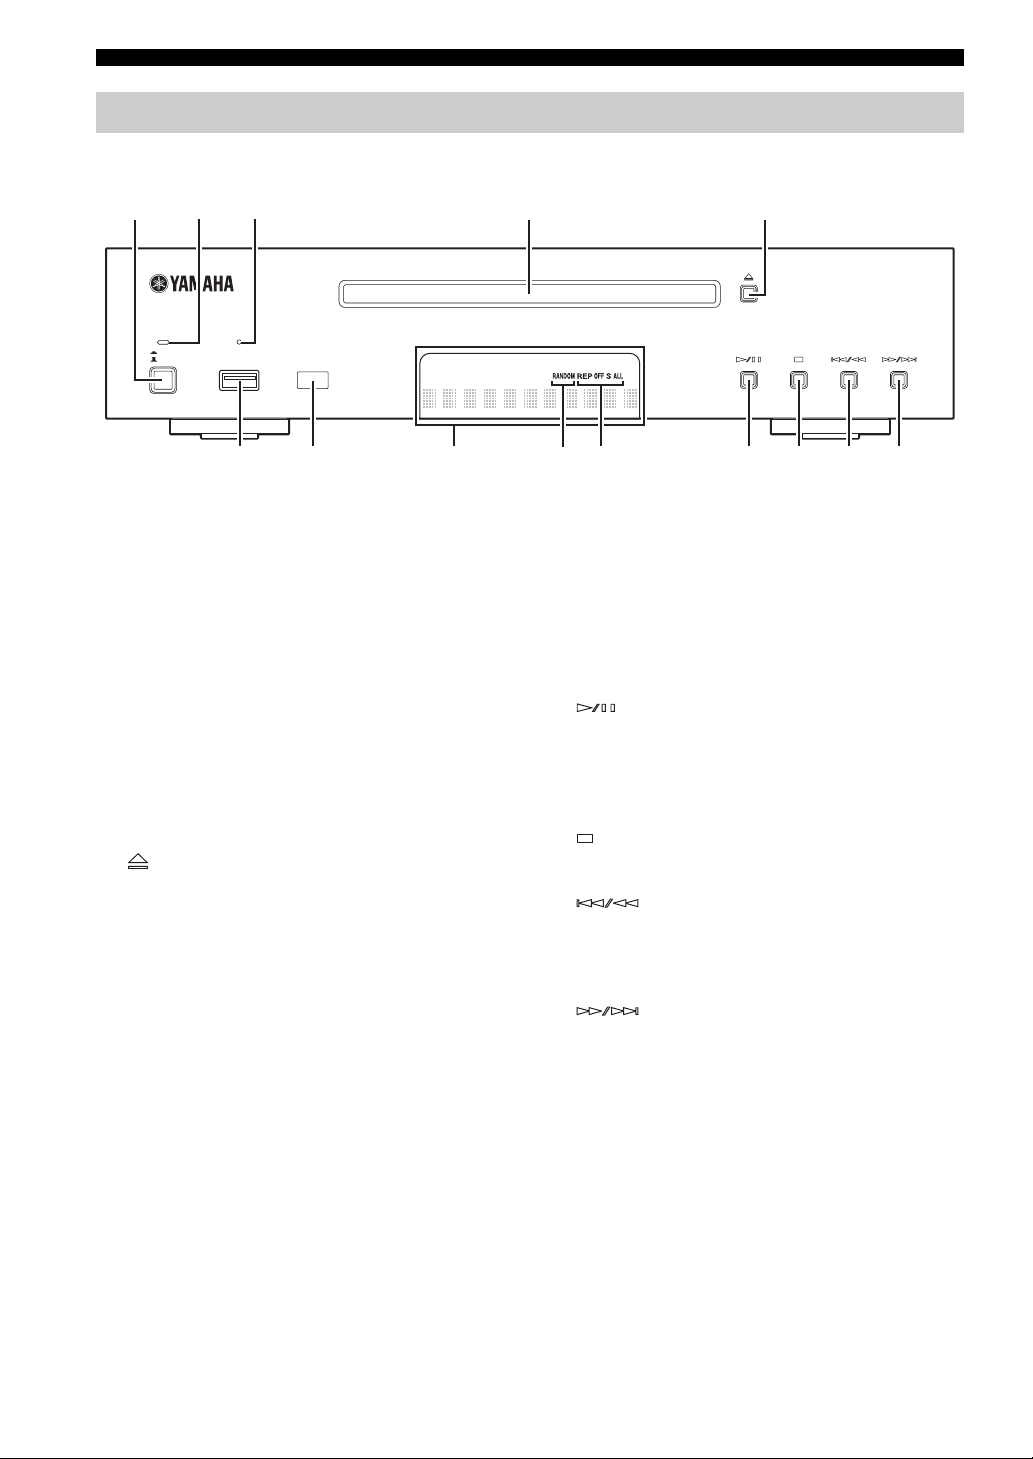
CONTROLS AND FUNCTIONS
CD player (CD-1330)
■ Front panel
14
1 ON/STANDBY, OFF
Turns the CD player to ON/STANDBY or OFF.
2 ON/STANDBY indicator
Lights up in green when the CD player is turned on. Lights
ON/STANDBY
OFF
2 3
USB
6 7
8
0
9
8 Front panel display
Shows the current status of the CD player.
9 RANDOM indicator
Lights up the icon for the selected Random play mode.
5
AB
up in amber when the CD player is in standby mode.
The indicator goes off when the CD player is turned off.
0 REP OFF S ALL indicator
Lights up the icon for the selected Repeat play mode.
3 USB indicator
Lights on when the CD player is in USB mode and goes
off when the CD player is in CD mode. Blinks when the
CD player is reading the USB device.
A
Starts or pauses playback (see page 14).
When this button is pressed during standby mode, the
receiver automatically turns on and the input changes to
4 Disc tray
either CD or USB whichever was the last selected.
Holds a disc to be played back.
B
5
Stops playback (see page 14).
Opens and closes the disc tray.
When this button is pressed during the standby mode, the
receiver automatically turns on and the input changes to
CD.
C
Skips to the beginning of the current track. Press and hold
to fast reverse. Press twice to skip to the previous track
(see page 14).
6 USB Port
Connect your USB device.
D
Skips to the next track. Press and hold to fast forward (see
7 Remote control sensor
page 14).
Receives signals from the remote control.
C D
4 En
Page 9
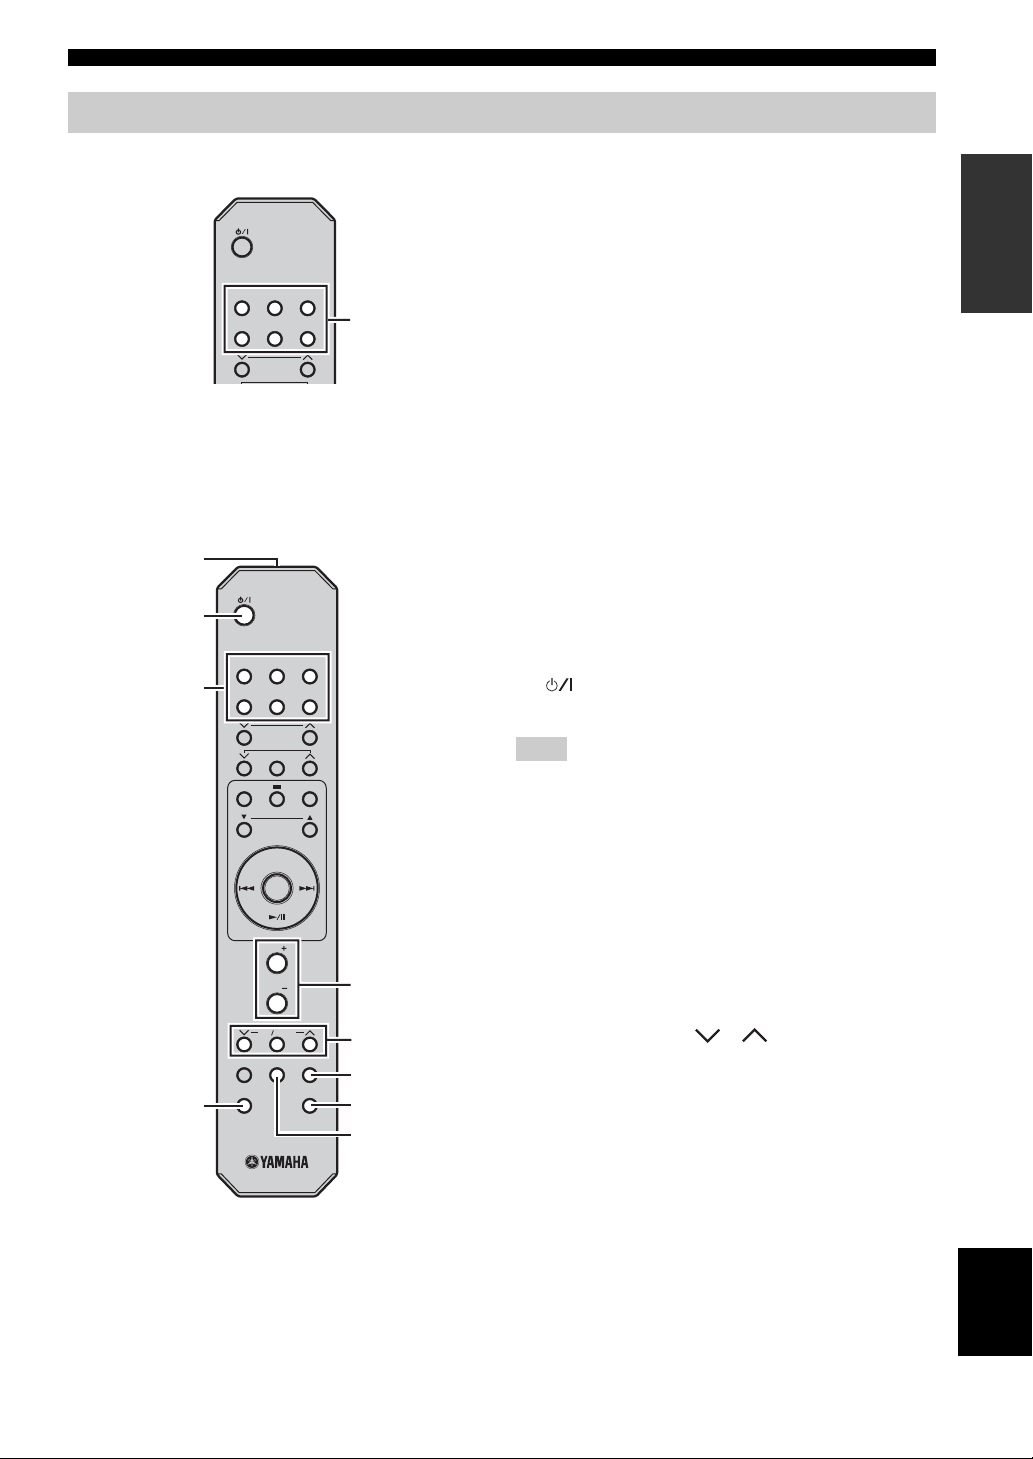
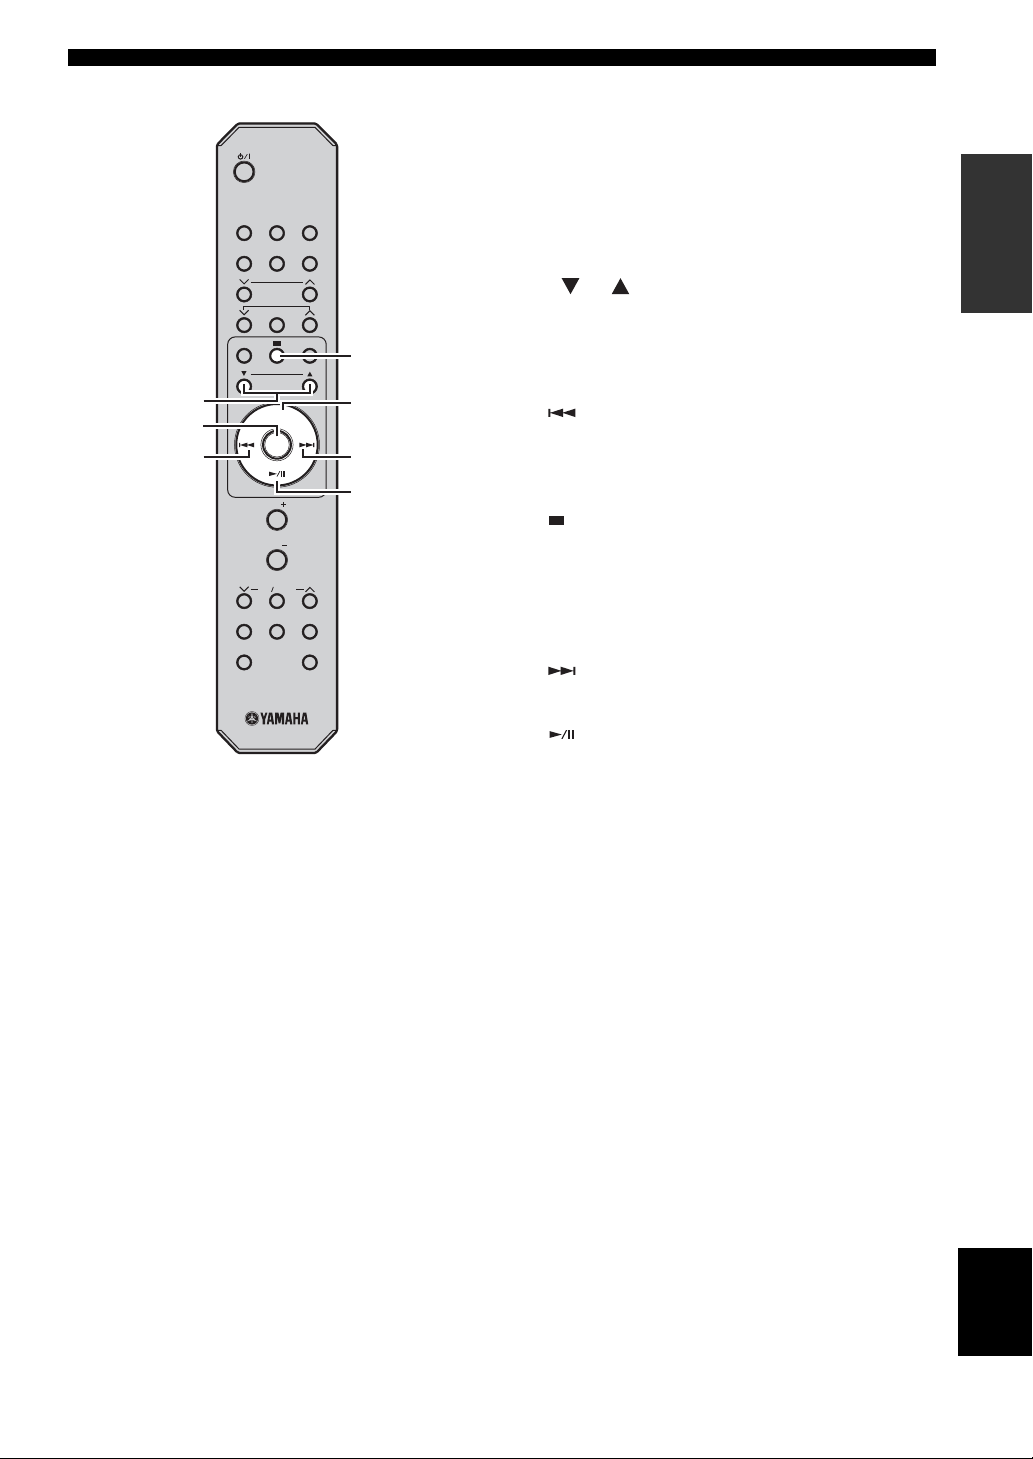
Remote control
CONTROLS AND FUNCTIONS
CDiPod
FM
PHONO
PRESET
TUNING
MEMORY
■ Common functions
1
2
CDiPod
3
FM
PHONO
PRESET
TUNING
MEMORY
REPEAT
iPod MENU SEL
USB
AUX
USB
AUX
RANDOM
Input
selection
keys
This remote control can operate the system components
(including tuner functions) and an iPod stationed in a
terminal on the top of the receiver.
To operate the CD player, tuner functions, or an iPod
using the remote control, you need to set the receiver to
the corresponding input mode.
To switch the input mode of the receiver
Press the corresponding input selection key on the remote
control (or rotate INPUT on the front panel).
The name of the corresponding input source appears in the
front panel display of the receiver.
y
When CD or USB is selected as an input source, the CD
player turns on automatically and when other input source
is selected, the CD player sets to standby mode.
Operations common to all modes
The following operations are available for the receiver
when it is set to any input mode.
1 Infrared signal transmitter
Sends signals to the system you want to control.
2 (standby/on)
Turns the system on or sets it to the standby mode.
Note
Even when the system is in standby mode, it consumes a small
amount of power in order to receive infrared-signals from the
remote control.
INTRODUCTION
4
MENU
ENTER
VOL
VOL
TONE BALANCE
DISPLAY DIMMER SLEEP
PURE DIRECT
MUTE
5
6
7
8
9
3 Input selection keys
Select the input source on the receiver.
4 PURE DIRECT
Turns on or off the Pure Direct mode (see page 12).
5 VOLUME +/–
Adjusts the overall volume level on the receiver.
6 TONE/BALANCE /
Adjusts the audio quality (see page 12).
7 SLEEP
Sets the sleep timer on the system (see page 13).
8 MUTE
Turn off the volume (see page 12).
9 DIMMER
Changes the brightness of the front panel display (see
page 13).
English
5 En
Page 10
CONTROLS AND FUNCTIONS
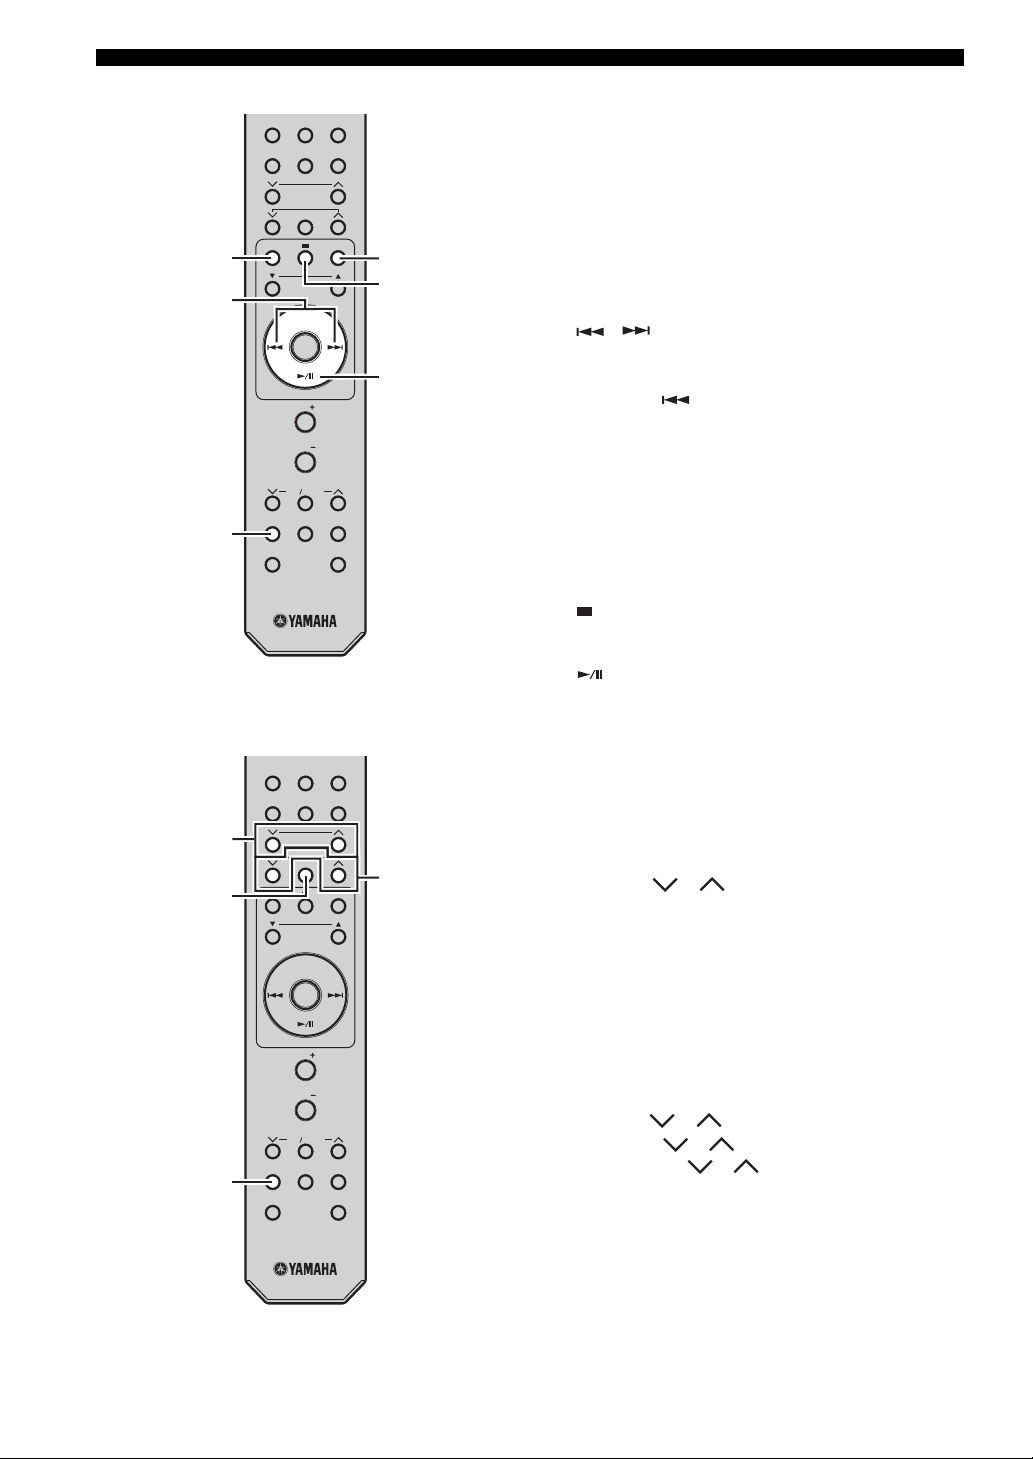
■ CD/USB mode Operations available in CD/USB mode
The following operations are available for the CD player
if the CD player is connected to the receiver with the
system control connection (see page 9).
y
Press CD or USB to set the receiver to the CD or USB
mode before carrying out the following operations.
1 REPEAT
Selects the Repeat Play mode (see page 16).
2 ,
Skips to the beginning of the current track or next track.
Press and hold to fast reverse or fast forward (see
page 14). Press twice to skip back to the previous
track.
3 DISPLAY
Switches the information shown in the front panel display
of the CD player (see page 15).
4 RANDOM
Turns on/off the Random Play feature (see page 16).
5
Stops playback (see page 14).
1
2
3
CDiPod
USB
FM
PHONO
AUX
PRESET
TUNING
MEMORY
REPEAT
DISPLAY DIMMER SLEEP
PURE DIRECT
RANDOM
iPod MENU SEL
MENU
ENTER
VOL
VOL
TONE BALANCE
MUTE
4
5
6
■ FM mode
1
2
3
CDiPod
USB
FM
PHONO
AUX
PRESET
TUNING
MEMORY
REPEAT
DISPLAY DIMMER SLEEP
PURE DIRECT
RANDOM
iPod MENU SEL
MENU
ENTER
VOL
VOL
TONE BALANCE
MUTE
4
6
Starts or pauses playback (see page 14).
Operations available in FM mode
The following operations are available for the receiver.
y
Press FM to set the receiver to the FM mode before carrying out
the following operations.
1 PRESET /
Select a preset station (see page 18).
2 MEMORY
Stores a preset station in the memory (see page 18). Starts
Automatic preset tuning (see page 17).
3 DISPLAY
Switches the FM information shown in the front panel
display of the receiver (see page 19).
4 TUNING /
Press TUNING / to Manual tuning and press
and hold TUNING / to Automatic tuning.
6 En
Page 11
CONTROLS AND FUNCTIONS
■ iPod mode Operations available in iPod mode
The following operations are available for the iPod. For
details on iPod operations, see “Using iPod™” on
page 20.
y
Press iPod to set the receiver to the iPod mode before carrying out
the following operations.
1 iPod MENU SEL
Press or to switch an item in the selected group.
2 ENTER
Press ENTER to enter the selected group. (Pressing
ENTER starts playback when a song is selected.)
3
Skips to the beginning of the current track. Press twice to
skip back to the previous track. Press and hold to fast
reverse.
4
Stops playback.
* The playback resumes from the first song in the iPod.
5 MENU
Returns to the upper level in the iPod menu.
6
Skips to the next song. Press and hold to fast forward.
1
2
3
CDiPod
USB
FM
PHONO
AUX
PRESET
TUNING
MEMORY
REPEAT
DISPLAY DIMMER SLEEP
PURE DIRECT
RANDOM
iPod MENU SEL
MENU
ENTER
VOL
VOL
TONE BALANCE
MUTE
4
5
6
7
INTRODUCTION
7
Starts or Pauses Playback.
English
7 En
Page 12
CONTROLS AND FUNCTIONS
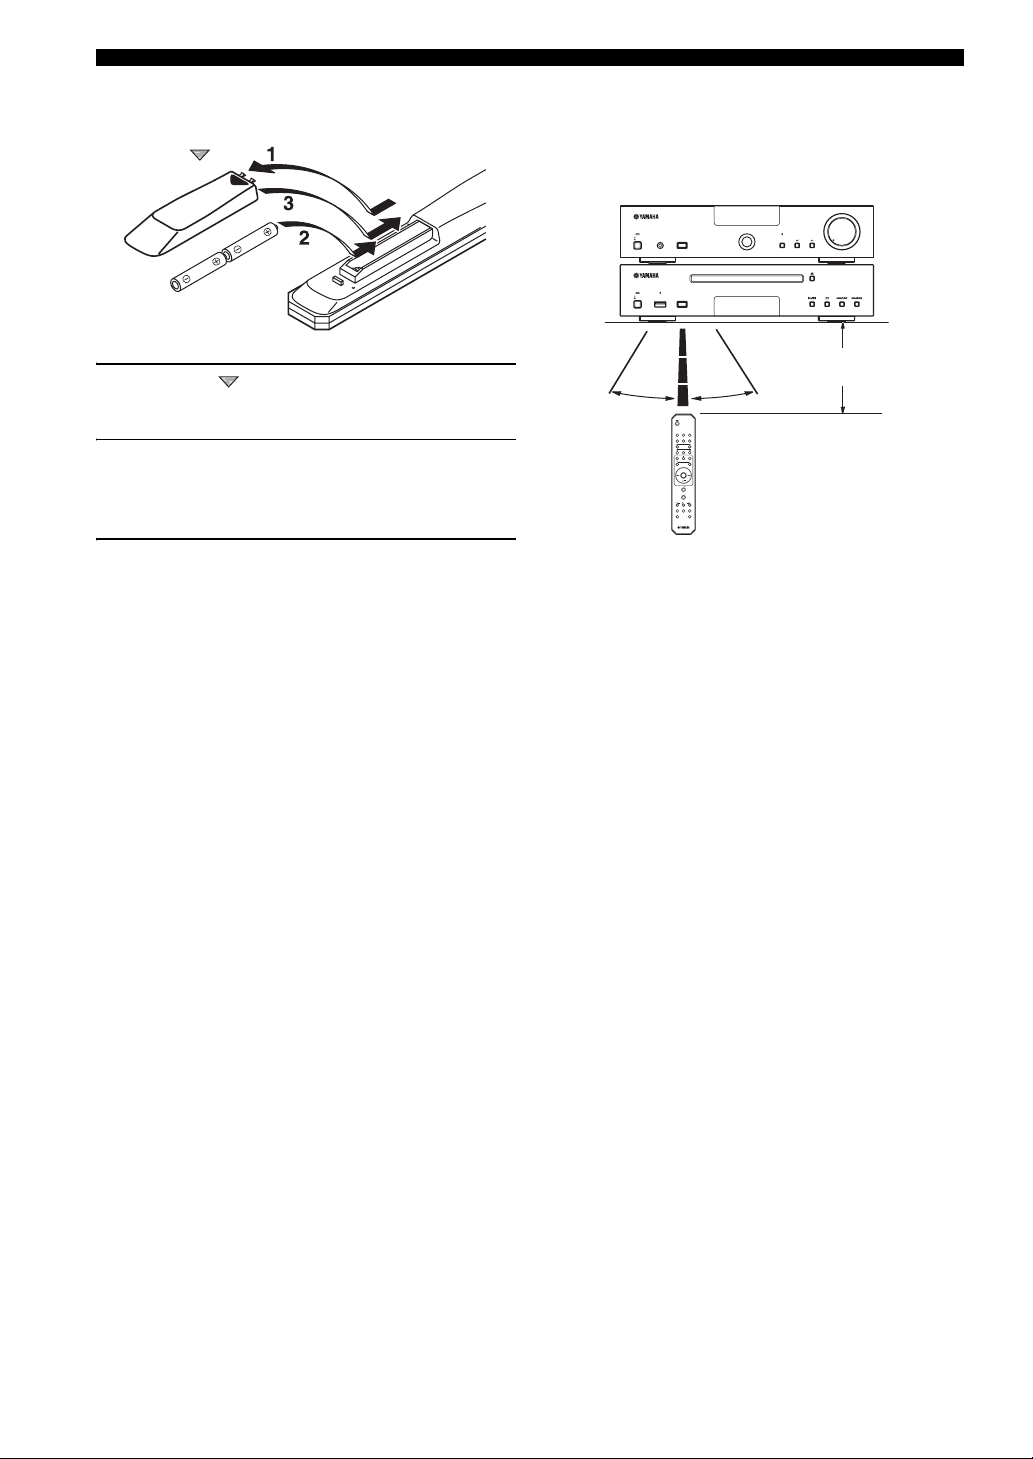
■ Installing the batteries in the remote
control
Press
1 Press the part and slide the battery
compartment cover off.
2 Insert two supplied batteries (AA, R6, UM-3)
according to the polarity markings (+ and –)
on the inside of the battery compartment.
3 Slide the cover back until it snaps into place.
■ Notes on batteries
• Change both batteries when the operation range of the
remote control decreases.
• Use AA, R6, UM-3 batteries.
• Make sure that the polarities are correct. See the
illustration inside the battery compartment.
• Remove the batteries if the remote control is not to be
used for an extended period of time.
• Do not use old batteries together with new ones.
• Do not use different types of batteries (such as alkaline
and manganese batteries) together. Read the packaging
carefully as these different types of batteries may have
the same shape and color.
• If the batteries have leaked, dispose of them
immediately. Avoid touching the leaked material or
letting it come into contact with clothing, etc. Clean the
battery compartment thoroughly before installing new
batteries.
• Do not throw away batteries with general house waste;
dispose of them correctly in accordance with your local
regulations.
■ Using the remote control
The remote control transmits a directional infrared beam.
Be sure to aim the remote control directly at the remote
control sensor on the front panel of the system during
operation.
VOLUME
INPUT PURE
ON/STANDBY
PHONES
OFF
ON/STANDBY
USB
OFF
30˚ 30˚
CDiPod
USB
FM
PHONO
AUX
PRESET
TUNING
MEMORY
RANDOM
REPEAT
iPod MENU SEL
MENU
ENTER
VOL
VOL
TONE BALANCE
DISPLAYDIMMER SLEEP
MUTE
PURE DIRECT
TUNER PRESET
DIRECT
MIN MAX
Within 6 m
(20 feet)
■ Handling the remote control
• The area between the remote control and the system
must be clear of large obstacles.
• Do not spill water or other liquids on the remote
control.
• Do not drop the remote control.
• Do not leave or store the remote control in the
following types of conditions:
– high humidity, such as near a bath
– high temperature, such as near a heater or a stove
– extremely low temperatures
– dusty places.
• Do not expose the remote control sensor to strong
lighting, in particular, an inverter type fluorescent
lamp; otherwise, the remote control may not work
properly. If necessary, position the system away from
direct lighting.
8 En
Page 13
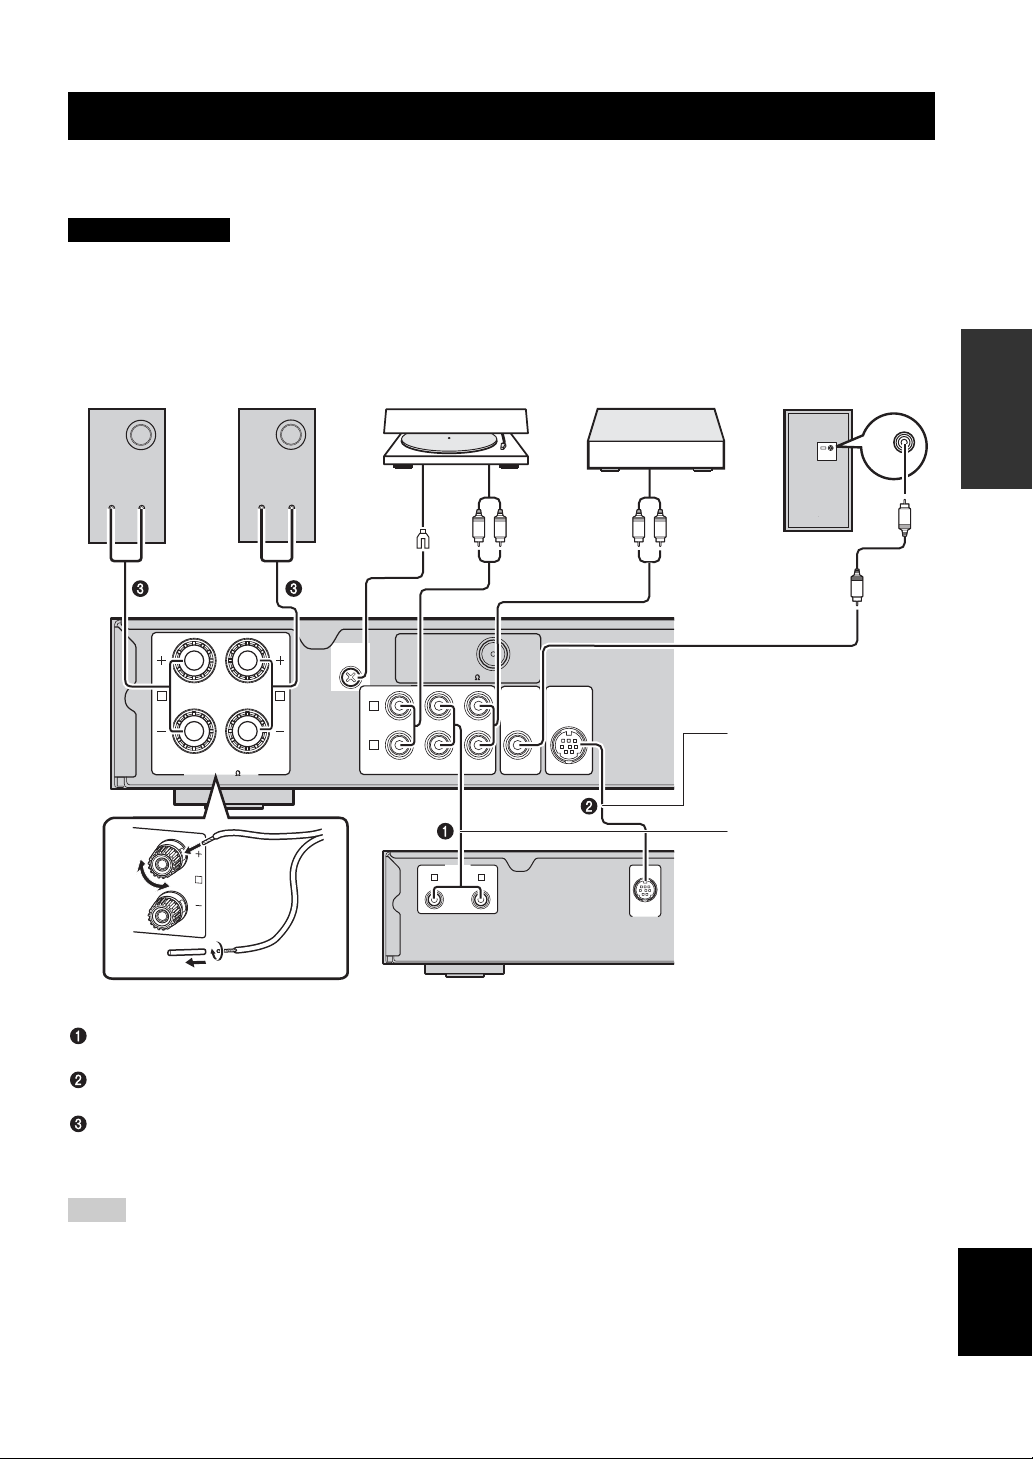
CONNECTING THE EXTERNAL COMPONENTS WITH THE SYSTEM
CONNECTING THE EXTERNAL COMPONENTS WITH THE SYSTEM
Make sure you read the following procedure and notes carefully before connecting the system. For information on the
speakers (NS-BP400), refer to the owner’s manual supplied with it.
CAUTION
• Do not connect this unit or other components to the main power until all connections between components are complete.
• Do not let the bare speaker wires touch each other or do not them touch any metal part of the receiver. This could damage the receiver
and/or the speakers.
• All connections must be correct: L (left) to L, R (right) to R, “+” to “+” and “–” to “–”. If the connections are faulty, no sound will be
heard from the speakers, and if the polarity of the speaker connections is incorrect, the sound will be unnatural and lack bass. Also,
refer to the owner’s manual for each of your components.
Turntable DVD player etc. Subwoofer
INPUT
INPUT
PREPARATION
GND
Left speaker
(NS-BP400)
Right speaker
Audio out
RCA
RL RL
stereo
Audio
out
cable
RCA
stereo
cable
(NS-BP400)
L
INPUT
R
PHONO CD
ANTENNA
75
AUX
UNBAL. FM
WOOFER
OUTPUT
SUB
SYSTEM
CONNECTOR
TO:CD PLAYER
Receiver (R-1330)
(Europe model)
System control
cable (supplied)
GND
R L
SPEAKERS:6 MIN.
RCA stereo cable
5
3
4
L
OUTPUT
R L
TO:RECEIVER
SYSTEM
CONNECTOR
(supplied)
CD player (CD-1330)
1
2
Connecting the system
Connect the CD (L/R) jacks of the receiver to the OUTPUT (L/R) jacks of the CD player using the supplied audio
RCA stereo cable.
Connect the SYSTEM CONNECTOR (TO:CD PLAYER) jack of the receiver to the SYSTEM CONNECTOR
(TO:RECEIVER) jack of the CD player using the supplied system control cable.
Connect the speaker terminals (L) of the receiver to the speaker terminals of the left speaker and the speaker terminals
(R) of the receiver to the speaker terminals of the right speaker using the speaker cables supplied with the speaker set
(NS-BP400).
Notes
• The NS-BP400 speakers are not magnetically shielded, so place the speakers away from the monitor. When conncecting speakers
other than NS-BP400, use speakers having more than 6Ω impedance.
• The PHONO jacks are only compatible with a turntable with MM cartridge.
• Connect your turntable to the GND terminal to reduce noise in the signal. However, you may hear less noise without the connection to
the GND terminal for some turntable(s).
9 En
English
Page 14
CONNECTING ANTENNAS
CONNECTING ANTENNAS
To enjoy radio on the receiver, connect the supplied FM antenna to the designated terminal. If there is a problem of weak
radio wave reception in your area or you want to improve radio reception, we recommend that you use optional outdoor
antennas. For details, consult the nearest authorized Yamaha dealer or service center.
Connecting the FM antenna
Indoor FM
antenna
(supplied)
ANTENNA
GND
L
INPUT
R
PHONO CD
75
AUX
UNBAL. FM
OUTPUT
SUB
WOOFER
SYSTEM
CONNECTOR
TO:CD PLAYER
1 Connect the supplied indoor FM antenna to
the FM jack and GND terminal of the receiver.
2 Place the antenna away from the receiver
and speaker cables. Find the best reception
position, expand the antenna, then fix it.
y
The GND terminal can be used together with the cable of
turntable.
CONNECTING THE POWER CABLES
After you made all connections, connect the power cables of this system and other components.
ANTENNA
R L
SPEAKERS:60MIN.
OUTPUT
R L
GND
INPUT
L
R
PHONO CD
75
UNBAL. FM
OUTPUT
AUX
WOOFER
TO:RECEIVER
SYSTEM
CONNECTOR
SYSTEM
CONNECTOR
SUB
TO:CD PLAYER
MAINS
MAINS
To AC wall outlet
To AC wall outlet
10 En
Page 15
CONNECTING THE iPod™ AND THE USB DEVICE
CONNECTING THE iPod™ AND THE USB DEVICE
You can connect various audio components, USB device or iPod to the receiver. For information on your external
component, refer to the owner’s manual supplied with each component.
Connecting an iPod™
The receiver is equipped with a terminal on the top panel
where you can station your iPod and control playback of
your iPod using the supplied remote control.
Use this receiver with iPod dock adapter (supplied with
your iPod or commercially available) appropriate for your
iPod. If you use this receiver without using an appropriate
iPod dock adapter, loose connection may result.
y
When the receiver is turned on or in standby mode, connect the
iPod during the playback, the receiver automatically starts
playback of iPod .
iPod
iPod
VOLUME
INPUT
PURE
ON/STANDBY
PHONES
OFF
Notes
• Only iPod (Click and Wheel), iPod nano, and iPod mini, and
iPod touch are supported.
• Do not connect any iPod accessories (such as headphones, a
wired remote control, or an FM transmitter) to your iPod when
it is stationed in a terminal.
• Unless your iPod is firmly stationed in a terminal, audio signals
may not be output properly.
• Once the connection between your iPod and the receiver is
complete and the receiver is set to iPod mode (see page 5),
“CONNECTED” appears in the front panel display. If the
connection between your iPod and the receiver fails, a status
message appears in the front panel display. For a complete list
of connection status message, see the iPod section in
“TROUBLESHOOTING” on page 21.
• When your iPod is stationed in a terminal of the receiver, your
iPod can be charged automatically even when the receiver is in
standby mode.
• You can disconnect the iPod during the playback.
TUNER PRESET
DIRECT
Receiver
MIN
MAX
Connecting USB devices
This CD player has a USB port and can access MP3 or
WMA files saved on your USB device. Connect your USB
device to the USB port on the front panel of the CD
player.
CAUTION
Do not disconnect your USB device while the USB indicator is
blinking.
ON/STANDBY
USB
OFF
CD player
USB device
■ Supported USB devices
This CD player supports USB mass storage class devices
(e.g., flash memories, card readers or portable audio
players) using FAT16 or FAT32 format.
Notes
• Some devices may not work properly even if they meet the
requirements.
• Do not connect devices other than the USB mass storage class
devices.
• When you insert two or more memory cards at the same time
using card readers, etc., only one of the memory cards is
recognized.
• Yamaha and suppliers accepts no liability for the loss of data
saved on the USB devices connected to the receiver. As a
precaution, it is recommended that the files are made backup
copies.
• Playability of and power supply to all kind of USB devices are
not guaranteed.
• When your USB device is connected to the USB port, your
USB device can be charged automatically even when the CD
player is in standby mode and ECO mode is OFF (see page 13).
• You can disconnect the USB device during the playback.
PREPARATION
English
11 En
Page 16
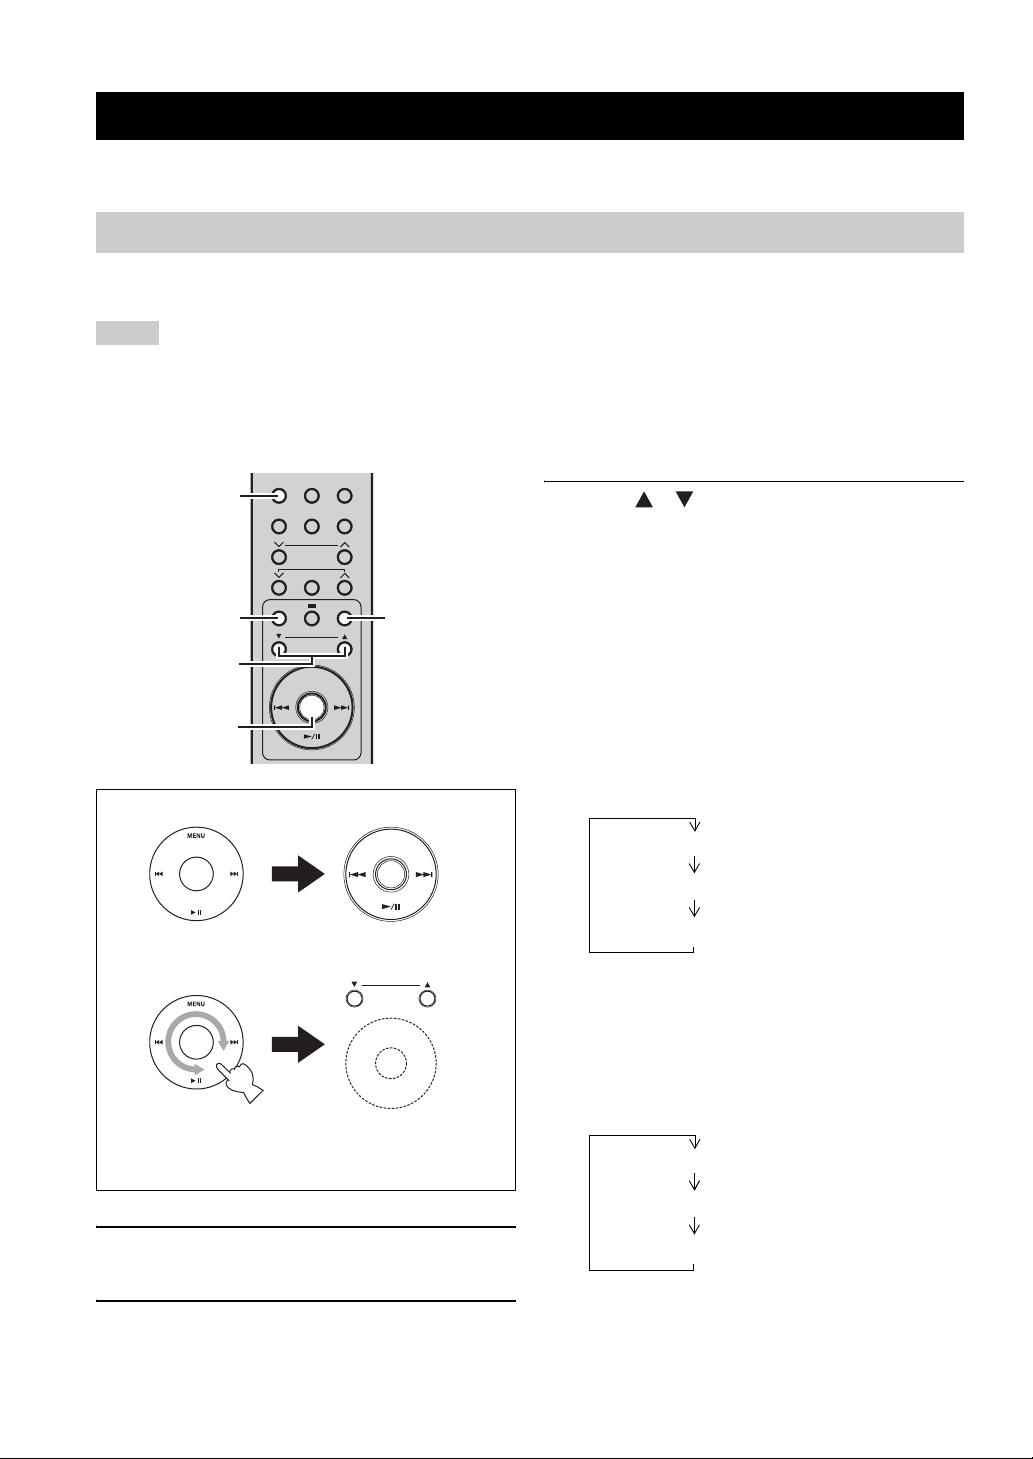
SYSTEM OPERATIONS
VOL
VOL
TONE BALANCE
DISPLAY DIMMER SLEEP
MUTE
PURE DIRECT
CDiPod
FM
PHONO
AUX
USB
PRESET
SYSTEM OPERATIONS
Follow the procedure below to select an input source and adjust the sound settings on the system.
ON/STANDBY, OFF
ON/STANDBY
PHONES
OFF
ON/STANDBY
USB
OFF
(standby/on)
Input selection
keys
VOLUME +/–
INPUT PURE
INPUT
PURE DIRECT
TUNER PRESET
DIRECT
MIN MAX
VOLUME
VOLUME
3 Press one of the input selection keys (or
rotate INPUT on the front panel) to select the
desired input source.
4 Start playback on the selected source
component or select a radio station.
For information on the disc/USB device playback,
see page 14, and for information on tuning, see
page 17.
5 Press VOLUME +/– (or rotate VOLUME on the
front panel) to adjust the volume to the
desired output level.
■ To adjust the audio quality
1 Press TONE/BALANCE to select BASS,
TREBLE, or BALANCE.
2 To adjust the setting, press or .
BASS: Adjusts the low frequency response.
TREBLE: Adjusts the high frequency response.
BALANCE: Adjusts the volume level of each left
and right speaker channel.
TONE/BALANCE
PURE DIRECT
MUTE
Basic system operations
1 Press ON/STANDBY, OFF on the front panel
of the receiver and the CD player.
2 Press (standby/on) to turn on the
receiver.
Depending on the input mode of the receiver, the CD
player also turns on by the system control connection
(see page 9). The front panel display lights up.
12 En
■ Pure Direct mode
The Pure Direct mode shuts down the tone control
/
circuitry and front panel display, allowing you to enjoy
pure high-fidelity sounds.
Press PURE DIRECT (or PURE DIRECT on the
front panel) to turn on the Pure Direct mode.
The PURE DIRECT indicator lights up, and the front
panel display goes off.
Notes
• If you carry out operations while the Pure Direct mode is turned
on, the front panel display lights up briefly to acknowledge the
command.
• While the Pure Direct mode is turned on, neither BASS,
TREBLE, nor BALANCE is available.
To turn off the Pure Direct mode
Press PURE DIRECT again so that PURE DIRECT
indicator turns off and the front panel display lights up.
■ Muting the sound (MUTE)
Press MUTE to turn off the sound.
MUTE ON appears on the front panel display.
To restore the sound, press MUTE again or press
VOLUME +/–.
Page 17

SYSTEM OPERATIONS
■ To use the ECO mode of the CD player
This mode reduces the power consumption during the
standby mode. Even if the USB device is connected to the
USB port of the CD player, the USB device cannot be
charged when the CD player is in standby mode and ECO
mode is ON.
Press ON/STANDBY, OFF while pressing and
holding of the CD player to turn on the CD
player.
Each time you turn on the CD player by press
ON/STANDBY, OFF while pressing and holding of
the CD player, ECO ON or ECO OFF appears on the front
panel display alternately.
Changing the brightness of the front panel display
Follow the procedure below to change the brightness of
the receiver’s front panel display.
VOL
TONE BALANCE
DISPLAY DIMMER SLEEP
PURE DIRECT
MUTE
DIMMER
Press SLEEP repeatedly to select the desired
duration.
Each time you press the key, the duration changes as
follows.
The SLEEP indicator lights up in the front panel display.
120min.
90min.
60min.
30min.
OFF
y
• The sleep timer is canceled if you set the receiver to the standby
mode.
• If you press SLEEP while the sleep timer is set, the remaining
time appears in the front panel display.
To cancel the sleep timer
Press SLEEP repeatedly to select “OFF”.
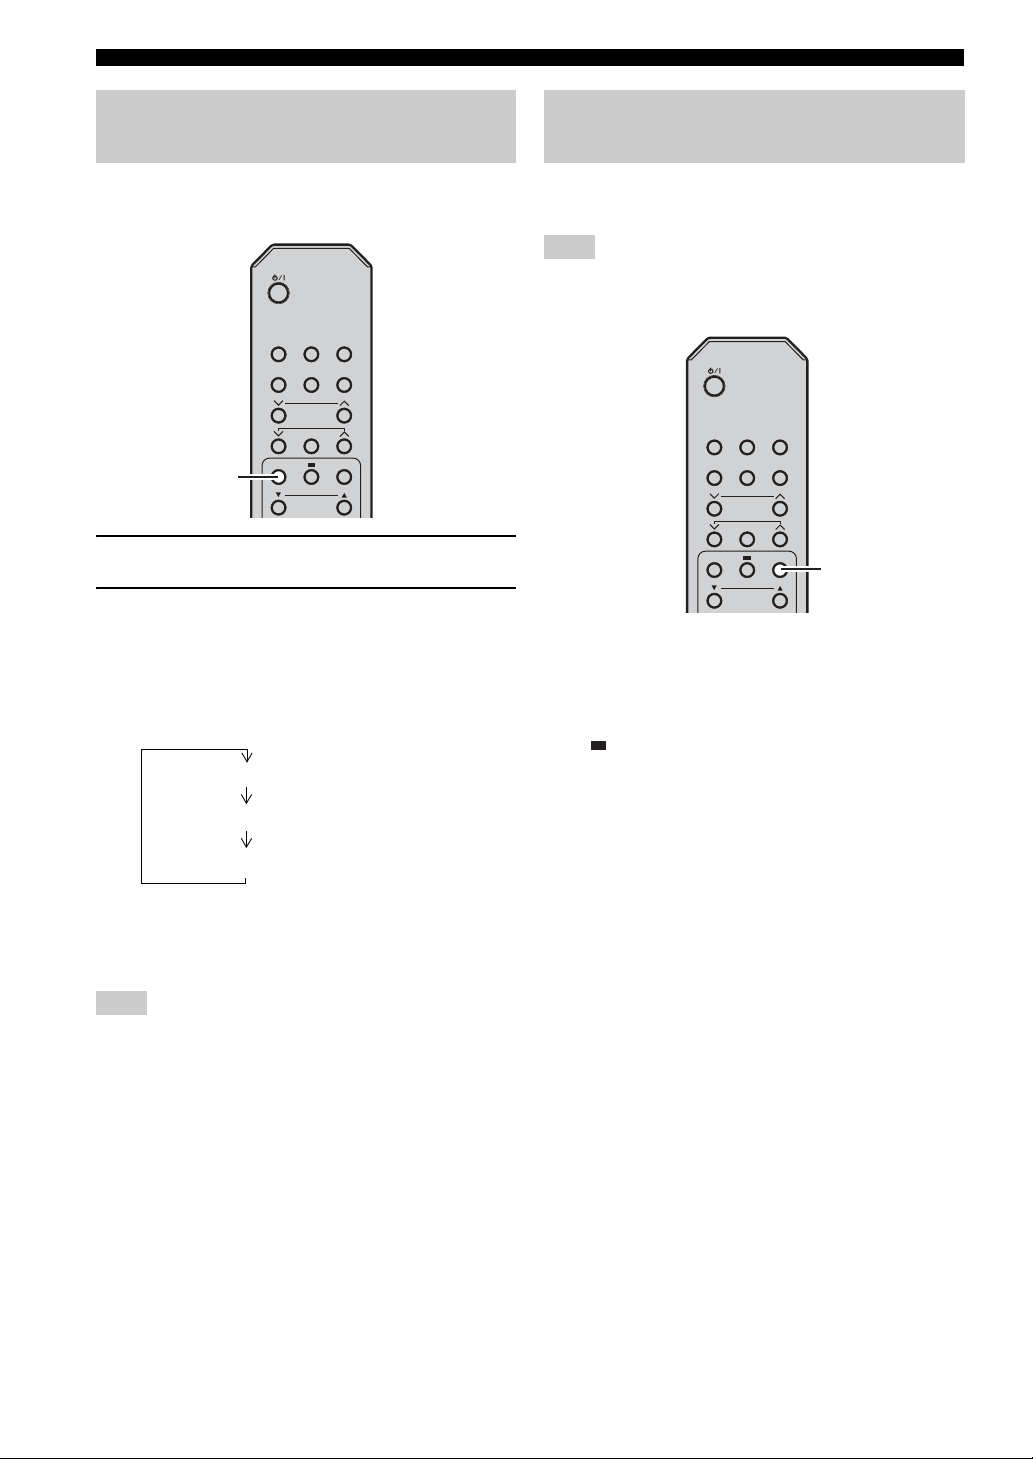
To use headphones
You can connect your headphones to the PHONES jack
on the front panel of the receiver.
The sound from the speakers and the subwoofer stops.
OPERATIONS
BASIC
Press DIMMER.
You can choose your desired brightness of the front panel
display between normal (bright), mid dim, and dim.
Setting the sleep timer
The sleep timer sets the system to the standby mode after
the specified time elapses.
VOL
TONE BALANCE
DISPLAY DIMMER SLEEP
PURE DIRECT
SLEEP
MUTE
ON/STANDBY
OFF
PHONES
English
13 En
Page 18
DISC AND USB DEVICE OPERATIONS
DISC AND USB DEVICE OPERATIONS
You can enjoy playing back your audio CDs, USB devices, and MP3 or WMA files recorded on a disc/USB device.
Some operations may be different or restricted depending on the disc/USB device. Before playing back, check the
compatibility of your disc/USB device with this system (see page 24).
Note
Depending on the disc, some operations may be different or
restricted.
CDiPod
CD
FM
REPEAT
PHONO
PRESET
TUNING
MEMORY
iPod MENU SEL
MENU
ENTER
VOL
USB
AUX
RANDOM
USB
/
Playback operations
■ To start disc playback
1 Select CD as an input source (see page 12).
3 Press to start playback.
For a USB device, playback in order by the date and
time of creation if playable files are in the USB
device.
Notes
• Total time does not appear for USB device playback.
• If the USB device is partitioned, only the first partition is
displayed.
• Some files may not work properly depending on the USB
device specification.
• Copyright-protected files cannot be played back.
• This system can play back files of 4 GB in size or less.
To stop playback
Press .
For audio CD, the total track number and total time of the
disc are displayed and for MP3/WMA disc or USB device,
the total file number is displayed on the front panel.
To pause playback
Press .
To return to normal playback, press .
2 Press to open the disc tray and load a
CD.
3 Press .
Playback starts automatically.
For an audio CD, playback starts from the first track,
and for MP3 or WMA files, playback starts in
alphanumeric order by the filename.
y
You can also close the disc tray by pressing on the front
panel of the CD player.
■ To start USB device playback
1 Select USB as an input source (see page 12).
2 Connect your USB device to the USB port on
the CD player.
The total number of files are displayed.
The reading time may exceed 30 seconds depending
on the number of files/folders.
14 En
To skip tracks
• To skip to the start of the current track, press .
• To skip to the next track, press .
• To skip to the previous track, quickly press twice.
To fast reverse or fast forward
• To fast reverse, press and hold .
• To fast forward, press and hold .
y
The sound can be heard (although slightly garbled) during these
operation in either direction. This is convenient for locating a
precise position within a track, or for reviewing the contents
quickly. Sound may not be heard depending on the MP3/WMA
file.
Page 19

DISC AND USB DEVICE OPERATIONS
Switching the playback information display
You can switch the disc playback information shown in the CD player’s front panel display. Available information
differs depending on the type of the disc/USB device.
VOL
Press DISPLAY repeatedly while playing back a
disc/USB device.
Each time you press the key, the information display
changes as described in “Playback information for audio
CDs” and “Playback information for MP3 or WMA files
recorded on discs/USB devices”.
DISPLAY
TONE BALANCE
DISPLAY DIMMER SLEEP
PURE DIRECT
MUTE
Note
Some special characters may not be shown properly.
■ Playback information for audio CDs
The following information is available during playback of an audio CD.
1 Elapsed time of the current track
2 Remaining time of the disc
■ Playback information for MP3 or WMA files recorded on discs/USB devices
1 Elapsed time of the current file
OPERATIONS
BASIC
2 File name
Returns to the normal display after displaying a file name.
English
15 En
Page 20
DISC AND USB DEVICE OPERATIONS
Repeating playback (Repeat Play)
You can repeat the playback of the selected item in a disc/
USB.
CDiPod
USB
FM
PHONO
AUX
PRESET
TUNING
MEMORY
REPEAT
REPEAT
1 Play back the disc/USB you want to repeat.
2 During the playback of the disc/USB, press
REPEAT to select the desired Repeat Play
mode.
Each time you press the key, the Repeat Play mode
indicator in the CD player’s front panel display
changes as follows.
Off (Normal playback)
RANDOM
iPod MENU SEL
Playing back randomly (Random Play)
You can play back tracks in the disc/USB in random
order.
Note
When playing back a disc/USB with Random Play, the remaining
time of the disc cannot be displayed.
CDiPod
USB
FM
PHONO
AUX
PRESET
TUNING
MEMORY
iPod MENU SEL
RANDOM
RANDOM
REPEAT
Press RANDOM while playback is stopped.
The RANDOM indicator lights up in the CD player’s
front panel display and Random Play starts.
To cancel Random Play
Press .
REP S (Repeat Play by the current track)
REP ALL (Repeat Play by disc/USB)
To cancel Repeat Play
Press REPEAT repeatedly so that the Repeat Play mode
indicator disappears from the front panel display.
Note
The Repeat play mode is canceled when the disc/USB device is
removed.
y
REP OFF appears when the system is set to the Pure Direct
mode.
16 En
Page 21

FM TUNING
There are 2 tuning methods: automatic and manual. Automatic tuning is effective when station signals are strong and
there is no interference. If the signal from the station you want to select is weak, tune into it manually. You can also use
the automatic and manual preset tuning features to store up to 30 stations.
Automatic tuning
Automatic tuning is effective when station signals are
strong and there is no interference.
CDiPod
USB
FM
PHONO
FM
REPEAT
1
Press FM (or rotate INPUT on the front panel) to
PRESET
TUNING
MEMORY
iPod MENU SEL
AUX
RANDOM
TUNING /
set the receiver to the FM mode.
2 Press and hold TUNING / for more
than 2 seconds to begin automatic tuning.
When the receiver is tuned into a station, the TUNED
indicator lights up and the frequency of the received
station is shown in the front panel display.
• Press d to tune into a lower frequency.
• Press u to tune into a higher frequency.
Manual tuning
If the signal received from the station you want to select is
weak, tune into it manually.
1
Press FM (or rotate INPUT on the front panel) to
set the receiver to the FM mode.
2 Press TUNING / to tune into the
desired station manually.
Automatic preset tuning
Follow the procedure below to preset radio stations
automatically.
CDiPod
USB
FM
PHONO
FM
REPEAT
1
Press FM (or rotate INPUT on the front panel) to
set the receiver to the FM mode.
2 Press and hold MEMORY for more than 2
seconds.
The PRESET indicator flashes in the front panel
display and starts presetting stations automatically.
After searching all the frequencies, stops
automatically.
• Auto Preset starts at the lowest frequency toward
the highest frequency.
• The receiver automatically applies a preset number
to each detected station.
• To cancel, press MEMORY.
Notes
• You can preset up to 30 of FM stations.
• Any stored station data existing under a preset station number is
cleared when you store a new station under the same preset
station number.
PRESET
TUNING
MEMORY
AUX
PRESET /
MEMORY
RANDOM
OPERATIONS
TUNER
17 En
English
Page 22
FM TUNING
Manual preset tuning
You can store up to 30 stations.
CDiPod
USB
FM
PHONO
AUX
PRESET
TUNING
MEMORY
REPEAT
1 Tune into a radio station you want to preset.
See page 17 for tuning instructions.
2 Press MEMORY.
The PRESET indicator flashes in the front panel
display for about 5 seconds.
3 Press PRESET / repeatedly to select
a preset station number while the MEMORY
indicator is flashing.
PRESET /
MEMORY
RANDOM
Selecting preset stations
You can tune into any desired station simply by selecting
the preset station under which it was stored (see page 17).
CDiPod
USB
FM
PHONO
FM
REPEAT
1
Press PRESET
preset station.
y
You can also use the front panel to select preset stations. Press
TUNER PRESET
d / u repeatedly to select a preset station.
PRESET
TUNING
MEMORY
iPod MENU SEL
/
AUX
PRESET /
RANDOM
repeatedly to select a
4 Press MEMORY to store while the MEMORY
indicator is flashing.
The PRESET indicator lights up in the front panel
display.
5 Repeat steps 1 to 4 until all desired stations
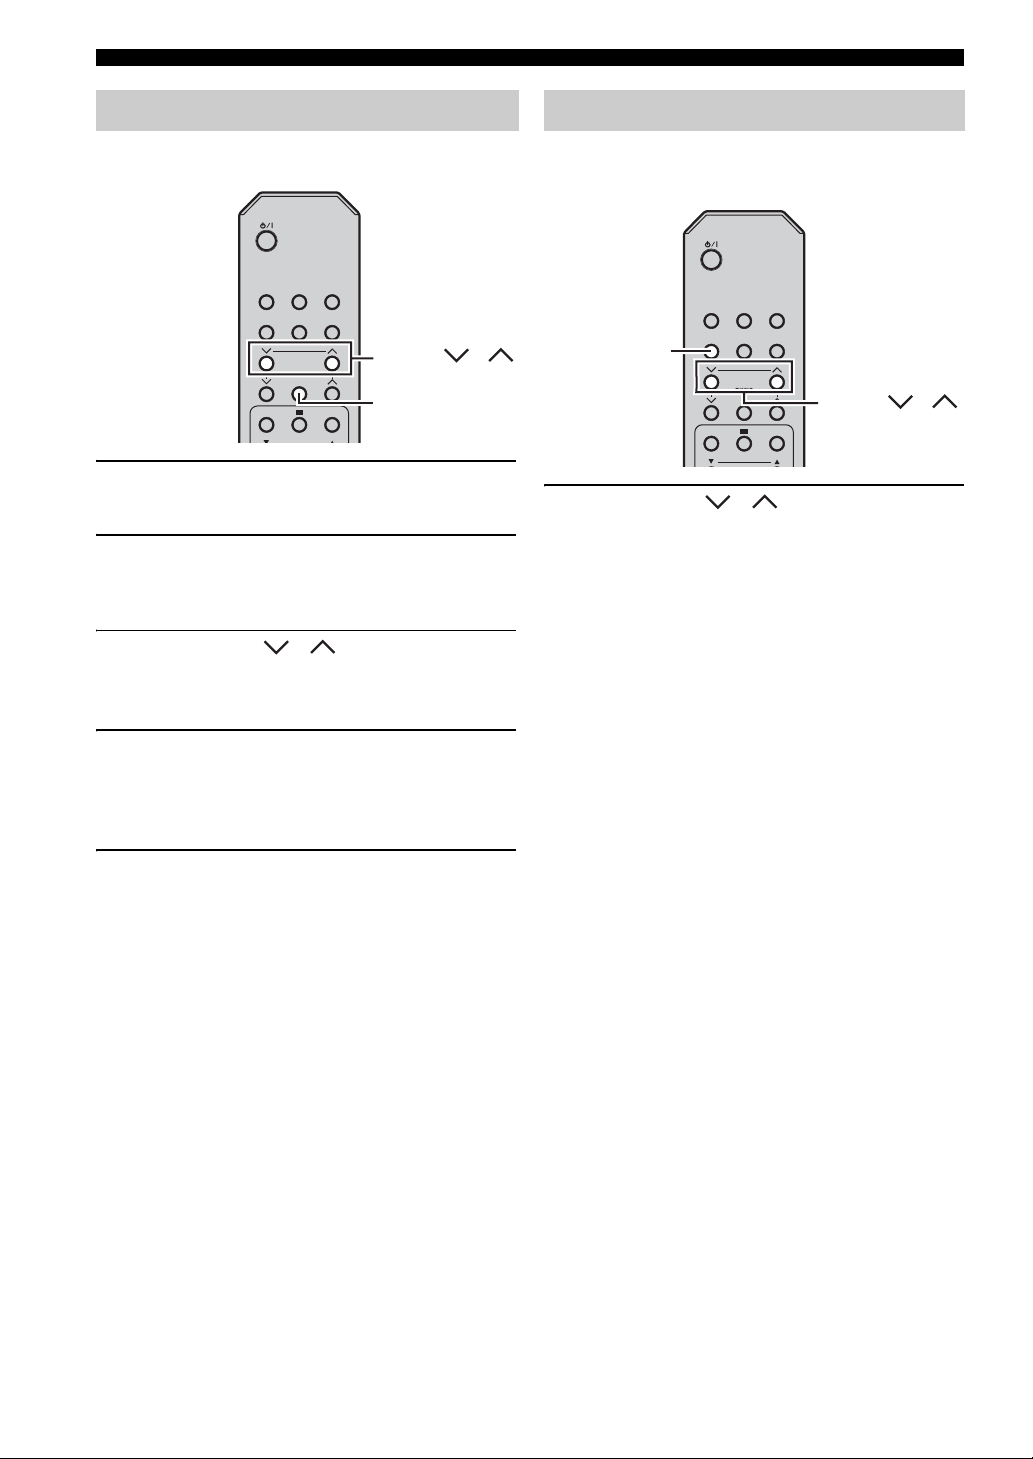
are preset.
18 En
Page 23
RADIO DATA SYSTEM TUNING (EUROPE MODEL ONLY)
PRESET
Radio Data System (Europe model only) is a data transmission system used by FM stations in many countries. The Radio
Data System function is carried out among the network stations. This receiver can receive various Radio Data System
data such as PS (program service), PTY (program type), RT (radio text), and CT (clock time) when receiving Radio Data
System broadcasting stations.
Displaying the Radio Data System information
Use this feature to display the 4 types of the Radio Data
System information: PS (program service), PTY (program
type), RT (radio text) and CT (clock time).
Notes
• You can select only the available Radio Data System modes
being offered by the station.
• If the signals being received are not strong enough, the receiver
may not be able to utilize the Radio Data System data. In
particular, the “RT” mode requires a large amount of data and
may not be available even when the other Radio Data System
modes are available.
• If the signal strength is weakened by external interference while
the receiver is receiving the Radio Data System data, the
reception may be cut off unexpectedly and “...WAIT” appears
in the front panel display.
• When the “RT” mode is selected, the receiver can display the
program information by a maximum of 64 alphanumeric
characters, including the umlaut symbol. Unavailable characters
are displayed with the “_” (underscore).
TUNING
MEMORY
RANDOM
iPod MENU SEL
MENU
ENTER
VOL
VOL
TONE BALANCE
MUTE
DISPLAY
REPEAT
DISPLAY DIMMER SLEEP
PURE DIRECT
While tuning into a Radio Data System station,
press DISPLAY repeatedly to select the desired
Radio Data System display mode.
PS
OPERATIONS
TUNER
PTY
RT
CT
Frequency
• Select “PS” to display the name of the Radio Data
System program currently being received.
• Select “PTY” to display the type of the Radio Data
System program currently being received.
• Select “RT” to display the information on the
Radio Data System program currently being
received.
• Select “CT” to display the current time.
English
19 En
Page 24
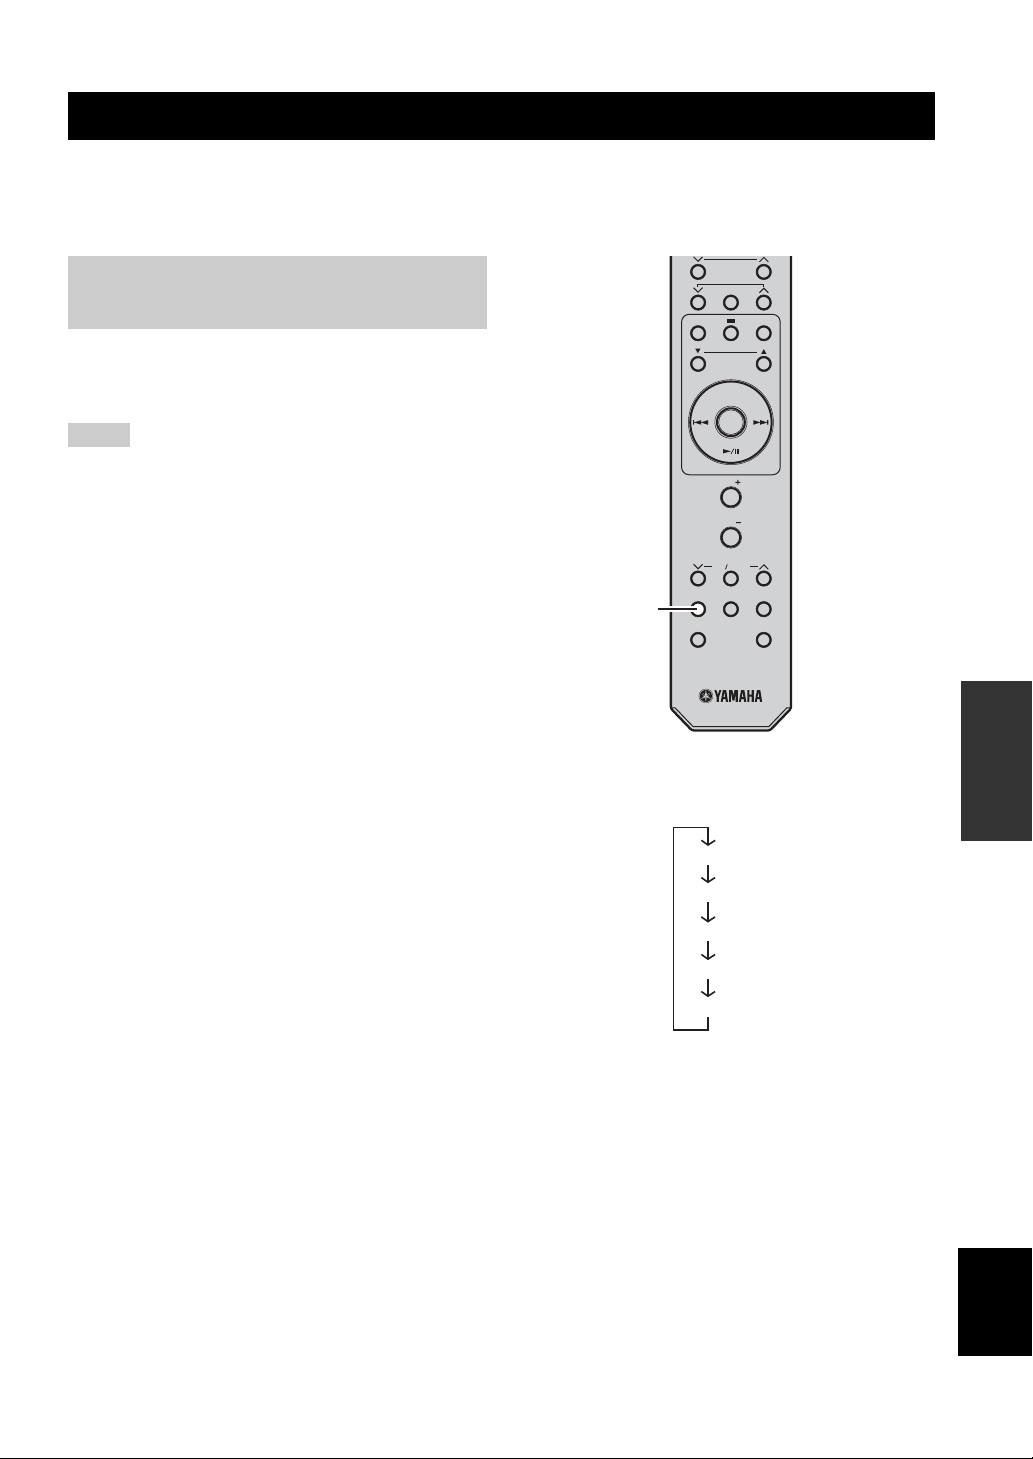
CONTROLLING iPod™
CONTROLLING iPod™
In addition to controlling the receiver (R-1330) and CD player (CD-1330), you can operate your iPod stationed in a
terminal using the supplied remote control.
Using iPod™
Once you have stationed your iPod to a terminal, you can enjoy playback of your iPod using the supplied remote control.
When connecting the iPod during the playback, this system automatically changes to the iPod mode.
Notes
• Only iPod (Click and Wheel), iPod nano, and iPod mini, iPod touch are supported.
• Some features may not be compatible depending on the model or the software version of your iPod.
y
For a complete list of status messages that appear in the front panel display of the receiver, refer to the “iPod” section in
“TROUBLESHOOTING” (see page 22).
CDiPod
iPod
REPEAT RANDOM
iPod MENU SEL
ENTER
iPod Remote control
FM
REPEAT
PHONO
PRESET
TUNING
MEMORY
iPod MENU SEL
MENU
ENTER
USB
AUX
RANDOM
MENU
ENTER
3 Press / to operate the iPod menu, and
then press ENTER to start playback of the
selected song (or group).
• View the screen of the iPod to control the menu.
• Operate the iPod using the iPod controls or the
supplied remote control.
■ Repeating playback (Repeat Play)
You can repeat the playback of the selected item in your iPod.
Press REPEAT to select the desired Repeat Play
mode.
Each time you press the key, the Repeat Play mode
changes as example below. To use properly, please check
it with your iPod.
One (Repeat play by song)
All (Repeat play by selected group)
iPod MENU SEL
The supplied remote control has the same function
keys with your iPod. So, these keys are corresponding
with each other.
1 Press iPod to select the iPod as the input
source.
2 Station your iPod to the terminal.
20 En
Off
■ Playing back randomly (Shuffle Play)
You can play back songs or albums in your iPod randomly.
Press RANDOM.
Each time you press the key, the Shuffle Play mode
changes as example below. To use properly, please check
it with your iPod.
Songs (Shuffle play by song)
Albums (Shuffle play by albums)
Off
Page 25

TROUBLESHOOTING
Refer to the table below when this system does not function properly. If the problem you are experiencing is not listed
below or if the instruction below does not help, turn off this system, disconnect the power cable, and contact the nearest
authorized Yamaha dealer or service center.
Receiver (R-1330)
■ General
Problem Cause Remedy
The receiver fails to
turn on or enters the
standby mode soon
after the power is
turned on.
No sound Incorrect input or output cable
Sound is heard from
the speaker on one
side only.
There is noise
interference from
digital or radio
frequency
equipment.
The sound is
distorted.
“CHK SP WIRE”
appears in the
display.
The power cable is not connected or the
plug is not completely inserted.
The receiver has been exposed to a strong
external electric shock (such as lightning
or strong static electricity).
The cable is short-circuited and the
protection circuity has been activated.
The internal temperature is too high, the
protection circuity has been activated.
connections.
No appropriate input source has been
selected.
Speaker connections are not secure. Secure the connections.
The volume is turned down. Turn up the volume.
The sound is muted. Press MUTE or VOLUME +/- to resume audio
Signals the receiver cannot reproduce are
being input from a source component,
such as a CD-ROM.
The sleep timer has turned off the
receiver.
Incorrect cable connections. Connect the cables properly. If the problem persists,
The receiver is too close to the digital or
high-frequency equipment.
The volume level is too high. Adjust the volume level.
The component other than turntable is
connected to the PHONO jacks.
Speaker cables are short-circuited. Make sure speaker cables are connected correctly.
Connect the power cable firmly.
Set the receiver to the OFF mode, disconnect the
power cable, plug it back in after 30 seconds and
then use it normally.
Make sure that all speaker wire connections on the
receiver and on all speakers are secure and that the
wire for each connection does not touch anything
other than its respective connection.
Wait about 1 hour for the receiver to cool down and
then turn it back on.
Connect the cables properly. If the problem persists,
the cables may be defective.
Select an appropriate input source with the INPUT
selector on the front panel (or the input selection
keys on the remote control).
output and then adjust the volume.
Play a source whose signals can be reproduced by
the receiver.
Turn on the receiver, and play the source again.
the cables may be defective.
Move the receiver further away from such
equipment.
Connect to the CD or AUX jacks.
See
page
10
—
9
9
9
—
9
—
5
—
—
9
—
12
9
9
INFORMATION
ADDITIONAL
English
21 En
Page 26
TROUBLESHOOTING
■ FM
Problem Cause Remedy
FM stereo reception is noisy. The characteristics of FM stereo
There is distortion, and clear
reception cannot be obtained
even with a good FM antenna.
The desired station cannot be
tuned into with the automatic
tuning method.
broadcasts may cause this problem
when the transmitter is too far away or
the antenna input is poor.
There is multi-path interference. Adjust the antenna position to eliminate
The signal is too weak. Use a high-quality directional FM antenna.
Check the antenna connections.
Try using a high-quality directional FM
antenna.
multi-path interference.
Use the manual tuning method.
See
page
10
—
—
—
17
■ iPod
Note
In case of a transmission error without a status message appearing in the front panel of the receiver, check the connection to your iPod
(see page 11).
Status message Cause Remedy
CONNECT ERR
UNKNOWN TYP
CONNECTED
NOT CONNECT
CAN'T PLAY
There is a problem with the signal path
from your iPod to the receiver.
The iPod being used is not supported by
the receiver.
Your iPod is properly stationed in a
terminal, and the connection between
your iPod and the receiver is complete.
Your iPod was removed from an iPod
terminal of the receiver.
The receiver cannot play back the songs
currently stored on your iPod.
Turn off the receiver and try resetting your iPod.
Only iPod (Click and Wheel), iPod nano, iPod mini,
and iPod touch are supported.
Station your iPod back to the terminal of the
receiver.
Check that the songs currently stored on your iPod
are playable.
Store some other playable music files on your iPod.
See
page
11
—
11
—
—
Remote control
Problem Cause Remedy
The remote control
does not work nor
function properly.
22 En
The remote control may be operated
outside its operation range.
The remote control sensor on this system
may be exposed to direct sunlight or
lightening (invented fluorescent lamps).
The battery may be worn out. Replace the battery with new one.
There are obstacles between the sensor of
this system and the remote control.
For information on the remote control operation
range, refer to “Using the remote control”.
Change the lighting or orientation of this system.
Remove the obstacles.
See
page
8
8
8
8
Page 27

CD player (CD-1330)
TROUBLESHOOTING
Problem Cause Remedy
Power does not turn onThe plug is not completely inserted. Connect the power cable firmly.
No sound or
distorted sound
Disc playback does
not start.
The USB device
cannot be
recognized.
Not linked with the
receiver
The receiver and the CD player are
connected incorrectly.
The receiver is set incorrectly. Check the setting (INPUT/Volume/MUTE/
The sampling rate of a MP3 or WMA file
may not be compatible with the CD
player.
You may use a CD-R/RW that is not
finalized.
The disc label may not be facing up. Check that the disc label is facing up.
The disc may be defective. Try to play back another disc. If the same problem
MP3/WMA disc may not contain
sufficient music tracks to be played back.
The sampling rate of a MP3 or WMA file
may not be compatible with the CD
player.
Check that the USB device is connected
correctly.
The system control cable is disconnected
from the system connector jack of the
receiver and/or the CD player.
Check the connection with the receiver.
Headphone) of the receiver.
Check the sampling rate and bit rate of an MP3 or
WMA file are compatible with the CD player.
Finalize the CD-R/RW.
does not happen, the disc you want to play back is
defective.
Check that your MP3/WMA disc contains at least 5
MP3/WMA music files.
Check the sampling rate and bit rate of an MP3 or
WMA file are compatible with the CD player.
Connect the USB device firmly.
Connect the receiver and the CD player with the
system control cable firmly.
See
page
9
9
—
24
—
—
—
—
24
11
9
■ USB
Note
In case of a transmission error without a status message appearing in the front panel of this unit, check the connection to the USB device
(see page 11).
Status message Cause Remedy
NO USB
OVER CURENT
The USB device is not connected. Connect playable USB device.
Connected the USB device not playable
on this system.
Connected the USB device diagonally.
Disconnect the USB device. Change input source
other than USB and select USB an input source
again. Then connect playable USB device again.
See
page
11
—
INFORMATION
ADDITIONAL
English
23 En
Page 28
NOTES ABOUT DISCS/MP3, WMA FILES
NOTES ABOUT DISCS/MP3, WMA FILES
■ Discs (audio CDs) playable with this CD
player
This player is designed for playing back compact discs
bearing the marks shown below. Never attempt to load
any other type of disc into the unit. The unit can also play
back 8-cm (3-inch) compact discs.
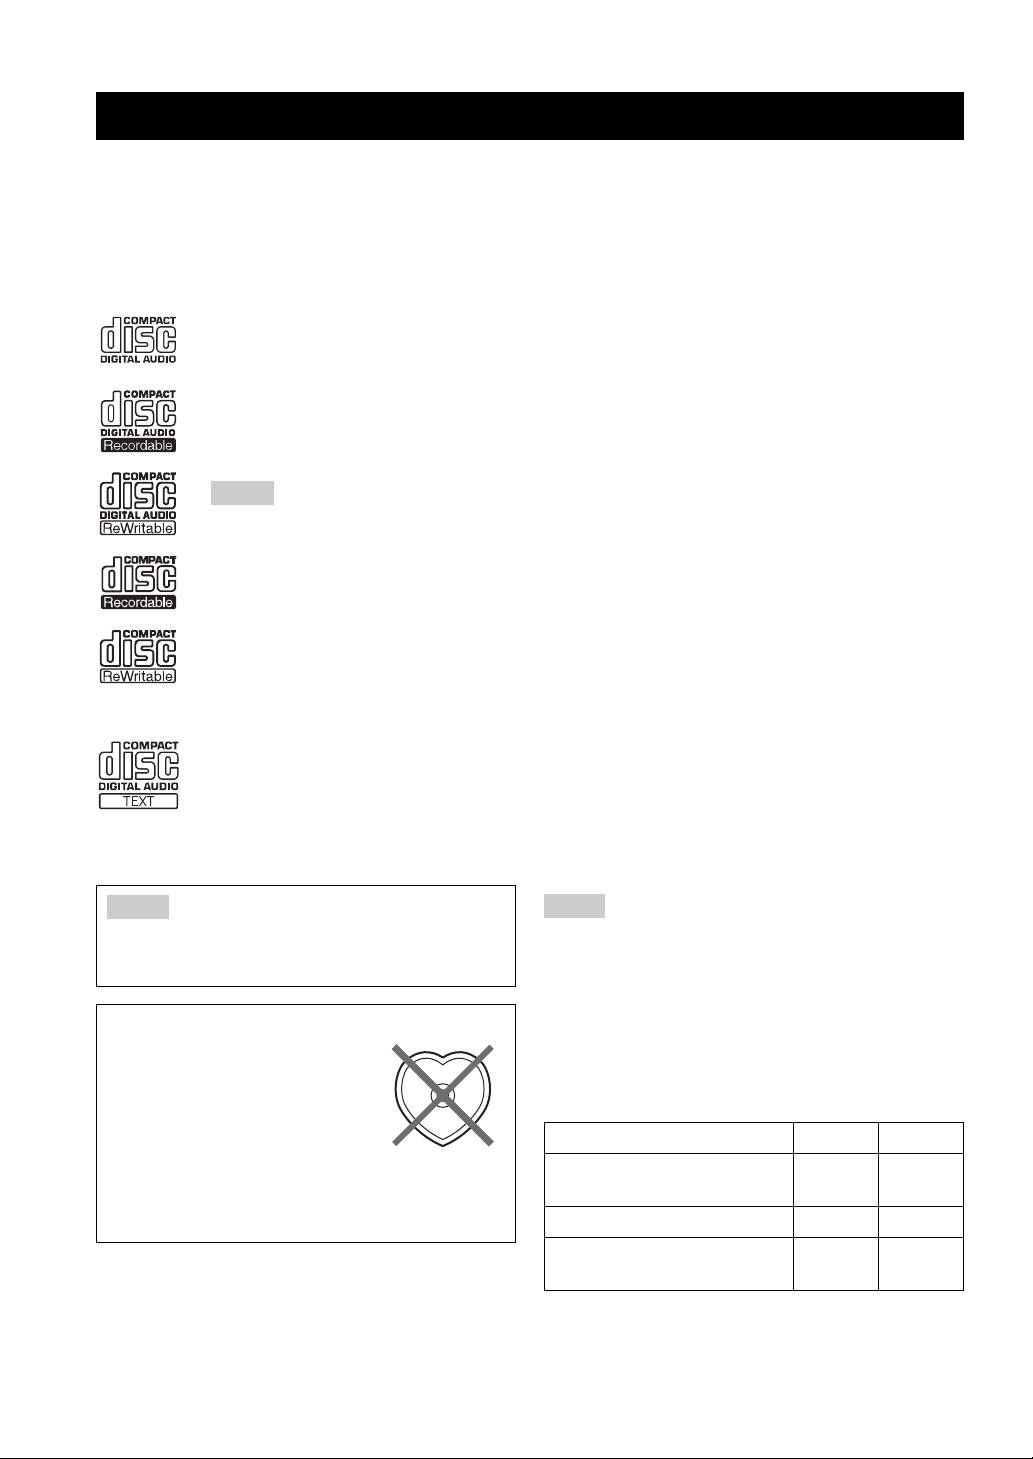
....
Compact discs (digital audio)
The most popular discs for commercially
available audio CDs.
....
CD-R,CD-RW digital audio discs
Music CDs made by copying onto a CD-R
or CD-RW (including MP3 or WMA
format files).
Notes
• Be sure to use a CD-R or CD-RW disc made
by a reliable manufacture.
• Be sure to use a CD-R or CD-RW disc which
has at least one of the following phrases on
the disc or disc case.
FOR CONSUMER
FOR CONSUMER USE
FOR MUSIC USE ONLY
• Be sure to use a finalized CD-R or CD-RW
disc.
....
CD-TEXT discs
The discs recorded with text data such as
album titles, track titles and artist names.
Though these discs can be played back
with ordinary CD players, the text data is
not displayed.
MP3
MP3 is a standard technology and format for compressing
an audio sequence into a small-sized file. However, the
original level of sound quality is preserved during
playback.
The playable formats are:
• MPEG-1 Audio Layer-3
Bitrate*: 32-320 kbps
Sampling frequency: 44.1/48/32 kHz
• MPEG-2 Audio Layer-3, 2
Bitrate*: 8-160 kbps
Sampling frequency: 24/22.05/16 kHz
• MPEG-2.5 Audio Layer-2
Bitrate*: 8-160 kbps
Sampling frequency: 12/11.025/8 kHz
* Variable bitrate is supported.
WMA
“WMA (Windows Media Audio)” is a Microsoft file
format for encoding digital audio files similar to MP3
though can compress files at a higher rate than MP3.
The playable formats are:
•Version 8
• Version 9 (Standard and variable bitrates are
supported. Professional and Lossless are not
supported.)
• High Profile
Bitrate*: 32-320 kbps
Sampling frequency: 48/44.1/32 kHz
• Mid Profile
Bitrate: 16-32 kbps
Sampling frequency: 22.05/16 kHz
* Both constant and variable bitrates are supported.
Note
This compact disc player may not be able to play back some
CD-RW discs or discs on which recording was not made
correctly.
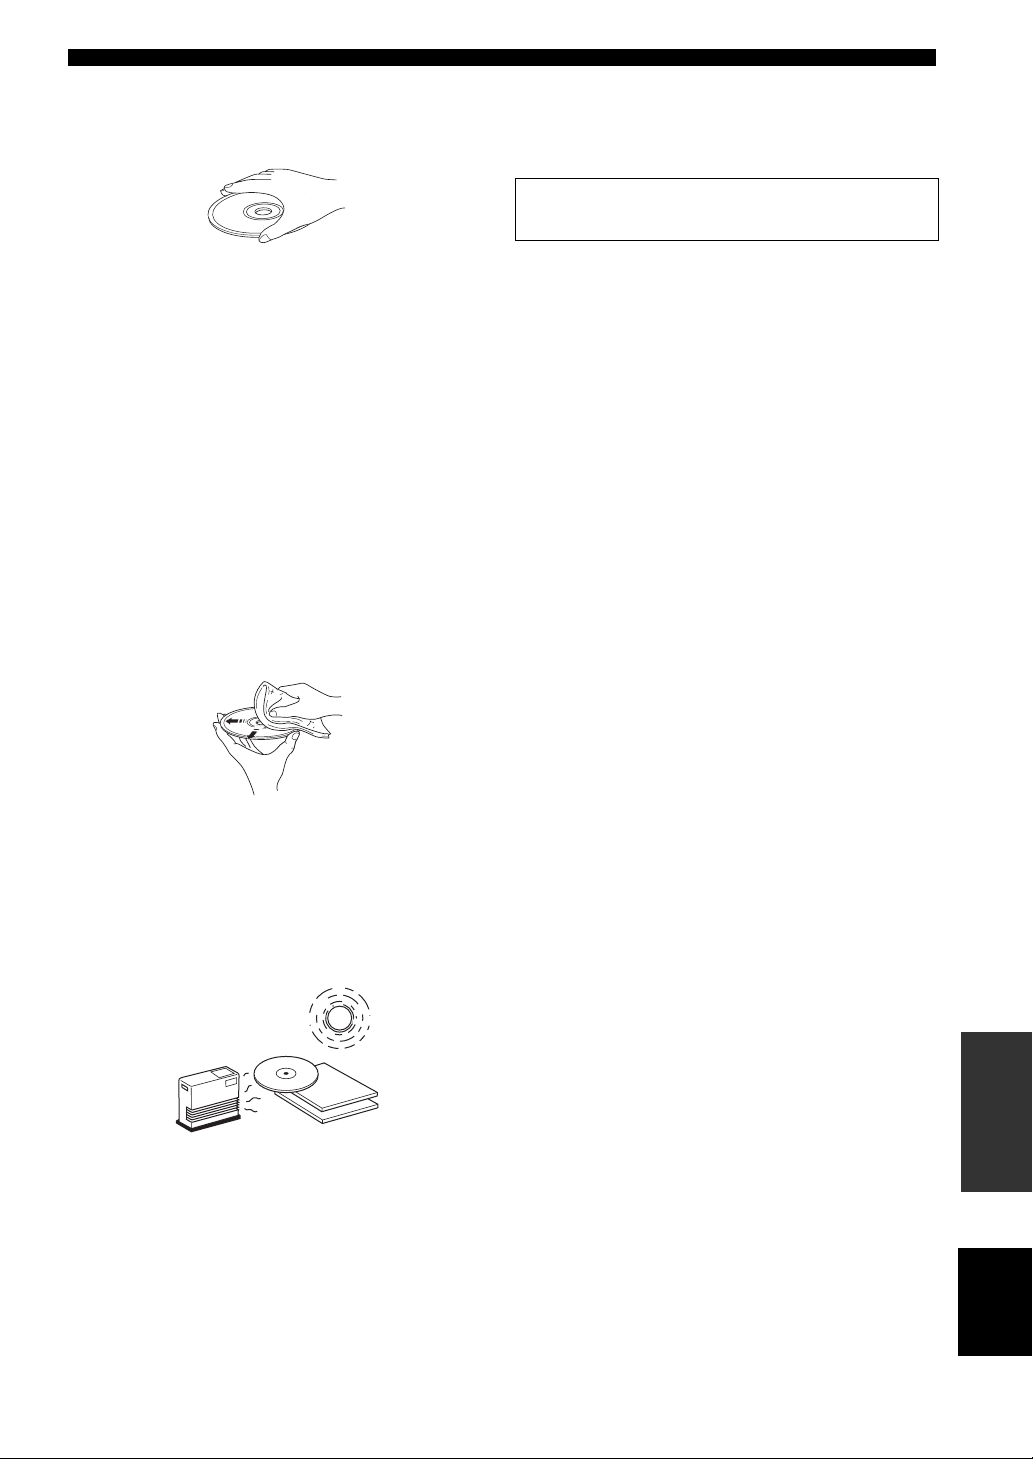
To prevent a malfunction of the CD player:
• Do not use any nonstandard
shaped disc (heart, etc.) available
on the market because it might
damage the unit.
• Do not use a disc with tape, stickers, or paste on it. If
you use such a disc, the disc may get stuck in the
unit, or damage to the unit may result.
■ About MP3 and WMA files
You can play back MP3 and WMA files recorded on a
CD-R/CD-RW and those stored on a USB device.
24 En
Notes
• Depending on the conditions of recording such as software
recording setting, this system may not be able to play a disc or
USB device in the order the tracks were recorded.
• Playback for Data Disc starts in alphanumeric order.
• Playback for USB starts in order by date and time of creation.
• Copyright-protected WMA (DRM) files cannot be played back
by the CD player.
• The disc must be ISO9660 compatible.
• The maximum file and folder numbers are as follows.
Data Disc USB
Maximum total number of file
and folder*
Maximum folder number* 255 255
Maximum file number per
folder
* The root is counted as one of the folders.
512 999
511 255
Page 29
NOTES ABOUT DISCS/MP3, WMA FILES
■ Notes about handling compact discs
• Always handle a disc with care so that its surface is not
scratched.
• Compact discs are not subjected to wear during
playback, but damage to the disc surface when the disc
is being handled can adversely affect the disc playback.
• Be sure to use a felt-tip pen or similar writing tool
when writing on the label side of the disc. Do not use a
ballpoint pen, pencil, or other hard-tipped writing tool,
as these may damage the disc and may adversely affect
the disc playback.
• Do not warp discs.
• When a disc is not being used, remove it from the unit
and store in an appropriate case.
• When removing or storing a disc, be careful not to
scratch the playing surface.
• Compact discs are not affected by small particles of
dust or fingerprints on their playing surface, but even
so they should be kept clean. Wipe by using a clean,
dry cloth.
Do not wipe with a circular motion; wipe straight
outward from the center.
To play back an 8-cm (3-inch) CD
Place it in the inner recessed area of the disc tray. Do not
put a normal (12-cm) CD on top of an 8-cm (3-inch) CD.
Note: Do not use any lens cleaners as they may be a
cause of malfunction.
• Do not try to clean the disc’s surface by using any type
of disc cleaner, record spray, anti-static spray or liquid,
or any other chemical-based liquid because such
substances might irreparably damage the disc’s
surface.
• Do not expose discs to direct sunlight, high
temperature or high humidity for a long period of time,
as these might warp or otherwise damage the disc.
No!
INFORMATION
ADDITIONAL
English
25 En
Page 30

GLOSSARY
GLOSSARY
Audio information
■ MP3 (MPEG Audio Layer-3)
One of the audio compression methods used by MPEG. It
employs the irreversible compression method, which
achieves a high compression rate by thinning out the data
of hardly audible part to the human ears. It is said to be
capable of compressing the data quantity by about 1/11
(128 kbps) while maintaining a similar audio quality to
music CD.
■ PCM (Pulse Code Modulation)
A signal that is changed to digital format without
compression. A CD is recorded with 16-bit sound at
44.1 kHz. This signal also has a type called Packed PCM
(PPCM) that can be compressed without any loss of data.
■ Track
A CD can be divided into a number of segments (tracks).
Each division is called a track number.
■ WMA (Windows Media Audio)
An audio compression method developed by Microsoft
Corporation. It employs the irreversible compression
method, which achieves a high compression rate by
thinning out the data of hardly audible part to the human
ears. It is said to be capable of compressing the data
quantity by about 1/22 (64 kbps) while maintaining a
similar audio quality to music CD.
Copyright and logo marks
MPEG Layer-3 audio decoding technology licensed from
Fraunhofer IIS and Thomson Multimedia.
■ Sampling frequency
The number of sampling (process for digitalizing analog
signals) per second. In principle, the higher the sampling
rate, the wider the frequency range that can be played
back, and the higher the quantized bit rate, the finer the
sound that can be reproduced.
SPECIFICATIONS
■ R-1330
AMPLIFIER SECTION
• Minimum RMS output power per channel
(6 Ω , 1 kHz, 0.5% THD).......................................... 60 W + 60 W
• Maximum power per channel
(4 Ω , 1 kHz, 0.7% THD).......................................... 70 W + 70 W
• Input sensitivity/Impedance
CD/AUX .................................................................200 mV/47 kΩ
PHONO....................................................................3.5 mV/47 kΩ
• Frequency Response
CD ..........................................................20 Hz to 20 kHz ± 0.5 dB
• Total Harmonic Distortion
CD (10 W/6 Ω)...........................................................0.01% or less
• Signal to Noise ratio (IHF-A network)
CD (200 mV, Input shorted) .................................. 100 dB or more
TUNER SECTION
• Tuning Range ................................................... 87.50 to 108.00 MHz
GENERAL
• Power Supply.........................................................AC 230 V, 50 Hz
• Power consumption................................................................... 80 W
• Dimensions (W x H x D) ....................................300 x 67 x 336 mm
• Weight......................................................................5.8 kg (12.7 lbs)
13
/16 x 2 5/8 x 13 1/4 in)
(11
iPod™
“iPod” is a trademark of Apple Inc., registered in the U.S. and
other countries.
“Made for iPod” means that an electronic accessory has been
designed to connect specifically to iPod and has been certified by
the developer to meet Apple performance standards.
Apple is not responsible for the operation of this device or its
compliance with safety and regulatory standards.
■ CD-1330
PLAYBACK SYSTEM
•CD, CD-R/RW
LASER
• Type.......................................................................................GaAlAs
• Wave length ............................................................................795 nm
• Emission Duration ............................................................ continuous
• Laser Output...............................................................max. 160 μW*
* This output is the value measured at a distance of about 200 mm
from the objective lens surface on the Optical Pick-up Block.
AUDIO PERFORMANCE
• Signal-Noise (1 kHz).................................................105 dB or more
• Dynamic range (1 kHz) .............................................100 dB or more
• Distortion and Noise (1 kHz)..................................... 0.003 % or less
GENERAL
• Power supply ..........................................................AC 230 V, 50 Hz
• Power consumption.....................................................Approx. 15 W
• Dimensions (W x H x D).....................................300 x 67 x 310 mm
• Weight ....................................................................... 3.8 kg (8.3 lbs)
Specifications are subject to change without notice.
13
/16 x 2 5/8 x 12 3/16 in)
(11
26 En
Page 31

Limited Guarantee for European Economic Area (EEA) and Switzerland
Thank you for having chosen a Yamaha product. In the unlikely event that your Yamaha product needs guarantee service, please contact the dealer from
whom it was purchased. If you experience any difficulty, please contact Yamaha representative office in your country. You can find full details on our
website (http://www.yamaha-hifi.com/ or http://www.yamaha-uk.com/ for U.K. resident).
The product is guaranteed to be free from defects in workmanship or materials for a period of two years from the date of the original purchase. Yamaha
undertakes, subject to the conditions listed below, to have the faulty product or any part(s) repaired, or replaced at Yamaha’s discretion, without any charge
for parts or labour. Yamaha reserves the right to replace a product with that of a similar kind and/or value and condition, where a model has been
discontinued or is considered uneconomic to repair.
Conditions
1 The original invoice or sales receipt (showing date of purchase, product code and dealer’s name) MUST accompany the defective product, along with a
statement detailing the fault. In the absence of this clear proof of purchase, Yamaha reserves the right to refuse to provide free of charge service and the
product may be returned at the customer’s expense.
2 The product MUST have been purchased from an AUTHORISED Yamaha dealer within the European Economic Area (EEA) or Switzerland.
3 The product must not have been the subject of any modifications or alterations, unless authorised in writing by Yamaha.
4 The following are excluded from this guarantee:
a. Periodic maintenance and repair or replacement of parts due to normal wear and tear.
b. Damage resulting from:
(1) Repairs performed by the customer himself or by an unauthorised third party.
(2) Inadequate packaging or mishandling, when the product is in transit from the customer. Please note that it is the customer’s responsibility to
ensure the product is adequately packaged when returning the product for repair.
(3) Misuse, including but not limited to (a) failure to use the product for its normal purpose or in accordance with Yamaha’s instructions on the
proper use, maintenance and storage, and (b) installation or use of the product in a manner inconsistent with the technical or safety standards in
force in the country where it is used.
(4) Accidents, lightning, water, fire, improper ventilation, battery leakage or any cause beyond Yamaha’s control.
(5) Defects of the system into which this product is incorporated and/or incompatibility with third party products.
(6) Use of a product imported into the EEA and/or Switzerland, not by Yamaha, where that product does not conform to the technical or safety
standards of the country of use and/or to the standard specification of a product sold by Yamaha in the EEA and/or Switzerland.
(7) Non AV (Audio Visual) related products.
(Products subject to “Yamaha AV Guarantee Statement” are defined in our website at http://www.yamaha-hifi.com/ or
http://www.yamaha-uk.com/ for U.K. resident.)
5 Where the guarantee differs between the country of purchase and the country of use of the product, the guarantee of the country of use shall apply.
6 Yamaha may not be held responsible for any losses or damages, whether direct, consequential or otherwise, save for the repair or replacement of the
product.
7 Please backup any custom settings or data, as Yamaha may not be held responsible for any alteration or loss to such settings or data.
This guarantee does not affect the consumer’s statutory rights under applicable national laws in force or the consumer’s rights against the dealer arising
8
from their sales/purchase contract.
Information for Users on Collection and Disposal of Old Equipment
and Used Batteries
These symbols on the products, packaging, and/or accompanying documents mean that used electrical and
electronic products and batteries should not be mixed with general household waste.
For proper treatment, recovery and recycling of old products and used batteries, please take them to
applicable collection points, in accordance with your national legislation and the Directives 2002/96/EC
and 2006/66/EC.
By disposing of these products and batteries correctly, you will help to save valuable resources and prevent
any potential negative effects on human health and the environment which could otherwise arise from
inappropriate waste handling.
For more information about collection and recycling of old products and batteries, please contact your
local municipality, your waste disposal service or the point of sale where you purchased the items.
[Information on Disposal in other Countries outside the European Union]
These symbols are only valid in the European Union. If you wish to discard these items, please contact
your local authorities or dealer and ask for the correct method of disposal.
Note for the battery symbol (bottom two symbol examples):
This symbol might be used in combination with a chemical symbol. In this case it complies with the
requirement set by the Directive for the chemical involved.
English
27 En
Page 32

ATTENTION: VEUILLEZ LIRE CE QUI SUIT AVANT D’UTILISER
L’APPAREIL.
1 Pour utiliser l’appareil au mieux de ses possibilités, lisez
attentivement ce mode d’emploi. Conservez-le soigneusement
pour référence.
2 Installez cet ensemble (R-1330 et CD-1330) dans un endroit
frais, bien aéré, sec et propre; ménagez un espace d’au moins
10 cm au dessus (sauf pour le CD-1330), 10 cm à gauche et à
droite et 10 cm à l’arrière de cet ensemble — veillez à ce qu’il
soit à l’abri de la lumière du soleil, des sources de chaleur, des
vibrations, des poussières, de l’humidité et du froid.
3 Placez l’appareil loin des équipements, moteurs et
transformateurs électriques, pour éviter les ronflements parasites.
4 N’exposez pas l’appareil à des variations brutales de température,
ne le placez pas dans un environnement très humide (par exemple
dans une pièce contenant un humidificateur) car cela peut
entraîner la condensation d’humidité à l’intérieur de l’appareil
qui elle-même peut être responsable de secousse électrique,
d’incendie, de dommage à l’appareil ou de blessure corporelle.
5 Evitez d’installer l’appareil dans un endroit où des objets peuvent
tomber, ainsi que là où l’appareil pourrait être exposé à des
éclaboussures ou des gouttes d’eau. Sur le dessus de l’appareil,
ne placez pas:
– D’autres appareils qui peuvent endommager la surface de
l’appareil ou provoquer sa décoloration.
– Des objets se consumant (par exemple, une bougie) qui
peuvent être responsables d’incendie, de dommage à
l’appareil ou de blessure corporelle.
– Des récipients contenant des liquides qui peuvent être à
l’origine de secousse électrique ou de dommage à l’appareil.
6 Ne couvrez pas l’appareil d’un journal, d’une nappe, d’un rideau,
etc. car cela empêcherait l’évacuation de la chaleur. Toute
augmentation de la température intérieure de l’appareil peut être
responsable d’incendie, de dommage à l’appareil ou de blessure
corporelle.
7 Ne branchez pas la fiche du cordon d’alimentation de l’appareil
sur une prise secteur aussi longtemps que tous les raccordements
n’ont pas été effectués.
8 Ne pas faire fonctionner l’appareil à l’envers. Il risquerait de
chauffer et d’être endommagé.
9 N’exercez aucune force excessive sur les commutateurs, les
boutons et les cordons.
10 Pour débrancher la fiche du cordon d’alimentation au niveau de
la prise secteur, saisissez la fiche et ne tirez pas sur le cordon.
11 Ne nettoyez pas l’appareil au moyen d’un solvant chimique, ce
qui pourrait endommager la finition. Utilisez un chiffon sec et
propre.
12 N’alimentez l’appareil qu’à partir de la tension prescrite.
Alimenter l’appareil sous une tension plus élevée est dangereux
et peut être responsable d’incendie, de dommage à l’appareil ou
de blessure corporelle. Yamaha ne saurait être tenue responsable
des dommages résultant de l’alimentation de l’appareil sous une
tension autre que celle prescrite.
13 Pour empêcher tout dommage causé par les éclairs, déconnectez
le cordon d’alimentation de la prise murale pendant un orage.
14 Ne tentez pas de modifier ni de réparer l’appareil. Consultez le
service Yamaha compétent pour toute réparation qui serait
requise. Le coffret de l’appareil ne doit jamais être ouvert, quelle
que soit la raison.
15 Si vous envisagez de ne pas vous servir de l’appareil pendant une
longue période (par exemple, pendant les vacances), débranchez
la fiche du cordon d’alimentation au niveau de la prise secteur.
16 Lisez la section intitulée “GUIDE DE DÉPANNAGE” où
figurent une liste d’erreurs de manipulation communes avant de
conclure que l’appareil présente une anomalie de
fonctionnement.
17 Avant de déplacer l’appareil, appuyez sur ON/STANDBY, OFF
pour éteindre le système, puis débranchez la fiche du cordon
d’alimentation au niveau de la prise secteur.
18 La condensation se forme lorsque la température ambiante
change brusquement. En ce cas, débranchez la fiche du cordon
d’alimentation et laissez l’appareil reposer.
19 La température de l’appareil peut augmenter en raison d’une
utilisation prolongée. En ce cas, coupez l’alimentation de
l’appareil et laissez-le au repos pour qu’il refroidisse.
20 Installez cet appareil à proximité de la prise secteur et à un
emplacement où la fiche du câble d’alimentation est facilement
accessible.
21 Les piles ne doivent pas être exposées à une chaleur extrême, par
exemple au soleil, à une flamme, etc.
22 Une pression excessive du son par les écouteurs et le casque
d’écoute peut entraîner la perte de l’ouïe.
Cet appareil n’est pas déconnecté du secteur tant qu’il reste
branché à la prise de courant par la touche . Il se trouve
alors “en veille”. En mode veille, l’appareil consomme une
très faible quantité de courant.
AVERTISSEMENT
POUR RÉDUIRE LES RISQUES D’INCENDIE OU DE
SECOUSSE ÉLECTRIQUE, N’EXPOSEZ PAS CET
APPAREIL À LA PLUIE OU À L’HUMIDITÉ.
SÉCURITÉ LASER
L’appareil utilise un laser. En raison des risques de blessure des
yeux, le retrait du couvercle ou les réparations de l’appareil
devront être confiés exclusivement à un technicien d’entretien
qualifié.
DANGER
Risque d’exposition au laser en cas d’ouverture. Eviter toute
exposition au faisceau. Lorsque cet appareil est branché à la prise
de courant, ne pas approcher les yeux de l’ouverture du plateau
changeur et des autres ouvertures pour regarder à l’intérieur.
Le laser de cet appareil peut émettre un rayonnement
dépassant les limites de la calsse I.
i Fr
Page 33

TABLE DES MATIÈRES
INTRODUCTION
CARACTÉRISTIQUES......................................... 2
ACCESSOIRES FOURNIS................................... 2
COMMANDES ET FONCTIONS ........................ 3
Ampli-tuner (R-1330)................................................ 3
Lecteur de CD (CD-1330) .........................................4
Boîtier de télécommande...........................................5
PRÉPARATIFS
RACCORDEMENT DE COMPOSANTS
EXTERNES AU SYSTÈME..............................9
RACCORDEMENT DES ANTENNES ............. 10
Raccordement de l’antenne FM............................... 10
RACCORDEMENT DES CORDONS
D’ALIMENTATION........................................ 10
RACCORDEMENT DE L’iPod™ ET DU
PÉRIPHÉRIQUE USB ....................................11
Raccordement d’un iPod™......................................11
Raccordement des périphériques USB ....................11
OPÉRATIONS DE BASE
FONCTIONNEMENT DU SYSTÈME .............. 12
Fonctionnement de base du système........................ 12
Modification de la luminosité de l’affichage du
panneau avant......................................................13
Réglage de la minuterie de mise hors service.......... 13
Pour utiliser le casque.............................................. 13
FONCTIONNEMENT DU DISQUE ET DU
PÉRIPHÉRIQUE USB ....................................14
Opérations de base pour la lecture........................... 14
Changement des informations concernant
la lecture sur l’affichage......................................15
Répétition de la lecture (Repeat Play)..................... 16
Lecture aléatoire (Random Play).............................16
AUTRES OPÉRATIONS
COMMANDE DE L’iPod™.................................20
Utilisation de l’iPod™............................................. 20
INFORMATIONS COMPLÉMENTAIRIES
GUIDE DE DEPANNAGE...................................21
Ampli-tuner (R-1330).............................................. 21
Boîtier de télécommande.........................................22
Lecteur de CD (CD-1330) ....................................... 23
REMARQUES SUR LES DISQUES MP3,
FICHIERS WMA..............................................24
GLOSSAIRE .........................................................26
Informations relatives aux signaux sonores............. 26
Droits d’auteur et logos ........................................... 26
CARACTERISTIQUES TECHNIQUES............26
INTRODUCTION
PRÉPARATIFS
OPÉRATIONS DE
BASE
OPÉRATIONS DE
SYNTONISATION
OPÉRATIONS
AUTRES
OPÉRATIONS DE SYNTONISATION
SYNTONISATION FM ....................................... 17
Syntonisation automatique.......................................17
Syntonisation manuelle............................................17
Mise en mémoire automatique des fréquences........17
Mise en mémoire manuelle des fréquences.............18
Accord des stations présélectionnées.......................18
SYNTONISATION AVEC LE SYSTÈME DE
DIFFUSION DE DONNÉES RADIO
(MODÈLES POUR L’EUROPE
SEULEMENT).................................................. 19
Affichage des informations du système
de diffusion de données radio.............................. 19
COMPLÉMENTAIRIES
INFORMATIONS
Français
1 Fr
Page 34

CARACTÉRISTIQUES
CARACTÉRISTIQUES
Ampli-tuner (R-1330)
•
Puissance de sortie efficace minimale par canal
60W + 60W (0,5% DHT, 1 kHz, 6Ω)
• Puissance maximale par canal
70W + 70W (0,7% DHT, 1 kHz, 4Ω)
• Mise en mémoire de 30 stations FM
• Fonctionnalité iPod (avec fonction de
recharge)
Lecteur de CD (CD-1330)
• Lit les CD audio, les disques MP3/WMA
• Prise en charge de disques CD-R, CD-RW
• Prise en charge des fichiers MP3/WMA
entregistrés sur un périphérique USB
• Opération liée à l’ampli-tuner, telle que le
mode Pure Direct, la luminosité de l’afficheur
réglable et le mode INPUT
• Mode Pure Direct
• Luminosité réglable
■ Quelques mots sur ce mode d’emploi
• Dans ce manuel, le « R-1330 » est indiqué par le terme « ampli-tuner » et le « CD-1330 » par le terme « lecteur CD ».
• Ce manuel décrit comment effectuer les différentes opérations au moyen du boîtier de télécommande, sauf lorsque ce n’est pas
possible. Certaines de ces opérations ne sont disponibles qu’avec les touches du panneau avant.
• Le symbole y appelle votre attention sur un conseil d’utilisation.
• Les remarques contiennent des informations importantes relatives à la sécurité et à l’utilisation de l’ensemble.
• Ce mode d’emploi a été imprimé avant la fabrication de l’appareil. Les caractéristiques et la présentation ont pu être modifiés à la suite
d’améliorations, etc. En cas de divergence entre le mode d’emploi et l’appareil, ce dernier prime.
ACCESSOIRES FOURNIS
Cet ensemble doit vous être livré accompagné des accessoires suivants. Avant de raccorder ce système, assurez-vous que vous avez reçu
tous les éléments suivants.
Boîtier de
télécommande
Piles (x2)
(AA, R6, UM-3)
Câble stéréo
RCA (1,0 m)
2 Fr
CDiPod
USB
FM
PHONO
AUX
PRESET
TUNING
MEMORY
RANDOM
REPEAT
iPod MENU SEL
MENU
ENTER
VOL
VOL
TONE BALANCE
DISPLAY DIMMER SLEEP
PURE DIRECT
MUTE
Antenne cadre FM
Câble de commande du
système (0,6 m)
Couvercle de la station
iPod
INPUT
PURE
ON/STANDBY
OFF
PHONES
TUNER PRESET
DIRECT
MIN
Lorsque le couvercle de la station est protégé.
VOLUME
MAX
Page 35

COMMANDES ET FONCTIONS
Ampli-tuner (R-1330)
■ Panneau avant
1
ON/STANDBY
OFF
2
PHONES
3
4
PRESET
iPod
D
56
TUNED
7
STEREO SLEEP
kHz MHz
INPUT PURE
DIRECT
E
INTRODUCTION
Vue de dessus
VOLUME
TUNER PRESET
MIN MAX
8 9
1 ON/STANDBY, OFF
Sert à mettre l’ampli-tuner en mode ON/STANDBY ou
OFF.
2 Témoin ON/STANDBY
Émet une lumière verte lorsque l’ampli-tuner est en service.
Émet une lumière orange lorsque l’ampli-tuner est en
veille.
Le témoin s’éteint lorsque l’ampli-tuner est hors tension.
3 Afficheur de la panneau avant
Affiche les différentes informations, notamment la
fréquence radio.
4 Témoin PRESET
Ce témoin s’éclaire lorsque vous sélectionnez des stations
radio en mémoire. (voir page 18).
5 Témoin TUNED
Ce témoin s’éclaire lorsqu’une station radio est accordée.
6 Témoin STEREO
Ce témoin s’allume lorsque l’ampli-tuner reçoit un signal
puissant d’une émission FM stéréo.
7 Témoin SLEEP
Ce témoin s’éclaire lorsque la minuterie de mise hors
service est active (voir page 13).
0
A
B
C
Vue de face
8 PHONES
Les signaux audio sont présents sur cette prise destinée à
l’écoute au casque.
9 Capteur de télécommande
Il reçoit les signaux émis par le boîtier de télécommande.
0 INPUT
Sert à sélectionner une source.
A PURE DIRECT
Sert à mettre en service ou hors service le mode Pure
Direct (voir page 12).
Le témoin au-dessus s’éclaire lorsque l’ampli-tuner est en
mode PURE DIRECT.
B TUNER PRESET /
La source d’entrée se règle sur FM. Permet de sélectionner
une station en mémoire.
Disponible même si l’ampli-tuner est en mode veille.
C VOLUME
Sert à régler le volume.
D h / e
La source d’entrée se règle sur iPod. Sert à démarrer la
lecture de l’iPod et à la mettre en pause. Disponible même
si l’ampli-tuner est en mode veille.
E Borne iPod
Sert à raccorder votre iPod (voir page 11).
Français
3 Fr
Page 36

COMMANDES ET FONCTIONS
Lecteur de CD (CD-1330)
■ Panneau avant
14
1 ON/STANDBY, OFF
Sert à mettre le lecteur de CD en mode ON/STANDBY ou
ON/STANDBY
OFF
2 3
USB
6 7
8
0
9
7 Capteur de télécommande
Il reçoit les signaux émis par le boîtier de télécommande.
5
AB
OFF.
8 Afficheur de la panneau avant
2 Témoin ON/STANDBY
Montre l’état actuel du lecteur de CD.
Émet une lumière verte lorsque le lecteur de CD est en
service. Émet une lumière orange lorsque le lecteur de CD
est en veille.
Le témoin s’éteint lorsque le lecteur de CD est hors
9 Témoin RANDOM
Allume l’icône correspondant au mode Lecture aléatoire
sélectionné.
tension.
0 Témoin REP OFF S ALL
3 Témoin USB
S’allume lorsque le lecteur de CD et en mode USB et
Allume l’icône correspondant au mode Lecture répétée
sélectionné.
s’éteint lorsque le lecteur de CD est en mode CD. Clignote
lorsque le lecteur de CD lit le périphérique USB.
A
Sert à démarrer la lecture ou à la mettre en pause (voir
4 Plateau CD
Posez le disque à lire dans ce plateau.
page 14).
Si vous appuyez sur cette touche en mode veille, l’ampli-
tuner se met automatiquement sous tension et l’entrée se
5
Sert à ouvrir ou fermer le tiroir pour le disque.
règle sur CD ou sur USB, selon la dernière sélection
effectuée.
Si vous appuyez sur cette touche en mode veille, l’amplituner se met automatiquement sous tension et l’entrée se
règle sur CD.
B
Sert à arrêter la lecture (voir page 14).
C D
6 Port USB
Sert à raccorder votre périphérique USB.
4 Fr
C
Accès au début de la plage actuelle. Maintenez la pression
pour accélérer la recherche arrière. Appuyez deux fois
pour atteindre le début de la plage précédente (voir
page 14).
D
Localisation de la plage suivante. Maintenez la pression
pour accélérer la recherche avant (voir page 14).
Page 37

Boîtier de télécommande
COMMANDES ET FONCTIONS
CDiPod
USB
FM
PHONO
AUX
PRESET
TUNING
MEMORY
■ Fonctions communes
1
2
CDiPod
USB
3
FM
PHONO
AUX
PRESET
TUNING
MEMORY
REPEAT
RANDOM
iPod MENU SEL
Touches de
sélection
d’entrée
Ce boîtier de télécommande peut agir sur les composants
du système (y compris sur les fonctions du syntoniseur) et
sur un iPod posé sur une station au-dessus de l’ampli-tuner.
Pour agir sur le lecteur de CD, sur les fonctions du tuner ou
sur un iPod avec le boîtier de télécommande vous devez
régler l’ampli-tuner sur le mode d’entrée correspondante.
Pour changer le mode d’entrée de l’ampli-tuner
Appuyez sur la touche de sélection d’entrée appropriée sur
le boîtier de télécommande (ou tournez INPUT sur le
panneau avant).
Le nom de la source d’entrée apparaît sur l’affichage du
panneau avant de l’ampli-tuner.
y
Si la source d’entrée CD ou USB est sélectionnée, le
lecteur de CD se met automatiquement sous tension et si
une autre source d’entrée est sélectionnée, il passe en
mode veille.
Opérations communes à tous les modes
Vous pouvez effectuer les opérations suivantes sur l’amplituner quel que soit le mode dans lequel il se trouve.
1 Émetteur de signaux infrarouges
Il envoie des signaux au système sur lequel vous voulez agir.
2 (en veille/en service)
Sert à mettre en service ou en veille le système.
INTRODUCTION
4
MENU
ENTER
VOL
VOL
TONE BALANCE
DISPLAY DIMMER SLEEP
PURE DIRECT
MUTE
5
6
7
8
9
Remarque
Même lorsque le système est en mode veille, il consomme une
faible quantité d’énergie afin de recevoir des signaux infrarouges
émis par le boîtier de télécommande.
3 Touches de sélection d’entrée
Servent à sélectionner la source d’entrée sur l’ampli-tuner.
4 PURE DIRECT
Sert à mettre en service ou hors service le mode Pure
Direct (voir page 12).
5 VOLUME +/–
Sert à ajuster le volume général de l’ampli-tuner.
6 TONE/BALANCE /
Règle la qualité du son (voir page 12).
7 SLEEP
Sert à mettre la minuterie d’arrêt en service sur le système
(voir page 13).
8 MUTE
Coupe le volume (voir page 12).
9 DIMMER
Sert à changer la luminosité de l’affichage du panneau
avant (voir page 13).
Français
5 Fr
Page 38

COMMANDES ET FONCTIONS
■ Mode CD/USB
FM
REPEAT
1
2
DISPLAY DIMMER SLEEP
3
PURE DIRECT
CDiPod
PHONO
PRESET
TUNING
MEMORY
iPod MENU SEL
MENU
ENTER
VOL
VOL
TONE BALANCE
USB
AUX
RANDOM
MUTE
4
5
6
Opérations disponibles en mode CD/USB
Vous pouvez effectuer les opérations suivantes sur le
lecteur de CD s’il est relié à l’ampli-tuner par le câble de
commande du système (voir page 9).
y
Appuyez sur CD ou USB pour mettre l’ampli-tuner en mode
CD ou USB avant d’effectuer les opérations suivantes.
1 REPEAT
Sert à sélectionner la lecture répétée (voir page 16).
2 ,
Pour accéder au début de la plage actuelle ou de la plage
suivante. Maintenez la pression du doigt sur une de ces
touches pour effectuer une recherche rapide vers la fin ou
le début du disque (voir page 14). Appuyez sur deux
fois pour atteindre le début de la plage précédente.
3 DISPLAY
Sert à changer les informations apparaissant sur l’affichage
du panneau avant du lecteur de CD (voir page 15).
4 RANDOM
Sert à mettre en et hors service la lecture aléatoire (voir
page 16).
■ Mode FM
1
2
3
CDiPod
USB
FM
PHONO
AUX
PRESET
TUNING
MEMORY
REPEAT
DISPLAY DIMMER SLEEP
PURE DIRECT
RANDOM
iPod MENU SEL
MENU
ENTER
VOL
VOL
TONE BALANCE
MUTE
4
5
Sert à arrêter la lecture (voir page 14).
6
Sert à démarrer la lecture ou à la mettre en pause (voir
page 14).
Opérations disponibles en mode FM
Les opérations suivantes sont disponibles pour l’ampli-
tuner.
y
Appuyez sur FM pour mettre l’ampli-tuner en mode FM avant
d’effectuer les opérations suivantes.
1 PRESET /
Pour choisir une station présélectionnée (voir page 18).
2 MEMORY
Sert à mettre des fréquences en mémoire (voir page 18).
Sert à démarrer la mise en mémoire automatique des
fréquences (voir page 17).
3 DISPLAY
Sert à changer les informations FM apparaissant sur
l’affichage de l’ampli-tuner (voir page 19).
4 TUNING /
Appuyez sur TUNING / pour la syntonisation
manuelle et maintenez la pression du doigt sur TUNING
/ pour la syntonisation automatique.
6 Fr
Page 39

■ Mode iPod
1
2
3
FM
REPEAT
iPod MENU SEL
CDiPod
PHONO
PRESET
TUNING
MEMORY
MENU
ENTER
VOL
VOL
USB
AUX
RANDOM
4
5
6
7
COMMANDES ET FONCTIONS
Opérations disponibles en mode iPod
Les opérations suivantes sont disponibles pour iPod. Pour
le détail sur les opérations iPod, voir « Utilisation de
l’iPod™ » à la page 20.
y
Appuyez sur iPod pour mettre l’ampli-tuner en mode iPod avant
d’effectuer les opérations suivantes.
1 iPod MENU SEL
Appuyez sur ou pour sélectionner un élément
dans le groupe sélectionné.
2 ENTER
Appuyez sur ENTER pour valider le groupe sélectionné.
(Lorsque vous appuyez sur ENTER, la lecture commence
si un morceau est sélectionné.)
3
Accès au début de la plage actuelle. Appuyez deux fois
pour accéder à la plage précédente. Maintenez la pression
pour accélérer la recherche arrière.
INTRODUCTION
TONE BALANCE
DISPLAY DIMMER SLEEP
PURE DIRECT
MUTE
4
Arrêt de la lecture.
* La lecture reprend à partir du premier morceau
enregistré dans l’iPod.
5 MENU
Retour à la première page du menu de l’iPod.
6
Pour passer au morceau suivant. Maintenez la pression
pour accélérer la recherche avant.
7
Sert à démarrer la lecture ou à la mettre en pause.
7 Fr
Français
Page 40

COMMANDES ET FONCTIONS
■ Mise en place des piles dans le boîtier
de télécommande
Appuyez sur
1 Appuyez sur l’élément et faites glisser le
couvercle du logement des piles.
2 Insérez deux piles fournies (AA, R6, UM-3) en
respectant les polarités (+ et –) à l’intérieur
du logement des piles.
3 Remettez le couvercle en le faisant glisser
jusqu’à émission d’un bruit sec.
■ Remarques sur les piles
• Remplacez les deux piles lorsque la portée de
fonctionnement du boîtier de télécommande diminue.
• Utilisez des piles AA, R6, UM-3.
• Assurez-vous que les polarités sont respectées. Voir
illustration à l’intérieur du logement des piles.
• Retirez les piles si le boîtier de télécommande sera
inutilisé pendant une longue durée.
• N’utilisez pas tout à la fois une pile neuve et une pile
usagée.
• N’utilisez pas, en même temps, des piles de type
différent (notamment, une pile alcaline et une pile au
manganèse). Veuillez lire attentivement l’emballage,
d’autant plus que ces différents types de piles peuvent
avoir la même forme et la même couleur.
• Si les piles ont fui, mettez-les immédiatement au rebut.
Évitez de toucher la substance dérivant de la fuite et de
la laisser venir en contact avec votre peau ou un
vêtement,etc. Nettoyez à fond le logement des piles
avant la mise en place de nouvelles piles.
• Ne jetez pas les piles avec les autres ordures
ménagères ; mettez-les correctement au rebut
conformément à la réglementation locale.
■ Utilisation du boîtier de télécommande
Le boîtier de télécommande transmet un rayon infrarouge
directionnel. Assurez-vous que vous dirigez le boîtier de
télécommande vers le capteur de télécommande sur la
panneau avant du système pendant l’opération.
VOLUME
INPUT PURE
ON/STANDBY
PHONES
OFF
ON/STANDBY
USB
OFF
30˚ 30˚
CDiPod
USB
FM
PHONO
AUX
PRESET
TUNING
MEMORY
RANDOM
REPEAT
iPod MENU SEL
MENU
ENTER
VOL
VOL
TONE BALANCE
DISPLAYDIMMER SLEEP
MUTE
PURE DIRECT
TUNER PRESET
DIRECT
MIN MAX
Moins de 6 m
■ Manipulation du boîtier de
télécommande
• La zone comprise entre le boîtier de télécommande et
le système doit être débarrassée de tout obstacle.
• Ne renversez pas de l’eau ou d’autres liquides sur le
boîtier de télécommande.
• Ne laissez pas tomber le boîtier de télécommande.
• Ne conservez pas et ne rangez pas le boîtier de
télécommande dans les types de conditions suivants :
– humidité élevée, par exemple près d’un bain
– température élevée, par exemple près d’un appareil
de chauffage ou d’une cuisinière
– très basses températures
– endroits poussiéreux.
• N’exposez pas le capteur de télécommande à un
éclairage vif, en particulier une lampe fluorescente à
convertisseur, sinon le boîtier de télécommande risque
de ne pas fonctionner correctement. Si besoin est,
mettez le système à l’abri de tout éclairage direct.
8 Fr
Page 41

RACCORDEMENT DE COMPOSANTS EXTERNES AU SYSTÈME
RACCORDEMENT DE COMPOSANTS EXTERNES AU SYSTÈME
Avant de raccorder le système, veuillez lire attentivement la procédure et les remarques suivantes. Pour de plus amples
informations sur les enceintes (NS-BP400), reportez-vous au mode d’emploi qui les accompagne.
AVERTISSEMENT
• Ne branchez pas cet appareil ou les autres composants sur l’alimentation secteur sans avoir effectué au préalable le raccordement des
composants entre eux.
• Veillez à ce que les fils nus des enceintes ne puissent pas venir en contact, ni entre eux ni avec une pièce métallique de l’ampli-tuner.
L’ampli-tuner et/ou les enceintes risqueraient d’être endommagés.
• Tous les raccordements doivent être exacts : L (gauche) à L, R (droite) à R, « + » à « + » et « – » à « – ». Si le raccordement n’est pas
effectué correctement, aucun son ne sortira des enceintes et si la polarité du raccordement des enceintes n’est pas respectée, la
restitution du son sera peu naturelle et dénuée de graves. Consultez également le mode d’emploi pour chacun de vos composants.
Platine Lecteur de DVD, etc. Caisson de graves
INPUT
INPUT
PRÉPARATIFS
Sortie audio
Câble
stéréo
RL RL
Sortie
audio
RCA
Câble
stéréo
RCA
Enceinte
GND
Enceinte
gauche
(NS-BP400)
droite
(NS-BP400)
L
INPUT
R
PHONO CD
ANTENNA
75
AUX
UNBAL. FM
WOOFER
OUTPUT
SUB
SYSTEM
CONNECTOR
TO:CD PLAYER
Ampli-tuner (R-1330)
(Modèle pour l’Europe)
Câble de contrôle
système (fourni)
GND
R L
SPEAKERS:6 MIN.
Câble stéréo RCA
5
1
3
4
L
OUTPUT
R L
TO:RECEIVER
SYSTEM
CONNECTOR
2
(fourni)
Lecteur de CD (CD-1330)
Raccordement du système
Reliez les prises CD (L/R) du récepteur aux prises de OUTPUT (L/R) du lecteur de CD avec le câble audio stéréo
RCA fourni.
Reliez la prise de SYSTEM CONNECTOR (TO : CD PLAYER) de l’ampli-tuner à la prise de
SYSTEM CONNECTOR (TO : RECEIVER) du lecteur de CD avec le câble de commande du système fourni.
Raccordez les bornes d’enceintes (L) de l’ampli-tuner aux bornes de l’enceinte gauche et les bornes d’enceintes (R)
de l’ampli-tuner aux bornes de l’enceinte droite avec les câbles d’enceintes fournis en même temps que la paire
d’enceintes (NS-BP400).
Remarques
• Les enceintes NS-BP400 ne sont pas blindées magnétiquement. Par conséquent, installez-les à une certaine distance du moniteur. Lors
du raccordement d’enceintes autres que les NS-BP400, utilisez des enceintes possédant une impédance supérieure à 6Ω.
• Les prises PHONO ne sont compatibles qu’avec une platine à cartouche MM.
• Raccordez votre platine à la borne GND pour réduire les bruits dans le signal. Toutefois, il se peut que vous perceviez peu de bruits
sans la connexion à la borne GND pour certaines platines.
9 Fr
Français
Page 42

RACCORDEMENT DES ANTENNES
RACCORDEMENT DES ANTENNES
Pour utiliser la radio de l’ampli-tuner, raccordez l’antenne FM fournie à la borne correspondante. Si la réception des
ondes est médiocre, ou encore si vous désirez l’améliorer, nous vous suggérons d’envisager l’emploi d’antennes
extérieures. Pour de plus amples détails concernant cette question, veuillez consulter le revendeur Yamaha ou un service
après-vente.
Raccordement de l’antenne FM
Antenne
intérieure FM
(fournie)
ANTENNA
GND
L
INPUT
R
PHONO CD
75
AUX
UNBAL. FM
OUTPUT
SUB
WOOFER
SYSTEM
CONNECTOR
TO:CD PLAYER
1 Reliez l’antenne FM intérieure fournie à la
prise FM et à la borne GND de l’ampli-tuner.
2 Tenez l’antenne à l’écart de l’ampli-tuner et
des câbles d’enceinte. Recherchez la
position de réception optimale, déployez
l’antenne, puid fixez-la.
y
La borne GND peut être utilisée conjointement avec le câble de la
platine.
RACCORDEMENT DES CORDONS D’ALIMENTATION
Après avoir effectué tous les raccordements, connectez les cordons d’alimentation de ce système et les autres
composants.
ANTENNA
R L
SPEAKERS:60MIN.
OUTPUT
R L
GND
INPUT
L
R
PHONO CD
75
UNBAL. FM
OUTPUT
AUX
WOOFER
TO:RECEIVER
SYSTEM
CONNECTOR
SYSTEM
CONNECTOR
SUB
TO:CD PLAYER
MAINS
MAINS
À la prise secteur
À la prise secteur
10 Fr
Page 43

RACCORDEMENT DE L’iPod™ ET DU PÉRIPHÉRIQUE USB
RACCORDEMENT DE L’iPod™ ET DU PÉRIPHÉRIQUE USB
Vous pouvez raccorder différents appareils audio, un périphérique USB ou un iPod à l’ampli-tuner. Pour de plus amples
informations sur les appareils à raccorder, reportez-vous aux modes d’emploi qui les accompagnent.
Raccordement d’un iPod™
L’ampli-tuner est muni d’une borne sur le panneau avant
où vous pouvez poser votre iPod et en contrôler la lecture
avec le boîtier de télécommande fourni.
Utilisez l’ampli-tuner avec l’adaptateur de station iPod
(fourni avec votre iPod ou disponible dans le commerce)
approprié. L’utilisation de l’ampli-tuner sans un
adaptateur de station iPod approprié peut induire un
raccordement défectueux.
y
Lorsque l’ampli-tuner est sous tension ou en mode veille, si vous
raccordez l’iPod pendant la lecture, l’ampli-tuner lance
automatiquement la lecture de l’iPod.
iPod
iPod
VOLUME
INPUT
PURE
ON/STANDBY
PHONES
OFF
Remarques
• Seuls les iPod (Click and Wheel), iPod nano, iPod mini et iPod
touch sont pris en charge.
• Ne raccordez pas d’accessoires d’iPod (écouteurs,
télécommande filaire ou émetteur FM) à votre iPod lorsqu’il est
sur une station.
• Les signaux audio ne seront pas transmis correctement si votre
iPod n’est pas posé correctement sur une station.
• Une fois que la liaison entre l’iPod et l’ampli-tuner est terminée
et que l’ampli-tuner est réglé sur le mode iPod (voir page 5),
« CONNECTED » s’affiche à l’écran du panneau avant. Si la
connexion entre votre iPod et l’ampli-tuner n’est pas possible,
un message apparaît sur l’affichage du panneau avant. Pour la
liste complète des messages concernant les connexions, voir le
paragraphe iPod dans « GUIDE DE DEPANNAGE » à la
page 21.
• Lorsque votre iPod est installé dans une borne de l’ampli-tuner,
votre iPod peut se recharger automatiquement même si l’amplituner est en mode veille.
• Vous pouvez débrancher l’iPod pendant la lecture.
TUNER PRESET
DIRECT
MIN
Ampli-tuner
MAX
Raccordement des périphériques USB
Ce lecteur de CD est muni d’un port USB qui peut accéder
à des fichiers MP3 ou WMA enregistrés dans votre
périphérique USB. Connectez votre périphérique USB au
port USB sur le panneau avant du lecteur de CD.
AVERTISSEMENT
Ne débranchez pas votre périphérique USB aussi longtemps que
le témoin USB clignote.
ON/STANDBY
USB
OFF
Lecteur de CD
Périphérique USB
■ Périphériques USB pris en charge
Ce lecteur de CD prend en charge des périphériques de
stockage de masse USB (par exemple, les clés USB, les
lecteurs de cartes ou les lecteurs audio portables) utilisant
le format FAT16 ou FAT32.
Remarques
• Il se peut que certains appareils ne fonctionnent pas
correctement même s’ils remplissent les conditions.
• Ne connectez pas des appareils autres que les périphériques de
stockage de masse USB.
• Lorsque vous insérez plus d’une carte mémoire utilisant
simultanément les lecteurs de cartes, etc., une seule carte
mémoire est reconnue.
• Yamaha et ses revendeurs déclinent toute responsabilité en cas
de perte de données enregistrées dans des périphériques USB
reliés à l’ampli-tuner. Par précaution, il est conseillé de faire des
copies de sauvegarde pour vos fichiers.
• Le bon fonctionnement et l’alimentation en énergie de tous les
périphériques USB ne sont pas garantis.
Lorsque votre périphérique USB est raccordé au port USB, votre
•
périphérique USB peut se recharger automatiquement même si le
lecteur de CD est en mode veille et si le mode ECO affiche OFF
(voir page 13).
• Vous pouvez débrancher le périphérique USB pendant la
lecture.
PRÉPARATIFS
Français
11 Fr
Page 44

FONCTIONNEMENT DU SYSTÈME
VOL
VOL
TONE BALANCE
DISPLAY DIMMER SLEEP
MUTE
PURE DIRECT
CDiPod
FM
PHONO
AUX
USB
PRESET
FONCTIONNEMENT DU SYSTÈME
Procédez de la façon suivante pour sélectionner une source et régler les paramètres du son sur le système.
ON/STANDBY, OFF
ON/STANDBY
PHONES
OFF
ON/STANDBY
USB
OFF
PURE DIRECT
INPUT PURE
DIRECT
TUNER PRESET
MIN MAX
3 Appuyez sur l’une des touches de sélection
VOLUME
(ou tournez INPUT sur le panneau avant)
pour sélectionner la source souhaitée.
4
Commencez la lecture sur l’appareil
sélectionné, ou choisissez une station de radio.
Pour de plus amples informations sur la lecture de
disque/du périphérique USB, voir page 14 et sur la
syntonisation, voir page 17.
(en veille/en
service)
Touches de
sélection
d’entrée
VOLUME +/–
PURE DIRECT
INPUT
VOLUME
TONE/BALANCE
/
MUTE
5 Appuyez sur VOLUME +/– (ou tournez
VOLUME sur la panneau avant) pour régler le
volume au niveau de sortie souhaité.
■ Pour régler la qualité sonore
1 Appuyez sur TONE/BALANCE pour
sélectionner BASS, TREBLE ou BALANCE.
2 Pour procéder au réglage, appuyez sur
ou .
BASS : Sert à régler la réponse des basses
fréquences.
TREBLE : Sert à régler la réponse des hautes
fréquences.
BALANCE : Sert à régler le volume des enceintes
gauche et droite.
■ Mode Pure Direct
Le mode Pure Direct ferme le réglage de la tonalité ainsi
que l’affichage du panneau avant et permet d’écouter le
son direct en haute fidélité.
Appuyez sur PURE DIRECT (ou PURE DIRECT sur
la panneau avant) pour activer le mode Pure Direct.
PURE DIRECT, le témoin s’allume et l’affichage du
panneau avant s’éteint.
Fonctionnement de base du système
1 Appuyez sur ON/STANDBY, OFF sur le
panneau avant de l’ampli-tuner et du lecteur
de CD.
2 Appuyez sur (en veille/en service) pour
mettre l’ampli-tuner en service.
Selon le mode d’entrée de l’ampli-tuner, le lecteur
CD est également mis en service par la connexion de
commande du système (voir page 9).
L’affichage du panneau avant s’allume.
12 Fr
Remarques
• Si vous effectuez des opérations quelconque alors que le mode
Balance est activé, l’affichage du panneau avant s’allume
brièvement pour signaler la commande.
• Lorsque le mode Pure Direct est activé, BASS, TREBLE ou
BALANCE ne sont pas disponibles.
Pour mettre hors service le mode Pure Direct
Appuyez une nouvelle fois sur PURE DIRECT pour que PURE
DIRECT s’éteigne et l’affichage du panneau avant s’allume.
■ Annulation du son (MUTE)
Appuyez sur MUTE pour annuler le son.
MUTE ON apparaît sur l’affichage du panneau avant.
Pour restaurer le son, appuyez de nouveau sur MUTE ou
appuyez sur VOLUME +/–.
Page 45

FONCTIONNEMENT DU SYSTÈME
■ Pour utiliser le mode ECO du lecteur de
CD
Ce mode réduit la consommation électrique en mode
veille. Même si le périphérique USB est connecté au port
USB du lecteur de CD, il ne peut pas être chargé lorsque le
lecteur de CD est en mode veille ou si le mode ECO est
réglé sur ON.
Appuyez sur ON/STANDBY, OFF tout en
maintenant enfoncée la touche
du lecteur de
CD afin de mettre le lecteur de CD sous tension.
A chaque mise sous tension du lecteur de CD en appuyant
sur ON/STANDBY, OFF tout en maintenant enfoncée la
touche du lecteur de CD, ECO ON ou ECO OFF
apparaissent en alternance sur l’affichage du panneau
avant.
Modification de la luminosité de l’affichage du panneau avant
Procédez de la façon suivante pour changer les paramètres
apparaissant sur l’affichage du panneau avant de l’amplituner.
VOL
TONE BALANCE
DISPLAY DIMMER SLEEP
PURE DIRECT
Appuyez sur DIMMER.
Vous pouvez choisir la luminosité souhaitée de l’affichage
du panneau avant entre normal (brillant), mi-sombre et
sombre.
MUTE
DIMMER
Appuyez plusieurs fois de suite sur SLEEP pour
sélectionner le délai souhaité.
Chaque fois que vous appuyez sur la touche, le délai
change de la façon suivante.
Le témoin SLEEP s’éclaire sur l’affichage du panneau
avant.
120min.
90min.
60min.
30min.
OFF
y
• La minuterie de mise hors service est annulée si l’ampli-tuner
est mis en veille.
• Vous pouvez voir le temps restant sur l’affichage du panneau
avant en appuyant une fois sur SLEEP lorsque la minuterie de
mise hors service est activée.
Pour désactiver la minuterie de mise hors
service
Appuyez plusieurs fois de suite sur SLEEP pour
sélectionner « OFF ».
Pour utiliser le casque
Vous pouvez raccorder votre casque à la prise de
PHONES sur le panneau avant de l’ampli-tuner.
Le son restitué par les enceintes et le caisson de graves
s’arrête.
OPÉRATIONS DE
BASE
Réglage de la minuterie de mise hors service
La minuterie de mise hors service met l’ampli-tuner en
veille dans le délai spécifié.
VOL
TONE BALANCE
DISPLAY DIMMER SLEEP
PURE DIRECT
SLEEP
MUTE
ON/STANDBY
OFF
PHONES
Français
13 Fr
Page 46

FONCTIONNEMENT DU DISQUE ET DU PÉRIPHÉRIQUE USB
FONCTIONNEMENT DU DISQUE ET DU PÉRIPHÉRIQUE USB
Vous pouvez procéder à la lecture des CD audio, des périphériques USB et des fichiers MP3 ou WMA enregistrés sur un
disque/périphérique USB. Selon le disque/périphérique USB, certaines opérations peuvent être différentes ou restreintes.
Avant d’engager la lecture, vérifiez si votre disque/périphérique USB est compatible avec ce système (voir page 24).
Remarque
Selon le disque, certaines opérations peuvent être différentes ou
restreintes.
CDiPod
CD
FM
REPEAT
PHONO
PRESET
TUNING
MEMORY
iPod MENU SEL
MENU
ENTER
VOL
USB
AUX
RANDOM
USB
/
Opérations de base pour la lecture
■ Pour commander la lecture du disque
1
Sélectionnez CD comme source (voir page 12).
2 Appuyez sur
disque et charger un CD.
3 Appuyez sur .
La lecture démarre automatiquement.
Pour un CD audio, la lecture commence à partir de la
première plage et pour les fichiers MP3 ou WMA,
elle suit l’ordre alphanumérique des noms de fichiers.
y
Vous pouvez aussi fermer le plateau du disque en appuyant sur la
touche du lecteur de CD.
■ Pour commencer la lecture du
périphérique USB
1
Sélectionnez USB comme source (voir page 12).
2 Raccordez votre périphérique USB au port
USB sur le lecteur de CD.
Le nombre total de fichiers est affiché.
Le temps de lecture peut dépasser 30 secondes selon
le nombre de fichiers/dossiers.
pour ouvrir le plateau du
3
Appuyez sur pour commander la lecture.
Pour un périphérique USB, la lecture se déroule
suivant la date et l’heure de création si les fichiers à
lire sont enregistrés dans le périphérique USB.
Remarques
• La durée totale n’apparaît pas pour la lecture du périphérique
USB.
• Si le périphérique USB est partitionné, seule la première
partition est affichée.
• Certains fichiers peuvent ne pas s’afficher correctement selon
les caractéristiques du périphérique USB.
• Les fichiers protégés contre la copie ne peuvent pas être lus.
• Ce système peut lire des fichiers dont la taille est inférieure ou
égale à 4 Go.
Pour arrêter la lecture
Appuyez sur .
Pour les CD audio, le nombre total de plages et la durée
totale du disque sont affichées, et pour les disques MP3/
WMA ou les périphériques USB, le nombre total de
fichiers est indiqué sur le panneau avant.
Pour interrompre la lecture
Appuyez sur .
Pour reprendre la lecture normale, appuyez sur .
Pour sauter des plages
• Pour revenir au début de la plage actuelle, appuyez
sur .
• Pour atteindre le début de la plage suivante, appuyez
sur .
• Pour atteindre le début de la plage précédente, appuyez
rapidement deux fois sur .
Pour déplacer rapidement le capteur dans
un sens ou dans l’autre
• Pour accélérer la recherche avant, maintenez la
pression .
• Pour accélérer la recherche avant, maintenez la
pression .
y
Le son peut être entendu (quoique légèrement brouillé) pendant ces
opérations dans l’une ou l’autre direction. C’est pratique pour repérer
une séquence précise dans une plage ou pour vite passer en revue le
contenu. Le son peut ne pas être entendu selon le fichier MP3/WMA.
14 Fr
Page 47

FONCTIONNEMENT DU DISQUE ET DU PÉRIPHÉRIQUE USB
Changement des informations concernant la lecture sur l’affichage
Sert à changer les informations qui apparaissent sur l’affichage du panneau avant du lecteur de CD. Les informations
disponibles dépendent du type de disque/périphérique USB.
VOL
Appuyez sur DISPLAY plusieurs fois de suite
pendant la lecture d’un disque/périphérique USB.
Chaque fois que vous appuyez sur la touche, l’affichage
change comme indiqué dans « Informations concernant la
lecture des CD audio » et « Informations concernant la
lecture des fichiers MP3 ou WMA enregistrés sur des
DISPLAY
TONE BALANCE
DISPLAY DIMMER SLEEP
PURE DIRECT
MUTE
disques/périphériques USB ».
Remarque
Certains caractères spéciaux ne s’afficheront pas correctement.
■ Informations concernant la lecture des CD audio
Les informations suivantes apparaissent pendant la lecture d’un CD audio.
1 Temps écoulé de la plage actuelle
2 Temps restant sur le disque
■ Informations concernant la lecture des fichiers MP3 ou WMA enregistrés sur des
disques/périphériques USB
1 Temps écoulé du fichier actuel
OPÉRATIONS DE
BASE
2 Nom du fichier
Pour revenir à l’affichage normal après l’indication d’un
nom de fichier.
Français
15 Fr
Page 48

FONCTIONNEMENT DU DISQUE ET DU PÉRIPHÉRIQUE USB
Répétition de la lecture (Repeat Play)
La lecture de l’élément sélectionné sur le disque/
périphérique USB peut être répétée.
CDiPod
USB
FM
PHONO
AUX
PRESET
TUNING
MEMORY
REPEAT
REPEAT
1 Commencez la lecture du disque/
périphérique USB qui doit être répété.
2 Pendant la lecture du disque/périphérique
USB, appuyez sur REPEAT pour sélectionner
le mode Lecture répétée souhaité.
À chaque pression de la touche, le témoin du mode de
lecture répétée sur l’affichage du panneau avant du
lecteur de CD change de la façon suivante.
RANDOM
iPod MENU SEL
Lecture aléatoire (Random Play)
Les plages sur le disque/périphérique USB peuvent être
lues dans un ordre aléatoire.
Remarque
Pendant la lecture aléatoire d’un disque/USB, le temps restant sur
le disque ne peut pas être indiqué.
CDiPod
USB
FM
PHONO
AUX
PRESET
TUNING
MEMORY
iPod MENU SEL
RANDOM
RANDOM
REPEAT
Appuyez sur RANDOM lorsque la lecture est
arrêtée.
Le témoin RANDOM s’allume sur l’affichage du panneau
avant du lecteur de CD et la lecture aléatoire commence.
Pour abandonner la lecture aléatoire
Appuyez sur .
Désactivée (Lecture normale)
REP S (Lecture répétée de plage)
REP ALL (Lecture répétée de disque)
Pour abandonner la lecture répétée
Appuyez plusieurs fois de suite sur REPEAT de sorte que
le témoin de lecture répétée disparaisse de l’affichage du
panneau avant.
Remarque
Le mode Lecture répétée est annulé lorsque vous retirez le
disque/périphérique USB.
y
REP OFF apparaît lorsque le système est réglé sur le mode Pure
Direct.
16 Fr
Page 49

SYNTONISATION FM
Il existe 2 méthodes de syntonisation : syntonisation automatique et syntonisation manuelle. La syntonisation
automatique est efficace lorsque les signaux captés sont puissants et qu’il n’existe aucun brouillage. Si le signal de la
station que vous désirez écouter est peu puissant, effectuez une syntonisation manuelle. Vous pouvez aussi utiliser la
syntonisation automatique et la syntonisation manuelle pour mettre en mémoire jusqu’à 30 stations.
Syntonisation automatique
La syntonisation automatique est efficace lorsque les
signaux captés sont puissants et qu’il n’existe aucun
brouillage.
CDiPod
USB
FM
PHONO
FM
REPEAT
1
Appuyez sur FM (ou tournez INPUT sur la
PRESET
TUNING
MEMORY
iPod MENU SEL
AUX
RANDOM
TUNING /
panneau avant) pour régler l’ampli-tuner sur le
mode FM.
2 Maintenez la pression sur TUNING /
pour plus de 2 secondes pour activer la
syntonisation automatique.
Lorsqu’une station est accordée, le témoin TUNED
s’éclaire et la fréquence de cette station apparaît sur
l’affichage du panneau avant.
• Appuyez sur d pour diminuer la fréquence de
syntonisation.
• Appuyez sur u pour augmenter la fréquence de
syntonisation.
Syntonisation manuelle
Si le signal de la station que vous désirez écouter est peu
puissant, effectuez une syntonisation manuelle.
1
Appuyez sur FM (ou tournez INPUT sur la face
avant) pour régler l’ampli-tuner sur le mode FM.
Mise en mémoire automatique des fréquences
Procédez de la manière ci-dessous pour présélectionner
automatiquement les stations radio.
CDiPod
USB
FM
PHONO
FM
REPEAT
1
Appuyez sur FM (ou tournez INPUT sur la
panneau avant) pour régler l’ampli-tuner sur le
mode FM.
2 Appuyez pour plus de 2 secondes sur
MEMORY.
Le témoin PRESET clignote sur l’affichage du
panneau avant et la présélection de stations démarre
automatiquement.
Une fois toutes les fréquences parcourues, la
présélection s’arrête automatiquement.
• La présélection automatique s’effectue de la
fréquence inférieure vers la fréquence supérieure.
• L’ampli-tuner attribue automatiquement un
numéro à chaque station détectée.
• Pour annuler, appuyez sur MEMORY.
Remarques
• Vous pouvez présélectionner jusqu’à 30 stations FM.
• Les données relatives à une station qui peuvent exister sous un
numéro de présélection sont effacées au moment où de
nouvelles données sont sauvegardées sous ce numéro.
PRESET
TUNING
MEMORY
AUX
PRESET /
MEMORY
RANDOM
SYNTONISATION
OPÉRATIONS DE
2 Appuyez sur TUNING / pour
effectuer manuellement la syntonisation sur
la station désirée.
Français
17 Fr
Page 50

SYNTONISATION FM
Mise en mémoire manuelle des fréquences
Vous pouvez enregistrer jusqu’à 30 stations.
CDiPod
USB
FM
PHONO
AUX
PRESET
TUNING
MEMORY
REPEAT
1 Réalisez l’accord sur la station radio que
vous voulez présélectionner.
Voir page 17 pour de plus amples détails sur la
syntonisation.
2 Appuyez sur MEMORY.
Le témoin PRESET clignote sur l’affichage du
panneau avant pendant 5 secondes environ.
3 Appuyez sur PRESET / plusieurs
fois de suite pour sélectionner un numéro de
station préréglée lorsque le témoin MEMORY
clignote.
PRESET /
MEMORY
RANDOM
Accord des stations présélectionnées
Vous pouvez accorder n’importe quelle station
simplement en sélectionnant le numéro de présélection où
elle a été préréglée (voir page 17).
CDiPod
USB
FM
PHONO
FM
REPEAT
1
Appuyez sur PRESET / plusieurs fois
de suite pour choisir une station
présélectionnée.
y
Vous pouvez aussi utiliser le panneau avant pour accorder une
station présélectionnée. Appuyez sur TUNER PRESET
plusieurs fois de suite pour choisir une station présélectionnée.
PRESET
TUNING
MEMORY
iPod MENU SEL
AUX
RANDOM
PRESET
/
d / u
4 Appuyez sur MEMORY pour mettre en
mémoire lorsque le témoin MEMORY
clignote.
Le témoin PRESET s’éclaire sur l’affichage du
panneau avant.
5 Répétez les étapes 1 à 4 jusqu’à ce que les
stations souhaitées soient présélectionnées.
18 Fr
Page 51

SYNTONISATION AVEC LE SYSTÈME DE DIFFUSION DE DONNÉES
PRESET
RADIO (MODÈLES POUR L’EUROPE SEULEMENT)
Le système de diffusion de données radio (modèles pour l’Europe seulement) est un système de transmission de données
utilisé par les stations FM d’un grand nombre de pays. Les services du système de diffusion de données radio sont
assurés par les stations d’un réseau. Cet ampli-tuner peut recevoir différents types de données via le système de diffusion
de données radio, par exemple le nom de l’émission (PS), le type de l’émission diffusée (PTY), le message écrit (RT),
l’heure (CT), les réseaux associés.
Affichage des informations du système de diffusion de données radio
Cette fonction permet d’afficher les 4 types
d’informations du système de diffusion de données radio
suivants : PS (nom de l’émission), PTY (type de
l’émission diffusée), RT (message écrit) et CT (heure).
Remarques
• Vous ne pouvez sélectionner que les modes du système de
diffusion de données radio proposés par la station.
• Si les signaux reçus ne sont pas assez forts, l’appareil peut être
incapable d’utiliser le système de diffusion de données radio.
Le mode « RT » diffuse souvent un grand nombre de données
qui ne pourront pas toujours être affichées en même temps que
d’autres modes du système de diffusion de données radio.
• Si le signal est affaibli par des interférences lorsque l’amplituner reçoit le système de diffusion de données radio, il peut
être soudainement coupé et dans ce cas « ...WAIT » apparaît sur
l’affichage du panneau avant.
• Lorsque le mode « RT » est sélectionné, le nombre maximal de
caractères alphanumériques pouvant être affichés s’élève à 64,
symbole du tréma compris. Les caractères ne pouvant pas être
retranscrits sont remplacés par « _ » (soulignement).
TUNING
MEMORY
RANDOM
iPod MENU SEL
MENU
ENTER
VOL
VOL
TONE BALANCE
MUTE
DISPLAY
REPEAT
DISPLAY DIMMER SLEEP
PURE DIRECT
Tout en accordant une station du système de
diffusion de données radio, appuyez plusieurs
fois de suite sur DISPLAY pour sélectionner le
mode d’affichage du système de données radio
souhaité.
SYNTONISATION
OPÉRATIONS DE
PS
PTY
RT
CT
Fréquence
• Sélectionnez « PS » pour afficher le nom de
l’émission du système de diffusion de données
radio actuellement reçue.
• Sélectionnez « PTY » pour afficher le type de
l’émission du système de diffusion de données
radio actuellement reçue.
• Sélectionnez « RT » pour afficher les messages
concernant l’émission du système de diffusion de
données radio actuellement reçue.
• Sélectionnez « CT » pour afficher l’heure actuelle.
19 Fr
Français
Page 52

COMMANDE DE L’iPod™
COMMANDE DE L’iPod™
Avec le boîtier de télécommande, vous pouvez non seulement agir sur l’ampli-tuner (R-1330) et le lecteur de CD,
(CD-1330) mais aussi sur votre iPod dans la mesure où il est posé sur une station.
Utilisation de l’iPod™
Lorsque vous posez votre iPod sur une station, vous pouvez utiliser le boîtier de télécommande pour écouter la musique
enregistrée sur votre iPod.
Lors du raccordement de l’iPod pendant la lecture, ce système passe automatiquement en mode iPod.
Remarques
• Seuls les iPod (Click and Wheel), iPod nano, iPod mini et iPod touch sont pris en charge.
• Certaines fonctions risquent de ne pas être compatibles selon le modèle ou la version du logiciel de votre iPod.
y
Pour obtenir la liste complète des messages apparaissant sur l’affichage du panneau avant de l’ampli-tuner, reportez-vous au paragraphe
« iPod » dans « GUIDE DE DEPANNAGE » (voir page 22).
CDiPod
iPod
REPEAT
iPod MENU
SEL
ENTER
iPod Boîtier de télécommande
FM
REPEAT
PHONO
PRESET
TUNING
MEMORY
iPod MENU SEL
MENU
ENTER
USB
AUX
RANDOM
RANDOM
MENU
ENTER
3 Appuyez sur / pour vous déplacer sur
le menu de l’iPod puis appuyez sur ENTER
pour écouter la chanson (ou le groupe)
sélectionné(e).
• Affichez l’écran de l’iPod pour utiliser le menu.
• Faites fonctionner l’iPod avec les commandes de
l’iPod ou le boîtier de télécommande.
■ Répétition de la lecture (Repeat Play)
La lecture de l’élément sélectionné sur l’iPod peut être répétée.
Appuyez sur REPEAT pour sélectionner le mode
de répétition souhaité.
Chaque fois que vous appuyez sur la touche, le mode
Lecture répétée change de la façon décrite dans l’exemple
suivant. Pour utiliser correctement cette procédure, testezla avec votre iPod.
Un (Lecture répétée de chansons)
Tous (Lecture répétée de groupes sélectionnés)
iPod MENU SEL
Le boîtier de télécommande fourni a les mêmes
touches de fonction que votre iPod. Ainsi, ces touches
correspondent les unes aux autres.
1 Appuyez sur iPod pour sélectionner iPod
comme source.
2 Posez votre iPod sur une station.
20 Fr
Non
■ Lecture aléatoire (Shuffle Play)
Les morceaux ou les albums peuvent être lus dans un
ordre aléatoire.
Appuyez sur RANDOM.
Chaque fois que vous appuyez sur la touche, le mode
Lecture aléatoire change de la façon décrite dans
l’exemple suivant. Pour utiliser correctement cette
procédure, testez-la avec votre iPod.
Morceaux (Lecture aléatoire de chansons)
Albums (Lecture aléatoire d’albums)
Non
Page 53

GUIDE DE DEPANNAGE
Reportez-vous au tableau suivant si l’appareil ne fonctionne pas convenablement. Si l’anomalie constatée n’est pas
mentionnée, ou encore si les actions correctives suggérées sont sans effet, mettez l’appareil hors service, débranchez la
fiche du câble d’alimentation et prenez contact avec le revendeur ou le service après-vente de Yamaha.
Ampli-tuner (R-1330)
■ Généralités
Anomalies Causes possibles Actions correctives
L’ampli-tuner ne se
met pas en service
ou en veille lorsque
vous appuyez sur la
touche
d’alimentation.
Absence de son Les raccordements des câbles d’entrée ou
Le son ne sort des
enceintes que d’un
côté.
Un appareil numérique
ou un appareil
radiofréquence génère
un brouillage.
Le son est déformé. Le volume est trop élevé. Sert à régler le volume.
« CHK SP WIRE »
apparaît sur
l’affichage.
La fiche du câble d’alimentation n’est pas
convenablement branchée, ou pas
branchée du tout.
L’ampli-tuner a été soumis à une
secousse électrique puissante (provoquée
par exemple par un orage ou une
décharge d’électricité statique).
Le câble est court-circuité et le circuit de
protection a été activé.
La température interne est trop élevée, le
circuit de protection a été activé.
de sortie ne sont pas corrects.
Aucune source convenable n’a été
sélectionnée.
Les raccordements des enceintes sont
défectueux.
Le niveau de sortie est réglé au minimum. Augmentez le niveau de sortie.
Le son n’est pas annulé. Appuyez sur MUTE ou VOLUME +/– pour
Les signaux transmis, par exemple ceux
d’un CD-ROM, ne peuvent pas être reçus
par l’ampli-tuner.
La minuterie a mis l’ampli-tuner hors
service.
Les raccordements des câbles sont
incorrects.
L’ampli-tuner est trop proche de
l’appareil numérique ou de l’appareil
radiofréquence.
Un composant autre qu’une platine est
raccordé aux prises PHONO.
Les câbles des enceintes sont courtcircuités.
Branchez soigneusement le câble d’alimentation.
Mettez l’ampli-tuner en mode OFF, débranchez le
câble d’alimentation puis rebranchez-le environ
30 secondes plus tard et utilisez l’ampli-tuner
comme à l’accoutumée.
Assurez-vous que les raccordements de câble de
l’enceinte sur l’ampli-tuner et sur toutes les enceintes
sont sécurisés et que le câble pour chaque
raccordement ne touche pas autre chose que son
raccordement respectif.
Attendez environ 1 heure pour que l’ampli-tuner
refroidisse et ensuite mettez en service à nouveau.
Raccordez les câbles comme il convient. Si
l’anomalie persiste, il se peut que les câbles soient
défectueux.
Sélectionnez la source appropriée avec le sélecteur
INPUT sur le panneau avant (ou avec les touches de
sélection d’entrée sur le boîtier de télécommande).
Corrigez les raccordements.
reprendre le son et ensuite réglez le volume.
Choisissez une source dont les signaux peuvent être
reproduits par l’ampli-tuner.
Mettez l’ampli-tuner en service et reprenez la
lecture.
Raccordez les câbles comme il convient. Si
l’anomalie persiste, il se peut que les câbles soient
défectueux.
Éloignez l’ampli-tuner de celui qui est concerné.
Raccordez-le aux prises CD ou AUX.
Assurez-vous que les câbles des enceintes sont
branchés correctement.
Voir la
page
10
—
9
9
9
—
9
—
5
—
—
9
—
12
9
9
COMPLÉMENTAIRIES
INFORMATIONS
Français
21 Fr
Page 54

GUIDE DE DEPANNAGE
■ FM
Anomalies Causes possibles Actions correctives
La réception FM en
stéréophonie est parasitée.
La réception FM est mauvaise,
même avec une antenne de
bonne qualité.
Il n’est pas possible
d’effectuer la syntonisation
automatique sur la station
souhaitée.
Les caractéristiques des émissions FM
stéréophoniques sont à l’origine de
cette anomalie si l’émetteur est trop
éloigné, ou encore si le niveau d’entrée
sur l’antenne est médiocre.
L’appareil est soumis aux effets de
trajets multiples.
La puissance captée est trop faible. Tentez d’utiliser une antenne FM
Vérifiez les raccordements de l’antenne.
Tentez d’utiliser une antenne FM
directionnelle de bonne qualité.
Essayez de changer la position de l’antenne
pour supprimer les trajets multiples.
directionnelle de bonne qualité.
Effectuez la syntonisation manuellement.
Voir la
page
10
—
—
—
17
■ iPod
Remarque
En cas d’erreur de transmission sans message sur l’affichage du panneau avant de l’ampli-tuner, vérifiez les liaisons à votre iPod (voir
page 11).
Message d’état Causes possibles Actions correctives
CONNECT ERR
UNKNOWN TYP
CONNECTED
NOT CONNECT
CAN'T PLAY
Il y a un obstacle entre le trajet de signal
de votre iPod et l’ampli-tuner.
L’iPod utilisé n’est pas pris en charge par
l’ampli-tuner.
Votre iPod est correctement posé sur une
borne et la liaison entre votre iPod et
l’ampli-tuner est terminée.
Votre iPod a été retiré d’une borne de
l’iPod de l’ampli-tuner.
Vous ne pouvez pas écouter les chansons
enregistrées sur votre iPod.
Mettez l’ampli-tuner hors service et rebranchez la
borne de l’iPod à l’ampli-tuner.
Seuls les iPod (Click and Wheel), iPod nano, iPod
mini et iPod touch sont pris en charge.
Posez votre iPod à nouveau sur la borne de l’amplituner.
Assurez-vous que les chansons enregistrées sur votre
iPod peuvent bien être lues sur cet appareil.
Enregistrez sur votre iPod des fichiers pouvant être
lus sur cet appareil.
Voir la
page
11
—
11
—
—
Boîtier de télécommande
Anomalies Causes possibles Actions correctives
Le boîtier de
télécommande ne
fonctionne pas ou
n’agit pas
convenablement.
22 Fr
Le boîtier de télécommande est peut-être
utilisé en dehors de sa portée de
fonctionnement.
Le capteur de la télécommande sur cet
appareil est peut-être exposé à la lumière
directe du soleil ou à l’éclairage (lampe
fluorescente inventée).
Les piles sont peut-être usées. Remplacez les piles usagées par des piles neuves.
Il y a des obstacles entre le capteur de cet
appareil et la télécommande.
Pour de plus amples informations sur la portée de
fonctionnement de la télécommande, référez-vous à
« Utilisation du boîtier télécommande ».
Changez l’éclairage ou l’orientation de l’appareil.
Enlevez les obstacles.
Voir la
page
8
8
8
8
Page 55

Lecteur de CD (CD-1330)
GUIDE DE DEPANNAGE
Anomalies Causes possibles Actions correctives
Impossible de mettre
l’appareil sous
tension
Aucun son ou
distorsion du son
La lecture de disque
ne démarre pas.
Impossible de
reconnaître le
périphérique USB.
Non lié à l’amplituner
La fiche n’est pas complètement insérée. Branchez soigneusement le câble d’alimentation.
L’ampli-tuner et le lecteur de CD ne sont
pas correctement raccordés.
L’ampli-tuner n’est pas correctement
configuré.
La fréquence d’écha ntillonnage du fichier
MP3 ou WMA n’est peut-être pas
compatible avec le lecteur de CD.
Vous utilisez peut-être un CD-R/RW qui
n’est pas clôturé.
La face étiquetée du disque n’est peutêtre pas orientée vers le haut.
Le disque est peut-être défectueux. Essayez de lire un autre disque. Si le problème
Le disque MP3/WMA ne contient peutêtre pas suffisamment de plages pour
pouvoir être lu.
La fréquence d’écha ntillonnage du fichier
MP3 ou WMA n’est peut-être pas
compatible avec le lecteur de CD.
Vérifiez que le périphérique USB est
convenablement branché.
Le câble de commande du système est
débranché de la prise du connecteur
système sur l’ampli-tuner et/ou lecteur de
CD.
Vérifiez le raccordement à l’ampli-tuner.
Vérifiez les réglages (INPUT/Volume/MUTE/
Casque) de l’ampli-tuner.
Vérifiez que la fréquence d’échantillonnage et le
débit binaire du fichier MP3 ou WMA sont
compatibles avec le lecteur de CD.
Clôturez le CD-R/RW.
Assurez-vous que la face étiquetée est bien orientée
vers le haut.
n’apparaît plus, c’est que le disque était défectueux.
Assurez-vous que le disque MP3/WMA contient au
moins 5 fichiers de musique MP3/WMA.
Vérifiez que la fréquence d’échantillonnage et le
débit binaire du fichier MP3 ou WMA compatibles
avec le lecteur de CD.
Branchez fermement le périphérique USB.
Raccordez l’ampli-tuner et le lecteur de CD
fermement à l’aide du câble de commande du
système.
Voir la
page
9
9
—
24
—
—
—
—
24
11
9
■ USB
Remarque
En cas d’erreur de transmission sans message d’état sur l’affichage du panneau avant de l’ampli-tuner, vérifiez les liaisons au
périphérique USB (voir page 11).
Message d’état Causes possibles Actions correctives
NO USB
OVER CURENT
Impossible de raccorder le périphérique
USB.
Un périphérique USB non pris en charge
a été connecté.
Un périphérique USB a été connecté sur
une source d’entrée incorrecte.
Raccordez un périphérique USB compatible.
Débranchez le périphérique USB. Changez la source
d’entrée autre que USB et sélectionnez USB comme
source d’entrée à nouveau. Ensuite, branchez le
périphérique USB qui peut jouer à nouveau.
Voir la
page
11
—
23 Fr
COMPLÉMENTAIRIES
INFORMATIONS
Français
Page 56

REMARQUES SUR LES DISQUES MP3, FICHIERS WMA
REMARQUES SUR LES DISQUES MP3, FICHIERS WMA
■ Disques (CD audio) compatibles avec ce
lecteur CD
Ce lecteur est conçu pour jouer des disques compacts portant
les marques indiquées ci-dessous. Ne jamais essayer de
charger un autre type de disque dans l’appareil. Le lecteur
CD peut lire également des disques compacts de 8 cm.
....
Disques compacts (audio numérique)
Les disques les plus courants pour les CD
audio disponibles sur le marché.
....
Disques audionumériques
CD-R, CD-RW
Les CD de musique obtenus par copie sur
un CD-R ou CD-RW (notamment les
fichiers MP3 ou WMA).
Remarques
• Assurez-vous que vous utilisez un CD-R ou
CD-RW fabriqué par un fabricant fiable.
Assurez-vous que vous utilisez un CD-R ou CD-
•
RW qui contient au moins l’une des expressions
suivantes sur le disque ou son emballage.
FOR CONSUMER
FOR CONSUMER USE
FOR MUSIC USE ONLY
• Assurez-vous que vous utilisez un CD ou CDRW clôturé.
....
Disques CD-TEXT
Les disques enregistrés avec des données
écrites telles que les titres d’album, titres
de morceaux et noms d’artistes.
Bien que ces disques puissent être joués
avec des lecteurs CD ordinaires, les
données écrites ne s’affichent pas.
Remarque
Le lecteur de disque compact peut ne pas jouer certains
disques CD-RW ou des disques sur lesquels l’enregistrement
n’a pas été fait correctement.
Pour éviter un dysfonctionnement du lecteur CD :
• Ne pas utiliser des disques qui ne
sont pas ronds (en forme de coeur,
etc.) vendus sur le marché parce
que cela pourrait endommager
l’appareil.
Ne pas utiliser un disque ayant une étiquette, du ruban
•
ou de la colle dessus. Si vous utilisez un tel disque, il
pourrait se coincer dans l’appareil ou l’endommager.
■ À propos des fichiers MP3 et WMA
Vous pouvez jouer des fichiers MP3 et WMA enregistrés sur
un CD-R/CD-RW et ceux stockés sur un périphérique USB.
MP3
Le MP3 est une technologie et un format standard de
compression d’une séquence audio en un fichier de petite
taille. Toutefois, le niveau original de la qualité du son est
préservé pendant la lecture.
Les formats suivants peuvent être lus :
• MPEG-1 Audio Layer-3
Débit binaire* : 32-320 kbps
Fréquence d’échantillonnage : 44,1/48/32 kHz
• MPEG-2 Audio Layer-3, 2
Débit binaire* : 8-160 kbps
Fréquence d’échantillonnage : 24/22,05/16 kHz
• MPEG-2.5 Audio Layer-2
Débit binaire* : 8-160 kbps
Fréquence d’échantillonnage : 12/11,025/8 kHz
* La variable de débit binaire est prise en charge.
WMA
« WMA (Windows Media Audio) » est un format de
fichier Microsoft pour encoder des fichiers audio
numériques similaires au MP3, mais peuvent compresser
des fichiers à un taux supérieur au MP3.
Les formats suivants peuvent être lus :
•Version 8
• Version 9 (Les débits binaires et variables sont pris en
charge. La version professionnelle et Lossless (sans
perte) ne sont pas pris en charge).
• High Profile
Débit binaire* : 32-320 kbps
Fréquence d’échantillonnage : 48/44,1/32 kHz
• Mid Profile
Débit binaire : 16-32 kbps
Fréquence d’échantillonnage : 22,05/16 kHz
* Les débits binaires constants et variables sont pris en charge.
Remarques
• Selon les conditions d’enregistrement, et en particulier les
réglages effectués, le lecteur de CD peut être dans l’incapacité
de lire un disque ou un périphérique USB dans l’ordre
d’enregistrement des plages.
• La lecture d’un disque de données commence par ordre
alphanumérique.
• La lecture d’un périphérique USB commence par ordre de date
et de l’heure de création.
• Les fichiers WMA (DRM) protégés contre la copie ne peuvent
pas être lus sur le lecteur de CD.
• Ce disque doit être conforme à ISO9660.
• Le nombre maximum de fichiers et de dossiers sont les suivants.
Disque de
données
Nombre total maximal de fichiers
de fichiers et de dossiers*
Nombre de dossiers maximum* 255 255
Nombre de fichiers maximum par
dossier
* La racine compte pour un dossier.
512 999
511 255
USB
24 Fr
Page 57

REMARQUES SUR LES DISQUES MP3, FICHIERS WMA
■ Remarques sur la manipulation des
disques compacts
• Toujours manipuler un disque avec soin pour que la
surface ne soit pas grattée.
• Les disques compacts ne sont pas soumis à l’usure
pendant la lecture, mais un dommage sur la surface du
disque lors de la manipulation peut dangereusement
affecter la lecture du disque.
• Assurez-vous que vous utilisez un stylo-feutre ou un
outil d’écriture similaire lorsque vous écrivez sur
l’étiquette du disque. Ne pas utiliser un stylo à bille, un
crayon ou tout autre objet pointu, car ils peuvent
endommager le disque et affecter sérieusement la
lecture du disque.
• Ne déformez pas les disques.
• Lorsqu’un disque n’est pas utilisé, retirez-le de
l’appareil et mettez dans une étui approprié.
• Lorsque vous retirez ou stockez un disque, faites
attention de ne pas gratter la surface de lecture.
• Les disques compacts ne sont pas affectés par de
petites particules de poussières ou empreintes digitales
sur la surface de lecture, mais elle doit quand même
être nettoyée. Essuyez à l’aide d’un chiffon propre et
sec.
Ne pas nettoyer en faisant des mouvements circulaires,
nettoyez du milieu vers l’extérieur.
Pour lire un CD de 8 cm
Placez-le dans la zone en retrait interne du tiroir du disque.
Ne pas mettre un CD normal (12 cm) au-dessus d’un CD
de 8 cm.
Remarque : Ne pas utiliser un dispositif de nettoyage
optique, car ceci pourrait entraîner un
dysfonctionnement.
• N’essayez pas de nettoyer la surface des disques à
l’aide de tout type de nettoyant, aérosol, aérosol
antistatique ou liquide ou tout liquide chimique parce
que ces substances peuvent de façon irréparable
endommager la surface des disques.
• Ne pas exposer les disques directement aux rayons du
soleil, une température élevée ou une humidité forte
pour une longue période, car ils peuvent déformer ou
autrement endommager le disque.
Non !
COMPLÉMENTAIRIES
INFORMATIONS
Français
25 Fr
Page 58

GLOSSAIRE
GLOSSAIRE
Informations relatives aux signaux sonores
■ MP3 (MPEG Audio Layer-3)
Une des méthodes de compression du son utilisée par
MPEG. Il s’agit d’une méthode de compression
irréversible, atteignant un très haut niveau de compression
en réduisant les données inaudibles à l’oreille humaine.
Elle est capable de comprimer à environ 1/11 e (128 kbps)
les données audio tout en conservant une qualité sonore
similaire à la qualité des CD musicaux.
■ PCM (Pulse Code Modulation)
Signal au format numérique obtenu sans compression. Un
CD contient du son enregistré en 16-bit à 44,1 kHz. Ce
signal existe également en version PPCM (Packed PCM),
version comprimée mais sans perte de données.
■ Fréquence d’échantillonnage
C’est le nombre d’échantillonnages (numérisation des
signaux analogiques) par seconde. En principe, plus la
fréquence d’échantillonnage est élevée plus le spectre est
large, et plus le taux binaire de quantification est élevé,
plus le niveau sonore peut être clairement traduit.
■ Plage
Un CD peut être divisé en un certain nombre de segments
(plages). À chaque division est attribué un numéro de
plage.
■ WMA (Windows Media Audio)
C’est une méthode de compression audio mise au point
par Microsoft Corporation. Il s’agit d’une méthode de
compression irréversible, atteignant un très haut niveau de
compression en réduisant les données inaudibles à
l’oreille humaine. Elle est capable de comprimer à environ
1/22 e (64 kbps) les données audio tout en conservant une
qualité sonore similaire à la qualité des CD musicaux.
Droits d’auteur et logos
Technique de codage audio MPEG Layer-3 sous licence
de Fraunhofer IIS et Thomson Multimedia.
™
iPod
« iPod » est une marque commerciale de Apple Inc., enregistrée
aux États-Unis et dans d’autres pays.
« Made for iPod » signifie qu’un accessoire électronique a été
spécialement conçu pour être raccordé à un iPod et qu’il a été
certifié par le développeur comme répondant aux normes de
performances d’Apple.
Apple n’est pas responsable du bon fonctionnement de cet
appareil ou de sa conformité aux normes de sécurité et à la
réglementation en vigueur.
CARACTERISTIQUES TECHNIQUES
■ R-1330
PARTIE AMPLIFICATEUR
• Puissance de sortie efficace minimale par canal
(6 Ω , 1 kHz, 0,5% THD).......................................... 60 W + 60 W
• Puissance maximale par canal
(4 Ω , 1 kHz, 0,7% THD).......................................... 70 W + 70 W
• Sensibilité d’entrée/Impédance
CD/AUX .................................................................200 mV/47 kΩ
PHONO....................................................................3,5 mV/47 kΩ
• Réponse en fréquence
CD ...........................................................20 Hz à 20 kHz ± 0,5 dB
• Distorsion harmonique totale
CD (10 W/6 Ω)......................................................0,01% ou moins
• Rapport signal/bruit (Réseau IHF-A)
CD (200 mV, entrée court-circuitée) ......................100 dB ou plus
SECTION SYNTONISEUR
• Plage d’accord ................................................... 87,50 à 108,00 MHz
GÉNÉRALITÉS
• Alimentation...........................................................CA 230 V, 50 Hz
• Consommation .......................................................................... 80 W
• Dimensions (L x H x P) ......................................300 x 67 x 336 mm
• Poids......................................................................................... 5,8 kg
■ CD-1330
SYSTEME DE LECTURE
•CD, CD-R/RW
LASER
• Type.......................................................................................GaAlAs
• Longueur d’onde.....................................................................795 nm
• Durée d’émission..................................................................continue
• Puissance du laser.......................................................max. 160 μW*
* Cette sortie est la valeur mesurée à une distance de 200 mm de la
surface de la lentille sur le bloc du capteur optique.
PERFORMANCES AUDIO
• Rapport Signal sur Bruit (1 kHz)............................... 105 dB ou plus
• Plage dynamique (1 kHz) .......................................... 100 dB ou plus
• Distorsion et Bruit (1 kHz)....................................0,003 % ou moins
GÉNÉRALITÉS
• Alimentation...........................................................CA 230 V, 50 Hz
• Consommation.............................................................Approx. 15 W
• Dimensions (L x H x P).......................................300 x 67 x 310 mm
• Poids .........................................................................................3,8 kg
Les caractéristiques peuvent être modifiées sans préavis.
26 Fr
Page 59

Garantie Limitée pour l’Espace Économique Européenne et la Suisse
Merci d’avoir porté votre choix sur un produit Yamaha. Dans l’hypothèse où vous devriez recourir au service de notre garantie après-vente, veuillez
contacter votre revendeur Yamaha. Si vous rencontrez la moindre difficulté, n’hésitez pas à contacter directement Yamaha dans votre pays de résidence.
Vous pouvez trouver toutes informations complémentaires sur notre site Web (http://www.yamaha-hifi.com/ ou http://www.yamaha-uk.com/ pour les
résidents au Royaume-Uni).
Yamaha garantit votre produit contre tout défaut de fabrication, pièces et main d’oeuvre, pour une durée de 2 ans à compter de la première date de vente au
détail. Yamaha s’engage, dans les conditions décrites ci-après, à procéder à la réparation du produit défectueux (ou d’un quelconque de ses composants) ou
à son remplacement à l’appréciation de Yamaha en prenant à sa charge les coûts relatifs aux pièces détachées et à la main d’oeuvre. Yamaha se réserve le
droit de remplacer le produit par un modèle semblable, de par sa valeur et ses caractéristiques, dès lors que la commercialisation dudit produit a cessé ou
bien lorsque sa réparation s’avère économiquement injustifiée.
Conditions
1 La facture d’achat originelle ou un justificatif d’achat correspondant (indiquant la date d’achat, la référence du produit et le nom du revendeur) DOIT
accompagner le produit défectueux, ainsi qu’une description précise du dysfonctionnement constaté. En l’absence de cette preuve d’achat, Yamaha se
réserve le droit de refuser le service de la garantie et le produit peut être restitué aux frais du consommateur.
2 Le produit DOIT avoir été acheté par un distributeur agréé Yamaha au sein de l’Espace Economique Européen ou en Suisse.
3 Le produit doit n’avoir fait l’objet d’aucune modification ou altération, sauf accord écrit de Yamaha.
4 Les cas suivants font obstacle à l’application de la garantie:
a. Entretien périodique et réparation ou remplacement de pièces ayant subi une usure ou défaillance normale.
b. Dommages résulótant de:
(1) Réparation effectuée par le consommateur lui-même ou par un tiers non autorisé.
(2) Emballage ou manutention inadéquats lors du transport du produit pour réparation. Veuillez noter qu’il est de la responsabilité de l’expéditeur de
s’assurer que le produit est correctement emballé.
(3) Utilisation non-conforme du produit, correspondant aux cas non limitatifs (a) d’utilisation non-conforme à l’objet normal du produit ou
nonconforme aux instructions d’utilisation, de maintenance ou d’installation publiées par Yamaha, (b) ou d’utilisation du produit incompatible
avec les normes techniques ou de sécurité en vigueur au sein du pays d’utilisation.
(4) Accidents, foudre, dégât des eaux, incendie, ventilation incorrecte, fuite de pile ou toute autre cause échappant au contrôle de Yamaha.
(5) Les défauts de la configuration dans laquelle ce produit est incorporé et/ou l’incompatibilité avec des produits tiers.
(6) Produit importé au sein de l’EEE , et/ou en Suisse, par une autre entité que Yamaha, dès lors que ce produit n’est pas conforme aux normes
techniques ou de sécurité du pays d’utilisation et/ou aux normes des produits commercialisés par Yamaha au sein de l’EEE et/ou en Suisse.
(7) Produits non audiovisuels.
(Les produits soumis à une “Déclaration de Garantie AV de Yamaha” sont indiqués sur notre site Web à l’adresse http://www.yamaha-hifi.com/
ou http://www.yamaha-uk.com/ pour les résidents au Royaume-Uni.)
5 Lorsque la garantie diffère entre le pays d’achat et le pays d’utilisation du produit, la garantie du pays d’utilisation est applicable.
6 Yamaha ne saurait être tenu pour responsable de quelconques pertes ou dommages, directs, consécutifs ou autres, sa responsabilité au titre de la
garantie étant strictement limitée à la réparation ou au remplacement du produit.
7 Nous vous invitons à sauvegarder toutes les données ou réglages personnalisés de votre produit, Yamaha ne pouvant être tenu responsable de leur
modification ou perte.
8 La présente garantie laisse intégralement subsister les droits que le consommateur peut détenir au titre de la garantie légale en vigueur ou au titre du
contrat de vente conclu avec son revendeur.
Information concernant la Collecte et le Traitement des piles usagées et
des déchets d’équipements électriques et électroniques
Les symboles sur les produits, l’emballage et/ou les documents joints signifient que les produits électriques
ou électroniques usagés ainsi que les piles ne doivent pas être mélangés avec les déchets domestiques
habituels.
Pour un traitement, une récupération et un recyclage appropriés des déchets d’équipements électriques et
électroniques et des piles usagées, veuillez les déposer aux points de collecte prévus à cet effet,
conformément à la réglementation nationale et aux Directives 2002/96/EC et 2006/66/EC.
En vous débarrassant correctement des déchets d’équipements électriques et électroniques et des piles
usagées, vous contribuerez à la sauvegarde de précieuses ressources et à la prévention de potentiels effets
négatifs sur la santé humaine qui pourraient advenir lors d’un traitement inapproprié des déchets.
Pour plus d’informations à propos de la collecte et du recyclage des déchets d’équipements électriques et
électroniques et des piles usagées, veuillez contacter votre municipalité, votre service de traitement des
déchets ou le point de vente où vous avez acheté les produits.
[Information sur le traitement dans d’autres pays en dehors de l’Union Européenne]
Ces symboles sont seulement valables dans l’Union Européenne. Si vous souhaitez vous débarrasser de
déchets d’équipements électriques et électroniques ou de piles usagées, veuillez contacter les autorités
locales ou votre fournisseur et demander la méthode de traitement appropriée.
Note pour le symbole “pile” (deux exemples de symbole ci-dessous):
Ce symbole peut être utilisé en combinaison avec un symbole chimique. Dans ce cas il respecte les
exigences établies par la Directive pour le produit chimique en question.
Français
27 Fr
Page 60

VORSICHT: VOR DER BEDIENUNG DIESES GERÄTES DURCHLESEN.
1 Um optimales Leistungsvermögen sicherzustellen, lesen Sie bitte
die Anleitung aufmerksam durch. Bewahren Sie die Anleitung
danach für spätere Nachschlagzwecke sorgfältig auf.
2 Installieren Sie dieses Gerät (R-1330 und CD-1330) einem gut
belüfteten, trockenen, sauberen Ort mit einem Abstand von
mindestens 10 cm an der Oberseite (ausgenommen für
CD-1330), 10 cm an der linken und rechten Seite sowie 10 cm an
der Rückseite des Geräts, entfernt von direktem Sonnenlicht,
Wärmequellen, Erschütterungen, Staub und/oder Feuchtigkeit.
3 Stellen Sie dieses Gerät entfernt von anderen elektrischen
Haushaltgeräten, Motoren oder Transformatoren auf, um
Brummgeräusche zu vermeiden.
4 Setzen Sie dieses Gerät keinen plötzlichen
Temperaturänderungen von kalt auf warm aus, und stellen Sie
dieses Gerät nicht an Orten mit hoher Luftfeuchtigkeit auf (z.B.
in Räumen mit Luftbefeuchtern), um Kondensation im Inneren
des Gerätes zu vermeiden, da es anderenfalls zu elektrischen
Schlägen, Feuer, Beschädigung dieses Gerätes und/oder zu
persönlichen Verletzungen kommen kann.
5 Vermeiden Sie die Aufstellung dieses Gerätes an Orten, an
welchen Fremdkörper in das Gerät fallen können bzw. an
welchen Flüssigkeiten auf das Gerät verschüttet werden können.
Stellen Sie auf der Oberseite des Gerätes niemals folgendes auf:
–
Andere Komponenten, da diese Beschädigung und/oder
Verfärbung der Oberfläche dieses Gerätes verursachen können.
–
Brennende Objekte (z.B. Kerzen), da diese Feuer, Beschädigung des
Gerätes und/oder persönliche Verletzungen verursachen können.
– Mit Flüssigkeiten gefüllte Behälter, da diese umfallen und die
Flüssigkeit auf das Gerät verschütten können, wodurch es zu
elektrischen Schlägen für den Anwender und/oder zu
Beschädigung des Gerätes kommen kann.
6 Decken Sie dieses Gerät niemals mit Zeitungen, Tischdecken,
Vorhängen usw. ab, damit die Wärmeabfuhr nicht behindert wird.
Falls die Temperatur im Inneren des Gerätes ansteigt, kann es zu
Feuer, Beschädigung des Gerätes und/oder zu persönlichen
Verletzungen kommen.
7 Schließen Sie dieses Gerät erst an eine Wandsteckdose an,
nachdem alle anderen Anschlüsse ausgeführt wurden.
8 Stellen Sie dieses Gerät niemals mit der Unterseite nach oben
auf, da es sonst beim Betrieb zu Überhitzung mit möglichen
Beschädigungen kommen kann.
9 Wenden Sie niemals Gewalt bei der Bedienung der Schalter,
Knöpfe und/oder Kabel an.
Wenn Sie das Netzkabel von der Wandsteckdose abtrennen, fassen
10
Sie immer den Netzstecker an; ziehen Sie niemals an dem Kabel.
11 Reinigen Sie dieses Gerät niemals mit chemisch behandelten
Tüchern; anderenfalls kann das Finish beschädigt werden.
Verwenden Sie ein reines, trockenes Tuch.
12 Verwenden Sie nur die für dieses Gerät vorgeschriebene
Netzspannung. Falls Sie eine höhere als die vorgeschriebene
Netzspannung verwenden, kann es zu Feuer, Beschädigung
dieses Gerätes und/oder zu persönlichen Verletzungen kommen.
Yamaha kann nicht verantwortlich gemacht werden für Schäden,
die auf die Verwendung dieses Gerätes mit einer anderen als der
vorgeschriebenen Spannung zurückzuführen sind.
13 Um Beschädigungen durch Blitzschlag zu vermeiden, ziehen Sie
den Netzstecker von der Netzdose ab, wenn es ein Gewitter gibt.
14 Versuchen Sie niemals ein Modifizieren oder Ändern dieses
Gerätes. Falls eine Wartung erforderlich ist, wenden Sie sich bitte
an einen Yamaha-Kundendienst. Das Gehäuse sollte niemals
selbst geöffnet werden.
Falls Sie das Gerät für längere Zeit nicht verwenden (z.B. während
15
der Ferien), ziehen Sie den Netzstecker von der Netzdose ab.
Lesen Sie unbedingt den Abschnitt „STÖRUNGSSUCHE„ durch,
16
um übliche Bedienungsfehler zu berichtigen, bevor Sie auf eine
Störung des Gerätes schließen.
17 Bevor Sie dieses Gerät an einen anderen Ort transportieren,
drücken Sie ON/STANDBY, OFF, um das System auszuschalten
und ziehen Sie das Netzkabel aus der Netzsteckdose.
18 Es kommt zu Kondensatbildung, wenn die
Umgebungstemperatur plötzlich ändert. Ziehen Sie den
Netzstecker von der Netzdose ab, und lassen Sie das Gerät ruhen.
19 Falls Sie das Gerät für längere Zeit in Betrieb halten, kann sich
das Gerät erwärmen. Schalten Sie die Stromversorgung aus, und
lassen Sie danach das Gerät abkühlen.
20 Stellen Sie dieses Gerät in der Nähe der Steckdose und so auf,
dass der Netzstecker gut zugänglich ist.
21 Die Batterien dürfen nicht starker Hitze wie direktem
Sonnenschein, Feuer o.ä. ausgesetzt werden.
22 Zu starker Schalldruck von Ohrhörern und Kopfhörern kann zu
Gehörschäden führen.
Dieses Gerät ist nicht vom Netz abgetrennt, so lange der
Netzstecker an eine Netzdose angeschlossen ist, auch wenn das
Gerät selbst ausgeschaltet wurde mit . Dieser Status wird
als Bereitschaftsmodus bezeichnet. Auch in diesem Status
weist das Gerät einen geringen Stromberbrauch auf.
WARNUNG
UM DIE GEFAHR EINES FEUERS ODER EINES
ELEKTROSCHOCKS ZU VERMEIDEN, DARF DAS
GERÄT WEDER REGEN NOCH FEUCHTIGKEIT
AUSGESETZT WERDEN.
VORSICHT MIT DEM LASER
Dieses Gerät enthält einen Laser. Um unnötige
Augenverletzungen zu vermeiden, sollten Sie alle Wartungs- und
Reparaturarbeiten einem qualifiziertem Wartungstechniker
überlassen.
GEFAHR
Sichtbare Laserstrahlen bei geöffneter Abdeckung. Achten Sie
darauf, nicht direkt in den Laserstrahl zu blicken. Wenn dieses
Gerät an eine Netzdose angeschlossen ist, blicken Sie niemals in
die Öffnung der Disc-Schublade oder in andere Öffnungen.
Die Laser-Komponente in diesem Produkt kann eine
Strahlung abgeben, die den Grenzwert der Klasse 1 übersteigt.
i De
Page 61

INHALTSVERZEICHNIS
EINFÜHRUNG
GERÄTEMERKMALE......................................... 2
ZUBEHÖR ..............................................................2
BEDIENELEMENTE UND FUNKTIONEN ...... 3
Receiver (R-1330) ..................................................... 3
CD-Player (CD-1330)................................................4
Fernbedienung ........................................................... 5
VORBEREITUNG
ANSCHLIESSEN EXTERNER
KOMPONENTEN AN DIE ANLAGE............. 9
ANSCHLIESSEN DER ANTENNEN ................ 10
Anschluss der UKW-Antenne................................. 10
ANSCHLIESSEN DER NETZKABEL .............. 10
ANSCHLUSS DES iPod™ UND
USB-GERÄTS................................................... 11
Anschließen eines iPod™........................................11
Anschließen von USB-Geräten................................ 11
GRUNDLEGENDE BEDIENUNG
SYSTEMBEDIENUNG ....................................... 12
Grundlegende Bedienungsvorgänge der Anlage ..... 12
Ändert die Helligkeit des Frontblende-Displays. ....13
Einstellen des Einschlaf-Timers.............................. 13
Zur Verwendung von Kopfhörern ........................... 13
BEDIENUNG VON DISC UND
USB-GERÄT..................................................... 14
Bedienungsvorgänge für die Wiedergabe................ 14
Umschalten des
Wiedergabeinformation-Displays........................ 15
Wiederholungswiedergabe (Repeat Play)................ 16
Zufallswiedergabe (Random Play) ..........................16
ANDERE BEDIENUNGSVORGÄNGE
BEDIENUNG DES iPod™ ...................................20
Verwendung von iPod™ .........................................20
ZUSÄTZLICHE INFORMATIONEN
STÖRUNGSSUCHE.............................................21
Receiver (R-1330) ...................................................21
Fernbedienung ......................................................... 22
CD-Player (CD-1330).............................................. 23
HINWEISE ZU DISCS/MP3,
WMA-DATEIEN...............................................24
GLOSSAR..............................................................26
Audio-Informationen...............................................26
Urheberrecht und Logos.......................................... 26
TECHNISCHE DATEN .......................................26
VORBEREITUNGEINFÜHRUNG
GRUNDLEGENDE
BEDIENUNG
BEDIENUNG
TUNER-
BEDIENUNGSVORGÄNGE
TUNER-BEDIENUNG
UKW-SENDERSUCHE.......................................17
Automatische Sendersuche......................................17
Manuelle Sendersuche............................................. 17
Automatische Speichersendersuche......................... 17
Manuelle Speichersendersuche................................ 18
Aufrufen eines Speichersenders.............................. 18
SUCHE VON SENDERN MIT
RADIO-DATEN-SYSTEM
(NUR EUROPA-MODELL)............................ 19
Anzeigen der Radio-Daten-System-Information.....19
1 De
ANDERE
INFORMATIONEN
ZUSÄTZLICHE
Deutsch
Page 62

GERÄTEMERKMALE
GERÄTEMERKMALE
Receiver (R-1330)
• Minimale effektive Ausgangsleistung pro
Kanal
60W + 60W (0,5% Klirrfaktor, 1 kHz, 6Ω)
• Maximale Leistung pro Kanal
70W + 70W (0,7% Klirrfaktor, 1 kHz, 4Ω)
• 30-Sender-UKW-Festsenderabstimmung
• iPod-Abspielbarkeit (mit Ladefunktion)
CD-Player (CD-1330)
• Spielt Audio-CDs, MP3/WMA-Discs
• Abspielbarkeit von CD-R, CD-RW-Discs
• Abspielbarkeit von MP3/WMA-Dateien, die auf
einem USB-Gerät gespeichert sind
• Verknüpfte Bedienung mit dem Receiver wie
z.B. die Funktionen Pure Direct, einstellbare
Displayhelligkeit und INPUT
• Pure Direct-Modus
• Einstellbare Displayhelligkeit
■ Über diese Anleitung
• In dieser Anleitung wird „R-1330“ als „Receiver“ und „CD-1330“ als „CD-Player“ bezeichnet.
• In dieser Anleitung wird grundsätzlich die Bedienung über Fernbedienung beschrieben, sofern diese möglich ist. Manche dieser
Bedienschritte sind auch über die Tasten an der Frontblende möglich.
• y Verweist auf einen Tipp für die Bedienung.
• Hinweise enthalten wichtige Informationen zu Sicherheit und Betrieb.
• Diese Anleitung wurde vor der Produktion gedruckt. Design und Spezifikationen können sich aufgrund von Verbesserungen o.Ä.
ändern. Bei Unterschieden zwischen Bedienungsanleitung und Produkt hat das Produkt Vorrang.
ZUBEHÖR
Dieses Produkt wird mit dem folgenden Zubehör geliefert. Bevor Sie diese Anlage anschließen, stellen Sie sicher, dass Sie die
folgenden Artikel erhalten haben.
R
C
A
-
S
t
e
o
e
Fernbedienung
Batterien (x2)
(AA, R6, UM-3)
r
b
k
a
e
(
0
1
,
l
)
m
2 De
CDiPod
USB
FM
PHONO
AUX
PRESET
TUNING
MEMORY
RANDOM
REPEAT
iPod MENU SEL
MENU
ENTER
VOL
VOL
TONE BALANCE
DISPLAY DIMMER SLEEP
PURE DIRECT
MUTE
UKW-Zimmerantenne
Systemsteuerkabel
(0,6 m)
Dock-Abdeckung
iPod
ON/STANDBY
OFF
PHONES
INPUT
Einsetzen der Dock-Abdeckung.
VOLUME
PURE
TUNER PRESET
DIRECT
MIN
MAX
Page 63

BEDIENELEMENTE UND FUNKTIONEN
Receiver (R-1330)
■ Frontblende
1
ON/STANDBY
OFF
2
PHONES
3
4
PRESET
iPod
D
56
TUNED
7
STEREO SLEEP
kHz MHz
INPUT PURE
DIRECT
E
EINFÜHRUNG
Ansicht von oben
VOLUME
TUNER PRESET
MIN MAX
8 9
1 ON/STANDBY, OFF
Schaltet den Receiver in den Modus ON/STANDBY oder OFF.
2 ON/STANDBY-Anzeige
Leuchtet bei eingeschaltetem Receiver grün. Leuchtet im
Bereitschaftsmodus des Receivers bernsteinfarben.
Beim Ausschalten des Receivers erlischt diese Anzeige.
3 Frontblende-Display
Zeigt verschiedene Informationen, wie beispielsweise die
Senderfrequenz.
4 PRESET-Anzeige
Leuchtet bei der Auswahl von Festsendern auf (siehe Seite 18).
5 TUNED-Anzeige
Leuchtet auf, wenn der Receiver auf einen Sender
abgestimmt ist.
6 STEREO-Anzeige
Leuchtet auf, wenn der Receiver ein starkes Signal von
einem UKW-Stereosender empfängt.
7 SLEEP-Anzeige
Leuchtet auf, wenn der Einschlaf-Timer eingeschaltet ist
(siehe Seite 13).
0
A
B
C
Ansicht von vorn
8 PHONES
Gibt die Audiosignale für privates Hörvergnügen mit den
Kopfhörern aus.
9 Fernbedienungssensor
Empfängt die Signale von der Fernbedienung.
0 INPUT
Wählt eine Eingangsquelle.
A PURE DIRECT
Schaltet den Pure Direct-Modus ein oder aus (siehe Seite 12).
Bei aktiviertem PURE DIRECT-Modus leuchtet die obige
Anzeige auf.
B TUNER PRESET /
Die Eingangsquelle wird auf UKW geschaltet. Wählt
einen Festsender.
Bedienbar auch wenn sich der Receiver im
Bereitschaftsbetrieb befindet.
C VOLUME
Stellt den Lautstärkepegel ein.
D h / e
Die Eingangsquelle wird auf iPod geschaltet. Startet und
pausiert die Wiedergabe des iPod. Bedienbar auch wenn
sich der Receiver im Bereitschaftsbetrieb befindet.
E iPod-Anschluss
Zum Anschluss Ihres iPod (siehe Seite 11).
Deutsch
3 De
Page 64

BEDIENELEMENTE UND FUNKTIONEN
CD-Player (CD-1330)
■ Frontblende
14
1 ON/STANDBY, OFF
Schaltet den CD-Player in den Modus ON/STANDBY
ON/STANDBY
OFF
2 3
USB
6 7
8
0
9
7 Fernbedienungssensor
Empfängt die Signale von der Fernbedienung.
5
AB
oder OFF.
8 Frontblende-Display
2 ON/STANDBY-Anzeige
Zeigt den aktuellen Status des CD-Players.
Leuchtet bei eingeschaltetem CD-Player grün. Leuchtet
im Bereitschaftsmodus des CD-Players bernsteinfarben.
Die Anzeige erlischt, wenn der CD-Player ausgeschaltet
wird.
3 USB-Anzeige
Leuchtet auf, wenn sich der CD-Player im USB-Modus
befindet und erlischt, wenn sich der CD-Player im
9 RANDOM-Anzeige
Hebt das Symbol für die gewählte Zufallswiedergabe
hervor.
0 REP OFF S ALL-Anzeige
Hebt das Symbol für die gewählte
Wiederholungswiedergabe hervor.
CD-Modus befindet. Blinkt, wenn der CD-Player das
USB-Gerät ausliest.
A
Startet oder pausiert die Wiedergabe (siehe Seite 14).
4 Disc-Schacht
Nimmt die wiederzugebende Disc auf.
Falls diese Taste während des Bereitschaftsbetriebs
gedrückt wird, schaltet sich der Receiver automatisch ein
und der Eingang wechselt abhängig von der letzten
5
Einstellung entweder auf CD oder USB.
Öffnet und schließt den Disc-Schacht.
Falls diese Taste während des Bereitschaftsbetriebs
gedrückt wird, schaltet sich der Receiver automatisch ein
B
Stoppt die Wiedergabe (siehe Seite 14).
und der Eingang wechselt auf CD.
C
6 USB-Port
Zum Anschluss Ihres USB-Geräts.
Springt an den Anfang des aktuellen Titels. Betätigen und
gedrückt halten, um den schnellen Rücklauf zu aktivieren.
Zweimal drücken, um zum vorherigen Titel zu springen
(siehe Seite 14).
C D
4 De
D
Springt zum nächsten Titel. Betätigen und gedrückt
halten, um den schnellen Vorlauf zu aktivieren (siehe
Seite 14).
Page 65

Fernbedienung
BEDIENELEMENTE UND FUNKTIONEN
CDiPod
USB
FM
PHONO
AUX
PRESET
TUNING
MEMORY
■ Gemeinsame Funktionen
1
2
CDiPod
USB
3
FM
PHONO
AUX
PRESET
TUNING
MEMORY
REPEAT
RANDOM
iPod MENU SEL
MENU
ENTER
Eingangswahltasten
Diese Fernbedienung kann die Systemkomponenten
(einschließlich Tunerfunktionen) und einen iPod steuern,
der in den Anschluss oben am Receiver eingesteckt ist.
Zur Bedienung von CD-Player, Tunerfunktionen oder
eines iPod mit der Fernbedienung müssen Sie den
Receiver auf den entsprechenden Eingangsmodus stellen.
Zum Umschalten des Eingangsmodus des
Receivers
Drücken Sie die entsprechende Eingangswahltaste an der
Fernbedienung (oder drehen Sie INPUT an der Frontblende).
Der Name der entsprechenden Eingangsquelle erscheint
auf dem Frontblende-Display des Receivers.
y
Falls CD oder USB als Eingangsquelle gewählt wurde,
schaltet sich der CD-Player automatisch ein und bei
Auswahl einer anderen Eingangsquelle geht der
CD-Player in den Bereitschaftsbetrieb.
Für alle Modi gemeinsame
Bedienungsvorgänge
Die folgenden Bedienungsvorgänge sind für den Receiver
möglich, wenn er auf einen Eingangsmodus gestellt ist.
1 Infrarot-Signalsender
Sendet Signale an das zu steuernde System.
2 (Bereitschaft/Ein)
Schaltet das System ein oder versetzt es in den
Bereitschaftsmodus.
EINFÜHRUNG
4
VOL
VOL
TONE BALANCE
DISPLAY DIMMER SLEEP
PURE DIRECT
MUTE
5
6
7
8
9
Hinweis
Selbst im Bereitschaftsmodus benötigt das System eine geringe
Menge Strom, um die Infrarotsignale der Fernbedienung
empfangen zu können.
3 Eingangswahltasten
Wählt die Eingangsquelle am Receiver.
4 PURE DIRECT
Schaltet den Pure Direct-Modus ein oder aus (siehe Seite 12).
5 VOLUME +/–
Stellt den Gesamtlautstärkepegel am Receiver ein.
6 TONE/BALANCE /
Stellt die Hörqualität ein (
siehe Seite 12
).
7 SLEEP
Stellt den Einschlaf-Timer des Systems ein (siehe Seite 13).
8 MUTE
Schaltet den Ton ab (siehe Seite 12).
9 DIMMER
Ändert die Helligkeit des Frontblende-Displays (siehe Seite 13).
5 De
Deutsch
Page 66

BEDIENELEMENTE UND FUNKTIONEN
■ CD/USB-Modus
CDiPod
USB
FM
PHONO
AUX
PRESET
TUNING
MEMORY
1
2
3
REPEAT
DISPLAY DIMMER SLEEP
PURE DIRECT
RANDOM
iPod MENU SEL
MENU
ENTER
VOL
VOL
TONE BALANCE
MUTE
4
5
6
Im CD/USB-Modus verfügbare
Bedienungsvorgänge
Die folgenden Bedienungen stehen für den CD-Player zur
Verfügung, wenn der CD-Player am Receiver über die
Systemsteuerungsverbindung angeschlossen ist (siehe Seite 9).
y
Drücken Sie CD oder USB, um den Receiver auf den
CD- oder USB-Modus zu stellen, bevor die folgenden
Bedienungsvorgänge ausgeführt werden.
1 REPEAT
Wählt den Wiederholungswiedergabemodus (siehe Seite 16).
2 ,
Springt an den Anfang des aktuellen Titels oder des
nächsten Titels. Betätigen und gedrückt halten, um den
schnellen Rücklauf oder schnellen Vorlauf zu aktivieren
(siehe Seite 14). zweimal drücken, um zurück zum
vorherigen Titel zu springen.
3 DISPLAY
Schaltet die Information im Frontblende-Display des
CD-Players um (siehe Seite 15).
4 RANDOM
Schaltet die Zufallswiedergabefunktion ein oder aus
(siehe Seite 16).
5
Stoppt die Wiedergabe (siehe Seite 14).
■ UKW-Modus
1
2
3
CDiPod
USB
FM
PHONO
AUX
PRESET
TUNING
MEMORY
REPEAT
DISPLAY DIMMER SLEEP
PURE DIRECT
RANDOM
iPod MENU SEL
MENU
ENTER
VOL
VOL
TONE BALANCE
MUTE
4
6
Startet oder pausiert die Wiedergabe (siehe Seite 14).
In dem UKW-Modus verfügbare
Bedienungsvorgänge
Die folgenden Bedienungsvorgänge stehen für den
Receiver zur Verfügung.
y
Drücken Sie FM, um den Receiver auf den UKW-Modus zu stellen,
bevor die folgenden Bedienungsvorgänge ausgeführt werden.
1 PRESET /
Um einen Speichersender auszuwählen (siehe Seite 18).
2 MEMORY
Legt einen Speichersender im Speicher ab (siehe
Seite 18). Startet den Automatische Speichersendersuche
(siehe Seite 17).
3 DISPLAY
Schaltet die UKW-Information im Frontblende-Display
des Receivers um (siehe Seite 19).
4 TUNING /
Drücken Sie TUNING / zur manuellen
Sendersuche und drücken und halten Sie TUNING /
zur automatischen Sendersuche.
6 De
Page 67

■ iPod-Modus
1
2
3
CDiPod
USB
FM
PHONO
AUX
PRESET
TUNING
MEMORY
REPEAT
DISPLAY DIMMER SLEEP
PURE DIRECT
RANDOM
iPod MENU SEL
MENU
ENTER
VOL
VOL
TONE BALANCE
MUTE
4
5
6
7
BEDIENELEMENTE UND FUNKTIONEN
Im iPod-Modus verfügbare
Bedienungsvorgänge
Die folgenden Bedienungsvorgänge stehen für den iPod
zur Verfügung. Zwecks Einzelheiten zur iPod-Bedienung
siehe „Verwendung von iPod™“ auf Seite 20.
y
Drücken Sie iPod, um den Receiver auf den iPod-Modus zu
stellen, bevor die folgenden Bedienungsvorgänge ausgeführt
werden.
1 iPod MENU SEL
Drücken Sie oder , um einen Eintrag in der
gewählten Gruppe zu wählen.
2 ENTER
Drücken Sie ENTER, um die gewünschte Gruppe
aufzurufen. (Durch Drücken von ENTER wird die
Wiedergabe gestartet, wenn ein Song gewählt ist.)
3
Springt an den Anfang des aktuellen Titels. Zweimal
drücken, um zum vorherigen Titel zu springen. Betätigen
und gedrückt halten, um den schnellen Rücklauf zu
aktivieren.
4
Stoppt die Wiedergabe.
*Die Wiedergabe beginnt erneut ab dem ersten Titel im
iPod.
EINFÜHRUNG
5 MENU
Kehrt zur oberen Ebene im iPod-Menü zurück.
6
Springt zum nächsten Titel. Betätigen und gedrückt
halten, um den schnellen Vorlauf zu aktivieren.
7
Startet oder pausiert die Wiedergabe.
Deutsch
7 De
Page 68

BEDIENELEMENTE UND FUNKTIONEN
■ Einsetzen der Batterien in die
Fernbedienung
Drücken Sie
1 Drücken Sie gegen den -Teil und schieben
Sie den Batteriefachdeckel ab.
2 Setzen Sie die zwei mitgelieferten Batterien
(AA, R6, UM-3) unter Beachtung der Polarität
(+ und –) in das Batteriefach ein.
3 Schieben Sie den Deckel zurück, bis er
einrastet.
■ Hinweise zu den Batterien
• Wechseln Sie beide Batterien aus, wenn die
Reichweite der Fernbedienung abnimmt.
• Verwenden Sie AA, R6, UM-3 Batterien.
• Achten Sie auf korrekte Polarität. Siehe Abbildung im
Inneren des Batteriefachs.
• Entnehmen Sie die Batterien, wenn die Fernbedienung
lange Zeit nicht betätigt wird.
• Verwenden Sie keinesfalls alte Batterien zusammen
mit neuen Batterien.
• Verwenden Sie keinesfalls gleichzeitig
unterschiedliche Batterietypen (zum Beispiel AlkaliBatterien und Mangan-Batterien). Lesen Sie die
Angaben auf der Verpackung sorgfältig durch, da diese
Batterietypen trotz identischer Form und Farbe
unterschiedliche Leistungsmerkmale besitzen.
• Ausgelaufene Batterien müssen sofort entsorgt werden.
Passen Sie auf, dass austretendes Material nicht auf die
Kleidung usw. gelangt. Reinigen Sie das Batteriefach
vor dem Einsetzen neuer Batterien gründlich.
• Werfen Sie keine Batterien in den Hausmüll; diese
müssen korrekt entsprechend den gesetzlichen
Bestimmungen entsorgt werden.
■ Verwendung der Fernbedienung
Die Fernbedienung sendet einen gerichteten Infrarotstrahl
aus. Richten Sie die Fernbedienung bei der Betätigung
unbedingt direkt auf den Fernbedienungssensor an der
Frontblende des Systems.
VOLUME
INPUT PURE
ON/STANDBY
PHONES
OFF
ON/STANDBY
USB
OFF
30˚ 30˚
CDiPod
USB
FM
PHONO
AUX
PRESET
TUNING
MEMORY
RANDOM
REPEAT
iPod MENU SEL
MENU
ENTER
VOL
VOL
TONE BALANCE
DISPLAYDIMMER SLEEP
MUTE
PURE DIRECT
TUNER PRESET
DIRECT
MIN MAX
Innerhalb
von 6 m
■ Handhabung der Fernbedienung
• Zwischen Fernbedienung und System dürfen sich keine
großen Hindernisse befinden.
• Vergießen Sie kein Wasser oder andere Flüssigkeiten
über die Fernbedienung.
• Lassen Sie die Fernbedienung nicht fallen.
• Legen Sie die Fernbedienung nicht an einem Ort ab,
der:
– hohe Luftfeuchtigkeit aufweist, wie beispielsweise
in einem Badezimmer
– hohe Temperaturen aufweist, wie beispielsweise in
der Nähe einer Heizung oder eines Ofens
– extrem kalt ist
– staubig ist.
• Setzen Sie den Fernbedienungssensor keinem hellen
Licht aus, besonders nicht Inverter-Leuchtstoffröhren,
da andernfalls die Funktion der Fernbedienung
beeinträchtigen werden kann. Drehen Sie
gegebenenfalls das System von der direkten
Beleuchtung weg.
8 De
Page 69

ANSCHLIESSEN EXTERNER KOMPONENTEN AN DIE ANLAGE
ANSCHLIESSEN EXTERNER KOMPONENTEN AN DIE ANLAGE
Machen Sie sich mit den folgenden Verfahren und Hinweisen vertraut, bevor Sie das System anschließen. Für
Informationen über die Lautsprecher (NS-BP400) siehe die damit mitgelieferte Bedienungsanleitung.
VORSICHT
• Schließen Sie das Netzkabel nicht an das Gerät oder andere Komponenten an, bevor nicht alle anderen Anschlüsse beendet wurden.
• Achten Sie darauf, dass sich die blanken Lautsprecherdrähte nicht gegenseitig oder andere Metallteile des Receivers berühren.
Dadurch könnten der Receiver und/oder die Lautsprecher beschädigt werden.
• Alle Anschlüsse müssen korrekt sein: L (links) an L, R (rechts) an R, „+“ an „+“ und „–“ an „–“. Falls die Anschlüsse fehlerhaft sind,
kann kein Sound von den Lautsprechern vernommen werden, und wenn die Polarität der Lautsprecher falsch ist, erklingt der Sound
unnatürlich und ohne Bässe. Siehe auch die Bedienungsanleitungen jeder Ihrer Komponenten.
Plattenspieler DVD-Player usw. Subwoofer
INPUT
INPUT
VORBEREITUNG
Rechter
GND
Linker
Lautsprecher
(NS-BP400)
Audio out
RCA
RL RL
-Stereokabel
Audio
out
RCA
-Stereokabel
Lautsprecher
(NS-BP400)
L
INPUT
R
PHONO CD
ANTENNA
75
AUX
UNBAL. FM
WOOFER
OUTPUT
SUB
SYSTEM
CONNECTOR
TO:CD PLAYER
Receiver (R-1330)
(Modell für Europa)
Systemsteuerkabel
(mitgeliefert)
GND
R L
SPEAKERS:6 MIN.
RCA-Stereokabel
5
1
3
4
L
OUTPUT
R L
TO:RECEIVER
SYSTEM
CONNECTOR
2
(mitgeliefert)
CD-Player (CD-1330)
Anschluss der Anlage
Verbinden Sie die CD (L/R)-Buchsen des Receivers mit den OUTPUT (L/R)-Buchsen des CD-Players, indem Sie das
mitgelieferte RCA-Stereokabel verwenden.
Verbinden Sie die SYSTEM CONNECTOR (TO:CD PLAYER)-Buchse des Receivers mit der
SYSTEM CONNECTOR (TO:RECEIVER)-Buchse des CD-Players, indem Sie das mitgelieferte Systemsteuerkabel
verwenden.
Verbinden Sie die Lautsprecherklemmen (L) am Receiver mit den Lautsprecherklemmen am linken Lautsprecher und
die Lautsprecherklemmen (R) am Receiver mit den Lautsprecherklemmen am rechten Lautsprecher mit den im
Lautsprechersatz (NS-BP400) mitgelieferten Lautsprecherkabeln.
Hinweise
• Die NS-BP400-Lautsprecher sind nicht magnetisch abgeschirmt. Die Lautsprecher aus diesem Grund entfernt vom Monitor aufstellen.
Falls andere Lautsprecher als NS-BP400 angeschlossen werden, Lautsprecher mit einer Impedanz höher als 6Ω verwenden.
• Die PHONO-Buchsen sind nur mit Plattenspielern mit MM-Kartusche kompatibel.
• Schließen Sie Ihren Plattenspieler an die GND-Klemme an, um Signalrauschen zu reduzieren. Bei manchen Plattenspielern jedoch
erfolgt eine Rauschreduzierung ohne den Anschluss an die GND-Klemme.
9 De
Deutsch
Page 70

ANSCHLIESSEN DER ANTENNEN
ANSCHLIESSEN DER ANTENNEN
Für den Rundfunkempfang am Receiver müssen Sie die mitgelieferte UKW-Antenne an die vorgeschriebene Klemme
anschließen. Falls ein Problem hinsichtlich schwachem Rundfunkempfang in Ihrem Gebiet auftreten sollte, oder wenn
Sie den Rundfunkempfang verbessern möchten, empfehlen wir die Verwendung optionaler Außenantennen. Für
Einzelheiten wenden Sie sich an den nächsten autorisierten Yamaha-Fachhändler oder Kundendienst.
Anschluss der UKW-Antenne
UKWZimmerantenne
(mitgeliefert)
1 Schließen Sie die mitgelieferte UKW-Antenne
an die UKW-Buchse und den GND-Anschluss
des Receivers an.
ANTENNA
GND
L
INPUT
R
PHONO CD
75
AUX
UNBAL. FM
OUTPUT
SUB
WOOFER
SYSTEM
CONNECTOR
TO:CD PLAYER
2 Ordnen Sie die Antenne entfernt von
Receiver und den Lautsprecherkabeln an.
Die beste Empfangsposition suchen, die
Antenne ausziehen und befestigen.
y
Der GND-Anschluss kann zusammen mit dem
Plattenspielerkabel verwendet werden.
ANSCHLIESSEN DER NETZKABEL
Schließen Sie nach der Herstellung aller Anschlussverbindungen die Netzkabel dieses Systems und der anderen
Komponenten an.
ANTENNA
R L
SPEAKERS:60MIN.
OUTPUT
R L
GND
INPUT
L
R
PHONO CD
75
UNBAL. FM
OUTPUT
AUX
WOOFER
TO:RECEIVER
SYSTEM
CONNECTOR
SYSTEM
CONNECTOR
SUB
TO:CD PLAYER
MAINS
MAINS
Zur Netzsteckdose
Zur Netzsteckdose
10 De
Page 71

ANSCHLUSS DES iPod™ UND USB-GERÄTS
ANSCHLUSS DES iPod™ UND USB-GERÄTS
Sie können verschiedene Audio-Komponenten, ein USB-Gerät oder einen iPod an den Receiver anschließen.
Für Informationen über Ihre externe Komponente siehe die mit der betreffenden Komponente mitgelieferte
Bedienungsanleitung.
Anschließen eines iPod™
Der Receiver ist an der Oberseite mit einem Anschluss
ausgestattet, in den Sie Ihren iPod einstecken und dessen
Wiedergabe über die mitgelieferte Fernbedienung steuern
können.
Verwenden Sie diesen Receiver mit einem iPodDockadapter (mit Ihrem iPod mitgeliefert oder im Handel
erhältlich), der für Ihren iPod vorgesehen ist. Falls Sie
diesen Receiver ohne geeigneten iPod-Dockadapter
verwenden, können Wackelkontakte auftreten.
y
Falls der Receiver eingeschaltet ist bzw. sich im
Bereitschaftsbetrieb befindet, den iPod während der Wiedergabe
anschließen. Der Receiver beginnt dann automatisch mit der
Wiedergabe des iPod.
iPod
iPod
VOLUME
INPUT
PURE
ON/STANDBY
PHONES
OFF
Hinweise
• Es werden nur iPod (Click and Wheel), iPod nano, iPod mini
und iPod touch unterstützt.
• Schließen Sie keinesfalls iPod-Zubehör (wie Kopfhörer,
Kabelfernbedienung oder UKW-Sender) an Ihren iPod an,
wenn sich dieser im Anschlussdock befindet.
• Sollte Ihr iPod nicht fest im Anschlussdock sitzen, werden
Audiosignale möglicherweise nicht korrekt ausgegeben.
• Wenn die Verbindung zwischen Ihrem iPod und dem Receiver
hergestellt ist und der Receiver auf den iPod-Modus (siehe
Seite 5) gestellt ist, erscheint „CONNECTED“ im FrontblendeDisplay. Wenn die Verbindung zwischen Ihrem iPod und dem
Receiver ausfällt, erscheint eine Statusmeldung im
Frontblende-Display. Für eine komplette Liste von
Verbindungsstatus-Meldungen siehe Abschnitt iPod in
„STÖRUNGSSUCHE“ auf Seite 21.
• Falls Ihr iPod an einer Klemme des Receivers angeschlossen
ist, kann Ihr iPod automatisch aufgeladen werden, auch wenn
sich der Receiver im Bereitschaftsbetrieb befindet.
• Sie können den iPod während der Wiedergabe lösen.
TUNER PRESET
DIRECT
Receiver
MIN
MAX
Anschließen von USB-Geräten
Dieser CD-Player besitzt einen USB-Port und kann MP3oder WMA-Dateien lesen, die in Ihrem USB-Gerät
gespeichert sind. Schließen Sie Ihr USB-Gerät an den
USB-Port an der Frontblende des CD-Players an.
VORSICHT
Entfernen Sie nicht das USB-Gerät, während die USB-Anzeige
blinkt.
ON/STANDBY
USB
OFF
CD-Player
USB-Gerät
■ Unterstützte USB-Geräte
Dieser CD-Player unterstützt USB-Massenspeichergeräte
(z.B. Flash-Speicher, Kartenleser oder tragbare Audiogeräte),
die das Format FAT16 oder FAT32 verwenden.
Hinweise
• Manche Geräte arbeiten möglicherweise selbst dann nicht
korrekt, wenn sie die Anforderungen erfüllen.
• Schließen Sie keinesfalls andere Geräte als klassifizierte USBMassenspeichergeräte an.
• Wenn zwei oder mehr Speicherkarten gleichzeitig bei
Verwendung von Kartenlesern usw. eingesetzt werden, wird
möglicherweise nur eine der Speicherkarten erkannt.
• Yamaha und Zulieferer übernehmen keinerlei Haftung für
Datenverlust von USB-Geräten, die an den Receiver
angeschlossen sind. Als Vorsichtsmaßnahme empfiehlt sich
eine Sicherungskopie der Dateien.
• Abspielbarkeit und Stromversorgung aller Arten von USBGeräten können nicht garantiert werden.
• Falls Ihr USB-Gerät am USB-Port angeschlossen ist, kann Ihr
USB-Gerät automatisch aufgeladen werden, auch wenn der
CD-Player sich im Bereitschaftsbetrieb befindet und der
ECO-Modus auf OFF gestellt ist (siehe Seite 13).
• Sie können das USB-Gerät während der Wiedergabe lösen.
VORBEREITUNG
Deutsch
11 De
Page 72

SYSTEMBEDIENUNG
VOL
VOL
TONE BALANCE
DISPLAY DIMMER SLEEP
MUTE
PURE DIRECT
CDiPod
FM
PHONO
AUX
USB
PRESET
SYSTEMBEDIENUNG
Gehen Sie wie folgt vor, um eine Eingangsquelle zu wählen und die Klangeinstellungen am System vorzunehmen.
ON/STANDBY, OFF
ON/STANDBY
PHONES
OFF
ON/STANDBY
USB
OFF
(Bereitschaft/Ein)
Eingangswahltasten
VOLUME +/–
INPUT PURE
INPUT
PURE DIRECT
TUNER PRESET
DIRECT
MIN MAX
VOLUME
VOLUME
3
Drücken Sie eine der Eingangswahltasten oder
(oder drehen Sie INPUT an der Frontblende) zur
Wahl der gewünschten Eingangsquelle.
4 Beginnen Sie mit der Wiedergabe der
gewählten Quellenkomponente oder wählen
Sie einen Radiosender.
Zwecks Informationen zur Disc-/USB-Wiedergabe
siehe Seite 14, und zwecks Informationen zur
Sendersuche siehe Seite 17.
5
Drücken Sie VOLUME +/– (oder drehen Sie
VOLUME an der Frontblende), um die Lautstärke
auf den gewünschten Pegel einzustellen.
■ Zum Einstellen der Tonqualität
1 Drücken Sie TONE/BALANCE zur Auswahl
von BASS, TREBLE oder BALANCE.
2 Zum Einstellen drücken Sie oder .
BASS: Stellt den Niederfrequenzgang ein.
TREBLE: Stellt den Hochfrequenzgang ein.
BALANCE: Stellt den Lautstärkepegel jedes linken
und rechten Lautsprecherkanals ein.
PURE DIRECT
Grundlegende Bedienungsvorgänge der Anlage
1 Drücken Sie ON/STANDBY, OFF auf der
Frontblende des Receivers und CD-Players.
2 Drücken Sie (Bereitschaft/Ein), um den
Receiver einzuschalten.
Abhängig von der Eingabe-Modus des Empfängers,
der CD-Player wird auch über den
Systemsteuerungsanschluss eingeschaltet (siehe
Seite 9). Das Frontblende-Display leuchtet auf.
12 De
TONE/BALANCE
/
MUTE
■ Pure Direct-Modus
Der Pure Direct-Modus schaltet die Klangregelschaltung
und das Frontblende-Display ab und ermöglicht das Hören
von reinem HiFi-Sound.
Drücken Sie PURE DIRECT (oder PURE DIRECT
an der Frontblende), um den Pure Direct-Modus
zu aktivieren.
Die PURE DIRECT-Anzeige leuchtet auf und das
Frontblende-Display wird abgeschaltet.
Hinweise
• Wenn Sie die Operationen ausführen, während der Modus Pure
Direct aktiviert ist, leuchtet das Frontblende-Display kurz auf,
um den Befehl zu bestätigen.
• Im Modus Pure Direct sind weder BASS, TREBLE oder
BALANCE verfügbar.
Zum Ausschalten des Pure Direct-Modus
Drücken Sie PURE DIRECT erneut, damit die PURE DIRECTAnzeige erlischt und das Frontblende-Display aufleuchtet.
■ Stummschaltung (MUTE)
Drücken Sie MUTE zum Ausschalten des Tons.
MUTE ON erscheint am Frontblende-Display.
Zur Wiederherstellung des Tons drücken Sie erneut
MUTE oder VOLUME +/–.
Page 73

SYSTEMBEDIENUNG
■ Verwendung der ECO-Funktion des
CD-Players
Diese Funktion verringert den Energieverbrauch im
Bereitschaftsbetrieb. Auch wenn das USB-Gerät am
USB-Port des CD-Players angeschlossen ist, kann das
USB-Gerät nicht aufgeladen werden, wenn sich der
CD-Player im Bereitschaftsbetrieb befindet und der
ECO-Modus auf ON gesetzt ist.
Drücken Sie ON/STANDBY, OFF während Sie
des CD-Players gedrückt halten, um den
CD-Player einzuschalten.
Jedes Mal, wenn Sie den CD-Player durch Drücken von
ON/STANDBY, OFF einschalten und dabei des
CD-Players gedrückt halten, erscheint abwechselnd ECO
ON oder ECO OFF auf dem Frontblende-Display.
Ändert die Helligkeit des Frontblende-Displays.
Folgen Sie dem Verfahren unten, um die Einstellungen
des Frontblende-Displays des Receivers zu ändern.
VOL
TONE BALANCE
DISPLAY DIMMER SLEEP
PURE DIRECT
MUTE
DIMMER
Drücken Sie wiederholt SLEEP, um die
gewünschte Dauer zu wählen.
Mit jedem Drücken der Taste ändert sich die Dauer wie
folgt.
Die SLEEP-Anzeige im Frontblende-Display leuchtet auf.
120min.
90min.
60min.
30min.
OFF
y
• Der Einschlaf-Timer wird aufgehoben, wenn Sie den Receiver
auf den Bereitschaftsmodus schalten.
• Wenn Sie SLEEP drücken, während der Einschlaf-Timer
eingestellt ist, erscheint die laufende Zeitdauer auf dem
Frontblende-Display.
Abbrechen des Einschlaf-Timers
Drücken Sie wiederholt SLEEP, um „OFF“ auszuwählen.
Zur Verwendung von Kopfhörern
Sie können Ihre Kopfhörer an die PHONES-Buchse an
der Frontblende des Receivers anschließen.
Der Ton von Lautsprechern und Subwoofer stoppt.
GRUNDLEGENDE
BEDIENUNG
Drücken Sie DIMMER.
Sie können für die gewünschte Helligkeit des
Frontblende-Displays zwischen normal (hell), halbdunkel
und dunkel wählen.
Einstellen des Einschlaf-Timers
Der Einschlaf-Timer schaltet den Receiver in den
Bereitschaftsmodus, nachdem die spezifizierte Zeit
abgelaufen ist.
VOL
TONE BALANCE
DISPLAY DIMMER SLEEP
PURE DIRECT
SLEEP
MUTE
ON/STANDBY
OFF
PHONES
Deutsch
13 De
Page 74

BEDIENUNG VON DISC UND USB-GERÄT
BEDIENUNG VON DISC UND USB-GERÄT
Sie können Ihre Audio-CDs, USB-Geräte und MP3- oder WMA-Dateien wiedergeben, die auf einer Disc/einem USBGerät gespeichert sind. Einige Vorgänge können je nach Disc-/USB-Gerät abweichen oder eingeschränkt sein. Prüfen
Sie vor der Wiedergabe die Kompatibilität Ihres Disc-/USB-Geräts mit diesem System (siehe Seite 24).
Hinweis
Je nach Disc können bestimmte Vorgänge anders ausgeführt
werden, oder sie unterliegen Einschränkungen.
CDiPod
CD
FM
REPEAT
PHONO
PRESET
TUNING
MEMORY
iPod MENU SEL
MENU
ENTER
VOL
USB
AUX
RANDOM
USB
/
Bedienungsvorgänge für die Wiedergabe
■ Starten der Disc-Wiedergabe
1 Wählen Sie CD als Eingangsquelle (siehe
Seite 12).
2 Drücken Sie zum Öffnen der
Disc-Schublade und laden Sie eine CD.
3 Drücken Sie .
Die Wiedergabe startet automatisch.
Bei einer Audio-CD beginnt die Wiedergabe ab dem
ersten Titel, bei MP3- oder WMA-Dateien in
alphanumerischer Reihenfolge nach Dateinamen.
y
Sie können auch die Disc-Schublade schließen, indem Sie auf
die Frontblende des CD-Players drücken.
■ Starten der Wiedergabe des USB-Geräts
1 Wählen Sie USB als Eingangsquelle (siehe
Seite 12).
2 Schließen Sie Ihr USB-Gerät an den USB-
Port des CD-Players an.
Die Gesamtanzahl der Dateien wird angezeigt.
Die Lesezeit kann je nach Anzahl der Dateien/Ordner
30 Sekunden überschreiten.
3 Drücken Sie zum Starten der
Wiedergabe.
Bei einem USB-Gerät erfolgt die Wiedergabe in
Reihenfolge von Aufnahmedatum und -zeit, sofern sich
auf dem USB-Gerät abspielbare Dateien befinden.
Hinweise
• Bei der Wiedergabe des USB-Geräts wird die Gesamtzeit nicht
angezeigt.
• Falls das USB-Gerät partitioniert ist, wird nur die erste Partition
angezeigt.
• Je nach technischen Daten des USB-Geräts werden manche
Dateien möglicherweise nicht korrekt wiedergegeben.
• Dateien mit Kopierschutz können nicht abgespielt werden.
• Dieses System kann Dateien bis maximal 4 GB wiedergeben.
Stoppen der Wiedergabe
Drücken Sie .
Bei Audio-CDs wird die Gesamtzahl der Titel und die
Gesamtzeit der Disc angezeigt. Bei einer
MP3/WMA-Disc bzw. eines USB-Geräts wird die
Gesamtanzahl der Dateien auf dem Frontblende-Display
angezeigt.
Schalten der Wiedergabe auf Pause
Drücken Sie .
Um zur normalen Wiedergabe zurückzukehren, drücken
Sie .
Überspringen von Titeln
• Um zum Beginn des aktuellen Titels zu springen,
drücken Sie .
• Um zum nächsten Titel zu springen, drücken Sie .
• Um zum vorherigen zu Titel springen, drücken Sie
zweimal kurz .
Schneller Rücklauf oder schneller Vorlauf
• Für schnellen Rücklauf drücken und halten Sie .
• Für schnellen Vorlauf drücken und halten Sie .
y
Während dieses Titelsprungs in jede der beiden Richtungen ist
der Ton zu hören (wenn auch leicht verstümmelt). Damit kann
auf komfortable Weise eine präzise Position innerhalb eines
Titels bestimmt oder eine schnelle Übersicht des Inhalts
gewonnen werden. Abhängig von der MP3/WMA-Datei wird
u.U. kein Ton wiedergegeben.
14 De
Page 75

BEDIENUNG VON DISC UND USB-GERÄT
Umschalten des Wiedergabeinformation-Displays
Sie können die Disc-Wiedergabeinformation umschalten, die im Frontblende-Display des CD-Players gezeigt ist. Die
verfügbaren Informationen variieren je nach Typ des Disc-/USB-Geräts.
VOL
Drücken Sie während der Wiedergabe eines
Disc-/USB-Geräts wiederholt DISPLAY.
Mit jedem Drücken der Taste ändert sich die
Informationsanzeige wie in „Wiedergabeinformation für
Audio-CDs“ und „Wiedergabeinformation für MP3- oder
WMA-Dateien, die auf Disc-/USB-Geräten gespeichert
DISPLAY
TONE BALANCE
DISPLAY DIMMER SLEEP
PURE DIRECT
MUTE
sind“ beschrieben.
Hinweis
Manche Sonderzeichen werden möglicherweise nicht richtig
angezeigt.
■ Wiedergabeinformation für Audio-CDs
Die folgende Information steht bei der Wiedergabe einer Audio-CD zur Verfügung.
1 Verstrichene Zeit des aktuellen Titels
2 Restliche Zeit der Disc
■ Wiedergabeinformation für MP3- oder WMA-Dateien, die auf Disc-/USB-Geräten
gespeichert sind
1 Verstrichene Zeit der aktuellen Datei
GRUNDLEGENDE
BEDIENUNG
2 Dateiname
Kehrt nach Anzeige eines Dateinamens zur normalen Anzeige
zurück.
Deutsch
15 De
Page 76

BEDIENUNG VON DISC UND USB-GERÄT
Wiederholungswiedergabe (Repeat Play)
Sie können die Wiedergabe des gewählten Disc/USBPostens wiederholen.
CDiPod
USB
FM
PHONO
AUX
PRESET
TUNING
MEMORY
REPEAT
REPEAT
1 Geben Sie die Disc/USB wieder, die Sie
wiederholen möchten.
2 Drücken Sie während der Wiedergabe der
Disc/USB die Taste REPEAT, um die
gewünschte Wiederholungswiedergabe zu
wählen.
Mit jedem Drücken der Taste ändert sich die
Wiederholungswidergabemodus-Anzeige am
Frontblende-Display des CD-Players wie folgt.
RANDOM
iPod MENU SEL
Zufallswiedergabe (Random Play)
Sie können Titel auf der Disc/USB in zufälliger
Reihenfolge abspielen.
Hinweis
Bei der Wiedergabe einer Disc/USB mit Zufallswiedergabe kann
die Restzeit der Disc nicht angezeigt werden.
CDiPod
USB
FM
PHONO
AUX
PRESET
TUNING
MEMORY
iPod MENU SEL
RANDOM
RANDOM
REPEAT
Drücken Sie während der angehaltenen
Wiedergabe die Taste RANDOM.
Die RANDOM-Anzeige leuchtet auf dem FrontblendeDisplay des CD-Players auf, und die Zufallswiedergabe
startet.
Abbrechen der Zufallswiedergabe
Drücken Sie .
Aus (Normale Wiedergabe)
REP S (Wiederholungswiedergabe nach Titel)
REP ALL (Wiederholungswiedergabe nach Disc/USB)
Abbrechen der Wiederholungswiedergabe
Drücken Sie wiederholt REPEAT, bis die
Wiederholwiedergabemodus-Anzeige vom FrontblendeDisplay verschwindet.
Hinweis
Die Wiederholungswiedergabe wird aufgehoben, wenn die Disc
bzw. das USB-Gerät entfernt wird.
y
REP OFF erscheint, wenn das System in den Pure Direct-Modus
geschaltet ist.
16 De
Page 77

UKW-SENDERSUCHE
Es gibt 2 Methoden für die Sendersuche: automatisch und manuell. Die automatische Sendersuche arbeitet, wenn die
Sendersignale stark und ohne Störungen empfangen werden. Falls das Signal des Senders, den Sie wählen möchten,
schwach ist, muss dieser manuell gesucht werden. Sie können auch die automatische und manuelle Speichersendersuche
verwenden, um bis zu 30 Festsender zu speichern.
Automatische Sendersuche
Die automatische Sendersuche arbeitet, wenn die
Sendersignale stark und ohne Störungen empfangen
werden.
CDiPod
USB
FM
PHONO
FM
REPEAT
1
Drücken Sie FM (oder drehen Sie INPUT an der
PRESET
TUNING
MEMORY
iPod MENU SEL
AUX
RANDOM
TUNING /
Frontblende), um den Receiver in den UKWModus zu schalten.
2 Drücken und halten Sie TUNING / für
länger als 2 Sekunden, um die automatische
Sendersuche zu beginnen.
Wenn der Receiver auf einen Sender abgestimmt ist,
leuchtet die TUNED-Anzeige auf, und die Frequenz
des empfangenen Senders wird im FrontblendeDisplay angezeigt.
• Drücken Sie d, um auf eine niedrigere Frequenz
abzustimmen.
• Drücken Sie u, um auf eine höhere Frequenz
abzustimmen.
Manuelle Sendersuche
Falls das Signal des Senders, den Sie wählen möchten,
schwach ist, muss dieser manuell gesucht werden.
1
Drücken Sie FM (oder drehen Sie INPUT an der
Frontblende), um den Receiver in den UKWModus zu schalten.
2 Drücken Sie TUNING / , um den
gewünschten Sender manuell zu suchen.
Automatische Speichersendersuche
Verfahren Sie wie folgt, um Radiosender automatisch
vorzuprogrammieren.
CDiPod
USB
FM
PHONO
FM
REPEAT
1
Drücken Sie FM (oder drehen Sie INPUT an der
Frontblende), um den Receiver in den UKWModus zu schalten.
2 Drücken und halten Sie MEMORY länger als
2 Sekunden.
Die PRESET-Anzeige blinkt auf dem FrontblendeDisplay und die Sender werden automatisch
gespeichert.
Nach Suchen aller Frequenzen stoppt diese Funktion
automatisch.
• Die automatische Speichersendersuche beginnt mit
der niedrigsten Frequenz und sucht das
Frequenzband nach oben ab.
• Der Receiver weist automatisch jedem erkannten
Sender eine Speichersendernummer zu.
• Zum Abbrechen drücken Sie MEMORY.
Hinweise
• Sie können bis zu 30 UKW-Sender vorprogrammieren.
• Die unter einer Festsendernummer vorhandenen Senderdaten
werden gelöscht, wenn Sie einen neuen Sender unter derselben
Festsendernummer speichern.
PRESET
TUNING
MEMORY
AUX
PRESET /
MEMORY
RANDOM
BEDIENUNG
TUNER-
Deutsch
17 De
Page 78

UKW-SENDERSUCHE
Manuelle Speichersendersuche
Sie können bis zu 30 Sender speichern.
CDiPod
USB
FM
PHONO
AUX
PRESET
TUNING
MEMORY
REPEAT
1 Suchen Sie einen Radiosender, den Sie
vorprogrammieren möchten.
Siehe Seite 17 für Hinweise zur Sendersuche.
2 Drücken Sie MEMORY.
Die PRESET-Anzeige blinkt für ca. 5 Sekunden im
Frontblende-Display.
3 Drücken Sie wiederholt PRESET / ,
um eine Speichersendernummer zu wählen,
während die MEMORY-Anzeige blinkt.
PRESET /
MEMORY
RANDOM
Aufrufen eines Speichersenders
Sie können jeden beliebigen Speichersender aufrufen,
indem Sie diesen mittels der zugewiesenen
Speichersendernummer auswählen (siehe Seite 17).
CDiPod
USB
FM
PHONO
FM
REPEAT
1
Drücken Sie wiederholt PRESET / , um
einen Speichersender auszuwählen.
y
Sie können die Speichersender auch an der Frontblende
auswählen. Drücken Sie wiederholt TUNER PRESET
um einen Speichersender auszuwählen.
PRESET
TUNING
MEMORY
iPod MENU SEL
AUX
PRESET /
RANDOM
d / u,
4 Drücken Sie zum Speichern MEMORY,
während die MEMORY-Anzeige blinkt.
Die PRESET-Anzeige im Frontblende-Display
leuchtet auf.
5 Wiederholen Sie die Schritte 1 bis 4, bis alle
gewünschten Sender vorprogrammiert sind.
18 De
Page 79

SUCHE VON SENDERN MIT RADIO-DATEN-SYSTEM
PRESET
(NUR EUROPA-MODELL)
Radio-Daten-System (nur Modelle für Europa) ist ein Datenübertragungssystem, das in vielen Ländern von UKWSendern verwendet wird. Die Radio-Daten-System-Funktion wird unter den Sendern eines Netzwerks ausgeführt. Dieser
Receiver kann verschiedene Radio-Daten-System-Daten, wie zum Beispiel PS (Programmdienstname), PTY
(Programmtyp), RT (Radiotext) und CT (Uhrzeit) empfangen, wenn Sie auf einen Sender mit Radio-Daten-System
abgestimmt haben.
Anzeigen der Radio-DatenSystem-Information
Verwenden Sie diese Funktion zur Anzeige der 4 Typen
von Radio-Daten-System-Informationen: PS
(Programmdienst), PTY (Programmtyp), RT (Radiotext)
und CT (Uhrzeit).
Hinweise
• Sie können nur die verfügbaren Radio-Daten-System-Modi
wählen, die vom Sender angeboten werden.
• Wenn die empfangenen Signale nicht stark genug sind, kann
der Receiver Radio-Daten-System-Daten möglicherweise nicht
nutzen. Insbesondere der „RT“-Modus erfordert eine große
Datenmenge und steht möglicherweise nicht zur Verfügung,
auch wenn die anderen Radio-Daten-System-Modi verfügbar
sind.
• Falls die Signalstärke während des Empfangs von Radio-DatenSystem-Daten durch externe Interferenzen abgeschwächt wird,
kann der Empfang unter Umständen plötzlich abgeschaltet
werden, wobei „...WAIT“ im Frontblende-Display erscheint.
• Wenn der „RT“-Modus gewählt ist, kann der Receiver die
Programminformation mit maximal 64 alphanumerischen
Zeichen, einschließlich des Umlaut-Zeichens, anzeigen. Nicht
verfügbare Zeichen werden mit „_“ (Unterstreichungszeichen)
angezeigt.
TUNING
MEMORY
RANDOM
iPod MENU SEL
MENU
ENTER
VOL
VOL
TONE BALANCE
MUTE
DISPLAY
REPEAT
DISPLAY DIMMER SLEEP
PURE DIRECT
Drücken Sie während der Suche eines Senders
mit Radio-Daten-System wiederholt DISPLAY,
um den gewünschten Anzeigemodus für das
Radio-Daten-System auszuwählen.
BEDIENUNG
TUNER-
PS
PTY
RT
CT
Frequenz
• Wählen Sie „PS“ zur Anzeige des Namens des
aktuell empfangenen Radio-Daten-SystemProgramms.
• Wählen Sie „PTY“ zur Anzeige des Typs des
aktuell empfangenen Radio-Daten-SystemProgramms.
• Wählen Sie „RT“ zur Anzeige der Information des
aktuell empfangenen Radio-Daten-SystemProgramms.
• Wählen Sie „CT“ zur Anzeige der aktuellen Zeit.
19 De
Deutsch
Page 80

BEDIENUNG DES iPod™
BEDIENUNG DES iPod™
Neben der Bedienung des Receivers (R-1330) und CD-Players (CD-1330) können Sie auch Ihren in den Anschluss
gesteckten iPod über die mitgelieferte Fernbedienung betätigen.
Verwendung von iPod™
Sobald Ihr iPod in den Anschluss gesteckt ist, können Sie die Wiedergabe des iPod mit der Fernbedienung steuern.
Falls der iPod während der Wiedergabe angeschlossen wird, schaltet die Anlage automatisch in den iPod-Modus.
Hinweise
• Es werden nur iPod (Click and Wheel), iPod nano, iPod mini und iPod touch unterstützt.
• Manche Funktionen können je nach Modell oder Software-Version Ihres iPod inkompatibel sein.
y
Für eine komplette Liste der im Frontblende-Display erscheinenden Statusmeldungen des Receivers siehe Abschnitt „iPod“ in der
„STÖRUNGSSUCHE“ (siehe Seite 22).
CDiPod
iPod
REPEAT
iPod MENU SEL
ENTER
iPod Fernbedienung
FM
REPEAT
PHONO
PRESET
TUNING
MEMORY
iPod MENU SEL
MENU
ENTER
USB
AUX
RANDOM
RANDOM
MENU
ENTER
3 Drücken Sie / zur Betätigung des
iPod-Menüs und starten Sie die Wiedergabe
des gewählten Titels (oder Gruppe) durch
Drücken von ENTER.
• Steuern Sie das Menü am Bildschirm des iPod.
• Betätigen Sie den iPod mit den iPod-Bedienelementen
oder der mitgelieferten Fernbedienung.
■ Wiederholungswiedergabe (Repeat Play)
Sie können die Wiedergabe des gewählten Postens in
Ihrem iPod wiederholen.
Drücken Sie REPEAT, um den gewünschten
Wiederholungwiedergabemodus zu wählen.
Mit jedem Tastendruck ändert sich der Wiedergabemodus
wie unten gezeigt. Testen Sie die Funktion zusammen mit
Ihrem iPod.
Ein (Wiedergabewiederholung von Titeln)
Alle (Wiedergabewiederholung einer
ausgewählten Gruppe)
iPod MENU SEL
Die mitgelieferte Fernbedienung weist die selben
Funktionstasten wie Ihr iPod auf. Daher stimmen diese
Tasten in Ihrer Funktion überein.
1 Drücken Sie iPod, um iPod als
Eingangsquelle zu wählen.
2 Stecken Sie Ihren iPod in den Anschluss.
20 De
Aus
■ Zufallswiedergabe (Shuffle Play)
Sie können Titel oder Alben in Ihrem iPod in
Zufallsreihenfolge wiedergeben.
Drücken Sie RANDOM.
Mit jedem Tastendruck ändert sich die Zufallswiedergabe
wie unten gezeigt. Testen Sie die Funktion zusammen mit
Ihrem iPod.
Title (Zufallswiedergabe von Titeln)
Alben (Zufallswiedergabe von Alben)
Aus
Page 81

STÖRUNGSSUCHE
Siehe nachfolgende Tabelle, wenn das System nicht korrekt funktioniert. Falls das aufgetretene Problem in der
nachfolgenden Tabelle nicht aufgeführt ist oder die nachfolgenden Instruktionen nicht helfen, schalten Sie das Gerät aus,
ziehen Sie den Netzstecker, und wenden Sie sich an den nächsten autorisierten Yamaha-Fachhändler oder Kundendienst.
Receiver (R-1330)
■ Allgemeines
Problem Ursache Abhilfe
Der Receiver schaltet sich nach
dem Einschalten sofort wieder
aus oder geht in den
Bereitschaftsmodus.
Kein Ton Fehlerhafte Anschlüsse der Ein- oder
Der Ton wird nur auf einer Seite
aus dem Lautsprecher
ausgegeben.
Es treten Rauschinterferenzen
von Digital- oder
Radiofrequenzgeräten auf.
Der Klang ist verzerrt. Der Lautstärkepegel ist zu hoch. Stellen Sie die Lautstärke ein.
„CHK SP WIRE“ erscheint im
Display.
Das Netzkabel ist nicht angeschlossen oder
der Stecker ist nicht vollständig eingesteckt.
Der Receiver wurde einem starken
externen Stromschlag (wie Blitzschlag
oder starke statische Elektrizität)
ausgesetzt.
Es liegt ein Kurzschluss im Kabel vor
und die Schutzschaltung wurde aktiviert.
Die interne Temperatur ist zu hoch. Die
Schutzschaltung wurde aktiviert.
Ausgangskabel.
Es wurde keine geeignete
Eingangsquelle gewählt.
Die Lautsprecheranschlüsse sind nicht fest.
Die Lautstärke ist auf Minimum gestellt. Erhöhen Sie die Lautstärke.
Die Stummschaltung ist aktiviert. Drücken Sie MUTE oder VOLUME +/-, um
Signale, die der Receiver nicht
reproduzieren kann, werden von einer
Quellenkomponente - wie zum Beispiel
einer CD-ROM - angelegt.
Der Einschlaf-Timer hat den Receiver
ausgeschaltet.
Fehlerhafte Kabelanschlüsse. Schließen Sie die Kabel korrekt an. Falls
Dieser Receiver ist zu nah am Digitaloder Hochfrequenzgerät angeordnet.
Eine andere Komponente als
Plattenspieler wurde an die PHONOBuchsen angeschlossen.
Lautsprecherkabel sind
kurzgeschlossen.
Schließen Sie das Netzkabel fest an.
Schalten Sie den Receiver OFF, ziehen Sie
den Netzstecker, schließen Sie diesen nach
30 Sekunden wieder an, und verwenden Sie
danach das Gerät im Normalbetrieb.
Stellen Sie sicher, dass alle
Lautsprecherkabel korrekt am Receiver und
allen Lautsprechern angeschlossen sind und
alle Verbindungskabel ausschließlich die
entsprechenden Anschlüsse berühren.
Lassen Sie den Receiver ungefähr 1 Stunde
lang abkühlen und schalten Sie ihn dann
wieder ein.
Schließen Sie die Kabel korrekt an. Falls
das Problem weiterhin besteht, sind
möglicherweise die Kabel defekt.
Wählen Sie eine geeignete Eingangsquelle
mit dem auf der Frontblende befindlichen
INPUT-Wahlschalter (oder einer der
Eingangswahltasten auf der Fernbedienung).
Schließen Sie die Kabel korrekt an.
die Audio-Wiedergabe fortzusetzen, und
stellen Sie dann die Lautstärke ein.
Eine Signalquelle wiedergeben, deren
Signale vom Receiver reproduziert werden
können.
Schalten Sie den Receiver ein, und geben
Sie danach die Quelle erneut wieder.
das Problem weiterhin besteht, sind
möglicherweise die Kabel defekt.
Stellen Sie den Receiver entfernt von
solcher Ausrüstung auf.
An CD- oder AUX-Buchsen anschließen.
Stellen Sie sicher, dass die Lautsprecherkabel
korrekt angeschlossen sind.
Siehe
Seite
10
—
9
9
9
—
9
—
5
—
—
9
—
12
9
9
INFORMATIONEN
ZUSÄTZLICHE
Deutsch
21 De
Page 82

STÖRUNGSSUCHE
■ UKW
Problem Ursache Abhilfe
Der UKW-Stereo-Empfang ist
verrauscht.
Es treten Verzerrungen auf,
und klarer Empfang ist auch
mit einer guten UKW-Antenne
nicht möglich.
Der gewünschte Sender kann
mit der automatischen
Sendersuchmethode nicht
abgestimmt werden.
Die Eigenschaften der UKW-StereoSendungen können dieses Problem
verursachen, wenn der Sender zu weit
entfernt oder der Antenneneingang
schlecht ist.
Es sind Mehrweginterferenzen
vorhanden.
Das Signal ist zu schwach. Verwenden Sie eine hochwertige UKW-
Überprüfen Sie die Antenennanschlüsse.
Versuchen Sie die Verwendung einer
hochwertigen UKW-Richtantenne.
Stellen Sie die Antennenposition ein, um die
Mehrweginterferenzen zu eliminieren.
Richtantenne.
Verwenden Sie die manuelle
Sendersuchmethode.
Siehe
Seite
10
—
—
—
17
■ iPod
Hinweis
Bei Übertragungsfehlern ohne Statusmeldung im Display der Frontblende des Receivers prüfen Sie die Verbindung zu Ihrem iPod
(siehe Seite 11).
Statusmeldung Ursache Abhilfe
CONNECT ERR
UNKNOWN TYP
CONNECTED
NOT CONNECT
CAN'T PLAY
Es besteht ein Problem im Signalpfad
zwischen iPod und Receiver.
Der verwendete iPod wird vom Receiver
nicht unterstützt.
Ihr iPod ist korrekt in den Anschluss
eingesteckt und die Verbindung zwischen
Ihrem iPod und dem Receiver ist
aufgebaut.
Ihr iPod wurde aus dem iPod-Anschluss
des Receivers entfernt.
Der Receiver kann die aktuell in Ihrem
iPod gespeicherten Songs nicht
wiedergeben.
Schalten Sie den Receiver aus und stecken Sie den
iPod erneut in den Anschluss des Receivers.
Es werden nur iPod (Click and Wheel), iPod nano,
iPod mini und iPod touch unterstützt.
Stecken Sie Ihren iPod wieder in den Anschluss am
Receiver.
Vergewissern Sie sich, dass die aktuell in Ihrem iPod
gespeicherten Titel abspielbar sind.
Speichern Sie abspielbare Musikdateien auf Ihrem
iPod.
Siehe
Seite
11
—
11
—
—
Fernbedienung
Problem Ursache Abhilfe
Die Fernbedienung
arbeitet oder
funktioniert nicht
richtig.
22 De
Die Fernbedienung wird möglicherweise
außerhalb der Reichweite betätigt.
Möglicherweise ist der
Fernbedienungssensor des Systems
direktem Sonnen- oder Kunstlicht
(Inverter-Leuchtstofflampen) ausgesetzt.
Möglicherweise ist die Batterie entladen. Erneuern Sie die Batterie.
Es befinden sich Hindernisse zwischen
dem Sensor des Systems und der
Fernbedienung.
Zwecks Informationen zur FernbedienungsReichweite siehe „Verwendung der Fernbedienung“.
Ändern Sie die Beleuchtung oder die Ausrichtung
des Systems.
Hindernisse entfernen.
Siehe
Seite
8
8
8
8
Page 83

CD-Player (CD-1330)
STÖRUNGSSUCHE
Problem Ursache Abhilfe
Kein Einschalten
möglich
Kein Ton oder
verzerrter Ton
Disc-Wiedergabe
startet nicht.
Das USB-Gerät wird
nicht erkannt.
Nicht mit dem
Receiver verbunden
Stecker ist nicht ganz eingesteckt. Schließen Sie das Netzkabel fest an.
Receiver und CD-Player sind nicht
korrekt angeschlossen.
Der Receiver ist nicht korrekt
eingerichtet.
Die Abtastrate einer MP3- oder WMADatei ist möglicherweise nicht mit dem
CD-Player kompatibel.
Sie verwenden möglicherweise eine CDR/RW, die nicht finalisiert ist.
Die Disc-Beschriftungsseite weist
möglicherweise nicht nach oben.
Die Disc ist möglicherweise defekt. Probieren Sie die Wiedergabe einer anderen Disc.
MP3/WMA-Discs enthalten
möglicherweise nicht ausreichend
Musiktitel zur Wiedergabe.
Die Abtastrate einer MP3- oder WMADatei ist möglicherweise nicht mit dem
CD-Player kompatibel.
Stellen Sie sicher, dass das USB-Gerät
korrekt angeschlossen ist.
Das Systemsteuerungskabel ist von der
Systemsteuerungsanschlussbuchse des
Receivers und/oder CD-Players
abgetrennt.
Prüfen Sie die Verbindung mit dem Receiver.
Prüfen Sie die Einstellung (INPUT/Lautstärke/
MUTE/Kopfhörer) des Receivers.
Prüfen Sie, ob die Abtastrate und Bitrate einer MP3oder WMA-Datei mit dem CD-Player kompatibel ist.
Finalisieren Sie die CD-R/RW.
Vergewissern Sie sich, dass die Disc richtig herum
eingelegt ist.
Wenn das gleiche Problem nicht mehr auftritt, ist die
abzuspielende Disc defekt.
Prüfen Sie, ob Ihre MP3/WMA-Disc mindestens 5
MP3/WMA-Musikdateien enthält.
Prüfen Sie, ob die Abtastrate und Bitrate einer MP3oder WMA-Datei mit dem CD-Player kompatibel ist.
Schließen Sie das USB-Gerät fest an.
Schließen Sie den Receiver und den CD-Player fest
mit dem Systemsteuerungskabel an.
Siehe
Seite
9
9
—
24
—
—
—
—
24
11
9
■ USB
Hinweis
Bei Übertragungsfehlern ohne Statusmeldung im Display der Frontblende dieses Geräts prüfen Sie die Verbindung zum USB-Gerät
(siehe Seite 11).
Statusmeldung Ursache Abhilfe
NO USB
OVER CURENT
Das USB-Gerät ist nicht angeschlossen. Schließen Sie ein spielbares USB-Gerät an.
Das angeschlossene USB-Gerät ist in
diesem System nicht abspielbar.
Schließen Sie das USB-Gerät diagonal
an.
Trennen Sie das USB-Gerät ab. Wählen Sie eine
andere Eingangsquelle als USB aus und schalten Sie
dann wieder auf USB als Eingangsquelle zurück.
Schließen Sie anschließend das abspielbare USBGerät erneut an.
Siehe
Seite
11
—
23 De
INFORMATIONEN
ZUSÄTZLICHE
Deutsch
Page 84

HINWEISE ZU DISCS/MP3, WMA-DATEIEN
HINWEISE ZU DISCS/MP3, WMA-DATEIEN
■ Auf diesem CD-Player abspielbare Discs
(Audio-CDs)
Dieser Player ist für die Wiedergabe von Compact-Discs mit
den nachfolgenden Kennzeichnungen konzipiert. Legen Sie
keinesfalls einen anderen Disc-Typ in dieses Gerät ein.
Dieses Gerät kann auch Compact-Discs (8 cm) abspielen.
....
Compact-Discs (Digital-Audio)
Die am häufigsten verwendeten Discs für
im Handel erhältliche Audio-CDs.
....
CD-R, CD-RW Digital-Audiodiscs
Durch Kopieren auf CD-R oder CD-RW
hergestellte Musik-CDs (einschließlich
Dateien im MP3- oder WMA-Format).
Hinweise
• Verwenden Sie ausschließlich eine von einem
zuverlässigen Hersteller produzierte CD-R
oder CD-RW.
• Verwenden Sie ausschließlich eine CD-R
oder CD-RW-Disc, die mit mindestens einem
der folgenden Vermerke versehen ist.
FOR CONSUMER
FOR CONSUMER USE
FOR MUSIC USE ONLY
• Verwenden Sie ausschließlich eine finalisierte
CD-R oder CD-RW-Disc.
....
CD-TEXT-Discs
Discs, die gespeicherte Textdaten wie
Albumtitel, Titelbezeichnungen und
Künstlernamen enthalten.
Diese Discs können auch mit gewöhnlichen
CD-Playern abgespielt werden, die
Textdaten werden jedoch nicht angezeigt.
MP3
MP3 ist eine Standard-Technologie und ein
Standardformat, bei der Audio-Sequenzen zu kleinen
Dateien komprimiert werden. Bei der Wiedergabe bleibt
die Original-Klangqualität jedoch erhalten.
Die abspielbaren Formate sind:
• MPEG-1 Audio Layer-3
Bit-Rate*: 32-320 kbps
Abtastfrequenz: 44,1/48/32 kHz
• MPEG-2 Audio Layer-3, 2
Bit-Rate*: 8-160 kbps
Abtastfrequenz: 24/22,05/16 kHz
• MPEG-2.5 Audio Layer-2
Bit-Rate*: 8-160 kbps
Abtastfrequenz: 12/11,025/8 kHz
* Variable Bit-Raten werden unterstützt.
WMA
„WMA (Windows Media Audio)“ ist ein MicrosoftDateiformat zur Codierung von digitalen Audiodateien
ähnlich wie bei MP3, wobei die Komprimierungsrate
höher als bei MP3 ist.
Die abspielbaren Formate sind:
•Version 8
• Version 9 (Standard- und variable Bit-Raten werden
unterstützt. Professional und Lossless werden nicht
unterstützt.)
• High Profile
Bit-Rate*: 32-320 kbps
Abtastfrequenz: 48/44,1/32 kHz
• Mid Profile
Bit-Rate: 16-32 kbps
Abtastfrequenz: 22,05/16 kHz
* Konstante und variable Bit-Raten werden unterstützt.
Hinweis
Dieser CD-Player kann manche CD-RW-Discs oder falsch
beschriebene Discs möglicherweise nicht wiedergeben.
Um eine Störung des CD-Players zu vermeiden:
• Verwenden Sie niemals im Handel
erhältliche Discs mit einer anderen
als der Standardform, z.B.
herzförmige Discs, da sie das
Gerät beschädigen können.
• Verwenden Sie niemals Discs mit auf der
Oberfläche angebrachtem Klebeband, Schildern
oder Aufklebern. Eine solche Disc könnte sich im
Gerät verklemmen oder das Gerät beschädigen.
■ Über MP3- und WMA-Dateien
Sie können MP3- und WMA-Dateien wiedergeben, die
auf eine CD-R/CD-RW geschrieben oder in einem USBGerät gespeichert sind.
24 De
Hinweise
• Je nach Aufzeichnungsbedingungen, wie SoftwareAufzeichungseinstellung, kann dieses System die Titel einer
Disc oder eines USB-Geräts möglicherweise nicht in der
aufgezeichneten Titelreihenfolge wiedergeben.
• Die Wiedergabe von Daten-Discs erfolgt in alphanumerischer
Reihenfolge.
• Die USB-Wiedergabe erfolgt in der Reihenfolge von
Speicherdatum und -zeit.
• Urheberrechtlich geschützte WMA-Dateien (DRM) können auf
dem CD-Player nicht wiedergegeben werden.
• Die Disc muss die Norm ISO9660 erfüllen.
• Die maximale Anzahl von Dateien und Ordnern ist wie folgt:
Daten-Disc
Maximale Gesamtanzahl von
Datei und Ordner*
Maximale Ordneranzahl* 255 255
Maximale Dateianzahl pro Ordner 511 255
* Das Hauptverzeichnis wird als einer der Ordner gezählt.
512 999
USB
Page 85

HINWEISE ZU DISCS/MP3, WMA-DATEIEN
■ Hinweise zur Handhabung von
Compact-Discs
• Handhaben Sie eine Disc stets mit Vorsicht, damit
deren Oberfläche nicht verkratzt wird.
• Compact-Discs sind während der Wiedergabe keinerlei
Verschleiß ausgesetzt. Durch falsche Handhabung
entstandene Schäden an der Disc-Oberfläche können
jedoch deren Wiedergabe beeinträchtigen.
• Verwenden Sie zum Beschreiben der CD-Labelseite
stets einen Filzschreiber o.Ä. Verwenden Sie
keinesfalls Kugelschreiber, Bleistifte oder andere
Schreibwerkzeuge mit harter Spitze, da diese die Disc
beschädigen und deren Wiedergabe beeinträchtigen
können.
• Verbiegen Sie keinesfalls Discs.
• Nehmen Sie nicht verwendete Discs aus dem Gerät und
bewahren Sie sie in einem geeigneten Gehäuse auf.
• Passen Sie auf, dass beim Entnehmen oder
Aufbewahren der Disc deren Abspielseite nicht
zerkratzt wird.
• Compact-Discs werden nicht von kleinen
Staubpartikeln oder Fingerabdrücken auf deren
Abspielseite beeinträchtigt, trotzdem sollten sie sauber
gehalten werden. Wischen Sie sie mit einem sauberen,
trockenen Tuch ab.
Wischen Sie nicht in Kreisbewegungen, sondern stets
von der Mitte gerade zum Rand.
Wiedergabe einer 8-cm CD
Legen Sie die Disc in die innere Vertiefung des CDTellers ein. Legen Sie keinesfalls eine normale (12-cm)
CD oben auf eine 8-cm CD.
Hinweis: Verwenden Sie keinesfalls Linsenreiniger,
da diese Störungen verursachen können.
• Reinigen Sie die Disc-Oberfläche keinesfalls mit CD-
Reinigern, CD/Schallplattenspray, Antistatik-Spray
oder -Flüssigkeit oder anderen chemischen
Flüssigkeiten, da diese Flüssigkeiten die Oberfläche
der Disc irreparabel beschädigen können.
• Setzen Sie Discs keinesfalls längere Zeit direktem
Sonnenlicht, hohen Temperaturen oder hoher
Luftfeuchtigkeit aus, um ein Verziehen oder andere
Schäden der Disc zu vermeiden.
Nein!
25 De
INFORMATIONEN
ZUSÄTZLICHE
Deutsch
Page 86

GLOSSAR
GLOSSAR
Audio-Informationen
■ MP3 (MPEG Audio Layer-3)
Eine der Audio-Kompressionsmethoden, die von MPEG
verwendet wird. Hier wird die irreversible
Kompressionsmethode eingesetzt, die eine hohe
Kompressionsrate durch Ausdünnen der Daten des vom
menschlichen Ohr kaum wahrnehmbaren
Frequenzbereichs erzielt. Von diesem Verfahren wird
angenommen, dass es die Datenmenge um etwa 1/11
(128 Kbps) komprimiert, während eine mit einer MusikCD vergleichbare Tonqualität bewahrt wird.
■ PCM (Pulse Code Modulation)
Ein Signal, das ohne Komprimierung in das Digitalformat
umgewandelt wurde. Eine CD ist mit 16-Bit-Sound mit
44,1 kHz bespielt. Dieses Signal weist auch einen mit
Packed PCM (PPCM) bezeichneten Typ auf, der ohne
Datenverlust komprimiert werden kann.
■ Track
Eine CD kann in eine Anzahl von Segmenten (Tracks)
aufgeteilt werden. Jede Aufteilung wird mit einer
Tracknummer bezeichnet.
■ WMA (Windows Media Audio)
Eine Audio-Kompressionsmethode, entwickelt von
Microsoft Corporation. Hier wird die irreversible
Kompressionsmethode eingesetzt, die eine hohe
Kompressionsrate durch Ausdünnen der Daten des vom
menschlichen Ohr kaum wahrnehmbaren
Frequenzbereichs erzielt. Von diesem Verfahren wird
angenommen, dass es die Datenmenge um etwa 1/22
(64 Kbps) komprimiert, während eine mit einer Musik-CD
vergleichbare Tonqualität bewahrt wird.
Urheberrecht und Logos
MPEG Layer-3 Audio-Decodierungstechnologie unter
Lizenz von Fraunhofer IIS und Thomson Multimedia.
■ Abtastfrequenz
Die Anzahl der Abtastungen (Prozess zur Digitalisierung
von Analogsignalen) pro Sekunde. Im Prinzip wird mit
höherer Abtastfrequenz der wiederzugebende
Frequenzbereich verbreitert, und je höher die quantisierte
Bitrate ist, desto feiner kann der Sound reproduziert werden.
TECHNISCHE DATEN
■ R-1330
VERSTÄRKER-BEREICH
• Minimale effektive Ausgangsleistung pro Kanal
(6 Ω , 1 kHz, 0,5% Klirrfaktor)................................. 60 W + 60 W
• Maximale Leistung pro Kanal
(4 Ω , 1 kHz, 0,7% Klirrfaktor)................................. 70 W + 70 W
• Eingangsempfindlichkeit/Impedanz
CD/AUX .................................................................200 mV/47 kΩ
PHONO....................................................................3,5 mV/47 kΩ
• Frequenzgang
CD ........................................................ 20 Hz bis 20 kHz ± 0,5 dB
• Gesamtklirrfaktor
CD (10 W/6 Ω)................................................0,01% oder weniger
• Signal-Rauschspannungsabstand (IHF-A Netzwerk)
CD (200 mV, Eingang kurzgeschlossen) ........... 100 dB oder mehr
TUNER-BEREICH
• Empfangsbereich ............................................ 87,50 bis 108,00 MHz
ALLGEMEINES
• Netzspannung/-frequenz .................230 V Wechselspannung, 50 Hz
• Leistungsaufnahme ................................................................... 80 W
• Abmessungen (B × H × T) ..................................300 × 67 × 336 mm
• Gewicht .................................................................................... 5,8 kg
iPod™
„iPod“ st ein Warenzeichen von Apple Inc., registriert in den
USA und anderen Ländern.
„Made for iPod“ (Hergestellt für iPod) bedeutet, dass ein auf den
iPod ausgelegtes elektronisches Anschlusszubehör entwickelt
und vom Entwickler zertifiziert wurde, um den Apple-Standards
zu entsprechen.
Apple haftet nicht für den Betrieb dieses Geräts bzw. für die
Einhaltung von Sicherheitsstandards und gesetzlichen
Vorschriften.
■ CD-1330
WIEDERGABESYSTEM
•CD, CD-R/RW
LASER
• Typ.........................................................................................GaAlAs
• Wellenlänge ............................................................................795 nm
• Emissionsdauer............................................................ kontinuierlich
• Laser-Ausgang............................................................max. 160 μW*
* Dieser Ausgangswert wird in einem Abstand von ca. 200 mm von
der Objektivlinsenoberfläche am optischen Tonabnehmer
gemessen.
AUDIOLEISTUNG
• Signal-Rauschabstand (1 kHz) ..............................105 dB oder mehr
• Dynamikbereich (1 kHz).......................................100 dB oder mehr
• Klirrfaktor und Rauschen (1 kHz) .................. 0,003 % oder weniger
ALLGEMEINES
• Netzspannung/-frequenz................. 230 V Wechselspannung, 50 Hz
• Leistungsaufnahme..............................................................Ca. 15 W
• Abmessungen (B × H × T) .................................300 × 67 × 310 mm
• Gewicht.....................................................................................3,8 kg
Technische Daten können ohne Ankündigung geändert werden.
26 De
Page 87

Begrenzte Garantie für den Europäischen Wirtschaftsraum (EWR) und die Schweiz
Herzlichen Dank, dass Sie sich für ein Yamaha Produkt entschieden haben. In dem unwahrscheinlichen Fall, dass die Garantie für das Yamaha-Produkt in
Anspruch genommen werden muss, wenden Sie sich bitte an den Händler, bei dem es gekauft wurde. Sollten Sie auf Schwierigkeiten stoßen, wenden Sie
sich bitte and die Yamaha Repräsentanz in Ihrem Land. Auf unserer Internetseite (http://www.yamaha-hifi.com/ oder http://www.yamaha-uk.com/ für
Einwohner Großbritanniens) finden Sie alle Einzelheiten.
Wir garantieren für einen Zeitraum von zwei Jahren ab ursprünglichem Kaufdatum, dass dieses Produkt frei von Verarbeitungs- oder Materialfehlern ist.
Yamaha verpflichtet sich, gemäß der nachstehend angeführten Bedingungen, ein fehlerhaftes Produkt (oder Teile desselben) kostenfrei (gilt für Teile und
Arbeit) zu reparieren oder auszutauschen. Diese Entscheidung obliegt ausschließlich Yamaha. Yamaha behält sich vor, das Produkt gegen ein in Art und/
oder Wert und Zustand ähnliches Produkt auszutauschen, wenn das entsprechende Modell nicht mehr erzeugt wird, oder die Reparatur als unrentabel
angesehen wird.
Bedingungen
1 Dem defekten Produkt MUSS die Originalrechnung oder der Originalkaufbeleg (der Beleg muss das Kaufdatum, den Produkt-Code und den Namen
des Händlers aufweisen) beigelegt werden, ebenso eine Fehlerbeschreibung. Bei Fehlen einer eindeutigen Kaufbestätigung behält sich Yamaha das
Recht vor, den kostenfreien Service abzulehnen und das Produkt auf Kosten des Kunden zu retournieren.
2 Das Produkt MUSS von einem AUTORISIERTEN Yamaha-Händler innerhalb des Europäischen Wirtschaftsraums (EWR) oder der Schweiz gekauft
worden sein.
3 Es wurden keine wie auch immer gearteten Änderungen am Produkt vorgenommen, außer diese wurden von Yamaha schriftlich genehmigt.
4 Folgendes ist von der Garantie ausgeschlossen:
a. Regelmäßige Wartung und Reparatur oder Austausch von Verschleißteilen.
b. Schaden durch:
(1) Vom Kunden selber oder von nichtbefugten Dritten ausgeführte Reparaturen.
(2) Unsachgemäße Verpackung oder Handhabung während des Transports vom Kunden. Beachten Sie bitte, dass die sachgerechte Verpackung des
zur Reparatur gebrachten Produkts in der Verantwortung des Retournierenden liegt.
(3) Unsachgemäße Verwendung, einschließlich der, jedoch nicht beschränkt auf, (a) die Verwendung des Produkts zu anderen als den normalen
Zwecken oder Behandlung entgegen die Anweisungen Yamahas zur korrekten Handhabung, Wartung oder Lagerung und (b) die Installierung
oder Verwendung des Produkts auf andere Weise als dies den technischen oder Sicherheitsstandards jenes Landes entspricht, in dem das Produkt
verwendet wird.
(4) Unfälle, Blitzschlag, Wasser, Feuer, ungeeignete Belüftung, Auslaufen der Batterie oder jedem anderen Grund, den Yamaha nicht beeinflussen
kann.
(5) Defekte an jenem System, an welches dieses Produkt angeschlossen wird und/oder die Inkompatibilität mit Produkten anderer Hersteller.
(6) Die Verwendung eines nicht von Yamaha in den EWR und/oder die Schweiz importierten Produkts, wenn dieses Produkt nicht den technischen
oder Sicherheitsstandards jenes Landes, in dem es verwendet wird, und/oder der standardisierten Produktspezifikation für von Yamaha im EWR
und/oder der Schweiz vertriebene Produkte, entspricht.
(7) Andere als fur den AV- (audio-visuellen) Bereich bestimmte Produkte.
(Produkte, die der „Yamaha AV-Garantieerklärung“ unterliegen, sind auf unserer Website bei http://www.yamaha-hifi.com/ oder
http://www.yamaha-uk.com/ für Einwohner Großbritanniens definiert.)
5 Wenn es Unterschiede in den Garantiebedingungen zwischen jenem Land in dem das Produkt gekauft wurde, und jenem in dem das Produkt verwendet
wird, finden die Garantiebedingungen jenes Landes Anwendung, in dem das Produkt verwendet wird.
6 Yamaha kann für keinerlei Verluste oder Schäden, ob direkt, in Konsequenz oder anderweitig, verantwortlich gemacht werden, außer bezüglich der
Reparatur oder des Ersatzes eines Produkts.
7 Legen Sie bitte Kopien aller persönlichen Einstellungen und Daten an, da Yamaha weder für irgendwelche Änderungen noch für den Verlust solcher
Daten verantwortlich gemacht werden kann.
8 Diese Garantie beeinflusst nicht die gesetzlichen Verbraucherrechte unter dem geltenden nationalen Recht oder die Verbraucherrechte gegenüber dem
Händler, die durch einen Kaufvertrag entstehen.
Verbraucherinformation zur Sammlung und Entsorgung alter
Elektrogeräte und benutzter Batterien
Befinden sich diese Symbole auf den Produkten, der Verpackung und/oder beiliegenden Unterlagen, so
sollten benutzte elektrische Geräte und Batterien nicht mit dem normalen Haushaltsabfall entsorgt werden.
In Übereinstimmung mit Ihren nationalen Bestimmungen und den Richtlinien 2002/96/EC und
2006/66/EC, bringen Sie alte Geräte und benutzte Batterien bitte zur fachgerechten Entsorgung,
Wiederaufbereitung und Wiederverwendung zu den entsprechenden Sammelstellen.
Durch die fachgerechte Entsorgung der Elektrogeräte und Batterien helfen Sie, wertvolle Ressourcen zu
schützen und verhindern mögliche negative Auswirkungen auf die menschliche Gesundheit und die
Umwelt, die andernfalls durch unsachgerechte Müllentsorgung auftreten könnten.
Für weitere Informationen zum Sammeln und Wiederaufbereiten alter Elektrogeräte und Batterien,
kontaktieren Sie bitte Ihre örtliche Stadt- oder Gemeindeverwaltung, Ihren Abfallentsorgungsdienst oder
die Verkaufsstelle der Artikel.
[Entsorgungsinformation für Länder außerhalb der Europäischen Union]
Diese Symbole gelten nur innerhalb der Europäischen Union. Wenn Sie solche Artikel ausrangieren
möchten, kontaktieren Sie bitte Ihre örtlichen Behörden oder Ihren Händler und fragen Sie nach der
sachgerechten Entsorgungsmethode.
Anmerkung zum Batteriesymbol (untere zwei Symbolbeispiele):
Dieses Symbol kann auch in Kombination mit einem chemischen Symbol verwendet werden. In diesem
Fall entspricht dies den Anforderungen der Direktive zur Verwendung chemischer Stoffe.
Deutsch
27 De
Page 88

OBSERVERA: LÄS DETTA INNAN ENHETEN TAS I BRUK.
1 Läs noga denna bruksanvisning för att kunna ha största möjliga
nöje av enheten. Förvara bruksanvisningen nära till hands för
framtida referens.
2 Installera anläggningen (R-1330 och CD-1330) på en
välventilerad plats där det är svalt, torrt och rent. Lämna ett
mellanrum på minst 10 cm ovanför (gäller ej CD-1330), till
vänster/höger och bakom anläggningen och skydda anläggningen
från direkt solljus, hög värme, vibrationer, damm, fukt och kyla.
3 Placera enheten på behörigt avstånd från andra elapparater,
motorer, transformatorer och annat som kan orsaka störningar.
4 Utsätt inte enheten för hastiga temperaturväxlingar och placera
den inte på ett ställe där luftfuktigheten är hög (t.ex. nära en
luftfuktare) då fuktbildning i enheten skapar risk för brand,
elstötar, skador på enheten eller personskador.
5 Placera inte enheten på ett ställe där främmande föremål kan
tränga in i den eller där den kan utsättas för droppar eller
vattenstänk. Placera aldrig det följande ovanpå enheten:
– Övriga apparater då sådana kan orsaka skador och/eller
missfärgning av enhetens hölje.
– Brännbara föremål (t.ex. stearinljus) då sådana skapar risk för
brand, skador på enheten och/eller personskador.
– Vätskebehållare som kan falla och spilla vätska över enheten,
vilket skapar risk för elstötar och/eller skador på enheten.
6 Täck aldrig över enheten med en tidning, duk, gardin el.dyl. då detta
skapar risk för överhettning. En alltför hög temperatur inuti enheten
kan leda till brand, skador på enheten och/eller personskador.
7 Anslut inte enheten till ett vägguttag förrän samtliga övriga
anslutningar slutförts.
8 Använd aldrig enheten vänd upp och ned. Detta kan leda till
överhettning som orsakar skador.
9 Hantera inte tangenter, reglage och kablar onödigt hårdhänt.
10 Fatta tag i själva kontakten när nätkabeln kopplas bort från
vägguttaget; dra aldrig i kabeln.
11 Använd aldrig några kemiska lösningar för rengöring då dessa
kan skada ytbehandlingen. Använd en ren, torr trasa.
12 Använd endast den spänning som står angiven på enheten.
Anslutning till en strömkälla med högre spänning än den angivna
kan orsaka brand, skador på enheten och/eller personskador.
Yamaha åtar sig inget ansvar för skador beroende på att enheten
används med en spänning utöver den angivna.
13 Koppla bort nätkabeln från vägguttaget för att undvika skador
p.g.a. blixtnedslag om ett åskväder uppstår.
14 Försöka aldrig att utföra egna reparationer. Kontakta en
kvalificerad tekniker från Yamaha om servicebehov föreligger.
Du får inte under några omständigheter ta av höljet.
15 Koppla bort nätkabeln från vägguttaget om enheten inte ska
användas under en längre tid (t.ex. under semestern).
16 Läs avsnittet “FELSÖKNING” om vanligt förekommande
driftsproblem innan du förutsätter att enheten är söndrig.
17 Innan enheten flyttas ska du trycka på ON/STANDBY, OFF för
att stänga av systemet och ta ut AC stickkontakten från
vägguttaget.
18 Kondensation (imma) uppstår, om den omgivande temperaturen
plötsligt ändras. Koppla i så fall loss nätkabeln från nätuttaget
och låt apparaten vila.
19 Vid långvarig användning kan det hända att apparaten blir väldigt varm.
Slå i så fall av strömmen och låt apparaten vila tills den har svalnat.
20 Installera receivern nära ett nätuttag och där stickkontakten lätt
kan kommas åt.
21 Utsätt inte batterierna för kraftig värme från exempelvis solljus,
eld eller liknande.
22 För högt ljudtryck från öronsnäckor eller hörlurar kan orsaka
hörselförlust.
Den här enheten är inte bortkopplad från nätströmmen så
länge den är inkopplad i vägguttaget, även om själva enheten
är avstängd med . Detta tillstånd kallas för
beredskapsläget (standby). Enheten är konstruerad för att
förbruka en mycket liten mängd ström i detta tillstånd.
VARNING
UTSÄTT INTE ENHETEN FÖR REGN ELLER FUKT DÅ
DETTA SKAPAR RISK FÖR BRAND ELLER ELSTÖTAR.
LASERSÄKERHET
Apparaten använder sig av en laser. På grund av risken för
ögonskador bör ingen annan än en kvalificerad reparatör öppna
höljet eller försöka reparera apparaten.
FARA!
Apparaten avger slig laserstrålning i öppet läge. Undvik direkt
ögonkontakt med strålen. Placera inte ögonen i närheten av
skivfacket eller någon annan öppning för att titta in i apparaten,
medan apparaten är ansluten till ett nätuttag.
Laserkomponenten i denna apparat kan avge en strålning som
överskrider gränsvärdet för klass 1.
i Sv
Page 89

INNEHÅLL
INLEDNING
FUNKTIONER.......................................................2
MEDFÖLJANDE DELAR ....................................2
KONTROLLER OCH FUNKTIONER ............... 3
Mottagare (R-1330)...................................................3
CD-spelare (CD-1330)...............................................4
Fjärrkontroll...............................................................5
FÖRBEREDELSE
ANSLUTA DE EXTERNA KOMPONENTERNA
TILL SYSTEMET..............................................9
KOPPLA ANTENNER ........................................ 10
Koppla FM-antennen...............................................10
KOPPLA ELKABLARNA .................................. 10
ANSLUTA DIN iPod™ OCH
USB-ENHETEN ...............................................11
Koppla en iPod™ ....................................................11
Koppla USB-minnen ...............................................11
GRUNDLÄGGANDE FUNKTIONER
SYSTEMFUNKTIONER..................................... 12
Grundläggande systemfunktioner............................ 12
Ändring av displayens ljusstyrka............................. 13
Inställning av insomningstimern..............................13
Lyssning via hörlurar............................................... 13
HANTERING AV SKIVOR OCH
USB-ENHET.....................................................14
Spelfunktioner.......................................................... 14
Val av uppspelningsinformation på displyen .......... 15
Repeterad uppspelning (Repeat Play)...................... 16
Att spela upp slumpvist (Random Play).................. 16
ÖVRIGA FUNKTIONER
KONTROLLERA iPod™ ....................................20
Använda iPod™.......................................................20
YTTERLIGARE INFORMATION
FELSÖKNING ......................................................21
Mottagare (R-1330)................................................. 21
Fjärrkontroll.............................................................22
CD-spelare (CD-1330)............................................. 23
ANMÄRKNING OM SKIVOR/MP3,
WMA-FILER.....................................................24
ORDLISTA............................................................26
Ljudinformation.......................................................26
Upphovsrätt och logotyper ...................................... 26
SPECIFIKATIONER ...........................................26
INLEDNING
FÖRBEREDELSE
GRUNDLÄGGANDE
FUNKTIONER
RADIOMOTTAGNING
RADIOMOTTAGNING
FM-MOTTAGNING............................................ 17
Automatisk stationsinställning................................. 17
Manuell stationsinställning...................................... 17
Automatisk förinställning........................................17
Manuell förinställning .............................................18
Ställa in en förinställd station..................................18
RADIODATASYSTEM-MOTTAGNING
(GÄLLER ENDAST MODELLER TILL
EUROPA).......................................................... 19
Visning av radiodatasystem-information................. 19
1 Sv
FUNKTIONER
ÖVRIGA
YTTERLIGARE
INFORMATION
Svenska
Page 90

FUNKTIONER
FUNKTIONER
Mottagare (R-1330)
• Minsta RMS uteffekt per kanal
60W + 60W (0,5 % THD, 1 kHz, 6Ω)
• Maximal ström per kanal
70W + 70W (0,7 % THD, 1 kHz, 4Ω)
• 30-stationers FM-förinställning
• iPod spelbar (med laddbar funktion)
• Pure Direct-läge
CD-spelare (CD-1330)
• Spelar ljud-CD, MP3-/WMA-skivor
• Kan spela CD-R-, CD-RW-skivor
• Kan spela MP3-/WMA-filer som lagrats på
USB-minne
• Länkad funktion tillsammans med mottagaren,
t ex Pure Direct-läge, justerbar ljusstyrka i
teckenfönstret samt INPUT-läge
• Justerbar ljusstyrka på displayen
■ Om bruksanvisningen
• I denna bruksanvisning beskrivs ”R-1330” som ”mottagare” och ”CD-1330” beskrivs som ”CD-spelare”.
• Bruksanvisningen beskriver hur systemet sköts med hjälp av en fjärrkontroll, utom då den inte är tillgänglig. Vissa av funktionerna
finns också med hjälp av knapparna på frampanelen.
• y indikerar ett förslag för hur du ska göra.
• Anteckningar innehåller viktig information om säkerhet och driftsinstruktioner.
• Bruksanvisningen trycks före produktionen. Design och specifikationer är underkastade förändringar, delvis som ett resultat av
förbättringar etc. Vid händelse av skillnader mellan bruksanvisningen och produkten, har produkten företräde.
MEDFÖLJANDE DELAR
Produkten inkluderar följande delar. Innan systemet kopplas måste du se till att du fått alla nedanstående delar.
Fjärrkontroll RCA stereokabel
Batterier (x2)
(AA, R6, UM-3)
(1,0 m)
CDiPod
USB
FM
PHONO
AUX
PRESET
TUNING
MEMORY
RANDOM
REPEAT
iPod MENU SEL
MENU
ENTER
VOL
VOL
TONE BALANCE
DISPLAY DIMMER SLEEP
PURE DIRECT
MUTE
FM-antenn för inomhusbruk
Styrkabel (0,6 m)
Dockningslock
ON/STANDBY
PHONES
OFF
När dockningslocket är täckt.
iPod
VOLUME
INPUT
PURE
TUNER PRESET
DIRECT
MIN
MAX
2 Sv
Page 91

KONTROLLER OCH FUNKTIONER
Mottagare (R-1330)
■ Frampanel
1
ON/STANDBY
OFF
2
PHONES
3
4
PRESET
iPod
D
56
TUNED
7
STEREO SLEEP
kHz MHz
INPUT PURE
DIRECT
E
INLEDNING
Sedd uppifrån
VOLUME
TUNER PRESET
MIN MAX
8 9
1 ON/STANDBY, OFF
Sätter mottagaren på ON/STANDBY eller OFF.
2 ON/STANDBY-indikator
Lyser grön när mottagaren är påslagen. Lyser gul när
mottagaren står i beredskapsläge.
Ljuset släcks när mottagaren stängs av.
3 Frampanelsdisplay
Visar olika typer av information, som
inställningsfrekvens.
4 PRESET-indikator
Tänds när du väljer förinställda radiostationer (se sid. 18).
5 TUNED-indikator
Tänds när mottagaren ställs in på en station.
6 STEREO-indikator
Tänds när mottagaren tar emot en stark signal från en
FM-stereosändare.
7 SLEEP-indikator
Tänds när vilolägestimern är på (se sid. 13).
0
A
B
C
Sedd framifrån
8 PHONES
Utmatning av ljudsignaler för att lyssna privat med hörlurar.
9 Fjärrkontrollsensor
Tar emot signaler från fjärrkontrollen.
0 INPUT
Väljer en ingångskälla.
A PURE DIRECT
Sätter på eller stänger av Pure Direct-läget (se sid. 12).
När PURE DIRECT-läget är på tänds indikationsljuset
ovanför.
B TUNER PRESET /
Ingångskällan har ändrats till FM. Väljer en förinställd
station. Fungerar även när mottagaren står i vänteläge.
C VOLUME
Justerar volymnivån.
D h / e
Ingångskällan ändras till iPod. Startar och pausar
iPod-uppspelningen. Fungerar även när mottagaren står i
vänteläge.
E iPod-terminal
Koppla din iPod (se sid. 11).
Svenska
3 Sv
Page 92

KONTROLLER OCH FUNKTIONER
CD-spelare (CD-1330)
■ Frampanel
14
1 ON/STANDBY, OFF
Sätter CD-spelaren på ON/STANDBY eller OFF.
2 ON/STANDBY-indikator
Lyser grön när CD-spelaren är påslagen. Lyser gul när
ON/STANDBY
OFF
2 3
USB
6 7
8
0
9
7 Fjärrkontrollsensor
Tar emot signaler från fjärrkontrollen.
8 Frampanelsdisplay
Visar CD-spelarens nuvarande status.
5
AB
CD-spelaren står i beredskapsläge.
Indikatorn slocknar när CD-spelaren stängs av.
9 RANDOM-indikator
Tänder ikonen för det slumpvisa (Random)
3 USB-indikator
uppspelningsläge som valts.
Tänds när CD-spelaren befinner sig i USB-läge och
slocknar när CD-spelaren befinner sig i CD-läge. Blinkar
när CD-spelaren läser USB-enheten.
0 REP OFF S ALL-indikator
Tänder ikonen för det upprepade (Repeat)
uppspelningsläge som valts.
4 Skivbricka
Fack för skiva som ska spelas upp.
A
Startar eller pausar uppspelning (se sid. 14).
5
Öppnar och stänger skivbrickan.
Om du trycker på denna knapp i vänteläget startar
mottagaren automatiskt, och inmatningen ändras till CD.
Om du trycker på denna knapp i vänteläget startar
mottagaren automatiskt, och inmatningen ändras till
antingen CD eller USB, beroende på vilket som valdes
senast.
C D
6 USB-port
Koppla ditt USB-minne.
4 Sv
B
Stoppar uppspelning (se sid. 14).
C
Hoppar till början av nuvarande spår. Tryck och håll för
snabb tillbakaspolning. Tryck två gånger för att hoppa till
föregående spår (se sid. 14).
D
Hoppar till nästa spår. Tryck och håll för snabb
framspolning (se sid. 14).
Page 93

Fjärrkontroll
FM
PHONO
PRESET
TUNING
MEMORY
■ Vanliga funktioner
1
KONTROLLER OCH FUNKTIONER
Fjärrkontrollen kan sköta systemkomponenterna
(inklusive inställningsfunktionerna) och en iPod som
placerats i en terminal på mottagarens ovansida.
INLEDNING
För att sköta CD-spelare, inställningsfunktioner eller en
iPod med hjälp av fjärrkontrollen, måste du ställa in
mottagaren på motsvarande ingångsläge.
CDiPod
USB
AUX
Ingångsväljare
För att skifta mottagarens ingångsläge
Tryck på motsvarande ingångsväljare på fjärrkontrollen
(eller rotera INPUT på frampanelen).
Namnet på motsvarande ingångsväljare visas på displayen
på mottagarens frampanel.
y
När du valt CD eller USB som ingångskälla startar
CD-spelaren automatiskt. När en annan ingångskälla väljs
hamnar CD-spelaren i vänteläge.
2
3
4
CDiPod
USB
FM
PHONO
AUX
PRESET
TUNING
MEMORY
REPEAT
DISPLAY DIMMER SLEEP
PURE DIRECT
RANDOM
iPod MENU SEL
MENU
ENTER
VOL
VOL
TONE BALANCE
MUTE
5
6
7
8
9
Funktioner som är gemensamma för alla
lägen
Följande funktioner finns för mottagaren, när den är
inställd på ett ingångsläge.
1 Infraröd signalsändare
Skickar signaler till systemt du vill kontrollera.
2 (beredskap/på)
Sätter på systemet eller ställer det i beredskapsläge.
Anmärkning
Även i beredskapsläge förbrukar systemet en liten mängd ström
för att ta emot infraröda signaler från fjärrkontrollen.
3 Ingångsväljare
Välj ingångskällan på mottagaren.
4 PURE DIRECT
Sätter på eller stänger av Pure Direct-läget (se sid. 12).
5 VOLUME +/–
Ställer in mottagarens totala volymnivå.
6 TONE/BALANCE /
Justerar ljudets kvalitet (se sid. 12).
7 SLEEP
Ställer in systemets vilotimer (se sid. 13).
8 MUTE (avstängd)
Stäng av volymen (se sid. 12).
9 DIMMER (ljusdämpare)
Ändrar ljusstyrkan på frampanelens display (se sid. 13).
5 Sv
Svenska
Page 94

KONTROLLER OCH FUNKTIONER
■ CD-/USB-läge
CDiPod
FM
PHONO
PRESET
TUNING
MEMORY
REPEAT
1
2
3
iPod MENU SEL
MENU
ENTER
VOL
VOL
TONE BALANCE
DISPLAY DIMMER SLEEP
PURE DIRECT
USB
AUX
RANDOM
MUTE
4
5
6
Tillgängliga funktioner i CD-/USB-läge
Följande funktioner finns tillgängliga för CD-spelaren om
CD-spelaren är kopplad till mottagaren med
styrkabelanslutningen (se sid. 9).
y
Tryck på CD eller USB för att ställa in mottagaren på CD-
eller USB-läge innan du utför följande åtgärder.
1 REPEAT (repetera)
Väljer läget repetera uppspelning (se sid. 16).
2 ,
Hoppar till början av nuvarande eller nästa spår. Tryck
och håll för snabb tillbaka- eller framspolning (se sid. 14).
Tryck två gånger för att hoppa till föregående spår.
3 DISPLAY
Ändrar informationen som visas på displayen på CD-
spelarens frampanel (se sid. 15).
4 RANDOM
Sätter på/stänger av funktionen slumpmässig uppspelning
(se sid. 16).
5
Stoppar uppspelning (se sid. 14).
■ FM-läge
1
2
3
CDiPod
USB
FM
PHONO
AUX
PRESET
TUNING
MEMORY
REPEAT
DISPLAY DIMMER SLEEP
PURE DIRECT
RANDOM
iPod MENU SEL
MENU
ENTER
VOL
VOL
TONE BALANCE
MUTE
4
6
Startar eller pausar uppspelning (se sid. 14).
Tillgängliga funktioner i FM-läge
Följande funktioner finns för mottagaren.
y
Tryck på FM för att ställa in mottagaren på FM-läge innan
följande funktioner utförs.
1 PRESET /
Välja en förinställd station (se sid. 18).
2 MEMORY
Lagrar en förinställd station i minnet (se sid. 18). Startar
Automatisk förinställning (se sid. 17).
3 DISPLAY
Ändrar FM-informationen som visas på mottagarens
frampanel (se sid. 19).
4 TUNING /
Tryck på TUNING / för manuell inställning och
tryck och håll TUNING / för automatisk
inställning.
6 Sv
Page 95

■ iPod-läge
1
2
3
FM
REPEAT
iPod MENU SEL
CDiPod
PHONO
PRESET
TUNING
MEMORY
MENU
ENTER
VOL
VOL
USB
AUX
RANDOM
4
5
6
7
KONTROLLER OCH FUNKTIONER
Tillgängliga funktioner i iPod-läge
Följande funktioner finns för iPod. För ytterligare
information om iPod-funktioner, se ”Använda iPod™” på
sidan 20.
y
Tryck på iPod för att ställa in mottagaren på iPod-läge innan
följande funktioner utförs.
1 iPod MENU SEL
Tryck på eller för att välja en funktion i den
utvalda gruppen.
2 ENTER
Tryck på ENTER för att mata in den utvalda gruppen.
(Genom att trycka på ENTER startas uppspelning när ett
musikstycke valts.)
3
Går till början av det nuvarande spåret. Tryck två gånger
om du vill gå till det föregående spåret. Tryck och håll för
snabb tillbakaspolning.
INLEDNING
TONE BALANCE
DISPLAY DIMMER SLEEP
PURE DIRECT
MUTE
4
Stoppar uppspelning.
* Uppspelningen återupptas från den första låten i din
iPod.
5 MENU
Återgår till iPod-menyns översta nivå.
6
Hoppar till nästa låt. Tryck och håll för snabb
framspolning.
7
Startar eller pausar uppspelning.
7 Sv
Svenska
Page 96

KONTROLLER OCH FUNKTIONER
■ Sätta i batterierna i fjärrkontrollen
Tryck
1 Tryck på -delen och för av batterifackets
lock.
2 Sätt i de två medföljande batterierna (AA, R6,
UM-3) enligt polmärkningarna (+ och –) på
batterifackets insida.
3 För tillbaka locket på batterifacket tills det
knäpper på plats.
■ Observera om batterier
• Byt båda batterierna när fjärrkontrollens funktionsradie
minskar.
• Använd AA-, R6-, UM-3-batterier.
• Kontrollera att polariteten är korrekt. Se illustrationen
på batterifackets insida.
• Ta bort batterierna från fjärrkontrollen om den inte ska
användas under en längre tid.
• Använd inte gamla batterier tillsammans med nya.
• Använd inte olika typer av batterier (som alkaliska och
mangnesiumbatterier) tillsammans. Läs noga på
förpackningen eftersom dessa olika typer av batterier
kan ha samma form och färg.
• Om batterierna har läckt, ska de genast kastas. Undvik
att röra vid det läckande materialet eller låta det
komma i kontakt med kläder etc. Rengör batterifacket
ordentligt innan nya batterier sätts i.
• Kasta inte batterier tillsammans med vanligt
hushållsavfall. Kasta dem i enlighet med lokala
föreskrifter.
■ Använda fjärrkontrollen
Fjärrkontrollen avger en riktad infraröd stråle. Se till att
rikta fjärrkontrollen direkt mot fjärrkontrollsensorn på
systemets frampanel när den används.
VOLUME
INPUT PURE
ON/STANDBY
PHONES
OFF
ON/STANDBY
USB
OFF
30˚ 30˚
CDiPod
USB
FM
PHONO
AUX
PRESET
TUNING
MEMORY
RANDOM
REPEAT
iPod MENU SEL
MENU
ENTER
VOL
VOL
TONE BALANCE
DISPLAYDIMMER SLEEP
MUTE
PURE DIRECT
TUNER PRESET
DIRECT
MIN MAX
Inom 6 m
■ Sköta fjärrkontrollen
• Området mellan fjärrkontrollen och systemet måste
vara fritt från stora föremål.
• Spill inte vatten eller andra vätskor på fjärrkontrollen.
• Tappa inte fjärrkontrollen.
• Lämna eller förvara inte fjärrkontrollen under följande
förhållanden:
– hög fuktighet, t.ex. i närheten av ett badkar
– hög temperatur, t.ex. i närheten av ett element eller
en spis
– extremt låga temperaturer
– dammiga platser.
• Exponera inte fjärrkontrollsensorn för starkt ljus,
speciella lysrör av inverter-typ, eftersom
fjärrkontrollen kanske inte fungerar riktigt då. Placera
vid behov systemet på en plats utan direkt belysning.
8 Sv
Page 97

ANSLUTA DE EXTERNA KOMPONENTERNA TILL SYSTEMET
ANSLUTA DE EXTERNA KOMPONENTERNA TILL SYSTEMET
Se till att läsa följande procedurbeskrivning och anteckningar noga innan systemet kopplas. För information om
högtalarna (NS-BP400), se bruksanvisningen som medföljer.
VARNING
• Anslut inte enheten eller andra komponenter till elnätet förrän alla kopplingar är klara mellan delarna.
• Låt inte de bara högtalarledningarna röra vid varandra eller röra vid någon metalldel på mottagaren. Det kan skada mottagaren och/
eller högtalarna.
• Alla kopplingar måste vara riktigt gjorda. L (vänster) till L, R (höger) till R, ”+” till ”+” och ”–” till ”–”. Om kopplingarna är felaktiga,
hörs inget ljud från högtalarna och om är högtalarnas polaritet är felaktig, blir ljudet onaturligt och saknar bas. Se också i
bruksanvisningen för information om delarna.
Vändbord DVD-spelare etc. Bashögtalare
INPUT
INPUT
FÖRBEREDELSE
Höger
GND
Vänster
högtalare
(NS-BP400)
Ljud ut
Ljud ut
RCA
RL RL
stereokabel
RCA
stereokabel
högtalare
(NS-BP400)
L
INPUT
R
PHONO CD
ANTENNA
75
AUX
UNBAL. FM
WOOFER
OUTPUT
SUB
SYSTEM
CONNECTOR
TO:CD PLAYER
Mottagare (R-1330)
(Europa-modell)
Styrkabel
(medföljer)
GND
R L
SPEAKERS:6 MIN.
RCA stereokabel
5
3
4
L
OUTPUT
R L
TO:RECEIVER
SYSTEM
CONNECTOR
(medföljer)
CD-spelare (CD-1330)
1
2
Ansluta systemet
Koppla CD (L/R) -uttagen på mottagaren till OUTPUT (L/R) -uttagen på CD-spelaren med hjälp av den medföljande
RCA stereokabeln för ljud.
Koppla SYSTEM CONNECTOR (TO:CD PLAYER) -uttaget på mottagaren till SYSTEM CONNECTOR
(TO:RECEIVER) -uttaget på CD-spelaren med hjälp av den medföljande styrkabeln.
Koppla högtalarterminalerna (L) på mottagaren till högtalarterminalerna på den vänstra högtalaren och
högtalarterminalerna (R) på mottagaren till högtalarterminalerna på den högra högtalaren, med hjälp av
högtalarkablarna som medföljer högtalarsetet (NS-BP400).
Anmärkningar
• NS-BP400-högtalarna är inte magnetiskt avskärmade, så placera dem på avstånd från bildskärmen. När du ansluter andra högtalare än
NS-BP400 ska du använda högtalare med en impedans på minst 6 Ω.
• PHONO-uttagen är bara kompatibla med ett vändbord med MM-kassett.
• Koppla ditt vändbord till GND-terminalen för att minska bruset i signalen. Men du kan höra mindre brus utan kopplingen till GNDterminalen för vissa vändbord.
9 Sv
Svenska
Page 98

KOPPLA ANTENNER
KOPPLA ANTENNER
För att lyssna på radio på mottagaren, kopplas den medföljande FM-antennen till den avsedda terminalen. Om det är
problem med svag mottagning av radiovågor i ditt område eller du vill förbättra radiomottagningen, rekommenderar vi
att du använder utomhusantenner. För mer information kan du kontakta närmaste Yamaha-försäljare eller servicecenter.
Koppla FM-antennen
FM-antenn för
inomhusbruk
(medföljer)
1 Anslut medföljande FM-antennen för
inomhusbruk i recieverns FM-jack och GNDanslutning.
ANTENNA
GND
L
INPUT
R
PHONO CD
75
AUX
UNBAL. FM
OUTPUT
SUB
WOOFER
SYSTEM
CONNECTOR
TO:CD PLAYER
2 Placera antennen en bit bort från receivern
och högtalarkablarna. Sök upp den bästa
mottagarpositionen, expandera antennen,
och fäst den.
y
GND-anslutningen kan användas tillsammans med skivspelarens
kabel.
KOPPLA ELKABLARNA
När du gjort alla kopplingar, kopplas systemets elkablar och andra komponenter.
ANTENNA
R L
SPEAKERS:60MIN.
OUTPUT
R L
GND
INPUT
L
R
PHONO CD
75
UNBAL. FM
OUTPUT
AUX
WOOFER
TO:RECEIVER
SYSTEM
CONNECTOR
SYSTEM
CONNECTOR
SUB
TO:CD PLAYER
MAINS
MAINS
Till AC-uttaget i
väggen
Till AC-uttaget i
väggen
10 Sv
Page 99

ANSLUTA DIN iPod™ OCH USB-ENHETEN
ANSLUTA DIN iPod™ OCH USB-ENHETEN
Du kan koppla olika ljudkomponenter som USB och iPod till mottagaren. För information om din externa komponent
kan du titta i bruksanvisningen som medföljer varje komponent.
Koppla en iPod™
Mottagaren är utrustad med en terminal på ovansidans
panel, där du kan placera din iPod och kontrollera
uppspelningen från din iPod med hjälp av den
medföljande fjärrkontrollen.
Använd mottagaren med iPod dockningsadapter
(medföljer din iPod eller finns att köpa) som passar din
iPod. Om du använder mottagaren utan att använda en
passande iPod dockningsadapter, kan resultatet bli en lös
koppling.
y
När mottagaren startats eller befinner sig i vänteläge, ska du
ansluta din iPod under pågående uppspelning. Mottagaren startar
då uppspelningen av din iPod automatiskt.
iPod
iPod
VOLUME
INPUT
PURE
ON/STANDBY
PHONES
OFF
Anmärkningar
• Enbart iPod (Click and Wheel), iPod nano och iPod mini och
iPod touch stöds.
• Koppla inte några iPod-tillbehör (som hörlurar, en fjärrkontroll
med ledning eller en FM-sändare) till din iPod när den placerats
i en terminal.
• Om inte din iPod sitter ordentligt i en terminal, kan
ljudsignalerna inte matas ut ordentligt.
• När kopplingen mellan din iPod och mottagaren är klar och
mottagaren är inställd på iPod-läge (se sid. 5), visas
”CONNECTED” på frampanelens display. Om kopplingen
mellan din iPod och mottagaren inte fungerar, visas ett
statusmeddelande på frampanelens display. För en komplett
lista över kopplingarnas statusmeddelanden, se iPod-avsnittet i
”FELSÖKNING” på sid. 21.
• När din iPod är ansluten till en av mottagarens kontakter kan
den laddas automatiskt även när mottagaren befinner sig i
vänteläge.
• Du kan koppla ur din iPod under pågående uppspelning.
TUNER PRESET
DIRECT
MIN
Mottagare
MAX
Koppla USB-minnen
Denna CD-spelare har en USB-port och kan komma åt
MP3- eller WMA-filer som sparats på ditt USB-minne.
Koppla ditt USB-minne till en USB-port på CD-spelarens
frampanel.
VARNING
Anslut inte din USB-enhet medan USB-indikatorn blinkar.
ON/STANDBY
USB
OFF
CD-spelare
USB-enhet
■ Stödda USB-minnen
Denna CD-spelare stödjer USB masslagringsminnen (t.ex.
flashminnen, kortläsare eller bärbara ljudspelare) med
hjälp av FAT16- eller FAT32-format.
Anmärkningar
• Vissa minnen kanske inte fungerar riktigt även om de uppfyller
kraven.
• Koppla inte andra enheter än USB masslagringsminnen.
• När du sätter i två eller fler minneskort samtidigt med hjälp av
kortläsare etc. identifieras bara ett av minneskorten.
• Yamaha och leverantörer tar inget ansvar för förlorad data som
sparats på USB-minnet som kopplats till mottagaren. Som
försiktighet rekommenderar vi att filerna säkerhetskopieras.
• Spelbarhet av och el till alla typer av USB-minnen kan inte
garanteras.
• När din USB-enhet är ansluten till USB-porten kan din
USB-enhet laddas automatiskt, även då CD-spelaren befinner
sig i vänteläge och då ECO-läget är OFF (se sid. 13).
• Du kan koppla ur USB-enheten under pågående uppspelning.
FÖRBEREDELSE
11 Sv
Svenska
Page 100

SYSTEMFUNKTIONER
VOL
VOL
TONE BALANCE
DISPLAY DIMMER SLEEP
MUTE
PURE DIRECT
CDiPod
FM
PHONO
AUX
USB
PRESET
SYSTEMFUNKTIONER
Följ proceduren nedan för att välja en ingångskälla och ändra ljudinställningarna på systemet.
ON/STANDBY, OFF
ON/STANDBY
PHONES
OFF
ON/STANDBY
USB
OFF
(beredskap/på)
Ingångsväljare
VOLUME +/–
INPUT PURE
INPUT
PURE DIRECT
TUNER PRESET
DIRECT
MIN MAX
VOLUME
VOLUME
3 Tryck på lämplig ingångsväljare (eller rotera
INPUT på frampanelen) för att välja önskad
ingångskälla.
4 Starta uppspelning på vald källkomponent
eller ställ in en radiostation.
För information om uppspelning med skiva/USBminne se sid. 14 och för information om
radiomottagning se sid. 17.
5 Tryck på VOLUME +/– (eller rotera VOLUME
på frampanelen) för att justera volymen till
önskat utgångsläge.
■ Att ställa in ljudkvaliteten
1 Tryck på TONE/BALANCE för att välja BASS,
TREBLE eller BALANCE.
2 För att justera inställningen, tryck eller
.
BASS: Reglerar lågfrekvent basljud.
TREBLE: Reglerar högfrekvent diskantljud.
BALANCE: Reglerar volymbalansen mellan vänster
och höger högtalarkanaler.
TONE/BALANCE
PURE DIRECT
MUTE
Grundläggande systemfunktioner
1 Tryck på ON/STANDBY, OFF på mottagarens
och CD-spelarens frontpanel.
2 Tryck på (beredskap/på) för att sätta på
mottagaren.
Beroende på mottagarens inmatningsläge sätts också
CD-spelaren på via styrkabelanslutningen (se sid. 9).
Frampanelens display tänds.
12 Sv
■ Pure Direct-läge
/
Pure Direct-läget stänger av kretsarna för
tonklangsreglering och displayen på frampanelen, vilket
gör att du kan lyssna på rena och naturtrogna ljud.
Tryck på PURE DIRECT (eller PURE DIRECT på
frampanelen) för att sätta på Pure Direct-läget.
PURE DIRECT-indikatorn tänds vid tryckningen och
frampanelens display släcks.
Anmärkningar
• Om du utföra åtgärder när Pure Direct-läget är aktiverat, tänds
frontpanelens teckenfönster en kort stund för att bekräfta kommandot.
• När Pure Direct-läget är aktiverat är varken BASS, TREBLE
eller BALANCE tillgängligt.
Att stänga av Pure Direct-läget
Tryck en gång till på PURE DIRECT så att PURE
DIRECT-indikatorn slocknar och belysningen i
frampanelens display tänds.
■ Dämpa ljudet (MUTE)
Tryck på MUTE för att stänga av ljudet.
MUTE ON visas på frampanelens display.
För att återställa ljudet, tryck på MUTE igen eller tryck på
VOLUME +/–.
 Loading...