

Yamaha L-255 ASSEMBLY INSTRUCTIONS [pt]

q Side boards
Placas laterais
Pannelli laterali
Боковые панели
측판
e Stand bases
Bases da mesa
Basi del supporto
Опоры
스탠드 받침대
w Back board
Placa posterior
Pannello posteriore
Задняя панель
후판
6 x 70 mm long screws (4 pcs.)
Parafusos longos de 6 x 70 mm (4 peças)
Viti lunghe 6 x 70 mm (4 pz.)
Винты длинные 6 x 70 мм (4 шт.)
6 x 70mm 긴 나사(4개 )
Joint connectors (4 pcs.)
Conectores de junção (4 peças)
Connettori di giunzione (4 pz.)
Соединительные муфты (4 шт.)
조인트 커넥터(4개 )
Screw hole patches (1 sheet)
• If desired, you can use these patches to conceal the screw holes from view, after assembling the stand.
Circular patches: To be affixed at position A as shown above.
Oblong patches: To be affixed at position B as shown above. (If you are using the stand along with your L-255
compatible pedal unit, there is no need to use the oblong patches.)
Adesivos para orifícios de parafuso (1 folha)
• Se quiser, é possível usar estes adesivos para ocultar os orifícios dos parafusos, após a montagem da mesa.
Adesivos circulares: para colocar na posição A, conforme ilustrado acima.
Adesivos retangulares: para colocar na posição B, conforme ilustrado acima. (Se estiver usando a mesa com uma unidade
de pedal compatível do L-255, os adesivos retangulares não são necessários.)
Patch per i fori delle viti (1 foglio)
• Se si desidera, è possibile utilizzare questi patch per nascondere i fori delle viti dopo l'assemblaggio del supporto.
Patch circolari: da applicare in posizione A come indicato sopra.
Patch oblunghi: da applicare in posizione B come indicato sopra. (Se si utilizza il supporto con la pedaliera
compatibile L-255, non occorre utilizzare i patch oblunghi.)
Наклейки на отверстия под винты (1 лист)
• При желании после сборки можно заклеить этими наклейками отверстия под винты.
Круглые наклейки: приклеиваются в поз. A, как показано на рисунке выше.
Продолговатые наклейки: приклеиваются в поз. B, как показано на рисунке выше. (Если подставка будет
использоваться вместе с совместимым с вашей стойкой L-255 блоком педалей, то
продолговатые наклейки не нужны.)
나사 구멍 패치(1장)
・ 스탠드 조립이 완료된 이후에 이 나사 구멍 패치를 나사 구멍을 감추는 용도로 사용해도 좋습니다.
원형 패치: 위에 표시된 A 위치에 붙입니다.
타원형 패치: 위에 표시된 B 위치에 붙입니다. (스탠드와 L-255 호환 페달 장치를 함께 사용할 경우, 타원형 패치를 사용할 필
요가 없습니다.)
NOTE
OBSERVAÇÃO
ПРИМЕЧАНИЕ
5 x 16 mm thin screws (4 pcs.)
Parafusos finos de 5 x 16 mm (4 peças)
Viti sottili 5 x 16 mm (4 pz.)
Винты тонкие 5 x 16 мм (4 шт.)
5 x 16mm 가는 나사(4개 )
Assembly Parts / Peças de montagem / Minuteria /
Детали для сборки
/ 조립 부품
6 x 14 mm short screws (6 pcs.)
Parafusos curtos de 6 x 14 mm (6 peças)
Viti corte 6 x 14 mm (6 pz.)
Винты короткие 6 x 14 мм (6 шт.)
6 x 14mm 짧은 나사(6 개)
r
t
y
u
i
A
B
Keyboard Stand / Mesa do teclado
EN PT IT RU KO
Supporto tastiera / Подставка для инструмента
건반 스탠드
L-255
Assembly Instructions / Instruções de montagem
Istruzioni per l'assemblaggio / Инструкции по сборке
조립 지침
C.S.G., DMI Development Division
© 2013 Yamaha Corporation
311PLXX*.*-01A0
ENGLISH
CAUTION
Read these precautions carefully
before you assemble or use the
keyboard stand.
These precautions are to promote safe
use of the stand and to prevent injury and
damage from occurring to you and others.
By following these precautions carefully,
you will be able to get long and safe usage
from your keyboard stand.
Please keep this manual in a safe and
handy place for future reference.
Be careful not to confuse any of the
parts, and be sure to install all parts in
the correct direction. Please assemble
according to the sequence given below.
Assembly should be carried out by at
least two persons.
Assemble the stand on a hard and flat
floor with ample space.
Use only the screws provided when
assembling the stand. Use of any other
screws may result in an inadequate
assembly that may cause damage to
both the keyboard and the stand.
Use the stand only after assembly is
complete. An incomplete assembly may
result in overturning of the stand and
damage to the keyboard.
Always place the stand on a flat, stable
surface. Placing the stand on uneven
surfaces may result in it becoming
unstable or overturning, causing the
keyboard to drop and possibly resulting
in injury.
Do not use the stand for anything other
than its designed purpose. The stand is
not designed to hold anything other than
the specified keyboard. Placing any
object other than the specified keyboard
on the stand may result in the object
dropping or the stand overturning.
Do not apply excessive force to the
keyboard as it may cause the stand to
overturn or the keyboard to drop.
Make sure the stand is sturdy and safe,
and all screws have been securely
tightened before use. If not, the stand
may overturn, the keyboard may drop, or
may result in injury to the user.
To disassemble, reverse the assembly
sequence given below.
PORTUGUÊS
CUIDADO
Leia estas precauções
cuidadosamente antes de montar ou
utilizar a mesa do teclado.
Estas precauções têm a finalidade de promover
o uso seguro da mesa e evitar ferimentos e
danos a você e a outras pessoas.
Seguindo as precauções cuidadosamente,
você poderá usar a mesa do seu teclado por
muito tempo ep com segurança.
Mantenha este manual em um lugar seguro e
conveniente para referência futura.
Cuidado para não confundir as peças.
Verifique se todas estão instaladas na
direção correta. Monte de acordo com a
sequência descrita a seguir.
A montagem deve ser realizada por,
pelo menos, duas pessoas.
Monte a mesa sobre um piso de
superfície dura e plana com amplo
espaço.
Para montar a mesa, use apenas os
parafusos fornecidos. Usar qualquer
outro parafuso pode resultar em uma
montagem inadequada, podendo
causar danos ao teclado e à mesa.
Use a mesa apenas após a conclusão
da montagem. Uma montagem
incompleta pode causar a queda da
mesa e danos ao teclado.
Sempre coloque a mesa em uma
superfície estável e plana. Colocar a
mesa em superfícies irregulares pode
provocar instabilidade ou virar a mesa,
fazendo com que o teclado caia e
podendo causar ferimentos.
Não use a mesa para outra finalidade
além da designada. A mesa foi
projetada para apoiar apenas o teclado
especificado e nada mais. Dispor
qualquer outro objeto na mesa pode
fazer com que o objeto caia ou que a
mesa vire e caia.
Não aplique muita força no teclado, pois
isso pode virar a mesa ou fazer o
teclado cair.
Certifique-se de que a mesa esteja
resistente e segura e que todos os
parafusos estejam apertados
adequadamente antes de utilizá-la. Do
contrário, a mesa pode virar, o teclado
pode cair ou o usuário pode se ferir.
Para desmontar, basta inverter a
sequência de montagem descrita a
seguir.
ITALIANO
ATTENZIONE
Leggere attentamente le seguenti
indicazioni prima di montare o
utilizzare il supporto della tastiera.
Queste indicazioni servono per assicurare
un utilizzo sicuro del supporto e per
evitare lesioni o danni alle persone.
Seguendo queste indicazioni con attenzione
sarà possibile utilizzare il supporto della
tastiera in modo sicuro e a lungo.
Tenere questo manuale in un luogo sicuro
e comodo per un riferimento futuro.
Prestare attenzione a non confondere i
componenti e assicurarsi di installarli tutti
correttamente, seguendo le istruzioni
nell'ordine indicato.
L'operazione di assemblaggio deve
essere eseguita da almeno due
persone.
Assemblare il supporto su un pavimento
duro e piano con ampio spazio a
disposizione.
Fissare il supporto utilizzando
esclusivamente le viti fornite. L'uso di altre
viti può comportare un assemblaggio non
corretto con conseguenti danni alla
tastiera e al supporto.
Utilizzare il supporto solo dopo aver
completato l'assemblaggio. Un
assemblaggio non completo può
causare il ribaltamento del supporto e
danneggiare la tastiera.
Posizionare sempre il supporto su una
superficie piana e stabile. Il
posizionamento del supporto su superfici
irregolari potrebbe comportarne
l'instabilità o il rovesciamento, causando
così la caduta della tastiera e possibili
lesioni personali.
Non utilizzare il supporto per scopi diversi
da quello originale. Il supporto non è
progettato per sostenere oggetti diversi
dalla tastiera specificata. Il
posizionamento di oggetti diversi dalla
tastiera sul supporto potrebbe causare la
caduta degli oggetti o il ribaltamento del
supporto.
Non applicare forza eccessiva alla
tastiera per non causare il
rovesciamento del supporto o la caduta
della tastiera stessa.
Prima dell'utilizzo accertarsi che il
supporto sia stabile e sicuro e che tutte le
viti siano serrate saldamente. In caso
contrario il supporto o la tastiera potrebbe
cadere oppure l'utente potrebbe subire
lesioni.
Per smontare il supporto, invertire
l'ordine delle istruzioni riportate di
seguito.
РУССКИЙ
ВНИМАНИЕ
Внимательно прочитайте эти
предостережения перед сборкой
или использованием подставки
для инструмента.
Данные предостережения представлены
для безопасного использования
подставки, а также для предотвращения
травм и повреждений.
Для безопасной и продолжительной
эксплуатации подставки для
инструмента неукоснительно
соблюдайте эти правила.
Сохраните настоящее руководство на
будущее в безопасном и удобном месте.
Не перепутайте детали подставки и
устанавливайте их в правильной
ориентации. Выполняйте сборку
согласно следующей инструкции.
Для сборки потребуется участие не
менее двух человек.
Собирайте стойку на твердой и плоской
поверхности пола при наличии
достаточного свободного места.
При сборке применяйте только винты,
входящие в комплект поставки стойки.
Использование других винтов может
привести к неправильной сборке и
вызвать повреждение клавишного
инструмента и подставки.
Используйте подставку только после
завершения сборки. Неполная сборка
может привести к опрокидыванию
подставки и вызвать повреждение
клавишного инструмента.
Всегда помещайте подставку на
ровную твердую поверхность. Если
расположить подставку на неровной
поверхности, то теряется ее
устойчивость. Она может
перевернуться, а инструмент — упасть,
что приведет к травмам.
Используйте подставку только по
назначению. Подставка предназначена
исключительно для размещения
определенного типа инструмента.
Помещение посторонних предметов
на подставку может привести к их
падению или опрокидыванию
подставки.
Не допускайте слишком сильного
нажатия на инструмент, так как это
может привести к опрокидыванию
подставки или падению инструмента.
Перед использованием убедитесь,
что подставка установлена надежно
и что все винты затянуты. В
противном случае подставка может
опрокинуться, а инструмент —
упасть, что приведет к травмам.
Разборка подставки выполняется в
обратном порядке.
한국어
주의
건반 스탠드를 조립하거나 사용하기 전에 안
전 주의사항을 읽으십시오.
이 안전 주의사항은 건반 스탠드를 안전하게
사용하고 사용자 및 다른 사람에게 발생할 수
있는 부상과 손해를 방지하기 위해 제공되었
습니다.
이 안전 주의사항을 준수하면 건반 스탠드를
오랫동안 안전하게 사용할 수 있습니다.
본 설명서를 찾기 쉬운 안전한 곳에 보관하여
향후에 참조하도록 하십시오.
부품들을 혼동하지 않도록 주의하고 모든
부품을 반드시 올바른 방향으로 설치하십
시오. 또한 아래의
하십시오.
조립은 최소한 두 사람이 해야 합니다.
공간이 넓고 바닥이 단단하고 평평한 곳에
서 스탠드를 조립하십시오.
스탠드를 조립할 때는 함께 제공된 나사만
을 사용하십시오. 다른 나사를 사용할 경우
제대로 조립되지 않아 건반과 스탠드가 모
두 손상될 수 있습니다.
조립이 완료된 후에만 스탠드를 사용하십
시오. 스탠드를 제대로 조립하지 않으면
탠드가 쓰러져 건반이 손상될 수 있습니다.
스탠드는 반드시 평평하고 고정된 표면에
놓으십시오. 표면이 고르지 않은 곳에 스탠
드를 놓을 경우 불안정해지거나 쓰러질 수
있으며, 이로 인해 건반이 떨어져 사용자가
부상을 입을 수 있습니다.
지정된 용도 외에 다른 목적으로 스탠드를
사용하지 마십시오. 스탠드는 지정된 건반
만을 고정하도록 설계되었습니다. 지정된
건반 이외에 다른 물체를 스탠드
경우, 물체가 떨어지거나 스탠드가 쓰러질
수 있습니다.
과도한 힘을 건반에 가하면 스탠드가 쓰러
지거나 건반이 떨어질 수 있습니다.
사용 전에 스탠드가 단단히 고정되어 있는
지, 모든 나사가 확실하게 조여져 있는지 확
인하십시오. 그렇지 않을 경우 스탠드가 쓰
러져 건반이 떨어지거나 사용자가 부상을
입을 수 있습니다.
스탠드를 분리할 때는 아래의 조립
반대로 시행하십시오.
순서에 따라 조립하도록
스
위에 놓을
순서를
Keyboard Stand Assembly
ENGLISH
Have a Phillips-head (+) screwdriver of the appropriate size
ready.
The parts shown in the “Assembly Parts” illustration will be used. Follow
the assembly instructions and select the parts as needed.
PORTUGUÊS
Montagem da mesa do teclado
Tenha à mão uma chave Phillips (com cabeça em +) de tamanho
adequado.
Serão usadas as peças ilustradas na imagem "Peças de montagem".
Siga as instruções de montagem e selecione as peças conforme necessário.
Assemblaggio del supporto della
ITALIANO
tastiera
Procurarsi un cacciavite a croce (+) della misura appropriata.
Saranno utilizzati i componenti mostrati nell'illustrazione "Minuteria".
Seguire le istruzioni per l'assemblaggio e selezionare i componenti a
seconda di quanto indicato.
Сборка подставки для инструмента
РУССКИЙ
Подготовьте крестовую (+) отвертку соответствующего
размера.
Для сборки используются элементы, показанные на рисунке
«Детали для сборки». В соответствии с инструкцией отберите
необходимые детали.
건반 스탠드 조립
한국어
● 적합한 크기의 십자(+) 드라이버를 준비하십시오.
"조립 부품" 그림에 표시되어 있는 부품들이 사용됩니다. 조립 지침에 따라 필요
한 부품을 선택합니다.
• The illustrations as shown in this Assembly Instructions are for instructional purposes only,
and may appear somewhat different from those on your stand or keyboard.
• As ilustrações mostradas nestas Instruções de montagem são apenas para fins de instrução
e podem ser diferentes em relação às da mesa ou do teclado.
• Le illustrazioni della sezione Minuteria vengono fornite esclusivamente a titolo esemplificativo
e possono avere un aspetto in qualche misura diverso da quanto visualizzato sul supporto o
sulla tastiera.
• Рисунки в данной инструкции по сборке приведены только в качестве примеров.
Реальная подставка может выглядеть несколько иначе.
• 이 조립 지침에 표시된 그림은 설명용이므로 실제 스탠드나 건반의 모습과는 약간 다를 수 있습니다.
1
NOTE
OBSERVAÇÃO
“L”
q
e
r
z-1
r Joint connectors
Conectores de junção
Connettori di giunzione
Соединительные муфты
조인트 커넥터
2
y Short screws
Parafusos curtos
Viti corte
Короткие винты
짧은 나사
q Side boards
Placas laterais
Pannelli laterali
Боковые панели
측판
t
Front
Frente
Parte anteriore
Лицевая сторона
전면
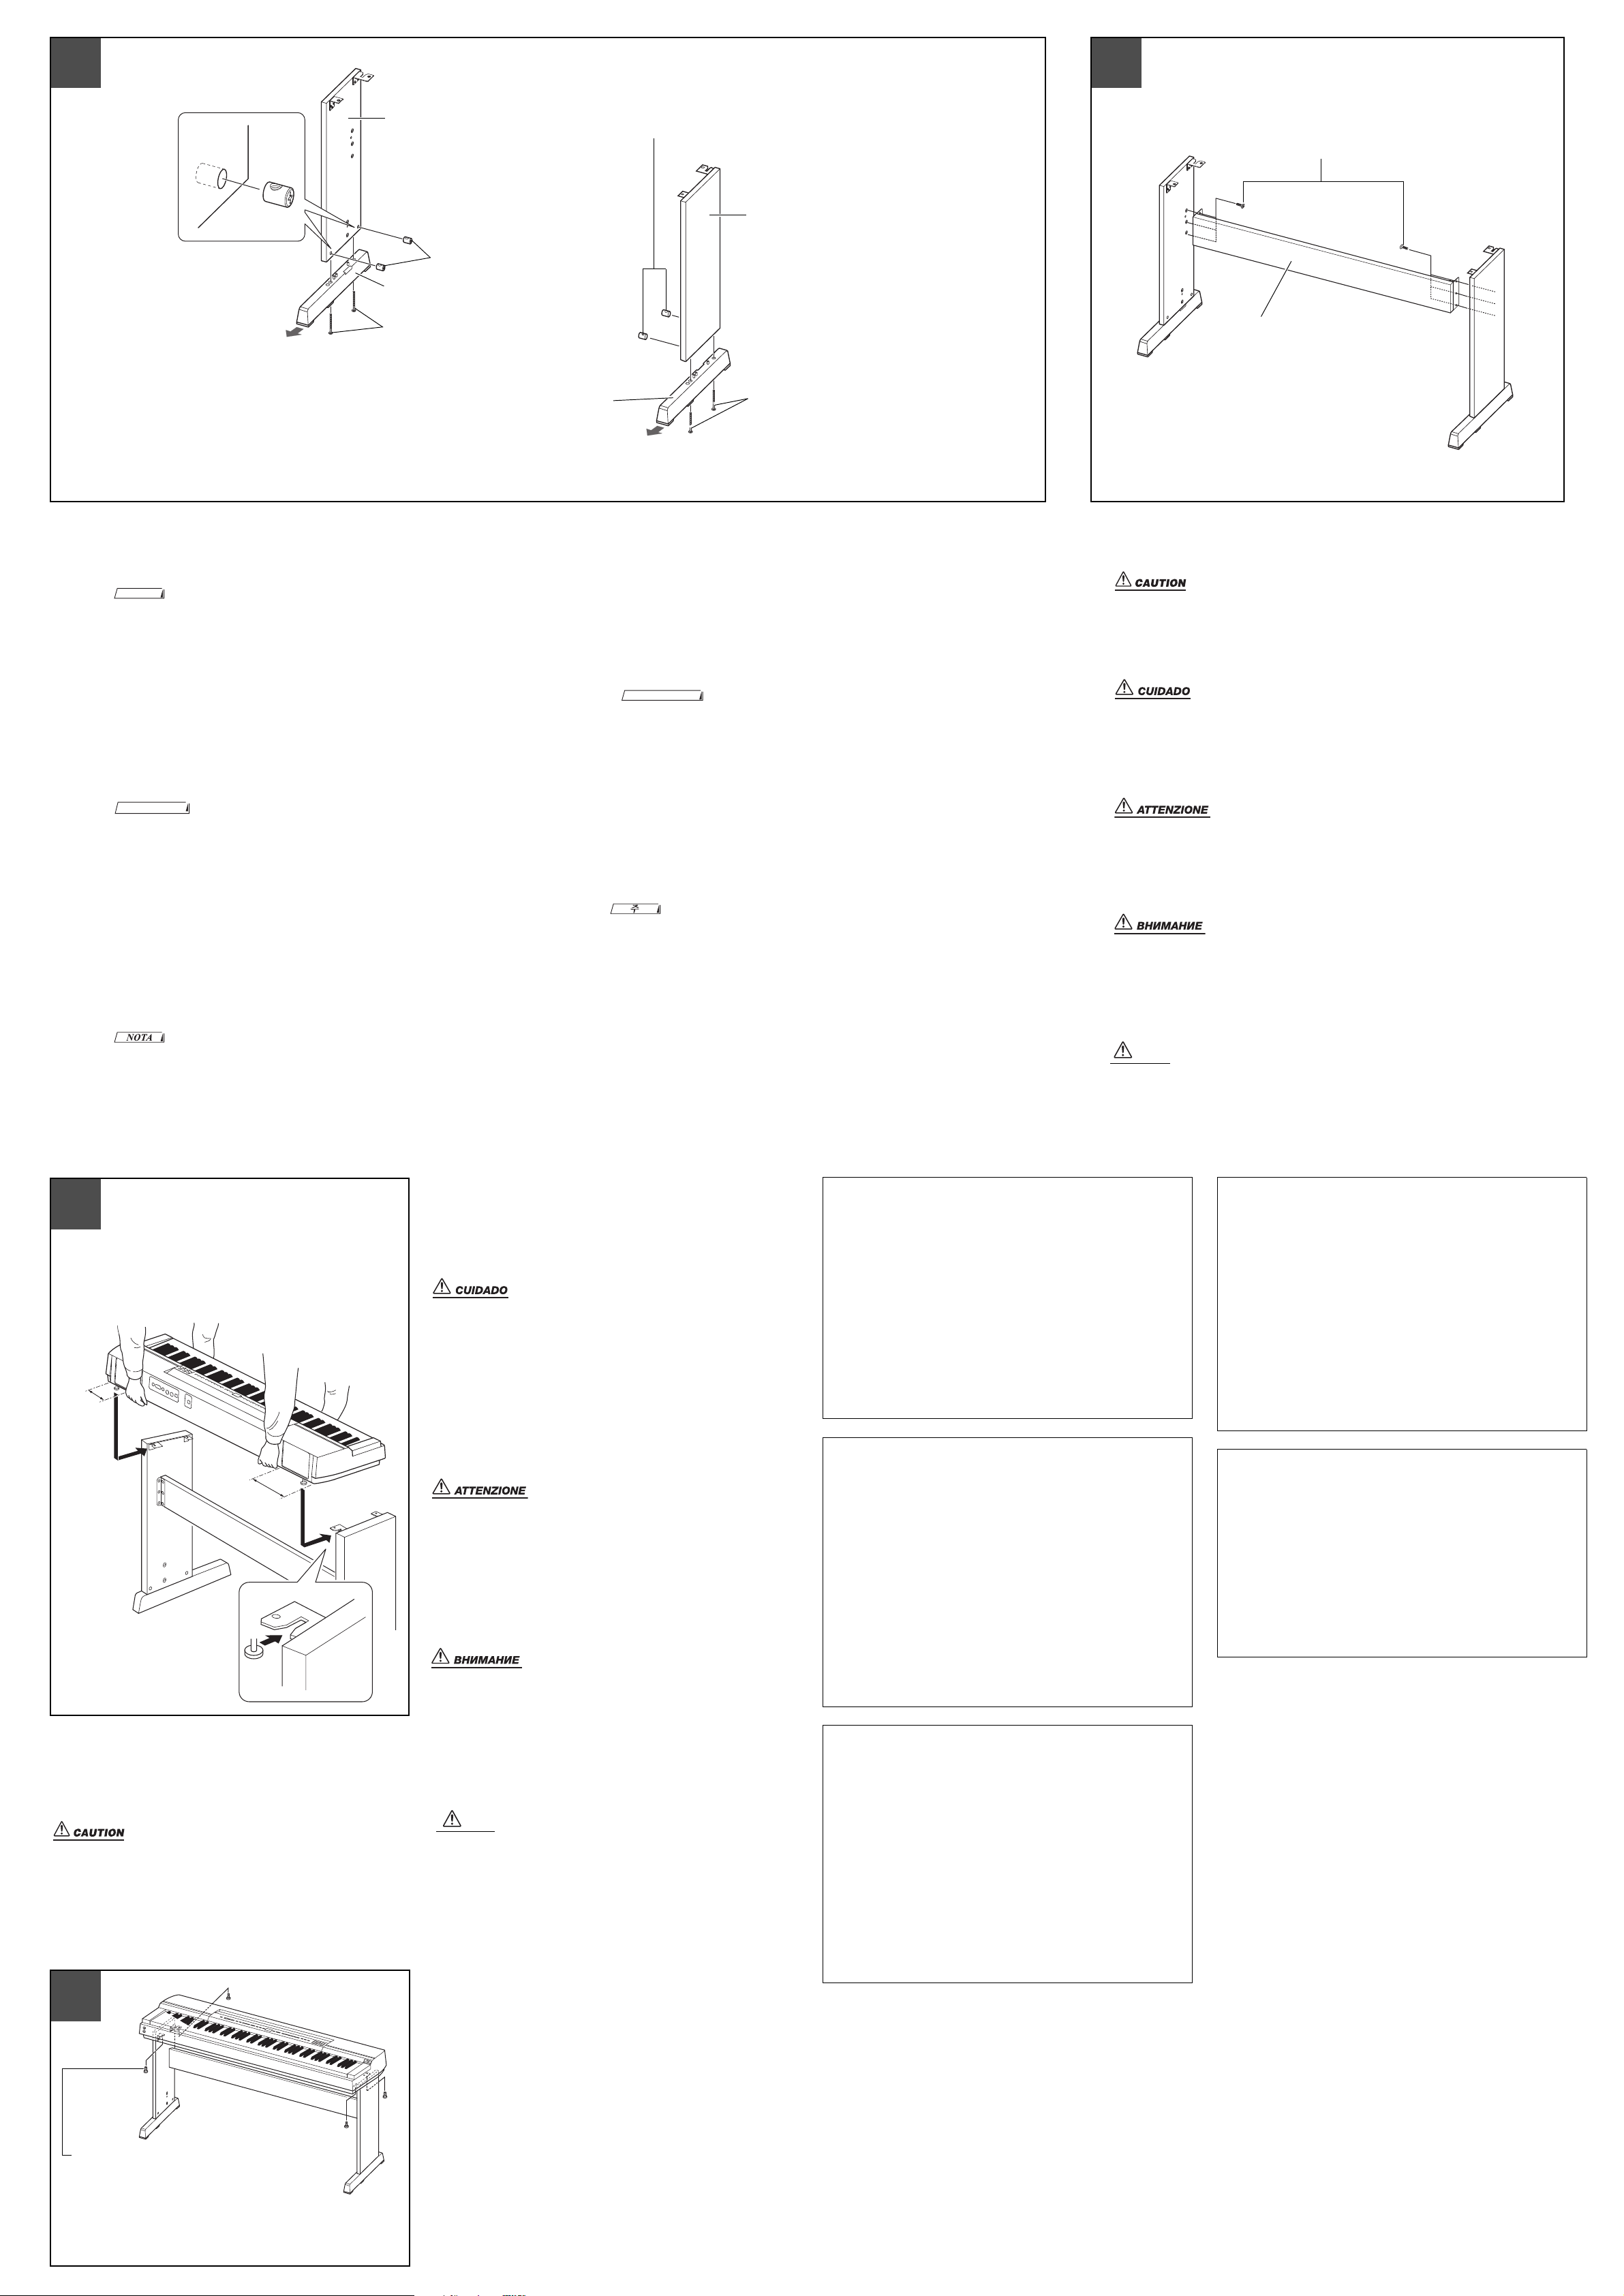
z Attach the stand bases.
z-1 Insert the joint connectors (r) into the “L” (Left) and “R” (Right) side boards (q)
as shown. The joint connectors (r) have been installed properly if you can see the
screw head on the connector. Make sure that the connector holes are facing down.
• If you put the connectors (r) in the wrong direction and want to take them out, tap
around the holes on the boards (
q
).
z-2 Attach the “L” (Left) and “R” (Right) stand bases (e) to the bottom of the side
boards (q), using the long screws (t). If you have trouble fastening the screws,
use a screwdriver to rotate the joint connectors (r) so that the connector holes are
aligned with the screw holes on the stand bases.
z Encaixe as bases da mesa.
z-1 Insira os conectores de junção (r) nas placas laterais "L" (esquerda) e "R" (direita)
(q), conforme ilustrado. Os conectores de junção (r) estarão instalados
adequadamente se a cabeça do parafuso estiver visível no conector. Garanta que os
orifícios do conector estejam para baixo.
e Stand bases
Bases da mesa
Basi del supporto
Опоры
스탠드 받침대
z-2 Fissare le basi del supporto "L" (sinistra) e "R" (destra) (e) alla parte inferiore dei
z Установите опоры.
z-1 Вставьте соединительные муфты (r) в левую («L») и правую («R») боковые
z-2 Прикрепите левую («L») и правую («R») опоры (e) к низу боковых панелей
“R”
z-2
t Long screws
Parafusos longos
Viti lunghe
Длинные винты
긴 나사
pannelli laterali (q), mediante le viti lunghe (t). In caso di problemi nel serraggio
delle viti, utilizzare un cacciavite per ruotare i connettori di giunzione (r) in modo
che i fori di questi ultimi siano allineati con i fori delle viti sulle basi del supporto.
панели (q), как показано на рисунке. Соединительные муфты (r)
установлены правильно, если в них видны головки винтов. Убедитесь, что
отверстия в муфтах обращены вниз.
ПРИМЕЧАНИЕ
• Если муфты (r) были установлены в неправильном положении и их требуется
снять, постучите вокруг отверстий на панелях(
q
).
(q) при помощи длинных винтов (t). Если установка винтов затруднена,
поверните отверткой соединительные муфты (r) так, чтобы совместить
отверстия в них с отверстиями под винты в опорах.
w Back board
Placa posterior
Pannello posteriore
Задняя панель
후판
x Attach the back board.
Attach the back board (w), using the six short screws (y).
Make sure the non-colored surface is facing down.
• Be careful not to drop the back board or touch the sharp metal fittings.
x Encaixe a placa posterior.
Encaixe a placa posterior (w) usando os seis parafusos curtos (y ).
Garanta que a superfície sem cor esteja voltada para baixo.
• Tenha cuidado para não deixar a placa posterior cair nem tocar nas conexões de metal
afiadas.
x Fissare il pannello posteriore.
Fissare il pannello posteriore (w), mediante le sei viti corte (y).
Accertarsi che la superficie non colorata sia rivolta verso il basso.
• Se você tiver colocado os conectores (r) na direção errada e quiser removê-los, bata
com cuidado ao redor dos furos das placas (
q
).
z-2 Encaixe as bases da mesa "L" (esquerda) e "R" (direita) (e) na parte inferior das
placas laterais (q) usando os parafusos longos (t). Se tiver dificuldade para
apertar os parafusos, use uma chave de fenda para girar os conectores de junção
(r) para que os furos dos conectores fiquem alinhados com os furos dos parafusos
nas bases da mesa.
z Fissare le basi del supporto.
z-1 Inserire i connettori di giunzione (r) sui pannelli laterali "L" (sinistro) e "R"
(destro) (q) come illustrato. I connettori di giunzione (r) sono installati
correttamente se sul connettore si riesce a vedere la testa della vite. Accertarsi che
i fori del connettore siano rivolti verso il basso.
• Se si inseriscono i connettori (r) in direzione sbagliata e si desidera estrarli, battere
3
leggermente intorno ai fori dei pannelli (
Be sure to place your hands at least 15–20 cm from either
end of the keyboard when positioning it.
Coloque suas mãos a pelo menos 15-20 cm de distância de
cada extremidade do teclado ao posicioná-lo.
Durante il posizionamento, tenere le mani a una distanza di
almeno 15-20 cm da ciascuna estremità della tastiera.
При установке инструмента держите руки на
расстоянии не менее 15–20 см от ее краев.
건반을 옮길 때는 반드시 건반 양끝에서 15-20cm 이상 떨어진 곳을 잡
고 옮기십시오 .
q
).
c Coloque o teclado na mesa.
Coloque o teclado com cuidado nas placas laterais, deslizando-o
horizontalmente para a frente.
Mova lentamente o teclado para que os orifícios na parte inferior
do teclado fiquem alinhados corretamente com os orifícios nos
suportes angulares.
• Tome cuidado para não deixar o teclado cair nem prender os dedos
entre o teclado e as peças da mesa.
• Não segure o teclado em nenhuma outra posição diferente da exibida
na ilustração.
c Appoggiare la tastiera sul supporto.
15–20
cm
15–20
cm
Posizionare con cautela la tastiera sui pannelli laterali, facendola
scorrere orizzontalmente verso la parte anteriore.
Spostare lentamente la tastiera in modo che i fori sul fondo della
stessa siano allineati correttamente con quelli posti sulle staffe ad
angolo.
• Prestare attenzione a non far cadere la tastiera e ad evitare che le dita
restino incastrate tra la tastiera e i componenti del supporto.
• Afferrare la tastiera unicamente nella posizione riportata nell'immagine.
c Поставьте инструмент на подставку.
Аккуратно установите инструмент на боковые стойки
подставки, задвигая его спереди в горизонтальном направлении.
Медленно передвиньте инструмент, чтобы совместить
отверстия на его нижней панели с отверстиями в угловых скобах.
• Осторожно! Не уроните инструмент и не защемите пальцы между
инструментом и деталями подставки.
• Держите инструмент только так, как показано на рисунке.
z 스탠드 받침대를 부착합니다.
-1 조인트 커넥터(r)를 “L”( 좌측) 과 “R”(우측) 측판(q) 에 그림과 같이 끼웁니다.
z
조인트 커넥터(r)가 제대로 설치되면 커넥터의 나사 머리가 보입니다. 커넥터
구멍은 아래를 향하게 해야 합니다.
•
잘못된 방향으로 끼운 커넥터
z-2 긴 나사(t) 를 사용하여 “L”(좌측) 및 “R”(우측) 스탠드 받침대(e) 를 측판(q)
바닥에 부착합니다. 나사가 잘 조여지지 않을 때는 드라이버로 조인트 커넥터
(r)를 돌려서 커넥터 구멍과 스탠드 받침대의 나사 구멍을 맞춥니다.
(r)를 빼낼 때는 판(q)의 구멍
Post-assembly checklist
Once you’ve assembled the stand, check the following
points:
• Are there any parts left over?
If so, read the assembly instructions again and correct any
mistakes you might have made.
• Is the instrument clear of doors and other movable fixtures?
If not, move the instrument to an appropriate location.
• Does the instrument make a rattling noise when you play it or
move it?
If so, properly tighten all screws.
• Also, if the keyboard makes a creaking noise or seems
unsteady when you play it, refer carefully to the assembly
instructions and diagrams and retighten all screws.
Lista de verificação pós-montagem
Depois de montar a mesa, verifique os seguintes pontos:
• Sobrou alguma peça?
Em caso afirmativo, leia as instruções de montagem
novamente e corrija os erros que possam ter ocorrido.
• O instrumento está longe de portas e de outras instalações
móveis?
Em caso negativo, mova o instrumento para um local
apropriado.
• O instrumento emite um ruído de chocalho quando é tocado
ou movido?
Em caso afirmativo, aperte todos os parafusos.
• Além disso, se o teclado emitir rangidos ou parecer instável
durante sua utilização, consulte as instruções e os
diagramas de montagem com atenção e aperte novamente
todos os parafusos.
주변을 가볍게 두드리십시오
• Prestare attenzione a non far cadere il pannello posteriore e a non toccare le parti di metallo
taglienti.
x Прикрепите заднюю панель.
Прикрепите заднюю панель (w) при помощи шести коротких винтов (y).
Убедитесь, что неокрашенная поверхность обращена вниз.
.
• Не роняйте заднюю панель и не притрагивайтесь к острым металлическим
креплениям.
x 후판을 부착합니다.
짧은 나사(y) 여섯 개를 사용하여 후판(w) 을 부착합니다.
무색 표면이 아래를 향하도록 합니다.
주의
•
후판을 떨어트리거나 날카로운 금속 부속품을 건드리지 않도록 주의하십시오
Проверка правильности сборки
После сборки подставки проверьте следующее:
• Не осталось ли лишних деталей?
Если остались какие-либо детали, еще раз прочтите
инструкцию по сборке и исправьте ошибки.
• Не мешает ли инструмент открывать двери и
перемещать другие аналогичные объекты?
Если мешает, передвиньте инструмент в более
подходящее место.
• Не слышно ли дребезжания при игре на инструменте или
его перемещении?
Если слышно, затяните все винты.
• Если инструмент скрипит или покачивается во время
игры, внимательно перечитайте инструкцию по сборке,
ознакомьтесь с чертежами и затяните все винты.
■ 조립 후 체크리스트
스탠드를 조립한 후에는 다음 사항을 확인합니다.
• 사용되지 않고 남은 부품이 있습니까?
만일 있다면, 조립 지침을 다시 읽고 잘못 조립한 부분을 바로
잡습니다.
• 악기 근처에 문이나 다른 이동식 물체가 있습니까?
만일 있다면, 악기를 적절한 장소로 옮깁니다.
• 악기를 연주하거나 움직일 때 덜거덕 소리가 납니까?
만일 그렇다면, 모든 나사들을 다시 확실히 조입니다.
• 건반에서 삐걱 소리가 나거나 연주할 때 불안정한 것 같을 때는 조
립 지침과 그림을 보고 모든 나사를 다시 조입니다.
.
c Put the keyboard on the stand.
horizontally toward the front.
keyboard are properly aligned with the holes on the angle brackets.
• Be careful not to drop the keyboard or to get your fingers caught
• Do not hold the keyboard in any position other than the position shown
Carefully place the keyboard on the side boards, while sliding it
Slowly move the keyboard so that the holes on the bottom of the
between the keyboard and the stand parts.
in the illustration.
4
u Thin screws
Parafusos finos
Viti sottili
Тонкие винты
가는 나사
c 건반을 스탠드 위에 놓습니다.
건반을 측판에 놓으면서 조심스럽게 앞쪽으로 밉니다.
건반 바닥의 구멍이 앵글 브래킷의 구멍과 일치하도록 천천히 건
반 위치를 조정합니다.
주의
・ 건반을 떨어트리거나 건반과 스탠드 부품 사이에 손가락이 끼지 않도록 주
의하십시오
・ 건반을 잡을 때는 반드시 그림에 표시된 위치를 잡으십시오
.
.
v Install the keyboard to the stand.
Fix the keyboard to the angle brackets, using the four thin screws (u).
v Instale o teclado na mesa.
Prenda o teclado aos suportes angulares usando os quatro parafusos
u).
finos (
v Installare la tastiera sul supporto.
Fissare la tastiera alle staffe ad angolo mediante le quattro viti
u).
sottili (
v Установите инструмент на подставку.
Прикрепите угловые скобы к инструменту с помощью
четырех тонких винтов (
u).
v 건반을 스탠드에 설치합니다.
가는 나사(u) 4개를 사용하여 건반을 앵글 브래킷에 고정시킵니다.
Controllo post-assemblaggio
Una volta assemblato il supporto, controllare i seguenti
punti:
• È avanzato qualche pezzo?
In tal caso leggere nuovamente le istruzioni di assemblaggio
e correggere eventuali errori.
• Lo strumento è al riparo da porte e da altre strutture mobili?
In caso contrario, spostare lo strumento in un luogo
adeguato.
• Si sente un rumore metallico quando lo strumento viene
suonato o spostato?
In tal caso serrare bene tutte le viti.
• Inoltre, se la tastiera scricchiola o risulta instabile quando
viene suonata, consultare con attenzione le istruzioni e gli
schemi di assemblaggio e serrare nuovamente tutte le viti.
 Loading...