

Page 1
CS-700
Video Conference System / Système de vidéoconférence
/ 视频电话会议终端
Video Sound Collaboration System for Huddle Rooms
ビデオ会議システム
Always update the firmware to the latest version.
Please refer to the user’s manual that provides detailed information on how to
use the product.
You can download the latest firmware and user’s manual from the following
website:
https://uc.yamaha.com/products/video-sound-bar/huddle-room-system/
Assurer que vous utilisez toujours la version la plus récente.
Reportez-vous au manuel de l'utilisateur qui fournit des informations détaillées
sur l'utilisation du produit.
Vous pouvez télécharger le logiciel le plus récent et le manuel de l'utilisateur à
partir du site Web suivant:
https://uc.yamaha.com/products/video-sound-bar/huddle-room-system/
Bringen Sie die Firmware ihres Systems auf den neuesten Stand.
Vor benutzung lesen Sie bitte die Bedinungsanleitung um sich mit dem Gebrauch
des Gerätes vertraut zu machen.
Die Firmware und Bedienungsanleitung können von der folgenden Webseite
geladen werde:
https://uc.yamaha.com/products/video-sound-bar/huddle-room-system/
Actualice siempre el firmware a la versión más reciente.
Consulte el manual del usuario que proporciona información detallada sobre
cómo utilizar el producto.
Quick Start Guide
Guide de démarrage rapide
Kurzanleitung
Guía de inicio rápido
クイックスタートガイド
快速入门指南
커잔 라이 퉁
Инструкция по началу работы
Puede descargar el último firmware y manual del usuario desde el siguiente sitio
web:
https://uc.yamaha.com/products/video-sound-bar/huddle-room-system/
常にファームウェアを最新バージョンに更新してください。
製品の使用方法の詳細については、ユーザーズマニュアルを参照してください。
以下のWeb サイトから最新情報をダウンロードできます。
マニュアル
https://sound-solution.yamaha.com/download/
ファームウェア
https://uc.yamaha.com/products/video-sound-bar/huddle-room-system/
始终确保固件更新到最新版本。
请参阅用户手册中提供的有关如何使用产品的详细信息。
您可以从以下网站下载最新的固件和用户手册:
https://uc.yamaha.com/products/video-sound-bar/huddle-room-system/
Всегда обновляйте прошивку до последней версии.
Пожалуйста, обратитесь к руководству пользователя, которое содержит
подробную информацию о том, как использовать продукт.
Вы можете загрузить последнюю версию прошивки и руководство
пользователя со следующего веб-сайта:
https://uc.yamaha.com/products/video-sound-bar/huddle-room-system/
EN
FR
DE
SP
JP
CN
KO
RU
Page 2

English . . . . . . . . . . . . . . . . . . . . . . . . . . . . . . . . . . . . . . . . . . . . . . . . . . . 3
Français . . . . . . . . . . . . . . . . . . . . . . . . . . . . . . . . . . . . . . . . . . . . . . . . . 11
Deutsch . . . . . . . . . . . . . . . . . . . . . . . . . . . . . . . . . . . . . . . . . . . . . . . . . 19
Español . . . . . . . . . . . . . . . . . . . . . . . . . . . . . . . . . . . . . . . . . . . . . . . . . . 27
日本語 . . . . . . . . . . . . . . . . . . . . . . . . . . . . . . . . . . . . . . . . . . . . . . . . . . 35
中文 . . . . . . . . . . . . . . . . . . . . . . . . . . . . . . . . . . . . . . . . . . . . . . . . . . . 44
한국어. . . . . . . . . . . . . . . . . . . . . . . . . . . . . . . . . . . . . . . . . . . . . . . . . 52
Русский . . . . . . . . . . . . . . . . . . . . . . . . . . . . . . . . . . . . . . . . . . . . . . . . . 60
EEA Precaution Information . . . . . . . . . . . . . . . . . . . . . . . . . . . . . . . . 69
EEA Guarantee Information . . . . . . . . . . . . . . . . . . . . . . . . . . . . . . . . . 71
Simplified Declaration of Conformity . . . . . . . . . . . . . . . . . . . . . . . . . 73
List of International Distributors . . . . . . . . . . . . . . . . . . . . . . . . . . . . . 75
2
Page 3
English
Content
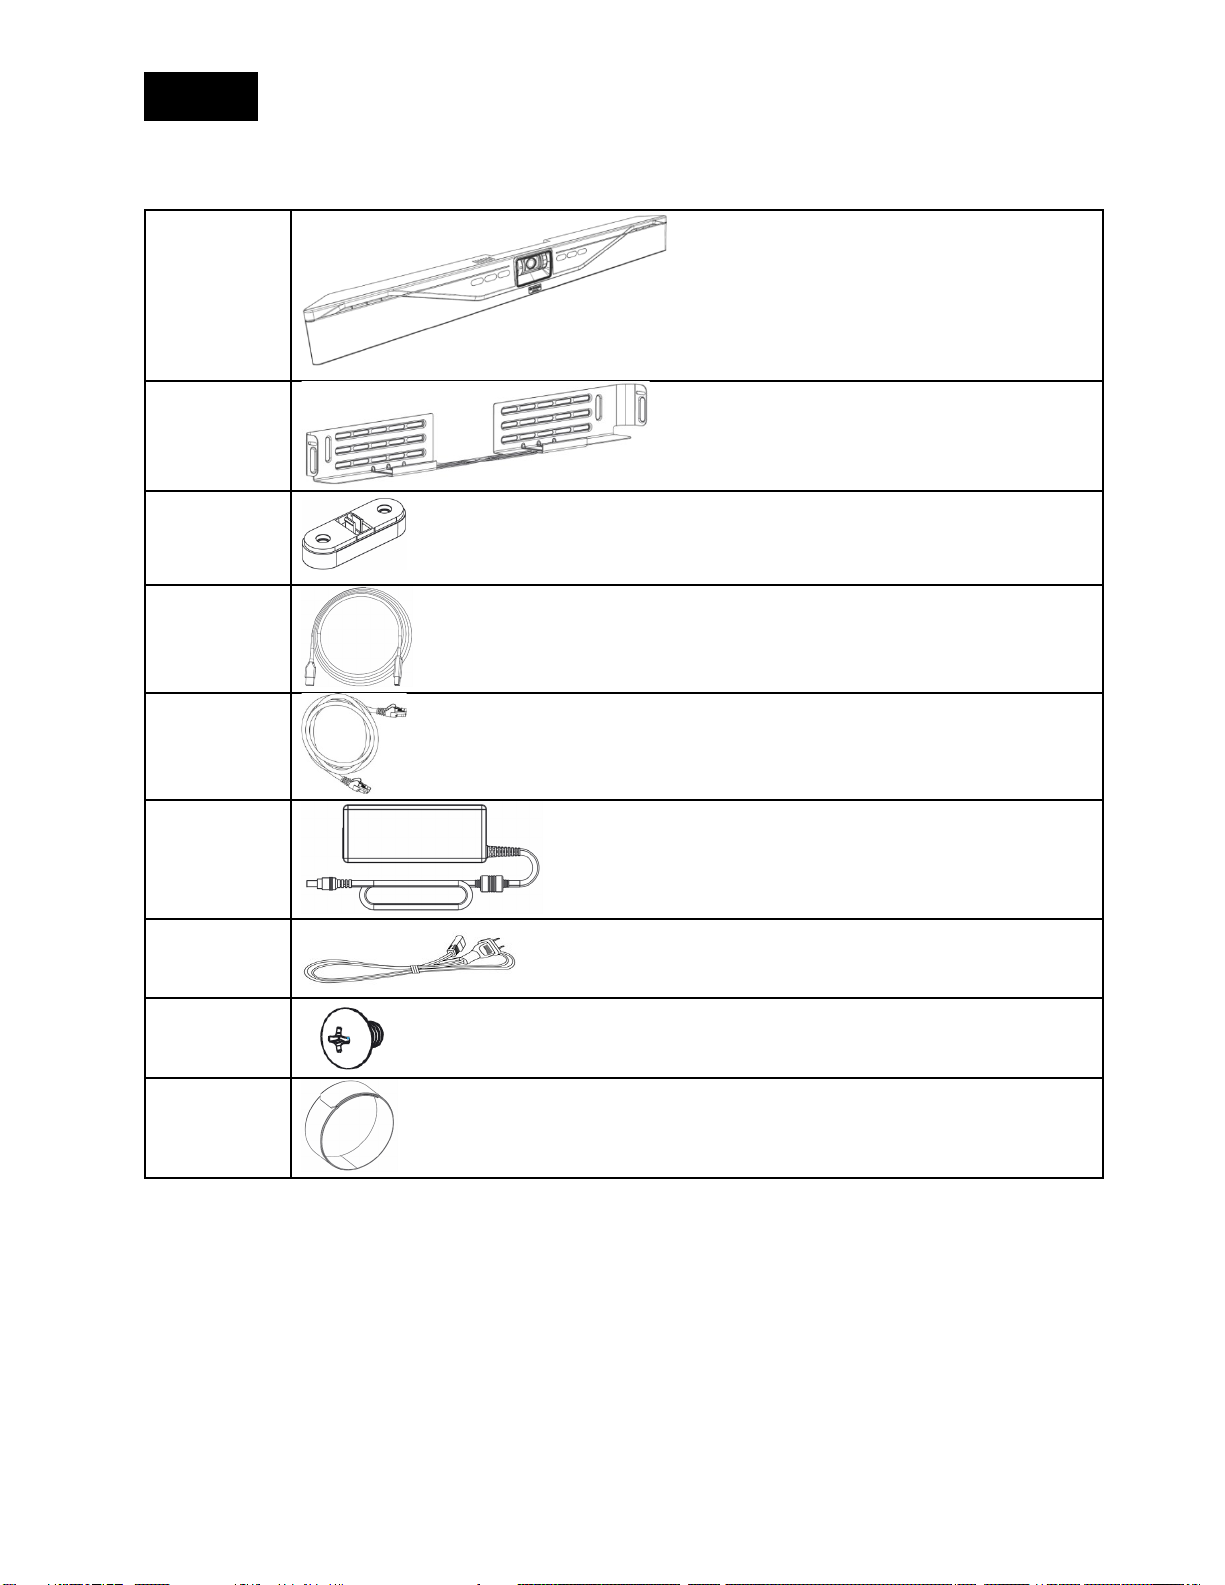
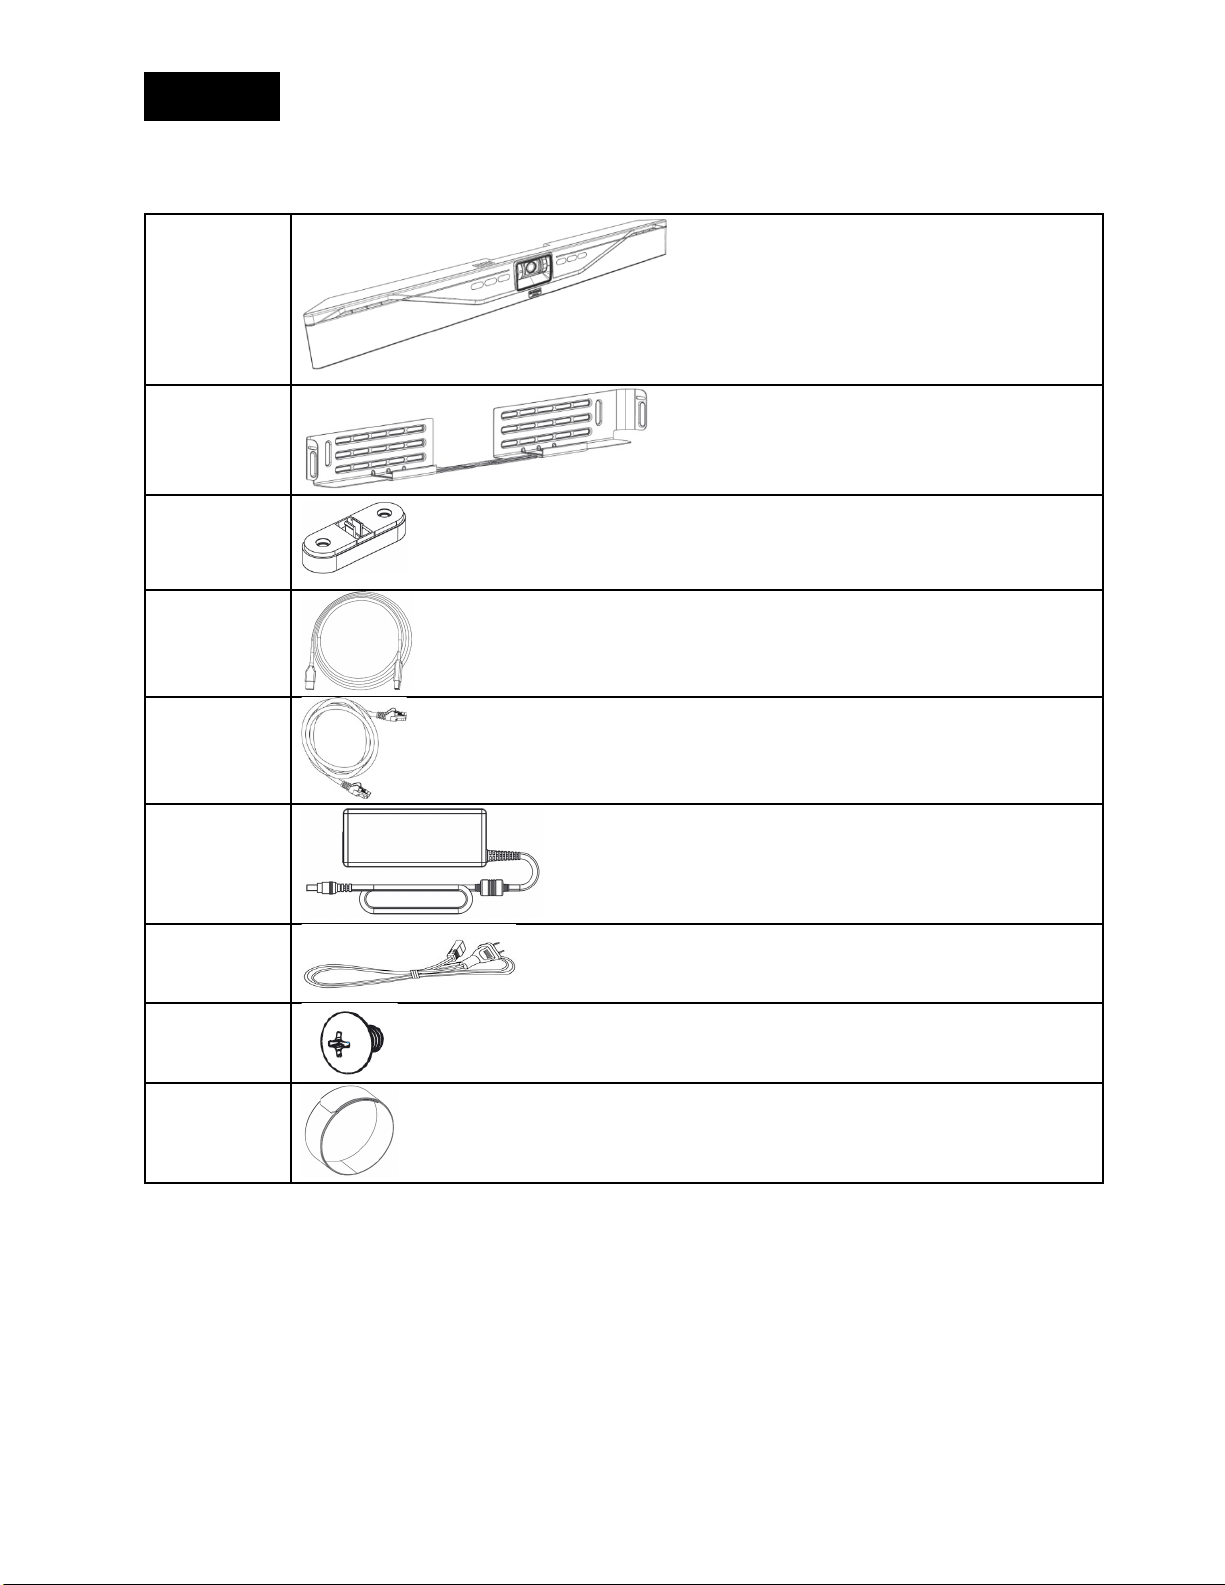
1 x
1 x
4 x
1 x
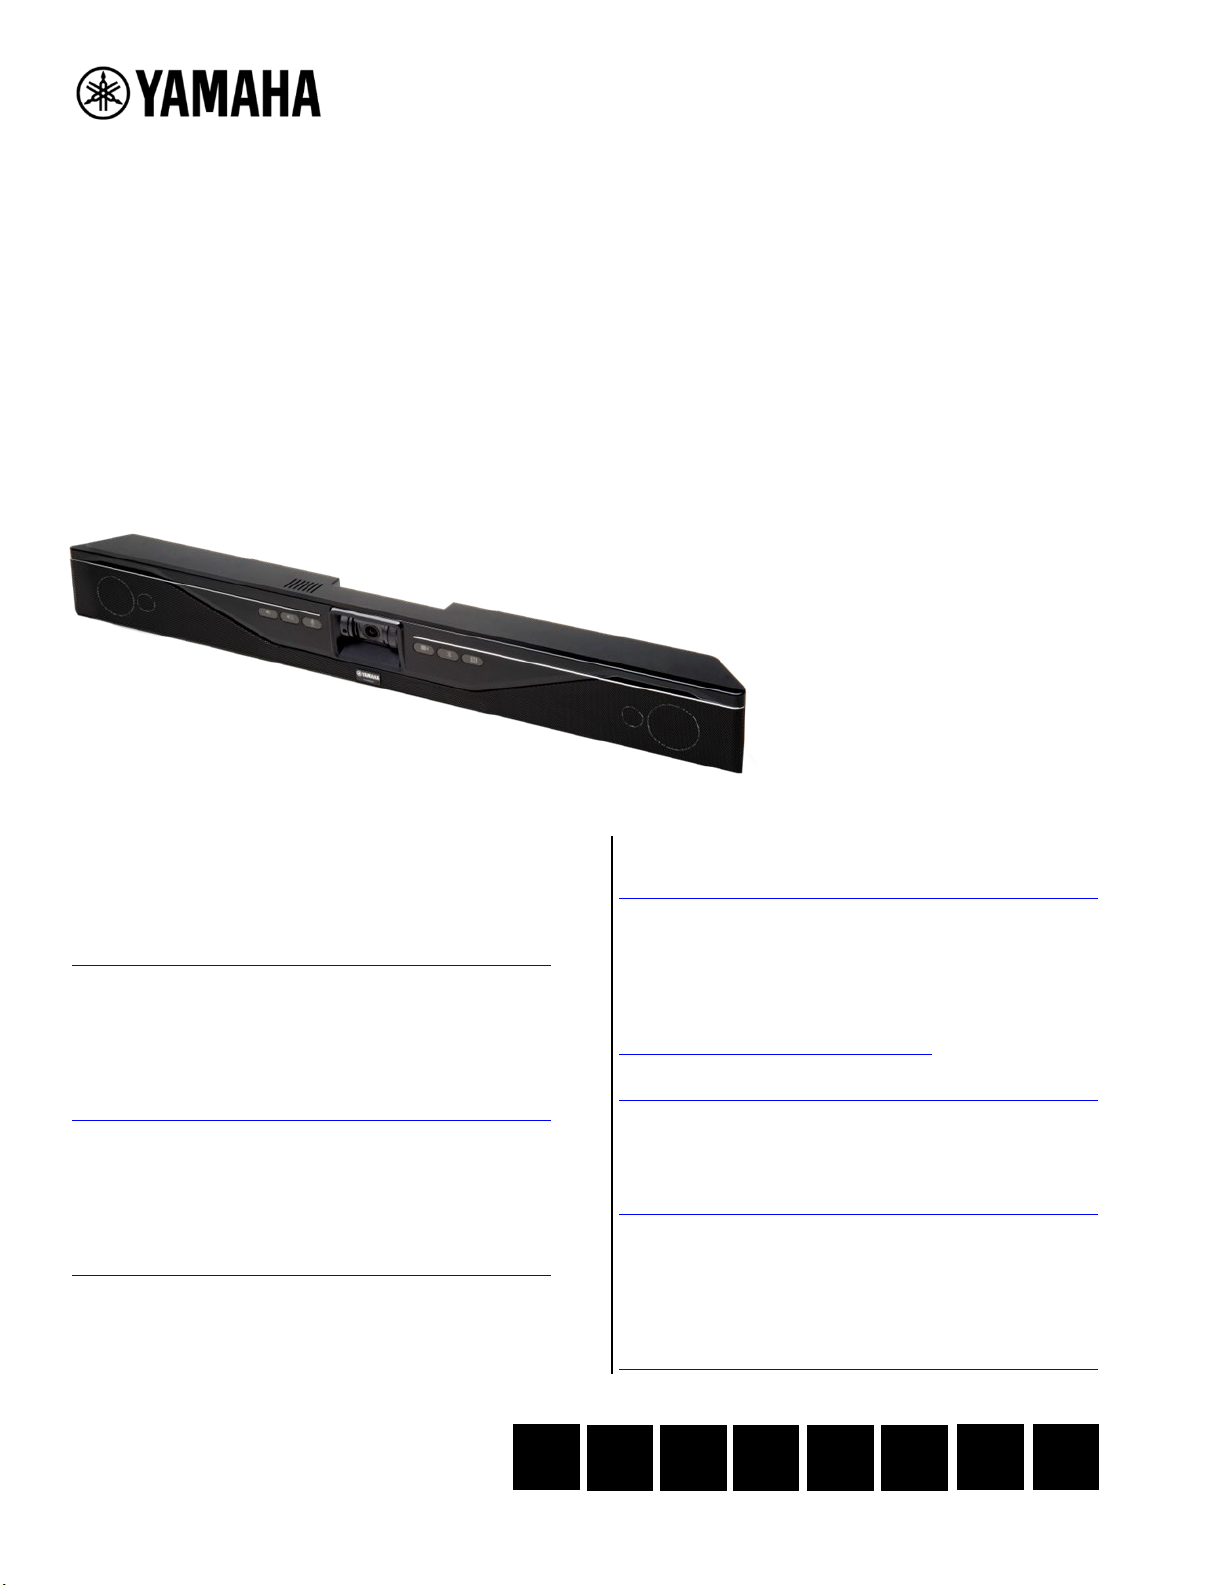
CS700-AV, CS700-SP
1 x
1 x
1 x
2 x
2 x
3
Page 4

English
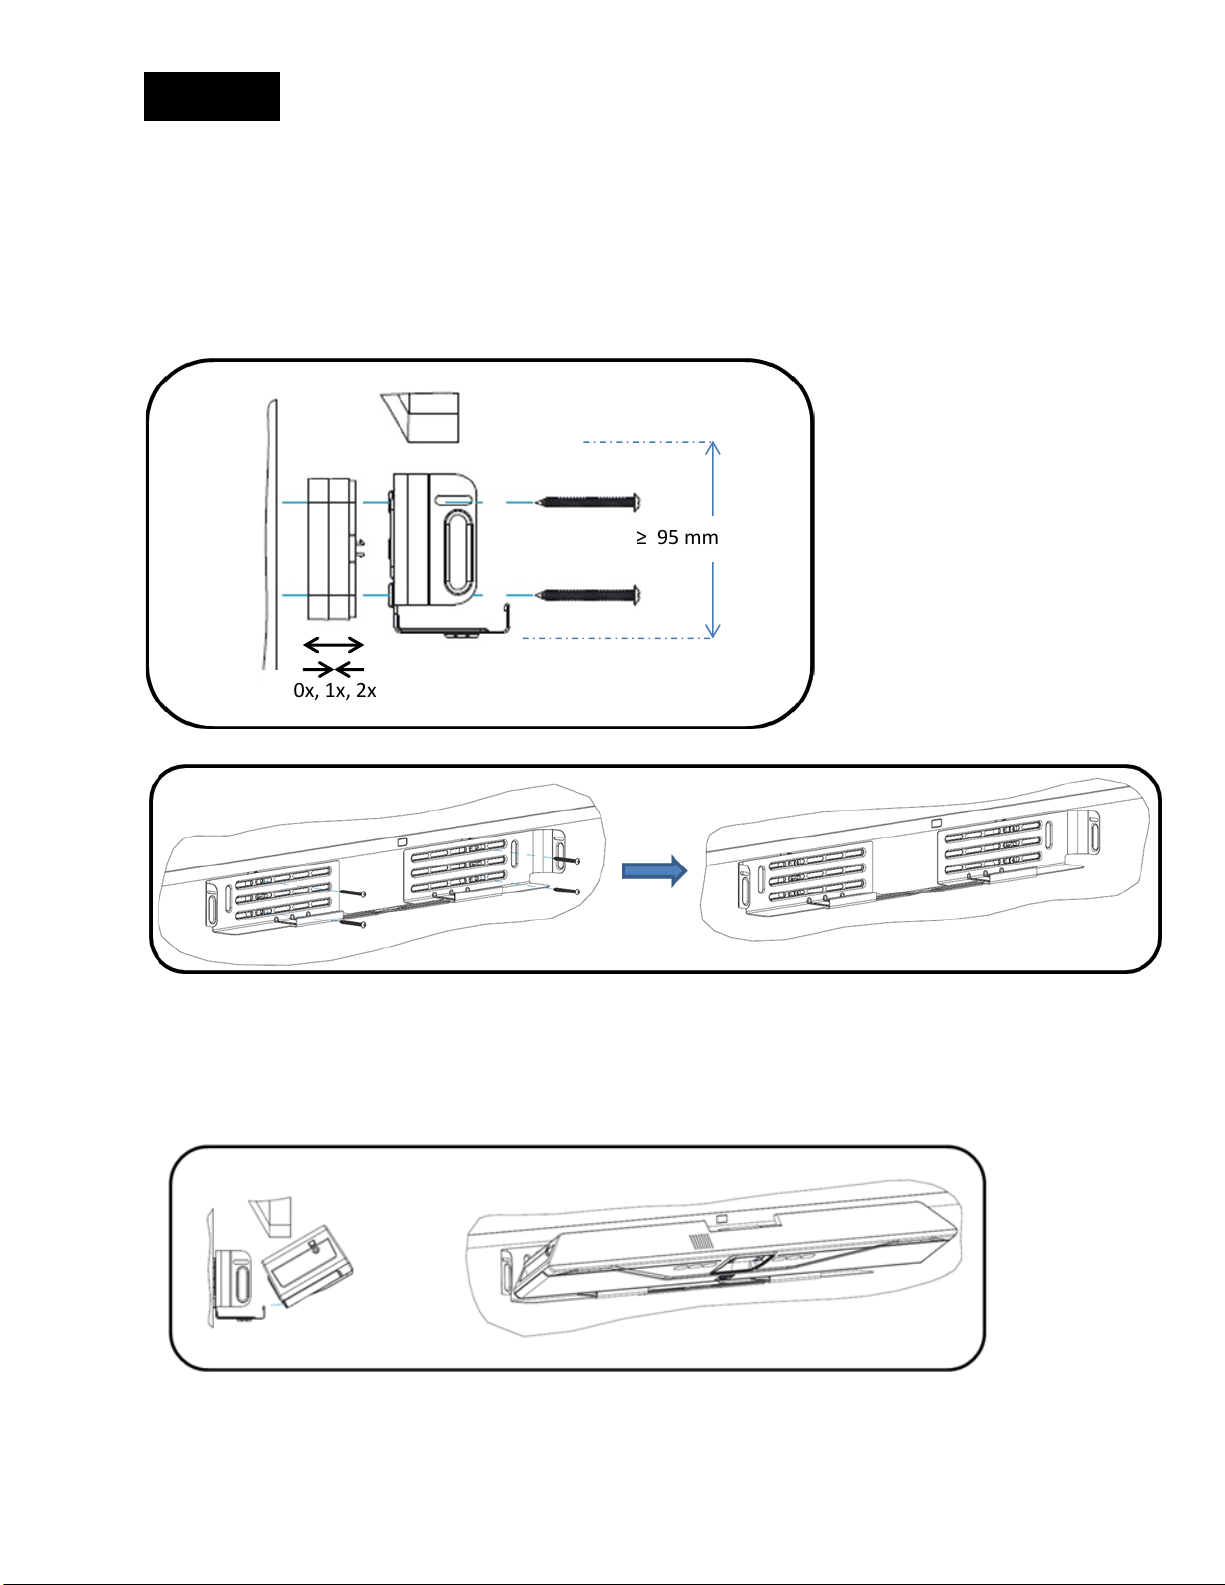
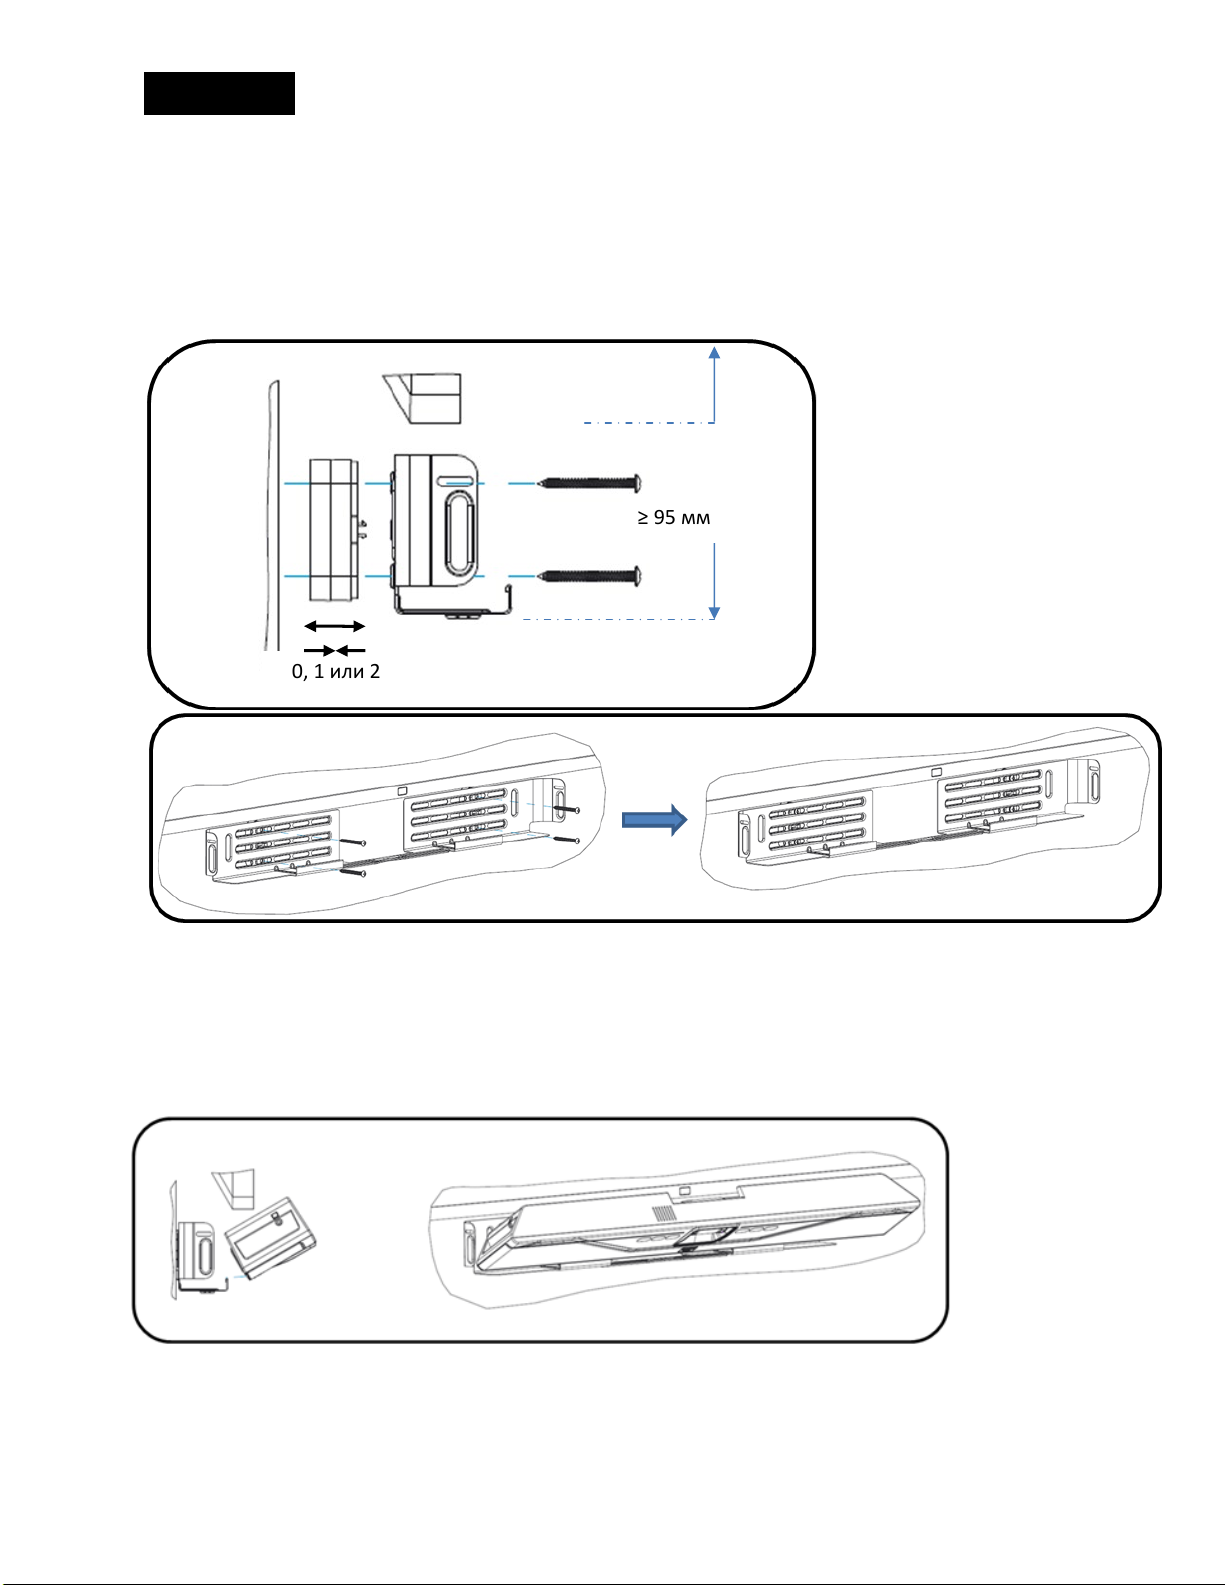
0x, 1x, 2x
≥ 3 ¾ in / 95 mm
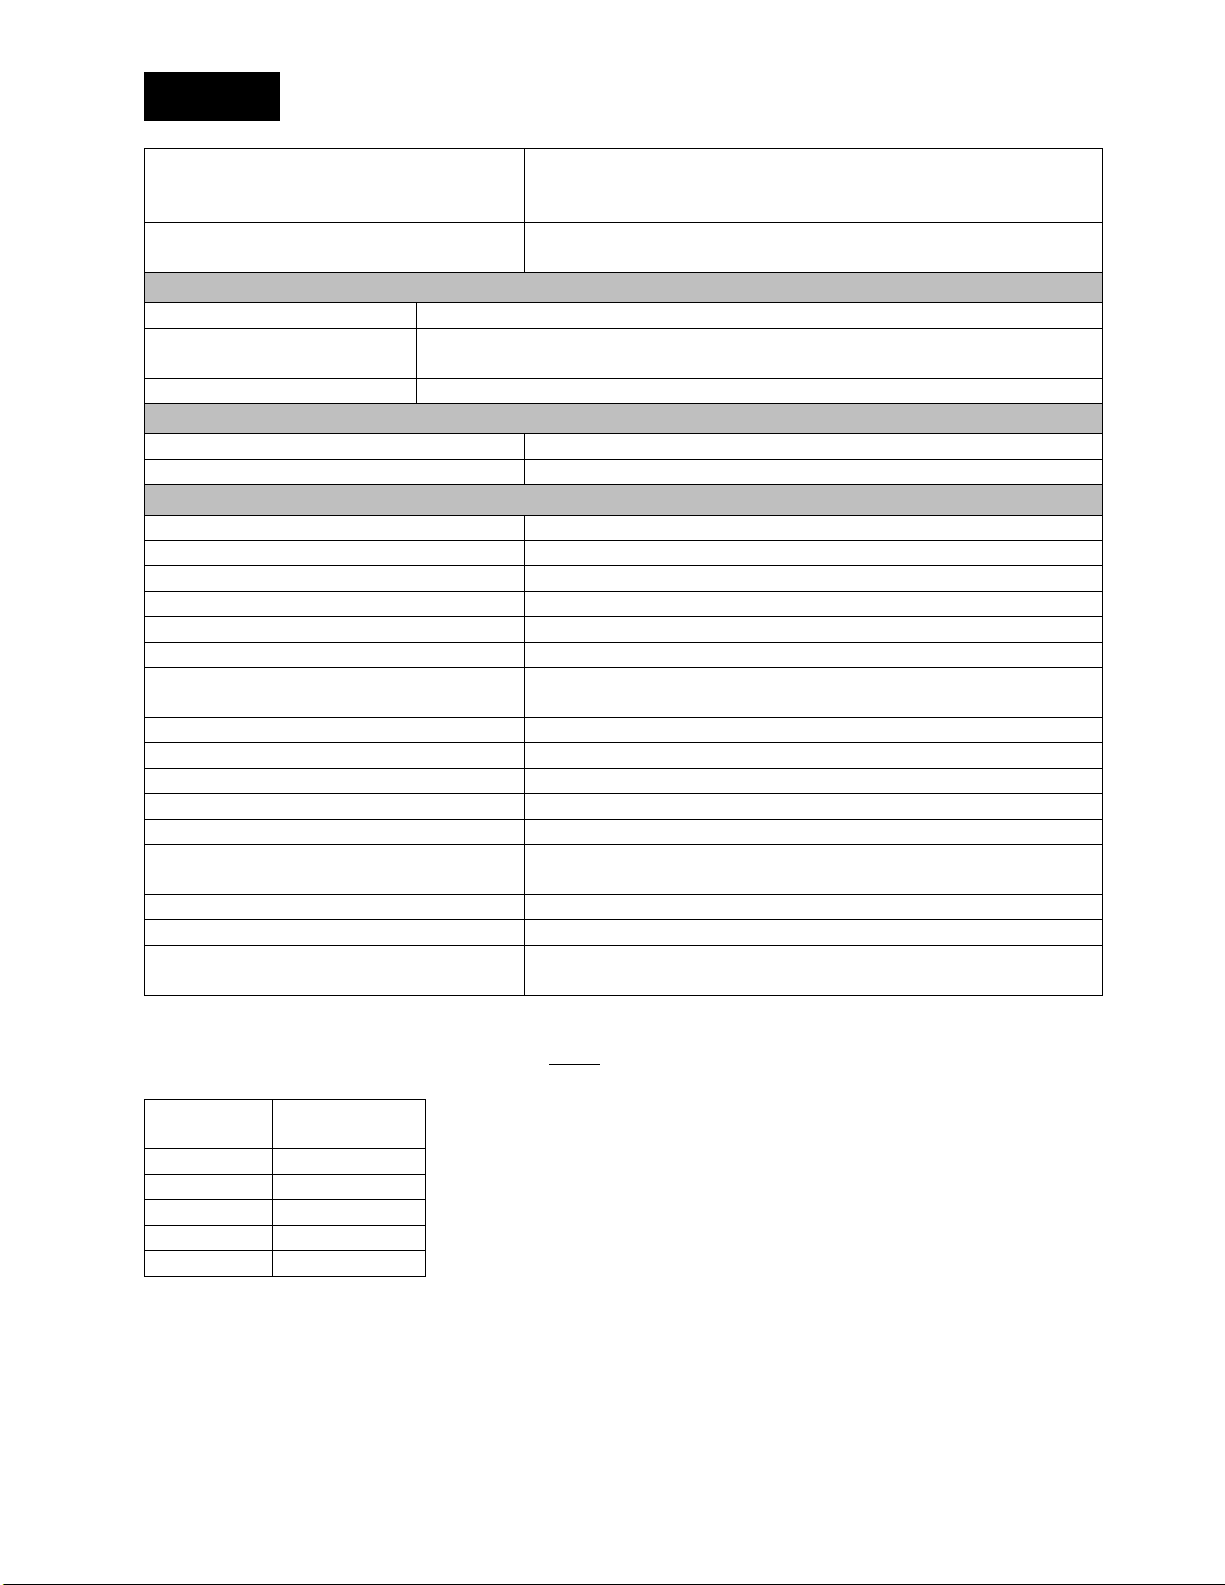
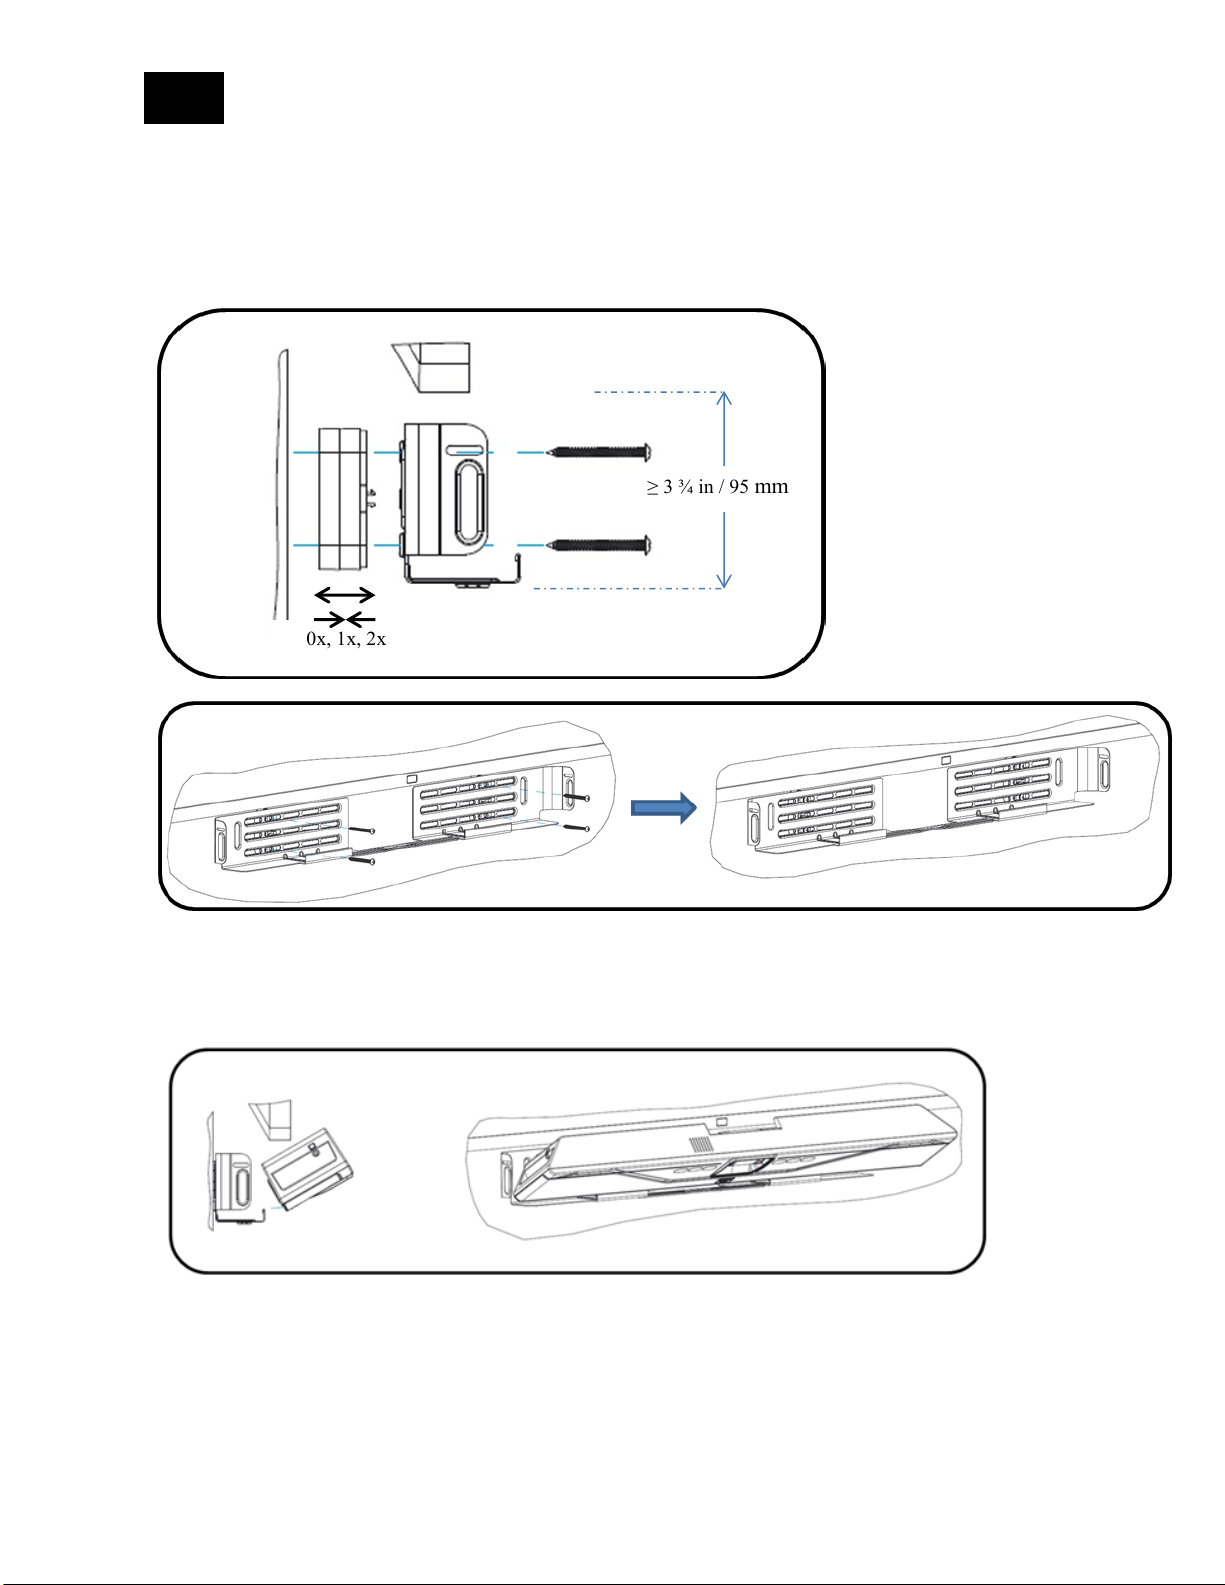
1. Bracket installation
Install the bracket with 4 appropriate screws on the wall, spacing two pair of screws as far apart as possible.
Ensure that the bracket is tight to the wall or the spacers to avoid vibration. If installed below the display ensure
that the distance is big enough to fit the CS-700 unit. You can adjust the depth of the installation by using the
appropriate number of spacers (0-2) on each side. Maximum mounting height is 2m / 6’ 8” from the floor. Always
use 4 screws.
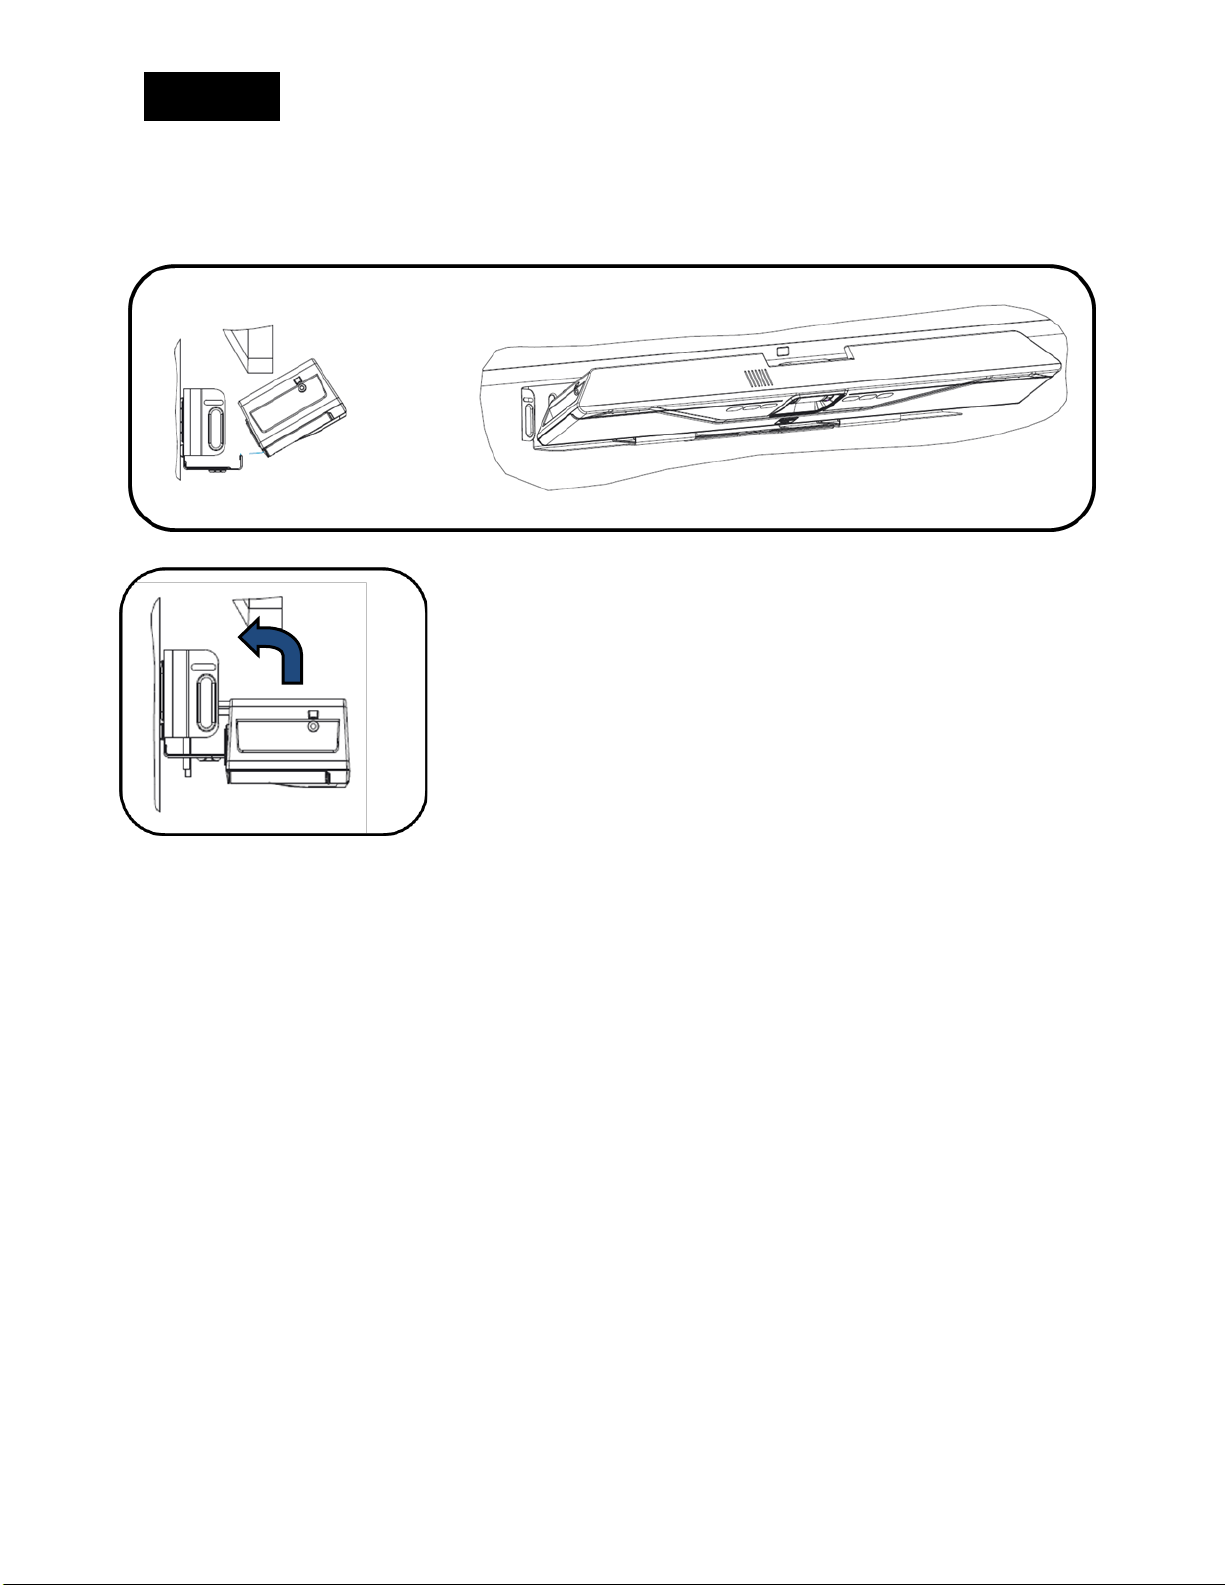
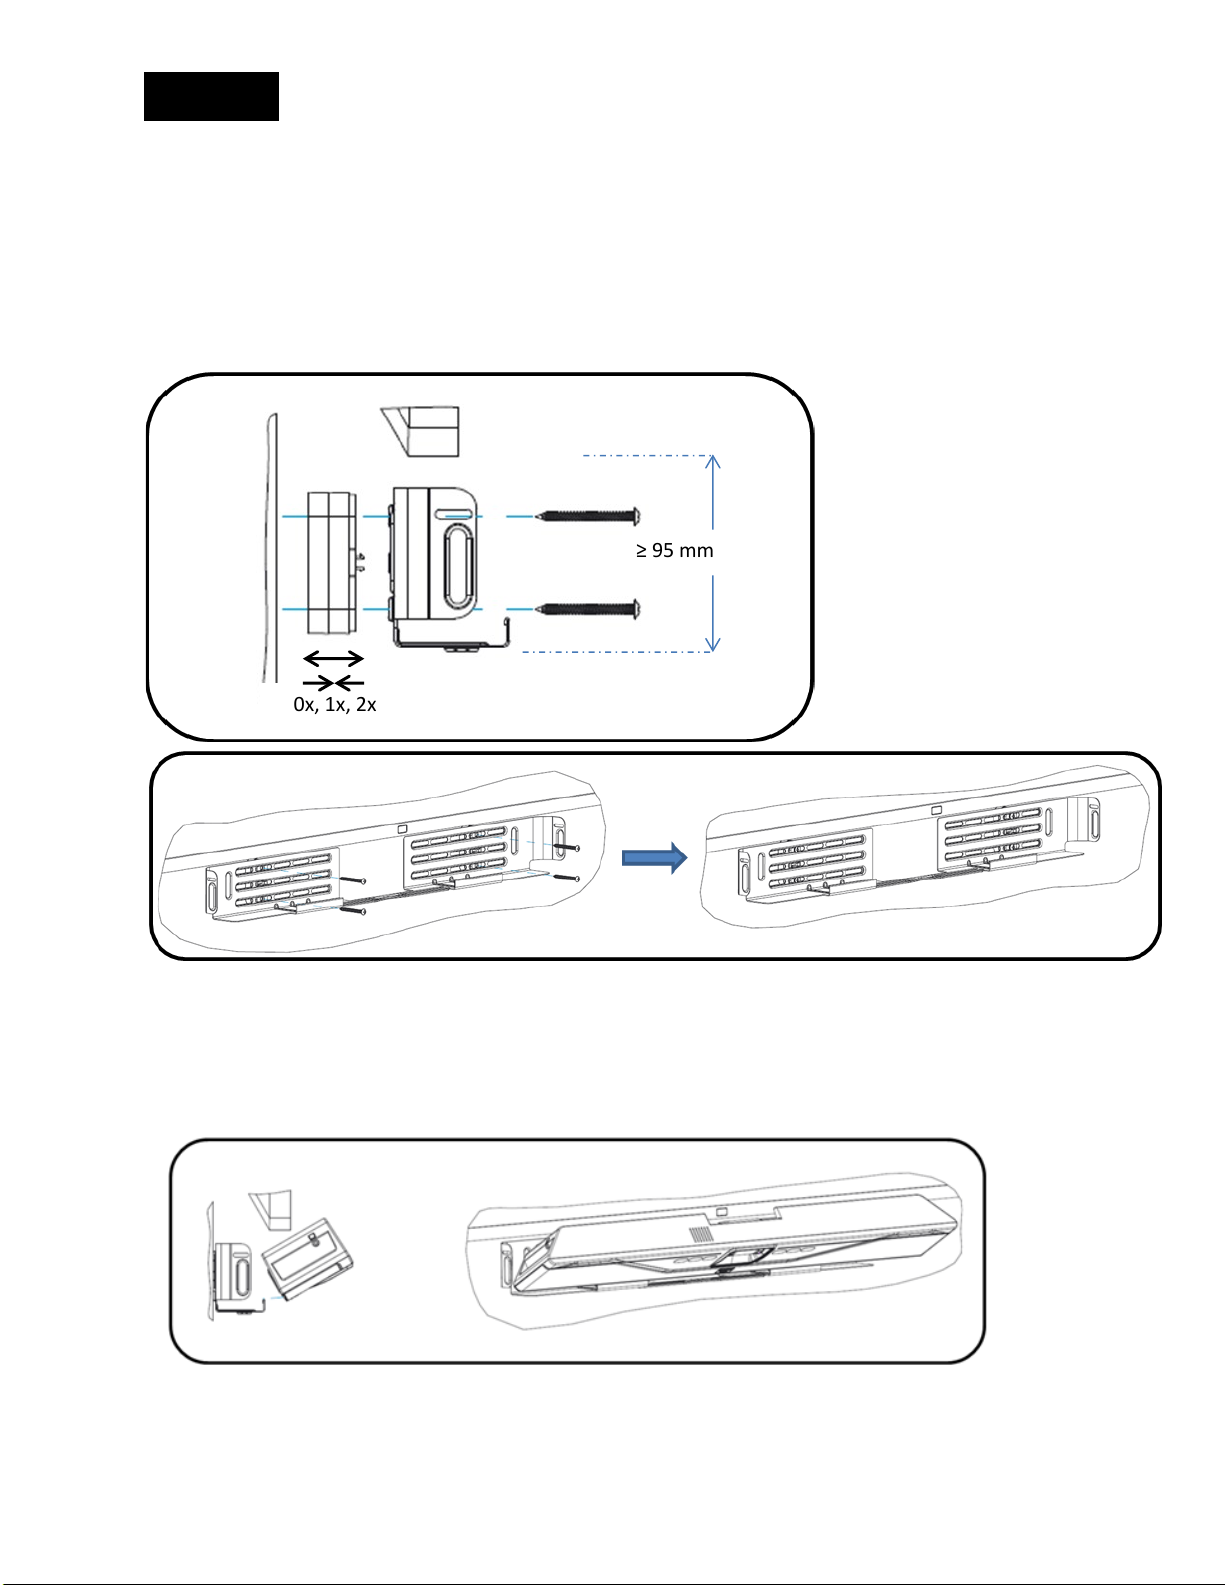
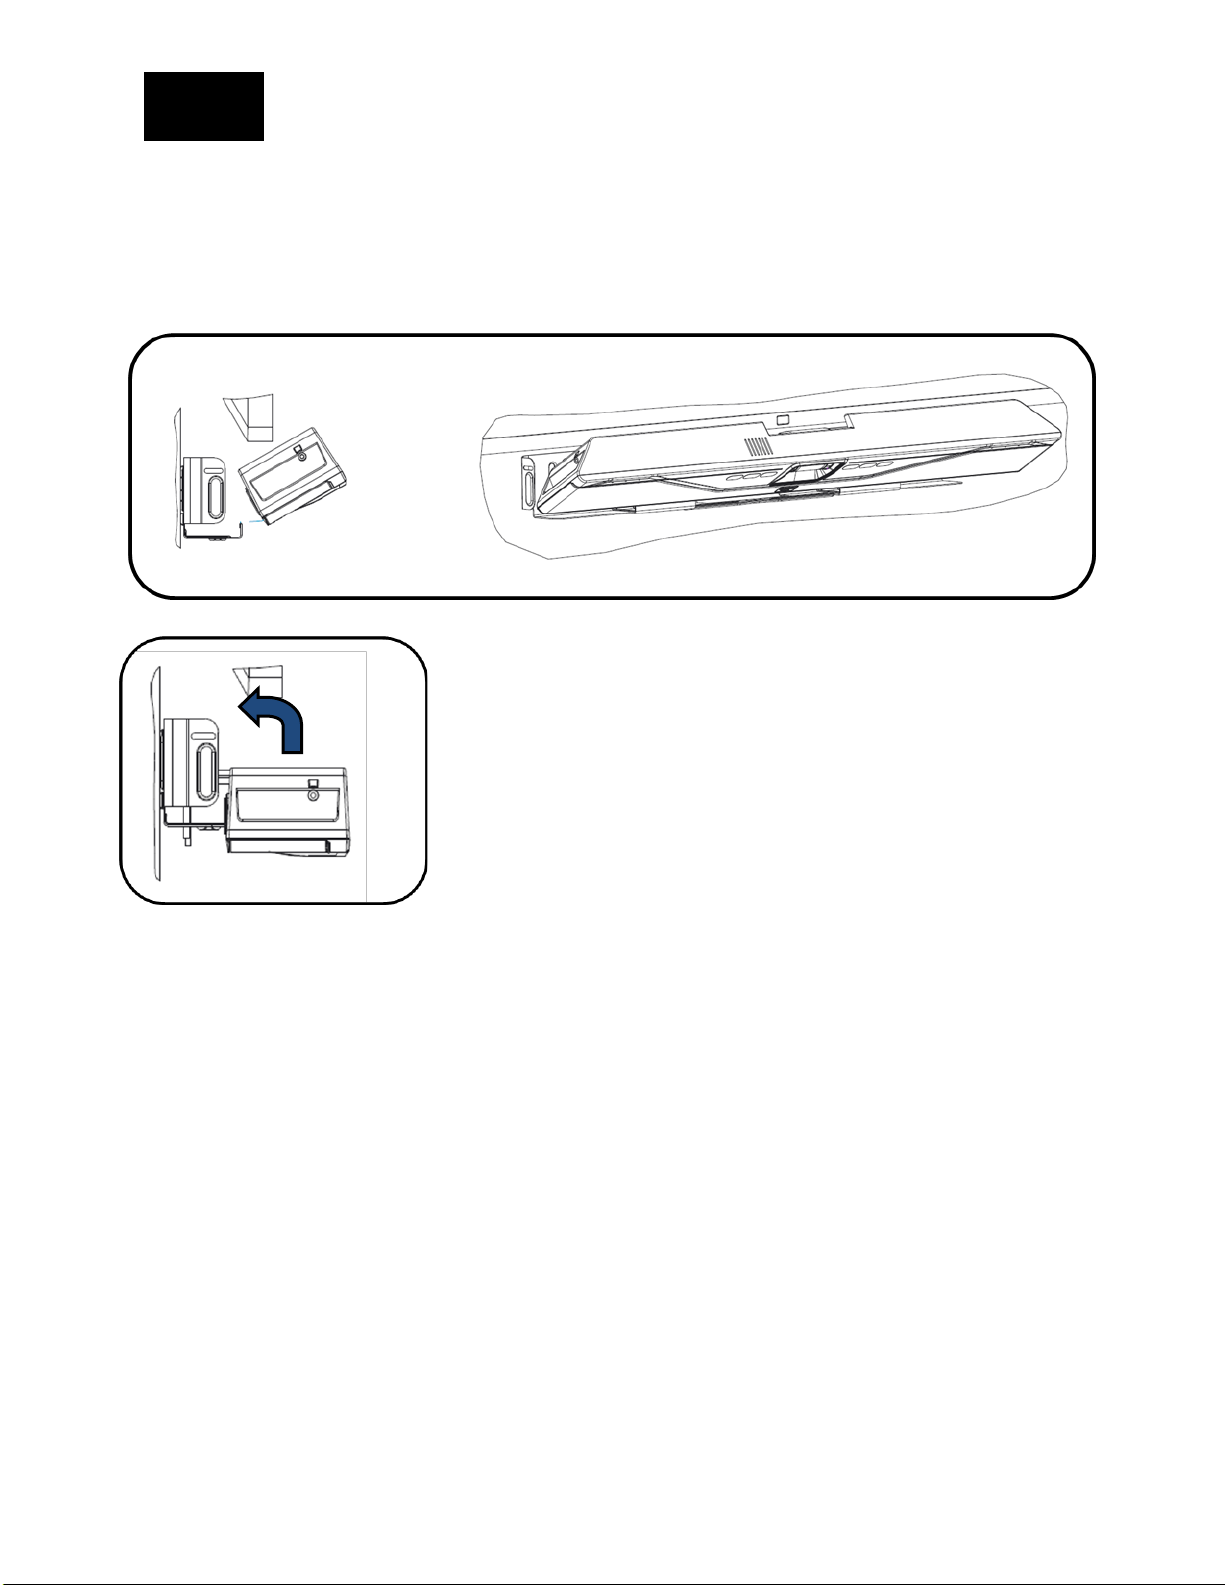
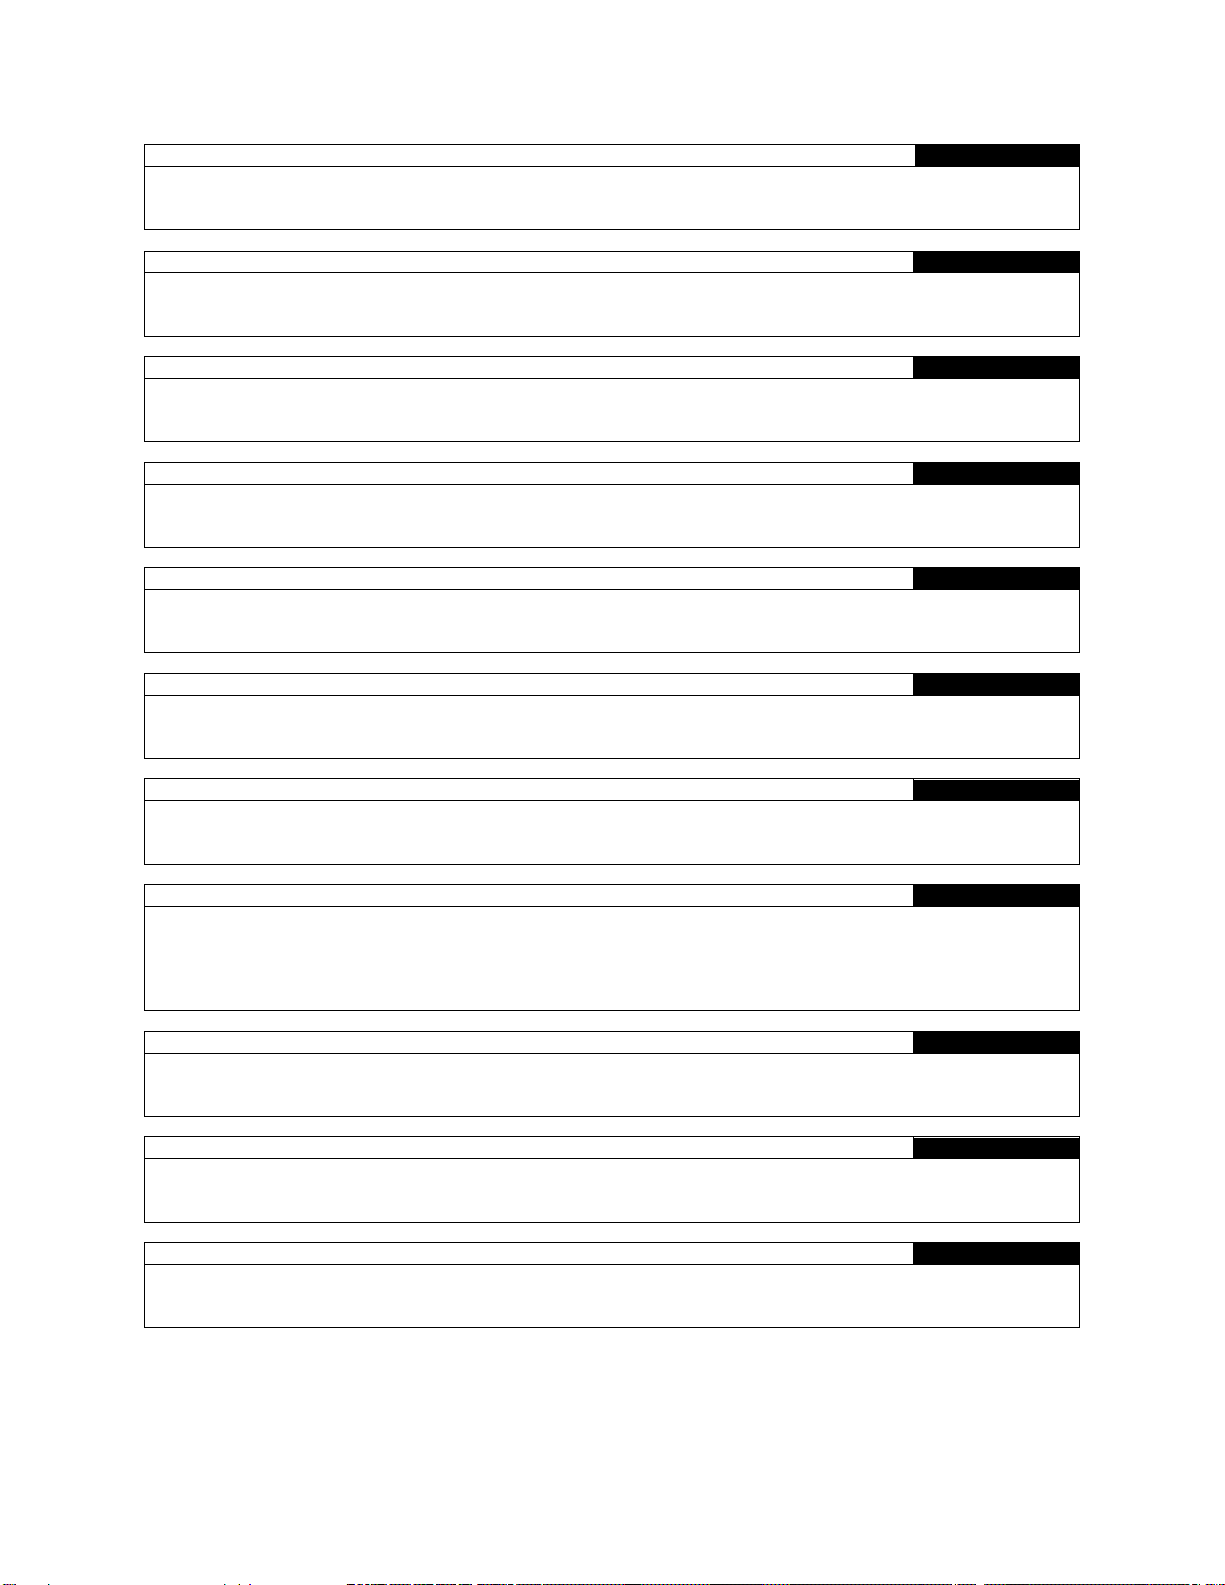
2. Placing the CS-700 unit on the bracket
Position the CS-700 in such a way that the two hooks in the front of the bracket fit into the cavities on the lower
part of the
CS-700. Ensure that the CS-700 is safely held by the hooks.
4
Page 5

English
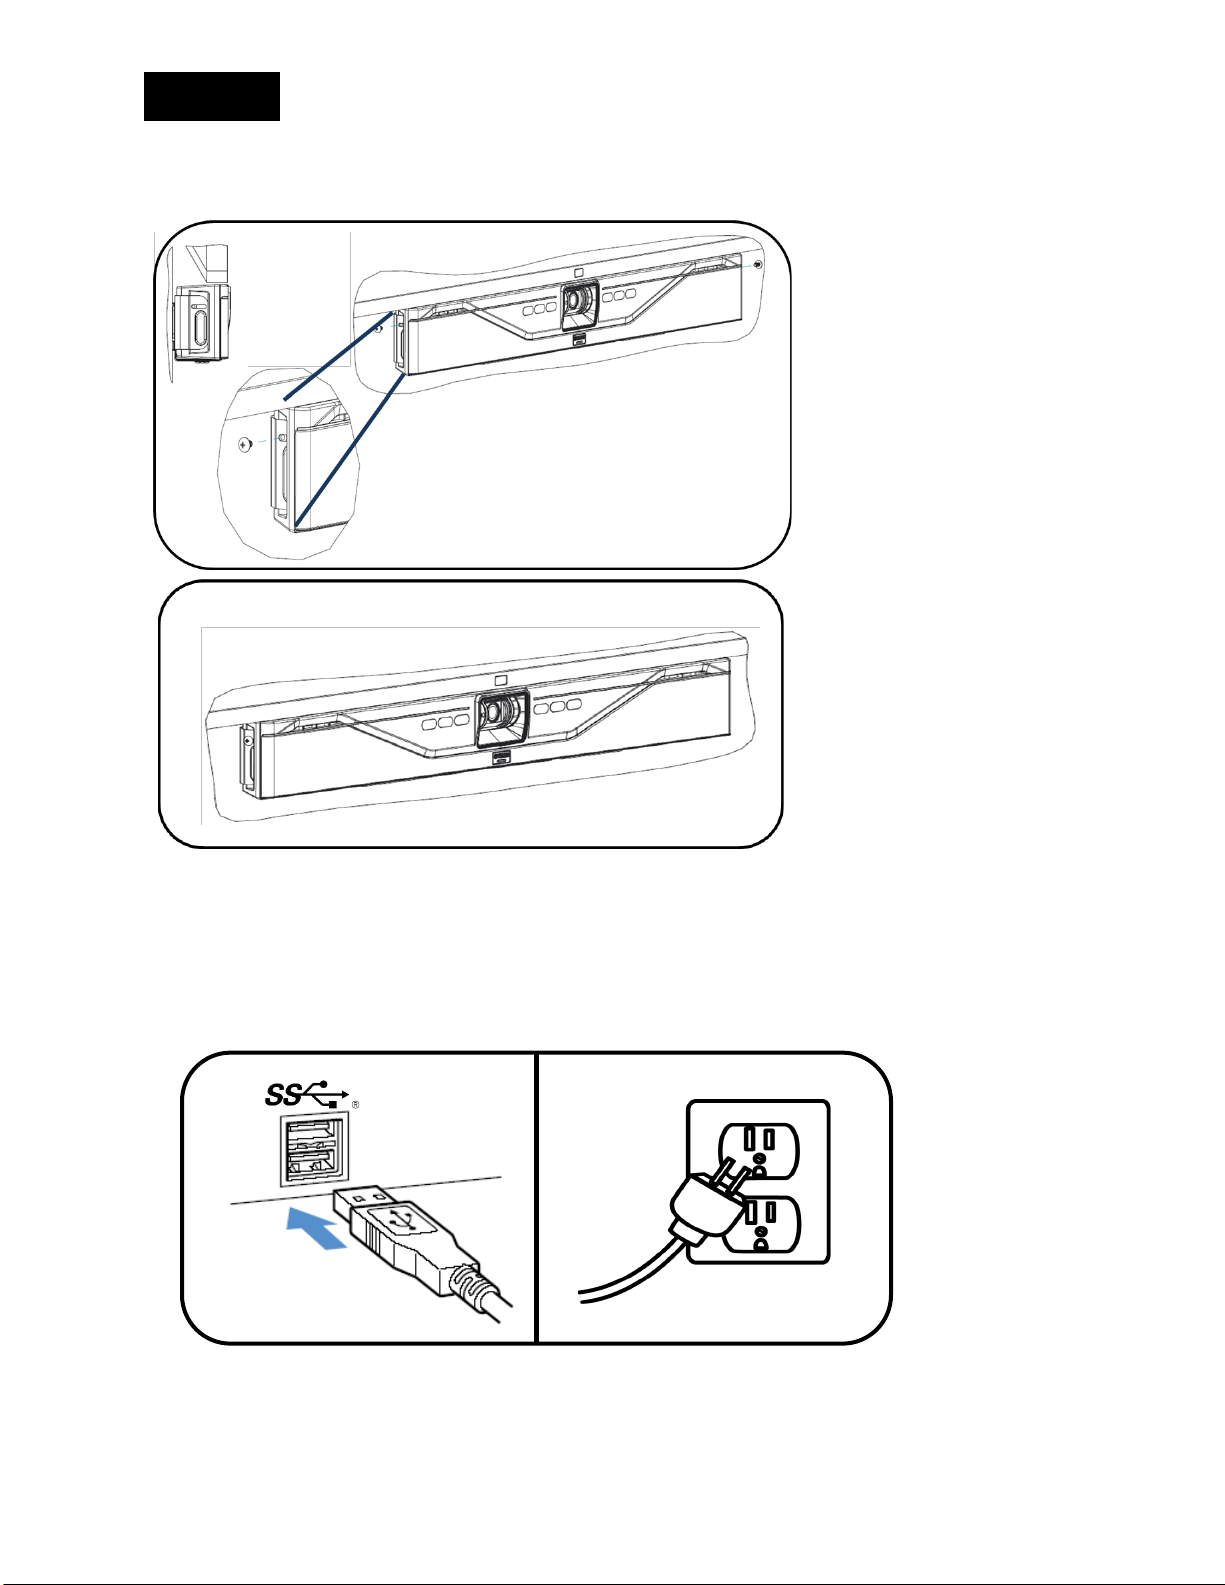
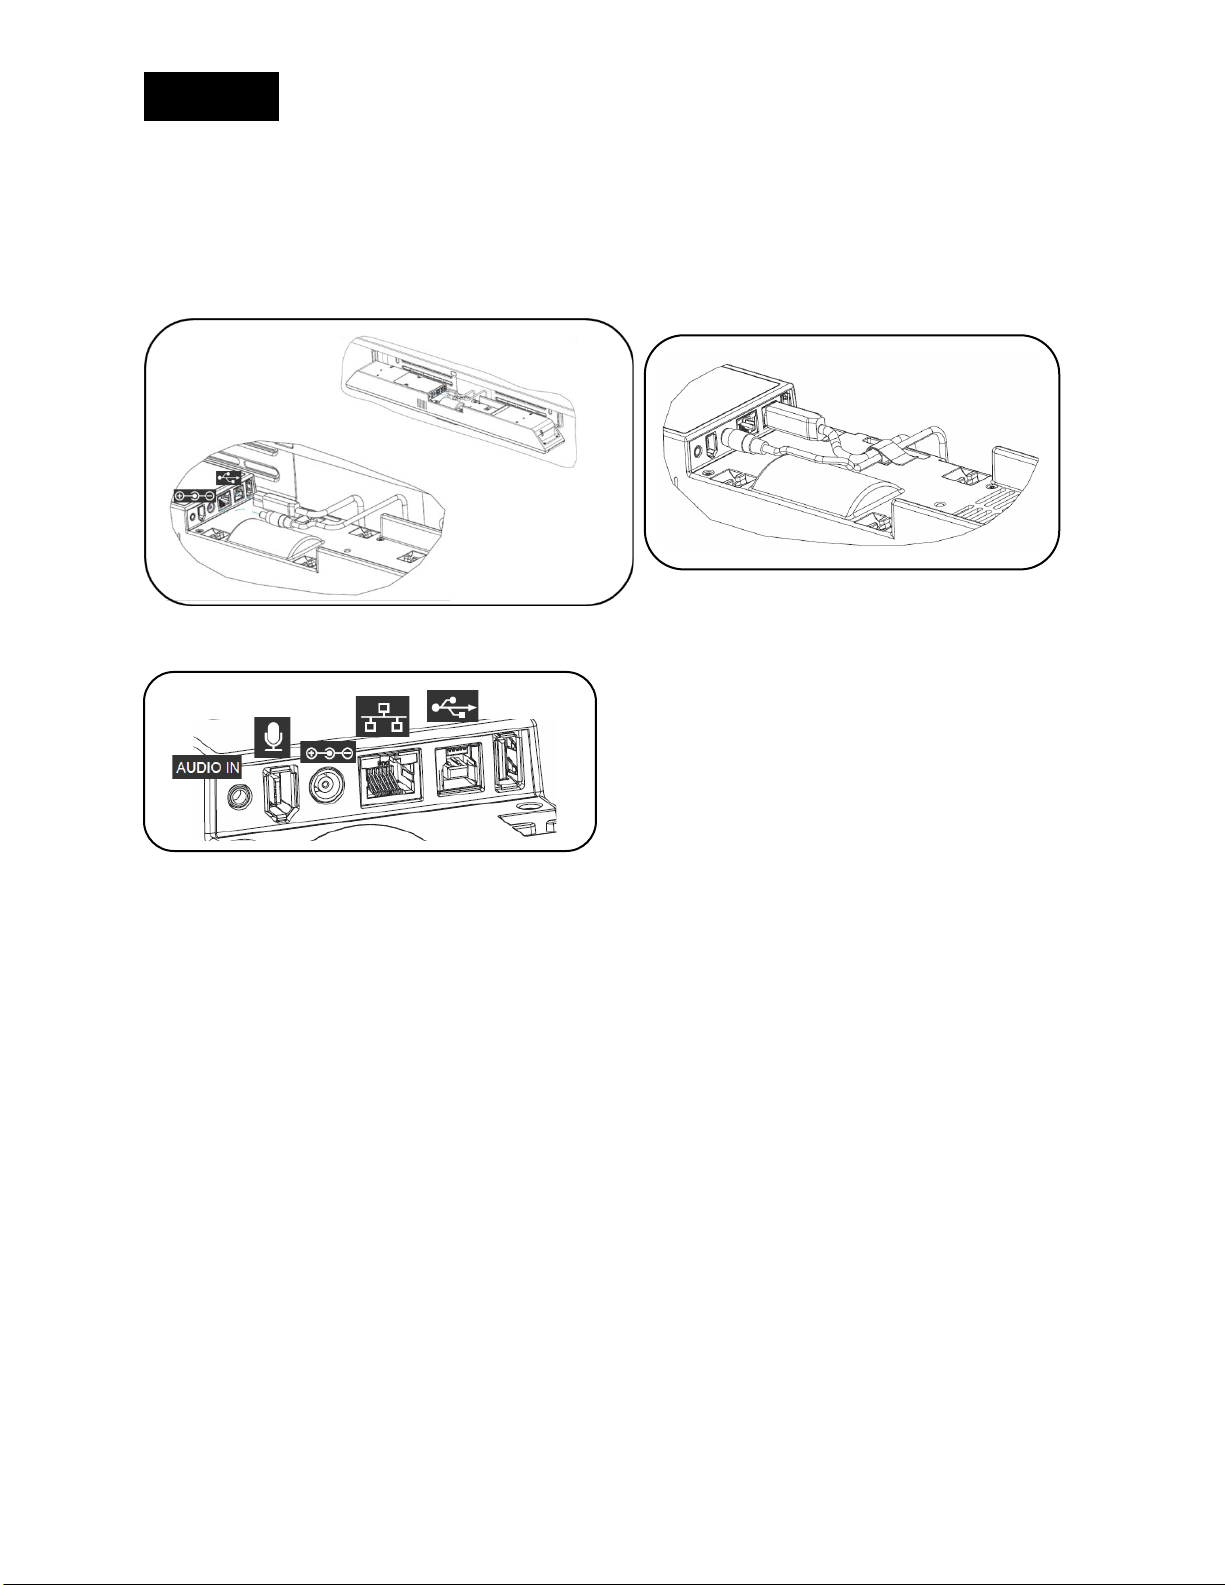
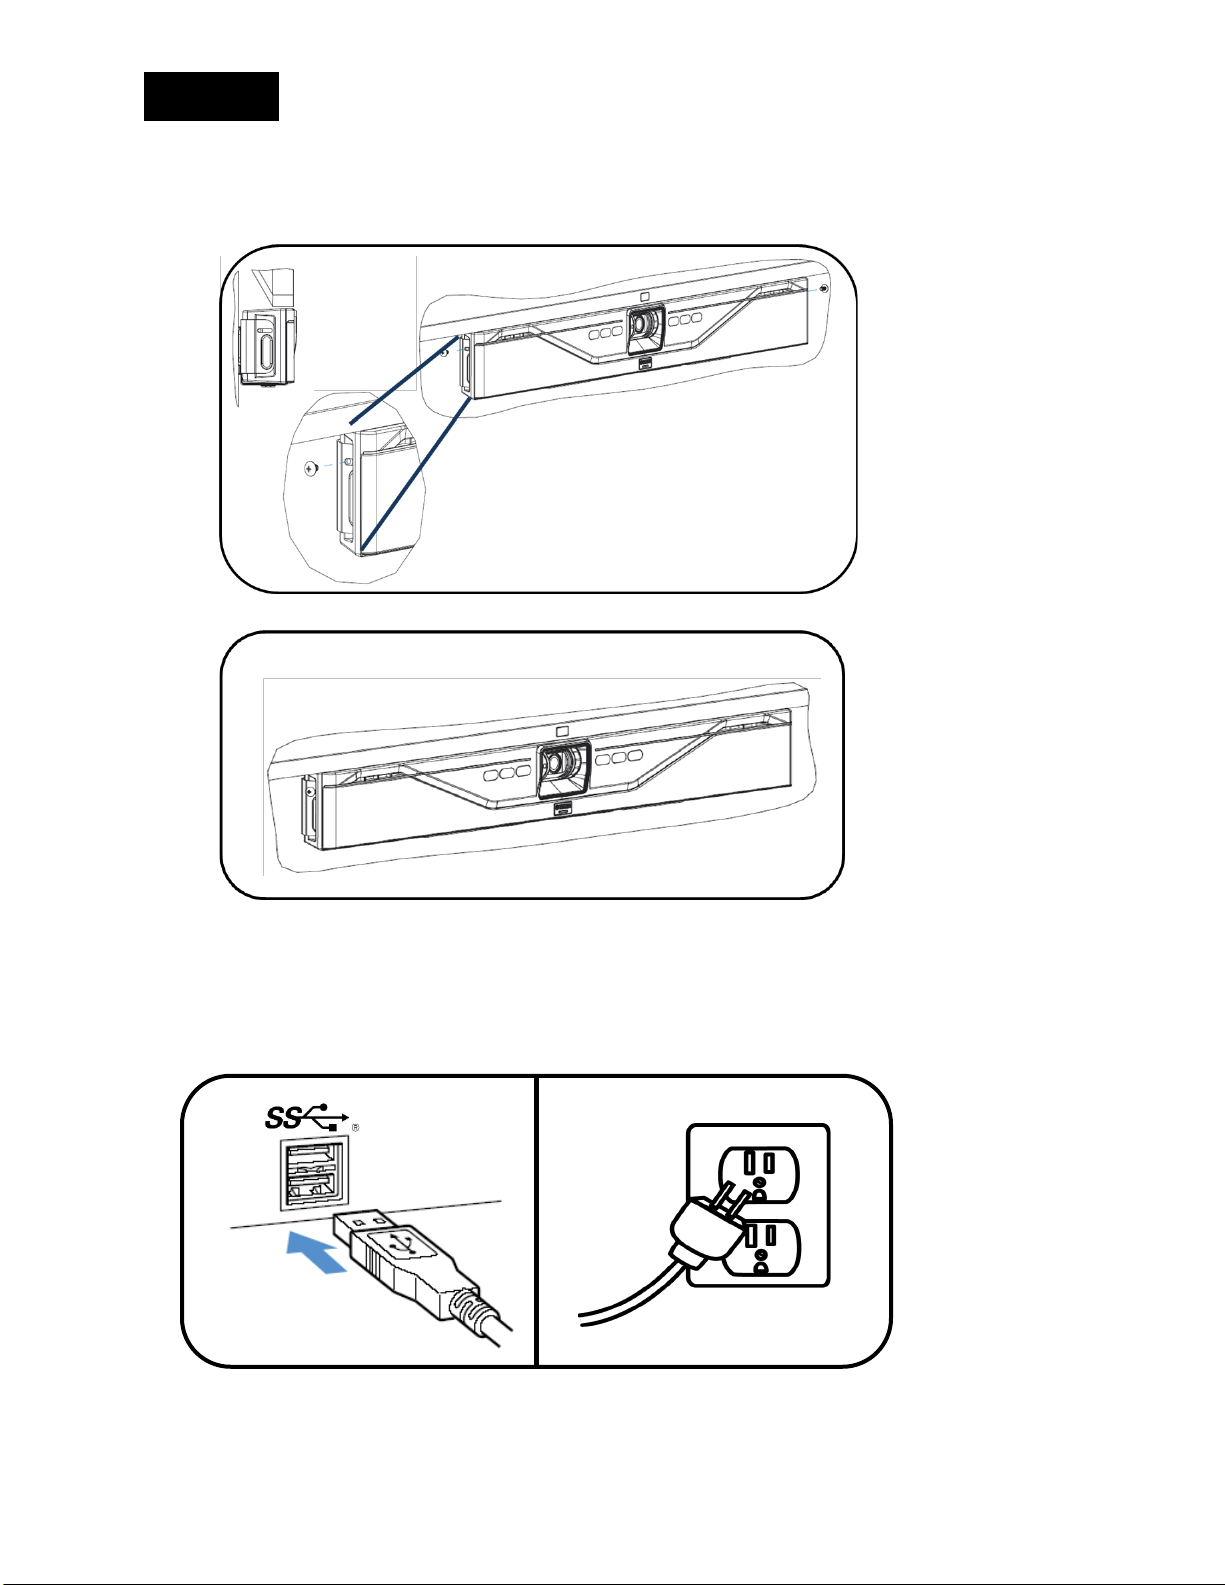
3. Connect the CS-700
Once the CS-700 is safely positioned on the hooks of the bracket, connect the power cable and the USB cable to
the CS-700 as shown. If it is planned to manage the CS-700 using the web browser, also connect the network cable
into the corresponding connector.
Secure the cable using the provided cable ties to the CS-700 unit.
5
Page 6
English
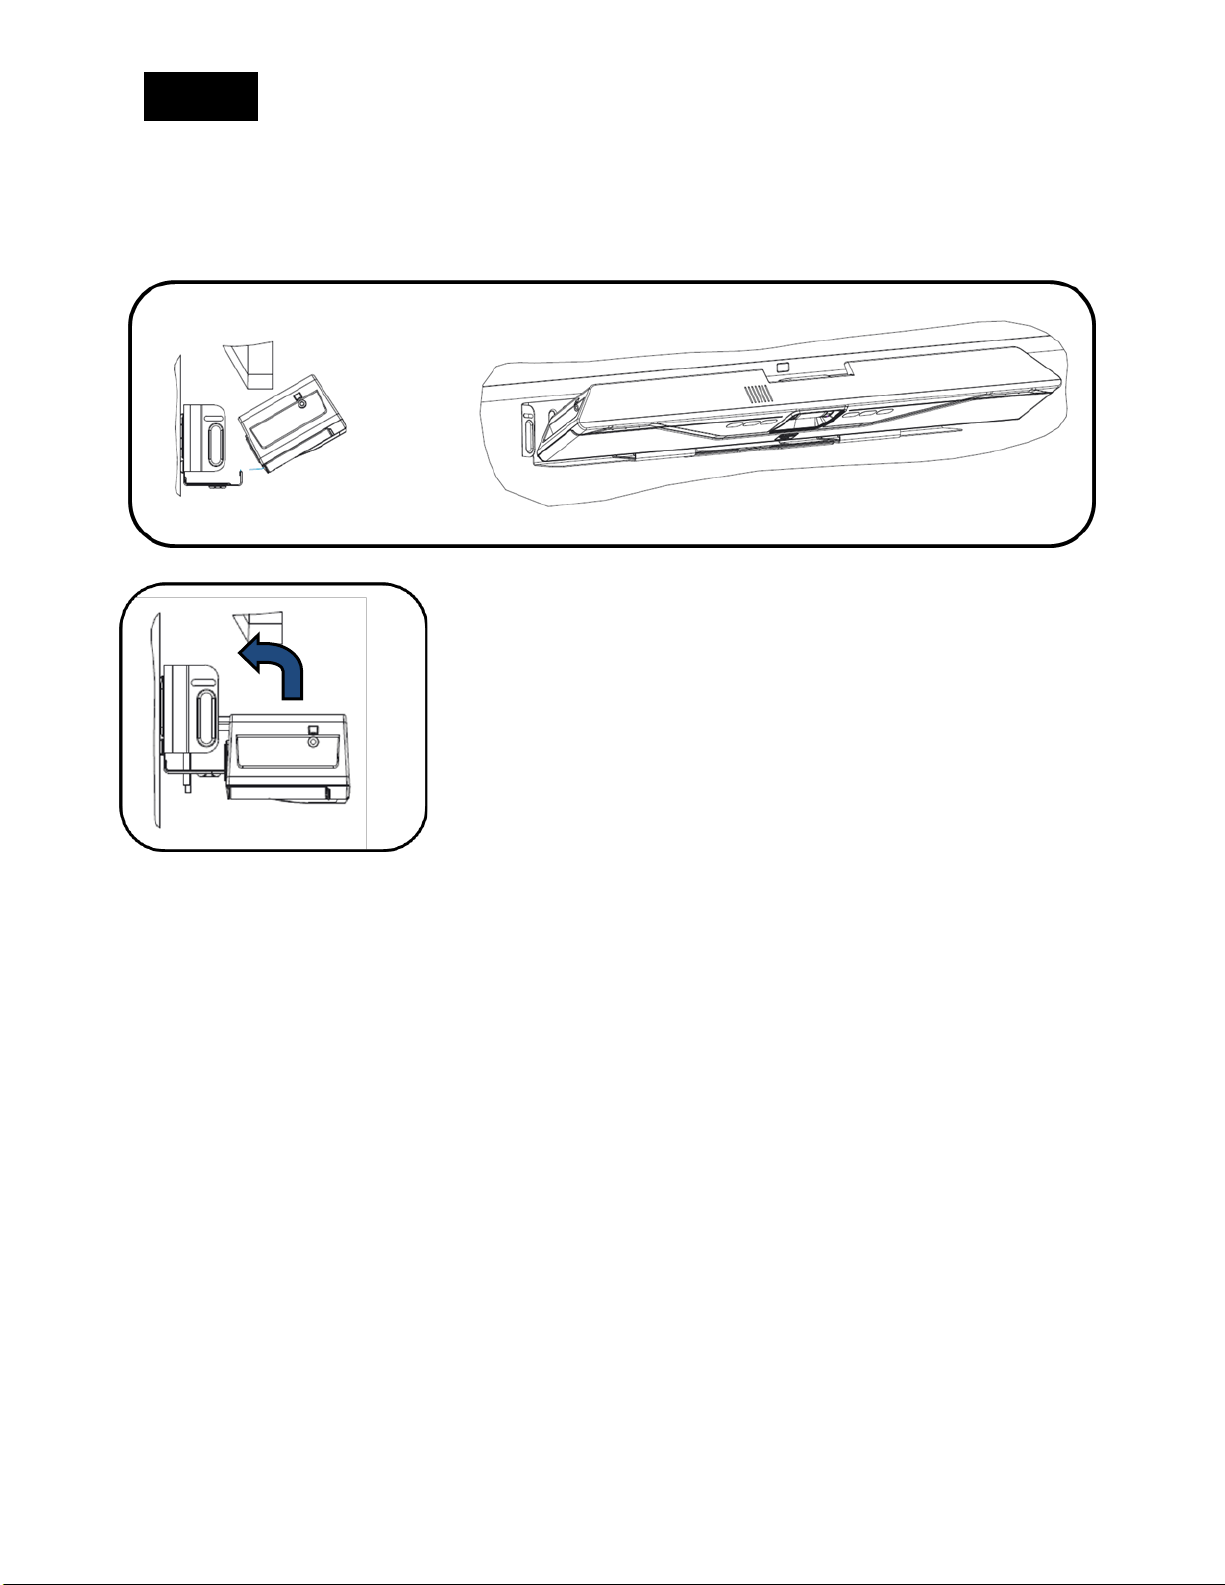
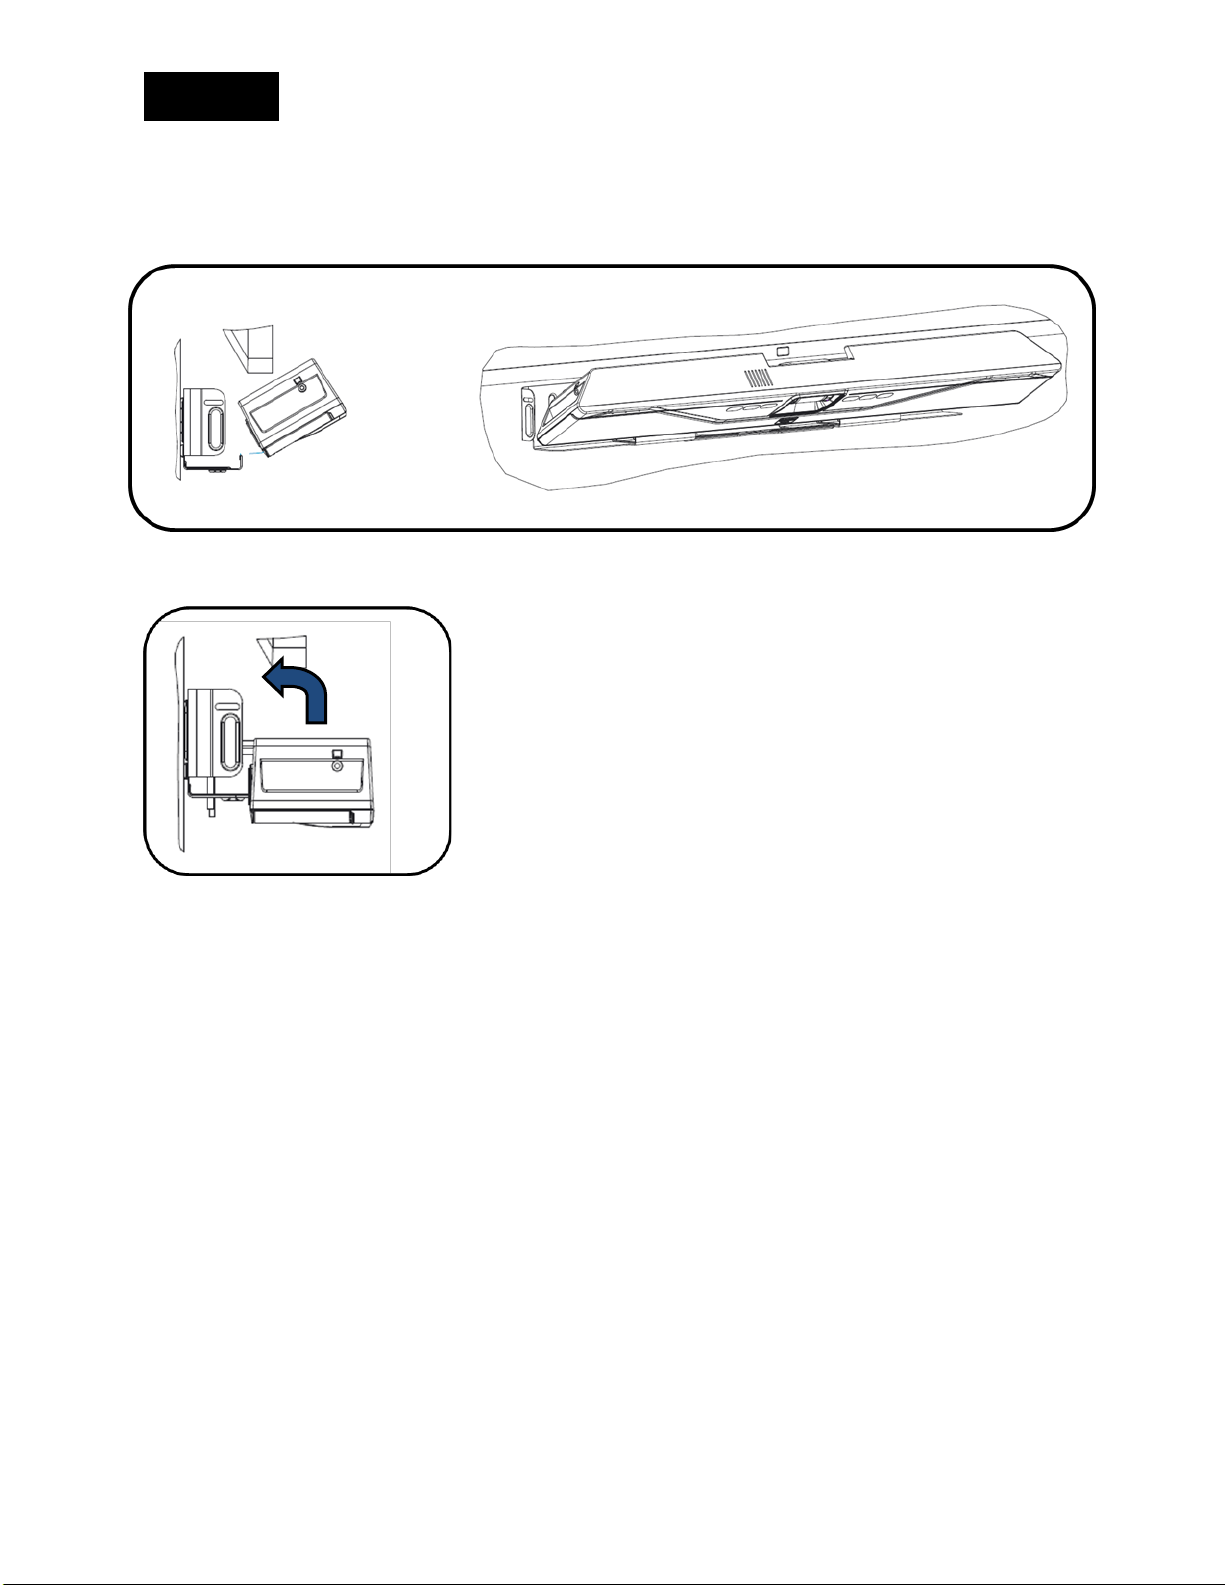
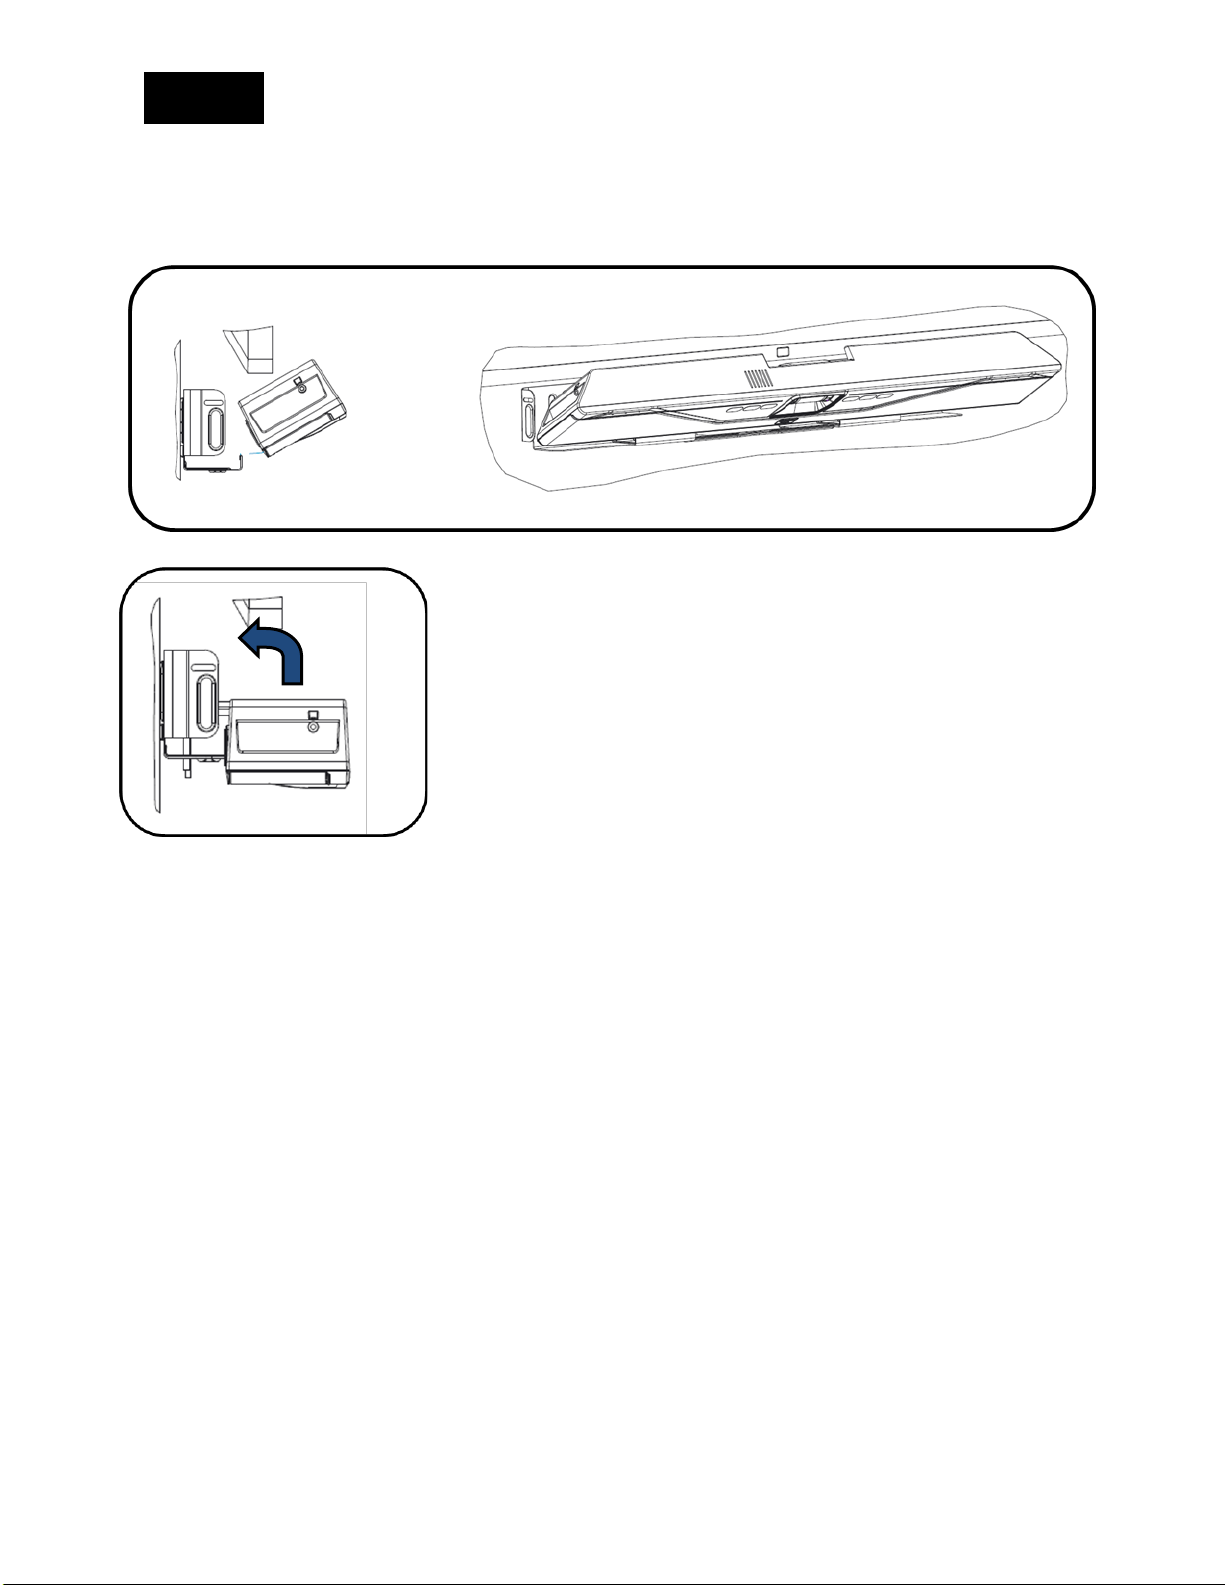
4. Installing unit in Bracket
Once all cables are correctly connected and secured, tilt the CS-700 back on the bracket and push it pack into the
bracket.
6
Page 7

English
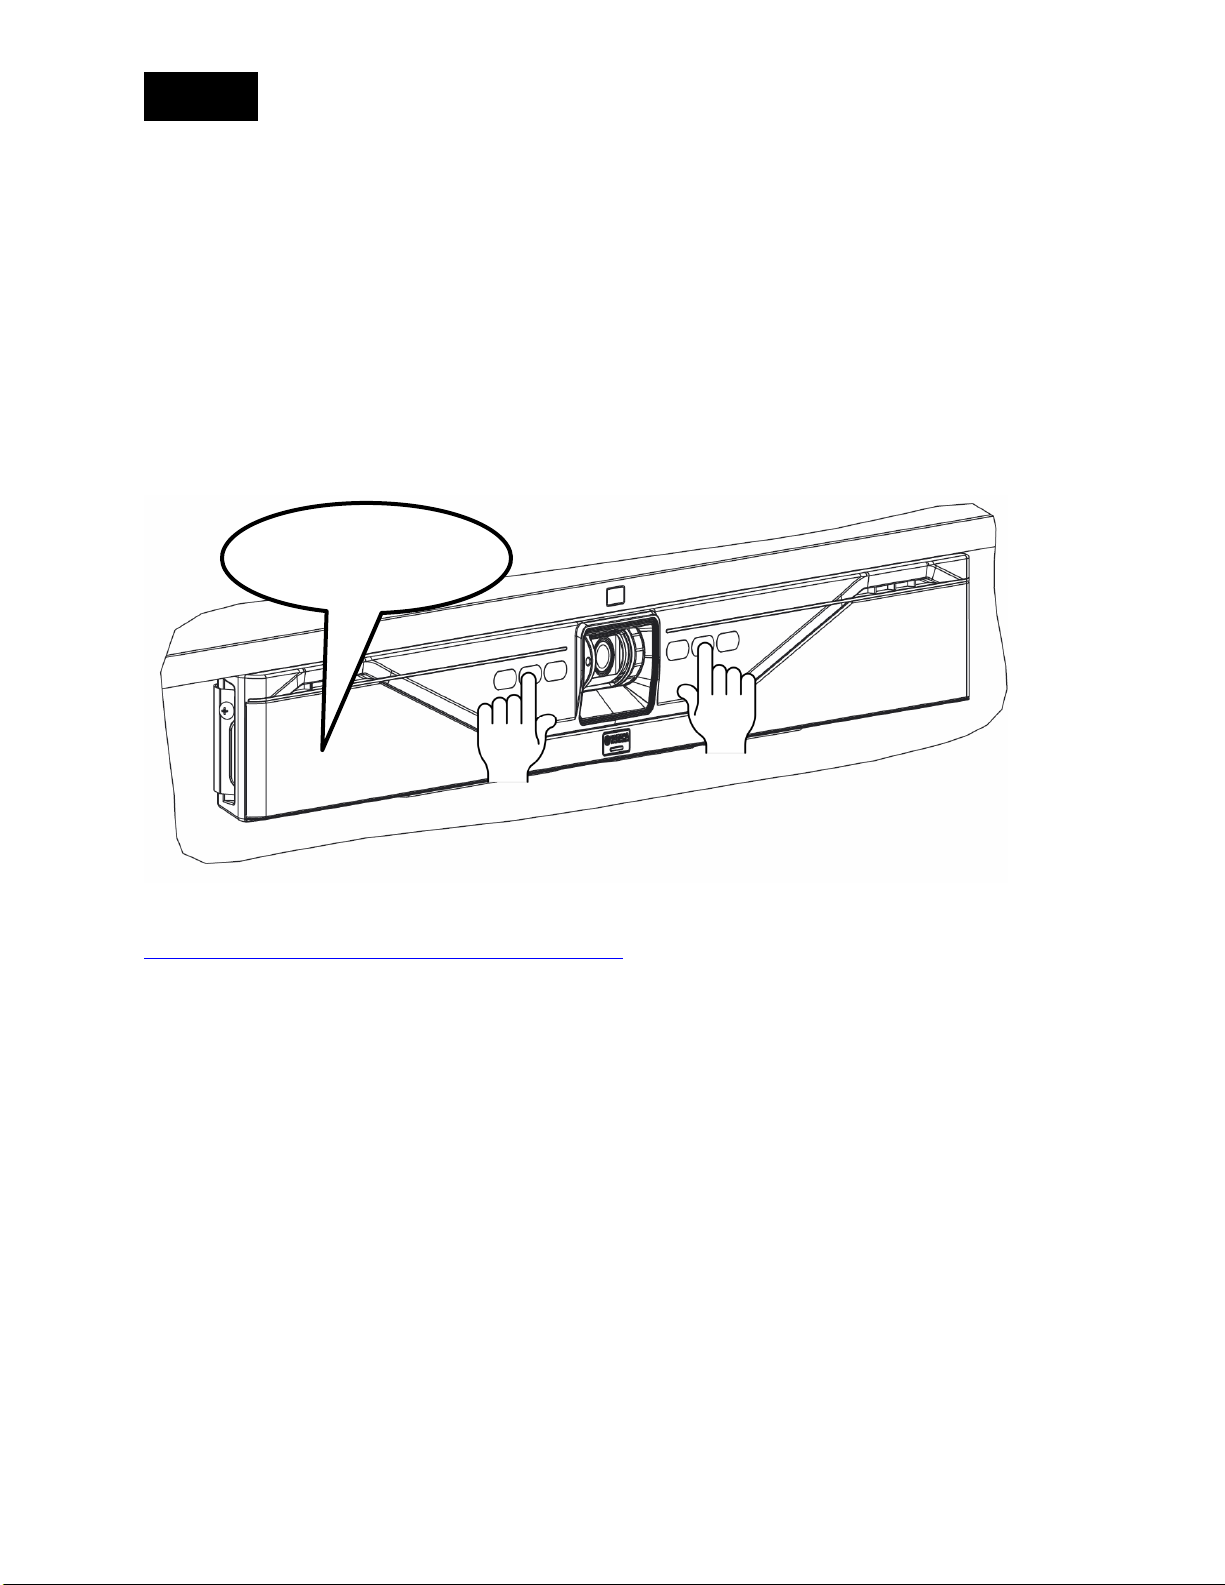
5. Secure unit
Secure the CS-700 unit in the bracket with the provided machine screws.
6. Connect to power and computer
Connect the power cord to the power supply, and plug the power cord into a mains power connector.
Connect the USB cable to a USB 3 (USB Super Speed) connector on the computer
7
Page 8
English
7. Select device
In your operating system select the “Yamaha AudioVideo Device” as your default audio playback and recording
device.
In your unified communications application, select the CS-700 as the Video device.
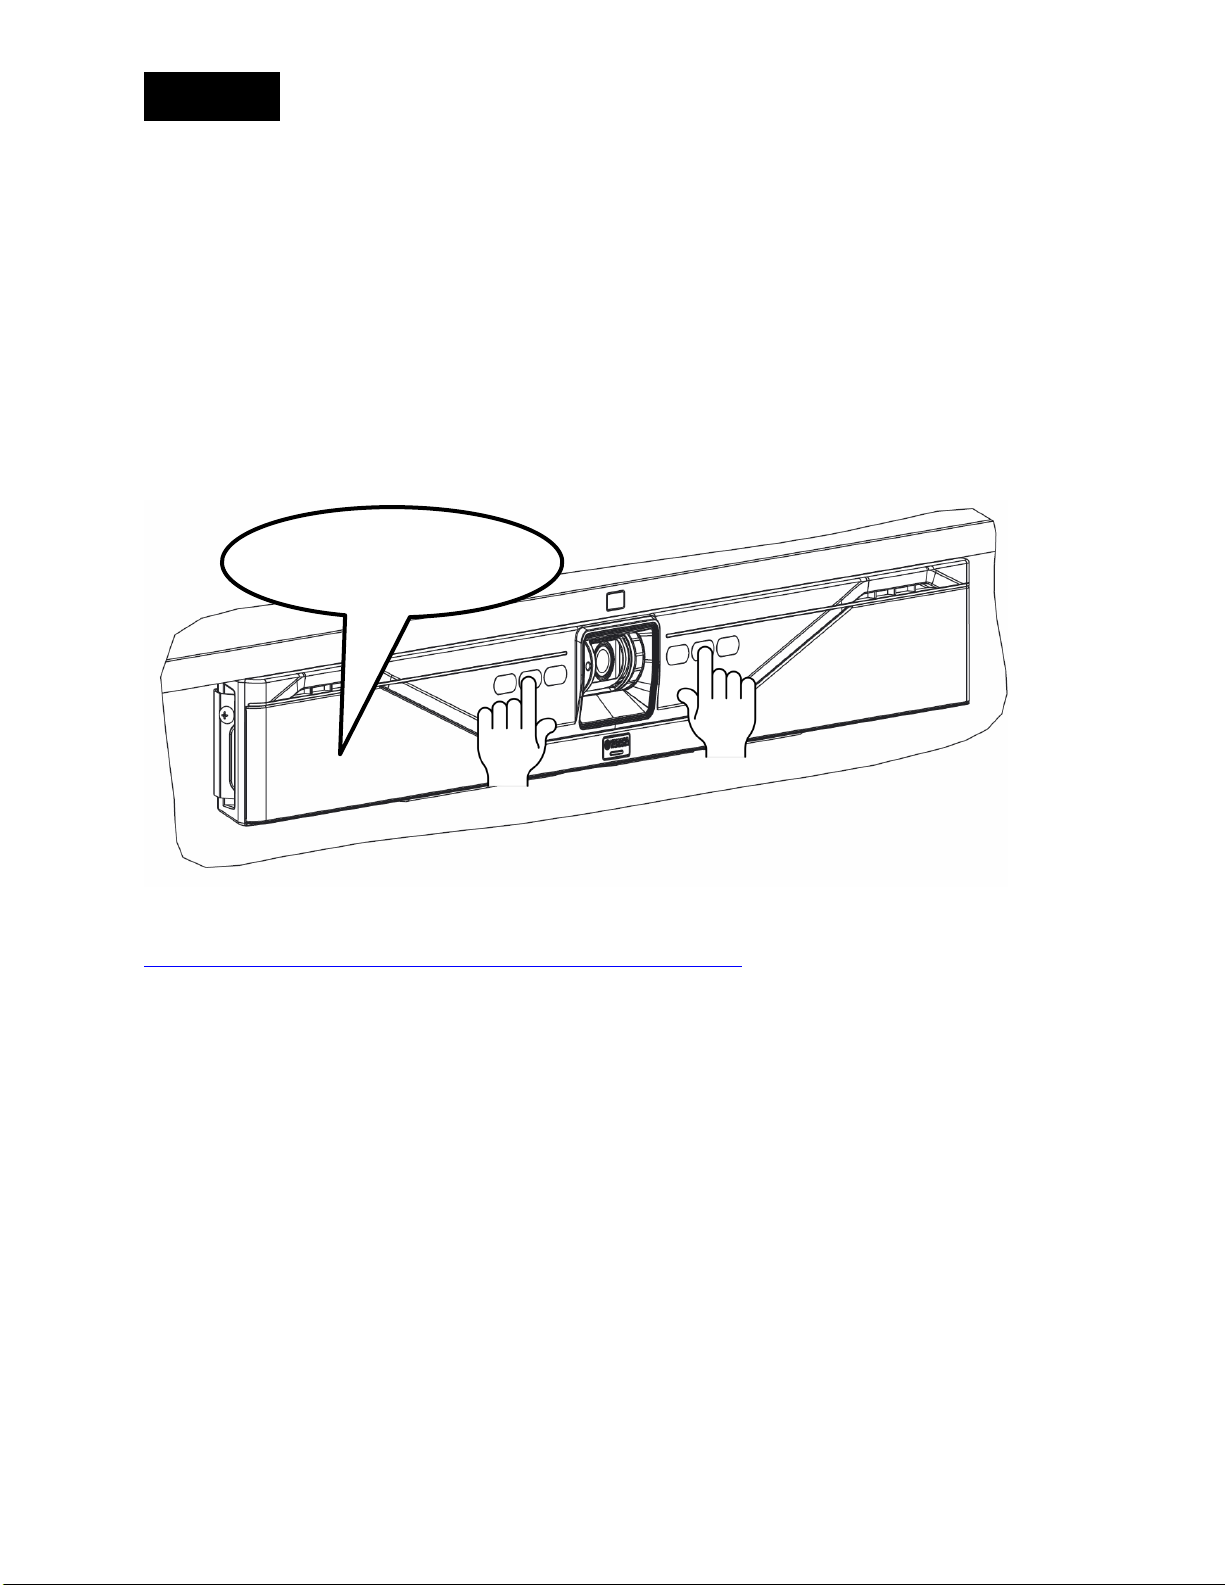
8. Manage through IP interface
If an IP connection was made to the CS-700, the unit is configured to receive a DHCP address.
Press the two middle buttons (volume up / Bluetooth) for 5 seconds, and the system will speak the IP address that
was assigned to it.
My IP address is …
For more information, download the full documentation:
https://uc.yamaha.com/products/video-sound-bar/huddle-room-system/
8
Page 9
English
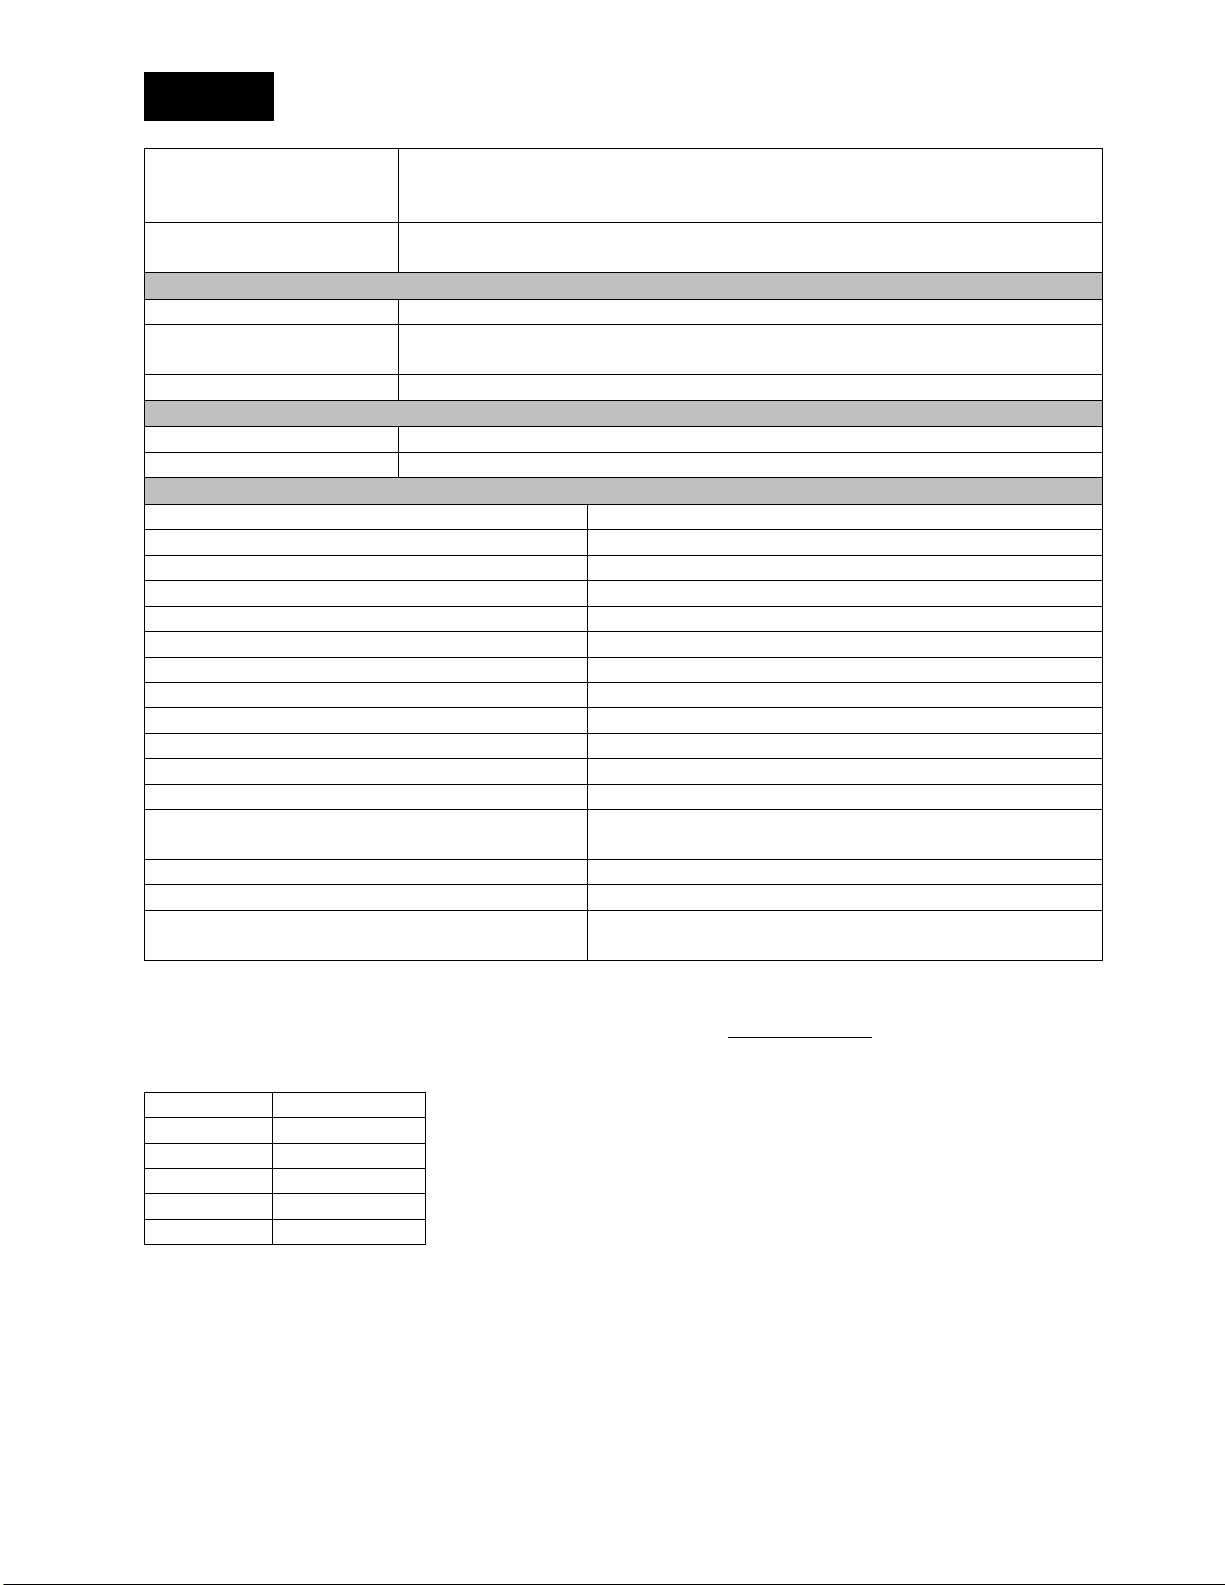
Power adapter
Model Number
ADP-38DR A
Bluetooth Specifications
Bluetooth specification version
2.1 + EDR
Supported profiles
HFP (1.6), A2DP
Supported Codecs
SBC, mSBC, CVSD
Wireless output
Class 2
Maximum communication distance
10 m
Radio frequency (Operational
frequency)
2,402 MHz to 2,480 MHz
Maximum output power (EIRP)
4.0 dBm (2.5 mW)
Audio
Speaker Bar
4 Speaker elements with tweeter and mid-woofer on left and right
Speaker Frequency Response
160 – 20,000 Hz
Max SPL
90 dB at 1m
Microphones
4 microphone dynamic beamforming array with human voice
activity detection
Microphone Coverage
120 degrees audio pickup, best results within 12 feet / 3.60m
Microphone Frequency Response
160 – 16,000 Hz
Full Duplex Audio
Yes
Echo Cancellation
Ultra-wideband adaptive AEC
LED indicator
Call activity and microphone mute/unmute
Video
Camera Sensor
High Definition CMOS
Image resolution
1080p, 30 fps (USB 3.0/3.1)
640 x 360, 30 fps (USB 2.0)
Video Mute
Digital privacy control
LED Indicators
Camera activity and video stream mute/unmute
UVC Support
UVC 1.5
Field of View
120 degrees diagonally
Interfaces
Mount Connector
Wall Mount Bracket for above or below display mounting
USB Host Port
USB with strain relief
3.0/3.1
Ethernet
RJ 45, 10M / 100M
Bluetooth®
Yes. HFP and A2DP support
Aux Audio Input
3.5mm Stereo
SIP (-SP model only)
Call Handling
Make, Answer, Hold, Resume, Transfer (Blind and Supervised),
configured)
Call Bridging
Supports Bridging SIP and USB Calls. Join, Split, Hold, Resume, 2+1+1
Lines: Up to 2 SIP calls, 1 USB call, 1 Bluetooth® call, plus the user
Codecs
G.711 (A-law and μ-law), G.722, G.726, G.729
DTMF Support
RTP event, SIP in-band, SIP info package
Specifications
Audio, video, HID and graphics display supported over USB 2.0 and
Forwarding, Do not disturb, Redial, Call Timer, Call ID, Speed Dial,
Missed Call Notifications, Voice Mail Notifications (Call Manager
9
Page 10
English
Security
SRTP/SRTCP Support (RFC 1889), IETF SIP support (RFC 3261 and
Password protected login
Network & Provisioning
DHCP or Static IP, Server Based Central Provisioning, Web Portal for
Individual Unit Configuration
Compliance
Safety
IEC60065, IEC60950, IEC62368
EMC
CISPR13/CISPR22/CISPR32/ FCC/J55013/ ETSI EN 300 328 / ETSI EN
301 489-1
Environmental
RoHS, Reach, WEEE
Warranty
Global except for EU
1 Year return to factory
European Union
2 Year return to factory
Size, Weight, Power, Operating Temperature
Height
3.9in/98.75mm
Length
2.7in/68.5mm
Width
34.in/861.7mm
Weight (incl. bracket)
7.3 lbs/3.3kg
Input Voltage (power supply)
100-240 VAC
Input Current (power supply)
1A
Input Frequency (power supply)
50-60 Hz
Input Voltage (CS-700)
15V
Input Current (CS-700)
2.4A
Power consumption (max)
36 W
Power consumption (network stand-by)
1.6 W
Stand-by time
20 minutes (user selectable)
Power Cord Length
10ft/3m - Please order correct SKU for regional power cord
requirements
Operating Temperature
32 to 104 °F (0 to 40 °C)
Storage Temperature
-22 to 131 °F (-30 to 55 °C)
Operating / Storage Relative Humidity
20%-85% (non-condensing)
First digit
Calendar year
7
2017
8
2018
9
2019
0
2020
1
2021
companion RFCs), SSIP, Password protected configuration files,
302 291-2 / ETSI EN 300 330-2 EN55024/ CISPR24 or 35 and ETSI EN
Date code
The date code on the CS-700 label indicates when the product was manufactured. The first digit
indicates the year.
The second and third digits indicate the calendar week in that year – from 01 at the beginning of the
year to 52 (or 53).
10
Page 11
Français
Contenu
1 x
1 x
CS700-AV, CS700-SP
4 x
1 x
1 x
1 x
1 x
2 x
2 x
11
Page 12
Français
0x, 1x, 2x
≥ 95 mm
1. Installation du support
Installer le support sur le mur avec 4 vis appropriées, en espaçant deux et deux vis autant que possible. S’assurer
que le support est solidement fixé au mur ou aux entretoises pour éviter les vibrations. S’il est installé en-dessous
de l’écran, s’assurer que l’écart est suffisamment grand pour insérer l’unité CS-700. La profondeur de l’installation
peut être ajustée en utilisant le nombre adéquat d’entretoises (0-2) de chaque côté. La hauteur maximale de
montage est à 2 m du sol. Toujours utiliser 4 vis.
2. Placer l’unité CS-700 sur le support
Positionner l’unité CS-700 de manière à ce que les deux crochets sur le devant du support s’insèrent
dans les cavités de la partie inférieure de l’unité CS-700. S’assurer que l’unité CS-700 est fermement
maintenue par les crochets.
12
Page 13

Français
3. Connecter l’unité CS-700
Une fois que l’unité CS-700 est solidement positionnée sur les crochets du support, connecter le câble
d’alimentation et le câble USB à l’unité CS-700, comme illustré. Si une gestion de l’unité CS-700 à l’aide du
navigateur internet est prévue, connecter également le câble réseau au connecteur correspondant.
Fixer le câble à l’unité CS-700 en utilisant les attaches de câble fournies.
13
Page 14
Français
4. Installer l’unité sur le support
Une fois que tous les câbles sont correctement connectés et fixés, incliner l’unité CS-700 vers l’arrière sur le
support et la repousser sur le support.
14
Page 15
Français
5. Fixer l’unité
Fixer l’unité CS-700 sur le support avec les vis machine fournies.
6. Connecter au réseau et à l’ordinateur
Connecter le cordon d’alimentation à l’alimentation secteur, et brancher le cordon d’alimentation à un connecteur
d’alimentation secteur.
Connecter le câble USB à un connecteur USB 3 (USB ultra-rapide) sur l’ordinateur.
15
Page 16
Français
My IP address is …
7. Sélectionner un appareil
Dans le système d’exploitation, sélectionner « Yamaha AudioVideo Device » comme appareil de lecture et
d’enregistrement audio par défaut.
Dans l’application de communications unifiées, sélectionner l’unité CS-700 comme appareil vidéo.
8. Gérer via l’interface IP
Si une connexion IP à la CS-700 a été effectuée, l’unité est configurée pour recevoir une adresse DHCP.
Appuyer sur les deux boutons du milieu (augmenter le volume / Bluetooth) pendant 5 secondes, et le système dira
l’adresse IP lui ayant été assignée.
(Mon adresse IP est …)
Pour de plus amples informations, télécharger la documentation complète :
https://uc.yamaha.com/products/video-sound-bar/huddle-room-system/
16
Page 17
Français
Adaptateur secteur
Numéro de modèle
ADP-38DR A
Spécifications Bluetooth
Version des caractéristiques Bluetooth
2.1 + EDR
Profils pris en charge
HFP (1.6), A2DP
Codec pris en charge
SBC, mSBC, CVSD
Sortie sans fil
Class 2
Distance maximale de communication
10 m
Fréquence radio (fréquence opérationnelle)
2 402 MHz à 2 480 MHz
Puissance de sortie maximale (EIRP)
4,0 dBm (2,5 mW)
AUDIO
Barre haut-parleur
4 éléments haut-parleurs avec haut-parleurs aigu et medium à
gauche et à droite
Réponse en fréquence du haut-parleur
160 – 20 000 Hz
Niveau de pression acoustique (SPL) max.
90 dB à 1 m
Microphones
4 microphones dynamiques directionnels avec détection d’activité
vocale (humaine)
Couverture du microphone
Couverture audio à 120°, meilleurs résultats jusqu’à 3,60 m
Réponse en fréquence du microphone
160 – 16 000 Hz
Audio duplex intégral
Oui
Annulation de l’écho
Annulation de l’écho acoustique (AEC) à bande ultralarge adaptable
Témoin LED
Activité d’appel et désactivation / activation du microphone
Vidéo
Capteur caméra
CMOS haute définition
Résolution d’image
1080 p, 30 images/s (USB 3.0/3.1)
640 x 360, 30 images/s (USB 2.0)
Cache caméra
Cache caméra numérique
Témoin LED
Activité de la caméra et désactivation / activation flux vidéo
Prise en charge UVC
UVC 1.5
Champ visuel
120° en diagonale
INTERFACES
Connecteur de montage
Support mural pour montage écran au-dessus ou en dessous
Port hôte USB
USB avec décharge de traction; Audio, vidéo, HID et affichage
graphique pris en charge via USB 2.0 et 3.0/3.1
Ethernet
RJ45, 10 M / 100 M
Bluetooth®
Oui. Prise en charge HFP et A2DP
Entrée audio aux.
Stéréo de 3,5 mm
SIP (modèle -SP uniquement)
Gestion des appels
Appeler, répondre, mettre en attente, reprendre, transférer
(gestionnaire des appels configuré)
Relais des appels
Support relais SIP et appels USB. Joindre, diviser, mettre en attente,
appel Bluetooth®, plus l’utilisateur
Codecs
G.711 (loi A et loi μ), G.722, G.726, G.729
Prise en charge DTMF
Événement RTP, SIP en bande, pack informations SIP
Spécifications
(aveugle ou supervisé), renvoyer, ne pas déranger, rappel,
compteur d’appel, affichage appelant, numérotation rapide,
notifications d’appel manqué, notifications de la messagerie vocale
reprendre, lignes 2 + 1 + 1 : jusqu’à 2 appels SIP, 1 appel USB, 1
17
Page 18
Français
Sécurité
Support SRTP / SRTCP (RFC 1889), support IETF SIP (RFC 3261
mot de passe, connexion protégée par mot de passe
Réseau & approvisionnement
DHCP ou IP statique, approvisionnement central basé sur serveur,
portail internet pour configuration unité individuelle
CONFORMITÉ
Sûreté
IEC 60065, IEC 60950, IEC 62368
CEM
CISPR 13 / CISPR 22 / CISPR 32 / FCC / J55013 / ETSI EN 300 328 / ETSI EN 302
291-2 / ETSI EN 300 330-2 EN55024 / CISPR 24 ou 35 et ETSI EN 301 489-1
Environnement
RoHS, Reach, DEEE
GARANTIE
Mondiale à l’exception de l’UE
1 an de garantie retour usine
Union européenne
2 ans de garantie retour usine
TAILLE, POIDS, ALIMENTATION, TEMPÉRATURE DE FONCTIONNEMENT
Hauteur
98,75 mm
Longueur
68,5 mm
Largeur
861,7 mm
Poids (support inclus)
3,3 kg
Tension d’entrée (alimentation électrique)
100-240 VAC
Courant d’entrée (alimentation électrique)
1 A
Fréquence d’entrée (alimentation
électrique)
50-60 Hz
Tension d’entrée (CS-700)
15 V
Courant d’entrée (CS-700)
2,4 A
Consommation électrique (maximum)
36 W
Consommation électrique (réseau stand-by)
1,6 W
Temps d'attente
20 minutes (sélectionnable par l'utilisateur)
Longueur du cordon d’alimentation
3 m – Commander UGS adaptée aux exigences régionales en
matière de cordon d’alimentation
Température de fonctionnement
de 0 à 35 °C
Température de stockage
de -30 à 55 °C
Humidité relative de
fonctionnement / stockage
20 %-85 % (sans condensation)
Premier
chiffre
Année
calendaire
7
2017
8
2018
9
2019
0
2020
1
2021
accompagnés de RFC), SSIP, fichiers de configuration protégés par
Code de date
Le code de date sur l’étiquette du CS-700 indique quand le produit a été fabriqué. Le premier chiffre indique
l’année.
Les deuxième et troisième chiffres indiquent la semaine calendaire de l’année concernée, de 01 au début de
l’année à 52 (ou 53).
18
Page 19

Deutsch
Inhalt
1 x
1 x
CS700-AV, CS700-SP
4 x
1 x
1 x
1 x
1 x
2 x
2 x
19
Page 20
Deutsch
0x, 1x, 2x
≥ 95 mm
1. Montage der Wandhalterung
Bringen Sie die Halterung an der Wand mit vier Schrauben an. Setzen Sie dabei jeweils zwei Schrauben so weit von
einander entfernt wie möglich. Stellen Sie sicher, dass die Halterung straff gegen die Wand bzw. den
Abstandhalter platziert ist, um Vibrationen zu vermeiden. Falls die Halterung unter einem Bildschirm angebracht
wird, stellen Sie sicher, dass der Abstand groß genug ist und dem CS-700 System ausreichend Platz bietet. Den
Abstand zur Wand können Sie über die Zahl der Abstandhalter (0-2) auf jeder Seite regulieren. Maximale
Montagehöhe ist 2m vom Boden. Benutzen Sie stets vier Schrauben.
2. Anbringen des CS-700 an die Wandhalterung
Halten Sie das CS-700 so, dass die beiden vorn an der Wandhalterung herausstehenden Haken in die beiden
Hohlräume am unteren Teil des CS-700 passen.
Stellen Sie sicher, dass das CS-700 sicher von den beiden Haken getragen wird.
20
Page 21
Deutsch
3. Anschluss des CS-700
Sobald das CS-700 sicher auf den Haken der Wandhalterung sitzt, verbinden Sie das Netzkabel und das USB-Kabel,
wie auf der Abbildung gezeigt, mit dem System. Falls Sie das CS-700 über einen Web-Browser steuern möchten,
verbinden Sie auch das Netzwerkkabel mit der dafür vorgesehenen Anschlusseinheit.
Befestigen Sie das Kabel mit den beigefügten Kabelbinder am CS-700.
21
Page 22
Deutsch
4. Befestigung des CS-700 an der Wandhalterung
Sobald alle Kabel richtig angeschlossen und gesichert sind, neigen Sie das CS-700 wieder nach hinten und setzen
Sie es zurück auf die Wandhalterung.
22
Page 23
Deutsch
5. Sicherung des CS-700
Nutzen Sie die beigefügten Geräteschrauben, um das CS-700 sicher auf der Wandhalterung zu befestigen.
6. Anschluss an Strom und Rechner
Schließen Sie das Netzkabel an und verbinden Sie den Netzstecker mit der Anschlussbuchse.
Verbinden Sie das USB-Kabel mit der USB 3 (USB Super Speed)-Anschlusseinheit des Rechners.
23
Page 24

Deutsch
My IP address is …
7. Wählen Sie das Gerät aus
Wählen Sie in Ihrem Betriebssystem das „Yamaha AudioVideo Device“ als Standard-Aufnahme und
Wiedergabegerät.
Wählen Sie in Ihrer Unified Communications-Plattform das CS-700 als Video-Kamera.
8. Verwaltung über IP-Schnittstelle
Falls das CS-700 mit einer IP-Schnittstelle versehen ist, kann das System eine DHCP-Adresse empfangen.
Halten Sie die beiden mittleren Knöpfe (Volume Up/Bluetooth) fünf Sekunden lang gedrückt, und das System
nennt die IP-Adresse, die ihm zugeordnet wurde.
(Meine IP-Adresse lautet …)
Weitere Informationen finden Sie in der vollständigen Dokumentation unter
https://uc.yamaha.com/products/video-sound-bar/huddle-room-system/
24
Page 25

Deutsch
Netzteil
Modell-Nr
ADP-38DR A
Bluetooth-Spezifikationen
Bluetooth-Spezifikationsversion
2.1 + EDR
Unterstütze Profile
HFP (1.6), A2DP
Unterstützte Codecs
SBC, mSBC, CVSD
Wireless-Ausgang
Class 2
Maximaler Übertragungsweg
10 m
Funkfrequenz (Betriebsfrequenz)
2.402 MHz bis 2.480 MHz
Maximale Ausgangsleistung (EIRP)
4,0 dBm (2,5 mW)
AUDIO
Lautsprechereinheit
4 Lautsprecherelemente mit Hochton- und Mitteltonlautsprechern auf der
linken und rechten Seite
Frequenzgang des Lautsprechers
160 – 20.000 Hz
Max. Schalldruckpegel
90 dB bei 1 m Abstand
Mikrofone
4 dynamische Richtmikrofone mit aktiver Erkennung menschlicher Stimmen
Aufnahmewinkel der Mikrofone
120 Grad Empfangsbereich für Audioempfang, die besten Ergebnisse mit
einem Abstand von bis zu 3,60 m
Frequenzgang der Mikrofone
160 – 16.000 Hz
Vollduplex-Audio
Ja
Echounterdrückung
ultrabreitband, adaptive Echounterdrückung
LED-Anzeige
Rufaktivitäten und Stummstellung der Mikrofone aktiviert/deaktiviert
Video
Kamerasensor
Hochauflösende CMOS
Bildauflösung
1080 Pixel, 30 BpS (USB 3.0/3.1)
640 x 360, 30 BpS (USB 2.0)
Schutz der Privatsphäre
digitaler Schutz
LED-Anzeigen
Kamera-Aktivität und Video-Stream Stummstellung aktivieren/deaktivieren
Unterstützung von UVC (USB Video
Class)
UVC 1,5
Gesichtsfeld
120 Grad diagonal
SCHNITTSTELLEN
Verbindungselement
Wandhalterung zur Montage über oder unter dem Bildschirm
USB-Hostanschluss
USB mit Zugentlastung; Audio, Video, HID und Graphik-Display wird über
USB 2.0 und 3.0/3.1 unterstützt
Ethernet
RJ 45, 10M / 100M
Bluetooth®
Ja. Unterstützung von HFP und A2DP
AUX-Audio Input
3,5 mm Stereo
SIP (nur SP-Modell)
Rufbearbeitung
Herstellen, Beantworten, Halten, Wiederaufnehmen, Weiterleiten (blind und
Voice Mail-Mitteilungen (Konfiguration des Call Managers)
Überbrückung
Unterstützung von SIP- und USB-Anrufen. Verbinden, Trennen, Halten,
zzgl. Nutzer
Codecs
G.711 (A-law und μ-law-Verfahren), G.722, G.726, G.729
Unterstützung von DTMF
RTP-Event, band-interne SIP, Infopaket SIP
Spezifikationen
überwacht), Rufverteilung, Bitte nicht stören, Wahlwiederholung,
Gesprächsdaueranzeige, Rufnummernüberprüfung, Kurzwahlnummern,
Benachrichtigungen für verpasste Anrufe, Benachrichtigungen zu neuen
Wiederaufnehmen, 2+1+1: bis zu 2 SIP-Rufe, 1 USB-Ruf, 1 Bluetooth®-Ruf,
25
Page 26

Deutsch
Technische Sicherheit
SRTP/SRTCP Unterstützung (RFC 1889), IETF SIP Unterstützung (RFC 3261
passwortgeschütztes Log-in
Netzwerk & Bereitstellung
DHCP oder statische IP-Adresse; server-basierte, zentralisierte Bereitstellung;
Web-Portal für die individuelle Konfiguration der Einheit
ERFÜLLUNG DER GESETZLICHEN VORSCHRIFTEN
Allgemeine Sicherheit
IEC60065, IEC60950, IEC62368
EMC
CISPR13/CISPR22/CISPR32/ FCC/J55013/ ETSI EN 300 328 / ETSI EN 302 291-2 / ETSI EN
300 330-2 EN55024/ CISPR24 bzw. 35 und ETSI EN 301 489-1
Umweltschutz
RoHS (Beschränkung der Verwendung gefährlicher Stoffe), Reach (Europäische
Chemikalienverordnung), WEEE (Richtlinie über Elektro- und Elektronikaltgeräte)
GARANTIE
weltweit außer EU
einjährige Garantie mit Rücksendung ans Werk
Europäische Union
zweijährige Garantie mit Rücksendung ans Werk
Europäische Union
zweijährige Garantie mit Rücksendung ans Werk
UMFANG, GEWICHT, STROMVERSORGUNG, BETRIEBSTEMPERATUR
Höhe
98,75 mm
Länge
68,5 mm
Breite
861,7 mm
Gewicht (inkl. Halterung)
3,3 kg
Eingangsspannung (Netzteil)
100-240 Volt Wechselstrom
Eingangsstrom (Netzteil)
1 A
Eingangsfrequenz (Netzteil)
50-60 Hz
Eingangsspannung (CS-700)
15 V
Eingangsstrom (CS-700)
2,4 A
Leistungsaufnahme (max.)
36 W
Leistungsaufnahme (Netzwerk
Stand-by)
1,6 W
Stand-by Zeit
20 Minuten (Benutzer wählbar)
Länge Stromkabel
3 m - Bitte bestellen Sie die passende Einheit für Netzkabel in Ihrer Region
Betriebstemperatur
0 bis 35 °C
Lagertemperatur
-30 bis 55 °C
relative Luftfeuchtigkeit für
Betrieb/Lagerung
20 % - 85 % (nicht kondensierend)
Erste Ziffer
Kalenderjahr
7
2017
8
2018
9
2019
0
2020
1
2021
und begleitende RFCs), SSIP, passwortgeschützte Konfigurationsdateien,
Datumscode
Der Datumscode auf dem Label des CS-700 bezieht sich auf das Herstellungsdatum. Die erste Ziffer steht für das
Jahr.
Die zweite und die dritte Ziffer stehen für die Kalenderwoche des betreffenden Jahres - von 01 für die erste Woche
des Kalenderjahres bis 52 (bzw. 53).
26
Page 27

Español
Contenido
1 x
1 x
CS700-AV, CS700-SP
4 x
1 x
1 x
1 x
1 x
2 x
2 x
27
Page 28

Español
0x, 1x, 2x
≥ 95 mm
1. Instalación del soporte
Para instalar el soporte sobre la pared, utilice 4 tornillos apropiados, especiando los tornillos de dos en dos lo más
separados posible. Asegúrese de que el soporte está bien sujeto a la pared o a los espaciadores para así evitar la
vibración. En el caso de que se instale debajo de la pantalla, asegúrese de que la distancia es lo suficientemente
grande como para encajar la unidad CS-700. Puede ajustar la profundidad de la instalación con el número
adecuado de espaciadores (de 0 a 2) a cada lado. La altura máxima de montaje es de 2 metros del suelo. Utilice
siempre 4 tornillos.
2. Colocación de la unidad CS-700 sobre el soporte
Coloque la unidad CS-700 de tal manera que los dos ganchos que hay en la parte de delante del soporte encajen en
las cavidades de la parte inferior de la unidad CS-700. Asegúrese de que la unidad CS-700 está bien sujeta con los
ganchos.
28
Page 29

Español
3. Conexión de la unidad CS-700
Una vez la unidad CS-700 esté bien colocada sobre los ganchos del soporte, conecte el cable de corriente y el cable
USB a la unidad CS-700, tal y como se muestra en la imagen. En el caso de que se pretenda gestionar la unidad CS700 mediante el navegador web, conecte también el cable de red al conector correspondiente.
Sujete el cable a la unidad CS-700 con las bridas o abrazaderas que se suministran.
29
Page 30

Español
4. Instalación de la unidad en el soporte
Una vez se hayan conectado y sujetado correctamente todos los cables, incline la unidad CS-700 hacia atrás sobre
el soporte y vuelva a colocarla dentro del soporte.
30
Page 31

Español
5. Sujeción de la unidad
Sujete la unidad CS-700 en el soporte con los tornillos para maquinaria que se suministran.
6. Conexión a la corriente y al equipo informático
Conecte el cable de corriente a la toma de corriente y el enchufe el cable de corriente a un conector de corriente.
Conecte el cable USB a un conector USB 3 (USB de alta velocidad) del equipo informático.
31
Page 32

Español
My IP address is …
7. Selección del dispositivo
En el sistema operativo, seleccione el «Dispositivo de Audio/Vídeo Yamaha» (Yamaha AudioVideo Device) como
dispositivo de reproducción y grabación de audio por defecto.
En la aplicación de comunicaciones unificadas, seleccione la unidad CS-700 como dispositivo de vídeo.
8. Gestión a través de la interfaz IP
En el caso de que se haya conectado la unidad CS-700 mediante la dirección IP, la unidad estará configurada para
recibir la dirección DCHP.
Pulse los dos botones centrales (subir volumen/Bluetooth) durante 5 segundos y el sistema le indicará la dirección
IP que se le ha asignado.
(Mi dirección IP es…)
Si desea más información al respecto, descargue la documentación al completo:
https://uc.yamaha.com/products/video-sound-bar/huddle-room-system/
32
Page 33

Español
Adaptador de corriente
Número de modelo
ADP-38DR A
Especificaciones Bluetooth
Especificación de Bluetooth versión
2.1 + EDR
Perfiles admitidos
HFP (1.6), A2DP
Códec admitidos
SBC, mSBC, CVSD
Salida inalámbrica
Class 2
Distancia máxima de comunicación
10 m
Radiofrecuencia (frecuencia operativa)
2.402 MHz a 2.480 MHz
Máxima potencia de salida (PIRE)
4,0 dBm (2,5 mW)
AUDIO
Barra de sonido
4 altavoces con tweeter (altavoz de agudos) y midwoofer (altavoz
de frecuencias medias) ubicados a derecha e izquierda
Respuesta de frecuencia de los altavoces
160 – 20 000 Hz
Nivel máximo de presión sonora
90 dB a 1 m
Micrófonos
Despliegue de 4 micrófonos de detección dinámica de fuentes
acústicas con detección de voz humana
Cobertura de los micrófonos
Recepción de audio en 120 grados; los mejores resultados se
consiguen dentro de un radio de 12 pies/3,60 metros.
Respuesta de frecuencia del micrófono
160 – 16 000 Hz
Audio bidireccional (full duplex)
Sí
Cancelación del eco
AEC adaptativa de banda ultra ancha
Indicador LED
Silenciación y activación del sonido para llamadas y micrófono
Vídeo
Sensor de la cámara
CMOS de alta definición
Resolución de la imagen
1080 p, 30 fps (USB 3.0/3.1)
640 × 360, 30 fps (USB 2.0)
Tapa de intimidad
Control digital de intimidad
Indicadores LED
Silenciación y activación del sonido para la cámara y la retransmisión de vídeo
Compatible con UVC
UVC 1.5
Campo de visión
120 grados en diagonal
INTERFACES
Conector para montaje
Soporte para montaje en la pared, por encima o debajo del montaje de la pantalla
Puerto anfitrión de USB
USB con protección contra tirones
Audio, vídeo, HID y pantalla de gráficos compatible con USB 2.0 Y 3.0/3.1
Ethernet
RJ 45, 10M / 100M
Bluetooth®
Sí. Compatible con HFP y A2DP
Entrada auxiliar de audio
3,5 mm estéreo
SIP (únicamente en modelo -SP)
Manejo de llamadas
Hacer, contestar, poner en espera, reanudar, traspasar (oculta y supervisada),
buzón de voz (administrador de llamadas configurado)
Desvío de llamada
Compatible con desvío de llamadas por SIP y USB. Unir, dividir, poner en espera,
Bluetooth®, además del usuario
Códecs
G.711 (A-law and μ-law), G.722, G.726, G.729
Compatible con tonos DTMF
Evento mediante protocolo RTP, SIP en banda, paquete de información SIP
Ficha técnica
reenviar, no molestar, volver a marcar, temporizador de llamada, identidad de
llamada, marcado rápido, notificaciones de llamadas perdidas, notificaciones del
reanudar, 2+1+1 líneas Hasta 2 llamadas por SIP, 1 llamada por USB, 1 llamada por
33
Page 34
Español
Seguridad
Compatible con SRTP/SRTCP (RFC 1889), compatible con protocolo SIP de IETF (RFC
contraseña, inicio de sesión protegido mediante contraseña
Red y aprovisionamiento
DHCP o IP estática, aprovisionamiento central basado en servidores, portal web
para configuración individual de las unidades
CUMPLIMIENTO NORMATIVO
Seguridad
IEC60065, IEC60950, IEC62368
EMC
CISPR13/CISPR22/CISPR32/ FCC/J55013/ ETSI EN 300 328 / ETSI EN 302 291-2 / ETSI
EN 300 330-2 EN55024/ CISPR24 o 35 y ETSI EN 301 489-1
Medioambiental
RoHS, Reach, WEEE
GARANTÍA
Mundial salvo para la UE
1 año con devolución a fábrica
Unión Europea
2 años con devolución a fábrica
TAMAÑO, PESO, POTENCIA, TEMPERATURA DE FUNCIONAMIENTO
Altura
98,75 mm
Largo
68,5 mm
Ancho
861,7 mm
Peso (incluido el soporte)
3,3kg
Tensión de entrada (suministro de corriente)
100-240 V CA
Corriente de entrada (suministro de corriente)
1 A
Frecuencia de entrada (suministro de corriente)
50-60 Hz
Tensión de entrada (CS-700)
15 V
Corriente de entrada (CS-700)
2,4 A
Consumo de potencia (máx.)
36 W
Consumo de potencia (red stand-by)
1,6 W
Tiempo de espera
20 minutos (seleccionable por el usuario)
Longitud del cable de corriente
3 m; se ruega pedir el número de referencia correcto para
los requisitos regionales del cable de corriente
Temperatura de funcionamiento
0 hasta 35 °C
Temperatura de almacenamiento
-30 hasta 55 °C
Humedad relativa de
funcionamiento/almacenamiento
20 % hasta el 85 % (sin condensación)
Primer dígito
Año natural
7
2017
8
2018
9
2019
0
2020
1
2021
3261 y RFC asociadas), SSIP, archivos de configuración protegidos mediante
Código relativo a la fecha
El código de la fecha que figura en la etiqueta del modelo CS-700 indica cuándo se fabricó el producto. El primer
dígito indica el año.
El segundo y el tercer dígito indican la semana natural de dicho año; desde 01 al comienzo del año hasta 52 (o 53).
34
Page 35

日本語
コンテンツ
1 x
1 x
CS700-AV, CS700-SP
4 x
1 x
1 x
1 x
1 x
2 x
2 x
1 x 保証書
35
Page 36

日本語
0x, 1x, 2x
≥ 3 ¾ in / 95
mm
1. ブラケットを設置する
適切なネジ 4 本を使用して、ブラケットを壁に取り付けます。左側のネジ 2 本と右側のネジ 2 本の間隔はできる限り空け
てください。ブラケットは、振動が発生しないように壁面またはスペーサーにしっかり固定します。ディスプレイの下に取り付け
る場合は、CS-700 本体が収まるよう十分なスペースを確保してください。取付時、壁からの距離は両サイドに取り付ける
スペーサーの数(0~2 個)で調節できます。最大取り付け高さは地面から 2m 。必ず 4 本のネジを使用してくださ
い。
2. CS-700 本体をブラケットの上に置く
ブラケット前面の 2 本のフックと CS-700 下部の穴の位置が一致するように CS-700 を配置します。CS-700 がフックに
しっかりかかっていることを確認してください。
36
Page 37

日本語
3. CS-700 を接続する
ブラケットのフックの上に CS-700 を正しく置いたら、電源ケーブルと USB ケーブルを CS-700 に接続します(下図を参
照)。CS-700 を Web ブラウザで管理する場合は、該当するコネクターにネットワークケーブルも接続します。
ケーブルは付属の結束バンドで CS-700 本体に固定してください。
37
Page 38
日本語
4. ブラケットに本体を取り付ける
すべてのケーブルを正しく接続して固定できたら、ブラケットの上で CS-700 を後方に倒し、ブラケットと密着させます。
38
Page 39

日本語
5. 本体を固定する
付属の小ネジで CS-700 本体をブラケットに固定します。
6. 電源と PC に接続する
電源コードの一端を本体の電源部に接続し、もう一端をコンセントに差し込みます。
PC の USB 3.0(USB Super Speed)コネクターに USB ケーブルを接続します。
39
Page 40

日本語
My IP address is …
(本機の IP アドレスは・・・)
7. デバイスを選択する
ご使用の OS で、既定のオーディオ再生・録音デバイスとして「Yamaha AudioVideo Device」を選択します。
ご使用のユニファイドコミュニケーションアプリケーションで、ビデオデバイスとして CS-700 を選択します。
8. IP インターフェースを通して管理する
CS-700 本体は、IP 接続が確立されると DHCP 経由でアドレスを受け取るように設定されています。
中央のボタン(音量アップと Bluetooth)を 2 つ同時に 5 秒間押すと、本体に割り当てられた IP アドレスが音声で通
知されます。
詳細については、下記の Web サイトからドキュメント一式をダウンロードしてください。
https://sound-solution.yamaha.com/download/
40
Page 41

日本語
アフターサービスについて
サポート規定
本製 のサポート規定は下記のWebサイトに掲載されています。
https://sound-solution.yamaha.com/support/uc/policy/
サポート窓口
本製品に関するご質問やお問い合わせは、下記へご連絡ください。
■ 音声コミュニケーション機器お客様ご相談センター
TEL:03-5651-1838 FAX:053-460-3489
ご相談受付時間 9:00 ~ 12:00 13:00 ~ 17:00
( 土・日・祝日、弊社定休日、年末年始は休業とさせていただきます)
■ お問い合わせページ
https://sound-solution.yamaha.com/support/uc/
保証と修理について
■ 保証書について
お買い上げ年月日、販売店などが確認できるレシートなどと一緒に保管してください。万一紛失なさいますと、保証期間中であっても有料となります。
■ 保証期間
保証書をご覧ください。
■ 保証期間中の修理
保証期間中に万一故障した場合には、ご購入の販売店までご連絡のうえ、製品をご送付ください。その場合必ず保証書と、お買い上げ年月日、販売
店などが確認できるレシートなども一緒に同封してください。
■ 保証期間後の修理
保証期間終了後の修理は有料となりますが、引き続き責任をもって対応させていただきます。ご購入の販売店または本書に記載されているサポート窓
口までご連絡ください。ただし、修理対応期間は生産終了後5年間です。
41
Page 42

日本語
電源アダプタ
モデル番号
ADP-38DR A
Bluetooth 仕様
Bluetooth バージョン
2.1 + EDR
対応プロファイル
HFP (1.6), A2DP
対応コーデック
SBC, mSBC, CVSD
無線出力
Class 2
最大通信距離
10 m
無線周波数 ( 動作周波数 )
2,402 MHz ~ 2,480 MHz
最大出力電力 (EIRP)
4.0 dBm (2.5 mW)
オーディオ
スピーカーバー
スピーカーエレメント 4 個、左側にツイーター、右側にミッドウーファー搭載
スピーカー周波数応答
160~20,000Hz
最大 SPL
90dB(1m)
マイク
4 個、Human Voice Activity Detection 機能搭載ダイナミックビームフォーミングアレイ
マイク収音範囲
120°の音声を収音、最適距離 3.60m 以内
マイク周波数応答
160~16,000Hz
双方向音声通信
可
エコーキャンセル
超広帯域適応型 AEC
LED 表示
コール動作、マイクのミュート/ミュート解除
ビデオ
カメラセンサー
高解像度 CMOS
640×360、30fps(USB 2.0 の場合)
プライバシーカバー
デジタルプライバシー制御
LED 表示
カメラ動作、ビデオストリームのミュート/ミュート解除
UVC 対応
UVC 1.5
画角
対角 120°
インターフェース
マウントコネクター
壁面取付用ブラケット(ディスプレイの上または下に取付可)
オーディオ、ビデオ、HID、グラフィック表示を USB 2.0 および 3.0/3.1 上でサポート
イーサネット
RJ-45、10M/100M
Bluetooth®
可。HFP および A2DP に対応
AUX オーディオ入力
3.5mm ステレオ
SIP (-SP モデルのみ)
マネージャの構成)
線:最大で SIP コール 2、USB コール 1、Bluetooth®コール 1 およびユーザー
コーデック
G.711(A-law およびμ-law)、G.722、G.726、G.729
主な仕様
解像度 1080p、30fps(USB 3.0/3.1 の場合)
USB ホストポート ストレインリリーフ付 USB
コール処理 発信、応答、保留、保留解除、転送(ブラインドおよび監視)、フォワーディング、着信拒否、リ
ダイヤル、コールタイマー、発信者 ID
コールブリッジ ブリッジする SIP および USB のコールをサポート結合、分割、保留、保留解除、2+1+1 回
、短縮ダイヤル、不在着信通知、ボイスメール通知(コール
42
Page 43

日本語
DTMF 対応
RTP イベント、SIP インバンド、SIP 情報パッケージ
SSIP、構成ファイル群のパスワード保護、ログインのパスワード保護
ル
適合規格
安全
IEC60065、IEC60950、IEC62368
489-1
環境
RoHS、Reach、WEEE
保証
EU を除く全地域
メーカー保証 1 年
EU
メーカー保証 2 年
寸法、質量、電源、動作温度
高さ
98.75mm
奥行き
68.5mm
幅
861.7mm
質量(ブラケットを含む)
3.3kg
入力電圧(電源)
AC100~240V
入力電流(電源)
1A
入力周波数(電源)
50~60Hz
入力電圧(CS-700)
15V
入力電流(CS-700)
2.4A
最大消費電力
36 W
消費電力(ネットワークスタンバイ)
1.6 W
待機時間
20 分(ユーザー選択可能)
電源コード長
3m(各地域の電源コード要件に適した SKU を発注してください。)
動作温度
0~35℃
保管温度
-30~55℃
動作/保管相対湿度
20~85%(結露しないこと)
先頭桁
暦年
7
2017
8
2018
9
2019
0
2020
1
2021
セキュリティ SRTP/SRTCP 対応(RFC 1889)、IETF SIP 対応(RFC 3261 および関連 RFC)、
ネットワークとプロビジョニング DHCP または静的 IP、サーバーベースの集中型プロビジョニング、各ユニット構成用 Web ポータ
EMC CISPR13/CISPR22/CISPR32/FCC/J55013/ETSI EN 300 328/ETSI EN 302
291-2/ETSI EN 300 330-2、EN55024/CISPR24 または 35 および
ETSI EN 301
日付コード
CS-700 ラベル上の日付コードは、製品の製造時期を表しています。先頭桁は年を表します。
2 桁目と 3 桁目はその年における週番号を表します。範囲は年第 1 週の 01 から 52(または 53)までです。
43
Page 44

中文
内容
1 x
1 x
CS700-AV, CS700-SP
4 x
1 x
1 x
1 x
1 x
2 x
2 x
44
Page 45
中文
0x, 1x, 2x
≥ 3 ¾ in / 95 mm
1.安装支架
使用 4 个适当的螺丝将支架安装在墙上,两个螺钉和另两个螺钉的间距应尽可能远。确保支架紧贴墙壁或 垫片,以避免振动。如果安装在显示器下方,请确保预留足够的空间安装 CS-700 装置。您可以在两侧使
用适当数量(0-2 个)的垫片来调整安装深度。
最大安装高度距地面 2 米。始终需要使用 4 个螺钉。
2.在支架上放置 CS-700 装置
将支架前端的两个挂钩放入 CS-700 下半部分的凹槽内以放置 CS-700。确保挂钩能够稳定支撑 CS-700。
45
Page 46

中文
3.连接 CS-700
将 CS-700 稳定放置在支架的挂钩上之后,按照下图所示将电源线和 USB 连接线连接至 CS-700。如果计 划使用网络浏览器管理 CS-700,也需要将网络线缆连接至相应的接口。 使用提供的束线带将线缆固定到 CS-700 装置上。
46
Page 47

中文
4.将装置安装到支架内
所有电缆都正确连接并固定之后,在支架上向后倾斜 CS-700,然后将其推回支架。
47
Page 48

中文
5.固定装置
利用提供的机械螺钉将 CS-700 装置固定到支架中。
6.连接电源和计算机
将电源线连接到电源上,然后将电源线插入主电源接口。
将 USB 连接线连接到计算机的 USB 3(高速 USB)接口。
48
Page 49

中文
My IP address is …
(
IP
...)
7.选择设备
在您的操作系统中,选择“Yamaha AudioVideo Device”作为您的默认音频播放和录音设备。
在您的统一通信应用程序中,选择 CS-700 作为 Video(视频)设备。
8.通过 IP 接口进行管理
如果 CS-700 拥有 IP 连接,则可以配置装置以接收 DHCP 地址。
按住中间两个键(增加音量/蓝牙)5 秒钟,系统会播报分配的 IP 地址。
我的
有关更多信息,请下载完整文档:https://uc.yamaha.com/products/video-sound-bar/huddle-room-system/
地址是
49
Page 50

中文
电源适配器
蓝牙规格
音频
视频
接口
SIP (仅适用于-SP 模型)
®
合规性
规格
型号 ADP-38DR A
蓝牙规格版本 2.1 + EDR
支持的配置文件 HFP (1.6), A2DP
支持的编解码器 SBC, mSBC, CVSD
无线输出 Class 2
最大通讯距离 10 m
无线电频率 (使用频率) 2,402 MHz ~ 2,480 MHz
最大输出功率 (EIRP) 4.0 dBm (2.5 mW)
条形音箱 4 个扬声器,左右配高音扬声器和中低音扬声器
扬声器频率响应 160 – 20,000 Hz
最大声压级 1m 时 90 分贝
麦克风 具备人声活动探测功能的 4 麦克风动态波束形成阵列
麦克风覆盖范围 120 度音频拾音器,12 英尺/3.60m 内效果最佳
麦克风频率响应 160 – 16,000 Hz
全双工音频 是
回声消除 超宽频自适应 AEC
LED 指示灯 呼叫活动和麦克风静音/解除静音
摄像头传感器 高清晰度 CMOS
图像分辨率 1080p,30 fps (USB 3.0/3.1)
640 x 360,30 fps (USB 2.0)
隐私保护 数字隐私保护
LED 指示灯 摄像头活动和视频流静音/解除静音
UVC 支持 UVC 1.5
视野 120 度对角
安装连接器 壁挂式支架,支持显示器上方或下方安装
USB 主机端口 USB 配应力消除连接体 配有 USB 2.0 和 3.0/3.1,支持音频、视频、HID 和
图形显示
以太网 RJ 45,10M/100M
Bluetooth® 是。 HFP 和 A2DP 支持
辅助音频输入 3.5mm 立体声
呼叫处理 呼叫、接听、保持、继续呼叫、转接(匿名和受监管)、转呼、勿打扰、重拨、
呼叫计时器、来电显示、快速拨号、未接来电提醒、语音邮件通知(配置呼叫管
理器)
呼叫桥接 支持桥接 SIP 和 USB 呼叫。连接、分离、保持、继续、2+1+1 线路:最多 2
个 SIP 呼叫、1 个 USB 呼叫、1 个 Bluetooth
编解码器 G.711(A 律和 μ 律)、G.722、G.726、G.729
DTMF 支持 RTP 事件、SIP 带内、SIP 信息包
安全性 SRTP/SRTCP 支持 (RFC 1889)、IETF SIP 支持(RFC 3261 和伴随 RFC)、
SSIP、受密码保护的配置文件、受密码保护的登录
网络和供应 DHCP 或静态 IP、基于服务器的中央供应、用于单个单元配置的 Web 门户
呼叫,加上用户
安全性 IEC60065、IEC60950、IEC62368
50
Page 51

中文
保修
尺寸、重量、功率、工作温度
7
2017
8
2018
9
2019
0
2020
1
2021
EMC CISPR13/CISPR22/CISPR32/FCC/J55013/ETSI EN 300 328/ETSI EN 302 291-
2/ETSI EN 300 330-2 EN55024/CISPR24 或 35 以及 ETSI EN 301 489-1
环保 RoHS、Reach、WEEE
除欧盟以外的任何国家/地区 1 年返厂期
欧洲联盟 2 年返厂期
高度 3.9 英寸/98.75mm
长度 2.7 英寸/68.5mm
宽度 34 英寸/861.7mm
重量(包括支架) 7.3 磅/3.3kg
输入电压(电源) 100-240 VAC
输入电流(电源) 1A
输入频率(电源) 50-60 Hz
输入电压 (CS-700) 15V
输入电流 (CS-700) 2.4A
功耗 (最大) 36 W
功耗(网络备用) 1.6 W
待机时间 20 分钟(用户可选)
电源线长度 10 英寸/3m - 请按照区域电源线要求订购正确的库存单位
工作温度 32 至 104 °F(0 至 40 °C)
储存温度 -22 至 131 °F(-30 至 55 °C)
工作/储存湿度 20%-85%(无冷凝)
日期代码
CS-700 标签上显示的日期代码表示产品的制造日期。 首位数字表示年份。
首位数字 日历年
第二和第三位数字表示该年的日历周 - 从年初的 01 到 52(或 53)。
51
Page 52

한국어
함유량
1 x
1 x
CS700-AV, CS700-SP
4 x
1 x
1 x
1 x
1 x
2 x
2 x
52
Page 53

한국어
0x, 1x, 2x
≥ 95 mm
1. 브래킷 설치
적절한 나사 4 개 를 사용하여 나사 2 개와 나사 2 개를 가능한 한 멀리 떨어뜨려 브래킷을 벽에
설치하십시오. 브래킷의 진동을 피하기 위해 벽이나 스페이서에 단단히 고정되어 있는지 확인하십시오.
디스플레이 아래에 설치할 경우 거리가 CS-700 기기에 맞게 충분히 넓어야 합니다. 각 면에 적절한
개수의 스페이서(0-2)를 사용하여 설치 깊이를 조정할 수 있습니다. 최대 장착 높이는지면으로부터
2m 입니다. 항상 나사 4 개를 사용하십시오.
53
Page 54

한국어
2. 브래킷에 CS-700 기기 배치
브래킷 전면에 있는 두 개의 고리가 CS-700 의 하부에 있는 구멍에 맞도록 CS-700 을 배치하십시오.
CS-700 이 고리에 안전하게 고정되었는지 확인하십시오.
3. CS-700 연결
CS-700 이 브래킷의 고리에 안전하게 배치되면 그림과 같이 전원 케이블과 USB 케이블을 CS-
700 에 연결하십시오. 웹 브라우저를 사용하여 CS-700 을 관리하려면 네트워크 케이블도 해당
커넥터에 연결하십시오.
케이블은 제공된 케이블 타이를 사용하여 CS-700 기기에 고정하십시오.
54
Page 55
한국어
4. 브래킷에 기기 설치
모든 케이블이 올바르게 연결되고 고정되면 CS-700 을 브래킷에 다시 기울여서 브래킷에 밀어
넣으십시오.
55
Page 56

한국어
5. 기기 고정
제공된 기계 나사를 사용하여 브래킷에 CS-700 기기를 고정시킵니다.
6. 전원 및 컴퓨터 연결
전원 코드를 전원 공급 장치에 연결하고 전원 코드를 주 전원 커넥터에 연결하십시오.
USB 케이블을 컴퓨터의 USB 3.0 (USB Super Speed) 커넥터에 연결하십시오.
56
Page 57

한국어
My IP address is …
(나의 IP 주소는 …)
7. 장치 선택
운영 체제에서 기본 오디오 재생 및 녹음 장치로 "Yamaha AudioVideo Device"를 선택하십시오.
통합 커뮤니케이션 애플리케이션에서 CS-700 을 비디오 장치로 선택하십시오.
8. IP 인터페이스를 통한 관리
CS-700 에 IP 연결이 되면 기기는 DHCP 주소를 수신하도록 구성됩니다.
2 개의 중간 버튼(볼륨 업/블루투스)을 5 초 동안 누르면 시스템이 할당된 IP 주소를 말합니다.
자세한 내용은 전체 설명서를 다운로드하십시오: https://uc.yamaha.com/products/video-sound-
bar/huddle-room-system/
57
Page 58

한국어
사양
전원 어댑터
모델 번호 ADP-38DR A
Bluetooth 명세서
Bluetooth 사양 버전 2.1 + EDR
지원 프로파일 HFP (1.6), A2DP
지원 코덱 SBC, mSBC, CVSD
무선 출력 Class 2
최대 통신 거리 10 m
무선 주파수 ( 작동 주파수 ) 2,402 MHz – 2,480 MHz
최대 출력 전력 (EIRP) 4.0 dBm (2.5 mW)
오디오
스피커 바 좌우에 트위터와 중앙 우퍼로 구성된 스피커 구성요소 4 개
스피커 주파수 응답 160~20,000Hz
최대 SPL 1m 에서 90dB
마이크로폰 사람의 음성 활동 감지 기능이 있는 마이크로폰 다이내믹 빔 형성 어레이 4 개
마이크로폰 유효 범위 120 도에서 음향 수집, 3.60m 이내가 최적
마이크로폰 주파수 응답 160~16,000Hz
풀 듀플렉스 오디오 가능
에코 캔슬 초광대역 적응형 AEC
LED 표시등 통화동작 및 마이크로폰 음소거/음소거 해제
비디오
카메라 센서 고화질 CMOS
이미지 해상도 1080p, 30fps(USB 3.0/3.1)
640x360, 30fps(USB 2.0)
프라이버시 커버 디지털 프라이버시 컨트롤
LED 표시등 카메라 동작 및 비디오스트림 음소거/음소거 해제
UVC 지원 UVC 1.5
시야각 대각선 방향으로 120 도
인터페이스
마운트 커넥터 디스플레이 위 또는 아래에 장착 가능한 벽면 장착 브래킷
USB 호스트 포트 변형 방지 장치가 있는 USB
USB 2.0, 3.0/3.1 에서 지원되는 오디오, 비디오, HID 및 그래픽 디스플레이
이더넷 RJ 45, 10M/100M
Bluetooth® 가능. HFP 및 A2DP 지원
AUX 오디오 입력 3.5mm 스테레오
SIP (-SP 모델 전용)
통화 처리 발신, 수신, 보류, 보류 해제, 전송(블라인드 및 감시), 전달, 착신 거부, 재다이얼, 통화 타이머,
통화 ID, 단축 다이얼, 부재중 전화 알림, 음성 메시지 알림(통화 관리자 구성)
통화 브리징 브리징 SIP 및 USB 통화 지원. 참여, 분리, 보류, 보류 해제, 2+1+1 회선: 2 SIP 통화, 1 USB 통화,
1 Bluetooth® 통화, 사용자 추가
코덱 G.711(A-law 및 μ-law), G.722, G.726, G.729
DTMF 지원 RTP 이벤트, SIP 인 밴드, SIP 정보 패키지
58
Page 59

한국어
7
2017
8
2018
9
2019
0
2020
1
2021
보안 SRTP/SRTCP 지원(RFC 1889), IETF SIP 지원(RFC 3261 및 관련 RFC), SSIP, 암호로 보호된 구성
파일, 암호로 보호 된 로그인
네트워크 및 프로비저닝 DHCP 또는 고정 IP, 서버 기반의 중앙 프로비저닝, 개별 장치 구성을 위한 웹 포털
적합 규격
안전 IEC60065, IEC60950, IEC62368
EMC CISPR13/CISPR22/CISPR32/ FCC/J55013/ ETSI EN 300 328 / ETSI EN 302 291-2 / ETSI EN 300
330-2 EN55024/ CISPR24 또는 35 및 ETSI EN 301 489-1
환경 RoHS, Reach, WEEE
보증
EU 를 제외한 모든 지역 제조사 보증 1 년
EU 제조사 보증 2 년
크기, 무게, 전원, 작동 온도
높이 98.75mm
길이 68.5mm
넓이 861.7mm
중량(브래킷 포함) 3.3kg
입력 전압(전원) 100~240VAC
입력 전류(전원) 1A
입력 주파수(전원) 50~60Hz
입력 전압(CS-700) 15V
입력 전류(CS-700) 2.4A
소비전력 ( 최대 ) 36 W
전력 소비 (네트워크 대기) 1.6 W
대기 시간 20 분 (사용자 선택 가능)
전원 코드 길이 3m(각 지역의 전원 코드 요건에 맞는 제품을 주문하십시오.
작동 온도 0~35℃
보관 온도 -30~55℃
작동/보관 상대 습도 20~85%(결로가 없을 것)
날짜 코드
CS-700 라벨의 날짜 코드는 제품의 제조시기를 나타냅니다. 첫째 자리는 연도를 나타냅니다.
첫째 자리 연도
둘째, 셋째 자리는 해당 연도의 주를 나타내며, 01 부터 시작하여 52(또는 53)까지 있습니다.
59
Page 60

Русский
содержание
1 x
1 x
CS700-AV, CS700-SP
4 x
1 x
1 x
1 x
1 x
2 x
2 x
60
Page 61
Русский
0, 1 или 2
≥ 95 мм
1. Установка кронштейна
Установите кронштейн на стену на 4 подходящих винта, две пары винтов должны стоять как можно дальше
друг от друга. Чтобы исключить вибрацию, кронштейн должен быть плотно прижат к стене или к
подкладкам. Если планируете установить систему CS-700 под экраном, убедитесь, что для неё хватает места.
Глубину установки можно отрегулировать подбором подкладок (по 0-2 шт. с каждой стороны).
Максимальная высота установки – 2 м от пола. Всегда используйте 4 винта.
2. Установка CS-700 на кронштейн
Установите CS-700 так, чтобы два крючка на фасадной части кронштейна вошли в углубления в нижней части
устройства CS-700. Убедитесь, что крючки надёжно держат устройство CS-700.
61
Page 62

Русский
3. Подключение устройства CS-700
Надёжно повесив устройство CS-700 на крючки кронштейна, подключите к устройству CS-700 провод
питания и USB кабель, как показано на рисунке. Если вы планируете управлять устройством CS-700 через
браузер, тогда подключите также к соответствующему разъёму кабель компьютерной (вычислительной)
сети.
Закрепите кабель на устройстве CS-700 с помощью кабельных стяжек из комплекта поставки.
62
Page 63

Русский
4. Установка устройства в кронштейн
Когда все кабели будут правильно подключены и закреплены, наклоните систему CS-700 назад и задвиньте
её в кронштейн.
63
Page 64

Русский
5. Зафиксируйте систему
Зафиксируйте систему CS-700 на кронштейне с помощью крепёжных винтов из комплекта поставки.
6. Подключите питание и компьютер
Подключите провод питания к блоку питания, вставьте вилку в розетку электросети.
Вставьте USB кабель в порт USB 3 (USB Super Speed) на компьютере.
64
Page 65

Русский
My IP address is …
7. Выбор устройства
В операционной системе выберите “Yamaha AudioVideo Device” устройство по умолчанию для аудио
воспроизведения и аудио записи.
В приложении для связи выберите видео устройство CS-700.
8. Управление по IP-интерфейсу
Если система CS-700 подключена через IP-соединение, то она настраивается для получения DHCP-адреса.
Держите нажатыми две средних кнопки (Громкость + / Bluetooth) в течение 5 секунд, система произнесёт
назначенный ей IP-адрес.
(Мой IP-адрес …)
Чтобы узнать подробности, скачайте полную документацию: https://uc.yamaha.com/products/video-sound-
bar/huddle-room-system/
65
Page 66

Русский
Блок питания
Номер модели
ADP-38DR A
Характеристики Bluetooth
Версия Bluetooth
2.1 + EDR
Поддерживаемые профили
HFP (1.6), A2DP
Поддерживаемые кодеки
SBC, mSBC, CVSD
Беспроводной вывод
Класс 2
Максимальная дальность связи
10 м
Радиочастота (рабочая частота)
2402 – 2480 МГц
Максимальная выходная мощность
(EIRP)
4,0 дБм (2,5 мВт)
Аудио
Звуковая панель
4 громкоговорителя (по 1 высокочастотной и 1 средне-и
низкочастотной головке слева и справа)
Диапазон воспроизводимых частот
160 – 20000 Гц
Максимальное звуковое давление
90 дБ на расстоянии 1 м
Микрофоны
Динамический блок состоящий из 4 микрофонов с
формированием звукового пучка и функцией обнаружения голоса
Покрытие микрофонов
Сектор охвата звука 120 градусов, наилучшие результаты на
расстоянии до 3,60 м
Диапазон частот микрофона
160 – 16000 Гц
Полное дуплексное аудио
Есть
Подавление эхо
Ультра-широкополосное адаптивное AEC
Светодиодная индикация
Активный вызов, включение/отключение звука микрофона
Видео
Матрица
CMOS высокого разрешения
Разрешение изображения
1080 пиксель, 30 кадров/с (USB 3.0/3.1)
640 x 360, 30 кадров/с (USB 2.0)
Шторка
Цифровое управление шторкой
Светодиодные индикаторы
Работа камеры, включение/отключение звука в потоковом видео
Поддержка UVC
UVC 1.5
Угол обзора
120 градусов по диагонали
Интерфейсы
Монтажный разъем
Монтажный кронштейн для крепления под или над экраном
Порт USB
USB с эластичной муфтой
интерфейси графики по USB 2.0 и 3.0/3.1
Ethernet
RJ 45, 10M / 100M
Bluetooth®
Есть Поддержка HFP и A2DP
Аудио вход
3,5 мм стерео
SIP (только модели с индексом -SP)
Управление вызовами
Сделать вызов, ответить, удерживать, возобновить,
вызова, быстрый набор, уведомления о пропущенных вызовах,
Технические характеристики
Поддерживается передача аудио, видео, человеко-машинный
переадресация (слепая и контролируемая), переключение, не
беспокоить, повторный набор, таймер вызова, идентификатор
66
Page 67

Русский
уведомления голосовой почты (при настроенном диспетчере
звонков)
Ретрансляция вызовов
Поддерживает ретрансляцию вызовов по SIP и USB.
плюс пользовательский
Кодеки
G.711 (A-law и μ-law), G.722, G.726, G.729
Поддержка DTMF
RTP-событие, передача в голосовом канале SIP, инфо пакеты по
SIP
Безопасность
Поддержка SRTP/SRTCP (RFC 1889), IETF SIP (RFC 3261 и
вход с паролем
Сети и ресурсы
DHCP или статический IP, централизованная инициализация на
сервере, веб-портал для индивидуальной настройки системы
Соответствие стандартам
Безопасность
IEC60065, IEC60950, IEC62368
EMC
CISPR13/CISPR22/CISPR32/ FCC/J55013/ ETSI EN 300 328 / ETSI EN
301 489-1
Охрана окружающей среды
RoHS, Reach, WEEE
Гарантия
Весь мир кроме ЕС
1 год, возврат изготовителю
Европейский Союз
2 года, возврат изготовителю
Размеры, масса, мощность, рабочая температура
Высота
98,75 мм
Длина
68,5 мм
Ширина
861,7 мм
Масса (с кронштейном)
3,3 кг
Входное напряжение (от блока
питания)
100-240 В переменного тока
Входной ток (от блока питания)
1 A
Частота входного напряжения (от
блока питания)
50-60 Гц
Входное напряжение (CS-700)
15 В
Входной ток (CS-700)
2,4 A
Потребляемая мощность (макс)
36 Вт
Потребляемая мощность (режим
ожидания по сети)
1,6 Вт
Время до включения режима
ожидания
20 минут (настраивается пользователем)
Длина шнура электропитания
3 м – заказывайте номенклатуру, соответствующую местным
требованиям к шнурам электропитания
Рабочая температура
от 0 до + 40 °C
Температура хранения
от -30 до +55 °C
Относительная влажность при
эксплуатации / хранении
20%-85% (без конденсации)
Присоединиться, разделить, удерживать, возобновить, линии
2+1+1: До 2 вызовов по
сопутствующие RFC), SSIP, файлы настроек с защитным паролем,
302 291-2 / ETSI EN 300 330-2 EN55024/ CISPR24 или 35 и ETSI EN
SIP, 1 вызов по USB, 1 вызов по Bluetooth®,
67
Page 68

Русский
Первая
цифра
Календарный
год 7 2017
8
2018
9
2019
0
2020
1
2021
Код даты
Код даты в паспортной табличке CS-700 указывает дату изготовления системы. Первая цифра
обозначает год.
Вторая и третья цифры обозначают номер календарной недели этого года – от 01 (первая неделя
года) до 52 (или 53).
68
Page 69

Precautions and legal information:
English
Sicherheitsvorkehrungen und rechtliche Hinweise:
Deutsch
Consignes et informations légales:
Français
Voorzorgen en juridische informatie:
Nederlands
Precauciones e información legal:
Español
Precauzioni e informazioni legali:
Italiano
Precauções e informações legais:
Português
Προφυλάξεις και νομικές πληροφορίες:
Ελληνικά
Försiktighetsåtgärder och juridisk information:
Svenska
Forholdsregler og juridiske oplysninger:
Dansk
Varotoimet ja oikeudelliset tiedot:
Suomi
Środki ostrożności i informacje prawne:
Polski
Important Notice: Precautions and legal information for customers in European
Economic Area (EEA), Switzerland and Turkey
For detailed precaution and legal information about this Yamaha product for customers in EEA* , Switzerland and
Turkey, please visit the website address below or contact the Yamaha representative office in your country. * EEA:
European Economic Area
Ausführliche Sicherheitsvorkehrungen und rechtliche Hinweise zu diesem Yamaha-Produkt für Kunden im EWR*, der
Schweiz und der Türkei finden Sie auf der unten angegebenen Website, oder wenden Sie sich an eine YamahaVertretung in Ihrem Land. * EWR: Europäischer Wirtschaftsraum
Les clients résidant dans l'EEE*, en Suisse et en Turquie et souhaitant consulter les consignes détaillées et les
informations légales sur ce produit Yamaha peuvent se rendre sur le site Web ci-dessous ou contacter leur bureau
de représentation Yamaha local. * EEE : Espace économique européen
Ga voor uitgebreide voorzorgen en juridische informatie met betrekking tot dit Yamaha-product voor klanten in de
EER*, Zwitserland en Turkije naar de hieronder vermelde website of neem contact op met de Yamaha-vertegenwoordiger
voor uw land.
Para obtener más detalles sobre las precauciones y la información legal de este producto Yamaha para clientes en
el EEE*, Suiza y Turquía, visite el siguiente sitio web o póngase en contacto con el representante de Yamaha en su
país. * EEE: Espacio Económico Europeo
* EER: Europese Economische Ruimte
Per precauzioni e informazioni legali dettagliate su questo prodotto Yamaha per clienti in SEE*, Svizzera e
Turchia, visitare il sito Web all'indirizzo seguente o rivolgersi all'ufficio di rappresentanza Yamaha nel proprio
paese. *SEE: Spazio Economico Europeo
Para obterem precauções detalhadas e informações legais sobre este produto da Yamaha, os clientes do EEE*, Suíça e
Turquia devem visitar o endereço do website abaixo indicado ou contactar o representante da Yamaha nos respetivos
países. * EEE: Espaço Económico Europeu
Για λεπτομερείς προφυλάξεις και νομικές πληροφορίες σχετικά με
αυτό το προϊόν Yamaha για πελάτες στον ΕΟΧ*, την Ελβετία και την
Τουρκία, επισκεφτείτε την παρακάτω τοποθεσία web ή επικοινωνήστε
με το γραφείο του αντιπροσώπου της Yamaha στη χώρα σας. * ΕΟΧ:
Ευρωπαϊκός Οικονομικός Χώρος
Besök webbplatsen med adress nedan eller kontakta ditt lands Yamaha-representant för detaljerad juridisk
information och information om försiktighetsåtgärder för kunder I EES*, Schweiz och Turkiet.
* EES: Europeiska
ekonomiska samarbetsområdet
Kunder i EØS-landene*, Schweiz og Tyrkiet kan få detaljerede forholdsregler og juridiske oplysninger om dette
Yamaha-produkt ved at gå til nedenstående websted eller kontakte Yamahas repræsentationskontor i deres land.
*
EØS: Det Europæiske Økonomiske Samarbejdsområde
Tämän Yamaha-tuotteen yksityiskohtaiset varotoimet ja oikeudelliset tiedot asiakkaille ETA:ssa*, Sveitsissä ja
Turkissa ovat saatavilla alla olevasta osoitteesta tai paikalliselta Yamaha-edustajalta.
*ETA: Euroopan talousalue
Szczegółowe środki ostrożności i informacje prawne dotyczące niniejszego produktu firmy Yamaha dla klientów w
obszarze EOG*, Szwajcarii i Turcji są dostępne w witrynie internetowej pod adresem podanym poniżej oraz u
krajowego przedstawiciela firmy Yamaha. * EOG: Europejski Obszar Gospodarczy
69
Page 70
Bezpečnostní opatření a právní informace:
Čeština
Óvórendszabályok és jogi információk:
Magyar
Ettevaatusabinõud ja õigusteave:
Eesti
Piesardzības pasākumi un juridiskie aspekti:
Latviski
Atsargumo priemonės ir teisinė informacija:
Lietuvių k.
Preventívne opatrenia a právne informácie:
Slovensky
Previdnostni ukrepi in pravne informacije:
Slovenščina
Предпазни мерки и правна информация:
Български
Măsuri de precauţie şi informaţii juridice:
Română
Mjere opreza i pravne informacije:
Hrvatski
Önlemler ve yasal bilgiler:
Türkçe
Podrobná bezpečnostní opatření a právní informace související s tímto produktem Yamaha pro zákazníky v EHP*,
Švýcarsku a Turecku najdete na webových stránkách uvedených níže, případně si je můžete vyžádat u zastoupení
společnosti Yamaha ve vaší zemi. * EHP: Evropský hospodářský prostor
A Yamaha termékekkel kapcsolatos, az EGT*-országokban, Svájcban és Törökországban érvényes óvórendszabályok és
jogi információk megtekintéséhez keresse fel az alább feltüntetett webhelyet, vagy érdeklődjön országa Yamaha
képviseleténél. *EGT: Európai Gazdasági Térség
EMP*, Šveitsi ja Türgi klientidele mõeldud üksikasjalikud ettevaatusabinõud ja õigusteabe selle Yamaha toote kohta
leiate alljärgnevalt veebisaidilt või pöörduge vastavas riigis olevasse Yamaha esinduskontorisse. * EMP: Euroopa
Majanduspiirkond
Lai pircēji no EEZ*, Šveices un Turcijas uzzinātu vairāk par piesardzības pasākumiem un juridiskajiem aspektiem,
apmeklējiet tālāk norādīto tīmekļa vietni vai sazinieties ar „Yamaha” pārstāvniecību savā valstī. * EEZ: Eiropas
Ekonomikas zona
Šio EEE*, Šveicarijos ir Turkijos klientams skirto „Yamaha“ gaminio išsamias atsargumo priemones ir teisinę
informaciją rasite toliau nurodytoje žiniatinklio svetainėje arba jų teiraukitės savo šalies
„Yamaha“ atstovybėje. * EEE: Europos ekonominė erdvė
Podrobnosti k preventívnym opatreniam a právnym informáciám týkajúcim sa tohto výrobku od spoločnosti Yamaha pre
zákazníkov v EHP*, Švajčiarsku a Turecku nájdete na webovej stránke uvedenej nižšie alebo sa obráťte na zastúpenie
spoločnosti Yamaha vo vašej krajine. * EHP: Európsky hospodársky priestor
Za podrobne previdnostne ukrepe in pravne informacije o tem izdelku Yamaha za stranke v EGP*, Švici in Turčiji
obiščite spodnje spletno mesto ali stopite v stik s predstavništvom Yamaha v svoji državi. * EGP: Evropski
gospodarski prostor
За подробни предпазни мерки и правна информация относно този
продукт на Yamaha за потребители в ЕИП*, Швейцария и Турция, моля,
посетете адреса на уеб сайта по-долу или се свържете с
представителство на Yamaha във вашата държава. * ЕИП: Европейско
икономическо пространство
Pentru detalii privind măsurile de precauţie şi informaţii juridice referitoare la acest produs Yamaha pentru
clienţii din ZEE*, Elveţia şi Turcia, vizitaţi site-ul web de la adresa de mai jos sau contactaţi biroul
reprezentanţei Yamaha din ţara dvs.
Detaljne mjere opreza i pravne informacije o ovom Yamahinu proizvodu za kupce u EGP-u*, Švicarskoj i Turskoj
potražite na mrežnoj stranici u nastavku ili se obratite predstavniku tvrtke Yamaha za svoju zemlju. * EGP:
Europski gospodarski prostor
AEA*, İsviçre ve Türkiye'de bulunan ve bu Yamaha ürününün önlemleri ve yasal bilgileri hakkında daha fazla bilgi
edinmek isteyen müşterilerimiz aşağıda verilen web sitesini ziyaret edebilir veya ilgili ülkede bulunan yetkili
Yamaha temsilcisiyle iletişime geçebilir. *AEA: Avrupa Ekonomik Alanı
*ZEE: Zona Economică Europeană
http://europe.yamaha.com/precautions/
70
Page 71

Important Notice: Guarantee Information for customers in EEA* and Switzerland
English
For detailed guarantee information about this Yamaha product, and Pan-EEA* and Switzerland warranty service, please either visit the website
EEA: European Economic Area
Wichtiger Hinweis: Garantie-Information für Kunden in der EWR* und der Schweiz
Deutsch
Für nähere Garantie-Information über dieses Produkt von Yamaha, sowie über den Pan-EWR*- und Schweizer Garantieservice, besuchen Sie
den für Ihr Land zuständigen Yamaha Unified Communications-Vertrieb. *EWR: Europäischer Wirtschaftsraum
Remarque importante: informations de garantie pour les clients de l’EEE et la Suisse
Français
Pour des informations plus détaillées sur la garantie de ce produit Yamaha et sur le service de garantie applicable dans l’ensemble de l’EEE ainsi
Yamaha Unified Communications dans votre pays de résidence. * EEE : Espace Economique Européen
Belangrijke mededeling: Garantie-informatie voor klanten in de EER* en Zwitserland
Nederlands
Voor gedetailleerde garantie-informatie over dit Yamaha-product en de garantieservice in heel de EER* en Zwitserland, gaat u naar de
vertegenwoordiger in uw land. * EER: Europese Economische Ruimte
Aviso importante: información sobre la garantía para los clientes del EEE* y Suiza
Español
Para una información detallada sobre este producto Yamaha y sobre el soporte de garantía en la zona EEE* y Suiza, visite la dirección web que se
Unified Communications en su país. * EEE: Espacio Económico Europeo
Avviso importante: informazioni sulla garanzia per i clienti residenti nell’EEA* e in Svizzera
Italiano
Per informazioni dettagliate sulla garanzia relativa a questo prodotto Yamaha e l’assistenza in garanzia nei paesi EEA* e in Svizzera, potete
rappresentanza locale della Yamaha Unified Communications. * EEA: Area Economica Europea
Aviso importante: informações sobre as garantias para clientes da AEE* e da Suíça
Português
Para obter uma informação pormenorizada sobre este produto da Yamaha e sobre o serviço de garantia na AEE* e na Suíça, visite o site a seguir
no seu país. * AEE: Área Econômica Européia
Σημαντική σημείωση: Πληροφορίες εγγύησης για τους πελάτες στον ΕΟΧ* και Ελβετία
Ελληνικά
Για λεπτομερείς πληροφορίες εγγύησης σχετικά με το παρόν προϊόν της Yamaha και την κάλυψη εγγύησης σε όλες τις χώρες του ΕΟΧ και την
της Yamaha Unified Communications στη χώρα σας. * ΕΟΧ: Ευρωπαϊκός Οικονομικός Χώρος
Viktigt: Garantiinformation för kunder i EES-området* och Schweiz
Svenska
För detaljerad information om denna Yamahaprodukt samt garantiservice i hela EES-området* och Schweiz kan du antingen besöka
ditt land. * EES: Europeiska Ekonomiska Samarbetsområdet
Viktig merknad: Garantiinformasjon for kunder i EØS* og Sveits
Norsk
Detaljert garantiinformasjon om dette Yamaha-produktet og garantiservice for hele EØS-området* og Sveits kan fås enten ved å besøke
Det europeiske økonomiske samarbeidsområdet
Vigtig oplysning: Garantioplysninger til kunder i EØO* og Schweiz
Dansk
De kan finde detaljerede garantioplysninger om dette Yamaha-produkt og den fælles garantiserviceordning for EØO* (og Schweiz) ved at besøge
nationale repræsentationskontor i det land, hvor De bor. * EØO: Det Europæiske Økonomiske Område
Tärkeä ilmoitus: Takuutiedot Euroopan talousalueen (ETA)* ja Sveitsin asiakkaille
Suomi
Tämän Yamaha-tuotteen sekä ETA-alueen ja Sveitsin takuuta koskevat yksityiskohtaiset tiedot saatte alla olevasta nettiosoitteesta. (Tulostettava
tiedosto saatavissa sivustolla.) Voitte myös ottaa yhteyttä paikalliseen Yamaha Unified Communications-edustajaan. *ETA: Euroopan talousalue
Important Notice: Guarantee Information for customers in European Economic
Area (EEA) and Switzerland
address below (Printable file is available at the website) or contact the Yamaha Unified Communications representative office for your country. *
bitte entweder die folgend angegebene Internetadresse (eine druckfähige Version befindet sich auch auf der Webseite), oder wenden Sie sich an
qu’en Suisse, consultez notre site Web à l’adresse ci-dessous (le fichier imprimable est disponible sur le site Web) ou contactez directement
onderstaande website (u vind een afdrukbaar bestand op de website) of neemt u contact op met Yamaha Unified Communications
incluye más abajo (la versión del archivo para imprimir está disponible en el sitio web) o póngase en contacto con el representante de Yamaha
consultare il sito Web all’indirizzo riportato di seguito (è disponibile il file in formato stampabile sul sito) oppure contattare l’ufficio di
(o arquivo para impressão está disponível no site) ou entre em contato com o escritório de representação da Yamaha Unified Communications
Ελβετία, επισκεφτείτε την παρακάτω ιστοσελίδα (Εκτυπώσιμη μορφή είναι διαθέσιμη στην ιστοσελίδα) ή απευθυνθείτε στην αντιπροσωπεία
nedanstående webbaddress (en utskriftsvänlig fil finns på webbplatsen) eller kontakta Yamaha Unified Communications officiella representant i
nettadressen nedenfor (utskriftsversjon finnes på nettsiden) eller kontakte Yamaha Unified Communications-kontoret i landet der du bor. *EØS:
det websted, der er angivet nedenfor (der findes en fil, som kan udskrives, på webstedet), eller ved at kontakte Yamaha Unified Communications
71
Page 72
Ważne: Warunki gwarancyjne obowiązujące w EOG* i Szwajcarii
Polski
Aby dowiedzieć się więcej na temat warunków gwarancyjnych tego produktu firmy Yamaha i serwisu gwarancyjnego w całym EOG* i Szwajcarii,
przedstawicielstwem firmy Yamaha Unified Communications w swoim kraju. * EOG — Europejski Obszar Gospodarczy
Důležité oznámení: Záruční informace pro zákazníky v EHS* a ve Švýcarsku
Česky
Podrobné záruční informace o tomto produktu Yamaha a záručním servisu v celém EHS* a ve Švýcarsku naleznete na níže uvedené webové
zemi. * EHS: Evropský hospodářský prostor
Fontos figyelmeztetés: Garancia-információk az EGT* területén és Svájcban élő vásárlók számára
Magyar
A jelen Yamaha termékre vonatkozó részletes garancia-információk, valamint az EGT*-re és Svájcra kiterjedő garanciális szolgáltatás
működő Yamaha Unified Communications képviseleti irodával. * EGT: Európai Gazdasági Térség
Oluline märkus: Garantiiteave Euroopa Majanduspiirkonna (EMP)* ja Šveitsi klientidele
Eesti keel
Täpsema teabe saamiseks selle Yamaha toote garantii ning kogu Euroopa Majanduspiirkonna ja Šveitsi garantiiteeninduse kohta, külastage palun
* EMP: Euroopa Majanduspiirkond
Svarīgs paziņojums: garantijas informācija klientiem EEZ* un Šveicē
Latviešu
Lai saņemtu detalizētu garantijas informāciju par šo Yamaha produktu, kā arī garantijas apkalpošanu EEZ* un Šveicē, lūdzu, apmeklējiet zemāk
Communications pārstāvniecību. * EEZ: Eiropas Ekonomikas zona
Dėmesio: informacija dėl garantijos pirkėjams EEE* ir Šveicarijoje
Lietuvių kalba
Jei reikia išsamios informacijos apie šį „Yamaha“ produktą ir jo techninę priežiūrą visoje EEE* ir Šveicarijoje, apsilankykite mūsų svetainėje toliau
ekonominė erdvė
Dôležité upozornenie: Informácie o záruke pre zákazníkov v EHP* a Švajčiarsku
Slovenčina
Podrobné informácie o záruke týkajúce sa tohto produktu od spoločnosti Yamaha a garančnom servise v EHP* a Švajčiarsku nájdete na webovej
Communications vo svojej krajine. * EHP: Európsky hospodársky priestor
Pomembno obvestilo: Informacije o garanciji za kupce v EGP* in Švici
Slovenščina
Za podrobnejše informacije o garanciji za ta Yamahin izdelek ter garancijskem servisu v celotnem EGP in Švici, obiščite spletno mesto, ki je
Communications v svoji državi. * EGP: Evropski gospodarski prostor
Важно съобщение: Информация за гаранцията за клиенти в ЕИП* и Швейцария
Български език
За подробна информация за гаранцията за този продукт на Yamaha и гаранционното обслужване в паневропейската зона на ЕИП* и
Yamaha Unified Communications във вашата страна. * ЕИП: Европейско икономическо пространство
Notificare importantă: Informaţii despre garanţie pentru clienţii din SEE* şi Elveţia
Limba română
Pentru informaţii detaliate privind acest produs Yamaha şi serviciul de garanţie Pan-SEE* şi Elveţia, vizitaţi site-ul la adresa de mai jos (fişierul
Economic European
należy odwiedzić wskazaną poniżej stronę internetową (Plik gotowy do wydruku znajduje się na stronie internetowej) lub skontaktować się z
adrese (soubor k tisku je dostupný na webových stránkách) nebo se můžete obrátit na zastoupení firmy Yamaha Unified Communications ve své
tekintetében keresse fel webhelyünket az alábbi címen (a webhelyen nyomtatható fájlt is talál), vagy pedig lépjen kapcsolatba az országában
veebisaiti alljärgneval aadressil (sel saidil on saadaval prinditav fail) või pöörduge Teie regiooni Yamaha Unified Communications esinduse poole.
norādīto tīmekļa vietnes adresi (tīmekļa vietnē ir pieejams drukājams fails) vai sazinieties ar jūsu valsti apkalpojošo Yamaha Unified
nurodytu adresu (svetainėje yra spausdintinas failas) arba kreipkitės į „Yamaha Unified Communications“ atstovybę savo šaliai. *EEE – Europos
stránke uvedenej nižšie (na webovej stránke je k dispozícii súbor na tlač) alebo sa obráťte na zástupcu spoločnosti Yamaha Unified
navedeno spodaj (natisljiva datoteka je na voljo na tem spletnem mestu), ali se obrnite na predstavnika podjetja Yamaha Unified
Швейцария или посетете посочения по-долу уеб сайт (на уеб сайта има файл за печат), или се свържете с представителния офис на
imprimabil este disponibil pe site) sau contactaţi biroul reprezentanţei Yamaha Unified Communications din ţara dumneavoastră. * SEE: Spaţiul
https://uc.yamaha.com/warranty
72
Page 73

ОПРОСТЕНА ЕС ДЕКЛАРАЦИЯ ЗА СЪОТВЕТСТВИЕ
Български език
С настоящото Yamaha Unified Communications, Inc. декларира, че този тип радиосъоръжение Yamaha CS-700 е в съответствие с
https://uc.yamaha.com/products/video-sound-bar/huddle-room-system/
DECLARACIÓN UE DE CONFORMIDAD SIMPLIFICADA
Español
Por la presente, Yamaha Unified Communications, Inc. declara que el tipo de equipo radioeléctrico Yamaha CS-700 es conforme con la
https://uc.yamaha.com/products/video-sound-bar/huddle-room-system/
ZJEDNODUŠENÉ EU PROHLÁŠENÍ O SHODĚ
Česky
Tímto Yamaha Unified Communications, Inc. prohlašuje, že typ rádiového zařízení Yamaha CS-700 je v souladu se směrnicí 2014/53/EU.
https://uc.yamaha.com/products/video-sound-bar/huddle-room-system/
FORENKLET EU-OVERENSSTEMMELSESERKLÆRING
Dansk
Hermed erklærer Yamaha Unified Communications, Inc., at radioudstyrstypen Yamaha CS-700 er i overensstemmelse med direktiv
https://uc.yamaha.com/products/video-sound-bar/huddle-room-system/
VEREINFACHTE EU-KONFORMITÄTSERKLÄRUNG
Deutsch
Hiermit erklärt Yamaha Unified Communications, Inc., dass der Funkanlagentyp Yamaha CS-700 der Richtlinie 2014/53/EU entspricht.
https://uc.yamaha.com/products/video-sound-bar/huddle-room-system/
LIHTSUSTATUD ELI VASTAVUSDEKLARATSIOON
Eesti keel
Käesolevaga deklareerib Yamaha Unified Communications, Inc., et käesolev raadioseadme tüüp Yamaha CS-700 vastab direktiivi 2014/53/EL
https://uc.yamaha.com/products/video-sound-bar/huddle-room-system/
ΑΠΛΟΥΣΤΕΥΜΕΝΗ ΔΗΛΩΣΗ ΣΥΜΜΟΡΦΩΣΗΣ ΕΕ
Ελληνικά
Με την παρούσα ο/η Yamaha Unified Communications, Inc., δηλώνει ότι ο ραδιοεξοπλισμός Yamaha CS-700 πληροί την οδηγία
https://uc.yamaha.com/products/video-sound-bar/huddle-room-system/
SIMPLIFIED EU DECLARATION OF CONFORMITY
English
Hereby, Yamaha Unified Communications, Inc. declares that the radio equipment type Yamaha CS-700 is in compliance with Directive
https://uc.yamaha.com/products/video-sound-bar/huddle-room-system/
DECLARATION UE DE CONFORMITE SIMPLIFIEE
Français
Le soussigné, Yamaha Unified Communications, Inc., déclare que l'équipement radioélectrique du type Yamaha CS-700 est conforme à la
https://uc.yamaha.com/products/video-sound-bar/huddle-room-system/
POJEDNOSTAVLJENA EU IZJAVA O SUKLADNOSTI
Hrvatski
Yamaha Unified Communications, Inc. ovime izjavljuje da je radijska oprema tipa Yamaha CS-700 u skladu s Direktivom 2014/53/EU.
https://uc.yamaha.com/products/video-sound-bar/huddle-room-system/
DICHIARAZIONE DI CONFORMITÀ UE SEMPLIFICATA
Italiano
Il fabbricante, Yamaha Unified Communications, Inc., dichiara che il tipo di apparecchiatura radio Yamaha CS-700 è conforme alla direttiva
https://uc.yamaha.com/products/video-sound-bar/huddle-room-system/
VIENKĀRŠOTA ES ATBILSTĪBAS DEKLARĀCIJA
Latviešu
Ar šo Yamaha Unified Communications, Inc. deklarē, ka radioiekārta Yamaha CS-700 atbilst Direktīvai 2014/53/ES.
https://uc.yamaha.com/products/video-sound-bar/huddle-room-system/
Yamaha CS-700 simplified declaration of conformity for Radio Equipment
Directive
Директива 2014/53/ЕС. Цялостният текст на ЕС декларацията за съответствие може да се намери на следния интернет адрес:
Directiva 2014/53/UE. El texto completo de la declaración UE de conformidad está disponible en la dirección Internet siguiente:
Úplné znění EU prohlášení o shodě je k dispozici na této internetové adrese:
2014/53/EU. EU-overensstemmelseserklæringens fulde tekst kan findes på følgende internetadresse:
Der vollständige Text der EU-Konformitätserklärung ist unter der folgenden Internetadresse verfügbar:
nõuetele. ELi vastavusdeklaratsiooni täielik tekst on kättesaadav järgmisel internetiaadressil:
2014/53/ΕΕ. Το πλήρες κείμενο της δήλωσης συμμόρφωσης ΕΕ διατίθεται στην ακόλουθη ιστοσελίδα στο διαδίκτυο:
2014/53/EU. The full text of the EU declaration of conformity is available at the following internet address:
directive 2014/53/UE. Le texte complet de la déclaration UE de conformité est disponible à l'adresse internet suivante:
Cjeloviti tekst EU izjave o sukladnosti dostupan je na sljedećoj internetskoj adresi:
2014/53/UE. Il testo completo della dichiarazione di conformità UE è disponibile al seguente indirizzo Internet:
Pilns ES atbilstības deklarācijas teksts ir pieejams šādā interneta vietnē:
73
Page 74

SUPAPRASTINTA ES ATITIKTIES DEKLARACIJA
Lietuvių kalba
Aš, Yamaha Unified Communications, Inc., patvirtinu, kad radijo įrenginių tipas Yamaha CS-700 atitinka Direktyvą 2014/53/ES.
https://uc.yamaha.com/products/video-sound-bar/huddle-room-system/
EGYSZERŰSÍTETT EU-MEGFELELŐSÉGI NYILATKOZAT
Magyar
Yamaha Unified Communications, Inc. igazolja, hogy a Yamaha CS-700 típusú rádióberendezés megfelel a 2014/53/EU irányelvnek.
https://uc.yamaha.com/products/video-sound-bar/huddle-room-system/
VEREENVOUDIGDE EU-CONFORMITEITSVERKLARING
Nederlands
Hierbij verklaar ik, Yamaha Unified Communications, Inc., dat het type radioapparatuur Yamaha CS-700 conform is met Richtlijn
https://uc.yamaha.com/products/video-sound-bar/huddle-room-system/
UPROSZCZONA DEKLARACJA ZGODNOŚCI UE
Polski
Yamaha Unified Communications, Inc. niniejszym oświadcza, że typ urządzenia radiowego Yamaha CS-700 jest zgodny z dyrektywą
https://uc.yamaha.com/products/video-sound-bar/huddle-room-system/
DECLARAÇÃO UE DE CONFORMIDADE SIMPLIFICADA
Português
O(a) abaixo assinado(a) Yamaha Unified Communications, Inc. declara que o presente tipo de equipamento de rádio Yamaha CS-700 está em
Internet: https://uc.yamaha.com/products/video-sound-bar/huddle-room-system/
DECLARAȚIA UE DE CONFORMITATE SIMPLIFICATĂ
Limba română
Prin prezenta, Yamaha Unified Communications, Inc. declară că tipul de echipamente radio Yamaha CS-700 este în conformitate cu Directiva
https://uc.yamaha.com/products/video-sound-bar/huddle-room-system/
ZJEDNODUŠENÉ EÚ VYHLÁSENIE O ZHODE
Slovenčina
Yamaha Unified Communications, Inc. týmto vyhlasuje, že rádiové zariadenie typu Yamaha CS-700 je v súlade so smernicou 2014/53/EÚ.
https://uc.yamaha.com/products/video-sound-bar/huddle-room-system/
POENOSTAVLJENA IZJAVA EU O SKLADNOSTI
Slovenščina
Yamaha Unified Communications, Inc. potrjuje, da je tip radijske opreme Yamaha CS-700 skladen z Direktivo 2014/53/EU.
https://uc.yamaha.com/products/video-sound-bar/huddle-room-system/
YKSINKERTAISTETTU EU-VAATIMUSTENMUKAISUUSVAKUUTUS
Suomi
Yamaha Unified Communications, Inc. vakuuttaa, että radiolaitetyyppi Yamaha CS-700 on direktiivin 2014/53/EU mukainen.
https://uc.yamaha.com/products/video-sound-bar/huddle-room-system/
FÖRENKLAD EU-FÖRSÄKRAN OM ÖVERENSSTÄMMELSE
Svenska
Härmed försäkrar Yamaha Unified Communications, Inc. att denna typ av radioutrustning Yamaha CS-700 överensstämmer med direktiv
https://uc.yamaha.com/products/video-sound-bar/huddle-room-system/
BASİTLEŞTİRİLMİŞ AVRUPA BİRLİĞİ UYGUNLUK BİLDİRİMİ
Türkçe
İşbu belge ile, Yamaha Unified Communications, Inc., radyo cihaz tipinin Yamaha CS-700, Direktif 2014/53/ AB'ye uygunluğunu beyan eder.
https://uc.yamaha.com/products/video-sound-bar/huddle-room-system/
FORENKLET EU-ERKLÆRING OM OVERENSSTEMMELSE
Norsk
Herved erklærer Yamaha Unified Communications, Inc. at radioutstyret Yamaha CS-700 er i samsvar med direktiv 2014/53 / EU. Den fulle
https://uc.yamaha.com/products/video-sound-bar/huddle-room-system/
Visas ES atitikties deklaracijos tekstas prieinamas šiuo interneto adresu:
Az EU-megfelelőségi nyilatkozat teljes szövege elérhető a következő internetes címen:
2014/53/EU. De volledige tekst van de EU-conformiteitsverklaring kan worden geraadpleegd op het volgende internetadres:
2014/53/UE. Pełny tekst deklaracji zgodności UE jest dostępny pod następującym adresem internetowym:
conformidade com a Diretiva 2014/53/UE. O texto integral da declaração de conformidade está disponível no seguinte endereço de
2014/53/UE. Textul integral al declarației UE de conformitate este disponibil la următoarea adresă internet:
Úplné EÚ vyhlásenie o zhode je k dispozícii na tejto internetovej adrese:
Celotno besedilo izjave EU o skladnosti je na voljo na naslednjem spletnem naslovu:
EU-vaatimustenmukaisuusvakuutuksen täysimittainen teksti on saatavilla seuraavassa internetosoitteessa:
2014/53/EU. Den fullständiga texten till EU-försäkran om överensstämmelse finns på följande webbadress:
AB uyumu beyanının tam metni aşağıdaki internet adresinden edinilebilir:
teksten til EU-samsvarserklæringen er tilgjengelig på følgende internettadresse:
74
Page 75

For details of products, please contact your
nearest Yamaha representative or the
authorized importer listed below.
Pour plus de détails sur les produits, veuillezvous adresser à Yamaha ou l'importateur
figurant dans la liste suivante.
North America
Yamaha Unified Communications, Inc.
144 North Road, Suite 3250, Sudbury, MA
01776, USA
Tel +1-800-326-1088
Europe
Yamaha Music Europe GmbH
Siemensstrasse 22-34, 25462 Rellingen,
Germany
Tel +49-4101-303-0
Japan
Yamaha Corporation
10-1 Nakazawa-cho, Naka-ku, Hamamatsu-shi,
Shizuoka, 430-8650, Japan
ヤマハ株式会社
〒430-8650 静岡県浜松市中区中沢町 10-1
Die Einzelheiten zu Produkten sind bei Ihrer
unten aufgeführten Niederlassung und bei
Yamaha Importeuren in den jeweiligen Ländern
erhältlich.
关于产品的详细信息,请向离您最近的雅马哈公司或者
如下的进口商咨询。
The People’s Republic of China
Digital China (China) Limited
Digital Technology Plaze, NO.9 Shangdi 9th
Street, Haidian District, Beijing, China
齐超
北京神州数码有限公司 商用 SBU 北京平台,
网络事业部 视讯, 地址:北京市海淀区上地九
街 9 号数码科技广场北侧二层
Australia / New Zealand
Hills Limited
Level 7, 130 Pitt Street, Sydney NSW 2000,
Australia
Other Countries
https://uc.yamaha.com/support/dealers-listing/
Korea
V2 Technology Korea, Inc
#1815, 128 Wangsan-Ro, Dongdaemun-Gu,
Seoul, 02566, Republic of Korea
주식회사 브이투테크놀러지코리아
(02566) 서울 동대문구 왕산로 128, 1815호
75
Page 76

© Yamaha Corporation. All Rights Reserved.
Published 8/2019 发行 D2
Printed in China
QS-CS700-201908-MUL / 2950267-00
Manufacturer: Yamaha Unified Communications, Inc.
Address: 144 North Road, Suite 3250
Sudbury, MA 01776, USA
76
 Loading...