

Network CD Receiver / Ampli-Tuner CD Réseau
OWNER ’ S MANUAL
MODE D ’EMPLOI
BEDIEN U NGSANL E ITUNG
GEBRUI K SAANWI J ZING
English Français Deutsch
Nederlands
Rea d th e su pp li ed b oo kl et “S af et y Br oc hu re ” be fo re u si ng t he u ni t.
Lis ez l e li vr et f our ni « Br och ur e s ur l a sé cur it é» ava nt d ’u ti li se r l’ un it é.
Les en S ie d ie „S ic he rh ei tsb ro sc hür e“, b evor S ie d as G er ät v erw en de n.
Lee s he t mee gel ever de b oe kj e “ Veil ig he id sb ro chu re” vo or da t u di t to es te l ge br ui kt.
G1

Contents
Introduction......4
Supplied accessories......4
About this manual......4
Part name......5
Front panel......5
Rear panel......6
Front panel display......7
Adjusting display brightness......7
Remote control......8
Preparations......9
Connecting the speakers......9
Connecting antenna......10
Connecting to the network......11
Turning on the power......12
Setting the network devices......13
PC......13
NAS......13
Mobile devices......13
Listening to CD......14
Listening to iPod/USB devices......15
Playing iPod......15
Playing USB devices......15
Listening to the songs in the
computer
Setting the media sharing of music files......17
Playing back songs in the PC......18
......17
Listening to external sources......19
More on playback......20
Shuffle playback......20
Repeat playback......20
Playback information......21
Adjusting sound quality......22
Listening to DAB stations
(CRX-N560D only)
Initial scan......23
Tuning in DAB stations......23
Presetting DAB stations......24
Selecting preset DAB stations......24
Deleting a preset station......24
Confirming the reception......25
......23
Listening to FM radio stations......26
Tuning in FM stations......26
Presetting FM stations......26
Selecting preset FM stations......27
Deleting a preset station......27
Radio Data System......28
Listening to Internet radio......29
Listening to the Music with
AirPlay
Playing iPod......30
Playing iTunes......30
......30
Using the clock......31
Setting the clock......31
Setting the wake-up timer......32
Sleep timer......33
Updating the firmware......34
Option settings......35
Option menu list......36
Troubleshooting......37
General......37
Network......38
iPod......39
Disc......40
USB devices......40
DAB reception (CRX-N560D only)......41
FM reception......41
Messages on the front panel display......42
Supported devices/media and
file formats
......43
Specifications......45
Information about software......i
2 En
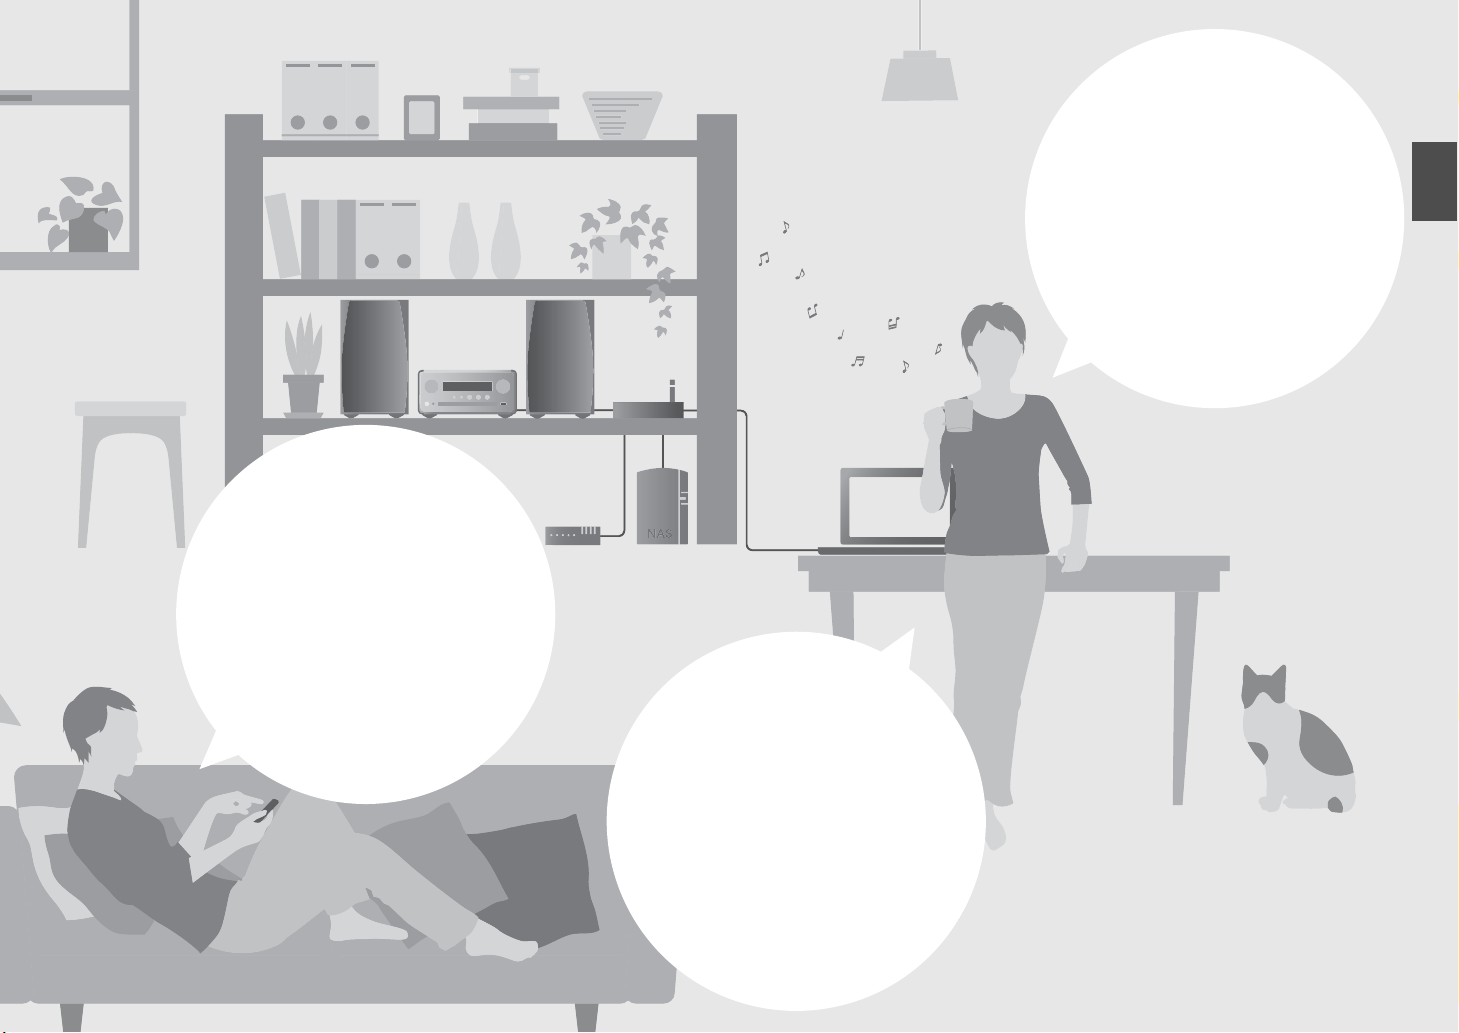
Anytime,
anywhere,
music!
Convenient App! My smartphone as a
remote control
......18
Awesome!
Great sound!!
The sound from a PC is
something else!
......17, 18
High-resolution sound is
played back
......22
English
Songs in my iPhone from
speakers wirelessly.
......30
More on music
A variety of external devices (Blu-ray/
DVD/mobile music player etc.) can
be connected
I can listen to the internet radio
from my audio system
...... 19
...... 29
En 3
Introduction
Confirm the package contents and useful points of this manual.
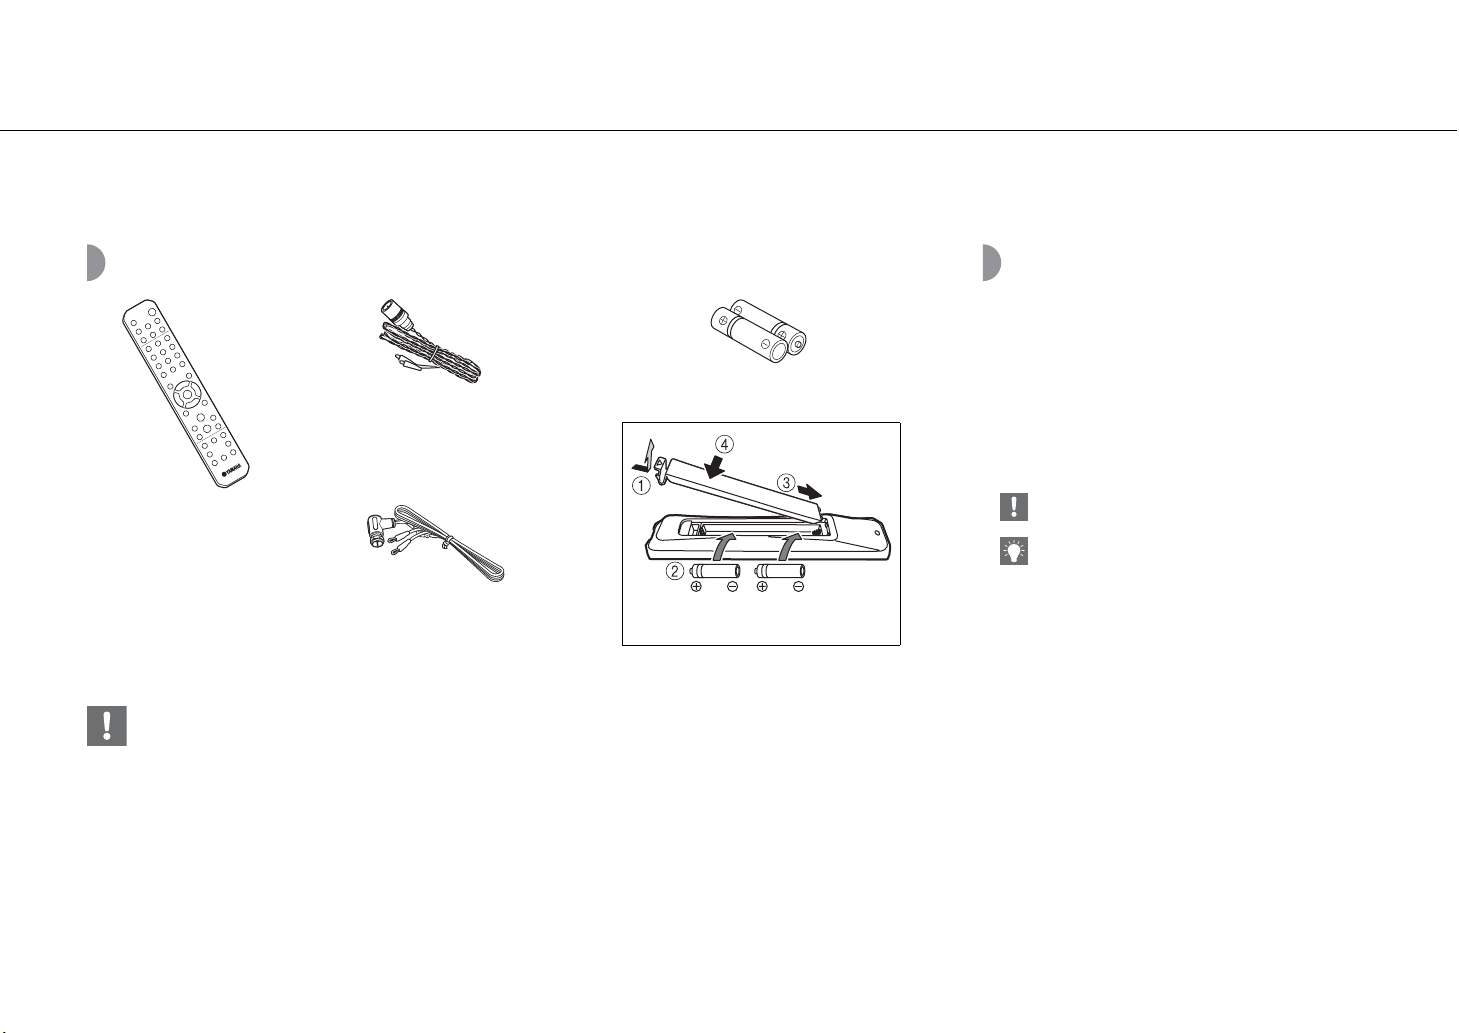
Supplied accessories
FM antenna
(for CRX-N560)
Remote control
DAB/FM antenna
(for CRX-N560D)
• Change both batteries when the operation range of the remote control decreases.
Batteries (× 2)
(AA, R6, UM-3)
Check the “+” and “-” of the batteries and
inset them the correct way around.
About this manual
• Instructions and illustrations used in this manual
refer to the CRX-N560, unless otherwise specified.
• How to operate this unit is described mainly using the
remote control.
• Illustrations may differ from actual item depicted.
• “iPod” described in this manual may also refer to
“iPhone” or “iPad.”
• Symbols:
Indicates precautions for use of the unit and its
feature limitations.
Indicates supplementary explanations for better
use.
Indicates the corresponding reference page(s).
&
4 En
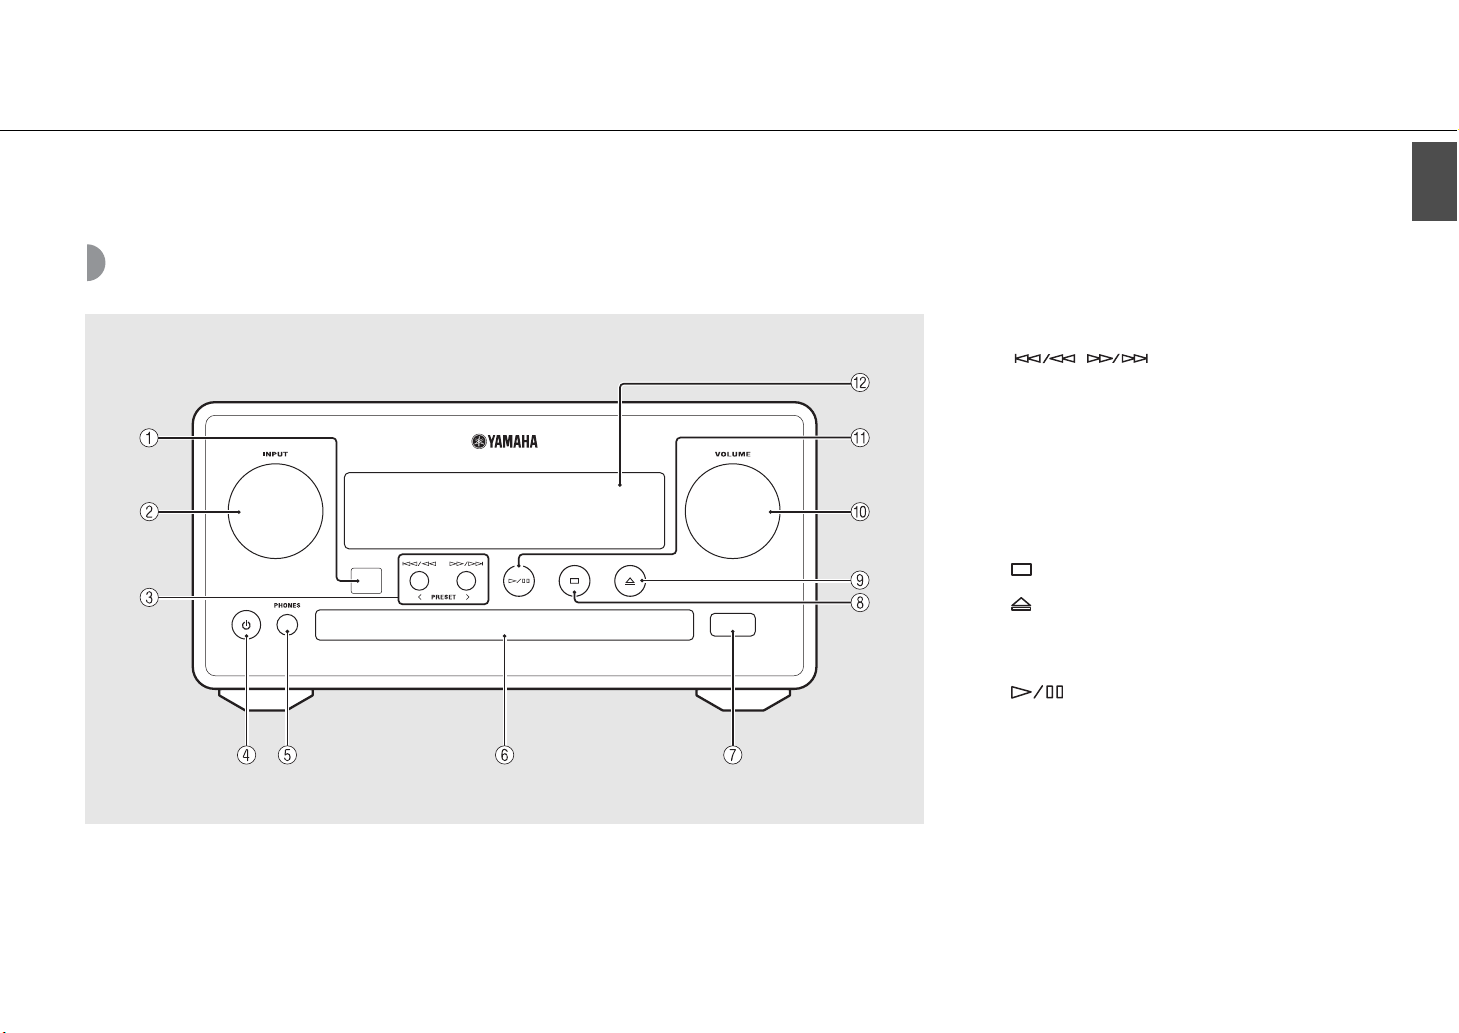
Part name
Familiarize yourself with all parts and these functions.
Front panel
English
1 Remote control receiver
2 INPUT
Turn left or right to change the audio source. (The source
is shown on the front panel display.)
3 (& P.14, 16, 18)
PRESET</> (& P.27)
4 A (Power) (& P.12)
5 PHONES
Connect headphones to this jack.
6 Disc tray (& P.14)
7 USB jack (& P.15)
8 (Stop) (& P.14, 16, 18, 29)
9 (Open/close the disc tray) (& P.14)
0 VOLUME
Controls the volume.
A (Play/pause) (& P.14, 16, 18)
B Front panel display (& P.7)
En 5
Part name
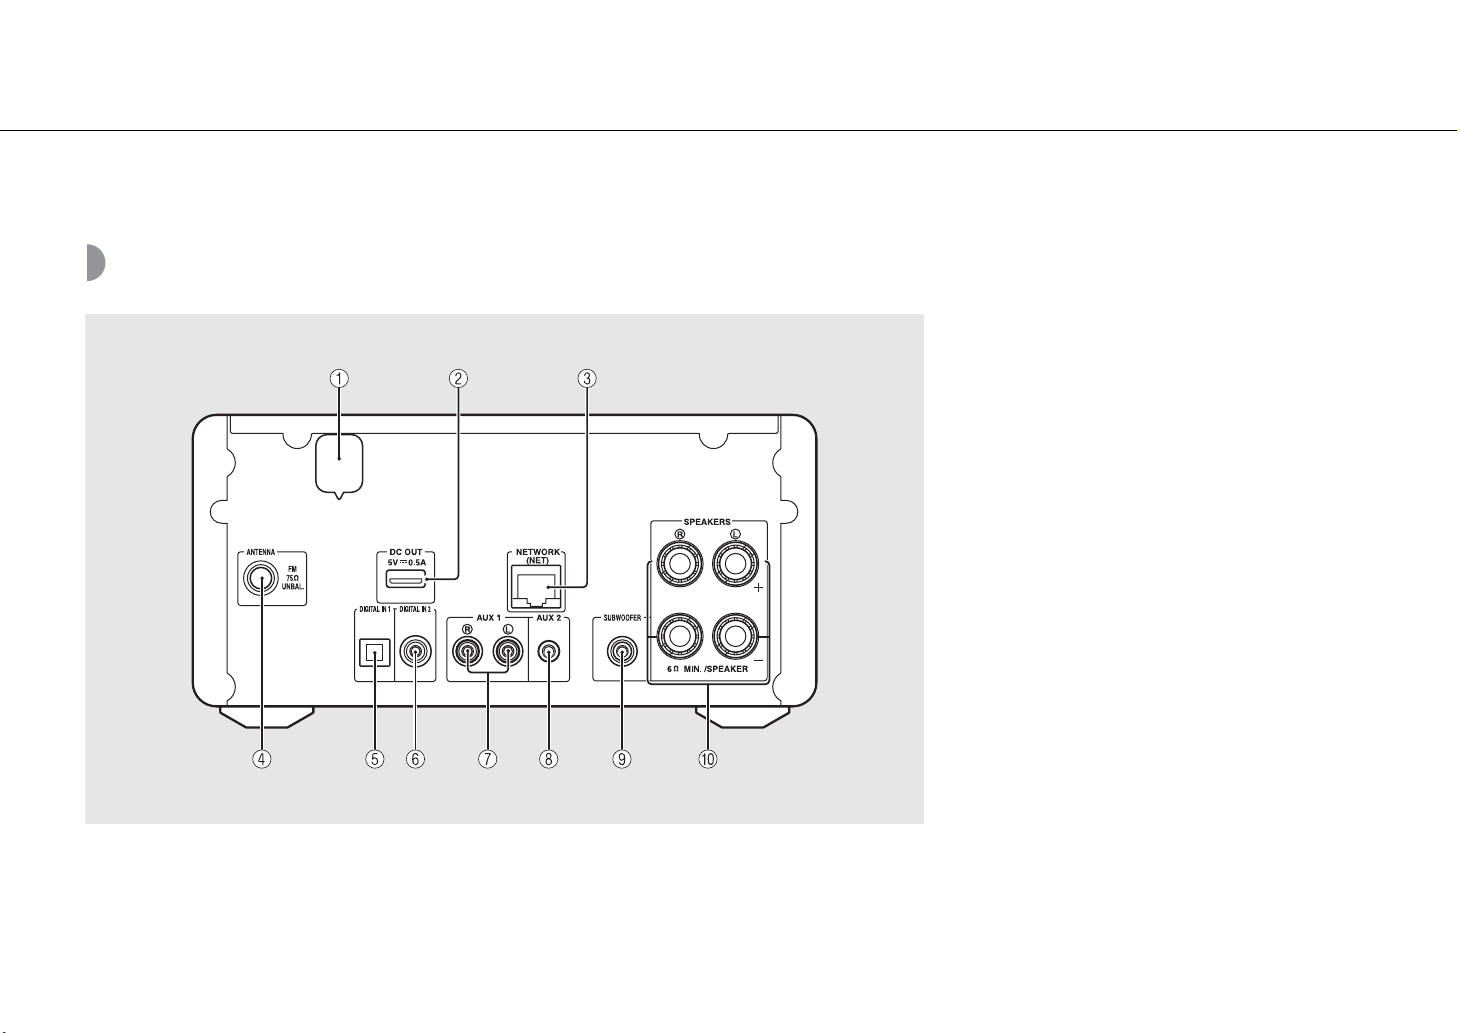
Rear panel
1 Power cable (& P.12)
2 DC OUT terminal
Supplies power to the Yamaha AV accessories from this
terminal. When using this, set [Use Accessory] in [System
Config] from the option setting, to [YES] (& P.35). For
details, refer to the owner’s manual supplied with the
accessory.
3 NETWORK terminal (& P.11)
Connects to a network using a commercially available
network cable.
4 FM (DAB/FM) antenna terminal (& P.10)
5 DIGITAL IN 1 terminal (optical input) (& P.19)
6 DIGITAL IN 2 terminal (coaxial input) (& P.19)
7 AUX 1 terminal (RCA input) (& P.19)
8 AUX 2 terminal (mini jack input) (& P.19)
9 SUBWOOFER terminal (& P.9)
0 SPEAKERS terminal (& P.9)
6 En
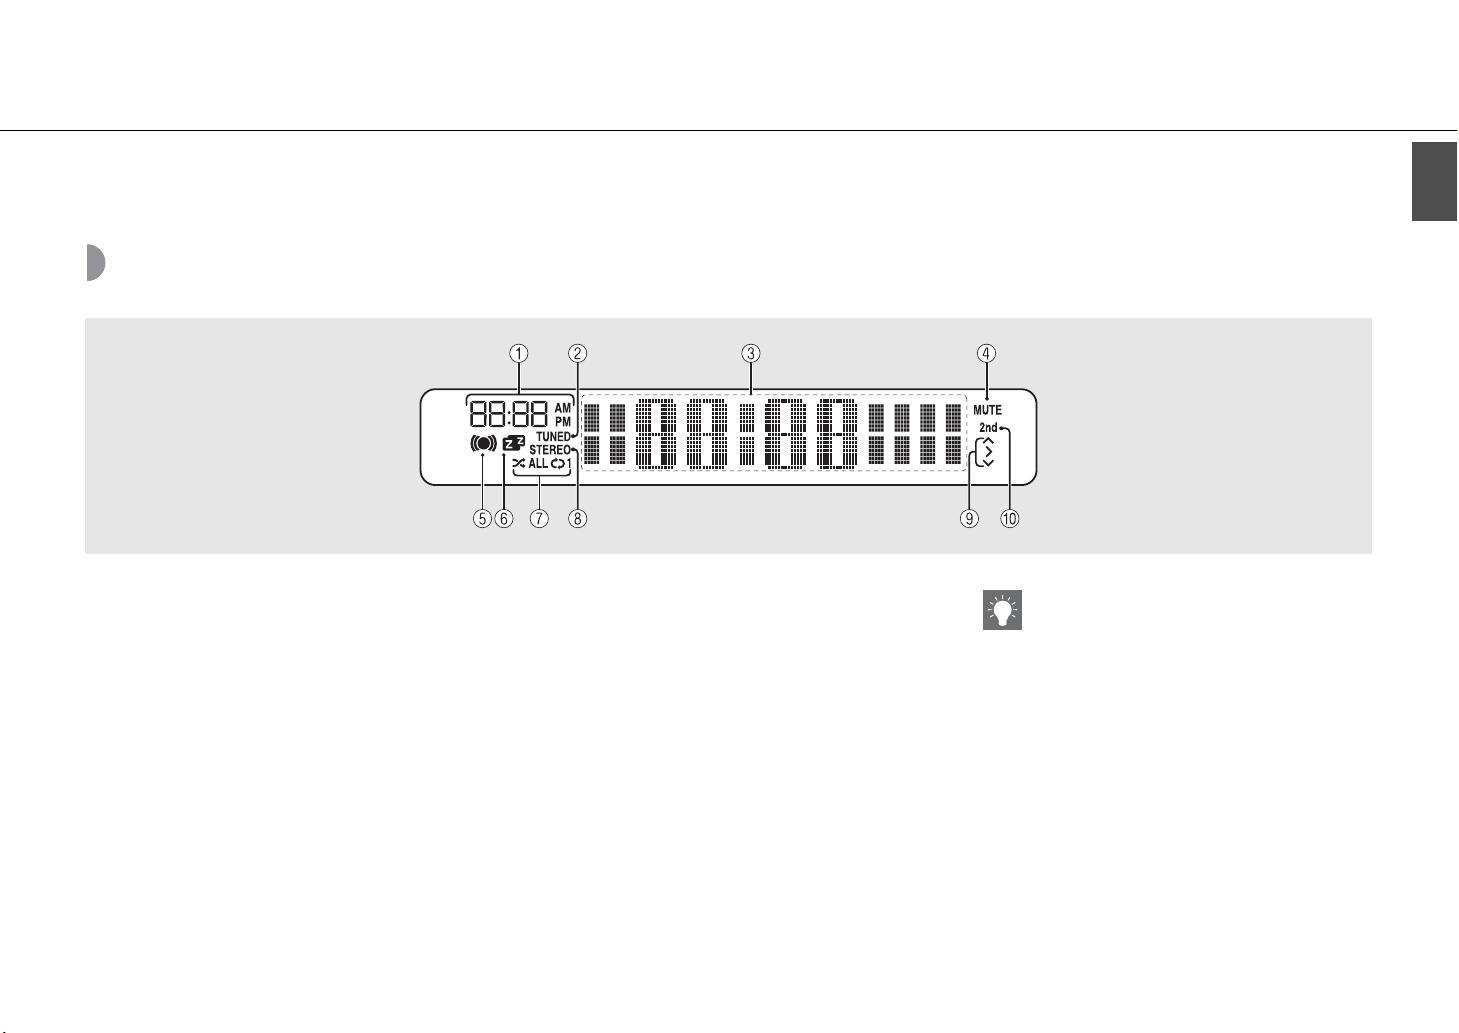
Front panel display
Part name
English
1 Clock
Displays the time when the power is on.
2 TUNED indicator
Lights up when the unit is tuned into a station.
3 Multi information display
Shows various information, such as the clock in standby
mode, music information, or radio frequency
(alphanumerics only).
4 MUTE indicator
Lights up when the sound is muted (& P.8).
5 Wake-up timer indicator
Blinks while setting the wake-up timer and lights up
when the timer is set (& P.32).
6 Sleep timer indicator
Lights up when the sleep timer is set (& P.33).
7 Shuffle/repeat indicator
Lights up when you set your iPod, CD, USB device, or
computer to shuffle or repeat playback (& P.20).
8 STEREO indicator
Lights up when the unit is receiving a strong signal from
an FM stereo broadcast.
9 Operation indicators
Shows available control buttons S/T/ENTER (& P.8) of
the remote control.
0 2nd indicator (CRX-N560D only)
Appears when the DAB station has a secondary station
(& P.23).
Adjusting display brightness
You can adjust the brightness of the front panel
display by pressing the DIMMER button on the
remote control (& P.8).
• Each press of the button changes the brightness:
bright (default), mid dim, or dim.
En 7
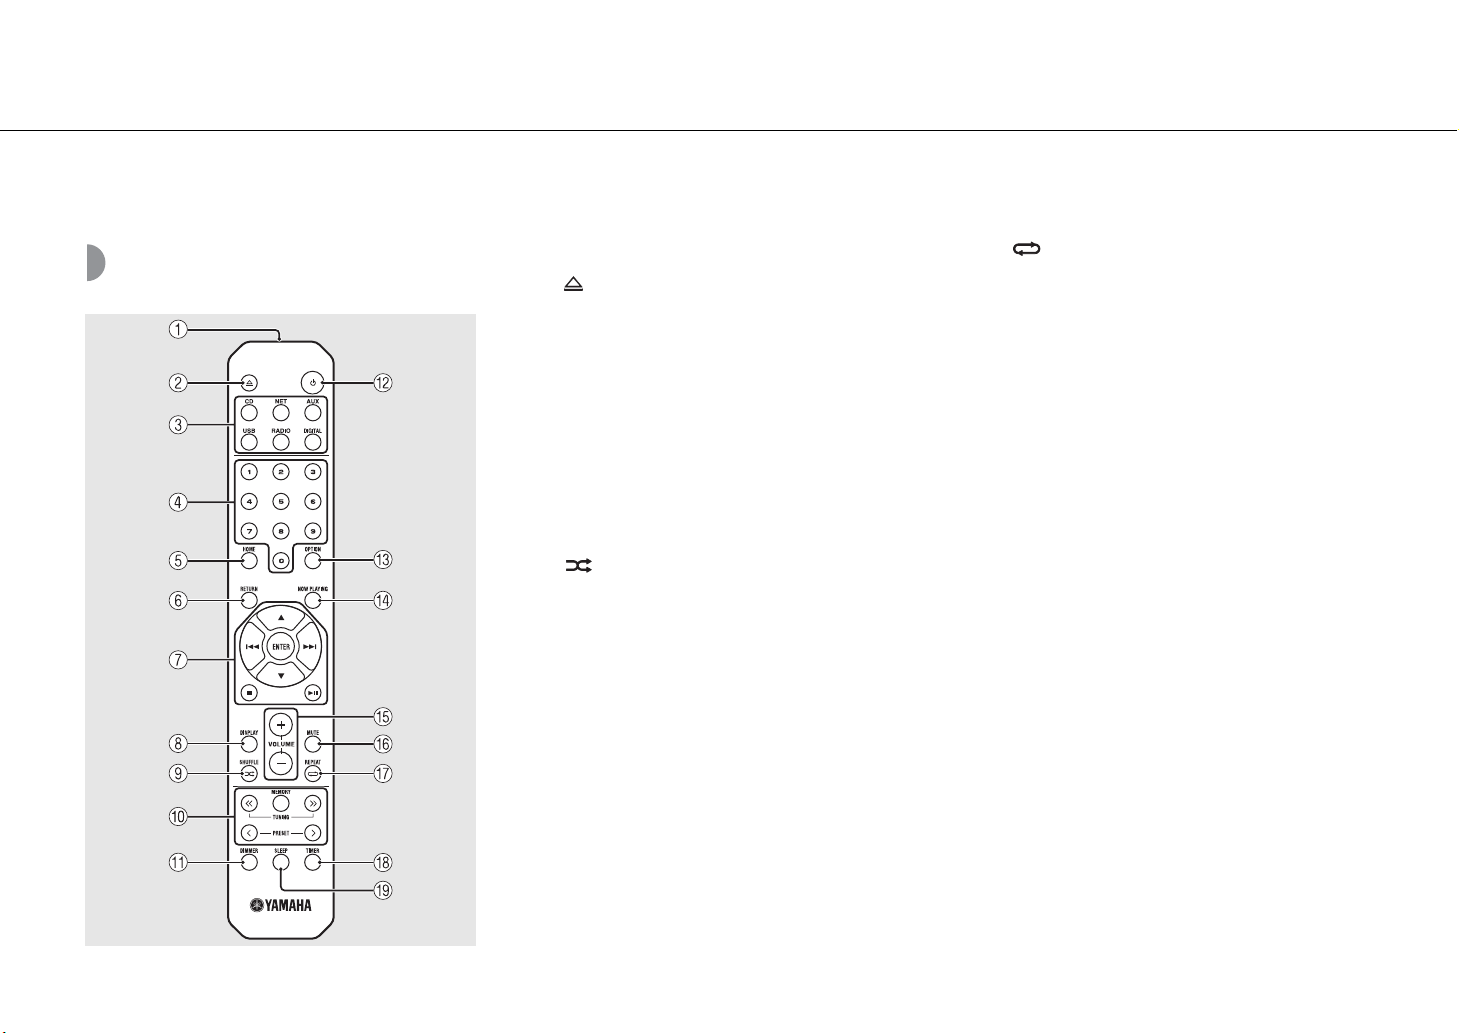
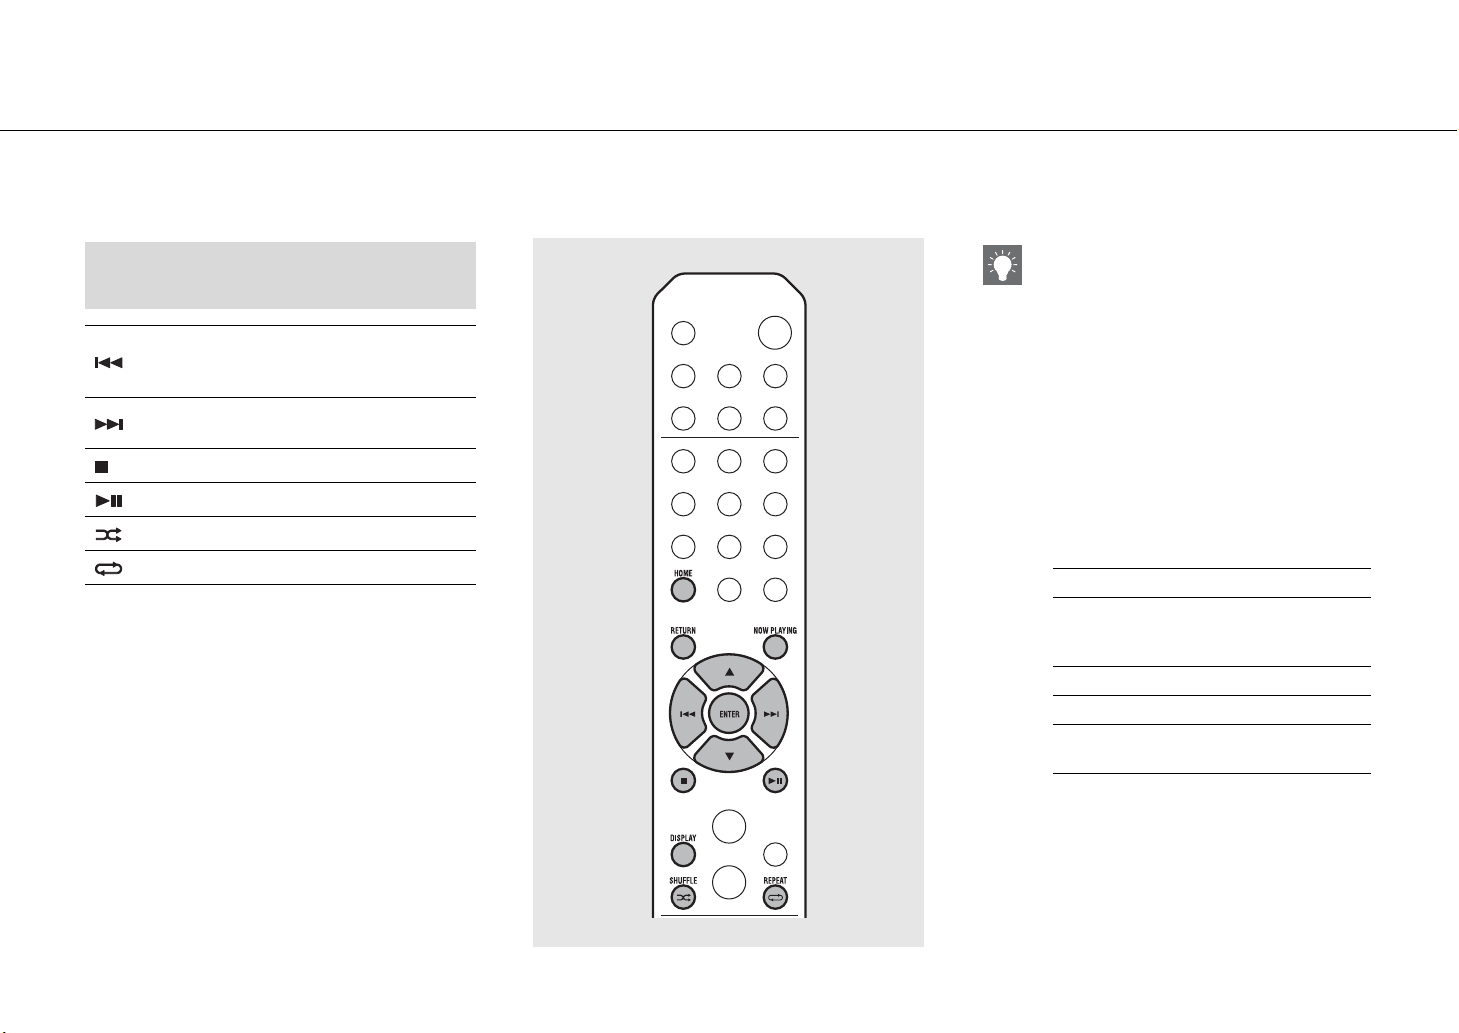
Part name
Remote control
1 Infrared signal transmitter
2 (Open/close the disc tray) (& P.14)
3 Source buttons
Switch the audio source to be played.
4 Numeric buttons (& P.14)
5 HOME (& P.16, 18, 29)
6 RETURN (& P.14, 16, 18, 29)
7 Audio control, cursor control buttons
(& P.14, 16, 18, 29)
8 DISPLAY (& P.21)
9 (SHUFFLE) (& P.20)
0 DAB/FM control buttons (& P.23, 24, 26, 27)
A DIMMER (& P.7)
B A (Power) (& P.12)
C OPTION (& P.22, 25, 31, 35)
D NOW PLAYING (& P.16, 18, 29)
E VOLUME +/–
Controls the volume.
F MUTE
Turns mute on or off.
G (REPEAT) (& P.20)
H TIMER (& P.32)
I SLEEP (& P.33)
8 En
Preparations
Connect speakers or antenna and turn the unit on.
Do not connect the power cable of the unit until you have finished connecting all cables.
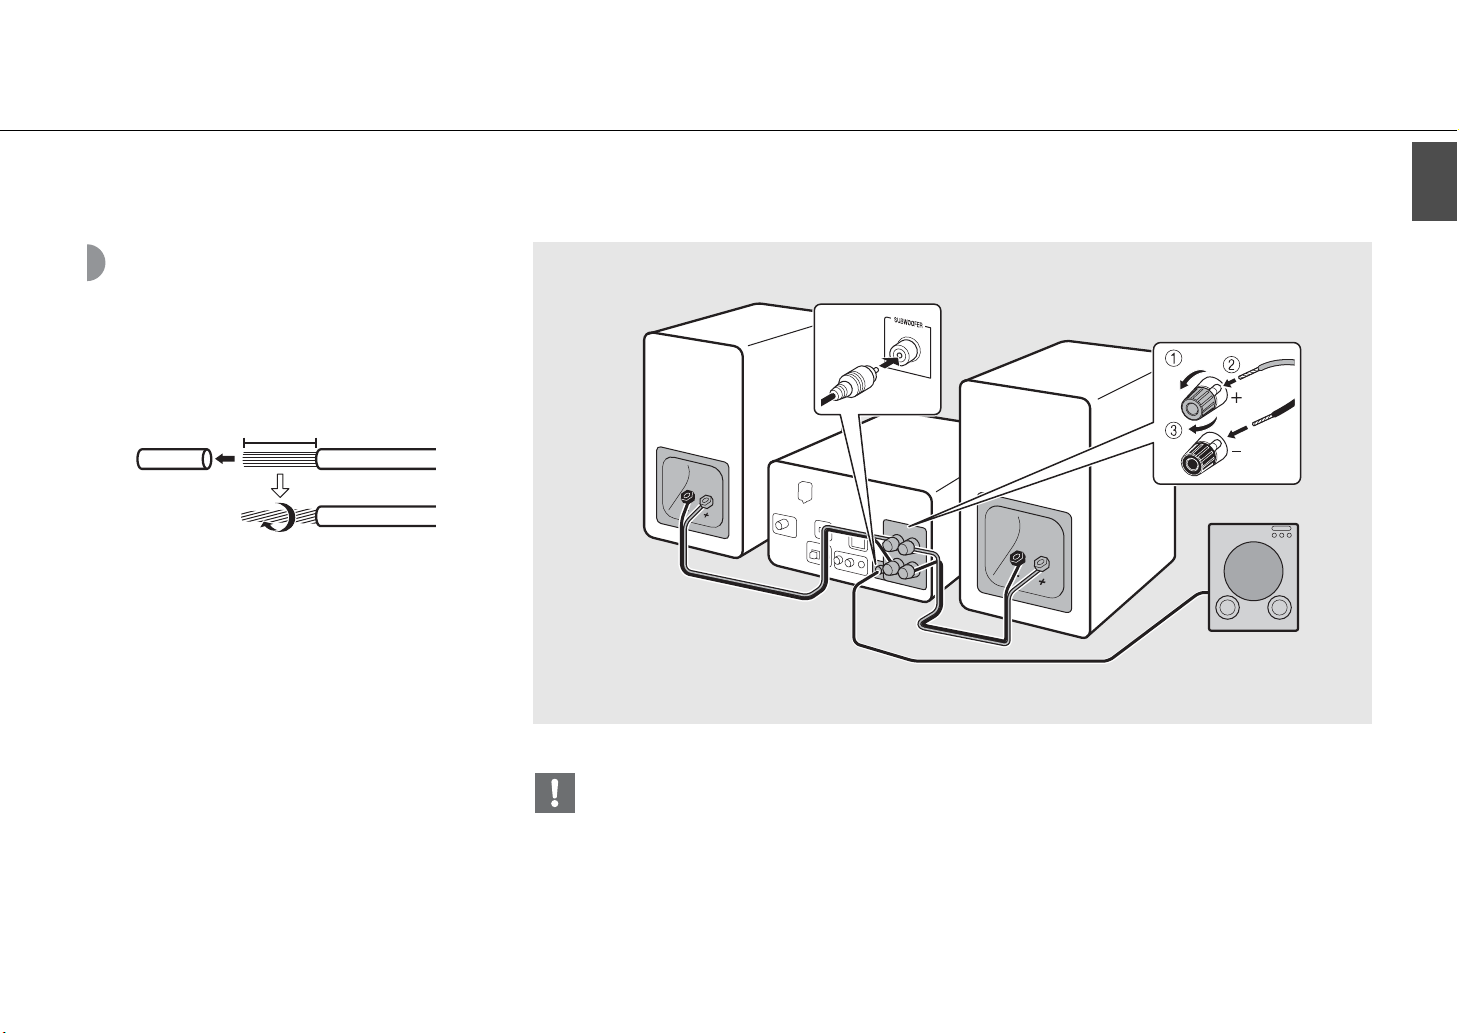
Connecting the speakers
Right speaker
1 Remove the insulation from the end of
the speaker cable to expose the bare
wires.
15 mm (5/8 in.)
2 Connect the speaker to the unit, as the
illustration shows.
• Prepare speakers and speaker cables separately.
• For connection of the speakers, refer to the
owner’s manual supplied with them.
Speaker
cable
English
Left speaker
2
Subwoofer
Monaural pin cable
• Take care not to allow the bare speaker wires to touch each other or any metal part of the unit. This could damage the
unit and/or the speakers.
• Make sure that left and right (L, R) connections and polarity (red: +, black: -) are correct. If connections are incorrect, the
sound will be unnatural.
• Use speakers of at least 6 Ω impedance.
• You can also connect a subwoofer with built-in amplifier to the unit.
En 9

Preparations
Connecting antenna
1 Connect the supplied antenna to the
unit.
2 Install it with pins where the unit can
obtain good reception.
Supplied antenna
2
10 En
1
• Be sure to stretch out the antenna as the illustration shows.
• If radio reception with the supplied antenna is not satisfactory, a commercially available outdoor antenna may improve
reception.

Preparations
English
Connecting to the network
You can play back music files stored on your PC, mobile
devices, DLNA*-compatible NAS, or audio contents on the
Internet, by connecting this unit to the network. You can
also operate the unit with your mobile device.
* Digital Living Network Alliance
Connect the unit to the network as shown
on the right.
• Connect with a commercially available STP (shielded
twisted pair) network cable (CAT-5 or higher, straightthroughcable).
This unit
LAN
Broadband
router
Internet
• For details on Internet connection, refer to the owner’s manuals of your network devices.
• If you are using a router that supports DHCP, you do not need to configure any network settings for the unit. If you are
using a router that does not support DHCP, configure the network setting from [Network Config] in the option setting
(& P.35).
• Wired connections are recommended for devices other than the mobile to ensure high sound quality.
• Some security software installed on your PC or the firewall settings of network devices (such as a router) may block the
access of the unit to the network devices or the Internet. In this case, change the setting of the security software or
network devices.
• When setting the subnet manually, each server must be connected to the same subnet as the unit (& P.36).
Modem
WAN
Network cable
Mobile device
PC
Network attached
storage (NAS)
En 11
Preparations
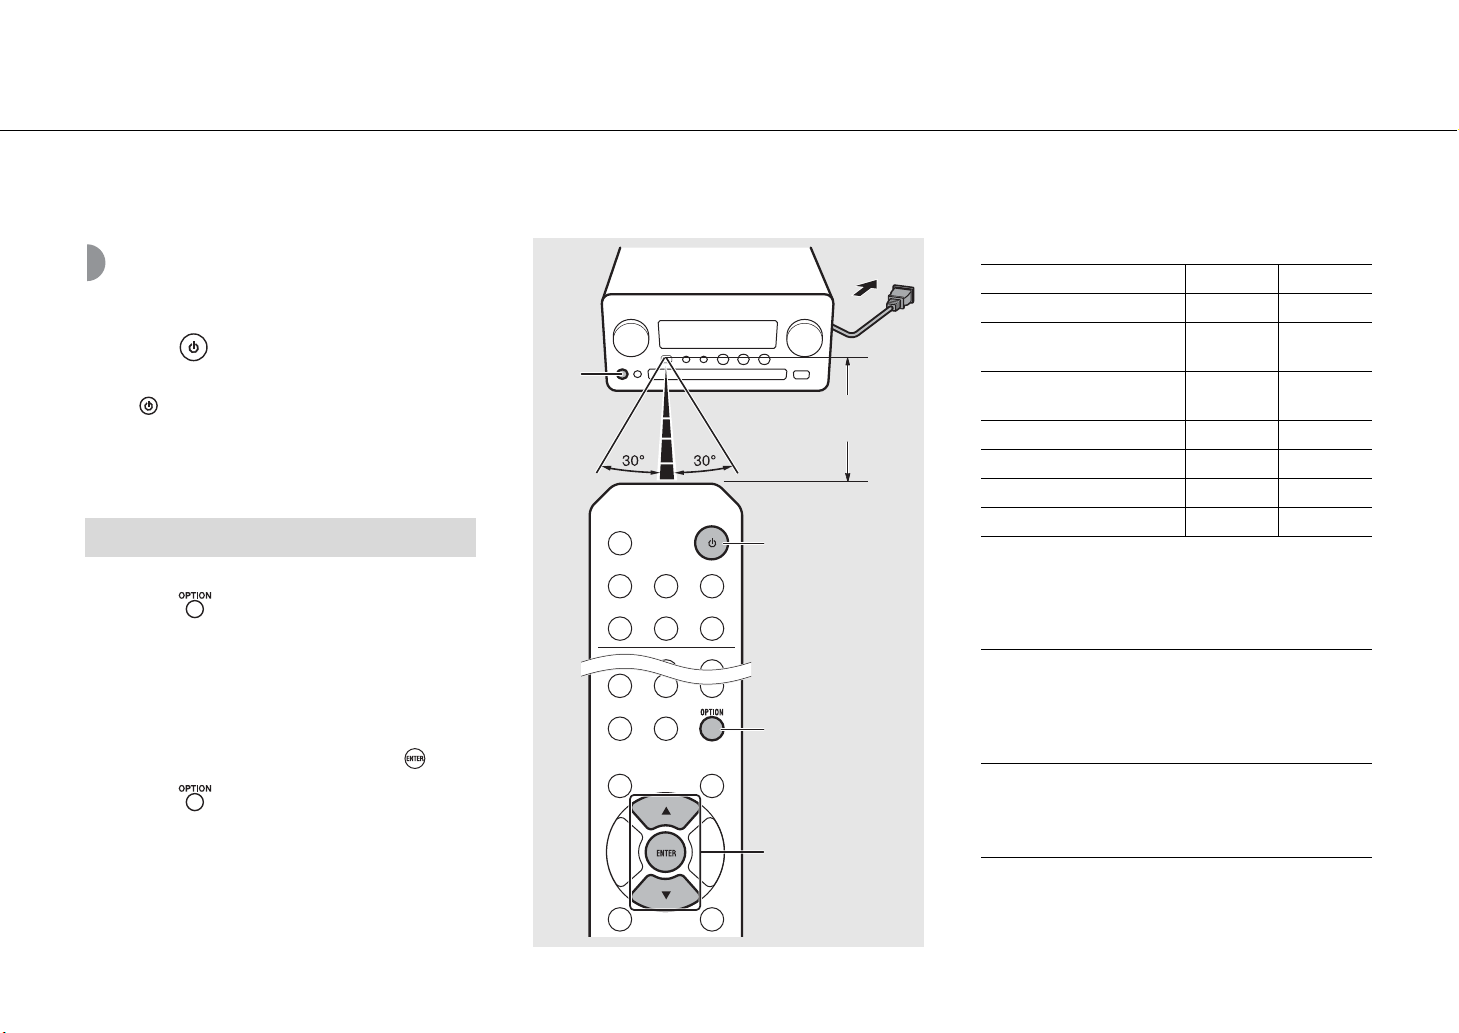
Turning on the power
Plug the power cable into the wall outlet
and press .
• The unit turns on.
• Press again to turn off (standby mode).
• “Eco standby” (default) reduces power consumption of
the unit while limiting certain features (as shown in the
table on the right).
Canceling the eco standby
Status in standby/eco standby
Standby Eco standby
Charging of iPod/USB devices 3 —
Enable/disable the wake-up
A
Within 6 m
(20 ft)
A
timer*
Operation of the source
buttons*
CD load/eject 33
AirPlay 3 —
Power-on by the application 3 —
Clock display 3 —
* Operation with the remote control only
3 —
33
1 Press .
• Option menu is shown on the front panel display.
2 Cancel the eco standby.
• Set the item in the order of [System Config] [Power Saving] - [Normal].
• Change the item with S/T and press to set.
3 Press to finish the option setting.
12 En
1, 3
OPTION
2
S/T,
ENTER
Option menu regarding power (System Config)
(Setting value. Bold: default)
Power Saving
Configure the power supply settings.
(Normal, Eco)
When you select [Eco], nothing is shown on the front
panel display in the eco standby mode.
Auto Power Off
Set the time at which the unit enters standby mode if no
operation is performed.
(Timer 2H, Timer 4H, Timer 8H, Timer 12H, OFF)
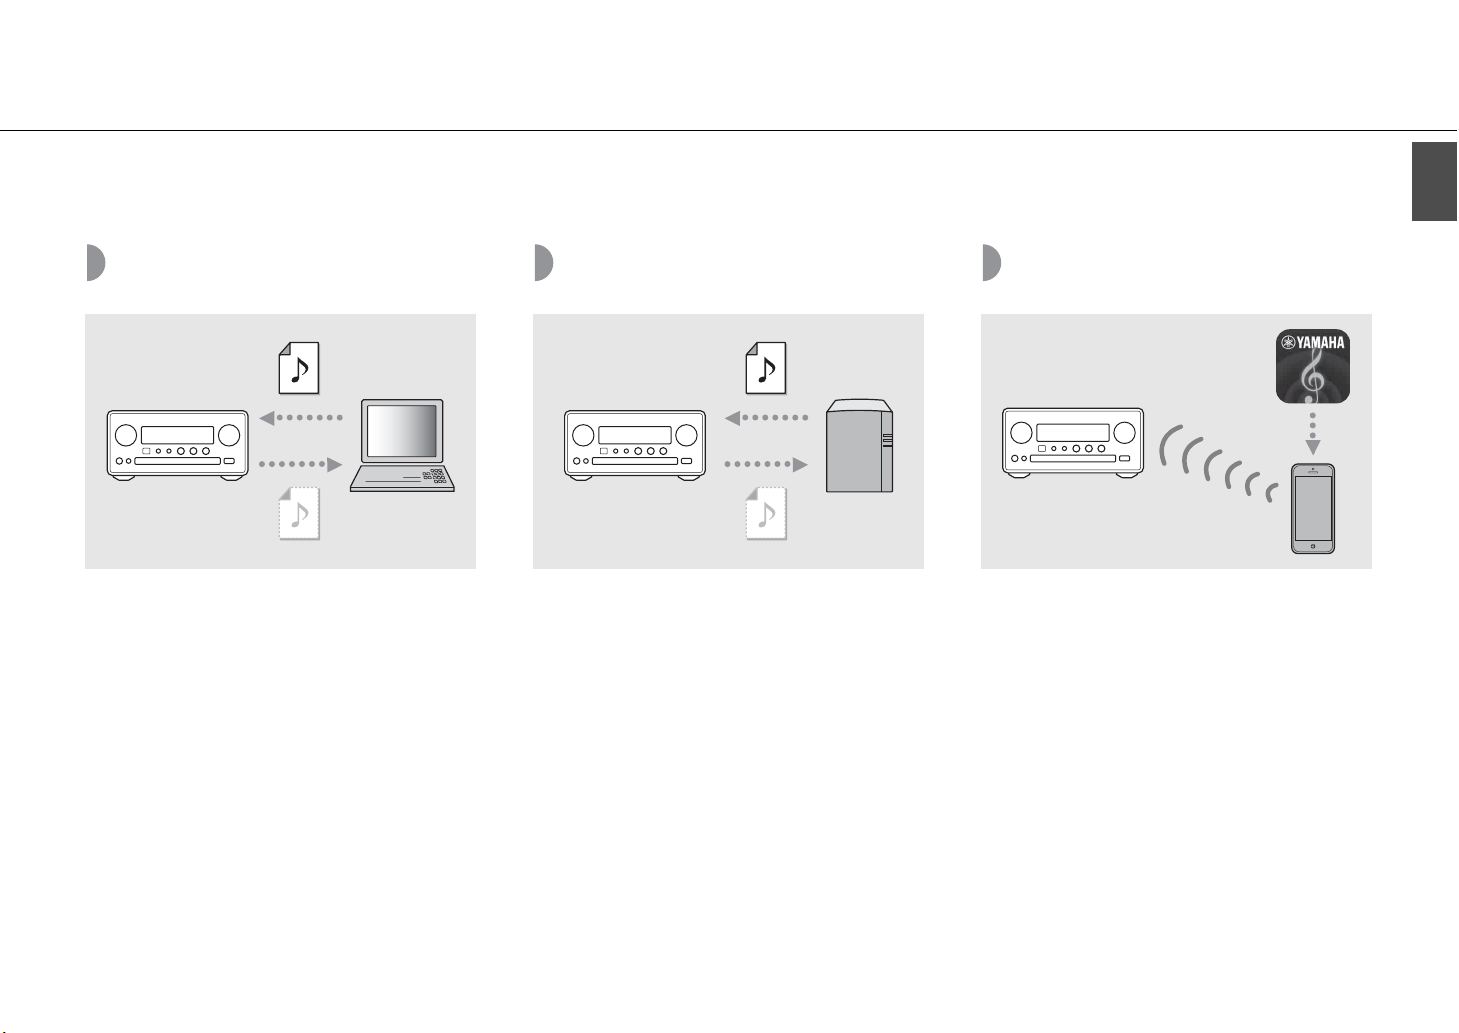
Setting the network devices
Configure your devices connected to the network to play back music files stored on your PC or NAS, or configure your mobile device to control this unit.
PC
Configure the media sharing setting of
your PC (& P.17).
NAS
Configure the settings to access your NAS.
• Enable DHCP setting of your NAS if needed.
• For more detailed settings, refer to the owner’s manual
supplied with your NAS.
Mobile devices
Install the dedicated application
“NETWORK PLAYER CONTROLLER” to your
mobile devices (& P.18).
• The application supports iPhone/iPad/iPod touch and
Android mobile devices.
• The mobile device needs to be connected to the same
router as the unit.
English
En 13
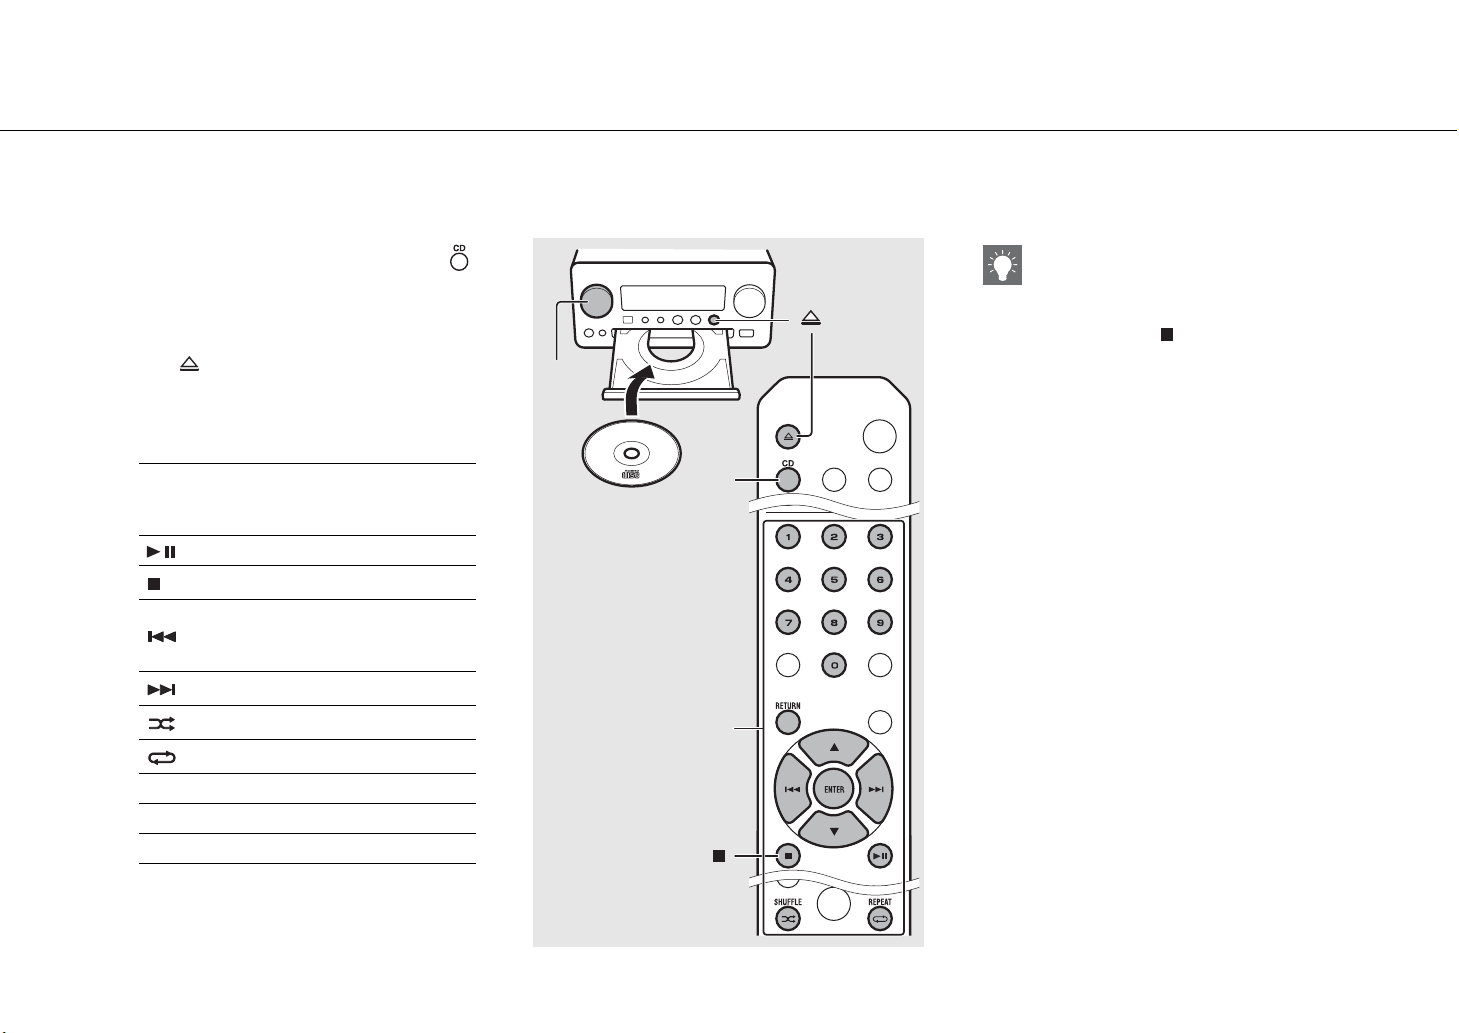
Listening to CD
This unit allows playback of audio CDs and data CDs in which the MP3/WMA files are recorded.
For details on playable CDs, see “Supported devices/medias” (P.43).
1 Turn INPUT to select [CD]. Or, press
on the remote control.
2 Set a CD in a disc tray.
• Press to open/close the disc tray.
3 Playback starts.
• The remote control functions are shown below.
S
T
1 - 9, 0 Specify the song number.
RETURN Cancel the song number.
ENTER Apply the song number.
Skip to the first file of the previous or
next folder when playing back MP3/
WMA files.
Play/pause
Stop
Skip to the beginning of the song
being played back or the previous
song.
Skip to the next song.
Starts shuffle playback (& P.20).
Starts repeat playback (& P.20).
1
INPUT
1
CD
3
• Files on a data CD are played back in
alphanumeric order.
2
• When CD playback is stopped, playback will
resume from the beginning of the song last
played. Pressing while playback is stopped will
clear resume playback.
14 En
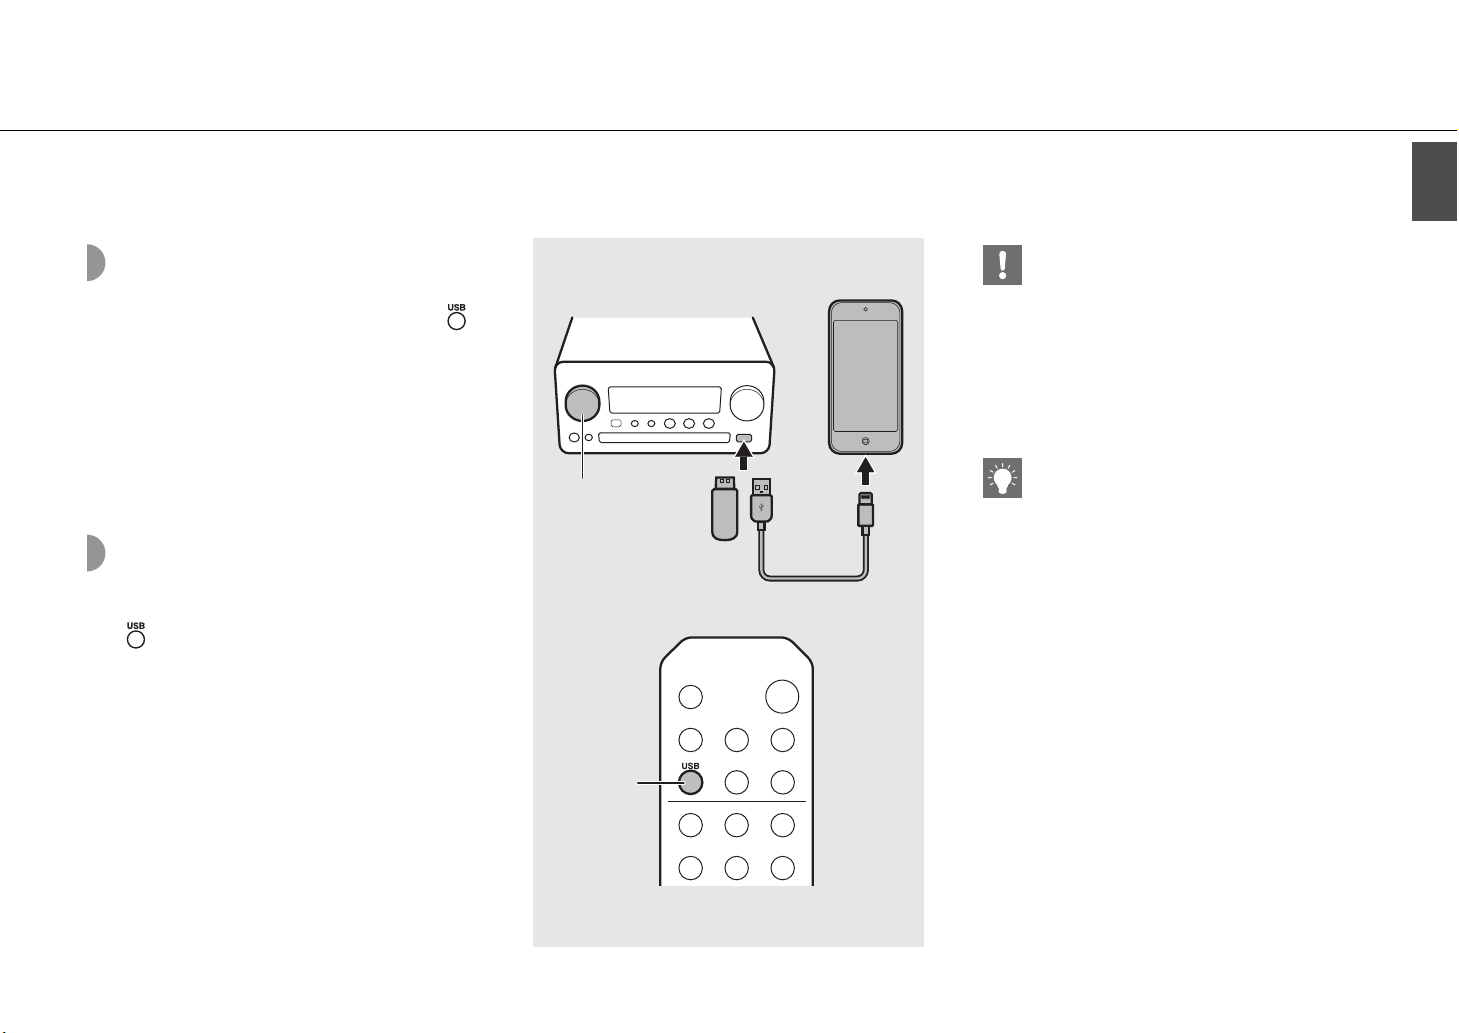
Listening to iPod/USB devices
This unit allows playback of iPod or USB devices which music files are recorded.
For details on playable iPod/USB devices, see “Supported devices/media and file formats” (P.43).
Playing iPod
1 Turn INPUT to select [USB] or press
on the remote control.
2 Connect the iPod to the USB jack.
• Prepare the USB cable supplied with your iPod.
• The source changes to [iPod].
3 Playback starts (& P.16).
Playing USB devices
1
INPUT
2
1 Turn INPUT to select [USB]. Or, press
on the remote control.
2 Connect a USB device to the USB port.
3 Playback starts (& P.16).
English
• Some iPods/USB devices may not work properly
even if they meet the requirements. Playability of
and power supply to all iPods/USB devices are not
guaranteed.
• Yamaha and suppliers do not accept any liability
for the loss of data saved on an iPod or a USB
device connected to the unit. As a precaution, it is
recommended to make backup copies of
important files.
• Stop playback before disconnecting the USB
device.
• An iPod or USB device is automatically charged
when it is connected to the unit, except in the eco
standby mode.
1
USB
En 15
Listening to iPod/USB devices
Remote control operation for iPods/USB
devices
Skip to the beginning of the song being
played back or previous song (for iPod, press
and hold to fast rewind).
Skip to the next song (for iPod, press and
hold to fast forward).
Stop
Play/pause
Shuffle playback (& P.20)
Repeat playback (& P.20)
Switching the information display of iPod
• When operating your iPod with Yamaha’s
application “NETWORK PLAYER CONTROLLER,” the
information display switches to the extended
mode.
To switch the information display mode, press and
hold the DISPLAY button.
- Standard mode (default): Operate your iPod
while viewing the screen of the iPod and select
a song to play back.
- Extended mode: Operate the remote control
while viewing the iPod information shown on
the front panel display (browsing operation)
and select a song to play back. The remote
control functions are as shown below.
S/T Show other item.
ENTER
HOME Show the top-level item.
RETURN Back to the previous item.
NOW
PLAYING
Confirm the selected item and
proceed to the next level or start
playback.
Finish browsing and display the
playback content information.
16 En
Listening to the songs in the computer
This unit allows you to play back music files such as MP3, WMA, or FLAC (lossless audio data compression format) files stored in the computer (server) connected to
the network or NAS. Brows the front panel display and select your favorite music file.
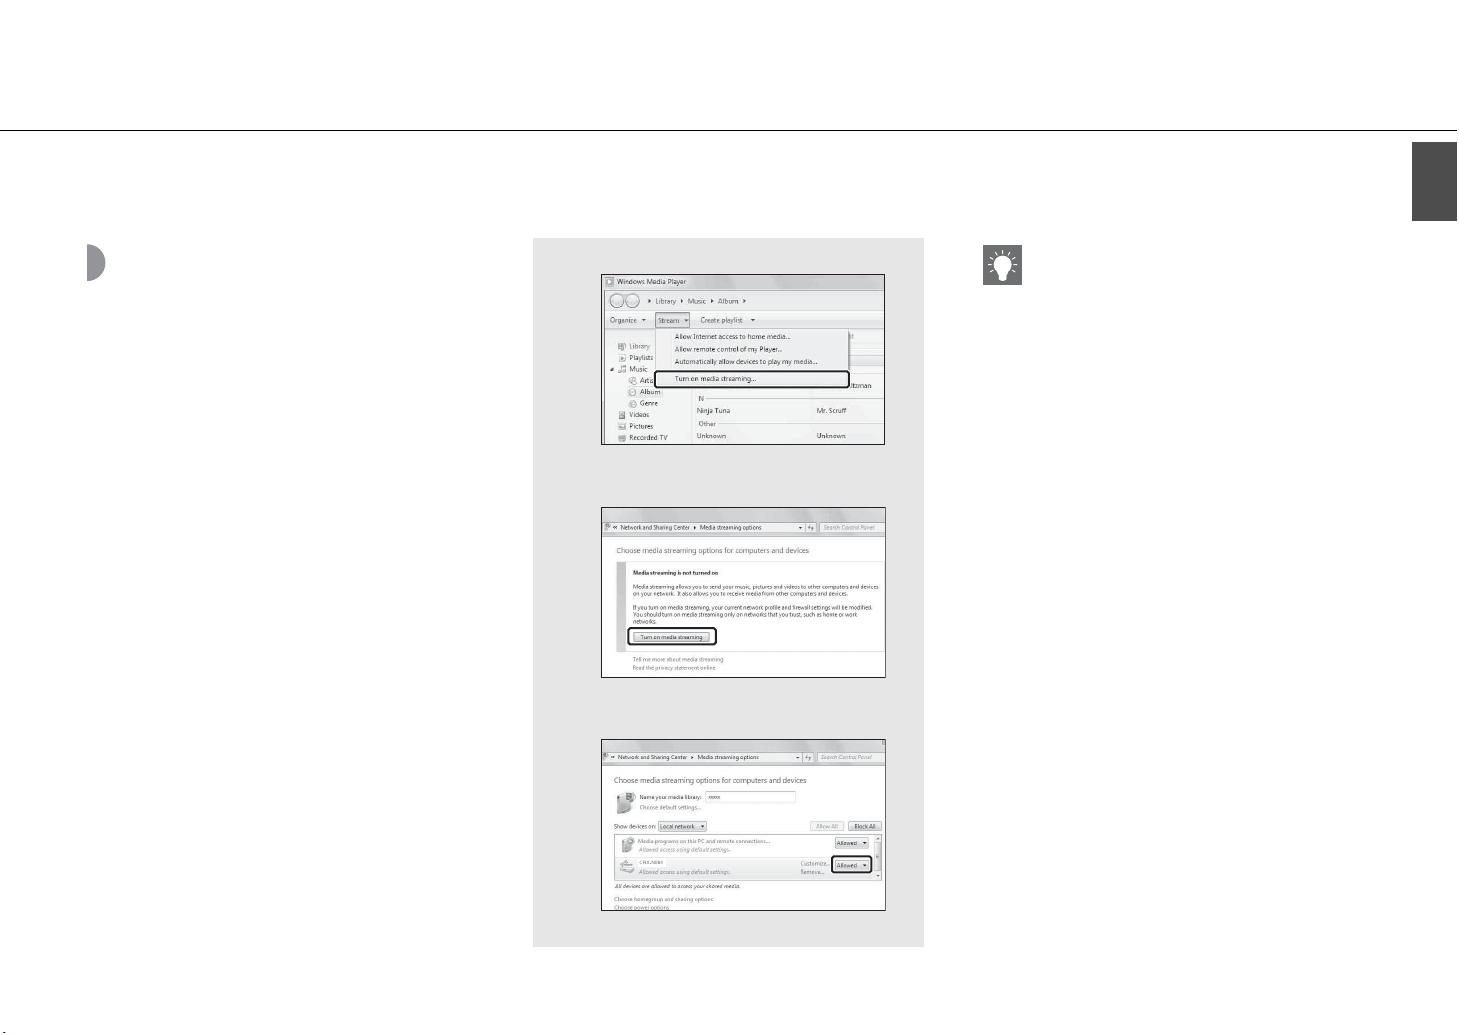
Setting the media sharing of music files
To play back music files in your computer with this unit,
you need to make the media sharing setting between the
unit and computer (Windows Media Player 11 or later). In
here, setting with Windows Media Player 12 in Windows 7
is taken as an example.
1 Start Windows Media Player 12 on
your PC.
2 Select “Stream”, then “Turn on media
streaming.”
• The control panel window of your PC is shown.
2
3
• For details on media sharing settings, refer to
Windows Media Player help.
For Windows Media Player 11
1 Start the Windows Media Player 11 on your PC.
2 Select “Library” then “Media Sharing.”
3 Check the “Share my media to” box, select the
“CRX-N560” icon, and click “Allow.”
4 Click “OK” to exit.
For a PC or a NAS with other DLNA server
software installed
Refer to the owner’s manual of your device or
software and configure the media sharing settings.
3 Click “Turn on media streaming.”
4 Select “Allowed” from the drop-down
list next to “CRX-N560.”
English
5 Click “OK” to exit.
4
En 17

Listening to the songs in the computer
Playing back songs in the PC
1 Press repeatedly and select
[Server].
2 Browse and select a song.
S/T Show other item.
Confirm the selected item and
ENTER
HOME Show the top-level item.
RETURN Back to the previous item.
NOW
PLAYING
proceed to the next level or start
playback.
Finish browsing and display
playback content information.
3 Start playback.
Play/pause
/ Move to the next or previous song
in the folder.
Stop
Shuffle playback (& P.20)
Repeat playback (& P.20)
1
NET
2, 3
• If playback is not possible, make sure this unit and
the PC (server) are connected to the same router
(& P.11).
Operating from your mobile device
Once you install the app “NETWORK PLAYER
CONTROLLER” in your mobile device, you can
operate the unit with the mobile device.
• Features
- Power-on/off, adjusting volume or other basic
operation
- Changing the music source
- Displaying the information of the radio tuner
- Selecting, playing back, and stopping songs
- Playing back songs stored in devices
For downloading the app or the latest information,
access to the App Store or Google Play and search
“NETWORK PLAYER CONTROLLER.”
18 En
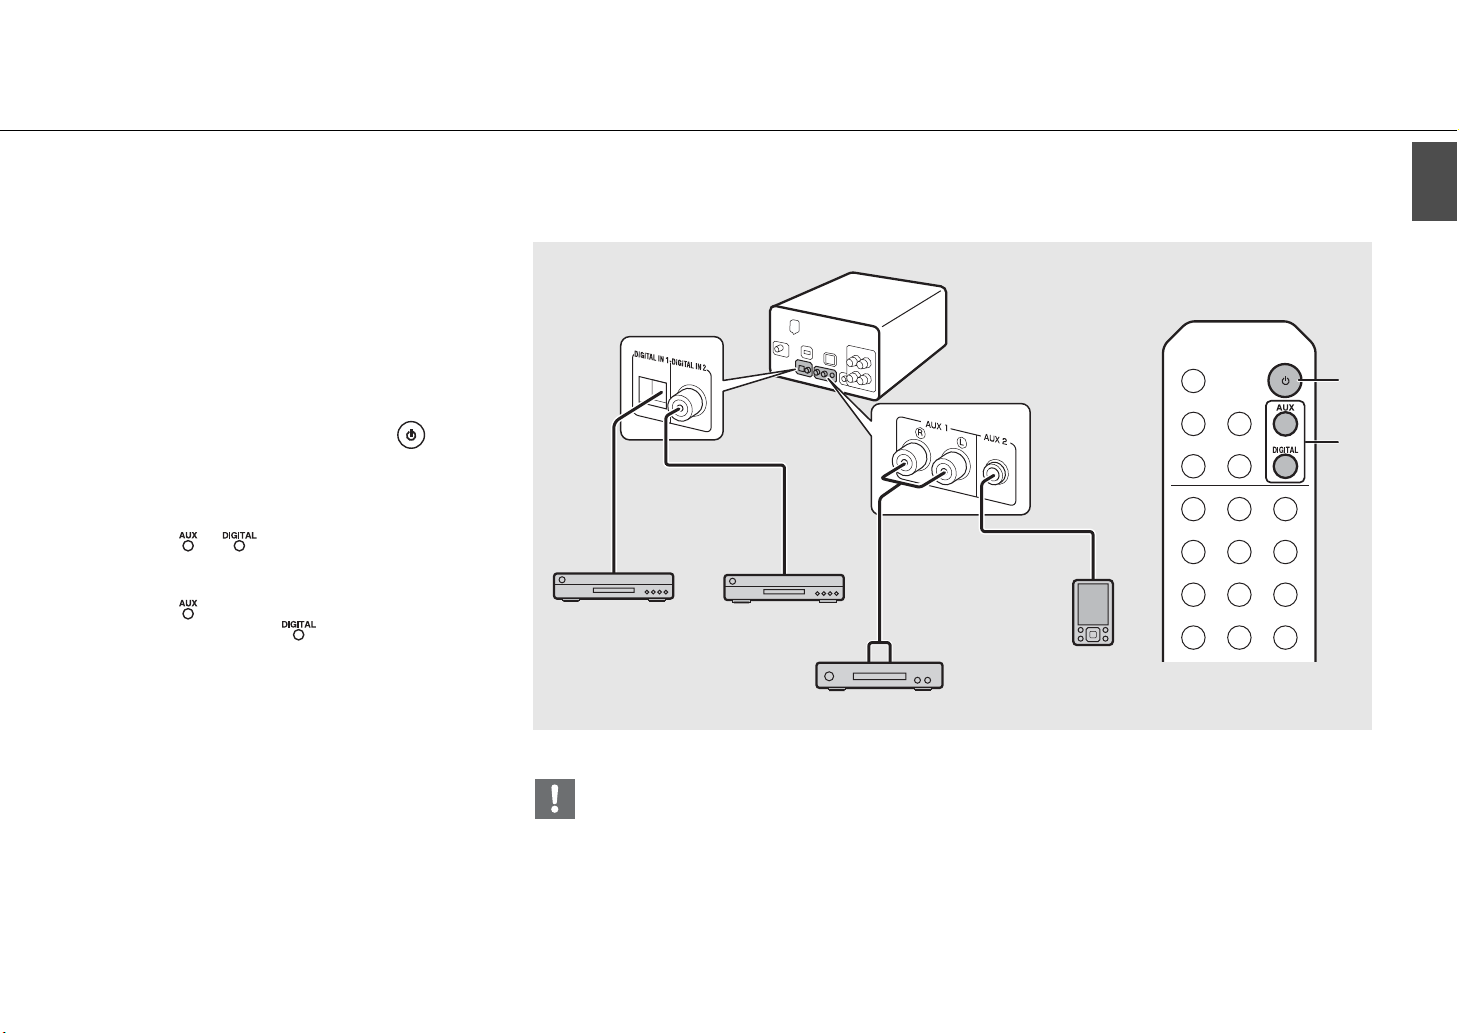
Listening to external sources
This unit allows playback of external devices, such as a DVD player or mobile music player. Use the terminal (DIGITAL IN 1/2 or AUX 1/2) according to the device to
be connected (& P.6). For the connection of each external device, refer to its supplied owner’s manual.
1 Unplug the power cable of the unit
and connect the external device to the
unit.
• Prepare commercially available cables for
connection.
2 Plug the power cable of the unit back
into the wall outlet and press to
turn the unit on.
3 Change the music source.
• Press or according to the connecting
terminal for the external device you wish to play
back.
• Press to change the source to AUX1/AUX2
(analog input), press to change the source
to DIGITAL IN1/DIGITAL IN2 (digital input).
4 Play back the connected external
device.
• For details on playback, refer to the owner’s
manual supplied with the external device.
1
Coaxial digital audio
Optical cable
Blu-ray disc player, etc.
• Decrease the volume of the unit and the external device before connection. Otherwise, playback volume may be
too loud.
cable
3.5 mm stereo
mini-plug cable
RCA stereo
cable
Mobile music
player
DVD disc player, etc.
2
A
3
English
En 19
More on playback
You can enjoy music in varied song order or sound quality, and view music information during playback.
Operations described in this section apply to all devices, such as PC (server), iPod, USB device, or CD.
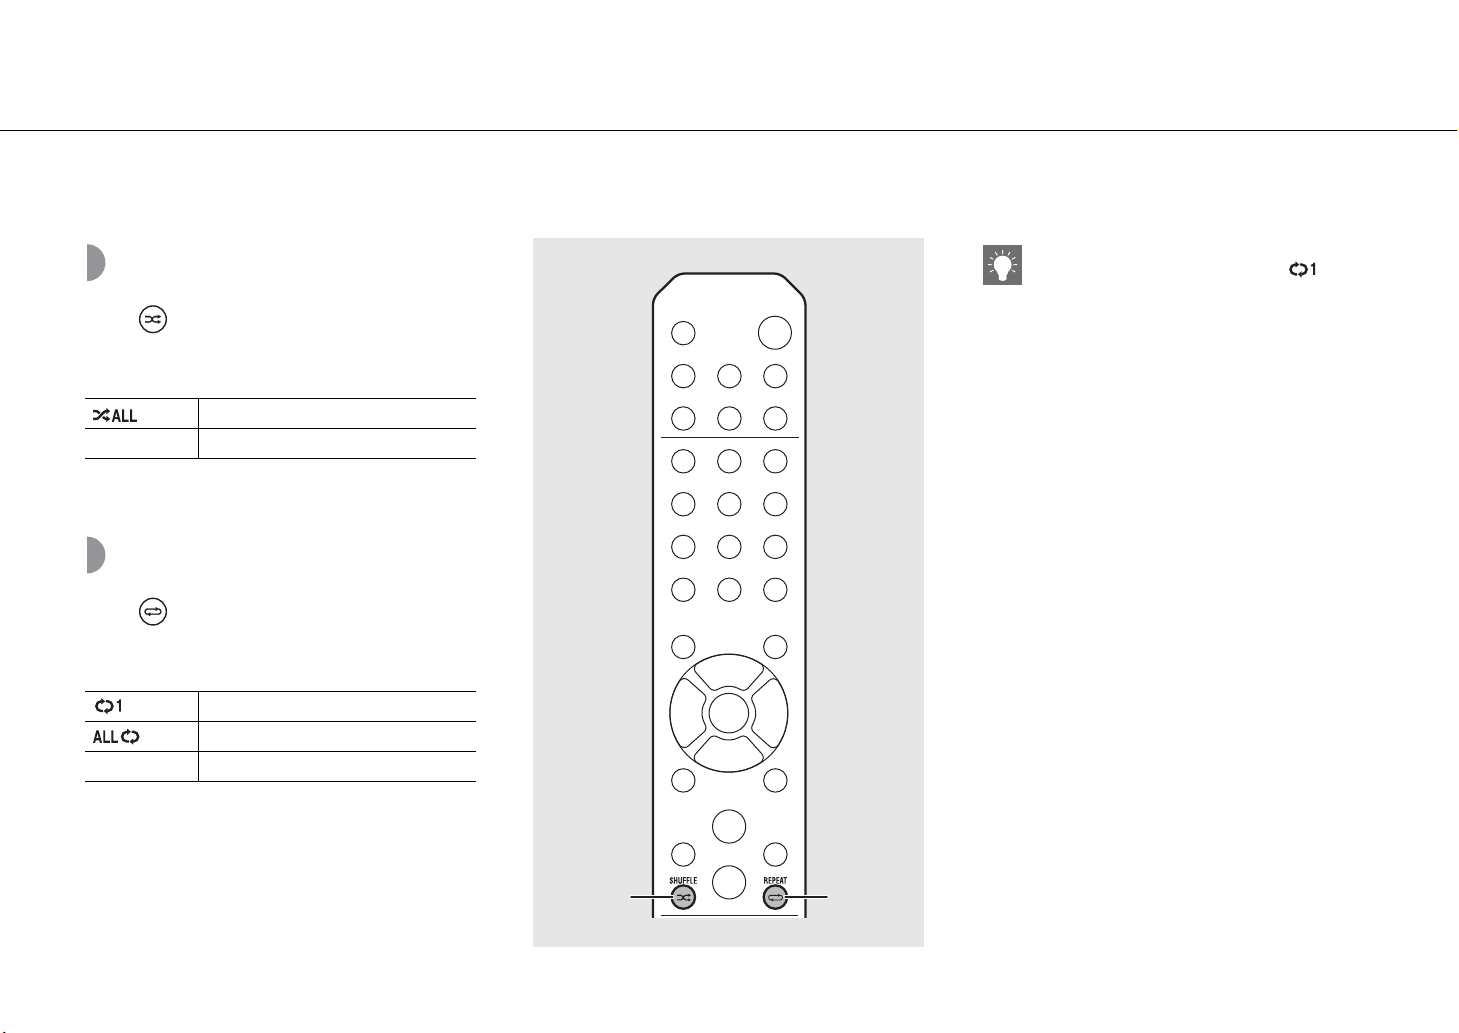
Shuffle playback
Press during playback.
• The shuffle indicator in the front panel display switches
as shown below each time you press the button.
Perform shuffle playback.*
Not displayed Does not perform shuffle playback.
* The range of shuffle depends on the media being played
back.
Repeat playback
Press during playback.
• The repeat indicator in the front panel display switches
as shown below each time you press the button.
Repeat the song being played back.
Perform repeat playback.*
Not displayed Does not perform repeat playback.
* The range of repeat depends on the playback media.
• Shuffle playback and repeat playback can be
performed at the same time (except ).
20 En
REPEAT SHUFFLE
More on playback
English
Playback information
Song title, elapsed time, etc., can be shown on the front
panel display.
Press during playback.
ALMBeUtM
eora
• Display switches in the order as shown below each time
you press .
USB/iPod/AirPlay/Server CD
Song title*
Album tile
Artist name
Playing time Song title*
*1 If the song title cannot be obtained, the file title may be
displayed.
*2 Only when playing an audio CD.
*3 Only when playing an audio CD and when there is
information to display.
1
Playing time
Remaining time of the
Remaining time of the
Artist name*
2
song*
2
disc*
Album tile*
1, 3
3
3
• Characters shown on the front panel display are
alphanumerics only.
• Information is not displayed when the iPod display
mode is the standard mode (& P.16).
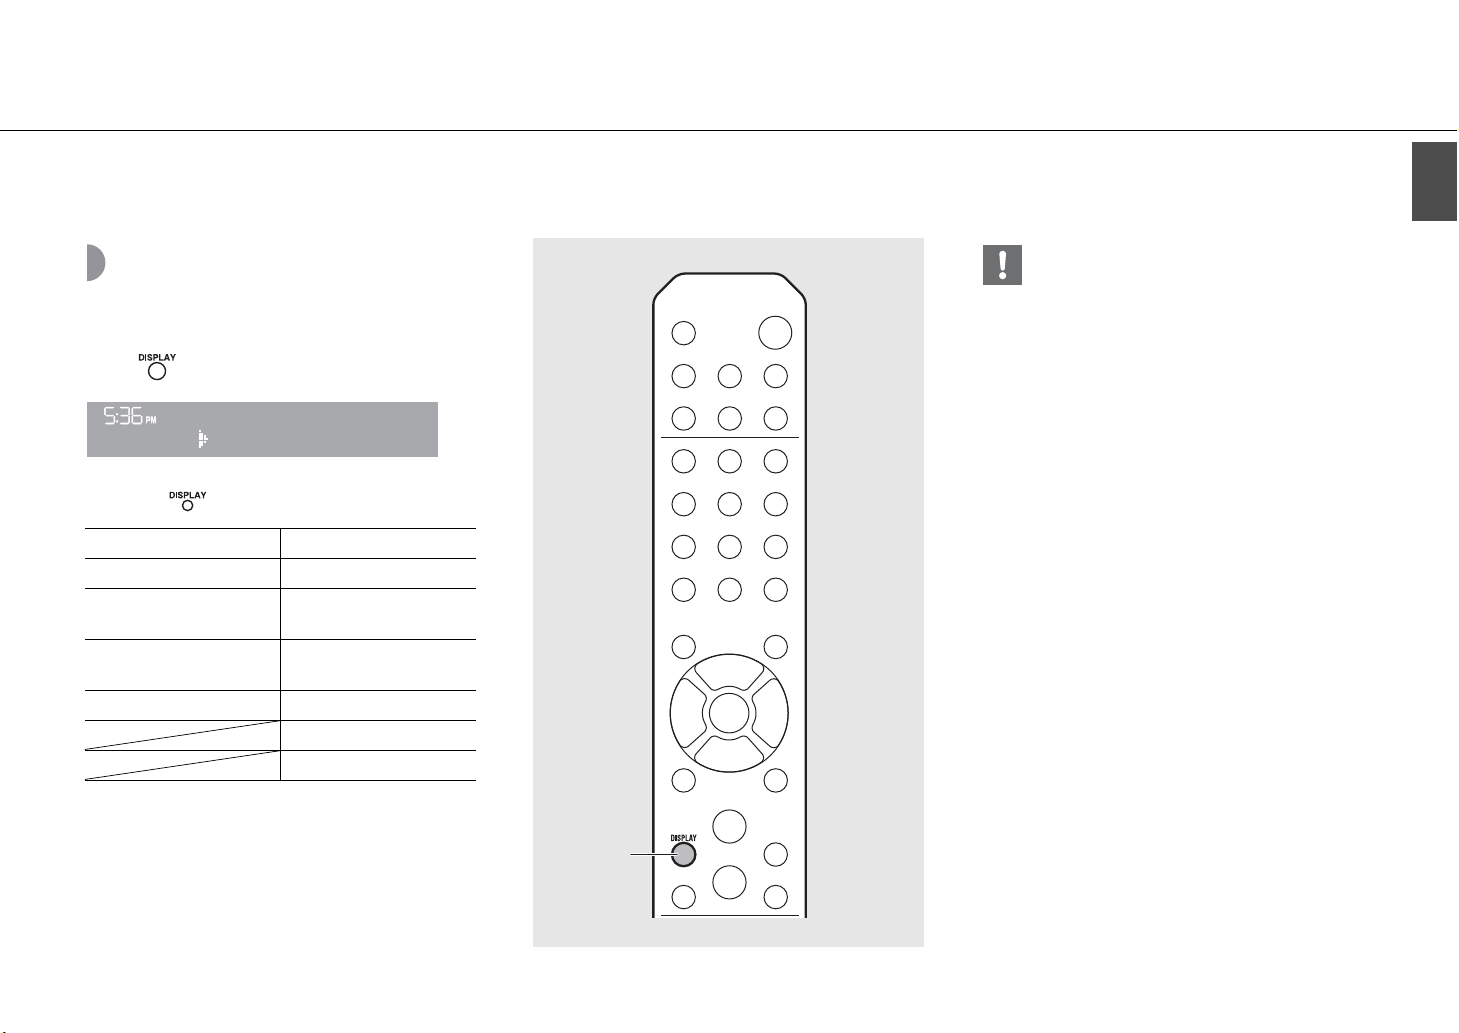
DISPLAY
En 21
More on playback
Adjusting sound quality
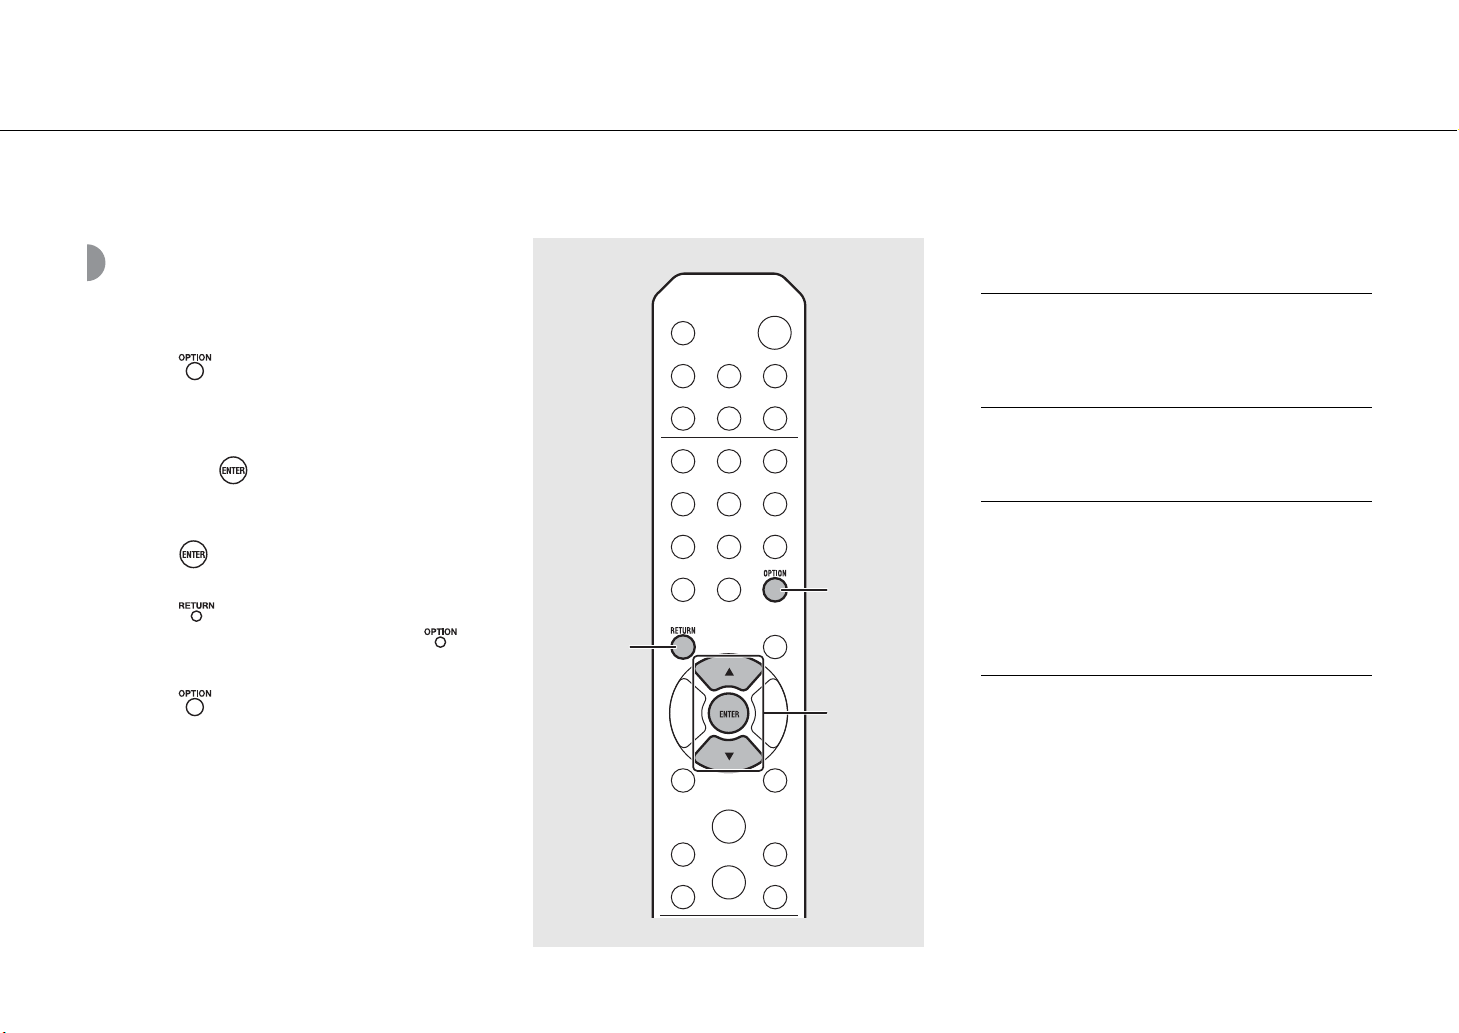
Use the option setting to adjust sound quality.
1 Press .
• Option menu is shown on the front panel display.
2 Press S/T to select the desired item
and press .
3 Press S/T to change the setting and
press .
• The setting is applied.
• Press to return to the previous item.
• To cancel the sound quality setting, press .
• To set other items, repeat steps 2 and 3.
4 Press to finish the option setting.
RETURN
1, 4
OPTION
2, 3
S/T,
ENTER
Option menu regarding sound quality
(Setting value. Bold: default)
Equalizer
Adjusts low frequency [EQ Low], middle frequency [EQ
Mid], and high frequency [EQ High]. The setting is also
applied when using headphones.
(-10 to 0 to +10)
Balance
Adjusts the volume balance of the left and right speakers.
This setting is not applied when using headphones.
(Lch. +10 to --CENTER-- to Rch.+10)
Music Enhancer
Regenerates musical elements that are lost through
compression.
(ON, OFF)
When playing back a high quality music source, such as
FLAC or WAV, it is recommended to set to [OFF]. When
playing back an audio CD that has not been compressed,
this function is not available even if [ON] is set.
22 En
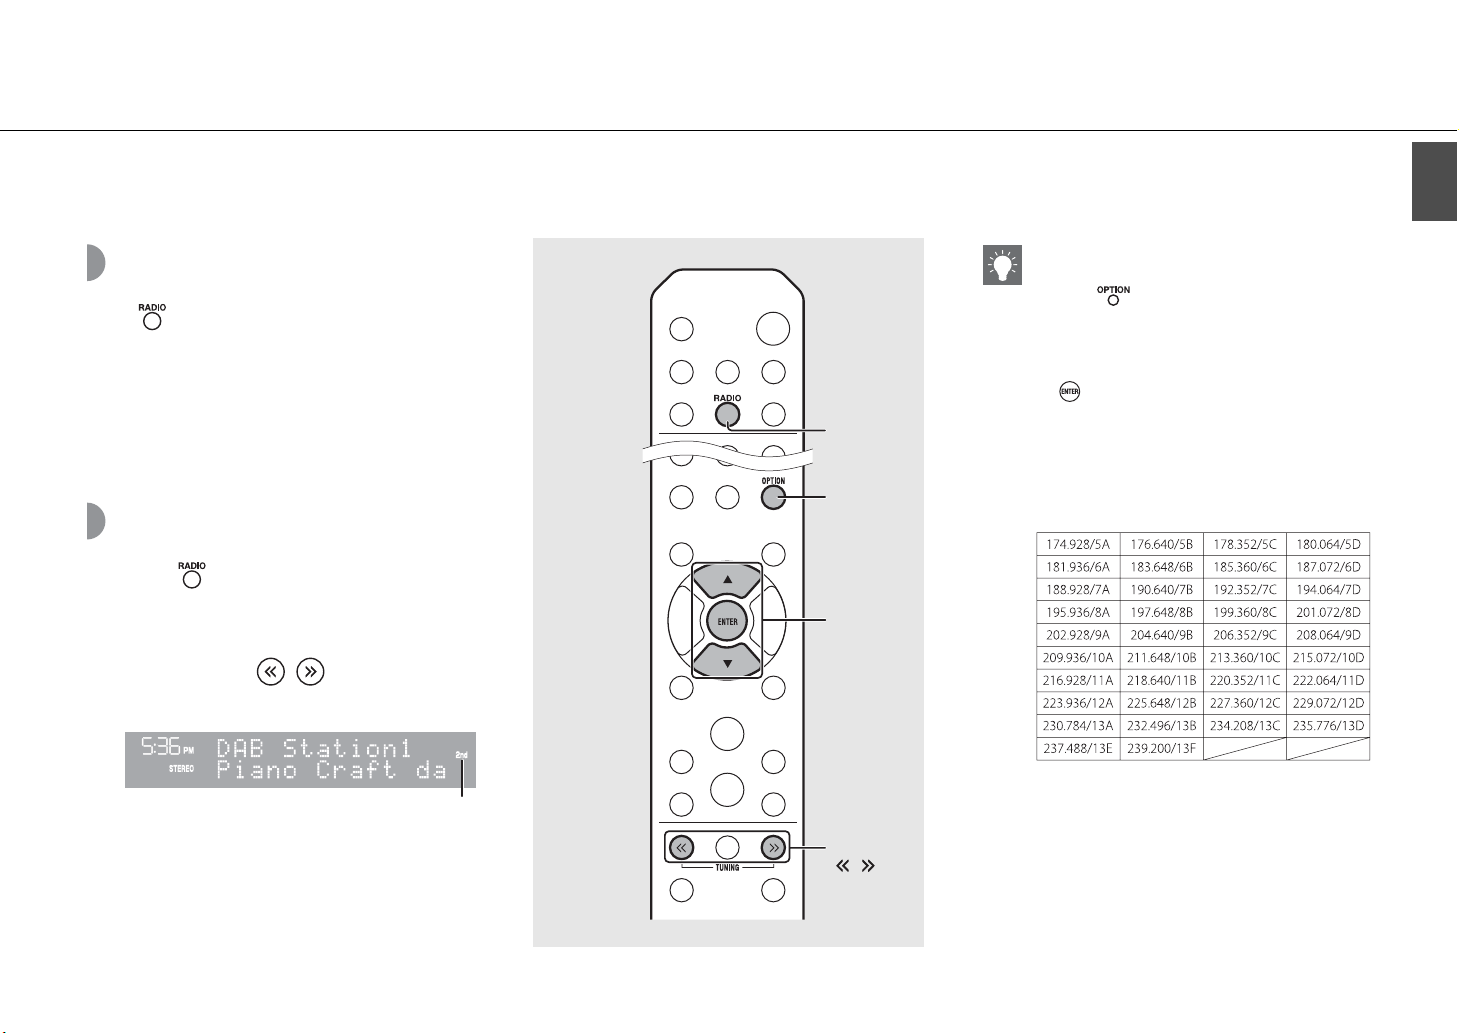
Listening to DAB stations (CRX-N560D only)
You can listen to radio of higher quality sound with Digital Audio Broadcasting (DAB) and DAB+ (upgraded version of DAB).
Connect the supplied antenna (& P.10) and perform an initial scan before you tune into DAB for the first time.
• You can also perform initial scan from the option
Initial scan
1 Press when the source is DAB.
Press repeatedly to select [DAB].
• Initial scan starts automatically when you select [DAB]
for the first time.
• When scanning is complete, the number of receivable
DAB stations is shown on the front panel display
momentarily, and the first station stored in station order
is played.
1
RADIO
OPTION
2 Press S/T to select [Initial Scan] and press
• If the initial scan is performed, stored DAB station
• This unit can receive only Band III DAB frequencies.
Tuning in DAB stations
1 Press repeatedly to select [DAB].
• When the unit cannot receive the DAB signal, “Off
Air” is shown on the front panel display.
S/T,
ENTER
2 Press TUNING / to select a DAB
station.
English
setting.
- Option menu is shown on the front panel
display.
.
- Initial scan starts and finishes automatically.
information and preset DAB stations are cleared.
Frequency in MHz/Channel label
(appears if station has a sub station)
Secondary indicator
2
TUNING
/
En 23
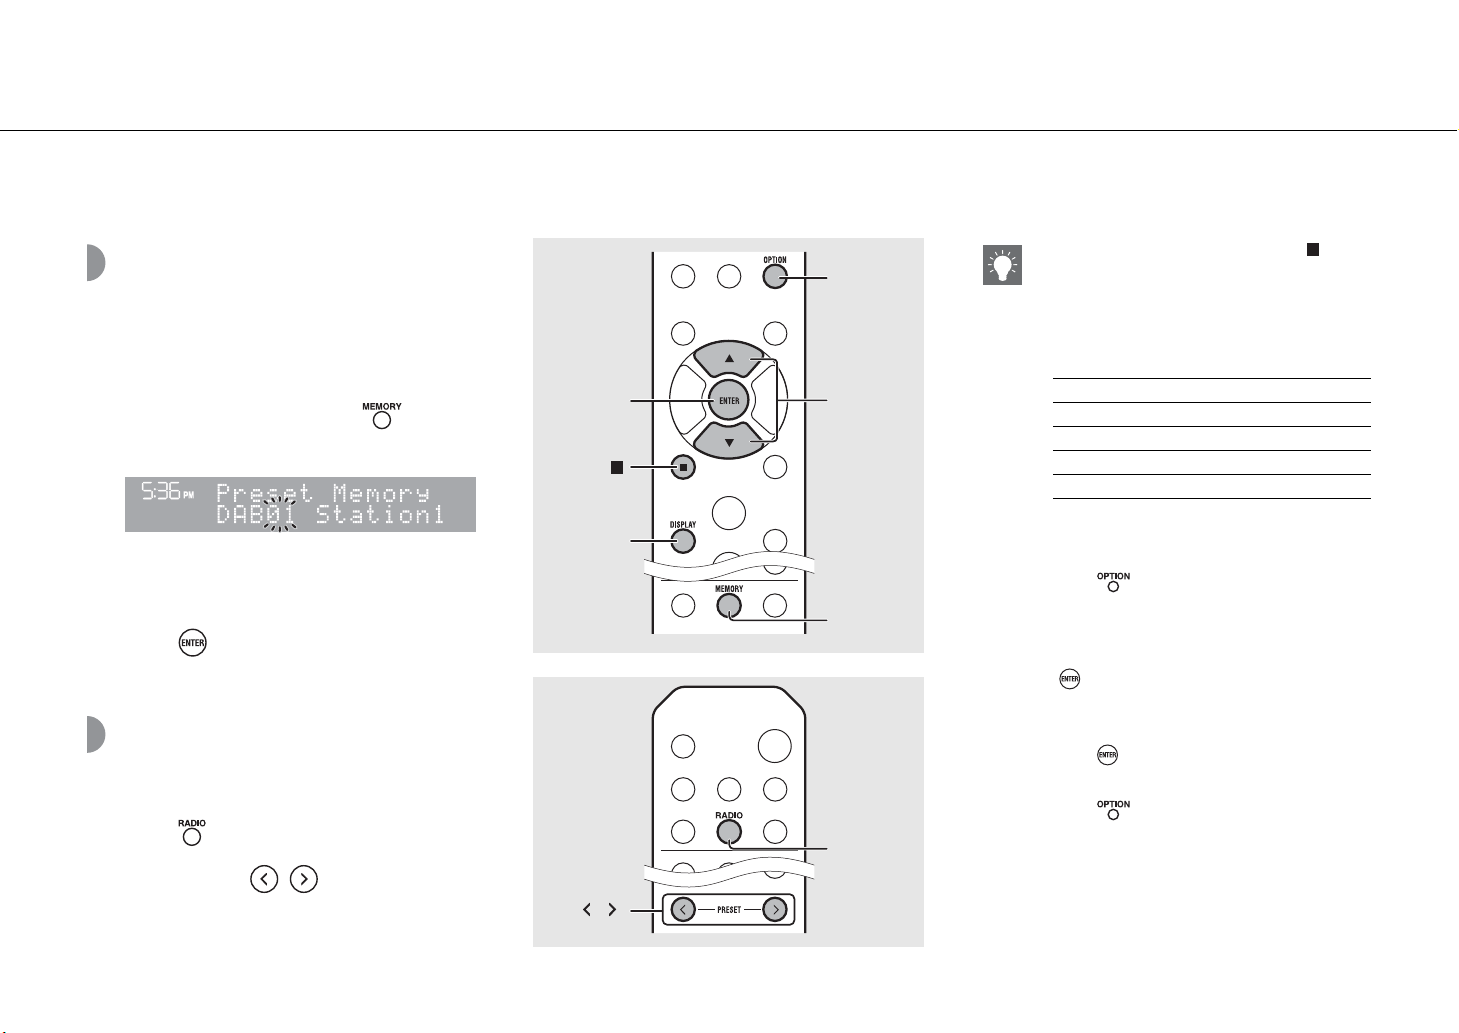
Listening to DAB stations (CRX-N560D only)
Presetting DAB stations
Use the preset function to store your favorite 30 DAB
stations.
1 Tune in a DAB station you want to
preset (& P.23) and press .
• Preset number flashes on the front panel display.
2 Press S/T to select the desired preset
number.
3 Press to completes presetting.
Selecting preset DAB stations
1 Press repeatedly to select [DAB].
2 Press PRESET / to select a
preset station.
3
ENTER
DISPLAY
2
PRESET
/
OPTION
2
S/T
1
MEMORY
1
RADIO
• To cancel the DAB preset setting, press .
• You can change the information of the DAB
station shown on the front panel display by
pressing the DISPLAY button. Display switches in
the order as shown below each time you press the
DISPLAY button.
DLS (Dynamic Label Segment) (default)
ENSEMBLE
CHANNEL/FREQ (Channel label and frequency)
SIGQ. (signal quality)
AUDIO FORMAT
Deleting a preset station
Use the option setting to delete a preset station.
1 Press when the source is DAB.
- Option menu is shown on the front panel
display.
2 Press S/T to select [Preset Delete] and press
.
3 Press S/T to select the preset number to be
deleted.
4 Press .
- A preset station is deleted.
5 Press to finish the option setting.
24 En
Listening to DAB stations (CRX-N560D only)
English
Confirming the reception
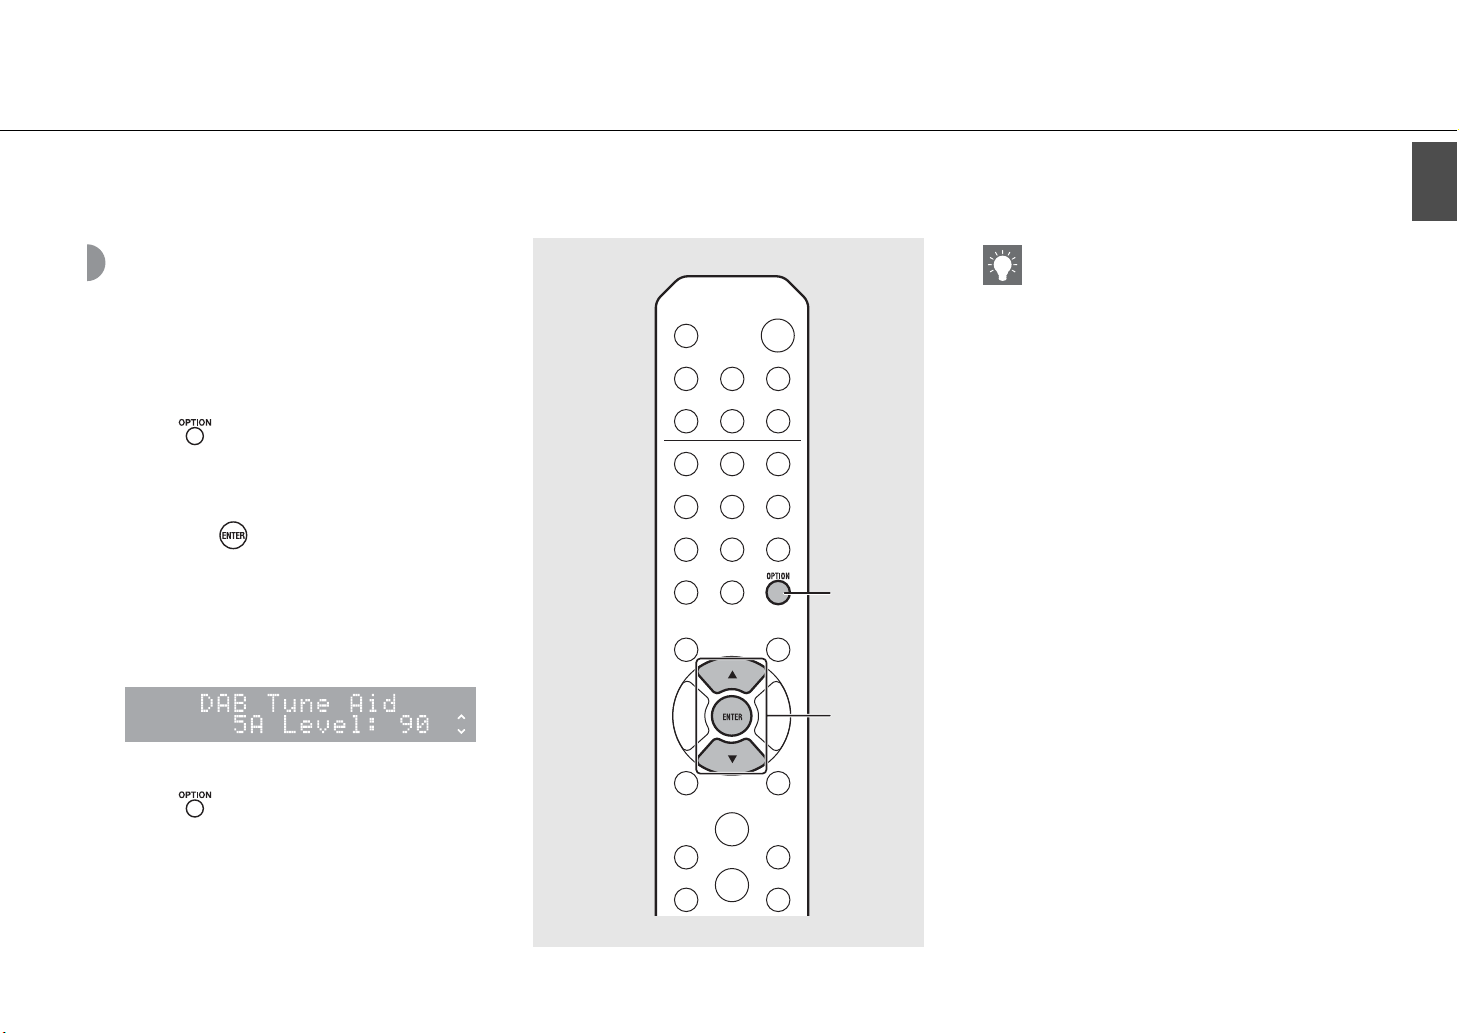
You can confirm the DAB signal level. This is useful when
you set the antenna.
1 Press when the source is [DAB].
• Option menu is shown on the front panel display.
2 Press S/T to select [DAB Tune Aid]
and press .
3 Press S/T to change the channel
label.
• The measured DAB signal reception level is
displayed.
• The level is from 0 (none) to 100 (best).
4 Press to finish the option setting.
• When performing DAB Tune Aid and the DAB
signal is weak, try adjusting the position of the
antenna to obtain good reception.
1, 4
OPTION
2, 3
S/T,
ENTER
En 25
Listening to FM radio stations
To listen to FM radio stations, connect the supplied antenna.
See “Connecting antenna” (P.10) for connecting the antenna to the unit.
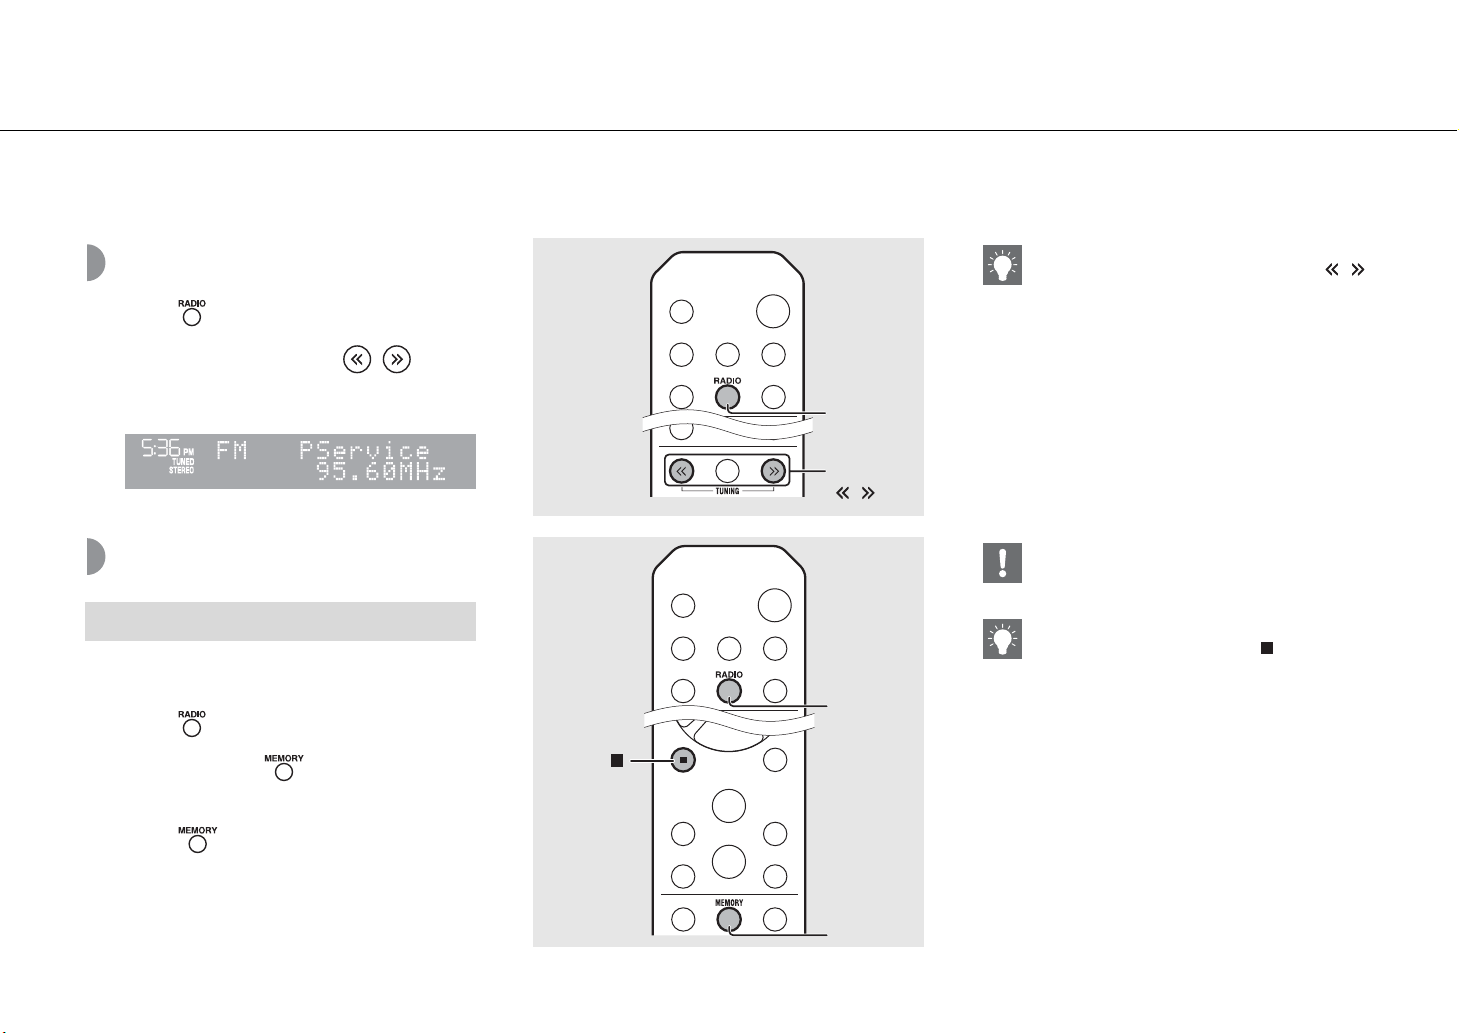
Tuning in FM stations
1 Press .
2 Press and hold TUNING / .
• Automatic tuning starts, then stops automatically
when a station is tuned in.
Presetting FM stations
Auto preset
Tunes in stations with good reception and presets them
automatically.
1 Press .
2 Press and hold for 2 seconds or
more.
• If station reception is weak, you can tune into a
station manually by pressing the TUNING /
button repeatedly.
1
RADIO
2
TUNING
/
• Auto preset replaces all currently-stored stations
with newly-stored stations.
• You can preset up to 30 FM stations.
• To cancel the auto preset, press .
1
RADIO
3 Press .
• Auto preset starts and when it finishes,
“Completed!” is shown on the front panel display.
26 En
2, 3
MEMORY
Listening to FM radio stations
English
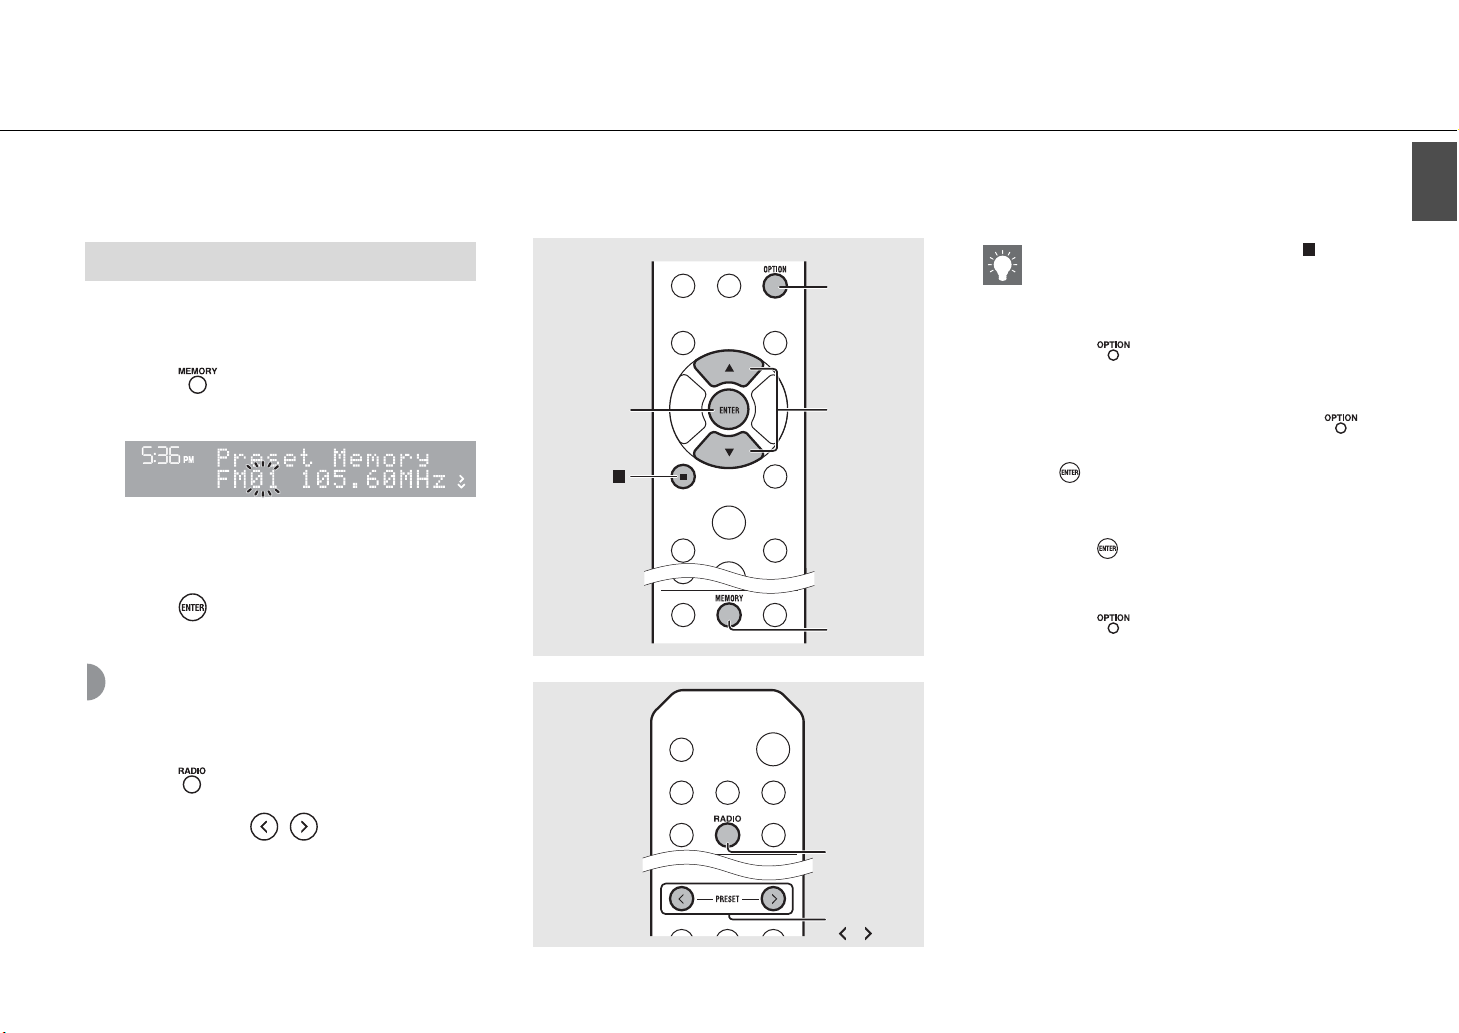
Manual preset
1 Tune into a station you want to store
(& P.26).
2 Press .
• Preset number flashes on the front panel display.
3 Press S/T to select the desired preset
number.
4 Press to preset the station.
Selecting preset FM stations
1 Press .
2 Press PRESET / to select a
station.
4
ENTER
OPTION
3
S/T
2
MEMORY
1
RADIO
• To cancel manual preset setting, press .
Deleting a preset station
Use the option setting to delete a preset station.
1 Press when the source is FM.
- Option menu is shown on the front panel
display.
- To cancel deleting preset stations, press .
2 Press S/T to select [Preset Delete] and press
.
3 Press S/T to select the preset number to be
deleted.
4 Press .
- The preset station is deleted and [Deleted!] is
shown on the front panel display.
5 Press to finish the option setting.
2
PRESET
/
En 27
Listening to FM radio stations
Radio Data System
The unit can receive Radio Data System information.
Press when the source is FM.
• Each press of the button changes the information
displays shown below.
Frequency (default)
PTY (Program Type)
RT (Radio Text)
CT (Clock Time)
DISPLAY
• If the signal transmission of the Radio Data System
station is too weak, this unit may not be able to
receive Radio Data System information
completely. In particular, RT (Radio Text)
information uses a lot of bandwidth, so it may be
less available compared to other types of
information.
28 En
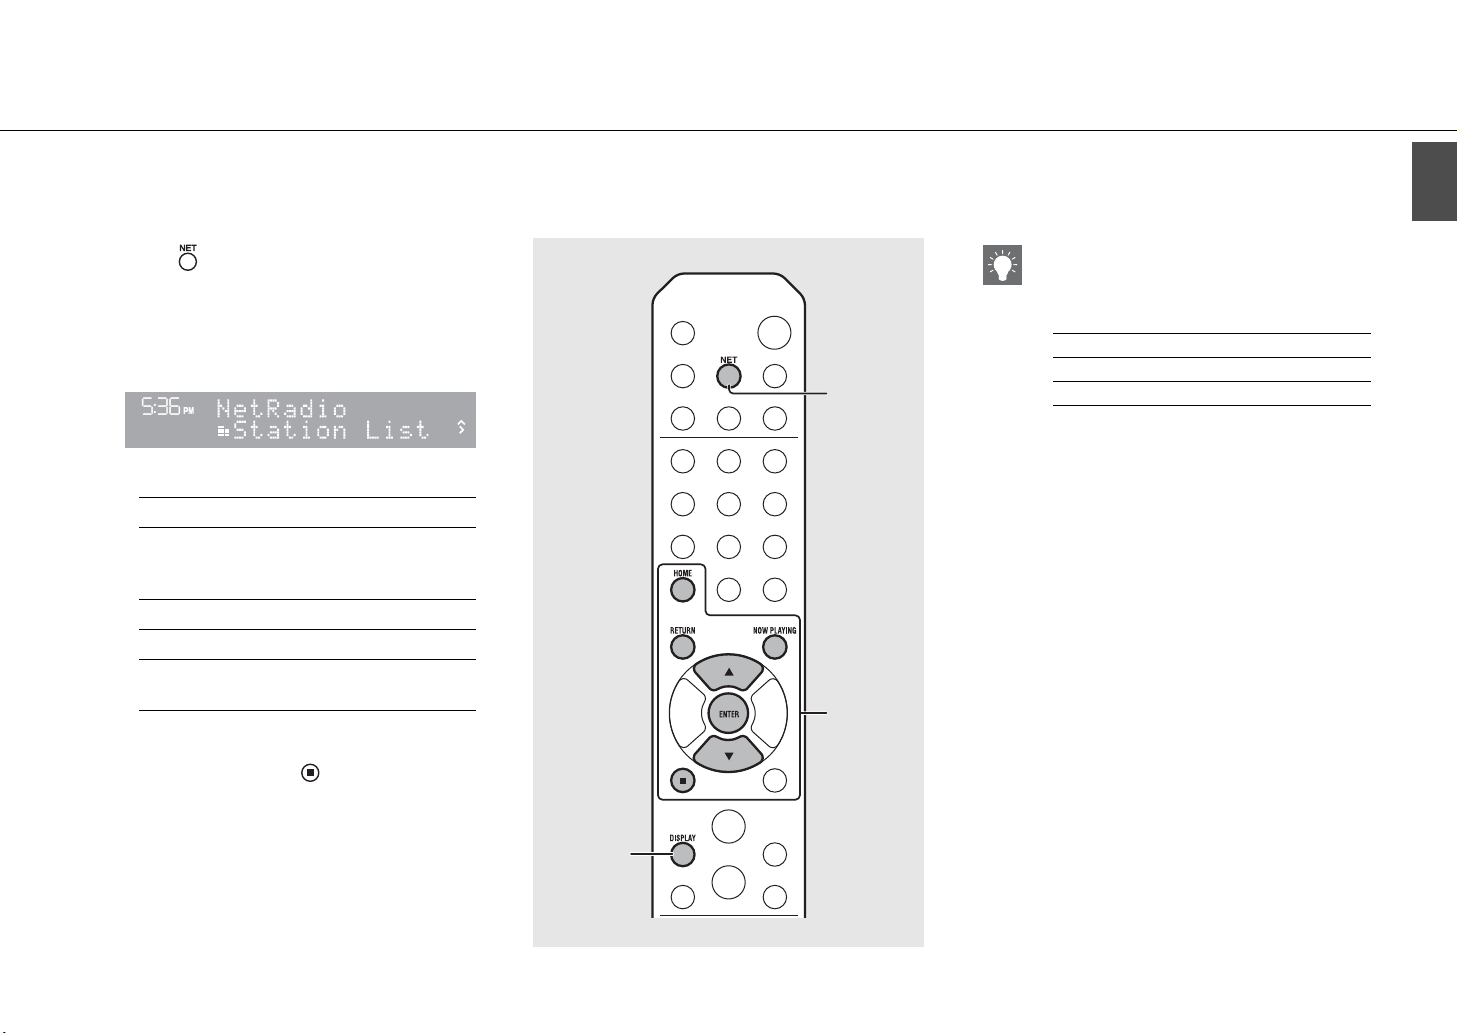
Listening to Internet radio
You can listen to world-wide radio stations via Internet.
Make sure that the unit is connected to the Internet properly (& P.11).
1 Press repeatedly to select [Net
Radio].
2 Browse the Internet and select a radio
station.
• The remote control functions are shown below.
S/T Shows other item.
Confirm the selected item and
ENTER
HOME Show the top-level item.
RETURN Back to the previous item.
NOW
PLAYING
proceed to the next level or start
playback.
Finish browsing and display the
playback content information.
3 Playback starts.
• To stop playback, press .
1
NET
2, 3
English
• Playback information can be shown by pressing
the DISPLAY button while Internet radio is played
back. Information changes as shown below each
time you press it.
Radio station name (default)
Song title
Playing time
• You can register your favorite Internet radio
stations to the “Bookmarks” folder by selecting
[Net Radio] as the source on the unit and then
accessing the following website with the web
browser on your PC.
http://yradio.vtuner.com/
To use this feature, you need the vTuner ID of the
unit and your e-mail address to create your
personal account. You can check the vTuner ID
(MAC address of the unit) in [Network Info]
(& P.36) in the option setting.
DISPLAY
En 29
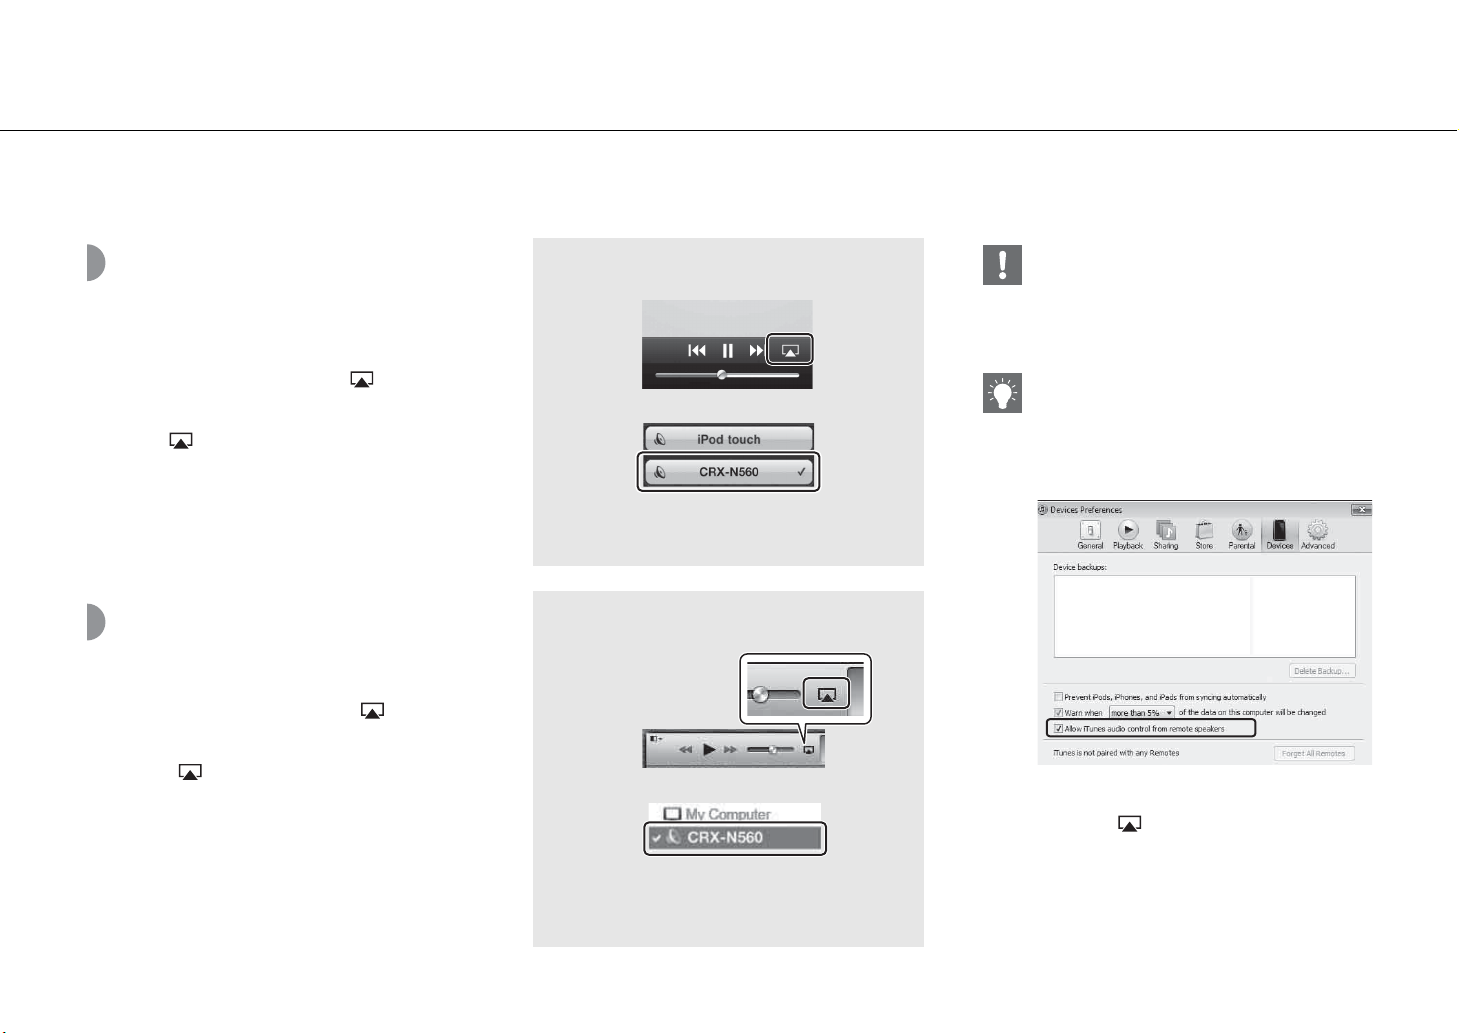
Listening to the Music with AirPlay
The AirPlay function allows you to play back iTunes/iPod music on the unit wirelessly via a network.
Make sure that the unit and your PC or iPod are connected to the same router (& P.11).
Playing iPod
1 Turn on the unit and display the
playback screen on the iPod.
• If the iPod recognizes the unit, is shown on
the screen of the iPod.
2 Tap and select the unit’s name.
• The source automatically switches to [AirPlay] and
playback starts (except in the eco standby mode).
Playing iTunes
1 Turn on the unit and start iTunes.
• If the iTunes recognizes the unit, is shown on
the screen of iTunes.
2 Click and select the unit’s name.
• The source automatically switches to [AirPlay]
(except in the eco standby mode).
3 Play back songs with iTunes.
Example
1
2
Example
1
2
• When you use iTunes/iPod controls to adjust
volume, the volume may be unexpectedly loud.
This could result in damage to the unit or
speakers. If the volume increases during playback,
stop playback on iPod/iTunes immediately.
• You can also use the unit and remote control to
play back, pause, stop, and skip songs.
• To control iTunes playback with the remote
control, you need to configure the iTunes
preferences to enable iTunes control from remote
speakers in advance.
Clearing AirPlay
• Tap/click on the iPod/iTunes screen and
select a device other than CRX-N560 from the
speaker list. Or, change the source to other than
AirPlay.
30 En
 Loading...