

Page 1
Network CD Player
Lecteur CD Réseau
G
OWNER’S MANUAL
MODE D’EMPLOI
BEDIENUNGSANLEITUNG
BRUKSANVISNING
MANUALE DI ISTRUZIONI
MANUAL DE INSTRUCCIONES
GEBRNUIKSAANWIJZIG
ИНСТРУКЦИЯ ПО ЭКСПЛУАТАЦИИ
Page 2
CAUTION: READ THIS BEFORE OPERATING YOUR UNIT.
1 To assure the finest performance, please read this manual
carefully. Keep it in a safe place for future reference.
2 Install this sound system in a well ventilated, cool, dry,
clean place - away from direct sunlight, heat sources,
vibration, dust, moisture, and/or cold. For proper
ventilation, allow the following minimum clearances.
Top: 10 cm (4 in)
Rear: 10 cm (4 in)
Sides: 10 cm (4 in)
3 Locate this unit away from other electrical appliances,
motors, or transformers to avoid humming sounds.
4 Do not expose this unit to sudden temperature changes
from cold to hot, and do not locate this unit in an
environment with high humidity (i.e. a room with a
humidifier) to prevent condensation inside this unit,
which may cause an electrical shock, fire, damage to this
unit, and/or personal injury.
5 Avoid installing this unit where foreign object may fall
onto this unit and/or this unit may be exposed to liquid
dripping or splashing. On the top of this unit, do not
place:
– Other components, as they may cause damage and/or
discoloration on the surface of this unit.
– Burning objects (i.e. candles), as they may cause fire,
damage to this unit, and/or personal injury.
– Containers with liquid in them, as they may fall and
liquid may cause electrical shock to the user and/or
damage to this unit.
6 Do not cover this unit with a newspaper, tablecloth,
curtain, etc. in order not to obstruct heat radiation. If the
temperature inside this unit rises, it may cause fire,
damage to this unit, and/or personal injury.
7 Do not plug in this unit to a wall outlet until all
connections are complete.
8 Do not operate this unit upside-down. It may overheat,
possibly causing damage.
9 Do not use force on switches, knobs and/or cords.
10 When disconnecting the power cable from the wall outlet,
grasp the plug; do not pull the cable.
11 Do not clean this unit with chemical solvents; this might
damage the finish. Use a clean, dry cloth.
12 Only voltage specified on this unit must be used. Using
this unit with a higher voltage than specified is dangerous
and may cause fire, damage to this unit, and/or personal
injury. Yamaha will not be held responsible for any
damage resulting from use of this unit with a voltage
other than specified.
13 To prevent damage by lightning, keep the power cable
and outdoor antennas disconnected from a wall outlet or
this unit during a lightning storm.
14 Do not attempt to modify or fix this unit. Contact
qualified Yamaha service personnel when any service is
needed. The cabinet should never be opened for any
reasons.
15 When not planning to use this unit for long periods of
time (i.e. vacation), disconnect the AC power plug from
the wall outlet.
16 Be sure to read the “TROUBLESHOOTING” section on
common operating errors before concluding that this unit
is faulty.
17 Before moving this unit, press to set this unit to the
standby mode, and disconnect the AC power plug from
the wall outlet.
18 Condensation will form when the surrounding
temperature changes suddenly. Disconnect the power
cable from the outlet, then leave this unit alone.
19 When using this unit for a long time, this unit may
become warm. Turn the power off, then leave this unit
alone for cooling.
20 Install this unit near the AC outlet and where the AC
power plug can be reached easily.
21 The batteries shall not be exposed to excessive heat such
as sunshine, fire or the like.
– Keep the batteries in a location out of reach of
children. Batteries can be dangerous if a child were to
put in his or her mouth.
– If the batteries grow old, the effective operation range
of the remote control decreases considerably. If this
happens, replace the batteries with two new ones as
soon as possible.
– Do not use old batteries together with new ones.
– Do not use different types of batteries (such as
alkaline and manganese batteries) together. Read the
packaging carefully as these different types of
batteries may have the same shape and color.
– Exhausted batteries may leak. If the batteries have
leaked, dispose of them immediately. Avoid touching
the leaked material or letting it come into contact with
clothing, etc. Clean the battery compartment
thoroughly before installing new batteries.
– If you plan not to use the unit for a long period of
time, remove the batteries from the unit. Otherwise,
the batteries will wear out, possibly resulting in a
leakage of battery liquid that may damage the unit.
– Do not throw away batteries with general house
waste. Dispose of them correctly in accordance with
your local regulations.
22 Excessive sound pressure from earphones and
headphones can cause hearing loss.
This unit is not disconnected from the AC power source as long as
it is connected to the wall outlet, even if this unit itself is turned off
by . This state is called the standby mode. In this state, this unit is
designed to consume a very small quantity of power.
WARNING
TO REDUCE THE RISK OF FIRE OR ELECTRIC SHOCK, DO
NOT EXPOSE THIS UNIT TO RAIN OR MOISTURE.
WARNING
DO NOT TOUCH THIS UNIT WHEN IT IS USED
CONTINUOUSLY AT HIGH VOLUME BECAUSE THE
BOTTOM OF THIS UNIT MAY BECOME HOT. IT MAY LEAD
TO INJURIES SUCH AS BURNS, ETC.
i En
Page 3
PREPARATION
WHAT YOU CAN DO WITH THIS UNIT
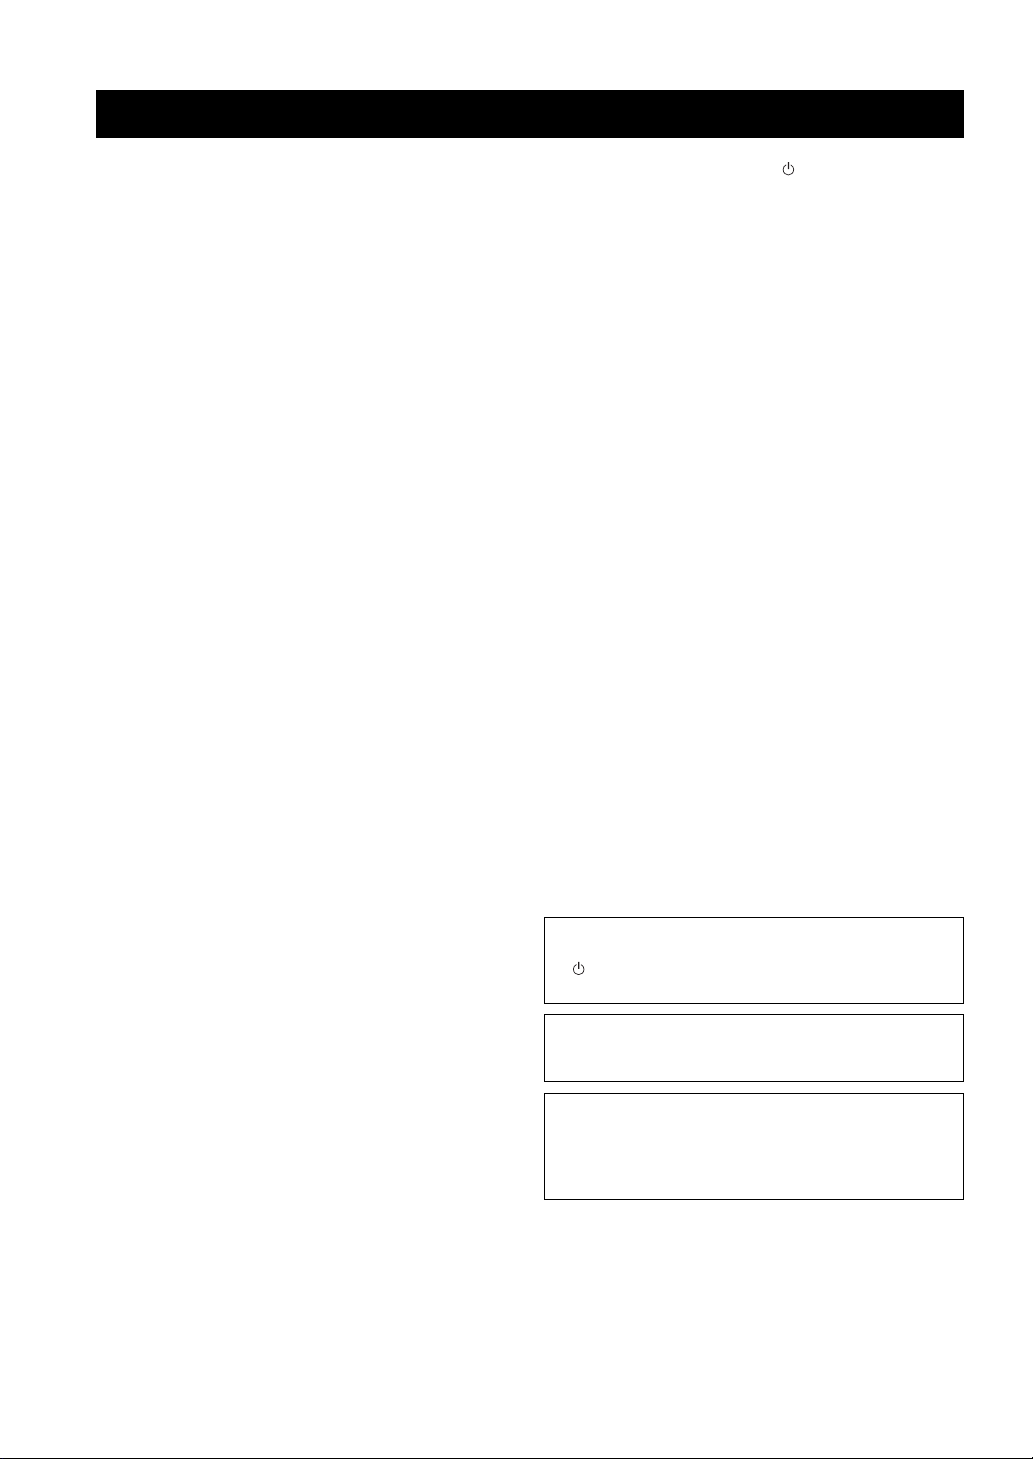
This unit is a network CD player, on which you can enjoy playing back music files stored on your media server (PC or
NAS), audio contents on the Internet, CD, iPod and USB devices, by connecting the unit to your home network (DLNA)
and audio system on the same network.
y
For details on DLNA or NAS, see “ADDITIONAL INFORMATION” (☞ P.30).
Internet
2
Modem
PC
1
Broadband router*
5V
2.1A
PURE DIRECTSOURCE
Amplifier
This unit (CD-N500)
iPod/USB devices
5
CD
4
SELECT
ENTER
PUSH
RETURN
PREPARATION
3
NAS
Mobile device* Remote control
A
B
* You need a commercially available WiFi broadband router when you use a mobile device.
❚ Sources that can be played back on this unit
1 Play back audio contents on the Internet
(☞ P.16)
2 Play back music files stored on your PC
(☞ P.11, 14)
3 Play back music files stored on your NAS
(☞ P.11, 14)
y
For details on connecting the devices, see “CONNECTIONS” (☞ P.9).
4 Play back a CD (☞ P.18)
5 Play back your iPod or USB devices
(☞ P.20)
❚ Devices that can control this unit
A Control this unit using your mobile devices (☞ P.11, 13)
B Control this unit using the remote control (☞ P.6, 14, 16, 18, 20, 22, 23)
English
1 En
Page 4
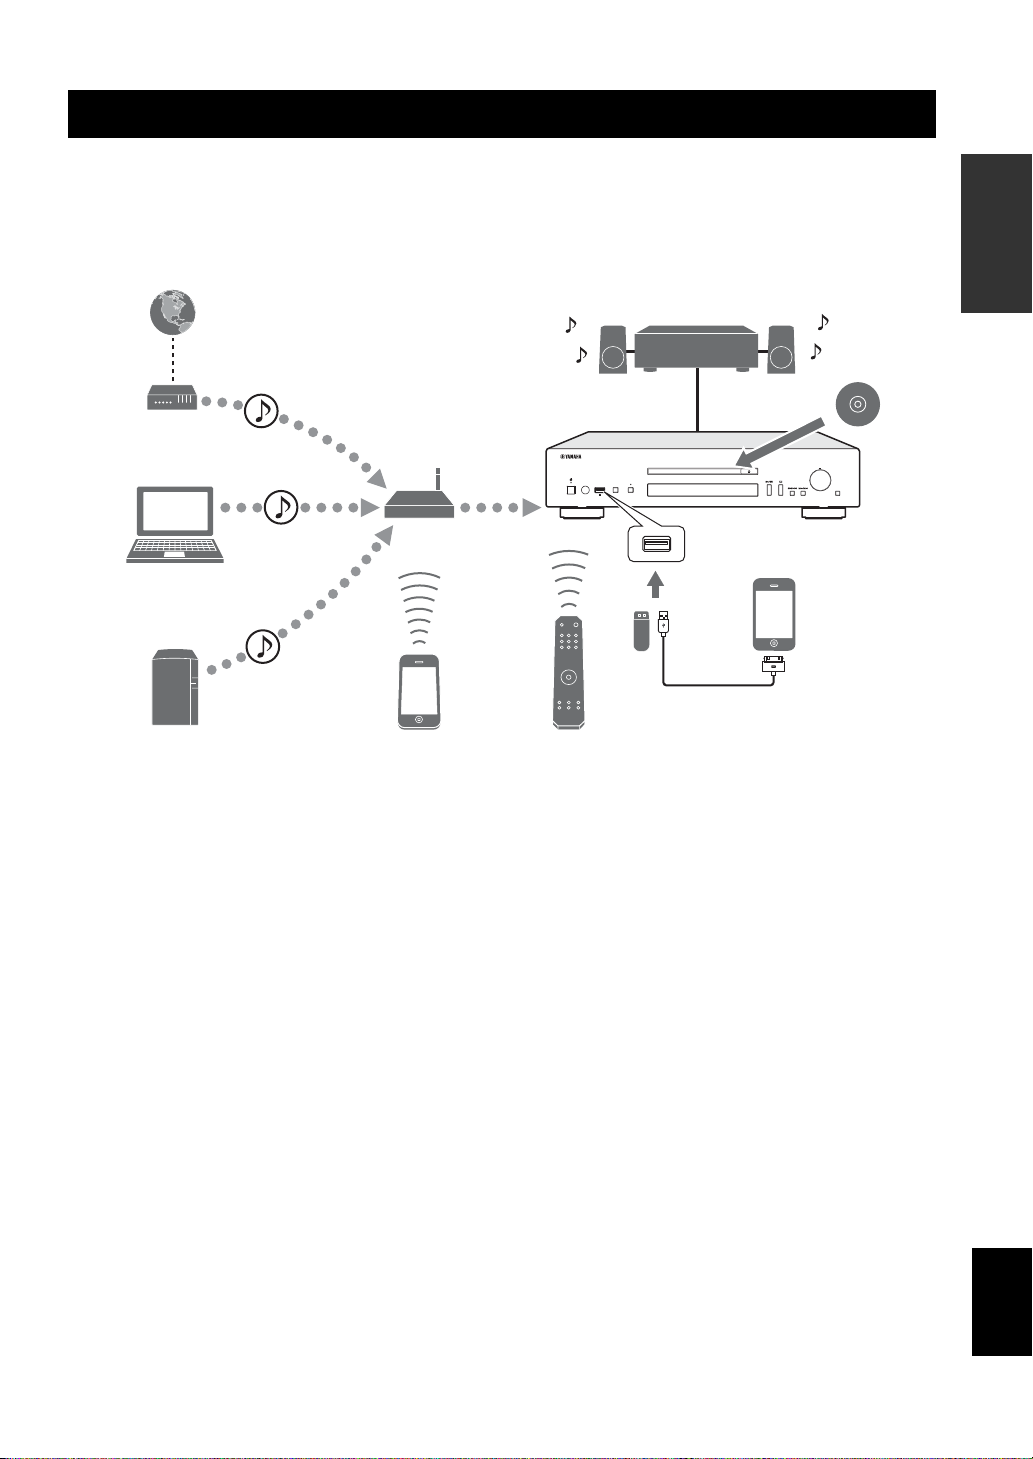
FREQUENTLY ASKED QUESTIONS
What kind of settings do I need to make?
→ For details on settings of your PC, NAS or mobile devices, see “SETUP OF YOUR PC/NAS/MOBILE DEVICES”
(☞ P.11).
→ For details on the setup menu on this unit, see “SETUP MENU” (☞ P.23).
Why can’t I find music files on my PC?
→ Check the media sharing settings of your PC or media server, such as Windows Media Player 12 (☞ P.11).
→ Check if the music files are playable (☞ P.31).
Can I control this unit with my iPhone?
→ For details on controlling this unit from your mobile device, see “Operations from your mobile device” (☞ P.13).
I can’t find this unit using the dedicated application installed on my mobile device!
→ Check if this unit is properly connected to the same network via the broadband router.
→ Check if access to this unit is restricted by MAC address filter function (☞ P.27).
What music files are playable on this unit?
→ For details on playable files and formats, see “PLAYABLE DISCS AND FILE FORMATS” (☞ P.31).
How can I listen to Internet radio on this unit?
→ For details on listening to Internet radio stations, see “PLAYBACK OF AUDIO CONTENTS ON THE
INTERNET” (☞ P.16).
How do I play back my iPod or USB devices?
→ For details on playback of your iPod or USB devices, see “PLAYBACK OF YOUR iPod/USB DEVICES”
(☞ P.20).
What do the messages on the front panel display stand for?
→ For details on the front panel display messages, see “Front panel display messages” (☞ P.29).
For latest information, please visit Yamaha website.
2 En
Page 5

CONTENTS
PREPARATION
WHAT YOU CAN DO WITH THIS UNIT ................. 1
FREQUENTLY ASKED QUESTIONS ....................... 2
SUPPLIED ACCESSORIES ......................................... 4
REMOTE CONTROL PREPARATION ..................... 4
CONTROLS AND FUNCTIONS ................................. 5
Front panel......................................................................... 5
Remote control................................................................... 6
Rear panel .......................................................................... 8
CONNECTIONS ............................................................9
Connecting to an amplifier................................................. 9
Connecting to a network
(PC/NAS/Internet connection)..................................... 10
Turning on this unit.......................................................... 10
OPERATIONS
SETUP OF YOUR PC/NAS/MOBILE DEVICES .... 11
Sharing music files stored on your PC............................. 12
Operations from your mobile device ............................... 13
PLAYBACK OF MUSIC FILES ON YOUR
PC/NAS...................................................................... 14
Operations from the main unit or remote control ............ 14
PLAYBACK OF AUDIO CONTENTS ON THE
INTERNET ............................................................... 16
Listening to Internet radio stations .................................. 16
PLAYBACK OF CDS ..................................................18
Playing back a CD ........................................................... 18
Using program playback mode ........................................ 19
PLAYBACK OF YOUR iPod/USB DEVICES.......... 20
Connecting your iPod or USB devices ............................ 20
Playing back your iPod.................................................... 20
Using extended playback mode for your iPod................. 21
Playing back USB devices............................................... 22
SETUP MENU ..............................................................23
Setup menu operations..................................................... 23
Setup menu list................................................................. 24
Advanced setup menu...................................................... 25
OTHERS
PREPARATION OPERATIONS OTHERS
TROUBLESHOOTING ...............................................26
Front panel display messages........................................... 29
ADDITIONAL INFORMATION................................30
PLAYABLE DISCS AND FILE FORMATS .............31
Playable media and devices............................................. 31
Playable discs and file formats ........................................ 32
SPECIFICATIONS.......................................................33
(at the end of this manual)
Information about software ...............................i
About this manual
• Notes contain important information about safety and operating instructions. y indicates a tip for your operation.
• “iPod” described in this manual may also refer to “iPhone” or “iPad”.
3 En
English
Page 6
PREPARATION
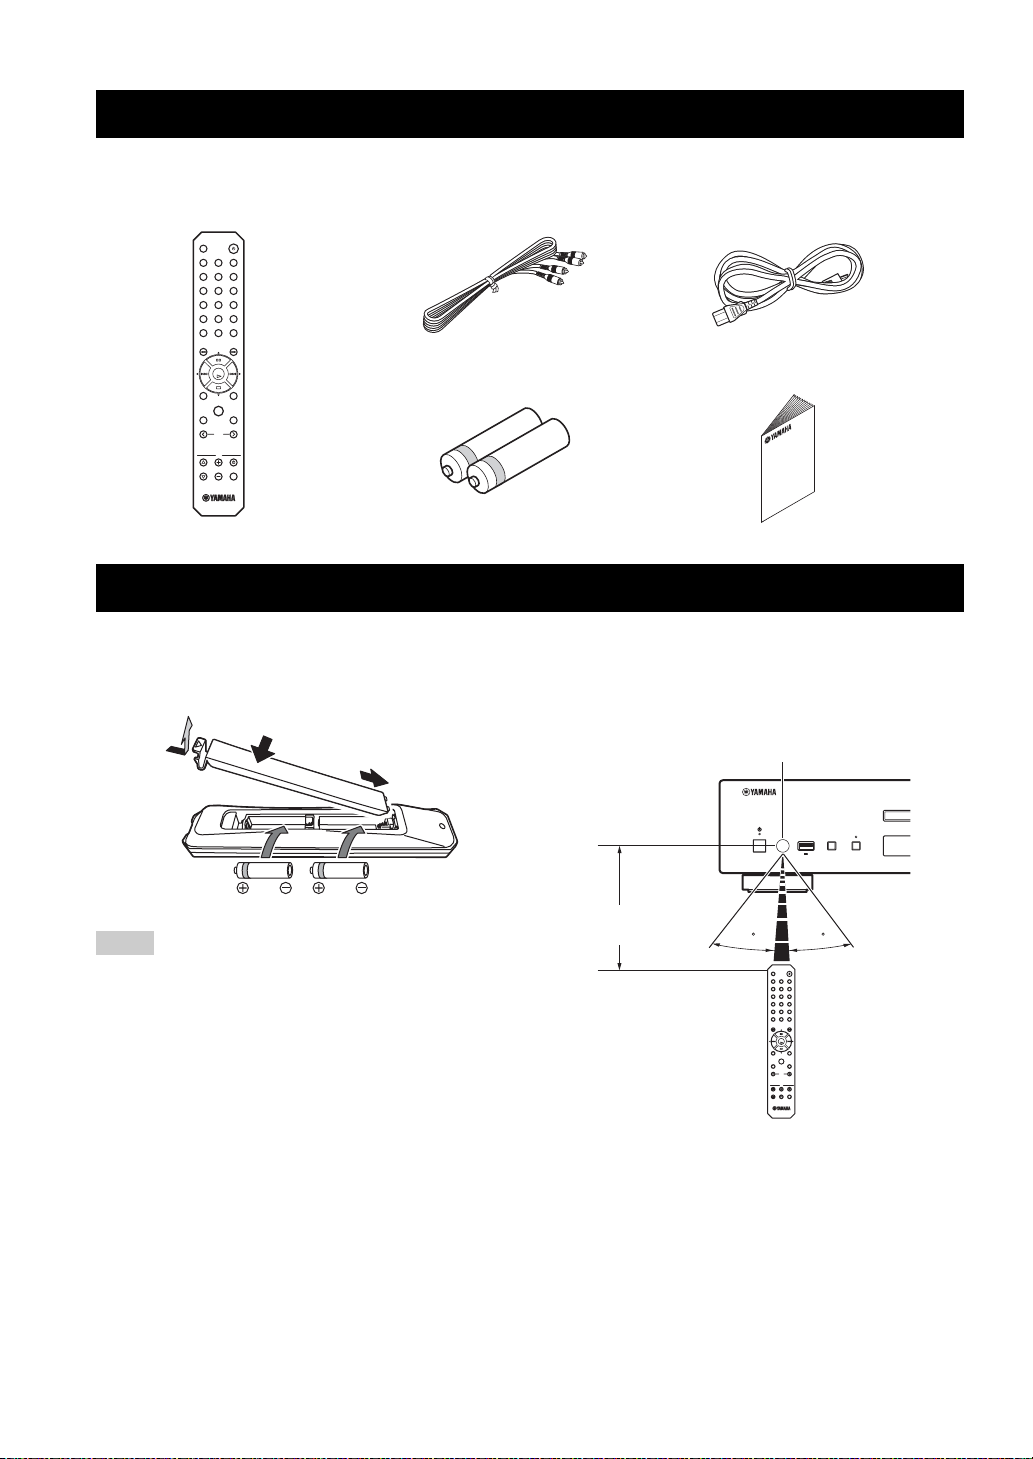
SUPPLIED ACCESSORIES
Check that you have received all of the following items.
Remote control RCA stereo cable Power cable
OPEN/CLOSE
PURE DIRECT
DISPLAY
SOURCE
123
456
7089
PROGRAM
CLEAR
REPEAT
A/BSHUFFLE
ENTER
HOME
RETURN
NOW PLAYING
SETUP
MODE
FOLDER
AMP
VOLUMEINPUT
MUTE
Batteries (AA, R6, UM-3) (× 2) Owner’s manual
REMOTE CONTROL PREPARATION
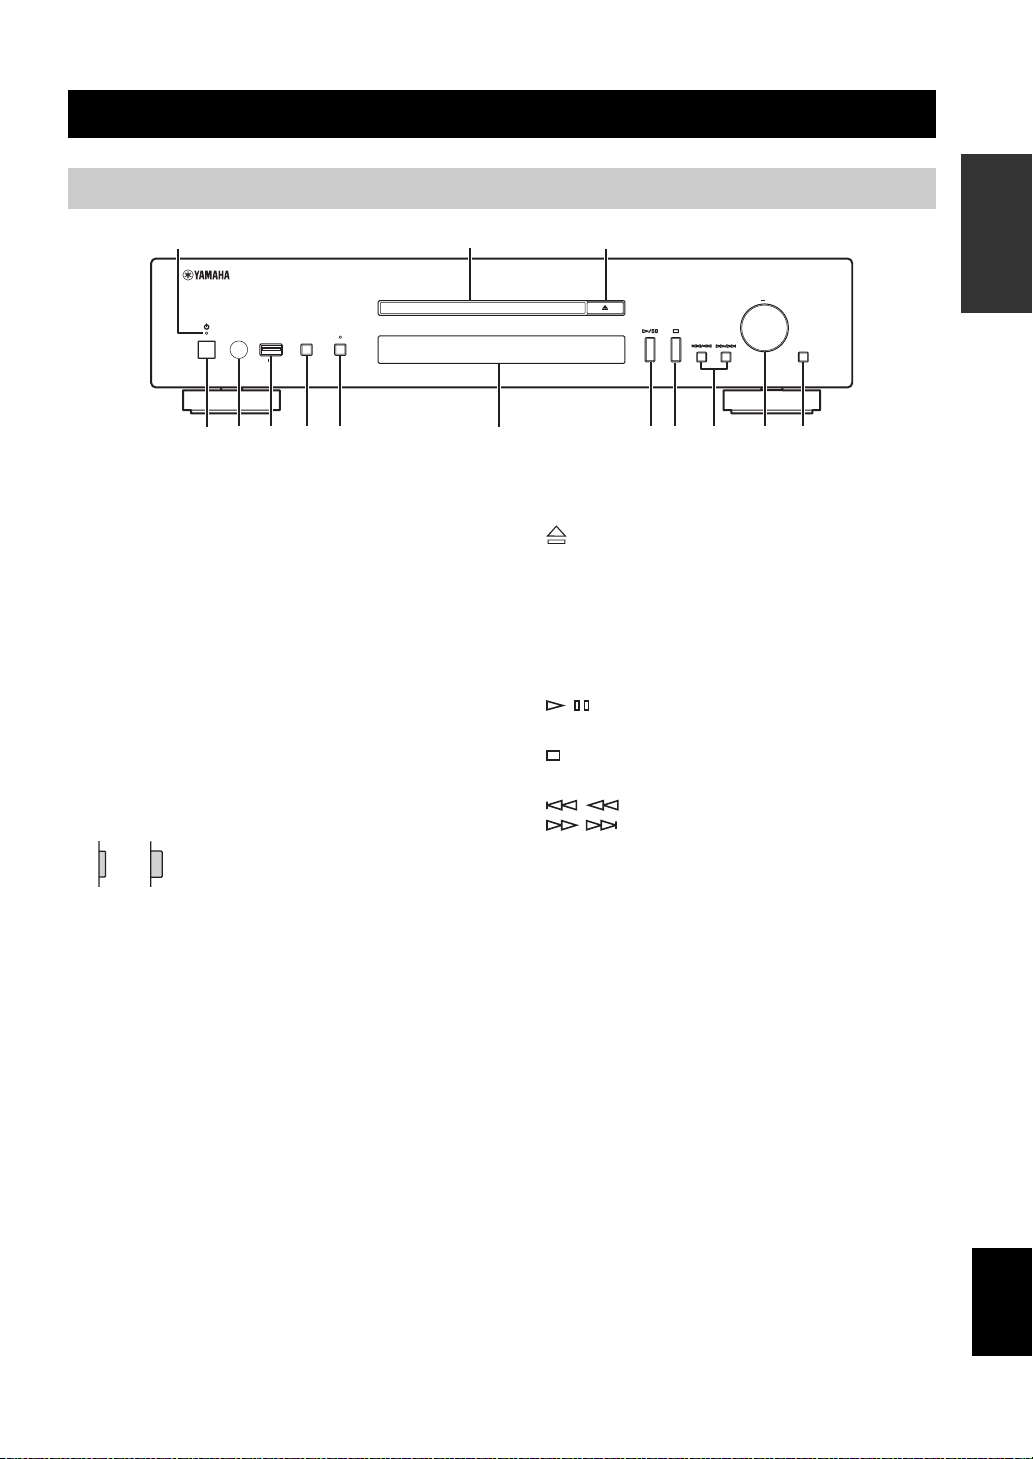
❚ Installing the batteries
1
Notes
• Change all batteries if the operation range of the remote control
narrows.
• Before inserting new batteries, wipe the compartment clean.
4
3
2
❚ Operation range
Aim the remote control directly at the remote control
sensor on the main unit during operation.
Remote control sensor
PURE DIRECTSOURCE
5V
2.1A
Within 6 m (20 ft)
30 30
OPEN/CLOSE
DISPLAY
SOURCE
PURE DIRECT
123
456
7089
CLEAR
PROGRAM
A/BSHUFFLE
REPEAT
ENTER
RETURN
HOME
NOW PLAYING
MODE
SETUP
FOLDER
AMP
VOLUMEINPUT
MUTE
4 En
Page 7
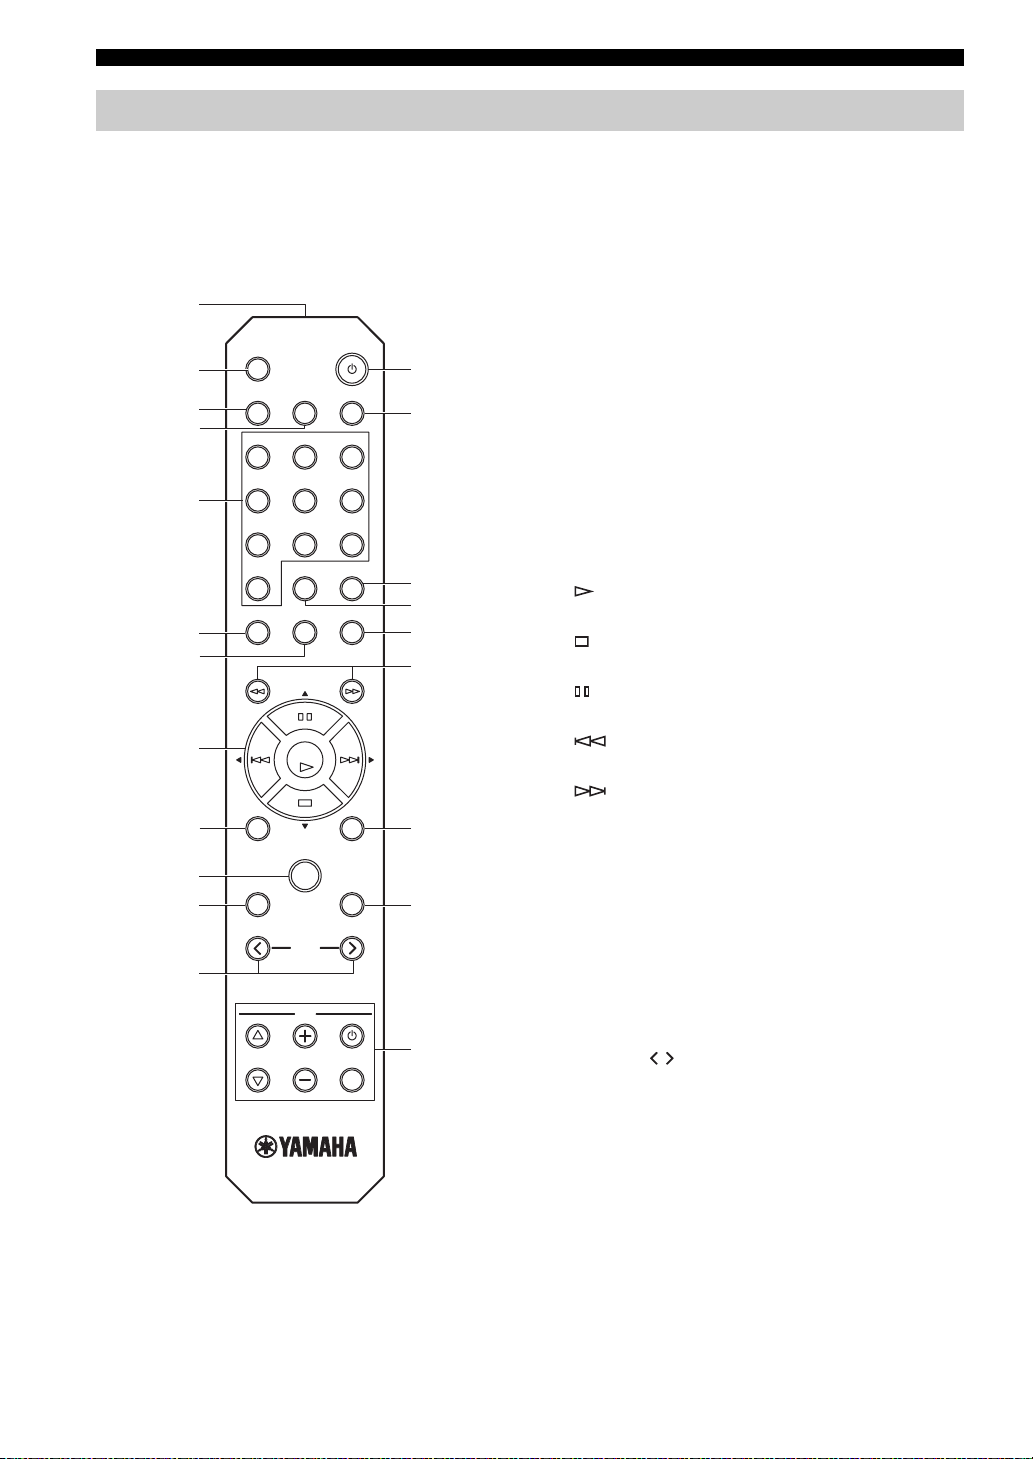
Front panel
CONTROLS AND FUNCTIONS
PREPARATION
18
PURE DIRECTSOURCE
5V
2.1A
23 546 09ABCD
1 Power indicator
• Lights up:
This unit is in a state that you can switch the unit to on or
standby mode with the remote control or mobile devices
(when network standby mode is on), or this unit is turned
on.
• Lights up dimly:
This unit is in a state that you can turn the unit on with the
remote control (when network standby mode is off).
• Off:
This unit is turned off and you can turn the unit on with the
power switch on the front panel of the main unit only.
y
You can switch the setting of the network standby mode to
on or off in the setup menu (☞ P.24).
2 Power switch (☞ P.10)
Switches this unit between on and off.
: On : Off
3 Remote control sensor (☞ P.4)
Receives infrared signals from the remote control.
4 USB port (☞ P.20)
Connects your iPod or USB devices.
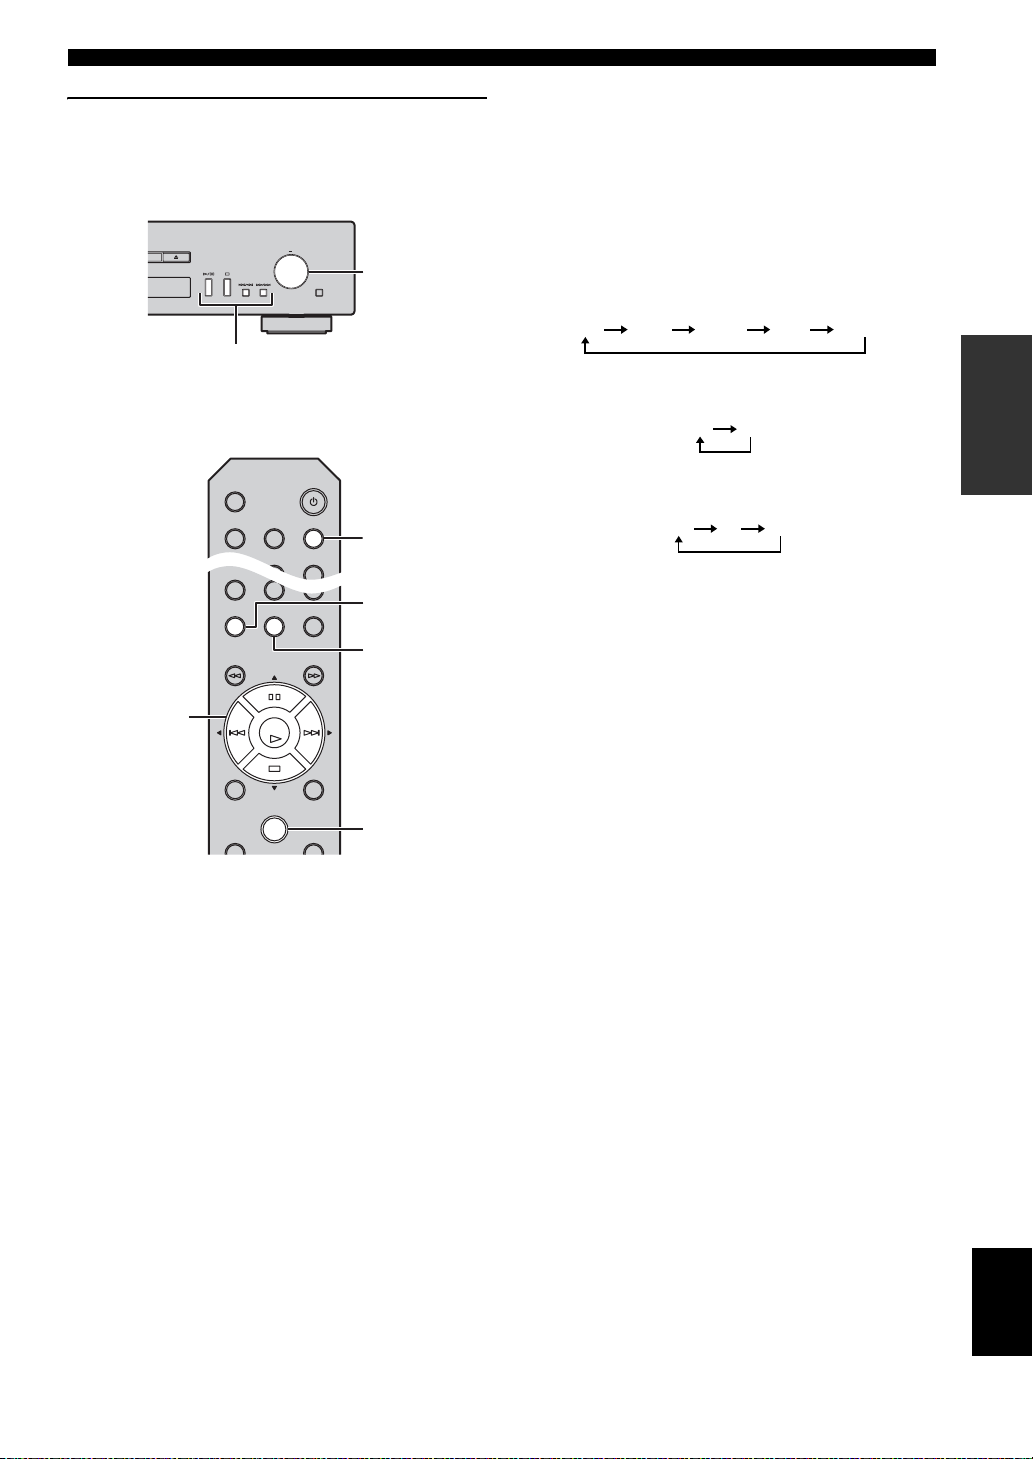
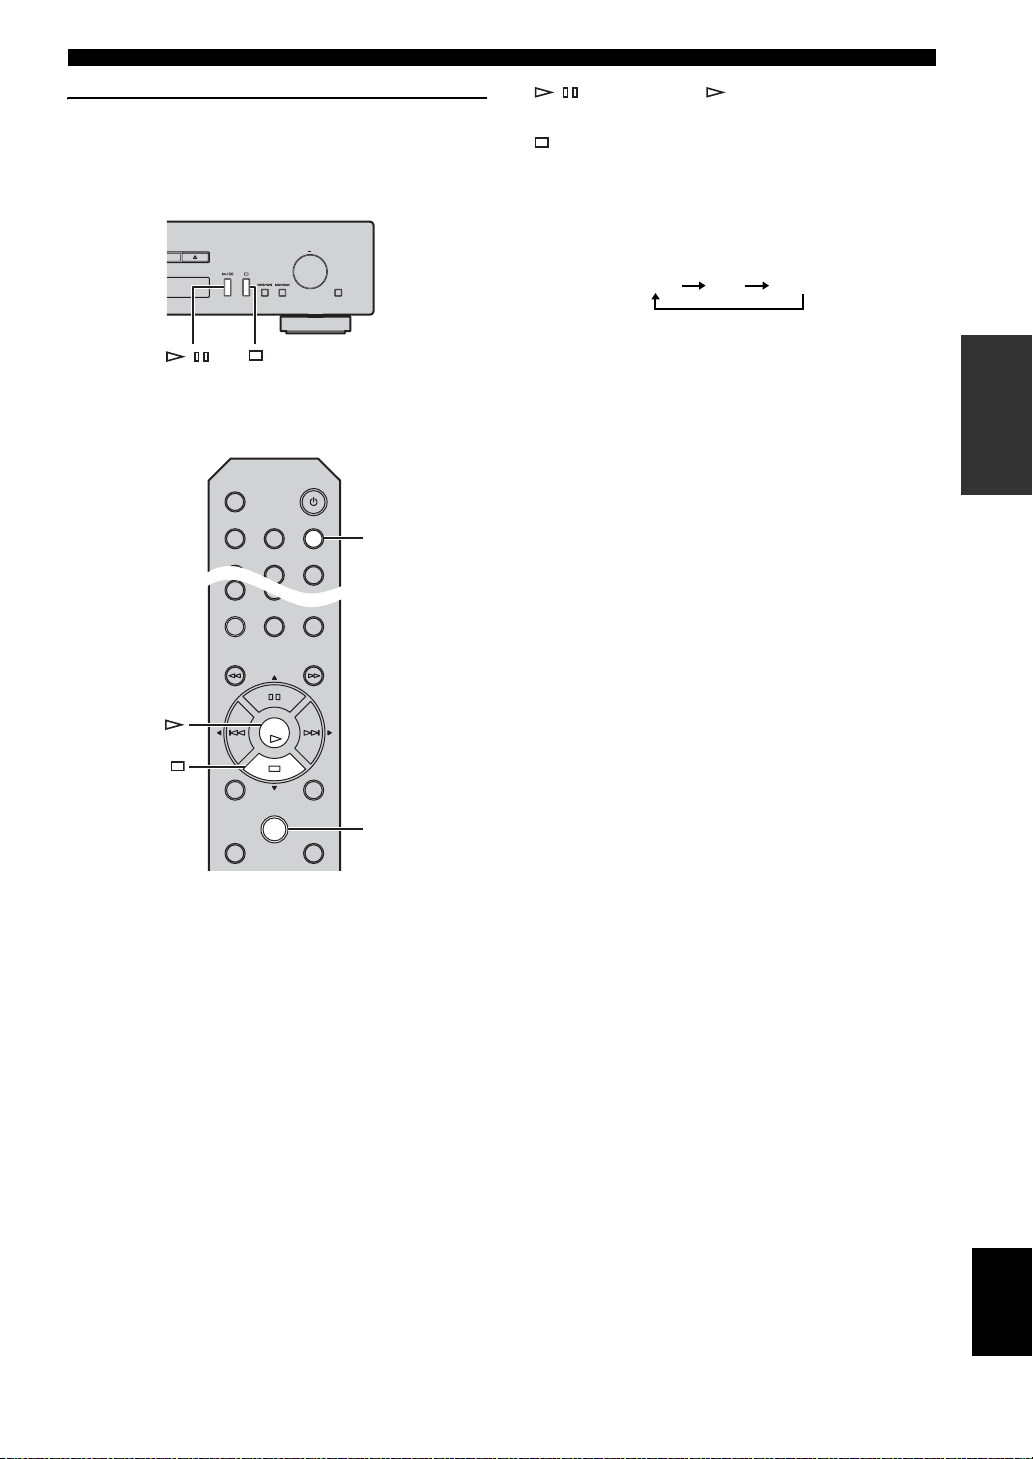
5 SOURCE (☞ P.14, 16, 18, 20, 22)
Selects an audio source. Each press cycles the audio sources
as follows.
CD → USB → SERVER → NET RADIO → Back to CD
6 PURE DIRECT
Turns on or off PURE DIRECT mode. Audio quality will be
improved when PURE DIRECT mode is on.
y
The PURE DIRECT indicator lights up when PURE
DIRECT mode is on.
7
SELECT
ENTER
PUSH
RETURN
7 Disc tray
Loads a disc.
8 (Open/Close)
Opens or closes the disc tray.
9 Front panel display
Shows menu items, playback information, etc.
y
For details on display messages, see “Front panel display
messages” (☞ P.29).
0 / (Play/Pause)
Starts or pauses playback.
A (Stop)
Stops playback.
B / (Skip/Search backward)
C SELECT/ENTER (jog dial) (☞ P.14, 16, 18, 21, 22, 24)
D RETURN (☞ P.14, 16, 21, 22)
/ (Skip/Search forward)
Skips back to the previous/beginning of the current track or
to the next track, or searches backward/forward.
Operations differ depending on audio sources.
Rotate to select an item and press to confirm the selection.
Shows the upper-level menu in the front panel display.
5 En
English
Page 8
CONTROLS AND FUNCTIONS
Remote control
1
OPEN/CLOSE
2
3
4
5
6
7
8
9
0
A
B
SOURCE
123
456
7
0
HOME
NOW PLAYING
SETUP
DISPLAY
PURE DIRECT
89
CLEAR
PROGRAM
A/BSHUFFLE
REPEAT
ENTER
RETURN
MODE
FOLDER
AMP
VOLUMEINPUT
MUTE
C
D
E
F
G
H
I
J
K
1 Remote control signal transmitter
Transmits infrared signals to the main unit.
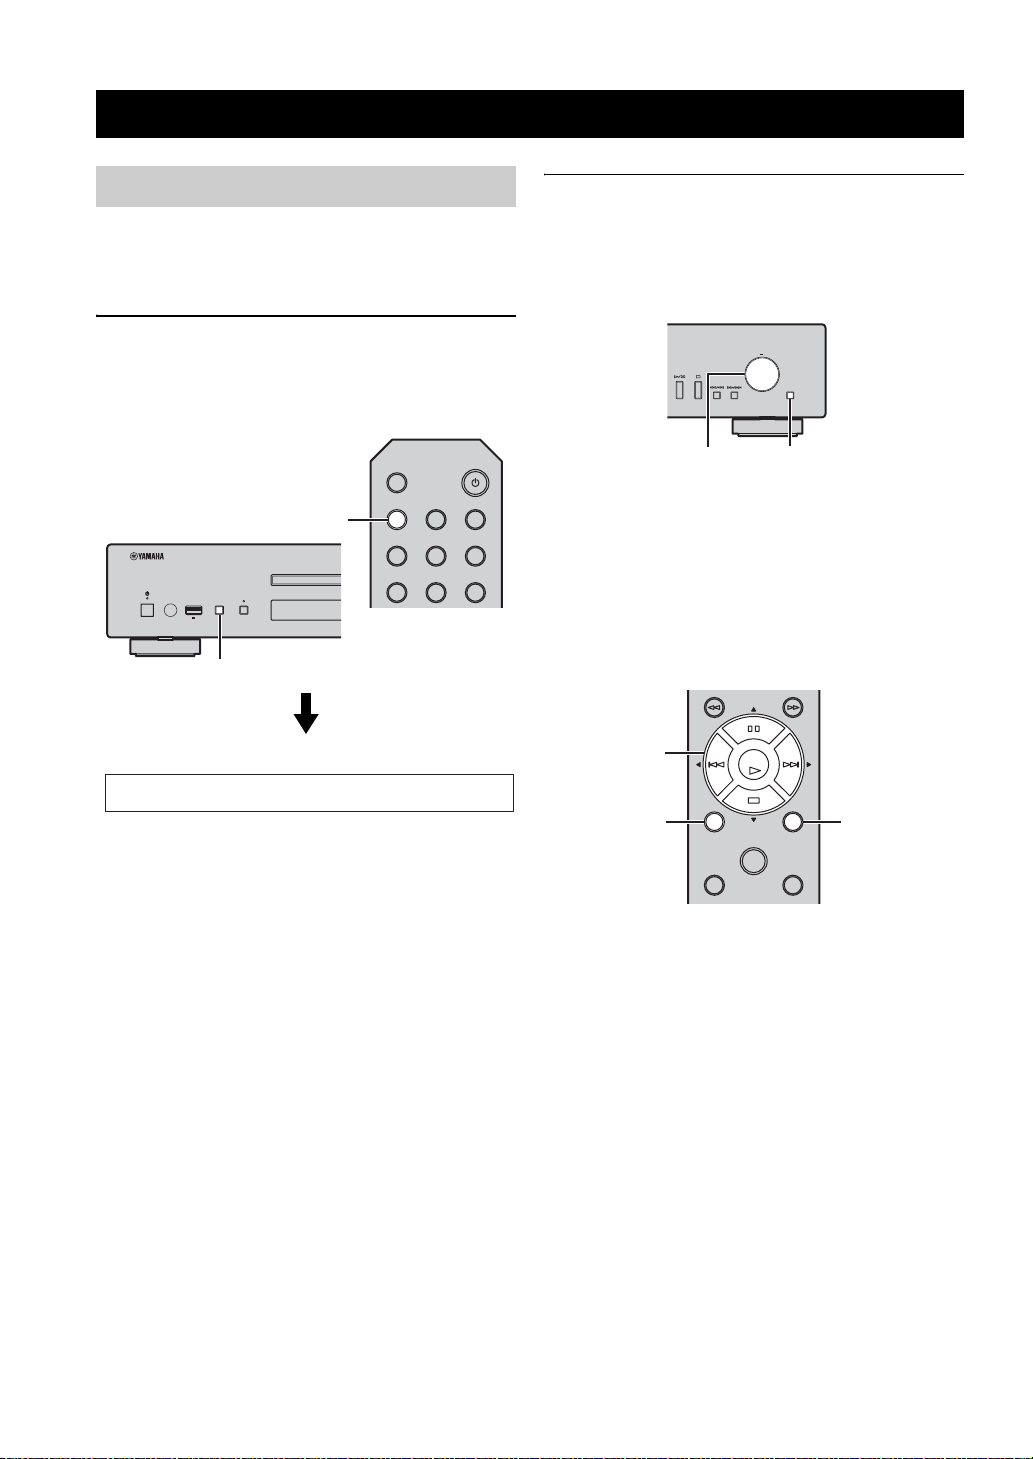
2 OPEN/CLOSE
Opens or closes the disc tray.
3 SOURCE (☞ P.14, 16, 18, 20, 22)
Selects an audio source. Each press cycles the audio sources
as follows.
CD → USB → SERVER → NET RADIO → Back to CD
4 PURE DIRECT
Turns on or off PURE DIRECT mode. Audio quality will be
improved when PURE DIRECT mode is on.
5 Numeric buttons (☞ P.18)
Use to select directly a track on the disc or the current folder.
6 SHUFFLE (☞ P.15, 18, 21, 22)
Switches shuffle modes.
7 REPEAT (☞ P.15, 18, 21, 22)
Switches repeat modes.
8 Playback buttons (☞ P.14, 16, 18, 21, 22, 23)
(Play)
Starts playback.
(Stop)
Stops playback.
(Pause)
Pauses playback.
(Skip backward)
Skips backward.
(Skip forward)
Skips forward.
S/T/W/X (Cursor buttons)/ENTER
Use the cursor buttons to select an item and press ENTER to
confirm the selection.
9 HOME (☞ P.14, 16, 21, 22)
Shows the top-level menu in the front panel display.
0 NOW PLAYING (☞ P.15, 17, 21, 22)
Shows the playback information in the front panel display.
A SETUP (☞ P.23)
Shows the setup menu in the front panel display.
B FOLDER ( / ) (☞ P.18)
Switches playback folders when playing music on data CDs.
C A (Power) (☞ P.10)
Switches this unit between on and standby mode.
y
For details on standby mode, see “Front panel” (☞ P.5).
D DISPLAY (☞ P.15, 17, 18, 21, 22)
Switches information shown in the front panel display, such
as playback information.
6 En
Page 9

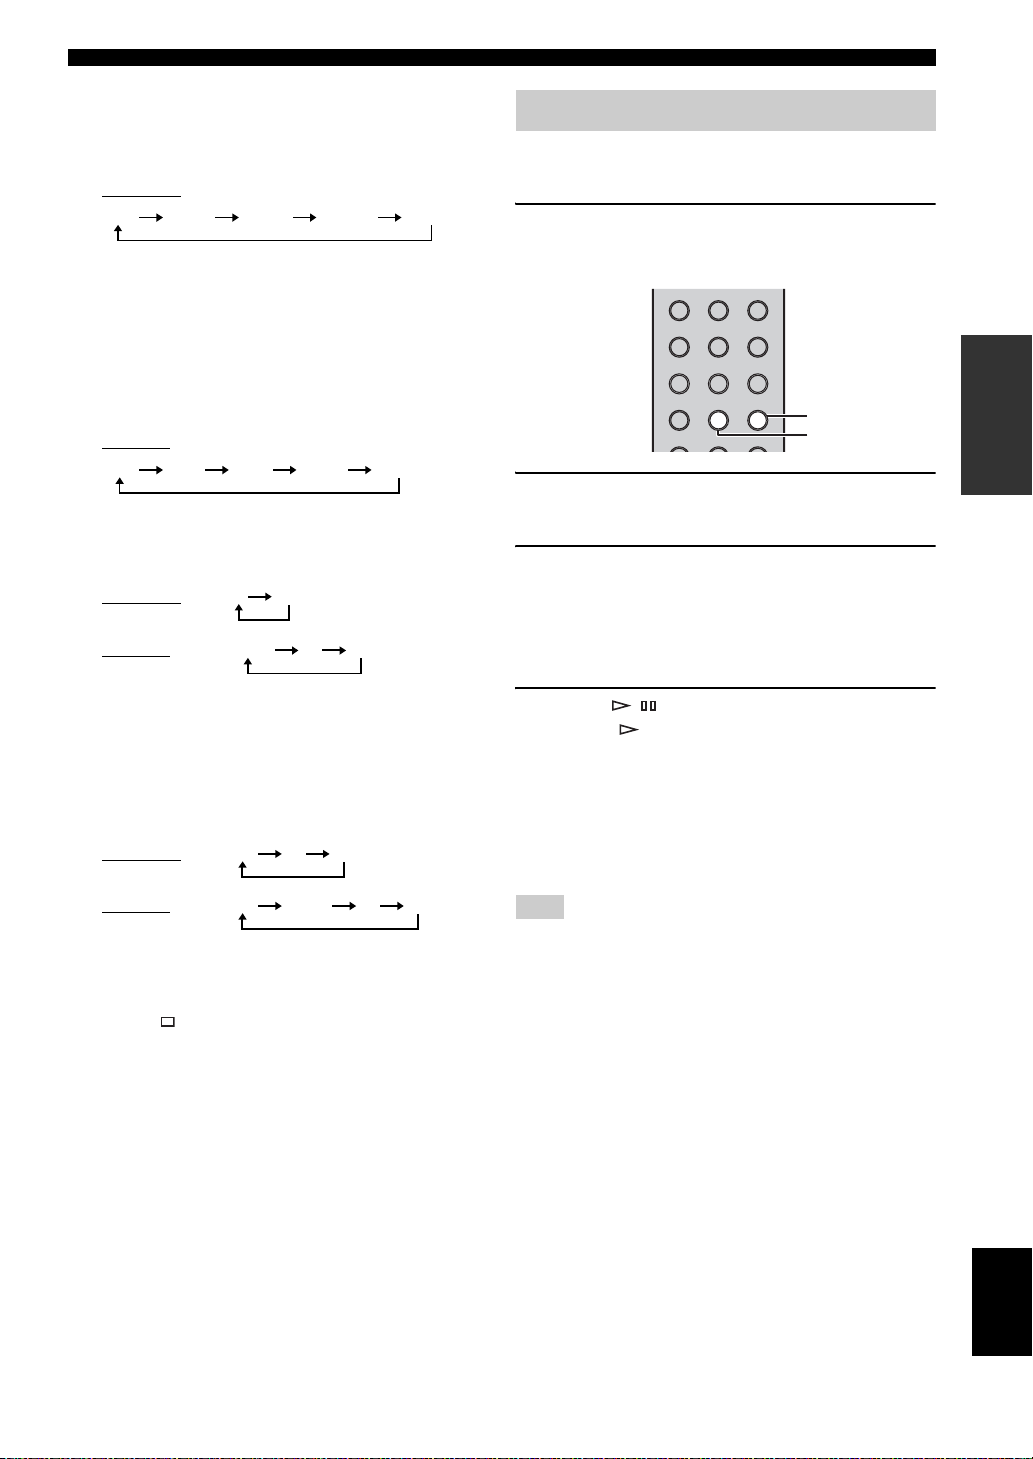
E CLEAR (☞ P.19)
Erases the last programmed track of an audio CD (except
data CDs) during program editing mode.
F PROGRAM
Turns on or off program playback mode. In program
playback mode, you can playback tracks of an audio CD
(except data CDs) in a programmed sequence. For details,
see “Using program playback mode” (☞ P.19).
G A/B
Repeats playback of a specified section of a track during
audio CD playback (except data CDs). To set the starting and
end points (A and B), press A/B twice during playback.
To cancel the repeat A-B function, press A/B again.
y
• A data CD is defined as a disc in which MP3 or WMA files
are recorded.
• You cannot set the repeat A-B function over two tracks.
• You cannot set the repeat A-B function for data CDs and
USB devices.
• The repeat A-B function is canceled when (Stop) is
pressed.
• You cannot set the repeat A-B function when this unit is in
PURE DIRECT mode.
• You cannot set the repeat A-B function when the unit is
showing the remaining playback time of the track or disc in
the front panel display.
H (Search backward), (Search forward)
(☞ P.18, 21)
Searches tracks backward/forward while the button is
pressed and held during playback.
I RETURN (☞ P.14, 16, 21, 22)
Shows the upper-level menu in the front panel display.
J MODE (☞ P.21)
Switches between standard mode and extended mode when
playing back your iPod.
K Amplifier control buttons
Controls the corresponding functions of a Yamaha amplifier.
A (Power)
Turns your amplifier on and off.
INPUT ( / )
Switches input sources.
VOLUME ( / )
Adjusts the volume.
MUTE
Turns mute on or off.
CONTROLS AND FUNCTIONS
PREPARATION
For details on operations, refer to the manual of your
amplifier.
y
These buttons may not work for some Yamaha amplifiers.
English
7 En
Page 10
CONTROLS AND FUNCTIONS
24 531
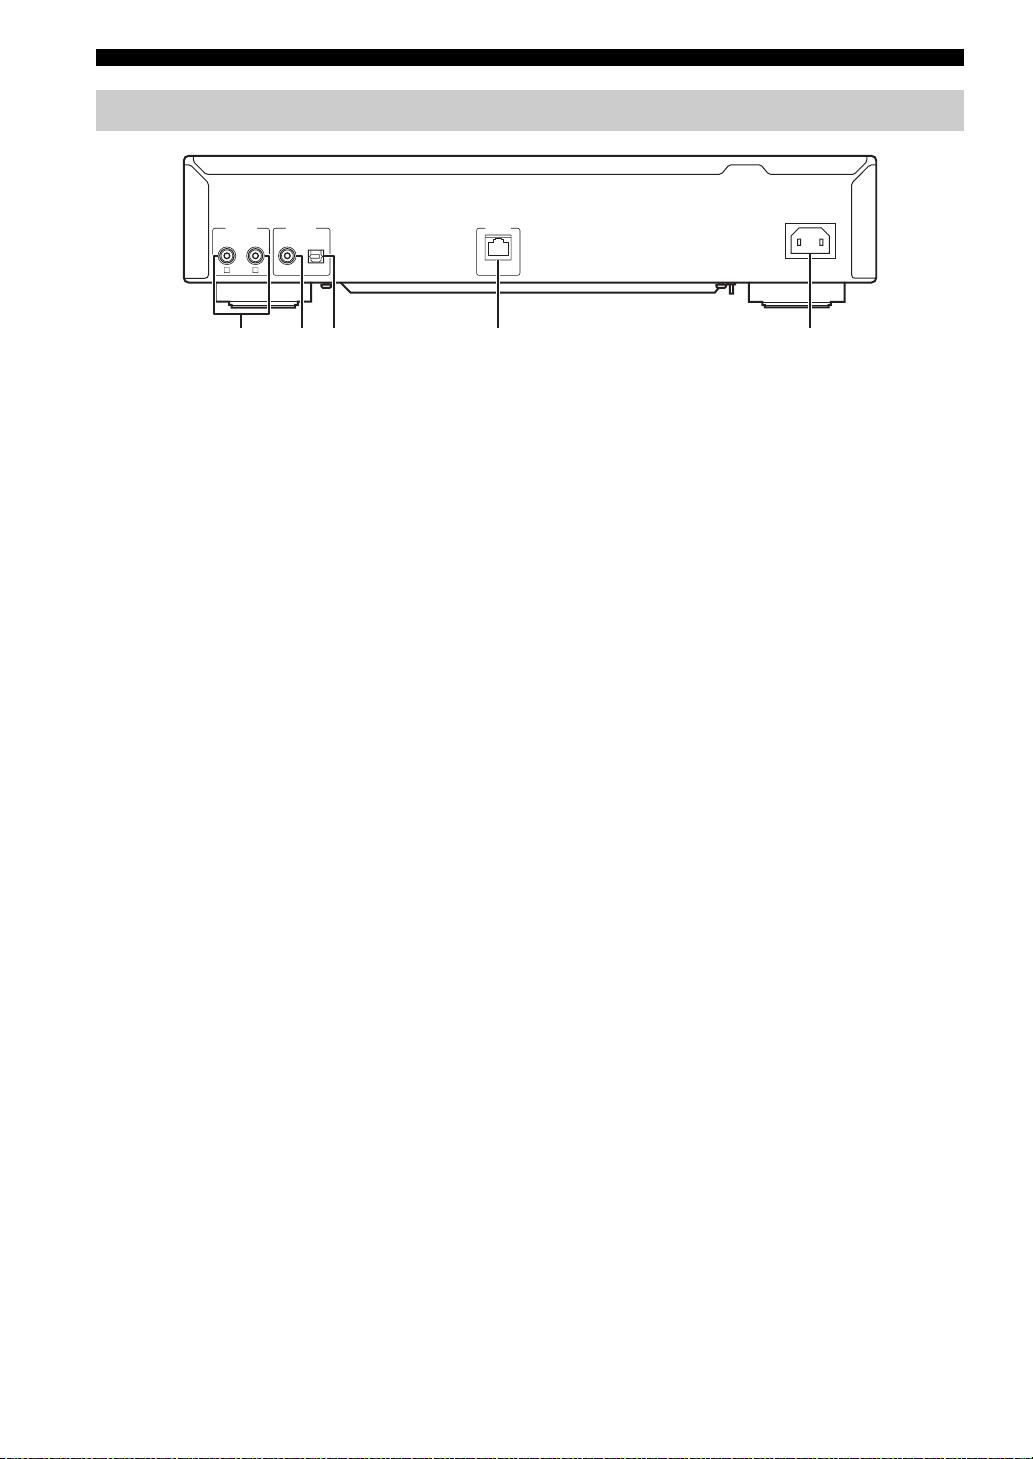
Rear panel
ANALOG OUT
RL
DIGITAL OUT
COAXIAL OPTICAL
1 ANALOG OUT terminal (☞ P.9)
Outputs L/R analog audio signals. Connect to your amplifier
or audio system using the RCA stereo cable (supplied).
2 DIGITAL OUT terminal (COAXIAL) (☞ P.9)
Outputs digital audio signals. Connect to your amplifier or
audio system using a coaxial digital audio cable
(commercially available).
3 DIGITAL OUT terminal (OPTICAL) (☞ P.9)
Outputs digital audio signals. Connect to your amplifier or
audio system using an optical cable (commercially
available).
4 NETWORK terminal (☞ P.10)
Connects to a network using a network cable (commercially
available).
5 AC IN socket (☞ P.9)
Connects to an AC outlet using the power cable (supplied).
NETWORK
AC IN
8 En
Page 11
CONNECTIONS
This section describes connections required before playing back with this unit.
Notes
• Do not connect the power cable of this unit until all connections are completed.
• You need to connect this unit to an amplifier and speakers before playing back.
• This unit can output digital signals up to 192 kHz/24 bits linear PCM signals.
• Proper playback may not be possible depending on the connected device and environment. Verify the settings and specifications of the
connected playback source device.
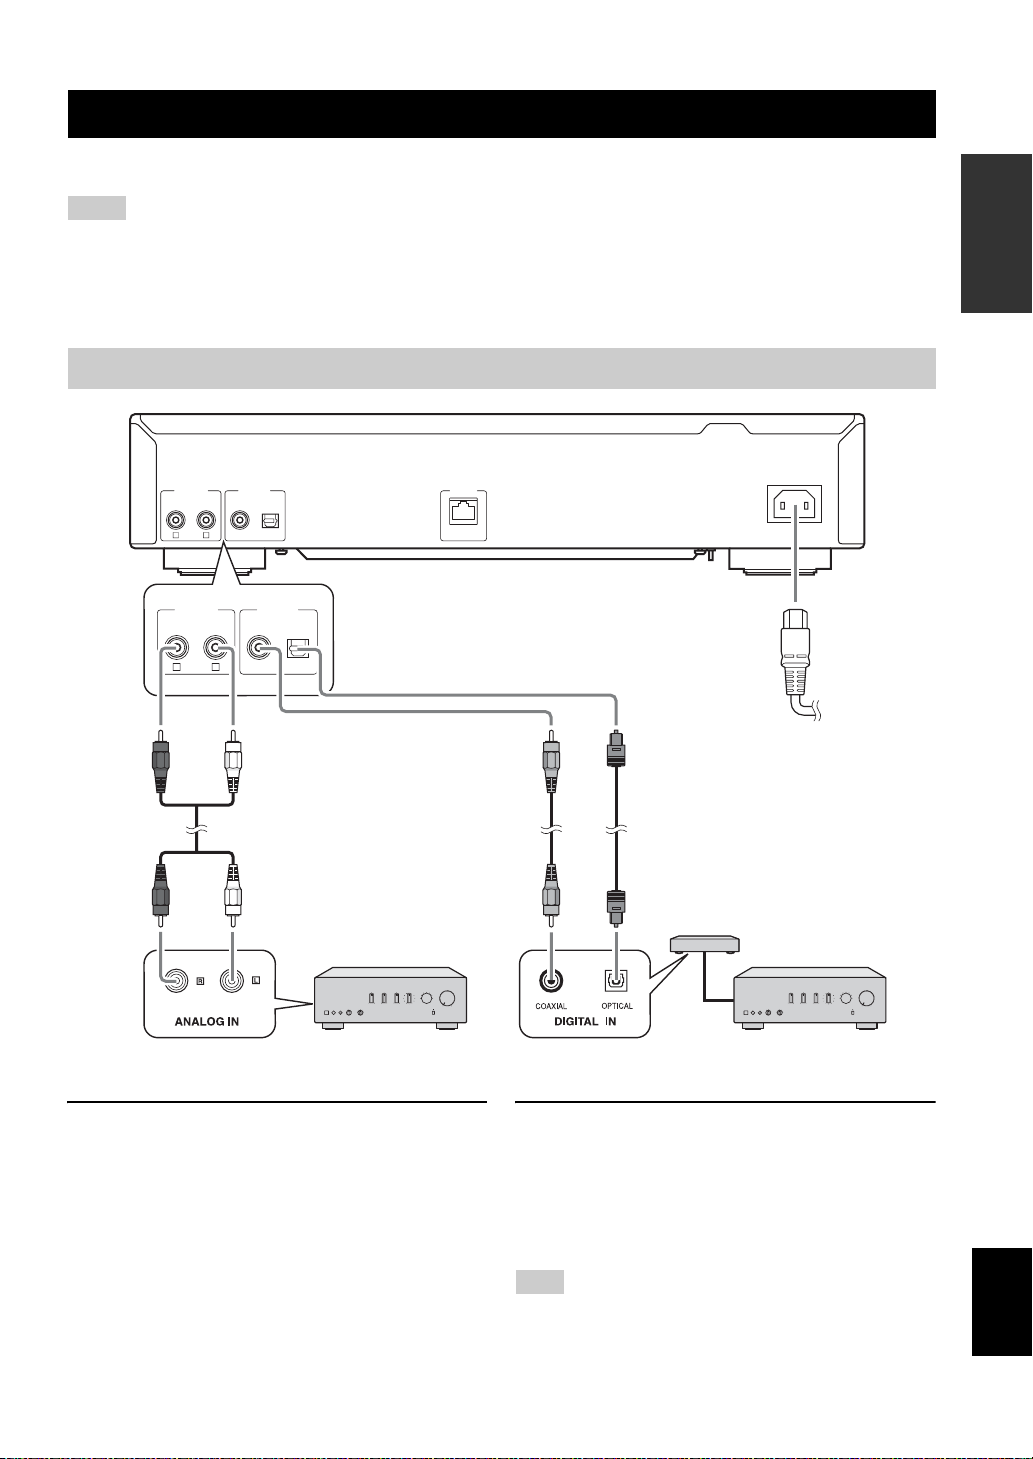
Connecting to an amplifier
ANALOG OUT
R L
R L
DIGITAL OUT
COAXIAL OPTICAL
DIGITAL OUTANALOG OUT
COAXIAL OPTICAL
NETWORK
This unit (CD-N500)
Power cable
(supplied)
1
21 3
AC IN
2
To AC outlet
PREPARATION
Amplifier
1 Connect this unit to your amplifier with
one of the following cables.
1 RCA stereo cable
(supplied)
2 Coaxial digital audio cable
(commercially available)
3 Optical digital cable
(commercially available)
DAC
(Digital-to-analog converter)
Amplifier
* The digital output is turned off when this unit is in
PURE DIRECT mode.
2 Connect the supplied power cable to the
AC IN socket, then plug into an AC
outlet.
y
For details on speaker connections, refer to the manual of your
amplifier or speakers.
English
Note
When using a digital connection, audio output may be interrupted
at the beginning of a track depending on the audio system
(amplifier, etc.).
9 En
Page 12
CONNECTIONS
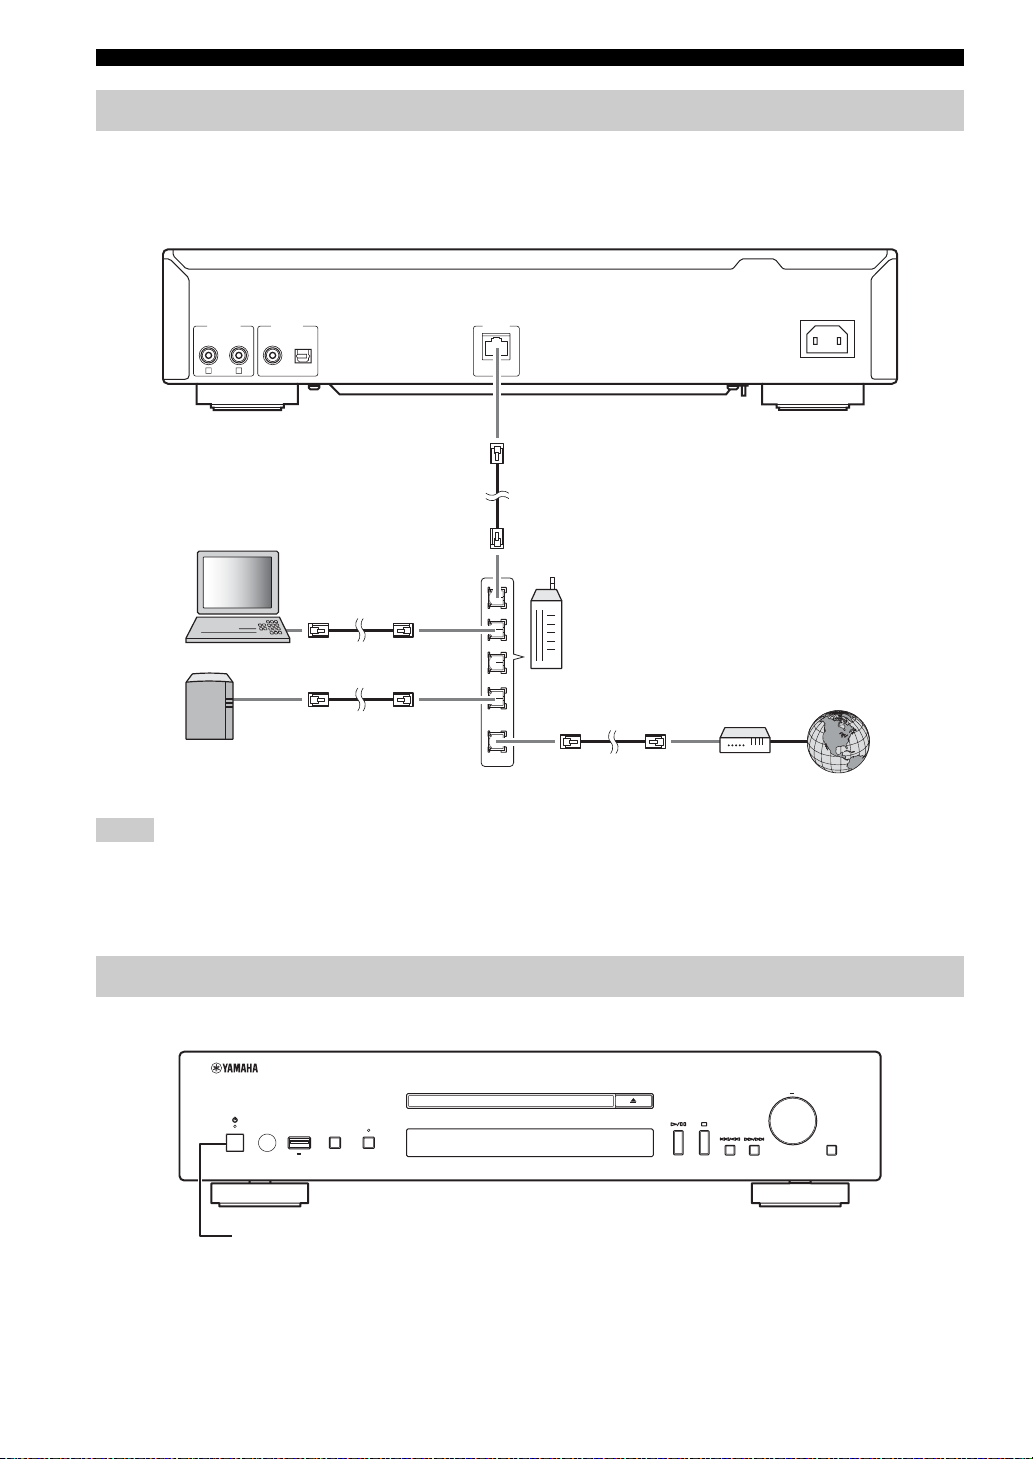
Connecting to a network (PC/NAS/Internet connection)
You can play back music files stored on your PC or NAS, audio contents on the Internet, by connecting this unit to a
network.
Connect with a commercially available STP (shielded twisted pair) network cable (CAT-5 or higher, straight-through
cable).
ANALOG OUT
R L
DIGITAL OUT
COAXIAL OPTICAL
NETWORK
AC IN
This unit (CD-N500)
Network cable
LAN
PC
Broadband router
WAN
NAS
Modem
Internet
Notes
• All devices other than this unit are sold separately.
• You need to configure your PC or NAS after connecting. For details on settings, see “SETUP OF YOUR PC/NAS/MOBILE
DEVICES” (☞ P.11).
• Wired connections are recommended for each device to sustain high sound quality.
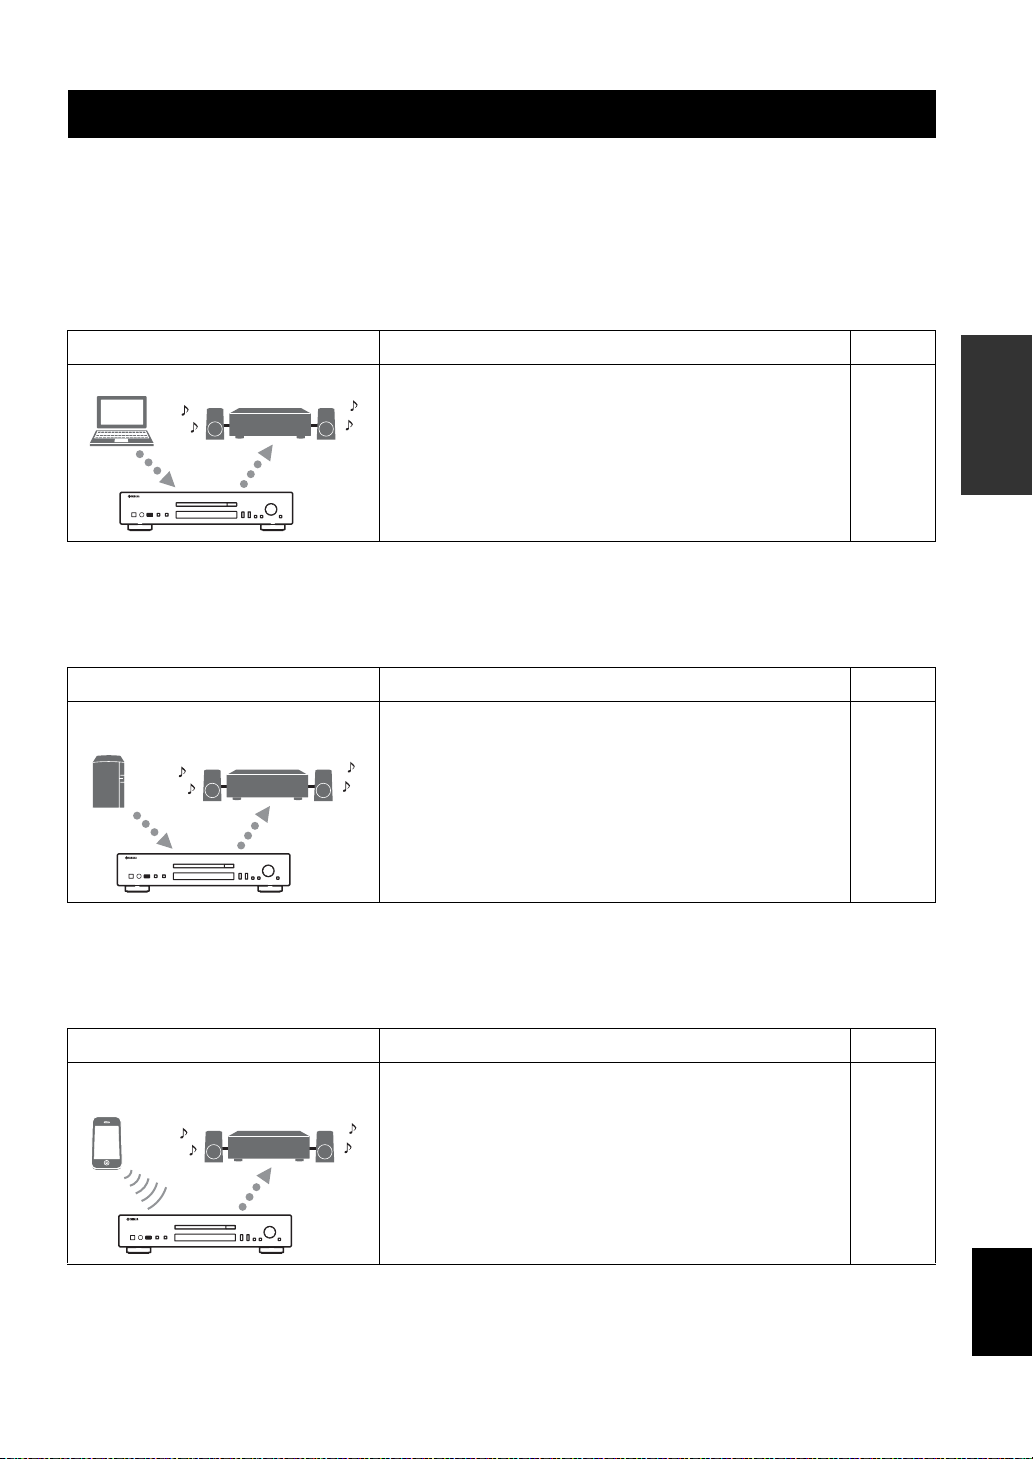
Turning on this unit
When you have established all cable connections, turn on this unit and other system components.
SELECT
ENTER
PUSH
PURE DIRECTSOURCE
5V
2.1A
Press the power switch to turn this unit on.
y
• With the power switch on, you can switch this unit to on or standby mode by pressing the power button on the remote control (☞ P.6).
• For details on standby mode, see “Front panel” (☞ P.5).
10 En
RETURN
Page 13
OPERATIONS
SETUP OF YOUR PC/NAS/MOBILE DEVICES
Configure your PC or NAS connected to the network to play back music files stored on the PC or NAS, or configure your
mobile device to control this unit.
y
For details on Internet connection, please refer to the manual of your network devices.
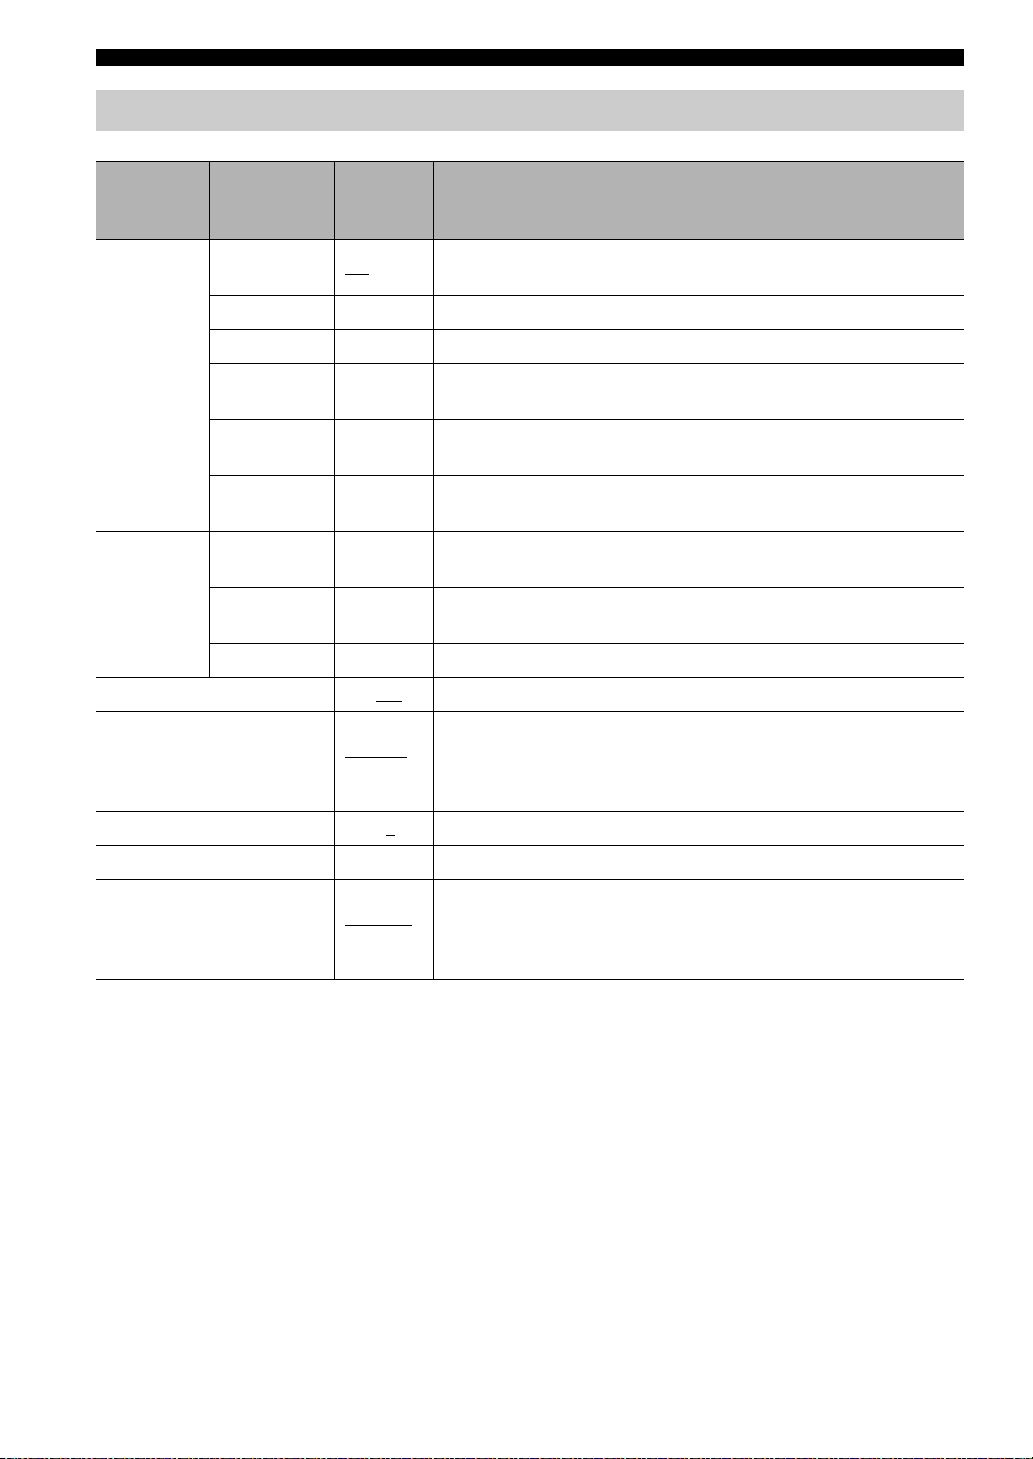
❚ Configuring your PC
What you want to do Setup Page
Play back music files stored on your PC
You need to configure the media sharing setting of your PC.
• Configure the media sharing setting of music files on
Windows Media Player 12.
y
You can operate from your PC using Windows Media Player. For details, refer to Windows Media Player help.
12
❚ Configuring your NAS
What you want to do Setup Page
Play back music files stored on your
NAS
* In case that you use DHCP and automatically obtain necessary information for network, such as IP address. If you want to configure
the network parameters manually, check that you are using an IP address which is not used by other network devices in your network.
You need to configure the following settings to access your
NAS.
• Configure media sharing settings of your NAS.
• Enable DHCP setting of your NAS.*
Setup operations differ depending on your NAS. Refer to the
NAS manual.
—
OPERATIONS
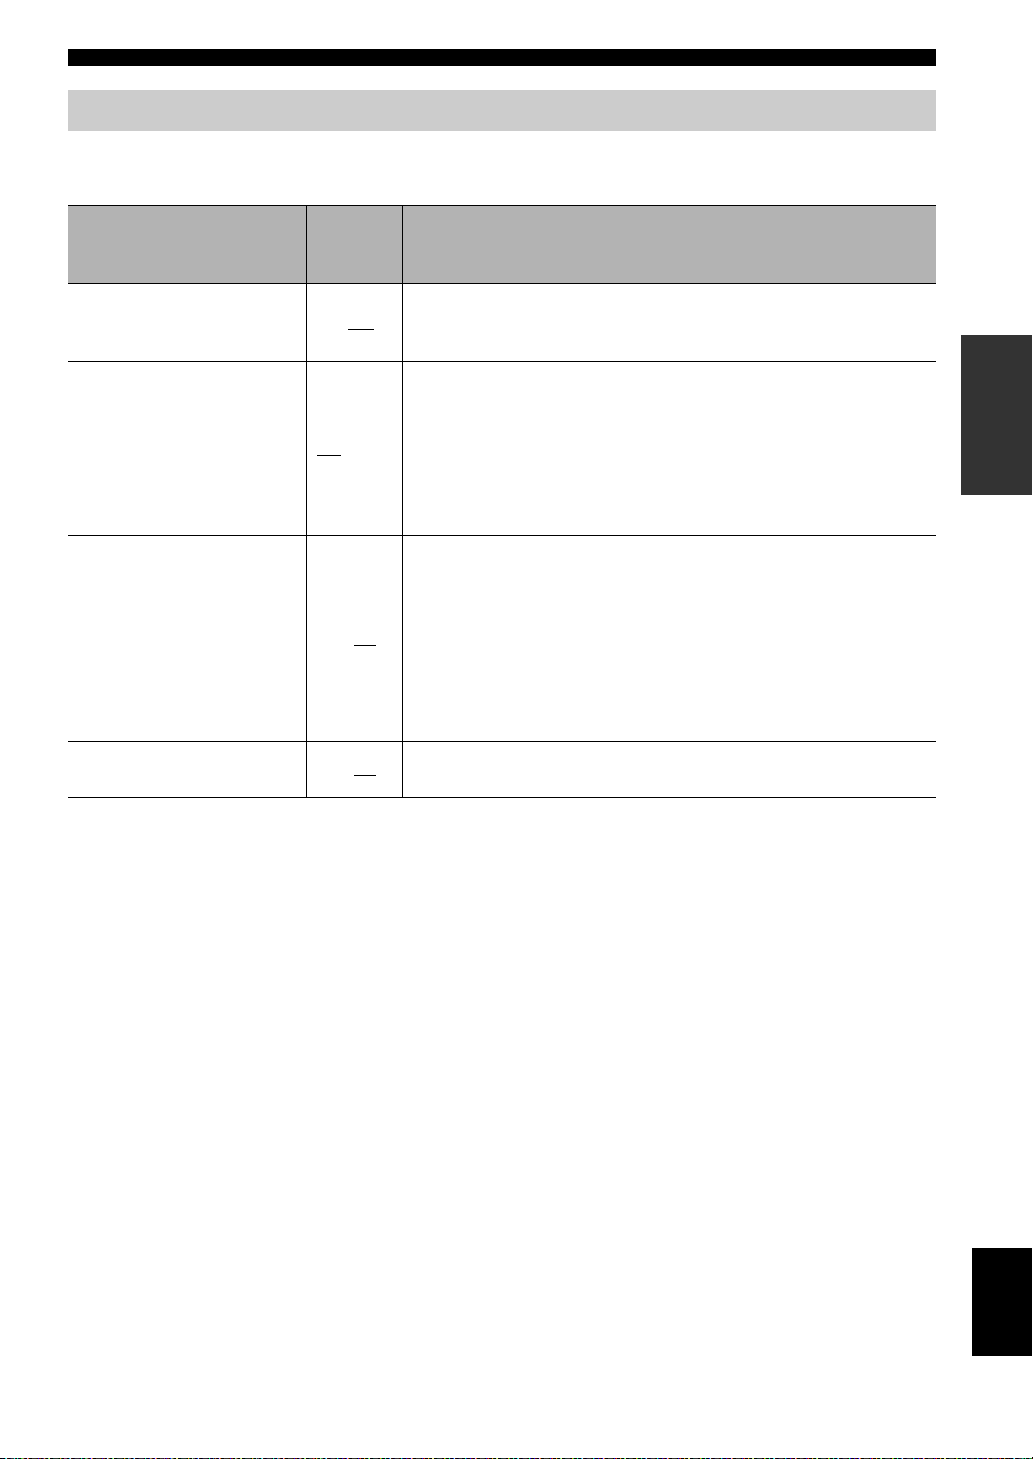
❚ Configuring your mobile device
What you want to do Setup Page
Operate this unit with your mobile
device
You need to download the dedicated application, and install it.
• Enable DHCP setting of your mobile device.*
* In case that you use DHCP and automatically obtain necessary information for network, such as IP address. If you want to configure
the network parameters manually, check that you are using an IP address which is not used by other network devices in your network.
13
11 En
English
Page 14
SETUP OF YOUR PC/NAS/MOBILE DEVICES
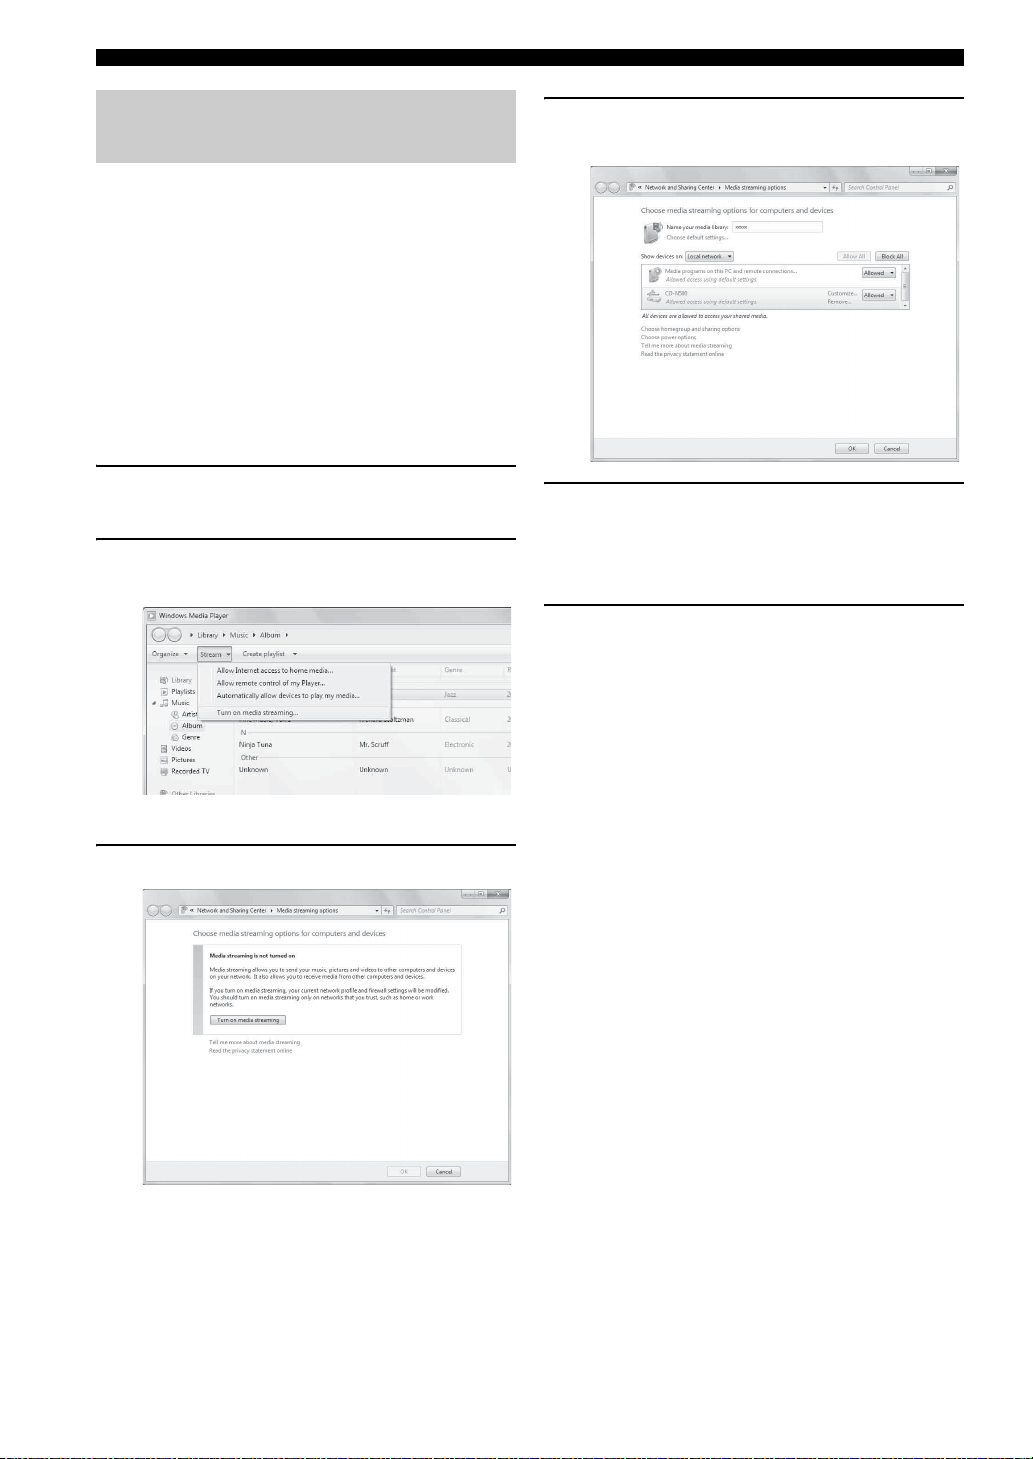
Sharing music files stored on your PC
To browse folders (directories) on your PC from this unit,
you need to change the media sharing setting of Windows
Media Player 12 or Windows Media Player 11 to make
those folders accessible from this unit. For details on
Windows Media Player, please refer to Windows Media
Player help.
y
You can connect up to 16 media servers to this unit.
❚ When using Windows Media Player 12
(on Windows 7)
1 Start Windows Media Player 12 on your
PC.
2 Select “Stream”, then “Turn on media
streaming”.
4 Select “Allowed” from the drop-down
list next to “CD-N500”.
5 In the same way, select the icons for
devices to be used as external media
controllers (other PCs or mobile
devices), then click “Allowed”.
6 Click “OK” to exit.
The Control Panel window of your PC appears.
3 Click “Turn on media streaming”.
12 En
Page 15

❚ When using Windows Media Player 11
1 Start Windows Media Player 11 on your
PC.
2 Select “Library” then “Media Sharing”.
3 Check the “Share my media to” box,
select the “CD-N500” icon, then click
“Allow”.
4 In the same way, select the icons for
devices to be used as external media
controllers (other PCs or mobile
devices), then click “Allow”.
5 Click “OK” to exit.
Operations from your mobile device
You can operate this unit by viewing the screen of your
mobile device.
SETUP OF YOUR PC/NAS/MOBILE DEVICES
OPERATIONS
❚ Using the dedicated application
You can do the following operations from your mobile
device using the dedicated application (free application).
• You can select and play back music files stored on your
PC or NAS.
• You can select the Internet radio stations.
• You can operate playback of CDs and USB devices.
y
For configuring the PC or NAS settings, see “SETUP OF YOUR
PC/NAS/MOBILE DEVICES” (☞ P.11).
❚ About the dedicated application
Download and install the dedicated application on your
mobile device.
For details, please visit Yamaha website.
English
13 En
Page 16

PLAYBACK OF MUSIC FILES ON YOUR PC/NAS
This section describes how to play back using the front
panel buttons on the main unit, or the remote control.
Operations from the main unit or remote control
y
For details on the controls on the main unit or remote control, see
“CONTROLS AND FUNCTIONS” (☞ P.5).
1 Press SOURCE repeatedly to switch the
audio source to “SERVER”.
Main unit/Remote control
OPEN/CLOSE
DISPLAY
SOURCE
PURE DIRECTSOURCE
123
2 Use the following controls to select a
menu item until you find a desired music
file.
Main unit
SELECT
ENTER
PUSH
RETURN
SELECT/ENTER RETURN
SELECT/ENTER (Jog dial)
Rotate to select a menu item and press to confirm the
selection.
RETURN
Shows the upper-level menu in the front panel
display.
PURE DIRECTSOURCE
5V
2.1A
SOURCE
Front panel display
Source SERVER
456
Remote control
S/T/W/X/
ENTER
HOME
S/T/W/X (Cursor buttons)/ ENTER
HOME
SETUP
ENTER
NOW PLAYING
RETURN
MODE
RETURN
Press S/T to select a menu item (or press W/X to
display the gauge indicating the current position of
the content), then press ENTER to confirm the
selection.
RETURN
Shows the upper-level menu in the front panel
display.
HOME
Shows the top-level menu in the front panel display.
14 En
Page 17
3 When playback starts, use the following
0
PROGRAM
REPEAT
HOME
SETUP
NOW PLAYING
RETURN
MODE
A/BSHUFFLE
CLEAR
DISPLAY
OPEN/CLOSE
SOURCE
123
PURE DIRECT
controls to operate desired functions.
Main unit
SELECT
ENTER
PUSH
SELECT/ENTER
RETURN
Playback buttons
Remote control
DISPLAY
SHUFFLE
REPEAT
Playback
buttons
ENTER
PLAYBACK OF MUSIC FILES ON YOUR PC/NAS
SELECT/ENTER (Jog dial)
Rotate while playing to skip to the next track, or back
to the previous/beginning of the current track.
Playback buttons
Use these buttons to operate audio contents (☞ P.5,
6).
DISPLAY
If you press this button while a song is playing or
paused, the information on the front panel display
will be switched in the following order.
Song Artist Album Time Source
OPERATIONS
SHUFFLE
Switches shuffle mode in the following order.
On Off
REPEAT
Switches repeat mode in the following order.
One All Off
NOW PLAYING
Shows the current playback information in the front
panel display.
y
• If the song being played is stopped, the track that you listened
will start playback from the beginning of the track the next time
you play.
• For details on playable files, see “PLAYABLE DISCS AND
FILE FORMATS” (☞ P.31).
NOW PLAYING
English
15 En
Page 18
PLAYBACK OF AUDIO CONTENTS ON THE INTERNET
Listening to Internet radio stations
❚ Operations from the main unit or
remote control
1 Press SOURCE repeatedly to switch the
audio source to “NET RADIO”.
Main unit/Remote control
OPEN/CLOSE
DISPLAY
SOURCE
PURE DIRECTSOURCE
5V
2.1A
SOURCE
Front panel display
Source NET RADIO
PURE DIRECTSOURCE
123
456
2 Use the following controls to select a
menu item until you find a desired
Internet radio station.
Main unit
SELECT
ENTER
PUSH
RETURN
SELECT/ENTER RETURN
SELECT/ENTER (Jog dial)
Rotate to select a menu item and press to confirm the
selection.
RETURN
Shows the upper-level menu in the front panel
display.
Remote control
S/T/W/X/
ENTER
HOME
HOME
SETUP
ENTER
NOW PLAYING
RETURN
MODE
RETURN
16 En
S/T/W/X (Cursor buttons)/ ENTER
Press S/T to select a menu item (or press W/X to
display the gauge indicating the current position of
the content), then press ENTER to confirm the
selection.
RETURN
Shows the upper-level menu in the front panel
display.
HOME
Shows the top-level menu in the front panel display.
Page 19
3 When playback starts, use the following
REPEAT
HOME
SETUP
NOW PLAYING
RETURN
MODE
A/BSHUFFLE
DISPLAY
OPEN/CLOSE
SOURCE
123
PURE DIRECT
controls to operate desired functions.
Main unit
SELECT
ENTER
PUSH
RETURN
PLAYBACK OF AUDIO CONTENTS ON THE INTERNET
/ (Play/Pause) or (Play)
Starts playback.
(Stop)
Stops playback.
DISPLAY
If you press this button while a song is playing or
paused, the information on the front panel display
will be switched in the following order.
Station Time Source
Remote control
/
Shows the current playback information in the front
NOW PLAYING
OPERATIONS
panel display.
y
You can register and bookmark your favorite Internet radio
stations by accessing the “vTuner Radio Guide” website. To use
this feature, you need the MAC address of this unit (☞ P.24) as
the ID for your Media player and your e-mail address to create
your personal account.
DISPLAY
ENTER
NOW PLAYING
For details, visit the website below.
http://yradio.vtuner.com/
English
17 En
Page 20

Playing back a CD
0
PROGRAM CLEAR
DISPLAY
OPEN/CLOSE
SOURCE
123
456
789
PURE DIRECT
REPEAT
HOME
SETUP
FOLDER
NOW PLAYING
RETURN
MODE
A/BSHUFFLE
ENTER
PLAYBACK OF CDS
Remote control
1 Press SOURCE repeatedly to switch the
Main unit/Remote control
Front panel display
Source CD
2 Press (Open/Close) on the main unit
3 Press (Open/Close) again to close the
4 When playback starts, use the following
Main unit
audio source to “CD”.
OPEN/CLOSE
DISPLAY
PURE DIRECTSOURCE
SOURCE
123
PURE DIRECTSOURCE
5V
2.1A
456
SOURCE
to open the disc tray, then load a CD.
disc tray.
Playback automatically starts.
controls to operate desired functions.
SELECT
ENTER
PUSH
SELECT/ENTER
RETURN
DISPLAY
Numeric
buttons
SHUFFLE
A/B
/
REPEAT
Playback
buttons
FOLDER
SELECT/ENTER (Jog dial)
Rotate while playing to skip to the next track, or back
to the previous/beginning of the current track.
Playback buttons
Use these buttons to operate audio contents (☞ P.5,
6).
Numeric buttons (Audio CD only)
Use to select directly a track on the CD.
(Search backward)/ (Search forward)
Searches backward/forward.
FOLDER ( / ) (Data CD only)
Selects the desired folder.
Playback buttons
18 En
Page 21
DISPLAY
0
PROGRAM CLEAR
123
456
789
REPEAT A/BSHUFFLE
If you press this button while a song is playing or
paused, the information on the front panel display
will be switched in the following order.
Audio CD:
Time (Song) (Artist) (Album) Source
y
• “Time” cycles through the three steps as follows each time
you press this button.
– Track number and elapsed playback time.
– Track number and remaining playback time of the track.
– Remaining playback time of the disc.
• “Song”, “Artist” and “Album” are shown only if text
information is included in the disc.
Data CD:
Time Song Artist Album Source
SHUFFLE
Switches shuffle mode to “Folder”, “All” and “Off”
as follows.
Audio CD:
Data CD:
All Off
Folder All Off
PLAYBACK OF CDS
Using program playback mode
In program playback mode, you can play back tracks in a
programmed sequence.
1 Press PROGRAM on the remote control
while playback is stopped.
This unit enters program editing mode.
OPERATIONS
CLEAR
PROGRAM
2 Select a track by using the numeric
buttons and press ENTER to confirm.
3 Repeat step 2 to program the next track.
You can program up to 50 tracks.
y
To cancel the programmed track, press CLEAR during program
editing mode. The last programmed track will be deleted.
A/B (Audio CD only)
Repeats playback of a specified section of a track
during audio CD playback (except data CDs)
(☞ P.7).
REPEAT
Switches repeat mode in the following order.
Audio CD:
Data CD:
One All Off
One Folder All Off
y
• If the song being played is stopped, the track that you listened
will start playback from the beginning of the track the next time
you play.
• If you press (Stop) while playback is stopped, the first track
of the CD you listened will start playback the next time you
play.
• For details on playable discs and files, see “PLAYABLE
DISCS AND FILE FORMATS” (☞ P.31).
4 Press / (Play/Pause) on the main
unit or (Play) on the remote control.
Playback starts from the beginning of the
programmed sequence.
y
• To erase all programmed tracks, press CLEAR while playback
is stopped.
• You cannot set a program playback for data CDs.
Note
The programmed tracks are erased when the disc is ejected or this
unit is turned off.
English
19 En
Page 22
PLAYBACK OF YOUR iPod/USB DEVICES
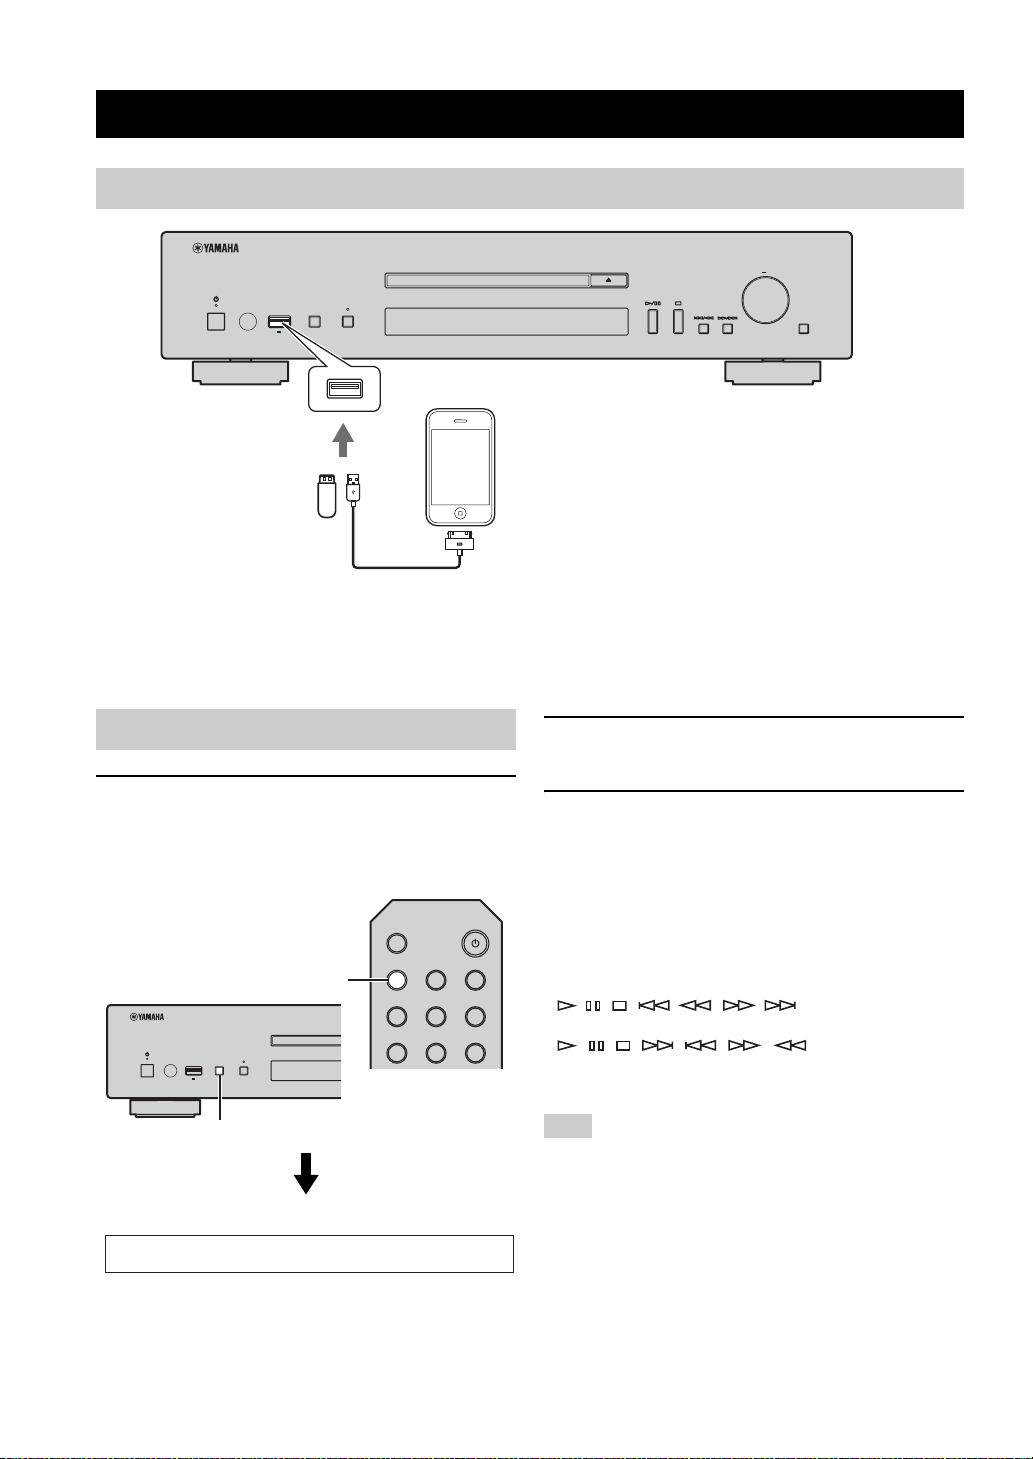
Connecting your iPod or USB devices
SELECT
ENTER
PUSH
PURE DIRECTSOURCE
5V
2.1A
y
• Connect your iPod using the USB cable supplied with your iPod.
• Remove a USB device after you stop playback.
• Do not use a USB hub. This unit does not recognize a USB device if the USB device is connected via a USB hub.
RETURN
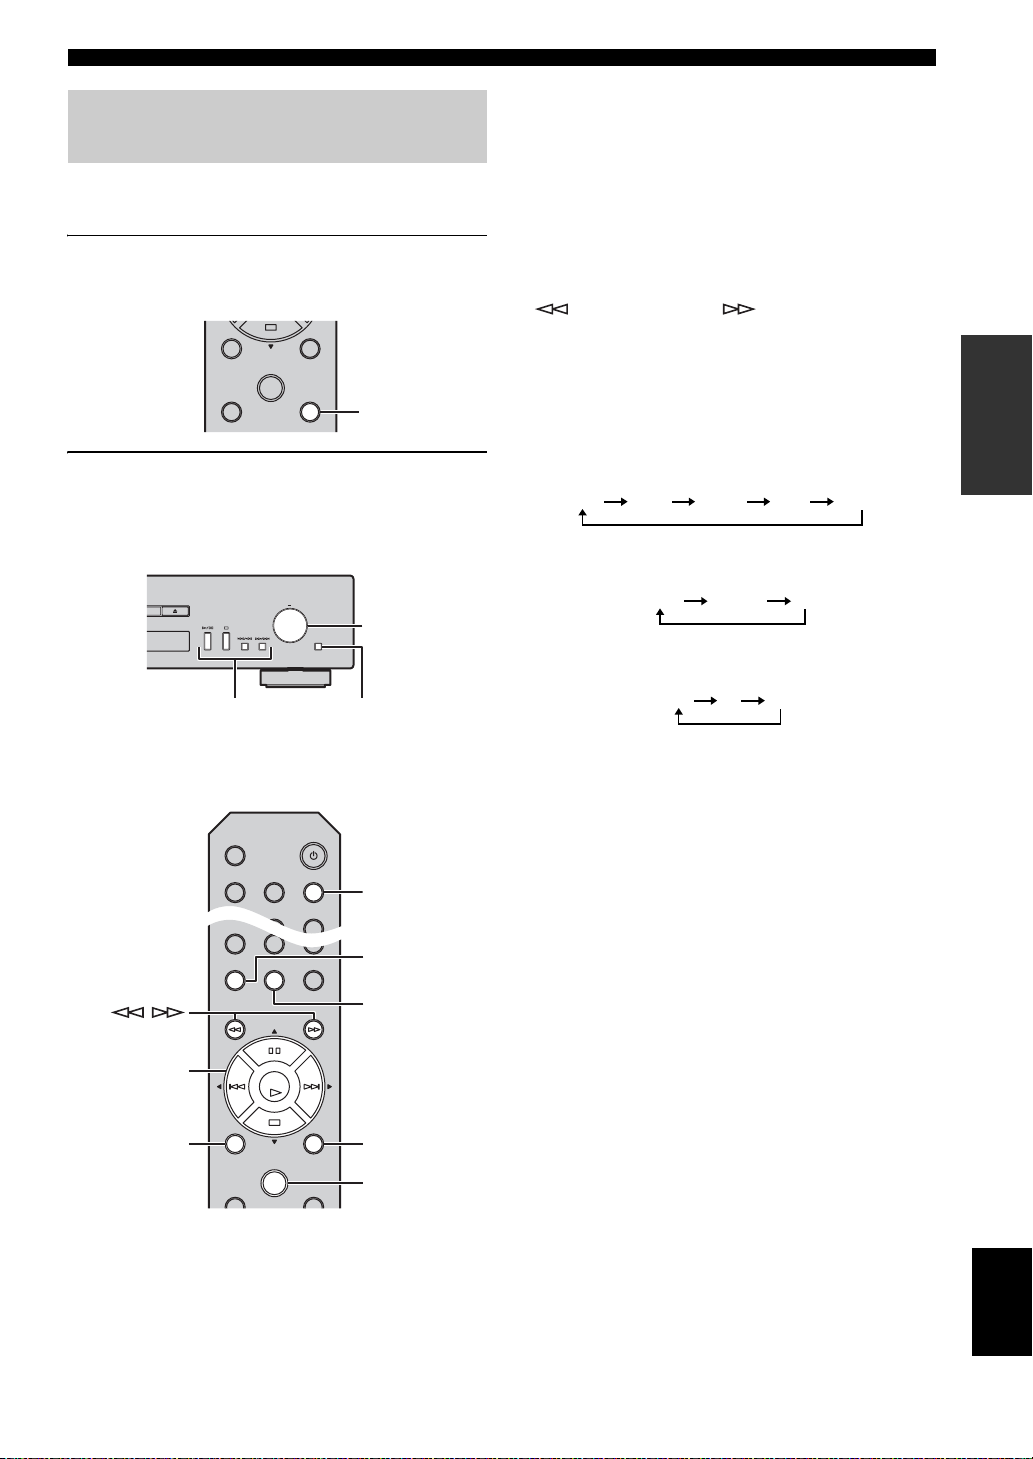
Playing back your iPod
1 Press SOURCE repeatedly to switch the
audio source to “USB”.
Main unit/Remote control
OPEN/CLOSE
DISPLAY
SOURCE
PURE DIRECTSOURCE
5V
2.1A
SOURCE
Front panel display
Source USB
PURE DIRECTSOURCE
123
456
2 Connect your iPod to the USB port on
the main unit.
3 Start playback on your iPod.
Operate your iPod to start playback, select a track,
pause, and stop playback (standard playback mode).
y
• You can also operate to play, pause, stop, skip forward/
backward, and search forward/backward from the playback
buttons on the main unit and remote control during standard
playback mode.
Main unit:
/, , / , /
Remote control:
, , , , , ,
• You cannot operate shuffle and repeat modes from your iPod
and the remote control during standard playback mode.
Note
iPod may not function properly with this unit if software on iPod
is not updated. Be sure to use the latest version of iPod software.
For details on supported iPod, see “Supported iPod via USB port”
(☞ P.31).
20 En
Page 23
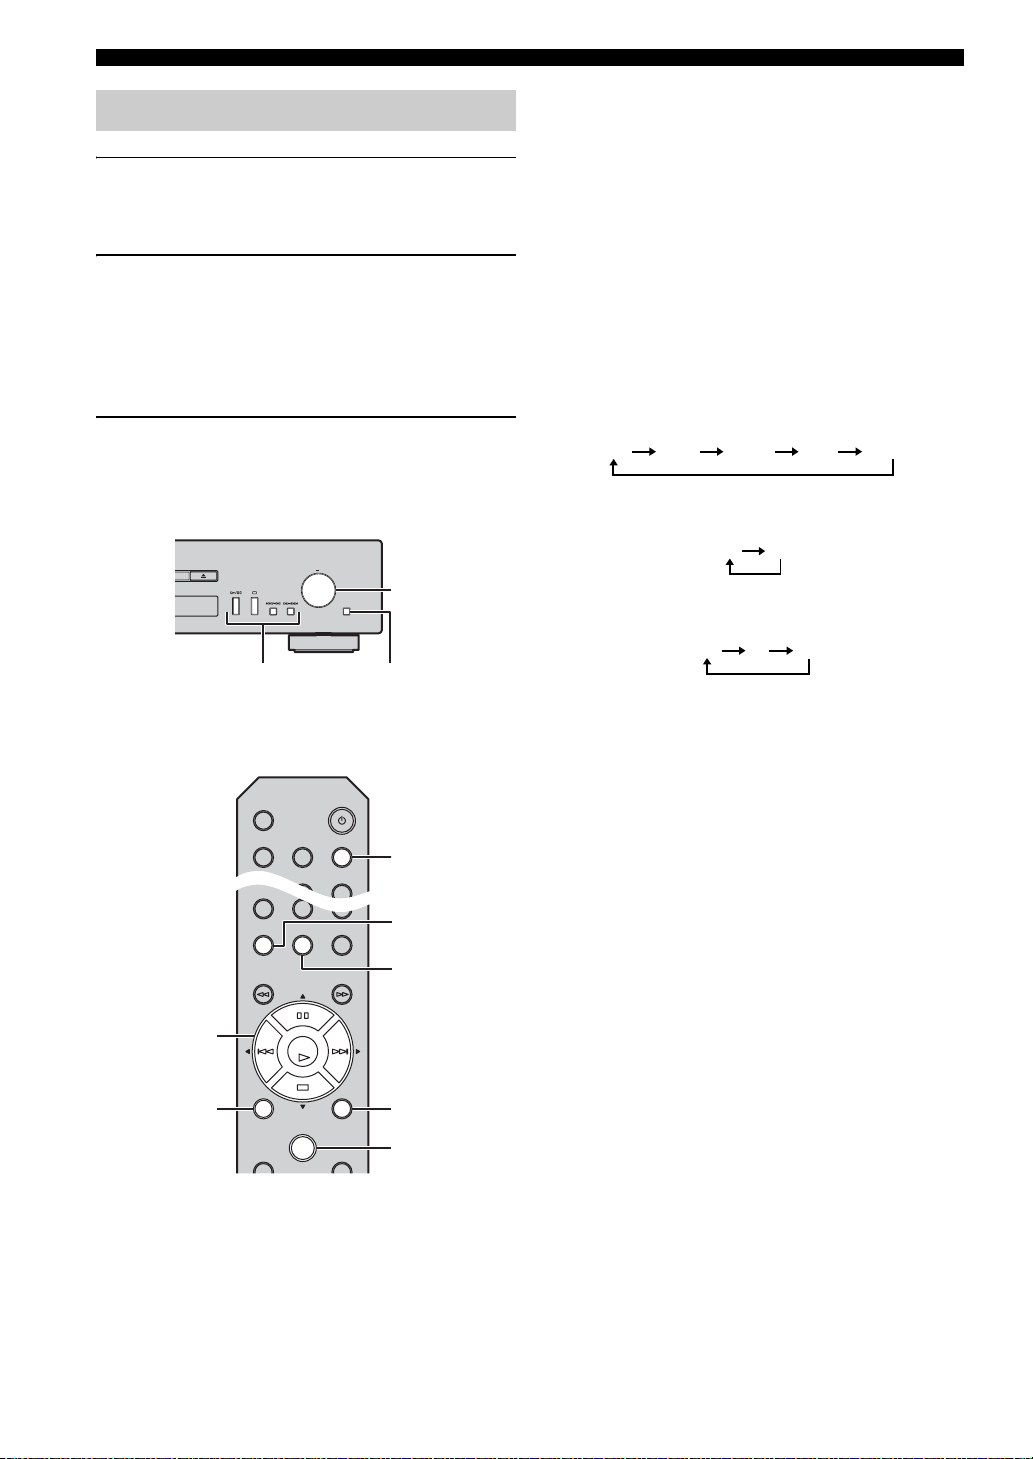
Using extended playback mode for
HOME
SETUP
NOW PLAYING
RETURN
MODE
0
PROGRAM
REPEAT
HOME
SETUP
NOW PLAYING
RETURN
MODE
A/BSHUFFLE
CLEAR
DISPLAY
OPEN/CLOSE
SOURCE
123
PURE DIRECT
your iPod
You can operate your iPod from the main unit or remote
control in extended mode.
1 Press MODE on the remote control while
playing back your iPod.
It switches to extended playback mode.
MODE
2 Use the following controls to operate
desired functions.
PLAYBACK OF YOUR iPod/USB DEVICES
SELECT/ENTER (Jog dial)
Rotate while playing to skip to the next track, or back
to the previous/beginning of the current track.
Playback buttons*
Use these buttons to operate audio contents (☞ P.5,
6).
RETURN
Shows the upper-level menu in the front panel
display.
(Search backward)/ (Search forward)*
Searches backward/forward.
HOME
Shows the top-level menu in the front panel display.
DISPLAY
If you press this button while a song is playing or
paused, the information on the front panel display
will be switched in the following order.
Song Artist Album Time Source
OPERATIONS
Main unit
Playback buttons
Remote control
/
Playback
buttons
ENTER
SHUFFLE*
Switches shuffle mode of your iPod.
SELECT
ENTER
PUSH
SELECT/ENTER
RETURN
REPEAT*
Songs Albums Off
Switches repeat mode in the following order.
RETURN
NOW PLAYING
One All Off
Shows the current playback information in the front
panel display.
* Operations differ depending on your iPod.
y
DISPLAY
SHUFFLE
REPEAT
Playable file formats via iPod depends on your iPod.
HOME
RETURN
NOW PLAYING
English
21 En
Page 24
PLAYBACK OF YOUR iPod/USB DEVICES
0
PROGRAM
REPEAT
HOME
SETUP
NOW PLAYING
RETURN
MODE
A/BSHUFFLE
CLEAR
DISPLAY
OPEN/CLOSE
SOURCE
123
PURE DIRECT
Playing back USB devices
1 Press SOURCE on the main unit or
remote control to switch the audio
source to “USB” (☞ P.20).
2 Connect your USB device to the USB
port on the main unit.
File name is displayed in the front panel display and
playback starts automatically in order by date and
time of creation if playable files are in the USB
device.
3 When playback starts, use the following
controls to operate desired functions.
SELECT/ENTER (Jog dial)
Rotate while playing to skip to the next track, or back
to the previous/beginning of the current track.
Playback buttons
Use these buttons to operate audio contents (☞ P.5,
6).
RETURN
Shows the upper-level menu in the front panel
display.
HOME
Shows the top-level menu in the front panel display.
DISPLAY
If you press this button while a song is playing or
paused, the information on the front panel display
will be switched in the following order.
Song Artist Album Time Source
Main unit
Playback buttons
Remote control
Playback
buttons
ENTER
SHUFFLE
Switches shuffle mode in the following order.
SELECT
ENTER
PUSH
SELECT/ENTER
RETURN
REPEAT
On Off
Switches repeat mode in the following order.
One All Off
RETURN
NOW PLAYING
Shows the current playback information in the front
panel display.
y
• If the song being played is stopped, the track that you listened
will start playback from the beginning of the track the next time
you play.
DISPLAY
SHUFFLE
REPEAT
• For details on playable files, see “PLAYABLE DISCS AND
FILE FORMATS” (☞ P.31).
22 En
HOME
RETURN
NOW PLAYING
Page 25
SETUP MENU
0
PROGRAM CLEAR
123
456
789
REPEAT
HOME
SETUP
NOW PLAYING
RETURN
MODE
A/BSHUFFLE
ENTER
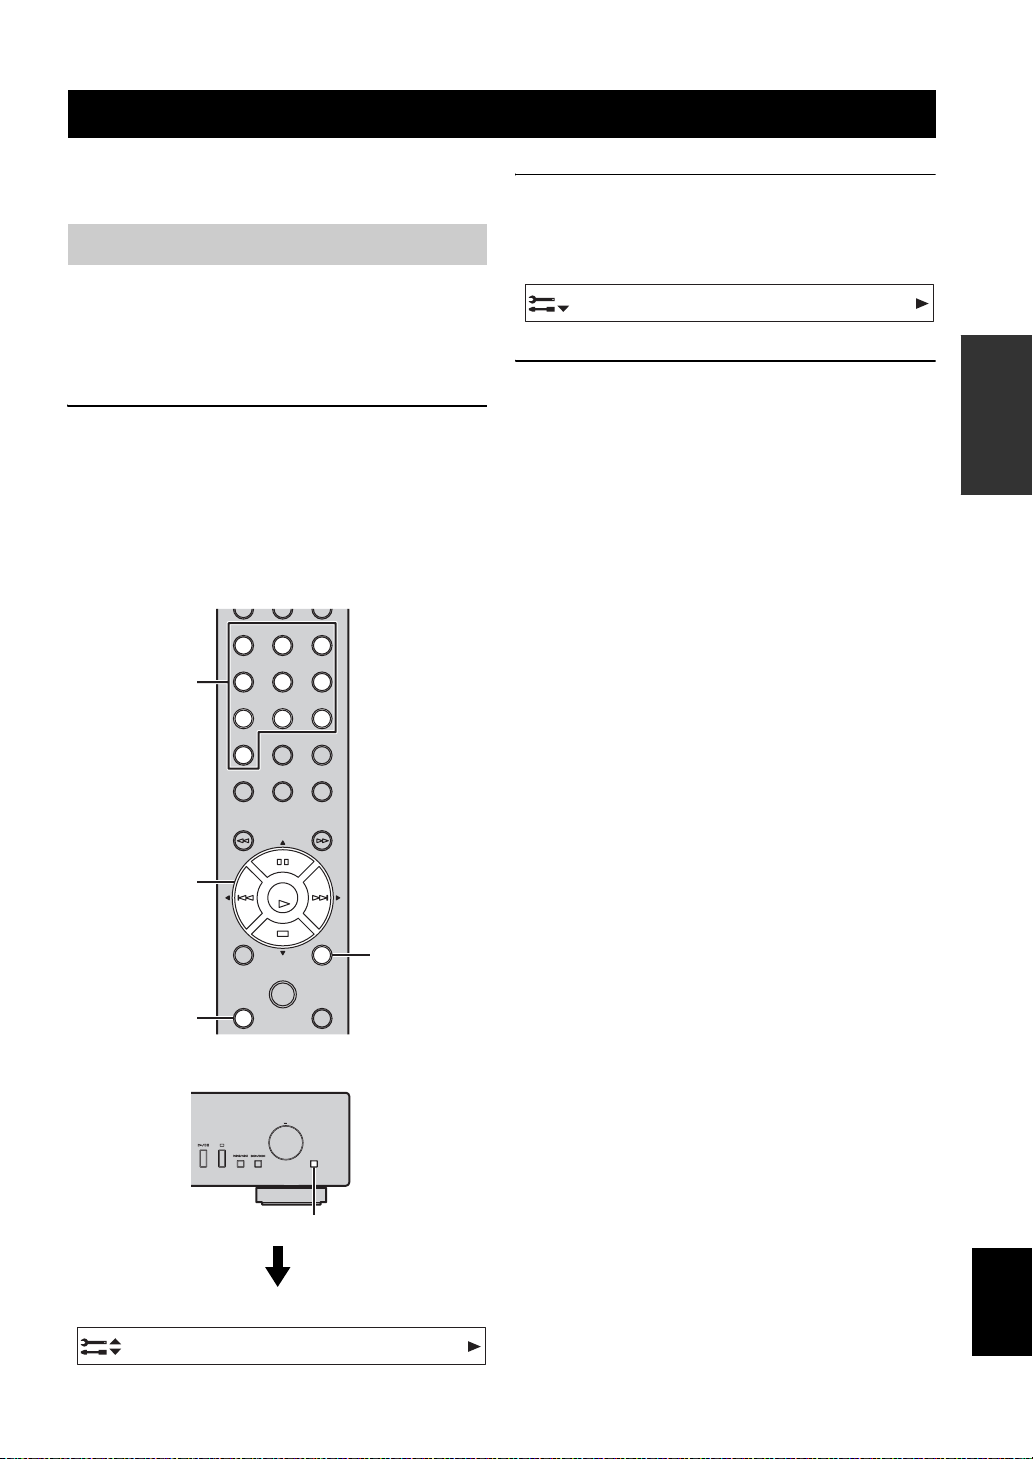
You can configure the various settings of this unit using
the setup menu.
Setup menu operations
❚ Operations from the remote control
y
For details on the controls on the main unit or remote control, see
“CONTROLS AND FUNCTIONS” (☞ P.5).
1 Press SETUP to enter the setup menu
(☞ P.24).
To make the advanced setup menu
items (☞ P.25) selectable, press SETUP
while holding down RETURN (on the
main unit).
Remote control
Numeric
buttons
2 Press S/T to select a menu item to
configure, then press ENTER.
For some menu items, repeat step 2 to select a
submenu item.
DHCP
1–1
3 Press S/T to select a parameter, then
press ENTER.
y
You need to enter a numerical address for some menu items. In
this case, press W/X to move the target and S/T to select a
number, or use the numeric buttons. Then press ENTER to
confirm it.
OPERATIONS
S/T/W/X/
ENTER
SETUP
Main unit
Front panel display
1
SELECT
ENTER
PUSH
RETURN
RETURN
Network Configuration
RETURN
English
23 En
Page 26
SETUP MENU
Setup menu list
Menu Submenu
DHCP On, Off
IP Address Specify the IP address when “DHCP” is “Off”.
Subnet Mask Specify the subnet mask when “DHCP” is “Off”.
Network
Configuration
Default
Gateway
DNS Server
(P)
Settings
(Bold:
default)
Function
Select “On” to use the DHCP server to automatically configure the
network settings of this unit or “Off” to configure manually.
*1
*1
Specify the default gateway when “DHCP” is “Off”.
Specify the primary DNS server when “DHCP” is “Off”.
*1
*1
Network
Information
DNS Server
(S)
MAC
Address
Status
Specify the secondary DNS server when “DHCP” is “Off”.
The MAC address of this unit is shown. The MAC address is also used
as a vTuner ID.
The network status of this unit is shown (“Connected” or “Not
connected”).
System ID The system ID number is shown.
Network Standby On, Off
4 Hours,
Auto Power Down
8Hours,
12 Hours,
Off
Dimmer –3 to 0
Select “On” to enable the network standby mode.
This unit automatically enters standby mode if it is left turned on for
the selected time without playback or any other operation being
performed.
Adjust the brightness of the front panel display.
Firmware Version The firmware version of this unit is shown.
Update the firmware of this unit after selecting “Network” or “USB”.
Firmware Update
Network,
USB
When “Press ENTER to start” appears, press ENTER to start firmware
update. Do not operate this unit until “UPDATE SUCCESS” appears.
Then turn off this unit once and turn it on again.
*1: When “DHCP” is “On”, you can check the values (IP address, etc.) assigned by the DHCP server.
*1
24 En
Page 27
SETUP MENU
Advanced setup menu
The following menu items are available only when you enter the setup menu by pressing SETUP (on the remote control)
while holding down RETURN (on the main unit).
Settings
Menu
(Bold:
default)
MAC Address Filter On, Off
Gapless Playback On
, Off
vTuner Account Reset Yes, No
Initialize Yes, No
Select “On” to specify the MAC addresses (up to 5) of the network
components that will be permitted access to this unit (“Address1” to
“Address5”). Select “Off” to disable the MAC address filter function.
Select “On” to skip silence between each track and enable seamless
playback. Select “Off” to disable the gapless playback function. This
function works on “SERVER” audio contents only.
y
When
“Gapless Playback” is “On”, this unit starts to read data of the
next track at the end of the current track. Some playback operations
(skip, repeat, etc.) will work on the next track during this process.
Select “Yes” and press ENTER on the remote control to reset the
vTuner account.
y
• If you reset your vTuner account, your user name, password and bookmarks
will be reset.
• To create a new account, visit the website below.
http://yradio.vtuner.com/
You need the MAC address of this unit as the ID for your Media player and
your e-mail address.
Select “Yes” to reset the settings of this unit to factory default. The
reset operation will be reflected the next time you turn on this unit.
Function
OPERATIONS
25 En
English
Page 28

OTHERS
TROUBLESHOOTING
Refer to the table below when this unit does not function properly. If the problem you are experiencing is not listed below
or if the instruction below does not help, turn off this unit, disconnect the power cable, and contact the nearest authorized
Yamaha dealer or service center.
❚ General
Problem Cause Remedy Page
The power cable is not
connected to the AC IN socket
on the main unit or not plugged
into an AC outlet.
Connect the power cable firmly. 9
This unit has been exposed to a
strong external electric shock
This unit fails to turn on.
The power indicator on the front
panel flashes.
This unit suddenly turns off. This unit entered standby mode.
No sound.
(such as lightning or strong
static electricity).
The protection circuitry has
been activated three times
consecutively. When this unit is
in this condition, the power
indicator on the main unit blinks
if you try to turn on the power.
There is a problem with the
internal circuitries of this unit.
The audio cable connection
between this unit and amplifier
is improper.
The input setting on the
amplifier is incorrect.
The amplifier is not compatible
with the digital signals.
Turn off this unit, disconnect
the power cable, plug it back in
after 30 seconds, then use it
normally.
As a safety precaution,
capability to turn on the power
is disabled. Contact your nearest
Yamaha dealer or service center
to request repair.
Turn off this unit, disconnect
the power cable, then contact
the nearest authorized Yamaha
dealer or service center.
This unit enters standby mode
after the time set for “Auto
Power Down” in the setup menu
has elapsed.
Connect the audio cable firmly.
If the problem persists, use
another audio cable.
Select the correct input (from
this unit) on the amplifier.
Use an analog signal
connection.
—
—
—
24
9
—
9
Noise is heard.
26 En
This unit is too close to the
digital or radio-frequency
equipment.
The audio cable between this
unit and the media sever is
defective.
Move this unit away from such
equipment.
Connect the audio cable firmly.
If the problem persists, use
another audio cable.
—
—
Page 29

Problem Cause Remedy Page
The remote control does not
work or function properly.
Wrong distance or angle.
Direct sunlight or lighting is
striking the remote control
sensor of this unit.
TROUBLESHOOTING
The remote control functions
within a maximum range of 6 m
(20 ft) and no more than 30
degrees off-axis from the front
panel of the main unit.
Adjust the lighting angle, or
reposition this unit.
4
—
The amplifier control buttons on
the remote control do not work
on the amplifier.
❚ Network
Problem Cause Remedy Page
The network feature does not
function.
This unit does not detect the
digital media server (PC).
The batteries are weak.
Your amplifier is not one of
Yamaha amplifiers. (These
buttons may not work on some
Yamaha amplifiers.)
The network parameters (IP
address) have not been obtained
properly.
The media sharing setting is not
correct.
Some security software installed
on your PC is blocking the
access of this unit to your PC.
This unit and your PC are not in
the same network.
Access to this unit is restricted
by MAC address filter function
Replace both batteries with new
ones.
Use the remote control of your
amplifier.
Enable the DHCP server
function on the broadband
router and set “DHCP” in the
setup menu to “On” on this unit.
If you want to configure the
network parameters manually,
check that you are using an IP
address which is not used by
other network devices in your
network.
Configure the media sharing
setting of your PC.
Check the settings of security
software installed on your PC.
Check the network connections
and the broadband router
settings, then connect this unit
and your PC to the same
network.
Disable MAC address filter
function in the setup menu of
this unit.
4
—
OTHERS
24
11
—
10
24
There are more than two routers
in use that are overlapping
among the network devices.
Disconnect the Internet
connection temporarily and
check via your local network, or
connect the network devices
you want to use to the same
router.
—
English
27 En
Page 30

TROUBLESHOOTING
Problem Cause Remedy Page
The files in your PC cannot be
viewed or played back.
Some audio files cannot be
played back on this unit.
The files are not supported by
this unit or the media server.
You are trying to play back
DRM audio files you purchased
on iTunes Store.
❚ Audio contents on the Internet
Problem Cause Remedy Page
The selected Internet radio
station is currently not
available.
The selected Internet radio
The Internet radio cannot be
played.
station is currently broadcasting
silence.
Use the file format supported by
both this unit and the media
server. For details on the
supported file formats by the
unit, see “PLAYABLE DISCS
AND FILE FORMATS”.
You cannot play back DRM
audio files you purchased on
iTunes Store.
There may be a network
problem at the radio station, or
the service may have been
stopped. Try the station later or
select another station.
Some Internet radio stations
broadcast silence at certain of
times of the day. Try the station
later or select another station.
31
31
—
—
❚ CD
Problem Cause Remedy Page
The disc tray does not close
completely.
Disc playback does not start.
Access to the network is
restricted by the firewall
settings of your network devices
(such as the broadband router).
A foreign object is obstructing
the tray.
The disc is damaged.
There is moisture on the laser
pickup.
The disc is loaded upside down.
The disc is dirty.
The format of the MP3 or WMA
file is not compatible with this
unit.
Check the firewall settings of
your network devices. The
Internet radio can be played only
when it passes through the port
designated by each radio station.
The port number varies
depending on the radio station.
Carefully check the disc tray and
remove the foreign object.
Check the disc carefully and
replace it if necessary.
Wait 20 to 30 minutes after
turning this unit on before trying
to play back a disc.
Reload the disc with the label
side up.
Clean the disc.
Replace the disc with a correctly
recorded disc playable with this
unit.
—
—
—
—
—
32
31
28 En
Page 31

Problem Cause Remedy Page
Disc playback does not start.
Playback is delayed, or begins
at the wrong place.
The CD-RW (ReWritable) disc
is not recorded correctly.
The disc is a non-standard disc
not playable with this unit.
The disc is scratched or
damaged.
TROUBLESHOOTING
Replace the disc with a correctly
recorded disc playable with this
unit.
Replace the disc with a correctly
recorded disc playable with this
unit.
Check the disc carefully and
replace it if necessary.
31
31
32
Noise from inside of the disc tray. The disc is warped.
❚ iPod/USB
Problem Cause Remedy Page
iPod playback does not start
though iPod is connected.
USB playback does not start.
The connected iPod is not
compatible with this unit.
The USB device is not
connected properly.
The format of the MP3 or WMA
file is not compatible with this
unit.
This unit is set to an audio
source than “USB”.
Front panel display messages
Message Status
This unit cannot access the USB device.
Access error
This unit cannot access the iPod.
The connected iPod is not supported by the unit.
There is a problem with the signal path from the network to the unit.
Replace the disc.
Connect an iPod compatible with
this unit.
Connect the USB device again.
Replace the file with a correctly
recorded file playable with this
unit.
Press SOURCE on the main unit
or remote control to switch the
audio source
to “
USB”.
—
31
20
OTHERS
31
22
Unable to play This unit cannot play back specified content.
List updated The content list of the media server has been updated.
No content This unit cannot find any content.
Not available The operation you have performed is not available.
Searching… This unit is searching for content.
No disc A CD is not inserted in the disc tray.
Connect error Connection to your iPod or USB device failed.
No device Your iPod or USB device is not connected.
USB overloaded An overcurrent is flowing through the USB device.
Loading… The specified content is being loaded.
Unknown iPod The connected iPod is not compatible.
English
29 En
Page 32

ADDITIONAL INFORMATION
This section describes about general ideas of DLNA (Digital Living Network Alliance) and NAS (Network Attached
Storage).
Internet
Modem
DLNA
SELECT
ENTER
(Digital Media Server)
PC
NAS
(Digital Media Server)
Broadband
router
5V
2.1A
This unit (CD-N500)
(Digital Media Renderer)
Mobile device
(Digital Media Controller)
PURE DIRECTSOURCE
PUSH
RETURN
❚ DLNA
“DLNA” stands for Digital Living Network Alliance, and is a guideline to promote standardization of interconnection of
home network devices such as digital consumer electronics.
DLNA components are separated into four device classes: Digital Media Server (DMS), Digital Media Renderer (DMR),
Digital Media Player (DMP) and Digital Media Controller (DMC).
“Digital Media Server (DMS)” is a device that is used to store or distribute digital contents such as music files. For the
system using this unit, PCs and NAS are regarded as “Digital Media Server (DMS)”.
“Digital Media Controller (DMC)” is a device to control digital contents. The dedicated mobile device application
corresponds to “Digital Media Controller (DMC)” for the system using this unit.
“Digital Media Renderer (DMR)” is a device to receive instructions from “Digital Media Controller (DMC)” and play
back digital contents such as this unit.
Similarly, “Digital Media Player (DMP)” is a device that can play back digital contents stored on “Digital Media Server
(DMS)”.
❚ NAS
“NAS” stands for Network Attached Storage. By connecting your NAS and home network with a network cable directly,
NAS can be a storage device, such as a hard disc drive. If your NAS is compatible with DLNA, you can share your
music, pictures, or movies on the same home network as a digital media server.
30 En
Page 33

PLAYABLE DISCS AND FILE FORMATS
Playable media and devices
❚ Supported PC
PC with Windows Media Player 11 or Windows Media
Player 12 installed.
❚ Supported NAS
NAS that is compatible with DLNA version 1.5.
❚ Supported USB devices
Device Class/Protocol File formats
USB memory
devices
USB audio
player
Notes
• Some devices may not work properly even if they meet the
requirements.
• This unit does not support encrypted USB memory devices.
• Do not connect devices other than USB mass storage class
devices: USB chargers, USB hubs, PCs, external HDD, etc.
• Yamaha and suppliers accepts no liability for the loss of data
saved on the USB devices connected to this unit. It is
recommended that the files are made backup copies.
• Playability of and power supply to all kinds of USB devices are
not guaranteed.
MSC (Mass
Storage Class)
MSC (Mass
Storage Class)
FAT16/32
FAT16/32
Notes
• iPod is licensed on the condition that individuals perform
privately duplication and playback of uncopyrighted material or
material legally approved of duplication and playback.
Infringement of copyright is prohibited by law.
• Yamaha and suppliers accepts no liability for the loss of data
saved on iPod connected to this unit. It is recommended that the
files are made backup copies.
❚ Supported mobile devices
For details, please visit Yamaha website.
❚ Playable discs
Use compact discs bearing the marks below.
Mark Details
Compact discs (digital audio)
CD-R, CD-RW digital audio discs
• CD-R or CD-RW discs bearing one of
the following phrases.
FOR CONSUMER
FOR CONSUMER USE
FOR MUSIC USE ONLY
• Finalized CD-R or CD-RW discs only.
Note
This unit may not be able to play some CD-R/
CD-RW discs or discs on which recording
was not made correctly.
OTHERS
❚ Supported iPod via USB port
iPod iPhone iPad
iPod touch,
iPod nano (2nd
through 6th
generations)
* As of August 2012
iPhone,
iPhone 3G,
iPhone 3GS,
iPhone 4,
iPhone 4S
iPad,
iPad 2,
iPad (3rd
generation)
CD-TEXT discs
The disc title, artist name, and track
name are also displayed in addition to
the time displays when playing back a
CD with CD TEXT.
To play back an 8-cm (3-inch) CD
Place it in the inner recessed area of the disc tray. Do not
put a normal 12-cm (5-inch) CD on top of an 8-cm (3inch) CD.
Notes
• Do not use any nonstandard shaped disc
(heart, etc.) available on the market
because it might damage the unit.
• Do not use a disc with tape, stickers, or
paste on it. If you use such a disc, the
disc may get stuck in the unit, or damage
to the unit may result.
31 En
English
Page 34

PLAYABLE DISCS AND FILE FORMATS
❚ About handling discs
• Always handle with care so that the playing surface is
not scratched. Do not warp discs.
• To keep clean the playing surface, wipe with a clean,
dry cloth. Do not use any type of disc cleaner, spray, or
any other chemical-based liquid.
• Do not wipe with a circular motion; wipe straight
outward from the center.
• Use a soft-tipped pen when writing on the label side of
the disc.
• When a disc is not being used, remove it from this unit
and store in an appropriate case.
• Do not expose discs to direct sunlight, high temperature
or high humidity for a long time.
Playable discs and file formats
❚ DLNA/USB
Formats
*1
WAV
*2
MP3
*3
WMA
AAC
FLAC
*4
ALAC
*1 Only Linear PCM format files are playable.
*2 MP3 PRO files are not supported.
*3 WMA PRO and Lossless files are not supported.
*4 ALAC stands for Apple Lossless Audio Codec.
y
• Playable file formats via iPod depends on your iPod.
• Files recorded with multi-channels are not supported.
• Playback for USB starts in order by date and time of creation.
Sampling
frequency (kHz)
8 to 192 16/24
8 to 48 16
8 to 48 16
8 to 48 16
8 to 192 16/24
44.1 to 48 16
Quontization bit
Note
Do not use any lens cleaners as they may be a cause of
malfunction.
❚ Discs
Formats
MP3
WMA
Notes
• Playback for MP3 or WMA files starts in alphanumeric order.
• Copyright-protected WMA (DRM) files cannot be played back
by this unit.
• The disc must be ISO 9660 compatible.
• Elapsed time may not be displayed correctly while playing back
variable bitrate contents.
Sampling
frequency (kHz)
8 to 48 16
16 to 48 16
Quontization bit
32 En
Page 35

SPECIFICATIONS
INPUT/OUTPUT
• NETWORK
Ethernet connection .................................100Base-TX/10Base-T
DLNA version .........................................................................1.5
• ANALOG OUT ...............................................................2ch (L/R)
•DIGITAL OUT
Optical ................................................................................... × 1
Coaxial................................................................................... × 1
• USB........................................................................................... × 1
AUDIO SECTION
• Output level
1 kHz, 0 dB, fs 44.1 kHz ............................................2.0 ± 0.3 V
• Signal to noise ratio (IHF-A network)
1 kHz, 0 dB, fs 44.1 kHz .................................... 110 dB or more
• Dynamic range
1 kHz, 0 dB, fs 44.1 kHz .................................... 100 dB or more
• Harmonic distortion
1 kHz, 0 dB, fs 44.1 kHz ...................................... 0.003% or less
• Frequency response
(CD)
fs 44.1 kHz................................................2 Hz to 20 kHz, –3 dB
(NETWORK)
fs 48 kHz...................................................2 Hz to 24 kHz, –3 dB
fs 96 kHz...................................................2 Hz to 48 kHz, –3 dB
fs 192 kHz.................................................2 Hz to 96 kHz, –3 dB
GENERAL
• Power supply
[Europe model].........................................AC 230-240 V, 50 Hz
[U.S.A and Canada models].............................AC 120 V, 60 Hz
[Asia model] ..........................AC 110-120/220-240 V, 50/60 Hz
[Australia model]......................................AC 230-240 V, 50 Hz
[China model]...................................................AC 220 V, 50 Hz
• Power consumption ................................................................28 W
• Standby power consumption when network standby mode is
enabled (reference data).........................................................3.5 W
• Standby power consumption when network standby mode is
disabled (reference data)......................................................0.35 W
• Dimensions (W × H × D)..............................435 × 96 × 313.3 mm
(17-1/8 × 3-3/4 × 12-1/3 in)
• Weight...................................................................5.25 kg (11.6 lb)
* Please note that all specifications are subject to change without
notice.
iPod, iPhone, iPad
iPad, iPhone, iPod, iPod nano, and iPod touch are
trademarks of Apple Inc., registered in the U.S. and
other countries.
“Made for iPod,” “Made for iPhone,” and “Made for
iPad” mean that an electronic accessory has been
designed to connect specifically to iPod, iPhone, or
iPad, respectively, and has been certified by the
developer to meet Apple performance standards. Apple
is not responsible for the operation of this device or its
compliance with safety and regulatory standards.
Please note that the use of this accessory with iPod,
iPhone, or iPad may affect wireless performance.
Android™ is a trademark of Google Inc.
Windows™
Windows is a registered trademark of Microsoft
Corporation in the United States and other countries.
Windows XP, Windows Vista, Windows 7, Windows
Media Audio and Windows Media Player are either
registered trademarks or trademarks of Microsoft
Corporation in the United States and/or other countries.
DLNA™ and DLNA CERTIFIED™ are trademarks or
registered trademarks of Digital Living Network
Alliance. All rights reserved. Unauthorized use is
strictly prohibited.
OTHERS
MPEG Layer-3 audio coding technology licensed from
Fraunhofer IIS and Thomson.
33 En
English
Page 36

ATTENTION : VEUILLEZ LIRE CE QUI SUIT AVANT D’UTILISER
L’APPAREIL.
1 Pour utiliser l’appareil au mieux de ses possibilités,
lisez attentivement ce mode d’emploi. Conservez-le
soigneusement pour référence.
2 Installez cet ensemble audio dans un endroit bien aéré,
frais, sec et propre - veillez à ce qu’il soit à l’abri de la
lumière directe du soleil, des sources de chaleur, des
vibrations, des poussières, de l’humidité et/ou du froid.
Pour une aération correcte, tenez compte des distances
minimales suivantes.
Au-dessus : 10 cm
À l’arrière : 10 cm
Sur les côtés : 10 cm
3 Placez l’appareil loin des équipements, moteurs et
transformateurs électriques, pour éviter les ronflements
parasites.
4 N’exposez pas l’appareil à des variations brutales de
température, ne le placez pas dans un environnement très
humide (par exemple dans une pièce contenant un
humidificateur) car cela peut entraîner la condensation
d’humidité à l’intérieur de l’appareil qui elle-même peut
être responsable de décharge électrique, d’incendie, de
dommage à l’appareil ou de blessure corporelle.
5 Evitez d’installer l’appareil dans un endroit où des objets
peuvent tomber, ainsi que là où l’appareil pourrait être
exposé à des éclaboussures ou des gouttes d’eau. Sur
le dessus de l’appareil, ne placez pas :
– d’autres appareils qui peuvent endommager la surface
de l’appareil ou provoquer sa décoloration.
– des objets se consumant (par exemple, une bougie)
qui peuvent être responsables d’incendie, de
dommage à l’appareil ou de blessure corporelle.
– des récipients contenant des liquides qui peuvent être
à l’origine de décharge électrique ou de dommage
à l’appareil.
6 Ne couvrez pas l’appareil d’un journal, d’une nappe,
d’un rideau, etc. car cela empêcherait l’évacuation de la
chaleur. Toute augmentation de la température intérieure
de l’appareil peut être responsable d’incendie, de
dommage à l’appareil ou de blessure corporelle.
7 Ne branchez pas la fiche du câble d’alimentation de
l’appareil sur une prise secteur aussi longtemps que tous
les raccordements n’ont pas été effectués.
8 Ne pas faire fonctionner l’appareil à l’envers. Il risquerait
de chauffer et d’être endommagé.
9 N’exercez aucune force excessive sur les commutateurs,
les boutons et les cordons.
10 Pour débrancher la fiche du câble d’alimentation au niveau de
la prise secteur, saisissez la fiche et ne tirez pas sur le cordon.
11 Ne nettoyez pas l’appareil au moyen d’un solvant
chimique, ce qui pourrait endommager la finition.
Utilisez un chiffon sec et propre.
12 N’alimentez l’appareil qu’à partir de la tension prescrite.
Alimenter l’appareil sous une tension plus élevée est
dangereux et peut être responsable d’incendie, de dommage à
l’appareil ou de blessure corporelle. Yamaha ne saurait être
tenue responsable des dommages résultant de l’alimentation
de l’appareil sous une tension autre que celle prescrite.
13 Pour empêcher tout dommage causé par les éclairs,
déconnectez le câble d’alimentation et toute antenne
extérieure de la prise murale pendant un orage.
14 Ne tentez pas de modifier ni de réparer l’appareil.
Consultez le service Yamaha compétent pour toute
réparation qui serait requise. Le coffret de l’appareil ne
doit jamais être ouvert, quelle que soit la raison.
15 Si vous envisagez de ne pas vous servir de l’appareil
pendant une longue période (par exemple, pendant les
vacances), débranchez la fiche du câble d’alimentation
au niveau de la prise secteur.
16 Lisez la section intitulée « GUIDE DE DÉPANNAGE »
où figurent une liste d’erreurs de manipulation
communes avant de conclure que l’appareil présente
une anomalie de fonctionnement.
17 Avant de déplacer l’appareil, appuyez sur pour placer
l’appareil en veille puis débranchez la fiche du cordon
d’alimentation au niveau de la prise secteur.
18 La condensation se forme lorsque la température
ambiante change brusquement. En ce cas, débranchez la
fiche du câble d’alimentation et laissez l’appareil reposer.
19 La température de l’appareil peut augmenter en raison d’une
utilisation prolongée. En ce cas, coupez l’alimentation de
l’appareil et laissez-le au repos pour qu’il refroidisse.
20 Installez cet appareil à proximité de la prise secteur et
à un emplacement où la fiche du câble d’alimentation
est facilement accessible.
21 Les piles ne doivent pas être exposées à une chaleur
extrême, par exemple au soleil, à une flamme, etc.
– Conservez les piles hors de portée des enfants. Les
piles constituent un danger potentiel si les enfants les
mettent en bouche.
– Si les piles sont vieilles, la portée de la télécommande risque
de diminuer considérablement. Le cas échéant, remplacez
les piles le plus rapidement possible par deux piles neuves.
– N’utilisez pas à la fois des piles neuves et des piles
usagées.
– N’utilisez pas non plus des piles de deux types différents
(par exemple, des piles alcalines et des piles au manganèse).
Lisez les instructions de l’emballage, car ces types de piles
peuvent être de forme et de couleur différentes.
– Des piles épuisées risquent de fuir. En cas de fuite, jetez
les piles immédiatement. Évitez de toucher le liquide qui
a fui et veillez à ce qu’il n’entre pas en contact avec vos
vêtements, etc. Nettoyez soigneusement le logement
d’insertion des piles avant d’insérer de nouvelles piles.
– Retirez les piles de l’appareil si vous n’avez pas
l’intention d’utiliser ce dernier pendant une période
prolongée. Sans cela, les piles s’usent et risquent de
fuir, ce qui pourrait endommager l’appareil.
– Ne jetez pas les piles avec les ordures ménagères.
Mettez-les au rebut conformément aux
réglementations locales en vigueur.
22 Une pression excessive du son par les écouteurs et le
casque d’écoute peut entraîner la perte de l’ouïe.
Cet appareil n’est pas déconnecté du secteur tant qu’il reste branché
à la prise de courant, même si l’appareil en soi est éteint par
la touche . Il se trouve alors « en veille ». En mode veille,
l’appareil consomme une très faible quantité de courant.
AVERTISSEMENT
POUR RÉDUIRE LES RISQUES D’INCENDIE OU DE
DÉCHARGE ÉLECTRIQUE, N’EXPOSEZ PAS CET APPAREIL
À LA PLUIE OU À L’HUMIDITÉ.
AVERTISSEMENT
LORSQUE VOUS UTILISEZ CET APPAREIL À UN VOLUME
ÉLEVÉ PENDANT UNE PÉRIODE PROLONGÉE, IL EST POSSIBLE
QUE LA PARTIE INFÉRIEURE CHAUFFE. PAR CONSÉQUENT, NE
TOUCHEZ PAS L’APPAREIL, CAR VOUS RISQUEZ DE VOUS
BLESSER, ET NOTAMMENT DE VOUS BRÛLER.
i Fr
Page 37

PRÉPARATION
FONCTIONS DE CET APPAREIL
Cet appareil est un lecteur CD réseau qui vous permet de lire des fichiers de musique stockés sur votre passerelle
multimédia (PC ou NAS), des contenus audio sur Internet, des CD, ou encore des périphériques iPod et USB, en le
connectant à votre réseau domestique (DLNA) et à votre chaîne hi-fi via le même réseau.
y
Pour des informations détaillées sur le DLNA ou le NAS, reportez-vous à la section « INFORMATIONS COMPLÉMENTAIRES »
(☞ P.30).
Internet
2
1
Modem
Routeur large
bande*
PC
PURE DIRECTSOURCE
5V
2.1A
Amplificateur
Cet appareil (CD-N500)
Périphériques iPod/USB
5
CD
4
SELECT
ENTER
PUSH
RETURN
PRÉPARATION
3
NAS
Périphérique
A
mobile*
Télécommande
B
* Vous avez besoin d’un routeur WiFi large bande en vente dans le commerce pour utiliser un périphérique mobile.
❚ Sources pouvant êtres lues par cet appareil
1 Lecture de contenus audio sur Internet
(☞ P.16)
2 Lecture de fichiers de musique stockés
sur votre PC (☞ P.11, 14)
3 Lecture de fichiers de musique stockés
sur votre NAS (☞ P.11, 14)
y
Pour plus de détails concernant le raccordement des périphériques, reportez-vous à la section « RACCORDEMENTS » (☞ P.9).
4 Lecture d’un CD (☞ P.18)
5 Lecture de votre périphérique iPod ou
USB (☞ P.20)
❚ Périphériques pouvant commander cet appareil
A Commandez cet appareil avec vos périphériques mobiles (☞ P.11, 13)
B Commandez cet appareil avec la télécommande (☞ P.6, 14, 16, 18, 20, 22, 23)
Français
1 Fr
Page 38

FOIRE AUX QUESTIONS
Quels réglages sont nécessaires ?
→ Pour plus de détails concernant les réglages de votre PC, NAS ou périphérique mobile, reportez-vous à la section
« CONFIGURATION DE VOTRE PC/NAS/PÉRIPHÉRIQUE MOBILE » (☞ P.11).
→ Pour plus de détails concernant le menu des réglages de cet appareil, reportez-vous à la section « MENU DES
RÉGLAGES » (☞ P.23).
Pourquoi les fichiers de musique sont-ils introuvables sur mon PC ?
→ Vérifiez les réglages du partage des fichiers multimédias de votre PC ou passerelle multimédia, par exemple
Lecteur Windows Media 12 (☞ P.11).
→ Vérifiez si les fichiers de musique sont lisibles (☞ P.31).
Puis-je commander cet appareil à l’aide de mon iPhone ?
→ Pour plus d’informations sur la manière de commande cet appareil à partir de votre appareil mobile, reportez-vous
à la section « Opérations depuis votre périphérique mobile » (☞ P.13).
Je ne parviens pas à trouver cet appareil avec l’application dédiée installée sur mon périphérique
mobile !
→ Vérifiez si l’appareil est bien connecté au même réseau via le routeur large bande.
→ Vérifiez si l’accès à cet appareil est limité par une fonction de filtre d’adresse MAC (☞ P.27).
Quels fichiers de musique sont lisibles sur cet appareil ?
→ Pour plus de détails concernant les fichiers et formats lisibles, reportez-vous à la section « FORMATS DE DISQUE
ET FICHIER LISIBLES » (☞ P.31).
Comment écouter la radio Internet sur cet appareil ?
→ Pour plus de détails concernant l’écoute de stations radio Internet, reportez-vous à la section « LECTURE DE
CONTENUS AUDIO SUR INTERNET » (☞ P.16).
Comment lire mon périphérique iPod ou USB ?
→ Pour plus de détails concernant la lecture de votre périphérique iPod ou USB, reportez-vous à la section
« LECTURE DE VOTRE PÉRIPHÉRIQUE iPod/USB » (☞ P.20).
Que signifient les messages à l’afficheur du panneau avant ?
→ Pour plus de détails concernant les messages à l’afficheur du panneau avant, reportez-vous à la section « Messages
à l’afficheur du panneau avant » (☞ P.29).
Pour obtenir les informations les plus récentes, veuillez consulter le site Web de Yamaha.
2 Fr
Page 39

TABLE DES MATIÈRES
PRÉPARATION
FONCTIONS DE CET APPAREIL .............................1
FOIRE AUX QUESTIONS ...........................................2
ACCESSOIRES FOURNIS........................................... 4
PRÉPARATION DE LA TÉLÉCOMMANDE ........... 4
COMMANDES ET FONCTIONS ................................5
Panneau avant .................................................................... 5
Télécommande................................................................... 6
Panneau arrière................................................................... 8
RACCORDEMENTS.....................................................9
Raccordement à un amplificateur ...................................... 9
Connexion à un réseau (connexion PC/NAS/Internet) .... 10
Mise en service de cet appareil........................................ 10
OPÉRATIONS
CONFIGURATION DE VOTRE PC/NAS/
PÉRIPHÉRIQUE MOBILE.................................... 11
Partage de fichiers de musique stockés sur votre PC....... 12
Opérations depuis votre périphérique mobile.................. 13
LECTURE DE FICHIERS DE MUSIQUE SUR
VOTRE PC/NAS ...................................................... 14
Opérations depuis l’appareil principal ou la
télécommande.............................................................. 14
LECTURE DE CONTENUS AUDIO SUR
INTERNET ............................................................... 16
Écoute de stations radio Internet...................................... 16
LECTURE DE CD ....................................................... 18
Lecture d’un CD .............................................................. 18
Utilisation du mode de lecture programmée.................... 19
LECTURE DE VOTRE PÉRIPHÉRIQUE
iPod/USB ...................................................................20
Raccordement de votre périphérique iPod ou USB ......... 20
Lecture de votre iPod ....................................................... 20
Utilisation du mode de lecture étendu pour votre iPod.... 21
Lecture des périphériques USB ....................................... 22
MENU DES RÉGLAGES............................................ 23
Opérations du menu des réglages .................................... 23
Liste du menu des réglages .............................................. 24
Menu des réglages avancés.............................................. 25
AUTRES
PRÉPARATION OPÉRATIONS AUTRES
GUIDE DE DÉPANNAGE...........................................26
Messages à l’afficheur du panneau avant ........................ 29
INFORMATIONS COMPLÉMENTAIRES ..............30
FORMATS DE DISQUE ET FICHIER
LISIBLES...................................................................31
Supports et appareils lisibles............................................ 31
Formats de disque et fichier lisibles................................. 32
CARACTÉRISTIQUES TECHNIQUES....................33
(à la fin de ce manuel)
Information sur le logiciel..................................i
À propos de ce manuel
• Les remarques contiennent des informations importantes concernant la sécurité et le fonctionnement. Le symbole
y appelle votre attention sur un conseil d’utilisation.
• La mention « iPod » peut également désigner un « iPhone » ou un « iPad ».
3 Fr
Français
Page 40

PRÉPARATION
ACCESSOIRES FOURNIS
Veuillez vous assurer que vous êtes bien en possession des éléments suivants.
Télécommande Câble stéréo RCA Câble d’alimentation
OPEN/CLOSE
PURE DIRECT
DISPLAY
SOURCE
123
456
7089
PROGRAM
CLEAR
REPEAT
A/BSHUFFLE
ENTER
HOME
RETURN
NOW PLAYING
SETUP
MODE
FOLDER
AMP
VOLUMEINPUT
MUTE
Piles (AA, R6, UM-3) (× 2) Manuel d’utilisation
PRÉPARATION DE LA TÉLÉCOMMANDE
❚ Mise en place des piles
1
Remarques
• Changez chacune des piles lorsque la portée de la
télécommande commence à se réduire.
• Avant de mettre la nouvelle pile en place, essuyez
soigneusement le compartiment.
4
3
2
❚ Portée de la télécommande
Pointez la télécommande directement sur le capteur de
télécommande de l’appareil principal pendant le
fonctionnement.
Capteur de télécommande
PURE DIRECTSOURCE
5V
2.1A
Moins de 6 m
30 30
OPEN/CLOSE
DISPLAY
SOURCE
PURE DIRECT
123
456
7089
CLEAR
PROGRAM
A/BSHUFFLE
REPEAT
ENTER
RETURN
HOME
NOW PLAYING
MODE
SETUP
FOLDER
AMP
VOLUMEINPUT
MUTE
4 Fr
Page 41

Panneau avant
COMMANDES ET FONCTIONS
PRÉPARATION
18
PURE DIRECTSOURCE
5V
2.1A
23 546 09ABCD
1 Témoin d’alimentation
• S’allume :
Cet appareil est dans un état qui vous permet de le mettre
sous tension ou en mode veille à l’aide de la télécommande
ou d’un périphérique mobile (lorsque le mode veille du
réseau est activé), ou cet appareil est sous tension.
• S’allume faiblement :
Cet appareil est dans un état qui vous permet de le mettre
sous tension à l’aide de la télécommande (lorsque le mode
veille du réseau est désactivé).
• Éteint :
Cet appareil est hors tension ; vous pouvez le mettre sous
tension à l’aide de l’interrupteur d’alimentation du panneau
avant de l’appareil principal.
y
Vous pouvez activer ou désactiver le mode veille du réseau
dans le menu des réglages (☞ P.24).
2 Interrupteur d’alimentation (☞ P.10)
Pour mettre cet appareil sous et hors tension.
: sous tension : hors tension
3 Capteur de télécommande (☞ P.4)
Il reçoit les signaux émis par la télécommande.
4 Port USB (☞ P.20)
Pour raccorder votre périphérique iPod ou USB.
5 SOURCE (☞ P.14, 16, 18, 20, 22)
Pour sélectionner une source audio. Chaque pression répète
le cycle des sources audio comme suit.
CD → USB → SERVER → NET RADIO → Retour au CD
6 PURE DIRECT
Pour activer ou désactiver le mode PURE DIRECT. La
qualité audio est améliorée lorsque le mode PURE DIRECT
est activé.
y
Le témoin PURE DIRECT s’allume lorsque le mode PURE
DIRECT est activé.
7
SELECT
ENTER
PUSH
RETURN
7 Plateau du disque
Pour charger un disque.
8 (Ouvrir/Fermer)
Pour ouvrir ou fermer le plateau du disque.
9 Afficheur du panneau avant
Affiche des options de menu, des informations sur la lecture,
etc.
y
Pour des informations détaillées sur les messages à
l’afficheur, reportez-vous à la section « Messages à
l’afficheur du panneau avant » (☞ P.29).
0 / (Lecture/Pause)
Pour démarrer ou mettre en pause la lecture.
A (Arrêter)
Pour arrêter la lecture.
B / (Saut/Recherche en arrière)
C SELECT/ENTER (Commande rotative) (☞ P.14, 16,
D RETURN (☞ P.14, 16, 21, 22)
/ (Saut/Recherche en avant)
Pour retourner à la plage précédente/au début de la plage en
cours ou à la plage suivante, ou pour effectuer une recherche
en arrière/avant.
Les opérations diffèrent selon les sources audio.
18, 21, 22, 24)
Tournez afin de sélectionner une option, puis appuyez pour
valider la sélection.
Pour afficher le niveau de menu supérieur à l’afficheur du
panneau avant.
Français
5 Fr
Page 42

COMMANDES ET FONCTIONS
Télécommande
1
OPEN/CLOSE
2
SOURCE
3
4
5
6
7
8
9
0
A
B
PURE DIRECT
123
456
7
0
HOME
NOW PLAYING
SETUP
DISPLAY
89
CLEAR
PROGRAM
A/BSHUFFLE
REPEAT
ENTER
RETURN
MODE
FOLDER
AMP
VOLUMEINPUT
MUTE
C
D
E
F
G
H
I
J
K
1 Émetteur du signal de télécommande
Pour transmettre des signaux infrarouge à l’appareil
principal.
2 OPEN/CLOSE
Pour ouvrir ou fermer le plateau du disque.
3 SOURCE (☞ P.14, 16, 18, 20, 22)
Pour sélectionner une source audio. Chaque pression répète
le cycle des sources audio comme suit.
CD → USB → SERVER → NET RADIO → Retour au CD
4 PURE DIRECT
Pour activer ou désactiver le mode PURE DIRECT. La
qualité audio est améliorée lorsque le mode PURE DIRECT
est activé.
5 Boutons numériques (☞ P.18)
À utiliser pour sélectionner directement une plage sur le
disque ou le dossier en cours.
6 SHUFFLE (☞ P.15, 18, 21, 22)
Pour permuter entre les modes aléatoires.
7 REPEAT (☞ P.15, 18, 21, 22)
Pour permuter entre les modes de répétition.
8 Touches de lecture (☞ P.14, 16, 18, 21, 22, 23)
(Lecture)
Pour lancer la lecture.
(Arrêter)
Pour arrêter la lecture.
(Pause)
Pour mettre la lecture en pause.
(Saut arrière)
Pour effectuer un saut arrière.
(Saut avant)
Pour effectuer un saut avant.
S/T/W/X (Touches de déplacement du curseur)/
ENTER
Utilisez les touches de déplacement du curseur pour
sélectionner une option, puis appuyez sur ENTER pour
valider la sélection.
9 HOME (☞ P.14, 16, 21, 22)
Pour afficher le menu principal à l’afficheur du panneau
avant.
0 NOW PLAYING (☞ P.15, 17, 21, 22)
Pour afficher les informations concernant la lecture à
l’afficheur du panneau avant.
A SETUP (☞ P.23)
Pour afficher le menu des réglages à l’afficheur du panneau
avant.
B FOLDER ( / ) (☞ P.18)
Pour permuter entre les dossiers de lecture pendant la lecture
de musique sur des CD de données.
6 Fr
Page 43

COMMANDES ET FONCTIONS
C A (Alimentation) (☞ P.10)
Pour permuter cet appareil entre la mise sous tension et le
mode veille.
y
Pour plus de détails concernant le mode veille, reportez-vous
à la section « Panneau avant » (☞ P.5).
D DISPLAY (☞ P.15, 17, 18, 21, 22)
Pour permuter entre les informations affichées sur l’afficheur
du panneau avant, comme les informations sur la lecture.
E CLEAR (☞ P.19)
Pour effacer la dernière plage programmée d’un CD audio
(excepté les CD de données) pendant le mode d’édition de
programme.
F PROGRAM
Pour activer ou désactiver le mode de lecture programmée.
En mode de lecture programmée, vous pouvez lire les plages
d’un CD audio (excepté celles d’un CD de données) dans un
ordre programmé. Pour plus de détails, reportez-vous à la
section « Utilisation du mode de lecture programmée »
(☞ P.19).
G A/B
Pour répéter la lecture d’une section particulière d’une plage
durant la lecture d’un CD audio (excepté un CD de données).
Afin de régler les points de début et de fin (A et B), appuyez
deux fois sur A/B durant la lecture.
Pour annuler la répétition A-B, appuyez à nouveau sur A/B.
y
• Un CD de données est défini comme un disque sur lequel
sont enregistrés des fichiers MP3 ou WMA.
• Vous ne pouvez pas régler la répétition A-B sur
deux plages.
• Vous ne pouvez pas régler la répétition A-B pour les CD de
données et les périphériques USB.
• Une pression sur (Arrêter) annule la répétition A-B.
• Vous ne pouvez pas régler la répétition A-B lorsque cet
appareil est en mode PURE DIRECT.
• Vous ne pouvez pas régler la répétition A-B lorsque cet
appareil affiche la durée de lecture restante de la plage ou
du disque à l’afficheur du panneau avant.
H (Rechercher en arrière), (Rechercher en
avant) (☞ P.18, 21)
Pour rechercher les plages en arrière/en avant lorsque la
touche est maintenue enfoncée durant la lecture.
I RETURN (☞ P.14, 16, 21, 22)
Pour afficher le niveau de menu supérieur à l’afficheur du
panneau avant.
J MODE (☞ P.21)
Pour commuter entre le mode standard et le mode étendu
durant la lecture de votre iPod.
K Touches de commande de l’amplificateur
Pour commander les fonctions correspondantes de
l’amplificateur Yamaha.
A (Alimentation)
Pour mettre votre amplificateur sous et hors tension.
INPUT ( / )
Pour permuter entre les sources d’entrée.
VOLUME ( / )
Pour régler le volume.
MUTE
Pour couper ou rétablir le son.
Pour plus de détails concernant les opérations, consultez la
notice de l’amplificateur.
y
Ces touches peuvent ne pas fonctionner pour certains
amplificateurs Yamaha.
PRÉPARATION
7 Fr
Français
Page 44

COMMANDES ET FONCTIONS
24 531
Panneau arrière
ANALOG OUT
RL
DIGITAL OUT
COAXIAL OPTICAL
1 Borne ANALOG OUT (☞ P.9)
Pour émettre des signaux audio analogiques L/R. À relier à
votre amplificateur ou chaîne hi-fi à l’aide du câble stéréo
RCA (fourni).
2 Borne DIGITAL OUT (COAXIAL) (☞ P.9)
Pour émettre des signaux audio numériques. Pour brancher
votre amplificateur ou chaîne hi-fi à l’aide d’un câble audio
numérique coaxial (en vente dans le commerce).
3 Borne DIGITAL OUT (OPTICAL) (☞ P.9)
Pour émettre des signaux audio numériques. Pour brancher
votre amplificateur ou chaîne hi-fi à l’aide d’un câble optique
(en vente dans le commerce).
4 Borne NETWORK (☞ P.10)
Pour la connexion à un réseau à l’aide d’un câble réseau (en
vente dans le commerce).
5 Prise AC IN (☞ P.9)
Pour le branchement sur une prise secteur à l’aide du câble
d’alimentation (fourni).
NETWORK
AC IN
8 Fr
Page 45

RACCORDEMENTS
Cette section décrit les raccordements à effectuer en vue de procéder à la lecture sur cet appareil.
Remarques
• Ne branchez pas le câble d’alimentation de cet appareil avant d’avoir terminé tous les raccordements.
• Vous devez raccorder cet appareil à un amplificateur et à des haut-parleurs avant la lecture.
• Cet appareil peut émettre des signaux numériques allant jusqu’aux signaux PCM linéaires 192 kHz/24 bits.
• La lecture peut s’avérer impossible en fonction de l’environnement et de l’appareil raccordé. Vérifiez les réglages et les
caractéristiques techniques de l’appareil source de lecture qui est raccordé.
Raccordement à un amplificateur
ANALOG OUT
R L
R L
DIGITAL OUT
COAXIAL OPTICAL
DIGITAL OUTANALOG OUT
COAXIAL OPTICAL
NETWORK
Cet appareil (CD-N500)
Câble d’alimentation
(fourni)
1
21 3
AC IN
2
PRÉPARATION
Vers une
prise secteur
Amplificateur
1 Reliez cet appareil à votre amplificateur
à l’aide de l’un des câbles suivants.
1 Câble stéréo RCA
(fourni)
2 Câble audio numérique coaxial
(en vente dans le commerce)
3 Câble numérique optique
(en vente dans le commerce)
CNA
(convertisseur numérique-analogique)
Amplificateur
* La sortie numérique est désactivée lorsque cet appareil
est en mode PURE DIRECT.
2
Branchez le câble d’alimentation fourni à
la prise AC IN, puis à une prise secteur.
y
Pour plus de détails concernant le raccordement des hautparleurs, consultez la notice de l’amplificateur ou des hautparleurs.
Remarque
Pendant l’utilisation d’un raccordement numérique, la sortie
audio risque d’être interrompue au début d’une plage selon la
chaîne hi-fi (amplificateur, etc.).
Français
9 Fr
Page 46

RACCORDEMENTS
Connexion à un réseau (connexion PC/NAS/Internet)
Vous pouvez lire des fichiers de musique stockés sur votre PC ou NAS et des contenus audio sur Internet en connectant
cet appareil à un réseau.
Effectuez la connexion à l’aide d’un câble réseau blindé (à paires torsadées ; câble droit de catégorie CAT-5 ou
supérieure).
ANALOG OUT
R L
DIGITAL OUT
COAXIAL OPTICAL
NETWORK
AC IN
Cet appareil (CD-N500)
Câble réseau
LAN
PC
Routeur large bande
WAN
NAS
Modem
Internet
Remarques
• Hormis celui-ci, tous les appareils sont vendus séparément.
• Vous devez configurer votre PC ou NAS après la connexion. Pour plus de détails concernant les réglages, reportez-vous à la section
« CONFIGURATION DE VOTRE PC/NAS/PÉRIPHÉRIQUE MOBILE » (☞ P.11).
• Pour maintenir une qualité sonore élevée, les connexions filaires sont recommandées pour chaque périphérique.
Mise en service de cet appareil
Une fois tous les raccordements de câble effectués, mettez cet appareil et les autres appareils de votre système sous
tension.
SELECT
ENTER
PUSH
PURE DIRECTSOURCE
5V
2.1A
Appuyez sur l’interrupteur d’alimentation pour mettre cet appareil sous tension.
y
• Lorsque l’interrupteur d’alimentation est allumé, vous pouvez mettre cet appareil sous tension ou en mode veille en appuyant sur la
touche d’alimentation de la télécommande (☞ P.6).
• Pour plus de détails concernant le mode veille, reportez-vous à la section « Panneau avant » (☞ P.5).
10 Fr
RETURN
Page 47

OPÉRATIONS
CONFIGURATION DE VOTRE PC/NAS/PÉRIPHÉRIQUE MOBILE
Configurez votre PC ou NAS connecté au réseau pour pouvoir lire des fichiers de musique stockés sur le PC ou NAS, ou
configurez votre périphérique mobile pour commander cet appareil.
y
Pour plus de détails concernant la connexion Internet, veuillez vous référer à la notice de vos périphériques réseau.
❚ Configuration de votre PC
Ce que vous souhaitez faire Configuration Page
Lecture de fichiers de musique stockés
sur votre PC
y
Vous pouvez commander votre PC avec le Lecteur Windows Media. Pour plus de détails, consultez l’aide du Lecteur Windows Media.
Vous devez configurer le réglage du partage des fichiers
multimédias de votre PC.
• Configurez le réglage du partage des fichiers multimédias
concernant les fichiers de musique sur le Lecteur Windows
Media 12.
12
❚ Configuration de votre NAS
Ce que vous souhaitez faire Configuration Page
Lecture de fichiers de musique stockés
sur votre NAS
Vous devez configurer les réglages suivants pour pouvoir
accéder à votre NAS.
• Configurez les réglages du partage des fichiers multimédias
de votre NAS.
• Activez le réglage du DHCP de votre NAS.*
Les opérations de configuration diffèrent selon votre NAS.
Consultez la notice du NAS.
—
OPÉRATIONS
* Si vous utilisez le DHCP et obtenez automatiquement les informations nécessaires pour le réseau, comme l’adresse IP. Si vous désirez
configurer les paramètres réseau manuellement, vérifiez que vous utilisez une adresse IP non utilisée par d’autres périphériques réseau
de votre réseau.
❚ Configuration de votre périphérique mobile
Ce que vous souhaitez faire Configuration Page
Commander cet appareil avec votre
périphérique mobile
Vous devez télécharger l’application dédiée, puis l’installer.
• Activez le réglage du DHCP de votre périphérique mobile.*
* Si vous utilisez le DHCP et obtenez automatiquement les informations nécessaires pour le réseau, comme l’adresse IP. Si vous désirez
configurer les paramètres réseau manuellement, vérifiez que vous utilisez une adresse IP non utilisée par d’autres périphériques réseau
de votre réseau.
13
11 Fr
Français
Page 48

CONFIGURATION DE VOTRE PC/NAS/PÉRIPHÉRIQUE MOBILE
Partage de fichiers de musique stockés sur votre PC
Pour parcourir les dossiers (répertoires) de votre PC à
partir de cet appareil, il vous faut modifier le réglage du
partage des fichiers multimédias du Lecteur Windows
Media 12 ou Lecteur Windows Media 11 afin que cet
appareil puisse avoir accès à ces dossiers. Pour plus de
détails concernant le Lecteur Windows Media, consultez
l’aide du Lecteur Windows Media.
y
Vous pouvez raccorder jusqu’à 16 passerelles multimédia à cet
appareil.
❚ Pour utiliser le Lecteur Windows
Media 12 (sur Windows 7)
1 Démarrez le Lecteur Windows Media 12
sur votre PC.
2 Sélectionnez « Diffuser en continu »,
puis « Activer la diffusion multimédia en
continu ».
4 Sélectionnez « Autorisé » dans le menu
déroulant affiché à côté de « CD-N500 ».
5 De même, sélectionnez les icônes pour
les périphériques que vous désirez
utiliser comme Media Controller externe
(autres PC ou périphériques mobiles),
puis cliquez sur « Autorisé ».
6 Cliquez sur « OK » pour quitter.
La fenêtre Panneau de configuration de votre PC
apparaît.
3 Cliquez sur « Activer la diffusion
multimédia en continu ».
12 Fr
Page 49

❚ Pour utiliser le Lecteur Windows
Media 11
1 Démarrez le Lecteur Windows Media 11
sur votre PC.
2 Sélectionnez « Bibliothèque », puis
« Partage des fichiers multimédias ».
3 Cochez la case « Partager mes fichiers
multimédias dans », sélectionnez l’icône
« CD-N500 », puis cliquez sur
«Autorisé».
4 De même, sélectionnez les icônes pour
les périphériques que vous désirez
utiliser comme Media Controller externe
(autres PC ou périphériques mobiles),
puis cliquez sur « Autorisé ».
5 Cliquez sur « OK » pour quitter.
CONFIGURATION DE VOTRE PC/NAS/PÉRIPHÉRIQUE MOBILE
OPÉRATIONS
Opérations depuis votre périphérique mobile
Vous pouvez commander cet appareil en affichant l’écran
de votre périphérique mobile.
❚ Utilisation de l’application dédiée
Vous pouvez effectuer les opérations suivantes depuis
votre périphérique mobile à l’aide de l’application dédiée
(application gratuite).
• Vous pouvez sélectionner et lire des fichiers de musique
stockés sur votre PC ou NAS.
• Vous pouvez sélectionner les stations de radio Internet.
• Vous pouvez commander la lecture de CD et de
périphériques USB.
y
Pour configurer les paramètres du PC ou du NAS, reportez-vous à
la section « CONFIGURATION DE VOTRE PC/NAS/
PÉRIPHÉRIQUE MOBILE » (☞ P.11).
❚ À propos de l’application dédiée
Téléchargez et installez l’application dédiée sur votre
périphérique mobile.
Pour plus de détails, veuillez consulter le site Web de
Yamaha.
Français
13 Fr
Page 50

LECTURE DE FICHIERS DE MUSIQUE SUR VOTRE PC/NAS
Cette section décrit comment commander la lecture à
l’aide des touches du panneau avant de l’appareil principal
ou de la télécommande.
Opérations depuis l’appareil principal ou la télécommande
y
Pour plus de détails concernant les commandes de l’appareil
principal ou de la télécommande, reportez-vous à la section
« COMMANDES ET FONCTIONS ».
1 Appuyez plusieurs fois sur SOURCE
pour permuter la source audio sur
«SERVER».
Appareil principal/Télécommande
OPEN/CLOSE
DISPLAY
SOURCE
PURE DIRECTSOURCE
5V
2.1A
SOURCE
Afficheur du panneau avant
PURE DIRECTSOURCE
123
456
2 Servez-vous des commandes suivantes
afin de sélectionner une option de menu
jusqu’à ce que vous trouviez le fichier
de musique de votre choix.
Appareil principal
SELECT
ENTER
PUSH
RETURN
SELECT/ENTER RETURN
SELECT/ENTER (Commande rotative)
Tournez afin de sélectionner une option de menu,
puis appuyez pour confirmer la sélection.
RETURN
Pour afficher le niveau de menu supérieur à
l’afficheur du panneau avant.
Télécommande
S/T/W/X/
ENTER
HOME
HOME
SETUP
ENTER
NOW PLAYING
RETURN
MODE
RETURN
Source SERVER
14 Fr
S/T/W/X (Touches de déplacement du curseur)/
ENTER
Appuyez sur S/T pour sélectionner une option de
menu (ou appuyez sur W/X pour afficher la jauge
indiquant la position en cours du contenu), puis
appuyez sur ENTER pour valider la sélection.
RETURN
Pour afficher le niveau de menu supérieur à
l’afficheur du panneau avant.
HOME
Pour afficher le menu principal à l’afficheur du
panneau avant.
Page 51

3 Une fois que la lecture démarre, vous
0
PROGRAM
REPEAT
HOME
SETUP
NOW PLAYING
RETURN
MODE
A/BSHUFFLE
CLEAR
DISPLAY
OPEN/CLOSE
SOURCE
123
PURE DIRECT
pouvez utiliser les commandes
suivantes pour régler les fonctions
voulues.
Appareil principal
SELECT
ENTER
PUSH
SELECT/ENTER
RETURN
Touches de lecture
Télécommande
DISPLAY
LECTURE DE FICHIERS DE MUSIQUE SUR VOTRE PC/NAS
SELECT/ENTER (Commande rotative)
Tournez pendant la lecture pour passer à la plage
suivante ou revenir à la plage précédente/au début de
la plage en cours.
Touches de lecture
Utilisez ces touches pour commander les contenus
audio (☞ P.5, 6).
DISPLAY
Si vous appuyez sur cette touche pendant la lecture
ou la pause d’un morceau, les informations de
l’afficheur du panneau avant permutent dans l’ordre
suivant.
Song Artist Album Time Source
SHUFFLE
Pour permuter le mode aléatoire dans l’ordre suivant.
On Off
REPEAT
Pour permuter le mode de répétition dans l’ordre
suivant.
One All Off
OPÉRATIONS
SHUFFLE
REPEAT
NOW PLAYING
Pour afficher les informations concernant la lecture
en cours à l’afficheur du panneau avant.
y
Touches de
lecture
ENTER
NOW PLAYING
• En cas d’arrêt du morceau en cours de lecture, la prochaine
lecture de la plage que vous avez écoutée reprend au début.
• Pour plus de détails concernant les fichiers lisibles, reportezvous à la section « FORMATS DE DISQUE ET FICHIER
LISIBLES » (☞ P.31).
Français
15 Fr
Page 52

LECTURE DE CONTENUS AUDIO SUR INTERNET
Écoute de stations radio Internet
❚ Opérations depuis l’appareil principal
ou la télécommande
1 Appuyez plusieurs fois sur SOURCE
pour permuter la source audio sur « NET
RADIO ».
Appareil principal/Télécommande
OPEN/CLOSE
DISPLAY
SOURCE
PURE DIRECTSOURCE
5V
2.1A
SOURCE
Afficheur du panneau avant
Source NET RADIO
PURE DIRECTSOURCE
123
456
2 Servez-vous des commandes suivantes
afin de sélectionner une option de menu
jusqu’à ce que vous trouviez la station
radio Internet de votre choix.
Appareil principal
SELECT
ENTER
PUSH
RETURN
SELECT/ENTER RETURN
SELECT/ENTER (Commande rotative)
Tournez afin de sélectionner une option de menu,
puis appuyez pour confirmer la sélection.
RETURN
Pour afficher le niveau de menu supérieur à
l’afficheur du panneau avant.
Télécommande
S/T/W/X/
ENTER
HOME
HOME
SETUP
ENTER
NOW PLAYING
RETURN
MODE
RETURN
16 Fr
S/T/W/X (Touches de déplacement du curseur)/
ENTER
Appuyez sur S/T pour sélectionner une option de
menu (ou appuyez sur W/X pour afficher la jauge
indiquant la position en cours du contenu), puis
appuyez sur ENTER pour valider la sélection.
RETURN
Pour afficher le niveau de menu supérieur à
l’afficheur du panneau avant.
HOME
Pour afficher le menu principal à l’afficheur du
panneau avant.
Page 53

3 Une fois que la lecture démarre, vous
REPEAT
HOME
SETUP
NOW PLAYING
RETURN
MODE
A/BSHUFFLE
DISPLAY
OPEN/CLOSE
SOURCE
123
PURE DIRECT
pouvez utiliser les commandes
suivantes pour régler les fonctions
voulues.
Appareil principal
SELECT
ENTER
PUSH
RETURN
/
Télécommande
DISPLAY
LECTURE DE CONTENUS AUDIO SUR INTERNET
/ (Lecture/Pause) ou (Lecture)
Pour lancer la lecture.
(Arrêter)
Pour arrêter la lecture.
DISPLAY
Si vous appuyez sur cette touche pendant la lecture
ou la pause d’un morceau, les informations de
l’afficheur du panneau avant permutent dans l’ordre
suivant.
Station Time Source
NOW PLAYING
Pour afficher les informations concernant la lecture
en cours à l’afficheur du panneau avant.
y
Vous pouvez mémoriser vos stations radio Internet favorites et
les mettre dans la liste des favoris en accédant au site Web
« vTuner Radio Guide ». Pour ce faire, vous avez besoin de
l’adresse MAC de cet appareil (☞ P.24) en guise d’identifiant
pour votre lecteur multimédia et de votre adresse électronique
pour créer un compte personnel.
Pour plus de détails, consultez le site Web ci-dessous.
http://yradio.vtuner.com/
OPÉRATIONS
ENTER
NOW PLAYING
Français
17 Fr
Page 54

Lecture d’un CD
0
PROGRAM CLEAR
DISPLAY
OPEN/CLOSE
SOURCE
123
456
789
PURE DIRECT
REPEAT
HOME
SETUP
FOLDER
NOW PLAYING
RETURN
MODE
A/BSHUFFLE
ENTER
LECTURE DE CD
Télécommande
1 Appuyez plusieurs fois sur SOURCE
Appareil principal/Télécommande
Afficheur du panneau avant
Source CD
2 Appuyez sur (Ouvrir/Fermer) de
3 Appuyez à nouveau sur (Ouvrir/
4 Une fois que la lecture démarre, vous
pour permuter la source audio sur
«CD».
OPEN/CLOSE
DISPLAY
PURE DIRECTSOURCE
SOURCE
123
PURE DIRECTSOURCE
5V
2.1A
456
SOURCE
l’appareil principal pour ouvrir le plateau
du disque, puis chargez un CD.
Fermer) pour refermer le plateau du
disque.
La lecture démarre automatiquement.
pouvez utiliser les commandes
suivantes pour régler les fonctions
voulues.
DISPLAY
Boutons
numériques
SHUFFLE
A/B
/
REPEAT
Touches de
lecture
FOLDER
SELECT/ENTER (Commande rotative)
Tournez pendant la lecture pour passer à la plage
suivante ou revenir à la plage précédente/au début de
la plage en cours.
Touches de lecture
Utilisez ces touches pour commander les contenus
audio (☞ P.5, 6).
Boutons numériques (CD audio uniquement)
À utiliser pour sélectionner directement une plage sur
un CD.
(Rechercher en arrière)/ (Rechercher en
avant)
Pour rechercher en arrière/en avant.
FOLDER ( / ) (CD de données uniquement)
Pour sélectionner le dossier de votre choix.
Appareil principal
18 Fr
Touches de lecture
SELECT
ENTER
PUSH
SELECT/ENTER
RETURN
Page 55

DISPLAY
0
PROGRAM CLEAR
123
456
789
REPEAT A/BSHUFFLE
Si vous appuyez sur cette touche pendant la lecture
ou la pause d’un morceau, les informations de
l’afficheur du panneau avant permutent dans l’ordre
suivant.
CD audio :
Time (Song) (Artist) (Album) Source
y
• À chaque pression sur cette touche, « Time » répète le
cycle des trois étapes comme suit.
– Numéro de plage et temps de lecture écoulé.
– Numéro de plage et temps de lecture restant de la plage.
– Temps de lecture restant du disque.
• « Song », « Artist » et « Album » s’affichent uniquement
si des informations textuelles figurent sur le disque.
CD de données :
Time Song Artist Album Source
LECTURE DE CD
Utilisation du mode de lecture programmée
Grâce au mode de lecture programmée, vous pouvez lire
les plages dans un ordre programmé.
1 Appuyez sur la touche PROGRAM de la
télécommande pendant l’arrêt de la
lecture.
Cet appareil entre en mode d’édition de programme.
OPÉRATIONS
CLEAR
PROGRAM
SHUFFLE
Permute le mode aléatoire sur « Folder », « All » et
« Off » comme suit.
CD audio :
CD de
All Off
Folder All Off
données :
A/B (CD audio uniquement)
Pour répéter la lecture d’une section particulière
d’une plage durant la lecture d’un CD audio (hormis
les CD de données) (☞ P.7).
REPEAT
Pour permuter le mode de répétition dans l’ordre
suivant.
CD audio :
CD de
One All Off
One Folder All Off
données :
y
• En cas d’arrêt du morceau en cours de lecture, la prochaine
lecture de la plage que vous avez écoutée reprend au début.
• Si vous appuyez sur (Arrêter) pendant l’arrêt de la lecture, la
première plage du CD que vous avez écouté sera lue lors de la
prochaine lecture.
• Pour plus de détails concernant les disques et fichiers lisibles,
reportez-vous à la section « FORMATS DE DISQUE ET
FICHIER LISIBLES » (☞ P.31).
2 Sélectionnez une plage en utilisant les
boutons numériques et appuyez sur
ENTER pour la valider.
3 Recommencez l’étape 2 pour
programmer la plage suivante.
Vous pouvez programmer jusqu’à 50 plages.
y
Pour annuler la plage programmée, appuyez sur CLEAR pendant
le mode d’édition de programme. La dernière plage programmée
est supprimée.
4 Appuyez sur la touche / (Lecture/
Pause) de l’appareil principal ou sur la
touche (Lecture) de la télécommande.
La lecture démarre à partir du début de la séquence
programmée.
y
• Afin d’effacer toutes les plages programmées, appuyez sur
CLEAR lorsque la lecture est arrêtée.
• Vous ne pouvez pas régler une lecture programmée pour les CD
de données.
Remarque
Les plages programmées sont effacées lorsque le disque est éjecté
ou lorsque cet appareil est mis hors tension.
Français
19 Fr
Page 56

LECTURE DE VOTRE PÉRIPHÉRIQUE iPod/USB
Raccordement de votre périphérique iPod ou USB
SELECT
ENTER
PUSH
PURE DIRECTSOURCE
5V
2.1A
y
• Utilisez le câble USB fourni avec votre iPod pour raccorder ce dernier.
• Ne retirez un périphérique USB qu’après avoir arrêté la lecture.
• N’utilisez pas de concentrateur USB. Cet appareil ne reconnaît pas un périphérique USB si ce dernier est raccordé via
un concentrateur USB.
RETURN
Lecture de votre iPod
1 Appuyez plusieurs fois sur SOURCE
pour permuter la source audio sur
«USB».
Appareil principal/Télécommande
OPEN/CLOSE
DISPLAY
SOURCE
PURE DIRECTSOURCE
5V
2.1A
SOURCE
Afficheur du panneau avant
Source USB
PURE DIRECTSOURCE
123
456
2 Branchez votre iPod sur le port USB de
l’appareil principal.
3 Démarrez la lecture sur votre iPod.
Actionnez votre iPod pour démarrer la lecture,
sélectionner un morceau, mettre en pause et arrêter la
lecture (mode de lecture standard).
y
• Vous pouvez aussi l’actionner pour lire, mettre en pause, arrêter
la lecture, effectuer un saut en avant/arrière et rechercher en
avant/arrière avec les touches de lecture de l’appareil principal
et de la télécommande pendant le mode de lecture standard.
Appareil principal :
/, , / , /
Télécommande :
, , , , , ,
• Vous pouvez utiliser les modes aléatoire et de répétition de
votre iPod et la télécommande pendant le mode de lecture
standard.
Remarque
Il est possible que l’iPod ne fonctionne pas normalement avec cet
appareil si le logiciel installé sur l’iPod n’est pas mis à jour.
Assurez-vous d’utiliser la dernière version du logiciel de l’iPod.
Pour plus de détails concernant l’iPod pris en charge, reportezvous à la section « iPod pris en charge via le port USB »
(☞ P.31).
20 Fr
Page 57

Utilisation du mode de lecture
HOME
SETUP
NOW PLAYING
RETURN
MODE
0
PROGRAM
REPEAT
HOME
SETUP
NOW PLAYING
RETURN
MODE
A/BSHUFFLE
CLEAR
DISPLAY
OPEN/CLOSE
SOURCE
123
PURE DIRECT
étendu pour votre iPod
Vous pouvez utilisez votre iPod depuis l’appareil
principal ou la télécommande en mode étendu.
1 Appuyez sur la touche MODE de la
télécommande pendant la lecture de
votre iPod.
Cette touche permet de permuter sur le mode de
lecture étendu.
MODE
2 Utilisez les commandes suivantes pour
régler les fonctions voulues.
Appareil principal
LECTURE DE VOTRE PÉRIPHÉRIQUE iPod/USB
SELECT/ENTER (Commande rotative)
Tournez pendant la lecture pour passer à la plage
suivante ou revenir à la plage précédente/au début de
la plage en cours.
Touches de lecture*
Utilisez ces touches pour commander les contenus
audio (☞ P.5, 6).
RETURN
Pour afficher le niveau de menu supérieur à
l’afficheur du panneau avant.
(Rechercher en arrière)/ (Rechercher en
avant)*
Pour rechercher en arrière/en avant.
HOME
Pour afficher le menu principal à l’afficheur du
panneau avant.
DISPLAY
Si vous appuyez sur cette touche pendant la lecture
ou la pause d’un morceau, les informations de
l’afficheur du panneau avant permutent dans l’ordre
suivant.
Song Artist Album Time Source
OPÉRATIONS
Télécommande
Touches de
Touches de lecture
/
lecture
HOME
ENTER
SELECT
ENTER
PUSH
SELECT/ENTER
RETURN
SHUFFLE*
Pour permuter le mode aléatoire de votre iPod.
Songs Albums Off
REPEAT*
RETURN
Pour permuter le mode de répétition dans l’ordre
suivant.
One All Off
NOW PLAYING
Pour afficher les informations concernant la lecture
en cours à l’afficheur du panneau avant.
DISPLAY
* Les commandes diffèrent selon votre iPod.
y
SHUFFLE
REPEAT
RETURN
NOW PLAYING
Les formats de fichier lisibles sur iPod dépendent de votre iPod.
Français
21 Fr
Page 58

LECTURE DE VOTRE PÉRIPHÉRIQUE iPod/USB
0
PROGRAM
REPEAT
HOME
SETUP
NOW PLAYING
RETURN
MODE
A/BSHUFFLE
CLEAR
DISPLAY
OPEN/CLOSE
SOURCE
123
PURE DIRECT
Lecture des périphériques USB
1 Appuyez sur la touche SOURCE de
l’appareil principal ou de la
télécommande pour permuter la source
audio sur « USB » (☞ P.20).
2 Branchez votre périphérique USB sur le
port USB de l’appareil principal.
Le nom du fichier s’affiche sur l’afficheur du
panneau avant et la lecture démarre automatiquement
dans l’ordre, selon la date et l’heure de création si les
fichiers lisibles se trouvent sur le périphérique USB.
3 Une fois que la lecture démarre, vous
pouvez utiliser les commandes
suivantes pour régler les fonctions
voulues.
SELECT/ENTER (Commande rotative)
Tournez pendant la lecture pour passer à la plage
suivante ou revenir à la plage précédente/au début de
la plage en cours.
Touches de lecture
Utilisez ces touches pour commander les contenus
audio (☞ P.5, 6).
RETURN
Pour afficher le niveau de menu supérieur à
l’afficheur du panneau avant.
HOME
Pour afficher le menu principal à l’afficheur du
panneau avant.
DISPLAY
Si vous appuyez sur cette touche pendant la lecture
ou la pause d’un morceau, les informations de
l’afficheur du panneau avant permutent dans l’ordre
suivant.
Song Artist Album Time Source
Appareil principal
Touches de lecture
Télécommande
Touches de
lecture
ENTER
SHUFFLE
Pour permuter le mode aléatoire dans l’ordre suivant.
SELECT
ENTER
PUSH
RETURN
SELECT/ENTER
REPEAT
On Off
Pour permuter le mode de répétition dans l’ordre
suivant.
RETURN
NOW PLAYING
One All Off
Pour afficher les informations concernant la lecture
en cours à l’afficheur du panneau avant.
y
• En cas d’arrêt du morceau en cours de lecture, la prochaine
lecture de la plage que vous avez écoutée reprend au début.
DISPLAY
SHUFFLE
REPEAT
• Pour plus de détails concernant les fichiers lisibles, reportezvous à la section « FORMATS DE DISQUE ET FICHIER
LISIBLES » (☞ P.31).
22 Fr
HOME
RETURN
NOW PLAYING
Page 59

MENU DES RÉGLAGES
0
PROGRAM CLEAR
123
456
789
REPEAT
HOME
SETUP
NOW PLAYING
RETURN
MODE
A/BSHUFFLE
ENTER
Le menu des réglages vous permet d’effectuer tous les
réglages sur cet appareil.
Opérations du menu des réglages
❚ Opérations depuis la télécommande
y
Pour plus de détails concernant les commandes de l’appareil
principal ou de la télécommande, reportez-vous à la section
« COMMANDES ET FONCTIONS » (☞ P.5).
1 Appuyez sur SETUP pour accéder au
menu des réglages (☞ P.24).
Afin de pouvoir sélectionner les options
du menu des réglages avancés (☞ P.25),
il convient d’appuyer sur SETUP tout en
maintenant RETURN enfoncé (sur
l’appareil principal).
Télécommande
Boutons
numériques
2 Appuyez sur S/T pour sélectionner une
option de menu à configurer, puis
appuyez sur ENTER.
Pour certaines options de menu, il convient de répéter
l’étape 2 pour sélectionner une option de sous-menu.
DHCP
1–1
3 Appuyez sur S/T pour sélectionner un
paramètre, puis appuyez sur ENTER.
y
Il sera nécessaire de saisir une adresse numérique pour certaines
options du menu. Dans ce cas, appuyez sur W/X pour changer de
cible, et sur S/T pour sélectionner un numéro, ou utilisez les
boutons numériques. Appuyez ensuite sur ENTER pour valider.
OPÉRATIONS
S/T/W/X/
ENTER
SETUP
Appareil principal
Afficheur du panneau avant
Network Configuration
1
SELECT
ENTER
PUSH
RETURN
RETURN
RETURN
Français
23 Fr
Page 60

MENU DES RÉGLAGES
Liste du menu des réglages
Réglages
(Gras :
Menu Sous-menu
DHCP On, Off
IP Address Définit l’adresse IP quand « DHCP » est « Off ».
Subnet Mask Définit le masque de sous-réseau quand « DHCP » est « Off ».
Network
Configuration
Default
Gateway
DNS Server
(P)
réglage
par
défaut)
Fonction
Sélectionnez « On » pour que le serveur DHCP configure
automatiquement les réglages de réseau de cet appareil ou sélectionnez
« Off » pour configurer manuellement.
*1
*1
Définit la passerelle par défaut quand « DHCP » est « Off ».
Définit le serveur DNS primaire quand « DHCP » est « Off ».
*1
*1
Network
Information
DNS Server
(S)
MAC
Address
Status
Définit le serveur DNS secondaire quand « DHCP » est « Off ».
L’adresse MAC de cet appareil s’affiche. L’adresse MAC sert
également d’identifiant pour le vTuner.
L’état du réseau de cet appareil s’affiche (« Connected » ou « Not
connected »).
*1
System ID Le numéro d’identification du système est affiché.
Network Standby On, Off
4 Hours,
Auto Power Down
8Hours,
12 Hours,
Off
Dimmer –3 à 0
Sélectionnez « On » pour activer le mode veille du réseau.
Si l’appareil reste sous tension pendant la durée sélectionnée sans
qu’aucune opération de lecture ou autre ne soit exécutée, il entre
automatiquement en mode veille.
Pour régler l’éclairage de l’afficheur du panneau avant.
Firmware Version La version du micrologiciel de cet appareil s’affiche.
Mettez à jour le micrologiciel de cet appareil après avoir sélectionné
« Network » ou « USB ».
,
Firmware Update
Network
USB
Lorsque « Press ENTER to start » s’affiche, appuyez sur ENTER pour
démarrer la mise à jour du logiciel. N’utilisez pas cet appareil avant
que « UPDATE SUCCESS » s’affiche. Ensuite, mettez cet appareil
hors tension, puis de nouveau sous tension.
*1 : Quand « DHCP » est réglé sur « On », vous pouvez vérifier les valeurs (adresses IP, etc.) assignées par le serveur
DHCP.
24 Fr
Page 61

MENU DES RÉGLAGES
Menu des réglages avancés
Les options de menu suivantes ne sont disponibles que lorsque vous accédez au menu des réglages en appuyant sur la
touche SETUP (de la télécommande) tout en maintenant enfoncée la touche RETURN (de l’appareil principal).
Réglages
(Gras :
Menu
MAC Address Filter On, Off
Gapless Playback On, Off
réglage
par
défaut)
Fonction
Sélectionnez « On » pour spécifier les adresses MAC (jusqu’à 5) des
composants réseau qui pourront accéder à cet appareil (« Address1 » à
« Address5 »). Sélectionnez « Off » pour désactiver la fonction de
filtre d’adresse MAC.
Sélectionnez « On » pour sauter les intervalles entre les plages et
permettre une lecture sans interruptions. Sélectionnez « Off » pour
désactiver la fonction de lecture sans intervalle. Cette fonction n’est
possible que pour les contenus audio « SERVER ».
y
Quand « Gapless Playback » est réglé sur « On », cet appareil
commence la lecture des données de la plage suivante dès qu’il arrive à
la fin de la plage en cours de lecture. Certaines opérations de lecture
(saut, répétition, etc.) seront appliquées à la plage suivante durant ce
laps de temps.
OPÉRATIONS
vTuner Account Reset Yes, No
Initialize Yes, No
Sélectionnez « Yes » et appuyez sur la touche ENTER de la
télécommande pour réinitialiser le compte vTuner.
y
• Si vous réinitialisez votre compte vTuner, votre nom d’utilisateur, votre mot
de passe et vos favoris sont également réinitialisés.
• Pour créer un nouveau compte, visitez le site Web ci-dessous.
http://yradio.vtuner.com/
Vous avez besoin de l’adresse MAC de cet appareil en guise d’identifiant pour
votre lecteur multimédia et de votre adresse électronique.
Sélectionnez « Yes » pour rétablir toutes les valeurs initiales de cet
appareil. La réinitialisation sera effective dès la prochaine mise sous
tension de cet appareil.
Français
25 Fr
Page 62

AUTRES
GUIDE DE DÉPANNAGE
Reportez-vous au tableau suivant si l’appareil ne fonctionne pas correctement. Si l’anomalie constatée n’est pas
mentionnée ci-dessous ou si les instructions suivantes sont sans effet, mettez cet appareil hors tension, débranchez le
cordon d’alimentation et prenez contact avec le revendeur ou service après-vente Yamaha le plus proche.
❚ Généralités
Anomalies Causes possibles Actions correctives Page
Le câble d’alimentation n’est pas
branché correctement à la prise
AC IN de l’appareil principal ou
n’est pas branché au secteur.
Branchez soigneusement le
câble d’alimentation.
9
Impossible de mettre cet
appareil sous tension.
Le témoin d’alimentation du
panneau avant clignote.
L’appareil se met brusquement
hors tension.
L’appareil a été soumis à une
forte décharge électrique
(provoquée par exemple par un
orage ou une décharge
d’électricité statique).
Le circuit de protection a été
activé trois fois de suite.
Lorsque l’appareil est dans cette
condition, le témoin
d’alimentation de l’appareil
principal clignote si vous
essayez de mettre sous tension.
Il y a un problème dans les
circuits internes de l’appareil.
L’appareil entre brusquement en
mode veille.
Le raccordement du câble audio
entre cet appareil et
l’amplificateur est incorrect.
Mettez l’appareil hors tension,
débranchez le câble
d’alimentation, puis rebranchezle environ 30 secondes plus tard
et utilisez l’appareil comme à
l’accoutumée.
Par mesure de précaution, la
mise sous tension devient
impossible. Contactez votre
revendeur ou service aprèsvente agréé Yamaha le plus
proche pour procéder à la
réparation.
Mettez l’appareil hors tension,
débranchez le câble
d’alimentation et contactez le
revendeur ou le service aprèsvente agréé Yamaha le plus
proche.
L’appareil entre en mode veille
une fois écoulée l’heure réglée
pour « Auto Power Down »
dans le menu des réglages.
Branchez soigneusement le
câble audio. Si le problème
persiste, utilisez un autre câble
audio.
—
—
—
24
9
Absence de son.
Présence de bruit.
26 Fr
Le réglage d’entrée de
l’amplificateur est incorrect.
L’amplificateur n’est pas
compatible avec les signaux
numériques.
Cet appareil est trop proche de
l’appareil numérique ou de
radiofréquence.
Le câble audio qui relie cet
appareil à la passerelle
multimédia est défectueux.
Sélectionnez l’entrée correcte
(de cet appareil) sur
l’amplificateur.
Utilisez un raccordement de
signal analogique.
Éloignez cet appareil de celui
qui est concerné.
Branchez soigneusement le
câble audio. Si le problème
persiste, utilisez un autre câble
audio.
—
9
—
—
Page 63

Anomalies Causes possibles Actions correctives Page
La télécommande ne fonctionne
pas normalement ou pas du tout.
La portée ou l’angle sont
incorrects.
Le lumière directe du soleil ou
d’un éclairage frappe le capteur
de télécommande de cet
appareil.
GUIDE DE DÉPANNAGE
La télécommande agit à une
distance inférieure à 6 m et à un
angle inférieur à 30 degrés par
rapport à une perpendiculaire au
panneau avant de l’appareil
principal.
Réglez l’angle d’éclairage ou
changez la disposition de cet
appareil.
4
—
Les touches de commande de
l’amplificateur sur la
télécommande n’agissent pas
sur l’amplificateur.
❚ Réseau
Anomalies Causes possibles Actions correctives Page
La fonction de réseau est
inopérante.
Les piles sont faibles.
Votre amplificateur n’est pas un
amplificateur Yamaha. (Ces
touches peuvent ne pas
fonctionner sur certains
amplificateurs Yamaha.)
Les paramètres réseau (adresse
IP) n’ont pas été obtenus
correctement.
Le réglage du partage des
fichiers multimédias est
incorrect.
Remplacez les deux piles à la
fois.
Utilisez la télécommande de
votre amplificateur.
Activez la fonction de serveur
DHCP du routeur large bande et
réglez « DHCP » du menu des
réglages sur « On », sur cet
appareil. Si vous désirez
configurer les paramètres réseau
manuellement, vérifiez que
vous utilisez une adresse IP non
utilisée par d’autres
périphériques réseau de votre
réseau.
Configurez le réglage du
partage des fichiers multimédias
de votre PC.
4
—
AUTRES
24
11
Cet appareil ne détecte pas la
passerelle multimédia
numérique (PC).
Un logiciel de sécurité installé
sur votre PC bloque l’accès de
cet appareil à votre PC.
Cet appareil et votre PC ne sont
pas sur le même réseau.
L’accès à cet appareil est limité
par une fonction de filtre
d’adresse MAC.
Plus de deux routeurs en cours
d’utilisation se chevauchent
parmi les périphériques réseau.
Vérifiez les réglages du logiciel
de sécurité installé sur votre PC.
Vérifiez les connexions réseau
et les réglages du routeur large
bande, puis connectez cet
appareil et votre PC au même
réseau.
Désactivez la fonction de filtre
d’adresse MAC dans le menu
des réglages de cet appareil.
Désactivez provisoirement la
connexion Internet et vérifiez-la
via votre réseau local, ou
connectez les périphériques
réseau que vous souhaitez
utiliser au même routeur.
—
10
24
—
27 Fr
Français
Page 64

GUIDE DE DÉPANNAGE
Anomalies Causes possibles Actions correctives Page
Les fichiers de votre PC ne
peuvent pas être affichés ou lus.
Les fichiers ne sont pris en
charge ni par cet appareil, ni par
la passerelle multimédia.
Utilisez le format de fichier pris
en charge par cet appareil et la
passerelle multimédia. Pour
plus détails concernant les
formats de fichier pris en charge
par cet appareil, reportez-vous à
la section « FORMATS DE
DISQUE ET FICHIER
LISIBLES ».
31
Certains fichiers audio ne
peuvent pas êtres lus par cet
appareil.
Vous tentez de lire des fichiers
audio DRM achetés au magasin
iTunes.
❚ Contenus audio sur Internet
Anomalies Causes possibles Actions correctives Page
La station radio Internet
sélectionnée n’est pas
disponible pour l’instant.
La station radio Internet
Impossible d’écouter la radio
Internet.
sélectionnée diffuse
actuellement un silence audio.
L’accès au réseau est limité par
les réglages de pare-feu de vos
périphériques réseau (tels que le
routeur large bande).
Vous ne pouvez pas lire les
fichiers audio DRM achetés au
magasin iTunes.
Il se peut que le réseau de la
station radio ait rencontré un
problème ou que le service ait
été arrêté. Tentez de réécouter la
station à un autre moment ou
sélectionnez une autre station.
Certaines stations radio Internet
diffusent du silence à certains
moments de la journée. Tentez
de réécouter la station à un autre
moment ou sélectionnez une
autre station.
Vérifiez les réglages de pare-feu
de vos périphériques réseau. La
radio Internet n’est lisible que
lorsqu’elle passe par le port
désigné par chaque station radio.
Le numéro de port varie selon la
station radio.
31
—
—
—
❚ CD
Anomalies Causes possibles Actions correctives Page
Le plateau du disque ne se
referme pas complètement.
La lecture du disque ne démarre
pas.
28 Fr
Un objet obstrue le plateau.
Le disque est endommagé.
Présence d’humidité sur le bloc
optique.
Le disque est inséré à l’envers.
Le disque est sale.
Le format du fichier MP3 ou
WMA n’est pas compatible
avec cet appareil.
Vérifiez attentivement le plateau
et retirez l’objet.
Vérifiez attentivement le disque
et remplacez-le le cas échéant.
Attendez 20 à 30 minutes après
la mise sous tension de
l’appareil, puis essayez de lire le
disque.
Rechargez le disque en orientant
l’étiquette vers le haut.
Nettoyez le disque.
Remplacez le disque par un
disque correctement enregistré
pouvant être lu par cet appareil.
—
—
—
—
32
31
Page 65

Anomalies Causes possibles Actions correctives Page
La lecture du disque ne démarre
pas.
Le disque CD-RW
(réinscriptible) n’est pas
correctement enregistré.
Il s’agit d’un disque non
standard ne pouvant pas être lu
par cet appareil.
GUIDE DE DÉPANNAGE
Remplacez le disque par un
disque correctement enregistré
pouvant être lu par cet appareil.
Remplacez le disque par un
disque correctement enregistré
pouvant être lu par cet appareil.
31
31
La lecture est retardée ou
commence au mauvais endroit.
Parasites provenant de
l’intérieur du plateau du disque.
Le disque est rayé ou
endommagé.
Le disque est déformé.
❚ iPod/USB
Anomalies Causes possibles Actions correctives Page
La lecture de l’iPod ne démarre
pas bien que l’iPod soit raccordé.
La lecture USB ne démarre pas.
L’iPod raccordé n’est pas
compatible avec cet appareil.
Le périphérique USB n’est pas
raccordé correctement.
Le format du fichier MP3 ou
WMA n’est pas compatible
avec cet appareil.
Cet appareil est réglé sur une
source audio autre que « USB ».
Messages à l’afficheur du panneau avant
Message État
L’unité ne parvient pas à accéder au dispositif USB.
Vérifiez attentivement le disque
et remplacez-le le cas échéant.
Remplacez le disque.
Connectez un iPod compatible
avec cet appareil.
Procédez à nouveau au
raccordement de votre
périphérique USB.
Remplacez le fichier par un
fichier correctement enregistré
pouvant être lu par cet appareil.
Appuyez sur la touche SOURCE
de l’appareil principal ou de la
télécommande pour permuter la
source audio sur « USB ».
32
—
31
20
AUTRES
31
22
Access error
L’unité ne parvient pas à accéder à l’iPod.
L’unité ne prend pas en charge l’iPod raccordé.
Un problème est survenu lors de l’acheminement du signal du réseau vers l’unité.
Unable to play Cet appareil ne peut pas lire le contenu en question.
List updated La liste du contenu de la passerelle multimédia a été mise à jour.
No content Cet appareil ne trouve aucun contenu.
Not available L’opération que vous avez tenté d’effectuer n’est pas disponible.
Searching… L’appareil recherche du contenu.
No disc Aucun CD n’est inséré dans le plateau du disque.
Connect error Échec de la connexion de votre périphérique iPod ou USB.
No device Votre périphérique iPod ou USB n’est pas connecté.
USB overloaded Une surintensité traverse le dispositif USB.
Loading… Le contenu spécifié est en cours de chargement.
Unknown iPod L’iPod raccordé n’est pas compatible.
Français
29 Fr
Page 66

INFORMATIONS COMPLÉMENTAIRES
Cette section donne une description générale du DLNA (Digital Living Network Alliance) et du NAS (Network Attached
Storage - Stockage en réseau).
Internet
Modem
DLNA
SELECT
ENTER
(passerelle multimédia numérique)
PC
NAS
(passerelle multimédia numérique)
Routeur large
bande
Périphérique mobile
(Media Controller numérique)
PURE DIRECTSOURCE
5V
2.1A
Cet appareil (CD-N500)
(diffuseur multimédia numérique)
PUSH
RETURN
❚ DLNA
« DLNA » est l’abréviation de « Digital Living Network Alliance », une alliance visant à promouvoir l’interopérabilité
des appareils de réseaux domestiques, tels les appareils électroniques numériques grand public.
Les appareils DLNA sont regroupés en quatre catégories : passerelle multimédia numérique (DMS), diffuseur
multimédia numérique (DMR), lecteur multimédia numérique (DMP) et Media Controller numérique (DMC).
Une « passerelle multimédia numérique (DMS) » est un dispositif permettant de stocker ou de distribuer du contenu
numérique tel que des fichiers de musique. En ce qui concerne le système qui utilise cet appareil, les PC et les NAS sont
considérés comme des « passerelles multimédia numériques (DMS) ».
Un « Media Controller numérique (DMC) » est un dispositif permettant de commander du contenu numérique.
L’application dédiée sur le périphérique mobile correspond au « Media Controller numérique (DMC) » pour le système
qui utilise cet appareil.
Un « diffuseur multimédia numérique (DMR) » est un dispositif permettant de recevoir des instructions en provenance
d’un « Media Controller numérique (DMC) » et de lire un contenu numérique, comme cet appareil.
De même, un « lecteur multimédia numérique (DMP) » est un dispositif capable de lire du contenu numérique stocké sur
une « passerelle multimédia numérique (DMS) ».
❚ NAS
« NAS » est l’abréviation de « Network Attached Storage », qui signifie « Stockage en réseau ». En connectant votre
NAS et votre réseau domestique directement à un câble réseau, le NAS peut devenir un périphérique de stockage comme
un disque dur. Si votre NAS est compatible avec le DLNA, vous pouvez partager votre musique, vos images ou vos
vidéos sur le même réseau domestique qu’une passerelle multimédia numérique.
30 Fr
Page 67

FORMATS DE DISQUE ET FICHIER LISIBLES
Supports et appareils lisibles
❚ PC pris en charge
PC sur lequel le Lecteur Windows Media 11 ou le Lecteur
Windows Media 12 est installé.
❚ NAS pris en charge
Le NAS est compatible avec le DLNA version 1.5.
❚ Périphériques USB pris en charge
Périphérique
Périphériques
USB
Lecteur audio
USB
Classe/
Protocole
MSC (Mass
Storage Class)
MSC (Mass
Storage Class)
Remarques
• Il se peut que certains appareils ne fonctionnent pas
correctement même s’ils répondent aux conditions requises.
• Cet appareil ne prend pas en charge les périphériques USB
cryptés.
• Ne raccordez pas les périphériques autres que les périphériques
de stockage de masse USB : chargeurs USB, concentrateurs
USB, PC, HDD externes, etc.
• Yamaha et ses fournisseurs ne peuvent être tenus responsables
de la perte de données enregistrées sur les périphériques USB
raccordés à cet appareil. Il est recommandé de créer des copies
de sauvegarde des fichiers.
• La possibilité d’utiliser et d’alimenter tous les types de
périphériques USB n’est pas garantie.
❚ iPod pris en charge via le port USB
iPod iPhone iPad
iPod touch,
iPod nano (de la
2e à la
6e génération)
* Depuis août 2012
iPhone,
iPhone 3G,
iPhone 3GS,
iPhone 4,
iPhone 4S
Formats de
fichier
FAT16/32
FAT16/32
iPad,
iPad 2,
iPad
(3e génération)
Remarques
• iPod est autorisé à la reproduction et à la lecture, à condition
que les personnes effectuent des copies à titre personnel ou
lisent du matériel non protégé, ou bien du matériel légalement
autorisé à la reproduction et à la lecture. La violation du droit
d’auteur est interdite par la loi.
• Yamaha et ses fournisseurs ne peuvent être tenus responsables
de la perte de données enregistrées sur l’iPod raccordé à cet
appareil. Il est recommandé de créer des copies de sauvegarde
des fichiers.
❚ Périphériques mobiles pris en charge
Pour plus de détails, veuillez consulter le site Web de
Yamaha.
❚ Disques lisibles
Utilisez des disques compact comportant les marques cidessous.
Marque Détails
Disques compacts
(audionumériques)
Disques audionumériques CD-R,
CD-RW
• Disques CD-R ou CD-RW portant au
moins l’une des mentions suivantes.
FOR CONSUMER
FOR CONSUMER USE
FOR MUSIC USE ONLY
• Disques CD-R ou CD-RW finalisés
uniquement.
Remarque
Il est possible que cet appareil ne puisse pas
effectuer la lecture de certains disques CD-R/
CD-RW ou de disques sur lesquels
l’enregistrement n’a pas été effectué
correctement.
Disques CD-TEXT
Le titre du disque, le nom de l’artiste, et
le nom du morceau sont aussi affichés
ainsi que le temps écoulé lors de la
lecture d’un CD avec CD TEXT.
Pour lire un CD de 8 cm (3 po)
Placez-le dans le renfoncement du plateau du disque. Ne
mettez pas de CD de taille normale de 12 cm (5 po) sur un
CD de 8 cm (3 po).
Remarques
• N’utilisez pas de disques de formes non
standard (cœur, etc.) en vente sur le
marché, car ils risquent d’abîmer
l’appareil.
• N’utilisez pas de disques comportant du
ruban adhésif, des joints ou de la colle.
Sinon, ce disque risque de se coincer
dans l’appareil et de l’endommager.
AUTRES
Français
31 Fr
Page 68

FORMATS DE DISQUE ET FICHIER LISIBLES
❚ À propos de la manipulation des
disques
• Manipulez avec soin le disque afin de ne pas rayer la
surface de lecture. Ne voilez pas les disques.
• Afin de conserver la surface de lecture propre, essuyezla avec un chiffon propre et sec. N’utilisez jamais de
nettoyeur pour disque, d’atomiseur ou de solution
chimique.
• N’essuyez pas avec un mouvement circulaire ; essuyez
du centre vers le bord en un mouvement droit.
• Utilisez un stylo à embout doux lorsque vous écrivez
sur l’étiquette du disque.
• Lorsque le disque n’est plus utilisé, retirez-le de
l’appareil et rangez-le dans son coffret.
• Ne pas exposer les disques à la lumière directe du soleil,
à une température élevée ou à une humidité excessive
pendant une période prolongée.
Remarque
N’utilisez pas de dispositif de nettoyage optique, car ceci pourrait
entraîner un dysfonctionnement.
Formats de disque et fichier
lisibles
❚ DLNA/USB
Formats
*1
WAV
*2
MP3
*3
WMA
AAC
FLAC
*4
ALAC
*1 Seuls les fichiers au format PCM sont lisibles.
*2 Les fichiers MP3 PRO ne sont pas pris en charge.
*3 Les fichiers WMA PRO et Lossless ne sont pas pris en
charge.
*4 ALAC est l’abréviation d’Apple Lossless Audio Codec.
Réponse en
fréquence (kHz)
8 à 192 16/24
8 à 48 16
8 à 48 16
8 à 48 16
8 à 192 16/24
44,1 à 48 16
y
• Les formats de fichier lisibles sur iPod dépendent de votre iPod.
• Les fichiers enregistrés en multicanaux ne sont pas pris en
charge.
• La lecture du périphérique USB démarre dans l’ordre, selon la
date et l’heure de création.
❚ Disques
Formats
MP3
WMA
Réponse en
fréquence (kHz)
8 à 48 16
16 à 48 16
Quantification
en bits
Quantification
en bits
32 Fr
Remarques
• La lecture des fichiers MP3 ou WMA commence par ordre
alphanumérique.
• Cet appareil ne peut pas lire les fichiers WMA (DRM) protégés
par les droits d’auteur.
• Le disque doit être compatible ISO 9660.
• Il se peut que le temps écoulé ne s’affiche pas correctement lors
de la lecture de contenus de débits binaires variables.
Page 69

CARACTÉRISTIQUES TECHNIQUES
ENTRÉE/SORTIE
• NETWORK
Connexion Ethernet .................................100Base-TX/10Base-T
Version du DLNA ...................................................................1.5
• ANALOG OUT ...................................................... 2 canaux (L/R)
•DIGITAL OUT
Optique .................................................................................. × 1
Coaxial................................................................................... × 1
• USB........................................................................................... × 1
SECTION AUDIO
• Niveau de sortie
1 kHz, 0 dB, fs 44,1 kHz ............................................2,0 ± 0,3 V
• Rapport signal/bruit (réseau IHF-A)
1 kHz, 0 dB, fs 44,1 kHz ................................. 110 dB minimum
• Dynamique
1 kHz, 0 dB, fs 44,1 kHz ................................. 100 dB minimum
• Distorsion harmonique
1 kHz, 0 dB, fs 44,1 kHz ............................... 0,003 % maximum
• Réponse en fréquence
(CD)
fs 44,1 kHz.................................................2 Hz à 20 kHz, –3 dB
(RÉSEAU)
fs 48 kHz....................................................2 Hz à 24 kHz, –3 dB
fs 96 kHz....................................................2 Hz à 48 kHz, –3 dB
fs 192 kHz..................................................2 Hz à 96 kHz, –3 dB
GÉNÉRALITÉS
• Alimentation
[Modèle pour l’Europe] ............................ 230-240 V CA, 50 Hz
[Modèles pour les États Unis et le Canada]......120 V CA, 60 Hz
[Modèle pour l’Asie] .............110-120/220-240 V CA, 50/60 Hz
[Modèle pour l’Australie]......................... 230-240 V CA, 50 Hz
[Modèle pour la Chine].....................................220 V CA, 50 Hz
• Consommation........................................................................28 W
• Consommation électrique en veille lorsque le mode veille du
réseau est activé (données de référence)................................3,5 W
• Consommation électrique en veille lorsque le mode veille du
réseau est désactivé (données de référence)........................0,35 W
• Dimensions (l × h × p) ..................................435 × 96 × 313,3 mm
• Poids ....................................................................................5,25 kg
* Notez que toutes les caractéristiques techniques sont susceptibles
d’être modifiées sans avis préalable.
iPod, iPhone, iPad
iPad, iPhone, iPod, iPod nano et iPod touch sont des
marques commerciales d’Apple Inc., déposées aux
États-Unis et dans d’autres pays.
« Made for iPod », « Made for iPhone » et « Made for
iPad » signifient qu’un accessoire électronique a été
conçu spécifiquement pour être connecté à l’iPod et a
été certifié par le développeur selon les normes de
performance d’Apple. Apple ne se tient pas
responsable du fonctionnement de cet appareil ou de sa
conformité aux normes réglementaires et de sécurité.
Veuillez noter que l’utilisation de cet accessoire avec
un iPod, iPhone ou iPad peut affecter les performances
sans fil.
Android™ est une marque commerciale de Google Inc.
AUTRES
Windows™
Windows est une marque déposée de Microsoft
Corporation aux États-Unis et dans les autres pays.
Windows XP, Windows Vista, Windows 7, Windows
Media Audio et Windows Media Player sont des
marques déposées ou des marques commerciales de
Microsoft Corporation aux États-Unis et dans d’autres
pays.
DLNA™ et DLNA CERTIFIED™ sont des marques
commerciales ou des marques déposées de Digital
Living Network Alliance. Tous droits réservés. Toute
utilisation non autorisée est strictement interdite.
Technologie d’encodage audio MPEG Layer-3 sous
licence de Fraunhofer IIS et Thomson.
33 Fr
Français
Page 70

VORSICHT: VOR DER BEDIENUNG DIESES GERÄTES DURCHLESEN.
1 Um optimales Leistungsvermögen sicherzustellen, lesen
Sie bitte die Anleitung aufmerksam durch. Bewahren Sie
die Anleitung danach für spätere Nachschlagzwecke
sorgfältig auf.
2 Installieren Sie diese Sound-Anlage an einem gut
belüfteten, trockenen, sauberen Ort - entfernt von
direktem Sonnenlicht, Wärmequellen, Erschütterungen,
Staub und Feuchtigkeit. Für eine sachgemäße Belüftung
sollten folgende Mindestabstände gewährleistet sein.
Oben: 10 cm
Hinten: 10 cm
Seiten: 10 cm
3 Stellen Sie dieses Gerät entfernt von anderen elektrischen
Haushaltgeräten, Motoren oder Transformatoren auf, um
Brummgeräusche zu vermeiden.
4 Setzen Sie dieses Gerät keinen plötzlichen
Temperaturänderungen von kalt auf warm aus, und stellen
Sie dieses Gerät nicht an Orten mit hoher Luftfeuchtigkeit
auf (z.B. in Räumen mit Luftbefeuchtern), um Kondensation
im Inneren des Gerätes zu vermeiden, da es anderenfalls zu
elektrischen Schlägen, Feuer, Beschädigung dieses Gerätes
und/oder zu persönlichen Verletzungen kommen kann.
5 Vermeiden Sie die Aufstellung dieses Gerätes an Orten,
an welchen Fremdkörper in das Gerät fallen können bzw.
an welchen Flüssigkeiten auf das Gerät verschüttet
werden können. Stellen Sie auf der Oberseite des Gerätes
niemals Folgendes auf:
– Andere Komponenten, da diese Beschädigung und/
oder Verfärbung der Oberfläche dieses Gerätes
verursachen können.
– Brennende Objekte (z. B. Kerzen), da diese Feuer,
Beschädigung des Gerätes und/oder persönliche
Verletzungen verursachen können.
– Mit Flüssigkeiten gefüllte Behälter, da diese umfallen
und die Flüssigkeit auf das Gerät verschütten können,
wodurch es zu elektrischen Schlägen für den Anwender
und/oder zu Beschädigung des Gerätes kommen kann.
6 Decken Sie dieses Gerät niemals mit Zeitungen,
Tischdecken, Vorhängen usw. ab, damit die Wärmeabfuhr
nicht behindert wird. Falls die Temperatur im Inneren des
Gerätes ansteigt, kann es zu Feuer, Beschädigung des
Gerätes und/oder zu persönlichen Verletzungen kommen.
7 Schließen Sie dieses Gerät erst an eine Wandsteckdose
an, nachdem alle anderen Anschlüsse ausgeführt wurden.
8 Stellen Sie dieses Gerät niemals mit der Unterseite nach
oben auf, da es sonst beim Betrieb zu Überhitzung mit
möglichen Beschädigungen kommen kann.
9 Wenden Sie niemals Gewalt bei der Bedienung der
Schalter, Knöpfe und/oder Kabel an.
10 Wenn Sie das Netzkabel von der Wandsteckdose
abtrennen, fassen Sie immer den Netzstecker an; ziehen
Sie niemals an dem Kabel.
11 Reinigen Sie dieses Gerät niemals mit chemisch behandelten
Tüchern; anderenfalls kann das Finish beschädigt werden.
Verwenden Sie ein reines, trockenes Tuch.
12 Verwenden Sie nur die für dieses Gerät vorgeschriebene
Netzspannung. Falls Sie eine höhere als die
vorgeschriebene Netzspannung verwenden, kann es
zu Feuer, Beschädigung dieses Gerätes und/oder zu
persönlichen Verletzungen kommen. Yamaha kann nicht
verantwortlich gemacht werden für Schäden, die auf die
Verwendung dieses Gerätes mit einer anderen als der
vorgeschriebenen Spannung zurückzuführen sind.
13 Um Beschädigungen durch Blitzschlag zu vermeiden,
ziehen Sie den Netzstecker von der Netzdose ab, wenn
es ein Gewitter gibt.
14 Versuchen Sie niemals ein Modifizieren oder Ändern
dieses Gerätes. Falls eine Wartung erforderlich ist,
wenden Sie sich bitte an einen Yamaha-Kundendienst.
Das Gehäuse sollte niemals selbst geöffnet werden.
15 Falls Sie das Gerät für längere Zeit nicht verwenden
(z. B. während der Ferien), ziehen Sie den Netzstecker
von der Netzdose ab.
16 Lesen Sie unbedingt den Abschnitt
„STÖRUNGSBEHEBUNG“ durch, um übliche
Bedienungsfehler zu berichtigen, bevor Sie auf eine
Störung des Gerätes schließen.
17 Bevor Sie dieses Gerät an einen anderen Ort
transportieren, drücken Sie die -Taste, um das Gerät auf
den Bereitschaftsmodus zu schalten, und ziehen Sie
danach den Netzstecker von der Netzdose ab.
18 Es kommt zu Kondensatbildung, wenn die
Umgebungstemperatur plötzlich ändert. Ziehen Sie den
Netzstecker von der Netzdose ab, und lassen Sie das
Gerät ruhen.
19 Falls Sie das Gerät für längere Zeit in Betrieb halten, kann
sich das Gerät erwärmen. Schalten Sie die Stromversorgung
aus, und lassen Sie danach das Gerät abkühlen.
20 Stellen Sie dieses Gerät in die Nähe der Steckdose und so
auf, dass der Netzstecker gut zugänglich ist.
21 Die Batterien dürfen nicht starker Hitze wie direktem
Sonnenschein, Feuer o.ä. ausgesetzt werden.
– Bewahren Sie die Batterien außerhalb der Reichweite
von Kindern auf. Batterien können gefährlich sein,
wenn Kinder diese in den Mund nehmen.
– Wenn sich die Batterien dem Ende ihrer Lebensdauer
annähern, verringert sich die effektive Reichweite der
Fernbedienung erheblich. Ersetzen Sie die Batterien
so bald wie möglich gegen zwei neue, sollte dieser
Fall eintreten.
– Verwenden Sie niemals alte Batterien gemeinsam mit
neuenBatterien.
– Verwenden Sie niemals gleichzeitig Batterien
unterschiedlichen Typs (wie z. B. Alkali- und
Manganbatterien). Lesen Sie die Anweisungen auf der
Verpackung sorgfältig durch, da unterschiedliche
Batterietypen die gleiche Form und Farbe haben können.
– Verbrauchte Batterien können auslaufen. Entsorgen Sie
Batterien, die auslaufen, umgehend. Vermeiden Sie einen
Kontakt zwischen der auslaufenden Flüssigkeit und Ihrer
Haut oder Kleidung, usw. Reinigen Sie das Batteriefach
sorgfältig, bevor Sie neue Batterien einsetzen.
– Falls Sie das Gerät über einen längeren Zeitraum nicht
nutzen, entfernen Sie die Batterien aus dem Gerät.
Andernfalls verschleißen die Batterien, was zum
Auslaufen der Batterieflüssigkeit und zur
Beschädigung des Geräts führen kann.
– Batterien dürfen nicht mit dem Hausmüll entsorgt
werden. Entsorgen Sie Batterien sachgemäß unter
Einhaltung der lokalen Vorschriften.
Zu starker Schalldruck von Ohrhörern und Kopfhörern kann
22
zu Gehörschäden führen.
Dieses Gerät ist nicht vom Netz abgetrennt, so lange der
Netzstecker an eine Netzdose angeschlossen ist, auch wenn das
Gerät selbst mit ausgeschaltet wurde. Dieser Status wird als
Bereitschaftsmodus bezeichnet. Auch in diesem Status weist das
Gerät einen geringen Stromverbrauch auf.
WARNUNG
UM DIE GEFAHR EINES FEUERS ODER EINES
ELEKTROSCHOCKS ZU VERMEIDEN, DARF DAS GERÄT
WEDER REGEN NOCH FEUCHTIGKEIT AUSGESETZT WERDEN.
WARNUNG
BERÜHREN SIE DIESES GERÄT NICHT, WENN ES
FORTLAUFEND MIT HOHER LAUTSTÄRKE VERWENDET
WIRD, DA DIE UNTERSEITE DIESES GERÄTS HEISS
WERDEN KANN. DIES KANN ZU VERLETZUNGEN, WIE
VERBRENNUNGEN USW., FÜHREN.
i De
Page 71

VORBEREITUNG
DIE FUNKTIONEN DIESES GERÄTS
Beim diesem Gerät handelt es sich um einen Netzwerk-CD-Player, auf dem Sie Musikdateien auf Ihrem Medienserver
(PC oder NAS), Audioinhalte im Internet, von einer CD, einem iPod und von USB-Geräten wiedergeben können, indem
Sie das Gerät an Ihr Heimnetzwerk (DLNA) und Audiosystem im gleichen Netzwerk anschließen.
y
Ausführliche Informationen zu DLNA oder NAS finden Sie unter „ZUSÄTZLICHE INFORMATIONEN“ (☞ S.30).
Internet
2
Modem
PC
1
Breitband-Router*
5V
Verstärker
CD
4
SELECT
ENTER
PURE DIRECTSOURCE
2.1A
Dieses Gerät (CD-N500)
iPod/USB-Geräte
5
PUSH
RETURN
VORBEREITUNG
3
NAS
Mobilgerät* Fernbedienung
A
B
* Sie benötigen ein im Handel erhältlichen WLAN-Breitbandrouter, wenn Sie ein Mobilgerät nutzen.
❚ Quellen, die mit diesem Gerät abgespielt werden können
1 Wiedergabe von Audioinhalten im
Internet (☞ S.16)
2 Wiedergabe von auf dem Computer
gespeicherten Musikdateien (☞ S.11, 14)
3 Wiedergabe von auf dem NAS
gespeicherten Musikdateien (☞ S.11, 14)
y
Ausführliche Informationen zum Anschluss der Geräte finden Sie unter „ANSCHLÜSSE“ (☞ S.9).
4 Wiedergabe einer CD (☞ S.18)
5 Wiedergabe von Ihrem iPod oder von
USB-Geräten (☞ S.20)
❚ Geräte, mit denen dieses Gerät bedient werden kann
A Steuern dieses Geräts mit Mobilgeräten (☞ S.11, 13)
B Steuern dieses Gerät mit der Fernbedienung (☞ S.6, 14, 16, 18, 20, 22, 23)
Deutsch
1 De
Page 72

HÄUFIG GESTELLTE FRAGEN
Welche Einstellungen muss ich vornehmen?
→ Ausführliche Informationen zu den Einstellungen am Computer, NAS oder an Mobilgeräten finden Sie unter
„KONFIGURATION DES PC/NAS/DER MOBILGERÄTE“ (☞ S.11).
→ Ausführliche Informationen zum Setup-Menü dieses Geräts finden Sie unter „SETUP-MENÜ“ (☞ S.23).
Warum kann ich auf dem Computer keine Musikdateien finden?
→ Überprüfen Sie die Medienfreigabe-Einstellungen des Computers oder Medienservers, wie z. B. Windows Media
Player 12 (☞ S.11).
→ Überprüfen Sie, ob die Musikdateien abspielbar sind (☞ S.31).
Kann ich das Gerät mit meinem iPhone steuern?
→ Ausführliche Informationen zur Steuerung dieses Geräts über ein Mobilgerät finden Sie unter „Bedienung über ein
Mobilgerät“ (☞ S.13).
Ich kann über die entsprechende Anwendung auf meinem Mobilgerät dieses Gerät nicht finden!
→ Überprüfen Sie, ob dieses Gerät korrekt über den Breitbandrouter mit dem gleichen Netzwerk verbunden ist.
→ Überprüfen Sie, ob der Zugriff auf dieses Gerät durch die Funktion MAC-Adressfilter eingeschränkt ist (☞ S.27).
Welche Musikdateien können auf diesem Gerät wiedergegeben werden?
→ Ausführliche Informationen zu den abspielbaren Dateien und Formaten finden Sie unter „ABSPIELBARE DISCS
UND DATEIFORMATE“ (☞ S.31).
Wie kann ich mit dem Gerät Internetradio hören?
→ Ausführliche Informationen zur Wiedergabe von Internetradiosendern finden Sie unter „WIEDERGABE VON
AUDIOINHALTEN AUS DEM INTERNET“ (☞ S.16).
Wie gebe ich Titel von einem iPod oder USB-Gerät wieder?
→ Ausführliche Informationen zur Wiedergabe von einem iPod oder USB-Gerät finden Sie unter „WIEDERGABE
VOM iPod/VON USB-GERÄTEN“ (☞ S.20).
Was bedeuten die Meldungen im Frontblenden-Display?
→ Ausführliche Informationen zu den Meldungen im Frontblenden-Display finden Sie unter „Frontblende-
Displaymeldungen“ (☞ S.29).
Aktuelle Informationen finden Sie auf der Yamaha-Website.
2 De
Page 73

INHALTSVERZEICHNIS
VORBEREITUNG
DIE FUNKTIONEN DIESES GERÄTS ...................... 1
HÄUFIG GESTELLTE FRAGEN ............................... 2
MITGELIEFERTES ZUBEHÖR................................. 4
VORBEREITUNG DER FERNBEDIENUNG............ 4
BEDIENUNGSELEMENTE UND DEREN
FUNKTION................................................................. 5
Vorderseite......................................................................... 5
Fernbedienung.................................................................... 6
Rückseite............................................................................ 8
ANSCHLÜSSE ............................................................... 9
Anschließen an einen Verstärker ....................................... 9
Anschließen an ein Netzwerk (PC/NAS/
Internetverbindung)..................................................... 10
Gerät einschalten.............................................................. 10
BETRIEB
KONFIGURATION DES PC/NAS/DER
MOBILGERÄTE ..................................................... 11
Freigabe von auf dem Computer gespeicherten
Musikdateien................................................................ 12
Bedienung über ein Mobilgerät ....................................... 13
WIEDERGABE VON MUSIKDATEIEN VOM
PC/NAS...................................................................... 14
Bedienung über Hauptgerät oder Fernbedienung ............ 14
WIEDERGABE VON AUDIOINHALTEN AUS
DEM INTERNET.....................................................16
Wiedergabe von Internetradiosendern............................. 16
WIEDERGABE VON CDS .........................................18
Wiedergabe einer CD....................................................... 18
Verwendung des Programmwiedergabemodus................ 19
WIEDERGABE VOM iPod/VON
USB-GERÄTEN .......................................................20
Anschließen des iPod oder USB-Geräts .......................... 20
Wiedergabe über den iPod ............................................... 20
Verwenden des erweiterten Wiedergabemodus für den
iPod.............................................................................. 21
Wiedergeben von Musik von USB-Geräten .................... 22
SETUP-MENÜ.............................................................. 23
Bedienung des Setup-Menüs............................................ 23
Setup-Menüliste............................................................... 24
Weiterführendes Setup-Menü.......................................... 25
VORBEREITUNG BETRIEB SONSTIGES
SONSTIGES
STÖRUNGSBEHEBUNG ............................................26
Frontblende-Displaymeldungen....................................... 29
ZUSÄTZLICHE INFORMATIONEN........................30
ABSPIELBARE DISCS UND DATEIFORMATE ....31
Abspielbare Medien und Geräte ...................................... 31
Abspielbare Discs und Dateiformate ............................... 32
TECHNISCHE DATEN ...............................................33
(am Ende dieser Anleitung)
Information uber Software.................................i
Über diese Anleitung
• Hinweise enthalten wichtige Informationen zu Sicherheits- und Bedienungsanleitungen. y weist auf einen Tipp
für die Bedienung hin.
• Die Bezeichnung „iPod“ kann sich in dieser Anleitung auch auf ein „iPhone“ oder ein „iPad“ beziehen.
3 De
Deutsch
Page 74

VORBEREITUNG
MITGELIEFERTES ZUBEHÖR
Bitte prüfen Sie, dass Sie alle folgenden Gegenstände erhalten haben:
Fernbedienung Stereo-Cinchkabel Netzkabel
OPEN/CLOSE
PURE DIRECT
DISPLAY
SOURCE
123
456
7089
PROGRAM
CLEAR
REPEAT
A/BSHUFFLE
ENTER
HOME
RETURN
NOW PLAYING
SETUP
MODE
FOLDER
AMP
VOLUMEINPUT
MUTE
Batterien (AA, R6, UM-3) (× 2) Bedienungsanleitung
VORBEREITUNG DER FERNBEDIENUNG
❚ Batterien einsetzen
1
Hinweise
• Falls die Reichweite der Fernbedienung abnimmt, müssen alle
Batterien erneuert werden.
• Reinigen Sie das Batteriefach gründlich, bevor Sie neue
Batterien einsetzen.
4
3
2
❚ Funktionsreichweite
Richten Sie die Fernbedienung während der Bedienung
direkt auf den Fernbedienungssensor des Hauptgeräts.
Fernbedienungssensor
PURE DIRECTSOURCE
5V
2.1A
Weniger als 6 m
30 30
OPEN/CLOSE
DISPLAY
SOURCE
PURE DIRECT
123
456
7089
CLEAR
PROGRAM
A/BSHUFFLE
REPEAT
ENTER
RETURN
HOME
NOW PLAYING
MODE
SETUP
FOLDER
AMP
VOLUMEINPUT
MUTE
4 De
Page 75

BEDIENUNGSELEMENTE UND DEREN FUNKTION
Vorderseite
VORBEREITUNG
18
PURE DIRECTSOURCE
5V
2.1A
23 546 09ABCD
1 Netzanzeige
• Leuchtet:
Dieses Gerät befindet sich in einem Zustand, indem Sie es
mit der Fernbedienung oder Mobilgeräten ein- oder in den
Bereitschaftsmodus schalten können (wenn der
Netzwerkbereitschaftsmodus aktiviert ist), oder das Gerät
ist eingeschaltet.
• Leuchtet schwach auf:
Dieses Gerät befindet sich in einem Zustand, in dem es mit
der Fernbedienung eingeschaltet werden kann (wenn der
Netzwerkbereitschaftsmodus deaktiviert ist).
• Aus:
Dieses Gerät ist ausgeschaltet und Sie können es nur mit
dem Netzschalter an der Frontblende des Hauptgeräts
einschalten.
y
Sie können die Einstellung des Netzwerkbereitschaftsmodus
im Setup-Menü aktivieren oder deaktivieren (☞ S.24).
2 Netzschalter (☞ S.10)
Schaltet das Gerät ein oder aus.
: Ein : Aus
3 Fernbedienungsempfänger (☞ S.4)
Empfängt die Infrarotsignale von der Fernbedienung.
4 USB-Anschluss (☞ S.20)
Schließen Sie hier Ihren iPod oder USB-Geräte an.
5 SOURCE (☞ S.14, 16, 18, 20, 22)
Wählt eine Audioquelle aus. Mit jeder Tastenbetätigung wird
die Audioquelle wie folgt umgeschaltet.
CD → USB → SERVER → NET RADIO → Zurück zu CD
6 PURE DIRECT
Aktiviert oder deaktiviert den PURE DIRECT-Modus. Die
Audioqualität wird verbessert, wenn der PURE DIRECTModus aktiviert ist.
y
Die Anzeige PURE DIRECT leuchtet, wenn der PURE
DIRECT-Modus aktiviert ist.
7
SELECT
ENTER
PUSH
RETURN
7 Disc-Fach
Zum Laden einer Disc.
8 (Öffnen/Schließen)
Zum Öffnen bzw. Schließen des Disc-Faches.
9 Frontblende-Display
Zeigt Menüeinträge, Wiedergabe-Informationen usw. an.
y
Ausführliche Informationen zu den Displaymeldungen
finden Sie unter „Frontblende-Displaymeldungen“ (☞ S.29).
0 / (Wiedergabe/Pause)
Startet die Wiedergabe oder hält sie an.
A (Stopp)
Zum Stoppen der Wiedergabe.
B / (Überspringen/Suchen rückwärts),
C SELECT/ENTER (Jograd) (☞ S.14, 16, 18, 21, 22, 24)
D RETURN (☞ S.14, 16, 21, 22)
/ (Überspringen/Suchen vorwärts)
Springt zum vorherigen/Anfang des aktuellen bzw. zum
nächsten Titel oder sucht rückwärts/vorwärts.
Der Bedienvorgang variiert abhängig von den Audioquellen.
Wird gedreht, um einen Eintrag zu wählen, und gedrückt, um
die Auswahl zu bestätigen.
Zeigt die vorherige Menüebene im Frontblende-Display an.
Deutsch
5 De
Page 76

BEDIENUNGSELEMENTE UND DEREN FUNKTION
Fernbedienung
1
OPEN/CLOSE
2
3
4
5
6
7
8
9
0
A
B
SOURCE
123
456
7
0
HOME
SETUP
DISPLAY
PURE DIRECT
89
CLEAR
PROGRAM
A/BSHUFFLE
REPEAT
ENTER
RETURN
NOW PLAYING
MODE
FOLDER
AMP
VOLUMEINPUT
MUTE
C
D
E
F
G
H
I
J
K
1 Fernbedienungssignal-Sender
Überträgt Infrarotsignale an das Hauptgerät.
2 OPEN/CLOSE
Zum Öffnen bzw. Schließen des Disc-Faches.
3 SOURCE (☞ S.14, 16, 18, 20, 22)
Wählt eine Audioquelle aus. Mit jeder Tastenbetätigung wird
die Audioquelle wie folgt umgeschaltet.
CD → USB → SERVER → NET RADIO → Zurück zu CD
4 PURE DIRECT
Aktiviert oder deaktiviert den PURE DIRECT-Modus. Die
Audioqualität wird verbessert, wenn der PURE DIRECTModus aktiviert ist.
5 Zahlentasten (☞ S.18)
Zum direkten Auswählen eines Titels auf der Disc oder im
aktuellen Ordner.
6 SHUFFLE (☞ S.15, 18, 21, 22)
Schaltet die Zufallsmodi um.
7 REPEAT (☞ S.15, 18, 21, 22)
Schaltet die Wiederholungsmodi um.
8 Wiedergabetasten (☞ S.14, 16, 18, 21, 22, 23)
(Wiedergabe)
Zum Starten der Wiedergabe.
(Stopp)
Zum Stoppen der Wiedergabe.
(Pause)
Zum Unterbrechen der Wiedergabe.
(Überspringen rückwärts)
Springt rückwärts.
(Überspringen vorwärts)
Springt vorwärts.
S/T/W/X (Cursortasten)/ENTER
Wählen Sie mit den Cursortasten einen Eintrag aus, und
drücken Sie ENTER, um die Auswahl zu bestätigen.
9 HOME (☞ S.14, 16, 21, 22)
Zeigt die oberste Menüebene im Frontblende-Display an.
0 NOW PLAYING (☞ S.15, 17, 21, 22)
Zeigt die Wiedergabe-Informationen im Frontblende-Display
an.
A SETUP (☞ S.23)
Zeigt das Setup-Menü im Frontblende-Display an.
B FOLDER ( / ) (☞ S.18)
Schaltet die Wiedergabeordner um, wenn Musik auf DatenCDs wiedergegeben wird.
C A (Stromversorgung) (☞ S.10)
Schaltet das Gerät zwischen Ein- und dem
Bereitschaftsmodus um.
y
Ausführliche Informationen zum Bereitschaftsmodus finden
Sie unter „Vorderseite“ (☞ S.5).
6 De
Page 77

BEDIENUNGSELEMENTE UND DEREN FUNKTION
D DISPLAY (☞ S.15, 17, 18, 21, 22)
Schaltet die im Frontblenden-Display angezeigten
Informationen, wie z. B. Wiedergabeinformationen, um.
E CLEAR (☞ S.19)
Löscht den letzten programmierten Titel einer Audio-CD
(außer Daten-CDs) im Programmbearbeitungsmodus.
F PROGRAM
Schaltet den Programmwiedergabemodus ein oder aus. Im
Programmwiedergabemodus können Sie Titel einer AudioCD (außer Daten-CDs) in einer programmierten Reihenfolge
wiedergeben. Ausführliche Informationen finden Sie unter
„Verwendung des Programmwiedergabemodus“ (☞ S.19).
G A/B
Wiederholt die Wiedergabe eines bestimmten Abschnitts
eines Titels während der Audio-CD-Wiedergabe (außer
Daten-CDs). Drücken Sie A/B während der Wiedergabe
zweimal, um die Start- und Endpunkte (A und B)
festzulegen.
Um die Funktion A-B-Wiederholung aufzuheben, drücken
Sie erneut A/B.
y
• Eine Daten-CD wird als eine Disc definiert, auf der MP3oder WMA-Dateien aufgezeichnet sind.
• Sie können die Funktion A-B-Wiederholung nicht auf zwei
Titel ausdehnen.
• Die Funktion A-B-Wiederholung kann für Daten-CDs und
USB-Geräte nicht genutzt werden.
• Die Funktion A-B-Wiederholung wird aufgehoben, wenn
(Stopp) gedrückt wird.
• Sie können die Funktion A-B-Wiederholung nicht
einstellen, wenn sich das Gerät im PURE DIRECT-Modus
befindet.
• Sie können die Funktion A-B-Wiederholung nicht
einstellen, wenn das Gerät die verbleibende
Wiedergabezeit des Titels oder der Disc im FrontblendenDisplay anzeigt.
H (Suchen rückwärts), (Suchen vorwärts)
(☞ S.18, 21)
Durchsucht die Titel rückwärts/vorwärts, wenn die Taste
während der Wiedergabe gedrückt gehalten wird.
I RETURN (☞ S.14, 16, 21, 22)
Zeigt die vorherige Menüebene im Frontblende-Display an.
J MODE (☞ S.21)
Schaltet bei der Wiedergabe vom iPod zwischen dem
Standardmodus und dem erweiterten Modus um.
K Verstärker-Steuertasten
Steuert die entsprechenden Funktionen eines YamahaVerstärkers.
A (Stromversorgung)
Schaltet den Verstärker ein und aus.
INPUT ( / )
Schaltet die Eingangsquelle um.
VOLUME ( / )
Passt die Lautstärke an.
MUTE
Schaltet die Stummschaltung ein oder aus.
Ausführliche Informationen zu den Bedienvorgängen finden
Sie in der Bedienungsanleitung Ihres Verstärkers.
y
Manche Yamaha-Verstärker sind über diese Tasten nicht
steuerbar.
VORBEREITUNG
7 De
Deutsch
Page 78

BEDIENUNGSELEMENTE UND DEREN FUNKTION
24 531
Rückseite
ANALOG OUT
RL
DIGITAL OUT
COAXIAL OPTICAL
1 ANALOG OUT-Anschluss (☞ S.9)
Gibt analoge L/R-Audiosignale aus. Schließen Sie den
Verstärker oder das Audiosystem über das CinchStereokabel (mitgeliefert) an.
2 DIGITAL OUT-Anschluss (COAXIAL) (☞ S.9)
Gibt digitale Audiosignale aus. Schließen Sie den Verstärker
oder das Audiosystem über ein digitales Koaxial-Audiokabel
(im Handel erhältlich) an.
3 DIGITAL OUT-Anschluss (OPTICAL) (☞ S.9)
Gibt digitale Audiosignale aus. Schließen Sie den Verstärker
oder das Audiosystem über ein optisches Kabel (im Handel
erhältlich) an.
4 NETWORK-Anschluss (☞ S.10)
Stellen Sie eine Verbindung zu einem Netzwerk über ein
Netzwerkkabel (im Handel erhältlich) her.
5 AC IN-Buchse (☞ S.9)
Stellen Sie über diesen Anschluss eine Verbindung mit dem
Netzkabel (mitgeliefert) zu einer Netzsteckdose her.
NETWORK
AC IN
8 De
Page 79

ANSCHLÜSSE
Dieser Abschnitt beschreibt die notwendigen Anschlüsse für die Wiedergabe mit diesem Gerät.
Hinweise
• Schließen Sie das Netzkabel des Geräts erst an, wenn alle anderen Anschlüsse hergestellt wurden.
• Sie müssen diese Gerät vor der Wiedergabe mit einem Verstärker und Lautsprechern verbinden.
• Dieses Gerät kann Digitalsignale bis 192 kHz/24 Bit Linear PCM-Signale ausgeben.
• Abhängig vom angeschlossenen Gerät und der Umgebung ist eine ordnungsgemäße Wiedergabe eventuell nicht möglich. Überprüfen
Sie die Einstellungen und technischen Daten des angeschlossenen Wiedergabequellgeräts.
Anschließen an einen Verstärker
ANALOG OUT
R L
R L
DIGITAL OUT
COAXIAL OPTICAL
DIGITAL OUTANALOG OUT
COAXIAL OPTICAL
NETWORK
Dieses Gerät (CD-N500)
Netzkabel
(mitgeliefert)
1
21 3
AC IN
2
Zur
Netzsteckdose
VORBEREITUNG
Verstärker
1 Verbinden Sie das Gerät über eines der
folgenden Kabel mit dem Verstärker.
1 Stereo-Cinchkabel
(mitgeliefert)
2 Digitales Koaxial-Audiokabel
(im Handel erhältlich)
3 Optisches Digitalkabel
(im Handel erhältlich)
DAC
(Digital-zu-Analog-Konverter)
Verstärker
* Der Digitalausgang wird deaktiviert, wenn sich dieses
Gerät im Modus PURE DIRECT befindet.
2 Schließen Sie das mitgelieferte
Netzkabel an den AC IN-Anschluss an
und stecken Sie das andere Ende in eine
Netzsteckdose.
y
Ausführliche Informationen zu den Lautsprecheranschlüssen
finden Sie in der Bedienungsanleitung des Verstärkers oder der
Lautsprecher.
Hinweis
Wenn Sie eine Digitalverbindung nutzen, wird die Audioausgabe
möglicherweise abhängig vom Audiosystem (Verstärker usw.)
am Anfang eines Titels unterbrochen.
9 De
Deutsch
Page 80

ANSCHLÜSSE
Anschließen an ein Netzwerk (PC/NAS/Internetverbindung)
Sie können Musikdateien, die auf einem Computer oder NAS gespeichert sind, sowie Audioinhalte im Internet
wiedergeben, indem Sie das Gerät mit dem Netzwerk verbinden.
Schließen Sie ein im Handel erhältliches STP (Shielded Twisted Pair) Netzwerkkabel (CAT-5 oder höher, nicht
gekreuztes Kabel) an.
ANALOG OUT
R L
DIGITAL OUT
COAXIAL OPTICAL
NETWORK
AC IN
Dieses Gerät (CD-N500)
Netzwerkkabel
LAN
PC
Breitband-Router
WAN
NAS
Modem
Internet
Hinweise
• Alle Geräte, mit Ausnahme dieses Geräts, werden separat vertrieben.
• Sie müssen den Computer bzw. NAS nach dem Anschluss konfigurieren. Ausführliche Informationen zu den Einstellungen finden Sie
unter „KONFIGURATION DES PC/NAS/DER MOBILGERÄTE“ (☞ S.11).
• Um eine hohe Klangqualität zu erreichen, werden kabelgebundene Verbindungen empfohlen.
Gerät einschalten
Nach Abschluss aller Kabelverbindungen schalten Sie dieses Gerät und andere Systemkomponenten ein.
SELECT
ENTER
PUSH
PURE DIRECTSOURCE
5V
2.1A
Drücken Sie den Netzschalter, um das Gerät einzuschalten.
y
• Wenn der Netzschalter eingeschaltet ist, können Sie das Gerät über die Netztaste auf der Fernbedienung ein- oder in den
Bereitschaftsmodus schalten (☞ S.6).
• Ausführliche Informationen zum Bereitschaftsmodus finden Sie unter „Vorderseite“ (☞ S.5).
10 De
RETURN
Page 81

BETRIEB
KONFIGURATION DES PC/NAS/DER MOBILGERÄTE
Konfigurieren Sie den mit dem Netzwerk verbundenen Computer oder NAS für die Wiedergabe von Musikdateien, die
auf dem Computer oder NAS gespeichert sind, oder konfigurieren Sie ein Mobilgerät zur Bedienung dieses Geräts.
y
Für Einzelheiten zur Internetverbindung beziehen Sie sich auf die Anleitung Ihrer Netzwerkgeräte.
❚ Konfigurieren des Computers
Was Sie tun möchten Setup Seite
Wiedergabe von auf dem Computer
gespeicherten Musikdateien
Sie müssen die Medienfreigabe-Einstellung des Computers
konfigurieren.
• Konfigurieren Sie die Medienfreigabe-Einstellung für
Musikdateien mit Windows Media Player 12.
y
Sie können die Bedienung über den Computer mit Windows Media Player durchführen. Ausführliche Informationen finden Sie in der
Windows Media Player-Hilfe.
12
BETRIEB
❚ Konfigurieren des NAS
Was Sie tun möchten Setup Seite
Wiedergabe von auf dem NAS
gespeicherten Musikdateien
* Wenn Sie DHCP nutzen und die notwendigen Informationen, wie z. B. die IP-Adresse, automatisch für das Netzwerk abrufen. Wenn
Sie die Netzwerkparameter manuell konfigurieren möchten, überprüfen Sie, dass Sie eine IP-Adresse verwenden, die von keinem
anderen Netzwerkgerät im Netzwerk verwendet wird.
Sie müssen die folgenden Einstellung konfigurieren, um auf
den NAS zuzugreifen.
• Konfigurieren Sie die Medienfreigabe-Einstellungen des
NAS.
• Aktivieren Sie die DHCP-Einstellung des NAS.*
Die Konfigurationsschritte variieren abhängig vom NAS.
Beachten Sie die Anleitung des NAS.
—
❚ Konfigurieren des Mobilgeräts
Was Sie tun möchten Setup Seite
Steuern des Geräts mit einem
Mobilgerät
Sie müssen die entsprechende Anwendung herunterladen und
sie installieren.
• Aktivieren Sie die DHCP-Einstellung des Mobilgeräts.*
13
* Wenn Sie DHCP nutzen und die notwendigen Informationen, wie z. B. die IP-Adresse, automatisch für das Netzwerk abrufen. Wenn
Sie die Netzwerkparameter manuell konfigurieren möchten, überprüfen Sie, dass Sie eine IP-Adresse verwenden, die von keinem
anderen Netzwerkgerät im Netzwerk verwendet wird.
11 De
Deutsch
Page 82

KONFIGURATION DES PC/NAS/DER MOBILGERÄTE
Freigabe von auf dem Computer gespeicherten Musikdateien
Um über dieses Gerät Ordner (Verzeichnisse) auf Ihrem
PC durchsuchen zu können, müssen Sie die
Medienfreigabe von Windows Media Player 12 oder
Windows Media Player 11 so einstellen, dass dieses Gerät
Zugriff auf diese Ordner hat. Ausführliche Informationen
zu Windows Media Player finden Sie in der Windows
Media Player-Hilfe.
y
Sie können bis zu 16 Medienserver mit diesem Gerät verbinden.
❚ Bei der Verwendung von Windows
Media Player 12 (unter Windows 7)
1 Starten Sie Windows Media Player 12 auf
dem Computer.
2 Wählen Sie „Streamen“ und dann
„Medienstreaming aktivieren“.
4 Wählen Sie „Zugelassen“ in der
Dropdown-Liste neben „CD-N500“.
5 Wählen Sie auf die gleiche Weise die
Symbole der Geräte, die als externe
Media Controller (andere Computer oder
Mobilgeräte) genutzt werden, und
klicken dann auf „Zugelassen“.
6 Klicken Sie auf „OK“, um das Dialogfeld
zu verlassen.
Das Systemsteuerungs-Fenster des Computers wird
angezeigt.
3 Klicken Sie auf „Medienstreaming
aktivieren“.
12 De
Page 83

❚ Bei der Verwendung von Windows
Media Player 11
1 Starten Sie Windows Media Player 11 auf
dem Computer.
2 Wählen Sie „Medienbibliothek“ und
dann „Medienfreigabe“.
3 Aktivieren Sie das Kontrollkästchen
„Freigabe der Medien an“, wählen Sie
das Symbol „CD-N500“, und klicken Sie
dann auf „Zulassen“.
4 Wählen Sie auf die gleiche Weise die
Symbole der Geräte, die als externe
Media Controller (andere Computer oder
Mobilgeräte) genutzt werden, und
klicken dann auf „Zulassen“.
5 Klicken Sie auf „OK“, um das Dialogfeld
zu verlassen.
KONFIGURATION DES PC/NAS/DER MOBILGERÄTE
BETRIEB
Bedienung über ein Mobilgerät
Sie können dieses Gerät über den Bildschirm des
Mobilgeräts bedienen.
❚ Verwenden der Spezialanwendungen
Sie können folgende Bedienvorgänge mit der
Spezialanwendung (kostenlose Anwendung) über das
Mobilgerät ausführen.
• Sie können Musikdateien auswählen und wiedergeben,
die auf dem Computer oder NAS gespeichert sind.
• Sie können die Internetradiosender auswählen.
• Sie können die Wiedergabe von CDs und USB-Geräten
steuern.
y
Informationen zur Konfiguration der PC- oder NASEinstellungen finden Sie unter „KONFIGURATION DES PC/
NAS/DER MOBILGERÄTE“ (☞ S.11).
❚ Informationen zur Spezialanwendung
Laden Sie sich die Spezialanwendung auf das Mobilgerät
herunter und installieren Sie sie.
Ausführliche Informationen finden Sie auf der YamahaWebsite.
Deutsch
13 De
Page 84

WIEDERGABE VON MUSIKDATEIEN VOM PC/NAS
Dieser Abschnitt beschreibt, wie die Wiedergabe über die
Tasten an der Vorderseite des Hauptgeräts oder über die
Fernbedienung gesteuert wird.
Bedienung über Hauptgerät oder Fernbedienung
y
Ausführliche Informationen zu den Bedienelementen des
Hauptgeräts oder der Fernbedienung finden Sie unter
„BEDIENUNGSELEMENTE UND DEREN FUNKTION“
(☞ S.5).
2 Wählen Sie mit den folgenden
Bedienelementen einen Menüeintrag,
bis Sie die gewünschte Musikdatei
finden.
Hauptgerät
SELECT
ENTER
PUSH
RETURN
1 Drücken Sie wiederholt SOURCE, um die
Audioquelle zu „SERVER“
umzuschalten.
Hauptgerät/Fernbedienung
OPEN/CLOSE
DISPLAY
SOURCE
PURE DIRECTSOURCE
5V
2.1A
SOURCE
Frontblende-Display
Source SERVER
PURE DIRECTSOURCE
123
456
SELECT/ENTER RETURN
SELECT/ENTER (Jograd)
Wird gedreht, um einen Menüeintrag zu wählen, und
gedrückt, um die Auswahl zu bestätigen.
RETURN
Zeigt die vorherige Menüebene im FrontblendeDisplay an.
Fernbedienung
S/T/W/X/
ENTER
HOME
S/T/W/X (Cursortasten)/ ENTER
HOME
SETUP
ENTER
NOW PLAYING
RETURN
MODE
RETURN
Drücken Sie S/T zur Auswahl eines Menüelements
(oder drücken Sie W/X zur Anzeige der Anzeige, die
die aktuelle Position des Inhalts darstellt), und
drücken Sie dann zur Bestätigung der Auswahl
ENTER.
RETURN
Zeigt die vorherige Menüebene im FrontblendeDisplay an.
HOME
Zeigt die oberste Menüebene im Frontblende-Display
an.
14 De
Page 85

3 Wenn die Wiedergabe beginnt, führen
0
PROGRAM
REPEAT
HOME
SETUP
NOW PLAYING
RETURN
MODE
A/BSHUFFLE
CLEAR
DISPLAY
OPEN/CLOSE
SOURCE
123
PURE DIRECT
Sie die gewünschten Funktionen mit
folgenden Bedienelementen aus.
Hauptgerät
SELECT
ENTER
PUSH
SELECT/ENTER
RETURN
Wiedergabetasten
Fernbedienung
WIEDERGABE VON MUSIKDATEIEN VOM PC/NAS
SELECT/ENTER (Jograd)
Drehen Sie das Rad während der Wiedergabe, um
zum nächsten Titel zu springen oder zum vorherigen
Titel/zum Anfang des aktuellen Titels zu springen.
Wiedergabetasten
Bedienen Sie mit diesen Tasten den Audioinhalt
(☞ S.5, 6).
DISPLAY
Wenn Sie diese Taste drücken, während ein Titel
wiedergegeben wird oder die Wiedergabe angehalten
ist, werden die Informationen im FrontblendenDisplay in der folgenden Reihenfolge umgeschaltet.
Song Artist Album Time Source
SHUFFLE
Schaltet den Zufallsmodus in der folgenden
Reihenfolge um.
On Off
BETRIEB
Wiedergabetasten
ENTER
DISPLAY
SHUFFLE
REPEAT
NOW PLAYING
REPEAT
Schaltet den Wiederholmodus in der folgenden
Reihenfolge um.
One All Off
NOW PLAYING
Zeigt die aktuellen Wiedergabeinformationen im
Frontblende-Display an.
y
• Wenn die Wiedergabe des Titels gestoppt wird, startet die
Wiedergabe des Titels, den Sie gehört haben, bei der nächsten
Wiedergabe am Anfang.
• Ausführliche Informationen zu den abspielbaren Dateien finden
Sie unter „ABSPIELBARE DISCS UND DATEIFORMATE“
(☞ S.31).
Deutsch
15 De
Page 86

WIEDERGABE VON AUDIOINHALTEN AUS DEM INTERNET
Wiedergabe von Internetradiosendern
❚ Bedienung über Hauptgerät oder
Fernbedienung
1 Drücken Sie wiederholt SOURCE, um die
Audioquelle zu „NET RADIO“
umzuschalten.
Hauptgerät/Fernbedienung
OPEN/CLOSE
DISPLAY
PURE DIRECTSOURCE
123
456
PURE DIRECTSOURCE
5V
2.1A
SOURCE
Frontblende-Display
SOURCE
2 Wählen Sie mit den folgenden
Bedienelementen einen Menüeintrag,
bis Sie den gewünschten
Internetradiosender finden.
Hauptgerät
SELECT
ENTER
PUSH
RETURN
SELECT/ENTER RETURN
SELECT/ENTER (Jograd)
Wird gedreht, um einen Menüeintrag zu wählen, und
gedrückt, um die Auswahl zu bestätigen.
RETURN
Zeigt die vorherige Menüebene im FrontblendeDisplay an.
Fernbedienung
S/T/W/X/
ENTER
ENTER
Source NET RADIO
16 De
HOME
HOME
SETUP
NOW PLAYING
RETURN
MODE
RETURN
S/T/W/X (Cursortasten)/ ENTER
Drücken Sie S/T zur Auswahl eines Menüelements
(oder drücken Sie W/X zur Anzeige der Anzeige, die
die aktuelle Position des Inhalts darstellt), und
drücken Sie dann zur Bestätigung der Auswahl
ENTER.
RETURN
Zeigt die vorherige Menüebene im FrontblendeDisplay an.
HOME
Zeigt die oberste Menüebene im Frontblende-Display
an.
Page 87

3 Wenn die Wiedergabe beginnt, führen
REPEAT
HOME
SETUP
NOW PLAYING
RETURN
MODE
A/BSHUFFLE
DISPLAY
OPEN/CLOSE
SOURCE
123
PURE DIRECT
Sie die gewünschten Funktionen mit
folgenden Bedienelementen aus.
Hauptgerät
SELECT
ENTER
PUSH
RETURN
WIEDERGABE VON AUDIOINHALTEN AUS DEM INTERNET
/ (Wiedergabe/Pause) oder (Wiedergabe)
Zum Starten der Wiedergabe.
(Stopp)
Zum Stoppen der Wiedergabe.
DISPLAY
Wenn Sie diese Taste drücken, während ein Titel
wiedergegeben wird oder die Wiedergabe angehalten
ist, werden die Informationen im FrontblendenDisplay in der folgenden Reihenfolge umgeschaltet.
Station Time Source
Fernbedienung
NOW PLAYING
/
Zeigt die aktuellen Wiedergabeinformationen im
BETRIEB
Frontblende-Display an.
y
Um Ihre bevorzugten Internet-Radiosender zu registrieren und
mit einem Lesezeichen zu versehen, besuchen Sie die Website
„vTuner Radio Guide“. Zur Verwendung dieser Funktion
benötigen Sie die MAC-Adresse dieses Geräts (☞ S.24) als ID
für den Medienplayer sowie Ihre E-Mail-Adresse, um Ihr
DISPLAY
ENTER
NOW PLAYING
persönliches Konto einzurichten.
Ausführliche Informationen finden Sie auf der Website unten.
http://yradio.vtuner.com/
Deutsch
17 De
Page 88

Wiedergabe einer CD
0
PROGRAM CLEAR
DISPLAY
OPEN/CLOSE
SOURCE
123
456
789
PURE DIRECT
REPEAT
HOME
SETUP
FOLDER
NOW PLAYING
RETURN
MODE
A/BSHUFFLE
ENTER
WIEDERGABE VON CDS
Fernbedienung
1 Drücken Sie wiederholt SOURCE, um die
Hauptgerät/Fernbedienung
Frontblende-Display
Source CD
2 Drücken Sie am Hauptgerät (Öffnen/
3 Drücken Sie (Öffnen/Schließen)
4 Wenn die Wiedergabe beginnt, führen
Hauptgerät
Audioquelle zu „CD“ umzuschalten.
OPEN/CLOSE
DISPLAY
PURE DIRECTSOURCE
SOURCE
123
PURE DIRECTSOURCE
5V
2.1A
456
SOURCE
Schließen), um die Disclade zu öffnen,
und legen Sie eine CD ein.
erneut, um die Disclade zu schließen.
Die Wiedergabe startet automatisch.
Sie die gewünschten Funktionen mit
folgenden Bedienelementen aus.
SELECT
ENTER
PUSH
SELECT/ENTER
RETURN
DISPLAY
Zahlentasten
SHUFFLE
A/B
/
REPEAT
Wiedergabetasten
FOLDER
SELECT/ENTER (Jograd)
Drehen Sie das Rad während der Wiedergabe, um
zum nächsten Titel zu springen oder zum vorherigen
Titel/zum Anfang des aktuellen Titels zu springen.
Wiedergabetasten
Bedienen Sie mit diesen Tasten den Audioinhalt
(☞ S.5, 6).
Zahlentasten (nur Audio-CD)
Über diese Tasten können Sie einen Titel der CD
direkt anwählen.
(Suchen rückwärts)/ (Suchen vorwärts)
Sucht rückwärts/vorwärts.
FOLDER ( / ) (nur Daten-CD)
Wählt den gewünschten Ordner aus.
Wiedergabetasten
18 De
Page 89

DISPLAY
0
PROGRAM CLEAR
123
456
789
REPEAT A/BSHUFFLE
Wenn Sie diese Taste drücken, während ein Titel
wiedergegeben wird oder die Wiedergabe angehalten
ist, werden die Informationen im FrontblendenDisplay in der folgenden Reihenfolge umgeschaltet.
Audio-CD:
Time (Song) (Artist) (Album) Source
y
• „Time“ durchläuft wie folgt die drei Schritte, wenn Sie die
Taste betätigen.
– Titelnummer und verstrichene Wiedergabezeit.
– Titelnummer und verbleibende Wiedergabezeit des
Titels.
– Verbleibende Wiedergabezeit der Disc.
• „Song“, „Artist“ und „Album“ werden nur angezeigt,
wenn Textinformationen auf der Disc enthalten sind.
Daten-CD:
Time Song Artist Album Source
WIEDERGABE VON CDS
Verwendung des Programmwiedergabemodus
Im Programmwiedergabemodus können Sie Titel in einer
programmierten Reihenfolge wiedergeben.
1 Drücken Sie PROGRAM auf der
Fernbedienung, währen die Wiedergabe
gestoppt ist.
Das Gerät wechselt zum
Programmbearbeitungsmodus.
BETRIEB
CLEAR
PROGRAM
SHUFFLE
Schaltet den Zufallsmodus wie folgt zwischen
„Folder“, „All“ und „Off“ um.
Audio-CD:
Daten-CD:
A/B (nur Daten-CD)
All Off
Folder All Off
Wiederholt die Wiedergabe eines bestimmten
Abschnitts eines Titels während der Audio-CDWiedergabe (außer Daten-CDs) (☞ S.7).
REPEAT
Schaltet den Wiederholmodus in der folgenden
Reihenfolge um.
Audio-CD:
Daten-CD:
One All Off
One Folder All Off
y
• Wenn die Wiedergabe des Titels gestoppt wird, startet die
Wiedergabe des Titels, den Sie gehört haben, bei der nächsten
Wiedergabe am Anfang.
• Wenn Sie (Stopp) drücken, während die Wiedergabe
gestoppt ist, wird die Wiedergabe beim nächsten Start mit dem
ersten Titel der CD beginnen, die Sie angehört haben.
• Ausführliche Informationen zu den abspielbaren Discs und
Dateien finden Sie unter „ABSPIELBARE DISCS UND
DATEIFORMATE“ (☞ S.31).
2 Wählen Sie mit den Zahlentasten einen
Titel, und drücken Sie zur Bestätigung
ENTER.
3 Wiederholen Sie Schritt 2, um den
nächsten Titel zu programmieren.
Es können bis zu 50 Titel programmiert werden.
y
Um den programmierten Titel aufzuheben, drücken Sie im
Programmbearbeitungsmodus CLEAR. Der zuletzt
programmierte Titel wird gelöscht.
4 Drücken Sie / (Wiedergabe/Pause)
am Hauptgerät oder (Wiedergabe) auf
der Fernbedienung.
Die Wiedergabe beginnt beim Anfang der
programmierten Reihenfolge.
y
• Zum Löschen aller programmierten Titel drücken Sie CLEAR,
wenn die Wiedergabe angehalten wurde.
• Für Daten-CDs können Sie keine programmierte Wiedergabe
festlegen.
Hinweis
Die programmierten Titel werden gelöscht, wenn die Disc
ausgeworfen oder das Gerät ausgeschaltet wird.
Deutsch
19 De
Page 90

WIEDERGABE VOM iPod/VON USB-GERÄTEN
Anschließen des iPod oder USB-Geräts
PURE DIRECTSOURCE
5V
2.1A
y
• Schließen Sie den iPod über das USB-Kabel an, das mit dem iPod mitgeliefert wurde.
• Entfernen Sie ein USB-Gerät, nachdem Sie die Wiedergabe gestoppt haben.
• Verwenden Sie keinen USB-Hub. Dieses Gerät erkennt ein USB-Gerät nicht, wenn es über einen USB-Hub
angeschlossen ist.
SELECT
ENTER
PUSH
RETURN
Wiedergabe über den iPod
1 Drücken Sie wiederholt SOURCE, um die
Audioquelle zu „USB“ umzuschalten.
Hauptgerät/Fernbedienung
OPEN/CLOSE
DISPLAY
SOURCE
PURE DIRECTSOURCE
5V
2.1A
SOURCE
Frontblende-Display
Source USB
PURE DIRECTSOURCE
123
456
2 Schließen Sie den iPod an den USB-
Anschluss des Hauptgeräts an.
3 Starten Sie die Wiedergabe am iPod.
Über Ihren iPod können Sie die Wiedergabe starten,
einen Titel auswählen, die Wiedergabe unterbrechen
und anhalten (Standard-Wiedergabemodus).
y
• Sie können über die Wiedergabetasten am Hauptgerät und auf
der Fernbedienung im Standard-Wiedergabemodus auch die
Wiedergabe starten, unterbrechen und anhalten, vorwärts/
rückwärts springen und vorwärts/rückwärts suchen.
Hauptgerät:
/, , / , /
Fernbedienung:
, , , , , ,
• Im Standard-Wiedergabemodus können Sie die Zufalls- und
Wiederholungsmodi über den iPod und die Fernbedienung nicht
steuern.
Hinweis
Der iPod funktioniert möglicherweise nicht korrekt mit diesem
Gerät, wenn die Software auf dem iPod nicht aktualisiert wird.
Stellen Sie sicher, dass Sie die neueste Version der iPod-Software
verwenden.
Ausführliche Informationen zu den unterstützten iPod-Modellen
finden Sie unter „Über den USB-Anschluss unterstützte iPodModelle“ (☞ S.31).
20 De
Page 91

Verwenden des erweiterten
HOME
SETUP
NOW PLAYING
RETURN
MODE
0
PROGRAM
REPEAT
HOME
SETUP
NOW PLAYING
RETURN
MODE
A/BSHUFFLE
CLEAR
DISPLAY
OPEN/CLOSE
SOURCE
123
PURE DIRECT
Wiedergabemodus für den iPod
Sie können den iPod im erweiterten Modus über das
Hauptgerät oder die Fernbedienung steuern.
1 Drücken Sie MODE auf der
Fernbedienung, währen die Wiedergabe
am iPod läuft.
Das Gerät schaltet zum erweiterten
Wiedergabemodus um.
MODE
2 Führen Sie die gewünschten Funktionen
mit folgenden Bedienelementen aus.
Hauptgerät
SELECT
ENTER
PUSH
SELECT/ENTER
RETURN
WIEDERGABE VOM iPod/VON USB-GERÄTEN
SELECT/ENTER (Jograd)
Drehen Sie das Rad während der Wiedergabe, um
zum nächsten Titel zu springen oder zum vorherigen
Titel/zum Anfang des aktuellen Titels zu springen.
Wiedergabetasten*
Bedienen Sie mit diesen Tasten den Audioinhalt
(☞ S.5, 6).
RETURN
Zeigt die vorherige Menüebene im FrontblendeDisplay an.
(Suchen rückwärts)/ (Suchen vorwärts)*
Sucht rückwärts/vorwärts.
HOME
Zeigt die oberste Menüebene im Frontblende-Display
an.
DISPLAY
Wenn Sie diese Taste drücken, während ein Titel
wiedergegeben wird oder die Wiedergabe angehalten
ist, werden die Informationen im FrontblendenDisplay in der folgenden Reihenfolge umgeschaltet.
Song Artist Album Time Source
SHUFFLE*
Schaltet den Zufallsmodus des iPod um.
Songs Albums Off
BETRIEB
Fernbedienung
Wiedergabetasten
Wiedergabetasten
/
HOME
ENTER
RETURN
DISPLAY
SHUFFLE
REPEAT
RETURN
NOW PLAYING
REPEAT*
Schaltet den Wiederholmodus in der folgenden
Reihenfolge um.
One All Off
NOW PLAYING
Zeigt die aktuellen Wiedergabeinformationen im
Frontblende-Display an.
* Die Bedienung variiert abhängig vom iPod.
y
Die über den iPod abspielbaren Dateiformate sind vom iPod
abhängig.
Deutsch
21 De
Page 92

WIEDERGABE VOM iPod/VON USB-GERÄTEN
0
PROGRAM
REPEAT
HOME
SETUP
NOW PLAYING
RETURN
MODE
A/BSHUFFLE
CLEAR
DISPLAY
OPEN/CLOSE
SOURCE
123
PURE DIRECT
Wiedergeben von Musik von USB-Geräten
1 Drücken Sie SOURCE am Hauptgerät
oder auf der Fernbedienung, um die
Audioquelle zu „USB“ umzuschalten
(☞ S.20).
2 Schließen Sie das USB-Gerät an den
USB-Anschluss des Hauptgeräts an.
Wenn das USB-Gerät abspielbare Dateien enthält,
zeigt die Anzeige im Display an der Vorderseite den
Dateinamen an und die Wiedergabe startet
automatisch sortiert nach Erstellungsdatum und uhrzeit.
3 Wenn die Wiedergabe beginnt, führen
Sie die gewünschten Funktionen mit
folgenden Bedienelementen aus.
Hauptgerät
SELECT
ENTER
PUSH
SELECT/ENTER
RETURN
Wiedergabetasten
RETURN
SELECT/ENTER (Jograd)
Drehen Sie das Rad während der Wiedergabe, um
zum nächsten Titel zu springen oder zum vorherigen
Titel/zum Anfang des aktuellen Titels zu springen.
Wiedergabetasten
Bedienen Sie mit diesen Tasten den Audioinhalt
(☞ S.5, 6).
RETURN
Zeigt die vorherige Menüebene im FrontblendeDisplay an.
HOME
Zeigt die oberste Menüebene im Frontblende-Display
an.
DISPLAY
Wenn Sie diese Taste drücken, während ein Titel
wiedergegeben wird oder die Wiedergabe angehalten
ist, werden die Informationen im FrontblendenDisplay in der folgenden Reihenfolge umgeschaltet.
Song Artist Album Time Source
SHUFFLE
Schaltet den Zufallsmodus in der folgenden
Reihenfolge um.
On Off
REPEAT
Schaltet den Wiederholmodus in der folgenden
Reihenfolge um.
One All Off
Fernbedienung
Wiedergabetasten
HOME
ENTER
DISPLAY
SHUFFLE
REPEAT
RETURN
NOW PLAYING
NOW PLAYING
Zeigt die aktuellen Wiedergabeinformationen im
Frontblende-Display an.
y
• Wenn die Wiedergabe des Titels gestoppt wird, startet die
Wiedergabe des Titels, den Sie gehört haben, bei der nächsten
Wiedergabe am Anfang.
• Ausführliche Informationen zu den abspielbaren Dateien finden
Sie unter „ABSPIELBARE DISCS UND DATEIFORMATE“
(☞ S.31).
22 De
Page 93

SETUP-MENÜ
0
PROGRAM CLEAR
123
456
789
REPEAT
HOME
SETUP
NOW PLAYING
RETURN
MODE
A/BSHUFFLE
ENTER
Mit dem Setup-Menü können Sie verschiedene
Einstellungen dieses Geräts konfigurieren.
Bedienung des Setup-Menüs
❚ Bedienung über die Fernbedienung
y
Ausführliche Informationen zu den Bedienelementen des
Hauptgeräts oder der Fernbedienung finden Sie unter
„BEDIENUNGSELEMENTE UND DEREN FUNKTION“
(☞ S.5).
1 Drücken Sie SETUP zum Aufrufen des
Setup-Menüs (☞ S.24).
Um die Einträge des weiterführenden
Setup-Menüs (☞ S.25) verfügbar zu
machen, drücken Sie SETUP bei
gedrückt gehaltener RETURN-Taste (am
Hauptgerät).
Fernbedienung
Zahlentasten
2 Drücken Sie S/T, um einen zu
konfigurierenden Menüeintrag zu
wählen, und drücken Sie dann ENTER.
Mit gewissen Menüeinträgen ist Schritt 2 zu
wiederholen, um einen Untermenüeintrag zu wählen.
DHCP
1–1
3 Drücken Sie S/T, um einen Parameter
zu wählen, und drücken Sie dann
ENTER.
y
Mit gewissen Menüeinträgen sind Nummern einzugeben.
Drücken Sie in diesem Fall W/X, um das Ziel zu ändern, und
S/T, um eine Nummer zu wählen, oder verwenden Sie die
Zahlentasten. Drücken Sie dann zur Bestätigung ENTER.
BETRIEB
S/T/W/X/
ENTER
SETUP
Hauptgerät
Frontblende-Display
1
SELECT
ENTER
PUSH
RETURN
RETURN
Network Configuration
RETURN
Deutsch
23 De
Page 94

SETUP-MENÜ
Setup-Menüliste
Menü Untermenü
Einstellungen
(Fett: Vorgabe)
DHCP On, Off
IP Address
Network
Subnet Mask
Configuration
Default
Gateway
DNS
Server(P)
DNS
Server(S)
MAC
Address
Network
Information
Status
System ID Die System-ID wird angezeigt.
Network Standby On, Off
Funktion
Wählen Sie „On“, um die Netzwerkeinstellungen dieses Geräts
automatisch vom DHCP-Server konfigurieren zu lassen, oder
„Off“, um sie manuell zu konfigurieren.
Geben Sie die IP-Adresse an, wenn für „DHCP“ „Off“ gewählt
*1
ist.
Geben Sie die Subnetzmaske an, wenn für „DHCP“ „Off“
gewählt ist.
*1
Geben Sie das Standard-Gateway an, wenn für „DHCP“ „Off“
gewählt ist.
*1
Geben Sie den primären DNS-Server an, wenn für „DHCP“
„Off“ gewählt ist.
*1
Geben Sie den sekundären DNS-Server an, wenn für „DHCP“
„Off“ gewählt ist.
*1
Die MAC-Adresse dieses Geräts wird angezeigt. Die MACAdresse dient ebenfalls als vTuner-Kennwort.
Der Netzwerk-Status dieses Geräts wird angezeigt
(„Connected“ oder „Not connected“).
Wählen Sie „On“, um den Netzwerkbereitschaftsmodus zu
aktivieren.
4 Hours,
Auto Power Down
8Hours
12 Hours,
Off
Dimmer –3 bis 0
,
Das Gerät wechselt automatisch in den Bereitschaftsmodus,
wenn es für die festgelegte Zeit eingeschaltet war und keine
Wiedergabe oder ein anderer Bedienvorgang durchgeführt
wurde.
Stellt die Helligkeit des Frontblende-Displays ein.
Firmware Version Die Firmwareversion dieses Geräts wird angezeigt.
Aktualisieren Sie die Firmware des Geräts, nachdem Sie
„Network“ oder „USB“ ausgewählt haben.
Wenn „Press ENTER to start“ angezeigt wird, drücken Sie
ENTER, um die Aktualisierung der Firmware zu starten.
Bedienen Sie das Gerät erst, wenn „UPDATE SUCCESS“
Firmware Update
Network
USB
,
angezeigt wird. Schalten Sie das Gerät dann einmal aus und
wieder ein.
*1: Wenn „DHCP“ auf „On“ eingestellt ist, können Sie die vom DHCP-Server zugewiesenen Werte (IP-Adresse usw.)
prüfen.
24 De
Page 95

SETUP-MENÜ
Weiterführendes Setup-Menü
Folgende Menüeintrage sind erst dann verfügbar, wenn Sie das Setup-Menü öffnen, indem Sie bei gedrückt gehaltener
RETURN-Taste (am Hauptgerät) die SETUP-Taste (auf der Fernbedienung) drücken.
Menü
Einstellungen
(Fett: Vorgabe)
MAC Address Filter On, Off
Gapless Playback On, Off
vTuner Account Reset Yes, No
Initialize Yes, No
Funktion
Wählen Sie „On“, um die MAC-Adressen (bis zu 5) der
Netzwerkkomponenten anzugeben, denen Zugriff auf das Gerät
gestattet wird („Address1“ bis „Address5“). Wählen Sie „Off“,
um die MAC-Adresse-Filterfunktion zu deaktivieren.
Wählen Sie „On“ für eine pausenlose Wiedergabe (ohne
Unterbrechung zwischen den Titeln). Wählen Sie „Off“, um die
pausenlose Wiedergabefunktion zu deaktivieren. Diese
Funktion ist auf „SERVER“-Audioinhalte beschränkt.
y
„Gapless Playback“ auf „On“ eingestellt ist, beginnt
Wenn
dieses Gerät die Wiedergabe des folgenden Titels sofort nach
Ende des aktuellen Titels. Hierbei bleiben gewisse
Wiedergabefunktionen (Suchlauf, Wiederholung usw.) für den
folgenden Track erhalten.
Wählen Sie „Yes“ und drücken Sie ENTER auf der
Fernbedienung, um das vTuner-Konto zurückzusetzen.
y
• Wenn Sie das vTuner-Konto zurücksetzen, werden Ihr
Benutzername, das Passwort und die Lesezeichen zurückgesetzt.
• Um ein neues Konto einzurichten, besuchen Sie die unten aufgeführte
Website.
http://yradio.vtuner.com/
Sie benötigen die MAC-Adresse dieses Geräts als ID für den
Medienplayer sowie Ihre E-Mail-Adresse.
Wählen Sie „Yes“, um die Einstellungen dieses Geräts auf die
Werksvorgaben zurückzusetzen. Die Rückstellung wird beim
nächsten Einschalten des Geräts wirksam.
BETRIEB
25 De
Deutsch
Page 96

SONSTIGES
STÖRUNGSBEHEBUNG
Beziehen Sie sich auf die Tabelle unten, wenn dieses Gerät nicht richtig funktioniert. Wenn das aufgetretene Problem
unten nicht aufgeführt ist oder wenn die Anleitung das Problem nicht behebt, schalten Sie das Gerät aus, trennen Sie das
Netzkabel und wenden Sie sich an den nächsten autorisierten Yamaha-Händler oder ein Servicecenter.
❚ Allgemeines
Problem Ursache Abhilfe Seite
Das Gerät kann nicht
eingeschaltet werden.
Das Netzkabel ist nicht mit der
AC IN-Buchse des Hauptgeräts
oder einer Steckdose verbunden.
Dieses Gerät wurde einem
starken externen Stromschlag
(wie Blitzschlag oder starke
statische Elektrizität)
ausgesetzt.
Schließen Sie das Netzkabel
richtig an.
Schalten Sie dieses Gerät aus,
ziehen Sie den Netzstecker
zunächst ab und stecken ihn
nach 30 Sekunden wieder ein;
fahren Sie anschließend mit
einer normalen Benutzung des
Geräts fort.
9
—
Die Netzanzeige an der
Frontblende blinkt.
Das Gerät schaltet sich plötzlich
aus.
Kein Sound.
Der Schutzschalter wurde
dreimal in Folge aktiviert.
Wenn das Gerät diesen Zustand
aufweist, blinkt die Netzanzeige
des Hauptgeräts, wenn Sie
versuchen, das Gerät
einzuschalten.
Ein innerer Schaltkreis dieses
Geräts ist gestört.
Das Gerät wechselt in den
Bereitschaftsmodus.
Die Audioverbindung zwischen
diesem Gerät und dem
Verstärker ist schlecht.
Die Eingangseinstellung am
Verstärker stimmt nicht.
Der Verstärker ist mit den
Digitalsignalen nicht kompatibel.
Als Sicherheitsmaßnahme ist
die Möglichkeit zum
Einschalten der Stromzufuhr
deaktiviert. Wenden Sie sich an
den nächsten Yamaha-Händler
oder ein Servicecenter, um das
Gerät reparieren zu lassen.
Schalten Sie dieses Gerät aus,
ziehen Sie das Netzkabel ab und
wenden Sie sich an den
nächsten Yamaha-Händler oder
ein Servicecenter.
Das Gerät wechselt in den
Bereitschaftsmodus, nachdem
die unter „Auto Power Down“
im Setup-Menü eingestellte Zeit
verstrichen ist.
Schließen Sie das Audiokabel
ordnungsgemäß an. Verwenden
Sie ein anderes Audiokabel,
wenn das Problem weiterhin
besteht.
Wählen Sie am Verstärker den
Eingang, der diesem Gerät
entspricht.
Verwenden Sie eine
Analogsignalverbindung.
—
—
24
9
—
9
Es ist ein Rauschen zu hören.
26 De
Das Gerät befindet sich zu nah
an einem digitalen oder
Radiofrequenzgerät.
Das Audiokabel zwischen
diesem Gerät und dem
Medienserver ist defekt.
Stellen Sie das Gerät weiter
entfernt von solchen Geräten
auf.
Schließen Sie das Audiokabel
ordnungsgemäß an. Verwenden
Sie ein anderes Audiokabel,
wenn das Problem weiterhin
besteht.
—
—
Page 97

STÖRUNGSBEHEBUNG
Problem Ursache Abhilfe Seite
Die Fernbedienung arbeitet in
Falscher Abstand oder Winkel.
einem Bereich von maximal
6 m und 30 Grad zur
Frontblende des Hauptgeräts.
4
Die Fernbedienung funktioniert
gar nicht oder nicht richtig.
Die Verstärker-Steuertasten an
der Fernbedienung steuern den
Verstärker nicht.
❚ Netzwerk
Problem Ursache Abhilfe Seite
Die Netzwerkfunktion
funktioniert nicht.
Direkte Sonneneinstrahlung
oder Beleuchtung erreichen den
Fernbedienungssensor des
Geräts.
Die Batterien sind entladen.
Ihr Verstärker ist kein
kompatibles Yamaha Modell.
(Manche Yamaha Verstärker
sind über diese Tasten nicht
steuerbar.)
Die Netzwerkparameter (IPAdresse) wurden nicht
ordnungsgemäß abgerufen.
Die Medienfreigabe-Einstellung
ist nicht korrekt.
Eine auf dem Computer
installierte Sicherheitssoftware
blockiert den Zugriff auf dieses
Gerät von Ihrem Computer.
Ändern Sie den
Lichteinfallwinkel, oder
positionieren Sie das Gerät neu.
Tauschen Sie beide Batterien
gegen neue aus.
Benutzen Sie die Fernbedienung
Ihres Verstärkers.
Aktivieren Sie die DHCPServer-Funktion am
Breitbandrouter und setzen Sie
am Gerät „DHCP“ im SetupMenü auf „On“. Wenn Sie die
Netzwerkparameter manuell
konfigurieren möchten,
überprüfen Sie, dass Sie eine IPAdresse verwenden, die von
keinem anderen Netzwerkgerät
im Netzwerk verwendet wird.
Konfigurieren Sie die
Medienfreigabe-Einstellung des
Computers.
Überprüfen Sie die
Einstellungen der auf dem
Computer installierten
Sicherheitssoftware.
—
4
—
SONSTIGES
24
11
—
Dieses Gerät erkennt den
Digital Media Server (PC)
nicht.
Dieses Gerät und der Computer
befinden sich nicht im gleichen
Netzwerk.
Der Zugriff auf dieses Gerät
wird durch die Funktion MACAdressfilter eingeschränkt.
Es werden mehr als zwei Router
verwendet, die sich bei den
Netzwerkgeräten überlappen.
Überprüfen Sie die
Netzwerkverbindungen und die
Einstellungen des
Breitbandrouters und verbinden
Sie dann dieses Gerät und den
Computer mit dem gleichen
Netzwerk.
Deaktivieren Sie die Funktion
MAC-Adressfilter im SetupMenü dieses Geräts.
Trennen Sie die
Internetverbindung
vorübergehend und überprüfen
Sie das lokale Netzwerk oder
verbinden Sie die zu
verwendenden Netzwerkgeräte
mit dem gleichen Router.
10
24
—
27 De
Deutsch
Page 98

STÖRUNGSBEHEBUNG
Problem Ursache Abhilfe Seite
Die Dateien auf Ihrem
Computer können nicht
angezeigt oder wiedergegeben
werden.
Die Dateien werden von diesem
Gerät oder dem Medienserver
nicht unterstützt.
Verwenden Sie ein Dateiformat,
das von diesem Gerät und dem
Medienserver unterstützt wird.
Ausführliche Informationen zu
den vom Gerät unterstützten
Dateiformaten finden Sie unter
„ABSPIELBARE DISCS UND
DATEIFORMATE“.
31
Gewisse Audiodateien sind mit
diesem Gerät nicht abspielbar.
❚ Audioinhalte im Internet
Problem Ursache Abhilfe Seite
Das Internetradio kann nicht
wiedergegeben werden.
Sie versuchen beim iTunes
Store erworbene DRMgeschützte Audiodateien
wiederzugeben.
Der gewählte InternetRadiosender ist z.Z. nicht
verfügbar.
Der gewählte InternetRadiosender sendet derzeit
keinen Inhalt.
Der Zugriff auf das Netzwerk
wird durch die FirewallEinstellungen der
Netzwerkgeräte eingeschränkt
(wie z. B. durch den
Breitbandrouter).
Beim iTunes Store erworbene
DRM-geschützte Audiodateien
können nicht wiedergegeben
werden.
Es gibt möglicherweise ein
Netzwerkproblem beim
Radiosender oder der Dienst
wurde unterbrochen. Versuchen
Sie den Sender später oder
wählen einen anderen Sender.
Einige Internetradiosender senden
zu bestimmten Tageszeiten keine
Inhalte. Versuchen Sie den
Sender später oder wählen einen
anderen Sender.
Überprüfen Sie die FirewallEinstellungen Ihrer
Netzwerkgeräte. Internetradio kann
nur wiedergegeben werden, wenn
es über den von jedem Radiosender
festgelegten Port empfangen wird.
Die Portnummer variiert abhängig
vom Radiosender.
31
—
—
—
❚ CD
Problem Ursache Abhilfe Seite
Das Disc-Fach schließt nicht
vollständig.
Die Wiedergabe der Disc
beginnt nicht.
28 De
Ein Fremdkörper blockiert das
Fach.
Die Disc ist beschädigt.
Auf dem Laser-Abtaster hat sich
Feuchtigkeit niedergeschlagen.
Die Disc wurde falsch herum
eingelegt.
Die Disc ist verschmutzt.
Das Format der MP3- oder
WMA-Datei ist mit diesem
Gerät nicht kompatibel.
Überprüfen Sie das Disc-Fach
sorgfältig und entfernen Sie den
Fremdkörper.
Überprüfen Sie die Disc
sorgfältig und tauschen Sie sie
gegebenenfalls aus.
Warten Sie nach dem
Einschalten des Geräts 20 bis 30
Minuten, bevor Sie versuchen,
eine Disc wiederzugeben.
Legen Sie die Disc mit der
Beschriftung nach oben ein.
Reinigen Sie die Disc.
Tauschen Sie die Disc gegen
eine korrekt bespielte Disc aus,
die mit diesem Gerät abgespielt
werden kann.
—
—
—
—
32
31
Page 99

Problem Ursache Abhilfe Seite
Die Wiedergabe der Disc
beginnt nicht.
Die Wiedergabe beginnt
verzögert oder an der falschen
Stelle.
Die CD-RW-Disc
(wiederbeschreibbar) wurde
nicht korrekt bespielt.
Bei der Disc handelt es sich um
eine Disc mit außergewöhnlicher
Form, die mit diesem Gerät nicht
abgespielt werden kann.
Die Disc ist zerkratzt oder
beschädigt.
STÖRUNGSBEHEBUNG
Tauschen Sie die Disc gegen
eine korrekt bespielte Disc aus,
die mit diesem Gerät abgespielt
werden kann.
Tauschen Sie die Disc gegen
eine korrekt bespielte Disc aus,
die mit diesem Gerät abgespielt
werden kann.
Überprüfen Sie die Disc
sorgfältig und tauschen Sie sie
gegebenenfalls aus.
31
31
32
Störgeräusche aus dem Disc-Fach.
Die Disc ist verbogen.
❚ iPod/USB
Problem Ursache Abhilfe Seite
Die iPod-Wiedergabe startet nicht,
obwohl ein iPod angeschlossen ist.
Die Wiedergabe des USBGeräts beginnt nicht.
Der angeschlossene iPod ist mit
diesem Gerät nicht kompatibel.
Das USB-Gerät ist nicht
ordnungsgemäß angeschlossen.
Das Format der MP3- oder
WMA-Datei ist mit diesem
Gerät nicht kompatibel.
Das Gerät ist auf eine andere
Audioquelle als „USB“
eingestellt.
Frontblende-Displaymeldungen
Meldung Status
Das Gerät kann nicht auf das USB-Gerät zugreifen.
Access error
Das Gerät kann nicht auf den iPod zugreifen.
Der angeschlossene iPod wird vom Gerät nicht unterstützt.
Tauschen Sie die Disc aus.
Schließen Sie einen iPod an, der
mit diesem Gerät kompatibel ist.
Schließen Sie das USB-Gerät
erneut an.
Tauschen Sie die Datei gegen
eine korrekt aufgezeichnete
Datei aus, die mit diesem Gerät
abgespielt werden kann.
Drücken Sie SOURCE am
Hauptgerät oder auf der
Fernbedienung, um die Audioquelle
zu „USB“ umzuschalten.
—
31
20
31
22
SONSTIGES
Es liegt ein Problem mit dem Signalpfad vom Netzwerk zum Gerät vor.
Unable to play Dieses Gerät kann den gewählten Inhalt nicht wiedergeben.
List updated Die Inhaltsliste des Media Servers wurde aktualisiert.
No content Dieses Gerät findet keine Inhalte.
Not available Die ausgeführte Bedienung ist nicht verfügbar.
Searching… Das Gerät sucht nach Inhalt.
No disc In die Disclade ist keine CD eingesetzt.
Connect error Die Verbindung mit dem iPod oder USB-Gerät ist fehlgeschlagen.
No device Der iPod oder das USB-Gerät ist nicht angeschlossen.
USB overloaded Ein Überstrom fließt durch das USB-Gerät.
Loading… Der angegebene Inhalt wird geladen.
Unknown iPod Der angeschlossene iPod ist nicht kompatibel.
Deutsch
29 De
Page 100

ZUSÄTZLICHE INFORMATIONEN
Dieser Abschnitt umfasst allgemeine Konzepte zu den Themen DLNA (Digital Living Network Alliance) und NAS
(Network Attached Storage).
Internet
Modem
DLNA
SELECT
ENTER
(Digital Media Server)
PC
NAS
(Digital Media Server)
Breitband-
Router
5V
2.1A
Dieses Gerät (CD-N500)
(Digital Media Renderer)
Mobilgerät
(Digital Media Controller)
PURE DIRECTSOURCE
PUSH
RETURN
❚ DLNA
„DLNA“ steht für Digital Living Network Alliance, einer Förderrichtlinie zur Standardisierung der Interoperabilität von
Heimnetzwerkgeräten wie digitaler Unterhaltungselektronik.
DLNA-Komponenten werden in vier Geräteklassen unterteilt: Digital Media Server (DMS), Digital Media Renderer
(DMR), Digital Media Player (DMP) und Digital Media Controller (DMC).
Ein „Digital Media Server (DMS)“ ist ein Gerät zum Speichern und Verteilen digitaler Inhalte wie Musikdateien. PCs
und NAS stellen für das System, das dieses Gerät verwendet, „Digital Media Server (DMS)“ dar.
Ein „Digital Media Controller (DMC)“ ist ein Gerät zum Steuern digitaler Inhalte. Die Spezialanwendung für
Mobilgeräte entspricht dem „Digital Media Controller (DMC)“ für das System, das dieses Gerät verwendet.
Ein „Digital Media Renderer (DMR)“ ist ein Gerät wie dieses, welches Befehle von einem „Digital Media Controller
(DMC)“ erhalten und digitale Inhalte wiedergeben kann.
Ähnlich ist ein „Digital Media Player (DMP)“ ein Gerät, das digitale Inhalte wiedergeben kann, die auf dem „Digital
Media Server (DMS)“ gespeichert sind.
❚ NAS
„NAS“ steht für Network Attached Storage. Indem Sie Ihren NAS und das Heimnetzwerk direkt über ein Netzwerkkabel
verbinden, kann der NAS als Speichergerät genutzt werden, wie z. B. als Festplattenlaufwerk. Wenn der NAS mit DLNA
kompatibel ist, können Sie Musik, Bilder und Filme im gleichen Heimnetzwerk wie der digitale Medienserver freigeben.
30 De
 Loading...