

Page 1

CBX-D5
DIGITAL RECORDING PROCESSOR
Owner's Manual 2
OPERATING MANUAL
Page 2
FCC INFORMATION (U.S.A.)
1. IMPORTANT NOTICE: DO NOT MODIFY THIS UNIT!
This product, when installed as indicated in the instructions contained in this manual, meets FCC requirements. Modifications not expressly approved by
Yamaha may void your authority, granted by the FCC, to use the product.
2. IMPORTANT: When connecting this product to accessories and/or another product use only high quality shielded cables. Cable/s supplied with this product
MUST be used. Follow all installation instructions. Failure to follow instructions could void your FCC authorization to use this product in the USA.
3. NOTE: This product has been tested and found to comply with the requirements listed in FCC Regulations, Part 15 for Class “B” digital devices. Compliance
with these requirements provides a reasonable level of assurance that your use of this product in a residential environment will not result in harmful interference with other electronic devices. This equipment generates/uses radio frequencies and, if not installed and used according to the instructions found in the
users manual, may cause interference harmful to the operation of other electronic devices. Compliance with FCC regulations does not guarantee that interference will not occur in all installations. If this product is found to be the source of interference, which can be determined by turning the unit “OFF” and “ON”,
please try to eliminate the problem by using one of the following measures:
Relocate either this product or the device that is being affected by the interference.
Utilize power outlets that are on different branch (circuit breaker or fuse) circuits or install AC line filter/s.
In the case of radio or TV interference, relocate/reorient the antenna. If the antenna lead-in is 300 ohm ribbon lead, change the lead-in to co-axial type cable.
If these corrective measures do not produce satisfactory results, please contact the local retailer authorized to distribute this type of product. If you can not
locate the appropriate retailer, please contact Yamaha Corporation of America, Electronic Service Division, 6600 Orangethorpe Ave, Buena Park, CA 90620
* This applies only to products distributed by YAMAHA CORPORATION OF AMERICA
Dette apparat overholder det gaeldende EF-direktiv vedrørende
radiostøj.
Cet appareil est conforme aux prescriptions de la directive communautaire 87/308/CEE.
Diese Geräte entsprechen der EG-Richtlinie 82/499/EWG und/
oder 87/308/EWG.
This product complies with the radio frequency interference
requirements of the Council Directive 82/499/EEC and/or 87/
308/EEC.
Questo apparecchio è conforme al D.M.13 aprile 1989 (Direttiva
CEE/87/308) sulla soppressione dei radiodisturbi.
Este producto está de acuerdo con los requisitos sobre interferencias de radio frequencia fijados por el Consejo Directivo 87/308/
CEE.
YAMAHA CORPORATION
IMPORTANT NOTICE FOR THE UNITED KINGDOM
Connecting the Plug and Cord
IMPORTANT: The wires in this mains lead are coloured in accordance
with the following code:
GREEN-AND-YELLOW : EARTH
BLUE : NEUTRAL
BROWN : LIVE
As the colours of the wires in the mains lead of this apparatus may not
correspond with the coloured markings identifying the terminals in your
plug, proceed as follows:
The wire which is coloured GREEN and YELLOW must be connected to
the terminal in the plug which is marked by the letter E or by the safety
earth symbol or coloured GREEN and YELLOW.
The wire which is coloured BLUE must be connected to the terminal
which is marked with the letter N or coloured BLACK.
The wire which is coloured BROWN must be connected to the terminal
which is marked with the letter L or coloured RED.
Page 3

SPECIAL MESSAGE SECTION
R
S
D
PRODUCT SAFETY MARKINGS: Yamaha electronic products may have either labels similar to the graphics shown
below or molded/stamped facsimiles of these graphics on the
enclosure. The explanation of these graphics appears on this
page. Please observe all cautions indicated on this page and
those indicated in the safety instruction section.
CAUTION: TO REDUCE THE RISK OF ELEC
TRIC SHOCK, DO NOT REMOVE COVER (O
BACK). NO USER-SERVICEABLE PART
INSIDE. REFER SERVICING TO QUALIFIE
SERVICE PERSONNEL.
● Explanation of Graphical Symbols
The exclamation point within the equilateral triangle is intended to alert the user to
the presence of important operating and
maintenance (servicing) instructions in the
literature accompanying the product.
The lightning flash with arrowhead symbol
within the equilateral triangle is intended to
alert the user to the presence of uninsulated
“dangerous voltage” within the product’s
enclosure that may be of sufficient magnitude to constitute a risk of electrical shock.
IMPORTANT NOTICE: All Yamaha electronic products are
tested and approved by an independent safety testing laboratory in order that you may be sure that when it is properly
installed and used in its normal and customary manner, all
foreseeable risks have been eliminated. DO NOT modify this
unit or commission others to do so unless specifically authorized by Yamaha. Product performance and/or safety standards may be diminished. Claims filed under the expressed
warranty may be denied if the unit is/has been modified.
Implied warranties may also be affected.
SPECIFICATIONS SUBJECT TO CHANGE: The information contained in this manual is believed to be correct at the
time of printing. However, Yamaha reserves the right to
change or modify any of the specifications without notice or
obligation to update existing units.
ENVIRONMENTAL ISSUES: Yamaha strives to produce
products that are both user safe and environmentally friendly.
We sincerely believe that our products and the production
methods used to produce them, meet these goals. In keeping
with both the letter and the spirit of the law, we want you to
be aware of the following:
Battery Notice: This product MAY contain a small nonrechargeable battery which (if applicable) is soldered in place.
The average life span of this type of battery is approximately
five years. When replacement becomes neccessary, contact a
qualified service representative to perform the replacement.
Warning: Do not attempt to recharge, disassemble, or incinerate this type of battery. Keep all batteries away from children.
Dispose of used batteries promptly and as regulated by applicable laws. Note: In some areas, the servicer is required by
law to return the defective parts. However, you do have the
option of having the servicer dispose of these parts for you.
Disposal Notice: Should this product become damaged
beyond repair, or for some reason its useful life is considered
to be at an end, please observe all local, state, and federal regulations that relate to the disposal of products that contain
lead, batteries, plastics, etc.
NOTICE: Service charges incurred due to lack of knowledge
relating to how a function or effect works (when the unit is
operating as designed) are not covered by the manufacturer’s
warranty, and are therefore the owners responsibility. Please
study this manual carefully and consult your dealer before
requesting service.
NAME PLATE LOCATION: The graphic below indicates the
location of the name plate. The model number, serial number,
power requirements, etc., are located on this plate. You
should record the model number, serial number, and the date
of purchase in the spaces provided below and retain this manual as a permanent record of your purchase.
Model
Serial No.
Purchase Date
92-469 1
Page 4

IMPORTANT SAFETY INSTRUCTIONS
INFORMATION RELATING TO PERSONAL INJURY, ELECTRICAL SHOCK,
AND FIRE HAZARD POSSIBILITIES HAS BEEN INCLUDED IN THIS LIST.
WARNING — When using any electrical or electronic prod-
uct, basic precautions should always be followed. These precautions include, but are not limited to, the following:
Read all Safety Instructions, Installation Instructions,
1.
Special Message Section items, and any Assembly
Instructions found in this manual BEFORE making any connections, including connection to the main supply.
Main Power Supply Verification: Yamaha products are
2.
manufactured specifically for the supply voltage in the
area where they are to be sold. If you should move, or if any
doubt exists about the supply voltage in your area, please
contact your dealer for supply voltage verification and (if
applicable) instructions. The required supply voltage is
printed on the name plate. For name plate location, please
refer to the graphic found in the Special Message Section of
this manual.
This product may be equipped with a polarized plug
3.
(one blade wider than the other). If you are unable to
insert the plug into the outlet, turn the plug over and try again.
If the problem persists, contact an electrician to have the
obsolete outlet replaced. DO NOT defeat the safety purpose
of the plug.
Some electronic products utilize external power
4.
supplies or adapters. DO NOT connect this type of
product to any power supply or adapter other than one
described in the owners manual, on the name plate, or specifically recommended by Yamaha.
WARNING: Do not place this product or any other
5.
objects on the power cord or place it in a position where
anyone could walk on, trip over, or roll anything over power
or connecting cords of any kind. The use of an extension cord
is not recommended! If you must use an extension cord, the
minimum wire size for a 25’ cord (or less) is 18 AWG.
NOTE: The smaller the AWG number, the larger the current
handling capacity. For longer extension cords, consult a local
electrician.
Ventilation: Electronic products, unless specifically
6.
designed for enclosed installations, should be placed in
locations that do not interfere with proper ventilation. If
instructions for enclosed installations are not provided, it
must be assumed that unobstructed ventilation is required.
Temperature considerations: Electronic products
7.
should be installed in locations that do not significantly
contribute to their operating temperature. Placement of this
product close to heat sources such as; radiators, heat registers
and other devices that produce heat should be avoided.
This product was NOT designed for use in wet/damp
8.
locations and should not be used near water or exposed
to rain. Examples of wet/damp locations are; near a swimming pool, spa, tub, sink, or wet basement.
This product should be used only with the components
9.
supplied or; a cart, rack, or stand that is recommended
by the manufacturer. If a cart, rack, or stand is used, please
observe all safety markings and instructions that accompany
the accessory product.
The power supply cord (plug) should be disconnected
10.
from the outlet when electronic products are to be left
unused for extended periods of time. Cords should also be
disconnected when there is a high probability of lightening
and/or electrical storm activity.
Care should be taken that objects do not fall and liquids
11.
are not spilled into the enclosure through any openings
that may exist.
Electrical/electronic products should be serviced by a
12.
qualified service person when:
a. The power supply cord has been damaged; or
b. Objects have fallen, been inserted, or liquids have
been spilled into the enclosure through openings; or
c. The product has been exposed to rain; or
d. The product does not operate, exhibits a marked
change in performance; or
e. The product has been dropped, or the enclosure of
the product has been damaged.
Do not attempt to service this product beyond that
13.
described in the user-maintenance instructions. All
other servicing should be referred to qualified service personnel.
This product, either alone or in combination with an
14.
amplifier and headphones or speaker/s, may be capable
of producing sound levels that could cause permanent hearing
loss. DO NOT operate for a long period of time at a high volume level or at a level that is uncomfortable. If you experience any hearing loss or ringing in the ears, you should
consult an audiologist. IMPORTANT: The louder the sound,
the shorter the time period before damage occurs.
Some Yamaha products may have benches and/or
15.
accessory mounting fixtures that are either supplied as a
part of the product or as optional accessories. Some of these
items are designed to be dealer assembled or installed. Please
make sure that benches are stable and any optional fixtures
(where applicable) are well secured BEFORE using. Benches
supplied by Yamaha are designed for seating only. No other
uses are recommended.
This information on safety is provided to comply with U.S.A. laws, but should be observed by users in all countiries.
92-469 2
PLEASE KEEP THIS MANUAL
Page 5
Page 6

1 Chapter : 1 Chapter :
Table of Contents
1
Introduction
Welcome to the CBX-D5...............................1
CBX-D5 features............................................1
Operating manual organization......................1
Important Notice............................................1
Unpacking .....................................................2
Installation......................................................2
Trademarks.....................................................2
Powering up a CBX-D5 System ....................2
2
CBX-D5 Terminology
3
What is the CBX-D5?
Inside the CBX-D5.........................................6
The CBX-D5 in a MIDI recording system.....7
4
Controls & Connections
Front panel .....................................................8
Rear panel ....................................................10
5
Connecting Hard Disk Drives
What type of hard disk?...............................13
Hard disk size...............................................13
Choosing a hard disk....................................14
SCSI ............................................................14
SCSI cables..................................................15
Computer connection...................................15
SCSI ID setting ............................................16
SCSI termination..........................................17
..............................................1
..........................3
...........................5
...................8
......13
8
Playback
Playback frequency (PB FREQ) ................. 23
Output level meters ..................................... 23
Sound file playback compatibility............... 23
Sound file regions........................................ 24
9
Converting the Sampling
.................................................. 23
Frequency & Digital Audio
Format in Real Time
10
Inputs & Outputs Explained
ANALOG IN............................................... 26
ANALOG OUT........................................... 26
AES/EBU IN 1/2......................................... 27
AES/EBU OUT 1/2, 3/4.............................. 27
CD/DAT IN................................................. 27
CD/DAT OUT............................................. 27
Y2 IN........................................................... 28
Y2 OUT....................................................... 28
WORD CLK IN/OUT................................. 28
11
TO HOST connection
MIDI ........................................................... 30
Mac ............................................................. 31
PC-1 ............................................................ 32
PC-2 ............................................................ 32
TO HOST computer connecting cables ...... 33
12
Glossary
............................................... 34
...................... 25
.................... 30
..... 26
6
Working with Hard Disks
Formatting....................................................18
Sound file management................................18
Sound file backup.........................................18
Computer utilities.........................................18
Hard disk fragmentation...............................19
Hard disk partitioning ..................................19
7
Recording
Sampling frequency (REC FREQ)...............20
Digital input levels.......................................21
Setting the analog input level.......................21
Input level meters.........................................21
Headphone monitoring.................................21
Digital audio data containing SCMS ...........22
Digital audio data with emphasis.................22
20-bit digital audio.......................................22
................................................20
...............18
13
Recording setup table
14
CBX-D5 Specifications
Index
Appendix
............................................................... 38
.............................................. Add-1
.................. 36
................ 37
Preset Effects ................................. Add-1
DSP/DEQ/DMIX Block Diagram.. Add-2
Preset effects parameter values ..... Add-3
Data-Value Assign Table ............... Add-5
Effect parameters............................ Add-8
MIDI Parameter............................ Add-24
MIDI Data Format........................ Add-28
MIDI Implementation chart.......... Add-32
Page 7

1 Introduction
Welcome to the CBX-D5
Thank you for purchasing a CBX-D5 Digital Recording Processor. Connecting the
CBX-D5 to a controlling computer with supporting software and an external hard disk will
provide up to four channels of CD quality audio recording, processing, and playback.
CBX-D5 features
• 4-channel system: 2-channel simultaneous recording, 4-channel playback.
• A/D conversion: 16-bit linear ∆ Σ modulation.
• D/A conversion: 18-bit with 8-times oversampling digital filter.
• Multi-band parametric DEQ for each channel.
• DSP provides 82 different reverb and modulation type effects.
• 4-input, 4-bus, 2-send digital mixer.
• Sampling frequencies: 48kHz, 44.1kHz, 32kHz, (22.05kHz analog input only).
• Analog inputs and outputs use professional style XLR type connectors.
• Digital I/O includes AES/EBU, CD/DAT & Y2 Yamaha format.
• 10 minutes of stereo audio requires approximately 100MB hard disk (fs=44.1kHz).
• Total recording time can be increased by adding more SCSI hard disks.
• All audio data processing is carried out within the CBX-D5, so much less is demanded
of the computer, eliminating data bottlenecks and slow screen redraws.
• Host computer connection allows direct connection to a computer without a MIDI
interface.
Introduction 1Introduction 1Introduction 1
Operating manual organization
The CBX-D5 is supplied with three manuals: this Operating Manual, the System Setup
Guide, and a Test Program manual.
This Operating Manual contains full details about the CBX-D5 Digital Recording
Processor: what it is, how it works, and how to use it. It also contains an index that will
allow you to locate information quickly, and also a glossary of CBX-D5 terminology.
The System Setup Guide describes how to set up a recording system using the current
supporting computers and music programs. From time to time this guide will be updated
using single sheet supplements. Please see your Yamaha dealer for the latest supplement.
The Test Program manual should be used in conjunction with the Hardwar e Test Program
Disk for testing the CBX-D5 hardware.
Important Notice
YAMAHA AND THE SOFTWARE COMPANIES THAT PRODUCE CBX-D5
CONTROLLING SOFTWARE CANNOT BE HELD RESPONSIBLE FOR ANY LOSS
OF DATA OR FOR ANY DIRECT, INDIRECT, SPECIAL INCIDENTAL,
CONSEQUENTIAL OR OTHER D AMAGES SUFFERED BY THE USER OR O THERS
RESULTING FROM THE USE OR PURCHASE OF THE CBX-D5, ITS
DOCUMENTATION, OR SUPPORTING SOFTWARE.
Page 8
2 Chapter 1 : Introduction2 Chapter 1 : Introduction2 Chapter 1 : Introduction
Unpacking
The CBX-D5 packaging should contain the following items.
1 CBX-D5 Serial No:
1 Power cable
1 8-pin mini DIN cable
1 MIDI cable
1 SCSI cable (50 to 50 Amphenol)
1 SCSI terminator
1 Rack-mount kit (L & R set)
1
1
1 This
1
1 User Registration Card
Store the packaging materials for future use.
Installation
The cosmetic appearance of the CBX-D5 has been designed to match typical computer
hardware. Its “footprint” size matches that of many computers so that it can easily be
installed with your other computer equipment.
Hardware Test Program Disk
Test Program Manual
Operating Manual
System Setup Guide
The CBX-D5 should be placed on a flat, stable surface.
The CBX-D5 can also be rack mounted using the supplied rack-mount kit. When installed
in the rack-mount kit the CBX-D5 requires 3U of rack space.
Trademarks
IBM, PC-AT, PS/1, and PS/2 are registered trademarks of International Business
Machines Corporation.
Apple
Atari
Mark of the Unicorn
and Macintosh are registered trademarks of Apple Computer, Inc.
, ST, TT, and STE are registered trademarks of Atari Corporation.
is a registered trademark of Mark of the Unicorn, Inc.
All other trademarks are the property of their respective holders.
Powering up a CBX-D5 System
Some computer systems are a little bit fussy about which devices are switched on first,
especially when a SCSI daisy chain is introduced into the system. As a good rule of
thumb, switch on all connected SCSI devices first, then the computer.
NOTE: While using your CBX-D5 computer music system, do not switch off or
disconnect any device connected in the SCSI chain. Doing so will probably
lead to a system crash and you could loose valuable data.
Page 9

2 CBX-D5 Terminology
SCSI
Pronounced scuzzy , the Small Computer System Interface is a connection format used for
connecting peripheral devices such as hard disks, printers, scanners, etc., to a computer.
Up to eight SCSI devices can be connected together in a daisy chain including the
controlling computer. Each device is given its own identity number from 0 to 7, this is
called the SCSI ID number.
The CBX-D5, a computer, and a hard disk are all connected as part of a SCSI daisy chain.
The SCSI connection carries audio data between the CBX-D5 and hard disk for recording
and playback, and also control data from the computer to the CBX-D5. The controlling
computer can also access the hard disk to perform basic sound file copy , delete, and backup
type functions. With the necessary software, digital audio data could be transferred
directly to the computer for on-screen waveform editing, etc.
The SCSI standard is quite a robust format, although, some care must be taken when
connecting and setting up SCSI devices. For full details about connecting SCSI hard disk
drives to the CBX-D5 see “Connecting Hard Disk Dri v es” on page13.
Sound files
Just like other types of computer data, digital audio data is stored in files – sound files.
When recording starts, a sound file is created on the hard disk. This sound file can be given
a name, copied, and deleted just like any other computer file.
CBX-D5 Terminology 3CBX-D5 Terminology 3CBX-D5 Terminology 3
AES/EBU format
AES/EBU is a digital interface format established by the AES (Audio Engineering
Society) and EBU (European Broadcasting Union). It is used to transfer digital audio data
between professional digital audio equipment. Usually , two channels of digital audio (left
& right) are carried in one XLR type connection.
Although similar to the CD/DAT format, it is primarily intended for professional usage.
AES/EBU format connections can be found on most professional digital audio equipment
including hard disk recorders, digital mixers, professional DAT recorders, and many
digital VTRs.
CD/DAT format
Similar to the professional AES/EBU format, CD/DAT, or S/PDIF (Son y/Philips Digital
Interface Format) as it is otherwise known, is a digital interface format that is used to
transfer digital audio data between consumer type digital audio equipment such as CD
players, consumer DAT recorders, and the new DCC recorders.
Like the AES/EBU format, two channels of digital audio (left & right) are carried in one
connection, usually a phono/RCA jack type connection. Some MIDI samplers are fitted
with a CD/DAT connection so that sample data can be transferred directly to a DAT
recorder for storage.
Y2 format
Y2 Yamaha format is a digital interface format developed by Yamaha that is used to
transfer digital audio data between Yamaha’s professional digital audio equipment. Two
channels of digital audio (left & right) are carried in one connection, usually an 8-pin DIN
type connection.
Y amaha’s professional digital audio products usually include the AES/EBU and CD/DAT
type formats as well as Y2, and the Y2 format can also be found on some other
manufacturers’ digital audio products. Yamaha’s professional digital audio products that
use Y2 include the DMR8 Digital Mixer/Recorder, DMC1000 Digital Mixing Console,
DRU8 Digital Recorder, and the DMP series of Digital Mixers.
Page 10
4 Chapter 2 : CBX-D5 Terminology4 Chapter 2 : CBX-D5 Terminology4 Chapter 2 : CBX-D5 Terminology
Sampling frequency (REC FREQ)
During the analog to digital conversion process, the level of the analog audio signal is
sampled (measured) many times per second. Each of these sample measurements is then
stored as a 16-bit binary value. For digital to analog conversion (playback), these 16-bit
binary values are used to reconstruct the analog audio signal. The rate at which these
sample measurements take place is called the sampling frequency and you may already
know that the sampling frequency used by CD players is 44.1kHz.
The CBX-D5 can record audio using any one of four sampling frequencies: 48kHz,
44.1kHz, 32kHz, and 22.05kHz. The audio quality (bandwidth) of a digital system is
directly affected by the sampling frequency. Essentially, the audio bandwidth will be
roughly half the chosen sampling frequency . See “Sampling frequenc y (REC FREQ)” on
page 20 for more details.
Word clock
When a number of digital audio devices are connected together and data is digitally
transferred between them, it is essential that the data processing circuits of all devices are
synchronized. To achieve this, one device operates as a word clock master and all other
devices operate as word clock slav es. The frequency of the word clock corresponds
directly to the digital audio data’s sampling frequenc y.
If you only connect two digital audio devices, say the CBX-D5 to a DAT recorder, word
clock setup is quite straight forward and no word clock connections will be required.
Howev er, when three devices are connected, serious thought will need to be given as to
which device is word clock master and how to mak e the w ord clock connections. See
“WORD CLK IN/OUT” on page 28 for more details.
NOTE:
To Host
An 8-pin mini DIN connector that allows direct connection to a computer that is running
CBX-D5 supporting software. This can be used when your computer does not have a
MIDI interface, i.e. MIDI input and output connections. See “TO HOST connection” on
page 30 for more details.
NOTE:
W ord clock signals should not be confused with other synchronizing signals
such as SMPTE timecode and MTC (MIDI Timecode). Although both may
be used in a digital audio system, word clocks are for synchronizing digital
audio data processing circuits such as CPUs, D/A, A/D converters, etc., while
SMPTE and MTC timecodes are for synchronizing audio and video tape
machines, MIDI sequencers, etc., relative to time – hours, minutes, seconds,
and frames.
Not all CBX-D5 supporting music software can use this type of connection,
so please consult your Yamaha dealer before making a purchase.
Page 11

3 What is the CBX-D5?
The CBX-D5 is a Digital Recording Processor that, when connected to a controlling
computer with supporting software and an external hard disk, provides up to four channels
of CD quality audio recording, processing, and playback.
Computer based
The CBX-D5 is controlled by a computer that is running CBX-D5 supporting software.
All audio data processing takes place inside the CBX-D5, so there is very little demand on
the controlling computer. F or this reason the CBX-D5 can be used with some of the less
powerful, less expensi v e computers such as the Apple Macintosh SE/30, Classic II, and
LC; and the Atari ST/STE. It also leaves the computer free to get on with other jobs such
as processing MIDI sequence data and screen updates.
The CBX-D5, computer, and hard disk are all connected as part of a SCSI daisy chain. The
SCSI connection carries audio data between the CBX-D5 and hard disk for recording and
playback, and also control data from the computer to the CBX-D5. A MIDI connection
between the CBX-D5 and computer carries continuous controller information for
real-time volume, EQ, and pan control of the CBX-D5’s digital mixer.
Four-channel system
The CBX-D5 is a 4-channel system, i.e., 2-channel simultaneous recording and
4-channel playback. Channels can be recorded while other channels playback.
What is the CBX-D5? 5What is the CBX-D5? 5What is the CBX-D5? 5
The CBX-D5 needs about 100Mbytes of hard disk space to record 10 minutes of stereo
digital audio (fs = 44.1kHz). The available recording time can be increased by simply
adding more, or larger hard disk drives to the SCSI daisy chain.
CD quality & editing
The CBX-D5 records audio data at a 16-bit resolution, and with 44.1kHz and 48kHz
sampling frequencies it provides all the sound quality benefits of the Compact Disc format
such as faithful reproduction, low noise, minimal distortion, etc.
Analog input and output signals are processed by 16-bit linear ∆ Σ modulation A/D and
18-bit 8-times oversampling D/A con verters. Analog connections use balanced XLR type
connectors. Digital I/O consists of AES/EBU, CD/DAT, and Y2. Allowing digital audio
data transfer between the CBX-D5 and other digital audio equipment.
As well as the A/D, D/A converters, the CBX-D5 also contains a 4-input, 4-bus, 2-send
digital mixer; a DSP for digital effects; DEQ for real-time EQ control; and sampling
frequency conv erters that allo w recording and playback at differing sampling frequencies.
As well as the sound quality , tw o other benefits of recording with a CBX-D5 system as
opposed to analog tape are, the ability to nondestructively edit recordings and being able
to move audio data relativ e to time, a feature often referred to as audio time slip.
For a listing of some other CBX-D5 features, see “CBX-D5 features” on page 1.
The future
The CBX-D5 is a software dependent device, so with future supporting software it may be
possible to use the CBX-D5 for digital mixing with digital EQ and effects, sampling,
2-track mastering, waveform editing, and multimedia type applications.
Page 12
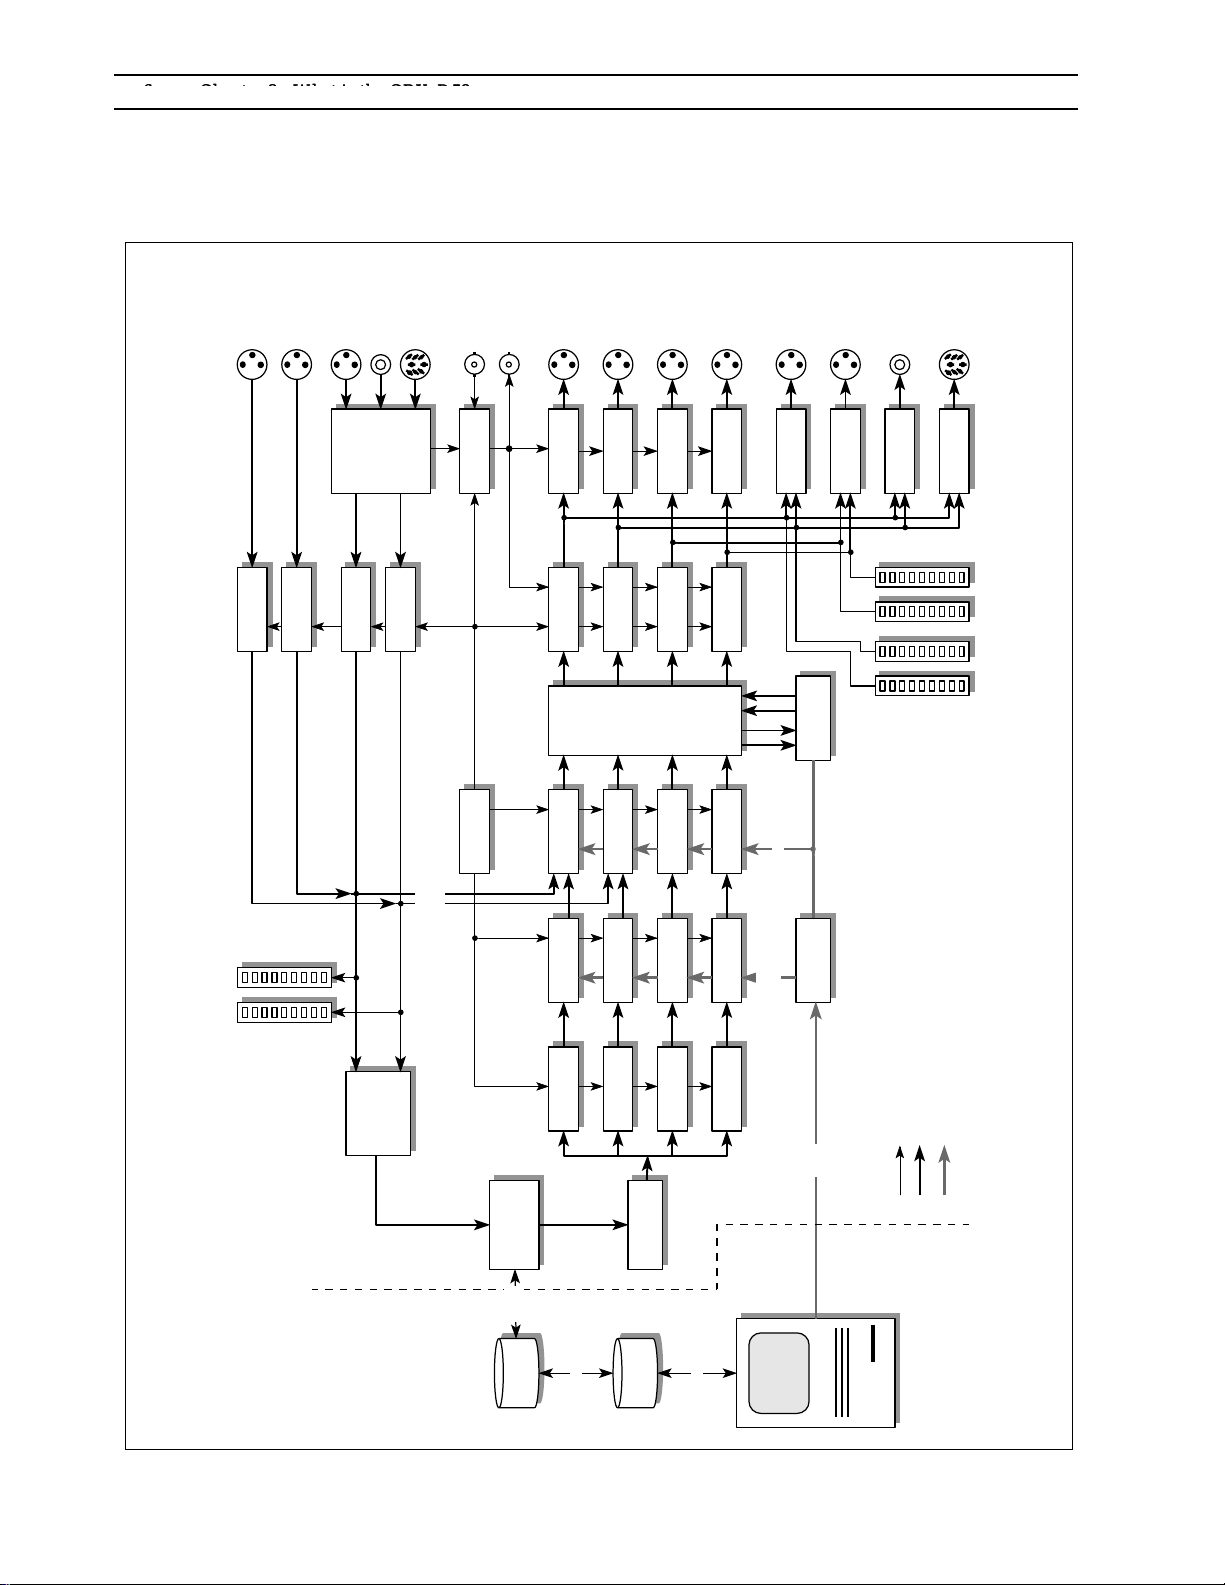
6 Chapter 3 : What is the CBX-D5?6 Chapter 3 : What is the CBX-D5?6 Chapter 3 : What is the CBX-D5?
S
Inside the CBX-D5
The following block diagram shows how the CBX-D5 processes audio data as it travels
from input to output and to the external SCSI hard disks.
AES/EBU
IN 1/2
CD/DAT
IN 1/2
ANALOG IN 1
ANALOG IN 2
Y2 IN 1/2
WORD
CLK IN
WORD
CLK OUT
ANALOG
OUT 1
ANALOG
OUT 2
ANALOG
OUT 3
ANALOG
OUT 4
AES/EBU
OUT 1/2
AES/EBU
OUT 3/4
CD/DAT
OUT 1/2
Y2 OUT 1/2
A/D
CONVERTER
A/D
CONVERTER
DIGITAL
INTERFACE
Fs
CONVERTER
Fs
CONVERTER
INPUT MONITOR
PLAYBACK
WORDCLOCK
RECORD
WORDCLOCK
SIGNAL PATH
D/A
CONVERTER
Fs
CONVERTER
DIGITAL
DEQ
PLAY
CONTROL
D/A
Fs
MIXER
DEQPLAY
D/A
CONVERTER
Fs
CONVERTER
4 INPUT
DEQPLAY
CONTROL
CONVERTER
CONVERTER
4 BUS
2 SEND
CONTROL
D/A
CONVERTER
Fs
CONVERTER
DEQPLAY
CONTROL
AES/EBU
INTERFACE
DSP
EFFECTS
EQ
CONTROLLER
SYNC
VOLUME, PITCH
AES/EBU
INTERFACE
S/PDIF
INTERFACE
OUTPUT
LEVEL
Y2
INTERFACE
METERS
MIDI IN, or
TO HOST
Fs
Fs
Fs
INPUT LEVEL
METER
CONVERTER
SCSI
CONVERTER
(RAM)
PLAY BUFFER
HARD
DISK 1
(RAM)
BUFFER
RECORD
SCSI
CBX-D5
CONTROLLER
SCSI
HARD
DISK 2
Fs
CONVERTER
SCSI
CONVERTER
MIDI
MIDI OUT, or
Serial port
WORDCLOCK
AUDIO
MIDI
HOST COMPUTER
Fs = Sampling Frequency
Page 13

The CBX-D5 in a MIDI recording system 7The CBX-D5 in a MIDI recording system 7The CBX-D5 in a MIDI recording system 7
The CBX-D5 in a MIDI recording system
The following diagram shows ho w the CBX-D5 can be inte grated into a MIDI sequencer
based music production system.
MONITOR AMP
MIDI
MULTI-EFFECTOR
MIDI TONE
GENERATOR
MIDI DRUM MODULE
MIDI SOUND
SAMPLER
MIDI
OUT
YAMAHA
CBX-D5
DIGITAL
TRANSFER
GROUP
OUT x2
MIDI IN
MIDI OUT
LINE IN x4
TO HOST
SCSI
HARD
DISK
MASTER
RECORDER
SERIAL PORT
SCSI
CD/DAT
MIDI CABLE
AUDIO CABLE
HOST CABLE
Page 14

8 Chapter 4 : Controls & Connections8 Chapter 4 : Controls & Connections8 Chapter 4 : Controls & Connections
4 Controls & Connections
Front panel
1 POWER switch
Used to turn the power on and off. Press once to switch on, press again to switch off.
2 SOURCE indicators
Indicates the input selected for recording: AES/EBU, Y2, CD/DAT, or ANALOG. The
source input selection is made by the controlling software.
3 REC FREQ indicators
Indicates the selected sampling frequency for recording: 48kHz, 44.1kHz, 32kHz, and
22.05kHz (analog inputs only). The sampling frequency selection is made by the
controlling software.
4 PB FREQ indicators
Indicates the sampling frequency of the digital audio data that is being output by the
CBX-D5: 48kHz, or 44.1kHz. The playback sampling frequency setting is made by the
controlling software.
When the CBX-D5 is used with an external word clock, the digital outputs will operate at
the same frequency as the external word clock and that frequency will not be indicated by
the “PB FREQ” indicators.
Page 15

Front panel 9Front panel 9Front panel 9
5 INPUT LEVEL meters
T wo 12-se gment LED bargraphs indicate the le vel of the incoming digital audio when the
input source is set to AES/EBU, CD/DAT, or Y2 (not af fected by the level controls), or the
level of the analog input signals when the input source is set to ANALOG (controlled by
the “ANALOG IN” level controls).
NOTE:
Unlike peak meters on analog equipment that light up approximately 3 ~ 6dB
before signal clipping, CLIP LEDs on digital equipment light up when the
signal has actually clipped. Digital audio signal clipping normally produces
unpleasant distortion, pops, and clicks, so care must be taken when setting
the recording level for analog input signals. See “Recording” on page 20 for
more details.
6 OUTPUT LEVEL meters
Four 12-segment LED bargraphs that indicate the output level of channels 1 ~ 4. The
“CLIP” LED indicates an output level of +17dBm.
NOTE:
Just like the input level meters, lighting an output le vel meter’s “CLIP” LED
should be avoided to pre vent signal distortion. This situation may occur when
two or more CBX-D5 audio channels are mixed, or if excessive EQ is
applied. The CBX-D5 does not have any output level controls, the output
level is set by the controlling software.
7 ANALOG IN LEVEL control
Independent level controls for analog input channels 1 and 2. As well as independent le vel
control, these controls can also be used to balance the left and right channels of a stereo
source connected to the analog inputs.
NOTE:
These controls have no effect on the AES/EBU, CD/DAT, and Y2 digital
inputs and outputs.
8 PHONES VOL
Adjusts the volume level of the headphones.
9 PHONES connection
A stereo 6.35 mm (1/4 inch) phone jack used for connecting a pair of stereo headphones.
All four CBX-D5 audio channels can be monitored – channels 1 and 3 appear in the left
speaker and channels 2 and 4 in the right.
Page 16

10 Chapter 4 : Controls & Connections10 Chapter 4 : Controls & Connections10 Chapter 4 : Controls & Connections
Rear panel
The explanations below are only brief introductions to the CBX-D5’s rear panel
connections. For full details about the inputs and outputs, see “Inputs & Outputs
Explained” on page 26.
1 ANALOG IN 1&2
A pair of female XLR 3-31 type connectors used for inputting analog audio signals. These
are balanced inputs with a nominal input level of +4dBm and a maximum input le v el of
+22dBm. These could be connected to the outputs of a mixer, synthesizer , drum machine,
etc. Microphones, guitars, and equipment with an output level less than –20dBm must first
be connected to a preamplifier, then to the CBX-D5.
NOTE:
When the Analog inputs are used unbalanced, the maximum input level is
reduced to +16dBm.
2 ANALOG OUT 1 ~ 4
Four male XLR 3-32 type connectors used for outputting channels 1 ~ 4 as analog audio
signals. These are balanced outputs with a nominal output level of 0dBm and a maximum
output level of +17dBm. These could be connected to the inputs of a mixer , amplifier , tape
recorder, or DAT recorder.
3 AES/EBU IN 1/2
A female XLR 3-31 type connector for inputting AES/EBU format digital audio. Only one
input connection is required for channels 1 and 2 because the AES/EBU format carries two
signals in one connection. These could be used when recording digital audio data from
professional digital audio equipment such as another hard disk recorder, a digital mixer,
digital recorder, or digital VTR.
Page 17

Rear panel 11Rear panel 11Rear panel 11
4 AES/EBU OUT 1/2 & 3/4
Two male XLR 3-32 type connectors for outputting AES/EBU format digital audio.
Channels 1 and 2 are output via “OUT 1/2”, and channels 3 and 4 via “OUT 3/4”. These
could be used to transfer digital audio data from the CBX-D5 to professional digital audio
equipment.
5 CD/DAT IN 1/2
A Phono/RCA jack for inputting CD/DAT format digital audio. Channels 1 and 2 are
carried in the same connection. This connection could be connected to the digital output
of a CD player or DAT recorder and allows digital audio recording without multiple D/A,
A/D audio data conversions. Some MIDI samplers are fitted with this type of connection.
In this case your sound samples could be recorded directly to your CBX-D5 system.
6 CD/DAT OUT 1/2
A Phono/RCA jack for outputting CD/DAT format digital audio. Channels 1 and 2 are
carried in the same connection. This could be connected to the digital input of a DAT
recorder or DCC recorder, and allo ws digital audio recording without multiple D/A, A/D
audio data conversions.
NOTE:
It is widely known that the weakest links in a digital audio system are the A/D
and D/A converters. For once the audio has been converted into a digital
form, it is immune from all the problems usually associated with analog
equipment such as distortions and noise. Although the effects of multiple
conversions will be hard to spot, e ven for the best trained ears, it makes sense
that once converted, we try and k eep the audio in a digital form by using these
digital I/O connections wherever possible.
7 Y2 IN 1/2
An 8-pin DIN socket for inputting Y2 Y amaha format digital audio. As with the AES/EBU
and CD/DAT formats, two audio channels are carried in the same connection. This could
be connected to one of Yamaha’s digital audio products such as a DMR8 Digital
Mixer/Recorder, DMC1000 Digital Mixing Console, DRU8 Digital Recorder, SPX1000
Effect Processor , or the DMP series of Digital Mix ers.
8 Y2 OUT 1/2
An 8-pin DIN socket for outputting Y2 Yamaha format digital audio. This could be used
to transfer digital audio data from the CBX-D5 to one of the Yamaha professional digital
audio products listed above. You might not own one of these products yourself, but you
may need to transfer some of your audio data to a recording studio that does.
9 WORD CLK IN/OUT
Two BNC type connectors for inputting and outputting word clock signals. A common
word clock signal is used to synchronize data processing circuits when a number of digital
audio devices are connected together . F or a full description of ho w and when to use these
connections, see “WORD CLK IN/OUT” on page 28.
Page 18

12 Chapter 4 : Controls & Connections12 Chapter 4 : Controls & Connections12 Chapter 4 : Controls & Connections
0 MIDI IN
The CBX-D5 receives MIDI control data from the computer via this connection. To
prevent the CBX-D5’s control data being delayed by other MIDI devices, the CBX-D5
should be the first device connected to your computer . Other MIDI devices should then be
connected to the CBX-D5’s MIDI THRU connection.
If your computer’s MIDI interf ace has tw o or three MIDI outputs, dedicate one for use
with the CBX-D5.
NOTE:
Although not usually a problem on a small MIDI system, when more than
three MIDI devices are daisy chained together using MIDI IN and THRU
connections, MIDI data can sometimes be delayed, especially if you transmit
a lot of continuous controller data such as pitch bend or modulation wheel. If
MIDI delays do become a problem, use a MIDI THRU Box to distribute the
MIDI signal to each MIDI device.
A MIDI OUT
When the CBX-D5 is being used as a MIDI interface, that is, a direct connection to a
computer via the To Host connection, MIDI data from the computer is output to other
MIDI devices from this connection. Also used for MIDI bulk dump.
NOTE:
The operation of the MIDI IN and MIDI OUT connections varies depending
on the position of the CBX-D5’s Host select switch. See “TO HOST
connection” on page 30 for full details.
B MIDI THRU
MIDI data appearing at the MIDI IN connection is buffered, then output from this
connection. In other words, all MIDI data appearing at the MIDI IN connector is output to
the MIDI THRU connector unaf fected by the CBX-D5.
C TO HOST connector
An 8-pin mini DIN connector that allows direct connection to a computer that is running
CBX-D5 supporting software. This can be used when your computer does not have a
MIDI interface, i.e., MIDI input and output connections. See “TO HOST connection” on
page 30 for more details.
D TO HOST select switch
This switch setting depends on the type of computer connected to the “TO HOST”
connector. See “TO HOST connection” on page 30 for full details.
E SCSI connectors
T wo 50-way Amphenol type connectors used to connect the CBX-D5 into the SCSI daisy
chain.
F SCSI ID selector
A thumb wheel type switch used to set the SCSI ID number of the CBX-D5. See “SCSI
ID setting” on page 16 for more details.
G Power inlet
A 3-pin power inlet socket. Connect the supplied power cable to this sock et, then plug the
other end of the cable into an AC receptacle of the correct type.
Page 19

5 Connecting Hard Disk Drives
Before connecting a hard disk drive, read through this chapter to familiarize yourself with
SCSI and how a SCSI daisy chain should be setup.
What type of hard disk?
If you don’t already have a hard disk or are thinking of b uying a larger one, see the supplied
card for a listing of recommended disk drives.
Hard disk size
The following table shows approximate a vailable recording times for v arious sizes of hard
disk. A vailable recording times are shown for all of the CBX-D5’s sampling frequencies,
and as you can see, with a higher sampling frequency – less time is available. This is
because using a high sampling frequency produces much more digital data, which means
a bigger sound file. See “Sampling frequency (REC FREQ)” on page 20 for more details
about selecting a sampling frequency.
Connecting Hard Disk Drives 13Connecting Hard Disk Drives 13Connecting Hard Disk Drives 13
Hard disk / Max.
Sound File Size
2000MB (2GB) 380 260 190 174 760 760 380 348
1000MB (1GB) 190 130 95 87 380 380 190 174
660MB 124 85 62 57 248 248 124 114
330MB 62 42 31 28 124 124 62 56
200MB 40 25 20 17 80 50 40 34
100MB 20 13 10 8 40 26 20 16
40MB 8 5 4 3.30 16 10 8 7
20MB 4 3 2 1.42 8 6 4 3.24
10MB 2 1.18 1 51
5MB 1 38
1MB 12
Stereo Recording (minutes) Mono Recording (minutes)
22.05
kHz
secs
32
kHz
secs
7 secs 6 secs 5 secs 24
44.1
kHz
30
secs
48
kHz
secs
26
secs
22.05
kHz
4 2.36 2 1.42
2 1.16 1 52
secs
32
kHz
24
secs
44.1
kHz
12
secs
48
kHz
secs
10
secs
Although it is doubtful that you will ever buy a hard disk smaller than 40MB for use with
the CBX-D5, the values below 40MB will be useful for checking the remaining record
time that is available on a hard disk that already contains some sound files.
Page 20

14 Chapter 5 : Connecting Hard Disk Drives14 Chapter 5 : Connecting Hard Disk Drives14 Chapter 5 : Connecting Hard Disk Drives
Choosing a hard disk
If you plan to buy a hard disk that is not listed on the supplied card, the following
specifications should be checked first.
Specification Check Notes
Is it compatible with your computer?
Does it have two SCSI connectors? You need two to continue the SCSI daisy chain.
Are the SCSI connectors 25-pin
D-SUB, or 50-way Amphenol?
Are the SCSI cables supplied? If not, you will need to purchase them separately.
Can the SCSI ID be set from 0 ~ 7? (for
Macintosh you only need 0 ~ 6)
Does it have internal or external
termination?
Access Time?
Data Transfer Rate?
Maybe it is advertised as compatible, or your
dealer recommends it.
Macintosh computers are fitted with a 25-pin
D-SUB connector, while most other SCSI devices
have a 50-way Amphenol connector.
If not, it might clash with another device’s ID, in
which case you may have to rearrange the ID
numbers of some other SCSI devices in the
chain.
External terminators are normally connected to
the rear of the SCSI device. If the device has an
internal terminator, make sure it can be switched
off so that any device can be positioned at the
end of the SCSI daisy chain.
Measured in milliseconds, this is an indication of
how fast data from different areas of the disk can
be retrieved. The maximum we recommend is
30ms. An access time slower than this may affect
the performance of the CBX-D5.
Usually measured in Megabits per second
(Mbit/s), this shows how fast data can be written
to and read from the hard disk. The minimum we
recommend is 16Mbits/s. A transfer rate less than
this may affect the performance of the CBX-D5.
SCSI
For an general introduction to SCSI, see “SCSI” on page 3.
Setting up a SCSI daisy chain requires a little more than just making connections. SCSI
devices require ID numbers and the daisy chain must be terminated correctly. These are
explained in the following three sections, “SCSI cables”, “SCSI ID setting”, and “SCSI
termination”.
When using a SCSI daisy chain, the following points should be borne in mind.
• Allocate each device its own SCSI ID number.
• Terminate the SCSI bus correctly.
• Use quality cables and keep the length down.
• Use the little wire clips (or screws) on a SCSI connector to fasten the cable plugs
securely.
• All devices connected in the daisy chain must be switched on to use the system.
• Never switch off, or disconnect a device once the system has been switched on.
NOTE:
Switch off all your equipment before making any SCSI connections.
Page 21

SCSI cables
Most SCSI devices are supplied with a SCSI cable, but if you need to b uy one, make sure
that it is designed for SCSI usage and that the connecters on either end of the cable are
correct for your application.
Cable length is an important issue, but it’s not the length of each individual SCSI cable,
it’s the total length of the SCSI daisy chain that must not e xceed 6m (20ft).
SCSI cables 15SCSI cables 15SCSI cables 15
Total length of SCSI daisy chain must not exceed 6m (20ft)
Computer connection
Apple Macintosh
Apple Macintosh computers use a 25-pin D-SUB connector for the SCSI port, so use a
25-pin D-SUB to 50-way Amphenol type SCSI cable, usually supplied with an external
Macintosh hard disk drive.
Atari ST/STE
For Atari ST/STE computers, a Steinberg SCSI adaptor is required. This should be
connected to the Atari ST/STE’s “HARD DISK” port (DMA) using a 19-pin DSUB to
19-pin DSUB cable. An external hard disk drive can then be connected to the SCSI
adaptor’s SCSI connector using a 50-w ay to 25-pin SCSI cable.
NOTE:
Some Atari ST/STE hard disk drives already contain a SCSI adaptor,
however, they cannot be used as a substitute for the Steinberg adaptor.
HARD
DISK 1
SCSI SCSISCSI
DISK 2
CBX-D5HARD
Although it is possible to use just one external hard disk, it is highly recommended, for the
sake of data integrity, that you use at least two external hard disks: one disk for your
computer software and data such as Cubase Audio, MIDI song files, etc., and the other disk
purely for recording CBX-D5 sound files.
Atari TT
The Atari TT has a SCSI connection built-in, so a SCSI hard disk drive can be connected
directly .
Atari TT computers are fitted with an internal hard disk as standard. The internal disk
should be used for your computer software and data such as Cubase Audio, MIDI song
files, etc., and an external hard disk should be used purely for recording CBX-D5 sound
files. An external hard disk must be used with an Atari TT, because it supplies the
termination power that is required by the SCSI bus.
IBM PC/AT compatible
For an IBM PC/AT compatible computer, a SCSI adaptor card is required. This should be
installed into one of the computer’s internal e xpansion slots.
Page 22

16 Chapter 5 : Connecting Hard Disk Drives16 Chapter 5 : Connecting Hard Disk Drives16 Chapter 5 : Connecting Hard Disk Drives
SCSI ID setting
The SCSI bus is a parallel type connection, and data on the bus is available to all devices.
Howev er, communication will usually be between two devices only, so each device is
allocated an ID number, like an address number. In this way , only the device with the ID
number that is specified in the data will actually read and respond to the data.
If two devices share the same ID number , the system will probably crash, so make sure that
each device has its own ID number. SCSI devices usually have a DIP switch or, like the
CBX-D5, a thumb wheel switch for ID setting. Refer to the instructions supplied with your
particular SCSI device.
ID No. 1 ID No. 2 ID No. 3
HARD
DISK 1
ID No. 6
SCSI
DEVICE
This device is
terminated
SCSI SCSISCSI
SCSI
DISK 2
SCSI
DEVICE
SCSI
CBX-D5HARD
ID No. 4ID No. 5
HARD
DISK 3
SCSI
The Apple Macintosh example above sho ws six de vices connected in a SCSI daisy chain
(seven including the computer). Each de vice has its own ID number. Note that the last
device in the chain is terminated. On a Apple Macintosh computer, SCSI ID 7 is reserv ed
for use by the computer, and ID 0 for the internal hard disk. Do not use either of these
IDs for any other SCSI device.
ID No. 0 ID No. 1
HARD
DISK 1
ID No. 3ID No. 6
HARD
DISK 4
SCSI
HARD
DISK 2
ID No. 2
HARD
DISK 3
SCSI
ATARI
ST/STE
19-pin
DSUB
SCSI
Adaptor
CBX-D5
This device is
terminated
SCSI SCSI
SCSI
In the Atari ST/STE system shown above, fiv e SCSI devices are connected in a daisy
chain. Hard disks must be set with continuous SCSI IDs starting from 0 (0, 1, 2, 3…).
Howev er, the CBX-D5 can be set to SCSI ID 5 or 6. Do not set any device to SCSI ID 7.
ATARI
TT
(internal hard disk
set to SCSI ID 0)
SCSI
ID No. 1 ID No. 2
HARD
DISK 1
ID No. 6
CBX-D5
This device is
terminated
SCSI SCSI
SCSI
HARD
DISK 1
HARD
DISK 4
SCSI
ID No. 3
HARD
DISK 2
ID No. 4ID No. 5
HARD
DISK 3
SCSI
In the Atari TT system shown above, six SCSI de vices are connected in a daisy chain. Hard
disks must be set with continuous SCSI IDs starting from 1 (1, 2, 3, 4…). Howev er, the
CBX-D5 can be set to SCSI ID 5 or 6. Do not set any device to SCSI ID 7.
Page 23

SCSI termination
Unlike audio signals, digital signals only have two values: high and low (+5V and 0V).
When no data is being transmitted, it is important that SCSI bus lines are kept in the high
state (+5V), so that when data is transmitted there is a clear distinction between high and
low pulses and the data is transferred without error. To achieve this, a device known as a
SCSI terminator is connected in the SCSI daisy chain. A terminator is usually fitted to the
last device in the chain.
SCSI termination 17SCSI termination 17SCSI termination 17
Terminate
this device
HARD
DISK 1
SCSI SCSISCSI
DISK 2
CBX-D5HARD
Some SCSI devices have a terminator b uilt-in. In this case that device should be connected
at the end of the daisy chain. Other devices, like the CBX-D5, are supplied with an in-line
type terminator and this can be connected as shown below.
CBX-D5 (Top view)
terminator is connected as shown)
TERMINATOR
To the next
SCSI device
NOTE:
HARD DISK 2
SCSI PLUGSCSI PLUG
SCSI CABLE
(In this case the CBX-D5 is the last device
connected in the daisy chain, so the SCSI
SCSI PLUG SCSI
If the SCSI daisy chain is not terminated correctly, numerous problems
including data corruption, system crashes, and intermittent glitches can
occur. If you have just set up your SCSI daisy chain or have added a new
SCSI device to it and it is not working as it should, check that the SCSI daisy
chain is terminated correctly . If the problem persists, try connecting the SCSI
devices in a different order.
Page 24

18 Chapter 6 : Working with Hard Disks18 Chapter 6 : Working with Hard Disks18 Chapter 6 : Working with Hard Disks
6 Working with Hard Disks
After connecting your hard disk, setting the SCSI ID, and installing the SCSI terminator,
you will need to format the hard disk before it can be used. If you have already powered
up your system you will notice that there isn’t a disk icon representing the new disk dri ve
on the desktop. This is because your computer could not mount the hard disk during
boot-up, due to it not being formatted.
Formatting
Most SCSI hard disks are supplied with their own disk formatting software, so please refer
to the hard disk’s Manual, and format the disk as specified.
Before disk formatting begins you will probably be asked to supply the SCSI ID of the
hard disk and maybe the required interleave value. The SCSI ID will be the number that
you set on that hard disk using its SCSI ID DIP switch or thumb wheel switch. If you have
to specify an interleave value, check the hard disk’s Manual. Also see the “Adding SCSI
disk drives” section of your computer manual.
When the disk has been formatted correctly and any supplied hard disk driver softw are has
been installed, a disk icon should appear on your computer’s desktop.
Sound file management
By double clicking on the disk’s icon you will be able to access sound files stored on the
disk. Sound files can be copied, deleted, size checked, etc., using the same menu
commands that you would use for your other computer files.
Sound file backup
Because the CBX-D5’s sound files can be managed just lik e your other computer files,
sound files can be backed up in much the same way using data compression and backup
utilities. Howev er, due to the relatively large size of sound files, floppy disks are not the
most effectiv e backup media. Remo vable hard disks and magneto optical disks are well
suited to this task and commonly available sizes include 44MB, 88MB, 128MB, and
650MB.
Another backup option is to digitally transfer your sound files to a DAT recorder. Then, if
you want them again in the future, just record them back to the CBX-D5.
Computer utilities
There are many computer utilities and desk accessories available for managing files and
hard disks such as a “file squashers”, “auto savers”, “hard disk size doublers”, etc. If you
choose to use a utility to work along side the CBX-D5, YOU DO SO AT YOUR OWN
RISK and no responsibility can be claimed for lost data, system crashes, and hardware
damage.
The CBX-D5 is designed to work with the software described in the System Setup Guide,
why risk losing your valuable audio data by using a “super disk space doubler”, or
“real-time data compressor”?
Page 25

Hard disk fragmentation
y
Hard disks record data into pre-formatted concentric tracks on a number of magnetic disks
that are mounted around a common spindle. Tracks are further divided into sectors, and
each sector can store 512bytes of data. On a newly formatted disk, files are recorded into
a continuous series of sectors as shown below.
Hard disk fragmentation 19Hard disk fragmentation 19Hard disk fragmentation 19
TRACK
SECTOR
6
SECTORS10SECTORS
FILE 1 FILE 2 FILE 3
SECTORS
8
As files are deleted and new files saved, files may be split (fragmented) o ver different areas
of the disk, losing the continuity of sectors. In this case, reading one file may cause the disk
drive to read sectors from many different parts of the disk, thus slowing down the overall
data read rate and making the disk drive work harder.
Space previously
occupied b
FILE 1 FILE 4 FILE 3FILE 5a FILE 5b
file 2
FILE 5 has been
split – fragmented.
Disk defragmentation is quite important for hard disk audio recording, as it is better to
record data into a continuous series of empty hard disk sectors. If recording starts in an
empty sector, but then subsequent sectors in the series are used by another file, because
there is so much data being recorded, the disk drive does not hav e time to find, then mov e
to another area on the disk, so recording may stop.
This is not a problem with a completely empty disk, but if a sound file is deleted, the next
recording might start in the deleted space, and recording might stop because there is not
enough continuous empty sectors available. This will be more noticeable on a smaller hard
disk where you have to keep deleting unwanted sound files to mak e w ay for new
recordings.
The answer is to use a good hard disk defragmentation utility when a sound file has been
deleted. By defragmenting the disk, all sound files will be moved up to the front end of the
disk, leaving the av ailable disk space as a series of continuous sectors at the end of the disk.
Hard disk partitioning
Because the CBX-D5 can read and write to any hard disk drive connected in the SCSI
chain, it is able to use individual partitions of a hard disk driv e that has been partitioned.
Howev er, the CBX-D5 cannot record across hard disks or partitions, so the available
recording time will be limited to the size of the partition.
NOTE:
The time available for all r ecordings is not limited by the size of a hard disk
partition, it is the time available for one continuous recording, or one take
that is limited.
Page 26

20 Chapter 7 : Recording20 Chapter 7 : Recording20 Chapter 7 : Recording
7 Recording
Sampling frequency (REC FREQ)
The CBX-D5 can record at any one of four sampling frequencies: 48kHz, 44.1kHz, 32kHz
(as specified by the AES), or 22.05kHz (analog input only). These sampling frequencies
are commonly used for digital audio, and each has its own specific applications.
The sampling frequency is set by the controlling software and the CBX-D5’s front panel
REC FREQ indicators show the selected frequency. The selected REC FREQ also
determines the clock rate for all internal processing, i.e., DSP, digital mixer, DEQ, etc.,
except for the output Fs conv erters, whose clock rate is determined by the PB FREQ.
NOTE:
When using the digital inputs, you should set the CBX-D5’s REC FREQ to
match the digital input signal’s sampling frequenc y . It is not essential, but we
recommend it.
48kHz
At 48kHz an audio bandwidth of about 22kHz is possible. Consumer DAT and DCC
recorders can record at 48kHz only . Professional equipment also supports this frequenc y.
44.1kHz
With this sampling frequency an audio bandwidth of about 20kHz is possible. This
frequency is used for all prerecorded CDs, DATs (if there are any), and DCC cassettes.
Although a higher audio bandwidth is possible using 48kHz, 44.1kHz is considered to be
good enough for most applications, and most professional digital audio engineers use this
sampling frequency.
32kHz
At this sampling frequency an audio bandwidth of about 15kHz is possible. This frequency
is widely used for broadcast applications where a 15kHz audio bandwidth, roughly that of
FM radio, is acceptable. Many DSB (Direct Satellite Broadcasting) transmissions use this
frequency, although, some may also use 48kHz.
22.05kHz
At this frequency an audio bandwidth of about 10kHz is available. This frequency is
widely used in multimedia applications. It might not seem very useful for your audio
applications, but if you are limited by hard disk space or the audio material you are
recording already has a limited bandwidth it may be useful.
Which sampling frequency?
Since the CBX-D5 contains a sampling frequency conv erter, digital audio can be output at
a different sampling frequency to that which was used during recording. Ho wever , playing
back a sound file at a higher sampling frequency will not improve the audio quality, as the
audio frequency bandwidth of a sound file is determined by the record sampling frequency ,
not the playback frequency.
This leaves you with two deciding factors for choosing a sampling frequenc y . Firstly , what
audio bandwidth (audio quality) do you want to use, and secondly, how much free disk
space is available? See “Hard disk size” on page 13 for a listing of recording times that are
available at each sampling frequency for a given size of hard disk (free disk space).
Varispeed
With some tape based digital recorders it is possible to v ary the speed of playback and
recording. When varispeed is used the sampling frequency of the digital audio is changed.
Since the CBX-D5 can playback digital audio at a sampling frequency different to that
used for recording, varispeed digital audio can be recorded.
Page 27

Digital input levels
Digital input signals entering the CBX-D5 cannot be level adjusted. This is the same for
most digital audio equipment, the idea being that once the level has been set during the
original A/D conversion it should not need readjustment. It also simplifies the interf acing
of digital audio signals between equipment.
The level of the audio signal output via the CBX-D5’s digital outputs, however, can be
level adjusted, and this is set by the controlling software.
Setting the analog input level
The recording level for analog input signals can be set using the CBX-D5’ s AN ALOG IN
LEVEL controls. These controls allows independent lev el setting for channels 1 and 2 and
they can also be used to balance the left and right channels of a stereo source connected to
the analog inputs. The maximum analog input level is +22dBm.
These controls should be used in conjunction with the input level meters, which are
described below.
Input level meters
Digital input levels 21Digital input levels 21Digital input levels 21
Unlike analog tape recorders, digital audio recorders are very unforgi ving when it comes
to excessive signal levels. Digital audio signal clipping normally produces unpleasant
distortion, pops, and clicks, and unless you have some very sophisticated editing
equipment it is impossible to remove it after the ev ent. So great care must be tak en when
setting the recording level.
With a digital audio recorder such as the CBX-D5, noise and hiss produced by setting the
recording level too lo w is not a problem. Howe ver , setting the recording le vel too lo w will
reduce the effectiv e dynamic range of the recording and with a dynamic range of 96dB
available it makes sense to use as much of it as possible.
Basically , the recording level should set so that the loudest signals light the –3, –6, –9
LEDs, but never light the CLIP LEDs. When recording with microphones, where sudden
signal increases are possible, it may be worth having a “dry run” before you hit the record
button. A compressor is a useful tool when recording vocals and acoustic instruments.
Headphone monitoring
During recording and playback, the four audio channels can be monitored using a pair of
stereo headphones. Headphones should be connected to the PHONES jack on the front
panel. The volume can be adjusted using the PHONES VOLUME control.
As you can see from the diagram below, channels 1 and 3 appear in the left speaker and
channels 2 and 4 in the right speaker .
*
Channel 1
Channel 3 Channel 4
* 96dB is the dynamic range available with a 16-bit digital system (6dB per bit).
RL
Channel 2
Page 28

22 Chapter 7 : Recording22 Chapter 7 : Recording22 Chapter 7 : Recording
Digital audio data containing SCMS
SCMS (Serial Copy Management System) is a protection system designed to stop illegal
digital copying of audio material. When a SCMS DAT recorder (most consumer DAT
recorders) receives a digital input signal with the copy protect flag set to “protect”, it
cannot enter record mode, making digital tape duplication impossible.
NOTE:
If a digital signal that contains SCMS is input to the CBX-D5 it will not prevent the
CBX-D5 from recording. The digital audio will be recorded in a sound file without SCMS.
When digital audio data containing SCMS is input into the CBX-D5, and the output format
(set from the host computer) is set to Professional, output from the digital output jacks may
be muted. When the output format is set to Consumer howev er, the digital and analog
outputs will be unaffected.
It is possible to record a copyrighted musical composition, edit it and replay it with the
CBX-D5. However, the user will be held responsible for its use.
SCMS does not affect recordings made using analog connections, and it is only
second generation digital copying (copy of a copy) that is prohibited.
Digital audio data with emphasis
For some recordings, emphasis is applied to a digital audio signal. During playback, this
emphasis is automatically detected by the replay device and de-emphasis applied. You
may have seen the word EMPHASIS appear on a CD player or DAT recorder when a
prerecorded disc or tape with emphasis was played back.
The CBX-D5 has no emphasis functions, so if a digital signal that has been emphasized
is input to the CBX-D5 it will not automatically be de-emphasized and the CBX-D5 will
record the signal with the emphasis. During playback, a slight boosting of frequencies
above 3.5kHz will be noticeable.
20-bit digital audio
Some CD players are now 20-bit and there is a small but gro wing selection of 20-bit CD
recordings available. Some 20-bit recorders are already being used for professional
applications including Y amaha’s DMR8 and DRU8 recorders, which ha ve always of fered
20-bit recording.
If a 20-bit digital signal is input to the CBX-D5, it will be converted to a 16-bit signal
before recording. For the technically minded, 4-bits, starting from the LSB (Least
Significant Bit) will be chopped off.
Page 29

8 Playback
Playback frequency (PB FREQ)
During playback, sound files are read from disk, processed in the CBX-D5, then output.
The CBX-D5 can read sound files that were recorded at sampling frequencies between
11.025kHz and 48kHz. Once inside the CBX-D5, the data is processed at the currently set
REC FREQ. Then it is output to the digital outputs at a rate determined by the PB FREQ,
and to the analog outputs after analog to digital conversion.
The CBX-D5 can output digital audio at one of two sampling frequencies: 44.1kHz and
48kHz. The playback frequency is set by the controlling software and the CBX-D5’s PB
FREQ indicators show the selection.
Playback 23Playback 23Playback 23
NOTE:
When the CBX-D5 is used with an external word clock, the digital outputs will
operate at the same frequency as the external word clock and that frequency
will not be indicated by the “PB FREQ” indicators.
The choice of playback frequency will usually be determined by the sampling frequency
of the device to which the digital audio is being sent, i.e., a D AT recorder, DCC recorder,
digital mixer, etc. There is nothing to be gained by playing a 44.1kHz recorded sound file
at 48kHz, and little to be lost by playing a 48kHz recorded sound file at 44.1kHz.
Output level meters
The four output level meters sho w the output level of each channel. The output level of
each channel can be controlled by the controlling software. The maximum output level is
+18dBm. So an analog output signal of about +18dBm will light the CLIP LED.
Sound file playback compatibility
As well as its own sound files, the CBX-D5 can also playback the following sound file
formats. These sound file formats are often used with the Apple Macintosh computer.
Sound Designer
Sound Designer II (mono and stereo)
Audio IFF (Interchange File Format)
The CBX-D5 can record and playback mono and stereo 2-channel interleave files.
4-channel interleave files can be played back only.
MONO FILE
DATA
1
1 1 1 1 2 1 2 1 2 3 4 1 2 3 4
STEREO 2-CHANNEL
INTERLEAVE FILE DATA
4-CHANNEL INTERLEAVE
FILE DATA
Page 30

24 Chapter 8 : Playback24 Chapter 8 : Playback24 Chapter 8 : Playback
Sound file regions
Your controlling software may allow you to select a section of a sound file so that it can
effectiv ely be handled as an independent piece of sound data. Using different channels, the
CBX-D5 can playback two overlapping sections from the same sound file simultaneously.
REGION B
SOUND FILE
REGION A
REGIONS A & B CAN BE
PLAYED SIMULTANEOUSLY
Page 31

Converting the Sampling Frequency & Digital Audio Format in Real Time 25Converting the Sampling Frequency & Digital Audio Format in Real Time 25Converting the Sampling Frequency & Digital Audio Format in Real Time 25
9 Converting the Sampling Frequency & Digital
Audio Format in Real Time
When transferring digital audio data between equipment, it is sometimes necessary to
convert from one digital audio format to another, say from CD/DAT to AES/EBU, or Y2
to CD/DAT. The CBX-D5 allo ws you to convert the digital audio format between
CD/DAT, AES/EBU, and Y2 in real time.
Real time means that you don’t actually have to record the digital audio, you just input it
to the CBX-D5, the CBX-D5 converts it, then outputs it for record monitoring.
As well as the digital audio format, the CBX-D5 also allows you to con v ert from one
sampling frequency to another, say from 44.1kHz to 48kHz or vice v ersa. Sampling
frequency conv ersion is useful if you have some DAT tapes, maybe masters, recorded at
48kHz and you want to transfer them directly to a CD disc recorder that will only accept
digital audio data at 44.1kHz.
Digital input and output source, record and playback sampling frequency settings are all
made via the controlling software, so you will need to refer to your Software Manuals. The
diagram below shows the conversion possibilities.
AES/EBU
48, 44.1, 32kHz
48, 44.1, 32kHz
CD/DAT (SPDIF)
48, 44.1, 32kHz
NOTE:
Y2
CBX-D5
In this configuration, SCMS and emphasis information will pass through the
AES/EBU
48, 44.1kHz
Y2
48, 44.1kHz
CD/DAT (SPDIF)
48, 44.1kHz
CBX-D5 and will be output unchanged.
In the system shown below, 48kHz data from DAT recorder No. 1 is fed to the CBX-D5
using the CD/DAT connections. The CBX-D5 converts the sampling frequency to
44.1kHz, then outputs the data to DAT recorder No. 2 via the AES/EBU connections.
DAT
RECORDER
No.1 (48kHz)
S/PDIF OUT
CD/DAT IN
CBX-D5
(48 to 44.1kHz)
REC FREQ = 48kHz
PB FREQ = 44.1kHz
AES/EBU OUT
AES/EBU IN
DAT
RECORDER
No.2 (44.1kHz)
Page 32

26 Chapter 10 : Inputs & Outputs Explained26 Chapter 10 : Inputs & Outputs Explained26 Chapter 10 : Inputs & Outputs Explained
10 Inputs & Outputs Explained
ANALOG IN
A pair of female XLR 3-31 type connectors used for inputting analog audio signals. These
are balanced inputs with a nominal input level of +4dBm and a maximum input le v el of
+22dBm. These inputs are intended for use with balanced line level signals, i.e., from a
mixer, synthesizer, drum machine, etc. Microphones, guitars, and equipment with an
output level less than –20dBm must first be connected to a preamplifier, then to the
CBX-D5.
The illustration below shows how an XLR to XLR type cable is wired.
XLR to XLR cable
2
3
1
3-PIN MALE
XLR PLUG
XLR to phone jack cable
Although balanced, these inputs can be used with unbalanced signals. The diagram below
shows how a balanced XLR to unbalanced phone jack connecting cable should be wired.
2
3
1
XLR PLUG
ANALOG OUT
Four male XLR 3-32 type connectors used for outputting channels 1 ~ 4 as analog audio.
These are balanced outputs with a nominal output level of 0dBm and a maximum output
level of +17dBm. These could be connected to the inputs of a mixer, amplifier, tape
recorder, DAT recorder, etc.
PIN 2
PIN 3
PIN 1
PIN 2
PIN 3
PIN 1
TIP
SLEEVE
PIN 2
PIN 3
PIN 1
2
3
1
3-PIN FEMALE
XLR LINE
SOCKET
1/4" PHONE JACK (mono)3-PIN MALE
Cable wiring is the same as the “XLR to XLR cable” shown above. Connection to
unbalanced inputs is also possible by using an XLR to phone jack cable like the one shown
above. Note, howe ver , that a 3-pin female XLR line socket would be used, not a 3-pin male
XLR plug as shown in the illustration.
NOTE:
You may buy your XLR connecting cables or you may decide to make your
own, either way always use good quality connectors and cable.
Page 33

AES/EBU IN 1/2
A female XLR 3-31 type connector for inputting AES/EBU format digital audio. This is a
balanced type connection and two channels, 1 and 2, are carried in the same connection.
This connection could be used when recording digital audio data from another hard disk
recorder, a digital mixer, DAT recorder, or digital VTR. The AES/EBU format is used
mainly on professional digital audio equipment.
Although an XLR to XLR type connecting cable is required, the recommended cable
impedance is different to that of typical audio XLR type connecting cables. You may find
that typical audio XLR type cables work successfully, but to eliminate any risk of data
corruption it is best to use a cable that is specifically made for use with the AES/EBU
format. The recommended cable impedance for AES/EBU is 110Ω.
AES/EBU OUT 1/2, 3/4
Two male XLR 3-32 type connectors for outputting AES/EBU format digital audio.
Channels 1 and 2 are output via OUT 1/2, and channels 3 and 4 through OUT 3/4. These
connections could be used to transfer digital audio data from the CBX-D5 to professional
digital audio equipment.
Here again, it is best to use a cable that is specifically made for use with the AES/EBU
format. Follow the same recommendations gi v en above for the AES/EBU IN connection.
AES/EBU IN 1/2 27AES/EBU IN 1/2 27AES/EBU IN 1/2 27
CD/DAT IN
A Phono/RCA jack for inputting CD/DAT format digital audio. Two channels, 1 and 2
(left, right), are carried in the same connection. This connection could be connected to the
digital output of a CD player or DAT recorder and allows digital audio recording without
multiple D/A, A/D audio data conversions. Some MIDI samplers are fitted with this type
of connection. In this case, sound samples could be transferred digitally between a sampler
and the CBX-D5. The CD/DAT format is found mainly on consumer type digital audio
equipment, although, most professional digital audio equipment supports it, too.
Phono/RCA type cables and connectors are commonly used for hi-fi equipment, howev er,
there are connecting cables designed specifically for use with the CD/D A T format and
wherever possible they should be used.
CD/DAT OUT
A Phono/RCA jack for outputting CD/DAT format digital audio. Two channels, 1 and 2
(left/right), are carried in the same connection. This could be connected to the digital input
of a DAT recorder or DCC recorder, and it allows digital audio recording without multiple
D/A, A/D audio data conversions.
Like the CD/DAT IN connection, it’s best to use cables specifically made for the job .
NOTE:
You might have heard or read that AES/EBU type connections can be
connected directly to CD/DAT connections and vice versa. In some cases this
may work, but it is not recommended. To ensure data integrity, connect
AES/EBU outputs to AES/EBU inputs, and CD/DAT inputs to CD/DAT
outputs.
Page 34

28 Chapter 10 : Inputs & Outputs Explained28 Chapter 10 : Inputs & Outputs Explained28 Chapter 10 : Inputs & Outputs Explained
Y2 IN
An 8-pin DIN socket for inputting Y2 Yamaha format digital audio. T w o channels, 1 and
2 (left/right), are carried in the same connection. This could be connected to one of
Y amaha’ s digital audio products including the DMR8 Digital Mix er/Recorder, DMC1000
Digital Mixing Console, DRU8 Digital Recorder, SPX1000 Effect Processor, and the
DMP series of Digital Mixers.
Special cables are available for use with this format. See your Yamaha dealer for details.
Y2 OUT
An 8-pin DIN socket for outputting Y2 Y amaha format digital audio. Two channels, 1 and
2 (left/right), are carried in the same connection. This could be used to transfer digital
audio data from the CBX-D5 to one of the Yamaha professional digital audio products
listed above.
Again, use the cables specifically recommended for use with the Y2 format.
WORD CLK IN/OUT
NOTE:
As we explained on page 4, when a number of digital audio devices are connected together
and data is digitally transferred between them, it is essential that the data processing
circuits of all devices are synchronized. To achieve this, one device operates as a w ord
clock master and all other devices operate as word clock slav es.
If you connect only two digital audio devices, say the CBX-D5 to a DAT recorder, word
clock setup is quite straight forward and no external word clock connections will be
required. This is because the AES/EBU, CD/DAT, and Y2 formats carry word clock
information within the digital audio data. Howev er, when three or more devices are
connected in a digital system, word clock connections will be required.
NOTE:
The CBX-D5 can operate as either word clock master, using its own internal clock, or as
a slave sourcing its word clock from one of the digital inputs or from the WORD CLK IN
connection. This setting is made via the controlling software. The CBX-D5’s word clock
output signal is always at the same frequency as the digital outputs.
If all your audio connections are analog, no word clock connections are
required.
Although we have said that a word clock connection is not required when
only two devices are used, some devices may require a BNC word clock
connection as well as the digital audio connection. Making a separate
connection using the CBX-D5’s BNC connectors may also improve data
transfer and eliminate any chance of data errors.
NOTE:
Because the CBX-D5 can convert the sampling frequency of incoming
digital audio signals, the word clock output signal will not necessarily match
the recording sampling frequency.
Page 35

WORD CLK IN/OUT 29WORD CLK IN/OUT 29WORD CLK IN/OUT 29
The following table shows how the WORD CLK IN/OUT connections work with each
word clock source. Word clock connections use coaxial BNC to BNC type cables.
WORD CLOCK
SOURCE
AES/EBU Input
CD/DAT Input
Y2 Input
Internal Clock
WORD CLK IN
Outputs a word clock signal at the internal clock rate
(REC FREQ).
Outputs a word clock signal at the internal clock rate
(REC FREQ).
Outputs a word clock signal at the internal clock rate
(REC FREQ).
Outputs a word clock signal at the internal clock rate
(REC FREQ).
Outputs a word clock signal at the same rate as the
word clock at the WORD CLK IN.
CBX-D5 WORD CLK OUT CBX-D5 WORD CLK IN
N/C
N/C
N/C
N/C
Receives the external word
clock
If, for some reason the external word clock source should become disconnected or the
CBX-D5 cannot synchronize to it, the CBX-D5 will automatically switch to internal clock.
When the digital output signal is synced to an external word clock, the exact sampling
frequency cannot be guaranteed. So the sampling frequency specified in the digital
output’s channel status bits may be different to the actual output sampling frequency.
In the following example, data from the four CBX-D5 channels are being transferred to a
digital mixer, which is also connected to a Yamaha DRU8 8-Track Digital Recorder. The
DRU8 is word clock master supplying both the CBX-D5 and the DMC1000 Digital Mix er.
In this system, the external word clock connections are essential.
WORD
CLK OUT
WORD
CLK IN
CBX-D5
WORDCLOCK SLAVE
(WORD CLK IN)
AES/EBU 1/2 OUT
AES/EBU 3/4 OUT
AES/EBU IN
AES/EBU IN
WORD CLK IN
DMC1000
DIGITAL MIXER
WORDCLOCK SLAVE
DRU8 DIGITAL
RECORDER
WORDCLOCK MASTER
(Internal clock source)
A Yamaha format connection
that can carry up to 8 digital
signals
(wordclock sourced from
the WORD CLK IN
connectionl)
In this example, audio data from two D AT recorders is being mixed via a digital mixer .
DAT No. 1 does not have any word clock connections, so the digital audio is fed to the
CBX-D5 first, then to the digital mixer . The CBX-D5 generates a word clock signal based
on the data from DAT No. 1 and feeds this signal to DA T No. 2, which syncs to the external
wordclock. The digital mixer deriv es its w ord clock from the AES/EB U inputs.
DAT No. 1
(no wordclock
connections)
AES/EBU
CBX-D5
(synced to
AES/EBU input)
WORD CLOCK
DAT No. 2
(synced to external
wordclock)
AES/EBU
AES/EBU
DIGITAL MIXER
(synced to
AES/EBU inputs)
Page 36

30 Chapter 11 : TO HOST connection30 Chapter 11 : TO HOST connection30 Chapter 11 : TO HOST connection
11 TO HOST connection
As well as the standard MIDI IN, OUT, and THRU connections, the CBX-D5 also has a
“TO HOST” connection. This allows direct connection to computers that do not have a
built-in or external MIDI interface.
The CBX-D5 has four interface modes for connecting to a controlling computer: MIDI,
Mac, PC-1, and PC-2. These interface modes are explained below.
MIDI
This mode is for use with a computer that has a MIDI interface. That is, a computer with
a built-in MIDI interface, such as the Atari ST , STE, and TT range of computers, an Apple
Macintosh computer with an external MIDI interface unit, or a PC-9801 or IBM PC/AT
compatible type computer fitted with a MIDI interface. Most MIDI music software can be
used with this type of connection.
The “HOST SELECT” switch should be set to MIDI.
The connecting MIDI cable should be of the type described in the “TO HOST computer
connecting cables” on page 33.
HARD
OTHER MIDI
DEVICES
DISK
SCSI
CBX-D5
SCSI
MIDI OUT
MIDI INMIDI THRUMIDI IN
MIDI IN
MIDI OUT
The table below explains ho w the MIDI signals are handled in MIDI mode.
Connection Function
TO HOST
MIDI IN MIDI data is input and processed.
MIDI OUT System Exclusive data is output.
MIDI THRU Data appearing at the MIDI IN port is fed directly to the MIDI THRU port.
RECEIVE No function.
SEND No function.
NOTE: Depending on the application software used, it is possible that the HOST
function on the CBX-D5 (the function that allows you to make a MIDI
connection to a host computer without a MIDI interface) may not work.
Page 37

Mac
Mac 31Mac 31Mac 31
This mode is for use with an Apple Macintosh computer that is not connected to an
external MIDI interface unit. The CBX-D5 can be connected directly to one of the Apple
Mac's serial (RS-422) ports.
1) Connect the CBX-D5’s “T O HOST” connector to one of the Apple Mac’ s serial ports
using the “Mac” connecting cable shown on page 33.
2) Set the CBX-D5’s “HOST SELECT” switch to Mac.
3) Switch on the Apple Mac and the CBX-D5.
4) Start the Apple Mac music software.
Your music software will probably require you to specify the type of MIDI interface you
are using. You should specify “Standard MIDI interface”. If it has a “MIDI Time Piece
option”, turn it off. If your software also requires you to specify the data rate, select 1MHz.
OTHER MIDI
DEVICES
HARD
DISK
SCSI
CBX-D5
MIDI INMIDI OUTMIDI IN
MIDI OUT
SCSI
TO HOST
MIDI
THRU ON
SERIAL
PORT
The table below explains ho w MIDI signals are handled in “Mac” mode. MIDI data is
carried to and from the computer via the “TO HOST” connection.
Connection Function Details
Synchronized. Data format: 8 bit, 1 stop
bit, no parity. 1MHz clock from CBX-D5 to
serial ports' HSKi data pin.
When the CBX-D5 is transmitting its Bulk
Dump data to the host computer, data
from the MIDI IN port is not sent to the host
computer. Any MIDI data received while a
Bulk Dump is in progress will be ignored.
The CBX-D5 does not respond to the MIDI
data appearing at the MIDI IN port, but to
the MIDI data from TO HOST RECEIVE.
TO HOST
MIDI IN
MIDI OUT
MIDI THRU
RECEIVE
SEND
MIDI data is input, processed, then fed to
the MIDI OUT port.
MIDI data received at the MIDI IN port is
output.
MIDI data received is output to the TO
HOST SEND.
MIDI data received at the TO HOST
RECEIVE is output.
MIDI data appearing at the MIDI IN port is
fed directly to the MIDI THRU.
Page 38

32 Chapter 11 : TO HOST connection32 Chapter 11 : TO HOST connection32 Chapter 11 : TO HOST connection
OU
PC-1
This mode is for use with an NEC PC-9801 type computer. The PC-9801 is a v ery popular
computer in Japan. The specifications are the same as those for “PC-2” mode except for
the baud rate. See “CBX-D5 Specifications” on page 37.
PC-2
This mode is for use with an IBM PC/AT compatible, PS/1, or PS/2 type computer that
does not have a MIDI interface card installed. The CBX-D5 can be connected directly to
the computers serial (RS-232C) port.
The music software used must be able support the CBX-D5’ s “TO HOST” connection.
Please consult your Yamaha dealer for more details. If your software does not support the
“TO HOST” connection, the CBX-D5 can still be connected to this type of computer by
installing a MIDI interface card in the computer or by using an external MIDI interface.
1) Connect the CBX-D5’s “T O HOST” connector to one of the computer’s serial ports
using the “PC-2” connecting cable shown on page 33.
2) Set the CBX-D5’s “HOST SELECT” switch to PC-2.
3) Switch on the computer and the CBX-D5.
4) Start the computer music software.
OTHER MIDI
DEVICES
HARD
DISK
SCSI
CBX-D5
MIDI INMIDI OUTMIDI IN
MIDI
SCSI
TO HOST
T
SCSI
CARD
MIDI
THRU
ON
SERIAL
PORT
The table below explains ho w the MIDI signals are handled in PC-2 mode. MIDI data is
carried to and from the computer via the “TO HOST” connection.
Connection Function Details
TO HOST
MIDI IN
MIDI OUT
MIDI THRU
RECEIVE
SEND
MIDI data is input, processed, then fed to
the MIDI OUT port.
MIDI data received at the MIDI IN port is
output.
MIDI data received is output to the TO
HOST SEND.
MIDI data received at the TO HOST
RECEIVE is output.
MIDI data appearing at the MIDI IN port is
fed directly to the MIDI THRU.
Synchronized. Data format: 8 bit, 1 stop
bit, no parity.
When the CBX-D5 is transmitting its Bulk
Dump data to the host computer, data
from the MIDI IN port is not sent to the host
computer. Any MIDI data received while a
Bulk Dump is in progress will be ignored.
The CBX-D5 does not respond to the MIDI
data appearing at the MIDI IN port, but to
the MIDI data from TO HOST RECEIVE.
 Loading...