

Page 1
PROFESSIONAL AUDIO WORKSTATION
PROFESSIONAL AUDIO WORKSTATION
Tutorial
Tutorial
E
Page 2

Introduction
Welcome to the world of the AW2816!
If you have an interest in music production, you probably know that the songs of the artists you see on television and in magazines are produced in
sophisticated recording and mixing studios using lots
of expensive equipment, and pass through numerous
processes under the care of professional sound engineers who have a wealth of specialized knowledge.
Into the AW2816 is packed the functionality used for
every process that happens in these large and sophisticated studios. If the optional CD-RW drive is
installed, the entire process from recording to CD production can be carried out completely within the
AW2816, and all at professional quality.
Starting with a powerful digital mixer of equivalent
quality with the Yamaha 02R mixing console (the defacto standard for digital recording), the AW2816
includes an automix function that records and reproduces the operations of the mixer section, two digital
multi-effect units with a rich array of functions, a completely uncompressed 16-track recorder that supports
not only 16 bit CD-quality but also 24 bit recording/
playback that captures even the most subtle nuances,
and many other functions.
If you already have experience using a digital mixing
console or digital recorder, operating the AW2816
will soon feel completely natural to you, and you will
quickly be amazed at the astounding amount of functionality that is packed into such a small unit. On the
other hand if you are new to this type of equipment,
be reassured that the AW2816 is designed to make it
easy for you to fully use every bit of its powerful functionality.
Although this tutorial will guide you through a full
range of actual operations, this is just the first step in
understanding the full potential of the AW2816. We
hope that by working through this tutorial, you will
acquire your very own know-how that will help you
take full advantage of the AW2816.
About this tutorial
This tutorial is intended for people who have an interest in recording and mixdown but have never before
used equipment like the AW2816, and explains the
process from recording to mixdown on the AW2816
while leading you through the actual steps of operation.
Once you have worked through this tutorial, you will
have learned how to operate the basic functionality of
the AW2816. For a more detailed explanation of each
function, refer to the AW2816’s “Owner’s Manual.” At
the end of this tutorial there is a glossary of specialized terms related to the AW2816, digital mixing consoles, and digital recorders. Please refer to it when
you encounter an unfamiliar term.
Tutorial
1
Page 3

Contents
Contents
Introduction........................................ 1
About this tutorial ......................................... 1
Contents ............................................. 2
Recording on the AW2816 ................. 3
Creating a new song ...................................... 3
Recording the rhythm section........................ 3
Using two mics to record the rhythm............ 3
Connect the mics to the AW2816 ................ 3
Recording sound from the mics onto the hard
disk............................................................ 4
Play back the recorded sound ...................... 4
Recording the sound of a rhythm machine.... 5
What is tempo data on the AW2816 ............ 5
Recording sounds that you step-recorded into
your sequencer............................................ 6
Recording vocals and acoustic instruments ... 6
Switching scene memories........................... 6
Tips – vocal recording.................................. 6
Overdubbing ................................................. 7
Switching virtual tracks ................................ 7
Tips – is it good or bad to record with
effects?....................................................... 7
To apply effects only to the sound being moni-
tored.......................................................... 7
Restoring the demo song................... 8
Restoring to the hard disk.............................. 8
Loading the demo song from hard disk.......... 8
Mixdown............................................. 9
Step 1. Listen to the recorded tracks and make
your plans.................................................... 9
Let’s begin ................................................... 9
Step 2. Setting up a rough mix..................... 10
Start with the kick and snare ...................... 10
Adding the drum overhead tracks .............. 10
Adding the hi-hat ....................................... 10
Adding the acoustic bass............................ 10
Adding the percussion ............................... 10
Adding the acoustic guitar ......................... 10
Adding the piano ....................................... 10
Adding the synthesizer............................... 11
Adding the organ ....................................... 11
Adding the electric guitar........................... 11
Adding the lead vocal ................................ 11
Adding the chorus...................................... 11
Listening to the rough mix.......................... 11
Saving the song.......................................... 11
Saving the scene ........................................ 11
Step 3. Assembling the mix for each part .....12
Channels 1/2: Bass drum and snare drum ...12
Channels 3/4: Drum overhead mics............13
Channel 5: Hi-hat.......................................14
Channel 6: Acoustic bass............................14
Channel 7: Percussion ................................15
Channel 8: Acoustic guitar..........................16
Channel 9: Piano........................................16
Channel 10: Synthesizer .............................17
Channel 11: Organ.....................................17
Channel 12: Electric guitar..........................18
Channels 13/14/15: Chorus ........................18
Channel 16: Lead vocal..............................19
Saving the song...........................................19
Step 4. Adding ambience..............................20
Using effect 1 send, and selecting an effect.20
Adding ambience to tracks as needed.........20
Channels 1/2: Kick and snare......................21
Channels 3 and 4: Overhead drum mics.....21
Channel 7: Percussion ................................21
Channel 8: Acoustic guitar..........................21
Channel 9: Piano........................................21
Channel 10: Synthesizer .............................21
Channel 11: Organ.....................................21
Channel 12: Electric guitar..........................21
Channels 13/14/15: Chorus ........................21
Channel 16: Lead vocal..............................21
Step 5. Completing the mix and making auto-
mation settings...........................................22
Automix ...................................................22
Listen to the recorded automix ....................22
About the contents of the “Can you feel it?” au-
tomix..........................................................22
Main contents of automix ........................23
Mastering ......................................... 24
Accurate monitoring is essential! ................24
Setting master EQ and dynamics..................24
Equalizer (EQ).............................................24
Compressor ................................................25
Master compressor settings for the demo
song..........................................................25
Recording the song to the stereo track.........25
Writing the song to a CD-R disc...................25
The next step.................................... 26
Glossary ............................................ 27
2
Tutorial
Page 4

Recording on the AW2816
Amazingly for its size, the AW2816 conceals potential
that rivals the mixing consoles found in large recording studios.
Although you can of course record a live performance
in a single pass, you can also use multi-track recording to take full advantage of the AW2816’s 16 x 8 =
128 tracks.
This tutorial will guide you through the actual recording process, so that you can learn how to utilize the
full power of the AW2816.
Creating a new song
In the WORK NAVIGATE section, press the [SONG]
key. When the Song List screen appears, move the
cursor downward, and press [ENTER] at the NEW
SONG button. You will be asked “Save current song?,”
so answer either YES or NO. Then specify the sampling rate (Fs) and number of recording bits (Recbit)
that the newly created song will use, and press
[ENTER]. Next you will be asked whether you want to
import mixer data (for details refer to the AW2816’s
“Owner’s Manual,” Reference section), but in this
case you need not select anything.
Now you can input a name for the song that will be
created. Press [ENTER] at OK, and the comment input
screen will appear. Unless you want to assign a comment, simply select OK. A new song has now been
created on the AW2816’s hard disk.
Recording the rhythm section
Using two mics to record the rhythm
Since the AW2816 provides two channels of XLR mic
input, you can put up two mics in a recording booth
and record in stereo. In this section we are going to
assume that you will record using two mics.
■
Connect the mics to the AW2816
Obtain two mics with the same characteristics (as far
as possible, two mics of the same manufacturer and
model), and connect the mic cables to the AW2816’s
INPUT 1 and 2 XLR jacks. If you are using condenser
mics, turn on the PHANTOM +48V switch located on
the back panel. (If you are using dynamic mics, leave
this switch turned off. Otherwise, the mic may be
damaged.)
Now let’s check that the sound from the mic is actually being input to the AW2816. First turn the gain
controls of the input to make adjustments. Recording
at as high a level as possible will take the best advantage of the AW2816’s potential, and give you the best
sound. However if the level is too high, the sound
may be distorted or a hissing noise may be recorded
along with the sound, so use caution. Adjust the gain
so that the PEAK indicator located at the upper right of
the gain control just barely flickers when you play
most loudly. If the PEAK indicator does not light even
when the gain control is turned all the way to the
right, check the connections once again, and if they
are OK, use the following procedure to check whether
the meters move.
When recording a new song, it is usual to start by
recording the rhythm section first, in order to set
down the tempo and groove (rhythmic feel) of the
song. After you have created the structure and rhythm
of the entire song, you can add vocals, guitar, and
other backing parts to complete the song.
At this stage, you just need the drums, bass, and percussion parts. In particular, recording the bass at an
early point in the process will clarify the chord progression of the song, and will make it easier for you to
perform overdubbing later. Parts that contribute to the
rhythmic feel of the song such as backing keyboard
and guitar chording should also be recorded early.
In the pages that follow, we will give several examples
of how the rhythm can be recorded. Refer to the
explanation for the method that you will actually use.
Tutorial
3
Page 5
Recording on the AW2816
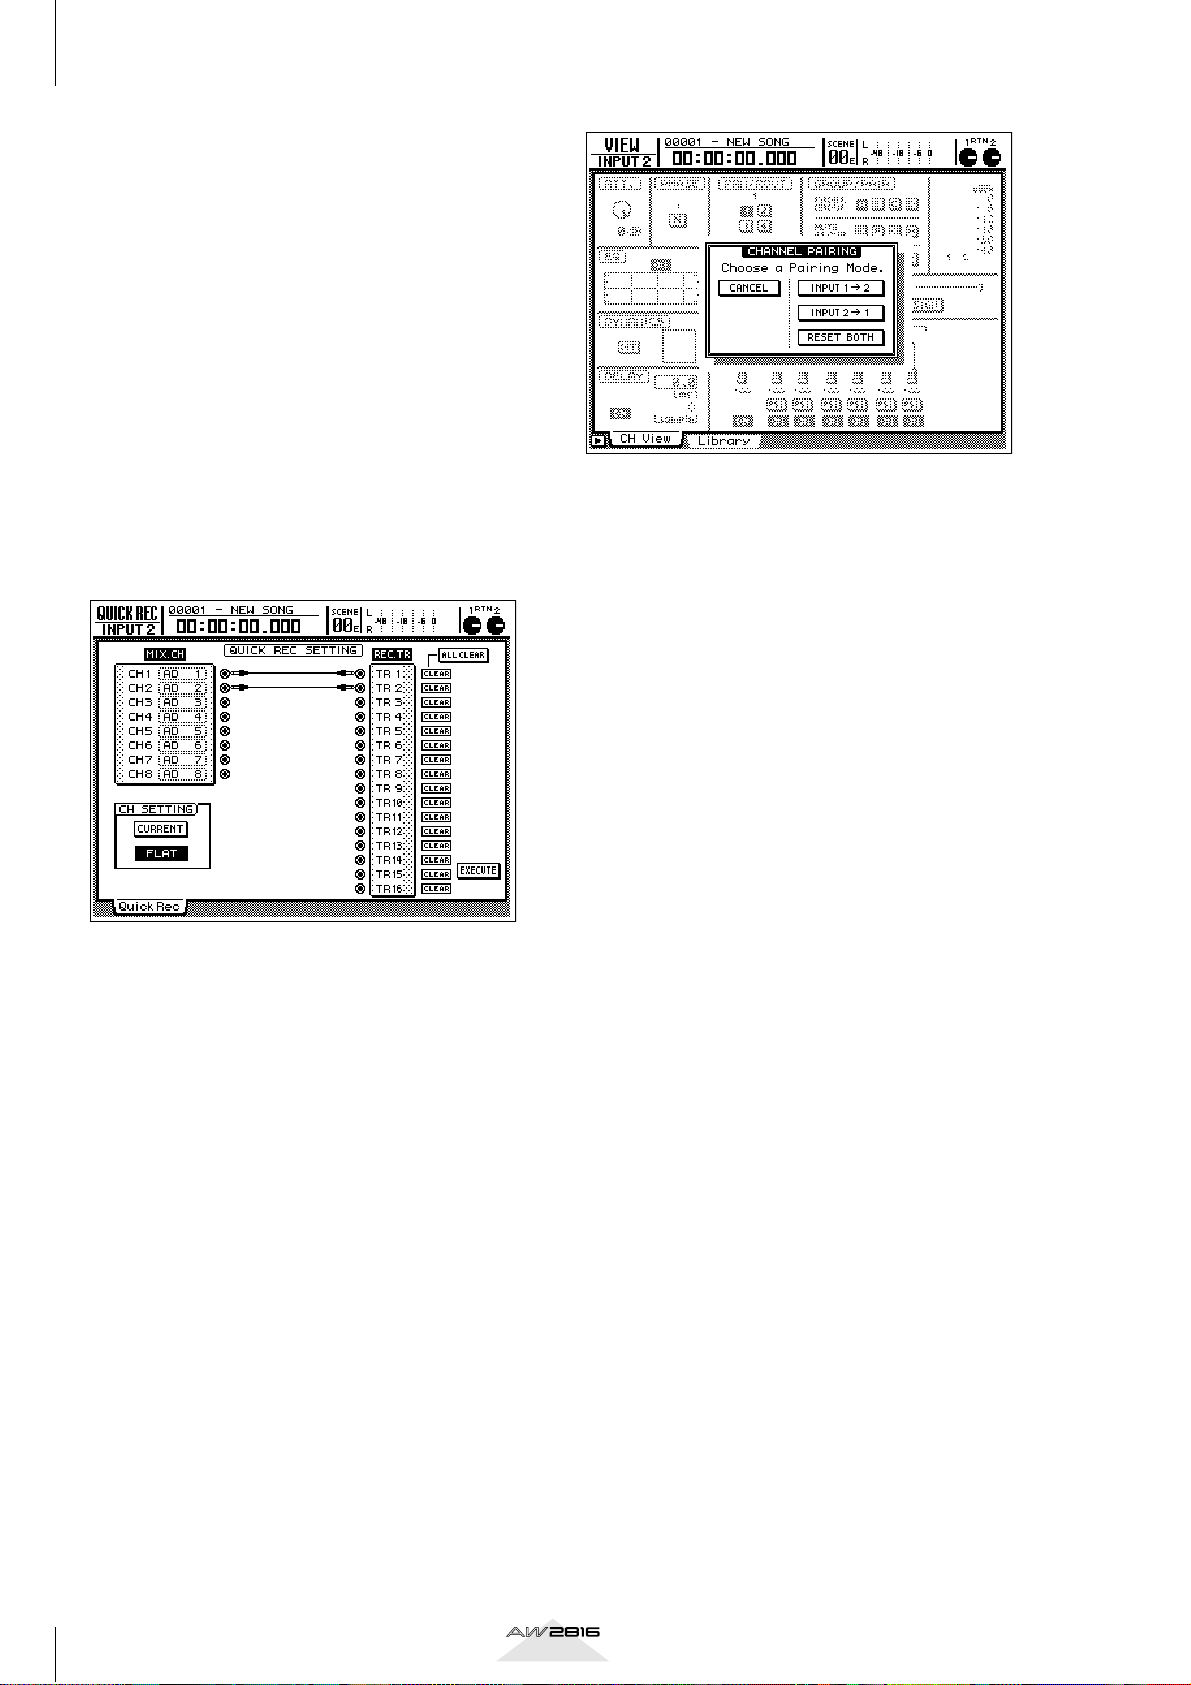
■
Recording sound from the mics
onto the hard disk
When you have finished adjusting the input level,
connect the input to the track on which it will be
recorded. In the WORK NAVIGATE section, press the
[QUICK REC] key. On the left side are the sounds
being input to the AW2816, and on the right side are
tracks 1–16 (a total of sixteen tracks) on which you
can record. Try pressing [ENTER] on the circle for
CH1 in the left. In the screen, a connection will be
made between CH1 and TR1. In the same way, connect CH2 and TR2. In the CH SETTING area, select
[FLAT] to select the default settings when recording
for the first time.
When you have completed these preparations, press
[ENTER] on EXECUTE, located at the far right. You will
be asked whether you are sure, so select OK. If the
REC TRACK SELECT 1 and 2 indicators in the upper
right of the AW2816 are blinking, you are ready.
Press the [ON] key located immediately above the
input channel 1 fader, making it light. (At this time,
the channel 2 [ON] key will also light if pairing has
been enabled.) A volume meter will be displayed at
the upper right of the CH View screen, so adjust the
fader, and check whether sound is being input from
each mic into the AW2816. You will be able to record
with the best-quality sound if the level is adjusted as
high as possible without allowing the OVER indicator
in the meter to light when the loudest sounds are
played. If you were able to adjust the gain control successfully in the beginning of this process, a fader position of approximately 0 dB should be just right.
Now we can just record. When you are ready to begin
playing, hold down the [REC] key and press the
[PLAY] key. When you are finished playing, press the
[STOP] key.
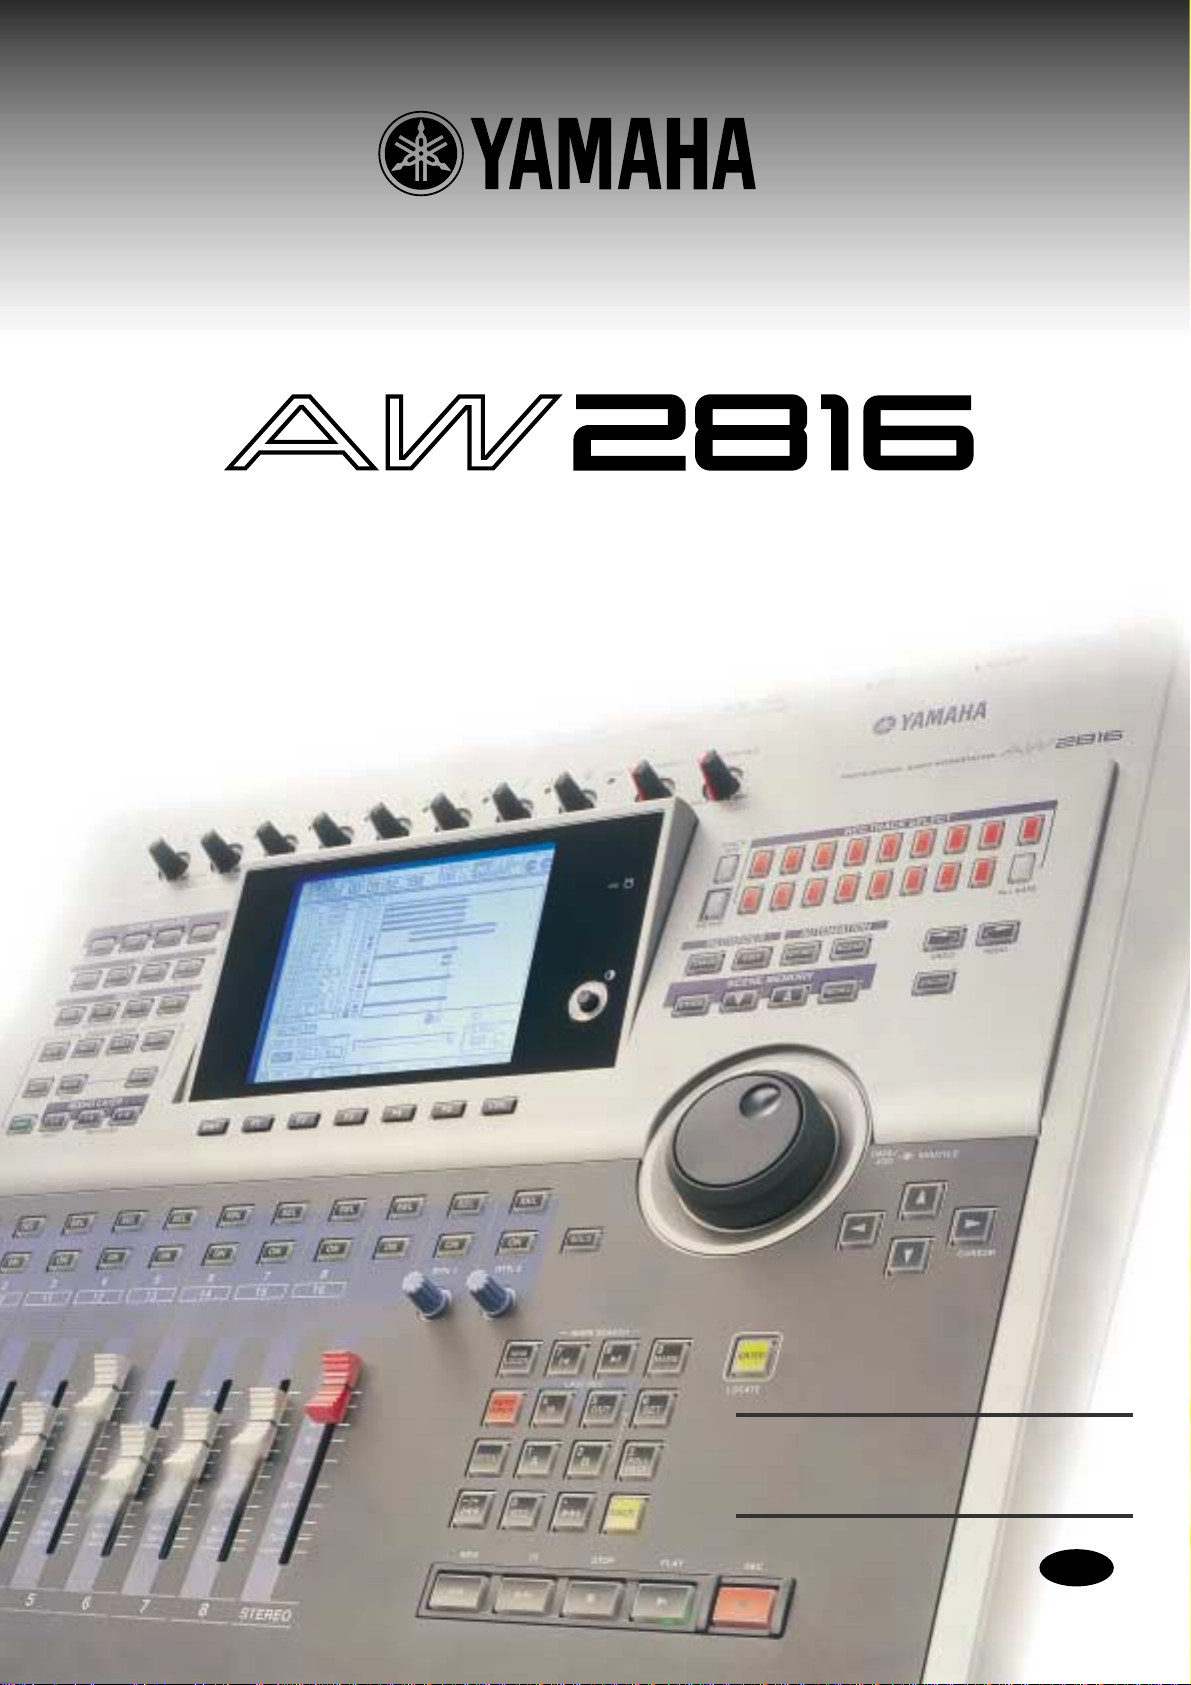
Although you could record immediately, let’s pair the
two inputs so that we can record in stereo.
In the MIXING LAYER section, press INPUT [1-8], and
then press the channel 1 [SEL] key to make it light.
Now in the MIXER section, press [VIEW], and then
press [F1] to access the CH View screen. Use the
[CURSOR] keys to move to the MONOx2 area beside
PAIR, and press [ENTER]. You will be asked how you
want to pair adjacent channels, so for this example,
press [ENTER] on INPUT 1
neously control the settings for the two inputs channel
1 and 2. To try this out, move the fader of input channel 1 up and down. The fader of the adjacent channel
should move with it.
→ 2. This lets you simulta-
■
Play back the recorded sound
Let’s listen to the sound that was recorded. If you used
the two mics in stereo, press the MIXER section [PAN]
key, and then press [F2] to open the Pan MONI
screen. If you have just created the song (and not
modified the settings), all sixteen tracks should be
heard from the middle (CENTER). In the screen, move
the cursor to the Pan control for track 1, and turn the
[DATA/JOG] dial all the way to the left (L16). In the
same way, set track 2 all the way to the right (R16).
What if you recorded the right mic on track 1? If so,
simply invert the left/right settings of the two tracks.
However since the input channels and tracks are
paired as 1-2, 3-4, ... etc., you should use the oddnumbered channel to input the left sound.
After you have made Pan settings, press the 0 [RTZ]
key of the keypad to return to the beginning of the
song, and press the [PLAY] key to play back. If you do
not hear sound, press the MIXING LAYER section
RECORDER [1-8] key, make the [ON] key light for
tracks 1 and 2 of the recorder, and make sure that the
faders are raised. Also make sure that the red STEREO
fader is raised and the PHONES control (if using headphones) or MONITOR OUT control (if using connected monitor speakers) are not lowered all the way.
If you still do not hear sound, it is possible that some
mistake was made when recording, so try the procedure described above once again, checking each step
as you perform it.
4
Tutorial
Page 6
Was the sound recorded correctly? If the sound is distorted or cracked, adjust the gain control and try the
recording once again. If the sound was recorded on
the hard disk in a distorted condition, it will be impossible to fix it later.
You should also pay close attention to the position of
the mics. Changing the direction of the mics and their
distance from the instrument makes an amazing
amount of difference in the recorded sound. Since the
AW2816 lets you re-record as many times as you like,
try various mic settings until you are happy with the
recorded sound you get. It is also useful to read magazines and watch what other people do, but unless you
are an experienced professional recording engineer, it
is difficult to put up mics in the “perfect” location
without some trial and error. We recommend that you
refer to professional publications, and try various
experiments with the AW2816.
Recording the sound of a rhythm machine
As an alternative to the preceding example, here’s
how a rhythm section created on a rhythm machine
with built-in sequencer functionality can be recorded
on the AW2816. Although you could simply press the
PLAY button of the rhythm machine at the same time
you begin recording, nearly all rhythm machines
these days support MTC or MIDI Clock, so let’s try
synchronizing the AW2816 with your rhythm
machine. In this example, we will use the AW2816 as
the MTC or MIDI Clock master, and make the rhythm
machine follow it.
First press [MIDI], and then [F1] to access the MIDI
Setup 1 screen. Make sure that MTC SYNC is set to
MASTER. Next, make sure that your rhythm machine
is able to receive MTC or MIDI Clock messages and
operate in synchronization. (On your rhythm
machine, this may be a setting named SYNC, or
something similar.) The settings and connections will
differ depending on which type of message is used for
synchronization.
If you are using MTC, use a MIDI cable to connect the
AW2816’s MTC OUT connector to your rhythm
machine’s MIDI IN connector (or its MTC IN connector, if there is on).
If you are using MIDI Clock, press [F2] to access the
MIDI Setup 2 screen. Turn the MIDI CLK setting ON,
set MIDI/HOST to MIDI, and set OUT/THRU to OUT.
For each of these, move the cursor to the setting, and
press [ENTER] to change the setting. Then use a MIDI
cable to connect the AW2816’s MIDI OUT connector
to the MIDI IN connector of your rhythm machine. If
you are using MIDI Clock, you will also need to make
tempo settings as explained below.
Next, change the settings on your rhythm machine so
that it will operate in synchronization to MTC or MIDI
Clock, and put the rhythm machine in a mode in
which it will wait for synchronization messages to
arrive. Now when you press the AW2816’s PLAY button, the rhythm machine should begin operating in
synchronization. Did it work? In the case of MTC, a
parameter called “Frame Rate” must also be set to the
same setting on both devices, so refer to the
AW2816’s “Owner’s Manual” and the manual of your
rhythm machine, and check this setting as well.
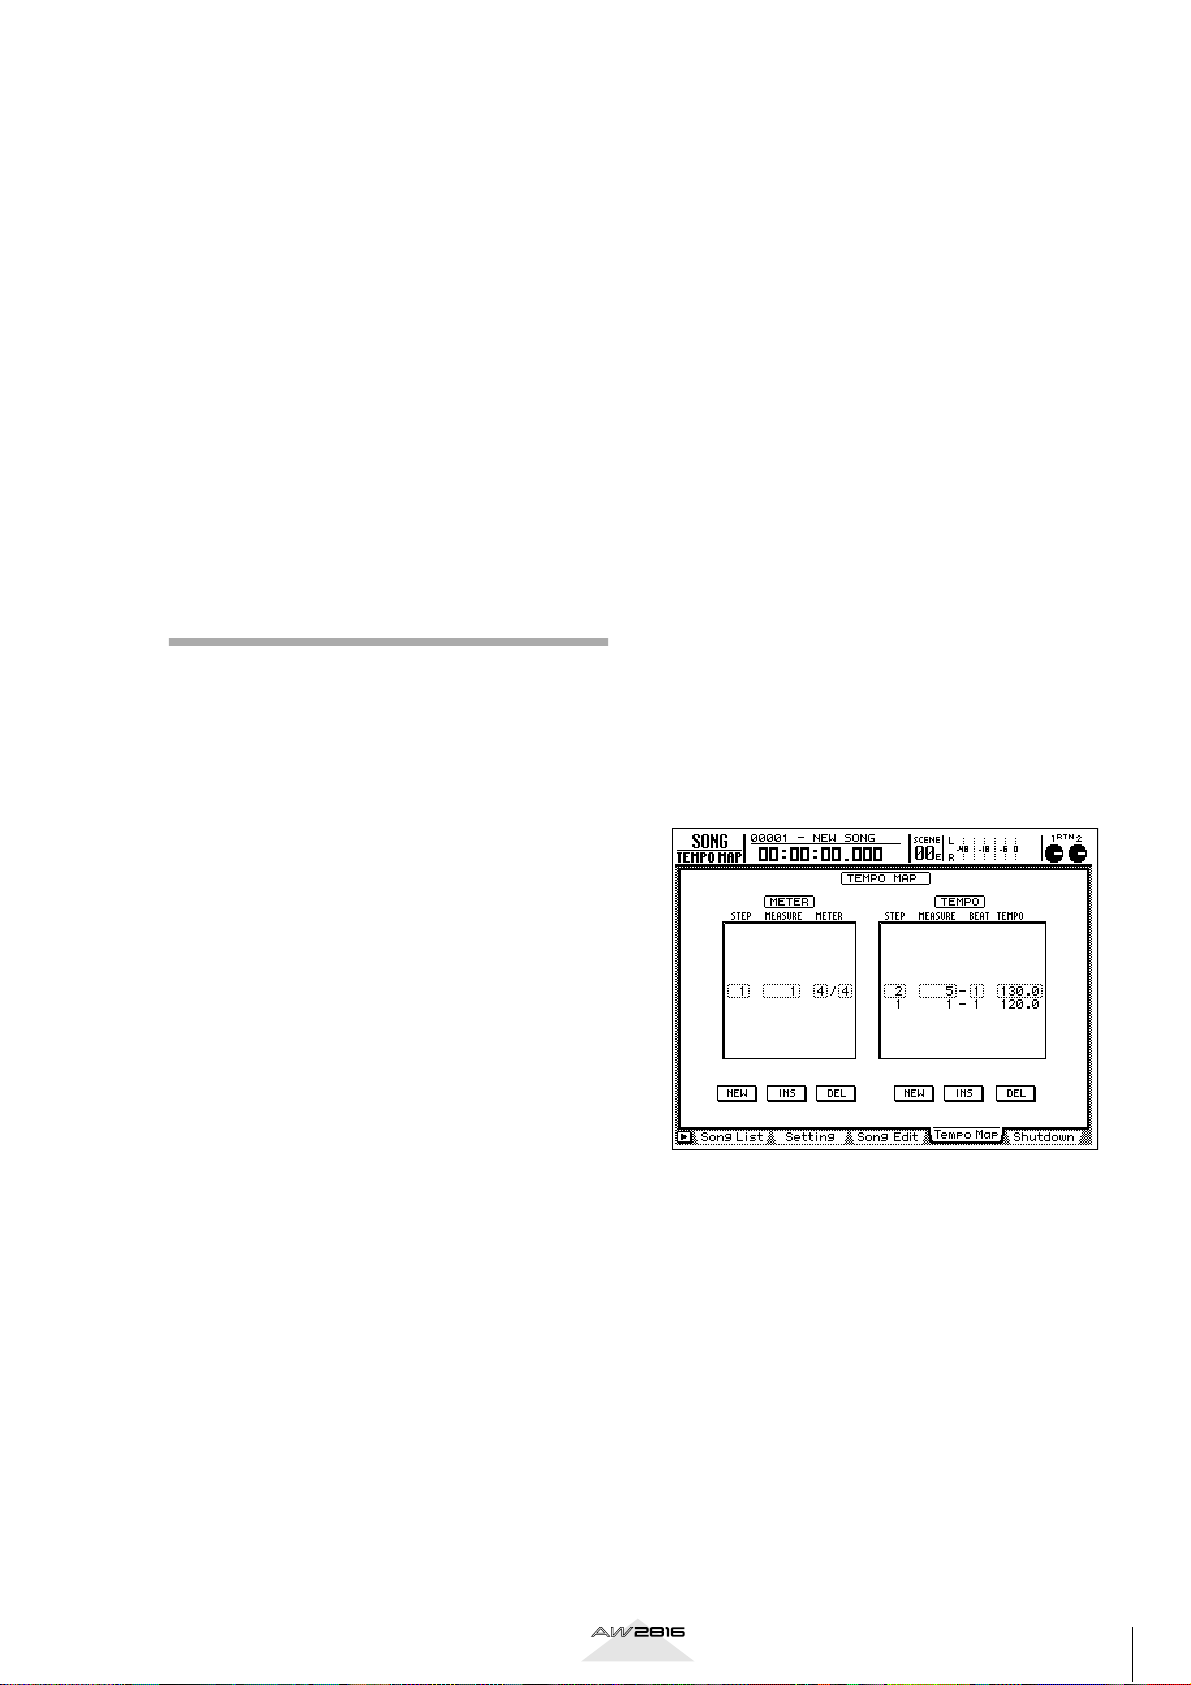
■
What is tempo data on the
AW2816
On the AW2816, tempo data is maintained independently for each song. When a new song is created, it
will be set to a time signature of 4/4 and a tempo of
120. If you want to change this, or if you want the
time signature or tempo to change during the song,
press [SONG] and then press [F4] to access the Tempo
Map screen. of the two frames, the left one is the time
signature (METER), and the right is the tempo
(TEMPO). To try this out, move the cursor to NEW in
the TEMPO area, and press [ENTER]. A second tempo
data will be created. Now try changing the STEP 2 settings MEASURE to 5, and TEMPO to 130.0. With these
settings, the tempo will be at the STEP 1 value (120)
for the first four measures, and will change to 130 at
measure 5.
If your rhythm machine has only a connector that
transmits MTC, or if you have already input detailed
tempo data into your rhythm machine and it’s too
much work to re-specify it for the AW2816, refer to
the AW2816’s “Owner’s Manual” and set it to operate
as a MTC slave.
Now that we have made the two devices operate in
synchronization, we are ready to record. Connect the
audio outputs of the rhythm to the inputs of the
AW2816, make sure that the sound is being input correctly, and then record. You can preserve a wider
range of mixdown options if you record separate
sounds from your rhythm machine on separate tracks
of the AW2816, so being mindful of the eventual
structure of your song, do this if you will have enough
recording tracks on the AW2816.
Tutorial
5
Page 7
Recording on the AW2816
Recording sounds that you steprecorded into your sequencer
The basic idea in this case is the same as when using a
rhythm machine, discussed above. However, the
AW2816 does not have tone generator functionality,
so you will have to provide a separate MIDI sound
module, use your sequencer software to play it, and
then record the audio onto the AW2816.
Recording vocals and acoustic instruments
When you are finished recording the rhythm section,
let’s record the vocals, lead guitar, and acoustic instruments. Our explanation will assume that you have
connected a mic to the AW2816’s INPUT 1 (or 2), and
will be recording a vocal.
When recording a vocal, the singer will obviously
need to sing while listening to the previouslyrecorded tracks. Nobody is going to make the mistake
of having the vocalist listen to the existing tracks over
the monitor speakers while singing into the mic, but
it’s worth noting that if the vocalist uses open-type
headphones for monitoring, sound that leaks from the
headphones can get into the mic and be recorded. We
strongly recommend that you use sealed-type headphones for monitoring when recording into a mic.
When recording a vocal, it is effective to use a monitor mix that is different from the real mix. For example
you may want to boost the volume of specific rhythm
parts, or to have a pre-recorded “scratch vocal” that
the vocalist can sing along with as a guide. The
AW2816 has a function called “scene memory,” so
first store the current settings of the MIXER section,
and then create a separate mix for monitoring by the
vocalist and store it in a different scene memory. This
way, you will always be able to return to the same
condition whenever you need to re-record the vocal
at some later point.
■
Switching scene memories
Let’s try actually switching the scene. First use the
SCENE MEMORY section [ ]/[ ] keys to change
the scene number to other than 00. (Scene number 00
contains default settings that cannot be edited.) The
scene number is displayed in the upper part of the
screen, slightly toward the right side. For this example
we will assume that you have selected 01. Press the
[STORE] key of the SCENE MEMORY section. You will
be asked to input a name for the scene, so assign an
appropriate name and select OK. Next, play back the
previously-recorded tracks, boost the volume of the
drums and other rhythm instruments so that the vocalist will have a clear sense of the song’s rhythm (while
reducing the volume of the other parts). Change the
setting to Scene Memory 02 and press STORE, assign
an appropriate name, and select OK to save the
scene.
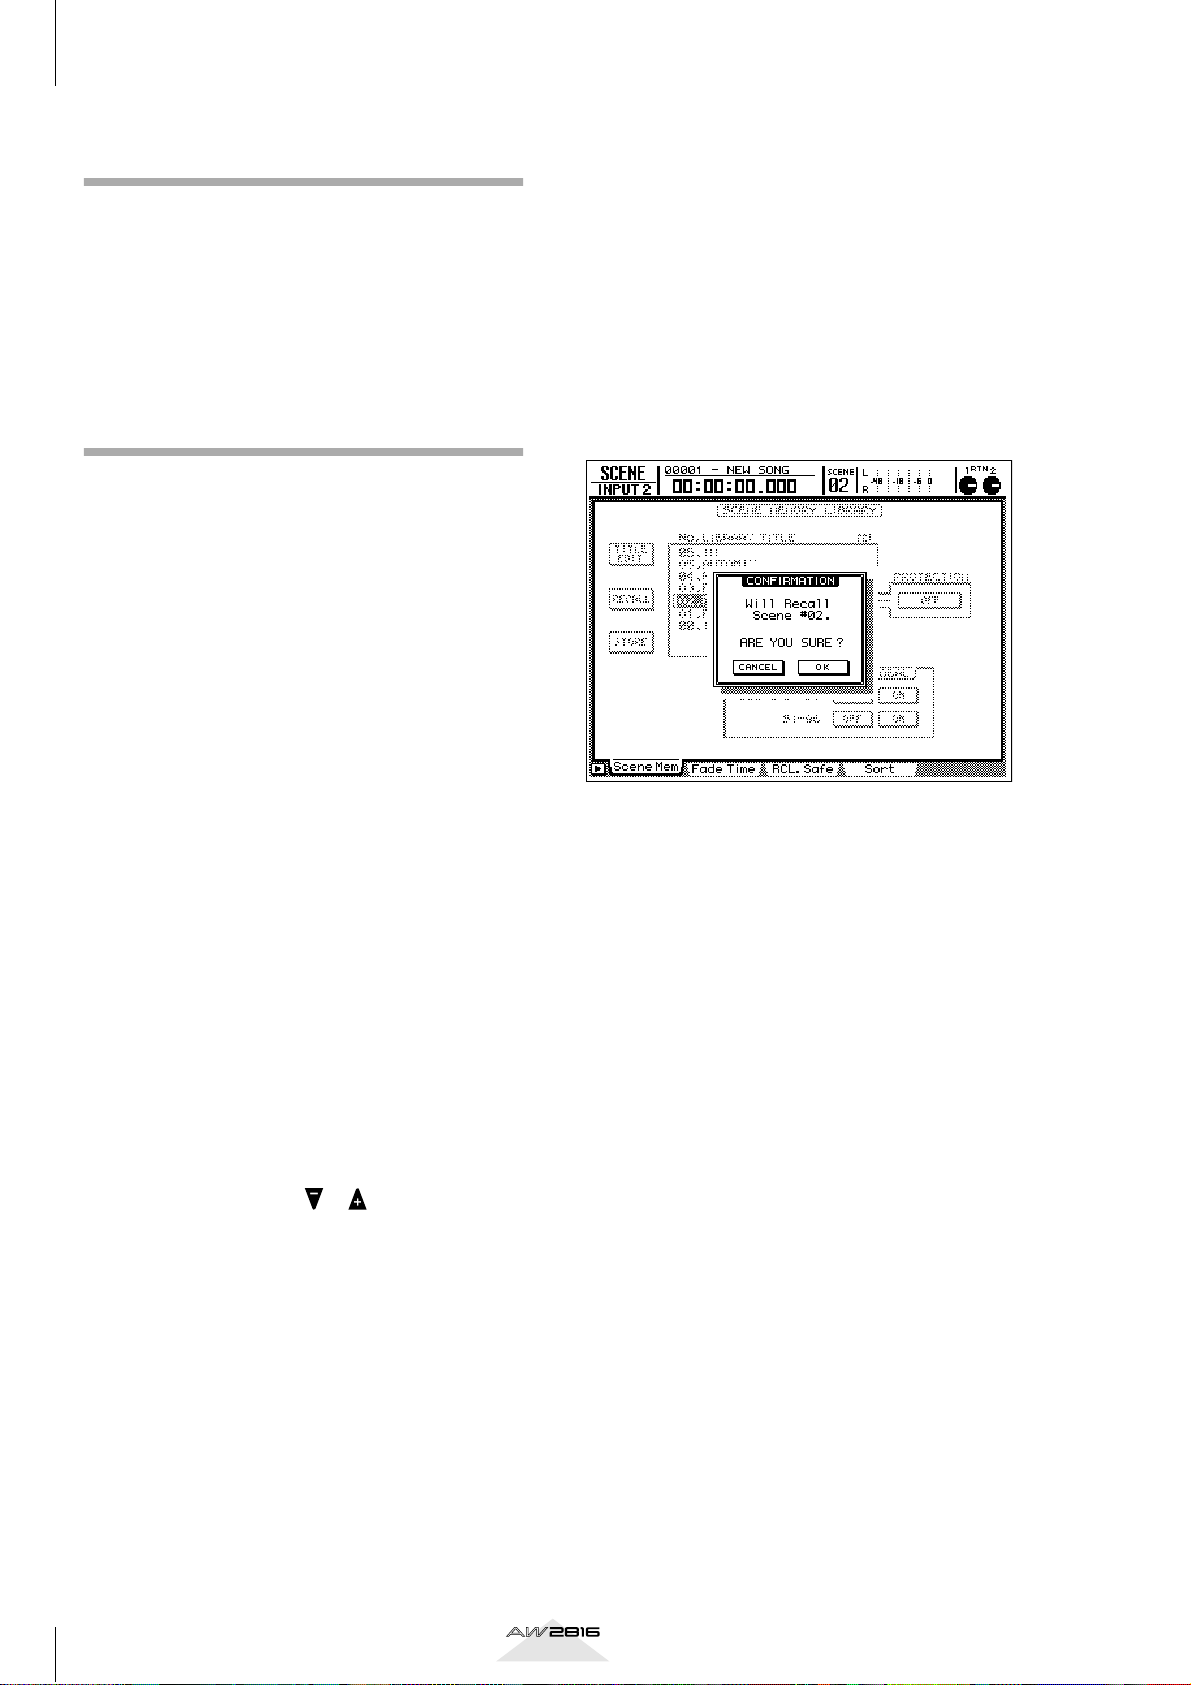
Now let’s recall the scenes you saved. Change the
scene number to 01 and press [RECALL]. A message
will ask “Will Recall – ARE YOU SURE?”, asking you
whether you are sure you want to recall. Press
[ENTER] on OK, and you will be back to the settings
that were in effect before you modified the volume of
each track for monitoring by the vocalist. In the same
way, select scene 02 and press [RECALL]. Now the
mixer has the settings that you previously saved for
vocal monitoring.
Scene memories are convenient, but if you recall a
different scene without remembering to save the previous settings, they cannot be recovered, so please
use caution.
■
Tips – vocal recording
For the music of today, recording the vocal is the most
important element in the recording. The volume
adjustment at the input of the AW2816 is of course
important, but you must also pay careful attention to
the height and direction of the mic, remember to use
a pop shield, and be aware of the volume and tonal
character of the vocal. Your selection of a recording
location is also important. The sound will differ dramatically depending on whether it was recorded in
the living room or in the shower.
The best settings are the settings that give you a
recording that maximizes the strengths of that vocalist. Try everything you can think of that will help the
vocalist perform at peak ability. You will probably not
get a good recording if the vocalist is very tense or
nervous. If you create an appropriately relaxed atmosphere for your vocalist, you will get a good recording
that takes full advantage of the broad dynamic range
offered by the AW2816 (very broad, since you can
even use 24 bit recording!).
6
Tutorial
Page 8
Overdubbing
The overdubbing procedure is basically the same as
when you recorded the rhythm section and vocal.
Record each of the backing tracks while you listen to
the previously-recorded tracks.
We recommend that during the recording stage, you
record all the parts you think you will ever want for
the song. You can always delete unneeded parts during the mixdown, and you can (for example) record
several different guitar solos and switch between them
to see which one you like best. The AW2816 has 128
virtual tracks, so if you record and keep several takes
of the vocal, you will have more flexibility during
mixdown.
■
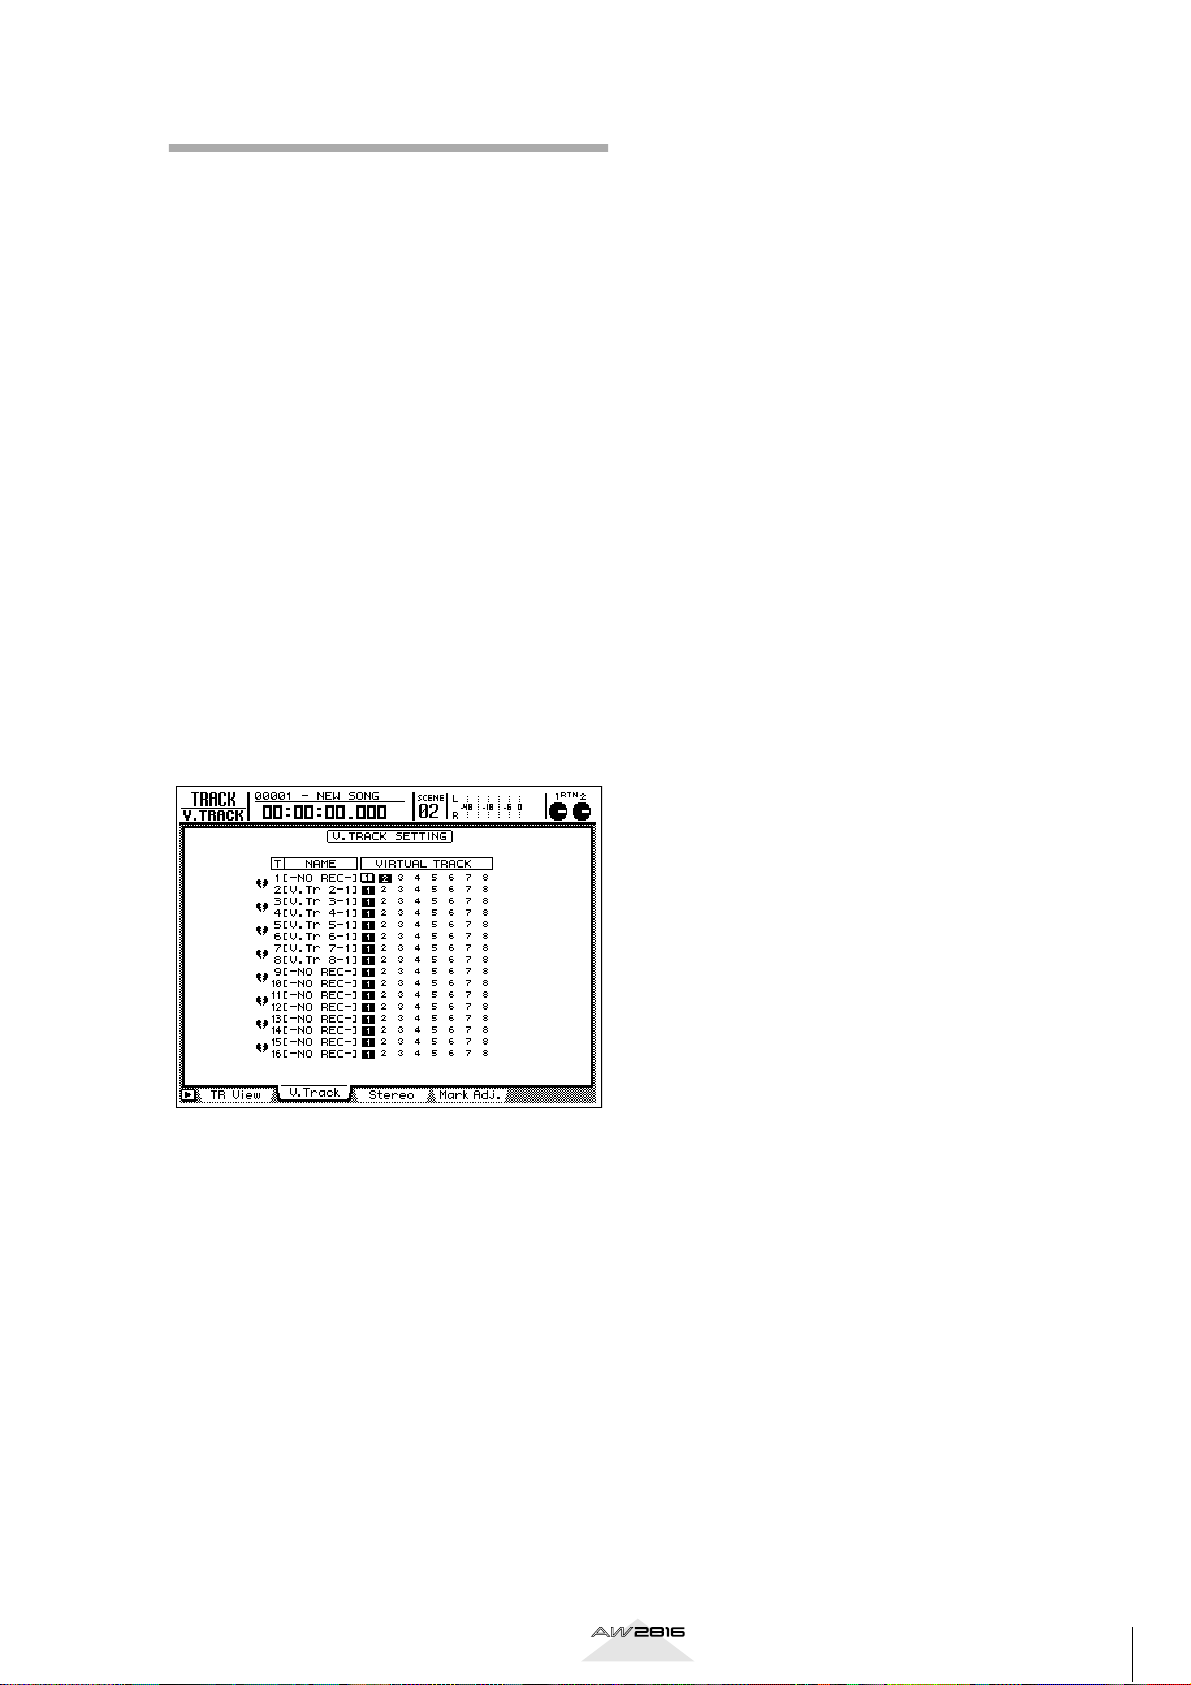
Switching virtual tracks
When you want to switch virtual tracks, press the
RECORDER section [TRACK] key, and then press [F2]
to access the V.Track screen. To try this out, go to the
virtual track area for track 1 (the top line), and press
[ENTER] on 2. The “2” will be highlighted. Now press
[F1] to return to the TR View screen. There is a column
labeled “V” at the right of the NAME column for each
track, and for track 1 this should indicate “2”. This
shows the virtual track that is currently selected for
each track.
■
To apply effects only to the sound
being monitored
When recording a vocal, the vocalist often finds it
easier to sing if a spatial-type effect such as reverb is
applied. In this case, it is useful to apply the effect by
using AUX SEND from the input, so that the unprocessed sound is recorded and the effect applied only to
the monitored sound.
Referring to the methods that we have discussed so
far, input the sound from the mic into input channel 1,
and use [QUICK REQ] to prepare to record on track 1.
Next, press [AUX 5] in the FADER MODE section. The
faders should all move down, and the Eff.Edit screen
should appear. Here, raise the input channel 1 fader,
and listen to the sound from the mic on the AW2816.
If a reverb-type effect is selected, reverberation should
be applied to the sound. At this point, the effect sound
is being output to the stereo out (which is the final
output of the AW2816), but is not being recorded on
track 1. Actually record the input, and verify that the
effect is not applied to the recorded sound.
■
Tips – is it good or bad to record
with effects?
The AW2816 provides a very wide range of effects,
but you should be aware that if you apply an effect
during recording so that the processed sound is
recorded, it will be impossible to make any changes
in that effect afterward. In particular, applying equalizer (EQ) or spatial-type effects during recording may
limit your freedom during mixdown.
In some cases, a limiter is used while recording drums
or bass to keep the sound from distortion, but this
requires a certain amount of technique, so until you
have some experience, we recommend that you actually watch the meter, and use the gain control or volume fader to adjust the level so that distortion is
avoided.
Tutorial
7
Page 9
Restoring the demo song
Restoring the demo song
The following chapter explains the mixdown procedure using the demo song included with the AW2816.
Thus, we will begin by explaining how to load the
demo song from the included CD-ROM into the
AW2816’s hard disk.
In this tutorial, we will assume that an ATAPI-connected CD-RW drive has already been installed in the
AW2816. However, it is also possible to use an external SCSI CD-RW drive. For details on how to install a
CD-RW drive, refer to the AW2816’s “Owner’s Manual.”
Restoring to the hard disk
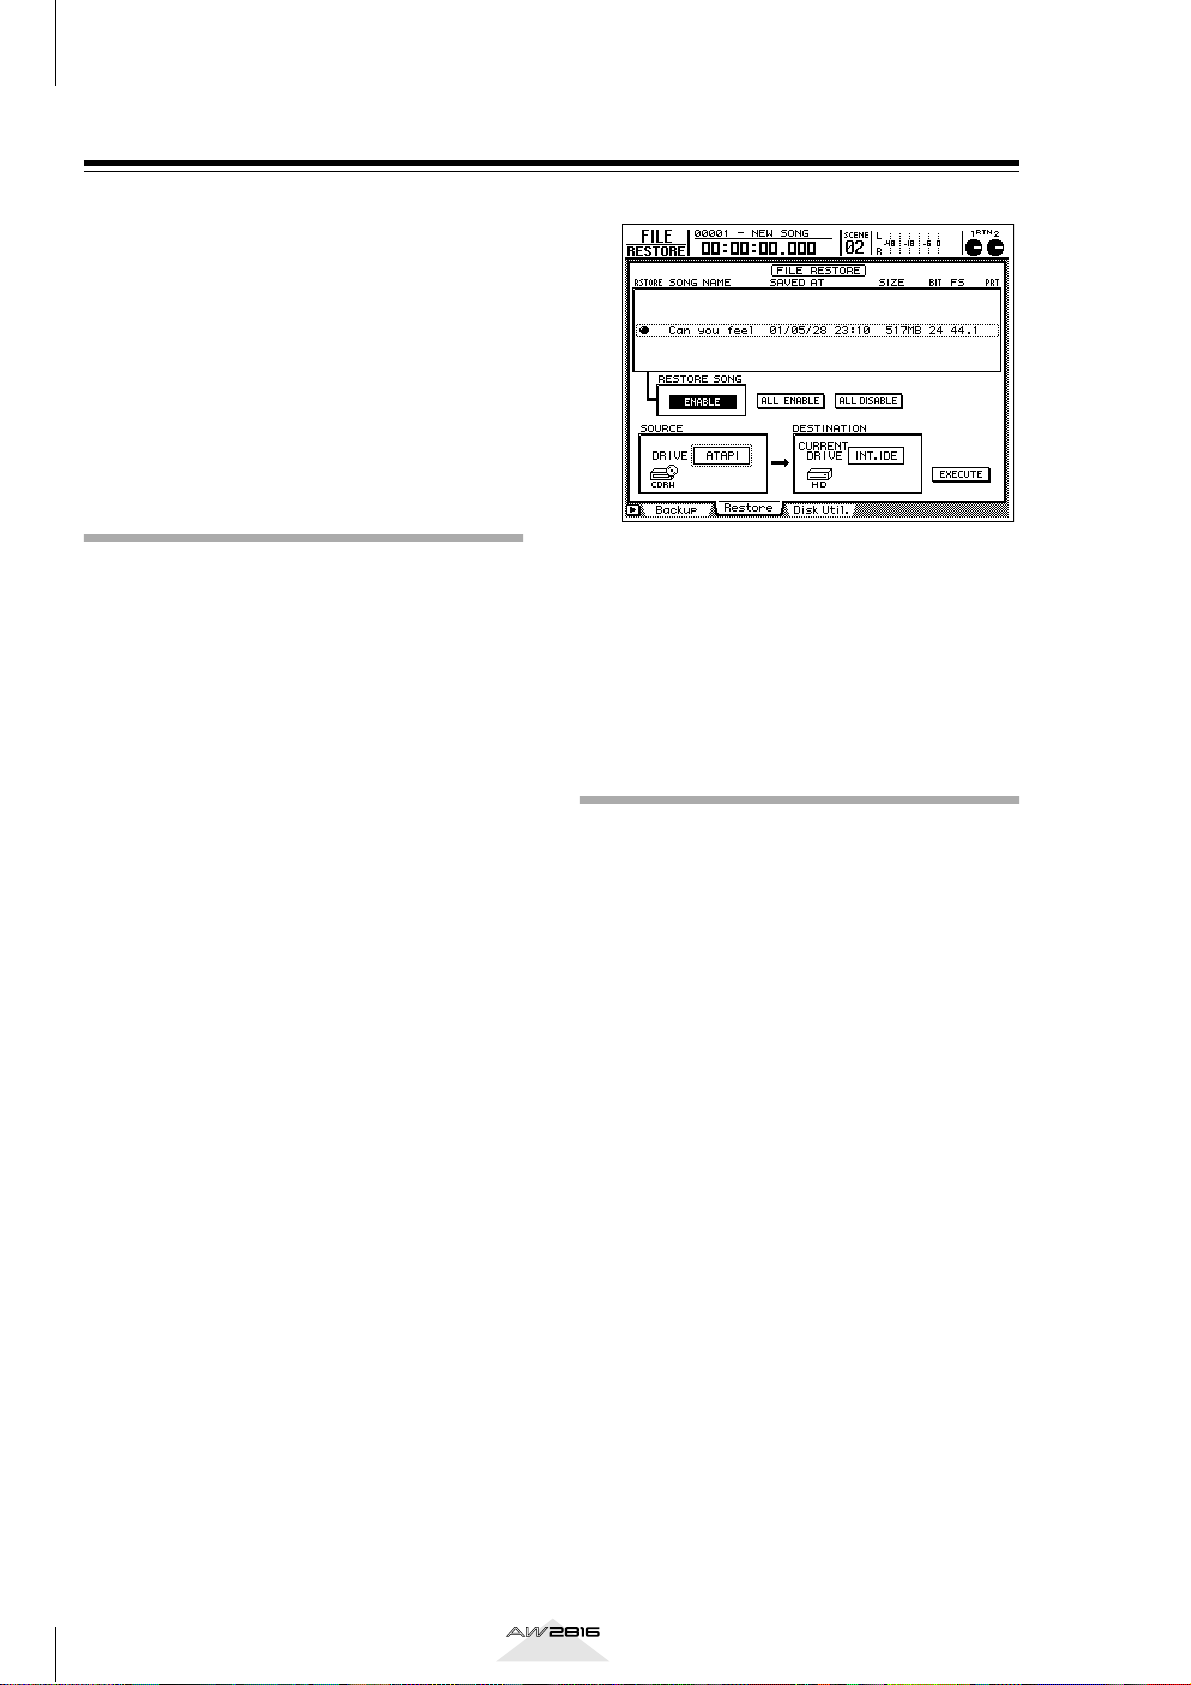
Press the [FILE] key.
1
Press the [F2] key to access the Restore
2
page.
Make sure that in the SOURCE area, the
3
DRIVE parameter is set to ATAPI.
(If you want to use an external SCSI CD-RW
drive, move the cursor to the SOURCE area, and
turn the [DATA/JOG] dial to select the appropriate SCSI ID number, and then press the [ENTER]
key.)
Hold down the [SHIFT] key and press the
4
[F2] key (CD UNLOAD) to open the CD
tray.
Place the included demo CD-ROM with the
label facing upward on the tray. Then hold down
the [SHIFT] key and press the [F1] key (CD
LOAD) to close the tray and load the CD.
The demo song “Can you feel it?” will
5
appear in the on-screen list.
Move the cursor to the RESTORE SONG area and
press the [ENTER] key. The RESTORE SONG button will change from DISABLE to ENABLE.
Move the cursor to the EXECUTE button in
6
the screen, and press the [ENTER] key. A
message of “ARE YOU SURE” will ask you
to confirm, so move the cursor to “OK”
and press the [ENTER] key to begin the
Restore operation.
When the display indicates “COMPLETE,”
7
the Restore operation has been completed.
The Restore operation will take approximately
ten minutes. Once you have executed Restore, it
is not possible to cancel the operation.
Loading the demo song from hard disk
Press the [SONG] key. (If the Song List
1
page does not appear, press the [F1] key.)
Use the [DATA/JOG] dial to select “Can you
2
feel it?”
Move the cursor to the LOAD button in the
3
screen, and press the [ENTER] key. A message of “Will Save Current Song. ARE YOU
SURE?” will appear, so move the cursor to
“YES” or “NO,” and press the [ENTER] key
to begin loading the data.
When the progress indicator disappears,
4
the demo song has finished loading.
If you want to hear the pre-mixed version of the
demo song before you mix it yourself:
Press the [PLAY] key. The demo song will be
loaded with automix turned on, and will be
played back according to this mix.
8
Tutorial
Page 10
Mixdown
“Mixdown” sounds like it refers to a single operation,
but in reality, it is a sequence that consists of numerous processes. As you become more experienced, the
various steps will blend together into one big process.
It is important to keep this in mind, because you must
be aware of the effect that even the smallest operation
will have on the overall sound. For example if you use
the equalizer to slightly modify the tonal character of
one instrument, it will affect the way in which other
instruments are heard. Through experience, you will
gain the ability to predict the result of such changes.
As you create more mixes, you will become better at
it.
Step 1. Listen to the recorded tracks and make your plans
The most important step in mixing is to make plans in
your mind before you actually begin mixing. Consider
the following points.
• Think about the music you intend to produce.
What is the lyric content? What is the atmosphere
you want to convey? How can you create a mix
that enhances the music itself?
• What is the defining characteristic of the song? The
lyrics? The voice of the singer? The rhythm? A specific instrument or sound? You should emphasize
the element that is most important. For example if
the lyrics are important, you should avoid letting
the vocal be buried in the background, or obscured
by excessive reverb.
• How are the instruments placed in the stereo field?
Are you going to recreate the sound field of a life
performance? Or are you trying to create a more
abstract impression?
• In what type of space do you want to place the
music? An open and dry space? A spacious and
reverberant space? Narrow and tight? Distant?
Nearby?
• Are there any instruments that share a similar frequency range and might conflict with each other?
Distorted electric guitar and organ are good examples of this. Such instruments might be separated
by being panned to left and right, or you might use
the equalizer to give each instrument its own distinct identity, skillfully bringing out the unique
character of each instrument.
• Will you need to change moods or scenes to create
significant shifts in level, equalizer, or effects during the mix? By using automation, even such complex mixes can be easily performed.
■
Let’s begin
Now that the song has been restored to the hard disk,
let’s listen to the “unmixed” song.
Before you proceed, you must be sure to turn AUTOMIX off. In the AUTOMATION section, press the
[AUTOMIX] key. In the AUTOMIX area, move the cursor to the ENABLE button and press the [ENTER] key
to set AUTOMIX to DISABLE (off).
Make sure that in the MIXING LAYER sec-
1
tion, “1-8” or “9-16” is selected.
Recall scene number 01 “FADERS NOMI-
2
NAL” to set faders 1–16 to the nominal
level. (Press the [SCENE] key, and use the
[DATA/JOG] dial to select scene number 01
“FADER NOMINAL,” move the cursor to
the RECALL button, and press the [ENTER]
key. Then select “OK” and press the
[ENTER] key to confirm.)
Press the MIXER section [VIEW] key to
3
access the parameters for the selected
monitor channel. Press [F1] to access the
CH View page.
Press the [PLAY] key, and listen to the
4
tracks.
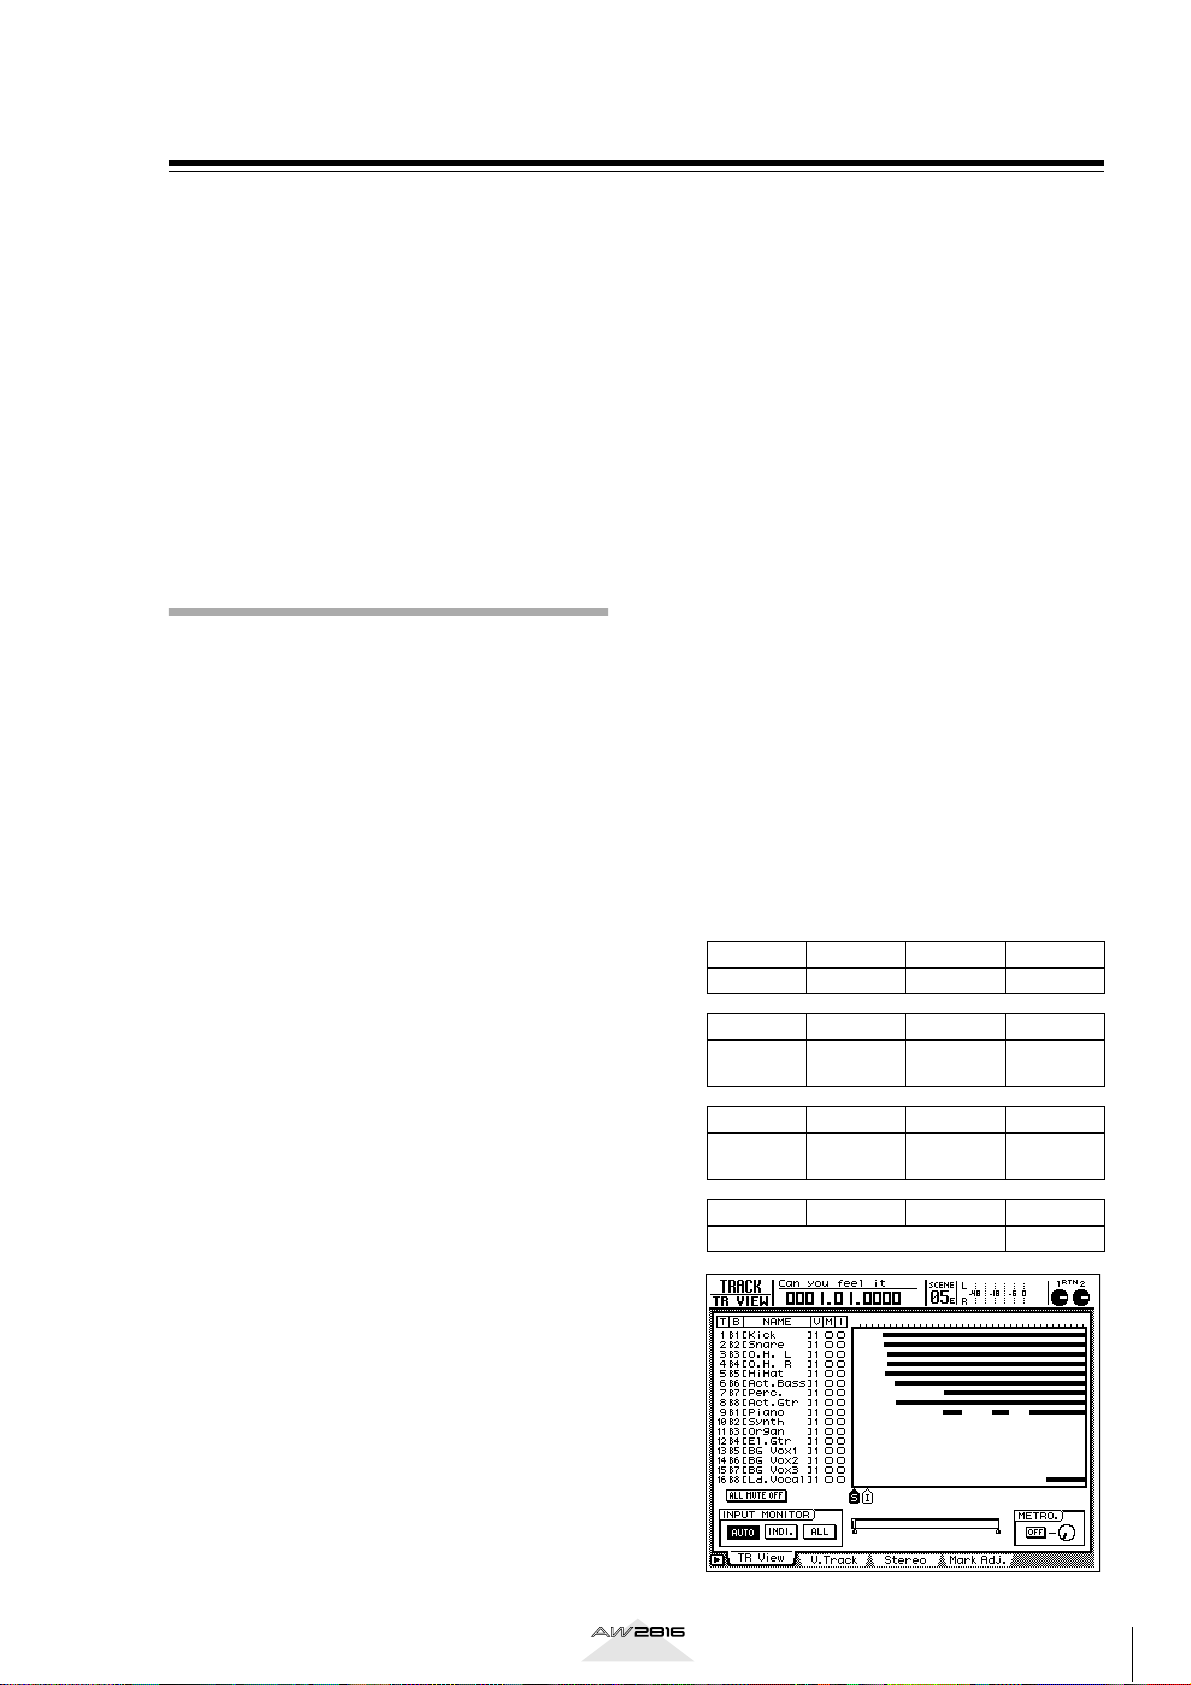
The following table shows the track contents of
the included demo song.
1234
Kick Snare
5678
Hi-hat
9 101112
Piano Synth Organ
13 14 15 16
Acoustic
bass
(Chorus) 16 Vocal
Overhead (L) Overhead (R)
Percussion
Acoustic
guitar
Electric
guitar
These are just a few examples, but as you gain experience, you will learn how to make a good mixing plan
for each song.
Tutorial
9
Page 11

Mixdown
Step 2. Setting up a rough mix
The rough mix is just a starting point for the final mix,
and does not need to be perfect. The purpose of creating a rough mix by adjusting only level and pan is to
have a reference point from which you can make
more detailed adjustments, and apply effects and
automation, so don’t spend too much time on this. Of
course if the fader or pan settings bother you in a way
that would affect your judgment during the remainder
of the mixing process, go ahead and make the necessary adjustments. Mixing is a process of trial and error,
so you will keep making adjustments as many times
as necessary until you are satisfied.
• The preset rough mix
If you do not want to set up your own rough mix, or if
you would like to listen to the existing rough mix,
recall scene number 02 “STEP2 MIX.” Press the
[SCENE] key, and use the [DATA/JOG] dial to select
scene number 02 “STEP2 MIX.” Next, move the cursor to “RECALL” and press the [ENTER] key. When the
confirmation message appears, select “OK” and press
the [ENTER] key. To return to the VIEW screen, press
the MIXER section [VIEW] key.
If you want to leave the VIEW screen displayed while
doing this, use the SCENE MEMORY section [ ]/
[ ] keys to select the scene that you want to recall.
(The scene number and title will be displayed in the
upper right of the screen.) Next press the [RECALL]
key, and when the confirmation message appears,
select “OK” and press the [ENTER] key.
You can make settings so that the entire song or a portion of it continues looping while you set up the rough
mix. This will make it easier to adjust level and pan.
Use MARK A and B to specify the beginning and end
of the loop, and press the [REPEAT] key make the
playback repeat. (For details refer to the AW2816
“Owner’s Manual.”)
■ Start with the kick and snare
Use the channel [ON] keys to turn off all tracks except
for the kick and snare (tracks 1 and 2). Leave the STEREO channel on. The kick and snare are recorded on
tracks 1 and 2 respectively.
■ Adding the drum overhead tracks
Use the following procedure to pair the monitor channels.
Hold down the channel 3 [SEL] key and
1
press the channel 4 [SEL] key.
When the CHANNEL PAIRING window
2
appears, select “MONITOR 3→4” and
press the [ENTER] key.
This will pair the two channels so that operating
the fader of one channel will cause the other
fader to move in the same way. The MIXER VIEW
screen will display the pan and routing controls
for both channels.
Next we will pan the stereo drum tracks to left and
right to create a stereo image. Use the following procedure to adjust the pan settings of channels 3 and 4.
Use the [SEL] key to select the channel
1
whose pan you want to adjust. (Since the
channels are paired, selecting a channel
will cause the [SEL] key of the other channel to blink.)
While you watch the pan control in the
2
screen, use the [PAN] control in the upper
right of the screen to make adjustments.
■ Adding the hi-hat
Turn channel 5 “ON,” and listen. This will sound better with the pan adjusted toward the right. If the hi-hat
is a bit obtrusive when the kick and snare track faders
and the overhead track faders are all at nominal level,
you can use fader 5 to lower the hi-hat level about
5 dB (the fader screen will indicate –5.0).
■ Adding the acoustic bass
Turn channel 6 “ON” and listen. There’s no need to
adjust the pan, since the bass is normally placed in
the center, but if the bass is too loud relative to the
drums when the drum track faders are at nominal
level, use fader 6 to lower the bass level about 5 dB
(the fader screen will indicate –5.0).
10
■ Adding the percussion
Turn channel 7 “ON” and listen. If the percussion
(handclaps) is too loud for the drum set and acoustic
bass, use fader 7 to lower the percussion level about
5 dB (the fader screen will indicate –5.0).
■ Adding the acoustic guitar
Turn channel 8 “ON”. If the guitar is too loud for the
other tracks, use fader 8 to lower the level about
10 dB.
■ Adding the piano
Turn channel 9 “ON”. If the piano is too loud for the
other tracks, use fader 9 to lower the level about 5 dB.
Tutorial
Page 12

■ Adding the synthesizer
Turn channel 10 “ON”. If the synthesizer is too loud
for the other tracks, use fader 10 to lower the level
about 5 dB.
■ Adding the organ
Turn channel 11 “ON”. Make fine adjustments to the
fader so that the sound does not stand out in comparison with the other tracks.
■ Adding the electric guitar
Turn channel 11 “ON”. Compared to the other tracks,
the electric guitar track will have a more intense sense
of volume, so you might use fader 12 to lower the
level about 10 dB.
■ Adding the lead vocal
Some of you probably expected to add the chorus
(tracks 13/14/15) before adding the lead vocal, but in
order to set appropriate levels for the chorus, it is
important to hear it in relation to the lead vocal level.
Turn channel 16 on, and with the pan left in the center (the usual position for the lead vocal), set the fader
at approximately nominal level (0 dB).
■ Saving the scene
Let’s save the completed rough mix. Press the SCENE
key, and use the [DATA/JOG] dial to select a vacant
scene that is displayed as “No Data!” Then move the
cursor to “STORE” and press the [ENTER] key. The
TITLE EDIT popup window will appear, so assign a
name (or leave it unassigned), select “OK” and press
the [ENTER] key.
You can alternately select this scene and another
scene to compare the pre-made rough mix with your
own.
■ Adding the chorus
In the intro, the chorus enters before the lead vocal,
and in the final mix a certain amount of automation
will be necessary. But for now, listen to a section of
the song where the lead vocal is heard together with
the chorus, and adjust the level of the chorus section.
Turn on channels 13/14/15, and raise the fader levels
to a point where they will not interfere with the lead
vocal on track 16.
■ Listening to the rough mix
Although you have already listened to the song
numerous times while creating the rough mix, now
you will listen to the entire song, rather than to an
individual part. Make adjustments as desired.
■ Saving the song
To save the song, press the WORK NAVIGATE section
[SONG] key to access the SONG screen. As necessary, press the [F1] key to display the Song List page.
Move the cursor in the screen to “SAVE,” and press
the [ENTER] key. When the confirmation window
appears, move the cursor to “OK” and press the
[ENTER] key. The song has now been saved.
Tutorial
11
Page 13

Mixdown
Step 3. Assembling the mix for each part
In order to create a balanced mix, we now need to
pay a bit more attention to the details of each track.
• Preset scene
You can recall a preset scene that contains all settings
up through step 3, below. Press the [SCENE] key
(press the [F1] key to select the Scene Mem page if
necessary), and use the [DATA/JOG] dial to select
scene number 03 “STEP3 MIX.” Move the cursor to
“RECALL” and press the [ENTER] key. When the confirmation message appears, select “OK” and press the
[ENTER] key. To return to the VIEW screen, press the
MIXER section [VIEW] key.
If you want to leave the VIEW screen displayed while
doing this, use the SCENE MEMORY section [ ]/
[ ] keys to select the scene that you want to recall.
(The scene number and title will be displayed in the
upper right of the screen.) Next, press the [RECALL]
key, and when the confirmation message appears,
select “OK” and press the [ENTER] key.
During the mix process, you will frequently be turning
channels on/off so that you can hear just a certain part
by itself, or together with specific other tracks. You
might think of using the Solo function to do this, but
in this case, this would require you to change the settings of the Solo function by accessing the SET UP
screen/Solo Setup page, and setting STATUS to MIXDOWN SOLO, and LISTEN to AFTER PAN. At this
stage of the mixdown, you need to hear the tracks
with the EQ, dynamics, and other effects applied.
Normally when you use the Solo function to monitor,
you will hear only the “dry sound” of a track. At this
stage, listening to the dry sound would not be very
helpful.
Make sure that the EQ is on for the
3
selected channel. (If it is off, move the cursor to the EQ ON button and press the
[ENTER] key to turn it on.)
Use the cursor keys to set the various EQ
4
parameters.
• Channel 1: Kick
DYNAMICS Gate
Threshold
–23 dB –57 dB 0ms 34.8 dB 110 ms
EQ (ATT –4 dB)
Range Attack Hold Decay
LOW L-MID H-MID HIGH
Q L.SHLF 6.3 0.9 H.SHLF
F 70 Hz 223 Hz 4.23 kHz 10.0 kHz
G +3.5 dB –4.5 dB 4.5 dB 0.0 dB
■ Channels 1/2: Bass drum and
snare drum
By applying a 3.5 dB boost to the LOW region below
70 Hz, we will fatten the resonance of the kick drum
shell. Next, we raise the HI-MID 4.23 kHz region by
4.5 dB to emphasize the character of the kick drum
skin. After than, we lower the L-MID 223 Hz region
by 4.5 dB to cut the sympathetic vibration of the kick
(bass drum), minimizing the unwanted resonance.
Next is the snare drum. By adding a 5.5 dB boost to
the HIGH 10.0 kHz region we can increase the sense
of sensation of air. We will lower the 187 Hz region
by 4.0 dB to create a sense of separation in the mix.
All of this produces a snare sound with a light touch.
Press the channel 1 [SEL] key. (Perform the
1
same operations for channel 2.)
Press the MIXER section [EQ] key. (This dis-
2
plays the details of the EQ parameter
adjustments.)
12
Tutorial
Page 14

• Channel 2: Snare
DYNAMICS Comp
Threshold
–18dB 2.5:1 3.0dB 19ms 87ms 2
EQ (ATT –8 dB)
Q L.SHLF 0.70 0.70 H.SHLF
F 187 Hz 1.00 kHz 2.11 kHz 10.0 kHz
G –4.5 dB 0.0 dB +2.0 dB 5.5 dB
Ratio
Out Gain
LOW L-MID H-MID HIGH
Attack Release Knee
Use the CURSOR keys and the [DATA/JOG]
4
dial to make the following dynamics settings for the overhead mic channels. (Since
channels 3 and 4 are paired, adjusting the
EQ on track 3 will automatically make the
same setting on track 4.)
• Channels 3 and 4: Drum overhead and
tom
Compander-Soft
Threshold
–10 dB 5:1 –3.5 dB 0 ms 139 ms 21 dB
Ratio
Out Gain
Attack Release Width
■ Channels 3/4: Drum overhead
mics
These tracks contain the cymbals and toms. By adding
a 3.5 dB boost to the HIGH 14.2 kHz region we will
clarify the metallic edge. By lowering the H-MID
157 Hz region by 6.5 dB we give a light touch to the
snare sound that is also recorded on these tracks.
Press the channel 3 [SEL] key to select the
1
overhead mic channel.
EQ (ATT –7 dB)
LOW L-MID H-MID HIGH
Q L.SHLF 0.70 9.0 H.SHLF
F 125 Hz 1.00 kHz 157 Hz 14.2 kHz
G 0.0 dB 0.0 dB –6.5 dB 3.5 dB
Press the MIXER section [DYN] key to
2
access the dynamics parameters.
In the TYPE area, “Compander-Soft”
3
should be selected (the default setting).
Move the cursor to “ON/OFF” and turn
dynamics “ON” for the selected channel.
Tutorial
13
Page 15

Mixdown
■ Channel 5: Hi-hat
By using a HPF (high pass filter) to cut the sound
below the LOW 125 Hz point, we will simultaneously
remove sounds other than the hi-hat. By adding a
2.5 dB boost to the L-MID 595 Hz region, we will
emphasize the crispness of the hi-hat, clarifying the
sense of beat.
Press the channel 5 [SEL] key to select the
1
hi-hat channel.
Press the MIXER section [EQ] key.
2
Make sure that EQ is on for the selected
3
channel.
Use the CURSOR keys and the [DATA/JOG]
4
dial to set the EQ as follows.
EQ (ATT –7 dB)
LOW L-MID H-MID HIGH
Q HPF 0.70 0.70 H.SHLF
F 125 Hz 595 Hz 4.00 kHz 16.0 kHz
G ON 2.5 dB 0.0 dB –3.5 dB
DYNAMICS Comp
Threshold
–24 dB 2:1 6.5 dB 12ms 70 ms hard
Ratio
Out Gain
Attack Release Knee
■ Channel 6: Acoustic bass
We will lower the LOW 35 Hz region by –7.5 dB to
add warmth to the sound. By lowering the L-MID
111 Hz region by 2.5 dB we will clarify the sense of
pitch, and by adding a 5.5 dB boost at the H-MID
2.82 kHz region we will emphasize the fingerboard
noise to enhance the characteristic flavor of an acoustic bass.
Press the MIXER section [DYN] key to
5
access the dynamics parameters.
In the TYPE area, “COMP” should already
6
be selected (the default setting). Move the
cursor to “ON/OFF” and turn dynamics
“ON” for the selected channel.
Use the CURSOR keys and the [DATA/JOG]
7
dial to make the following dynamics settings.
Press the channel 6 [SEL] key to select the
1
bass channel.
Press the MIXER section [EQ] key.
2
Make sure that the EQ of the selected
3
channel is turned on.
Use the CURSOR keys and the [DATA/JOG]
4
dial, or the EQ controls at the right of the
display, to make the following EQ settings
for the bass.
EQ (ATT –8 dB)
LOW L-MID H-MID HIGH
Q L.SHLF 5.0 2.5 H.SHLF
F 35 Hz 111 Hz 2.82 kHz 4.00 kHz
G –7.5 dB 2.5 dB 5.5 dB 0.0 dB
14
Tutorial
Page 16

Press the MIXER section [DYN] key to
5
access the dynamics parameters.
Press the DYN button, and then press the
6
[F2] key located below the screen.
In this screen, load a library whose TYPE field is
displayed as “EXP.” Move the cursor to “ON/
OFF” and turn dynamics “ON” for the selected
track.
Use the CURSOR keys and the [DATA/JOG]
7
dial to make the following dynamics settings.
DYNAMICS Expander
Threshold
–14 dB 3.5:1 3.5 dB 0 ms 70 ms 2
Ratio
Out Gain
Attack Release Knee
■ Channel 7: Percussion
For the percussion channel, we will cut the 125 Hz
region by –8.0 dB to reduce the weight of the low
range, making the sound a bit lighter. In the dynamics
section, we will use a compander to increase the perceived loudness to compensate for the reduction in
the low range.
EQ (ATT –7 dB)
LOW L-MID H-MID HIGH
Q L.SHELF 0.50 — —
F 125 Hz 1.00 kHz — —
G –8.0 dB 1.0 dB 0.0 0.0
Type Compander soft
Threshold
–13 dB 3:1 0.0 dB 14 ms 87 ms 1 dB
Ratio
Out Gain
Attack Release Width
Tutorial
15
Page 17

Mixdown
■ Channel 8: Acoustic guitar
We will not make any changes to the relaxed feel in
the high range of the acoustic guitar, but will apply a
slight boost to thicken the low-mid range, and use a
compander to even out the loudness.
EQ (ATT –11 dB)
LOW L-MID H-MID HIGH
Q HPF 6.3 0.70 —
F 35 Hz 2.24 kHz 140 Hz —
G ON –2.0 dB 3.5 dB —
■ Channel 9: Piano
Since this has an overall familiar tone, we will leave it
essentially unchanged. A slight boost in the 500 Hz
region will bring out the core of the sound.
DYNAMICS OFF
EQ (ATT –7 dB)
LOW L-MID H-MID HIGH
Q — 0.5 — —
F — 500 Hz — —
G — 3.0 dB — —
Type Compander Soft
Threshold
–14 dB 4:1 0.0 dB 0 ms 145 ms 15 dB
Ratio
Out Gain
Attack Release Width
16
Tutorial
Page 18

■ Channel 10: Synthesizer
We will use the EQ to enhance the high range,
emphasizing the tonal hardness characteristic of synthesizers. To make the phrasing crisper, we will apply
a hard compander.
Type Compander Hard
Threshold
–17 dB 2.5:1 –6.5 dB 0 ms 70 ms 7 dB
EQ (ATT –7 dB)
Q L.SHELF 0.45 0.40 —
F 99 Hz 1.26 kHz 5.99 kHz —
G –11.5 dB 2.0 dB 5.5 dB —
Ratio
Out Gain
LOW L-MID H-MID HIGH
Attack Release Width
■ Channel 11: Organ
We will boost the mid range that adds a distinctive
character to the organ sound.
DYNAMICS OFF
EQ (ATT –7 dB)
LOW L-MID H-MID HIGH
Q — — 1.6 —
F — — 749 Hz —
G — — 5.5 dB —
Tutorial
17
Page 19

Mixdown
■ Channel 12: Electric guitar
Keeping in mind the balance with other parts, we will
lower the low range and boost the mid range of the
electric guitar, giving it a brighter sound. To restrain
the loudness, we will apply a soft compander with a
high RATIO setting.
• Dynamics settings for electric guitar:
Compander soft
Threshold
–11 dB 20:1 0.0 dB 38 ms 180 ms 10 dB
Ratio
Out Gain
Attack Release Width
■ Channels 13/14/15: Chorus
The chorus in channels 13 and 14 are the high (stereo)
+ low (monaural) tracks. High is panned to L and R,
and low is panned slightly left. Make appropriate
level and panning adjustments to create a good mix
with the chorus 3 (middle/monaural) of channel 15.
So that it does not interfere with the lead vocal, we
will emphasize part of the mid-range so that the voice
carries sufficiently. In addition, we will use a compander on chorus 1 and 2 to restrain changes in
dynamics, tightening up the sound and cutting the
noise.
• Chorus 1 and 2 (high & low)
EQ (ATT –7 dB)
LOW L-MID H-MID HIGH
Q — 0.70 0.35 —
F — 2.11 kHz 5.99 kHz —
G — 1.0 dB 3.5 dB —
• EQ settings for electric guitar: ATT –7 dB
LOW L-MID H-MID HIGH
Q L.SHELF 0.70 — —
F 125 Hz 1.88 kHz — —
G –3.0 dB 4.5 dB — —
• Chorus 3 (middle)
EQ (ATT –6 dB)
LOW L-MID H-MID HIGH
Q L.SHELF 0.70 — H.SHELF
F 105 Hz 2.52 kHz — 10.0 kHz
G –7.0 dB 3.5 dB — 0.0
18
Tutorial
Page 20

• Dynamics settings for chorus 1 and 2
(Compander Hard)
Threshold
–26 dB 2:1 –1.0 dB 0 ms 122 ms 8 dB
Ratio
Out Gain
Attack Release Width
• Dynamics settings for chorus 3: OFF
■ Channel 16: Lead vocal
The lead vocalist on this channel has a strong and rich
low-mid range, but in order to give the sound more
definition, we will set L-Mid to 236 Hz and cut it by
–5.0 dB. In addition, we will use a soft compander on
the lead vocal to cut the noise and apply compression
to emphasize the vocal strength and create a “hi-fi”
feeling.
EQ (ATT –14dB)
LOW L-MID H-MID HIGH
Q 0.11 10.0 1.2 H.SHELF
F 198 Hz 236 Hz 5.04 kHz 7.55 kHz
G 3.0 dB –5.0 dB 4.5 dB 4.0 dB
• Dynamics settings (Compander Soft)
Threshold
–23 dB 2.5:1 0 dB 26 ms 180 ms 4 dB
Ratio
Out Gain
Attack Release Width
When adjusting the EQ or dynamics, you should also
adjust the fader level as appropriate. Since the level is
also affected when you adjust EQ or dynamics, you
will find it necessary to adjust it as well.
■ Saving the song
To save the song, press the WORK NAVIGATE section
[SONG] key to access the SONG screen. If necessary,
press the [F1] key to display the Song List page. Move
the cursor in the screen to “SAVE” and press the
[ENTER] key. When the confirmation message
appears, move the cursor to the “OK” button and
press the [ENTER] key. The song has now been saved.
Tutorial
19
Page 21

Mixdown
Step 4. Adding ambience
Ambience-type effects such as reverb, delay, and echo
can be used to add spaciousness and warmth. Up to
this point in the process, you have been working with
the “dry” sound, unprocessed by effects, but there are
many engineers and artists who prefer to work with
ambience-type effects already applied. Many artists
also like to monitor the “wet” sound (i.e., with an
effect) while they record. There is no hard and fast
rule as to when in the mixing process ambience
should be added, but in this tutorial we will handle it
as a separate process. This is because unlike EQ or
compressor, ambience effects do not directly affect
the actual sound of the tracks. Ambience does not
modify the sound, but rather adds sound.
To create a sense of unity, we will apply only one type
of reverb to the entire song. Since the AW2816 contains two internal effect units, it is easy to apply two
different reverbs or other effects to separate tracks, but
to convey the “liveness” of this song, simpler effect
settings will be more effective.
Applying excessive reverb to all tracks is the worst
possible thing you can do. Use ambience effects with
a light touch. Since reverb accumulates, applying
even a small amount to each track will result in a significant amount when the entire mix is played back.
In the beginning, you will need to repeatedly keep
adjusting the reverb send of each track, but as you
gain experience, you will learn the appropriate
amounts to use.
• Preset scene
By recalling the preset scene number 04 “STEP4 MIX”
you can hear the reverb and other settings that will be
explained below. By now you probably know how to
recall a scene, but if you are not sure, turn back to a
previous section.
■ Using effect 1 send, and selecting
an effect
Press the FADER MODE section [AUX5] key.
1
Now the faders will act as the AUX send controls
for the corresponding track. On the AW2816,
AUX5 is assigned to internal effect 1, and AUX6
is assigned to internal effect 2. Here we will use
only the AUX5 send.
Press the [F2] key to access the Effect
2
Library page.
The default Reverb Hall effect is a bit too big, so
we will select the Reverb PLATE effect which has
a warmth and presence that is just right for this
song.
From the effect library list, use the [DATA/
3
JOG] dial to select Reverb PLATE. Then
move the cursor to the RECALL button and
press the [ENTER] key.
A message will ask you for confirmation, so
move the cursor to “OK” and press the [ENTER]
key.
Press the [F1] key to access the Effect Edit
4
page, and make sure that the “BYPASS”
setting is OFF. (If it is ON, move the cursor
to “BYPASS” and turn it OFF.)
Effects used in “Can you feel it?”
EFFECT 1
Reverb PLATE
Reverb time 0.8s
EFFECT 2
Symphonic
■ Adding ambience to tracks as
needed
In AUX5 mode, use the faders to add just the necessary amount of the Reverb PLATE effect to each track.
As in the other stages of the mixing process, you will
frequently be turning each channel on/off to hear how
a certain track sounds with the effect, or how it
sounds in combination with other tracks. As discussed
earlier, you should use the channel [ON] keys to turn
channels on/off, rather than using the Solo function.
20
Tutorial
Page 22

■ Channels 1/2: Kick and snare
When recording drums, you record the dry sound as
on the tracks of the demo song. Adding just a slight
amount of reverb will create a dramatically wider
sense of space. However, be careful not to apply too
much. Sometimes for a ballade you will year fairly
heavy reverb on the drums, but even in this case it is
applied only to a specific drum (such as the snare). In
order to do this, it is obviously necessary to record the
snare on its own track. On the other hand, it is just
fine to leave the drum sound completely dry. In the
demo song, we set the reverb time to 0.8 seconds to
create a light reverb that will not “muddy” the drums,
and lightly apply the reverb only to the snare and percussion. Raise the channel 2 and channel 7 AUX5
faders to about –25 dB.
In the MIXER VIEW screen (accessed by pressing the
MIXER section [VIEW] key), you can view and make
fine adjustments to the fader settings of the selected
channel. The AUX5 fader in the lower right of the
screen indicates the current level. You can move the
cursor here and turn the [DATA/JOG] dial to make
accurate adjustments. If you want to go back to the
channel fader and make additional reverb adjustments, press the FADER MODE section [AUX5] key.
■ Channels 3 and 4: Overhead
drum mics
These tracks combine the toms and hi-hat of the drum
set. This is a stereo track. So that we do not impair the
clarity of the hi-hat work, we will not apply any effect.
■ Channel 7: Percussion
The tambourine and handclaps are recorded on this
channel. It might be nice to apply an effect to the
handclaps, but since we don’t want to blur the place
of the tambourine in the rhythm section, we will not
apply effects to this track either.
■ Channel 8: Acoustic guitar
To give a sense of spaciousness to the phrases played
by the acoustic guitar, we will apply some light
reverb. Raise the AUX5 track 8 fader to about –25 dB.
■ Channel 9: Piano
We will add a certain amount of reverb to the piano
to make the sound richer.
■ Channel 11: Organ
It is difficult to decide on an appropriate amount of
reverb for instruments like organ. Since the sound is
sustained, a large amount of reverb can occur before
you realize it, ruining your mix. In the case of this
song, we will simulate a narrow space (such as a
garage) by not applying an effect.
■ Channel 12: Electric guitar
Since the electric guitar takes a solo, we will add a
certain amount of reverb in order to add richness to
the sound.
■ Channels 13/14/15: Chorus
We will apply just enough reverb to make the backing
vocals blend together. Be careful, since more reverb
will make the sound richer but will also make the lyrics less understandable, and will blur the overall mix.
Don’t overdo the reverb for channels 13/14/15.
■ Channel 16: Lead vocal
It is common to apply quite a bit of reverb on the lead
vocal, but please listen carefully to the result. The less
reverb is used, the better you will be able to hear the
result. Apply reverb gradually, and stop when you
sense that the sound has become a bit warmer and
plumper. In particular, the detail and expressiveness of
the AW2816’s “24 bit high-quality reverb” can be best
appreciated when it is applied lightly.
Since each adjustment performed during the mix will
affect the audible balance, adjust the fader levels as
necessary.
• Saving the song
It is very important to save the song frequently while
you are working on it. If you have been working hard
for several hours and the power cable is accidentally
disconnected or a power failure occurs, or someone
operates a key or fader, your hard work will be for
nothing.
To save the song, press the WORK NAVIGATE section
[SONG] key to access the SONG screen. If necessary
press the [F1] key to display the Song List page. Move
the cursor in the screen to “SAVE,” and press the
[ENTER] key. When the confirmation message
appears, move the cursor to “OK” and press the
[ENTER] key to save the song.
■ Channel 10: Synthesizer
We will intentionally refrain from applying reverb to
the synthesizer. Instead we will use “Symphonic” for
effect 2. This effect is used mainly to add depth, a
sense of speed, and a stereo feeling (horizontal
spread) to synthesizer sounds. By increasing the EQ.G
parameter we will give the sound more edge, and
then raise FREQ to give the sound an increased sense
of speed.
Tutorial
21
Page 23

Mixdown
Step 5. Completing the mix and making automation settings
The basic mix is now nearly complete. Effects have
been added, and now it’s time to listen carefully to the
entire song and make final adjustments. As you listen
to the mix, you may decide that you are not satisfied
with having a single “average” mix throughout the
entire song. That’s where automation comes in. In the
days before automation was available, a recording
engineer had to make this type of adjustment manually while the actual master recording was being
made. If the changes involved multiple faders or controls, it was sometimes necessary to obtain the help of
other people. Of course, timing is vital, so if the
changes were not made at the right time, the mixing
process had to be repeated over and over until it was
perfect. On the AW2816, the faders, channel on/off,
pan, and EQ can all be automated, so it’s easy to create a perfect automix.
The automix in the demo song uses a combination of
automated fader operations, channel on/off, and pan.
For details on recording and editing automation, you
can refer to the Operation Guide. Here we will provide a brief explanation of the changes we made to
the presets, and the reasons for the change. Turn automix on, and watch how the faders and channel [ON]
keys change as the song progresses.
Use the following procedure to turn automix on.
In the AUTOMATION section, press the
1
[AUTOMIX] key. If necessary, press the [F1]
key to display the Main page.
• Automix
We will be explaining the progress of automix according to the absolute time counter. Please be aware that
the times are approximate.
Listen to the recorded automix
This automix is stored with a title of “Can you feel it,”
so press the “AUTOMIX” button to access the “AUTOMIX” screen. Then press the “AUTOMIX” key several
times to access the “MEMORY” screen, and recall
“Can you feel it.”
Next, turn the “AUTOMIX” setting to “ENABLE” so the
automix will be reflected in the playback.
About the contents of the “Can you feel it?” automix
At each point in the demo song, the automix pushes
forward “the sound that is most important at that
point” by adjusting the level of each part (the faders
will move).
During the electric guitar solo, automix will also
adjust the depth of the effect (Reverb PLATE).
The automix is recorded according to the following
time-line. Listen to the actual sound as you read
through this, and use it as a source of ideas for your
own automixes.
Move the cursor to AUTOMIX, and press
2
the [ENTER] key to select ENABLE.
As explained earlier in this tutorial, return
3
to the VIEW screen or another desired
screen.
22
Tutorial
Page 24

• Main contents of automix
1) Initial automix scene
The automix starts from the “AUTOMIX” scene memory.
2) Guitar
“0:10–0:45”: The faders are adjusted to make the guitar backing and melody stand out.
3) Piano
For approximately the first 40 seconds of the song, the
level is adjusted by raising the fader briefly to emphasize the backing in the lower register.
4) Synth
Approximately 1:30 into the song, the fader will be
turned “ON.” Then at about 2:25 the fader will be
lowered, creating silence during the break. At about
2:40, the fader is raised once again.
5) Acoustic guitar
“1:35–”: During the acoustic guitar solo phrase, automix controls the effect send level to adjust the crispness and resonance of the sound.
6) Handclaps
In the climactic section from 2:40, the sense of “liveness” is emphasized by slightly raising the handclap
fader.
Tutorial
23
Page 25

Mastering
Mastering
Once you have completed the mixdown, you will perform mastering before writing the song to a CD-R
disc. Mastering is the process of making overall
adjustments to the song mixed to a stereo track. It may
seem as though the song itself is essentially complete
when you finish the mixdown. However, this does not
guarantee that it will sound right when played back
on a CD player. For example, it may be that the overall volume is low, so that you will have to turn up the
volume further than when listening to other songs on
CD, or the overall tone may be muffled, or there may
be too much low-range sound so that the speaker distorts when you turn the volume up a bit.
Instead of simply writing the mix to CD-R, you perform the mastering process to adjust the overall balance so that the song will be more “listenable.”
Although this is sometimes thought of as consisting of
“fine adjustments,” it is actually a very important step
that determines the overall quality of the sound.
Normally, EQ and compressor are used to adjust the
sound during mastering. Professional engineers sometimes add a tiny amount of reverb to the overall sound
to create more depth, or pass the digitally-recorded
sound through an analog device to give it the warmth
characteristic of analog processing.
When multiple songs are recorded on one CD, significant differences in volume and tonal character
between songs can make it unpleasant to listen to the
CD. Thus, the mastering process also includes adjustments to the volume of each song, and determines the
spacing between songs.
In this section we are going to explain the process
from making mastering settings through writing the
song to a CD-R disc to make a CD that can be played
back on a conventional CD player.
■ Accurate monitoring is essential!
Although this can also be said for the mixing process,
a good monitoring environment is essential for mastering. This is because not only the amp and speakers,
but also the room and everything in it will affect the
sound. If we wanted to be more particular, a great
deal more could be said about this. If you use different equipment and a different room for monitoring,
there will obviously be differences in the sound you
that hear. For example in your private home studio,
you might feel that the bass is weak, and boost the
low range, but may be surprised to find that you hear
nothing but bass when you play the song back at
someone else’s home.
The ideal mastering environment is one with as little
reverberation as possible, and in which the recorded
sound and effects are reproduced as faithfully as possible (the technical term is “with a flat frequency
response”). However in reality, only real professionals
are probably able to do their mastering in a large
recording studio.
So how can you create the best sound during mastering? Through their experience in mixing down and
mastering at a particular studio, professional engineers have gained a sense of how the music heard in
that studio will sound on an average stereo system or
“boom box.” In other words, the best mastering is that
which results in a song that sounds good when played
back on any system. You should make an effort to listen to your song in a wide variety of locations. Listen
to it on expensive stereo systems, cheap cassette players, portable audio devices, on a car stereo, ...and you
will begin to see where your mastering is excessive
and where it is lacking.
Setting master EQ and dynamics
It is not necessarily a rule that you must use EQ and
compression when mastering. In this example, we
will apply only a compressor to adjust the sound, and
will not apply EQ.
Press the STEREO channel [SEL] key, and use the
MIXER section [DYN] key to access the dynamics
parameters. On the AW2816, you can adjust the master EQ and dynamics settings while listening to their
effect on the overall sound.
While you are mastering you may feel like returning
to the mixdown and changing something. For normal
recording it is not possible to redo the mixdown once
you are in the mastering process, but on the AW2816
you can recall scene memories and automix settings
to go back and forth between the mixdown and mastering processes whenever you like.
In general, mastering is a matter of “fine adjustments,”
as mentioned earlier, so if your mixdown has been
brought to a high level of completion, you will have
less to do during mastering. If mastering causes an
abrupt change in the sound, you may want to reconsider the mixdown.
■ Equalizer (EQ)
Mastering EQ is used sparingly, in cases where you
want to adjust the overall outline of the sound after it
has been mixed, or if the low range just doesn’t sound
quite sufficient. Conversely, you might cut the appropriate frequency range a bit to make the sound
cleaner if the low range was excessive, or if too much
sound ended up in the mid-range.
In this example we will not be applying EQ to the
demo song, but we recommend that you adjust the
parameters while the song plays back, and notice how
the sound changes when adjust each frequency
region.
24
Tutorial
Page 26

■ Compressor
By using a compressor during mastering, you can not
only improve the overall balance of the song, but
sometimes also give the sound more punch and
speed, or emphasize the groove. This may be somewhat difficult until you get the knack, but once you
do, you will be able to make your mix “sound better”
every time.
The compressor settings for the demo song are nothing extreme, but here too, you can learn by trying out
various settings as you did with the EQ, and noticing
how the sound is affected.
■ Master compressor settings for
the demo song
Threshold
–35 dB 3:1 0.0 dB 0 ms 110 ms 2
Ratio
Out Gain
Attack Release Knee
Recording the song to the stereo track
On the AW2816, you must first record the mixed song
onto the stereo track, and then write that stereo track
to the CD. Once you are satisfied with the master EQ
and compressor settings, use the following procedure
to record the song to the stereo track.
Press the [ST] key to enter STEREO track
1
recording mode.
(The key indicator will blink.)
Return to the beginning of the song, and
2
start recording.
(Simultaneously press the [REC] key and [PLAY]
key.)
When the song ends, press the [STOP] key.
3
Writing the song to a CD-R disc
This procedure is explained in detail in the AW2816’s
“Owner’s Manual,” so please refer to the appropriate
pages.
Are you happy with your new CD?
Tutorial
25
Page 27

The next step
The next step
If you have worked through the preceding pages, you
now have a basic understanding of the process.
The AW2816 supports many other recording methods
and mixdown functions that we were not able to
introduce in these pages. We hope you will make full
use of these capabilities, and even develop techniques that are not mentioned in the AW2816’s
“Owner’s Manual.”
As you spend time with the AW2816, it is sure to
become a favorite partner in music production.
We hope that the AW2816 will continue to make your
musical life even more wonderful!
26
Tutorial
Page 28

Glossary
■ A/D converter
A circuit that converts an analog audio signal into a
digital audio signal.
■ AD/DA
Conversion of an audio signal from analog to digital,
or from digital to analog. All processing within the
AW2816 is performed in digital form, but when an
analog audio signal is input, it passes through AD
conversion, and when sound from the AW2816 is
monitored (*see entry), it passes through DA conversion.
■ AES/EBU
This is one of the professional formats for exchanging
digital audio signals, and is a versatile format used on
many devices. The MY8-AE (separately sold option)
which can be installed in the YGDAI slot (*see entry)
provides a D-sub 25 pin connector that can simultaneously transmit and receive eight channels of digital
audio signals.
■ ATAPI
A specification for CD-RW drives that can be installed
in the AW2816. The specification is the same as IDE,
but on the AW2816 this term is used to distinguish it
from the internal hard disk.
■ Audio source
A collective term for the signals that are input to a
mixer or recorder. In the field of recording, the similar
terms “tone generator” or “sound module” usually
refer to an electronic instrument that produces sound,
such as a synthesizer.
■ Automix
A function by which operations of mixer parameters
such as knobs and faders are recorded along the time
axis defined by the AW2816’s internal time code or
externally-received MTC (*see entry), and can reproduce these movements during playback.
■ AUX
Stands for “auxiliary.” Signal output destinations used
when using the two internal effects of the AW2816, or
when using an external effect processor.
■ Bus
An audio signal route within the AW2816’s mixer section, used to combine multiple channels (*see entry).
Normally you will not need to be aware of buses if
you use the QUICK REC function to prepare for
recording. However you can also use buses to perform more sophisticated recording or mixdown techniques.
■ Channel
A signal routing unit through which a sound that is
input to the mixer section is adjusted by volume and
pan (*see entry) and then output. The mixer section of
the AW2816 provides a total of 28 channels, including the recorder playback and the outputs of the two
effects.
■ Chase
A state in which the AW2816 is receiving MTC (*see
entry) from an external device and running in synchronization with it. A standby state in which synchronization operation is possible is sometimes called
“chase on” or “chase standby.”
■ Coaxial
Refers to a type of connector that carries IEC60958 (S/
P DIF) format digital audio signals.
■ Compressor
An effect that lowers the volume when the input
sound exceeds the specified Threshold level, or boosts
the sound when it is below this level, in this way making the overall volume more consistent.
■ D/A converter
A circuit that converts a digital audio signal into an
analog audio signal.
■ Default setting
The state of a setting when a device is purchased or
powered-on. Also called “factory setting” or “initial
setting.” The AW2816 can be restored to the default
settings by recalling scene memory 00.
■ Dithering
When a digital audio signal is transmitted to a device
with a lower quantization (*see entry), dithering combines some of the rounded-off portion with the data
that is retained (i.e., instead of simply discarding the
lower-value bits), in order to reduce the noise that is
generated by this conversion. Since this changes the
data itself, there are situations in which it is better not
to apply dithering.
■ Dynamic range
The range from maximum volume to silence,
expressed in dB (decibels). This is one aspect from
which you can determine the accuracy with which a
certain device can handle audio signals.
■ Dynamics
Refers to changes in the volume; for example if the
volume varies dramatically between loud and soft,
one might say that there is “a lot of variation in the
dynamics.” Effects such as compressor (*see entry) or
limiter (*see entry) that are used to compensate the
volume are referred as “dynamics effects.”
■ Equalizer
A function that adjusts the sound by boosting/cutting
a specific frequency band (*see entry) of the sound
that is input to that channel. On the AW2816, a fourband parametric equalizer with adjustable frequency
and AW2816 (*see entry) is provided on every channel.
■ Frequency band
Refers to a point or area on the frequency axis of
sound, from low to high ranges. This term is used
when specifying the point at which an equalizer (*see
entry) will adjust the sound.
Tutorial
27
Page 29

Glossary
■ Gain
A knob that adjusts the sensitivity of the head amp
(*see entry) in the input section of the AW2816. If this
control is adjusted to keep the input volumes consistent at this point, it will be easier to use the faders of
each channel to create a balance.
■ Head amp (HA)
A circuit placed before the A/D converter (*see entry)
of an AW2816 input jack, used to adjust the analog
input signal to a level that is suitable for digital conversion. (Also called mic preamp.)
■ Impedance
Resistance to alternating current. In general, this refers
to the load of a signal input or output. The input/output jacks of the AW2816 have specific impedances
depending on their type or intended input/output signal, and must be connected to a device of the same or
similar impedance. Even if its cable connector has the
same form as a line input, a high-impedance source
such as a guitar must be connected to a high-impedance jack, not to a regular input.
■ Internal arithmetic precision (bits)
The arithmetic precision with which digital signals are
processed inside a device. The AW2816 uses 32 bit
arithmetic internally, guaranteeing an excellent
dynamic range (*see entry) of 192 dB.
■ Jitter
When digital audio signals are transferred, the word
clock (*see entry) of the devices must match. If this
word clock is not generated accurately, a type of noise
called jitter will occur. Less variation in the word
clock rate as compared to a square wave with precise
spacing (i.e., a more stable clock) will mean less jitter
and better audio quality.
■ Library
Preset settings for the AW2816’s equalizers (*see
entry), dynamics processors (*see entry), and the two
effect units, created with a wide range of uses in
mind.
■ Limiter
An effect that limits the volume to prevent overload
when the input sound exceeds a specified threshold.
■ Mastering
The process of adjusting the overall tone and volume
of a song that has been mixed down. On the
AW2816, the term is used in reference to the process
up to creating an audio CD.
■ Mini YGDAI
The YGDAI (*see entry) input/output expansion slot
found on the rear panel of the AW2816.
■ Mixdown
Also called “track down.” The process of combining
multiple tracks of sound into a final two-track mix that
can be played back on an audio CD player, etc.
■ MMC (MIDI Machine Control)
A group of MIDI messages used to control recorder
operations such as Play, Stop, and Record.
■ Monitor
The headphones or speakers used to reproduce the
sound that is output from the AW2816. Also used to
refer to the act of listening to the playback from the
headphones or speakers.
■ Moving faders
Faders that automatically move to a position that corresponds to the value of the parameters that were
recalled, for example when you switch the selection
of the MIXING LAYER section or recall another scene
from scene memory. On the AW2816, all nine faders
(including the ST channel) are moving faders. This is
very convenient, since the faders will move according
to the parameter changes during automix, providing
visual confirmation of the mixdown status.
■ MTC (MIDI Time Code)
A type of MIDI message used to convey time data in
realtime over a MIDI cable, in order to synchronize
the operation of the AW2816 and devices such as
rhythm machines, sequencer software, or other
recorders.
■ Nominal level
The “nominal level” referred to on a mixer or recorder
indicates the standard level setting for that device.
When all parameters are set to the nominal level, the
audio quality will be the closest to the specifications
given in the catalog.
■ Optical
Refers to a type of connector to which an optical
cable is connected. For consumer audio, a format
called IEC60958 (S/P DIF) is used. However, the MY8AT (separately sold) option that can be installed in the
YGDAI (*see entry) slot of the AW2816 provides an
optical connector that uses the ALESIS ADAT format,
and allows eight channels of digital audio to be input
or output when connected to a compatible device.
■ Overdubbing
A technique that can be used on multi-track recorders
such as the AW2816, in which (for example) drums
are recorded first, and then other instruments such as
guitar and bass are recorded on other tracks while the
musician listens to the previously-recorded tracks, in
this way accumulating a larger number of tracks.
■ Pan
A term derived from “panorama,” referring to a
parameter that specifies the location of a sound within
the stereo field. Normally if a sound that is originally
stereo is assigned to two monaural channels, the pan
controls of the two channels are set to far left and far
right so that the sound can be monitored in its original
spatial state.
■ Phantom power
Power that is supplied via the cable of a microphone,
and is normally required when using a condenser
mic. This is defined as 48 volts.
■ Pop guard
A thin mesh card placed between the vocalist’s mouth
and the mic to reduce “breath” noise or “pop” noise
when recording a vocal. Tissue paper is sometimes
used.
28
Tutorial
Page 30

■ Punch-in/punch-out
When you want to re-record just a specified area of a
previously-recorded track, the action of switching
from playback into record mode at the beginning of
that area is called “punch-in,” and the action of
switching from record mode back into playback at the
end of that area is called “punch-out.”
■ Q
A parameter of the parametric-type equalizers (*see
entry) provided by the AW2816. Q specifies the width
of the frequency band (*see entry) that will be boosted
or cut. High settings of Q will make the band narrower, producing a steeper curve of change.
■ Quantization (number of bits)
The resolution of the data when an analog input signal
is converted into a digital signal.
■ Restore
The action of recalling a previously backed-up song
from CD-R/CD-RW back into the internal hard disk.
■ SCSI (Small Computer System Interface)
This was originally a specification used to transfer
data between a computer and an external storage
device, but the AW2816 also uses this connector to
connect external hard disks or external CD-R/RW
drives. (*Do not connect the SCSI connector of the
AW2816 directly to a computer. Doing so may damage both devices.)
■ S/N
The ratio of audio signal to noise. In dB (decibel)
units, this indicates the level of the residual noise that
is produced when absolutely no sound is being output.
■ S/P DIF
Stands for Sony/Philips Digital Audio Interface. The
specification is formally called IEC60958, but is more
generally known as S/P DIF. This is a consumer format
for transferring digital audio signals, and simultaneously transmits or receives two channels (one stereo
pair) of audio.
■ Track
A number assigned to an audio signal that is recorded
or played back by a recorder. The AW2816 has 16
tracks x 8 virtual tracks (*see entry), for a total of 128
tracks.
■ Virtual track
Although the AW2816 can play back 16 tracks simultaneously, each track actually has eight tracks, and
you can select one of these tracks for playback. The
eight tracks that can be selected for each track are
called “virtual tracks.”
■ Word clock
A synchronization signal used when transferring digital audio data, which is used to ensure that the audio
data is received at the same rate it is being transmitted. When two or more devices are digitally connected, all devices must be using the same word
clock. If not, it may be impossible to transfer audio
signals, or noise may occur in the signal.
■ XLR connector
This is type of three-pin connector used for mics. It
has a locking mechanism that prevents the cable from
being pulled out accidentally.
■ YGDAI
Stands for Yamaha General Digital Audio Interface.
Digital mixers or digital recorders that have a YGDAI
slot allow you to install separately-sold I/O cards that
support various professional digital audio formats or
provide AD/DA functionality. There are two types of
cards; YGDAI cards (CD series) that can be used by
the Yamaha 02R and 03D, and Mini YGDAI cards (MY
series) that can be used by the Yamaha 01V, D24, and
AW4416. One optional Mini YGDAI card can be
installed in the AW2816.
■ Sampling rate
Also called Sampling Frequency. The number of times
per second that an analog sound is converted into digital data. A sampling rate of 44.1 kHz means that
44,100 digital conversions are being performed each
second. If this number is higher, a broader frequency
range of sound can be captured as data.
■ Scene memory
A function that collectively saves the parameter settings of the AW2816’s mixer section. A scene that you
saved can be recalled at any time to reproduce those
settings.
■ Solo
A function that allows you to listen only to the sound
of a desired channel during mixdown, etc.
■ Time code
Time data that is used when making the AW2816
operate in synchronization with a rhythm machine,
sequencer program, or another recorder. The AW2816
is able to transmit and receive MTC (*see entry).
Tutorial
29
Page 31

YAMAHA CORPORATION
V766850 R1 1 IP 32 Pro Audio & Digital Musical Instrument Division
P.O. Box 3, Hamamatsu, 430-8651, Japan
01 08 3500 AP Printed in Japan
 Loading...