

Yamaha AT135 Owner's Manual
,
..
..
~VAMAHA
•
--~----"
A.
Read this manual carefully before operating this vehicle .
OWNER'S MANUAL
-+
8199-E1
http://mototh.com

-"
i
.1It.
.,
\ .
.,
,
(Ct"
--.-
1
SPO
YS199
__
EI,book Page
1 Tlmrscb y January 15,2009 1 10 PM
,1) I
.~"
& Read
this
manual carefully before operating
this
vehicle.
This
manual
should
stay
with
this
vehicle
if
it
is sold.
-t)-
http://mototh.com
;"
....
\
I .••. /
INTRODUCTION
Welcome to the Yamaha wo r
ld
of motorcycling!
As
th
e owner of the AT135, you are benefiting from Yamaha's vast experience and newest technology regarding the design
and manufactu
re
of high-quality products, which have earned
Yamaha a reputati
on
for dependability.
Please take the
ti
me
to read this manual thoroughly, so as to enjoy all advantages of your AT135.
Tile
Owner's Manual does
not on ly inst
ru
ct you
in
how to operate, inspect and maintain your motorcycle, but also
in
how to safeguard yourself and others from trouble and injury.
In addition, the many tips given
in
this manual will help keep your motorcycle in the best possible condition. If you have any
further questions, do not hesitate to contact your
Yamaha dealer.
The
Yamaha team wishes you many safe and pleasant rides. So, remember
to
put safet y firs
t!
Yamaha continually seeks advancements
in product design and qualit
y.
Therefor
e, while this manual contains the most cur-
re
nt product information availab
le
at the time of printing, there may be minor discrepancies between your motorcycle and this
manua
l.
If there is any question concerning this manual, please consult a Yamaha dealer.
E
WA
10031
A
WARNING
Please read this manual carefully and completely before operating this motorcycle.
--
-,
--
Ii
i I •
tl
http://mototh.com
IMPORTANT
MANUAL
INFORMATION
EAU10
132
Particularly important information
is
distinguished
in
this manua l by the following notations:
~WARNING
This
is
the
safety
alert
symbol.
11
is
Llsed
to
alert
you
to
potential
personal
injury
haz-
ards.
Obey
all
safety
messages
that
follow
this
symbol
to
avoid
possibl
1e
injury
or
death.
A WARNING in
dicates a hazardous
situation
which,
if
not
avoided,
could
result
in
death
or
serious injury.
A NOTICE i
ndicates
special
precautions
that
must
be
taken
to
avoid
damage
to
the
vehicle
or
other
property.
A TIP provides key informati
on to make procedures easier or cleare
r,
---(~~) . ~
--
1' 11
~
_ ._~
__
_
J
'·r
http://mototh.com
IMPORTANT MANUAL INFORMATI
ON
AT135
OWNER
'S MANUAL
EAUJ7430
©2008
by
Thai Yamaha M
otor
Co.,
Ltd
.
1
st
edition,
October
2008
All
rights
reserved.
Any
reprinting
or
unauthorized
use
without
the written perm
ission
of
Thai Yamaha
Motor
Co., Ltd.
is
express
ly
proh
ibited.
Printed
in
Thailand.
-k I
(:1)-
- __ _
http://mototh.com
(
..
\
,
...
. '
s
ro
FSl99_Elbook Page I Th
u"day
, Janua
ry 15,2
009
1:10 PM
TABLE OF CONTENTS
LOCATION
OF
IMPORTANT
LABELS """"""""""""""""""""""""""""""""
""'
" 1-1
SAFETY INFORMATION ..........
"".""
"",2
-1
Helmets """"
"""""
""""
""""",., ..... "
..
"."
..
2-5
DESCRIPTION
""
...
..
""
.......
"."
.... " ........
3-
1
Left view
" ..........
""
................. " ........
3-1
Right view .
""""
""""""""""",,,"",,,"",,,,,,,,""3-2
Con
trols and instruments
""."
.. """,,
,3-3
INSTRUMENT AND
CONTROL
FUNCTIONS ............ " ........ """"'"""""""..4- 1
Main switch/steering lock ... " ........
.. .4-1
Keyhole cove r ...................
.......
......
.4-2
Indicator and warnin g lights ........
..
.4-3
Speedometer .................................
.4
-3
Fuel gau
ge
................................... ".4-4
Digital
coo
lant tempera
tur
e
gauge/od
ometer ............. ............ .4-4
Handl
ebar
switches ................... .... .4
-5
Front
brake
lever ........................... .4-5
Rear brake l
ever
...........................
. .4-6
Fuel tank cap ...........................
.... ..
.4-6
Fuel ............... " ...
,'"
..................
""
... 4-7
Ca
talyt
ic
converter ......................... .4-8
Kickstarte r
" .................................... .4-9
Sea
t ....................................... ......
..
.4-9
Helme! holders .....
..
..................... .4
-1
0
Convenience hook ....................
... .4-10
Storage
com
partment .................. .4-
11
i t
!t-
-
+-"
I
FOR YOUR SAFETY - PRE-
OPERATION
CHECKS
........
""
.. .
..
5-1
OPERATION A
ND
IMPORTANT
RIDING
POINTS .................................
6-1
Starting a cold engine ... " ...... ........
6-1
Starting
off
....................................
..
6-2
Acceleration
and
deceleration
....
.... 6-2
Br
aking ........................................... 6-2
Tips for reducing fuel
consumption ............
..
................. 6-3
Engine break-in .............
................. 6-3
Parking ....................
.. " .....
... .......
.... 6-5
Gene
ral note .......................
........... 6-6
PERIODIC MAINTENANCE AND
ADJ
UST
MENT
.......................
.. .
..
""
7-1
Owner
's too l kit ...............................
7-1
Periodic mai ntenance chart for
the em ission
co
ntrol syst
em
.....
..
7-2
Gene
ral maintenance and
lubrication
chart
...........................
7-3
Removing
and ins
talling cowlin
gs
and panels .................................. 7-6
Checking the spark plug ................. 7-8
Engi
ne oil
and oil strainer ............... 7-9
Final transmission oil ....................
7-11
Coolant ....................
........
..
" ........ 7- 12
Air filter and
V-b
elt case air filter
elements .
..
................................ 7
-1
3
Adjusting the carburetor
............... 7-16
(
1;
I
1'
>
Adjusting the engine idling
speed ........
................................ 7- 16
Adjust
ing the throttle cable
fr
ee play
..................................
..
7-17
Valve clearance .................... ....... 7-17
Tires ........
....
.... " ..... ....................
..
7-18
Wheels
.................................. ....... 7-
20
Checking the front brake lever
fr
ee play
............................. ....... 7-20
Ad
justing the rear brake le
ver
free pl
ay
............................... ...
..
7-2
1
Chec
king the front brake pads
and rear brake sh
oes
............... 7-
22
Check
ing the brake fluid l
evel ..
.... 7-22
Cha
nging the brake fluid
.........
.... 7-23
Check
ing t
he
V-belt
.................
....
7-24
Check
ing and lubricating the
cables ...............
..
.............
...
...... 7-24
Checking
and
lubricating the
throttle grip and
cab
le ............... 7-24
Lubricat ing the front and rear
brake levers .............................. 7-25
Check
ing
and
lub
ricating the
centerstand
and
sidesta
nd
...
.... 7-25
Checking
the front fork ................. 7-26
Checking the steering .................. 7-27
Checking the wheel bea rings
..
..... 7-27
Ba
ttery ......................................... 7-28
Replacing t
he
fuse .....................
..
7-29
Replacing a headlig ht bulb ..........
7-30
http://mototh.com
{
..
\
\
••
- ,i
--.--'
5PO_FSI
99 Ef.book
Pagc2
Thursday, January 1
5,2009 lIQPI\·1
TABLE OF CONTENTS
Replacing the tail/brake
light bulb ......................
......
....
.. .7-31
Replacing a tu
rn
signal
l
ig
ht bulb ............. .....................
. .7-32
Replacing a front tu
rn
signal
light bulb ...........
..
....................... 7-33
Replacing an auxiliary ligh!
bulb ...........
..
...........................
...
7-33
Troubleshooting
........... ...............
..
7-34
Troubleshooting charts
................. 7-35
MO
TORCYCLE CARE A
ND
STORAGE ...
................... .............. 8
-1
Ca
re ...................
....
.........
................ 8-1
Sto
ra
ge .
__
........................................ 8-3
SPECIFICATIONS ...........................
... 9-1
CONSUMER INFORMATION ........... 1 0-1
Id
entification numbers ................
..
10-1
http://mototh.com
(
~)
5
PO FS1
<J')_Fl.b
ook Page I Thursday, Ja nu:uy 15,2009 I In
P~·
1
•
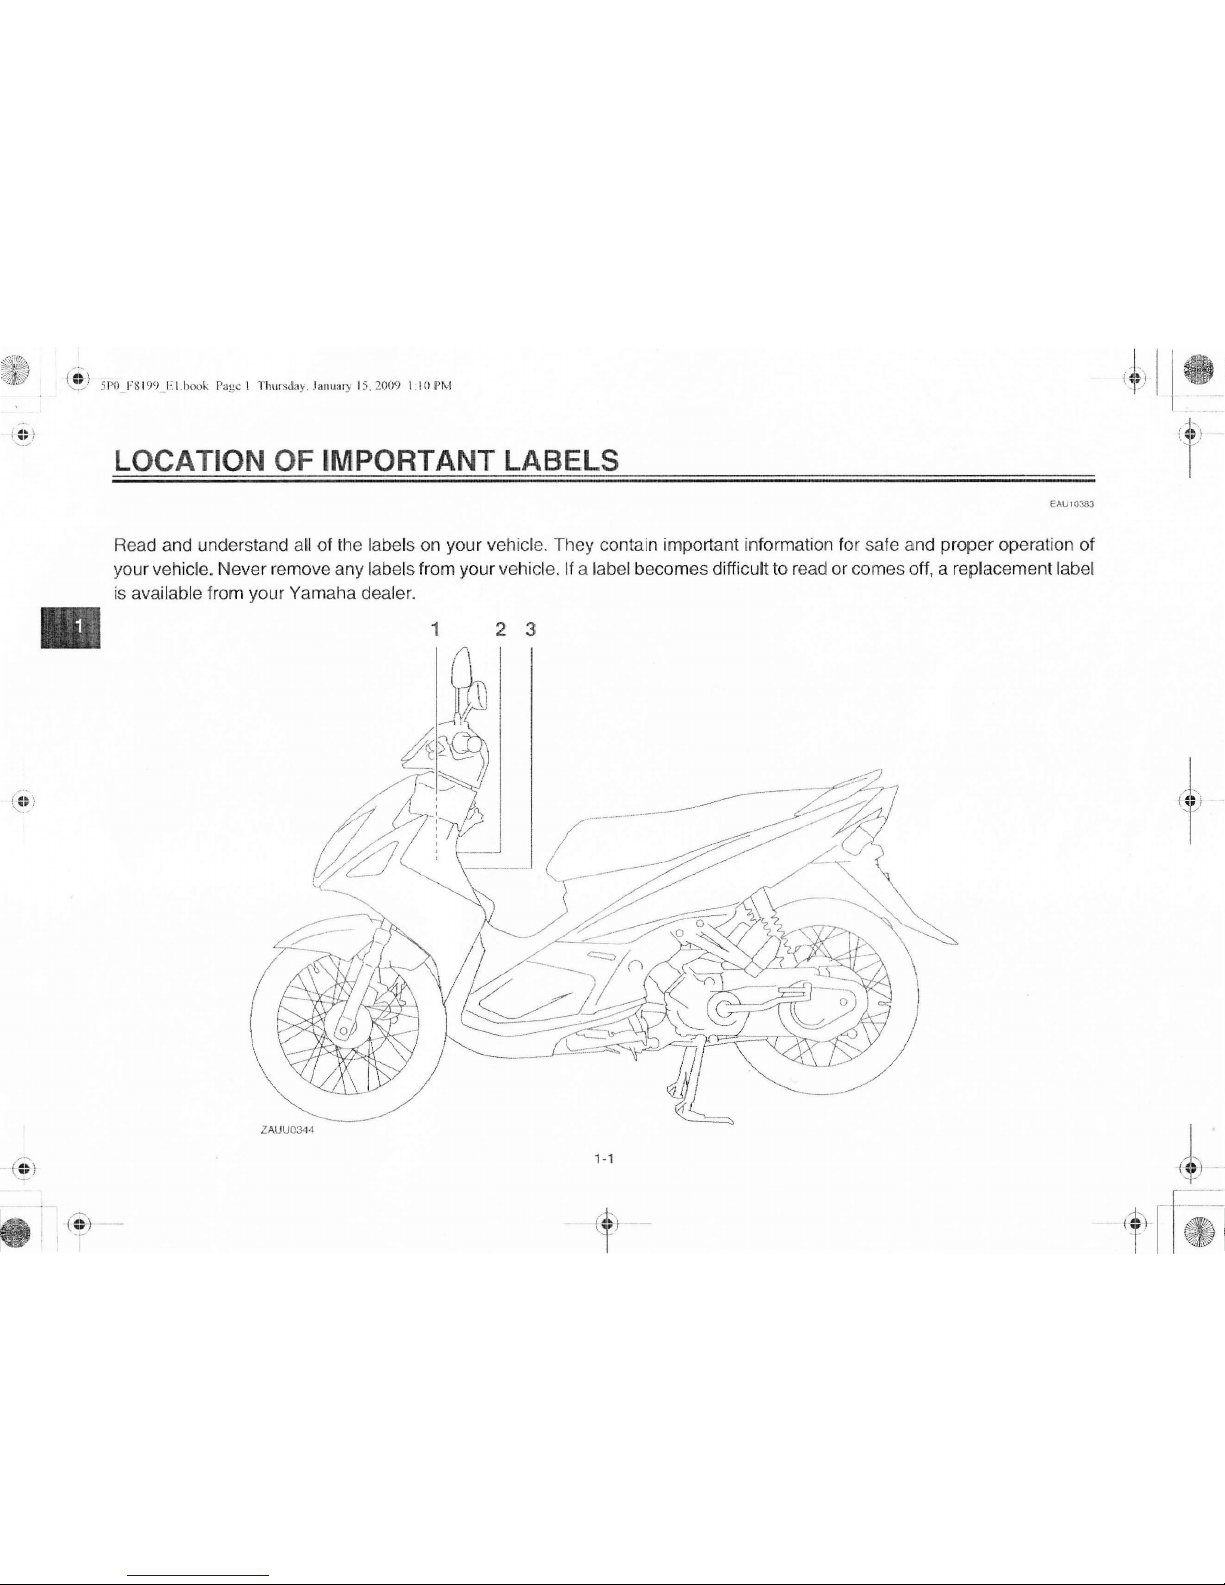
LOCATION OF IMPORTANT LABELS
EAU t
038
3
Re
ad and understand all of the labels on your vehicle. They contain important information for safe and proper operation of
your vehicl
e.
Never remove any labels from your vehicle. If a label becomes difficult to read or comes of
f,
a replacement label
is availab
le
from your Yamaha dealer.
1·1
1
{TO) -
, -
http://mototh.com
(
"
...
"
~."
j
(~
)
El\UH1313
Be a Respo nsible Owner
As tt1e vehicle's owner, you are responsible for the safe and proper operation
of your motorcycl
e.
Motorcycles are single-track vehicles.
Their safe use and o
pe
ration a
re
de-
pendent upon the use of proper riding
tech niques as well as the expertise of
the operator. Every operator should
know
th
e following requirements before
riding this motorcycle.
He or she should:
• Obta
in
thorough instructions from
a competent source on all aspects
of motorcycle operation.
• Observe the warnings
and mainte-
nance requirements
in
this Own-
er's Manua
l.
• Obtain qualified training
in
safe
and proper riding techniques.
• Obta
in
professional technica
l ser-
vice as indicated in this Owne
r'
s
Manual and/or when made necessary by mechanical conditions.
ill
SAFETY INFORMATION
Safe
Riding
Perform
the pre-operation checks each
time you use the vehicle to make sure it
is in safe operating conditio
n.
Failure
to
in
spect or mainta
in the vehicle properly
in
creases the possibility of an accide
nt
or equipment damage. See page 5-1
for a list of pre-operation checks.
• This motorcycle is designed
to
car
ry
the operator and a passen-
ger.
• The failure
of motorists to detect
and recognize motorcycles
in
traffic is the predominating cause of
au
tomobile/motorcycle accidents.
Many acciden
ts
have been
caused by
an
automobile driver
who did not see
th
e motorcycle.
Making yourself con
sp
icuous ap-
pea
rs
to be very effective in reducing the chance of this type of
acciden
t.
Therefore:
• Wear a br ightly colored jacket.
• Use ext
ra
caution when you are
approaching and passing
through
in
tersections, since in-
2-1
tersections are the most likely
places for motorcycle accidents
to occur.
• Ride where other motorists can
see you. Avoid riding in another •
motorist's
blind spot.
• Many accidents
involve inexperi-
enced operato
rs
. In fact, many op-
erators who have been involved
in
accidents do not even have a cur-
ren
t motorcycle license.
• Make sure that you are qualified
and that y
ou
only lend your mo-
torcycle to other quali
fi
ed opera-
tor
s.
• Know your skills and limits.
Staying within your limi
ts
may
help you to avoid an acc iden
t.
• We recommend that you practice riding your motorcycle
whe
re
there is no traffic until you
have become thoroughly familiar with the
mo
torcycle and all of
its controls.
• Many accidents have been
ca
used by error of the motorcycle
J
Il)
operat
or.
A ty pical erro r made by J .
-!:
tJ
--
·····
~I
=
http://mototh.com
•
ill
SAFETY INFORMATION
the operator is veering wide on a
tu
rn
due to excessive speed or undercornering (insufficient lean angie for the speed).
• Always obey the speed limit and
never travel faster than wa rranted by road and traf
fi
c co ndi-
ti
ons.
• Always signal before turni
ng
or
changing lanes. Make sure that
other motorists can see yo
u.
• The posture of the operator and
passenger is important for proper
control.
•
The operator should keep both
hands on the handlebar and
bo
th
feet on the operator foot-
rests during operation to main-
tain control of the motorcycle.
• The passenger should always
hold onto the operator, the seat
strap or g
ra
b bar, if equipped,
with both hands and keep both
feet on the passenger footrests.
Never car
ry
a passenger unless
he or she
can fi
rmly place both
feet
on the passenger footrests.
• Never ride under the influence of
alcohol or other drugs.
Protective apparel
The majority of fatalities from motorcycle accidents are the result of head injuries. The use of a safety helmet is the
single most critical factor in the prevention or reduc
ti
on of head injurie
s.
• Always wear an approved helmet.
• Wear a face shield or goggles.
Wind
in
your unprotected eyes
could contribute to an impairment
of vision that could delay seeing a
hazard.
• The use of a jacket, heavy boots,
t
ro
user
s,
gloves, etc
.,
is
effective
in preventing or reducing abrasions or lacerations.
• Neve r wea r loose-fitting clothes,
otherwise
th
ey could catch on the
control levers, footr
ests,
or wheels
a
nd
cause injury or
an
acciden
t.
• Always wear protective clothi
ng
that covers your legs, ankles, and
feet. The engine or exhaust sys-
2-2
tem become very hot during or after operation and can cause
burns.
• A passenger should also observe
the above precautions .
Avoid Carbon Monoxide Poisoning
All engine exhaust contains carbon
monoxide, a deadly gas. Breathing ca
rbon mon oxide can cause headaches,
dizz
in
ess, drowsiness, nausea, confu-
sion, and eventuall y deat
h.
Carbon Monoxide is a co lorless, odorless, tasteless gas which may be
present
even if you do not see or sme
ll
any engine exhaus
t.
Deadly leve ls of
ca
rb
on monoxide can collect rapidly
and
yo
u can quickly be overcome and
unable to sa
ve
yoursel
f.
Also, deadly
levels of carbon monoxide can linger
for hou
rs
or days in enclosed or poorly
ventilated areas.
If you expe
ri
ence any
symptoms of carbon monox
id
e poison-
in
g,
lea
ve the area immediately, get
fresh air, and SEEK
MEDICAL TREAT-
MENT.
http://mototh.com
J
-+$)
/1'
1-+ ..
... '\
--
I
\l--
i 5
PO ___
FS I99_
EI.b
ook Page :' r
hurs
day, January 15,
2009
1 iO P
r-.,
,1
• Do not run engine indoors. Even if
you try to ventilate engine exhaust
wi
th
fans or open windows and
doors, carbo n monoxide can rapidly reach dangerous levels.
• Do not run engine
in
poorly venti-
lated or partia
ll
y enclosed areas
such as barns, garages, or carports.
• Do not run engine outdoors where
engine exhaust can be drawn into
a building through openings such
as w
in
dows and doors.
loading
Adding accessories or cargo to your
motorcy
cl
e can adversely affect stability and handling if the weight distribution
of the motorcycle is changed . To avo
id
the possibility of an accident, use extreme caution when adding cargo
or
accessories to yo ur motorcycl
e.
Use
extra care when riding a motorcycle
that has added cargo or accessories.
Here, along
wi
th the information about
accessories below, are some gen eral
ill
SAFETY INFORMATION
guidelines to follow if loading cargo to
your motor cycle:
The total weight
of the operator,
passe
nger, access
ories and cargo
must n
ot
exceed
the
maximu
m l
oad
limit. Operat
ion
of
an
overloade
d ve-
hicl
e c
ould
cau
se
an
accident.
Maxi
mum load
:
160
kg (353Ib)
When loading within this weight limit,
keep the following in mind:
• Cargo and accessory weig
ht
should be kept as low and close to
the motorcycle as possible.
Securely pack your heaviest items as
cl
ose to the center of the vehicle
as possible and make sure to distribute the weight as evenly as
po
ssible on both sides of the motorcyc le to minimize imbalance or
instabi
lity.
• Shifting weights can create a sudden
im
balanc
e.
Make sure that ac-
cessories and cargo are securely
2-3
attached to the motorcycle before
ri
ding. Check accessory mounts
and cargo restra
in
ts frequent
ly.
• Prope rly adjust the suspension
for your load, and che
ck
the
condi
ti
on and pressure of your
tires.
• Never attach any large or heavy
items to the handleba
r,
front
fo
rk,
or front fender. These
items, including such cargo as
sleeping bags, du
ff
el ba gs,
or
tent
s,
can create unstable handling or a slow steering respons
e.
• Th
is vehicle
is not des
igned
to
pull a traile
r or to
be attached
to
a sid
ecar
.
Genuin
e Yamaha Ac
cessori
es
Choosing acc essories for your vehicle
is an
im
portant decision. Genuine
Yamaha accessories, which are available only from a
Yamaha dealer, have
been designed, tested, and app
ro
ved
by
Yamaha for use on your vehicl
e.
.I.J .. )·
,
~
~
http://mototh.com

,
(~'
~
.
.1
I '
-f
....
5PO
_F8 199_1·:l.
hook Page
4.
Th
ursday. Janua ry
15,2
009 I 10 PI\
·!
•
(
2ii
+
-
~
I
l
r
ill
SAFETY INFORMATION
Many companies with no connection to
Yamaha manufactu
re
parts and acces-
sories or offer other modifica
ti
ons for
Yamaha
vehicles. Yamaha is not in a
position to test the products that these
aftermarket companies produce.
Therefo re, Yamaha can neither endorse nor recommend the use of accessories not sold by Yamaha or
modi
ficati
ons not specifically recom-
mended by Yamah
a,
even if sold and
installed by a Yamaha dealer.
Aftermarket
Parts, Ac
cessor
ies,
and
Modifi
catio
ns
Whi
le
you may find aftermarket prod-
ucts s
imilar in design and quality to
genuine
Ya
maha accessories, recog-
nize that some aftermarket accessories
or modi
ficati
ons are not suitable be-
cause of potential safety haza
rd
s to
you or other
s.
Installing aftermarket
products or having other modifications
pe
rf
ormed
to
your vehic
le
that change
any of the ve
hi
cle's design or operation
characte
risti
cs can put you and others
at greater risk of serious inju
ry
or death.
You are responsible for injuries related
to changes
in
the vehicle.
Keep the following guidel
in
es
in min
d,
as we
ll
as those provided under "Load-
ing"
when mounting accessories .
• Never insta
ll
accessories or car
ry
cargo that would impair the performance of your motorcycle.
Care-
fully
inspect the accessory before
using it to make sure that it does
not in any way
re
duce ground
clearance or come
rin
g clearance,
limit suspension
tr
avel, steering
travel or control opera
ti
on, or ob-
scure lights or re
fl
ector
s.
• Accessories fitted to the handlebar or the front fork area can
create instability due to improper weight distribution or aerodynamic changes.
If accessories
are added to the handlebar or
front
fo
rk area, they must be as
lightweight as possible and
should
be
kept to a minimum.
• Bulky or large accessories may
seriously affect the
stability of
th
e motorcycle due to aerody-
2-4
namic effects. Wind may attempt to lift the motorcycl
e,
or
the motorcycle may become unstable in cross winds . These ac-
cessories may also cause
instability whe n passing or being passed by la
rg
e vehicles.
• Ce rta
in
accessories can displace the operator from his or
her normal riding posi
tion.
This
i
mp
roper pos ition limits the free-
dom of movem
en
t of the opera-
tor and may limit control ab
il
ity,
th
erefore, such accessories are
not recommended .
• Use caution when adding electrical accessories . If electrical accessories exceed the capacity of the
motorcycle's electrical system, an
electric failure cou
ld
result, which
could cause a dangero us loss of
lights or engine power.
A
ft
ermarket
Tires
and
Rims
The tires an d rims that came with your
moto
rc
ycle were designed to match
the performance capabili
ti
es and to
\~
~
J
I "
if
i
lL
..
http://mototh.com
provide the best combination of handling, braking, and com fort. Other
tires, rims, sizes, and combinations
may not be approp
ri
ate. Refer to page
7 -18 for ti
re
specifications and more
information on replacing your tires.
ill
SAFETY INFORMATION
EAUU0030
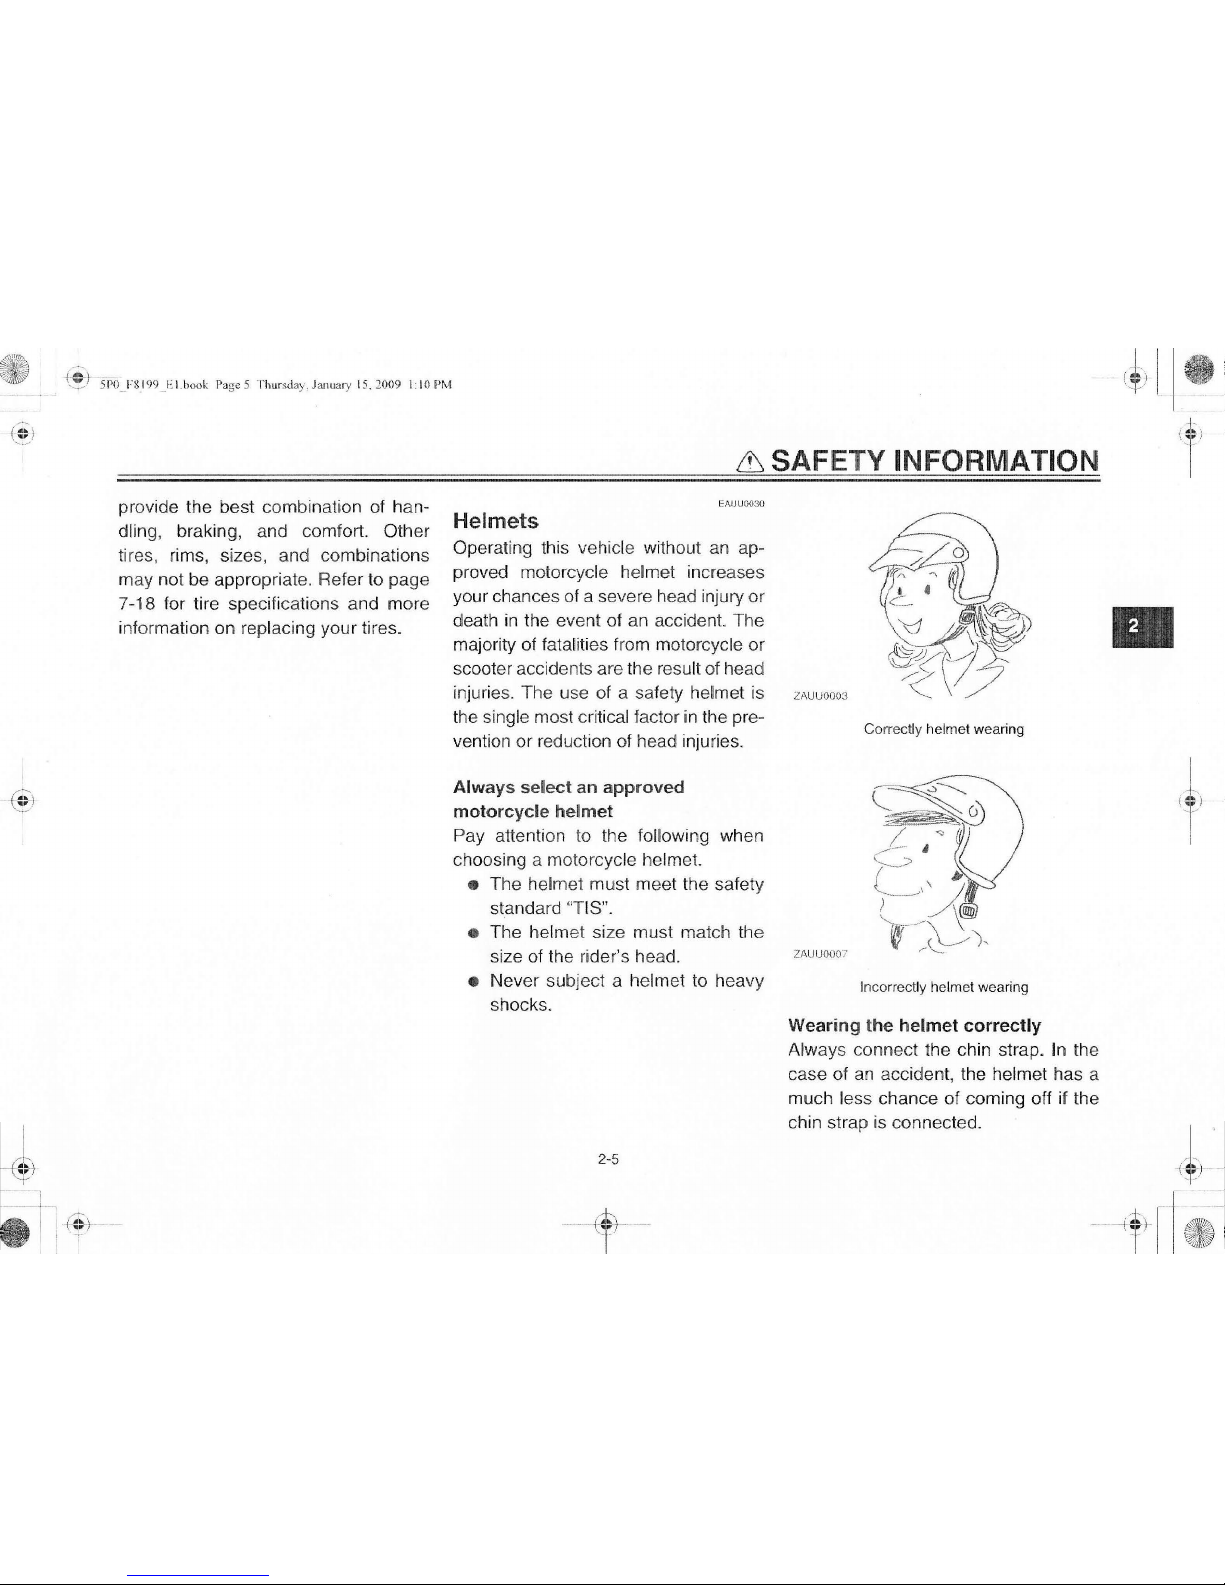
Helmets
Operating this vehicle without an approved motorcycle helmet increases
your chances of a severe head
injury
or
death in the event of an accide
nt.
The
majority of fatalities from motorcycle or
scoote r accidents are the res
ul
t of head
inju
ri
es. The u
se
of a safety helm
et
is
the single most critical factor in the prevention or reduction of head inju
ri
es.
Always
select an
approved
m
otorcycle
helmet
Pay attention to the following when
choosing a motorcyc
le
helmet.
• The helmet must meet the safety
standard
"TIS".
• The helmet size must match the
size of the rider's head.
• Never subject a helmet to heavy
shocks.
2-5
___
ft.)
T'
-I'
Lf\UU000J
Correctly helmet wearing
Z
AUU000
7
Incorrectly helmet wearing
W
ear
ing the
helmet
correctly
Always connect the chin strap. In the
case of an accident,
th
e helmet has a
much less chance of coming off if the
chin strap is connected.
··.J··
··I
I
,~
I
•
http://mototh.com
(
...
",
1 •
••
f
'",--~
.....
:
I
·"
;
\
••
.!
•
I@:)
IT
5PO_F8199_FI book Page 6 Thursday , January 1
5,2009
{.I OP
I'\"
1
& SAFETY INFORMATION
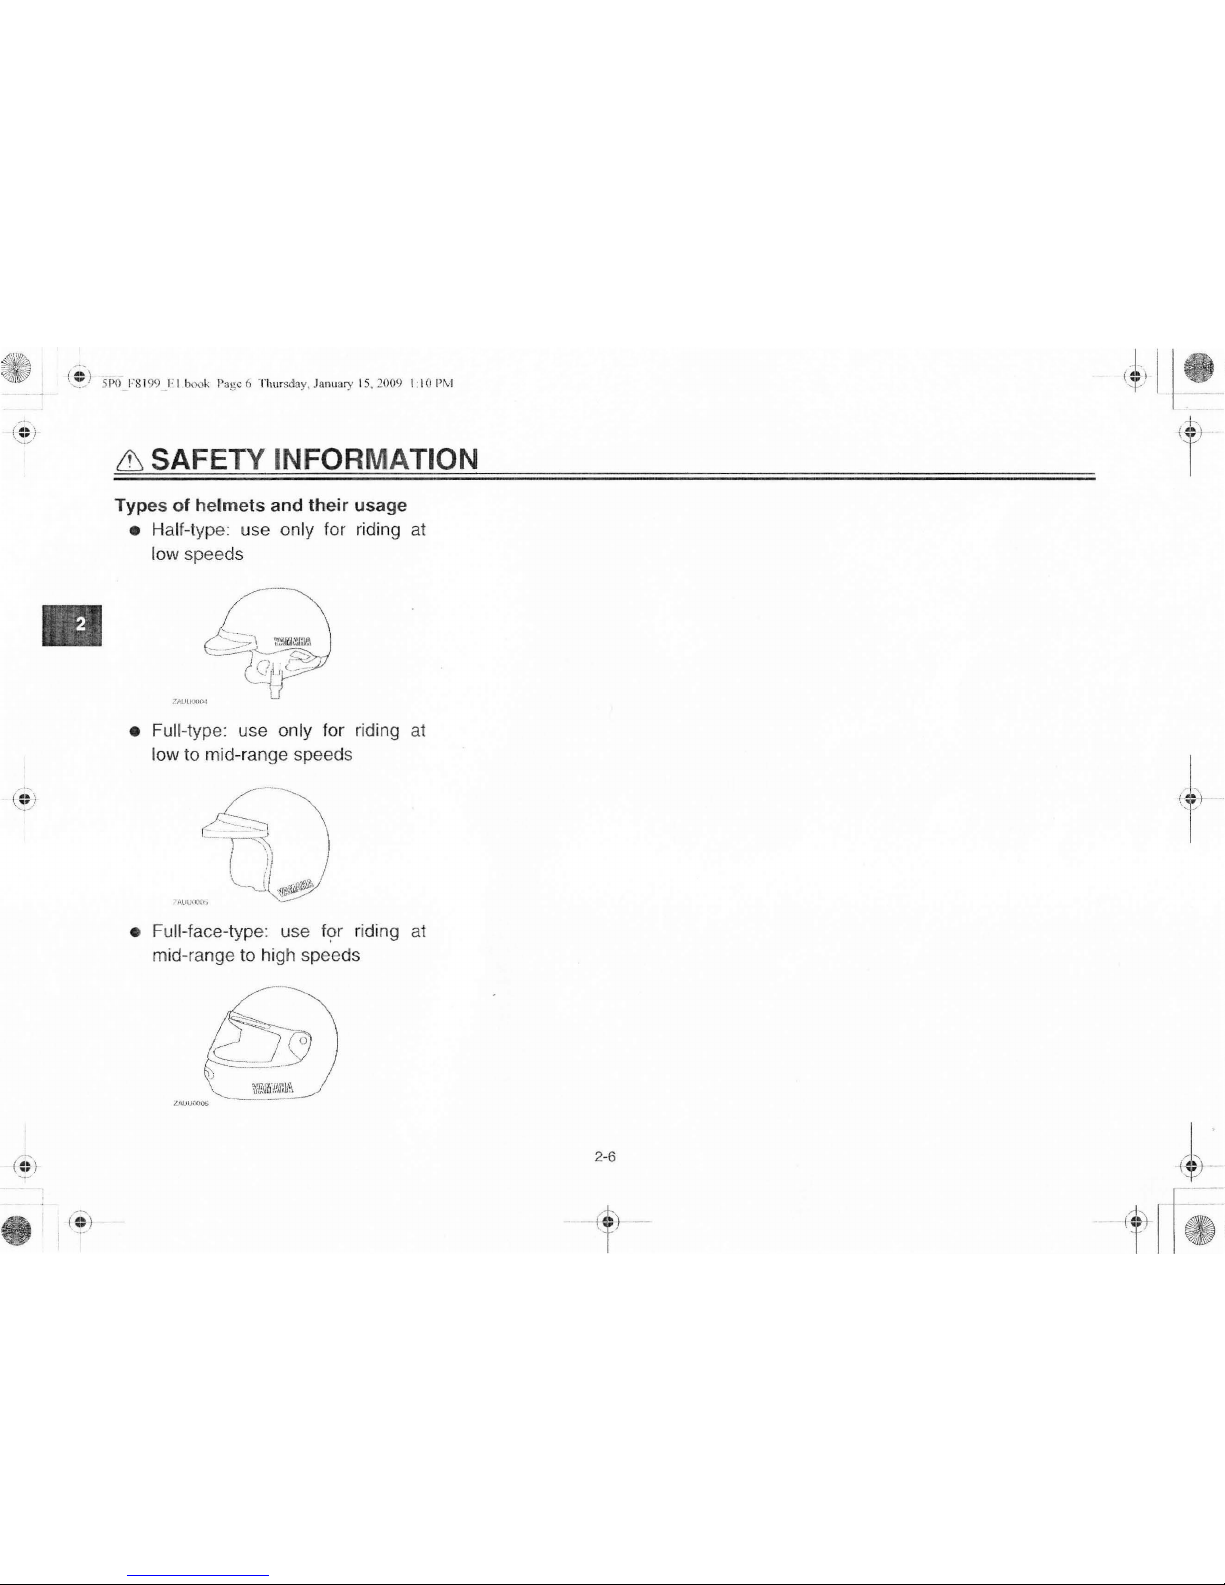
Types
of
helme
ts
and
their usage
• Half-type use only for riding at
low speeds
•
FUll
-type: use only for ridi
ng
at
low to mid-range speeds
• Full-face-typ
e:
use for riding at
mid-range to high speeds
i
1
i I
~".
'
2-6
http://mototh.com

--
--~-:-~
i
i
-
~~
I
I
~
I
-r-
-Ef)-
SPO
fSI99_Elbook
Page I Thursday, January 15,2
009
110
PM
left
view
J 2
ZAUU0345
1. HeadlighUauxiliary lights (page 7-30, 7-33)
2. Front tum signal
lights (page 7-33)
3.
Convenience hook (page 4-10)
4. Throttle stop screw (page 7-16)
5. Owner's
tool kit (page 7-1)
6.
Tail/brake light (page 7-31)
11
t-
-41{~
DESCRIPTION
"t-
EAU10410
4
5
6 7
12
11
10 9
8
7. Rear tum signal lights (page 7-32)
8. Kickstarter (page 4-9)
9.
Engine oil drain bolt A (page 7-9)
10. Engine oil drain bolt B (page 7-9)
11.
V-belt case air filter element (page 7-13)
12. Air
filter element (page 7-13)
3-1
http://mototh.com

I
I
--
(f;
-
E!)
-SPOF8199 El.book Page 2 Thursday, January 15,2009 1:10PM
, - -
DESCRIPTION
Right view
1,
Fuel tank cap (page 4-6)
2. Fuse/starter relay (page 7-29)
3.
Storage compartment (page 4-11 )
4_
Battery (page 7-28)
5.
Seat lock (page 4-9)
ZAUU0346
6.
Front brake fluid reservoir (page 7-22)
7. Coolant reservoir (page 7-12)
8. Dipstick (page 7-9)
lt -
1
2 3 4 5
8
7
3-2
6
-
-
~~jl
e
t
EAU 1 0420
J;
---
i},
-•
http://mototh.com
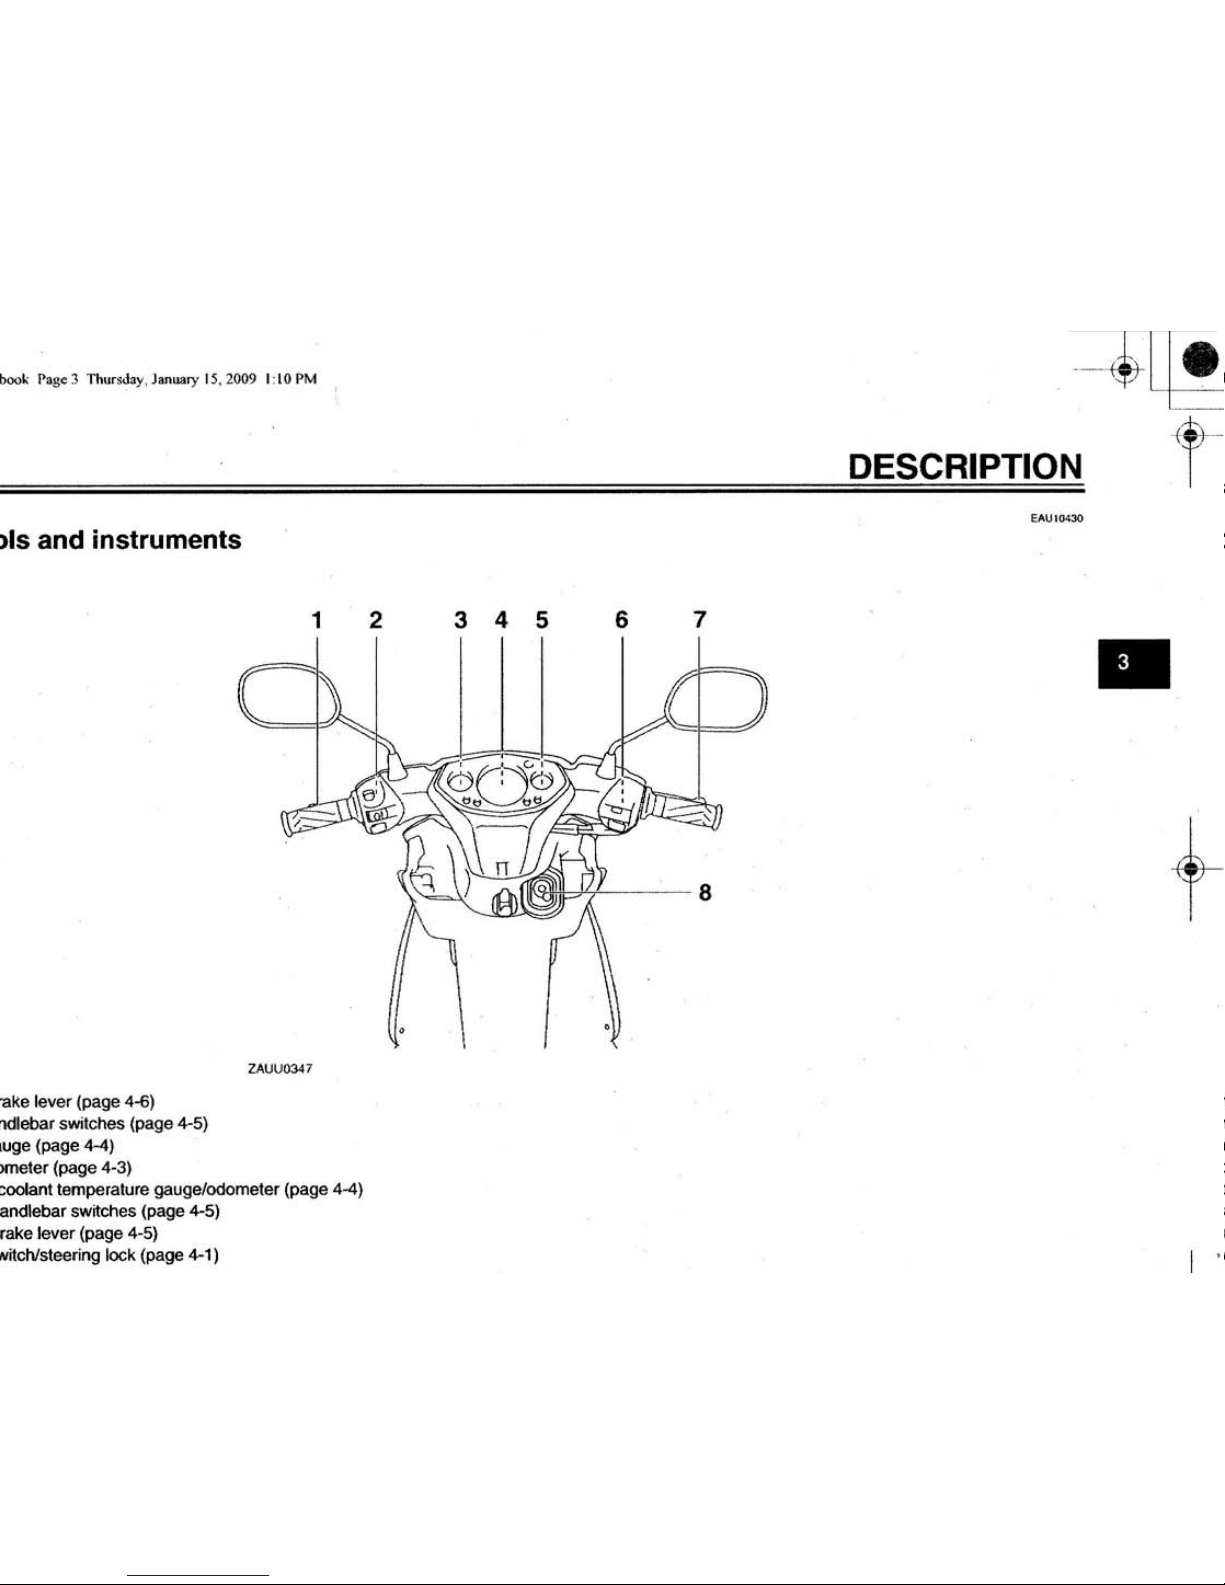
)ls and instruments
rake
lever (page 4-6)
rlCIebar
switches (page 4-5)
luge (page
4-4)
;meIe
r (page 4-3)
1
Z
AUU03oI7
coolant temperature gauge/odometer (page
4-4)
andlebar swrtches (page 4-5)
rake lever (page 4-5)
Nitchlsteering lock (page
4-1
)
2
345
DESCRIPTION
6 7
oJf,L
--
a
+
I .
http://mototh.com
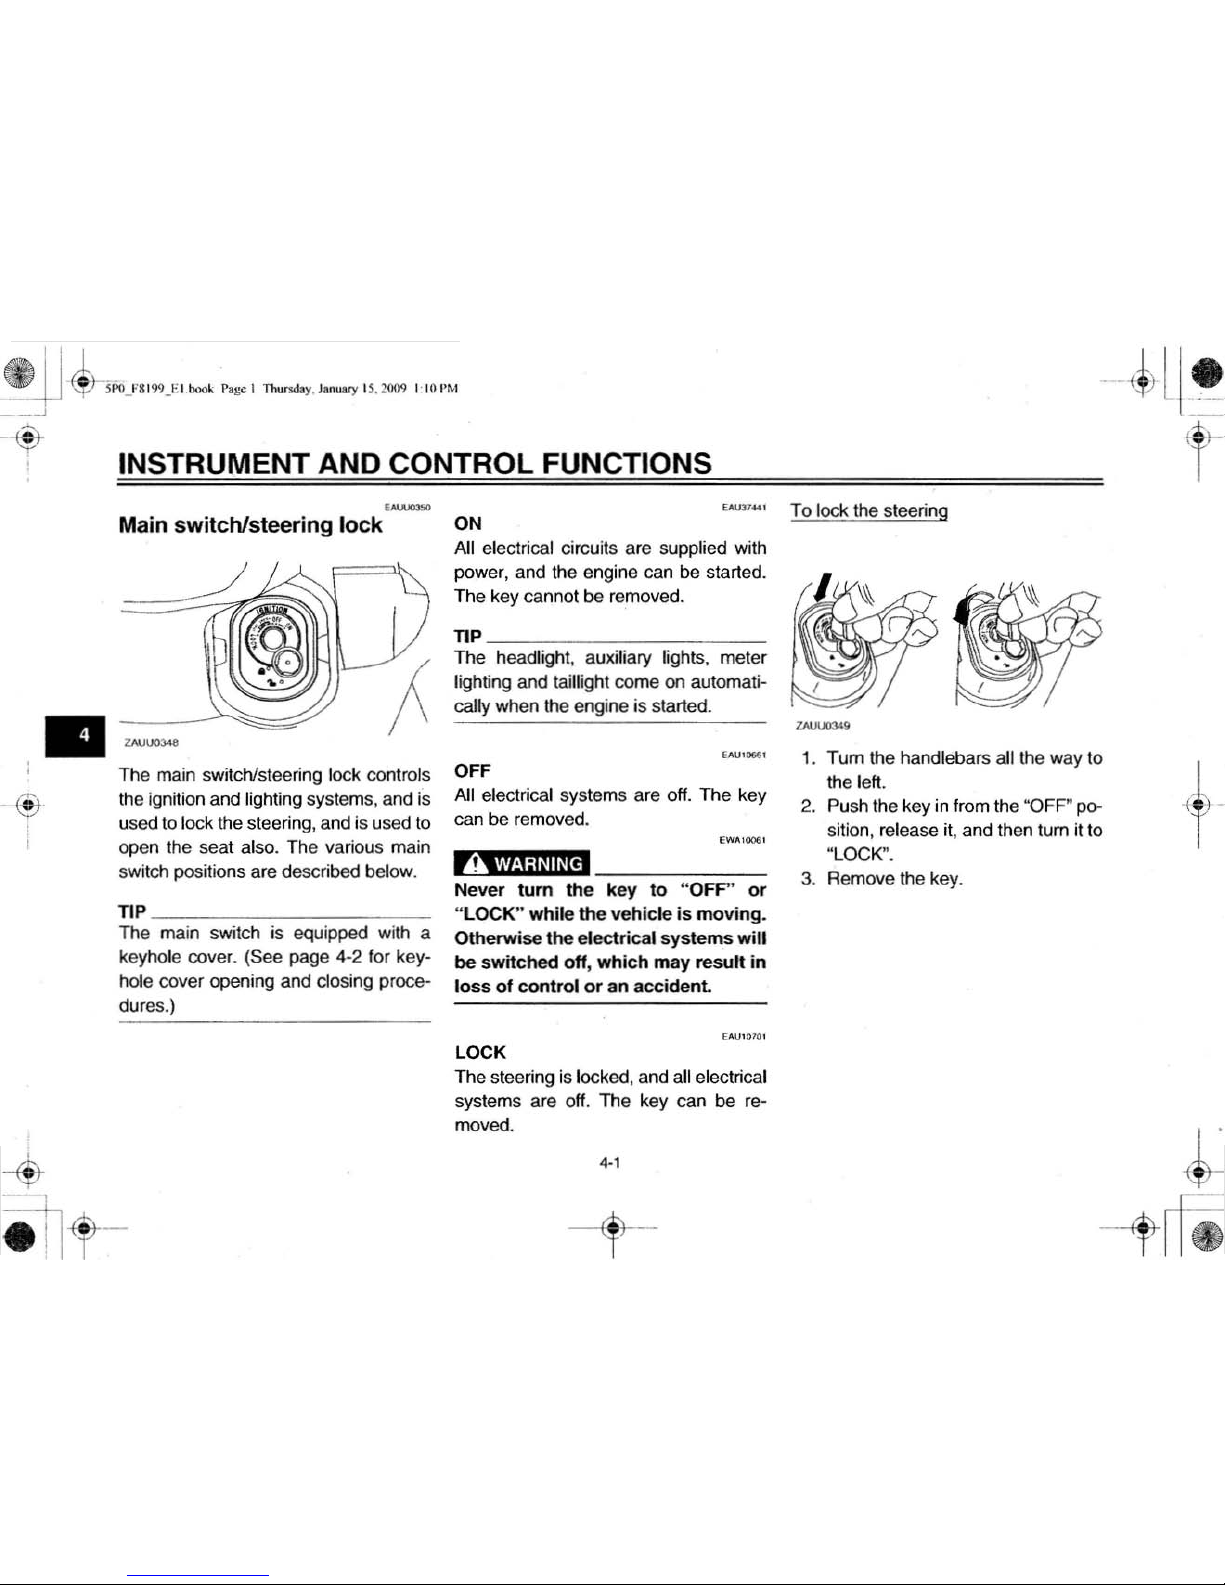
INSTRUMENT AND CONTROL FUNCTIONS
~
Ma
in switch/steering
lock
The main switch/stee ring lock controls
the ignition and lighting systems, a
nd
is
used to lock t
he
steering, and is used to
open the seat als
o. The various main
switch positions are described below.
TIP
______
~~~--~~_
The main switch is equipped with a
keyhole oover. (See page 4-2 for keyhole cover opening and
dosing
proce-
dures.)
ON
All electrica
l circuits are supplied with
power, and the engine can
be
started.
The key ca nnot
be
removed.
TIP
________
~~~--~
The
h
ead
light, auxiliary light
s,
meter
lighting and taillight come on automati-
cally
when the engine is started.
OFF
All electrical systems are off. The key
can be removed.
AWAANING
Never t
um
the k
ey
to "
OFP' or
"LOCK" whi le
the
vehicle is
moving
.
Otherw
ise
the
el
ectrical sys
tems will
be
switched
off, which may res
ult
in
loss of c
ontrol
or
an
accide
nt.
EM."'
'''
'
LOCK
The steering is locked , and all electrical
systems are off,
The
key can be re-
moved.
,.,
--t
-
To
lock
the
steering
"""".
-4l
~
,t
1.
Tum
the handlebars
a1l
lhe way
10
the left.
2.
Push I
he
key
in from
the
~
OFF"
po-
sition,
release it, and then tum it to
"LOCK".
3. Remove the key.
http://mototh.com
-@
I
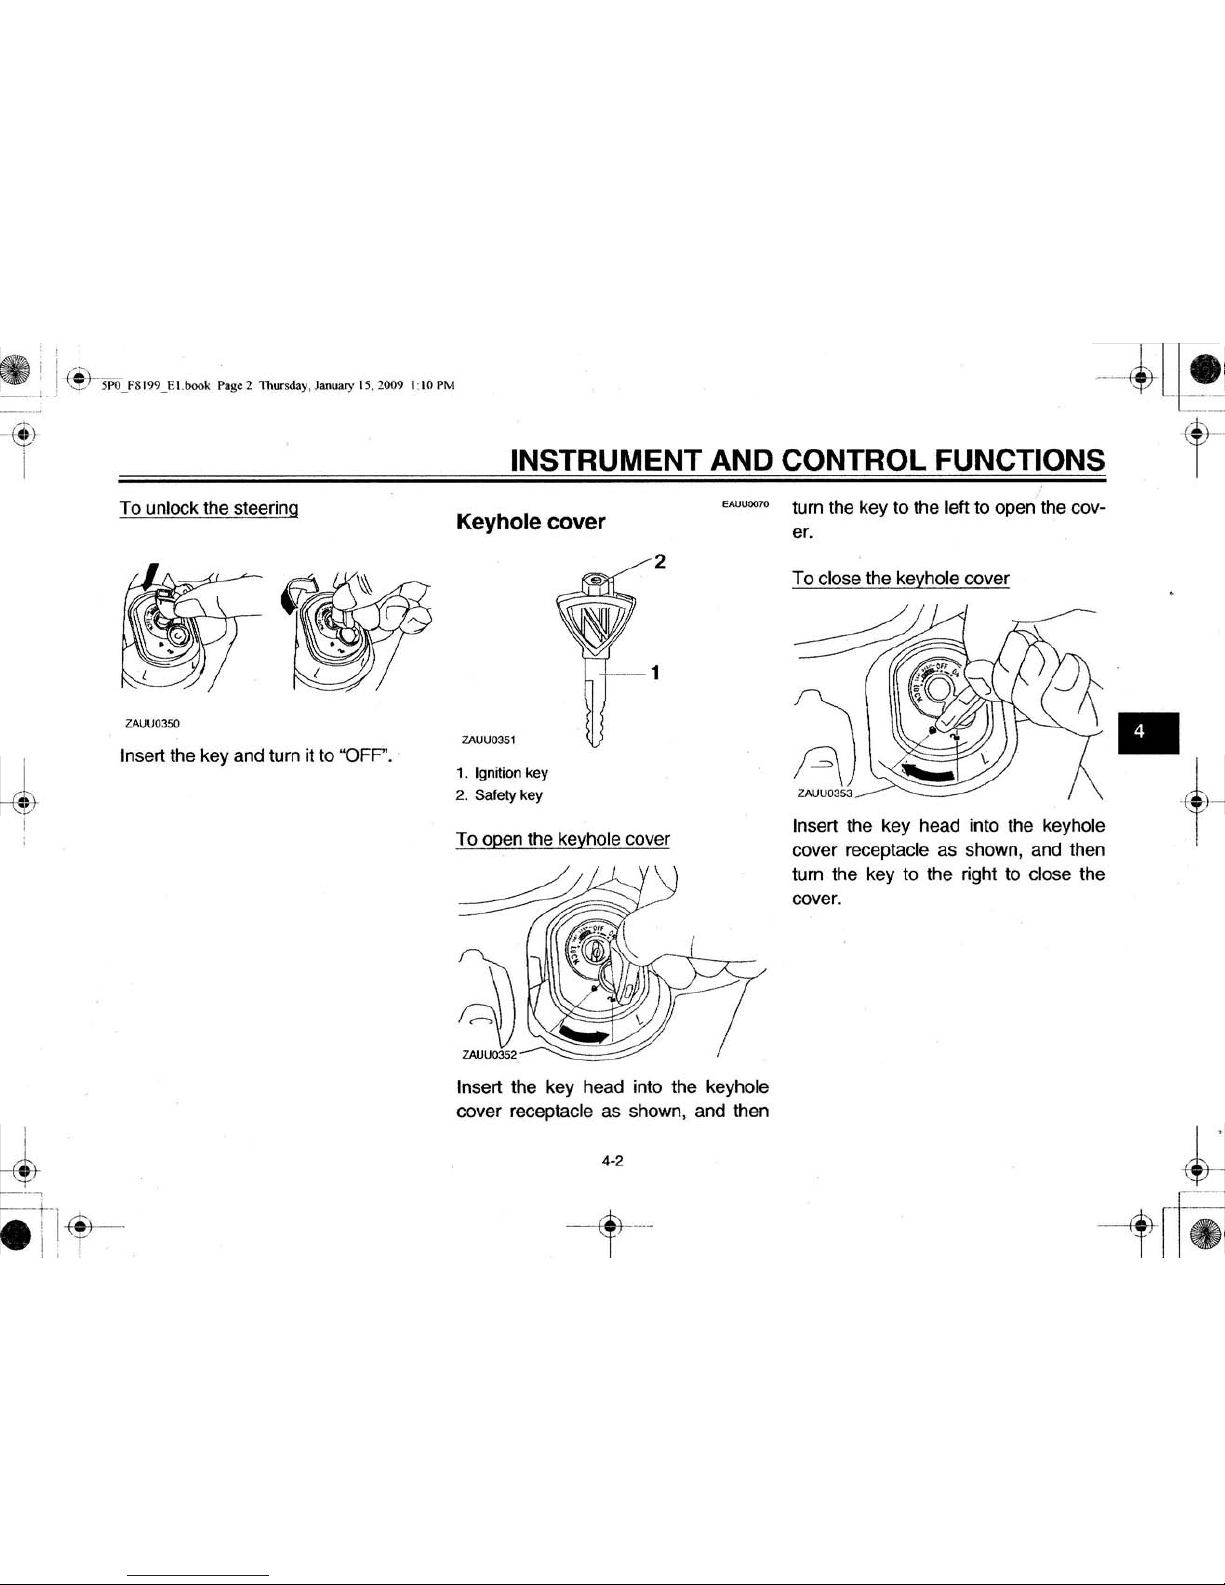
To
unlock the steering
Insert the key and turn
it
to "OFF".
INSTRUMENT AND CONTROL FUNCTIONS
Keyhole cover
2
1
1. Ignition key
2.
Sa
lely key
To open the keyhole cover
In
sert the key head into the keyhole
cover receptacle
as
shown, and then
4-
'
-t
--
tum the k
ey
to t
he
lett to open the cov-
e
r.
To close the keyh
ole
cover
In
sert the key head into the keyhole
cover receptacle as shown, and then
tum the key to the right to close the
cove r.
http://mototh.com
€>
,
,
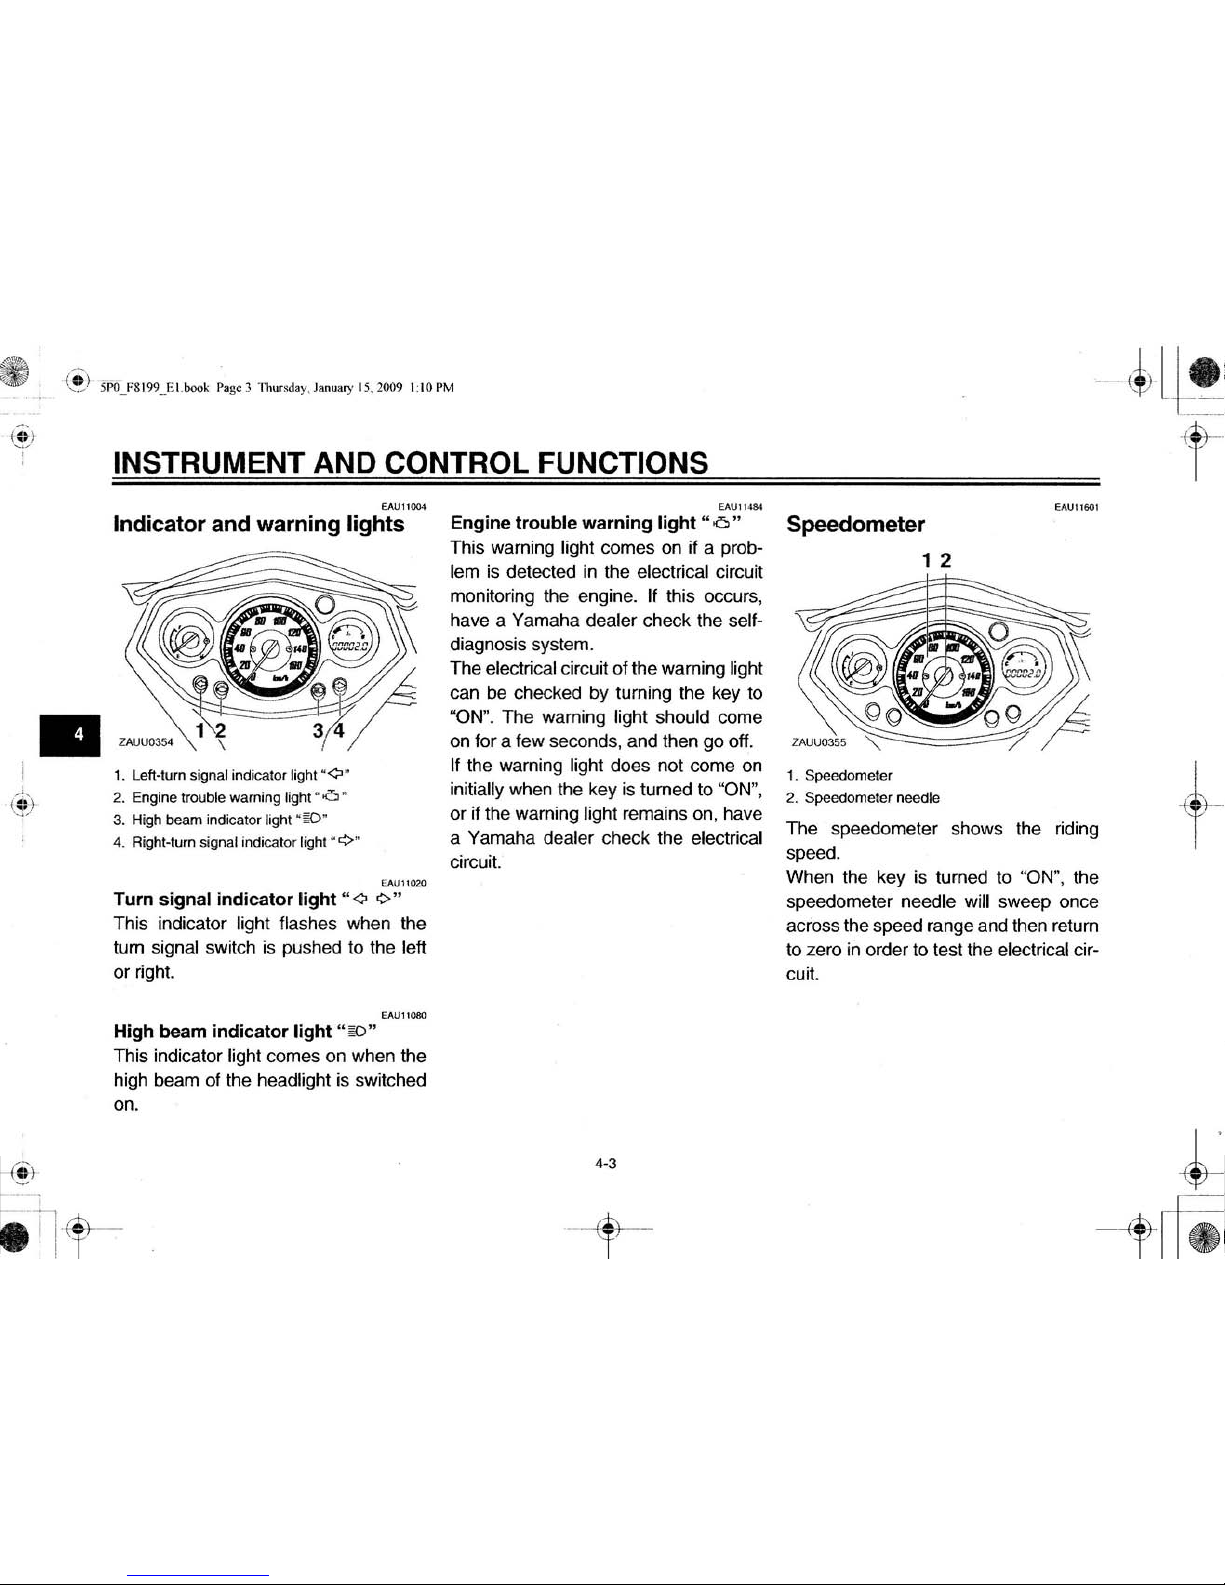
INSTRUMENT AND CONTROL FUNCTIONS
£AU""'"
EAU1l484
Indicator
and
warning
lights
Engine
trouble warning light
"6"
1.
Left-Ium signal indicatollight "
.0
-
2.
Engine trouble warning
light'
6 •
3.
High
beam
indicator light
"ro"
<I.
Right-Ium signal indicator light
-<>"
Do.U1I02O
Turn
signal
indicator
light
"¢
0"
This indicator light flashes when the
tum signal switch
is
pushed to the left
or right.
Uo.U11
0110
High beam
indicator
light" ro"
This indicator light comes on when the
high beam of the headlight is switched
on.
This warning light comes on
if
a prob-
lem is detected in the electrical circuit
monitoring the engine. If this occurs,
have a Yamaha dealer check the
sell-
diagnosis system.
The electrical circuit of the warning light
can
be
checked by turning the key to
"ON
H
•
The
warning light should come
on for a few seconds, and then go off.
If the warning light does not come on
initially when
lhe
key is turned to
~ON",
or if the warning light r
ema
ins on, have
a Yamaha dealer check the electrical
circuit.
4·'
--t-
~
,~
)l~
_
.
Speedometer
1 2
1.
Speedometer
2. Speedometer noodle
The speedometer shows the riding
speed.
When the key is turned to
"OW, the
speedometer needle will sweep once
across the speed range and then return
to zero
in
order
10
test the electrical cir-
cuit.
If
+-
http://mototh.com
(~)
@
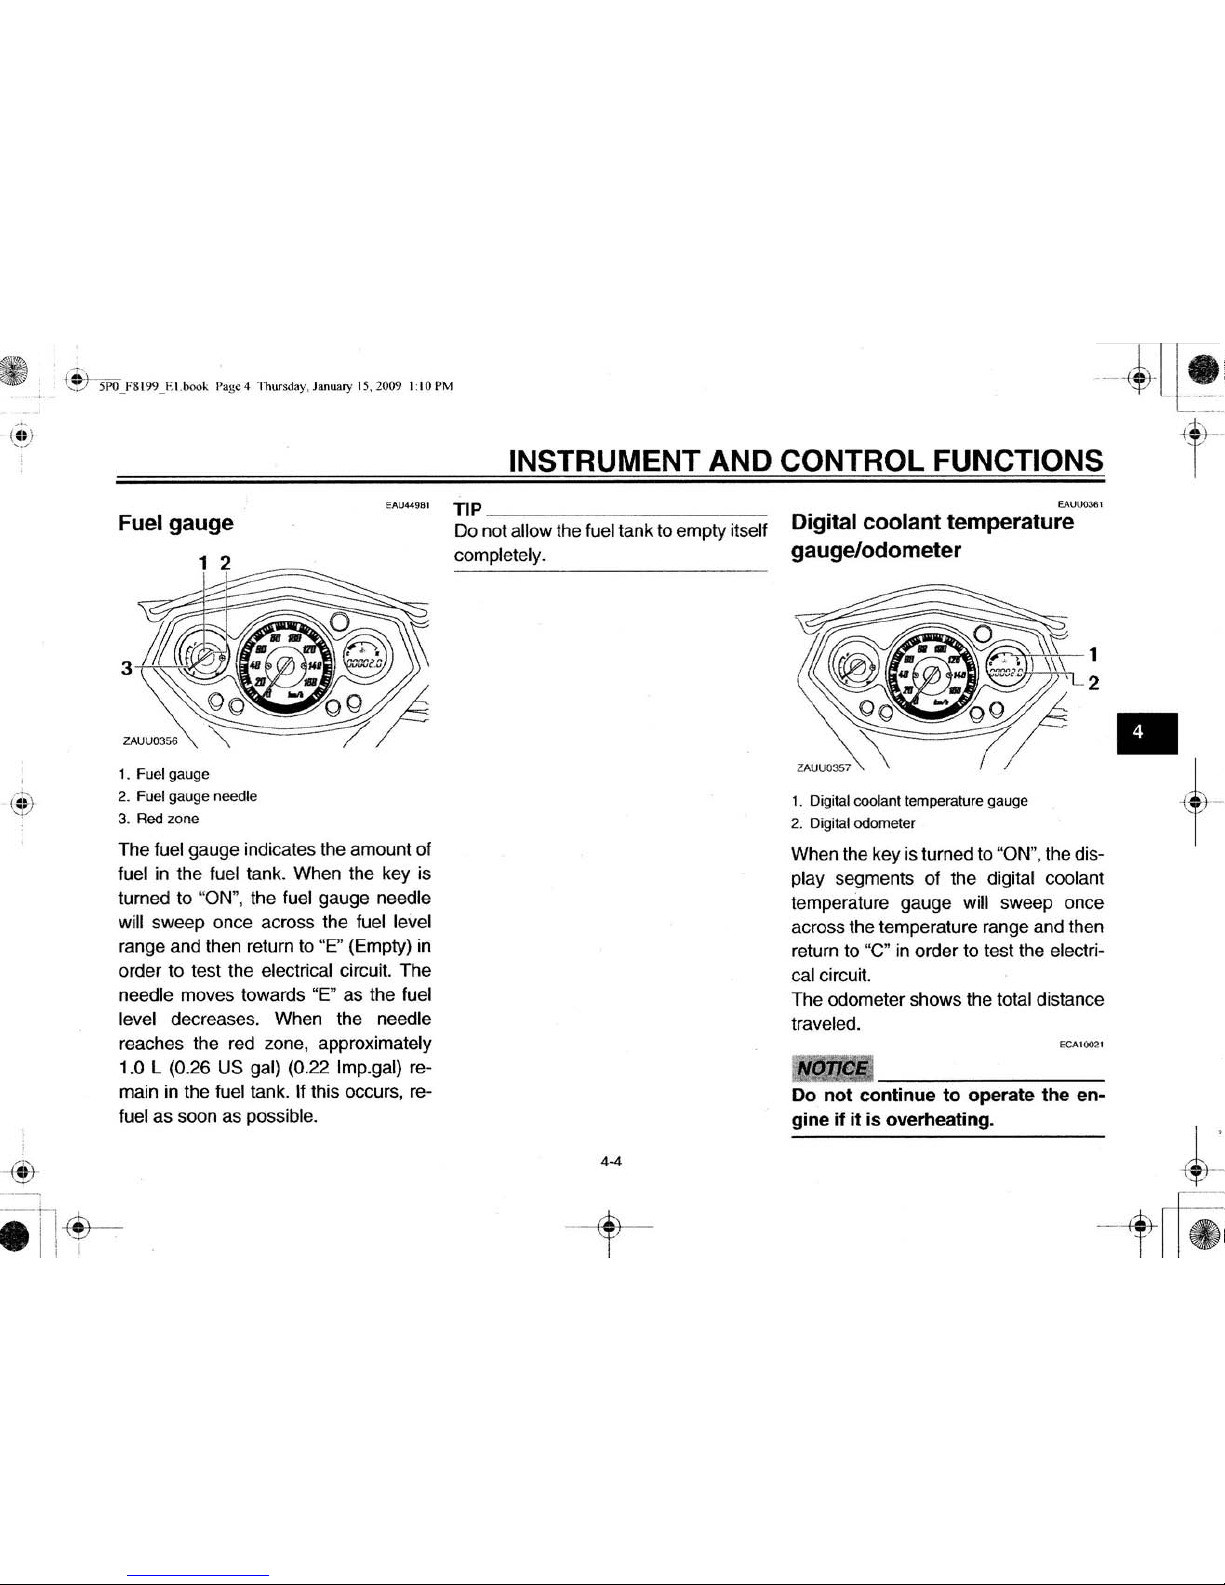
Fuel gauge
1 2
3
1. Fucl gauge
2. Fuel gauge needle
3. Red
2:o
nc
The fuel gauge indicates the amount of
fuel in the fuel tank. When the key is
turned to
kON~,
the fuel gauge needle
wi
ll
sweep once across the fuel level
range and then return
to
"P' (Empty)
in
order to test the electrical circuit. The
needle moves towards
"E
" as the fuel
level decreases. When the needle
reaches the red zone, approximately
1
.0
L (0.26
US
gal) (0.22 Imp.ga
l)
re-
main in the fuel tank. If this occur
s,
re-
fuel as soon as possibl
e.
+-
INSTRUMENT AND CONTROL FUNCTIONS
np~~~~~~~~~~~
~
Do
not allow the fuel tank to empty itse
lf
completel
y.
4-4
-
t-
Digital
coolant
temperature
gauge/odometer
~
e.·u~
.
'
1
~
.
• 2
GG -GG
/A
UU~3S7
~
I
1 Digital cooIant lemperature gauge
2_
Digital odometer
When the key is turned
to
kON",
the display segments of the digital coolant
temperature gauge
wi
ll sweep once
across
th
e temperature range and then
return
to
"C"
in
order
to
test the electr
ical circuit.
The odometer shows the total distance
traveled.
Do not continue to operate
the
en-
gine
if
it
is
overheating.
http://mototh.com
INSTRUMENT AND CONTROL FUNCTIONS
Handlebar
switches
Left
1:::---':::
?
1. Dimmer switch "101110
"
2. Tum signal s
wit
ch "
0/0
"
3. Horn switch "
Ioo:r
'
Rig
ht
-~
•
1
i
-@-----
II
:
Dimm
er
swi
tch "
10
/ 10"
Set
th
is switch to
MK)
~
for the high
beam and to
·
.Y
for the low beam.
Tum
signal
swi
tch "9/
9"
To signal a rig,t-ha
nd tum, push this
switch
to "0",
To signal a left-hand
lum, push this switch to
~¢"
.
When re-
leased, the switch returns to the center
posllion. To cancel the tum signal
lights, push the switch in after it has returned to the center positi
on.
Horn swit
ch "
Ioo:r
"
Press this switch to sound the hom.
Sta
rt swit
ch "
(i)"
Pu
sh this switch while applying the
front
or
rear brake to crank the engine
wi
th t
he
starte
r.
See
page 6-1 lor sta
rt
-
ing instructions prior to starting
the
en-
gine.
'
-5
Fr
ont
brake
lever
1. Front brake lever
The front brake lever is located on the
right handlebar grip. To
apply the Iront
brake, pull this lever towa
rd
the handle-
bar grip.
+-
http://mototh.com

(!
l
I
!
-$
Rear brake lever
./1
1
Rear
brake lever
The rear brake lever is located on the
left handlebar grip.
To
apply the r
ear
brake, pull this lever toward the handlebar
grip.
!l
rr
-
INSTRUMENT AND CONTROL FUNCTIONS
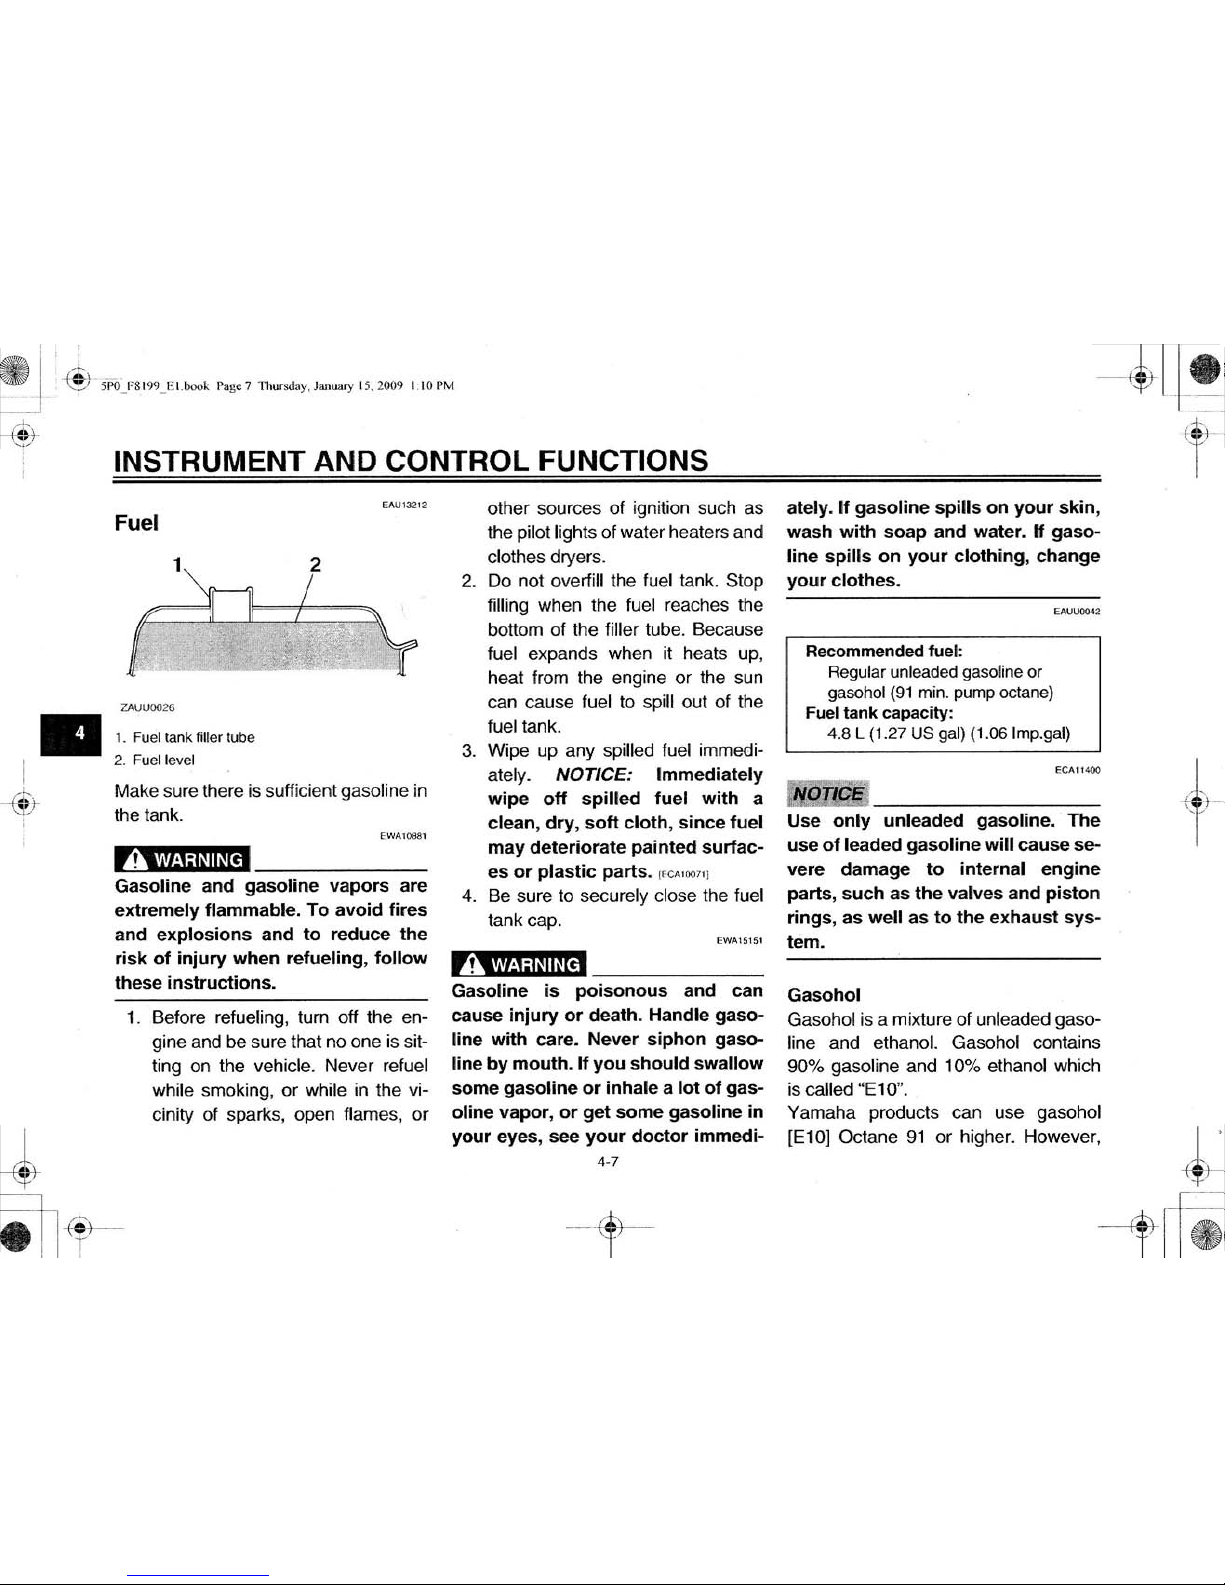
Fuel
tank
cap
1
1. Fuel tank cap
a. Open.
b. Close.
To
remove the fuel
tank
cap
1.
Open the seat. (See page 4-9.)
2. Tum the fuel lank cap counler-
ck>ckwise and pull it off.
4-6
To
install
the
fuel
tank cap
1.
In
sert the fuel tank cap into the
tank opening and
tum
it clockwise
until
the
~
t:..
~
marks on the cap and
tank are aligned.
2. Close the seal.
"WARNING
Make
sure
that the fuel tank cap
is
properly
closed after
filling
fuel.
Leaking fuel
is a fire
hazard.
+-
http://mototh.com
I
4)-
INSTRUMENT AND CONTROL FUNCTIONS
"""''''2
Fuel
1
~
2
/
r
I
"
"
""=~
1. Fuel tank filler tube
2. Fucl ievcl
Make sure there is sufficient gasoline
in
the tank.
f WAH)$$l
A WARNING
Gasoline
and
gasoline
vapors
are
extremely
flammable.
To
avoid
fires
and
explosions
and
to
reduce
the
risk
of
injury
when
refueling, follow
th
ese
instructions.
1. Before refueling, tum o
ff
the en-
gine and
be
sure that no one is sit-
ting
on
the vehicl
e.
Never refuel
while smoking, or while in the vi-
cinity 01 s
par1<
s, open flame
s,
or
2.
3.
other sources of ignition such as
the pil
ot lig
hts of water heaters and
clothes dryers.
Do
not averii
ll
the fuel lan
k.
Stop
filling when the fuel reaches the
bottom
of
the filler tube. Because
fuel expa
nds wh
en
it
heats up,
heat from
th
e engine or the
sun
can cause fuel to spill out of the
fuel tank.
Wipe up any
spilled fuel immedi-
atel
y_
NOTICE:
Immediately
wipe
off
spilled
fuel
with
a
clean, dry, soft
cloth,
since
fuel
may
deteriorate
painted
surfac-
es
or
plastic
part
s.
l.eAlOO"1
4.
Be sure
to
securely close the fuel
lank ca
p.
A WARNING
Gasoline
is
poisonous
and can
cause
injury
or
death.
Hand~
gaso-
line
with
care. Never
siphon
gaso-
line
by
mouth.
H you
should
swa
llow
some
gasoline
or
inhale a
lot
of
gas-
oline vapor,
or
get
some
gasoline
in
your
eyes, see
your
doctor
immedi-
'"'
ately.
If
gasoline
spills
on
your
skin
,
wash
with
soap
and
water.
ff
gaso-
line
spills
on
your
clothing
, change
your
clothes.
Recommended fuel:
Regular
unl
eaded
gasoline
or
gasohol
(91
min.
pump
octane)
Fuel tank capacity:
4.8
L (1
.27
US gal) (l.06lmp.ga
l)
OTICE
Use
only
unleaded gasoline. The
use
of
leaded gasoline
will
cause se-
vere damage
to
internal
engine
parts,
such as
the
valves
and
piston
rings, as well as
to
the
exhaust
sys-
tem.
Gasohol
Gasohol is a mixture of unleaded
gasoline and ethanol. Gaso hol contains
90% gasoline a
nd
10% ethanol which
is ca
ll
ed "El 0".
Yamaha products can use gasohol
IE10] Octa
ne
91 or higher. Ho wever,
http://mototh.com
99 ]
1.b<>oI<
PaS" ~ n ,ursdoy. Jan .... ')' 15. 2009
1.111
PM
m filli
ng with
gasohol, cold engine
rt
ing may
be
difficult.
Therefore,
be
e 10
follow the procedures in UStart-
a cold eng
in
e
H
•
EC,""",,'"
IT/CE
i
ng
gas
ohol
may
cause
engine
uble
depending
on
the
engine
.
If
ohol
is
used
and
engine
trouble
urs, contact
your
Yamaha deal-
IS
soon
as pos
sibl
e_
INSTRUMENT
AND
CONTROL
FUNCTII
fA"""'"
Catalytic
converter
This model is equipped with a catalytic
converter in the exhaust system.
A
WARNING
The
exhaust
system
is
hot
after
op-
eration.
To pre
vent
a fire hazard
or
burns:
• Do
not
park the vehicle near
possible
fire hazards
such
as
gr
ass
or
other materials that
e
asily
burn.
• Park th e vehicle in a place
wh
ere pedes
trians
or
children
are
not
likely
to
touch
the
hot
exhaust
syst
em.
• Make sure that the
exhaust
sys-
tem has
coo
led
down
before
do-
ing any maintenance work.
•
00
not
allow the engine
to
idle
more than a few
minutes. long
idling
can cause a
build-up
of
heat.
Use
only
unleaded
gasolin
use
of
leaded gasoline will
unrepairable damage
to the
co
converter.
http://mototh.com
 Loading...