

Page 1

03DVideoEditSuiteSoftware
Owner’s Manual
Mode d’emploi
Bedienungsanleitung
M
YAMAHA CORPORATION
Pro Audio & Digital Musical Instrument Division
P.O. Box 3, Hamamatsu, 430-8651, Japan
Page 2

i
Contents
Introduction . . . . . . . . . . . . . . . . . . . . . . . . . 1
Welcome . . . . . . . . . . . . . . . . . . . . . . . . . . . . . . . . . . . . . . . . . . . . . . . . . . . . . . . 1
Features . . . . . . . . . . . . . . . . . . . . . . . . . . . . . . . . . . . . . . . . . . . . . . . . . . . . . . . . 1
1. Installing the Software . . . . . . . . . . . . . . . 3
Installation Requirements . . . . . . . . . . . . . . . . . . . . . . . . . . . . . . . . . . . . . . . . . 3
Installing from a Macintosh Computer . . . . . . . . . . . . . . . . . . . . . . . . . . . . . . 3
Installing from a Windows 95 PC . . . . . . . . . . . . . . . . . . . . . . . . . . . . . . . . . . 6
Reinstalling the Regular 03D Software . . . . . . . . . . . . . . . . . . . . . . . . . . . . . . 7
2. About the Video Edit Suite Software . . . . 8
ESAM II . . . . . . . . . . . . . . . . . . . . . . . . . . . . . . . . . . . . . . . . . . . . . . . . . . . . . . . 8
Video Edit Suite Functions . . . . . . . . . . . . . . . . . . . . . . . . . . . . . . . . . . . . . . . . 8
System Hookup (audio only) . . . . . . . . . . . . . . . . . . . . . . . . . . . . . . . . . . . . . 10
Activating the TO EDITOR Port . . . . . . . . . . . . . . . . . . . . . . . . . . . . . . . . . . 10
Functions that Cannot Be Used when the TO EDITOR Port is Active . . . 11
How it works . . . . . . . . . . . . . . . . . . . . . . . . . . . . . . . . . . . . . . . . . . . . . . . . . . 12
Operating Notes . . . . . . . . . . . . . . . . . . . . . . . . . . . . . . . . . . . . . . . . . . . . . . . . 12
3. Quick Start . . . . . . . . . . . . . . . . . . . . . . . . 13
4. Display Pages . . . . . . . . . . . . . . . . . . . . . 14
MIDI/HOST Page . . . . . . . . . . . . . . . . . . . . . . . . . . . . . . . . . . . . . . . . . . . . . . 14
Machine Page (Cross Point Setting) . . . . . . . . . . . . . . . . . . . . . . . . . . . . . . . 16
CrossFade Page . . . . . . . . . . . . . . . . . . . . . . . . . . . . . . . . . . . . . . . . . . . . . . . . 16
From-To Page . . . . . . . . . . . . . . . . . . . . . . . . . . . . . . . . . . . . . . . . . . . . . . . . . 20
CH 1-16 & 17-24/Stin Pages . . . . . . . . . . . . . . . . . . . . . . . . . . . . . . . . . . . . . . 21
Monitor Page . . . . . . . . . . . . . . . . . . . . . . . . . . . . . . . . . . . . . . . . . . . . . . . . . . 22
Prefer. Page . . . . . . . . . . . . . . . . . . . . . . . . . . . . . . . . . . . . . . . . . . . . . . . . . . . . 22
Delay Page . . . . . . . . . . . . . . . . . . . . . . . . . . . . . . . . . . . . . . . . . . . . . . . . . . . . 23
MIDI Setup Page . . . . . . . . . . . . . . . . . . . . . . . . . . . . . . . . . . . . . . . . . . . . . . . 24
Bulk Page . . . . . . . . . . . . . . . . . . . . . . . . . . . . . . . . . . . . . . . . . . . . . . . . . . . . . 24
Solo Setup Page . . . . . . . . . . . . . . . . . . . . . . . . . . . . . . . . . . . . . . . . . . . . . . . . 24
Moni. Setup Page . . . . . . . . . . . . . . . . . . . . . . . . . . . . . . . . . . . . . . . . . . . . . . . 25
User Define Page . . . . . . . . . . . . . . . . . . . . . . . . . . . . . . . . . . . . . . . . . . . . . . . 25
EQ Library Page . . . . . . . . . . . . . . . . . . . . . . . . . . . . . . . . . . . . . . . . . . . . . . . . 26
Effects Library Page . . . . . . . . . . . . . . . . . . . . . . . . . . . . . . . . . . . . . . . . . . . . . 26
Appendix . . . . . . . . . . . . . . . . . . . . . . . . . . . 27
Supported Editors . . . . . . . . . . . . . . . . . . . . . . . . . . . . . . . . . . . . . . . . . . . . . . 27
Supported Commands . . . . . . . . . . . . . . . . . . . . . . . . . . . . . . . . . . . . . . . . . . 28
MIDI Bulk Dump . . . . . . . . . . . . . . . . . . . . . . . . . . . . . . . . . . . . . . . . . . . . . . 29
03D Video Edit Suite Software—Owner’s Manual
Page 3

Introduction
1
Introduction
Welcome
Thank you for purchasing the Yamaha 03D Video Edit Suite Software. With support for the
ESAM II editor protocol, the 03D Video Edit Suite software turns the 03D Digital Mixing
Console into a full-feature digital audio mixer for video post-pro.
Features
• Audio signals can be mixed and edited along with the video editing.
• With support for ESAM II, the 03D works like a video switcher for audio, allowing
remote transition previews from a video editor.
• Several extended functions of the ESAM II protocol including remote fader level control
have been employed.
• 03D data can be downloaded or uploaded to the video editor for centralized data management.
• Phase reverse, input delay up to approximately six frames (with 1/4 frame accuracy),
4-band parametric EQ, dynamics, and effects for flexible audio mixing and audio sweetening.
• The 03D does not require extra hardware, such as boards and ports. A 9-pin TO EDITOR port comes as standard.
• Channels can be assigned to the 03D’s four bus outputs as FROM sources and TO
sources, allowing for dissolve transitions. Crossfades can be performed using one of
seven crossfade patterns, which can be set individually for each channel, and three curve
slopes, which can be applied to all channels globally.
• The 03D’s motorized faders allow for accurate level adjustments and precisely reflect
input level settings. In FROM-TO mode, faders reflect transition levels.
• Preview sources can be selected for monitoring, and CHANNEL and BUS modes allow
individual channel monitoring or bus monitoring.
Package Contents
The package should contain the following items. Make sure that you have them all.
• 03D regular software (Mac and PC disks labeled “03D”)
• 03D Video Edit Suite software (Mac and PC disks labeled “03D for Video Editing”)
• This Owner’s Manual
Contact your Yamaha dealer if something is missing.
Trademarks
Accom is a trademark of Accom Corporation, Inc. Ampex is a trademark of Ampex Corporation, Inc. CMX is a trademark of CMX Company. Macintosh is a trademark of Apple Computer, Inc. Panasonic is a trademark of Matsushita Corporation, Inc. Sony is a trademark of
Sony Corporation, Inc. Windows 95 is a trademark of Microsoft Corporation, Inc.
Yamaha is a trademark of Yamaha Corporation, Inc.
All other trademarks are the property of their respective holders.
03D Video Edit Suite Software—Owner’s Manual
Page 4

Features
Copyright
© 1997 Yamaha Corporation. All rights reserved.
No part of the this software or this
any form or by any means without the prior written authorization of Yamaha Corporation.
Owner’s Manual may be reproduced or distributed in
Yamaha on the World Wide Web
http://www.yamaha.co.jp/product/proaudio/homeenglish/
Keep This Manual For Future Reference
2
03D Video Edit Suite Software—Owner’s Manual
Page 5

Installing the Software
3
1
Installing the Software
This chapter explains how to install the 03D Video Edit Suite software.
Warning
All automix data will be lost when the 03D Video Edit Suite software is installed, so back
up your important data using MIDI Bulk Dump before installing. Refer to the 03D
Owner’s Manual for details. Similarly, Video Edit Suite settings and roll library memory
data will be lost if the regular 03D software is reinstalled.
Installation Requirements
The 03D Video Edit Suite software can be installed from a Macintosh or PC computer running Windows 95.
Transmission Device
Macintosh TO HOST Macintosh serial cable
Windows 95 PC TO HOST
1. Terminal-J is included with the Video Edit Suite software.
2. 9-pin D-sub to 8-pin mini DIN cable
3. The HyperTerminal program is included with Windows 95.
03D
Connection
PC serial cable
Cable
Recommended
Software
Terminal-J
2
HyperTerminal
1
3
Installing from a Macintosh Computer
1. Connect an 8-pin mini DIN cable between the 03D’s TO HOST port and
the Macintosh’s Modem port.
2. Turn on the Macintosh.
3. Insert the Mac 03D for Video Editing floppy disk into the floppy disk
drive, double-click the floppy disk icon, and then copy the Terminal-J file
to your hard disk.
4. Double-click the Terminal-J file to decompress it.
The Terminal-J folder containing the Terminal-J program is created.
5. Copy the “03VEKxxxMIX.sea” file to your hard disk, and then double-click
it to decompress it.
The “03VEKxxxMIX” folder is created.
6. Copy the “03VEKxxx.T” and “03VEKxxx.X” files from the “03VEKxxxMIX”
folder to the Terminal-J folder.
7. On the Chooser, turn off AppleTalk.
8. While holding down the [UTILITY], [DYNAMICS], and [EFFECT 2] buttons,
turn on the 03D.
The UPDATE PROGRAM page appears.
9. Double-click the Terminal-J icon to launch the program.
10. Choose Connection from the Options menu.
The Connection Settings dialog box appears.
03D Video Edit Suite Software—Owner’s Manual
Page 6

Installing from a Macintosh Computer
11. Make the following settings, as shown on the dialog box below, and then
click OK.
Method: Direct Serial
Baud Rate: 38.4K
Parity: None
Data Bits: 8
Stop Bits: 1
Handshake: None
12. Choose Transfer from the Options menu.
The Transfer Settings dialog box appears.
13. Click the Binary file icon.
The settings for binary file transfers appear.
14. Turn off the “Recognize and use MacBinary format for non-TEXT files”
setting, as shown below, and then click OK.
4
15. Choose X/YMODEM from the Options menu.
The X/YMODEM options dialog box appears.
16. Turn off the CRC setting, as shown below, and then click OK.
17. Choose Connect from the Session menu.
18. On the 03D, use the cursor buttons and [ENTER] button to make the following settings.
PORT: TO HOST
FLYING: ON
UPDATE BLOCK: ALL
19. In Terminal-J, choose TRANSMIT XMODEM from the File menu.
The File Open dialog box appears.
03D Video Edit Suite Software—Owner’s Manual
Page 7

Installing the Software
5
20. Locate the “03VEKxxx.T” file, and then click Transmit.
21. On the 03D, use the cursor buttons to select START, and press the [ENTER]
button.
The message “Please send BLOCK TABLE FILE” appears on the 03D.
The file is transmitted to the 03D.
Wait until the following message appears on the 03D before proceeding:
“Please send BLOCK 0, 1, 2, 3, 4, 5, 6, 7, 8, 9, A, B, C, D, E, F, G, H”.
22. In Terminal-J, choose TRANSMIT XMODEM from the File menu.
The File Open dialog box appears.
23. Locate the “03VEKxxx.X” file, and then click Transmit.
24. On the 03D, use the cursor buttons to select START, and press the [ENTER]
button.
The file is transmitted to the 03D. While the data is being transmitted, an asterisk flashes
slowly on the 03D.
Transmission may take between 5 and 20 minutes. When the file have been transmitted successfully, “UPDATE . . . DONE” and an EXIT option appear on the 03D.
25. Press the [ENTER] button to restart the 03D.
That completes the installation process.
03D Video Edit Suite Software—Owner’s Manual
Page 8

Installing from a Windows 95 PC
Installing from a Windows 95 PC
1. Connect an 8-pin mini DIN to 9-pin D-sub cable between the 03D’s TO
HOST port and a serial port (COM port) on the PC.
2. Turn on the PC.
3. Insert the 03D Video Edit Suite floppy disk into the floppy disk drive, and
then copy the “03VEKxxx.T” and “03VEKxxx.X” files to the HyperTerminal folder on your hard disk (Hard Disk–>Program Files–>Accessories–>HyperTerminal.
4. While holding down the [UTILITY], [DYNAMICS], and [EFFECT 2] buttons,
turn on the 03D.
The UPDATE PROGRAM page appears.
5. Double-click the Hypertrm icon to launch the program.
The Connection Description dialog box appears.
6. Enter a name for the connection (e.g., “03D”), and then click OK. Ignore
the icon settings in this dialog box.
The Phone Number dialog box appears.
6
7. Choose “Direct to Com x” from the Connect using menu (x being the
number of the serial port to which the 03D is connected), and then click
OK.
The Port Settings dialog box appears.
8. Make the following settings, as shown on the dialog box below, and then
click OK.
Bits per second: 38400
Data bits: 8
Parity: None
Stop bits: 1
Flow control: None
9. Choose Connect from the Call menu.
10. On the 03D, use the cursor buttons and [ENTER] button to make the following settings.
PORT: TO HOST
FLYING: ON
UPDATE BLOCK: ALL
11. In HyperTerminal, choose Send File from the Transfer menu.
The Send File dialog box appears.
03D Video Edit Suite Software—Owner’s Manual
Page 9

Installing the Software
7
12. Choose Xmodem from the Protocol menu.
13. Click Browse and locate the “03VEKxxx.T” file, and then click Send.
14. On the 03D, use the cursor buttons to select START, and press the [ENTER]
button.
The message “Please send BLOCK TABLE FILE” appears on the 03D.
The file is transmitted to the 03D.
Wait until the following message appears on the 03D before proceeding:
“Please send BLOCK 0, 1, 2, 3, 4, 5, 6, 7, 8, 9, A, B, C, D, E, F, G, H”.
15. In HyperTerminal, choose Send File from the Transfer menu.
The Send File dialog box appears.
16. Click Browse and locate the “03VEKxxx.X” file, and then click Send.
17. On the 03D, use the cursor buttons to select START, and press the [ENTER]
button.
The file is transmitted to the 03D. While the data is being transmitted, an asterisk flashes
slowly on the 03D.
Transmission may take between 5 and 20 minutes. When the file have been transmitted successfully, “UPDATE . . . DONE” and an EXIT option appear on the 03D.
18. Press the [ENTER] button to restart the 03D.
That completes the installation process.
Reinstalling the Regular 03D Software
To reinstall the regular 03D software, follow the same procedure as for installing the 03D
Video Edit Suite software noting the following differences:
• Use the floppy disks labeled “03D” instead of the “03D for Video Editing” disks.
• On the Macintosh floppy disks, the compressed file for the regular 03D software is
“03D_VxxxMIX.sea” (instead of “03VEKxxxMIX.sea”)
• The “T” data file is “03D_Vxxx.T” (instead of “03VEKxxx.T”)
• The “X” data file is “03D_Vxxx.X” (instead of “03VEKxxx.X”)
• You don’t have to use the same type of computer to reinstall the regular 03D software.
For example, if you installed the 03D Video Edit Suite software using a Macintosh computer, you can reinstall the regular 03D software using either a Macintosh or Windows
95 PC.
03D Video Edit Suite Software—Owner’s Manual
Page 10

2
About the Video Edit Suite Software
About the Video Edit Suite Software
ESAM II
The 03D Video Edit Suite supports only ESAM (Editing Suite Audio Mixers) Serial II Protocol-Extended. See page 28 for a list of supported commands.
Video Edit Suite Functions
This sections lists the new functions provided by the 03D Video Edit Suite software.
Crossfade
Crossfades can be performed over the number of frames specified by the ESAM II commands sent from the editor. ESAM II allows you to specify from between 0 to 32,767 frames
in single frame steps (1,365 seconds at 24 frames/second). The maximum frame value
depends on the editor being used. Audio control accuracy is within one frame (only when
no other 03D functions are being used).
8
Local Switch
Using Local mode, which works only when the CH 1–16 or 17–24/Stin pages are displayed,
the channel [SEL] buttons can be used to set channels to ignore incoming ESAM II commands. When a [SEL] button’s indicator is off, that channel responds to incoming ESAM II
commands. When it’s flashing, the channel is in Local mode and ignores ESAM II commands. See
CH 1-16 & 17-24/Stin Pages on page 21 for more information.
Three Setup Memories
Video Edit Suite settings such as SOURCE/MACHINE ASSIGN, FRAME TYPE, FADER
MODE, and reference levels for the auto-level setting function can be stored in the TO EDITOR SETUP MEMORY (1, 2, 3). See
MIDI/HOST Page on page 14 for more information.
Crossfade Patterns & Curves
One of seven crossfade patterns can be assigned to each source (channel), and one of three
curves can be applied to sources globally. See
tion.
CrossFade Page on page 16 for more informa-
Limit Level Setting
The fade out level or “floor” can be set to from 0 dB to minus infinity. See MIDI/HOST Page
on page 14 for more information.
Automatic Level Setting
By reading the level of the test tone at the beginning of a reel (tape), the gain is set automatically so that the nominal level set by the user corresponds to the output level. The adjustable
range is from –18 dB to +18 dB. If the level exceeds this range and cannot be controlled by
the 03D, a warning message appears. For channels configured as a stereo pair, only the left
channel is used for level sensing. The level determined for the left channel is also applied to
the right channel. Due to circuitry limitations, the levels may vary between channels. See
MIDI/HOST Page on page 14 for more information.
03D Video Edit Suite Software—Owner’s Manual
Page 11

About the Video Edit Suite Software
9
Specify Input & Output Delay in Frames
In addition to samples and time, input and output delays can also be specified as frames in
quarter-frame steps. With a sampling rate of 48 kHz and the Frame Type set to DF, the delay
range is approximately six frames. See
When a bus out is selected, and the LONGER OUTPUT DELAY TIME option is turned on,
the OFFSET parameter appears on the CH Delay page. This parameters sets the delay for
bus outs globally, and can be used to correct the timing between audio and video. An offset/delay of up to four frames in single frame steps can be set.
On the Prefer. page, the LONGER OUTPUT DELAY TIME option allows you to increase
the output delay by 3,160 samples. Since the input and output delay functions share the same
memory, the maximum input delay is reduced by 3,160 samples when this option is on. See
Prefer. Page on page 22 for more information.
Pan Flip
Assigning the new PAN L-C-R Flip function to a USER DEFINE button allows you to quickly
pan from center to right, to left, to center, and so on. See
more information.
Delay Page on page 23 for more information.
User Define Page on page 25 for
Master Level Protect
Bus out and aux send master faders can be protected against accidental operation by using
the MASTER LEVEL PROTECT option on the Prefer. page. This is useful when master levels
are not adjusted regularly. See
Prefer. Page on page 22 for more information.
Inputs 9-16/17-24 Swap
Analog inputs 9 to 16 and digital inputs 17 to 24 can be swapped so that the analog inputs
appears as channels 17 to 24 and the digital inputs appear as channel 9 to 16. This allows
you to control signals from the digital inputs without pressing the [MIXING LAYER] button.
The SWAP CH option is on the Prefer. page. See
tion.
Prefer. Page on page 22 for more informa-
New EQ Programs
The following three programs have been added to the end of the EQ library.
• 80. 60 Hz hum removal
• 79. 50 Hz hum removal
• 78. High-range white noise (i.e., tape hiss) removal using LPF
After installing the Video Edit Suite software, you must initialize all memories to access the
new EQ programs. See
EQ Library Page on page 26 for more information.
New Effects Programs
The following three programs have been added to the end of the effects library.
• 96. Echo Reverb
• 95. FEMALE Pitch
• 94. MALE Pitch
After installing the Video Edit Suite software, you must initialize all memories to access the
new effects programs. See
03D Video Edit Suite Software—Owner’s Manual
Effects Library Page on page 26 for more information.
Page 12

System Hookup (audio only)
System Hookup (audio only)
VTR1
(PLAY 1)
D. BETA-cam
VTR2
(PLAY 2)
D. BETA-cam
VTR3
(REC 1)
D. BETA-cam
Video Switcher
(video effects)
AES/EBU
4
AES/EBU
4
AES/EBU
4
Analog
4
9-pin Remote (9-pin D-sub)
4
CD8-AE-S
CH17-20
(Digital)
CH21-24
(Digital)
BUS OUT
1-4 (Digital)
CH1-4 (Analog)
Activating the TO EDITOR Port
03D
ESAM II Interface
Video Editor
10
TO EDITOR
ESAM II
(9-pin D-sub)
After installing the 03D Video Edit Suite software, the HOST INTERFACE setting on the
MIDI/HOST page must be set to EDITOR in order to use the TO EDITOR port.
Warning
All automix data will be lost when the HOST INTERFACE parameter on the MIDI/HOST
page is changed from STAND. or MULTI. to EDITOR, so back up your important data
using MIDI Bulk Dump before changing. Refer to the 03D Owner’s Manual for details.
Similarly, Video Edit Suite settings and roll library memory data will be lost when the
EDITOR setting is changed back to either STAND. or MULTI.
1. Use the [UTILITY] button to locate the MIDI/HOST page shown below.
2. Use the cursor buttons to select the EDITOR switch under HOST INTERFACE, and then press the [ENTER] button.
The following dialog box appears.
This dialog box
appears when
changing from
EDITOR to
STAND.
03D Video Edit Suite Software—Owner’s Manual
Page 13

11 About the Video Edit Suite Software
3. Select the OK switch, and then press the [ENTER] button.
The MIDI/HOST page shown below appears. The Fader Start and MMC parameters from
the regular MIDI/HOST page can be found on the MIDI Setup page.
The 03D is now ready for use with a video editor.
Functions that Cannot Be Used when the TO
EDITOR Port is Active
When the TO EDITOR port is active, the following 03D functions are disabled:
Automix—The automix function is disabled, and the automix pages are replaced with
video edit suite-related pages. All automix data will be lost when the 03D Video Edit Suite
software is activated, so back up your important data using MIDI Bulk Dump before activating. Refer to the 03D Owner’s Manual for details.
Channel delay ECHO and SLAP—On the Channel Delay function, the SLAP and
ECHO options are disabled. Basic DELAY is still available.
Surround pan—The Surround Pan function is disabled, and the Pan mode is set to regular
STEREO.
Flashing MIXING LAYER indicator—The MIXING LAYER indicator does not flash
when mixing layer 17-24/MASTER is selected. The red indicator just remains lit.
SOLO TRIM—The SOLO TRIM control on the Solo Setup page cannot be used.
MONI TRIM—The MONI TRIM control on the Moni. Setup page cannot be used.
03D Video Edit Suite Software—Owner’s Manual
Page 14

How it works 12
How it works
Channel level adjustments are performed using the channel fader. Crossfades are performed
by the ESAM fader, which appears after the channel fader. The input level is controlled by
the INPUT LEVEL ADJUST control. Both controls are shown in the following illustration.
INPUT LEVEL ADJUST
& ADJUST ON/OFF
ATT
ON
Input channels 1–24
ESAM FADER
& LOCAL ON/OFF
OFF
Delay
4Band
PEQ
CH Fader
Dynamics
ON
To AUX
(pre)
ON
OFF
PAN
To AUX
(post)
When the TO EDITOR parameter is set to ENABLE and the 03D is being remotely controlled
by an editor, the channel send level is controlled by the CH fader and ESAM fader. ESAM
faders on channels specified using the FROM command are set to nominal (0 dB). ESAM
faders on channels specified using the TO command are set to the LIMIT LEVEL (usually
minus infinity). After a crossfade, FROM command channels are set to the LIMIT LEVEL,
while TO command channels are set to nominal (0 dB).
When the TO EDITOR parameter is set to DISABLE, the 03D operates as normal (i.e.,
ESAM II commands are ignored). Likewise, a channel in Local mode (i.e., the LOCAL
ON/OFF switch in the ON position) operates as normal, ignoring ESAM II commands.
Local mode is engaged using the [SEL] buttons, but works only when the CH 1–16 or
17–24/Stin pages are displayed. The following illustration shows a channel in Local mode
(or with the TO EDITOR parameter set to DISABLE).
INPUT LEVEL ADJUST
& ADJUST ON/OFF
ATT
ON
Input channels 1–24
Operating Notes
ESAM FADER
& LOCAL ON/OFF
OFF
Delay
4Band
PEQ
CH Fader
Dynamics
ON
To AUX
(pre)
ON
OFF
PAN
To AUX
(post)
The editor should be configured so that the recording machine can be monitored. Typically,
the editor will be set to EE mode (Electric-to-Electric).
When the 03D’s output delay is used, it functions as a predelay and the sound will not be
synchronized with the video.
When input channels or bus outputs are configured as stereo pairs, set the corresponding
pan controls hard left and hard right (note there is a 3 dB signal gain in this condition).
To output digital bus signals via the ST DIGITAL OUT connection, use the BUS TO ST function.
03D Video Edit Suite Software—Owner’s Manual
Page 15

13 Quick Start
3 Quick Start
This chapter explains how to get up and running with the 03D Video Edit Suite software.
1. On the MIDI/HOST page, set the HOST INTERFACE to EDITOR. See
MIDI/HOST Page on page 14 for more information.
2. Set the TO EDITOR parameter to ENABLE. See MIDI/HOST Page on
page 14 for more information.
3. Set the FRAME TYPE (ND, DF, 25, or 24). See MIDI/HOST Page on page 14
for more information.
4. Set the PARITY FLAG (usually EVEN, although editors such as the Ampex
ACE200 require ODD). See MIDI/HOST Page on page 14 for more information.
5. Set the FADER MODE (ABSOLUTE or FROM-TO). See MIDI/HOST Page on
page 14 for more information.
6. Configure channels connected to stereo sources as stereo pairs, and pan
the left channel hard left and the right channel hard right.
7. If the outputs are stereo, configure them as stereo pairs.
8. On the Machine page, assign input channels to machines and set the REC
machine. See Machine Page (Cross Point Setting) on page 16 for more
information.
9. Make sure that channels assigned to play machines are not routed to the
Stereo bus. Only the REC machine channels should be routed to the Stereo bus.
10. On the ROUTING or From-To page, assign channels to buses. See From-To
Page on page 20 for more information.
11. Set the input levels.
12. Select crossfade patterns and curves. See CrossFade Page on page 16 for
more information.
13. The 03D is now ready to be controlled by the editor.
03D Video Edit Suite Software—Owner’s Manual
Page 16

4 Display Pages
MIDI/HOST Page
This section explains the parameters on the MIDI/HOST page shown below. Use the [UTILITY] button to locate this page.
HOST INTERFACE—The STAND. and MULTI. switches under HOST INTERFACE are
the same as the STANDARD I/F and MULTIPORT switches on the regular 03D. The EDITOR switch is used to activate the TO EDITOR port for use with a video editor.
TO EDITOR SETUP MEMORY—Three setup memories are available for storing settings
related to the TO EDITOR port. When the memory contents match the current settings,
these switches are grayed out. When a parameter setting is changed, the RECALL and STORE
switches can be used to recall the stored settings or store the new settings. The following
parameters are stored in these memories: FRAME TYPE, PARITY FLAG, FADER MODE,
INPUT LEVEL ADJUST OUTPUT level, and SOURCE/MACHINE ASSIGN settings.
INPUT LEVEL ADJUST—The OUTPUT level control determines the send level when the
fader is set to nominal (0 dB), and can be set from –48 dB to 0 dB in 1 dB steps. The input
level of the selected channel can be set manually or automatically so that the channel level
matches the specified output level. This setting is based on the assumption that the level will
not be changed using the faders, pan, EQ, or dynamics.
By reading the level of the test tone at the beginning of a reel (tape), the gain can be set automatically so that the nominal level set by the user corresponds to the output level. The adjustable range is from –18 dB to +18 dB in 0.5 dB steps. If the level exceeds this range and cannot
be controlled, a warning message appears. For channels configured as a stereo pair, only the
left channel is used for level sensing. The level determined for the left channel is also applied
to the right channel. Due to circuitry limitations, the levels may vary between channels.
To automatically set the level for a channel, select the channel, use the cursor buttons to select
the AUTO switch, and then press the [ENTER] button.
To manually set the level for a channel, select the channel, use the cursor buttons to select
the MANUAL control, and then use the PARAMETER wheel.
When a channel level is set either manually or automatically, the corresponding Adjust
On/Off switch on the CH 1–16 or 17–24/Stin pages appears highlighted.
TO EDITOR—This parameter is used to enable and disable the TO EDITOR port, and must
be set to ENABLE for the 03D to respond to incoming ESAM II commands. Commands are
ignored when this is set to DISABLE.
FRAME TYPE—This parameter should be set to match the frame rate of the video. Options
are: ND (30 frames), DF (29.97 frames), 25 (25 frames), and 24 (24 frames). The 03D uses
this setting to calculate fade and delay times specified in frames.
Display Pages 14
03D Video Edit Suite Software—Owner’s Manual
Page 17

15 Display Pages
PARITY FLAG—This parameter should be set to match the parity requirements of the edi-
tor. Options are: EVEN, ODD, and NONE. The default being EVEN.
FADER MODE—This parameter determines how 03D faders operate when ESAM II com-
mands are received.
In ABSOLUTE mode, faders indicate channel fader positions and do not move when
ESAM II commands change levels using the ESAM faders. In this mode, faders can still be
used to make manual level adjustments, a common feature of ESAM mixers.
In FROM-TO mode, faders indicate ESAM fader levels and move when ESAM II commands
change channel levels using the ESAM faders. FROM source faders move to the LIMIT
LEVEL, usually minus infinity, and TO source faders move to the specified input level. In
this mode, faders cannot be used to make manual level adjustments. Faders move only when
an ESAM-related page is displayed (i.e., Machine, CrossFade, From-To, CH 1-16, or
17-24/Stin).
03D Video Edit Suite Software—Owner’s Manual
Page 18

Machine Page (Cross Point Setting) 16
Machine Page (Cross Point Setting)
This section explains the parameters on the Machine page shown below. Use the [AUTOMIX] button to locate this page.
The Machine page is used to assign input channels to machines, and up to eight machines
from A to H are available. Input channels can be assigned in two or four-channel groups
and cannot be assigned to more than one machine. Machine A corresponds to Cross Point
1, Machine B to Cross Point 2, and so on through to Machine H which corresponds to Cross
Point 8. The channel set as REC, however, also corresponds to Cross Point 0. For example,
in the Machine page shown above, input channels 1, 2, 3, and 4 are controlled by commands
for Cross Point 1 (Machine A), and also controlled by commands for Cross Point 0 since
REC is selected. On a typical editor, the machine number of the ESAM II command is determined by the cross point settings.
Settings on the Machine page are effective only when ESAM II machine commands are
received. Typically, they are ineffective when individual channel control using source commands is used, although this may vary between editors. Refer to the editor’s manual for more
information.
To assign channels to a machine, use the cursor buttons to select a machine from A to H,
and the [SEL] buttons to add and remove channels. Channels cannot be assigned to more
than one machine, and the ST IN channel can be assigned only to the ST IN machine.
To set the REC machine, use the cursor buttons to select a machine from A to H, and then
press the [ENTER] button.
CrossFade Page
This section explains the parameters on the CrossFade page shown below. Use the [AUTOMIX] button to locate this page.
The CrossFade page is used to select crossfade patterns for channels individually, and seven
different patterns are available. When channels are paired, both use the same pattern. In
addition to patterns, one of three curves (A, B, C) can be applied to channels globally.
03D Video Edit Suite Software—Owner’s Manual
Page 19

17 Display Pages
To select a pattern, use the [SEL] buttons to select a channel, and then use the PARAMETER
wheel to select a pattern.
Below the pattern for each channel is a LIMIT LEVEL parameter, which is the target level
for FROM settings, or the start level for TO settings, when a fader is set to 0 dB. The actual
level is the input fader level minus the LIMIT LEVEL, which has a range from 0 to minus
infinity.
Crossfade Patterns 1 to 7
TD (Transition Duration) in frames
TD
12
FROM
TO
Time
TD
34
FROM
TO
Time
FROM
TO
FROM
TO
TD TD
Time
TD
Time
56
03D Video Edit Suite Software—Owner’s Manual
FROM
TO
TD
Time
TD TD
FROM
TO
Time
Page 20

CrossFade Page 18
TD TD
7
FROM
TO
Time
Crossfade Curves A, B, C
Curves (A, B, C) do not apply to patterns with a simple in/out level cut. In these cases, the
level changes within one frame. In the following examples the LIMIT LEVEL is set to minus
infinity.
TD
FROM 0 dB
FROM 0 dB
AB
–6 dB
TO
TD
FROM 0 dB
–∞ dB
TO
TD
–3 dB
–∞ dB
C
–13 dB
TO
–∞ dB
03D Video Edit Suite Software—Owner’s Manual
Page 21

19 Display Pages
When curve type B is selected, the Machine page appears as follows.
When curve type C is selected, the Machine page appears as follows.
03D Video Edit Suite Software—Owner’s Manual
Page 22

From-To Page 20
From-To Page
This section explains the parameters on the From-To page shown below. Use the [AUTOMIX] button to locate this page.
The From-To page is used to monitor transitions from one source to another, and can also
be used to assign FROM and TO channels to bus outs 1 to 4.
When a Transition Start command is received, the ESAM fader on FROM channels is set to
the LIMIT LEVEL, while the ESAM fader on TO channels is set to 0 dB. When the transition
is complete, FROM channels become TO channels, and TO channels become FROM channels.
To assign channels to bus outs, use the cursor buttons to select bus outs in the FROM
ASSIGN and TO ASSIGN windows, and the [SEL] buttons to add and remove channels.
Assignments made on this page are reflected on the [PAN/ROUTING] Pan 1-16 and Pan
17-24 pages. Likewise, assignments made on the [PAN/ROUTING] Pan 1-16 and Pan 17-24
pages are reflected on this page. Typically, Cross Point settings are made on the editor, otherwise, operation may not be correct. Channels and bus outs configured as stereo pairs are
assigned simultaneously. Effects returns 1 and 2 are assigned automatically to both FROM
and TO.
03D Video Edit Suite Software—Owner’s Manual
Page 23

21 Display Pages
CH 1-16 & 17-24/Stin Pages
This section explains the parameters on the CH 1-16 and 17-24/Stin pages shown below.
Use the [AUTOMIX] button to locate these pages.
The CH 1-16 and 17-24/Stin pages contain individual channel on/off switches for channel
delay (DLY), dynamics (DYN), EQ, and auto level adjust (A). The rotary controls show the
actual send levels. The value below these controls indicates the level of the channel fader.
When either of these pages are selected, the [SEL] buttons work as Local on/off buttons.
When a [SEL] button’s indicator is off, that channel responds to incoming ESAM II commands. When it’s flashing, the channel is in Local mode and ignores ESAM II commands.
The ROLL LIB. (library) allows you to store and recall channel information for each machine
(i.e., roll or tape).
Up to 100 memories (0 to 99) are available in the ROLL library (memory 0 is recall-only),
and the following parameters can be stored:
• Channel settings that can be stored in channel library programs
• Crossfade curve settings
• LIMIT LEVEL setting
• Level set using LEVEL ADJUST
• ADJUST on/off
To store channel information, select a MACHINE, select a memory, and then press the
STORE switch. The settings of channels assigned to the selected machine will be stored
(maximum of four channels).
To recall channel information, select a MACHINE, select a memory, and then press the
RECALL switch. If the number of stored channels and the number of recalled channels are
different, the following applies:
• If a memory containing data for four channels is recalled to a machine assigned to two
channels, the data from the first two channels is used.
• If a memory containing data for two channels is recalled to a machine assigned to four
channels, the data from the first two channels is recalled twice.
03D Video Edit Suite Software—Owner’s Manual
Page 24

Monitor Page 22
Monitor Page
This section explains the parameters on the Monitor page shown below. Use the [VIEW]
button to locate this page.
The Monitor page allows you to monitor fader positions, which are indicated using vertical
bars. Below these are exact fader positions. If a bar is not solid, it means that the channel is
assigned as a TO channel, or not assigned to either TO or FROM. When a transition occurs,
a hollow area inside the bar increases for FROM channels, and the solid area increases for
TO channels.
Prefer. Page
This section explains the new options on the Prefer. page shown below. Use the [UTILITY]
button to locate this page.
MASTER LEVEL PROTECT—Bus out and aux send master faders can be protected against
accidental operation by turning on the MASTER LEVEL PROTECT option. This is useful
when master levels are not adjusted regularly.
SWAP CH 9–16 <–> 17–24—Analog inputs 9 to 16 and digital inputs 17 to 24 can be
swapped so that the analog inputs appears as channels 17 to 24 and the digital inputs appear
as channel 9 to 16. This allows that you to control signals from the digital inputs without
pressing the [MIXING LAYER] button. The word SWAP appears next to the SIGNAL
meters.
DIGITAL BUS OUTPUT DELAY—On the regular 03D, the output delay applies only to
the analog bus outs, not the digital bus outs. With this option turned on, however, the output
delay applies to the digital bus outs as well.
LONGER OUTPUT DELAY TIME—The LONGER OUTPUT DELAY TIME option
allows you to increase the output delay by 3,160 samples. Since the input and output delay
functions share the same memory, the maximum input delay is reduced by 3,160 samples
when this option is on. You must restart the 03D for this option to take effect.
03D Video Edit Suite Software—Owner’s Manual
Page 25
23 Display Pages
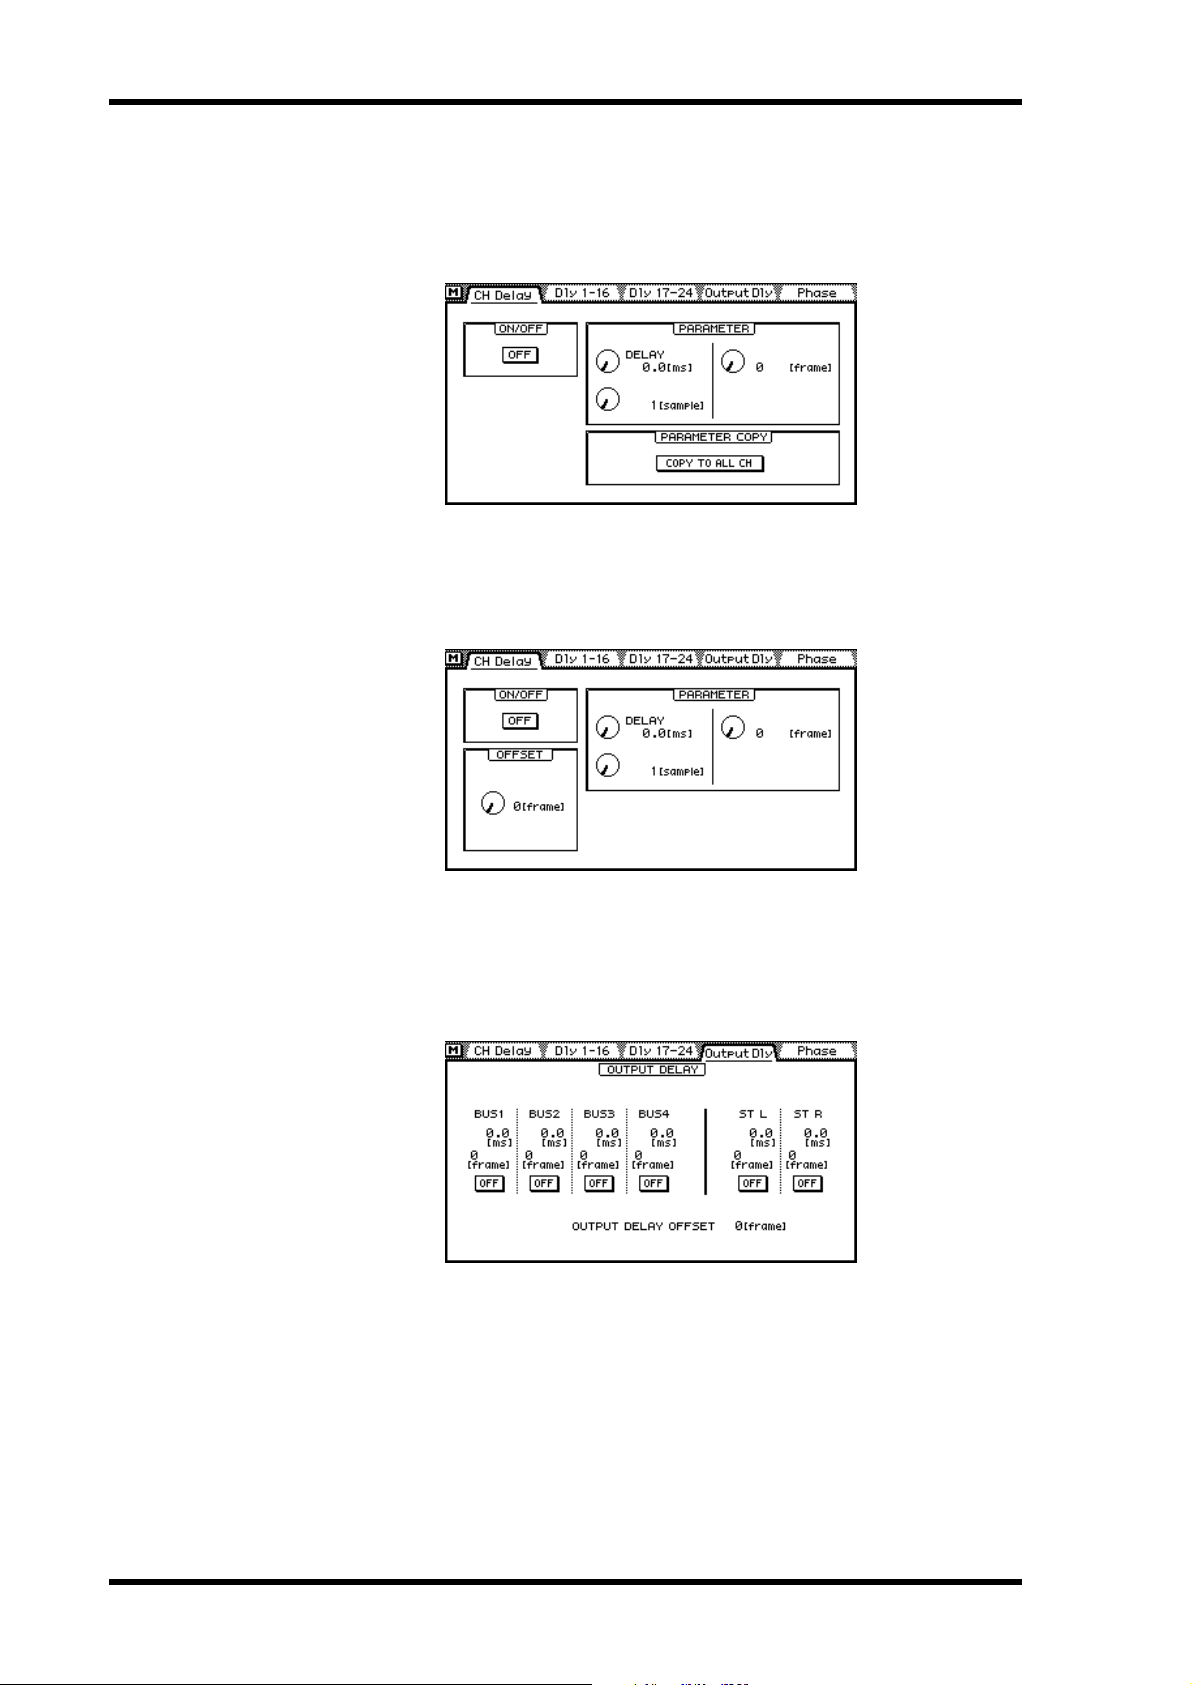
Delay Page
This section explains the changes to the Delay page shown below. Use the [DELAY/∅] but-
ton to locate this page.
In addition to samples and time, input and output delays can also be specified as frames in
quarter-frame steps, as shown on the page above. With a sampling rate of 48 kHz and the
Frame Type set to DF, the delay range is approximately six frames.
When a bus out is selected, the OFFSET parameter appears on the CH Delay page, as shown
above. This parameters sets the delay for bus outs globally, and can be used to correct the
timing between audio and video. An offset/delay of up to four frames in single frame steps
can be set.
Shown above is the Output Dly monitoring page. Delay values are indicated in frames. The
global OFFSET value for bus outs is also shown.
03D Video Edit Suite Software—Owner’s Manual
Page 26

MIDI Setup Page 24
MIDI Setup Page
Shown below is the MIDI Setup page. Use the [MIDI] button to locate this page. On the
regular 03D, the Fader Start MIDI Channel and MMC No. parameters are on the
MIDI/HOST page.
Bulk Page
Shown below is the Bulk page. Use the [MIDI] button to locate this page. To EDITOR memories can be stored to an external MIDI device on this page.
Solo Setup Page
While the TO EDITOR port enabled, you cannot use the SOLO TRIM control on the Solo
Setup page shown below.
03D Video Edit Suite Software—Owner’s Manual
Page 27

25 Display Pages
Moni. Setup Page
User Define Page
• 21. ESAM Auto Adjust—toggles the LEVEL ADJUST function on and off.
• 20. ESAM Local on/off—toggles Local on and off.
• 19. ESAM Fader ABS—toggles the FADER MODE between ABSOLUTE and FROM-TO.
• 18. PANL-C-R Flip—allows you to quickly pan from center to right, to left, to center,
While the TO EDITOR port enabled, you cannot use the MONI TRIM control on the Moni.
Setup page shown below.
The following four functions have been added to the User Define function and are assigned
by default to Bank 4.
In FROM-TO mode, to adjust a channel fader you have to turn Local on or select a
non-video edit suite page. This functions allows you to quickly switch to ABSOLUTE
mode, adjust a fader, and then switch back to FROM-TO mode.
and so on.
03D Video Edit Suite Software—Owner’s Manual
Page 28

EQ Library Page 26
EQ Library Page
The following three programs have been added to the end of the EQ library.
• 80. 60Hz HUM CUT—60 Hz hum removal.
• 79. 50Hz HUM CUT—50 Hz hum removal.
• 78. HIGH CUT—High-range white noise—i.e., tape hiss—removal using LPF.
After installing the Video Edit Suite software, you must initialize all memories to access the
new EQ programs.
Warning
All user programs will be lost when the memories are initialized, so back up your important data using MIDI Bulk Dump first. Refer to the 03D Owner’s Manual for details.
To initialize all memories, hold down the [STORE] button while turning on the 03D. When
the <<INITIALIZE MEMORY?>> page appears, press the [RECALL] button. The new EQ
programs are now available.
Effects Library Page
The following three programs have been added to the end of the effects library.
• 96. Echo Reverb
• 95. FEMALE Pitch
• 94. MALE Pitch
After installing the Video Edit Suite software, you must initialize all memories to access the
new effects programs. See EQ Library Page on page 26 for more information.
03D Video Edit Suite Software—Owner’s Manual
Page 29

27 Appendix
Appendix
Supported Editors
Sony
BVE9100 (+Option)
BVE2000
BVE910 (+Option)
BVE900 (+Upgrade +Option)
BVE9000 (+Upgrade +Option)
PVE500
CMX
CMX3600
Ampex
ACE200
Panasonic
AU-A960
AG-A850
Accom
Axial 3000
03D Video Edit Suite Software—Owner’s Manual
Page 30

Supported Commands
Supported Commands 28
Command
All Stop —A0
From Source — A1, A2
To Source — A3, A4
Monitor Source — A5, A6
Transition Duration — A7, A8
Transition Start —A9
Monitor Mode —AA
Restore From Edit —AB
Fader Level —AD
Save Mixer —AE
Recall Mixer —AF
Transfer Register 30 B0
From Machine —B4
To Machine —B5
Monitor Machine —B6
From Source —BC
To Source —BD
Monitor Source —BE
Transition Duration —BF
1. Read commands allow the editor to check the condition of the 03D (values in hex).
2. Write commands allow the editor to change the condition of the 03D, and allow for replies to the
read commands from the editor (values in hex).
Read
1
Write
2
While a transition is in progress, commands other than All Stop are ignored.
When transmitting several commands, each should be separated by a one frame interval.
03D Video Edit Suite Software—Owner’s Manual
Page 31

29 Appendix
MIDI Bulk Dump
Bulk Dump data formats supported by the 03D Video Edit Suite software.
1. Video Editor Setup Bulk Dump Format
STATUS 11110000 F0 System Exclusive Message
ID No. 01000011 43 Manufacturer's ID No.(YAMAHA)
SUB STATUS 0000nnnn 0n n=0-15(Device Channel No.1-16)
FORMAT No. 01111110 7E Universal Bulk Dump
BYTE COUNT(HIGH) 00000001 01 140(130+10)bytes
BYTE COUNT(LOW) 00001100 0C
01001100 4C 'L'
01001101 4D 'M'
00100000 20 ' '
00100000 20 ' '
00111000 38 '8'
01000010 42 'B'
00110000 30 '0'
00110011 33 '3'
DATA NAME 01010110 56 'V'
0mmmmmmm mm m=0-2,127(Video Editor Setup
No.1-3,current)
DATA 0ddddddd ds Video Editor Setup(130bytes)
: :
0ddddddd de
CHECK SUM 0eeeeeee ee ee=(-('L'+'M'+...+ds+...+de)) AND
7Fh
EOX 11110111 F7 End Of Exclusive
2. Video Editor Setup Bulk Dump Request Format
STATUS 11110000 F0 System Exclusive Message
ID No. 01000011 43 Manufacturer's ID No.(YAMAHA)
SUB STATUS 0010nnnn 2n n=0-15(Device Channel No.1-16)
FORMAT No. 01111110 7E Universal Bulk Dump
01001100 4C 'L'
01001101 4D 'M'
00100000 20 ' '
00100000 20 ' '
00111000 38 '8'
01000010 42 'B'
00110000 30 '0'
00110011 33 '3'
DATA NAME 01010110 56 'V'
0mmmmmmm mm m=0-2,127(Video Editor Setup
No.1-3,current)
EOX 11110111 F7 End Of Exclusive
03D Video Edit Suite Software—Owner’s Manual
Page 32

MIDI Bulk Dump 30
3. Roll Library Bulk Dump Format
STATUS 11110000 F0 System Exclusive Message
ID No. 01000011 43 Manufacturer's ID No.(YAMAHA)
SUB STATUS 0000nnnn 0n n=0-15(Device Channel No.1-16)
FORMAT No. 01111110 7E Universal Bulk Dump
BYTE COUNT(HIGH) 00000010 02 290(280+10)bytes
BYTE COUNT(LOW) 00100010 22
01001100 4C 'L'
01001101 4D 'M'
00100000 20 ' '
00100000 20 ' '
00111000 38 '8'
01000010 42 'B'
00110000 30 '0'
00110011 33 '3'
DATA NAME 01001100 4C 'L'
0mmmmmmm mm m=1-99(Roll Library No.1-99)
DATA 0ddddddd ds Roll Library(280bytes)
: :
0ddddddd de
CHECK SUM 0eeeeeee ee ee=(-('L'+'M'+...+ds+...+de)) AND
7Fh
EOX 11110111 F7 End Of Exclusive
4. Roll Library Bulk Dump Request Format
STATUS 11110000 F0 System Exclusive Message
ID No. 01000011 43 Manufacturer's ID No.(YAMAHA)
SUB STATUS 0010nnnn 2n n=0-15(Device Channel No.1-16)
FORMAT No. 01111110 7E Universal Bulk Dump
01001100 4C 'L'
01001101 4D 'M'
00100000 20 ' '
00100000 20 ' '
00111000 38 '8'
01000010 42 'B'
00110000 30 '0'
00110011 33 '3'
DATA NAME 01001100 4C 'L'
0mmmmmmm mm m=1-99(Roll Library No.1-99)
EOX 11110111 F7 End Of Exclusive
03D Video Edit Suite Software—Owner’s Manual
Page 33

03DVideoEditSuiteSoftware
Mode d’emploi
Français
Page 34

i
Sommaire
Introduction . . . . . . . . . . . . . . . . . . . . . . . . . 1
Bienvenue . . . . . . . . . . . . . . . . . . . . . . . . . . . . . . . . . . . . . . . . . . . . . . . . . . . . . . 1
Caractéristiques . . . . . . . . . . . . . . . . . . . . . . . . . . . . . . . . . . . . . . . . . . . . . . . . . 1
1. Installation du logiciel . . . . . . . . . . . . . . . . 3
Configurations requises . . . . . . . . . . . . . . . . . . . . . . . . . . . . . . . . . . . . . . . . . . 3
Installation avec un Macintosh . . . . . . . . . . . . . . . . . . . . . . . . . . . . . . . . . . . . 3
Installation sous Windows 95 . . . . . . . . . . . . . . . . . . . . . . . . . . . . . . . . . . . . . . 6
Installation du système normal du 03D . . . . . . . . . . . . . . . . . . . . . . . . . . . . . . 7
2. Le Logiciel d’édition vidéo pour 03D . . . . 8
ESAM II . . . . . . . . . . . . . . . . . . . . . . . . . . . . . . . . . . . . . . . . . . . . . . . . . . . . . . . 8
Fonctions Video Edit Suite . . . . . . . . . . . . . . . . . . . . . . . . . . . . . . . . . . . . . . . . 8
Connexions du système (audio uniquement) . . . . . . . . . . . . . . . . . . . . . . . . 10
Activer le port TO EDITOR . . . . . . . . . . . . . . . . . . . . . . . . . . . . . . . . . . . . . . 10
Fonctions non disponibles lorsque le port TO EDITOR est activé . . . . . . . 11
Voici comment cela fonctionne . . . . . . . . . . . . . . . . . . . . . . . . . . . . . . . . . . . 12
Remarques sur le fonctionnement . . . . . . . . . . . . . . . . . . . . . . . . . . . . . . . . . 12
3. Démarrage rapide . . . . . . . . . . . . . . . . . . 13
4. Pages d’écran . . . . . . . . . . . . . . . . . . . . . 14
Page MIDI/HOST . . . . . . . . . . . . . . . . . . . . . . . . . . . . . . . . . . . . . . . . . . . . . . 14
Page Machine (points de transition) . . . . . . . . . . . . . . . . . . . . . . . . . . . . . . . 16
Page CrossFade . . . . . . . . . . . . . . . . . . . . . . . . . . . . . . . . . . . . . . . . . . . . . . . . 16
Page From-To . . . . . . . . . . . . . . . . . . . . . . . . . . . . . . . . . . . . . . . . . . . . . . . . . 20
Page CH 1-16- & 17-24/Stin . . . . . . . . . . . . . . . . . . . . . . . . . . . . . . . . . . . . . . 21
Page Monitor . . . . . . . . . . . . . . . . . . . . . . . . . . . . . . . . . . . . . . . . . . . . . . . . . . 22
Page Prefer. . . . . . . . . . . . . . . . . . . . . . . . . . . . . . . . . . . . . . . . . . . . . . . . . . . . . 22
Page Delay . . . . . . . . . . . . . . . . . . . . . . . . . . . . . . . . . . . . . . . . . . . . . . . . . . . . 23
Page MIDI Setup . . . . . . . . . . . . . . . . . . . . . . . . . . . . . . . . . . . . . . . . . . . . . . . 24
Page Bulk . . . . . . . . . . . . . . . . . . . . . . . . . . . . . . . . . . . . . . . . . . . . . . . . . . . . . 24
Page Solo Setup . . . . . . . . . . . . . . . . . . . . . . . . . . . . . . . . . . . . . . . . . . . . . . . . 24
Page Moni. Setup . . . . . . . . . . . . . . . . . . . . . . . . . . . . . . . . . . . . . . . . . . . . . . . 25
Page User Define . . . . . . . . . . . . . . . . . . . . . . . . . . . . . . . . . . . . . . . . . . . . . . . 25
Page EQ Library . . . . . . . . . . . . . . . . . . . . . . . . . . . . . . . . . . . . . . . . . . . . . . . . 26
Page Effects Library . . . . . . . . . . . . . . . . . . . . . . . . . . . . . . . . . . . . . . . . . . . . . 26
Appendice . . . . . . . . . . . . . . . . . . . . . . . . . . 27
Editeurs reconnus . . . . . . . . . . . . . . . . . . . . . . . . . . . . . . . . . . . . . . . . . . . . . . 27
Commandes reconnues . . . . . . . . . . . . . . . . . . . . . . . . . . . . . . . . . . . . . . . . . . 28
MIDI Bulk Dump . . . . . . . . . . . . . . . . . . . . . . . . . . . . . . . . . . . . . . . . . . . . . . 29
Logiciel d’édition vidéo pour 03D—Mode d’emploi
Page 35

Introduction
1
Introduction
Bienvenue
Nous vous remercions d’avoir opté pour le Logiciel d’édition vidéo pour 03D de Yamaha.
Grâce au support du protocole d’édition ESAM II, le Logiciel d’édition vidéo pour 03D
transforme la console de mixage numérique 03D en console de mixage numérique audio
pour post-production numérique.
Caractéristiques
• Mixage et édition des signaux audio durant le traitement des images vidéo.
• Comme le protocole ESAM II est reconnu, le 03D peut faire fonction de commutateur
vidéo pour matériel audio et exécuter les commandes preview d’un éditeur vidéo.
• Supporte les fonctions élargies du protocole ESAM II, dont le pilotage à distance des
curseurs.
• Les données pour le 03D peuvent être chargées de l’éditeur vidéo ou y être transmises
afin de centraliser la gestion des données.
• Inversion de phase, retard d’entrée allant jusqu’à 6 frames (par pas d’1/4 de frame), égalisation paramétrique à 4 bandes, processeurs de dynamique et d’effets offrent une
liberté illimitée pour affiner la partie audio.
• Le 03D n’exige aucun matériel supplémentaire tel cartes ou interfaces. Il offre déjà un
connecteur à 9 broches TO EDITOR.
• Les canaux peuvent être attribués aux 4 sorties de bus du 03D ainsi qu’aux sources
FROM et TO, ce qui permet des transitions imperceptibles. Vous pouvez réaliser des
chassés-croisés réglables par canal en vous servant d’un des 7 motifs Crossfade. La pente
(slope) des courbes est réglable selon trois niveaux et s’applique à tous les canaux.
• Les curseurs motorisés du 03D garantissent un réglage exact du niveau et reflètent fidèlement les niveaux d’entrées. En mode FROM-TO, les curseurs reflètent les niveaux de
transition.
• Vous pouvez choisir les sources preview librement. En mode CHANNEL et BUS, vous
pouvez écouter des canaux ou des bus individuels.
Contenu de l’emballage
L’emballage doit contenir les articles suivants. Assurez-vous que tout s’y trouve.
• Logiciel d’édition vidéo pour 03D (disquettes pour Mac et PC portant le logo “03D for
Video Editing”).
• Logiciel de fonctionnement original du 03D (disquettes pour Mac et PC portant le logo
“03D”).
• Ce mode d’emploi.
Veuillez contacter votre revendeur Yamaha si un de ces articles manque.
Marques commerciales
Accom est une marque commerciale de Accom Corporation, Inc. Ampexest une marque
commerciale de Ampex Corporation, Inc. CMX est une marque commerciale de CMX
Company. Macintosh est une marque commerciale de Apple Computer, Inc. Panasonic est
une marque commerciale de Matsushita Corporation, Inc. Sony est une marque commer-
Logiciel d’édition vidéo pour 03D—Mode d’emploi
Page 36

Caractéristiques
ciale de Sony Corporation, Inc. Windows 95 est une marque commerciale de Microsoft Corporation, Inc.
Yamaha est une marque commerciale de Yamaha Corporation, Inc.
Toutes les autres marques commerciales sont la propriété de leurs détenteurs respectifs.
Copyright
© 1997 Yamaha Corporation. Tous droits réservés.
Ce Mode d’emploi ne peut être copié en tout ou en partie, sur quelque support que ce soit,
sans autorisation préalable écrite de Yamaha Corporation.
Yamaha sur le World Wide Web
http://www.yamaha.co.jp/product/proaudio/homeenglish/
Veuillez conservez ce manuel pour toute
référence ultérieure.
2
Logiciel d’édition vidéo pour 03D—Mode d’emploi
Page 37

Installation du logiciel
3
1
Installation du logiciel
Dans ce chapitre, nous vous montrons comment installer le Logiciel d’édition vidéo pour
03D.
Attention
Lors de l’installation du Logiciel d’édition vidéo pour 03D, toutes les données Automix
du 03D sont effacées. Sauvegardez-les donc sur votre ordinateur ou séquenceur en effectuant des transferts de blocs MIDI. Voyez le Mode d’emploi du 03D. Si, par la suite, vous
réinstallez le logiciel “normal” du 03D, les données Video Edit Suite et Bibliothèque Roll
sont effacées.
Configurations requises
Le Logiciel d’édition vidéo pour 03D peut être installé sur Macintosh ou sur PC fonctionnant
sous Windows 95.
Ordinateur Borne 03D Câble
Macintosh TO HOST Câble série Macintosh
Windows 95 PC TO HOST
1. Terminal-J fait partie de la livraison.
2. Câble avec connecteur 9 broches D-SUB et prise Mini-DIN à 8 broches
3. Le programme HyperTerminal est livré avec Windows 95.
Câble série PC
Programme
recommandé
Terminal-J
2
HyperTerminal
1
3
Installation avec un Macintosh
1. Branchez le câble Mini-DIN à 8 broches au connecteur TO HOST du 03D
ainsi qu’au port modem du Macintosh.
2. Faites démarrer le Macintosh.
3. Insérez la disquette pour Mac du Logiciel d’édition vidéo pour 03D, double-cliquez sur l’icône de la disquette et copiez le fichier Terminal-J sur
votre disque dur.
4. Double-cliquez sur le fichier Terminal-J pour le décomprimer.
Vous obtiendrez alors un dossier Terminal-J qui contient le logiciel Terminal-J.
5. Copiez le fichier “03VEKxxxMIX.sea” sur votre disque dur et double-cliquez-le pour le décomprimer.
Vous créez ainsi un dossier “03VEKxxxMIX”.
6. Copiez les fichiers “03VEKxxx.T” et “03VEKxxx.X” du dossier
“03VEKxxxMIX” dans le dossier Terminal-J.
7. Coupez Apple Talk dans le Sélecteur (Chooser).
8. Maintenez les boutons [UTILITY], [DYNAMICS] et [EFFECT 2] du 03D
enfoncés tout en mettant la console sous tension.
La page UPDATE PROGRAM apparaît.
9. Double-cliquez sur l’icône Terminal-J pour lancer le programme.
Logiciel d’édition vidéo pour 03D—Mode d’emploi
Page 38

Installation avec un Macintosh
10. Sélectionnez Connection dans le menu Options.
La boîte de dialogue Connection Settings est alors affichée.
11. Réglez les paramètres proposés comme suit et cliquez ensuite sur OK.
Method: Direct Serial
Baud Rate: 38.4K
Parity: None
Data Bits: 8
Stop Bits: 1
Handshake: None
12. Sélectionnez Transfer
dans le menu Options.
La boîte de dialogue Transfer Settings apparaît.
13. Cliquez sur l’icône du fichier Binary.
Les réglages pour le transfert de données binaires sont alors affichés.
4
14. Coupez “Recognize and use MacBinary format for non-TEXT files” (voyez
l’illustration) et cliquez sur OK.
15. Sélectionnez X/YMODEM dans le menu Options.
La boîte de dialogue X/YMODEM apparaît.
16. Coupez CRC (voyez l’illustration) et cliquez sur OK.
17. Sélectionnez Connect dans le menu Session.
18. Servez-vous des boutons CURSOR ainsi que du bouton ENTER du 03D
pour régler les paramètres suivants:
PORT: TO HOST
FLYING: ON
UPDATE BLOCK: ALL
Logiciel d’édition vidéo pour 03D—Mode d’emploi
Page 39

Installation du logiciel
5
19. Dans le menu File de Terminal-J, sélectionnez TRANSMIT XMODEM .
La boîte de dialogue File Open apparaît.
20. Sélectionnez le fichier “03VEKxxx.T” et cliquez sur Transmit.
21. Utilisez les boutons CURSOR du 03D pour sélectionner START et appuyez
sur [ENTER].
L’écran du 03D affiche le message “Please send BLOCK TABLE FILE”.
Le fichier est transmis au 03D.
Attendez le message suivant avant de poursuivre:
“Please send BLOCK 0, 1, 2, 3, 4, 5, 6, 7, 8, 9, A, B, C, D, E, F, G, H”.
22. Sélectionnez TRANSMIT XMODEM dans le menu File de Terminal-J.
La boîte de dialogue File Open apparaît.
23. Sélectionnez le fichier “03VEKxxx.X” et cliquez sur Transmit.
24. Utilisez les boutons CURSOR du 03D pour sélectionner START et appuyez
sur [ENTER].
Le fichier est transmis au 03D. Pendant ce temps, l’écran du 03D affiche un astérisque.
La transmission des données dure entre 5 et 20 minutes. Dès que tous les blocs de données
sont transmis, le message “UPDATE... DONE” apparaît à l’écran du 03D, suivi de EXIT.
25. Appuyez sur le bouton [ENTER] pour faire redémarrer le 03D.
Le programme est installé.
Logiciel d’édition vidéo pour 03D—Mode d’emploi
Page 40

Installation sous Windows 95
Installation sous Windows 95
1. Branchez le câble 8-9 broches D Sub à la borne TO HOST du 03D et au
connecteur série (port COM) du PC.
2. Faites démarrer le PC.
3. Insérez la disquette Logiciel d’édition vidéo pour 03D dans le lecteur et
copiez les fichiers “03VEKxxx.T” et “03VEKxxx.X” dans le dossier Hyper
Terminal sur le disque dur (Disque dur
HyperTerminal).
4. Maintenez les boutons [UTILITY], [DYNAMICS] et [EFFECT 2] du 03D
enfoncés tout en mettant la console sous tension.
La page UPDATE PROGRAM apparaît.
5. Double-cliquez sur l’icône Hypertrm pour faire démarrer ce programme.
La boîte de dialogue Description de la connexion apparaît.
6. Nommez la connexion (par ex. “03D”) et cliquez sur OK. Ignorez les
réglages d’icône de cette boîte de dialogue.
La boîte de dialogue Numéro de téléphone apparaît.
→
Programme
→
Accessoires
→
6
7. Dans le menu Connecter en utilisant sélectionnez “Diriger vers Com x” (le
“x” représente ici le numéro de l’interface série à laquelle le 03D est branché). Cliquez sur OK.
La boîte de dialogue Paramètres apparaît.
8. Réglez les paramètres disponibles ici comme indiqué ci-dessous et cliquez sur OK.
Bits par seconde: 38400
Bits de données: 8
Parité: Aucun
Bits d’arrêt: 1
Contrôle de flux: Aucun
9. Sélectionnez Se connecter dans le menu Appel .
10. Servez-vous des boutons CURSOR ainsi que du bouton ENTER du 03D
pour régler les paramètres suivants:
PORT: TO HOST
FLYING: ON
UPDATE BLOCK: ALL
11. Sélectionnez Envoyer le fichier dans le menu Transfert de HyperTerminal.
La boîte de dialogue Envoi d’un fichier apparaît.
Logiciel d’édition vidéo pour 03D—Mode d’emploi
Page 41

Installation du logiciel
7
12. Sélectionnez “Xmodem” sous Protocole.
13. Cliquez sur Parcourir et sélectionnez le fichier “03VEKxxx.T”. Cliquez
ensuite sur Envoi.
14. Utilisez les boutons CURSOR du 03D pour sélectionner START et appuyez
sur [ENTER].
L’écran du 03D affiche le message “Please send BLOCK TABLE FILE”.
Le fichier est transmis au 03D.
Attendez le message suivant avant de poursuivre: “Please send BLOCK 0, 1, 2, 3, 4, 5, 6, 7,
8, 9, A, B, C, D, E, F, G, H”.
15. Sélectionnez Envoyer le fichier dans le menu Transfert de HyperTerminal.
La boîte de dialogue Envoi de fichier apparaît.
16. Cliquez sur Parcourir et sélectionnez le fichier “03VEKxxx.X”. Cliquez
ensuite sur Envoi.
17. Utilisez les boutons CURSOR du 03D pour sélectionner START et appuyez
sur [ENTER].
Le fichier est transmis au 03D. Pendant ce temps, l’écran du 03D affiche un astérisque.
La transmission des données dure entre 5 et 20 minutes. Dès que tous les blocs de données
sont transmis, le message “UPDATE... DONE” apparaît à l’écran du 03D, suivi de EXIT.
18. Appuyez sur le bouton [ENTER] pour faire redémarrer le 03D.
Le nouveau programme est installé.
Installation du système normal du 03D
Pour réinstaller le système d’exploitation normal du 03D, procédez comme pour l’installation du Logiciel d’édition vidéo pour 03D. Faites toutefois attention aux divergences suivantes:
• Utilisez la disquette portant le logo “03D” et non “03D for Video Editing”.
• Le fichier comprimé de la disquette Macintosh s’appelle “03D_VxxxMIX.sea” (au lieu de
“03VEKxxxMIX.sea”)
• Le fichier “T” s’appelle “03D_Vxxx.T” (au lieu de “03VEKxxx.T”)
• Le fichier “X” s’appelle “03D_Vxxx.X” (au lieu de “03VEKxxx.X”)
• Il n’est pas nécessaire d’utiliser le même type d’ordinateur pour installer le logiciel
d’exploitation du 03D que celui utilisé pour le Logiciel d’édition vidéo pour 03D. Si vous
aviez installé ce dernier sur un Mac, par exemple, vous pouvez réinstaller le logiciel “normal” du 03D en vous servant d’un PC (il suffit de veiller à utiliser la bonne disquette).
Logiciel d’édition vidéo pour 03D—Mode d’emploi
Page 42

2
Le Logiciel d’édition vidéo pour 03D
Le Logiciel d’édition vidéo pour 03D
ESAM II
Le Logiciel d’édition vidéo pour 03D ne supporte que le protocole ESAM série II(Editing
Suite Audio Mixers). A la page 28, vous trouverez une liste de toutes les commandes acceptées.
Fonctions Video Edit Suite
Voyons les fonctions offertes par le Logiciel d’édition vidéo pour 03D.
Crossfade
Vous pouvez réaliser des chassés-croisés en fonction du nombre de frames compris dans les
commandes ESAM II envoyées par l’éditeur vidéo. La plage de réglage ESAM II est de
0~32.767 frames (réglable par unités d’un frame). Cela correspond à 1.365 pour une résolution de 24 frames/seconde. La valeur frame maximum dépend de l’éditeur utilisé. La précision de contrôle audio est de un frame (à condition qu’aucune autre fonction du 03D ne
soit utilisée).
8
Commutateur Local
En mode Local, qui ne fonctionne que lorsque les pages CH1–16 ou 17–24/Stin sont affichées, vous pouvez vous servir des boutons [SEL] pour permettre aux canaux d’ignorer les
commandes ESAM II. Lorsque le témoin d’un bouton [SEL] est éteint, ce canal répond aux
commandes ESAM II. Lorsqu’il clignote, le canal est en mode Local et ignore les commandes
ESAM II. Pour en savoir davantage, voyez
Page CH 1-16- & 17-24/Stin à la page 21.
Trois mémoires de configuration
Les réglages Video Edit Suite, tels que SOURCE/MACHINE ASSIGN, FRAME TYPE,
FADER MODE, ainsi que les valeurs de référence pour le réglage de niveau automatique,
peuvent être sauvegardés dans une mémoire TO EDITOR SETUP MEMORY (1, 2 ou 3).
Pour en savoir davantage, voyez Page MIDI/HOST à la page 14.
Motifs et courbes de chassé-croisé
Chaque source (chaque canal) peut se voir attribuer un des sept motifs Crossfade disponibles. En outre, il est possible de choisir une courbe (1~3) qui sera appliquée de manière globale. Pour en savoir davantage, voyez Page CrossFade à la page 16.
Réglage de niveau limite
Le niveau Fade Out (ou “seuil”) peut être compris entre 0dB et moins l’infini. Pour en savoir
davantage, voyez Page MIDI/HOST à la page 14.
Réglage automatique du niveau
Après la lecture de la tonalité test en début de bande, la sensibilité d’entrée (le gain) est réglé
automatiquement de sorte à ce que le niveau nominal choisi par l’utilisateur corresponde
au niveau de sortie. La plage de réglage va de –18 dB à +18 dB. Lorsque le niveau dépasse
cette plage et ne peut pas être contrôlé par le 03D, un avertissement apparaît. Pour les canaux
formant des paires stéréo, seul le canal gauche est utilisé pour le test de niveau. Le niveau
déterminé pour le canal gauche s’applique aussi au canal droit. Pour en savoir davantage,
voyez Page MIDI/HOST à la page 14.
Logiciel d’édition vidéo pour 03D—Mode d’emploi
Page 43

9 Le Logiciel d’édition vidéo pour 03D
Retard d’entrée et de sortie réglable par frames
Le retard d’entrée et de sortie peut non seulement être réglé par échantillons ou valeurs temporelles mais aussi par frames et ce, par unités de quarts de frame. Lorsque la fréquence
d’échantillonnage est de 48kHz et le paramètre Frame Type est “DF”, la plage de retard est
d’environ 6 frames. Pour en savoir davantage, voyez Page Delay à la page 23.
Lorsqu’une sortie de bus est sélectionnée et que LONGER OUTPUT DELAY TIME est
activé, le paramètre OFFSET apparaît à la page CH Delay. Ce paramètre vous permet de
déterminer le retard pour tous les bus de sortie et permet de corriger des décalages de timing
entre le matériel audio et vidéo. Il est possible de régler un temps de retard (un décalage) de
maximum 4 frames (par unités d’un frame).
A la page Prefer., l’option LONGER OUTPUT DELAY TIME vous permet d’allonger le
retard de sortie de 3160 échantillons. Comme le paramètre de retard de sortie et d’entrée
utilise la même mémoire, le retard maximum d’entrée est raccourci de 3160 échantillon lorsque cette fonction est activée. Pour en savoir davantage, voyez Page Prefer. à la page 22.
Pan Flip
Lorsque vous attribuez la fonction PAN L-C-R Flip à un bouton USER DEFINE, vous pouvez
agencer un signal très rapidement au centre, à droite, à gauche, de nouveau au centre, etc.
Pour en savoir davantage, voyez Page User Define à la page 25.
Master Level Protect
Les curseurs Bus et AUX Send Master peuvent être protégés contre une malencontreuse opération avec l’option MASTER LEVEL PROTECT. Pour en savoir davantage, voyez Page Pre-
fer. à la page 22.
Echange des entrées 9-16 & 17-24 (Swap)
Les entrées analogiques 9~16 et les entrées numériques 17~24 peuvent être échangées de
sorte à ce que les entrées analogiques se voient attribuer les canaux 17~24 et les entrées
numériques les canaux 9~16. Ainsi, même sans actionner le bouton [MIXING LAYER], vous
avez accès aux signaux numériques. L’option SWAP CH se trouve à la page Prefer. Pour en
savoir davantage, voyez Page Prefer. à la page 22.
Nouveaux programmes EQ
La bibliothèque EQ est enrichie par les programmes suivants:
• 80. 60 Hz Hum Cut (Suppression de bourdonnement)
• 79. 50 Hz Hum Cut (Suppression de bourdonnement)
• 78. Suppression de bruit blanc à haute fréquence (sifflement de bande, par exemple)
avec un filtre passe-bas (LPF)
Après avoir installé le Logiciel d’édition vidéo pour 03D, initialisez toutes les mémoires pour
avoir accès aux nouveaux programmes. Pour en savoir davantage, voyez Page EQ Library à
la page 26.
Nouveaux programmes d’effet
La bibliothèque d’effets est enrichie par les programmes suivants:
• 96. Echo Reverb
• 95. FEMALE Pitch
• 94. MALE Pitch
Ici aussi, initialisez toutes les mémoires pour accéder aux nouveaux programmes après l’ins-
tallation du Logiciel d’édition vidéo pour 03D. Pour en savoir davantage, voyez Page Effects
Library à la page 26.
Logiciel d’édition vidéo pour 03D—Mode d’emploi
Page 44

Connexions du système (audio uniquement) 10
Connexions du système (audio uniquement)
VTR1
(PLAY 1)
D. BETA-cam
VTR2
(PLAY 2)
D. BETA-cam
VTR3
(REC 1)
D. BETA-cam
Commutateur vidéo
(Effets d'images)
AES/EBU
4
AES/EBU
4
AES/EBU
4
Analog
4
9-pin Remote (9-pin D-sub)
4
CD8-AE-S
CH17-20
(Digital)
CH21-24
(Digital)
BUS OUT
1-4 (Digital)
CH1-4 (Analog)
03D
Interface ESAM
Video-Editor
Activer le port TO EDITOR
Après l’installation du Logiciel d’édition vidéo pour 03D, le paramètre HOST INTERFACE
de la page MIDI/HOST doit être réglé sur EDITOR pour pouvoir utiliser le port TO EDITOR.
TO EDITOR
ESAM II
(9-pin D-sub)
Attention
Lorsque vous modifiez le réglage du paramètre HOST INTERFACE de la page
MIDI/HOST de STAND ou MULTI à EDITOR, les données Automix sont effacées. Il vaut
donc mieux sauvegarder toutes ces données au préalable par transfert de blocs MIDI
(Bulk Dump). Voyez le Mode d’emploi du 03D. Inversement, les données Video Edit Suite
et Roll Library sont effacées lorsque vous passez du réglage EDITOR à STAND ou MULTI.
1. Appuyez sur le bouton [UTILITY] jusqu’à ce que la page MIDI/HOST apparaisse.
Logiciel d’édition vidéo pour 03D—Mode d’emploi
Page 45

11 Le Logiciel d’édition vidéo pour 03D
2. Avec les boutons CURSOR, sélectionnez le commutateur EDITOR sous
HOST INTERFACE et appuyez sur [ENTER].
La fenêtre de dialogue suivante apparaît.
3. Sélectionnez OK avec les boutons CURSOR et appuyez sur [ENTER].
La page MIDI/HOST est alors affichée (voyez l’illustration). Les paramètres Fader Start et
MMC du système normal se trouvent à la page MIDI Setup.
Cette fenêtre de
dialogue apparaît
lorsque vous passez de EDITOR à
STAND.
Le 03D peut alors communiquer avec un éditeur vidéo.
Fonctions non disponibles lorsque le port TO
EDITOR est activé
Lorsque le port TO EDITOR est activé, les fonctions suivantes du 03D ne sont plus accessibles:
Automix—La fonction Automix est désactivée et les pages Automix sont remplacées par
les pages Video Edit Suite. Lors de l’installation du Logiciel d’édition vidéo pour 03D, les
données Automix sont effacées. Sauvegardez-les donc (avec Bulk Dump) si vous en avez
encore besoin. Voyez le Mode d’emploi du 03D.
Retard de canal (ECHO et SLAP)—Les options SLAP et ECHO de la page Channel
Delay sont désactivées. Les retards de base restent toutefois disponibles.
Surround Pan—La fonction Surround Pan est désactivée et le mode Pan est automatiquement réglé sur STEREO.
Témoin MIXING LAYER clignotant—Le témoin MIXING LAYER ne clignote pas lors-
que vous sélectionnez le niveau 17-24/MASTER. Au lieu de cela, le témoin rouge s’allume.
SOLO TRIM—La fonction SOLO TRIM de la page Solo Setup n’est plus accessible.
MONI TRIM—La fonction MONI TRIM de la page Moni. Setup n’est plus accessible.
Logiciel d’édition vidéo pour 03D—Mode d’emploi
Page 46

Voici comment cela fonctionne 12
Voici comment cela fonctionne
Le volume de canaux est réglé par les curseurs. Les chassés-croisés (crossfade) sont réalisés
avec le curseur ESAM. Celui-ci se trouve derrière le curseur de canal. Le niveau d’entrée
dépend du réglage de la commande INPUT LEVEL ADJUST. Voyez l’illustration ci-dessous.
INPUT LEVEL ADJUST
& ADJUST ON/OFF
ATT
Canaux d'entrée 1–24
OFF
ON
ESAM-FADER
& LOCAL ON/OFF
Delay
PEQ
4 bandes
Curseur
de canal
Dynamique
ON
Vers AUX
(Pre)
ON
OFF
PAN
Vers AUX
(Post)
Lorsque le paramètre TO EDITOR est réglé sur ENABLE alors que le 03D est piloté à distance
par un éditeur vidéo, le volume de canal dépend du curseur de canal et du curseur ESAM.
Les curseurs ESAM des canaux spécifiés avec la commande FROM sont au niveau nominal
(0dB) tandis que les curseurs ESAM des canaux réagissant aux commandes TO sont au
niveau LIMIT LEVEL (en général, moins l’infini). Après un chassé-croisé, les canaux FROM
se retrouvent au niveau LIMIT LEVEL et les canaux TO au niveau nominal (0dB).
Lorsque le paramètre TO EDITOR est réglé sur DISABLE, le 03D se comporte comme
d’habitude (les commandes ESAM sont ignorées). Un canal réglé sur Local (LOCAL ON)
se comporte aussi de manière habituelle et ignore toute commande ESAM II. Le mode Local
peut être activé avec les boutons [SEL]. Cependant, il n’est d’application que tant que la page
CH 1–16- ou 17–24/Stin est affichée. Vous trouverez ci-dessous un canal dont le paramètre
LOCAL est sur ON (vous voyez ainsi ce qui se passe lorsque le paramètre TO EDITOR est
sur DISABLE).
INPUT LEVEL ADJUST
& ADJUST ON/OFF
ATT
Canaux d'entrée 1–24
OFF
ON
Remarques sur le fonctionnement
ESAM FADER
& LOCAL ON/OFF
Delay
PEQ
4 bandes
Curseur
de canal
Dynamique
ON
Vers AUX
(Pre)
ON
OFF
PAN
Vers AUX
(Post)
L’éditeur doit être configuré de sorte à ce que l’enregistreur puisse être contrôlé. Un réglage
EE (Electric-to-Electric) est généralement recommandé.
Le retard de sortie du 03D fait office de “Pre-Delay” et empêche toute synchronisation des
données audio avec les images vidéo.
Si vous configurez deux canaux d’entrée ou deux sorties de bus en paires stéréo, réglez leurs
commandes PAN à l’extrême gauche et à l’extrême droite (notez toutefois qu’il en résulte
un gain de signal de 3dB).
La fonction BUS TO ST permet d’acheminer les signaux du bus numérique à la sortie ST
DIGITAL OUT.
Logiciel d’édition vidéo pour 03D—Mode d’emploi
Page 47

13 Démarrage rapide
3 Démarrage rapide
Dans ce chapitre, nous vous expliquons comment travailler avec le Logiciel d’édition vidéo
pour 03D.
1. A la page MIDI/HOST, réglez le paramètre HOST INTERFACE sur EDITOR.
Pour en savoir davantage, voyez Page MIDI/HOST à la page 14.
2. Réglez le paramètre TO EDITOR sur ENABLE. Pour en savoir davantage,
voyez Page MIDI/HOST à la page 14.
3. Réglez ensuite le paramètre FRAME TYPE en fonction du matériel (ND,
DF, 25 ou 24). Pour en savoir davantage, voyez Page MIDI/HOST à la
page 14.
4. Réglez le PARITY FLAG correctement (généralement sur EVEN, bien que
certains éditeurs, comme Ampex ACE200, exigent un réglage ODD). Pour
en savoir davantage, voyez Page MIDI/HOST à la page 14.
5. Réglez le paramètre FADER MODE (ABSOLUTE ou FROM-TO). Pour en
savoir davantage, voyez Page MIDI/HOST à la page 14.
6. Configurez tous les canaux reliés à des sources stéréo sous forme de paires stéréo et réglez la commande PAN du canal gauche sur l’extrême gauche et la commande du canal droit sur l’extrême droite.
7. Lorsque la sortie audio est également stéréo, configurez les sorties
comme paires stéréo.
8. Assignez les canaux d’entrée à la page Machine aux appareils et précisez
quel est l’appareil enregistreur (REC). Pour en savoir davantage, voyez
Page Machine (points de transition) à la page 16.
9. Veillez à ce que les canaux assignés aux appareils de reproduction (lecture) ne soient pas acheminés au bus stéréo. Seul l’appareil REC peut
l’être.
10. Passez à la page ROUTING ou From-To et assignez les canaux aux bus.
Pour en savoir davantage, voyez Page From-To à la page 20.
11. Réglez les niveaux d’entrée.
12. Sélectionnez les types et les courbes de chassé-croisé. Pour en savoir
davantage, voyez Page CrossFade à la page 16.
13. Le 03D peut alors être piloté par l’éditeur.
Logiciel d’édition vidéo pour 03D—Mode d’emploi
Page 48

4 Pages d’écran
Page MIDI/HOST
Les paramètres de la page MIDI/HOST (voyez l’illustration) sont décrits ci-dessous.
Appuyez plusieurs fois sur le bouton [UTILITY] pour accéder à cette page.
Pages d’écran 14
HOST INTERFACE—Les commutateurs STAND. et MULTI. sous HOST INTERFACE ont
la même fonction que les commutateurs STANDARD I/F et MULTIPORT en mode normal
du 03D. Le commutateur EDITOR vous permet d’activer/de couper le connecteur TO EDITOR.
TO EDITOR SETUP MEMORY—Vous disposez de trois mémoires pour sauvegarder les
réglages concernant le port TO EDITOR. Lorsque le contenu de la mémoire correspond aux
réglages actifs, ces commutateurs sont affichés en gris. Dès que vous modifiez un paramètre,
les commutateurs RECALL et STORE vous permettent de rappeler les anciens réglages ou
de sauvegarder les nouveaux. Les paramètres suivants sont conservés dans ces mémoires:
FRAME TYPE, PARITY FLAG, FADER MODE, INPUT LEVEL ADJUST OUTPUT, ainsi
que les réglages SOURCE/MACHINE ASSIGN.
INPUT LEVEL ADJUST—La commande OUTPUT détermine le niveau de sortie des
canaux dont le curseur est sur le niveau nominal (0dB). La plage de réglage va de –48dB à
0dB (par pas de 1dB). Le niveau d’entrée d’un canal peut être réglé automatiquement ou
manuellement de sorte à ce que le niveau du canal corresponde au niveau de sortie spécifié.
Toutefois, il ne faut pas que ce réglage de niveau soit modifié par le curseur, la commande
PAN, le processeur EQ ou de dynamique.
Après la lecture de la tonalité test en début de bande, la sensibilité d’entrée (le gain) est réglé
automatiquement de sorte à ce que le niveau nominal choisi par l’utilisateur corresponde
au niveau de sortie. La plage de réglage va de –18 dB à +18 dB (par pas de 0,5dB). Lorsque
le niveau dépasse cette plage, ce réglage ne peut être effectué et un avertissement apparaît.
Pour les canaux formant des paires stéréo, seul le canal gauche est utilisé pour le test de
niveau. Le niveau déterminé pour le canal gauche s’applique aussi au canal droit. Il peut arriver, cependant, que des canaux stéréo aient un niveau différent.
Pour régler le niveau d’un canal automatiquement, sélectionnez le canal, puis servez-vous
des boutons CURSOR pour sélectionner le commutateur AUTO et appuyez sur [ENTER].
Pour régler le niveau d’un canal manuellement, sélectionnez le canal, puis servez-vous des
boutons CURSOR pour sélectionner le commutateur MANUAL et utilisez la molette Parameter.
Après un réglage manuel ou automatique du niveau, le commutateur Adjust ON/OFF de la
page CH 1–16- ou 17–24/Stin est activé.
Logiciel d’édition vidéo pour 03D—Mode d’emploi
Page 49

15 Pages d’écran
TO EDITOR—Ce paramètre vous permet d’activer (ENABLE) ou de couper (DISABLE)
le connecteur TO EDITOR. Le 03D ne réagit aux commandes ESAM II qu’avec un réglage
ENABLE.
FRAME TYPE—Ce paramètre doit être réglé pour correspondre à la résolution en frames
du matériel vidéo. Vous avez le choix entre: ND (30 frames), DF (29.97 frames), 25 (25 frames) et 24 (24 frames). Le 03D se sert de ce réglage pour calculer les temps Fade et Delay
(en frames).
PARITY FLAG—Ce paramètre doit être réglé pour correspondre à la parité de l’éditeur
vidéo: EVEN, ODD ou NONE. L’option par défaut est EVEN.
FADER MODE—Ce paramètre vous permet de déterminer le comportement des curseurs
du 03D lorsqu’il reçoit des commandes ESAM II.
En mode ABSOLUTE, les curseurs indiquent le volume du canal. Lors de la réception de
nouvelles valeurs pour les curseurs ESAM, les curseurs canal ne bougent pas. Ce mode vous
permet donc d’utiliser les curseurs pour corriger le volume, ce qui est le cas sur beaucoup
de consoles ESAM.
En mode FROM-TO, les curseurs indiquent le réglage des curseurs ESAM II. Lors de la réception de nouvelles valeurs pour les curseurs ESAM, les curseurs canal prennent donc une nouvelle position. Les curseurs FROM passent en position LIMIT LEVEL (généralement moins
l’infini) et les curseurs TO gagnent la position correspondant au niveau d’entrée. Toute correction manuelle du volume du canal est donc impossible ici. N’oubliez pas que les curseurs
ne bougent que lorsqu’une page ESAM est affichée (Machine, CrossFade, From-To, CH 1-16
ou 17-24/Stin).
Logiciel d’édition vidéo pour 03D—Mode d’emploi
Page 50

Page Machine (points de transition) 16
Page Machine (points de transition)
Vous trouverez ci-dessous une description des paramètres de la page Machine. Pour accéder
à cette page, appuyez sur le bouton [AUTOMIX].
A la page Machine, vous pouvez assignez les canaux d’entrée aux appareils voulus. Vous pouvez assigner jusqu’à 8 appareils (A~H). Les canaux d’entrée peuvent être assignés à un appareil par groupes de deux ou de quatre. L’appareil A correspond au point de transition (Cross
Point) “1”, l’appareil B au point de transition “2” etc. L’appareil H correspond au point de
transition “8”. Veillez à ce que le canal REC soit assigné au point de transition “0”.
Exemple: Les réglages de la page ci-dessus indiquent que les canaux d’entrée 1~4 sont pilotés
par les commandes Cross Point 1 (appareil A). Comme REC est activé, ces canaux sont aussi
pilotés par les commandes Cross Point 0. Sur la plupart des éditeurs vidéo, le numéro d’appareil de la commande ESAM II est fonction des réglages Cross Point.
Les réglages de la page Machine ne sont valables que lors de la réception de commandes
Machine ESAM II. En général, ils ne s’appliquent donc pas lorsque les canaux sont pilotés
individuellement par des commandes source (cela peut varier d’un éditeur à l’autre). Voyez
donc le mode d’emploi de l’éditeur utilisé.
Pour assigner un canal à un appareil, sélectionnez la ligne de l’appareil voulu (A~H) avec
les boutons CURSOR et appuyez sur le bouton [SEL] du canal en question. Un canal ne peut
être assigné qu’à un appareil à la fois. Le canal ST IN ne peut être assigné qu’à l’appareil ST IN.
Pour sélectionner l’appareil enregistreur (REC), sélectionnez la ligne de l’appareil voulu
(A~H) avec les boutons CURSOR et appuyez sur [ENTER].
Page CrossFade
Vous trouverez ci-dessous une description des paramètres de la page CrossFade. Pour accéder à cette page, appuyez sur le bouton [AUTOMIX].
La page CrossFade vous permet de sélectionner des motifs de chassés-croisés pour chaque
canal. Vous avez le choix parmi 7 motifs. Les paires stéréo ont toujours le même motif. Outre
le motif, vous pouvez également sélectionner une courbe (A, B ou C). Celle-ci s’applique
toutefois à tous les canaux.
Logiciel d’édition vidéo pour 03D—Mode d’emploi
Page 51

17 Pages d’écran
Pour sélectionner un motif, appuyez sur le bouton [SEL] du canal et sélectionnez le motif
voulu avec la molette PARAMETER.
Sous les motifs de chaque canal se trouve un paramètre LIMIT LEVEL. Sa valeur constitue
le niveau cible (réglage FROM) ou le niveau de sortie (réglage TO) qui doit être atteint lorsque le curseur est sur 0dB. Le niveau réel résulte du réglage curseur moins la valeur LIMIT
LEVEL. Ce paramètre a une plage de 0 à moins l’infini.
Motifs Crossfade1~7
TD (Transition Duration= vitesse de transition) en frames
TD
12
34
FROM
TO
Temps
TD
FROM
TO
Temps
FROM
TO
FROM
TO
TD TD
Temps
TD
Temps
56
Logiciel d’édition vidéo pour 03D—Mode d’emploi
FROM
TO
TD
Temps
TD TD
FROM
TO
Temps
Page 52

Page CrossFade 18
TD TD
7
FROM
TO
Time
Courbes Crossfade A, B, C
Les courbes (A, B, C) ne s’appliquent pas aux motifs ayant des transitions de niveau
d’entrée/de sortie immédiates. Leur niveau change effectivement sur le temps d’un frame.
Dans les exemples suivants, LIMIT LEVEL est réglé sur moins l’infini.
AB
C
FROM 0 dB
TO
FROM 0 dB
TO
TD
TD
–6 dB
–∞ dB
–13 dB
–∞ dB
FROM 0 dB
TO
TD
–3 dB
–∞ dB
Logiciel d’édition vidéo pour 03D—Mode d’emploi
Page 53

19 Pages d’écran
Lorsque la courbe B est sélectionnée, la page Machine a cet aspect:
Lorsque la courbe C est sélectionnée, la page Machine a cet aspect.
Logiciel d’édition vidéo pour 03D—Mode d’emploi
Page 54

Page From-To 20
Page From-To
Vous trouverez ci-dessous une description des paramètres de la page From-To. Pour accéder
à cette page, appuyez sur le bouton [AUTOMIX].
La page From-To vous permet de contrôler les transitions d’une source à l’autre. En outre,
vous pouvez attribuer les canaux FROM et TO aux sorties de bus 1~4.
Lors de la réception d’une commande Transition Start, le curseur ESAM des canaux FROM
est réglé sur la valeur LIMIT LEVEL tandis que le curseur ESAM des canaux TO est sur 0dB.
Une fois la transition terminée, les canaux FROM deviennent les canaux TO et vice versa.
Pour assigner les canaux aux sorties de bus, sélectionnez la ligne de bus voulue (1~4) avec
les boutons CURSOR dans la partie FROM ASSIGN ou TO ASSIGN et appuyez sur le bouton [SEL] du canal voulu. Les assignations effectuées ici sont affichées aux pages [PAN/ROUTING] Pan 1-16 et Pan 17-24. Cela fonctionne aussi dans l’autre sens: les réglages effectués
aux pages [PAN/ROUTING] Pan 1-16 ou Pan 17-24 sont également affichés à cette page.
Les points de transition (Cross Points) sont généralement réglés sur l’éditeur car le système
ne fonctionne convenablement qu’ainsi. Les canaux et bus de sortie formant des paires stéréo
sont toujours assignés ou libérés ensemble. Les retours d’effet 1 et 2 sont assignés automatiquement à FROM et à TO.
Logiciel d’édition vidéo pour 03D—Mode d’emploi
Page 55

21 Pages d’écran
Page CH 1-16- & 17-24/Stin
Voici une description des paramètres des pages CH 1-16 et 17-24/Stin. Pour accéder à ces
pages, appuyez sur le bouton [AUTOMIX].
Les pages CH 1-16 et 17-24/Stin ont les commutateurs suivants: DLY (retard de canal), DYN
(Dynamique), EQ et [A] (réglage automatique du niveau). Les icônes de potentiomètres indiquent les niveaux d’envoi réels. La valeur sous ces commandes indique le niveau du curseur
canal.
Lorsque vous sélectionnez une de ces pages, les boutons [SEL] font fonction de boutons Local
On/Off. Si le témoin d’un bouton [SEL] est éteint, ce canal réagit aux commandes ESAM II.
Lorsque ce témoin clignote, le canal est en mode Local et ignore les commandes ESAM II.
La ROLL. LIB (bibliothèque) permet de sauvegarder des informations canal pour chaque
appareil (rouleau ou bande).
Cette bibliothèque ROLL offre 100 mémoires (0~99) vous permettant de conserver les
valeurs des paramètres suivants (la mémoire “0” peut uniquement être chargée):
• Tous les réglages de canal pouvant être conservés dans un programme de la bibliothèque
Canal.
• Les réglages de courbe Crossfade (voyez page 16).
• Réglage LIMIT LEVEL
• Réglage LEVEL ADJUST
• ADJUST On/Off
Pour sauvegarder les informations canal, choisissez un appareil (MACHINE), une mémoire,
puis sélectionnez STORE avec les boutons CURSOR et appuyez sur [ENTER]. Les réglages
des canaux assignés à cet appareil sont sauvegardés (max. 4 canaux).
Pour charger les informations canal, choisissez un appareil (MACHINE), une mémoire,
sélectionnez RECALL avec les boutons CURSOR et appuyez sur [ENTER]. Si le nombre de
canaux sauvegardés ne correspond plus au nombre des canaux à charger, voici ce qui se passe:
• Lorsque la mémoire contient des données pour quatre canaux alors que seuls deux canaux
sont utilisés, le 03D ne charge que les valeurs du premier et deuxième canal.
• Lorsque la mémoire contient des données pour deux canaux alors que quatre canaux sont
utilisés, le 03D charge deux fois les valeurs du premier et deuxième canal.
Logiciel d’édition vidéo pour 03D—Mode d’emploi
Page 56

Page Monitor 22
Page Monitor
Vous trouverez ci-dessous une description des paramètres de la page Monitor. Pour accéder
à cette page, appuyez sur le bouton [VIEW].
La page Monitor vous permet de contrôler les réglages des curseurs avec des barres verticales.
En dessous se trouvent les positions exactes des curseurs. Une barre “vide” signifie que le
canal en question est un canal TO ou n’est assigné ni à TO ni à FROM. Lors d’une transition,
une zone vide augmente pour les canaux FROM tandis que la zone pleine augmente pour
les canaux TO.
Page Prefer.
Vous trouverez ci-dessous une description des nouvelles options de la page Prefer. Pour accéder à cette page, appuyez sur le bouton [UTILITY].
MASTER LEVEL PROTECT—Cette fonction vous permet de bloquer les curseurs Bus et
AUX Send Master. Cela n’a un sens que si vous ne modifiez pratiquement jamais ces valeurs
de niveau ou si vous souhaitez vous protéger contre un changement accidentel.
SWAP CH 9–16 <–> 17–24—Cette fonction vous permet d’échanger les entrées analogiques 9~16 et les entrées numériques 17~24 pour que les entrées numériques soient assignées aux canaux 9~16. Vous pouvez ainsi régler le bus numérique sans devoir utiliser le
bouton [MIXING LAYER]. Dans ce cas, le message SWAP à côté des VU-mètres indique
l’échange.
DIGITAL BUS OUTPUT DELAY—En mode normal du 03D, le retard de sortie ne s’applique qu’aux sorties de bus analogiques (pas aux bus numériques). Activez cette fonction pour
retarder les sorties de bus numériques aussi.
LONGER OUTPUT DELAY TIME—L’option LONGER OUTPUT DELAY TIME vous
permet d’allonger le temps de retard de 3160 échantillons. Comme les fonctions de retard
de sortie et d’entrée utilisent la même mémoire, le retard maximum d’entrée est raccourci
de 3160 échantillon lorsque cette fonction est activée. Vous devez redémarrer le 03D pour
activer cette option.
Logiciel d’édition vidéo pour 03D—Mode d’emploi
Page 57

23 Pages d’écran
Page Delay
Vous trouverez ici une description des fonctions de la page Delay. Pour accéder à cette page,
appuyez sur le bouton [DELAY/
Le retard d’entrée et de sortie peut être réglé en millisecondes, par échantillons ainsi que –
et c’est nouveau – par quarts de frame. Lorsque la fréquence d’échantillonnage est de 48kHz
et que le paramètre Frame Type est sur “DF”, la plage de retard est d’environ 6 frames.
∅].
Lorsqu’une sortie de bus est sélectionnée, le paramètre OFFSET apparaît à la page CH Delay.
Ce paramètre vous permet de déterminer le retard pour tous les bus de sortie et permet de
corriger des décalages de timing entre le matériel audio et vidéo. Il est possible de régler un
temps de retard (un décalage) de maximum 4 frames (par unités d’un frame).
Vous voyez ci-dessus la page Output Dly. Le retard est donné en frames. Vous y voyez en outre
la valeur OFFSET des quatre sorties de bus.
Logiciel d’édition vidéo pour 03D—Mode d’emploi
Page 58

Page MIDI Setup 24
Page MIDI Setup
La page MIDI Setup du Logiciel d’édition vidéo pour 03D a cet aspect. En mode de fonctionnement normal du 03D, les paramètres Fader Start et MMC No. se trouvent à la page
MIDI/HOST.
Page Bulk
Pour accéder à la page Bulk, appuyez sur le bouton [MIDI]. Elle vous permet de sauvegarder
le contenu de la mémoire TO EDITOR via MIDI (Bulk Dump) en le transférant vers un
séquenceur, un ordinateur etc.
Page Solo Setup
Lorsque le port TO EDITOR est activé, la fonction SOLO TRIM de la page Solo Setup ne
peut pas être utilisée.
Logiciel d’édition vidéo pour 03D—Mode d’emploi
Page 59

25 Pages d’écran
Page Moni. Setup
Page User Define
• 21. ESAM Auto Adjust—Activer/couper la fonction LEVEL ADJUST.
• 20. ESAM Local On/Off—Activer/couper la fonction Local.
• 19. ESAM Fader ABS—Sélection de ABSOLUTE ou FROM-TO pour FADER MODE.
• 18. PANL-C-R Flip—Cette fonction vous permet de placer un canal à droite, au milieu,
Lorsque le port TO EDITOR est activé, la fonction MONI TRIM de la page Moni Setup ne
peut pas être utilisée.
La fonction User Define a été élargie de quatre options. Elles sont assignées à la banque 4.
En mode FROM-TO, le réglage du curseur canal ne peut se faire qu’en mode Local On
ou lorsque l’écran n’affiche pas une page Video Edit Suite. Cette fonction vous permet de
passer rapidement en mode ABSOLUTE, de régler un curseur et de revenir en mode
FROM-TO.
à gauche, puis de nouveau à droite, etc.
Logiciel d’édition vidéo pour 03D—Mode d’emploi
Page 60

Page EQ Library 26
Page EQ Library
La bibliothèque EQ offre aussi trois nouveaux programmes:
• 80. 60Hz HUM CUT— Suppression de bourdonnement de 60 Hz.
• 79. 50Hz HUM CUT— Suppression de bourdonnement de 50 Hz.
• 78. HIGH CUT—Suppression de bruit blanc à hautes fréquences (sifflement de bande,
par exemple) avec un filtre passe-bas (LPF).
Après l’installation du Logiciel d’édition vidéo pour 03D, toutes les mémoires doivent être
initialisées pour avoir accès aux nouveaux programmes EQ.
Attention
Lors de l’initialisation, tous les programmes utilisateur sont effacés. Sauvez-les au préalable via MIDI (Bulk Dump). Voyez le Mode d’emploi du 03D.
Pour initialiser toutes les mémoires, maintenez [STORE] enfoncé et mettez le 03D sous tension. Dès que la page <<INITIALIZE MEMORY?>> apparaît, appuyez sur [RECALL]. Les
nouveaux programmes EQ sont alors disponibles.
Page Effects Library
La bibliothèque d’effet comprend trois nouveaux programmes.
• 96. Echo Reverb
• 95. FEMALE Pitch
• 94. MALE Pitch
Après l’installation du Logiciel d’édition vidéo pour 03D, toutes les mémoires doivent être
initialisées pour avoir accès aux nouveaux programmes d’effet. Pour en savoir davantage,
voyez Page EQ Library à la page 26.
Logiciel d’édition vidéo pour 03D—Mode d’emploi
Page 61

27 Appendice
Appendice
Editeurs reconnus
Sony
BVE9100 (+Option)
BVE2000
BVE910 (+Option)
BVE900 (+Upgrade +Option)
BVE9000 (+Upgrade +Option)
PVE500
CMX
CMX3600
Ampex
ACE200
Panasonic
AU-A960
AG-A850
Accom
Axial 3000
Logiciel d’édition vidéo pour 03D—Mode d’emploi
Page 62

Commandes reconnues
Commandes reconnues 28
Commande
All Stop —A0
From Source — A1, A2
To Source — A3, A4
Monitor Source — A5, A6
Transition Duration — A7, A8
Transition Start —A9
Monitor Mode —AA
Restore From Edit —AB
Fader Level —AD
Save Mixer —AE
Recall Mixer —AF
Transfer Register 30 B0
From Machine —B4
To Machine —B5
Monitor Machine —B6
From Source —BC
To Source —BD
Monitor Source —BE
Transition Duration —BF
1. Les commandes Lecture (Read) informent l’éditeur sur l’état du 03D (valeurs hexadécimales).
2. Les commandes Ecriture (Write) permettent de modifier l’état du 03D à partir de l’éditeur. En outre,
elles permettent de répondre aux commandes Lecture de l’éditeur (valeurs hexadécimales).
Lecture
1
Ecriture
2
Durant une transition, d’éventuelles commandes All Stop sont ignorées.
Lors de la transmission de plusieurs commandes, celles-ci doivent avoir un intervalle d’un
frame au moins entre elles.
Logiciel d’édition vidéo pour 03D—Mode d’emploi
Page 63

29 Appendice
MIDI Bulk Dump
Formats de blocs de données qui sont reconnus par le Logiciel d’édition vidéo pour 03D.
1. Video Editor Setup Bulk Dump-Format
STATUS 11110000 F0 System Exclusive Message
ID No. 01000011 43 Manufacturer's ID No.(YAMAHA)
SUB STATUS 0000nnnn 0n n=0-15(Device Channel No.1-16)
FORMAT No. 01111110 7E Universal Bulk Dump
BYTE COUNT(HIGH) 00000001 01 140(130+10)bytes
BYTE COUNT(LOW) 00001100 0C
01001100 4C 'L'
01001101 4D 'M'
00100000 20 ' '
00100000 20 ' '
00111000 38 '8'
01000010 42 'B'
00110000 30 '0'
00110011 33 '3'
DATA NAME 01010110 56 'V'
0mmmmmmm mm m=0-2,127(Video Editor Setup No.1-
3,current)
DATA 0ddddddd ds Video Editor Setup(130bytes)
: :
0ddddddd de
CHECK SUM 0eeeeeee ee ee=(-('L'+'M'+...+ds+...+de)) AND 7Fh
EOX 11110111 F7 End Of Exclusive
2. Video Editor Setup Bulk Dump Request-Format
STATUS 11110000 F0 System Exclusive Message
ID No. 01000011 43 Manufacturer's ID No.(YAMAHA)
SUB STATUS 0010nnnn 2n n=0-15(Device Channel No.1-16)
FORMAT No. 01111110 7E Universal Bulk Dump
01001100 4C 'L'
01001101 4D 'M'
00100000 20 ' '
00100000 20 ' '
00111000 38 '8'
01000010 42 'B'
00110000 30 '0'
00110011 33 '3'
DATA NAME 01010110 56 'V'
0mmmmmmm mm m=0-2,127(Video Editor Setup No.1-
3,current)
EOX 11110111 F7 End Of Exclusive
Logiciel d’édition vidéo pour 03D—Mode d’emploi
Page 64

MIDI Bulk Dump 30
3. Roll Library Bulk Dump-Format
STATUS 11110000 F0 System Exclusive Message
ID No. 01000011 43 Manufacturer's ID No.(YAMAHA)
SUB STATUS 0000nnnn 0n n=0-15(Device Channel No.1-16)
FORMAT No. 01111110 7E Universal Bulk Dump
BYTE COUNT(HIGH) 00000010 02 290(280+10)bytes
BYTE COUNT(LOW) 00100010 22
01001100 4C 'L'
01001101 4D 'M'
00100000 20 ' '
00100000 20 ' '
00111000 38 '8'
01000010 42 'B'
00110000 30 '0'
00110011 33 '3'
DATA NAME 01001100 4C 'L'
0mmmmmmm mm m=1-99(Roll Library No.1-99)
DATA 0ddddddd ds Roll Library(280bytes)
: :
0ddddddd de
CHECK SUM 0eeeeeee ee ee=(-('L'+'M'+...+ds+...+de)) AND 7Fh
EOX 11110111 F7 End Of Exclusive
4. Roll Library Bulk Dump Request-Format
STATUS 11110000 F0 System Exclusive Message
ID No. 01000011 43 Manufacturer's ID No.(YAMAHA)
SUB STATUS 0010nnnn 2n n=0-15(Device Channel No.1-16)
FORMAT No. 01111110 7E Universal Bulk Dump
01001100 4C 'L'
01001101 4D 'M'
00100000 20 ' '
00100000 20 ' '
00111000 38 '8'
01000010 42 'B'
00110000 30 '0'
00110011 33 '3'
DATA NAME 01001100 4C 'L'
0mmmmmmm mm m=1-99(Roll Library No.1-99)
EOX 11110111 F7 End Of Exclusive
Logiciel d’édition vidéo pour 03D—Mode d’emploi
Page 65

03DVideoEditSuiteSoftware
Bedienungsanleitung
Deutsch
Page 66

i
Inhalt
Vorweg . . . . . . . . . . . . . . . . . . . . . . . . . . . . . 1
Willkommen . . . . . . . . . . . . . . . . . . . . . . . . . . . . . . . . . . . . . . . . . . . . . . . . . . . 1
Features . . . . . . . . . . . . . . . . . . . . . . . . . . . . . . . . . . . . . . . . . . . . . . . . . . . . . . . . 1
1. Installieren der Software . . . . . . . . . . . . . 3
Systemanforderungen . . . . . . . . . . . . . . . . . . . . . . . . . . . . . . . . . . . . . . . . . . . . 3
Installation mit einem Macintosh Computer . . . . . . . . . . . . . . . . . . . . . . . . . 3
Installieren mit einem Windows 95 PC . . . . . . . . . . . . . . . . . . . . . . . . . . . . . . 6
Installieren des normalen 03D-Betriebssystems . . . . . . . . . . . . . . . . . . . . . . . 7
2. Die 03D Video Edit Suite Software . . . . . . 8
ESAM II . . . . . . . . . . . . . . . . . . . . . . . . . . . . . . . . . . . . . . . . . . . . . . . . . . . . . . . 8
Video Edit Suite-Funktionen . . . . . . . . . . . . . . . . . . . . . . . . . . . . . . . . . . . . . . 8
Systemanschlüsse (Audioverbindungen) . . . . . . . . . . . . . . . . . . . . . . . . . . . 10
Aktivieren des TO EDITOR-Anschlusses . . . . . . . . . . . . . . . . . . . . . . . . . . . 10
Nicht belegte Funktionen,
wenn der TO EDITOR-Anschluß aktiviert wurde . . . . . . . . . . . . . . . . . . . . 11
Und so funktioniert es… . . . . . . . . . . . . . . . . . . . . . . . . . . . . . . . . . . . . . . . . 12
Bedienhinweise . . . . . . . . . . . . . . . . . . . . . . . . . . . . . . . . . . . . . . . . . . . . . . . . 12
3. Kurzanleitung . . . . . . . . . . . . . . . . . . . . . 13
4. Display-Seiten . . . . . . . . . . . . . . . . . . . . . 14
MIDI/HOST-Seite . . . . . . . . . . . . . . . . . . . . . . . . . . . . . . . . . . . . . . . . . . . . . . 14
Machine-Seite (Übergangsstellen) . . . . . . . . . . . . . . . . . . . . . . . . . . . . . . . . . 16
CrossFade-Seite . . . . . . . . . . . . . . . . . . . . . . . . . . . . . . . . . . . . . . . . . . . . . . . . 16
From-To-Seite . . . . . . . . . . . . . . . . . . . . . . . . . . . . . . . . . . . . . . . . . . . . . . . . . 20
CH 1-16- & 17-24/Stin-Seite . . . . . . . . . . . . . . . . . . . . . . . . . . . . . . . . . . . . . 21
Monitor-Seite . . . . . . . . . . . . . . . . . . . . . . . . . . . . . . . . . . . . . . . . . . . . . . . . . . 22
Prefer.-Seite . . . . . . . . . . . . . . . . . . . . . . . . . . . . . . . . . . . . . . . . . . . . . . . . . . . 22
Delay-Seite . . . . . . . . . . . . . . . . . . . . . . . . . . . . . . . . . . . . . . . . . . . . . . . . . . . . 23
MIDI Setup-Seite . . . . . . . . . . . . . . . . . . . . . . . . . . . . . . . . . . . . . . . . . . . . . . . 24
Bulk-Seite . . . . . . . . . . . . . . . . . . . . . . . . . . . . . . . . . . . . . . . . . . . . . . . . . . . . . 24
Solo Setup-Seite . . . . . . . . . . . . . . . . . . . . . . . . . . . . . . . . . . . . . . . . . . . . . . . . 24
Moni. Setup-Seite . . . . . . . . . . . . . . . . . . . . . . . . . . . . . . . . . . . . . . . . . . . . . . 25
User Define-Seite . . . . . . . . . . . . . . . . . . . . . . . . . . . . . . . . . . . . . . . . . . . . . . . 25
EQ Library-Seite . . . . . . . . . . . . . . . . . . . . . . . . . . . . . . . . . . . . . . . . . . . . . . . 26
Effects Library-Seite . . . . . . . . . . . . . . . . . . . . . . . . . . . . . . . . . . . . . . . . . . . . . 26
Anhang . . . . . . . . . . . . . . . . . . . . . . . . . . . . 27
Unterstützte Editoren . . . . . . . . . . . . . . . . . . . . . . . . . . . . . . . . . . . . . . . . . . . 27
Unterstützte Befehle . . . . . . . . . . . . . . . . . . . . . . . . . . . . . . . . . . . . . . . . . . . . 28
MIDI Bulk Dump . . . . . . . . . . . . . . . . . . . . . . . . . . . . . . . . . . . . . . . . . . . . . . 29
03D Video Edit Suite Software—Bedienungsanleitung
Page 67

Vorweg
1
Vorweg
Willkommen
Features
Vielen Dank, daß Sie sich für die 03D Video Edit Suite Software von Yamaha entschieden
haben. Dank Unterstützung des ESAM II-Editorprotokolls verwandelt die 03D Video Edit
Suite Software das 03D Digital-Mischpult in einen komplett ausgestattetes Digital-Audiomischpult für die Video-Nachbearbeitung.
• Abmischen und Editieren der Audiosignale während der Bearbeitung der Videobilder.
• Da das ESAM II-Protokoll unterstützt wird, kann das 03D als Video-Schalteinheit für
Audiomaterial verwendet werden und Vorschau-Befehle eines Video-Editors ausführen.
• Unterstützung weiterführender Funktionen des ESAM II-Protokolls, darunter die Fernbedienung der Fader.
• Die Daten für das 03D können vom Video-Editor heruntergeladen bzw. dorthin übertragen werden, so daß die Datenverwaltung zentral geregelt wird.
• Phasenumkehrung, Eingabeverzögerung von bis zu sechs Frames (in 1/4-Frame-Schritten), parametrische 4band-Klangregelung, Dynamikprozessoren und Effekte bieten die
größtmögliche Freiheit für die Veredelung des Audiomaterials.
• Das 03D erfordert keine zusätzliche Hardware, wie z.B. Karten und Schnittstellen. Ein
9stiftiger TO EDITOR-Anschluß ist bereits eingebaut.
• Die Kanäle können den vier Bus-Ausgängen des 03D als FROM- und TO-Quellen zugeordnet werden, so daß nahtlose Übergänge durchaus möglich sind. Überblendungen
können gemäß eines der sieben Crossfade-Muster durchgeführt werden und sind pro
Kanal einstellbar. Die Kurvenneigung ist in drei Stufen einstellbar und gilt für alle
Kanäle.
• Die motorisierten Fader des 03D garantieren eine exakte Pegeleinstellung und zeigen
jederzeit den Stand der Dinge an. Im FROM-TO-Betrieb bezieht sich die Fader-Position
auf den Übergangspegel.
• Die Vorschauquelle kann frei angewählt werden. Im CHANNEL- und BUS-Betrieb lassen sich einzelne Kanäle bzw. Summen abhören.
Lieferumfang
Zum Lieferumfang gehören folgende Dinge. Bitte kontrollieren Sie nach dem Auspacken,
ob alles da ist
• 03D Video Edit Suite Software (Mac- und PC-Disketten; diese heißen “03D for Video
Editing”)
• Ursprüngliche 03D-Betriebssoftware (Disketten für Mac und PC; diese heißen “03D”)
• Diese Bedienungsanleitung
Bitte wenden Sie sich an Ihren Yamaha-Händler, wenn etwas fehlt.
Warenzeichen
Accom ist ein Warenzeichen der Accom Corporation, Inc. Ampex ist ein Warenzeichen der
Ampex Corporation, Inc. CMX ist ein Warenzeichen der CMX Company. Macintosh ist ein
Warenzeichen der Apple Computer, Inc. Panasonic ist ein Warenzeichen der Matsushita
Corporation, Inc. Sony ist ein Warenzeichen der Sony Corporation, Inc. Windows 95 ist ein
Warenzeichen der Microsoft Corporation, Inc.
03D Video Edit Suite Software—Bedienungsanleitung
Page 68

Features
Yamaha ist ein Warenzeichen der Yamaha Corporation, Inc.
Alle anderen Warenzeichen sind Eigentum der betreffenden Firmen.
Copyright
© 1997 Yamaha Corporation. Alle Rechte vorbehalten.
Diese Bedienungsanleitung darf ohne die schriftliche Genehmigung der Yamaha Corpora-
tion weder ganz noch auszugsweise kopiert oder anderweitig vervielfältigt werden.
Yamaha im World Wide Web
http://www.yamaha.co.jp/product/proaudio/homeenglish/
Bewahren Sie diese Bedienungsanleitung auf.
2
03D Video Edit Suite Software—Bedienungsanleitung
Page 69

Installieren der Software
3
1
Installieren der Software
In diesem Kapitel zeigen wir Ihnen, wie man die 03D Video Edit Suite Software installiert.
Achtung
Beim Installieren der 03D Video Edit Suite Software werden alle Automix-Daten des 03D
gelöscht. Am besten übertragen Sie sie also vorher als MIDI Bulk Dump zu einem
Sequenzer oder Ihrem Rechner. Siehe die Bedienungsanleitung des 03D. Wenn Sie zu
einem späteren Zeitpunkt wieder die “normale” Betriebssoftware des 03D installieren,
werden die Video Edit Suite- und Bibliothekdaten gelöscht.
Systemanforderungen
Die 03D Video Edit Suite Software kann entweder von einem Macintosh oder einem PC mit
Windows 95 aus installiert werden.
Computer
Macintosh TO HOST
Windows 95 PC TO HOST Serielles PC-Kabel
1. Terminal-J gehört zum Lieferumfang.
2. 9stiftiger D-SUB-Anschluß zu 8stiftigem Mini-DIN-Stecker
3. Das HyperTerminal-Programm gehört zum Lieferumfang von Windows 95.
03D-
Buchse
Kabel
Serielles MacintoshKabel
Empfohlenes
Programm
Terminal-J
2
HyperTerminal
1
3
Installation mit einem Macintosh Computer
1. Verbinden Sie das 8stiftige Mini-DIN-Kabel mit der TO HOST-Buchse des
03D sowie dem Modem-Anschluß Ihres Macintosh.
2. Starten Sie den Macintosh.
3. Legen Sie die 03D Video Edit Suite Software-Diskette in das Laufwerk,
doppelklicken Sie auf die Diskettenikone und kopieren Sie die Terminal-JDatei zu Ihrer Festplatte.
4. Doppelklicken Sie auf die Terminal-J-Datei, um sie zu dekomprimieren.
Dabei wird ein Terminal-J-Ordner angelegt, der das Terminal-J-Programm enthält.
5. Kopieren Sie die “03VEKxxxMIX.sea”-Datei zu Ihrer Festplatte und doppelklicken Sie sie anschließend, um sie zu dekomprimieren.
Dabei wird ein “03VEKxxxMIX” Ordner angelegt.
6. Kopieren Sie die “03VEKxxx.T” und “03VEKxxx.X” Datei im
“03VEKxxxMIX” Ordner zum Terminal-J-Ordner.
7. Schalten Sie in der
8. Halten Sie den [UTILITY]-, [DYNAMICS]- und [EFFECT 2]-Taster des 03D
gedrückt, während Sie das Pult einschalten.
Es erscheint nun die UPDATE PROGRAM-Seite.
Auswahl
(Chooser) AppleTalk aus.
9. Doppelklicken Sie auf die Terminal-J-Ikone, um das betreffende Programm zu starten.
03D Video Edit Suite Software—Bedienungsanleitung
Page 70

Installation mit einem Macintosh Computer
10. Wählen Sie im Options-Menü Connection .
Es erscheint nun das Connection Settings-Dialogfenster.
11. Stellen Sie die angebotenen Parameter wie nachstehend gezeigt ein und
klicken Sie auf OK.
Method: Direct Serial
Baud Rate: 38.4K
Parity: None
Data Bits: 8
Stop Bits: 1
Handshake: None
12. Wählen Sie im Options-Menü Transfer .
Es erscheint nun das Transfer Settings-Dialogfenster.
13. Klicken Sie auf das Binary-Dateisymbol.
Nun erscheinen die Einstellungen für den Transfer von binären Daten.
4
14. Schalten Sie “Recognize and use MacBinary format for non-TEXT files”
aus (siehe Abbildung) und klicken Sie auf OK.
15. Wählen Sie im Options-Menü X/YMODEM .
Es erscheint nun das X/YMODEM-Dialogfenster.
16. Schalten Sie CRC aus (siehe Abbildung) und klicken Sie auf OK.
17. Wählen Sie im Session-Menü
Connect
.
18. Verwenden Sie die Cursor- sowie den [ENTER]-Taster des 03D, um folgende Parameter einzustellen:
PORT: TO HOST
FLYING: ON
UPDATE BLOCK: ALL
03D Video Edit Suite Software—Bedienungsanleitung
Page 71

Installieren der Software
5
19. Wählen Sie im File -Menü von Terminal-J TRANSMIT XMODEM .
20. Wählen Sie die Datei “03VEKxxx.T” und klicken Sie auf Transmit.
21. Führen Sie den Cursor des 03D mit den Cursortastern zu START und drük-
22. Wählen Sie im File -Menü von Terminal-J TRANSMIT XMODEM .
23. Wählen Sie die Datei “03VEKxxx.X” und klicken Sie auf Transmit.
24. Führen Sie den Cursor des 03D mit den Cursortastern zu START und drük-
Es erscheint nun das File Open-Dialogfenster.
ken Sie auf [ENTER].
Im Display des 03D erscheint die Meldung “Please send BLOCK TABLE FILE”.
Die Datei wird nun zum 03D übertragen.
Warten Sie, bis folgende Meldung angezeigt wird, bevor Sie weitermachen:
“Please send BLOCK 0, 1, 2, 3, 4, 5, 6, 7, 8, 9, A, B, C, D, E, F, G, H”.
Es erscheint nun das File Open-Dialogfenster.
ken Sie auf [ENTER].
Die Datei wird nun zum 03D übertragen. Währenddessen blinkt ein Sternchen langsam im
Display des 03D.
Die Datenübertragung dauert zwischen 5 und 20 Minuten. Sobald alle Datenblöcken übertragen sind, erscheint zuerst die Meldung “UPDATE . . . DONE” und anschließend EXIT
im Display des 03D.
25. Drücken Sie den [ENTER]-Taster, um das 03D neuzustarten.
Damit ist das Programm installiert.
03D Video Edit Suite Software—Bedienungsanleitung
Page 72

Installieren mit einem Windows 95 PC
Installieren mit einem Windows 95 PC
1. Verbinden Sie ein 8stift-zu-9stift D-Sub-Kabel mit der TO HOST-Buchse
des 03D und dem seriellen Anschluß (COM-Port) des PC.
2. Schalten Sie den PC ein.
3. Legen Sie die 03D Video Edit Suite Software-Diskette in das Laufwerk und
kopieren Sie die Dateien “03VEKxxx.T” und “03VEKxxx.X” zum Hyper
Terminal-Ordner auf der Festplatte (Festplatte
hör
→
HyperTerminal).
4. Halten Sie den [UTILITY]-, [DYNAMICS]- und [EFFECT 2]-Taster des 03D
gedrückt, während Sie das Pult einschalten.
Es erscheint nun die UPDATE PROGRAM-Seite.
5. Doppelklicken Sie auf die Hypertrm-Ikone, um dieses Programm zu starten.
Nun erscheint das Beschreibung der Verbindung -Dialogfenster (Connection Description).
6. Benennen Sie die Verbindung (z.B. “03D”) und klicken Sie auf OK. Die
Symbole in diesem Dialogfenster lassen wir links liegen.
Nun erscheint das Telefonnummer-Dialogfenster.
→
Programme
→
Zube-
6
7. Wählen Sie für Verbinden über “Direktverbindung über Com x” ( das “x”
vertritt hier die Nummer der seriellen Schnittstelle, an die Sie das 03D
angeschlossen haben). Klicken Sie auf OK.
Nun erscheint das Anschlußeinstellungen -Dialogfenster.
8. Stellen Sie die hier verfügbaren Parameter wie nachstehend gezeigt ein
und klicken Sie auf OK.
Bits pro Sekunde: 38400
Datenbits: 8
Parität: Keine
Stoppbits: 1
Protokoll: Kein
9. Wählen Sie im Anruf-Menü Verbinden .
10. Verwenden Sie die Cursor- sowie den [ENTER]-Taster des 03D, um folgende Parameter einzustellen:
PORT: TO HOST
FLYING: ON
UPDATE BLOCK: ALL
11. Wählen Sie im Übertragung -Menü von HyperTerminal Datei senden .
Nun erscheint das Datei senden -Dialogfenster.
03D Video Edit Suite Software—Bedienungsanleitung
Page 73

Installieren der Software
7
12. Wählen Sie für Protokoll die Option “Xmodem”.
13. Klicken Sie auf Durchsuchen und wählen Sie die Datei “03VEKxxx.T”. Klik-
14. Führen Sie den Cursor des 03D mit den Cursortastern zu START und drük-
15. Wählen Sie im Übertragung -Menü von HyperTerminal Datei senden .
16. Klicken Sie auf Durchsuchen und wählen Sie die Datei “03VEKxxx.X”. Klik-
ken Sie anschließend auf Senden.
ken Sie auf [ENTER].
Im Display des 03D erscheint die Meldung “Please send BLOCK TABLE FILE”.
Die Datei wird nun zum 03D übertragen.
Warten Sie, bis folgende Meldung angezeigt wird, bevor Sie weitermachen: “Please send
BLOCK 0, 1, 2, 3, 4, 5, 6, 7, 8, 9, A, B, C, D, E, F, G, H”.
Nun erscheint das Datei senden -Dialogfenster.
ken Sie anschließend auf Senden.
17. Führen Sie den Cursor des 03D mit den Cursortastern zu START und drükken Sie auf [ENTER].
Die Datei wird nun zum 03D übertragen. Währenddessen blinkt ein Sternchen langsam im
Display des 03D.
Die Datenübertragung dauert zwischen 5 und 20 Minuten. Sobald alle Datenblöcken übertragen sind, erscheint zuerst die Meldung “UPDATE . . . DONE” und anschließend EXIT
im Display des 03D.
18. Drücken Sie den [ENTER]-Taster, um das 03D neuzustarten.
Damit wäre die neue Betriebssoftware installiert.
Installieren des normalen 03D-Betriebssystems
Um wieder das normale Betriebssystem des 03D zu installieren, verfahren Sie genau wie bei
der Installation der 03D Video Edit Suite Software. Beachten Sie jedoch folgende Unterschiede:
• Verwenden Sie die Diskette mit der Aufschrift “03D” statt der “03D for Video Editing”
Diskette.
• Die benötigte komprimierte Datei der Macintosh-Diskette heißt “03D_VxxxMIX.sea”
(statt “03VEKxxxMIX.sea”)
• Die “T” Datei heißt “03D_Vxxx.T” (statt “03VEKxxx.T”)
• Die “X” Datei heißt “03D_Vxxx.X” (statt “03VEKxxx.X”)
• Für die Neuinstallation der Betriebssoftware brauchen Sie nicht denselben Computer zu
verwenden wie für die Installation der 03D Video Edit Suite Software. Wenn Sie letztere
z.B. von einem Mac aus installiert haben, können Sie das normale 03D-Betriebssystem
trotzdem mit einem Windows 95 PC zum 03D übertragen (Hauptsache, Sie verwenden
die richtige Diskette).
03D Video Edit Suite Software—Bedienungsanleitung
Page 74

2
Die 03D Video Edit Suite Software
Die 03D Video Edit Suite Software
ESAM II
Die 03D Video Edit Suite Software unterstützt nur das erweiterte ESAM-Protokoll (Editing
Suite Audio Mixers). Auf Seite 28 finden Sie eine Übersicht aller unterstützten Befehle.
Video Edit Suite-Funktionen
Sehen wir uns nun die Funktionen an, die die 03D Video Edit Suite Software bietet.
Crossfade (Überblendung)
Überblendungen erstrecken sich über die Anzahl Frames, die in den vom Video-Editor
gesendeten ESAM II-Befehlen enthalten sind. Der Einstellbereich von ESAM II beträgt
0~32.767 Frames (einstellbar in Frame-Schritten). Dies entspricht 1.365 Sekunden bei einer
Auflösung von 24 Frames/Sekunde. Der größtmögliche Frame-Wert richtet sich nach dem
verwendeten Editor. Die Audiosteuerungsgenauigkeit liegt bei einem Frame (allerdings nur,
solange nicht gleichzeitig andere Funktionen des 03D verwendet werden).
8
Local-Schalter
Im Local-Betrieb, der nur belegt ist, wenn die CH1–16 oder 17–24/Stin-Seite angezeigt wird,
können Sie mit den [SEL]-Tastern der Kanalzüge einstellen, welche Kanäle die eingehenden
ESAM II-Befehle nicht auswerten dürfen. Leuchtet die [SEL]-Diode eines Kanals nicht, so
wertet der Kanal ESAM II-Befehle aus. Blinkt die Diode, so befindet sich der betreffende
Kanal im Local-Betrieb und ignoriert daher die eingehenden ESAM II-Befehle. Weitere Einzelheiten hierzu finden Sie unter
CH 1-16- & 17-24/Stin-Seite auf Seite 21.
Drei Einstellungsspeicher
Video Edit Suite-Einstellungen, wie z.B. SOURCE/MACHINE ASSIGN, FRAME TYPE,
FADER MODE, sowie die Referenzwerte für die automatische Pegeleinstellung können in
einem TO EDITOR SETUP MEMORY (1, 2 oder 3) gesichert werden. Weitere Einzelheiten
hierzu finden Sie unter
MIDI/HOST-Seite auf Seite 14.
Überblendungsmuster & -kurven
Jeder Quelle (jedem Kanal) kann eines der sieben angebotenen Crossfade-Muster zugeordnet. Außerdem kann eine Kurve (1~3) gewählt werden, die jedoch global verwendet wird.
Weitere Einzelheiten hierzu finden Sie unter CrossFade-Seite auf Seite 16.
Grenzpegeleinstellung
Der Fade Out-Pegel (oder “Schwelle”) kann zwischen 0dB und minus unendlich eingestellt
werden. Weitere Einzelheiten hierzu finden Sie unter MIDI/HOST-Seite auf Seite 14.
Automatische Pegeleinstellung
Nach Auswerten des Pilottons am Beginn eines Bandes wird die Eingangsempfindlichkeit
(Gain) automatisch so eingestellt, daß der vom Anwender gewählte Nominalpegel dem Ausgangspegel entspricht. Der Einstellbereich beträgt –18 dB bis +18 dB. Wenn der angebotene
Pegel diesen Bereich überschreitet und daher vom 03D nicht zuverlässig ausgewertet werden
kann, erscheint eine Warnung im Display. Bei zu Stereopaaren konfigurierten Kanälen wird
nur der Pegel des linken Kanals ausgewertet. Der so ermittelte Wert wird dann auch für den
rechten Kanal eingestellt. Es kann jedoch vorkommen, daß der Pegel nicht für alle Kanäle
gleich ist. Weitere Einzelheiten hierzu finden Sie unter MIDI/HOST-Seite auf Seite 14.
03D Video Edit Suite Software—Bedienungsanleitung
Page 75

9 Die 03D Video Edit Suite Software
Ein- und Ausgabeverzögerung frameweise einstellbar
Die Ein- und Ausgabeverzögerung kann nicht nur als Sample- oder Zeitwert, sondern auch
als Frame-Wert –und zwar in Viertelframe-Schritten– eingestellt werden. Wenn die SamplingFrequenz 48kHz und der Frame Type-Parameter “DF” lauten, beträgt der Verzögerungsbereich etwa sechs Frames. Weitere Einzelheiten hierzu finden Sie unter Delay-Seite auf Seite 23.
Wenn ein Bus-Ausgang gewählt und LONGER OUTPUT DELAY TIME eingeschaltet wird,
erscheint auf der CH Delay-Seite auch ein OFFSET-Parameter, mit dem Sie die Verzögerung
für alle Bus-Ausgänge gemeinsam einstellen können. Somit können Timing-Verschiebungen des Audio- und Videomaterials ausgebügelt werden. Hier kann eine Verzögerung/Versatz von maximal 4 Frames (in 1-Frame-Schritten) eingestellt werden.
Auf der Prefer.-Seite können Sie die Ausgabeverzögerung mit LONGER OUTPUT DELAY
TIME um 3160 Samples verlängern. Da der Ein- und Ausgabeverzögerungsparameter aber
denselben Speicher verwenden, fällt die Eingabeverzögerung bei Aktivieren dieser Funktion
3160 Samples kürzer aus. Weitere Einzelheiten hierzu finden Sie unter Prefer.-Seite auf Seite 22.
Pan Flip
Wenn Sie die neue PAN L-C-R Flip-Funktion einem USER DEFINE-Taster zuordnen, können Sie ein Signal blitzschnell links, in der Mitte, rechts, wieder links usw. im Schallbild
anordnen. Weitere Einzelheiten hierzu finden Sie unter User Define-Seite auf Seite 25.
Master Level Protect
Die Bus- und AUX Send Master-Fader können mit der MASTER LEVEL PROTECT-Option
arretiert werden. Weitere Einzelheiten hierzu finden Sie unter Prefer.-Seite auf Seite 22.
Austausch der Eingänge 9-16 & 17-24 (Swap)
Die Analog-Eingänge 9~16 sowie die Digital-Eingänge 17~24 können gegeneinander ausgetauscht werden, so daß die Analog-Eingänge Kanal 17~24 und die Digital-Eingänge Kanal
9~16 zugeordnet werden. Somit haben Sie auch ohne Drücken des [MIXING LAYER]Tasters Zugriff auf die angebotenen Digital-Signale. Die SWAP CH-Option befindet sich auf
der Prefer.-Seite. Weitere Einzelheiten hierzu finden Sie unter Prefer.-Seite auf Seite 22.
Neue EQ-Programme
Die EQ-Bibliothek wurde um folgende Programme erweitert:
• 80. 60 Hz Unterdrücken von Brummschleifen
• 79. 50 Hz Unterdrücken von Brummschleifen
• 78. Unterdrücken von hochfrequentem weißen Rauschen (z.B. Bandrauschen) mit
einem Tiefpaßfilter (LPF)
Nach Installieren der 03D Video Edit Suite Software müssen Sie alle Speicher initialisieren,
um auf die neuen EQ-Programm zugreifen zu können. Weitere Einzelheiten hierzu finden
Sie unter EQ Library-Seite auf Seite 26.
Neue Effektprogramme
Ganz hinten in der Effektbibliothek befinden sich drei neue Effektprogramme:
• 96. Echo Reverb
• 95. FEMALE Pitch
• 94. MALE Pitch
Auch hier gilt, daß alle Speicher nach Installieren der 03D Video Edit Suite Software initia-
lisiert werden müssen. Weitere Einzelheiten hierzu finden Sie unter Effects Library-Seite auf
Seite 26.
03D Video Edit Suite Software—Bedienungsanleitung
Page 76

Systemanschlüsse (Audioverbindungen) 10
Systemanschlüsse (Audioverbindungen)
VTR1
(PLAY 1)
D. BETA-cam
VTR2
(PLAY 2)
D. BETA-cam
VTR3
(REC 1)
D. BETA-cam
Video-Schalteinheit
(Bildeffekte)
AES/EBU
4
AES/EBU
4
AES/EBU
4
Analog
4
9-pin Remote (9-pin D-sub)
4
CD8-AE-S
CH17-20
(Digital)
CH21-24
(Digital)
BUS OUT
1-4 (Digital)
CH1-4 (Analog)
03D
ESAM II-Schnittstelle
Video-Editor
Aktivieren des TO EDITOR-Anschlusses
Nach Installieren der 03D Video Edit Suite Software muß der HOST INTERFACE-Parameter auf der MIDI/HOST-Seite auf EDITOR gestellt werden. Erst dann kann der TO EDITORAnschluß nämlich angesprochen werden.
TO EDITOR
ESAM II
(9-pin D-sub)
Achtung
Sobald Sie den HOST INTERFACE-Parameter der MIDI/HOST-Seite von STAND oder
MULTI zu EDITOR umschalten, werden alle Automix-Daten gelöscht. Am besten
sichern Sie alle diesbezüglichen Einstellungen also vorher via MIDI (Bulk Dump). Siehe
die Bedienungsanleitung des 03D. Umgekehrt werden die Video Edit Suite- und Roll
Library-Daten beim Wechsel von EDITOR zu STAND oder MULTI gelöscht.
1. Drücken Sie den [UTILITY]-Taster, bis die MIDI/HOST-Seite angezeigt
wird.
03D Video Edit Suite Software—Bedienungsanleitung
Page 77

11 Die 03D Video Edit Suite Software
2. Führen Sie den Cursor zum EDITOR-Symbol unter HOST INTERFACE und
drücken Sie den [ENTER]-Taster.
Es erscheint nun folgendes Dialogfenster.
3. Führen Sie den Cursor zu OK und drücken Sie den [ENTER]-Taster.
Nun erscheint die MIDI/HOST-Seite im Display (siehe Abbildung). Die Parameter Fader
Start und MMC des normalen Betriebssystems befinden sich auf der MIDI Setup-Seite.
Dieses Dialogfenster erscheint
nach Umschalten
von EDITOR zu
STAND.
Nun kann das 03D mit einem Video-Editor kommunizieren.
Nicht belegte Funktionen, wenn der TO
EDITOR-Anschluß aktiviert wurde
Nach Aktivieren des TO EDITOR-Anschlusses sind folgende 03D-Funktionen nicht mehr
belegt:
Automix—Die Automix-Funktion wird deaktiviert und statt der Automix-Seiten werden
nun Video Edit Suite-Seiten angezeigt. Beim Installieren der 03D Video Edit Suite Software
werden die Automix-Daten gelöscht. Diese müssen also vorher via MIDI gesichert werden,
wenn Sie sie noch brauchen (Bulk Dump). Siehe die Bedienungsanleitung des 03D.
Kanalverzögerung (ECHO und SLAP)—Die SLAP- und ECHO-Option der Channel
Delay-Seite werden deaktiviert. Herkömmliche Verzögerungen bleiben jedoch weiterhin
verfügbar.
Surround Pan—Die Surround Pan-Funktion wird deaktiviert, so daß die Pan-Betriebsart
automatisch STEREO lautet.
Blinkende MIXING LAYER-Diode—Die MIXING LAYER-Diode blinkt nicht, wenn Sie
die Ebene 17-24/MASTER wählen. Statt dessen leuchtet die rote Diode.
SOLO TRIM—Die SOLO TRIM-Funktion der Solo Setup-Seite ist nicht belegt.
MONI TRIM—Die MONI TRIM-Funktion der Moni. Setup-Seite ist nicht belegt.
03D Video Edit Suite Software—Bedienungsanleitung
Page 78

Und so funktioniert es… 12
Und so funktioniert es…
Die Lautstärke der Kanäle wird mit den Fadern eingestellt. Überblendungen (Crossfades)
können mit dem ESAM-Fader erzielt werden. Dieser befindet sich hinter dem Kanalfader.
Der Eingangspegel richtet sich nach der Einstellung des INPUT LEVEL ADJUST-Reglers.
Siehe auch nachstehende Abbildung.
INPUT LEVEL ADJUST
& ADJUST ON/OFF
ATT
ON
Eingangskanäle 1–24
ESAM-FADER
& LOCAL ON/OFF
OFF
Delay
4band
PEQ
Kanal-
fader
Dynamik
ON
Zu AUX
(Pre)
ON
OFF
PAN
Zu AUX
(Post)
Wenn der TO EDITOR-Parameter auf ENABLE gestellt und das 03D von einem Video-Editor aus fernbedient wird, richtet sich die Kanallautstärke nach der Einstellung des Kanal- und
ESAM-Faders. Dabei werden die ESAM-Fader der mit dem FROM-Befehl angesteuerten
Kanäle auf den Nennwert (0dB) gestellt, während die ESAM-Fader der auf TO-Befehle
hörenden Kanäle auf den LIMIT LEVEL-Wert gestellt werden (in der Regel minus unendlich). Nach einer Überblendung werden die FROM-Kanäle auf LIMIT LEVEL und die TOKanäle auf den Nennwert (0dB) gestellt.
Wenn der TO EDITOR-Parameter auf DISABLE gestellt wird, verhält sich das 03D wie
gewohnt (d.h. die ESAM-Befehle werden ganz einfach ignoriert). Ein Local geschalteter
Kanal (dessen LOCAL ON/OFF-Parameter auf ON gestellt wurde) verhält sich ebenfalls wie
gewohnt und ignoriert also eventuell eingehende ESAM-Befehle. Der Local-Betrieb kann
mit den [SEL]-Tastern aktiviert werden; er gilt jedoch nur, solange die CH 1–16- oder
17–24/Stin-Seite angezeigt wird. Nachstehend sehen Sie einen auf Local ON geschalteten
Kanal (bzw. was geschieht, wenn der TO EDITOR-Parameter auf DISABLE gestellt wird).
INPUT LEVEL ADJUST
& ADJUST ON/OFF
ATT
ON
Eingangskanäle 1–24
Bedienhinweise
ESAM FADER
& LOCAL ON/OFF
OFF
Delay
4band
PEQ
Kanal-
fader
Dynamik
ON
To AUX
(Pre)
ON
OFF
PAN
Zu AUX
(Post)
Der Editor muß so eingestellt werden, daß jeweils das Aufnahmegerät überwacht werden
kann. In der Regel empfiehlt sich also die Einstellung EE (Electric-to-Electric).
Die Ausgabeverzögerung des 03D fungiert als “Pre-Delay”, das verhindert, daß das Audiomaterial mit den Videobildern synchronisiert wird.
Wenn Sie zwei Eingangskanäle oder Bus-Ausgänge als Stereopaar konfigurieren, müssen Sie
die beiden PAN-Regler hart links bzw. hart rechts einstellen (beachten Sie jedoch, daß dies
eine 3dB-Anhebung des Signals zur Folge hat).
Mit der BUS TO ST-Funktion können Sie einstellen, daß die Signale der Digital-Summe
über ST DIGITAL OUT ausgegeben werden.
03D Video Edit Suite Software—Bedienungsanleitung
Page 79

13 Kurzanleitung
3 Kurzanleitung
In diesem Kapitel erklären wir, wie man mit der 03D Video Edit Suite Software arbeitet.
1. Rufen Sie die MIDI/HOST-Seite auf und stellen Sie den HOST INTERFACEParameter auf EDITOR. Weitere Einzelheiten hierzu finden Sie unter
MIDI/HOST-Seite auf Seite 14.
2. Stellen Sie TO EDITOR auf ENABLE. Weitere Einzelheiten hierzu finden
Sie unter MIDI/HOST-Seite auf Seite 14.
3. Stellen Sie den FRAME TYPE-Parameter dem Material entsprechend ein
(ND, DF, 25 oder 24). Weitere Einzelheiten hierzu finden Sie unter
MIDI/HOST-Seite auf Seite 14.
4. Stellen Sie PARITY FLAG ordnungsgemäß ein (in der Regel wohl auf
EVEN, obwohl Editoren, wie z.B. der Ampex ACE200, die ODD-Einstellung voraussetzen). Weitere Einzelheiten hierzu finden Sie unter
MIDI/HOST-Seite auf Seite 14.
5. Stellen Sie den FADER MODE-Parameter ein (ABSOLUTE oder FROM-TO).
Weitere Einzelheiten hierzu finden Sie unter MIDI/HOST-Seite auf
Seite 14.
6. Konfigurieren Sie alle Kanäle, die mit Stereo-Quellen verbunden sind, als
Stereopaare und stellen Sie den PAN-Regler des linken Kanals auf HartLinks und den Regler des rechten Kanals auf Hart-Rechts.
7. Wenn die Audio-Ausgabe ebenfalls stereo ist, müssen Sie auch die Ausgänge als Stereopaare konfigurieren.
8. Ordnen Sie die Eingangskanäle auf der Machine-Seite den Geräten zu
und geben Sie an, welches das Aufnahme-Gerät (REC) ist. Weitere Einzelheiten hierzu finden Sie unter Machine-Seite (Übergangsstellen) auf
Seite 16.
9. Sorgen Sie dafür, daß Kanäle, die Wiedergabemaschinen zugeordnet
sind, nicht an die Stereosumme angelegt werden. Nur die REC-Maschine
darf an die Stereosumme angelegt werden.
10. Rufen Sie die ROUTING- oder From-To-Seite auf und ordnen Sie die
Kanäle den Summen zu. Weitere Einzelheiten hierzu finden Sie unter
From-To-Seite auf Seite 20.
11. Stellen Sie den Eingangspegel ein.
12. Wählen Sie das Überblendungsverfahren und die benötigte Kurve. Weitere Einzelheiten hierzu finden Sie unter CrossFade-Seite auf Seite 16.
13. Nun kann das 03D vom Video-Editor aus angesteuert werden.
03D Video Edit Suite Software—Bedienungsanleitung
Page 80

4 Display-Seiten
MIDI/HOST-Seite
Hier werden die Parameter der MIDI/HOST-Seite (siehe Abbildung) erklärt. Diese Seite
erreichen Sie durch mehrmaliges Drücken des [UTILITY]-Tasters.
HOST INTERFACE—Das STAND.- und MULTI.-Schaltersymbol unter HOST INTERFACE haben die gleiche Funktion wie das STANDARD I/F- und MULTIPORT-Schaltersymbol im Normalbetrieb des 03D. Mit dem EDITOR-Symbol können Sie den TO EDITORAnschluß aktivieren bzw. ausschalten.
TO EDITOR SETUP MEMORY—Es stehen drei Speicher zur Verfügung, in denen Einstellungen bezüglich des TO EDITOR-Anschlusses abgelegt werden können. Wenn der Speicherinhalt den derzeit aktiven Einstellungen entspricht, werden diese Schaltersymbol
hellblau (grau) angezeigt. Sobald Sie auch nur einen Parameterwert ändern, können Sie
diese Änderung mit dem RECALL- und STORE-Schaltersymbol rückgängig machen bzw.
speichern. Folgende Einstellungen können in den SETUP-Speichern untergebracht werden:
FRAME TYPE, PARITY FLAG, FADER MODE, INPUT LEVEL ADJUST OUTPUT-Pegel,
sowie die SOURCE/MACHINE ASSIGN-Einstellungen.
INPUT LEVEL ADJUST—Mit dem OUTPUT-Regler bestimmen Sie den Ausgabepegel,
der bei auf Nennwert (0dB) gestelltem Fader verwendet wird. Der Einstellbereich beträgt
–48dB bis 0dB (in 1dB-Schritten). Der Eingangspegel eines Kanals kann entweder automatisch oder von Hand so eingestellt werden, daß die Kanallautstärke dem angegebenen Ausgangspegel entspricht. Hierbei wird jedoch davon ausgegangen, daß der Pegel nicht mit dem
Fader, dem PAN-Regler, dem EQ oder dem Dynamikprozessor geändert wird.
Nach Auswerten des Pilottons vor Beginn eines Audioprogramms kann der Eingangspegel
(Gain) automatisch eingestellt werden, so daß der vom Anwender eingestellte Nominalpegel
dem Ausgangspegel entspricht. Der Einstellbereich beträgt –18dB~+18dB (in 0,5dB-Schritten). Bei einem höheren Pegel kann diese Einstellung nicht vorgenommen werden. In dem
Fall wird eine Warnmeldung angezeigt. Bei als Stereopaare konfigurierten Kanälen wird nur
der Eingangspegel des linken Kanals ausgewertet. Der für diesen Kanal ermittelte Wert wird
dann auch dem rechten Kanal zugeordnet. In manchen Fällen kann es passieren, daß Stereokanäle einen unterschiedlichen Pegel aufweisen.
Wenn Sie die automatische Kanalpegeleinstellung bevorzugen, müssen Sie den Kanal
anwählen, den Cursor zum AUTO-Schaltersymbol führen und den [ENTER]-Taster drükken.
Um den Kanalpegel von Hand einzustellen, wählen Sie den Kanal an, führen den Cursor zu
MANUAL und verwenden das PARAMETER-Eingaberad.
Nach manueller oder automatischer Pegeleinstellung eines Kanals wird der Adjust ON/OFFSchalter auf der CH 1–16- oder 17–24/Stin-Seite aktiviert.
Display-Seiten 14
03D Video Edit Suite Software—Bedienungsanleitung
Page 81

15 Display-Seiten
TO EDITOR—Mit diesem Parameter können Sie den TO EDITOR-Anschluß aktivieren
(ENABLE) bzw. ausschalten (DISABLE). Das 03D wertet ESAM-Befehle nur aus, wenn Sie
ENABLE wählen.
FRAME TYPE—Stellen Sie diesen Parameter der Frame-Auflösung des Videomaterials entsprechend ein. Es stehen zur Wahl: ND (30 Frames), DF (29.97 Frames), 25 (25 Frames) und
24 (24 Frames). Das 03D benötigt diese Angabe zum Berechnen der Fade- und Delay-Werte
(Frames).
PARITY FLAG—Stellen Sie hier die vom Video-Editor vorausgesetzte Parität ein: EVEN,
ODD oder NONE. Die Vorgabe lautet EVEN.
FADER MODE—Mit diesem Parameter bestimmen Sie, wie sich die Fader verhalten,
sobald das 03D ESAM-Befehle empfängt.
Im ABSOLUTE-Betrieb bezieht sich die Faderposition auf die Kanallautstärke. Bei Empfang
neuer Werte für den ESAM-Fader bewegen sich die Kanalfader nicht. In dieser Betriebsart
können Sie die Fader also auch weiterhin zum Nachbessern der Lautstärke verwenden, was
bei vielen ESAM-Mischpulten der Fall ist.
Im FROM-TO-Betrieb zeigen die Fader die Einstellung des ESAM-Faders an. Bei Empfang
neuer ESAM-Werte fahren die Fader also die neue Position an. FROM-Fader fahren in die
LIMIT LEVEL-Position (in der Regel minus unendlich) und TO-Fader fahren in die dem
Eingangspegel entsprechende Position. Manuelles Nachbessern der Kanallautstärke ist hier
also nicht möglich. Bitte bedenken Sie, daß sich die Fader nur bewegen, wenn eine ESAMSeite angezeigt wird (Machine, CrossFade, From-To, CH 1-16 oder 17-24/Stin).
03D Video Edit Suite Software—Bedienungsanleitung
Page 82

Machine-Seite (Übergangsstellen) 16
Machine-Seite (Übergangsstellen)
Nachstehend werden die Parameter der Machine-Seite beschrieben. Diese Seite erreichen Sie
durch Drücken des [AUTOMIX]-Tasters.
Auf der Machine-Seite können Sie die Eingangskanäle dengewünschten Geräten zuordnen.
Es werden bis zu acht Geräte (A~H) unterstützt. Die Eingangskanäle können einem Gerät
jeweils in Zweier- oder Vierergruppen zugeordnet werden. Gerät A entspricht Übergangsstelle (Cross Point) “1”, Gerät B Übergangsstelle “2” usw. Gerät H entspricht Übergangsstelle
“8”. Bitte beachten Sie, daß der REC-Kanal Cross Point “0” zugeordnet wird.
Beispiel: Die Einstellungen der obigen Display-Seite besagen, daß Eingangskanal 1~4 mit
den Cross Point 1-Befehlen (Gerät A) angesteuert werden. Da REC aktiviert wurde, werten
sie jedoch auch die Cross Point 0-Befehle aus Bei den meisten Video-Editoren richtet sich
die Gerätenummer des ESAM II-Befehls nach den Cross Point-Einstellungen.
Die Einstellungen der Machine-Seite gelten nur bei Empfang von ESAM II-Maschinenbefehlen. In der Regel gelten sie also nicht, wenn die Kanäle individuell mit Quellenbefehlen
versorgt werden. Ganz so genau läßt sich das nicht vorhersagen, weil sich nicht alle Editoren
daran halten. Siehe also die Bedienungsanleitung des verwendeten Editors.
Um einen Kanal einem Gerät zuzuordnen, müssen Sie den Cursor zur gewünschten Gerätezeile (A~H) führen und den [SEL]-Taster des betreffenden Kanals drücken. Ein Kanal
kann nur jeweils einem Gerät zugeordnet werden. Der ST IN-Kanal kann ausschließlich der
ST IN-Maschine zugeordnet werden.
Um das Aufnahmegerät zu wählen, führen Sie den Cursor zu einer Gerätezeile (A~H) und
drücken den [ENTER]-Taster.
CrossFade-Seite
Hier werden die Parameter der CrossFade-Seite erklärt (siehe Abbildung). Diese Seite erreichen Sie über den [AUTOMIX]-Taster.
Auf der CrossFade-Seite können Sie jedem Kanal das gewünschte Überblendungsmuster
(Crossfade Pattern) zuordnen. Es stehen sieben Muster zur Wahl. Stereopaare verwenden
immer dasselbe Muster. Außer Mustern können Sie hier auch eine Kurve (A, B oder C) wählen, die jedoch für alle Kanäle gilt.
03D Video Edit Suite Software—Bedienungsanleitung
Page 83

17 Display-Seiten
Um ein Muster zu wählen, müssen Sie den [SEL]-Taster des änderungsbedürftigen Kanals
drücken und dann mit dem PARAMETER-Eingaberad das benötige Muster aufrufen.
Unter der Mustergrafik befindet sich ein LIMIT LEVEL-Parameter. Dessen Wert vertritt den
Zielpegel (FROM-Einstellung) bzw. den Ausgangspegel (TO-Einstellung), der bei Einstellung des Faders auf 0dB erzielt wird. Der tatsächliche Pegel ergibt sich aus der Berechnung
[Fader-Einstellung (minus) LIMIT LEVEL]. Letzterer hat einen Einstellbereich von 0 bis
minus unendlich.
Crossfade-Muster 1~7
TD (Transition Duration= Übergangsgeschwindigkeit) in Frames
FROM
TD
FROM
TD TD
12
TO
Zeit
TD
FROM
TO
Zeit
TD
FROM
34
TO
Zeit
TD
FROM
TO
Zeit
TD TD
FROM
56
TO
03D Video Edit Suite Software—Bedienungsanleitung
Zeit
TO
Zeit
Page 84

CrossFade-Seite 18
TD TD
FROM
7
TO
Zeit
Crossfade-Kurven A, B, C
Die Kurven (A, B, C) gelten nicht für Muster mit sofortigen Ein-/Ausgangspegelübergängen.
Deren Pegel ändert sich nämlich innerhalb eines Frames. In den nachstehenden Beispielen
wurde LIMIT LEVEL auf minus unendlich gestellt.
TD
FROM 0 dB
FROM 0 dB
AB
–6 dB
TO
C
TO
TD
FROM 0 dB
TO
–∞ dB
–13 dB
–∞ dB
TD
–3 dB
–∞ dB
03D Video Edit Suite Software—Bedienungsanleitung
Page 85

19 Display-Seiten
Nach Anwahl von Kurve B sieht die Machine-Seite folgendermaßen aus:
Nach Anwahl von Kurve C sieht die Machine-Seite folgendermaßen aus.
03D Video Edit Suite Software—Bedienungsanleitung
Page 86

From-To-Seite 20
From-To-Seite
Hier werden die Parameter der From-To-Seite beschrieben. Diese Seite erreichen Sie durch
Drücken des [AUTOMIX]-Tasters.
Auf der From-To-Seite können die Übergänge von einer Quelle zur anderen überwacht werden. Außerdem können Sie die FROM- und TO-Kanäle hier den Bus-Ausgängen 1~4 zuordnen.
Bei Empfang eines Transition Start-Befehls (Übergangsstart) wird der ESAM-Fader der
FROM-Kanäle auf den LIMIT LEVEL-Wert gestellt, während der ESAM-Fader der TOKanäle auf 0dB gestellt wird. Sobald der Übergang vollzogen ist, ändern sich die FROMKanäle zu TO-Kanälen und umgekehrt (TO zu FROM).
Um einen Kanal einem Bus-Ausgang zuzuordnen (bzw. wieder abzukoppeln), müssen Sie
den Cursor im FROM ASSIGN- bzw. TO ASSIGN-Teil zur benötigten Bus-Zeile (1~4) führen und den [SEL]-Taster des änderungsbedürftigen Kanals drücken. Die hier vorgenommenen Zuordnungen werden auch auf der [PAN/ROUTING] Pan 1-16- und Pan 17-24Seite angezeigt. Umgekehrt funktioniert das auch: Die auf der [PAN/ROUTING] Pan 1-16oder Pan 17-24-Seite vorgenommenen Einstellungen werden auch auf dieser Seite angezeigt.
Die Übergangsstellen (Cross Points) werden in der Regel auf dem Editor eingestellt, weil das
System nur dann zuverlässig funktioniert. Als Stereopaare konfigurierte Kanäle und BusAusgänge werden immer gemeinsam zugeordnet bzw. abgekoppelt. Effektrückweg 1 und 2
werden automatisch sowohl FROM als auch TO zugeordnet.
03D Video Edit Suite Software—Bedienungsanleitung
Page 87

21 Display-Seiten
CH 1-16- & 17-24/Stin-Seite
Hier werden die Parameter der CH 1-16- und 17-24/Stin-Seite beschrieben. Diese Seiten
erreichen Sie durch Drücken des [AUTOMIX]-Tasters.
Auf der CH 1-16- und 17-24/Stin-Seite befinden sich folgende Kanalschalter: DLY (Kanalverzögerung), DYN (Dynamik), EQ sowie [A] (automatische Pegeleinstellung. Die Drehreglersymbole zeigen den tatsächlichen Hinwegpegel an, während die Wertangabe darunter
die Einstellung des Kanalfaders angibt.
Wenn Sie eine dieser beiden Seiten aufrufen, fungieren die [SEL]-Taster als Local On/OffSchalter. Leuchtet die Diode eines [SEL]-Tasters nicht, so wertet der betreffende Kanal die
eingehenden ESAM-Befehle aus. Wenn eine SEL-Diode blinkt, befindet sich der betreffende
Kanal im Local-Betrieb und ignoriert die ESAM-Befehle.
Die ROLL. LIB (Bibliothek) erlaubt das Speichern der Kanalinformationen für jedes Gerät
(d.h. Rolle oder Band).
Die ROLL-Bibliothek bietet 100 Speicher (0~99), in denen folgende Parameterwerte gesichert werden können (Speicher “0” kann nur geladen werden):
• Alle Kanaleinstellungen, die in einem Kanalspeicher abgelegt werden können
• Anwahl der Überblendungskurve (siehe Seite 16)
• LIMIT LEVEL-Einstellung
• LEVEL ADJUST-Einstellung
• ADJUST an/aus
Um die Kanaleinstellungen zu speichern, müssen Sie ein Gerät (MACHINE) wählen, einen
Speicher aufrufen, den Cursor zu STORE führen und den [ENTER]-Taster drücken. Die
Einstellungen aller diesem Gerät zugeordneten Kanäle werden dann gespeichert (maximal
vier Kanäle).
Um die Kanaleinstellungen zu laden, müssen Sie ein Gerät (MACHINE) wählen, einen Speicher aufrufen, den Cursor zu RECALL führen und den [ENTER]-Taster drücken. Wenn die
Anzahl der gespeicherten Kanäle nicht mehr der Zahl der zu ladenden Kanäle entspricht,
geschieht folgendes:
• Wenn der Speicher Einstellungen für vier Kanäle enthält, während nur zwei Kanäle verwendet werden, lädt das 03D ausschließlich die Werte des ersten und zweiten Kanals.
• Wenn der Speicher Einstellungen für zwei Kanäle enthält, während vier Kanäle verwendet
werden, lädt das 03D die Werte des ersten und zweiten Kanals zweimal (1= 3 und 2= 4).
03D Video Edit Suite Software—Bedienungsanleitung
Page 88

Monitor-Seite 22
Monitor-Seite
Hier werden die Parameter der Monitor-Seite (siehe Abbildung) beschrieben. Diese Seite
erreichen Sie durch Drücken des [VIEW]-Tasters.
Auf der Monitor-Seite können Sie die Fadereinstellungen optisch kontrollieren. Die senkrechten Balken vertreten die Fader, während die Werte darunter die genaue Einstellung
anzeigen. Ein “hohler” Balken bedeutet, daß der betreffende Kanal zur TO-Ebene gehört
(bzw. weder TO noch FROM zugeordnet ist). Bei einem Übergang wird ein FROM-Balken
nach und nach hohl, während sich ein TO-Balken nach und nach füllt.
Prefer.-Seite
Hier werden die neuen Optionen der Prefer.-Seite beschrieben. Diese Seite erreichen Sie
durch Drücken des [UTILITY]-Tasters.
MASTER LEVEL PROTECT—Mit dieser Funktion können Sie die Bus- und AUX Send
Master-Fader arretieren. Das ist natürlich nur sinnvoll, wenn Sie diese Pegelwerte kaum je
ändern bzw. peinlichen Irrtümern vorbeugen möchten.
SWAP CH 9–16 <–> 17–24—Mit dieser Funktion können Sie die Analog-Eingänge 9~16
und Digital-Eingänge 17~24 miteinander vertauschen, so daß die Digital-Eingänge Kanal
9~16 zugeordnet werden. Somit können Sie die Digital-Summe also ohne Verwendung des
[MIXING LAYER]-Tasters einstellen. In dem Fall erscheint neben den Metern die Meldung
SWAP.
DIGITAL BUS OUTPUT DELAY—Im Normalbetrieb des 03D bezieht sich die Ausgabeverzögerung ausschließlich auf die analogen Bus-Ausgänge (also nicht auf die Digital-Summen). Wenn Sie diese Funktion aktivieren, können auch die digitalen Bus-Ausgänge
verzögert werden.
LONGER OUTPUT DELAY TIME—Mit der LONGER OUTPUT DELAY TIME-Option
können Sie die Ausgabeverzögerung um 3160 Samples verlängern. Da die Eingabe- und Ausgabeverzögerung jedoch denselben Speicher verwenden, wird der Einstellbereich der Eingabeverzögerung bei Aktivieren dieser Funktion um 3160 Sample-Schritte gekürzt. Nach
Einstellen dieser Option müssen Sie das 03D neustarten.
03D Video Edit Suite Software—Bedienungsanleitung
Page 89

23 Display-Seiten
Delay-Seite
Hier werden die Funktionen der Delay-Seite beschrieben. Diese Seite erreichen Sie durch
Drücken des [DELAY/
Die Ein- und Ausgabeverzögerung können in Millisekunden- und Sample-Schritten sowie
–und das ist neu– in Viertelframe-Schritten eingestellt werden. Wenn die Sampling-Frequenz 48kHz beträgt und Frame Type auf DF gestellt wurde, beträgt der Verzögerungsbereich etwa sechs Frames.
∅]-Tasters.
Wenn Sie einen Bus-Ausgang anwählen, erscheint auf der CH Delay-Seite (siehe obige Abbildung) ein OFFSET-Parameter. Mit diesem Parameter können die Bus-Ausgänge gemeinsam
verzögert werden. Das ist z.B. sinnvoll, um einen eventuellen Versatz zwischen dem Audiound Bildmaterial auszubügeln. Der Einstellbereich für den Versatz/die Verzögerung beträgt
4 Frames (in Frame-Schritten).
Hier sehen Sie die Output Dly-Seite. Die Verzögerung wird in Frames angezeigt. Außerdem
erscheint hier der OFFSET-Wert der vier Bus-Ausgänge.
03D Video Edit Suite Software—Bedienungsanleitung
Page 90

MIDI Setup-Seite 24
MIDI Setup-Seite
Die MIDI Setup-Seite der 03D Video Edit Suite Software sieht folgendermaßen aus. Beim
normalen 03D-Betriebssystem des 03D befinden sich der Fader Start- und MMC No.-Parameter auf der MIDI/HOST-Seite.
Bulk-Seite
Die Bulk-Seite erreichen Sie durch Drücken des [MIDI]-Tasters. Hier können Sie den Inhalt
der TO EDITOR-Speicher via MIDI (Bulk Dump) zu einem Sequenzer, Rechner usw. übertragen.
Solo Setup-Seite
Wenn der TO EDITOR-Anschluß aktiviert ist, kann die SOLO TRIM-Funktion der Solo
Setup-Seite nicht verwendet werden.
03D Video Edit Suite Software—Bedienungsanleitung
Page 91

25 Display-Seiten
Moni. Setup-Seite
User Define-Seite
• 21. ESAM Auto Adjust—Ein- und Ausschalten der LEVEL ADJUST-Funktion.
• 20. ESAM Local On/Off—Ein- und Ausschalten der Local-Funktion.
• 19. ESAM Fader ABS—Anwahl von ABSOLUTE oder FROM-TO für FADER MODE.
• 18. PANL-C-R Flip—Mit dieser Funktion können Sie einen Kanal links, in der Mitte,
Wenn der TO EDITOR-Anschluß aktiviert ist, kann die MONI TRIM-Funktion der Moni.
Setup-Seite nicht verwendet werden.
Die User Define-Funktion wurde um vier Optionen erweitert. Diese werden ab Werk Bank
4 zugeordnet.
Im FROM-TO-Betrieb kann die Kanalfadereinstellung nur geändert werden, wenn die
Local-Funktion aktiviert wurde bzw. wenn das Display derzeit keine Video Edit SuiteSeite anzeigt. Dank dieser Funktion können Sie blitzschnell den ABSOLUTE-Betrieb
aktivieren, einen Fader einstellen und wieder in den FROM-TO-Betrieb wechseln.
rechts, wieder links usw. anordnen.
03D Video Edit Suite Software—Bedienungsanleitung
Page 92

EQ Library-Seite 26
EQ Library-Seite
Auch die EQ-Bibliothek enthält drei neue Programme:
• 80. 60Hz HUM CUT— Unterdrücken von 60 Hz-Brummschleifen.
• 79. 50Hz HUM CUT— Unterdrücken von 50 Hz-Brummschleifen.
• 78. HIGH CUT—Unterdrücken von hochfrequentem weißen Rauschen (z.B. Bandrauschen) mit einem Tiefpaßfilter (LPF).
Nach Installieren der 03D Video Edit Suite Software müssen alle Speicher initialisiert werden. Erst dann sind die neuen Programme verfügbar.
Achtung
Beim Initialisieren werden alle Anwenderprogramme gelöscht. Am besten sichern Sie sie
also vorher via MIDI (Bulk Dump). Siehe die Bedienungsanleitung des 03D.
Um alle Speicher zu initialisieren, müssen Sie [STORE] gedrückt halten, während Sie das
03D einschalten. Sobald die <<INITIALIZE MEMORY?>> Seite erscheint, drücken Sie auf
[RECALL]. Nun sind auch die neuen EQ-Programme verfügbar.
Effects Library-Seite
Die Effektbibliothek wurde um drei Programme erweitert.
• 96. Echo Reverb
• 95. FEMALE Pitch
• 94. MALE Pitch
Nach Installieren der 03D Video Edit Suite Software müssen Sie alle Speicher initialisieren.
Erst dann sind die neuen Effektprogramme nämlich verfügbar. Weitere Einzelheiten hierzu
finden Sie unter EQ Library-Seite auf Seite 26.
03D Video Edit Suite Software—Bedienungsanleitung
Page 93

27 Anhang
Anhang
Unterstützte Editoren
Sony
BVE9100 (+Option)
BVE2000
BVE910 (+Option)
BVE900 (+Upgrade +Option)
BVE9000 (+Upgrade +Option)
PVE500
CMX
CMX3600
Ampex
ACE200
Panasonic
AU-A960
AG-A850
Accom
Axial 3000
03D Video Edit Suite Software—Bedienungsanleitung
Page 94

Unterstützte Befehle
Unterstützte Befehle 28
Befehl Lesen
All Stop —A0
From Source — A1, A2
To Source — A3, A4
Monitor Source — A5, A6
Transition Duration — A7, A8
Transition Start —A9
Monitor Mode —AA
Restore From Edit —AB
Fader Level —AD
Save Mixer —AE
Recall Mixer —AF
Transfer Register 30 B0
From Machine —B4
To Machine —B5
Monitor Machine —B6
From Source —BC
To Source —BD
Monitor Source —BE
Transition Duration —BF
1. Lesebefehle (Read) informieren den Editor über den Status des 03D (Hexadezimalwerte).
2. Mit Schreibbefehlen (Write) kann der Status des 03D vom Editor aus geändert werden. Außerdem
werden sie zum Beantworten von Lesebefehlen verwendet (Hexadezimalwerte).
1
Schreiben
2
Während eines Übergangs (Transition) werden eventuell eingehende All Stop-Befehle ignoriert.
Es dürfen niemals mehrere Befehle gleichzeitig gesendet werden. Lassen Sie einen Abstand
von mindestens einem Frame.
03D Video Edit Suite Software—Bedienungsanleitung
Page 95

29 Anhang
MIDI Bulk Dump
Datenblockformate, die von der 03D Video Edit Suite Software unterstützt werden.
1. Video Editor Setup Bulk Dump-Format
STATUS 11110000 F0 System Exclusive Message
ID No. 01000011 43 Manufacturer's ID No.(YAMAHA)
SUB STATUS 0000nnnn 0n n=0-15(Device Channel No.1-16)
FORMAT No. 01111110 7E Universal Bulk Dump
BYTE COUNT(HIGH) 00000001 01 140(130+10)bytes
BYTE COUNT(LOW) 00001100 0C
01001100 4C 'L'
01001101 4D 'M'
00100000 20 ' '
00100000 20 ' '
00111000 38 '8'
01000010 42 'B'
00110000 30 '0'
00110011 33 '3'
DATA NAME 01010110 56 'V'
0mmmmmmm mm m=0-2,127(Video Editor Setup No.1-
3,current)
DATA 0ddddddd ds Video Editor Setup(130bytes)
: :
0ddddddd de
CHECK SUM 0eeeeeee ee ee=(-('L'+'M'+...+ds+...+de)) AND 7Fh
EOX 11110111 F7 End Of Exclusive
2. Video Editor Setup Bulk Dump Request-Format
STATUS 11110000 F0 System Exclusive Message
ID No. 01000011 43 Manufacturer's ID No.(YAMAHA)
SUB STATUS 0010nnnn 2n n=0-15(Device Channel No.1-16)
FORMAT No. 01111110 7E Universal Bulk Dump
01001100 4C 'L'
01001101 4D 'M'
00100000 20 ' '
00100000 20 ' '
00111000 38 '8'
01000010 42 'B'
00110000 30 '0'
00110011 33 '3'
DATA NAME 01010110 56 'V'
0mmmmmmm mm m=0-2,127(Video Editor Setup No.1-
3,current)
EOX 11110111 F7 End Of Exclusive
03D Video Edit Suite Software—Bedienungsanleitung
Page 96

MIDI Bulk Dump 30
3. Roll Library Bulk Dump-Format
STATUS 11110000 F0 System Exclusive Message
ID No. 01000011 43 Manufacturer's ID No.(YAMAHA)
SUB STATUS 0000nnnn 0n n=0-15(Device Channel No.1-16)
FORMAT No. 01111110 7E Universal Bulk Dump
BYTE COUNT(HIGH) 00000010 02 290(280+10)bytes
BYTE COUNT(LOW) 00100010 22
01001100 4C 'L'
01001101 4D 'M'
00100000 20 ' '
00100000 20 ' '
00111000 38 '8'
01000010 42 'B'
00110000 30 '0'
00110011 33 '3'
DATA NAME 01001100 4C 'L'
0mmmmmmm mm m=1-99(Roll Library No.1-99)
DATA 0ddddddd ds Roll Library(280bytes)
: :
0ddddddd de
CHECK SUM 0eeeeeee ee ee=(-('L'+'M'+...+ds+...+de)) AND 7Fh
EOX 11110111 F7 End Of Exclusive
4. Roll Library Bulk Dump Request-Format
STATUS 11110000 F0 System Exclusive Message
ID No. 01000011 43 Manufacturer's ID No.(YAMAHA)
SUB STATUS 0010nnnn 2n n=0-15(Device Channel No.1-16)
FORMAT No. 01111110 7E Universal Bulk Dump
01001100 4C 'L'
01001101 4D 'M'
00100000 20 ' '
00100000 20 ' '
00111000 38 '8'
01000010 42 'B'
00110000 30 '0'
00110011 33 '3'
DATA NAME 01001100 4C 'L'
0mmmmmmm mm m=1-99(Roll Library No.1-99)
EOX 11110111 F7 End Of Exclusive
03D Video Edit Suite Software—Bedienungsanleitung
Page 97

03DVideoEditSuiteSoftware
取扱説明書
このたびはヤマハ03Dビデオエディットスイートソフト
ウェア03DVEKをお買い求めいただきまして、まことに
ありがとうございます。
03DVEKの優れた機能を十分に発揮させるとともに、末
永くご愛用いただくために、この取扱説明書をご使用の
前に必ずお読みください。お読みになったあとは、保管
してください。
VZ64150 R3 1 IP 136
01 07 100 AP Printed in Japan
M
PA営業部PA営業課☎03-5488-5472
〒108-8568東京都港区高輪2-17-11
Page 98

目 次
ii
目 次
はじめに................................................................................1
特長 .......................................................................................................................................................... 1
1. ソフトウェアのインストール ............................................3
インストールの条件 .............................................................................................................................. 3
Macintoshコンピュータからのインストール ..................................................................................... 3
Windows95PCからのインストール .................................................................................................... 6
03D標準ソフトウェアの再インストール ........................................................................................... 7
2. ビデオ編集用ソフトウェアについて..................................8
ESAMII ................................................................................................................................................... 8
ビデオ編集用機能 .................................................................................................................................. 8
システムの接続(オーディオ接続のみ)............................................................................................ 10
TOEDITOR端子を使用可能にする設定 ........................................................................................... 10
TOEDITOR端子が有効になっている時に使用できない機能 ....................................................... 11
コントロールの仕組み ........................................................................................................................ 12
操作上の注意 ........................................................................................................................................ 12
3. クイックスタート ...........................................................13
4. ディスプレイ画面 ...........................................................14
MIDI/HOSTページ................................................................................................................................ 14
Machineページ(クロスポイントの設定).......................................................................................... 16
CrossFadeページ ................................................................................................................................... 16
From-Toページ...................................................................................................................................... 19
CH1-16ページと17-24/Stinページ ..................................................................................................... 20
Monitorページ ....................................................................................................................................... 21
Prefer.ページ ......................................................................................................................................... 21
Delayページ........................................................................................................................................... 23
MIDISetupページ ................................................................................................................................. 24
Bulkページ ............................................................................................................................................ 24
SoloSetupページ................................................................................................................................... 24
Moni.Setupページ ................................................................................................................................ 25
UserDef.ページ..................................................................................................................................... 25
EQLibraryページ.................................................................................................................................. 26
EffectsLibraryページ ............................................................................................................................ 26
付録 ....................................................................................27
対応編集機 ............................................................................................................................................ 27
対応コマンド一覧 ................................................................................................................................ 28
MIDIバルクダンプ ............................................................................................................................... 29
サービスについて
03DVEK取扱説明書
Page 99

はじめに
特長
はじめに
03Dビデオエディットスイートソフトウェア03DVEKはESAMIIエディタプロトコルをサポー
トしており、03Dにビデオポストプロダクション用機能を搭載するものです。
• ビデオ編集中にオーディオ信号のミックス、編集ができます。
• ESAMIIをサポートしているため、03Dはオーディオ用ビデオスイッチャーとして機能し、ビデオ
編集機からリモートでトランジションのプレビューができます。
• リモートのフェーダーレベルコントロールなど、ESAMIIプロトコルの拡張機能をいくつか採用
しています。
• 03Dのデータをビデオ編集機との間でダウンロード、アップロードすることで、データの集中管
理が行えます。
• フェーズリバース、(1/4フレームの精度で)約6フレームまでの入力ディレイ、4-バンドパラメト
リックEQ、ダイナミックス、そして多様なオーディオのミックス、最終調整を行うためのエフェ
クトを搭載しています。
• 03Dはボードや端子など余分なハードウェアは不要です。標準で9ピンのTOEDITOR端子を搭載
しています。
1
• チャンネルを03Dの4つのバス出力にFROMソースとTOソースとして割り当て、トランジション
のディゾルブが可能です。各チャンネルごとに別個に設定できるクロスフェードパターンは7種
類から選べ、また3種類の曲線スロープからすべてのチャンネルに共通の曲線を選んでグローバ
ルに適用することができます。
• 03Dのモーターフェーダーで正確なレベル調整ができ、かつ正確な入力レベル設定が可能です。
FROM-TOモードでは、フェーダーはトランジションレベルを反映します。
• モニターする場合は、プレビューソースを選択することで、チ ャンネルモードとバスモードで
個々のチャンネルモニタリング、またはバスモニタリングが可能です。
パッケージの内容
パッケージに次の品目があることを確かめてください。
• 03Dビデオ編集用ソフトウェアディスク(MacおよびWindows用):ビデオエディタから03Dをコン
トロールするときに使用します。
• 03D標準ソフトウェアディスク(MacおよびWindows用):03DVEKをインストールしていない標
準状態に戻すときに使用します。
• 本取扱説明書
商標について
AccomはAccomCorporation,Inc.の商標です。
AmpexはAmpexCorporation,Inc.の商標です。
CMXはCMXCompanyの商標です。
Macintoshはアップルコンピュータ社の商標です。
Panasonicは松下電器産業株式会社の商標です。
Sonyはソニー株式会社の商標です。
Windows95はMicrosoftCorporation,Inc.の商標です。
その他の商品名、社名は各社の登録商標および商標です。
03DVEK取扱説明書
Page 100

2
はじめに
著作権について
このソフトウェアあるいは本取扱説明書のどの部分のいかなる方法での複製・配布も、ヤマハ株
式会社の文書による承認がない限り、これを禁じます。
インターネットのYamahaのホームページをご覧ください。
http://www.yamaha.co.jp/product/proaudio/
03DVEK取扱説明書
 Loading...