

Page 1
The Matrix Mixer
Yamaha 01X and Yamaha 01V96
Digital Audio Mixing Desks
User Manual
Page 2

Contents
1. Overview:......................................................................................................................3
1.1. Route Audio Sources to Audio Destinations:.........................................................3
1.2. Process Audio at Source:......................................................................................4
1.3. Process Audio at Destination:................................................................................5
2. Installation: ...................................................................................................................5
2.1. Windows Installation:.............................................................................................5
2.2. Mac Installation:.....................................................................................................6
3. Startup:.........................................................................................................................8
4. MIDI Settings:...............................................................................................................9
5. Updating the Matrix Mixer to Reflect the State of the Audio Mixing Desk.....................9
6. Creating and Breaking Patches..................................................................................10
7. Adjusting Parameters: ................................................................................................13
7.1. Adjusting Parameters at Audio Source Points or Audio Destination Points:........13
7.2. Adjusting Parameters at Patch Points:................................................................16
8. Pairing Channels: .......................................................................................................17
9. Creating a Custom Mixing Surface:............................................................................17
9.1. Adding Components to the Favourites Area:.......................................................19
9.2. Removing Components from the Favourites Area...............................................20
9.3. Saving, Loading and Clearing the Favourites Area .............................................20
10. Saving and Loading the 01X State:.........................................................................21
11. Displaying Help:......................................................................................................21
2
Page 3
Welcome to the Matrix Mixer for the Yamaha 01X and Yamaha 01V96 Digital Audio Mixing
Desks! The Matrix Mixer is designed to help you unleash the potential of your audio mixing
desk without the tedium of working your way through a manual and pressing sequences of
buttons.
1. Overview:
The Matrix Mixer is unlike other mixing desk control software in that it provides an intuitive
view of the audio mixing process. In essence there are three simple steps to this process:
• Route audio sources to audio destinations
• Process audio at source
• Process audio at destination
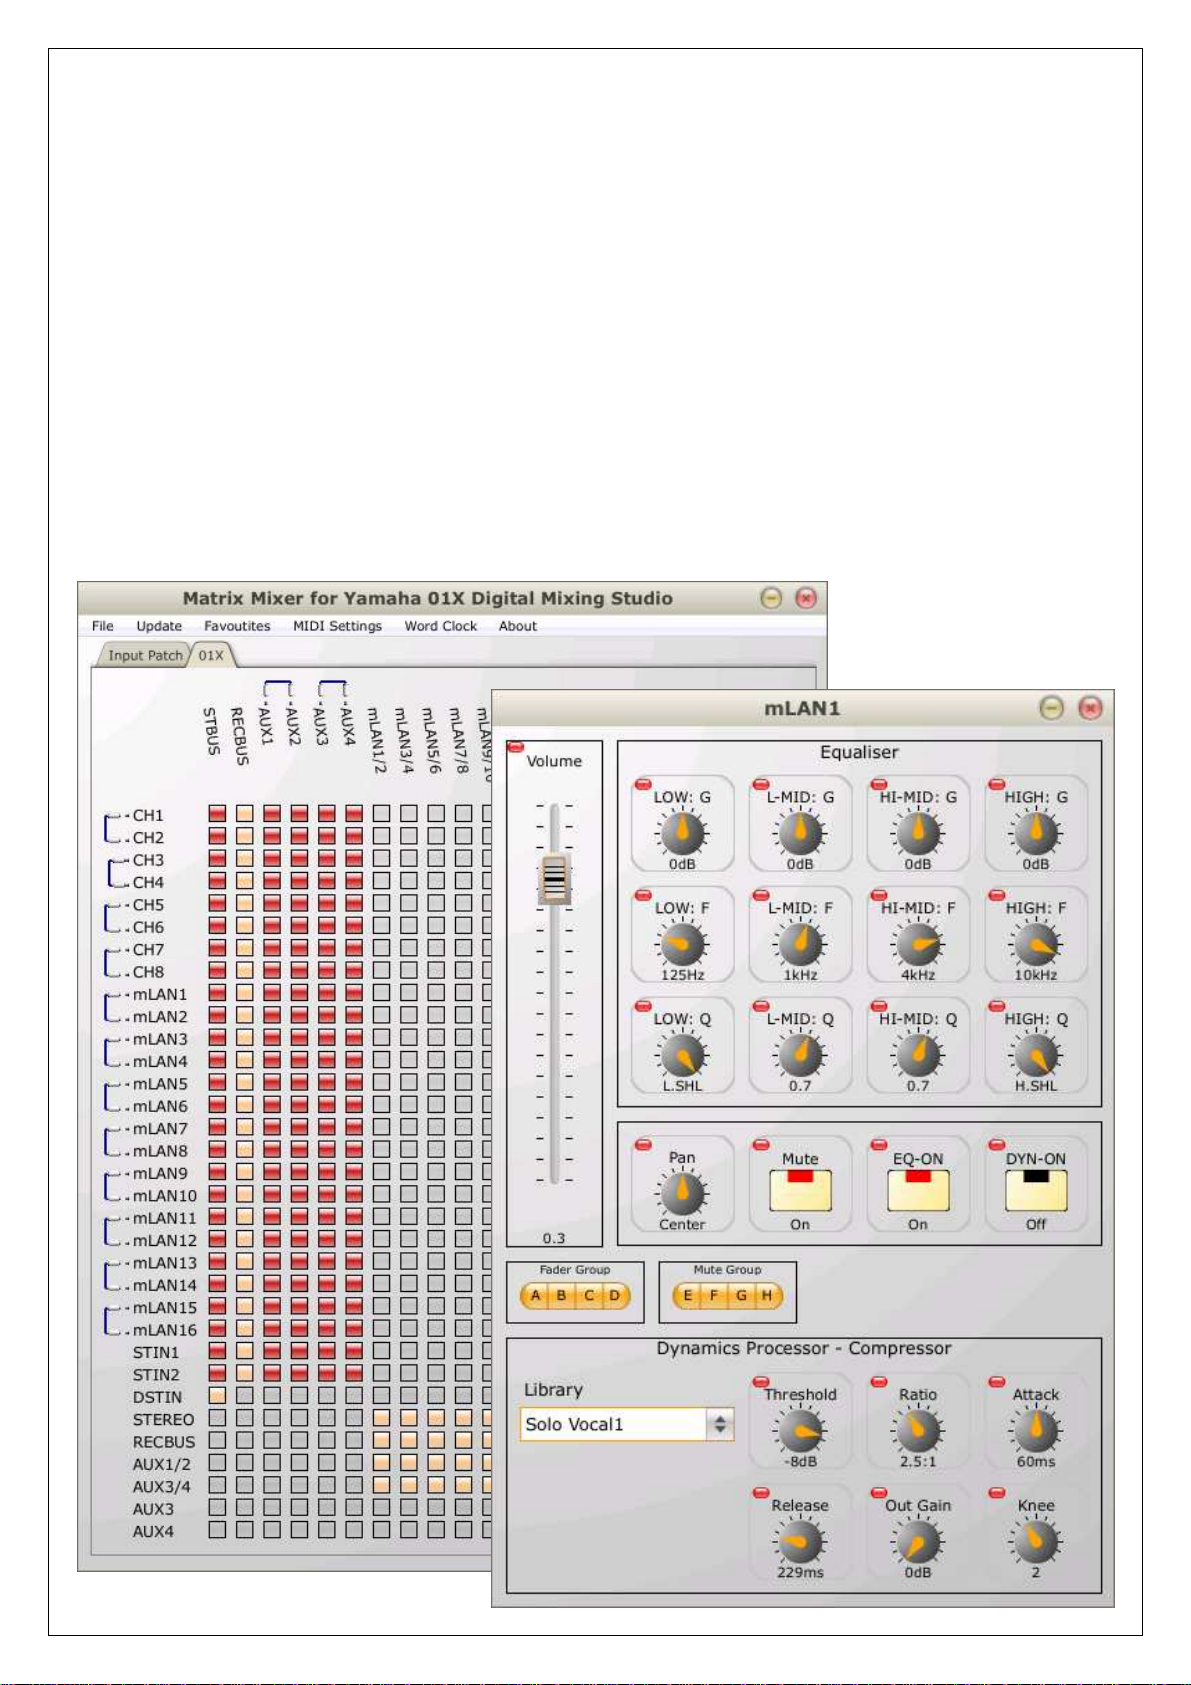
1.1. Route Audio Sources to Audio Destinations:
Shown below is the main routing matrix of the 01X Matrix Mixer:
3
Page 4
The Matrix Mixer presents the user with a matrix, where sources are the rows and
destinations are the columns of the matrix. All routing possibilities are displayed, and any
routing can be accomplished simply by selecting the appropriate row/column cross point
button. Sources can be input channels, mLAN inputs, or buses. Destinations can be buses,
mLAN outputs, stereo outputs, or internal effects.
1.2. Process Audio at Source:
The 01X and 01V96 allows audio to be processed at source, and the Matrix Mixer allows
for easy control over the source processing capabilities. If the first 01X mLAN input
channel is right-clicked / ctrl-clicked (Mac), then the following audio processing screen will
appear:
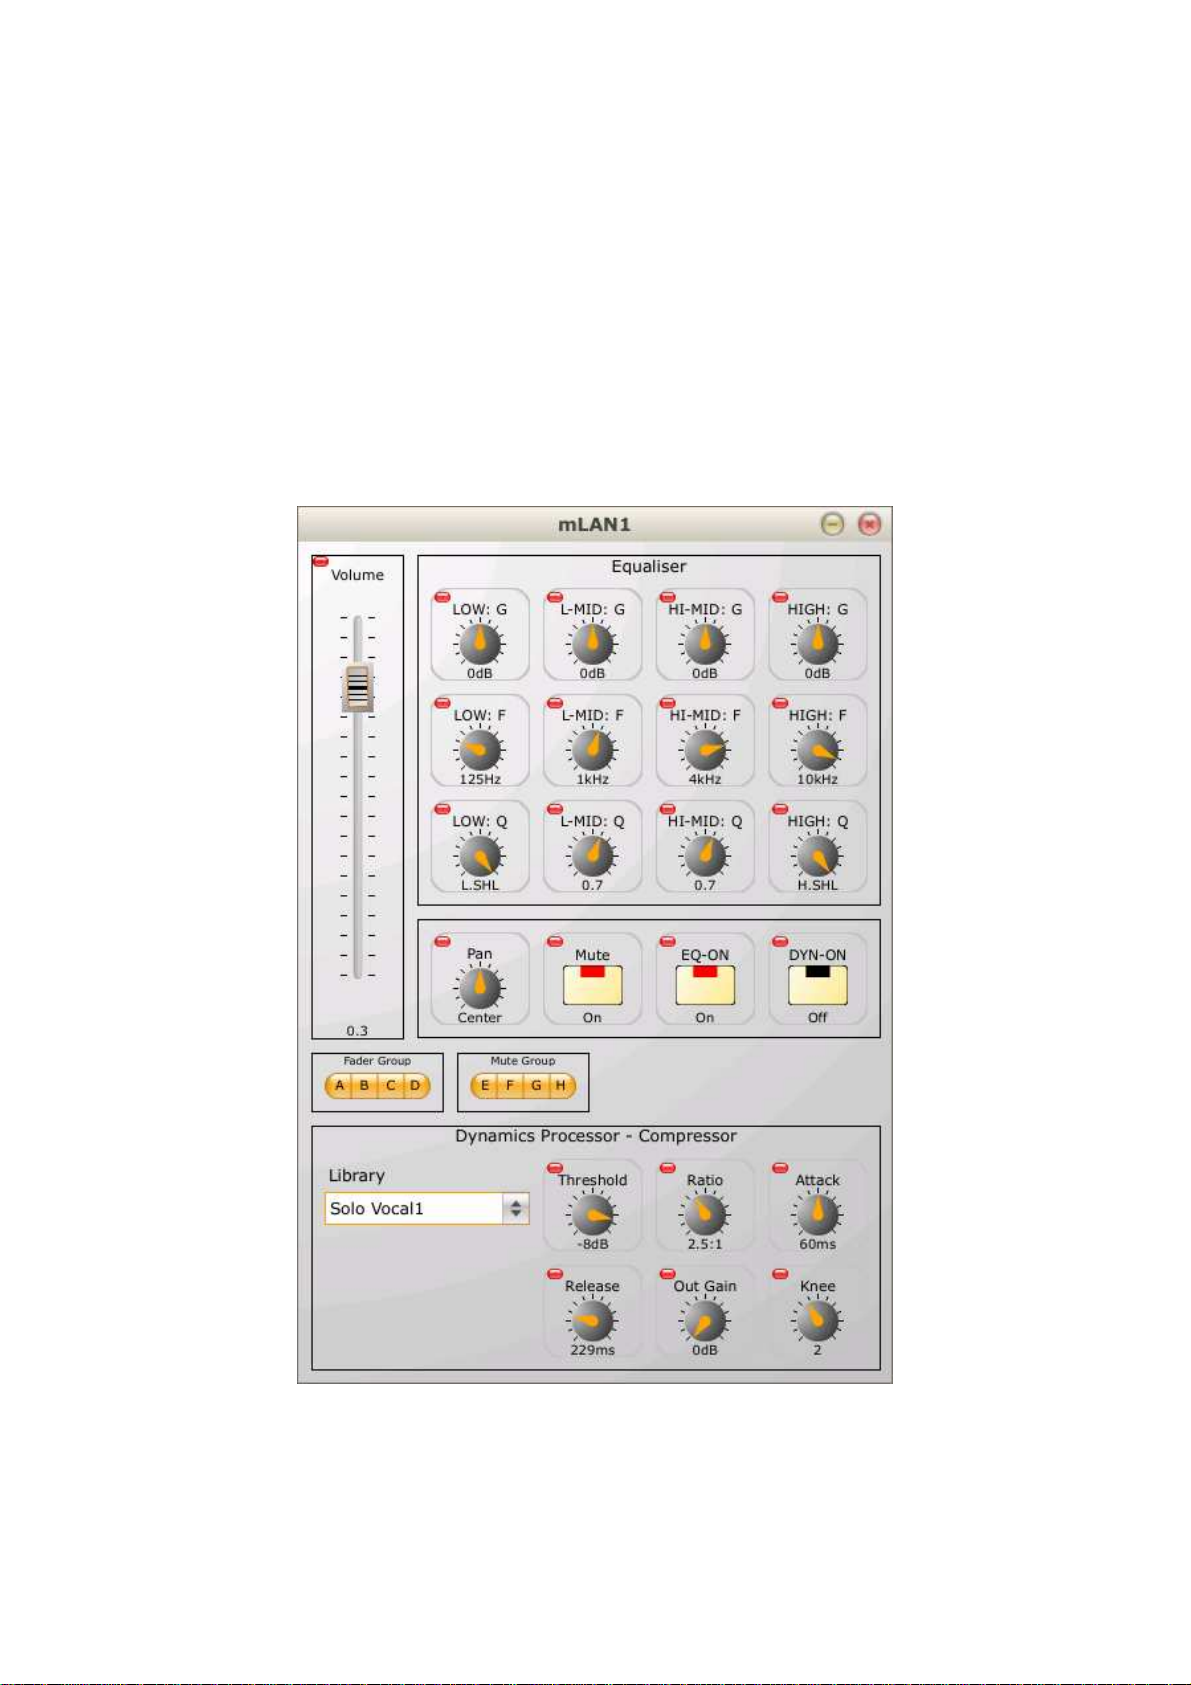
There is easily accessible control over volume, equalization, pan, dynamics (dynamics
processors can be selected from a library) and fader and mute grouping. The processing
capabilities of all sources are similarly accessible. Sources will vary with regard to their
processing capabilities, and only the functional capabilities will be displayed. When
4
Page 5
controls are adjusted on the mixing desk surface, the corresponding display controls will
be updated to reflect the new state.
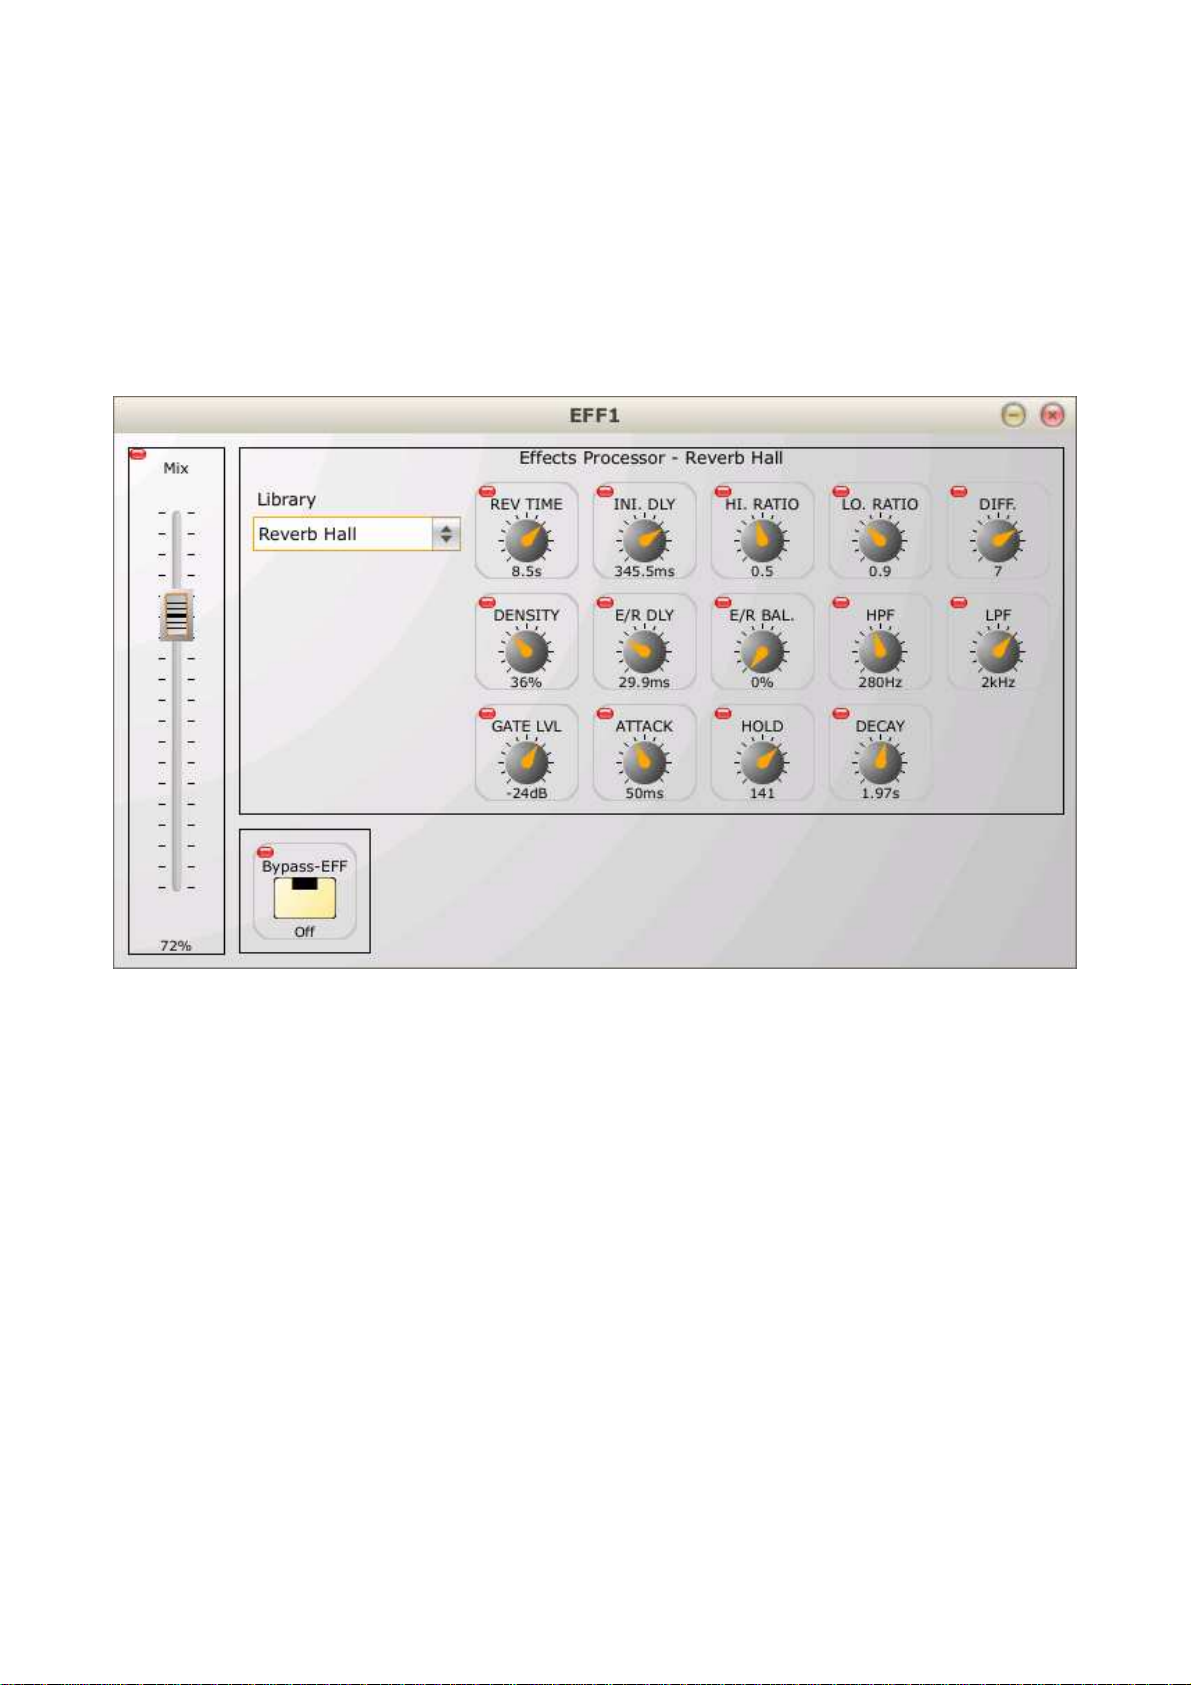
1.3. Process Audio at Destination:
The 01X and 01V96 allows audio to be processed at a destination, and the Matrix Mixer
also allows for easy control over the destination processing capabilities. If the first internal
effects destination is right-clicked / ctrl-clicked (Mac), then the following audio processing
screen will appear:
There is control over the level of effect applied to the source signal, as well as control over
the nature of the effect. As with sources, destinations will vary with regard to their
processing capabilities and only the functional capabilities will be displayed.
After this 3-step overview, you should have an idea of how easy it can be to have
complete control over your audio mixing desk using the Matrix Mixer software.
Now let’s move on and have a look at some of the details of the Matrix Mixer, starting with
the installation:
2. Installation:
2.1. Windows Installation:
Installation is a simple 2-step process. Double click on the installation file, and the
following dialog box will be displayed:
5
Page 6
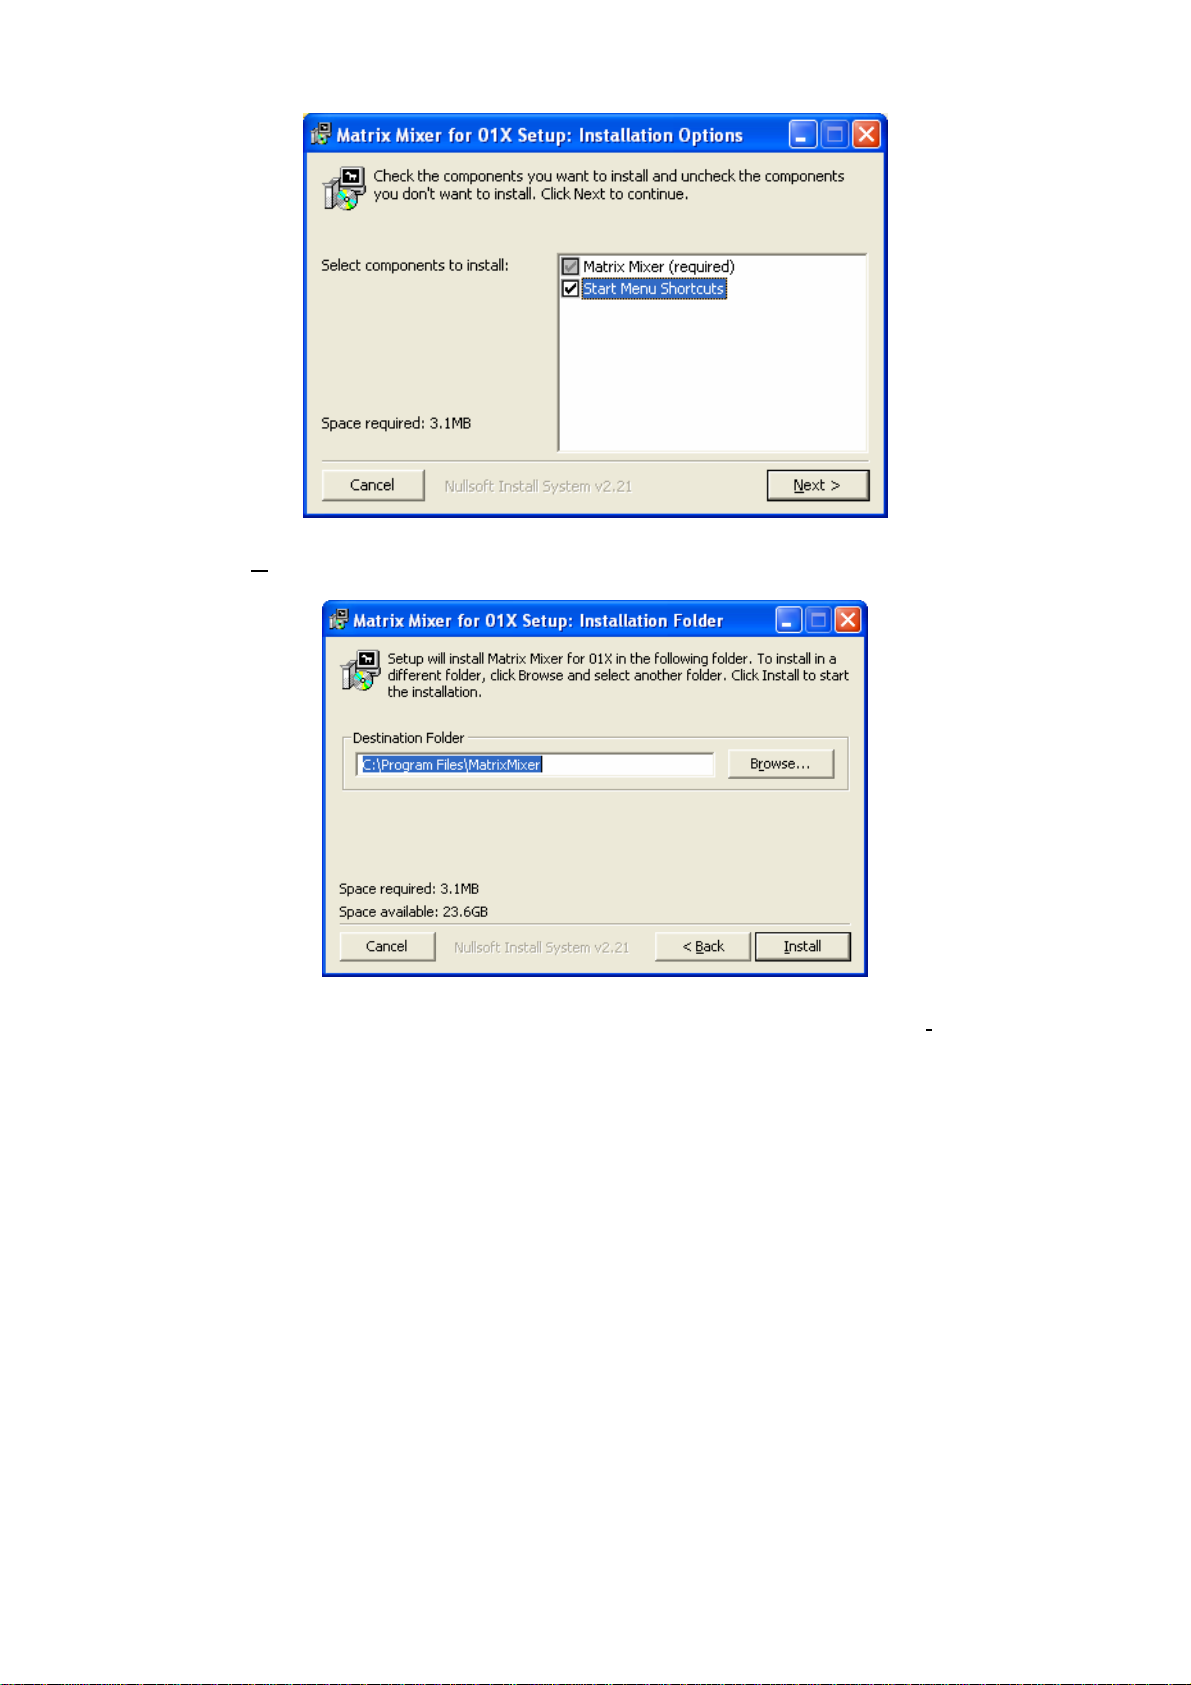
Click on the ‘Next >’ button, and the following button will be displayed:
Choose your installation directory (usually can accept the default), and click ‘Install’.
2.2. Mac Installation:
Double click on the installation file, and the following dialog box will be displayed:
6
Page 7
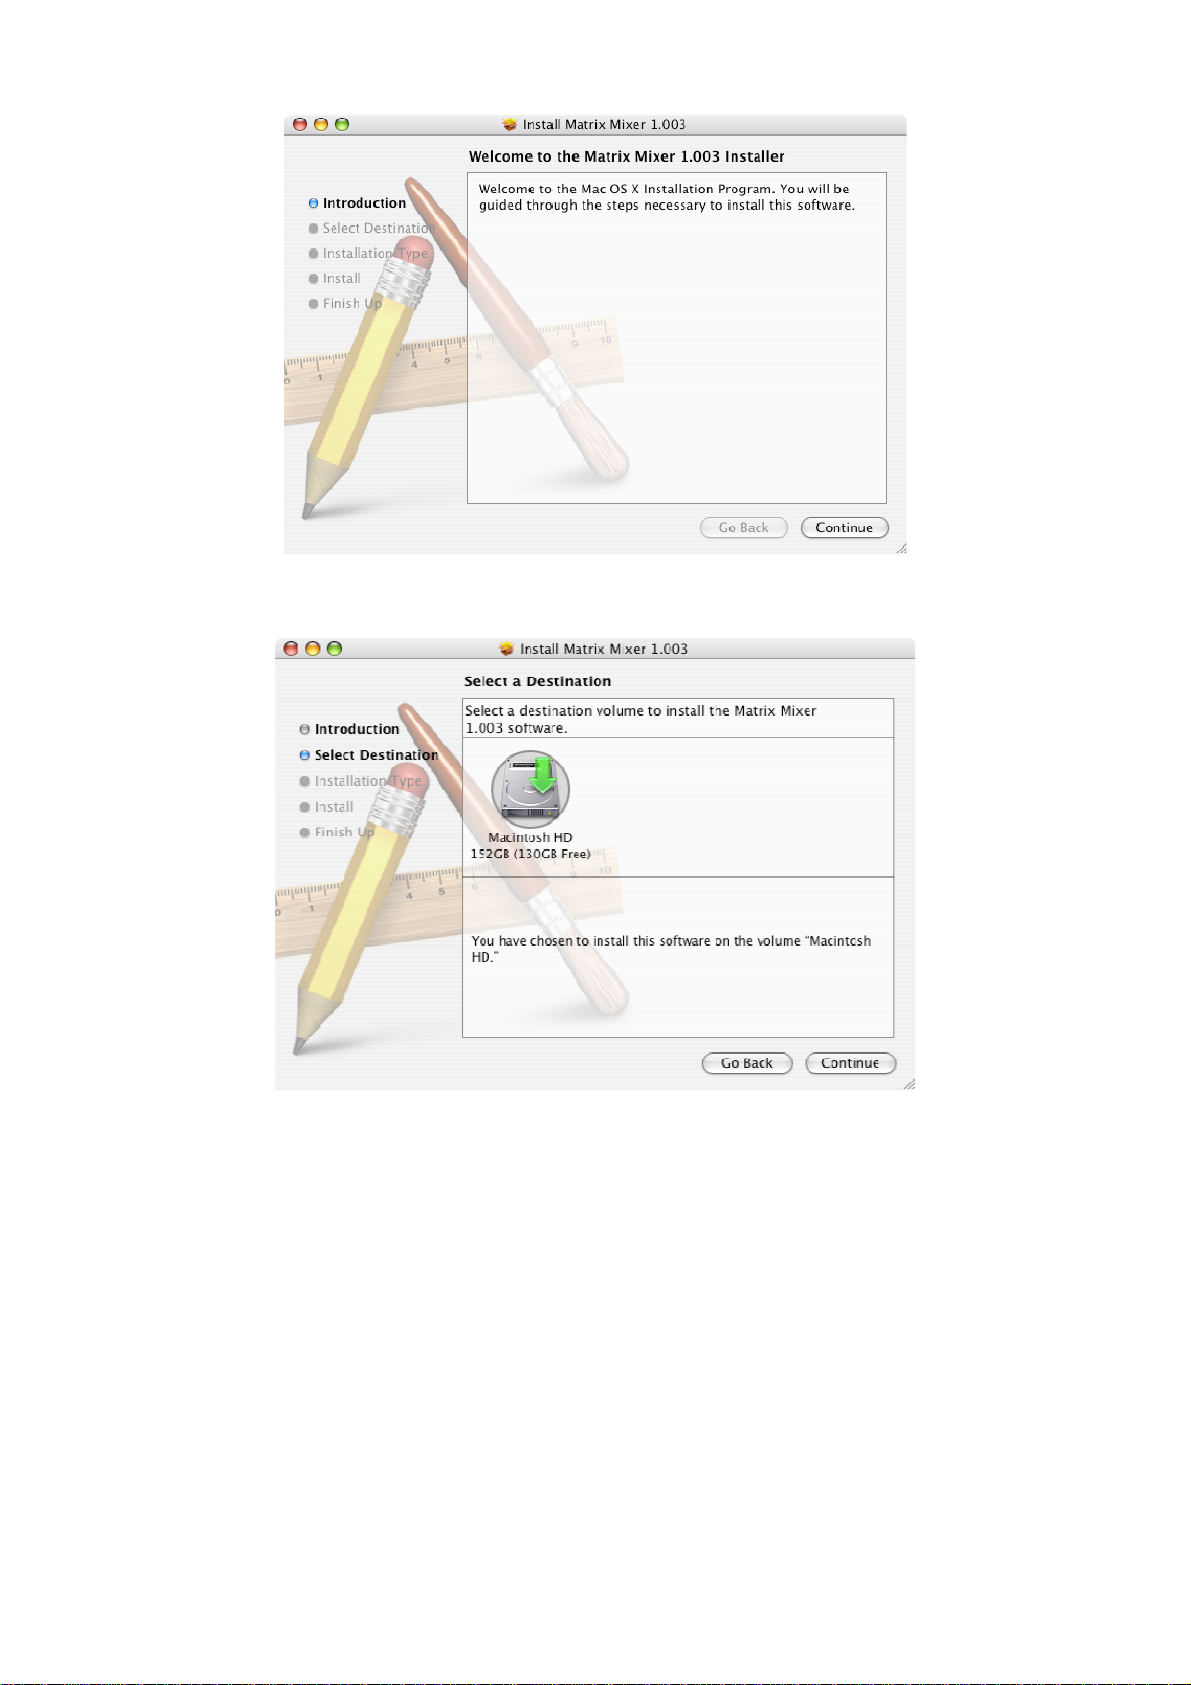
Click on the ‘Continue’ button and the following will be displayed:
Select the destination volume where the Matrix Mixer is to be installed and click the
‘Continue’ button. The following will be displayed:
7
Page 8

Click on the ‘Upgrade’ button. The software will be installed. Once the software is installed
the following will be displayed:
Click the ‘Close’ button to complete the installation.
3. Startup:
In Windows, the Matrix Mixer is started by clicking on ‘Start’ ‘Matrix Mixer’ ‘Matrix
Mixer’. On the Mac, the Matrix Mixer is started by clicking on the Matrix Mixer icon in the
Applications folder.
During the initialization process, the Matrix Mixer configures itself to represent and control
the audio mixing desk.
8
Page 9

4. MIDI Settings:
Once the Matrix Mixer has initialised itself, the primary window of the Matrix Mixer is
displayed. Before the Matrix Mixer is capable of controlling the audio mixing desk, it has to
know which MIDI ports are linking the Matrix Mixer to the audio mixing desk. These
settings are set via the MIDI Settings Window, shown below.
Via the MIDI Settings Window, the following settings can be adjusted:
• The MIDI output port that the controlling computer is going to use to send MIDI
messages to the audio mixing desk.
• The MIDI input port that the controlling computer is going to listen on for MIDI
messages coming from the audio mixing desk.
• The MIDI input and output channels that the Matrix Mixer must transmit and receive
MIDI messages on respectively.
• The device number of the audio mixing desk that the Matrix Mixer is representing
and controlling.
These setting will only take effect if the user clicks on the OK button. The MIDI Settings
window can be displayed at any time via the MIDI Settings menu shown below:
5. Updating the Matrix Mixer to Reflect the State of the Audio
Mixing Desk
The Matrix Mixer can be made to reflect the state that the audio mixing desk is in via the
‘Audio Mixer to PC’ (Windows) / ‘Audio Mixer to Mac’ (Mac) sub menu of the Update menu,
shown below:
9
Page 10

The state of the Matrix Mixer may also be sent to the audio mixing desk by clicking the ‘PC
to Audio Mixer’ (Windows) / ‘Mac to Audio Mixer’ (Mac) sub menu.
Whilst the Matrix Mixer is performing any updates, the progress will be indicated with a
progress bar:
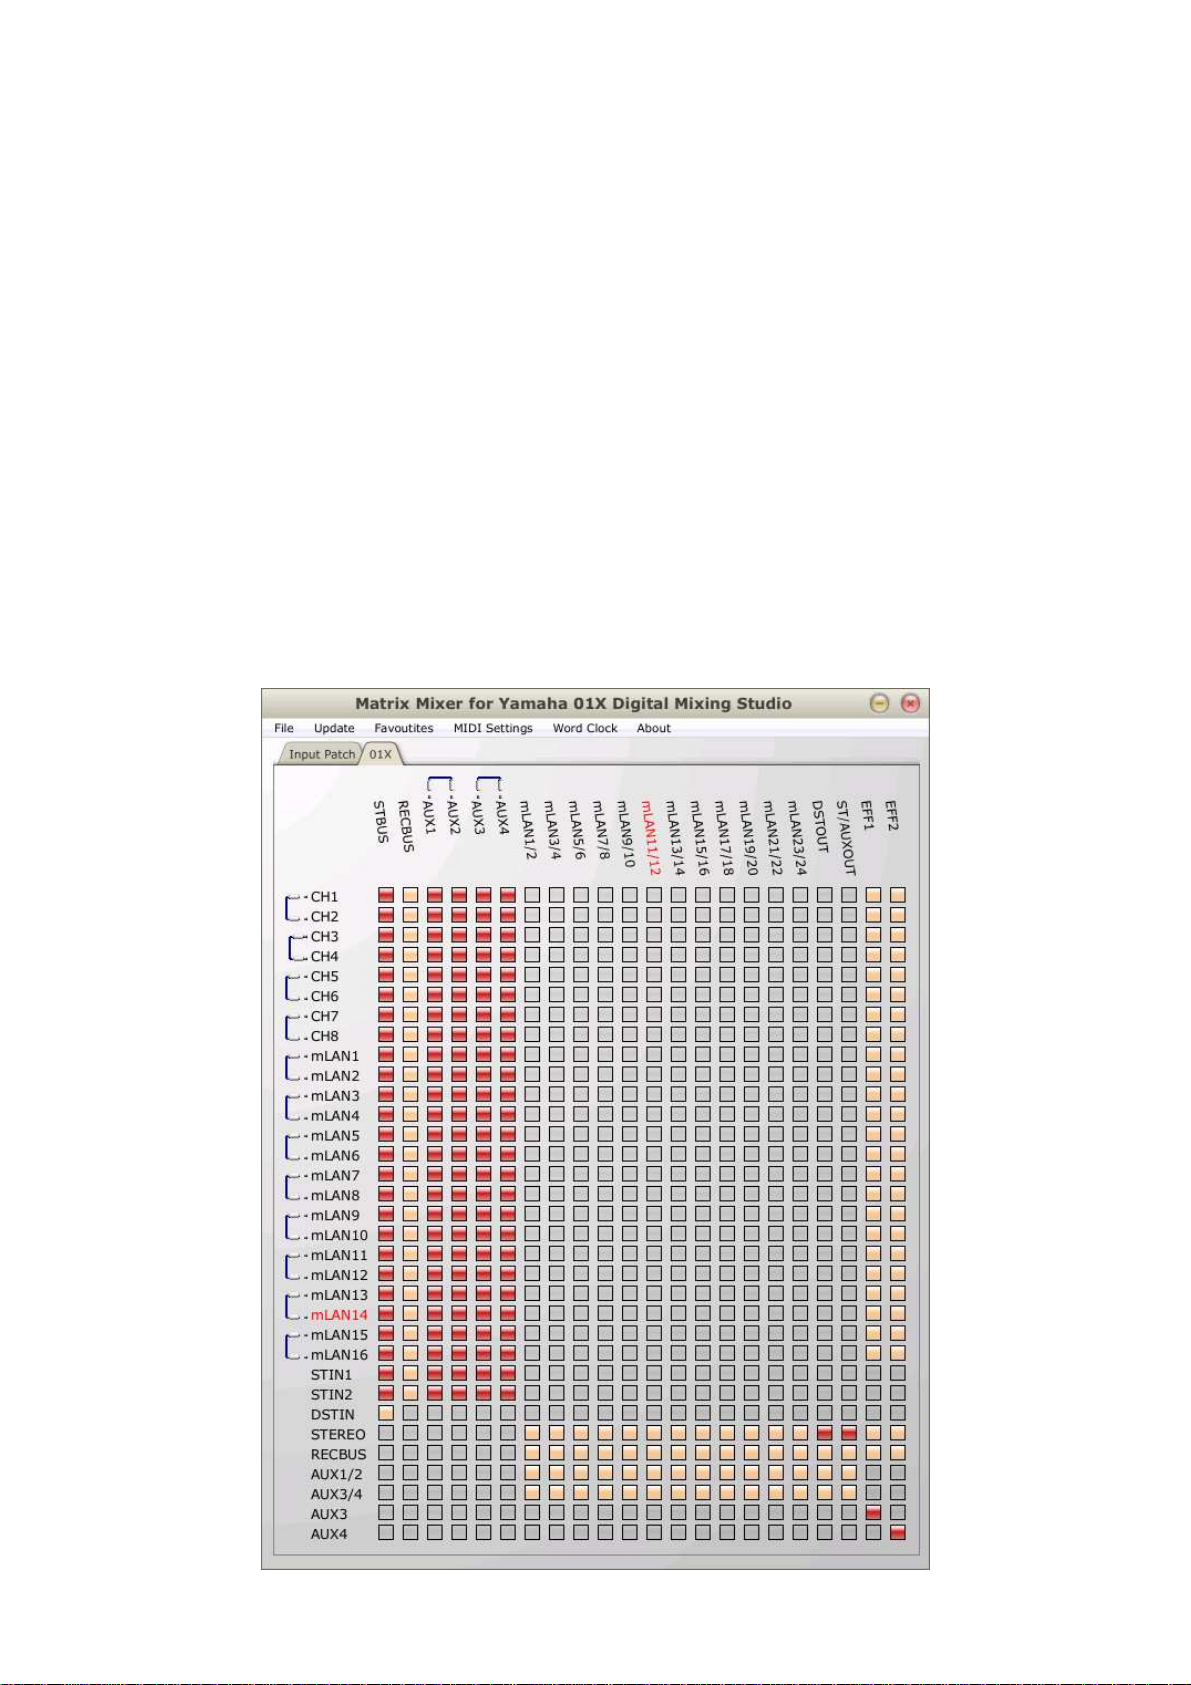
6. Creating and Breaking Patches
The main patch matrix displays a number of sound sources as rows of the matrix, and
destinations as columns of the matrix.
The sources include:
• Input channels
• mLAN inputs / Slot inputs
• Buses
The destinations include:
• Buses
• mLAN outputs / Slot outputs
• Digital stereo outs
• Stereo / Aux outs
• Internal effects sends
The main patch matrix for the 01X Matrix Mixer with its rows of sources and destination
columns is shown below:
10
Page 11

Patch points where rows and columns intersect are shown as buttons. Disabled buttons
on the grid are light grey in colour and denote that a patching cannot be explicitly
performed between the selected audio source point and the selected audio destination
point.
Enabled buttons on the grid are light orange in colour and denote that patching can be
performed between the selected audio source point and the selected audio destination
point. An active patch is denoted with a red button.
11
Page 12

To make a connection from a source to a destination, simply click on the enabled button at
the intersection of source row and destination column. The button will turn red. To break a
connection between source and destination, simply click on a red button at the intersection
of source row and destination column.
The Matrix Mixer provides simple matrices to facilitate patching at the audio mixing desks
various input and output patches. The input patch of the 01X Matrix Mixer is shown below:
12
Page 13

The layouts are similar to the primary patch display. The patching procedure is the same
as that of the primary patch display.
7. Adjusting Parameters:
The Matrix Mixer allows a user to adjust:
• volume,
• equalisation,
• mute,
• pan,
• fader and mute grouping,
• dynamics and
• effects parameters
at any of the:
• audio source points,
• audio patch points, or
• audio destination points
- if the specific signal processing points supports these features. For the signal processing
points that do not support one or more of the supported parameters, the controls for those
parameters are omitted from the display.
7.1. Adjusting Parameters at Audio Source Points or Audio Destination
Points:
To adjust parameters at an audio source point or an audio destination point in the audio
mixing desk, right click / ctrl-click (Mac) on one of the labels either along the left hand side
of the grid (audio source points), or one of those along the top of the grid (audio
destination points). Doing this will display the Parameter Adjustment Window.
The contents of the Parameter Adjust Window will vary, depending on the signal
processing capabilities at the source or destination points. Given below are a range of
Parameter Adjust Window displays ranging from simple to complex. Note that the
parameter values within these displays will reflect the current state of these parameters
within the audio mixing desk.
If a particular source or destination has no processing capability, then the following alert
window will be displayed:
13
Page 14

Given below is the Parameter Adjust Window for the Aux4 bus destination (01X), which
contains two parameters that can be adjusted:
The next two screenshots show more complex Parameter Adjust Windows. The first
shows the Parameter Adjust Window for the first mLAN input (01X), indicating equalization,
pan, mute, fader and mute grouping and dynamics processing parameters.
14
Page 15

Note that a particular dynamics processor option can be selected from a library of
dynamics processors, and parameters appropriate for that particular processor will be
displayed.
The next screenshot shows the Parameter Adjust Window that appears when the first
internal effects destination is selected for display:
15
Page 16

An effects processor can be selected from a library of effects processors, after which
parameters appropriate to that effects processor will be displayed.
7.2. Adjusting Parameters at Patch Points:
Apart from the source and destinations, it is also possible, in some cases, to adjust volume
at patch points. Specifically, these are patches made to the auxiliary buses (AUX1 –
AUX4(01X)).
Given below is the Parameter Adjust Window that is displayed after right-clicking on the
input channel 1 to auxiliary bus 1 patch point (01X):
16
Page 17

8. Pairing Channels:
Adjacent odd and even channels can be paired via the ‘channel pair’ buttons on the main
routing matrix of the Matrix Mixer. When a ‘channel pair’ button is clicked, the following
dialog is displayed:
Choose the option you want from the combo box and click the OK button. The channels
will now be paired. To release a pair, simply click the channel pair button again and the
channels will be released.
9. Creating a Custom Mixing Surface:
The Matrix Mixer allows you to drag components on to a ‘favourites’ area for easy access.
This is useful for components that are adjusted often as it allows easy access to them. The
‘favourites’ area can either be attached to the main Matrix Mixer window or it can be
17
Page 18

displayed in its own window. The ‘favourites’ area can be hidden, displayed, attached or
detached via the ‘Hide’, ‘Show’, ‘Attach’ and ‘Detach’ selections of the ‘Favourites’ menu
respectively.
Shown below are two screen shots. The first one is of the ‘favourites’ area attached to the
main Matrix Mixer window and the second is of the ‘favourites’ area in its own window.
18
Page 19

9.1. Adding Components to the Favourites Area:
Components are added to the ‘favourites’ area by simply dragging them from the
Parameter Adjust Window to the ‘favourites’ area via their drag handles. Components that
are dragable have drag handles in their top left hand corners, shown in the following
screen shot:
19
Page 20

9.2. Removing Components from the Favourites Area
Components are simply removed from the ‘favourites’ area by dragging them out of the
‘favourites’ area and dropping them.
9.3. Saving, Loading and Clearing the Favourites Area
The ‘favourites’ area can be saved by clicking on the ‘Save’ selection of the ‘Favourites’
pop-up menu of the Matrix Mixer. When the ‘Save’ selection is clicked you will be asked to
provide a file name for the storage of the ‘favourites’ area.
A saved ‘favourites’ area may be later recalled by clicking on the ‘Load’ selection of the
‘Favourites’ pop-up menu. You will be asked to select a file to which a ‘favourites’ area
was saved.
The ‘favourites’ area may have all it components cleared by clicking on the ‘Clear’
selection of the ‘Favourites’ pop-up menu.
These menus are shown below:
20
Page 21

10. Saving and Loading the 01X State:
There are ‘Load’ and ‘Save’ selections within ‘File’ pop-up menu of the Matrix Mixer. When
the ‘Save’ selection is clicked you will be asked to provide a file name for the storage of
the 01X mixer state. When at a later time you request to load the file, the state of the
Matrix Mixer display as well as the 01X state will be restored.
11. Displaying Help:
The Matrix Mixer makes it easy for you to find out what a particular parameter does.
Simply hover the mouse over a slider, knob or button and a speech-bubble will pop-up for
10 seconds describing what the specific parameter does. This is show below:
21
Page 22

22
 Loading...