

Page 1

SPECIAL NOTICES
• The included CD-ROM/software is protected and cannot be copied. Yamaha makes no representations or warranties with regard to any problems while
attempting to copy the CD-ROM(s) or software and cannot be held responsible for the results of attempts to copy the data.
• The software and this Installation Guide are exclusive copyrights of Yamaha Corporation.
• Use of the software and this guide is governed by the SOFTWARE LICENSING AGREEMENT which the purchaser fully agrees to upon breaking the seal
of the software packaging. (Please read carefully the AGREEMENT at the end of this guide before installing the application.)
• Copying of the software or reproduction of this guide in whole or in part by any means is expressly forbidden without the written consent of the manufacturer.
• Yamaha makes no representations or warranties with regard to the use of the software and documentation and cannot be held responsible for the results of
the use of this guide and the software.
• Copying of the commercially available music data is strictly prohibited except for your personal use.
• The company names and product names in this Installation Guide are the trademarks or registered trademarks of their respective companies.
• Software such as the mLAN driver may be revised and updated without prior notice. Make sure to check and download the latest version of the software
from the following site.
http://www.yamahasynth.com/down/index.htm
• Future upgrades of application and system software and any changes in specifications and functions will be announced separately.
BESONDERE HINWEISE
• Diese CD-ROM ist geschützt und kann nicht kopiert werden. Yamaha gibt bei Problemen im Zusammenhang mit dem Versuch, die CD-ROM oder die Software zu kopieren, keine Zusicherungen oder Gewährleistungen und kann für die Folgen des Kopierens der CD-ROM oder der Software nicht verantwortlich
gemacht werden.
• Dieses Programm und diese Installationsanleitung sind im Sinne des Urheberrechts alleiniges Eigentum der Yamaha Corporation.
• Die Benutzung des Programms und dieser Anleitung unterliegt der SOFTWARE-LIZENZVEREINBARUNG, mit der sich der Erwerber durch Öffnen des
Siegels der Programmverpackung uneingeschränkt einverstanden erklärt. (Bitte lesen Sie die VEREINBARUNG am Ende dieser Anleitung vor Installation
der Anwendung sorgfältig durch.)
• Das Kopieren der Software und die Reproduktion dieser Anleitung, in welcher Form auch immer, in Teilen oder als Ganzes, sind nur mit schriftlicher Genehmigung des Herstellers erlaubt und sonst ausdrücklich verboten.
• Yamaha leistet keinerlei Garantie hinsichtlich der Benutzung des Programms und der zugehörigen Dokumentation und übernimmt keine Verantwortung für
die Ergebnisse der Benutzung dieser Anleitung oder des Programms.
• Das Kopieren im Handel erhältlicher Musikdaten ist nur für Ihren Privatgebrauch zulässig und sonst streng untersagt.
• Die in dieser Installationsanleitung erwähnten Firmen- und Produktnamen sind Warenzeichen bzw. eingetragene Warenzeichen der betreffenden Firmen.
• Software wie z.B. der mLAN Driver kann ohne vorherige Benachrichtigung überarbeitet und aktualisiert werden. Achten Sie darauf, auf der folgenden
Website nach der neuesten Version der Software zu suchen und sie herunterzuladen.
http://www.yamahasynth.com/down/index.htm
• Zukünftige Aktualisierungen von Anwendungs- und Systemsoftware sowie jede Änderung der technischen Daten und Funktionen werden separat bekanntgegeben.
REMARQUES PARTICULIERES
• Ce CD-ROM est protégé et ne peut être copié. Yamaha n’offre aucune garantie quant aux problèmes pouvant surgir lors de la copie du CD-ROM ou du
logiciel et ne peut être tenu responsable du résultat de la copie du CD-ROM ou du logiciel.
• Les droits d’auteurs (copyright) de ce logiciel et de ce manuel d’installation appartiennent exclusivement à Yamaha Corporation.
• L’usage de ce logiciel et de ce manuel est défini par l’accord de licence auquel l’acheteur déclare souscrire sans réserve lorsqu’il ouvre le sceau de l’emballage du logiciel. (Veuillez donc lire attentivement l’accord de licence du logiciel situé à la fin de ce manuel avant d’installer le logiciel.)
• Toute copie du logiciel et toute reproduction totale ou partielle de ce manuel, par quel moyen que ce soit, est expressément interdite sans l’autorisation
écrite du fabricant.
• Yamaha n’offre aucune garantie en ce qui concerne l’utilisation du logiciel et de la documentation. Yamaha ne peut en aucun cas être tenu responsable des
dommages éventuels résultant de l’utilisation de ce manuel et de ce logiciel.
• Toute copie de données musicales commercialisées est formellement interdite, sauf pour usage personnel.
• Les noms des firmes et des produits apparaissant dans ce manuel d’installation sont des marques commerciales ou des marques déposées appartenant à leurs
détenteurs respectifs.
• Les logiciels tels que le pilote mLAN sont susceptibles d’être révisés et mis à jour sans avertissement préalable. Veuillez toujours à vérifier la version du
logiciel utilisée et à télécharger la dernière version en date sur le site suivant :
http://www.yamahasynth.com/down/index.htm
• Les remises à jour du programme et du système ainsi que toute modification des caractéristiques et fonctions seront annoncées séparément.
EnglishDeutschFrançais
TOOLS for 01X/Plug-in Effect Installation Guide/Installationshandbuch/Manuel d’installation
1
Page 2
Contents
Important Notices about the CD-ROM............................................... 2
Data Types........................................................................................ 2
Operating System (OS)..................................................................... 2
CD-ROM Installation Procedure........................................................ 2
For Windows Users............................................................................. 3
CD-ROM Contents............................................................................3
About Open Plug-in Technology .......................................................4
System Requirements for 01X/Software...........................................5
Software Installation.......................................................................... 6
MIDI port setting (when starting the software as a stand-alone appli-
cation).............................................................................................. 15
Important Notices about the CD-ROM
Data Types
For Macintosh Users.........................................................................17
CD-ROM Contents...........................................................................17
System Requirements for 01X/Software..........................................18
Software Installation ........................................................................18
Demo playback/Remote Control Setup ...........................................24
SQ01................................................................................................24
Cubase SX/SL.................................................................................27
Logic................................................................................................27
Digital Performer..............................................................................28
SONAR............................................................................................28
Display Messages..............................................................................29
Troubleshooting ................................................................................30
This CD-ROM includes the application software. Please refer to pages
• Never attempt to play back the CD-ROM on an audio CD player. Doing so may result in damage to your hearing as well as to your CD player/audio speakers.
(Windows) or 17 (Macintosh) for software installation instructions.
3
Operating System (OS)
The applications in this CD-ROM are provided in versions for both Windows and Macintosh operating systems. The installation procedure and the
applications themselves differ depending on the operating system that you are using. Please refer to the appropriate installation instructions.
For Windows, see page 3.
For Macintosh, see page 17.
CD-ROM Installation Procedure
Before breaking the seal of the software packaging, please read carefully the Software Licensing Agreement at the end of this guide.
q Verify that your system meets the operating requirements of the software (Studio Manager, mLAN Tools, driver, etc.).
..........................................................................................................................................................................................Windows: page 5; Macintosh: page 18
w Install the appropriate driver to your computer, and make the necessary settings. ........................................................Windows: page 6; Macintosh: page 18
e Install the software (Studio Manager, etc.). ..................................................................................................... Windows: pages 3, 13; Macintosh: pages 17, 22
r Start up the software.
For subsequent operations, refer to the owner’s manual for each software program (online help/PDF manual).
• In order to view PDF files, you will need to install Acrobat Reader in your computer (Windows: page 6; Macintosh: page 18).
Most of the computer display examples in this guide are taken from the English version OS/software.
Quick solutions/Reference materials
• Setting the sampling frequency ................................... page 9, 20
• Determining the number of mLAN audio channels. ..... page 9, 20
• Changing the settings of the mLAN Driver....................... page 10
• Determining the latency ................................................... page 11
• The driver cannot be installed.......................................... page 30
• Playback response is not correct..................................... page 30
• How can I delete or re-install the driver?........ pages 6, 12, 15, 21
• Using the SQ01 online manual......................................... page 16
• Checking the compatible DAW software.......................... page 24
TOOLS for 01X/Plug-in Effect Installation Guide
2
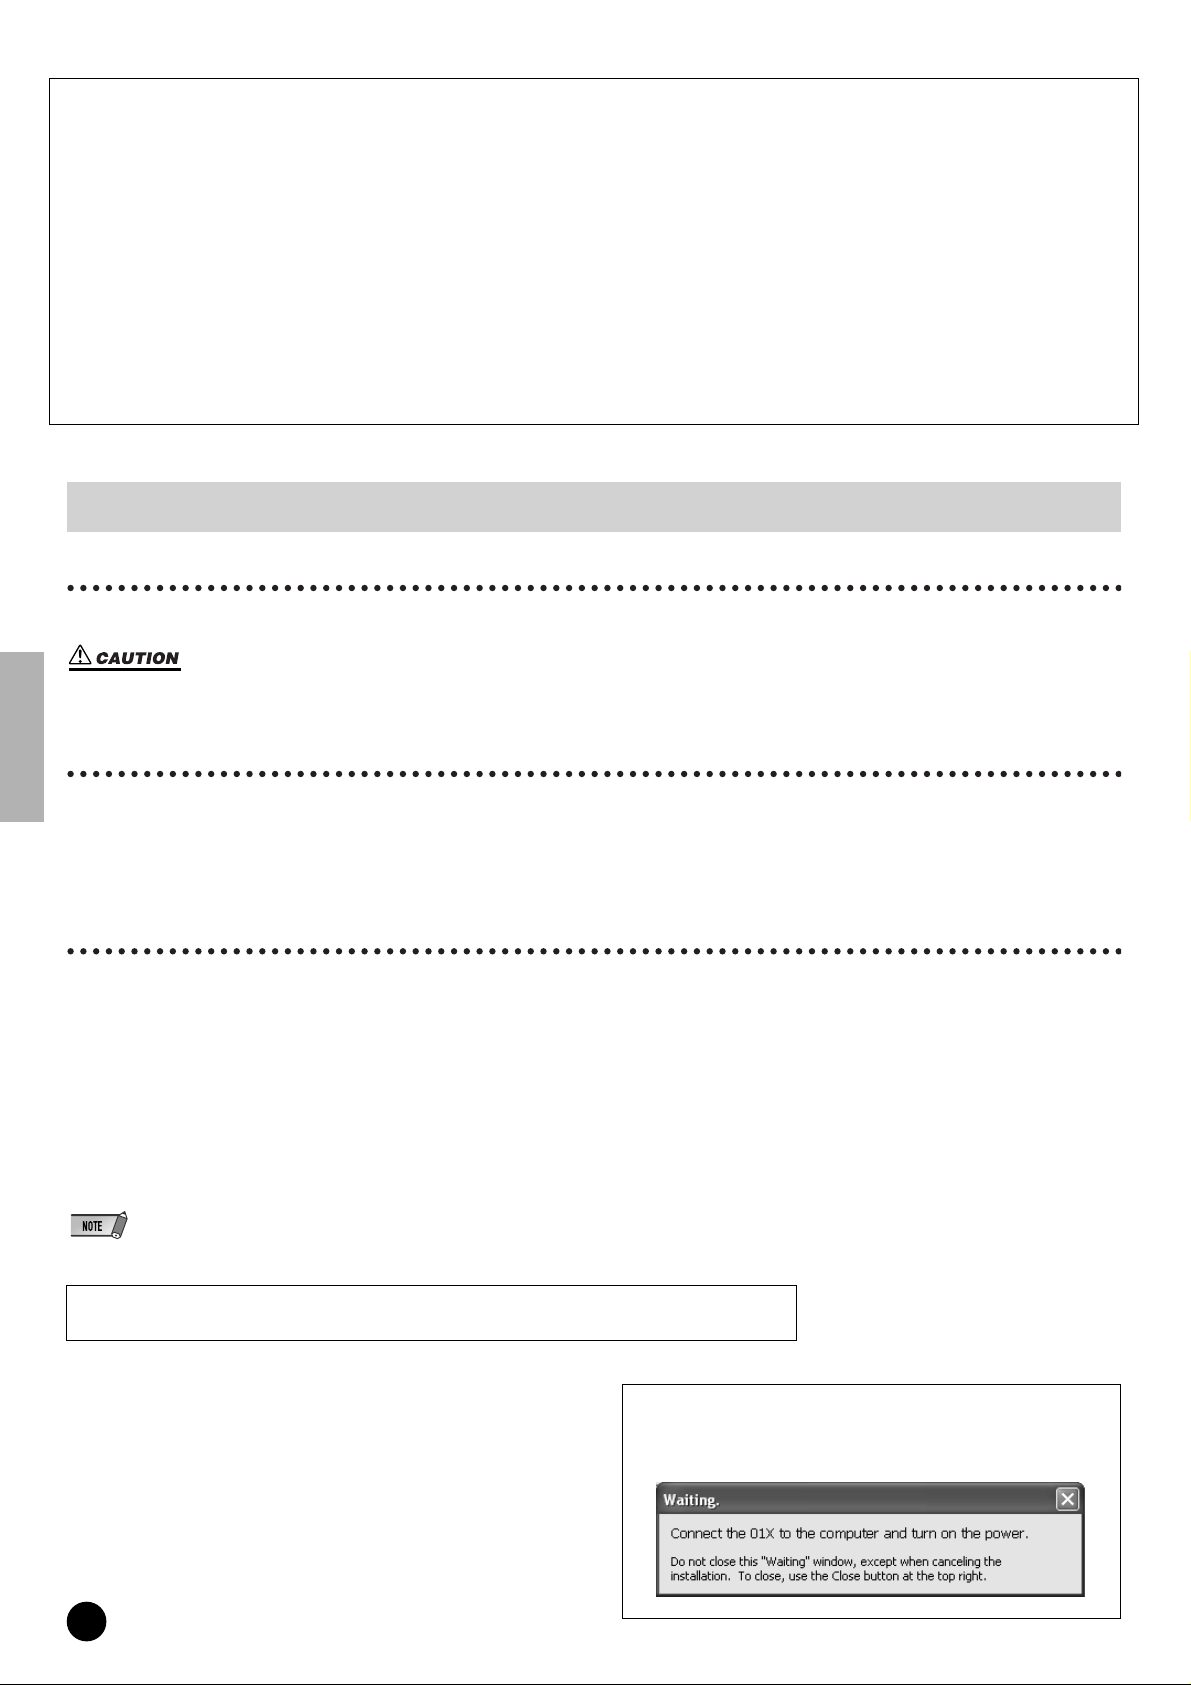
For Windows users
Turn on the 01X AFTER the following message appears during
installation.
Page 3
For Windows Users
CD-ROM Contents
The CD-ROM contains a variety of applications (with installers) and data in the following folders.
Install the software on the Tools for 01X CD-ROM first, before installing the Plug-in Effect software.
TOOLS for 01X
Folder Name Application Name Contents
Acroread_ Acrobat Reader
StudioManager_ Studio Manager
Sq01_ SQ01 V2
AudioMixer_
TWE_ Wave Editor TWE
MltPartEditor_
mLAN_
NIdemo_
DemoSong
*1
Audio Mixer
(plug-in for SQ01 V2 )
Multi Part Editor for
MOTIF-RACK
mLAN Driver
mLAN T ools
B4 (Demo)
Pro-53 (Demo)
Demo Song
• SQ01 V2
• Cubase SX/SL
• SONAR2
*1
*1
*2
*2
*2
*1*2
*1*3
*1
*2
Enables you to view each PDF manual for the applications.
• Open the online help by pressing the [F1] button on the computer.
This software allows you to use a computer for editing and controlling the various mixer-related settings of the 01X.
When using it as a plug-in with the SQ01, the Studio Manager settings can be stored along with the song data settings of the SQ01. Regardless of whether you use the software as a plug-in or stand-alone, mLAN MIDI Port 4 must
be used for data transfer with the 01X. (Refer to the Studio Manager PDF owner’s manual.)
• To call up the PDF manual, select “Manual” from the Help menu.
• To install, follow the onscreen instructions after double-clicking “Setup.exe” in the Studio Manager folder.
Full-scale sequencing software, for easily creating and playing back your own songs on computer. This can serve as
a host application for plug-in software, compatible with the ASIO driver (ASIO mLAN). mLAN MIDI Port 1 is used for
remote control data transfer with the 01X (page 24).
• To call up the online manual, select “Online manual” or “Key word” from the Help menu in any of the windows.
• For instructions on installing, see page 13.
This is compatible with the ASIO driver (ASIO mLAN). It can be installed in succession after installing SQ01.
This is an audio editor for editing .WAV or .AIFF format audio data on your computer. When using it, set Mode in the
mLAN Driver Setup to “WDM(2CH) + ASIO” (page 10).
• To call up the online manual, select [Start] ➝ [All programs] ➝ [YAMAHA TWE] ➝ [Wave Editor TWE Manual].
• If you want to install only TWE, double-click “Setup.exe” in the TWE folder, then follow the onscreen instructions.
Enables you to edit the Mixing parameters (such as effect) of the MOTIF-RACK on your computer when using the
MOTIF-RACK as a multi-timbral tone generator. This software allows you to use the 01X for remote control over the
MOTIF-RACK tone generator (via Multi Part Editor). When using the software as a stand-alone program, use mLAN
MIDI Port 5 for remote control data transfer with the 01X.
• To install, double-click “Setup.exe” in the folder “MltPartEditor,” then follow the onscreen instructions.
This software is necessary for using 01X and computer with the mLAN connection. Make sure to turn the power of
the 01X off before starting installation. (See page 6.)
Demo for the VST plug-in software synthesizer of Native Instruments.
• In the “NIdemo” folder, double-click on “***Setup.exe” of which the file name is the plug-in software to be installed,
then follow the on-screen instructions.
This is a demo song (page 24) for use with the respective DAW software programs, when using the 01X for remote
control. You can also audition or try out the included Plug-in Effects below with the song (except Demo song for
SONAR).
●
●
➝
Plug-in Effect
This software can be used as plug-in software within a VST compatible program.
To call up the PDF manual for each program, select [Start]
[All programs] ➝ [YAMAHA VST Plugins] ➝ (the relevant software) ➝ [Online Manual].
For instructions on installing the Plug-in Effects, see page 14.
Folder Name Application Name Contents
This software reproduces the EQ and Dynamics effects built into each channel of the 01X, and uses the processing
power of the computer for the effects.
It can also be used with the Studio Manager program to transfer settings to and from the connected 01X.
This program is used to edit the pitch of recorded vocals. More than just a pitch processor, it can also be used to
change the character of the vocals. Moreover, you can use MIDI data on the host application to control the Pitch Fix
effect. For more information on setting up with the host application, refer to the Pitch Fix PDF owner’s manual.
This is a multi-effect program for processing vocals. The plug-in features various effects, including a high-pass filter,
compressor and a 3-band equalizer.
This is a multi-effect program for mastering purposes. It features a compressor, limiter and soft-clip function, and
allows you to split the signal into three bands for separate multi-band processing.
VST_
01X Channel
*1
Module
*1
Pitch Fix
Vocal Rack
Final Master
*1
*1
*1 These applications are supplied with online/PDF manuals.
*2 Unfortunately, Yamaha makes no guarantee concerning the stability of these programs nor can it offer user support for them.
*3 When using this with SONAR, only stand-alone operation is available.
TOOLS for 01X/Plug-in Effect Installation Guide
3
Page 4
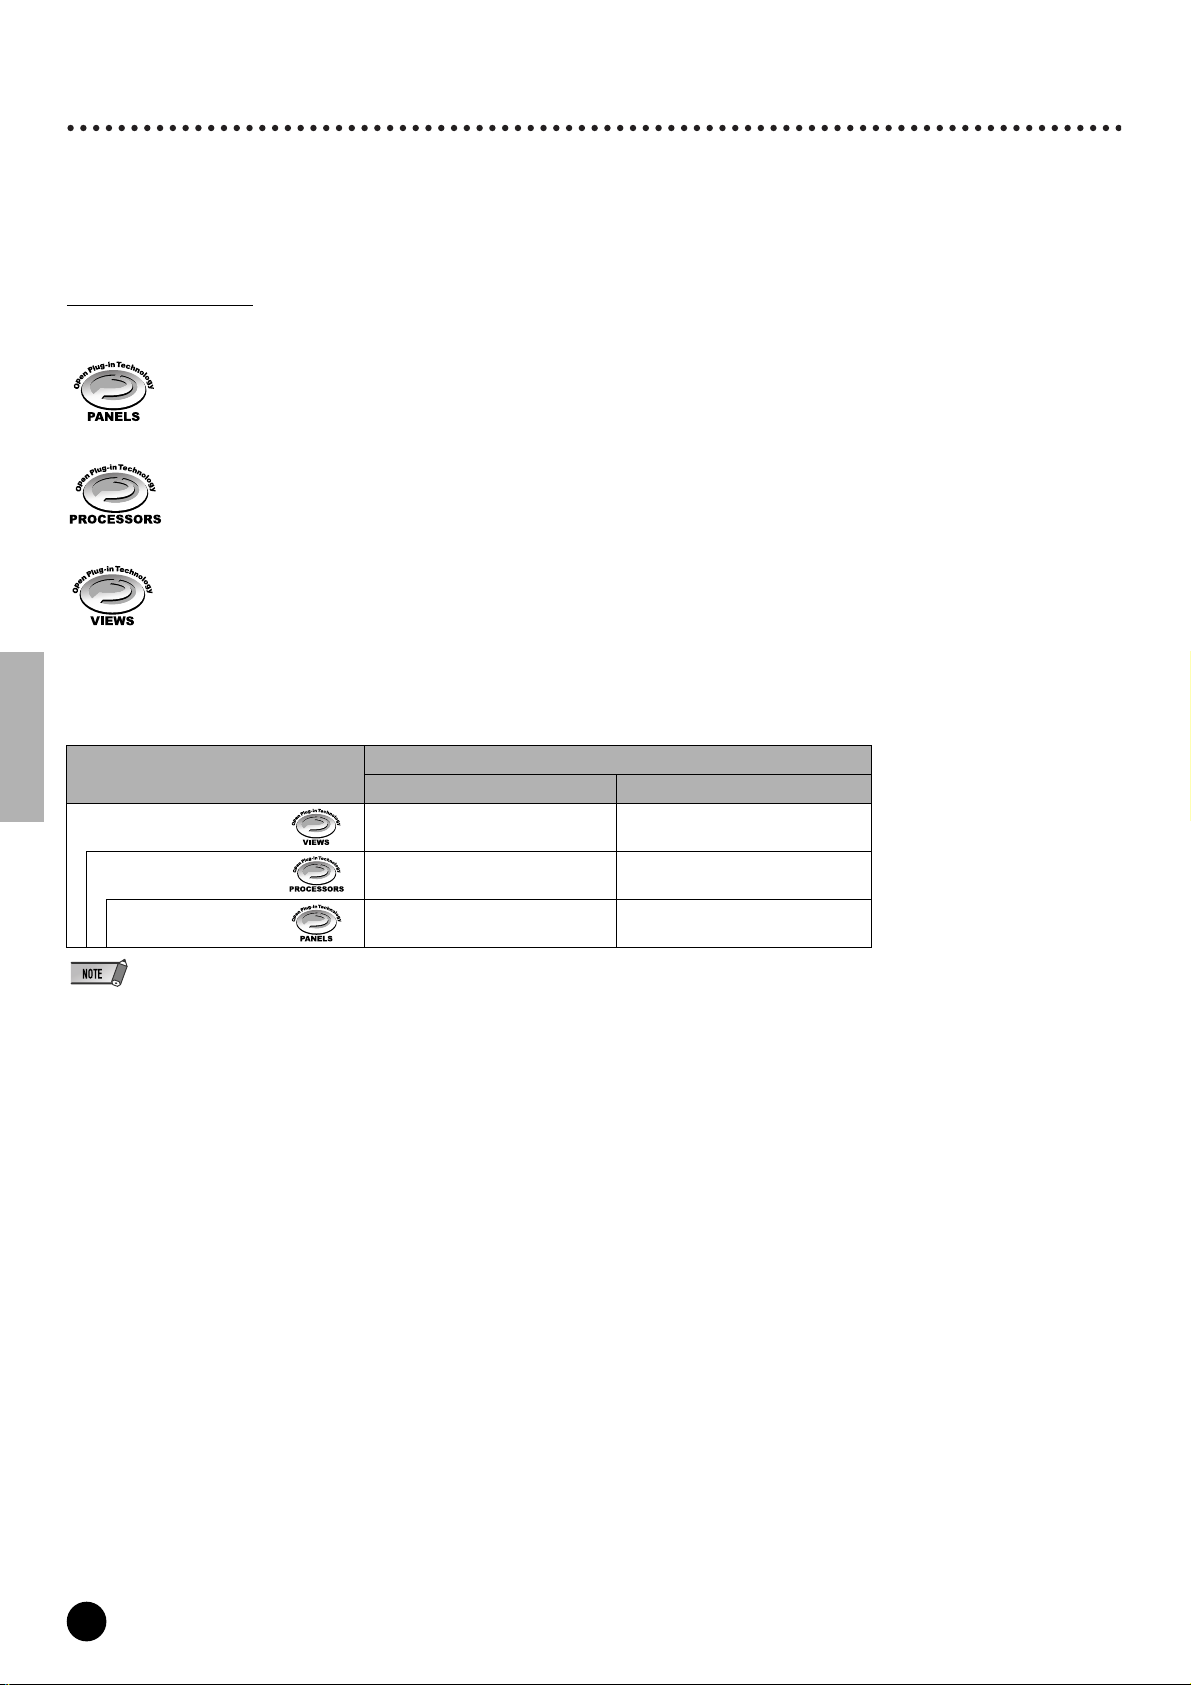
About Open Plug-in Technology
You can start the Studio Manager for 01X or Multi Part Editor software as either a stand-alone software or a plug-in application in an Open Plug-in
Technology compatible application.
Open Plug-in Technology (OPT) is a newly developed software format that allows control over MIDI devices from a music software sequencer. For
example, this allows you to start up and operate various parts of your music system, such as Plug-in Board editors, and mixing control editors – directly
from an OPT-compatible sequencer, without having to use each separately. This also makes it unnecessary to set MIDI drivers for each application,
streamlining your music production system and making all operations more convenient and seamless.
About the OPT Le
vels
The client application and its compatibility with OPT can be divided into three levels, as shown below.
Level 1 – OPT Panels provides basic support for opening and displaying OPT control panels that can transmit data via the clients’ external MIDI ports.
Typically this allows basic hardware editor control panels to operate properly.
OPT Processors provides support for real-time MIDI processors and panel automation. Typically this allows both real-time and offline MIDI
Level 2 –
effects (e.g. Arpeggiators, transposers etc.) to operate properly and supply automation to OPT panels.
Level 3 – OPT Views provides support for edit views and MIDI processors/panels that require direct access to client sequencer storage structures.
Typically this allows sophisticated MIDI edit views to be supported (e.g. List editors, Auto Accompaniment, Data Checkers etc.).
OPT Level Implementation for the Studio Manager
This chart shows the OPT-compatibility of the Studio Manager for 01X.
OPT levels of the client application
VIEWS (Level 3) Yes None
PROCESSORS (Level 2) Yes None
Operation support Operation limits
Studio Manager for 01X operation
PANELS (Level 1) Yes (with limitations) Only applicable to offline operation
• Certain operations may not work as expected if there is no corresponding function in the client application (sequencer, etc.). The highest level of implementation for the client application is indicated in the OPT logo (which appears along with the version information in the application).
For information on the implementation for the Multi Part Editor, refer to the PDF owner’s manual.
TOOLS for 01X/Plug-in Effect Installation Guide
4
Page 5

System Requirements for 01X/Software
The system requirements below are necessary for using the 01X with mLAN and the included software.
• The system requirements below may differ slightly depending on the particular operating system.
• The minimum requirements for included software not listed below may differ. For details, refer to the relevant online manual or documentation of the software.
• For details on minimum requirements for each DAW software, refer to the respective owner’s manual.
01X (including the requirements for mLAN Driver/mLAN Tools)
These are the total system requirements, including the audio sequencer,
mLAN Driver/mLAN Tools and the plug-in effects.
OS : Windows XP Professional/XP Home Edition
Computer : Intel Pentium or Celeron family processor, with the S400
・
Recommended system (*2)
Computer : 2.2 GHz or higher; Intel Pentium 4 processor
Available Memory : 512 MB or more
Hard Disk : Free disk space of 500 MB or more; high-speed
Minimum system requirements (*3)
・
●
●
Computer : Intel Pentium 1.2 GHz or Intel Celeron 1.7 GHz (or
Available Memory : 384 MB or more
Hard Disk : Free disk space of 500 MB or more; high-speed
*1 The computer must have an IEEE 1394 (FireWire) or i.Link terminal. If
there is no terminal, install an IEEE 1394 interface card (PCI or PCMCIA).
For more details on system requirements and recommended PCI or PCM-
CIA cards, see
*2 The system requirements listed here apply when using the included soft-
ware and when playing/recording audio/MIDI data detailed below on standard sequencer software. This may differ depending the particular
sequencer software you are using.
(400 Mbps) IEEE 1394 (FireWire) or i.Link terminal (*1).
hard disk
●
●
●
higher)
hard disk
http://www.yamahasynth.com
Frequency/resolution: 44.1 kHz/24 bit
Audio Driver: 24 in/18 out (active)
MIDI Driver: 4 in/4 out
(including MIDI Remote Control/Automation)
Audio playback tracks: 12
Audio recording tracks: 2
MIDI playback tracks: 16
MIDI Remote Control/Automation
Send effects (plug-in): 2
Insert effects (plug-in): 10
Plug-in synthesizer: 3
Latency: 5 msec or less
SQ01 V2/Audio Mixer
OS : Windows XP Professional/XP Home Edition/2000/Me/98
Computer : 500 MHz or higher; Intel Pentium/Celeron processor (750
• Processor speed of 1 GHz or greater is needed when using the included
plug-in effects.
Available Memory : 256MB or more
Hard Disk : Free disk space of 300MB or more
Display : 1024 x 768 pixels or more
MHz or higher when using Windows XP)
Studio Manager
OS : Windows XP Professional/XP Home Edition/2000/Me/
Computer : 433 MHz or higher; Intel Pentium/Celeron processor
Available Memory : 128MB or more
Hard Disk : Free disk space of 20MB or more
Display : 1024 x 768 pixels, 256 colors or more
• If you use display settings of 1024 x 768, turn on the Task Bar’s Auto-hide option.
98SE
●
(1280 x 1024 pixels, High Color16 bit is recommended)
TWE V2.4.4
OS : Windows XP/NT/2000/Me/98/95
Computer : 166 MHz or higher; Intel Pentium/Celeron processor
Available Memory : 24MB or more
Hard Disk : Average access time 30 ms or less
Display : 800 x 600 pixels or more, 256 colors or more
Multi Part Editor for MOTIF-RACK
OS : Windows 98/Me/2000/XP Home Edition/XP Professional
Computer : 166 MHz or higher; Intel Pentium/Celeron processor
Available Memory : 32MB or more
Hard Disk : Free disk space of 32MB or more
Display : 1024 x 768 pixels or more
Plug-in Effect
OS : Windows XP Professional/XP Home Edition/2000/Me/
98SE/98
*3 The system requirements listed here apply when using the included soft-
ware and when playing audio/MIDI data detailed below on standard
sequencer software. This may differ depending the particular sequencer
software you are using.
Frequency/resolution: 44.1 kHz/16 bit
Audio Driver: 8 in/2 out (active)
MIDI Driver: 1 in/1 out (MIDI Remote Control/Automation)
Audio playback tracks: 12
MIDI Remote Control/Automation
Send effects (plug-in): 2
Insert effects (plug-in): 6
Plug-in synthesizer: none
Latency: about 50 msec
• Up to two PCI or PCMCIA cards can be used. If you are using an IEEE 1394 interface built into the computer, only one IEEE 1394 PCI/PCMCIA interface card can
be used.
• When using a laptop or notebook computer, a built-in IEEE 1394 terminal may not
be available. If this is the case, install an appropriate PCMCIA interface card.
To use mLAN, turn mLAN on each time you start the computer by
using the mLAN icon (mLAN Manager) in the task bar (page 10).
TOOLS for 01X/Plug-in Effect Installation Guide
5
Page 6
Software Installation
For instructions on how to install the software other than one
referred to below, see page 3 in the section “CD-ROM Contents.”
mLAN Driver and mLAN Tools
The mLAN T ools software is used to change the mLAN related settings of
the computer. The mLAN Driver software is necessary for transferring
MIDI data, audio data and remote control data between the DAW (digital
audio workstation) and the 01X via the mLAN connection.
Uninstall (removing the installed application)
You can remove the installed application software.Select [START]
[Settings]) ➝ [Control Panel] ➝ [Add/Remove Programs] ➝
(
[Install/Uninstall], then select the application to be removed and
click [Add/Remove...]. Follow the on-screen instructions to uninstall
the application.
• The button names or menus may differ depending on the computer OS.
• In order to uninstall the mLAN software, the following two items must be
deleted. Delete them in order, 1 then 2.
1. Install mLAN for 01X
2. mLAN Tools 2.0
➝
Check beforehand the drive name (D:, E:, etc.) corresponding to
the CD-ROM you are using. The drive name is indicated under the
CD-ROM icon of [My computer]. (The root directory of the CDROM driver is indicated as D:\, E:\, etc.)
Acrobat Reader
In order to view the electronic (PDF) manuals included with each
application,you’ll need to install Acrobat Reader.
• If an older version of Acrobat Reader is installed on your PC, you’ll need to uninstall it
before proceeding.
• For explanations on error messages, see page 29.
Preparing to install
Disconnect all MIDI cables connecting MIDI devices to the MIDI IN/OUT
1
of the 01X.
Using an IEEE 1394 (FireWire/iLink) cable, connect the 01X directly to
2
the computer (without use of a hub), and disconnect all other IEEE 1394connected devices from the computer.
Make sure that the 01X is turned off.
3
4
Start the computer and log in to the Administrator account.
• When using the mLAN connection, make sure to disable any energy saving
features on the computer (such as Suspend, Sleep, Standby or Pause).
• If you are using the S200 data transfer rate standard (check the rear panel of
your particular device, or refer to the specifications in the owner’s manual), make
sure to uninstall the old version of mLAN Tools beforehand. (If you are using a
Yamaha mLAN device, refer to the “Uninstall” explanation at left.
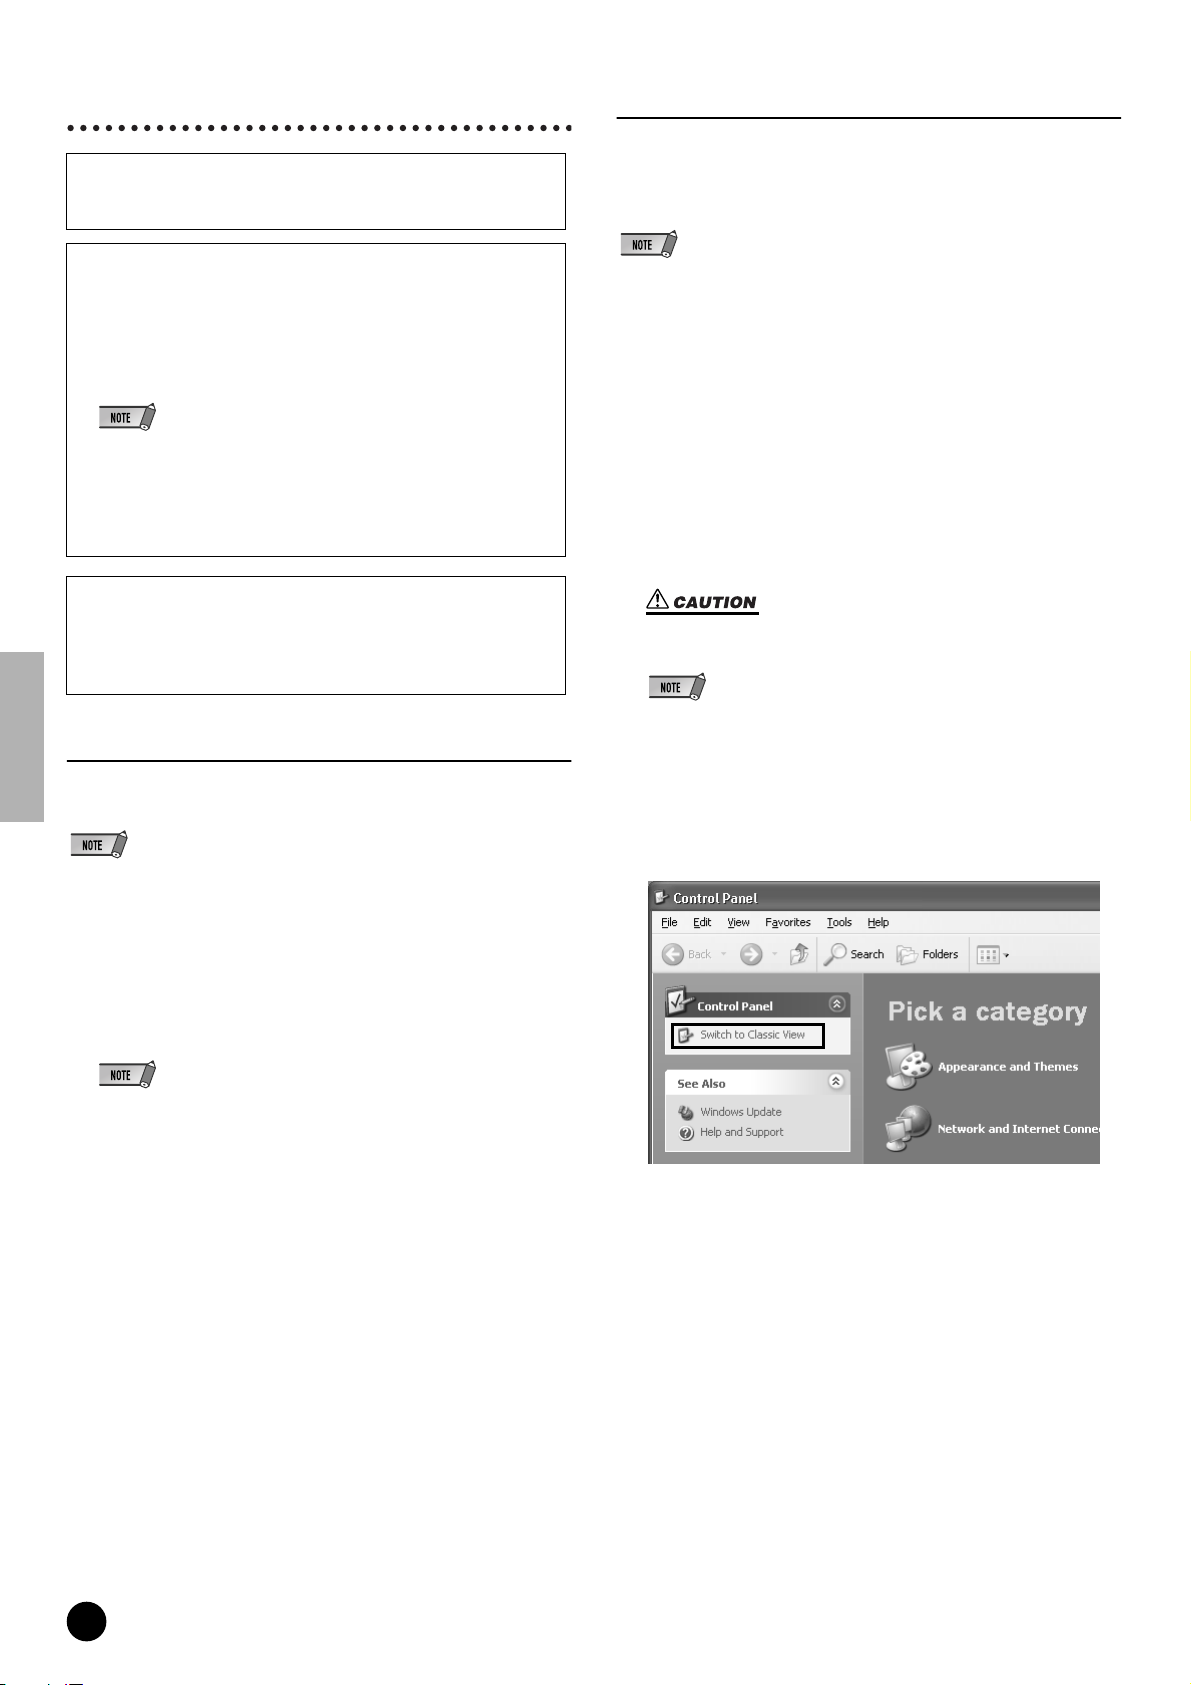
Select [Start] ➝ [Control Panel]. If the control panel appears as shown
5
below, click “Switch to Classic View” in the upper left of the window.All
control panels and icons will be displayed.
Double-click on the “Acroread_” folder.Four different language folders
1
will be displayed.
2
Select the language you want to use and double-click on its folder.The
file “arxxx***.exe” file will be displayed. (“xxx” indicates figures and “***”
indicates the selected language.)
• File names with the “.exe” extension may have changed to different names than
indicated here.
3
Double-click on “arxxx***.exe.”
Acrobat Reader Setup Dialog box will be displayed.
4
Execute the installation by following the on-screen directions.
After installation is complete, the Acrobat folder appears on your
PC (in Program Files, as the default).For information on using the
Acrobat Reader, refer to the Reader Guide in the Help menu.
Proceed to the next step.
TOOLS for 01X/Plug-in Effect Installation Guide
6
Page 7

Go to [System] ➝ [Hardware] ➝ [Driver Signing] ➝ [File Signature Verifi-
6
cation], and check the radio button to the left of “Ignore -Install all files,
regardless of file signature” and click [OK].
• After completing the installation, make sure to restore the original setting if necessary.
Check that no “!” or “x” marks appear next to “IEEE 1394 Bus host con-
7
trollers” (in [System]
marks is shown, the mLAN (IEEE 1394/i.Link) connection cannot be
used. Refer to the owner’s manual of your computer for details.
8
Click [OK] to close the System Properties window, then click the Close
button ([X]) at the top right of the window to close the Control Panel.
9
Exit from any open applications and close all open windows.
Insert the included CD-ROM (“TOOLS for 01X”) into the CD-ROM
10
drive.
[Hardware] ➝ [Device Manager]). If one of these
Starting up the Installer for the mLAN Software
The installer will install the following two programs to your computer.
• mLAN Tools 2.0
• Install mLAN for 01X
• Use the Cancel button or Close button to quit the installation. Quitting by using the
[CTR]+[ALT]+[DEL] buttons or by turning off the power while installation is in process
is can result in problems since the installation is terminated without performing a
proper uninstall.
Double-click on the “mLAN_” folder.
11
Various files are shown, including “Setup.exe.”
Double-click on “Setup.exe.”
12
13
A series of confirmation messages appear. If there are no problems,
click [OK] in each message. When finished, a “Welcome” display
appears.
➝
Installation of mLAN Tools
14
Click [Next]. The display for installing mLAN Tools appears.
Click [Next]. The “Destination Directory” window appears, letting you
15
determine the desired drive and folder name for installing mLAN
Tools. The destination directory is automatically set; however, if you
wish to change it, click the [Browse…] button and select the desired
folder (drive:\folder name). Click [Next] after making or confirming the
selection.
• In general, there is no need to change the destination directory.
Confirm the drive and folder name and click [Next] to start installation.
16
• To cancel the installation, click [Cancel].
When installation is finished, a “Completed” message appears. Click
17
[Finish].
• For information on the “Waiting” display, see page 8.
Proceed to the next step.
TOOLS for 01X/Plug-in Effect Installation Guide
7
Page 8
Installation of mLAN Bus Driver(mLAN Stream Driver)
18
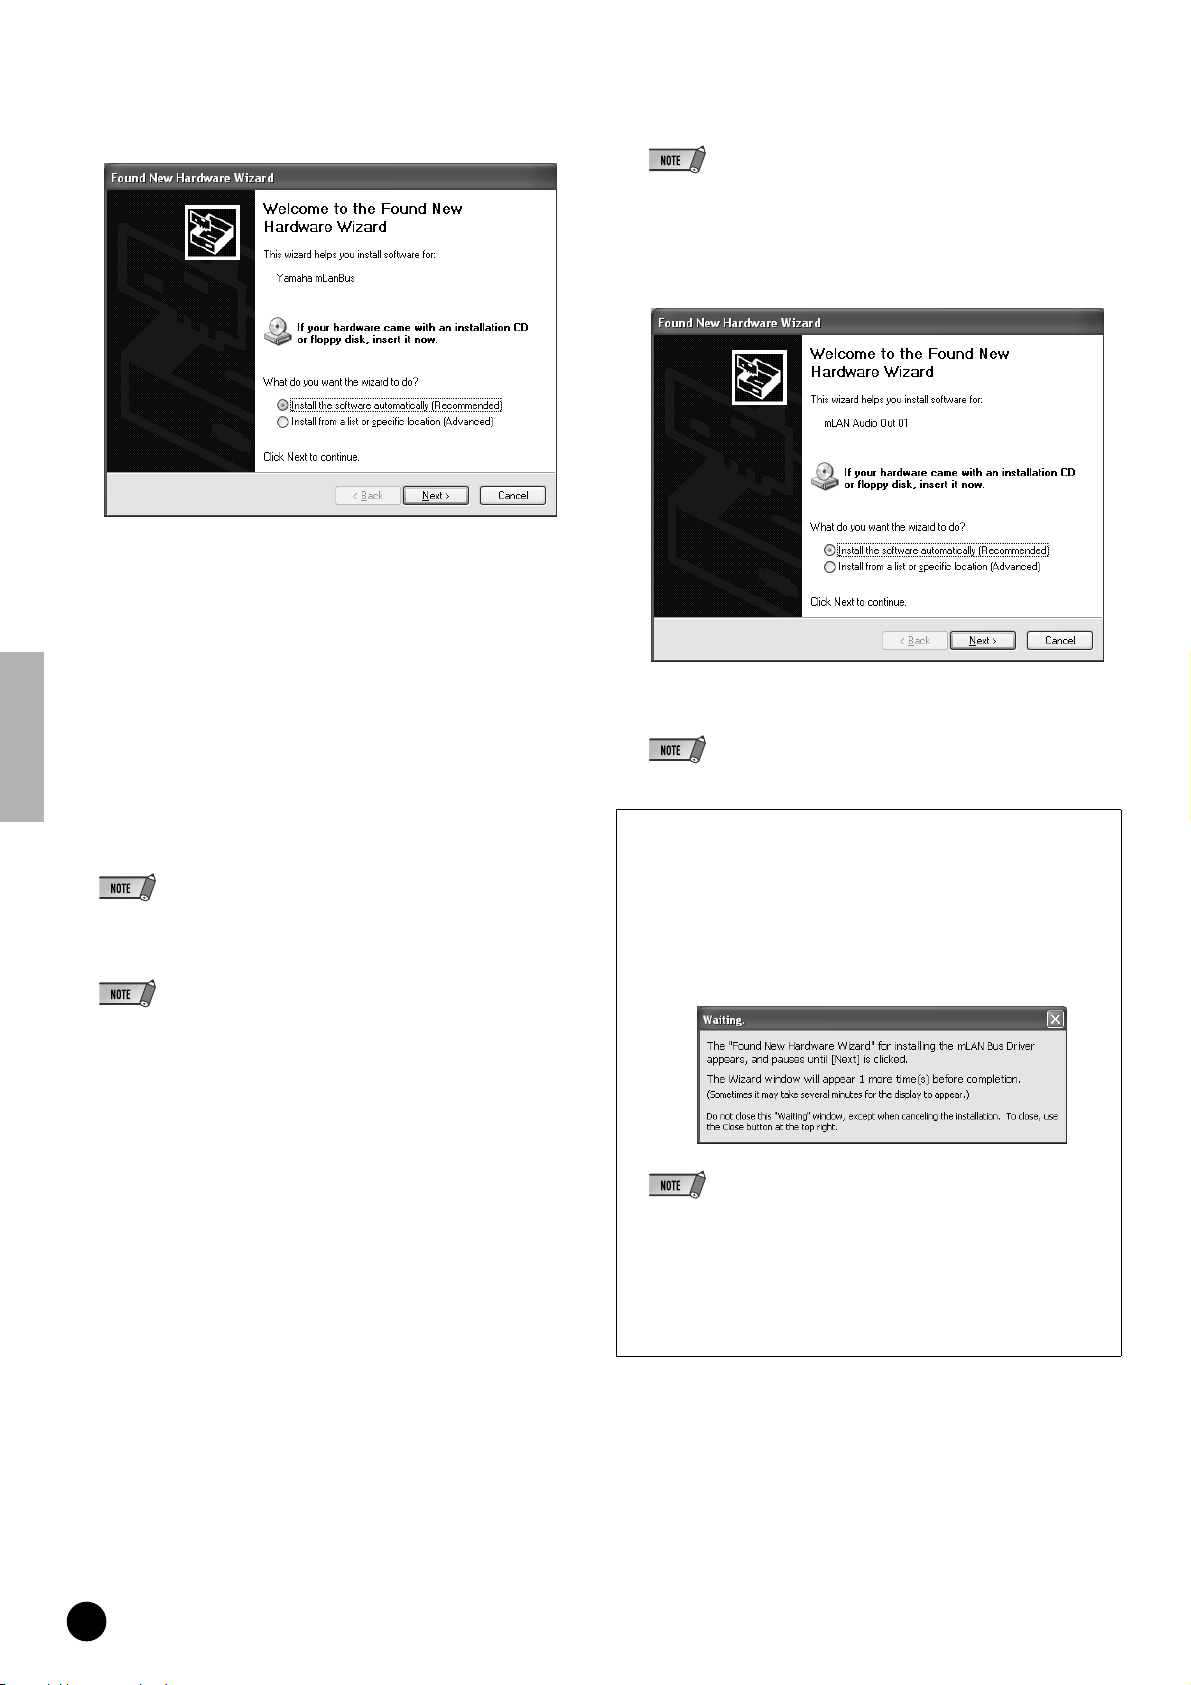
The “New Hardware Wizard” automatically appears.
Check the radio button next to “Install the software automatically [Recommended],” and click [Next] to start installation.
19
When installation is finished, a “Complete” message appears. Click
[Finish].
When installation is finished, a “Complete” message appears. Click
23
[Finish].
• For information on the “Waiting” display, see below.
Registering the ports for the mLAN Driver
The “New Hardware Wizard” automatically appears.
24
Installation of Install mLAN for 01X(mLAN Software)
When the pre-install routine is finished, a “Welcome” display appears.
Click [Next].
Determine the desired destination drive and folder name for installa-
20
tion in the “Destination Directory” window. The destination directory is
automatically set; however, if you wish to change it, click the
[Browse…] button and select the desired folder (drive:\folder name).
• To cancel the installation, click [Cancel].
Confirm the drive and folder name and click [Next] to start installation.
21
• To cancel the installation, click [Cancel].
A message prompting you to turn on the 01X appears. Turn on the
22
power of the 01X.
Check the radio button next to “Install the software automatically [Recommended],” and click [Next] to start installation.
• It may take some time for the initial “New Hardware Wizard” window to appear.
“Waiting” display
If the connection of the 01X (or other hardware) is found while the
installation is in progress, the “Found New Hardware Wizard”
screen automatically appears in Windows XP. The “Waiting” display indicates this information.
The number of times that the Waiting display appears differs depending on the
audio driver selected in the Setup Type display.
ex. )
• Do not close the Waiting display, unless you’ve made a mistake (for example, if you’ve interrupted the installation by mistakenly clicking Cancel), or
when the Wizard does not finish properly because of an error. The Waiting
display automatically closes when the Wizard properly finishes.
• Do not close the Waiting display by performing a [CTRL] + [ALT] +
[DELETE]. This results in improper termination of installation of Tools for
01X.
TOOLS for 01X/Plug-in Effect Installation Guide
8
Proceed to the next step.
Page 9
When installation is finished, a “Complete” message appears. Click
25
[Finish].
Repeat steps
26
ing display disappears.
• The Waiting display may sometimes be hidden behind the “New Hardware Wizard” display. If this happens, click on the “New Hardware Wizard” display to
bring it to the front.
24
and
25
above as often as necessary, until the Wait-
Setting of mLAN AUTO W.CLK(01X)
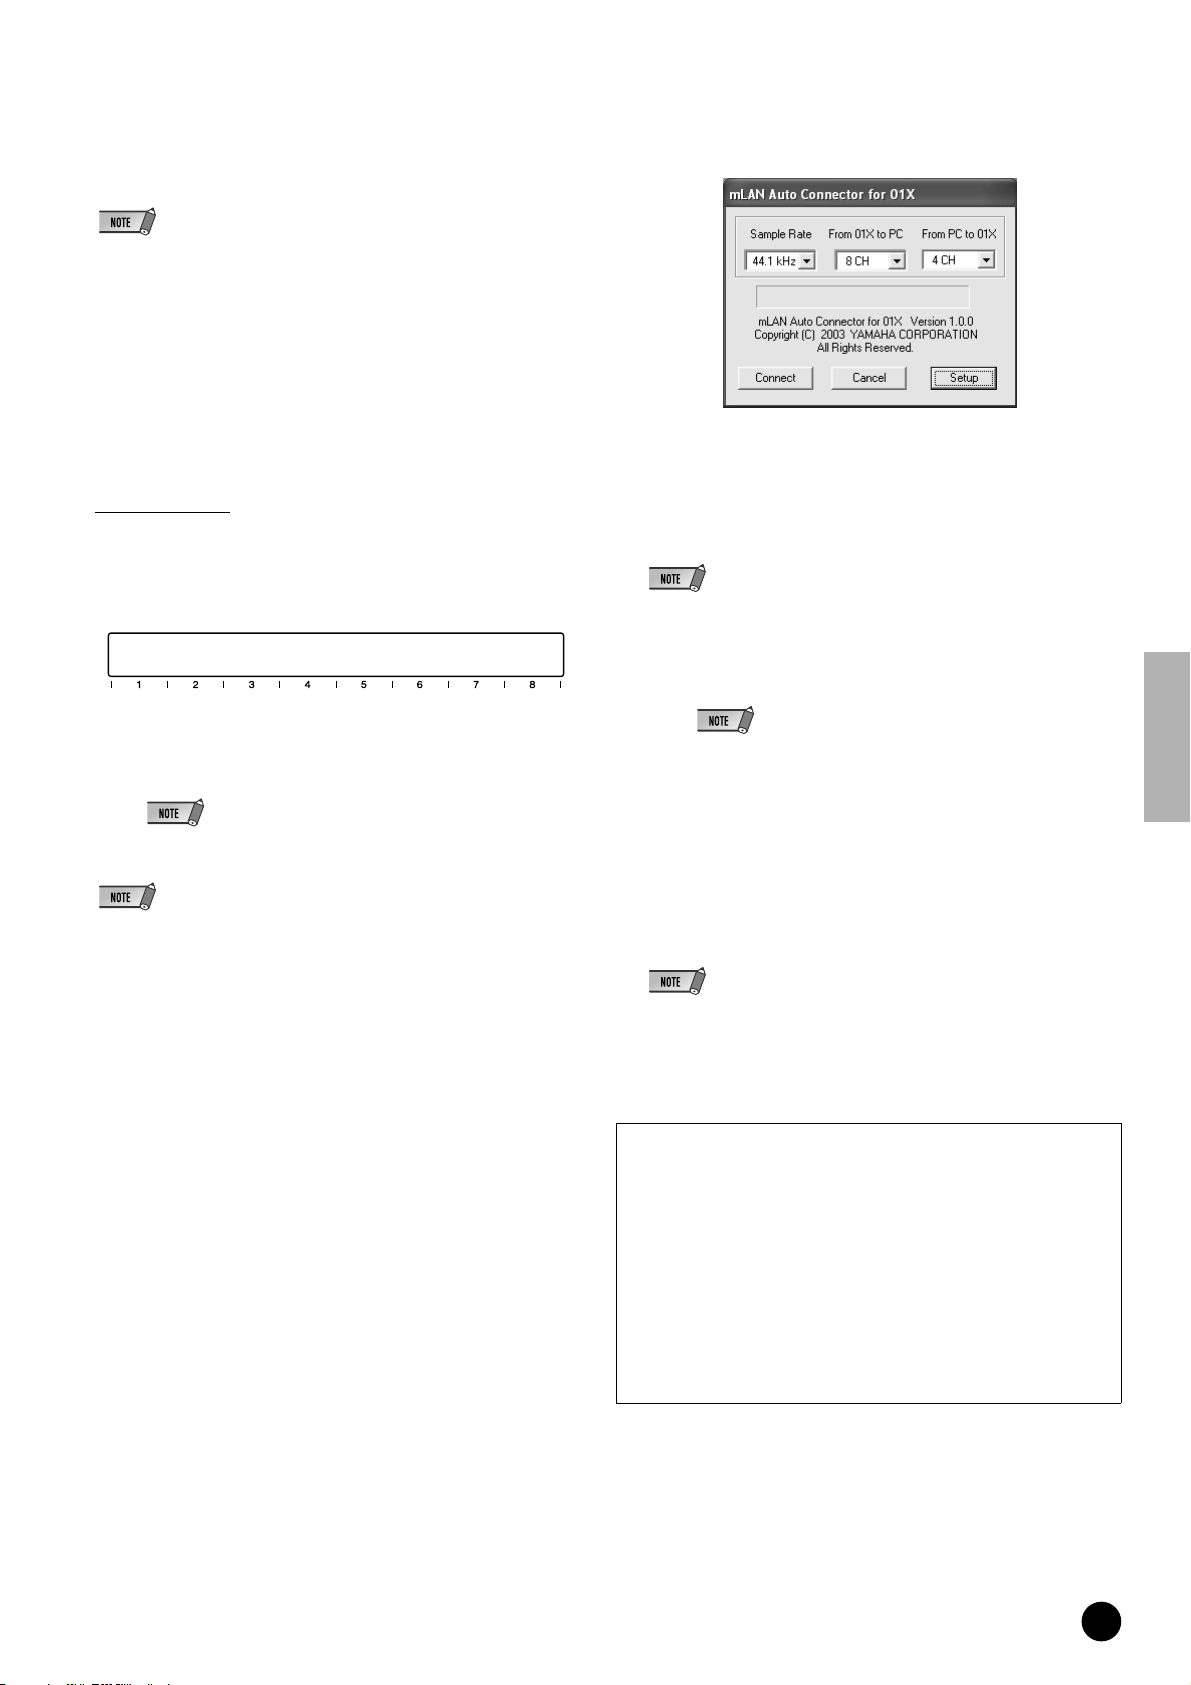
When the mLAN Driver is installed, the mLAN Auto Connector starts.
27
To ensure that settings of the mLAN Auto Connector are properly
received, set the mLAN AUTO W.CLK (wordclock) parameter to
ENABLE, as described in the following instructions. These settings
can also be made after the mLAN Auto Connector has run.
Setting on the 01X
27-1
Enter the UTILITY mode by pressing the [UTILITY] button on
the 01X.
Call up the mLAN AUTO W.CLK display by pressing W.CLK
27-2
(channel knob 3).
UTILITY mLAN AUTO W.CLK [INT : 48 kHz] 1/2
ENABLE/DISABLE
Settings in the mLAN Auto Connector
Change the mLAN Auto Connector settings as necessary for your par-
28
ticular mLAN usage.
Sample Rate ..........Determines the sampling frequency (frequency of
the wordclock)
From 01X to PC .....Determines the number of mLAN audio transmis-
sion channels from the 01X to the computer.
From PC to 01X .....Determines the number of mLAN audio transmis-
sion channels from the computer to the 01X.
• Connecting the 01X by using the mLAN Auto Connector may produce noise in
some of the devices. For this reason, make sure to turn down the level of your
amp/speaker system or the MONITOR/PHONES knob/Stereo fader during the
“Connect” operation.
Press ENABLE (channel knob 1).
27-3
27-4
The “ENABLE SURE?” prompt is shown. Change the setting by pressing channel knob 8.
• If this parameter is already set to ENABLE, the prompt will not appear,
so proceed to the next step.
• The 01X Utility settings are lost when the power is turned off, unless System
Backup is performed. (Refer to the 01X Owner’s Manual.) In order to ensure the
settings here are effective the next time you turn the 01X on, perform System
Backup by holding [SHIFT] and pressing [UTILITY].
• When selecting “ASIO + WDM” (see the "Mode" of mLAN Driver setup
on page 10), the indication shows “4CH + 2CH.” The first number (4CH)
refers to the amount of channels to be handled by ASIO and the latter
two channels of the four are connected to the monitor input channels 17/
18 of the 01X (or 9/10, when set to 96 kHz/88.2 kHz). The second number in the indication refers to the amount of channels to be handled by
WDM, and they are input to channels 15/16 of the 01X (or 7/8, when set
to 96 kHz/88.2 kHz). When “2CH + 2CH” is selected, the audio is not
sent to the monitor input of the 01X.
• The display indication shows “6CH” when only ASIO or WDM is
selected, and the latter two channels are connected to the monitor input.
• If you change the Sample Rate to 96 kHz when LAYER of the 01X is set to 17 –
24 (mLAN), LAYER 1 – 8 will be called up and channel 1 will automatically be
selected.
• If you want to change the settings here after installing, right-click on the mLAN
icon in the task bar to start the mLAN Auto Connector.
Setting the 01X mLAN Control Panel
Clicking [Setup] from the mLAN Auto Connector display opens the
01X mLAN Control Panel.
When the wordclock of the 01X is set to slave to an external mLAN
and the incoming wordclock changes, this determines whether the
wordclock will adjust quickly or slowly to match the master wordclock.
Slow ....The wordclock changes slowly. (This is the usual setting
for most applications.)
Fast .....The wordclock changes quickly. (This may result in
increased jitter noise.)
Proceed to the next step.
TOOLS for 01X/Plug-in Effect Installation Guide
9
Page 10
Click [Connect]. If the connections are correct, the mLAN Auto Con-
29
nector completes operation and the mLAN data communication starts,
with the 01X as slave.
• If for some reason connection fails, right- click the mLAN icon in the task bar to
restart the mLAN Auto Connector and click [Connect] again.
• You need not to restart your computer.
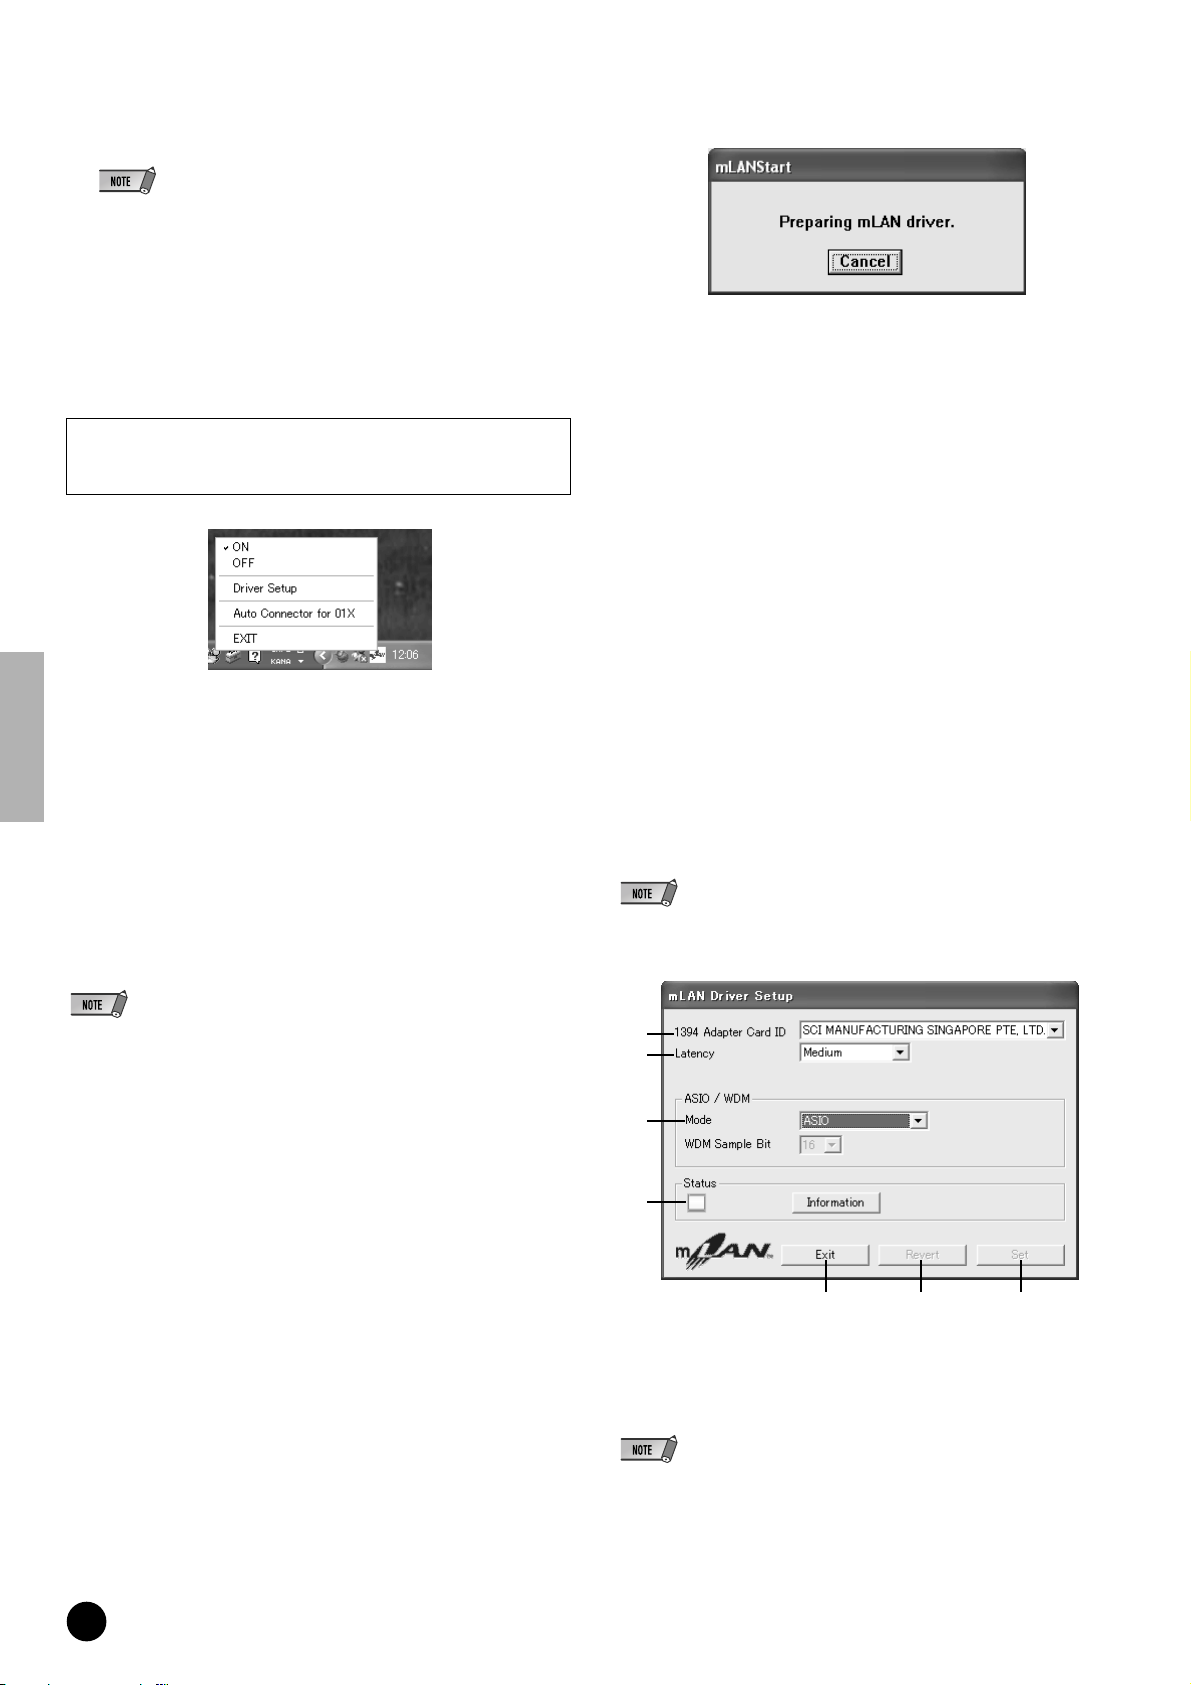
When starting up the mLAN
The message below appears when mLAN is being started
Confirming the installation
Task bar (mLAN Manager)
If the installation is successful, an mLAN icon (mLAN Manager) is added
to the task bar. To call up the menu, right-click on the icon.
When using mLAN, right click on the mLAN icon (mLAN Manager)
in the task bar and select “ON” (start mLAN).
........................................Enables mLAN operation for data transfer
(Run the “mLAN Start application”).
OFF ......................................Disables mLAN operation (Run the “mLAN
Stop” application). You can lessen the CPU
load by not using mLAN.
Driver Setup ........................Starts mLAN Driver Setup (page 10).
Auto Connector for 01X ....Starts the mLAN Auto Connector. Use this
when you want to change the settings after
the software has been installed.
EXIT ....................................This deletes the mLAN icon from the task
bar, maintaining the current mLAN ON/OFF
status. To display it again, select [Start]
[(All) Programs]
Manager].
[Startup] ➝ [mLAN
To cancel mLAN startup, click [Cancel] in the mLAN Start window. To
use mLAN, right-click on the mLAN icon (mLAN Manager) in the task
bar, and select [ON].
Device Manager (Operating System)
1
Select [Control Panel] from the Start menu.
Double-click on the System icon to call up the System Properties win-
2
dow.
Select the Hardware tab and click [Device Manager].
3
4
Click on the [+] mark next to “Sound, video and game controllers,” and
check that “YAMAHA 01x-mLAN” and “YAMAHA mLAN Bus” are shown.
Changing settings after installation
The mLAN-related settings can be changed after installation from the
mLAN Driver Setup window.
mLAN Driver Setup
(Right-click the mLAN icon in the taskbar ➝ DriverSetup)
This window lets you check and change the mLAN settings for receiving/
transmitting data. Make sure to close any application (DAW, etc.) using
the mLAN connection before making changes.
• To change the wordclock (sample rate) and the number of channels used, right-click
on the mLAN icon in the task bar and start the mLAN Auto Connector
• You can use the mLAN Driver Setup (See below) to check whether data is being
properly transmitted and received via mLAN.
ON
➝
➝
q
w
e
r
y tu
1394 Adapter Card ID
This indicates the particular ID of the IEEE 1394 (FireWire/iLink)
interface card installed to the computer. When several cards are installed,
this is used to select the desired card. Cards not recognized by the mLAN
driver are not displayed.
• The correct name of the manufacturer or vendor may not be displayed depending on
the particular card you are using.
q
TOOLS for 01X/Plug-in Effect Installation Guide
10
Page 11
Latency
This determines the latency of mLAN, or how quickly the data is processed.
Latency when using mLAN
The particular configuration of your computer (processing speed, system memory size, etc.) may affect its ability to properly record and play back audio
data in your audio sequencer, resulting in noise or other audio problems. In most cases, you can solve the problem by adjusting the latency (delay time).
• A small latency value results in a short delay time and gives optimum response for real-time recording/playback.
• A large latency value results in a long delay time, but allows for use of more audio channels and plug-in effects.
The chart below shows latency values when using the mLAN ASIO Driver.
● Transmission latency of mLAN (in playback of audio sequencer)
The total audio latency of the mLAN driver is the sum of the two values below:
(1) Basic latency value, determined by the Latency setting in the Driver Setup.
(2) Settings within the application (audio sequencer, etc.) – for example, the Preferred Buffer Size in the ASIO Control Panel.
Audio latency (msec) (Information current as of October, 2003)
Driver Setup settings
(basic)
Very Low 2 1 3 2 (1 x 2)
Low 4 2 6 4 (2 x 2)
Medium 8 2 10 4 (2 x 2)
High 16 4 20 8 (4 x 2)
Very High 80 10 90 20 (10 x 2)
MIDI latency (msec)
Driver Setup settings
(basic)
Very Low 2 1
Low 2 1
Medium 2 1
High 4 2
Very High 8 4
• When using the mLAN ASIO Driver, open the ASIO Control Panel within the driver settings of the DAW software (the particular menu depends on the software you are using)
and set the Preferred Buffer Size as needed. When changing the Preferred Buffer Size, the latency of the ASIO driver will change from the smallest value as shown in the
chart. The total latency is the sum of the basic latency and the changed value.
• Also, when using the mLAN WDM driver, adjust as necessary the latency value of the WDM driver (which corresponds to the latency of the ASIO driver in this chart) within the
driver settings of the DAW software.
• The initial setting of the Preferred Buffer Size of the mLAN ASIO driver is the smallest value.
Basic latency value
(with Driver Setup settings)
Transmission (from computer to 01X) Reception (from 01X to computer)
Transmission (playback; from computer to 01X) Reception (recording; from 01X to computer)
Settings on relevant application
(least value for Preferred Buffer Size
of mLAN ASIO Driver)
Total latency value
Settings on relevant application
(double the least value for Preferred Buffer
Size of mLAN ASIO Driver)
● Receiving latency of mLAN (recording to audio sequencer)
The audio latency of the mLAN driver can be determined only by settings within the DAW software. (For example, twice the value of the Preferred Buffer
Size set in the ASIO mLAN Control panel becomes the actual latency value.)
w
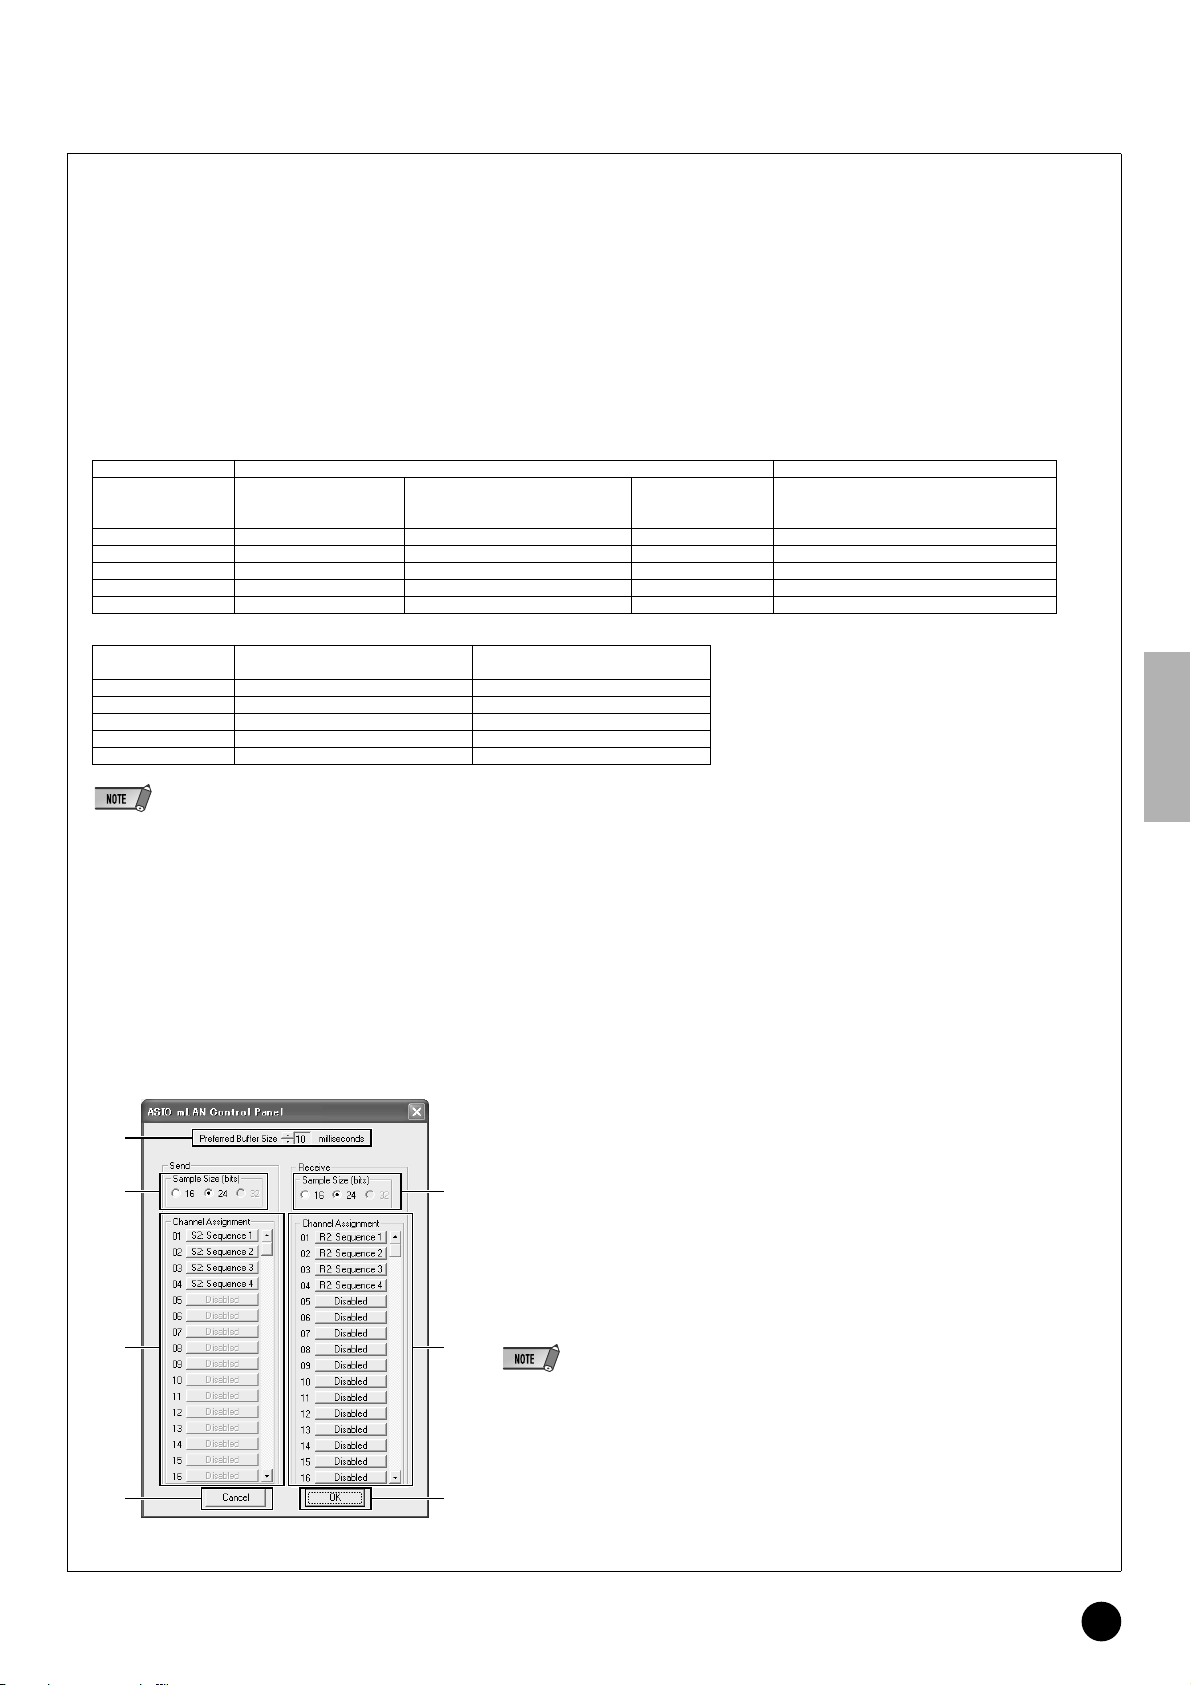
● ASIO mLAN Control Panel
When you start the ASIO mLAN Control Panel, the system displays the following dialog box.
q Preferred Buffer Size
q
w
This parameter enables you to specify the size of the buffer inside the mLAN ASIO driver.
w Sample Size
This parameter enables you to specify the bit resolution of the audio data transmission and reception.
w
e Channel Assignment
The pop-up list in the “Send” and “Receive” columns enable you to specify which mLAN audio
sequences are transmitted and received by the computer via which audio channels.
We recommend that you not change the channel assignment since this is already set by the setup
application (mLAN Auto Connector, etc.) for optimum use with mLAN devices such as the 01X. If
you’ve inadvertently changed this, reset it by manually assigning the Sequence numbers in
numerical order. This example screen shows the settings when the number of mLAN audio transmission and reception channel s is set to “4CH.”
e
e
• When using the WDM + ASIO setting, you’ll need to do the following. In mLAN Driver Setup, first set
the Mode to “ASIO.” Then, after manually assigning the Sequence numbers in numerical order from
the mLAN Control Panel, go back to the mLAN Driver Setup and reset the Mode to “WDM + ASIO.”
• You can specify the sampling rate in the mLAN Driver Setup.
r OK
t
Click to enable the settings and close the dialog box.
r
t Cancel
Click to close the dialog box without changing the settings.
TOOLS for 01X/Plug-in Effect Installation Guide
11
Page 12
e Mode
This determines the particular driver operation, and should be set to match
the particular software used.
•
ASIO...........................All mLAN audio channels are set for ASIO.
The two latter channels are connected to the
monitor input of the 01X.
WDM(2CH)+ASIO...... This setting is intended for certain sequencers,
•
such as the SQ01. In this setting, mLAN audio
channels 15 and 16 (7and 8 when 01X is set to
96kHz/88.2kHz operation) (from computer to
01X) are set to WDM (for TWE), while the
remaining channels (also computer to 01X) are
set to ASIO (for the Audio Mixer). All mLAN
audio channels from the 01X to computer are
set to ASIO operation. The two latter ASIO
channels are connected to the monitor input of
the 01X.
WDM ...........................This setting is intended for certain sequencers,
•
such as SONAR, and sets all mLAN audio
channels to WDM operation. The two latter
channels are connected to the monitor input of
the 01X.
• When selecting "WDM + ASIO" or "WDM," confirm the settings in the Sounds
and Audio Devices Properties (page 13) after installing
t Set
Clicking this button actually applies the settings made in this window.
Changes to the settings do not take effect unless [Set] is clicked.
y Revert
If you’ve made changes to the settings (b ut not yet click ed [Set]), clicking
this button restores the settings made the last time [Set] was clicked. Once
you click [Set], [Revert] cannot be used.
u EXIT
Click to close the dialog box.
When canceling the installation
If you’ve cancelled an installation before it is complete, the software may not have been installed properly. Follow the instructions
below to properly install the software.
1 Click on “Add or Remove Programs” in the Control Panel (page
6) and find “Install mLAN for 01X” and “mLAN Tools 2.0” in the
list.
2 Delete the two programs in order: first, “Install mLAN for 01X,”
then “mLAN Tools 2.0.”
3 Start installation again from step 12 (page 7).
r Status
This indicates the current data (MIDI/Audio) reception status (from 01X
to Computer) of the mLAN connection. If there is an error in
transmission, a message is shown.
Blue .........Data is being properly transmitted.
Yellow......Only one type of data (MIDI or audio) is being received.
Red ..........Error in reception.
Gray.........No reception.
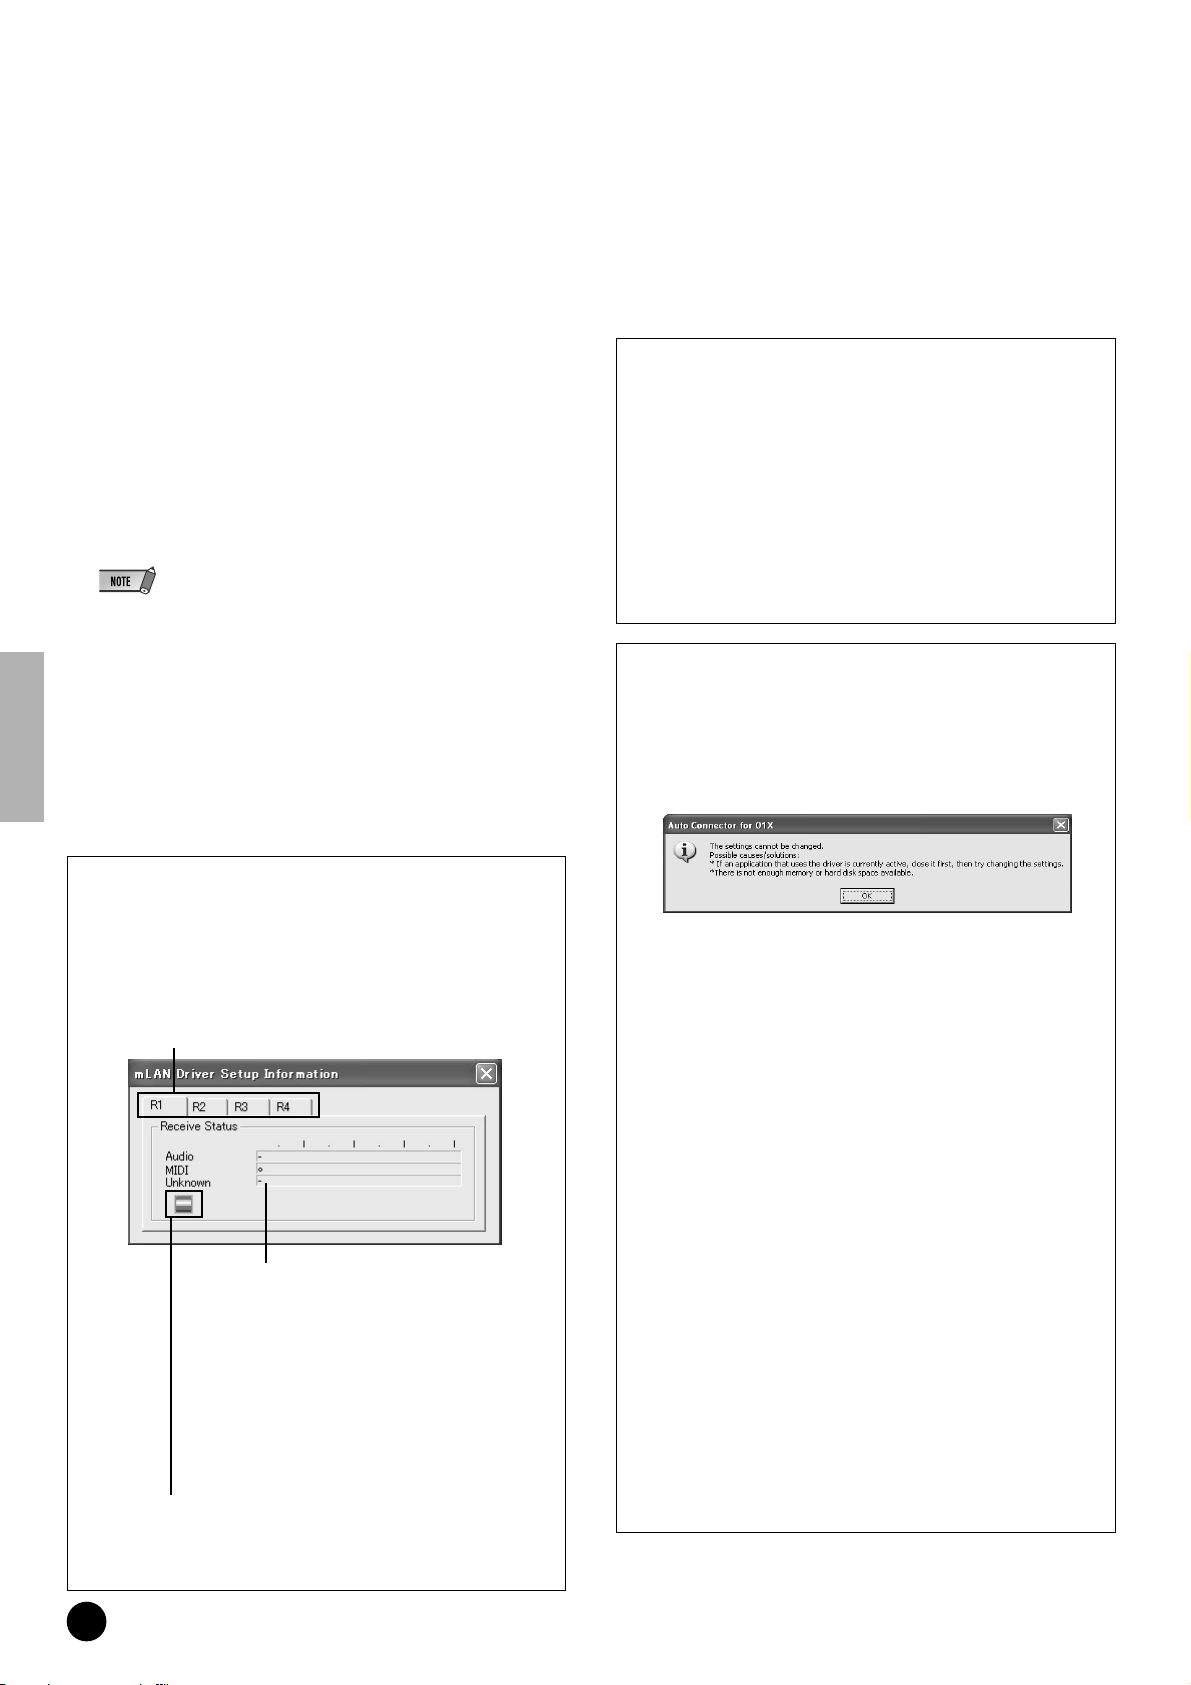
About the Information window
This window indicates the data reception status (from the 01X to
computer) for both MIDI and audio.
R1, R2, etc.
This indicates the data reception status. “R1” corresponds to MIDI reception while “R2 corresponds
to audio reception from the 01X. The number of
tabs shown differs depending on your particular
computer configuration.
Receive Status
This mark indicates the order in which the data of each format is
received. The symbol “o” indicates that data in the corresponding
format is being received. The symbol “-” indicates that data in a
different format is being received. For example, the symbol
“oooooooo-” in the “Audio” field indicates that nine sequences
have been received, and the first eight sequences are in the
audio data format. The “Unknown” field displays symbols if
sequences in unknown formats are received. These fields are
blank if no mLAN data is received. If an error occurs during
reception, a red warning message flashes. In this case, check
the transmission device.
Icon
Blue.........Reception is normal.
Red..........Error in reception.
Gray ........No reception.
When the settings of the mLAN Auto Connector or Driver
Setup cannot be changed, or when the program Install
mLAN for 01X/mLAN Tools 2.0 cannot be uninstalled.
The message below may sometimes appear when changing the
settings with mLAN Auto Connector and Driver Setup or when
uninstalling.
When using the mLAN driver with a program such as an audio
sequencer, the settings in mLAN Auto Connector and Driver
Setup cannot be changed, and Install mLAN for 01X/mLAN
Tools 2.0 cannot be uninstalled. Execute these operation only
after closing all applications.
There may be times when the settings in mLAN Auto Connector and Driver Setup cannot be changed and Install mLAN for
01X/mLAN Tools 2.0 cannot be uninstalled, even when applications are not running. This may occur in the following
cases.
• When Mode in the Driver Setup is set to “WDM” or “WDM +
ASIO.”
• When the mLAN WDM driver (“mLAN Audio Out/In 01”) is
selected as the audio device in Windows.
If this is the case, follow the instructions below before changing the
settings in mLAN Auto Connector and Driver Setup and/or uninstalling Install mLAN for 01X/mLAN Tools 2.0.
1 Select [Start] ➝ [Control Panel] ➝ [Sounds and Audio
Devices] ➝ [Voice]. Make sure that something other than
“mLAN Audio Out/In 01” is selected for the “Voice playback”
and “Voice recording” settings.
2 Select [Start] ➝ [Control Panel] ➝ [Sounds and Audio
Devices] ➝ [Audio]. Make sure that something other than
“mLAN Audio Out/In 01” is selected for the “Sound playback”
and “Sound recording” settings.
TOOLS for 01X/Plug-in Effect Installation Guide
12
Page 13
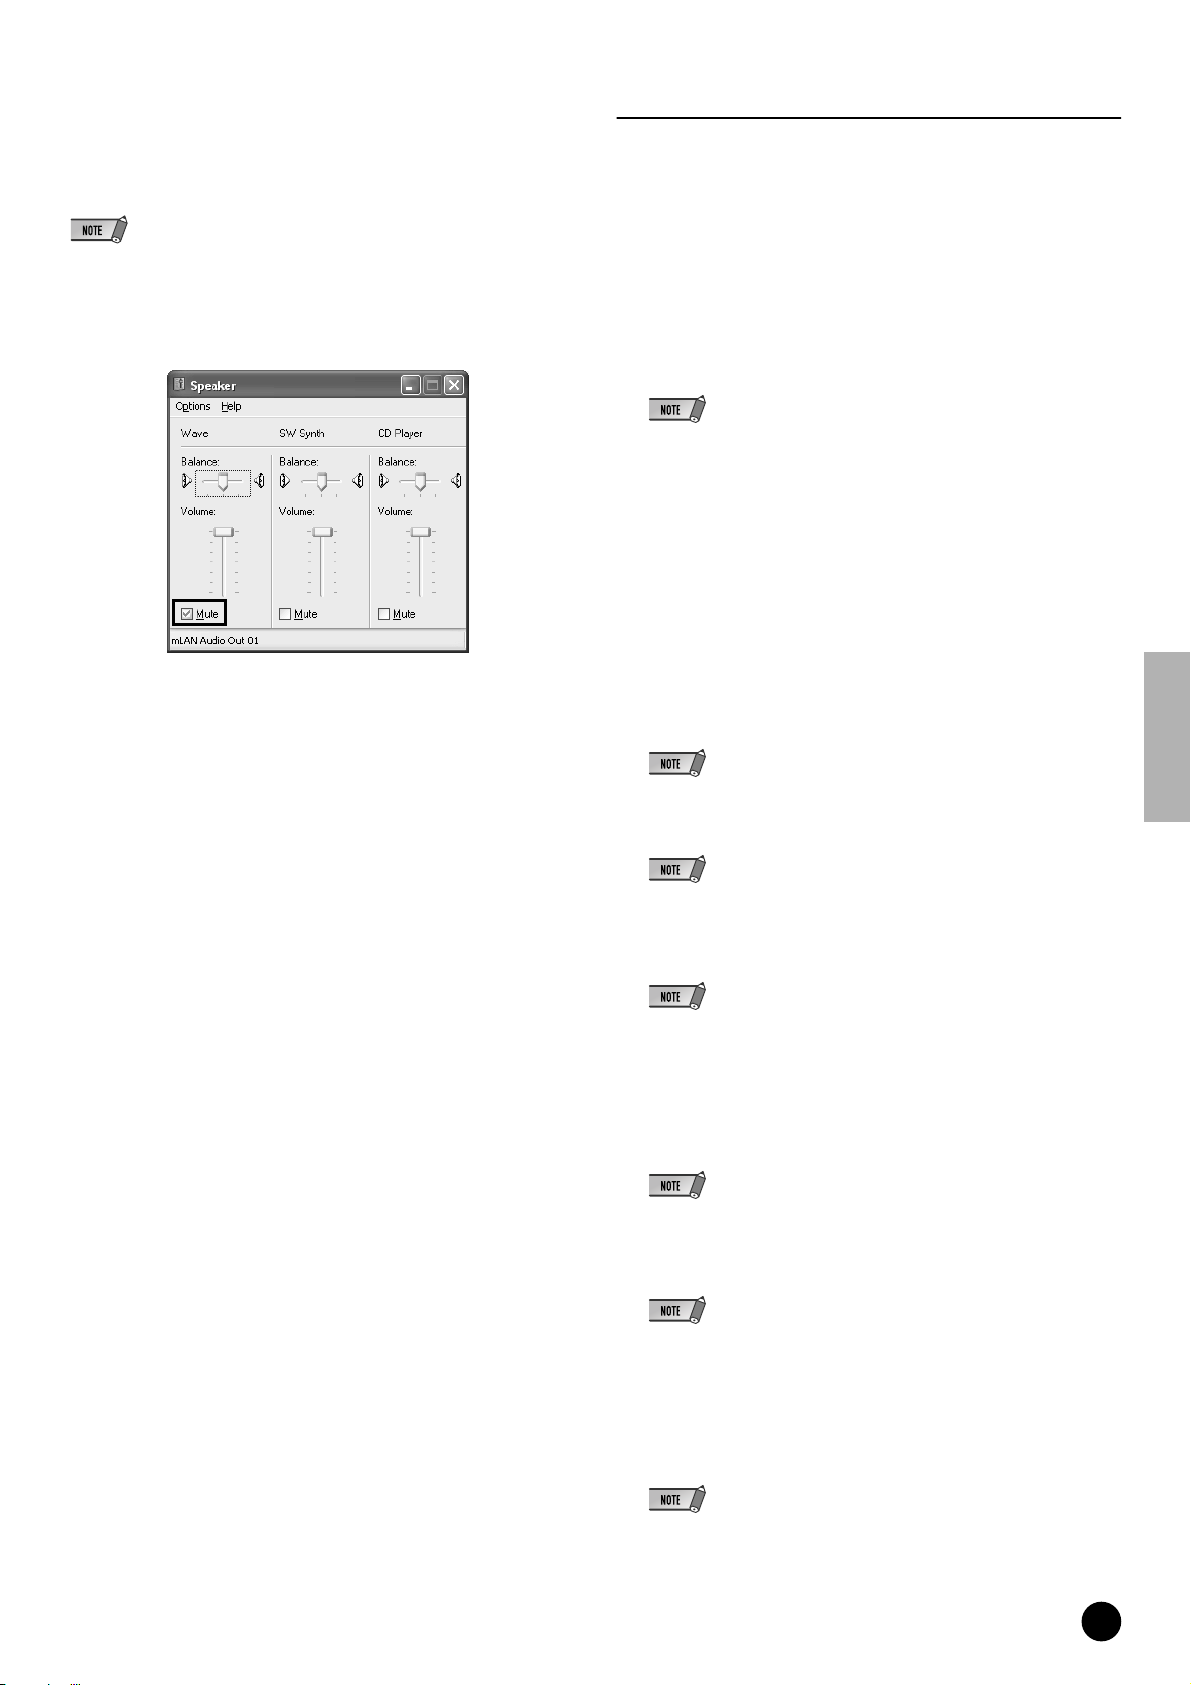
Sounds and Audio Devices Properties
If the mLAN Driver has been installed and set for WDM operation, the
sounds of Windows events (cautions, alarms, etc.) will be output via the
mLAN audio channels. To keep this from happening, follow the
instructions below.
SQ01, Audio Mixer and TWE Wave Editor
This section explains how to install the SQ01. Once you’ve installed the
SQ01, you can continue installing the Audio Mixer and TWE in the same
way.
• The following setting cancels output of all Wave sounds from the computer speakers.
1 Select [Start] ➝ [Control Panel] ➝ [Sounds and Audio Devices] ➝
[Voice], and click [Volume…] in the “Voice playback” section to call up
the Master Volume window.
2
Check the Mute checkbox in the Wave column.
1 Double-click on the “SQ01” folder.
Various files are shown, including “Setup.exe.”
2
Double-click on “Setup.exe.”
A message prompting you to uninstall a previous version of the program
appears. Click [Yes] to continue with the installation if the previous version
is not installed or has already been removed.
• If any previous version has not yet been removed, make sure to remove the old
version before continuing (page 6).
3 If DirectX 8.0 or higher has not been installed, a message appears
prompting you to install DirectX. Click [Yes] to install DirectX. After
installing the program, restart the computer and resume installation of
SQ01 from step 1 above.
4 When the pre-install routine is finished, a “Welcome” display appears.
Click [Next].
5 The “Choose Destination Location” window appears, letting you deter-
mine the desired drive and folder name for installation. The destination
directory is automatically set; however, if you wish to change it, click the
[Browse…] button and select the desired folder (drive:\folder name).
• In general, there is no need to change the destination directory.
6 Confirm the drive and folder name and click [Next] to start installation.
• To cancel the installation, click [Cancel].
7 After installation is completed, a window appears prompting you to install
the Audio Mixer. Click [Yes] to continue and install the program.
• To skip installation of Audio Mixer, click [No].
8 When the pre-install routine for Audio Mixer is finished, a “Welcome” dis-
play appears.
9 Click [Next]. Specify the destination drive and folder name for installing
Audio Mixer in the “Choose Destination Location ” window.
• If you wish to change the destination location, click the [Browse...] button and
specify the desired folder.
10 Click [Next] to start installation.
• To cancel the installation, click [Cancel].
11 When installation is finished, a “Complete” message appears. Click [Finish].
12 After installation is completed, a window appears prompting you to
install the TWE Audio Editor. Click [Yes] to continue and install the
program.
• To skip installation of TWE, click [No] and go on to step 17 below.
TOOLS for 01X/Plug-in Effect Installation Guide
13
Page 14
13 When the pre-install routine for TWE is finished, a “Welcome” display
appears.
14 Click [Next]. Specify the destination drive and folder name for install-
ing TWE in the “Choose Destination Location” window.
• If you wish to change the destination location, click the [Browse…] button and
specify the desired folder.
15 Click [Next] to start installation.
• To cancel the installation, click [Cancel].
16 When installation is finished, a “Complete” message appears. Click
[Finish].
Plug-in Effect
1 Double-click on the “VST_” folder. Various files including “Setup.exe” will
be displayed
2 Double-click on “Setup.exe.” “Welcome to the installShield Wizard” win-
dow will be displayed.
3 Click [Next]. In the window that appears, enter the User Name, Company
Name, and Serial Number.
• Serial number is provided in the included Users Card.
4 Click [Next]. The Registration Confirmation window will be displayed.
Make sure the registration information you entered is correct, then click
[Yes].
17 When setup is finished, a “Complete” message appears. Before the
software can be used, you must restart the computer. Make sure
“Yes, I want to restart my computer now” is selected, then click [Finish] to restart the computer.
• If the information is incorrect, click [No] and return to step 3 above.
5 A window for selecting plug-in effects will be displayed. Select (check)
the software you want to install and click [Next].
6 A window appears prompting you for confirmation of the plug-in effects to
be installed. Make sure the information is correct, then click [Yes]
• When you wish to change the software to be installed, click [Return] and go back
to step 5.
7 In the window that appears, you can select the drive and folder to which
the owner’s manual(PDF file) and setup program will be installed. You
should avoid changing the installation location.
• If you want to change the location, click [Browse...] then select the installation
location (drive and folder).
8 Click [Next]. In the window that appears, you can select the “VstPlugins”
folder to which the plug-in effect will be installed.
• In order to be able to use the VST plug-in software with the SQ01, it is necessary
to check “Program Files\YAMAHA\VstPlugins.”
• If no folder is shown in the list, click [Add] then select the folder from the “Browse
for Folder” dialog box.
TOOLS for 01X/Plug-in Effect Installation Guide
14
9 Click [Next]. The installation starts.
10 When the installation is complete, the message“InstallShield Wizard
Complete.” appears. Click [Finish].
Page 15
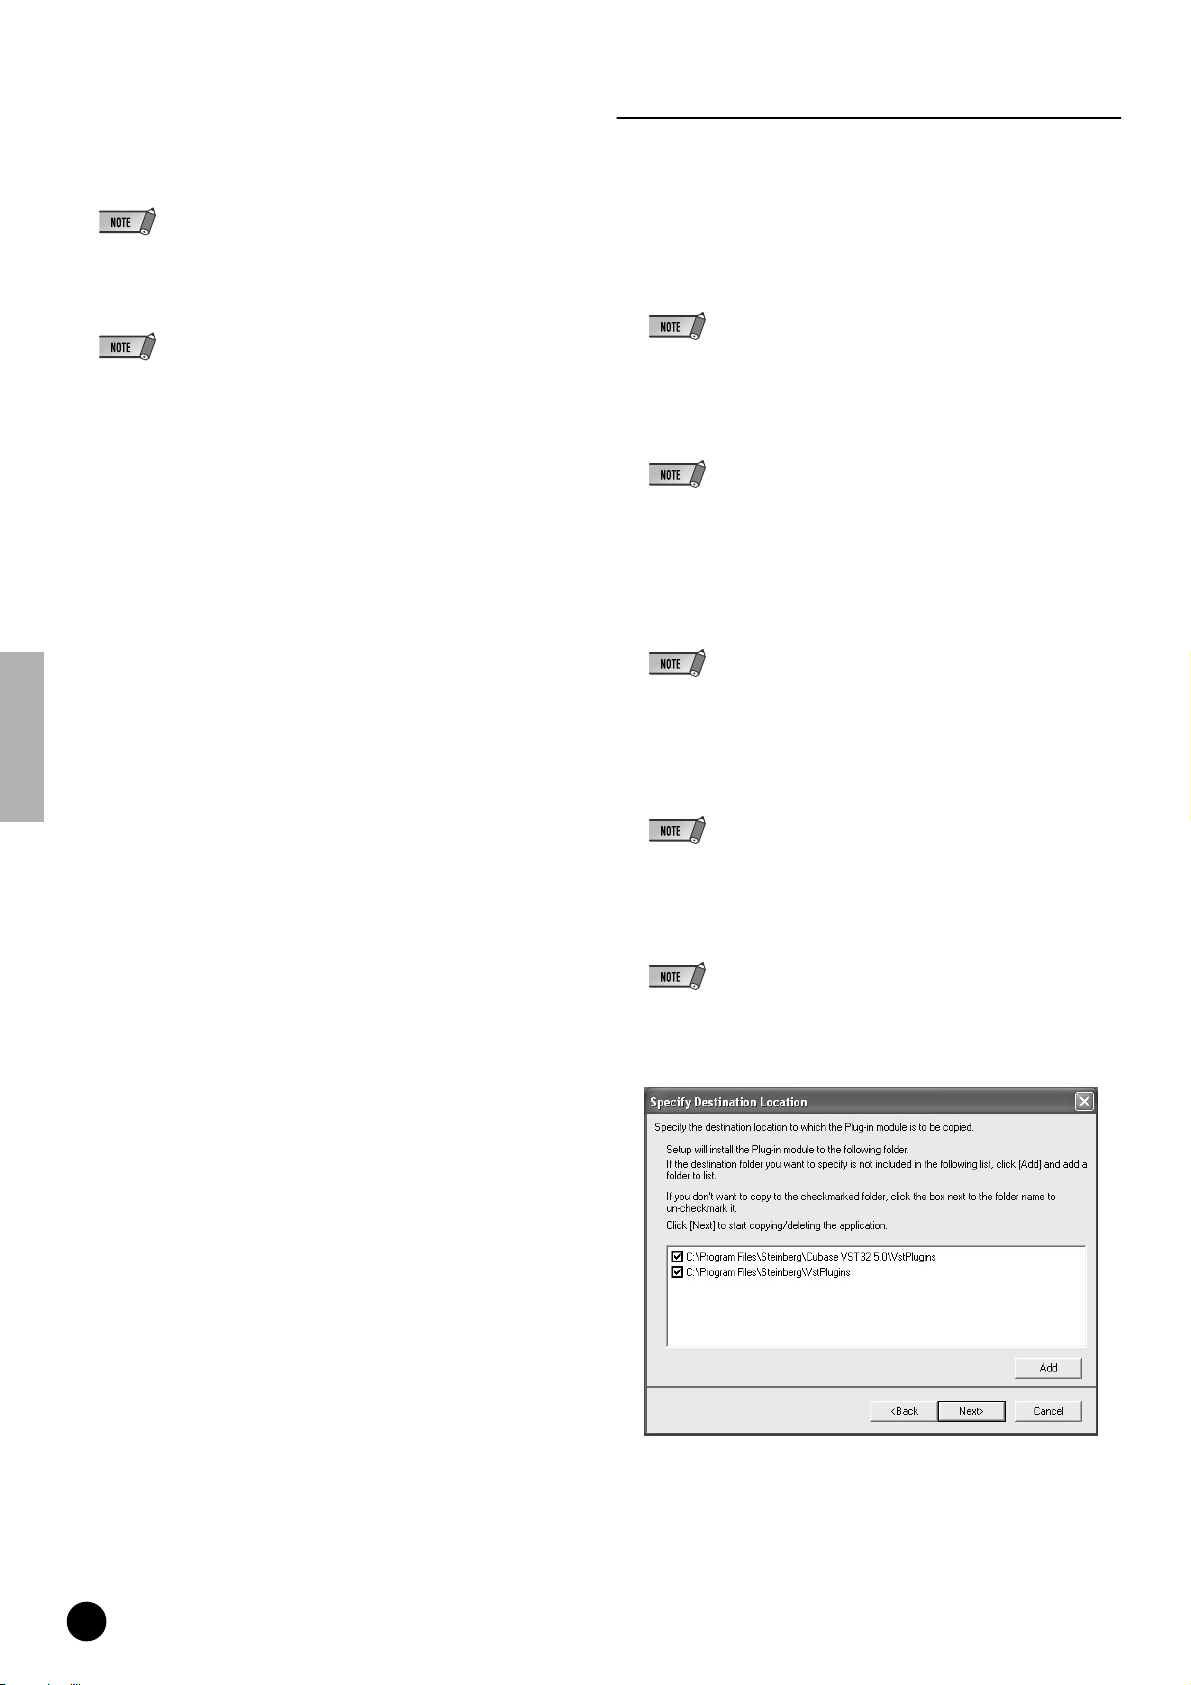
Using the Installed Plug-in Effect on another host application
Even after you’ve installed the plug-in effect, if you intend to use it with
another VST-compatible host application, you will need to manually copy
the effect plug-in module to the “VstPlugins” folder specified by the host
application.
1 Select [Start] ➝ [(All) Programs] ➝ [YAMAHA VST Plugins] ➝ [(Plug-in
Effect name)] ➝ [Setup].
A “Welcome” window appears.
2 Select [Modify], then click [Next].
3 A window appears allowing you to specify the destination location to
which the plug-in effect is to be copied. Select (check) the “VstPlugins”
folder corresponding to the host application with which you intend to use
the plug-in effect.
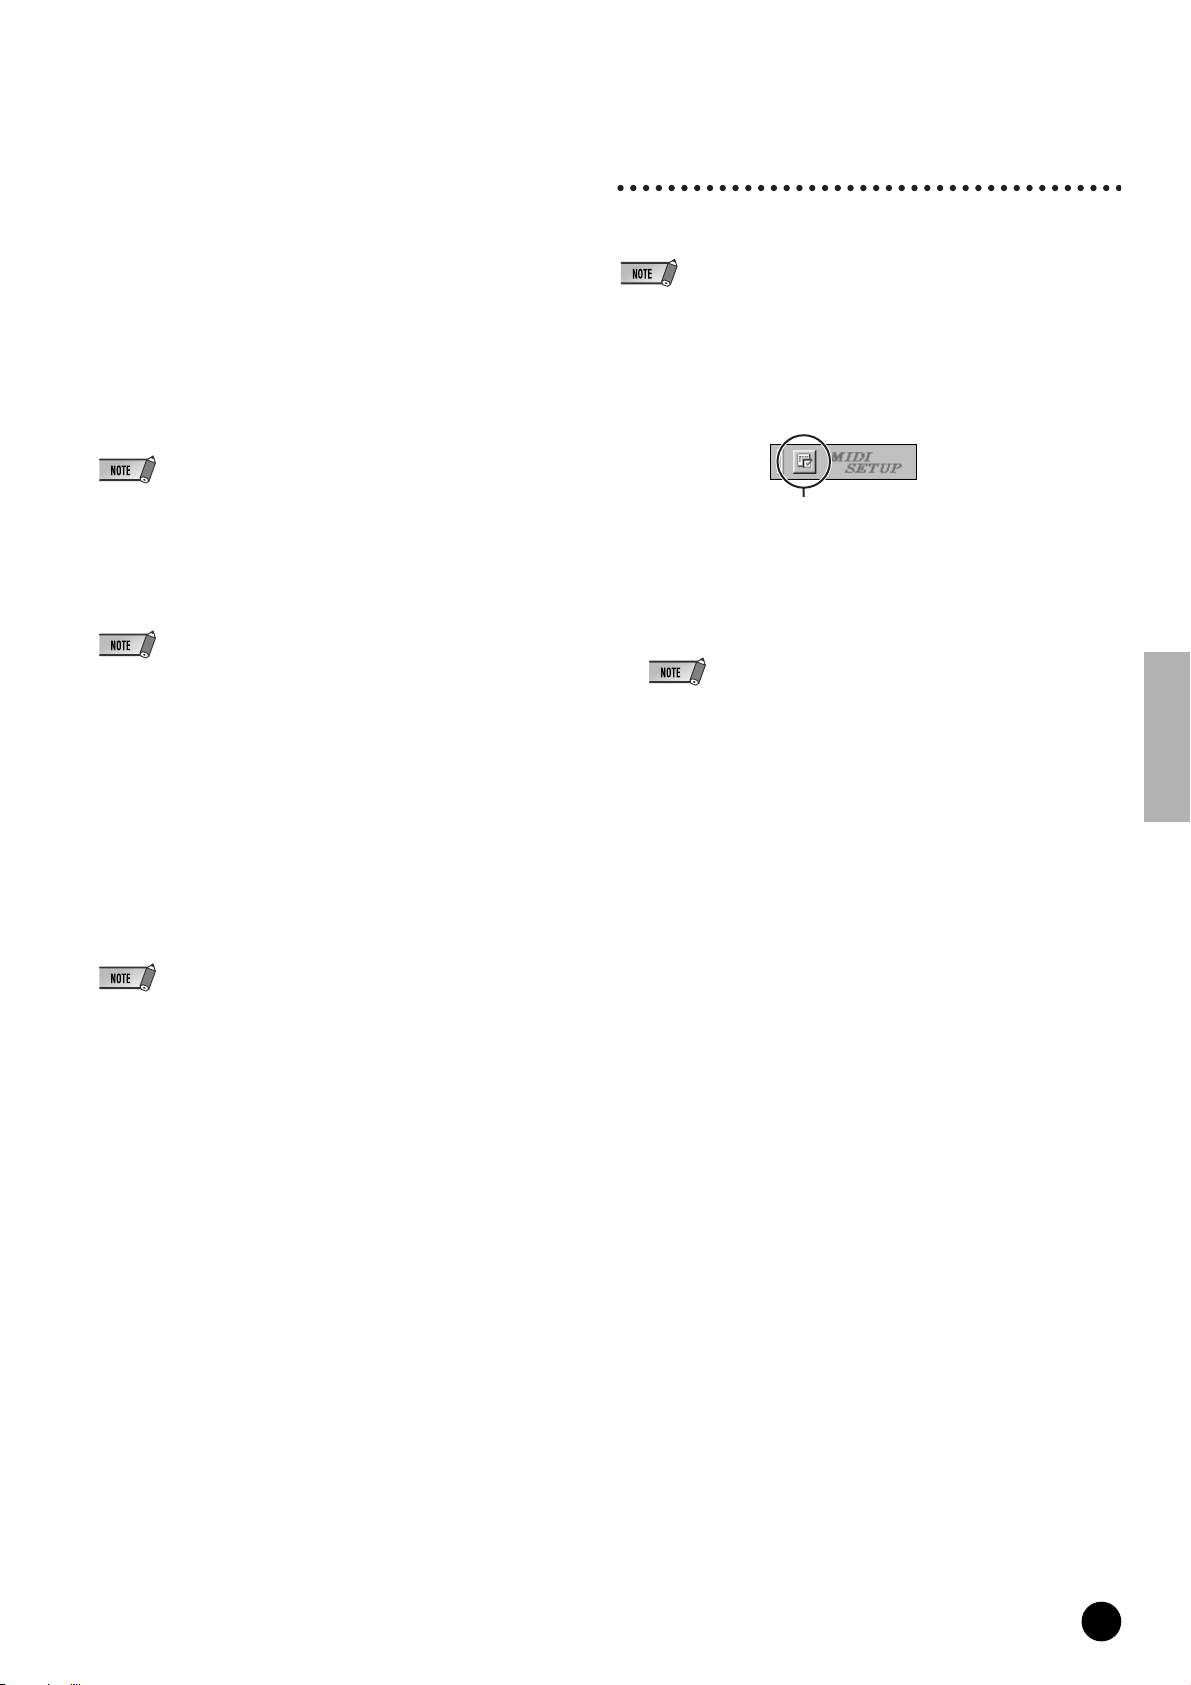
MIDI port setting
(when starting the software as a standalone application)
Before setting the MIDI port on the Studio Manager or Multi Part Editor,
you should set the MIDI port from the MIDI SETUP toolbar.
• When you start the software as a plug-in application in the Open Plug-in Technology
compatible application, refer to the PDF manual for the respective software.
1 Start the application.
2 Click the MIDI Setup button in the Toolbar.
• If you remove the checkmark from the folder for the installed host-application,
you can remove the installed plug-in effect.
• For details, refer to the owner’s manual of each host application.
4 Click [Next].
The copy operation is executed.
• To cancel the operation, click [Cancel].
Uninstall (removing the installed plug-in effect)
1 Select [Start] ➝ [(All) Programs] ➝ [YAMAHA VST Plugins] ➝ [(Plug-in
Effect name)] ➝ [Setup].
A “Welcome” window appears.
2 Select [Remove], then click [Next].
A window appears prompting you for confirmation of the file deletion.
3 Click [OK] to remove the files.
• To cancel the operation, click [Cancel].
MIDI Setupbutton
3 Pressing the MIDI Setup button calls up the MIDISetup dialog. Set each
port for MIDI In/Out/Thru that is to be connected to the MIDI device or
MIDI application. When remote controlling the Multi Part Editor for
MOTIF-RACK, enable mLAN MIDI In/Out Port 5, and when using the
Studio Manager, enable mLAN MIDI In/Out Port 4.
• In order for MIDI ports to be available here, you’ll need to select the relevant
MIDI port within each application software. This is the port that you’ll use in the
various software. For details on setting the MIDI port,refer to the on-line manual
of each software.
TOOLS for 01X/Plug-in Effect Installation Guide
15
Page 16
About the Online Manual
The SQ01 has a convenient online manual that you can view on
your computer display. This manual is installed automatically when
you install the SQ01.
Use this online manual when you want to find out information on
and instructions for each function. Since the manual is revised thoroughly with each upgrade, you can find out information on the new
features, functions and changes that have been made in each
upgrade.
The online manual lets you search for the desired information from
the Contents or by keyword from the Index. The size of the manual
window is fully adjustable, letting you easily view the desired information while operating the software.
How to use the online manual
Select [Online Manual] or [Keyword] from the Help menu to call up
the online manual.
Selecting items in the Search page
In the Search page, you can enter a keyword and call up all items
related to the word.
1 Double-click on [Search] to call up the Search page.
2 Type in the name of the feature or function you wish learn about
in the keyword field. If you’re not sure about the specific name,
type in part of the name or a related word.
3 Click on the [List Topics] button to display the items that contain
the specified word or phrase.
4 Click on the desired item in the list (the item is highlighted), then
click [Display] to call up the explanation for the item.
Selecting items in the Contents page
In the Contents page, you can search for desired information by
selecting a general topic and exploring the related items in increasing detail.
1 Double-click on [Contents] to call up the Contents page.
2 Double-click on the book icon corresponding to the desired topic
or function. Items related to the topic are listed in the window.
3 Click on an item name to call up the explanation for the item.
4 By clicking on words or phrases shown in blue type, you can
instantly jump to the related information.
TOOLS for 01X/Plug-in Effect Installation Guide
16
Page 17
For Macintosh Users
CD-ROM Contents
The CD-ROM contains a variety of applications (with installers) and data in the following folders.
● TOOLS for 01X
Folder Name Application Name Contents
Acroread_ Acrobat Reader
StudioManager_ Studio Manager
mLAN_
OMS_
NIdemo_
DemoSong
mLAN Driver
mLAN T ools
Open Music System
(OMS) 2.3.8
OMS Setup for
YAMAHA(folder)
B4 (Demo)
Pro-53 (Demo)
Demo Song
• Logic
*2
*2
*2
*1*2
*1
*2
Enables you to view each PDF manual for the applications.
• Open the online help by pressing the [F1] button on the computer.
This software allows you to use a computer for editing and controlling the various mixer-related settings of the 01X.
mLAN MIDI Port 4 must be used for data transfer with the 01X.
• To call up the PDF manual, select “Manual” from the Help menu.
• For instructions on installing, see page 22.
This software is necessary for using 01X and computer with the mLAN connection.
• For instructions on installing, see page 18.
This software is necessary for using the 01X and computer with the mLAN
connection to transfer MIDI data (Remote Control and Studio Manager data).
• For instructions on installing, see page 18.
Contains the OMS Setup files for the 01X (page 21).
Demo for the VST plug-in software synthesizer of Native Instruments.
• In the “NIdemo” folder, double-click on “***Demo Install/installer” of which the file name is the plug-in softw are to be
installed, then follow the on-screen instructions.
This is a demo song (page 24) for use with the Logic, when using the 01X for remote control. You can also audition or
try out the included Plug-in Effects below with the song.
● Plug-in Effect
This software can be used as plug-in software within a VST compatible program.
• For instructions on how to use the application, refer to the PDF manual.
(The destination disk you specified)/YAMAHA/Plug-in Effect/(the relevant software folder)
For instructions on installing the Plug-in Effects, see page 23.
Folder Name
Mac OS 9 VST_
*3
Application Name Contents
01X Channel
*1
Module
*1
Pitch Fix
Vocal Rack
Final Master
*1
*1
This software reproduces the EQ and Dynamics effects built into each channel of the 01X, and uses the processing
power of the computer for the effects.
It can also be used with the Studio Manager program to transfer settings to and from the connected 01X.
This program is used to edit the pitch of recorded vocals. More than just a pitch processor, it can also be used to
change the character of the vocals. Moreover, you can use MIDI data on the host application to control the Pitch Fix
effect. For more information on setting up with the host application, refer to the Pitch Fix PDF owner’s manual.
This is a multi-effect program for processing vocals. The plug-in features various effects, including a high-pass filter,
compressor and a 3-band equalizer.
This is a multi-effect program for mastering purposes. It features a compressor, limiter and soft-clip function, and
allows you to split the signal into three bands for separate multi-band processing.
*1 These applications are supplied with online/PDF manuals.
*2 Unfortunately, Yamaha makes no guarantee concerning the stability of these programs nor can it offer user support for them.
*3 About Plug-in Effects compatible with Mac OS X
The following plug-in effects, which are compatible with VST and Audio Units, are included in the “Mac OS X” folder.
• 01X Channel Module
• Pitch Fix
• V ocal Rack
• Final Master
Unfortunately at this time, these software effects cannot be used with the01X, since the 01X audio /MIDI driver is not yet compatible with Mac OS X.
We are currently working with Apple Computer, Inc. and in the near future, the 01X will be compatible with Mac OS X. For the latest information, please see the
site below:
http://www.yamahasynth.com
The site also includes instructions on installing the software effects for OS X
With Macintosh notebook computers such as the iBook and PowerBook, always first connect the 01X and mLAN cable then turn on the power of the
01X, before starting up the computer.
TOOLS for 01X/Plug-in Effect Installation Guide
17
Page 18
System Requirements for 01X/Software
The system requirements below are necessary for using the included
software.
• The system requirements below may differ slightly depending on the particular operating system.
• For details on minimum requirements for each DAW software, refer to the respective
owner’s manual.
Studio Manager
OS : Mac OS 8.6 through 9.2.2 (Mac OS X and Mac Classic
environment are not supported.)
Computer : 233 MHz or high; G3
Available Memory : 80 MB or more (Virtual memory must be turned off)
Hard Disk : Free disk space of 7 MB or more
Display : 1024 x 768 dots, 256 colors or more
(1280 x 1024 dots, High Color16 bit is recommended)
Plug-in Effect
OS : Mac OS 8.6 through 9.2
Mac OS X 10.2
● 01X (including the requirements for mLAN Driver/mLAN Tools)
These are the total system requirements, including the audio
sequencer,mLAN Driver/mLAN Tools and the plug-in effects.
OS : Mac OS 9.2 (Mac OS X and Mac Classic environment are
Computer : System having a built-in S400 (400 Mbps) FireWire termi-
・
Recommended system (*2)
Computer : G4/G3 signal processor 900 MHz (or higher)
Available Memory : 512 MB or more (Virtual memory must be turned
Hard Disk : Free disk space of 175 MB or more; high-speed
Minimum system requirements (*3)
●
●
・
Computer : G4 dual processor 450 MHz or G4/G3 single proAvailable Memory : 320 MB or more (Virtual memory must be turned
Hard Disk : Free disk space of 175 MB or more; high-speed
*1 The computer must have an IEEE 1394 (FireWire) or i.Link terminal. If
there is no terminal, install an IEEE 1394 interface card (PCI or PCMCIA).
For more details on system requirements and recommended PCI or PCM-
CIA cards, see
*2 The system requirements listed here apply when using the included soft-
ware and when playing/recording audio/MIDI data detailed below on standard sequencer software. This may differ depending the particular
sequencer software you are using.
not supported.)
nal. (*1)
off)
hard disk
➝
cessor 700 MHz (or higher)
off)
hard disk
http://www.yamahasynth.com
Frequency/resolution: 44.1 kHz/24 bit
Audio Driver: 24 in/18 out (active)
MIDI Driver: 4 in/4 out
(including MIDI Remote Control/Automation)
Audio playback tracks: 12
Audio recording tracks: 2
MIDI playback tracks: 16
MIDI Remote Control/Automation
Send effects (plug-in): 2
Insert effects (plug-in): 10
Plug-in synthesizer: 3
Latency: 5 msec or less
• When using a PowerBook under battery power, go Apple menu ➝ [Control Panel]
[Energy Saver] ➝ [Advanced Settings] (Settings for: Battery), and remove the
check from the “Allow processor cycling.”
Software Installation
For instructions on how to install the software other than one
referred to below, see page 17 in the section “CD-ROM Contents.”
Acrobat Reader
In order to view the electronic (PDF) manuals included with each
application,you’ll need to install Acrobat Reader.
Double-click on the “Acroread_” folder. Three different language folders
1
will be displayed: English, German, French and Japanese.
2
Select the language you want to use and double-click on its folder.
“Reader Installer” will be displayed.
The Installer name may differ depending on the language you select.
3
Double-click on the “Reader Installer.”
Acrobat Reader Setup Dialog will be displayed.
4
Execute the installation by following the directions appearing on the
screen.
After installation is complete, the Acrobat folder appears on your computer (in Hard Disk, as the default).
For information on using the Acrobat Reader, refer to the Reader Guide in
the Help menu.
*3 The system requirements listed here apply when using the included soft-
ware and when playing audio/MIDI data detailed below on standard
sequencer software. This may differ depending the particular sequencer
software you are using.
Frequency/resolution: 44.1 kHz/16 bit
Audio Driver: 8 in/2 out (active)
MIDI Driver: 1 in/1 out (MIDI Remote Control/Automation)
Audio playback tracks: 12
MIDI Remote Control/Automation
Send effects (plug-in): 2
Insert effects (plug-in): 6
Plug-in synthesizer: none
Latency: about 90 msec
TOOLS for 01X/Plug-in Effect Installation Guide
18
Page 19
mLAN Driver/mLAN Tools and OMS
The mLAN T ools software is used to change the mLAN related settings of
the computer. The mLAN Driver software is necessary for transferring
MIDI data, audio data and remote control data between the DAW (digital
audio workstation) and the 01X via the mLAN connection.
mLAN TOOLS
12
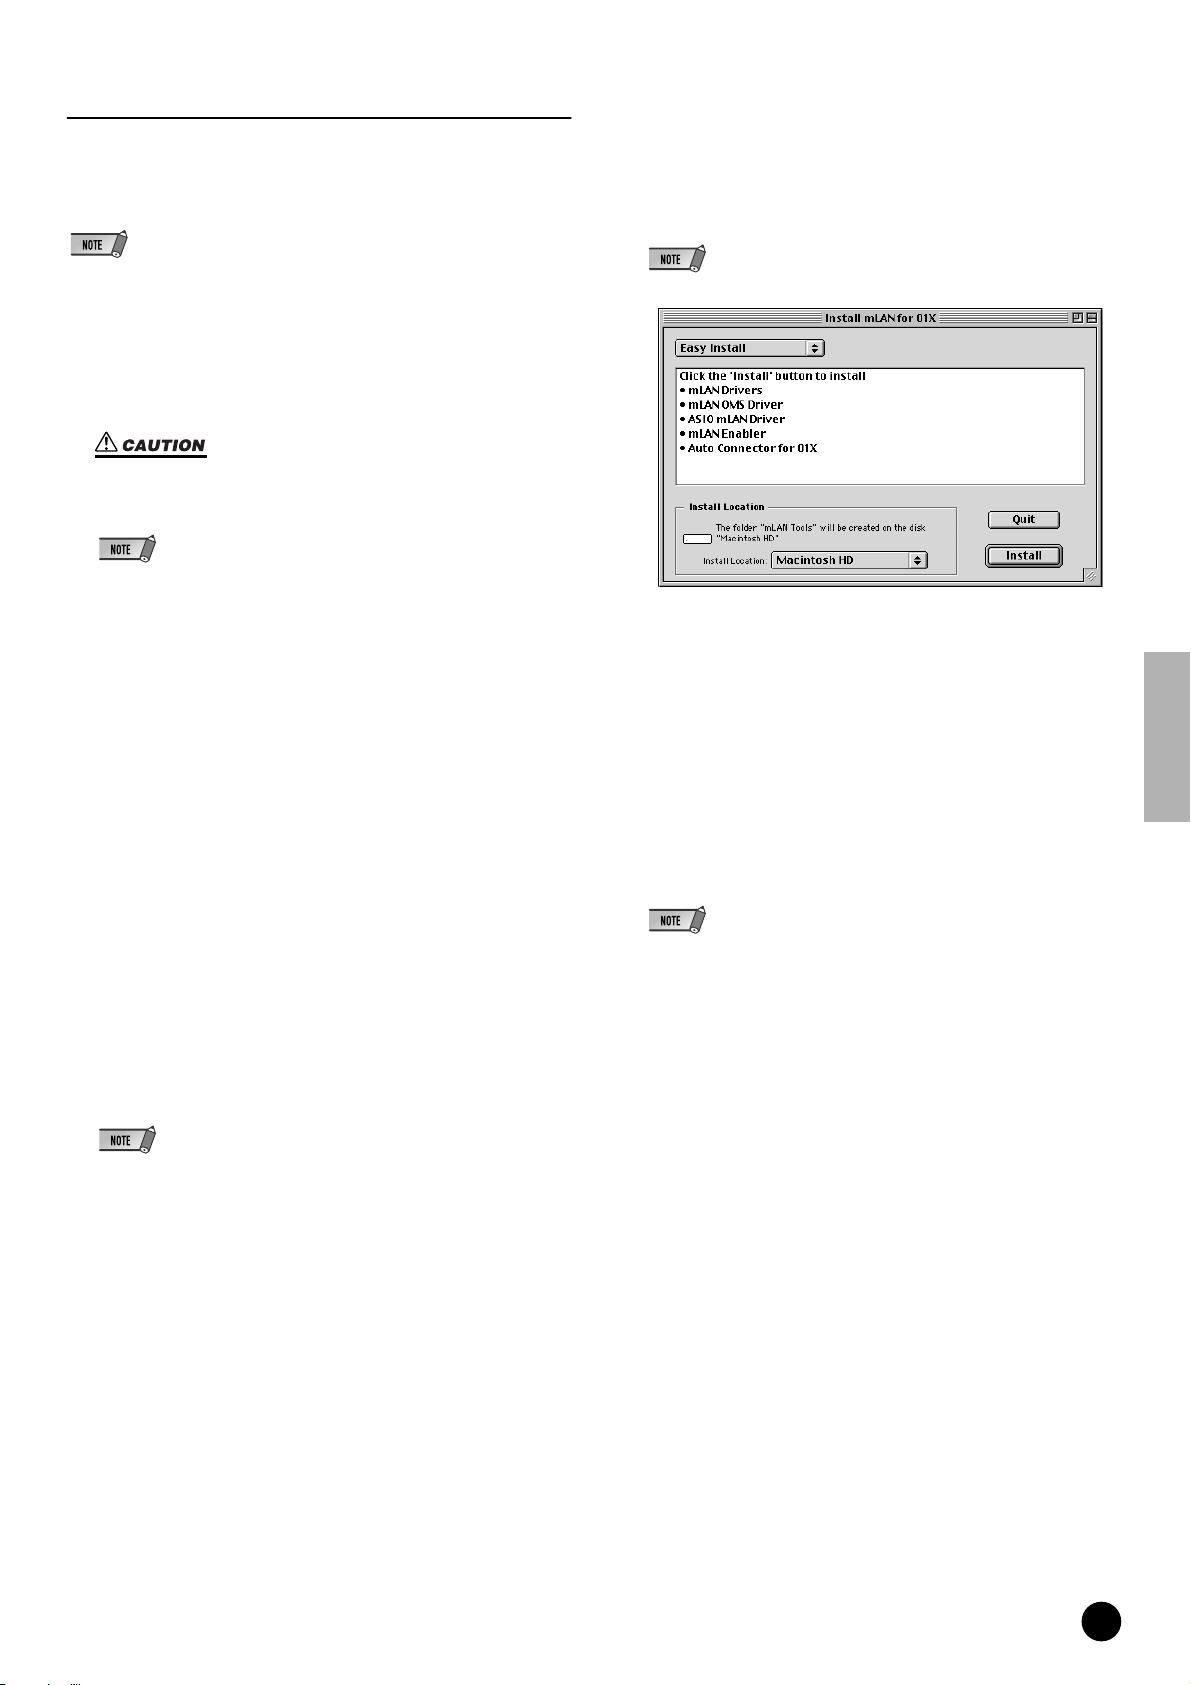
Double-click the “Install mLAN for 01X” icon in the “mLAN_” folder to
display the following installation screen. The “Install Location” box displays the destination of the installation. If you wish to change the destination disk or folder, use the [Switch Disk] button and the pop-up
menu to specify the desired destination.
• For explanations on error messages, see page 29.
• For information on the uninstall (removing the installed application), refer to page 21.
Preparing to install
1
Start the computer.
• When using the mLAN connection, make sure to disable any energy saving
features on the computer (such as Suspend, Sleep, Standby or Pause).
When using the virtual memory, turn it off, then restart the computer.
• If you are using the S200 data transfer rate standard (check the rear panel of
your particular device, or refer to the specifications in the owner’s manual), make
sure to uninstall the old version of mLAN Tools beforehand. (Refer to the
owner’s manual of your particular device.)
2
Exit from any open applications and close all open windows.
Disconnect all MIDI cables connecting MIDI devices to the MIDI IN/OUT
3
of the 01X.
Using an IEEE 1394 (FireWire/iLink) cable, connect the 01X directly to
4
the computer (without use of a hub), and disconnect all other IEEE 1394connected devices from the computer.
• In general, there is no need to change the destination directory.
13
Confirm that “Easy install” is selected and click “Install.” At the confirmation message that appears, click “Continue.”
If a message “OMS Folder cannot be found in the system folder” or the
14
like appears, after finishing the installation, copy the file “mLAN OMS
Driver” (located in “Into OMS Folder” of the “mLAN Tools” folder in the
installation destination) to the system folder “OMS Folder.”
The message prompting to search the ASIO Drivers folder is shown.
15
Click [OK]. The result of the search will be displayed.
Insert the included CD-ROM (“TOOLS for 01X”) into the CD-ROM drive.
5
OMS (Open Music System)
Double-click on the “OMS_” folder (English version only).
6
“Install OMS 2.3.8” will be displayed.
7
Double-click on “Install OMS 2.3.8.”
OMS Setup Dialog will be displayed.
8
Execute the installation by following the on-screen directions.
After the installation, select “Restart.”
• After the installation is complete, you may encounter an error message warning
that the installer did not close. In this case, go to the “File” menu and select
“Quit” to close the installer. Then reboot the computer.
9
After restarting the Macintosh, you will find the “Opcode”/“OMS Applications” folder on your computer (Hard Disk, as the default).
10
Copy the “OMS_2.3_Mac.pdf” in the CD-ROM to the “OMS Applications” folder (drag-and-drop it to the folder).
Refer to the “OMS_2.3_Mac.pdf” (English version only) for information
on how to use the application.
11
Copy the “OMS Setup for YAMAHA” in the CD-ROM to the “OMS
Applications” folder (drag-and-drop it to the folder).
In the “OMS Setup for YAMAHA” folder you will find the OMS Setup
files for the 01X, which can be used as templates.
Select the installation destination of the ASIO mLAN Driver, then click
16
[OK].
• If a message “ASIO Driver folder cannot be found in the system folder” or the
like appears, after finishing the installation, copy the file “ASIO mLAN” (located
in “Into ASIO Drivers” of the “mLAN Tools” folder in the installation destination)
to the “ASIO Drivers” folder of the particular application you are using.
Turn on the 01X.
17
18
When installation is finished, a “Installation was successful.” message
appears. Click [Restart].
Proceed to the next step.
TOOLS for 01X/Plug-in Effect Installation Guide
19
Page 20
Setting of mLAN AUTO W.CLK(01X)
19
When the mLAN Driver is installed, the mLAN Auto Connector starts.
To ensure that settings of the mLAN Auto Connector are properly
received, set the mLAN AUTO W.CLK (wordclock) parameter to
ENABLE, as described in the following instructions. These settings
can also be made after the mLAN Auto Connector has run.
Setting on the 01X
19-1
Enter the UTILITY mode by pressing the [UTILITY] button on
the 01X.
Call up the mLAN AUTO W.CLK display by pressing W.CLK
19-2
(channel knob 3).
UTILITY mLAN AUTO W.CLK [INT : 48 kHz] 1/2
ENABLE/DISABLE
19-3
Press ENABLE (channel knob 1).
The “ENABLE SURE?” prompt is shown. Change the set-
19-4
ting by pressing channel knob 8.
• If this parameter is already set to ENABLE, the prompt will not appear,
so proceed to the next step.
• The 01X Utility settings are lost when the power is turned off, unless System
Backup is performed. (Refer to the 01X Owner’s Manual.) In order to ensure the
settings here are effective the next time you turn the 01X on, perform System
Backup by holding [SHIFT] and pressing [UTILITY].
Proceed to the next step.
Settings in the mLAN Auto Connector
20
Change the mLAN Auto Connector settings as necessary for your particular mLAN usage.
Sample Rate ..........Determines the sampling frequency (frequency of
the wordclock)
From 01X to Mac ...Determines the number of mLAN audio transmis-
sion channels from the 01X to the computer.
From Mac to 01X ...Determines the number of mLAN audio transmis-
sion channels from the computer to the 01X. The
latter two channels are connected to the monitor
input.
• Connecting the 01X by using the mLAN Auto Connector may produce noise in
some of the devices. For this reason, make sure to turn down the level of your
amp/speaker system or the MONITOR/PHONES knob/Stereo fader during the
“Connect” operation.
• If you change the Sample Rate to 96 kHz/88.2 kHz when LAYER of the 01X is
set to 17 – 24 (mLAN), LAYER 1 – 8 will be called up and channel 1 will automatically be selected.
Setting the Wordclock Transition Speed
Clicking [Setup] from the mLAN Auto Connector display opens the
serup display
When the wordclock of the 01X is set to slave to an external mLAN
and the incoming wordclock changes, this determines whether the
wordclock will adjust quickly or slowly to match the master wordclock.
Slow ....The wordclock changes slowly. (This is the usual setting
for most applications.)
Fast .....The wordclock changes quickly. (This may result in
increased jitter noise.)
21
Click [Connect]. If the connections are correct, the mLAN Auto Connector completes operation and the mLAN data communication starts,
with the 01X as slave.
• If connection fails, restart mLAN Auto Connector (located in the “mLANTools”
folder in the installation destination), then click [Connect] again.
• When starting the mLAN Auto Connector for the first time, the following files are
included in the Trash. These files can be deleted.
• AutoConnector01X alias
• AutoConnector01X launcher
Proceed to the next step.
TOOLS for 01X/Plug-in Effect Installation Guide
20
Page 21

Setting up OMS
• If you are using mLAN on your Macintosh with an optionally installed IEEE 1394
(FireWire) interface card, recreate a new Studio Setup by OMS Setup without using
the 01X-mLAN OMS Setup file included in the installation CD-ROM. For details, refer
to the OMS manual.
22
Double-click on the “OMS” folder and “OMSSetup for YAMAHA”
folder. The “01X-mLAN” file appears. Copy this to the hard disk on
your computer.
23
Double-click on the “01X-mLAN” file to start the OMS Setup.
24
After starting the OMS Setup, the Studio setup file double-clicked in
23
opens.
step
If “ ” is not indicated at the right of the setup file name, select “Make
Current” from the “File” menu and execute the save operation.
The OMS studio setup has been completed. You’ll also need to set the
OMS port when using the software (page 22).
The setting names (device names) of each MIDI port are as shown
below, when the Studio Setup file of 01X-mLAN is loaded. They
correspond to the functions of the fixed MIDI port of 01X. Select the
proper device (port) for the application you are using.
01X MIDI Port Function
MID Port Device Name Function
1DAW Remote control
2MIDI-A Direct connection to MIDI-A terminal
3MIDI-B Direct connection to MIDI-B terminal
4 Studio Manager Studio Manager
5 Scene CTRL Remote control (Mode is fixed to
• After the OMS studio setup above has been completed, your computer will recognize
only the 01X as a MIDI device. If you use another MIDI instrument in addition to the
01X or you add an 01X to the existing system, you should create an original Studio
Setup file. For details,refer to the on-line manual supplied with OMS.
• The included OMS studio setup file may not function even if you follow the above procedure, depending on your Macintosh/Mac OS version. (MIDI data cannot be transmitted/received even if the setup becomes available.) In this situation, connect your
Macintosh to the 01X and follow the procedure below to re-create the setup file.
Start OMS Setup and select “New Setup” from the “File” menu.
1
The “OMS Driver Search” dialog appears. Remove the check from the “Modem”
2
and “Printer” check boxes, and click [Search] to execute the device search. If the
Search operation has been completed successfully, the [mLAN-01] device is displayed in the OMS driver setting dialog.
Click the [OK] button to search for ports. Port 1, Port 2 ... appears in the dialog.
3
Mark the appropriate checkbox of the port and click the [OK] button to store the
setting.
(MIDI/mLAN MIDIconversion)
(MIDI/mLAN MIDIconversion))
“GENERAL.” This is used for control
of the Multi Part Editor, or for
recalling Library Scenes by program
change messages.
• Double clicking the icon of the mLAN device or executing “MIDI Device Info...”
from the “Studio” menu by selecting the mLAN device, calls up the Device Info
dialog box. We recommend that you not change the channel assignment since
this is already set by the setup application (mLAN Auto Connector, etc.) for optimum use with mLAN devices such as the 01X. Reset the settings as shown in
the illustration below if you have inadvertently changed them.
Confirming the installation
The mLAN Installer places the following files in the following locations.
Control panel folder of the startup disk
mLAN Driver Setup (page 10)
• You can use the mLAN Driver Setup (page 10) to check whether data is being properly transmitted and received via mLAN.
Extensions folder of the startup disk
mLAN Driver
mLAN Expert
mLAN Family
mLAN Transporter Family
The folder you specify
mLAN T ools folder
Opcode/OMS Applications
System folder
Control Panels/mLAN Driver Setup
OMS Folder/mLAN OMS Driver
Preferences/mLAN HALs/01XTransporter.hal
Preferences/mLAN Prefs folder
*Delete the files and folders listed above when
uninstalling . Be careful
not to delete data already existing before the installation, including files
related to OMS
TOOLS for 01X/Plug-in Effect Installation Guide
21
Page 22
Changing settings after installation
The mLAN-related settings can be changed after installation from the
mLAN Driver Setup window. To display it, start the mLAN Driver Setup
in the Control Panels folder.
mLAN Driver Setup
This window lets you check and change the mLAN settings for receiving/
transmitting data. Make sure to close any application (DAW, etc.) using
the mLAN connection before making changes. The settings here are the
same as that in Windows. See page 10.
• The Mode setting is only for Windows.
• The [EXIT] button is only for Windows.
• To change the wordclock (sample rate) and the number of channels used, Start the
mLAN Auto Connector in the mLAN Tools folder.
Studio Manager
Installation of Studio Manager
Double-click the “Install Studio Manager” icon in the “StudioManager_”
1
folder to display the following installation screen. The “Install Location”
box displays the destination of the installation. If you wish to change the
destination disk or folder, use the [Switch Disk] button and the pop-up
menu to specify the desired destination.
OMS Port Setup
4
Start up Studio Manager by double-clicking its icon.
• If AppleTalk is enabled, you will get an alert message. Click “OFF.” It will take
some time for AppleTalk to be disabled.
Choose “Selects OMS Ports” from Studio Manager’s “File” menu, then
5
select the port settings.
Input Port: Select “Studio Manager” (Port 4).
Output Port: Select “Studio Manager”(Port 4).
6
Click [OK] to close OMS Port Setup.
• In general, there is no need to change the destination directory.
In order to install the Studio Manager owner’s manual (PDF), select
2
[Custom Install], make sure that “Studio Manager for 01X” and “*****PDFManual” are checked (“***” indicates the selected language), then click
[Install].
Select [Custom Install]
3
When installation is finished, a “Installation was successful.” message
appears. Click [Quit].
TOOLS for 01X/Plug-in Effect Installation Guide
22
Page 23
Plug-in Effect
Double-click on the “Mac OS 9” folder. “VST_” folder will be displayed.
1
Double-click on the “VST_” folder. “VST Plugin Installer.” will be dis-
2
played.
3
Double-click on “VST Plugin Installer.”
A window for selecting plug-in effects will be displayed.
In the window , the “Install Location” box displays the destination of the
owner’s manual (PDF file). You should avoid changing the installation
location. Select (check) the software you want to install .
Click [Install]. In the window that appears, enter the User Name, Com-
4
pany Name, and Serial Number.
• Serial number is provided in the included Users Card.
5
Click [Continue]. In the window that appears, you can select the “VstPlugins” folder to which the plug-in effect will be installed.
• If there is only one “VstPlugins” folder in your computer, this step is unnecessary. Go on to step
• If there is no “VstPlugins” folder in your computer, you can select the location to
which the plug-in effect will be installed, in the window that appears.
6
Click [OK]. The installation starts.
7
When the installation is complete, the following screen appears.
To finish the installation, click [Quit]. To copy the module to a location
other than selected in step 5 above, click [Continue] and repeat the
procedure from step 3.
7 .
TOOLS for 01X/Plug-in Effect Installation Guide
23
Page 24

Demo playback/Remote Control Setup
Computer Software that can be controlled from the 01X
SQ01 V2 (ver 2.0 or later) Logic 5 series (ver 5.1 or later) Logic 6 series (ver 6.0 or later) (Logic Plutinum/Gold/Audio)
Cubase SX (ver 1.0.3 or later) Cubase SL (ver 1.0.3 or later) Nuendo 2.0 (ver 2.0 or later) SONAR/XL (ver 2.1 or later)
Digital Performer (ver 3.1 or later) Multi Part Editor for MOTIF-RACK/MOTIF ES
• Check also the system requirements of the 01X (when using mLAN). (See pages 5, 18.)
SQ01
• For information on settings for Cubase, refer to the Getting Started in the owner’s
manual.
Hints when using audio data (Windows)
For optimum use of the audio functions, we recommend you make
the following settings. These settings minimize possible audio
problems, such as drop outs, glitches and noise.
• Set the DMA mode (high-speed transfer mode) of the hard
disk to on
To set the DMA mode, select [Control Panel] ➝ [System] (➝
[Hardware]) ➝ [Device Manager], then change the setting from
[Disk drives] or [Hard disk controllers].
• Set Processor Scheduling to “Background services”
Select [Control Panel] ➝ [System] ➝ [Advanced] ➝ [Performance] ➝ [Settings] ➝ [Advanced] and check (enable) “Background services” in the “Processor scheduling” section.
• Set the Visual Effects options to “best performance”
Select [Control Panel] ➝ [System] ➝ [Advanced] ➝ [Performance] ➝ [Settings] ➝ [Visual Effects] and check (enable)
“Adjust for best performance.”
• Turn Automatic Updates off
Select [Control Panel] ➝ [System] ➝ [Automatic Updates] and
un-check (disable) “Keep my computer up to date.”
• Set Remote Assistance to off
Select [Control Panel] ➝ [System] ➝ [Remote] and un-check
“Allow Remote Assistance invitations...”
• Enable the Classic Start menu
Right click on an empty space in the task bar and select [Properties] ➝ [Start Menu], then check (enable) “Classic Start menu.”
• Disable transition effects
Select [Control Panel] ➝ [Display] (➝ [Appearance]) ➝ [Effects...]
button, and un-check (disable) “Use the following transition effect
for menus and tooltips.”
After finishing the installation of SQ01, select [Start] ➝ [All programs] ➝
[YAMAHA SQ01 Ver 2.0] ➝ [SQ01] to start the SQ01.
• While SQ01 is starting, do not turn any mLAN-connected external devices on or
off, and do not insert or disconnect the mLAN cable. Doing so may result in
the computer freezing or hanging up, or result in termination of the functions of
the external devices.
This section shows how to make the MIDI/Audio and remote control
settings for playing back MIDI/audio data from the SQ01. Once you
finish setting up, try playing back the demo songs included in the CDROM.
MIDI setup
When using the 01X for remote control
When using an external MIDI device (tone generator, MIDI
keyboard, etc.)
1 Select [MIDI] ➝ [Device] from the Setup menu in the Track View window
to call up the dialog boxes below.
TOOLS for 01X/Plug-in Effect Installation Guide
24
2 Select (highlight) the driver applicable to the MIDI keyboard (or MIDI
interface) you will be using by clicking in the “In” column. Select also the
port (page 21) you will be using on the 01X. You can select several if
desired.
3 As in step 2 above, select the MIDI driver applicable to the tone genera-
tor (or MIDI interface) you will be using in the “Out” column, then click
[OK]. Select also the port(s) (page 21) you will be using on the 01X.
Page 25
When using VST instruments (plug-in software synthesizers)
The settings of the plug-in software synthesizer are saved separately for
each song. This means that when you open a song, all settings which have
been already stored to the song are automatically called up.
This section explains how to set a VST plug-in softw are synthesizer when
creating a new song.
1 In the toolbar, click [ ] (Soft Synth rack) to open the Soft Synth rack.
2 Click the [ ] (Add) button and select the plug-in synthesizer to be used
from the pop up menu that appears.
Audio setup
1 Make sure that the “Disable Audio” setting is not checked. (Select
“Audio” from the Setup menu, then click it if necessary to turn the checkmark off.) If this is checked, the audio cannot be used.
2 From the Setup menu, select [Audio] ➝ [Device] to call up the window
below.
• In the pop up menu called up here when clicking [Add], the plug-in synthesizers
located in Program Files
on using these plug-ins with other programs, refer to “Settings for VST Plug-ins”
(page 26).
➝
Yamaha ➝ Vstplugins, is displayed. For information
Remote Control Settings
1 From the Setup menu in the Track View window, select “Remote Control”
to call up the dialog boxes below, then make the settings as shown.
Mode: 01X
Input device: mLAN MIDI In (Port 1)
Output device: mLAN MIDI Out (Port 1)
01X port number: 1
3 Select ASIO for the audio driver and “ASIO mLAN” for the device.
4 Enable (checkmark) the appropriate channels that will be used for the
inputs/outputs of the active channels.
5 Click [OK] to close the window.
• The port not indicated with a number is Port 1.
• When using the Multi Part Editor for remote control as the plug-in of SQ01, select
“Multi Part Editor for MOTIF-RACK” as the MIDI Editor.
• The MIDI Mixer in the SQ01 cannot be remote controlled by the 01X.
• [Setup] of Audio Mixer window – setting of the [Remote Control...] becomes
invalid.
2 On the 01X, select UTILITY ➝ REMOTE (knob 1) ➝ REMOTE SELECT,
then select “GENERAL.”
TOOLS for 01X/Plug-in Effect Installation Guide
25
Page 26
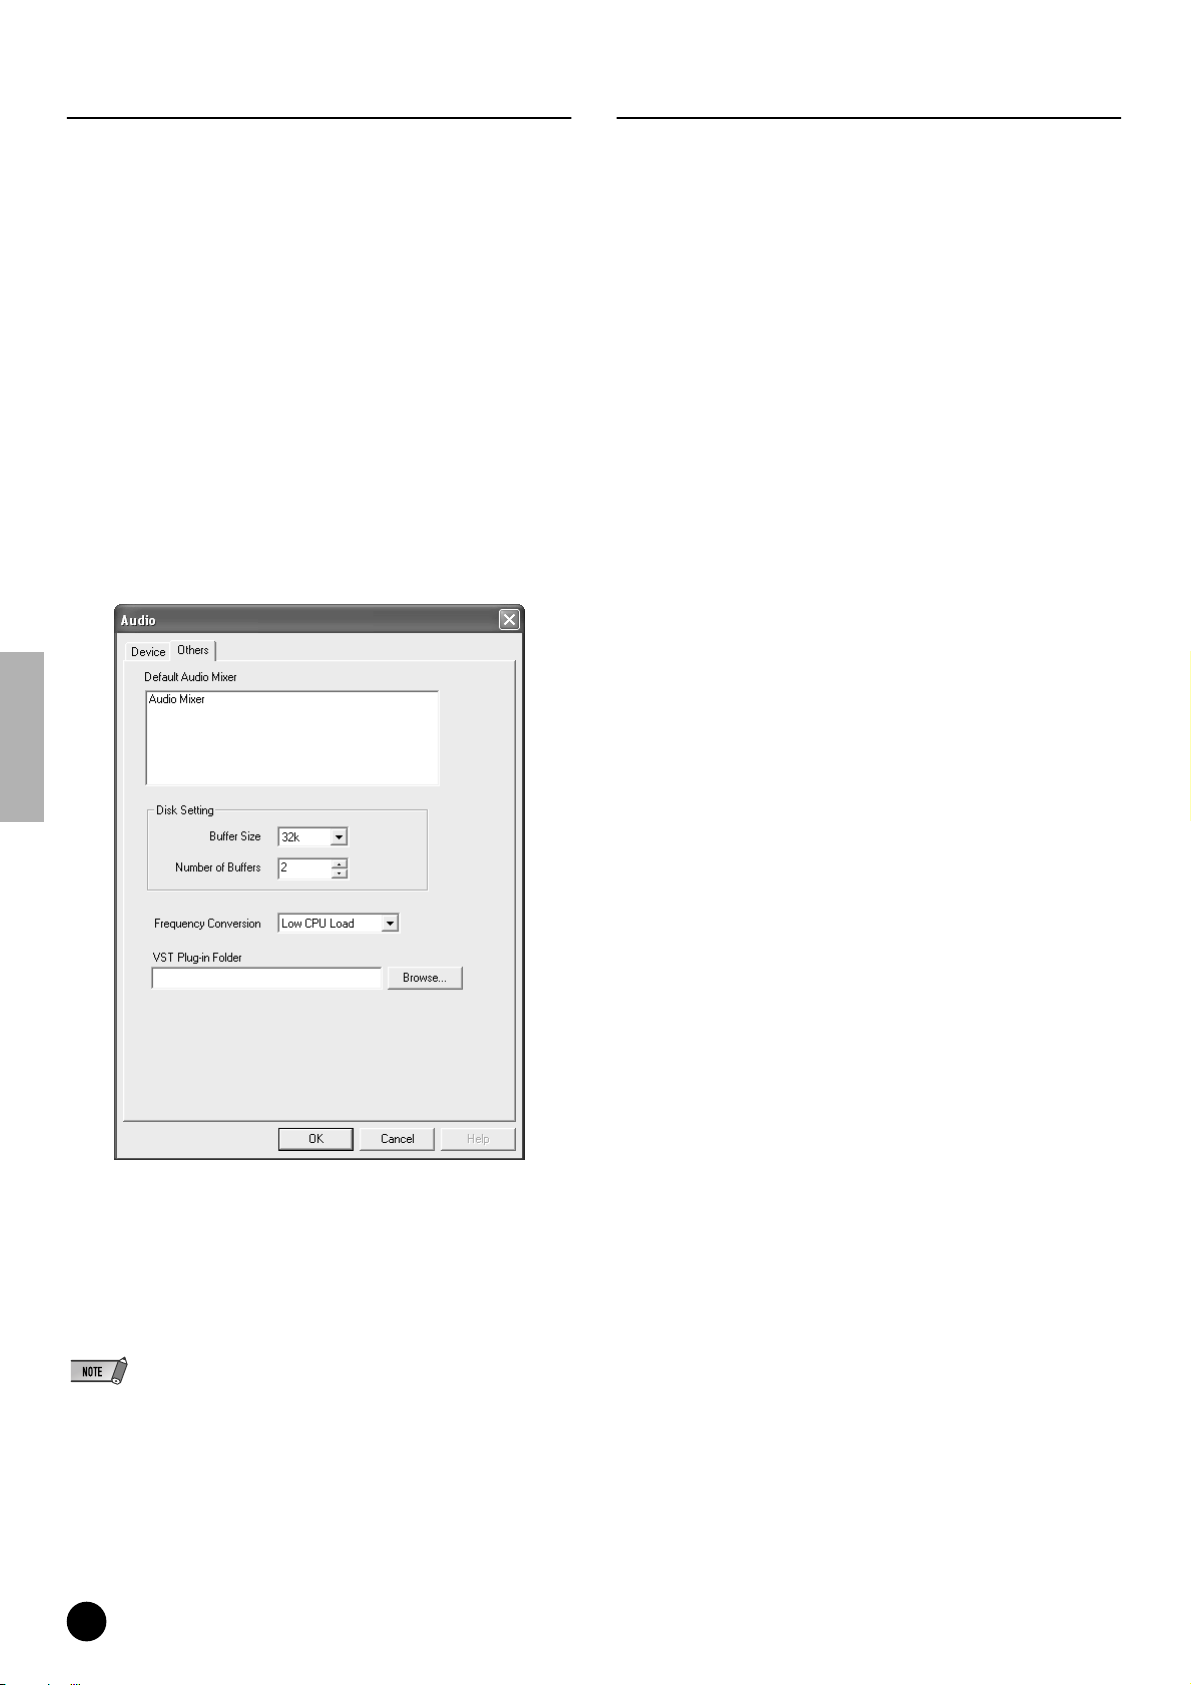
Settings for VST Plug-ins
Playing the demo song
When using VST plug-ins on the SQ01, you will first need to move the
module(s) of the plug-in software you want to use to the VST Plugins
folder ([Program Files] ➝ [YAMAHA] ➝ [Vst plugins]). The VST plugin software included with the SQ01 is installed in this folder when
following the installation steps on page 14. This means it can be used on
the SQ01 without having to make any new settings.
This section explains about the settings you need to make when you want
to use VST plug-in software from other companies on SQ01, and also
about the settings necessary when using VST plug-in software included
with the SQ01 on host applications other than the SQ01.
Using other companies’ VST plug-ins on the SQ01
In addition to the module in the [Program Files] ➝ [YAMAHA] ➝ [Vst
plugins] folder, you can specify another folder for the SQ01 to search for
the VST plug-in. This also allows you to use the VST plug-in software
with other applications. Make the settings as shown below.
1 From the Setup menu in SQ01, select [Audio] ➝ [Others] to call up the
window below.
1 Copy the demo song file (All for You for SQ01.yws) from the
“DemoSong” folder of the CD-ROM to your hard disk.
2 From the File menu in SQ01, select [Open] to call up the [Open] dialog
box. Select the demo song you copied to the hard disk and click [Open].
A new Track View window/Audio Mixer window (refer to the online help)
will open and the selected demo song data will appear as blocks in the
tracks.
3 On the 01X, switch to INTERNAL mode and select the [9/16 (mLAN)]
layer.
4 Set faders 1 and 2 (mL1/mL2) to appropriate levels.
5 Call up the PAN setting display by pressing the [PAN] button, turn chan-
nel knobs 1 and 2 to opposite left/right pan positions.
6 After checking that MONITOR B (lamp is off) is selected for MOINTOR A/
B, turn up the master fader.
7 Set Remote Control (page 24) to set the 01X to REMOTE mode.
8 To start playback of the demo song, press the play button of 01X or click
the play button of the transport bar (refer to the online manual of SQ01).
For details on subsequent operation steps, refer to the online manual of
SQ01.
2 Click the [Browse...] button at the right of the [VST Plug-in Folder] box to
call up the box for selecting the folder.
3 Select the VST plug-in folder which has the VST plug-in you want to use
from the list and click [OK].
4 Click [OK] to close the Audio dialog.
• Alternately, you can copy the VST plug-in module you want to use to the [Program
➝
[YAMAHA] ➝ [Vst plugins] folder so that it can also be used on the SQ01.
Files]
For details, refer to the owner’s manual of the particular VST plug-in you are using.
TOOLS for 01X/Plug-in Effect Installation Guide
26
Page 27
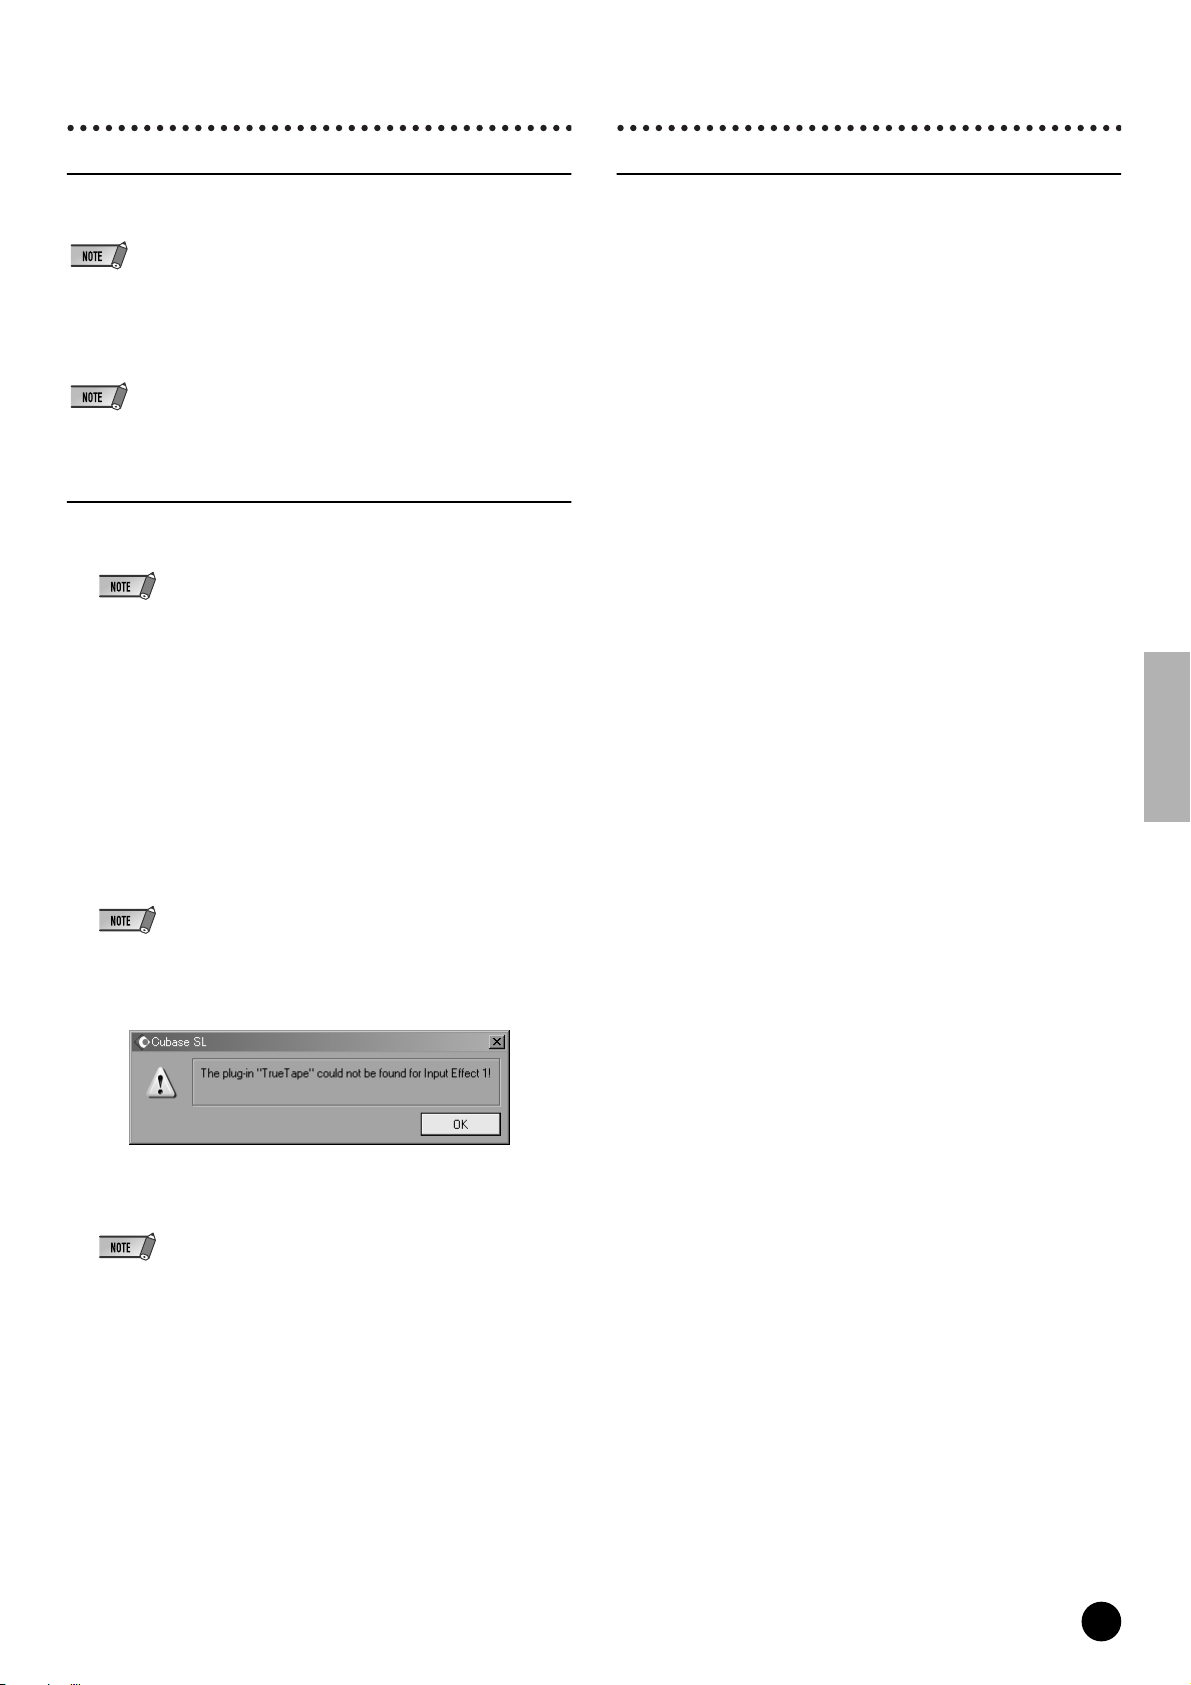
Cubase SX/SL
Logic
MIDI (Remote Control)/Audio setup
For information on the MIDI/Audio setup, see page 66 of the main owner’s
manual.
• Setup for Nuendo
The settings for Nuendo (ver. 2.0 or later) are the same as for Cubase. However, to
specify the Audio Inputs/Outputs to be assigned to the desired buses, select [VST
Connections] from the [Devices] menu, then set the inputs/outputs by using the [Add
Bus] operation.
• The settings for Cubase SL are the same as for Cubase SX.
Playing the demo song
1 Install the Vocal Rack, Final Master and Pitch Fix Plug-in Effects (page
14).
• Cubase SX/SL may sometimes quit automatically if you open the demo song for
Cubase SX/SL without installing these Plug-in Effects.
2 Copy the folder of the demo song from the CD-ROM to C:\Program
Files\YAMAHA on your computer.
If there is no Program Files folder in the C: drive of your computer, or the
Yamaha software has been installed to a different folder and you need
copy the demo song to some other folder location, make sure to establish
again the necessary file link (as described in the note below), since the
link between the demo song file and audio files has been broken.
3 From the File menu, select [Open] call up the [Open] dialog box.
Select “All for You for Cubase SXSL” from the demo song folder you
have copied to the hard disk, and click [Open].
• If a message appears indicating that the file cannot be found, select the specified
file in the demo song folder you have copied to the hard disk.
• The message below may sometimes appear when opening the song within
Cubase SL; however, this does not affect song playback. Click [OK].
Remote Control setup
When turning on the power of the 01X before starting
Logic:
1 On the 01X, select UTILITY ➝ REMOTE (knob 1) ➝ REMOTE SELECT
➝ “LOGIC,” then enter the Remote mode by pressing the [REMOTE]
button.
2 Start Logic on the computer.
Logic automatically recognizes the 01X for Logic Control and performs
the required settings.
When starting Logic before turning on the power of the
01X:
1 Start Logic on the computer, then turn on the power of the 01X. If you
have already set the software to be controlled to “Logic” in the Utility
mode, you need not perform step 2 because Logic automatically recognizes the 01X when this step is performed.
2 On the 01X, select UTILITY ➝ REMOTE (knob 1) ➝ REMOTE SELECT
➝ “LOGIC,” then enter the Remote mode by pressing the [REMOTE]
button. Logic automatically recognizes the 01X for Logic Control and performs the required settings.
If for some reason Logic fails to recognize the 01X, follow the instruc
tions below.
1
Select [Options] ➝ [Preferences] ➝ [Control Surface] ➝ [Install]
from the menu.
Scan Logic Control (Yamaha 01X) on the window called up in step
2
1
).When the scanning is successful, the Logic recognizes the01X
for Logic Control and performs the required settings automatically.
If Logic still fails to recognize the 01X even after performing the above
instructions, follow the instructions below.
1
Select [Options] ➝ [Preferences] ➝ [Control Surface] ➝ [Install]
from the menu.
2 Add Logic Control (Yamaha 01X) on the window called up in step
1).
3 Specify the Input Port (DAW/mLAN MIDI In: Port 1) and Output Port
(DAW/mLAN MIDI Out: Port 1) on the CONTROL SURFACE
SETUP window called up in step 2.
-
4 The steps following this are the same as those following step 3 of playing
the demo song on the SQ01 (page 26).
• When playing back song data for the first time after starting Cubase, the automation data and audio data may not be synchronized. Stop playback once and try
playing back again.
TOOLS for 01X/Plug-in Effect Installation Guide
27
Page 28

Audio setup
SONAR
1 Select [Options] ➝ [Preferences] ➝ [Audio Hardware & Drivers] ➝
[Install] from the menu. A window for setup appears.
2 (Windows only) Click the Audio Driver 2 tab, then check (select) ASIO for
the driver.
3 Select “ASIO mLAN” for the device, then restart Logic.
Playing the demo song (Macintosh only)
1 Install the Vocal Rack, Final Master and Pitch Fix Plug-in Effects (page
23).
2 Copy the “DemoSong” folder of the CD-ROM to your hard disk.
3 Double click on the demo song file (All for you for Logic) in the
“DemoSong” folder to open the demo song file.
4 The steps following this are the same as those following step 3 of playing
the demo song on the SQ01 (page 26).
Digital Performer
Remote Control setup
1 Pull down the [Basics] menu and select [Control Surface Setup] to call up
the “Control Surface” window.
2 Select “Mackie Control” in the Driver section. If Mackie Control is not
available here, see the supplementary instructions below.
3 In the box for setting “Unit” and “MIDI,” select “Mackie Control” in the
“Unit” section and select the DAW/Port 1 (mLAN MIDI In/Out Port 1) in
the “MIDI” section.
Remote Control setup
1 Pull down the [Options] menu and select [MIDI Devices] to call up the
“MIDI Devices” window.
2 Add “mLAN MIDI In (Port 1)” to the “Inputs” and add “mLAN MIDI Out
(Port 1)” to the “Outputs.”
3 Pull down the [Options] menu and select [Control Surfaces] to call up the
Control Surface window.
4 Click the “New” icon, select “Mackie Control” in [Control Surfaces] then
set the Input Port to “mLAN MIDI In (Port 1)” and the Output Port to
“mLAN MIDI Out (Port 1).”
5 On the 01X, select UTILITY ➝ REMOTE (knob 1) ➝ REMOTE SELECT
➝ “SONAR,” then enter the Remote mode by pressing the [REMOTE]
button.
Audio setup (WDM)
• If the WDM setting (for SONAR) is not specified set Mode in Driver Setup (page 10) to
WDM after closing the application.
1 Select Options ➝ Audio to open the “Audio Options” window.
2 Click Advanced tab to make sure the Driver Mode is set to WDM/KS.
• If WDM/KS is not selected, select “WDM/KS,” then restart the SONAR.
3 Select Options ➝ Audio to open the “Audio Options” window, then select
mLAN audio ports to be used from “General” ➝ “Input Monitoring” ➝
“Drivers.”
Playing the demo song
4 On the 01X, select UTILITY ➝ REMOTE (knob 1) ➝ REMOTE SELECT
➝ “DP,” then enter the Remote mode by pressing the [REMOTE] button.
When you cannot select “Mackie Control” in step 2:
1 Download the Mackie Control Plug-in software from
“www.motu.com” and save it to your hard disk.
2 Move the Mackie Control file to the “Plug-ins” folder contained in the
folder to which Digital Performer has been installed.
3 Start Digital Performer.
• Set the MIDI Thru function of OMS Setup and the MIDI Patch Thru function of
Digital Performer so that they function in the background.
Audio setup
1 Pull down the [Basics] menu and select [Configure Audio System] ➝
[Configure Hardware Driver] to call up the “Configure Hardware Driver”
window.
2 Select “ASIO” from the menu.
3 Select ASIO mLAN for the “ASIO Driver.”
• To call up the ASIO mLAN Control Panel, click “Configure Driver.”
4 Copy the folder of the demo song from the CD-ROM to C:\Program
Files\YAMAHA on your computer.
If there is no Program Files folder in the C: drive of your computer, or the
Yamaha software has been installed to a different folder and you need
copy the demo song to some other folder location, make sure to establish
again the necessary file link (as described in the note below), since the
link between the demo song file and audio files has been broken.
5 From the File menu, select [Open] call up the [Open] dialog box.
Select “All for You for Cubase SXSL” from the demo song folder you
have copied to the hard disk, and click [Open].
• If a message appears indicating that the file cannot be found, select the specified
file in the demo song folder you have copied to the hard disk.
6 The steps following this are the same as those following step 3 of playing
the demo song on the SQ01 (page 26).
TOOLS for 01X/Plug-in Effect Installation Guide
28
Page 29

Display Messages
Messages Page
Can’t find the mLAN Stream Driver.
Re-install the mLAN Drivers.
Can’t find the 01X on the mLAN network.
Make sure that the 01X is turned on and that the mLAN cable connection is correct and secure. After that, restart “mLAN Auto
Connector for 01X”.
The settings of the mLAN Driver could not be changed.
1) If an application that uses the driver is currently active, close it first, then change the settings.
2) There is not enough resource memory.
Failed to set the 01X’s wordclock to slave.
Set the master clock of the 01X so that mLAN Auto W.CLK is set to “ENABLE.”
1) Press the [UTILITY] button on the 01X.
2) Select “W.CLK” (press knob 3) on the 01X.
3) Set the parameter to “ENABLE”
Failed to initialize the mLAN settings because the application “mLAN Start” is not running.
Select “ON” from the menu of “mLAN Manager” application.
Can’t connect the 01X’s mLAN audio output plug to the computer’s mLAN audio input plug. 9, 10
Can’t connect the 01X’s mLAN MIDI output plug to the computer’s mLAN MIDI input plug. 9, 10
Can’t connect the computer’s mLAN MIDI output plug to the 01X’s mLAN MIDI input plug. 9, 10
Can’t connect the computer’s mLAN wordclock output plug to the 01X’s mLAN wordclock input plug. 9, 10
Can’t connect the 01X’s mLAN wordclock output plug to the computer’s mLAN wordclock input plug. 9, 10
A new 1394 adaptor card has been found.
If you’ve inserted a new card, restart the computer.
There is not enough resource memory.
Execute mLAN Stop, then execute mLAN Start again. If this fails, restart the computer.
The 1394 adaptor card has not been found.
Check the card and start mLAN again.
One of the programs could not be started. Follow the instructions/messages in the appropriate application. If there are no
messages, execute mLAN Start again or restart the computer.
The application is not responding.
Execute mLAN Start again or restart the computer.
Failed to load the mLAN Bus Driver.
If the New Hardware Wizard has not been run, use it to install the hardware, then execute mLAN Start.
One or more programs could not be closed.
After quitting all DAW programs and any programs using mLAN, execute mLAN Stop.
6, 18
9, 20
12
9, 20
10
10
32
10
10
10
10
TOOLS for 01X/Plug-in Effect Installation Guide
29
Page 30

Troubleshooting
■ Cannot install the driver.
• Is the mLAN cable properly connected? Check the connection; disconnect the mLAN cable once, then insert it again.
■ The mLAN connection does not work.
• Has the driver been installed?...................................................................................................................................................................pages 3, 17
• Is the mLAN cable properly connected? Check the connection; disconnect the mLAN cable once, then insert it again.
• (For Windows) Is mLAN set to “ON”? From the taskbar, right click on the mLAN Manager icon.......................................................... page 10
• (For Windows) When adding a new IEEE 1394 card, right click on the mLAN Manager icon in the taskbar and select “ON.”............... page 10
• Is the ACTIVE lamp on the rear panel of the 01X lit (in blue)? If it is not lit, check the followings:
• In mLAN Driver Setup (from taskbar, right click on the mLAN Manager icon, then “Driver Setup”), is the Status indicator blue?
If not, restart the 01X and re-enable connection by using mLAN Auto Connector...................................................................................... page 10
• Is mLAN AUTO W.CLK (Auto Wordclock) on the 01X set to “ENABLE”? ........................................................................................pages 9, 20
• Has connection been enabled with mLAN Auto Connector? Re-enable connection if necessary.
..........................................................................................................................................“Settings by mLAN Auto Connector” on pages 9 and 20
• Have you changed the device? Even if the model is the same, if the actual device is different,
it is necessary to re-enable connection by using mLAN Auto Connector.
..........................................................................................................................................“Settings by mLAN Auto Connector” on pages 9 and 20
• Is there a loop connection? Check the cabling and make sure none of the devices are connected in a loop.
Example of loop connection
Computer
01X
Computer
01X
: IEEE1394-equipped device
• There may be a limit on the IEEE 1394 interface of your computer as to the number of ports that can be used simultaneously.
Check how many ports can be used simultaneously.
• Turn off all devices on the mLAN network (except the computer) and re-connect each device one-by-one until the device causing the problem is found.
• (For Windows) (When removing the mLAN bus from the [Safely Remove Hardware] setting of the task bar.) Restart the computer when using mLAN again.
• With Macintosh notebook computers such as the iBook and PowerBook, always first connect the 01X and mLAN cable then
turn on the power of the 01X, before starting up the computer.
■ The mLAN Driver (MIDI/Audio) is not detected from the application (DAW, audio sequencer, etc.).
• (For Windows) Is mLAN (mLAN Driver) set to “ON”? From the taskbar, right click on the mLAN Manager (mLAN icon). ...............page 10
• Is the 01X properly connected to the computer by an mLAN cable, and is the power turned on?
(Try starting the mLAN Auto Connector and “connect” again.)
..........................................................................................................................................“Settings by mLAN Auto Connector” on pages 9 and 20
• With Macintosh notebook computers such as the iBook and PowerBook, always first connect the 01X and mLAN cable then
turn on the power of the 01X, before starting up the computer.
• Are the mLAN settings correct? .................................................................................................. (“The mLAN connection does not work.” above)
■ The Remote Control or Automation features do not work.
• Is the correct DAW software selected in Remote Select? ............................................................................................................................. page 24
• Are the mLAN settings correct? .................................................................................................. (“The mLAN connection does not work.” above)
• Are settings on the DAW correct?................................................................................................................................................................. page 24
• Is Port 1 selected for mLAN MIDI transmission/reception?......................................................................................................................... page 21
■ Cannot change the wordclock.
• Set this with the mLAN Auto Connector when using mLAN..........................................“Settings by mLAN Auto Connector” on pages 9 and 20
• Is the mLAN Auto Wordclock (AUTO W.CLK) setting appropriate?
TOOLS for 01X/Plug-in Effect Installation Guide
30
Page 31

■ The computer operation is sluggish.
• Decrease the number of audio channels to be used by the mLAN Auto Connector. ...............................................................................pages 9, 20
• Increase the latency value.............................................................................................................................................................................. page 11
• (For Macintosh) Operation may become sluggish when resuming a dual processor computer from a sleep or suspended condition. Restart the computer.
• (For Windows) Refer to “Hints when handling audio data.” ....................................................................................................................... page 24
• (For Windows) This problem can sometimes be solved by setting Hyper Threading to “Disable.”
• (For Windows) When not using mLAN, right click on the mLAN Manager icon in the task bar and select “OFF” (close mLAN).......... page 10
■ Cannot close the applications or shut down the computer (operating system).
■ Cannot change the mLAN settings.
■ Cannot uninstall (remove) Install mLAN for 01X (mLAN driver) or mLAN Tools 2.0.
• (For Windows) Is the mLAN (WDM) driver selected as the default audio device for the system?............................................................ page 12
• Select [Start] ➝ [Control Panel] ➝ [Sounds and Audio Devices] ➝ [Voice]. Make sure that something other than
“mLAN Audio Out/In 01” is selected for the “Voice playback” and “Voice recording” settings.
• Select [Start] ➝ [Control Panel] ➝ [Sounds and Audio Devices] ➝ [Audio]. Make sure that something other than
“mLAN Audio Out/In 01” is selected for the “Sound playback” and “Sound recording” settings.
• (For Windows) Select [Start] ➝ [Control Panel] ➝ [Sounds and Audio Devices] ➝ “Sounds” tab, and select “No sounds” in
the “Sound scheme” box, then execute again.
• If you cannot close mLAN (by selecting “OFF” after right clicking the mLAN icon in the task bar), end the processes listed
below manually. ([Ctrl] + [Alt] + [Delete] ➝ “Processes” tab ➝ select process ➝ [End process]) When finished, start mLAN
Manager to change the mLAN settings again.
mLANVDevice.exe
mLANTFamily.exe
mLANSoftPH.exe
mLANManager.exe
• (When a message such as “file cannot be found” appears when uninstalling:) Try executing the installation once more, then
uninstall again.
■ (For Windows) The mLAN Manager (mLAN icon in the task bar) has disappeared.
• Select [Start] ➝ [(All) Programs] ➝ [Startup] (or [mLAN Tools]) ➝ [mLAN Manager]........................................................................... page 10
■ Playback response is delayed.
• Does your computer satisfy the system requirements?.............................................................................................................................pages 5, 18
• (For Macintosh) Turn off virtual memory.
• (For Macintosh) Disable AppleTalk.
• For information on audio problems such as no sound or excess noise, refer to the Troubleshooting section of the 01X Owner’s Manual.
TOOLS for 01X/Plug-in Effect Installation Guide
31
Page 32

Inhalt
Wichtige Hinweise zur CD-ROM ........................................................ 2
Datentypen........................................................................................ 2
Betriebssystem.................................................................................. 2
Verfahren zur Installation der CD-ROM ............................................ 2
Für Windows-Anwender ..................................................................... 3
Inhalt der CD-ROM............................................................................ 3
Open-Plug-in-Technologie ................................................................ 4
Systemanforderungen für 01X/Software ........................................... 5
Softwareinstallation ........................................................................... 6
MIDI-Port-Einstellung (bei Ausführung der Software als
eigenständige Anwendung)............................................................. 15
Für Macintosh-Benutzer ...................................................................17
Inhalt der CD-ROM ..........................................................................17
Systemanforderungen für 01X/Software..........................................18
Softwareinstallation..........................................................................18
Demo-Wiedergabe/Einrichten der Fernsteuerung..........................24
SQ01................................................................................................24
Cubase SX/SL .................................................................................27
Logic ................................................................................................27
Digital Performer..............................................................................28
SONAR............................................................................................28
Display-Meldungen............................................................................29
Problemlösungen ..............................................................................30
Wichtige Hinweise zur CD-ROM
Datentypen
Diese CD-ROM enthält Anwendungssoftware. Anweisungen zur Installation der Software finden Sie auf Seite 3 (für Windows) bzw. Seite 17 (für Macintosh).
VORSICHT
• Versuchen Sie niemals, diese CD-ROM auf einem Audio-CD-Player abzuspielen. Dies kann sowohl zu Hörschäden als auch zu Beschädigungen an CD-Player und Boxen
führen.
Betriebssystem
Die Anwendungen auf dieser CD-ROM werden in einer Version für Windows und in einer Version für das Macintosh-Betriebssystem bereitgestellt. Der
Installationsvorgang und die Anwendungen für die beiden Betriebssysteme weisen Unterschiede auf. Folgen Sie daher der Ihrem Betriebssystem entsprechenden
Installationsanleitung.
Anweisungen zu Windows finden Sie auf Seite 3.
Anweisungen zum Macintosh-Betriebssystem finden Sie auf Seite 17.
Verfahren zur Installation der CD-ROM
Lesen Sie sich, bevor Sie das Siegel der Softwareverpackung öffnen, die Software-Lizenzvereinbarung am Ende dieser Anleitung sorgfältig durch.
q Stellen Sie sicher, dass das System die Betriebsanforderungen der Software
(Studio Manager, mLAN Tools, Treiber usw.) erfüllt. ........................................................................................................Windows: Seite 5; Macintosh: Seite 18
w Installieren Sie den für Ihren Computer geeigneten Treiber, und nehmen Sie die notwendigen Einstellungen vor. .......Windows: Seite 6; Macintosh: Seite 18
e Installieren Sie die Software (Studio Manager usw.). ......................................................................................Windows: Seiten 3, 13; Macintosh: Seiten 17, 22
r Starten Sie die Software.
Informationen zur weiteren Bedienung finden Sie in der Bedienungsanleitung des jeweiligen Softwareprogramms (Online-Hilfe/Handbuch als PDF-Datei).
• Um PDF-Dateien anzeigen zu können, muss Acrobat Reader auf Ihrem Computer installiert sein (Windows: Seite 6; Macintosh: Seite 18).
Die meisten Beispiele für Computerbildschirmanzeigen in dieser Anleitung stammen aus der englischen Version des Betriebssystems/der Software.
Soforthilfe/Referenzmaterialien
• Einstellen der Sampling-Frequenz ..............................Seiten 9, 20
• Festlegen der Anzahl der mLAN-Audiokanäle............Seiten 9, 20
• Ändern der Einstellungen des mLAN-Treibers..................Seite 10
• Festlegen der Latenz (Wartezeit) ......................................Seite 11
• Der Treiber lässt sich nicht installieren..............................Seite 30
• Die Wiedergabe ist nicht korrekt .......................................Seite 30
• Wie lässt sich der Treiber entfernen oder
neu installieren? ..............................................Seiten 6, 12, 15, 21
• Verwendung der SQ01-Online-Hilfe..................................Seite 16
• Überprüfen der kompatiblen DAW-Software.....................Seite 24
TOOLS for 01X/Plug-in Effect Installationshandbuch
2
Für Windows-Anwender
Schalten Sie das 01X ein, NACHDEM (während der Installation) die
folgende Meldung angezeigt wurde.
Page 33

Für Windows-Anwender
Inhalt der CD-ROM
Die CD-ROM enthält verschiedene Anwendungen (mit Installationsprogrammen) und Daten in den angegebenen Ordnern.
Installieren Sie zunächst die Software auf der CD-ROM „Tools for 01X“, bevor Sie die Plug-in-Effekt-Software installieren.
● TOOLS for 01X
Verzeichnisname Name der Anwendung Inhalt
Acroread_ Acrobat Reader
StudioManager_ Studio Manager
Sq01_ SQ01 V2
AudioMixer_
TWE_ Wave Editor TWE
MltPartEditor_
mLAN_
NIdemo_
DemoSong
Audio Mixer
(Plug-in für SQ01 V2)
Multi Part Editor for
MOTIF-RACK
mLAN Driver
mLAN Tools
B4 (Demo)
Pro-53 (Demo)
Demo-Song
• SQ01 V2
• Cubase SX/SL
• SONAR2
*1*2
*1*3
*1
*1
*1
*1
*2
*2
*2
*2
● Plug-in Effect
Diese Software kann innerhalb eines VST-kompatiblen Programms als Plug-in-Anwendung verwendet werden.
Um das PDF-Handbuch eines Programms aufzurufen, klicken Sie auf [Start] ➝ [Programme] ➝ [YAMAHA VST Plugins] ➝ (Name der gewünschten
Software) ➝ [Online Manual].
Anweisungen zur Installation von Plug-in-Effekten finden Sie auf Seite 14.
Verzeichnisname Name der Anwendung Inhalt
01X Channel
*1
Module
*1
VST_
Pitch Fix
Vocal Rack
Final Master
*1
*1
Dient zum Anzeigen der Anwendungshandbücher im PDF-Format.
• Drücken Sie die Taste [F1] der Computertastatur, um die Online-Hilfe zu öffnen.
Mit Hilfe dieser Software können Sie von einem Computer aus die verschiedenen Mixer-Einstellungen des 01X
bearbeiten und steuern. Wenn Sie sie als Plug-in für SQ01 verwenden, können Sie die Einstellungen in Studio
Manager zusammen mit den SQ01-Einstellungen für Songdaten speichern. Unabhängig davon, ob Sie die Software
als Plug-in oder eigenständige Anwendung verwenden, muss für die Datenübertragung mit dem 01X der mLAN MIDI
Port 4 reserviert sein. (Informationen hierzu finden Sie im PDF-Handbuch zu Studio Manager.)
• Um das PDF-Handbuch aufzurufen, klicken Sie im Menü [Help] (Hilfe) auf [Manual] (Handbuch).
• Klicken Sie zum Durchführen der Installation auf die Datei „Setup.exe“ im Ordner „Studio Manager“, und folgen Sie
den Bildschirmanweisungen.
Umfassende Sequenzersoftware, mit der Sie am Computer bequem eigene Songs erstellen und wiedergeben
können. Dieses Programm kann als Hostanwendung für mit dem ASIO-Treiber (ASIO mLAN) kompatible Plug-inSoftware verwendet werden. mLAN MIDI Port 1 wird zur Fernsteuerung der Datenübertragung mit dem 01X
verwendet (Seite 24).
• Um die Online-Hilfe aufzurufen, klicken Sie in einem beliebigen Fenster im Menü [Help] (Hilfe) auf [Online Manual]
(Online-Hilfe) oder [Key Word] (Schlüsselwort).
• Anweisungen zur Installation finden Sie auf Seite 13.
Kompatibel mit dem ASIO-Treiber (ASIO mLAN). Kann im Anschluss an die Installation von SQ01 installiert werden.
Ein Audio-Editor zum Bearbeiten von Audiodaten im WAV- oder AIFF-Format auf dem Computer. Um diesen Editor
zu verwenden, setzen Sie „Mode“ (Modus) im Fenster „mLAN Driver Setup“ (Setup des mLAN-Treibers) auf
„WDM(2CH) + ASIO“ (Seite 10).
• Um die Online-Hilfe aufzurufen, klicken Sie auf [Start] ➝ [Programme] ➝ [YAMAHA TWE] ➝ [Wave Editor TWE
Manual].
• Wenn Sie lediglich TWE installieren möchten, doppelklicken Sie auf die Datei „Setup.exe“ im Ordner „TWE“, und
folgen Sie den Bildschirmanweisungen.
Ermöglicht die Bearbeitung der Mixing-Parameter (wie Effekte) des MOTIF-RACK auf dem Computer, wenn Sie den
MOTIF-RACK als multitimbralen Klangerzeuger verwenden. Mit dieser Software können Sie das 01X zur
Fernsteuerung des Klangerzeugers des MOTIF-RACK (über den Multi Part Editor) verwenden. Wenn Sie diese
Software als eigenständiges Programm benutzen, verwenden Sie mLAN MIDI Port 5 zur Fernsteuerung der
Datenübertragung mit dem 01X.
• Klicken Sie zum Durchführen der Installation auf die Datei „Setup.exe“ im Ordner „MltPartEditor“, und folgen Sie
den Bildschirmanweisungen.
Diese Softwareanwendung ist notwendig, um das 01X und den Computer über die mLAN-Verbindung zu nutzen. Vor
Beginn der Installation muss das 01X ausgeschaltet werden. (Siehe Seite 6.)
Demo für den VST Plug-in-Software-Synthesizer von Native Instruments.
• Doppelklicken Sie im Ordner „NIdemo“ auf die Datei „***Setup.exe“ für die zu installierende Plug-in-Anwendung,
und folgen Sie den Bildschirmanweisungen.
Ein Demo-Song (Seite 24) zur Verwendung mit dem entsprechenden DAW-Softwareprogramm, wenn das 01X zur
Fernsteuerung verwendet wird. Mit dem Song können Sie auch die im Lieferumfang enthaltenen Plug-in-Effekte
(s. u.) ausprobieren (außer mit dem Demo-Song für SONAR).
Diese Softwareanwendung reproduziert die in jeden Kanal des 01X integrierten EQ- und Dynamikeffekte und
verwendet die Rechenleistung des Computers für die Effekte.
Zur Übertragung von Einstellungen von und zu einem angeschlossenen 01X kann sie auch mit dem Programm
Studio Manager verwendet werden.
Dieses Programm dient zur Bearbeitung der Tonhöhe von aufgenommenen Singstimmen. Über die Funktion als
reiner Tonhöhenprozessor hinaus kann es verwendet werden, um den Charakter der Singstimme zu verändern.
Darüber hinaus können Sie über MIDI-Daten in der Hostanwendung den Pitch-Fix-Effekt steuern. Weitere
Informationen zum Einrichten für die Hostanwendung finden Sie im PDF-Handbuch zu Pitch Fix.
Hierbei handelt es sich um ein Multi-Effekt-Programm zur Verarbeitung von Singstimmen. Das Plug-in verfügt über
mehrere Effekte, einschließlich einem Hochpassfilter, Kompressor und 3-Band-Equalizer.
Hierbei handelt es sich um ein Multi-Effekt-Programm für Mastering-Zwecke. Es verfügt über einen Kompressor,
einen Limiter und eine Soft-Clip-Funktion und ermöglicht Ihnen die Aufspaltung des Signals in drei Bänder zur
separaten Multi-Band-Verarbeitung.
*1 Für diese Anwendungen liegt eine Online-Hilfe/ein Handbuch als PDF-Datei vor.
*2 Yamaha gibt keine Garantie für die Stabilität dieser Programme und kann den Anwendern auch keine technische Unterstützung dafür anbieten.
*3 Zusammen mit SONAR ist nur Stand-alone-Betrieb möglich.
TOOLS for 01X/Plug-in Effect Installationshandbuch
3
Page 34

Open-Plug-in-Technologie
Sie können „Studio Manager for 01X“ oder den Multi Part Editor entweder als eigenständige Software oder als Plug-in-Anwendung in OPT-kompatiblen (Open
Plug-in Technology) Programmen ausführen.
„Open Plug-in Technology“ (OPT) ist ein neu entwickeltes Softwareformat, das die Steuerung von MIDI-Geräten von einem Softwaresequenzer aus ermöglicht. Mit
dieser Technologie können Sie zum Beispiel verschiedene Bereiche Ihres Musiksystems wie Editoren von Plug-in-Erweiterungskarten und Mixer-Software direkt
von einem OPT-kompatiblen Sequenzer aus starten und bedienen und müssen sie nicht einzeln verwenden. Dadurch ist es nicht mehr erforderlich, MIDI-Treiber für
jedes Programm einzurichten. Ihr Musikproduktionssystem ist einfacher und bequemer zu bedienen, alles greift nahtlos ineinander.
OPT Levels – die Ebenen der Open Plug-in Technology
Die Client-Anwendung und ihre OPT-Kompatibilität lässt sich in drei Ebenen einteilen (s.u.).
Level 1 – OPT Panels bietet eine grundlegende Unterstützung in Bezug auf das Öffnen und die Darstellung von OPT-Bedienelementen, die Daten über
die externen MIDI-Ports des Clients übertragen können. Diese Ebene ermöglicht in der Regel ein ordnungsgemäßes Funktionieren einfacher
Bedienelemente von Hardware-Editoren.
Level 2 – OPT Processors bietet Unterstützung für Echtzeit-MIDI-Prozessoren und die Automatisierung von Bedienelementen. Diese Ebene
ermöglicht in der Regel ein ordnungsgemäßes Funktionieren von MIDI-Effekten (z.B. Arpeggiatoren, Transposern usw.) in Echtzeit oder offline sowie
die Automatisierung von OPT-Bedienelementen.
Level 3 – OPT Views bietet Unterstützung zur Bearbeitung von Ansichten und MIDI-Prozessoren/-Bedienelementen, die einen direkten Zugriff auf die
Speicherstrukturen des Client-Sequenzers benötigen. Diese Ebene ermöglicht in der Regel die Unterstützung von ausgefeilten Ansichten von MIDIEditoren (z.B. Listendarstellungen, automatische Begleitung, spezielle Editoren usw.).
Implementierung von OPT Level für Studio Manager
Diese Tabelle stellt die OPT-Kompatibilität von „Studio Manager for 01X“ dar.
OPT-Levels der Client-Anwendung
VIEWS (Level 3) Ja Keine
PROCESSORS (Level 2) Ja Keine
PANELS (Level 1) Ja (mit Einschränkungen) Nur anwendbar auf den Offline-Betrieb
• Bestimmte Funktionen arbeiten nicht erwartungsgemäß, wenn es in der Client-Anwendung (Sequenzer usw.) keine entsprechende Funktion gibt. Die höchste
Implementierungsebene für die Client-Anwendung ist anhand des OPT-Logos erkennbar (das in der Anwendung zusammen mit den Versionsinformationen angezeigt wird).
Funktionsunterstützung Funktionseinschränkungen
Informationen zur Implementierung für den Multi Part Editor finden Sie im PDF-Handbuch.
Studio Manager for 01X-Funktion
TOOLS for 01X/Plug-in Effect Installationshandbuch
4
Page 35

Systemanforderungen für 01X/Software
Die nachfolgenden Systemanforderungen sind notwendig für die Verwendung des 01X mit mLAN und der im Lieferumfang enthaltenen Software.
• Die nachfolgend angegebenen Systemanforderungen können je nach Betriebsystem geringfügig abweichen.
• Die Mindestanforderungen für nicht aufgelistete Softwareanwendungen können abweichen. Einzelheiten finden Sie in der Online-Hilfe oder Dokumentation zur jeweiligen Software.
• Einzelheiten zu den Mindestanforderungen für jede DAW-Software erhalten Sie im entsprechenden Benutzerhandbuch.
● 01X (einschließlich der Anforderungen für mLAN Driver/mLAN
Tools)
Es folgen die gesamten Systemanforderungen, einschließlich AudioSequenzer, mLAN Driver/mLAN Tools und Plug-in-Effekten.
Betriebssystem : Windows XP Professional/XP Home Edition
Computer : Prozessor der Intel Pentium- oder Celeron-Familie, mit
S400- (400 Mbps) IEEE 1394 (FireWire) oder i.Link Anschluss (*1).
・Empfohlenes System (*2)
Computer : Mindestens 2,2 GHz; Intel Pentium 4 Prozessor
Verfügbarer
Arbeitsspeicher : Mindestens 512 MB
Festplatte : Mindestens 500 MB freier Speicherplatz; High-
Speed-Festplatte
・Minimale Systemanforderungen (*3)
Computer : Intel Pentium 1,2 GHz oder Intel Celeron 1,7 GHz
(oder höher)
Verfügbarer
Arbeitsspeicher : Mindestens 384 MB
Festplatte : Mindestens 500 MB freier Speicherplatz; schnelle
Festplatte
*1 Der Computer muss über einen IEEE 1394 (FireWire) oder i.Link-
Anschluss verfügen. Wenn kein Anschluss vorhanden ist, installieren Sie
eine IEEE 1394-Schnittstellenkarte (PCI oder PCMCIA).
Weitere Einzelheiten zu Systemanforderungen und empfohlenen PCIoder PCMCIA-Karten finden Sie unter
http://www.yamahasynth.com
*2 Die hier aufgeführten Systemanforderungen gelten, wenn die im
Lieferumfang enthaltene Software verwendet wird und die nachfolgend
genannten Audio-/MIDI-Daten mit einer standardmäßigen
Sequenzeranwendung abgespielt/aufgezeichnet werden. Je nach
verwendeter Sequenzersoftware kann es Abweichungen geben.
Frequenz/Auflösung: 44,1 kHz/24 Bit
Audio-Treiber: 24 Ein-/18 Ausgänge (aktiv)
MIDI-Treiber: 4 Ein-/4 Ausgänge
(einschließlich MIDI-Fernsteuerung/Automation)
Audio-Wiedergabespuren: 12
Audio-Aufnahmespuren: 2
MIDI-Wiedergabespuren: 16
MIDI-Fernsteuerung/Automation
Send-Effekte (Plug-in): 2
Insert-Effekte (Plug-in): 10
Plug-in-Synthesizer: 3
Latenz (Wartezeit): 5 ms oder weniger
*3 Die hier aufgeführten Systemanforderungen gelten, wenn die im
Lieferumfang enthaltene Software verwendet wird und die nachfolgend
genannten Audio-/MIDI-Daten mit einer standardmäßigen
Sequenzeranwendung abgespielt werden. Je nach verwendeter
Sequenzersoftware kann es Abweichungen geben.
Frequenz/Auflösung: 44,1 kHz/16 Bit
Audio-Treiber: 8 Ein-/2 Ausgänge (aktiv)
MIDI-Treiber: 1 Ein-/1 Ausgang (MIDI Remote Control/
Automation)
Audio-Wiedergabespuren: 12
MIDI-Fernsteuerung/Automation
Send-Effekte (Plug-in): 2
Insert-Effekte (Plug-in): 6
Plug-in-Synthesizer: Keiner
Latenz (Wartezeit): ungefähr 50 ms
• Es können bis zu zwei PCI- oder PCMCIA-Karten verwendet werden. Wenn Sie
eine in den Computer eingebaute IEEE 1394-Schnittstelle verwenden, kann nur
eine IEEE 1394 PCI/PCMCIA-Schnittstellenkarte verwendet werden.
• Bei Verwendung eines Laptop- oder Notebookcomputers ist unter Umständen kein
integrierter IEEE 1394-Anschluss vorhanden. Installieren Sie in diesem Fall eine
geeignete PCMCIA-Schnittstellenkarte.
● SQ01 V2/Audio Mixer
Betriebssystem : Windows XP Professional/XP Home Edition/2000/Me/98
Computer : Mindestens 500 MHz; Intel Pentium/Celeron-Prozessor
(mindestens 750 MHz bei Verwendung von Windows XP)
• Bei Verwendung der im Lieferumfang enthaltenen Anwendung „Plug-in
effects“ ist eine Verarbeitungsgeschwindigkeit von mindestens 1 GHz
erforderlich.
Verfügbarer
Arbeitsspeicher : Mindestens 256 MB
Festplatte : Mindestens 300 MB freier Speicherplatz
Bildschirm : Mindestens 1024 x 768 Pixel
● Studio Manager
Betriebssystem : Windows XP Professional/XP Home Edition/2000/Me/
98SE
Computer : Mindestens 433 MHz; Intel Pentium/Celeron-Prozessor
Verfügbarer
Arbeitsspeicher : Mindestens 128 MB
Festplatte : Mindestens 20MB freier Speicherplatz
Bildschirm : 1024 x 768 Pixel, mindestens 256 Farben
(Empfohlen wird: 1280 x 1024 Pixel, High Color (16 Bit))
• Wenn Sie die Bildschirmauflösung 1024 x 768 Pixel verwenden, aktivieren Sie für
die Taskleiste das Kontrollkästchen [Automatisch im Hintergrund].
● TWE V2.4.4
Betriebssystem : Windows XP/NT/2000/Me/98/95
Computer : Mindestens 166 MHz; Intel Pentium/Celeron-Prozessor
Verfügbarer Arbeitsspeicher: Mindestens 24 MB
Festplatte : Durchschnittliche Zugriffszeit 30 ms oder weniger
Bildschirm : Mindestens 800 x 600 Pixel, mindestens 256 Farben
● Multi Part Editor for MOTIF-RACK
Betriebssystem : Windows 98/Me/2000/XP Home Edition/XP Professional
Computer : Mindestens 166 MHz; Intel Pentium/Celeron-Prozessor
Verfügbarer
Arbeitsspeicher : Mindestens 32 MB
Festplatte : Mindestens 32 MB freier Speicherplatz
Bildschirm : Mindestens 1024 x 768 Pixel
● Plug-in Effect
Betriebssystem : Windows XP Professional/XP Home Edition/2000/Me/
98SE/98
Um mLAN zu benutzen, schalten Sie mLAN bei jedem Start des
Computers ein, indem Sie das mLAN-Symbol (mLAN Manager) in
der Taskleiste benutzen (Seite 10).
TOOLS for 01X/Plug-in Effect Installationshandbuch
5
Page 36

Softwareinstallation
Anweisungen zur Installation von nachfolgend nicht aufgeführten
Anwendungen finden Sie auf Seite 3 im Abschnitt „Inhalt der CDROM“.
mLAN Driver und mLAN Tools
Die Software mLAN Tools dient dazu, die mLAN-bezogenen Einstellungen
des Computers zu ändern. Die Software mLAN Driver ist notwendig für die
Übertragung von MIDI-Daten, Audiodaten und Fernsteuerungsdaten zwischen
der DAW-Software (digitaler Audio-Arbeitsplatz) und dem 01X über die
mLAN-Verbindung.
Deinstallieren (installierte Anwendung entfernen)
Sie können eine installierte Anwendungssoftware wieder
entfernen. Klicken Sie nacheinander auf [START] (➝
[Einstellungen]) ➝ [Systemsteuerung] ➝ [Software] ➝ [Installieren/
Deinstallieren], markieren Sie die zu deinstallierende Anwendung,
und klicken Sie auf [Hinzufügen/Entfernen…]. Folgen Sie den
Bildschirmanweisungen zur Deinstallation der Anwendung.
• Je nach Betriebssystem können die Namen von Schaltflächen oder Menüs
anders lauten.
• Um die Software mLAN zu deinstallieren, müssen die folgenden beiden
Elemente gelöscht werden. Löschen Sie sie in der Reihenfolge 1 und dann 2.
1. Install mLAN for 01X
2. mLAN Tools 2.0
Prüfen Sie vorab den Laufwerkbuchstaben des verwendeten CDROM-Laufwerks (D:, E: usw.). Den Laufwerksbuchstaben finden
Sie im Ordner „Arbeitsplatz“ unterhalb des CD-ROM-Symbols.
(Das Stammverzeichnis des CD-ROM-Laufwerks wird
beispielsweise mit „D:\“, „E:\“ usw. angegeben.)
Acrobat Reader
Um die elektronischen Handbücher (im PDF-Format) der einzelnen
Anwendungen anzeigen zu können, müssen Sie Acrobat Reader installieren.
• Wenn bereits eine ältere Version von Acrobat Reader auf Ihrem PC installiert ist,
müssen Sie diese deinstallieren, bevor Sie mit der Installation fortfahren.
• Beschreibungen der Fehlermeldungen finden Sie auf Seite 29.
Vorbereitungen zur Installation
1 Ziehen Sie alle MIDI-Kabel heraus, über die MIDI-Geräte an die MIDI IN/
OUT-Anschlüsse des 01X angeschlossen sind.
2 Verbinden Sie das 01X über ein IEEE 1394-(FireWire/iLink)-Kabel direkt
mit dem Computer (nicht über einen Hub), und stöpseln Sie alle anderen
über IEEE 1394 angeschlossenen Geräte vom Computer ab.
3 Achten Sie darauf, dass das 01X ausgeschaltet ist.
4 Starten Sie den Computer, und melden Sie sich unter dem
Administratorenkonto an.
VORSICHT
• Stellen Sie bei Verwendung der mLAN-Verbindung sicher, dass alle
Energiesparfunktionen auf dem Computer (wie Ruhezustand, Anhalten,
Standby oder Pause) deaktiviert sind.
• Wenn Sie die Standard-Datenübertragungsrate S200 verwenden (überprüfen
Sie dies an der Rückseite des jeweiligen Geräts, oder schlagen Sie die
Spezifikationen in der Bedienungsanleitung nach), müssen Sie zuvor die alte
Version von mLAN Tools deinstallieren. (Wenn Sie ein mLAN-Gerät von
Yamaha verwenden, befolgen Sie die Vorgehensweise „Deinstallieren“ in der
linken Spalte.)
5 Klicken Sie auf [Start] ➝ [Systemsteuerung]. Falls die Systemsteuerung
wie in der folgenden Abbildung dargestellt wird, klicken Sie oben links im
Fenster auf „Zur klassischen Ansicht wechseln“. Es werden alle Einträge
(Programmsymbole) der Systemsteuerung angezeigt.
1 Doppelklicken Sie auf den Ordner „Acroread_“. Daraufhin werden Ordner
für vier verschiedene Sprachen angezeigt.
2 Wählen Sie die zu verwendende Sprache aus, und doppelklicken Sie auf
den entsprechenden Ordner. Die Datei „arxxx***.exe“ wird angezeigt.
(„xxx“ gibt die Versionsnummer und „***“ die ausgewählte Sprache an.)
• Dateinamen mit der Erweiterung EXE können anders benannt sein als hier
angegeben.
3 Doppelklicken Sie auf „arxxx***.exe“.
Das Dialogfeld „Acrobat Reader Setup“ wird angezeigt.
4 Führen Sie die Installation aus, indem Sie den Bildschirmanweisungen
folgen.
Nach erfolgreicher Installation befindet sich auf Ihrem PC das
Acrobat-Verzeichnis (standardmäßig unter „Programme“).
Informationen über die Verwendung von Acrobat Reader finden Sie
im Menü „Hilfe“ unter „Reader Guide“.
Fahren Sie fort mit dem nächsten Schritt.
TOOLS for 01X/Plug-in Effect Installationshandbuch
6
Page 37

6 Klicken Sie auf [System] ➝ [Hardware] ➝ [Treibersignierung] ➝
[Dateisignaturverifizierung], wählen Sie die Option „Ignorieren - Software
unabhängig von Zulassung installieren“ aus, und klicken Sie auf [OK].
• Stellen Sie nach Beendigung der Installation ggf. die ursprüngliche Einstellung
wieder her.
7 Stellen Sie sicher, dass unter [System] ➝ [Hardware] ➝ [Geräte-
Manager] neben „IEEE-1394 Bus-Hostcontroller“ keines der Zeichen „!“
oder „x“ angezeigt wird. Wenn eines dieser Zeichen angezeigt wird, kann
die mLAN-(IEEE 1394/i.Link)-Verbindung nicht genutzt werden.
Einzelheiten hierzu finden Sie in der Bedienungsanleitung Ihres
Computers.
8 Klicken Sie auf [OK], um das Fenster „Systemeigenschaften“ zu
schließen, und klicken Sie dann oben rechts im Fenster auf die
Schließen-Schaltfläche ([X]), um die Systemsteuerung zu schließen.
9 Beenden Sie alle laufenden Anwendungen, und schließen Sie alle
geöffneten Fenster.
10 Legen Sie die mitgelieferte CD-ROM („TOOLS for 01X“) in das CD-
ROM-Laufwerk ein.
Starten des Installationsprogramms für die mLAN-Software
Das Installationsprogramm installiert die folgenden beiden Programme auf
Ihrem Computer.
• mLAN Tools 2.0
• Install mLAN for 01X
• Klicken Sie auf die Schaltfläche Cancel oder die Schließen-Schaltfläche ([X]), um die
Installation abzubrechen. Das Beenden der laufenden Installation durch Drücken der
Tasten [STRG]+[ALT]+[ENTF] oder durch Ausschalten des Computers kann zu
Problemen führen, da die Installation ohne ordnungsgemäße Deinstallation beendet
wird.
11 Doppelklicken Sie auf den Ordner „mLAN“.
Daraufhin werden mehrere Dateien angezeigt, unter anderem
„Setup.exe“.
12 Doppelklicken Sie auf „Setup.exe“.
13 Es erscheint eine Reihe von Bestätigungsmeldungen. Wenn keine
Probleme auftreten, klicken Sie in jeder Meldung auf [OK]. Nach
Beendigung der Installation wird ein Begrüßungsbildschirm angezeigt.
Installation von „mLAN Tools“
14 Klicken Sie auf [Weiter]. Das Fenster für die Installation von mLAN
Tools wird angezeigt.
15 Klicken Sie auf [Weiter]. Das Fenster „Zielverzeichnis“ wird angezeigt,
in dem Sie das gewünschte Laufwerk und Verzeichnis zur Installation
von mLAN Tools festlegen können. Das Zielverzeichnis wird
automatisch vorgegeben; wenn Sie es ändern möchten, klicken Sie
auf die Schaltfläche [Durchsuchen…], und wählen Sie den
gewünschten Ordner aus (Laufwerk:\Verzeichnisname). Wählen Sie
das Verzeichnis aus, oder bestätigen Sie es, und klicken Sie auf
[Weiter].
• In der Regel besteht keine Veranlassung, das Zielverzeichnis zu ändern.
16 Bestätigen Sie das Laufwerk und den Namen des Verzeichnisses, und
klicken Sie auf [Weiter], um die Installation zu starten.
• Um die Installation abzubrechen, klicken Sie auf [Abbrechen].
17 Nach Beendigung der Installation wird eine Fertigstellungsmeldung
angezeigt. Klicken Sie auf [Fertig stellen].
• Informationen zum Fenster „Im Wartezustand“ finden Sie auf Seite 8.
Fahren Sie fort mit dem nächsten Schritt.
TOOLS for 01X/Plug-in Effect Installationshandbuch
7
Page 38

Installation des mLAN Bus-Treibers (mLAN Stream Driver)
18 Der „Assistent für das Suchen neuer Hardware“ wird automatisch
angezeigt.
Wählen Sie die Option „Software automatisch installieren (empfohlen)“
aus, und klicken Sie auf [Weiter].
19 Nach Beendigung der Installation wird eine Fertigstellungsmeldung
angezeigt. Klicken Sie auf [Fertig stellen].
23 Nach Beendigung der Installation wird eine Fertigstellungsmeldung
angezeigt. Klicken Sie auf [Fertig stellen].
• Informationen zum Fenster „Im Wartezustand“ finden Sie nachfolgend.
Registrieren der Ports für den mLAN-Treiber
24 Der „Assistent für das Suchen neuer Hardware“ wird automatisch
angezeigt.
Installation von Install mLAN for 01X (mLAN-Software)
Nach Beendigung der Vorinstallationsroutine wird ein Begrüßungsbildschirm
angezeigt. Klicken Sie auf [Weiter].
20 Legen Sie im Fenster „Zielverzeichnis“ das gewünschte Laufwerk und
Verzeichnis für die Installation fest. Das Zielverzeichnis wird
automatisch vorgegeben; wenn Sie es ändern möchten, klicken Sie
auf die Schaltfläche [Durchsuchen…], und wählen Sie den
gewünschten Ordner aus (Laufwerk:\Verzeichnisname).
• Um die Installation abzubrechen, klicken Sie auf [Abbrechen].
21Bestätigen Sie das Laufwerk und den Namen des Verzeichnisses, und
klicken Sie auf [Weiter], um die Installation zu starten.
• Um die Installation abzubrechen, klicken Sie auf [Abbrechen].
22 Es erscheint eine Meldung, in der Sie aufgefordert werden, das 01X
einzuschalten. Schalten Sie das 01X ein.
Wählen Sie die Option „Software automatisch installieren (empfohlen)“
aus, und klicken Sie auf [Weiter].
• Unter Umständen nimmt es ein wenig Zeit in Anspruch, bis das erste Fenster
des Hardwareassistenten angezeigt wird.
Das Fenster „Im Wartezustand“
Das Fenster „Im Wartezustand“
Wenn die Verbindung zum 01X (oder zu einem anderen Gerät)
gefunden wird, während die Installation ausgeführt wird, wird in
Windows XP der „Assistent für das Suchen neuer Hardware“
angezeigt. Das Fenster „Im Wartezustand“ informiert Sie darüber.
Wie häufig das Fenster „Im Wartezustand“ angezeigt wird, hängt von dem im
Fenster „Setuptyp“ ausgewählten Audio-Treiber ab.
Bsp.:
• Schließen Sie das Fenster „Im Wartezustand“ nicht, es sei denn, Ihnen ist
ein Fehler unterlaufen (wenn Sie beispielsweise die Installation
unterbrochen haben, indem Sie irrtümlich auf „Abbrechen“ geklickt haben),
oder der Assistent wurde aufgrund eines Fehlers nicht ordnungsgemäß
beendet. Das Fenster „Im Wartezustand“ wird automatisch geschlossen,
wenn der Assistent ordnungsgemäß beendet wird.
• Schließen Sie das Fenster „Im Wartezustand“ nicht durch Drücken der
Tasten [STRG] + [ALT] + [ENTF]. Dies führt dazu, dass „Tools for 01X“
nicht ordnungsgemäß beendet wird.
TOOLS for 01X/Plug-in Effect Installationshandbuch
8
Fahren Sie fort mit dem nächsten Schritt.
Page 39

25 Nach Beendigung der Installation wird eine Fertigstellungsmeldung
(„Complete“) angezeigt. Klicken Sie auf [Finish] (Fertig stellen).
26 Wiederholen Sie die Schritte 24 und 25 so oft wie erforderlich, bis
das Fenster „Im Wartezustand“ ausgeblendet wird.
• Das Fenster „Im Wartezustand“ ist unter Umständen hinter dem
Hardwareassistenten verborgen. Wenn dies passiert, klicken Sie auf den
Hardwareassistenten, um ihn in den Vordergrund zu bringen.
Konfigurieren von mLAN AUTO W.CLK(01X)
27 Nach der Installation des mLAN-Treibers wird der mLAN Auto
Connector gestartet. Um den korrekten Empfang der mLAN-AutoConnector-Einstellungen sicherzustellen, setzen Sie den Parameter
„mLAN AUTO W.CLK“ (Wordclock) in der nachfolgend beschriebenen
Weise auf „ENABLE“ (Aktivieren). Diese Einstellungen können auch
nach der Ausführung von mLAN Auto Connector vorgenommen
werden.
Konfigurieren auf dem 01X
27-1 Drücken Sie auf dem 01X die Taste [UTILITY], um den
UTILITY-Modus aufzurufen.
27-2 Drücken Sie W.CLK (Kanalregler 3), um den Bildschirm
„mLAN AUTO W.CLK“ aufzurufen.
UTILITY mLAN AUTO W.CLK [INT : 48 kHz] 1/2
ENABLE/DISABLE
Einstellungen im „mLAN Auto Connector“
28 Ändern Sie die Einstellungen im Fenster „mLAN Auto Connector“
entsprechend Ihren individuellen mLAN-Anforderungen.
Sample Rate .......... (Sampling-Frequenz) Legt die Sampling-
Frequenz fest (die Frequenz der Wordclock)
From 01X to PC.....(Vom 01X zum PC) Legt die Anzahl der mLAN-
Audioübertragungskanäle vom 01X zum
Computer fest.
From PC to 01X.....(Vom PC zum 01X) Legt die Anzahl der mLAN-
Audioübertragungskanäle vom Computer zum
01X fest.
• Wenn die 01X-Verbindungen unter Verwendung von mLAN Auto Connector
hergestellt werden, kann dies in einigen Geräten Rauschen erzeugen. Achten
Sie daher darauf, dass während des Verbindungsvorgangs an Ihrer
Stereoanlage oder am MONITOR/PHONES-Regler/Stereo-Fader eine minimale
Lautstärke eingestellt ist.
27-3 Drücken Sie ENABLE (Aktivieren) (Kanalregler 1).
27-4 Die Abfrage „ENABLE SURE?“ (Sind Sie sicher, dass Sie
aktivieren möchten?) erscheint. Bestätigen Sie die
Einstellung, indem Sie auf Kanalregler 8 drücken.
• Wenn dieser Parameter bereits auf ENABLE eingestellt ist, erscheint die
Abfrage nicht. Fahren Sie in diesem Fall mit dem nächsten Schritt fort.
• Wenn kein System-Backup durchgeführt wird, gehen die Utility-Einstellungen
des 01X beim Ausschalten des Geräts verloren. (Informationen hierzu finden Sie
in der Bedienungsanleitung des 01X.) Um sicherzustellen, dass die hier
vorgenommenen Einstellungen nach dem nächsten Einschalten des 01X zur
Verfügung stehen, führen Sie ein System-Backup aus, indem Sie [SHIFT] halten
und [UTILITY] drücken.
• Wenn Sie „ASIO + WDM“ wählen (siehe „Mode“ im mLAN Driver Setup
auf Seite 10), wird hier „4CH + 2CH“ angezeigt. Die erste Zahl (4CH)
bezieht sich auf die Anzahl der mit ASIO zu verarbeitenden Kanäle, und
die anderen beiden der vier Kanäle werden mit den MonitorEingangskanälen 17/18 des 01X (oder 9/10 bei der Einstellung „96 kHz/
88,2 kHz“) verbunden. Die zweite Zahl (2CH) bezieht sich auf die
Anzahl der mit WDM zu verarbeitenden Kanäle, und sie werden auf den
Kanälen 15/16 des 01X (oder 7/8 bei der Einstellung „96 kHz/88,2 kHz“)
empfangen. Bei Auswahl von „2CH + 2CH“ werden die Audiosignale
nicht an den Monitor-Eingangskanal des 01X gesendet.
• „6CH“ wird nur dann angezeigt, wenn nur ASIO oder WDM ausgewählt
ist und die letzten beiden Kanäle mit den Monitor-Eingangskanälen
verbunden sind.
• Wenn Sie die Sampling-Frequenz auf 96 kHz kHz ändern, während die LAYER
des 01X auf 17–24 (mLAN) eingestellt ist, wird LAYER 1–8 aufgerufen und
automatisch Kanal 1 ausgewählt.
• Wenn Sie diese Einstellungen nach der Installation ändern möchten, klicken Sie
mit der rechten Maustaste auf das mLAN-Symbol in der Taskleiste, um den
mLAN Auto Connector zu starten.
Einstellen des 01X mLAN-Kontrollfelds
Wenn Sie im Fenster „mLAN Auto Connector“ auf [Setup] klicken,
wird das „01X mLAN Control Panel“ (Kontrollfeld) geöffnet.
Wenn die Wordclock des 01X als Slave eines externen mLANGeräts konfiguriert ist und sich die eingehende Wordclock ändert,
wird hierdurch bestimmt, ob die Wordclock schnell oder langsam an
die Master-Wordclock angepasst wird.
Slow .... (Langsam) Die Wordclock ändert sich langsam. (Dies ist
die gängige Einstellung für die meisten Anwendungen.)
Fast ..... (Schnell) Die Wordclock ändert sich schnell. (Dies kann zu
einer Zunahme von Jitterproblemen führen.)
Fahren Sie fort mit dem nächsten Schritt.
TOOLS for 01X/Plug-in Effect Installationshandbuch
9
Page 40

29 Klicken Sie auf [Connect] (Verbinden). Wenn die Verbindungen
korrekt sind, schließt der mLAN Auto Connector den
Verbindungsvorgang ab, und die mLAN-Datenkommunikation beginnt
mit dem 01X als Slave.
• Falls die Verbindung fehlschlägt, klicken Sie mit der rechten Maustaste auf das
mLAN-Symbol in der Taskleiste, um den mLAN Auto Connector erneut zu
starten, und klicken Sie erneut auf [Connect] (Verbinden).
• Es ist nicht erforderlich, den Computer neu zu starten.
Bestätigen der Installation
Taskleiste (mLAN Manager)
Wenn die Installation erfolgreich verläuft, wird der Taskleiste ein mLANSymbol (mLAN Manager) hinzugefügt. Klicken Sie mit der rechten Maustaste
auf das Symbol, um das Menü aufzurufen.
Klicken Sie zur Verwendung von mLAN mit der rechten Maustaste
auf das mLAN-Symbol (mLAN Manager) in der Taskleiste, und
wählen Sie „ON“ (Ein) aus, um mLAN zu starten.
Beim Starten von mLAN
Wenn mLAN gestartet wird, wird die folgende Meldung eingeblendet:
Um den mLAN-Startvorgang abzubrechen, klicken Sie im Fenster „mLAN
Start“ auf [Cancel] (Abbrechen). Klicken Sie zur Verwendung von mLAN mit
der rechten Maustaste auf das mLAN-Symbol (mLAN Manager) in der
Taskleiste, und wählen Sie „ON“ (Ein) aus.
Geräte-Manager (Betriebssystem)
1 Klicken Sie im Menü [Start] auf [Systemsteuerung].
2 Doppelklicken Sie auf das Symbol „System“, um das Fenster
„Eigenschaften von System“ bzw. „Systemeigenschaften“ zu öffnen.
3 Wechseln Sie zur Registerkarte „Hardware“, und klicken Sie auf [Geräte-
Manager].
4 Klicken Sie auf das Zeichen [+] neben „Audio-, Video- und
Gamecontroller“, und überprüfen Sie, ob „YAMAHA 01x-mLAN“ und
„YAMAHA mLAN Bus“ angezeigt werden.
ON .......................................... (Ein) Aktiviert den mLAN-Betrieb zur
Datenübertragung (Führt die Anwendung zum
Starten von mLAN aus).
OFF ........................................ (Aus) Deaktiviert den mLAN-Betrieb zur
Datenübertragung (Führt die Anwendung zum
Anhalten von mLAN aus). Sie können die
Prozessorbelastung reduzieren, indem Sie
mLAN deaktivieren.
Driver Setup ..........................(Treiber-Setup) Öffnet das Fenster „mLAN
Driver Setup“ (Setup des mLAN-Treibers)
(Seite 10).
Auto Connector for 01X ....... Startet den mLAN Auto Connector. Hierüber
können Sie die Einstellungen ändern, nachdem
die Software installiert wurde.
EXIT....................................... (Beenden) Blendet das mLAN-Symbol in der
Taskleiste aus; der aktuelle mLAN-Ein/AusStatus bleibt erhalten. Um es wieder
einzublenden, klicken Sie auf [Start] ➝
[Programme] ➝ [Startup] ➝ [mLAN
Manager].
• Im Fenster „mLAN Driver Setup“ (Setup des mLAN-Treibers) (Seite 10) können Sie
überprüfen, ob die Daten ordnungsgemäß über mLAN gesendet und empfangen
werden.
Ändern von Einstellungen nach der Installation
Im Fenster „mLAN Driver Setup“ (Setup des mLAN-Treibers) können die
mLAN-bezogenen Einstellungen nach der Installation geändert werden.
mLAN Driver Setup (Setup des mLAN-Treibers)
(Klicken Sie mit der rechten Maustaste auf das mLAN-Symbol in
der Taskleiste ➝ DriverSetup)
In diesem Fenster können Sie die mLAN-Einstellungen zum Empfangen/
Senden von Daten überprüfen und ändern. Bevor Sie Änderungen vornehmen,
müssen Sie alle Anwendungen (DAW usw.) schließen, die die mLANVerbindung verwenden.
• Um die Wordclock (Sampling-Frequenz) und die Anzahl der verwendeten Kanäle zu
ändern, klicken Sie mit der rechten Maustaste auf das mLAN-Symbol in der
Taskleiste, um den mLAN Auto Connector zu starten.
q
w
e
r
TOOLS for 01X/Plug-in Effect Installationshandbuch
10
u
y t
q 1394 Adapter Card ID (ID der 1394-Adapterkarte)
Gibt die ID der auf dem Computer installierten IEEE-1394-(FireWire/iLink)Schnittstellenkarte an. Falls mehrere Karten installiert sind, wird hiermit die
gewünschte Karte ausgewählt. Vom mLAN-Treiber nicht erkannte Karten
werden nicht angezeigt.
• Je nach Karte wird der korrekte Name des Herstellers oder Händlers unter
Umständen nicht angezeigt.
Page 41

w Latency (Wartezeit)
Hiermit wird die mLAN-Wartezeit (Latenz) festgelegt, d.-h., die Schnelligkeit der Datenverarbeitung.
Latenz (Wartezeit) bei mLAN
Die Konfiguration eines Computers (Verarbeitungsgeschwindigkeit, Systemspeichergröße usw.) wirkt sich u.U. auf die Fähigkeit zur ordnungsgemäßen
Aufzeichnung und Wiedergabe von Audiodaten im Audio-Sequenzer aus, was zu Rauschen oder anderen Klangproblemen führen kann. In den meisten
Fällen können Sie das Problem beheben, indem Sie die Latenz (Wartezeit) ändern.
• Ein kleiner Latenzwert führt zu einer kurzen Verzögerungszeit und sorgt für eine optimale Reaktion für Echtzeitaufnahmen/-wiedergabe.
• Ein hoher Latenzwert führt zu einer langen Verzögerungszeit, ermöglicht jedoch die Verwendung von mehr Audiokanälen und Plug-in-Effekten.
Die nachfolgende Tabelle zeigt Latenzwerte bei Verwendung des mLAN-ASIO-Treibers.
● Sendelatenz von mLAN (bei Wiedergabe eines Audio-Sequenzers)
Die Gesamt-Audiolatenz des mLAN-Treibers ist die Summe der beiden folgenden Werte:
(1) Basis-Latenzwert, festgelegt durch die Einstellung „Latency“ im Fenster „mLAN Driver Setup“.
(2) Einstellungen in Anwendungen (Audio-Sequenzer usw.) – beispielsweise die „Preferred Buffer Size“ (Bevorzugte Puffergröße) im Fenster „ASIO
mLAN Control Panel“ (ASIO-mLAN-Kontrollfeld).
Audiolatenz (ms)
Treiber-SetupEinstellungen (Basis)
Very Low (Sehr niedrig) 2 1 3 2 (1 x 2)
Low (Niedrig) 4 2 6 4 (2 x 2)
Medium (Mittel) 8 2 10 4 (2 x 2)
High (Hoch) 16 4 20 8 (4 x 2)
Very High (Sehr hoch) 80 10 90 20 (10 x 2)
MIDI-Latenz (ms)
Treiber-Setup-Einstellungen (Basis) Übertragung (vom Computer zum 01X) Empfang (vom 01X zum Computer)
Very Low (Sehr niedrig) 2 1
Low (Niedrig) 2 1
Medium (Mittel) 2 1
High (Hoch) 4 2
Very High (Sehr hoch) 8 4
Basis-Latenzwert (mit TreiberSetup-Einstellungen)
Übertragung (Wiedergabe; vom Computer zum 01X) Empfang (Aufzeichnung; vom 01X zum Computer)
Einstellungen in relevanter Anwendung
(kleinster Wert für „Preferred Buffer Size“
des mLAN-ASIO-Treibers)
GesamtLatenzwert
Einstellungen in relevanter Anwendung
(Verdoppeln Sie den Mindestwert für „Preferred
Buffer Size of mLAN ASIO Driver“)
(Stand Oktober 2003)
• Wenn Sie den mLAN-ASIO-Treiber verwenden, öffnen Sie das ASIO-Kontrollfeld in den Treibereinstellungen der DAW-Software (der genaue Name des Menüs hängt von
der verwendeten Software ab), und legen Sie die bevorzugte Puffergröße („Preferred Buffer Size“) fest. Durch die Änderung der bevorzugten Puffergröße ändert sich die
Latenz des ASIO-Treibers vom kleinsten Wert (siehe Tabelle). Die Gesamtlatenz ist die Summe der Basislatenz und des geänderten Wertes.
• Ändern Sie bei Verwendung des WDM-Treibers in analoger Weise in den Treibereinstellungen der DAW-Software den Latenzwert des WDM-Treibers (der der Latenz des
ASIO-Treibers in dieser Tabelle entspricht).
• Die Ausgangseinstellung der bevorzugten Puffergröße des mLAN-ASIO-Treibers ist der kleinste Wert.
● Empfangslatenz von mLAN (bei Aufnahme auf Audio-Sequenzer)
Die Audiolatenz des mLAN-Treibers lässt sich auch ausschließlich über Einstellungen in der DAW-Software steuern. (Beispiel: Der doppelte Wert der
bevorzugten Puffergröße, die im ASIO-mLAN-Kontrollfeld eingestellt wird, wird zum effektiven Latenzwert.)
● ASIO mLAN Control Panel (ASIO-mLAN-Kontrollfeld)
Wenn Sie das ASIO-mLAN-Kontrollfeld starten, wird das folgende Dialogfeld angezeigt.
q Preferred Buffer Size (Bevorzugte Puffergröße)
q
Mit diesem Parameter können Sie die Größe des Puffers innerhalb des mLAN-ASIO-Treibers
festlegen.
w Sample Size (Sample-Größe)
w
Mit diesem Parameter können Sie die Bit-Auflösung für das Senden und Empfangen von
w
Audiodaten festlegen.
e Channel Assignment (Kanalzuweisung)
Die Pop-Up-Listen in den Spalten „Send“ (Senden) und „Receive“ (Empfangen) geben an, welche
mLAN-Audiosequenzen vom Computer über welche Audiokanäle gesendet und empfangen
werden.
Es wird empfohlen, die Kanalzuordnung nicht zu ändern, da sie von der Setupanwendung (mLAN
Auto Connector usw.) bereits optimal zur Verwendung mit mLAN-Geräten wie dem 01X
eingestellt wurde. Falls die Zuweisung versehentlich geändert wurde, setzen Sie sie zurück,
e
t
indem Sie die Sequenznummern in numerischer Reihenfolge manuell zuordnen. Dieser
e
Beispielbildschirm zeigt die Einstellungen, wenn die Anzahl der Kanäle für mLANAudioübertragung und empfang auf „4CH“ gestellt ist.
• Wenn Sie die Einstellung „WDM + ASIO“ verwenden, müssen Sie folgendermaßen vorgehen: Setzen
Sie im Fenster „mLAN Driver Setup“ (Setup des mLAN-Treibers) zunächst den Parameter „Mode“
(Modus) auf „ASIO“. Kehren Sie, nachdem Sie im mLAN-Kontrollfeld die Sequenznummern manuell
r
in numerischer Reihenfolge den Kanälen zugewiesen haben, zum Setup des mLAN-Treibers zurück,
und setzen Sie den Modus wieder auf „WDM + ASIO“.
• Im Setup des mLAN-Treibers können Sie die Sampling-Frequenz angeben.
r OK
Klicken Sie hierauf, um die Einstellungen zu aktivieren und das Dialogfenster zu schließen.
t Cancel (Abbrechen)
Klicken Sie hierauf, um das Dialogfeld zu schließen, ohne die Einstellungen zu ändern.
TOOLS for 01X/Plug-in Effect Installationshandbuch
11
Page 42

e Mode (Modus)
Hiermit wird die Treiberfunktion festgelegt. Dieser Parameter muss
entsprechend der verwendeten Software festgelegt werden.
• ASIO .............................Alle mLAN-Audiokanäle sind auf ASIO gesetzt.
Die beiden letzten Kanäle sind mit den MonitorEingangskanälen des 01X verbunden.
• WDM(2CH)+ASIO.......Diese Einstellung ist für bestimmte Sequenzer wie
den SQ01 gedacht. Mit dieser Einstellung werden
die mLAN-Audiokanäle 15 und 16 (7 und 8, wenn
die Sampling-Frequenz des 01X auf 96 kHz/
88,2kHz eingestellt ist) (vom Computer zum 01X)
auf „WDM“ (für TWE) festgelegt, während die
übrigen Kanäle (ebenfalls vom Computer zum
01X) auf „ASIO“ (für den Audio Mixer) gesetzt
sind. Alle mLAN-Audiokanäle vom 01X zum
Computer sind auf ASIO-Betrieb eingestellt. Die
beiden letzten ASIO-Kanäle sind mit den MonitorEingangskanälen des 01X verbunden.
• WDM..............................Diese Einstellung ist für bestimmte Sequenzer
gedacht, z.B. für den SONAR; alle mLANAudiokanäle werden auf WDM-Betrieb gesetzt.
Die beiden letzten Kanäle sind mit den MonitorEingangskanälen des 01X verbunden.
• Wenn Sie an dieser Stelle „WDM + ASIO“ oder „WDM“ auswählen,
bestätigen Sie die Einstellungen nach der Installation in den
Eigenschaften für Sounds und Audiogeräte (Seite 13).
r Status
Zeigt den aktuellen Status des Empfangs von (MIDI-/Audio-) Daten (vom 01X
zum Computer) der mLAN-Verbindung an. Wenn ein Übertragungsfehler
vorliegt, wird eine Meldung angezeigt.
Blau....... Daten werden ordnungsgemäß übertragen.
Gelb....... Es wird nur ein Datentyp (MIDI- oder Audio-Daten) empfangen.
Rot......... Fehler beim Datenempfang.
Grau ...... Kein Empfang.
Das Fenster „mLAN Driver Setup Information“
(Informationen zum Setup des mLAN-Treibers)
Dieses Fenster zeigt den Status des Datenempfangs (vom 01X
zum Computer) für MIDI- und Audio-Daten an.
R1, R2 usw.
Zeigt den Status des Datenempfangs an. „R1“ entspricht dem MIDIEmpfang, während „R2“ dem Audio-Empfang des 01X entspricht. Die
Anzahl der angezeigten Registerkarten hängt von der Konfiguration
des Computers ab.
Receive Status (Empfangsstatus)
Dieses Zeichen gibt die Reihenfolge an, in der die Daten jedes
Formats empfangen werden. Das Symbol „o“ zeigt an, dass Daten
im entsprechenden Format empfangen werden. Das Symbol „-“
zeigt an, dass Daten in einem anderen Format empfangen werden.
Beispielsweise bedeutet die Anzeige „oooooooo-“ im Feld „Audio“,
dass neun Sequenzen empfangen wurden, die ersten acht davon
im Audiodatenformat. Im Feld „Unknown“ (Unbekannt) werden
Symbole angezeigt, wenn Sequenzen unbekannten Formats
empfangen werden. Diese Felder sind leer, wenn keine mLANDaten empfangen werden. Wenn während des Empfangs ein
Fehler auftritt, blinkt eine rote Warnmeldung auf. Prüfen Sie in
diesem Fall das sendende Gerät.
Symbol
Blau.........Normaler Empfang.
Rot...........Fehler beim Datenempfang.
Grau ........Kein Empfang.
t Set (Festsetzen)
Indem Sie auf diese Schaltfläche klicken, werden die in diesem Fenster
vorgenommenen Einstellungen übernommen. Änderungen an den
Einstellungen werden erst wirksam, wenn Sie auf [Set] klicken.
y Revert (Zurücksetzen)
Wenn Sie Änderungen an den Einstellungen vorgenommen, aber noch nicht
auf [Set] geklickt haben, können Sie auf diese Schaltfläche klicken, um die
Einstellungen wiederherzustellen, die beim letzten Klicken auf [Set] festgelegt
wurden. Sobald auf [Set] geklickt wurde, kann [Revert] nicht mehr verwendet
werden.
y EXIT
Klicken Sie hier, um das Dialogfenster zu schließen.
Beim Abbrechen der Installation
Wenn Sie eine Installation abbrechen, bevor Sie abgeschlossen
ist, ist die Software möglicherweise nicht ordnungsgemäß
installiert. Folgen Sie den nachfolgenden Schrittanweisungen, um
die Software ordnungsgemäß zu installieren.
1 Klicken Sie in der Systemsteuerung auf „Software“ (Seite 6),
und suchen Sie in der Liste nach „Install mLAN for 01X“ und
„mLAN Tools 2.0“.
2 Löschen Sie die beiden Programme in der folgenden Reihenfolge:
zuerst „Install mLAN for 01X“, dann „mLAN Tools 2.0“.
3 Starten Sie die Installation erneut ab Schritt 12 (Seite 7).
Wenn die Einstellungen im Fenster „mLAN Auto
Connector“ oder „mLAN Driver Setup“ nicht geändert
werden können, oder wenn das Programm „Install mLAN
for 01X“/„mLAN Tools 2.0“ nicht deinstalliert werden kann.
Beim Ändern der Einstellungen in den Fenstern „mLAN Auto
Connector“ und „mLAN Driver Setup“ oder beim Deinstallieren wird
u.U. die folgende Meldung angezeigt.
Wenn Sie den mLAN-Treiber mit einem Programm wie einem
Audio-Sequenzer verwenden, können die Einstellungen in den
Fenstern „mLAN Auto Connector“ und „mLAN Driver Setup“
nicht geändert werden, und die Programme „Install mLAN for
01X“/„mLAN Tools 2.0“ lassen sich nicht deinstallieren.
Führen Sie diesen Vorgang aus, nachdem Sie zuvor alle
Anwendungen geschlossen haben.
Unter Umständen lassen sich die Einstellungen in den Fenstern
„mLAN Auto Connector“ und „mLAN Driver Setup“ nicht
ändern bzw. die Programme „Install mLAN for 01X“/„mLAN
Tools 2.0“ nicht deinstallieren, obwohl keine Anwendungen
ausgeführt werden. Dies ist in den folgenden Fällen möglich.
• Wenn „Mode“ im Treiber-Setup auf „WDM“ oder „WDM +
ASIO“ gesetzt ist.
• Wenn der mLAN-WDM-Treiber („mLAN Audio Out/In 01“) als
Audiogerät in Windows ausgewählt ist.
Folgen Sie in diesem Fall den nachfolgenden Anweisungen, bevor
Sie die Einstellungen in den Fenstern „mLAN Auto Connector“ und
„mLAN Driver Setup“ ändern und/oder „Install mLAN for 01X“/
„mLAN Tools 2.0“ deinstallieren.
1 Klicken Sie nacheinander auf [Start] ➝ [Systemsteuerung] ➝
[Sounds und Audiogeräte] ➝ [Voice]. Vergewissern Sie sich,
dass unter „Voice-Wiedergabe“ und „Voice-Aufnahme“ nicht
„mLAN Audio Out/In 01“ ausgewählt ist.
2 Klicken Sie nacheinander auf [Start] ➝ [Systemsteuerung] ➝
[Sounds und Audiogeräte] ➝ [Audio]. Vergewissern Sie sich,
dass unter „Soundwiedergabe“ und „Soundaufnahme“ nicht
„mLAN Audio Out/In 01“ ausgewählt ist.
TOOLS for 01X/Plug-in Effect Installationshandbuch
12
Page 43

Eigenschaften für Sounds und Audiogeräte
Wenn der mLAN-Treiber installiert und auf WDM-Betrieb gesetzt wurde,
werden die Klänge von Windows-Ereignissen (Warn-/Alarmsignale usw.) über
die mLAN-Audiokanäle ausgegeben. Folgen Sie den nachfolgenden
Anweisungen, um dies zu verhindern.
• Die folgende Einstellung hebt die Ausgabe aller Wavesounds über die
Computerlautsprecher auf.
1 Klicken Sie nacheinander auf [Start] ➝ [Systemsteuerung] ➝ [Sounds
und Audiogeräte] ➝ [Stimme], und klicken Sie im Abschnitt
„Stimmenwiedergabe“ auf [Lautstärke…], um das Fenster „MasterLautstärke“ (Master Volume) aufzurufen.
2 Aktivieren Sie in der Spalte „Wave“ das Kontrollkästchen „Aus“ (Mute).
SQ01, Audio Mixer und TWE Wave Editor
In diesem Abschnitt wird die Installation von SQ01 beschrieben. Nachdem Sie
SQ01 installiert haben, können Sie den Audio Mixer und TWE auf dieselbe
Weise installieren.
1 Doppelklicken Sie auf den Ordner „SQ01“.
Daraufhin werden mehrere Dateien angezeigt, unter anderem
„Setup.exe“.
2 Doppelklicken Sie auf „Setup.exe“.
Es erscheint eine Meldung, die Sie dazu auffordert, eine frühere Version
des Programms zu deinstallieren. Klicken Sie auf [Yes] (Ja), um die
Installation fortzusetzen, falls keine frühere Version installiert ist oder
falls die frühere Version bereits entfernt wurde.
• Wenn die frühere Version noch nicht entfernt wurde, müssen Sie diese zunächst
deinstallieren, bevor Sie den Vorgang fortsetzen (Seite 6).
3 Wenn DirectX 8.0 oder höher nicht installiert ist, werden Sie dazu
aufgefordert, DirectX zu installieren. Klicken Sie auf [Yes] (Ja), um
DirectX zu installieren. Starten Sie nach der Installation des Programms
den Computer neu, und setzen Sie die Installation von SQ01 ab Schritt 1
(s.o.) fort.
4 Nach Beendigung der Vorinstallationsroutine wird ein
Begrüßungsbildschirm angezeigt.
Klicken Sie auf [Next] (Weiter).
5 Das Fenster „Choose Destination Directory“ (Zielverzeichnis auswählen)
wird angezeigt, in dem Sie das gewünschte Laufwerk und Verzeichnis
zur Installation festlegen können. Das Zielverzeichnis wird automatisch
vorgegeben; wenn Sie es ändern möchten, klicken Sie auf die
Schaltfläche [Browse…] (Durchsuchen), und wählen Sie den
gewünschten Ordner aus (Laufwerk:\Verzeichnisname).
• In der Regel besteht keine Veranlassung, das Zielverzeichnis zu ändern.
6 Bestätigen Sie das Laufwerk und den Namen des Verzeichnisses, und
klicken Sie auf [Next] (Weiter), um die Installation zu starten.
• Um die Installation abzubrechen, klicken Sie auf [Cancel] (Abbrechen).
7 Nach Beendigung der Installation wird ein Fenster angezeigt, das Sie zur
Installation von Audio Mixer auffordert. Klicken Sie auf [Yes] (Ja), um
fortzufahren und das Programm zu installieren.
• Um die Installation von Audio Mixer auszulassen, klicken Sie auf [No] (Nein).
8 Nach Beendigung der Vorinstallationsroutine für Audio Mixer wird ein
Begrüßungsbildschirm angezeigt.
9 Klicken Sie auf [Next] (Weiter). Legen Sie im Fenster „Choose
Destination Directory“ (Zielverzeichnis auswählen) das gewünschte
Laufwerk und Verzeichnis für die Installation von Audio Mixer fest.
• Um das Zielverzeichnis zu ändern, klicken Sie auf die Schaltfläche [Browse…]
(Durchsuchen), und geben Sie das gewünschte Verzeichnis an.
10 Klicken Sie auf [Next] (Weiter), um die Installation zu starten.
• Um die Installation abzubrechen, klicken Sie auf [Cancel] (Abbrechen).
11 Nach Beendigung der Installation wird eine Fertigstellungsmeldung angezeigt.
Klicken Sie auf [Finish] (Fertig stellen).
12 Nach Beendigung der Installation wird ein Fenster angezeigt, das Sie
zur Installation von „TWE Audio Editor“ auffordert. Klicken Sie auf
[Yes] (Ja), um fortzufahren und das Programm zu installieren.
• Um die Installation von „TWE“ auszulassen, klicken Sie auf [No] (Nein), und
fahren Sie mit Schritt 17 fort.
TOOLS for 01X/Plug-in Effect Installationshandbuch
13
Page 44

13 Nach Beendigung der Vorinstallationsroutine für TWE wird ein
Begrüßungsbildschirm angezeigt.
14 Klicken Sie auf [Next] (Weiter). Legen Sie im Fenster „Choose
Destination Directory“ (Zielverzeichnis auswählen) das gewünschte
Laufwerk und Verzeichnis für die Installation von TWE fest.
• Um das Zielverzeichnis zu ändern, klicken Sie auf die Schaltfläche [Browse…]
(Durchsuchen), und geben Sie das gewünschte Verzeichnis an.
Plug-in Effect
1 Doppelklicken Sie auf den Ordner „VST_“. Daraufhin werden mehrere
Dateien angezeigt, unter anderem „Setup.exe“.
2 Doppelklicken Sie auf „Setup.exe“. Das Fenster „Willkommen bei
InstallShield Wizard“ wird angezeigt.
3 Klicken Sie auf [Next] (Weiter). Geben Sie in dem daraufhin angezeigten
Fenster den Benutzernamen, den Firmennamen und die Seriennummer
ein.
15 Klicken Sie auf [Next] (Weiter), um die Installation zu starten.
• Um die Installation abzubrechen, klicken Sie auf [Cancel] (Abbrechen).
16 Nach Beendigung der Installation wird eine Fertigstellungsmeldung
angezeigt. Klicken Sie auf [Finish] (Fertig stellen).
17 Nach Beendigung des Setups wird eine Fertigstellungsmeldung
angezeigt. Bevor Sie die Software verwenden können, müssen Sie
den Computer neu starten. Vergewissern Sie sich, dass „Yes, I want
to restart my computer now“ (Ja, ich möchte meinen Computer nun
erneut starten) ausgewählt ist, und klicken Sie auf [Finish] (Fertig
stellen), um den Computer neu zu starten.
• Die Seriennummer finden Sie auf der mitgelieferten Benutzerkarte.
4 Klicken Sie auf [Next] (Weiter). Das Fenster zur
Registrierungsbestätigung wird angezeigt. Vergewissern Sie sich, dass
die eingegebenen Registrierungsangaben richtig sind, und klicken Sie
auf [Yes] (Ja).
• Falls die Angaben falsch sind, klicken Sie auf [No] (Nein), und gehen Sie zu
Schritt 3 (s.o.) zurück.
5 Ein Fenster zur Auswahl von Plug-in-Effekten wird angezeigt. Wählen
Sie die zu installierende Software aus, und klicken Sie auf [Next]
(Weiter).
6 Ein Fenster wird angezeigt, in dem Sie zur Bestätigung der zu
installierenden Plug-in-Effekte aufgefordert werden. Vergewissern Sie
sich, dass die Angaben richtig sind, und klicken Sie auf [Yes] (Ja).
• Um die zu installierende Software zu ändern, klicken Sie auf [Return] (Zurück),
und kehren Sie zu Schritt 5 zurück.
7 In dem daraufhin angezeigten Fenster können Sie das Laufwerk und
Verzeichnis für die Installation von Bedienungsanleitung (PDF-Datei)
und Setup-Programm angeben. Es wird davon abgeraten, das
Installationsverzeichnis zu ändern.
• Um das Verzeichnis zu ändern, klicken Sie auf [Browse…] (Durchsuchen), und
wählen Sie Laufwerk und Verzeichnis aus.
8 Klicken Sie auf [Next] (Weiter). In dem angezeigten Fenster können Sie
den Ordner „VstPlugins“ auswählen, in dem der Plug-in-Effekt installiert
werden soll.
• Um die Plug-in-Software VST mit SQ01 verwenden zu können, müssen Sie
„Programme\YAMAHA\VstPlugins“ aktivieren.
• Falls in der Liste kein Verzeichnis angezeigt ist, klicken Sie auf [Add]
(Hinzufügen), und wählen Sie im Dialogfeld „Browse for Folder“ (Nach
Verzeichnis suchen) das gewünschte Verzeichnis aus.
9 Klicken Sie auf [Next] (Weiter). Die Installation wird gestartet.
10 Wenn die Installation abgeschlossen ist, erscheint die Meldung
„InstallShield Wizard Complete“ (InstallShield Wizard abgeschlossen).
Klicken Sie auf [Finish] (Fertig stellen).
TOOLS for 01X/Plug-in Effect Installationshandbuch
14
Page 45

Verwenden des installierten Plug-in-Effekts in einer
anderen Hostanwendung
Auch nach der Installation des Plug-in-Effekts müssen Sie, wenn Sie diesen in
einer anderen VST-kompatiblen Hostanwendung verwenden möchten, das
Effekt-Plug-in-Modul manuell in den von der Hostanwendung festgelegten
Ordner „VstPlugins“ kopieren.
1 Klicken Sie nacheinander auf [Start] ➝ [Programme] ➝
[YAMAHA VST Plugins] ➝ [(Name des Plug-in-Effekts)] ➝ [Setup].
Ein Begrüßungsfenster wird angezeigt.
2 Klicken Sie auf [Modify] (Ändern) und dann auf [Next] (Weiter).
3 Im daraufhin angezeigten Fenster können Sie das Zielverzeichnis
angeben, in das der Plug-in-Effekt kopiert werden soll. Wählen Sie den
Ordner „VstPlugins“ aus, der der Hostanwendung entspricht, in der Sie
den Plug-in-Effekt verwenden möchten (aktivieren Sie das
entsprechende Kontrollkästchen).
• Indem Sie das Kontrollkästchen des Ordners für die installierte Hostanwendung
deaktivieren, können Sie den installierten Plug-in-Effekt entfernen.
• Einzelheiten hierzu finden Sie in der Bedienungsanleitung der jeweiligen
Hostanwendung.
4 Klicken Sie auf [Next] (Weiter).
Der Kopiervorgang wird ausgeführt.
• Um den Vorgang abzubrechen, klicken Sie auf [Cancel] (Abbrechen).
MIDI-Port-Einstellung
(bei Ausführung der Software als
eigenständige Anwendung)
Bevor Sie im Studio Manager oder im Multi Part Editor den MIDI-Port
einstellen, müssen Sie den MIDI-Port über [MIDI SETUP] in der Symbolleiste
festlegen.
• Wenn Sie die Software innerhalb eines OPT-kompatiblen (Open Plug-in Technology)
Programms als Plug-in starten, konsultieren Sie die PDF-Anleitung des
entsprechenden Programms.
1 Starten Sie die Anwendung.
2 Klicken Sie in der Symbolleiste auf die Schaltfläche [MIDI Setup].
Schaltfläche [MIDI Setup]
3 Daraufhin wird das Dialogfeld „MIDISetup“ geöffnet. Legen Sie alle Ports
für „MIDI In/Out/Thru“ fest, die mit dem MIDI-Gerät oder der MIDIAnwendung verbunden werden sollen. Wenn Sie Multi Part Editor for
MOTIF-RACK fernsteuern, aktivieren Sie „mLAN MIDI In/Out Port 5“,
und wenn Sie den Studio Manager verwenden, aktivieren Sie „mLAN
MIDI In/Out Port 4“.
Deinstallieren (Entfernen installierter Plug-in-Effekte)
1 Klicken Sie nacheinander auf [Start] ➝ [Programme] ➝
[YAMAHA VST Plugins] ➝ [(Name des Plug-in-Effekts)] ➝ [Setup].
Ein Begrüßungsfenster wird angezeigt.
2 Klicken Sie auf [Remove] (Entfernen) und dann auf [Next] (Weiter).
Daraufhin wird ein Fenster angezeigt, in dem Sie zur Bestätigung der
Löschung der Dateien aufgefordert werden.
3 Klicken Sie auf [OK], um die Dateien zu entfernen.
• Um den Vorgang abzubrechen, klicken Sie auf [Cancel] (Abbrechen).
• Damit an dieser Stelle MIDI-Ports verfügbar sind, müssen Sie den
entsprechenden MIDI-Port in der jeweiligen Anwendungssoftware auswählen.
Dabei handelt es sich um den Port, den Sie in den verschiedenen
Softwareanwendungen verwenden. Weitere Informationen zur Festlegung des
MIDI-Ports finden Sie in der Online-Hilfe der jeweiligen Software.
TOOLS for 01X/Plug-in Effect Installationshandbuch
15
Page 46

Die Online-Hilfe
SQ01 verfügt über eine praktische Online-Hilfe, die Sie auf dem
Computerbildschirm anzeigen können. Beim Installieren von SQ01
wird die Online-Hilfe automatisch installiert.
In der Online-Hilfe finden Sie Informationen und Anweisungen zu
allen Funktionen. Da das Handbuch bei jedem Upgrade gründlich
überarbeitet wird, finden Sie Informationen zu neuen Features und
Funktionen sowie zu den im jeweiligen Upgrade vorgenommenen
Änderungen.
Die Online-Hilfe stellt zwei Suchfunktionen bereit: nach den
gewünschten Informationen auf der Seite „Inhalt“ oder nach
Schlüsselwörtern auf der Seite „Index“. Die Größe des
Handbuchfensters ist beliebig einstellbar, so dass Sie die
gewünschten Informationen bequem anzeigen können, während
Sie in der Software arbeiten.
So verwenden Sie die Online-Hilfe
Klicken Sie im Menü „Hilfe“ auf [Online-Hilfe] oder [Schlüsselwort],
um die Online-Hilfe aufzurufen.
Auswählen von Elementen auf der Seite „Suchen“
Auf der Seite „Suchen“ können Sie ein Schlüsselwort eingeben und
alle mit diesem Wort verknüpften Elemente aufrufen.
1 Doppelklicken Sie auf [Suchen], um die Seite „Suchen“ zu
öffnen.
2 Geben Sie in das Schlüsselwortfeld den Namen der Funktion
oder des Features ein, über die/das Sie Informationen erhalten
möchten. Wenn Sie den genauen Namen nicht kennen, geben
Sie einen Teil des Namens oder ein verknüpftes Wort ein.
3 Klicken Sie auf die Schaltfläche [Themenliste], um die Elemente
anzuzeigen, die das angegebene Wort oder die angegebene
Phrase enthalten.
4 Klicken Sie auf das gewünschte Element in der Liste (das
Element wird hervorgehoben), und klicken Sie auf [Anzeigen],
um die Erklärung für das Element aufzurufen.
Auswählen von Elementen auf der Seite „Inhalt“
Auf der Seite „Inhalt“ können Sie nach den gewünschten
Informationen suchen, indem Sie ein Oberthema auswählen und
die untergeordneten, immer mehr ins Detail gehenden Themen
durchsuchen.
1 Doppelklicken Sie auf [Inhalt], um die Seite „Inhalt“ zu öffnen.
2 Doppelklicken Sie auf das dem gewünschten Thema oder der
gewünschten Funktion entsprechende Buchsymbol. Die mit dem
Thema verknüpften Elemente werden im Fenster aufgelistet.
3 Klicken Sie auf die Bezeichnung eines Elements, um die
entsprechende Erklärung aufzurufen.
4 Indem Sie auf blau formatierte Wörter oder Phrasen klicken,
springen Sie sofort zu den verknüpften Informationen.
TOOLS for 01X/Plug-in Effect Installationshandbuch
16
Page 47

Für Macintosh-Benutzer
Inhalt der CD-ROM
Die CD-ROM enthält eine Reihe an Anwendungen (mit Installationsroutinen) und Daten in den folgenden Verzeichnissen.
● TOOLS for 01X
Verzeichnis-Name Name der Anwendung Inhalt
Acroread_ Acrobat Reader
StudioManager_ Studio Manager
mLAN_
OMS_
NIdemo_
DemoSong
mLAN Driver
mLAN Tools
Open Music System
(OMS) 2.3.8
OMS Setup for YAMAHA
(Ordner)
B4 (Demo)
Pro-53 (Demo)
Demo-Song
• Logic
*2
*2
*2
*1*2
*1
*2
Dient zum Anzeigen der Anwendungshandbücher im PDF-Format.
• Drücken Sie die Taste [F1] der Computertastatur, um die Online-Hilfe zu öffnen.
Mit Hilfe dieser Software können Sie von einem Computer aus die verschiedenen Mixer-Einstellungen des 01X
bearbeiten und steuern.
mLAN MIDI Port 4 muss für die Datenübertragung vom/zum 01X benutzt werden.
• Um das PDF-Handbuch aufzurufen, klicken Sie im Help-Menü (Hilfe) auf „Manual“ (Handbuch).
• Anweisungen zur Installation finden Sie auf Seite 22.
Diese Softwareanwendung ist notwendig, um das 01X und den Computer über die mLAN-Verbindung zu nutzen.
• Anweisungen zur Installation finden Sie auf Seite 18.
Diese Software ist notwendig, um das 01X und den Computer über die mLAN-Verbindung
für die MIDI-Datenübertragung zu nutzen (Fernsteuerung und Studio-Manager-Daten).
• Anweisungen zur Installation finden Sie auf Seite 18.
Enthält die OMS Setup-Dateien für den 01X (Seite 21).
Demo für den VST Plug-in-Software-Synthesizer von Native Instruments.
• Öffnen Sie den Ordner „NIdemo“, und doppelklicken Sie für die Plug-in-Software, die Sie installieren möchten, auf
die entsprechende Datei „***Demo Install/installer“ (*** steht für den Dateinamen der Plug-in-Software). Folgen Sie
anschließend den Anweisungen auf dem Bildschirm.
Ein Demo-Song (Seite 24) zur Verwendung mit Logic, wenn das 01X zur Fernsteuerung verwendet wird. Sie können
auch die folgend aufgeführten, mitgelieferten Plug-in-Effekte im Song einsetzen.
● Plug-in Effect
Diese Software kann innerhalb eines VST-kompatiblen Programms als Plug-in-Anwendung verwendet werden.
• Anweisungen zur Verwendung der Anwendung finden Sie im PDF-Handbuch.
(Angegebenes Zielvolume)/YAMAHA/Plug-in Effect/(der entsprechende Ordner der Software)
Anweisungen zur Installation von Plug-in-Effekten finden Sie auf Seite 23.
Ordnername
Mac OS 9 VST_
*3
Name der Anwendung Inhalt
Diese Softwareanwendung reproduziert die in jeden Kanal des 01X integrierten EQ- und Dynamikeffekte und
01X Channel
*1
Module
*1
Pitch Fix
Vocal Rack
Final Master
*1
*1
verwendet die Rechenleistung des Computers für die Effekte.
Zur Übertragung von Einstellungen von und zu einem angeschlossenen 01X kann sie auch mit dem Programm
Studio Manager verwendet werden.
Dieses Programm dient zur Bearbeitung der Tonhöhe von aufgenommenen Singstimmen. Über die Funktion als
reiner Tonhöhenprozessor hinaus kann es verwendet werden, um den Charakter der Singstimme zu verändern.
Darüber hinaus können Sie über MIDI-Daten in der Hostanwendung den Pitch-Fix-Effekt steuern. Weitere
Informationen zum Einrichten für die Hostanwendung finden Sie im PDF-Handbuch zu Pitch Fix.
Hierbei handelt es sich um ein Multi-Effekt-Programm zur Verarbeitung von Singstimmen. Das Plug-in verfügt über
mehrere Effekte, einschließlich einem Hochpassfilter, Kompressor und 3-Band-Equalizer.
Hierbei handelt es sich um ein Multi-Effekt-Programm für Mastering-Zwecke. Es verfügt über einen Kompressor,
einen Limiter und eine Soft-Clip-Funktion und ermöglicht Ihnen die Aufspaltung des Signals in drei Bänder zur
separaten Multi-Band-Verarbeitung.
*1 Diese Anwendungen werden mit Online-Hilfedateien/PDF-Anleitungen ausgeliefert.
*2 Leider gibt Yamaha keine Garantie für die Stabilität dieser Programme und kann den Anwendern auch keine technische Unterstützung dafür anbieten.
*3 Über die Plug-in-Effekte, die mit Mac OS X kompatibel sind
Die folgenden Plug-in-Effekte, die mit VST und Audio Units kompatibel sind, sind im Ordner „Mac OS X“ enthalten.
• 01X Channel Module
• Pitch Fix
• Vocal Rack
• Final Master
Zu diesem Zeitpunkt können diese Software-Effekte leider nicht mit dem 01X benutzt werden, da der Audio/MIDI-Treiber des 01X noch nicht mit Mac OS X
kompatibel ist.
Wir bemühen uns in Zusammenarbeit mit Apple Computer, Inc. um baldige Kompatibilität des 01X mit Mac OS X. Neueste Informationen erhalten Sie auf
folgender Website:
http://www.yamahasynth.com
Diese Site enthält außerdem Anweisungen zur Installation der Software-Effekte für OS X
Bei den Apple-Notebooks iBook und PowerBook sollten Sie immer zuerst den 01X und das mLAN-Kabel anschließen und dann das 01X einschalten,
bevor Sie den Computer starten.
TOOLS for 01X/Plug-in Effect Installationshandbuch
17
Page 48

Systemanforderungen für 01X/Software
Für die Benutzung der mitgelieferten Software gelten die folgenden
Systemanforderungen.
• Die nachfolgend angegebenen Systemanforderungen können je nach Betriebsystem
geringfügig abweichen.
• Einzelheiten zu den Mindestanforderungen für jede DAW-Software erhalten Sie im
entsprechenden Benutzerhandbuch.
● 01X (einschließlich der Anforderungen für mLAN Driver/mLAN
Tools)
Hier sind die Systemanforderungen für das gesamte System
einschließlich Audiosequenzer, mLAN-Treiber/mLAN-Tools und
Plug-in-Effekten angegeben.
Betriebssystem : Mac OS 9.2 (Die Umgebungen Mac OS X und Mac
Classic werden nicht unterstützt.)
Computer : System mit integriertem S400-FireWire-Anschluss
(400 Mbps). (*1)
・Empfohlenes System (*2)
Computer : G4/G3-Prozessor mit 900 MHz (oder höher)
Verfügbarer
Arbeitsspeicher : 512 MB oder mehr (der virtuelle Speicher muss
abgeschaltet werden)
Festplatte : Mindestens 175 MB freier Speicherplatz; schnelle
Festplatte
・Minimale Systemanforderungen (*3)
Computer : G4-Dualprozessor mit 450 MHz oder G4/G3-
Prozessor mit 700 MHz (oder höher)
Verfügbarer
Arbeitsspeicher : 320 MB oder mehr (der virtuelle Speicher muss
abgeschaltet werden)
Festplatte : Mindestens 175 MB freier Speicherplatz; schnelle
Festplatte
*1 Der Computer muss über einen IEEE 1394 (FireWire) oder i.Link-
Anschluss verfügen. Wenn kein Anschluss vorhanden ist, installieren Sie
eine IEEE 1394-Schnittstellenkarte (PCI oder PCMCIA).
Weitere Einzelheiten zu Systemanforderungen und empfohlenen PCIoder PCMCIA-Karten finden Sie unter
http://www.yamahasynth.com
*2 Die hier aufgeführten Systemanforderungen gelten, wenn die im
Lieferumfang enthaltene Software verwendet wird und die nachfolgend
genannten Audio-/MIDI-Daten mit einer standardmäßigen
Sequenzeranwendung abgespielt/aufgezeichnet werden. Je nach
verwendeter Sequenzersoftware kann es Abweichungen geben.
Frequenz/Auflösung: 44,1 kHz/24 Bit
Audio-Treiber: 24 Ein-/18 Ausgänge (aktiv)
MIDI-Treiber: 4 Ein-/4 Ausgänge
(einschließlich MIDI-Fernsteuerung/Automation)
Audio-Wiedergabespuren: 12
Audio-Aufnahmespuren: 2
MIDI-Wiedergabespuren: 16
MIDI-Fernsteuerung/Automation
Send-Effekte (Plug-in): 2
Insert-Effekte (Plug-in): 10
Plug-in-Synthesizer: 3
Latenz (Wartezeit): 5 ms oder weniger
● Studio Manager
Betriebssystem : Mac OS 8.6 bis 9.2.2 (Die Umgebungen Mac OS X und
Mac Classic werden nicht unterstützt.)
Computer : 233 MHz oder höher; G3
Verfügbarer
Arbeitsspeicher: 80 MB oder mehr (der virtuelle Speicher
muss abgeschaltet werden)
Festplatte : Mindestens 7 MB freier Speicherplatz
Bildschirm : 1024 x 768 Pixel, mindestens 256 Farben
(Empfohlen wird: 1280 x 1024 Pixel, High Color (16 Bit))
● Plug-in Effect
Betriebssystem : Mac OS 8.6 bis 9.2
Mac OS X 10.2:
• Wenn Sie ein PowerBook im Batteriebetrieb nutzen, rufen Sie den Eintrag Apple-
Menü ➝ [Kontrollfelder] ➝ [Energie sparen] ➝ [Optionen] (Einstellungen für:
Batterie), und entfernen Sie die Markierung im Kontrollkästchen
„Prozessorgeschwindigkeit reduzieren“.
Softwareinstallation
Anweisungen zur Installation von hier nicht aufgeführten
Anwendungen finden Sie auf Seite 17 im Abschnitt „Inhalt der
CD-ROM“.
Acrobat Reader
Um die elektronischen Handbücher (im PDF-Format) der einzelnen
Anwendungen anzeigen zu können, müssen Sie Acrobat Reader
installieren.
1 Doppelklicken Sie auf den Ordner „Acroread_“. Es werden Ihnen
Verzeichnisse für drei verschiedene Sprachen angezeigt: Englisch,
Deutsch, Französisch, Spanisch und Italienisch.
2 Wählen Sie die Sprache, die Sie verwenden möchten, und doppelklicken
Sie auf den entsprechenden Ordner. „Reader Installer“ wird angezeigt.
Der Name des Installationsprogramms kann je nach ausgewählter
Sprache variieren.
3 Doppelklicken Sie auf „Reader Installer“.
Das Dialogfenster “Acrobat Reader Setup” wird angezeigt.
4 Führen Sie die Installation aus, indem Sie den Anweisungen auf dem
Bildschirm folgen.
Nach erfolgreicher Installation befindet sich auf Ihrem Mac der AcrobatOrdner (standardmäßig auf dem Startvolume).
Informationen über die Verwendung von Acrobat Reader finden Sie im
Reader Guide im [Hilfe]-Menü von Acrobat Reader.
*3 Die hier aufgeführten Systemanforderungen gelten, wenn die im
Lieferumfang enthaltene Software verwendet wird und die nachfolgend
genannten Audio-/MIDI-Daten mit einer standardmäßigen
Sequenzeranwendung abgespielt werden. Je nach verwendeter
Sequenzersoftware kann es Abweichungen geben.
Frequenz/Auflösung: 44,1 kHz/16 Bit
Audio-Treiber: 8 Ein-/2 Ausgänge (aktiv)
MIDI-Treiber: 1 Ein-/1 Ausgang (MIDI Remote Control/
Automation)
Audio-Wiedergabespuren: 12
MIDI-Fernsteuerung/Automation
Send-Effekte (Plug-in): 2
Insert-Effekte (Plug-in): 6
Plug-in-Synthesizer: Keiner
Latenz (Wartezeit): ungefähr 90 ms
TOOLS for 01X/Plug-in Effect Installationshandbuch
18
Page 49

mLAN Driver/mLAN Tools und OMS
Die Software mLAN Tools dient dazu, die mLAN-bezogenen
Einstellungen des Computers zu ändern. Die Software mLAN Driver ist
notwendig für die Übertragung von MIDI-Daten, Audiodaten und
Fernsteuerungsdaten zwischen der DAW-Software (digitaler AudioArbeitsplatz) und dem 01X über die mLAN-Verbindung.
11 Kopieren Sie „OMS Setup for YAMAHA“ von der CD-ROM in das
Verzeichnis „OMS Applications“ (zum Beispiel durch Ziehen und
Ablegen).
Im Verzeichnis „OMS Setup for YAMAHA“ finden Sie die OMS-SetupDateien für die Yamaha-Klangerzeuger, die als Vorlagen verwendet
werden können.
• Beschreibungen der Fehlermeldungen finden Sie auf Seite 29.
• Für Informationen zur Deinstallation (Entfernen installierter Anwendungen) lesen Sie
weiter auf Seite 21.
Vorbereitungen zur Installation
1 Starten Sie den Computer.
VORSICHT
• Stellen Sie bei Verwendung der mLAN-Verbindung sicher, dass alle
Energiesparfunktionen auf dem Computer (wie Ruhezustand, Anhalten,
Standby oder Pause) deaktiviert sind. Wenn der virtuelle Speicher benutzt
wird, schalten Sie ihn aus und starten den Computer neu.
• Wenn Sie die Standard-Datenübertragungsrate S200 verwenden (überprüfen
Sie dies an der Rückseite des jeweiligen Geräts, oder schlagen Sie die
Spezifikationen in der Bedienungsanleitung nach), müssen Sie zuvor die alte
Version von mLAN Tools deinstallieren. (Beachten Sie auch die
Bedienungsanleitung Ihres speziellen Geräts.)
2 Beenden Sie alle laufenden Anwendungen, und schließen Sie alle
geöffneten Fenster.
3 Ziehen Sie alle MIDI-Kabel heraus, über die MIDI-Geräte an die MIDI IN/
OUT-Anschlüsse des 01X angeschlossen sind.
4 Verbinden Sie das 01X über ein IEEE 1394-(FireWire/iLink)-Kabel direkt
mit dem Computer (nicht über einen Hub), und stöpseln Sie alle anderen
über IEEE 1394 angeschlossenen Geräte vom Computer ab.
5 Legen Sie die mitgelieferte CD-ROM („TOOLS for 01X“) in das CD-ROM-
Laufwerk ein.
OMS (Open Music System)
6 Doppelklicken Sie auf den Ordner „OMS“ (nur englische Version).
„Install OMS 2.3.8“ wird angezeigt.
7 Doppelklicken Sie auf „Install OMS 2.3.8“.
Das Dialogfenster „OMS Setup” wird angezeigt.
8 Führen Sie die Installation aus, indem Sie den Bildschirmanweisungen
folgen.
Klicken Sie nach der Installation auf „Restart“ (Neustart).
• Nach Beendigung der Installation wird u.U. eine Fehlermeldung angezeigt, die
darauf hinweist, dass das Installationsprogramm nicht geschlossen wurde.
Wechseln Sie in diesem Fall in das Menü „File“ (Datei), und wählen Sie „Quit“
(Beenden) aus, um das Installationsprogramm zu beenden. Starten Sie dann
den Computer neu.
9 Nach dem Neustart des Macintosh befindet sich auf dem Computer ein
Ordner namens „Opcode“/“OMS Applications“ (standardmäßig auf dem
Startvolume).
mLAN TOOLS
12 Doppelklicken Sie auf das Symbol „Install mLAN for 01X“ im Ordner
„mLAN_“, so dass das folgende Installationsfenster angezeigt wird.
Das Feld „Install Location“ („Installationsspeicherort“) zeigt den
Zielordner der Installation an. Wenn Sie Ziellaufwerk oder -ordner
ändern möchten, klicken Sie auf die Schaltfläche [Switch Disk]
(Laufwerk wechseln), und geben Sie im Pop-Up-Menü das
gewünschte Ziel an.
• Normalerweise muss das Zielverzeichnis nicht geändert werden.
13 Achten Sie darauf, dass „Easy install“ („Einfache Installation“) gewählt
ist und klicken Sie auf „Install“ („Installieren“). Klicken Sie im darauf
folgenden Bestätigungsdialog auf „Continue“ („Fortfahren“).
14 Wenn eine Meldung „OMS Folder cannot be found in the system
folder“ („Kein OMS-Ordner im Systemordner gefunden“) o.ä.
erscheint, kopieren Sie nach der Installation die Datei „mLAN OMS
Driver“ (zu finden im Ordner „Into OMS Folder“ innerhalb des Ordners
„mLAN Tools“ im Zielordner der Installation) in den Ordner „OMS
Folder“ im Systemordner.
15 Es wird eine Meldung angezeigt, die Sie auffordert, den Ordner mit
den ASIO-Treibern zu suchen. Klicken Sie auf [OK]. Das
Suchergebnis wird angezeigt.
16 Wählen Sie das Installationsziel für den ASIO-mLAN-Treiber und
klicken auf [OK].
• Wenn eine Meldung „ASIO Driver folder cannot be found in the system folder“
(„Kein Ordner namens ASIO Drivers im Systemordner gefunden“) o.ä.
erscheint, kopieren Sie nach der Installation die Datei „ASIO mLAN“ (zu finden
im Ordner „Into ASIO Drivers“ innerhalb des Ordners „mLAN Tools“ im
Zielordner der Installation) in den Ordner „ASIO Drivers“ im Systemordner.
17 Schalten Sie das 01X ein.
18 Nach Abschluss der Installation wird die Meldung „Installation was
successful.“ (Installation war erfolgreich.) angezeigt. Klicken Sie auf
[Restart] (Neu starten).
Fahren Sie fort mit dem nächsten Schritt.
10 Kopieren Sie die Datei „OMS_2.3_Mac.pdf“ von der CD-ROM in das
Verzeichnis „OMS Applications“ (zum Beispiel durch Ziehen und
Ablegen).
In der Datei „OMS_2.3_Mac.pdf“ (nur auf Englisch verfügbar) finden
Sie Informationen zur Verwendung des Programms.
TOOLS for 01X/Plug-in Effect Installationshandbuch
19
Page 50

Konfigurieren von mLAN AUTO W.CLK(01X)
19 Nach der Installation des mLAN-Treibers wird der mLAN Auto
Connector gestartet. Um den korrekten Empfang der mLAN-AutoConnector-Einstellungen sicherzustellen, setzen Sie den Parameter
„mLAN AUTO W.CLK“ (Wordclock) in der nachfolgend beschriebenen
Weise auf „ENABLE“ (Aktivieren). Diese Einstellungen können auch
nach der Ausführung von mLAN Auto Connector vorgenommen
werden.
Konfigurieren auf dem 01X
19-1 Drücken Sie auf dem 01X die Taste [UTILITY], um den
UTILITY-Modus aufzurufen.
19-2 Drücken Sie W.CLK (Kanalregler 3), um den Bildschirm
„mLAN AUTO W.CLK“ aufzurufen.
UTILITY mLAN AUTO W.CLK [INT : 48 kHz] 1/2
ENABLE/DISABLE
19-3 Drücken Sie ENABLE (Aktivieren) (Kanalregler 1).
19-4 Die Abfrage „ENABLE SURE?“ (Sind Sie sicher, dass Sie
aktivieren möchten?) erscheint. Bestätigen Sie die
Einstellung, indem Sie auf Kanalregler 8 drücken.
Einstellungen im mLAN Auto Connector
20 Ändern Sie die Einstellungen im Fenster „mLAN Auto Connector“
entsprechend Ihren individuellen mLAN-Anforderungen.
Sample Rate .......... (Sampling-Frequenz) Legt die Sampling-
Frequenz fest (die Frequenz der Wordclock)
From 01X to Mac...(Vom 01X zum Mac) Legt die Anzahl der mLAN-
Audioübertragungskanäle vom 01X zum
Computer fest.
From Mac to 01X...(Vom Mac zum 01X) Legt die Anzahl der mLAN-
Audioübertragungskanäle vom Computer zum
01X fest. Die beiden letzten Kanäle werden mit
dem Monitoreingang verbunden.
• Wenn dieser Parameter bereits auf ENABLE eingestellt ist, erscheint die
Abfrage nicht. Fahren Sie in diesem Fall mit dem nächsten Schritt fort.
• Wenn kein System-Backup durchgeführt wird, gehen die Utility-Einstellungen
des 01X beim Ausschalten des Geräts verloren. (Informationen hierzu finden Sie
in der Bedienungsanleitung des 01X.) Um sicherzustellen, dass die hier
vorgenommenen Einstellungen nach dem nächsten Einschalten des 01X zur
Verfügung stehen, führen Sie ein System-Backup aus, indem Sie [SHIFT] halten
und [UTILITY] drücken.
Fahren Sie fort mit dem nächsten Schritt.
• Wenn die 01X-Verbindungen unter Verwendung von mLAN Auto Connector
hergestellt werden, kann dies in einigen Geräten Rauschen erzeugen. Achten
Sie daher darauf, dass während des Verbindungsvorgangs an Ihrer
Stereoanlage oder am MONITOR/PHONES-Regler/Stereo-Fader eine minimale
Lautstärke eingestellt ist.
• Wenn Sie die Sampling-Frequenz in 96 kHz/88,2 kHz ändern, während die
LAYER des 01X auf 17–24 (mLAN) eingestellt ist, wird LAYER 1–8 aufgerufen
und automatisch Kanal 1 ausgewählt.
Einstellen der Wordclock-Änderungsgeschwindigkeit
Wenn Sie im Auto Connector auf [Setup] klicken, wird das SetupDisplay geöffnet.
Wenn die Wordclock des 01X als Slave eines externen mLANGeräts konfiguriert ist und sich die eingehende Wordclock ändert,
wird hierdurch bestimmt, ob die Wordclock schnell oder langsam an
die Master-Wordclock angepasst wird.
Slow .... (Langsam) Die Wordclock ändert sich langsam. (Dies ist
die gängige Einstellung für die meisten Anwendungen.)
Fast ..... (Schnell) Die Wordclock ändert sich schnell. (Dies kann zu
einer Zunahme von Jitterproblemen führen.)
21 Klicken Sie auf [Connect] (Verbinden). Wenn die Verbindungen
korrekt sind, schließt der mLAN Auto Connector den
Verbindungsvorgang ab, und die mLAN-Datenkommunikation beginnt
mit dem 01X als Slave.
TOOLS for 01X/Plug-in Effect Installationshandbuch
20
• Wenn die Verbindung fehlschlägt, starten Sie Auto Connector erneut (zu finden
unter „mLANTools" im Zielordner der Installation), und klicken Sie erneut auf
[Connect] (Verbinden).
• Wenn Sie den mLAN Auto Connector zum ersten Mal starten, werden die
folgenden Dateien in den Papierkorb verschoben. Diese Dateien können
gelöscht werden.
• AutoConnector01X-Alias
• AutoConnector01X-Launcher
Fahren Sie fort mit dem nächsten Schritt.
Page 51

OMS einrichten
• Wenn Sie mLAN auf einem Mac mit zusätzlich installierter IEEE-1394-(FireWire)
Schnittstellenkarte benutzen, erzeugen Sie im OMS Setup ein neues Studio Setup,
ohne die Datei 01X-mLAN OMS Setup zu verwenden, die sich auf der InstallationsCD-ROM befand. Einzelheiten hierzu finden Sie in der Anleitung zu OMS.
22 Doppelklicken Sie auf die Ordner „OMS“ und „OMSSetup for
YAMAHA“. Die Datei „01X-mLAN“ erscheint. Kopieren Sie diese auf
die Festplatte Ihres Computers.
23 Doppelklicken Sie auf die Datei „01X-mLAN“, um das OMS Setup zu
starten.
24 Um mehrere MOTIF-RACK-Einheiten an den Computer
anzuschließen, benötigen Sie einen USB-Hub. Nachdem das OMSSetup gestartet wurde, wird die in Schritt Nr. 23 doppelt angeklickte
Studio-Setup-Datei geöffnet.
Falls rechts neben dem Namen der Setup-Datei nicht „“ angezeigt
wird, wählen Sie im Menü „File“ (Datei) die Option „Make Current“ (Zur
aktuellen Datei machen) aus, und führen Sie den Speichervorgang
aus.
Das OMS-Studio-Setup ist abgeschlossen. Zur Verwendung der
Software müssen Sie zusätzlich den OMS-Port einstellen (Seite 22).
• Mit einem Doppelklick auf das Symbol des mLAN-Gerätes oder Ausführen von
„MIDI Device Info…“ im „Studio“-Menü durch Auswählen des mLAN-Gerätes
wird der Device-Info-Dialog geöffnet. Wir empfehlen Ihnen, die Kanalzuordnung
nicht zu ändern, da sie von der Setup-Anwendung (mLAN Auto Connector usw.)
bereits für die optimale Verwendung mit mLAN-Geräten wie dem 01X eingestellt
wurde. Stellen Sie alles wieder wie in folgender Abbildung gezeigt ein, falls Sie
versehentlich etwas geändert haben sollten.
Die Einstellungsnamen (Gerätenamen) jedes MIDI-Ports sind
nachfolgend dargestellt, wenn die Studio-Setup-Datei von 01XmLAN geladen ist. Diese entsprechen den Funktionen des festen
MIDI-Ports des 01X. Stellen Sie die für von Ihnen verwendete
Anwendung geeigneten Geräte (Ports) ein.
MIDI-Port-Funktion des 01X
MID Port Gerätename Funktion
1 DAW Fernsteuerung
2 MIDI-A Direkte Verbindung mit der Buchse MIDI-A
3 MIDI-B Direkte Verbindung mit der Buchse MIDI-B
4 Studio Manager Studio Manager
5 Scene CTRL Fernsteuerung (Der Modus ist auf
• Nachdem Sie mit den obigen Anweisungen das OMS Studio Setup eingerichtet
haben, erkennt Ihr Computer nur das 01X als MIDI-Gerät. Wenn Sie zusätzlich zum
01X ein anderes MIDI-Instrument oder einen weiteren 01X in das System integrieren
möchten, sollten Sie eine eigene Studio-Setup-Datei einrichten. Informationen dazu
finden Sie im Online-Handbuch zu OMS.
• Je nach Macintosh/Mac OS-Version funktioniert die mitgelieferte OMS-Studio-SetupDatei u.U. nicht, obwohl Sie die oben beschriebene Verfahrensweise befolgt haben.
(MIDI-Daten können nicht gesendet/empfangen werden, auch dann nicht, wenn das
Setup verfügbar wird.) Verbinden Sie in dieser Situation Ihren Mac mit dem 01X und
befolgen Sie die nächsten Schritte, um die Setup-Datei neu zu erzeugen.
(MIDI/mLAN-MIDI-Konvertierung)
(MIDI/mLAN-MIDI-Konvertierung)
„GENERAL“ festgelegt.) Dient zum Steuern
des Multi Part Editors oder zum Laden von
Bibliotheksszenen mithilfe von
Programmwechsel-Meldungen.
1 Starten Sie das OMS-Setup, und wählen Sie im Menü „File“ (Datei) die
Menüoption „New Setup“ (Neues Setup) aus.
2 Der Dialog „OMS Driver Search“ (Suche nach OMS-Treiber) erscheint.
Deaktivieren Sie die Kontrollkästchen „Modem“ und „Printer“ (Drucker), und
klicken Sie auf [Search] (Suchen), um nach dem Gerät zu suchen. Wenn der
Suchvorgang erfolgreich abgeschlossen wurde, wird im Dialogfeld zur
Einstellung des OMS-Treibers das Gerät [mLAN-01] angezeigt.
3 Klicken Sie auf [OK], um nach den Ports zu suchen. Im Dialogfenster wird „Port
1”, „Port 2” ... angezeigt. Aktivieren Sie das gewünschte Kontrollkästchen für den
Port, und klicken Sie auf [OK], um die Einstellung zu speichern.
Bestätigen der Installation
Der mLAN Installer kopiert die folgenden Dateien an die nachfolgenden
Stellen.
Ordner „Kontrollfelder“ im Systemordner des Startvolumes
mLAN Driver Setup (Seite 10)
• Im mLAN Driver Setup (Seite 10) können Sie prüfen, ob die Daten korrekt über mLAN
gesendet und empfangen werden.
Ordner „Systemerweiterungen“ im Systemordner des Startvolumes
mLAN Driver
mLAN Expert
mLAN Family
mLAN Transporter Family
Der von Ihnen angegebenen Ordner
Ordner mLAN Tools
Opcode/OMS Applications
Systemordner
Kontrollfelder/mLAN Driver Setup
Ordner OMS/mLAN OMS Driver
Preferences/mLAN HALs/01XTransporter.hal
Ordner Preferences/mLAN Prefs
* Löschen Sie die oben aufgeführten Dateien und Ordner, wenn Sie die
Software deinstallieren. Achten Sie darauf, keine Daten zu löschen, die
bereits vor der Installation vorhanden waren, einschließlich der Dateien
für OMS.
TOOLS for 01X/Plug-in Effect Installationshandbuch
21
Page 52

Ändern von Einstellungen nach der Installation
Im mLAN Driver Setup können die mLAN-bezogenen Einstellungen nach
der Installation geändert werden.
mLAN Driver Setup (Setup des mLAN-Treibers)
In diesem Fenster können Sie die mLAN-Einstellungen zum Empfangen/
Senden von Daten überprüfen und ändern. Bevor Sie Änderungen
vornehmen, müssen Sie alle Anwendungen (DAW usw.) schließen, die die
mLAN-Verbindung verwenden. Die Einstellungen hier entsprechen denen
unter Windows. Siehe Seite 10.
• Die Mode-Einstellung (Modus) gilt nur für Windows.
• Die [EXIT]-Taste ist nur für Windows vorgesehen.
• Um die Wordclock (Sample Rate) und die Anzahl der verwendeten Kanäle zu ändern,
starten Sie den mLAN Auto Connector im Ordner mLAN Tools.
Studio Manager
Installation des Studio Managers
1 Doppelklicken Sie auf das Symbol „Install Studio Manager“ im Ordner
„StudioManager_“, so dass das folgende Installationsfenster erscheint.
Das Feld „Install Location“ („Installationsspeicherort“) zeigt den
Zielordner der Installation an. Wenn Sie Ziellaufwerk oder -ordner ändern
möchten, klicken Sie auf die Schaltfläche [Switch Disk] (Laufwerk
wechseln), und geben Sie im Pop-Up-Menü das gewünschte Ziel an.
OMS Port Setup
4 Starten Sie zunächst den Studio Manager durch einen Doppelklick auf
dessen Symbol.
• Falls AppleTalk aktiviert ist, erhalten Sie eine Warnmeldung. Klicken Sie auf
„OFF“. Es dauert eine Weile, bis AppleTalk deaktiviert ist.
5 Wählen Sie im „File“-Menü des Studio Managers die Option „Select OMS
Ports“ und wählen Sie Ihre Port-Einstellungen aus.
Im folgenden Beispiel ist das MIDI-Gerät ein 01X; dessen Einstellungen
werden an OMS übergeben.
Input Port: Wählen Sie „Studio Manager“ (Port 4) aus.
Output Port: Wählen Sie „Studio Manager“ (Port 4) aus.
6 Klicken Sie auf [OK], um das Fenster „OMS Port Setup” zu schließen.
• Normalerweise muss das Zielverzeichnis nicht geändert werden.
2 Um die Bedienungsanleitung des Studio Managers (PDF) zu installieren,
wählen Sie [Custom Install], achten Sie darauf, dass „Studio Manager for
01X“ und „*****PDFManual“ markiert sind („***“ steht für die ausgewählte
Sprache), und klicken Sie dann auf [Install].
Wählen Sie [Custom Install]
3 Nach Abschluss der Installation wird die Meldung „Installation was
successful.“ (Installation war erfolgreich.) angezeigt. Klicken Sie auf
[Quit] (Beenden).
TOOLS for 01X/Plug-in Effect Installationshandbuch
22
Page 53

Plug-in Effect
1 Doppelklicken Sie auf den Ordner „Mac OS 9“. Der Ordner „VST_“ wird
angezeigt.
2 Doppelklicken Sie auf den Ordner „VST_“. „VST Plugin Installer.“ wird
angezeigt.
3 Doppelklicken Sie auf „VST Plugin Installer“.
Ein Fenster zur Auswahl von Plug-in-Effekten wird angezeigt.
Im Fenster erscheint im Feld „Install Location“ (Installationsort) der
Zielort der Bedienungsanleitung (PDF-Datei). Es wird davon abgeraten,
das Installationsverzeichnis zu ändern. Wählen Sie die zu installierende
Software durch Ankreuzen aus.
4 Klicken Sie auf [Install] (Installieren). Geben Sie in dem daraufhin
angezeigten Fenster den Benutzernamen, den Firmennamen und die
Seriennummer ein.
• Die Seriennummer finden Sie auf der mitgelieferten Benutzerkarte.
5 Klicken Sie auf [Continue] (Weiter). In dem erscheinenden Fenster
können Sie den Ordner „VstPlugins“ auswählen, in dem der Plug-inEffekt installiert werden soll.
• Falls sich auf Ihrem Computer nur ein Ordner „VstPlugins“ befindet, ist dieser
Schritt nicht nötig. Fahren Sie mit Schritt 7 fort.
• Falls sich auf Ihrem Computer kein Ordner „VstPlugins“ befindet, können Sie in
dem angezeigten Fenster den Zielort auswählen, an dem der Plug-in-Effekt
installiert werden soll.
6 Klicken Sie auf [OK]. Die Installation wird gestartet.
7 Nach Beendigung der Installation erscheint das folgende Fenster.
Klicken Sie zum Beenden der Installation auf [Beenden]. Um das
Modul an einen anderen als den in Schritt 5 (siehe oben)
ausgewählten Ort zu kopieren, klicken Sie auf [Continue] (Fortfahren),
und wiederholen Sie den Vorgang ab Schritt 3.
TOOLS for 01X/Plug-in Effect Installationshandbuch
23
Page 54

Demo-Wiedergabe/Einrichten der Fernsteuerung
Computersoftware, die vom 01X aus gesteuert werden kann
SQ01 V2 (V. 2.0 oder neuer) Logic 5 (V. 5.1 oder neuer) Logic 6 (V. 6.0 oder neuer) (Logic Platinum/Gold/Audio)
Cubase SX (V. 1.0.3 oder neuer) Cubase SL (V. 1.0.3 oder neuer) Nuendo 2.0 (V. 2.0 oder neuer) SONAR/XL (V. 2.1 oder neuer)
Digital Performer (V. 3.1 oder neuer) Multi Part Editor for MOTIF-RACK/MOTIF ES
• Prüfen Sie auch die Systemanforderungen für den 01X (bei Verwendung von mLAN). (Siehe Seiten 5, 18.)
SQ01
• Für Informationen zur Einrichtung von Cubase lesen Sie den Abschnitt „Erste
Schritte“ in der Bedienungsanleitung.
Tipps für den Einsatz von Audiodaten (Windows)
Für den optimalen Einsatz der Audio-Funktionen empfehlen wir
Ihnen die folgenden Einstellungen. Diese Einstellungen minimieren
mögliche Probleme mit Audio wie Aussetzer,
Tonhöhenschwankungen und Rauschen.
• Schalten Sie den DMA-Modus (High-SpeedÜbertragungsmodus) der Festplatte ein
Zur Einstellung des DMA-Modus wählen Sie [Systemsteuerung]
➝ [System] (➝ [Hardware]) ➝ [Gerätemanager], und ändern Sie
die Einstellung bei [Laufwerke] oder [Festplattencontroller].
• Stellen Sie Prozessorzeitplanung auf „Hintergrunddienste“
Wählen Sie [Systemsteuerung] ➝ [System] ➝ [Erweitert] ➝
[Leistung] ➝ [Einstellungen] ➝ [Erweitert] und markieren Sie
„Hintergrunddienste“ im Bereich „Prozessorzeitplanung“.
• Stellen Sie die Optionen für Visuelle Effekte auf „Optimale
Leistung“
Wählen Sie [Systemsteuerung] ➝ [System] ➝ [Erweitert] ➝
[Leistung] ➝ [Einstellungen] ➝ [Visuelle Effekte] und markieren
Sie „Für optimale Leistung anpassen“.
• Schalten Sie Automatische Updates aus
Wählen Sie [Systemsteuerung] ➝ [System] ➝ [Automatische
Updates] und löschen Sie die Markierung bei „Diesen Computer
auf dem Laufenden halten“.
• Schalten Sie Remoteunterstützung aus
Wählen Sie [Systemsteuerung] ➝ [System] ➝ [Remote] und
löschen sie die Markierung bei „Ermöglicht das Senden von…“
• Schalten Sie das Classic-Startmenü ein
Nach einem Rechtsklick auf eine freie Stelle in der Taskleiste
können Sie [Eigenschaften] ➝ [Startmenü] auswählen, und dort
das „Classic Start Menu“ auswählen (ankreuzen).
• Übergangseffekte ausschalten
Wählen Sie [Systemsteuerung] ➝ [Anzeige] (➝ [Darstellung]) ➝
[Effekte…], und löschen Sie die Markierung bei
„Übergangseffekte für Menüs und Quickinfo verwenden.“
Nach Abschluss der Installation des SQ01 wählen Sie [Start] ➝ [Alle
Programme] ➝ [YAMAHA SQ01 Ver 2.0] ➝ [SQ01], um den SQ01 zu
starten.
VORSICHT
• Während der SQ01 startet, schalten Sie kein über mLAN angeschlossenes,
externes Gerät ein oder aus, und stecken Sie auch kein mLAN-Kabel ein oder
ziehen eines heraus. Dadurch kann der Computer hängenbleiben oder
abstürzen, oder die Funktionen für das externe Gerät werden deaktiviert.
Dieser Abschnitt zeigt, wie Sie MIDI-, Audio- und
Fernsteuerungseinstellungen für die Wiedergabe von MIDI-/Audio-Daten
vom SQ01 aus vornehmen. Nachdem Sie Aufbau und Einrichtung
abgeschlossen haben, versuchen Sie, die Demosongs von der CD-ROM zu
starten.
MIDI-Setup
Bei Einsatz des 01X zur Fernsteuerung
Bei Einsatz eines externen MIDI-Gerätes (Tongenerator,
MIDI-Keyboard, usw.)
1 Wählen Sie [MIDI] ➝ [Device] (Gerät) aus dem Setup-Menü im Track-
View-Fenster, um die unten abgebildeten Dialogboxen aufzurufen.
TOOLS for 01X/Plug-in Effect Installationshandbuch
24
2 Wählen Sie den Treiber für das MIDI-Keyboard (oder das MIDI-Interface)
aus, den Sie verwenden möchten, indem Sie in die Spalte „In“ klicken.
Wählen Sie außerdem den Port (Seite 21), den Sie am 01X verwenden
werden. Sie können mehrere Ports auswählen, falls gewünscht.
3 Wählen Sie wie im obigen Schritt 2 den MIDI-Treiber für den
Klangerzeuger (oder das MIDI-Interface) aus, den Sie verwenden
möchten, indem Sie in die Spalte „Out“ klicken, und klicken Sie dann auf
[OK]. Wählen Sie außerdem den/die Port(s) aus (Seite 21), den/die Sie
am 01X verwenden werden.
Page 55

Bei Einsatz von VST-Instrumenten
(Plug-in-Software-Synthesizer)
Die Einstellungen der Software-Synthesizer-Plug-ins werden getrennt für
jeden Song gespeichert. Wenn Sie also einen Song öffnen, werden alle
Einstellungen die mit diesem Song gespeichert wurden, automatisch
abgerufen.
Dieser Abschnitt beschreibt, wie ein Software-Synthesizer in Form eines
VST-Plug-ins bei der Erstellung eines neuen Songs eingestellt werden
sollte.
1 Klicken Sie in der Werkzeugleiste auf [ ] (Soft-Synth-Rack), um das
Soft-Synth-Rack zu öffnen.
2 Klicken Sie auf die Taste [ ] (Hinzufügen) und wählen Sie den Plug-
in-Synthesizer aus dem erscheinenden Pop-up-Menü.
Audio-Setup
1 Achten Sie darauf, dass „Disable Audio“ nicht markiert ist. (Wählen Sie
„Audio“ aus dem Setup-Menü, und klicken Sie darauf, falls erforderlich,
um die Markierung zu entfernen.) Wenn diese Option markiert ist, kann
Audio nicht benutzt werden.
2 Wählen Sie im Setup-Menü den Eintrag [Audio] ➝ [Device], um das
folgende Fenster zu öffnen.
• In dem Pop-up-Menü, das sich nach Anklicken von [Add] (Hinzufügen) öffnet,
werden die Plug-in-Synthesizer angezeigt, die sich im Ordner Program files
➝
Yamaha
ins mit anderen Programmen lesen Sie den Abschnitt „Einstellungen für VST
Plug-ins“ (Seite 26).
Vstplugins befinden. Für Informationen zur Verwendung dieser Plug-
➝
Einstellungen für die Fernsteuerung
1 Wählen Sie im Setup-Menü im Track-View-Fenster den Eintrag „Remote
Control“ (Fernsteuerung), um die folgend abgebildeten Dialoge zu
öffnen, und nehmen Sie die Einstellungen vor wie gezeigt.
Mode (Modus): 01X
Input Device (Eingabegerät): mLAN MIDI In (Port 1)
Output Device (Ausgabegerät): mLAN MIDI Out (Port 1)
01X Port Number (Port-Nummer des 01X): 1
3 Wählen Sie ASIO als Audio-Treiber und „ASIO mLAN“ als Gerät.
4 Aktivieren (Markieren) Sie die entsprechenden Kanäle, die für die Ein-/
Ausgänge der aktiven Kanäle benutzt werden sollen.
5 Klicken Sie auf [OK], um das Fenster zu schließen.
• Der Port ohne Nummer ist Port 1.
• Wenn Sie den Multi-Part-Editor als Plug-in des SQ01 zur Fernsteuerung
verwenden, wählen Sie „Multi Part Editor for MOTIF-RACK“ als MIDI-Editor.
• Der MIDI Mixer im SQ01 kann nicht vom 01X aus ferngesteuert werden.
• [Setup] des Audio-Mixer-Fensters – die Einstellung der [Remote Control...]
(Fernsteuerung) wird ungültig.
2 Wählen Sie am 01X UTILITY ➝ REMOTE (Regler 1) ➝ REMOTE
SELECT, und wählen Sie dann „GENERAL“.
TOOLS for 01X/Plug-in Effect Installationshandbuch
25
Page 56

Einstellungen für VST-Plug-ins
Demo-Song abspielen
Wenn Sie VST-Plug-ins im SQ01 verwenden, müssen Sie zunächst die
Modul(e) der zu verwendenden Plug-in-Software in den VST-Plug-inOrdner verschieben ([Program files] ➝ [YAMAHA] ➝ [Vst plugins]). Die
mit dem SQ01 gelieferte VST-Plug-in-Software wird in diesem Ordner
installiert, wenn Sie die Installationsanleitung auf Seite 14 befolgen. In
diesem Fall kann die Software ohne weitere Maßnahmen im SQ01
verwendet werden.
Dieser Abschnitt erklärt die Einstellungen, die Sie vornehmen müssen,
wenn Sie VST-Plug-in-Software anderer Hersteller mit dem SQ01
benutzen möchten. Außerdem erfahren Sie, wie Sie die mit dem SQ01
gelieferte VST-Plug-in-Software zusammen mit anderen Programmen als
dem SQ01 benutzen möchten.
Einsatz von VST-Plug-ins anderer Hersteller mit dem SQ01
Zusätzlich zu dem normalen Speicherort für Module in [Program files] ➝
[YAMAHA] ➝ [Vst plugins] können Sie einen weiteren Ordner angeben,
in dem der SQ01 nach VST-Plug-ins sucht. Dadurch können Sie VSTPlug-in-Software mit anderen Anwendungen einsetzen. Nehmen Sie die
Einstellungen vor wie unten gezeigt.
1 Wählen Sie im Setup-Menü des SQ01 den Eintrag [Audio] ➝ [Others],
um das unten abgebildete Fenster zu öffnen.
1 Kopieren Sie die Demo-Song-Datei (All for You for SQ01.yws) aus dem
Ordner „DemoSong“ auf der CD-ROM auf Ihre Festplatte.
2 Wählen Sie im Menü „File“ (Datei) des SQ01 den Befehl „Open“ (Öffnen)
aus, um den [Öffnen]-Dialog aufzurufen. Wählen Sie den Demo-Song
aus, den Sie auf die Festplatte kopiert hatten und klicken Sie auf [Open]
(Öffnen). Es erscheint ein neues Track-View-Fenster/Audio-MixerFenster (lesen Sie hierzu in der Online-Hilfe nach) und die Daten des
ausgewählten Demo-Songs erscheinen als Blöcke auf den Spuren.
3 Schalten Sie am 01X in den INTERNAL-Modus und wählen Sie die Layer
[9/16 (mLAN)].
4 Stellen Sie Fader 1 und 2 (mL1/mL2) auf geeignete Pegel.
5 Rufen Sie mit der Taste [PAN] die PAN-Anzeige auf, und drehen Sie die
Kanaldrehregler 1 und 2 auf entgegengesetzte Panoramapositionen
(ganz links/ganz rechts).
6 Nachdem Sie überprüft haben, dass bei MONITOR A/B die Einstellung
MONITOR B gewählt ist (Lämpchen leuchtet nicht), regeln Sie den
Master-Fader auf.
7 Schalten Sie die Fernsteuerung ein (Seite 24), um den 01X in den
REMOTE-Modus zu versetzen.
8 Um die Wiedergabe des Demo-Songs zu starten, drücken Sie die
Wiedergabetaste am 01X oder klicken Sie die entsprechende
Schaltfläche in der Transportleiste an (lesen Sie hierzu die OnlineAnleitung des SQ01).
2 Klicken Sie auf die Taste [Browse…] rechts von dem Feld [VST Plug-in
Folder], um den Dateidialog zur Auswahl des Ordners zu öffnen.
3 Wählen Sie aus der Liste den VST-Plug-in-Ordner mit dem/den
gewünschten VST-Plug-in(s) und klicken Sie auf [OK].
4 Klicken Sie auf [OK], um den Audio-Dialog zu schließen.
• Sie können auch das VST-Plug-in-Modul in den Ordner [Program files] ➝ [YAMAHA]
➝
[Vst plugins] kopieren, um es mit dem SQ01 zu verwenden. Ausführliche
Informationen finden Sie im Benutzerhandbuch des verwendeten VST-Plug-ins.
Näheres zu den folgenden Schritten erfahren Sie in der Online-Anleitung
des SQ01.
TOOLS for 01X/Plug-in Effect Installationshandbuch
26
Page 57

Cubase SX/SL
Logic
MIDI- (Fernsteuerung) und Audio-Einstellungen
Informationen zum MIDI/Audio Setup finden Sie auf Seite 66 des
Haupthandbuchs.
• Einstellungen für Nuendo
Die Einstellungen für Nuendo (V. 2.0 oder neuer) sind die gleichen wie für Cubase.
Für die Angabe der Audio-Ein- und Ausgänge und deren Zuweisung zu den
gewünschten Bussen müssen Sie jedoch den Eintrag [VST Connections] (VSTVerbindungen) aus dem Menü [Devices] (Geräte) wählen, und dann die Ein-/
Ausgänge mit dem Vorgang [Add Bus] (Bus hinzufügen) einstellen.
• Die Einstellungen für Cubase SL sind die gleichen wie für Cubase SX.
Demo-Song abspielen
1 Installieren Sie die Plug-in-Effekte Vocal Rack, Final Master und Pitch
Fix (Seite 14).
• Cubase SX/SL kann sich unter Umständen automatisch beenden, wenn diese
Plug-in-Effekte noch nicht installiert wurden und Sie den Demo-Song für Cubase
SX/SL öffnen.
2 Kopieren Sie den Ordner des Demo-Songs von der CD-ROM auf
C:\Program Files\YAMAHA auf Ihrem Computer.
Wenn im Verzeichnis C: kein Ordner namens Program files vorhanden
ist, oder wenn die Software von Yamaha in einem anderen Ordner
installiert wurde, müssen Sie den Demo-Song an einen anderen Ort
kopieren. In diesem Fall ist es notwendig, eine entsprechende
Verknüpfung anzulegen (wie im folgenden Hinweis erklärt), da so die
Verbindung zwischen dem Demo-Song und den Audio-Dateien
unterbrochen ist.
3 Wählen Sie im Menü File (Datei) den Eintrag [Open] (Öffnen), um den
Öffnen-Dialog aufzurufen.
Wählen Sie „All for You for Cubase SXSL“ aus dem Demo-Song-Ordner
aus, den Sie auf die Festplatte kopiert hatten, und klicken Sie auf [Open].
Einrichtung der Fernsteuerung
Wenn Sie vor dem Starten von Logic den 01X einschalten
möchten:
1 Wählen Sie am 01X den Eintrag UTILITY ➝ REMOTE (Regler 1) ➝
REMOTE SELECT ➝ „LOGIC“, und schalten Sie dann mit der Taste
[REMOTE] in den Fernsteuerungsmodus.
2 Starten Sie Logic am Computer.
Logic erkennt den 01X automatisch als Logic Control und nimmt die
erforderlichen Einstellungen vor.
Wenn Sie Logic vor dem Einschalten des 01X starten
möchten:
1 Starten Sie Logic am Computer, und schalten Sie dann den 01X ein.
Wenn Sie im Utility-Modus die zu steuernde Software bereits auf „Logic“
gestellt haben, brauchen Sie Schritt 2 nicht auszuführen, da Logic den
01X automatisch erkennt, wenn dieser Schritt durchgeführt wird.
2 Wählen Sie am 01X den Eintrag UTILITY ➝ REMOTE (Regler 1) ➝
REMOTE SELECT ➝ „LOGIC“, und schalten Sie dann mit der Taste
[REMOTE] in den Fernsteuerungsmodus. Logic erkennt den 01X
automatisch als Logic Control und nimmt die erforderlichen Einstellungen
vor.
Sollte Logic aus irgendeinem Grund den 01X nicht erkennen, dann
folgen Sie bitte den nachstehenden Anweisungen.
1 Wählen Sie aus dem Menü den Befehlspfad [Options] ➝
[Preferences…] ➝ [Control Surface] ➝ [Install…].
2 Scannen Sie nach Logic Control (Yamaha 01X) in dem in Schritt 1
aufgerufenen Fenster. Wenn der Scan-Vorgang erfolgreich war,
erkennt Logic den 01X als Logic Control und führt die erforderlichen
Einstellungen automatisch aus.
Sollte Logic den 01X immer noch nicht erkennen, auch wenn Sie den
vorstehenden Anweisungen gefolgt sind, dann folgen Sie bitte den
nachstehenden Anweisungen.
• Wenn eine Meldung erscheint, dass die Datei nicht gefunden wurde, wählen Sie
die entsprechende Datei aus dem Demo-Song-Ordner aus, den Sie auf die
Festplatte kopiert hatten.
• Unter Umständen erscheint die folgende Meldung, wenn Sie den Song in
Cubase SL öffnen; dies beeinträchtigt jedoch nicht die Song-Wiedergabe.
Klicken Sie auf [OK].
4 Die folgenden Schritte sind die gleichen wie die nach Schritt 3 der
Demo-Song-Wiedergabe mit dem SQ01 (Seite 26).
• Wenn Sie die Songdaten nach dem Start von Cubase zum ersten Mal
wiedergeben, kann es sein, dass die Automationsdaten und die Audiodaten
nicht synchron sind. Stoppen Sie die Wiedergabe und starten Sie sie nochmals.
1 Wählen Sie aus dem Menü [Options] ➝ [Preferences…] ➝
[Control Surface] ➝ [Install…].
2 Fügen Sie in dem in Schritt 1 aufgerufenen Fenster Logic Control
(Yamaha 01X) hinzu.
3 Geben Sie den Eingangs-Port (DAW/mLAN MIDI In: Port 1) und
den Ausgangs-Port (DAW/mLAN MIDI Out: Port 1) im Fenster
CONTROL SURFACE SETUP an, das Sie in Schritt 2 aufgerufen
hatten.
TOOLS for 01X/Plug-in Effect Installationshandbuch
27
Page 58

Audio-Setup
SONAR
1 Wählen Sie aus dem Menü [Options] ➝ [Preferences…] ➝ [Audio
Hardware & Drivres] ➝ [Install]. Es erscheint ein Fenster mit
Einstellungen.
2 (Nur Windows) Klicken Sie auf den Reiter Audio-Treiber 2, und wählen
(markieren) Sie ASIO als Treiber.
3 Wählen Sie „ASIO mLAN“ als Gerät, und starten Sie Logic neu.
Abspielen des Demo-Songs (nur Macintosh)
1 Installieren Sie die Plug-in-Effekte Vocal Rack, Final Master und Pitch
Fix (Seite 23).
2 Kopieren Sie den Ordner „DemoSong“ von der CD-ROM auf Ihre
Festplatte.
3 Doppelklicken Sie auf die Demo-Song-Datei (All for you for Logic) im
Ordner „DemoSong“, um den Demo-Song zu öffnen.
4 Die folgenden Schritte sind die gleichen wie die nach Schritt 3 der
Demo-Song-Wiedergabe mit dem SQ01 (Seite 26).
Digital Performer
Einrichtung der Fernsteuerung
1 Klappen Sie das Menü [Basics] (Grundeinstellungen) herunter, und
wählen Sie die Option [Control Surface Setup] (Bedienungsoberflächen
einrichten), um das Fenster „Control Surface“ aufzurufen.
2 Wählen Sie im Bereich „Driver“ (Treiber) „Mackie Control“. Sollte Mackie
Control hier nicht zur Verfügung stehen, folgen Sie bitte den
nachstehenden ergänzenden Anweisungen.
3 Wählen Sie im Feld zur Einrichtung von „Unit“ (Einheit) und „MIDI“ im
Unit-Bereich die Option „Mackie Control“ aus und im MIDI-Bereich den
„DAW/Port 1” (mLAN MIDI In/Out Port 1).
4 Wählen Sie am 01X den Eintrag UTILITY ➝ REMOTE (Regler 1) ➝
REMOTE SELECT ➝ „DP“, und schalten Sie dann mit der Taste
[REMOTE] in den Fernsteuerungsmodus.
Wenn in Schritt 2 die Option „Mackie Control“ nicht auswählbar ist:
1 Laden Sie von der Adresse „www.motu.com“ die Plug-In-Software
„Mackie Control“ herunter, und speichern Sie sie auf Ihrer
Festplatte.
2 Verschieben Sie die Datei „Mackie Control“ in den Ordner „Plug-
ins“, der sich in dem Ordner befindet, in dem der Digital Performer
installiert wurde.
3 Starten Sie den Digital Performer.
• Stellen Sie die Funktion „MIDI Thru“ im OMS Setup und die Funktion „MIDI Patch
Thru“ im Digital Performer so ein, dass sie im Hintergrund arbeiten.
Audio-Setup
1 Klappen Sie das Menü [Basics] (Grundeinstellungen) herunter, und
wählen Sie die Option [Configure Audio System] (Audiosystem
konfigurieren) ➝ [Configure Hardware Driver] (Hardware-Treiber
konfigurieren), um das Fenster „Configure Hardware Driver“ zu öffnen.
2 Wählen Sie „ASIO“ aus dem Menü.
3 Wählen Sie „ASIO mLAN“ als ASIO-Treiber aus.
Einrichtung der Fernsteuerung
1 Klappen Sie das Menü [Options] herunter, und wählen Sie die Option
[MIDI Devices] (MIDI-Geräte); um das Fenster „MIDI Devices“
aufzurufen.
2 Fügen Sie „mLAN MIDI In (Port 1)” den „Inputs“ hinzu und „mLAN MIDI
Out (Port 1)“ den „Outputs“.
3 Klappen Sie das Menü [Options] herunter, und wählen Sie die Option
[Control Surfaces] (Steuerungsoberflächen), um das Fenster „Control
Surface“ aufzurufen.
4 Klicken Sie auf das Symbol „New“ (Neu), wählen Sie „Mackie Control“ in
[Control Surfaces], und stellen Sie dann den Eingangs-Port auf „mLAN
MIDI In (Port 1)“ und den Ausgangs-Port auf „mLAN MIDI Out (Port 1)“.
5 Wählen Sie am 01X den Eintrag UTILITY ➝ REMOTE (Regler 1) ➝
REMOTE SELECT ➝ „SONAR“, und schalten Sie dann mit der Taste
[REMOTE] in den Fernsteuerungsmodus.
Audio-Einstellungen (WDM)
• Wenn die WDM-Einstellung (für SONAR) nicht angegeben wurde, stellen Sie den
Modus („Mode“) in „Driver Setup“ (Seite 10) auf „WDM“, nachdem Sie die Anwendung
beendet haben.
1 Wählen Sie Options ➝ Audio, um das Fenster „Audio Options“ zu öffnen.
2 Klicken Sie auf den Reiter „Advanced“ (Erweitert), um sicherzustellen,
dass der Treiber-Modus auf „WDM/KS“ steht.
• Wenn „WDM/KS“ nicht ausgewählt ist, wählen Sie es aus und starten Sie
SONAR neu.
3 Wählen Sie Options ➝ Audio, um das Fenster „Audio Options“ zu öffnen,
und wählen Sie dann die zu verwendenden mLAN-Audio-Ports unter
„General“ ➝ „Input Monitoring“ ➝ „Drivers“.
Demo-Song abspielen
4 Kopieren Sie den Ordner des Demo-Songs von der CD-ROM auf
C:\Program Files\YAMAHA auf Ihrem Computer.
Wenn im Verzeichnis C: kein Ordner namens Program files vorhanden
ist, oder wenn die Software von Yamaha in einem anderen Ordner
installiert wurde, müssen Sie den Demo-Song an einen anderen Ort
kopieren. In diesem Fall ist es notwendig, eine entsprechende
Verknüpfung anzulegen (wie im folgenden Hinweis erklärt), da so die
Verbindung zwischen dem Demo-Song und den Audio-Dateien
unterbrochen ist.
5 Wählen Sie im Menü File (Datei) den Eintrag [Open] (Öffnen), um den
Öffnen-Dialog aufzurufen.
Wählen Sie „All for You for Cubase SXSL“ aus dem Demo-Song-Ordner
aus, den Sie auf die Festplatte kopiert hatten, und klicken Sie auf [Open].
• Wenn eine Meldung erscheint, dass die Datei nicht gefunden wurde, wählen Sie
die entsprechende Datei aus dem Demo-Song-Ordner aus, den Sie auf die
Festplatte kopiert hatten.
6 Die folgenden Schritte sind die gleichen wie die nach Schritt 3 der
Demo-Song-Wiedergabe mit dem SQ01 (Seite 26).
• Zum Aufrufen des ASIO-mLAN-Kontrollfelds klicken Sie auf „Configure Driver“
(Treiber konfigurieren).
TOOLS for 01X/Plug-in Effect Installationshandbuch
28
Page 59

Display-Meldungen
Meldung Erklärung Seite
Can’t find the mLAN Stream Driver.
Re-install the mLAN Drivers.
Can’t find the 01X on the mLAN network.
Make sure that the 01X is turned on and that the mLAN cable
connection is correct and secure. After that, restart “mLAN
Auto Connector for 01X”.
The settings of the mLAN Driver could not be changed.
1) If an application that uses the driver is currently active,
close it first, then change the settings.
2) There is not enough resource memory.
Failed to set the 01X’s wordclock to slave.
Set the master clock of the 01X so that mLAN Auto W.CLK is
set to “ENABLE.”
1) Press the [UTILITY] button on the 01X.
2) Select “W.CLK” (press knob 3) on the 01X.
3) Set the parameter to “ENABLE”
Failed to initialize the mLAN settings because the application
“mLAN Start” is not running.
Select “ON” from the menu of “mLAN Manager” application.
Can’t connect the 01X’s mLAN audio output plug to the computer’s mLAN audio input plug.
Can’t connect the 01X’s mLAN MIDI output plug to the computer’s mLAN MIDI input plug.
Can’t connect the computer’s mLAN MIDI output plug to the
01X’s mLAN MIDI input plug.
Can’t connect the computer’s mLAN wordclock output plug to
the 01X’s mLAN wordclock input plug.
Can’t connect the 01X’s mLAN wordclock output plug to the
computer’s mLAN wordclock input plug.
A new 1394 adaptor card has been found.
If you’ve inserted a new card, restart the computer.
There is not enough resource memory.
Execute mLAN Stop, then execute mLAN Start again. If this
fails, restart the computer.
The 1394 adaptor card has not been found.
Check the card and start mLAN again.
One of the programs could not be started. Follow the instructions/messages in the appropriate application. If there are no
messages, execute mLAN Start again or restart the computer.
The application is not responding.
Execute mLAN Start again or restart the computer.
Failed to load the mLAN Bus Driver.
If the New Hardware Wizard has not been run, use it to install
the hardware, then execute mLAN Start.
One or more programs could not be closed.
After quitting all DAW programs and any programs using
mLAN, execute mLAN Stop.
mLAN Stream Driver nicht gefunden.
Installieren Sie die mLAN-Treiber neu.
01X auf dem mLAN-Netzwerk nicht gefunden.
Achten Sie darauf, dass der 01X eingeschaltet ist und dass
die mLAN-Kabelverbindung richtig und sicher ist. Starten Sie
dann den „mLAN Auto Connector for 01X“ nochmals.
Die Einstellungen des mLAN-Treibers konnten nicht
verändert werden.
1) Wenn ein Programm aktiv ist, das den Treiber benutzt,
schließen Sie dieses, und ändern Sie dann erst die
Einstellungen.
2) Es ist nicht genügend Arbeitsspeicher vorhanden.
Die Wordclock des 01X konnte nicht in den Slave-Modus
geschaltet werden.
Stellen Sie die Master-Clock des 01X so ein, dass „mLAN
Auto W.CLK“ auf „ENABLE“ steht.
1) Drücken Sie die Taste [UTILITY] am 01X.
2) Wählen Sie „W.CLK“ am 01X (drücken Sie Regler 3).
3) Stellen Sie den Parameter auf „ENABLE“ ein.
Die mLAN-Einstellungen konnten nicht initialisiert werden, da
die Anwendung „mLAN Start“ nicht läuft.
Wählen Sie „ON“ im Menü des Programms „mLAN Manager“.
Der mLAN-Audio-Ausgangsstecker des 01X’ kann nicht mit
dem mLAN-Audio-Eingangsstecker des Computers
verbunden werden.
Der mLAN-MIDI-Ausgangsstecker des 01X’ kann nicht mit
dem mLAN-MIDI-Eingangsstecker des Computers verbunden
werden.
Der mLAN-MIDI-Ausgangsstecker des Computers kann nicht
mit dem mLAN-MIDI-Eingangsstecker des 01X verbunden
werden.
Der mLAN-Wordclock-Ausgangsstecker des Computers kann
nicht mit dem mLAN-Wordclock-Eingangsstecker des 01X
verbunden werden.
Der mLAN-Wordclock-Ausgangsstecker des 01X’ kann nicht
mit dem mLAN-Wordclock-Eingangsstecker des Computers
verbunden werden.
Eine neue 1394-Schnittstellenkarte wurde gefunden.
Wenn Sie eine neue Karte eingesetzt haben, starten Sie den
Computer neu.
Es ist nicht genügend Arbeitsspeicher vorhanden.
Führen Sie mLAN Stop aus, und führen Sie dann erneut
mLAN Start aus. Falls dies fehlschlägt, starten Sie den
Computer neu.
Die 1394-Schnittstellenkarte wurde nicht gefunden.
Prüfen Sie die Karte, und starten Sie mLAN erneut.
Eines der Programme konnte nicht gestartet werden.
Befolgen Sie die Anweisungen/Meldungen der
entsprechenden Anwendung. Wenn keine Meldungen
angezeigt werden, führen Sie erneut mLAN Start aus, oder
starten Sie den Computer neu.
Die Anwendung reagiert nicht.
Führen Sie erneut mLAN Start aus, oder starten Sie den
Computer neu.
Der mLAN-Bus-Treiber konnte nicht geladen werden.
Wenn der New Hardware Wizard nicht gestartet wurde,
benutzen Sie diesen, um die Hardware zu installieren, und
führen Sie dann mLAN Start aus.
Eines oder mehrere Programme konnten nicht beendet
werden.
Führen Sie mLAN Stop aus, nachdem Sie alle DAWProgramme und andere, die mLAN benutzen, beendet
haben.
6, 18
9, 20
12
9, 20
10
9, 10
9, 10
9, 10
9, 10
9, 10
10
32
10
10
10
10
TOOLS for 01X/Plug-in Effect Installationshandbuch
29
Page 60

Problemlösungen
■ Der Treiber lässt sich nicht installieren.
• Ist das mLAN-Kabel richtig angeschlossen? Prüfen Sie die Verbindung; ziehen Sie das mLAN-Kabel einmal ab und schließen es erneut an.
■ Die mLAN-Verbindung funktioniert nicht.
• Wurde der Treiber installiert?................................................................................................................................................................. Seiten 3, 17
• Ist das mLAN-Kabel richtig angeschlossen? Prüfen Sie die Verbindung; ziehen Sie das mLAN-Kabel einmal ab und schließen es erneut an.
• (Für Windows) Ist mLAN eingeschaltet („ON“)? Rechtsklicken Sie auf das mLAN-Manager-Symbol in der Taskleiste. ...................... Seite 10
• (Für Windows) Wenn Sie eine neue IEEE-1394-Karte einsetzen, rechtsklicken Sie auf das mLAN-Manager-Symbol
in der Taskleiste und wählen Sie „ON“........................................................................................................................................................ Seite 10
• Leuchtet die ACTIVE-LED auf der Rückseite des 01X (blau)? Wenn nicht, prüfen Sie folgende Dinge:
• Leuchtet die Statusanzeige im mLAN Driver Setup (rechtsklicken Sie auf das mLAN-Manager-Symbol in der Taskleiste und wählen Sie
„Driver Setup“) blau?
Wenn nicht, starten Sie das 01X neu und reaktivieren Sie die Verbindung mit dem mLAN Auto Connector............................................ Seite 10
• Ist mLAN AUTO W.CLK (Auto Wordclock) am 01X auf „ENABLE“ eingestellt? ............................................................................ Seiten 9, 20
• Wurde die Verbindung mit mLAN Auto Connector aktiviert? Reaktivieren Sie die Verbindung falls nötig.
.........................................................................................................................„Einstellungen durch mLAN Auto Connector“ auf Seiten 9 und 20
• Haben Sie das Gerät gewechselt? Auch dann, wenn es Geräte gleichen Modells sind: wenn das aktuelle Gerät ein anderes ist,
muss die Verbindung mit mLAN Auto Connector reaktiviert werden............„Einstellungen durch mLAN Auto Connector“ auf Seiten 9 und 20
• Besteht eine Ringverbindung? Prüfen Sie die Verkabelung und stellen Sie sicher, dass die Geräte nicht „im Kreis“ angeschlossen werden.
Beispiel einer Ringverbindung
Computer
01X
Computer
01X
: Mit IEEE-1394-Schnittstelle
ausgerüstetes Gerät
• Es kann eine Grenze für die IEEE-1394-Schnittstelle Ihres Computers bezüglich der gleichzeitig nutzbaren Ports geben. Prüfen
Sie, wie viele Ports gleichzeitig benutzt werden können.
• Schalten Sie alle Geräte auf dem mLAN-Netzwerk (mit Ausnahme des Computers) aus, und schließen Sie nacheinander die
Geräte wieder an, bis dasjenige Gerät gefunden ist, welches das Problem verursacht.
• (Für Windows) (Wenn Sie den mLAN-Bus aus der Einstellung [Hardware sicher entfernen] der Taskleiste entfernen.) Starten
Sie den Computer neu, wenn Sie mLAN wieder benutzen möchten.
• Bei den Apple-Notebooks iBook und PowerBook sollten Sie immer zuerst den 01X und das mLAN-Kabel anschließen und
dann das 01X einschalten, bevor Sie den Computer starten.
■ Der mLAN-Treiber (MIDI/Audio) wird von dem Programm (DAW, Audio-Sequenzer, usw.) nicht
erkannt.
• (Für Windows) Ist mLAN (mLAN Driver) eingeschaltet („ON“)? Rechtsklicken Sie auf das mLAN-Manager-Symbol
in der Taskleiste............................................................................................................................................................................................ Seite 10
• Ist das 01X richtig am Computer mit einem mLAN-Kabel angeschlossen, und ist das Gerät eingeschaltet?
(Starten Sie den mLAN Auto Connector und „verbinden“ Sie erneut.)
.........................................................................................................................„Einstellungen durch mLAN Auto Connector“ auf Seiten 9 und 20
• Bei den Apple-Notebooks iBook und PowerBook sollten Sie immer zuerst den 01X und das mLAN-Kabel anschließen und
dann das 01X einschalten, bevor Sie den Computer starten.
• Sind die mLAN-Einstellungen korrekt? ......................................................................(„Die mLAN-Verbindung funktioniert nicht.“ weiter oben)
■ Die Fernsteuerungsfunktionen oder die Automation funktionieren nicht.
• Ist die richtige DAW-Software bei „Remote Select“ ausgewählt?............................................................................................................... Seite 24
• Sind die mLAN-Einstellungen korrekt? ......................................................................(„Die mLAN-Verbindung funktioniert nicht.“ weiter oben)
• Sind die Einstellungen in der DAW richtig? ................................................................................................................................................ Seite 24
• Ist Port 1 für mLAN-MIDI-Übertragung/Empfang eingestellt?................................................................................................................... Seite 21
■ Die Wordclock kann nicht geändert werden.
• Stellen Sie dies mit dem mLAN Auto Connector ein, wenn Sie mLAN benutzen.
.........................................................................................................................„Einstellungen durch mLAN Auto Connector” auf Seiten 9 und 20
• Ist die Einstellung der mLAN Auto Wordclock (AUTO W.CLK) geeignet?
TOOLS for 01X/Plug-in Effect Installationshandbuch
30
Page 61

■ Der Computerbetrieb ist schwerfällig.
• Verringern Sie die Anzahl der Audiokanäle, die vom mLAN Auto Connector benutzt werden. .......................................................... Seiten 9, 20
• Erhöhen Sie den Latenzwert. ........................................................................................................................................................................ Seite 11
• (Für Macintosh) Der Betrieb kann sich verlangsamen, wenn Sie einen Dualprozessor-Computer aus dem Sleep-Modus bzw.
Ruhezustand aktivieren. Starten Sie den Computer neu.
• (Für Windows) Lesen Sie „Tipps für den Umgang mit Audio-Daten“ ...................................................................................................... Seite 24
• (Für Windows) Dieses Problem kann oft gelöst werden, indem Sie „Hyper Threading“ auf „Disable“ stellen (ausschalten).
• (Für Windows) Wenn Sie mLAN nicht benutzen, rechtsklicken Sie auf das mLAN-Manager-Symbol
in der Taskleiste und wählen Sie „OFF“ (mLAN schließen). ...................................................................................................................... Seite 10
■ Anwendungen können nicht geschlossen oder der Computer (das Betriebssystem) nicht
heruntergefahren werden.
■ Die mLAN-Einstellungen können nicht geändert werden.
■ „Install mLAN for 01X“ (mLAN-Treiber) oder „mLAN Tools 2.0“ können nicht deinstalliert werden.
• (Für Windows) Ist der mLAN-Treiber (WDM) als voreingestelltes Audiogerät für das System eingestellt? ........................................... Seite 12
• Wählen Sie [Start] ➝ [Systemsteuerung] ➝ [Sounds und Audiogeräte] ➝ [Voice]. Vergewissern Sie sich, dass
unter „Voice-Wiedergabe“ und „Voice-Aufnahme“ nicht „mLAN Audio Out/In 01“ ausgewählt ist.
• Wählen Sie [Start] ➝ [Systemsteuerung] ➝ [Sounds und Audiogeräte] ➝ [Audio]. Vergewissern Sie sich, dass
unter „Soundwiedergabe“ und „Soundaufnahme“ nicht „mLAN Audio Out/In 01“ ausgewählt ist.
• (Für Windows) Wählen Sie [Start] ➝ [Systemsteuerung] ➝ [Sounds und Audiogeräte] ➝ und dort den Reiter „Sounds“, und
wählen Sie „Keine Sounds“ im Feld „Audioschema“, und führen Sie die Funktion erneut aus.
• Wenn Sie mLAN nicht schließen können (durch Auswahl von „OFF“ nach Rechtsklick auf das mLAN-Manager-Symbol in der
Taskleiste), beenden Sie die unten aufgeführten Prozesse manuell. ([Strg] + [Alt] + [Entf] ➝ Reiter „Prozesse” ➝ Prozess
wählen ➝ [Prozess beenden]). Nach Abschluss starten Sie mLAN Manager, um die mLAN-Einstellungen erneut zu ändern.
mLANVDevice.exe
mLANTFamily.exe
mLANSoftPH.exe
mLANManager.exe
• (Wenn bei der Deinstallation eine Meldung wie „Datei nicht gefunden“ erscheint:) Führen Sie erneut eine Installation aus, und
versuchen Sie nochmals die Deinstallation.
■ (Für Windows) Der mLAN Manager (das mLAN-Symbol in der Taskleiste) ist verschwunden.
• Wählen Sie [Start] ➝ [(Alle) Programme] ➝ [Startup] (oder [mLAN Tools]) ➝ [mLAN Manager]. ....................................................... Seite 10
■ Die Wiedergabe erfolgt verzögert.
• Erfüllt Ihr Computer die Systemanforderungen? ................................................................................................................................... Seiten 5, 18
• (Für Macintosh) Schalten Sie den virtuellen Speicher aus.
• (Für Macintosh) Deaktivieren Sie AppleTalk.
• Für Informationen zu Audio-Problemen wie kein Signal oder starkes Rauschen lesen Sie den Abschnitt Problemlösungen der Anleitung zum 01X.
TOOLS for 01X/Plug-in Effect Installationshandbuch
31
Page 62

Table des matières
Remarques importantes concernant le CD-ROM............................. 2
Types de données............................................................................. 2
Système d'exploitation (OS).............................................................. 2
Procédure d'installation du CD-ROM ................................................ 2
Pour les utilisateurs de Windows...................................................... 3
Contenu du CD-ROM ........................................................................ 3
A propos de l'Open Plug-in Technology............................................ 4
Configuration requise pour le 01X/logiciel......................................... 5
Installation des logiciels..................................................................... 6
Configuration du port MIDI (lors du démarrage du logiciel en tant
qu'application autonome) ................................................................ 15
Pour les utilisateurs de Macintosh ..................................................17
Contenu du CD-ROM ......................................................................17
Configuration requise pour le 01X/logiciel .......................................18
Installation des logiciels ................................................................... 18
Reproduction de morceaux de démonstration/
configuration de la commande à distance......................................24
SQ01................................................................................................24
Cubase SX/SL .................................................................................27
Logic ................................................................................................27
Digital Performer..............................................................................28
SONAR ............................................................................................ 28
Messages de l'écran.......................................................................... 29
Dépistage des pannes.......................................................................30
Remarques importantes concernant le CD-ROM
Types de données
Ce CD-ROM contient les logiciels de l'application. Reportez-vous aux pages 3 (Windows) ou 17 (Macintosh) pour obtenir les instructions relatives à l'installation du
logiciel.
• N'essayez jamais de lire le CD-ROM sur un lecteur de CD audio. Cela pourrait avoir des conséquences sur votre ouïe ainsi que sur le lecteur et ses haut-parleurs.
Système d'exploitation (OS)
Les applications de ce CD-ROM sont proposées dans des versions compatibles avec les systèmes d'exploitation Windows et Macintosh. La procédure d'installation et
les applications elles-mêmes diffèrent en fonction du système d'exploitation que vous utilisez. Veuillez vous reporter aux instructions d'installation correspondantes.
Pour Windows, reportez-vous à la page 3.
Pour Macintosh, reportez-vous à la page 17.
Procédure d'installation du CD-ROM
Avant d'ouvrir l'emballage scellé du logiciel, lisez attentivement l'accord de licence du logiciel disponible à la fin de ce guide.
q Vérifiez que votre système est conforme à la configuration minimale requise pour les logiciels
(Studio Manager, mLAN Tools, pilote, etc.)................................................................................................................... Windows : page 5 ; Macintosh : page 18
w Installez le pilote approprié sur votre ordinateur et effectuez les paramétrages nécessaires. ..................................... Windows : page 6 ; Macintosh : page 18
e Installez le logiciel (Studio Manager, etc.). ....................................................................................................Windows : pages 3, 13 ; Macintosh : pages 17, 22
r Démarrez le logiciel.
Pour toute opération ultérieure, reportez-vous au mode d'emploi des différents logiciels (aide en ligne/manuel PDF).
• Pour pouvoir visualiser des fichiers PDF, vous devez préalablement installer Acrobat Reader sur votre ordinateur (Windows : page 6 ; Macintosh : page 18).
La plupart des exemples d'écran proposés dans ce manuel sont issus de la version anglaise du système d'exploitation/logiciel.
Solutions rapides/matériel de référence
• Paramétrage de la fréquence d'échantillonnage....... pages 9, 20
• Détermination du nombre de canaux audio mLAN.... pages 9, 20
• Modification des réglages du pilote mLAN...................... page 10
• Paramétrage de la latence ............................................... page 11
• Installation du pilote impossible ....................................... page 30
• Réponse de la reproduction incorrecte............................ page 30
• Comment supprimer ou réinstaller le pilote ?. pages 6, 12, 15, 21
• Utilisation du manuel en ligne du SQ01 ........................... page 16
• Vérification des logiciels DAW compatibles..................... page 24
TOOLS for 01X/Plug-in Effect Manuel d’installation
2
Pour les utilisateurs de Windows :
Mettez le 01X sous tension APRES l'affichage du message suivant
pendant la procédure d'installation.
Page 63

Pour les utilisateurs de Windows
Contenu du CD-ROM
Le CD-ROM contient toute une série d'applications (avec programmes d'installation) et de données dans les dossiers suivants.
Installez d'abord les logiciels présents sur le CD-ROM Tools for 01X, avant d'installer le logiciel Plug-in Effect.
● TOOLS for 01X
Nom du dossier Nom de l'application Contenu
Acroread_ Acrobat Reader
StudioManager_ Studio Manager
Sq01_ SQ01 V2
AudioMixer_
TWE_ Wave Editor TWE
MltPartEditor_
mLAN_
NIdemo_
DemoSong
Audio Mixer
(plug-in pour SQ01 V2)
Multi Part Editor for
MOTIF-RACK
mLAN Driver
mLAN Tools
B4 (Demo)
Pro-53 (Demo)
Demo Song
• SQ01 V2
• Cubase SX/SL
• SONAR2
*1 *2
*1*3
*1
*1
*1
*1
*2
*2
*2
*2
● Plug-in Effect
Ce logiciel peut être utilisé en tant que logiciel plug-in dans un programme compatible avec VST.
Pour appeler le manuel PDF de chaque programme, sélectionnez [Démarrer] ➝ [Tous les programmes] ➝ [YAMAHA VST Plugins] ➝ (le logiciel
approprié) ➝ [Online Manual] (Manuel en ligne).
Pour obtenir des instructions sur l'installation des effets plug-in, reportez-vous à la page 14.
Nom du dossier Nom de l'application Contenu
01X Channel
*1
Module
*1
VST_
Pitch Fix
Vocal Rack
Final Master
*1
*1
Vous permet de visualiser les manuels PDF des différentes applications.
• Ouvrez l'aide en ligne en appuyant sur la touche [F1] de l'ordinateur.
Ce logiciel vous permet d'utiliser un ordinateur pour éditer et contrôler les différents réglages liés au mixeur du 01X.
Lorsque vous l'utilisez en tant qu'application plug-in avec le SQ01, vous pouvez stocker les réglages du Studio
Manager avec les réglages des données du morceau du SQ01. Que vous utilisiez le logiciel en tant qu'application
plug-in ou autonome, vous devez utiliser le port MIDI mLAN 4 pour transférer des données avec le 01X. (Reportezvous au mode d'emploi au format PDF du Studio Manager.)
• Pour appeler le manuel PDF, sélectionnez « Manual » (Manuel) dans le menu Help (Aide).
• Pour installer le logiciel, suivez les instructions à l'écran après avoir double-cliqué sur le fichier « Setup.exe » dans le
dossier Studio Manager.
Ce logiciel de séquençage vous permet de créer et reproduire en toute simplicité vos propres morceaux sur
l'ordinateur. Vous pouvez l'utiliser en tant qu'application hôte du logiciel plug-in, compatible avec le pilote ASIO (ASIO
mLAN). Le port MIDI mLAN 1 est utilisé pour contrôler à distance le transfert de données avec le 01X (page 24).
• Pour appeler le manuel en ligne, sélectionnez « Online manual » (Manuel en ligne) ou « Key word » (Mot-clé) dans
le menu Help de n'importe quelle fenêtre.
• Pour obtenir des instructions sur l'installation, reportez-vous à la page 13.
Ce logiciel est compatible avec le pilote ASIO (ASIO mLAN). Vous pouvez l'installer après avoir installé le SQ01.
Il s'agit d'un éditeur audio vous permettant d'éditer des données audio au format.WAV ou .AIFF sur votre ordinateur.
Lorsque vous l'utilisez, paramétrez l'option Mode de la fenêtre mLAN Driver Setup (Configuration du pilote mLAN) sur
« WDM(2CH) + ASIO » (page 10).
• Pour appeler le manuel en ligne, sélectionnez [Démarrer] ➝ [Tous les programmes] ➝ [YAMAHA TWE] ➝ [Wave
Editor TWE Manual].
• Si vous voulez uniquement installer le TWE, double-cliquez sur le fichier « Setup.exe » dans le dossier TWE, puis
suivez les instructions à l'écran.
Vous permet d'éditer les paramètres de mixage (tels que les effets) du MOTIF-RACK sur votre ordinateur lorsque
vous utilisez le MOTIF-RACK en tant que générateur de sons multi-timbre. Ce logiciel vous permet d'utiliser le 01X
pour commander à distance le générateur de sons MOTIF-RACK (via le Multi Part Editor (Editeur multi-parties)).
Lorsque vous utilisez le logiciel en tant que programme autonome, utilisez le port MIDI mLAN 5 pour commander à
distance le transfert de données avec le 01X.
• Pour installer le logiciel, double-cliquez sur le fichier « Setup.exe » dans le dossier « MltPartEditor », puis suivez les
instructions à l'écran.
Ce logiciel est nécessaire pour pouvoir utiliser le 01X et l'ordinateur avec la connexion mLAN. Prenez soin de mettre
le 01X hors tension avant de débuter l'installation. (Voir page 6.)
Démonstration pour le logiciel synthétiseur du plug-in VST des instruments natifs.
• Dans le dossier « Nidemo », double-cliquez sur « ***Setup.exe », où le nom de fichier correspond au logiciel plug-in
à installer, et suivez les instructions qui apparaissent à l'écran.
Morceau de démonstration (page 24) à utiliser avec les programmes DAW respectifs, lorsque vous utilisez le 01X pour
la commande à distance. Vous pouvez également écouter ou tester les effets plug-in suivants avec le morceau (à
l'exception du morceau de démonstration pour SONAR).
Ce logiciel reproduit les effets d'égaliseur et de dynamique intégrés dans chacun des canaux du 01X et utilise la
puissance de traitement de l'ordinateur pour produire les effets.
Vous pouvez également l'utiliser avec le programme Studio Manager pour transférer des réglages depuis et vers le
01X connecté.
Ce programme est utilisé pour modifier la hauteur de ton des voix enregistrées. Plus qu'un simple processeur de
hauteur de ton, il vous permet également de modifier le caractère des voix. En outre, vous pouvez utiliser des
données MIDI sur l'application hôte pour contrôler l'effet Pitch Fix (Fixation de la hauteur de ton). Pour plus
d'informations sur la configuration avec l'application hôte, reportez-vous au mode d'emploi du Pitch Fix au format PDF.
Programme à effets multiples utilisé pour le traitement des voix. Le plug-in propose différents effets, dont un filtre
passe-haut, un compresseur et un égaliseur à trois bandes.
Programme à effets multiples utilisé à des fins de mastérisation. Il comprend un processeur, un limiteur et une
fonction d'écrêtage léger et vous permet de diviser le signal en trois bandes afin de procéder à un traitement multibandes distinct.
*1 Ces applications sont fournies avec des manuels PDF/en ligne.
*2 Malheureusement, Yamaha ne peut garantir la stabilité de ces programmes, de même qu'il ne peut proposer d'assistance utilisateur pour ceux-ci.
*3 Si vous utilisez ce logiciel avec SONAR, l'application ne pourra fonctionner qu'en mode autonome.
TOOLS for 01X/Plug-in Effect Manuel d’installation
3
Page 64

A propos de l'Open Plug-in Technology
Vous pouvez utiliser le logiciel Studio Manager for 01X ou Multi Part Editor en tant que logiciel autonome ou qu'application plug-in dans toute application
compatible avec l'Open Plug-in Technology (Technologie de plug-in ouvert).
L'Open Plug-in Technology (OPT) est un nouveau format de logiciel qui permet de contrôler les périphériques MIDI à partir d'un séquenceur de logiciel de musique.
Vous pouvez, par exemple, démarrer et faire fonctionner différents éléments de votre système musical, tels que les éditeurs de carte plug-in et les éditeurs de
commande de mixage, directement à partir d'un séquenceur compatible OPT, sans devoir les utiliser séparément. De plus, il n'est plus nécessaire de configurer les
pilotes MIDI pour chaque application, ce qui simplifie votre système de production de musique et rend les opérations plus simples et plus sûres.
A propos des niveaux OPT
La compatibilité de l'application client avec l'OPT comprend trois niveaux différents, comme indiqué ci-dessous.
Niveau 1 – L'OPT Panels offre un support de base pour l'ouverture et l'affichage des panneaux de commande OPT qui peuvent transmettre des
données via les ports MIDI externes des clients. En général, ce niveau permet aux panneaux de commande de l'éditeur de matériel de base de
fonctionner correctement.
Niveau 2 – L'OPT Processors prend en charge les processeurs MIDI et l'automatisation du panneau en temps réel. En général, ce niveau permet aux
effets MIDI en temps réel et hors ligne (fonction d'arpèges, de transposition, etc.) de fonctionner correctement et d'automatiser le fonctionnement
d'OPT Panels.
Niveau 3 – L'OPT Views offre un support qui vous permet d'éditer les vues et les processeurs/panneaux MIDI qui exigent un accès direct aux structures
de stockage du séquenceur client. En général, ce niveau permet de gérer des vues d'édition MIDI avancées (éditeurs de listes, accompagnement
automatique, contrôleurs de données, etc.).
Implémentation du niveau de l'OPT du Studio Manager
Ce tableau montre la compatibilité du Studio Manager for 01X avec l'OPT.
Niveaux de l'OPT de l'application client
VIEWS (Niveau 3) Oui Aucune
PROCESSORS (Niveau 2) Oui Aucune
PANELS (Niveau 1) Oui (avec certaines limitations) Uniquement applicable aux opérations hors ligne
• Il arrive que certaines opérations ne fonctionnent pas correctement lorsqu'il n'y a pas de fonction correspondante dans l'application client (séquenceur, etc.). Le niveau
d'implémentation le plus haut de l'application client apparaît dans le logo OPT (qui s'affiche en même temps que les informations relatives à la version de l'application).
Support des opérations Limites des opérations
Pour plus d'informations sur l'implémentation du Multi Part Editor, reportez-vous au mode d'emploi au format PDF.
Opérations du Studio Manager for 01X
TOOLS for 01X/Plug-in Effect Manuel d’installation
4
Page 65

Configuration requise pour le 01X/logiciel
La configuration système spécifiée ci-dessous est requise pour pouvoir utiliser le 01X avec le mLAN et le logiciel fourni.
• La configuration matérielle présentée ci-dessous peut différer légèrement en fonction du système d'exploitation utilisé.
• Les exigences minimales concernant le logiciel fourni et qui ne sont pas répertoriées ci-après sont susceptibles de différer. Pour plus de détails, reportez-vous au manuel en ligne ou
à la documentation du logiciel.
• Pour plus de détails sur la configuration minimale requise pour chaque logiciel DAW, reportez-vous aux modes d'emploi correspondants.
● 01X (y compris les exigences liées aux logiciels mLAN Driver/
mLAN Tools)
La configuration système totale, qui inclut le séquenceur audio, mLAN
Driver/mLAN Tools et les effets plug-in, est la suivante.
Système
d'exploitation : XP Edition Professionnelle/XP Edition Familiale
Ordinateur : Processeur de la famille Intel Pentium ou Celeron, avec
borne IEEE 1394 S400 (400 Mbps) (FireWire) ou
i.Link (*1).
・Système recommandé (*2)
Ordinateur : 2,2 GHz minimum, processeur Intel Pentium 4
Mémoire disponible : 512 Mo ou plus
Disque dur : 500 Mo minimum d'espace disque disponible ;
disque dur haute vitesse
• Vous pouvez utiliser deux cartes PCI ou PCMCIA maximum. Si vous utilisez une
interface IEEE 1394 intégrée dans l'ordinateur, vous ne pouvez utiliser qu'une
seule carte d'interface IEEE 1394 PCI/PCMCIA.
• Si vous utilisez un ordinateur portable, il est possible qu'aucune borne IEEE 1394
intégrée ne soit disponible. Dans ce cas, installez une carte d'interface PCMCIA
appropriée.
● SQ01 V2/Audio Mixer
Système
d'exploitation : XP Edition Professionnelle/
XP Edition Familiale/2000/Me/98
Ordinateur : 500 MHz ou supérieur ; processeur Intel Pentium/Celeron
(750 MHz ou plus en cas d'utilisation de Windows XP)
・Configuration minimale requise (*3)
Ordinateur : Intel Pentium 1,2 GHz ou Intel Celeron 1,7 GHz
(ou supérieur)
Mémoire disponible : 384 Mo ou plus
Disque dur : 500 Mo minimum d'espace disque disponible ;
disque dur haute vitesse
*1 L'ordinateur doit être équipé d'une borne IEEE 1394 (FireWire) ou i.Link.
En l'absence de borne, installez une carte d'interface IEEE 1394 (PCI ou
PCMCIA).
Pour plus de détails sur la configuration système et les cartes PCI ou
PCMCIA recommandées, consultez le site
http://www.yamahasynth.com
*2 La configuration système décrite ici est d'application lorsque vous utilisez
le logiciel fourni et lorsque vous reproduisez/enregistrez les données
audio/MIDI détaillées ci-dessous sur un logiciel de séquençage standard.
Elle peut néanmoins varier en fonction du logiciel de séquençage que
vous utilisez.
Fréquence/résolution : 44,1 kHz/24 bits
Pilote audio : 24 entrées/18 sorties (actives)
Pilote MIDI : 4 entrées/4 sorties
(y compris commande à distance/automation MIDI)
Pistes de reproduction audio : 12
Pistes d'enregistrement audio : 2
Pistes de reproduction MIDI : 16
Commande à distance/automation MIDI
Effets d'envoi (plug-in) : 2
Effets d'insertion (plug-in) : 10
Synthétiseur plug-in : 3
Latence : 5 msec maximum
*3 La configuration système décrite ici est d'application lorsque vous utilisez
le logiciel fourni et lorsque vous reproduisez les données audio/MIDI
détaillées ci-dessous sur un logiciel de séquençage standard. Elle peut
néanmoins varier en fonction du logiciel de séquençage que vous utilisez.
Fréquence/résolution : 44,1 kHz/16 bits
Pilote audio : 8 entrées/2 sorties (actives)
Pilote MIDI : 1 entrée/1 sortie (commande à distance/
automation MIDI)
Pistes de reproduction audio : 12
Commande à distance/automation MIDI
Effets d'envoi (plug-in) : 2
Effets d'insertion (plug-in) : 6
Synthétiseur plug-in : aucun
Latence : environ 50 msec
• Un processeur d'une vitesse de 1 GHz minimum est nécessaire lorsque
vous utilisez les effets plug-in inclus.
Mémoire disponible : 256 Mo ou plus
Disque dur : 300 Mo d'espace libre ou plus
Ecran : 1024 x 768 pixels minimum
● Studio Manager
Système
d'exploitation : XP Edition Professionnelle/
XP Edition Familiale/2000/Me/98SE
Ordinateur : 433 MHz minimum, processeur Intel Pentium/Celeron
Mémoire disponible : 128 Mo ou plus
Disque dur : 20 Mo d'espace libre ou plus
Ecran : 1024 x 768 pixels, 256 couleurs ou plus
(un écran de 1280 x 1024 pixels, 16 bits haut en couleur
est recommandé)
• Si vous utilisez des paramètres d'affichage de 1024 x 768, activez l'option Auto-
hide (Masquer automatiquement) de la barre de tâches.
● TWE V2.4.4
Système
d'exploitation : Windows XP/NT/2000/Me/98/95
Ordinateur : 166 MHz minimum, processeur Intel Pentium/Celeron
Mémoire disponible : 24 Mo ou plus
Disque dur : Temps d'accès moyen de 30 ms maximum
Ecran : 800 x 600 pixels minimum, 256 couleurs ou plus
● Multi Part Editor for MOTIF-RACK
Système
d'exploitation : Windows 98/Me/2000/XP Edition Familiale/
XP Edition Professionnelle
Ordinateur : 166 MHz minimum, processeur Intel Pentium/Celeron
Mémoire disponible : 32 Mo ou plus
Disque dur : 32 Mo d'espace libre ou plus
Ecran : 1024 x 768 pixels minimum
● Plug-in Effect
Système
d'exploitation : Windows XP Edition Professionnelle/
XP Edition Familiale/2000/Me/98SE/98
Pour pouvoir utiliser le mLAN, activez-le chaque fois que vous
démarrez l'ordinateur à l'aide de l'icône mLAN (mLAN Manager) de
la barre de tâches (page 10).
TOOLS for 01X/Plug-in Effect Manuel d’installation
5
Page 66

Installation des logiciels
Pour obtenir des instructions sur l'installation des logiciels autres
que celui décrit ci-dessous, reportez-vous à la page 3 de la section
« Contenu du CD-ROM ».
mLAN Driver et mLAN Tools
Le logiciel mLAN Tools est utilisé pour modifier les paramètres liés au mLAN
de l'ordinateur. Quant au logiciel mLAN Driver, il permet de transférer des
données MIDI, des données audio et des données de commande à distance
entre le DAW (station de travail audionumérique) et le 01X via la connexion
mLAN.
Désinstallation (suppression de l'application installée)
Vous pouvez retirer le logiciel installé. Pour ce faire, sélectionnez
[Démarrer] (➝ [Paramètres]) ➝ [Panneau de configuration] ➝
[Ajout/Suppression de programmes] ➝ [Installer/Désinstaller], puis
choisissez l'application à supprimer et cliquez sur [Ajouter/
Supprimer...]. Suivez les instructions qui apparaissent à l'écran
pour désinstaller le logiciel.
• Les noms des boutons ou des menus peuvent différer légèrement selon le
système d'exploitation de votre ordinateur.
• Pour pouvoir désinstaller le logiciel mLAN, vous devez supprimer les deux
éléments suivants dans l'ordre, à savoir 1 et puis 2.
1. Install mLAN for 01X
2. mLAN Tools 2.0
Vérifiez préalablement le nom du lecteur (D:, E:, etc.)
correspondant au CD-ROM que vous utilisez. Ce nom est affiché
sous l'icône du CD-ROM dans [Poste de travail]. (Le répertoire
racine du lecteur de CD-ROM est, par exemple, D:\, E:\, etc.)
Acrobat Reader
Pour pouvoir visualiser les manuels électroniques (PDF) fournis avec chaque
application, vous devez installer Acrobat Reader.
• Si une version plus ancienne d'Acrobat Reader est installée sur votre PC, vous devez
d'abord la désinstaller avant de poursuivre.
• Pour obtenir des explications sur les messages d'erreur, reportez-vous à la page 29.
Préparation de l'installation
1 Débranchez tous les câbles MIDI reliant les périphériques MIDI aux
bornes MIDI IN/OUT (Entrée/sortie MIDI) du 01X.
2 A l'aide d'un câble IEEE 1394 (FireWire/iLink), connectez le 01X
directement à l'ordinateur (sans utiliser de concentrateur) et débranchez
tous les autres périphériques connectés via la borne IEEE 1394 de
l'ordinateur.
3 Vérifiez que le 01X est hors tension.
4 Démarrez l'ordinateur et ouvrez la session Administrateur.
• Lorsque vous utilisez la connexion mLAN, prenez soin de désactiver
toutes les fonctions d'économie d'énergie de l'ordinateur (telles que
Suspension, Veille, Attente ou Pause).
• Si vous utilisez le taux de transfert de données du S200 (vérifiez le panneau
arrière de votre périphérique ou reportez-vous aux caractéristiques techniques
du mode d'emploi), prenez soin de désinstaller préalablement l'ancienne version
de mLAN Tools. (Si vous utilisez un périphérique mLAN de Yamaha, reportezvous à l'explication « Désinstallation » sur la gauche.)
5 Sélectionnez [Démarrer] ➝ [Panneau de configuration]. Si le panneau de
configuration s'affiche comme illustré ci-dessous, cliquez sur « Basculer
vers l'affichage classique » dans le coin supérieur gauche de la fenêtre
pour afficher tous les panneaux de configuration et les icônes.
1 Double-cliquez sur le dossier « Acroread_ ». Quatre dossiers
correspondant aux différentes langues disponibles s'affichent.
2 Sélectionnez la langue que vous souhaitez utiliser et double-cliquez sur
son dossier. Le fichier « arxxx***.exe » apparaît. (« xxx » représentent
des chiffres et « *** » la langue sélectionnée.)
• Les fichiers avec l'extension « .exe » peuvent porter un nom différent de celui
spécifié ici.
3 Double-cliquez sur « arxxx***.exe ».
La boîte de dialogue d'installation d'Acrobat Reader s'affiche.
4 Procédez à l'installation en suivant les instructions qui apparaissent à
l'écran.
Une fois l'installation terminée, le dossier Acrobat apparaît sur votre
PC (par défaut, dans Programmes). Pour plus d'informations sur
l'utilisation d'Acrobat Reader, consultez le Reader Guide dans le
menu Help.
Passez à l’étape suivante.
TOOLS for 01X/Plug-in Effect Manuel d’installation
6
Page 67

6 Sélectionnez [Système] ➝ [Matériel] ➝ [Signature du pilote] ➝
[Vérification des signatures de fichiers], cochez la case d'option à
gauche de « Ignorer : installe tous les fichiers, quelles que soient leurs
signatures » et cliquez sur [OK].
• Au terme de l'installation, prenez soin de restaurer la configuration d'origine si
nécessaire.
7 Assurez-vous qu'aucun symbole « ! » ou « x » n'apparaît à côté de
« Contrôleur de bus IEEE 1394 » (dans [Système] ➝ [Matériel] ➝
[Gestionnaire de périphériques]). Si l'un de ces symboles apparaît, la
connexion mLAN (IEEE 1394/i.Link) ne peut pas être utilisée. Reportezvous au mode d'emploi de votre ordinateur pour plus de détails.
8 Cliquez sur [OK] pour fermer la fenêtre Propriétés système, puis sur le
bouton Fermer ([X]) dans le coin supérieur droit de la fenêtre pour fermer
le panneau de configuration.
Démarrage du programme d'installation du logiciel mLAN
Le programme d'installation installe les deux programmes suivants sur votre
ordinateur.
• mLAN Tools 2.0
• Install mLAN for 01X
• Utilisez le bouton Annuler ou Fermer pour quitter l'installation. Sortir à l'aide des
touches [CTRL]+[ALT]+[SUPPR.] ou en mettant l'appareil hors tension pendant la
procédure d'installation risque d'engendrer des problèmes dans la mesure où
l'installation est interrompue sans que la désinstallation ait été effectuée de manière
correcte.
11 Double-cliquez sur le dossier « mLAN ».
Différents fichiers s'affichent, dont « Setup.exe ».
12 Double-cliquez sur « Setup.exe ».
9 Sortez des applications ouvertes et fermez toutes les fenêtres actives.
10 Insérez le CD-ROM inclus (« TOOLS for 01X ») dans le lecteur de CD-
ROM.
13 Une série de messages de confirmation apparaissent. S'il n'y a pas de
problèmes, cliquez sur [OK] en réponse à chaque message. Lorsque
vous avez terminé, un écran « Bienvenue » apparaît.
Installation de mLAN Tools
14 Cliquez sur [Suivant]. L'écran d'installation de mLAN Tools apparaît.
15 Cliquez sur [Suivant]. La fenêtre « Répertoire de destination », dans
laquelle vous pouvez spécifier le lecteur et le nom du dossier dans
lesquels installer mLAN Tools, apparaît. Le répertoire de destination
est automatiquement défini. Cependant, si vous souhaitez le modifier,
cliquez sur le bouton [Parcourir] et sélectionnez le dossier de votre
choix (lecteur:\nom du dossier). Cliquez sur [Suivant] après avoir
effectué ou confirmé la sélection.
• En général, il n'est pas nécessaire de modifier le répertoire de destination.
16 Confirmez le lecteur et le nom du dossier, puis cliquez sur [Suivant]
pour démarrer l'installation.
• Pour annuler l'installation, cliquez sur [Annuler].
17 Au terme de l'installation, le message « Terminé » apparaît à l'écran.
Cliquez sur [Terminer].
• Pour obtenir des informations sur l'écran « En attente », reportez-vous à la
page 8.
Passez à l’étape suivante.
TOOLS for 01X/Plug-in Effect Manuel d’installation
7
Page 68

Installation de mLAN Bus Driver (mLAN Stream Driver)
18 La fenêtre « Assistant Matériel détecté » apparaît automatiquement.
Cochez la case en regard de « Installer le logiciel automatiquement
(recommandé) » et cliquez sur [Suivant] pour démarrer l'installation.
19 Au terme de l'installation, le message « Terminé » apparaît à l'écran.
Cliquez sur [Terminer].
Installation de Install mLAN for 01X (logiciel mLAN)
Lorsque la procédure de pré-installation est terminée, un écran « Bienvenue »
apparaît. Cliquez sur [Suivant].
23 Au terme de l'installation, le message « Terminé » apparaît à l'écran.
Cliquez sur [Terminer].
• Pour obtenir des informations sur l'écran « En attente », reportez-vous cidessous.
Enregistrement des ports du pilote mLAN
24 La fenêtre « Assistant Matériel détecté » apparaît automatiquement.
Cochez la case en regard de « Installer le logiciel automatiquement
(recommandé) » et cliquez sur [Suivant] pour démarrer l'installation.
20 Déterminez le lecteur de destination et le nom du dossier souhaités
dans la fenêtre « Répertoire de destination ». Le répertoire de
destination est automatiquement défini. Cependant, si vous souhaitez
le modifier, cliquez sur le bouton [Parcourir] et sélectionnez le dossier
de votre choix (lecteur:\nom du dossier).
• Pour annuler l'installation, cliquez sur [Annuler].
21Confirmez le lecteur et le nom du dossier, puis cliquez sur [Suivant]
pour démarrer l'installation.
• Pour annuler l'installation, cliquez sur [Annuler].
22 Un message vous invitant à mettre le 01X sous tension apparaît.
Allumez le 01X.
• L'affichage de la fenêtre « Assistant Matériel détecté » peut prendre un certain
temps.
Ecran « En attente »
Ecran « En attente »
Si la connexion du 01X (ou d'un autre périphérique) est détectée
pendant la procédure d'installation, l'écran « Assistant Matériel
détecté » apparaît automatiquement dans Windows XP. L'écran
« En attente » affiche les informations suivantes.
Le nombre d'apparitions de l'écran En attente varie en fonction du pilote audio
sélectionné dans l'écran Type d'installation.
par ex.
• Ne fermez pas l'écran En attente, sauf si vous avez fait une erreur (par
exemple, si vous avez interrompu l'installation en cliquant sur Annuler par
inadvertance) ou si l'Assistant ne se termine pas correctement à la suite
d'une erreur. L'écran En attente se ferme automatiquement lorsque la
procédure d'installation à l'aide de l'Assistant se déroule correctement.
• Ne fermez pas l'écran En attente en appuyant sur les touches [CTRL] +
[ALT] + [SUPPR.]. Cela aurait pour effet d'interrompre l'installation de Tools
for 01X de façon incorrecte.
TOOLS for 01X/Plug-in Effect Manuel d’installation
8
Passez à l’étape suivante.
Page 69

25 Au terme de l'installation, le message « Terminé » apparaît à l'écran.
Cliquez sur [Terminer].
26 Répétez les étapes 24 et 25 ci-dessus aussi souvent que nécessaire,
jusqu'à ce que l'écran En attente disparaisse.
• L'écran En attente est parfois caché derrière l'écran « Assistant Matériel
détecté ». Dans ce cas, cliquez sur l'écran « Assistant Matériel détecté » pour le
faire apparaître en avant-plan.
Configuration de mLAN AUTO W.CLK (01X)
27 Lorsque le logiciel mLAN Driver est installé, le mLAN Auto Connector
démarre. Pour être certain que les paramètres du mLAN Auto
Connector sont correctement reçus, réglez le paramètre mLAN AUTO
W.CLK (wordclock) (Horloge automatique) sur ENABLE (Activé)
comme décrit dans les instructions suivantes. Vous pouvez également
effectuer ces réglages après avoir lancé le mLAN Auto Connector.
Paramétrage du 01X
27-1 Ouvrez le mode UTILITY (Utilitaire) en appuyant sur la
touche [UTILITY] du 01X.
27-2 Appelez l'écran mLAN AUTO W.CLK en appuyant sur
W.CLK (bouton de canal 3).
Paramètres du mLAN Auto Connector
28 Modifiez les paramètres du mLAN Auto Connector en fonction de
l'usage que vous comptez faire du mLAN.
Sample Rate (Vitesse d'échantillonnage)
Détermine la fréquence d'échantillonnage
(fréquence de l'horloge)
From 01X to PC (Du 01X vers l'ordinateur)
Détermine le nombre de canaux de transmission
audio du mLAN depuis le 01X vers l'ordinateur.
From PC to 01X (De l'ordinateur vers le 01X)
Détermine le nombre de canaux de transmission
audio du mLAN depuis l'ordinateur vers le 01X.
UTILITY mLAN AUTO W.CLK [INT : 48 kHz] 1/2
ENABLE/DISABLE
27-3 Appuyez sur ENABLE (bouton de canal 1).
27-4 Le message « ENABLE SURE? » (Etes-vous sûr de vouloir
activer ?) apparaît. Modifiez le réglage en appuyant sur le
bouton de canal 8.
• Si le paramètre est déjà réglé sur ENABLE, le message n'apparaît pas.
Vous pouvez donc passer à l'étape suivante.
• A moins d'effectuer une sauvegarde système, les réglages Utility du 01X sont
perdus lors de la mise hors tension de l'appareil. (Reportez-vous au mode
d'emploi du 01X.) Pour être certain que les réglages effectués ici seront effectifs
lors de la prochaine mise sous tension du 01X, effectuez une sauvegarde
système en appuyant sur la touche [UTILITY] tout en maintenant la touche
[SHIFT] enfoncée.
• Le fait de connecter le 01X à l'aide du mLAN Auto Connector peut provoquer
des bruits parasites au niveau de certains périphériques. Prenez dès lors soin de
baisser le volume de votre système amplificateur/haut-parleur ou du bouton
MONITOR/PHONES (Contrôleur/Casque) ou du curseur Stereo lors de
l'opération « Connect ».
• Lorsque vous sélectionnez « ASIO + WDM », (reportez-vous au
paramètre « Mode » de la fenêtre mLAN Driver Setup à la page 10),
l'écran affiche « 4CH + 2CH ». Le premier nombre (4CH) indique le
nombre de canaux que doit gérer l'ASIO et le deuxième que deux
canaux sur les quatre sont connectés aux canaux d'entrée du contrôleur
17/18 du 01X (ou 9/10, en cas de réglage sur 96 kHz/88,2 kHz). Le
deuxième nombre indique le nombre de canaux que doit gérer le WDM
et qui sont attribués aux canaux 15/16 du 01X (ou 7/8, en cas de
réglage sur 96 kHz/88,2 kHz). Si vous sélectionnez « 2CH + 2CH », les
données audio ne sont pas envoyées à l'entrée du contrôleur du 01X.
• L'écran affiche « 6CH » uniquement lorsque le paramètre ASIO ou
WDM est sélectionné et que les deux derniers canaux sont connectés à
l'entrée du contrôleur.
• Si vous paramétrez la vitesse d'échantillonnage sur 96 kHz lorsque le paramètre
LAYER (Couche) du 01X est réglé sur 17 – 24 (mLAN), le paramètre LAYER 1 –
8 est appelé et le canal 1 est automatiquement sélectionné.
• Si vous voulez modifier ces paramètres après l'installation, cliquez avec le
bouton droit sur l'icône mLAN de la barre de tâches pour lancer le mLAN Auto
Connector.
Configuration du 01X mLAN Control Panel (Panneau de
commande mLAN du 01X)
Cliquez sur [Setup] (Configurer) dans l'écran mLAN Auto Connector
pour ouvrir la fenêtre 01X mLAN Control Panel.
Lorsque l'horloge du 01X est paramétrée en tant qu'esclave d'un
périphérique mLAN externe et que le signal d'horloge entrant
change, ce panneau de commande détermine si l'ajustement de
l'horloge en fonction de l'horloge maître doit se faire rapidement ou
lentement.
Slow (Lent) ....... L'horloge change lentement. (C'est le réglage par
défaut de la plupart des applications.)
Fast (Rapide)....L'horloge change rapidement. (Ce réglage risque
d'augmenter les bruits de gigue.)
Passez à l’étape suivante.
TOOLS for 01X/Plug-in Effect Manuel d’installation
9
Page 70

29 Cliquez sur [Connect] (Connecter). Si les connexions sont correctes,
le mLAN Auto Connector termine l'opération et la communication de
données du mLAN démarre, le 01X jouant le rôle d'esclave.
• Si pour une raison quelconque, la connexion échoue, cliquez avec le bouton
droit sur l'icône mLAN de la barre de tâches pour redémarrer le mLAN Auto
Connector et cliquez à nouveau sur [Connect].
• Il n'est pas nécessaire de redémarrer l'ordinateur.
Lors du démarrage du mLAN
Le message suivant apparaît lorsque vous démarrez le mLAN.
Confirmation de l'installation
Barre de tâches (mLAN Manager (Gestionnaire mLAN))
Si l'installation réussit, une icône mLAN (mLAN Manager) apparaît dans la
barre de tâches. Pour appeler le menu, cliquez avec le bouton droit de la souris
sur l'icône.
Lorsque vous utilisez le mLAN, cliquez avec le bouton droit sur
l'icône mLAN (mLAN Manager) dans la barre de tâches et
sélectionnez « ON » (Activer) (pour démarrer le mLAN).
ON .......................................... Active le mLAN pour le transfert de données
(exécute l'application « mLAN Start »).
OFF (Désactiver)................... Désactive le mLAN (exécute l'application
« mLAN Stop »). Vous pouvez alléger la charge
de l'unité centrale en n'utilisant pas le mLAN.
Driver Setup
(Configuration du pilote)...... Lance le mLAN Driver Setup (page 10).
Auto Connector for 01X ....... Lance le mLAN Auto Connector. Utilisez cette
option lorsque vous voulez modifier les
paramètres après l'installation du logiciel.
EXIT (Fermer) ......................Cette option supprime l'icône mLAN de la
barre de tâches, tout en conservant l'état ON/
OFF actuel du mLAN. Pour l'afficher à
nouveau, sélectionnez [Démarrer] ➝
[(Tous les) Programmes] ➝ [Démarrage] ➝
[mLAN Manager].
Pour annuler le démarrage du mLAN, cliquez sur [Cancel] (Annuler) dans la
fenêtre mLAN Start. Pour utiliser le mLAN, cliquez avec le bouton droit sur
l'icône mLAN (mLAN Manager) dans la barre de tâches et sélectionnez [ON].
Gestionnaire de périphériques (Système d'exploitation)
1 Sélectionnez [Panneau de configuration] dans le menu Démarrer.
2 Double-cliquez sur l'icône Système pour ouvrir la fenêtre Propriétés
système.
3 Sélectionnez l'onglet Matériel et cliquez sur [Gestionnaire de
périphériques].
4 Cliquez sur le signe [+] en regard de « Contrôleurs son, vidéo et jeu » et
vérifiez que « YAMAHA 01x-mLAN » et « YAMAHA mLAN Bus »
apparaissent.
Modification des paramètres après l'installation
Vous pouvez modifier les paramètres du mLAN après l'installation depuis la
fenêtre mLAN Driver Setup.
mLAN Driver Setup
(Cliquez avec le bouton droit sur l'icône mLAN de la barre de
tâches ➝ Driver Setup)
Cette fenêtre vous permet de vérifier et de modifier les paramètres de
réception/transmission de données du mLAN. Prenez soin de fermer toutes les
applications (DAW, etc.) utilisant la connexion mLAN avant d'apporter des
modifications.
• Pour modifier l'horloge (vitesse d'échantillonnage) et le nombre de canaux utilisés,
cliquez avec le bouton droit sur l'icône mLAN de la barre de tâches et lancez le mLAN
Auto Connector.
• Vous pouvez utiliser le mLAN Driver Setup (page 10) pour vérifier si les données sont
correctement transmises et reçues via mLAN.
TOOLS for 01X/Plug-in Effect Manuel d’installation
10
q
w
e
r
u
q 1394 Adapter Card ID (ID carte adaptateur 1394)
Cette option affiche l'ID de la carte d'interface IEEE 1394 (FireWire/iLink)
installée sur l'ordinateur. Lorsque plusieurs cartes sont installées, vous pouvez
utiliser cette option pour sélectionner la carte voulue. Les cartes non reconnues
par le pilote mLAN ne sont pas affichées.
• Il est possible que le nom du fabricant ou du fournisseur ne s'affiche pas
correctement, selon la carte que vous utilisez.
y t
Page 71

w Latency (Latence)
Cette option détermine la latence du mLAN ou la vitesse de traitement des données.
Latence en cas d'utilisation du mLAN
La configuration de l'ordinateur (vitesse de traitement, taille de la mémoire système, etc.) est susceptible d'affecter sa capacité à enregistrer et reproduire
correctement des données audio dans votre séquenceur audio, avec pour conséquence l'apparition de bruits ou d'autres problèmes audio. Dans la
plupart des cas, vous pouvez résoudre le problème en ajustant la latence (temps de retard).
• Une valeur de latence peu élevée se traduit par un bref temps de retard et offre une réponse optimale en cas d'enregistrement/reproduction en temps réel.
• Une valeur de latence élevée se traduit par un long temps de retard, mais permet d'utiliser un plus grand nombre de canaux audio et d'effets plug-in.
Le tableau ci-dessous présente les valeurs de latence disponibles en cas d'utilisation du pilote ASIO mLAN.
● Latence de transmission du mLAN (lors de la reproduction du séquenceur audio)
La latence audio totale du pilote mLAN correspond à la somme des deux valeurs ci-dessous :
(1) Valeur de latence de base, déterminée par le paramètre Latency de la fenêtre Driver Setup.
(2) Paramètres de l'application (séquenceur audio, etc.) – par exemple, Preferred Buffer Size (Taille préférée du tampon) dans le panneau de configuration
ASIO.
Latence audio (msec)
Paramètres de la fenêtre
Driver Setup (base)
Very Low (Très lente) 2 1 3 2 (1 x 2)
Low (Faible) 4 2 6 4 (2 x 2)
Medium (Moyenne) 8 2 10 4 (2 x 2)
High (Elevée) 16 4 20 8 (4 x 2)
Very High (Très élevée) 80 10 90 20 (10 x 2)
Latence MIDI (msec)
Paramètres de la fenêtre
Driver Setup (base)
Very Low 2 1
Low 2 1
Medium 2 1
High 4 2
Very High 8 4
Valeur de latence de base
(avec les paramètres
Driver Setup)
Transmission (de l'ordinateur vers le 01X) Réception (du 01X vers l'ordinateur)
Transmission (reproduction ; de l'ordinateur vers le 01X) Réception (enregistrement ; du 01X vers l'ordinateur)
Paramètres de l'application correspondante
(valeur minimale du paramètre Preferred
Buffer Size du pilote ASIO mLAN)
Valeur de
latence totale
Paramètres de l'application correspondante
(doublez la valeur minimale du paramètre Preferred
Buffer Size du pilote ASIO mLAN)
(Informations d'application à
partir d'octobre 2003)
• Lorsque vous utilisez le pilote ASIO mLAN, ouvrez le panneau de configuration ASIO depuis les paramètres du pilote du logiciel DAW (le menu dépend du logiciel utilisé) et
réglez le paramètre Preferred Buffer Size selon vos besoins. Lorsque vous modifiez le paramètre Preferred Buffer Size, la latence du pilote ASIO change, en partant de la
valeur la plus petite, comme illustré dans le tableau. La latence totale est la somme de la latence de base et de la valeur modifiée.
• Par ailleurs, lorsque vous utilisez le pilote WDM mLAN, ajustez si nécessaire la valeur de la latence du pilote WDM (qui correspond à la latence du pilote ASIO dans ce
tableau) depuis les paramètres du pilote du logiciel DAW.
• Le réglage initial du paramètre Preferred Buffer Size du pilote ASIO mLAN est la plus petite valeur.
● Latence de réception du mLAN (lors de l'enregistrement sur le séquenceur audio)
La latence audio du pilote mLAN peut uniquement être déterminée par les réglages effectués au niveau du logiciel DAW. (Ainsi, la valeur du paramètre
Preferred Buffer Size définie dans le panneau de configuration ASIO mLAN multipliée par deux devient la valeur de latence réelle.)
● Panneau de configuration ASIO mLAN
Lorsque vous lancez le panneau de configuration ASIO mLAN, le système affiche la boîte de dialogue suivante.
q Preferred Buffer Size (Taille préférée du tampon)
q
w
Ce paramètre vous permet de spécifier la taille du tampon à l'intérieur du pilote ASIO mLAN.
w Sample Size (Taille de l'échantillon)
Ce paramètre vous permet de spécifier la résolution en bit de la transmission et de la réception
de données audio.
w
e Channel Assignment (Affection de canal)
Les menus déroulants des colonnes « Send » (Envoi) et « Receive » (Réception) vous
permettent de spécifier quelles séquences audio mLAN sont transmises ou reçues par
l'ordinateur et via quels canaux audio.
Nous vous recommandons de ne pas modifier l'affectation des canaux configurée par
l'application de configuration (mLAN Auto Connector, etc.) afin de permettre une utilisation
optimale avec des périphériques mLAN tels que le 01X. Si vous la modifiez par inadvertance,
réinitialisez-la manuellement en affectant les numéros de séquence par ordre numérique. Cet
e
t
exemple d'écran montre les réglages lorsque le nombre de canaux de transmission et de
e
réception audio du mLAN est paramétré sur « 4CH ».
• Lorsque vous utilisez le réglage WDM + ASIO, vous devez effectuer les opérations suivantes. Dans la
fenêtre mLAN Driver Setup, paramétrez le mode sur « ASIO ». Ensuite, après avoir affecté
manuellement les numéros de séquence par ordre numérique à partir de la fenêtre mLAN Control
Panel, revenez dans la fenêtre mLAN Driver Setup et réinitialisez le mode sur « WDM + ASIO ».
• Vous pouvez spécifier la vitesse d'échantillonnage dans la fenêtre mLAN Driver Setup.
r
r OK
Cliquez sur ce bouton pour accepter les réglages et fermer la boîte de dialogue.
t Cancel (Annuler)
Cliquez sur ce bouton pour fermer la boîte de dialogue sans modifier les réglages.
TOOLS for 01X/Plug-in Effect Manuel d’installation
11
Page 72

e Mode
Cette option détermine le fonctionnement du pilote et doit être réglée en
fonction du logiciel utilisé.
• ASIO .............................Tous les canaux audio du mLAN sont paramétrés
pour fonctionner en mode ASIO. Les deux
derniers canaux sont connectés à l'entrée du
contrôleur du 01X.
• WDM(2CH)+ASIO.......Ce paramètre est destiné à certains séquenceurs,
tels que le SQ01. Dans ce cas-ci, les canaux audio
15 et 16 du mLAN (7 et 8 lorsque le 01X est
paramétré sur 96 kHz/88,2 kHz) (de l'ordinateur
vers le 01X) sont paramétrés sur WDM (pour le
TWE), tandis que les autres canaux (également de
l'ordinateur vers le 01X) sont paramétrés sur ASIO
(pour le mixeur audio). Tous les canaux audio du
mLAN allant du 01X à l'ordinateur sont
paramétrés pour fonctionner en mode ASIO. Les
deux derniers canaux ASIO sont connectés à
l'entrée du contrôleur du 01X.
• WDM..............................Ce paramètre est destiné à certains séquenceurs,
tels que le SONAR, et règle tous les canaux audio
du mLAN sur le mode WDM. Les deux derniers
canaux sont connectés à l'entrée du contrôleur du
01X.
• Si vous sélectionnez « WDM + ASIO » ou « WDM », confirmez les paramètres
dans la fenêtre Propriétés de Sons et périphériques audio (page 13) après
l'installation.
r Status (Statut)
Ce paramètre indique le statut de réception actuel des données (MIDI/Audio)
(depuis le 01X vers l'ordinateur) de la connexion mLAN. En cas d'erreur au
niveau de la transmission, un message apparaît.
Bleu.......... Les données sont correctement transmises.
Jeune ........Un seul type de données (MIDI ou audio) est reçu.
Rouge ....... Erreur lors de la réception.
Gris........... Pas de réception.
t Set (Appliquer)
Cliquez sur ce bouton pour appliquer les réglages effectués dans cette fenêtre.
Les modifications apportées aux paramètres ne prendront pas effet si vous ne
cliquez pas sur [Set].
y Revert (Restaurer)
Si vous avez modifié les réglages (mais que vous n'avez pas encore cliqué sur
[Set]), vous pouvez cliquer sur ce bouton pour restaurer les réglages en vigueur
la dernière fois que vous avez sélectionné [Set]. Une fois que vous cliquez sur
[Set], vous ne pouvez plus utiliser [Revert].
u EXIT (Quitter)
Cliquez sur cette option pour fermer la boîte de dialogue.
Lors de l'annulation de l'installation
Si vous interrompez une procédure d'installation avant la fin, il est
possible que le logiciel ne soit pas installé correctement. Veuillez
suivre les instructions ci-dessous pour installer correctement le
logiciel.
1 Cliquez sur l'option « Ajout/suppression de programmes » dans
le Panneau de configuration (page 6) et recherchez « Install
mLAN for 01X » et « mLAN Tools 2.0 » dans la liste.
2 Supprimez les deux programmes dans l'ordre suivant : d'abord
« Install mLAN for 01X », puis « mLAN Tools 2.0 ».
3 Relancez l'installation à partir de l'étape 12 (page 7).
Lorsque vous ne pouvez pas modifier les paramètres de
mLAN Auto Connector ou de Driver Setup ou installer le
programme Install mLAN for 01X/mLAN Tools 2.0
Le message ci-dessous apparaît parfois lorsque vous modifiez les
réglages de mLAN Auto Connector et de Driver Setup ou en cas
de désinstallation d'un programme.
A propos de la fenêtre Information
Cette fenêtre affiche le statut de la réception (depuis le 01X vers
l'ordinateur) des données MIDI et audio.
R1, R2, etc.
Indique l'état de réception des données. « R1 »
correspond à la réception de données MIDI et
« R2 » à la réception de données depuis le 01X.
Le nombre d'onglets affichés varie en fonction de
la configuration de votre ordinateur.
Receive Status (Statut de réception)
Indique l'ordre dans lequel les données de chaque format sont
reçues. Le symbole « o » indique que des données dans le
format correspondant sont reçues. Le symbole « - » indique que
des données d'un format différent sont reçues. Par exemple, le
symbole « oooooooo- » dans la zone « Audio » indique que neuf
séquences ont été reçues et que les huit premières sont au
format audio. La zone « Unknown » (Inconnu) contient des
symboles lorsque des séquences de format inconnu sont
reçues. Ces zones sont vides si aucune donnée mLAN n'est
reçue. En cas d'erreur lors de la réception, un message
d'avertissement rouge clignote. Dans ce cas, vérifiez le
périphérique de transmission.
Icône
Bleu .........Réception normale.
Rouge......Erreur lors de la réception.
Gris..........Pas de réception.
Lorsque vous utilisez le pilote mLAN avec un programme tel
qu'un séquenceur audio, vous ne pouvez pas modifier les
réglages de mLAN Auto Connector et Driver Setup, pas plus
que désinstaller le logiciel Install mLAN for 01X/mLAN
Tools 2.0. Vous ne pouvez exécuter ces opérations qu'après
avoir fermé toutes les applications.
Il arrive parfois qu'il soit impossible de modifier les réglages
de mLAN Auto Connector et de Driver Setup ou de
désinstaller le logiciel Install mLAN for 01X/mLAN Tools 2.0,
même lorsqu'aucune application n'est en cours d'exécution.
Cela peut arriver dans les cas suivants.
• Lorsque le paramètre Mode de la fenêtre Driver Setup est
réglé sur « WDM » ou « WDM + ASIO ».
• Lorsque le pilote WDM mLAN WDM (« mLAN Audio Out/
In 01 ») est sélectionné en tant que périphérique audio dans
Windows.
Dans ce cas, suivez les instructions ci-dessous avant de modifier
les réglages de mLAN Auto Connector et de Driver Setup et/ou de
désinstaller Install mLAN for 01X/mLAN Tools 2.0.
1 Sélectionnez [Démarrer] ➝ [Panneau de configuration] ➝
[Sons et périphériques audio] ➝ [Voix]. Assurez-vous qu'une
option autre que « mLAN Audio Out/In 01 » est sélectionnée
pour les paramètres « Lecture des voix » et
« Enregistrement des voix ».
2 Sélectionnez [Démarrer] ➝ [Panneau de configuration] ➝
[Sons et périphériques audio] ➝ [Audio]. Assurez-vous
qu'une option autre que « mLAN Audio Out/In 01 » est
sélectionnée pour les paramètres « Lecture des sons » et
« Enregistrement des sons ».
TOOLS for 01X/Plug-in Effect Manuel d’installation
12
Page 73

Propriétés des sons et des périphériques audio
Si le logiciel mLAN Driver a été installé et configuré pour fonctionner en mode
WDM, les sons des événements Windows (avertissements, alarmes, etc.) sont
émis via les canaux audio du mLAN. Pour éviter que cela ne se produise,
suivez les instructions ci-dessous.
• Le réglage suivant annule la sortie de tous les sons Wave via les haut-parleurs de
l'ordinateur.
1 Sélectionnez [Démarrer] ➝ [Panneau de configuration] ➝ [Sons et
périphériques audio] ➝ [Voix] et cliquez sur [Volume…] dans la section
« Lecture des voix » pour appeler la fenêtre Master Volume (Volume
principal).
2 Cochez la case Muet dans la colonne Wave.
SQ01, Audio Mixer et TWE Wave Editor
Cette section explique comment installer le SQ01. Une fois le SQ01 installé,
vous pouvez installer les logiciels Audio Mixer et TWE de la même manière.
1 Double-cliquez sur le dossier « SQ01 ».
Différents fichiers s'affichent, dont « Setup.exe ».
2 Double-cliquez sur « Setup.exe ».
Un message vous invitant à désinstaller la précédente version du
programme apparaît. Cliquez sur [Oui] pour poursuivre l'installation si
l'ancienne version n'est pas installée ou a déjà été supprimée.
• Si l'ancienne version n'a pas encore été supprimée, prenez soin de la
désinstaller avant de poursuivre (page 6).
3 Si le logiciel DirectX 8.0 ou une version supérieure n'a pas été installé,
un message vous invitant à le faire apparaît. Cliquez sur [Oui] pour
installer DirectX. Après avoir installé le programme, redémarrez
l'ordinateur et reprenez l'installation du SQ01 à partir de l'étape 1 cidessus.
4 Au terme de la procédure de pré-installation, un écran « Bienvenue »
apparaît. Cliquez sur [Suivant].
5 La fenêtre « Sélectionner le répertoire de destination », dans laquelle
vous pouvez spécifier le lecteur et le nom du dossier dans lesquels
installer le logiciel, apparaît. Le répertoire de destination est
automatiquement défini. Cependant, si vous souhaitez le modifier,
cliquez sur le bouton [Parcourir] et sélectionnez le dossier de votre choix
(lecteur:\nom du dossier).
• En général, il n'est pas nécessaire de modifier le répertoire de destination.
6 Confirmez le lecteur et le nom du dossier, puis cliquez sur [Suivant] pour
démarrer l'installation.
• Pour annuler l'installation, cliquez sur [Annuler].
7 Une fois l'installation terminée, une fenêtre vous invitant à installer Audio
Mixer apparaît. Cliquez sur [Oui] pour poursuivre et installer le
programme.
• Pour passer outre de l'installation de Audio Mixer, cliquez sur [Non].
8 Au terme de la procédure de pré-installation de Audio Mixer, un écran
« Bienvenue » apparaît.
9 Cliquez sur [Suivant]. Sélectionnez le lecteur de destination et le nom du
dossier dans lesquels vous souhaitez installer Audio Mixer dans la
fenêtre « Sélectionner le dossier de destination ».
• Si vous souhaitez modifier le dossier de destination, cliquez sur le bouton
[Parcourir] et sélectionnez le dossier de votre choix.
10 Cliquez sur [Suivant] pour lancer l'installation.
• Pour annuler l'installation, cliquez sur [Annuler].
11 Au terme de l'installation, le message « Terminé » apparaît à l'écran. Cliquez sur
[Terminer].
12 Une fois l'installation terminée, une fenêtre vous invitant à installer le
TWE Audio Editor apparaît. Cliquez sur [Oui] pour poursuivre et
installer le programme.
• Pour passer outre de l'installation du TWE, cliquez sur [Non] et passez à
l'étape 17 ci-dessous.
TOOLS for 01X/Plug-in Effect Manuel d’installation
13
Page 74

13 Au terme de la procédure de pré-installation du TWE, un écran
« Bienvenue » apparaît.
14 Cliquez sur [Suivant]. Dans la fenêtre « Sélectionner le dossier de
destination », sélectionnez le lecteur de destination et le nom du
dossier dans lesquels vous souhaitez installer TWE.
Plug-in Effect
1 Double-cliquez sur le dossier « VST_ ». Plusieurs fichiers, parmi
lesquels « Setup.exe », s'affichent.
2 Double-cliquez sur « Setup.exe ». La fenêtre « Bienvenue dans
l'InstallShield Wizard » s'affiche.
• Si vous souhaitez modifier le dossier de destination, cliquez sur le bouton
[Parcourir] et sélectionnez le dossier de votre choix.
15 Cliquez sur [Suivant] pour lancer l'installation.
• Pour annuler l'installation, cliquez sur [Annuler].
16 Au terme de l'installation, le message « Terminé » apparaît à l'écran.
Cliquez sur [Terminer].
17 Au terme de l'installation, le message « Terminé » apparaît à l'écran.
Avant de pouvoir utiliser le logiciel, vous devez redémarrer
l'ordinateur. Vérifiez que l'option « Oui, je veux redémarrer l'ordinateur
maintenant » est sélectionnée, puis cliquez sur [Terminer] pour
redémarrer l'ordinateur.
3 Cliquez sur [Suivant]. Dans la fenêtre qui apparaît, saisissez le nom
d'utilisateur, le nom de la société et le numéro de série.
• Vous pouvez trouver le numéro de série sur la carte utilisateur fournie.
4 Cliquez sur [Suivant]. La fenêtre de confirmation de l'enregistrement
apparaît. Vérifiez que les informations relatives à l'enregistrement sont
correctes, puis cliquez sur [Oui].
• Si les informations sont incorrectes, cliquez sur [Non] et revenez à l'étape 3 ci-
dessus.
5 Une fenêtre de sélection des effets plug-in apparaît. Sélectionnez
(cochez) le logiciel à installer, puis cliquez sur [Suivant].
6 Une fenêtre vous invitant à confirmer l'installation des effets plug-in
apparaît. Vérifiez que les informations sont correctes, puis cliquez sur
[Oui].
• Si vous souhaitez modifier le logiciel à installer, cliquez sur [Précédent] et
revenez à l'étape 5.
7 Dans la fenêtre qui apparaît ensuite, vous pouvez sélectionner le lecteur
et le dossier dans lesquels installer le mode d'emploi (fichier PDF) et le
programme d'exécution. Evitez de modifier l'emplacement de
destination.
• Si vous souhaitez modifier l'emplacement, cliquez sur [Parcourir], puis
sélectionnez l'emplacement de destination (lecteur et dossier).
8 Cliquez sur [Suivant]. Dans la fenêtre qui apparaît, sélectionnez le
dossier « VstPlugins » dans lequel l'effet plug-in doit être installé.
• Pour pouvoir utiliser le logiciel VST Plug-in avec le SQ01, vous devez vérifier
« Programmes\YAMAHA\VstPlugins ».
• Si aucun dossier n'apparaît dans la liste, cliquez sur [Parcourir], puis
sélectionnez le dossier dans la boîte de dialogue « Rechercher dossier ».
TOOLS for 01X/Plug-in Effect Manuel d’installation
14
9 Cliquez sur [Suivant]. L'installation débute.
10 Une fois l'installation terminée, le message « Fin de l'InstallShield
Wizard » apparaît. Cliquez sur [Terminer].
Page 75

Utilisation de l'effet plug-in installé sur une autre
application hôte
Même après avoir installé l'effet plug-in, si vous prévoyez de l'utiliser avec une
autre application hôte compatible avec VST, vous devrez copier manuellement
le module de l'effet plug-in dans le dossier « VstPlugins » spécifié par
l'application hôte.
1 Sélectionnez [Démarrer] ➝ [(Tous les) Programmes] ➝ [YAMAHA VST
Plugins] ➝ [(nom de l'effet plug-in)] ➝ [Configurer].
Un écran de bienvenue apparaît.
2 Sélectionnez [Modifier], puis cliquez sur [Suivant].
3 Une fenêtre vous permettant de spécifier à quel endroit copier l'effet
plug-in apparaît. Sélectionnez (cochez) le dossier « VstPlugins »
correspondant à l'application hôte avec laquelle vous avez l'intention
d'utiliser l'effet plug-in.
• Si vous désélectionnez le dossier de l'application hôte installée, vous pouvez
supprimer l'effet plug-in installé.
• Pour plus de détails, reportez-vous au mode d'emploi de chaque application
hôte.
4 Cliquez sur [Suivant].
L'opération de copie s'exécute.
• Pour annuler l'opération, cliquez sur [Annuler].
Configuration du port MIDI
(lors du démarrage du logiciel en tant
qu'application autonome)
Avant de configurer le port MIDI dans le Studio Manager ou le Multi Part
Editor, vous devez configurer le port MIDI depuis la barre d'outils MIDI
SETUP (Configuration MIDI).
• Lorsque vous démarrez le logiciel en tant qu'application plug-in dans une application
compatible avec l'Open Plug-in Technology, reportez-vous au manuel PDF du logiciel
en question.
1 Démarrez l'application.
2 Cliquez sur le bouton MIDI Setup dans la barre d'outils.
Touche MIDI Setup
3 En appuyant sur le bouton MIDI Setup, vous appelez la boîte de dialogue
MIDISetup. Configurez chacun des ports MIDI In/Out/Thru à connecter
au périphérique MIDI ou à l'application MIDI. En cas de commande à
distance du Multi Part Editor for MOTIF-RACK, activez le port MIDI In/
Out 5 du mLAN MIDI, tandis que si vous utilisez le Studio Manager,
activez le port MIDI In/Out 4 du mLAN.
Désinstallation (suppression de l'effet plug-in installé)
1 Sélectionnez [Démarrer] ➝ [(Tous les) Programmes] ➝
[YAMAHA VST Plugins] ➝ [(nom de l'effet plug-in)] ➝ [Configurer].
Un écran de bienvenue apparaît.
2 Sélectionnez [Supprimer], puis cliquez sur [Suivant].
Une fenêtre vous invitant à confirmer la suppression du fichier apparaît.
3 Cliquez sur [OK] pour supprimer les fichiers.
• Pour annuler l'opération, cliquez sur [Annuler].
• Pour que des ports MIDI soient disponibles dans cette fenêtre, vous devez
sélectionner le port MIDI approprié dans chaque logiciel d'application. C'est le
port que vous utiliserez dans les différents logiciels. Pour plus de détails sur la
configuration du port MIDI, reportez-vous au manuel en ligne de chaque logiciel.
TOOLS for 01X/Plug-in Effect Manuel d’installation
15
Page 76

A propos du manuel en ligne
Le SQ01 dispose d'un manuel en ligne très pratique que vous
pouvez visualiser sur l'écran de l'ordinateur. Ce manuel est installé
automatiquement en même temps que le SQ01.
Utilisez ce manuel en ligne pour trouver des informations et des
instructions sur les différentes fonctions. Dans la mesure où le
manuel est entièrement révisé lors de chaque mise à niveau, vous
pouvez y trouver des informations sur les nouvelles
caractéristiques, fonctions et modifications de la mise à niveau.
Le manuel en ligne vous permet de rechercher les informations
souhaitées depuis la table des matières ou par mot-clé à partir de
l'index. Vous pouvez ajuster la taille de la fenêtre du manuel, de
manière à pouvoir visualiser facilement les informations souhaitées
tout en utilisant le logiciel.
Comment utiliser le manuel en ligne
Sélectionnez [Online Manual] ou [Keyword] dans le menu Help pour
appeler le manuel en ligne.
Sélection d'une entrée dans la page Search (Rechercher)
Dans la page Search, vous pouvez entrer un mot-clé et ouvrir les
entrées associées à ce mot.
1 Double-cliquez sur [Search] pour ouvrir la page Search.
2 Tapez le nom de la fonction à propos de laquelle vous souhaitez
obtenir des informations dans le champ Keyword. Si vous n'êtes
pas sûr du nom, tapez une partie du nom ou un mot associé.
3 Cliquez sur le bouton [List Topics] (Rubriques de la liste) pour
afficher les entrées contenant le mot ou la phrase spécifié(e).
4 Cliquez sur l'entrée souhaitée dans la liste (elle apparaît en
surbrillance), puis cliquez sur [Display] (Afficher) pour afficher
l'explication de l'article.
Sélection d'une entrée dans la page Contents
(Table des matières)
Dans la page Contents, vous pouvez rechercher les informations
souhaitées en sélectionnant une rubrique générale et en parcouant
les entrées associées plus en détails.
1 Double-cliquez sur [Contents] pour appeler la page Contents.
2 Double-cliquez sur l'icône en forme de livre correspondant à la
rubrique ou à la fonction de votre choix. Les entrées associées à
la rubrique s'affichent dans la fenêtre.
3 Cliquez sur une entrée pour obtenir une explication à son sujet.
4 En cliquant sur des mots ou des phrases apparaissant en bleu,
vous pouvez atteindre instantanément les informations
correspondantes.
TOOLS for 01X/Plug-in Effect Manuel d’installation
16
Page 77

Pour les utilisateurs de Macintosh
Contenu du CD-ROM
Le CD-ROM contient toute une série d'applications (avec programmes d'installation) et de données dans les dossiers suivants.
● TOOLS for 01X
Nom du dossier Nom de l'application Contenu
Acroread_ Acrobat Reader
StudioManager_ Studio Manager
mLAN_
OMS_
NIdemo_
DemoSong
mLAN Driver
mLAN Tools
Open Music System
(OMS) 2.3.8
OMS Setup for YAMAHA
(dossier)
B4 (Demo)
Pro-53 (Demo)
Demo Song
• Logic
*2
*2
*2
*1 *2
*1
*2
Vous permet de visualiser les manuels PDF des différentes applications.
• Ouvrez l'aide en ligne en appuyant sur la touche [F1] de l'ordinateur.
Ce logiciel vous permet d'utiliser un ordinateur pour éditer et contrôler les différents réglages liés au mixeur du 01X.
Vous devez utiliser le port MIDI mLAN 4 pour transférer des données à l'aide du 01X.
• Pour appeler le manuel PDF, sélectionnez « Manual » (Manuel) dans le menu Help (Aide).
• Pour obtenir des instructions sur l'installation, reportez-vous à la page 22.
Ce logiciel est nécessaire pour pouvoir utiliser le 01X et l'ordinateur avec la connexion mLAN.
• Pour obtenir des instructions sur l'installation, reportez-vous à la page 18.
Ce logiciel est nécessaire pour pouvoir utiliser le 01X et l'ordinateur avec la connexion mLAN
afin de transférer des données MIDI (données Remote Control et Studio Manager).
• Pour obtenir des instructions sur l'installation, reportez-vous à la page 18.
Contient les fichiers de configuration OMS pour le 01X (page 21).
Démonstration pour le logiciel synthétiseur du plug-in VST des instruments natifs.
• Dans le dossier « NIdemo », double-cliquez sur « ***Demo Install/installer », où le nom de fichier correspond au
logiciel plug-in à installer, et suivez les instructions qui apparaissent à l'écran.
Morceau de démonstration (page 24) à utiliser avec le programme Logic, lorsque vous utilisez le 01X pour la
commande à distance. Vous pouvez également écouter ou tester les effets plug-in ci-dessous avec le morceau.
● Plug-in Effect
Ce logiciel peut être utilisé en tant qu'application plug-in dans un programme compatible avec VST.
• Pour obtenir des instructions sur l'utilisation de l'application, veuillez vous reporter au manuel PDF.
(Le disque de destination que vous avez spécifié)/YAMAHA/Plug-in Effect/(le dossier du logiciel approprié)
Pour obtenir des instructions sur l'installation des effets plug-in, reportez-vous à la page 23.
Nom du dossier
Mac OS 9 VST_
*3
Nom de l'application Contenu
Ce logiciel reproduit les effets d'égaliseur et de dynamique intégrés dans chacun des canaux du 01X et utilise la
01X Channel
*1
Module
*1
Pitch Fix
Vocal Rack
Final Master
*1
*1
puissance de traitement de l'ordinateur pour produire les effets.
Vous pouvez également l'utiliser avec le programme Studio Manager pour transférer des réglages depuis et vers le
01X connecté.
Ce programme est utilisé pour modifier la hauteur de ton des voix enregistrées. Plus qu'un simple processeur de
hauteur de ton, il vous permet également de modifier le caractère des voix. En outre, vous pouvez utiliser des
données MIDI sur l'application hôte pour contrôler l'effet Pitch Fix (Fixation de la hauteur de ton). Pour plus
d'informations sur la configuration avec l'application hôte, reportez-vous au mode d'emploi du Pitch Fix au format
PDF.
Programme à effets multiples utilisé pour le traitement des voix. Le plug-in propose différents effets, dont un filtre
passe-haut, un compresseur et un égaliseur à trois bandes.
Programme à effets multiples utilisé à des fins de mastérisation. Il comprend un processeur, un limiteur et une
fonction d'écrêtage léger et vous permet de diviser le signal en trois bandes afin de procéder à un traitement multibandes distinct.
*1 Ces applications sont fournies avec des manuels PDF/en ligne.
*2 Malheureusement, Yamaha ne peut garantir la stabilité de ces programmes, de même qu'il ne peut proposer d'assistance utilisateur pour ceux-ci.
*3 A propos des effets plug-in compatibles avec Mac OS X
Les effets plug-in suivants, qui sont compatibles avec VST et Audio Units, sont disponibles dans le dossier « Mac OS X ».
• 01X Channel Module
• Pitch Fix
• Vocal Rack
• Final Master
Malheureusement, les effets du logiciel ne peuvent pas être utilisés avec le 01X à l'heure actuelle, dans la mesure où le pilote audio 01X/MIDI n'est pas encore
compatible avec le Mac OS X.
Nous travaillons actuellement en collaboration avec Apple Computer, Inc. et le 01X devrait être compatible avec le Mac OS X dans un avenir proche. Pour
obtenir les toutes dernières informations, veuillez consulter le site ci-dessous :
http://www.yamahasynth.com
Ce site propose également des instructions pour l'installation des effets du logiciel sur le OS X
Si vous utilisez un ordinateur portable Macintosh tel que iBook et PowerBook, connectez d'abord le câble du 01X et du mLAN, puis mettez le 01X sous
tension, avant d'allumer l'ordinateur.
TOOLS for 01X/Plug-in Effect Manuel d’installation
17
Page 78

Configuration requise pour le 01X/
logiciel
La configuration système spécifiée ci-dessous est requise pour pouvoir
utiliser les logiciels fournis.
• La configuration matérielle présentée ci-dessous peut différer légèrement en fonction
du système d'exploitation utilisé.
• Pour plus de détails sur la configuration minimale requise pour chaque logiciel DAW,
reportez-vous aux modes d'emploi correspondants.
● 01X (y compris les exigences liées aux logiciels mLAN Driver/
mLAN Tools)
La configuration système totale, qui inclut le séquenceur audio, mLAN
Driver/mLAN Tools et les effets plug-in, est la suivante.
Système
d'exploitation : Mac OS 9.2 (Les environnements Mac OS X et Mac
Ordinateur : Système équipé d'une borne FireWire S400 (400 Mbps)
・Système recommandé (*2)
Ordinateur : Processeur de signaux G4/G3 de 900 MHz (ou
Mémoire disponible : 512 Mo minimum (la mémoire virtuelle doit être
Disque dur : 175 Mo minimum d'espace disque disponible ;
Classic ne sont pas pris en charge.)
intégrée. (*1)
supérieur)
désactivée)
disque dur haute vitesse
● Studio Manager
Système
d'exploitation : Mac OS 8.6 à 9.2.2 (Les environnements Mac OS X et
Mac Classic ne sont pas pris en charge.)
Ordinateur : 233 MHz minimum ; G3
Mémoire disponible : 80 Mo minimum (la mémoire virtuelle doit être
désactivée)
Disque dur : 7 Mo d'espace libre ou plus
Ecran : 1024 x 768 pixels, 256 couleurs ou plus
(un écran de 1280 x 1024 pixels, 16 bits haut en couleur
est recommandé)
● Plug-in Effect
Système
d'exploitation : Mac OS 8.6 à 9.2
Mac OS X 10.2
• Lorsque vous utilisez un PowerBook avec des piles, allez dans le menu Apple
$$$ ➝ [Control Panel] ➝ [Energy Saver] ➝ [Advanced Settings] (Settings for:
Battery) et désactivez l'option « Allow processor cycling ».
Installation des logiciels
Pour obtenir des instructions sur l'installation des logiciels autres
que celui décrit ci-dessous, reportez-vous à la page 17 de la
section « Contenu du CD-ROM ».
・Configuration minimale requise (*3)
Ordinateur : Processeur double G4 de 450 MHz ou processeur
simple G4/G3 de 700 MHz (ou supérieur)
Mémoire disponible : 320 Mo minimum (la mémoire virtuelle doit être
désactivée)
Disque dur : 175 Mo minimum d'espace disque disponible ;
disque dur haute vitesse
*1 L'ordinateur doit être équipé d'une borne IEEE 1394 (FireWire) ou i.Link.
En l'absence de borne, installez une carte d'interface IEEE 1394 (PCI ou
PCMCIA).
Pour plus de détails sur la configuration système et les cartes PCI ou
PCMCIA recommandées, consultez le site
http://www.yamahasynth.com
*2 La configuration système décrite ici est d'application lorsque vous utilisez
le logiciel fourni et lorsque vous reproduisez/enregistrez les données
audio/MIDI détaillées ci-dessous sur un logiciel de séquençage standard.
Elle peut néanmoins varier en fonction du logiciel de séquençage que
vous utilisez.
Fréquence/résolution : 44,1 kHz/24 bits
Pilote audio : 24 entrées/18 sorties (actives)
Pilote MIDI : 4 entrées/4 sorties
(y compris commande à distance/automation MIDI)
Pistes de reproduction audio : 12
Pistes d'enregistrement audio : 2
Pistes de reproduction MIDI : 16
Commande à distance/automation MIDI
Effets d'envoi (plug-in) : 2
Effets d'insertion (plug-in) : 10
Synthétiseur plug-in : 3
Latence : 5 msec maximum
Acrobat Reader
Pour pouvoir visualiser les manuels électroniques (PDF) fournis avec
chaque application, vous devez installer Acrobat Reader.
1 Double-cliquez sur le dossier « Acroread_ ». Trois dossiers
correspondant aux différentes langues s'affichent : English (Anglais),
German (Allemand), French (Français) et Japanese (Japonais).
2 Sélectionnez la langue que vous souhaitez utiliser et double-cliquez sur
son dossier. La fenêtre « Reader Installer » s'affiche.
Le nom du programme d'installation peut varier en fonction de la langue
sélectionnée.
3 Double-cliquez sur « Reader Installer ».
La boîte de dialogue d'installation d'Acrobat Reader s'affiche.
4 Procédez à l'installation en suivant les indications qui apparaissent à
l'écran.
Une fois l'installation terminée, le dossier Acrobat apparaît sur votre
ordinateur (par défaut, sur le disque dur).
Pour plus d'informations sur l'utilisation d'Acrobat Reader, consultez le
Reader Guide dans le menu Help.
*3 La configuration système décrite ici est d'application lorsque vous utilisez
le logiciel fourni et lorsque vous reproduisez les données audio/MIDI
détaillées ci-dessous sur un logiciel de séquençage standard. Elle peut
néanmoins varier en fonction du logiciel de séquençage utilisé.
Fréquence/résolution : 44,1 kHz/16 bits
Pilote audio : 8 entrées/2 sorties (actives)
Pilote MIDI : 1 entrée/1 sortie (commande à distance/
automation MIDI)
Pistes de reproduction audio : 12
Commande à distance/automation MIDI
Effets d'envoi (plug-in) : 2
Effets d'insertion (plug-in) : 6
Synthétiseur plug-in : aucun
Latence : environ 90 msec
TOOLS for 01X/Plug-in Effect Manuel d’installation
18
Page 79

mLAN Driver/mLAN Tools et OMS
Le logiciel mLAN Tools est utilisé pour modifier les paramètres liés au
mLAN de l'ordinateur. Quant au logiciel mLAN Driver, il permet de
transférer des données MIDI, des données audio et des données de
commande à distance entre le DAW (station de travail audionumérique) et
le 01X via la connexion mLAN.
• Pour obtenir des explications sur les messages d'erreur, reportez-vous à la page 29.
• Pour plus d'informations sur la procédure de désinstallation (retrait de l'application
installée), reportez-vous à la page 21.
Préparation de l'installation
1 Allumez l'ordinateur.
• Lorsque vous utilisez la connexion mLAN, prenez soin de désactiver
toutes les fonctions d'économie d'énergie de l'ordinateur (telles que
Suspension, Veille, Attente ou Pause). Si vous utilisez la mémoire virtuelle,
désactivez-la, puis redémarrez l'ordinateur.
• Si vous utilisez le taux de transfert de données du S200 (vérifiez le panneau
arrière de votre périphérique ou reportez-vous aux caractéristiques techniques
du mode d'emploi), prenez soin de désinstaller préalablement l'ancienne version
de mLAN Tools. (Reportez-vous au mode d'emploi de votre périphérique.)
11 Copiez le dossier « OMS Setup for YAMAHA » du CD-ROM vers le
dossier « OMS Applications » (opération de glisser-déposer).
Le dossier « OMS Setup for YAMAHA » contient les fichiers
d'installation de l'OMS pour le 01X, que vous pouvez utiliser comme
modèles.
mLAN TOOLS
12 Double-cliquez sur l'icône « Install mLAN for 01X » du dossier
« mLAN_ » pour afficher l'écran d'installation suivant. Le champ
« Install Location » (Emplacement d'installation) affiche la destination
de l'installation. Si vous voulez modifier le disque ou le dossier de
destination, utilisez le bouton [Switch Disk] (Changer de disque) et le
menu déroulant pour spécifier la destination de votre choix.
• En général, il n'est pas nécessaire de modifier le répertoire de destination.
2 Sortez des applications ouvertes et fermez toutes les fenêtres actives.
3 Débranchez tous les câbles MIDI reliant les périphériques MIDI aux
bornes MIDI IN/OUT (Entrée/sortie MIDI) du 01X.
4 A l'aide d'un câble IEEE 1394 (FireWire/iLink), connectez le 01X
directement à l'ordinateur (sans utiliser de concentrateur) et débranchez
tous les autres périphériques connectés via la borne IEEE 1394 de
l'ordinateur.
5 Insérez le CD-ROM inclus (« TOOLS for 01X ») dans le lecteur de
CD-ROM.
OMS (Open Music System)
6 Double-cliquez sur le dossier « OMS » (uniquement disponible en
anglais).
La fenêtre « Install OMS 2.3.8 » s'affiche.
7 Double-cliquez sur « Install OMS 2.3.8 ».
La boîte de dialogue OMS Setup (Installation d'OMS) s'affiche.
8 Procédez à l'installation en suivant les instructions qui apparaissent à
l'écran.
Après l'installation, sélectionnez « Restart » (Redémarrer).
• Au terme de l'installation, il est possible qu'un message d'erreur indiquant que le
programme d'installation n'a pas été fermé s'affiche. Si tel est le cas, allez dans
le menu « File » (Fichier) et sélectionnez « Quit » (Quitter) pour fermer le
programme d'installation. Redémarrez ensuite l'ordinateur.
9 Après avoir redémarré votre Macintosh, vous trouverez les dossiers
« Opcode » et « OMS Applications » sur votre ordinateur (par défaut, sur
le disque dur).
13 Vérifiez que « Easy install » est sélectionné et cliquez sur « Install ».
Cliquez sur « Continue » (Continuer) en réponse au message de
confirmation qui apparaît.
14 Si le message « OMS Folder cannot be found in the system folder »
(Dossier OMS introuvable dans le dossier système) ou un message
similaire s'affiche au terme de l'installation, copiez le fichier « mLAN
OMS Driver » (situé dans le dossier « Into OMS Folder » du dossier
« mLAN Tools » du dossier de destination de l'installation) dans le
dossier système « OMS Folder ».
15 Le message vous invitant à rechercher le dossier ASIO Drivers
s'affiche. Cliquez sur [OK]. Le résultat de la recherche s'affiche.
16 Sélectionnez le dossier de destination du pilote ASIO mLAN, puis
cliquez sur [OK].
• Si le message « ASIO Driver folder cannot be found in the system folder »
(Dossier du pilote ASIO introuvable dans le dossier système) ou un message
similaire s'affiche au terme de l'installation, copiez le fichier « ASIO mLAN »
(situé dans le dossier « Into ASIO Drivers » du dossier « mLAN Tools » du
dossier de destination de l'installation) dans le dossier « ASIO Drivers » de
l'application que vous utilisez.
17 Mettez le 01X sous tension.
18 Au terme de l'installation, le message « Installation was successful. »
(Installation réussie) apparaît à l'écran. Cliquez sur [Restart]
(Redémarrer).
Passez à l’étape suivante.
10 Copiez le fichier « OMS_2.3_Mac.pdf » du CD-ROM vers le dossier
« OMS Applications » (opération de glisser-déposer).
Reportez-vous au fichier « OMS_2.3_Mac.pdf » (version anglaise
uniquement) pour plus d'informations sur l'utilisation de l'application.
TOOLS for 01X/Plug-in Effect Manuel d’installation
19
Page 80

Configuration de mLAN AUTO W.CLK (01X)
19 Lorsque le logiciel mLAN Driver est installé, le mLAN Auto Connector
démarre. Pour être certain que les paramètres du mLAN Auto
Connector sont correctement reçus, réglez le paramètre mLAN AUTO
W.CLK (wordclock) (Horloge automatique) sur ENABLE (Activé),
comme décrit dans les instructions suivantes. Vous pouvez également
effectuer ces réglages après avoir lancé le mLAN Auto Connector.
Configuration sur le 01X
19-1 Ouvrez le mode UTILITY (Utilitaire) en appuyant sur la
touche [UTILITY] du 01X.
19-2 Appelez l'écran mLAN AUTO W.CLK en appuyant sur
W.CLK (bouton de canal 3).
Paramètres de mLAN Auto Connector
20 Modifiez les paramètres du mLAN Auto Connector en fonction de
l'usage que vous comptez faire du mLAN.
UTILITY mLAN AUTO W.CLK [INT : 48 kHz] 1/2
ENABLE/DISABLE
19-3 Appuyez sur ENABLE (bouton de canal 1).
19-4 Le message « ENABLE SURE? » (Etes-vous sûr de vouloir
activer ?) apparaît. Modifiez le réglage en appuyant sur le
bouton de canal 8.
• Si le paramètre est déjà réglé sur ENABLE, le message n'apparaît pas.
Vous pouvez donc passer à l'étape suivante.
• A moins d'effectuer une sauvegarde système, les réglages Utility du 01X sont
perdus lors de la mise hors tension de l'appareil. (Reportez-vous au mode
d'emploi du 01X.) Pour être certain que les réglages effectués ici seront effectifs
lors de la prochaine mise sous tension du 01X, effectuez une sauvegarde
système en appuyant sur la touche [UTILITY] tout en maintenant la touche
[SHIFT] enfoncée.
Passez à l’étape suivante.
Sample Rate (Vitesse d'échantillonnage)
Détermine la fréquence d'échantillonnage
(fréquence de l'horloge)
From 01X to Mac (Du 01X vers le Mac)
Détermine le nombre de canaux de transmission
audio du mLAN depuis le 01X vers l'ordinateur.
From Mac to 01X (Du Mac vers le 01X)
Détermine le nombre de canaux de transmission
audio du mLAN depuis l'ordinateur vers le 01X.
Les deux derniers canaux sont connectés à
l'entrée du contrôleur.
• Le fait de connecter le 01X à l'aide du mLAN Auto Connector peut provoquer
des bruits parasites au niveau de certains périphériques. Prenez dès lors soin de
baisser le volume de votre système amplificateur/haut-parleur ou du bouton
MONITOR/PHONES (Contrôleur/Casque) ou du curseur Stereo lors de
l'opération « Connect ».
• Si vous paramétrez la vitesse d'échantillonnage sur 96 kHz/88,2 kHz lorsque le
paramètre LAYER (Couche) du 01X est réglé sur 17 – 24 (mLAN), le paramètre
LAYER 1 – 8 est appelé et le canal 1 est automatiquement sélectionné.
Paramétrage de la vitesse de transition de l'horloge
Cliquez sur [Setup] (Configurer) dans l'écran mLAN Auto Connector
pour ouvrir la fenêtre de configuration.
Lorsque l'horloge du 01X est paramétrée en tant qu'esclave d'un
périphérique mLAN externe et que le signal d'horloge entrant
change, ce panneau de commande détermine si l'ajustement de
l'horloge en fonction de l'horloge maître doit se faire rapidement ou
lentement.
Slow (Lent) ....... L'horloge change lentement. (C'est le réglage par
défaut de la plupart des applications.)
Fast (Rapide)....L'horloge change rapidement. (Ce réglage risque
d'augmenter les bruits de gigue.)
TOOLS for 01X/Plug-in Effect Manuel d’installation
20
21 Cliquez sur [Connect] (Connecter). Si les connexions sont correctes,
le mLAN Auto Connector termine l'opération et la communication de
données du mLAN démarre, le 01X jouant le rôle d'esclave.
• En cas d'échec de la connexion, redémarrez le mLAN Auto Connector (situé
dans le dossier « mLANTools » du dossier de destination de l'installation), puis
cliquez à nouveau sur [Connect].
• Lorsque vous démarrez le mLAN Auto Connector pour la première fois, les
fichiers suivants apparaissent dans le dossier Trash (Poubelle). Vous pouvez
supprimer ces fichiers.
• AutoConnector01X alias
• AutoConnector01X launcher
Passez à l’étape suivante.
Page 81

Configuration de l'OMS
• Si vous utilisez le mLAN sur votre Macintosh avec une carte d'interface IEEE 1394
(FireWire) installée en option, créez une nouvelle configuration Studio à l'aide de
OMS Setup sans utiliser le fichier 01X-mLAN OMS Setup disponible sur le CD-ROM
d'installation. Pour plus de détails, reportez-vous au manuel OMS.
22 Double-cliquez sur le dossier « OMS », puis « OMSSetup for
YAMAHA ». Le fichier « 01X-mLAN » s'affiche. Copiez-le sur le disque
dur de votre ordinateur.
23 Double-cliquez sur le fichier « 01X-mLAN » pour lancer la
configuration OMS.
24 Si vous connectez plusieurs MOTIF-RACK à l'ordinateur, vous avez
besoin d'un concentrateur USB. Après avoir lancé OMS Setup, le
fichier de configuration du studio sur lequel vous avez double-cliqué à
l'étape 23 s'ouvre.
Si « » n'apparaît pas à droite du nom du fichier de configuration,
sélectionnez « Make Current » (Activer) dans le menu « File » et
exécutez l'opération de sauvegarde.
La configuration du studio OMS est terminée. Vous devez également
paramétrer le port OMS lorsque vous utilisez le logiciel (page 22).
Les noms de paramètre (noms de périphérique) des différents ports
MIDI apparaissent tels qu'indiqué ci-dessous lorsque le fichier
Studio Setup du 01X-mLAN est chargé. Ils correspondent aux
fonctions du port MIDI fixe du 01X. Sélectionnez le périphérique
(port) correspondant à l'application que vous utilisez.
Fonction des ports MIDI du 01X
Port MIDI Nom du périphérique Fonction
1 DAW Commande à distance
2 MIDI-A Connexion directe à la borne MIDI-A
3 MIDI-B Connexion directe à la borne MIDI-B
4 Studio Manager Studio Manager
5 Scene CTRL Commande à distance (Le mode est
• Une fois la configuration du studio OMS terminée, votre ordinateur ne reconnaît plus
que le 01X comme périphérique MIDI. Si vous utilisez un autre instrument MIDI en
plus du 01X ou que vous ajoutez un deuxième 01X au système existant, vous devrez
créer un fichier Studio Setup original. Pour plus de détails, reportez-vous au manuel
en ligne fourni avec l'OMS.
• Il est possible que le fichier de configuration du studio OMS ne fonctionne pas et ce,
même si vous avez suivi la procédure ci-dessus, selon la version de votre Macintosh/
Mac OS. (Il est impossible de transmettre/recevoir des données MIDI même lorsque
la configuration est disponible.) Dans ce cas, connectez votre Macintosh au 01X et
suivez la procédure ci-dessous pour recréer le fichier de configuration.
(conversion MIDI/mLAN MIDI)
(conversion MIDI/mLAN MIDI)
paramétré sur « GENERAL ». Celui-ci est
utilisé pour contrôler le Multi Part Editor ou
pour rappeler des scènes de bibliothèque à
l'aide de messages de changement de
programme.)
1 Lancez OMS Setup et sélectionnez « New Setup » (Nouvelle configuration)
dans le menu « File ».
2 La boîte de dialogue « OMS Driver Search » (Recherche du pilote OMS)
apparaît. Décochez les cases « Modem » et « Printer » (Imprimante), puis
cliquez sur [Search] (Rechercher) pour lancer la recherche de périphérique. Si
l'opération de recherche se déroule correctement, le périphérique [mLAN-01]
apparaît dans la boîte de dialogue de configuration du pilote OMS.
3 Cliquez sur le bouton [OK] pour rechercher des ports. Port 1, Port 2, ...
apparaissent dans la boîte de dialogue. Cochez la case du port approprié et
cliquez sur le bouton [OK] pour stocker la configuration.
• Double-cliquez sur l'icône du périphérique mLAN ou lancez « MIDI Device
Info... » (Infos sur le périphérique MIDI) depuis le menu « Studio » en
sélectionnant le périphérique mLAN pour ouvrir la boîte de dialogue Device Info.
Nous vous recommandons de ne pas modifier l'affectation des canaux définie
par l'application de configuration (mLAN Auto Connector, etc.) pour une
utilisation optimale avec les périphériques mLAN tels que le 01X. Réinitialisez
les paramètres comme indiqué dans l'illustration suivante si vous les avez
modifiés par inadvertance.
Confirmation de l'installation
Le programme d'installation mLAN Installer place les fichiers suivants
aux emplacements suivants.
Dossier Control panel (Panneau de configuration) du disque de
démarrage
mLAN Driver Setup (page 10)
• Vous pouvez utiliser le mLAN Driver Setup (page 10) pour vérifier si les données sont
correctement transmises et reçues via le bus mLAN.
Dossier Extensions du disque de démarrage
mLAN Driver
mLAN Expert
mLAN Family
mLAN Transporter Family
Le dossier que vous spécifiez
Dossier mLAN Tools
Opcode/OMS Applications
Dossier système
Control Panels/mLAN Driver Setup
OMS Folder/mLAN OMS Driver
Preferences/mLAN HALs/01XTransporter.hal
Preferences/mLAN Prefs folder
* Supprimez les fichiers et dossiers répertoriés ci-dessus lors de la
désinstallation. Prenez soin de ne pas supprimer des données déjà
présentes avant l'installation, de même que les fichiers liés à l'OMS.
TOOLS for 01X/Plug-in Effect Manuel d’installation
21
Page 82

Modification des paramètres après l'installation
Vous pouvez modifier les paramètres du mLAN après l'installation depuis
la fenêtre mLAN Driver Setup.
Configuration des ports OMS
4 Lancez le Studio Manager en double-cliquant sur son icône.
mLAN Driver Setup
Cette fenêtre vous permet de vérifier et de modifier les paramètres de
réception/transmission de données du mLAN. Prenez soin de fermer
toutes les applications (DAW, etc.) utilisant la connexion mLAN avant
d'apporter des modifications. Les paramètres sont les mêmes que dans
Windows. Reportez-vous à la page 10.
• Le paramètre Mode concerne uniquement Windows.
• Le bouton [EXIT] est uniquement disponible dans Windows.
• Pour modifier l'horloge (vitesse d'échantillonnage) et le nombre de canaux utilisés,
lancez le mLAN Auto Connector dans le dossier mLAN Tools.
Studio Manager
Installation du Studio Manager
1 Double-cliquez sur l'icône « Install Studio Manager » du dossier
« StudioManager_ » pour afficher l'écran d'installation suivant. Le champ
« Install Location » affiche la destination de l'installation. Si vous voulez
modifier le disque ou le dossier de destination, utilisez le bouton [Switch
Disk] et le menu déroulant pour spécifier la destination de votre choix.
• En général, il n'est pas nécessaire de modifier le répertoire de destination.
• Si AppleTalk est activé, un message d'avertissement apparaît. Cliquez sur
« OFF » (Désactiver). La désactivation d'AppleTalk prend un certain temps.
5 Sélectionnez « Selects OMS Ports » dans le menu « File » du Studio
Manager, puis sélectionnez les réglages des ports.
Dans l'exemple suivant, le périphérique MIDI est un 01X et ses
paramètres s'appliquent à l'OMS.
Input Port (Port d'entrée) : Sélectionnez « Studio Manager »
(Port 4).
Output Port (Port de sortie) : Sélectionnez « Studio Manager »
(Port 4).
6 Cliquez sur [OK] pour quitter la fenêtre OMS Port Setup.
2 Pour installer le mode d'emploi du Studio Manager (PDF), sélectionnez
[Custom Install] (Installation personnalisée), vérifiez que les options
« Studio Manager for 01X » et « *****PDFManual » sont cochées (« *** »
indique la langue sélectionnée), puis cliquez sur [Install] (Installer).
Sélectionnez [Custom Install]
3 Au terme de l'installation, le message « Installation was successful. »
apparaît à l'écran. Cliquez sur [Quit].
TOOLS for 01X/Plug-in Effect Manuel d’installation
22
Page 83

Plug-in Effect
1 Double-cliquez sur le dossier « Mac OS 9 ». Le dossier « VST_ »
s'affiche.
2 Double-cliquez sur le dossier « VST_ ». La fenêtre « VST Plugin
Installer » s'affiche.
3 Double-cliquez sur « VST Plugin Installer ».
Une fenêtre de sélection des effets plug-in apparaît.
Dans la fenêtre, la zone « Install Location » affiche la destination du
mode d'emploi (fichier PDF). Evitez de modifier l'emplacement de
destination. Sélectionnez (cochez) le logiciel à installer.
4 Cliquez sur [Install]. Dans la fenêtre qui apparaît, saisissez le nom
d'utilisateur, le nom de la société et le numéro de série.
• Vous pouvez trouver le numéro de série sur la carte utilisateur fournie.
5 Cliquez sur [Continue]. Dans la fenêtre qui apparaît, vous pouvez
sélectionner le dossier « VstPlugins » dans lequel installer l'effet plug-in.
• S'il n'existe qu'un seul dossier « VstPlugins » sur votre ordinateur, cette étape
n'est pas nécessaire. Passez à l'étape 7.
• S'il n'y a pas de dossier « VstPlugins » sur votre ordinateur, vous pouvez
sélectionner l'emplacement dans lequel installer l'effet plug-in dans la fenêtre qui
apparaît.
6 Cliquez sur [OK]. L'installation débute.
7 Lorsque l'installation est terminée, l'écran suivant apparaît :
Pour terminer l'installation, cliquez sur [Quit]. Pour copier le module à un
endroit autre que celui sélectionné à l'étape 5 ci-dessus, cliquez sur
[Continue] et répétez la procédure à partir de l'étape 3.
TOOLS for 01X/Plug-in Effect Manuel d’installation
23
Page 84

Reproduction de morceaux de démonstration/
configuration de la commande à distance
Logiciels informatiques susceptibles d'être contrôlés à partir du 01X
SQ01 V2 (version 2.0 ou ultérieure) Série Logic 5 (version 5.1 ou ultérieure) Série Logic 6 (version 6.0 ou ultérieure)
(Logic Plutinum/Gold/Audio) Cubase SX (version 1.0.3 ou ultérieure) Cubase SL (version 1.0.3 ou ultérieure)
Nuendo 2.0 (version 2.0 ou ultérieure) SONAR/XL (version 2.1 ou ultérieure) Digital Performer (version 3.1 ou ultérieure)
Multi Part Editor for MOTIF-RACK/MOTIF ES
• Vérifiez également la configuration système du 01X (en cas d'utilisation de mLAN). (Reportez-vous aux pages 5, 18.)
SQ01
• Pour plus d'informations sur les paramètres de Cubase, reportez-vous à la section
Mise en route du mode d'emploi.
Astuces en cas d'utilisation de données audio (Windows)
Pour une utilisation optimale des fonctions audio, nous vous
recommandons d'effectuer les paramétrages suivants. Ceux-ci
permettent de limiter les éventuels problèmes audio, tels que des
coupures, des dissonances et des bruits parasites.
• Activez le mode DMA (mode de transfert grande vitesse) du
disque dur
Pour paramétrer le mode DMA, sélectionnez [Panneau de
configuration] ➝ [Système] (➝ [Matériel]) ➝ [Gestionnaire de
périphériques], puis modifiez le paramètre dans [Lecteurs de
disque] ou [Contrôleurs de disque dur].
• Paramétrez Performance des applications sur « Les services
d'arrière-plan »
Sélectionnez [Panneau de configuration] ➝ [Système] ➝
[Avancé] ➝ [Performances] ➝ [Paramètres] ➝ [Avancé] et
cochez (activez) « Les services d'arrière-plan » dans la section
« Performance des applications ».
• Paramétrez l'option Effets visuels sur « meilleures
performances »
Sélectionnez [Panneau de configuration] ➝ [Système] ➝
[Avancé] ➝ [Performances] ➝ [Paramètres] ➝ [Effets visuels] et
cochez (activez) « Ajuster afin d'obtenir les meilleures
performances ».
• Désactivez les mises à jour automatiques
Sélectionnez [Panneau de configuration] ➝ [Système] ➝ [Mises à
jour automatiques] et décochez (désactivez) l'option « Mettre à
jour mon ordinateur ».
• Désactivez l'assistance à distance
Sélectionnez [Panneau de configuration] ➝ [Système] ➝
[Utilisation à distance] et décochez l'option « Autoriser l'envoi
d'invitations d'assistance à distance… ».
• Activez le menu Démarrage classique
Cliquez avec le bouton droit à un endroit vide de la barre de
tâches et sélectionnez [Propriétés] ➝ [Menu Démarrer], puis
cochez (activez) « Menu Démarrer classique ».
• Désactivez les effets de transition
Sélectionnez [Panneau de configuration] ➝ [Affichage] (➝
[Apparence]) ➝ bouton [Effets...] et décochez (désactivez)
l'option « Utiliser l'effet de transition suivant pour les menus et les
info-bulles ».
Après avoir installé le SQ01, sélectionnez [Démarrer] ➝ [Tous les
programmes] ➝ [YAMAHA SQ01 Ver 2.0] ➝ [SQ01] pour lancer le
SQ01.
• Pendant le démarrage du SQ01, ne mettez pas les périphériques externes
connectés au mLAN sous ou hors tension et ne (dé)branchez pas le câble du
mLAN. Une telle opération risque de bloquer l'ordinateur ou de mettre fin aux
fonctions des périphériques externes.
Cette section explique comment procéder aux paramétrages MIDI/Audio
et de la commande à distance pour la reproduction de données MIDI/
audio à partir du SQ01. Une fois la configuration terminée, essayez de lire
les morceaux de reproduction disponibles sur le CD-ROM.
Configuration MIDI
En cas d'utilisation du 01X pour la commande à distance
En cas d'utilisation d'un périphérique MIDI externe
(générateur de sons, clavier MIDI, etc.)
1 Sélectionnez [MIDI] ➝ [Device] (Périphérique) dans le menu Setup
(Configuration) de la fenêtre Track View (Vue des pistes) pour ouvrir les
boîtes de dialogue ci-dessous.
2 Sélectionnez le pilote correspondant au clavier MIDI (ou à l'interface
MIDI) que vous comptez utiliser en cliquant dans la colonne « In ».
Sélectionnez également le port (page 21) que vous utiliserez sur le 01X.
Vous pouvez en sélectionner plusieurs, si vous le souhaitez.
TOOLS for 01X/Plug-in Effect Manuel d’installation
24
3 Comme à l'étape 2 ci-dessus, sélectionnez le pilote MIDI qui correspond
au générateur de sons (ou à l'interface MIDI) que vous comptez utiliser
dans la colonne « Out », puis cliquez sur [OK]. Sélectionnez également
le(s) port(s) (page 21) que vous utiliserez sur le 01X.
Page 85

En cas d'utilisation d'instruments VST
(synthétiseurs logiciels plug-in)
Les paramètres du synthétiseur logiciel plug-in sont sauvegardés
séparément pour chaque morceau. Cela signifie que lorsque vous ouvrez
un morceau, tous les paramètres déjà enregistrés pour ce morceau sont
automatiquement appelés.
Cette section explique comment paramétrer un synthétiseur logiciel plugin VST lors de la création d'un nouveau morceau.
1 Dans la barre d'outils, cliquez sur [ ] (Rack logiciels synthétiseurs)
pour ouvrir la fenêtre Soft Synth rack.
2 Cliquez sur le bouton [ ] (Ajouter) et sélectionnez le synthétiseur plug-
in à utiliser dans le menu déroulant qui apparaît.
Configuration audio
1 Vérifiez que le paramètre « Disable Audio » (Désactiver audio) n'est pas
coché. (Sélectionnez « Audio » dans le menu Setup, puis cliquez s'il
s'avère nécessaire d'enlever la coche.) Si la case est cochée, l'audio ne
pourra pas être utilisé.
2 Dans le menu Setup, sélectionnez [Audio] ➝ [Device] pour ouvrir la
fenêtre suivante.
• Le menu déroulant ouvert en cliquant sur [Add] affiche les synthétiseurs plug-in
disponibles dans Programmes
d'informations sur l'utilisation de ces plug-ins avec d'autres programmes,
reportez-vous à la section « Paramètres des plug-ins VST » (page 26).
➝
Yamaha ➝ Vstplugins. Pour plus
Paramètres de commande à distance
1 Dans le menu Setup de la fenêtre Track View, sélectionnez « Remote
Control » pour ouvrir les boîtes de dialogue ci-dessous, puis effectuez
les paramétrages comme indiqué.
Mode : 01X
Input device (Périphérique d'entrée) : mLAN MIDI In (Port 1)
Output device (Périphérique de sortie) : mLAN MIDI Out (Port 1)
01X port number (Numéro de port du 01X) : 1
3 Sélectionnez ASIO comme pilote audio et « ASIO mLAN » comme
périphérique.
4 Activez (cochez) les canaux appropriés qui seront utilisés pour les
entrées/sorties des canaux actifs.
5 Cliquez sur [OK] pour fermer la fenêtre.
• Le port sans numéro est le port 1.
• Si vous utilisez le Multi Part Editor pour la commande à distance en tant
qu'application plug-in du SQ01, sélectionnez « Multi Part Editor for MOTIFRACK » en tant qu'éditeur MIDI.
• Le mixeur MIDI du SQ01 ne peut pas être commandé à distance par le 01X.
• [Setup] de la fenêtre Audio Mixer (Mixeur audio) – la configuration de [Remote
Control...] devient invalide.
2 Sur le 01X, sélectionnez UTILITY ➝ REMOTE (bouton 1) ➝ REMOTE
SELECT (Sélection à distance), puis « GENERAL ».
TOOLS for 01X/Plug-in Effect Manuel d’installation
25
Page 86

Paramètres des plug-ins VST
Reproduction du morceau de démonstration
Si vous utilisez des plug-ins VST sur le SQ01, vous devez d'abord
déplacer le(s) module(s) du logiciel plug-in que vous souhaitez utiliser
dans le dossier VST Plugins ([Programmes] ➝ [YAMAHA] ➝ [Vst
plugins]). Le logiciel plug-in VST fourni avec le SQ01 est installé dans ce
dossier lors de la procédure d'installation décrite à la page 14. Cela signifie
que vous pouvez l'utiliser sur le SQ01 sans devoir effectuer de nouveaux
paramétrages.
Cette section explique les réglages à effectuer lorsque vous voulez utiliser
le logiciel plug-in VST d'une autre société sur le SQ01, ainsi que les
réglages nécessaires en cas d'utilisation du plug-in VST livré avec le SQ01
sur des applications hôtes autres que le SQ01.
Utilisation des plug-ins VST d'autres sociétés sur le SQ01
Outre le module situé sous [Programmes] ➝ [YAMAHA] ➝ [Vst
plugins], vous pouvez spécifier un deuxième dossier dans lequel le SQ01
cherchera le plug-in VST. Cela vous permet également d'utiliser le logiciel
plug-in VST avec d'autres applications. Effectuez les paramétrages
comme indiqué ci-dessous.
1 Dans le menu Setup du SQ01, sélectionnez [Audio] ➝ [Others] (Autres)
pour ouvrir la fenêtre suivante.
1 Copiez le fichier du morceau de démonstration (All for You for
SQ01.yws) du dossier « DemoSong » du CD-ROM sur votre disque dur.
2 Dans le menu File du SQ01, sélectionnez [Open] (Ouvrir) pour afficher la
boîte de dialogue « Open ». Sélectionnez-y le morceau de
démonstration copié sur le disque dur, puis cliquez sur le bouton [Open].
Une nouvelle fenêtre Track View/Audio Mixer (reportez-vous à l'aide en
ligne) s'ouvre et les données du morceau de démonstration sélectionné
apparaissent sous forme de blocs dans les pistes.
3 Sur le 01X, basculez en mode INTERNAL (Interne) et sélectionnez la
couche [9/16 (mLAN)].
4 Réglez les curseurs 1 et 2 (mL1/mL2) sur des niveaux appropriés.
5 Appelez l'écran de réglage du PAN en appuyant sur la touche [PAN],
tournez les boutons de canal 1 et 2 dans les positions de balayage
panoramique gauche/droite opposées.
6 Après avoir vérifié que MONITOR B (le voyant est éteint) est sélectionné
dans MOINTOR A/B, faites glisser le curseur principal vers le haut.
7 Réglez le paramètre Remote Control (page 24) de manière à paramétrer
le 01X sur le mode REMOTE.
8 Pour lancer la reproduction du morceau de démonstration, appuyez sur
la touche de lecture du 01X ou cliquez dessus dans la barre de transfert
(reportez-vous au manuel en ligne du SQ01).
2 Cliquez sur le bouton [Browse...] (Parcourir) à droite de la case [VST
Plug-in Folder] pour ouvrir la boîte de dialogue de sélection du dossier.
3 Dans la liste qui s'affiche, sélectionnez le dossier contenant le plug-in
VST à utiliser et cliquez sur [OK].
4 Cliquez sur [OK] pour fermer la boîte de dialogue Audio.
Pour plus de détails sur les étapes ultérieures, reportez-vous au manuel en
ligne du SQ01.
• Vous pouvez également copier le module plug-in VST à utiliser sous
[Programmes]
le SQ01. Pour plus de détails, reportez-vous au mode d'emploi du plug-in VST que
vous utilisez.
26
➝
[YAMAHA] ➝ [Vst plugins] de manière à pouvoir l'utiliser aussi sur
TOOLS for 01X/Plug-in Effect Manuel d’installation
Page 87

Cubase SX/SL
Logic
Configuration MIDI (Remote Control)/Audio
Pour plus d'informations sur la configuration MIDI/Audio, reportez-vous à la
page 66 du mode d'emploi principal.
• Configuration pour Nuendo
Les paramétrages à effectuer pour Nuendo (version 2.0 ou ultérieure) sont les
mêmes que pour Cubase. Cependant, pour spécifier les entrées/sorties audio à
affecter aux bus souhaités, sélectionnez [VST Connections] (Connexions VST) dans
le menu [Devices] (Périphériques), puis paramétrez les entrées/sorties à l'aide de
l'option [Add Bus] (Ajouter bus).
• Les paramétrages de Cubase SL sont les mêmes que pour Cubase SX.
Reproduction du morceau de démonstration
1 Installez les effets plug-in Vocal Rack, Final Master et Pitch Fix
(page 14).
• Il arrive que Cubase SX/SL se ferme automatiquement lorsque vous ouvrez le
morceau de démonstration de Cubase SX/SL sans installer ces effets plug-in.
2 Copiez le dossier du morceau de démonstration du CD-ROM dans
C:\Programmes\YAMAHA sur votre ordinateur.
Si votre lecteur C: ne possède pas de dossier Programmes ou si le
logiciel Yamaha a été installé dans un autre dossier et que vous devez
copier le morceau de démonstration à un autre endroit, prenez soin
d'établir à nouveau la liaison au fichier nécessaire (comme décrit dans la
note ci-dessous), dans la mesure où la liaison entre le fichier du morceau
de démonstration et les fichiers audio a été interrompue.
3 Dans le menu File, sélectionnez [Open] pour afficher la boîte de dialogue
« Open ».
Sélectionnez « All for You for Cubase SXSL » depuis le dossier du
morceau de démonstration copié sur le disque dur, puis cliquez sur
[Open].
• Si un message indiquant que le fichier est introuvable apparaît, sélectionnez le
fichier spécifié dans le dossier du morceau de démonstration copié sur le disque
dur.
• Le message ci-dessous apparaît parfois lorsque vous ouvrez le morceau dans
Cubase SL ; il n'affecte cependant pas la reproduction du morceau. Cliquez sur
[OK].
Configuration de la commande à distance
Lorsque vous mettez le 01X sous tension avant de lancer
Logic :
1 Sur le 01X, sélectionnez UTILITY ➝ REMOTE (bouton 1) ➝ REMOTE
SELECT ➝ « LOGIC », puis passez en mode Remote en appuyant sur
la touche [REMOTE].
2 Lancez Logic sur l'ordinateur.
L'application reconnaît automatiquement le 01X for Logic Control et
effectue les réglages nécessaires.
Lorsque vous lancez Logic avant de mettre le 01X sous
tension :
1 Démarrez Logic sur l'ordinateur, puis mettez le 01X sous tension. Si vous
avez déjà paramétré le logiciel à contrôler sur « Logic » en mode Utility,
vous ne devez pas exécuter l'étape 2, car Logic reconnaît
automatiquement le 01X lors de l'exécution de cette étape.
2 Sur le 01X, sélectionnez UTILITY ➝ REMOTE (bouton 1) ➝ REMOTE
SELECT ➝ « LOGIC », puis passez en mode Remote en appuyant sur
la touche [REMOTE]. L'application reconnaît automatiquement le 01X for
Logic Control et effectue les réglages nécessaires.
Si, pour une raison quelconque, Logic ne reconnaît pas le 01X, suivez
les instructions ci-dessous.
1 Sélectionnez [Options] ➝ [Preferences] (Préférences) ➝ [Control
Surface] (Surface de contrôle) ➝ [Install] dans le menu.
2 Recherchez Logic Control (Yamaha 01X) dans la fenêtre appelée à
l'étape 1. Au terme du balayage, Logic reconnaît le 01X for Logic
Control et effectue automatiquement les réglages nécessaires.
Si Logic n'arrive toujours pas à reconnaître le 01X, même après
l'exécution des instructions ci-dessus, suivez la procédure ci-dessous.
1 Sélectionnez [Options] ➝ [Preferences] ➝ [Control Surface] ➝
[Install] dans le menu.
2 Ajoutez Logic Control (Yamaha 01X) dans la fenêtre appelée à
l'étape 1.
3 Sélectionnez le port d'entrée (DAW/mLAN MIDI In: Port 1) et le port
de sortie (DAW/mLAN MIDI Out: Port 1) dans la fenêtre CONTROL
SURFACE SETUP (Configuration de la surface de contrôle)
appelée à l'étape 2.
4 Les étapes suivantes sont identiques à celles qui suivent l'étape 3 de la
reproduction du morceau de démonstration sur le SQ01 (page 26).
• Lorsque vous reproduisez des données de morceau pour la première fois, après
avoir démarré Cubase, il est possible que les données d'automation et les
données audio ne soient pas synchronisées. Interrompez la reproduction et
essayez de les lire à nouveau.
TOOLS for 01X/Plug-in Effect Manuel d’installation
27
Page 88

Configuration audio
SONAR
1 Sélectionnez [Options] ➝ [Preferences] ➝ [Audio Hardware & Drivers]
(Matériel et pilotes audio) ➝ [Install] dans le menu. Une fenêtre de
configuration apparaît.
2 (Windows uniquement) Cliquez sur l'onglet Audio Driver 2, puis cochez
(sélectionnez) ASIO comme pilote.
3 Sélectionnez « ASIO mLAN » comme périphérique, puis redémarrez
Logic.
Reproduction du morceau de démonstration
(Macintosh uniquement)
1 Installez les effets plug-in Vocal Rack, Final Master et Pitch Fix
(page 23).
2 Copiez le dossier « DemoSong » du CD-ROM sur le disque dur.
3 Double-cliquez sur le fichier du morceau de démonstration (All for you for
Logic) du dossier « DemoSong » pour l'ouvrir.
4 Les étapes suivantes sont identiques à celles qui suivent l'étape 3 de la
reproduction du morceau de démonstration sur le SQ01 (page 26).
Digital Performer
Configuration de la commande à distance
1 Allez dans le menu déroulant [Basics] (Base) et sélectionnez [Control
Surface Setup] pour appeler la fenêtre « Control Surface ».
2 Sélectionnez « Mackie Control » dans la section Driver (Pilote). Si
Mackie Control est indisponible, reportez-vous aux instructions
complémentaires ci-dessous.
3 Dans la zone de réglage des paramètres « Unit » et « MIDI »,
sélectionnez « Mackie Control » dans la section « Unit », puis DAW/Port
1 (mLAN MIDI In/Out Port 1) dans la section « MIDI ».
4 Sur le 01X, sélectionnez UTILITY ➝ REMOTE (bouton 1) ➝ REMOTE
SELECT ➝ « DP », puis passez en mode Remote en appuyant sur la
touche [REMOTE].
Configuration de la commande à distance
1 Allez sur le menu déroulant [Options] et sélectionnez [MIDI Devices]
(Périphériques MIDI) pour appeler la fenêtre « MIDI Devices ».
2 Ajoutez « mLAN MIDI In (Port 1) » dans « Inputs » (Entrées) et « mLAN
MIDI Out (Port 1) » dans « Outputs » (Sorties).
3 Ouvrez le menu déroulant [Options] et sélectionnez [Control Surfaces]
pour appeler la fenêtre « Control Surface ».
4 Cliquez sur l'icône « New » (Nouveau), sélectionnez « Mackie Control »
dans [Control Surfaces], puis paramétrez le port d'entrée sur « mLAN
MIDI In (Port 1) » et le port de sortie sur « mLAN MIDI Out (Port 1) ».
5 Sur le 01X, sélectionnez UTILITY ➝ REMOTE (bouton 1) ➝ REMOTE
SELECT ➝ « SONAR », puis passez en mode Remote en appuyant sur
la touche [REMOTE].
Configuration audio (WDM)
• Si le paramètre WDM (pour SONAR) n'est pas spécifié au cours de l'installation du
mLAN, configurez le paramètre Mode dans Driver Setup (page 10) sur WDM après
avoir fermé l'application.
1 Sélectionnez Options ➝ Audio pour ouvrir la fenêtre « Audio Options ».
2 Cliquez sur l'onglet Advanced (Avancé) pour vérifier que Driver Mode est
réglé sur WDM/KS.
• Si le paramètre WDM (pour SONAR) n'est pas sélectionné, configurez le
paramètre Mode de la fenêtre Driver Setup (page 10) sur WDM après avoir
fermé l'application.
3 Sélectionnez Options ➝ Audio pour ouvrir la fenêtre « Audio Options »,
puis sélectionnez les ports audio du mLAN à utiliser dans « General » ➝
« Input Monitoring » (Contrôle d'entrée) ➝ « Drivers ».
Si vous n'arrivez pas à sélectionner « Mackie Control » à l'étape 2 :
1 Téléchargez le logiciel Mackie Control Plug-in depuis le site
« www.motu.com » et enregistrez-le sur votre disque dur.
2 Déplacez le fichier Mackie Control dans le dossier « Plug-ins » que
vous pouvez trouver dans le dossier dans lequel le logiciel Digital
Performer est installé.
3 Démarrez Digital Performer.
• Pour appeler ASIO mLAN Control Panel, cliquez sur « Configure Driver ».
Configuration audio
1 Allez dans le menu déroulant [Basics] et sélectionnez [Configure Audio
System] (Configurer système audio) ➝ [Configure Hardware Driver]
(Configurer pilote matériel) pour appeler la fenêtre « Configure Hardware
Driver ».
2 Sélectionnez « ASIO » dans le menu.
3 Sélectionnez ASIO mLAN dans « ASIO Driver ».
• Configurez la fonction MIDI Thru de OMS Setup et la fonction MIDI Patch Thru
de Digital Performer pour qu'elles s'exécutent en arrière-plan.
Reproduction du morceau de démonstration
4 Copiez le dossier du morceau de démonstration du CD-ROM dans
C:\Programmes\YAMAHA sur votre ordinateur.
Si votre lecteur C: ne possède pas de dossier Programmes ou si le
logiciel Yamaha a été installé dans un autre dossier et que vous devez
copier le morceau de démonstration à un autre endroit, prenez soin
d'établir à nouveau la liaison au fichier nécessaire (comme décrit dans la
note ci-dessous), dans la mesure où la liaison entre le fichier du morceau
de démonstration et les fichiers audio a été interrompue.
5 Dans le menu File, sélectionnez [Open] pour afficher la boîte de dialogue
« Open ».
Sélectionnez « All for You for Cubase SXSL » depuis le dossier du
morceau de démonstration copié sur le disque dur, puis cliquez sur
[Open].
• Si un message indiquant que le fichier est introuvable apparaît, sélectionnez le
fichier spécifié dans le dossier du morceau de démonstration copié sur le disque
dur.
6 Les étapes suivantes sont identiques à celles qui suivent l'étape 3 de la
reproduction du morceau de démonstration sur le SQ01 (page 26).
TOOLS for 01X/Plug-in Effect Manuel d’installation
28
Page 89

Messages de l'écran
Messages Informations Page
Can’t find the mLAN Stream Driver.
Re-install the mLAN Drivers.
Can’t find the 01X on the mLAN network.
Make sure that the 01X is turned on and that the mLAN cable
connection is correct and secure. After that, restart “mLAN
Auto Connector for 01X”.
The settings of the mLAN Driver could not be changed.
1) If an application that uses the driver is currently active,
close it first, then change the settings.
2) There is not enough resource memory.
Failed to set the 01X’s wordclock to slave.
Set the master clock of the 01X so that mLAN Auto W.CLK is
set to “ENABLE.”
1) Press the [UTILITY] button on the 01X.
2) Select “W.CLK” (press knob 3) on the 01X.
3) Set the parameter to “ENABLE”
Failed to initialize the mLAN settings because the application
“mLAN Start” is not running.
Select “ON” from the menu of “mLAN Manager” application.
Can’t connect the 01X’s mLAN audio output plug to the computer’s mLAN audio input plug.
Can’t connect the 01X’s mLAN MIDI output plug to the computer’s mLAN MIDI input plug.
Can’t connect the computer’s mLAN MIDI output plug to the
01X’s mLAN MIDI input plug.
Can’t connect the computer’s mLAN wordclock output plug to
the 01X’s mLAN wordclock input plug.
Can’t connect the 01X’s mLAN wordclock output plug to the
computer’s mLAN wordclock input plug.
A new 1394 adaptor card has been found.
If you’ve inserted a new card, restart the computer.
There is not enough resource memory.
Execute mLAN Stop, then execute mLAN Start again. If this
fails, restart the computer.
The 1394 adaptor card has not been found.
Check the card and start mLAN again.
One of the programs could not be started. Follow the instructions/messages in the appropriate application. If there are no
messages, execute mLAN Start again or restart the computer.
The application is not responding.
Execute mLAN Start again or restart the computer.
Failed to load the mLAN Bus Driver.
If the New Hardware Wizard has not been run, use it to install
the hardware, then execute mLAN Start.
One or more programs could not be closed.
After quitting all DAW programs and any programs using
mLAN, execute mLAN Stop.
Pilote mLAN Stream Driver introuvable.
Réinstallez les pilotes mLAN.
01X introuvable sur le réseau mLAN.
Vérifiez que le 01X est sous tension et que le câble mLAN est
correctement branché et bien enfoncé. Redémarrez ensuite
« mLAN Auto Connector for 01X ».
Impossible de modifier les paramètres de mLAN Driver.
1) Si une application utilisant le pilote est actuellement
active, fermez-la, puis modifiez les paramètres.
2) La mémoire ressource est insuffisante.
Echec de la configuration de l'horloge du 01X en tant
qu'esclave.
Paramétrez l'horloge maître du 01X de manière à ce que
mLAN Auto W.CLK soit réglé sur « ENABLE ».
1) Appuyez sur la touche [UTILITY] du 01X.
2) Sélectionnez « W.CLK » (en appuyant sur le bouton 3)
sur le 01X.
3) Réglez le paramètre sur « ENABLE ».
Echec de l'initialisation des paramètres du mLAN car
l'application « mLAN Start » n'est pas ouverte.
Sélectionnez « ON » dans le menu de l'application « mLAN
Manager ».
Impossible de connecter la prise de sortie audio mLAN du
01X à la prise d'entrée audio mLAN de l'ordinateur.
Impossible de connecter la prise de sortie MIDI mLAN du 01X
à la prise d'entrée MIDI mLAN de l'ordinateur.
Impossible de connecter la prise de sortie MIDI mLAN de
l'ordinateur à la prise d'entrée MIDI mLAN du 01X.
Impossible de connecter la prise de sortie du signal d'horloge
mLAN de l'ordinateur à la prise d'entrée du signal d'horloge
mLAN du 01X.
Impossible de connecter la prise de sortie du signal d'horloge
mLAN du 01X à la prise d'entrée du signal d'horloge mLAN
de l'ordinateur.
Une nouvelle carte adaptateur 1394 a été détectée.
Si vous avez introduit une nouvelle carte, redémarrez
l'ordinateur.
La mémoire ressource est insuffisante.
Exécutez l'application mLAN Stop, puis mLAN Start. Si cela
ne marche pas, redémarrez l'ordinateur.
Carte adaptateur 1394 introuvable.
Vérifiez la carte et redémarrez le mLAN.
Un des programmes n'a pas pu être lancé. Suivez les
instructions/messages de l'application correspondante. Si
aucun message ne s'affiche, exécutez à nouveau mLAN Start
ou redémarrez l'ordinateur.
L'application ne répond pas.
Exécutez à nouveau mLAN Start ou redémarrez l'ordinateur.
Echec du chargement pilote du bus mLAN.
Si l'Assistant Matériel détecté n'a pas été exécuté, utilisez-le
pour installer le matériel, puis exécutez mLAN Start.
Un ou plusieurs programmes n'ont pas pu être fermés.
Après avoir fermé tous les programmes DAW et les
programmes utilisant le mLAN, exécutez mLAN Stop.
6, 18
9, 20
12
9, 20
10
9, 10
9, 10
9, 10
9, 10
9, 10
10
32
10
10
10
10
TOOLS for 01X/Plug-in Effect Manuel d’installation
29
Page 90

Dépistage des pannes
Ordinateur
Ordinateur
01X
01X
: Périphérique équipé
d'une borne IEEE1394
Exemple de connexion en boucle
■ Impossible d'installer le pilote.
• Le câble mLAN est-il correctement branché ? Vérifiez la connexion, débranchez le câble mLAN, puis branchez-le à nouveau.
■ La connexion mLAN ne fonctionne pas.
• Le pilote a-t-il été installé ? ..................................................................................................................................................................... pages 3, 17
• Le câble mLAN est-il correctement branché ? Vérifiez la connexion, débranchez le câble mLAN, puis branchez-le à nouveau.
• (Pour Windows) Le mLAN est-il paramétré sur « ON » ? Dans la barre de tâches, cliquez avec le bouton droit
sur l'icône mLAN Manager. ..........................................................................................................................................................................page 10
• (Pour Windows) Lorsque vous ajoutez une nouvelle carte IEEE 1394, cliquez avec le bouton droit sur l'icône mLAN Manager
de la barre de tâches et sélectionnez « ON ». ................................................................................................................................................page 10
• Le voyant ACTIVE situé sur le panneau arrière du 01X est-il allumé (bleu) ? S'il ne l'est pas, vérifiez les points suivants :
• Le voyant d'état de mLAN Driver Setup (dans la barre de tâches, cliquez avec le bouton droit sur l'icône mLAN Manager, puis sur « Driver
Setup ») est-il bleu ?
S'il ne l'est pas, redémarrez le 01X et réactivez la connexion en utilisant mLAN Auto Connector..............................................................page 10
• Le paramètre mLAN AUTO W.CLK (Auto Wordclock) du 01X est-il réglé sur « ENABLE » ? ......................................................... pages 9, 20
• La connexion a-t-elle été activée avec le mLAN Auto Connector ? Réactivez la connexion si nécessaire.
...................................................................................................................................« Paramètres du mLAN Auto Connector » aux pages 9 et 20
• Avez-vous modifié le périphérique ? Même si le modèle est le même, mais que le périphérique est différent,
vous devez réactiver la connexion à l'aide de mLAN Auto Connector.
...................................................................................................................................« Paramètres du mLAN Auto Connector » aux pages 9 et 20
• La connexion est-elle en boucle ? Vérifiez le câblage et assurez-vous qu'aucun des périphériques n'est connecté en boucle.
• Il peut y avoir une limite sur l'interface IEEE 1394 de votre ordinateur quant au nombre de ports pouvant être utilisés
simultanément. Vérifiez le nombre de ports pouvant être utilisés en même temps.
• Mettez tous les périphériques du réseau mLAN hors tension (à l'exception de l'ordinateur) et rebranchez les périphériques un par
un jusqu'à ce que vous ayez identifié le périphérique à l'origine du problème.
• (Pour Windows) (En cas de retrait du bus mLAN à l'aide du paramètre [Safely Remove Hardware] (Retrait du matériel en toute
sécurité) de la barre de tâches.) Redémarrez l'ordinateur lorsque vous décidez d'utiliser à nouveau le mLAN.
• Si vous utilisez un ordinateur portable Macintosh tel que iBook et PowerBook, connectez d'abord le câble du 01X et du mLAN,
puis mettez le 01X sous tension, avant d'allumer l'ordinateur.
■ Le pilote mLAN (MIDI/Audio) n'est pas détecté par l'application (DAW, séquenceur audio, etc.).
• (Pour Windows) Le mLAN (pilote mLAN) est-il paramétré sur « ON » ? Dans la barre de tâches, cliquez avec le bouton droit sur mLAN
Manager (icône mLAN). ...............................................................................................................................................................................page 10
• Le 01X est-il correctement relié à l'ordinateur par un câble mLAN et est-il bien sous tension ?
(Essayez de démarrer le mLAN Auto Connector et de vous reconnecter.)
...................................................................................................................................« Paramètres du mLAN Auto Connector » aux pages 9 et 20
• Si vous utilisez un ordinateur portable Macintosh tel que iBook et PowerBook, connectez d'abord le câble du 01X et du mLAN,
puis mettez le 01X sous tension, avant d'allumer l'ordinateur.
• Les paramètres du mLAN sont-ils corrects ? ....................................................................(« La connexion mLAN ne fonctionne pas. » ci-dessus)
■ Les paramètres Remote Control et Automation ne fonctionnent pas.
• Le logiciel DAW correct est-il sélectionné dans Remote Select ? ................................................................................................................page 24
• Les paramètres du mLAN sont-ils corrects ? ....................................................................(« La connexion mLAN ne fonctionne pas. » ci-dessus)
• Les réglages du DAW sont-ils corrects ? ...................................................................................................................................................... page 24
• Le port 1 est-il sélectionné pour la transmission/réception MIDI mLAN ? ..................................................................................................page 21
■ Impossible de modifier l'horloge.
• Paramétrez-la avec le mLAN Auto Connector lorsque vous utilisez le mLAN. ....... « Paramètres du mLAN Auto Connector » aux pages 9 et 20
• Le paramètre mLAN Auto Wordclock (AUTO W.CLK) est-il correctement réglé ?
TOOLS for 01X/Plug-in Effect Manuel d’installation
30
Page 91

■ Le fonctionnement de l'ordinateur est lent.
• Diminuez le nombre de canaux audio que peut utiliser le mLAN Auto Connector. ............................................................................... pages 9, 20
• Augmentez la valeur de latence. ....................................................................................................................................................................page 11
• (Pour Macintosh) Le fonctionnement peut être ralenti lorsqu'un ordinateur à double processeur quitte le mode veille ou
suspendu. Redémarrez l'ordinateur.
• (Pour Windows) Reportez-vous à la section « Astuces en cas d'utilisation de données audio ». ................................................................page 24
• (Pour Windows) Ce problème peut parfois être résolu en paramétrant Hyper Threading sur « Disable ».
• (Pour Windows) Lorsque vous n'utilisez pas le mLAN, cliquez avec le bouton droit sur l'icône mLAN Manager de la barre de tâches et
sélectionnez « OFF » (Désactiver) (pour fermer le mLAN)..........................................................................................................................page 10
■ Impossible de fermer les applications ou d'éteindre l'ordinateur (système d'exploitation).
■ Impossible de modifier les paramètres du mLAN.
■ Impossible de désinstaller (supprimer) Install mLAN for 01X (pilote mLAN) ou mLAN Tools 2.0.
• (Pour Windows) Le pilote mLAN (WDM) est-il sélectionné en tant que périphérique audio par défaut pour le système ? ......................page 12
• Sélectionnez [Démarrer] ➝ [Panneau de configuration] ➝ [Sons et périphériques audio] ➝ [Voix]. Assurez-vous
qu'une option autre que « mLAN Audio Out/In 01 » est sélectionnée pour les paramètres « Lecture des voix » et
« Enregistrement des voix ».
• Sélectionnez [Démarrer] ➝ [Panneau de configuration] ➝ [Sons et périphériques audio] ➝ [Audio]. Assurez-vous
qu'une option autre que « mLAN Audio Out/In 01 » est sélectionnée pour les paramètres « Lecture des sons » et
« Enregistrement des sons ».
• (Pour Windows) Sélectionnez [Démarrer] ➝ [Panneau de configuration] ➝ [Sons et périphériques audio] ➝ onglet « Sons » et
sélectionnez « Aucun son » dans le champ « Modèle », puis exécutez à nouveau l'opération.
• Si vous ne parvenez pas à fermer le mLAN (en sélectionnant « OFF » après avoir cliqué avec le bouton droit sur l'icône mLAN
de la barre de tâches), fermez les processus répertoriés ci-dessous manuellement. ([Ctrl] + [Alt] + [Suppr.] ➝ onglet
« Processus » ➝ sélectionnez le processus ➝ [Terminer le processus]) Lorsque vous avez terminé, démarrez le mLAN Manager
pour modifier à nouveau les paramètres mLAN.
mLANVDevice.exe
mLANTFamily.exe
mLANSoftPH.exe
mLANManager.exe
• (Lorsqu'un message du type « fichier introuvable » apparaît lors de la désinstallation :) Essayez d'effectuer à nouveau
l'installation, puis de relancer la procédure de désinstallation.
■ (Pour Windows) Le mLAN Manager (icône mLAN de la barre de tâches) a disparu.
• Sélectionnez [Démarrer] ➝ [(Tous les) Programmes] ➝ [Démarrage] (ou [mLAN Tools]) ➝ [mLAN Manager]. ...................................page 10
■ La réponse de reproduction est lente.
• Votre ordinateur respecte-t-il la configuration minimale ? ..................................................................................................................... pages 5, 18
• (Pour Macintosh) Désactivez la mémoire virtuelle.
• (Pour Macintosh) Désactivez AppleTalk.
• Pour plus d'informations sur les problèmes audio tels que l'absence de son ou des bruits excessifs, reportez-vous à la section Dépistage des pannes du mode d'emploi du 01X.
TOOLS for 01X/Plug-in Effect Manuel d’installation
31
Page 92

SOFTWARE LICENSING AGREEMENT
The following is a legal agreement between you, the end user, and Yamaha Corporation (“Yamaha”). The enclosed Yamaha software program is
licensed by Yamaha to the original purchaser for use only on the terms set forth herein. Please read this licensing agreement with care. Opening this
package indicates that you accept all terms outlined herein. If you do not agree to the terms, return this package unopened to Yamaha for a full
refund.
1. GRANT OF LICENSE AND COPYRIGHT
Yamaha grants you, the original purchaser, the right to use one copy of the enclosed software program and data (“SOFTWARE”) on a single-user
computer system. You may not use it on more than one computer or computer terminal. The SOFTWARE is owned by Yamaha and is protected by
Japanese copyright laws and all applicable international treaty provisions. You are entitled to claim ownership of the media in which the SOFTWARE is included. Therefore, you must treat the SOFTWARE like any other copyrighted materials.
2. RESTRICTIONS
The SOFTWARE program is copyrighted. You may not engage in reverse engineer-ing or reproduction of the SOFTWARE by other conceivable
methods. You may not reproduce, modify, change, rent, lease, resell, or distribute the SOFTWARE in whole or in part, or create derivative works
from the SOFTWARE. You may not transmit or network the SOFTWARE with other computers. You may transfer ownership of the SOFTWARE
and the accompanying written materials on a permanent basis provided that you retain no copies and the recipient agrees to the terms of the licensing agreement.
3. TERMINATION
The licensing condition of the software program becomes effective on the day that you receive the SOFTWARE. If any one of the copyright laws or
clauses of the licensing conditions is violated, the licensing agreement shall be terminated automatically without notice from Yamaha. In this case,
you must destroy the licensed SOFTWARE and its copies immediately.
4. PRODUCT WARRANTY
Yamaha warrants to the original purchaser that if the SOFTWARE, when used in normal conditions, will not perform the functions described in the
manual provided by Yamaha, the sole remedy will be that Yamaha will replace any media which proves defective in materials or workmanship on
an exchange basis without charge. Except as expressly set forth above, the SOFTWARE is provided “as is,” and no other war-ranties, either expressed or implied, are made with respect to this software, including, without limitation the implied warranties of merchantability and fitness for a particular purpose.
5. LIMITED LIABILITY
Your sole remedies and Yamaha’s entire liability are as set forth above. In no event will Yamaha be liable to you or any other person for any damages, including without limitation any incidental or consequential damages, expenses, lost profits, lost savings or other damages arising out of the
use or inability to use such SOFTWARE even if Yamaha or an authorized dealer has been advised of the possibility of such damages, or for any
claim by any other party.
6. GENERAL
This license agreement shall be interpreted according to and governed by Japanese laws.
TOOLS for 01X/Plug-in Effect Installation Guide
32
Page 93

SOFTWARE-LIZENZVEREINBARUNG
Die folgende Vereinbarung ist eine rechtsgültige Vereinbarung zwischen Ihnen, dem Endanwender, und der Yamaha Corporation (“Yamaha”).
Yamaha erteilt dem ursprünglichen Käufer für das beiliegende Yamaha-Softwareprogramm ausschließlich zu den hier ausgeführten Bedingungen
eine Lizenz zur Verwendung. Bitte lesen Sie diese Lizenzvereinbarung sorgfältig. Durch das Öffnen dieser Packung bringen Sie zum Ausdruck,
daß Sie alle darin enthaltenen Bedingungen akzeptieren. Wenn Sie nicht mit den Bedingungen einverstanden sind, können Sie die Packung ungeöffnet an Yamaha zurückgeben; der Kaufpreis wird in voller Höhe zurückerstattet.
1. ERETILUNG VON LIZENZ UND COPYRIGHT
Yamaha erteilt Ihnen, dem ursprünglichen Käufer, das Recht, ein Exemplar des beiliegenden Softwareprogramms und der darin enthaltenen Daten
(“SOFTWARE”) als Einzelperson auf jeweils einem Computer zu verwenden. Sie dürfen sie nicht auf mehr als einem Computer bzw. einer Computerstation verwenden. Die SOFTWARE bleibt im Besitz von Yamaha und ist durch japanische Copyrightgesetze sowie alle anwendbaren internationalen Vertragsbestimmungen geschützt. Sie haben ein Anspruchsrecht auf das Eigentum an den Medien, denen die SOFTWARE beiliegt. Daher
müssen Sie die SOFTWARE wie alle anderen durch Copyright geschützten Materialien behandeln.
2. EINSCHR
Die SOFTWARE ist durch Copyright geschützt. Sie dürfen Sie weder analysieren noch durch anderweitige Methoden reproduzieren. Sie dürfen die
SOFTWARE weder ganz noch teilweise reproduzieren, modifizieren, verändern, gegen Entgelt oder unentgeltlich verleihen, verkaufen oder vertreiben, und Sie dürfen auf der Grundlage der SOFTWARE keine Ableitungen erstellen. Sie dürfen die SOFTWARE nicht an andere Computer senden oder in Netzwerke einspeisen. Sie dürfen das Eigentum an der SOFTWARE und den schriftlichen Begleitmaterialien auf unbefristeter Basis
unter den Voraussetzungen übertragen, daß Sie keine Kopien zurückbehalten und sich der Empfänger mit den Bedingungen der Lizenzvereinbarung einverstanden erklärt.
3. BEENDIGUNG
Die Lizenzbedingung des Softwareprogramms wird am Tag, an dem Sie die SOFTWARE erhalten, wirksam. Falls ein Copyrightgesetz oder eine
Bestimmung der Lizenzbedingungen verletzt wird, wird automatisch und ohne Benachrichtigung durch Yamaha die Lizenzvereinbarung beendet.
In diesem Fall müssen Sie die lizensierte SOFTWARE und ihre Kopien unverzüglich vernichten.
4. PRODUKTGARANTIE
Yamaha garantiert dem ursprünglichen Käufer, daß, falls die SOFTWARE bei Verwendung unter normalen Bedingungen nicht die in der von
Yamaha bereitgestellten Anleitung beschriebenen Funktionen erfüllt, die einzige Abhilfe darin bestehen wird, daß Yamaha auf Austauschbasis
kostenlos jedes Medium ersetzen wird, das Material- oder Verarbeitungsfehler aufweist. Abgesehen von dem oben Ausgeführten wird die SOFTWARE “wie die Ware liegt und steht” geliefert, und es werden keine anderen ausdrücklichen oder stillschweigenden Garantien hinsichtlich dieser
Software übernommen, einschließlich, aber nicht beschränkt auf, die stillschweigenden Garantien für handelsübliche Qualität und Eignung für
einen bestimmten Einsatzzweck.
5. BESCHR
Ihre einzige Abhilfe und die gesamte Haftung Yamahas bestehen in dem oben Ausgeführten. Keinesfalls haftet Yamaha Ihnen oder einer anderen
Person gegenüber für etwaige Schäden, einschließlich, aber nicht beschränkt auf, zufällige Schäden oder Folgeschäden, Kosten, Verdienstausfall,
verlorene Ersparnisse oder andere Schadenersatzansprüche, die aus der Verwendung der SOFTWARE oder aus der Tatsache hervorgehen, daß
diese SOFTWARE nicht verwendet werden konnte, selbst wenn Yamaha oder ein autorisierter Händler über die Möglichkeit derartiger Schadenersatzansprüche informiert wurde, oder für etwaige andere Ansprüche einer anderen Partei.
6. ALLGEMEINES
Diese Lizenzvereinbarung soll gemäß und in Übereinstimmung mit den japanischen Gesetzen ausgelegt werden.
TOOLS for 01X/Plug-in Effect Installationshandbuch
33
Page 94

CONTRAT DE LICENCE DE LOGICIEL
Ceci est un contrat entre vous-même, l’utilisateur final, et Yamaha Corporation (« Yamaha »). Le logiciel Yamaha ci-inclus est concédé sous licence
par Yamaha à l’acheteur original et ne peut être utilisé que dans les conditions prévues aux présentes. Veuillez lire attentivement ce contrat de
licence. Le fait d’ouvrir ce coffret indique que vous acceptez l’ensemble des termes du contrat. Si vous n’acceptez pas lesdits termes, renvoyez le
coffret non ouvert à Yamaha pour en obtenir le remboursement intégral.
1. CONCESSION DE LICENCE ET DROITS D’AUTEUR
Yamaha vous concède le droit d’utiliser, en tant qu’acheteur original, un exemplaire du logiciel et des données afférentes à celui-ci (« LOGICIEL
») sur un ordinateur pour utilisateur unique. Vous n’êtes pas autorisé à utiliser ces éléments sur plus d’un ordinateur ou terminal d’ordinateur. Le
LOGICIEL est la propriété de Yamaha. Il est protégé par les dispositions relatives au droit d’auteur contenues dans la législation japonaise et les
traités internationaux. Vous êtes en droit de revendiquer l’appartenance du support du LOGICIEL. A ce titre, vous devez traiter le LOGICIEL
comme tout autre élément protégé par le droit d’auteur.
2. RESTRICTIONS
Le LOGICIEL est protégé par le droit d’auteur. Vous n’êtes pas autorisé à reconstituer la logique du LOGICIEL ou à reproduire ce dernier par quelque autre moyen que ce soit. Vous n’êtes pas en droit de reproduire, modifier, prêter, louer, revendre ou distribuer le LOGICIEL en tout ou partie,
ou d’utiliser le LOGICIEL à des fins de création dérivée. Vous n’êtes pas autorisé à transmettre le LOGICIEL à d’autres ordinateurs ou à l’utiliser
en réseau. Vous êtes en droit de céder, à titre permanent, le LOGICIEL et la documentation imprimée qui l’accompagne, sous réserve que vous n’en
conserviez aucun exemplaire et que le bénéficiaire accepte les termes du présent contrat.
3. RESILIATION
Les conditions énoncées dans le présent contrat de licence prennent effet à compter du jour où le LOGICIEL vous est remis. Si l’une quelconque
des dispositions relatives au droit d’auteur ou des clauses du contrat ne sont pas respectées, le contrat de licence sera résilié de plein droit par
Yamaha, ce sans préavis. Dans ce cas, vous devrez immédiatement détruire le LOGICIEL concédé sous licence ainsi que les copies réalisées.
4. GARANTIE PRODUIT
Si, dans des conditions normales d’utilisation, le LOGICIEL ne remplit pas les fonctions décrites dans le manuel fourni, Yamaha s’engage vis-à-vis
de l’acheteur original à remplacer gratuitement, sur la base d’un échange, tout support reconnu défectueux par suite d’un défaut de matière
première ou d’un vice de fabrication. Ceci constitue le seul recours opposable à Yamaha. Hormis dans les cas expressément énoncés plus haut, le
LOGICIEL est livré « en l’état » et toute autre garantie expresse ou implicite le concernant, y compris, de manière non limitative, toute garantie
implicite de qualité marchande et d’adéquation à un usage particulier, est exclue.
5. RESPONSABILITE LIMITEE
Votre unique recours et la seule responsabilité de Yamaha sont tels qu’énoncés précédemment. En aucun cas Yamaha ne pourra être tenu responsable, par vous-même ou une autre personne, de quelques dommages que ce soit, notamment et de manière non limitative, de dommages indirects,
frais, pertes de bénéfices, pertes de fonds ou d’autres dommages résultant de l’utilisation ou de l’impossibilité d’utiliser le LOGICIEL, même si
Yamaha ou un distributeur agréé ont été prévenus de l’éventualité de tels dommages, ou de quelque autre revendication formulée par une tierce partie.
6. REMARQUE GENERALE
Le présent contrat de licence est régi par le droit japonais, à la lumière duquel il doit être interprété.
TOOLS for 01X/Plug-in Effect Manuel d’installation
34
Page 95

This document is printed on chlorine free (ECF) paper with soy ink.
Auf Umweltpapier mit Sojatinte gedruckt.
Ce document a été imprimé sur du papier non blanchi au chlore avec de l'encre d'huile de soja.
U.R.G., Pro Audio & Digital Musical Instrument Division, Yamaha Corporation
© 2003 Yamaha Corporation
WB29370
312POCP2.3-02B0 Printed in Japan
 Loading...