

Page 1

DIGITAL DOOR VIEWER
USER MANUAL
The following rights are reserved:
Any changes, without previous notice, made to either the
functionality or appearance of this product will invalidate
the guarantee.
Use of this product in any environment or in any way other
than specified here will also invalidate the guarantee.
Page 2
1.Please read this user manual carefully before using our product.
2.Never attempt to repair or modify this product or its accessories
by yourself, to avoid injury and invalidating guarantee!
3.
4.DO NOT use any chemicals to clean this product, such as
alcohol or benzene thinner.
5.Please change the batteries soon after the low-battery indicator
shows, in order to avoid any damage to this product which could
be caused by battery weeping.
Attention:
Any accidental factor such as being struck by lightning or any
incorrect operation could cause a memory loss on the SD card.
Keeping copies of the videos is strongly recommended in case
of memory loss. We are not responsible for any loss of data.
②
⑤
⑥
①
③
AA
AA
AA
AA
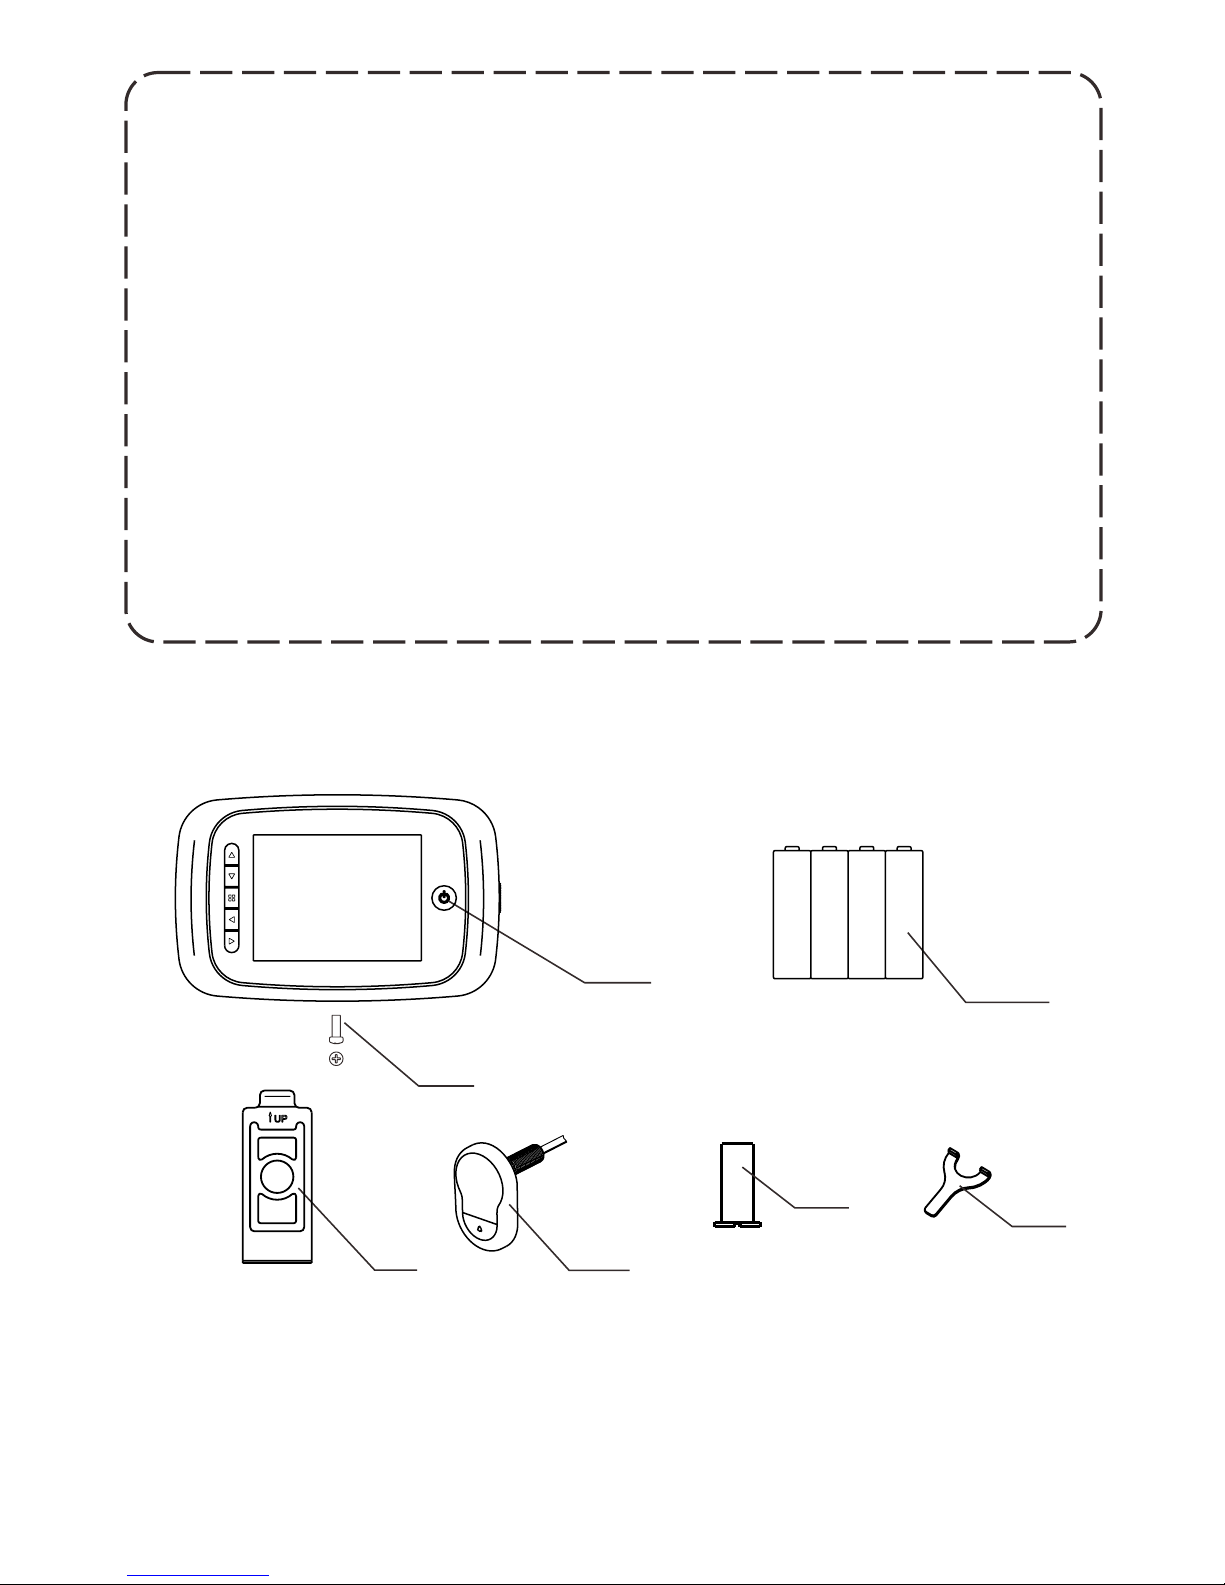
Package list:
①LCD Screen
③4 AA batteries
⑤Camera
② fixing screw1
④Holding plate
⑥Locking barrel
④
2
⑦
⑦Tightening tool
Page 3

Installation instructions:
1.Replace the existing door viewer or drill a 14mm hole in the door
at the required height, insert the camera from the outside . Making
sure the washer is fitted between the camera and the door. Ensure
the bell push is at the bottom and adjust so that the camera is
perpendicular
2.Peel off the 3M stickers on the holding plate and fit it over the end
of the lens, then screw the locking barrel on to the threaded sleeve
of the camera and tighten. This will hold the plate to the door. Make
sure that the arrow on the plate points upwards.
3.The data wire should be fully plugged in at the back of the screen;
excess wire should be gently placed into the groove at the back of
the screen.
4.Hook the screen over the bracket at the top of the plate and secure
with one small screw through the hole at the bottom of the screen
case.
(FIG.1)
(FIG.2)
(FIG.3)
to the horizon.
hook the screen
case
fix the screw
3
DOOR
FIG. 1
FIG. 2
FIG. 4
FIG. 3
Page 4

Installation and replacement of batteries:
Installation:
1.Slide the lid upwards and open outwards as shown in diagram.
2.Put in the batteries according to the “+” “-” sign on the lid.
3.Take the reverse steps to close the lid.
1.DO NOT force when opening and closing the lid to avoid
damaging the lid.
2.DO NOT press the lid to the opposite direction when open to
avoid any damage to the lid.
3.When the low battery indicator is on, please replace the batteries
to avoid any damage to this product by battery weeping.
Attention:
The battery icon shows the power state. When the power is
reducing, the bars in the icon will reduce. But as for some
dry batteries or rechargeable batteries, the power state in
the icon could be unstable, which is normal .
When the batteries run out, this icon will be in blank, which
indicates the user to replace the batteries. The following types
of batteries can be used in this product:AA, LR6 1.5V alkaline
battery. Any abandoned batteries should be disposed according
to local environment protection rules and regulations.
4
Full power No power
AA
AA
AA
AA
Page 5

1
2
3
4
5
6
Back side of screen case
:No
basic function
multi function
1
Upward shift
2
Downward shift
3
Menu
4
Left shift only in menu setting selection key to replay mode
5
Right shift only in menu setting start shooting key in normal use
6
Power button
Operation instruction:
Parts specifications:
The front part of the screen case:
Button functions:
8
7.TF card socket 8.camera data wire connector
7
in normal use.
5
Page 6

Camera front view
1.Camera 2. Door bell button 3. Data wire
Operation instructions:
Parts specification:
Menu interface instruction:
2011-01-01
00000
1
2
3
4
5
6
2
1
3
Camera side view
6
TF
Page 7

No :
Icon
1
Mode directing icons
2
4
5
Door bell state icon
photo shooting mode
3
TF
This icon shows the DND(do not
disturb) mode
Picture memory
max. 99999 pictures storage
(depends on the volume of the
memory card)
hows full batteryS
Shows 70% battery left
Shows 40% battery left
Shows battery is running out
Power state icon
6
System date icon
Function
TF card plugged-in icon
shows the current system date
Video shooting mode
Playback mode for photos or videos
This icon shows the TF card is
plugged in and is recognized by
the system.
This icon shows the normal door
bell mode
Operations:
7
*
-
-
-
-
-
*
-
-
Memory Card Installation:
Please insert the memory card before installing the batteries.
Before inserting the memory card make sure the marked side is
facing the front, when you hear a click the card is locked and fitted
correctly.
This product will take a max. 8GB SD memory card.
To remove the memory card: press the card and it will pop out
approximately one third, you can then remove the card.
This product supports hot plugging.
Please set the system date and time after installing the batteries.
Press menu button, shift the selection key to “date setting”, and
System time and date setting:
Page 8

press menu button to enter.
Select “ setting the date” key, press the menu button to enter and use
“ ”key to select the digit to be set and use“ ”to adjust the
number.
If you want to add date and time information on the photos, you can
choose the “time & date display” -ON, otherwise choose OFF.
this product has user-defined setting for auto-power off.
if you need to change the default setting, please press “menu”
button, then choose the “auto-power off ” and press “menu” button
to enter.
There are 4 options to choose in this menu: 10S/20S/30S/OFF.
20S is the default mode, which is the best option for balancing the
power consumption and operational convenience.
OFF mode is for laboratory test and for customers with special
needs. Caution: in this mode the screen will stay on until manually
turned off, if not turned off, the batteries will quickly run out of
power.
-
-
*
-
-
-
-
Auto-power off setting:
*
-
-
-
*
-
-
-
*
-
-
-
Visitors
When visitors press the door bell button on the door viewer camera,
the door bell will ring inside of the room.
“”
“”
At the same time, the screen inside the door will turn on
automatically to show the outside images and will last for 20
seconds before turning itself off.
Also as the door bell is pressed, the camera will
automatically take a photo of the visitors and the photo will be
stored in the TF card in case the host is out, so as to check the
visitors' identity or to use the information for security purposes.
Press the power button, an image of the exterior will be shown on the
screen.
The screen will automatically power off after 20 seconds with no
other operations.
After turning on the product, press on the power button again and
the product will be turned off.
When viewing outside with this product, photos or videos
can be taken at the same time.
When the screen is on, press to take a photo.
To take a video, press the till the instruction icon appears to
To view outside
To check outside and take photos or videos
8
Page 9

-
*
-
-
-
-
*
-
-
-
-
-
switch into video taking mode and press“ ”to start shooting, one
more press of “ ”will end the video taking.
All videos taken have no sound.
The stored photos and videos can be played on this product, and can
also be deleted or edited.
When the screen is on, press the“ ”till the xx icon appears, which
indicates the replay mode is on.
Select the photo or video you want to play using the “ ”button.
If you want to delete certain photos or videos, select it then press
menu button to edit.
Different languages are available in language setting.
The mains power frequency differs in different countries and zones.
To achieve the best results, please adjust your settings
according to your local mains power frequency.
Setting reference: electric between 100-120V, the corresponding
setting is 60Hz (America, Japan, etc)
Between 220-240V, 50Hz (Europe,etc)
Users can set the type and volume of the door bell.
Choose the “ door bell setting”, press menu button to enter, and
press “ up” button to choose door bells.
Choose the “ High” mode to maximize the volume.
Choose the “Low” mode to turn down the volume to 70% of the
maximum.
Choose the “OFF” mode to turn off the door bell into DND ( Do
Not Disturb) mode .
Camera (Video) ON/OFF:
Some countries and areas have strict rules that no one is allowed to
take photos or videos of other people without permission, so users
can choose ON/OFF of the camera (video).
Press menu button to enter “ camera” menu, when the mode is “ON”,
this product will automatically take a photo when the door bell is
pressed; users can also use the “right” button to take photos or video.
When the mode is “OFF”, all the photo taking/video taking function
will turn off.
Operation:
Replay and edit of the stored photos/videos
Other setting options:
To format the memory card, please choose this option.
This process cannot be reversed, once the process finishes, all
data and operations in this card will be removed. Be cautious!
Door bell:
9
Page 10

Specifications:
Door thickness: 40-70mm
Door barrel diameter: 14-26mm
Camera: 0.3 mega pixels
LCD Screen: 3.5”TFT
Power: 4 AA batteries
Memory card: Micro SD card (TF), max 8GB
Photo volume for 1GB: 15000pc (lab condition, the actual volume
could differ under different circumstances
Inferred wavelength: 940nM
Size: 135 (L) x 86(W) x 25(T)mm
Weight: 310g
10
This product has an infrared function, which enables user to observe
outside images at night or in dark areas.
Due to the image-forming principle, all images shown on the screen
are black and white form, which is normal.
The photos are taken in jpeg format, and the videos are taken in MP4
format. Users can scan and edit these photos and videos on windows
PC.
-
*
-
-
*
-
If you choose the Factory reset option, all the settings will be reset to
the original state. All the user settings will be cleared. Be cautious!
Infrared function
The recorded photo and video format
 Loading...