

Page 1
DAS1100
Distress alert system
• Alerts friends and family at the press of a button
• Allows independence while keeping you in touch
• Helps you maintain your active lifestyle
User Manual
Keep this manual safe for future reference
/
Page 2

Telephone
Step 2. Turn on main unit
OFFON
Step 1. Connection
- Lift cover at rear of unit
(
(
(
(
*
Step 3. Red light stops flashing
& stays lit
Step 4. Press keyfob button
Step 5. Red light will turn off
(
(
(
(
*
Step 6. Set maximum 3 phone
numbers
/
/
Input phone numbers
(including area codes)
Rear view
4X
A
lkaline cell
*Op
tional backup batteries
AAA 1.5V
?
?
Landli
ne phone
*Optional
Landline
socket
?
(
(
(
To set up other numbers, use same
sequence but replace with 2 and
3 button at this stage.
(
(
Step 7. Recording voice message
/
/
Input phone numbers
(including area codes)
Rear view
4X
AA
A
A
lkaline cell
tional backup batteries
AAA 1.5V
?
?
an
dli
ne phone
*Optional
Landline
socket
?
(
(
(
To set up other numbers, use same
sequence but replace with 2 and
3 button at this stage.
(
(
Hold both buttons together,
and speak into microphone in
the main unit for 10 seconds to
record message
Step 8. Play back voice message
/
/
Press to play back pre-recorded message.
Input phone numbers
(including area codes)
Rear view
4X
AA
A
A
lkaline cell
tional backup batteries
AAA 1.5V
?
?
an
dli
ne phone
*Optional
Landline
socket
?
(
(
(
To set up other numbers, use same
sequence but replace with 2 and
3 button at this stage.
(
(
Hold both buttons together,
and speak into microphone in
the main unit for 10 seconds to
record message
Repeat step 7 if required.
Set-up is now complete
Telephone
wall outlet
Page 3

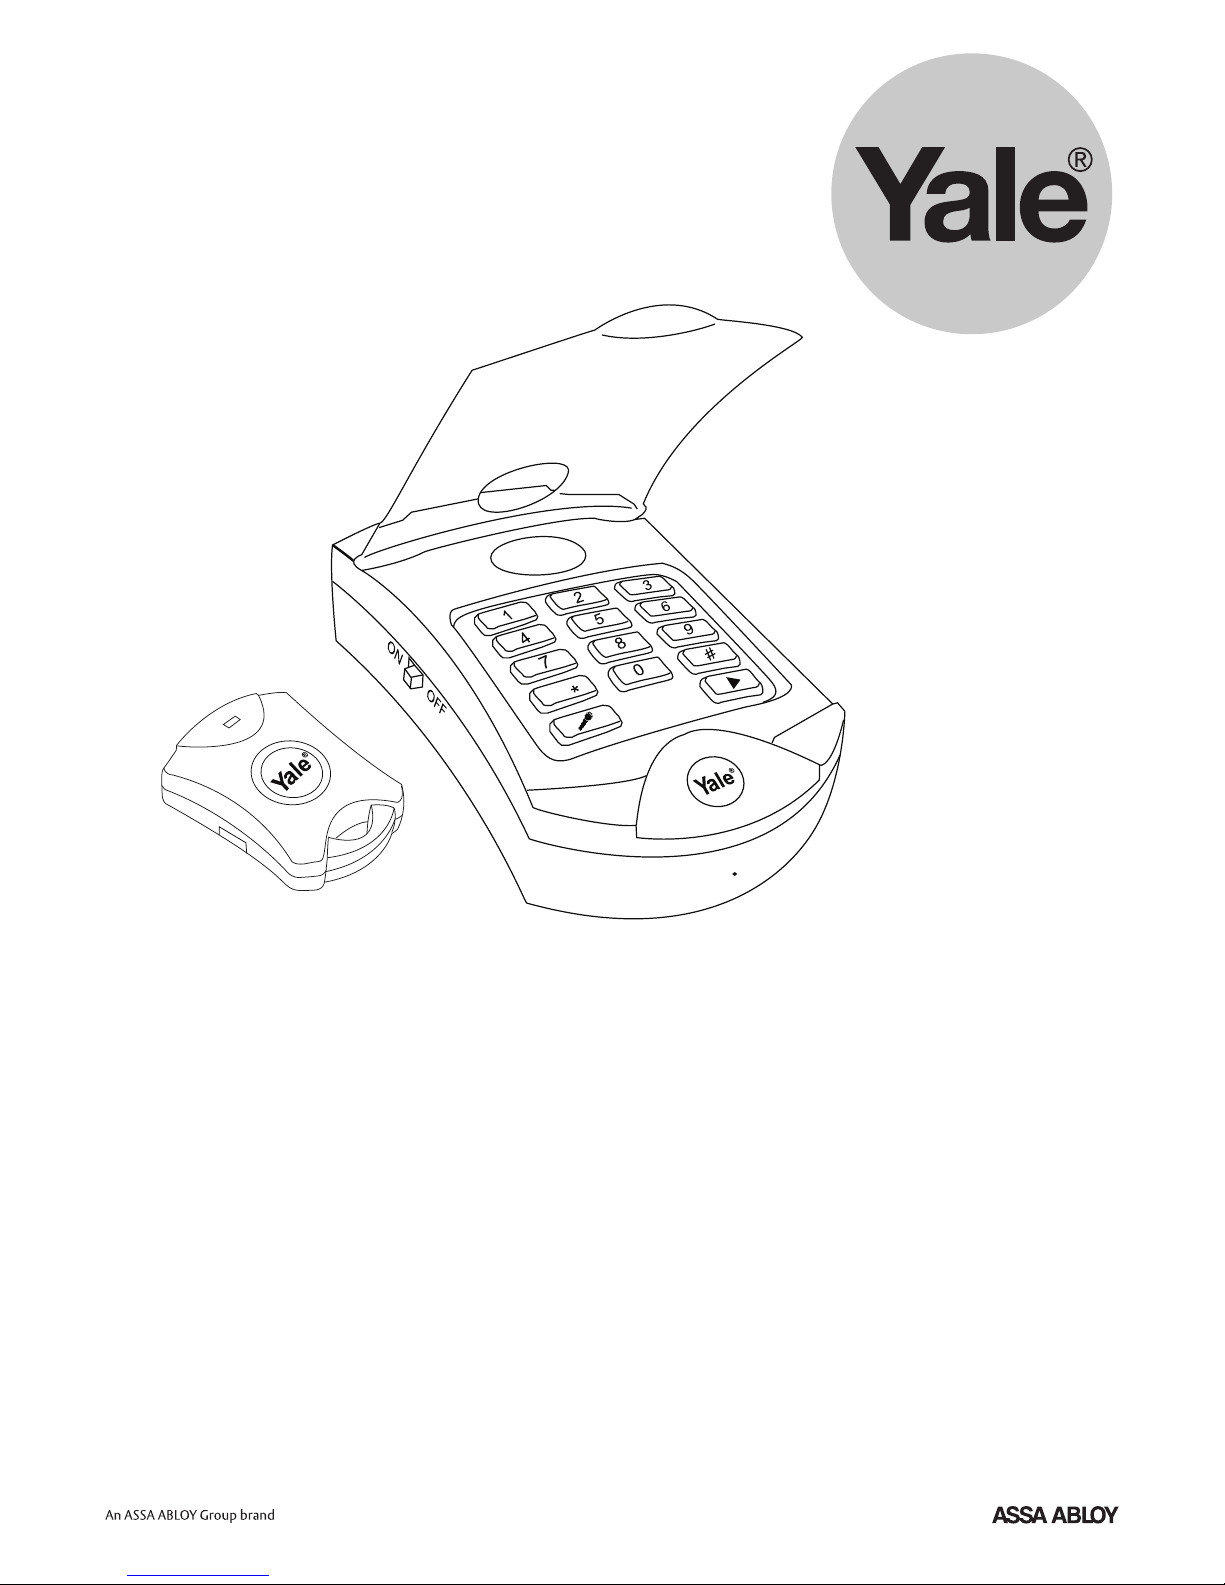
Set-up
Package content
• 1xMainunit
• 1xRemotekeyfob(batterypre-tted)
• 1x6VDCadaptor
• 1xNecklaceholderforkeyfob
• 1xTelephonecable
• 1xTelephonesplitter
Connection
Remove all components from packaging. Open
the cover on back of the main unit and plug in one
end of the supplied telephone cable. Connect
the other end into the supplied telephone splitter.
Remove the existing telephone cable from the wall
outlet and plug into the telephone splitter. Then
plug the telephone splitter into the telephone wall
outlet. Connect the power adaptor to the main unit
and plug into the mains. Insert optional 4 x AAA
batteries if back-up power is required for the main
unit.
Programming the keyfob(s)
Turn the system ON when you are ready to proceed
with the set-up. The red light will then ash for 15
seconds while initialising. Afterwards, the light will
remain red for 1 minute, during which time you can
program or ‘learn in’ your keyfob(s) (maximum of 3).
Now press the ‘Yale’ button on your keyfob once.
Your system will respond with a beep to indicate
that ‘learning’ is successful. Allow 3 seconds before
pressing further keyfobs for ‘learning in’.
If the red light goes out, the main unit is no longer in
‘learn’ mode. In order to return to ‘learn’ mode, turn
the main unit OFF and then back ON again. Wait
for the static red light and continue your ‘learning’
process.
Setting contact telephone numbers
After the red light goes out you can program up to 3
telephone numbers - landline or mobile. First, press
the ‘handset and star’ button, followed by button 1
(this will be the rst contact number used by the
system). Then key in the full telephone number
including the area code. Finally, press the ‘handset
and star’ button again to nish the process. Repeat
this process for each of your remaining 2 contact
numbers, using buttons 2 and 3 accordingly. If you
make a mistake, these numbers can be overwritten,
using the same process.
Recording your voice message
You can now record your voice message, which
can be up to 10 seconds long. This is the message
that the system will play if triggered. Try to ensure
that the message is as detailed as possible.
To record the message, press and hold the
‘microphone’ button and the ‘hash’ button together
and speak clearly into the main unit. When you
have nished recording, release the buttons.
To play back your message, press the ‘play’ button.
If you want to re-record your message, repeat the
process above.
Page 4

Operation
1 2 3
4
1 2 3
4
Using your distress alert system
If you need to activate your system, press the
‘Yale’ button, either on a keyfob or the main unit.
The system will beep 10 times, then, after a short
delay, will automatically dial the preset numbers
in the order that you set them (beginning with the
telephone number you assigned to button 1). The
speaker on the main unit will playback your prerecorded message repeatedly. Each number will
be dialled 5 times, with each call lasting 45 seconds
if not acknowledged.
If you accidentally press the ‘Yale’ button and activate
the system, you can cancel the alert by switching
the main unit OFF and then back ON. After the red
light goes out, the system is ready to use.
Instructions for your nominated contacts
When any of your nominated contacts receives a
call, they will hear your recorded message being
played repeatedly. To acknowledge the call they
must press any number on their telephone keypad.
This will then activate a 2-way communication with
you. If you are near the main unit you will be able to
speak to them via the built in speaker/ microphone
(if you are too far from the main unit, the microphone
may not pick up your voice).
The 2-way communication will last for 50 seconds
before 3 warning beeps indicate that the call will
end within 10 seconds. To extend the call for a
further 60 seconds, your nominated contact should
press any number on their telephone keypad. After
the call is ended the system is ready to use.
Testing your system
To ensure your system is set up correctly, test it
fully before using. Ensure your nominated contacts
are aware that you are testing, and then activate, to
check all functions. If your system doesn’t work,
rst check all connections and then reset using the
‘reset procedure’. Then work through the ‘set-up’
procedure again.
This is a wireless system with a limited transmission
range. Try triggering your keyfob(s) in different parts
of your house. Doors, walls and other wireless
equipment may reduce the range. Make a note of
where the signal cannot be consistently received
by the main unit and do not use keyfob(s) in these
areas.
Reset procedure
Resetting keyfob programming
To reset keyfob ID codes, change the 4 ‘dip
switches’ (found underneath the cover) to another
random combination. Next, turn the main unit OFF,
then ON and wait for the static red light. Press
the ‘Yale’ button on any keyfob 3 times to clear all
programming.
Clearing your nominated contact numbers
Press the following key sequence on the main unit:
/*
1
*
*
2
*
*
3
*
Clearing your voice message
Press the ‘microphone’ button and the ‘hash’ key
together and then release.
Page 5

Model: HSA3400
HSA3020
HSA3060
HSA3010
HSA3050
HSA3045
HSA3080
HSA3030
HSA3070
ASSA ABLOY Ltd.
School Street
Willenhall
West Midlands
England
WV13 3PW
DAS1100
DAS11
Date: 20/04/07
On behalf of ASSA ABLOY Ltd.
ASSA ABLOY Ltd.
School Street, Willenhall
West Midlands
England, WV13 3PW
John Ward Director
Model: HSA3400
HSA3020
HSA3060
HSA3010
HSA3050
HSA3045
HSA3080
HSA3030
HSA3070
EN 60950-1:2001+A11:2004
ETSI EN 301 489-3 V 1.4.1 (2002-08)
ETSI EN 300 220-3 V 1.1.1 (2000-09)
TBR 21
Page 6

Troubleshooting
Unit triggers without cause
There may be interference from another
keyfob or wireless equipment nearby. Reset
the keyfob ID code and ‘re-learn’ it into the
system (refer to “reset procedure”)
Audible Interference through speaker
Occasionally, other electrical items in a room
(TVs, radios etc) can interfere with the main
unit’s speaker. Try moving the unit, or the
suspected item affecting it, to a different
location.
Poor sound quality on message
Try re-recording your message, speaking
clearly into the main unit.
Keyfob low battery indicator
The light on the keyfob will turn red instead
of green when the ‘Yale’ button is pressed.
Replace battery.
Your nominated contact(s) cannot acknowledge
the call
The call acknowledgement will only work if
your nominated contact is using a touch-tone
(DTMF) phone.
Important notes
To indicate low battery on the main unit (when
running on batteries only) the main unit red light
will be on permanently. Plug in mains adaptor and
replace backup batteries.
The system is not waterproof and is only intended
for indoor, dry usage.
This product is purely a communication device and
should not be used as a substitute for a specic
medical or emergency alarm. If you have any special
requirements, you should always consult a medical
professional for appropriate advice on tele-medical
equipment.
This device should never be used to dial emergency
telephone numbers (i.e. 999).
Keep the main unit away from direct sunlight or hot
surfaces.
Only use the supplied power adaptor. Other
adaptors may damage the main unit.
Always inform your nominated contact(s) prior
to their inclusion and agree a particular course of
action upon their receiving your automated call.
Specification
• Frequency: 433.92MHz
• Range: 30 metres free line of sight
• Power supply Main Unit: 6V DC adaptor or 4 x AAA alkaline
batteries (backup power, not included)
Remote Keyfob: 12V A23S battery
Adaptor information:
Input: 100-240V 50-60Hz 0.2A
Output: 6.0V 1000mA
Consumer helpline
If you have a question concerning your system
please call the helpline on:
0871 70 30 630 (UK only) –
Lines open 8am-5pm, Monday-Friday
Calls cost approximately 10p per minute from a UK landline
From outside the UK please call +44 (0)1902 635998
Additional Information
Yale
School Street, Willenhall,
West Midlands WV13 3PW
Tel: +44 (0) 1902 364606
Fax: +44 (0) 1902 364692
email: info@yale.co.uk
www.yale.co.uk
E1 04/07
WEEE
Note: Waste electrical products should
not be disposed of with household
waste. Please recycle where facilities
exist. Check with your local authority or
retailer for recycling advice.
 Loading...