

Page 1

2 Din Car RDS/FM Radio, CD, CD-R/RW,
MP3 Player with USB/SD Card Inputs
Model No.:XM-2CDB622
USER’S MANUAL
Page 2

CONTENTS
Prec au ti on s. .. .. .. ......................... .. .. .. .. .. .. .. ......................... .. .. .. .. .. .. .. ......................... .. .. 1
How to Handle D iscs..................................... .. .. .. .. .. .. .. .. .. .. .. ........................................1
Precauti on s & Warnings................................. .. .. .. .. .. .. .. .. .. .. .. .......................................1
L it hi um Battery Cell Warnings...................... .. .. .. .. .. .. .. .. .. .. .. ......................................... 1
Drivers and Connections............................... .. .. .. .. .. .. .. .. .. .. .. ........................................1
Oth er War ni ngs...................................... .. .. .. .. .. .. .. .. .. .. .. ......................................... .. .. .1
Installation......................................................................... .. .. .. .. .. .. .. .. .. .. .. .. .. .. .. .. .. .. .. .. .. .2
Installation Procedures............................. .. .. .. .. .. .. .. .. .. .. .. ......................................... .. .2
Im po rt an t.......................................... .. .. .. .. .. .. .. .. .. .. .. ......................................... .. .. .. .. .. 2
To In st al l th e Car Radio................................. .. .. .. .. .. .. .. .. .. .. .. .....................................2-3
Wiring Connections............................. .. .. .. .. .. .. .. .. .. .. .. ........................................... .. .. .. 3
Remo va l of the Main Unit ................................... .. .. .. .. .. .. .. .. .. .. .. ...................................3
Control Pa ne l Button Locations........................ .. .. .. .. .. .. .. .. .. .. .. .. .......................................4
General Operation.................................. .. .. .. .. .. .. .. .. .. .. .. ......................................... .. .. .. .. 5
Turn Unit O n/ Off...................................... .. .. .. .. .. .. .. .. .. .. .. ......................................... .. .. 5
Ad ju st Vol um e (VOL)................................. .. .. .. .. .. .. .. .. .. .. .. ......................................... .. 5
Adjust Menu Options (SEL)............................... .. .. .. .. .. .. .. .. .. .. .. .................................5-6
Se t the Clock (CLOCK).................................. .. .. .. .. .. .. .. .. .. .. .. .......................................6
Change t he Source (MODE).............................. .. .. .. .. .. .. .. .. .. .. .. ....................................6
Mute o n/ off.................................... .. .. .. .. .. .. .. .. .. .. .. .. ......................................... .. .. .. .. .. .6
Pr eset EQ(Equalizer).............................. .. .. .. .. .. .. .. .. .. .. .. ......................................... .. .. 6
U SB Po rt ......................................... .. .. .. .. .. .. .. .. .. .. .. ......................................... .. .. .. .. .. .6
Micro SD Card Slot...................................... .. .. .. .. .. .. .. .. .. .. .. ......................................... 6
Hands-free Microphone......................... .. .. .. .. .. .. .. .. .. .. .. ......................................... .. .. .. 6
AU X i np ut Connector................................. .. .. .. .. .. .. .. .. .. .. .. ......................................... .. 6
Re set S ystem(Reset)............................... .. .. .. .. .. .. .. .. .. .. .. ........................................... .6
Radio O peration................................... .. .. .. .. .. .. .. .. .. .. .. ......................................... .. .. .. .. .. 7
Change B an ds (BAND)................................. .. .. .. .. .. .. .. .. .. .. .. ......................................... 7
Manual Tuning ( / ).............................. .. .. .. .. .. .. .. .. .. .. .. ......................................... 7
Auto Seek Tu ni ng ( / ).............. .. .. .. .. .. .. .. .. .. .. .. ........................................... .. .. .. .. .7
To Sto re /R ec al l Pr es et S ta ti on s (1 - 6)......................... .. .. .. .. .. .. .. .. .. .. .. ............................7
A utomatic Store St at io n / Preset S ta ti on Scan (AMS)........ .. .. .. .. .. .. .. .. .. .. .. .......................7
St er eo /M ono...................................... .. .. .. .. .. .. .. .. .. .. .. .. ......................................... .. .. .. .. 7
L oc al /D X........................................ .. .. .. .. .. .. .. .. .. .. .. ......................................... .. .. .. .. .. .. .7
Us in g th e PT Y search function............................ .. .. .. .. .. .. .. .. .. .. .. .................................7-8
Disc/USB/Micro SD C ar d Operation........................ .. .. .. .. .. .. .. .. .. .. .. .. ................................9
To In sert D is c/ US B/ Mi cr o SD Card............................... .. .. .. .. .. .. .. .. .. .. .. ...........................9
Eject Disc/USB/Micro S D Card.............................. .. .. .. .. .. .. .. .. .. .. .. .................................9
P la y/ Pa use........................................ .. .. .. .. .. .. .. .. .. .. .. ......................................... .. .. .. .. .. 9
Next/Previous Track................................... .. .. .. .. .. .. .. .. .. .. .. ......................................... .. 9
Fast Fo rw ar d/Backward................................. .. .. .. .. .. .. .. .. .. .. .. ........................................9
Introduction Scan................................. .. .. .. .. .. .. .. .. .. .. .. ........................................... .. .. .. 9
Rep ea ti ng the same track........................... .. .. .. .. .. .. .. .. .. .. .. ......................................... .9
Pl ay in g All Tracks i n Random.............................. .. .. .. .. .. .. .. .. .. .. .. ...................................9
Track/Folder Navigation............................ .. .. .. .. .. .. .. .. .. .. .. ........................................... .9
Select the track or file fo r pl ay ba ck i n MP3 format................ .. .. .. .. .. .. .. .. .. .. .. ...................10
Auxiliary Input operation.............................. .. .. .. .. .. .. .. .. .. .. .. ......................................... .. 10
Bluetooth Op er at io n. .. .. .. .. .. ......................................... .. .. .. .. .. .. .. .. .. .. .. ...........................11
Pair an d Co nn ec t. .. .. .. .. .. .. .. ......................................... .. .. .. .. .. .. .. .. .. .. .. .. .......................11
Mak e a C al l. .. .. .. .. .. .. .. .. .. .. ......................................... .. .. .. .. .. .. .. .. .. .. .. ...........................11
Redial L as t Dialed Nu mb er. .. .. .. .. .. ......................................... .. .. .. .. .. .. .. .. .. .. .. ...............11
An sw er a Call / R ej ec t a Call / End a C al l. .. .. ......................................... .. .. .. .. .. .. .. .. .. .. .. .11
Sw it ch Au di o Between Car audio and Moble Phone................................... .. .. .. .. .. .. .. .. .. .. 11
Ad ju st Talk Vol um e. .. .. .. .. .. .. .. ......................................... .. .. .. .. .. .. .. .. .. .. .. ......................11
Audio Stream in g ( A2 DP ). .. .. .. .. .. ......................................... .. .. .. .. .. .. .. .. .. .. .. ..................11
Remote Co nt ro l........................................ .. .. .. .. .. .. .. .. .. .. .. ......................................... .. .. 12
Spec if ic at io ns .. ......................... .. .. .. .. .. .. .. .. ......................... .. .. .. .. .. .. .. ......................... .. 13
Tr o u b l e s h ooting . . . . . . . . ....... . . . . . . . ....... . . . . . . . . ...... . . . . . . . . ...... . . . . . . . . ....... . . . . . . . . ...... . . . . . 1 4
Page 3

PRECAUTIONS
How to Hand le Discs
• Handle a disc by its edges. Do not touch the playing side
• Before inserting a disc, wipe the disc outward from the disc center w it h a
clean, soft, dry and lint-free cloth. Do not use solvents or thin ne rs s uc h a
petrol/benzene or cleaners.
• After removing a disc from the disc slot, place the disc in a sleeve or ca se
to keep it clean and prevent scratches.
• Do not stick paper or tape on the disc surface. If there is glue (or adhe si ve )
on the disc surface, remove it before using the disc.
Precaut ions & Warnings
• To reduce the risk of fire, electric shock, and interfer-ence, do not attempt to repair this
unit yourself. Refer all service to a qua li fi ed t ec hn ic ia n.
• Some MP3/WMA files may not be playable.
• Keep the volume at a reasonable level to avoid distracted driving. Hi gh v ol um e le ve ls
may make it difficult to co nc en tr at e on t ra ffic and road conditions while driving.
• If the car has been in direct sunlight for an extended period, you may ne ed t o re du ce t he
temperature inside the car before turning on and using the unit.
• If the battery is disconnected, discharged, or changed, the pres et m em or y of t he u ni t wi ll
be lost and require reprogramming.
• The unit is designed to be inst al le d in a level,horizontal position.
For optimal performance, avoid installing the unit at an angle.
• Never use excessive force when removing or attaching the facepl at e.
Do not tightly grip the display and buttons to avo id d am ag e.
Lithium B attery Cell Warn ings
• Cell leakage may cause damage to the remote control
• Do not throw cells into as this may cause an explosion.
• Keep battery cells out of reach of children.
Drives an d connections
Never place any foreign objects into the openings of the car radio (dis c co mp ar tm en t, U SB
jack, card slot, AUX IN connection). Otherwise you might damage th e sl ot s an d co nn ec ti on s.
Others Warnings
Do not switch on the car radio for long periods of time when the motor is swi tc he d off.
This could cause the car battery to discharge and the vehicle can no long er b e st ar te d.
1
Page 4
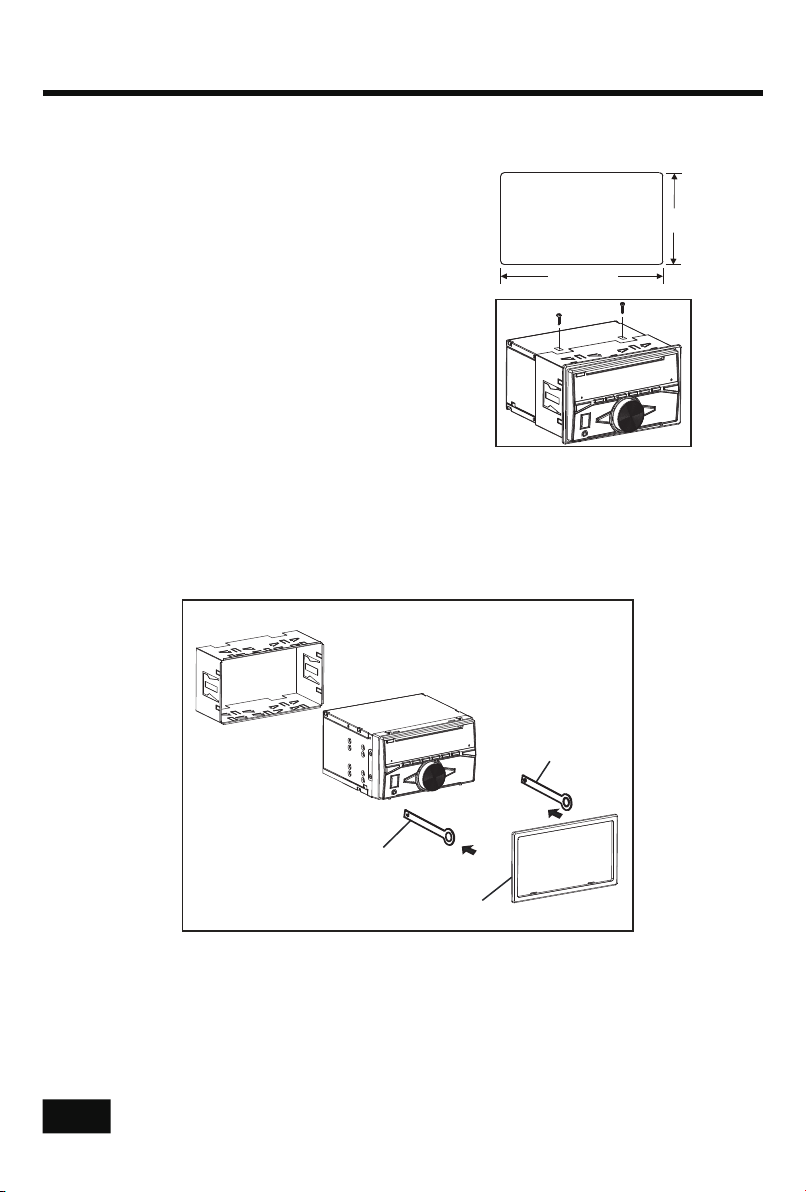
INSTALLATION
Install ation Procedure s
First complete the electrical connections and then check for co rr ec tn es s.
Install ation Opening
This unit can be installed in any dashboard Having
an opening as shown the right figure.
182 mm
Importa nt:
Remove the transport CD deck screws before use.
To Install the C ar Radio
Be sure you test all connections first, and then follow these steps t o in st al l th is u ni t.
1. Make sure the ignition is turned off , an d th en d is co nn ec t th e ca bl e fr om the vehicle battery’s
negative (-) terminal.
2. Disconnect the wire harness and the antenna.
3. Lift the left or right top corner of the plastic outer trim ring the n pu ll i t ou t to r em ov e it .
4. Insert the two bracket keys into the left and right side of the chas si s, a s sh ow n th e be lo w
figure to separate the chassis from the housing.
103 mm
Bracket key
Bracket key
Plastic outer trim ring
5. Insert mounting sleeve into the dashboard and bend the mounting ta bs o ut w it h a sc re w driver. Make sure that the lock lever is flush with the mounting sleev e an d is n ot p ro je ct in g
beyond.
6. Insert car radio into the mounting sleeve.
7. Use a metal strap to secure the rear part of the chassis using the hardw ar e in di ca te d.
8. Make wiring connections, as illustrated in the “Wiring Diagram .”
9. Install the plastic outer trim ring.
2
Page 5

INSTALLATION(CONT.)
INS TALL ATION
DIA GRA M
- Only use speakers with 4 ohms impedance.
- The maximum current of th e au to a nt en na i s 20 0m A.
Wiring Connections
WIRING DIAGRAM
CAU TION
+12 V DC
NEG ATIV E
GRO UND
Removal of the Main Unit
1. Remove the metal strap from the main unit.
2. Remove the plastic trim out from the main unit.
3. Insert a bracket key into the left and right side of the main unit and d ra w th e un it o ut o f
the mounting sleeve.
3
Page 6
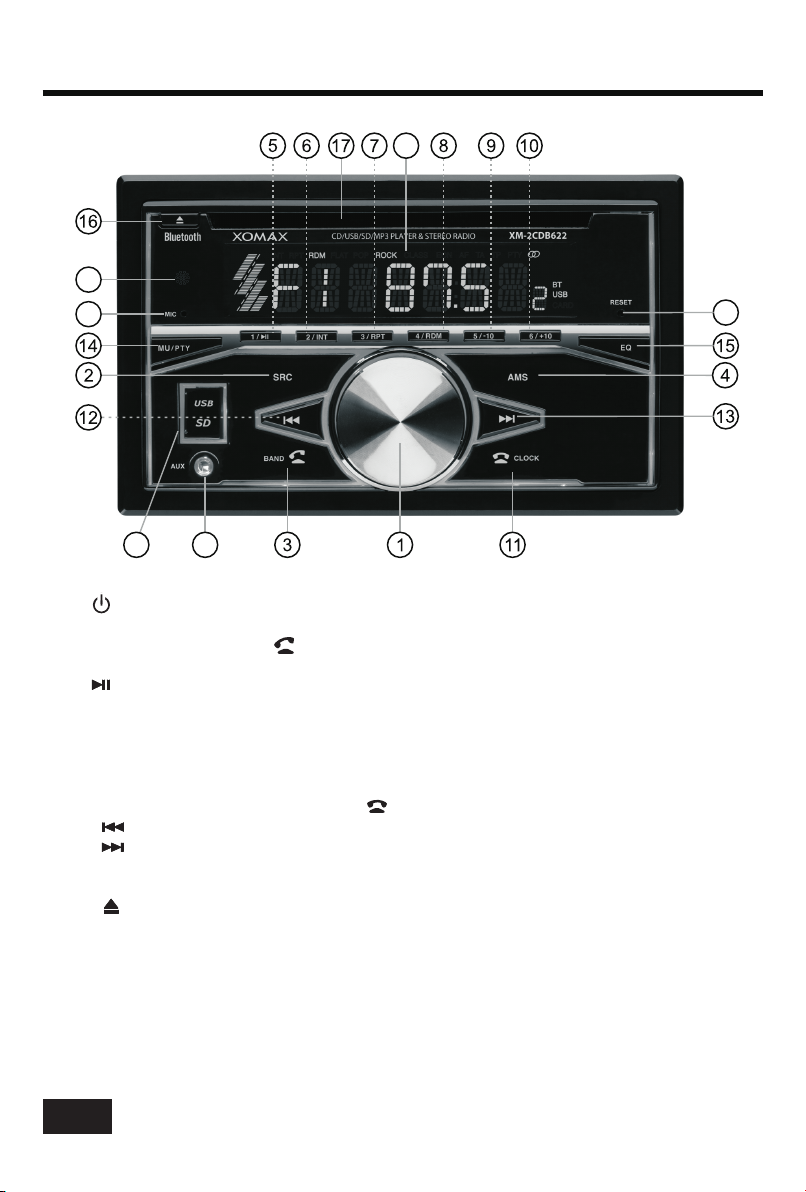
CONTROL PANEL BUTTON LOCATIONS
19
18
22
23
20
1. (po wer)/Volum e knob and
2. SRC ( source) but ton
3. BAN D(band) but ton, (answe r call) butto n
4. AMS (a utomatic st ore / preset st ation scan, a utomatic mu sic search) b utton
5. (pa use/play) , Preset stat ion1 button
6. INT (intr o), Preset st ation 2 butto n
7. RPT (repe at), Preset s tation 3 butt on
8. RDM ( random), Pr eset statio n 4 button
9. -10 (previous 1 0 tracks), Pr eset statio n 5 button
10. +1 0(next 10 tra cks), Prese t station 6 but ton
11. CLOCK (cl ock setting ) button, (en d call) butto n
12. (t une down, see k down,prev ious, fast re verse) butt on
13. (t une up, seek up , next track, f ast forward )button
14. MU TE button, PT Y (Pro gram Type) butto n
15. EQ ( Equalizer )
16. (e ject) butto n
17. Di sc slot
18. IR r emote senso r
19. LC D Display
20. US B Port & Micro SD c ard slot
21. AUX I N (auxiliar y input) jack
22. Ha nds-free Mi crophone
23. Re set button
21
SEL (select/ me nu) butto n
4
Page 7

GENERAL OPERATION
Turn Unit On/Off
•
Press any button on the front panel or remote control to turn on the unit .
• Press and hold the power button (VOL knob) or POWER( ) button on the remote control to
turn the unit off.
Adjust Volume (VOL)
Rotate the VOL knob on the front panel or press the VOL+ /VOL- bu tt on o n th e re mo te
control to increase or decrease the volume level.
Adjust Menu Options (SEL)
• Press the SEL bu tt on o n the front panel or press th e SE LE CT button on the remote
contro l re pe at ed ly t o cy cl e th rough the following adjustable audio functions: BASS,TREBLE,
BALANCE, FADER, EQ FLAT/P OP /R OC K/ CL AS S/ OF F, LOU D ON /O FF, AUTO/BLUE/RED/
CYAN/GREEN/PURPLE/ YE LL OW /W HI TE , DX /L OC , ST ER EO /M ono, VOL(L AS /A DJ),
A-VOL XX, CLOCK 24/12,BEEP ON/OFF, TA VOL, EON ON/OFF, AF ON/OFF,TA ON/ OF F,
REG ON/OFF and VOLUME.
• Rotate the VOL knob on the front panel or press the VOL+ /VOL- bu tt on o n th e re mo te
control to adjust the selected item.
- BASS/TREBLE:-07,-06, ~, -01,00,+01,~, +06,+07
- BALANCE:L07,L06,~, L01, 00, R01,~,R06,R07
- FADER:R07,R06~,R01,00,F01,~,F06,F07
- EQ(Equalizer) Setting:OFF, FLAT, POP, ROCK, CLASS
- Loudness: LOUD ON/OFF
- 7 color-changing illumination in buttons:This car radio d ev ic e is e qu ip pe d 7 co lo r changing illumination in buttons.The illumination col or c an b e pr es et B lu e, R ed ,
Cyan, Green, Purple,Yellow, WhiteorAuto (color automatically change oneby one ).
- DX/LOCAL: Enables or disables the local broadcast mode (LOC AL ).
- Stereo/Mono: Switches between MONO and STEREO recep ti on m od e fo r ra di o
frequencies.
- VOL(LA S/ AD J):This op ti on a ll ow s yo u to p re se t a vo lu me l ev el a s th e po we r-on
memory volume level.
- VOL LAS T: In th is m od e, the unit switches on at the actual volume it had when it
was last switched off .
- VOL ADJ: In this mode, the unit power on at the actual volume t ha t yo u pr es et ed a
constant switch-on volume level.
- A-VOL XX :
Press the SEL button to enter the constant switch-on volu me a dj us ti ng m od e an d
the “A-VOL XX ” wi ll b e sh own on the LCD display.
Then you can adjust a con st an t sw it ch -o n vo lu me l ev el b y ro ta ti ng t he VOL knob.
- CLOCK 24 /1 2:
This unit is equipped w it h tw o ty pe s of c lo ck d is pl ay f or ma ts , 24 a nd 1 2 hours.
Rotate the volume knob to choose 24 hours format or 12 hours form at .
- BEEP ON/OFF:Enables or disables the “BEEP” signal to confirm use.
- TA VOL (traffic an no un ce me nt v ol um e) : This function allows you to define the
minimum volume for the traffi c an no un ce me nt s. The adjustable range is 0~40.
The defaulted value i s 25 . Ro ta te t he V OL k no b to a dj us t th e vo lu me o f the traffic
announcements.
-
- AF ON/OFF: Enables or disables the alternative frequency s ea rc h mo de ( AF ).
This function is us ed f or m ai nt ai ni ng a p ro gr am b ei ng l is te ne d to d ur ing a trip if its
frequency changes.
- TA ON/OFF: Enables or disables the TA f un ct io n (t ra ffic information).
EON ON/OFF:Enables or disables the EON (Enhanced other networ k) .
5
Page 8

GENERAL OPERATION (CONT.)
When this function is enabled, the tuner will periodically sc an r ec ei ve d fr eq ue nc ie s
and play any traffi c in fo rm at io n me ss ag e th at m ay b e br oa dc as t.
- REG ON/OFF:
Some broadcasting stations change their program from no rm al b ro ad ca st in g to
regional broadcasting for a certain time period. When regio n is o n, t he c ur re nt
listening program remains unchanged. When region is off , it a ll ow s the reception
moved to the regional station.
-
• Rotate the VOL knob on the front panel or press the VOL+ /VOL- bu tt on o n th e re mo te
control to adjust the selected item.
Set the Clock (CLOCK)
1. To display clock time, press t he C LO CK b ut to n.
2. To set clock time, press and h ol d th e CL OC K bu tt on a nd t he h ou r wi ll f la sh .
3. Press the or button on the front panel or on the remote control to a dj us t th e ho ur.
4. Press the CLOCK button and the minutes will flash.
5. Press the or button on the front panel or on the remote control to a dj us t th e mi nu te .
6. Note: During Bluetooth mode, the clock can not be adjusted.
Change the Source (SRC)
Press the SRC button to switch between RADIO, BT(Bluetooth) , DI SC (w it h a CD /M P3 d is c
inside the disc slot), USB(with USB device inserted), CARD(wi th S D ca rd i ns er te d) a nd
AUX-IN(auxiliary input) modes.
Mute on/off
In power on mode, briefly press the MUTE button to toggle mute on or off.
will be also released when the volume knob is used.
Preset EQ (Equalizer)
Press the EQ button on the front panel to toggle between EQ OFF, FLAT, POP, ROCK, CLASS.
Volume level:00,01,~,40
Enables or disables
the region mode.
The muted state
USB port
The USB port of this car radio is designed for media playback from flas h me mo ry d ev ic es a nd
charging for iPhone / andriod mobile phone.The charging current con su mp ti on i s 1 am pe re .
Micro SD card slot
This micro SD card slot is designed for media playback from micro SD ca rd .
Hands-free Microphone
To receive your voice when you calling by using this bluetooth handsfre e sy st em .
Aux input connector
The 3.5mm auxiliary input stereo connection is designed for deive ce s wi th 3 .5 mm l in e- ou t or
headphone output.
Reset System (Reset)
The RESET button is used to r es et a ll p ar am et er s to f ac to ry d ef au lt s et tings.
This function may be used when the LCD does not display normally or sound i s di st or te d, o r
when any of controls are disabled.To reset your system, use a thin object w it h a po in te d en d
to depress the RESET button.
6
Page 9

RADIO OPERATION
Change Bands (BAND)
Press the BAND button to switch between the FM1, FM2 and FM3 band.
Each band stores up to six preset stations.
Manual Tuning ( / )
Press and hold the or button on the front panel or on the remote contro l to e nt er m an ua l
tuning mode. In manual tuning mode, press the or button to move the r ad io f re qu en cy
number up or down one step.
Auto Seek Tuning ( / )
In standby mode or while not in manual tuning mode, quickly press the or bu tt on t o
move to the next/previous available station automatically.
To Store / Recall Preset Sta ti on s
The radio can be stored 6 preset stations for each band (FM1, FM2, FM 3) f or a t ot al o f 18
preset stations.
To memorize a station:
- Turn the radio on and select the desired band and station.
- Select a station by button
- Press and hold the desired preset button (numbered 1-6 on the face of t he r ad io ) fo r mo re
than 2 seconds to save the station to that preset number.
- To recall a preset station :
- Select the desired band.
- Briefly press a preset button (numbered 1-6) to recall the corres po nd in g pr es et s ta ti on .
Automatic Store station/ Preset station scan (AMS)
Press and hold the AMS button for more than 2 seconds to select six stron g st at io ns a nd s to re
them in the current band. The r ad io w il l au to ma ti ca ll y sc an t he c ur re nt f requency and enter
the six strongest stations into the preset memory positions for t ha t ba nd .
Briefly press the AMS button on the remote control to recall each pre se t st at io n th at s av ed i n
the memories in each band.
or .
STEREO/MONO
FM station is received in stereo mode. However, if the signal weak or reception is not as
good as you would like, switching to MONO mode usually improves the ove ra ll s ou nd q ua li ty.
Press the ST button on the remote control to choose FM STEREO or MONO a ud io e ffect.
LOCAL/DX
In urban areas, most stations are strong enough and“LOCALON”m od e sh ou ld b e se le ct ed .
Switch to LOCALOFF mode to search for stations with weaker signal s.
Press the LOC button on the remote control to choose local or distant r ec ep ti on m od e.
Using the PTY seach funct io n
The PTY function allows you t o se ar ch f or a p ar ti cu la r pr og ra m ty pe .
Press and hold the PTY/MUTE button on panel or press the PTY bu tt on o n th e re mote control
can switch between PTY spee ch g ro up a nd P TY music group. “NEWS”(speech) or
(music) will appear on the LCD display.
When PTY group is on, pressin g on e of 6 n um be re d (1 ~6 ) bu tt on s ca n se le ct o ne o f typed
program.
When you select the speech/ music pty group, the numbered (1~6) but to ns a re s ha re d as
follows RDS station programs:
is
“POP M”
7
Page 10

RADIO OPERATION
Numeric k ey
1
2
3
4
5
6
When you select a program type, the will search for a station broadcasting this type of
Speech PT Y Group
NEWS, AFFAI RS , IN FO
SPORT, ED UC ATE, DRA MA
CULTUR E, S CIENCE, VARI ED
WEATHE R, F INANCE, CHI LD REN
SOCIAL, R EL IG ION, PHON E IN
TRAVEL ,L EISURE, DOC UM ENT
tuner
Music PTY G roup
POP M, RO CK M
EASY M, L IG HT M
CLASSIC S, O TH ER M
JAZZ, COU NT RY
NATION (n ational), O LD IES
FOLK M
program. The tuner will sto p se ar ch in g if i t fi nd s th e re le va nt p ro gr am t ype. If the radio does
not find a station broadcasting the type of program selected, the t ex t “N O PT Y ” be shown on
the LCD displaty and return back to the previous station.
AF ON/OFF
Press the AF button on the remote control to enables or disables the alt er na ti ve f re qu en cy
search mode (AF). This fu nc ti on i s us ed f or m ai nt ai ni ng a p ro gr am b ei ng l istened to during a
trip if its frequency changes.
TA ON/OFF
Press the TA button on the remote control to enables or disables the TA function (traff ic
information). When this function is enabled, the tuner will perio di ca ll y sc an r ec ei ve d
frequencies and play any traffi c in fo rm at io n me ss ag e th at m ay b e br oa dcast.
8
Page 11

DISC / USB / MICRO SD CARD OPERATION
To insert DISC / USB / SD CARD
• To play files on a disc, insert a dis c wi th t he l ab el s ur fa ce f ac in g up wa rd i nt o th e disc slot.
Playback will begin automatically.
Label s ur fac e up
• To play files in a USB device or an SD ca rd , op en t he U SB p or t co ve r an d in se rt t he U SB
storage device into the USB port or an micro SD card into the micro SD card s lo t.
Playback will begin automatically.
Eject Disc/USB/Micro SD
• To eject a disc, press the butt on t o st op p la yb ac k. P re ss t he ( ej ec t) b utton to eject the
disc and then remove it
• To eject a USB device, press the bu tt on t o st op p la yb ac k, t he n re mo ve t he U SB device.
• To eject an Micro SD card, press th e bu tt on t o st op p la yb ac k, t he n pr es s th e mi cro SD
card, to eject the SD card then remove the SD card from the micro SD card s lo t.
Play/Pause
Press the (play/pause) button to pause or resume playback.
Next/Previous Track
• To play the next track, press t he b ut to n.
• To play the previous track, pre ss t he b ut to n.
Fast Forward/Backward
• To fast forward, press and hold t he b ut to n.
• To fast backward, press and hol d th e bu tt on .
Introduction Scan
Press the INT button to play the first 10 seconds of each track, pres s ag ai n to s to p th e
introduction scan, and play the current track.
Repeating the same track
Press the RPT button to repeat the current track, press again to st op r ep ea t pl ab ac k an d
resume normal playback.
Playing all tracks in random
Press the RDM button to play all tracks in random order, press again to ca nc el t hi s fu nc ti on .
Track/Folder Navigation
• During a disc, USB or micro SD card mode, press the 5/-10 button to go back wa rd 1 0 tr ac ks .
Press the 6/+10 button to jump forward 10 tracks.
• During a MP3 disc, USB or SD card mode, press and hold the 5/-10 button to go b ac k th e
previous folder. Press and hold the 6/+10 button to go to the next folde r.
You can repeat this function depending on the number and level of folders.
• These buttons have no this fu nc ti on i f th e US B de vi ce o r SD c ar d ha s no f ol de rs .
9
Page 12

DISC / USB / MICRO CARD OPERATION (CONT.)
Select the track or file for playback in MP3 format
Press the AMS button repeatedly to select one of the following 3 sear ch m od es :
NUM SCH (Searching by track or file serial number)
DIR SCH (Searching by folder serial number)
FILE SCH (Searching by track or file name)
Searching by track or file serial number:
a) In playback of files with MP3 format, press the AMS button once to a cc es s th e tr ac k or f il e
number searching mode which allow you to quickly find a specific MP3 tr ac k or f il e by i ts s er ia l
number, and the “NUM SCH” and “NUM ***” sequence, and
the first symbol “*” will blink
b)
Rotate the VOL knob to select the serial number of your favorite fi le w it h hi gh s pe ed .
c) Finally press the SEL button to confirm and play the selected file .
Searching by folder serial number:
The folder search mode allows you to quickly find an MP3 track or file un de r a sp ec if ic g ro up
folder.
a) In playback of files with MP3 format, press the AMS button twice , will be
shown on the LCD display.
) to select a desired folder.If there are no root Folder in the MP3 disc,
b Rot at e the VOL kno b
USB or SD card, the LCD will display “ROOT”)
c) Press the SEL button to play the first track or file of the select ed f ol de r.
Searching by track or file name:
This track or file name search function requires only the first few c ha ra ct er a s se ar ch k ey wo rd ,
it will allow you to quickly find an MP3 title by its name.
a) Press the AMS button three times, the “FILE SCH” and “ ” will be shown on the LCD
display in sequence, and the first character “*” will blink.
b) to change the first character (*). The character will be changed fr om
Rotate the VOL kn ob
“A” to “Z”, “0” to “9” and “_”, “-”, “, ” ,“ . Press the SEL button to con fi rm t he c ha ra ct er
entered and the next character will blink for setting. Press the AM S bu tt on t o de le te t he
incorrect character.
c) When matched files was found, press the SEL button to start play t he s ea rc he d fi le .
If the file was not found, “NO FOUND” message will be visible on the disp la y.
.
+ space”
will appear on the LCD display in
the “DIR SCH”
*- -- -- -
AUXILIARY INPUT OPERATION
This car radio is equipped an external auxiliary input jack (3.5mm) o n th e fr on t pa ne l, a nd a
pair audio auxiliary input RCA connector at the rear cabinet of the head u ni t, i t is c om pa ti bl e
with audio output from an MP3 music player.If you have plugged such a play er i nt o th e AUX I N
jack with a audio cable. Or connect other audio device to the audio auxil ia ry i np ut R CA
connector on the rear cabinet of the head unit with a audio input cable.
Press the SRC button to switch to the AUX input mode, then you can listen to m us ic f ro m
external devices.
NOTE:
Do not use the AUX IN jack and the audio auxiliary input RCA connector at the sam et im e,
otherwise, it will cause the audio auxiliary function unusable.
10
Page 13

BLUETOOTH OPERATION
Pair and Connect
Prior to using the Bluetooth device as a handsfree system for a Bluet oo th -e na bl ed m ob il e
phone for the first time, you must pair and connect the two devices as fo ll ow s:
1. In any mode, prior to pairing and connecting, the BT log o in t he L CD i nd ic at in g that no
device is connected. To begin p ai ri ng , en ab le B T mode on your mobile phone.
2. When the phone finds the car audio system,the XM-2CDB622 name wi ll b e di sp la ye d.
3. Choose the XM-2CDB622 from the device list to pair and connect with th e ca r au di o
system. Upon confirming, the BT log o wi ll s to p fl as hi ng .
4. When pairing is complete, the mobile phone audio will automatica ll y tr an sf er t o th e ca r
audio system whenever a call is made or received, or when the mobile phon e pl ay s mu si c.
Make a Call
• To make a call, dial the call direc tl y fr om t he p ai re d mo bi le p ho ne .
• To make a call with this bluetoot h ha nd sf re e sy st em :
a) When linking up the Bluetooth-enabled mobile phone to this bluetoo th h an ds fr ee s ys te m,
press the button to access the dial telephone number mode, th en p re ss t he “ 0~ 9” , *
and # button on remote control to input the telephone number, and the en te re d nu mb er
will be shown on the LCD.
b) If a number has been incorrectly inputted, press the DEL butto n or b ut to n to d el et e it .
c) Press the button to make outgoing call.
Redial Last Dialed Number
Press and hold the button on the control panel to redial the last diale d ph on e nu mb er.
Answer a Call
• When the mobile phone is called, the incoming telephone number displa ys i n th e LC D.
• To receive the call, press the bu tt on o n th e co nt ro l pa ne l.
Reject a Call
To reject the call, press the button on the control panel.
End a Call
To end an active call, press the button.
Switch Au di o Be tw ee n Ca r Aud io a nd m ob il e Ph on e
During a call, press the VOL knob/button to switch the audio source f ro m th e ca r au di o sy st em
back to your mobile phone.
Adjust Talk Vol um e
• During a call, use VOL knob or button to adjust the volume level.
• Use the MUTE button to mute sound.
Audio Streaming (A2DP)
1. Press the SRC button to enter BT mod e an d di sp la y me di a in t he L CD d is pl ay.
2. When a mobile device is paired, music played through that device wil l au to ma ti ca ll y be
heard through the car audio system.
3. Press the or button to play the next or previous on the mobile pho ne .
4. Press the button to pause or resume music playback.
VOL+ /VOL-
11
Page 14

REMOTE CONTROL
Remove In sulating Sheet
The remote control comes with an insulating sheet
attached to the underside of the remote control, as
illustrated on the right. The r em ot e co nt ro l wi ll n ot
work until the insulating sheet is removed.
Replace L ithium Battery Ce ll
1. When the lithium cell battery becomes weak,
replace it as illustrated on the right.
2. Press and hold the movable block in the direction
indicated by arrow 1. At the same time, pull the cell
holder out of the remote control in the direction
1
indicated by arrow 2.
3. Replace the old cell with a new one, making sure the
(+) polarity is facing upward.
4. Re-insert the cell holder into the remote control.
4
- Cell leakage may cause damage to the remote control.
- Do not throw cells into as this may cause an explosion.
- Keep battery cells out of reach of children.
Remote Co ntrol Operation
Position the emitting window of the remote control toward the sen so r wi nd ow o f th e un it .
• The operation angle for fro nt p an el r em ot e co nt ro l re ce pt io n is a bo ut 3 0 degrees.
• The distance between th e em it ti ng w in do w of t he r em ot e co nt ro l an d th e se nsor window
of the unit should remain less 5 meters.
Button Names and Locations
2
3
1. (Power on/off) butto n
2. VOL+/VOL-(volume increase/decrease) button
3. Band button, (answer call) button
4. Tune down, seek down; Track down, fast reverse
1
5. SEL(selection) button
6. button:tune up, seek up; Track up, fast forward
4
7. Mute button, DEL(Delete) button
8. CLK(clock setting) button, (end call) button
button, preset station 1 button, keypad 1
9.
10. INT(intro) 2 button,keypad 2
11. RPT(repeat) 3 button, keypad 3
12. RDM (random) 4 b ut to n, k ey pa d 4
13. -10(previous 10 tracks) 5 bu tt on , ke yp ad 5
14. +10(next 10 tracks) 6 bu tt on , ke yp ad 6
button, preset station
button, preset station
, preset station
, preset station
, preset station
15. ST (stereo) button, k ey pa d 7
16. MODE button, keypad 8
17.AMS (automatic music search) button, keypad 9
18. AF(list of alternative frequency) button, keypad
19. PTY(program type) button, keypad 0
7
9
10
12
13
15
18
19
20. TA (traffic announce me nt ) bu tt on , ke yp ad #
Note: When using the remote control for the first time, you
must pull out the portective plastic tab from the battery compa rt me nt
found on the back of the remote control.
12
3
5
2
6
8
11
14
16
17
20
Page 15

SPECIFICATIONS
General
Chassis Dimensions....................... .. .. .. .. .. .. .. .. .. .. .. ................178(W) x 160(D) x 100(H) mm
Power Supply Requirement ...................... .. .. .. .. .. .. .. .. .. .. .. ......................................DC 12 V
Current Consumption ....................... .. .. .. .. .. .. .. .. .. .. .. ......................................... 15 A (ma x. )
Maximum Power Output ........................ .. .. .. .. .. .. .. .. .. .. .. ....................................60W x 4CH
Radio
FM
Frequency Range.......................... .. .. .. .. .. .. .. .. .. .. .. ...............87.5 - 108.0 MHz (50KHz/Step)
Usable Sensitivity ........................ .. .. .. .. .. .. .. .. .. .. .. ......................................... .. .. .. .. .. 30 d Bu
I.F. Frequency ............................ .. .. .. .. .. .. .. .. .. .. .. ......................................... .. .. .. .1 0. 7 MH z
CD/USB/Card
Usable Audio Formats ......................... .. .. .. .. .. .. .. .. .. .. .. .................................CD/MP3/WMA
USB Port Type......... .. .. .. .. .. .. .. .. .. .. .. ......................................... .. .. .. .. .. .. .. .. .. .. .. ..............2.0
USB Charging............................. .. .. .. .. .. .. .. .. .. .. .. ......................................... .. .. .. .. .. .. 5V /1 A
Card Types.......... .. .. .. .. .. .. .. .. .. .. .. ......................................... .. .. .. .. .. .. .. .. .. .. .. .Micro SD Card
Pre-amp Output .......................... .. .. .. .. .. .. .. .. .. .. .. .................................Front ,Rear an d Su b
Frequency Response ........................ .. .. .. .. .. .. .. .. .. .. .. ...................................20 Hz - 20 KHz
S/N Ratio ............................... .. .. .. .. .. .. .. .. .. .. .. ......................................... .. .. .. .. .. .. .. .. .. 60 dB
BT
BT Profile supports ... .. .. .. .. .. .. .. .. .. .. .. ......................................... .. .. .. .. .. .A 2D P, AVRCP, HF P
Range of frequency .......................... .. .. .. .. .. .. .. .. .. .. .. ...............................2.4GHz spectru m
13
Page 16

TROUBLESHOOTING
The following chart will help in solving most problems that may occur.
If you still have questions after going through the checklist, pl ea se c on su lt y ou r lo ca l
customer service representative. Before going through this ch ec k li st , re fe r th e wi ri ng a nd
operating procedures.
Symptom Cause Solution
If the po we r suppl y is conn ec ted to
the car a cc essor y circu it s, but th e
engin e is n ot movi ng, swi tc h the
ignit io n key to “A CC”.
No powe r
The car i gn ition s witch h av e
not tur n on .
The fus e ha s been bl own. Repla ce a n ew one.
Prese nc e of CD dis c insid e
the pla ye r.
Inser ti ng the di sc in rev er se
Disc ca n no t be load ed
or ejec te d.
No soun d
Sound s ki ps
The ope ra tion ke ys
do not wo rk
No radi o re cepti on. The a nt enna ca ble is no t co nnect ed.
direc ti on.
The sur fa ce of CD is e xtrem el y
dirty o r ha s been sc raped .
Tempera tu re insi de the ca r
is too hi gh .
Conde ns ation
Volume i s in m inimu m.
The wir in g is not pr operl y
conne ct ed.
The i ns talla tion an gl e is
more th an 3 0 .
The sur fa ce of CD is e xtrem el y
dirty o r ha s been sc raped .
1. Car in te rior is t oo hot.
2. Th e fr ont pan el has no t
prope rl y insta lled.
0
Remov e th e disc fr om the pl ay er,
and ins er t a new one .
Inser t th e CD with t he lab l fa ci ng
upwar d.
Clean t he d isc or tr y to repl ac e
a new one .
Cool of f or unti l the amb ie nt
tempe ra ture re turn to n or mal.
Leave t he p layer o ff fo r an h our or so ,
and the n tr y again .
Adjus t vo lume to a d esire d le vel.
Check w ir ing con necti on .
Adjus t th e insta llati on a ngle
less th an 3 0 .
Clean t he d isc or tr y to repl ac e
a new one .
1. Allow v eh icle to c ool bef or e using
this pl ay er.
2. Fixe d th e front p anel in to
its pla ce .
Inser t th e anten na cabl e fi rmly in to
the ant en na sock et of thi s ra dio.
0
e
In auto ma tic sea rch mod e
the rad io d oes not s top at
a trans mi tting s tatio n.
14
The t ra nsmis sion si gn als are
too wea k.
Selec t a ra dio sta tion ma nu ally.
 Loading...