

Page 1
User Guide
ME3612E4-1
System Administration
Guide
XE3022EN0-2
Page 2

© 2008 by Fuji Xerox Co., Ltd. All rights reserved.
Copyright protection claimed includes all forms and matters of copyrighted material and
information now allowed by statutory or judicial law or hereinafter granted, including without
limitations, material generated from the software programs which are displayed on the screen,
such as icons, screen displays, looks etc.
Xerox
®
and all Xerox products mentioned in this publication are trademarks of Xerox
Corporation. Product names and trademarks of other companies are hereby acknowledged.
The information in this document is correct at the time of publication. Xerox reserves the right
at any time to change the information without notice. Changes and technical updates will be
added in subsequent editions of the documentation. For the latest information go to
www.xerox.com
.
Products Subject To Ordinary Export Regulations
An export of this product is strictly limited in accordance with Laws concerning Foreign
Exchange and Foreign Trade of Japan and/or the export control regulations of the United
States. You must obtain, if you wish to export this product, any appropriate export license from
the Japanese Government or its agency and/or re-export approval from the U.S. Government
or its agency.
Products Subject To Supplementary Export Regulations
An export of this product is strictly limited in accordance with Laws concerning Foreign
Exchange and Foreign Trade of Japan and/or the export control regulations of the United
States. You must obtain, if you know the product is to be used, or was used for development,
manufacturing or use of any mass destructive weapons including nuclear weapon, chemical
weapon or biological weapon because of a dealing document such as legal contract or
information from the importer, any appropriate export license from the Japanese Government
or its agency and/or re-export approval from the U.S. Government or its agency.
Page 3

3
Table of Contents
1 Before Using the Machine ...................................................................13
Xerox Welcome Center .........................................................................13
Serial Number ...................................................................................13
Language Displayed on the Touch Screen ...........................................14
Conventions ..........................................................................................14
Related Information Sources .................................................................16
2 Paper and Other Media ........................................................................17
Loading Paper .......................................................................................17
Preparing Paper for Loading .............................................................17
Trays 1 & 2/Two Tray Module (Trays 3 & 4) .....................................17
High Capacity Tandem Tray (Trays 3 & 4) .......................................18
Bypass Tray (Tray 5) ........................................................................19
High Capacity Feeder (Tray 6) .........................................................20
Envelope Tray ...................................................................................22
Auto Tray Switching ..............................................................................22
Storing and Handling Paper ..................................................................23
Supported Paper Sizes and Types ........................................................23
Supported Paper Sizes .....................................................................23
Supported Paper Types ....................................................................26
3 Maintenance..........................................................................................29
Ordering Supplies ..................................................................................29
Cleaning the Machine ............................................................................29
Control Panel and Touch Screen ......................................................29
Document Glass and Document Feeder Glass ................................29
Document Feeder Rollers .................................................................30
Replacing the Drum Cartridge ...............................................................30
Removing the Old Drum Cartridge ...................................................30
Inserting the New Drum Cartridge .................................................... 31
Replacing the Toner Cartridge ..............................................................32
Removing the Old Toner Cartridge ..................................................33
Inserting the New Toner Cartridge ....................................................33
Loading Staples in the Integrated Office Finisher (Optional) .................33
Loading Staples in the Office Finisher LX (Optional) ............................35
Loading the Booklet Staples in the Office Finisher LX (Optional) .........36
Emptying the Hole Punch Waste Container (Optional) .........................37
4 Job Status .............................................................................................39
Job Status .............................................................................................39
Page 4

4
Active Jobs ............................................................................................ 40
Completed Jobs .................................................................................... 41
Secure Print Jobs & More ..................................................................... 42
Charge Print ..................................................................................... 43
Private Charge Print ......................................................................... 44
Secure Print ...................................................................................... 44
Sample Set ....................................................................................... 45
Delayed Print .................................................................................... 46
Public Mailbox .................................................................................. 46
Undelivered Faxes ............................................................................47
5 Machine Status..................................................................................... 49
Machine Information ..............................................................................49
General Information .......................................................................... 50
Paper Tray Status .............................................................................50
Print Mode ........................................................................................51
Overwrite Hard Disk ......................................................................... 52
Print Reports .....................................................................................52
Automatically Printed Reports/Lists ..................................................57
Fax Receiving Mode .........................................................................58
Faults .................................................................................................... 58
Supplies ................................................................................................58
Billing Information .................................................................................. 59
Billing Information ............................................................................. 59
User Account Billing Information ...................................................... 59
Tools ..................................................................................................... 60
System Settings ................................................................................60
Setup ................................................................................................ 60
Accounting ........................................................................................61
Authentication/Security Settings .......................................................61
6 Setups ................................................................................................... 63
Setting Procedure .................................................................................63
1. Enter the System Administration Mode ........................................63
2. Configure a Feature ...................................................................... 64
3. Exit the System Administration Mode ...........................................64
Main Menu on the [Tools] Screen .........................................................65
System Settings ....................................................................................65
Common Service Settings ................................................................ 65
Machine Clock/Timers ................................................................. 66
Audio Tones .................................................................................67
Screen/Button Settings ................................................................68
Paper Tray Settings .....................................................................70
Image Quality ...............................................................................72
Reports ........................................................................................ 72
Maintenance ................................................................................74
Page 5

5
Watermark ...................................................................................76
Other Settings ..............................................................................77
Copy Service Settings ......................................................................84
Copy Tab .....................................................................................84
Copy Defaults ..............................................................................84
Copy Control ................................................................................88
Original Size Defaults ..................................................................89
Reduce/Enlarge Presets ..............................................................89
Connectivity & Network Setup ..........................................................90
Port Settings ................................................................................90
Protocol Settings .......................................................................... 92
Machine’s E-mail Address/Host Name ........................................93
Proxy Server Settings ..................................................................94
Outgoing/Incoming E-mail Settings ..............................................95
Remote Authentication Server Settings .......................................96
Security Settings ..........................................................................97
Other Settings ............................................................................100
Print Service Settings .....................................................................100
Allocate Memory ........................................................................101
Other Settings ............................................................................103
Scan Service Settings .....................................................................105
Scan Defaults .............................................................................105
Scan to PC Defaults ...................................................................107
Original Size Defaults ................................................................107
Output Size Defaults ..................................................................108
Reduce/Enlarge Presets ............................................................108
Other Settings ............................................................................109
Fax Service Settings .......................................................................110
Screen Defaults .........................................................................110
Fax Defaults ...............................................................................110
Fax Control ................................................................................111
Fax Received Options ................................................................115
Reduce/Enlarge Presets ............................................................115
Original Size Defaults ................................................................116
Local Terminal Information ........................................................116
Internet Fax Control ...................................................................117
E-mail/Internet Fax Service Settings ..............................................118
E-mail Control ............................................................................119
Mailbox/Stored Document Settings ................................................121
Mailbox Service Settings ............................................................121
Stored Document Settings .........................................................122
Job Flow Service Settings ..............................................................123
Setup ...................................................................................................123
Create Mailbox ................................................................................124
[Link Job Flow Sheet to Mailbox] Screen ...................................125
Stored Programming .......................................................................125
Registering Operations with a Job Number ...............................125
Page 6

6
Create Job Flow Sheet ...................................................................126
[Create Job Flow Sheet] Screen ................................................127
[Create Job Flow Sheet] Screen ................................................127
Create Job Flow Sheet Keyword ....................................................129
Add Address Book Entry ................................................................ 129
Create Fax Group Recipients .........................................................132
Add Fax Comment .......................................................................... 133
Paper Tray Attributes ......................................................................133
Accounting ..........................................................................................133
Create/View User Accounts ............................................................134
View Accounts ................................................................................136
Reset User Accounts ......................................................................136
System Administrator’s Meter (Copy Jobs) .................................... 137
Accounting Type .............................................................................137
Accounting Login Screen Settings ..................................................138
Fax Billing Data ..............................................................................138
Charge Rate per Unit ................................................................. 139
Auto Reset of User Billing Information ............................................ 139
Copy Activity Report .......................................................................139
Authentication/Security Settings .........................................................139
System Administrator Settings ....................................................... 140
System Administrator’s Login ID ................................................140
System Administrator’s Passcode .............................................140
Authentication .................................................................................140
Login Type ................................................................................. 141
Access Control ........................................................................... 141
Create/View User Accounts .......................................................142
Reset User Accounts .................................................................142
Create Authorization Groups .....................................................142
User Details Setup ..................................................................... 143
System Administrator Maximum Login Attempts .......................144
Passcode Policy ........................................................................144
Charge / Private Print Settings .................................................. 144
Allow User to Disable Active Settings ............................................. 145
Job Status Default .......................................................................... 145
Active Jobs View ........................................................................ 146
Completed Jobs View ................................................................ 146
Overwrite Hard Disk ....................................................................... 146
Number of Overwrites ................................................................ 147
Scheduled Image Overwrite ......................................................147
7 CentreWare Internet Services ...........................................................149
Information Checklist ...........................................................................149
CentreWare Internet Services Environments ...................................... 150
CentreWare Internet Services Installation ........................................... 150
Installation Procedure ..................................................................... 150
Network Communication Setup ...................................................... 150
Page 7

7
Test Access ....................................................................................152
Selecting Transport Protocols .............................................................153
Screen Layout .....................................................................................153
Services ...............................................................................................154
Default User ID and Passcode .......................................................156
Status ..................................................................................................156
General ...........................................................................................156
Trays ...............................................................................................156
Consumables ..................................................................................157
Jobs .....................................................................................................158
Active Jobs .....................................................................................158
Job History List ...............................................................................158
Error History ....................................................................................160
Print .....................................................................................................160
Job Submission ..............................................................................160
Scan ....................................................................................................162
Job Templates ................................................................................162
Mailbox ...........................................................................................170
Job Flow Sheets .............................................................................173
Properties ............................................................................................178
Properties Features ........................................................................179
Support ................................................................................................230
8 Printer Environment Settings............................................................233
Windows TCP/IP .................................................................................233
Quick Network Setup (DHCP) ........................................................233
Quick Network Setup (Static IP) .....................................................234
NetWare ..............................................................................................236
Information Checklist ......................................................................236
NetWare Environments ...................................................................236
NetWare Installation .......................................................................237
UNIX TCP/IP .......................................................................................240
Information Checklist ......................................................................240
UNIX TCP/IP Environments ............................................................241
UNIX TCP/IP Installation ................................................................241
Printing ............................................................................................248
Printer Status ..................................................................................251
-C Option ........................................................................................253
EtherTalk .............................................................................................257
Information Checklist ......................................................................257
EtherTalk Environments .................................................................257
EtherTalk Installation ......................................................................258
Microsoft Networking ...........................................................................259
Information Checklist ......................................................................259
SMB Environments .........................................................................260
Page 8

8
SMB Installation ..............................................................................260
TCP/IP (LPD or Port9100) .................................................................. 263
Information Checklist ......................................................................263
TCP/IP (LPD or Port9100) Environments .......................................264
TCP/IP (LPD or Port9100) Installation ............................................ 264
USB Port .............................................................................................267
Information Checklist ......................................................................267
USB Port Environment ...................................................................268
USB Port Installation ......................................................................268
IPP (Internet Printing Protocol) ........................................................... 270
Information Checklist ......................................................................270
IPP Environment .............................................................................270
IPP Installation ................................................................................271
Computer Setup ............................................................................. 273
Test Print ........................................................................................273
9 E-mail Environment Settings ............................................................ 275
E-mail Overview .................................................................................. 275
Information Checklist ...........................................................................276
E-mail Environments ........................................................................... 277
E-mail Installation ................................................................................277
Installation Procedure ..................................................................... 277
Network Communication Setup ...................................................... 278
Test Mail .........................................................................................280
10 Scanner Environment Settings......................................................... 283
Scanning Overview .............................................................................283
Scanning with the machine .............................................................283
Scanning Process ...........................................................................284
Scan to E-mail Setup .......................................................................... 284
Prerequisites for Scan to E-mail Setup ...........................................284
Procedure for Scan to E-mail Setup ...............................................285
Scan to E-mail Troubleshooting .....................................................286
Scan to Mailbox Setup ........................................................................ 286
Prerequisites for Scan to Mailbox Setup ........................................286
Procedure for Scan to Mailbox Setup through
CentreWare Internet Services ........................................................287
Procedure for Scan to Mailbox Setup through the Control Panel ...288
Computer Setup ............................................................................. 288
Network Scanning Setup .....................................................................288
Prerequisites for Network Scanning Setup .....................................288
Procedure for Network Scanning Setup ......................................... 289
Computer Setup ............................................................................. 289
Scan to Home Setup ........................................................................... 289
Prerequisites for Scan to Home Setup ...........................................290
Procedures for Scan to Home Setup ..............................................290
Page 9

9
Scan to PC Setup (FTP) ......................................................................291
Prerequisites for Scan to PC Setup (FTP) ......................................291
Procedure for Scan to PC Setup (FTP) ..........................................292
Scan to PC Setup (SMB) .....................................................................292
Prerequisites for Scan to PC Setup (SMB) .....................................292
Procedure for Scan to PC Setup (SMB) .........................................293
Job Flow Service Setup .......................................................................293
11 Internet Fax .........................................................................................295
Internet Fax Overview .........................................................................295
Information Checklist ......................................................................295
Internet Fax Environments ..................................................................296
Internet Fax Installation .......................................................................296
Installation Procedure .....................................................................296
Network Communication Setup ......................................................297
Test Internet Fax .............................................................................299
12 Server Fax ...........................................................................................301
Server Fax Overview ...........................................................................301
Server Fax Environments ....................................................................301
Server Fax Installation .........................................................................302
Installation Procedure .....................................................................302
Fax Server Installation and Configuration .......................................302
Machine Configuration ....................................................................303
Test Server Fax Transmission ........................................................304
13 Security - Encryption/Digital Signature............................................305
Types of Encryption/Digital Signature Services Available ...................305
Configuration of HTTPS (SSL/TLS) Communication Encryption ........306
Installation Overview .......................................................................306
Configuring Certificates with CentreWare Internet Services ...........307
Configuration of E-mail Encryption/Digital Signature ..........................308
Installation Overview .......................................................................308
Configuring S/MIME Certificates with
CentreWare Internet Services ........................................................308
Configuration of Scan File Signatures (PDF/XPS Documents) ...........311
Installation Overview .......................................................................311
Configuring Scan File certificates with
CentreWare Internet Services ........................................................311
Configuration of IPsec .........................................................................313
14 Authentication and Account Administration...................................315
Overview of Authentication ..................................................................315
Users Controlled by Authentication ................................................315
Types of Authentication ..................................................................316
Functions Controlled by Authentication ..........................................317
Page 10

10
Authentication for Job Flow Sheets and Mailboxes ............................318
Job Flow Sheet Types ....................................................................319
Types of Mailboxes ......................................................................... 322
Linking Job Flow Sheets to Mailboxes ........................................... 326
Overview of Account Administration ................................................... 328
Types of Account Administration .................................................... 328
Management Features and Services .............................................328
Xerox Standard Accounting ................................................................334
Overview .........................................................................................334
Installation Checklist ....................................................................... 334
Enabling Xerox Standard Accounting (from Internet Services) ......335
Creating a Group Account ..............................................................335
Creating a User Account and Setting Usage Limits .......................335
Maximum Usage Limits and Resetting Individual Usage Limits .....336
Using XSA at the machine ..............................................................336
Resetting Usage Data ....................................................................337
Printing a Usage Report .................................................................337
Enabling XSA in your Print Drivers .................................................337
Backing Up XSA data and settings and Cloning to another device 337
802.1x Authentication ..........................................................................338
Local Machine Authentication Setup ...................................................339
Remote Authentication Setup .............................................................340
Configuring Remote Authentication for Kerberos (Windows 2000) 341
Configuring Remote Authentication for Kerberos (Solaris) .............341
Configuring Remote Authentication for SMB ..................................342
Configuring Remote Authentication for LDAP ................................342
Network Authentication Setup .............................................................344
Xerox Secure Access Setup ............................................................... 345
Configuring Xerox Secure Access to Work with
Remote Authentication ...................................................................346
Enabling Specific Xerox Secure Access Settings ...........................346
15 Problem Solving.................................................................................349
Fault Clearance Procedure .................................................................349
Paper Jams .........................................................................................350
Paper Jams in Cover A ...................................................................353
Paper Jams in Cover B ...................................................................354
Paper Jams in Cover C ..................................................................355
Paper Jams in Cover E ...................................................................355
Paper Jams in Trays 1 and 2, Trays 3 and 4 (Optional), and
the Envelope Tray (Optional) ..........................................................356
Paper Jams in the High Capacity Tandem Tray (Optional) ............356
Paper Jams in Tray 5 (Bypass) ......................................................357
Paper Jams in the Duplex Module Cover D (Optional) ...................357
Paper Jams in the High Capacity Feeder (Optional) ......................357
Paper Jams in the Integrated Office Finisher (Optional) ................359
Page 11

11
Paper Jams in the Office Finisher LX (Optional) ............................359
Document Jams ..................................................................................361
Stapler Faults ......................................................................................362
Staple Jams in the Integrated Office Finisher (Optional) ................363
Staple Jams in the Office Finisher LX (Optional) ............................364
Common Problems ..............................................................................366
Network-related Problems ...................................................................370
Problem Solving Procedure ............................................................370
SMB ................................................................................................370
NetWare ..........................................................................................374
UNIX ...............................................................................................377
TCP/IP ............................................................................................379
EtherTalk ........................................................................................381
Bonjour ........................................................................................... 382
CentreWare Internet Services ........................................................383
Scanning Services ..........................................................................384
E-mail Services ...............................................................................386
Internet/Intranet Connection ...........................................................387
IPv6 Addresses ...............................................................................389
Fault Codes .........................................................................................390
Screen Messages ...........................................................................428
Xerox Welcome Center .......................................................................429
16 Appendix .............................................................................................431
Specifications ......................................................................................431
Machine Specifications ...................................................................431
Paper Supply ..................................................................................433
Paper Output ..................................................................................434
Electrical Specifications .................................................................. 435
Specifications for the Fax Service ..................................................436
Emulation Parameters .........................................................................437
PCL Emulation ................................................................................437
PDF Direct Printing .........................................................................440
Machine Software Upgrade .................................................................440
Xerox Extensible Interface Platform (XEIP) ........................................441
Configuring XEIP ............................................................................442
17 Index ....................................................................................................445
Page 12

12
Page 13
13
1 Before Using the Machine
Welcome to the Xerox family of WorkCentre products.
This System Administration Guide provides detailed information, technical
specifications and procedures for using the integral features of the machine.
Xerox Welcome Center
If you need assistance during or after product installation, visit the Xerox website for
on-line solutions and support.
http://www.xerox.com/support
If you require further assistance, contact our experts at the Xerox Welcome Center. A
telephone number for the local representative may have been provided when the
product was installed. For convenience and future reference, please record the
telephone number in the space below.
Welcome Center or local representative telephone number:
#
Xerox US Welcome Center: 1-800-821-2797
Xerox Canada Welcome Center: 1-800-93-XEROX (1-800-939-3769)
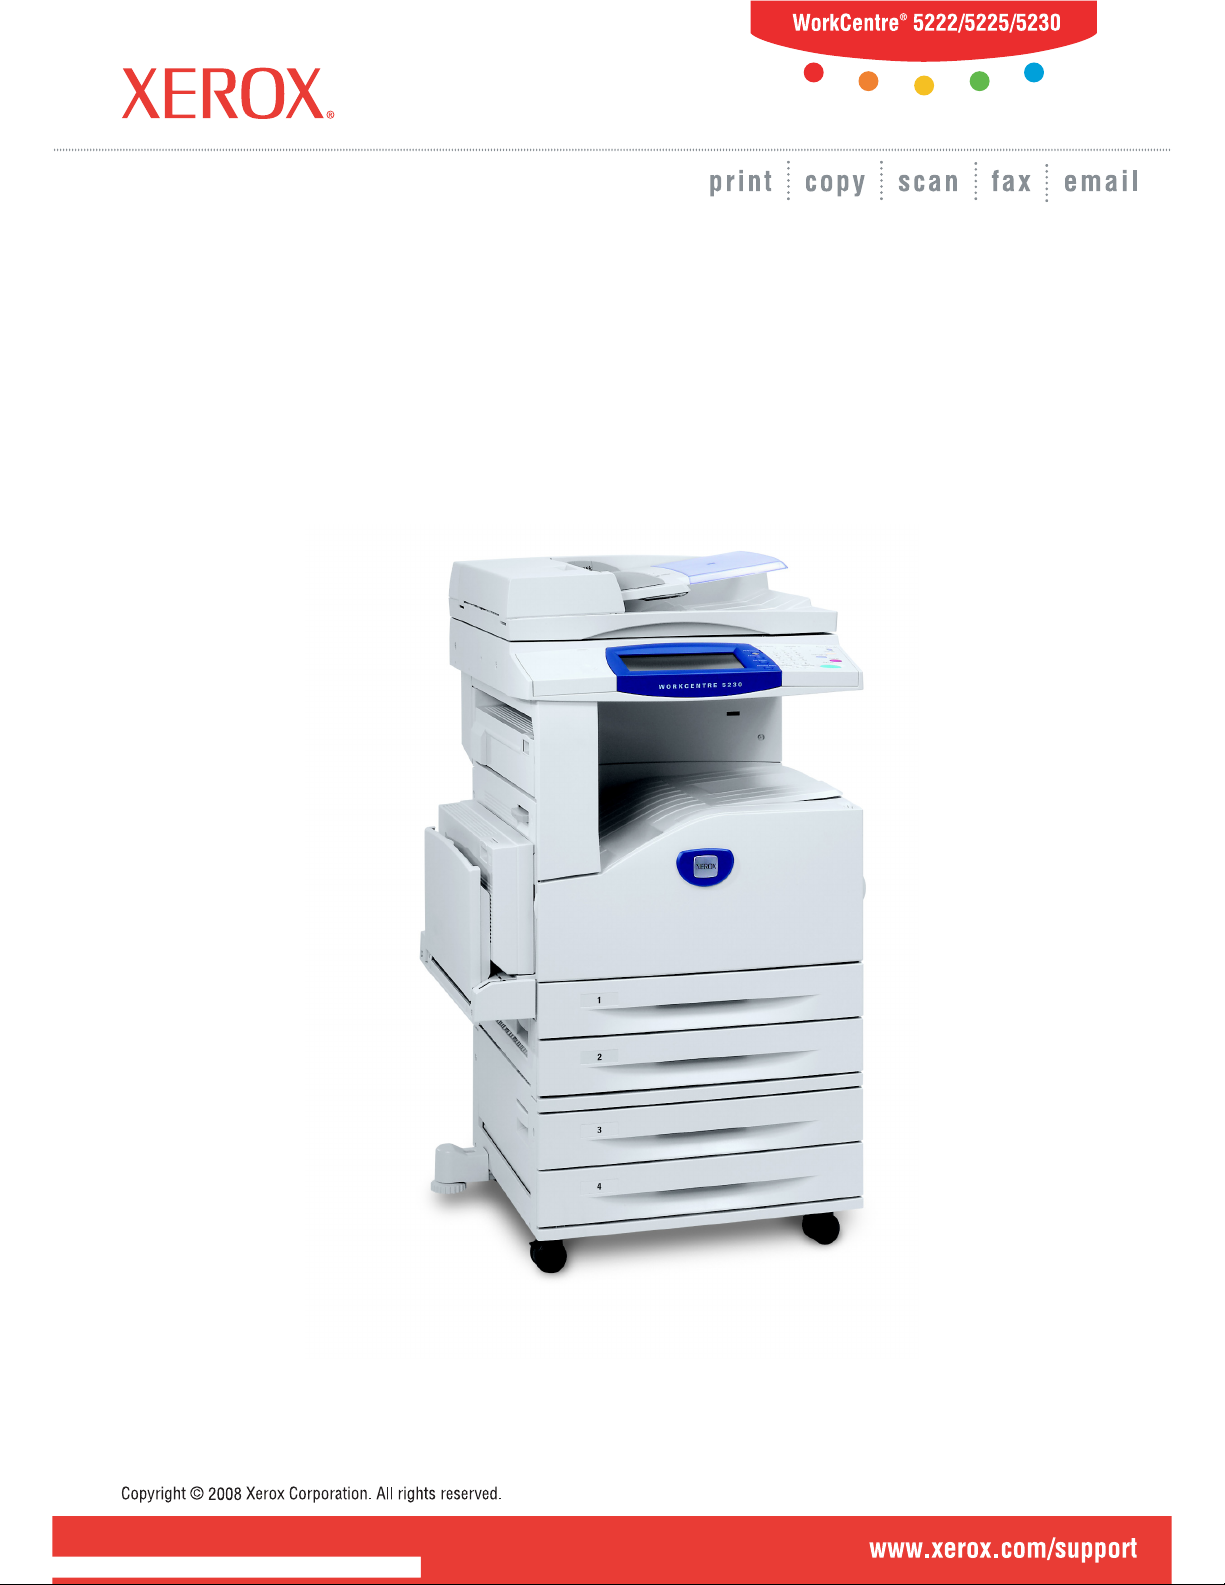
Serial Number
When you call the Welcome Center you will need to provide the serial number which is
located on the left side of the machine behind Cover A, as shown in the diagram.
For your convenience, record the serial number in the space below.
Serial Number:
Keep a record of any error messages. This information helps us solve problems faster.
Page 14

1 Before Using the Machine
14
Language Displayed on the Touch Screen
The language of the touch screen can be changed in the following two ways:
• To change the language for temporary use, press the <Language> button on the
control panel, and then select the required language.
NOTE: The language returns to the default language after rebooting the machine.
• To change the default language, enter the System Administration mode, press the
<Machine Status> button, and then select [Tools] > [System Settings] > [Common
Service Settings] > [Screen/Button Settings] > [Default Language]. On the [Default
Language] screen, select the required language as the default language. For more
information, refer to the
Setups chapter on page 63.
Conventions
This section describes the conventions used throughout this System Administration
Guide. In this guide, you will find that some terms are used interchangeably:
• Paper is synonymous with media.
• Document is synonymous with original.
• Xerox WorkCentre 5222/5225/5225A/5230/5230A is synonymous with the machine.
Orientation
Orientation is used to mean the direction of images on the page. When the image is
upright, the paper (or other media) can be either long edge feed or short edge feed.
Long Edge Feed (LEF)
When loading documents long edge feed into the document feeder, load with one of
the long edges facing into the document feeder, with the short edges facing the front
and back of the document feeder. When loading paper long edge feed into a paper tray,
place the paper with one of the long edges toward the left-hand side and one of the
short edges toward the front of the tray.
Short Edge Feed (SEF)
When loading documents short edge feed into the document feeder, load with one of
the short edges facing into the document feeder, with the long edges facing the front
and back of the document feeder. When loading paper short edge feed into a paper
tray, place the paper with one of the short edges toward the left-hand side and one of
the long edges toward the front of the tray.
LEF Orientation
SEF Orientation
Paper feed direction
Paper feed direction
Page 15

Conventions
15
Text in [Square Brackets]
Indicates the names of the screens, tabs, buttons, features, and option categories.
Square brackets are also used when referring to file and folder names on a PC.
For example:
• Select [Original Type] on the [Image Quality] screen.
• Select [Save].
Text in <Angle Brackets>
Indicates the names of the hard buttons, numeric or symbol buttons, lights on the
control panel, or symbols on the power switch label.
For example:
• Press the <Machine Status> button to display the [Machine Information] screen.
• Press the <C> button on the control panel to clear the suspended job.
Italic Typeface
Italic typeface is used to indicate references to other sections and chapters.
For example:
• For more information, refer to “Loading Paper” on page 17.
• Job Status – page 39.
Warnings
Warnings are statements that alert you to the possibility of personal harm.
For example:
WARNING: Do not use aerosol cleaners. Aerosol cleaners can be explosive or
flammable when used on electromechanical equipment.
Before cleaning this product, unplug the product from the electrical outlet.
Always use materials specifically designated for this product. The use of other
materials may result in poor performance and create a hazardous situation.
Always unplug this equipment from the electrical outlet before cleaning.
Notes
Notes are statements that provide additional information.
For example:
NOTE: If the document feeder is not installed, this feature is not available.
Page 16

1 Before Using the Machine
16
Related Information Sources
The following sources of information are available for the machine.
User Guide
This guide is intended for general users and describes how to use the features of the
machine, such as copy, scan, and fax.
System Administration Guide
This guide is intended for the System Administrator and provides information such as
the supported paper and media, troubleshooting tips, how to configure network and
security settings, and how to replace consumables.
Quick Network Setup Guide
This guide is intended for the System Administrator and provides TCP/IP setup
procedures.
Quick Use Guide
This guide is intended for general users and describes how to use some useful features
on the machine and how to replace toner and drum cartridges.
Quick Scan Features Setup Guide
This guide is intended for the System Administrator and describes how to configure
scanning services.
NOTE: Please note that the screens shown in these guides apply to a fully configured
machine and therefore may not exactly represent the configuration being used.
Page 17
17
2 Paper and Other Media
The machine is designed to use various paper types and other media. This chapter
provides information on loading paper and other types of media into the machine.
Loading Paper
The machine can be equipped with various paper trays. Depending on the machine
configuration, up to six paper trays are available including the Envelope Tray. This
section provides information on how to load paper into each type of tray.
NOTE: Make sure the side and rear paper guides on the trays are properly positioned
to match the size of paper loaded. If there is a gap between the paper stack and the
guides, paper may not be fed into the machine properly, or paper jams may occur.
For information on the paper sizes and media types for each tray, refer to
Supported
Paper Sizes and Types on page 23
.
For information on the acceptable range of paper sizes and capacity for each tray, refer
to
Paper Supply in the Appendix chapter on page 433.
Preparing Paper for Loading
Before loading paper into the paper trays, fan the edges. This procedure separates any
sheets of paper that are stuck together and reduces the possibility of paper jams.
NOTE: To avoid paper jams and misfeeds, do not remove paper from its packaging
until required.
Trays 1 & 2/Two Tray Module (Trays 3 & 4)
Trays 1 to 4 can be loaded with standard and non-standard sized paper.
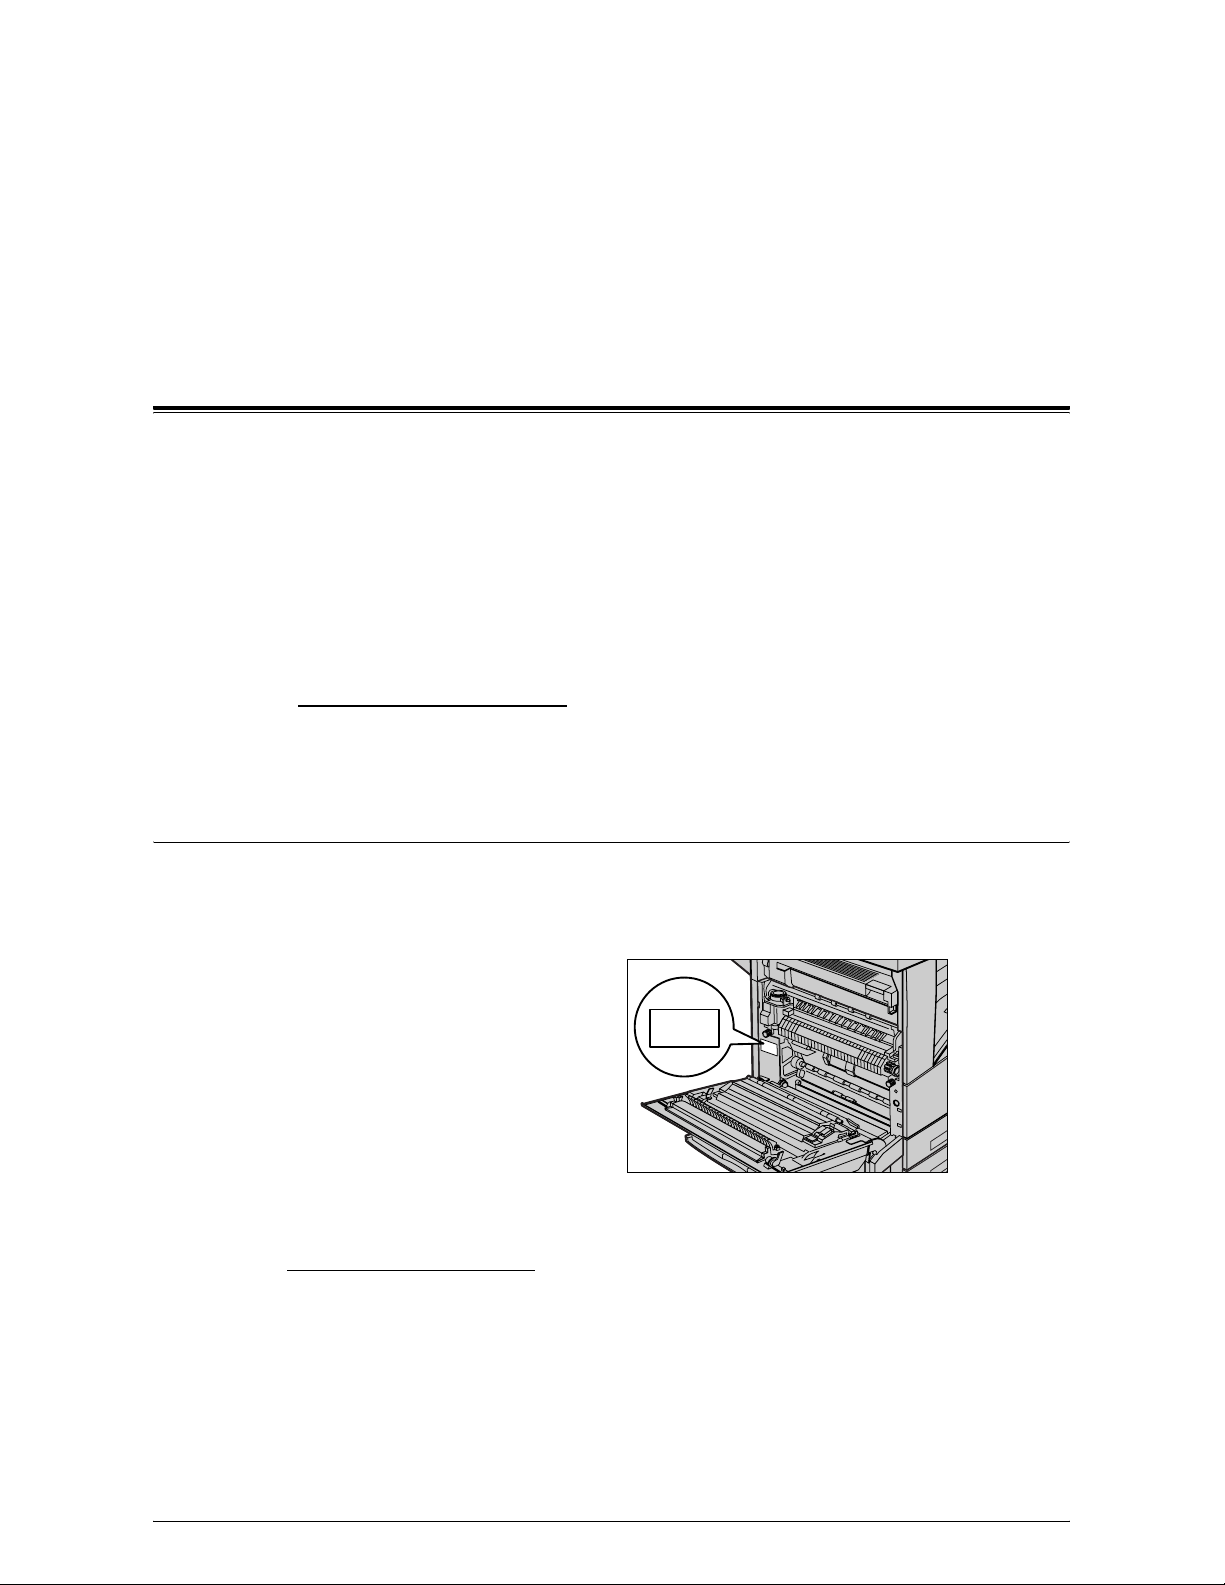
NOTE: If the machine is processing a job, do not open the active paper tray.
1.
Pull out the paper tray towards
you.
NOTE: To avoid jams and misfeeds,
do not load paper on top of any
remaining paper in the tray. Remove
the paper, and reload it on top of the
new stock loaded.
2.
If required, move the paper tray
guides further out to load the
new stock.
To adjust the side and rear
guides, pinch the guide lever on
each guide and slide the guides
to their new position. To secure
the guides in position, release
the levers.
Page 18
2 Paper and Other Media
18
NOTE: When changing the size or type of stock in the tray, refer to
Paper Tray
Settings in the Setups chapter on page 70.
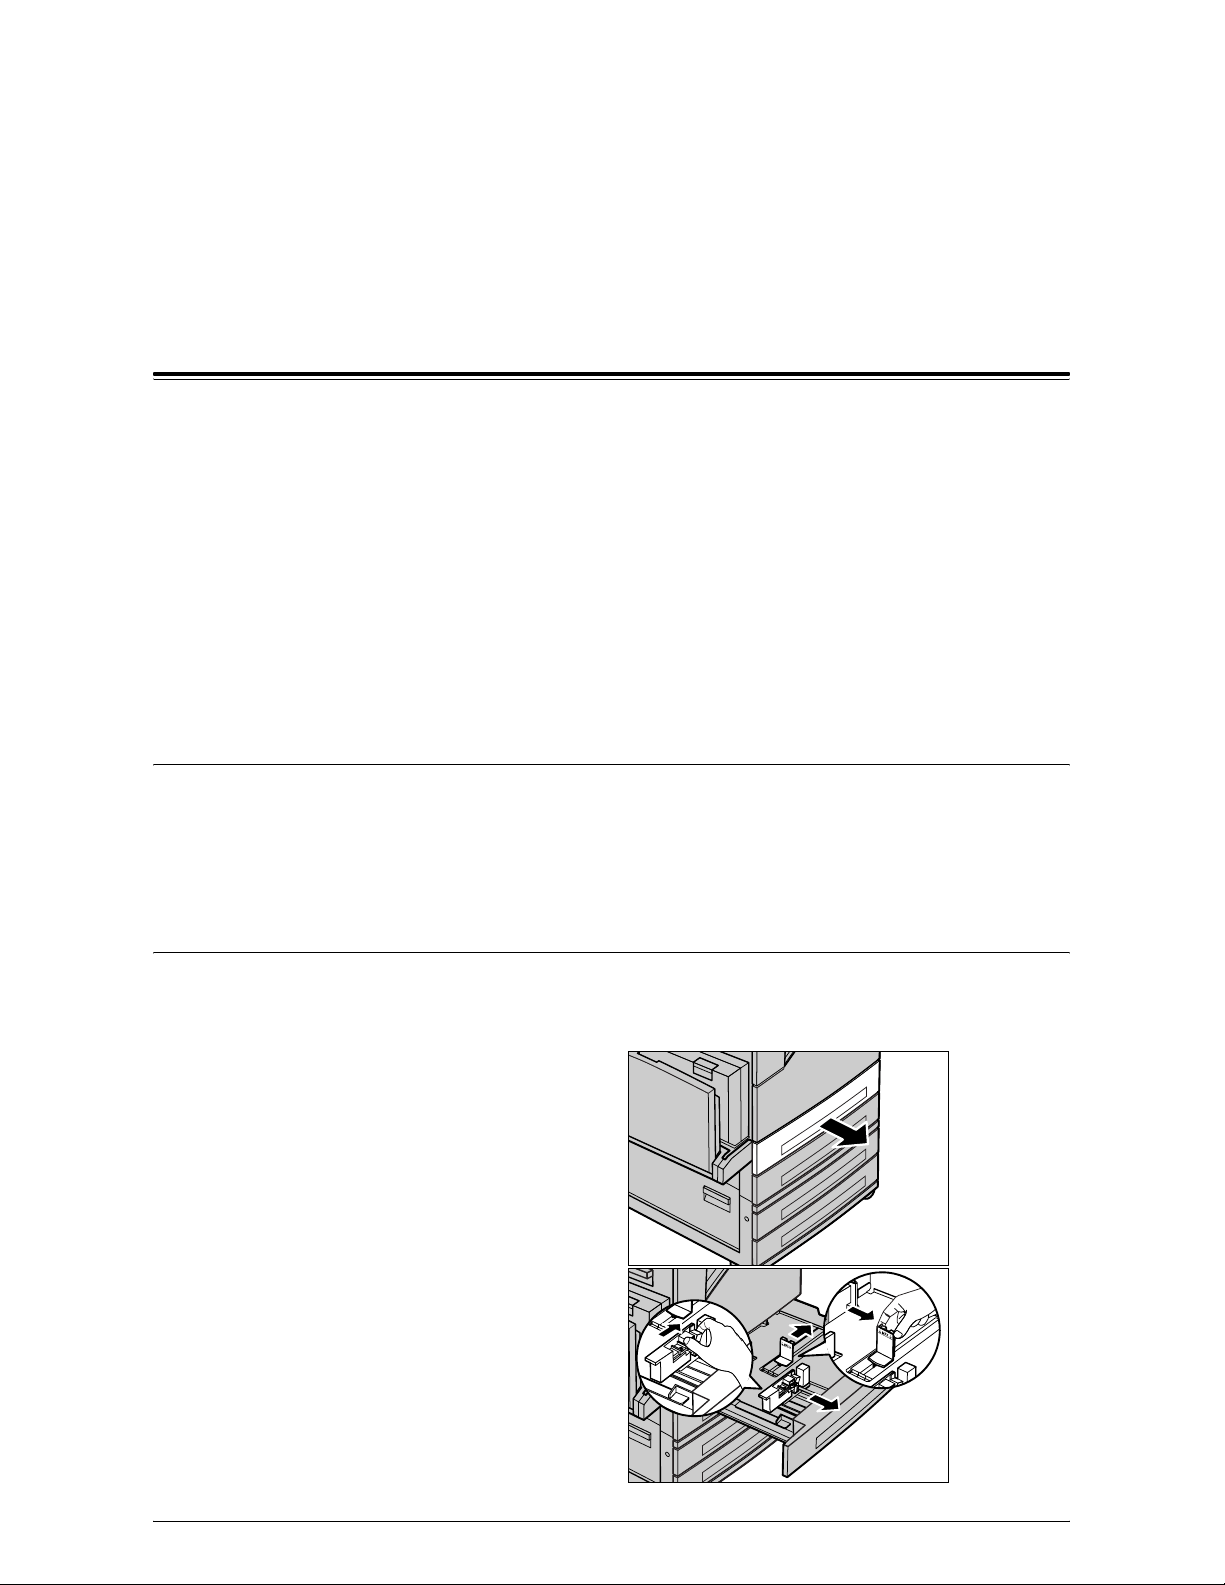
3.
Load the paper neatly and tightly
against the left-hand side of the
tray.
NOTE: Do not load paper above the
maximum fill line.
NOTE: When making single/double
sided copies on perforated paper,
load the paper to feed the opposite
side of the perforated edge first.
Feeding the perforated edge first may cause paper jams.
4.
If the paper guides have been
moved, slide the guides to just
touch the edge of the paper.
NOTE: When loading standard size
paper, set the guides onto the
notches on the tray to match the
paper size. The machine recognizes
8K/16K paper as standard sizes
even though the paper trays have no
notches for these sizes.
5.
Close the paper tray.
NOTE: Paper can be loaded either
short edge feed or long edge feed.
6.
Set the machine to detect the
paper size automatically, or
manually specify the required
size. For more information,
refer to
Paper Size in the Setups chapter on page 70.
NOTE: Paper sizes detected by the machine vary depending on the system settings.
For more information, refer to
Paper Size Settings in the Setups chapter on page 78.
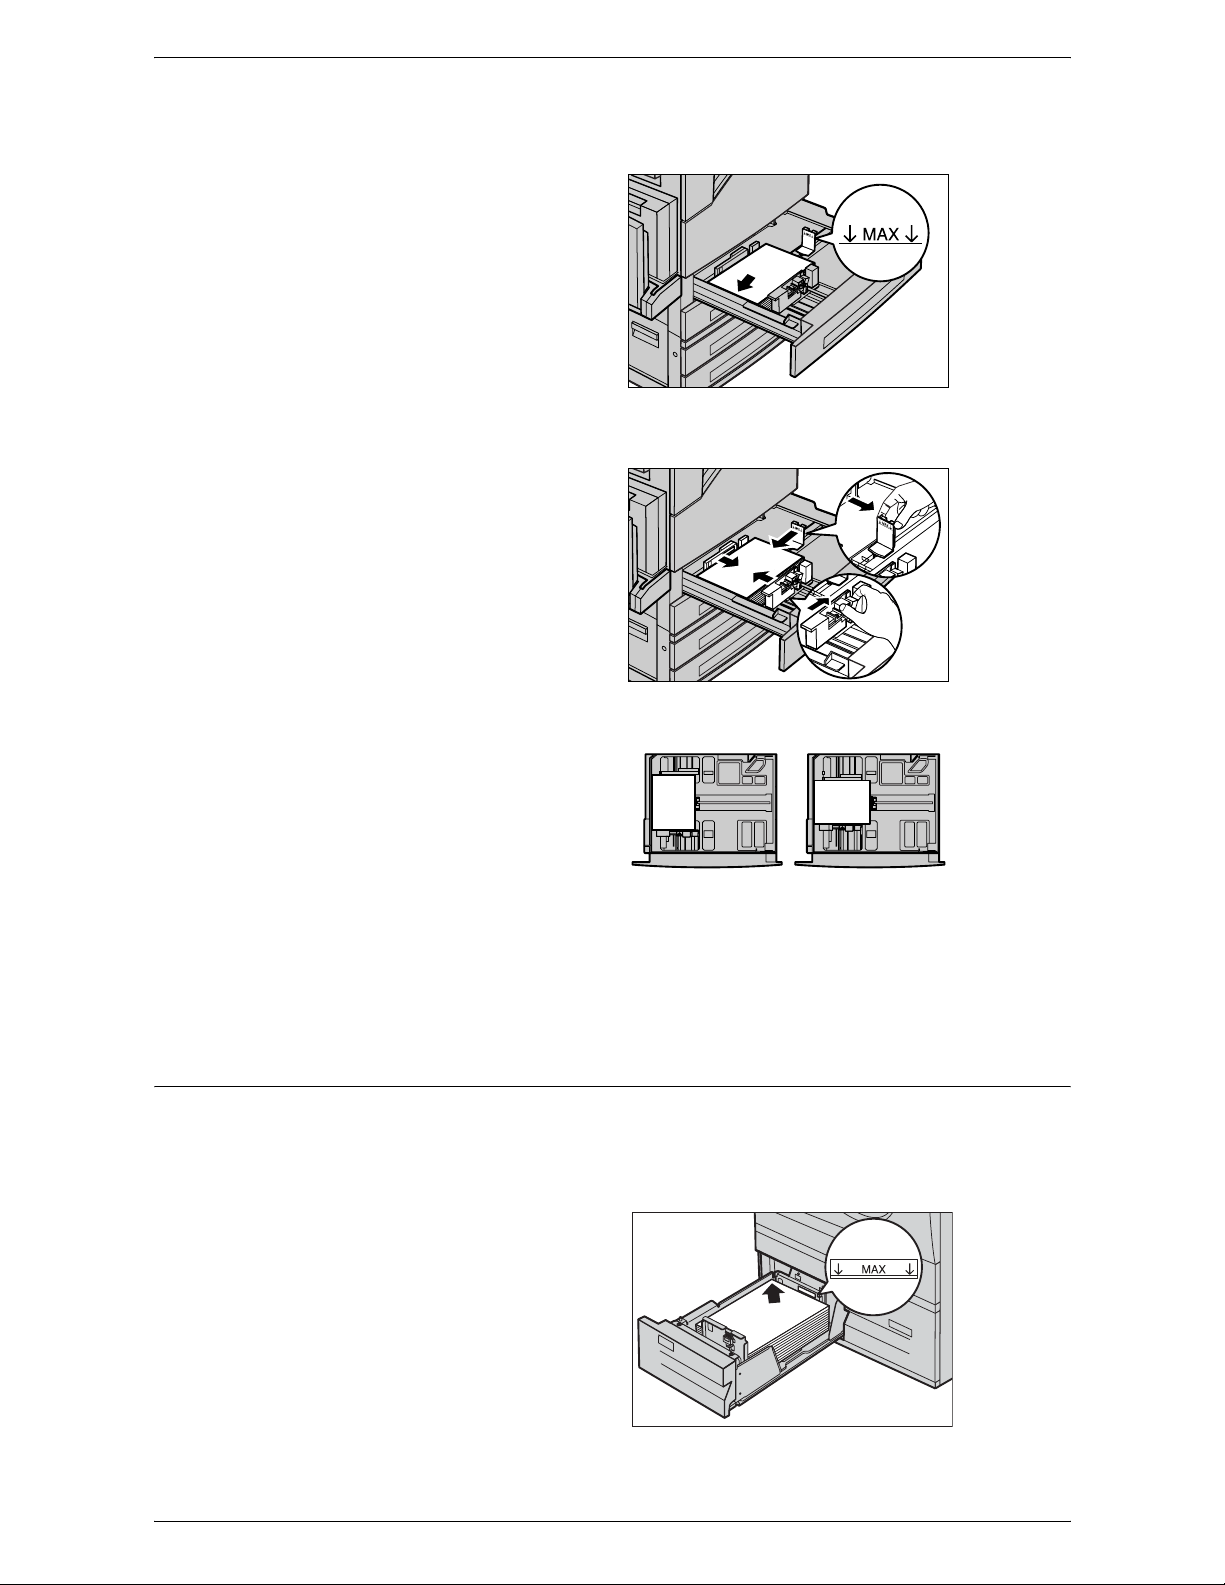
High Capacity Tandem Tray (Trays 3 & 4)
The High Capacity Tandem Tray (Trays 3 and 4) allows you to load up to 2,000 sheets
of paper.
NOTE: You cannot load custom size paper into the High Capacity Tandem Tray.
1.
Pull out Tray 3 or 4.
The elevator in the tray lowers.
2.
Place the paper stock tightly
against the left rear corner of the
tray.
NOTE: Do not load paper above the
maximum fill line.
Long edge feed
(LEF)
Short edge feed
(SEF)
Page 19
Loading Paper
19
NOTE: Always load paper into the tray in the orientation shown in the diagram.
3.
Close the tray.
The elevator rises and positions the paper for use.
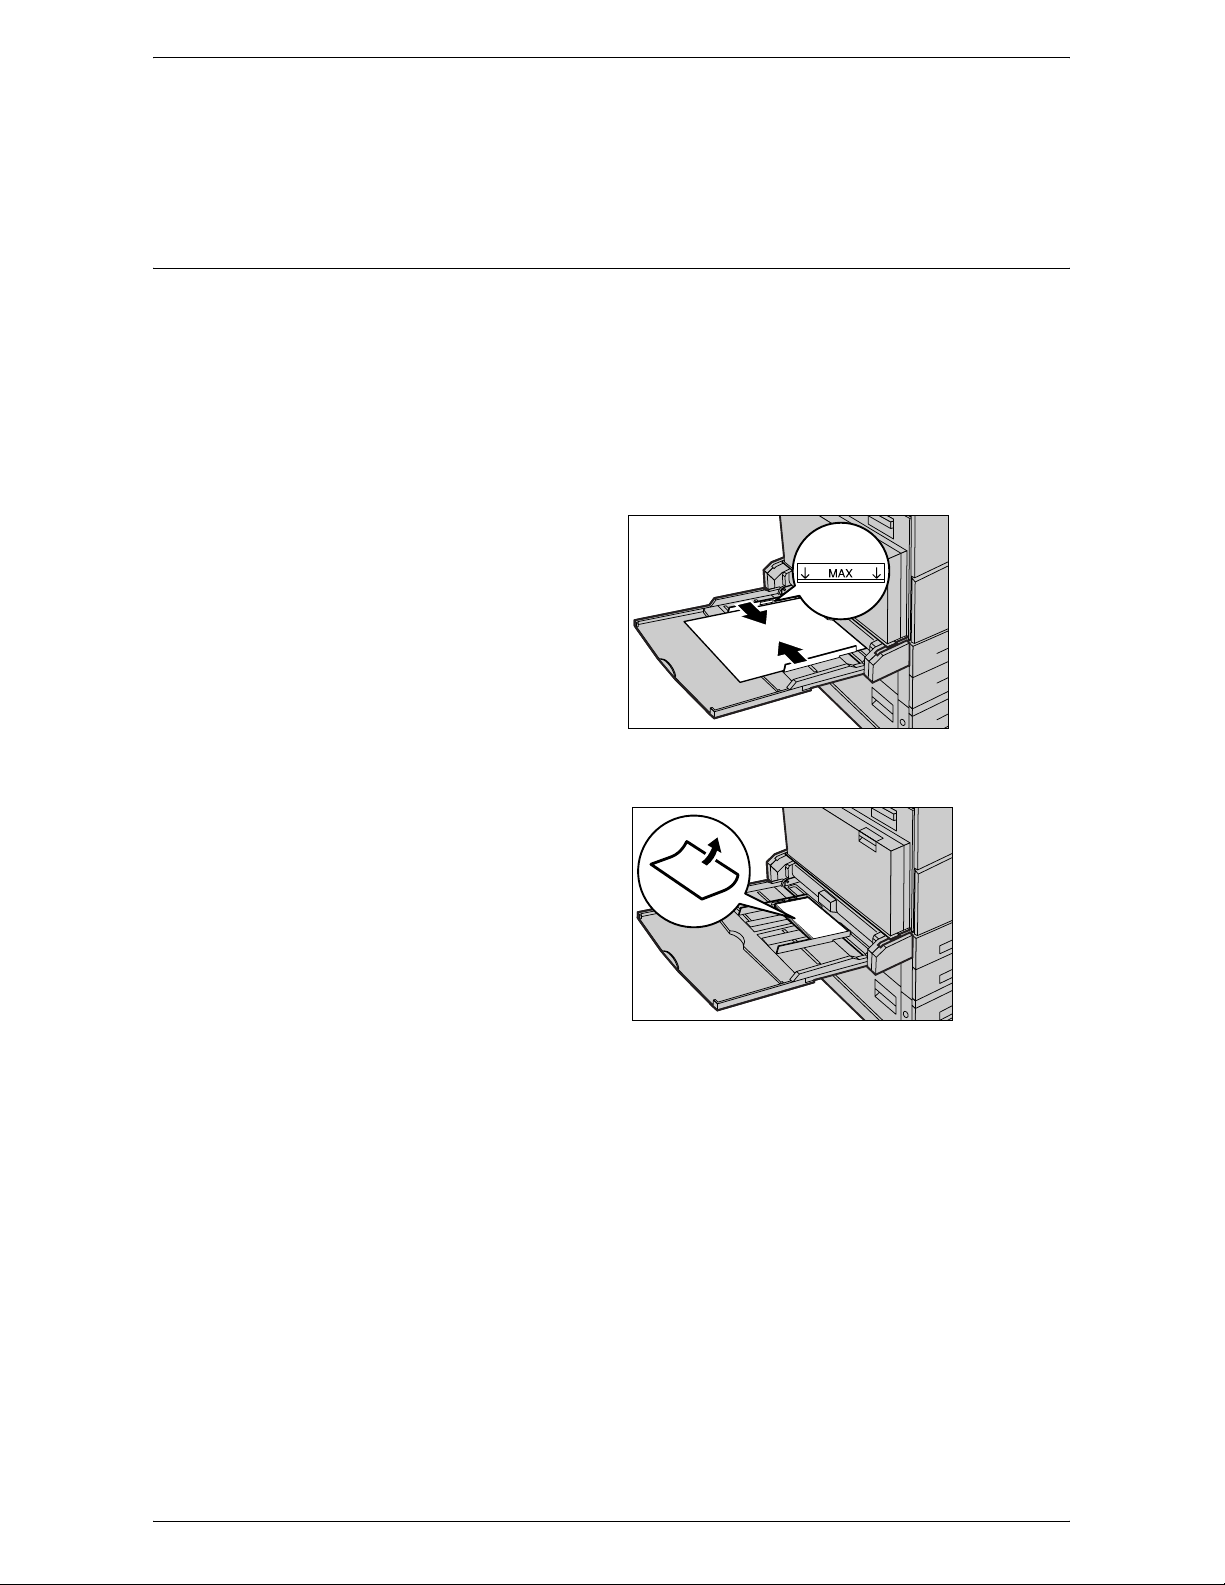
Bypass Tray (Tray 5)
Tray 5 (Bypass) allows you to use a variety of paper types. Tray 5 (Bypass) is located
on the left-hand side of the machine. A tray extension is provided to accommodate
larger sized paper. After loading paper stock in Tray 5 (Bypass), make sure that the
Tray 5 (Bypass) settings on the touch screen match the paper size and type of stock
loaded. If they do not match, reprogramming is required. For more information on
programming of Tray 5 (Bypass), refer to the Copy chapter in the User Guide.
NOTE: To avoid paper jams, make sure that the paper size and paper type settings
are identical to the paper stock loaded.
1.
Load the paper neatly into Tray
5 (Bypass), making sure that the
paper stock is in the center of
the tray.
NOTE: Do not load paper above the
maximum fill line.
NOTE: When making single/double
sided copies on perforated paper,
load the paper to feed the opposite side of the perforated edge first. Feeding the
perforated edge first might cause paper jams.
NOTE: If, when making copies or
prints on thick-stock paper, the
paper will not feed into the machine,
apply a curl to the paper as shown in
the illustration above. Note however,
that excessively bending or folding
the paper might cause paper jams.
NOTE: When loading envelopes,
make sure the flaps are closed and
that the envelopes are oriented on the tray so that the edge with the flaps will enter the
machine first. However, when loading C5-size envelopes, set them long edge feed so
that the edge with the flaps will face toward you.
2.
Slide the side guides towards the paper until they are just touching the edge of the
stock.
Page 20
2 Paper and Other Media
20
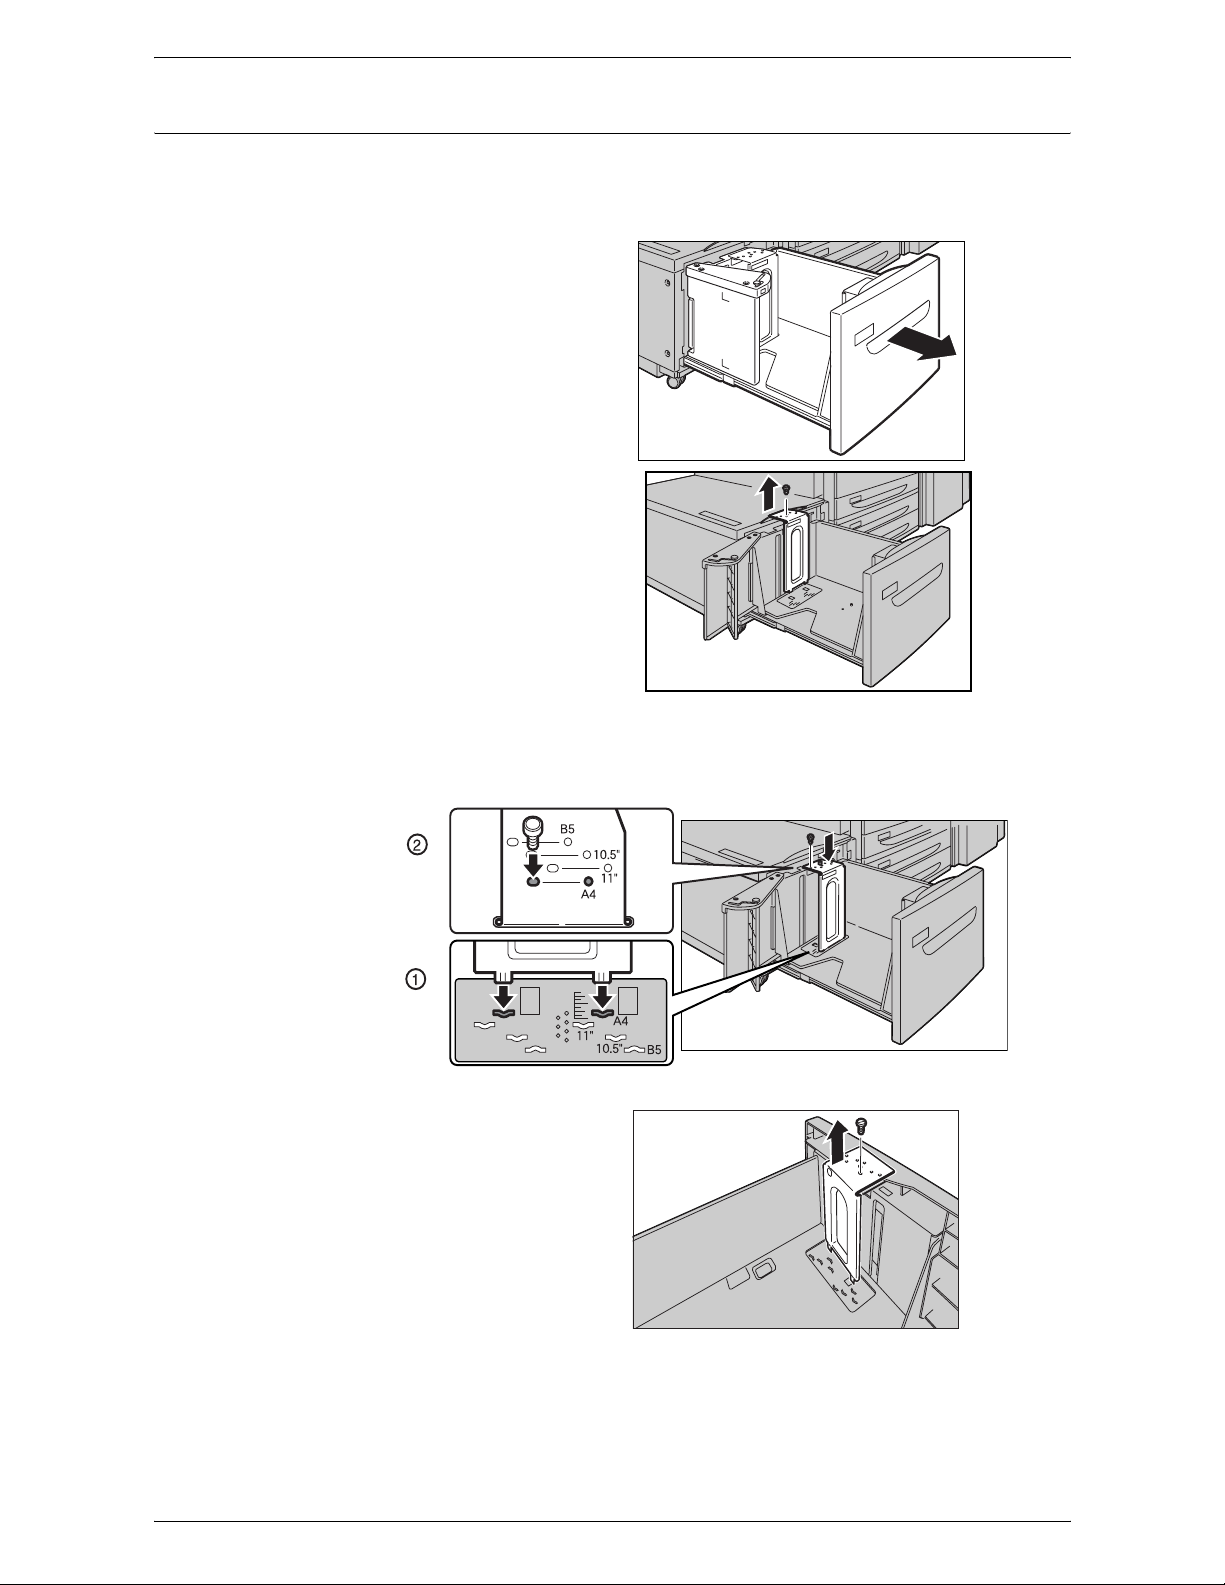
High Capacity Feeder (Tray 6)
The High Capacity Feeder (Tray 6) allows you to load up to 2,000 sheets of paper.
NOTE: You cannot load custom size paper into the High Capacity Feeder.
1.
Pull out Tray 6.
2.
Remove the screw from the
guide at the back of the tray, and
remove the guide from the tray.
3.
Insert the projections on the
bottom of the guide into the paper size holes on the tray (1). Insert the projection
on the tray into the paper size hole on the guide (2), and then tighten the screw
removed in step 1.
4.
Remove the screw from the
guide at the front of the tray, and
remove the guide from the tray.
5.
Insert the projections on the
bottom of the guide into the paper size holes on the tray (1). Insert the projection
on the tray into the paper size hole on the guide (2), and then tighten the screw
removed in step 4.
Page 21
Loading Paper
21
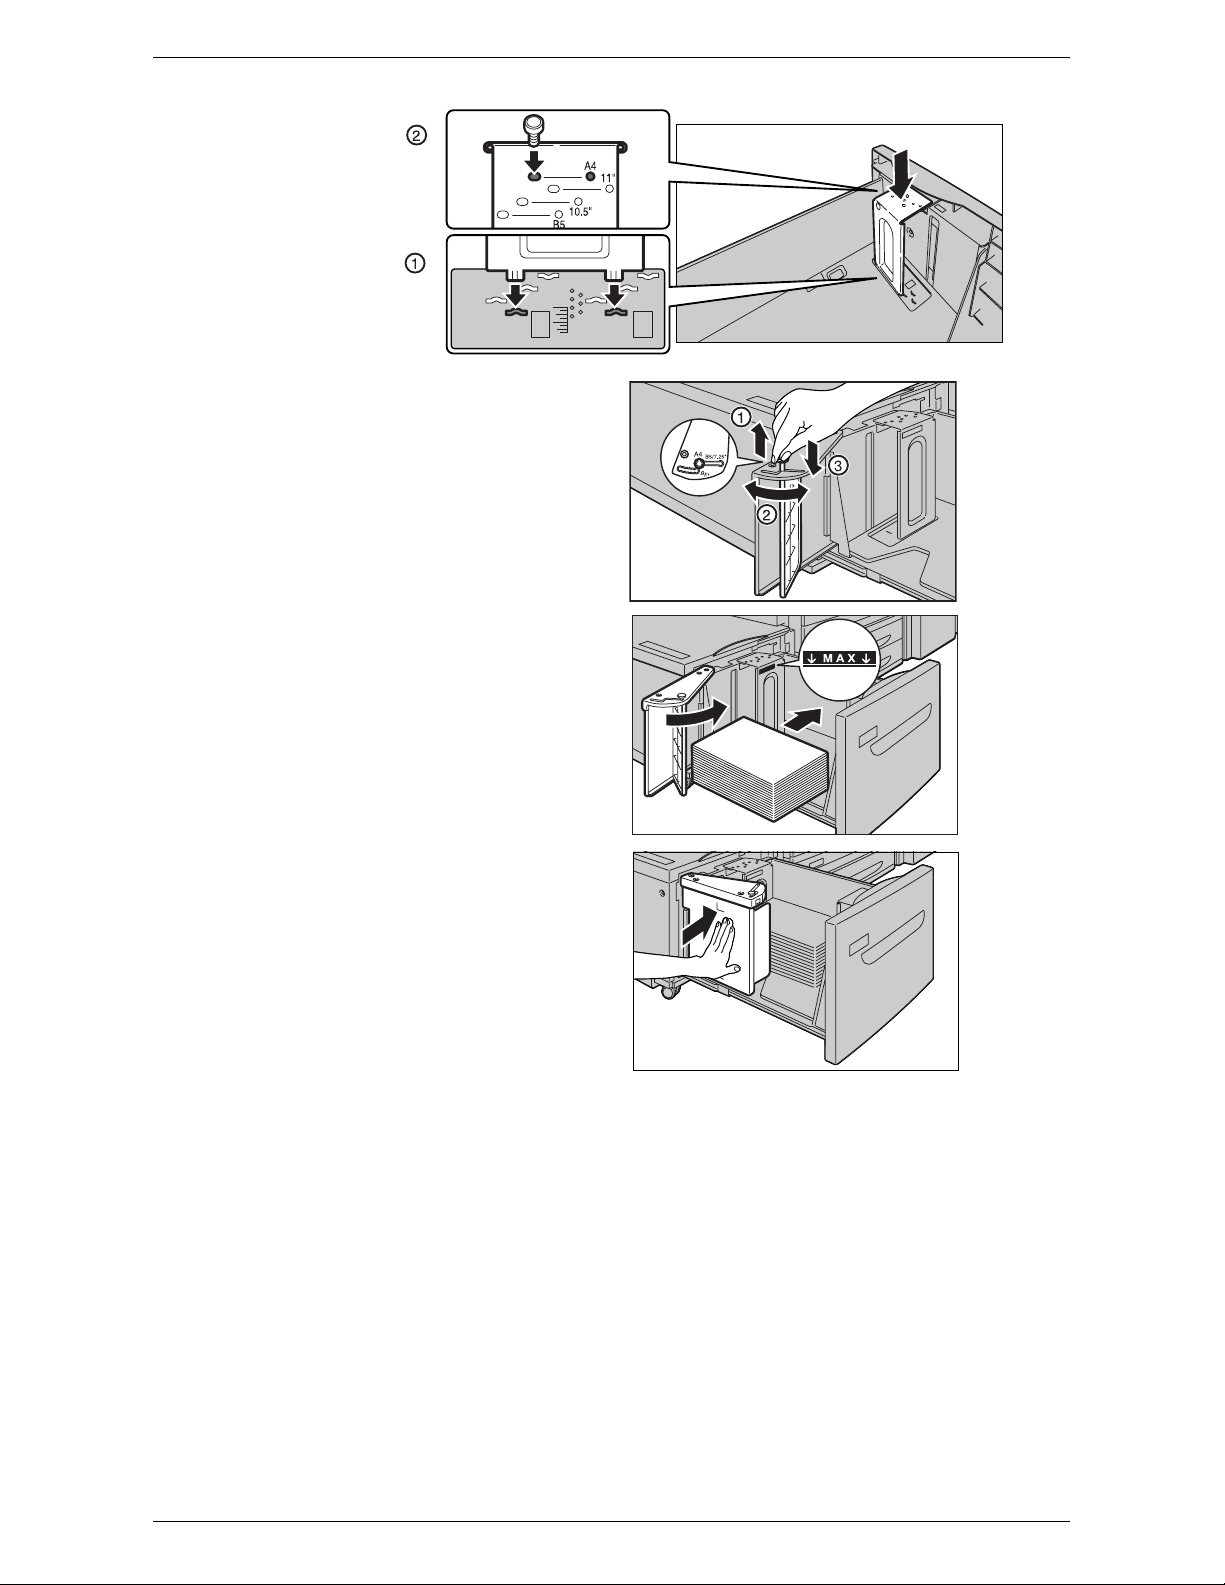
6.
Pull up the end-guide lever
along the slot (1), adjust the
position of the lever to the size
of the paper (2), and then push
the lever back into its position
(3).
NOTE: Do not use the slot at the left
of the 8.5” slot on the end guide.
7.
Open the end guide, and place
the paper stack tightly against
the right edge of the tray.
NOTE: Do not load paper above the
maximum fill line.
8.
Close the end guide.
9.
Push the tray in gently until it
stops.
Page 22

2 Paper and Other Media
22
Envelope Tray
The Envelope Tray allows you to stack up to 43 mm of envelopes.
NOTE: Insert the Envelope Tray in the slot for Tray 1 only. Inserting the Envelope Tray
in any other slot will damage it.
1.
Pull out the Envelope Tray.
2.
Load the envelopes in the
Envelope Tray with the side to
be printed face up and the edge
with the flap against the left
edge of the tray.
3.
Adjust the paper guides to the
size of the envelopes.
Auto Tray Switching
The machine automatically switches from one tray to another under the following
conditions.
• When an active tray runs out of paper during printing.
• When the paper size of the selected tray differs from that detected upon document
scanning.
• When the selected tray is open upon paper feeding.
• When the selected tray malfunctions upon paper feeding.
NOTE: Tray 5 (Bypass) is not subject to Auto Tray Switching.
NOTE: The paper tray and paper type priority settings can be programmed in the
System Administration mode. For more information, refer to
Paper Tray Priority in the
Setups chapter on page 71
and
Paper Size Settings in the Setups chapter on
page 78.
When not in use, the paper trays can be opened and loaded with paper while the
machine is running. However, do not open an active paper tray. This will cause the
machine to stop the job that is being processed.
Page 23

Storing and Handling Paper
23
Storing and Handling Paper
Always use high quality, xerographic grade paper in the machine. Damaged, curled, or
damp paper can cause jams and image quality problems. Follow these simple rules to
store paper.
• Store paper in dry conditions, away from extreme heat or cold, such as radiators or
open windows.
• Store paper flat on a shelf or pallet above floor level.
• Leave the paper wrapped and boxed until ready to be used.
• Re-wrap partly used packages of paper.
NOTE: Do not store paper in the paper trays.
Supported Paper Sizes and Types
This section lists the sizes and types of paper that can be used with the machine.
Supported Paper Sizes
The following table lists the paper sizes supported by each paper tray, output tray, and
the duplex module.
NOTE: For the capacity of each tray, refer to
Appendix
on page 431.
Standard Sizes
NOTE: The standard sizes of paper that can be detected vary depending on the paper
size table specified by the System Administrator. For information on setting the paper
size table, refer to
Paper Size Settings in the Setups chapter on page 78.
Paper Trays - Standard Sizes
Paper Size
Dimensions
(mm)
LEF/
SEF
Tray 1, 2
/
Tray 3, 4
(Two Tray
Module)
Tray 3, 4
(High
Capacity
Tandem
Tray)
Tray 5
(Bypass)
Tray 6
(High
Capacity
Feeder)
Envelope
Tray
A6 105.0 148.0 LEF O
A5 148.0 210.0 SEF O
LEF O
A4 210.0 297.0 SEF O O
LEFOOOO
A3 297.0 420.0 SEF O O
B6 128.5 182.0 SEF O
B5 182.0 257.0 SEF O O
LEF O
B4 257.0 364.0 SEF O O
5.5 × 8.5” 139.7 215.9 SEF O O
LEF O
Page 24

2 Paper and Other Media
24
O : Available
blank : Not available
7.25 × 10.5” 184.2 266.7 SEF O
LEF O O O O
8.5 × 11” 215.9 279.4 SEF O O
LEF O O O O
8.5 × 13” 215.9 330.2 SEF O O
8.5 × 14” 215.9 355.6 SEF O O
11 × 17” 297.4 431.8 SEF O O
16K (Taiwan) 194.0 267.0 SEF O
LEF O
8K (Taiwan) 267.0 388.0 SEF O
16K (China) 195.0 270 SEF O
LEF O
8K (China) 270.0 390.0 SEF O
Postcard 100.0 148.0 LEF O
Prepaid
Postcard
200.0 148.0 SEF O
4 x 6” 101.6 152.4 LEF O
European 3
(Chouyoukei
3) Envelope
120.0 235.0 LEF O
Commercial
10 Envelope
104.8 241.3 LEF O O
Monarch
Envelope
98.4 190.5 LEF O O
DL Envelope 110.0 220.0 LEF O O
C4 Envelope 229.0 324.0 SEF O
C5 Envelope 162.0 229.0 LEF O O
Paper Size
Dimensions
(mm)
LEF/
SEF
Tray 1, 2
/
Tray 3, 4
(Two Tray
Module)
Tray 3, 4
(High
Capacity
Tandem
Tray)
Tray 5
(Bypass)
Tray 6
(High
Capacity
Feeder)
Envelope
Tray
Page 25

Supported Paper Sizes and Types
25
Output Trays/Duplex Module - Standard Sizes
O : Available
blank : Not available
Paper Size
Dimensions
(mm)
LEF/
SEF
Center
Tray
Left Side
Tray
Integrated
Office
Finisher
Office
Finisher
LX
Duplex
Module
A6 105.0 148.0 LEF O O O
A5 148.0 210.0 SEF O O O O
LEFOOO O
A4 210.0 297.0 SEF O O O O O
LEFOOOOO
A3 297.0 420.0 SEF O O O O O
B6 128.5 182.0 SEF O O O
B5 182.0 257.0 SEF O O O O
LEFOOOOO
B4 257.0 364.0 SEF O O O O O
5.5 × 8.5” 139.7 215.9 SEF O O O O
LEFOOO O
7.25 × 10.5” 184.2 266.7 SEF O O O O
LEFOOOOO
8.5 × 11” 215.9 279.4 SEF O O O O O
LEFOOOOO
8.5 × 13” 215.9 330.2 SEF O O O O O
8.5 × 14” 215.9 355.6 SEF O O O O O
11 × 17” 297.4 431.8 SEF O O O O O
16K (Taiwan) 194.0 267.0 SEF O O O O
LEFOOOOO
8K (Taiwan) 267.0 388.0 SEF O O O O O
16K (China) 195.0 270 SEF O O O O
LEFOOOOO
8K (China) 270.0 390.0 SEF O O O O O
Postcard 100.0 148.0 LEF O O O
Prepaid
Postcard
200.0 148.0 SEF O O O
4 x 6” 101.6 152.4 LEF O O O
European 3
(Chouyoukei
3) Envelope
120.0 235.0 LEF O O O
Commercial
10 Envelope
104.8 241.3 LEF O O O
Monarch
Envelope
98.4 190.5 LEF O O O
DL Envelope 110.0 220.0 LEF O O O
C4 Envelope 229.0 324.0 SEF O O O
C5 Envelope 162.0 229.0 LEF O O O
Page 26
2 Paper and Other Media
26
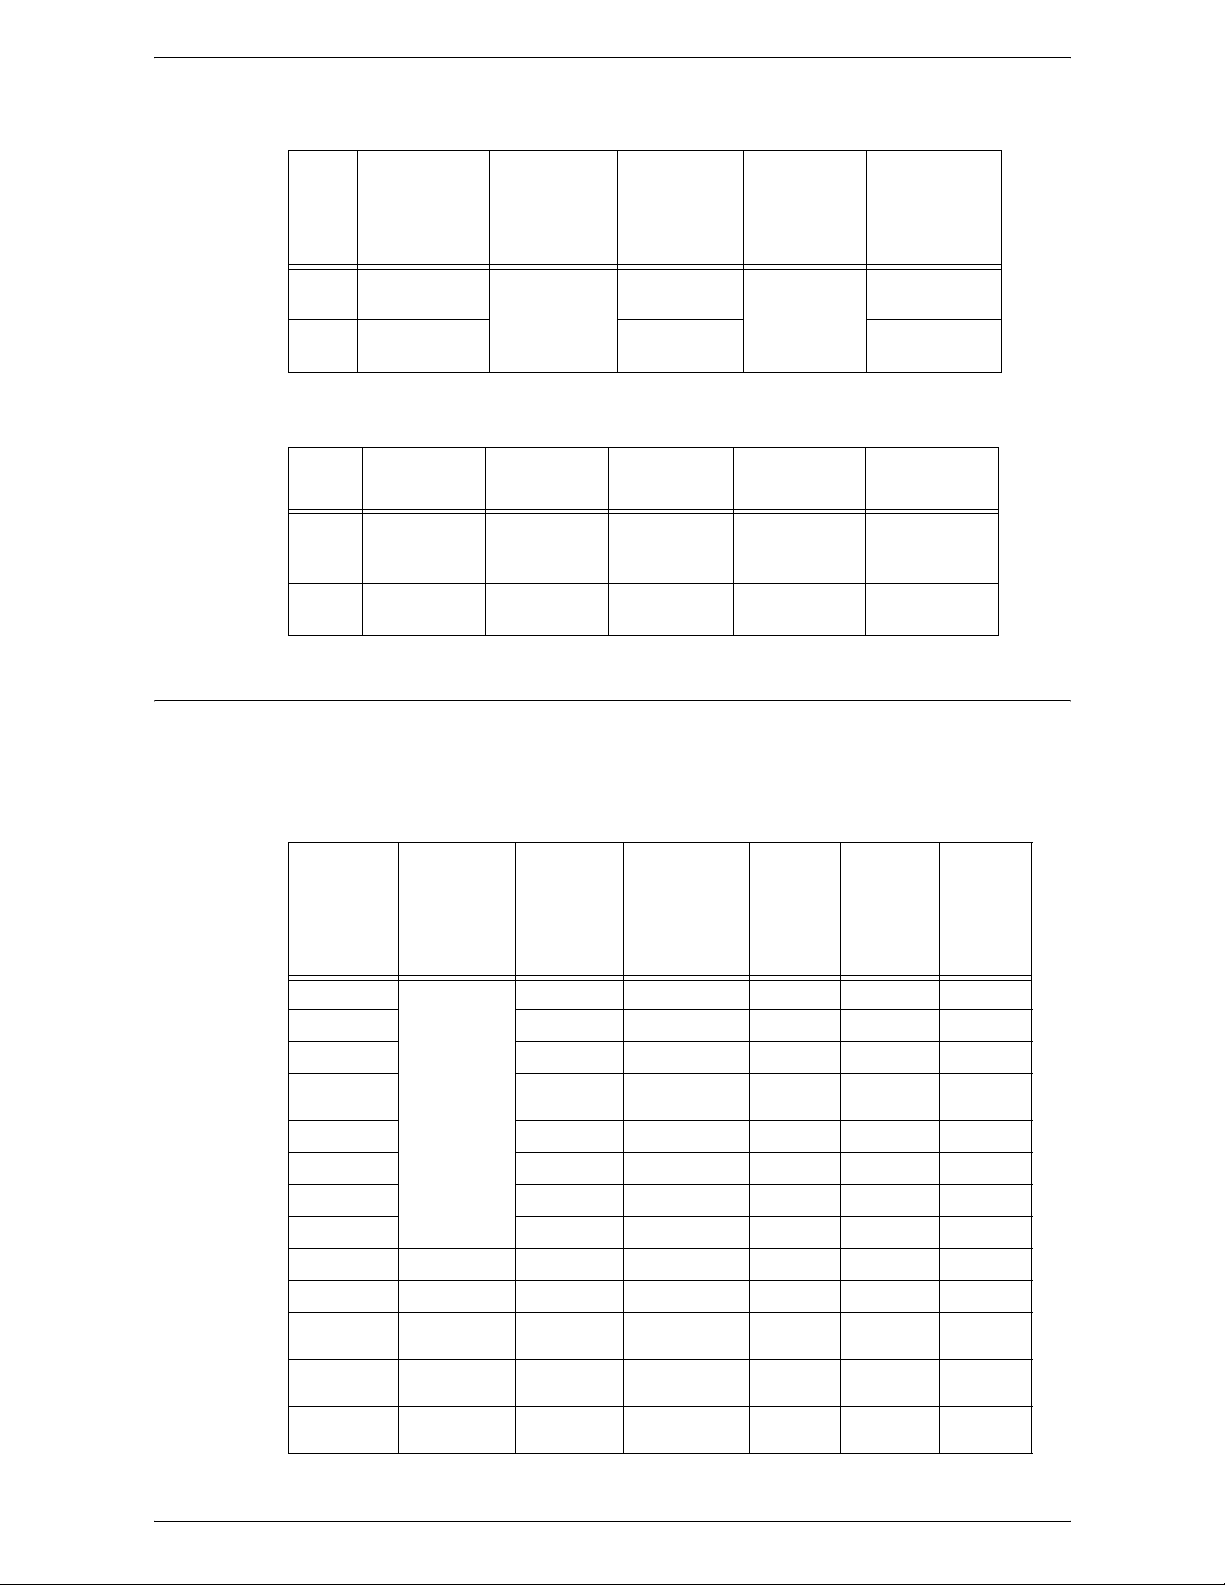
Paper Trays - Non-standard Sizes
Output Trays/Duplex Module - Non-standard Sizes
Supported Paper Types
The following table lists the paper types supported by each paper tray, duplex module,
and the finisher.
Paper Trays
Paper
Size
Tra y 1 , 2
/
Tray 3, 4
(Two Tray
Modules)
Tray 3, 4
(High Capacity
Tandem Tray)
Tray 5
(Bypass)
Tray 6
(High Capacity
Feeder)
Envelope Tray
Width 139.7-297.0 mm
5.5-11.8”
Not Available
88.9-297.0 mm
3.6-11.8”
Not Available
148.7-241.0 mm
5.9-9.6"
Length 182.0-431.8 mm
7.2-17.2”
98.4-431.8 mm
3.9-17.2”
98.4-162.0 mm
3.9-6.4”
Paper
Size
Center Tray Left Side Tray
Integrated
Office Finisher
Office Finisher
LX
Duplex Module
Width 88.9-297.0 mm
3.6-11.9”
88.9-297.0 mm
3.6-11.9”
88.9-297.0 mm
3.6-11.9”
210.0-297.0 mm
8.4-11.9”
139.7-297.0 mm
3.5-11.9”
Length 98.4-431.8 mm
3.9-17.2”
98.4-432.0 mm
3.9-17.3”
98.4-431.8mm
3.9-17.2”
182.0-431.8 mm
7.3-17.2”
182.0-431.8 mm
5.1-17.2”
Paper Type
Weight g/m
2
Tray 1
Tray 2,
Tray 3, 4
(Two Tray
Module/
High Capacity
Tandem Tray)
Tray 5
(Bypass)
Tray 6
(High
Capacity
Feeder)
Envelope
Tray
Plain
60-105
OOOO
Plain Reload*
1
OOOO
Recycled O O O O
Custom Paper
1 - 5
OOOO
Hole Punched O O O O
Letterhead O O O O
Pre-Printed O O O O
Other O O O O
Lightweight 56-63 O O O O
Heavyweight 106-169 O O O
Extra
Heavyweight
170-215
OOO
Bond Paper
170-215
OOO
Envelope
170-215
OO
Page 27

Supported Paper Sizes and Types
27
O : Available
blank : Not available
*1: Plain Reload refers to paper already printed on one side.
NOTE: When printing onto postcards or envelopes, Extra Heavyweight should be
selected, and the size should be specified.
NOTE: Depending on the heavyweight paper used, the paper cannot be loaded Short
Edge Feed. In that case, load the paper Long Edge Feed.
NOTE: Depending on the type of paper used and the operating environment, the
paper may not be fed into the machine properly, or print quality may be negatively
affected.
Output Trays/Duplex Module
O : Available
blank : Not available
*1: Plain Reload refers to paper already printed on one side.
Labels – O O O O
Transparency – O O O O
Paper Type
Weight g/m
2
Tra y 1
Tray 2,
Tray 3, 4
(Two Tray
Module/
High Capacity
Tandem Tray)
Tray 5
(Bypass)
Tray 6
(High
Capacity
Feeder)
Envelope
Tray
Paper Type
Weight g/m
2
Center Tray
Left Side
Tray
Integrated
Office
Finisher
Office
Finisher LX
Duplex
Module
Plain
60-105
O O OOO
Plain Reload*
1
OOOO
Recycled O O O O O
Custom Paper
1 - 5
O O OOO
Hole Punched O O O O O
Letterhead O O O O O
Pre-Printed O O O O O
Other O O O O O
Lightweight 56-63 O O O O O
Heavyweight 106-169 O O O O
Extra
Heavyweight
170-215
OOOO
Bond Paper 170-215 O O O O
Envelope 170-215 O O O
Labels – O O O
Transparency – O O O
Page 28

2 Paper and Other Media
28
Page 29

29
3 Maintenance
This chapter describes the maintenance tasks that are required periodically to maintain
the machine in proper working order.
Ordering Supplies
A variety of supplies are available for the machine, including machine-specific
consumables such as a toner cartridge, a drum cartridge, staple cartridges and refills.
General-use supplies are also available, such as glass cleaners, cleaning solvents,
paper and media products.
To obtain supplies, contact the local Xerox Sales Representative, giving the company
name, the product number and the machine’s serial number.
Use the space below to record the telephone number.
Supplies Telephone Number:
NOTE: If you do not use the consumables recommended by Xerox, the performance
of the machine may not be at its optimum level. Use only the consumables
recommended by Xerox.
Cleaning the Machine
This section describes how to clean the machine to help maintain high performance.
WARNING: Do not use aerosol cleaners. Aerosol cleaners can be explosive or
flammable when used on electromechanical equipment.
Before cleaning this product, unplug the product from the electrical outlet.
Always use materials specifically designated for this product. The use of other
materials may result in poor performance and create a hazardous situation.
Always unplug this equipment from the electrical outlet before cleaning.
Control Panel and Touch Screen
Clean the exterior of the machine, touch screen, and control panel on a regular basis
to keep them free from dust, dirt, and fingerprint smudges. Wipe the exterior surfaces
with a soft, firmly wrung cloth moistened with water. Do not use cleaning agents other
than water or neutral detergent. Wipe off any excess water with a dry cloth.
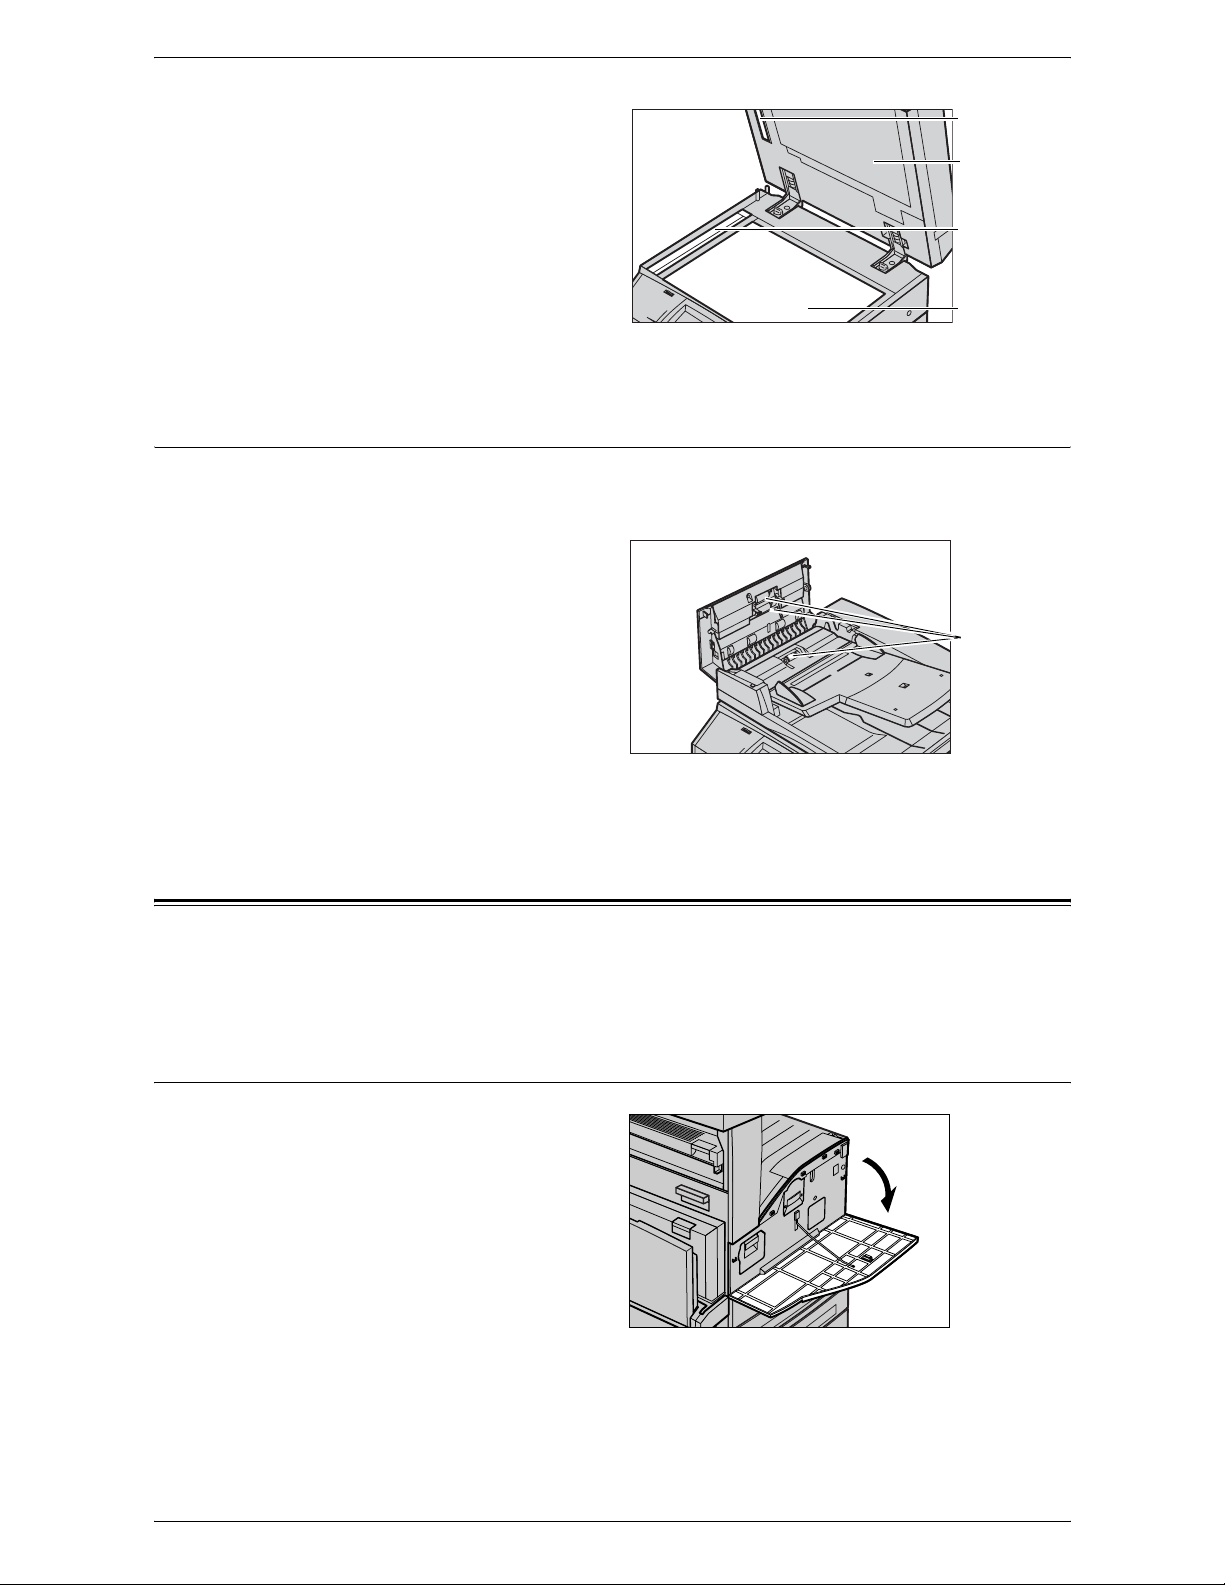
Document Glass and Document Feeder Glass
Clean the document cover and document glass monthly to prevent streaks, smears,
and other marks from appearing on copies or prints. If the optional document feeder is
installed, also clean the film and document feeder glass.
Page 30
3 Maintenance
30
1.
Wipe the document cover and
document glass with a soft cloth
moistened with water or Xeroxapproved cleaner to remove any
marks, and then wipe with a
soft, dry cloth.
2.
If the document feeder is
installed, wipe the document
feeder glass and the film on the
cover with a soft cloth moistened with water or Xerox-approved cleaner to remove
any marks, and then wipe with a soft, dry cloth.
Document Feeder Rollers
If the machine is installed with a document feeder, clean the feeder rollers monthly to
prevent streaks appearing on the output and to prevent document feeder paper jams.
1.
Open the document feeder
cover.
2.
Wipe the document feeder
rollers while turning them with a
soft cloth moistened with water
to remove any dirt.
3.
Close the cover.
Replacing the Drum Cartridge
The drum cartridge is a customer replaceable unit. The machine will display a warning
message before the drum reaches the end of its life. When the message is displayed,
order a replacement cartridge to ensure continuous operation.
Removing the Old Drum Cartridge
1.
Make sure that the machine is
not operating, and open the
front cover.
Document glass
Document
feeder glass
Feeder film
Document cover
Document feeder
rollers
Page 31

Replacing the Drum Cartridge
31
2.
Open Tray 5 (Bypass) and then
Cover A while lifting up the
release lever.
3.
Lift up the colored lever, and
slide the drum cartridge out until
you can grasp the handle on top
of the cartridge.
4.
Hold the handle and remove the
cartridge from the machine.
NOTE: When replacing the drum cartridge, make sure that the new cartridge is the
correct one specified for the machine.
Inserting the New Drum Cartridge
1.
Remove the new drum cartridge from the box.
2.
Carefully remove the protective
sheet from the cartridge by
pulling up the sealing tape.
3.
Insert the cartridge as shown in
the illustration, and slide it into
the machine until it clicks.
Page 32

3 Maintenance
32
4.
Pull the cartridge tape straight
out without breaking it.
5.
Push the cartridge again to
ensure it is positioned correctly.
6.
Close Cover A until it latches,
and then close Tray 5 (Bypass).
7.
Close the front cover.
NOTE: If the front cover is not
completely closed, a message will
appear and the machine will not
operate.
Replacing the Toner Cartridge
The toner cartridge is a customer replaceable unit. The touch screen will display a
message when the cartridge needs to be replaced.
If toner spills onto your skin or clothing, wash it off with soap and water.
If you get toner particles in your eyes, wash it out with plenty of water for at least 15
minutes until irritation is gone. Consult a physician if necessary.
If you inhale toner particles, move to a fresh air location and rinse your mouth with
water.
If you swallow toner, spit it out, rinse your mouth with water, drink plenty of water and
consult a physician immediately.
Page 33

Loading Staples in the Integrated Office Finisher (Optional)
33
Removing the Old Toner Cartridge
1.
Make sure that the machine is
not operating, and open the
front cover.
2.
Pull the toner cartridge out until
you can grasp the handle on top
of the cartridge.
3.
Hold the handle and remove the
cartridge from the machine.
NOTE: Be careful when handling the empty cartridge to avoid spilling any residue
toner.
Inserting the New Toner Cartridge
1.
Remove the new toner cartridge
from the box. Before removing
the cartridge from the bag,
shake it from side to side to
evenly distribute the toner
inside.
2.
Insert the cartridge as shown in
the illustration, and slide it into
the machine until it clicks.
3.
Close the front cover.
NOTE: If the front cover is not
completely closed, a message will
appear and the machine will not
operate.
Loading Staples in the Integrated Office Finisher (Optional)
The Integrated Office Finisher contains an automatic stapler. When the finisher runs
out of staples, a message appears on the touch screen. When this message is
displayed, load a new staple case into the staple cartridge.
Page 34

3 Maintenance
34
1.
Make sure that the machine is
not operating, and open the
front cover of the finisher.
2.
Take the staple cartridge out of
the finisher.
3.
After removing the staple
cartridge, check the inside of
the finisher for any remaining
staples.
4.
Pinch both sides of the empty
staple case with your fingers
(1), and remove the staple
case from the cartridge (2).
5.
Insert the front side of the new
staple case into the staple
cartridge (1), and then push the
rear side into the cartridge (2).
1
1
2
1
2
Page 35

Loading Staples in the Office Finisher LX (Optional)
35
6.
Return the staple cartridge to
its original position
7.
Close the front cover of the finisher.
NOTE: If the front cover is not completely closed, a message will appear and the
machine will not operate.
Loading Staples in the Office Finisher LX (Optional)
The Office Finisher LX contains an automatic stapler. When the finisher runs out of
staples, a message appears on the touch screen. When this message is displayed,
load a new staple case into the staple cartridge.
1.
Make sure that the machine is
not operating, and open the
front cover of the finisher.
2.
Hold the staple cartridge by the
lever R1 and pull it to the right.
3.
Hold the staple cartridge by the
orange lever and remove it
from the finisher.
NOTE: The staple cartridge is
firmly inserted. A slight force is
required to pull the cartridge out of
the finisher.
Lever R1
Orange Lever
Page 36

3 Maintenance
36
4.
Pinch both sides of the empty
staple case with your fingers
(1), and remove the staple
case from the cartridge (2).
5.
Insert the front side of the new
staple case into the staple
cartridge (1), and then push the
rear side into the cartridge (2).
6.
Hold the staple cartridge by the
orange lever, and insert it into
the finisher until it clicks.
7.
Close the front cover of the
finisher.
NOTE: If the front cover is not completely closed, a message will appear and the
machine will not operate.
Loading the Booklet Staples in the Office Finisher LX (Optional)
If the optional Booklet Maker is installed, a message appears on the touch screen when
the unit runs out of staples. When the message is displayed, load a new staple
cartridge into the Booklet Maker. The Booklet Maker contains two staple cartridges.
1.
Make sure that the machine is
not operating, and open the
side cover of the finisher.
2.
Hold the tabs on both sides of
the booklet staple cartridge
and pull the cartridge out of the
finisher.
1
1
2
1
2
Page 37

Emptying the Hole Punch Waste Container (Optional)
37
3.
Hold the tabs on both sides of
the new booklet staple
cartridge, and insert it into the
original position until it clicks.
NOTE: If you have trouble inserting
the cartridge, make sure that the
staples in the cartridge are properly
in place.
4.
Repeat steps 2 and 3 to replace the other booklet staple cartridge.
5.
Close the side cover of the finisher.
NOTE: If the side cover is not completely closed, a message will appear and the
machine will not operate.
Emptying the Hole Punch Waste Container (Optional)
The Hole Punch Unit for the Office Finisher LX contains a hole punch waste container.
When the hole punch waste container becomes full, a message appears on the touch
screen. When the message is displayed, empty the hole punch waste container.
Make sure to discard all paper chads when emptying the hole punch waste container.
If you do not empty the container completely, the container becomes full before a
message stating to empty the container appears again, and this can cause a
breakdown of the machine.
NOTE: Make sure you empty the hole punch waste container when the power is on. If
you empty the container when the power is off, the machine will not recognize that the
container has been emptied.
1.
Make sure that the machine is not
operating, and open the front
transport cover of the finisher.
2.
Pull out the hole punch waste
container.
Page 38

3 Maintenance
38
3.
Empty the container.
4.
Insert the empty hole punch waste
container all the way into the
finisher.
5.
Close the front transport cover of the finisher.
NOTE: If the center front transport cover of the finisher is not completely closed, a
message will appear and the machine will not operate.
Page 39

39
4Job Status
This chapter contains information on the job status screens and the features available.
Job Status
This feature allows you to check the progress of incomplete jobs, or display the detailed
information of completed jobs. The newest job will be displayed at the top of the list.
You can also check, delete, or print documents stored in the public mailbox (polling
box) of the machine. Use the scroll bar to switch between screens.
For more information on each button, refer to the following:
Active Jobs – page 40
Completed Jobs – page 41
Secure Print Jobs & More – page 42
1.
Press the <Job Status> button
on the control panel.
NOTE: Press the <Features> or <All
Services> button at any time to exit.
2.
Select the required option.
<Job Status>
button
Page 40

4 Job Status
40
Active Jobs
This screen allows you to view incomplete jobs that are waiting, in progress, or
suspended. It also allows you to view Charge Print, Secure Print, Sample Set, or
Delayed Print documents that are currently stored in the machine. You can see job
attributes or promote/delete jobs.
1.
Press the <Job Status> button
on the control panel.
2.
Select the [Active Jobs] tab.
NOTE: Use the scroll bar to switch
between screens.
3.
Select a job to cancel or promote as required.
Print Waiting Jobs
Prints the jobs waiting in the incomplete jobs queue.
View by Job Type
Allows you to display only the selected type of jobs.
Owner
Displays the owner of each job.
Name
Identifies each job by job number and type.
Status
Displays the status of each job, such as printing, transferring, and sending.
Pop-up Menu
Selecting an active job in the [Active Jobs] screen displays the pop-up menu that allows
you to delete the job, release the job, or view the details of the job. The items displayed
on the menu are different depending on the job type and status.
• Delete - Deletes the job, or
displays a page that asks whether
or not to delete the job, depending
on the job type.
• Release - Prints the stored
document.
• Promote - Processes the job immediately after the one that is currently being
processed.
• Job Details/Details - Displays a job screen where you can view the details of the job.
• Close Menu - Closes the pop-up menu.
Job Screen
A job screen allows you to view the details of a job or stored document and select the
following buttons. The content of the screen and the buttons displayed vary depending
on the service type and status of the job or stored document.
Page 41

Completed Jobs
41
Delete
Cancels a job that is being processed or on hold, or deletes a stored document from
the machine’s memory.
Promote Job
Promotes a job to be processed immediately after the one being processed.
Last Original
Indicates the current scan batch is the last in a job to be scanned.
Next Original
Sequentially scans more sections in the same scan job.
Start
Starts scanning the next document or prints a job being held on the machine.
Release
Prints a stored document.
Completed Jobs
This screen allows you to view the completed jobs in the machine. You can select a job
in the list to display detailed attributes for that job. The contents of each screen may
differ depending on the type or status of the job.
1.
Press the <Job Status> button
on the control panel.
2.
Select the [Completed Jobs] tab.
Use the scroll bar to switch
between screens.
Group Parent Jobs
Select this check box to group all parent jobs, such as fax broadcasting jobs and jobs
executed using a job flow sheet.
View by Job Type
Allows you to display only the selected type of jobs.
Owner
Displays the owner of each job.
Name
Identifies each job by job number and type.
Status
Displays the status of each job, such as completed, deleted, and shutdown.
Completion Time
Displays the completion date and time of each job.
Page 42

4 Job Status
42
Job Attributes
Select a job on the [Completed Jobs] screen to display the job attributes. The attributes
displayed vary depending on the type of job.
Show Child Jobs
Select this button to show all child jobs for the selected job. The button is displayed only
when there are child jobs available.
Print this job History Report
Select this button to print a job history report for both parent and child jobs.
NOTE: The Job History Report feature is enabled by setting [System Settings] >
[Common Settings] > [Reports] > [Print Reports Button] to [Enabled]. For more
information, refer to
Reports in the Setups chapter on page 72.
Secure Print Jobs & More
This screen allows you to check, print, or delete documents stored in the machine.
NOTE: Some of the features on this screen may not be displayed depending on the
system settings and machine configuration.
For more information, refer to the following:
Charge Print – page 43
Private Charge Print – page 44
Secure Print – page 44
Sample Set – page 45
Delayed Print – page 46
Public Mailbox – page 46
Undelivered Faxes – page 47
1.
Press the <Job Status> button
on the control panel.
2.
Select the [Secure Print Jobs &
More] tab.
3.
Select the required option.
Page 43

Secure Print Jobs & More
43
Charge Print
The Charge Print feature temporarily stores documents on the machine per billing ID.
The feature prevents unauthorized printing by requiring users to log in to the machine
before printing. Documents without a billing ID are stored under [No User ID], and do
not require user login to be printed.
NOTE: Billing IDs can be set up on the print driver. For more information, refer to the
online help provided for the print driver.
NOTE: This feature is displayed when one of the following is selected under [Tools] >
[System Settings] > [Authentication/Security Settings] > [Authentication] > [Charge/
Private Print Settings] > [Receive Control] in the System Administration mode:
- [Save in Charge Print]
- [According to Print Auditron] > [Job Login Failure] > [Save in Charge Print]
- [According to Print Auditron] > [Job without User ID] > [Save in Charge Print]
- [Save in Private Charge Print] > [Job without User ID] > [Save in Charge Print]
1.
Select [Charge Print] on the
[Secure Print Jobs & More]
screen.
2.
Select a billing user ID, and then
the [Document List] button.
NOTE: Use the scroll buttons to switch between screens.
3.
Enter the passcode for the billing user ID, and select [Confirm].
NOTE: The passcode entry screen will not appear if a passcode is not set up for the
billing ID.
4.
Select a document to print or delete.
5.
Select the required option.
Refresh
Refreshes the displayed information.
Go to
Specifies the Charge Print number to be displayed on the screen. Enter a number
within the range of 001 to 200 using the scroll buttons or the numeric keypad.
Document List
Displays the list of stored documents for the selected billing ID in the list. The following
options are available:
• Delete - Deletes a document selected in the list.
• Print - Prints a document selected in the list. After printing, the document will be
deleted.
Page 44

4 Job Status
44
Private Charge Print
The Private Charge Print feature temporarily stores documents per user ID, until a user
logs in and manually prints them from the machine’s control panel. This feature only
displays documents of a logged-in user, and thus provides security and privacy to
documents stored in the machine.
NOTE: This feature is displayed only when [System Settings] > [Authentication/
Security Settings] > [Authentication] > [Charge/Private Print Settings] > [Receive
Control] > [Save in Private Charge Print] is selected.
1.
Press the <Log In/Out> button.
2.
Enter your user ID using the screen board or numeric keypad on the control panel,
and select [Confirm].
3.
Select [Private Charge Print] on the [Secure Print Jobs & More] screen.
NOTE: If you log in to the machine
with the System Administrator’s ID,
a list of user login IDs is displayed
on the screen. Select the desired
user ID from the list or enter it in [Go
to], and select [Document List]. The
documents stored for the selected user ID will be displayed.
4.
Select a document to print or
delete.
5.
Select the required option.
Refresh
Refreshes the displayed information.
Select All
Selects all documents in the list.
Delete
Deletes a document selected in the list.
Print
Prints a document selected in the list. After printing, the document will be deleted.
Secure Print
This feature allows you to print or delete passcode-protected stored documents. A
secure print job requires a user ID and a passcode registered in the machine.
1.
Select [Secure Print] on the
[Secure Print Jobs & More]
screen.
2.
Select a user ID.
NOTE: Use the scroll buttons to
switch between screens.
Page 45

Secure Print Jobs & More
45
3.
Select [Document List].
4.
Enter the passcode for the user ID, and select [Confirm].
5.
Select a document to print or delete.
6.
Select the required option.
Refresh
Refreshes the displayed information.
Go to
Specifies the Secure Print number to be displayed on the screen. Enter a number within
the range of 001 to 200 using the scroll buttons or the numeric keypad.
Document List
Displays the passcode entry screen for the selected user ID. Enter the passcode to
display the list of stored documents. The following options are available:
• Select All - Selects all documents in the list.
• Delete - Deletes a document selected in the list.
• Print - Prints a document selected in the list. Select whether or not to delete the
document after printing.
NOTE: Only the System Administrator can access the stored documents without
entering the passcode.
Sample Set
This feature allows you to print a sample set of a document prior to printing the whole
quantity. You can choose whether or not to print more sets after checking the print
result.
1.
Select [Sample Set] on the
[Secure Print Jobs & More]
screen.
2.
Select a user ID.
NOTE: Use the scroll buttons to
switch between screens.
3.
Select [Document List].
4.
Select a document to print or delete.
5.
Select the required option.
Refresh
Refreshes the displayed information.
Go to
Specifies the Sample Set number to be displayed on the screen. Enter a number within
the range of 001 to 200 using the scroll buttons or the numeric keypad.
Document List
Displays the list of stored documents for the selected user ID in the list. The following
options are available:
Page 46

4 Job Status
46
• Select All - Selects all documents in the list.
• Delete - Deletes a document selected in the list.
• Print - Prints a document selected in the list. After printing, the document will be
deleted.
Delayed Print
This feature allows you to store documents on the machine for printing at a later time.
You can check, print, or delete the stored documents before the specified print time.
1.
Select [Delayed Print] on the
[Secure Print Jobs & More]
screen.
2.
Select a document to print or
delete.
NOTE: Use the scroll buttons to switch between screens.
3.
Select the required option.
Refresh
Refreshes the displayed information.
Delete
Deletes a document selected in the list.
Print
Prints a document selected in the list.
Public Mailbox
This feature allows you to check, print, and delete documents stored in the public
mailbox (polling box) on the machine for polling.
For more information, refer to the Fax chapter in the User Guide.
1.
Select [Public Mailbox] on the
[Secure Print Jobs & More]
screen.
2.
Select a document to print or
delete.
NOTE: Use the scroll buttons to switch between screens.
3.
Select the required option.
Refresh
Refreshes the displayed information.
Document/Type
Identifies each document by number and type.
Stored Date
Displays the date the document was stored.
Page 47

Secure Print Jobs & More
47
Pages
Displays the number of printed, scanned, sent, or received pages.
Select All
Selects all the documents in the [Public Mailbox].
Print
Prints a document selected in the list.
Delete
Deletes a document selected in the list.
Undelivered Faxes
This feature allows you to delete or resend undelivered faxes. You can resend faxes to
their original recipient or change the recipient.
1.
Select [Undelivered Faxes] on
the [Secure Print Jobs & More]
screen.
2.
Select a document to delete or
resend.
NOTE: Use the scroll buttons to switch between screens.
3.
Press the <Start> button on the
control panel to resend the fax
to the original recipient.
Alternatively, select to delete the
document or send the document
to a different recipient.
Delete This Document
Deletes the selected document. A confirmation screen will be displayed before the
document is deleted.
Change Recipients
Displays the [Resend Fax] screen where you can specify a new fax recipient.
[Resend Fax] Screen
1.
Select the [Change Recipients]
button on the [Undelivered Fax]
screen.
2.
Specify a new recipient using
the [New Recipients] or
[Address Book] button.
New Recipients
Displays a keyboard which allows you to directly enter a recipient. For information on
how to enter a recipient on the keyboard, refer to the Fax chapter in the User Guide.
Page 48

4 Job Status
48
Address Book
Displays a page which allows you to select a recipient from the Address Book. For
information on how to select a recipient from the Address Book, refer to the Fax chapter
in the User Guide.
Starting Rate
Displays the [Starting Rate] screen where you can select the [G3 Auto] or [Forced 4800
bps] communication mode for fax transmissions. For more information, refer to the Fax
chapter in the User Guide.
Page 49

49
5 Machine Status
This chapter describes how to check the machine status, billing meter, and status of
consumables. It also describes how to print various reports/lists and how to access the
System Administration mode.
For information on each tab, refer to the following:
Machine Information – page 49
Faults – page 58
Supplies – page 58
Billing Information – page 59
Tools – page 60
1.
Press the <Machine Status>
button on the control panel.
NOTE: Press the <Features> or <All
Services> button at any time to exit.
2.
Select the required option.
Machine Information
This section describes how to view general information about the machine, the status
of paper trays and the hard disk, and how to change the print mode or fax receiving
mode.
For more information on the features available, refer to the following:
General Information – page 50
Paper Tray Status – page 50
Print Mode – page 51
Overwrite Hard Disk – page 52
Print Reports – page 52
Automatically Printed Reports/Lists – page 57
Fax Receiving Mode – page 58
<Machine Status> button
Page 50

5 Machine Status
50
1.
Press the <Machine Status>
button on the control panel.
2.
Select the [Machine Information]
tab.
3.
Select the required option.
General Information
This feature allows you to view user support information, the machine’s serial number
and configuration, and the software versions of the machine components.
1.
Select [General Information] on
the [Machine Information]
screen.
2.
Select the required option.
For enquiry on maintenance and operation
Displays the contact for technical support.
Machine Serial Number
Displays the serial number of the machine.
IP Address
Displays the IP address of the machine.
NOTE: If an IP Address is not displayed, check the settings under [Tools] > [System
Settings] > [Connectivity & Network Setup] > [Protocol Settings].
Machine Configuration
Displays the [Machine Configuration] screen where you can view the status of the
machine components. The screen displays the hardware components and the options
installed on the machine.
Software Version
Displays the [Software Version] screen where you can identify the software versions of
the machine components.
Paper Tray Status
This feature allows you to check the status of each paper tray, including Tray 5
(Bypass) and optional trays. It also displays the size, type, and remaining amount of
media in each tray.
1.
Select [Paper Tray Status] on
the [Machine Information]
screen.
Page 51

Machine Information
51
Print Mode
This feature allows you to change the default printer mode and emulation parameter
settings.
For the lists of emulation parameters and their values, refer to
Emulation Parameters
in the Appendix chapter on page 437.
1.
Select [Print Mode] on the
[Machine Information] screen.
2.
Select the required option.
Off-line
Takes the printer off-line. The printer is unavailable in this mode.
On-line
Puts the printer on-line, ready to accept data.
PCL Emulation
Allows you to set parameter values for PCL emulation to print documents. For a list of
parameters, refer to
PCL Emulation on page 437
.
1.
Select [PCL Emulation] on the
[Print Mode] screen.
2.
Enter a 3-digit parameter item
number in the [Item Number]
field.
3.
Select [Change Value] to change the displayed value, or select [Confirm] if no
change is required.
4.
If you selected [Change Value], enter the required value in the [New Value] field.
5.
Select [Save].
PDF
Allows you to set parameter values and a password for PDF direct printing.
NOTE: This feature is only available with the PostScript driver.
1.
Select [PDF] on the [Print Mode]
screen.
2.
Select the required option
Setup
Allows you to set emulation parameter item values for PDF direct printing. For a list of
PDF parameters, refer to
PDF Direct Printing on page 440
.
Page 52

5 Machine Status
52
1.
Select [Setup] on the [PDF]
screen.
2.
Enter a 3-digit parameter item
number in the [Item Number]
field.
3.
Select [Change Value] to change the displayed value, or select [Confirm] if no
change is required.
4.
If you selected [Change Value], enter the required value in the [New Value] field.
5.
Select [Save].
Password
Allows you to enter a password to restrict access to PDF direct printing.
1.
Select [Password] on the [PDF]
screen.
2.
Enter a password using the
keyboard.
3.
Select [Next].
4.
Re-enter the password.
5.
Select [Save].
Overwrite Hard Disk
This feature displays the overwrite status of the hard disk.
NOTE: This option is displayed when [Authentication/Security Settings] > [Overwrite
Hard Disk] is enabled.
1.
Select [Overwrite Hard Disk] on
the [Machine Information]
screen.
Print Reports
This feature allows you to print various reports/lists for each service.
NOTE: [Print Reports] is displayed when [System Settings] > [Common Service
Settings] > [Reports] > [Print Reports Button] is enabled. For more information, refer to
Reports in the Setups chapter on page 72.
NOTE: Some of the reports/lists on this screen are not displayed unless you are
logged in as the System Administrator.
NOTE: The reports/lists displayed on this screen vary depending on the enabled fax
service.
Page 53

Machine Information
53
1.
Select [Print Reports] on the
[Machine Information] screen.
Job Status/Activity Report
NOTE: When Server Fax is enabled, the [Job Status] feature is displayed instead of
the [Job Status/Activity Report] feature, and the [Activity Report] and [Stored
Document List] options are not available.
1.
Select [Job Status/Activity
Report] on the [Print Reports]
screen.
2.
Select the required option.
3.
Select the <Start> button on the
control panel.
Job History Report
Lists the jobs recorded on the machine. The data for the last 200 jobs is printed. Print
reports are available for [All Jobs], [Scan, Fax, & Internet Fax Jobs], [Job Flow & Auto
File Transfer jobs], and [Printer & Print from Mailbox Job]. Selecting the [Include Child
Jobs] check box prints one child job (related job) per line. Clearing the check box prints
all child jobs in one line.
Activity Report
Lists activity results of incoming and outgoing fax communications.
Error History Report
Lists the 50 most recent errors that occurred in the machine.
Stored Document List
Lists the fax jobs queued on the machine.
Copy Reports
1.
Select [Copy Reports] on the
[Print Reports] screen.
2.
Select the required option.
3.
Select the <Start> button on the
control panel.
Configuration Report
Lists common settings, such as hardware configuration, network information, and print
and copy feature settings.
Page 54

5 Machine Status
54
Printer Reports
1.
Select [Printer Reports] on the
[Print Reports] screen.
2.
Select the required option. Use
the scroll bars to switch between
screens.
3.
Select the <Start> button on the control panel.
Configuration Report
Lists common settings, such as hardware configuration, network information, and print
and copy feature settings.
PCL Settings List
Lists the PCL emulation mode settings.
PCL Macro List
Lists the macros registered for use with PCL emulation.
PDF Settings List
Lists the settings for PDF print mode.
TIFF/JPEG Settings List
Lists the settings for TIFF/JPEG print mode.
TIFF/JPEG Logical Printers List
Lists the settings for up to 20 logical printers created in TIFF/JPEG print mode.
PostScript Logical Printers List
Lists the logical printers created in PostScript mode.
Font List
Lists all the fonts available on the machine.
PCL Font List
Lists the fonts available in PCL emulation mode.
PostScript Font List
Lists the PostScript fonts available.
Scan Reports
NOTE: When Server Fax is enabled, the [Scan/Fax Reports] feature is displayed
instead of the [Scan Reports] and [Fax Reports] features. The options available for the
[Scan/Fax Reports] feature are identical to those of [Scan Reports].
1.
Select [Scan/Fax Reports] on
the [Print Reports] screen.
2.
Select the required option.
3.
Select the <Start> button on the
control panel.
Page 55

Machine Information
55
Reports
• Configuration Report - Lists common settings, such as hardware configuration,
network information, and print and copy feature settings.
• Scan/Fax Configuration Report - Lists settings specific to fax and scan features.
• Domain Filter List - Lists domains registered for domain filtering.
Job Template List
Lists the job templates that can be used on the machine. For more information on job
templates, refer to
Job Templates in the CentreWare Internet Services chapter on
page 162
.
Address Book
Prints a list of recipient addresses and relay stations for the selected range of address
numbers. Multiple ranges can be selected.
Fax Reports
NOTE: When Server Fax is enabled, the [Scan/Fax Reports] feature is displayed
instead of the [Scan Reports] and [Fax Reports] features. The options available for the
[Scan/Fax Reports] feature are identical to those of [Scan Reports].
1.
Select [Fax Reports] on the
[Print Reports] screen.
2.
Select the required option.
3.
Select the <Start> button on the
control panel.
Reports
• Configuration Report - Lists common settings, such as hardware configuration,
network information, and print and copy feature settings.
• Mailbox Selector List - Lists the settings for sorting into mailboxes.
• Scan/Fax Configuration Report - Lists settings specific to fax and scan features.
• Domain Filter List - Lists domains registered for domain filtering.
Address Book
Prints a list of recipient addresses and relay stations for the selected range of address
numbers. Multiple ranges can be selected. Check boxes are available to print only
group send settings or the settings for all address numbers.
Fax Comments List
Lists the comments saved for use on cover notes.
Billing Data List
Lists the billing data for fax jobs.
NOTE: This option is displayed when [Accounting] > [Accounting Type] > [Auditron
Mode] > [Fax Service] is enabled.
Page 56

5 Machine Status
56
Mailbox List
1.
Select [Mailbox List] on the
[Print Reports] screen.
2.
Select the required option.
3.
Select the <Start> button on the
control panel.
Mailbox List
Lists the mailbox settings and procedure when storing data in the mailbox.
Job Counter Report
1.
Select [Job Counter Report] on
the [Print Reports] screen.
2.
Select the required option.
3.
Select the <Start> button on the
control panel.
Job Counter Report
Lists the job counter reports for each service.
Auditron Reports
1.
Select [Auditron Reports] on the
[Print Reports] screen.
2.
Select the required option.
3.
Select the <Start> button on the
control panel.
When [Accounting Type] is [Accounting Disabled]
• Meter Report (Print Jobs) - Displays the number of pages printed per user and by all
users.
When [Accounting Type] is [Local Accounting] and [Auditron Mode] is enabled
• Auditron Report (Print Jobs) - Displays an Auditron report for all print jobs completed
by the selected users.
• Auditron Report (Copy Jobs) - Displays an Auditron report for all copy jobs
completed by the selected users.
• Auditron Report (Fax Jobs) - This is displayed when [Fax Service] or [Internet Fax
Service] is enabled under [Auditron Mode], and displays an Auditron report for all fax
jobs completed by the selected users.
• Auditron Report (Scan Jobs) - This is displayed when [E-mail Service], [Scan to PC
Service], [Scan to Mailbox Service], or [Network Scanning Service] is enabled under
[Auditron Mode], and displays an Auditron report for all scan jobs completed by the
selected users.
Page 57

Machine Information
57
Automatically Printed Reports/Lists
This section describes the various reports/lists that can be printed automatically.
Job History Report
Lists the last 50 jobs processed on the machine. For more information, refer to
Job
History Report on page 73
.
Activity Report
Lists activity results of incoming and outgoing fax communications. For more
information, refer to
Activity Report on page 73
.
Transmission Report - Job Undelivered
Lists undelivered documents and their transmission status. For more information, refer
to
Transmission Report - Job Undelivered on page 73
.
Transmission Report - Job Deleted
Lists transmissions cancelled by the user. For more information, refer to
Transmission
Report - Job Deleted on page 73
.
Mailbox Report
Lists documents received into a mailbox. For more information, refer to
Mailbox Report
on page 73
.
Broadcast/Multi-Poll Report
Lists the results of multi-poll transmissions. For more information, refer to
Broadcast/
Multi-Poll Report on page 73
.
Relay Broadcast Report
Lists the results of a relay broadcast when the broadcast ends. For more information,
refer to
Relay Broadcast Report on page 73
.
Scan File Transfer Report
Shows the results of scan file transfers. For more information, refer to
Scan File
Transfer Report on page 73
.
File Transfer Report - Fax Server
Shows the results of Server Fax transmissions. For more information, refer to
File
Transfer Report - Fax Server on page 74
.
Job Flow Error Report
Notifies a job flow error. For more information, refer to
Job Flow Error Report on
page 74
.
Copy Activity Report
Shows the usage report of a user’s completed copy service session. For more
information, refer to
Copy Activity Report in the Setups chapter on page 139.
Page 58

5 Machine Status
58
Fax Receiving Mode
This feature allows you to set the fax reception mode to [Manual Receive] or [Auto
Receive].
NOTE: This feature is not displayed when Server Fax is enabled.
1.
Select [Fax Receiving Mode] on
the [Machine Information]
screen.
Manual Receive
Starts receiving a fax or polling after you have answered the call and confirmed it is a
fax.
Auto Receive
Receives a fax automatically.
Faults
This tab allows you to print a report of recent errors, the date and time of the errors, the
error codes, and the status of each error. The status is either active or cleared.
NOTE: [Error History Report] is displayed when [System Settings] > [Common Service
Settings] > [Reports] > [Print Reports Button] is enabled. For more information, refer to
Reports in the Setups chapter on page 72.
1.
Press the <Machine Status>
button on the control panel.
2.
Select the [Faults] tab.
3.
Select [Error History Report] and
press the <Start> button on the
control panel.
Supplies
This tab allows you to view the status of consumables.
1.
Select the [Supplies] tab on the
[Machine Status] screen.
Page 59

Billing Information
59
Billing Information
This tab allows you to view the billing meter information.
For more information, refer to the following:
Billing Information – page 59
User Account Billing Information – page 59
1.
Press the <Machine Status>
button on the control panel.
2.
Select the [Billing Information]
tab.
3.
Select the required option.
Billing Information
This feature allows you to view the total number of prints made on the machine. You
can also view the machine’s serial number.
1.
Select [Billing Information] on
the [Billing Information] screen.
Machine Serial Number
Displays the serial number of the
machine.
Current Meter Reading
• Total Impressions - Displays the number of total copies and prints.
User Account Billing Information
This feature displays the billing information of the currently logged-in user.
NOTE: This feature is available only when [Accounting] > [Accounting Type] is set to
[Local Accounting], and the corresponding [Auditron Mode] is enabled.
1.
Select [User Account Billing
Information] on the [Billing
Information] screen.
Meter (Copy Jobs)
Displays the meter readings for copy jobs.
Meter (Scan Jobs)
Displays the meter readings for scan jobs.
Meter (Print Jobs)
Displays the meter reading for print jobs.
Page 60

5 Machine Status
60
Tools
On the [Tools] screen, the System Administrator can change various default presets on
the machine, register mailboxes and job flow sheets, and configure authentication and
security features.
To access all features on this screen, you must enter the machine in the System
Administration mode. Use the following steps to enter the [Tools] screen in the System
Administration mode.
1.
Press the <Log In/Out> button
on the control panel.
2.
Enter the correct user ID using
the numeric keypad on the
control panel or the screen
keyboard.
NOTE: The default System
Administr at o r I D i s “11111 ” . I f the A u t hentication feature is enabled, you may also be
required to enter a passcode. The default passcode is “x-admin”. To change the
default user ID or passcode, refer to
System Administrator Settings on page 140
.
3.
Press the <Machine Status> button.
4.
Select the [Tools] tab.
5.
Select the required option.
System Settings
This menu allows you to change various default presets on the machine.
For more information on the features available, refer to
System Settings on page 65
.
Setup
This menu allows you to program various items, such as mailboxes, job flow sheets,
and the Address Book.
NOTE: This feature is available on the [Tools] screen even when you enter the screen
in the general user’s mode (when you skip Steps 1 and 2).
For more information on the features available, refer to
Setup on page 123
.
<Log In/Out>
button
Page 61

Tools
61
Accounting
This menu allows you to configure accounting functions and view jobs performed by
each account.
For more information on the features available, refer to
Accounting on page 133
.
Authentication/Security Settings
This menu allows you to set up the authentication and security features.
For more information on the features available, refer to
Authentication/Security
Settings on page 139
.
Page 62

5 Machine Status
62
Page 63

63
6Setups
This chapter describes how to change the various defaults preset on the machine, how
to register the various items such as mailboxes and destinations, and how to configure
or change the System Administrator settings.
Setting Procedure
This section describes the basic setting procedure available in the System
Administration mode. Follow the steps below.
1. Enter the System Administration Mode – page 63
2. Configure a Feature – page 64
3. Exit the System Administration Mode – page 64
1. Enter the System Administration Mode
1.
Press the <Log In/Out> button
on the control panel.
2.
Enter the correct user ID using
the numeric keypad on the
control panel or the screen
keyboard. For information on
how to use the keyboard, refer
to New Recipients in the Fax
chapter of the User Guide.
NOTE: The default System Administrator ID is “11111”. If the Authentication feature is
enabled, you may also be required to enter a passcode. The default passcode is
“x-admin”. To change the user ID or passcode, refer to
System Administrator Settings
on page 140
.
<Log In/Out>
button
Page 64

6Setups
64
2. Configure a Feature
1.
Press the <Machine Status>
button on the control panel.
2.
On the Machine Status screen,
select the [Tools] tab.
3.
Select a menu item from the
main menu displayed on the left
side of the [Tools] screen.
4.
Select a group in the [Group]
menu.
5.
Select a feature in the [Features] menu, and then configure the feature.
NOTE: Some features display the [Change Settings] button. Select the button to
change settings or to enter information using the screen keyboard. For information on
how to use the keyboard, refer to New Recipients in the Fax chapter of the User
Guide.
6.
Select [Close].
3. Exit the System Administration Mode
1.
Press the <Log In/Out> button
on the control panel.
2.
If the [Logout] screen appears,
select [Logout] to exit the
System Administration mode.
If the [Reboot Machine] screen
appears, select [Reboot Now] to
exit the System Administration
mode and to reboot the
machine.
<Machine
Status>
button
<Log In/Out>
button
Page 65

Main Menu on the [Tools] Screen
65
Main Menu on the [Tools] Screen
The main menu, displayed on the left side of the [Tools] screen, provides the following
menu items. Refer to the respective sections for details. [Setup] is also available for
general users.
System Settings – page 65
Setup – page 123
Accounting – page 133
Authentication/Security Settings –
page 139
System Settings
The [System Settings] menu on the [Tools] screen is categorized into the following
groups. For details, refer to the respective sections.
Common Service Settings – page 65
Copy Service Settings – page 84
Connectivity & Network Setup – page 90
Print Service Settings – page 100
Scan Service Settings – page 105
Fax Service Settings – page 110
E-mail/Internet Fax Service Settings – page 118
Mailbox/Stored Document Settings – page 121
Job Flow Service Settings – page 123
Common Service Settings
This section describes how to configure or change machine settings common to main
services such as copy, fax, and scan. For more information, refer to the following:
Machine Clock/Timers – page 66
Audio Tones – page 67
Screen/Button Settings – page 68
Paper Tray Settings – page 70
Image Quality – page 72
Reports – page 72
Maintenance – page 74
Watermark – page 76
Other Settings – page 77
1.
Select [System Settings], and
then select [Common Service
Settings] in the [Group] menu.
Page 66

6Setups
66
Machine Clock/Timers
This feature allows you to set the correct date, time, and other related values.
1.
Select [Machine Clock/Timers]
in the [Features] menu.
2.
Change the required settings.
Use the side tabs to switch
between screens.
3.
Select [Close].
Date
Specifies the current date. Select from three date formats: Y/M/D, M/D/Y, and D/M/Y.
The date set here is printed on lists and reports.
Time
Specifies the current time. Select a 12- or 24-hour display format. If you select [12 Hour
Clock], the buttons for specifying AM or PM are displayed. The time set here is printed
on lists and reports.
Time Zone
Specifies the time zone relative to Greenwich Mean Time (GMT).
Daylight Savings
Specifies whether to automatically adjust the machine clock for Daylight Savings.
• WorkCentre 5225A/5230A:
Select [Adjust by Day, Month & Time] or [Adjust by Month, Week, Day of Week &
Time], and then specify the start and end dates of the Daylight Savings time to
automatically adjust the current time when the Daylight Savings time starts and
ends.
• WorkCentre 5222/5225/5230:
Select [Adjust On] and then specify the start and end dates of the Daylight Savings
time to automatically adjust the current time when the Daylight Savings time starts
and ends.
NTP Time Synchronization
Specifies the parameters used to synchronize the time of the machine with that of the
specified time server using the Network Time Protocol (NTP).
NOTE: If the time server connection fails, the machine maintains its own time without
synchronization.
• Connection to Time Server
Specifies whether to enable the connection to a time server.
• Connection Interval
Specifies the time span between connections to the specified server, in the range
from 1 to 500 hours.
• Time Server Address
Specifies the IP address of the time server using the numeric keypad on the control
panel.
Page 67

System Settings
67
Auto Clear
Specifies whether to automatically display the default screen if you do not perform any
operation within the selected period of time. Select [On] and then select the time period
in the range from 30 to 900 seconds.
Auto Job Release
Specifies whether to automatically release the current job to allow execution of the next
job, if a problem such as a paper jam interrupts the current copy or scan job and is not
resolved within the selected period of time. Select [On] and then select the time period
in the range from 4 to 99 minutes.
Auto Print
Specifies whether to automatically print jobs if you do not perform any operation within
the selected period of time. Select [On] and then select the time period in the range
from 1 to 240 seconds.
Printer Lockout Duration
Specifies whether to prohibit printing of incoming documents (for example, faxes) for a
specified duration. Select [On] and then specify the start and end times of the interval
during which printing will be prohibited.
Power Saver/Energy Saver Timers
Specifies the time interval of inactivity before automatically switching the machine to
Low Power Mode, a second time interval of inactivity before switching to Sleep Mode.
Select the time period for each mode in the range from 2 to 60 minutes. You must select
a longer time period for the Sleep Mode than for the Low Power Mode.
Audio Tones
This feature allows you to select the volume level of tones to be generated at various
occasions. You can choose different volume levels for each item shown on the screen.
1. Select [Audio Tones] in the
[Features] menu.
2. Change the required settings.
Use the side tabs to switch
between screens.
3. Select [Close].
Control Panel Select Tone
Specifies the volume level of the tone generated when an appropriate button on the
control panel is pressed and its action is accepted.
Control Panel Alert Tone
Specifies the volume level of the tone generated when an inappropriate button on the
control panel is pressed.
Machine Ready Tone
Specifies the volume level of the tone generated when the machine becomes ready to
copy or print, for example, after the power is switched on.
Page 68

6Setups
68
Job Complete Tone 1 / Job Complete Tone 2
Specifies the volume level of the tone generated when a job is completed successfully.
Select a volume level, and then, under [Targeted Jobs], select the job types to apply
the volume level to.
Fault Tone
Specifies the volume level of the tone generated when a job did not finish properly.
Alert Tone
Specifies the volume level of the tone generated when a job is suspended due to an
error.
Out of Paper Warning Tone
Specifies the volume level of the tone generated when the machine runs out of paper.
Low Toner Alert Tone
Specifies the volume level of the tone generated when it is time to replace the toner
cartridge.
Line Monitor Volume
Specifies the volume level of the tone generated for the line monitor, which allows you
to hear call and response signals when connecting to a destination.
Ringing Volume
Specifies the volume level of the tone generated when a call is received.
Stored Programming Tone
Specifies the volume level of the tone generated each time an operation is performed
during job memory registration. You cannot completely turn off the volume for this tone.
Auto Clear Alert Tone
Specifies the volume level of the tone generated just before the machine performs auto
clear.
Base Tone
Specifies the volume level of the base tone generated when you toggle settings. The
machine emits a base tone when it exits the interrupted mode.
Screen/Button Settings
This feature allows you to customize the initial screen and select the initial language to
be displayed on the touch screen.
1.
Select [Screen/Button Settings]
in the [Features] menu.
2.
Change the required settings.
Use the side tabs to switch
between screens.
3.
Select [Close].
Page 69

System Settings
69
Screen Default at Power On
Specifies the initial screen to be displayed when the machine is switched on. Set the
preset initial screen to the All Services, Job Status, or Machine Status screen. For
information on the Job Status and Machine Status screens, refer to
Job Status on page
39 and Machine Status on page 49
.
Service Screen Default
Specifies the default features to be displayed when canceling the Energy Saver mode.
Use the scroll buttons to switch between screens.
Service Screen After Auto Clear
Specifies the screen to be displayed after the machine performs Auto Clear.
Auto Display of Login Screen
Specifies whether to display the [Login] screen automatically when power is switched
on, or when the Energy Saver mode is canceled.
All Services
Specifies the services and features available on the All Services screen. Select a
button, and then select a service or feature to assign to the button. Use the scroll
buttons to switch between screens.
NOTE: Assigning the [Setup] feature to a button enables users to directly access the
[Tools] screen from the All Services screen. The button for the [Setup] feature will be
displayed on the All Services screen as [Tools] in the System Administration mode,
and as [Setup] in the general user mode.
Job Type on Job Status screen
Specifies the job types to be displayed when you select [Completed Jobs] on the [Job
Status] screen.
Default Language
Specifies the default language to be displayed on the touch screen.
Reconfirm E-mail Recipient
Specifies whether to reconfirm e-mail recipients before transmission. Select
[Confirmation Not Required] to disable this setting, [Always Reconfirm Recipient] to
always require reconfirmation of recipients, or [Reconfirm If Multiple Recipients] to
require reconfirmation only when multiple recipients are specified.
Reconfirm Fax Recipient
Specifies whether to reconfirm fax recipients before transmission. Select [Confirmation
Not Required] to disable this setting, [Always Reconfirm Recipient] to always require
reconfirmation of recipients, or [Reconfirm If Multiple Recipients] to require
reconfirmation only when multiple recipients are specified.
Reconfirm Internet Fax Recipient
Specifies whether to reconfirm Internet Fax recipients before transmission. Select
[Confirmation Not Required] to disable this setting, [Always Reconfirm Recipient] to
always require reconfirmation of recipients, or [Reconfirm If Multiple Recipients] to
require reconfirmation only when multiple recipients are specified.
Page 70

6Setups
70
Paper Tray Settings
This feature allows you to configure various settings for trays, and for paper to be
loaded in the trays.
1.
Select [Paper Tray Settings] in
the [Features] menu.
2.
Change the required settings.
3.
Select [Close].
Custom Paper Name / Color
Specifies user-defined paper names and paper colors for Custom Paper Type 1 to 5
and Custom Paper Color 1 to 5 respectively. The settings are available for plain paper,
bond paper, and recycled paper. Enter a name of up to 24 alphanumeric characters
and symbols. Assigned names are displayed on the screens relating to paper supply.
Paper Tray Attributes
Specifies the size and type of paper loaded in the paper trays. The paper trays
available vary depending on your machine configuration.
Select automatic detection of the paper size or specify a fixed size. Select a paper type
from the list of preset types.
NOTE: The machine also displays a screen for changing/confirming the following
settings when a paper tray is pulled out and then closed.
• Paper Size
Specifies automatic detection of the paper size for Tray 1 to Tray 4, and Tray 6 using
the tray guide levers. If the guide levers in a paper tray are not in the correct position
for the size of paper loaded in the tray, a size error will occur. This setting is not
available for Tray 5 (Bypass).
NOTE: When loading trays with postcards, contact the Xerox Welcome Center to
have the tray settings changed specially for the use of postcards.
–Custom Size
Displays the [Custom Size] screen. When you load non-standard size paper in Tray
1, Tray 2, Tray 3, or Tray 4, specify the paper width (X) and the paper height (Y) for
that tray.
NOTE: Tray 6 does not support the [Custom Size] setting.
– Auto Size Detect
Enables the Auto Detect feature.
• Paper Type / Color
Specifies the paper type and color for each paper tray.
NOTE: When the Envelope Tray is installed, place a check mark in the [Envelope
Feeder] check box on the [Tray 1] screen. Paper size, type, and color options for the
Envelope Tray will then be selectable under [Paper Size] and [Paper Type / Color].
Paper Tray Attributes on Setup Screen
Specifies whether to display the paper tray attributes on the [Setup] menu.
Page 71

System Settings
71
Paper Tray Attributes During Loading
Specifies whether to display the paper tray attributes on the control panel when the tray
is opened to load paper. This setting does not apply to Tray 5 (Bypass).
Paper Tray Priority
Specifies the paper tray priority for Auto Tray Switching. Tray 5 (Bypass) is not
available. To exclude a tray from Auto Tray Switching, select the tray and then select
the [Exclude from Tray Switching] button. For more information on Auto Tray Switching,
refer to
Auto Tray Switching on page 22
.
Paper Type Priority
Specifies the paper type priority for Auto Tray Switching. This setting overrides the
Paper Tray Priority. If the priority of paper types is set to the same value, then Auto Tray
Switching will select a tray based on the Paper Tray Priority. Selecting [Auto Paper Off]
prevents the paper type from being used by Auto Tray Switching. For more information
on Auto Tray Switching, refer to
Auto Tray Switching on page 22
.
Tray 5 - Paper Size Defaults
Specifies the default paper sizes to be displayed on the [Tray 5] screen of the [Paper
Supply] feature. If you frequently use non-standard size paper for copying, assigning
the paper size to a button will be helpful for you.
• A/B Series Size
Displays standard paper sizes of the A/B series.
•Inch Size
Displays standard paper sizes of the Inch series.
• Others
Displays other paper sizes.
•Custom Size
Allows you to enter a paper size. Specify the paper width (X) and the paper length
(Y).
Auto Tray Switching Control
Specifies whether to enable Auto Tray Switching. For more information on Auto Tray
Switching, refer to
Auto Tray Switching on page 22
.
• Auto Tray Switching
Specifies the conditions to enable the Auto Tray Switching feature.
• Targeted Paper Type (Copy Jobs)
Targets some paper types according to the settings in [Paper Tray Priority] or only
one paper type.
• Targeted Paper Color (Copy Jobs)
Targets all paper colors or only one paper color.
NOTE: In any of the following cases, Auto Tray Switching is not available.
– If Tray 5 (Bypass) is selected.
– If the specified tray holds paper other than Plain paper, Recycled paper, Side 2
paper, and Custom paper.
Page 72

6Setups
72
– If the specified tray holds paper set under [Auto Paper Off] in the [Paper Type
Priority] setting.
Image Quality
This feature allows you to configure various settings to adjust the quality of scanned
data.
1.
Select [Image Quality] in the
[Features] menu.
2.
Change the required settings.
3.
Select [Close].
Photo & Text Recognition
Specifies the level at which the machine distinguishes between text and photos when
[Original Type] is set to [Photo & Text] on the [Image Quality] screen. Select [More Text]
to make very fine characters become more easily recognizable as text. Select [More
Photo] to make halftone images on newspapers and flyers become more easily
recognizable as photos.
Background Suppression (B/W Copy)
Specifies the method for detecting the background color for background suppression
when making copies. Select [High Quality] to pre-scan the whole document to detect
the background color. Select [High Speed] to sample a portion of the document to
detect the background color.
NOTE: This function is available only for documents placed on the document glass.
NOTE: When [High Quality] is selected, a picture fragment may be produced if the
[Corner Shift] option is set and [Reduce/Enlarge] is set to less than 60%.
Background Suppression (Scan Jobs)
Specifies the method for detecting the background color for background suppression
when making scans. Select [High Quality] to pre-scan the whole document to detect
the background color. Select [High Speed] to sample a portion of the document to
detect the background color.
NOTE: This function is available only for documents placed on the document glass.
Image Enhancement
Specifies whether to perform smoothing on print data for copy and fax jobs. This will
give smoother images on printed paper.
Reports
This feature allows you to specify how reports are to be automatically printed.
1.
Select [Reports] in the
[Features] menu.
2.
Change the required settings.
Use the side tabs to switch
between screens.
3.
Select [Close].
Page 73

System Settings
73
Print Reports Button
Specifies whether to display the [Print Reports] button on the [Machine Information]
screen. Refer to
Print Reports in the Machine Status chapter on page 52.
Job History Report
Specifies whether to automatically print a Job History Report for every 50 jobs.
Activity Report
Specifies whether to automatically print an Activity Report for every 100 fax jobs. An
Activity Report shows the result of transmissions and receptions.
Transmission Report - Job Undelivered
Specifies whether to automatically print a “Transmission Report - Job Undelivered”
report for fax jobs. A “Transmission Report - Job Undelivered” report shows the list of
documents where transmission failed.
Transmission Report - Job Deleted
Specifies whether to automatically print a “Transmission Report - Job Deleted” report
for fax jobs when fax transmission jobs are interrupted. A “Transmission Report - Job
Deleted” report shows the list of documents where transmission was cancelled.
Mailbox Report
Specifies whether to automatically print a Mailbox Report for fax jobs. A Mailbox Report
shows the accumulation of documents in the Private Mailbox. For more information,
refer to Remote Mailbox in the Fax chapter in the User Guide.
Broadcast/Multi-Poll Report
Specifies whether to automatically print a Broadcast/Multi-Poll Report for fax jobs. A
Broadcast/Multi-Poll Report shows the results of transmissions and polling requests to
multiple remote machines.
Relay Broadcast Report
Specifies whether to automatically print a Relay Broadcast Report for fax jobs. A Relay
Broadcast Report shows the result of fax transmissions for relay broadcasting.
•Off
Disables the feature.
• Send to Relay Station
Sends a Relay Broadcast Report to relay stations.
• Print at Local Station
Prints out a Relay Broadcast Report.
• Send to Relay, Print at Local
Prints out a Relay Broadcast Report and sends it to the relay stations.
Scan File Transfer Report
Allows you to set whether to print a transmission report after the machine sends
scanned data using a scan service.
Page 74

6Setups
74
• No Report
Does not print a report regardless of whether data transmission is successfully
completed or not.
• Print Report
Automatically prints a transmission report for a successful transmission, and a
“Transmission Report - Job Undelivered” for a transmission failure.
• Print when delivery fails
Prints a “Transmission Report - Job Undelivered” for a transmission failure.
File Transfer Report - Fax Server
Allows you to set whether to print a transmission report after the machine sends
scanned data using the Server Fax service.
• No Report
Does not print a report regardless of whether data transmission is successfully
completed or not.
• Print Report
Automatically prints a transmission report for a successful transmission, and a
“Transmission Report - Job Undelivered” for a transmission failure.
• Print when delivery fails
Prints a “Transmission Report - Job Undelivered” for a transmission failure.
NOTE: When [IPv4 - IP Address] is not set under [Protocol Settings] in [Connectivity &
Network Setup], no destination will be written in reports.
2 Sided Report
Specifies whether a report is to be automatically output to both sides of paper or one
side only.
Recipient on Activity Report
Specifies the section of the destination’s information to be printed on an Activity Report.
Select [First 40 characters] or [Last 40 characters].
Job Flow Error Report
Specifies whether to automatically print a Job Flow Error Report.
Maintenance
This feature allows you to initialize the hard disk on the machine, to delete all document
data stored in the machine, and to enter software options.
1.
Select [Maintenance] in the
[Features] menu.
2.
Change the required settings.
3.
Select [Close].
Page 75

System Settings
75
Initialize Hard Disk
This feature allows you to initialize the hard disk on the machine. After selecting
[Initialize Hard Disk], select a partition, and then select [Start]. Then select [Yes] to
execute initialization. After the initialization is completed, select [Confirm].
NOTE: This process may take a while depending on the machine configuration.
Delete All Data
Allows you to delete all document data on the machine. Select [Delete All Data], and
then select [Start]. Then select [Yes] to execute deletion. After the deletion finishes, you
need to switch the machine off and then on.
NOTE: This process may take a few hours depending on the machine configuration.
Software Options
Specifies software options. For information on setting procedures and software codes,
refer to the instructions for the required software option package. Enter passwords for
the software options using the keyboard screen and select [Reboot].
Document Feeder Scanning Position
Allows you to adjust the scanning position for the document feeder. To reset the
scanning position to the factory-default position, use the [Factory Settings] button.
Finisher Adjustment
Allows you to configure the punch and booklet functions of the Office Finisher LX.
• Hole Punch Tool
Displays the available hole punch tools. Select the hole punch tool installed on the
Finisher.
• Adjust Punch Position/Booklet Fold Position
– Punch Position, smaller than B4 - Allows you to adjust the punch position for
paper smaller than the B4 size.
– Punch Position, B4 or larger - Allows you to adjust the punch position for B4 or
larger paper.
The following explains how to adjust the punch position.
1.
Select [Punch Position, smaller than B4] or [Punch Position, B4 or larger], and
then select [Change Settings].
2.
On the screen displayed, select [Sample Printout], and then select the tray to
output a sample printout for. Press the <Start> button.
3.
Enter the value of the current punch position into [Value A Before Adjustment].
4.
Enter the desired punch position into [Desired Value A].
5.
Select [Adjust] to apply the setting.
6.
Select [Sample Printout] and then select the tray again, to output a sample
printout. Check with the sample printout that the punch position has been
adjusted.
–Booklet fold Position, smaller than B4 - Allows you to adjust the fold and staple
positions for paper smaller than the B4 size.
– Booklet Fold Position, B4 or larger - Allows you to adjust the fold and staple
positions for B4 or larger paper.
Page 76

6Setups
76
The following explains how to adjust the fold and staple positions.
1.
Select [Booklet fold Position, smaller than B4] or [Booklet Fold Position, B4 or
larger], and then select [Change Settings].
2.
Select [Sample Printout], and then select the tray to output a sample printout for.
Press the <Start> button.
3.
Select the option that best describes the current fold and staple positions.
4.
Enter the desired fold and staple positions into [A] and [B].
5.
Select [Adjust] to apply the settings.
6.
Select [Sample Printout] and then select the tray again, to output a sample
printout. Check with the sample printout that the fold and staple positions have
been adjusted.
Delete All Certificates/Initialize Settings (WorkCentre 5225A/5230A)
Deletes all certificates stored in the machine, and initializes the security settings
associated with the certificates.
Watermark
This feature allows you to set the defaults for date and text information which can be
added to the output as a watermark, for document management control.
1.
Select [Watermark] in the
[Features] menu.
2.
Change the required settings.
Use the side tabs to switch
between screens.
3.
Select [Close].
Date Format
Specifies the current date. Select from three date formats: 20yy/mm/dd, dd/mm/20yy,
mm/dd/20yy.
Default Watermark Effect
Specifies the default setting of the Text Effect feature.
•Off
Does not use the Text Effect feature.
• Embossed
Embosses background text.
• Outline
Prints the outline of background text.
Default Watermark
Specifies the default watermark text from a list of preset and custom text strings.
Font Size
Specifies the default watermark font size. You can select from three preset font sizes
or specify a value between 24 and 80 points using the scroll buttons.
Page 77

System Settings
77
Background Pattern
Specifies the background pattern to be used for the Watermark feature.
Density
Specifies the output density of the watermark text. You can select from Lighten,
Normal, and Darken.
Watermark/Background Contrast
Specifies the level of contrast between watermark text and its background.
Force Watermark - Copy Job
Specifies whether to always enable the Watermark feature for copy jobs.
Force Watermark - Client Print
Specifies whether to always enable the Watermark feature for print jobs submitted from
client computers.
Force Watermark - Mailbox Print
Specifies whether to always enable the Watermark feature for Mailbox Print jobs.
Custom Watermark 1 to 3
Specifies three user-defined text strings that appear in the [Text Default] list. A
maximum of 32 alphanumeric and symbol characters can be entered.
Other Settings
This feature allows you to configure various other settings common to the main
services such as copy, fax, and scan.
1.
Select [Other Settings] in the
[Features] menu.
2.
Change the required settings.
Use the side tabs to switch
between screens.
3.
Select [Close].
Fax Service
Switches between the Fax and Server Fax services.
NOTE: This setting appears when both Fax and Server Fax services are installed on
the machine.
Offset (xxx Tray)
Specifies the output paper stacking position for the tray. The tray name displayed for
this setting depends on the machine configuration. When printing, the machine can
slightly offset the paper output position for each copy or print set. This allows you to
identify the start of each set.
Booklet Offset
Specifies whether to offset the copies or prints processed using the Folding function of
the Office Finisher LX Booklet Maker. This setting is effective only when the [Offset]
setting for the Right Middle Tray is set to [Offset per Set].
Page 78

6Setups
78
Extended Tray Module
Select the type of Extended Tray Module used. If the Left Side Tray is installed, select
[Offset Module] to use the Center Tray.
Auto Job Promotion
Specifies whether jobs can automatically be promoted, bypassing other jobs, when the
machine is unable to complete the current job. For example, if there is no paper in the
required paper tray for the current job.
NOTE: Stored documents, such as secure prints and sample prints, cannot be
promoted.
Default Print Paper Size
Specifies the paper size to be used as the initial setting.
Odd Page 2 Sided
Specifies whether to add a blank page to a document that contains an odd number of
pages, so that the document prints as an even number of pages.
Paper Size Settings
Specifies the paper size table used when the machine is set to detect standard sizes
of documents and recording media automatically.
You can select from the following tables: [A/B Series (8 × 13”)], [A/B Series], [A/B
Series (8K/16K)], [A/B Series (8 × 13”/8 × 14”)], and [Inch Series].
NOTE: When loading trays with postcards, contact the Xerox Welcome Center to
have the tray settings changed specially for the use of postcards.
• Documents
The machine automatically recognizes the sizes listed on the following page when
a document is placed on the document glass or loaded in the document feeder.
Page 79

System Settings
79
O: Available
Blank: Not available
Size
Width
(mm)
Length
(mm)
Document Glass Document Feeder
A/B Series
(8 x 13”)
A/B Series
A/B Series
(8K/16K)
A/B Series
(8 x 13”/8 x 14”)
Inch Series
A/B Series
(8 x 13”)
A/B Series
A/B Series
(8K/16K)
A/B Series
(8 x 13”/8 x 14”)
Inch Series
A5 SEF 148.0 210.0 O O O O O*1O*1O*1O*
1
A5 LEF 210.0 148.0 O O O O O O
5.5 × 8.5” LEF 215.9 139.7 O O O O O
5.5 × 8.5” SEF 139.7 215.9 O O*
1
B5 SEF 182.0 257.0 O O O O O
B5 LEF 257.0 182.0 O O O O*
1
OOO*1O*
1
A4 SEF 210.0 297.0 O O O O O*1OOO*1O*
1
A4 LEF 297.0 210.0 O O O OOOOO OO
8.5 × 11” SEF
(Letter)
215.9 279.4 O O O O*
1O*1
OO
8.5 × 11” LEF
(Letter)
279.4 215.9 O O O O O O*
1O*1
OO
8.5 × 13” SEF
(Legal)
215.9 330.2 O O O O O
8.5 × 14” SEF
(Legal)
215.9 355.6 O O
B4 SEF 257.0 364.0 O O O O*
1
OOO*1O*
1
16K SEF 194.0 267.0 O
16K LEF 267.0 194.0 O O*
1O*1
8K SEF 267.0 388.0 O O*1O*
1
A3 SEF 297.0 420.0 O O O OOOOO OO
11 × 17” SEF 279.4 431.8 O O O O O O*
1O*1
OO
7.25 × 10.5” SEF
(Executive)
184.2 266.7
7.25 × 10.5” LEF
(Executive)
266.7 184.2 O O O O O
C4 Envelope SEF 229.0 324.0
C5 Envelope LEF 229.0 162.0
C5 Envelope SEF 162.0 229.0
Commercial 10
Envelope LEF
241.3 104.8
DL Envelope LEF 220.0 110.0
Monarch Envelope
LEF
190.5 98.4
European 0
Envelope LEF
235.0 120.0
A6 SEF 105.0 148.0 O O O O
A6 LEF 148.0 105.0
Postcard SEF 100.0 148.0
Postcard LEF 148.0 100.0
4 × 6” LEF 152.4 101.6
4 × 6” SEF 101.6 152.4 O
Prepaid Postcard
LEF
200.0 148.0
3.5 × 5.5” SEF 89.0 139.7
5 × 7” SEF 127.0 177.8 O
B6 LEF 182.0 128.0
B6 SEF 128.0 182.0 O O O O
Page 80

6Setups
80
*1: When scanning mixed sized originals, automatic size detection is not available.
• Paper Size
The machine automatically recognizes the sizes listed on the following pages when
recording media is loaded in Trays 1, 2, Trays 3 and 4 (Two Tray Module), Trays 3
and 4 (High Capacity Tandem Tray), Envelope Tray, or Tray 6 (High Capacity
Feeder).
NOTE: For [Tray 5], 11 paper sizes can be selected as presets by the System
Administrator from the sizes listed in the table on the following pages.
Page 81

System Settings
81
O: Available
Blank: Not available
Size
Width
(mm)
Length
(mm)
Tray 1, 2
Tray 3 & 4
(Two Tray Module)
Tray 1
(Envelope Tray)
Tray 3 & 4 (HCTT)
A/B Series
(8 x 13”)
A/B Series
A/B Series
(8K/16K)
A/B Series
(8 x 13”/8 x 14”)
Inch Series
A/B Series
(8 x 13”)
A/B Series
A/B Series
(8K/16K)
A/B Series
(8 x 13”/8 x 14”)
Inch Series
A/B Series
(8 x 13”)
A/B Series
A/B Series
(8K/16K)
A/B Series
(8 x 13”/8 x 14”)
Inch Series
A5 SEF 148.0 210.0 O O O O
A5 LEF 210.0 148.0
5.5 × 8.5” LEF 215.9 139.7
5.5 × 8.5” SEF 139.7 215.9 O
B5 SEF 182.0 257.0 O O O O O
B5 LEF 257.0 182.0 O O O O
A4 SEF 210.0 297.0 O O O O O
A4 LEF 297.0 210.0 O O O O O O O O O O
8.5 × 11” SEF
(Letter)
215.9 279.4 O O O O O
8.5 × 11” LEF
(Letter)
279.4 215.9 O O O O O O O O O O
8.5 × 13” SEF
(Legal)
215.9 330.2 O O O O O
8.5 × 14” SEF
(Legal)
215.9 355.6 O O O O O
B4 SEF 257.0 364.0 O O O O O
16K SEF 194.0 267.0
16K LEF 267.0 194.0 O O
8K SEF 267.0 388.0 O O
A3 SEF 297.0 420.0 O O O O O
11 × 17” SEF 279.4 431.8 O O O O O
7.25 × 10.5” SEF
(Executive)
184.2 266.7
7.25 × 10.5” LEF
(Executive)
266.7 184.2 O O O O O O
C4 Envelope
SEF
229.0 324.0
C5 Envelope
LEF
229.0 162.0 O O O O O
C5 Envelope
SEF
162.0 229.0
Commercial 10
Envelope LEF
241.3 104.8 O O O O O
DL Envelope
LEF
220.0 110.0 O O O O O
Monarch
Envelope LEF
190.5 98.4 O O O O O
Youkei 0
Envelope LEF
235.0 120.0
A6 SEF 105.0 148.0
A6 LEF 148.0 105.0
Postcard SEF 100.0 148.0
Postcard LEF 148.0 100.0
4 × 6” LEF 152.4 101.6
4 × 6” SEF 101.6 152.4
Prepaid Postcard
LEF
200.0 148.0
3.5 × 5.5” SEF 88.9 139.7
B6 LEF 182.0 128.0
B6 SEF 128.0 182.0
Page 82

6Setups
82
O: Available
Blank: Not available
Size
Width
(mm)
Length
(mm)
Tray 6 (HCF)
A/B Series
(8 x 13”)
A/B Series
A/B Series
(8K/16K)
A/B Series
(8 x 13”/8 x 14”)
Inch Series
A5 SEF 148.0 210.0
A5 LEF 210.0 148.0
5.5 × 8.5” LEF 215.9 139.7
5.5 × 8.5” SEF 139.7 215.9
B5 SEF 182.0 257.0
B5 LEF 257.0 182.0 O O
A4 SEF 210.0 297.0
A4 LEF 297.0 210.0 O O O O O
8.5 × 11” SEF
(Letter)
215.9 279.4
8.5 × 11” LEF
(Letter)
279.4 215.9 O O O O O
8.5 × 13” SEF
(Legal)
215.9 330.2
8.5 × 14” SEF
(Legal)
215.9 355.6
B4 SEF 257.0 364.0
16K SEF 194.0 267.0
16K LEF 267.0 194.0
8K SEF 267.0 388.0
A3 SEF 297.0 420.0
11 × 17” SEF 279.4 431.8
7.25 × 10.5” SEF
(Executive)
184.2 266.7
7.25 × 10.5” LEF
(Executive)
266.7 184.2 O O O
C4 Envelope
SEF
229.0 324.0
C5 Envelope
LEF
229.0 162.0
C5 Envelope
SEF
162.0 229.0
Commercial 10
Envelope LEF
241.3 104.8
DL Envelope
LEF
220.0 110.0
Monarch
Envelope LEF
190.5 98.4
Youkei 0
Envelope LEF
235.0 120.0
A6 SEF 105.0 148.0
A6 LEF 148.0 105.0
Postcard SEF 100.0 148.0
Postcard LEF 148.0 100.0
4 × 6” LEF 152.4 101.6
4 × 6” SEF 101.6 152.4
Prepaid Postcard
LEF
200.0 148.0
3.5 × 5.5” SEF 88.9 139.7
B6 LEF 182.0 128.0
B6 SEF 128.0 182.0
Page 83

System Settings
83
Millimeters/Inches
Specifies [Millimeters] or [Inches] as the unit for entering document or scan sizes.
Tray 1 Configuration
Specifies whether Tray 1 is used as the standard paper tray, or is replaced with the
Envelope Tray (optional).
NOTE: Some models do not support the Envelope Tray (optional).
Keyboard Input Restriction
Specifies whether the machine is to allow entry of standard ASCII characters only, or
characters including those specific to the selected language. Select [On (Standard
ASCII Only)] to display standard ASCII characters only on the keyboard screen.
Operation of Up/Down Buttons
Specifies whether the machine is to allow the up and down buttons (scroll buttons) on
the touch screen to provide fast scrolling when they are pressed continuously.
Display Consumables Screen
Specifies whether to display the consumables screen, and the event that causes the
machine to display the consumables screen.
Data Encryption
Specifies whether to enable encoding when data is saved to RAM, NV-RAM, backed
up memory chips, or the hard disk of the machine. Enter a 12-digit encoding code using
the screen keyboard. When the setting is changed, the machine needs to be switched
off and then on to make it effective. Note that all data corresponding to the encoding
then will be initialized.
NOTE: Encrypted data cannot be recovered if a problem occurs on the hard disk.
Encryption Key for Confidential Data
Setting an encryption key allows you to encrypt confidential information, such as the
passcodes of the System Administrator and mailboxes. This prevents interceptions and
unauthorized access to the information during transmission across networks.
Select [Keyboard], and then use 4 to 12 alphanumeric characters to enter an encryption
key.
NOTE: Once you change an encryption key, confidential information may not be able
to be restored from a backup.
Service Rep. Restricted Operation
Specifies whether the Service Representative has full access to the security features
of the machine, including the ability to change System Administrator settings.
For the WorkCentre 5225A/5230A, select [On] and then set [Maintenance Passcode]
to restrict the Service Representative from entering the maintenance mode.
Software Download
Specifies whether the machine is to allow software downloads.
Country
Specifies the country code for the line type used in your area.
NOTE: When setting up Fax options, users in European countries and North
American countries may be required to set the country code for the line. Also refer to
“Country Code for the Fax Service” in the Fax chapter of the User Guide.
Page 84

6Setups
84
Restrict Recipient Selection Method
Specifies whether any restrictions apply to the method of selecting recipients of Fax,
Internet Fax, Server Fax, and scanned (E-mail) documents. Select [Only From Address
Book] to disable input of recipients from the keyboard screen and buttons on the control
panel, and restrict recipients to only those registered in the Address Book.
Restrict User to Edit Address Book
Specifies whether to permit users to edit the Address Book.
Copy Service Settings
This section describes the features that allow you to change the default settings for
each copy feature. For more information, refer to the following:
Copy Tab – page 84
Copy Defaults – page 84
Copy Control – page 88
Original Size Defaults – page 89
Reduce/Enlarge Presets – page 89
1.
Select [System Settings], and
then select [Copy Service
Settings] in the [Group] menu.
Copy Tab
This feature allows you to define the functions of the paper tray buttons and copy
magnification buttons shown in [Paper Supply] on the [Copy] screen.
1.
Select [Copy Tab] in the
[Features] menu.
2.
Change the required settings.
3.
Select [Close].
Paper Supply - Button 2 to 4
Specifies the paper trays for paper tray buttons 2 to 4 shown in [Paper Supply] on the
[Copy] screen. This allocation allows you to easily select the paper trays you frequently
use, with the exception of Trays 3 and 4 of the optional High Capacity Tandem Tray.
Reduce/Enlarge - Button 3 and 4
Specifies the magnifications for Reduce/Enlarge buttons 3 and 4 shown in
[Reduce/Enlarge] on the [Copy] screen. This allocation allows you to easily select the
copy magnifications you frequently use.
Copy Defaults
This feature allows you to set the default for each copy feature. The copy settings are
returned to the defaults set here when the power is switched on, when the Energy
Saver mode is cancelled, or when the <Clear All> button is pressed. If you set defaults
for the features you frequently use, you can quickly copy documents without changing
the settings each time.
Page 85

System Settings
85
1.
Select [Copy Defaults] in the
[Features] menu.
2.
Change the required settings.
Use the side tabs to switch
between screens.
3.
Select [Close].
Paper Supply
Specifies the default for the [Paper Supply] feature on the [Copy] screen.
NOTE: If the default for [Reduce/Enlarge] is set to [Auto %], [Auto Paper Select]
cannot be selected for [Paper Supply].
Reduce/Enlarge
Specifies the default for the [Reduce/Enlarge] feature on the [Copy] screen.
NOTE: If the default for [Paper Supply] is set to [Auto Paper Select], [Auto %] cannot
be selected for [Reduce/Enlarge].
The preset options of the Reduce/Enlarge feature can be changed. For more
information, refer to
Reduce/Enlarge Presets on page 89
.
Original Type
Specifies the default for the [Original Type] feature on the [Image Quality] screen.
Lighten/Darken
Specifies the default for the [Lighten/Darken] feature on the [Image Quality] screen.
Sharpness
Specifies the default for the [Sharpness] feature on the [Image Quality] screen.
Background Suppression
Specifies the default for the [Background Suppression] feature on the [Image Quality]
screen.
2 Sided Copying
Specifies the default for the [2 Sided Copying] feature on the [Copy] screen.
Mixed Sized Originals
Specifies whether to enable [Mixed Sized Originals] on the [Layout Adjustment] screen
by default.
Edge Erase - Top & Bottom Edges
Specifies the defaults for top and bottom margins of the [Edge Erase] feature on the
[Layout Adjustment] screen. Set the margins within the range of 0-50 mm (0-2.0 inches)
using the scroll buttons or the numeric keypad on the control panel.
Edge Erase - Left & Right Edges
Specifies the defaults for left and right margins of the [Edge Erase] feature on the
[Layout Adjustment] screen. Set the margins within the range of 0-50 mm (0-2.0 inches)
using the scroll buttons.
Page 86

6Setups
86
Image Shift - Side 1
Specifies the default position of [Side 1] in the [Image Shift] feature on the [Layout
Adjustment] screen.
Image Shift - Side 2
Specifies the default position of [Side 2] in the [Image Shift] feature on the [Layout
Adjustment] screen.
Image Rotation
Specifies the default for the [Image Rotation] feature on the [Layout Adjustment]
screen.
Image Rotation Direction
Specifies the default image rotation direction in the [Image Rotation] feature on the
[Layout Adjustment] screen.
Original Orientation
Specifies the default for the [Original Orientation] feature on the [Layout Adjustment]
screen.
Copy Output
Specifies the default for [Collation] in the [Copy Output] feature on the [Copy] screen.
The options available vary depending on your machine configuration.
Copy Output - Separator Tray
Specifies the default for [With Separators] > [Paper Supply] in the [Copy Output] feature
on the [Copy] screen.
Output Destination
Specifies the default output tray.
NOTE: When the staple/punch/fold function is used, the output tray changes to
[Finisher Tray] automatically.
Annotations - Font Size
Specifies the default font size of annotations.
Annotations - Position on Side 2
Specifies the default annotation position for side 2 of copy sheets. Selecting [Mirror
Side 1] prints annotations in the position symmetrical to the print position on side 1.
Annotations - Comment
Specifies whether to enable the Comment feature by default.
Annotations - Apply Comment To
Specifies the default pages a comment is to be printed on. Select from [First Page
Only], [All Pages], and [All Pages Except First].
Annotations - Stored Comment
Specifies the default text strings for [Comment] in the [Annotations] feature on the
[Output Format] screen.
Page 87

System Settings
87
Annotations - Comment - Position
Specifies the default for [Comment] > [Position] in the [Annotations] feature on the
[Output Format] screen.
Annotations - Date Stamp
Specifies whether to enable the Date Stamp feature by default.
Annotations - Apply Date Stamp To
Specifies the default pages a date is to be printed on. Select from [First Page Only], [All
Pages], and [All Pages Except First].
Annotations - Date Stamp - Position
Set the default value for [Position] displayed when [Date Stamp] is selected under
[Annotations] on the [Output Format] tab.
Annotations - Page Numbers
Specifies whether to enable the Page Numbers feature by default.
Apply Page Numbers To
Specifies the default pages that page numbers are to be printed on. Select from [All
Pages] and [All Pages Except First].
Annotations - Starting Number
Specifies the default starting number to use when page numbers are printed on copies.
Annotations - Page Numbers - Position
Specifies the default for [Page Numbers] > [Position] in the [Annotations] feature on the
[Output Format] screen.
Annotations - Bates Stamp
Specifies whether to enable the Bates Stamp feature by default.
Annotations - Apply Bates Stamp To
Specifies the default pages that bates stamps are to be printed on. Select from [All
Pages] and [All Pages Except First].
Bates Stamp - Starting Number
Specifies the default starting number to use when bates stamps are printed on copies.
Bates Stamp - Number of Digits
Specifies the default value for [Number of Digits] displayed when [Bates Stamp] is
selected for [Page Numbers] under [Annotations] on the [Output Format] tab.
Bates Stamp - Stored Prefix
Specifies the prefix strings for bates stamps.
Bates Stamp - Position
Specifies the default value for [Position] displayed when [Bates Stamp] is selected for
[Page Numbers] under [Annotations] on the [Output Format] tab.
Page 88

6Setups
88
Sample Job
Specifies the default for the [Sample Job] feature on the [Job Assembly] screen.
Booklet Creation - Cover Tray
Specifies the default for [Covers] > [Paper Supply] > [Cover Tray] in the [Booklet
Creation] feature on the [Output Format] screen.
Covers - Cover Tray
Specifies the default for [Paper Supply] > [Cover Tray] in the [Covers] feature on the
[Output Format] screen.
Build Job - Segment Separator Tray
Specifies the default for [Copy Job] > [Chapter Start] > [Separators Tray] of the [Build
Job] feature on the [Job Assembly] screen.
Copy Control
This feature allows you to implement operational control of the various copy features.
1.
Select [Copy Control] in the
[Features] menu.
2.
Change the required settings.
Use the scroll buttons to switch
between screens.
3.
Select [Close].
Memory Full Procedure
Specifies the default process to execute if the hard disk becomes full while reading
documents. A message asking how to process the data read up to that point is
displayed. You can predefine a processing method to be performed after the message
has been displayed for a specified period. If you select [Delete Job], the data will be
discarded. If you select [Run Job], the data read up to that point will be processed.
Maximum Stored Pages
Specifies the maximum number of pages that can be stored in memory when you copy
documents. Select a number in the range from 1 to 999.
Auto Paper Off
Specifies the paper tray used when you cancel [Auto Paper Select] in the [Paper
Supply] feature by selecting [Auto %] or [Independent X-Y%] in the [Reduce/Enlarge]
feature.
Mixed Sized Originals - 2 Sided Copy
Specifies the copy operation when a different paper size is detected when making 2
sided copies from mixed sized originals. Select [Copy to new sheet] to print to a new
page. Select [Copy to Side 2] to copy onto the reverse side of the current page.
NOTE: Some areas of images may be cropped if you select [Copy to Side 2].
Fine-tune 100%
Specifies the actual magnification ratio for making copies on the document glass when
[100%] is selected on the [Reduce/Enlarge] screen. Fine tune the value in the range of
98.0 to 102.0%.
Page 89

System Settings
89
Pseudo-Photo Gradation Mode
Specifies whether to perform gradation level correction for documents containing
photographs. Select from [Error Diffusion] and [Dither].
Original Type - See-Through Paper
Specifies whether to display the [Text on See-Through Paper] option when [Text] is
selected on the [Original Type] screen.
Annotations - Edit Comment 1 to 8
Specifies whether to allow users to edit Comment 1 to Comment 8 in the Annotation
settings.
Bates Stamp - Edit Prefix 1 to 8
Specifies whether to allow users to edit Prefix 1 to Prefix 8 in the Annotation settings.
Maximum Number of Sets
Allows you to specify the maximum number of allowed copy sets between 1 and 999.
Users will not be able to specify the number of copy sets larger than the value set here.
Original Size Defaults
This feature allows you to assign preset document size buttons. These are displayed
when you use the [Original Size] feature on the [Layout Adjustment] screen. If you
predefine frequently used document sizes, you can set the size of the original, quickly
and easily.
1.
Select [Original Size Defaults] in
the [Features] menu.
2.
Change the required settings.
Use the scroll buttons to switch
between screens.
3.
Select [Close].
Original Size 1 to 11
Specifies the document sizes assigned to each of the 11 buttons.
• A/B Series Size
Specifies standard document sizes from A/B series. Use the scroll buttons to switch
between screens.
•Inch Size
Specifies standard document sizes from Inch series. Use the scroll buttons to switch
between screens.
• Others
Specifies other miscellaneous sizes. Use the scroll buttons to switch between
screens.
•Custom Size
Specifies a user-defined size set using the scroll buttons.
Reduce/Enlarge Presets
This feature allows you to assign preset magnification buttons. These are displayed
when you select [Proportional %] in the [Reduce/Enlarge] feature on the [Copy] screen.
Page 90

6Setups
90
If you predefine frequently used magnifications, the original can be expanded or
reduced, quickly and easily.
1.
Select [Reduce/Enlarge
Presets] in the [Features] menu.
2.
Change the required settings.
Use the scroll buttons to switch
between screens.
3.
Select [Close].
R/E Preset 1 to 7
Specifies the reduce/enlarge ratios assigned to each of the seven buttons. Select from
26 options in the range of 25-400%.
Connectivity & Network Setup
This section describes the features that allow you to change the default settings for the
network configuration. For more information on network setups, refer to
Printer
Environment Settings on page 233
.
NOTE: The options available may vary with the usage environment.
Port Settings – page 90
Protocol Settings – page 92
Machine’s E-mail Address/Host Name – page 93
Proxy Server Settings – page 94
Outgoing/Incoming E-mail Settings – page 95
Remote Authentication Server Settings – page 96
Security Settings – page 97
Other Settings – page 100
1.
Select [System Settings], and
then select [Connectivity &
Network Setup] in the [Group]
menu.
Port Settings
This feature allows you to set the print mode, port status, communication mode, and
auto eject time for the communication ports.
1.
Select [Port Settings] in the
[Features] menu.
2.
Change the required settings.
Use the scroll buttons to switch
between screens.
3.
Select [Close].
USB
Specifies whether to enable the USB port and configures the port settings.
Page 91

System Settings
91
• Port Status
Specifies whether to enable the USB port.
• Print Mode
Specifies the PDL to be used for print jobs. Only pre-installed PDLs are available.
•PJL
Specifies whether to enable the PJL (Printer Job Language).
• Auto Eject Time
Specifies the time-out period when print data is not sent to the machine sequentially.
If the specified time elapses, the remaining data inside the machine is automatically
printed out. You can enter a time within the range of 5-1,275 seconds in 5-second
increments.
• Adobe Communication Protocol
Specifies the communication protocol format for Adobe Communication Protocol.
– Standard - Select this option when the communication protocol is in ASCII format.
– Binary - Select this option when the communication protocol is in binary format.
Depending on the data, the print job may be completed faster than [Standard].
– TBCP - Select this option to switch the specific control codes when the
communication protocols involve both ASCII and binary formats.
– RAW - Select this option when the communication protocol is in RAW format.
Using this option allows you to correctly print EPS files from a Macintosh
computer via USB.
LPD
Specifies whether to enable the LPD port, and specifies the port number and the
maximum number of sessions.
NetWare
Specifies whether to enable the NetWare port.
SMB
Specifies whether to enable the SMB port.
IPP
Specifies whether to enable the IPP port, and specifies the port number.
EtherTalk
Specifies whether to enable the EtherTalk port.
Bonjour
Specifies whether to enable the Bonjour port.
Port 9100
Specifies whether to enable the Port 9100 port, and specifies the port number.
SNMP
Specifies whether to enable the SNMP agent.
Page 92

6Setups
92
FTP Client
Specifies whether to enable the FTP Client port.
Receive E-mail
Specifies whether to enable the mail receiving port.
Send E-mail
Specifies whether to enable the mail transmission port.
E-mail Notification Service
Specifies whether to enable the mail notification service.
UPnP Discovery
Specifies whether to enable the UPnP port, and specifies the port number.
WSD
Specifies whether to enable the WSD port, and specifies the port number.
Internet Services
Specifies whether to enable the Internet Services port, and specifies the port number.
SOAP
Specifies whether to enable the SOAP port, and specifies the port number to
communicate with external applications.
WebDAV
Specifies whether to enable the WebDAV port, and specifies the port number and
operation time limit.
Protocol Settings
This feature allows you to configure the machine settings that correspond with the
protocol being used.
1.
Select [Protocol Settings] in the
[Features] menu.
2.
Change the required settings.
Use the scroll buttons to switch
between screens.
3.
Select [Close].
Ethernet Rated Speed
Specifies the Ethernet port speed according to the network environment to which the
machine is connected.
TCP/IP - IP Mode
Specifies the IP operation mode. Selecting [Dual Stack] enables both IPv4 and IPv6
communications.
Page 93

System Settings
93
IPv4 - IP Address Resolution
Specifies how to get an IPv4 address for the machine. Selecting [STATIC] allows you
to manually configure the IPv4 settings.
IPv4 - IP Address
Specifies the IP address in IPv4 format.
IPv4 - Subnet Mask
Specifies the subnet mask in IPv4 format.
IPv4 - Gateway Address
Specifies the gateway address in IPv4 format.
IPv4 - IP Filter
Specifies whether to filter access from remote machines. The IP addresses to be
filtered can be specified in CentreWare Internet Services. For more details, refer to
Properties Features on page 179
.
IPv6 Address Manual Configuration
Specifies whether to set the IPv6 address manually. Selecting [Enabled] allows you to
configure the IPv6 settings.
NOTE: Select [Enabled] when the machine is connected to a network on which IPv6
stateless address autoconfiguration is disabled, or when you want to set the static
IPv6 address.
Manually Configured IPv6 Address
Specifies the IP address in IPv6 format.
Manually Configured IPv6 Prefix
Specifies the length of the IP address prefix between 0 to 128.
Manually Configured IPv6 Gateway
Specifies the gateway address in IPv6 format.
Auto Configured IPv6 Address
Displays the link-local address, auto stateless address 1 to 3, and auto gateway
address.
IPv6 - IP Filter
Specifies whether to filter access from remote machines. The addresses to be filtered
can be specified in CentreWare Internet Services. For more details, refer to
Properties
Features on page 179
.
Machine’s E-mail Address/Host Name
This feature allows you to set the e-mail address, host name, and domain name for the
machine.
Page 94

6Setups
94
1.
Select [Machine’s E-mail
Address/Host Name] in the
[Features] menu.
2.
Change the required settings.
3.
Select [Close].
E-mail Address
Specifies the e-mail address of the machine. Enter an address of up to 128 characters.
Machine Name
Specifies the name of the machine.
Host Name
Specifies the host name of the machine. Enter a host name of up to 32 characters.
Domain Name
Specifies the domain name of the machine. Enter a domain name of up to 64
characters.
Proxy Server Settings
This feature allows you to set up the proxy server settings and HTTP/HTTPS server
settings.
1.
Select [Proxy Sever Settings] in
the [Features] menu.
2.
Change the required settings.
Use the scroll buttons to switch
between screens.
3.
Select [Close].
Use Proxy Server
Specifies whether to enable the proxy server.
Proxy Server Setup
Specifies the proxy server assignment method. Select from [Different Proxy for Each
Protocol] and [Same Proxy for All Protocols].
Addresses to Bypass Proxy Server
Specifies the addresses to bypass the proxy server. One address can be up to 64
characters long. When you specify multiple addresses, use semicolons to separate
them.
HTTP Proxy Server Name
Specifies the HTTP proxy server name.
HTTP Proxy Server Port Number
Specifies the HTTP proxy server port number.
HTTP Proxy Server Authentication
Specifies whether to enable HTTP proxy server authentication.
Page 95

System Settings
95
HTTP Proxy Server Login Name
Specifies the HTTP proxy server login name.
HTTP Proxy Server Password
Specifies the HTTP proxy server password. Enter a password and then re-enter the
password for confirmation.
HTTPS Proxy Server Name
Specifies the HTTPS proxy server name.
HTTPS Proxy Server Port Number
Specifies the HTTPS proxy server port number.
HTTPS Proxy Server Authentication
Specifies whether to enable HTTPS proxy server authentication.
HTTPS Proxy Server Login Name
Specifies the HTTPS proxy server login name.
HTTPS Proxy Server Password
Specifies the HTTPS proxy server password. Enter a password and then re-enter the
password for confirmation.
Outgoing/Incoming E-mail Settings
This feature allows you to set the outgoing and incoming mail server settings.
1.
Select [Outgoing/Incoming Email Settings] in the [Features]
menu.
2.
Change the required settings.
3.
Select [Close].
POP3 Server Settings
Specifies the POP3 server settings. Use the scroll buttons to switch between screens.
• POP3 Server Name / IP Address
Specifies the server name or IP address of the POP3 server.
• POP3 Port Number
Specifies the POP3 server port number.
• POP3 Polling Interval
Specifies the POP3 server interval to poll the POP3 server. Enter a time in the range
of 1 to 120 minutes.
• POP3 Login Name
Specifies the POP3 server login name. Enter a login name of up to 64 characters.
• POP3 Password
Specifies the POP3 server password. Enter a password of up to 32 characters and
then re-enter the password for confirmation.
Page 96

6Setups
96
• POP Password Encryption
Specifies whether to enable the POP password encryption using APOP.
SMTP Server Settings
Specifies the SMTP server settings. Use the scroll buttons to switch between screens.
• SMTP Server Name / IP Address
Specifies the domain name or IP address of the SMTP server.
• SMTP Server Port Number
Specifies the SMTP server port number.
• E-mail Send Authentication
Specifies the SMTP server authentication method. If you select [POP before SMTP],
POP server authentication is required before transmitting e-mails to the SMTP
server. If you select [SMTP AUTH], the SMTP server authentication is enabled.
• SMTP AUTH Login Name
Specifies the SMTP AUTH login name. Enter a login name of up to 64 characters.
This entry is required only when [SMTP AUTH] is selected on the [E-mail Send
Authentication] screen.
• SMTP AUTH Password
Specifies the SMTP AUTH password. Enter a password of up to 36 characters and
then re-enter the password for confirmation. This entry is required only when [SMTP
AUTH] is selected on the [E-mail Send Authentication] screen.
Domain Filtering
Specifies domain name restrictions to filter incoming e-mail.
• Domain Filtering
Specifies whether to enable domain filtering, and the type of filtering. Select from
[Allow Domains] and [Block Domains] to enable filtering.
• Domain 1 to 50
Specifies the domain names to be restricted or permitted according to the selection
on the [Domain Filtering] screen.
Remote Authentication Server Settings
This feature allows you to set up the external authentication server and directory
service settings. The options available may vary depending on your machine
configuration.
1.
Select [Remote Authentication
Server Settings] in the
[Features] menu.
2.
Change the required settings.
3.
Select [Close].
Authentication System Setup
• Authentication System
Specifies the remote authentication service. Select from [Kerberos (Windows
2000)], [Kerberos (Solaris)], [LDAP], [SMB], and [Authentication Agent].
Page 97

System Settings
97
• Server Response Time-Out
Specifies the time-out value for a response from the server.
• Search Time-Out
Specifies the time-out value for user search on the server.
Kerberos Server Settings
Specifies the Kerberos servers. The following parameters are available for each
Kerberos server. Use the scroll buttons to switch between screens.
• Kerberos Server 1 to 5
– Primary Server Name / IP Address - Specifies the domain name or IP address of
the primary server.
– Primary Server Port Number - Specifies the primary server port number.
– Secondary Server Name / IP Address - Specifies the domain name or IP address
of the secondary server.
– Secondary Server Port Number - Specifies the secondary server port number.
– Domain Name - Specifies the Kerberos domain name. Enter a domain name up
to 64 characters.
SMB Server Settings
Specifies the SMB server settings.
• SMB Server Setup
Specifies the settings for the SMB server. Select [Domain Name] or [Domain &
Server Names / Address].
• SMB Server 1 to 5
– Domain Name - Specifies the domain name. This setting is mandatory. The
domain name for SMB Server 1 will be the default domain name.
– Server Name / IP Address - Specifies the server name or IP address of up to 64
characters. This setting is effective when [Domain & Server Names / Address] is
selected in [SMB Server Setup].
Security Settings
This feature allows you to set up the security settings.
NOTE: It is necessary to specify the device certificate for the machine in order to
specify the HTTP-SSL/TLS communications and S/MIME settings. For more
information, refer to
Security - Encryption/Digital Signature on page 305
.
1.
Select [Security Settings] in the
[Features] menu.
2.
Change the required settings.
3.
Select [Close].
SSL/TLS Settings
Specifies the SSL/TLS settings.
• Device Certificate - Server
Specifies the server certificate to attach to the e-mail address.
Page 98

6Setups
98
• HTTP - SSL/TLS Communication
Specifies whether to enable SSL/TLS communications.
• HTTP - SSL/TLS Port Number
Specifies the SSL/TLS communications port number.
• LDAP - SSL/TLS Communication
Specifies whether to enable SSL/TLS communications using LDAP.
• Device Certificate - Client
Specifies the client certificate to attach to the E-mail address.
• Verify Remote Server Certificate
Specifies whether to enable verification of the remote server certificate.
S/MIME Settings
Specifies the S/MIME settings. Use the scroll buttons to switch between screens.
• Device Certificate - S/MIME
Specifies the S/MIME certificate to attach to the E-mail address.
• S/MIME Communication
Specifies whether to enable S/MIME communications.
• Receive Untrusted E-mail
Specifies whether to receive an untrusted E-mail. Select [No] to block a non-S/MIME
E-mail when S/MIME communication is enabled, and to block an E-mail with an
incorrect signature/validation.
• Receive Untrusted Internet Fax
Specifies whether to receive an untrusted Internet Fax. Select [No] to block a nonS/MIME Internet Fax when S/MIME communication is enabled, and to block an
Internet Fax with an incorrect signature/validation.
• Message Digest Algorithm
Specifies the message digest algorithm. Select from [SHA1] and [MD5].
• Message Encryption Method
Specifies the message encryption method. Select from [3DES], [RC2-40], [RC2-64],
and [RC2-128].
• Digital Signature - Outgoing E-mail
Specifies whether to add a digital signature to an outgoing E-mail or to prompt the
user to add the signature.
• Signature - Outgoing Internet Fax
Specifies whether to add a signature to an outgoing Internet Fax or to prompt the
user to add the signature.
• Certificate Auto Store
Specifies the client certificate to attach to the E-mail address.
PDF/XPS Signature Settings
Specifies the PDF/XPS signature settings.
NOTE: XPS stands for XML Paper Specification.
Page 99

System Settings
99
• Device Certificate
Specifies the certificate for the PDF/XPS signature. For information on certificates,
refer to
Security - Encryption/Digital Signature on page 305
.
• PDF Signature
Specifies whether to add a PDF signature, whether to add a visible or invisible
signature, or whether to prompt the user to add a signature.
• XPS Signature
Specifies whether to add a XPS signature, or whether to prompt the user to add a
signature.
IPSec Settings
Allows you to configure the IPSec settings.
• IKE Authentication Method
Specifies the authentication method.
• Preshared Key
Specifies the preshared key. A preshared key is a password used for establishing
trust between devices. This setting is valid when [IKE Authentication Method] is set
to [Authenticate by Preshared Keys].
• Device Certificate
Specifies the device certificate. This setting is valid when [IKE Authentication
Method] is set to [Authenticate by Digital Signature].
• IPSec Communication
Specifies whether to enable IPSec communications.
• IKE SA Life Time
Specifies the IKE SA lifetime in the range of 60 to 28800 minutes in 1 minute
increments. The value must be greater than the value set in [IPSec SA Life Time].
• IPSec SA Life Time
Specifies the IPSec SA lifetime in the range of 300 to 28800 seconds in 1 second
increments. The value must be smaller than the value set in [IKE SA Life Time].
• DH Group
Specifies the DH group. [G2] ensures higher security than [G1].
• PFS Settings
Specifies whether to enable the PFS (Perfect Forward Security).
• Destination IPv4 Address
Specifies the destination address or the range of addresses in IPv4 format.
• Destination IPv6 Address
Specifies the destination address or the range of addresses in IPv6 format.
• Communicate with Non-IPSec Device
Specifies whether to enable communication with non-IPSec devices.
IEEE 802.1x Settings
Allows you to configure the IEEE 802.1x authentication settings.
Page 100

6Setups
100
• IEEE 802.1x
Specifies whether to enable IEEE 802.1x authentication.
• Authentication Method
Specifies the IEEE 802.1x authentication method.
• Login User Name
Specifies the user login name for IEEE 802.1x authentication.
• Login Password
Specifies the password for the user login name specified in [Login User Name].
• Server Certificate Verification
Specifies whether to verify the server certificate. This setting is valid when
[PEAP/MS-CHAPv2] is selected in [Authentication Method].
Other Settings
This feature allows you to set the e-mail receiving protocol and the output tray for email printing.
1.
Select [Other Settings] in the
[Features] menu.
2.
Change the required setting.
3.
Select [Close].
E-mail Receive Protocol
Specifies the protocol for receiving e-mail. Select from [SMTP] or [POP3].
Output Destination for E-mail
Specifies the output tray for e-mail printing. The available options vary depending on
the machine configuration. Selecting [Auto] sets to the default output tray.
Print Service Settings
This section describes the features that allow you to change the default settings for the
printer configuration. For more information, refer to the following:
Allocate Memory – page 101
Other Settings – page 103
1.
Select [System Settings], and
then select [Print Service
Settings] in the [Group] menu.
 Loading...