

Page 1

FreeFlow® Accxes® Print Server V15.0
August 2010
701P50894
Xerox® Wide Format 6622 Solution
User Guide
™
Page 2

©2010 Xerox Corporation. All rights reserved. XEROX® and Xerox and Design®, 6622
Solution™, Accxes® and FreeFlow®, are trademarks of Xerox Corporation in the US
and/or other countries.
ENERGY STAR® and ENERGY STAR MARK® are registered United States trademarks.
Microsoft Windows® is a trademark of Microsoft Corporation in the United States and/or
other countries. Adobe®, PostScript®, PostScript®3™, and PostScript Logo® are
trademarks of Adobe Systems Incorporated in the US and/or other countries. AutoCAD®
is a registered trademark of Autodesk, Incorporated. Product status, build status, and/or
specifications are subject to change without notice.
Page 3

Table of Contents
1 Product Overview.......................................................................................1-1
Product Software Tools Overview..................................................................................1-2
Main Components...............................................................................................................1-2
Controller Front View..........................................................................................................1-5
Controller Rear View...........................................................................................................1-6
Controller Back Panel Connectors..................................................................................1-7
Controller Cables and Connectors.................................................................................1-8
Scanner (Optional)..............................................................................................................1-8
User Interface (UI)..............................................................................................................1-9
Touch Screen.......................................................................................................................1-10
Using the Touch Screen.....................................................................................1-10
Touch Screen Features and Functions.........................................................1-12
Keyboards...............................................................................................................1-13
Control Panel.......................................................................................................................1-14
Language................................................................................................................1-15
Using the Power Saver Feature....................................................................................1-15
Operator Panel & Status Display.................................................................................1-16
Media and Toner Status Panel.....................................................................................1-17
Powering the System On.................................................................................................1-18
Off Line/On Line.................................................................................................................1-19
Document Input................................................................................................................1-19
Precautions When Handling Documents...................................................1-20
Copy Strategies for Special Documents......................................................1-20
Media Source......................................................................................................................1-23
To Specify the Media Source...........................................................................1-23
Media Types and Loading..............................................................................................1-23
Media Types...........................................................................................................1-24
Adding Media Rolls...........................................................................................................1-26
Handling and Storing Media...........................................................................1-27
Handling Media.......................................................................................1-27
Storing Media...........................................................................................1-27
Dehumidifier.............................................................................................1-28
Loading the Media Roll (Roll 1, 2, and 3)......................................1-28
Loading the Media Roll (Roll 4).........................................................1-32
Loading the Media Roll when Printing...........................................1-36
Using Manual Feed-in Shelf (Bypass)........................................................................1-37
Xerox® Wide Format 6622 Solution
User Guide
™
i
Page 4

Table of Contents
To load cut sheets into the Manual Feed-in Shelf (Bypass):............................1-37
2 Printing and Copying Documents.......................................................2-1
Print from Device..................................................................................................................2-1
Copying Procedures.............................................................................................................2-3
Step 1: Selecting Features...................................................................................2-3
Basic Copy Tab...........................................................................................2-3
Image Quality Tab....................................................................................2-4
Advanced Settings Tab...........................................................................2-5
Step 2: Entering the Copy Quantity................................................................2-6
Step 3: Copying the Original..............................................................................2-6
Step 4: Stopping the Copy Job..........................................................................2-7
Making Copies Using the Manual Feed-in Shelf (Bypass)...................................2-7
Main Components of This Task.........................................................................2-8
Setting Up the Copy Selections........................................................................2-9
Reduce/Enlarge..........................................................................................2-9
Reduce/Enlarge Using the Scale Factor............................2-10
Reduce/Enlarge Using Presets and More.........................2-10
Original Type............................................................................................2-11
Media Source............................................................................................2-11
Output Format ........................................................................................2-11
Collation.....................................................................................................2-12
Collation (Making Sets)........................................................................2-12
Copy Set Specifications........................................................................2-13
Check Plot..................................................................................................2-14
Printer Interrupt......................................................................................2-15
Scan Display.............................................................................................2-15
Setting Up the Image Quality Selections..................................................2-15
Density........................................................................................................2-16
Sharpness...................................................................................................2-16
Contrast......................................................................................................2-16
Background Suppression.....................................................................2-17
Setting up the Advanced Settings selections...........................................2-17
Media Type.............................................................................................................2-18
Sample Copy..........................................................................................................2-19
Rendering................................................................................................................2-19
Mirror Image..........................................................................................................2-20
Image Inversion ..................................................................................................2-20
Image Location....................................................................................................2-21
ii
Xerox® Wide Format 6622 Solution
User Guide
™
Page 5

Table of Contents
Margins....................................................................................................................2-21
Scan Width ............................................................................................................2-22
Scan Offset.............................................................................................................2-23
Finishing..................................................................................................................2-24
Setting Up the Recall Selections.................................................................................2-25
Recall Tab................................................................................................................2-25
View Last Scan......................................................................................................2-26
3 Scanning Documents ..............................................................................3-1
Preparation for Scanning..................................................................................................3-1
Establish the Network Setup...........................................................................................3-2
Creating a Mailbox..............................................................................................................3-2
Selecting Mailboxes...............................................................................................3-3
Standard Mailbox Document Lists..................................................................3-3
Document List.............................................................................................3-4
Settings.........................................................................................................3-5
Deleting a Mailbox......................................................................3-5
Mailbox Passwords .....................................................................3-5
Rename Mailboxes......................................................................3-6
Setting up a Default Mailbox..................................................3-6
Delete...............................................................................................3-6
Deleting Documents from a Mailbox...................................3-6
Delete All Documents.................................................................3-7
Delete a Document.....................................................................3-7
Removable Device Document Lists.................................................................3-8
Scanning To a Standard Mailbox...................................................................................3-9
Step 1: Selecting a Mailbox and Using Templates....................................3-9
Step 2: Selecting Scan to Mailbox Features..............................................3-12
Step 3: Select Image Quality Features........................................................3-13
Density........................................................................................................3-13
Contrast......................................................................................................3-14
Sharpness...................................................................................................3-14
Background Suppression.....................................................................3-14
Step 4: Select Advanced Settings Features...............................................3-15
Image Inversion......................................................................................3-16
Scan Offset................................................................................................3-17
Color Space...............................................................................................3-17
Mirror Image............................................................................................3-18
Scan to Printer..........................................................................................3-19
Xerox® Wide Format 6622 Solution
User Guide
™
iii
Page 6

Table of Contents
Naming Scanned Files.....................................................................................................3-22
Scan to Removable Devices..........................................................................................3-23
Scan to FTP..........................................................................................................................3-26
Scan to Remote Printer...................................................................................................3-27
Preview Generation................................................................................3-19
Scan Width ...............................................................................................3-20
Resolution..................................................................................................3-21
Step 5: Scanning the Document....................................................................3-21
Additional Information........................................................................3-22
Step 6: Stopping a Scan Job............................................................................3-22
Step 7: Retrieving Files Stored in a Mailbox..............................................3-22
Scan to Device.......................................................................................................3-24
Scan Multiple Pages to Device........................................................................3-25
How to Scan to an FTP Site..............................................................................3-27
Color Calibration...................................................................................................3-28
Creating a new Color Calibration.....................................................3-29
Problems During Color Calibration ....................................3-31
4 Job Information.........................................................................................4-1
All Tab.......................................................................................................................................4-1
Active Tab..................................................................................................................4-1
Held Tab......................................................................................................................4-2
Administrator Managed Queue........................................................................4-2
Job Reprint..............................................................................................................................4-3
Reprint Jobs with Edits.......................................................................................................4-3
Edit Job Settings...................................................................................................................4-4
Reduce/Enlarge........................................................................................................4-4
Media Types..............................................................................................................4-4
Media Source............................................................................................................4-4
Output Format.........................................................................................................4-4
Output Format (Print Jobs).................................................................................4-5
Output Format (Copy Jobs)................................................................................4-5
Collation...................................................................................................................................4-5
Finishing...................................................................................................................................4-6
Remove Selected Jobs........................................................................................................4-6
Job Reprint from Web Printer Management Tool ..................................................4-6
5 System Administration............................................................................5-1
System Administration Overview...................................................................................5-1
Entering System Administration Mode..........................................................5-2
iv
Xerox® Wide Format 6622 Solution
User Guide
™
Page 7

Table of Contents
Login Options...........................................................................................................5-2
System Administrator ..........................................................................................5-4
Job Accounting........................................................................................................5-4
Exiting System Administration Mode.............................................................5-5
General Administration Settings....................................................................................5-5
Setting the Date and Time.................................................................................5-6
Changing the Administrator Password..........................................................5-7
Job Accounting Overview....................................................................................5-7
Entering Job Accounting Mode...........................................................5-8
Logging in as a Job Accounting User................................................5-8
Configure Job Reprint...........................................................................................5-9
Shutdown/Restart...................................................................................................5-9
Power Outage Job Status..................................................................................5-10
If Job Reprint is enabled:.....................................................................5-10
Shutdown from the User Interface...............................................................5-10
Shutdown from the Web Printer Management Tool..............................5-11
Image Recall.............................................................................................5-12
Immediate Image Overwrite.............................................................5-12
Immediate Image Overwrite Algorithm.......................................5-13
Scan Display.............................................................................................5-13
Set Thumbnail Creation.......................................................................5-13
Administrator Managed Queue........................................................5-14
Control Panel Settings..........................................................................5-14
Sound Settings .......................................................................................5-15
Configure Timers....................................................................................5-15
Low Power Timeout..................................................................5-15
Sleep Timeout.............................................................................5-16
Feature Timeout........................................................................5-16
File Deletion Timeout..............................................................5-17
Print Interrupt Timeout..........................................................5-17
Set Start Scan Mode................................................................5-18
Calibrate Touch Screen............................................................5-18
Network Setup.........................................................................................5-19
Setting up a Static IP Address..............................................5-20
Setting up IP Gateway............................................................5-21
Setting up Netmask.................................................................5-21
Setting up DHCP........................................................................5-22
Copy Options.........................................................................................................5-23
Select Output Media Series................................................................5-24
Xerox® Wide Format 6622 Solution
User Guide
™
v
Page 8

Table of Contents
Select Custom Reduction and Enlargement................................5-24
Set Reduction Line Preservation.......................................................5-26
Configure Custom Output Formats.................................................5-27
Auto Rotate...............................................................................................5-29
6 Machine Info ..............................................................................................6-1
Overview of Machine Info................................................................................................6-1
Media Status and Setup .....................................................................................6-3
How to Access Media Settings.............................................................6-4
Print Reports Tab..................................................................................................................6-6
Print Reports..............................................................................................................6-6
From the User Interface.......................................................................................6-6
From the Web Printer Management Tool.....................................................6-7
Configuration Test Sample Report (Printer).................................................6-8
Setup Test Print Sample Report (Printer Settings).....................................6-9
Pen Settings............................................................................................................6-10
PostScript Test Sample Report........................................................................6-11
Machine Configuration Tab..........................................................................................6-11
How to Access Machine Configuration.......................................................6-11
Administration Tab...........................................................................................................6-12
How to Access Administration........................................................................6-12
7 User Modes..................................................................................................7-1
User Mode 1- U1(Test Print)............................................................................................7-2
User Mode 2 - U1(Date and Time)...............................................................................7-2
User Mode 3 - UE (Low Power Saver Mode)..............................................................7-4
User Mode 4 - U4 (High Power Saver Mode)............................................................7-5
User Mode 5 - U5 (Automatic Initial Media Cut) ..................................................7-6
User Mode 6 - U6 (Detack Lamp Control Mode) ....................................................7-7
User Mode 7 - U7 (Attention Beeper Enable Mode)..............................................7-7
User Mode 8 - U8 (Custom Setting Plain Paper).....................................................7-8
User Mode 9 - U9 (Custom Setting Vellum/Tracing Paper) ...............................7-9
User Mode A - UA (Custom Setting Film)................................................................7-10
User Mode b - Ub (Image Enhancement)...............................................................7-10
User Mode D - Ud (Temporary Clearance of Error E-26)...................................7-12
User Mode E - UE (Temporary Clearance of Error E-28)....................................7-12
8 Maintenance...............................................................................................8-1
Toner Cartridge Replacement (C-01)...........................................................................8-1
Replacing the Toner Cartridge (C-01).............................................................8-2
vi
Xerox® Wide Format 6622 Solution
User Guide
™
Page 9

Table of Contents
Cleaning the Charge Scorotron Wire ..........................................................................8-5
Cleaning the LED Print Head ..........................................................................................8-5
Cleaning the Machine Surface........................................................................................8-6
Cleaning the Scanner.........................................................................................................8-6
Ordering Supplies.................................................................................................................8-8
Supply Order List.....................................................................................................8-8
Supply Order Procedure..........................................................................8-8
9 Problem Solving.........................................................................................9-1
General Problems.................................................................................................................9-1
Problems During Copying.................................................................................................9-2
Problems During Scanning...............................................................................................9-7
Problems During Printing..................................................................................................9-8
Document Misfeeds.........................................................................................................9-11
Media jams information.................................................................................................9-12
Media Jams............................................................................................................9-13
Clearing Media Jam (J-01, J-02, J-03 & J-04).........................................................9-14
Clearing Media Jam (J-05)............................................................................................9-17
Clearing Media Jam (J-11)............................................................................................9-18
Clearing Media Jam (J-12 & J-13)..............................................................................9-20
Misfeed in the Fuser Assembly (J-14)........................................................................9-22
Clearing Misfeeds in the Folder (J-21)......................................................................9-25
Clearing Misfeeds in the Auto Stacker J-22)...........................................................9-26
Printer Errors (E-XX)..........................................................................................................9-26
Door Open Errors (U-XX).................................................................................................9-27
Thumping Noise in Standby.........................................................................................9-27
Image Quality Problem Solving...................................................................................9-27
Service Call Errors..............................................................................................................9-28
Xerox® Wide Format 6622 Solution
User Guide
™
vii
Page 10

Table of Contents
viii
Xerox® Wide Format 6622 Solution
User Guide
™
Page 11

1
Product Overview
The Xerox Wide Format 6622 Solution processes print jobs that it receives from a client
workstation, a USB device and scanned and copied jobs. The Xerox Wide Format 6622
Solution enables all types of image data to be printed in the supported formats, including
standard and non-standard sized documents. It also allows the user to view the status
of print jobs, cancel print jobs, and change print job priority.
This chapter describes the overall operation of the Xerox Wide Format 6622 Solution
and the functions of its major components. You will see the following information:
• Machine Components
• Controller
• Scanner
• User Interface (UI)
• Operator Panel and Status Display
• Media and Toner Status Panel
• Powering the System Off and On
• Document Input
• Media Source
• Media Types and Loading
• About Media and Originals
• Loading Media Roll
• Loading Originals into the Scanner
• Loading Cut Sheet Media
Xerox® Wide Format 6622 Solution
User Guide
™
1-1
Page 12
Product Overview
Product Software Tools Overview
Instructions for printing are located in the appropriate documentation for the tool that
is being used to send the print job to the printer, such as Windows Drivers, Web Printer
Management Tool, Accxes Client Tools, etc. Refer to the documentation for the
appropriate tool.
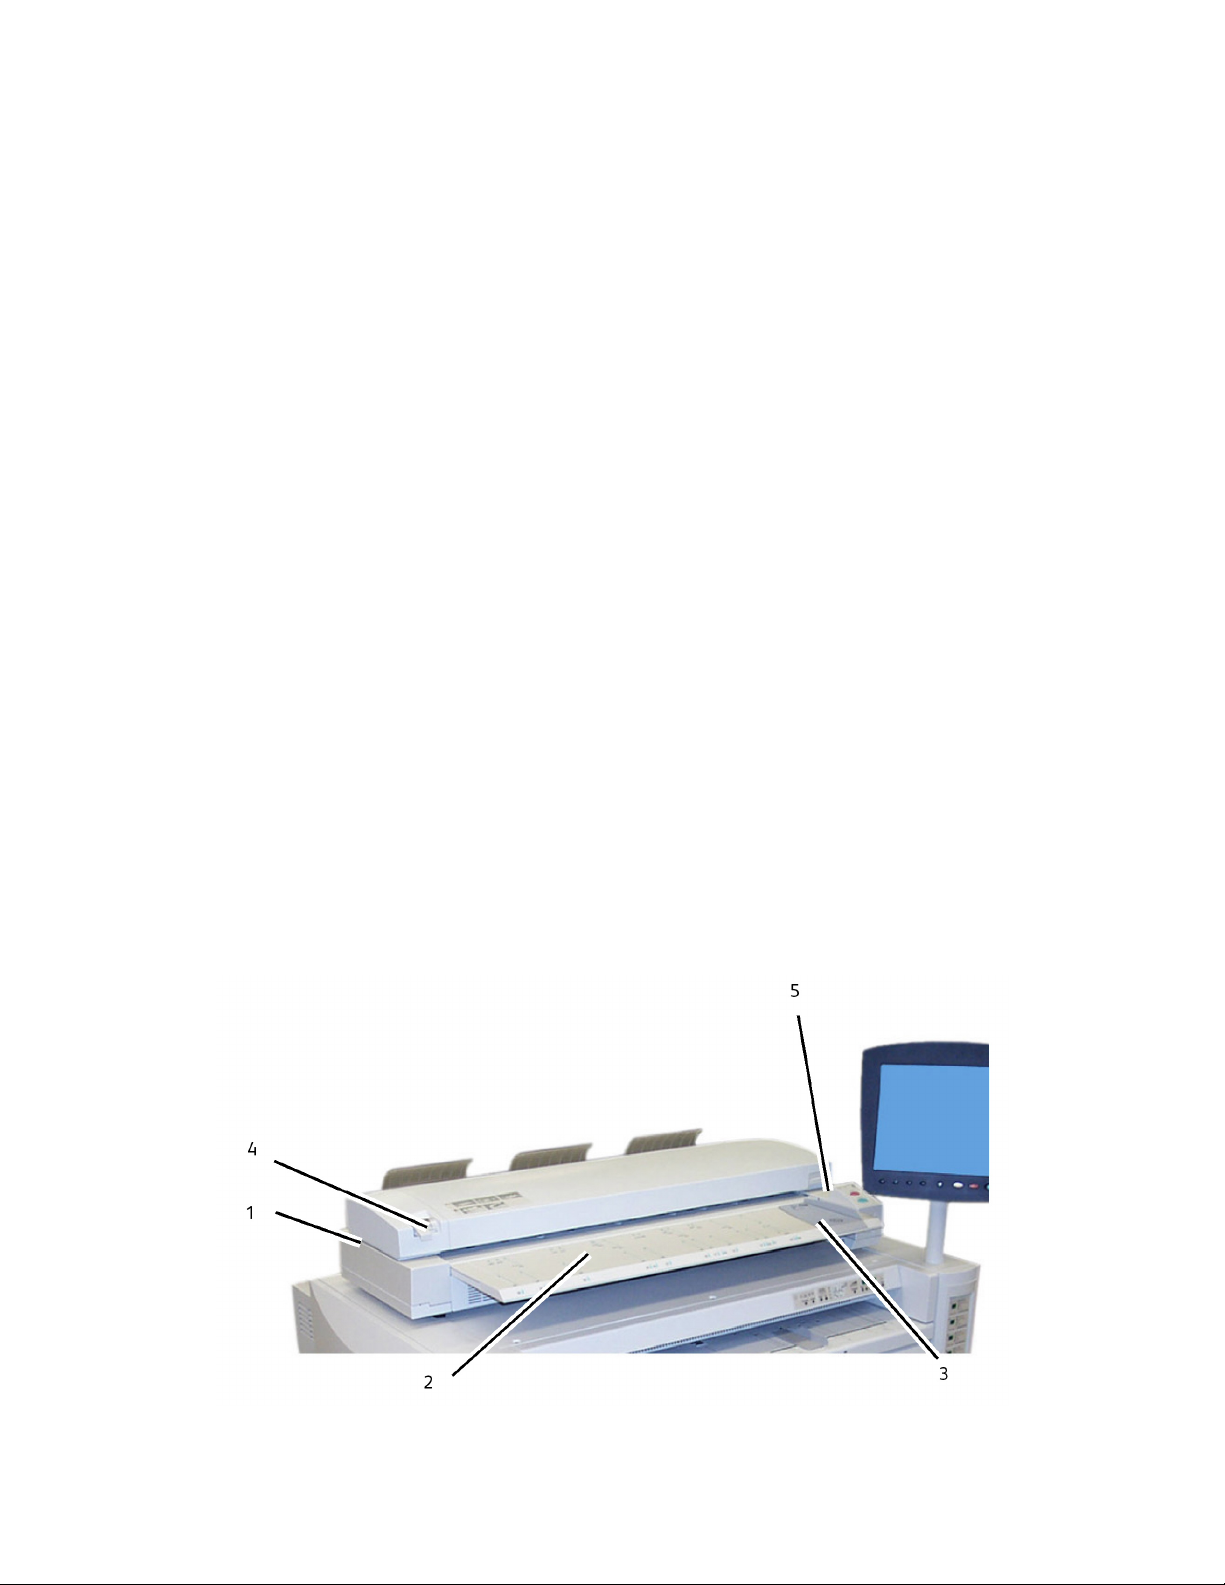
Main Components
Front View
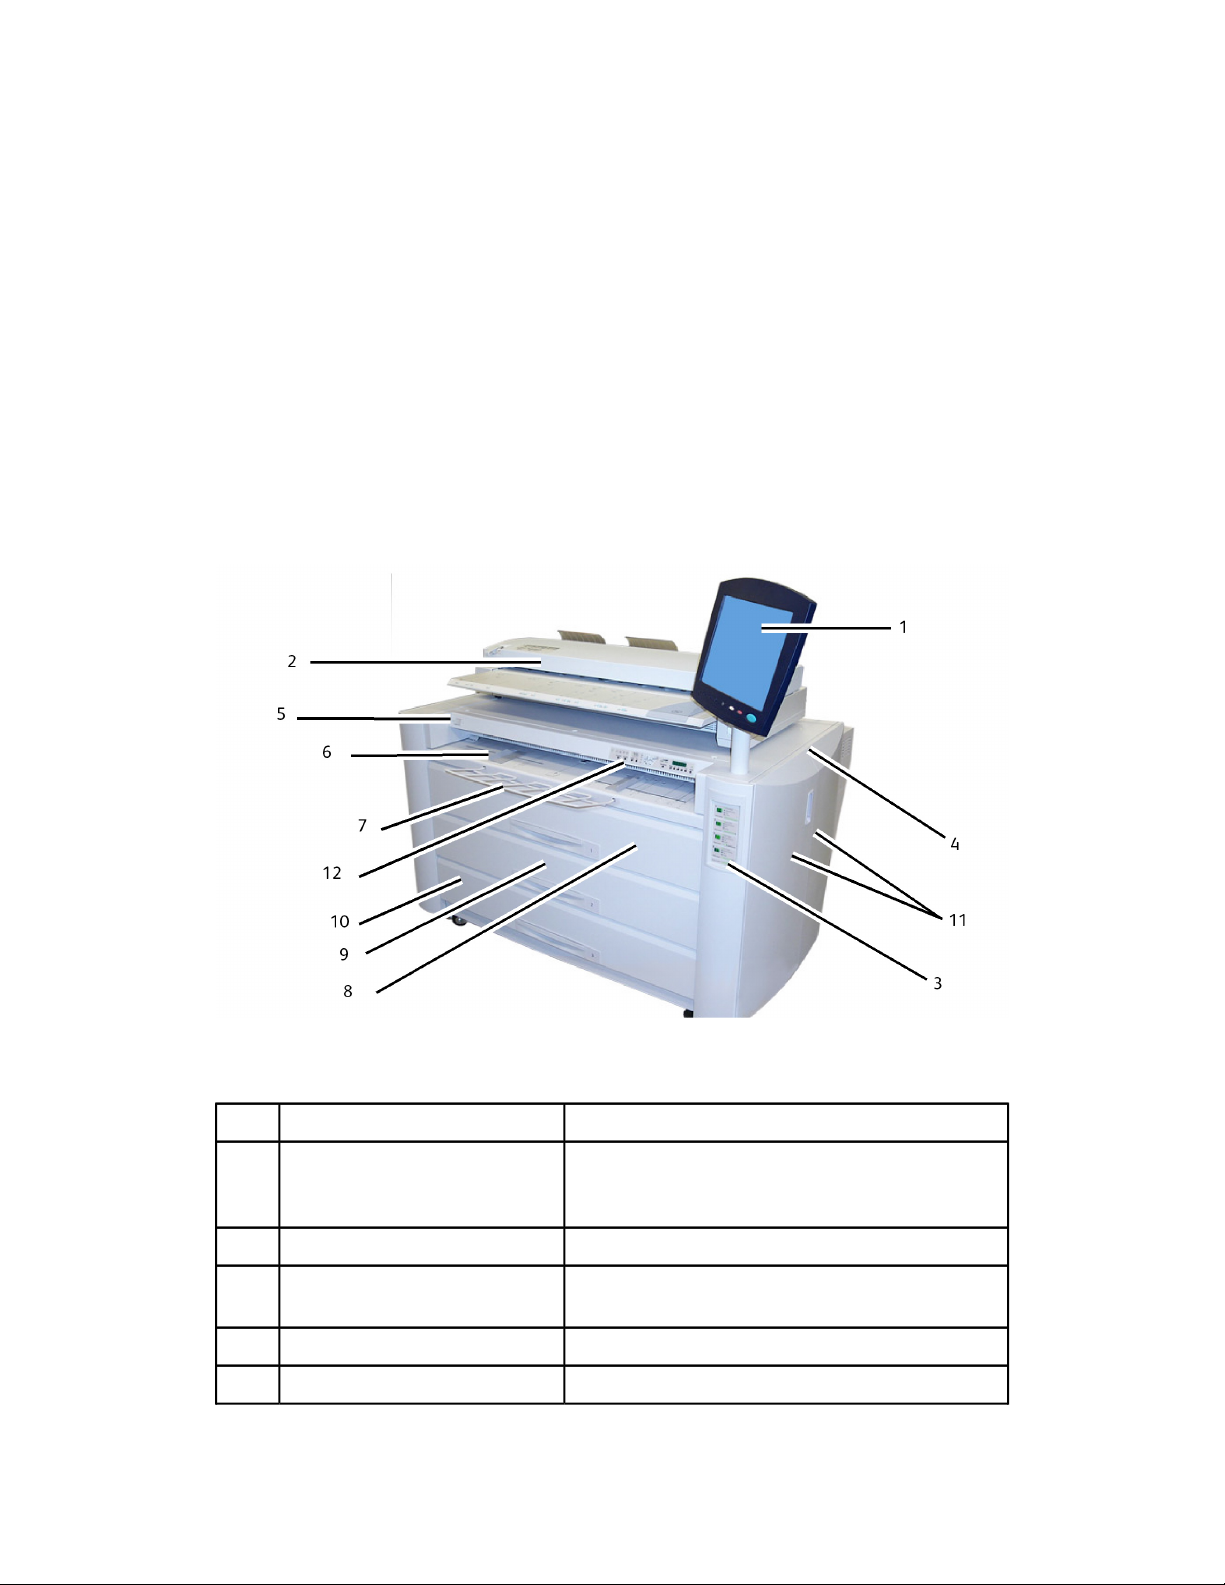
Table 1: Machine Components (Front View)
User Interface1.
3.
1-2
Toner Display Level and Media
Display
Specifications for Xerox 6622SubjectNum.
Also known as the UI, contains the Touch Screen,
Control Panel and USB ports. This is where the
operator programs jobs and configures the settings.
The Document Glass area where images are scanned.Scanner (Optional)2.
Displays remaining toner and media selection and
level.
The printer is used to image and output all jobs.Printer4.
Press to switch the printer on and off.Printer Power On/Off Switch5.
Xerox® Wide Format 6622 Solution
User Guide
™
Page 13
Product Overview
6.
Manual Feed-in Shelf (Bypass)
and Bypass Guides
Wire Form Holder7.
12.
Display
Rear Side View
Load cut sheet media in the Manual Bypass Feeder.
Adjust guides to the size of cut sheet media.
Used to hold large cut sheets when loading the
Manual Feed-in Shelf (Bypass).
Open to load media roll and clear media jams.Drawer 1 - (Roll 1)8.
Open to load media roll and clear media jams.Drawer 2 - (Roll 2)9.
Open to load media rolls and clear media jams.Drawer 3/4 - (Roll 3 &4)10.
Open to clear media jams and load toner.Left and Right Side Doors11.
Displays messages and status indicators.Operator Panel and Status
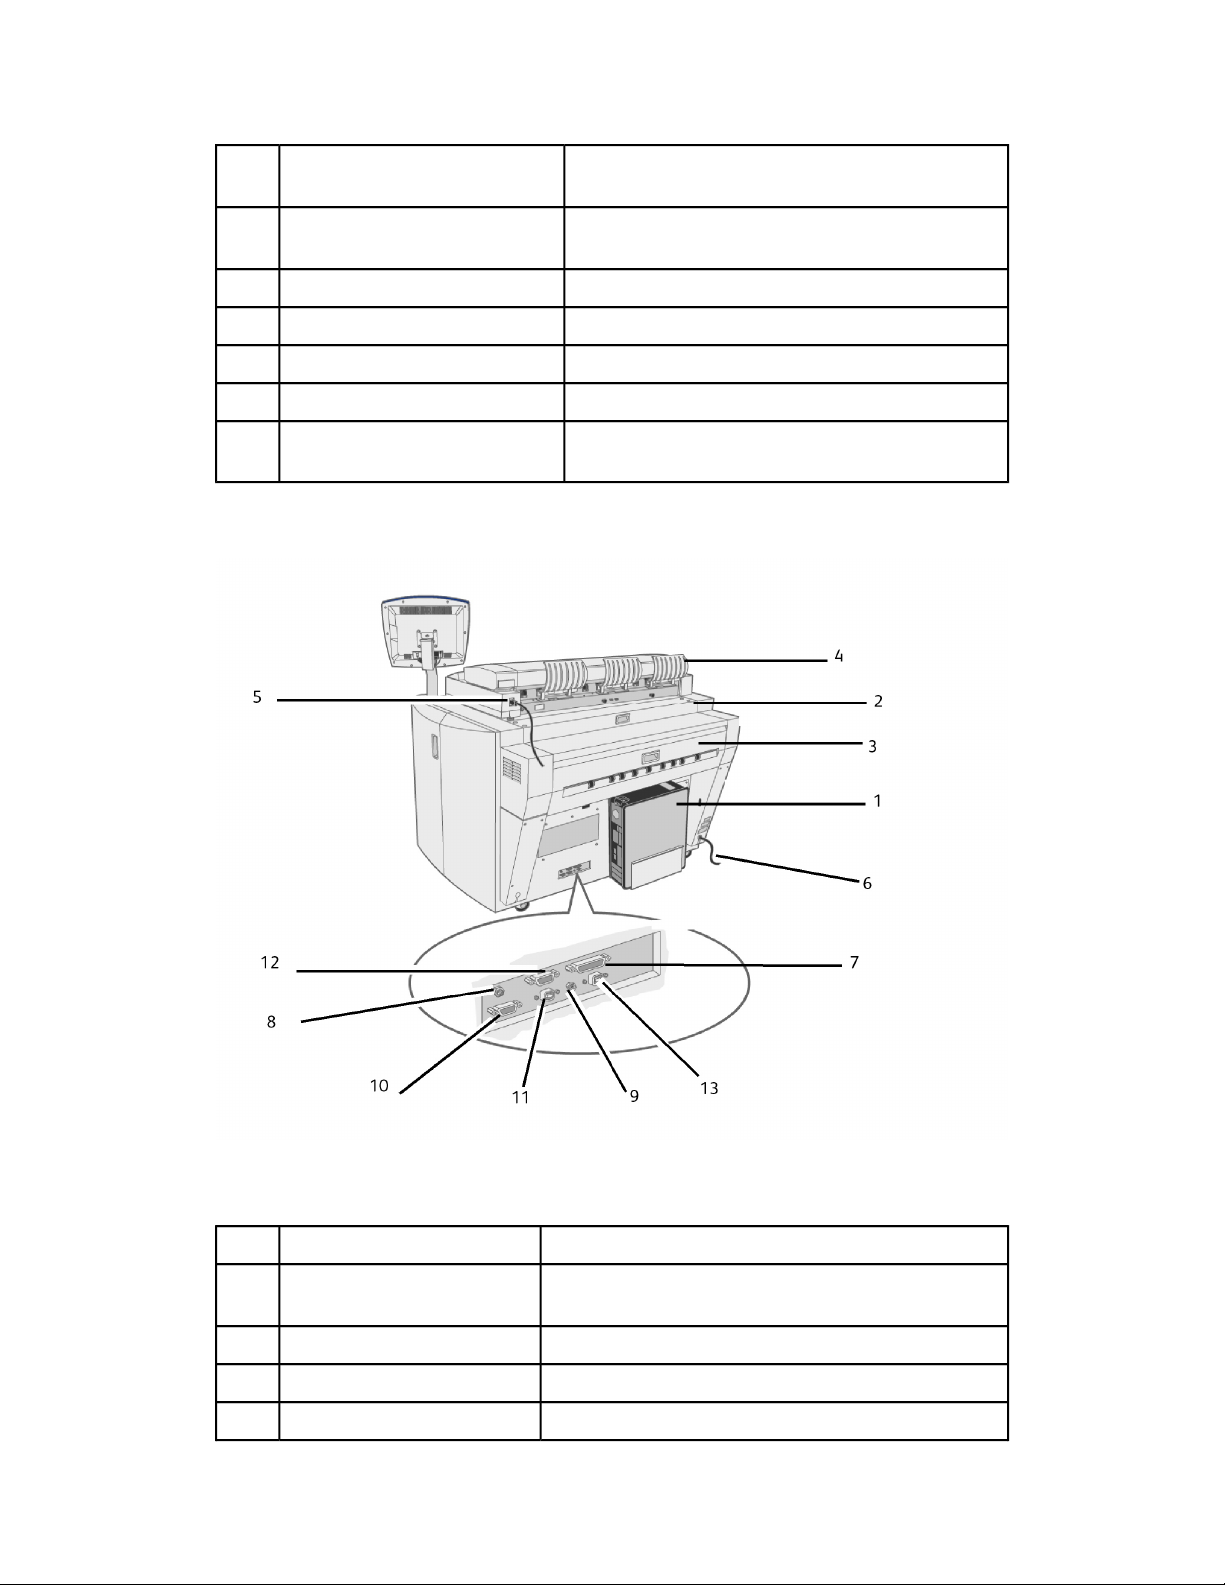
Table 2: Machine Components (Rear View)
Controller1
Xerox® Wide Format 6622 Solution
User Guide
™
Specifications for Xerox 6622SubjectNum.
Contains selection buttons and copy/print services
access.
Pull the handle and open to clear media jams.Top Rear Cover2.
Open to clear media jams.Exit Cover3.
Assists the original document as it exits the printer.Catch Tray4.
1-3
Page 14
Product Overview
5.
Scanner Power Cord
and Scanner Interface
IF-VIII Connector7.
S. L. SIG Port10.
DIAG Port11.
VGA Port12.
USB Port13.
Right Side View with Doors Open
Connect the Scanner Power Cord to a receptacle.
I/F Connector (USB)
Connect to a suitable power outlet.Power Cord (220 VAC)6.
Connect the Interface Cable from the Accxes Controller
(37 pins).
A Power Cable (12Vdc) for the Touch Screen Monitor.12Vdc8.
A Stereo Cable for the Touch Screen Monitor.S. T. Jack9.
Connect the Shutdown Signal Cable here. This is used
for shutting down as well as for starting the Sleep Mode.
12Vdc maximum.
Service use only. 5Vdc maximum, USB Connector Type
B.
Connect the cable here which comes from the Controller
VGA port for Touch Screen LCD. 5Vdc maximum.
Connect the cable here which comes from the Controller
USB Key Connector Type B for the Touch Screen LCD.
5Vdc Maximum.
1-4
Xerox® Wide Format 6622 Solution
User Guide
™
Page 15

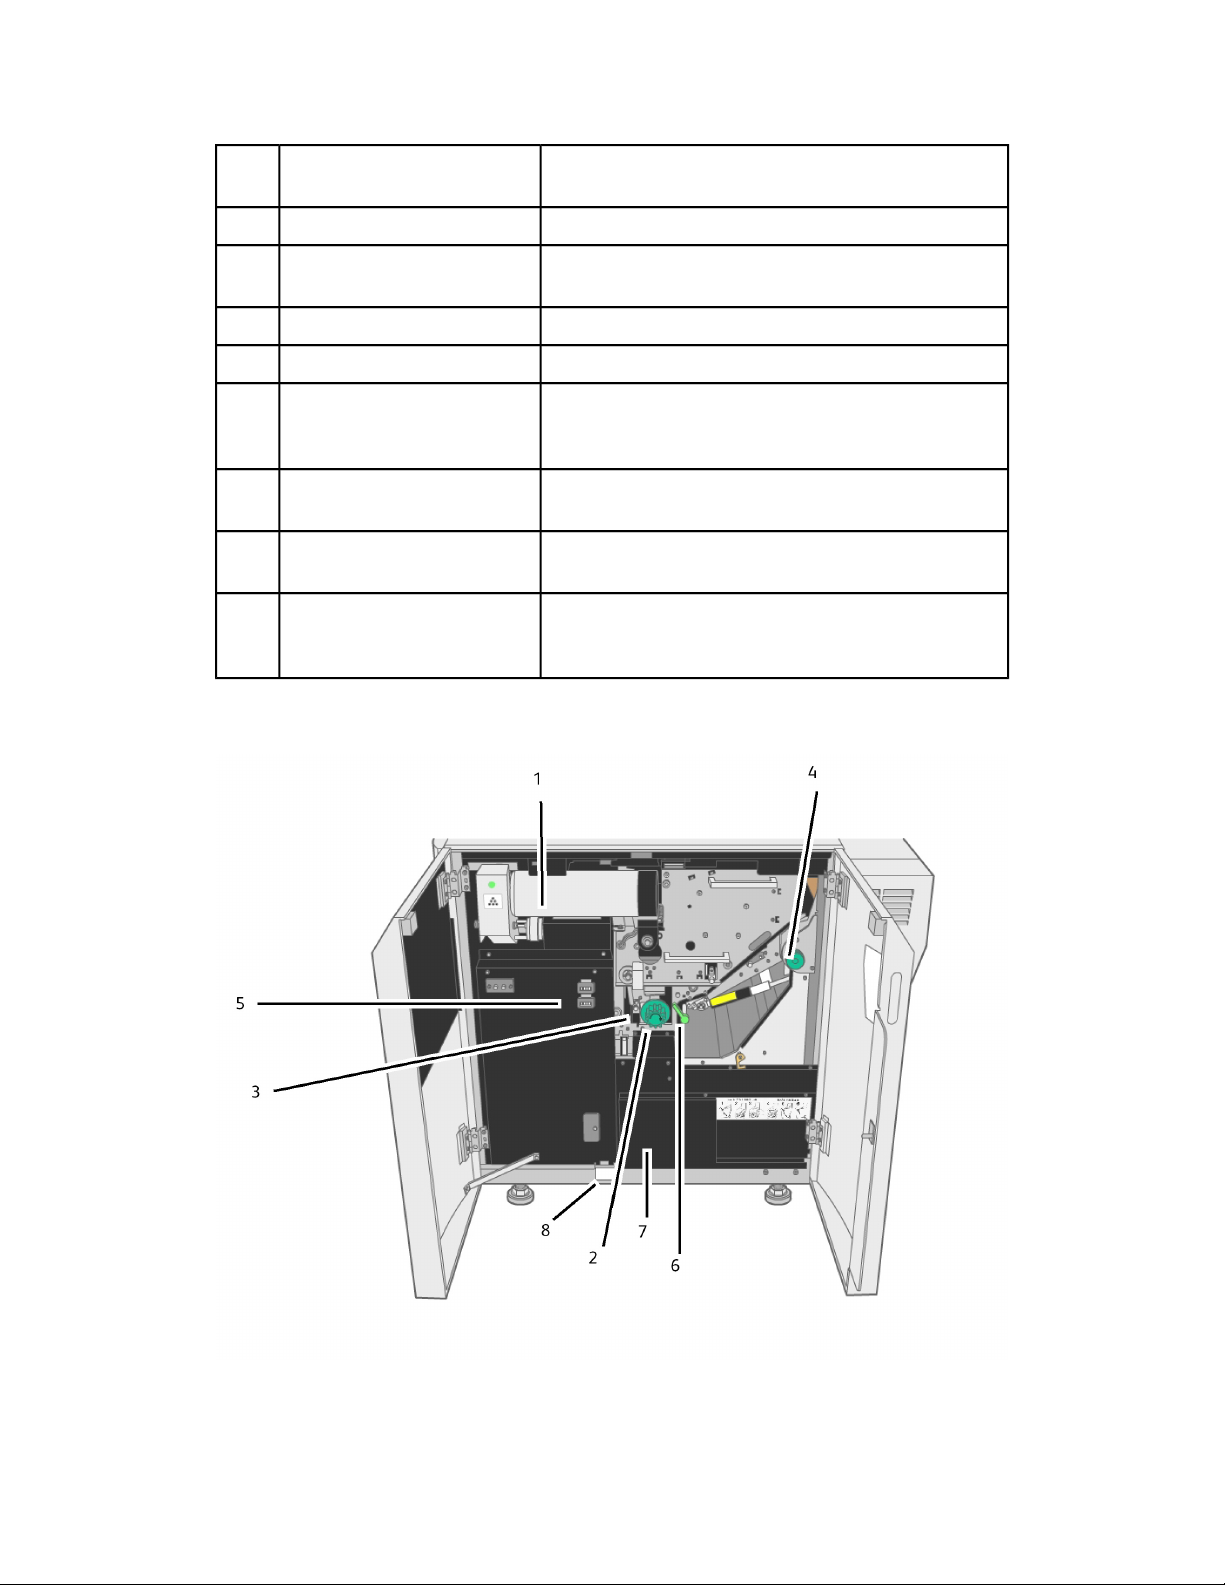
Table 3: Machine Components (Right Side View Doors Open)
Specifications for Xerox 6622SubjectNum.
Contains ink for imaging.Toner Cartridge1.
Turn to cut media during jam clearance.Media Cutter Knob2.
Indicates cutter positions.Cutter Home Indicator3.
Used to eject the mis-fed media from the Fuser.Fuser Knob4.
Product Overview
5.
Meter A - Billing
Meter B - Service
Square Counter for billing purposes.
Linear Counter for service purposes.
Open to clear media jams.Inner Transport Unit6.
Contains service information.Service Record Cover7.
Use to identify specific machine hardware.Serial Number Name Plate8.
Controller Front View
The Accxes Controller communicates with the Print Engine/machine via the Command
Status Interface. The Command Status Interface software provides status messages
about the operation of the print engine.
Xerox® Wide Format 6622 Solution
User Guide
™
1-5
Page 16

Product Overview
Controller Rear View
This design may vary depending on your model.
Table 4: Controller Rear View
DescriptionNo.
Card Slide (location may vary depending on Controller model)1
Cover Release Latch2
Power Connector3
Padlock Ring4
1-6
Xerox® Wide Format 6622 Solution
User Guide
™
Page 17
Controller Back Panel Connectors
This design may vary depending on your model.
Product Overview
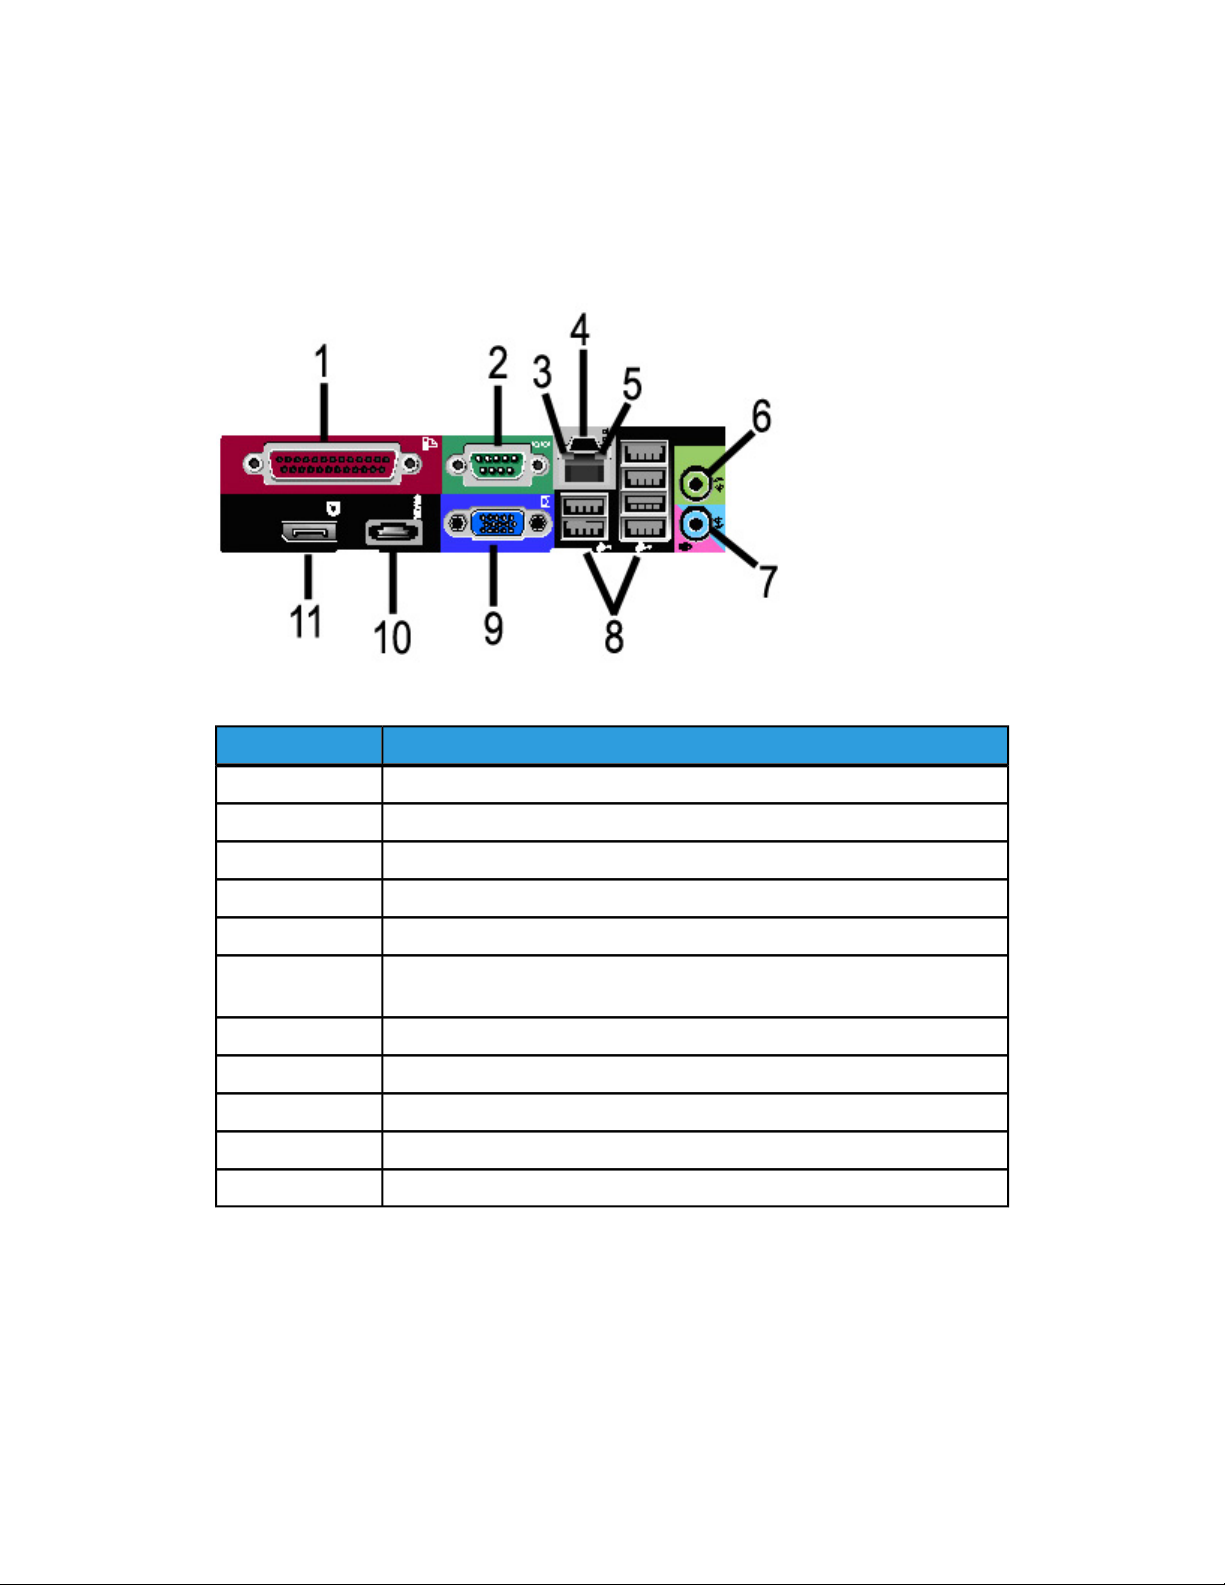
Table 5: Back Panel Connectors
DescriptionNo.
Parallel Connector (not used)1
Serial Connector2
Link Integrity Light3
Network Adapter Connector4
Network Activity Light5
6
Line-out Connector
(Audio)
Line-in/Microphone Connector (not used)7
USB 2.0 Connectors (6)8
VGA Video Connector9
eSATA Connector (not used)10
DisplayPort Connector (not used)11
NOTE
On a system that is working normally and has a good network connection, the Link
Integrity Light illuminates continuously; the Network Activity Light blinks in response
to network activity.
Xerox® Wide Format 6622 Solution
User Guide
™
1-7
Page 18
Product Overview
Controller Cables and Connectors
The six communication pathway cables (called out as item 8 on the Back Panel Connector)
are described below.
• USB - Scanner to Controller - provides status and image information.
• USB - Printer to Controller - provides status and image information.
• USB - Power Module to Controller - provides status of the front Power Switch and
enables power to the Printer.
• USB - User Interface to the Controller.
• Audio Cable - UI to Controller for speaker tones, such as key beeps and alert tones.
• Video Cable - UI to Controller for displaying monitor screen contents.
Both Video Data and Command Status information is transmitted via the same USB
Interface. The Accxes Controller downloads Printer software/firmware through the
command status interface on the USB Port.
Scanner (Optional)
The Xerox Wide Format 6622 Solution is an integrated printing system for basic copying
and electronically scanning and printing copies of the images for engineering and
architectural size documents. The scanner produces images up to 40 inches wide (1016
mm) and can send the image to a mailbox, a File Transfer Protocol (FTP) location or a
remote printer.
1-8
Xerox® Wide Format 6622 Solution
User Guide
™
Page 19

Table 6: Scanner Components
Product Overview
DescriptionComponentNum.
Scanner1.
Original Guide3.
Original Thickness Lever4.
Scanner Control Panel5.
In addition to the Printer configuration, the
Scanner is optional for copying and scanning
to remote locations.
Documents to be scanned are input here.Scanner Feed-in Shelf2.
Helps the user align the edge of a document
when feeding it into the scanner.
Adjusts for paper thickness. (0-0.5 in/0-12
mm.)
Manual controls for the Scanner (inactive).
Use the Start and Stop buttons located on
the User Interface Control Panel instead.
User Interface (UI)
The Printer User Interface and Web Printer Management Tool, accessed with a Web
Browser, are the two sources that enable users to set up and perform print service
operations.
The Printer User Interface is used to perform a variety of tasks using the Touch Screen
and Control Panel Buttons.
Xerox® Wide Format 6622 Solution
User Guide
™
1-9
Page 20
Product Overview
Table 7: User Interface Components
FunctionComponent
Touch Screen
USB Ports
Control Panel Buttons
Displays messages and on-screen buttons for selecting
features. Touch the screen to select features and options.
Connect accessories like keyboards, mouse and USB storage
devices to the Accxes Controller.
Contains the Services, Machine Info, Log In/Out, Language,
Power Saver, Clear, Stop, and Start buttons.
Touch Screen
Some capabilities of the User Interface are:
• Media setup for Media Roll and the Manual Feed-in Shelf
• System Parameter Setup
• Printing of test patterns to verify Printer operation
• Job log and error log management
• Display of billing meter information
The Touch Screen displays messages and contains the selection and feature buttons for
setting up copy and scan jobs. Touch the screen to select a feature or option.
NOTE
The features that display may vary, depending on the model, the options installed,
and the machine settings.
Using the Touch Screen
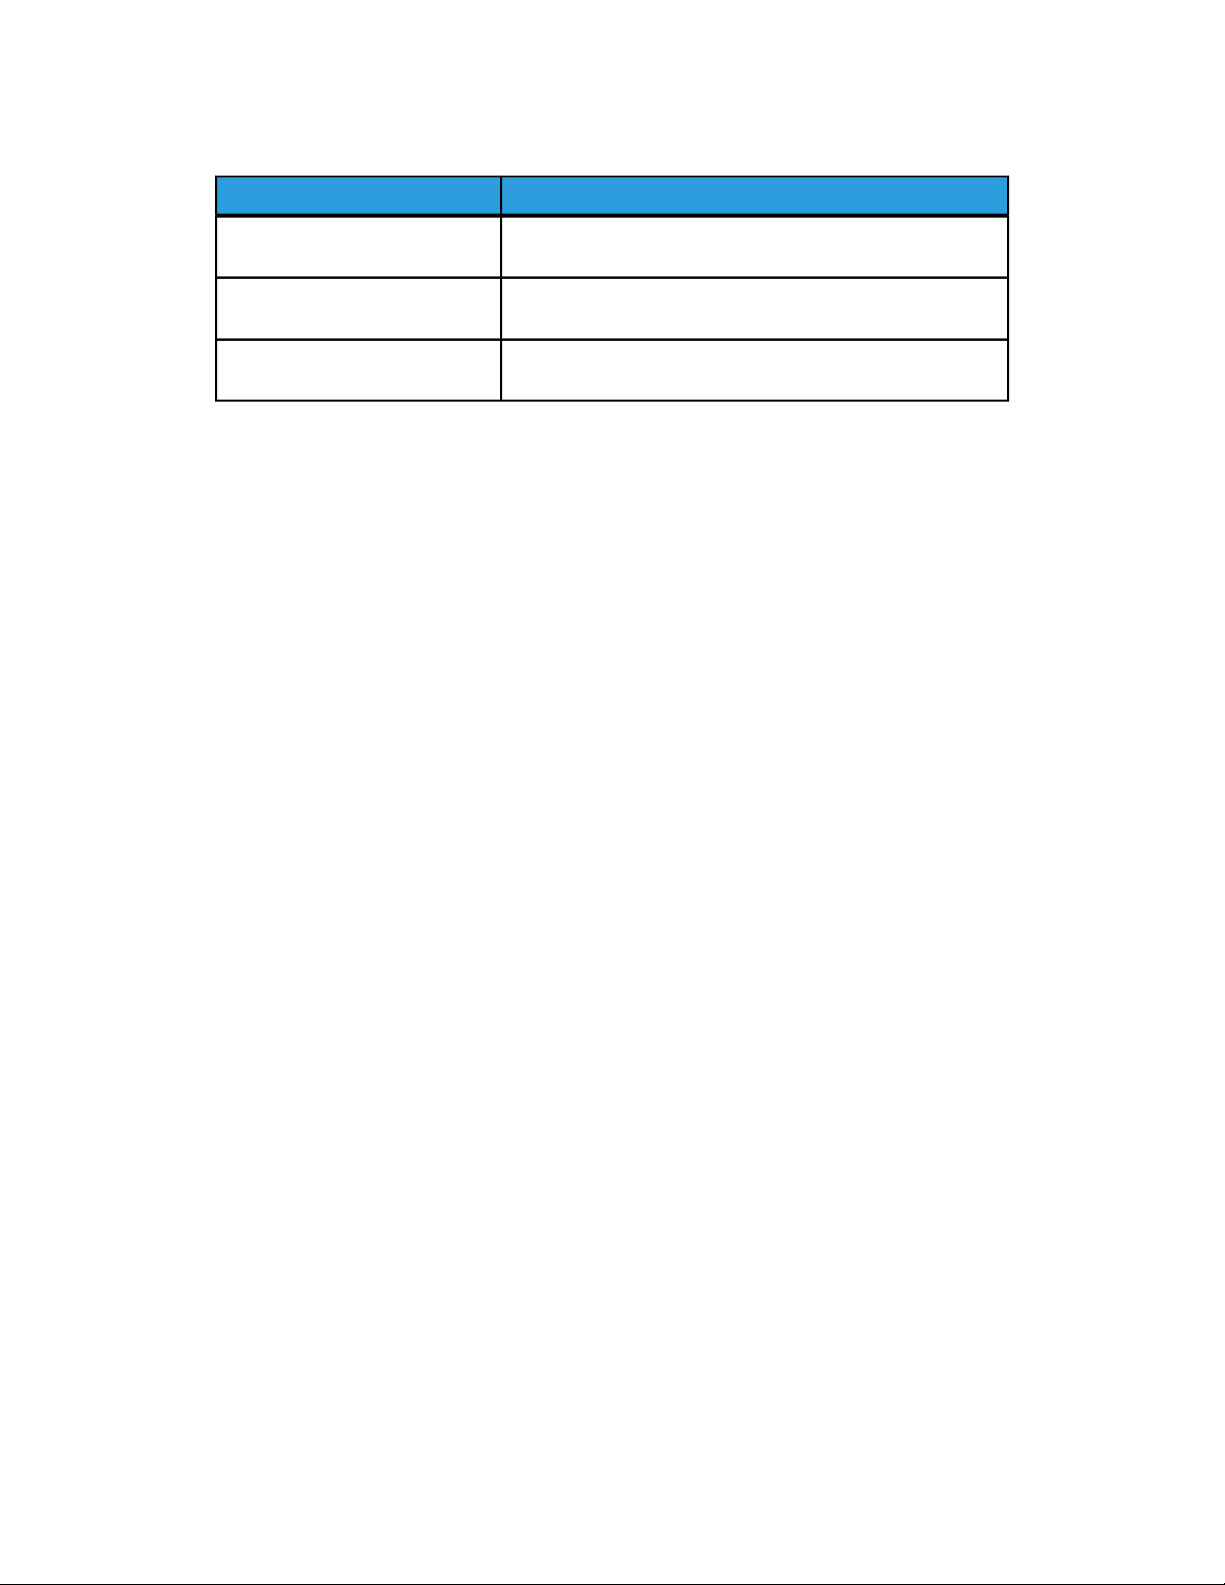
Features on the Services Menu
The Services Menu is the default page for the User Interface. It appears after the machine
is powered on or exits the Power Saver mode, and when the machine exits the System
Administration mode.
The screen below displays the copy/scan features. There is a scanner connected.
1-10
Xerox® Wide Format 6622 Solution
User Guide
™
Page 21
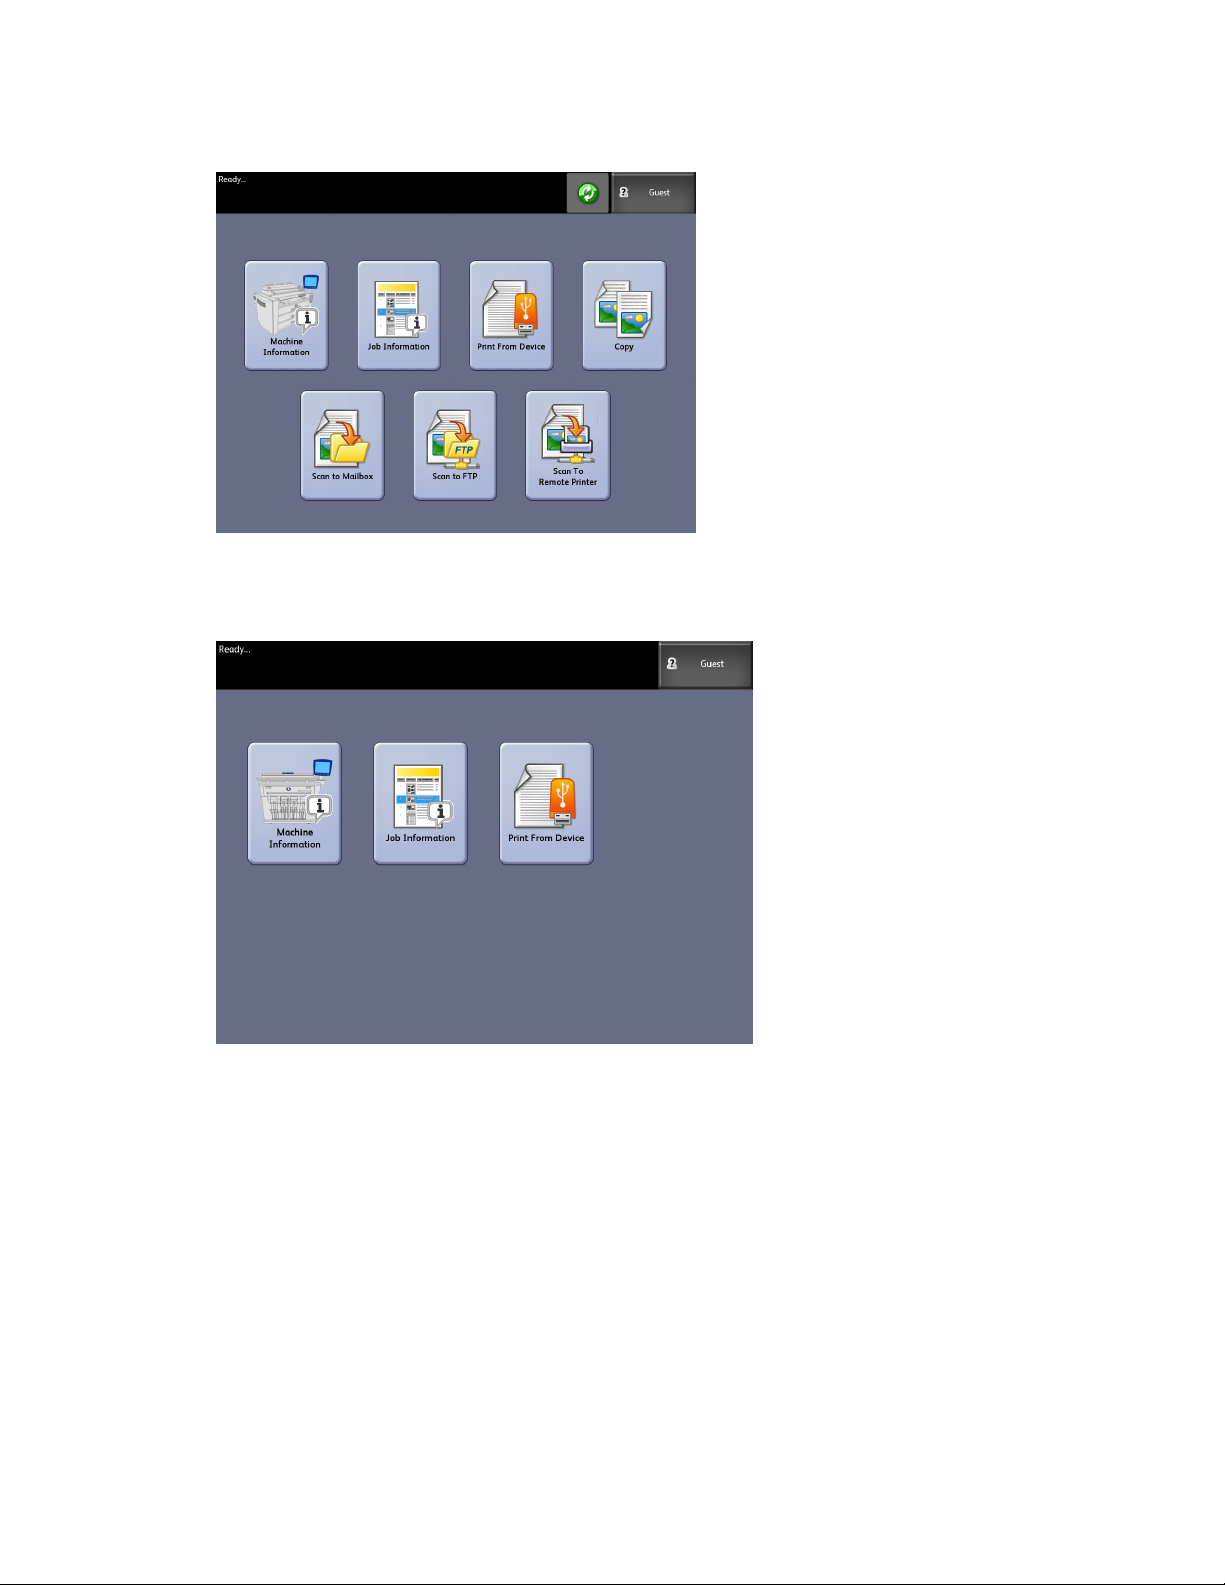
Product Overview
The following screen displays the printer only features. There is no scanner connected.
Xerox® Wide Format 6622 Solution
User Guide
™
1-11
Page 22
Product Overview
Table 8: Services Menu
FunctionService
Machine Info
Where system settings and configurations are
enabled and changed.
Job Information
Jobs are listed with status. Users can reprint
jobs from the queue list.
Print from Device
Scan to and print from a removable media
device (USB).
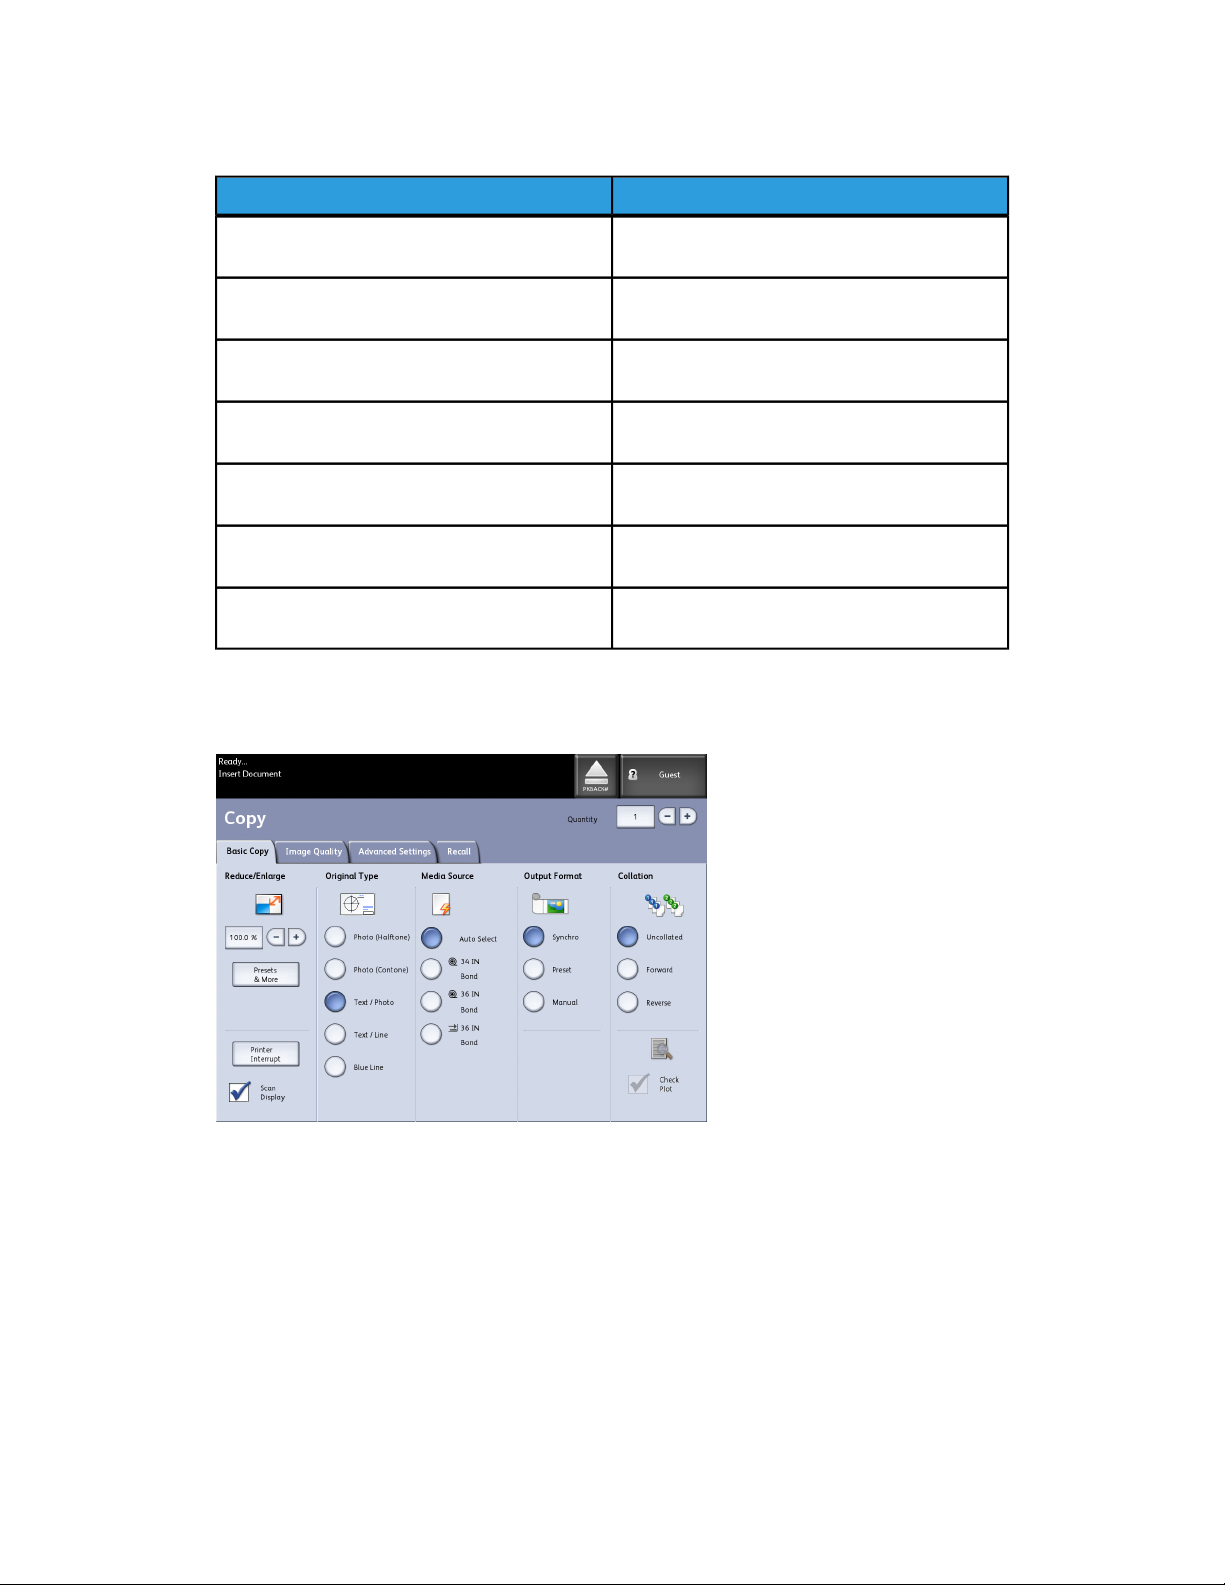
Copy
Displays the Basic Copy tab, Image Quality tab,
Advanced Settings tab and Recall tab.
Scan-to-Mailbox
Allows users to store scanned jobs in a mailbox
for later retrieval and printing.
Scan-to-FTP
Allows users to send scan jobs to a networked
file server destination.
Scan-to-Remote Printer
Allows users to send scan jobs to a remote
printer.
Touch Screen Features and Functions
1-12
Xerox® Wide Format 6622 Solution
User Guide
™
Page 23
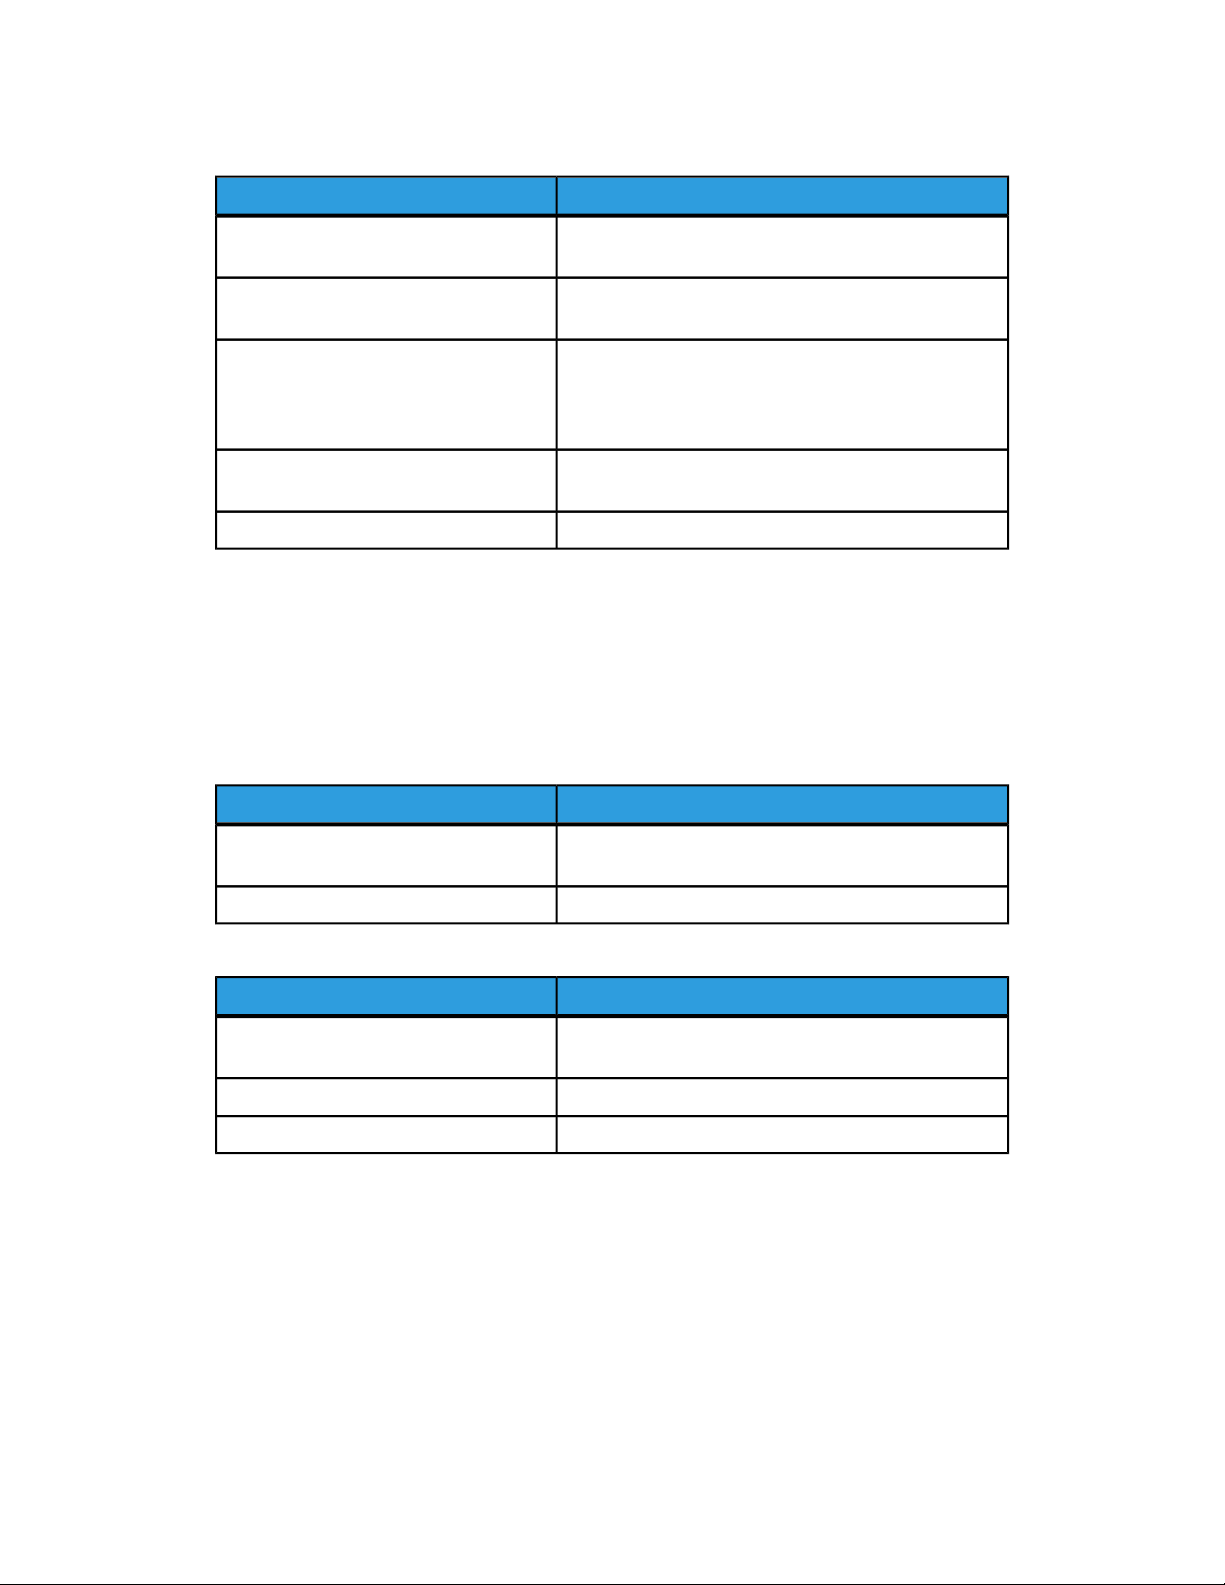
Table 9: Touch Screen
Product Overview
FunctionTouch Screen Component
Message Area
Feature Tabs
Copy Quantity
Selection Buttons
Displays status information, user instructions and login
access.
Touch tabs to select and display the Menu and
additional features.
Enter the number of copies using the numeric keypad.
The number of copies can be set from 1 to 999. Press
the Control Panel Clear button to clear an incorrect
entry.
Touch to select an option. When selected, the button
highlights.
Use the arrow buttons to scroll to and select a value.Scroll Buttons
Keyboards
Entering Text
Screens may display that require you to enter text. This section of the keyboard is used
to enter text.
Table 10: Keyboard layout
FunctionComponent
Entry Area
Table 11: Keyboard procedures
Entering alphabetic characters and
numbers
Displays the characters entered on the numeric
keypad.
Use the cursor buttons to move to and insert text.Cursor Buttons
ProcedureFunction
Touch the desired characters. Select Shift to switch
between lowercase and uppercase characters.
Select Backspace to delete one character at a time.Deleting a character
Select Cancel or Save, as appropriate.Canceling or saving your input
NOTE
You may get an Invalid Entry error message if you select a character that is
unacceptable in the feature. For instance, when naming a mailbox, you may not use
an apostrophe.
Xerox® Wide Format 6622 Solution
User Guide
™
1-13
Page 24

Product Overview
Control Panel
Table 12: Control Panel
Services1
Machine Information2
Login/out3
Language4
Power Saver5
Clear6
FunctionButton NameNum.
Displays the Services Menu, which has a button for
Machine Information, Job Information, Copying, Scan to
Mailbox, Scan to FTP and Scan to Remote Printer. These
are the primary services.
Displays the machine status, media status, billing meter
readings and serial number, system description
(Configuration) and recent faults. Also enables the printing
of configuration and settings information.
Enables System Administrator and Job Accounting Login
access. Administrator access requires a secured password.
Job Accounting access requires an account name and User
ID. Guest access does not require a login.
Screen allows users to change text to an alternative
language, select inches or millimeters for Units and select
an Imperial or International Date Format.
The <Power Saver> button illuminates when the system
is in the Low Power or Sleep modes.
Clears incorrect values entered when using the numeric
keypad, and is used to reset scan defaults in any of the
scan modes.
1-14
Xerox® Wide Format 6622 Solution
User Guide
™
Page 25

Product Overview
FunctionButton NameNum.
Used to Stop the scanning of an original.Stop7
Used to Start the scanning of a copy or scan job.Start8
Language
The Language feature enables you to select the default language, units of measurement,
and date format that displays on the Touch Screen, web interface, controller-generated
test prints, banner sheets, configuration pages, and so forth.
1. Press the Language button on the Control Panel.
2. Select the radio button of the desired language.
3. Select the Inches or the Millimeters radio button to set up the default units of
measurement.
4. Select the appropriate radio button from the Date Format choices.
• Imperial: The date displays in the format MM/DD/YYYY.
• International: The date displays in the format DD/MM/YYYY.
5. Select Save to close the Language screen and return to the Services menu.
Using the Power Saver Feature
The Power Saver feature automatically reduces the power consumption when no print
data is received within a preset period. The Power Saver feature has two modes, Low
Power Mode and Sleep Mode.
The machine enters the Low Power Mode after a preset period elapses. The machine
transitions to the Sleep Mode from the Low Power Mode if the machine remains idle for
an additional period.
NOTE
Refer to the Timers section to learn how to customize the Power Saver mode settings.
Low Power Mode
In this mode, the power to the control panel and the fuser is reduced. As the machine
enters the Low Power Mode, the Touch Screen shuts down and the Power Saver button
on the control panel illuminates.
Sleep Mode
In this mode, the power is reduced more than in the Low Power Mode. During the
transition from the Low Power mode to the Sleep mode, the Touch Screen remains dark
and the Power Saver button remains illuminated.
Entering the Power Saver Mode
The Power Saver Mode may be entered either automatically or manually.
Xerox® Wide Format 6622 Solution
User Guide
™
1-15
Page 26
Product Overview
Automatic Method
The machine enters the Low Power Mode after a preset period elapses. The machine
enters the Sleep Mode from the Low Power Mode if the machine remains idle for an
additional, preset period.
Manual Method
Press the Power Saver button on the Control Panel. The button illuminates, the machine
enters the Low Power Mode and the Touch Screen backlight extinguishes.
Exiting the Power Saver Mode
The Power Saver mode may be exited either manually or automatically.
Manual Method
With the machine in the Power Saver mode, press the illuminated Power Saver button.
The button’s indicator light extinguishes, the Touch Screen displays the message Warming
Up, and the machine begins its warm up cycle.
Automatic Method
The machine exits the Power Saver mode when it detects a print job in the active queue.
NOTE
Refer to the System Administration chapter to learn how to customize the Power
Saver mode settings. This is a System Administrator only setting.
Operator Panel & Status Display
The operator panel is located on top of the front side of the printer. It consists of a
graphic display, a message display and several function keys.
1-16
Xerox® Wide Format 6622 Solution
User Guide
™
Page 27
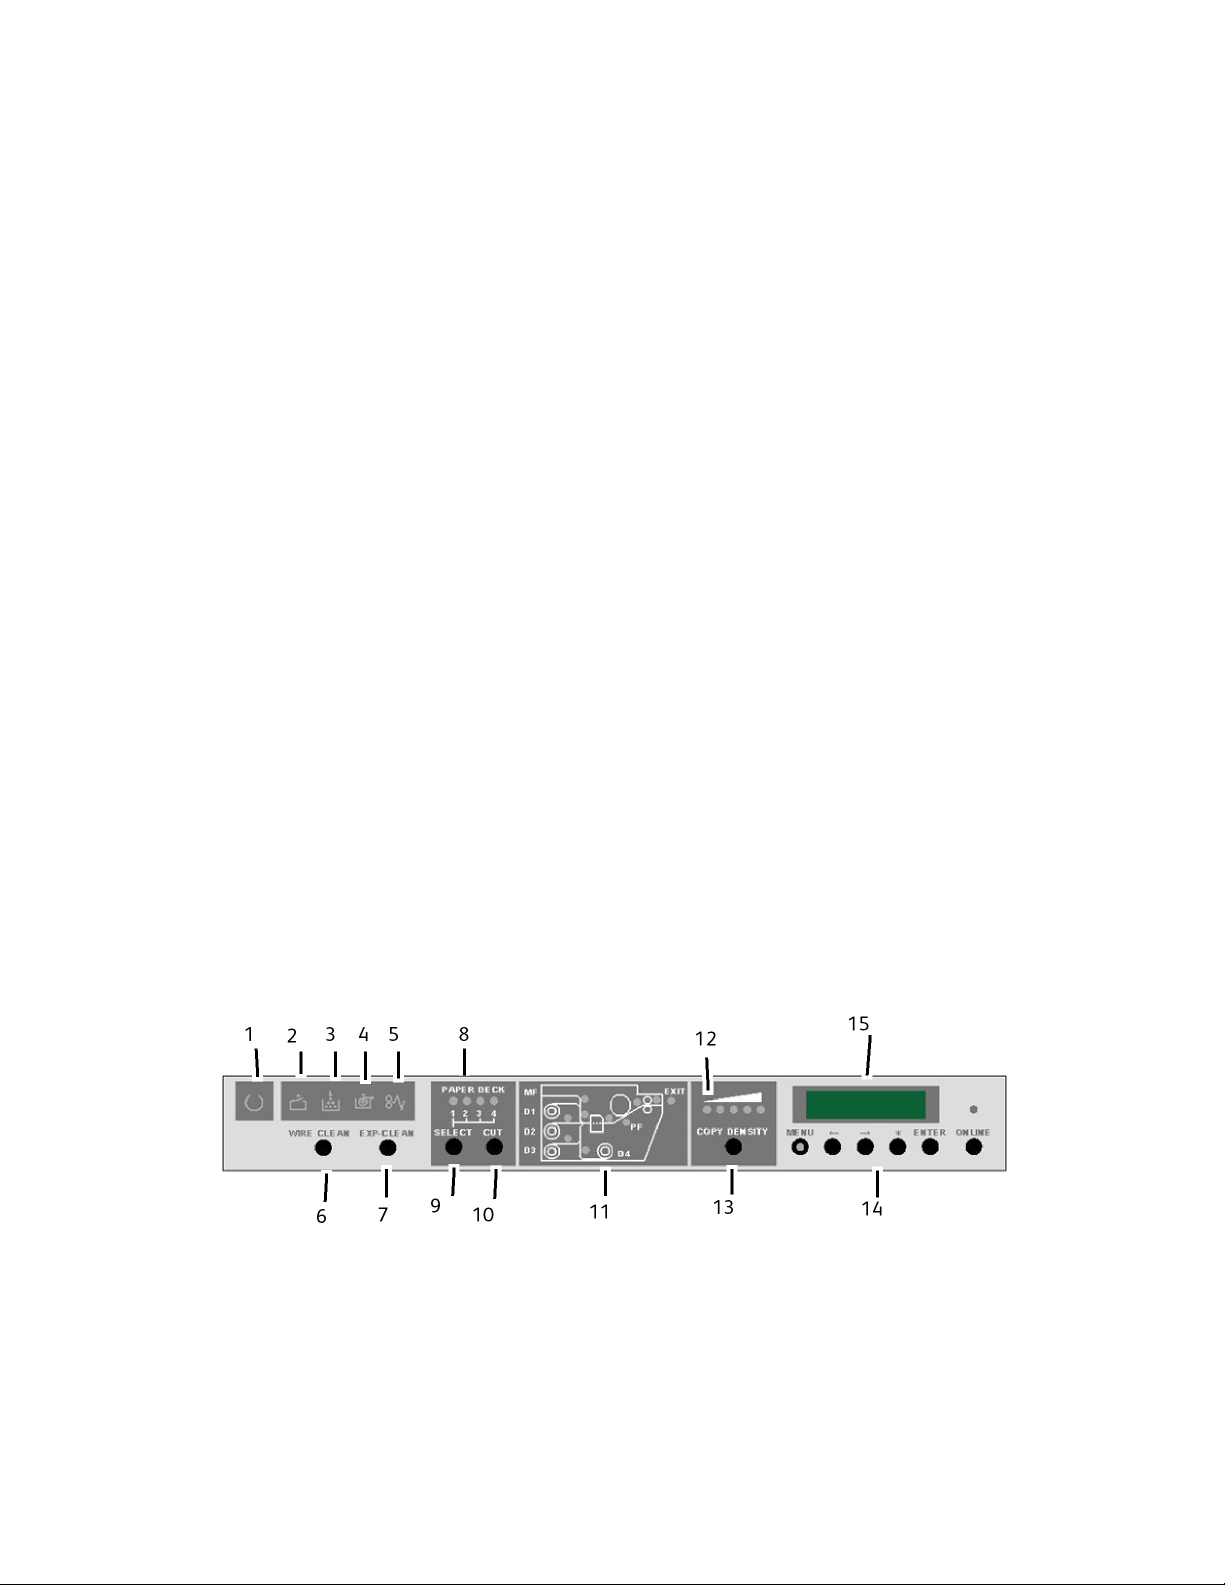
Table 13: Operator and Status Displays
Product Overview
Specifications for Xerox 6622SubjectNum.
Ready Indicator1.
Door Open Indicator2.
Toner Empty Indicator3.
Media Empty Indicator4.
Media Jam Indicator5.
Wire-Clean key6.
Exp-Clean key7.
Media Roll Indicator8.
Flashes when the printer is warming up, and remains
on steady when the printer is ready to operate.
This indicator flashes and an error code is displayed
when a door is opened, or the Inner Transport Unit is
opened.
This indicator flashes when the toner level is low. When
the toner supply is empty, the indicator is on steady
and no more prints can be made. You can replace the
Toner cartridge even if the printer is operating.
This indicator flashes when the selected media roll is
depleted.
This indicator flashes when media is jammed in the
printer.
The Charge Scorotron Wire is cleaned when this key
is pressed. The Ready Indicator flashes during the
cleaning process.
Lens Array of LED Print Head is cleaned when this
button is pressed. The Ready Indicator flashes during
the cleaning process.
Displays the selected media roll for lead edge cut when
the SELECT key is pressed.
Select key9.
Cut key10.
Menu, , , *, Enter, Online14.
Status Display15.
Press this key to select the media roll desired for a lead
edge cut.
Press this key to feed and cut 240mm of the lead edge
of the selected roll.
Indicates the location where Jam has occurred.Media Jam Location Indicator11.
The selected Print Density level is illuminated.Copy Density Indicator12.
Use this key to increase or decrease the image density.Copy Density Key13.
These keys are used for changing User Modes. The
Online Key is also used to place the printer Offline and
Online.
Error Codes, Status Codes and messages are displayed
here.
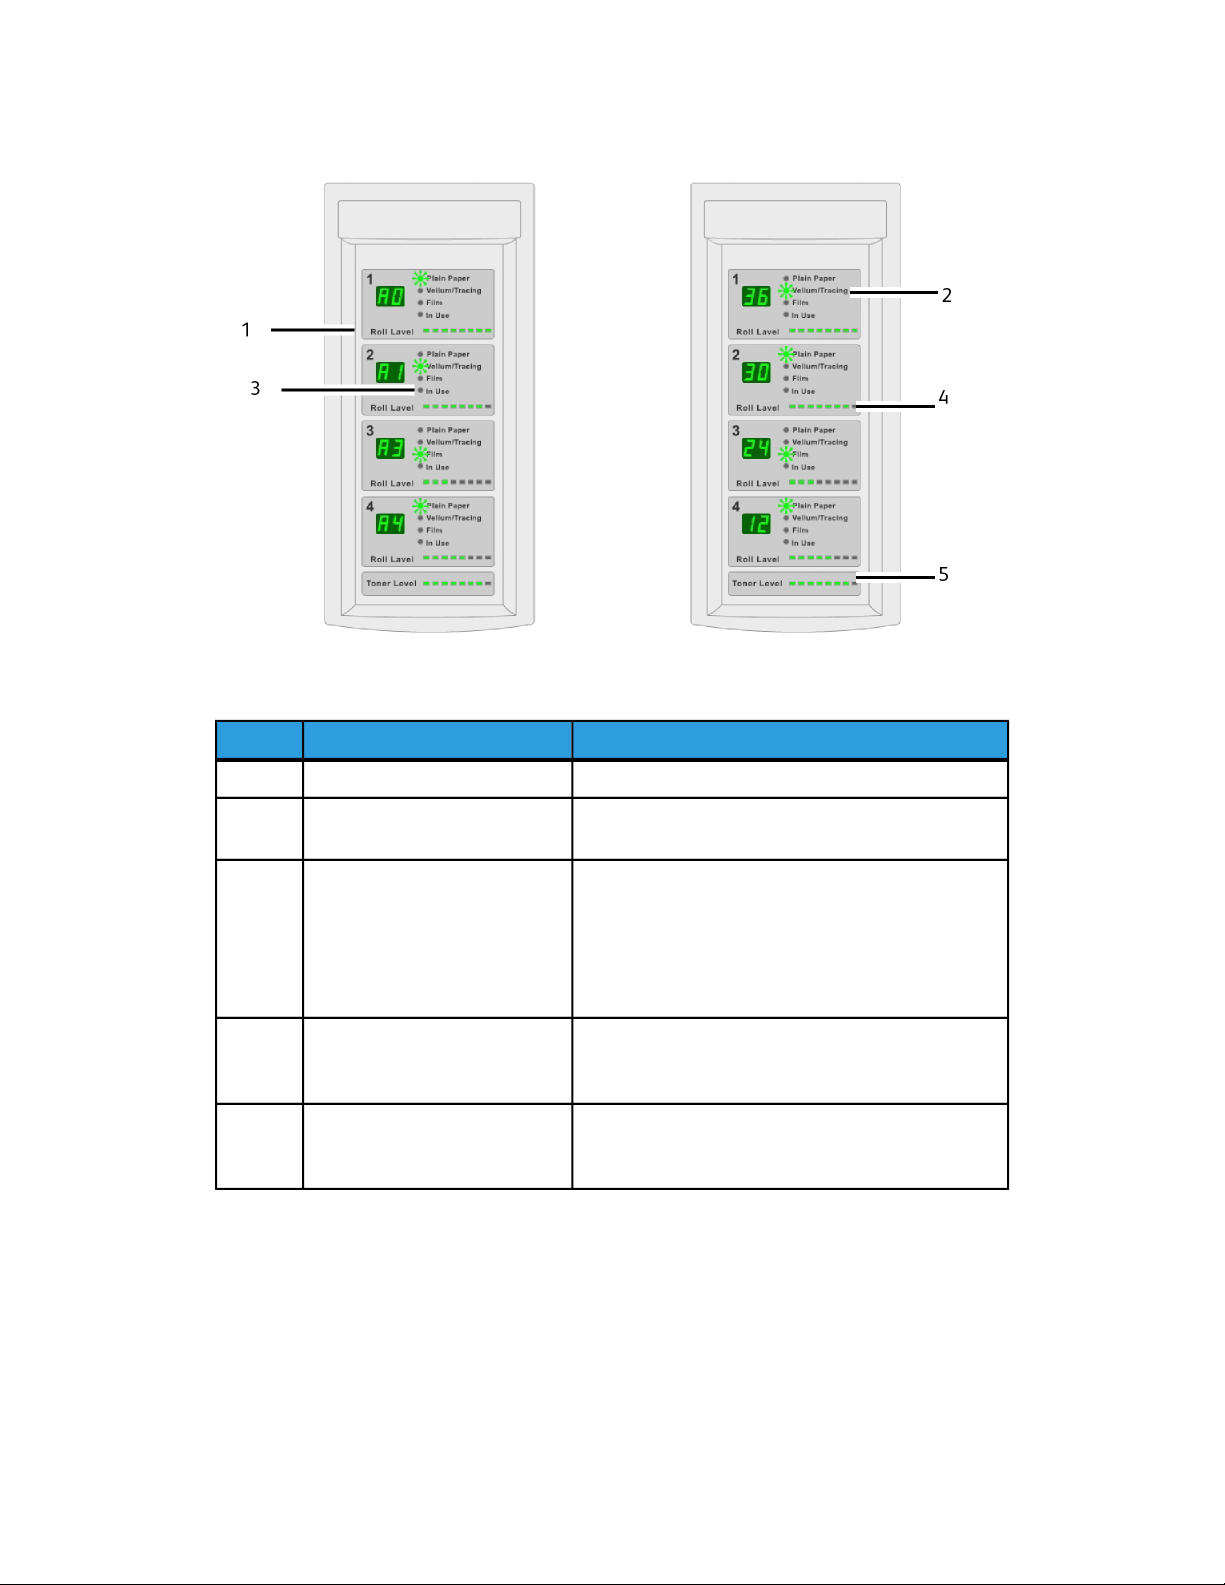
Media and Toner Status Panel
The Media and Toner Panel is located on the front right face of the printer. It displays
the size of the media, the type of the media, the media in use, and how much media
and toner is remaining.
Xerox® Wide Format 6622 Solution
User Guide
™
1-17
Page 28
Product Overview
Table 14: Media and Toner Status Panel
Specifications for Xerox 6622SubjectNum.
Displays the size of the Media Roll.Roll Size Displays1.
Media Type Indicators2.
In Use Indicators3.
Roll Level Indicators4.
Toner Level Indicator5.
Displays “Plain Paper”,”Vellum/Tracing” or”Film”
depending on the media loaded in the drawer.
Illuminates to indicate that the drawer is “In Use”.
Even if the printer is in the print cycle, you can
replace media rolls 1, 3 and 4 if “In Use” indicator
is off. Also, the drawer in use is identified in the
message display as “-dx-” (x being the drawer
number).
This indicator displays the remainder of the Media
Roll. Lamps go off from right to left as the media
diminishes.
This indicator displays the remainder of toner in the
toner cartridge. Lamps go off from right to left as
the toner diminishes.
Powering the System On
The Printer and Controller are each equipped with a Power Switch.
System Power On
1. Always move the Printer Power Switch to the On [ | ] position before turning on the
Controller.
1-18
Xerox® Wide Format 6622 Solution
User Guide
™
Page 29

Product Overview
2. Press the Power Button on the front of the Controller.
The Power Button light illuminates. After about one-half minute, the Control Panel
displays the Printer Warming Up message. The machine becomes print ready in about
three minutes.
Off Line/On Line
1. Press the Online Key to take the printer Offline.
The green LED light goes off, the page in process finishes and the printer enters the
Offline Mode. Print jobs are still accepted to the job queue.
2. To return the printer to the Online Mode, press the Online Key.
The green LED light goes on and the printer returns to the Online Mode.
Document Input
Documents that match any of the following sizes may be used.
Xerox® Wide Format 6622 Solution
User Guide
™
1-19
Page 30

Product Overview
Table 15: Document Input
ThicknessOriginal Size
Width: 4.5 - 41 inches (114 - 1050 mm) (1016 mm Active Scan)
Length: 7.8 - 644 inches (200-16510 mm)
Flat paper (0.05 - 3.2 mm)
(0.3 mm max)
NOTE
The maximum length that can be scanned to the network is 650 inches. The
maximum copy length is 590.55 inches (15 meters).
Precautions When Handling Documents
Observe the following precautions when handling documents:
• The Scanner Feed-in Shelf may become soiled if documents to which glue, adhesive
tape or correction fluids have been applied are placed in the Scanner. Stick or spray
glues may soil the scanning area, causing black lines to appear on copies.
• Use caution with documents that have been folded, wrinkled, torn or had holes
punched in them. These may result in document jams and tearing.
• When rolled documents are used, ensure that the diameter of the roll is 1.6" (40 mm)
or larger. Rolls with a diameter of less than 1.6" must be flattened on the lead edge
to scan correctly.
Copy Strategies for Special Documents
When copying documents, always try the default Image Quality settings first. These
settings have been designed to give the optimum image quality for most documents.
Select the Original Type:
• Photo (Halftone)
• Photo (Contone)
• Text/Photo
• Text/Line
• Text/Line (Clear)
NOTE
Saving customized jobs with special settings for different document types is saving
time. After following the suggestions below, refer to the use of Templates on the
Recall Tab of this chapter.
1-20
Xerox® Wide Format 6622 Solution
User Guide
™
Page 31

Table 16: Copy Strategies for Special Documents
Product Overview
ThirdSecondFirstOriginal Type
Color Photograph
Pencil Drawings
and
Blue-prints/line
Copy Mode:
Set Original Type to
Photo
(Continuous-Tone).
Scan Mode:
Set Original Document
Type to Photo
(Contone), set Rendering
to Color (24-bit) and File
Format to TIFF files.
Copy Mode:
Set Original Type to
Text/Line. Set Advanced
Settings Rendering to
Binary and enable
Invert.
Scan Mode:
Set Original Document
Type to Text/Line.
Set Rendering to Snap to
Black.
Copy Mode:
Adjust Image Quality
by setting the
Background
Suppression to
Disabled (unchecked).
Scan Mode:
Adjust Image Quality
by setting the
Background
Suppression to
Enabled (checked).
Copy Mode:
Set Background
Suppression to
Disabled (unchecked).
Scan Mode:
Set Background
Suppression to
Disabled (unchecked).
Copy Mode:
Continue with Image
Quality adjustments as
required. In the
Advanced Setting tab,
select Rendering settings
to get desired results.
Scan Mode:
Continue with Image
Quality adjustments as
required.
Copy Mode:
Continue with Image
Quality adjustments as
required.
Scan Mode:
Continue with Image
Quality adjustments as
required.
Color Map
Copy Mode:
Set original document
type to Text/Photo.
Scan Mode:
Set Original Document
Type to Photo
(Half-Tone) or
Text/Photo.
Copy Mode:
Set Image Quality to
Background
Suppression to
Disabled (unchecked).
Scan Mode:
Continue with Image
Quality adjustments as
required.
Copy Mode:
Continue with Image
Quality adjustments as
required.
Xerox® Wide Format 6622 Solution
User Guide
™
1-21
Page 32

Product Overview
Old Blueprints
Old blueprint or
sepia with dark
background and
side-to-side fading
Copy Mode:
Set Original Type to
Text/Line. Set Advanced
Settings Rendering to
Binary and enable
Invert.
Scan Mode:
Set Original Document
Type to Text/Line.
Set Rendering to Snap to
Black.
Copy Mode:
Set Original Type to
Text/Line. Advanced
Settings Rendering to
Binary and enable
Invert.
Scan Mode:
Set Original Document
Type to Text/Line.
Set Rendering to Snap to
Black.
Copy Mode:
Set Background
Suppression to
Enabled (checked).
Set Background
Suppression to Max.
Scan Mode:
Set Background
Suppression to
Enabled (checked).
Set Background
Suppression to Max.
Copy Mode:
Rotate the original 90
degrees. Generally,
feeding the darkest
edge first provides the
best results.
Set Background
Suppression to
Enabled (checked).
Scan Mode:
Set Background
Suppression to
Enabled (checked).
Set Background
Suppression to Max.
Copy Mode:
Adjust the copy Contrast
as required for best
image quality.
Scan Mode:
Adjust the copy Contrast
as required for best
image quality.
Copy Mode:
Adjust the copy Contrast
as required for best
image quality.
Scan Mode:
Adjust the copy Contrast
as required for best
image quality.
Faded line/text
drawing, uneven
density
Clear film, vellum,
or translucent
media with lines,
photos or mixed
original
Copy Mode:
Set Original Type to
Text/Line and increase
Image Quality,
Background Suppression.
Scan Mode:
Set Original Document
Type to Text/Line.
Copy Mode:
Set Original Type to
Text/Line (Clear).
Scan Mode:
Set Original Document
Type to Text/Line
(Clear).
Copy Mode:
If fade is still visible in
the copy, rotate the
original 90 degrees.
Generally, feeding the
darkest edge first
provides the best
results.
Scan Mode:
Set the Image Quality
Background
Suppression to
minimum.
Copy Mode:
Set the Image Quality,
Background
Suppression to
Disabled (unchecked).
Scan Mode:
Set the Image Quality,
Background
Suppression to
Disabled (unchecked).
Copy Mode:
In Reduction mode, use
Reduction Line
Preservation located in
Machine Info > Admin >
Copy Options.
Adjust the copy Contrast
as required for best
image quality.
Scan Mode:
Adjust the copy Contrast
as required for best
image quality.
Copy Mode:
Change Rendering in the
Advanced Settings tab
as required for best
results.
Scan Mode
Adjust the Image Quality
Density, Contrast and
Sharpness for best
results.
1-22
Xerox® Wide Format 6622 Solution
User Guide
™
Page 33

Product Overview
Media Source
Before you load an original in the Xerox Wide Format 6622 Solution, you must specify
where the media (paper) is going to be feeding from. This is referred to as the Media
Source which provides the output.
To Specify the Media Source
1. Press the Services button on the Control Panel.
The Services menu displays.
2. Select the Copy button.
3. Choose from the following Media Source selections.
• Auto Select - The machine automatically selects the correct media based on the
original size detected and the specified reduction and enlargement.
• Media Roll - Select from the Media Roll size(s) loaded in the Media Drawers.
• Cut Sheet Media - Select this to load media in the Manual Feed-in Shelf.
4. Load the original face down for scanning.
NOTE
Refer to the Copying Documents and Scanning Documents chapters, for complete
Copy and Scan instructions, respectively.
Media Types and Loading
This section describes the available media for this machine and the appropriate media
handling, loading and storage procedures.
The use of inappropriate media may result in media jams, reduced print quality,
malfunctions and other problems. To make the most effective use of the machine, we
recommend that you use only the media recommended by Xerox.
Xerox® Wide Format 6622 Solution
User Guide
™
1-23
Page 34

Product Overview
NOTE
Media may be ordered from Xerox at www.xerox.com. In the US, from the home
page, select Supplies > Paper and Media Type > For Wide Format Products.
NOTE
A Media Mismatch screen displays if the required media is not loaded in the
machine when you make copies. Follow the instructions on the screen to resolve
the condition. A Media Mismatch button displays on the Menu screen if the
controller detects this condition when it receives a print job. Press
the Media Mismatch button, and then follow the instructions on the screen.
If you choose to use media not recommended by Xerox, contact your Xerox Customer
Support Center.
Media Types
Printable Media:
When using supplier paper for copies or prints, make sure that it complies with the
following specifications. The standard paper is recommended by Xerox.
1-24
Xerox® Wide Format 6622 Solution
User Guide
™
Page 35

Table 17: Media Types
Product Overview
Roll 1,
Roll 2
Roll 3,
Roll 4
Bond Paper:
20 lb.-500 ft.
rolls: Xerox
Premium
Bond or
Xerox
Performance
Bond
18 lb.:
Translucent
Bond
Film: 4-mil
Accu-Image
Elite
European:
75-100
micron
Loadable Media SizeWeightRoll/Tray
ARCH-2 30", 24", 18", 12"
ANSI 34", 22", 17", 11"
ISO A0, A1, A2, A3, A4
JIS B1, B2, B3
ISO B1, B2, B3
SP. A0 (880, 860 mm)
SP.A1 (620 mm)
SP.A2 (440 mm)
Outside diameter of the
roll: less than or equal to
6.7 inches (170 mm)
Standard Paper
(including recommended paper)
Name
Meter
Bond
4-mil
Accu-Image
Film
Lb.Grams/Square
2080 g/m2PremiumARCH-1 36", 24", 18",12"
2075 g/m2Performance
18N/ATranslucent
N/AFilm -
Tracing
Paper
90-112 g/m2
Vellum
20 lb. 500ft.
Tracing 90
Tracing 112
Translucent 100
micron
Performance
Production
80 g/m2
80 g/m2
N/A90 g/m2Premium
N/A112 g/m2Premium
N/APremium
20
20
Xerox® Wide Format 6622 Solution
User Guide
™
1-25
Page 36

Product Overview
Manual
feed
Plain Bond
Paper: 20
lb.-500
ft.rolls:
Xerox
Premium
Bond or
Xerox
Performance
Bond
18 lb.:
Translucent
Bond
Tracing
Paper
90-112 g/m2
Loadable Media SizeWeightRoll/Tray
18x24", 12x18", 12x9"
ARCH-2: 30x42"
ANSI: 34x44", 22x34",
17x22", 11x17", 11x8.5"
ISO A0, A1, A2, A3, A4
JIS B1, JIS B2, JIS B3, JIS
B4
ISO B1, ISO B2, ISO B3,
ISO B4
SP. A0 (880, 860 mm)
SP.A1 (620 mm)
SP.A2 (440 mm)
Width: 210-914.4 mm
Length: 297-15000 mm
Standard Paper
(including recommended paper)
Name
Meter
A4)
Bond
Premium
Tracing 90
Premium
Tracing 112
112 g/m2
Lb.Grams/Square
2075 g/m2PremiumARCH-1: 36x48", 24x36",
2075 g/m2Business (A3,
18N/ATranslucent
N/A90 g/m2
Film: 4-Mil
Zero-Solvent
A-I Elite
Film European:
75-100
micron
Translucent 100
micron
Accu-Image
Film
N/APremium
N/A4-mil
NOTE
Jams may occur if the media being used differs from the current media settings.
Always select the correct media size, type and thickness to achieve the best results.
NOTE
G.S.M. (g/m2) is a measure of a substance/weight of a paper expressed in grams
per square meter, which does not depend on the number of sheets in the ream.
Adding Media Rolls
When the Media Roll in use is empty, the Media Empty Indicator on the Operation Panel
remains on steady.
To load a new Media Roll, follow the instructions in the “Loading The Media Roll” sections
of this chapter.
1-26
Xerox® Wide Format 6622 Solution
User Guide
™
Page 37

Product Overview
NOTE
Roll sizes 880 mm, 891 mm and 900 mm can be loaded in Media Drawer 1 only. The
printer is set for 900 mm size. To enable 880 mm or 891 mm sizes, contact Xerox
Service.
NOTE
B3 media should not be loaded in drawer 1. If B3 media is loaded in drawer 1, the
printer reports the size as either A3 or 11” media.
Handling and Storing Media
Handling Media
Do not use media that has been folded, creased or heavily curled, because media jams
may occur.
Storing Media
The optimum environment in which to store paper media is a humidity of 40 to 45%.
Keep the following in mind when storing paper media:
• Moisture is not good for media. For storage, wrap the media in wrapping paper and
store it in a comparatively dry place. Tracing paper, especially, should be put in a
plastic or moisture-proof bag that contains desiccant.
• When the machine is not used for a long period of time, remove the media and store
it appropriately.
• The printer has a paper heater. This goes on when the system detects humidity. The
switch is located next to the waste toner bottle on the right hand side of the machine.
• Store the media on a flat surface to prevent curl.
Xerox® Wide Format 6622 Solution
User Guide
™
1-27
Page 38

Product Overview
Dehumidifier
The printer is equipped with a Dehumidifier, which, when enabled, maintains the media
at a constant temperature. The Dehumidifier operates at night and in high-humidity
conditions in order to avoid moisture-related problems with the media such as wrinkling
and deletions in the print.
Your Xerox Service Representative can enable the heaters to operate in one of three
modes:
• Off all the time.
• Off when printer is switched on. The heaters continue to operate when the printer is
switched off, as long as the printer is connected to a live power outlet.
• On all the time.
If the Xerox Service Representative has enabled the Dehumidifier, the heaters can be
switched on or off by the Operator as environmental conditions change.
1. Open the Top Rear Cover in order to locate the Dehumidifier Switch.
2. Set the switch to the correct position for humid or dry conditions:
a) In humid conditions, the Dehumidifier Switch should be set to H (on).
b) In dry conditions, the Dehumidifier Switch should be set to L (off).
Loading the Media Roll (Roll 1, 2, and 3)
1. Pull the handle and open the desired drawer.
1-28
Xerox® Wide Format 6622 Solution
™
User Guide
Page 39

Product Overview
2. Rewind the media remaining on the roll.
3. Hold the roll at both ends and lift the roll out of the drawer. The roll must remain
parallel when removed.
4. Place the roll on a flat surface to change the roll.
CAUTION
Failure to keep the spindle parallel may cause the gear at the left end to break.
5. Press the green Media Locking Lever at the end of the Spindle.
6. Slide the Spindle out of the Media Core.
7. Press the green Media Locking Lever and insert the Spindle into the new roll of media.
8. Align the edge of the media with the appropriate Media Width Indicator.
NOTE
To ensure that the media roll will not slip on the Spindle, lift up on the green
Media Locking Lever after the roll is in position. This action provides a positive
grip on the Media Core.
NOTE
To avoid unnecessary strain, load the heaviest roll in the top drawer and the
lightest rolls in the bottom drawer.
Xerox® Wide Format 6622 Solution
User Guide
™
1-29
Page 40

Product Overview
9. Hold the roll at both ends and place the roll into the drawer.
10. Notice the placement of the gears located on the left of the roll when installing it.
NOTE
Ensure that the Drive Belt (located on the right side) is lying flat underneath the
plastic Roller on the right side of the Spindle. If the belt is not correctly positioned,
the printer indicates an out-of-media condition.
11. If the leading edge of the Media Roll is taped, cut enough to eliminate the possibility
of glue from the tape contaminating internal printer components. If the leading edge
is torn, folded, or very ragged, cut the leading edge using a sharp blade and the slit
mounted to the inside of the drawer.
12. Insert the lead edge of the media between the Upper and Lower Feed Rollers.
1-30
Xerox® Wide Format 6622 Solution
User Guide
™
Page 41

Product Overview
13. Rotate the Lower Roller, approximately 1/4 turn, by hand in order to feed the media
between the rollers.
Roll 3 only:
NOTE
Roll 3 is the only roll with the Viewing Window used to confirm the position of
the lead edge of the media.
14. Rotate the feed roller until the lead edge is visible in the center of the Viewing Window
hole.
Xerox® Wide Format 6622 Solution
User Guide
™
1-31
Page 42

Product Overview
15. Set the Media Type Button according to the media installed.
16. Push in on the drawer until it is closed and latched.
17. Press the Select key on the Operator Panel to select the appropriate Paper Deck, then
press the Cut key. This ensures the lead edge of the paper has a clean cut and prevents
problems.
Loading the Media Roll (Roll 4)
1. Pull the Drawer Handle and open Media Drawer 3/4.
2. Rotate the Spindle in the rewind direction even if the paper is not in the rollers but
is loose. Failure to perform this step may cause the gear at the left end of the Spindle
to be broken.
3. Hold the roll at both ends and lift the roll out of the Media Drawer. The Spindle must
remain parallel when removed.
4. Place the Media Roll on a flat surface to change the roll.
CAUTION
Failure to keep the spindle parallel may cause the gear at the left end to break.
1-32
Xerox® Wide Format 6622 Solution
User Guide
™
Page 43

Product Overview
5. Press the green Media Locking Lever at the end of the Spindle and slide the Media
Roll off.
6. Press the green Spindle Lever and insert the new roll of media.
7. Align the edge of the media with the appropriate Media Width Indicator.
NOTE
To ensure that the Media Roll will not slip on the Spindle, lift up on the green
Media Locking Lever after the roll is in position. This action provides a positive
grip on the Media Roll.
NOTE
To avoid unnecessary strain, load the heaviest roll in the Drawer 1 and the lightest
rolls in the Drawer 3/4.
Xerox® Wide Format 6622 Solution
User Guide
™
1-33
Page 44

Product Overview
8. Hold the roll at both ends and place the roll into the Media Drawer.
NOTE
Ensure that the Drive Belt is underneath the plastic Roller on the right side of
the Spindle. If the belt is not correctly positioned, the Printer indicates an
out-of-media condition.
9. If the leading edge of the Media Roll is taped, cut enough to eliminate the possibility
of glue from the tape contaminating internal printer components. If the leading edge
is torn, folded, or very ragged, cut the leading edge using a sharp blade and the slit
mounted to the inside of the drawer.
1-34
Xerox® Wide Format 6622 Solution
User Guide
™
Page 45

Product Overview
10. Insert the lead edge of the media between the Upper and Lower Feed Rollers.
NOTE
Notice the media in Media Roll 4 feeds from underneath.
11. Rotate the Media Advance Knob in order to feed approximately 1 inch (25 mm) of
media between the feed rollers.
Xerox® Wide Format 6622 Solution
User Guide
™
1-35
Page 46

Product Overview
12. Set the Media Type button according to the media installed.
13. Push in on the Media Drawer until it is closed and latched.
14. Press the Select key on the Operator Panel to select the appropriate Paper Deck, then
press the Cut key. This ensures the lead edge of the paper has a clean cut and prevents
problems.
Loading the Media Roll when Printing
Media Drawers 1, 3 and 4 may be loaded when the Xerox Wide Format 6622 Solution
is in progress.
Media Roll 2 can not be loaded when the 6622 is operating.
1. Ensure that the Media Roll is not currently being used by observing that the “In Use”
indicator (located on the Operator Panel) is OFF for the roll to be loaded and the
message display does not indicate that the roll is in use (“-dx-“, x being the roll
number).
2. Refer to the Loading Media Roll instructions previously shown in this chapter for
details.
1-36
Xerox® Wide Format 6622 Solution
User Guide
™
Page 47

Product Overview
Using Manual Feed-in Shelf (Bypass)
When the desired media is not loaded in the Media Drawers, you can bypass using the
drawers and manually load cut sheet media into the Manual Feed-in Shelf (Bypass).
NOTE
The Xerox Wide Format 6622 Solution accepts any media type, regardless of the
media type specified. Ensure that the media type is correct or the toner image may
rub off of the print as the printer uses media type to determine fusing temperature.
To load cut sheets into the Manual Feed-in Shelf (Bypass):
1. Select the appropriate cut sheet for the print job.
2. Position the media Long Edge Lead (LEL).
NOTE
The 6622 expects all cut sheet media to be fed with the Long Edge Leading (LEL)
except for E-size (A0 size) documents. Any image attempted to be printed on a
sheet of media beyond the width of a standard ISO, ANSI, or ARCH series
document will be truncated.
NOTE
As an example, if an Arch C 18” x 24” print is desired but the 18” x 24” media is
loaded Short Edge Lead (SEL), or 18” edge first, the image will stop after a length
of 12” because the 6622 assumes the media loaded is Arch B size (12” x 18”).
Xerox® Wide Format 6622 Solution
User Guide
™
1-37
Page 48

Product Overview
3. Adjust the Bypass Media Guides to the correct size.
4. Feed the cut sheet media squarely into the shelf, curl side down and between the
Bypass Media Guides. For media 24” or wider, the 6622 pre-feeds the sheet into the
Manual Feed-in Shelf (Bypass). For media smaller than 24”, the 6622 feeds the media
when the print job starts.
• 841mm or wider (greater than 24”): 1 sheet only
• 279mm (11”) to 609mm (24”) width: up to 50 sheets (457mm - 18 inch length
maximum) fed long edge.
• Install the Wire Form Holder for paper larger than 18” (447mm).
5. From the client workstation or the scanner, specify Manual Feed as the media source.
6. Submit the print job or scan the document.
1-38
Xerox® Wide Format 6622 Solution
User Guide
™
Page 49

2
Printing and Copying Documents
This chapter describes the Print-from-Device and Copy features of the Xerox 6622 Wide
Format Solution available with the attached Scanner configuration. Included are
instructions on how to make copies from both the Media Drawers and the Manual Feed-in
Shelf (Bypass). Details about using these features, from basic jobs through jobs requiring
advanced settings are provided in the chapter.
• Print from Device (Removable Devices)
• Copying Procedures
• Making Copies Using the Manual Feed-in Shelf (Bypass)
• Interrupting a Print Job
• Setting Up the Basic Copy Selections
• Setting Up the Image Quality Selections
• Setting Up the Advanced Settings Selection
• Setting Up the Recall Selections
Print from Device
There are several removable device types such as Universal Serial Bus (USB), flash drives,
CD/DVD and memory cards etc., that are supported by FreeFlow Accxes.
Job Accounting is also available to log jobs using the Removeable Media feature.
Files stored on removable devices are printed using the FreeFlow Accxes default settings.
To locate the desired files for print, simply browse the files and file folders of the device.
1. Insert the Removeable Media.
Xerox® Wide Format 6622 Solution
User Guide
™
2-1
Page 50

Printing and Copying Documents
2. Select Print-from-Device from the Services menu.
The Print from Device screen displays.
Here you can browse the attached device and eject it.
3. Browse then select the file desired.
• Current Directory - lists the device being read.
• The arrow key takes you back.
• Delete files using the red “X” selection.
• The View All selection displays all file types beyond the primary FreeFlow Access
recognizes.
4. Select Print.
A message indicates the spooling progress and a cancel option.
NOTE
Should an error occur while printing, the Print from File screen displays with
details and the job is cancelled.
2-2
Xerox® Wide Format 6622 Solution
User Guide
™
Page 51

Printing and Copying Documents
5. If desired, press Cancel to stop the job and return to the Print from File screen.
6. Always press Eject before removing the USB device. Properly removing the device
can prevent damaged or corrupted files.
NOTE
If multiple devices are attached, you will be requested to choose which to eject
from a list.
Copying Procedures
This section describes the procedures for making copies using the Xerox Wide Format
printer.
Refer to the sections listed below for instructions.
Step 1: Selecting Features
Step 2: Entering the Copy Quantity
Step 3: Copying the Original
Step 4: Stopping a Copy Job
Step 1: Selecting Features
Making a copy begins by displaying the Copy screen on the User Interface. Once that
is done, setup the copy job by selecting the necessary features from the Basic Copy,
Image Quality, and Advanced Settings and Recall tabs, and then enter the copy quantity.
Basic Copy Tab
1. Select Copy from the Services menu.
The Copy screen displays with the list below:
• Quantity
• Reduce/Enlarge
• Original Type
• Media Source
• Output Format
• Collation and Check Plot
• Scan Display
Xerox® Wide Format 6622 Solution
User Guide
™
2-3
Page 52

Printing and Copying Documents
2. Select the required copy features from those displayed on the Basic Copy tab.
For more information about this tab, refer to Setting Up the Basic Copy Selections,
which appears later in this chapter.
Image Quality Tab
Select the required image quality features from those displayed on the Image Quality
tab.
2-4
Xerox® Wide Format 6622 Solution
User Guide
™
Page 53

Printing and Copying Documents
The Image Quality screen displays the following options:
• Density
• Contrast
• Sharpness
• Background Suppression
NOTE
The Background Suppression feature is unavailable when [Original Type] is set to
either [Photo-Halftone] or [Photo-Continuous Tone].
For more detailed information about these features and the procedure to enable them,
refer to Setting Up the Image Quality Selections,which appears later in this chapter.
Advanced Settings Tab
Select the features to be setup from those displayed on the Advanced Settings tab.
The Advanced Settings screen displays the following options:
• Image Inversion
• Scan Offset
• Rendering
• Image Mirroring
• Image Location
• Sample Copy
• Scan Width
• Margins
• Media Type
Xerox® Wide Format 6622 Solution
User Guide
™
2-5
Page 54

Printing and Copying Documents
• Finishing (optional-not shown)
For more information about this area, refer to Setting Up the Advanced Settings
Selections which appears later in this chapter.
Step 2: Entering the Copy Quantity
You may enter a copy quantity between 1 and 999 using the Numeric Entry screen. This
screen displays automatically when required.
1. Enter the copy Quantity using the up and down arrow in the Copy screen.
2. If you enter an incorrect value, press the C button to clear the entry and then enter
the correct value.
Step 3: Copying the Original
1. Orient the original, image face down, in the Scanner Feed-in Shelf aligning the
document with the Document Input Guide.
2. Evenly and gently insert the lead edge of the original into the Scanner.
If the document does not feed automatically, the Scan Start mode may be set to
Manual Start. In this case, press the Start button on the Control Panel. For more
information about the Scan Start mode, refer to System Administration, Set Start
Scan mode.
2-6
Xerox® Wide Format 6622 Solution
™
User Guide
Page 55

Step 4: Stopping the Copy Job
Press the Stop button on the User Interface Control Panel.
Printing and Copying Documents
Making Copies Using the Manual Feed-in Shelf (Bypass)
The Manual Feed-in Shelf (Bypass) feature enables copying using cut sheet media. Only
one sheet may be loaded at a time.
1. Select Copy on the Services menu.
Xerox® Wide Format 6622 Solution
User Guide
™
2-7
Page 56

Printing and Copying Documents
2. Select the Manual Feed-in Shelf (Bypass) from the Copy screen above.
NOTE
Listed under Media Source are the current settings for size and type of media
for both roll and cut sheet media.
Main Components of This Task
NOTE
If after selecting this Media Source, you start scanning the original before loading
the cut sheet media, a Load or Change Media Type message displays.
Load cut sheet media into the Manual Feed-in Shelf (Bypass) before loading the original
into the Scanner.
Evenly and gently insert the original face down into the Scanner Feed-in Shelf.
• If the original does not feed automatically, the Scan Start mode may be set to
Manual Start. In this case, press the Start button on the Control Panel.
• For more information about the Scan Start mode, refer to the System Administration
chapter.
• An original jam may occur if you pull or press down too hard on an original while it
scans.
• To prevent document jams when copying originals that contain holes, orient the
original so that the holes are fed in last (trail edge).
• Hold the original down flat with two hands (one on either side of it) while it feeds
into the starting position. Doing this helps prevent wrinkles that can cause dark areas
on the copy.
• Keep guiding the original until it feeds automatically.
2-8
Xerox® Wide Format 6622 Solution
User Guide
™
Page 57

Printing and Copying Documents
NOTE
When the Scanner detects the original, it feeds it a short distance and stops briefly,
you can then feed the cut sheet media into the machine and the copy is made
automatically.
Refer to the key points about additional Media Source options later in this chapter under
Setting Up Basic Copying selections,
Setting Up the Copy Selections
When the requirements of a particular copy job differ from the machine default settings,
you can make job-specific changes on the Basic Copy, Image Quality and More Features
tabs.
The following options may be selected from the Basic Copy tab:
• Reduce/Enlarge
• Original Type
• Media Source
• Output Format
• Collation and Check Plot
• Scan Display
• Printer Interrupt
• Scanned Image
To access the Copy screen and the Basic Copy tab:
1. Select Copy on the Services menu.
2. Select the required features from the Basic Copy tab.
Reduce/Enlarge
The Reduce/Enlarge feature has variable options for scaling the images being copied.
The Copy Option feature provides the ability to customize the preset
reduction/enlargement settings beyond the basics discussed here.
Refer to the System Administration chapter under Copy Options, Select Custom Reduction
and Enlargement for more details.
The factory default setting is 100%. Once a job has been scaled to a different percentage,
that percentage then becomes the new image and setting. This is seen during Job Recall
and is considered 100% of the document.
Xerox® Wide Format 6622 Solution
User Guide
™
2-9
Page 58

Printing and Copying Documents
There are two features available:
• Scale Factor: The Scale Factor is set by pressing the increase and decrease arrows for
25-400% in single increments and selecting Auto, or by entering in numbers using
the numeric entry keypad.
• Presets and More: The Presets and More feature displays a Scale Factor screen to
allow Variable or Perset Percentages. You can customize one percentage value as
desired.
Reduce/Enlarge Using the Scale Factor
1. Select Copy on the Services menu.
2. Select the Reduce/Enlarge percentage using the scale factor increase and decrease
buttons or select the 100% button.
3. If you select the 100%, you can then enter the desired percentage manually from
the numeric entry keypad.
4. Select Enter.
Reduce/Enlarge Using Presets and More
To select a reduction/enlargement ratio that does not appear on the Copy screen, follow
the steps below:
1. Select Presets and More on the Basic Copy tab below Reduce/Enlarge.
The Scale Factor screen displays.
2. Select from either the Variable Percentage or Preset Percentage as desired.
• Manual: You can enter any ratio between 25% and 400% in 0.1% increments.
Enter the value using the numeric keypad. The machine does not accept a value
that is out of range.
• Auto: The ratio is automatically set up based on the original document size and
the installed media size. The document is copied to fit the currently selected media.
• Presets: Select any of the preset ratios.
Refer to Media Settings in the Product Overview chapter and verify the correct settings
are present.
3. Select Save.
Refer to Select Custom Reduction and Enlargement in the System Administration chapter,
for details on changing these custom presets percentages.
2-10
Xerox® Wide Format 6622 Solution
User Guide
™
Page 59

Printing and Copying Documents
Original Type
Select the Original Type from the available options on the Basic Copy tab.
• Photo (Halftone)
• Photo (ConTone)
• Text/Photo
• Text/Line
• Text/Line (Clear)
Refer to Document Input in the Product Overview chapter, for details on copying special
original types.
Media Source
The Media Source selections enable you to select where the media for the copy job is
fed. The definition describing each selection under Media Source is that which is currently
loaded. The Media Source indicates the type of media that is currently loaded.
The factory default setting is Auto Select.
NOTE
If you prefer a different media series (ARCH, ANSI, etc.), go to Machine Info
> Media Status and Setup and change the series.
1. Select Copy on the Services menu.
The Copy screen displays.
2. Choose from the following Media Source selections:
• Auto Select:The machine automatically selects the correct media based on the
original size detected and the specified reduction and enlargement.
• Cut Sheet Media:Cut sheet media is the media type which is loaded in the Manual
Feed-in Shelf (Bypass). The Media Feed-in Shelf is the last choice shown in the
column.
• Roll Media:Select from the roll media size(s) loaded in the Media Drawers.
Output Format
The Output Format feature permits you to specify the media cut mode.
The factory default setting is Synchronized.
1. Select Copy on the Services menu.
The Copy screen displays.
2. Select the button that appears under Output Format for the media cut mode desired:
Xerox® Wide Format 6622 Solution
User Guide
™
2-11
Page 60

Printing and Copying Documents
Synchronized: The Media Roll is cut the same size as the original.•
• Preset: The Media Roll is cut to a standard size that you select. The standard size
options displays when you select the Preset.
• Manual: The Media Roll is cut to a customized size that you specify (x and y
coordinates). A screen with data entry fields displays when you select Manual.
3. Enter the desired size information, and press Save.
Collation
Collated copies can be produced for jobs that involve multiple originals. When forward
or reverse collation is selected, the machine prints sheets sorted into sets that are
arranged in page order. The originals in the set also can be mixed, that is, of different
types (text, photo, etc.). A maximum of 256 pages may be scanned in each collation
job.
The factory default setting for Collation is None.
NOTE
For uncollated copies, the machine prints the specified quantity of the first page,
then the specified quantity of the next and so on. For collated output, the
machine sorts the copies into sets.
1. Select Copy on the Services menu.
The Copy screen displays.
2. Select from the collation options:
• Uncollated: Non-sets build mode. Pages are printed as they are copied.
• Reverse Collation: Page (n) is on the top of the output stack.
• Forward Collation: Page 1 is on the top of the output stack.
• Checkplot: Select this if you want a printed proof copy (check the plot) after you
scan each original and before they are printed as sets.
3. Place the originals in 1-(n) order with the image face down.
4. Load the (n) document face down into the Scanner Feed-in Shelf.
5. Continue in this order until your job is complete.
When collation is desired and selected, the Building Sets Insert Documents message
appears on the top right of the screen.
Collation (Making Sets)
Collated copies can be produced for jobs that involve multiple originals. When forward
or reverse collation is selected, the machine prints sheets sorted into sets that are
arranged in page order. The originals in the set also can be mixed, that is, of different
types (text, photo, etc.). A maximum of 256 pages may be scanned in each collation
job.
Refer to the following table for details on making sets.
2-12
Xerox® Wide Format 6622 Solution
User Guide
™
Page 61

Printing and Copying Documents
NOTE
For uncollated copies, the machine prints the specified quantity of the first page,
then the specified quantity of the next and so on. For collated output, the machine
sorts the copies into sets.
NOTE
When collation is desired and selected, the Building Sets Insert Documents message
appears on the top right of the screen.
Copy Set Specifications
The following table provides the copy set maximums according to the Document Size
for Original Types set to Photo (Text/Line) and Blue Line exclusively.
This information is useful to ensure the memory can accept the copy set capacity.
Maximum pagesDocument Size
256Ansi A (8.5x11)
256Ansi B (11x17)
256Ansi C (17x22)
256Ansi D (22x34)
239Ansi E (34x44)
256Arch A (9x12)
256Arch B (12x18)
256Arch 15 (15x21)
256Arch C (18x24)
256Arch D (24x36)
256Arch 30 (30x42)
207Arch E (36x48)
256ISO A4 (8.3x11.7)
256ISO A3 (11.7x16.5)
256ISO A2 (16.5x23.4)
256ISO A1 (23.4x33.1)
230ISO A0 (33.1x46.8)
Xerox® Wide Format 6622 Solution
User Guide
™
2-13
Page 62

Printing and Copying Documents
Check Plot
Select this box if you want a printed, proof copy (check plot) after you scan the originals
and before they are printed as sets. Check Plot jobs are not intended to be the final job
but rather a preview.
NOTE
Check Plot only works on Collated Sets.
NOTE
When collation is selected, the Building Sets, Insert Documents message appears
in the upper right corner of the screen.
1. Set up the copy features for the first original from the selections on the Basic Copy,
Image Quality and Advanced Settings tabs.
2. Enter a copy quantity from 1 to 999, using the numeric keypad.
3. Insert the first original face down into the scanner. The machine scans the document.
The scanning progress message displays on the Sets Build screen.
4. When the original exits the scanner, the Sets Build screen displays four buttons (listed
below). If all of the originals to be scanned are the same type and size, you can
continue to feed them at this time.
• Delete Previous Image: You can delete the image data from the most recently
scanned original. This is a useful feature to modify one or more of the copy settings.
• Delete All Images: Selecting this button causes all the scanned images to be
deleted.
• Change Settings: Displays the Copy screen, enabling you to change the settings
(reduction/enlargement, original type, media selection, etc.,) from the Basic Copy,
Image Quality and More Features tabs.
• Media Status and Setup: This area is where you can set media type and size in
the printer while in the middle of a build job.
• Last Original: This selection informs the machine that scanning is done and
printing can begin. Select this button after the final original in the set has been
scanned.
5. If there are different types or sizes of originals in the set or you wish to select a
different media source or apply a different feature, use the Change Settings button
to display the Copy screen. This allows you to customize the settings for the next
original.
NOTE
The Copy screen now displays a Close selection in the upper, right corner. You
may select it to close the Copy screen and return to the Sets Build screen if you
choose not to make any settings changes for the next original.
6. Continue inserting the originals in the scanner and making the required copy settings
for each.
7. When the last original has scanned, select Last Original.
2-14
Xerox® Wide Format 6622 Solution
User Guide
™
Page 63

Printing and Copying Documents
8. Confirm the copy quantity on the Quantity screen, or enter a new quantity using
either the numeric keypad or the scroll buttons.
9. Select Print on the Quantity screen.
The machine starts printing collated sets of copies.
Printer Interrupt
You can interrupt a print job to make a high priority copy. The interrupted print job
resumes after the copy job finishes.
1. Select Printer Interrupt on the Copy > Basic Copy screen while a print job is
processing.
The Printer Interrupt selection remains illuminated throughout the interrupt job.
Typically, no more than two prints exit the machine from the interrupted job.
2. When the suspended job stops, the Copy screen reappears.
3. Select the required copy settings.
4. Enter the copy quantity desired.
5. Scan the original(s).
6. When the copy job is finished, select the Printer Interrupt button again to resume
the print job.
NOTE
If you forget to select Printer Interrupt to resume the print job, it will be canceled
automatically as a default.
NOTE
The Print Interrupt Timeout period may be changed from the one minute default
up to 99 minutes. Print Interrupt Timeout can be reset by the Administrator.
Refer to the System Administration chapter for details.
Scan Display
This feature displays a scanned preview as your original is fed into the Scanner. The
preview reflects data taken directly from the Scanner and may not represent the quality
of the final output. Depending on the scan mode, additional image conversion takes
place beyond the initial scan.
Check mark the Scan Display box located on the Basic Copy screen to enable.
If the Scan Display box is not visible on the Basic Copy screen, it has been disabled by
the System Administrator in Machine Information > Administration
> General Administration > Set Scan Display.
Setting Up the Image Quality Selections
You can configure the Image Quality features displayed to ensure that you obtain the
best image results from each original.
Xerox® Wide Format 6622 Solution
User Guide
™
2-15
Page 64

Printing and Copying Documents
This section provides procedures for setting up the following:
• Density
• Contrast
• Sharpness
• Background Suppression
Density
The Density option allows you to adjust the lightness or darkness of the copies relative
to the original.
1. Select Copy on the Services menu.
The Copy screen displays.
2. Select the Image Quality tab.
3. Select the best Density match using the scroll key.
Sharpness
The Sharpness feature enables you to enhance lines and fine detail in the scanned
image.
1. Press the Services button on the Control Panel.
The Services menu will display with Scan to Mailbox as an option.
2. Select Scan to Mailbox.
3. Select the Image Quality tab.
4. Select the best Sharpness setting using the scroll key.
Contrast
The Contrast option increases or decreases the contrast of the copy relative to the
original. High contrast settings increase the difference between the light and dark areas
of an image by making the light areas lighter and the dark areas darker. Low contrast
settings exhibit smaller differences between the light and dark areas. Use this feature
to copy photographs and posters.
1. Select Copy on the Services menu.
The Copy screen displays.
2. Select the Image Quality tab.
3. Select the Contrast setting, using the scroll keys, to obtain the desired results.
2-16
Xerox® Wide Format 6622 Solution
User Guide
™
Page 65

Printing and Copying Documents
Background Suppression
The Background Suppression feature enables you to make adjustments for documents
that exhibit poor contrast between the foreground image and the background. This
feature is particularly useful for enhancing copy quality when the originals contain cut
and pastes, uneven density, dark or colored backgrounds. You can easily erase the
unwanted background color of the original.
NOTE
The Background Suppression feature is unavailable when Original Type is set to
either Photo-Halftone or Photo-Continuous Tone.
1. Select Copy from the Services menu.
The Copy screen displays.
2. Select the Image Quality tab.
3. Select Background Suppression from the Image Quality screen.
4. Select the Background Suppression setting from the Image Quality screen using the
scroll key to obtain the desired background results.
5. Select the Enabled key to save your setting.
Setting up the Advanced Settings selections
You can configure items such as scanned image size and the scan start position on the
Advanced Features screen.
1. Select the features to be set up from those displayed on the Advanced Settings tab.
The Advanced Settings tab allows you to configure the layout, processing and
finishing of your jobs output.
Xerox® Wide Format 6622 Solution
User Guide
™
2-17
Page 66

Printing and Copying Documents
The selections are defined below:
• Media Type
• Sample Copy
• Mirror Image
• Invert Image
• Image Location
• Rendering (Binary or Error Diffusion)
• Margins
• Scan Width
• Scan Offset
• Finishing (optional)
2. Select the Advanced Features tab from the Copy screen and configure each feature.
3. Set up the features on the Advanced Features tab for the documents you will be
scanning.
Media Type
The media types are Bond, Vellum or Film. If the media type chosen is not loaded in the
printer Media Drawer or Manual Feed-in Shelf, the selection is not available (grayed
out).
The default is Bond.
1. Select Copy on the Services menu.
The Copy screen displays.
2. Select the Advanced Settings tab.
2-18
Xerox® Wide Format 6622 Solution
User Guide
™
Page 67

Printing and Copying Documents
3. Select Media Type and select the type desired from those available.
NOTE
If the Media Type desired is not selectable, load the desired media and program
the media source.
Sample Copy
The Sample Copy feature produces a proof copy of a section in the middle of the originals
image. You can then accept or modify the copy settings before making copies, or reject
and cancel the job.
The factory default settings is Disabled, no sample copy generated.
1. Press the Services button on the Control Panel.
The Services menu will display with Copy as an option.
2. Select Copy.
The Copy screen will display.
3. Select the Advanced Settings tab.
4. Select Sample Copy and one of the two choices.
Rendering
The Rendering option permits you to specify the type of image processing that will be
applied to the scanned image information, that is Error Diffusion or Binary.
The factory default setting is Error Diffusion.
• Error Diffusion
Select Diffusion when scanning an original that needs to be reproduced with halftones,
such as photos.
• Binary
Select Binary processing for originals which consist of line and text images.
1. Press the Services button on the Control Panel.
The Services menu will display with Copy as an option.
2. Select Copy.
The Copy screen will display.
3. Select the Advanced Settings tab.
Xerox® Wide Format 6622 Solution
User Guide
™
2-19
Page 68

Printing and Copying Documents
4. Select Rendering.
5. Select Rendering.
6. Select the appropriate option Error Diffusion or Binary.
7. Select Save when finished.
Mirror Image
The Mirror Image feature enables you to reverse the left and right sides of the original,
the top and bottom of the original or a combination of both.
Perform the following steps to set up Mirror Image:
1. Select Copy on the Services menu.
2. Select the Advanced Settings tab.
3. Select Mirror Image.
4. Select Off, X, Y, or XY.
• X Axis - Copies are made with the left and right sides of the original image reversed.
• Y Axis - Copies are made with the top and bottom of the original image reversed.
• XY Axis - Copies are made with the top and bottom of the original image and
with the left and right sides of the original image reversed.
5. Select Save.
The factory default setting is Off.
Image Inversion
The Image Inversion feature reverses the black and white portions of the original image
on the copy (shown below). Pixels that were white in the scanned image are printed
black, and black pixels in the scanned image are printed white.
1. Select Copy on the Services menu.
2-20
Xerox® Wide Format 6622 Solution
User Guide
™
Page 69

Printing and Copying Documents
2. Select the Advanced Settings tab.
3. Select Image Inversion
4. Select Enable or Disable.
5. Select Save.
Image Location
Image Location shifts the image copy position. Use this feature when copying letters
on the edge of the original or makingpunch holes. The image can be printed by shifting
the image to theleft, right, top or bottom. You can also set up the feature to automatically
center the image on the media.
The factory default is Corner Shift.
• Auto Center: The center of the original is centered on the copy.
• Corner Shift: The original image is shifted to the edges or corners of the media. Use
the arrow buttons to shift the image to the desired location.
1. Select Copy on the Services menu.
2. Select the Advanced Settings tab.
3. Select Image Location.
4. Select Auto Center or Corner Shift.
5. If you choose Corner Shift, continue by selecting from the options provided.
6. Select Save when finished.
Margins
The Margins feature enables you to add margins (white space) at the top, bottom, left
and/or right edges of copies. All margins may be defined in a range from -8.0 to +8.0
inches, in increments of 0.1 inch.
The factory default setting is 0 for the top, bottom, left and right margins.
1. Press the Services button on the Control Panel.
The Services menu will display with Copy as an option.
2. Select Copy.
The Copy screen will display.
3. Select Advanced Settings tab.
4. Select Margins.
The Margins screen will display.
5. Select the input field or fields where you wish to add margins, then enter the desired
value using either the numbers keypad or the scroll buttons.
NOTE
To enter a negative number on the numeric keypad, either scroll to the negative
number or press the toggle button.
Xerox® Wide Format 6622 Solution
User Guide
™
2-21
Page 70

Printing and Copying Documents
6. Select Save when finished.
TIP
When making copies from a book or other unique originals, black shadows
sometimes appear in the margins on the edge of the paper. If this happens, you
can make copies with the shadows erased.
When Reduce/Enlarge is set up, the border erase amount is proportionately changed.
Scan Width
The Scan Width can be changed from the standard sizes of originals if you wish. Simply
define the new width using the Variable selection.
The factory default is Standard Width Detection.
• Standard Width: This features lets the scanner determine the actual original
documents width.
• Variable Width: This feature allows you to set variable scan widths from 8.2 to 36
inches, in increments of 0.1 inch.
1. Press the Services button on the Control Panel.
The Services menu will display with Scan to Mailbox as an option.
2. Select Scan to Mailbox.
3. Select the Advanced Settings tab
4. Select Scan Width.
5. Select Variable Width when scanning a non-standard width original.
6. Then enter the desired scan width using either the numbers keypad or the scroll
buttons.
7. Select Save when finished.
2-22
Xerox® Wide Format 6622 Solution
User Guide
™
Page 71

Printing and Copying Documents
Scan Offset
When the Scan Offset feature is enabled, and a scan offset position is defined, the
machine will ignore image information from the lead edge to the scan offset position.
This enables you to eliminate unnecessary detail from the lead edge of an original.
The scan offset position can be set up from 0 to 36.0 inches, in 0.1 inch increments.
The factory default is Disabled.
• Disabled: Scan offset will not be applied to the original
• Enabled: A scan offset equivalent to the dimension you specify will be applied to the
original when it is scanned.
1. Press the Services button on the Control Panel.
The Services menu will display with Copy as an option.
2. Select Copy.
3. Select the Advanced Settings tab.
4. Select Scan Offset.
5. Select Enabled to define the amount of scan offset.
6. Set up the scan offset, using either the numbers keypad or the scroll buttons.
7. Select Save when finished.
TIP
When a Reduce/Enlarge ratio of other than 100% has been set up for the copy
job, the scan start position will be enlarged or reduced proportionately.
Xerox® Wide Format 6622 Solution
User Guide
™
2-23
Page 72

Printing and Copying Documents
Finishing
This feature is only available if the printer is attached to a folding device.
1. Press the Services button on the Control Panel.
The Services menu will display with Copy as an option.
2. Select Copy.
The Copy screen will display.
3. Select the Finishing.
The Finishing selections will display.
4. Select the required Folder Program
5. Select More for additional finishing options:
2-24
Xerox® Wide Format 6622 Solution
User Guide
™
Page 73

Punch•
• Tab
• Margins
• Crossfold
Printing and Copying Documents
Setting Up the Recall Selections
Recall Tab
This feature enables you to recall the last job run and all the settings associated with it.
The recalled image can then be printed without rescanning the originals.
This feature is enabled or disabled by the System Administrator within
Machine Information > Administration > General Administration
> Enable/Disable Image Recall.
The default setting is Enabled.
If Immediate Image Overwrite is disabled and Image Recall is enabled, you can recall
the last copy. However, this feature is not available if the System Administrator has
enabled Immediate Image Overwrite.
Refer to the Image Recall section of the System Administration chapter for more details.
1. Select Copy on the Services menu.
Xerox® Wide Format 6622 Solution
User Guide
™
2-25
Page 74

Printing and Copying Documents
2. Select the Recall tab.This feature allows you to do the following:
• Templates - save commonly run jobs with special settings for document types and
image quality enhancements. Refer to the Copy Strategies for Special Documents
section in the Product Overview for examples.
• Recall - stores the last scanned job run at the final state whether complete or
incomplete due to an interuption. The incomplete job can be resumed and finished.
The job is retained until printed or deleted.
• Delete - removes the file and eliminates the storage consumed in memory.
• View Last Scan - allows you to review the last scanned image.
.
A System Power On Default template can be set to save time and redundancy
programming features for commonly run jobs.
3. Select Template.
4. Check off System Power On Default.
The customized saved template displays at power up.
View Last Scan
After scanning your document, you are given a scaled down image on which you can
zoom in and out on the areas you select.
If the View Last Scan button is not present on the Recall tab, it has been disabled by
the System Administrator and View Last Scan is not available.
This feature is enabled or disabled by the System Administrator within
General Administration > Control Panel > Set Scan Display.
2-26
Xerox® Wide Format 6622 Solution
User Guide
™
Page 75

The View Last Scan features are:
• Zoom In
• Zoom Out
• Pan
• Select
• Best Fit
Perform the following:
1. Select Copy on the Services menu.
2. Scan in your original.
3. Select the Recall tab.
4. Select View Last Scan.
Printing and Copying Documents
• Zoom Plus and Minus
Incrementally zooms in and out on the image.
• Pan
In this mode, the image may be dragged left, right, up, and down.
• Select
In this mode, a portion of the image may be selected by touching and dragging
over the image. The zoom box may be moved by touching the center of the box
dragging. The zoom box may be resized by touching and dragging a corner of the
box.
• Zoom Box
Xerox® Wide Format 6622 Solution
User Guide
™
2-27
Page 76

Printing and Copying Documents
Displays only when in the Select mode. Zooms to the box drawn over the image
and changes to the Pan mode.
• Scroll Bars
Used to also move the entire image left, right, up, and down. Scroll bars appear
when the image does not fit on the entire screen. Scroll bars appear in both Pan
and Select modes.
• Best Fit
Returns the image to the original scanned view. Changes to the Pan mode.
5. Touch the Select button to highlight the image.
6. Touch the image on the User Interface then drag and box off an area of interest.
This selected area is highlighted.
7. Select the Plus or Minus sign and zoom in or out on the highlighted area.
8. Select Best Fit to return to the original view.
2-28
Xerox® Wide Format 6622 Solution
User Guide
™
Page 77

3
Scanning Documents
This chapter introduces the multiple scan features of the Xerox Wide Format Solution
available with the attached Scanner configuration. FreeFlow Accxes, the software of the
controller, has the capability to configure scan destinations to the following locations:
• Scan-to-Mailbox - Stores your files on the FreeFlow Accxes Print Server (hard drive)
or a removable media device (USB) for later retrieval.
• Scan-to-Mailbox Removable Devices - Used to scan and view files on a removable
device (USB).
• Scan-to-FTP - Sends the scanned images to a File Transfer Protocol (FTP) directory
destination. There are 16 possible directory destinations available.
• Scan-to-Remote Printer- Sends the scanned images to be printed on a network printer.
There are 16 printer destinations available.
In this chapter, you will find the following information for scanning:
• Preparation for Scanning
• Creating a Mailbox
• Scanning To a Standard Mailbox
• Naming Scanned Files
• Scanning to Removable Devices (USB)
• Scanning to FTP
• Scanning to Remote Printers
• Color Calibration
Preparation for Scanning
Prior to being able to communicate with your FreeFlow Accxes Scanner and Printer, the
FreeFlow Accxes Print Server needs to be configured to the network.
The following must be prepared prior to scanning to network or mailbox:
Xerox® Wide Format 6622 Solution
User Guide
™
3-1
Page 78

Scanning Documents
• Network Setup
• A destination (mailbox) to receive the image information from the documents you
scan
Items to install on your computer:
• FreeFlow Accxes Client Tools (ACT) for document retrieval and submission
• Application software for image editing
• Accxes Printer Drivers (www.xerox.com)
Establish the Network Setup
NOTE
Refer to System Administration Network Setup, for additional information or use
the Xerox FreeFlow Accxes Printer Server and Web Printer Management Tool Setup
Guide for detailed instructions.
Creating a Mailbox
Before using the Scan-to-Mailbox service, you need to define a mailbox as a Destination.
This section reviews all the areas for mailbox options and settings. The Destination
feature includes the ability to change or delete the settings of a given mailbox and
review a scrolling list of documents previously scanned.
1. Select Scan to Mailbox on the Services menu.
2. Select Destination.
3-2
Xerox® Wide Format 6622 Solution
User Guide
™
Page 79

3. Select an <unused> mailbox destination.
Scanning Documents
The Enter a Mailbox Name screen appears with a keyboard displayed.
4. Use the keyboard to enter your mailbox name. You can enter up to 16 alphanumeric
characters.
5. Select Save. The Select a Destination Mailbox screen redisplays. The assigned name
appears on the Mailbox Name.
6. Select Close to return to the Scan to Mailbox screen or continue setting up new
mailboxes.
Options of the Select a Destination Mailbox are:
• Standard Mailboxes - up to 50 total
• Document List - within a mailbox
• Settings - of a mailbox
• Delete - a mailbox
Selecting Mailboxes
The Scroll to selection is used to link you to a mailbox or you may enter the mailbox
number (if known) in the Selected Mailbox field using the numeric keypad.
Standard Mailbox Document Lists
Jobs scanned to a Standard Mailbox as the destination, are provided as thumbnail
preview .jpg files, if Preview Generation is enabled under the Advanced Settings tab.
Also provided are the documents in the File Format you chose on the Scan to Mailbox
tab.
Xerox® Wide Format 6622 Solution
User Guide
™
3-3
Page 80

Scanning Documents
The Document List selection displays the documents scanned to the Standard Mailbox
selected.
The Edit Mailbox Document List screen is where you can do the following to your
documents:
• Scroll the list
• Delete
• Delete All
Document List
The Document List section located on the Select a Destination Mailbox screen, displays
the Edit Mailbox Document List where you can do the following to your documents:
• Rename
• Delete
• Delete All
3-4
Xerox® Wide Format 6622 Solution
User Guide
™
Page 81

Scanning Documents
Settings
The Settings section located on the Select a Destination Mailbox screen, displays the
Mailbox Settings screen. If you want to prevent others from changing your mailbox
settings, scanning documents to it or retrieving your documents from it, you can assign
a mailbox password.
There you can set up the following:
• Password Protection Settings
• Mailbox Name
• Default Mailbox Settings
Deleting a Mailbox
1. Press the Services button on the Control Panel.
2. Select Scan to Mailbox on the screen.
3. Select Destination.
The Select a Destination Mailbox screen displays.
4. Select the mailbox you wish to delete.
5. Then select Delete.
A Delete Confirmation window displays.
NOTE
Once a mailbox is deleted, it can not be recovered. All documents in the mailbox
will be deleted.
6. Select Yes on the Confirmation window.
Mailbox Passwords
1. Select Scan to Mailbox.
2. Select Destination.
The Select a Destination Mailbox screen displays.
3. Select Settings.
The Mailbox Settings screen displays.
4. Select any one of the Password Protection Setting options followed by Set Password.
The Create Password screen displays.
5. Use the alphanumeric keyboard to enter your password.
Xerox® Wide Format 6622 Solution
User Guide
™
3-5
Page 82

Scanning Documents
6. Select Save when finished.
Rename Mailboxes
1. Select Scan to Mailbox.
2. Select Destination.
3. Select Settings.
The Mailbox Settings screen displays.
4. Select Rename.
The Enter a Mailbox Name screen displays.
5. Use the alphanumeric keyboard to enter your password.
6. Select Save when finished.
NOTE
When renaming a mailbox, a warning message informs you that doing so deletes
all mailbox contents.
Setting up a Default Mailbox
This is a useful feature when there is a frequently used mailbox for running jobs.
1. Select Scan to Mailbox.
2. Select Destination.
3. To designate a destination as the default mailbox, select the mailbox from the
Select a Destination Mailbox screen.
4. Select Settings.
The Mailbox Settings screen displays.
5. Select the Set this Mailbox as the default to set.
NOTE
The default mailbox appears as the selected mailbox when the machine enters
the Scan mode.
6. Select Save when finished.
Delete
The Delete option on the Select a Destination Mailbox screen simply deletes the selected
mailbox, the mailbox name and all of the contents.The mailbox name default is <unused>.
Deleting Documents from a Mailbox
TIP
Documents stored in a mailbox will be deleted automatically, based on the System
Administrator configured File Deletion setting. The File Deletion setting range is
from 1 to 24 hours in increments of 1 hour. Be sure to retrieve your file in a timely
manner to prevent data loss.
3-6
Xerox® Wide Format 6622 Solution
™
User Guide
Page 83

Scanning Documents
Delete All Documents
1. Press the Services button on the Control Panel.
2. Select the Scan to Mailbox feature on the screen.
3. Select Destination.
4. Select the plus and minus keys or enter your mailbox number in the entry box using
the numeric keypad.
5. Select Document List.
The Edit Mailbox Document List screen displays.
6. Select Delete All.
NOTE
Once the documents are deleted, they cannot be recovered. All documents in
the mailbox will be deleted, and a confirmation message will display.
7. Select Yes on the Confirmation window.
Delete a Document
1. Press the Services button on the Control Panel.
2. Select the Scan to Mailbox feature on the screen.
3. Select Destination.
4. Select the plus and minus keys or enter your mailbox number in the entry box using
the numeric keypad.
5. Select Document List.
The Edit Mailbox Document List screen will display.
6. Select and highlight the image file you wish to delete.
7. Select Delete.
NOTE
Do not select Delete All because this will delete all files from the mailbox.
8. Select Yes on the Confirmation window.
NOTE
Once a document is deleted, it cannot be recovered. The remaining documents
will renumber, with the previous number 002 document becoming 001, and so
on.
Xerox® Wide Format 6622 Solution
User Guide
™
3-7
Page 84

Scanning Documents
Removable Device Document Lists
The Removable Device selection of the Scan-to-Mailbox feature, displays the name of
the attached device.
1. Select Removable Device to highlight.
2. Select Document List.
The Print From Device screen displays. Here you see the removable device list of
contents.
3. Browse the Document List, select the document desired and then Print.
Refer to the Printing and Copying document chapter for more on the Print-from-Device
feature.
3-8
Xerox® Wide Format 6622 Solution
User Guide
™
Page 85

Scanning Documents
Scanning To a Standard Mailbox
This section describes scanning to a standard mailbox, and assumes that a mailbox has
already been setup. Listed below are the steps involved in the scanning process:
Step 1: Selecting a Standard Mailbox
Step 2: Selecting Scan to Mailbox Features
Step 3: Select Image Quality Features
Step 4: Select Advanced Settings Features
Step 5: Scanning the Document
Step 6: Stopping a Scan Job
Step 7: Retrieving Files Stored in a Mailbox
Step 1: Selecting a Mailbox and Using Templates
Scanning a copy begins by displaying the Scan to Mailbox screen on the User Interface.
Once that is done, set up the scan job by selecting the necessary features from the Scan
to Mailbox, Image Quality and Advanced Settings tabs.
NOTE
You must first specify the destination of the scanned image data before scanning
can begin.
1. Select Scan to Mailbox.
The screen displays with the following:
1. Destination (mailbox or removable device name)
2. Template (customized format)
Xerox® Wide Format 6622 Solution
User Guide
™
3-9
Page 86

Scanning Documents
2. Select Destination.
The Select a Destination screen displays.
• Standard Mailboxes
The destination feature includes the ability to change or delete the settings of a
mailbox and review a scrolling list of documents previously scanned.
• Document List
Lists documents in the format selected on the Scan to Mailbox tab. If
Preview Generation located under Advanced Settings tab is enabled, you also
get a thumbnail in the form of a .jpg file. The thumbnail image can be downloaded
into Accxes Client Tools.
• Settings
To prevent others from changing your mailbox settings, scanning documents to
it or retrieving your documents from it, you can assign a mailbox password.
• Delete
3-10
Xerox® Wide Format 6622 Solution
™
User Guide
Page 87

Scanning Documents
You can delete a mailbox. A confirmation message diplays since the mailbox
cannot be retrieved once deleted.
3. Either select an existing mailbox by scrolling the list or enter the mailbox number (if
known) and select Scroll to. Touch the mailbox to highlight it.
4. Select Close to return to the Scan to Mailbox screen.
NOTE
If required, you can save the job settings from the Scan to Mailbox and Advanced
Settings you choose as a Template for future use. A System Power On Default
template can be set as well to save time and redundancy by programming
features for commonly run jobs.
Follow steps 5 through 7 for default templates:
5. Select Template from the Scan to Mailbox screen.
6. Choose from a previously saved template or select an Unused one and create a new
uniquely named one and save it.
7. Check off System Power On Default if desired. The customized saved template
displays at power up.
Xerox® Wide Format 6622 Solution
User Guide
™
3-11
Page 88

Scanning Documents
Step 2: Selecting Scan to Mailbox Features
Additional selections from the Scan to Mailbox screen are shown below:
• Rendering (Output Type)
• File Format (Single-page and Multi-page)
• Original Type
• Compression
Table 18: Scan to Mailbox Features
•
Rendering
B & W (1-bit)
Snap to Black (1-bit)
Grayscale (8-bit)
Color (24-bit)
Format
TIFF
PDF
CALS
TIFF
PDF
CALS
PDF
JPEG
TIFF
PDF
JPEG
Photo (Contone)
Text/Photo
Text/Line
Text/Line (Clear)
Photo (Contone)
Text/Photo
Text/Line
Text/Line (Clear)
Photo (Halftone)TIFFGrayscale (8-bit)
Photo (Contone)
Text/Photo
Text/Line
Text/Line (Clear)
Photo (Halftone)
Photo (Contone)
Text/Photo
CompressionOriginal TypeFile
CCITT4Photo (Halftone)
CCITT4Photo (Halftone)
Packbits
Raw
Normal, Best
Compression, Best
Image Quality
Packbits
Index
Index ED
1. Select the Output Type Rendering to generate the electronic file.
2. Select the Output File Format type desired.
3. Select the Original Type you are scanning.
3-12
Xerox® Wide Format 6622 Solution
™
User Guide
Page 89

4. Select Compression to reduce the size of large files.
Scanning Documents
Step 3: Select Image Quality Features
You can configure the Image Quality features displayed on the Scan to Mailbox >
Image Quality screen to ensure that you obtain the best image results from each original.
This Image Quality section provides procedures for setting up the following:
• Density
• Contrast
• Sharpness
• Background Suppression
1. Select Scan to Mailbox.
2. Select the Image Quality tab and the required image quality features from those
displayed on the screen.
Density
The Density option allows you to adjust the lightness or darkness of the copies relative
to the original.
1. Press the Services button on the Control Panel.
The Services menu will display with Scan to Mailbox as an option.
2. Select Scan to Mailbox.
3. Select the Image Quality tab.
4. Select the best Density match using the scroll key.
Xerox® Wide Format 6622 Solution
User Guide
™
3-13
Page 90

Scanning Documents
Contrast
The Contrast option increases or decreases the contrast of the copy relative to the
original. High contrast settings increase the difference between the light and dark areas
of the image by making the light areas lighter and the dark areas darker. Low contrast
settings exhibit smaller differences between the light and dark areas.
1. Press the Services button on the Control Panel.
The Services menu will display with Scan to Mailbox as an option.
2. Select Scan to Mailbox.
3. Select the Image Quality tab.
4. Select the best Contrast match using the scroll key.
Sharpness
The Sharpness feature enables you to enhance lines and fine detail in the scanned
image.
1. Press the Services button on the Control Panel.
The Services menu will display with Scan to Mailbox as an option.
2. Select Scan to Mailbox.
3. Select the Image Quality tab.
4. Select the best Sharpness setting using the scroll key.
Background Suppression
The Background Suppression feature enables you to make adjustments for documents
that exhibit poor contrast between the foreground image and the background. This
feature is particularly useful for enhancing copy quality when the originals contain cut
and past, uneven density, or dark or colored backgrounds.
NOTE
The Background Suppression feature is unavailable when Original Type is set
to either Photo-Halftone or Photo-Continuous Tone.
1. Press the Services button on the Control Panel.
The Services menu will display with Scan to Mailbox as an option.
2. Select Scan to Mailbox.
3-14
Xerox® Wide Format 6622 Solution
User Guide
™
Page 91

3. Select the Image Quality tab.
4. Select the best Background Suppression using the scroll key.
5. Select the Enable key to save your setting.
Scanning Documents
NOTE
Background Suppression is the only image quality adjustment that requires the
check mark to enable.
Step 4: Select Advanced Settings Features
You can configure items such as scanned image size and the scan start position on the
Advanced Features screen. The Advanced Settings tab allows you to configure the layout
and processing of your jobs output.
1. Select Scan to Mailbox on the Services menu.
2. Select the Advanced Settings tab.
Xerox® Wide Format 6622 Solution
User Guide
™
3-15
Page 92

Scanning Documents
The selections are listed below:
• Image Inversion
• Scan Offset
• Color Space
• Image Mirroring
• Scan to Printer
• Preview Generation
• Scan Width
• Resolution
Image Inversion
The Image Inversion feature reverses the black and white portions of the original image
on the copy (shown below). Pixels that were white in the scanned image are printed
black, and black pixels in the scanned image are printed white.
1. Press the Services button on the Control Panel.
The Services menu will display with Scan to Mailbox as an option.
2. Select Scan to Mailbox.
3. Select the Advanced Settings tab.
4. Select Image Inversion.
5. Select Image Inversion or No Image Inversion.
6. Select Save when finished.
3-16
Xerox® Wide Format 6622 Solution
User Guide
™
Page 93

Scanning Documents
Scan Offset
When the Scan Offset feature is enabled, and a scan offset position is defined, the
machine will ignore image information from the lead edge to the scan offset position.
This enables you to eliminate unnecessary detail from the lead edge of an original.
The scan offset position can be set up from 0 to 36.0 inches, in 0.1 inch increments.
The factory default is Disabled.
• Disabled: Scan offset will not be applied to the original.
• Enabled: A scan offset equivalent to the dimension you specify will be applied to the
original when it is scanned.
1. Press the Services button on the Control Panel.
The Services menu will display with Scan to Mailbox as an option.
2. Select Scan to Mailbox.
3. Select the Advanced Settings tab.
4. Select Scan Offset.
5. Select Enabled to define the amount of scan offset.
6. Set up the scan offset, using either the numbers keypad or the scroll buttons.
7. Select Save when finished.
TIP
When a Reduce/Enlarge ratio of other than 100% has been set up for the copy
job, the scan start position will be enlarged or reduced proportionately.
Color Space
1. Press the Services button on the Control Panel.
The Services menu will display with Scan to Mailbox as an option.
2. Select Scan to Mailbox.
Xerox® Wide Format 6622 Solution
User Guide
™
3-17
Page 94

Scanning Documents
3. Select the Advanced Settings tab
4. Select Color Space.
• Standard
• Adobe
5. Select Save when finished.
Mirror Image
The Mirror Image feature enables you to reverse the left and right sides of the original,
the top and bottom of the original or a combination of both. The factory default setting
is Off.
Selections include:
• X Axis - Copies are made with the left and right sides of the original image reversed.
• Y Axis - Copies are made with the top and bottom of the original image reversed.
• XY Axis - Copies are made with the top and bottom and with the left and right sides
of the original image reversed.
Perform the following steps to set Mirror Image:
1. Select Scan to Mailbox on the Services menu.
2. Select the Advanced Settings tab.
3. Select Mirror Image.
4. Select Off, X, Y, or XY.
5. Select Save.
3-18
Xerox® Wide Format 6622 Solution
User Guide
™
Page 95

Scanning Documents
Scan to Printer
The Scan to Printer feature generates a proof print of the scanned document, enabling
you to change the Basic Scan, Image Quality or Advanced Settings to achieve the
results you want. The factory default is Do Not Print Image.
1. Press the Services button on the Control Panel.
The Services menu will display with Scan to Mailbox as an option.
2. Select Scan to Mailbox.
3. Select the Advanced Settings tab
4. Select Scan to Printer.
5. Select the desired option.
• Disabled: The controller will not generate a print of the scanned image.
• Enabled: The controller will print the scanned image.
6. Select Save when finished.
Preview Generation
Use the Preview Generation option to enable or disable the generation of a preview
image for your scanned document. The thumbnail image is a.jpg file, which can be
downloaded into Accxes Client Tools.
The factory default setting is Create Preview Image.
1. Select Scan to Mailbox on the Services menu.
2. Select the Advanced Settings tab.
3. Select Preview Generation.
4. Select the desired option:
Xerox® Wide Format 6622 Solution
User Guide
™
3-19
Page 96

Scanning Documents
Disable: The controller does not create a thumbnail image file.•
• Enable: The controller creates a thumbnail image file, which can be downloaded
into Accxes Client Tools.
5. Select Save when finished.
Scan Width
The Scan Width can be changed from the standard sizes of originals if you wish. Simply
define the new width using the Variable selection.
The factory default is Standard Width Detection.
• Standard Width: This features lets the scanner determine the actual original
documents width.
• Variable Width: This feature allows you to set variable scan widths from 8.2 to 36
inches, in increments of 0.1 inch.
1. Press the Services button on the Control Panel.
The Services menu will display with Scan to Mailbox as an option.
2. Select Scan to Mailbox.
3. Select the Advanced Settings tab
4. Select Scan Width.
5. Select Variable Width when scanning a non-standard width original.
6. Then enter the desired scan width using either the numbers keypad or the scroll
buttons.
7. Select Save when finished.
3-20
Xerox® Wide Format 6622 Solution
User Guide
™
Page 97

Scanning Documents
Resolution
The printer measures how fine a printer can print the images. This measurement is known
as dots per inch, or "dpi." The greater the dpi, the better the image. Select from the
available options below:
• 600 DPI
• 400 DPI
• 300 DPI
• 200 DPI
• 150 DPI
Step 5: Scanning the Document
Follow the procedure below to scan your document(s).
NOTE
A document jam may occur if you press down too hard on the original, pull it
during scanning or release it before it stops feeding.
NOTE
To prevent document jams when copying originals that contain holes, orient the
original so that the holes feed in last.
1. Orient the original, image face down, in the Scanner Feed-in Shelf aligned with the
graphic size indicator labels.
2. Evenly insert the lead edge of the original into the Scanner.
When the Scanner detects the original, it feeds it a short distance, stops briefly and
completes the scan.
Xerox® Wide Format 6622 Solution
User Guide
™
3-21
Page 98

Scanning Documents
Additional Information
If the document does not feed automatically, the Scan Start mode may be set to Use
Start Key. In this case, press the Start button on the User Interface Control Panel. This
is a System Administrator configuration setting.
Refer to the System Administration chapter, Set Start Scan Mode, for more details.
If a problem occurs during scanning, an error message appears on the Touch Screen.
Solve the problem as instructed in the message.
The system automatically assigns a file name, “0000nnnn.xxx” (where “n” is the sequential
number assigned to the image file, and “xxx” is the selected file type extension, e.g.,
TIFF, PDF, etc.).
If the Preview Generation option on the Advanced Settings tab is enabled, a thumbnail
is created on the controller in a JPG format. The thumbnail image file can be downloaded
into Accxes Client Tools.
Step 6: Stopping a Scan Job
Press the Stop button on the User Interface Control Panel.
NOTE
The Clear Pathway message screen displays if the scan is not in the prefeed
mode. In this case, follow the instructions on the User Interface as indicated.
Step 7: Retrieving Files Stored in a Mailbox
Import the scanned data stored in your mailbox to your computer.
Refer to the FreeFlow Accxes Client Tools Customer Training Guide for instructions on
importing files to your computer.
Naming Scanned Files
When scanning jobs to a file destination you assign a filename and organize them within
groups using a customized naming convention or allow default naming to occur.
This feature is available for the following:
• Scan-to-Mailbox
• Scan-to-Removable Devices
• Scan-to-FTP
3-22
Xerox® Wide Format 6622 Solution
User Guide
™
Page 99

Scanning Documents
Auto Indexing:
When Auto Indexing is enabled, files get a default name of XWF-0000.tif (Xerox Wide
Format - XWF).
The Base File Name, or prefix, is used with the number indexing automatically for each
scanned document that follows.
The default is Auto Indexing on.
Base Files Names can also be customized for easy filing and identification.
Each Destination is independant, therefore, names can be duplicated and not conflict
and be invalid. If a filename is posted as <invalid> there are three options for resolution:
• Select Auto Indexing
• Rename the file
• Change the destination
Without Auto Indexing:
When Auto Indexing is deselected, you enter the name manually and save it.
If the name already exists, an “Invalid Base File Name” error message displays after
each successful scan. Change the Base File Name to resolve.
To reset the Base File Name and Destination, select the Clear button located on the
Control Panel.
To reset indexing to zero, remove or retrieve scanned files from that destination.
Scan to Removable Devices
There are several removable device types that jobs can be scanned to. Universal Serial
Bus (USB) Flash Drives, CD/DVD, and Memory Cards. Multiple devices can be attached
at one time. The display naturally presents the newly added device as it is inserted.
Should you prefer another device, those media choices are also available in the file
browser.
Starting at the Services screen, if a removable device is inserted into the User Interface
USB port, device related options will display. If the device is not supported, you will get
an “Invalid Mailbox” message instead.
The choices presented are Scan-to-Mailbox or Print-from-Device.
Scanning to the removable device is an extension of the Scan to Mailbox feature. This
is a second pathway from the Destination selection.
Xerox® Wide Format 6622 Solution
User Guide
™
3-23
Page 100

Scanning Documents
Scan to Device
1. Insert the removable device into the USB port located on the right side of the User
Interface.
Notice the green icon in the upper right on the Touch Screen as it recognizes your
device.
The Device Services screen displays with two choices.
• Print from Device
• Scan-to-Mailbox
NOTE
If the selections are unavailable the System Administrator has enabled Job
Accounting. Enter your Job Accounting User ID and Account ID Login to access.
NOTE
The Scan-to-Mailbox feature will not be displayed if the Scan-to-Network feature
key is not present and enabled. See your System Administrator.
2. Select Scan to Mailbox followed by the features and settings desired from the Scan
to Mailbox, Image Quailty and Advanced Settings tabs.
3. Select Destination.
4. Select Removable Device.
5. Insert your document into the Scanner.
A screen displays with the transferring status of the scan as it processes. The transfer
can be cancelled at anytime during the busy cycle. Once finished, the file is present
on the device. At completion, the User Interface display returns to the beginning
state.
6. Select the Eject button to safely remove the device.
3-24
Xerox® Wide Format 6622 Solution
User Guide
™
 Loading...