

Page 1

TeemTalk
-05W, -07W & -11W
User's Guide
Page 2

USA
Neoware, Inc.
3200 Horizon Drive
King of Prussia, PA 19406
Tel: +1-610-277-8300
Fax: +1-610-771-4200
Email: info@neoware.com
UK
Neoware UK Ltd
The Stables, Cosgrove
Milton Keynes MK19 7JJ
Tel: +44 (0) 1908 267111
Fax: +44 (0) 1908 267112
Email: teem-info@neoware.com
Page 3

TeemTalk
Software Support
Telephone: +1.610.277.8300
Web: http://www.neoware.com/support/
Software Version 4.3.1
November 1999
Part number: TT6TM-4.3.1
Neoware UK Ltd,
The Stables, Cosgrove,
Milton Keynes, MK19 7JJ
Tel: +44 (0) 1908 267111
Fax: +44 (0) 1908 267112
TeemTalk © 1988-2003 Neoware UK Ltd, All Rights Reserved.
Page 4

The material in this user's guide is for information purposes only
and is subject to change without notice. Neoware UK Ltd
accepts no responsibility for any errors contained herein.
Trademarks
TeemTalk is a registered trademark of Neoware UK Ltd.
ADDS Viewpoint A2 is a trademark of Applied Digital Data Systems Inc.
D100, D200 and D410 are trademarks of Data General.
DEC, VT52, VT100, VT131, VT220, VT300, VT320, VT340, VT420, ReGIS,
DECnet, LK250 and LK450 are registered trademarks of Digital Equipment
Corporation.
Ethernet is a registered trademark of Xerox Corporation.
Hazeltine is a trademark of Esprit Systems, Inc.
HP700/92, HP2392A and HP2622A are trademarks of Hewlett Packard Company.
IBM is a registered trademark of International Business Machines Corporation.
INFOConnect and Unisys are trademarks of Unisys Corporation.
Microsoft and MS-DOS are registered trademarks, and Windows and Excel are
trademarks of Microsoft Corporation.
NEWT is a trademark of NetManage, Inc.
OSLAN is a registered trademark of ICL.
PathWay is a trademark of the Wollongong Group, Inc.
PC/TCP is a registered trademark of FTP Software, Inc.
PowerStation is a trademark of KEA Systems.
Prime is a registered trademark and PT250 is a trademark of Prime Computer, Inc.
Reflection is a registered trademark of Walker Richer & Quinn, Inc.
Retrographics and VT640 are registered trademarks of Digital Engineering, Inc.
Sun, PC-NFS and NFS are registered trademarks of Sun Microsystems, Inc.
Tandem, NonStop and LXN are trademarks of Tandem Computers Inc.
TeleVideo is a registered trademark, and TeleVideo 910, 910+ and 925 are trademarks
of TeleVideo Systems, Inc.
Tektronix is a registered trademark of Tektronix, Inc.
Westward is a registered trademark of Telemetrix, Inc.
WordPerfect is a trademark of WordPerfect Corporation.
WYSE is a registered trademark, and WY-50, WY-50+ and WY-60 are trademarks of
Wyse Technology Inc.
All other product names are trademarks of their respective manufacturers.
© 1988-2003 Neoware UK Ltd, All Rights Reserved.
Before reproduction of this material in part or in whole, obtain
written consent from Neoware UK Ltd.
Page 5

Contents
Contents
Introduction ....................................................... 1-1
What Is TeemTalk? ........................................................................ 1-1
About This User's Guide ............................................................... 1-2
Terms & Conventions .................................................................... 1-4
Getting Started.................................................. 2-1
Running TeemTalk......................................................................... 2-1
Quitting TeemTalk ......................................................................... 2-1
Host Communications ................................................................... 2-3
Creating A Communications Session ............................................... 2-3
Making A Serial Host Connection ............................................. 2-3
Making A Network Host Connection......................................... 2-4
Creating A Connection Template ..................................................... 2-6
Using Environment Variables To Locate Settings Files ........... 2-7
Selecting A Connection Template .................................................... 2-7
Selecting The Terminal Emulation ................................................ 2-9
Tablet & Mouse Configuration ................................................... 2-10
Primary Setup Mode .................................................................... 2-11
The TeemTalk Display ................................................................. 2-12
The Title Bar ................................................................................... 2-12
The Minimize & Maximize Buttons ............................................... 2-13
The Menu Bar .................................................................................. 2-13
Resizing The Window .............................................................. 2-14
The Toolbar ..................................................................................... 2-15
The Scroll Bar ................................................................................. 2-16
The Soft Buttons .............................................................................. 2-16
The Status Bar ................................................................................. 2-19
Contents-1
Page 6

Contents
The Window Border & Corners ...................................................... 2-20
The Emulation Workspace .............................................................. 2-21
Default Font Sizes .................................................................... 2-21
The Text Cursor ............................................................................... 2-22
The Selection Cursor ....................................................................... 2-22
The Gin Cursor ................................................................................ 2-23
Keyboard Configuration ................................... 3-1
Introduction ................................................................................... 3-1
DEC LK250 Keyboard Drivers ..................................................... 3-8
Keyboard Nationality .................................................................... 3-9
Cursor Keys ................................................................................... 3-9
Remapping The Keyboard ........................................................... 3-10
Programming A Key........................................................................ 3-12
Entering Control Characters ............................................................ 3-13
Key Combinations & Sequences ..................................................... 3-13
Entering Command Lines ............................................................... 3-14
Changing The Window Focus ......................................................... 3-14
Initiating A Script File .................................................................... 3-14
Action Locally Or Transmit To Host .............................................. 3-14
Default Key Definitions .................................................................. 3-15
Euro Sign ......................................................................................... 3-15
Compose Character Sequences ................................................... 3-16
Mouse Functions .............................................. 4-1
Introduction ................................................................................... 4-1
Redefining The Mouse Buttons ...................................................... 4-1
Selecting & Copying Text.............................................................. 4-3
Disabling The Copy & Paste Functions ....................................... 4-3
2-Button Mouse Emulating 3-Button ............................................ 4-4
Show & Action Hotspots ............................................................... 4-4
Send Keyword ................................................................................ 4-4
Moving The Cursor In Block Mode ............................................... 4-4
The Toolbar ........................................................ 5-1
Using The Toolbar ........................................................................ 5-1
Contents-2
Page 7

Contents
The Predefined Button Tools ......................................................... 5-2
Redefining The Toolbar................................................................. 5-5
Adding Button Bitmaps ..................................................................... 5-5
Assigning Functions To Buttons ....................................................... 5-6
Removing Button Tools .................................................................... 5-8
Saving The Button Tools .................................................................. 5-8
Hotspots ............................................................ 6-1
Using Hotspots .............................................................................. 6-1
Defining Hotspots .......................................................................... 6-2
Setup Menus ..................................................... 7-1
Selecting & Closing Menus ........................................................... 7-1
Using The Menus ........................................................................... 7-2
Dialog Boxes ................................................................................. 7-3
Default Settings ............................................................................. 7-4
Creating A Connection Template .................................................. 7-5
Using Environment Variables To Locate Settings Files .................. 7-6
Selecting A Connection Template .................................................... 7-7
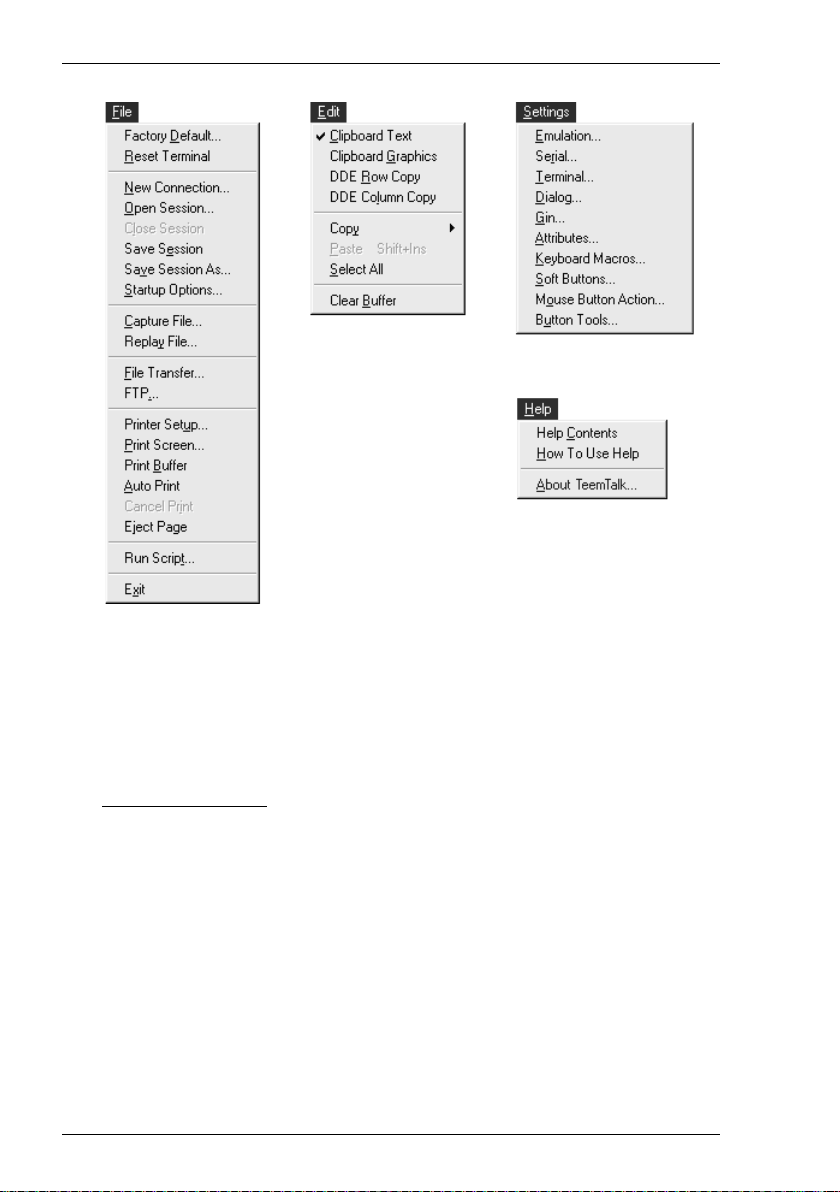
Menu Descriptions ........................................................................ 7-8
File Menu ........................................................................................... 7-8
Telnet Options ................................................................................. 7-19
Edit Menu ........................................................................................ 7-21
Settings Menu .................................................................................. 7-24
Emulation Settings .......................................................................... 7-25
Serial Settings .................................................................................. 7-27
NCSI Settings .................................................................................. 7-29
Terminal Settings ............................................................................ 7-31
Dialog Settings ................................................................................ 7-35
Gin Settings ..................................................................................... 7-38
Attributes ......................................................................................... 7-40
Keyboard Macros ............................................................................ 7-44
Euro Sign .................................................................................. 7-49
Soft Buttons ..................................................................................... 7-50
Mouse Button Actions ..................................................................... 7-54
Button Tools .................................................................................... 7-56
Help Menu ....................................................................................... 7-58
Contents-3
Page 8

Contents
File Transfer....................................................... 8-1
Introduction ................................................................................... 8-1
Protocols Supported ...................................................................... 8-1
Sending Files ................................................................................. 8-3
Receiving Files .............................................................................. 8-5
Cancelling A File Transfer ........................................................... 8-7
Setting Protocol Parameters ......................................................... 8-8
General Parameters ............................................................................ 8-8
Kermit Parameters ........................................................................... 8-10
ASCII Parameters ............................................................................ 8-12
ZMODEM Parameters..................................................................... 8-14
Kermit Remote Operations .......................................................... 8-17
Local Operation .......................................................................... 8-19
ICL FTF File Transfer ........................................ 9-1
Configuration Requirements ......................................................... 9-1
Sending & Receiving Files ............................................................ 9-2
Transfer Options ........................................................................... 9-4
Remote Host Options ..................................................................... 9-7
FTP File Transfer ............................................. 10-1
The Transfer Procedure .............................................................. 10-1
Menu & Toolbar Options ............................................................ 10-7
The File Menu ................................................................................. 10-7
The Session Menu ......................................................................... 10-10
The Configure Menu ..................................................................... 10-11
The View Menu ............................................................................. 10-12
FTP Initialization File Entries .................................................. 10-13
Use Asynchronous Calls................................................................ 10-13
Disable Delete Command ............................................................. 10-14
FTP Command Line Options .................................................... 10-14
Progress Bar ................................................................................... 10-14
Disabling The Include Subdirectories Option .............................. 10-14
Time Out ........................................................................................ 10-14
Contents-4
Page 9

Contents
Initialization Commands ................................ 11-1
Introduction ................................................................................. 11-1
Initialization File ......................................................................... 11-1
Windows 3.1x .................................................................................. 11-1
TeemTalk Private Profile File .................................................. 11-2
Windows 95 & NT .......................................................................... 11-3
Command Line Option Format ................................................... 11-5
Command Summary .................................................................... 11-6
Network Connection .................................................................... 11-8
Telnet Commands ...................................................................... 11-12
Session Configuration ............................................................... 11-13
Display....................................................................................... 11-17
Keyboard & Mouse ................................................................... 11-25
Printing...................................................................................... 11-27
Creating A Script File ..................................... 12-1
Introduction ................................................................................. 12-1
Initiating A Script File ................................................................ 12-1
Assigning Values To Variables ................................................... 12-3
Script File Examples ................................................................... 12-4
Syntax Conventions ................................................................... 12-12
Script Operators ........................................................................ 12-14
Command Descriptions ............................................................. 12-18
Error Numbers .......................................................................... 12-67
Script Error Trapping Functions .............................................. 12-71
PSET & PGET Parameters & Values ....................................... 12-73
FTU SET & GET Parameters ................................................... 12-86
Dynamic Data Exchange ................................ 13-1
Introduction ................................................................................. 13-1
DDE Terminology ....................................................................... 13-3
Hot & Warm DDE Links ............................................................. 13-3
Using The Edit Menu DDE Functions ........................................ 13-4
Contents-5
Page 10

Contents
File Transfer ................................................................................ 13-6
Slave Mode .................................................................................. 13-6
Additional DDE Functions ........................................................ 13-18
DDE Link To A Visual Basic Application ................................. 13-24
Troubleshooting ................................................ A-1
Virtual Key Names ............................................ B-1
Standard Virtual Key Names ......................................................... B-1
DEC VT220 Virtual Key Names.................................................... B-2
Tek Virtual Key Names.................................................................. B-2
Key Reference Numbers .................................. C-1
Character Sets ..................................................D-1
Host Command Summary................................ E-1
VT52 Mode .................................................................................... E-1
ANSI VT100 Mode ......................................................................... E-3
ANSI VT220 Mode ......................................................................... E-6
Tek Mode ....................................................................................... E-7
W3220 Mode................................................................................ E-13
TeemTalk Additional Commands ................................................ E-15
Contents-6
Page 11

Introduction
Introduction
This chapter introduces TeemTalk terminal emulation software for
Microsoft Windows and the contents of this User's Guide.
What Is TeemTalk?
TeemTalk for Windows provides precise emulation of a wide range of industry
standard text and graphics terminals on any PC running Microsoft Windows. Multiple
concurrent sessions with different hosts can be conducted over serial RS232 lines or
local area networks (LANs) including DECnet, TCP/IP and Novell.
TeemTalk incorporates an impressive range of additional features formulated to
increase productivity and reduce network loading. These include file transfer, session
capture and replay, dynamic data exchange, a toolbar, hotspots, soft buttons, keyboard
mapping, mouse button definition, connection templates, customising capabilities, a
comprehensive script language, and an optional Application Programming Interface
(API).
1
1-1
Page 12

Introduction
About This User's Guide
This User's Guide describes how to use TeemTalk-05W, TeemTalk-07W and
TeemTalk-11W version 4.3.1 for Windows 3.1x, 95 and NT. The information
contained in the following chapters applies equally to TeemTalk-05W, TeemTalk07W and TeemTalk-11W unless indicated otherwise.
The illustrations in this User's Guide that show the TeemTalk window or dialog boxes
are shown in the Windows NT style. The layout for Windows 3.1 and 95 will be very
similar, but if their are significant differences then these will be illustrated accordingly.
If you require information on network protocols and facilities, refer to the TeemTalk
for Windows Networking Guide.
Chapter 1: Introduction
Introduces TeemTalk for Windows and the contents of this
User's Guide.
Chapter 2: Getting Started
Describes how to use TeemTalk and configure it for
compatibility with your hardware and the application.
Chapter 3: Keyboard Configuration
Describes how to configure TeemTalk for your particular
keyboard, remap key functions and compose special characters.
Chapter 4: Mouse Functions
Describes the special functions assigned to the mouse buttons
by TeemTalk and how to redefine the buttons.
Chapter 5: The Toolbar
Describes how to use the toolbar and redefine the buttons.
Chapter 6: Hotspots
Describes the hotspot facility which enables functions to be
performed by clicking on keywords displayed on the screen.
Chapter 7: Setup Menus
Describes all the commands and setup dialog boxes that can
be accessed via drop-down menus in the menu bar.
Chapter 8: File Transfer
Describes how to transfer files using the Kermit, XMODEM,
XMODEM-1K, YMODEM Batch, ZMODEM and ASCII
protocols.
1-2
Page 13

Chapter 9: ICL FTF File Transfer
Describes the ICL FTF file transfer utility supported by
TeemTalk for Windows 3.1x in all terminal emulation modes.
Chapter 10: FTP File Transfer
Describes the FTP interface for file transfer across Windows
Sockets based networks.
Chapter 11: Initialization Commands
Describes commands that can be included in the initialization
file and on the command line to specify the loading
configuration for TeemTalk.
Chapter 12: Creating A Script File
Describes how to create a script file to automate certain
activities such as logging onto remote computers.
Chapter 13: Dynamic Data Exchange
Describes the support of dynamic data exchange (DDE) by
TeemTalk.
Appendix A: Troubleshooting
Provides answers to the most commonly asked questions.
Appendix B: Virtual Key Names
Lists all the virtual key names that enable you to include a
specific key function in a user definition for key macros, soft
buttons, hotspots, etc.
Introduction
Appendix C: Key Reference Numbers
Lists all the valid key reference numbers used for key
programming in Tek Primary Setup and host commands,
and the script language PSET and PGET commands.
Appendix D: Character Sets
Shows the character set code tables supported by TeemTalk.
Appendix E: Host Command Summary
Lists the host commands that are supported in each terminal
emulation mode.
1-3
Page 14

Introduction
Terms & Conventions
This User's Guide uses the following terms and conventions.
1. References to TeemTalk in the main text of this User's Guide apply
equally to TeemTalk-05W, TeemTalk-07W and TeemTalk-11W for
Windows 3.1x, 95 and NT unless indicated otherwise.
2. Some sections of this User's Guide assume you are using TeemTalk-07W
or TeemTalk-07W32 when describing various procedures. References to
TT07W in filenames and commands apply to TeemTalk-07W and
TeemTalk-07W32 and, unless indicated otherwise, should be substituted
with TT05W if you are using TeemTalk-05W or TeemTalk-05W32, or
TT11W if you are using TeemTalk-11W or TeemTalk-11W32.
3. An asterisk in a filename or directory name must be substituted with the
number indicating the version of your TeemTalk software unless specified
otherwise. For example, 07 for TeemTalk-07W.
4. When references to keys are shown linked by a + (plus sign), this means
that two or more keys have to be pressed at the same time. For example,
'press Ctrl + M' means press and hold down the Ctrl key, press the M
key then release both keys.
5. 'Click' means position the mouse pointer over an element on the display
then quickly press and release the specified mouse button.
6. 'Double click' means position the mouse pointer over an element on the
display then quickly press and release the specified mouse button twice
in quick succession.
7. 'Drag the pointer' means hold down the left mouse button (or button
assigned with the select function) and slide the mouse so that a selection
box is displayed.
1-4
Page 15

Getting Started
Getting Started
This chapter describes how to run TeemTalk and configure it for
compatibility with your hardware and the application.
Running TeemTalk
To run TeemTalk, display the TeemTalk group window (or the window you specified
when installing the software) and select the icon shown below.
2
Mouse: Double-click the TT05W, TT07W or TT11W icon.
Keyboard: Press Ctrl + Tab until the icon is selected then press Return.
The screen will display a copyright message then the TeemTalk window (shown
overleaf) in which the DEC VT100 emulation is running by default.
Quitting TeemTalk
You can quit an instance of TeemTalk in one of two ways, from the File menu when
the window is displayed, or the Control menu when the window is displayed or
iconized.
Quitting using the File menu:
Mouse: Click on File in the menu bar to display the File menu, then click the
Exit option.
Keyboard: Press Alt + F to display the File menu, then press X to exit.
2-1
Page 16

Getting Started
Quitting using the Control menu:
Mouse: If the window is displayed, click the box or icon in the top left corner of
the window to display the Control menu, then click the Close option.
If the window is iconized, click the icon to display the Control menu
then click the Close option.
Keyboard: If the window is displayed, press Alt + Spacebar to display the
Control menu. Press the down arrow key until the highlight rests over
Close then press Return.
If the window is iconized, press Alt + Esc until the icon title is
highlighted then Alt + Spacebar to display the Control menu. Press the
down arrow key until the highlight rests over Close then press Return.
2-2
Page 17

Getting Started
Host Communications
Creating A Communications Session
When TeemTalk is loaded for the first time, a dialog box will be displayed which
enables you to configure TeemTalk for a serial or network host connection.
Note: If you do not wish to make a host connection at this moment,
just click the Cancel button to close the dialog box. You can
display the New Connection dialog box again later by
clicking File in the menu bar and selecting New
Connection... in the menu.
The Type option specifies whether a serial or network connection is to be made.
Clicking the arrow button will display a drop-down list box containing all the
possible settings.
The Services option specifies the port or network host node which TeemTalk is to
communicate with. This is a text box with an associated drop-down list box. You can
either make a selection from the list box or enter a valid host name or internet address
in the text box.
Note: If you are unfamiliar with using dialog boxes and setup
menus, refer to the beginning of the Setup Menus chapter.
Making A Serial Host Connection
To connect to a serial host, select Serial in the Type list box (default), then select the
Com port required in the Services list box.
Click the Configure... button to display the Serial Settings dialog box (shown
overleaf) and make sure the settings match that of the host.
Click OK to return to the New Connection dialog box then click the Connect button.
2-3
Page 18
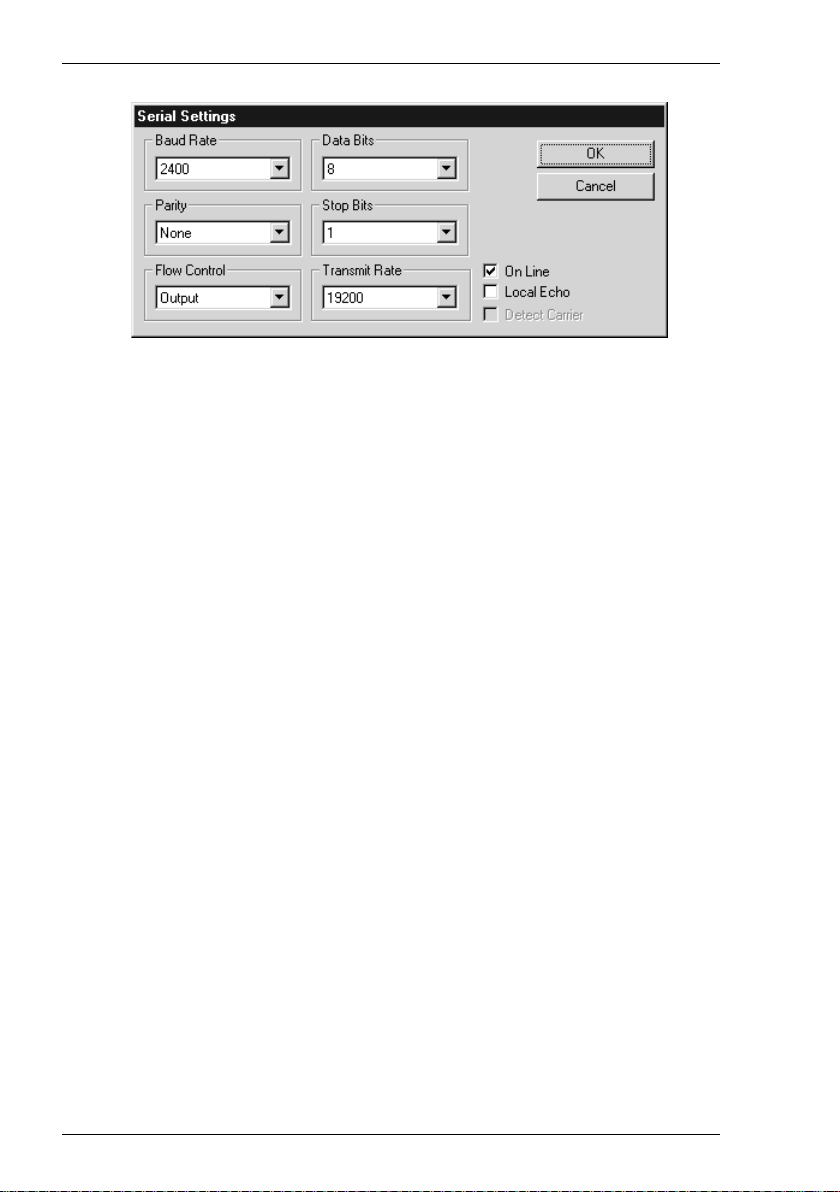
Getting Started
Note: The options in this dialog box are described in the Serial
Settings section in the Setup Menus chapter and only apply
when the connection type is set to Serial.
The status bar along the bottom of the TeemTalk window displays two LEDs. The first
LED indicates whether or not you are connected to the host. It will show red when
not connected and green when you are connected. The second LED indicates
whether or not data is being sent to or from the host. It will show dull green when
there is no activity, red when data is being sent to the host, and bright green when
data is being received from the host.
Making A Network Host Connection
To connect to a network host, select the protocol required in the Type list box:
TeemTalk for Windows 95 and NT:
TCP/IP CTERM WinSock 2
NetBIOS MultiLan ISDN
LAT Microsoft SNA TeemTalk-OSI (option)
TeemTalk for Windows 3.1x:
LAT NetBIOS B and W. TCP INFOConnect
FTP PC/TCP OSLAN WinSock ISDN
Sun PC/NFS TELAPI Ext. NCSI DOSLANTI
LAN W/Place BAPI Eicon X25 MultiLan
NetManage Interrupt 14 IPX/SPX
PathWay INT6B / NASI NetWare for LAT
CTERM LanManager TeemTalk-OSI
Note: Refer to the Network Connection chapter in the Networking
Guide for a description of each protocol supported and for
any additional configuration required prior to making a
connection.
2-4
Page 19
Getting Started
The Services list box (in the New Connection dialog box) will display the devices on
the network which use the currently selected protocol. Click the name of the device
required or, in the case of TELAPI, enter an Internet address in the text box (for
example, 128.127.126.2). Note that either the host name or IP address may be entered
for TCP/IP connections. When Eicon X25 is selected, TeemTalk requires you to enter
a valid X25 address as none will be listed.
The Telnet Options button becomes available when a Telnet protocol is selected in
the Type list box. The dialog box displayed when this button is clicked is described
in the Setup Menus chapter.
Clicking the Connect button or the name of the host in the Services list box twice
will cause TeemTalk to attempt to connect to the specified host. If a connection cannot
be made because the network driver is not installed or the host node name is invalid,
an error message will indicate this. Failure to connect for any other reason will result
in a Connection Failed message.
The status bar along the bottom of the TeemTalk window displays two LEDs. The first
LED indicates whether or not you are connected to the host. It will show red when
not connected and green when you are connected. The second LED indicates
whether or not data is being sent to or from the host. It will show dull green when
there is no activity, red when data is being sent to the host, and bright green when
data is being received from the host.
Connection to the network host node will close if you change the settings in the New
Connection dialog box and attempt to connect, if you log out of the host, or the host
closes the connection. When the host closes the connection a message box will be
displayed giving you the option of reconnecting to the network host node, cancelling
the message box and returning to TeemTalk, or exiting TeemTalk.
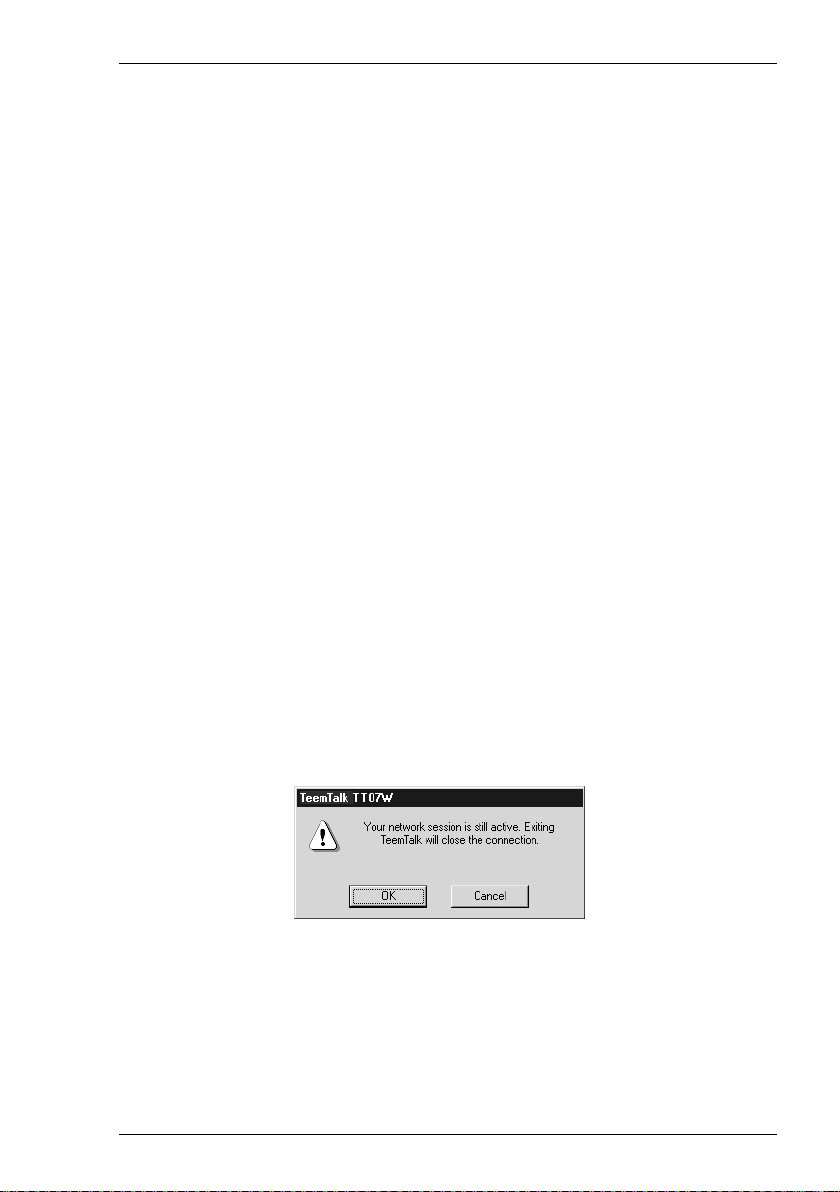
A warning message will be displayed if you attempt to open a new session while a
session is already open. If you attempt to exit TeemTalk while a network session is still
active, the following message box will be displayed:
Any of these message boxes can be disabled so that the current connection is
automatically closed when the host closes the connection, a new session is opened, or
TeemTalk is exited. Refer to the Initialization Commands chapter for details.
2-5
Page 20
Getting Started
Creating A Connection Template
You can save the current session configuration as a connection template. To make
TeemTalk automatically attempt to make a host connection using the same settings the
next time it is loaded, click the File option in the menu bar to display the File menu,
then click the Save Session option.
TeemTalk enables you to create multiple connection templates, any one of which can
be used either when TeemTalk is loaded or while it is running. The procedure is as
follows:
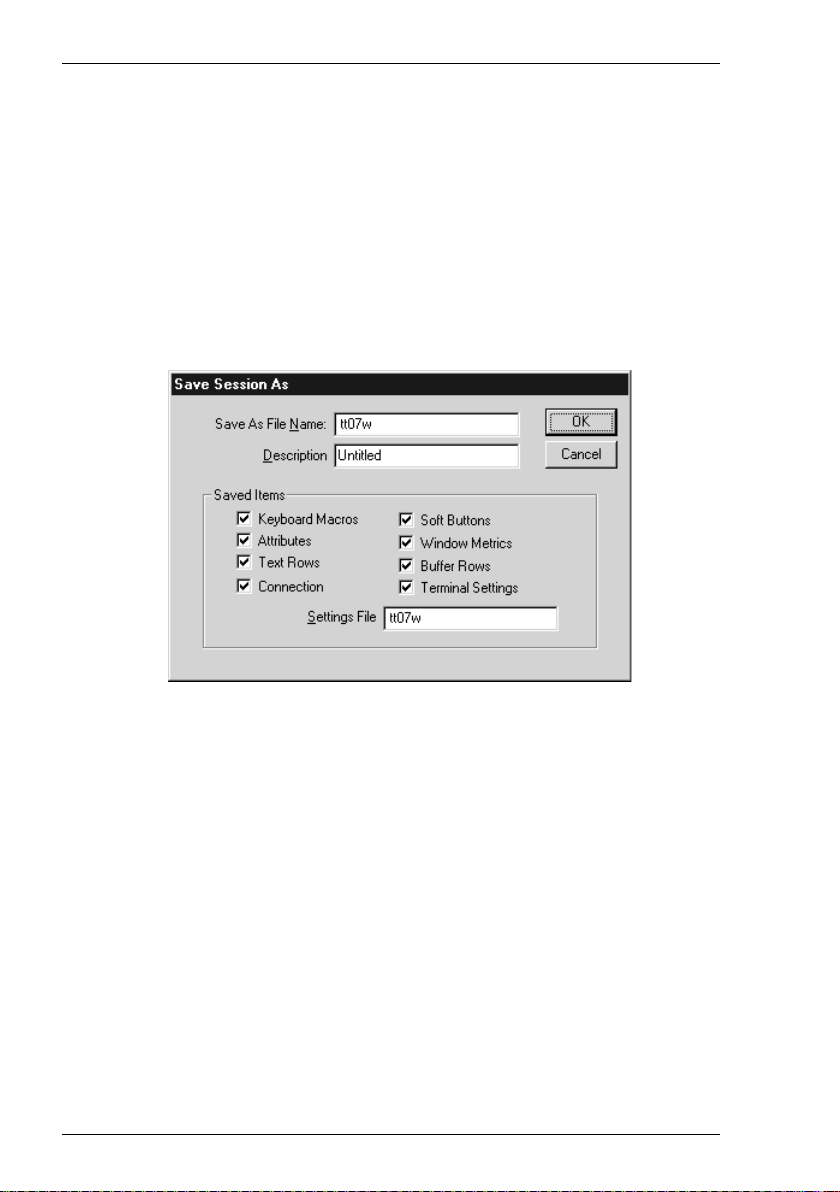
1. In the File menu, select the Save Session As... option to display a dialog box.
2. In the Saved Items box, indicate which user preference settings are to be saved by
checking the boxes next to the relevant options.
3. In the Settings File text box, specify the name of the terminal emulation settings
file (and the directory path if different from the default) which is to store settings
only affecting the terminal emulation. The default filename is tt*w.nv where * is
05, 07 or 11, depending on your version of TeemTalk.
4. In the Save As File Name text box, specify the name of the workspace settings file
(and the directory path if different from the default) which is to store the user
preference settings selected by the Saved Items options. The default filename is
tt*w.wsp where * is 05, 07 or 11, depending on your version of TeemTalk.
Note: Splitting the saved settings into two files enables users to
share a common terminal emulation settings file while
allowing each user to have their own workspace settings
file.
2-6
Page 21
Getting Started
5. In the Description text box, enter a unique description (up to 132 characters long)
which will be used to identify the connection template for future selection. This
description will also appear in the Open Session dialog box.
6. Click the OK button to save the template settings. If you specified the names of
settings files that already exist, a message box will ask you to confirm whether or
not you want to overwrite the existing files with the new settings.
Using Environment Variables To Locate Settings Files
When TeemTalk for Windows 95 or NT is installed on a terminal server, environment
variables may be used to locate settings files on the client PC. This means that each
client may use a different setup configuration, reading and saving settings locally,
instead of changing files stored on the server which would affect all clients.
Each client must use the same user environment variable name to specify the
directory path for the TeemTalk settings file(s). This name is then specified in the
registry on the terminal server, enclosed by % (percentage) characters.
For example, each client has the user environment variable USERPROFILE pointing
to a local directory (which may be different on each client). To make the directory
specified by USERPROFILE the location of the TeemTalk settings files (.nv and
.wsp), the TeemTalk registry entries on the terminal server would look like this:
NvPath: "%USERPROFILE%"
WsPath: "%USERPROFILE%"
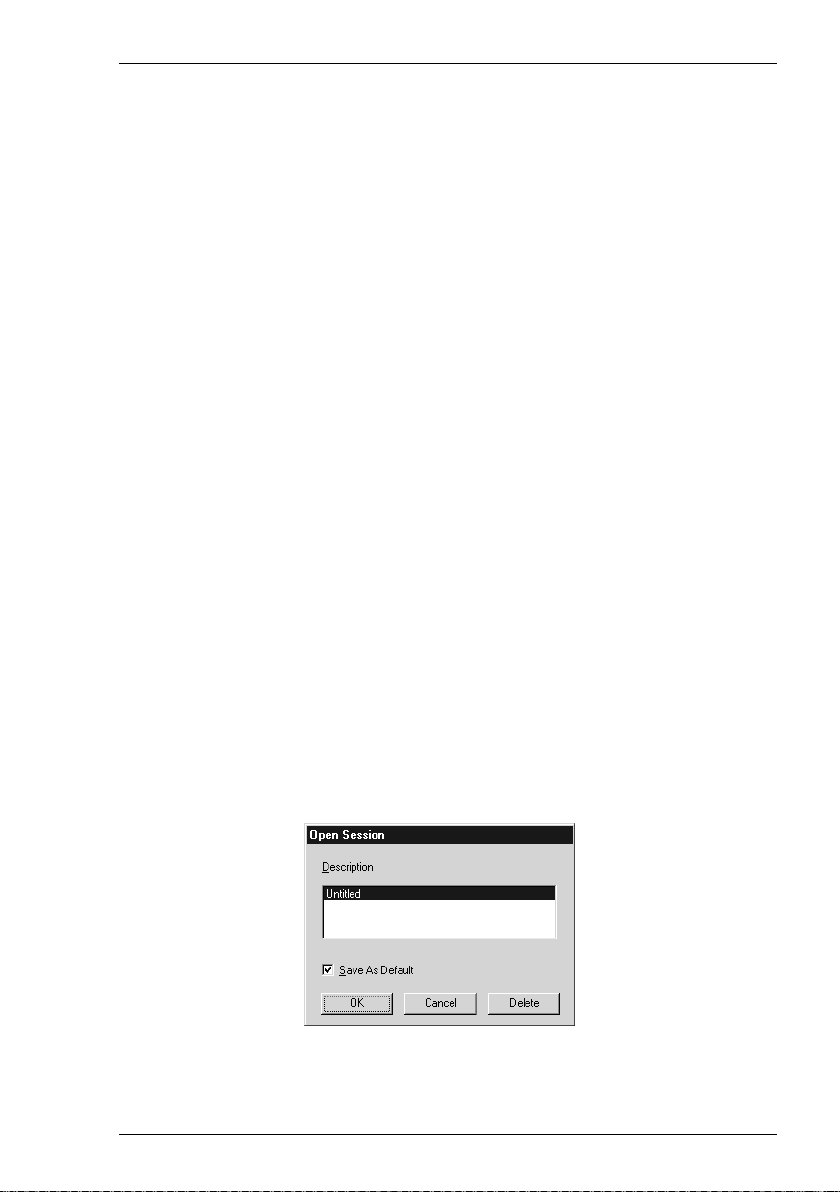
Selecting A Connection Template
The Open Session option in the File menu displays a dialog box that enables you to
select a connection template for TeemTalk to use.
The Description list box displays the one-line descriptions of connection templates
that were created using the Save Session As dialog box. The description of the
2-7
Page 22

Getting Started
connection template currently in use is highlighted. The factory default connection
template is Untitled. Clicking one of the descriptions then the OK button will cause
TeemTalk to use the connection template associated with the chosen description.
You can make TeemTalk automatically use a particular connection template when it is
loaded or reset by clicking the required description, checking the Save As Default
check box, then clicking the OK button. To delete a connection template, select the
description then click the Delete button.
You can also use the following command line option to override the default
connection template used when TeemTalk is loaded:
-se"description"
where description must exactly match the description assigned to a connection
template already saved using the Save Session As dialog box. The description must be
enclosed by double-quotes.
2-8
Page 23

Getting Started
Selecting The Terminal Emulation
When you load TeemTalk for the first time, the DEC VT100 emulation will be
running by default. All the terminal emulations supported by TeemTalk can be
accessed from the Emulation Settings dialog box. This is displayed by selecting
Settings in the menu bar then Emulation... The emulations available are listed in the
Emulation list box.
To change the current emulation mode, select the emulation required then click the
OK button. The emulation setting may be saved so that TeemTalk will automatically
run it when it is loaded or reset by selecting the Save Session option in the File
menu.
A brief description of the emulation options follows.
VT52 and VT100 modes enable you to run applications written for the DEC VT52
and VT100 terminals, respectively.
Tek mode provides compatibility with software designed to drive the Tektronix 4100
or 4200 series terminals. Emulation of the Tektronix 4014 terminal can be achieved
by selecting this option and setting the Dialog Area Enabled option in the Dialog
Settings dialog box to 0.
Edit mode provides compatibility with software designed to drive the DEC VT100
terminal. In this mode the following features are set to pre-determined conditions:
A. The dialog area is enabled and visible.
B. The dialog area buffer and scrolling region are set to 24 lines.
C. Cursor origin mode is set to Absolute (refer to the description of
the Cursor Origin option in the Dialog Settings dialog box).
2-9
Page 24

Getting Started
D. Insert/Replace character mode is set to Replace.
E. Keys PF1 through PF4 generate ANSI cursor movement se-
quences.
F. All programmed strings for keys are temporarily disabled.
VT220-7 and VT220-8 modes are emulations of the DEC VT220 terminal, the
difference is in their treatment of 8-bit control codes. When VT220-7 is selected, all
8-bit codes are converted to their 7-bit equivalents, whereas VT220-8 leaves 8-bit
codes unchanged. If you are using VT200 applications, select VT220-7.
W3220 mode provides compatibility with software designed to drive the Westward
3220 terminal.
Tablet & Mouse Configuration
If you are using a tablet or mouse, you must specify the type of device and the port to
which it is connected before TeemTalk will recognize it. To do this, display the Gin
Settings dialog box by selecting Gin... in the Settings menu.
The Tablet Type option specifies the graphics input (GIN) device that is attached to
your system and the data format that TeemTalk uses to communicate with it.
TeemTalk incorporates several tablet drivers. The following list includes the baud rate,
data bits, stop bits and parity settings that are automatically set for the tablet type
selected.
MM1201 Summagraphics MM1201
(9600, 8, 1, Odd)
MM1812 Summagraphics MM1812
(9600, 8, 1, Odd)
2-10
Page 25

Getting Started
Bitpad-Plus Summagraphics Bitpad-Plus
(9600, 7, 1, Even)
Calcomp Calcomp (16 button)
(9600, 7, 1, Even)
Mouse Mouse
(Uses the communication settings specified
in the Serial Settings dialog box)
Click the button next to the Tablet Type required then specify the Serial Port
Device to which the Gin device is attached. You can save these settings so that
TeemTalk will automatically assert them when loaded or reset by clicking the Save
Session option in the File menu.
Refer to the Setup Menus chapter for a complete description of the Gin Settings
dialog box.
Primary Setup Mode
TeemTalk can be configured for your hardware and application either by using setup
dialog boxes displayed from the Settings menu in the menu bar, or by specifying
settings in the Tektronix form of setup called Primary Setup.
The easiest way to configure TeemTalk is by using the various dialog boxes displayed
from the Settings menu. Some of these are discussed in this chapter and all of them
are described in detail in the Setup Menus chapter.
Primary Setup mode is used by those who have experience in programming. No
menus are displayed and the only indication that you are in Primary Setup mode is an
asterisk (*) character displayed in the first column. Primary Setup mode is toggled on
and off either by clicking the Setup button at the bottom of the TeemTalk window or
by pressing the keys Alt + Z together. Configuration is achieved by entering a
command at the asterisk prompt followed by one or more values. The valid
commands that can be entered are listed in the Command Summary appendix
alongside the equivalent host commands.
You can display the current setup configuration by entering STAT (short for status)
at the asterisk prompt and hitting Return. Changes made to the Primary Setup
configuration are automatically reflected in the Settings dialog boxes and vice versa.
2-11
Page 26

Getting Started
The TeemTalk Display
The TeemTalk window incorporates several special facilities in addition to the
standard facilities supported by Microsoft Windows. The illustration below shows the
various elements of the window which are described in the following sections.
Control Menu Icon Title Bar
Menu Bar
Text Cursor
Selection Cursor
Soft Buttons
Window Border Window Corner
Toolbar
Emulation Workspace
Status Bar
Shutdown Button
Minimize Button
Minimize Button
Scroll Box
Scroll Bar
Scroll Arrow
The Title Bar
The title bar displays the name of your version of TeemTalk software (title), the name
of the session currently running (subtitle) in brackets, and an indication of the current
host connection (host name, IP address or COM port). You may specify a different title
or subtitle on the command line for loading TeemTalk or in the initialization file. Refer
to the Initialization Commands chapter for details.
2-12
Page 27

Getting Started
The Minimize & Maximize Buttons
These buttons are used by the mouse to shrink the window to an icon or increase the
window to the maximum size possible while still displaying the number of lines and
columns specified in setup, the default setting being 80 columns by 32 lines. (The
equivalent keyboard functions are enabled via the Control menu).
Note: The number of lines and columns displayed is affected by
the setting of the Resize Font, Rows and Columns options
in the Dialog Settings dialog box. Refer to the Setup Menus
chapter for details.
Once the window has been iconized, it can be restored to its original state by doubleclicking the icon.
When the window has been maximized, the maximize button changes to show an up
and down arrow. Clicking the button now will restore the window to its previous size.
Note: You can cause the window to be minimized, maximized or
fill the display area when TeemTalk is first started by using
an initialization file command or command line option.
Refer to the Initialization Commands chapter for details.
The Menu Bar
The menu bar provides access to a series of commands and dialog boxes which
enable you to perform various functions and configure TeemTalk for compatibility
with the application.
One of four menus may be displayed at any one time. These are headed File, Edit,
Settings and Help.
To display a menu:
Mouse: Click the title of the menu required.
Keyboard: Hold down the Alt key and press the key bearing the underlined
character in the menu title. For example, pressing Alt + F will display
the File menu.
When the menu bar is not displayed you can still display the menus by pressing the
following keys:
Alt + F for the File menu
Alt + E for the Edit menu
Alt + S for the Settings menu
Alt + H for the Help menu
2-13
Page 28
Getting Started
When you display a menu and move the cursor over the menu options, the status bar at
the bottom of the window will change to display a brief description of the option at the
cursor position.
Refer to the Setup Menus chapter for a complete discussion on selecting and using the
options in these menus.
To close a menu:
Mouse: Click anywhere outside the menu.
Keyboard: Press the Alt key.
Resizing The Window
The menu bar also includes two commands for resizing the window.
The << and >> commands enable you to decrease or increase the size of the window
to the size of the next smallest or largest font supported while retaining the same
number of lines and columns.
2-14
Page 29
Getting Started
To resize the window:
Mouse: Click the pointer over the << or >> commands.
Keyboard: Hold down the Alt key and press the key bearing the underscored
character in one of the menu titles, for example, Alt + F. Press the right
arrow key to move the highlight over << or >> and press Return.
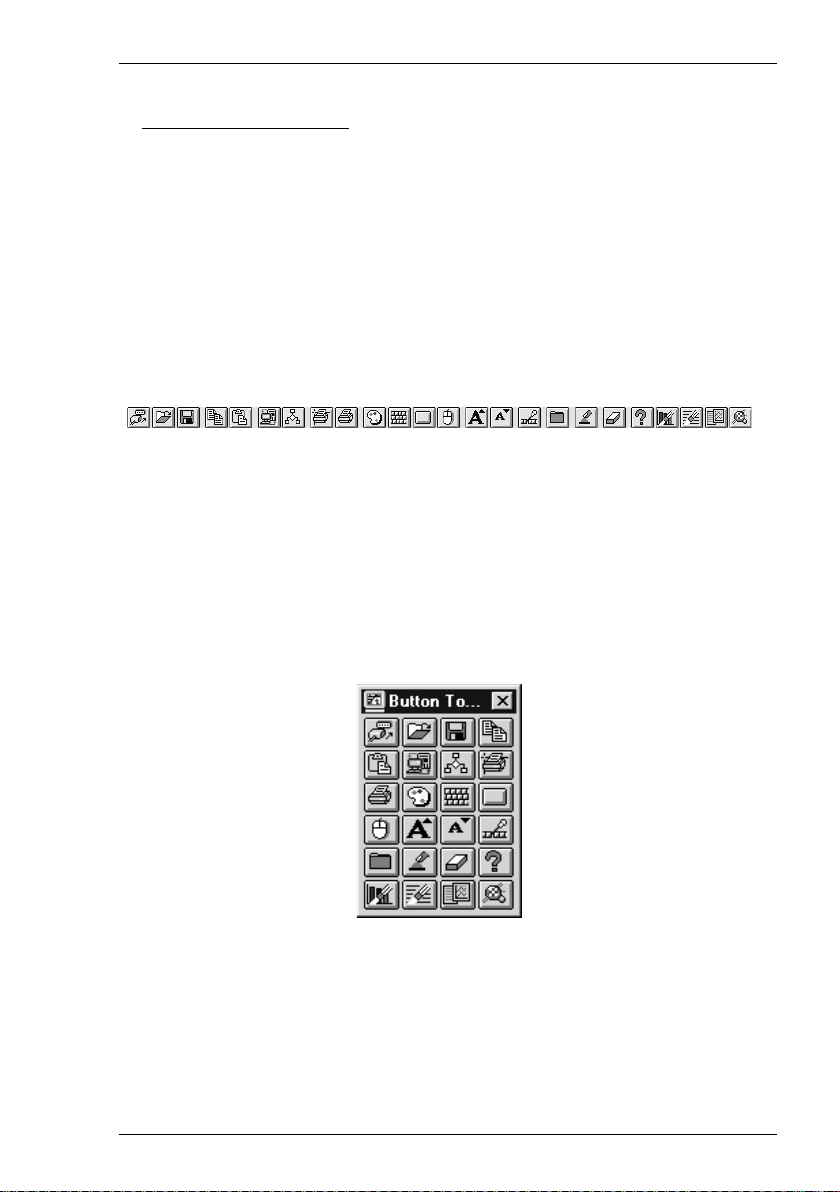
The Toolbar
The toolbar and associated floating button palette provide a quick way of actioning
commands or displaying setup dialog boxes by just clicking a button. TeemTalk
displays a toolbar below the menu bar by default.
The toolbar contains a series of buttons with graphical representations of their
functions. These buttons are predefined with functions found in the setup menus.
You can redefine all the buttons and add or remove buttons from the toolbar via the
Button Tools dialog box. Refer to the chapter entitled The Toolbar for a complete
description.
The toolbar can be pulled away from the menu bar and floated on the display by
positioning the mouse pointer anywhere in the toolbar except on a button, holding
down the left mouse button then dragging the pointer down until the toolbar outline
changes shape. Releasing the mouse button will display the floating button palette.
The floating button palette contains the same buttons as the toolbar. You can move
and resize the palette in the same way as any other window. To convert the floating
button palette back into the toolbar, click the control menu box at the top left corner
of the palette window and select Attach. If you click the shutdown button on the
floating button palette, you can restore display of the tool buttons by selecting the
Button Tools option in the Settings menu and checking the Visible option in the
dialog box.
2-15
Page 30

Getting Started
The Scroll Bar
The scroll bar enables you to display alphanumeric data that is above or below the
view of the dialog area. The dialog area is a 'window' into the dialog buffer which is
used to store alphanumeric data. The dialog area may fill the entire emulation
workspace or consist of only two lines. The scroll bar represents the entire buffer.
You can specify the size of the dialog buffer and the number of lines actually
displayed (the dialog area) in the Dialog Settings dialog box, as described in the
Setup Menus chapter. The total number of dialog buffer lines may not exceed 100.
A mouse is required to enable scrolling as keyboard commands for moving through the buffer are not supported. The scroll bar includes up and down scroll arrow buttons and a scroll box to enable you to scroll through the buffer.
The scroll arrow buttons allow you to scroll up or down a line at a time or several
lines at a time when clicked, depending on the setting of the Burst Scroll option in
the Dialog Settings dialog box. Holding down the mouse button while a scroll arrow
is selected will enable continuous scrolling.
The scroll box allows you to quickly move through the buffer when it is dragged up or down the scroll bar by placing the pointer over it, holding down the left mouse button then moving the mouse.
Clicking the pointer in the scroll bar above or below the scroll box will cause the
previous or next block of data to be displayed. (A block is equal to the number of
lines and columns displayed in the window.)
The Soft Buttons
A set of soft buttons is displayed at the bottom of the TeemTalk window by default.
These can be programmed so that they perform various functions when clicked.
There are four soft button levels. Level 1 is displayed by default. Each level consists
of twelve programmable buttons, providing a combined total of 48 programmable
buttons. You can display all four levels at the same time if required. All levels are
accessible even if not all are displayed, levels stored off-screen can be 'scrolled' into
view by clicking the Level button. You can specify how many levels of soft buttons
are actually displayed by using an initialization file command or command line
option.
The soft buttons are programmed using the Soft Buttons dialog box, which is displayed by selecting Settings in the menu bar then Soft Buttons... Refer to the Setup Menus chapter for information on programming the buttons.
2-16
Page 31

Getting Started
The soft buttons can be removed from the display by unchecking the Visible check
box in the Soft Buttons dialog box.
The soft buttons can be detached as a separate window by deselecting the Attached
option in the Soft Buttons dialog box.
If you close the Soft Buttons window, you can display it again by selecting the Soft
Buttons option in the Settings menu, checking the Visible check box, then clicking
OK.
The current position and size of the Soft Buttons window can be saved so that it is
displayed the same way the next time TeemTalk is loaded. To do this, select the Save
Session As option in the File menu, make sure the Soft Buttons option is checked in
the resulting dialog box, then click OK.
By default, the buttons displayed on level 1 are predefined with functions supported
by the Tektronix 4105 or 4207 and 4111 terminals as follows:
GErase This will erase the contents of the graphics area and redraw all visible
segments.
DErase This will erase all the text contained in the dialog area buffer.
DVisib This will toggle the visibility of the dialog area on and off.
Cancel This will halt terminal activity by resetting bypass, Gin, marker, prompt,
snoopy, and vector modes.
Setup This will toggle the Tektronix form of setup called Primary Setup on and
off. An asterisk prompt indicates that you are in Primary Setup mode.
(Primary Setup can also be toggled on and off by pressing the keys Alt +
Z together.) Refer to the Primary Setup Mode section earlier in this
chapter for more details.
Zoom (Not supported by TeemTalk-05W.) This will activate the zoom/pan
feature. When the pointer is moved into the emulation workspace it will
change into the zoom cursor, which appears as a two-way arrow. Click
the left mouse button to select that location as the centre of the area to be
zoomed. Moving the cursor now will cause two rectangles to appear. The
larger one represents what will be the edge of the window. Clicking the
middle mouse button (or holding down the Shift key while clicking either
the left or right button on a two-button mouse) will cause the contents of
this rectangle to be redrawn to fill the window.
2-17
Page 32

Getting Started
If the left mouse button is clicked when the zoom cursor is displayed but
no zoom rectangles, an overview of the entire 4096x4096 display
memory will be displayed.
The zoom function can be exited without changing the window contents
by clicking the right mouse button.
After an increase or decrease in zoom, the view of the image prior to the
last redraw can be restored by clicking the RstView button. Up to four
views can be stored; clicking RstView repeatedly will recall these views
in sequence.
ViewUp (Not supported by TeemTalk-05W.) This will save the state of the current
view then make the next higher numbered view the current view.
ViewDn (Not supported by TeemTalk-05W.) This will save the state of the current
view then make the next lower numbered view the current view.
RstView (Not supported by TeemTalk-05W.) This will display the last four views
when clicked repeatedly.
DefView (Not supported by TeemTalk-05W.) This will display the default view.
Patterns This will display all the predefined fill patterns that can be selected by the
Tek Primary Setup FILLPATTERN command to fill polygons.
2-18
There are three types of fill pattern: solid, textured and dithered. A fill
pattern is selected by specifying the number of the pattern required after
the FILLPATTERN command in Primary Setup. Fill patterns are
numbered as follows:
Solid fill patterns are numbered 0 to -15, left to right.
Textured fill patterns are numbered 1 to 16, left to right.
Page 33

Getting Started
Dithered fill patterns are numbered 50 to 174, left to right, top to bottom,
as follows:
Row 1: 50 to 65 Row 5: 115 to 129
Row 2: 66 to 81 Row 6: 130 to 145
Row 3: 82 to 97 Row 7: 146 to 161
Row 4: 98 to 114 Row 8: 162 to 174
Print This will display a dialog box which enables you to produce a hardcopy
of data displayed on the screen in a specified format. Refer to the
description of the File menu Print Screen option in the Setup Menus
chapter for more information.
The Status Bar
The status bar consists of several fields and buttons which show the status of various
operations and enable you to switch between modes.
F1 B1 B2 F2 F3 F4 F5 F6
Field 1: This displays two LEDs. The first LED indicates whether or not you are
connected to the host. It will show red when not connected and green
when you are connected. The second LED indicates whether or not data
is being sent to or from the host. It will show dull green when there is no
activity, red when data is being sent to the host, and bright green when
data is being received from the host.
Button 1: This enables you to switch between Local and Online mode. The label
indicates the mode TeemTalk will switch to if the button is clicked.
Button 2: This enables you to Pause or Resume scrolling data in the window. The
label indicates the action that will be taken if the button is clicked.
Field 2: Indicates the current terminal emulation.
Field 3: This displays the line,column location of the text cursor.
Field 4: This indicates whether Overstrike Mode or Insert Mode is currently
selected. In Overstrike Mode (default), new characters will replace
already existing characters at the cursor position. When Insert Mode is
selected, new characters will be inserted at the cursor position without
deleting existing characters, which will move to the right.
2-19
Page 34

Getting Started
Field 5: Indicates the status of the printer as follows:
None signifies that the printer is not turned on or not connected, or not
installed in Microsoft Windows.
Not Ready signifies that the printer is not ready to receive data for
printing.
Ready signifies that the printer is ready to receive data for printing.
Auto signifies that the emulation is in Auto Print mode in which the
current cursor line is sent to the printer when a command for the cursor to
move to the next line is issued.
Controller signifies that the emulation is in Printer Controller mode in
which the host has direct control over the printer. Print screen commands
issued from the keyboard or mouse will be ignored.
Field 6: This is not used in the current version of TeemTalk.
The Window Border & Corners
The window border and corners can be selected and moved to resize the window. The
effect of resizing the window is determined by the Resize Font and Rows options in
the Dialog Settings dialog box.
When Resize Font is selected (default), resizing the window will cause TeemTalk to
search a list of known fonts and select the one that allows the same number of rows
and columns (80 or 132) to fill the new window size. The window will be adjusted to
display all the rows and columns.
When Resize Font is not selected, resizing the window will have no effect on the
font size and the number of displayed rows will be increased or decreased according
to the new window size.
To resize the window using the border:
Mouse: Place the pointer over the border at the edge or corner to be moved,
hold down the left mouse button and drag the mouse.
Keyboard: Press Alt + Spacebar to display the Control menu then S to select
Size. Press the relevant arrow key once to move the four-headed arrow
to the border edge and, if a corner, press the arrow key in the direction
of the corner. Pressing the arrow keys will now resize the window until
Return is pressed to display the new window size.
2-20
Page 35

Getting Started
The Emulation Workspace
The emulation workspace is the area which emulates the display of the terminal
specified in setup (the VT100 terminal by default) and where work is carried out with
an application. Refer to the section entitled Selecting The Terminal Emulation earlier
in this chapter for details on how to change the emulation.
In Tek mode, the emulation workspace effectively consists of two layers, one lying
on top of the other. One layer, referred to as the dialog area, is used to display
alphanumeric text. The other layer is used to display graphics and graphics text, and
is called the graphics area.
The dialog area is a 'window' into the dialog buffer which is used to store
alphanumeric text. The dialog area may fill the entire emulation workspace or consist
of only two lines. You can specify the size of the dialog buffer and the number of
lines actually displayed in the Dialog Settings dialog box, as described in the Setup
Menus chapter.
When the dialog area is disabled within Tek mode, all incoming alphanumeric text is
directed to the graphics area, providing an emulation of the Tektronix 4014 terminal
which does not support a separate dialog area. In any other terminal emulation mode,
the dialog area is always enabled (there is no separate graphics layer) and all
alphanumeric text is directed to it.
You can toggle the visibility of the dialog area on and off by clicking the DVisib soft
button in the Soft Buttons window. The contents of the dialog buffer can be erased
by clicking the DErase button, and you can erase the contents of the graphics area
and cause all visible segments to be redrawn by clicking the GErase button.
Default Font Sizes
The size of the font used by default when TeemTalk is loaded usually depends on
the type of display adaptor in your system. However, you can specify a different
default font size using the initialization file command defaultFontIndex=# or
-df# command line option, where # is the index of the font as defined in the following
table.
The size of the font for a particular index will vary depending on the terminal
emulation. Specifying an index outside the range for the emulation will cause the
highest valid index number for that emulation to be used. The font sizes are defined
in pixels.
2-21
Page 36

Getting Started
Font
Index
0
1
2
3
4
5
6
7
8
9
10
11
DEC VT Modes
80 Cols 132 Cols
24 x 12
19 x 10
18 x 9
17 x 8
16 x 8
15 x 8
14 x 7
13 x 6
12 x 5
10 x 5
8 x 5
7 x 5
24 x 7
19 x 6
18 x 5
17 x 4
16 x 4
15 x 4
14 x 4
13 x 3
12 x 3
10 x 3
8 x 3
7 x 3
Tek 4205 & 4207
80 Cols 132 Cols
23 x 12
21 x 11
19 x 10
17 x 9
15 x 8
13 x 7
12 x 7
12 x 6
11 x 6
9 x 5
7 x 4
6 x 3
23 x 7
21 x 6
19 x 6
17 x 5
15 x 4
13 x 4
12 x 4
12 x 3
11 x 3
9 x 3
7 x 2
6 x 2
Tek 4111
128 Cols
16 x 8
14 x 7
12 x 6
10 x 5
8 x 4
7 x 3
7 x 3
7 x 3
7 x 3
7 x 3
7 x 3
7 x 3
The Text Cursor
The text cursor is a flashing block or underline character which indicates the position
at which the next displayable character received from the host or entered by the
keyboard will be displayed. The type of text cursor displayed can be selected by the
Cursor Style option in the Dialog Settings dialog box. Refer to the Setup Menus
chapter for details.
The Selection Cursor
The selection cursor is a vertical bar which is displayed when the mouse pointer is
moved into the emulation workspace. It is controlled by the mouse and is used to
select text for editing.
To select text, position the selection cursor next to the first character position to be
selected, hold down the left mouse button then move the cursor to the end of the
selection. Moving the cursor above or below the boundary of the emulation
workspace while the left mouse button is held down will cause the display to scroll
enabling selection of text stored in display memory. The text will be highlighted
when selected. You can use the copy and paste commands in the Edit menu on
selected text as described in the Setup Menus chapter.
When the selection cursor is moved outside the emulation workspace, or when
menus or dialog boxes are displayed, it changes back to the mouse pointer, enabling
you to select window elements.
2-22
Page 37

Getting Started
The Gin Cursor
The Gin (Graphics Input) cursor is a small crosshair cursor which is used to make
selections and specify locations in the graphics area. The Gin cursor can be steered
using the mouse or cursor keys. You can change the size of the cursor by using the
following initialization file command or command line option, where size is a
numeric value in the range 1 to 4096 (i.e. world coordinates):
Initialization file command: CrosshairSize=size
Command line option: -xsize
2-23
Page 38

Getting Started
Notes
2-24
Page 39

Keyboard Configuration
3
Keyboard Configuration
This chapter describes how to configure TeemTalk for your particular
keyboard, remap key functions and compose special characters.
Introduction
TeemTalk maps the keyboard to be as near as possible to the terminal being emulated.
The illustrations on the following pages show how the 83/84 key AT, 101/102 key
Enhanced AT and DEC LK250/450 keyboard layouts are mapped in DEC VT100,
VT220, Edit and Tek modes. The mapping for other layouts can be displayed by
using the Show Map option in the Keyboard Macros dialog box as described later
in the Remapping The Keyboard section. You can remap the keyboard as required
and functions that may not be represented on the keyboard can be assigned to
specific keys.
TeemTalk for Windows 3.1x supports the Digital LK250 and LK450 keyboards, and
the KEA Systems PowerStation keyboard. If a driver for one of these is loaded,
TeemTalk scans the SYSTEM.INI file to see if the string "LK250", "LK450" or
"PowerStation" is present and maps the keyboard accordingly.
TeemTalk for Windows 95 or NT will interrogate the system registry to see if LK450
drivers are installed. If LK450 drivers are installed then the keyboard will be mapped
accordingly.
Note: When running TeemTalk with the LK250 or LK450
keyboard, it is imperative that the LED on the keyboard
labelled SPECIAL or DEC is not on. This can be toggled on
and off by pressing the keys Alt + F17 together.
3-1
Page 40

Keyboard Configuration
AT Keyboard Layout
DEC VT220 Mode Mapping
SCRL
LOCK
NUM
LOCK
ESC BREAK
PF1 PF2 PF3 PF4
F17
Shift
DO
Shift
DO F17
FIND PREV
_
789
Shift
Shift
F18 F19
F19
F18
HOME
,
456
Shift
F20
F20
SELECT NEXT
ENTER
123
Alt
INSERT
.
Normal With
0
Shift
+
Alt
Ctrl Ctrl
3-2
Shift
Shift
F6 F7
F7
F6
Shift
Shift
F8 F9
F9
F8
Shift
Shift
F10 F11
F11
F10
Shift
Shift
F12 F13
F13
F12
Shift
HELP
F14
Shift
F14 HELP
Shift
With
Normal With
The cursor keys will function without
when Num Lock is OFF.
All unmarked keys function as indicated
by the legends on the keycaps.
Page 41

Keyboard Configuration
AT Keyboard Layout
Tek, VT100 & Edit Mode Mapping
F3 F4
F1 F2
F1 F2
All unmarked keys function as indicated by the legends on the keycaps.
F3 F4
3-3
Page 42

Keyboard Configuration
Enhanced AT Keyboard Layout
DEC VT220 Mode Mapping
,
_
PF3 PF4PF2
ENTER
.
.
F20
BREAK
F19
SCRLK
F18
PF1
NUMLK
RE-
MOVE
HERE
INSERT
FIND
4
EURO
HOME
PREV-
789
NEXT
IOUS
SELECT
123
456
(SCRL)
0
(SCRL) (SCRL) (SCRL)
Control
All unmarked keys function as indicated by the legends on the keycaps.
Bracketed functions are generated when used in conjunction with
PF1
NUMLK
3-4
F6 F8 F9F7 F10 F12 F13F11 F14 DO F17HELP
key usage:
Alt
Normal key usage:
Page 43

Keyboard Configuration
Enhanced AT Keyboard Layout
Tek, VT100 & Edit Mode Mapping
,
-
ENTER
.
✳
BREAK
✳
SCRLK
✳
✳
ESC
LINE
FEED
BACK
SPACE
F1 F2 F3 F4
Except Tek Mode
RE-
INSERT
EURO
F1 F2 F3 F4
MOVE
HERE
FIND
4
789
NEXT
IOUS
PREV-
SELECT
456
0
123
in Tek Mode
In conjunction with
Control
have no function.
✳
Keys marked
All unmarked keys function as indicated by the legends on the keycaps.
✳
BREAK
key usage:
Normal key usage:
Alt
3-5
Page 44

Keyboard Configuration
DEC LK250/450 Keyboard Layout
HOLD
DEC VT220 Mode Mapping
,
_
F19
ENTER
.
.
F6 F8 F9F7 F10 F12 F13F11 F14 DOHELP F18 F20F17
RE-
INSERT
EURO
PF1 PF3 PF4PF2
MOVE
HERE
FIND
4
7 98
NEXT
IOUS
PREV-
SELECT
4 65
(SCRL)
1 32
(SCRL) (SCRL) (SCRL)
0
Control
All unmarked keys function as indicated by the legends on the keycaps.
Bracketed functions are generated when used in conjunction with
F19
HOLD
3-6
key usage:
Alt
Normal key usage:
Page 45

Keyboard Configuration
DEC LK250/450 Keyboard Layout
Tek, VT100 & Edit Mode Mapping
,
RE-
INSERT
F1 F3 F4F2
MOVE
HERE
FIND
_
7 98
NEXT
IOUS
PREV-
SELECT
ENTER
.
1 32
0
in Tek Mode
conjunction with
Cursor keys used in
Control
4 65
✳
BREAK
✳
SCRLK
✳
✳
ESC
LINE
FEED
BACK
SPACE
Except Tek Mode
F1 F2 F3 F4
have no function.
✳
Keys marked
All unmarked keys function as indicated by the legends on the keycaps.
4
EURO
✳
BREAK
key usage:
Alt
Normal key usage:
3-7
Page 46

Keyboard Configuration
DEC LK250 Keyboard Drivers
TeemTalk for Windows 3.1x does not supply its own drivers for the LK250 keyboard,
it relies on using the drivers supplied by Digital on the Pathworks PCSA distribution
disk. If Pathworks has not been installed with the LK250 option then the following
modifications should be made to the SYSTEM.INI file in the WINDOWS directory
on the basis that the drivers and associated files are available:
SYSTEM.INI:[boot]
keyboard.drv=lk250.drv
[keyboard]
subtype=50
type=k
oemansi.bin=xlat437.bin
keyboard.dll=decuk250.dll
[boot.description]
keyboard.typ=Digital LK250 Keyboard
keyboard=vkd250.386
The following files must exist in the WINDOWS\SYSTEM directory :-
lk250.drv
xlat437.bin
vkd250.386
decus250.dll (US LK250 Keyboard Driver)
decuk250.dll (UK LK250 Keyboard Driver)
decda250.dll (Danish LK250 Keyboard Driver)
decfi250.dll (Finnish LK250 Keyboard Driver)
decfr250.dll (French LK250 Keyboard Driver)
decge250.dll (German LK250 Keyboard Driver)
decit250.dll (Italian LK250 Keyboard Driver)
decno250.dll (Norwegian LK250 Keyboard Driver)
decsf250.dll (Swiss/French LK250 Keyboard Driver)
decsg250.dll (Swiss/German LK250 Keyboard Driver)
decsp250.dll (Spanish LK250 Keyboard Driver)
decsw250.dll (Swedish LK250 Keyboard Driver)
decce250.dll (Canadian LK250 Keyboard Driver)
deccf250.dll (Canadian/French LK250 Keyboard Driver)
If the keyboard drivers and files have not been installed correctly the following will
be observed:
1) Displaying the Keyboard Macros dialog box will result in an incorrect keyboard
display window. The dialog box should show the LK250 layout and be titled
“Digital LK250 Keyboard”.
3-8
Page 47

Keyboard Configuration
2) Although the alphanumeric area of the keyboard may appear to function, the
keypad, function keys and centre key cluster will not operate correctly, giving
unpredictable results.
Note: The LK250 keyboard for the PC is designed to operate in 2
modes. Mode 1 emulates an AT keyboard, and Mode 2
emulates a VT320 keyboard. The keyboard is switched
between Mode 1 and Mode 2 using Alt + F17. Mode 1 is
indicated as being active by the ‘SPECIAL’ LED on the top
right hand side of the keyboard. TeemTalk requires the
keyboard to be in Mode 2 (VT320). Mode 1 disables certain
function keys.
Keyboard Nationality
When running TeemTalk for Windows 3.1x, the factory default keyboard nationality
is determined by the Keyboard Layout setting in the International dialog box within
the Microsoft Windows Control Panel. You can specify a different nationality while
TeemTalk is running and save it so that it is reassserted each time TeemTalk is loaded
or reset. When you exit TeemTalk the keyboard nationality will revert back to that
specified in the International dialog box.
When running TeemTalk for Windows 95 or NT, the factory default keyboard
nationality is determined by the system locale setting. You can specify a different
nationality while TeemTalk is running and save it so that it is reassserted each time
TeemTalk is loaded or reset. When you exit TeemTalk the keyboard nationality will
revert back to that specified in the locale.
To change the current nationality, display the Terminal Settings dialog box by
selecting Settings in the menu bar then Terminal...
The Keyboard Language option enables you to specify the nationality of the
keyboard being used. It is important that this is correct otherwise the characters
displayed may not match the key legends. Select the nationality required in this list
box then click the OK button to action the change and close the dialog box. If you
want to save the setting, display the File menu and select Save Session.
Cursor Keys
The cursor (arrow) keys on some keyboards will only function when the Alt key is
held down. This applies to IBM PC or any keyboards which do not have a separate
cluster of four cursor keys.
3-9
Page 48

Keyboard Configuration
To enable the cursor keys permanently so that the Alt key does not have to be held
down when you want to use them, press the keys Alt + Num Lock together so that
the Num Lock indicator is not lit. To make the cursor keys generate their numeric
values again, press Alt + Num Lock. The Num Lock indicator should be lit.
Remapping The Keyboard
The Keyboard Macros dialog box enables you to redefine the function of most of the keys on your keyboard and shows the mapping of the keyboard for the current terminal emulation mode. This dialog box is displayed by selecting Keyboard Macros in the Settings menu.
Two keyboard layouts are displayed. The upper layout corresponds to the keyboard
you are using, which will be one of the following: 101 key, 102 key, 84 key, Digital's
LK250 or LK450, or KEA Systems' PowerStation, depending on the type specified
within Microsoft Windows Setup for your PC.
Note: When an LK250, LK450 or PowerStation keyboard driver is
loaded, the SYSTEM.INI file is scanned by TeemTalk to see
if the string "LK250", "LK450" or "PowerStation" is
present and maps the keyboard accordingly.
The lower layout represents the keyboard associated with the terminal currently
being emulated, as specified in the Emulation Settings dialog box.
3-10
Page 49

Keyboard Configuration
You can show how TeemTalk has mapped your keyboard within the current terminal
emulation mode by setting the Keyboard Action option (between the two layouts) to
Show Map, then moving the pointer over a key in the lower layout and holding down
the left mouse button. The key or combination of keys which emulate the function of
the key you are currently pressing will be displayed in the upper layout as if pressed
in.
Note: Control key functions are not shown.
TeemTalk provides two quick and easy ways of changing the default keyboard
mapping to suit your requirements.
Remapping Normal Key Functions
The following method is suitable when the function to be remapped does not require
a combination of keys to be pressed to action it. For example, you can make the F1
key on your keyboard emulate the Insert key of the terminal keyboard being
emulated, but you cannot specify that pressing the keys Alt + F1 together will
perform the Insert key function.
First, set the Keyboard Action option to Map Key, click the key in the lower layout
showing the legend of the function required, then click the key in the upper layout
which you want to assign that function to.
Note that you will now have two keys which emulate the same function, the default
mapping and the mapping you have just specified. You can either leave them this
way or assign a new function to the key which was mapped by default.
Remapping Key Combination Functions
The following method is suitable for both normal key functions and key combination
functions. For example, you can map the Insert key function to the F1 key on your
keyboard, and you can make the keys Alt + F1 emulate the Help key when pressed
together.
First, click the key in the upper layout (representing your keyboard) to which you
want to assign a function. The Define Key Macro dialog box will be displayed, as
shown below. This example shows how the F1 key is mapped by default.
3-11
Page 50

Keyboard Configuration
The Predefined Macros option at the bottom of this dialog box enables you to select
from a list of standard functions associated with the current terminal emulation.
Clicking the arrow button will display a list box in which the names of valid key
functions (called virtual key names) are shown.
Note: The Virtual Key Names appendix lists all the functions and
associated virtual key names for each terminal emulation.
Before making a selection from this list box, click the pointer in the text box next to
the key combination that will be required to perform the function, that is, Normal
(key pressed on its own), Shift (key shifted) etc. For example, to assign the Help key
function to the key combination Alt + F1, click the pointer in the text box next to Alt,
display the Predefined Macros list box and scroll through the selection until
VT_HELP is displayed, click the pointer on it then click the Apply button. The
current function of the Alt + F1 key combination will be replaced with the Help
function, indicated in the text box by <VT_HELP>. If you want the mapping of this
key to be saved when you perform a Save Session, make sure the Non-Volatile box
is checked. Click the OK button to activate the change and close the dialog box. Note
that you will now have two keys which emulate the same function, the default
mapping and the mapping you have just specified. You can either leave them this
way or assign a new function to the key which was mapped by default.
When you have finished remapping the keyboard, click the OK button in the
Keyboard Macros dialog box to close it and cause TeemTalk to assert the changes.
You can save the new keyboard mapping so that TeemTalk will reassert it each time it
is loaded or reset by displaying the Save Session As dialog box, selecting the
Keyboard Macros option, then clicking the OK button.
Programming A Key
Most of the keys on the keyboard may be programmed with up to five definitions
each. Keys that cannot be redefined include Shift, Caps Lock, Alt, Alt Gr and Print
Screen. Both Ctrl keys can be redefined.
To program a key, click the key in the upper layout (which represents your
keyboard). The Define Key Macro dialog box will be displayed. This dialog box
shows the current definitions of all the following combinations for the selected key:
Key
Shift + Key
Control + Key
Control + Shift + Key
Alt + Key
Each key combination may contain a string of up to 127 characters. The combined
total of all the characters that may be programmed into keys is determined by the 127
character limit per definition and the amount of memory available in your PC.
3-12
Page 51

Keyboard Configuration
All keyboard macros can be saved so that TeemTalk will reassert them each time it is
loaded or reset by displaying the Save Session As dialog box from the File menu,
selecting the Keyboard Macros option, then clicking the OK button.
Entering Control Characters
You can enter a control character either as the control key character equivalent or the
decimal value of the ASCII character. For example, the control character for the
Return key function, CR (carriage return), can be entered by typing the characters ^
and M, representing the keys Ctrl + M which, when pressed together would
generate the CR code.
Decimal values are entered as three-digit numbers immediately preceded by an
underscore character. Values with only two digits must be preceded by a zero. For
example, the decimal value of CR is 13, so this would be entered as _013.
Refer to the ASCII character table in the Character Sets appendix for code and
decimal references.
Key Combinations & Sequences
You can program a key to perform the function of a combination or sequence of
keys. For example, you can cause the F1 key to perform the same function as
pressing the keys Alt + F4 together, or pressing the keys F2 then F3 then F4.
Keys are identified by their virtual key names as listed in the Virtual Key Names
appendix. The virtual key name has to be enclosed by the < and > characters in the
key definition text box. You may omit the VK_ and VT_ (etc.) parts of the virtual
key name.
To program a key so that it performs the same function as pressing two or more other
keys together, type the < character followed by the virtual key names linked together
with + (plus sign) characters and ending with the > character.
For example, to program the F1 key so that when it is pressed it performs the same
function as pressing the keys Alt + F4 together, enter the following characters in the
relevant text box:
<ALT+F4>
To program a key so that it performs the same function as pressing a sequence of
keys one after the other, enter each virtual key name in the order required, enclosing
each virtual key name with the < and > characters. Each enclosed virtual key name
must immediately follow the previous enclosed virtual key name with no spaces.
3-13
Page 52

Keyboard Configuration
For example, to program the A key so that when it is pressed it performs the same
function as pressing the keys F2 then F3 then F4 enter the following characters in the
relevant text box:
<F2><F3><F4>
Entering Command Lines
You can enter a command line in a key definition by enclosing it within the ( and )
characters. This enables you to launch an application by just pressing a key. For
example, to program the F1 key so that another instance of TeemTalk-07W is run
when the key is pressed, you would enter the following in the relevant text box:
(C:\TEEMTALK\TT07W.EXE)
Changing The Window Focus
You can program a key to change the currently selected window or icon (that is the
window or icon to which keyboard and mouse commands will be directed) by
entering its window class name as a string enclosed by the < and > characters. For
example, to program the F4 key so that the TeemTalk-07W window is selected when
the key is pressed, you would enter the following in the relevant text box:
<"tt07w">
(tt07w is the window class name for TeemTalk-07W.)
Initiating A Script File
You can program a key to run a script file when pressed by enclosing the name of the
file and any arguments within the <' (left angle bracket and single quote) and '>
(single quote and right angle bracket) characters.
For example, to program a key so that it will run the script file myscript.scr and
assign the values value1 and value2 to two variables, you would enter the following:
<'myscript.scr(value1,value2)'>
Refer to the chapter entitled Creating A Script File for more information on initiating
script files.
Action Locally Or Transmit To Host
A key definition may be actioned locally or transmitted to the host when the key is
pressed. This is determined by the setting of the Local check box next to the
definition. When the check box is unchecked the definition will be transmitted to the
host.
3-14
Page 53

Keyboard Configuration
Default Key Definitions
The default definition of a specific key may be reasserted by clicking the Default
button in the Define Key Macro dialog box for that key. The default definition of the
entire keyboard may be reasserted by clicking the Default button in the Keyboard
Macros dialog box.
Euro Sign
TeemTalk enables you to generate the euro sign from the keyboard by pressing the keys Alt + 4 by default. TeemTalk also provides a cross-mapping mechanism to allow any unused character symbols or string to be cross-mapped to display the euro. This means, for instance, that a host application needing to display the euro could be adjusted to send an unused character or character string, which TeemTalk would convert to the euro symbol. Keyboard mapping is also configurable to allow the input to the application to be similarly cross-mapped. The cross-mapping configuration is specified in the Euro Currency Symbol dialog box which is displayed by clicking the Euro Sign button in the Define Key Macro dialog box.
TeemTalk also provides the ability to print the euro symbol on printers that are euro
compliant, or to send a set of sequences that approximate to that symbol on non-euro
compliant printers. Similarly, data can be copied to or pasted from other Microsoft
Windows desktop applications that are also euro compliant.
3-15
Page 54

Keyboard Configuration
Compose Character Sequences
Compose character sequences can be used to generate codes for characters not shown
on your keyboard when you are in VT220 mode.
The characters that can be composed depend on the setting of the Multinational
option in the Emulation Settings dialog box. When this option is not selected only
characters found in the character set that corresponds to the selected keyboard
nationality can be composed. When Multinational is selected (default), characters
from all national keyboard layouts may be composed.
If a character is a diacritical symbol (e.g. ´ or ¨) and this symbol does not appear on
the keyboard, an equivalent character can be used in some cases. The diacritical
symbols and the possible substitutes are shown below. There are no equivalents for
the circumflex accent and tilde mark.
Diacritical Mark Equivalent Character
´ Acute accent ' Apostrophe
¨ Umlaut " Double quote
` Grave accent ' Single quote
° Ring mark * Asterisk or degree sign
To compose a character, first find the character you wish to compose in the left hand
column of the following tables. The two characters shown in the right hand column
are the keys that are used to create it. Several alternatives may be given for
generating the same character. A compose sequence is initiated by pressing the keys
Alt + I together, followed by the key bearing the first character then the key bearing
the second character.
Note: The compose character sequence can also be initiated by
pressing a key defined with the COMPOSE virtual key
name.
A compose character sequence may be abandoned before completion by pressing the
Delete key. Pressing Alt + I (or the key defined with the COMPOSE virtual key
name) again before completing a compose character sequence will cause it to be
abandoned and a second sequence to be started. An invalid compose character
sequence will cause the bell to sound.
The following tables use several conventions:
The keys bearing the characters used to compose a special character may be
pressed in any order unless (in order) is specified.
If a nationality is specified with the character description, for example
(Dutch), then the character can only be composed when the Multinational
option in the Emulation Settings dialog box is not selected.
3-16
Page 55

Keyboard Configuration
COMPOSE CHARACTER SEQUENCES
"
#
'
@
[
\
]
^
`
{
|
}
~
¡
¢
£
¥
§
¤
C
quotation mark
number sign
apostrophe
commercial at
a a
opening bracket
back slash
closing bracket
circumflex
accent
grave accent
opening brace
vertical line
closing brace
tilde
inverted !
cent sign
pound sign
yen sign
section
sign
National includes
currency sign
copyright sign
s o
S !
(National & Multinational)
¨ space
+ +
' space
a a or A A
(Multinational)
or
A A or a A
(National)
( (
or
/ <
/ /
) )
^ space
` space
( -
/ ^
) -
~ space
! !
c / or C /
or
C |
c |
l -
or
L -
or
L =
l =
y -
or
Y -
or
y =
or
S O or s !
or
s 0 or S 0
s O or S o
x o or X O
or
x 0
c o
or
or
c 0
Y =
X 0
C O
C 0
ª
«
°
±
2
3
µ
¶
·
1
º
»
1
/
4
1
/
2
3
/
4
fl
ij
¿
À
Á
Â
Ã
feminine ordinal
indicator
double open
angle brackets
degree sign
plus or
minus sign
superscript 2
superscript 3
micro sign
paragraph sign
centred period
superscript 1
masculine
ordinal indicator
double closed
angle brackets
fraction
one quarter
fraction
one half
fraction threequarters (Dutch)
Florin (Dutch)
i j sign (Dutch)
inverted ?
A grave
A acute
A circumflex
A tilde
a -
< <
0 ^
space
°
+ -
2 ^
3 ^
/ u or / U
(in order)
p !
. ^
1 ^
o _
> >
1 4
(in order)
1 2
(in order)
3 4
(in order)
f l
(in order)
i j
(in order)
? ?
A `
A '
A ^
A ~
or
A _
(Multinational)
(National)
or
P !
or
O _
3-17
Page 56

Keyboard Configuration
COMPOSE CHARACTER SEQUENCES (continued)
Ä
Å
Æ
Ç
È
É
Ê
Ë
Ì
Í
Î
Ï
Ñ
Ò
Ó
A umlaut
A ring
A E diphthong
C cedilla
E grave
E acute
E circumflex
E umlaut
I grave
I acute
I circumflex
I umlaut
N tilde
O grave
O acute
A " or ¨ A
A * or A
(degree sign)
A E
(in order)
/ u or / U
(in order)
E `
E '
E ^
or
¨ E
E "
I `
I '
I ^
I "
or
¨ I
N ~
O `
O '
U circumflex
Û
°
Ü
Ÿ
ß
à
á
â
ã
ä
å
æ
ç
è
é
ê
U umlaut
Y umlaut
(DEC Multinat.)
German small
sharp s
a grave
a acute
a circumflex
a tilde
a umlaut
a ring
a e diphthong
c cedilla
e grave
e acute
e circumflex
U ^
or
¨ U
U "
or
¨ Y
Y "
s s
a `
a '
a ^
a ~
or
¨ a
a "
a * or a
(degree sign)
a e
(in order)
c ,
(comma)
e `
e '
e ^
°
3-18
Ô
Õ
Ö
Œ
Ø
Ù
Ú
O circumflex
O tilde
O umlaut
O E diphthong
(DEC Multinat.)
O slash
U grave
U acute
O ^
O ~
or
O "
O E
(in order)
O /
U `
U '
¨ O
ë
ì
í
î
ï
ñ
ò
e umlaut
i grave
i acute
i circumflex
i umlaut
n tilde
o grave
e "
i `
i '
i ^
i "
n ~
o `
or
¨ e
or
¨ i
Page 57

Keyboard Configuration
COMPOSE CHARACTER SEQUENCES (continued)
ó
ô
õ
ö
œ
ø
o acute
o circumflex
o tilde
o umlaut
o e diphthong
(DEC Multinat.)
o slash
o '
o ^
o ~
or
o "
o e
(in order)
o /
¨ o
ù
ú
û
ü
ÿ
u grave
u acute
u circumflex
u umlaut
y umlaut
u `
u '
u ^
u "
y "
or
or
¨ u
¨ y
3-19
Page 58

Keyboard Configuration
Notes
3-20
Page 59

Mouse Functions
4
Mouse Functions
This chapter describes the special functions assigned to the mouse
buttons by TeemTalk and how to redefine the buttons.
Introduction
TeemTalk assigns a variety of special functions to the mouse buttons. Each button can
be used to action up to six functions when pressed in conjunction with modifier keys.
The following table lists the functions assigned to each button and key combination
by default.
Right Button
Edit Copy
Edit Paste
Show Hotspots
Unassigned
Send Keyword
Unassigned
Normal
Shift
Control
Control + Shift
Alt
Double Click
Left Button
Select
Extend Selection
Action Hotspot
Select Rectangle
Send CR
Select Word
Redefining The Mouse Buttons
TeemTalk enables you to redefine the functions assigned to the mouse buttons via the
Mouse Button Actions dialog box (shown overleaf), which is displayed from the
Settings menu. This enables you to specify the function of the left and right mouse
buttons when they are pressed on their own or in conjunction with modifier keys.
You can assign up to six functions to each button. Clicking one of the arrow buttons
will display a drop-down list box which lists all the standard functions that can be
assigned.
4-1
Page 60

Mouse Functions
The following functions can be assigned:
Unassigned Send CR
Select Send Keyword
Extend Selection Middle Button
Edit Copy Select Rectangle
Edit Paste Select Word
Show Hotspots Select and Copy
Action Hotspot Cursor Select
Move Cursor
You can also enter a definition of your own in the text box associated with each
button and key combination. Definitions are entered in the same way as for keyboard
macros and soft buttons, as described in the Setup Menus chapter.
The setting of the Highlight When Actioned option determines whether or not a
visual indication is given that a function has been actioned when a hotspot is clicked.
The Edit... button becomes active when you select the Show Hotspots or Action
Hotspot setting. Clicking the Edit... button will open a text editor window in which
the contents of the current hotspot definition file will be displayed. This enables you
to make changes without having to leave TeemTalk. The text editor used by default is
notepad.exe. You can specify a different text editor by modifying the Editor= line in
the TeemTalk private profile file.
4-2
Page 61

Mouse Functions
Selecting & Copying Text
You can use the mouse buttons to copy and paste text. The region of the display that
will be selected for copying depends on whether you use the Select, Select
Rectangle, Select and Copy or Select Word function.
The Select function will select all text from the start position to the finish position,
working left to right across the entire width of the display, whereas the Select
Rectangle function will only select text contained within the rectangular area defined
by the start position (top left corner) and the finish position (bottom right corner). The
Select and Copy function is the same as Select but will also copy the selected data to
the Clipboard automatically. The Select Word function will cause the word under the
mouse cursor to be selected.
The default method for selecting and copying text is as follows. Place the cursor at
the start of the text to be copied, hold down the Left mouse button then drag the
cursor across to the end of the required text and release the mouse button. To extend
the selection, hold down the Shift key and click the Left mouse button at the new
position. Click the Right mouse button to copy the selected text to the clipboard.
Text copied to the clipboard may be pasted at the current cursor position by holding
down the Shift key and clicking the Right mouse button.
Disabling The Copy & Paste Functions
In some cases it may be necessary to disable the copy and paste function of the
mouse buttons to prevent accidental editing. This can be achieved using the
following initialization file commands or command line options:
Initialization file: mouseEdit=off or mouseEdit=disabled
Command line: -me0 allows highlighting but no copy or paste
-me1 all editing functions enabled
-me2 all editing functions disabled
When the mouse editing functions are disabled, use the Edit menu options or the
following keyboard commands to copy and paste instead:
Copy: Shift + Delete (i.e. Numeric keypad . key)
Paste: Shift + Insert (i.e. Numeric keypad 0 key)
4-3
Page 62

Mouse Functions
2-Button Mouse Emulating 3-Button
You can assign the function of the middle button found on a three button mouse to
any button or button and key combination. The Mouse Button Actions dialog box
includes a Middle Button setting for this purpose.
Show & Action Hotspots
TeemTalk incorporates a user-definable hotspot facility which enables you to invoke a
function by clicking the mouse cursor over a keyword displayed on the screen. For
example, an application may display information relating to keys you can press to
perform a particular function. Instead of pressing the key on the keyboard, you could
invoke the function by moving the mouse cursor over the displayed key name,
holding down the Control key and clicking the Left mouse button (assuming default
mouse configuration).
Hotspots are supported in ALL terminal emulation modes. TeemTalk provides a set of default hotspot keywords for each mode. These relate to key functions specific to the emulation. For example, in VT200 mode you can click on the word Help displayed on the screen and TeemTalk will execute the function associated with the Help key. Refer to the Hotspots chapter for details.
You can identify hotspots that are currently present in display memory by holding
down the Control key and the Right mouse button. All colour attributes will be
temporarily removed from the display and the hotspots will be highlighted with a red
background. Releasing the keys will return the display to its original state.
Send Keyword
The Send Keyword function enables you to click on any delimited word displayed on the screen and it will be sent to the host, as long as the word is not already defined as a hotspot. Keyword delimiters are the same as for hotspots by default, that is: space, NULL, / , : = ( ) [ and ].
Moving The Cursor In Block Mode
When TeemTalk is in any of the local block modes you can use the Move Cursor function to quickly move the text cursor. Move the mouse cursor to the required position then click the mouse button (with modifier key(s) held down) assigned with the Move Cursor function. The text cursor will then jump to that position.
4-4
Page 63

The Toolbar
The Toolbar
This chapter describes how to use and redefine the toolbar and associated floating button palette.
Using The Toolbar
The toolbar and associated floating button palette provide a quick way of actioning
commands or displaying setup dialog boxes by just clicking a button. TeemTalk
displays a toolbar below the menu bar by default.
5
The toolbar contains a series of buttons with graphical representations of their
functions. These buttons are predefined with functions found in the setup menus and
are described in the next section. You can redefine all the buttons and add or remove
buttons from the toolbar via the Button Tools dialog box which is described later.
The toolbar can be pulled away from the menu bar and floated on the display by
positioning the mouse pointer anywhere in the toolbar except on a button, holding
down the left mouse button then dragging the pointer down until the toolbar outline
changes shape. Releasing the mouse button will display the floating button palette.
5-1
Page 64

The Toolbar
The floating button palette contains the same buttons as the toolbar. You can move and
resize the palette in the same way as any other window. To convert the floating button
palette back into the toolbar, click the control menu box at the top left corner of the
palette window and select Attach. If you click the shutdown button on the floating
button palette, you can restore display of the tool buttons by selecting the Button
Tools option in the Settings menu and checking the Visible option in the dialog box.
The Predefined Button Tools
The toolbar displayed by default contains a series of buttons defined with functions
found in the setup menus. These functions are listed below and described in the Setup
Menus chapter.
Displays the New Connection dialog box for making a serial
or network host connection.
Displays the Open Session dialog box. This enables you to
load a particular setup configuration.
Displays the Save Session As dialog box. This enables you to
specify how the current session configuration is to be saved.
5-2
Copies selected data to the clipboard.
Pastes clipboard data at the current cursor position.
Displays the Initiate File Transfer dialog box for transferring
files using the Kermit, XMODEM, XMODEM-1K, YMODEM
Batch, ZMODEM, ASCII, or ICL FTF protocols. Refer to the
File Transfer chapter for details.
Displays the Run Script dialog box for specifying the name of
a script file to execute.
Displays the Printer Setup dialog box. This enables you to
select any printer that is configured in Microsoft Windows.
Page 65

The Toolbar
Displays the Print Screen dialog box for producing a hardcopy
of screen data in a particular format.
Displays the Attributes dialog box. This enables you to specify
the colours used in the dialog area and how text with attributes is
displayed.
Displays the Keyboard Macros dialog box. This shows the
mapping of your keyboard and enables you to redefine the
function of keys.
Displays the Soft Buttons dialog box for redefining the buttons
at the bottom of the TeemTalk window.
Displays the Mouse Button Actions dialog box for assigning
up to six functions to each mouse button.
Increases the size of the window to the next font size up while
retaining the same number of rows and columns.
Decreases the size of the window to the next font size down
while retaining the same number of rows and columns.
Displays the Button Tools dialog box for redefining the
toolbar.
Closes the current session.
Resets the current terminal emulation mode.
Erases the contents of the window and the scroll buffer.
Displays the Help contents dialog box.
Erases the contents of the graphics area and redraws all visible
segments.
5-3
Page 66

The Toolbar
Erases the contents of the dialog area and buffer.
Toggles dialog area visibility on and off.
Activates the zoom/pan feature (except TeemTalk-05W and
TeemTalk-05W32).
5-4
Page 67

The Toolbar
Redefining The Toolbar
Clicking the last button in the default toolbar, or selecting Button Tools from the
Settings menu will display a dialog box which enables you to redefine the toolbar.
Up to 64 button tools can be defined, all of which can be displayed in the floating
button palette but only one row of buttons can be displayed in the toolbar. The
maximum number of buttons that can be displayed in the toolbar depends on the
display resolution and the size of the window.
A button tool is defined in two stages. The first stage is to specify the button bitmap
for display in the toolbar and the second stage is to assign a function to it.
Adding Button Bitmaps
Clicking the arrow button in the Current Tool box will display a list box showing all
the button bitmapss in the order displayed in the toolbar, together with their
functions. The Current Tool will be highlighted in this list. When you add a new
button to the toolbar it is positioned to the left of the button currently selected in this
list. Select the current tool then close the list box by clicking the arrow button again.
To add a new button, select a button bitmap from the Buttons list box then click the
Insert at Current button. Note that the function of this new button will be the same
as that of the previously selected button tool until you redefine it. You can insert a
space before the current button tool as it is displayed in the toolbar by selecting
[Space] in the Commands list box then clicking the Insert at Current button.
5-5
Page 68

The Toolbar
You are not restricted to the set of predefined button bitmaps displayed in the Buttons
list box. You can add your own customised buttons to the bottom of the list by
clicking the Add Custom... button. This will display the Load Custom Bitmap
dialog box which enables you to select a bitmap file from which a button will be
automatically generated.
Specify the name of the bitmap file to use then click the OK button. The dialog box
will close and you will see the new button bitmap highlighted at the bottom of the
Buttons list box.
If you want to delete a custom button from the Buttons list box, select the button
bitmap then click the Delete Custom button. DO NOT click the Delete Current
button as this will remove the currently selected button tool from the toolbar. Note
that you cannot delete the predefined button bitmaps displayed by default.
Assigning Functions To Buttons
You can assign a variety of functions to the buttons. You can either enter a definition
of your own or you can select a menu command from the Commands list box.
The buttons displayed in the toolbar by default are defined with some of the functions
listed in the setup menus. These enable you to quickly action a command or display a
setup dialog box without having to display the menu first. The Commands list box
displays all the menu items that can be assigned to the buttons.
To assign a function to a button, make sure that the button bitmap required is
displayed in the Current Tool box, enter the new definition in the associated text
box or select a menu command from the Commands list box, then click the Change
Current button to action the change. The toolbar will not be updated until you click
the OK button to close the dialog box.
Entering Control Characters
You can enter a control character in a button tool definition either as the control key
character equivalent or the decimal value of the ASCII character. For example, the
control character for the Return key function, CR (carriage return), can be entered
by typing the characters ^ and M, representing the keys Ctrl + M which, when
pressed together would generate the CR code.
Decimal values are entered as three-digit numbers immediately preceded by an
underscore character. Values with only two digits must be preceded by a zero. For
example, the decimal value of CR is 13, so this would be entered as _013. Refer to
the Character Sets appendix for code and decimal references.
5-6
Page 69

The Toolbar
Key Combinations & Sequences
You can program a button tool to perform the function of a combination or sequence
of keys. For example, you can cause a button to perform the same function as
pressing the keys Alt + F4 together, or pressing the keys F2 then F3 then F4.
Keys are identified by their virtual key names as listed in the Virtual Key Names
appendix. The name has to be enclosed by the < and > characters in the Current
Tool text box. You may omit the VK_, VT_ parts (etc.) of the virtual key name.
To program a button so that it performs the same function as pressing two or more
other keys together, type the < character followed by the virtual key names linked
together with + characters and ending with the > character. For example, to program
a button so that when it is clicked it performs the same function as pressing the keys
Alt + F4 together, enter the following characters in the Current Tool text box:
<ALT+F4>
To program a button so that it performs the same function as pressing a sequence of
keys one after the other, enter each virtual key name in the order required, enclosing
each virtual key name with the < and > characters. Each enclosed virtual key name
must immediately follow the previous enclosed virtual key name with no spaces. For
example, to program a button so that when it is clicked it performs the same function
as pressing the keys F2 then F3 then F4 enter the following characters in the
Current Tool text box:
<F2><F3><F4>
Entering Command Lines
You can enter a command line in a button definition by enclosing it within the ( and )
characters. This enables you to launch an application by just clicking a button. For
example, to program a button so that another instance of TeemTalk-07W is run when
the button is clicked, you would enter the following in the Current Tool text box:
(C:\TEEMTALK\TT07W.EXE)
Changing The Window Focus
You can program a button to change the currently selected window or icon (that is the
window or icon to which keyboard and mouse commands will be directed) by entering
its window class name as a string enclosed by the < and > characters. For example, to
program a button so that the TeemTalk-07W window is selected when it is clicked,
you would enter the following in the Current Tool text box:
<"tt07w"> (tt07w is the window class name for TeemTalk-07W.)
5-7
Page 70

The Toolbar
Initiating A Script File
You can program a button to run a script file when pressed by enclosing the name of
the file and any arguments within the <' (left angle bracket and single quote) and '>
(single quote and right angle bracket) characters. For example, to program a button
so that it will run the script file myscript.scr and assign the values value1 and
value2 to two variables, you would enter the following:
<'myscript.scr(value1,value2)'>
Refer to the chapter Creating A Script File for more information.
Removing Button Tools
You can remove individual button tools from the toolbar or you can remove the entire
toolbar and floating button palette from the display.
A button tool is removed by selecting it in the Current Tool list box then clicking
the Delete Current button. To remove the toolbar and floating button palette from
the display, deselect the Visible check box.
Saving The Button Tools
When you have finished defining button tools you can save them so that they will be
reasserted when TeemTalk is loaded or reset by selecting Save Session in the File
menu.
Button tool definitions are saved in a file which has the same name (and is in the
same directory) as the current workspace file but with the extension .tbr instead of
.wsp. If you specify a different workspace file name in the Save Session As dialog
box and save the current settings, TeemTalk will automatically make a copy of the
current button tool definitions file and give it the new workspace name if a file with
the same name does not already exist.
5-8
Page 71

Hotspots
6
Hotspots
This chapter describes the hotspot facility which enables functions to be
performed by clicking on keywords displayed on the screen.
Using Hotspots
TeemTalk incorporates a user-definable hotspot facility which enables you to invoke a
function by clicking the mouse pointer over a keyword displayed on the screen. For
example, an application may display information relating to keys you can press to
perform a particular function. Instead of pressing the key on the keyboard, you could
invoke the function by moving the mouse pointer over the displayed key name,
holding down the Control key and clicking the Left mouse button.
Hotspots are supported in ALL terminal emulation modes. TeemTalk provides a set of
default keywords for each mode. These keywords relate to key functions specific to
the emulation. For example, in VT200 mode you can click on the word Help
displayed on the screen and TeemTalk will execute the function associated with the
Help key.
You can identify hotspots that are currently present in display memory by holding
down the Control key and the Right mouse button (assuming default mouse
configuration). All colour attributes will be temporarily removed from the display and
the hotspots will be highlighted with a red background. Releasing the keys will return
the display to its original state.
In summary, the following key and mouse button combinations are used to identify
and action hotspot functions by default:
Identify hotspots: Control + Right Mouse Button
Action hotspot function: Control + Left Mouse Button
Note: These functions may be assigned to different mouse button
and key combinations. Refer to the Mouse Functions
chapter for details.
6-1
Page 72

Hotspots
Defining Hotspots
Hotspot keywords and associated functions are specified in a text file which has the
same name (and is in the same directory) as the current workspace file but with the
extension .hot instead of .wsp. For example, the default hotspot definitions supplied
with TeemTalk-07W32 are stored in the file tt07w.hot. If you specify a different
workspace file name in the Save Session As dialog box and save the current settings,
TeemTalk will automatically make a copy of the current hotspot file and give it the
new workspace name if a hotspot file with the same name does not already exist.
Note: A hotspot file may not necessarily be in use, in which case
TeemTalk will not attempt to create a new hotspot file with
the new workspace file.
You can view the contents of the hotspot file currently in use without leaving
TeemTalk by displaying the Mouse Button Actions dialog box, selecting one of the
hotspot options (from a drop down list box if necessary), then clicking the Edit...
button.
The format of entries in the hotspot definition file is as follows. Each hotspot
definition is entered on a separate line and definition lines are grouped under
headings which specify the terminal emulation mode in which they will take effect.
The following definition line examples are taken from the tt07w.hot file supplied
with TeemTalk-07W32.
[Separators]
Separators= /,:=()[]
[Definitions]
F1=<VK_F1>
F2=<VK_F2>
[Definitions,VT52]
[Definitions,VT200 7-Bit]
F6=<VT_F6>
F7=<VT_F7>
The first command group, headed [Separators], specifies the displayed characters
which delimit the hotspot keyword. Delimiters include SPACE and NULL as well as
the characters shown in the example by default. The end delimiter does not need to
be the same as the first. Delimiters are necessary to prevent hotspots occuring within
words that happen to contain the same formation of characters as the keywords.
The following command groups specify the keywords used in each terminal emulation mode. Keyword definitions that can apply to all modes are specified under the
heading [Definitions]. Keyword definitions that apply to a specific mode are
specified under the heading [Definitions,<emulation>], where <emulation> must be
the name of the terminal emulation mode as already specified in the default hotspot
6-2
Page 73

Hotspots
definitions file. Note that a keyword definition under a [Definitions,<emulation>]
heading will override the definition given to the same keyword in any other definitions group when that particular emulation is running.
Each keyword definition line consists of the keyword immediately followed by an
equals (=) sign, then the function that it will perform. The keyword can consist of any
characters except those specified as delimiters in the Separators= line. TeemTalk will
search for the keyword on a case insensitive basis.
The function that will be performed when the keyword is selected is specified in the
same way as for key macros, soft buttons and script language programming.
Entering Control Characters
You can enter a control character in a keyword definition either as the control key
character equivalent or the decimal value of the ASCII character. For example, the
control character for the Return key function, CR (carriage return), can be entered
by typing the characters ^ and M, representing the keys Ctrl + M which, when
pressed together would generate the CR code. This could be used to define the
keyword Login to enable you to log on to a host:
Login=hostname^M
Decimal values are entered as three-digit numbers immediately preceded by an
underscore character. Values with only two digits must be preceded by a zero. For
example, the decimal value of CR is 13, so this would be entered as _013. Refer to
the ASCII character table in the Character Sets appendix for code and decimal
references.
Key Combinations & Sequences
You can define a keyword to perform the function of a particular key, a combination
of keys, or a sequence of keys. For example, you can define a keyword to perform
the same function as pressing the key F4, or pressing the keys Alt + F4 together, or
pressing the keys F2 then F3 then F4. Keys are identified by their virtual key names
as listed in the Virtual Key Names appendix. You may omit the VK_, VT_ (etc.)
parts of the name.
To define a keyword so that it will perform the function of a particular key, type the <
character followed by the virtual key name then the > character. For example, to
define the keyword Insert so that it will perform the same function as the Insert key
found on the DEC VT320 keyboard, enter the following line in the relevant Definitions command group:
Insert=<VT_INSERT>
To define a keyword so that it will perform the same function as pressing two or more
other keys together, type the < character followed by the virtual key names linked
6-3
Page 74

Hotspots
together with + characters and ending with the > character. For example, to define the
keyword Help so that when it is clicked it performs the same function as pressing the
keys Alt + F4 together, enter the following line in the relevant Definitions command
group:
Help=<ALT+F4>
To define a keyword so that it will perform the same function as pressing a sequence
of keys one after the other, enter each virtual key name in the order required,
enclosing each name with the < and > characters. Each enclosed virtual key name
must immediately follow the previous enclosed virtual key name with no spaces. For
example, to define the keyword Command so that when it is clicked it performs the
same function as pressing the keys F2 then F3 then F4, enter the following:
Command=<F2><F3><F4>
Entering Command Lines
You can enter a command line in a keyword definition by enclosing it within the (
and ) characters. For example, to define the keyword TT07W so that when it is
clicked another instance of TeemTalk-07W32 is run, you would enter the following:
TT07W=(C:\PROGRAM FILES\TEEMTALK\TT07W.EXE)
Changing The Window Focus
You can define a keyword to change the currently selected window or icon (that is the
window or icon to which keyboard and mouse commands will be directed) by entering
its window class name as a string enclosed by the < and > characters. For example, to
define the keyword TeemTalk so that the TeemTalk-07W32 window is selected when
the keyword is clicked, you would enter the following line in the relevant Definitions
command group:
TeemTalk=<"tt07w"> (tt07w is the window class name for TeemTalk-07W32.)
Initiating A Script File
You can define a keyword to run a script file when clicked by enclosing the name of
the file and any arguments within the <' (left angle bracket and single quote) and '>
(single quote and right angle bracket) characters. For example, to define the keyword
Script so that it will run the script file myscript.scr and assign the values value1 and
value2 to two variables, you would enter the following in the relevant Definitions
command group:
Script=<'myscript.scr(value1,value2)'>
6-4
Page 75

Setup Menus
Setup Menus
This chapter describes the options available in the setup menus and
dialog boxes.
Selecting & Closing Menus
The following menus can be displayed from the menu bar:
7
7-1
Page 76

Setup Menus
To display a menu:
Mouse: Click the title of the menu required.
Keyboard: Hold down the Alt key and press the key bearing the underlined
character in the menu title. For example, pressing Alt + F will display
the File menu.
When the menu bar is not displayed you can still display the menus by pressing the
following keys:
Alt + F for the File menu
Alt + E for the Edit menu
Alt + S for the Settings menu
Alt + H for the Help menu
To close a menu:
Mouse: Click anywhere outside the menu.
Keyboard: Press the Alt key.
Using The Menus
When you display a menu and move the cursor over the menu options, the status bar
at the bottom of the TeemTalk window will change to display a brief description of the
option at the cursor position.
The menu options follow several conventions:
Options that are displayed dimmed are not applicable to the current mode of
operation and cannot be selected. An example of this is the Cancel Print option in
the File menu. This can only be selected after a print command has been initiated.
Options that include an underlined character may be actioned by pressing the key
bearing that character. For example, pressing the X key while the File menu is
displayed will cause TeemTalk to shut down.
Options that are not followed by an ellipsis (...) perform a particular function when
selected. For example, selecting Save Session in the File menu will cause TeemTalk to
save the session configuration to the currently selected saved settings files.
Options that are followed by an ellipsis indicate that a dialog box will be displayed
with all the selections applicable to that option. For example, selecting New
Connection... in the File menu will display a dialog box in which you can specify
host communication settings.
Some options display a tick mark when they are selected or activated, such as the
Clipboard Text option in the Edit menu.
7-2
Page 77

Setup Menus
To select a menu option:
Mouse: Click the menu option.
Keyboard: Method 1: If the option includes an underlined character, press the key
bearing that character. For example, pressing X while the File menu is
displayed will cause TeemTalk to shut down.
Method 2: Use the up or down arrow keys to highlight the option
required then hit Return.
Dialog Boxes
Selecting an option which is followed by an ellipsis (...) will cause a dialog box to be
displayed. The example shown below is displayed by selecting the Dialog... option in
the Settings menu.
There are four basic methods for making selections within the dialog boxes.
Options preceded by a check box, such as Auto Wrap in the example above, are true
or selected when the box contains a ✔ or X, and false or unselected when the box is
empty. Click the pointer in the box to toggle the setting on or off.
When a group of options preceded by round buttons are enclosed in a box, such as
the Cursor Origin options in the example above, only one of these options is
selected or true at any one time. The currently selected option is indicated by a button
with a dark centre. These buttons behave just like radio buttons in that clicking one
will cause the previously selected button to be deselected.
Some options require you to type information in a text box, such as the Dialog Area
Lines option.
7-3
Page 78

Setup Menus
When an option has many possible settings, these will be shown in a list box. The
Baud Rate option in the Serial Settings dialog box is an example of this. To make a
selection using the mouse, click the arrow button to display a drop-down list box then
click on the setting required. If the list is long a scroll bar may be displayed. To make
a selection using the keyboard, press the up or down arrow keys to cycle through the
available settings until the one required is highlighted in the box.
To select a dialog box option:
Mouse: Click the check box, button or list box. The current setting is high-
lighted or surrounded by a dotted rectangle, or both.
Keyboard: Press the Tab key to move forward through the options (left to right,
top to bottom), or Shift + Tab to move backwards, until the required
option is highlighted or surrounded by a dotted rectangle, or both. Press
the Spacebar to toggle check boxes or buttons on or off.
To close a dialog box without actioning changes:
Mouse: Click the Cancel button.
Keyboard: Press the Tab or Shift + Tab keys to move the cursor until it rests over
the Cancel button and press Return or the Spacebar.
To close a dialog box and action changes:
Mouse: Click the OK button.
Keyboard: Press Return.
Default Settings
TeemTalk is supplied with the setup options set to factory default. If these have been
altered since and you wish to reassert the original settings of all the options, display
the File menu and select the Factory Default option.
Some dialog boxes include a Default button to enable the factory default settings of
options contained in the dialog box to be reasserted.
7-4
Page 79

Setup Menus
Creating A Connection Template
You can save the current session configuration as a connection template. To make TeemTalk automatically attempt to make a host connection using the same settings the next time it is loaded, display the File menu and select the Save Session option.
TeemTalk enables you to create multiple connection templates, any one of which can
be used either when TeemTalk is loaded or while it is running. The procedure is as
follows:
1. In the File menu, select the Save Session As... option to display the following
dialog box.
2. In the Saved Items box, indicate which user preference settings are to be saved by
checking the boxes next to the relevant options.
3. In the Settings File text box, specify the name of the terminal emulation settings
file (and the directory path if different from the default) which is to store settings
only affecting the terminal emulation. The default filename is tt*w.nv, where * is
either 05, 07 or 11, depending on your version of TeemTalk.
Note: There is no need to specify file extensions as defaults are
applied when the files are created.
4. In the Save As File Name text box, specify the name of the workspace settings
file (and the directory path if different from the default) which is to store the user
preference settings selected by the Saved Items options. The default filename is
tt*w.wsp, where * is either 05, 07 or 11, depending on your version of TeemTalk.
Note: Splitting the saved settings into two files enables users to share
a common terminal emulation settings file while allowing each
user to have their own workspace settings file.
7-5
Page 80

Setup Menus
5. In the Description text box, enter a unique description (up to 132 characters long)
which will be used to identify the connection template for future selection. This
description will also appear in the Open Session dialog box.
6. Click the OK button to save the template settings. If you specified the names of
settings files that already exist, a message box will ask you to confirm whether or
not you want to overwrite the existing files with the new settings.
Using Environment Variables To Locate Settings Files
When TeemTalk for Windows 95 or NT is installed on a terminal server, environment
variables may be used to locate settings files on the client PC. This means that each
client may use a different setup configuration, reading and saving settings locally,
instead of changing files stored on the server which would affect all clients.
Each client must use the same user environment variable name to specify the
directory path for the TeemTalk settings file(s). This name is then specified in the
registry on the terminal server, enclosed by % (percentage) characters.
For example, each client has the user environment variable USERPROFILE pointing
to a local directory (which may be different on each client). To make the directory
specified by USERPROFILE the location of the TeemTalk settings files (.nv and
.wsp), the TeemTalk registry entries on the terminal server would look like this:
7-6
NvPath: "%USERPROFILE%"
WsPath: "%USERPROFILE%"
Page 81

Setup Menus
Selecting A Connection Template
The Open Session dialog box in the File menu enables you to select a connection
template for TeemTalk to use.
The Description list box displays the one-line descriptions of connection templates
that were created using the Save Session As dialog box. The description of the
connection template currently in use is highlighted. The factory default connection
template is Untitled. Clicking one of the descriptions then the OK button will cause
the dialog box to close and TeemTalk to use the connection template associated with
the chosen description.
You can make TeemTalk automatically use a particular connection template when it is
loaded or reset by clicking the required description, checking the Save As Default
check box, then clicking the OK button. To delete a connection template, select the
description then click the Delete button.
You can also use the following command line option to override the default
connection template used when TeemTalk is loaded:
-se"description"
where description must exactly match the description assigned to a connection
template already saved using the Save Session As dialog box. The description must
be enclosed by double-quotes.
7-7
Page 82

Setup Menus
Menu Descriptions
The following pages describe the options available in all the menus and associated
dialog boxes. The descriptions begin by showing the menu or dialog box as it is
displayed on the screen. The factory default setting is shown below each option title
where applicable.
File Menu
Factory Default...
This will make TeemTalk reassert all the original settings that it had when you first
installed it. A message box will be displayed asking you to confirm whether or not
you want to assert the factory default settings. Click the OK button to assert the
factory defaults or Cancel to cancel the selection.
7-8
Page 83

Setup Menus
Reset Terminal
This will reset the current terminal emulation mode.
New Connection...
Factory default: Serial, Com 1
This will display a dialog box which enables you to make a serial or network host
connection.
The Type option specifies whether a serial or network connection is to be made.
Clicking the arrow button will display a drop-down list box containing all the
possible settings.
The Services option specifies the port or network host node which TeemTalk is to
communicate with. This is a text box with an associated drop-down list box. You can
either make a selection from the list box or enter a valid host name or internet address
in the text box.
Making A Serial Host Connection
To connect to a serial host, select Serial in the Type list box (default), then select the
Com port required in the Services list box. Click the Configure... button to display
the Serial Settings dialog box and make sure the settings match that of the host.
Click OK then click Connect.
Note: These options are described in the Serial Settings section
later in this chapter and only apply when the connection
type is set to Serial.
7-9
Page 84

Setup Menus
The status line along the bottom of the window displays two LEDs. The first LED
indicates whether or not you are connected to the host. It will show red when not
connected and green when you are connected. The second LED indicates whether or
not data is being sent to or from the host. It will show dull green when there is no
activity, red when data is being sent to the host, and bright green when data is being
received from the host.
Making A Network Host Connection
To connect to a network host node, select the protocol required in the Type list box:
TeemTalk for Windows 95 and NT:
TCP/IP CTERM WinSock 2
NetBIOS MultiLan ISDN
LAT Microsoft SNA TeemTalk-OSI (option)
TeemTalk for Windows 3.1x:
LAT NetBIOS B and W. TCP INFOConnect
FTP PC/TCP OSLAN WinSock ISDN
Sun PC/NFS TELAPI Ext. NCSI DOSLANTI
LAN W/Place BAPI Eicon X25 MultiLan
NetManage Interrupt 14 IPX/SPX
PathWay INT6B / NASI NetWare for LAT
CTERM LanManager TeemTalk-OSI
Note: Refer to the Network Connection chapter in the Networking
Guide for a description of each protocol supported and for
any additional configuration required prior to making a
connection.
The Services list box (in the New Connection dialog box) will display the devices
on the network which use the currently selected protocol. Click the name of the
device required or, in the case of TELAPI, enter an Internet address in the text box
(for example, 128.127.126.2). Note that either the host name or IP address may be
entered for TCP/IP connections. When Eicon X25 is selected, TeemTalk requires you
to enter a valid address as none will be listed.
The Telnet Options button becomes available when a Telnet protocol is selected in
the Type list box. The dialog box displayed when this button is clicked is described
in the next section.
Clicking the Connect button or the name of the host in the Services list box twice
will cause TeemTalk to attempt to connect to the specified host. If a connection cannot
be made because the network driver is not installed or the host node name is invalid,
an error message will indicate this. Failure to connect for any other reason will result
in a Connection Failed message.
7-10
Page 85

Setup Menus
The status line along the bottom of the window displays two LEDs. The first LED
indicates whether or not you are connected to the host. It will show red when not
connected and green when you are connected. The second LED indicates whether or
not data is being sent to or from the host. It will show dull green when there is no
activity, red when data is being sent to the host, and bright green when data is being
received from the host.
Connection to the network host node will close if you change the settings in the New
Connection dialog box and attempt to connect, if you log out of the host, or the host
closes the connection. Warning messages will be displayed if the host closes the
connection, or you attempt to open a new session or exit TeemTalk while a session is
open. These message boxes can be disabled using initialization file commands or
command line options. Refer to the Initialization Commands chapter for details.
Open Session...
This enables you to select a connection template for TeemTalk to use. The following
dialog box will be displayed.
The Description list box displays the one-line descriptions of connection templates
that were created using the Save Session As dialog box. The description of the
connection template currently in use is highlighted. The factory default connection
template is Untitled. Clicking one of the descriptions then the OK button will cause
TeemTalk to use the connection template associated with the chosen description.
You can make TeemTalk automatically use a particular connection template when it is
loaded or reset by clicking the required description, checking the Save As Default
check box, then clicking the OK button. To delete a connection template, select the
description then click the Delete button.
Close Session
This will close the current session.
7-11
Page 86

Setup Menus
Save Session
Selecting this option will cause the current session configuration to be saved to the
connection template specified in the Save Session As dialog box.
Save Session As...
This will display a dialog box which enables you to save the current session
configuration as a connection template.
TeemTalk enables you to create multiple connection templates, any one of which can
be used either when TeemTalk is loaded or while it is running. The procedure is as
follows:
1. In the Saved Items box, indicate which user preference settings are to be saved
by checking the boxes next to the relevant options.
2. In the Settings File text box, specify the name of the terminal emulation settings
file (and the directory path if different from the default) which is to store settings
only affecting the terminal emulation. The default filename is tt*w.nv, where * is
either 05, 07 or 11, depending on your version of TeemTalk.
Note: There is no need to specify file extensions as defaults are
applied when the files are created.
3. In the Save As File Name text box, specify the name of the workspace settings
file (and the directory path if different from the default) which is to store the user
preference settings selected by the Saved Items options. The default filename is
tt*w.wsp, where * is either 05, 07 or 11, depending on your version of TeemTalk.
Note: Splitting the saved settings into two files enables users to share
a common terminal emulation settings file while allowing each
user to have their own workspace settings file.
7-12
Page 87

Setup Menus
4. In the Description text box, enter a unique description (up to 132 characters long)
which will be used to identify the connection template for future selection. This
description will also appear in the Open Session dialog box.
5. Click the OK button to save the template settings. If you specified the names of
settings files that already exist, a message box will ask you to confirm whether or
not you want to overwrite the existing files with the new settings.
Startup Options...
The following dialog box will be displayed when this option is selected.
This enables you specify whether TeemTalk is to make a host connection using the
default connection template, display the New Connection dialog box, or display the
Open Session dialog box when it is loaded (but not when it is reset). Refer to the
relevant descriptions earlier in this section for information on these dialog boxes.
Clicking the Edit... button will open a text editor window in which the contents of the
TeemTalk private profile file containing startup settings will be displayed. This enables
you to make changes without leaving TeemTalk. (Note that changes will not take
effect until the next time TeemTalk is loaded.) The text editor used by default is
notepad.exe. You can specify a different text editor by modifying the Editor= line in
the command group headed [Startup] in the TeemTalk private profile file.
Note: Refer to the Initialization Commands chapter for information
on the private profile file.
Capture File...
This will display a dialog box which enables you to specify the name of a file in which
all following data received from the host will be logged.
Clicking the OK button after entering the name of the file will cause all data received
from the host to be stored in this file until the Cancel Capture option (which
replaces the Capture File option during a capture session) is selected. The contents
of this file can be played back later by selecting the Replay File... option.
7-13
Page 88

Setup Menus
Replay File...
Factory default: *.*
This option will display a dialog box which enables you to replay the contents of a file
previously created by the Capture File... option.
Enter the name of the file to be replayed in the Replay File Name text box, or
alternatively select a file name in the list box below, specify whether the replay is
directed to the emulation (default) or host, then click the OK button.
To cancel a file replay, select the Cancel Replay option which replaces the Replay
File option while a file is being replayed.
File Transfer...
This option provides access to the file transfer utility. Refer to the File Transfer
chapter for details.
FTP...
This option provides access to the FTP file transfer utility. Refer to the FTP File
Transfer chapter for details.
Printer Setup...
This displays a dialog box which enables you to select any printer that is configured
in Microsoft Windows instead of just the default printer.
7-14
Note: You can specify a different printer which TeemTalk will use
by default instead of that specified in the Control panel by
including the printer details on a device= line in the
initialization file.
Page 89

Setup Menus
The currently selected printer is the TeemTalk default printer if specified, or the printer
specified in the Control panel, when the dialog box is displayed for the first time after
TeemTalk is loaded or reset, otherwise it is the printer that was last used.
Selecting a printer other than the default printer will enable the Save New Default
option. If you click the OK button when this option is selected, the currently
highlighted printer will become the new default printer. If you want to keep the
original printer as the default, uncheck this box before clicking OK.
The Microsoft Windows Print Manager normally controls all print formatting,
translates host characters to supported printer characters, and also provides a spooling
facility. A disadvantage of using the Print Manager is that any print formatting escape
sequences received from the host are stripped. The Through Print Action options
enable you overcome this problem.
If you want to use the Print Manager but disable its print formatting process so that the
original escape sequences from the host are retained, select both the Use Print
Manager and PassThru options. (Note that the PassThru option will be
unselectable if the printer driver currently selected does not support this facility.)
If you want to bypass the Print Manager, deselect the Use Print Manager option.
The FormFeed Terminator and Translate National Characters options will
become available. Selecting the FormFeed Terminator option will cause the printer
to advance the paper to the top of the form when it has finished printing. The setting
of the Translate National Characters option determines whether or not the ISO
Latin characters used by Microsoft Windows are translated to IBM characters for the
printer.
If you find a through print results in data being split into lines, each treated as a
separate print job, specify a time in the Seconds Close Delay box (e.g. 5 seconds).
This will enable the next line of data to be sent before the print job is assumed to
have finished and therefore prevents the print job from being closed prematurely.
When Auto Line Feed is selected, every carriage return command will be followed
by a line feed command.
The Setup... button enables you to display the Microsoft Windows Print Setup
dialog box for the currently selected printer. This includes a Fonts... button which
enables you to change the font settings. The "Courier New" 11 point font will be used
by default.
Note: The Printer Setup option will be unselectable if no printer
is installed or if the Status option in the Microsoft Windows
Printers dialog box is set to Inactive.
Print Screen...
This will display a dialog box which enables you to produce a hardcopy of data
displayed on the screen in a particular format.
7-15
Page 90

Setup Menus
The Text option is selected by default and the printer resolution and scaling options
are not accessible. Clicking the OK button with Text selected will cause a fast print of
the screen using ASCII text codes, therefore any graphics displayed in the TeemTalk
client area will not be printed.
Note: The virtual key name VT_PRINT will also cause this dialog
box to be displayed.
Selecting Graphics will print all the data in the TeemTalk client area, both graphics
and text, when the OK button is clicked. The hardcopy output will be an almost exact
representation of the client area. Note that a graphics print will take a lot longer than
a text print.
The Use Printer Resolution option is available when Graphics print is selected.
This will force a dot for dot print of the screen on the printer and generally produces a
small print, depending on the printer resolution. When this option is not selected
(unchecked), TeemTalk will try and print as large an image as possible on the printer's
paper. Both methods can print in landscape or portrait format, depending on the
current setup of the printer.
The Centre Image on Paper option is available when Graphics print is selected.
This will ensure that the graphics image is printed centrally on the paper.
The Scaling option is available when Graphics print is selected. This enables the
image to be scaled to suit your preference. When the Use Printer Resolution option
is selected, you can scale the image up, and when unselected you can scale the image
down. (Scaling up when Use Printer Resolution is not selected may result in loss of
some of the image.)
The Graphics Image option is available when Graphics print is selected. This
enables you to specify how the graphics image is to be printed. Clicking the arrow
button next to the text box will cause four print options to be displayed.
7-16
Page 91

Setup Menus
These options allow you to print the graphics image as displayed (Normal by default),
with black and white reversed, with colour converted to monochrome, or colour
converted to monochrome with black and white reversed.
Once a screen print is initiated by clicking OK, another dialog box will be displayed
while the screen data is being spooled out to the print manager. This enables you to
terminate the print process before data is actually printed.
Print Buffer
This will send a copy of all the data contained in the window buffer to the currently
selected printer.
Auto Print
This toggles auto print mode on and off, as indicated by a tick when auto print mode
is on. Auto print mode causes each line of data to be transmitted to the printer when
the cursor moves to a new line as a result of a carriage return, line feed, vertical tab,
or form feed.
Cancel Print
This will cancel the current Print Screen or Print Buffer function.
Eject Page
When TeemTalk is in Auto Print or Printer Controller mode and the Use Print
Manager option in the Printer Setup dialog box is checked, this option enables data
that has been spooled to the printer to be printed. This option will be greyed
(unselectable) when TeemTalk is not in Auto Print or Printer Controller mode.
Run Script...
This will display a dialog box which enables you to run a script file.
Windows 3.1x Windows 95 & NT
The name of the file is entered in the Script File Name text box, or alternatively you
can select a file name in the list box below.
7-17
Page 92

Setup Menus
The Parameters text box enables you to specify the values of ArgV# type variables
within the script file, if required. Values are separated from each other by a comma.
You must ensure that the values are entered in the right order so that they are
assigned to the correct variables. Refer to the Initiating A Script File section in the
Creating A Script File chapter for details.
Note: If the values to be entered include sensitive data, such as a
password, you can cause the text to be displayed as
asterisks instead of normal text by using the -hs command
line option or scriptparameter=off initialization file
command.
When the name of the script file has been specified and any parameters entered, click
the OK button to run the script file. To cancel a script file, select the Cancel Script
option which replaces the Run Script option while a file is being run.
The Edit... button becomes active when you select the name of a script file. Clicking
the Edit... button will open a text editor window in which the contents of the selected
script file will be displayed. This enables you to make changes without leaving
TeemTalk.
Exit
This option will cause TeemTalk to shut down. If you attempt to exit TeemTalk while
a network session is still active, the following message box will be displayed:
This message box can be disabled so that the connection is automatically closed when
TeemTalk is exited by using the -J command line option or entering the line
warnExit=off in the initialization file.
7-18
Page 93

Setup Menus
Telnet Options
This dialog box is displayed when you click the Telnet Options button in the New Connection dialog box when any Telnet protocol is selected in the Type list box.
Note that the options available and the default settings depend on the current terminal
emulation. The '3270' and '5250' options are not applicable to this version of
TeemTalk.
Note: Many of these settings can be specified in the TeemTalk
private profile file. Refer to the Initialization Commands
chapter for details.
Port Number
This enables you to specify the Telnet port number. The default Telnet port number,
23, can be substituted with any valid 16 bit port number. Specifying a number outside
the valid range will cause the setting to default to 1.
Telnet Name
This enables you to override the name that will be reported for the terminal type over
Telnet.
Suppress Echo
When selected, this will will prevent the emulator from generating the Telnet echo
option on connection.
7-19
Page 94

Setup Menus
Force Negotiation
These settings determine whether or not the Telnet Binary or EOR options are
supported. Both are set to no by default.
No Will not force any negotiations. It will leave it up to the
host to decide what to do.
DO Will force negotiation. The host will be informed that the
option is supported.
DONT Will force negotiation. A negotiation packet will be sent
to the host telling it that the option is not supported.
Break Settings
The setting of these options determine whether or not a timing mark (TM) and/or
carriage return (CR) is sent with a Telnet break packet. A timing mark is sent by
default.
7-20
Page 95

Setup Menus
Edit Menu
Clipboard Text
Clipboard Graphics
Selecting one of these options will enable selected text or graphics to be copied to the
clipboard when the Copy command is used. The Paste and Select All commands
will also be enabled. A tick will be displayed next to the option when it is selected
and the DDE commands will be disabled.
DDE Row Copy
DDE Column Copy
Dynamic Data Exchange (DDE) is a much more powerful tool than the clipboard as
it establishes a link between the copied data and the original source data so that when
changes occur to the source data, the copied data can be updated automatically so
that you do not have to copy and paste the data again. A tick will be displayed next to
the option when it is selected and the Paste command will be disabled.
The DDE Row Copy and DDE Column Copy options enable selected data to be
copied in a format suitable for applications which use cells to store information, such
as spreadsheets. When the Copy command is used, selected data will be copied so
that each line is treated as a separate cell.
The way in which each cell of data is inserted in the application's worksheet when
pasted is determined by whether the DDE Row Copy or DDE Column Copy option
was selected before the Copy command was used. DDE Row Copy will enable each
line of copied data to be pasted in a row of selected cells, and DDE Column Copy
will enable each line of copied data to be pasted in a column of selected cells.
Note: Refer to the Dynamic Data Exchange chapter for more
information.
7-21
Page 96

Setup Menus
Copy
This command becomes available (ungreyed) when data has been selected. The
function of this command is determined by whether the Clipboard Text, Clipboard
Graphics, DDE Row Copy or DDE Column Copy option is selected.
When the Clipboard Text or Clipboard Graphics option is selected, this command
will cause currently selected text or graphics to be copied to the clipboard. The data
can then be inserted in a different position or another file using the Paste command.
The next block of data that is copied will delete the previous block on the clipboard.
When DDE Row Copy or DDE Column Copy is selected, various commands
representing the selected screen area will be copied to the clipboard. These
commands can be pasted to an appropriate area of the screen by another Windows
application that can interpret the commands, for example, Microsoft Excel. DDE
messages will be exchanged between TeemTalk and the application in which the
commands were pasted and, if acknowledged positively by both parties, an automatic
update will be performed from TeemTalk to the application if data in the selected area
changes.
To use the Copy option, hold down the left mouse button and move the pointer
across to the right to display additional options, as shown below.
The first option enables you to perform a standard copy. Pressing the keys Shift +
Delete together will perform the same function. The last three options are only
available when Clipboard Graphics is selected. They enable you to copy the
graphics image with black and white reversed, with colour converted to
monochrome, or both.
Note: A standard copy can also be performed by clicking the
middle mouse button on a 3-button mouse, or the right
button on a 2-button mouse.
Paste
This only functions when the Clipboard Text or Clipboard Graphics option is
selected and will cause data that has been copied to the clipboard to be pasted at the
7-22
Page 97

Setup Menus
current cursor position. The same block of data may be pasted repeatedly as the
clipboard stores it until the Copy command is used again.
Note: The same function can be performed by clicking the right
mouse button on a 3-button mouse, or Shift + Left or Right
Button on a 2-button mouse, or by pressing the keys Shift +
Insert.
Select All
This will cause the window contents (not the entire buffer) to be selected.
Clear Buffer
This will erase the contents of the window and the scroll buffer.
7-23
Page 98

Setup Menus
Settings Menu
The following dialog boxes can be displayed from this menu:
Emulation Settings - for specifying the terminal emulation, terminal
identity and displayable characters.
Serial Settings - for specifying serial communication settings.
Terminal Settings - for specifying terminal and keyboard settings.
Dialog Settings - for specifying the text window format, buffer
size and cursor movement.
Gin Settings - for configuring TeemTalk for compatibility with
the attached GIN device.
Attributes - for assigning colours and specifying how
characters with attributes are displayed.
Keyboard Macros - for remapping the keyboard and defining the
function of keys.
Soft Buttons - for defining soft button functions.
Mouse Button Actions - for defining mouse button functions.
Button Tools - for defining the toolbar/floating button palette.
7-24
Page 99

Setup Menus
Emulation Settings
This dialog box is displayed by selecting Emulation in the Settings menu.
Emulation
Factory default: VT100
The setting of this option determines the current terminal emulation mode.
VT52 and VT100 modes enable you to run applications written for the DEC VT52
and VT100 terminals, respectively.
Tek mode provides compatibility with software designed to drive the Tektronix 4100
or 4200 series terminals. Emulation of the Tektronix 4014 terminal can be achieved
by selecting this option and setting the Dialog Area Enabled option in the Dialog
Settings dialog box to 0.
Edit mode provides compatibility with software designed to drive the DEC VT100
terminal. In this mode the following features are set to pre-determined conditions:
A. The dialog area is enabled and visible.
B. The dialog area buffer and scrolling region are set to 24 lines.
C. Cursor origin mode is set to Absolute (refer to the description of
the Cursor Origin option in the Dialog Settings dialog box).
D. Insert/Replace character mode is set to Replace.
E. Keys PF1 through PF4 generate ANSI cursor movement
sequences.
F. All programmed strings for keys are temporarily disabled.
7-25
Page 100

Setup Menus
VT220-7 and VT220-8 modes run emulations of the DEC VT220 terminal, the
difference is in their treatment of 8-bit control codes. When VT220-7 is selected, all
8-bit codes are converted to their 7-bit equivalents, whereas VT220-8 leaves 8-bit
codes unchanged. If you are using VT200 applications, select VT220-7.
W3220 mode provides compatibility with software designed to drive the Westward
3220 terminal.
Code 1 Selects
Factory default: ANSI
The setting of this option determines what action will be taken on receipt of an 'Enter
ANSI Mode' (Code 1) command from the host. It can be set to cause entry to the
DEC VT220 7 or 8-bit emulation instead of ANSI (VT100). This provides the same
functionality as the Tektronix DecTerminal command.
Terminal ID
Factory default: VT100
This option identifies the particular 'VT' terminal model emulated by TeemTalk in
response to a terminal identification request from the host when in any mode except
Tek.
Multinational
Factory default: Unselected
The setting of this option determines whether the national or multinational character
set is used when TeemTalk is in VT220 7 or 8-bit Alpha mode. (All other modes use
the national character set.)
When this option is unselected, the national character set which corresponds to the
keyboard language selected in the Terminal Settings dialog box will be used. Only
characters found in this character set may be generated.
When this option is selected, the multinational character set will be used. This
consists of the 7-bit ASCII character set and the 8-bit VT220 Additional character set
(as shown in the Character Sets appendix). This enables characters from all national
character sets to be generated.
Display Controls
Factory default: Unselected
The setting of this option determines whether received control codes are actioned or
displayed. When selected, a representation of most control codes will be displayed on
the screen.
7-26
 Loading...