

Xerox Synergix 8830, 850DX - Phaser Color Solid Ink Printer, Synergix 8855, 850DP - Phaser Color Solid Ink Printer, 850N - Phaser Color Solid Ink Printer Supplementary Manual
Page 1

X
ES Synergix
8
825/8830/8855 Digital
S
olution Folding Supplement
7
01P36595 January 2001
Page 2

Page 3

XES Synergix 8825/8830/8855 Digital Solution Folding Supplement i
Trademark Acknowledgments
XEROX®, 8825, XES Synergix 8825 Digital Solution, 8830, XES Synergix
8830 Digital S olution, 8855, XES S y ner gix 8855 Digi tal Solution, Synergix
Scan Digital Solution, the digital box icon, A c c XES, and acronym, XES are
trademarks of Xerox Corporation.
Internet Explorer is a copyright protected program of Mi c r osoft Corporation.
Windows
®
2000, Windows NT®, Windows® 95,and Windows® 98 are
registered trademarks of Microsoft Corporation.
HP-GL/2 is a trademark of t he Hewlett-Packard Com pany .
Postscript is a trademark of Adobe S y st ems Incorporated.
Page 4

XES Synergix 8825/8830/8855 Digital Solution Folding Supplement ii
Page 5

XES Synergix 8825/8830/8855 Digital Solution Folding Supplement iii
Table of Contents
Table of Contents............................................................................iii
Title Block Position is Incorrect on the Folded Print.....................1
System Consistency........................................................................1
Bi-directional Communications ........................................................1
.fin file .............................................................................................1
Title Block Location.........................................................................1
Document/Title Block Orientation....................................................2
Short Edge Leading ...............................................................................2
Long Edge Leading................................................................................2
Input Orientation....................................................................................3
Output Orientation.................................................................................3
Output Style...........................................................................................4
Selecting the Title Block Location...................................................5
Workstation...........................................................................................5
Title Block Location Selection................................................................6
Scanner.................................................................................................7
AUTO WIDTH DETECTION..............................................................7
Title Block Position Solutions Chart ................................................8
Sort Bin Overflow...........................................................................15
Bin Overflow........................................................................................15
End of Media Roll ...........................................................................16
Out of Media........................................................................................16
Adding a Folder to a Work Station................................................17
Client Tool or Print Driver With Bi-directional Capability................17
Client Tool or Print Driver Without Bi-directional Capability...........17
Page 6

XES Synergix 8825/8830/8855 Digital Solution Folding Supplement iv
Page 7

XES Synergix 8825/8830/8855 Digital Solution Folding Supplement 1
Title Block Position is Incorrect
on the Folded Print
System Consistency
In order for the Printing S y stem to print and pr oduc e a folded copy with the
title block in the desired location, t he modules (Folder, Printer, Controller,
and Workstation) must be setup with c onsistent infor mation. Folding Styl es,
Media Size (A NS I, ARCH, ISO) , and the Workstation Client Tool/Print Driver
Finishing proper ties must all be set up so that they are communicating with
the same finishing information.
Finishing information (Folding programs) resides at the Finishing Device. In
the case of f olding, a Fol der c omes programmed with many Fold Types that
are capable of pr ovidi ng the types of f olds required for standar d si z e A RCH,
ANSI or ISO dr awings. These Fold Types then m ust be enabled on the
Folder f or it to make the correct f old. Some Folders come pre-programmed
from the factory with the customer’s folding requirements already enabled.
Others must have the programs l oaded by the service per sonnel. The Print er
is next in the foldi ng c hain. It m ust have the correc t media size(s) loaded in
order for i t to print the file on t he c or r ec t size media. Then at the
Workstation, the AccXES Client Tool ( A CT) and/or Print Dr iver (HP - GL2,
Postscript, ADI /HDI) fi nishing properties m ust be set up to match the Pr inter
and Folder.
Bi-directional Communications
If the print driver’s bi-direct ional communications are enabled; the finishing
information will automatically be updated at the workstation. If bi-directi onal
communication is not enabled or avai lable, the finishing properties will have
to be manually setup. The ACT tools and some print dri vers do not support
bi-direct ional communications; therefore the folder type information must be
installed in the form of a finisher fi le (.fin files). Some .f in files are provided
with the ACT software and must be installed in the ACT Tool. This
information will get the file on the correct size media and folded correctly .
.fin file
A finisher file ( .fin file) descri bes the c apabilities and requirement s for a
particular finishing device. In the case of a Fol der , it describes the fold style
available, and the i nput requirement s to pr oduc e the folds. These files are
used to setup the Finishi ng pr operties of the Client Tools and Pr int Drivers
that do not have bi-directional com municati ons capabilities.
Xerox Engineeri ng S y stems provi des a F inisher Fil e Cr eator program on the
WEB site at www.xes.com. This progr am is used to create a finisher file for
the finishing device connected to a Synergix 8825/8830 Digital Solution.
Title Block Location
The locati on of the title block on the folded print is also an important
requirement . The locati on will define the folded output orientation and style.
It must be visible so that the print can be readily identifiable at the folder and
where it will be archived. In order for the Title Block to be located correctly,
the locati on of the title block on the file must be identified to the system. This
is done in the
Finishing
property window of the Client Tool/Print Dri ver by
selecting the
Title Block
location t hat matches the title block location on the
file.
Wi th some drivers, the tit le block may not be located in t he posi tion as it is
viewed on the workstation. (E.g.: the drawing may appear i n landscape on
the workstation, but in actuality it is a portr ait orientat ion.). The driver
settings may al so manipulate the file t o give you t he pr int job that was
requested. Unfort unately this is not r ealized until the fi le is printed and then
folded. In cases such as this, you will need to identif y the titl e block location
based on the folded print and send the job again. Other fact or s and/or
printing feature requests such as Scaling, Rotation, Mi smatch, folding styles,
and media sizes in the printer will affect the location of the title block. To
satisfy these pri nting requests the system may need to scale, rotate the print,
etc. to satisfy the print r equest. Also, there will be print jobs that will not be
able to be print ed with the title block visible in the folded copy.
Page 8
XES Synergix 8825/8830/8855 Digital Solution Folding Supplement 2
)
Typically standard size files, printed on standard size media, wi th the
title block located as positioned in the f ile, will fold with the title block
visi ble on the fol ded c opy .
Document/Title Block Orientation
Title B lock and document or ientation i nto the folder is very i mportant.
Folders generall y have a pref er r ed title bl oc k location for each orientat ion of
the print. S ince the Folder c annot sense the title bl oc k position, the fold
programs assume a location. These orientations are Short Edge Leading
(SEL) and Long Edge Leading (LEL) . When the title bl oc k is in the prefer r ed
location as it enters the fol der , the folded pr int will have the title block
visi ble. Depending on the fold style, the title block maybe face up or face
down in the output catch bin.
Short Edge Leading
There are two document or ientations Short Edge Leading (SEL) and Long
E
dge Leading (LEL). The standar d or most common orientation is SEL,
which is defined as i mage up, tit le block leading and short edge leading
(Figure 1).
Figure 1. Short Edge Leading
Long Edge Leading
Long Edge Leading (Figur e 2) whi c h is defined as image up, title block
leading, l ong edge leading is being used mor e with printing electronic files
which can be rotated and elec tronicall y manipulated wi th the software.
However, this orientation presents more problems and restrictions for the
foldi ng pr ogr ams, such as prints whose LEL is larger than the width of the
media rolls in the printer. This will require that the print be rotat ed to put the
print on the available media. T his image manipulation may position the title
block in a l oc ation that when folded will not have the title block visible on the
folded copy.
Figure 2. Long Edge Leading
PRINTER
F
OLDER
Print
P
RINTER
F
OLDER
P
rint
Page 9

XES Synergix 8825/8830/8855 Digital Solution Folding Supplement 3
Input Orientation
The title block can be located in the four diff er ent corners of the print as
shown in Figure 3. The number position is relative to the feed direction into
the Folder as indicated by the arrow. The t itle block position into t he folder
may not be the sam e as viewed on the workstation bec ause the file
orientati on may have been c hanged to accommodate the print and fold
request. There can be m any r easons for this, some of which are listed
below:
Print dri ver setti ngs
Media av ailable in the printer
Fol d styl e selected
File orientation and size defined on the workstati on
Rotation
The AccXES Control ler using either bi-directional comm unications or finisher
file information will attempt to place the title block in the folder-preferred
location for the fold style selected. If the Controller positi ons the title bl oc k
correctly, the title block, in most cases, will be visible on the folded print.
Figure 3. Title Block Orientation into the Folder
Output Orientation
Depending on the fold style (f old program) selected, the folded package may
be delivered to the output c atch bin with the title block either face down
①
or face up ②. If a collation or r everse print or der sel ec tion is av ailable on
the print driver; it may be an appropriate selection to change the output.
When using ACT, the coll ation is based on the selected fold style and the
AccXES controller will determine the ordering of the prints.
Figure 4. Title Block Output P osition
PRINTER
F
OLDER
421
3
12
43
feed direction
②
①
T
itle Block
Page 10

XES Synergix 8825/8830/8855 Digital Solution Folding Supplement 4
Output Style
Typically folder s fold all pr ints into an A/A4 si z e, with the tit le block aligned
with the shortest edge (Portrait Styl e) or the long edge (Landscape Style) as
shown in Figure 5.
The terms Port r ait and Landscape are key to understanding what takes place
in the folder.
For documents fed
SEL into the folder:
Landscape will deliver wide fan fold panels with
the exception of the compensating panels.
Portrait will deliver narrow fan fold panels with
the exception of the compensating panels
For documents fed
LEL into the folder
Landscape will deliver narrow fan fold panels
with the except ion of the compensating panels.
Portrait will deliver wide fan fold panels with the
exception of the compensating panels.
For exam ple: If a doc ument is deli vered to the folder SEL t he fan fold panel
will be 11 inches wide using a fold program that delivers an 8½X11
landscape package. The same doc ument fed SE L to an 8½X11 portrait
program will deliver an 8½ inch accordion fold.
Figure 5. Output Styles
Some folders also have the c apability of crossfolding in both a C-fold style
and Z-fol d sty le (DIN fold) shown in Figure 6. The Z-fold is the more
conventional fold done by all folders.
Figure 6. Z-Fold an d C-Fold St yles
Portrait
L
andscape
Page 11

XES Synergix 8825/8830/8855 Digital Solution Folding Supplement 5
Selecting the Title Block Location
Workstation
Typically, the ti tle block on engi neer ing drawings is positioned i n the lower
right corner as viewed on the workstation. However, as mentioned earlier,
the drawing program and/ or the print dri ver/cl ient tool program may interpret
the title block as being in a differ ent location. Therefore, t he A c c XES
controller software provides a selection on the drivers that allows the user to
indicate t he location of the title block. Figures 7, 8, and 9 show the driv er
Finishing windows and the associated
Title Block
selection for the dif ferent
client tools. With this information the AccXES controller will, in most cases,
position the title block so that it will be visible on the folded copy.
Figure 7. AccXES Client Tool Finishing Window
Figure 8. WebPMT Finishing Window
Figure 9. Wi n 95/98 and NT 4.0/2000 Finishing Wind ow
Page 12

XES Synergix 8825/8830/8855 Digital Solution Folding Supplement 6
Title Block Location Selection
The choices available wit hin the Title Block select ion are:
Default, No P ref erence, Don’t care
Lower Left
Lower Right
Upper Left
Upper Right
The
Default, No Preference
, and
Don’t care
selection nam es di ffer
depending on the client or driver that is bei ng used. This selection should be
made only i f the operator does not car e were the title bl oc k is positioned on
the folded c opy . The AccXES controller will rotate the image to try and
position the title block to have it visi ble on the fol ded c opy . AccXES will do
this based on the preferr ed title bl oc k location within the fold sty le (fold
program) select ed.
The other selections listed abov e r efer to the four corners of the file as
viewed on the user’s workstation. Make the selecti on based on the location
of the title block in the fi le. Depending on the print job, there may or may not
be a correlati on between these title bloc k location and the folder numer ical
locations m entioned earlier in the manual. The client tool or folder may have
rotated the pri nt to satisfy t he pr int or fold job request.
Page 13

XES Synergix 8825/8830/8855 Digital Solution Folding Supplement 7
Scanner
When using a scanner, the title block location selection (upper left, upper
right, l ower l eft, and lower right) is as you would v iew the document to read it
(Figure 10). S ome scanners provi de a label (Figure 11) that indicates the
title block positions with t he image in the face down position. T his is done to
help the operator locate the title block with the document in the scan
position.
If a document has to be rotated to fit it into the scanner, t he title bl oc k
location selection is still the original location as you would read the
document.
Note: When using the XES Synergix Digital Solution, the Auto Rotation
feature must be enabled, and the Output Format, Preset should be
used to match the out put print size to the size of the document being
scanned.
AUTO WIDTH DE TECTION
If scanned docum ents are not being folded with the tit le blocked positioned
where it is visible, a possibility may be that Auto Width feature is not
functi oning correctly . When using t he XES S y ner gix Digi tal Solution, refer t o
the scanner customer documentation, Cleaning and M aintenance.
Refer to the scanner c ustomer documentation for any additional information
regarding the scanning of a document.
UL UR
UR UL
Figure 10. V iewed as Read
(Image Up)
LR
LRLL
LL
Figure 11. As Scanned
(Image down)
Title Block
Scan Direction
Page 14

XES Synergix 8825/8830/8855 Digital Solution Folding Supplement 8
Title Block Position Solutions Chart
Typically, print jobs that consist of files that ar e standar d drawing sizes, printed on standard media sizes av ailable in the printer will be folded with the ti tle block
visi ble on the fol ded pac k age. If there is a problem gett ing the title block positioned as desired, refer t o the Chart and begin with Solution 1 to try and isolate the
problem.
Solutions AccXES Client Tools Web PMT
Windows Optimized
HP-GL/2 Driver
(95/98/NT 4.0/2000)
Postscript Driver
1
Verify Folder is
capable of making
the desired fold
.
•
Reference the User Documentation provided with t he Folder and check that a Fold Style is available that will position the title
block in the desi r ed position.
If the style is available, cont inue with Solution 2. If a style is not av ailable, t he desi r ed fold is non-conforming and c annot be
folded.
2
Verify that the Fold
Style program is
enabled on the
Folder.
•
At the Folder Operator Control P anel, check that the desired Fold Sty le program is enabl ed.
If enabled, continue with Solution 3. If not enabled, load the Fold Style program and run t he pr int job again. Loading the program
may require that the printer and c ontroller be switched off then on (r ebooted) or Serv ice be called.
3
Verify that the
media loaded in the
Printer will allow the
desired Fold Style
to be folded.
•
Check that the media series (ARCH, ANSI , or ISO) in the printer m atch the available Fold Styles and or Fol der Type.
•
Load the standard width media rolls in the pr inter for the media series bei ng used.
Run the print j ob again. If the job is incorrec t, continue with S olution 4.
Page 15

XES Synergix 8825/8830/8855 Digital Solution Folding Supplement 9
Solutions AccXES Client Tools Web PMT
Windows Optimized
HP-GL/2 Driver
(95/98/NT 4.0/2000)
Postscript Driver
4
Verify that a Folder
has been added to
the Client Tool.
1. Access the
Finishing
tab.
Click
Job
then
Job Options
.
Click the
Finishing
tab.
2. Check that the
Folder
Type:
matches the Folder
that is instal led on the
Printer. If
None
is
displayed, do the
following:
Click the pull-down arrow in
the
Folder Type
fiel d and if a
folder is listed, click on the
folder. If no folder is listed,
click
Add folder
and continue
with b.
Reference the Ac c XES Client
Tools User Guide, Job P r int
Options, and Finishing
Options. It may be necessary
to create a f inisher fi le, refer
the Xerox Engineering
Systems WEB site, Support ,
Downloads, AccXES Family
Products, Finisher File
Creator.
1. Open the WebPMT
2. Access the
Finishing
window.
Click on PRINTER
DEFAULTS.
Click on PROCESSING
DEFAULTS.
Click Finishing.
3. Check that the
Folder
Model
matches the folder
that is instal led.
4. Check that the
Programs
match the F old Type
(Style) enabled at the
Folder.
1. Access the driver
Properties
window.
Click
Start
>
Settings
>
Printers
.
Right mouse cl ick on the
AccXES Printer icon.
Click on
Properties
.
2. Click on the
Device
Options
tab.
3. Check that the
Finisher
Type:
matches the Folder
that is instal led on the
Printer.
1. Access the driver
Properties
window.
Click
Start
>
Settings
>
Printers
.
Right mouse cl ick on the
AccXES Printer icon.
Click on
Properties
.
2. Click on the
Device
Options
tab.
3. Check that the
Finisher:
matches the Folder that is
installed on t he P r inter.
If Not installed is displ ay ed,
click Add Finisher then refer
to your driver customer
documentation and foll ow the
instructions to load a finisher.
Page 16

XES Synergix 8825/8830/8855 Digital Solution Folding Supplement 10
Solutions AccXES Client Tools Web PMT
Windows Optimized
HP-GL/2 Driver
(95/98/NT 4.0/2000)
Postscript Driver
5
Verify that the
folding style(s)
match the folding
style on the Folder
Operator Control
Panel (OCP).
1. Access the
Finishing
tab.
Click
Job
then
Job Options
.
Click the
Finishing
tab
2. Ensure that a folder type
is displayed in t he
Folder
Type:
fiel d.
3. Click the
Folding
Method:
fiel d pull-down
arrow and check that the
Folding Method:
selections mat c h the
selections available on
the Folder Oper ator
Control Panel.
1. Open WebPMT.
2. Click
Printer Defaults
.
3. Click Processing Defaults.
4. Click Finishing.
5. Ensure that a Finisher is
displayed in the
Finisher
Model
field.
6. Click the
Programs
field
pull-down arrow.
7. Check that Programs
:
selections mat c h the
selections available on
the Folder Oper ator
Control Panel.
1. Access the driver
Properties
window.
Click
Start
>
Settings
>
Printers
.
Right mouse cl ick on the
AccXES Printer icon.
2. Click on
Properties
.
3. Click on the
Job
tab.
4. Click on
Settings
button
in the
Finishing
fiel d.
5. Click on the pull-down
arrow for the
Finishing
program:
fiel d.
6. Check that
Finishing
program:
selections
match the selec tions
available on the Fol der
Operator Control Panel.
6
Verify that the title
block selected
matches the
location of the title
block on the file.
1. Select
Job
>
Job
Options
.
2. Select
Finishing
tab.
3. Check
Folder Type:
.
4. Check that a folder has
been specified in the
Folder Type:
fiel d.
5. Check the
Folding
Method:
. Verify that the
foldi ng sty le matches the
foldi ng sty le on the Folder
Operator Control Panel.
(Continued)
1. Open Web PMT.
2. Click
Printer Defaults
.
3. Click Processing Defaults.
4. Click Finishing.
5. Ensure that a Finisher is
displayed in the
Finisher
Model
field.
6. Check that the
Title
Block Locati on
selection
match the t itle block
location on t he file.
1. Access the driver
Properties
window.
Click
Start
>
Settings
>
Printers
.
Right mouse cl ick on the
AccXES Printer icon.
2. Click on
Properties
.
3. Click on the
Job
tab.
4. Click on
Settings
button
next to the
Finishing
field.
(Continued)
1. Access the driver
Properties
window.
Click
Start
>
Settings
>
Printers
.
Right mouse cl ick on the
AccXES Printer icon.
2. Click on
Properties
.
3. Click on the
Job
tab.
4. Click on
Settings
button
next to the
Finishing
field.
(Continued)
Page 17

XES Synergix 8825/8830/8855 Digital Solution Folding Supplement 11
Solutions AccXES Client Tools Web PMT
Windows Optimized
HP-GL/2 Driver
(95/98/NT 4.0/2000)
Postscript Driver
6. Check in the
Title Block
fiel d. Check that the title
block locat ion on the fi le
is the same as indicated.
Note: If the job contains m or e
than one file you must ver ify
the title block locat ion for each
file.
5. Check in the
Title Block:
fiel d. Check that the title
block locat ion on the fi le
is the same as indicated.
5. Check in the
Title Block:
fiel d. Check that the title
block locat ion on the fi le
is the same as indicated.
7
Verify that the plot
file rotation is set to
Auto
1. Double click the f ile within
the
Documents:
window.
2. Click the
Transform
tab.
3. Check the box labeled
Auto Rotate
.
4. Send the print job again.
1. Open Web PMT.
2. Click
Printer Defaults
.
3. Click
Processing
Defaults
.
4. Click
Transform
on the
left- hand si de of the page.
5. Click the
Auto
radio
button for r otation.
6. Click the
Update Printer
button.
7. Send the print job again.
1. Access the driver
Properties
window.
Click Start > Settings >
Printers.
Right mouse cl ick on the
AccXES Printer icon.
2. Click on
Properties
.
3. Click the
Graphics
tab.
4. Check that the
Rotation
is set to
Auto
.
5. Send the print job again.
Page 18

XES Synergix 8825/8830/8855 Digital Solution Folding Supplement 12
Solutions AccXES Client Tools Web PMT
Windows Optimized
HP-GL/2 Driver
(95/98/NT 4.0/2000)
Postscript Driver
8
Verify that the
orientation of the
image is consistent
with the specified
title block location.
1. Double click the f ile within
the
Documents:
window.
2. Select the
Transform
tab.
3. Uncheck the box entitl ed
Auto Rotate
4. Select 0 rotation in the
Rotation
drop-down box.
5. Select the
Setup
Tab.
6. Using the
Media Size:
pull-down arrow, select
the widest roll t hat is
installed in the printer.
(E.g. if a 36" roll is the
widest roll installed, select
36 Inch Roll. )
7. Send the pri nt job again
using the
Folder Bypass
as the
Folding Method
on the
Job
tab.
8. Check the posit ion of the
title block on the copy.
9. Access the
Title Block
fiel d on the
Finishing
tab.
Set the title block l oc ation
based on the location of
the title block as it would
be when you read copy.
10. Run the f old job again.
1. Open WebPMT.
2. Click
Printer Defaults
at
the top of t he page.
3. Click
Processing
Defaults
on the left-hand
side of the page.
4. Click
Transform
on the
left- hand si de of the page.
5. Click the
Fixed
radio
button and set 0
degrees
.
6. Click
Media
.
7. Using the
Media Source:
pull-down arrow, select
the widest roll t hat is
installed in the printer.
(E.g. if a 36" roll is the
widest roll installed, select
36 Inch Roll. )
8. Select
Update Printer
.
9. Send the pri nt job again
using the Folder By pass
10. Check the position of the
title block on the copy.
11. Access t he
Title Block
fiel d in the
Finishing
selection. Set the title
block locat ion based on
the locati on of the title
block as it would be when
you read copy.
12. Run the f old job again
1. Access the driver
Properties
window.
Click
Start
>
Settings
>
Printers
.
Right mouse cl ick on the
AccXES Printer icon.
2. Click on
Properties
.
3. Click the
Graphics
tab.
4. Using the
Rotation
pulldown arrow set the
rotation to 0.
5. Click the
Paper
tab.
Wi n 200 only: Clic k
Printing Preferences
6. Clic k the Application
media size pull-down and
select Custom (yy.y X yy).
7. In the Or ientation field,
set the orientation to
match the file bei ng
printed.
8. Click the
Media Sizes…
button.
9. Using the
Media
mapping:
pull-down
arrow, select the largest
width roll.
10. Send the print job again
using Folder Bypass.
11. Check the position of the
Title B lock on the copy.
(Continued)
Page 19

XES Synergix 8825/8830/8855 Digital Solution Folding Supplement 13
Solutions AccXES Client Tools Web PMT
Windows Optimized
HP-GL/2 Driver
(95/98/NT 4.0/2000)
Postscript Driver
12. Access the Ti tle Block
fiel d in the
Properties
>
Job
>
Settings>Finishing
selection. Set the title
block locat ion based on
the locati on of the title
block as it would be when
you read the copy.
13. Run the f old job again.
Page 20

XES Synergix 8825/8830/8855 Digital Solution Folding Supplement 14
Solutions AccXES Client Tools Web PMT
Windows Optimized
HP-GL/2 Driver
(95/98/NT 4.0/2000)
Postscript Driver
9
Define the output
print size.
1. Double cl ick the file within
the
Documents:
window.
2. Select the
Setup
Tab.
3. Using the
Media Size:
pull-down arrow, select a
size (E.G.: ANSI B, ANSI
C, ARCH C, etc.) that is
the same size as the f ile
to be printed.
4. Send the pri nt job again
1. Double cl ick the file within
the
Documents:
window.
2. Select the
Setup
Tab.
3. Using the
Media Size:
pull-down arrow, select a
size (E.G.: ANSI B, ANSI
C, ARCH C, etc.) that is
the same size as the f ile
to be printed.
4. Send the pri nt job again
1. Access the driver
Properties
window.
Click
Start
>
Settings
>
Printers
.
Right mouse cl ick on the
AccXES Printer icon.
2. Click on
Properties
.
3. Click the
Paper
tab.
4. Click the
Media Sizes…
button.
5. Using the
Media
mapping:
pull-down
arrow select a size (E.G.:
ANSI B, ANSI C, ARCH
C, etc.) that is the same
size as the file to be
printed.
6. Send the pri nt job again.
1. Access the driver
Properties
window.
Click
Start
>
Settings
>
Printers
.
Right mouse cl ick on the
AccXES Printer icon.
2. Click on
Properties
.
3. Click the
Paper
tab.
4. Use on the
Paper size:
scroll bar or arrows, and
select a si ze (E.G.: ANSI
B, ANSI C, ARCH C, etc.)
that is the same siz e as
the file to be printed.
5. Send the pri nt job again.
Page 21

XES Synergix 8825/8830/8855 Digital Solution Folding Supplement 15
Sort Bin Overflow
Bin Overflow
Bin ov er flow can only occur on finishing device wit h multiple Sort Bins.
When Bin 1 reaches its capacity the remaini ng pr ints will begin stacking in
the next available bin. In order for the print s to flow into the next bin, the Bin
selection on your Client Tool or pr int driver must be set to
Default, Don’t
Care
, or No
Preference
. The name of this of t his selection varies with the
driv er or c lient tool being used.
Figure 12. AccXES Client Tool Finishing Window
Figure 13. WebPMT Finishing Window
Figure 14. Wi n 95/98 and NT 4.0/2000 Finishing Window
Page 22

XES Synergix 8825/8830/8855 Digital Solution Folding Supplement 16
End of Media Roll
Out of Media
An out of media situation will affect the folding of a print. The resulting affect
is dependent on the type of printer bei ng used. There could be a print that is
the wrong length, or ther e c ould be and extra copy of a print.
If an XES Synergix 8825/8830 Digital Solution is being used, look for an
extra page in the folded stack then run the print again.
If an XES Synergix 8855 Digi tal Solution is being used, look for a short sheet
in the folded stack then run the print again.
It is recom mended that media rolls that ar e glued or taped to the core be
used to prevent this. Xerox Engineer ing Systems media meets these
requirement s and i s rec ommended for use in the XES Synergix 8825/8830
Digital S olution and Synergix 8855 Digital Solution.
Page 23

XES Synergix 8825/8830/8855 Digital Solution Folding Supplement 17
Adding a Folder to a Work
Station
Client Tool or Print Driver With Bidirectional Capability
Client Tools and Print drivers that have bi-dir ec tional com municati ons
capability will automatically update the fini shi ng inform ation when a folder is
added or updated. However, to do this the bi- directional feature must be
enabled and the
Refresh printer configuration, Refresh on op en
must be
enabled.
Client Tool or Print Driver Without Bidirectional Capability
Client Tools and Print Drivers that do not have bi-directional
communications capabilities must be updated using the Finisher File Creator
executable file (xesfin.exe). This file is found on the Xerox Engineer ing
Systems WEB site, www.xes.com.
Perform the following procedure to download xesfin.exe.
1. On the WEB site, click on
Support>Downloads
, then cli c k on the
AccXES Family Products
hyperlink.
2. Select Finisher File Creator, then Download Finisher F ile Cr eator.
3. Select or c r eate a directory t o downl oad the file, xesfin.exe, int o. Make
note of where it downloads too bec ause you will need to reference it
later in t he pr oc edur e.
4. Click
Start>Programs>Command Prompt.
The
MS-DOS Prompt
or
Command Prompt
window will open (Figure 1).
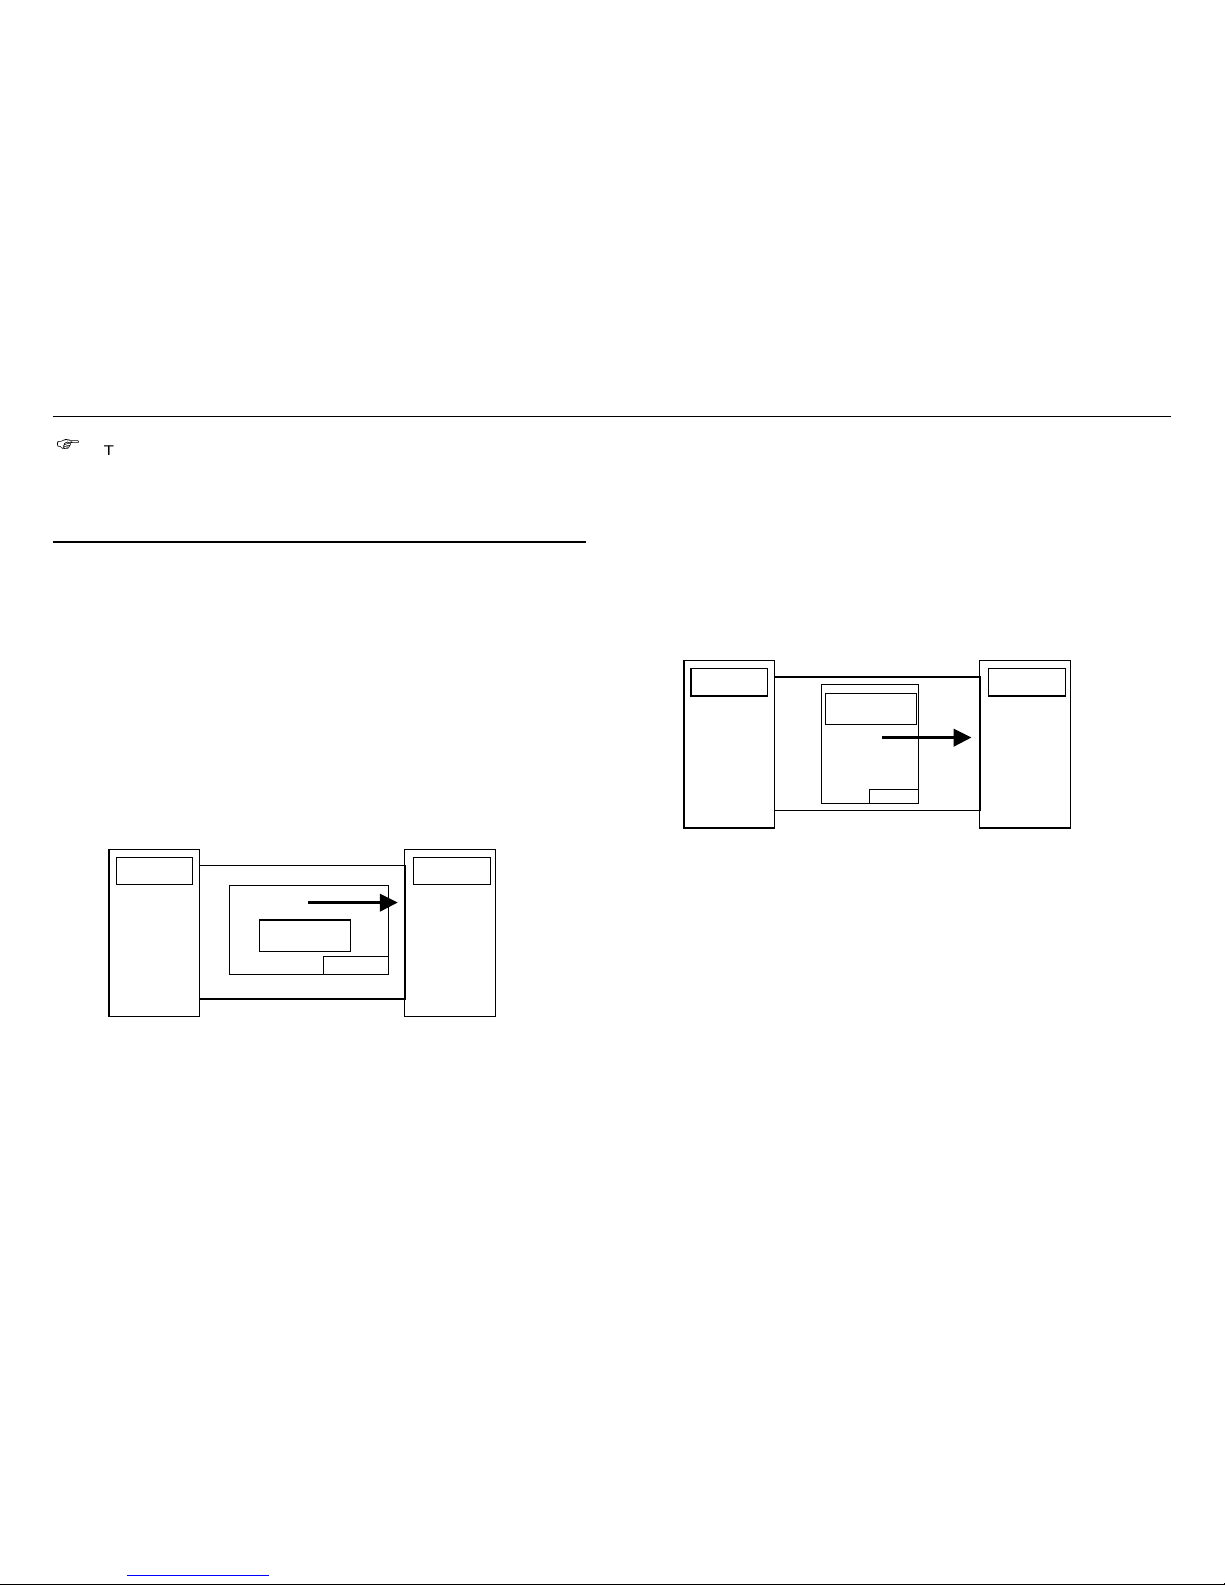
5. (Figur e 1) : Type in the di r ec tory path to where the x esfin.exe file i s
located as indic ated by the arrows shown in this example. Press
Enter
to
display the m essage.
Figure 1. E xample of Accessing th e Finisher File Creator
Page 24

XES Synergix 8825/8830/8855 Digital Solution Folding Supplement 18
Client Tool or Print Driver Without Bi-directional
Capability
(Continued)
Note: To do the next s tep the Folder must be connec ted to the
Printer, and the f older pr inter and controller are sw itched on.
6. Follow the
Instructions:
as shown in the Prompt window (Figur e 2) and
type in xesfin.exe followed by the I P addr ess then a name for your folder
as indicated by the ar r ow.
The example shown:
C:\driver>xesfin 13.1.105.30 Folder1
Then press
Enter
. A fi nisher fil e with the name you chose (e.g. : Folder1)
will be saved to the same directory that you saved the xesfin.exe file in.
7. Refer to the Client Tool or Print Dr iver User Documentation, and follow
the instructions on how to add a finishing device.
Figure 2. Creat ing the Fi nisher File
Page 25

Page 26

Prepared by:
Xerox Corporation
Global Knowledge & Language S er vices
800 Phillips Road
Building 845- 17S
Webster, New York 14580- 9791
USA
©XESystems Inc. 2000. All right s reserved.
Printed in the United States of Americ a
Xerox, XES, The Document Company, and the identifying product names
and numbers are tradem ar ks of the Xerox Corporation
701P36595 01/2001
 Loading...