

Page 1

WorkCentre Pro 412
User Guide
708P86380
Page 2

Prepared by:
The Document Company Xerox
GKLS European Operations
Bessemer Road
Welwyn Garden City
Hertfordshire
AL7 1HE
ENGLAND
©2001 by Xerox Corporation. All rights reserved.
Copyright protection claimed includes all forms and matters of
copyrighted material and information now allowed by statutory
or judicial law or hereinafter granted, including without
limitations, material generated from the software programs
which are displayed on the screen, such as icons, screen
displays, looks etc.
®
Xerox
, The Document Company
products mentioned in this publication are trademarks of Xerox
Corporation. Product names and trademarks of other
companies are hereby acknowled
Changes are periodically made to this document. Changes,
technical inaccuracies, and typographical errors will be
corrected in subsequent e dit ion s.
®
, the digital X® and all Xerox
ged.
Page 3

Table of Contents
1 About This Guide...................................................................1-1
Finding Information in the User Guide.....................................................1-2
Customer Support......................................................................................1-4
Conventions ...............................................................................................1-5
Orientation....................................................................................................1-5
Bracket Text Typeface .................................................................................1-7
Italic Typeface..............................................................................................1-7
Quick Pathway .............................................................................................1-7
Notes............................................................................................................1-8
Hints.............................................................................................................1-8
Cautions.......................................................................................................1-8
Warnings......................................................................................................1-8
Related Information Sources ....................................................................1-9
2 Product Overview..................................................................2-1
Unpacking...................................................................................................2-2
Identifying the Machine Components ......................................................2-4
Front View....................................................................................................2-4
Rear View.....................................................................................................2-5
Control Panel Components and Keys......................................................2-6
Entering Characters Using the Numeric Keypad ...................................... ...2- 8
Making Connections................................................................................2-11
Installing Drum and Toner Cartridges....................................................2-14
Loading Paper ..........................................................................................2-18
Setting the Language...............................................................................2-22
Setting the Local ID and Name ...............................................................2-23
Setting the Date and Time.......................................................................2-25
Installing Software ........... ....... ...... ....... ...... ....... ...... ...... ...........................2-26
3 Copy........................................................................................3-1
Copying Procedure....................................................................................3-2
1. Press the Copy/Fax/Scan Key.................................................................3-2
Xerox WorkCentre Pro 412 User Guide i
Page 4

2. Select the Paper Supply...........................................................................3-3
3. Load the Originals....................................................................................3-4
4. Select the Copy Features.........................................................................3-7
5. Enter the Quantity................. ...... ....... ...... ....... ...... ...... ....... ......................3-7
6. Press Start ...............................................................................................3-8
Standard Copy Features............................................................................3-9
Lighten/Darken.............................................................................................3-9
Original Type..............................................................................................3-10
2-Sided Copy .............................................................................................3-11
Reduce/Enlarge .........................................................................................3-12
Output ........................................................................................................3-12
Resetting Copy Features ...........................................................................3-13
Special Copy Features.................. ....... ...... ....... ...... ...... ....... ...... ....... ...... .3-14
Auto Fit.......................................................................................................3-14
Clone..........................................................................................................3-15
4 Print.........................................................................................4-1
Printing a Document from an Application ...............................................4-2
Printer Settings ..........................................................................................4-3
Accessing Printer Settings ........................... ....... ...... ...... ....... ...... ....... ...... ...4-3
Printer Properties Tabs ................................................................................4-5
5 Fax...........................................................................................5-1
Faxing Procedure.......................................................................................5-2
1. Load the Originals....................................................................................5-2
2. Press the Copy/Fax/Scan Key.................................................................5-5
3. Select the Fax Features...........................................................................5-6
4. Enter the Fax Number.............................. ....... ...... ...................................5-6
5. Press Start ...............................................................................................5-7
6. Fax Job Management ..............................................................................5-7
Dialing Methods ................................... ...... ....... ...... ...... ....... ...... ....... ...... ...5-9
Keypad Dialing.............................................................................................5-9
Speed Dialing.............................................................................................5-10
Group Dialing (for Multi-Address Transmission)........................................5-12
Manual Group Dialing ................................................................................5-14
Manual Dialing ...........................................................................................5-16
Redial.........................................................................................................5-16
Sending a Fax After Talking.......................................................................5-17
Receiving a Fax........................................................................................5-18
Receive Modes ..........................................................................................5-18
ii Xerox WorkCentre Pro 412 User Guide
Page 5

Standard Fax Features ............................................................................5-20
Resolution ..................................................................................................5-20
Scan Options..............................................................................................5-21
Original Type..............................................................................................5-21
Lighten/Darken...........................................................................................5-22
Resetting Fax Features..............................................................................5-22
Advanced Fax Features...........................................................................5-23
Sending a Color Fax ..................................................................................5-23
Delay Send.................................................................................................5-24
Priority Sending..........................................................................................5-27
Polling ........................................................................................................5-28
Canceling a Scheduled Operation .............................................................5-32
Fax Reports ..............................................................................................5-33
6 Scan........................................................................................6-1
The WorkCentre Pro 412 TWAIN Scanner Program................................6-2
Scanning Procedure ..................................................................................6-3
1. Load the Originals....................................................................................6-3
2. Run the ScanToPC Program ...................................................................6-6
3. Press the Copy/Fax/Scan Key.................................................................6-6
4. Select the Scan Features.........................................................................6-7
5. Press Start ...............................................................................................6-7
Configuring the Default Scan Application...............................................6-8
Standard Scan Features............................................................................6-9
Resolution ....................................................................................................6-9
Scan Options................................................................................................6-9
Original Type..............................................................................................6-10
Lighten/Darken...........................................................................................6-11
Reduce/Enlarge .........................................................................................6-12
Resetting Scan Features............................................................................6-12
Advanced Scanning.................................................................................6-13
7 Maintaining the Product........................................................7-1
Cleaning......................................................................................................7-2
Cleaning the WorkCentre Pro 412 .. ....... ...... ....... .........................................7- 2
Cleaning the Document Glass and Cover....................................................7-3
Control Panel and LCD Display ................... ................................................ 7- 3
Document Feeder and Output Tray .................... ...... ...... ....... ...... ................7-3
Ordering Supplies......................................................................................7-4
Customer Replaceable Units ....................................................................7-5
Xerox WorkCentre Pro 412 User Guide iii
Page 6

Toner Cartridge............................................ ....... ...... ...... ....... ...... ....... ...... ...7- 5
Drum Cartridge............. ...... ....... ...... ....... ...... ....... ...... ...... ...........................7-11
Loading Media..........................................................................................7-14
Using the Paper Cassette..........................................................................7-15
Using the Bypass Tray...............................................................................7-19
Media Guidelines .......................................................................................7-23
8 Basic Troubleshooting..........................................................8-1
Document Jams .........................................................................................8-2
Input Misfeed................................................................................................8-2
Exit Misfeed..................................................................................................8-3
Roller Misfeed ..............................................................................................8-3
Paper Jams.................................................................................................8-4
Paper Feed Area..........................................................................................8-4
Fuser Area ...................................................................................................8-6
Paper Exit Area............................................................................................8-8
Duplex Jam................................................................................................8-11
Bypass Jam................................................................................................8-11
Calling for Service............ ....... ...... ....... ...... ....... ...... ...... ...........................8-12
Customer Support Telephone Number ......................................................8-12
LCD Error Messages................................................................................8-13
Solving Problems.....................................................................................8-16
Copier Problems Solution Chart.................................................................8-16
Printing Problems Solution Chart...............................................................8-18
Faxing Problems Solution Chart ................................................................8-21
Resetting the Machine.............................................................................8-23
9 System Setup.........................................................................9-1
System Setup .............................................................................................9-2
System Setup Options ....... ....... ...... ....... ...... ....... ...... ...... .............................9-2
Changing the System Setup Options...........................................................9-4
Adjusting Speaker Volume........................................................................9-5
System Data Settings ................................................................................9-6
System Data Options ......... ....... ...... ....... ...... ....... .........................................9- 6
Setting System Data Options.......................................................................9-8
Reports........................................................................................................9-9
Clearing Memory......................................................................................9-11
ControlCentre 5.0.....................................................................................9-12
Installing ControlCentre 5.0................................. ...... ...... ....... ...... ....... ...... .9-12
iv Xerox WorkCentre Pro 412 User Guide
Page 7

Running ControlCentre 5.0 ........................................................................9-12
Using ControlCentre 5.0.............................................................................9-13
10 Appendix A - Safety Notes...................................................A-1
Safety Standards......................................................................................... A-3
Regulatory Information............................................................................. A-4
Laser Safety................................................................................................ A-5
The Electricity at Work Regulations - UK ONLY ......................................... A-6
Certification to 1999/5/EC .. ....... ...... ....................................... ...... ....... ...... .. A-9
FCC Regulations....................................................................................... A-10
Canadian Certification............................................................................... A-13
Environmental Compliance.................................................................... A-14
Energy Star®............................................................................................. A-14
11 Appendix B - Specifications................................................B-1
Printer Specification .. ...... ....... ...... ....... ...... ....... ...... ...... ....... ...... ...............B-2
Fax Specification.......................................................................................B-3
Scanner and Copier Specification........................................................... B-4
General Specification ............................................................................... B-5
Paper Specification................. ...... ....... ............................................. ........B-6
12 Index ..............................................................................Index - i
Xerox WorkCentre Pro 412 User Guide v
Page 8

vi Xerox WorkCentre Pro 412 User Guide
Page 9

1 About This Guide
Thank you for purchasing the WorkCentre Pro 412. The
WorkCentre Pro 412 is designed for ease of use, but to use
your machine to its fullest potential, take some time to read the
User Documentation.
About This Guide
Xerox WorkCentre Pro 412 User Guide Page 1-1
Page 10

Finding Information in the User Guide
The User Guide contains the following sections:
- Table of Contents
Use the Table of Contents to find topics easily.
- About this Guide - Chapter 1
Describes the information in this User Guide.
- Product Overview - Chapter 2
Describes the system and hardware features of the
machine and provides instructions for unpacking and
setting up your new machine ready for use.
- Copy - Chapter 3
Describes the procedures for loading and copying
originals. It also includes instructions for using the copy
features available.
- Print - Chapter 4
Describes the procedure for printing from a PC and an
overview of the printer driver features.
- Fax - Chapter 5
Describes the procedures for sending and receiving
faxes. It also includes instructions for using all the fax
features and functions available.
- Scan - Chapter 6
Describes the procedures for using the Scan function
available on your machine.
- Maintaining the Product - Chapter 7
Provides maintenance and cleaning procedures
necessary to ensure optimum product performance.
Includes instruction s for orderi ng and replacing
consumables.
- Basic Troubleshooting - Chapter 8
Guides the user through problem solving and provides a
list of error messages and recommended corrective
actions.
Page 1-2 Xerox WorkCentre Pro 412 User Guide
Page 11

- System Setup - Chapter 9
Provides instructions for programming the default
system settings available on the machine. Also provides
information about setting up and using ControlCentre
5.0.
- Safety Notes - Appendix A
Provides safety procedures and approval certification
information for the product.
- Specifications - Appendix B
Provides information on the machine specifications. Use
this chapter to ensure all materials being used are within
specification.
- Index
Refer to the Index to locate specific information.
About This Guide
Xerox WorkCentre Pro 412 User Guide Page 1-3
Page 12
Customer Support
If after product installation further assistance is required,
please call our experts at the Xerox Welcome Centre or your
local representative. When telephoning please quote the
machine serial number. Use the space below to make a note
of the machine serial number:
# _______________________________________
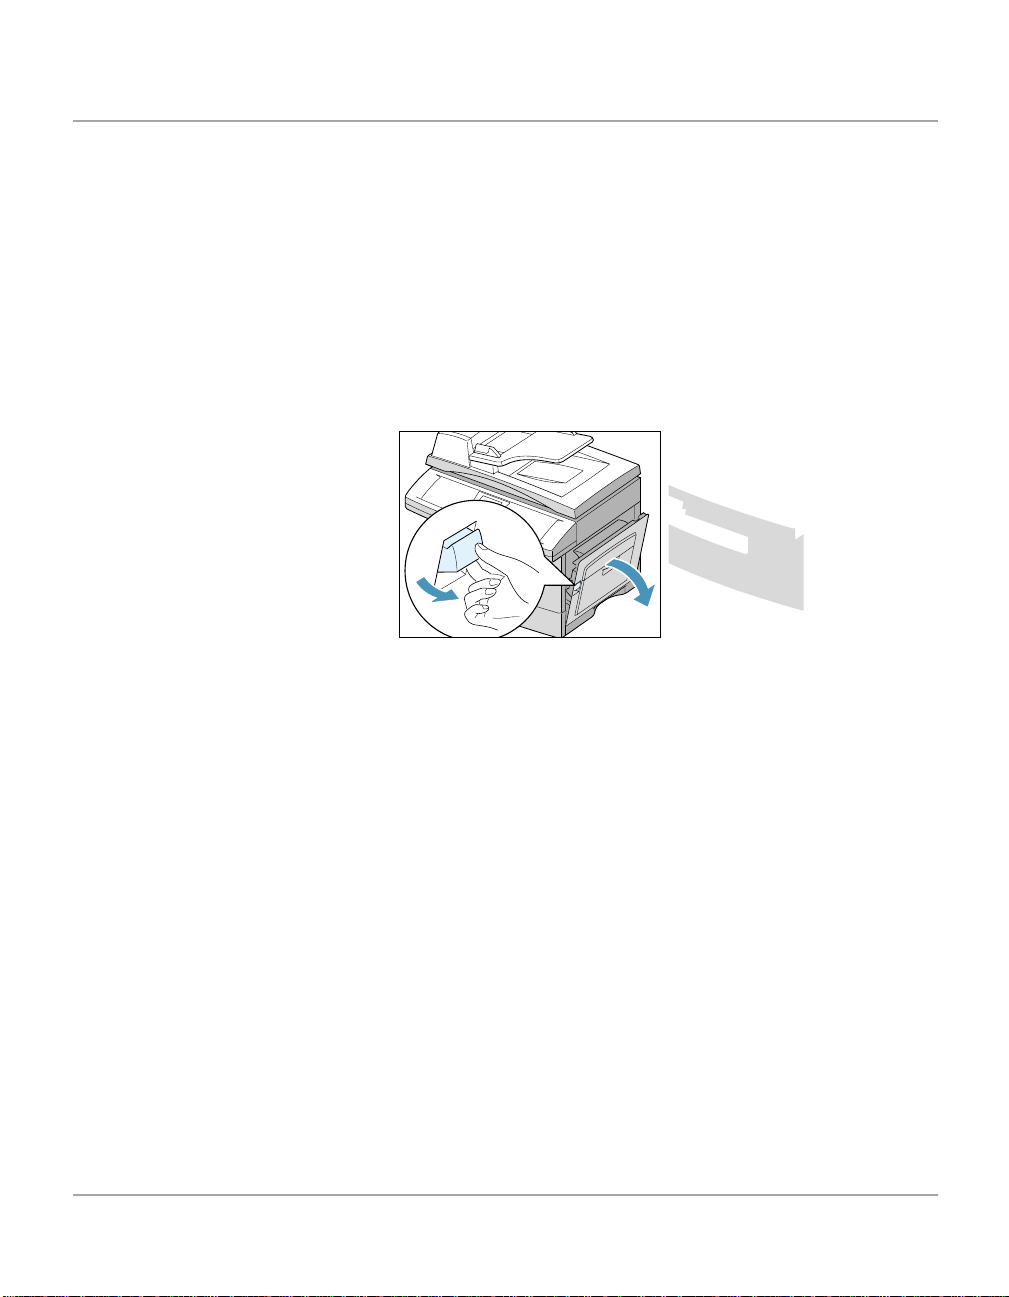
The serial number is located on the machine, behind the front
door. To access the serial number, open the side cover using
the release latch and then open the front door.
You will be provided with the Xerox Welcome Centre or local
representative telephone number when the WorkCentre Pro
412 is installed. For convenience and future reference, please
record the telephone number in the space below:
Welcome Centre or local representative Telephone Number:
# _______________________________________
Xerox US Welcome Center: 1-800- 821 -2797
Xerox Canada Welcome Center: 1-80 0- 93-XE RO X
(1-800-939-3769)
Page 1-4 Xerox WorkCentre Pro 412 User Guide
Page 13
Conventions
Orientation
Throughout this User Guide, there are some terms that are
used interchangeably:
½
Document is synonymous with original.
½
Button is synonymous with key.
½
Page is synonymous with sheet.
½
WorkCentre Pro 412 is synonymous with the machine.
There are two types of orientation referred to in this guide,
Image Orientation and Feed Orientation.
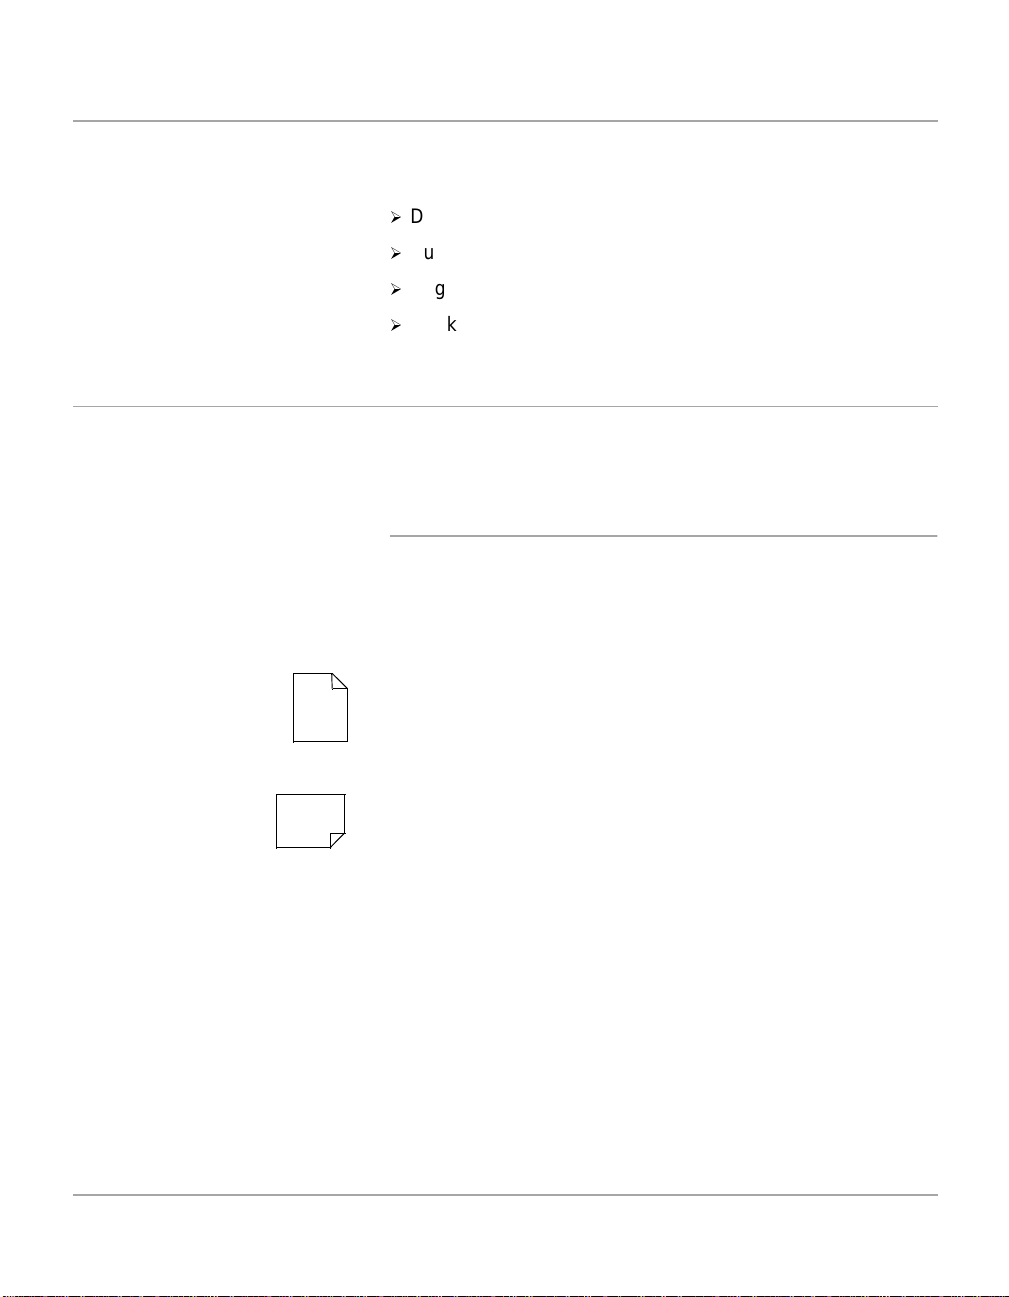
Image Orientation
Image Orientation describes the direction of the image on the
page. There are two types of image orientation:
Portrait
About This Guide
The image is portrait when vertically aligned with the longest
A
A
Xerox WorkCentre Pro 412 User Guide Page 1-5
edge of the paper.
Landscape
The image is landscape when vertically aligned with the
shortest edge of the paper.
Page 14
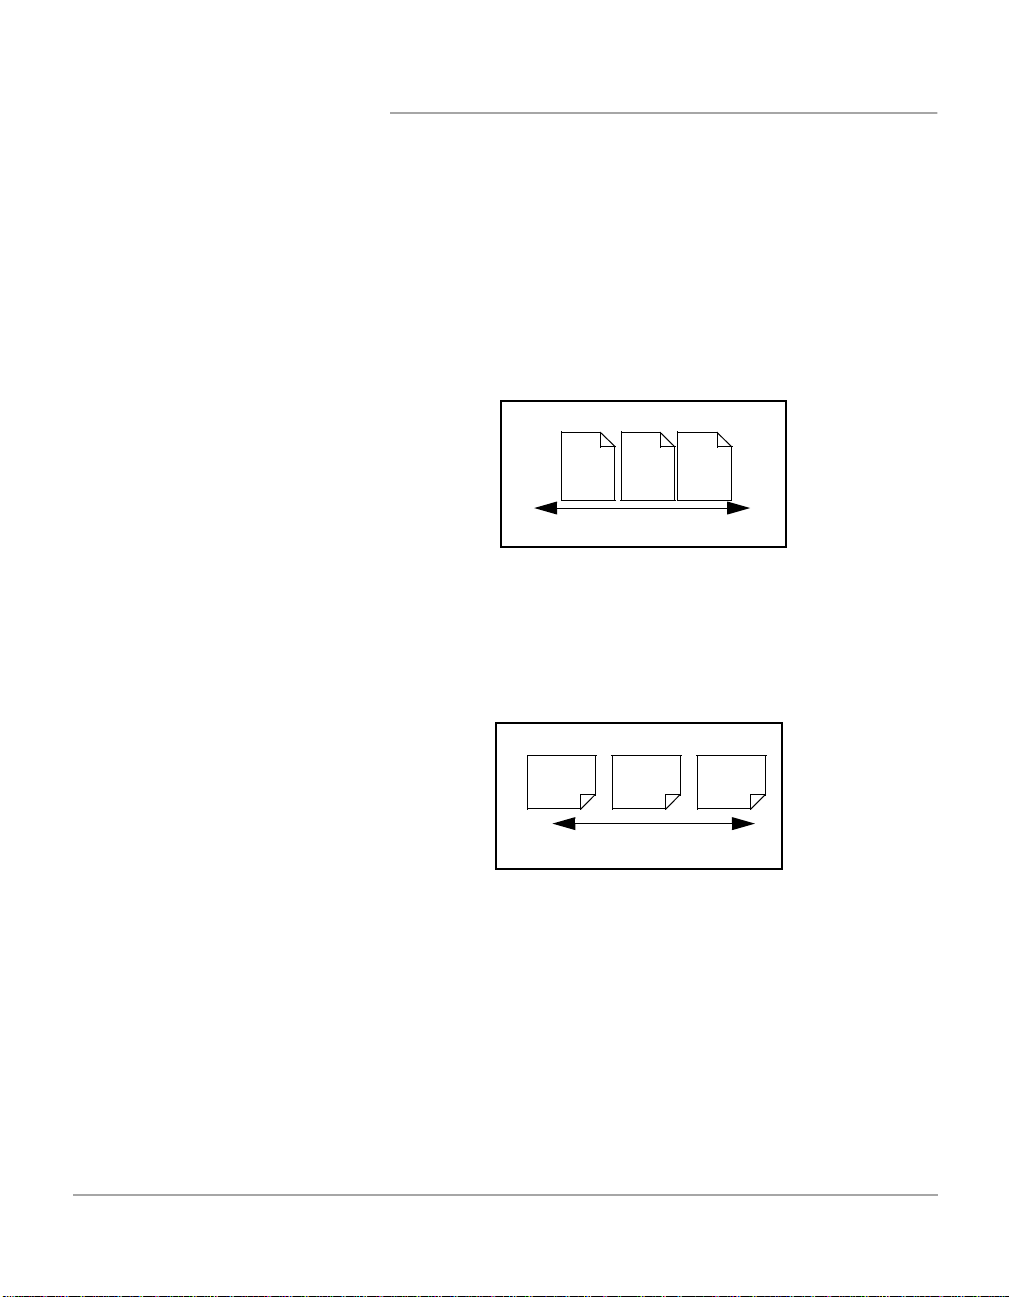
Feed Orientation
Feed Orientation describes the direction the originals and the
media is fed through the machine. It is recommended the feed
orientation of the originals matches that of the media.
There are two types of feed orientation:
Long Edge Feed (LEF)
When observed from the front of the machine, originals or
media with the long edges to the left and right of the document
feeder or paper tray.
LEF Orientation
A
Original / Media Feed Direction
Short Edge Feed (SEF)
When observed from the front of the machine, originals or
media with the short edges to the left and right of the document
feeder or paper tray.
SEF Orientation
A
Original / Media Feed Direction
A
A
Page 1-6 Xerox WorkCentre Pro 412 User Guide
Page 15
Bracket Text Typeface
The [Bracket Text] typeface is used to emphasize the selection
of a feature or key. For example:
½
Press [Reduce/Enlarge] on the control panel repeatedly
until ‘REDUCE/ENLARGE’ displays on the LCD.
Italic Typeface
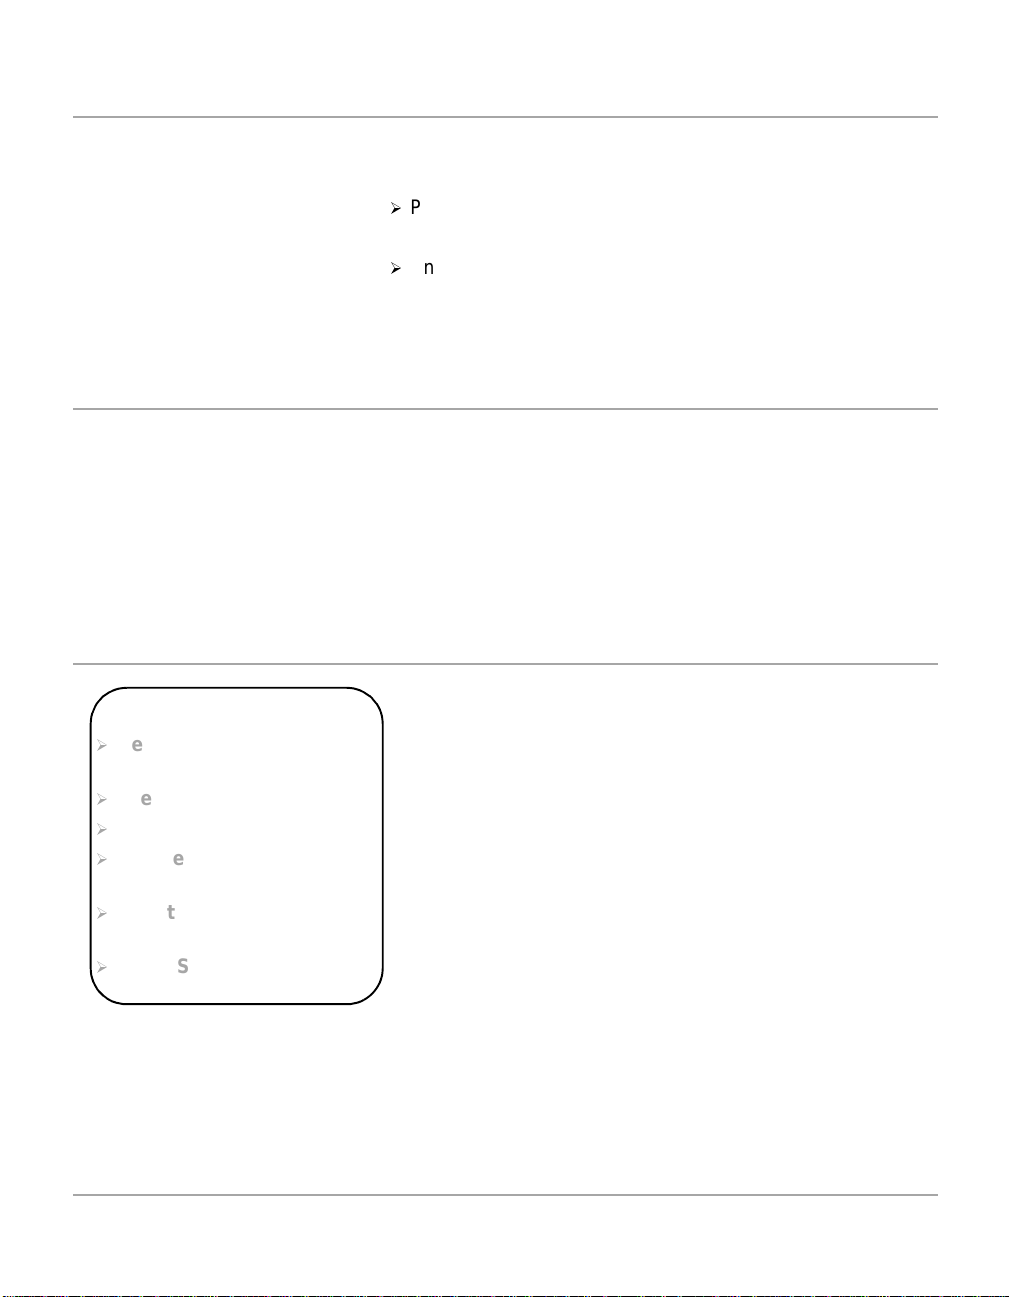
Quick Pathway
Quick Pathway
½
Press the Copy/Fax/Scan
Key.
½
Select the Paper Supply.
½
Load the Originals.
½
Choose the Copy features
required.
½
Enter the copy quantity
required.
½
Press [Start].
½
Enter the required percentage using the numeric keypad.
If you press [Clear/Clear All], the selected percentage
returns to 100%.
The Italic typeface is used to emphasize a word or phrase. For
example:
- Always follow safety procedures when operating the
equipment.
- There are several fax dialing methods available on your
WorkCentre Pro 412.
In addition to the step by step instructions available throughout
this User Guide, a summary of the steps is contained in the
Quick Pathway at the beginning of a chapter or section. After
becoming familiar with the procedures for a particular feature,
the Quick Pathway is a useful reminder of the steps required to
access a particular feature.
About This Guide
Xerox WorkCentre Pro 412 User Guide Page 1-7
Page 16
Notes
Hints
Cautions
Notes are statements that provide additional information. For
example:
NOTE: You cannot include one group dial number in another
group dial number.
Hints help users perform a task. For example:
HINT: For information about all the dialing methods available,
refer to the section “Dialing Methods” on page 5-9.
Cautions are statements that suggest mechanical damage
may be the result of an action. For example:
CAUTION:When cleaning the WorkCentre Pro 412, do not
use organic solvents or aerosol cleaners.
Warnings
Warnings are statements that alert users to the possibility of
personal injury. For example:
WARNING:This product must be connected to a
protective earthing circuit.
Page 1-8 Xerox WorkCentre Pro 412 User Guide
Page 17

Related Information Sources
Information available for the WorkCentre Pro 412 consists of:
-This User Guide
- The Quick Sta rt Gu id e
- The Installation Sheet
- The Customer Documentat ion CD
About This Guide
Xerox WorkCentre Pro 412 User Guide Page 1-9
Page 18

Page 1-10 Xerox WorkCentre Pro 412 User Guide
Page 19

2 Product Overview
Thank you for purchasing the WorkCentre Pro 412. This
product provides printing, copying, faxing and scanning
functionality.
This chapter provides an overview of your WorkCentre Pro 412
and step-by-step instructions for setting up your machine and
installi ng the software.
This chapter includes:
- Unpacking
- Identifying the Machine Compone nts
- Control Panel Components and Keys
- Making Connections
- Installing Drum and Toner Cartridges
- Loading Paper
- Setting the Language
- Setting the Local ID and Name
Product Overview
- Setting the Date and Time
- Installing Software
Xerox WorkCentre Pro 412 User Guide Page 2-1
Page 20
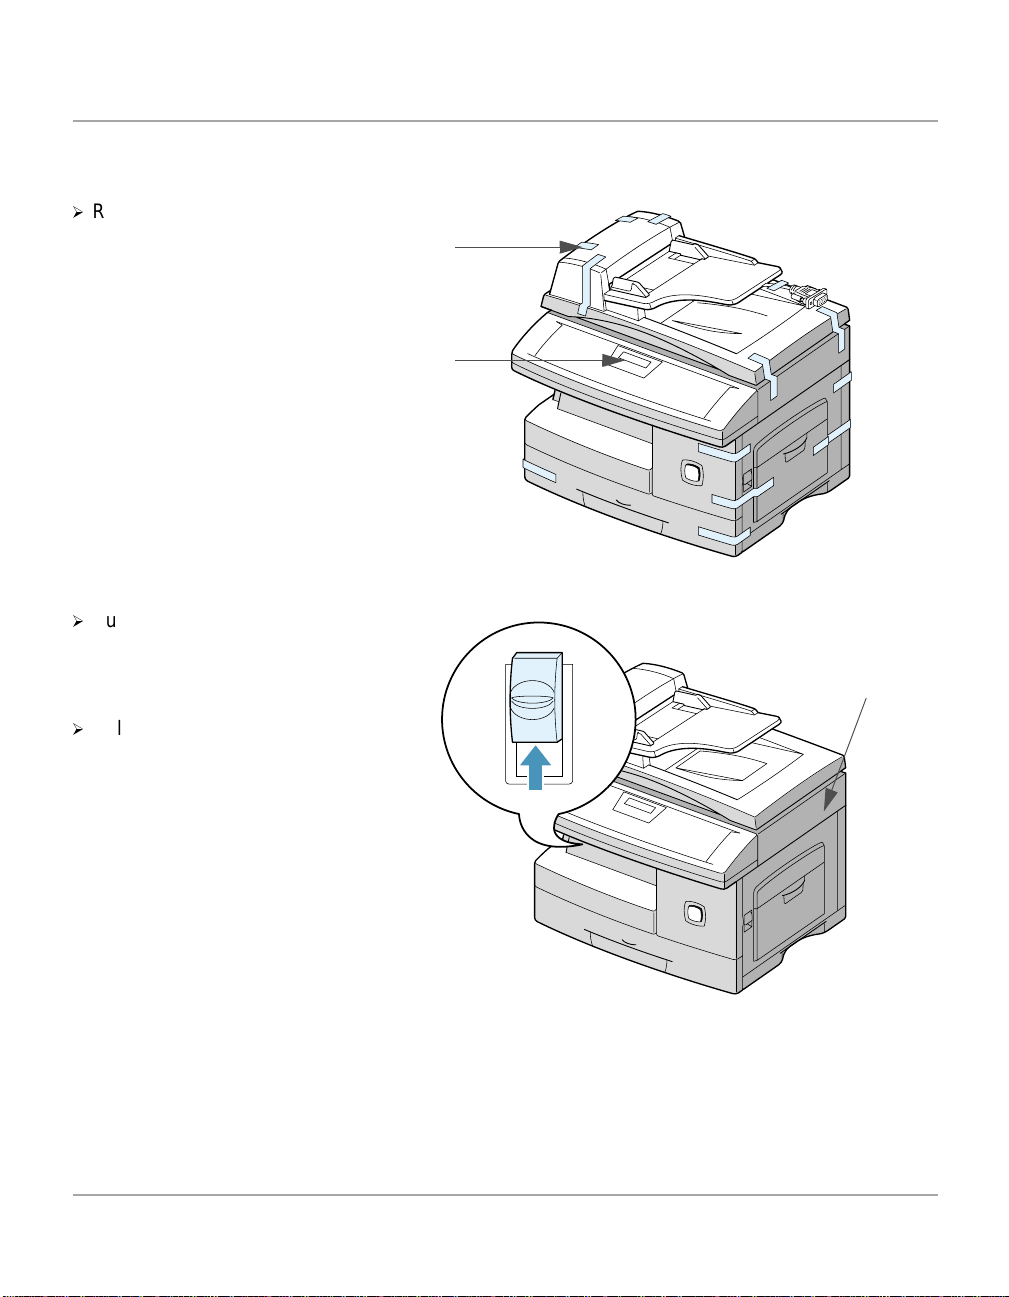
Unpacking
½
Remove the plastic film from
the LCD. Remove all tapes
and packing materials from
your WorkCentre Pro 412.
½
Pull the Scan unlock switch
located on the bottom of the
scanner module toward you
to unlock the scanner.
Using the instructions provided in this section, unpack your
Xerox WorkCentre Pro 412.
Tape
LCD
Scanner
module
½
Pull open the paper cassette
and remove the packing
material from the paper
cassette.
Page 2-2 Xerox WorkCentre Pro 412 User Guide
Page 21
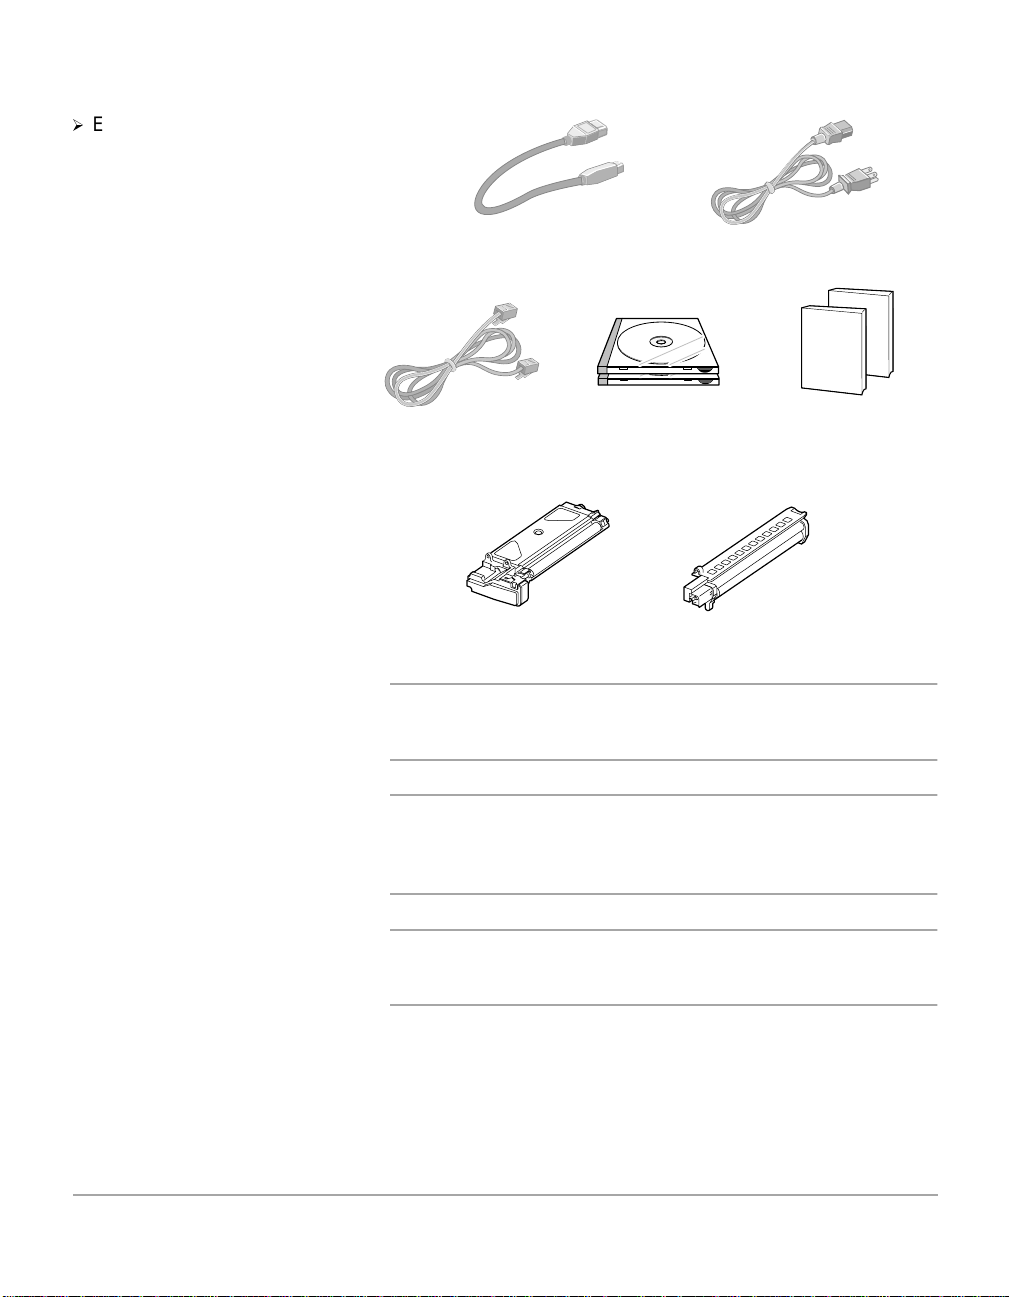
½
Ensure that you have the
following components:
USB Cable
AC Power Cord
Telephone Line Cord Software User
Documentation
Starter Toner Cartridge Drum Cartridge
NOTE: The WorkCentre Pro 412 is equipped with a USB port
and a parallel port for use with IBM Compatible computers
with a 100MHz Pentium or higher equivalent processor.
NOTE: You must be running Windows 98, Windows 2000 or
Windows Me to use the USB cable. Otherwise, use a parallel
cable. (Parallel or USB cables are not required for standalone
features.)
Product Overview
HINT: If using a parallel cable, ensure that it meets IEEE
standard 1284 specifications and is not longer than twelve
feet.
Xerox WorkCentre Pro 412 User Guide Page 2-3
Page 22
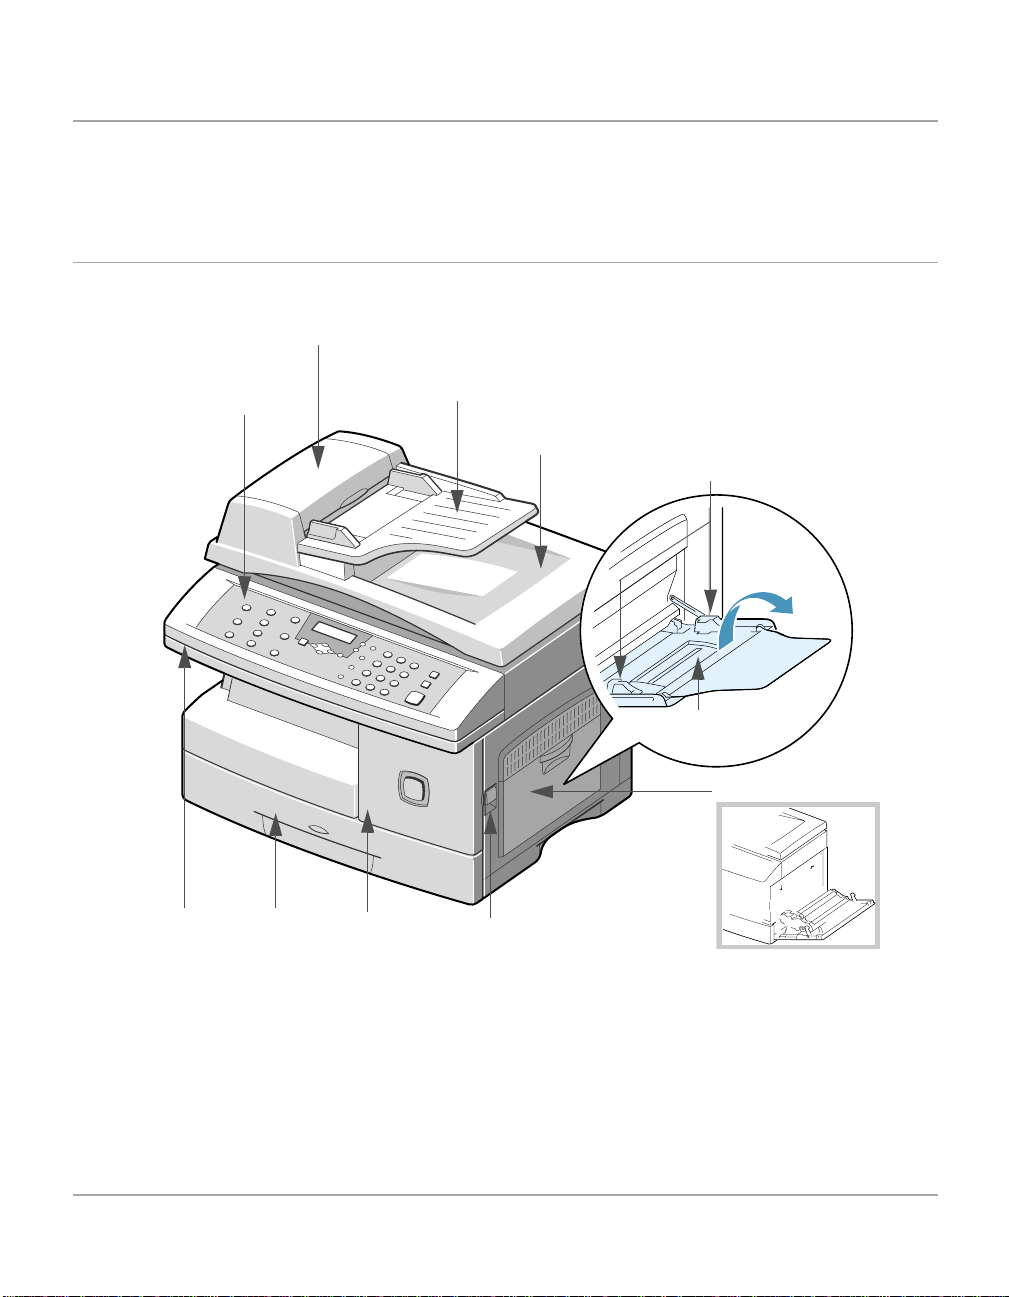
Identifying the Machine Components
Use the illustrations in this section, identify your WorkCentre
Pro 412 components and their location.
Front View
Automatic Document
Feeder
Control Panel
Document Guides
Document Input
Tray
Document Output
Tray
Paper Guides
Bypass Tray
Side Cover
Scanner
Module
Page 2-4 Xerox WorkCentre Pro 412 User Guide
Paper
Cassette
Front
Cover
Release Latch
Page 23
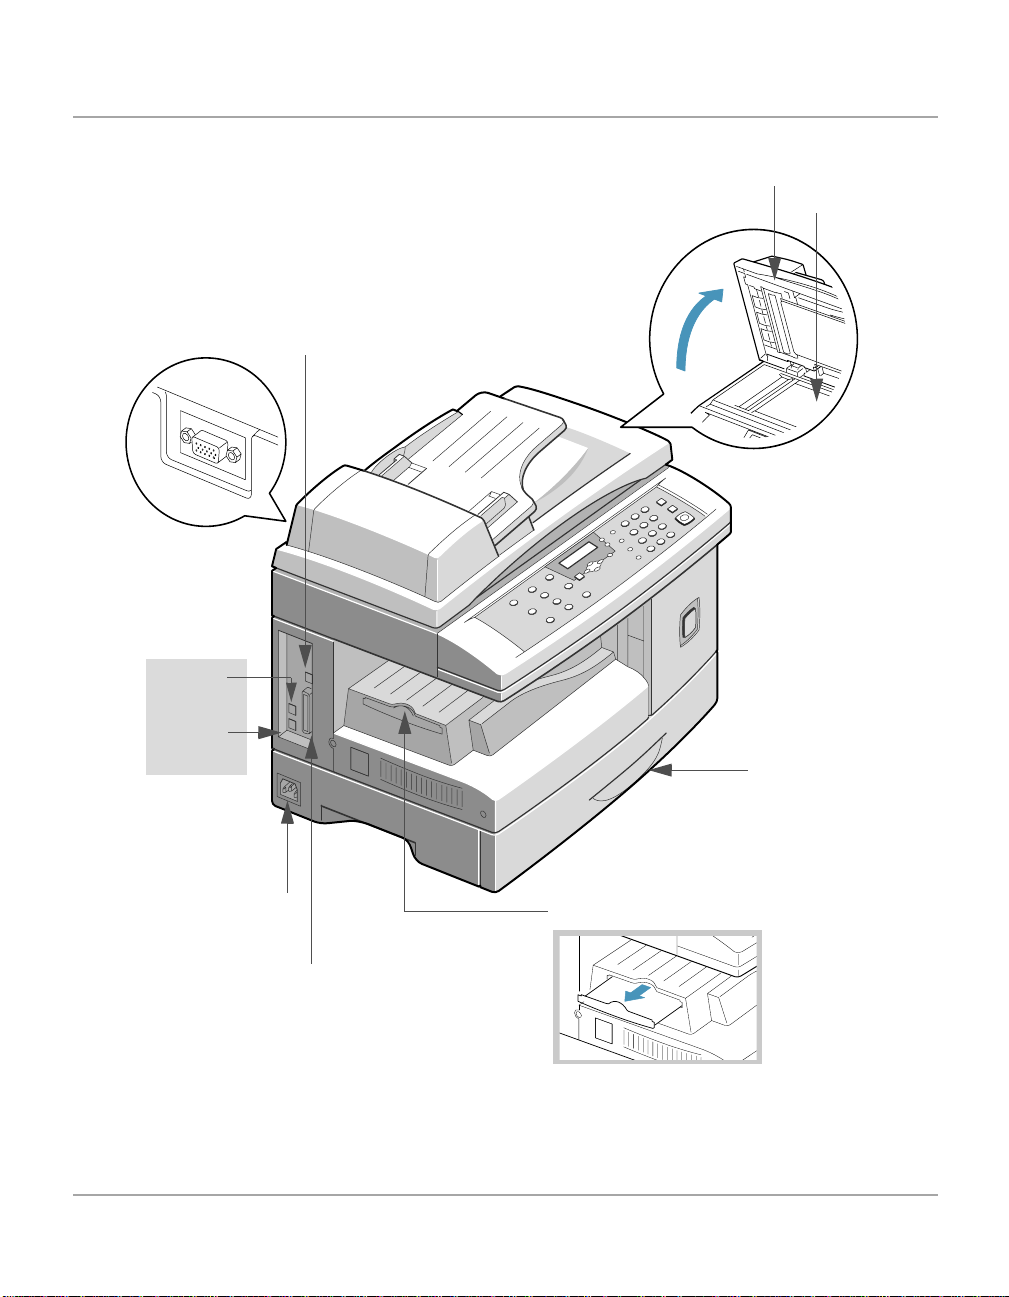
Rear View
Scan Module
Connector
Telephone
Connections
EXT.
LINE
USB Connector
Document Cover
Document
Glass
Product Overview
Paper
Cassette
AC Power Cord
Connector
Parallel Connector
Xerox WorkCentre Pro 412 User Guide Page 2-5
Paper Exit Extension
Page 24
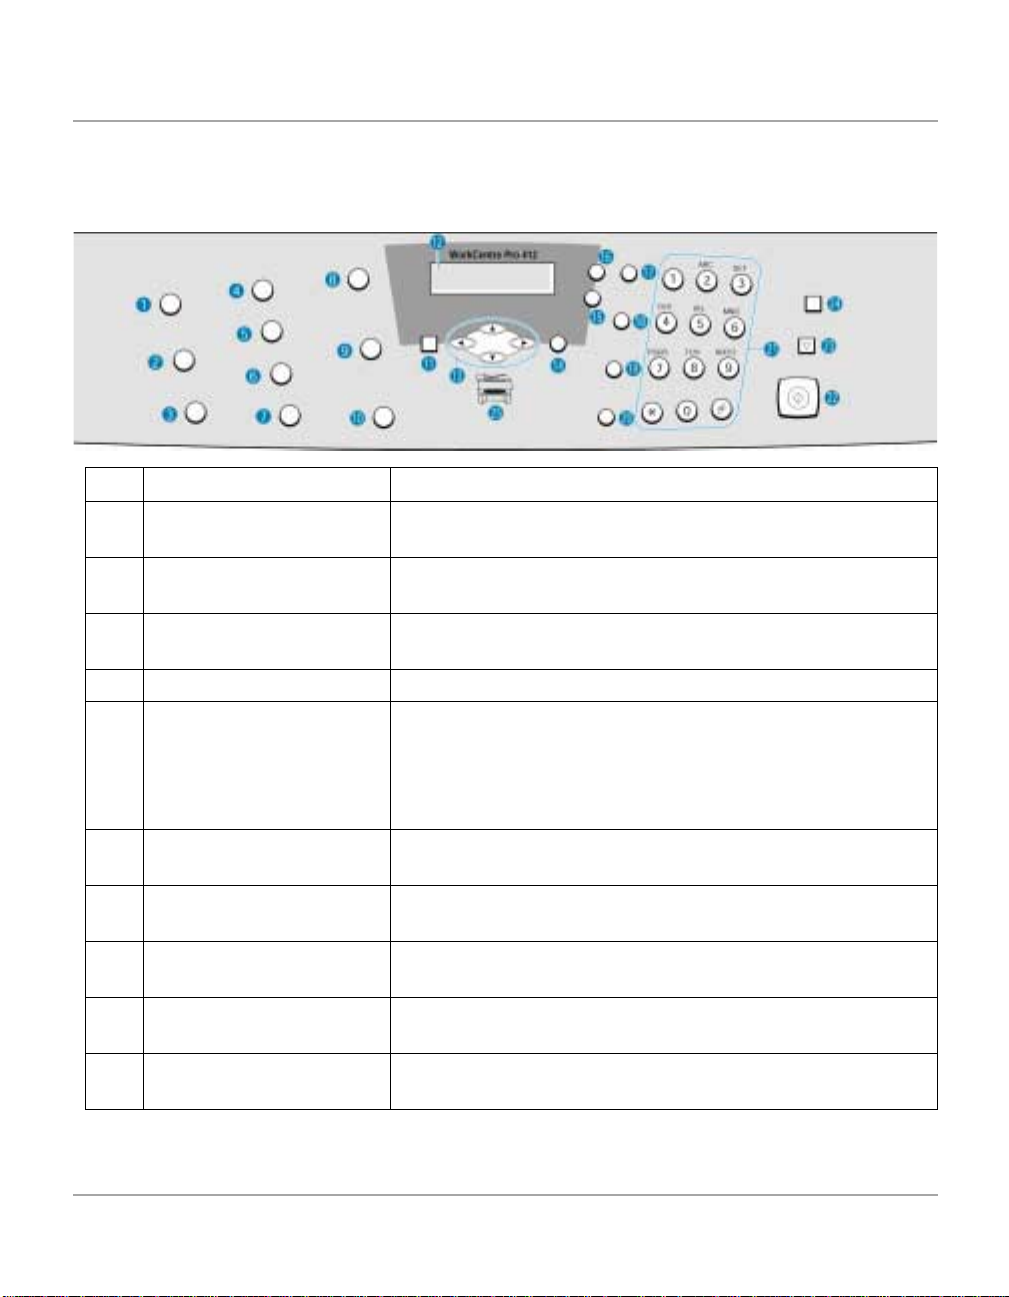
Control Panel Components and Keys
Use the illustration below to identify the components and keys
of your WorkCentre Pro 412 control panel.
Item
1 Pause PC Printing Use to pause a print job. When pressed again, the PC print
2 Reports Use to display a list of available reports for printing and the
3 2-Sided Copy Use to make one or two-sided copies from one-sided
4 Output Use to collate outputs in copy mode.
5 Reduce/Enlarge Use to adjust copy size from 25% to 400% when you feed an
6 Lighten/Darken Use to adjust contrast level prior to copying, faxing or
7 Paper Supply Use to select paper supply source between Cassette and
8 Resolution Use to adjust the resolution or sharpness for the current fax
9 Original Type Use to select original type between text, mixed, and photo for
10 Scan Options Use to select COLOR, B&W or GRAY mode for scanning.
Description Function
job is resumed.
menu map.
originals.
original from the document glass, and 25% to 100% from the
ADF.
When feeding from the document glass, Clone and AutoFit
features are available using this key.
scanning.
Bypass in Copy or Fax mode.
or scan job.
copying, faxing, and scanning.
In Fax mode, B&W or COLOR mode is selectable.
Page 2-6 Xerox WorkCentre Pro 412 User Guide
Page 25
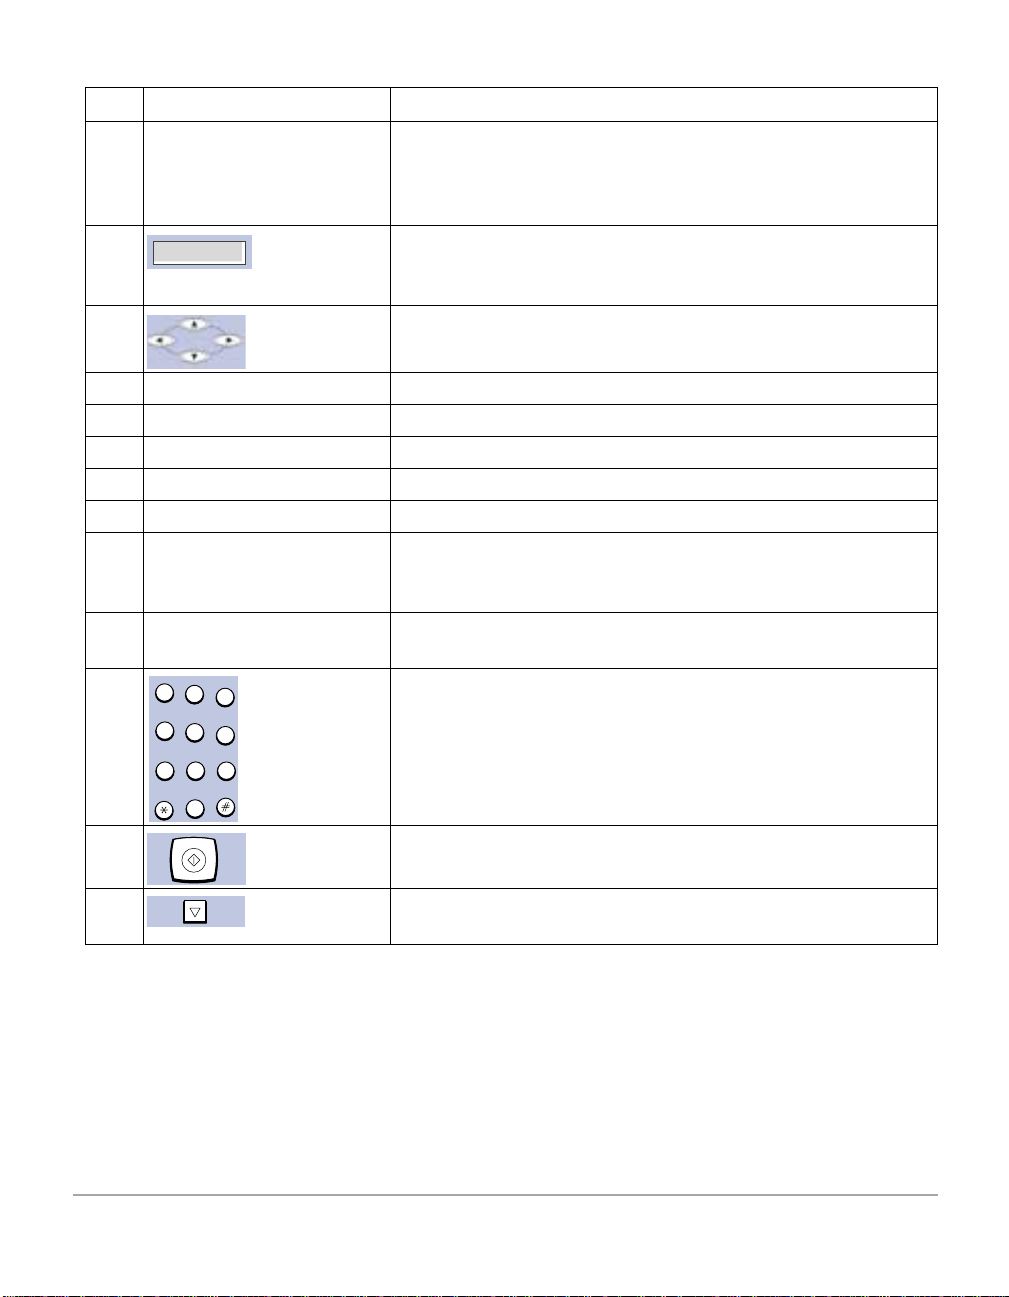
Item
Description Function
11 Copy/Fax/Scan Use to select the functionality of the machine; COPY MODE,
FAX MODE or SCAN MODE. When the required mode
displays, press Select or wait a few seconds to access the
mode.
12 The display shows the current status of the machine and
guides the user through various tasks using a menu system
for each operation.
13 Use to navigate the menu list vertically and horizontally.
14 Select Use to save a curr ent selection.
15 Job Status Use to display current job status and pending jobs.
16 Menu/Exit Use to enter or exit Menu mode.
17 Manual Group Use to send a fax job to multiple destinations.
18 Manual Dial Use to dial a fax number manually (inter-active dial).
19 Speed Dial Use to dial calls and send fax documents by entering a 2 digit
Speed Dial number which has been stored in the machine’s
phone book memory.
20 Pause/Redial Use to redial the last phone number called or to add a pause
when storing a number in the phone book memory.
ABC
1
GHI
4
7
DEF
2
3
JKL
MNO
5
6
89
special functions in conjunction with the Menu button.
21 Use to dial a phone number, to enter a letter, or to choose
PQRS TUV WXYZ
Product Overview
0
22 Use to start a job.
23 Use to stop an operation at any time. Any operation
originating on a PC should be stopped on the PC.
Xerox WorkCentre Pro 412 User Guide Page 2-7
Page 26
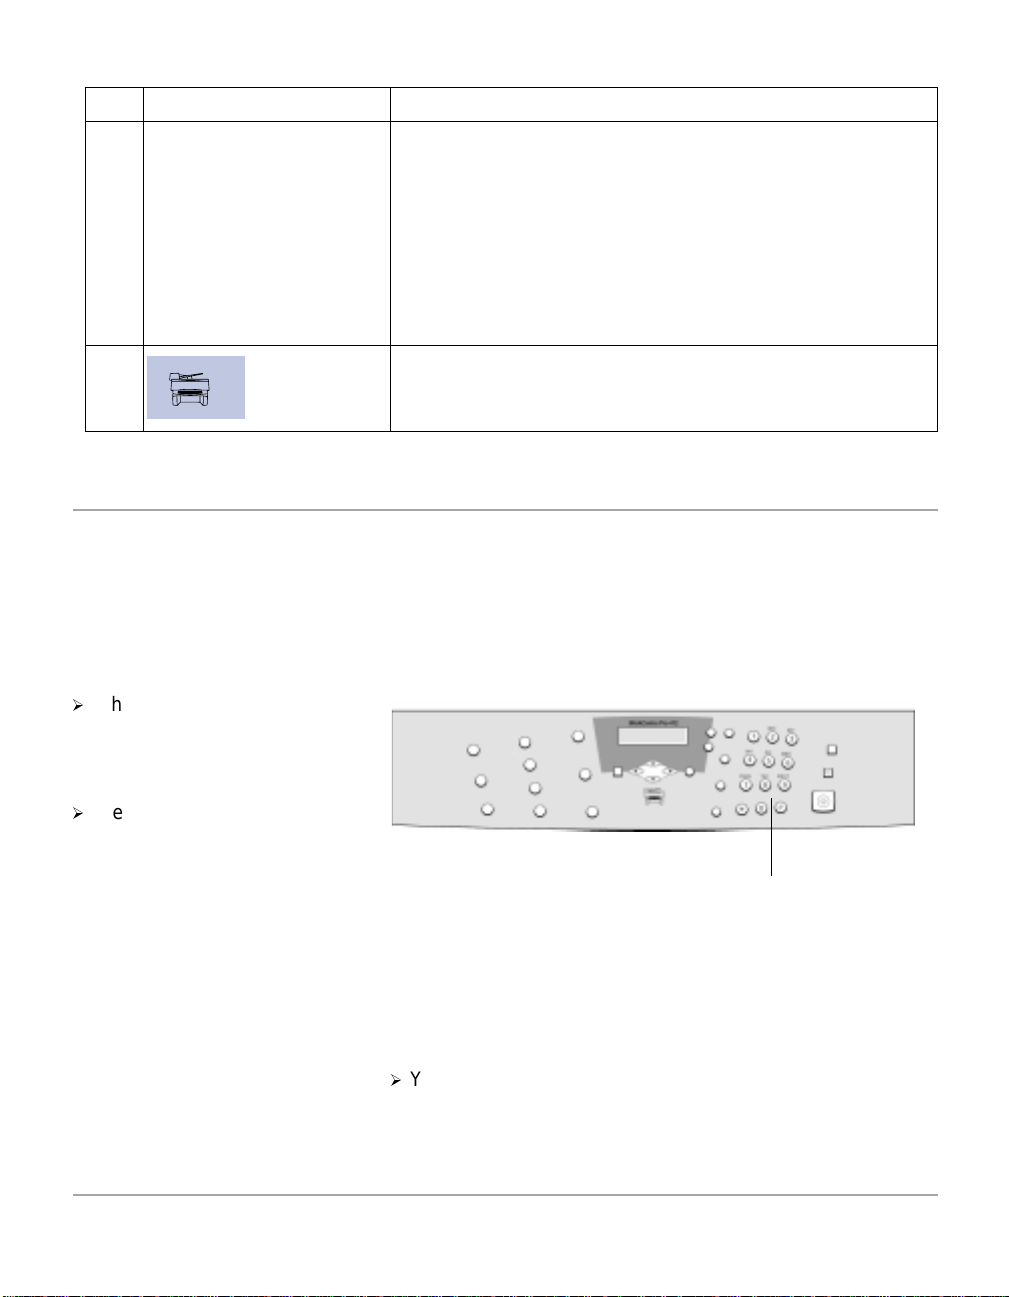
Item
Description Function
24 Clear/Clear All Clear/Clear All operates differently depending on the
selected mode:
• Copy Mode - Use to clear the copy quantity (while you are
entering a number) or clear the currently selected feature
setting (while you are programming a copy feature).
• Scan Mode - Use to return to Standby mode.
• Fax Mode - Use to clear an incorrect fax number. Press
twice to clear all currently user selected settings and return to
Standby mode.
25 Illuminates when a system error occurs.
Entering Characters Using the Numeric Keypad
As you perform various tasks, you’ll need to enter names and
numbers. For example, when you set up your machine you
enter your name (or your company’s name) and telephone
number. When you store Speed dial or Group dial numbers,
you may also enter the correspondi ng name s.
Use the instructions below to enter alphanumeric characters.
½
When prompted to enter a
letter, locate the button
labeled with the character you
want.
½
Press the button repeatedly
until the correct letter appears
in the display.
For example, to enter the
Numeric Keypad
letter O, press 6, (labeled
MNO). Each time you press 6,
the display shows a different
letter, first M, then N and O,
and finally 6.
½
You can enter special characters (space, plus sign, etc.).
For details, see “Keypad Character Assignment” on page 9.
Page 2-8 Xerox WorkCentre Pro 412 User Guide
Page 27

½
To enter additional letters, repeat the procedure.
½
If the next letter is printed on the same button, move the
cursor by pressing , then press the button labeled with
the letter you want.
The cursor moves to the right and the next letter appears in
the display.
½
When you have finished entering letters, press [Select].
Keypad Character Assignment
Key Assigned Numbers, Letters or Characters
1 1
2 A > B> C > 2
3 D > E > F > 3
4 G > H > I > 4
5 J > K > L > 5
6 M > N > O > 6
7 P > Q > R > S > 7
Product Overview
8 T > U > V > 8
9 W > X > Y > Z > 9
0 + > - > , > . > ‘ > / > * > # > & > 0
Editing Numbers or Names
If you make a mistake, move the cursor under the wrong
character by pressing or . Press the correct number to
overwrite the inco rrect charact er. If y ou press [Clear /Clear All],
all the characters are deleted.
Xerox WorkCentre Pro 412 User Guide Page 2-9
Page 28

Inserting a Pause
With some telephone systems, you must dial an access code
(9 for example) and listen for a second dial tone. In such cases,
you must insert a pause in the telephone number. You can
insert a pause while you are setting up a Speed dial number.
To insert a pause, press [Pause/Redial] at the appropriate
place while entering the telephone number. A “-” will appear in
the display at the corresponding location.
Page 2-10 Xerox WorkCentre Pro 412 User Guide
Page 29
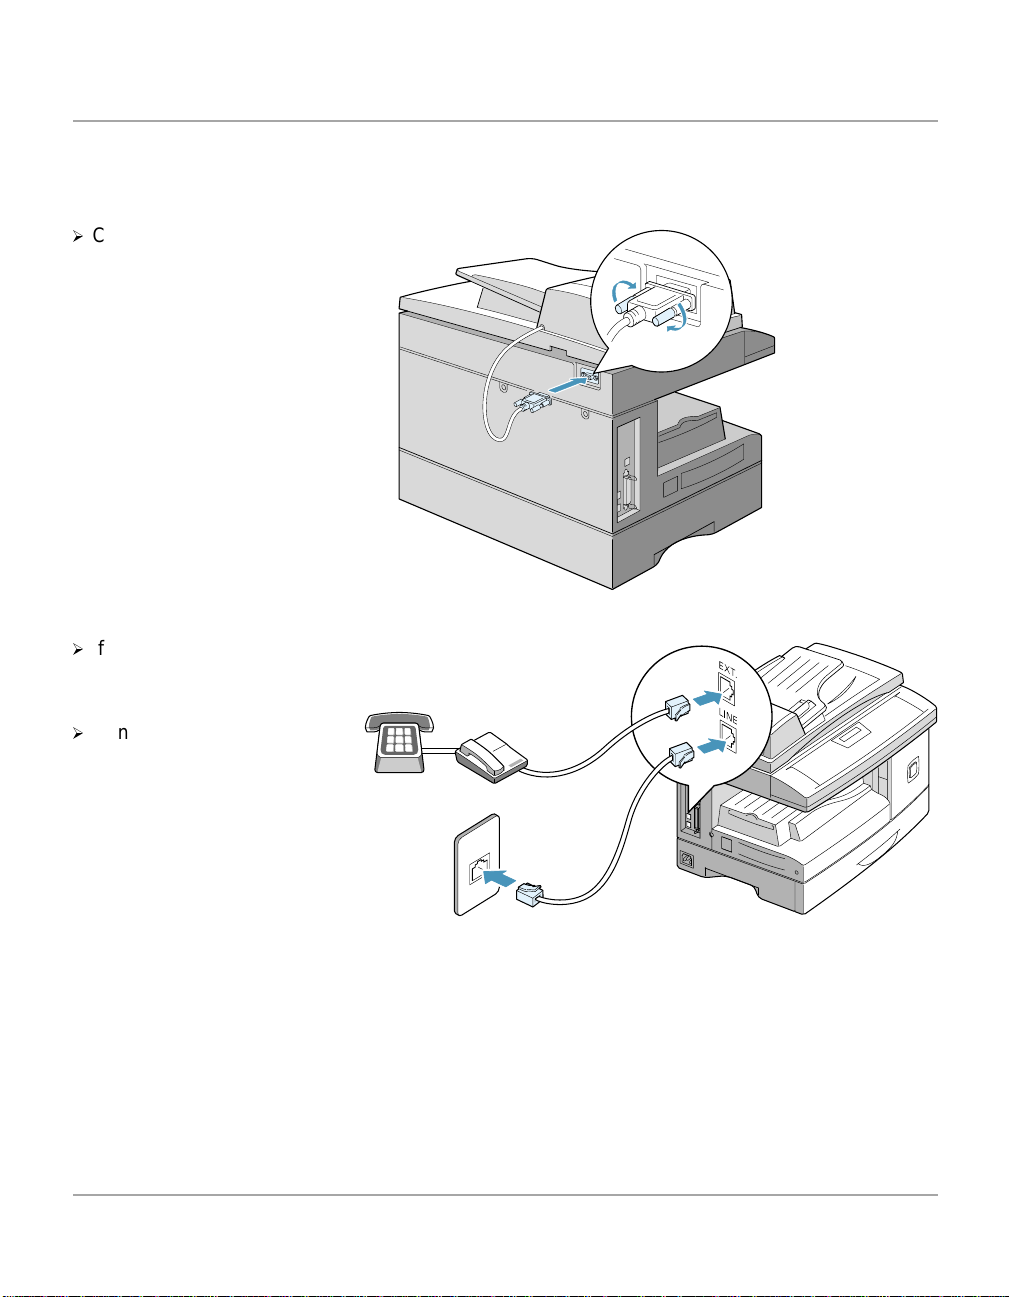
Making Connections
½
Connect the Scan Module
cord to the port shown and
fasten the side screws.
½
If required, connect your
answering machine and/or
telephone to the EXT jack.
Use the following instructions to make the necessary
connections required to install your Xerox WorkCentre Pro
412.
Product Overview
½
Connect the Telephone Line
Cord from the wall jack to the
LINE jack.
Xerox WorkCentre Pro 412 User Guide Page 2-11
Page 30
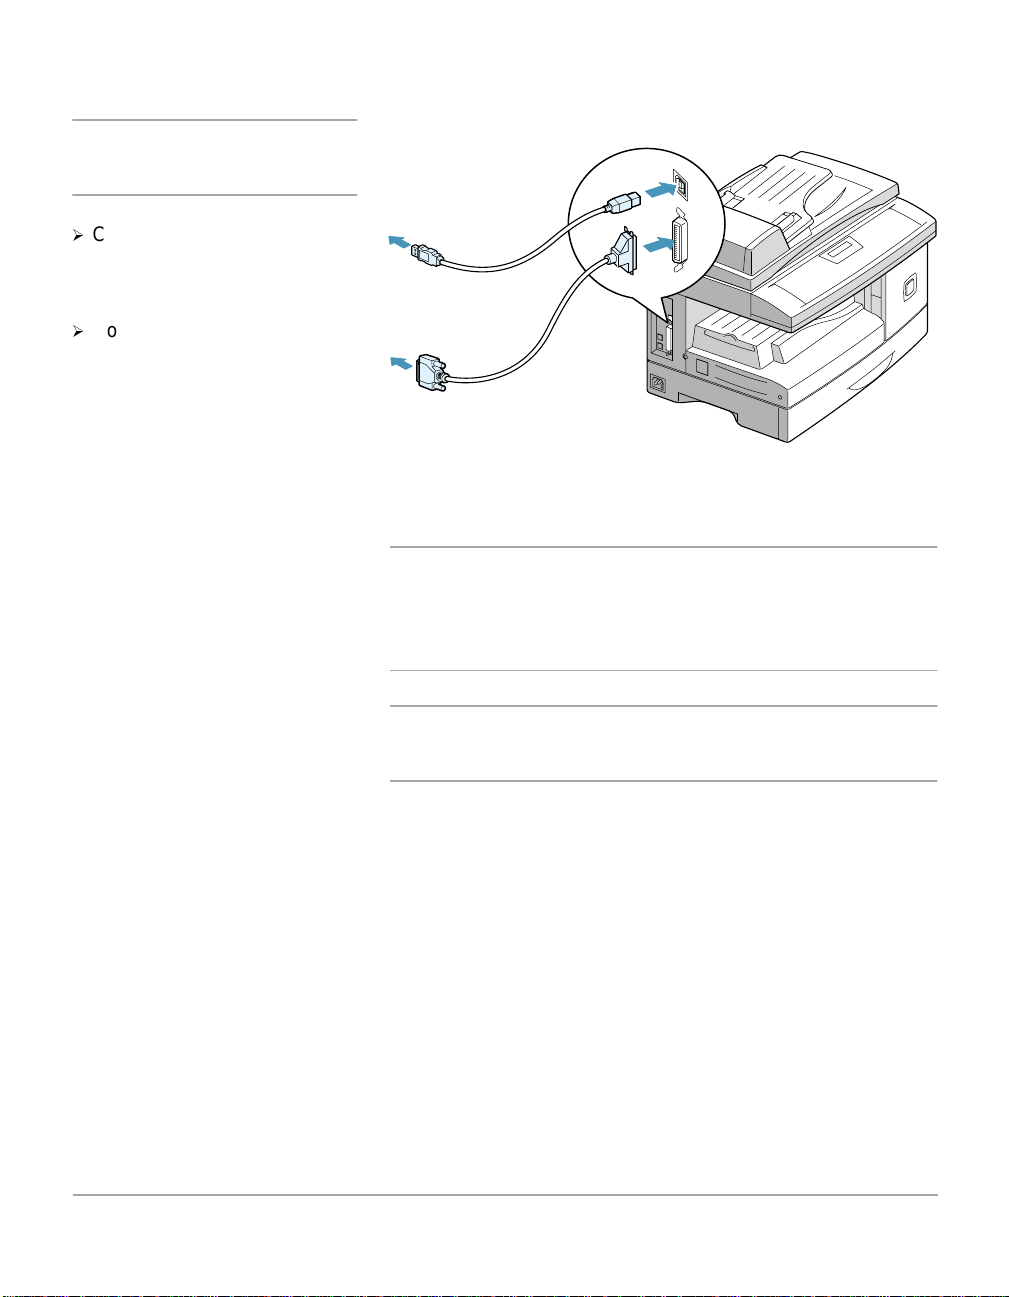
CAUTION:Shut down your
computer before connecting
the cable.
½
Connect the USB Cable
directly to your computer.
USB Cable
OR
½
Connect a Parallel Port Cable
(sold separately).
Parallel Port
Cable
NOTE: Use only the Parallel cable or the USB cable. You
must be running Windows 98, Windows 2000 or Windows Me
to use the USB cable. Otherwise, use a parallel cable.
(Parallel or USB cables are not required for standalone
features.)
HINT: If using a parallel cable, ensure that it meets IEEE
standard 1284 specifications and is not longer than twelve
feet.
Page 2-12 Xerox WorkCentre Pro 412 User Guide
Page 31

½
Ensure you have unlocked
the Scanner. Pull the scan
unlock switch toward you
before connecting the power
cord. For details refer to
“Unpacking” starting on page
2-2.
½
Connect the AC Power Cord
to your machine and a power
outlet.
When plugged in, the
WorkCentre Pro 412 is
switched on.
Product Overview
Xerox WorkCentre Pro 412 User Guide Page 2-13
Page 32

Installing Drum and Toner Cartridges
Using the instructions provided, install the Drum and Toner
cartridges.
½
Pull the release latch to open
the side cover.
CAUTION:Ensure that the side cover is always open
before opening the front cover.
½
Open the front cover.
Page 2-14 Xerox WorkCentre Pro 412 User Guide
Page 33

½
Remove the drum cartridge
from its packaging and slide it
into the WorkCentr e Pr o 412
until it locks into place.
Product Overview
Xerox WorkCentre Pro 412 User Guide Page 2-15
Page 34
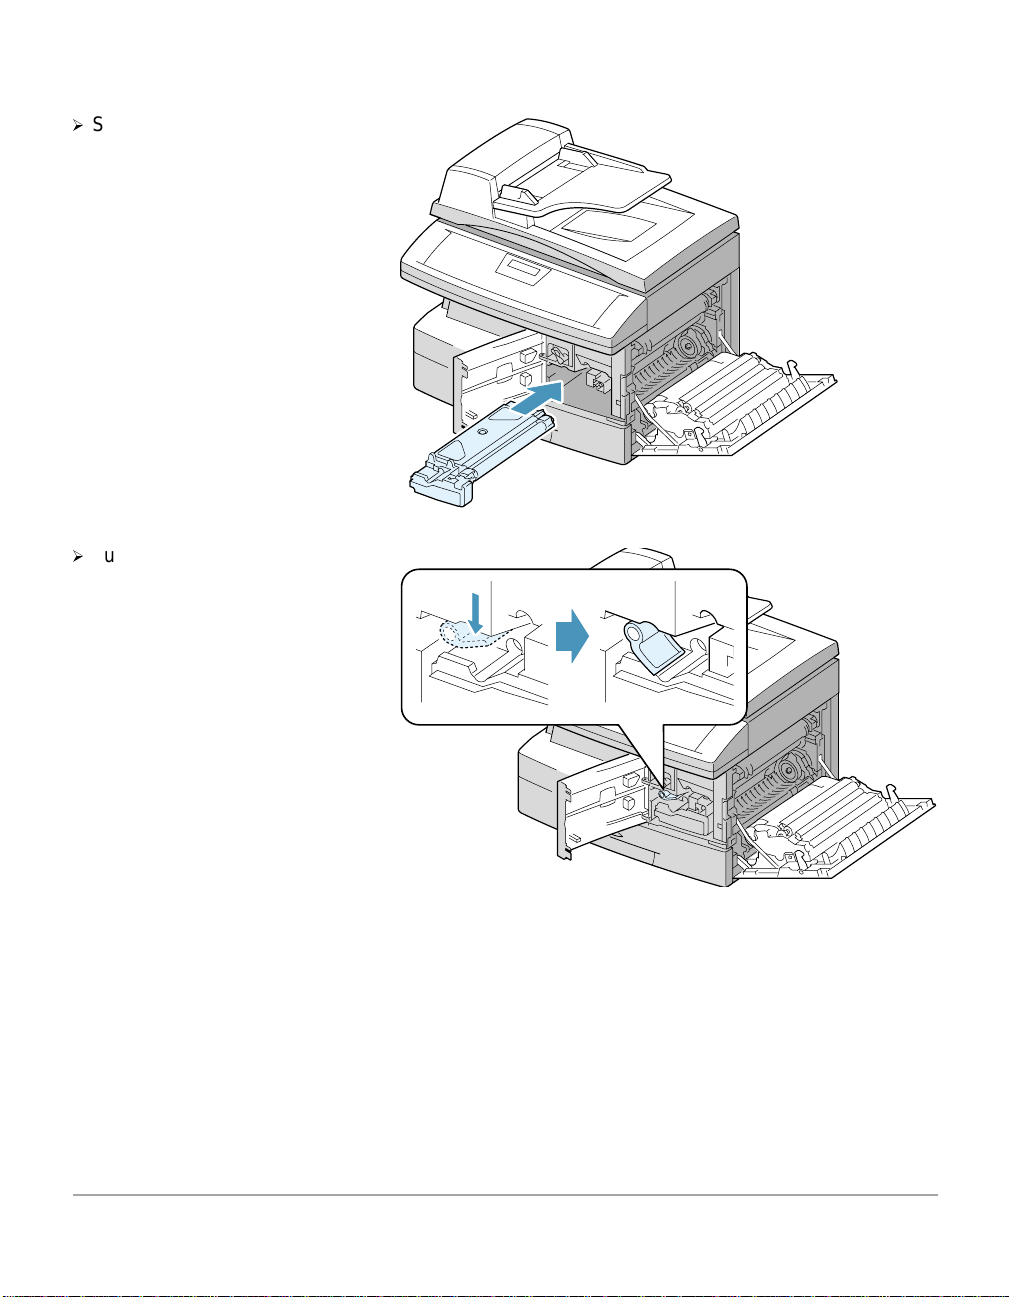
½
Slide the toner cartridge into
the WorkCentre Pro 412 until
it locks into place.
½
Turn the toner lever
downwards until it locks into
place.
Page 2-16 Xerox WorkCentre Pro 412 User Guide
Page 35

½
Close the front cover and
the side cover .
2
1
2
Product Overview
1
Xerox WorkCentre Pro 412 User Guide Page 2-17
Page 36
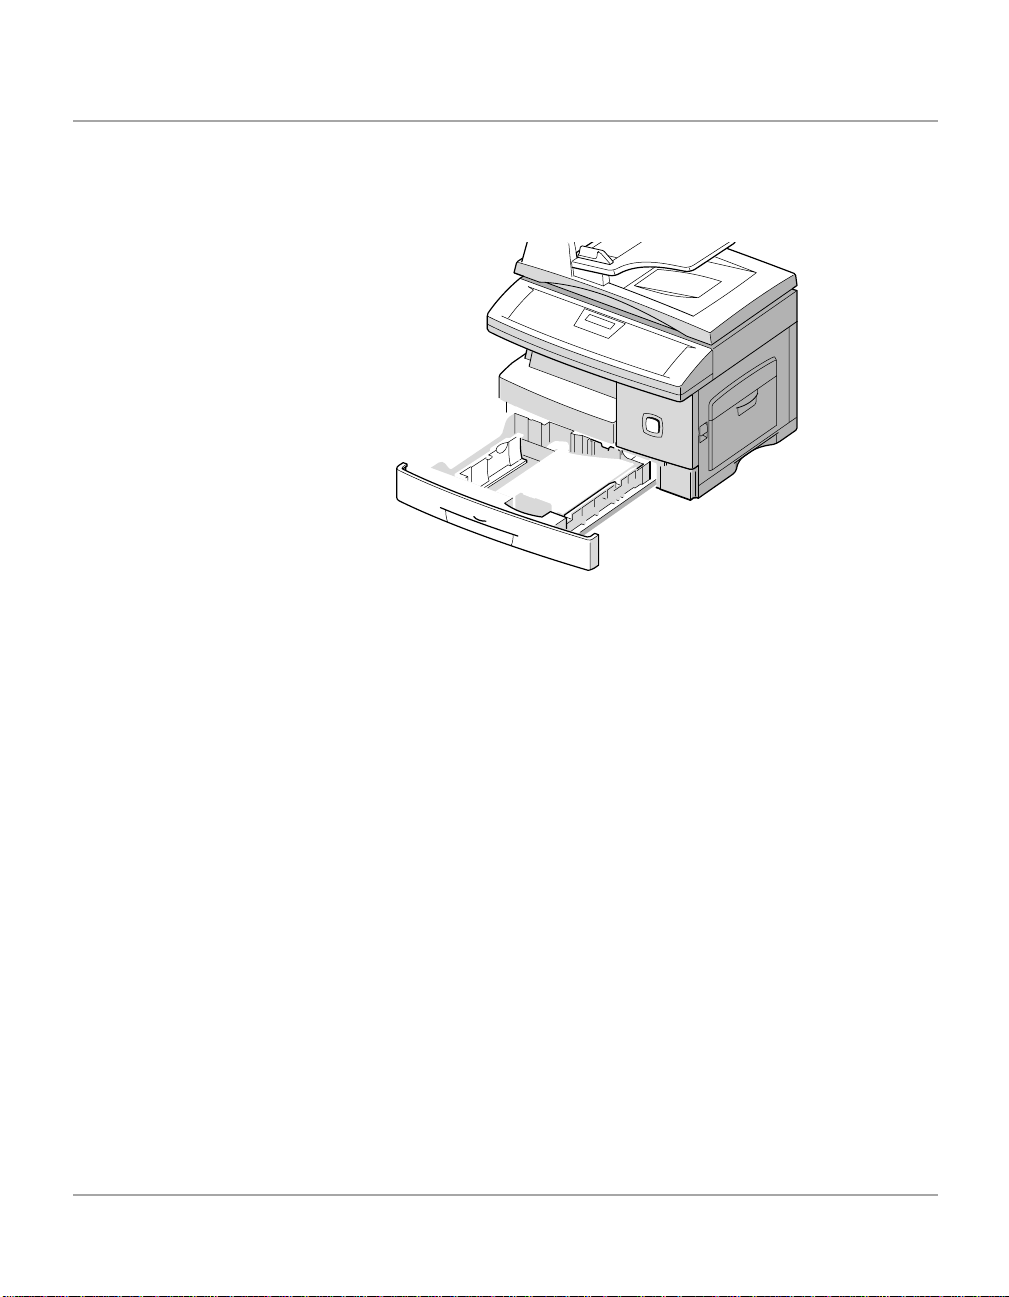
Loading Paper
Using the instructions provided, load paper into your Xerox
WorkCentr e Pro 412 . The paper cassette can hold a maximum
of 550 sheets of 80 g/m
2
(20 lb) plain paper.
Page 2-18 Xerox WorkCentre Pro 412 User Guide
Page 37

½
LGL
FOLIO
A4
LTR
Adjust the rear paper guide to
the required paper length.
It is preset to A4 or 8.5 x 11
inch size depending on
country.
½
To load another size, lift and
insert the rear guide into the
corresponding posit ion .
½
Fan the paper and insert it
into the cassette.
Rear guide
Product Overview
Xerox WorkCentre Pro 412 User Guide Page 2-19
Page 38
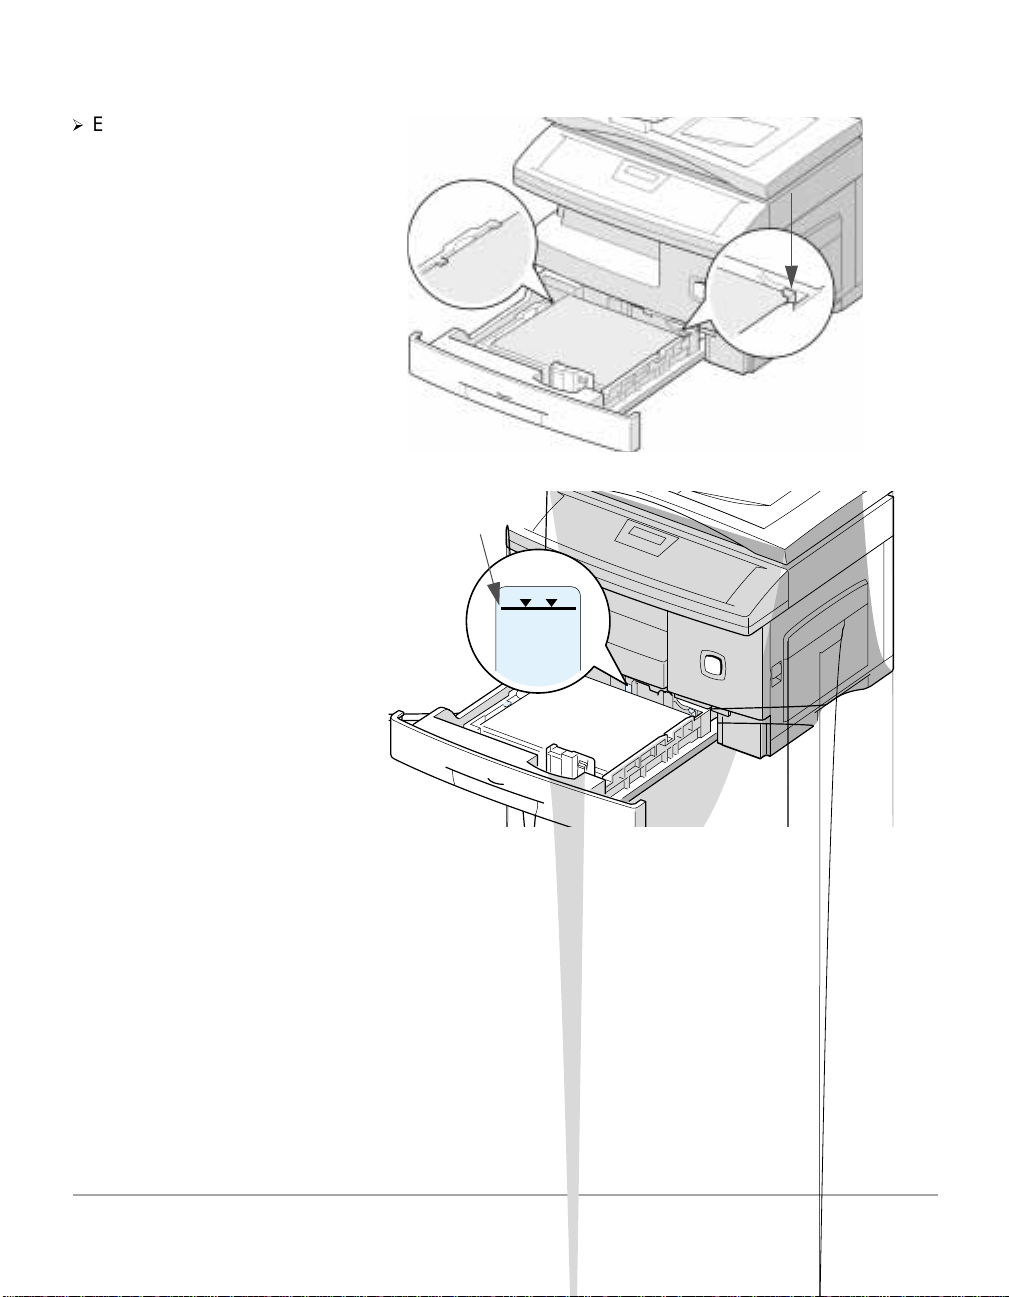
½
Ensure that the paper is
positioned under the
snubbers.
Do not fill above the max fill
line.
Snubber
Max Fill Line
Page 2-20 Xerox WorkCentre Pro 412 User Guide
Page 39

½
While squeezing the side
guide as shown, move it
toward the stack of paper until
it gently touches the side of
the stack.
Do not allow the guide to
press against the edge of the
paper tightly; the guide may
bend the paper.
½
Close the paper cassette.
Product Overview
Xerox WorkCentre Pro 412 User Guide Page 2-21
Page 40

Setting the Language
If the machine language requires changing, follow the
instructions below to change the Select Language setting.
½
Press [Menu/Exit] on the control panel. The display shows
the first menu; SYSTEM DATA.
½
Scroll to the ‘SYSTEM SETUP’ menu by pressing
repeatedly, then press [Select].
½
Scroll to the ‘SELECT LANGUAGE’ option by pressing
repeatedly.
½
Using the or . navigation keys, select the required
language option and press [Select].
The language will change to the required setting.
½
Press [Menu/Exit] to exit.
Page 2-22 Xerox WorkCentre Pro 412 User Guide
Page 41

Setting the Local ID and Name
In some countries you are required by law to indicate your fax
number on any fax you send. The System ID, containing your
telephone number and name (or company name), will be
printed at the top of each page sent from your machine. Follow
the instructions below to enter your machine’s System ID.
NOTE: In some countries access to the local ID by the user is
not permitted due to local regulations.
½
Press [Menu/Exit] on the control panel. The display shows
the first menu; SYSTEM DATA.
½
Scroll to the next menu ‘SYSTEM ID’ by pressing , then
press [Select].
The displays asks you to enter the fax number. If there is a
number already entered the number displays.
½
Enter your fax telephone number. You can include + symbol
in the phone number by pressing the key, and insert a
space by pressing the # key.
½
If you make a mistake, move the cursor under the wrong
character by pressing or . Press the correct number
to overwrite the incorrect number. If you press [Clear/Clear
All], all the characters are deleted.
Product Overview
½
Press [Select] when the number on the display is correct.
The display asks you to enter the ID.
½
Enter your name or company name by using the numeric
keypad.
You can enter alphanumeric ch arac ter s using the numer ic
keypad, and include special symbols by pressing 0
repeatedly.
HINT: For details on how to use the numeric keypad to enter
alphanumeric characters, refer to “Entering Characters Using
the Numeric Keypad” on page 2-8
Xerox WorkCentre Pro 412 User Guide Page 2-23
Page 42

If you want to enter the same letter or number in succession
(e.g. SS, AA, 777), enter one digit, then move the cursor by
pressing the button, and enter the next digit.
If you want to insert a space in the name, you can also use
the button to move the cursor to skip the position.
½
Press [Select] when the name on the display is correct.
You have now entered the System ID for your machine.
Page 2-24 Xerox WorkCentre Pro 412 User Guide
Page 43

Setting the Date and Time
The current time and date are shown on the display when the
machine is on and ready for faxing (Standby mode). The time
and date are printed on all faxes you send.
½
Press [Menu/Exit] on the control panel. The display shows
the first menu; SYSTEM DATA.
½
Press or until ‘DATE & TIME’ appears, then press
[Select].
½
Enter the correct date and time using the numeric keypad:
Day = 01 ~ 31
Month = 01 ~ 12
Year = 00 ~ 99
Hour = 00 ~ 23 (24-hour mode)
Minute = 00 ~ 59
The date and time is entered and displayed in the following
order:
MM = Month
DD = Day
YY = Year
HH: = Hour
MM = Minute
You can also use or to move the cursor under the
digit you want to correct, then enter a new number.
Product Overview
= 01 ~ 12 (12-hour mode)
½
To select AM or PM for 12-hour format, press or .
½
Press [Select] when the time and date on the display is
correct.
If you enter an invalid number, the machine beeps and does
not proceed to the next step. If this happens, just re-enter the
correct number.
The display shows the time and date you have set, then
returns to Standby mode.
Xerox WorkCentre Pro 412 User Guide Page 2-25
Page 44

Installing Software
You are now ready to install the drivers and other software that
will enable PC printing and scanning.
NOTE: Ensure the WorkCentre Pro 412 is plugged in and
connected to your computer’s parallel or USB port before
installing software from the CD. Windows 95 and Windows NT
4.0 do not support USB connection.
1. Switch on your PC, and start Windows.
NOTE: If a window appears concerning New Hardware, select
Cancel.
2. Insert the Setup CD into the CD-ROM drive of your PC. If
the Xerox screen appears automatically, go to step 4.
3. From the Start menu, select [Run]. Type
D:\XINSTALL.EXE (Where “D” is the letter of your CDROM drive), then click [OK].
4. Follow the on-screen instructions to complete the software
installation.
5. After installing all of your software, reboot your PC. For
Windows 95/98, upon restart, eject the CD.
Congratulations! Your machine is now set up and fully
operational.
NOTE: For more information about printing and scanning,
refer to the “Print” and “Scan” chapters of this Guide.
Page 2-26 Xerox WorkCentre Pro 412 User Guide
Page 45

3 Copy
Copy
This chapter provides step-by-step instructions for copying
documents.
This chapter includes:
- Copying Procedure
- Standard Copy Features
- Special Copy Features
Xerox WorkCentre Pro 412 User Guide Page 3-1
Page 46

Copying Procedure
Quick Pathway
½
Press the Copy/Fax/Scan
Before making copies identify what is to be copied, the number
of copies required and any special programming requirements.
Use the following steps to make a copy.
Key.
½
Select the Paper Supply.
½
Load the Originals.
½
Choose the Copy features
required.
½
Enter the copy quantity
required.
½
Press [Start].
1. Press the Copy/Fax/Scan Key
Ensure that the LCD displays
‘READY TO COPY’.
If not, press the [Copy/Fax/
Scan] key on the control panel
repeatedly until ‘COPY MODE’
displays in the bottom line of
the LCD, then press [Select].
Copy/Fax/Scan Key Select Key
3-2 Xerox WorkCentre Pro 412 User Guide
Page 47

2. Select the Paper Supply
You can copy to a size of media as large as a sheet of legal
size (216 x 356 mm / 8.5 x 14 inch) paper. For full media
specifications, refer to Appendix B - Specifications.
The instructions for loading this media are the same whether
you are printing, faxing, or copying.
HINT: For instructions on how to load media, refer to Chapter
7 - Maintaining the Product, page 7-14.
½
Select the required paper supply source by pressing [Paper
Supply].
½
If you are using the cassette, press [Paper Supply] until the
LCD displays ‘CASSETTE’.
½
If you are using the bypass tray to load special print media,
press [Paper Supply] until the LCD displays ‘BYPASS’.
½
Press [Select] to save the required selection.
NOTE: When feeding media through the Bypass Tray the
paper size option in System Data Settings must be set to the
correct size. If feeding media smaller than A4/Letter, the
setting can remain set at A4, Letter or Legal size. Refer to
Chapter 9 - System Setup, page 9-6 for instructions.
Copy
Xerox WorkCentre Pro 412 User Guide Page 3-3
Page 48

3. Load the Originals
A choice of document input areas is available. These are:
- An automatic document feeder (ADF) for multiple
originals.
- A document glass for single originals or bound originals.
Automatic Document Feeder (ADF)
Using the Automatic Document Feeder (ADF), you can load up
to 30 documents in one job. Ensure documents are in good
condition, and that all staples and paper clips have been
removed. Ensure any glue, ink or correction fluid on the paper
is completely dry before loading the documents.
Originals should be between 45 g/m
and 28 lb), and between B5 (182 x 257 mm / 7 x 10 inch) and
Legal size (216 x 356 mm / 8.5 x 14 inch).
Do not attempt to feed the following types of documents into
the Automatic Document Feeder:
- carbon-paper or carbon-back ed pape r
- coated paper
2
and 105 g/m2 (12.5 lb
- onion skin or thin paper
- wrinkled or creased paper
- curled or rolled paper
- torn paper
Do not load documents containing different sizes or weights of
paper.
NOTE: If your document falls into any of these categories, use
the document glass only.
Page 3-4 Xerox WorkCentre Pro 412 User Guide
Page 49

½
Remove all staples and paper
clips before placing the
originals into the document
feeder.
½
If necessary, adjust the sliding
document guides to the paper
size required.
½
Insert the originals neatly into
the document feeder, face up.
The first page should be on
top with the headings towards
the back or left of the
machine.
½
Align the stack with the left
and rear edges of the
document feeder tray and
adjust the guides to just touch
the front and rear edges of
the originals.
Copy
Document guides
Document Glass
The document glass should be used for single pages or bound
originals up to a maximum size of Legal size paper (216 x 356
mm / 8.5 x 14 inch).
½
Raise the document glass
cover.
Xerox WorkCentre Pro 412 User Guide Page 3-5
Page 50

½
Position the original face down
on the document glass. Align it
with the registration arrow in
the rear left corner.
NOTE: Ensure that no documents
are loaded in the ADF. If a
document is detected in the ADF,
the document has a priority than
the document on the glass.
½
Lower the document glass
cover.
Leaving the cover open while
copying will affect the copy
quality and toner consumption.
NOTE: On completion of a copy
job ensure the document glass
cover is fully closed.
Page 3-6 Xerox WorkCentre Pro 412 User Guide
Page 51

4. Select the Copy Features
5. Enter the Quantity
There are five standard features available. The keys are
located on the Control Panel.
If you do not adjust any setting, the machine will make a copy
with the following features:
- Lighten/Darken – Normal
- Original Type – Mixed
- 2-Sided Copy – OFF
- Reduce/Enlarge – 100 %
- Output – OFF
For a more detailed explanation of the standard Copy features
available, please refer to the following pages:
- Lighten/Darken - page 3-9
- Original Type - page 3-10
- 2-Sided Copy - page 3-11
- Reduce/Enlarge - page 3-12
- Output - page 3-12
Copy
Up to 999 copies can be entered using the numeric keypad.
½
Use the numeric keypad to
enter the number of copies
required.
½
If necessary, press [Clear/
Clear All] on the control panel
to clear the selected quantity
and enter a new quantity.
Numeric Keypad Clear/Clear All
Key
Xerox WorkCentre Pro 412 User Guide Page 3-7
Page 52

6. Press Start
½
Press [Start] to begin copying.
The LCD displays copy
processing.
Start Key
Page 3-8 Xerox WorkCentre Pro 412 User Guide
Page 53

Standard Copy Features
You can set the following standard features for Copy. Use the
feature buttons on the control panel to change feature settings
before pressing the Start button to begin copying.
Lighten/Darken
The Lighten/Darken key can adjust the contrast for a document
containing faint markings or dark images.
½
Press [Lighten/Darken] on the control panel to display the
current setting.
½
Press [Lighten/Darken] repeatedly to scroll through the
choices.
You can choose from 5 contrast settings. Each time you
press the key, the selection block on the LCD moves to the
left or the right. As the selection block moves to the right, the
contrast be comes darker.
½
Press [Select] to save the selection.
Copy
Xerox WorkCentre Pro 412 User Guide Page 3-9
Page 54

Original Type
The Original Type setting can be used to improve copies of
different documents by specifying the type of document being
loaded.
½
Press [Original Type] on the control panel to display the
current setting.
½
Press [Original Type] repeatedly to change the setting.
½
Press [Select] to save the selection.
Original Type Options
Text Use to copy documents containing mostly text.
Mixed Use to copy documents with mixed text and graphics.
Photo Use when the originals are photographs.
Page 3-10 Xerox WorkCentre Pro 412 User Guide
Page 55

2-Sided Copy
Use the 2-Sided Copy option to produce 2-sided copies from 1sided originals.
½
Press [2-Sided Copy] repeatedly until the required selection
displays.
½
Press [Select] to save the selection.
½
Press [Start].
2-Sided Copy Options
Long Edge Produces copies with the binding orientation along the long
edge of the paper as in a magazine.
Short Edge Produces copies with the binding orientation along the short
edge of the paper as in a calendar.
Copy
Xerox WorkCentre Pro 412 User Guide Page 3-11
Page 56

Reduce/Enlarge
Output
You can reduce or enlarge the size of a copied image from
25% to 400% using the document glass or from 25% to 100%
using the ADF.
NOTE: The percentage available is different according to the
document loading method.
½
Press [Reduce/Enlarge] on the control panel repeatedly
until ‘REDUCE/ENLARGE’ displays on the LCD.
½
Enter the required percentage using the numeric keypad.
NOTE: Use leading zero’s to ensure three digits are entered
e.g. enter 050 to program a 50% reduction.
If you press [Clear/Clear All], the selected percentage
returns to 100%.
½
Press [Select] to save the selection.
When the Output feature is On, the machine collates the copy
job into sets. For example, 2 copies of a 3 page job will print
one complete document followed by the second complete
document (e.g. 1, 2, 3 then 1, 2, 3).
NOTE: If producing multiple collated sets, use the document
feeder to scan the originals.
½
Press [Output] on the control panel to display the current
setting.
½
Press [Output] to select ‘ON’.
½
Press [Select] to save the setting.
Page 3-12 Xerox WorkCentre Pro 412 User Guide
Page 57

Resetting Copy Features
½
Press [Clear/Clear All] on the
control panel twice.
The LCD displays ‘READY
TO COPY’.
You can reset all the Copy feature selections you have made
back to the factory default status.
Clear/Clear All
Key
Copy
Xerox WorkCentre Pro 412 User Guide Page 3-13
Page 58

Special Copy Features
Special Copy Features can be used for more advanced Copy
jobs. Use the Special Copy Features for:
Auto Fit
This feature automatically reduces or enlarges the original
image to fit on the paper currently loaded in the machine.
This feature can only be applied when you are using the
document glass. If a document is detected in the ADF, the Auto
Fit option does not work.
½
Ensure that the document to
be copied is loaded on the
document glass.
NOTE: Ensure that no
documents are loaded in the
ADF. Auto Fit does not work
with ADF loading.
- Printing the Original Image to Fit on the Paper (Auto Fit)
- Printing Multiple Copies on a Single Page (Clone)
½
Press [Reduce/Enlarge] repea tedl y unti l ‘AUTO FIT’
displays.
½
Press [Select] to save the setting.
½
Press [Start]. The machine prescans the original image with
low resolution to determine the copy ratio.
The machine begins copying the image onto the paper size
you have loaded.
Page 3-14 Xerox WorkCentre Pro 412 User Guide
Page 59

Clone
½
Ensure that the document to
be copied is loaded on the
document glass.
NOTE: Ensure that no
documents are loaded in the
ADF. Clone does not work with
ADF loading.
The Clone feature prints multiple image copies from an original
document onto a single page. The number of images is
automatically determined by the original image size.
This feature can only be applied when you are using the
document glass. If a document is detected in the ADF, the
Clone option does not work.
½
Press [Reduce/Enlarge] repea tedl y unti l ‘CLONE’ displays.
½
Press [Select] to save the setting.
½
Press [Start]. The machine prescans the original image with
low resolution to detect the image size and determines the
number of images to be printed on a page.
Copy
The machine scans the original and reproduces multiple
images.
Xerox WorkCentre Pro 412 User Guide Page 3-15
Page 60

Page 3-16 Xerox WorkCentre Pro 412 User Guide
Page 61

4Print
Print
This section describes printing from your PC to your Xerox
WorkCentre Pro 412.
This chapter includes:
- Printing a Document from an Application
- Printer Settings
Xerox WorkCentre Pro 412 User Guide Page 4-1
Page 62

Printing a Document from an Application
This procedure describes the general steps required for
printing from various Windows applications. The exact steps
for printing a document may vary depending on the application
program you are using. Refer to your software application’s
documentation for the exact printing procedure.
The following steps describe the typical process to print from a
Windows environment:
1. Ensure that your W or kC entre Pr o 412 is properly
connected to the computer, the machine is powered on,
and there is paper in one of the paper trays.
2. Verify that you have installed the printer driver software for
your machine. For instructions, refer to Chapter 2 - Product
Overview, page 2-26.
3. Start the program you are using to create the document,
and create or open the document you want to print.
4. Choose [Print] or [Page Setup] from the File menu. Ensure
the WorkCentre Pro 412 is selected as your default printer.
Click [Properties] or [Setup] if you want to make any
adjustments that are appropriate for printing your
document.
HINT: For instructions refer to the next section “Printer
Settings”.
5. Click [OK] to close the Properties dialog box.
6. After making any necessary changes to the printing
parameters, click [OK] to start the print job.
Page 4-2 Xerox WorkCentre Pro 412 User Guide
Page 63

Printer Settings
You can use your machine with all your Windows 95/98/2000/
Me or Windows NT 4.0 applications. Ensure you have set the
WorkCentre Pro 412 as the default printer for all your Windows
operations.
Most Windows software applications allow you to make
changes to the printer settings. This includes settings that
determine how a print job looks such as paper size, paper
orientation, and margins. Settings made in the application to
create the document will usually override settings made in the
printer driver.
NOTE: You do not need to use any of the control panel keys
to use the machine as a PC printer. For example, if you want
to adjust the printing contrast you do not have to press
Lighten/Darken on the control panel. The control panel keys
are used primarily for copying, faxing and scanning.
Accessing Printer Settings
You can access printer settings by using either of these
methods.
Print
Windows 95/98/Me
½
Select the File > Print > Properties or File > Page Setup
command from within any Windows application.
Or
½
Select the Xerox WorkCentre printer from the Printers
folder, then select File > Properties (or select the printer
icon in the Printers folder, and click the right mouse button).
Xerox WorkCentre Pro 412 User Guide Page 4-3
Page 64

Windows NT 4.0
½
Select the File > Print > Properties or File > Page Setup
command from within any Windows application.
Or
½
Select the Xerox WorkCentre printer from the Printers
folder, click the right mouse button, then select Document
Defaults from the drop-down list.
Windows 2000
½
Select the File > Print or File > Page Setup command from
within any Windows application.
Or
½
Select the Xerox WorkCentre printer from the Printers
folder, click the right mouse button, then select Printing
Preferences from the drop-down list.
Page 4-4 Xerox WorkCentre Pro 412 User Guide
Page 65

Printer Properties Tabs
When the Printer Properties are displayed, you can review and
Print
change settings for your print job.
Your printer’s Properties window consists of 5 tabs:
- Paper
- Image Quality
- Page Layout
-Watermark
- About
If you access the Printer Properties through the Printers folder,
you can view more Windows-based tabs, as well as these 5
tabs.
For information on the Windows-based tabs, refer to your
Windows User Guide.
For details on the pr inter set tings avai lable on each tab, p lease
refer to the printer driver on-line help.
Xerox WorkCentre Pro 412 User Guide Page 4-5
Page 66

NOTE: If you access the Printer Properties through the
Printers folder, any settings made will become the default
settings for the printer. Settings made when the Printer
Properties are accessed through an application File menu
and
Print or Page Setup will remain active until the
application you are printing from is closed.
Printer Properties Buttons and Icons
½
Click [OK] when you have finished reviewing or making
changes.
½
Click [Cancel] if you want to exit the tab menus without
applying any changes.
½
Click [Help] to view the online Help feature and tab menu
details.
½
Click the [?] icon in the title bar. Position the ? pointer over
the parameter in question and click to see a pop up window
explaining that parameter.
½
Click the [Defaults] button to reset the parameter values for
current tab to their default settings (i.e., before you made
any pending changes).
Page 4-6 Xerox WorkCentre Pro 412 User Guide
Page 67

5 Fax
Fax
This chapter contains information about the Fax function and
the features available. It gives step by step instructions on how
to send and receive faxes using all the features and functions
available.
The following topics are included:
- Faxing Procedure
- Dialing Methods
- Receiving a Fax
- Standard Fax Features
- Advanced Fax Features
-Fax Reports
Xerox WorkCentre Pro 412 User Guide Page 5-1
Page 68

Faxing Procedure
Quick Pathway
½
Load the Originals.
½
Press the Copy/Fax/Scan
Key
½
Choose the Fax features
required.
½
Enter the fax number.
½
Press [Start].
1. Load the Originals
Before sending a fax identify what is to be faxed, the fax
number and any special programming requirements. Use the
following steps to send a fax.
A choice of document input areas is available. These are:
- An automatic document feeder (ADF) for multiple single
sided originals.
- A document glass for single originals or bound originals.
Automatic Document Feeder (ADF)
Using the Automatic Document Feeder (ADF), you can load up
to 30 documents in one job. Ensure documents are in good
condition, and that all staples and paper clips have been
removed. Ensure any glue, ink or correction fluid on the paper
is completely dry before loading the documents.
Originals should be between 45 g/m
and 28 lb), and between B5 (182 x 257 mm / 7 x 10 inch) and
Legal size (216 x 356 mm / 8.5 x 14 inch).
2
and 105 g/m2 (12.5 lb
Page 5-2 Xerox WorkCentre Pro 412 User Guide
Page 69

½
Remove all staples and paper
clips before placing the
originals into the document
feeder.
½
If necessary, adjust the sliding
document guides to the paper
size required.
½
Insert the originals neatly into
the document feeder, face up.
Do not attempt to feed the following types of documents into
the Automatic Document Feeder:
- carbon-paper or carbon-back ed pape r
- coated paper
- onion skin or thin paper
- wrinkled or creased paper
- curled or rolled paper
- torn paper
Do not load documents containing different sizes or weights of
paper.
NOTE: If your document falls into any of these categories, use
the document glass only.
Document guides
Fax
The first page should be on
top with the headings towards
the back or left of the
machine.
½
Align the stack with the left
and rear edges of the
document feeder tray and
adjust the guides to just touch
the front and rear edges of
the originals.
Xerox WorkCentre Pro 412 User Guide Page 5-3
Page 70

½
Raise the document glass
cover.
½
Position the original face down
on the document glass. Align it
with the registration arrow in
the rear left corner.
Document Glass
The document glass should be used for single pages or bound
originals up to a maximum size of Legal size (216 x 356 mm /
8.5 x 14 inch).
NOTE: Ensure that no documents
are loaded in the ADF. If a
document is detected in the ADF,
the document has a priority than
the document on the glass.
½
Lower the document glass
cover.
NOTE: On completion of a job
ensure the document glass cover
is fully closed.
Page 5-4 Xerox WorkCentre Pro 412 User Guide
Page 71

2. Press the Copy/Fax/Scan Key
½
Ensure that the LCD displays
the date and time (FAX
mode).
½
If not, press the [Copy/Fax/
Scan] key on the control
panel repeatedly until ‘FAX’
displays in the bottom line of
the LCD, then press [Select].
Copy/Fax/Scan Key Select Key
Fax
Xerox WorkCentre Pro 412 User Guide Page 5-5
Page 72

3. Select the Fax Features
There are four standard features available. The keys are
located on the Control Panel.
For a more detailed explanation of the standard Fax features
available, please refer to the following pages:
4. Enter the Fax Number
Enter the fax number of the remote machine using the Numeric
Keypad.
½
Use the numeric keypad to
enter the telephone number
of the remote fax machine.
½
If an incorrect number is
entered, use the navigation
keys to select the incorrect
number and press the correct
number.
Pressing the [Clear/Clear All]
key will delete the entire fax
number entered.
- Resolution - page 5-20
- Scan Options - page 5-21
- Original Type - page 5-21
- Lighten/Darken - page 5-22
Numeric Keypad Clear/Clear All
Key
There are several methods available for entering the remote
fax number, including functions such as Speed dialing and
Group dialing.
HINT: For information about all the dialing methods available,
refer to “Dialing Methods” on page 5-9.
Page 5-6 Xerox WorkCentre Pro 412 User Guide
Page 73

5. Press Start
½
Press [Start] to begin scanning
and faxing.
½
If scanning originals using the
document glass, the displays
asks if you want to send
another page. Using the
navigation keys select [1:YES]
or [2:NO] and press [Select].
½
If [1:YES] is selected, repeat
the procedure until all the
originals have been scanned,
then select [2:NO] and press
[Select] to send the job.
6. Fax Job Management
Fax
Start Key
Canceling a Fax
To cancel a fax, press Stop at any time during the
transmission.
Confirming Transmission
When the last page of your document has been sent
successfully, the machine beeps and returns to Standby mode.
If something went wrong during your fax transmission, an error
message appears on the display.
HINT: For a listing of error messages and their meanings,
refer to Chapter 8 - Basic Troubleshooting, page 8-13.
If you receive an error message, press [Stop] to clear the
message and try to send the document again.
Xerox WorkCentre Pro 412 User Guide Page 5-7
Page 74

You can set your machine to print out a Confirmation Report
(Message Confirm) automatically each time sending is
completed. For instructions refer to Chapter 9 - System Setup,
page 9-6.
Monitoring Dual Job Status
Your machine can perform more than one of many functions
simultaneously. For example, you can:
- Receive a fax into the memory while making a copy.
- Store a fax document for later transmission while printing
an incoming fax.
When the machine performs dual tasks, press [Job Status] to
see the current status on the display of the other operation.
Each time you press [Job Status], the current status of the two
operations displays alternatively.
Page 5-8 Xerox WorkCentre Pro 412 User Guide
Page 75

Dialing Methods
Keypad Dialing
There are several fax dialing methods available on your
WorkCentre Pro 412.
Use the following instructions to send the fax using Keypad
Dialing.
½
Feed the document(s) face up into the ADF or place a
single document on the document glass face down.
½
Ensure the LCD displays the date and time (FAX mode). If
not, press the [Copy/Fax/Scan] key until FAX displays, then
press [Select].
½
Use the numeric keypad to enter the telephone number of
the remote fax machine.
½
Press [Start].
Fax
Xerox WorkCentre Pro 412 User Guide Page 5-9
Page 76

Speed Dialing
You can store up to 80 numbers in one or 2-digit Speed Dial
locations (1 -8 0) .
Storing a Number for Speed Dialing
½
Ensure that the LCD displays the date and time (FAX
mode). If not, press [Copy/Fax/Scan] until FAX displays,
then press [Select].
½
Press and hold [Speed Dial] on the control panel for 2
seconds.
½
Enter a speed dial number using the numeric keypad, then
press [Select].
If a number is already stored in the location you chose, the
display shows the number.
½
Enter the fax number you want to store, then press [Select].
½
To assign a name to the number, enter the required name.
For information on how to enter names, refer to Chapter 2 -
Product Overview, page 2-8.
If you do not want to assign a name, skip this step.
½
Press [Select] when the name appears correctly or simply
without entering a name.
½
To store more telephone numbers, repeat the procedure.
½
To return to Standby mode, press [Menu/Exit] or [Stop].
Page 5-10 Xerox WorkCentre Pro 412 User Guide
Page 77

Using Speed Dialing
½
Feed the document(s) face up into the ADF or place a
single document on the document glass face down.
½
Ensure the LCD displays the date and time (FAX mode). If
not, press the [Copy/Fax/Scan] key until FAX displays, then
press [Select].
½
Program any features required for the job.
½
Press [Speed Dial] on the control panel.
½
Enter the speed dial number.
½
Press [Start].
The fax number stored in the speed dial location will be
automatically dialed, then the document will be sent when the
remote fax machine answers.
Fax
Xerox WorkCentre Pro 412 User Guide Page 5-11
Page 78

Group Dialing (for Multi-Address Transmission)
A number of speed dial numbers can be assigned as a group.
By using the group number, you can send a document to
multiple parties in a single operation. Your machine will dial the
remote numbers in stored sequence. If the number is busy,
your machine will dial the next stored number and after dialing
all of the s t ored num bers , wi ll aut oma tic all y re di al a ny nu mbe r
that was previously busy. Before you can use this feature, you
must coordinate and store the group numbers required.
Assigning Speed Dial Numbers to a Group
½
Ensure that the LCD displays the date and time (FAX
mode). If not, press [Copy/Fax/Scan] until FAX displays,
then press [Select].
½
Press [Menu/Exit] on the control panel. The display shows
the first menu; SYSTEM DATA.
½
Press or until you find ‘GROUP DIAL’, then press
[Select].
½
Press [Select] to access ‘NEW’.
½
Enter the required group number between Speed Dial
location numbers 01 and 80, then press [Select].
NOTE: If the group number is already used, ‘NO. IS
REGISTERED’ appears on the LCD.
The display asks for a 2-digit speed dial number.
½
Enter the speed dial number you want to include in the
group and press [Select].
The speed dial number, fax number and name displays.
½
Press [Select].
½
Repeat the procedure to enter other speed dial numbers
into the selected group.
½
Press [Menu/Exit] when you have entered all the required
speed dial numbers.
The display asks you to enter an ID (name).
Page 5-12 Xerox WorkCentre Pro 412 User Guide
Page 79

½
To assign a name to the group, enter the required name.
If you do not want to assign a name, skip this step.
½
When you have finished, press [Select].
½
If you want to assign another group, repeat the whole
procedure.
½
To exit and return to the previous menu level, press [Menu/
Exit]. To return to Standby mode, press [Stop].
NOTE: You cannot include a group dial number in another
group dial number.
Editing Group Dial Numbers
You can delete a specific speed dial number from a selected
group or add a new speed dial number to the selected group.
½
Ensure that the LCD displays the date and time (FAX
mode). If not, press [Copy/Fax/Scan] until FAX displays,
then press [Select].
½
Press [Menu/Exit] on the control panel. The display shows
the first menu; SYSTEM DATA.
½
Press or until you find ‘GROUP DIAL’, then press
[Select].
Fax
½
Press or to select ‘EDIT’ then press [Select].
½
Enter the group number you want to edit, then press
[Select].
The display prompts you to enter a speed dial number.
½
If you want to delete a specific speed dial number from the
group, enter the speed dial number and press [Select].
The LCD displays ‘DELETE?’.
½
If you want to add a new speed dial number, enter the new
speed dial number and press [Select].
The LCD displays ‘ADD?’.
½
Press [Select] to select the required option. Repeat the
steps to add or remove other speed dial number s.
Xerox WorkCentre Pro 412 User Guide Page 5-13
Page 80

½
Press [Select] when you have finished editing the Group. If
there is a name assigned to the group, the name appears.
½
Change the name if necessary, then press [Select]. Y ou can
continue editing other groups by repeating the whole
procedure.
½
To exit and return to the previous menu level, press [Menu/
Exit]. To return to Standby mode, press [Stop].
Using Group Dialing (Multi-Address Transmi ssion)
You can use Group Dialing for Manual Group sendi ng, or
Delayed sending.
Follow the procedure of the required operation, for Manual
Group sending refer to the instructions below. For Delayed
Sending, refer to “Delay Send” page 5-24.
When you come to a step in which the display asks you to enter
the remote fax number, press Speed Dial and enter the group
dial number. You can use only one group number for one
operation. Then continue the procedure to complete the
required operation.
Your machine automatically scans the document into memory,
and the machine will dial each of the numbers included in the
Group.
Manual Group Dialing
Use this feature to send your documents to multiple locations.
After sending, the documents are automatically erased from
the memory.
½
Feed the document(s) face up into the ADF or place a
single document on the document glass face down.
½
Ensure the LCD displays the date and time (FAX mode). If
not, press the [Copy/Fax/Scan] key until FAX displays, then
press [Select].
½
Program any features required for the job.
½
Press [Manual Group] on the control panel.
Page 5-14 Xerox WorkCentre Pro 412 User Guide
Page 81

½
Enter the remote fax phone number using the numeric
keypad.
To enter the number, you can also press [Speed Dial] and
enter a speed dial number and press [Select].
½
Press [Select] to confirm the number.
The display asks you to enter the next fax number to send
the document to.
NOTE: If you have an operation stored in the memory which
requires the machine to send or receive to or from more than
one location, the machine will not allow additional fax numbers
to be entered here.
½
Press [Select] and enter another fax number using the
numeric keypad.
You can also press [Speed Dial] and enter a speed dial
number and press [Select]. Note that you cannot use Group
dial numbers for another fax number.
The number appears on the display.
½
Press [Select] to confirm the number.
½
To send to one location or when you complete the last fax
number setting, press [Menu/Exit].
Fax
The document will be scanned into the memory before
transmission.
The display shows the memory capacity and the number of
pages being stored in the memory, then the machine begins
sending the document in order of the numbers you entered.
NOTE: For an original fed from the document glass, the
display asks if you want to feed another page. Using the
navigation keys, select [1:YES] or [2:NO] and press [Select].
When you have finished scanning all the originals, select
[2:NO] and press [Select] to send the fax.
Xerox WorkCentre Pro 412 User Guide Page 5-15
Page 82

Manual Dialing
Redial
½
Feed the document(s) face up into the ADF or place a
single document on the document glass face down.
½
Ensure the LCD displays the date and time (FAX mode). If
not, press the [Copy/Fax/Scan] key until FAX displays, then
press [Select].
½
Program any features required for the job.
½
Press [Manual Dial] on the control panel. The dial tone will
be audible.
½
Enter the remote fax phone number using the numeric
keypad.
½
When you hear the fax tone from the remote machine,
press [Start] to begin sending.
To Redial the Last Number:
½
Ensure the LCD displays the date and time (FAX mode). If
not, press the [Copy/Fax/Scan] key until FAX displays, then
press [Select].
½
Press [Pause/Redial]. If a document is loaded in the ADF or
on the document glass, the machine automatically begins to
send.
To Search Redial Memory:
½
Ensure the LCD displays the date and time (FAX mode). If
not, press the [Copy/Fax/Scan] key until FAX displays, then
press [Select].
½
Press and hold [Pause/Redial] for 2 seconds.
The Redial memory in your machine retains the last 10
numbers called. If you have dialed the same number multiple
times, the machine does not count the duplicates.
Page 5-16 Xerox WorkCentre Pro 412 User Guide
Page 83

½
Press or to search through the memory until you
find the number you want.
½
When the number you want appears on the display, press
[Start] to dial.
Sending a Fax After Talking
If you have a phone connected to the EXT jack, you can send
a fax after speaking with a person at the remote site.
½
When you have finished talking, instruct the person at the
remote location to start their fax machine and hang up. The
remote fax machine will send the initial fax tones.
½
Wait until you hear the fax tone from the remote fax
machine.
½
Place the documents in the Automatic Document Feeder.
½
Press [Start] and replace your handset.
Fax
Xerox WorkCentre Pro 412 User Guide Page 5-17
Page 84

Receiving a Fax
Receive Modes
Your WorkCentre Pro 412 can automatically answer, receive,
and print all incoming faxes.
During PC file printing, an incoming fax can be received and
stored in memory.
You can change the receive mode.
You can configure your machine to TEL, FAX, TEL/FAX or
ANS/FAX mode.
½
Press [Menu/Exit] on the control panel.
½
Press or until ‘SYSTEM SETUP’ appears in the
display, then press [Select].
½
Press or to select the required receive mode.
½
Press [Select] to save the setting.
½
Press [Menu/Exit] to exit and return to the previous menu
level.
½
To return the Standby mode, press [Stop].
Receive Mode Options
TEL In TEL mode, automatic fax answering and reception is turned
off. To receive a fax manually, pick up the external phone
handset or press Manual Dial to accept the call. You can hear
voice or fax tone from the remote machine. Press [Start] and
replace the handset.
NOTE: If the machine is in Scan or Copy mode, the Manual
Dial button will not be activated. Ensure that the LCD displays
the date and time (FAX mode).
FAX The machine answers an incoming call and immediately goes
into fax receive mode.
Page 5-18 Xerox WorkCentre Pro 412 User Guide
Page 85

TEL/FAX The machine answers the incoming call. If a fax signal is not
detected, the machine sounds a ringing tone to indicate a voice
phone call. To answer the call, press [Start] on the control
panel, then lift the handset. If the external phone is not lifted
while the ringing tone is sounding, the machine will switch to
automatic fax reception mode.
ANS/FAX Use if attaching an answering machine to the Xerox
WorkCentre Pro 412. If the machine senses a fax tone, it
automatically switches to FAX mode.
Receiving Manually in TEL Mode
If you have an external phone connected to the EXT jack, you
can answer voice phone calls and receive faxes manually.
½
Answer an incoming call by picking up the external phone.
½
If you hear a fax tone, or if the person calling asks you to
receive a fax, press [Start].
You may also press the characters *9* on the telephone to
initiate reception.
½
Replace the external phone handset. The machine begins
receiving and returns to Standby mode when reception is
complete.
Fax
NOTE: The characters *9* (star-nine-star) are preset at the
factory as the default remote receive start code (Rcv Code) for
machines operated with a telephone connected to the EXT
jack. The asterisks in the code are fixed characters, but the
number can be changed. For instructions, refer to Chapter 9 System Setup, page 9-6.
Xerox WorkCentre Pro 412 User Guide Page 5-19
Page 86

Standard Fax Features
You can set the following standard features for Faxing. Use the
feature buttons on the control panel to change feature settings
before pressing the Start button to begin scanning.
Resolution
Use the Resolution option to increase sharpness and clarity. If
you press [Resolution] repeatedly after loading an original, you
can choose between FINE, SUPER FINE, and STANDARD.
½
½
½
Resolution Options
Standard Use for documents with normal sized characters.
Fine Use for documents containing small characters or thin lines, or
for sending documents printed using a dot-matrix printer.
Press [Resolution] on the control panel to display the
current setting.
Press [Resolution] repeatedly to scroll through the choices.
Press [Select] to save the required selection.
Super Fine Use for documents containing extremely fine detail. Super Fine
mode is enabled only if the remote machine also supports
Super Fine resolution.
NOTE: Super Fine resolution is not available if the Send from
Memory feature is set to ON. If Send From Memory is set to
ON, all documents will be stored to memory in Standard
mode. If the product is set to Super Fine resolution and the
remote fax machine does not support Super Fine resolution,
your product will transmit using the highest resolution mode
supported by the remote fax machine.
Page 5-20 Xerox WorkCentre Pro 412 User Guide
Page 87

Scan Options
Original Type
If the remote fax machine has color reception capability, you
can send color documents. Select B&W for non-color
documents, and COLOR for color documents.
½
Press [Scan Options] on the control panel to display the
current setting.
½
Press [Scan Options] repeatedly to scroll through the
choices.
½
Press [Select] to save the selection.
If you send different types of documents, use this option to
change the original type to ensure a high quality.
½
Press [Original Type] on the control panel to display the
current setting.
½
Press [Original Type] repeatedly to change the setting.
½
Press [Select] to save the selection.
Original Type Options
Fax
Text Use to scan documents containing mostly text.
Mixed Use to scan documents with mixed text and graphics.
Photo Use when the originals are photographs.
Xerox WorkCentre Pro 412 User Guide Page 5-21
Page 88

Lighten/Darken
Resetting Fax Features
½
Press [Clear/Clear All] on the
control panel twice.
Use Lighten/Darken to compensate for the brightness or
darkness of your faxed document. Set to darker mode when
the document contains faint pencil markings or light print. Set
to lighter mode for dark print.
½
Press [Lighten/Darken] on the control panel to display the
current setting.
½
Press [Lighten/Darken] repeatedly to scroll through the
choices.
You can choose from 5 contrast settings. Each time you
press the key, the selection block on the LCD moves to the
left or the right. As the selection block moves to the right, the
contrast be comes darker.
½
Press [Select] to save the selection.
You can reset all the Fax feature selections you have made
back to the factory default status.
The LCD displays the date
and time.
Clear/Clear All
Key
Page 5-22 Xerox WorkCentre Pro 412 User Guide
Page 89

Advanced Fax Features
There are a number of fax functions which can be used for
more advanced fax jobs.
Sending a Color Fax
Use the following procedure to send a color fax if your original
contains color:
½
Feed the document(s) face up into the ADF or place a
single document on the document glass face down.
½
Ensure the LCD displays the date and time (FAX mode). If
not, press the [Copy/Fax/Scan] key until FAX displays, then
press [Select].
½
Press [Resolution] on the control panel to display the
current setting.
½
Press [Resolution] repeatedly until ‘FINE’ is disp laye d .
½
Press [Select] to save the setting.
½
Press [Scan Options] on the control panel to display the
current setting.
Fax
½
Press [Scan Options] repeatedly until ‘COLOR’ is displayed.
½
Press [Select] to save the setting.
½
Press [Manual Dial] on the control panel and enter the
number of the remote machine using the numeric keypad.
½
Press [Start] to begin scanning and then sending.
NOTE: If the remote machine does not have color printing
capability, the received fax will be printed in black and white.
Xerox WorkCentre Pro 412 User Guide Page 5-23
Page 90

Delay Send
You can set your machine to send a fax at a later time when
you will not be present.
½
Feed the document(s) face up into the ADF or place a
single document on the document glass face down.
½
Ensure the LCD displays the date and time (FAX mode). If
not, press the [Copy/Fax/Scan] key until FAX displays, then
press [Select].
½
Program any features required for the job.
½
Press [Menu/Exit] on the control panel.
½
Press or until ‘DELAY SEND’ appears, then press
[Select].
½
Enter the number of the remote machine using the numeric
keypad.
To enter the number, you can also press Speed Dial and
enter the speed dial number then press [Select].
½
Press [Select] to confirm the number.
The display asks you to enter the next fax number to send
the document to.
NOTE: If you have an operation stored in the memory which
requires the machine to send or receive to or from more than
one location, the machine will not allow additional fax numbers
to be entered here.
½
If you want to send to more than one location, press
[Select], and enter another fax number using the numeric
keypad.
You can also press Speed Dial and enter a speed dial
number, then press [Select].
½
The number appears on the display. Press [Select] to
confirm the number.
½
To send to one location or when you complete the last fax
number setting, press [Menu/Exit].
Page 5-24 Xerox WorkCentre Pro 412 User Guide
Page 91

½
The display asks you to enter an ID. If you want to assign a
name to the transmission, enter the name. If not, skip this
step.
For details on how to enter the name using the numeric
keypad, refer to Chapter 2 - Product Overview, page 2-8.
½
Press [Select].
The display shows the current time and asks you to enter the
start time when the fax is to be sent.
½
Enter the time by using the numeric keypad.
To select AM or PM for 12-hour format, press or . If
you set a time earlier than the current time, the document will
be sent at that time on the following day.
½
Press [Select] when the start time displays correctly.
The document will be scanned into the memory before
transmission. The display shows the memory capacity and
the number of pages being stored in the memory.
NOTE: For an original fed from the document glass, the
display asks if you want to feed another page. Using the
navigation keys, select [1:YES] or [2:NO] and press [Select].
When you have finished scanning all the originals, select
[2:NO] and press [Select].
Fax
½
The machine returns to Standby mode and the LCD
reminds you that you are in Standby mode and that Delayed
Transmission is set.
NOTE: For instructions on canceling a delayed send
transmission, refer to “Canceling a Schedule Transmission”
on page 5-32.
Xerox WorkCentre Pro 412 User Guide Page 5-25
Page 92

Adding Documents To a Delayed Transmission
You can add documents to the delayed transmission
previously reserved in your machine’s memory.
½
Feed the document(s) face up into the ADF or place a
single document on the document glass face down.
½
Ensure the LCD displays the date and time (FAX mode). If
not, press the [Copy/Fax/Scan] key until FAX displays, then
press [Select].
½
Program any features required for the job.
½
Press [Menu/Exit] on the control panel.
½
Press or until ‘ADD/CANCEL’ appears, then press
[Select].
½
Press [Select] to access ‘ADD’. The display shows the
information of the last job reserved in the memory.
½
Press or repeatedly until you find the operation to
which you want to add documents, then press [Select].
The machine automatically stores the documents in the
memory, and the display shows the memory capacity and
the number of pages.
After storing, the machine displays the number of total
pages, then returns to Standby mode.
Page 5-26 Xerox WorkCentre Pro 412 User Guide
Page 93

Priority Sending
When the Priority Send is enabled, a high priority document
can be transmitted ahead of reserved operations. The
document is scanned into the memory, then transmitted when
the current operation is concluded. In addition, the Priority
Send will interrupt a broadcast operation between stations (i.e.,
when transmission to station A ends, before transmission to
station B begins) or between redial attempts.
½
Feed the document(s) face up into the ADF or place a
single document on the document glass face down.
½
Ensure the LCD displays the date and time (FAX mode). If
not, press the [Copy/Fax/Scan] key until FAX displays, then
press [Select].
½
Program any features required for the job.
½
Press [Menu/Exit] on the control panel.
½
Press or until ‘PRIORITY SEND’ appears, then
press [Select].
½
Enter the number of the remote machine using the numeric
keypad.
To enter the number you can also press [Speed Dial] and
enter the speed dial number, then press [Select].
Fax
½
Press [Select] to confirm the number.
½
The display asks you to enter an ID. If you want to assign a
name to the transmission, enter the name. If not, skip this
step.
For details on how to enter the name using the numeric
keypad, refer to Chapter 2 - Product Overview, page 2-8.
½
Press [Select].
The document will be scanned into the memory before
transmission. The display shows the memory capacity and
the number of pages being stored in the memory.
Xerox WorkCentre Pro 412 User Guide Page 5-27
Page 94

Polling
NOTE: For an original fed from the document glass, the
display asks if you want to feed another page. Using the
navigation keys, select [1:YES] or [2:NO] and press [Select].
When you have finished scanning all the originals, select
[2:NO] and press [Select] to send the job.
The machine shows the number being dialed, then begins
sending the document.
What is Polling?
Polling is used when one fax machine requests another to send
a document. This is useful when the person with the original
document to be sent is not in the office. The person who wants
to receive the document calls the machine holding the original
and requests that the document be sent. In other words, it
“polls” the machine holding the original.
TX Poll
You can program your fax machine to send documents in your
absence when polled by a r emote fax m achine. It is possibl e to
use a poll code to prevent unauthorized polling of your fax
machine. When you secure your machine in this manner, only
those who know the poll code can poll your machine.
½
Feed the document(s) face up into the ADF or place a
single document on the document glass face down.
½
Ensure the LCD displays the date and time (FAX mode). If
not, press the [Copy/Fax/Scan] key until FAX displays, then
press [Select].
½
Program any features required for the job.
½
Press [Menu/Exit] on the control panel.
½
Press or until ‘POLLING’ appears, then press
[Select].
½
Press [Select] to access ‘TX POLL’.
Page 5-28 Xerox WorkCentre Pro 412 User Guide
Page 95

The display asks you to enter a 4-digit poll code. The poll
code is preset to 0000 at the factory, which represents no
poll code.
½
If you want to use a poll code, enter the required 4-digit
code (except for 0000), then press [Select]
½
If you do not want to secure the transmission with a poll
code, press [Select] when the display shows 0000 for the
poll code, or enter 0000.
½
The display asks you to store the document in the
machine’s bulletin board memory.
If you store the document in the bulletin board memory, more
than one remote station can poll that document from your
machine. If not, the document will be automatically erased
after being polled by a remote machine.
½
Using the or key, select ‘ON’ to store in the bulletin
board or ‘OFF’ not to store in the bulletin board. Then press
[Select].
The machine stores the document in the memory. The
display counts the number of pages being stored in the
memory and the memory capacity remaining.
HINT: A Schedule Job Information report can be printed to
confirm that a TX Poll operation has been set. Refer to “Fax
Reports” on page 5-33 for further information.
Fax
The machine returns to Standby mode.
NOTE: For an original fed from the document glass, the
display asks if you want to feed another page. Using the
navigation keys, select [1:YES] or [2:NO] and press [Select].
When you have finished scanning all the originals, select
[2:NO] and press [Select].
NOTE: If you have previously set the receive mode to other
than FAX mode, the machine automatically switches to FAX
mode (automatic receiving) when set to be polled.
Xerox WorkCentre Pro 412 User Guide Page 5-29
Page 96

RX Poll and Delay RX Poll
You can set your machine to automatically receive documents
from one or more unattended remote fax machines now, or at
a later time. This feature permits unattended polling in the
evening hours when telephone rates are lower:
NOTE: The remote machine must be ready for polling.
½
Ensure the LCD displays the date and time (FAX mode). If
not, press the [Copy/Fax/Scan] key until FAX displays, then
press [Select].
½
Press [Menu/Exit] on the control panel.
½
Press or until ‘POLLING’ appears, then press
[Select].
½
Press or to select ‘DELAY RX POLL’, then press
[Select].
The display asks you to enter the number of the remote fax
machine.
½
Enter the number of the remote fax machine using the
numeric keypad.
You can press [Speed Dial] and enter the speed dial number
and press [Select].
½
Press [Select] to confirm the number.
The display asks you to enter another fax number to receive
documents from another location.
NOTE: If you have an operation stored in the memory which
requires the machine to send or receive to or from more than
one location, the machine will not allow additional fax numbers
to be entered here.
½
To poll more than one location, press [Select] and repeat
the procedure.
½
To poll one location or when you have entered all locations,
press [Menu/Exit].
The display asks you to enter the time you require your
machine to call the remote machine.
Page 5-30 Xerox WorkCentre Pro 412 User Guide
Page 97

½
Enter the time using the numeric keypad.
Use or to select AM or PM. If you set a time earlier
than the current time, your machine will call the number at
that time on the following day.
To call the remote machine immediately, skip this step.
½
Press [Select] when the time appears correctly in the
display or without entering the time.
The display asks you to enter a 4-digit code. Poll code ‘0000’
represents no code.
½
If the remote machine is secured with a Poll code, you must
enter the correct code, and press [Select]
If the remote machine is not secured with a Poll code, press
[Select] to accept [0000] which represents no code, or enter
0000.
If you have entered a specific start time, the machine will
dial, and receive a document from the remote machine at the
time specified.
If not, the machine dials the remote machine immediately to
retrieve the document.
Fax
Xerox WorkCentre Pro 412 User Guide Page 5-31
Page 98

Canceling a Scheduled Operation
Delayed Sends, Priority Sends, Group Sends and TX Polling
are all scheduled operations. T o cancel a scheduled operation,
use the following instructions.
½
Ensure the LCD displays the date and time (FAX mode). If
not, press the [Copy/Fax/Scan] key until FAX displays, then
press [Select].
½
Press [Menu/Exit] on the control panel. The display shows
the first menu; SYSTEM DATA.
½
Press or until ‘ADD/CANCEL’ appears, then press
[Select].
½
Press or to select ‘CANCEL’, then press [Select].
The display shows the information of the last job reserved in
memory.
½
Press or repeatedly until you find the operation you
want to cancel, then press [Select].
½
A confirmation message appears, press [Select] to initiate
canceling the job. The selected job is canceled.
Page 5-32 Xerox WorkCentre Pro 412 User Guide
Page 99

Fax Reports
Message Confirmation This report shows the fax number, the number of pages,
Fax
Various Reports and Lists are available on your machine. The
Fax Reports help you confirm and monitor your fax activity.
Reports can be set up to include specific information or to print
automatically.
Your machine can print reports containing useful information –
Schedule Job, Phonebook List, etc.
NOTE: For further information about Reports refer to the
Customer Documentation CD.
The following fax reports are available:
elapsed time of the operation, the communication mode, and
the communication results.
You can set up your machine to print the message confirmation
report in one of the following ways:
- Automatically after each transmission (ON)
- Automatically only if an error occurs during transmission
(ERR)
- No report printed at all (OFF). You can print this report
manually at any time you want.
Schedule Job Information This list shows the document currently stored for Delayed
Sending, Priority Sending, Group Sending, and TX polling. The
list shows the starting time, type of operation, etc.
Phonebook List This list shows all of the numbers currently stored in the
machine’s memory as Speed dial numbers and Group dial
numbers.
Transmission Journal This report shows information concerning transmission
activities recently made.
Reception Journal This report shows information concerning reception activities
recently made.
Xerox WorkCentre Pro 412 User Guide Page 5-33
Page 100

Multi-Communication Report This report is printed automatically after sending documents or
receiving documents from more than one location.
NOTE: The list you have set to print out automatically will not
print out when there is no paper loaded or a paper jam has
occurred.
HINT: For a full list of the reports available, refer to Chapter 9 System Setup, page 9-9.
Printing Reports
½
Press [Reports] on the control panel.
The display shows the first menu; MSG. CONFIRM.
½
Press [Reports] repeatedly until you find the list you want to
print, then press [Select].
The selected list will be printed out.
Page 5-34 Xerox WorkCentre Pro 412 User Guide
 Loading...