

Page 1

Xerox PrinterMap
Enterprise Printer Platform
Version 1.3
User Guide for Windows NT and Windows
95/98
Page 2

Xerox Corporation
701 South Aviation Blvd.
El Segundo, CA
90245
USA
Americas Customer Operations
800 Long Ridge Road
Stamford, CT
06904-1600
USA
Copyright 1998 Xerox Corporation. All Rights Reserved.
Copyright protection claimed includes all forms of matters of copyrightable materials and information now allowed by statutory or judicial law or
hereinafter granted, including without limitation, material generated from the software programs which are displayed on the screen such as styles,
templates, icons, screen displays, looks, etc.
XEROX, The Document Company, the stylized X, and CentreWare DP, are trademarks of Xerox Corporation or its subsidiaries.
Lexmark and MarkVision are trademarks of Lexmark International, Inc. HP and JetAdmin are trademarks of Hewlett-Packard Company. Microsoft,
Microsoft Windows, Windows NT, Windows 95/98, MS, and MS-DOS are trademarks of Microsoft Corporation. Novell, NetWare, and Client 32 are
trademarks of Novell Inc. All other product names are trademarks/tradenames of their respective owners.
Xerox Canada, Limited
5650 Yonge Street
North York, Ontario
Canada
M2M 4G7
Xerox Limited
Parkway
Marlow
Buckinghamshire
SL7 1YL
United Kingdom
Notice
Specifications described in this publication are subject to change without notice. Use of some features may be limited by your hardware or software
configuration. Contact your dealer, Xerox, or Xerox Limited for details.
Page 3

Contents
Contents
List of Figures
...................................................................................................... vi
i
List of Tables............................................................................... ix
Preface ...........................................................................................x
Chapter Overview ................................................................................xi
Who should Use this Guide ..................................................................xi
Conventions Guide...............................................................................xi
Mouse Conventions.............................................................................xii
Related Reading..................................................................................xii
Workstation Requirements .................................................................. xii
Hardware.........................................................................................xii
Software ..........................................................................................xii
Memory Requirements.....................................................................xii
Projecting Hard Disk Requirements..................................................xii
Projecting Discover Time................................................................ xiii
Projecting Network Traffic.............................................................. xiii
Conclusion.......................................................................................xv
Chapter 1 Overview.......................................................................1
How it all Works...................................................................................3
PrinterMap Components........................................................................4
PrinterMap User Guide
iii
Page 4

Contents
Chapter 2 Getting Started.............................................................6
PrinterMap Installation..........................................................................7
Loading PrinterMap Files...................................................................7
PrinterMap Re-Installation .................................................................9
PrinterMap Uninstall ..........................................................................9
Running PrinterMap for the First Time................................................10
Configuring PrinterMap.......................................................................12
Configuration Window Panels..........................................................13
Discover...........................................................................................13
Alarms .............................................................................................13
Alarm...............................................................................................14
Status...............................................................................................16
Application Paths.............................................................................16
Reporting.........................................................................................18
PrinterMap Shutdown .........................................................................20
Chapter 3 Discover Process
...................................................................................................... 2
1
Overview.............................................................................................22
Discover Configuration .......................................................................22
IP.....................................................................................................23
IPX..................................................................................................24
Community Strings...........................................................................25
Operation............................................................................................27
Advanced Configuration Issues............................................................30
Supported Vendors and Printer Models............................................30
PrinterMap User Guide
Chapter 4 User Interface
...................................................................................................... 3
4
Topology Overview.............................................................................35
Menu Bar Items...................................................................................36
File...................................................................................................36
Topology .........................................................................................36
Group ..............................................................................................39
Report..............................................................................................41
Tools ...............................................................................................42
Help.................................................................................................43
Toolbar...............................................................................................43
Topology Viewing Areas.....................................................................44
Viewing Printer Information................................................................46
Printer Groups .................................................................................47
Printer Icons.....................................................................................47
iv
Page 5

Contents
Printer Status ...................................................................................48
Printer Properties Window...............................................................49
Adding and Deleting Managed Printers................................................51
Adding Printers to PrinterMap..........................................................51
Deleting Printers from PrinterMap....................................................51
Right-Click Menus ..............................................................................51
Printer Icon Right-Click Menu .........................................................51
Topology Right-Click Menu.............................................................54
Additional Functionality ......................................................................55
Adding Printers to Groups through Drag and Drop ..........................55
Selecting Multiple Printers................................................................56
Chapter 5 Status and Reporting
...................................................................................................... 5
6
Service Overview................................................................................57
Memory Requirements.....................................................................57
Stopping and Re-starting Polling Tasks ............................................57
Status Function ...................................................................................59
Overview .........................................................................................59
Operation.........................................................................................59
Icon Colors......................................................................................60
Reporting Function..............................................................................60
Reporting Service.............................................................................61
Disabling Reporting..........................................................................61
Enabling Reporting...........................................................................63
Generating Reports ..........................................................................63
Standard Reports .............................................................................64
Reporting Data Custodial Procedures...............................................69
Chapter 6 Alarms
...................................................................................................... 7
2
Alarm Detection..................................................................................73
Alarm Configuration............................................................................73
Viewing Alarms...................................................................................73
Chapter 7 Troubleshooting
...................................................................................................... 7
7
Log Files and Debug Functionality.......................................................78
Discover Problems ..............................................................................80
Discover Error message is returned immediately and no printers are
discovered........................................................................................80
Incomplete Discover ........................................................................80
PrinterMap User Guide
v
Page 6

Contents
Discover doesn't complete................................................................81
Status / Alarm Problems......................................................................81
Icons Not Changing Color According to Status:...............................81
Alarms Not Being Received in Alarm Log Window..........................81
Alarm Reads “Invalid Alarm Value from Printer”..............................81
No Pop-ups or Application Launches Occurring...............................81
Reporting Problems.............................................................................82
Standard Reporting Reports.............................................................82
Error Messages ...................................................................................82
PrinterMap Discover Error Messages...............................................90
PrinterMap Reporting Service Messages ..........................................99
PrinterMap Alarm Log Messages ...................................................107
PrinterMap Status Service Messages..............................................109
PrinterMap User Guide
vi
Page 7

Contents
List of Figures
Figure 1 PrinterMap Components........................................................... 4
Figure 2 Welcome to PrinterMap window............................................. 10
Figure 3 Discovery Required window................................................... 11
Figure 4 PrinterMap Configuration window.......................................... 13
Figure 5 Alarm Configuration window.................................................. 14
Figure 6 Alarm Notification Pop-up window......................................... 15
Figure 7 Status Configuration window.................................................. 16
Figure 8 Application Configuration window.......................................... 17
Figure 9 Reporting Configuration window............................................ 18
Figure 10 Select Report Attributes window ..........................................19
Figure 11 Discover Configuration window............................................ 22
Figure 12 Router Discover Configuration window................................ 24
Figure 13 Community Strings window.................................................. 26
Figure 14 Community Strings Update dialog......................................... 26
Figure 15 Available Disk Space window............................................... 27
Figure 16 Not Enough Disk Space Notification window ....................... 28
Figure 17 Discover Progress window.................................................... 29
Figure 18 Discover Complete dialog..................................................... 29
Figure 19 PrinterMap Topology window .............................................. 35
Figure 20 Add Printer window.............................................................. 37
Figure 21 Update Printer Information window...................................... 38
Figure 22 Create Group window........................................................... 39
Figure 23 Delete Group Confirmation dialog ........................................40
Figure 24 Add Printer(s) to Group window........................................... 40
Figure 25 Remove Printer Confirmation dialog ..................................... 41
Figure 26 Printer Icon Components ...................................................... 48
Figure 27 Printer Properties window..................................................... 49
Figure 28 Edit Serial Number window.................................................. 50
Figure 29 Printer Icon Right-click Menu............................................... 51
Figure 30 Generate Report sub-menu.................................................... 52
Figure 31 Add Printer(s) to Group dialog .............................................54
Figure 32 Remove Printer dialog........................................................... 54
Figure 33 Topology Right-Click menu.................................................. 55
Figure 34 Group Right-Click menu....................................................... 55
Figure 35 Service Control window........................................................ 58
Figure 36 Reporting Configuration window.......................................... 62
Figure 37 Verify Disabling Reporting Option window........................... 62
Figure 38 Reporting Parameters window .............................................. 65
Figure 39 Example Group Standard Report window............................. 66
Figure 40 Report Attributes window..................................................... 67
PrinterMap User Guide
vii
Page 8

Contents
Figure 41 Impending Loss of Information window................................ 70
Figure 42 Upcoming Loss of Information – Details window.................. 70
Figure 43 Individual Printer Alarms window......................................... 73
Figure 44 Alarm Log window............................................................... 75
Figure 45 Alarm log – Acknowledge window ....................................... 76
PrinterMap User Guide
viii
Page 9

Contents
List of Tables
Table 1 Document Typographic Conventions......................................... xi
Table 2 Additional Disk Space Required with Reporting Enabled..........xiii
Table 3 Default SNMP Time-out Values............................................... 33
Table 4 Toolbar Icons........................................................................... 43
Table 5 Attribute List ...........................................................................44
Table 6 Predefined Groups ...................................................................46
Table 7 Printer Icons ............................................................................47
Table 8 Printer Status to Icon Color Mapping....................................... 48
Table 9 Printer Status to Icon Color Mapping....................................... 60
Table 10 Alarm Condition to Status Color Mapping.............................. 74
Table 11 Processes Eligible for Debug.................................................. 78
Table 12 Debug Parameter Values........................................................ 78
PrinterMap User Guide
ix
Page 10

Preface
This user guide details the installation, configuration, administration, and
operation of Xerox PrinterMap.
Working knowledge of your network environment, infrastructure, and the
operating system of the client workstation (Windows95 or NT) is assumed.
PrinterMap User Guide
x
Page 11

at the DOS prompt
Chapter Overview
Chapter 1 Overview - Benefits and components of PrinterMap.
Chapter 2 Getting Started - Prerequisites for installation as well as
installation procedures.
Chapter 3 Discover Process – PrinterMap’s Discover process is discussed
in detail.
Chapter 4 User Interface – The functionality accessed via PrinterMap’s
main menu.
Chapter 5 Status and Reporting – PrinterMap’s Status and Reporting
functionality are discussed in detail.
Chapter 6 Alarms – PrinterMap’s alarm capabilities as well as alarm
summary and alarm log windows are discussed.
Chapter 7 Troubleshooting - What to do when something unexpected
occurs
Who should Use this Guide
This guide is designed as a tool for the following personnel:
• System Administrators
• Network Technical Support Personnel
Conventions Guide
The following table explains the typographic conventions used in this guide.
Table 1 Document Typographic Conventions
Typeface Description Example
AaBbCc123
AABBCC123
AaBbCc123
AaBbCc123
AaBbCc123
Indicates text you must enter as a command
at a workstation prompt.
Indicates a specific key or keys you must
press to perform an action.
Indicates a direct reference to an item
appearing in a window. Also indicates the
title of a guide.
Indicates the name of a file or directory in
the workstation environment.
Indicates emphasis.
Type exit
to close the window.
Press ENTER to execute the
following command.
Double-click the Reset
menu item to...
This member is in the Site
dataset.
You must run a discover
before using PrinterMap.
PrinterMap User Guide
xi
Page 12

Mouse Conventions
This guide assumes that you are familiar with a two button mouse. The left button
is used to select an item and perform drag and drop functions, and the right button
displays menus.
1. Click (Double-Click) indicates you press and rapidly release the left mouse
2. Press indicates you must keep the button pressed until the desired action is
Related Reading
To gain a broader understanding of topics covered in this guide, the user should be
familiar with material relating to the following printer management applications.
1. Xerox CentreWare DP
2. HP JetAdmin
3. Lexmark MarkVision
4. Tektronix PhaserShare
5. Olivetti
button (twice for Double-Click).
achieved.
Workstation Requirements
Hardware
1. Pentium or higher processor
2. 9 Mb of Hard Disk for program files
3. 32 Mb of RAM
Software
1. Windows NT 3.51 or 4.0, or Windows 95/98
2. TCP/IP or IPX network configuration
3. NetWare IntranetWare/Client 32 required for IPX Discover of devices
Memory Requirements
The main PrinterMap executable (the Topology window) occupies approximately
4Mb of RAM.
The Status and Reporting services occupy approximately 2.5MB of RAM each.
Projecting Hard Disk Requirements
The following is a scenario designed to provide a view of PrinterMap process and
device requirements.
Reporting
Option
Disabled
PrinterMap User Guide
If the reporting option is disabled, the disk space requirements are 9Mb for
programs and log files.
xii
Page 13

Reporting
Option
Enabled
Each managed printer requires a static amount of reporting and status information.
Allow for an additional 412Kb per managed printer to support reporting data.
This covers a rolling two-year span of data. Please note that this space is
allocated for each printer when it is discovered.
Given these requirements, managing 100 printers would require an additional
41.2Mb of disk space over and above the 9Mb required for PrinterMap programs
and log files. Below is a table showing the additional disk space required for
managing 10, 100 and 1000 printers if the reporting option is enabled.
Number of Printers to
Manage
Additional Disk Space
10 Printers 4.12Mb
100 Printers 41.2Mb
1000 Printers 412Mb
Table 2 Additional Disk Space Required with Reporting Enabled
Projecting Discover Time
The following is an example of Discover process time.
Assumptions
The System Administrator chooses to discover network printers through a local
range of IP addresses. This range contains 35 entries, of which 6 are printers.
Discover takes approximately 3.0 seconds per entry or 105.0 seconds total.
Projecting Network Traffic
In this scenario, the Discover time is affected by total number of entries in the
range of IP addresses and the number of devices being determined as printers. A
greater number of IP address entries increase the discover time even for the same
amount of printers.
The following is a collection of data illustrating the amount of network activity
you can expect when using PrinterMap. To demonstrate expectations of traffic, an
example has been used of a standard network of 100 printers.
Average SNMP request packet size: 200 bytes
Average SNMP response packet size: 200 bytes
Example
Class C Network (254 addressable nodes)
254 Network devices
100 Network printers which support Host Resources MIB (SNMP)
PrinterMap User Guide
xiii
Page 14

40 are Xerox printers
20 are Lexmark printers
20 are HP printers
20 are other printers
All devices support default SNMP community string of "public" for read-only
queries.
The 100 printers have an average of 3 toner cartridges and 3 paper trays per
printer.
Status poll interval has been set to 1 hour.
Custom report poll interval of 1 hour.
No standard report polling configured.
Initial Discover
Estimates
Step 1 Poll: Is this a printer?
254 SNMP queries for hrDeviceType MIB value
154 additional queries for SysObjID to determine devices are not printers.
Step 2 Poll: Who makes this printer?
100 SNMP queries for SysObjID MIB value (for printer's SysObjID)
Step 3 Poll: What is the MAC address for this printer?
100 SNMP queries for ifPhysAddress MIB value (MAC address)
Final Poll: What else can we find out about this printer?
40 SNMP queries of the Xerox printers for xcmiHrDevInfoSerialNumber MIB
value (Serial Number)
100 SNMP queries for hrDeviceStatus MIB value (Device Status)
100 SNMP queries for sysName MIB value (System Name)
100 SNMP queries for sysDescription MIB value (Model)
PrinterMap User Guide
xiv
Page 15

100 SNMP queries for prtMarkerCounterUnit MIB value (Impression Count
Units)
100 SNMP queries for prtMarkerLifeCount MIB value (Lifetime Impression
Count)
400 SNMP queries for prtMarkerSuppliesSupplyUnit MIB value (Toner level
units)
400 SNMP queries for prtMarkerSuppliesMaxCapacity MIB value (Toner level
max)
400 SNMP queries for prtMarkerSuppliesLevel MIB value (Current supply/toner
level)
400 SNMP queries for prtInputCapacityUnit MIB value (Paper level units)
400 SNMP queries for prtInputMaxCapacity MIB value (Paper level max)
400 SNMP queries for prtInputCurrentLevel MIB value (Current paper level)
On-going
Status Service
Estimates
On-going
Reporting
Service
Estimates
Discover traffic totals: 3,548 queries X 400 bytes = 1,419,200 bytes (1.4mb)
100 SNMP queries for hrDeviceStatus MIB value (Device Status) (per hour)
100 SNMP queries for prtMarkerLifeCount MIB value (Lifetime Impression
Count) (per hour)
400 SNMP queries for prtMarkerSuppliesLevel MIB value (Current supply/toner
level) (per hour)
400 SNMP queries for prtInputCurrentLevel MIB value (Current paper level)
100 SNMP queries for hrPrinterDetectedErrorState MIB value (Alarm condition
code) (per hour)
Traffic subtotal: 1,100 queries/hr X 400 bytes/query = 440 kb/hr
100 SNMP queries for prtMarkerLifeCount MIB value (Lifetime Impression
Count)
400 SNMP queries for prtMarkerSuppliesLevel MIB value (Current toner level)
Conclusion
Traffic subtotal: 500 queries/hr X 400 bytes/query = 200 kb/hr
PrinterMap User Guide
xv
Page 16

Based on this scenario, if you were to support 100 printers with 1 hour status and
reporting intervals you can expect approximately 640 kb of traffic per hour on
your network from PrinterMap. This traffic can be more than offset by proactively
fixing parameters before several users send multiple jobs to non-functioning
printers.
Note: This traffic does not reflect a constant impact on bandwidth. These
queries occur in bursts.
PrinterMap User Guide
xvi
Page 17

Clear, graphical printer and printer
Chapter 1 Overview
Xerox PrinterMap is an administrative and management software platform
providing access to a heterogeneous printer environment at the enterprise level.
PrinterMap delivers expanded capacity for network personnel by giving the
operator a graphical topology, and granting easy access to status and report
information for every SNMP-enabled enterprise network printer.
PrinterMap provides:
Single View Topology • Single focal point for managing
SNMP/MIB printers in local and
remote networks
•
status representation
• Viewing by printer attribute,
model, or other administratordefined groups
Alert-driven Architecture for
Proactive Management
• Polling for up-to-date supply,
status, and maintenance
information at selectable intervals
PrinterMap User Guide
• User-defined alarms (i.e., low
paper or toner)
1
Page 18

Configurable report content: name,
JetAdmin, Lexmark’s MarkVision,
Report Generation Based on
Preset Polling Intervals
Printer Management
Application Launch
• Frequency specification of printer
report data polling - daily, weekly,
monthly, quarterly, or yearly
• Easy, accurate bill-back to the
appropriate printer
•
vendor/model, IP/IPX address,
MAC address, status, impressions
or toner over a specified period
• Generated reports exported to
common spreadsheet applications
such as Microsoft Excel or Lotus
1-2-3
• Launch Hewlett-Packard’s
Tektronix PhaserShare, and
Xerox’ CentreWare DP
• Launch printer embedded web
servers
• Reconfigure specific printers
Printer Support • Single tool for the network
administrator to view the SNMP
based printer fleet
• Single point focus for managing
SNMP based Xerox, HP,
Lexmark, Tektronix, Olivetti and
generic network printers
• Network administrators are
proactive in managing enterprise
printer environment
• Tracking printers, allowing load
dispersal or specialized
preventative maintenance
schedules
PrinterMap User Guide
2
Page 19

How it all Works
PrinterMap displays a managed printer topology represented by icons. The icons
provide real-time status and reporting information for each printer.
Through a process called Discover, PrinterMap populates its database with printer
information from SNMP enabled printers and then associates each printer with an
icon in the Topology window. By grouping managed printers, custom topologies
are created based on parent topology. Third party applications are configured for
launch against selected printers through the PrinterMap Topology window.
PrinterMap utilizes two configurable background tasks (Status and Reporting
services) that maintain PrinterMap’s printer and reporting databases with up-todate information. Once PrinterMap is installed, these processes run in the
background, gathering printer information, whether the PrinterMap Topology
window is active or inactive.
Both processes display on the Windows 95/98 system tray and, if double-clicked,
launches the PrinterMap Service Control window. The Status and Reporting
services are stopped and restarted from the Service Control window. On Windows
NT, the Status and Reporting Services are controlled as any other NT service
through the Services option on the Control Panel.
PrinterMap provides an interface for configuring automated responses to detected
printer alarms. Detected alarms may be logged, triggered by a notification Pop-up
window or launched by another application.
Reporting data is used to generate printer reports. Generated reports are printed or
exported to comma-delimited format files for later import into third party database
or spreadsheet software packages.
PrinterMap User Guide
3
Page 20
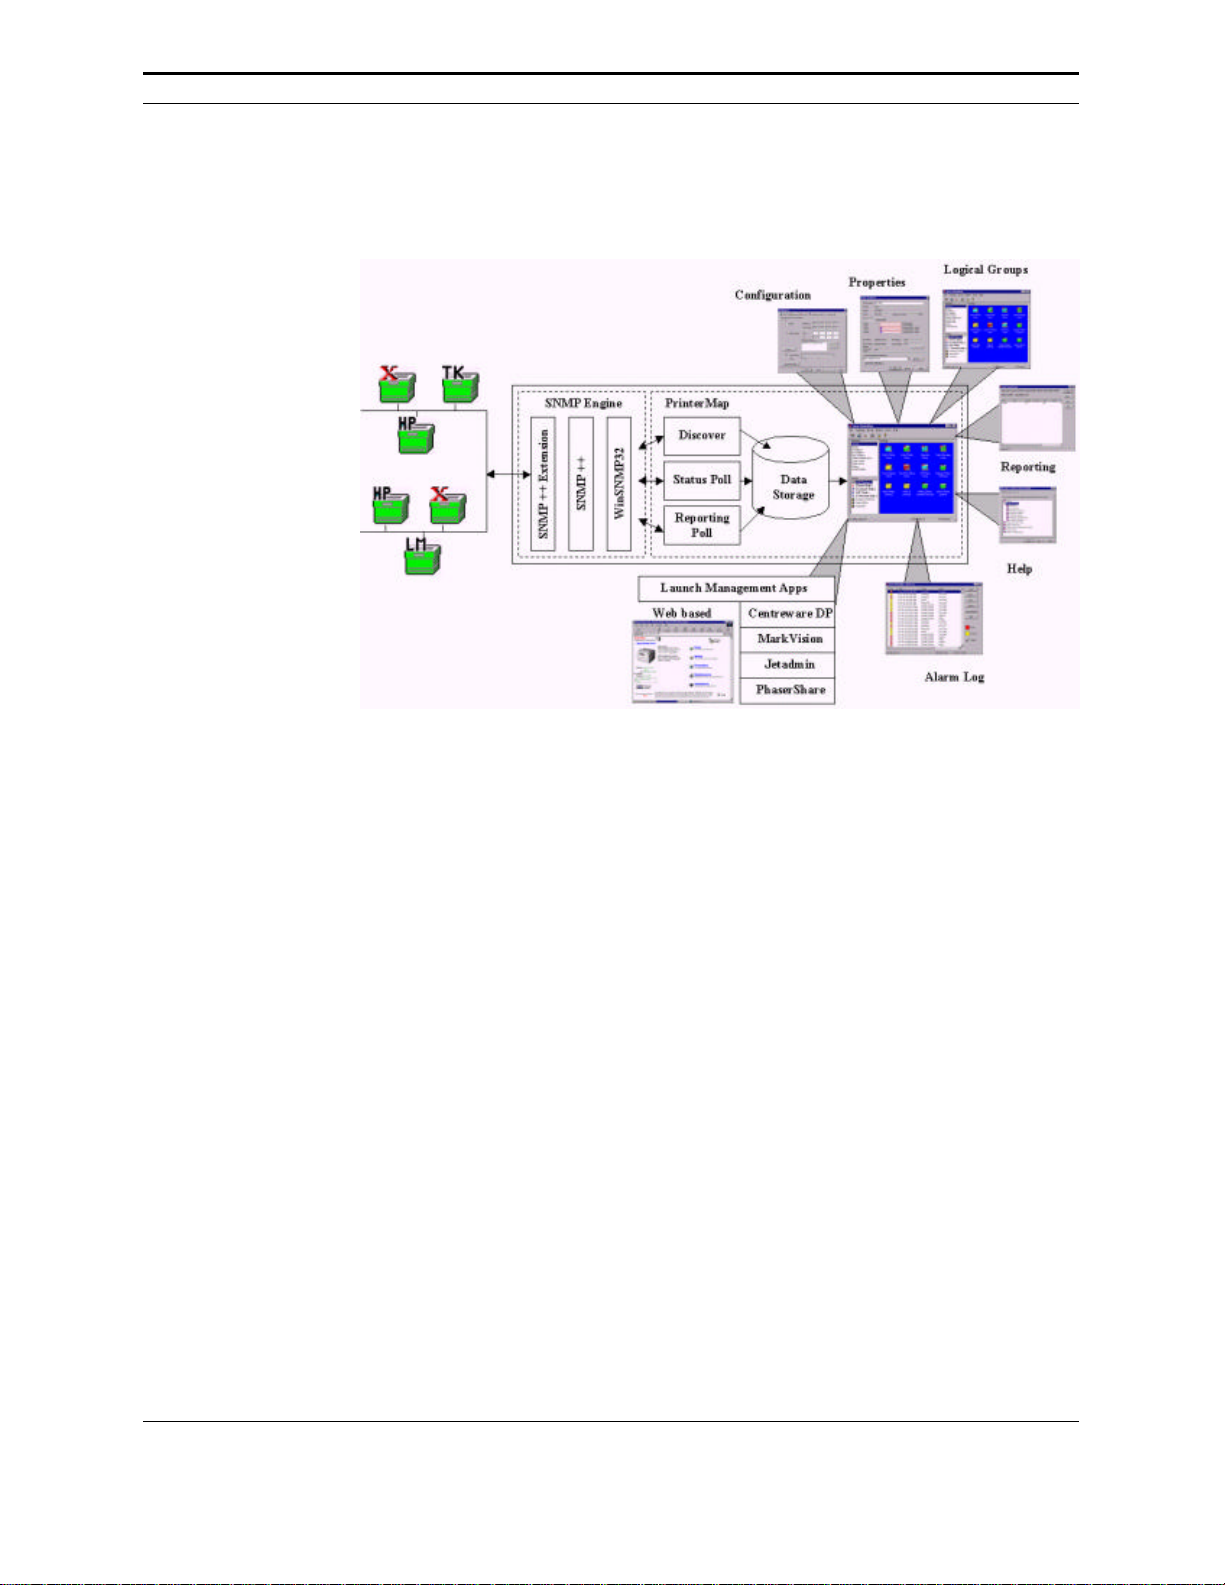
PrinterMap Components
This section provides an overview of the PrinterMap components.
Topology
SNMP Engine
Discover
Report
Alarm
Figure 1 PrinterMap Components
The Topology component refers to PrinterMap’s main graphical user interface
window where most PrinterMap functionality is accessed. It is the main
PrinterMap window portion where printer icons and printer status are displayed.
PrinterMap’s SNMP engine services SNMP requests generated by the Report,
Status and Discover processes.
PrinterMap Discover finds the SNMP enabled network printers within the
configured discover scope and builds a printer information database. This
database is used by PrinterMap for displaying printers and printer status in the
main topology window.
PrinterMap’s Report function configures how often printer report data is collected.
It polls printers for report data at the configured intervals, and provides an
interface for generating Standard and Custom reports for individual printers or
printer groups.
The Alarm function defines automated responses to detected printer alarm
conditions and provides detected alarm viewing.
Application
Paths
The Applications Paths function provides a mechanism for configuring paths to
vendor specific management application. It insures the ability to automatically
associate a management application with a managed printer based on the printer’s
PrinterMap User Guide
4
Page 21

vendor and attributes. There is an interface to launch any managed printer
management application.
Status
PrinterMap’s Status function allows configuration of how often printer status and
alarm information is collected. It also polls printers for status and alarm
information at the configured interval, carries out automated alarm responses, and
triggers PrinterMap Topology status refreshes.
PrinterMap User Guide
5
Page 22

Chapter 2 Getting Started
This chapter covers the following topics:
• Installing PrinterMap
• Starting PrinterMap
• Configuring PrinterMap
• Running the PrinterMap discover process for the first time
• Shutting down PrinterMap.
PrinterMap User Guide
6
Page 23

PrinterMap Installation
This section provides information for installing PrinterMap. Instructions are given
for:
• Loading PrinterMap files
• Reinstalling PrinterMap
• Uninstalling PrinterMap
NOTE: Installation on a Windows NT machine requires administrator authority
Loading PrinterMap Files
The PrinterMap Windows (95, NT) software is available on the Xerox DocuPrint
Services CD-ROM which contains the PrinterMap installation file
PRINTMAP.EXE.
Running the
Installation
Program
Follow the steps below to run PrinterMap’s installation program:
1. Place the Xerox DocuPrint Services CD in the CD-ROM drive.
2. Select Run from the Start menu then enter the following when prompted for
executing the program (Windows 95/98 and NT v4.0):
[Drive]:\instal\printmap\english\setup.exe (where [Drive] is the drive letter
associated with the CD-ROM drive).
NOTE: Windows NT 3.51 users use the Windows File Manager to locate the
PRINTMAP.EXE file from the CD ROM drive.
3. A Pop-up window is displayed indicating that PrinterMap setup is preparing
the InstallShield wizard to guide the user through the installation process. This
window displays a percentage complete bar indicating process progress. A
welcome screen is displayed when the process is complete. During the
installation process, select Back at any time to go to the previous screen.
4. The welcome screen gives opportunity to continue or quit the installation. To
continue with installation, select Next. To halt the process, select Cancel.
After continuing with the installation, PrinterMap displays the PrinterMap
software license agreement.
5. The PrinterMap software license agreement screen instructs the user to read
the license agreement. License agreement terms are accepted by selecting Yes
or the installation is discontinued by selecting No. License agreement
acceptance is necessary to continue PrinterMap installation.
6. A screen is displayed containing important information related to printer
discovery on Novell Netware networks. The message indicates that Client32 /
IntranetWare software is required by PrinterMap to find printers via IPX.
Also mentioned are recommended locations to acquire Client32 / IntranetWare
software. Select Next to continue installation or Cancel to exit the installation.
7. The installation search process searches the hard drive for existing PrinterMap
installations. If an existing installation is detected, an information popup is
displayed indicating the default install directory is set to the existing
PrinterMap User Guide
7
Page 24

PrinterMap installation directory. If the default install directory is accepted,
the installation program overwrites the existing PrinterMap installation and
removes any obsolete files. However, printer and reporting data as well as
configuration information is preserved. If the default install directory is
modified, the existing PrinterMap installation remains on disk, but menu items
and registry information are replaced by the new installation. Select OK to
continue.
8. The Select Destination Location screen is displayed. If no previous
PrinterMap installation is found the default installation directory is set to
[Drive]:\Program Files\Xerox\PrinterMap. Select Browse to alter the
installation destination directory. After choosing a destination directory select
Next to continue installing. Select Cancel to terminate the installation.
9. The Copying Program Files window is displayed (along with several meters)
indicating installation program progress copying PrinterMap files. During this
time the Xerox PrinterMap program group is created and populated with:
• PrinterMap
• PrinterMap Reporting
• PrinterMap Services
• PrinterMap Status
• PrinterMap Readme
• Uninstall PrinterMap
Under Windows NT, the Status and Reporting services are registered as NT
services and therefore do not appear in the Xerox PrinterMap program group.
Directory
Structure
10. The Setup Complete screen is displayed. At this point PrinterMap
installation is complete. By default the “View Readme file now” and “Launch
PrinterMap now” boxes are checked. To prevent displaying the Readme file,
uncheck the “View Readme file now” box. To prevent automatic PrinterMap
launch, uncheck the “Launch PrinterMap now” box. Select the Finish button
to complete setup program. The PrinterMap Status and Reporting services are
started automatically.
The PrinterMap installation program creates the following: (assuming the default
C:\Program Files\Xerox\Printermap installation path).
C:\Program Files\Xerox\PrinterMap
PrinterMap initialization files
C:\Program Files\Xerox\PrinterMap\Group
PrinterMap default and user-created group files
C:\Program Files\Xerox\PrinterMap\Log
PrinterMap error log files
PrinterMap User Guide
8
Page 25

C:\Program Files\Xerox\PrinterMap\Data
PrinterMap printer information files and reporting data files
C:\Program Files\Xerox\PrinterMap\Help
PrinterMap help files
C:\Program Files\Xerox\PrinterMap\Icons
PrinterMap Xerox model specific icons
C:\Program Files\Xerox\PrinterMap \Reports
PrinterMap user-generated reports (default directory)
C:[Windows System Directory]\pmapdeinstall.exe
PrinterMap uninstall utility
PrinterMap Re-Installation
In some circumstances (corrupt executables or accidental program files deletion),
a PrinterMap reinstall may be necessary. Reinstalling PrinterMap does not affect
any existing printer, group or report information. Refer to “Running the
Installation Program” in Chapter 2 for more information on installing PrinterMap.
Remember to terminate all PrinterMap processes including the Status and
Reporting services. Refer to “PrinterMap Shutdown” in Chapter 2 for more
information on shutting down PrinterMap.
PrinterMap Uninstall
To uninstall PrinterMap:
1. Stop all PrinterMap processes. Refer to “PrinterMap Shutdown” in Chapter 2
for more information on shutting down PrinterMap.
2. On a Windows 95/98 or NT 4.0 machine, from the Start menu, select
Programs >Xerox PrinterMap > Uninstall PrinterMap. The uninstall program
may also be launched by selecting Add/Remove Programs from the Control
Panel and choosing Xerox PrinterMap. On an NT 3.51 machine, double-click
the PrinterMap uninstall icon located in the PrinterMap program group.
3. The uninstall program asks to verify intention before completely removing the
Xerox PrinterMap product from the machine. The PrinterMap uninstall
window indicates the application was removed. Either now or at a later time,
reboot the computer to remove the uninstall utility. Select Finish to end the
process.
PrinterMap User Guide
9
Page 26

Running PrinterMap for the First Time
Before PrinterMap can manage network printers, PrinterMap configuration and
discovery processes must occur. PrinterMap is designed to assist in this process
when it is first started. This section describes how PrinterMap assists in this
process and where to look for additional information. By default, the install
program starts the PrinterMap user interface (Topology window). Selecting
PrinterMap from the Xerox PrinterMap program group is another way to get
started.
Welcome
Screen
The first time the PrinterMap Topology window is started a welcome screen is
displayed.
Figure 2 Welcome to PrinterMap window
The welcome screen is displayed every time PrinterMap is started until discover
parameters are configured or the “Continue to show this window” box is
unchecked. Select the OK button to continue. The PrinterMap Configuration
window is displayed.
PrinterMap
Configuration
Window
At minimum, PrinterMap requires the user to define discover parameters. The
discover parameters specify how PrinterMap discovers network printers. After
closing the Welcome screen, PrinterMap displays the PrinterMap configuration
window. By default, the Discover panel is shown. PrinterMap automatically fills
in as many parameters on the Discover panel as possible. IP parameters that
PrinterMap supplies include the machine’s IP address, subnet mask and default
gateway. PrinterMap also fills in the machine’s Novell preferred server, if
applicable. Refer to “Discover Configuration” in Chapter 3 for more information
on configuring PrinterMap’s discover process.
Other PrinterMap configuration parameters may be specified at this time. Only
discover configuration is required. Refer to “Configuring PrinterMap” for more
information on configuring PrinterMap.
PrinterMap User Guide
10
Page 27

Select the OK button or Apply and Cancel buttons to apply any configuration
modifications and exit the PrinterMap Configuration window.
Discovery
Required
Window
Following configuration, PrinterMap displays the Discovery Required window.
Running the Discover process is a prerequisite to managing network printers.
Figure 3 Discovery Required window
Selecting the Yes button automatically starts the PrinterMap Discover process and
allows PrinterMap to find and begin managing the network printers.
Refer to “Operation” in Chapter 3 for more information on running the
PrinterMap discover process.
PrinterMap User Guide
11
Page 28

Configuring PrinterMap
PrinterMap can set a variety of parameters to customize its behavior.
Additionally, several parameters, such as those related to discovery, must be set
before performing certain functions. PrinterMap’s Configuration window provides
an intuitive interface for setting these parameters.
To access the PrinterMap Configuration window, select File > Configuration from
the main menu. To switch from one configuration panel to the next, select the tabs
located at the top of the window (Discover, Alarms, Reports, etc.). By default, the
Discover panel is displayed when the Configuration window comes up.
PrinterMap User Guide
12
Page 29
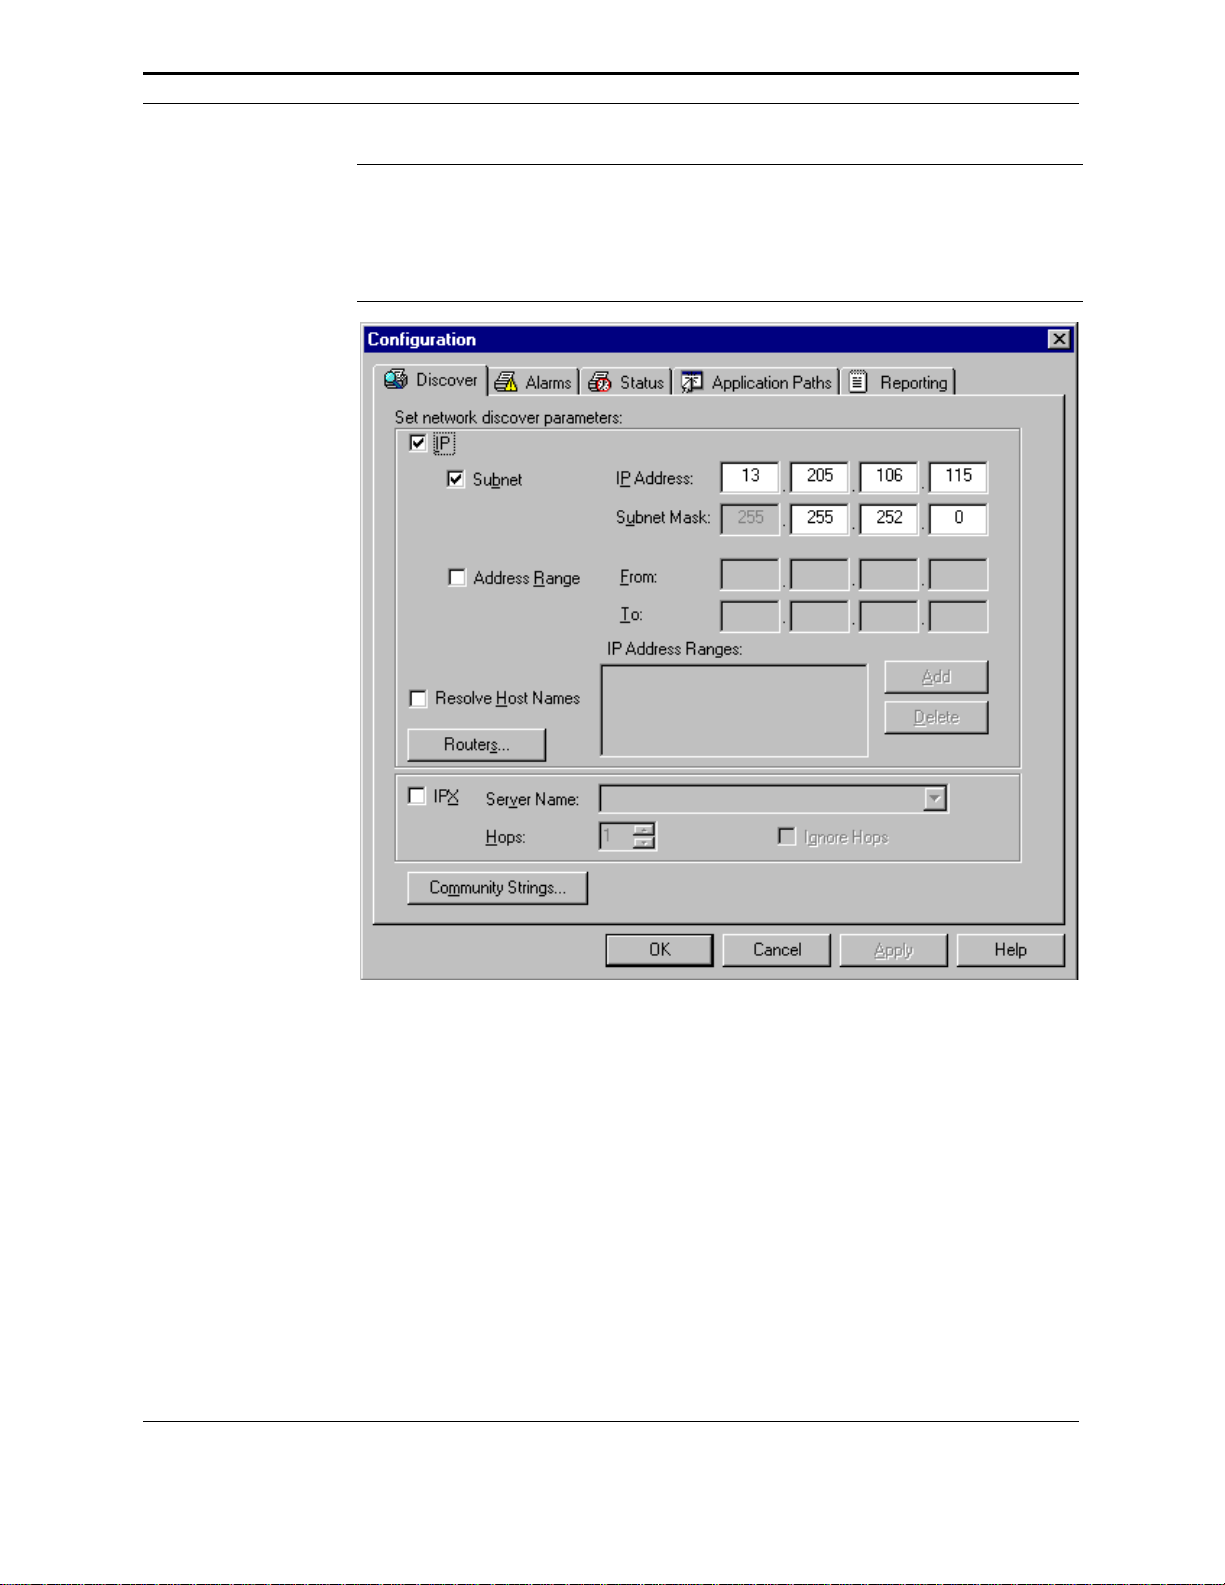
NOTE: After PrinterMap is installed for the first time a Welcome screen is
displayed. Next the Configuration window appears allowing PrinterMap
configuration for particular user needs. Minimally, the Discover panel
needs configuring. The Discover process does not run nor is it able to
discover network printers without user configuration.
Figure 4 PrinterMap Configuration window
Configuration Window Panels
This section contains Configuration window panel descriptions.
Discover
The Discover Configuration window provides an interface for customizing
PrinterMap’s discover process. Refer to “Discover Configuration” in Chapter 3
for information on configuring PrinterMap’s discover process.
Alarms
PrinterMap User Guide
13
Page 30

The Alarms Configuration window allows PrinterMap customizing for handling
detected printer alarms. PrinterMap can be configured to log the alarm. It can also
launch a Pop-up window notification, or launch an executable. More than one
action can be configured for a single alarm.
PrinterMap only takes the configured action(s) if it detects a change in printer
conditions. For example, if a printer is low on paper for consecutive status polls
PrinterMap only logs the first low paper detection. There are two exceptions to
this rule. One is when the PrinterMap graphical user interface (topology) is
restarted. The other is when the Status Service is restarted. In both cases all
detected alarm conditions takes the configured action(s). This ensures that
important printer events are not missed.
Figure 5 Alarm Configuration window
Alarm
The Alarm Configuration window’s Alarm column lists each alarm condition
detected by PrinterMap. Select one to three automation actions on an individual
alarm basis by checking the desired action next to the alarm condition. Automated
action indication is applied to all alarm conditions by selecting the desired action
next to the All item (last entry in the Alarm column).
PrinterMap detects the following printer alarm conditions:
• Low Paper
PrinterMap User Guide
14
Page 31

Log to File
• No Paper
• Low Toner
• No Toner
• Door Open
• Jammed
• Offline
• Service Requested
Checking this box for alarms causes PrinterMap to log the alarm occurrence to a
file located in [Drive]:\[Install Directory]\log\alarm.log. This alarm history may
be viewed by selecting Tools > Display Alarm Log > from the main menu.
Pop-up
Launch
Checking this box for alarms causes PrinterMap to display an alarm notification
Pop-up window when the specified condition occurs.
Figure 6 Alarm Notification Pop-up window
The alarm notification Pop-up window describes when an alarm occurred, which
printer issued the alarm and the alarm type. Select the OK button to close this
window.
NOTE: When configuring PrinterMap be certain to generate alarm pop-up
notifications. Each Pop-up window uses system windowing resources
and requires user interaction for dismissal. Selecting pop-up
notifications for all detected alarms is not advisable unless only a few
printers are managed.
Checking this box allows an alarm response configuration for an application
launch. Right-clicking in the blank text box summons a browse window. In the
Application Path text box, fill the path and executable (including parameters) for
any application needing alarm response. When any alarms are enabled for Log to
File, the maximum alarm log size is enabled for editing.
PrinterMap User Guide
15
Page 32

Status
The Status Intervals Configuration window allows customizing of the interval that
PrinterMap polls printers for status.
PrinterMap User Guide
Figure 7 Status Configuration window
Check the corresponding box and slide the bar to adjust the polling interval for
Minutes (1 - 59), Hours (1 - 23), Days (1-31), or None. If none is selected, the
topology icon colors and attribute values cannot represent current printer state.
Changing status polling frequency in the Configuration window Status panel
assures change takes place immediately. Any change triggers a new status poll,
and the new polling interval becomes active.
Application Paths
The Application Paths Configuration window allows configuration of default printer
management software for PrinterMap. If any listed software resides on the host
machine, PrinterMap checks the corresponding box and provides a path for the
executable. If PrinterMap cannot find the software (if, for example, the software is
installed in a directory other than the default), browse the machine to manually
locate the executable.
16
Page 33

Each time the Configuration window is accessed PrinterMap searches the system’s
hard drive for the following applications:
§ Xerox CentreWare DP
§ Hewlett-Packard JetAdmin
§ Lexmark MarkVision
§ Tektronix PhaserShare
If any specified management applications are found, PrinterMap automatically
fills the corresponding edit field on the Application Paths Configuration window.
PrinterMap only searches for these applications in a default installation location.
If the application is installed in a directory other than default, the Browse button
manually locates and fills in the path to the executable.
If no path is specified for a specific vendor, the Printer Management Application
field of the Properties window is not filled for discovered printers from that vendor.
As such, the Launch Application option normally available off the right-click menu
for a printer is not available, nor is it available from the main menu Tools
Pulldown.
Figure 8 Application Configuration window
PrinterMap User Guide
17
Page 34

Reporting
The Reporting Configuration window allows customizing of how often printers are
queried for reporting information and what information is included when
generating printer reports. PrinterMap’s reporting function may also be disabled.
Disabling
Reporting
Standard
Report Polling
Figure 9 Reporting Configuration window
A disable button is located at the very top of the Reporting Configuration window.
This allows the user to enable or disable PrinterMap’s Reporting functionality. If
the intention is to use PrinterMap only as a status manager for printers, or
PrinterMaps’s significant disk space requirements for reporting cannot be met, this
function may be disabled. Doing do deletes all existing reporting data.
A Disable button is located at the top of the Reporting Configuration window.
This allows enabling or disabling of PrinterMap's Reporting functionality. The
disable function may be deleted if PrinterMap is used solely as a status manager
for printers or if it cannot meet PrinterMap's significant disk space requirements
for reporting. Deleting the disable function deletes all existing reporting data.
Beneath the Disable button is the Standard Report Polling section of the Reporting
Configuration window. This section is used to specify how often data is collected.
It also specifies when data collection starts for generating standard reports. The
selected Standard Report Polling Interval determines how much control exists to
specify the Standard Report Polling Interval Start values. For example, if Hourly
is checked, the status poll begins gathering data at the top of every hour. Start
values need not be specified. If Weekly is selected the Hour and Day of Week
Start values must be specified.
PrinterMap User Guide
18
Page 35

Custom
Report Polling
Report
Attributes
Below the Standard Report Polling section is the Custom Report Polling section of
the Reporting Configuration Window. This is used to specify how often data is
collected for generating custom reports. Using slide levels, the poll can be
configured for hours (1 - 23) or days (1 - 31).
NOTE: Selecting None for the Standard or Custom Report Polling Interval
affects the available data for generating custom and standard reports. If
No Standard Report is selected and the custom report polling interval is
set to every 12 hours, then every report generated between each 12 hour
poll is taking data from only one poll. For example, if the polling period
is set to poll at 12:00 a.m. and 12:00 p.m., all reports generated between
12:00 a.m. and 12:00 p.m. relies on the 12:00 a.m. poll for information.
If a report is generated for 1:00 a.m. to 3:00 a.m. and then from 4:00
a.m. to 11:00 a.m. both reports generate based on the 12:00 a.m. data.
The same holds true for switching back to standard reports. Until the
polling period for the standard reports catches up, any standard reports
are generated with the custom reports polling data.
The Report Attributes button accesses the Select Report Attributes window. This
is where the content of a Printer report may be modified. Name and Lifetime
Impression Count are standard on every report. Information shown in the window
below may also be included.
Figure 10 Select Report Attributes window
Refer to “Generating Reports” in Chapter 5 for details on PrinterMap report
attributes.
PrinterMap User Guide
19
Page 36

Make selections, then select the OK button to accept and close the window.
After all Reporting parameters are specified, select OK to apply the settings and
close the window. Select Apply to apply the settings and continue displaying the
window. Select Cancel to nullify settings and close the Reporting Configuration
window.
PrinterMap Shutdown
To terminate PrinterMap Topology and the Status and Reporting services, follow
the instructions below.
First exit PrinterMap Topology by selecting Exit from the File pull-down. Next
terminate the background service tasks by following the instructions below for the
appropriate operating system.
Windows
95/98
Windows NT
4.0
Windows NT
3.51
1. Locate the PrinterMap Status and/or PrinterMap Reporting icon in the
Windows 95/98 service tray. An icon appears if the particular service is
currently active.
2. Right-click the icon for the PrinterMap service being terminated and select the
Stop Status Service or Stop Reporting Service menu item, whichever is
appropriate. Repeat this step for each active service.
1. From the Start menu, select Settings > Control Panel
2. From the Control Panel, double-click the Services icon to access NT’s
background services window.
3. Scroll and locate the PrinterMap Status and PrinterMap Reporting services
4. Highlight each process in turn and select the Stop button for each.
1. Double-click the Control Panel icon located on the desktop.
2. From the Control Panel, double-click the Services icon to access NT’s
Background Services window.
3. Scroll and locate the PrinterMap Status and the PrinterMap Reporting
services.
4. Highlight each process in turn and select the Stop button for each.
PrinterMap User Guide
20
Page 37

Chapter 3 Discover Process
This chapter describes PrinterMap’s discover process in detail. The discover
process collects information from the SNMP enabled network printer’s on the
user’s network. This chapter covers configuring the discover process and the
discover process operation.
PrinterMap User Guide
21
Page 38

Overview
During a discover, PrinterMap issues SNMP queries to network printers as defined by
the discover configuration panel. When a supported network printer is encountered,
PrinterMap gathers configuration and status information via SNMP, adding it to the
topology map with an appropriate icon. Depending on the support level of the
discovered printer, PrinterMap associates the printer with an icon indicating its status,
vendor and model type.
Discover Configuration
NOTE: PrinterMap is only capable of discovering SNMP enabled printers.
To initiate a discover, from the Topology menu, select Discover. To modify the
scope of the discovery that PrinterMap is to perform, the discover parameters may
be edited by accessing the Configuration window Discover panel.
Figure 11 Discover Configuration window
PrinterMap User Guide
22
Page 39

The following section discusses various discover parameters that may be set
through the Discover Configuration window. The Discover Configuration window
is divided into three portions. IP, IPX, and Community String.
IP
To discover network printers via IP, check the IP box located at the top left corner
of the Discover Configuration window. The user may now configure up to four
different methods by which PrinterMap can discover printers via IP. Subnet and
IP address range discover are configured under the main Discover Configuration
window and default gateway and secondary router discover are configured on the
Routers window accessible by clicking on the Routers button.
Subnet
IP Address
Range
Discover
Resolve Host
Names
To perform an IP subnet discovery, check this box. In most cases PrinterMap
automatically fills-in the IP address and subnet mask of the local machine. The
user may use these values or fill-in new IP address and subnet mask information in
order to discover the printers on a remote subnet. Using the IP address and subnet
mask values, the discover process systematically checks all IP addresses within the
specified subnet. For example, if there is a class C network and the local
machine’s IP address is 12.13.12.67 with a subnet mask of 255.255.255.0 then
PrinterMap queries every IP address between 12.13.12.1 and 12.13.12.254.
To perform an IP address range discover, check this box. Multiple IP address
ranges can be specified. The discover process queries all the IP addresses within
each specified range. After entering a new IP address range click the Add button.
Address ranges can be edited in-place by clicking the desired range twice. To
remove a range, highlight the range and click the Delete button.
To have PrinterMap resolve IP addresses of discovered printers to their host name
equivalent, check this box. In environments where IP host names are relied on
more than the MIB II system name value, this box should be checked. After the
discover process, PrinterMap resolves each discovered printer's IP address into its
equivalent host name value.
Routers
Choosing the Routers button retrieves another IP discover configuration window
with further choices for discovery via network routers.
PrinterMap User Guide
23
Page 40

Figure 12 Router Discover Configuration window
Primary
Router/Default
Gateway
Discovery
Secondary
Router
Discover
To perform a default gateway discovery, check this box. In most cases PrinterMap
automatically fills-in the local machine’s default gateway IP address. The discover
process walks the ARP (Address Resolution Protocol) cache of the gateway and
identify those IP addresses belonging to SNMP enabled printers.
To perform a secondary router discovery, check this box. IP addresses of multiple
secondary routers may be specified. The discover process walks the ARP (Address
Resolution Protocol) cache of each router and identifies those IP addresses
belonging to SNMP enabled printers.
NOTE: Gateways/Routers can be configured to maintain a static or dynamic arp
cache. If set to dynamic, this arp cache is regularly flushed of
information and allowed to re-build. In some networks, this arp cache
purge occurs every few seconds. To use the arp cache to discover
networked printers, ensure that the target router is configured with a
reasonable amount of time between cache purges. This provides
PrinterMap access to a cache with a larger sampling of IP addresses.
Thus, discovery of the majority of printers on the network is more
likely.
IPX
To discover network printers via IPX, check the IPX box and fill the Server Name
input area with the NetWare preferred server name.
Preferred
Server
In most cases PrinterMap retrieves the local machine’s preferred server name and
auto-populates the Server Name field. During discovery, PrinterMap identifies all
NetWare printer objects on that server, confirms them to be network printers
supported by PrinterMap, and adds them to the PrinterMap topology. The user
may define additional NetWare server names, however PrinterMap only discovers
PrinterMap User Guide
24
Page 41

the NetWare server displayed in the Server Name input area (i.e. the current
server). PrinterMap stores up to twenty NetWare server names.
Hops
Also in this section is a numeric field labeled Hops. Each NetWare server defined
to PrinterMap has a corresponding Hops value. The Hops value serves as a filter
for discovering printers accessible via IPX. When the discover process identifies a
potential network printer through the currently defined NetWare server, it
generates a RIP request for that printer’s network number. The RIP response
indicates the number of network hops (or interfaces) away that network is.
PrinterMap then compares the Hops value associated with the NetWare server and
if the printer’s network number is farther away than the Hops value the printer is
not discovered. The minimum hop count is 1 and the maximum is 15. By default
the Hops value is set to the maximum value of 15. In this instance all network
printers “known” by the NetWare server are discovered. In contrast, if the user
sets the Hops value to 1 only network printers on the local network are discovered.
If the Ignore Hops check box is selected, the Hops value is ignored. All network
printers “known” by the currently configured NetWare server are discovered
regardless of the network where the printers reside.
For example, if you only want to discover printers in your building and your
building’s router is four hops away, then set the Hops value to four. If however,
you only want to discover printers on your floor (or your local area network), set
the Hops value to one.
NOTE: IntranetWare/Client32 must be installed and running for PrinterMap to
perform an IPX discover. Without IntranetWare/Client32 PrinterMap is
unable to communicate with NetWare servers.
Community Strings
Within SNMP, community strings provide a form of security. If an SNMP agent
receives an SNMP query without a valid community string, it rejects the request. The
default read community string for SNMP devices is ‘public’. By default, PrinterMap
uses ‘public’ for all SNMP requests. PrinterMap is capable of discovering and
monitoring printers on the network which are configured with community strings other
than the default. These non-default community strings are entered through the
Community String window.
Choosing the Community String button at the bottom of the discover configuration
window accesses the Community Strings window.
PrinterMap User Guide
25
Page 42

Figure 13 Community Strings window
Each additional community string defined may increase the amount of time it takes
to run the discover process. Community strings may be added to PrinterMap to be
used in subsequent discoveries by entering the value in the Community String edit
field and clicking Add. Existing community strings can be edited in-place by
clicking twice on the string. Community strings may be deleted by highlighting the
target community string and clicking Delete.
It is strongly recommended that the PrinterMap Discover process be re-run
following any modifications made through the Community Strings window. Valid
community strings are required by the Status and Reporting services in order to
communicate and retrieve information from managed printers. The discover
process updates the community string stored for each managed printer as well as
discover any new printers as a result of community string additions. After changes
have been made and applied to the community strings, PrinterMap displays the
following confirmation dialog requesting that it be allowed to automatically start
the discover process.
Figure 14 Community Strings Update dialog
Selecting the Yes button initiates the discover process, updating the community
strings of all managed printers and discovering any new printers. Selecting the No
button closes the confirmation dialog and the discover process is not run.
PrinterMap User Guide
26
Page 43

Operation
If the PrinterMap reporting feature is enabled, PrinterMap displays the Available
Disk Space window at the beginning of the discover process. This window
indicates how many printers can be discovered given the amount of disk space
available. This window also indicates the total number of printers currently
managed by PrinterMap and the amount of disk space consumed by the reporting
data files.
Figure 15 Available Disk Space window
If the drive where PrinterMap is installed runs out of disk space during the
discover process, the Not Enough Disk Space window is displayed. This gives a
detailed explanation of and assistance in remedying the problem.
PrinterMap User Guide
27
Page 44

PrinterMap User Guide
Figure 16 Not Enough Disk Space Notification window
During the discover process, PrinterMap displays an activity meter as well as the
current state of the discover, such as the IP address range it is currently querying.
The discover process may be cancelled at any time.
The application window can be minimized for the duration of the discovery
process by selecting the minimize button on the progress window.
28
Page 45

Figure 17 Discover Progress window
Once the discover process is completed, PrinterMap indicates how many new
printers are discovered and a total of all printers currently managed. If errors
occur during the discover process, PrinterMap reports the errors and also records
them in the PrinterMap log file (pmap.log).
Figure 18 Discover Complete dialog
Objects are added to the topology map with a color-coded icon based on
information retrieved during the discover process. If a printer becomes
inaccessible (possibly due to reboot or network outage) or is experiencing an
alarm condition, the icon representing that object changes colors. This occurs at
the time of the next status poll to reflect the change in status. If PrinterMap is
unable to determine the status of a network printer, the printer is added to the
topology as a blue (unknown status) icon.
NOTE: Any printer with two network interfaces (network cards) is discovered and mapped to
the topology twice. After the initial building of a printer topology map, a discovery
may be periodically performed to insure the topology includes any printers added to
the network. Discovered printers no longer a part of the existing network may be
removed from PrinterMap topology by deleting the printer icon. New printers may be
added to Print erMap topology via the Add Printer menu option or by initiating a new
discover with the proper discover configuration parameters.
PrinterMap User Guide
29
Page 46

Advanced Configuration Issues
This section provides a look at advanced details of the PrinterMap discover
process. These topics include PrinterMap vendor and model support as well as
configuring PrinterMap SNMP time-out values.
Supported Vendors and Printer Models
When the discover process finds a device on the network it determines is a printer,
it attempts associating that printer with one of the supported printer manufacturers
(Xerox, HP, Lexmark, etc.). If the discover process makes this association the
printer is represented in the PrinterMap Topology window with a vendor-specific
icon. Otherwise the printer is represented with the Generic printer icon. In the case
of Xerox manufactured printers, PrinterMap attempts associating a particular
printer with a model-specific icon. If a model-specific icon is not defined for a
particular printer’s model, the printer is represented with the Xerox-Generic
printer icon.
PrinterMap is shipped with a pre-defined set of supported printer manufacturers or
vendors. The set of supported vendors cannot be extended by the user. Future
PrinterMap versions will support an ever increasing number of printer vendors.
PrinterMap is shipped with a default set of printer models associated with each
supported vendor. These vendor and model associations are defined in
PrinterMap’s Mib.ini file. Xerox printer model to icon associations are defined in
PrinterMap’s Pmap.ini file. The content of both of these files is loaded during
PrinterMap initialization and are located in the PrinterMap install directory
([Drive]:\[Install Directory]).
Mib.ini File
PrinterMap User Guide
PrinterMap’s Mib.ini file contains entries mapping each supported vendor to one
or more supported models (identified by the model’s MIB II System Object
Identifier). The Mib.ini file is found in the [Drive]:\[Install Directory]\ directory.
An excerpt from a sample Mib.ini file follows. The excerpt is for the supported
vendor Xerox.
[xerox]
number=5
// 4512
valid1=1.3.6.1.4.1.253.8.62.1.2.1.1.1:0
// 4517
valid2=1.3.6.1.4.1.253.8.62.1.2.2.1.1:0
// DocuPrint C55
valid3=1.3.6.1.4.1.253.8.62.1.2.3.1.1:1
// Docuprint N24
valid4=1.3.6.1.4.1.253.8.62.1.3.2.2.1:1
// DocuPrint N32
valid5=1.3.6.1.4.1.253.8.62.1.3.2.1.1:1
30
Page 47

Format
Editing the
Mib.ini File
Each vendor section within the Mib.ini file follows the format shown in the sample
text above. In this case the Xerox vendor has 5 valid MIB II System Object
Identifiers (SysObjIDs) associated with it. Concatenated to the SysObjID is an
integer value delimited by a colon (‘:’). Valid values for this integer value are 0, 1
or 2. This integer value is used to indicate whether or not the printer with the
specified SysObjID has a built in HTTP server. A value of 0 indicates that the
printer does NOT have an HTTP server, a value of 1 indicates that it does have an
HTTP server, and a value of 2 indicates PrinterMap is to determine whether the
printer has a built in HTTP server.
NOTE: The Mib.ini file may contain comment lines shown in the previous
sample. The first two characters of comment lines should be two
forward slashes (“//”) for consistency.
The Mib.ini file may be modified with any text editor. Be careful not to damage
the file structure or modify any default entries because PrinterMap may not
function properly afterwards. To edit the Mib.ini file the user needs the vendor of
the printer being added, the printer’s System Object Identifier, and whether the
printer has a built in HTTP server. The printer’s System Object Identifier may be
determined using any MIB browser to view the printer’s MIB II System values.
Updating
PrinterMap
After Mib.ini
File Changes
Pmap.ini File
Using a text editor, find the vendor portion of the Mib.ini file to be modified. Next,
update the number= entry under the vendor block identifier field with the total
number of System Object Identifiers for this vendor following the modifications.
Next append the new System Object Identifiers to the end of the vendor block by
adding new validN= entries for each new SysObjID:HTTP_flag combination.
Save and exit the file after modifying.
NOTE: The PrinterMap Topology window must be exited and restarted to
register the new Mib.ini entries.
Following changes to the Mib.ini file, the discover process may be run to find any
new printers on the network which match the new Mib.ini file entries. However,
Generic printers already discovered by PrinterMap prior to the Mib.ini file
changes are unaffected. PrinterMap’s Update process may be used to convert any
Generic printers now identified in the Mib.ini file to the appropriate vendor
printer.
Refer to “Update” in Chapter 4 for more information on PrinterMap’s Update
process.
The [xerox_models] section of PrinterMap’s Pmap.ini file contains entries which
map Xerox printer models to model-specific icon files. PrinterMap Topology uses
these entries to determine the icons to display for supported Xerox printers. If a
Xerox printer is discovered but contains no entry in the Pmap.ini file associating it
PrinterMap User Guide
31
Page 48

Format
with a particular icon file set, the Xerox-Generic icon is displayed. Models are
mapped to icons based on the MIB II System Object Identifier. The Pmap.ini file
is found in the [Drive]:\[Install Directory]\ directory. The [xerox_models]
section of a sample Pmap.ini file follows.
[xerox_models]
count=5
// 4512
model1=1.3.6.1.4.1.253.8.62.1.2.1.1.1:xer_4512_normal.ico:xer_4512_green.ic
o:x er_4512_blue.ico:xer_4512_yell.ico:xer_4512_red.ico
// 4517
model2=1.3.6.1.4.1.253.8.62.1.2.2.1.1:xer_4517_normal.ico:xer_4517_green.ic
o:x er_4517_blue.ico:xer_4517_yell.ico:xer_4517_red.ico
// DocuPrint C55
model3=1.3.6.1.4.1.253.8.62.1.2.3.1.1:xer_c55_normal.ico:xer_c55_green.ico:
xer _c55_blue.ico:xer_c55_yell.ico:xer_c55_red.ico
// DocuPrint N24
model4=1.3.6.1.4.1.253.8.62.1.3.2.2.1:xer_n24_normal.ico:xer_n24_green.ico:
xer _n24_blue.ico:xer_n24_yell.ico:xer_n24_red.ico
// DocuPrint N32
model5=1.3.6.1.4.1.253.8.62.1.3.2.1.1:xer_n32_normal.ico:xer_n32_green.ico:
xer _n32_blue.ico:xer_n32_yell.ico:xer_n32_red.ico
The sample shows a [xerox_models] section with 5 model to icon definitions. Each
model statement consists of a valid MIB II System Object Identifier (SysObjID)
concatenated with 5 icon file names of type ‘ico’. The SysObjID and file names
are delimited by colons (‘:’). For best results each icon file should contain an icon
easily associated with the Xerox mode being represented. Each icon file should
contain icons of the following sizes: 32x32 and 43x43 pixels. Each icon file must
represent one of the status conditions reportable by PrinterMap. The file names
must be in the following order:
1. Gray (Normal) Icon (This icon is not currently used by PrinterMap but is still
required).
2. Green (Running) Icon
3. Blue (Unknown) Icon
4. Yellow (Warning) Icon
5. Red (Down) Icon
PrinterMap User Guide
32
Page 49

Editing the
Pmap.ini File
NOTE: The Pmap.ini file may contain comment lines shown in the previous
sample. The first two characters of comment lines should have two
forward slashes (“//”) for consistency.
The Pmap.ini file may be modified with any text editor. Be careful not to damage
the file structure or modify any default entries because PrinterMap may not
function properly afterwards. To edit the Pmap.ini file the user needs the System
Object Identifier of the Xerox printer model being added and the name of the 5
icon files being used by PrinterMap to display the various printer status
conditions. The new Xerox model’s icon files must be placed in the
[Drive]:\[Install Directory]\Icons directory. During initialization PrinterMap
looks in the...\Icons directory for the icon files specified in each model statement.
If PrinterMap is unable to load one or more icons for a particular Xerox model,
the corresponding Xerox-Generic icon(s) is substituted.
Using a text editor, find the [xerox_models] section of the Pmap.ini file. Next,
update the number= entry under the [xerox_models] section header with the total
number of model statements after the Pmap.ini file is edited. Next append the new
model statements to [xerox_models] section by adding new modelN= entries for
each new Xerox model being supported. Save and exit the file after modifying.
SNMP
Timeouts
NOTE: The PrinterMap Topology window must be exited and restarted to
register the new Pmap.ini entries.
If the discover process does not receive a response from a printer within a
specified amount of time, a time-out occurs for that printer. Time-out values are
defined in the [Drive]:\[Install Directory]\Pmap.ini file. If the default time-out
values shown in the table below are not long enough (possibly due to attempting
printer discovery across multiple routers) use any text to edit the pmap.ini file and
increase time-out values.
Table 3 Default SNMP Time-out Values
Pmap.ini Variable Name Setting (in hundredths of a
second)
snmp_get_local_time-out 40
snmp_get_remote_time-out 100
snmp_set_time-out 200
PrinterMap User Guide
33
Page 50

Chapter 4 User Interface
This chapter covers PrinterMap’s user interface. The PrinterMap Topology
window provides a graphical representation of the user’s network printers and
access to a variety of useful information for managing those printers. This chapter
takes a detailed look at the PrinterMap Topology window.
PrinterMap User Guide
34
Page 51

Topology Overview
The PrinterMap Topology window makes up the vast majority of PrinterMap’s
user interface. The PrinterMap Topology window is started by selecting
PrinterMap from the Xerox PrinterMap program group.
PrinterMap User Guide
Figure 19 PrinterMap Topology window
PrinterMap Topology window components:
1. Printer Icon - Represents a network printer discovered by PrinterMap.
2. Printer Display Name - The printer’s display name appears beneath the
printer icon. PrinterMap uses the MIB II sysName (system Name) value as
the printer’s display name. This can be changed so a printer's IP host name is
used. Please refer to item 10 of this list (Default Display Name) for more
information on changing the default display name setting. PrinterMap
substitutes Netware Pserver name or IP address for the name of any printer
whose default value is unavailable. Names may be truncated, depending on
screen resolution and string length.
3. Attributes Value - The value of the selected printer attribute is displayed
beneath the printer’s name. Attribute values may be truncated based on screen
resolution and string length.
4. Attributes – Lists available printer attributes. When selected, the attribute
value for each printer is displayed beneath each printer’s name. When a new
35
Page 52

attribute is selected, the topology area is repainted, displaying new printer
attribute values. Printer icons are sorted based on the selected attribute.
5. Groups – Lists all pre-defined and user-defined printer groups. When a new
group is selected, the topology area is repainted, displaying all printers in the
selected group.
6. Main Menu – Provides access to the majority of PrinterMap functionality.
Refer to “Menu Bar Items” in Chapter 4 for a detailed look at the Topology
window’s main menu.
7. Topology - Displays icons representing managed printers in the main
PrinterMap window. The topology area contains useful printer information
such as name, status, vendor, and attribute values.
8. Toolbar – Accesses key PrinterMap functionality such as the Configuration
window and Discover process.
9. Status bar – Contains help information, the name of the selected group and
the number of printer’s contained in the selected group.
10. Default Display Name – Displays the selected default printer display name.
The default display name selection controls which value PrinterMap displays
for the name of a managed printer. The possible values for default display
names are System Name and Host Name. System name refers to the MIB II
system name of the printer. Host name refers to the IP host name of the
printer ( typically administered via DNS).
Menu Bar Items
Configuration
Exit
Discover
This section describes each main menu bar item on PrinterMap’s Topology
window.
File
Selecting this menu item accesses the Configuration window. The following
PrinterMap processes can be customized: Discovering, Reporting, handling
Alarms, paths to Application executables, and Status polling interval.
Refer to “Configuring PrinterMap” in Chapter 2 for more details.
Exits the program. No discover information is lost.
Topology
Selecting this menu item causes PrinterMap to discover all network printers within
the currently defined network discover parameters.
To initiate a new discover, select Topology > Discover. This initiates discovery
of new network printers added since the last discover process. Printers already
discovered and managed by PrinterMap are unaffected. The Discover process does
NOT rediscover or refresh information for already discovered printers.
PrinterMap User Guide
36
Page 53

Refer to “Adding and Deleting Managed Printers” in Chapter 4 for more details.
Order Icons
Add Printer
PrinterMap supports two different sorting modes for printer icons in the Topology.
The default behavior is sorting the printers based on the current selected attribute.
Selecting this menu freezes the sort order on the current selected attribute.
Selecting another attribute when the sort order is frozen updates the attribute
information for printers in the Topology, but does NOT re-sort printers. When a
check is found beside this menu item, icon sorting is enabled.
This menu option provides the ability to add (or discover) a single printer to the
Topology if its IP address or IPX address is known. Selecting this menu item
accesses the Add Printer window.
Figure 20 Add Printer window
To add a printer, select Topology > Add Printer from the main menu and enter
the printer’s IP or IPX address in the Add Printer text box. After selecting the OK
button, PrinterMap attempts discovering the printer at the specified address by
issuing SNMP queries. If the printer is a responding printer, it is discovered and
added to the PrinterMap topology.
Update
PrinterMap User Guide
This window retains the last addresses entered.
Selecting this menu choice accesses the Update Printer Information window. Three
different PrinterMap updates types can be initiated from the Updated Printer
information window: update printer configuration, update generic printers and
update host names. The update process is useful following a PrinterMap upgrade
installation or after one or more managed printers have additional paper trays
configured. The update process converts any Generic printers added to the Mib.ini
to the appropriate vendor type.
37
Page 54

Figure 21 Update Printer Information window
Update Printer Configuration
Checking this box and continuing with the update causes PrinterMap to update
configuration information for all managed printers.
An example is media input source information (i.e. paper tray information). The
number of paper trays a printer has is determined at the time the printer is
discovered. From that point PrinterMap only maintains current paper levels for
those trays. In the future, if an additional tray is configured for the printer,
PrinterMap is not aware of the new tray and does not gather or display any related
information. Using the update printer mechanism provides the ability to update
this tray configuration information for all discovered printers.
Another use of this functionality is updating printer information following a
PrinterMap upgrade installation. For example, PrinterMap v1.0 only maintained
information on the first five media input sources (paper trays). PrinterMap v1.1
maintains up to ten media input sources. Running the update process with the
Update Printer Configuration box checked causes PrinterMap to find any
additional paper trays not found by the previous version.
Update Generic Printers
Checking this box and continuing with the update causes PrinterMap to compare
all printers currently identified as Generic (i.e. not associated with any supported
vendors) with the vendor system object id information maintained in the mib.ini
file. If a printer’s system object id is found under one supported vendor in the
Mib.ini file the printer is converted from Generic to the appropriate vendor type.
The topology icon which represents the printer within PrinterMap is updated
accordingly.
For example, it would be useful to run this update after manually adding support
for a new printer model. Another appropriate instance for running this update is
PrinterMap User Guide
38
Page 55

following a PrinterMap upgrade installation. During a PrinterMap upgrade
installation the Mib.ini file is modified. All the newly supported printer system
object id’s for each supported vendors is added. Generic printers discovered by the
previous PrinterMap version may have a corresponding mib.ini entry following the
upgrade install. Running the update process with the Update Generic Printers box
checked converts any PrinterMap supported printers to the appropriate vendor
type.
Refer to “Supported Vendors and Printer Models” in Chapter 3 for more
information about adding support for new printer models and modifying the
Mib.ini file.
Selecting Continue With Update initiates those updates. Selecting Exit cancels the
operation and closes the window.
Update Host Names
Selecting this box and continuing with the update causes PrinterMap to update the
host name value stored for each printer. In an environment where one or more
Domain Name Servers (DNS) are used for IP address to host name resolution, run
this type of update following any changes to the DNS configuration.
Create Group
Selecting Continue With Update inititates updates. Selecting Exit cancels the
operation and closes the window.
Group
PrinterMap has several pre-defined groups based on the supported vendor list (i.e.,
Xerox, HP, Lexmark, etc…)and the All Printers group. PrinterMap also supports
creating user-defined groups. User-defined groups can be created by selecting
printers from any existing group and selecting this menu item. The Create Group
window prompts for the new group name.
Figure 22 Create Group window
When creating a user-defined group only alphanumeric characters may be used.
The maximum length for user-defined group names is 64 characters. This menu
option is grayed out if printers are not selected from the Topology.
PrinterMap User Guide
39
Page 56

Delete Group
Add Printer[s]
to Group
Any user-defined group can be deleted from the Topology by selecting this menu
item.
Figure 23 Delete Group Confirmation dialog
To delete a group, highlight the target group in the Group list box, select the
Delete Group menu item and select the Yes button on the confirmation dialog.
NOTE: Only user-defined groups may be deleted. Pre-defined groups (All
Printer, Xerox Only, etc…) cannot be deleted. This menu item is grayed
out when the focus if the printers cannot be added to a user defined
group.
To copy the selected printer to an existing group highlight the printer or printers
then select this menu item which prompts the user for group selection.
Figure 24 Add Printer(s) to Group window
This window lists all user-defined groups where highlighted printers may be
added. Choosing the desired group and selecting the OK button adds highlighted
printers to that group. This menu item is grayed out if there are no user-defined
groups where printers can be added.
PrinterMap User Guide
40
Page 57

Remove
Printer[s] from
Group
A printer may be removed from a user-defined group by highlighting the desired
printer(s) and selecting Group > Remove Printer(s) from Group or by rightclicking the highlighted icon and selecting the Remove Printer(s) from the Group
menu item. When doing so the Remove Printer Confirmation dialog is displayed.
This gives the option for removing the printer icon from the group or cancelling
the operation.
Figure 25 Remove Printer Confirmation dialog
Highlighting a printer in the PrinterMap maintained All Printers group and
selecting the Remove Printer(s) from Group menu item accesses a modified
Remove Printer Confirmation dialog. This modified dialog explains how removing
a printer from the All Printers group completely removes the printer from
PrinterMap. The printer is removed from all groups where it is a member and any
reporting data stored for this printer is deleted. Do not remove a printer from the
All Printers group unless intending to remove it completely from PrinterMap.
Select All
Generate
Standard
Report
Generate
Custom
Report
Printers may not be removed from any pre-defined vendor groups. The Remove
Printer(s) from Group menu item is grayed out if Topology is currently focused on
one pre-defined vendor groups.
This menu item allows the user to highlight all currently displayed printers.
Report
This menu item has two sub-menu items, Selected Printer and Selected Group.
Selecting either sub-menu item accesses the Reporting Parameters window.
Specify the desired From and To period criteria. Select the Show Report button on
the Reporting Parameters window to generate a standard report for the selected
printer or group.
Refer to “Generating Reports” in Chapter 5 for more details.
This menu item has two sub-menu items, Selected Printer and Selected Group.
Selecting either sub-menu item accesses the Reporting Parameters window.
Specify the desired From and To period criteria. Select the Show Report button on
the Reporting Parameters window to generate a custom report for the selected
printer or group.
“Generating Reports” in Chapter 5 for more details.
PrinterMap User Guide
41
Page 58

Tools
Display Alarm
Log
Launch
Management
Application
Select this menu item to display the Alarm Log window. This gives a managed
printer alarm history for all alarms detected by PrinterMap. The Alarm Log
window features columns displaying information on any alarms received,
including color-coded Status, Date, Printer name, a brief Textual alarm
explanation, and an optional acknowledgment Comment.
Refer to “Alarm Log Window” in Chapter 6 for more details.
The Launch Management Application menu has a sub-menu item for each vendor
supported (Xerox, HP, etc.) printer management applications. Supported vendors
and their default management application products is listed as follows. These are
only the defaults. The default management application for each vendor may be
configured for any desired executable through the Application Paths Configuration
window.
Xerox CentreWare DP
CentreWare DP is the default printer management application for Xerox printers.
HP JetAdmin
JetAdmin is the default printer management application for HP printers.
Lexmark MarkVision
MarkVision is the default printer management application for Lexmark printers.
Tektronix PhaserShare
PhaserShare is the default printer management application for Tektronix printers.
PrinterMap User Guide
42
Page 59

NOTE: If any application edit fields from the Application Paths Configuration
window are left blank, the corresponding sub-menu item for the Launch
Management Application menu is grayed out (disabled).
Refer to “Application Paths” in Chapter 1 for more information on configuring an
executable path for vendor management applications.
Help
Contents
About
Toolbar
Select this menu item to display help files for PrinterMap in standard Microsoft
Windows format.
Select this menu item to display PrinterMap’s About window.
PrinterMap functionality can be accessed via the Toolbar located directly under
the main menu.
Table 4 Toolbar Icons
Change Configuration - Selecting this button summons
the Configuration window.
Discover - Selecting this button initiates a new discover.
Enable/Disable icon sorting - Selecting this button
allows enabled (depressed - default) or disabled (not
depressed) icon sorting based on the attribute selected from
the attributes list.
Add printer manually - Selecting this button allows
manual printer addition to the All group.
Alarm log - Selecting this button displays the Alarm Log.
Help Topics - Selecting this button summons PrinterMap
on-line help.
PrinterMap User Guide
43
Page 60

Host Name or System Name IP host name or MIB II
e (depending on the currently selected
Topology Viewing Areas
Topology
Attributes
The Topology is a map of discovered network printers represented as icons.
Printer specific actions are launched from the PrinterMap Topology window. The
status, vendor and in some cases printer model are ascertained from the Topology
window.
NOTE: The topology layout depends on which attribute is selected from the
Attributes list and whether icon sorting is enabled or disabled. In
general, when icon sorting is enabled, icons are arranged in order from
highest to lowest value. For example, the Status attribute displays icons
from Red > Yellow > Green > Blue (highest severity to lowest). The
Vendor and Model attributes are sorted alphabetically. Paper, Toner,
and Lifetime Impressions are displayed in order from the printer with
the most to the printer with the least.To view one or more printer
attributes when sorting is enabled, highlight the printer(s) by selecting
them before changing attributes. This provides a visual cue about the
new topological printer location.
The Attributes list box allows printer attribute selection which is displayed
beneath all printer icons in the topology area. The available printer attributes are
listed and described in the following table.
Table 5 Attribute List
Attributes Description
• Vendor
• Host Name or System
Name
• Model
• IP Address
• IPX Address
• MAC Address
• Lifetime Impressions
Printer manufacturer.
system nam
default display name).
Printer model
IP address assigned to networked printer. An example
might be: 123.123.123.123.
IPX address assigned to networked printer. An
example might be 12345678-0000aa550ad5.
MAC address for network interface used by the
printer. This address is included as part of the
printer’s IPX address. An example might be
0000aa550ad5.
Number of printer generated impressions.
PrinterMap User Guide
44
Page 61

the toner percentage remaining in each toner cartridge,
“
a paper level string displayed as “21%, 76%, 54%” or
• Toner Level
• Paper Level
Toner amount toner remaining in printer’s toner
repositories (cartridges). Each toner level value is
delimited by a comma. Toner levels are displayed as
if the printer supports this technology. Different
printers support this technology to varying degrees.
PrinterMap displays as much information as the
printer provides. Therefore, toner levels are displayed
as “some”, indicating the printer knows that the toner
cartridge is not empty, or “—“, indicating the printer
doesn’t know how much toner is remaining. For
example, a printer having three toner cartridges may
have a toner level string displayed as “21%, 76%,
54%” or “some, some, some” depending on
information available from the printer.
If the Toner Level attribute is selected, printers are
displayed in descending order according to toner
percentage. For printers with multiple cartridges, an
average toner percentage is determined. Values of “ –
and “some” are given a percentage of 0% and 1%.
Paper amount remaining in printer’s input sources
(paper trays). Each paper level value is delimited by a
comma. Paper levels are displayed as a percentage of
paper remaining in each paper tray, provided that the
printer supports this technology. Different printers
support this technology to varying degrees.
PrinterMap displays as much information as the
printer provides. Therefore, paper levels may be
displayed as “some”, indicating the printer knows that
the paper tray is not empty, or “—“, indicating the
printer does not know how much paper is remaining.
For example, a printer that has three paper trays have
PrinterMap User Guide
“some, some, some” depending on information
available by the printer.
NOTE: If Paper Level attribute is selected, printers are
displayed in descending order according to paper
percentage. For printers with multiple paper
sources, an average is determined. Values of “– “
and “some”are given a percentage of 0% and
1%.
45
Page 62

Printer’s serial number. PrinterMap only supports this
• Status
Printer’s status since the most recent PrinterMap
status poll. Status values include Running, Warning,
Down, and Unknown.
• Serial Number
attribute for Xerox printers. A value of “N/A” is
displayed for non Xerox printers or Xerox printers
which do not support this attribute.
PrinterMap is dependent on correct MIB printer implementation for retrieving and
displaying printer attribute values. Values retrieved from printers with incomplete
or incorrect MIB implementation provide little user value.
NOTE: Attribute values are truncated to 25 characters for display under printer
icons. NT 4.0 machines further truncate attribute values displayed
beneath printer icons. Placing the cursor over the icon causes the
operating system to display more truncated information. Use the Printer
Properties window to view all attributes for each printer.
Groups
The Groups listing area contains all predefined and user-defined printer groups.
To display printers belonging to a particular group, select the desired group from
the list.
When PrinterMap is first installed the Groups list box contains predefined groups.
Following is a table displaying predefined groups with a description of printer
types in the groups.
Table 6 Predefined Groups
Predefined Groups
Group
All Printers Contains all managed printers
Xerox Only Contains all Xerox managed printers
HP Only Contains all Hewlett-Packard managed printers
Olivetti Only Contains all Olivetti managed printers
Lexmark Only Contains all Lexmark managed printers
Tektronix Only Contains all Tektronix managed printers
Description
Refer to “Printer Groups” in Chapter 4 for more information on printer groups.
Viewing Printer Information
PrinterMap User Guide
46
Page 63

Printer Groups
Discovered printers are placed into predefined PrinterMap groups based on their
manufacturer. The vendor groups allow easy viewing of all Xerox, HP, Lexmark
Tektronix or Olivetti printers. PrinterMap also supports user-defined groups.
User-defined groups simplify management by collecting printers into logical
groups. For example, creating a group named “3rd Floor” allows all printer
additions from the 3rd floor into that group.
Refer to “Group” in Chapter 4 for more information on PrinterMap groups.
Printer Icons
PrinterMap’s topology uses the following icons to represent discovered network
printers based on manufacturer and model.
Table 7 Printer Icons
Xerox Printers - Printers manufactured by Xerox are
represented by a model specific icon image if PrinterMap
has an icon for that model. If not, a generic Xerox icon is
used. The DocuPrint N32 icon is shown here as an
example of a model specific icon.
Hewlett-Packard Printers - Printers manufactured by
HP are represented by this icon.
Lexmark Printers - Printers manufactured by Lexmark
are represented by this icon.
Tektronix Printers - Printers manufactured by
Textronix are represented by this icon.
Olivetti Printers – Printers manufactured by Olivetti
are represented by this icon.
Generic Printers - Printers manufactured by companies
other than Xerox, HP, Olivetti and Tektronix are
represented by this icon.
Each printer’s name is displayed directly beneath the corresponding icon image.
The attribute value of the currently selected printer (IP/IPX Address, Status, etc.)
is displayed below the printer’s name.
PrinterMap User Guide
47
Page 64

Figure 26 Printer Icon Components
Printer Status
In PrinterMap topology, each printer is represented by an icon. The icon
background color indicates the printer status. PrinterMap topology can be a
patchwork including Red, Yellow, Green, and Blue icons, based on individual
printer status. Below is a table showing printer status to icon color mapping
utilized by PrinterMap.
Table 8 Printer Status to Icon Color Mapping
Printer Status Color Scheme
Printer Status
Running (Up) Green
Warning Yellow
Down (Critical) Red
Unknown Blue
Icon Color
Printer status is typically determined by presence or absence of alarm conditions.
Low paper, no paper, low toner, no toner, door open, jammed and service
requested are all printer alarm examples detected by PrinterMap. A printer can
have multiple alarm conditions set at any given time. In the event of several alarm
conditions the printer icon’s color reflects the most severe condition. For example,
if a printer is low on paper (a warning condition) and is also out of toner (a critical
condition) the printer icon’s color is set to Red. If the printer is low on both paper
and toner the printer icon’s color is set to Yellow since both alarms have a severity
of warning.
Refer to “Viewing Alarms” in Chapter 6 for more details on the alarm conditions
and severities detected by PrinterMap.
Based on the status polling interval configured in the Status Configuration
window, PrinterMap’s Status Service periodically updates the status of each
printer. If PrinterMap detects a managed printer status change, the change is
reflected with a printer icon color change.
PrinterMap User Guide
48
Page 65

Refer to “Check Status” in Chapter 4 for information on updating printer status
independent of the Status Service.
Printer Properties Window
The Printer Properties window lists static and dynamic printer information and
allows the user to specify and launch other management applications. The Printer
Properties window is accessed by double-clicking on a particular printer or by
selecting the Show Properties menu item on the printer icon’s right-click menu.
Figure 27 Printer Properties window
The first section of the Properties window lists the System Name, Host Name,
Vendor, Model, Impressions Count and Status. A printer’s system name can be
modified in this section.
From the second window section, a printer’s paper and toner level information is
accessible. The Paper Level and Toner Level buttons displays this information in
bar chart, percentage and unit count formats (when available). Whenever possible,
PrinterMap User Guide
49
Page 66

paper and toner descriptions and units are retrieved and displayed from the printer.
If this information is unavailable the paper and toner description defaults to
“Source N” and units defaults to “units”.
The third portion of the Properties window lists the IP Address, IPX Address,
MAC Address, Serial Number, and Community String used by the printer.
Note that underneath the Serial Number value is an Edit button which brings up
the Edit Serial Number window.
Figure 28 Edit Serial Number window
The existing serial number for the selected printer is displayed in the serial number
edit box. Enter the new serial number in the edit box and select OK to save the
change. PrinterMap sends a SNMP request to the printer with the new serial
number. Note that the serial changed in this manner cannot be canceled by
canceling the Properties window. Select Cancel to dismiss the window without
making any changes.
NOTE: Serial numbers and serial number manipulation are available only for Xerox
manufactured printers. The bottom window section allows configuration for
up to three management application paths. Only the active application can
be launched (i.e., the application visible in the Printer Management
Application edit field). PrinterMap attempts automatically filling in one or
more application paths when the printer is discovered. Typically these paths
are the vendor specific printer management application or the HTTP address
of the printer's internal web server. A Browse button is provided for
executable and Launch locations. This Application button initiates the
application. Any application may be entered, including parameters, not
exceeding 256 characters.
Refer to “Launch Application” in Chapter 4 for more information on launching
configured management applications.
PrinterMap User Guide
50
Page 67

Adding and Deleting Managed Printers
Adding Printers to PrinterMap
PrinterMap provides the ability to manually add (discover) individual printers.
Newly discovered printers are automatically added to the “All Printer” group.
Refer to “Add Printer” in Chapter 4 for more information on adding Printers to
PrinterMap.
Deleting Printers from PrinterMap
PrinterMap provides the ability to remove printers from PrinterMap. Printers are
removed from user-defined groups or removed entirely from the PrinterMap
application by deletion from the All Printers group.
If a printer is removed from the All Printers group, it is removed from all printer
groups and all the printer’s associated data (attribute information and reporting
data files) are deleted. Generate reports before deleting a printer from PrinterMap
to save valuable historical data.
Right-Click Menus
Refer to “Remove Printer[s] from Group” in Chapter 4 for more information on
deleting printers from PrinterMap
Printer Icon Right-Click Menu
To access the icon right-click menu select a printer icon then click the right mouse
button. The following menu is displayed.
Figure 29 Printer Icon Right-click Menu
Another option is highlighting several printers on the topology and accessing the
right-click menu. In a multi-printer selection, only Add Printer[s] to Group and
Remove Printer[s] from Group can be selected from the menu.
PrinterMap User Guide
51
Page 68

Check Status
Show Printer
Alarms
Show
Properties
Generate
Report
Selecting the menu item for a highlighted printer causes PrinterMap to
initiate an immediate status check for that printer. PrinterMap updates
selected printer status regardless of the status polling interval defined in the
Status Configuration panel.
NOTE: If the currently selected printer attribute is Status and the printer
status changes (as a status poll result) the selected printer icon is
repositioned in the topology area.
Selecting this menu item displays the alarms for the selected printer. This popup
window displays a printers’ detected alarms from the most recent PrinterMap
status poll.
Refer to “Viewing Alarms” in Chapter 6 for more information on viewing printer
alarms.
Selecting this menu item displays the Printer Properties window for the selected
printer.
Refer to “Printer Properties Window” in Chapter 4 for more information on the
Printer Properties window.
Selecting this menu option produces a standard or custom report for the selected
printer.
Figure 30 Generate Report sub-menu
Standard
Selecting this menu option produces a standard report for the selected printer. This
option is only available if the Standard Report Polling Interval is configured on the
Reporting Configuration panel.
Refer to “Generating Reports” in Chapter 5 for more information on generating
reports.
Custom
Selecting this menu option produces a custom report for the selected printer.
PrinterMap User Guide
52
Page 69

Refer to “Generating Reports” in Chapter 5 for more information on generating
reports.
Launch
Application
Selecting this menu option launches the active management application of the
selected printer. Applications are configured and assigned to individual printers
via the Printer Properties window. Up to three management application paths can
be defined via the Printer Properties window. However, only the active
management application is launched (i.e., the application that appears in the
Printer Management Application field of the Printer Properties window).
When a printer is discovered PrinterMap attempts filling in one or more
application paths depending on the printer’s manufacturer (vendor) and
capabilities. The discover process first determines whether the printer has a built
in HTTP server. If it does, PrinterMap sets the active management application
path to “HTTP://<ip_address>” (provided that the printer’s IP address is known).
Next, the process discovers whether a default management application is
configured for the printer’s vendor. If so, PrinterMap adds the appropriate
management application path to the printer’s management applications list (if the
printer is not HTTP enabled or the printer’s IP address is not available then this
path becomes the printer’s active management application).
If the selected printer lacks an application path specified in its Properties window
the Launch Application menu item is grayed out.
NOTE: If the active application is a vendor specific management application
(such as HP’s JetAdmin), once the application comes up it may be
necessary to re-select the target printer. Whenever possible PrinterMap
launches the management application with focus on the selected printer.
PrinterMap can launch CentreWare DP with focus on the selected
printer if PrinterMap knows the printer’s IPX address. If not, select
CentreWare’s IP option and find the printer.
Add Printer[s]
to Group
PrinterMap User Guide
Selecting this menu option adds the current selected printer or printers to an
existing group.
The selected printer is copied to an existing group by highlighting the printer or
printers and selecting this menu item which prompts for a group name.
53
Page 70

Figure 31 Add Printer(s) to Group dialog
Assign highlighted printers to a group using the list box in this window.
Remove
Printer[s] from
Group
The Remove Printer(s) from Group menu item is used for removing printers from
a particular group. Using this menu option with one or more printers in a userdefined group ONLY removes the printer from that group. Printer reporting and
attribute information is NOT affected when removing a printer from a userdefined group. In addition, the printer remains a member of the All Printer group
as well as any other pre-defined groups it belongs to. If however a printer is
removed from the All Printer group, the printer is removed from all printer groups
where it is a member and all its associated data (attribute information and
reporting data files) is deleted. Generate reports before deleting a printer from
PrinterMap to save valuable historical data.
Figure 32 Remove Printer dialog
To remove one or more printers from a group:
1. Select the group to be modified.
2. Select printers for removal and right-click one highlighted printer icon. (The
Delete key brings up the Remove Printer dialog).
3. Select Remove Printer(s) from the Group menu item.
4. Select Yes in the confirmation Pop-up window.
Topology Right-Click Menu
PrinterMap User Guide
54
Page 71

To access the Topology Right-Click menu, place the cursor in the topology area
and click on the right mouse button.
Figure 33 Topology Right-Click menu
Select All
Printers
Order Icons
Printer Name
Groups
Listing RightClick Menu
Delete Group
Create Group
Selecting this menu option highlights all icons on the currently displayed group
topology.
Selecting this menu option enables or disables icon sorting based on attributes. A
check beside this menu item indicates sorting is enabled.
Selecting this menu option brings up the default printer name selection sub-menu.
The user may select either Host Name or System Name as the source for the
PrinterMap default printer name. The default selection is System Name.
Highlighting any group in the group listing area and right-clicking that group
accesses its Group Right-Click menu.
Figure 34 Group Right-Click menu
Selecting this menu option deletes the selected group.
Rename
Select All
Selecting this menu option creates a new group containing the selected printers
Selecting this menu option allows the user to edit the group name in place.
Selecting this menu option highlights all icons displayed on the current group
topology.
Additional Functionality
Adding Printers to Groups through Drag and Drop
Several methods are available for copying/adding printers to user-defined groups.
Managed printers may be copied to user-defined groups through PrinterMap’s
drag and drop capability. Simply highlight one or more printers, leaving the left
mouse button depressed, then drag the icon to the target group located in the
Groups list box.
PrinterMap User Guide
55
Page 72

Refer to “Add Printer[s] to Group” in Chapter 4 for information on
copying/adding printers using the menu bar. Refer to “Add Printer[s] to Group” in
Chapter 4 for information on copying/adding printers using the printer icon rightclick menu.
Selecting Multiple Printers
Multiple printer icons must be selected to initiate various actions such as creating
new groups, deleting multiple printers, moving printers between groups, etc. The
topology area supports the windows extended selection mode.
Multiple printers are selected in any of the following ways:
• Holding down the Ctrl key, left-click on several printers, one at a time, until
all desired printers are selected.
• Holding down the Shift key, left click on a printer then left click on another
printer. All rectangular shaped printers in between are selected.
• Placing the mouse pointer in the topology map background, hold down the left
mouse button and drag the pointer across the map background, forming a
group selection box around the target icons.
• Selecting the Select All item under the main menu Group.
Chapter 5 Status and Reporting
This chapter provides information on the status and reporting functions of
PrinterMap.
PrinterMap User Guide
56
Page 73

Service Overview
The Status and Reporting Service tasks run behind the scenes and periodically
query printers via SNMP for current status and reporting information. Following a
reboot the Status and Report polling services starts automatically. Printer
information collected is stored in data files. These files are accessed by the
PrinterMap Topology window and report generation processes. The Status and
Report service polling intervals are configured through the Status and Reporting
Configuration windows.
Refer to “Configuring PrinterMap” in Chapter 2 for more information on
configuring the Status and Reporting services.
Memory Requirements
The Status and Reporting Service occupy approximately 2.5MB of RAM each.
Stopping and Re-starting Polling Tasks
The Status and Reporting services must be active to collect status and reporting
data from managed printers. If, for example, if the Status polling process is
terminated, PrinterMap Topology no longer reflects the current status of managed
printers. To terminate or re-start either background task, follow instructions below
for the appropriate operating system.
Windows 95
PrinterMap User Guide
1. Double-click the PrinterMap Status icon or the PrinterMap Reporting icon
located in the Windows 95/98 service tray to access the PrinterMap Service
57
Page 74

Control window. The Service Control window is also accessible by selecting
the Service Control Manager menu item from the Status and Reporting service
icon right-click menu. The Status and Reporting service icons only appear in
the service tray if they are currently active. If neither service is currently
running, select PrinterMap Services from the Start > Programs > Xerox
PrinterMap menu to access the Service Control window.
Windows NT
4.0
Figure 35 Service Control window
2. Select the STOP Status Service or STOP Reporting Service button to
terminate service. Select the START Status Service or START Reporting
Service button to restart service.
3. Select the Exit button to close the Service Control window.
The following steps terminate the Status and Reporting services on Windows
95/98.
1. Right-click on the PrinterMap Status or PrinterMap Reporting icon located in
the Windows 95/98 service tray. Only active PrinterMap services appear in
the service tray.
2. Select Stop Status Service or Stop Reporting Service from the right-click
menu to terminate the Status or Reporting services.
1. From the Start menu, select Settings > Control Panel
2. From the Control Panel, double-click the Services icon which accesses the NT
Services window.
3. Scroll and locate the PrinterMap Status and PrinterMap Reporting services
4. Highlight each process and select the Stop button to terminate service or the
Start button to re-start service.
PrinterMap User Guide
58
Page 75

Windows NT
3.51
Status Function
1. Double-click the Control Panel icon located on the desktop.
2. From the Control Panel, double-click the Services icon which accesses NT’s
Background Services window.
3. Scroll and locate the PrinterMap Status and the PrinterMap Reporting
services.
4. Highlight each process and select the Stop button to terminate service or the
Start button to re-start service.
The status function consists of a Status Service responsible for polling managed
printers for status and alarm information, the means to configure the polling rate
of the Status Service, and a mechanism for updating the PrinterMap user interface
with this information.
Overview
PrinterMap’s status polling service (Status Service) periodically queries all
network managed printers. Each printer provides information on paper levels,
toner levels, lifetime impressions, status, and alarm conditions. This information is
viewed in the main Topology printer window. The Status Service detects and
records printer alarms, and takes action on alarms as defined in the Configuration
window Alarm panel.
Refer to “Alarms” in Cahpter 6 for alarm information and configuring action(s)
taken by PrinterMap when specific alarm conditions are detected.
Refer to “Status” in Chapter 2 for more information about configuring the status
polling service.
Operation
The status polling service launches automatically following installation and
whenever the machine comes up. The polling frequency is determined by settings
on the Status panel of the Configuration window. By default PrinterMap is
configured to start a poll every four minutes.
If necessary, manually disable the status polling. PrinterMap runs if the status
polling process is not active. Printer information displayed in the main Topology
printer window is no longer current.
Refer to “Service Overview” in Chapter 5 for details on stopping and re-starting
the Status Service.
Under Windows 95/98, the status service icon appears in the system tray when the
status service is running. There is no immediate visual cue under Windows NT.
PrinterMap User Guide
59
Page 76

The status polling process runs as an NT Service. It can be found by viewing
Services from the Control Panel.
To check printer status before the next scheduled poll, highlight the target printer
and right-click the mouse, accessing the printer right-click menu. Select Check
Status from the menu and PrinterMap performs an immediate status check for the
target printer. PrinterMap updates printer’s status and if necessary logs any
alarms.
NOTE: PrinterMap services write printer information to the hard drive
during polling operations. Norton Speed Disk and other disk
defragmenting tools may have difficulty operating during hard drive
updates. If this occurs, temporarily stop the Reporting and Status
services until defragmenting is completed.
Icon Colors
In the Topology window, each printer is represented by an icon. The icon color
indicates the status of the printer. The PrinterMap topology can be a patchwork of
Red, Yellow, Green, and Blue, depending on the status of individual printers.
If the status of a printer changes from one polling period to the next, the screen
icon color changes to reflect the new status. The colors used are listed in the table
below:
Table 9 Printer Status to Icon Color Mapping
Printer Status Icon Color
Running (Up) Green
Warning Yellow
Down (Critical) Red
Unknown Blue
Refer to “Check Status” in Chapter 3 for information on updating the status of a
printer independent of the Status Service.
Reporting Function
PrinterMap User Guide
60
Page 77

The reporting function of PrinterMap consists of a Reporting Service responsible
for polling managed printers for reporting data, the means to configure the polling
rates for the Reporting Service, and a mechanism for allowing users to generate
reports from collected data.
Reporting Service
The PrinterMap report polling service (Reporting Service) periodically queries all
managed printers on the network. Each printer provides information toner levels
and lifetime impression count. This information is written to data files and used to
generate reports.
NOTE: PrinterMap services write printer information to the hard drive during
polling operations. Norton Speed Disk and other disk defragmenting
tools may have difficulty operating during hard drive updates. If this
occurs, temporarily stop the Reporting and Status services until
defragmenting is completed.
Disabling Reporting
The reporting function of PrinterMap can be disabled from the reporting
configuration window. When installing PrinterMap and disabling the Reporting
Option, it is best done before running the Discover process for the first time.
Discover allocates significant space for each managed printer to support the
Reporting Option. By disabling the Reporting Option prior to running the
Discover process, space allocation is bypassed.
PrinterMap User Guide
61
Page 78

Figure 36 Reporting Configuration window
Selecting the Disable button located at the top of this window accesses the Verify
Disabling Reporting window.
Figure 37 Verify Disabling Reporting Option window
This window informs about the consequences of disabling the reporting function.
After confirmation, PrinterMap no longer collects reporting data for managed
printers. PrinterMap also deletes all reporting data. Until the reporting function is
PrinterMap User Guide
62
Page 79

re-enabled, all reporting features and functions are not selectable (grayed out) on
PrinterMap menus and windows. The Verify Disabling Reporting window
provides an exact summary of these details and instructions for stopping the
disabling process.
After selecting the OK button to confirm the intention to disable reporting, the
Reporting Configuration window displays “(Pending)” beside the Disable button
(which now reads Undo). This is the last chance to stop the disabling process and
preserve historical reporting data and functionality. Once the OK or Apply button
is selected, the reporting process and function is disabled.
If the Reporting service is active when the request for disabling the Reporting
Option is processed, the service is stopped immediately. (Under Windows NT, the
reporting service is removed from the list of available services.) A user message
appears confirming the Reporting service is terminated.
The user is informed about how many reporting data files are deleted.
Enabling Reporting
PrinterMap is installed with the reporting feature enabled. Re-enable the Reporting
Option only if it was previously disabled.
The Reporting Option can be enabled at any time. However, please refer to
“Projecting Hard Disk Requirements” on page ix of the Preface prior to reenabling the Reporting Option.
The Reporting Option is enabled from the Reporting panel of the Configuration
window:
When the Enable button is selected, an informational window appears giving
details on the disk space requirements for the Reporting Option.
Once this window is accepted, the request to enable the Reporting Option enters a
Pending state. It remains pending until the OK or Apply button is selected. Then
reporting data files are created and reporting selections throughout PrinterMap are
enabled (they no longer appear grayed-out). Under Windows 95/98, the reporting
service starts automatically. Under Windows NT, the reporting service is
automatically installs and starts as a service.
Generating Reports
Single and Printer Group reporting can be accessed from Report > Generate
[Custom or Standard] Report > [Selected Printer or Selected Group].
All reports filter out empty data arrays. For example, if generating a report from
January 1st to June 1st 1998 and PrinterMap is not installed until March 1st the
report does not contain entries for January and February.
PrinterMap User Guide
63
Page 80

NOTE: Reports generated for a long time period or for a large group ofprinters
with high granularity may require a significant amount of time to
generate. For example, generating a Standard Report (with the standard
report polling interval set to every hour) for an entire year on one or
more printers is time consuming. The resulting report contains an entry
for every hour of every day for an entire year.
PrinterMap retains reporting information for the present year and the past year on
a rolling two year basis. The reference point for this data preserving method is
January 1st not PrinterMap’s installation date. Refer to “Reporting Data Custodial
Procedures” in Chapter 5 for more details.
The four PrinterMap user-generated report types are described in detail in the
following sections:
Standard
Reports
Custom
Reports
• Standard Single Printer Report
• Standard Group Printer Report
Standard Reports are reports that use Standard Report Polling Interval
configuration values entered by the user in the Reporting Configuration window.
Standard reports only contain printer data entries for data collected on the
currently configured standard polling interval. If standard report polling is
configured to poll hourly then a standard report contains an entry for every hour
within the report generation time parameters defined by the user (provided the
reporting data printer file has data stored for each hour). If standard report polling
is configured to poll monthly, a standard report contains a single entry for each
month within the report generation time parameters defined by the user.
• Custom Single Printer Report
• Custom Group Printer Report
Custom Reports are reports that use the Custom Report Polling Interval
configuration values entered by the user in the Reporting Configuration window.
They allow entry of special values and parameters for one particular report or
reports period outside the standard report cycle. It is important to note that
Custom reports contain printer data entries for every hour available in the printer’s
reporting data file. If the custom report polling interval is configured to poll every
six hours but the standard report polling interval is configured to poll hourly, then
a custom report contains hourly data entries not data entries for every sixth hour.
When selecting Standard or Custom reports, specify reporting parameters on a
window similar to the one shown. Select a printer or group for generating a report
and the type of generated report. Respond to prompting by specifying the From
and To time period for the generated report.
PrinterMap User Guide
64
Page 81

Figure 38 Reporting Parameters window
In the case of Standard Reports, specific From and To criteria may be set by
PrinterMap based on the Standard Report Polling Interval configuration values.
For example if standard report polling is configured to poll on a weekly basis,
PrinterMap sets Day and Hour parameters for the Reporting Parameters window.
The user is not able to modify these settings. Once the From and To parameters
are set, selecting the Show Report button initiates the report generation process.
Generated
Report
Window
At the completion of the report generation process a Report window is displayed.
The report window title indicates the type of report generated (standard versus
custom). The report heading contains information related to the generated report
time period (From and To values of the Reporting Parameters window). The
report heading for single printer reports also contains the printer’s name, model,
and serial number (if applicable). Below is an example of a user generated
standard report for the All Printers pre-defined group.
PrinterMap User Guide
65
Page 82

Figure 39 Example Group Standard Report window
When closing a report window that contains a large amount of report data,
PrinterMap may require significant time to clean up and dismiss the window.
Exporting Reports
Generated reports may be exported to a file in comma-delimited format by
selecting the Export button on the Report window. The default save location for
these files is [Drive]:\[Install Directory]\Reports. By default reports are saved to
SINGLEREP.CSV and GROUPREP.CSV for single printer and group reports.
The resulting comma-delimited file may be imported into popular database and
spreadsheet packages. When importing a PrinterMap report file to a third party
package, identify the report as having comma-delimited fields.
NOTE: Microsoft Excel may remove leading zeros from the serial number field
while importing PrinterMap generated reports. IPX address and MAC
address fields are not affected.
Printing Reports
Generated reports may be printed to any accessible local or network printer. By
default, reports are printed in landscape format.
The type of information contained in generated reports is highly configurable. The
Report Attributes Content window is a sub-window of the Reporting
Configuration window. A generated report can be modified in this window. Name
and Lifetime Impressions are standard on every report. Additional information
may be included as shown in the window below.
PrinterMap User Guide
66
Page 83

Figure 40 Report Attributes window
After making selections, select the OK button to accept and close the window.
Following is a brief description of each attribute which may be selected from the
Reports Attributes window.
Period Impressions
This attribute displays the number of printer impressions created from one report
entry to the next. A report’s first Period Impression for a printer is always zero.
Toner Level
This attribute displays the toner percentage remaining in each toner cartridge. A
printer may not provide enough information for PrinterMap to display a toner
percentage. Toner level values are then expressed as some, if any toner is detected,
or --, if the printer is unable to determine toner levels. If the printer does not
provide any toner information the toner levels are displayed as N/A (Not
Available).
Period Toner
This attribute displays how many times toner level increased (i.e., new toner
cartridge is added) from one report entry to the next.
IP Address
This attribute displays the printer’s IP address.
IPX Address
This attribute displays the printer’s IPX address.
PrinterMap User Guide
67
Page 84

MAC Address
This attribute displays the printer’s MAC address.
Model
This attribute displays the model number of the printer and is only optional for
group reports.
Vendor Name
This attribute displays the name of the printer’s manufacturer and is only optional
for group reports.
PrinterMap User Guide
68
Page 85

Serial Number
This attribute displays the Serial Number assigned to the selected printer. This is
only applicable to Xerox printers and is only optional for group reports.
A brief description of attributes that appear on all printed reports follows.
Name
This attribute assigns a name to the printer. The printer name is taken from an
assigned name retrieved from the printer during the PrinterMap discover process.
If the name is not available, PrinterMap uses the printer’s IP or IPX address as its
name. A printer’s name can be modified through the printer’s Printer Properties
window.
Date
This attribute displays date and time data is collected (i.e., when the report poll
occurred).
Lifetime Impressions
This attribute displays the total impression count created by the printer over the
course if its life.
Reporting Data Custodial Procedures
PrinterMap stores up to two years of reporting data in individual printer files in
the [Drive]:\[Install Directory]\Data\Accinfo directory. At the end of the second
year, PrinterMap removes all data from the first year and proceeds to store Third
year reporting data is stored in place of first year data. After the third year,
PrinterMap removes all data from the second year in preparation for storing the
fourth year’s data.
NOTE: PrinterMap stores reporting data based on a calendar year. Regardless
of the PrinterMap installation date, December 31st is considered the end
of a year’s reporting data. If PrinterMap is installed in November of
1998, in January of 2000 the reporting data for all of 1998 is removed.
The data is cleared during the first poll after midnight of January 1st. The exact
date and time of the poll depends on the Standard and Custom polling interval
parameters specified in the Reporting Configuration window.
In preparation for data loss, 28 days before December 31st, PrinterMap gives
warning of the impending data loss using the warning shown below.
PrinterMap User Guide
69
Page 86

Figure 41 Impending Loss of Information window
After acknowledging this window, it reappears every seven days leading up to
December 31st unless the Keep Showing This Warning box is unselected.
The Details button accesses a window providing details about the impending data
deletion. For this window, current polling selections are used to predict exactly
when data is deleted. Changing the polling settings may also change the date and
time.
Figure 42 Upcoming Loss of Information – Details window
PrinterMap User Guide
70
Page 87

PrinterMap User Guide
71
Page 88

Chapter 6 Alarms
This chapter provides information on how PrinterMap detects printer alarms, the
conditions that constitute a printer alarm, how to view alarms for a particular
printer or the alarm log, and how to configure automatic responses to alarms.
Detecting printer status and corresponding alarms is paramount to a proactive
versus reactive approach to printer management and is at the core of PrinterMap
functionality.
PrinterMap User Guide
72
Page 89

Alarm Detection
The PrinterMap Status Service periodically queries printers for current status and
alarm information. The polling interval of the Status Service is configured through
the Status panel of the Configuration window. When a printer reports an alarm
condition the alarm information is recorded. Automated actions are launched when
configured through the Configuration window Alarms panel. By default, all alarms
are written to the PrinterMap alarm log.
Alarm Configuration
Once an alarm is detected, PrinterMap can log the alarm, launch a pop-up
notification window, or launch an executable. The action taken by PrinterMap
depends on the settings of the Configuration window Alarms panel. By default,
PrinterMap logs all detected printer alarms to the alarm history log.
Refer to “Alarms” in Chapter 2 for more details.
Viewing Alarms
Individual
Printer Alarms
Window
Alarm Log
Window
Printer alarms detected by PrinterMap may be viewed in two different ways. An
individual printer’s most recent alarm conditions or the history of all alarms
logged by PrinterMap can be viewed.
Alarms for an individual printer are viewed by selecting the Show Printer Alarms
menu item from the icon right-click menu. This accesses the Individual Printer
Alarms window. The window title contains the selected printer’s name for easy
identification. This window displays alarms for an individual printer as detected
by the most recent status poll. The information contained in this window includes
Date, Printer name, and a brief textual explanation for each alarm.
Figure 43 Individual Printer Alarms window
The Alarm Log window features sortable columns displaying the following
information:
PrinterMap User Guide
73
Page 90

• Status (severity of the alarm condition)
• Date and Time the alarm is detected
• Printer Name
• Alarm description
• Comment (used for acknowledgment)
The comment field remains blank until the alarm is acknowledged. The Alarm Log
displays a color coded status box for each alarm condition. The table below shows
severity and resulting status color for each alarm condition detected by
PrinterMap.
Table 10 Alarm Condition to Status Color Mapping
Alarm Condition Severity Status Color
Low Paper Warning Yellow
Low Toner Warning Yellow
Service Requested Warning Yellow
No Paper Critical Red
No Toner Critical Red
Door Open Critical Red
Jammed Critical Red
Offline Critical Red
Unknown Critical Red
If PrinterMap is unable to determine the cause of an alarm condition, “Invalid
Alarm Type” is displayed.
NOTE: A printer’s status on the topology and related alarms in the log file may
not show the same severity color indicator (critical/red vs.
warning/yellow). The values that determine overall status indications
and specific alarm indications are provided to PrinterMap by each
printer from two different notifications. PrinterMap is dependent on the
printer notification implementation for severity indicators accuracy. For
example, this occurs on the Xerox 4517 printer, where “No Paper” in
the envelope feeder results in status indication of warning/yellow
displayed on the topology map. The logged alarms are critical/red due to
an open door. This is the alarm that an empty envelope feeder creates on
the Xerox 4517.
PrinterMap User Guide
74
Page 91

To display the alarm history log, select Tools > Display Alarm Log from the
main menu.
Alarm Log
Buttons
Figure 44 Alarm Log window
Close
Closes the Alarm Log window. Changes made to the alarm entries are saved.
Export
Saves the alarm log data into a comma-delimited file (*.csv). Default save
directory for these files is [Drive]:\[Install Directory]\reports.
Print
Prints contents of the alarm log. The default printing orientation is Landscape. All
entries are printed.
Refresh
Refreshes alarm log data displayed in the window. Changes made to the alarm
entries during this session are saved before new entries are read in. This operation
cannot be cancelled.
Acknowledge
Provides ability for keeping track of any follow-up action initiated to rectify an
alarm condition. Selecting this button accesses the following window.
PrinterMap User Guide
75
Page 92
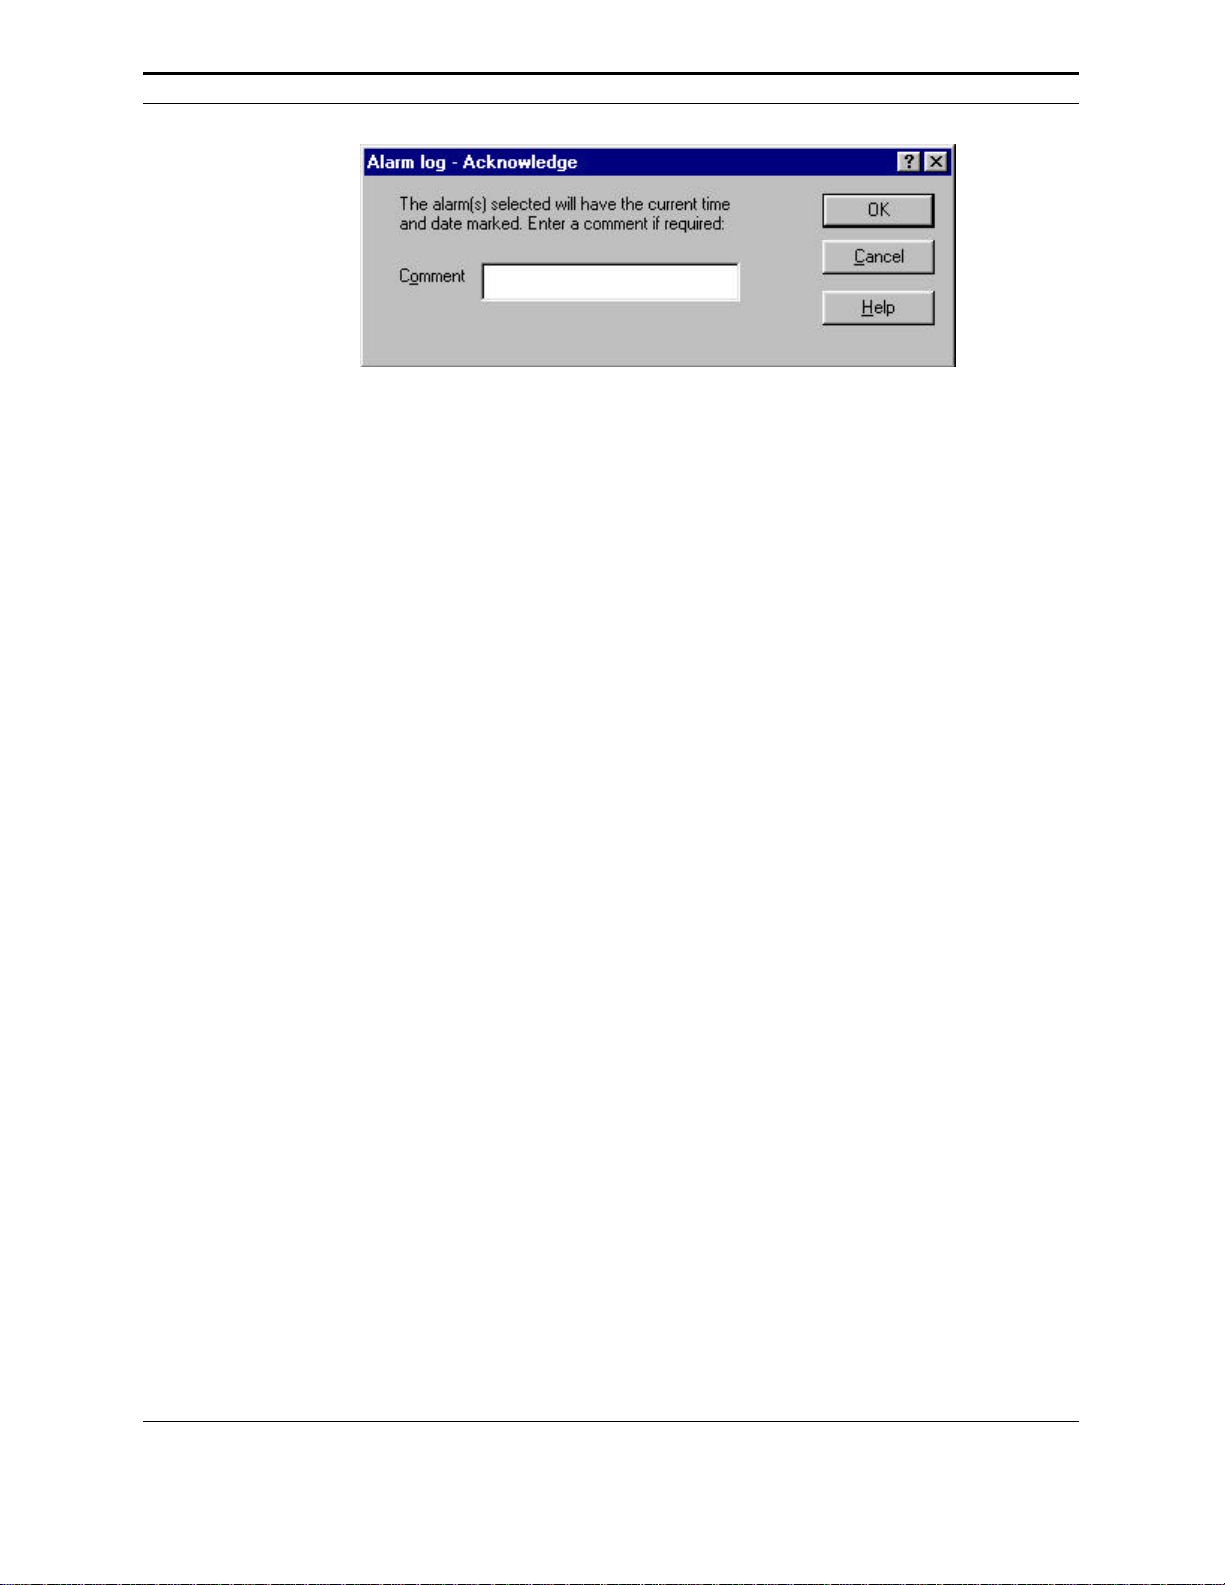
Figure 45 Alarm log – Acknowledge window
This window prompts for a brief comment related to the resolution or
acknowledgment of the selected alarm. All comments are displayed in the
Comment column accompanied by a time stamp. Adding text is not required. In
this case only the date and time stamp is displayed under the Comment heading.
Selecting multiple alarm records and the Acknowledge button assigns a single
comment to multiple alarms.
A check mark appears in the severity indicator box of all acknowledged alarms.
Select OK to complete operation or Cancel to abort.
Help
This button accesses the contextual help file for the Alarm Log window.
PrinterMap User Guide
76
Page 93

Chapter 7 Troubleshooting
Consult this chapter for basic troubleshooting suggestions when experiencing
operational problems with PrinterMap.
This chapter explores troubleshooting techniques for the following areas.
• Log Files and Debug Functionality
• Discover
• Status and Alarm
• Reporting
• Error Messages
PrinterMap User Guide
77
Page 94

Internals (Tracing + any function input parameter values
Details (Tracing +Internals + any variables or conditions
Log Files and Debug Functionality
When PrinterMap encounters a problem, a pop-up message appears referring the
user to the pmap.log. which contains general application status messages. Several
process-specific logs can be generated by activating PrinterMap's debugging
facility, for which several debug levels are available. The application initialization
file, [Drive]:\[nstall Directory]\pmap.ini contains debug parameter settings and
can be edited using any standard ASCII file editor.
Debugging is available for the following processes:
Table 11 Processes Eligible for Debug
Parameter Process Log Files
Topology Main PrinterMap application pmap.log,
Discover Discover process pmap.log,
topology.log*
discover.log*
Status Status polling process pmap.log,
status.log*
Reporting Report polling process pmap.log,
reporting.log*
* Generated only when debug level is > 0. See valid values in the following table.
The following are valid debug settings for any of the above processes:
Table 12 Debug Parameter Values
Parameter Value Information Type
0
Debugging Off (status messages -initialization and
process termination messages- only in pmap.log
10
Tracing (entrance to and return from functions)
20
30
PrinterMap User Guide
the developer anticipated being significant)
the developer anticipated being significant)
78
Page 95

40
50
A debug setting of 10 or higher initiates the *_dbg.log files. If debug is 0 for all
processes, the only log maintained is pmap.log containing general status messages.
Each log message is prefixed by the date/time of occurrence and name of the
generated process.
Maximum log file size can also be specified in the "[logfile]" parameter of the
[Drive]:\[Install Directory]\pmap.ini file. Default, measured in kilobytes, is 100.
Each time PrinterMap is activated, it checks the pmap.log file for size and
proceeds trimming the file by 20%, The oldest historical data is trimmed first.
NOTE: When debugging is activated the process must be RE-STARTED to
affect the change. For example, if running Windows NT and increasing
the debug level for the PrinterMap Status process, go to the Services
window of the control panel. Stop and re-start PrinterMap Status
service.
Looping (Tracing + Internals + Details + monitoring
entrance to and exit from all looping sections of code)
Verify (Tracing + Internals +Details + Looping +error
conditions not warranting a message being logged to the
pmap.log file)
PrinterMap User Guide
79
Page 96

Discover Problems
Discover Error message is returned immediately and no
printers are discovered
This normally occurs if the Discover process does not initialize properly, possibly
due to an invalid setting on a Discover configuration option. A pop-up window
containing a discover error message is displayed. Check the log file,
[Drive]:\[Install Directory]\discover.log. If the cause of the error is not
apparent, increase the debug level for the discover process and re-run Discover.
Most likely one of the following caused the problem:
• Invalid discover parameter or missing initialization file, pmap.ini
• No discover type specified in discover configuration
• Incorrect router address or local IP submask
• IPX Discover specified but local machine is not configured for IPX (NetW
are client).
Incomplete Discover
If the printer is
on an IP
network
If the printer is
on an IPX
network
If any printers are not discovered, check the following:
Refer to [Drive]:\[Install Directory]\pmap.log and increase the level of debug for
the discover process if necessary. When discover is re-attempted, the log file
[Drive]:\[Install Directory] \discover.log contains more information. If a
particular printer is not discovered, try the following:
1. Verify that a response is received from a ping.
2. Try manually adding through the Topology > Add Printer menu item.
3. If the router Discover configuration option is in use (local or secondary),
check contents of the arp cache via a MIB browser.
4. If the printer is not listed as a MIB object value, Telnet to the router and issue
a broadcast ping to update the router cache.
5. Ensure the correct Community String discover configuration option is set.
("Public" is used by default).
6. Increase the SNMP time-out values (snmp_get_local_time-out and
snmp_get_remote_time-out) in the pmap.ini file.
1. Ensure IPX discover configuration option is selected and that the IPX server
name is correct.
2. See if it can it be manually added through the Topology > Add Printer menu
item.
3. Ensure the correct Community String discover configuration option is set.
("Public" is used by default).
4. Increase the SNMP time-out values (snmp_get_local_timeout and
snmp_get_remote_timeout) in the pmap.ini file.
PrinterMap User Guide
80
Page 97

Discover doesn't complete.
The time required for the discover process varies with configuration options and
number of printers to discover. For example, if selecting local IP Discover, allow
time for polling the entire set of IP addresses within the subnet mask (even if they
don't actually exist). To decrease length of time required by the Discover process,
use the IP Address Range Discover configuration option. Multiple IP address
ranges can be specified to minimize the amount of required polling.
Status / Alarm Problems
Icons Not Changing Color According to Status:
1. On Windows NT platforms, access the Services window from the Control
Panel and verify that PrinterMap Status service has a status of “Started”. If
not, start it.
2. On Windows 95/98, verify that the PrinterMap Status icon appears in the
system tray. If not, start the Status service by selecting the PrinterMap Status
menu option under Start > Programs > Xerox PrinterMap. The Status service
can also be started from the Service Control window.
3. Right-click on the printer’s icon and select Check Status. This immediately
updates printer status if a change is recognized. If the icon changes color,
check the Status panel of the Configuration window to ensure the poll rate is set to
a frequency matching expectations for printer status information update. If the
icon does not change color, follow instructions given earlier in this chapter
concerning incomplete Discover.
Alarms Not Being Received in Alarm Log Window
1. Verify that the PrinterMap Status process is running as described in step one
above.
2. Check the Alarms Configuration panel to ensure the "Log to File" option is
selected for the alarm in question. The file [Drive]:\[Install
Directory]\alarms.log contains these messages.
3. If lost communication with the printer is suspected (the printer is discovered
initially but expected alarms are not received) follow instructions given earlier
in this chapter concerning incomplete Discover. Alarms are not received from
a printer whose present status is "Unknown".
Alarm Reads “Invalid Alarm Value from Printer”
The information being returned by the printer is not consistent with expectations.
These issues must be addressed by the printer manufacturer.
No Pop-ups or Application Launches Occurring
Go to the Service Manager and verify that “Allow service to interact with
desktop” is selected for PrinterMap Status.
PrinterMap User Guide
81
Page 98

NOTE: These actions only occur when the printer’s error condition first changes
Reporting Problems
On Windows NT platforms, access the Services window from the Control Panel
and verify that PrinterMap Reporting service has a status of "Started". If not, start
it.
On Windows 95/98, verify that the PrinterMap Reporting icon appears in the
system tray. If not, start the Reporting service by selecting the PrinterMap
Reporting menu option under Start > Programs > Xerox PrinterMap. The
Reporting Service can also be started from the Service Control window.
Standard Reporting Reports
to prevent flooding with popup windows. Pop-up alarm notification only
occurs once per new alarm condition. If the condition persists into the
next status poll, there is no pop-up notification.
Unable to
Open File
error
Month/Day/Ye
ar/ Hour
option(s) are
not selectable
Error Messages
XPC000
XPC010: Unable to open file: [Drive]:\[Install Directory]\data\accinfo\
nnnnnnnnnnn.zzz where nnnnnnnnnnnn represents a physical address and zzz
represents a 3-letter vendor code. This occurs when starting the PrinterMap
Reporting process and reporting data is not collected for that printer. Click OK to
acknowledge this warning.
Check Reports Configuration panel to ensure data is collected for the type of
report generated. For example, if poll rate is set to "Daily" it is not possible to
generate an "Hourly" report with existing data.
The following is a list of PrinterMap error messages logged to [Drive]:\[Install
Directory]\pmap.log. This list recommends actions and lists system action that is
taken by PrinterMap.
Common PrinterMap Error Messages
Text
$process initialization successful.
Variables
$process - a PrinterMap executable
Description
The process successfully completed all initialization.
System Action
None.
PrinterMap User Guide
82
Page 99

User Action
None.
XPC001
XPC002
Text
$function 1 failed calling $function 2.
Variables
$function1 - Error detecting function
$function 2 - Failing function
Description
Function 1 detected that function 2 did not successfully complete.
System Action
Function dependent
User Action
Note accompanying error messages for the failure cause.
Text
$function 1 failed calling $function 2, rc = $value
Variables
$function1 - Error detecting function
$function 2 - Failing function
$value - Return code from failing function
Description
Function 1detected that function 2 did not successfully complete. An error code
(integer value) is returned.
XPC003
PrinterMap User Guide
System Action
Function dependent
User Action
Note accompanying error messages for the failure cause.
Text
$function 1 failed calling $function 2, rc = $value
Variables
$function 1 - Error detecting function
$function 2 - Failing function
$value - Return code from failing function
Description
Function 1 detected that function 2 did not successfully complete. An error code
(hex value) is returned.
System Action
Function dependent
User Action
Note accompanying error messages for the failure cause.
83
Page 100

XPC004
XPC005
Text
$function 1 failed calling $function 2, reason = $reason
Variables
$function 1 - Error detecting function
$function 2 - Failing function
$reason - Failure cause
Description
Function 1 detected that function 2 did not successfully complete. A string
containing the reason for the failure is returned.
System Action
Function dependent
User Action
Note accompanying error messages for the failure.
Text
$function 1 failed with return code: $value
Variables
$function 1 - Failing function
$value - Return code from failing function
Description
Function 1 failed and an error code is returned.
XPC006
XPC009
System Action
Function dependent
User Action
Note accompanying error messages for the failure cause.
Text
$function 1 failed, reason = $reason
Variables
$function 1 - Failing function
$reason - Failure cause
Description
Function1 failed and a string containing the reason for the failure is returned.
System Action
Function dependent
User Action
Note accompanying error messages for the failure cause.
Text
$case: Invalid case or condition reached.
Variables
PrinterMap User Guide
84
 Loading...