

Page 1
USER GUIDE
Cover Page
Page 2

Copyright © 1997-2006 PLP Digital Systems, Inc.
All rights reserved.
This documentation is subject to the PLP Digital Systems, Inc. End-User License Agreement ("EULA"), revised November 30, 2004. A copy of this agreement is available in this User Guide. By using any of the instructions given here, you indicate your acceptance of those terms and conditions.
The software described in this document is furnished under a license agreement. The software may be used
or copied only in accordance with the terms of the agreement. It is against the law to copy the software except
as specifically allowed in the license agreement.
This guide may not be reproduced or transmitted in any form or by any means, electronic or mechanical,
including photocopying and recording, in whole or in part, without written consent of PLP Digital Systems,
except for normal internal use by employees of a business licensed by PLP Digital Systems. External
distribution to customers or other outside parties is expressly prohibited. The proprietary and copyright
notices that appear on this page must be affixed to any permitted copies.
The information in this guide is subject to change without notice. PLP Digital Systems, Inc. makes no warranty of any kind with regard to this guide, and shall not be liable for any errors or for incidental or consequential damages in connection with the use of the instructions or examples herein.
PlotWorks is a registered trademark of PLP Digital Systems, Inc. Arlington VA, USA. Windows and Windows NT are trademarks of Microsoft Corp.
Other brands and products mentioned in this guide are the trademarks of their respective manufacturers and
should be noted as such.
Depending on the PlotWorks version you are using, one or more software components or some
of their features may not be available. Please see your PlotWorks retailer for more
information.
2300 Clarendon Boulevard, Suite 711, Arlington, VA 22201
Phone:1 (800) 444-7568 or 1 (703) 740-8909
FAX: 1 (703) 995-9348
www.plp.com
Page 3

PlotWorks User Guide Table of Contents • i
Table of Contents
Chapter 1
Introduction ......................................................................................................1-1
What’s New in PlotWorks Version 5.7.0 ..................................................1-1
Supported PlotWorks Devices ................................... ..................................... ..1-3
Printers ....................................................................................................... 1-3
Legacy Printers ..........................................................................................1-3
Scanners .....................................................................................................1-3
Folders .......................................................................................................1-4
Supported File Formats .......................................................... ...........................1-5
Job Ticket Compatibility ...........................................................................1-5
PlotWorks Hardware Configurations ................................................................1-6
Interface Cards ...........................................................................................1-7
Scorpion Interface Card ............................................................................. 1-7
Gecko Interface Card .................................................................................1-7
Security Key/External Dongle .................................................................1-10
PlotWorks Smart Switch I .......................................................................1-11
System Requirements .....................................................................................1-15
PlotWorks Software Components ...................................................................1-16
The Job Queue .........................................................................................1-16
The Job Editor .........................................................................................1-16
The Printer Interface ................................................................................1-16
The Job Processor ....................................................................................1-16
Network Polling ........................................................... ............................1-16
Optional PlotWorks Components: ...........................................................1-17
The Scanner Interface ..............................................................................1-17
Print-to-Queue .........................................................................................1-17
PlotWorks Client .....................................................................................1-17
Software Flowchart .........................................................................................1-18
Using this Manual ...........................................................................................1-19
Before You Start ......................................................................................1-20
Documentation Conventions ...................................................................1-20
Help and Technical Support ...........................................................................1-21
Online Help ..............................................................................................1-21
Technical Support ....................................................................................1-21
PLP Internet Support ...............................................................................1-22
Printing Electronic Documentation .........................................................1-22
Chapter 2
Getting Started .................................................................................................2-1
Page 4

ii • PlotWorks User Guide
Installing PlotWorks® ......................................................................................2-1
Installing PlotWorks Server or Demo For the First Time .........................2-1
Updating from Version 4.3 or above preserving previous settings ...........2-3
Updating from Version 4.2 or Below ........................................................2-4
Opening PlotWorks Applications .....................................................................2-7
Configure Your PlotWorks Applications .........................................................2-8
Configure the Job Queue .................................................... .......................2-8
Configure and Start the Job Processor .......................................................2-8
Configure the Printer Interface .............................................................. 2-9
Setup the Job Editor ................................................................. ................2-13
Saving Job Tickets ....................................... ............................................2-15
Sending Jobs for Print ................................................... ...........................2-15
System Tray Icons ..........................................................................................2-17
Demo Mode ....................................................................................................2-19
Network Polling ............................................................ ...........................2-19
Job Editor .................................................................................................2-19
Printer Interfaces ......................................................................................2-19
Chapter 3
The Job Queue ..................................................................................................3-1
The Job Queue Window ...................................................................................3-2
Toolbar Buttons .........................................................................................3-2
File Menu ...................................................................................................3-3
View Menu ............................................................................................ ....3-3
Setup Menu ................................................................................................3-4
Job Menu ...................................................................................................3-4
Help Menu ............................................................................... ..................3-5
Columns and Icons ....................................................................................3-6
Job Queue Structure ...................................................................................3-9
Setting up the Job Queue ................................................................................3-10
Open an Existing Job Queue ....................................................................3-10
Create a New Job Queue ..........................................................................3-10
Set Queue Options ...................................................................................3-11
Select Queue Colors ................................................................................3-13
Working with Jobs in the Queue .....................................................................3-15
Importing Jobs .........................................................................................3-15
Prioritize Jobs (Automatic Printing) ........................................................3-16
Put Jobs on Hold ......................................................................................3-17
Process Jobs .................................................... .........................................3-18
Printing Jobs Manually ............................................................................3-18
Interrupting a Job to Print Another Immediately .....................................3-18
Reprint a Job ............................................................................................3-19
Delete a Job from the Queue ...................................................................3-19
Page 5

PlotWorks User Guide Table of Contents • iii
Saving Jobs from the Queue to a different location ................................3-20
Output to File ............................................................. .....................................3-21
Logs and Reports ............................................................................................3-22
Processing Log ................................................... .................................. ...3-22
Printing and Print to File Logs ................................................................3-22
Media/Capabilities Log ...........................................................................3-22
Job Information ........................................................................................3-23
Job Order .................................................................................................3-23
Troubleshooting ..............................................................................................3-24
Rebuild the Queue ...................................................................................3-24
Reset the Activity Field for a Job ............................................................3-25
Chapter 4
The Job Editor .................................................................................................4-1
Creating a simple job ticket ..............................................................................4-3
To start a new job ticket: ...........................................................................4-3
To add images to a job ticket: ....................................................................4-3
The Job Editor Window ....................................................................................4-5
The Toolbar ...............................................................................................4-5
The Menus .................................................................................................4-7
The Job Grid ............................................................................................4-12
Changing Print Parameters .............................................................................4-15
To change prototype parameters: .............................................................4-15
Editing Functions .....................................................................................4-15
Change Image Filenames ................................................ .........................4-16
Saving a Job Ticket ..................................................................................4-16
The Detail Property Sheet ...............................................................................4-18
Main Tabbed Dialog Box ............................................................. ...........4-19
Specified Size Tabbed Dialog Box ..........................................................4-21
Output Setup Tabbed Dialog Box ...........................................................4-25
Data Format Tabbed Dialog Box .............................................................4-27
Pens tabbed dialog box ............................................................................4-32
Pen/Print Options Tabbed Dialog Box ....................................................4-39
Overlays Tabbed Dialog Box ..................................................................4-46
Watermarks Tabbed Dialog Box .............................................................4-49
Margins Tabbed Dialog Box ...................................................................4-52
Labels Tabbed Dialog Box ......................................................................4-58
Saving and applying options selected from the Detail Property Sheet ...........4-61
Saving and applying a Pen Set ............................................................. ...4-61
Saving and applying watermark, margin and label settings ....................4-61
The Scale View ...............................................................................................4-64
Setting Preferences .........................................................................................4-65
General Preferences tabbed dialog box ...................................................4-65
Page 6

iv • PlotWorks User Guide
User Information Tabbed Dialog Box .....................................................4-67
Finishing Options ....................................................................................4-68
Nesting Options Tab ................................................................................4-70
Processing Options ................................................... ......................................4-73
Processing tabbed dialog box ..................................................................4-73
Size Tolerances Sheet ........................................................... ...................4-75
AutoCAD/DWG Direct Setup Sheet .......................................................4-76
Adding Files from a Polled Directory .............................................................4-78
Creating the Directories: ..........................................................................4-78
Using the Poll Directory Function: ..........................................................4-79
Adding Files from a Polled FTP Directory .....................................................4-84
Using the Poll Directory Function: ..........................................................4-84
Scanning from Twain Devices ........................................................................4-88
Confirming your computer detects the scanner: ......................................4-88
Twain Scanning Options ..........................................................................4-88
Adding images to the Job Editor from a TWAIN scanner: .....................4-91
Output to File ..................................................................................................4-94
Using Output to File ................................................................................4-94
Revision Highlighting .....................................................................................4-99
Using Revision Highlighting ...................................................................4-99
Revision Highlighting Options ..............................................................4-101
The File Configuration Tabbed Dialog Box .......................................... 4-103
The Revision Highlighting Dialog Box Buttons ...................................4-106
Possible error messages generated by Revision Highlighting ...............4-107
Process Image Files ......................................................................................4-109
The Process Job dialog box ................................................................... 4-109
Viewing Image Files .....................................................................................4-111
The PlotWorks Image Viewer ...............................................................4-111
The Windows XP Viewer ......................................................................4-111
Viewing an image ..................................................................................4-111
Configure an Output Destination ..................................................................4-112
Configuring Multiple Destinations ........................................................ 4-112
Destination Types ..................................................................................4-114
Edit an existing Output Destination .......................................................4-118
Delete an existing Output Destination ...................................................4-119
Sending Print Jobs ........................................................................................ 4-120
Send a Special Instruction File ..............................................................4-120
Job Information ......................................................................................4-122
Output Jobs ...................................................................................................4-123
Output to FTP ........................................................................................4-125
Chapter 5
The Image Viewer ............................................................................................5-1
Page 7

PlotWorks User Guide Table of Contents • v
Viewing Image Files ..................................................................................5-1
Open the Image Viewer .............................................................................5-1
The Viewer Window .................................................................................5-2
Zoom In or Out ..........................................................................................5-7
Adjust the Size of a Print ...........................................................................5-7
Adjust the Origin of a Print .......................................................................5-7
Black Paper ................................................................................................5-8
Show or Hide Pens ....................................................................................5-8
Identify Pens ..............................................................................................5-8
Refresh the Viewer Window .....................................................................5-9
Configure a Third Party Viewer .......................................................................5-9
Chapter 6
The Network Polling Program ........................................................................6-1
Advantages of Network Polling ................................................................6-1
The Network Polling Window ..........................................................................6-2
The Network Polling Toolbar ....................................................................6-2
Network Polling Menus ...................................... .......................................6-3
Columns .....................................................................................................6-4
Setting Up Network Polling ..............................................................................6-6
Set Polling Options ....................................................................................6-6
Add a Target Directory ..............................................................................6-6
Modify a Polling Directory ......................................................................6-11
Delete a Target Directory ........................................................................6-12
Edit the Directory PFS File .....................................................................6-12
Edit the Master PFS File .......................................................................... 6-13
Polling for Jobs ...............................................................................................6-14
Receiving Jobs from a Remote Source ....................................................6-14
Poll Target Directories .............................................................................6-15
Polling Status ...........................................................................................6-15
The Polling Log .......................................................................................6-15
Chapter 7
The Job Processor ............................................................................................ 7-1
The Job Processor Window ..............................................................................7-1
The File Menu ...........................................................................................7-2
The View Menu .........................................................................................7-3
The Setup Menu. ........................................................................................7-3
The Help Menu ..........................................................................................7-4
Setting Up the Job Processor ............................................................................7-5
Connect to a Queue ....................................................................................7-5
Running the Job Processor ................................................................................7-7
Start and Stop Processing ..........................................................................7-7
Page 8

vi • PlotWorks User Guide
Run Processing in the Background ............................................................7-7
View Processing Log ......................................... .. ......................................7-7
Chapter 8
The Printer Interface .......................................................................................8-1
The Printer Interface Window ..........................................................................8-3
The Toolbar Buttons ..................................................................................8-3
The Menu Options .....................................................................................8-4
The Printer Diagram ..................................................................................8-7
The Printer Information Box .....................................................................8-8
The Print Status Box ..................................................................................8-8
Setting Up the Printer Interface ......................................................................8-10
Set General Printing Options ...................................................................8-10
Configure Device Specific Options .........................................................8-15
Generic Embedded Controller Options ...................................................8-18
Selecting Notification Sounds .................................................................8-20
Setting Up Media Inventory ...........................................................................8-21
About the Media Inventory ......................................................................8-21
Adding Media to Inventory .....................................................................8-21
Edit the Media Inventory List ..................................................................8-24
Deleting Media from Inventory ...............................................................8-24
Media Override ........................................................................................8-24
Change Media Type .................................................................................8-25
Manual Feed .............................................................. ..............................8-26
Printing Basics ................................................................................................8-28
Set Printing Modes ......................................... .........................................8-28
Printing Rush Jobs ...................................................................................8-28
Display Images When Printing .......................................................................8-30
Printing Separator Pages ............................................................. .............8-30
Advanced Options ...........................................................................................8-33
Opening the Advanced Options dialog box. ............................................8-33
The Vector Imaging and Raster Imaging Tabbed Dialog Boxes .............8-34
The RK Color Model Specific Tab Window ........................................... 8-37
Connect to a Different Queue .........................................................................8-39
Job Recovery ...................................................................................................8-40
Printer Errors ...................................................................................................8-41
Out of Toner ............................................................................................8-41
Media Type Unknown Error ....................................................................8-41
Paper Jam .................................................................................................8-42
Simulate Printing ............................................................................................8-44
Printer-Specific Options .................................................................................8-46
XES MAX 200 and 8180 Printer Interfaces ............................................8-46
XEROX WIDE FORMAT 8825, 8830, & 8850 .....................................8-51
Page 9

PlotWorks User Guide Table of Contents • vii
Xerox 8840D/Fuji Xerox 4024 Printer Interface Options ..............................8-53
Xerox 8845/Fuji Xerox 4036 Printer Interface Options .................................8-54
Pen Widths ......................................................................................... ......8-55
Using a Folder with the 8845 ..................................................................8-55
XEROX WIDE FORMAT 721p, 8855 and KIP 8000 ...................................8-56
KIP 3620 Printer Interface Options ................................................................8-58
KIP 2950 Options ...........................................................................................8-59
KIP 1230 Options ...........................................................................................8-60
KIP 7095 Options ...........................................................................................8-61
KIP 9010 Options ...........................................................................................8-62
Océ 9600 Printer Interface Options ................................................................8-63
Océ 9800 Options ...........................................................................................8-64
Generic Embedded Controller Printers ...........................................................8-65
Selecting a Different Printer Interface from an open one ........................8-65
Change from a Color to a Monochrome Printer ......................................8-66
Socket Printers ................................................................................................8-67
Enable LMHOSTS Lookup .....................................................................8-67
Obtaining the IP Address: ........................................................................8-67
AccXES Controller Driven Printers ........................................................8-71
Océ Power Logic Controller Driven Printers ..........................................8-73
Kyocera-Mita Controller .........................................................................8-74
Windows Printers ............................................................................................8-76
Selecting a Windows Printer ...................................................................8-76
Change from Color to Monochrome .......................................................8-77
Paper Sizes Supported by Windows Printers ..........................................8-77
Chapter 9
The Scanner Interface .....................................................................................9-1
Opening the Scanner Interface ..................................... ..............................9-1
The Scanner Interface Window ........................................................................9-2
Setting Up the Scanner Interface ....................................................................9-17
Set Basic Scanning Parameters ............................................... .................9-17
Set Up File Naming .................................................. ...............................9-17
Image File Formats ..................................................................................9-20
Set the Scanning Resolution ....................................................................9-20
Set the Scanning Speed ............................................................................9-20
Choose a Document Ejection Option ......................................................9-20
Right Edge Scanning ...............................................................................9-21
Reduce or Enlarge an Image .................................. ..................................9-21
Invert Images ...........................................................................................9-21
Mirror Image ............................................................................................ 9-21
Set the Document Size ............................................................... ..............9-21
Set the Document Offset ................................................. .........................9-22
Page 10

viii • PlotWorks User Guide
Setting the Image Data Buffer Size .........................................................9-23
Enhancing Images ...........................................................................................9-24
Remove Background Automatically ........................................................9-24
Working with Standard Configurations ...................................................9-25
Scanning, Copying and Viewing ....................................................................9-26
Scan Documents Automatically ..............................................................9-26
Scan Images into a Job Ticket .................................................................9-26
Scan-to-Print (Copy) ................................................................................9-27
Rescan a Document .................................................................................9-27
Scanning a Document to Replace a Saved Digital Document .................9-27
Send the Current File to the Printer ......................................................... 9-31
View a Scanned Image ............................................................................9-31
Scanner-Specific Options ...............................................................................9-33
Xerox 7336 Scanner Interface .................................................................9-33
7336 Scan Controls tab ............................................................................9-33
7336 General Configuration Options .......................................................9-34
Xerox 7356 Scanner Interface .................................................................9-35
Xerox 7396 Scanner Interface .................................................................9-37
Xerox 7399 Scanner Interface .................................................................9-39
Xerox MAX 200 and 8180 Scanner Interfaces ........................................9-42
Océ 9800 TWAIN Scanner ................................................... ...................9-45
Synergix Scanner .....................................................................................9-47
Color Scanning Support ...........................................................................9-49
Ensure the Scanner is Ready to Use ........................................................9-49
Configure TWAIN Scanning Options .....................................................9-50
How to use the Synergix Scan System ....................................................9-51
Synergix Scan System options in detail ..................................................9-56
Vidar Flash Scanner Interface .................................................................9-70
Vidar Flash+ Scanner Interface ...............................................................9-71
KIP 2035 and 7095 Scanner Interface .....................................................9-74
KIP 2020 and 2030 Scanner Interface .....................................................9-75
KIP 2040 Scanner Interface .....................................................................9-76
KIP 2950 Scanner Interface .....................................................................9-77
Océ 9800 Scanner Interface ............................................................................9-79
Contex FSS/FCS Scanners ..............................................................................9-80
Chapter 10
Advanced Reporting Utility (ARU) ..............................................................10-1
Producing a Job Report ...................................................................................10-1
Specifying what Data the ARU Log Collects .................................................10-2
Editing the DEF File ................................................................................10-2
ARU Data Fields .................................... ..................................................10-3
Disabling the Printer ARU ............................................................................10-14
Page 11

PlotWorks User Guide Table of Contents • ix
LOG Files .....................................................................................................10-15
Archiving a log file ................................................................................10-15
ARU file size ............................................................... ..........................10-15
Using the ARU Log to Generate Reports .....................................................10-16
Importing the ARU Log File into Microsoft EXCEL ...........................10-16
Importing the ARU log file into Microsoft Access ...............................10-17
Chapter 11
Folder Information ........................................................................................11-1
Supported Folders ................................ ...........................................................11-1
Setting up the Folder .......................................................................................11-2
Connecting the PlotWorks Folder Cable .................................................11-2
Setting up GFI Folders ............................................................................11-4
Media Requirements for Folding .............................................................11-7
Setting up the Printer Interface to use your Folder ..................................11-8
Fold Types and Options ................................................................................11-11
Fold Types ............................................................................................. 1 1-11
Folding Options .....................................................................................11-14
Folding and Image Orientation .....................................................................11-17
Specifying the Title Block Location ......................................................11-17
Specifying Folding Options in Job Tickets ...................................................11-20
Folding Options for All Folders ............................................................11-20
Folding Options for the MAX 200 NACO ............................................11-27
Folding Options for the MAX 200 EO ..................................................11-29
Folding Options for GFI Folders ...........................................................11-31
Chapter 12
Print-to-Queue ...............................................................................................12-1
Just What is Print-to-Queue? ..........................................................................12-1
Considerations before installing Print-to-Queue .....................................12-2
Installing Print-to-Queue ................................................................................12-3
Editing a PFS File ...........................................................................................12-3
Sample Custom PFS File ..................................................... ....................12-4
Selecting a Driver ....................................................................................12-6
Mapping a Local Printer to the PlotWorks Port on Windows NT ...........12-6
Using a Network Printer on Windows NT ....................................................12-12
Mapping a Local Printer to the Port (Windows XP) .............................12-13
Output a Job to the Print-to-Queue Printer ...................................................12-20
Configuring LPD to Work with PlotWorks ..................................................12-20
Configuring PlotWorks and Print-to-Queue ..........................................12-20
Configuring NT Workstation 4.0 to support LPD .................................12-20
Setting Up a Line Printing Utility (LPR)-Compatible Printer ......................12-22
Printing to PlotWorks using LPR ..........................................................1 2-23
Page 12

x • PlotWorks User Guide
Configuring Linux to Submit to Plotworks Job Queue .........................12-24
Printing from AutoCAD or Microstation to the Job Queue ..................12-24
Troubleshooting ............................................................................................12-24
Appendix A
Memory Requirements .................................................................Appendix A-1
How to calculate the amount of RAM needed for each Computer: Appendix A-1
To calculate: ..........................................................................Appendix A-1
Imaging Memory Setting Guidelines for the Printer Interface Appendix A-3
Windows and Generic Embedded Controller Printers .............Appendix A-4
Image Data Buffer Size Guidelines for the Scanner Interface Appendix A-5
Appendix B
Error Messages and Common Problems .....................................Appendix B-1
The Job Queue ................................................................................ Appendix B-1
Network Polling ..............................................................................Appendix B-5
The Printer Interface ................................................. ...................... Appendix B-8
Common Printing Problems .................................................... Appendix B-8
Error Messages ........................................................................ Appendix B-9
Job Editor ...................................................................................... Appendix B-18
Job Processor: ............................................................................... Appendix B-26
Image Viewer ................................................................................Appendix B-27
Scanner Interface: ......................................................................... Appendix B-27
Appendix C
Image File Requirements .............................................................. Appendix C-1
Plot Files .........................................................................................Appendix C-1
CalComp Commands ...................................................................... Appendix C-3
CalComp Error Codes ..................................... ......................... Appendix C-4
HP-GL Supported Command List .................................................. Appendix C-5
HP-GL/2 ........................................................................................ Appendix C-11
Appendix D
PFS Files .........................................................................................Appendix D-1
Understanding PFS Files ................................................................Appendix D-1
PlotWorks Network Polling ............................................................ A ppend ix D-1
PFS File Types ................................... .................................. ...........Appendix D-3
Directory-level Defaults ..........................................................Appendix D-4
Site-level Defaults ...................................................................Appendix D-4
PFS File Layout .......................................................... ....................Appendix D-5
JOB section ............................................................ ................Appendix D-5
FILE section .............................................................................Appendix D-5
Page 13

PlotWorks User Guide Table of Contents • xi
Keywords and Values ........................................................ ......Appendix D-5
Defining Parameters .......................................................................A ppendix D-7
How to Use this Section ..........................................................Appendix D-7
Parameter Setting Requirements .....................................................Appendix D-8
Pens Data .............................................. ...................................Appendix D-8
Size Data ..................................................................................Appendix D-8
Keywords by Category ...................................................................Appendix D-9
Administrative Information .....................................................Appendix D-9
AutoCAD, DWG & DXF File Setup .....................................Appendix D-18
Pen Control ................................... ..................................... ....Appendix D-19
Folding ...................................................................................Appendix D-25
Overlay Control .....................................................................Appendix D-29
Nesting Controls ....................................................................Appendix D-30
Watermarks ............................................................................Appendix D-31
Label Control .........................................................................Appendix D-35
Log File Data .........................................................................Appendix D-38
Locking Parameters ...............................................................Appendix D-39
Advanced Features ........................................................................Appendix D-40
Special Fields .........................................................................Appendix D-40
Open and Write to a File ........................................................Appendix D-41
Printing a Job (Network Polling Mode 3) .....................................Appendix D-42
Sending Jobs to a Target Directory .......................................Appendix D-42
The Polling Log File ..............................................................Appendix D-42
Sample PFS Files ..........................................................................Appendix D-42
Incoming PFS File .................................................................Appendix D-43
Sample User Interfaces .................................................................Appendix D-44
Sample Windows Interface .................................................... Appendix D-44
PFS File Created from Windows Interface ............................Appendix D-44
Sample Excel Interface .......................................................... Appendix D-45
PFS File Created from Excel Interface .................................. Appendix D-46
Appendix E
Configuring RAS to Output PlotWorks Job Files ..........................................Appendix E-1
Install & Configure a Remote Access Server (Hub) ........................Appendix E-2
Verify Current Configuration ...................................................Appendix E-2
Install RAS .......................................................................................Appendix E-4
Create User Accounts for Remote Access Service ...................Appendix E-7
Create Shared Folders ...............................................................Appendix E-8
Start the Remote Access Administrator ....................................Appendix E-9
Making Remote Access Service Start Automatically ...............Appendix E-9
Stopping the Remote Access Admin ........................................Appendix E-9
Set Up the Client’s Dial-Up Networking Connection ...................Appendix E-10
Be Prepared .............................................................................Appendix E-10
Page 14

xii • PlotWorks User Guide
Verify Current Configuration .................................................Appendix E-10
Add a Dial-Up Networking Connection .................................Appendix E-12
Make the Connection ..............................................................Appendix E-13
RAS Installation .....................................................................Appendix E-14
Set up the Client Dial-Up Networking Connection (Win95) ........Appendix E-15
Add a Dial-Up Networking Connection .................................Appendix E-16
Make the Connection ..............................................................Appendix E-17
Installing Network Protocols (Windows NT) ................................Appendix E-18
Install TCP/IP .........................................................................Appendix E-18
Install NWLink IPX/SPX Compatible Transport ...................Appendix E-22
Installing NetBEUI Protocol ...................................................Appendix E-23
Installing the MS Loopback Adapter ......................................Appendix E-24
Installing Network Protocols (Win95) ...........................................Appendix E-24
Installing TCP/IP ....................................................................Appendix E-24
Installing IPX/SPX Compatible Protocol (Win95) ................Appendix E-25
Installing NetBEUI Protocol ...................................................Appendix E-26
Installing Client for Microsoft Networks ...............................Appendix E-27
Installing Dial-Up Networking on Win95 .....................................Appendix E-27
Output Job Tickets .........................................................................Appendix E-28
Installing FTP ................................................................................Appendix E-29
Installing Internet Information Server on an NT Serv er ......... Appendix E-30
Configuring Windows NT 4.0 Workstation for FTP ..............Appendix E-32
Appendix F
Processing AutoCAD Jobs .............................................................Appendix F-1
DWG Direct* File Processing ...............................................Appendix F-1
AutoCAD File Processing ................................................. .....Appendix F-1
How AutoCAD Files are Processed .........................................Appendix F-1
Prechecking ...............................................................................Appendix F-2
Preprocessing and Interaction ...................................................Appendix F-2
AutoCAD Printing Boundaries .................................................Appendix F-2
PlotWorks Parameters and AutoCAD ......................................Appendix F-3
Configuring AutoCAD For Use with PlotWorks ............................Appendix F-6
Configuring AutoCAD R14 ...................................................... Appendix F-6
Configuring AutoCAD 2000 or 2002 .......................................Appendix F-7
Configuring AutoCAD or DWG Direct* in PlotWorks ...........Appendix F-9
AutoCAD and “Error Free Printing™” .........................................Appendix F-10
Examples of parameter settings ..............................................Appendix F-11
Identifying Errors ....................................................................Appendix F-13
Printing with AutoCAD using Network Polling Mode 1 .......Appendix F-14
.......................................................................................................Appendix F-16
Page 15

PlotWorks User Guide Table of Contents • xiii
Appendix G
Repro Desk Support ......................................................................Appendix G-1
Supported Repro Desk Files .......................................................Appendix G-1
Printing Repro Desk Jobs with PlotWorks ...............................Appendix G-3
Processing Files before Outputting from Repro Desk ............. Appendix G-3
Using PlotWorks Network Polling for Repro Desk Jobs ........ A ppendix G-3
Polling for Repro Desk VIC Files ..........................................Appendix G-5
Sending Files from Repro Desk to PlotWorks ..................Appendix G-6
Outputting VIC files from the Repro Desk Client ...................Appendix G-7
Outputting Jobs from the Repro Desk Queue ..........................Appendix G-7
Importing Repro Desk Job files ...............................................Appendix G-8
Repro Desk Pens and Patterns ......................................................Appendix G-13
Repro Desk Pen Properties and the PlotWorks Equivalent ... Appendix G-13
PlotWorks Pen Macros not supported by Repro Desk .......... Appendix G-14
Importing Repro Desk Pattern Files ......................................Appendix G-14
Importing a User Defined Repro Desk pattern ..................... Appendix G-14
Reverting to the Default Standard Patterns ...........................Appendix G-15
Warnings and Other Print Parameter Issues ................................Appendix G-16
Warnings ................................................................................Appendix G-16
Print Parameter Issues ...........................................................Appendix G-20
PlotWorks Settings Not Supported by Repro Desk ......................Appendix G-24
Printing differences between Repro Desk and PlotWorks .... Appendix G-24
License Agreements
PlotWorks End-User Licence Agreement ..............................................Waranty-i
ADOBE ACROBAT READER LICENSE ..........................................Waranty-v
Index
.................................................................................................................... Index-i
Page 16

xiv • PlotWorks User Guide
Page 17

Chapter 1
Introduction
PlotWorks is a software solution that manages all aspects of document production.
It offers high-speed copying, scanning, and printing as well as job management,
image viewing, and remote job submission. PlotWorks provides the greatest
production power of any digital solution available today.
PlotWorks modular, customizable design can be used in any reprographics
environment, from service bureaus to in-house production facilities. You can
choose individual components to meet your document production needs and
combine them any way. Build a customized system using only the equipment you
need while establishing a flexible foundation that can be easily updated when your
needs change.
This documentation applies, either all or in part, to the following PlotWorks
packages:
•PlotWorks Server
• PlotWorks Client
• PlotWorks Connect
• PlotWorks Convert
• PlotWorks 9800 Server
PlotWorks User Guide • Introduction • 1-1
What’s New in PlotWorks Version 5.7.0
We are pleased to announce the release of PlotWorks version 5.7.0. The latest
generation of PLP's reprographics software includes new features and methods
that improve performance, output quality and interoperability. This release once
again affirms our committment to helping you Take Control of Your Business™.
• 600 DPI Production Printing: PlotWorks now provides optional support for
the KIP 7000 printer. With a direct interface to the KIP 7000, PlotWorks users
can now enjoy 600 DPI production printing at 13 D size sheets per minute.
The KIP 7000 Printer Interface supports independent gamma correction for
both raster and vector image components, independent dithering methods
(either error diffusion or ordered dither patterns) for both raster and vector
components, and full bi-directional communication to obtain media, toner
Page 18

1-2 • PlotWorks User Guide
and printer status. The KIP 7000 Printer Interface is compatible with
OpCenter, so that customers may track the status of every job, on every
printer, in every location.
• Improved DWF Processing: PlotWorks users will experience a dramatic
improvement in DWF processing speeds compared to earlier versions:
• Processing DWF files is approximately 350% faster than the default
installation of version 5.5.2
• Performing DWF to TIFF conversions is approximately 160% faster than
the default installation of version 5.5.2
• Processing DWF files is approximately 85% faster than processing to
LDF when using the latest version (1.6.4.002) of Océ Client Tools.
• Resampling Performance Increase: Monochrome TIFF resampling was
first introduced in version 5.5.1 to help our customers produce half-size
output from scanned images with unprecedented quality and clarity. The
resampling process is computationally intensive, and requires ample memory
and processing power. With a new approach to this complex task, PlotWorks
now resamples images approximately 45% faster than earlier versions.
• PDF Processing Improvements: PlotWorks 5.7.0 introduces a new
interpreter for processing PDF files, resulting in:
• Faster performance
• Improved data integrity
• Ability to handle PDF files from more applications than ever before.
• Online Plan Room Integration: Through the Job Submission Connector
API, PlotWorks has long supported integration with third party applications
such as online plan rooms and document management systems. With this
release, operators now have the ability to open and print Job Orders and
Multi-Page Submittals, if provided, directly from the Job Queue. Operators
now have access to all of the transactional documents from one location,
eliminating several steps from the existing workflow and improving quality
control.
Page 19

PlotWorks User Guide • Introduction • 1-3
Supported PlotWorks Devices
This list was current when this document was printed. If your printer is not on the
list, please contact PLP.
PlotWorks currently supports the following printers, scanners and folders:
Printers
KIP 7000
KIP 8000
Kyocera Mita 4850w
Océ 9800
Océ TDS400
Océ TDS600
Océ TDS800
Xerox Wide Format 721
Xerox Wide Format 510
PlotWorks also supports a variety of other printers, both small and wide format,
through generic Windows interfaces.
Legacy Printers
KIP 1230 KIP 2950
KIP 3620 KIP 7095
KIP 9010
Xerox Wide Format 8180 Xerox Wide Format 8825
Xerox Wide Format 8830 Xerox Wide Format 8840
Xerox Wide Format 8845 Xerox Wide Format 8850
Xerox Wide Format 8855 Xerox Wide Format MAX 200
Xerox Wide Format MAX 200 NP
Scanners
All Twain driven scanners are supported.
Page 20

1-4 • PlotWorks User Guide
Xerox Scanners:
Xerox 7336 Xerox 7356
Xerox 7396 Xerox 7399
XES 8180 XES MAX 200
Xerox Wide Format Scan System
Contex Monochrome Scanners (All at 400 dpi resolution only):
FSS 4300 FSS 8300
FSS 8300 Plus FSS 8300 Copy
FSS 12300 FSS 18300
Contex Color Scanners (all in monochrome mode at 400 dpi resolution only):
FSC 3010 FSC 5010
FSC 5010 Copy FSC 6010
FSC 8010 FSC 8010 Copy
KIP Scanners:
KIP 2020 KIP 2030
KIP 2035 KIP 2040
KIP 7095 KIP 2950
Other Scanners:
Océ 9800 Vidar Flash and Flash+
Kyocera Mita 4850
Folders
Xerox 8180 XES MAX 200
XEROX WIDE FORMAT 8830 (Gera and Bay 3) Xerox 8845
XEROX WIDE FORMAT 8855 (Bay) PrintFold 2150 / 3150
GFI Folders
Page 21

PlotWorks User Guide • Introduction • 1-5
Supported File Formats
Support for the following file formats is included with every PlotWorks system:
• CalComp 907/907
•CALS
• HP-GL, HP-GL/2, HP-RTL
•TIFF
•VRF
Support for the following file formats is optional:
•DWF
• PDF/PostScript
•VIC/JOB
Support for the following file formats requires the installation of Global 360
Imaging for Windows:
•BMP
•DCX
•JPG
•PCX
•XIF
Job Ticket Compatibility
PlotWorks 5.7.0 job tickets (.plp files) are fully compatible with systems running
versions 5.5.1 or 5.5.2. Job tickets created with PlotWorks 5.7.0 may not be
opened by systems running version 5.5 SP3a or earlier. In most cases PlotWorks
provides backwards compatibility, so that a system running version 5.7.0 would
be able to open job tickets created with versions prior to 5.5.1.
Page 22
1-6 • PlotWorks User Guide
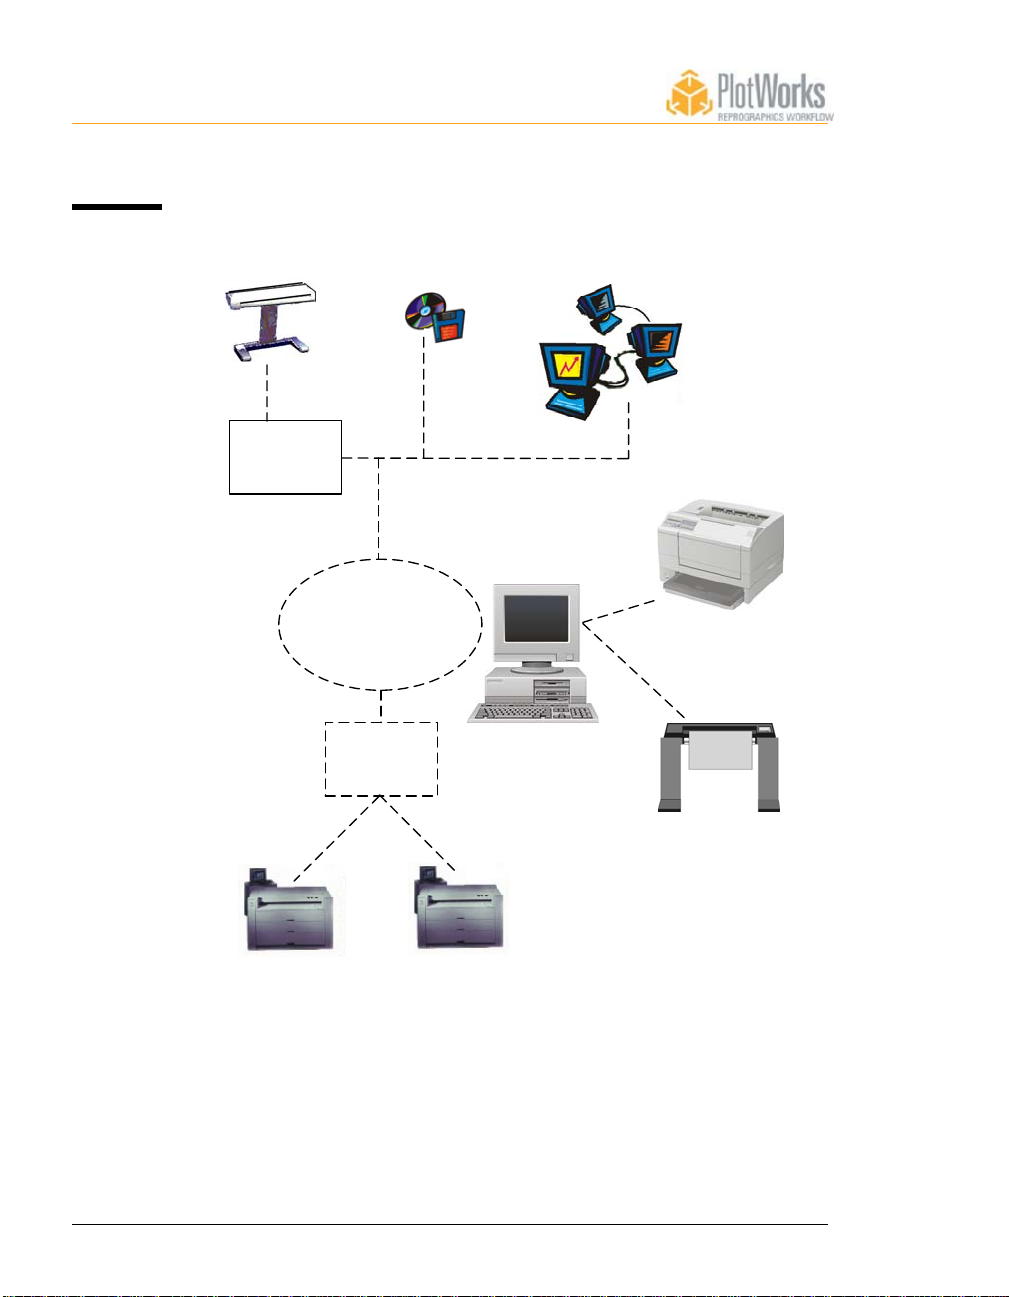
PlotWorks Hardware Configurations
Fig 1.1
Hardware
Config-
uration
Hard Copy
Documents
Removable
Media
Network Workstations
(Local and Remote)
Scanner
Interface
Windows
PlotWorks
Print Server
Network Polling
Job Editor
Image Viewer
Job Queue
Explorer
Windows
Printer
Printer
Interface
HP-RTL
Printer
Printer 1
Printer 2
The PlotWorks system consists of several hardware and software components.
This section describes the various hardware components and provides step-bystep instructions for installing the software.
Page 23
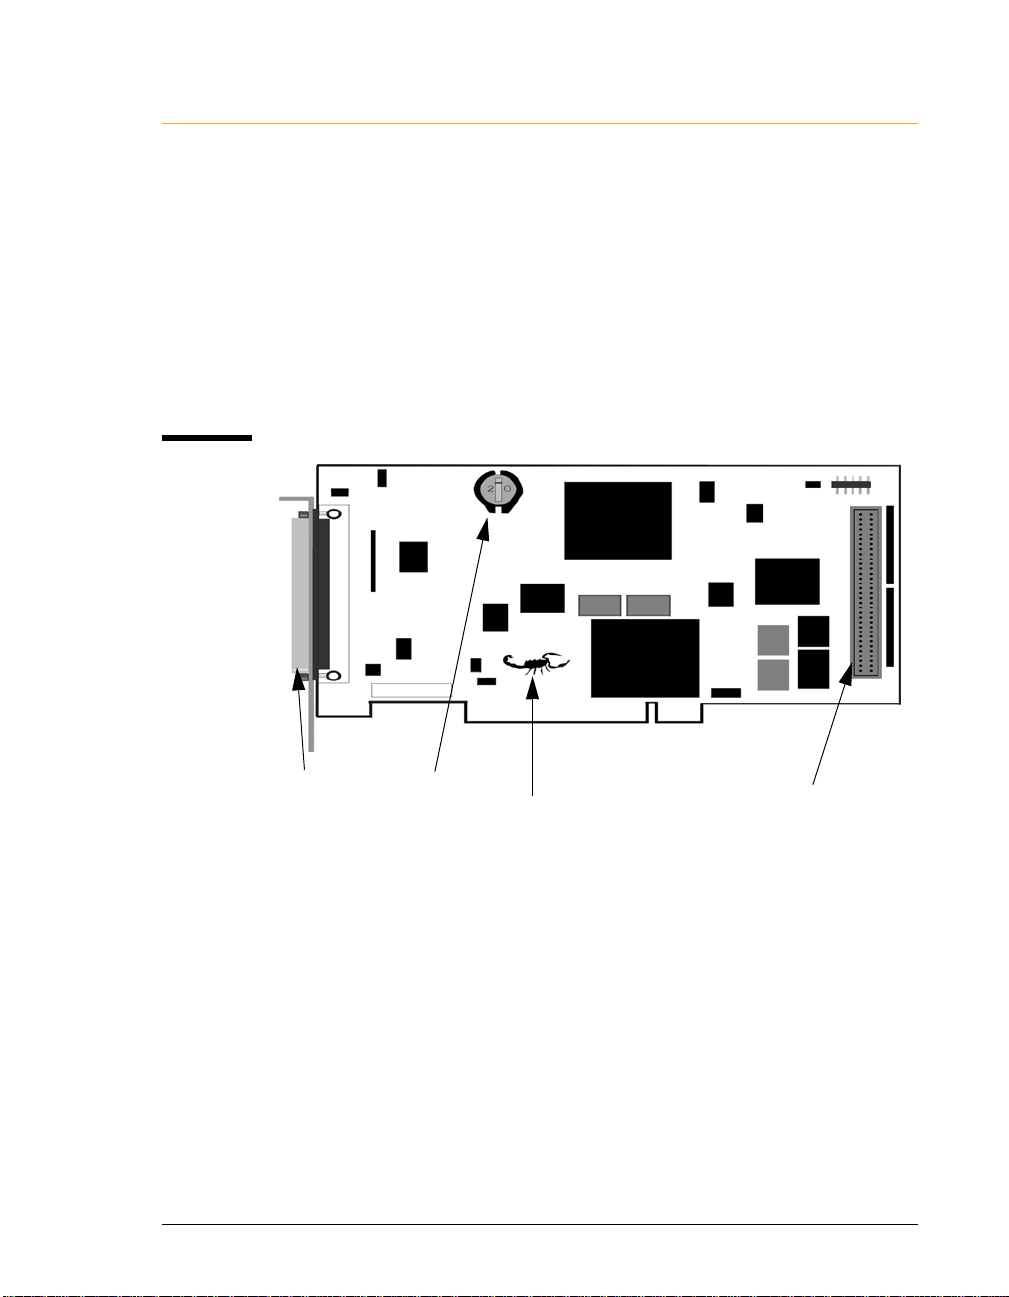
Fig 1.2
Scorpion
Card
PlotWorks User Guide • Introduction • 1-7
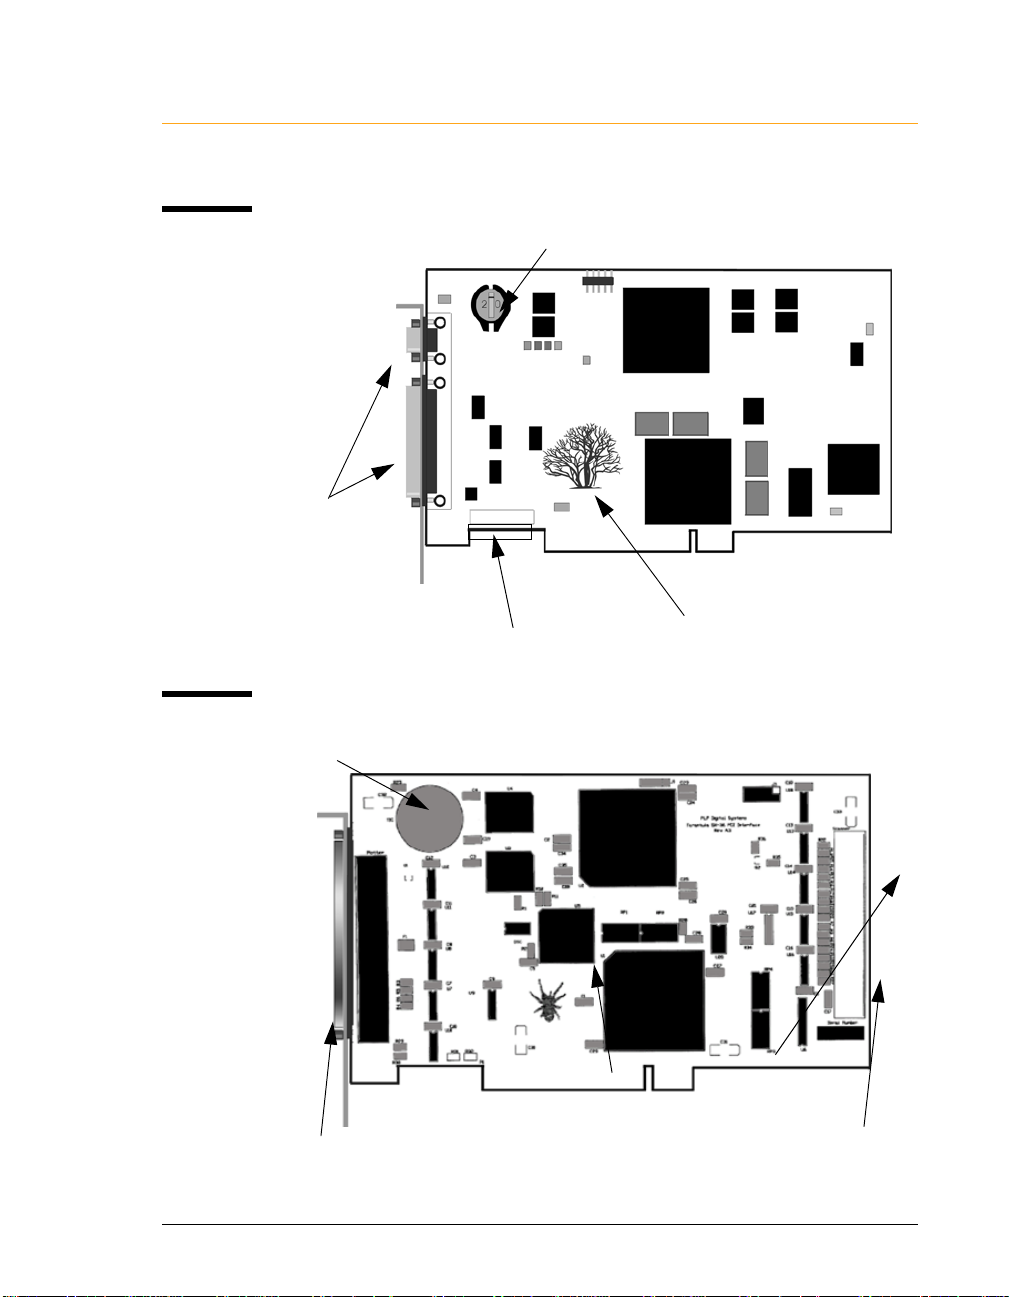
Interface Cards
The PlotWorks Interface Card is installed in the Print Server (hub) and is
responsible for connecting to the printer. There are four different interface cards
available, depending on the printer and scanner you are using.
Scorpion Interface Card
The Scorpion Interface Card supports the XEROX WIDE FORMAT 8855
printer, the Xerox 7396 and 7399 scanners, and all KIP printers and scanners.
Input/Output ports are shown in the diagram below.
Output to
8855 printer
Security key
Scorpion
Input from
7396/7399 Scanner
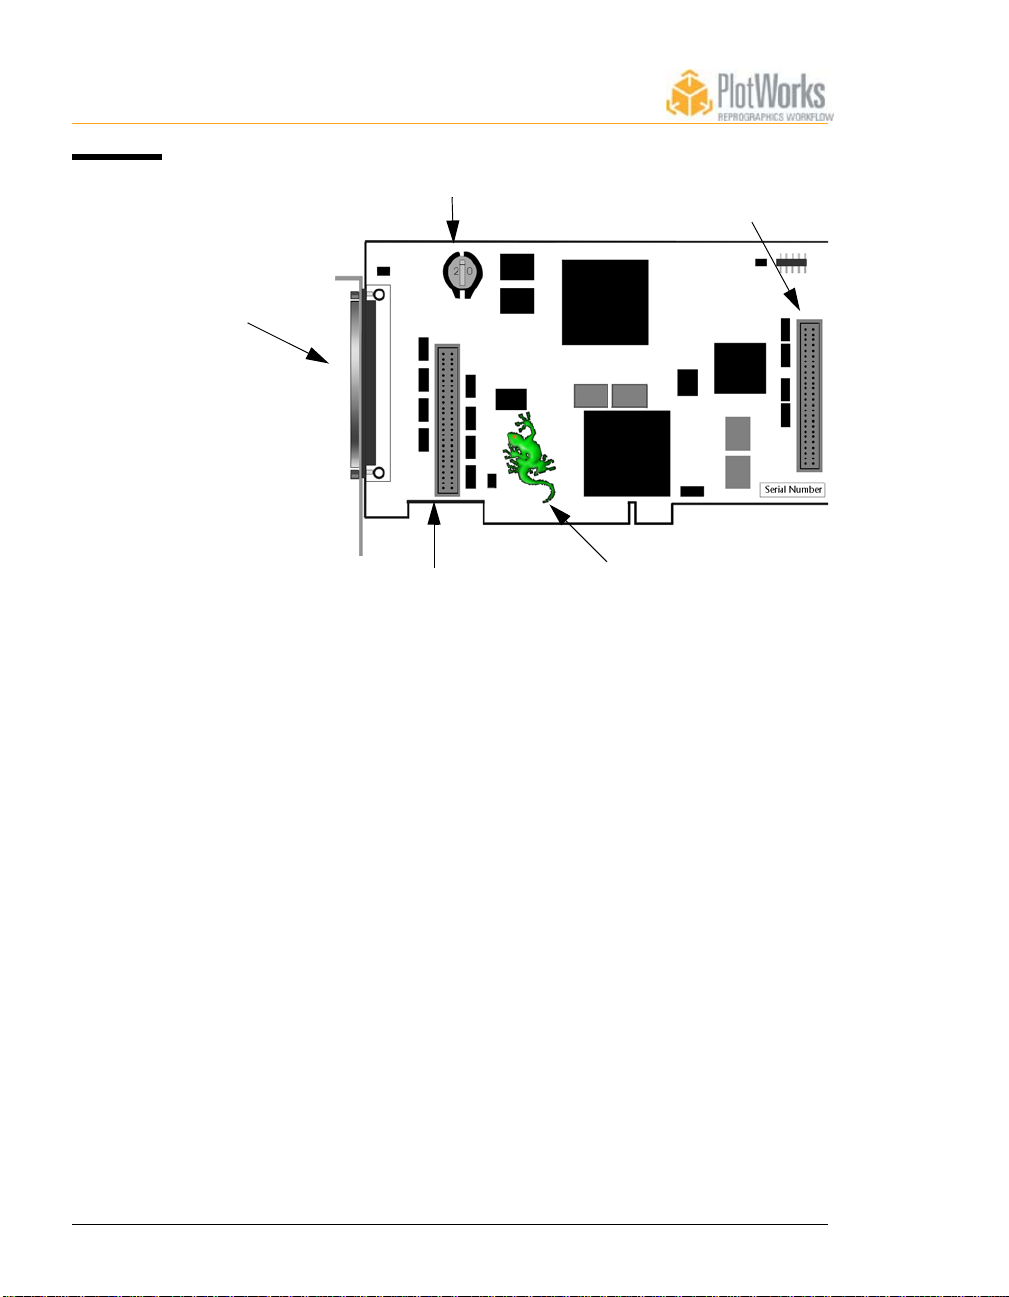
Gecko Interface Card
The Gecko Interface Card supports the XEROX WIDE FORMAT 8825/1,
8825/2, 8830, 8840D, 8845, and Fuji Xerox 4036 printers. (Input/Output ports are
shown in diagram below.)
Page 24
1-8 • PlotWorks User Guide
Fig 1.3
Gecko
Card
Output to
8825/8830/8845
Security key P 193 input
Output to second
Gecko
8825/8830/8845
(for future use)
Page 25
PlotWorks User Guide • Introduction • 1-9
The Mesquite Interface Card supports the Océ 9800 printer). (Output ports are
shown in diagram below.)
Fig 1.4
Mesquite
Card
Fig 1.5
Tarantula
Card
Security key
Output to
printer
Serial Number
Serial number
Mesquite
The Tarantula Interface Card provides direct support for the MAX 200 printer.
Security
key
Output to
printer
Tarantula
Scanner Pass thru
Serial number
Page 26
1-10 • PlotWorks User Guide
For parallel printers:
Use a standard parallel port, like LPT1, to drive the following devices:
• Océ 9400, 9600, and 9800 printers with embedded controllers
• Large Format Inkjet Printers (i.e., HP DesignJet, Xerox 2230/2240)
• Large Format Printers with Embedded Controllers (i.e., XEROX WIDE
FORMAT 8825, 8855 and 8830 with the AccXES controller; 8825 and 8830
DDS)
• Windows printers
RTL and Windows printers can be connected using Windows NT or Ethernet
networking.
For all others:
Use an Adaptec 2940U SCSI I card to drive the following devices:
XES 8180 Printer and Scanner
XES MAX 200 Printer and Scanner using the embedded controller
Xerox 7356
Xerox 7336
Vidar Flash and Flash +
Fig 1.6
Security
Key/
External
Dongle
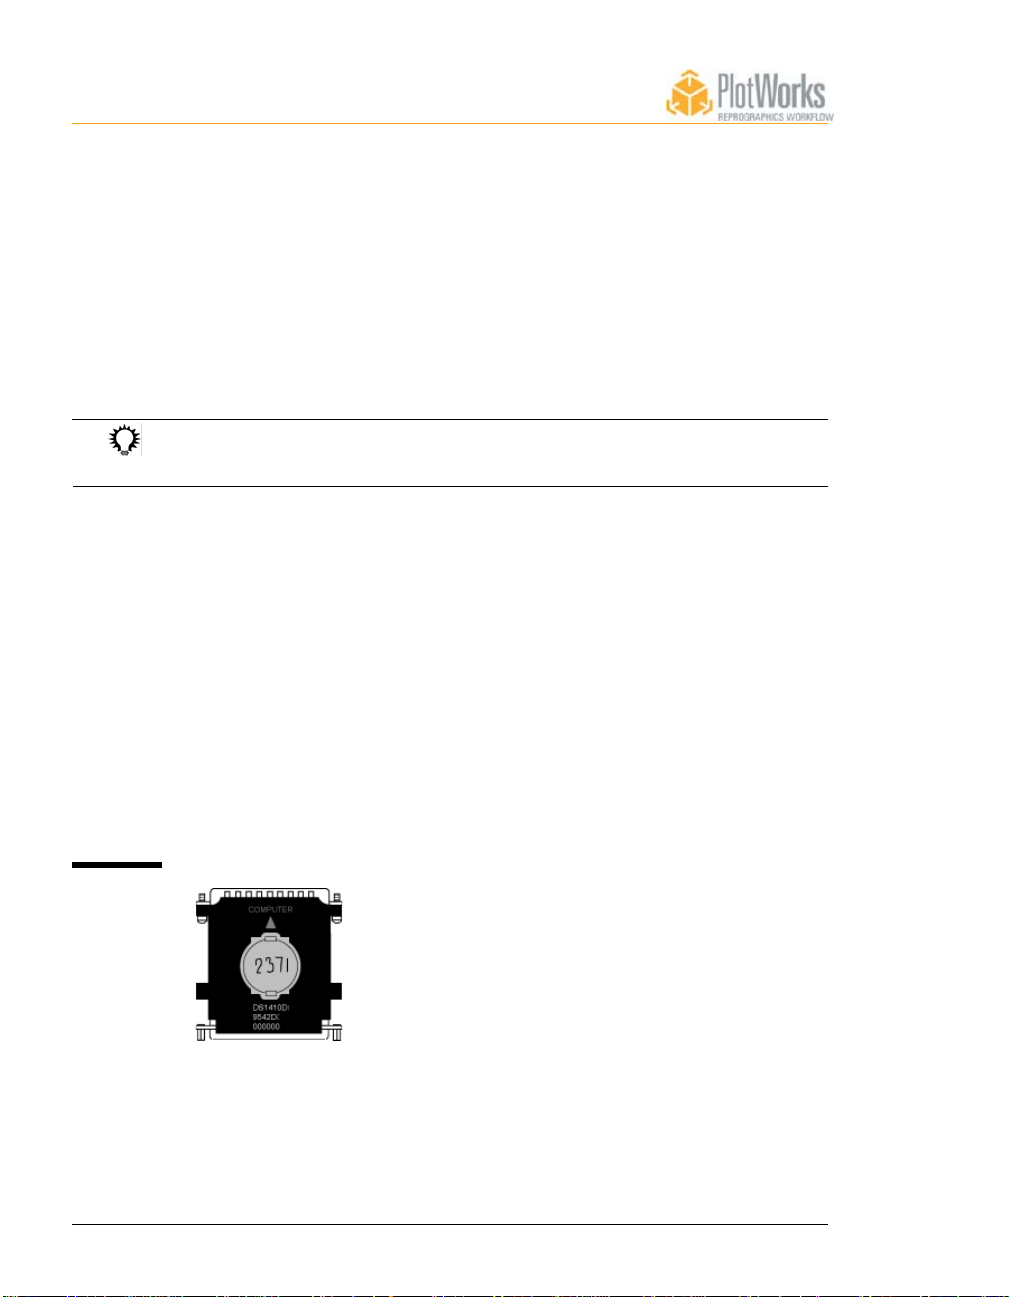
Security Key/External Dongle
A provided Security Key must be connected to the computer to run the PlotWorks
server software. The Print Server and Scan Station computers usually have the key
installed on their interface cards.
Page 27
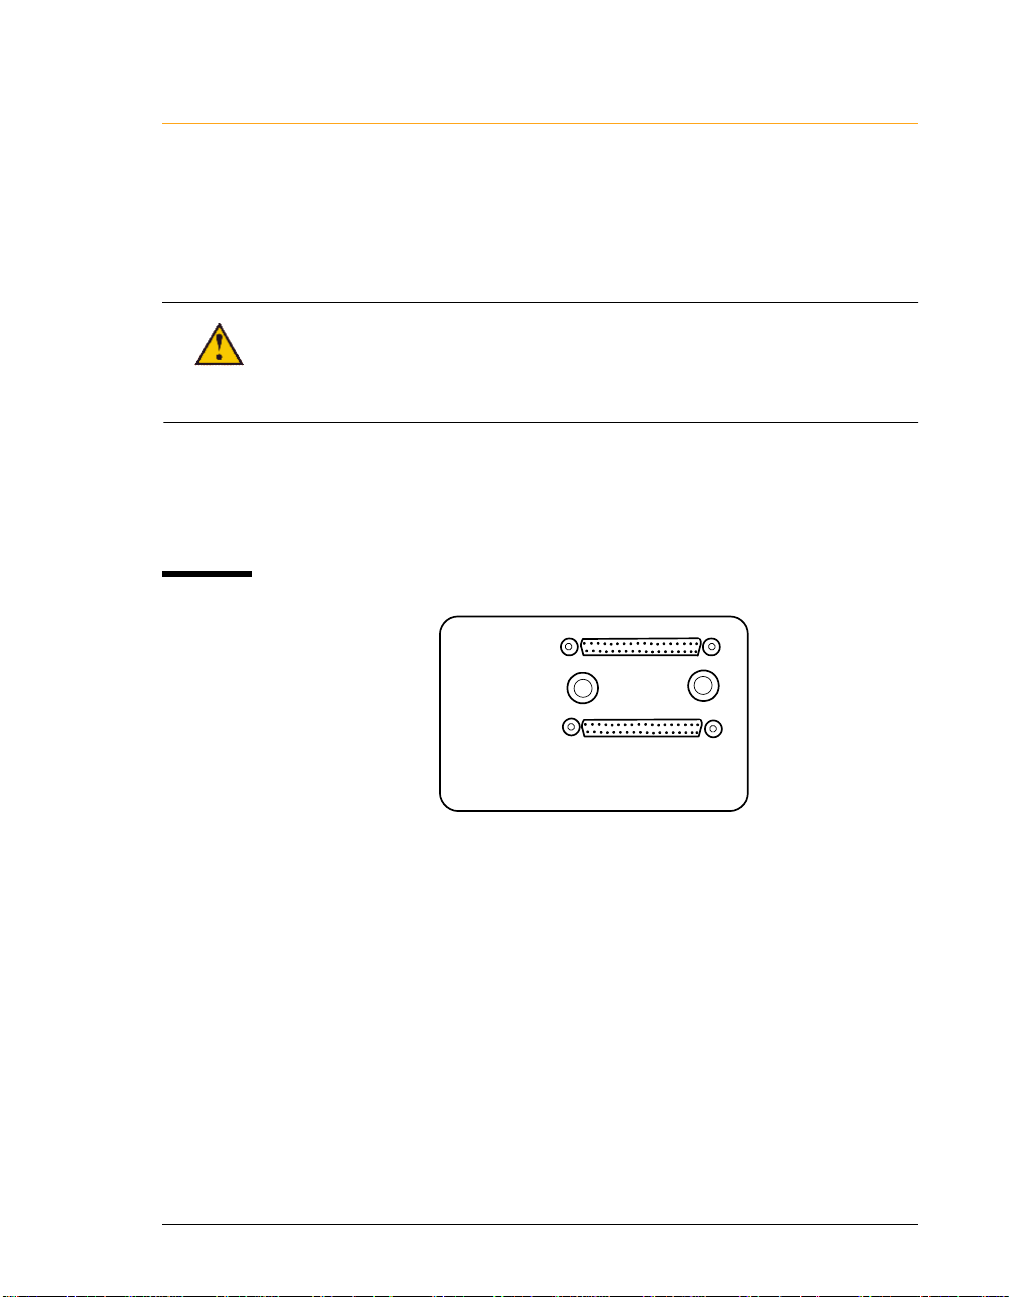
Fig 1.7
Smart
Switch I
PlotWorks User Guide • Introduction • 1-11
Print and Scan Stations that do not have an interface card, like SCSI or parallel
port driven printers or scanners, use an externally mounted, keyed dongle, plugged
into a parallel port. Without this key, your software wil l not run. If the Security
Key or chip is lost, please contact your PlotWorks Service Representative to
purchase a new one.
If you receive an “Invalid Codes” message when attempting to start PlotWorks,
check to see that the External Dongle is pushed firmly into the parallel port and
that the key is seated properly. If using a key on the controller board, ensure the
board is inserted firmly in the motherboard and that the key is seated properly.
PlotWorks Smart Switch I
The PlotWorks Smart Switch I selects the scanning mode for scanning/printing
systems like the XEROX WIDE FORMAT 8855 printer, the Xerox 7396 and
7399 scanners, and all KIP printers and scanners.
PC
Printer
PLP Digital System
Smart Switch
M
Page 8- 12 provides more information on scanning modes.
There are four possible configurations using the Smart Switch:
• Single PC workstation as shown in Fig 1.8.
• Dual PC workstations, as shown in Fig 1.9.
• Four port, single workstation configuration, as shown in Fig. 1.10.
• Four port, dual-station configuration, as shown in Fig. 1.11
Select the configuration that best meets your needs and consult the appropriate
diagram to connect your cables.
Page 28

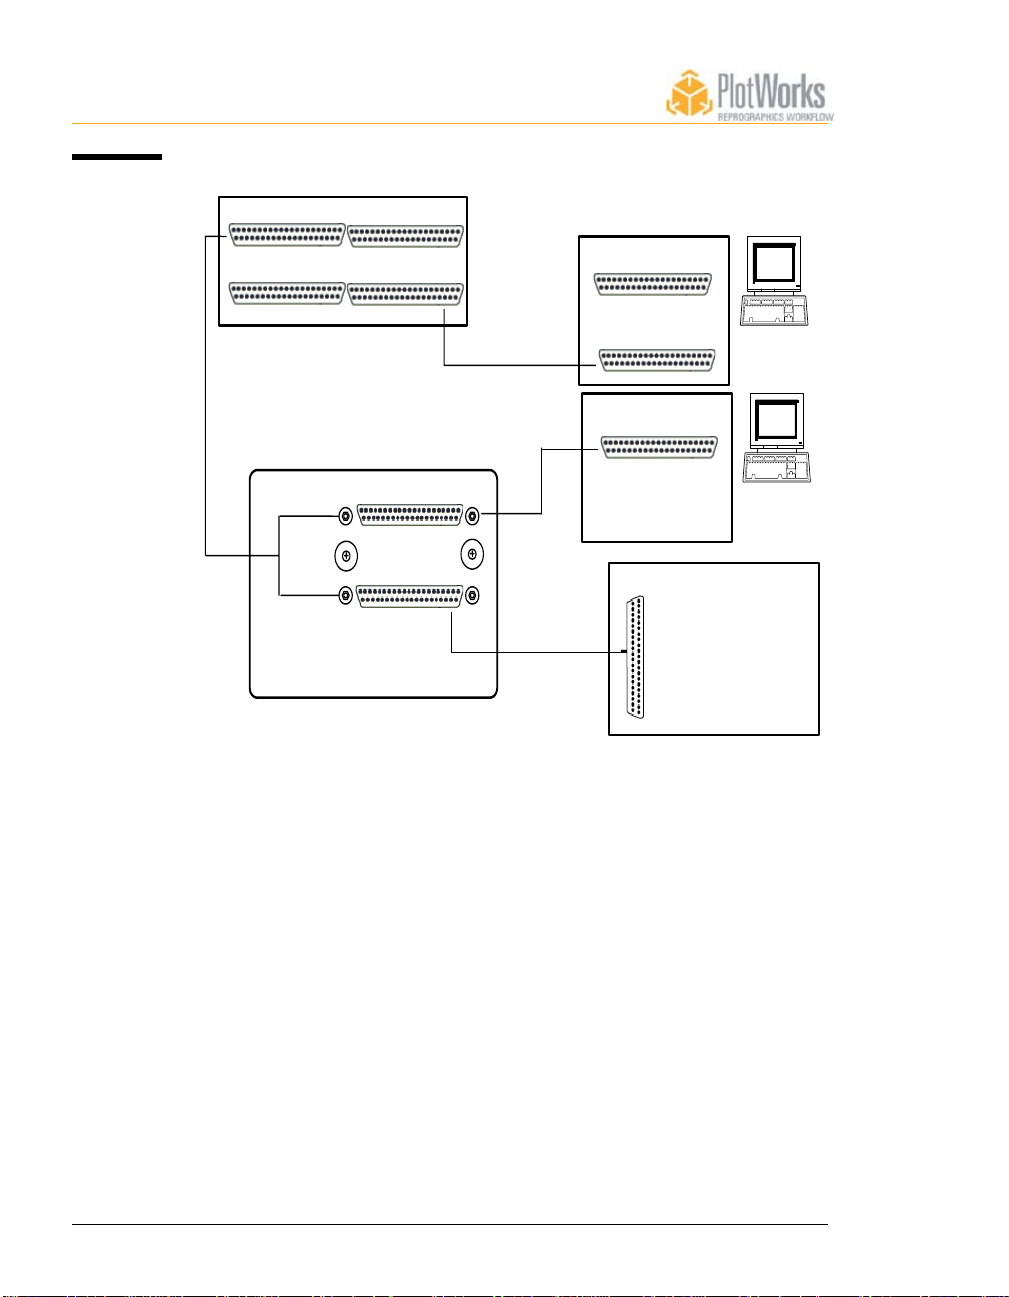
1-12 • PlotWorks User Guide
Fig 1.8 P
rinter
Cables,
Single
Station
Config-
uration
Fig 1.9
Printer
Cables,
Dual
Station
Config-
uration
Printer I/F
PLP Digital System
Smart Switch
Smart Switch 1
F = Female end of cable
M = Male end of cable
PC
Printer
M
M
Cable Supplied
7396/7399
Cable Supplied
M
Cable Supplied
Scorpion
F
Scanner Port
F
PlotWorks
M
8855
Page 29

PlotWorks User Guide • Introduction • 1-13
Fig 1.10
Four Port,
Single
Station
Configuration
F
F
F
PLP Digital Systems
Smart Switch 1
Smart Switch 1
I/F-B
Printer
7399
M
Cable Supplied
M
Cable Supplied
M
Cable Supplied
F = Female end of cable
M = Male end of cable
F
F
Scorpion
Scanner Port
M
PlotWorks
8855
Page 30
1-14 • PlotWorks User Guide
Fig 1.11
Four Port,
Dual-
F
Station
Config-
uration
I/F-B
7399
M
Cable Supplied
F
F
Scorpion
Scanner Port
Scorpion
Scan Station
F
F
PLP Digital Systems
Smart Switch 1
Smart Switch 1
PC
Printer
M
Cable Supplied
M
M
Cable Supplied
F = Female end of cable
M = Male end of cable
Print Station
8855
Page 31

PlotWorks User Guide • Introduction • 1-15
System Requirements
PlotWorks is certified for use with the following PC models:
• Dell OptiPlex GX260
• Dell OptiPlex GX270
• Dell OptiPlex GX280
• Dell OptiPlex GX620
• Dell OptiPlex 170L
Windows XP Professional, either Service Pack 1 or Service Pack 2, is required.
Neither Hyper-Threading nor Dual Core processors are supported.
Most configurations will require one or more full height PCI slots, a parallel port,
and possibly a serial port. Please contact PLP Customer Support for a current PC
specification including recommended processors and memory capacity.
Page 32

1-16 • PlotWorks User Guide
PlotWorks Software Components
PlotWorks consists of a group of programs that work together to create, transmit,
manage, process, scan and print your jobs. PlotWorks contains many features that
are purchased and activated seperately.
Depending upon your organizatio ns needs and what features are activated, one
or more software components or features may not be available. Please see your
PlotWorks retailer for more information.
The following PlotWorks programs reside on the Print Server and are included
with every PlotWorks installation:
The Job Queue
The Job Queue is the heart of the PlotWorks system. All incoming jobs pass
through the Queue, where they can be prioritized, edited, and processed.
The Job Editor
The Job Editor is used to create and edit electronic job tickets. Job tickets list the
images to print and their printing parameters. The Job Editor also lets you view
images, process files, and send jobs to a Job Queue.
The Printer Interface
The Printer Interface is used to rasterize and output each image to the selected
printer. It is also manages the printer and any attached peripherals (i.e., folders).
It provides real time feedback on many printer operations. These include
displaying information about the sheet and set printing, printer errors, media
drawer contents, and media available in inventory.
The Job Processor
The Job Processor corrects common errors and converts jobs to PGS
(Performance Graphics Standard) format to prepare for printing.
Network Polling
Network Polling monitors (polls) a set of target directories for incoming print
jobs. These are then submitted to the Queue for printing. The Network Polling
program accepts jobs submitted with job tickets or customized text order forms in
PFS files. The Network Polling can also apply default printing parameters to
single image files.
Page 33

PlotWorks User Guide • Introduction • 1-17
Optional PlotWorks Components:
Additional components can be added to added to the PlotWorks system to increase
functionality. These include:
The Scanner Interface
The optional Scanner Interface offers copy, Scan-to-File and Scan-to-Print
functions. Scanned documents can be added directly to a job ticket, stored
digitally or printed. The Scanner Interface can be installed on the Print Server or
on a stand-alone Scan Station.
Print-to-Queue
PlotWorks Print-to-Queue is used to print directly to a PlotWorks printer from
any Windows application. It is installed on a network server or on local PCs. You
can customize Print-to-Queue with PFS files to specify printing parameters like
output, media size, fold types, etc.
PlotWorks Client
The PlotWorks Client is a limited version of the Job Editor. It is used to create "job
tickets" at remote sites to send to the Job Queue via modem, network or floppy
disk. The Client resides on remote user workstations, not on the Print Server.
Page 34

1-18 • PlotWorks User Guide
Software Flowchart
Fig 1.12
PlotWorks
Software
Scanner
Interface
File System
(direct copy into
polled directory)
Windows
applications
can print
directly to
the Queue
using Print-
to-Queue
Job
Queue
Printer
Interface
Removable
Media
Network
Polling
Scanner
Job Editor/
Client submits
jobs to the
Queue or to a
remote polled
directory.
Watched
Directory
Standalone
applications
that makes
PFS files
submit directly
to the polled
directory.
Windows
Printer
Printer 1
Printer 2
HP-RTL
Printer
Page 35

PlotWorks User Guide • Introduction • 1-19
Using this Manual
This manual is a comprehensive guide to the PlotWorks system. It provides
instructions for using the PlotWorks software applications, and troubleshooting
information. The following is a list of chapters and what each provides:
Chapter 1: Introduction
Describes the features and capabilities of the PlotWorks system, as well as
information on using this manual and other sources of technical help. It also
lists the image file formats supported, and any special requirements for using
them.
Chapter 2: Getting Started
Provides instructions for hardware setup, software installation and
configuration.
The following chapters provide instructions for each PlotWorks module:
Chapter 3: The Job Queue
Chapter 4: The Job Editor
Chapter 5: The Network Polling Program
Chapter 6: The Job Processor
Chapter 7: The Post Processor
Chapter 8: The Printer Interface
Chapter 9: The Scanner Interface
Chapter 10: Advanced Reporting Utility (ARU)
Chapter 11: Folder Information
Provides information on using PlotWorks with folding devices.
Chapter 12: Print-to-Queue™
Appendices:
Provide additional information, including how to calculate memory
requirements, warning and error messages, and device specific options. The
appendices also provide information on PFS files, and using RAS and Dialup Networking with PlotWorks.
Page 36

1-20 • PlotWorks User Guide
Before You Start
This manual assumes that the reader has an understanding of the following:
• Basic computer use, including keyboard and mouse operation
• Windows conventions such as toolbars, pull-down menus, the Start menu and
Windows Explorer
• Image file formats used
• Hardware used. This includes printers, scanners, folders, modems, network
servers, and removable media drives
If you are unfamiliar with any of the above topics, please research the appropriate
documentation before proceeding.
Before using PlotWorks, be sure that you understand the operation and
maintenance of your:
• Large-format printer
• Network, if applicable
• Peripheral products like scanners, folders, and modems
Documentation Conventions
This guide uses several conventions to help you identify different types of
information.
Menu names and commands are printed in bold type. For example:
Open the File menu and select Exit.
Dialog box names begin with uppercase letters. For example:
This is the Configure Destination dialog box.
Information to be typed is displayed in Courier text. For example:
Type this sentence.
Many menu commands also are accessible as buttons on the toolbar. These
buttons are displayed in the left margin, as shown here.
This guide also provides warnings to help avoid errors and prevent damage to your
system. These are marked with the caution symbol as below.
Do not ignore these warnings!
Special tips and hints are marked with a light bulb icon.
These tips make your job easier!
Page 37

PlotWorks User Guide • Introduction • 1-21
Help and Technical Support
Several methods of help and technical support are available. These include:
• Online Help
• PLP Technical Support
• PLP Internet Support
• Electronic Documentation on the PlotWorks CD-ROM
• The PLP Knowledge Base on our web site, www.plp.com
Online Help
Each PlotWorks application contains an online Help file that provides detailed
information on operating the program. To access an online Help file from within
a program either:
• Press F1
•Open the Help menu and select Help Topics. Or click on the Help button.
Technical Support
All PlotWorks customers receive 90 days of free telephone technical support after
receipt of their new software. To receive support beyond this 90-day period, you
must purchase the PLP Maintenance and Warranty Plan.
You can contact PLP technical support at:
PLP Digital Systems
2300 Clarendon Boulevard
Suite 711
Arlington, Virginia 22201
Phone: 1 (800) 444-7568 or 1 (703) 740-8909
FAX: 1 (703) 995-4398
E-mail: support@plp.com
When you call for technical support, be sure to have the following information
available:
• The version number and type of PlotWorks software you are using
• Printer model and configuration
• Computer hardware and software configurations
• Available RAM and hard disk space on the PC
Page 38

1-22 • PlotWorks User Guide
• The PlotWorks sample files listed below. These files are usually located
on your computer hard drive under Program
Files\PLP\Plotworks\Sample Files. These files can also be found on your
PlotWorks CD-ROM.
Samples.PlotWorks SampleHP_RTL.PLT Sample multipage.TIF
Sample CC1.PLT Sam pl e Acad 12.DWG Sample.PS
Sample CC3.PLT Sam pl e Acad 13.DWG Sample.TIF
Sample HP1.PLT Sample Acad 14.DWG Sample.VRF
Sample HP2.PLT Sample multipage.PDF
You need a phone line available at your printing and scanning stations for
Technical support to be able to help you solve your PlotWorks problems.
PLP Internet Support
PLP’s World Wide Web site (http://www.plp.com) offers a “Customers Only”
section for customers on the Maintenance and Warranty Program.
The section offers:
• Frequently Asked Questions (FAQs) about PlotWorks system so ftware
and hardware
• Product documentation
• Early announcements of new products and services
Printing Electronic Documentation
PlotWorks documentation is provided in PDF format on the PlotWorks CD-ROM
in the Documentation folder. These files print on 8.5" x 11" or A4 size paper to fit
in a 3-ring binder.
The following guides are available on the CD-ROM.
• Getting Started Guide: This manual provides basic information on using the
PlotWorks system.
• The PlotWorks User Guide: This manual provides comprehensive
information on the PlotWorks system, including a description of each
software component, installation, and instructions.
• The PlotWorks Preinstallation Guide: This guide contains information on
preparing for installation.
Page 39

PlotWorks User Guide • Introduction • 1-23
Viewing and Printing PDF Files
Adobe’s Acrobat Reader is required to view and print PDF files. A copy is
provided on the PlotWorks CD-ROM.
To Install Adobe Acrobat Reader 5.0
1. Insert your PlotWorks CD in the CD-ROM drive. The PlotWorks Installation
window opens.
2. Click on Install Acrobat Reader.
3. Click on the text Adobe Acrobat Reader. The Adobe Acrobat Reader Auto
Install application opens and leads you through the installation process.
To View a PDF File:
1. Once the Acrobat Reader is installed open Windows Explorer
2. Select your CD ROM drive
3. Open the Documentation folder
4. Double Click on the PlotWorks guide you wish to open. The guide will open in
Adobe Acrobat Reader
ToPrint a PDF File:
1. Open the Guide you wish to print in Adobe Acrobat Reader.
2. Select Print from the Acrobat Reader File menu
Page 40

1-24 • PlotWorks User Guide
Page 41

Chapter 2
Getting Started
Installing PlotWorks®
Before beginning the PlotWorks installation please note the following:
• If you were previously running the Tiered version of PlotWorks, it is necessary to uninstall PlotWorks and then reinstall PlotWorks version 5.5.1.
• If you plan to process MicroStation DGN files, install MicroStation SE before
PlotWorks.
• If you plan to process AutoCAD DWG files install AutoCAD, Release 14 or
later, and ensure that it is configured to use only the PGS Driver for printing.
• If Adobe Acrobat Reader 5.0 is not already installed, please install it before
PlotWorks.
The PlotWorks Installation Wizard scans the computer for existing copies of
PlotWorks. If PlotWorks 4.2 or an earlier version is detected, the entire PlotWorks
directory, including subdirectories, is deleted. PlotWorks is then reinstalled
completely. If a newer version is found, the installation application allows you to
choose whether to update PlotWorks, preserving all previous settings, or reinstall
the application completely.
Click the Back button to return to the previous screen anytime during the
installation process.
PlotWorks User Guide • Getting Started • 2-1
Installing PlotWorks Server or Demo For the First Time
1. Exit any open Windows applications.
2. Insert the Activation Code disk in the floppy drive. If installing the Demo
version, skip this step.
3. Insert the PlotWorks CD-ROM in the CD-ROM drive. The Installation
application automatically opens.
4. Click on Install Packages. The Install Packages window opens.
5. Click on PlotWorks Server. The installation wizard opens.
6. Select the language you are most comfortable with from the list provided. The
default is English.
To switch to a different language at a later date, use the Language Selector
program in the PlotWorks directory.
Page 42

2-2 • PlotWorks User Guide
7. Click on the OK button. The installation wizard begins the PlotWorks Setup
program and a Welcome page appears.
8. Click Next. The PlotWorks license agreement displays.
9. Please read the license agreement and click Yes (if you agree with it). The
User Information dialog box appears.
10. Enter your name and the company name in the appropriate text boxes.
11. Click Next to continue. The Choose Destination Location dialog box appears.
By default, PlotWorks is installed in C:\Program Files\PLP\PlotWorks.
12. Click Next to accept the default destination or click on the Browse button to
select a different destination. Then a Setup Type dialog box appears.
13. Select the radio button for the unit of measurements you prefer.
14. Click Next. The ARU Size warning dialog box appears.
15. The default maximum ARU size is 10MB. Click Next to accept this size or
enter the desired maximum size in the text box and then click Next. A dialog
box appears asking if you want to automatically start PlotWorks programs
when the computer is restarted.
16. Select the appropriate radio button depending on if you wish to automatically
or manually start PlotWorks.
17. Click on the Next button. The Task Bar options dialog box opens.
18. Select the appropriate radio button depending on if you want to leave your
applications on the task bar when minimized or not.
19. Click on the Next button. The Job Queue path dialog box opens.
20. Select a Job Queue path. All jobs sent to the Queue are received in this
directory. The default is C:\Queue. Click the Browse button to select a
different directory or click Next to accept the default.The Automatic
PlotWorks Pen and Patterns Printing After Install dialog box opens.
21. Select the Yes radio button if you wish to print the pen and patterns chart after
completing the installation process. This chart is helpful when choosing what
pen or pattern to apply. Select No to skip this step.
If your activation codes are not on the disk in the A drive, you are prompted
to locate the codes. Click on the Browse button and navigate to the directory
containing your activation codes and then click on the OK button.
22. Select whether you want AutoCAD or DWG Direct to process your
AutoCAD files. Select “Use DWG” if you do not have AutoCAD R 14 or
later installed.
23. Confirm the location of AutoCAD fonts. The default file path is provided.
Click Next to accept the default or click on the Browse button to select a
different directory and then click Next.
Page 43

PlotWorks User Guide • Getting Started • 2-3
24. Confirm the location of AutoCAD support files. The default file path is
provided. Click on the Browse button if you need to select a different
directory. Then click Next
25. Select a folder for the PlotWorks program icons (usually PlotWorks) and
click Next.
26. If Adobe Acrobat Reader is not detected, you are prompted to install it. Then
click Next.
The upgrade begins. A dialog box containing a status bar indicates the installation progress.
Once the file transfer process is complete, if MicroStation is installed, the Important Information dialog box opens. In this case, read the information provided and then click on the Next button.
The Setup complete dialog box appears prompting you to restart the computer.
27. Select Yes, I want to restart my computer now radio button.
28. Click on the Finish button. The computer will shut down and restart
completing installation.
29. If you purchased MicroStation, run MicroStation and configure it to use
PlotWorks. See Appendix I of your PlotWorks manual for instructions.
You have now completed the installation.
Updating from Version 4.3 or above preserving previous settings
If PlotWorks version 4.3 or higher is already installed, you have the option of
updating to the latest version. This preserves all your previous settings. To update:
1. Exit any open Windows applications.
2. Insert the Activation Code disk in the floppy drive. If installing the Demo
version, skip this step.
3. Insert the PlotWorks CD-ROM in the CD-ROM drive. The Installation
application will automatically open.
4. Click on Install Packages. The Install Packages window opens.
5. Click on PlotWorks Server. The installation wizard opens.
6. Select the language you are most comfortable with from the list provided. The
default is English.
To switch to a different language at a later date, use the Language Selector
program in the PlotWorks directory.
Page 44

2-4 • PlotWorks User Guide
7. Click on the OK button. The installation wizard begins the PlotWorks Setup
program and a Welcome page appears.
8. Click Next. The PlotWorks license agreement displays.
9. Please read the license agreement and click Yes (if you agree with it). A
Question dialog box appears asking if you want to update your existing
version of PlotWorks keeping your old settings.
10. Click YES.
If your activation codes are not on the disk in the A drive, you are prompted
to locate the codes. Click on the Browse button and navigate to the directory
containing your activation codes and then click on the OK button.
The upgrade begins. A dialog box containing a status bar indicates the upgrade progress.
Once the file transfer process is complete, if MicroStation is installed, the Important Information dialog box opens advising you of the final steps needed
for MicroStation. Read the information provided in this dialog box. Then
click on the Next button.
The Setup Complete dialog box appears prompting you to restart the computer.
11. Select the Yes, I want to restart my computer now radio button.
12. Click on the Finish button. The computer will shut down and restart
completing the upgrade.
Updating from Version 4.2 or Below
or Updating a Higher Version not Saving Previous Settings
If you want to completely delete an existing version of PlotWorks, or your existing
version is 4.2 or lower, follow the steps below:
1. Exit any open Windows applications.
2. Insert the Activation Code disk in the floppy drive. If installing the Demo
version, skip this step.
3. Insert the PlotWorks CD-ROM in the CD-ROM drive. The Installation
application will automatically open.
4. Click on Install Packages. The Install Packages window opens.
5. Click on PlotWorks Server. The installation wizard opens.
6. Select the language you are most comfortable with from the list provided. The
default is English.
To switch to a different language at a later date, use the Language Selector
program in the PlotWorks directory.
Page 45

PlotWorks User Guide • Getting Started • 2-5
7. Click on the OK button. The installation wizard begins the PlotWorks Setup
program and a Welcome page appears.
8. Click Next. The PlotWorks license agreement displays.
9. Please read the license agreement and click Yes (if you agree with it). A
Question dialog box appears asking if you want to update your existing
version of PlotWorks keeping your old settings
10. Click NO. A dialog box appears confirming your decision.
11. Click on the Yes button. The User Information dialog box appears.
12. Enter your name and the company name in the appropriate text boxes.
13. Click Next to continue.
14. Click Next. The Choose Destination Location dialog box appears. By default,
PlotWorks is installed in C:\Program Files\PLP\PlotWorks.
15. Click Next to accept the default destination or click on the Brows e button to
select a different destination. Then a Setup Type dialog box appears.
16. Select the radio button for the unit of measurements you prefer.
17. Click Next. The ARU Size warning dialog box appears.
18. The default maximum ARU size is 10MB. Click Next to accept this size or
enter the desired maximum size in the text box and then click Next. A dialog
box appears asking if you want to automatically start PlotWorks programs
when the computer is restarted.
19. Select the appropriate radio button depending on if you wish to automatically
or manually start PlotWorks.
20. Click on the Next button. The Task Bar options dialog box opens.
21. Select the appropriate radio button depending on if you want to leave your
applications on the task bar when minimized or not.
22. Click on the Next button. The Job Queue path dialog box opens.
23. Select a Job Queue directory. All jobs sent to the Queue are received in this
directory. The default is C:\Queue. Click the Browse button to select a
different directory or click Next to accept the default. The Automatic
PlotWorks Pen and Patterns Printing After Install dialog box opens.
24. Select the Yes radio button if you wish to print the pen and patterns chart after
completing installation. This chart is helpful when choosing what pen or
pattern to apply. Select No to skip this step.
25. Click the Next button.
If your activation codes are not on the disk in the A drive, you are prompted
to locate the codes. Click on the Browse button and navigate to the directory
containing your activation codes and then click on the OK button.
Page 46

2-6 • PlotWorks User Guide
26. You might be prompted to select whether you want AutoCAD or DWG
Direct to process your AutoCAD files. Select Use DWG if you do not have
AutoCAD R 14 or later installed.
27. Confirm the location of AutoCAD fonts. The default file path is provided.
Click Next to accept the default or click on the Browse button to select a
different directory and then click Next.
28. Confirm the location of AutoCAD support files. The default file path is
provided. Click on the Browse button if you need to select a different
directory. Then click Next
29. Select a folder for the PlotWorks program icons (usually PlotWorks) and
click Next.
30. If Adobe Acrobat Reader is not detected, you are prompted to install it. Then
click Next.
The upgrade begins. A dialog box containing a status bar indicates the upgrade progress. The upgrade begins. A dialog box containing a status bar indicates the upgrade progress. Once the file transfer process is complete, if
MicroStation is installed, the Important Information dialog box opens advis
ing you of the final steps needed for MicroStation.
31. Read the information provided in this dialog box. Then click on the Next
button. The Setup Complete dialog box appears prompting you to restart the
computer.
32. Select the Yes, I want to restart my computer now radio button.
33. Click on the Finish button. The computer will shut down and restart
completing installation.
34. If you purchased MicroStation support, run MicroStation and configure it to
use PlotWorks. See Appendix I of your PlotWorks manual for instructions.
You have now completed the installation.
-
Page 47

PlotWorks User Guide • Getting Started • 2-7
Opening PlotWorks Applications
1. Make sure all the printer media drawers contain media. For information on
loading media into the printer, refer to the printer User Guide.
2. Turn on the scanner, printer, and the computer (in this order). Always turn on
the computer last.
If you chose to “Automatically start PlotWorks” during installation, you will not
need to perform all of the remaining steps as the applications are already open.
Click on their icons in the system tray to maximize.
3. Once Windows is open, click the Windows Start button.
4. Select Programs then PlotWorks then the Job Queue. The Job Queue
opens.
When a PlotWorks application is first opened a splash screen displays. This
screen disappears automatically in a few seconds. You can click on it to make it
go away faster.
5. Open the Job Processor similarly by selecting Start/Programs/PlotWorks/
Job Processor.
6. Open the Printer Interface by selecting Start/Programs/PlotWorks/Printer
Interface.
7. Open the Job Editor: Select Start/Programs/PlotWorks/Job Editor.
8. Open the Scanner Interface: Select Start/Programs/PlotWorks/Scanner
Interface. If applicable.
Do not open a second instance of a PlotWorks application.
If you have logged on to the computer running the PlotWorks Server using a User
ID and/or password and then it is necessary to log on using a different User ID
and/or password, you must first close all PlotWorks applications before logging
on again. Otherwise PlotWorks will encounter problems.
Page 48

2-8 • PlotWorks User Guide
Configure Your PlotWorks Applications
This section takes you through the basic steps required to configure PlotWorks.
You will not have to repeat this section unless you add more printers or scanners,
or reinstall the software.
Configure the Job Queue
The Job Queue is the heart of the PlotWorks system. All incoming jobs pass
through the Queue. The Printer prints jobs from the Queue in order of priority. The
Job Queue lets you place jobs on hold, change a job’s print priority, reprint and
delete jobs.
1. Open the Job Queue. The Job Queue window displays. If a Queue directory
does not exist, you are prompted to create one. The default Job Queue
directory is C:\Queue.
Fig 2.1
The Job
Queue
window
.
2. If the Job Queue you desire is not displayed in the title bar of the Job Queue
window, select Open Queue from the File menu or click on the Open button.
3. Select the appropriate queue directory and click OK.
The Job Queue directory is ready.
Configure and Start the Job Processor
The Job Processor preprocesses print jobs in the Job Queue. It is also used by
Network Polling, FTP, or other submission methods where the Job Editor is not
used.
1. Open the Job Processor. The Job Processor window opens.
Page 49

Fig 2.2
The Job
Processor
PlotWorks User Guide • Getting Started • 2-9
2. If the Job Queue you created earlier does not appear in the Process jobs in
queue field, click on the Queue button. Select the queue directory listed on
the title bar of the Job Queue window and click OK.
If it is listed, ignore this step.
3. Select the Start button to start monitoring the Job Queue.
4. Minimize the Job Processor, ensuring that it stays running to process jobs in
the Job Queue.
Configure the Printer Interface
1. Open the Printer Interface. The Printer Interface window opens.
Page 50

2-10 • PlotWorks User Guide
Fig 2.3
The XES
8180
Printer
Interface
2. From the Setup menu, select User Interface Units. Select either the Inches
or Millimeters radio button depending on your preference.
3. Click on the OK button
4. If you selected the “Windows” or “Generic Embedded Controller” Printer
Interface, select Device Specific Options from the Setup menu (or press
Ctrl+D) and select the appropriate Windows printer driver from the Printer
name: list near the bottom of the dialog box (see figure 2.4).
Page 51

Fig 2.4
Select
Windows
printer
driver
PlotWorks User Guide • Getting Started • 2-11
For more detail, on setting printer options, see “Set General Printing Options” on
page 8-10 and “Configure Device Specific Options” on page 8-15.
Add media to the media inventory
Configure the Printer Interface for media:
1. Click on the Inventory button. The Media Inventory dialog box displays.
2. Click Add.
3. The Add/Edit Media Inventory dialog box appears.
Page 52

2-12 • PlotWorks User Guide
Fig 2.5
Add/Edit
Media
Inventory
dialog box
4. Select Yes, always.
5. Enter the Actual Width. You do not need to set the Actual Length for rollfed media.
6. Enter the Actual Type: Bond, Blue Bond, Film, etc.
7. Use the Width Detected drop-down box to select a value for the detected
width. This is usually the closest standard width. Refer to your printer manual
for details.
8. Use the drop-down list in the Type Detected box to select either: Bond,
Vellum, or Film. Select the type that most closely matches the actual media
type. See your printer manual for details.
9. Select either the Roll Feed, Sheet Feed, or Manual Feed radio button
depending on how the media type is loaded.
10. Click OK.
The printer diagram changes to show the type and amount of media detected in the
media “drawer.”
See “” on page 8-19 for more information.
Page 53

Fig 2. 5
The Job
Editor
(top),
Printer
Interface
(left), and
Job Queue
(right)
PlotWorks User Guide • Getting Started • 2-13
Setup the Job Editor
The Job Editor is used to create and send electronic print order forms called “job
tickets.” Job tickets list all the images in a job and their associated printing
parameters.
Configure the Job Editor Destinations
1. Open the Job Editor
2. Click on the Setup menu
3. Click on Configure Destinations. The Configure Destinations dialog box opens.
4. Click on the Job Queue listed. (If the Job Queue is not listed then Click on the
Add button and Add the Job Queue)
5. Click on Edit.
6. Confirm the Queue name and path is correctly listed in the destination path text
box.
7. Click on OK
Page 54

2-14 • PlotWorks User Guide
Set Default Print Parameters
Default print parameters are assigned to the prototype line. This is the first row of
the job grid. When images are added to the job ticket, they are assigned the
prototype print parameters by default. You can change these parameters for any
row, including the prototype row at any time.
1. Open the Job Editor.
2. Click the Properties button to display the Detail property sheet. The fields
here correspond to the fields on the grid. Changes made here are
automatically applied to the grid.
3. Click through each tab of the Detailed Property Sheet selecting your most
commonly used print parameters.
4. Select Save Configuration from the File menu. This saves job-wide settings
to the configuration file (conf.plp) as well as to the prototype line and will be
applied to all new job tickets.
Add Files to a Job Ticket
The Add Files button is used to add image files to your print job. Once added, the
file names appear on the job grid. The prototype print parameters are applied to all
images added to the job ticket by default.
Long filenames are supported when the job output destination supports long
filenames. Long filenames are not supported, and are then truncated, when
outputting to a removable disk, DOS applications, or older Novell networks or
servers.
To add images to a job ticket:
1. Click Add Files. The Add Files dialog box opens.
2. Navigate to the directory containing your image files and select the file(s) you
want to print.
3. Click OK. If a file format is not recognized, an error message displays. You
can then choose to skip the file or add it. The file will be added with a format
value of User Specified.
You can then change the print parameters if desired. For more information,
see
“Changing Print Parameters” on page 4-15.
PlotWorks supports the “drag-and-drop” method of adding files. Simply drag the
image files from Windows Explorer and drop them onto the Job Editor grid.
Page 55

PlotWorks User Guide • Getting Started • 2-15
Fig 2. 6
Sample
files in the
Job Editor
Saving Job Tickets
Save completed job tickets in case you need to reprint the job in the future. Saving
the Job Ticket does not save the image files. If the original image files are deleted,
it might not be possible to reprint the job.
To save a job ticket:
1. Click Save Job.
If the file was not previously saved, enter a filename in the File Name field.
Long filenames are acceptable.
2. In the Save In field, select a directory in which to save the file.
3. Click Save.
Sending Jobs for Print
A print “job” can consist of one copy (set) of one file, multiple copies of one file,
one copy of multiple files, or multiple copies of multiple files.
Output the Job
The Output Job button is used to send your job ticket, image files, and
information file (if any) to the Job Queue for processing and printing.
To output a job:
1. Click the Output Job button (or select Output Job from the File menu). The
Output Job dialog box displays.
Page 56

2-16 • PlotWorks User Guide
Fig 2. 7
Output
Job dialog
box
2. Select your output options in this dialog box. Options include:
• Send To: This drop-down list is used to select an output destination.
Options include destinations configured using the Configure
Destinations dialog box as well as available disk drives. The default
destination is “Default Queue”.
• # of Sets: Enter the number of sets (copies) to print.
• Selected Files Only: Select this check box to print only files selected in
the grid. If there is only one file in the job grid, or the Proto row is
selected, this option is unavailable.
• Reverse standard print order: Select this box to reverse the order the
images are printed.
• Folding Options: Click this button to access the Folding Options dialog
box to select folding options. This dialog box offers the same options as
the Finishing Options tab window under Setup/ Preferences.
• Job Priority: Enter a number between 1 and 10, with 10 being the
highest priority. This value determines which jobs are printed first.
• Device #: Select the printer’s device number – Any (default), 1, 2, 3, or
4. This number is defined in the Printer Interface program, in the Printing
Configuration dialog box under the Setup menu. If you select Any, jobs
are printed on the first available printer.
3. Click OK to send your job.
The job name displays in the Job Queue and the Printer Interface displays the job’s
print progress. For more information refer to,
“Output Jobs” on page 4-123.
Page 57

PlotWorks User Guide • Getting Started • 2-17
System Tray Icons
When the Job Queue, Job Processor, Network Polling, Printer Interface, and Post
Processor applications are open, the System Tray (lower right corner) displays an
icon for each application. Right clicking on each icon displays a menu. Double
clicking on the icon maximizes the application.
When a program is running, that program’s icon appears in the system tray.
Program icons are visible on the task bar only if you chose to have the applications
run minimized on the task bar during installation.
Icons are identified and defined as follows.
Icon and
Application
Job Queue
Job Processor
Red
Green
Yellow
Network Polling
Description
Right-click options include minimize, restore,
disable task bar button, and exit the application.
Dragging the cursor over the icon displays the
current queue path and application name.
Right-click options include start and stop
processing, minimize, restore, disable task bar
button, and exit the application.
• Red: Job Processor is stopped.
• Green: Job Processor is started and idle.
• Yellow: Jobs are being processed.
Dragging the cursor over the icon, displays the cur-
rent queue path and application name.
Right-click options include start and stop polling,
minimize, restore, disable task bar button, and exit
the application. Red arrows on the icon indicate
polling has stopped; green arrows indicate polling.
Dragging the cursor over the icon displays the
application name.
Page 58

2-18 • PlotWorks User Guide
Printer Interface
Red
Green
Yellow
!
Post Processor
Red
The icon colors indicate printer status:
• Red: The printer is either stopped or paused.
• Green: The printer is ready to print.
• Yellow: The printer is printing. This icon is an-
imated and displaying paper ejecting.
Right-clicking on the icon displays a menu. Menu
choices include: Restore, Minimize, Disable task
bar button, Automatic, paused and Stopped.
Moving the cursor over the icon displays the
current queue path and application name.
In the event of an error, the printer interface icon
alternately blinks and displays a warning. Moving
the cursor over the icon then displays an error
message.
Right-clicking on the icon displays a menu.
Choices include: Restore, Minimize, Start, Stop,
and Exit. The color of the Post Processing icon
denotes its status:
• Red: This denotes that Post Processing has
stopped due to completion or error.
• Green: This indicates that the Post Processor is
trying to contact an external application or is
Green
Yellow
Unless you chose to have the applications run minimized on the task bar during
installation, the task bar will not display active, minimized applic ati ons.
waiting to begin.
• Yellow: Indicates that the Post Processor is us-
ing an external application. This icon is animated.
Moving the cursor over the icon displays the
current queue path and application name.
Page 59

PlotWorks User Guide • Getting Started • 2-19
Demo Mode
PlotWorks can be installed in Demo Mode for demonstration purposes.
Network Polling
If the user does not have a code (or key) for either PLP or PFS polling modes,
Network Polling runs in “Demo Mode”. In Demo Mode, a “Demo System”
watermark displays on each image in the job. In the Add Directory dialog box, the
Polling Mode name changes to “Demo System”.
NOTE: Mode 2 and Mode 4 are linked. They both enter or exit demo mode
together.
If the user has a key and expired activation codes for polling, Mode options are
greyed out in the Add Directory dialog box.
Job Editor
If a job ticket is created by Network Polling in demo mode, each image file and
the prototype will contain a “Demo System” watermark. This watermark cannot
be removed.
When in demo mode, the Output size (Output Setup tab) is restricted to size A or
A4, depending on the Measurement Units selected.
Printer Interfaces
Only the Windows Printer Interface can print in “demo mode” and only size A or
A-4 is outputted. All other printer interfaces will ‘Print to Display’ only.
Following chapters discuss each PlotWorks application in depth.
Page 60

2-20 • PlotWorks User Guide
Page 61

Chapter 3
The Job Queue
The Job Queue is the heart of the PlotWorks system. The Job Queue manages all
incoming print jobs and then sends the job to a printer.
Within the Job Queue, the user can:
• View and edit parameters for each job
• View special instructions by clicking on the Special Instructions icon
• Determine the status of a job in the Queue based on the color of the text
• Sort jobs in the Queue in Ascending or Descending order by clicking on a
column header
• Send jobs to a printer manually or automatically
• Set the order and priority of printing
• View job logs
• Retain the original job number in the description field when dragging-anddropping jobs from one queue into another
• Drag-and-drop jobs into Windows Explorer for archiving
• Choose a selected WAV file to play when a job enters the queue instead of
the default beeping sound
• Delete jobs
PlotWorks User Guide • The Job Queue • 3-1
Page 62

3-2 • PlotWorks User Guide
The Job Queue Window
Fig 3.1
Job Queue
window
The Job Queue window displays a list of jobs in the Queue Directory. It also
displays information such as the sender, status, activity, and destination of each
job.
Toolbar Buttons
The following buttons appear on the Job Queue tool bar:
• Open Queue: Opens an existing Job Queue directory to displaying its
contents.
• Import from Job Editor: Imports a PlotWorks Job file (.PWJ) created using
the Client or Job Editor.
• Delete a job: Deletes the selected job from the Job Queue. Deleted jobs are
sent to the Windows Recycle Bin, where they can be recovered if needed
(unless the Recycle Bin is emptied).
Ctrl+ Delete bypasses the Windows Recycle Bin deleting files from the system’s
hard drive.
• Hold: Puts the selected job on hold. If the job is printing, it is held after the
current page leaves the printer.
• Reprint: Reprints the job, starting from a user-specified image and set, with
a specified priority.
• Print Next: Assigns the selected job a priority of Print Next. The job prints
as soon as the current job (if any) finishes.
Page 63

Fig 3.2
Job Queue
File menu
PlotWorks User Guide • The Job Queue • 3-3
• Print Immediate: Sends the selected job to the printer immediately. If
another job is printing, it is interrupted and will resume printing after the
Immediate job.
• Job Information: Displays the job information (.INF) file, if submitted with
the selected job.
File Menu
The File menu contains options for the Queue directory.
The following options are available under the File menu:
• New Queue Directory: Creates a new Queue directory and QUEUE.QUE
file.
• Open Queue: Opens an existing Job Queue directory and displays its
contents.
• Rebuild Queue: This option is used only if the Job Queue becomes corrupted
and you need to rebuild it.
• Import Job: Imports a PlotWorks Job file (.PWJ) created using the Client or
Job Editor.
• Import DOS Job: Imports individual compressed job files created using the
DOS-based Remote Module.
• 1, 2, 3, etc.: Opens the listed Job Queue.
• Exit: Quits the application.
View Menu
The View menu contains options related to the appearance of the Job Queue
window.
Page 64

3-4 • PlotWorks User Guide
Fig 3.3
Job Queue
View menu
• Column Options: Is used to select which columns appear in the Job Queue
window.
• Status Bar: Is used to hide or show the status bar.
• Toolbar: Is used to hide or show the tool bar.
Setup Menu
The Setup menu contains options to configure the selected Job Queue.
Fig 3.4
Job Queue
Setup
menu
•:Options: Is used to set:
• How often the Queue gets polled for new jobs
• Whether or not to sound a beep or play a WAV file when new jobs enter
the Queue
• Which devices are online and should be monitored (polled)
• Colors: Is used to select colors for the Job Queue window background, and
to select colors to indicate print job statuses.
To see all the color choices in the Color dialog box, change the color settings for
your computer. Open the Windows Start menu, select Settings, then select Control
Panel. In the Control Panel window, click Display, then the Settings tab window.
Go to the Color Palette group box and select True Color (24 bit) from the dropdown list. Click OK.
Job Menu
The Job menu contains options related to a selected job. These options are also
accessed by right clicking on a job in the Job Queue.
The following options are available under the Job menu:
• Delete: Deletes the selected job from the Job Queue.
• Priority: Sets a printing priority for the selected job
• Reprint: Reprints the selected job, starting from a specified image and set
Page 65

Fig 3.5
Job Queue
Job menu
PlotWorks User Guide • The Job Queue • 3-5
• Set Job Position: Is used to specify a set, page, and copy to print of a selected
job. (This function is disabled.)
• Change Destination: This function only changes the text that appears under
the Destination/Source File column heading.
• Edit Description and Comment: This option is used to edit the text in the
Description and Comment column for the selected job.
• Ignore Warnings: This option is used to print the job regardless of warnings
or errors detected during processing.
• View: This option is used to view job information, processing, printing,
capabilities/media logs, the job order, and the submitted PFS file for a
selected job.
• Abort Job: Halts the selected job immediately. If a job is printing, it is
interrupted immediately.
• Output to File: This option is used to convert and save a file or job as a TIFF
or PDF file. It can also be used to create multi-page TIFF or PDF files and
change other file properties. For more information refer to
"Output to File".
• Reset Job: Resets the Activity field for a selected job.This option is used
when a system errors occurs that causes the Activity field to display incorrect
information.
Page 3-21 under
Help Menu
The Help menu contains information about the Job Queue.
Page 66

3-6 • PlotWorks User Guide
Fig 3.6
Job Queue
Help menu
The following options are available under the Help menu:
• Online Manual: Opens the online manual at the Job Queue chapter
• Index: Displays an index of help topics
• Table of Contents: Displays the help table of contents.
• Release Notes: Displays the latest PlotWorks release notes
• About Job Queue: Displays the software name and version and copyright
information
Columns and Icons
The 12 columns of the Job Queue display information about the jobs in the Queue.
• Job #: A unique number assigned to each job.
• Priority: The job print priority. Jobs are printed in the following order:
1. Print Immediate: This priority is assigned to jobs that must be printed
immediately. If another job is printing, it is interrupted to print the job
with the Immediate priority. Only one job at a time can be selected for
Print Immediate.
2. Interrupted jobs: This priority is assigned to a job that was interrupted
during printing by a job that needed to be printed immediately. The
interrupted job will resume printing where it left off as soon as the rush
job finishes.
3. Print Next: A job with this priority prints as soon as the currently
printing job finishes. Only one job at a time can be selected for Print
Next.
4. Copy: When the Scanner Interface is set to Scan to Print, scanned images
are assigned the Copy priority.
5. 10-1: Numbered jobs are printed starting with the highest number. Jobs
with a priority of 10 are printed first, jobs with a priority of 1are printed
last.
6. Hold: Jobs on hold are not printed. To print a job on hold, change its print
priority.
Page 67

PlotWorks User Guide • The Job Queue • 3-7
7. Hold After Next Set: Hold the job after printing the current set.
• Activity: Displays icons that indicate the job’s current status. The following
icons are used:
The job is being copied to or deleted from the Job Queue.
The job is being edited.
The job is processing.
The job is printing.
• Status: Displays icons indication the last process completed. The following
icons are used:
The job was processed successfully.
The job was printed successfully.
The job is partially printed.
The job was interrupted during printing.
• Problems: Displays icons to indicate job warnings and errors. The following
icons may display:
This red icon indicates that the Job Processor encountered
processing errors. The job can not printed until the errors are
resolved or the Job Processor is set to ignore them.
This blue icon indicates that the Job Processor encountered errors
during processing which wer e ig nored.
This icon indicates that a hardware error occurred. These errors
often occur when a folder, media, or a requested fold is not available.
• Description/Company/Project: This column displays the project and
company name, as entered in the Project and Company fields of the
PlotWorks or PFS file.
• Job size: This column displays the number of sets and images in the job.
During printing, this field displays the number of sets and images that have
been printed.
• Submitted by: This column displays the job submitters computer, user, and
contact names when the job is sent via Network Polling or the Client. The
computer and user name is displayed if the job was sent via the Job Editor. If
long or multiple E-mail addresses are specified in the PFS file, only the Email addresses are displayed. Data displayed in this field is limited to 64
characters.
Page 68

3-8 • PlotWorks User Guide
• Device: This column displays the device number of the printer assigned to
print the job. This number is specified in the Job Editor or by Network
Polling. If “Any” is selected, the job is printed on the first available device.
• Destination/Source File: This column lists destination information if entered
in Network Polling. To change the information displayed in this field, select
Change Destination in the Job menu. This option is rarely used.
PlotWorks returns a “Job Printed” notification to the Client or Job Editor when
a job completes printing. If a destination is configured in the Job Queue, the
notification displays that information, otherwise, the destination is blank.
• Time submitted: This column displays the time the job was submitted to the
Queue.
• Comment: Customer comments, taken from the Comment field of the
PlotWorks or PFS file.
To add or remove columns from the Job Queue window:
1. Click on the View menu
2. Select Column Options. The Column Options dialog box opens.
Fig 3.7
Column
Options
dialog box
3. Select check boxes for the columns you want Deselect check boxes for the
columns you do not want.
4. Click OK.
Page 69

PlotWorks User Guide • The Job Queue • 3-9
To change a column width:
1. Place your cursor on the right-hand edge, next to the column heading, of the
column you want to resize. The cursor will change to a vertical bar crossed
by a double-arrow.
2. Press the left button on your mouse and drag the cursor until the column is the
desired width.
You can autosize a column width by double-clicking on the right side of the
column header. This makes the column the width of the column text. This may
truncate the column heading.
A column can be removed from the Job Queue by reducing its size until it
disappears. Restore the column from within the Column Options box described
above.
To sort jobs in the Queue:
All columns can be sorted except for Job Size. Jobs are sorted in Ascending order
(1, 2, 3...) by default. To sort files in Descending order (10, 9, 8...), click the
desired column heading. Toggle between Ascending and Descending order by
clicking the column heading.
When the Job Queue is closed, the current sort parameters are saved.
If you want to save a specific sort parameter, and you have more than one Job
Queue open, close all other Queues first. Then close the Job Queue containing the
sort parameters you want saved.
Job Queue Structure
During PlotWorks installation, a Queue directory was created. When a job is
submitted to the Queue, the software creates a numbered subdirectory within the
Queue directory. The job ticket, image files, and information files are copied to
this subdirectory.
The Queue directory contains a database file called QUEUE.QUE. This file
contains a record of every job submitted to the Queue directory. The Job Queue
window displays information from the QUEUE.QUE file. When jobs are added,
edited, or deleted from the Queue, this information is updated in the QUEUE.QUE
file.
Page 70

3-10 • PlotWorks User Guide
Setting up the Job Queue
Open an Existing Job Queue
If using more than one Job Queue, you can open a different Queue from within the
Job Queue program.
1. Click Open Queue. The Select Queue Directory to open dialog box appears.
Fig 3.8
The Select
Queue
Directory
To Open
dialog box
2. Select the appropriate Queue Directory.
3. Click OK.
When a new job enters an open minimized Job Queue, the icon on the Windows
task bar becomes highlighted (usually blue).
Create a New Job Queue
When you installed PlotWorks, you were prompted to create a Queue directory.
All PlotWorks components center around this Queue. You can use multiple Job
Queues. You create a new Queue from an existing Job Queue window.
If the QUEUE.QUE file (the queue database) does not exist or cannot be found,
you are prompted to create it when the Job Queue is opened for the first time.
To create a new Queue:
1. Click on the File menu.
2. Select New Queue Directory. The Enter The Queue Directory To Create
dialog box opens.
Page 71

Fig 3.9
The Enter
The Queue
Directory
To Create
dialog box
PlotWorks User Guide • The Job Queue • 3-11
3. Select the directory you want to use for your Queue directory. Or, enter the
path for a directory you want to create.
4. Click Create.
The title bar of the Job Queue window displays the name of the new Queue
directory.
If using multiple Job Queues, connect Network Polling (if used), Job Processor (if
needed), and Printer Interface(s) to the appropriate Queue directories.
Set Queue Options
The Options dialog box is used to set Job Queue polling and printing
configurations.
To set Queue options:
1. Click on the Setup menu.
2. Select Options. The Options dialog box opens.
Page 72

3-12 • PlotWorks User Guide
Fig 3.10
The
Options
dialog box
3. Fill in the fields in the Options dialog box as follows:
• Poll queue every: Enter how often the Queue should search the Job
Directory for incoming jobs in this field.
• Beep on new queue entries: Select this check box to sound an alert
when new jobs arrive in the Queue. The default sound is a beep. To select
a different sound, open the Windows Control Panel, select Sounds and
Audio Devices, click on the Sound tab, navigate to PlotWorks from the
Program Events select box, and click on JobReceived. Then select a
sound from the Sounds drop down list.
Seven WAV files were installed with PlotWorks. These are named: chirp.wav,
incomingjobx-cyborg.wav, incomingjobx-voice.wav, jobrecieved-cyborg.wav,
jobrecieved-voice.wav, steamwhistle.wav, and sweep.wav.
• Devices Online: The Job Queue uses this setting to determine which
devices are online. Select check boxes for devices connected to this
Queue. The device numbers correspond to the number specified as
Device Number, in the Printer Interface General Configuration dialog
box, under Setup.
If the Job Queue cannot determine which devices are online, or if a
device is specified as online but is not connected, then jobs can remain
indefinitely in the Job Queue without printing or showing an error.
4. Click OK.
Page 73

Fig 3.11
The Colors
dialog box
PlotWorks User Guide • The Job Queue • 3-13
Select Queue Colors
The Color dialog box is used to choose a background color for the Job Queue
window, and to select job status colors.
To select Colors:
1. Click on the Setup menu
2. Select Colors. The Colors dialog box opens.
3. Click on the Background button. The Color dialog box opens.
Fig 3.12
The Color
dialog box
Page 74

3-14 • PlotWorks User Guide
4. Click on a color to select it. You can select from Basic Colors or Custom
Colors. To select a custom color click on the Define Custom Colors button.
5. Click on the OK button.
6. Select colors for Normal Status, Hold Status and Done similarly by clicking
on their appropriate buttons. PLP suggests that you select the following colors
for these values:
• Normal Status: Green
• Hold Status: Yellow
• Done: Red
7. After selecting the desired colors, click OK.
Page 75

Fig 3.13
The Select
Parameter
File to
Import
dialog box
PlotWorks User Guide • The Job Queue • 3-15
Working with Jobs in the Queue
Importing Jobs
Jobs created on the Client or Remote Module that are saved on a floppy disk, or
CD can be imported into the Job Queue. These jobs have a .PWJ extension and are
called parameter files.
ZIP and CD-RW drives cannot be installed on the same computer as the
PlotWorks Server. Therefore if your .PWJ job exists on a CD-RW or ZIP disk you
can add it to the Job Queue via another computer, containing a ZIP or CD-RW
drive, on your network.
To import a job (from a directory, CD, or floppy disk):
1. If applicable, insert the CD or floppy disk containing the job into the
appropriate drive.
2. Click Import Job. The Select Parameter File to Import dialog box displays.
3. Select the desired parameter file (it has a .PWJ extension) and click Open.
4. Click Done when the import finishes, unless you want to import additional
files.
Importing a DOS Job from a Floppy Disk
To import a job created on a Remote DOS Module:
1. From the File menu, select Import DOS Job. The Import DOS Job From
Floppy Disk dialog box opens.
2. Select the radio button for your disk drive.
3. Select the check box labeled Hold Job to place if you wish to place the job on
Hold.
Page 76

3-16 • PlotWorks User Guide
4. Click OK. If the job spans more than one disk, you are prompted for the next
disk. Insert the next disk and click Next to continue.
5. Click Done.
When moving a job from one Queue to another, the job moved retains the job
number in the Description/Company/Project field, assigned in the first Job Queue
window. If a job in the second Queue has the same file number, the new job would
overwrite the existing job.
See also: “The Job Grid Columns” on page 4-12, “Changing Print Parameters”
on page 4-15, and “Viewing Image Files” on page 4-111.
Prioritize Jobs (Automatic Printing)
Every job that enters the Queue is assigned a priority. This priority determines the
order in which jobs are printed.
To set a job priority:
1. Right click on the job you wish to set a priority for. You can also open the
Priority menu from the Job menu.
2. Select Priority from the right click menu. The Priority menu displays.
Fig 3.14
The Job
Queue
Priority
menu
opened
form the
Job menu.
3. Select a priority. Jobs are printed in the following order:
• Print Immediate:
• Interrupted jobs:
Page 77

PlotWorks User Guide • The Job Queue • 3-17
• Print Next:
• Copy:
• 10-1:
• Hold:
• Hold After Next Set:
See page 3-6 for a detailed description of each Priority menu choice.
Put Jobs on Hold
You can put any job in the Queue on hold to prevent it from printing
automatically. Three hold options are available:
To abort a job that is printing:
1. Right-click on the job.
2. Select Abort Job. The job is put on pending hold. A white pending hold icon
appears in the Priority column and the job stops printing. Any partially
printed media is ejected. The icon then turns yellow.
To put a job on hold:
1. Select the job you want to hold.
2. Click Hold.
The job is put on hold. A yellow hold icon appears in the Priority column. If the
job is already printing, it is put on hold after the current sheet has left the printer.
To hold after the current set has printed:
1. Right click on the job.
2. Select Priority from the right click menu.
3. Select Hold After Next Set. The job is put on hold as after the current set
leaves the printer. The hold icon appears in the Priority column.
To print a job on hold:
1. Right click on the job.
2. Select Priority from the right click menu.
3. Choose a priority for the job. The job wil l resum e prin ting where it left off.
The Job Editor and Network Polling can be set to submit jobs on hold. These jobs
appear in the Queue with a Hold icon and will not print until their priorities are
changed. This feature is useful for printing some jobs manually while the rest are
printed automatically.
Page 78

3-18 • PlotWorks User Guide
Process Jobs
The Job Processor needs to be set up to automatically process jobs for printing.
To set up the Job Processor:
1. Open the Job Processor.
2. Click on the File menu.
3. Select Connect to Queue (or press Ctrl + O).
4. Select the Queue directory from which to process jobs and click OK.
5. Open the File menu and select Start Processing to begin automatic
processing.
6. Click the minimize button in the top right corner of the Job Processor
window. The Job Processor is still minimized and running.
If you exit the Job Processor program, the software cannot process and print jobs
that enter the Queue.
Printing Jobs Manually
PlotWorks can be configured for manual printing. When the Printer Interface is in
Manual mode, only jobs with a priority of Print Next or Print Immediate are
printed. (See page 8-3 for more information on manual printing.)
To print a job in the Queue manually:
1. In the Queue, select the job you want to print.
2. Click Print Next.
Interrupting a Job to Print Another Immediately
You can interrupt large print jobs to print a rush job or make a copy and then
continue printing the original job.
1. Select the job you want to print immediately.
2. Click the Print Immediate or NOW! button. A dialog box opens.
3. Click OK to interrupt the job currently printing. This causes:
• The sheet currently in the printer finishes printing
• The original job is put in “Interrupt” mode.
• The “Print Immediate” job begins printing.
• The Printer Interface printer diagram displays red lines to indicate that
the job being printed interrupted another job.
Page 79

PlotWorks User Guide • The Job Queue • 3-19
• The Print Status window, displays both jobs including their current job
status
• When the urgent job finishes printing, the interrupted job resumes
printing.
Reprint a Job
You can reprint a job that was printed previously. You can start the reprint from
any set or sheet in the job.
To reprint a job:
1. Select the job to reprint.
2. Click Reprint.
3. Fill in the fields in the Reprint Job dialog box as follows:
• Select where to begin printing: Select this box to start printing from a
specific file or set in the job and then specify where to start using the
following options.
• Set: Enter the number of the set from which to start printing.
• Image: Enter the number of the image from which to start printing.
• Copy: Enter the number of the copy from which to start printing.
• Page: Enter the number of the page from which to start printing.
• Number of sets: Enter the total number of complete sets to print.
• Job Priority: Enter the printing priority of the job.
• Device: Select the number of the printer to use for the job.
• Reverse standard print order: Select this option to reverse the print
order.
• Use set memory: (OCE 9800, Xerox MAX 200 and the 8180 only) Set
memory allows the job request to be sent to the set memory of a printer
instead of sending each set over again.
4. Click OK. The job is printed according to the priority defined in step 3.
Delete a Job from the Queue
The Delete command removes a job from the Queue and sends it to the Windows
Recycle Bin. You cannot delete a job while it is being processed, printed, or
edited. To stop a job once it has begun printing, use the Hold, Hold After Next Set,
or Abort Job options. See
order:” on page 3-16.
“Select a priority. Jobs are printed in the following
Page 80

3-20 • PlotWorks User Guide
To delete a job:
1. Select the job to delete.
2. Click Delete.
3. Click Yes to confirm the deletion. The job directory and all of its contents are
deleted from the Queue directory.
When you delete jobs from the Queue, they are sent to the Windows Recycle bin
where they can be permanently deleted or restored to the Job Queue (using the
drag-and-drop method). If you want the files removed permanently, hold down the
Shift key and press Delete.
Saving Jobs from the Queue to a different location
You can save jobs from the Queue onto your hard drive, a removable disk drive,
or a network location. To save a job to a different location, drag and drop the job
from the Queue to the desired location in Windows Explorer. The Job Queue saves
the image files, parameter file, and any information files in the selected location .
Page 81

Fig 3.15
Output to
File
selected
from the
Job Queue
right click
menu
PlotWorks User Guide • The Job Queue • 3-21
Output to File
The Output to File option is used to save a file as a TIFF or PDF file. It can also
be used to create multi-page TIFF or PDF files and change other file properties.
To save a file as a PDF it is necessary to have purchased and installed the PDF
Option
All pen settings, macros, sizes and other print parameters assigned to each file in
the job is saved in the converted file.
To Output to File follow the instructions below:
1. Ensure the job you wish to Output to File is listed in the Job Queue window.
2. Right click on the job. The right click menu displays. (The Output to File
option is also available from the Job menu.)
3. Click on Output to File. The Job Editor will open listing all the files in the
job. The Output to File dialog box will also open.
4. Select options from this dialog box. More detailed information is available on
Page 4-94 under "Output to File".
5. Click on the OK button
If the ARU file support option is enabled, ARU logs are created for the Output to
File function. Information collected by the Output to File function is stored in the
ARUPublisher.log file.
Page 82

3-22 • PlotWorks User Guide
Logs and Reports
Processing Log
The Processing Log displays processing information about the selected job,
including any warnings or error messages received during processing.
To view the Processing Log:
1. Right click on the job.
2. Select View.
3. Select Processing Log. The log file opens in Windows Notepad.
4. Close the log file by selecting Exit from the File menu in Notepad when you
are done.
Printing and Print to File Logs
The Printing Log displays printing information about the selected job. Information
on printed jobs is written to a log file called ARU<printer>.LOG. Where <printer>
is replaced with the name of your printer. This log includes all fields defined in
the ARU log definition in comma-delimited format (see
on page 10-1).
The Print to File log contains the same information as the printing log except for
media type and "OUTPUT_DEVICE" information as these don’t apply here. The
"FINAL_XSIZE" and "FINAL_YSIZE" fields reflect the size set in the "Output
Setup" field not the final printed paper size. Information collected by the Output
to File function is stored in the ARUPublisher.log file
“Producing a Job Report”
To view the Printing Log:
1. Right click on the job.
2. Select View.
3. Select Printing Log. The log file opens in Windows Notepad.
4. Close the log file by selecting Exit from the File menu in Notepad when you
are done.
Media/Capabilities Log
The Media/Capabilities Log displays media errors (such as “Media Out,” “Invalid
Size,” etc.) that might have occurred while printing.
If Devices Online selections are not made in the Setup Options menu, Media/
Capabilities warning messages do not display in the Problems column of the Job
Queue.
Page 83

PlotWorks User Guide • The Job Queue • 3-23
To view the Media Log:
1. Right click on the job.
2. Select View.
3. Select Media/Capabilities Log. The log file opens in Windows Notepad.
4. Close the log file by selecting Exit from the File menu in Notepad when you
are done.
Job Information
If the print job was submitted with a job information (.INF) file, you can view this
file from the Job Queue in the Job Information log.
To view the job information (.INF) file:
1. Right click on the job.
2. Select View.
3. Select Job Information. The INF file opens in Windows Notepad.
4. Close the log file by selecting Exit from the File menu in Notepad when you
are done. See also:
“Send a Special Instruction File” on page 4-120.
Job Order
If the print job was submitted with a job order file, you can view this file from the
Job Queue.
1. Right click on the job.
2. Select View.
3. Select Job Order. The job order opens in Windows Notepad.
4. Close the log file by selecting Exit from the File menu in Notepad when you
are done.
Page 84

3-24 • PlotWorks User Guide
Troubleshooting
Rebuild the Queue
If the Queue database becomes corrupt, you can repair and recreate it.
Some information might be lost if the data is corrupt.
To rebuild the Queue:
1. Close all other PlotWorks programs except the Job Queue.
2. Open the File menu
3. Select Rebuild Queue.
4. A warning box confirms that you want to rebuild the Queue. Click Yes to
continue.
5. If the rebuild function detects any problems with a job(s) in the queue, a
dialog box displays to alert you.
Fig 3.16
Dialog box
warning
6. Select one of the following options:
• To delete the indicated job or file, click Delete.
• To delete all jobs with problems, click Delete All.
• To skip the displayed job and leave it in the Queue, click Skip.
• To skip the all jobs with problems and leave them in the Queue, click
Skip All.
• To change your mind about rebuilding the Queue, click Abort.
When you rebuild the Job Queue, the original Queue database (QUEUE.QUE) i s
renamed and saved as BACKUP.QUE. The software then creates a new Queue
database by combining the information in BACKUP.QUE with the actual job data
contained in the Queue directory.
Page 85

PlotWorks User Guide • The Job Queue • 3-25
If the software finds a job in the Queue directory that is not listed in the
BACKUP.QUE, it adds the job to the new Queue database. Some job information,
such as the priority, device number, destination, status, problems, and
administrative information will be lost .
Reset the Activity Field for a Job
The Reset Job feature is useful when system errors cause the Activity field to
display incorrect information. For example, if you experience a power failure
while a job is processing, the Activity field will show the processing icon although
the job is no longer being processed.
To reset jobs:
1. Right click on the job.
2. Select Reset Job.
3. Click OK to confirm your selection. The Activity field returns to an idle
(blank) setting.
Page 86

3-26 • PlotWorks User Guide
Page 87

Chapter 4
The Job Editor
The Job Editor’s main function is to collect files for printing, set printin g
parameters, create the print job ticket and send the file for printing. The Job Editor
can also:
• Create print jobs containing multiple format image files
• Sort files
• Choose which page to print from a multipage document
• Create and save pen sets
• Reduce and enlarge images
• Add watermarks, labels and overlays
• Add margins and justify the image on the medium
• Nest jobs
• Send jobs over a network, modem or disk
• Print digitally collated sets
• View images before printing
• Process files to check for errors before submitting
• Apply finishing options like folds, binding, hole punching etc.
• Add images to a job directly from a Twain device.
• Poll a Network or FTP directory
• Compare two documents and report changes or differences
• Convert files into TIFF or PDF file formats
PlotWorks User Guide • The Job Editor • 4-1
Fig 4.1
The Job
Editor with
several im
age files
listed.
-
Page 88

4-2 • PlotWorks User Guide
The Job Editor is used is used to add images to a job file, also referred to as a job
ticket. You can then edit print parameters for each job individually. You can also
apply commonly used print parameters to the Prototype job. Print Parameters
applied to the Prototype job, are applied by default to each image added to a job.
Print parameters for images, or the prototype, can be changed, as desired.
Page 89

PlotWorks User Guide • The Job Editor • 4-3
Creating a simple job ticket
To start a new job ticket:
1. Open the Job Editor.
2. Click on the New Job button, or select New from the File menu.
Now add image files to the job. These can be in any supported format. Multiple
supported file formats can be added to the same job. Image files are printed in the
order they are listed in the job ticket.
To add images to a job ticket:
1. Click Add Files.
2. The Look In field displays the directory in which you last saved files.
3. Select the file(s) you want to add. Select multiple files using the Shift or Ctrl
keys.
PlotWorks supports the Windows “drag-and-drop” method of adding files.
Simply drag the image files from the Window Explorer window and drop them
onto the Job Editor grid.
4. Click Open. The Job Editor automatically detects the image file formats and
adds the images to the job grid. If the Job Editor does not recognize a file
format, the Unrecognized File Format dialog box appears. You can then
choose to skip the file(s) or add them with the format value User Specified.
Fig 4.2
The Un
recogn-
ised File
Format di
alog box.
-
-
Page 90

4-4 • PlotWorks User Guide
To Skip a File Listed in the Unrecognized Format Dialog Box:
1. Click on the file in the select box.
2. Click on the Skip button
To Add a File as listed in the Unrecognized Format Dialog Box
1. Click on the file in the select box. The Add button becomes available.
2. Click on the Add button. The file is added to the job ticket as User Spec-
ified.
5. Once image files are added to a new job ticket, you can set printing
parameters. When done, click on the Output button to send the job for
printing.
Adding DWF Files to the Job Editor
Before a DWF file can be added to the Job Editor, it is necessary to ensure that
all fonts are already embedded in the DWF file.
DWF files can be manually added or imported from AutoDesk. Manually add a
DWF files the same way you add other files to the job grid.
When a multiple sheet DWF file is added, each sheet appears as a separate line
item in the job grid with the sheet name and number appended to the file name.
Individual sizes are supported for multipage DWF files.
If the DWF file is password protected, the Missing or Invalid Password dialog box
appears. Enter the password and then click OK. When multiple password
protected files are added, PlotWorks will prompt you as necessary for additional
passwords.
Page 91

PlotWorks User Guide • The Job Editor • 4-5
The Job Editor Window
This section provides a brief description of the Job Editor window components.
The Toolbar
The following buttons appear on the Job Editor toolbar:
• New Job: Creates a new, blank job file.
• Open Job: Opens an existing job file.
• Add Files: Adds image files to the print job.
• Save Job: Saves the current job file.
• Cut: Removes the selected row from the grid placing it in temporary
memory. From there, it can be pasted into a new position or in a different job
file.
• Copy: Places a duplicate of the selected row in temporary memory. The
duplicate can be pasted and edited apart from the original.
• Paste: Pastes the last row placed in temporary memory onto the grid.
• Delete: Removes the selected row(s) from the grid.
• Properties: Displays or hides the Detail Property Sheet.
• Process: Processes selected images or all images in a job.
Page 92

4-6 • PlotWorks User Guide
• Revision Highlighting: Compares two documents that are generated in the
same way, and illustrates the differences between the two files. Revision
Highlighting cannot be used with scanned images
• View: Processes the selected image and displays it in the viewing application.
• Output: Is used to set up output options and to send entire jobs or selected
files to a specified destination.
• Scan: Opens the optional Scanner Interface application.
Page 93

Fig 4.3
The Job
Editor File
menu
PlotWorks User Guide • The Job Editor • 4-7
The Menus
The File Menu
The File menu contains options for job tickets.
These include:
• New Job: Creates a new, blank job ticket. (Keyboard shortcut: Ctrl+N)
• Open Job: Opens an existing job ticket. (Keyboard shortcut: Ctrl+O)
• Open Pen Set: Applies an existing pen set to the selected image.
• Add Files: Adds images to the print job.You can add files from a directory
on your network, or from an FTP directory. (Keyboard shortcut: Insert)
• Templates: Is used to save and open settings created for watermarks, margins
and labels.
• Scan: Opens the Scanner Interface application if installed. (Keyboard
shortcut: Ctrl+A)
Page 94

4-8 • PlotWorks User Guide
•Twain: Adds images from a Twain scanner to a job ticket.
• Process All: Processes all images in a job.
• Process Selected: Processes the selected file(s) in the grid.
• Output to File: Is used to convert and save a file as a TIFF or PDF file. It can
be used to create multi-page TIFF or PDF files and change other file
properties. For more information refer to page
• Output Job: Is used to select output options and output the job. (Keyboard
shortcut: Ctrl+J)
• Save Job: Saves the active job ticket. (Keyboard shortcut Ctrl+S)
• Save Job As: Saves the active job ticket under a selected new name. The
original document will still exist under its original name. The new document
displays in the active window.
• Save Pen Set: Saves the selected file’s pen set, under a specified filename.
• Save Configuration: Saves job-wide settings to the configuration file,
conf.plp.
• 1, 2, 3, 4 . . . etc.: Opens the selected job ticket.
• Exit: Exits the Job Editor, prompting you to save unsaved changes, if any.
The Edit Menu
The Edit menu contains options used to organize image files on the grid.
4-94.
Fig 4.4
The Job
Editor Edit
menu
menu
The following items are available under the Edit menu:
• Cut Row: Removes the selected row from the grid and places it in temporary
memory. From there, it can be pasted into a new position in the same or
different job ticket. (Ctrl+X)
Page 95

PlotWorks User Guide • The Job Editor • 4-9
• Copy Row: Places a duplicate of the selected row in temporary memory.
(Ctrl+C)
• Paste Row: Lets you paste a row from temporary memory onto the job grid.
(Ctrl+V)
• Delete Row: Deletes a row from the job ticket. This does not delete the actual
image file from your computer.
• Copy Row to Prototype: Copies all image file parameters to the Prototype
row.
• Copy Field: Copies the value of a selected field to other fields in the same
column. This is useful when you want to change all values in a column
efficiently. (Ctrl+R)
• Copy Field Up: Copies the value of the selected field to all fields above the
selected field in the same column. (Ctrl+U)
• Copy Field Down: Copies the value of the selected field to fields below it in
the same column. (Ctrl+I)
• Sort by Column: Sorts selected columns alphabetically. (Ctrl+M)
• Revision Highlighting: Compares two documents that are generated in the
same way, and illustrates the differences between the two files. Revision
Highlighting cannot be used with scanned images.
The View Menu
Fig 4.5
The Job
Editor
View menu
The View menu is used to change the appearance of the Job Editor window, and
for processing and viewing options.
menu
The following items are available under the View menu
• Toolbar: Hides or shows the toolbar.
Page 96

4-10 • PlotWorks User Guide
• Status Bar: Hides or shows the status bar.
• Property Sheets: Hide or shows the Detail Property Sheet.
• Scale View: Hides or shows an illustration depicting the original and output
size of a selected image.
• Move Up: Moves the cursor up one row in the grid. (F7)
• Move Down: Moves the cursor down one row in the grid. (F8)
• View Image: Processes the selected image and displays it in the selected
viewing application. (Ctrl+Shift+V)
• Title Block Location Viewer: Opens the Title Block Location dialog box
when an image is selected in the job grid. This is useful when using a GFI
folding device. For more information refer to
Dialog Box” on page 11-19.
• Refresh Viewer: Updates the Image Viewer window. (F5)
• Always Use PlotWorks Viewer: Forces the PlotWorks Image Viewer to
open when you select View Image, regardless of the file format.
NOTE: Double-clicking on a file in the Job Editor opens the Viewer with the
selected image file displayed.
• Do not show splash screens: Select this option to disable the splash screens
Splash screens are the windows that appear briefly when PlotWorks
applications are first launched. The splash screens are enabled by default.
When disabled a check mark appears beside this option.
“Using the Title Block Location
Fig 4.6
The Job
Editor Set
up menu
The Setup Menu
The Setup menu is used to configure the job ticket.
menu
-
The following items are available under Setup
• Preferences: Is used to set job-wide preferences.
• Processing Options: Is used to set job processing options.
• Configure Destinations: Is used to set up output destinations.
• Configure Viewers: Is used to select third party image viewers. Selecting
this menu item opens the Configure Viewers dialog box.
Page 97

PlotWorks User Guide • The Job Editor • 4-11
Fig 4.7
The Con
figure
Viewers
dialog box
menu
-
Select the file type from the Data Type drop down list and then select the
viewer you would like to use for this file type from the Viewer path drop
down list. The viewer must support the file format that you wish to display.
If the Viewer you wish to use is not listed, click on the provided browse
button and select the application file for the viewer you want.
The “Always Use PlotWorks Viewer” setting in the View menu over rides choices
made here.
• Twain Options: Is used to access the Twain Scanning Options dialog box.
This is described in detail und e r
“Adding Files from a Polled Directory” on
page 4-78
The Help Menu
The Help menu provides access to online help files and program information.
The following options are available under Help:
• Online Manual: Opens the online manual at the Job Editor chapter
• Index: Displays the help index file.
• Table of Contents: Displays the table of contents for the online manual
• Release Notes: Displays the latest PlotWorks information.
• About: Displays program version and copyright information.
Fig 4.8
The Job
Editor
Help menu
menu
Page 98

4-12 • PlotWorks User Guide
The Job Grid
When images are added to a job ticket, they are listed in the job grid and assigned
the same parameters as the Prototype row, except for the file name and type. Each
row of a job grid represents an image file and the parameters assigned to it.
Print parameters can be changed directly on the job grid. Simply click in the cell
you want to edit. Either the cursor will flash, indicating that you can type in your
changes, or the cell will change to display a drop down list that you can select
from.
Fig 4.9
The Job
Editor
Grid
.
The first row of the grid, Proto, lists a set of default parameters. Images added to
a job are listed beneath the Proto row.
To move through the grid use the:
•Scroll bars
• Arrow keys on your keyboard
• Arrow keyboard equivalents: F7 (up) and F8 (down)
• Page Up and Page Down keys
• Click on the desired cell with the mouse
The Job Grid Columns
The columns of the grid display the assigned printing parameters for each job.
Depending on the image format, some print parameters do not apply. Those cells
display a line.
The following columns are available:
• Filename: The image file name, not including its three-character extension.
• Ext: The file extension.
• Status: The processing status of an image file is displayed automatically in
the status column. The following processing statuses are used:
• O: User selected Ignore Warnings or Ignore All
• W: Processing warnings
• - : The image was skipped during processing
Page 99

PlotWorks User Guide • The Job Editor • 4-13
• C: The image was prechecked successfully. All needed information and
reference files, etc., exist
• P: The image was processed successfully
• F: The file could not be processed or printed due to fatal errors.
Job tickets created with DOS PlotWorks, display the following statuses:
• ?: The image was printed with warnings
•±: The image was corrected with Error Free Printing
• *: The image was printed successfully
• Qty: Stands for Quantity. Enter the number of copies to print, up to 99. Enter
X or 0 for overlays and other files you do not want to print.
• Size: Select the original image size. To enter a custom size, select User
Specified, then enter the width, height, and origin values on the Specified
Size tabbed dialog box. To auto detect the image size, select Auto Detected.
• Media: Select a printing medium.
• Output: Select a finished size for the print, or select a percentage of the
original size. To enter a custom size, open the Detail Property Sheet and
click on the Output Setup tab. In the field labeled Output Size, select User
Specified, then enter the width, height, and origin values. To force the use of
the closest standard media size, select Auto Standard.
• Pens: This field always displays User Specified. To use a different pen set,
use the Pens tabbed dialog box or import a previously defined pen set.
• Format: The image file data format. The Job Editor automatically detects
this format when you use the Add Files option. PLP recommends that you do
not change automatically detected format values.
• Scale: This column is used only for AutoCAD or MicroStation files. Enter
one of the following in this cell:
• A valid AutoCAD scale (printed units = drawing units).
• A valid MicroStation scale (master units per inch) for MicroStation DGN
files.
• FIT, for automatic scaling depending on the Specified Size. Refer to
“Specified Size tabbed dialog box” on page 4-18 for more information.
Scaling to FIT cannot be used when the Specified Size is set to Auto Detected.
• Plot by: This column only applies to AutoCAD or MicroStation drawings
and is used to select printing boundaries. The following boundaries are
available:
Page 100

4-14 • PlotWorks User Guide
• Extents: Prints all drawn entities in the image file.
• Display: Prints the last saved screen display of the image.
• Limits: Prints a specified range of coordinates.
• View: Prints a predefined view. MicroStation drawings are always
printed based on a view.
• Layout: This boundary can only be used with AutoCAD 2000
processing. it prints a predefined layout.
• View Name: Cells in this column are only available when View is selected
in the Plot By field for AutoCAD or MicroStation drawings.
Allowable entries for Microstation files are:
• the saved view name
• the special view names of 1 through 8 (representing the allowable
MicroStation view window numbers);
• a selection cell name in addition to a view name or number. For example:
topview CELL<linepa> where topview is a name given to a view and
linepa is a named cell.
• Watermark: The watermark text is displayed in this field when a watermark
is applied to the image, See “Watermarks tabbed dialog box” on page 4-34.
• Justification: This field is used to justify the image on the media. See
“Adding Margins” on page 4-39.
• Mirror: Select whether or not to mirror the image.
• Label: This field is used to enter label text. See “Adding a Label to the
Printed Image” on page 4-43.
• Overlays: This field displays the number of files selected as overlays. Up to
ten images can be layered on an image.
Overlay file(s) have to be added to the job ticket with a quantity of X or 0. See
“Overlays tabbed dialog box” on page 4-31.
• Title Block: This option is used with GFI folding devices. Select either the
location of the title block or Don’t Care from this drop down list. For more
information refer to
To change a column width:
1. Place your cursor on the right-hand edge of the column heading. The cursor
changes to a vertical bar crossed by a double-headed arrow.
2. Drag the cursor to the desired width.
“Specifying the Title Block Location” on page 11-17.
 Loading...