

Page 1

PhaserLink
TM
User Manual
Remote Internet Printing Software
V3 November 1999
46XX-34
Page 2

Copyright © Tektronix, Inc. Printed in the United States of America. Unpublished rights reserved under the copyright
laws of the United States. Contents of this publication may not be reproduced in any form without permission of
Tektronix, Inc.
Tektronix
®
, Phaser
Inc. PhaserLink™, PhaserPrint™, PhaserSym™, PhaserTools™, and the TekColor™ name are trademarks of
Tektronix, Inc. TekColor Care
®
Adobe
, Acrobat
®
, PhaserShare
®
, Acrobat
®
, the TekColor
SM
is a service mark of Tektronix, Inc.
®
Reader, Illustrator
®
icon, and Made For Each Other
®
, PageMaker
®
, Photoshop
®
are registered trademarks of Tektronix,
®
, and PostScript
®
are registered trademarks
and Brilliant Screens™ and IntelliSelect™ are trademarks of Adobe Systems Incorporated or its subsidiaries which may be
registered in certain jurisdictions.
Apple
®
, LaserWriter
®
, LocalTalk
®
, Macintosh
®
, and TrueType2
®
are registered trademarks and Mac™OS is a trademark of
Apple Computer, Incorporated.
Ethernet
FTP
ITC Avant Garde Gothic
®
is a registered trademark of Xerox Corporation.
®
Software is a registered trademark of FTP Software, Incorporated.
®
, ITC Bookman
®
, ITC Zapf Chancery
®
, and ITC Zapf Dingbats
®
are registered trademarks of
International Typeface Corporation.
Times™, Helvetica™ and Palatino™ are trademarks of Linotype-Hell AG and/or its subsidiaries.
MS-DOS
®
Novell
SPARC
®
and Windows
and NetWare
®
is a registered trademark of SPARC International, Incorporated. SPARCstation™ is a trademark of SPARC
®
are registered trademarks of Microsoft Corporation.
®
are registered trademarks of Novell, Incorporated.
International, Incorporated, licensed exclusively to Sun Microsystems, Incorporated.
®
Sun
, Sun Microsystems
®
, and Sun Microsystems Computer Corporation
®
are registered trademarks of Sun
Microsystems, Incorporated.
®
UNIX
is a registered trademark in the US and other countries, licensed exclusively through X/Open Company Limited.
Other marks are trademarks or registered trademarks of the companies with which they are associated.
®
PCL
is a registered trademark of Hewlett-Packard Corporation.
PANTONE
®
Colors generated by Phaser color printer are four- and/or three-color process simulations and may not match
PANTONE-identified solid color standards. Use current PANTONE Color Reference Manuals for accurate colors.
PANTONE Color simulations are only obtainable on this product when driven by qualified Pantone-licensed software
packages. Contact Pantone, Inc. for a current list of qualified licensees.
All trademarks noted herein are either the property of Tektronix, Inc., Pantone, Inc., or their respective companies.
© Pantone, Inc., 1988.
Page 3

Contents
1 PhaserLink Remote Internet Printing Software Overview
How PhaserLink Remote Internet Printing Software works 1
Supported operating systems 2
Understanding PhaserLink Remote Internet Printing Software
fundamental concepts 2
Clients and servers 2
Email servers 2
PhaserLink Remote Internet Printing servers 3
Email accounts 3
Communication using TCP/IP 3
Communication on the Internet 4
Understanding the PhaserLink Remote Internet Printing process 4
Simple, recommended configuration 4
Alternative configuration 5
Overview of steps you need to complete 6
Understanding what printers can comprise a group 6
2 Setting Up and Configuring Printers from the PhaserLink Web Page
System requirements 7
Overview of setup and installation 8
Configuring your printers 8
Printer configuration for Phaser 850 printers 9
Printer configuration for Phaser 840, 740, 780, and 360 printers 9
Required fields on the PhaserLink Printing Settings web page 10
Fields required for email status messages 10
Optional fields on the PhaserLink Printing Settings web page 11
Applying your changes 11
3 Installing and Configuring PhaserLink Remote Internet Printing Software
Installing the client software 14
Getting to know the Destination Manager 15
Adding an Internet-connected printer 17
How the Internet-connected Printers list relates to the Windows Printers folder 21
Adding groups of Internet-connected printers 22
How the Internet-connected Groups of Printers list relates to the Windows Printers folder 23
Adding printers to a group 23
Deleting printers and groups 24
Requesting a printer’s status 25
Controlling the appearance of the Destination Manager 25
Displaying and suppressing the toolbar 25
Displaying and suppressing the status bar 25
Closing the Destination Manager 26
User Manual
iii
Page 4

4 Printing with PhaserLink Remote Internet Printing Software
Using the Print Redirector 28
Adding groups and printers to the destination list 28
Removing groups and printers from the destination list 28
Setting options for the current job 29
5 Using Advanced Features
Creating subgroups 31
Viewing and modifying printer properties 32
Viewing group properties 34
Renaming printers and groups 35
Receiving printer status email messages 36
Setting job options 36
Sharing Destination Manager information 37
Importing Destination Manager configuration files 38
Exporting Destination Manager configuration files 38
Printing your Destination Manager information 39
6 Getting Help
On-line support 41
Receiving email update notices 41
Customer Support Centers 42
TekSMART™ Knowledge Base 43
Index
iv
PhaserLink Remote Internet Printing Software
Page 5

Chapter
1
PhaserLink Remote Internet Printing Software Overview
PhaserLink Remote Internet Printing Software allows you to print to one or more
remote Tektronix Phaser color printers (such as a Phaser 360 color printer) over the
Internet, directly from Windows applications. The print jobs are sent as email
(electronic mail).
PhaserLink Remote Internet Printing Software provides the following key features:
The ability to send print jobs to a group of printers
■
Print services across firewalls and proxies
■
■
Status reporting using email messages
This chapter provides an overview of how PhaserLink Remote Internet Printing
Software works. Chapter 2 tells you how to install and set up the PhaserLink
Remote Internet Printing client software and your printers, while Chapter 3
discusses the basics of creating groups of Internet-connected printers, using the
client software. Chapter 4 explains how to send print jobs using PhaserLink Remote
Internet Printing Software; Chapter 5 covers more advanced topics. Chapter 6 tells
you how to find help if you need it.
How PhaserLink Remote Internet Printing Software works
PhaserLink Remote Internet Printing Software consists of two parts:
■
Client software installed on each user’s workstation or personal
computer. This software allows users to send print jobs from Windows
applications to remote Tektronix printers over the Internet.
The client software lets users set up their Internet-connected printers, and
create groups and subgroups of printers for easy distribution of print jobs.
The client software includes the following components:
■
Destination Manager , which enables you to create groups of
Internet-connected printers.
■
Print Redirector , which routes a print job to the appropriate
Internet-connected printer or group of printers.
PhaserLink Remote Internet Printing Server on a Phaser color printer.
■
Part of the printer software, this server processes print jobs from the clients.
User Manual
1
Page 6

E
PhaserLink Remote Internet Printing Software Overview
1
Supported operating systems
For this software release, PhaserLink Remote Internet Printing software is available
only for Windows 95.
Understanding PhaserLink Remote Internet Printing Software fundamental concepts
It is beyond the scope of this manual to explain in detail how to install email servers.
You can refer to your operating system’s documentation and your email
application’s documentation for further details. However, this section does supply
the fundamental concepts of email communication between client PCs and remote
printers, so you can properly install and configure PhaserLink Remote Internet
Printing Software.
Clients and servers
The first concept you should understand is client versus server. The following table
explains this concept in both general terms and in terms of PhaserLink Remote
Internet Printing Software.
Understanding Clients and Servers
General a piece of hardware or
PhaserLink Remote
Internet Printing Software
Email servers
Email servers receive email from and send email to clients. When the email moves
from client to server or vice versa, the email is transferred using a particular protocol
that defines how the message is handled. For PhaserLink Remote Internet Printing
Software, you need to have email servers that support two email protocols:
SMTP protocol : SMTP stands for Simple Mail Transfer Protocol. This
■
protocol is used for email communication over the Internet and for email
from clients to server.
Client Server
software that requests a
service from another piece
of hardware or software
a PC that sends a print job
to a remote printer
a piece of hardware or
software that provides a
service for a client
■
email servers
PhaserLink Remote
■
Internet Printing Server
on each remote printer
POP3 protocol : POP3 stands for version 3 of the Post Office Protocol. This
■
protocol is used for email communication from server to clients.
N
O
T
It is possible for one email server to support both the SMTP and POP3 email
protocols.
2
PhaserLink Remote Internet Printing Software
Page 7

E
Email accounts
PhaserLink Remote Internet Printing Software Overview
In most cases, POP3 email servers have a password associated with them that
enables you to control who can send email through that server. You’ll need to know
this password before you can configure a printer to be used with PhaserLink Remote
Internet Printing Software.
If you need more information on these email protocols, or information on where to
obtain SMTP and POP3 email servers for your operating system, contact your
System Administrator or operating system vendor.
PhaserLink Remote Internet Printing servers
PhaserLink Remote Internet Printing servers are part of the printer’s software. You
configure the server through the printer’s PhaserLink web page, where you set
printer options such as who is allowed to send jobs to the printer, how often the
printer polls the system for jobs, and who is responsible for fixing problems with the
printer.
Each client PC that is a member of an email network has an email account, which is
basically a name that uniquely identifies the client. This account is created using
whatever email application the network uses.
1
For printers to be used with PhaserLink Remote Internet Printing Software, each
printer client that will be sent email needs an email account on a POP3 email server.
For example, the printer’s email account name might be Phaser360 . When sending
email to a network client, use the form account-name @ mail-server-name . For example,
email addressed to the printer might be addressed to
Phaser360@wolf.mycompany.com .
N
O
T
When you create email accounts for printers that will receive email, be sure to
provide the printer’s gatew a y address (that is, the address of the router). Otherwise,
the printer cannot interact with network components outside its own subnet. If you
do not know the printer’s gateway address, contact your System Administrator.
Communication using TCP/IP
When setting up your printer as a PhaserLink Remote Internet Printing Software
client, you need to know certain information about the printer:
IP address
■
Network mask
■
Possibly a gateway address
■
Your System Administrator may have to set these parameters manually, or they may
already be set by a TCP/IP management application using a method such as RARP
(Reverse Address Resolution Protocol), DHCP (Dynamic Host Configuration
Protocol), or BOOTP (Bootstrap Protocol). For more information on configuring a
printer for TCP/IP communication, see your PhaserShare Networking Setup Guide
manual.
For more information about creating email accounts, refer to your email
application’s documentation.
User Manual
3
Page 8
PhaserLink Remote Internet Printing Software Overview
1
Communication on the Internet
The power of PhaserLink Remote Internet Printing Software lies in its ability to send
print jobs, in the form of email messages, over the Internet to remote printers. For
example, an employee in one company can send a print job to a printer at another
company. The reason this is possible is that the email is sent using the SMTP email
protocol, which can pass through firewalls. (A firewall is a network security
measure that keeps the security of the network from being compromised.)
Understanding the PhaserLink Remote Internet Printing process
The PhaserLink Remote Internet Printing process consists of various
communications between the client PC and the remote printer via email servers.
The exact process depends on how your email system is configured.
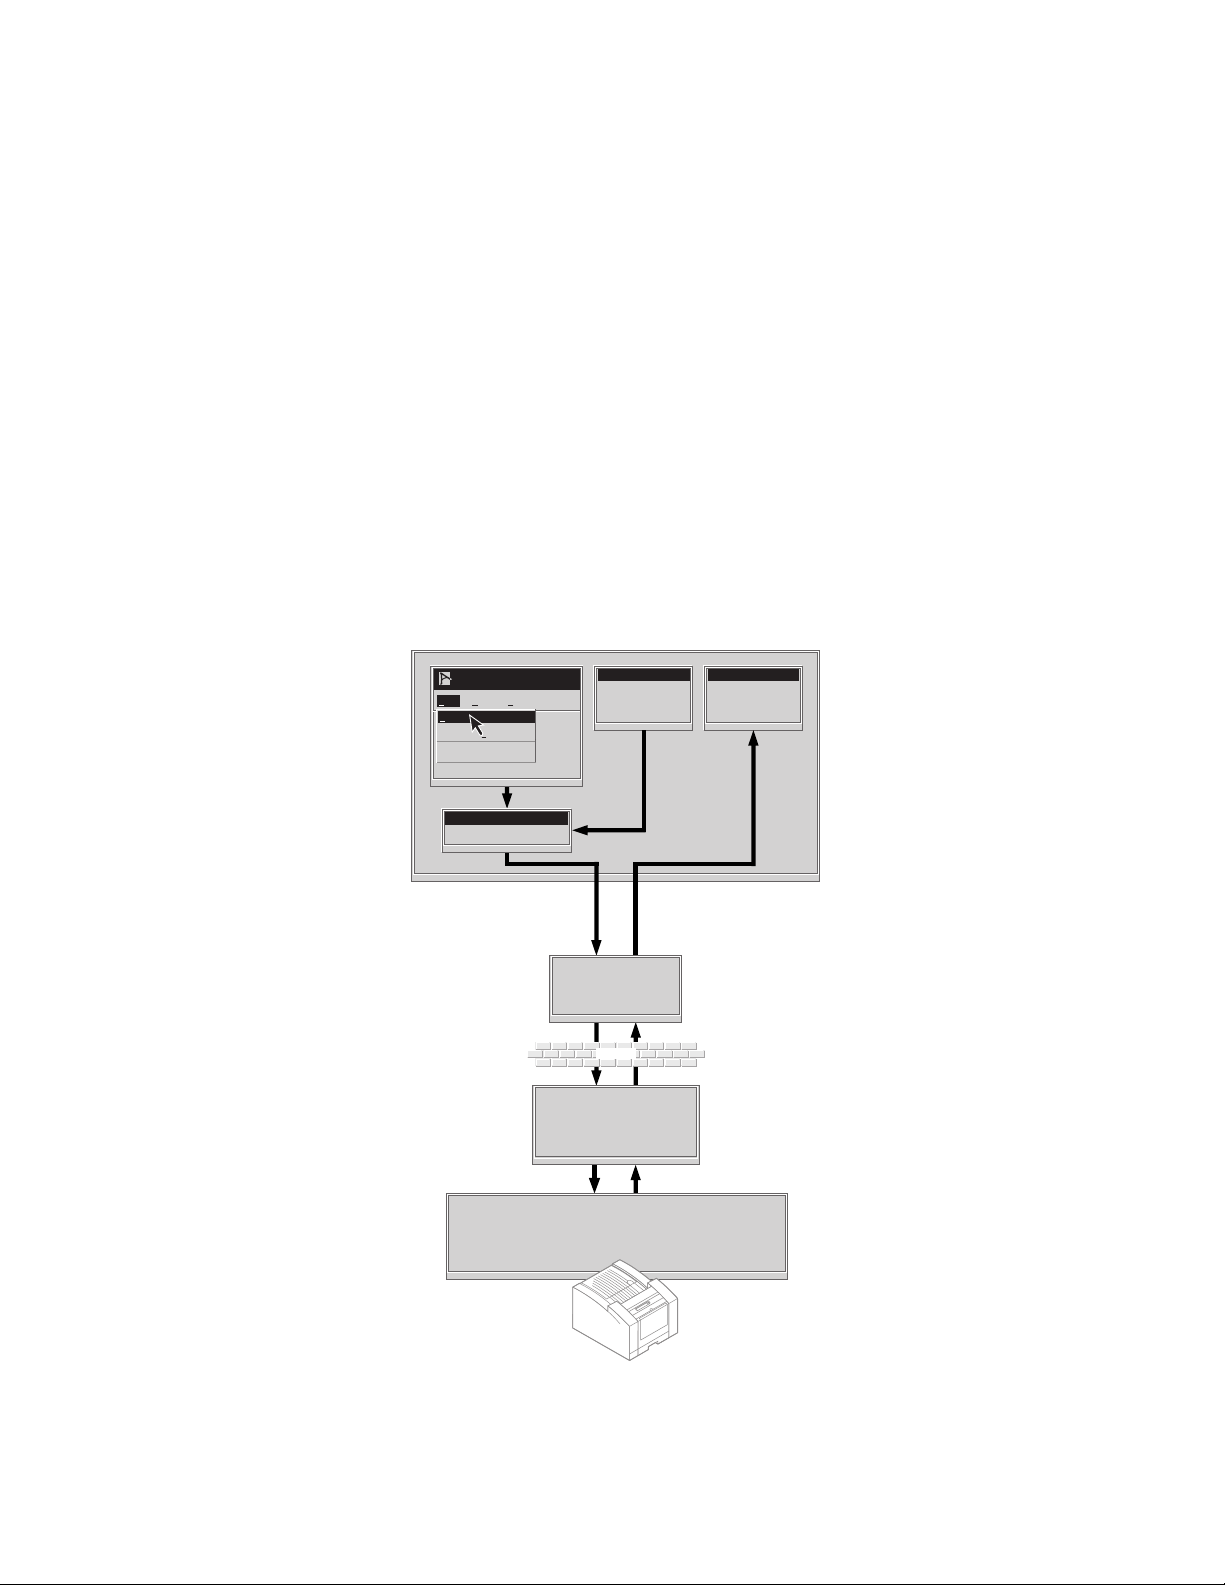
Simple, recommended configuration
The following illustration represents the simplest email system configuration used
by PhaserLink Remote Internet Printing Software:
A user executes a print
1.
command from a Windows
application to a remote
Tektronix printer or group
of printers.
The Print Redirector captures
2.
the print data, encapsulates
the print data into an SMTP
email message or messages,
then sends the email to the
client's SMTP email server.
The SMTP email server
3.
forwards the email (perhaps
through a firewall) to the POP3
email server connected to the
remote printer.
The POP3 email server stores
4.
the message(s) for distribution
to the printer.
The PhaserLink Printing
5.
Server on the Phaser color
printer retrieves the email
message(s) and prints it as a
PostScript print file.
Client = Windows PC
A Windows Application
File Edit View
Print Ctrl+P
Print Preview
Print Redirector
PhaserShare Series B network interface
Destination
Manager
SMTP email
server no.1
Firewall
POP3 email server
(also SMTP email
server no. 2)
Printer with
(e.g. Phaser 360)
User's email
application
7.
6.
Printer status messages are
forwarded to the client's SMTP
server, and thence to the
client's email application.
If requested by the user, the
printer sends status messages
back to the client through the
printer's SMTP email server.
4
PhaserLink Remote Internet Printing Software
Page 9
E
PhaserLink Remote Internet Printing Software Overview
In the illustration, “User’s email application” refers to how a PC receives email (such
as Eudora, MCI Mail, or another application).
O
T
N
While not required by PhaserLink Remote Internet Printing Software (and therefore
not shown in the illustration), a POP3 email server is usually required to view the
printer status messages.
In this simple configuration, the printer’s POP3 email server (from which the printer
receives email) has the same IP address as the printer’s SMTP email server (to which
the printer sends email).
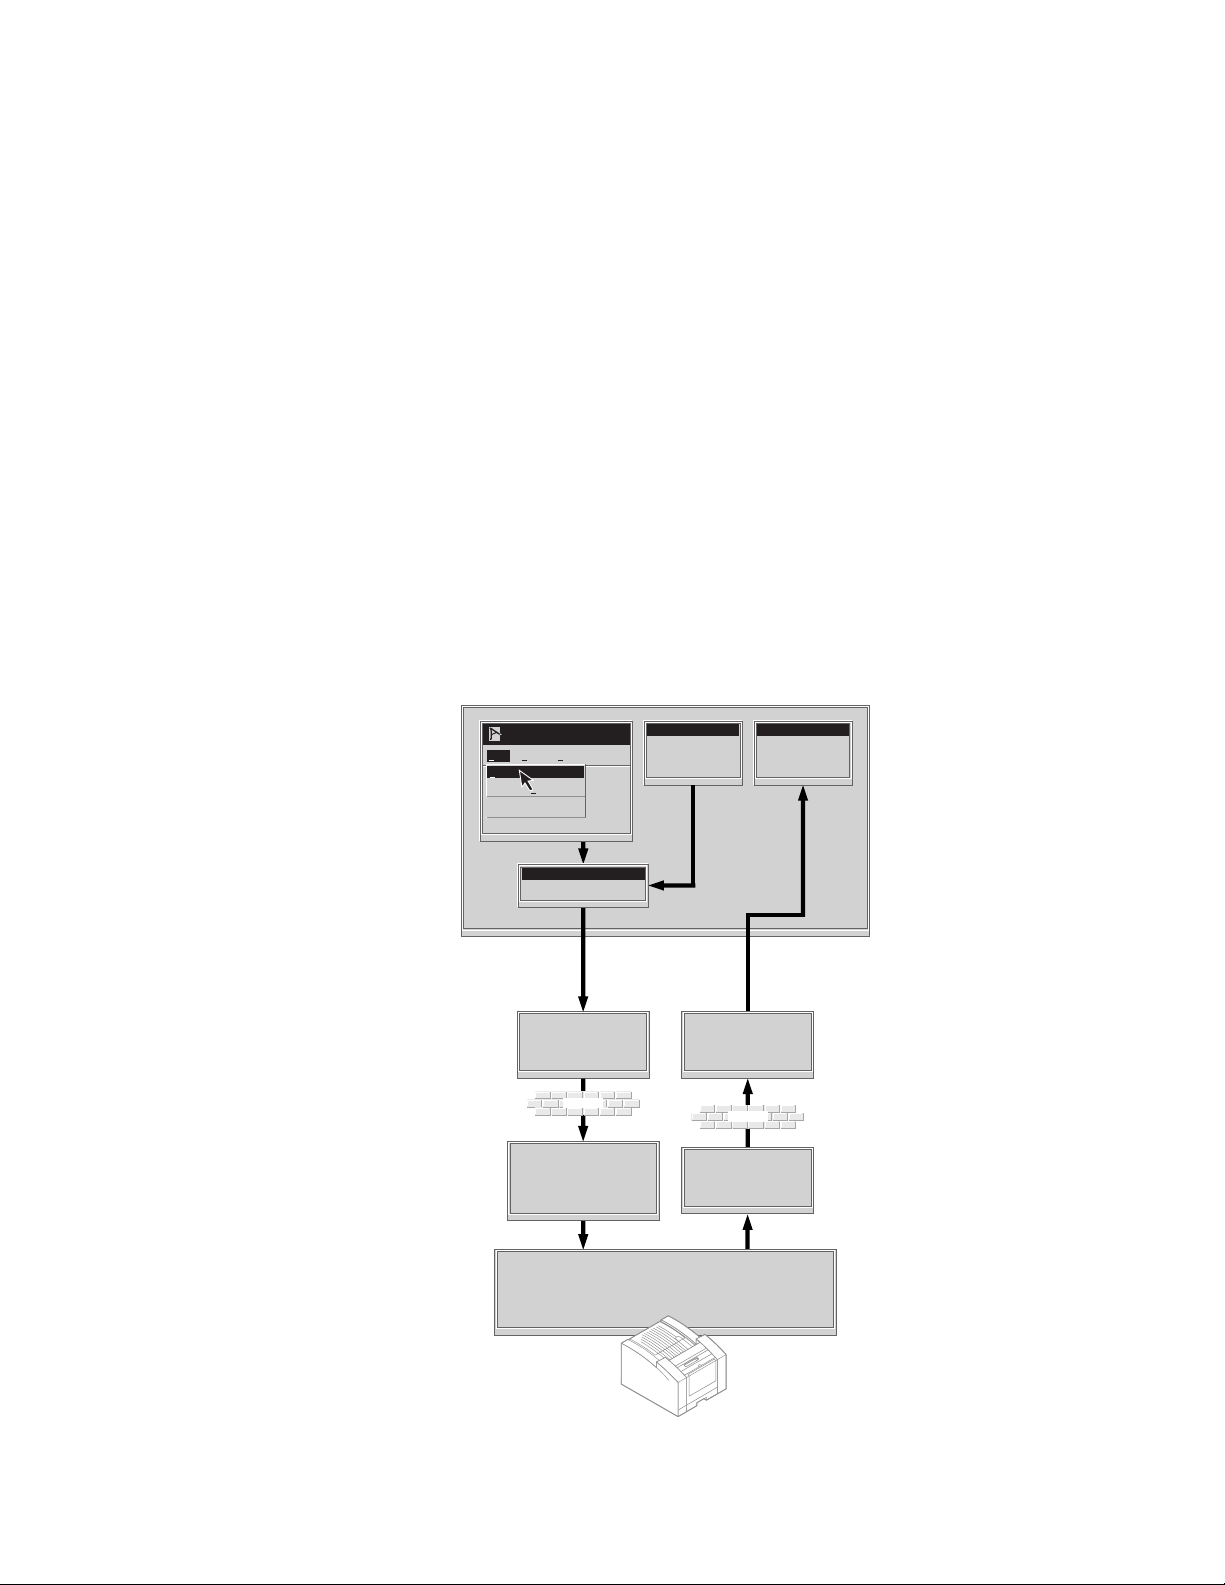
Alternative configuration
Your email system may not be as simple as the one shown in the diagram on page 4,
especially if you are printing to printers at a different company. The following
illustration may better represent your email system configuration. In this more
complicated setup, both the printer and the client are connected to two SMTP email
servers (for a total of four SMTP email servers). If your network is configured
somewhat like this, you’ll need to keep in mind the various IP addresses of the
different SMTP servers.
1
A user executes a print
1.
command from a Windows
application to a remote
Tektronix printer or group
of printers.
2.
The Print Redirector captures
the print data, encapsulates
the print data into an SMTP
email message or messages,
then sends the email to the
client's SMTP email server.
3.
The SMTP email server
forwards the email (perhaps
through a firewall) to the
POP3 email server connected
to the remote printer.
The POP3 email server stores
4.
the message(s) for distribution
to the printer.
The PhaserLink Printing Server
5.
on the Phaser color printer
retrieves the email message(s)
and prints it as a PostScript
print file.
Client = Windows PC
A Windows Application
File Edit View
Print Ctrl+P
Print Preview
Print Redirector
SMTP email
server no.1
Firewall
POP3 email server
(also SMTP
email server)
PhaserShare Series B network interface
Destination
Manager
Printer with
(e.g. Phaser 360)
User's email
application
SMTP email
server no.2
Firewall
SMTP email
server no.4
Printer status messages
7.
are forwarded to the client
through a separate SMTP
email server.
Printer status messages
6.
are sent back via the
printer's own SMTP email
server.
User Manual
5
Page 10
PhaserLink Remote Internet Printing Software Overview
1
The illustrations on page 4 and page 5 show only one client PC and one printer.
Now imagine hundreds of PCs and hundreds of remote Tektronix printers — you
begin to see the possible power (and complexity) of printing over the Internet.
Fortunately, the PhaserLink Remote Internet Printing client software makes it easy
to configure and organize the email server, printer IP addresses, and other
information that PhaserLink Remote Internet Printing Software needs.
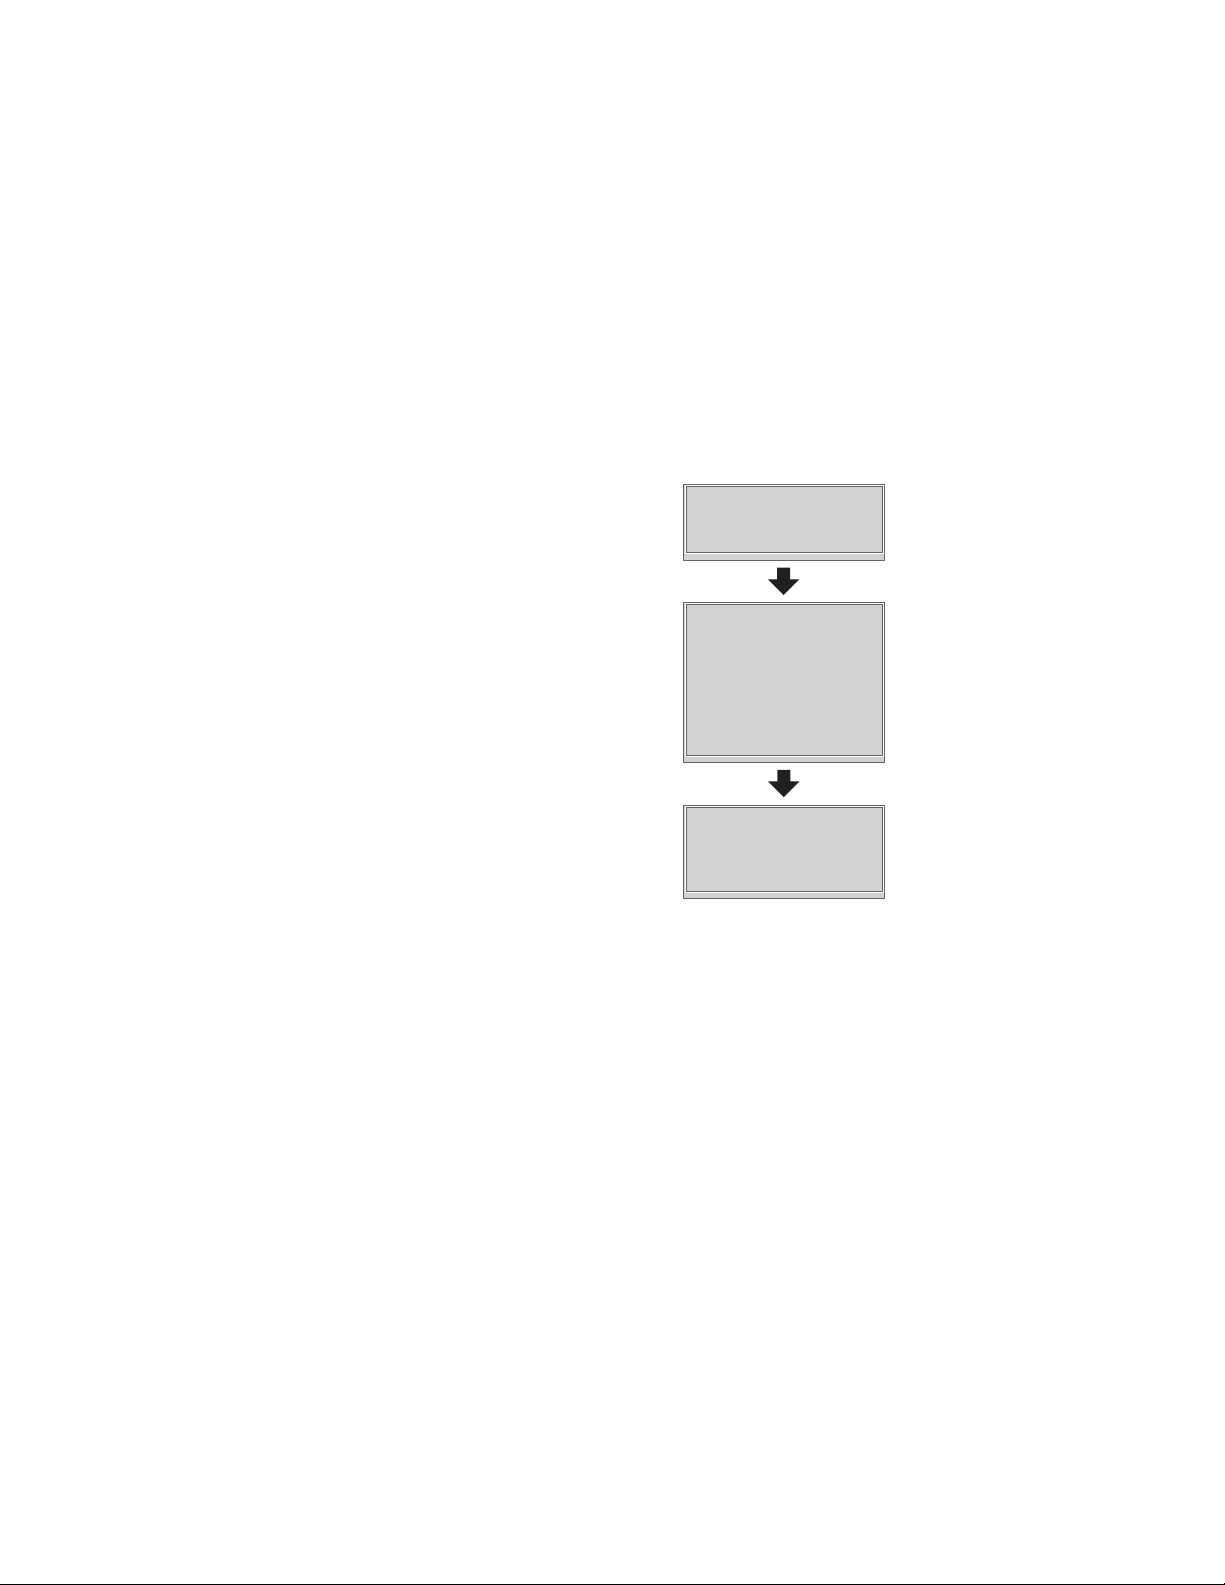
Overview of steps you need to complete
The following illustration explains the steps you need to complete before you can
use PhaserLink Remote Internet Printing Software:
1.
First, you need to create an
email account for each printer
on a POP3 email server.
Create email account
for each printer
2.
Next, configure each printer so
that it can receive email, as
described in "Configuring your
printers" on page 8.
PhaserLink Printing
3.
Finally, install the client software
and use it to add printers and
groups of printers to the
Destination Manager, as described
in Chapter 3.
N
O
T
E
Configuring the printers and adding printers and groups of printers to the
Destination Manager can be done in any order.
Install and configure
client software
Understanding what printers can comprise a group
When you create groups of printers, the printers in a group should use a similar
printer driver. Also, each printer needs a PhaserShare Series B network interface
card.
Configure
each printer
using
web page
on your PC
N O T
E
For this release of PhaserLink Remote Internet Printing Software, the only printer
available that meets the network interface requirement is the Phaser 360 color
printer.
6
PhaserLink Remote Internet Printing Software
Page 11

Chapter
2
Setting Up and Configuring Printers from the PhaserLink Web Page
This chapter tells you how to configure your network and printers so that
PhaserLink Remote Internet Printing Software will work. Then it explains how to
install the PhaserLink Remote Internet Printing client software. Typically, the
network and printer configuration tasks are performed by a System Administrator.
System requirements
For this software release, the client software is available only for Windows 95.
The client software requires an SMTP-capable email server/forwarder through
which the client software on your PC can send email.
Printers used with PhaserLink Remote Internet Printing Software need one of the
following:
■ PhaserShare Series B Ethernet Interface
■ PhaserShare Series B 10/100 Mbps Ethernet Card
■ PhaserShare Series B Token Ring Card
PhaserLink Remote Internet Printing Software on each printer requires a
POP3-capable email server from which it can retrieve email.
User Manual
7
Page 12

2
Setting Up and Configuring Printers from the PhaserLink Web Page
Overview of setup and installation
Before you can send print jobs to a printer through PhaserLink Remote Internet
Printing Software, complete these steps:
1.
Locate an SMTP email server to which the client software on your PC can
connect when sending email. For the fundamentals of email server
configuration, see “Understanding PhaserLink Remote Internet Printing
Software fundamental concepts” on page 2.
2.
Establish an email account on a POP3 email server for each printer you
want to use with PhaserLink Remote Internet Printing software. For the
fundamentals of email server configuration, see “Understanding
PhaserLink Remote Internet Printing Software fundamental concepts” on
page 2.
3.
Configure each printer you intend to use as a remote printer. This step is
described on page 8.
4.
Install the client software on each PC that will send print jobs to remote
printers. This step is described in “Installing the client software” on page 14.
Configuring your printers
Before you begin the printer configuration process, be sure you have identified the
following for each printer you will be configuring:
■ Numeric IP address (not the DNS name) of the POP3 email server to which
the printer will send email
■ Printer’s email ID on the POP3 email server
■ The POP3 email server password
If you do not know these items, refer to the discussion in “Understanding
PhaserLink Remote Internet Printing Software fundamental concepts” on page 2 for
more details, or contact your System Administrator or other source of technical
support at your company.
Configure each printer that you intend to use with PhaserLink Remote Internet
Printing Software. See the following topics for details:
■ “Printer configuration for Phaser 850 printers” on page 9.
■ “Printer configuration for Phaser 840, 740, 780, and 360 printers” on page 9.
8
PhaserLink Remote Internet Printing Software
Page 13

Setting Up and Configuring Printers from the PhaserLink Web Page
Printer configuration for Phaser 850 printers
Use the PhaserLink Remote Internet Printing web page. To access this web page,
follow these steps:
1.
Enter the printer’s URL into a web browser. The printer’s URL is:
http://printer’s-IP-address/
where printer’s-IP-address is the IP address or DNS name you
set during TCP/IP configuration.
■ Example using IP addess: http://192.1.1.1/
■ Example using DNS name:
http://Tektronix_Marketing/
2.
On the left side of the page, click Settings.
3.
Under INTERFACES, click Remote Internet Printing.
4.
Follow the instructions on the page for setting up Remote Internet Printing.
2
Printer configuration for Phaser 840, 740, 780, and 360 printers
Use the PhaserLink Printing web page. To access this web page, follow these steps:
1.
Open the web browser that you want to use.
2.
Enter the following URL: IP-address, where IP-address is the IP address for
the printer you are configuring.
3.
Click Configuration. Click View and Configure Interface Settings. Click
View and Configure PhaserLink Printing Settings.
N O T
E
To jump directly to the View and Configure PhaserLink Printing Settings page, you
can enter the complete URL: IP-address/netconfig_plprint.html.
Set the various options on the View and Configure PhaserLink Printing Settings web
page. The following sections give an explanation of the required and optional fields
for the Phaser 840, 740, 780, and 360 printers:
■ “Required fields on the PhaserLink Printing Settings web page” on page 10.
■ “Fields required for email status messages” on page 10.
■ “Optional fields on the PhaserLink Printing Settings web page” on page 11.
■ “Applying your changes” on page 11.
User Manual
9
Page 14

2
Setting Up and Configuring Printers from the PhaserLink Web Page
Required fields on the PhaserLink Printing Settings web page
■
POP3 Server IP Address:
for the printer’s POP3 email server. If this field is blank, PhaserLink
Printing Software looks for a POP3 server at the printer’s SMTP email
server IP address (the server that the printer sends email to).
For the printer to use the SMTP email server IP address, you must have
configured the printer’s email account with a gateway address; see “Email
accounts” on page 3 and your email system’s documentation for details.
■
POP3 User Name:
name on the POP3 email server. This is the same email address you enter
for the printer in the Destination Manager, as described on page 17.
■
POP3 Password:
POP3 password with the PhaserLink Printing job password. The POP3
password provides access to the POP3 email server; the PhaserLink Printing
job password provides access to the printer.
■
Printer Name:
printer name specified in the Destination Manager (as described on page
17).
Enter the printer’s email ID. This is an email account
Enter the printer’s POP3 password. Do not confuse the
Enter the printer name. The printer name should match the
Enter the numeric IP address (not a DNS name)
Fields required for email status messages
N O T
E
The SMTP fields are required only if you want email responses sent back from
PhaserLink Printing Software (such as error or job tracing messages). Because
these messages are useful, you should provide values for these fields.
The following fields relate to the SMTP email server to which the printer (not the
client PC) is connected. Refer to the diagrams on page 4 and page 5 and their
accompanying explanations for more information.
■
SMTP Server IP Address:
for the printer’s SMTP email server. This SMTP email server is the server
to which the printer will send status messages.
N O T
E
This machine must be on the same side of the firewall as the printer.
■
SMTP Domain Name:
(such as mycompany.com).
■
SMTP Reverse Path:
From: and Sender: email addresses in the email message are invalid.
Supplying a value for this field prevents the printer from being sent
bounced SMTP email. For example, you could set it to
phaserlinkmaster@mycompany.com. Whatever you set this field to, it
should be an email address that is always valid, so undeliverable email is
not returned to the printer.
Enter the numeric IP address (not a DNS name)
Enter the printer’s SMTP email server domain name
Enter an email address that will be used in case the
10
PhaserLink Remote Internet Printing Software
Page 15

Setting Up and Configuring Printers from the PhaserLink Web Page
Optional fields on the PhaserLink Printing Settings web page
■
PhaserLink Printing Enabled:
Printing Software with this printer. Choose No to disable PhaserLink
Printing Software for this printer.
■
POP3 Polling Interval:
Printing Software to check for new messages on the printer’s POP3 email
server. The default value is 3 minutes; the maximum value is 32767
minutes.
■
PhaserLink Printing Job Password:
has one. If you enter a password in this field, it should match the password
set for the printer in the Destination Manager (as described on page 19).
(Do not confuse this password with the POP3 password described on page
10, which provides access to the POP3 email server.)
■
Allow PhaserLink Printing Jobs from (Hosts):
the printer to selected hosts, enter the IP addresses of those hosts in this
field. Separate multiple hosts with a single space. The maximum number
of characters you can specify in this field is 256. This field is
case-insensitive. Leaving this field blank implies unrestricted access to the
printer.
Specify how often (in minutes) you want PhaserLink
Choose Yes if you want to use PhaserLink
Enter the password for the printer, if it
If you want to limit access to
2
■
Allow PhaserLink Printing Jobs from (Users):
the printer to selected users, enter the user IDs in this field. Separate
multiple IDs with a single space. The maximum number of characters you
can specify in this field is 256. This field is case-insensitive. Leaving this
field blank implies unrestricted access to the printer.
■
System Location:
360. If you are unsure of the printer’s location, contact your System
Administrator.
■
System Contact:
will receive the print jobs from this printer.
Enter the printer’s location, such as Building R, Room
Enter the name (not an email address) of the person who
If you want to limit access to
Applying your changes
1.
On the View and Configure PhaserLink Printing Settings web page, click
the Do/Apply button.
2.
If a PhaserLink password has been set, supply that password in the
Validation Password field on the View and Configure PhaserLink Printing
Settings web page. See your PhaserShare Networking Manual on your
printer’s software CD-ROM for more information.
User Manual
11
Page 16

2
Setting Up and Configuring Printers from the PhaserLink Web Page
12
PhaserLink Remote Internet Printing Software
Page 17

Chapter
Installing and
3
Configuring PhaserLink
Remote Internet Printing
Software
After you install the PhaserLink Remote Internet Printing client software, use the
Destination Manager to set up and organize Internet-connected printers and groups
of printers. Once you have completed this task, you can print to Internet-connected
printers and groups of printers from a Windows application, just as you would print
to any printer installed on your system. See Chapter 4 for details on printing.
N O T
E
Unless you are familiar with Internet addresses, passwords, and other details of
your printers, network, and Internet connection, you will probably want your System
Administrator to help you use the Destination Manager to set up your
Internet-connected printers.
Using the Destination Manager involves these steps:
1.
Add each available Internet-connected printer to the Internetconnected Printers list.
2.
Create groups of printers in the Internet-connected Groups of Printers list.
User Manual
13
Page 18

3
Installing and Configuring PhaserLink Remote Internet Printing Software
Installing the client software
Before you begin the installation process, be sure you have identified the following
for each PC on which you are installing the client software.
If you do not know these items, refer to the discussion in “Understanding
PhaserLink Remote Internet Printing Software fundamental concepts” on page 2 for
more details, or contact your System Administrator or other source of technical
support at your company.
■
The IP address of the SMTP email server to which the client software will
send email
enter this IP address. You can enter either the numerical IP address (such
as 123.45.67.89) or the DNS name (such as mycompany.com) for the email
server. If you specify a DNS name, be sure that the client is configured to
use DNS to resolve the DNS name to a numeric IP address. Also, be sure
that the client email account is configured to include the gateway address
(the IP address of the router).
■
The email ID of the person who will receive status messages about the email
print jobs
this email address. For example, the ID might be somebody@
mycompany.com.
: When prompted for the SMTP Hostname during installation,
: When prompted for the Administrative E-mail Address, enter
1.
Start Windows on your workstation.
2.
Insert the printer’s CD-ROM into your computer’s CD-ROM drive.
3.
The CD-ROM is auto-running. If you have this feature turned off, run the
file SETUP.EXE, using the Windows Run dialog box. (To access the Run
dialog box, click on the Start button, then click on Run.)
4.
Click Install Printer Driver.
5.
At the Select Installation Type dialog box, select Custom Install.
6.
In the Choose Components and Sub-components dialog box, check the
boxes for Drivers and Remote Printing. Select other options as desired.
7.
Follow the instructions displayed on the screen to finish the installation.
From a default installation, you can launch the Destination Manager by selecting
Start > Programs > Tektronix PhaserLink Remote Internet Printing > Destination
Manager. The installation process creates on your desktop a shortcut to the
Destination Manager.
N O T
E
If you need to uninstall PhaserLink Remote Internet Printing Software, select Start
> Programs > Tektronix PhaserLink Remote Internet Printing > unInstall
PhaserLink Remote Internet Printing. This uses the standard Windows
InstallSheild uninstall program.
14
PhaserLink Remote Internet Printing Software
Page 19

Installing and Configuring PhaserLink Remote Internet Printing Software
Getting to know the Destination Manager
From a default installation, you can launch the Destination Manager by selecting
Start > Programs > Tektronix PhaserLink Remote Internet Printing > Destination
Manager. The Destination Manager opens, ready for your input. (See your
operating system documentation for details on how to open program groups and
launch applications.)
Before you begin to work with the Destination Manager, it will be helpful to
understand the various sections of the window.
As with most Windows applications, there is a menu bar at the top of the window
and a toolbar beneath the menu bar.
Explanation of the Destination Manager tools
Tool Meaning Tool Meaning
3
Add a printer to the
Internet-connected
Printers list
Import existing
information into the
Destination Manager
Print the Destination
Manager information
Display
context-sensitive
help for the
Destination Manager
window
Create a new
group of printers
Export all or a
portion of your
Destination
Manager
information to
another file
Display the help
menu
You can choose not to display the toolbar; see “Displaying and suppressing the
toolbar” on page 25 for instructions.
User Manual
15
Page 20

3
Installing and Configuring PhaserLink Remote Internet Printing Software
The main part of the Destination Manager window displays information about the
Internet-connected printers and groups of printers available to you. The window is
divided into two parts: a left pane and a right pane, similar to how the Windows
Explorer is divided. Initially, the Destination Manager shows only the information
in the following illustration:
After you add printers and groups, the left pane lists all printers and groups; the
right pane displays different information, depending on what you select in the left
pane:
■ If a printer is selected in the left pane, the right pane displays the printer
information, such as name and description.
■ If a main group is selected in the left pane, the right pane displays any
subgroups and printers that are members of that group.
■ If a subgroup is selected in the left pane, the right pane displays the
printers that are members of that subgroup. (See “Creating subgroups” on
page 31 for instructions on creating subgroups.)
At the bottom of the Destination Manager window is a status bar. This area displays
messages, such as information about the tools on the toolbar. You can choose
whether this status bar is displayed; see “Displaying and suppressing the status
bar” on page 25 for instructions.
If you need help while using the Destination Manager, access on-line help by
clicking Help in the menu bar, or clicking the Help tool on the toolbar.
16
PhaserLink Remote Internet Printing Software
Page 21

Installing and Configuring PhaserLink Remote Internet Printing Software
Adding an Internet-connected printer
It is important to tell the Destination Manager about an Internet-connected printer
before you try to send jobs to the printer. To add a printer to the Internet-connected
Printers list, follow these steps:
1.
Start the Destination Manager.
2.
In the main menu, click File. Next, click New. Now click Add Printer.
Alternatively, click the New Printer tool on the toolbar. This opens the Add
Printer Wizard. Click Next.
3
3.
In this dialog box, enter the printer name and the printer email address.
Use a descriptive name, such as 1st Floor 360 or Oslo 360. This is the
printer name that appears in the Destination Manager window shown on
page 16. Click Next.
User Manual
17
Page 22

3
Installing and Configuring PhaserLink Remote Internet Printing Software
4.
In this dialog box, choose a printer driver for the printer. Click the down
arrow next to the entry field, and select the appropriate printer driver for
the printer.
If the driver you want to use is not listed, click New Driver. In the
resulting dialog box, navigate to the folder that contains the driver you
want to use, click the driver’s name, then click Select. Now the driver
appears in the drivers list; click the driver’s name to select it.
N O T
E
The Add Printer Wizard looks for .INF files (not .PPD) files, so be sure to select the
appropriate .INF file (such as tek.inf) for the printer driver you want to use.
Click Next.
18
PhaserLink Remote Internet Printing Software
Page 23

Installing and Configuring PhaserLink Remote Internet Printing Software
5.
This dialog box prompts you for the following information:
■
Printer Description:
Enter a text string that describes the printer. For
example, you might enter Phaser 360 color printer in our Oslo,
Sweden office. The text string can be a maximum of 180 characters.
■
Default Recipient:
Enter the name of the person who is to receive the
print job. This information is printed on a banner page that
accompanies the print job. (A banner page is a page that precedes the
actual print job.)
■
Recipient Location:
Enter a text string that describes the physical
location of the Default Recipient. This information is printed on a
banner page that accompanies the print job.
■
Printer Passw or d:
Enter the password for the printer. If the printer has
no password, leave this field blank. This password should match the
PhaserLink Printing Job Password entered in the printer via
PhaserLink Software.
■
Confirm Password:
■
Banner Page Required and Trailer Page Required:
Enter the printer password again.
appropriate for jobs printed on this printer. (A trailer page is similar to
a banner page, except that trailer pages are printed after the print job.)
3
Select one or both, as
■
Message Size Limit in Kb:
Select the check box and enter a value in the
field. The message size limit is the maximum number of bytes a
message can contain.
Various components of the network and Internet communication
configuration can affect message size limits. For example, any firewalls
the message passes through may have message size limits, as may the
Internet Service Provider the Internet connection uses; set this value
between 2 to 100 Kbytes. However, the value you use will be unique to
your email system. If you are unsure of the message size limits for
your system, you may have to perform some trial messages until you
find the cut-off limits.
Click Next.
User Manual
19
Page 24

3
Installing and Configuring PhaserLink Remote Internet Printing Software
6.
This screen summarizes all the information you have supplied. Verify that
all fields are correct. If not, use the Back button to return to the appropriate
screen and correct the information.
7.
When all the information is correct, click Finish.
If you clicked New Driver in Step 4, a dialog box appears, asking you to
select the appropriate .PPD file for the driver you selected. Click the driver
name, then click OK. This dialog box does not appear if you did not click
New Driver in Step 4.
20
PhaserLink Remote Internet Printing Software
Page 25

Installing and Configuring PhaserLink Remote Internet Printing Software
When you’ve completed these steps, the printer is listed in the Internetconnected Printers list. If necessary, click the plus sign (+) next to the list to expand
the list (or double-click the list name). Your display should look similar to the
following illustration:
3
Repeat these steps for each Internet-connected printer you want to add. You can add
printers at any time; you do not have to add them all at once.
How the Internet-connected Printers list relates to the Windows Printers folder
Each printer and group you add to the Internet-connected Printers list is also added
to the Windows Printers folder.
User Manual
21
Page 26

3
Installing and Configuring PhaserLink Remote Internet Printing Software
Adding groups of Internet-connected printers
Once you have added some Internet-connected printers, you are ready to create
groups of printers for distributing your print jobs.
A printer group consists of one or more Internet-connected printers, and can contain
subgroups. (For information on creating subgroups, see “Creating subgroups” on
page 31.) All printers in a group should use a similar printer driver.
1.
Start the Destination Manager.
2.
In the main menu, click File. Next, click New. Now click Add Group.
Alternatively, click the New Group tool on the toolbar. The New Group
dialog box appears:
3.
Enter the group’s name and the group’s description, then click OK. The
group is added to the Internet-connected Groups of Printers list. If
necessary, click the plus sign (+) next to the Internet-connected Groups of
Printers list to see the group (or double-click the list name). Your display
should look similar to the following illustration:
4.
Repeat these steps for each group you want to add. The next step is to add
printers to each group; see page 23.
22
PhaserLink Remote Internet Printing Software
Page 27

Installing and Configuring PhaserLink Remote Internet Printing Software
How the Internet-connected Groups of Printers list relates to the Windows Printers folder
Each group you add to the Internet-connected Groups of Printers list is also added
to the Windows Printers folder.
Adding printers to a group
A group can have an unlimited number of printers. All printers in a group should
use a similar printer driver.
1.
Start the Destination Manager.
2.
Select the printer you want to add to a group by clicking it in the
Internet-connected Printers list.
3.
Drag and drop the printer onto the group to which you want to add it. If
the added printer’s driver is incompatible with the group driver, a warning
dialog box appears. From this dialog box, you can choose one of the
following:
3
■ Cancel the add printer operation
■ Change the group’s driver to the added printer’s driver
■ Ignore the warning
If you choose to ignore the warning, the group’s printer driver is used,
regardless of what printers the job is actually printed on. Note that this may
cause your document to be printed incorrectly in some cases, if the group’s
printer driver does not support printing features used by the document.
4.
If necessary, click the plus sign (+) next to the group’s name (or
double-click the group’s name) to see the group’s printers. Your display
should look similar to the following illustration:
5.
Repeat these steps to add printers to all your groups. You can add a printer
to a group at any time; you do not have to add all printers at once.
User Manual
23
Page 28

3
Installing and Configuring PhaserLink Remote Internet Printing Software
Deleting printers and groups
You can delete a printer from a single group, or from the Internet-connected
Printers list (which also deletes the printer from all groups of which it was a
member). Similarly, you can delete a group. The scope of the deletion is as follows:
■ If you select a printer in a group then delete it, only that instance of the
printer is deleted. The printer remains in the Internet-connected Printers
list.
■ If you select a printer in the Internet-connected Printers list then delete it,
all instances of that printer in all groups is deleted. The printer is also
deleted from the Windows Printers folder.
■ If you select a main group then delete it, all instances of that group,
including subgroup instances, are deleted.
■ If you select a subgroup then delete it, only that instance of the group is
deleted. The main group remains.
1.
Start the Destination Manager.
2.
Select the instance of the printer or group you want to delete.
3.
In the main menu, click Organizer. Then click Delete Printer/Group.
Alternatively, right-click the printer or group you want to delete, then in
the popup menu, click Delete.
Depending on whether you selected a printer or a group, either the Delete
Printer or Delete Group dialog box appears. Here is a sample Delete Group
dialog box:
4.
Whichever dialog box appears, click OK to delete the printer or group, or
click Cancel to cancel the delete.
N O T
E
Always use the Destination Manager to delete Internet-connected printers instead
of using the Windows Printers window. If you use the Windows Printers window to
delete an Internet-connected printer, this change is not reflected in the Destination
Manager.
24
PhaserLink Remote Internet Printing Software
Page 29

Installing and Configuring PhaserLink Remote Internet Printing Software
Requesting a printer’s status
Before you send a print job to a printer, you may want to make sure that the printer
is available. You can get a printer’s status in the form of email messages from the
printer.
1.
Start the Destination Manager.
2.
Double-click the printer on which you want a status report.
3.
In the resulting dialog box, click Get Status. This causes an email message
to be sent to the email address you specified when you installed the
PhaserLink Remote Internet Printing Software.
N O T
E
If you want to change this email address, use the Communication Setup dialog bo x,
as described in “Receiving printer status email messages” on page 36.
Controlling the appearance of the Destination Manager
3
As with most Windows applications, you can adjust the appearance of the
Destination Manager, such as choosing whether the toolbar and status bar are
displayed.
Displaying and suppressing the toolbar
The toolbar contains icons that represent commonly used commands. By default,
the toolbar is displayed.
■
To suppress the toolbar:
View. Then click Toolbar. The check mark next to the Toolbar menu
choice disappears and so does the toolbar.
■
To redisplay the toolbar:
View. Then click Toolbar. A check mark next to the Toolbar menu choice
appears and the toolbar is displayed.
In the Destination Manager’s main menu, click
In the Destination Manager’s main menu, click
Displaying and suppressing the status bar
The status bar is a field at the bottom of the Destination Manager window that
displays a brief explanation of each tool icon in the tool bar, as well as other
messages. By default, the status bar is displayed.
■
To suppress the status bar:
View. Then click Status Bar. The check mark next to the Status Bar menu
choice disappears and so does the status bar.
In the Destination Manager’s main menu, click
■
To redisplay the status bar:
View. Then click Status Bar. A check mark next to the Status Bar menu
choice appears and the status bar is displayed.
In the Destination Manager’s main menu, click
User Manual
25
Page 30

3
Installing and Configuring PhaserLink Remote Internet Printing Software
Closing the Destination Manager
In the main menu, click File. Then click Exit. All changes you have made are
automatically saved.
26
PhaserLink Remote Internet Printing Software
Page 31

Chapter
4
Printing with PhaserLink Remote Internet Printing Software
Printing to a remote printer using PhaserLink Remote Internet Printing Software is
similar to printing on any printer installed on your system, except for one extra step:
after you select the printer and click Print in your application’s Print dialog box, the
Print Redirector appears.
In your Windows application, select the Print command.
1.
2.
In the Print dialog box, select the appropriate printer or group from the list
of printers.
3.
When the Print Redirector dialog box appears, modify the destination and
job parameters as necessary. See “Using the Print Redirector” on page 28
for more information.
4.
To send the print job, click OK.
5.
A message appears indicating that the print job was sent successfully.
N O T
E
If your print job is very large, you may have to break it up into smaller pieces and
send each piece separately. See the discussion of message size limits on page 19
for more information.
User Manual
27
Page 32

4
Printing with PhaserLink Remote Internet Printing Software
Using the Print Redirector
When the Print Redirector dialog box appears, you can change the distribution of
your print job. For example, you can send it to a different group or printer, or
change the job parameters.
The following illustration shows a sample Print Redirector window (yours will look
slightly different because you will have different groups and printers defined):
The right pane lists the printer or group you chose from the Print dialog box; the left
pane lists the printers and groups with same driver as the selected printer or group.
You can modify the destination list and the job parameters, as described in the
following sections. Once you have adjusted the destination list and job parameters
to your satisfaction, click OK to send the print job.
Adding groups and printers to the destination list
1.
In the left pane, select the group or printer.
2.
Click Add.
Removing groups and printers from the destination list
1.
In the right pane, select the group or printer.
2.
Click Remove.
28
PhaserLink Remote Internet Printing Software
Page 33

Printing with PhaserLink Remote Internet Printing Software
Setting options for the current job
You can override the default job options by clicking the Job Options button; this
opens the Job Options dialog box:
In this dialog box, you can change the three types of status email messages you
receive:
■ Job Printed: Sends a status message only when the print job has finished.
■ On Error: Sends a status message if the printer encounters an error
condition (such as out of paper).
4
■ Trace Job: Sends status messages indicating the following:
■ The printer receives a piece of split mail
■ The printer has received the entire set of split mails
■ Printer status
■ Job done
■ On error.
Trace Job is used mainly by the System Administrator to debug a job in
case of errors.
The job description appears in the Job Description field. You can modify this name
if you want; the value you enter can be a maximum of 80 characters. Although
filling in this field is not required, it is recommended, because this name identifies
the job in status messages.
The values you select in the Job Options dialog box from the Print Redirector
override any job option settings you have made via the Job Options dialog box
accessed through the Organizer menu in the Destination Manager.
When you have chosen the settings you want, click Apply or OK:
■ Apply sets the options for the current job and also changes the default
Destination Manager configuration file option settings. That is, the next
time you access the Job Options dialog box from the Destination Manager
Organizer menu, the options will reflect the changes you made from the
Print Redirector.
■ OK affects only the current job; it does not affect the default job option settings.
N O T
E
If Destination Manager is running at the same time you click Apply in the Job
Options dialog box from the Print Redirector, whichever application updated the
configuration file last has precedence.
User Manual
29
Page 34

4
Printing with PhaserLink Remote Internet Printing Software
30
PhaserLink Remote Internet Printing Software
Page 35

Chapter
5
Using Advanced Features
Chapter 3 provided the basic information about using the Destination Manager.
This chapter discusses more advanced tasks, such as creating subgroups and
modifying printer properties. Do not attempt the tasks covered in this chapter until
you have fully mastered the earlier chapters of this book.
Creating subgroups
A group of printers can contain a subgroup of printers. A subgroup must already
exist as a main group as well. To add a subgroup to a group, follow these steps:
1.
Start the Destination Manager.
2.
Select the group you want to add as a subgroup by clicking it in the
Internet-connected Groups of Printers list.
3.
Drag and drop the group you want to add onto the target group. If
necessary, click the plus sign (+) next to the main group to see the printers
and subgroups (or double-click the group name). Your display should look
similar to the following illustration:
4.
Repeat these steps to add other subgroups to groups.
N O T
E
Before you can add a subgroup to a group, the subgroup must contain at least one
printer. All printers in a subgroup should use similar printer drivers.
User Manual
31
Page 36

5
Using Advanced Features
Viewing and modifying printer properties
1.
Start the Destination Manager.
2.
In the Internet-connected Printers list, select the printer.
N O T
E
As an alternative to Steps 1 and 2, you can double-click a printer in the
Internet-connected Printers list.
3.
In the main menu, click Organizer. Then click Properties. Alternatively,
right-click the printer; then in the popup menu, click Properties. This
displays the General Info tab of the Printer Properties dialog box. Here,
you can determine or change such basic printer properties as printer name,
printer email, default recipient, and so on. You can also click Get Status to
receive an email message that tells you the printer status. (For more
instructions on receiving printer status messages, see “Receiving printer
status email messages” on page 36.)
32
PhaserLink Remote Internet Printing Software
Page 37

Using Advanced Features
4.
To see what groups and subgroups the printer is a member of, click the
Member Of tab in the Printer Properties dialog box. You cannot change the
group membership of the printer from this dialog box; this information is
read-only.
5
5.
The Advanced Info tab of the Printer Properties dialog box lets you set the
printer password. The Mail Info options control whether the printer prints
a banner and/or trailer page with each print job and set the message size
limit. For a full explanation of these options, see Step 5 of adding a new
Internet-connected printer to the Destination Manager, on page 19.
6.
To close the dialog box, click OK.
N O T
E
Always use Destination Manager to change an Internet-connected printer’s
properties. If you use the Windows Printers window to change an
Internet-connected printer’s properties (such as changing the port), these changes
are not reflected in the Destination Manager.
User Manual
33
Page 38

5
Using Advanced Features
Viewing group properties
1.
Start the Destination Manager.
2.
In the Internet-connected Groups of Printers list, click the group for which
you want to see properties.
3.
In the main menu, click Organizer. Then click Properties. Alternatively,
right-click the group name. In the popup menu, click Properties; this
opens the Group Properties dialog box:
4.
To close the dialog box, click OK.
34
PhaserLink Remote Internet Printing Software
Page 39

Renaming printers and groups
1.
Start the Destination Manager.
2.
In the Internet-connected Printers list, click the printer. Or, in the
Internet-connected Groups of Printers list, click the group.
3.
In the main menu, click Organizer. Then click Rename Printer/Group.
Alternatively, right-click the printer or group you want to rename. In the
popup menu, click Rename; this opens the Rename dialog box:
Using Advanced Features
5
4.
Edit the name of the printer or group, and the group’s description if
appropriate. When you are finished, click OK.
If you rename a printer, all instances of that printer in all groups are renamed. If you
rename a group, any instance of that group as a subgroup are renamed as well. In
addition to updating the information in the Destination Manager, PhaserLink
Remote Internet Printing Software also updates the information displayed in the
Windows Printers folder.
N O T
E
To change a printer’s description, edit the printer’s properties, as described in
“Viewing and modifying printer properties” on page 32.
User Manual
35
Page 40

5
Using Advanced Features
Receiving printer status email messages
Printer status messages are sent to the email address that was specified when the
PhaserLink Remote Internet Printing Software was installed. However, this
recipient can be changed by using the Communication Setup dialog box. Printer
status messages contain information about the status of the job — what information
is reported in the messages is specified in the Job Options dialog box, as described in
“Setting job options” on page 36.
1.
Start the Destination Manager.
2.
In the main menu, click Organizer. Then click Communication Setup; this
displays the Communication Setup dialog box:
3.
Enter the IP address or DNS name of your system email server. For
example, you could enter 123.45.67.89 or mycompany.com.
4.
Enter your email address.
5.
To close the dialog box, click OK.
Setting job options
You can control the type of printer status messages that are sent for a job through the
Job Options dialog box. To open this dialog box, in the main menu, click Organizer.
Then click Job Options; the dialog box appears:
36
PhaserLink Remote Internet Printing Software
Page 41

Using Advanced Features
A description of the print job appears in the Job Description field. The value of this
field can be a maximum of 80 characters.
You can choose to have printer status messages sent in one or more of the following
situations:
■ Job Done indicates you receive an email message when the job has finished
printing.
■ On Error indicates you receive an email message when there is a problem
with the printer, such as out of paper.
■ Trace Job indicates you receive an email message indicating the following:
■ The printer receives a piece of split mail
■ The printer has received the entire set of split mails
■ Printer status
■ Job done
■ On error.
5
Trace Job is used mainly by the System Administrator to debug a job in
case of errors.
Select the appropriate options for your print jobs, then click Apply or OK:
■ Apply causes the changes to take effect immediately, but does not close the
dialog box.
■ OK changes the default settings in the Destination Manager configuration
file, but these changes do not take effect until you restart the Destination
Manager. OK also closes the dialog box.
The options you set using this dialog box become the default values for all printers
and groups. You can override the option values for a particular print job from the
Print Redirector, as described in “Setting options for the current job” on page 29.
Sharing Destination Manager information
The Destination Manager information for each user is stored in a configuration file.
It is possible to share Destination Manager information by either importing someone
else’s information into yours, or exporting all or a portion of your information to a
new file for someone else to import.
One useful application of importing and exporting is when you are printing to
printers on a different network. If these printers have already been added to a
Destination Manager configuration file, then all you have to do is import that
information into your copy of Destination Manager — there is no need to recreate
and reconfigure the printers.
User Manual
37
Page 42
5
Using Advanced Features
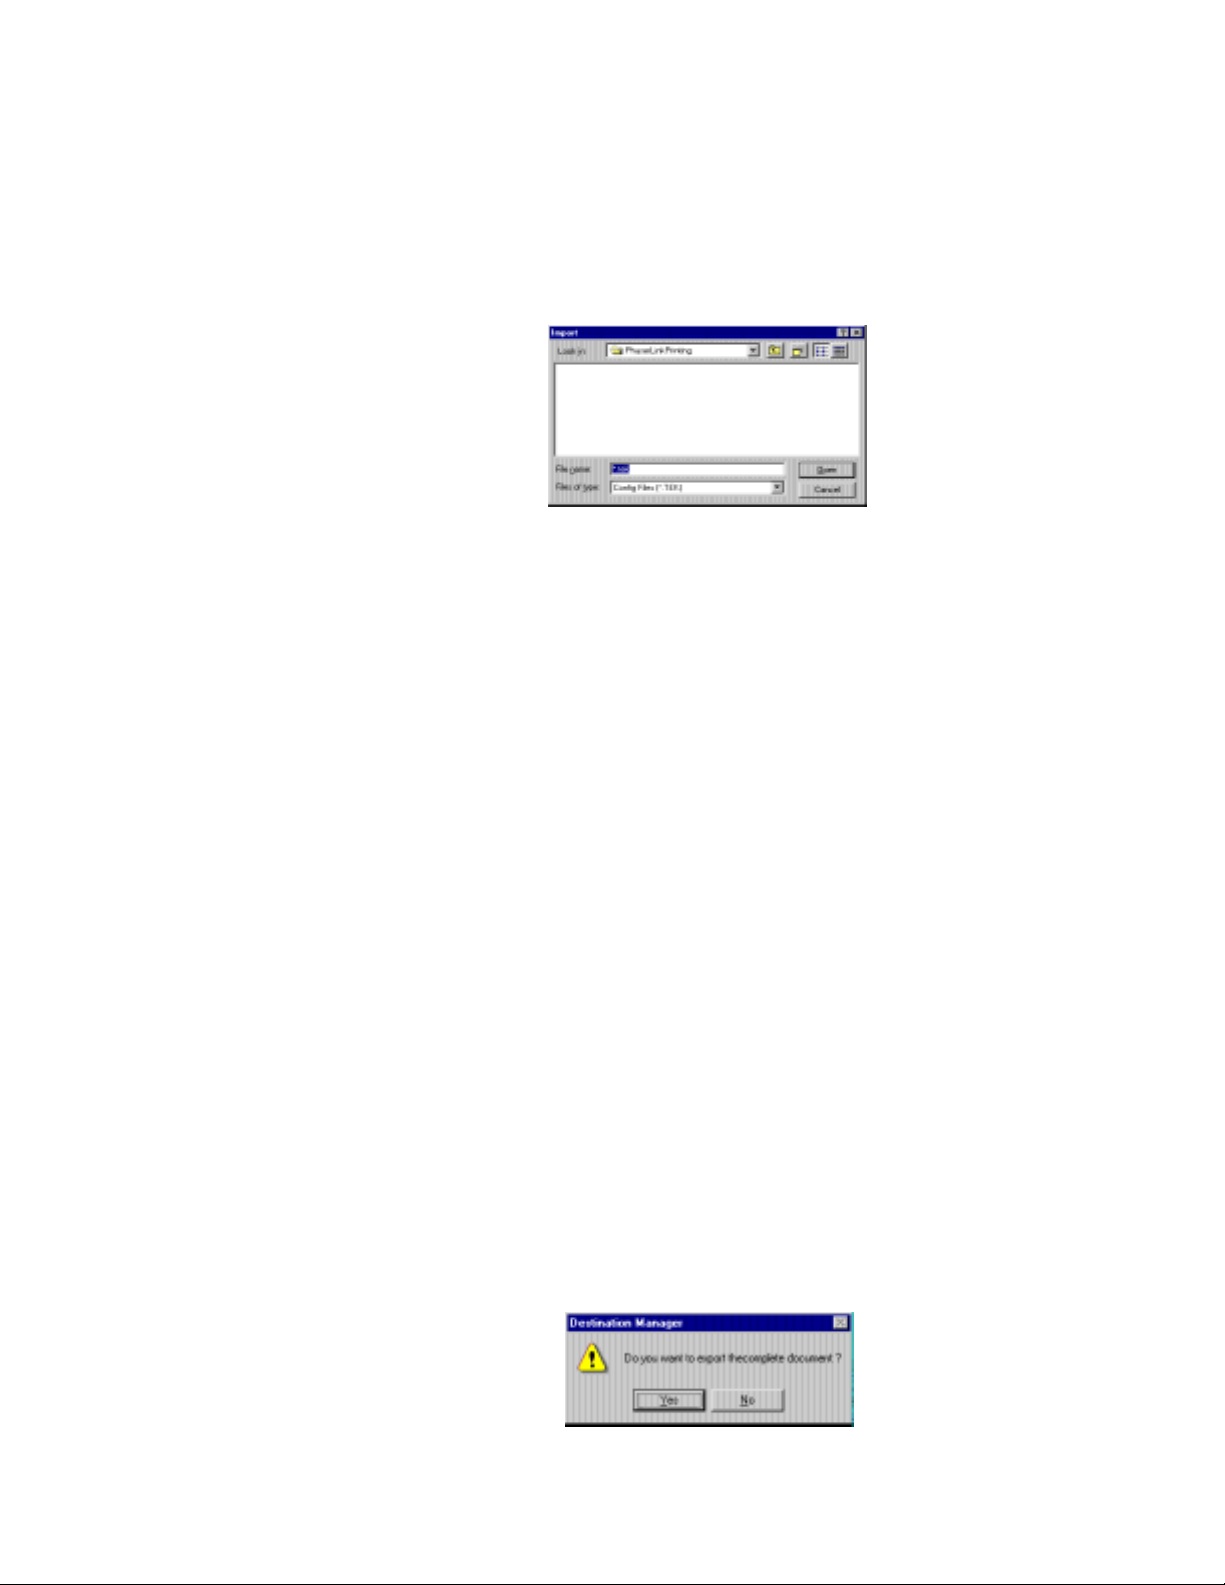
Importing Destination Manager configuration files
1.
Start the Destination Manager.
2.
In the main menu, click File. Then click Import. Alternatively, click the
Import tool on the toolbar; this opens the Import dialog box:
3.
Use the Import dialog box as you would use any Windows Open dialog
box. Once the File name field contains the name of the configuration file
you want to import, click Open.
N O T
E
The Import dialog box lists only those files with a .tek file extension. If you want to
import a file with a different extension, you must type the entire file name in the File
name field.
The imported configuration file becomes part of your configuration file. Any
duplicate groups and printers are ignored; only unique printers and groups are
added to your file.
N O T
E
You can import only entire configuration files; you cannot import a portion of a
configuration file.
Exporting Destination Manager configuration files
If you want to share all or a portion of your Destination Manager configuration file
with someone else, export it to a new file; then the other person can import that file.
1.
Start the Destination Manager.
2.
If you are exporting the entire file, skip to Step 3. If you want to export
only a portion of the file, select the printer or group you want to export.
You can select only one printer or one group at a time.
3.
In the main menu, click File. Then click Export. Alternatively, click the
Export tool on the toolbar; you are prompted by the following message:
38
PhaserLink Remote Internet Printing Software
Page 43

Using Advanced Features
4.
If you are exporting the entire file, click Yes. If you are exporting only a
portion of the file, click No. Next, the Export dialog box opens:
5.
Use the Export dialog box as you would use any Windows Save As dialog
box. Once the File name field contains the correct target file name, click
Save.
5
N O T
E
The default file extension for Destination Manager configuration files is .tek; you
can use other file extensions if you want.
The file is created, and can be imported by another Destination Manager user.
Printing your Destination Manager information
You may wish to keep a written record of the various groups and printers in those
groups.
1.
Start the Destination Manager.
2.
In the main menu, click File. Then click Print.
3.
Use the resulting Print dialog box as you would any Windows Print dialog
box. Once the print options are set to your satisfaction, click Print.
In the File menu, you can also click Print Setup to adjust your print options, as you
can do in most Windows applications.
User Manual
39
Page 44

5
Using Advanced Features
40
PhaserLink Remote Internet Printing Softwar
Page 45

Chapter
6
Getting Help
On-line support
Visit Tektronix’ color printer web site for the most up-to-date information about your
printer; view updated user documentation, download utility files, get answers to
frequently asked questions, find a list of Tektronix dealers in your area, or contact
customer support.
Tektronix Color Printer
web site
Documentation www.tek.com/Color_Printers/userdoc/introduction.html
Technical support www.tek.com/Color_Printers/support/colcare.html
Color use tips for novices
and experts
PhaserLink software www.tek.com/Color_Printers/support/phaserlink.html
TekSMART™ Knowledge
Base
www.tek.com/Color_Printers/
colorize.com
www2.tek.com/merlin/TKO
Anonymous FTP server ftp.tek.com/Color_Printers/
Email update notices www.tek.com/Color_Printers/support/subscribe.html
Receiving email update notices
Register your printer on-line and sign up to receive notification by email of new
printer drivers, accessories, and upgrades for your Tektronix Phaser color printer. To
subscribe to this free service, follow these steps:
1.
Point your web browser to the Tektronix web site:
www.tek.com/Color_Printers/support/subscribe.html
2.
From the pull-down list, enter your email address and select your model of
Phaser color printer.
3.
Click subscribe.
User Manual
41
Page 46

6
Getting Help
Customer Support Centers
For more information or for getting help with troubleshooting or servicing your
printer, contact your local Tektronix reseller, authorized service provider, or the
following resources worldwide:
Customer Support Centers
Australia
1-800-811-177
Austria
0660 5804
Belgium
02 720 9602
Brazil
0800 16 0220
Canada
1-800-835-6100
China
10-6235-1230
Denmark
(44) 533 444
Eastern Europe and
the Middle East
+44 1908 68187
Finland
0203 206 30
All other locations: Contact local Tektronix resellers and authorized service providers or
Tektronix offices.
For a list of resellers in your area, visit www.tek.com/Color_Printers/contacts
France
01 69 86 8137
Germany
0180 525 3535
Hong Kong
2585-6655
India (South Asia)
(91) 80-227-5577
Italy
02 45 287 000
Japan
81 3 3448 4872
Korea
2-528-5299
Luxembourg
400 847
Netherlands
(040) 267 0440
New Zealand
+61 2 9888 0100
Norway
(22) 723 801
Singapore (ASEAN)
1-800-356-5565
Spain
902 239 272
Sweden
(08) 299 071
Switzerland
155 9493
Taiwan
(02) 2757-1571
Thailand
2-645-4407
U.K.
(01) 908 681 707
U.S.
1-800-835-6100
42
PhaserLink Remote Internet Printing Software
Page 47

TekSMART™ Knowledge Base
The TekSMART Knowledge Base, researched and maintained by Tektronix’
Customer Support Center, is an extensive library of articles to help you care for and
get the most from your printer.
1.
From your web browser, access the TekSMART Knowledge Base web site:
www2.tek.com/merlin/TKO
Getting Help
6
2.
To refine the topic search, use the pull-down menus
3.
Click Search; a list of relevant articles appears.
4.
To view an article, click a title in the list.
User Manual
43
Page 48

6
Getting Help
44
PhaserLink Remote Internet Printing Software
Page 49

Index
A
Add Printer Wizard 17 to 20
Banner Page Required 19
Confirm Password 19
Default Recipient 19
Message Size Limit in Kb 19
Printer Description 19
Printer Driver 18
Printer Name 17
Printer Password 19
Recipient Location 19
Trailer Page Required 19
adding
groups 22
Internet-connected printers 17 to 21
printers to a group 23
subgroups 31
Allow PhaserLink Printing Jobs from (Hosts)
field 11
Allow PhaserLink Printing Jobs from (Users)
field 11
B
banner page
definition 19
Required 19
C
Client 2
client
email account 3
software, installing 14
closing Destination Manager 26
communication on the Internet 4
Communication Setup dialog box 25, 36
configuration files
exporting Destination Manager 38 to 39
extension 38, 39
importing Destination Manager 38
configuring
Destination Manager 13 to 26
printers 8 to 11
Confirm Password 19
customer support
customer support centers 42
on-line help 41
customer support centers 42
D
Default Recipient 19
Delete Group dialog box 24
Delete Printer dialog box 24
deleting, printers and groups 24
Destination Manager
adding subgroups 31
closing 26
configuration file extension 38, 39
configuring 13 to 26
controlling appearance of 25
exporting configuration files 38 to 39
importing configuration files 38
installing 14, 14 to??
modifying printer properties 32 to??
opening 15
overview of 13
printing information 39
receiving printer status messages 36
renaming printers and groups 35
sharing information 37 to 39
status bar, suppressing 25
toolbar, suppressing 25
tools 15
viewing printer and group properties 32 to 34
Do/Apply button 11
driver
choosing for new printer 18
incompatible warning 23
installing new 18
E
email accounts 3
client 3
printers 3
email protocols
POP3 2
SMTP 2
email servers 2, 3
email system configuration 4 to 6
email update notices 41
email update notices from Tektronix 41
Export dialog box 39
exporting Destination Manager configuration
files 38 to 39
User Manual
Index-45
Page 50

F
filename extension, Destination Manager
configuration files 38, 39
firewall
definition 4
relationship to printer’s SMTP email server 10
G
gateway address, printer 3
Get Status button 25
getting help 42
in Destination Manager 16
group
renaming ?? to 35
Group Properties dialog box 34
groups
adding 22
adding printers to 23
deleting 24
renaming 35 to??
viewing properties 32 to 34
H
help
in Destination Manager 16
on-line support 41
host list for printer 11
I
Import dialog box 38
importing Destination Manager configuration
files 38
Install New Driver 18
installing client software 14
Internet
communications on 4
Internet-connected Groups of Printers list 13
Internet-connected printers
adding 17 to 21
Internet-connected Printers list 13
interval, polling 11
J
Job Done email message 37
Job Options dialog box 36
Job Printed email message 29
L
large print jobs 27
M
message size
definition 19
limit on 27
Message Size Limit in Kb 19
N
network interface requirements, printer 6, 7
New Group dialog box 22
O
On Error email message 29, 37
on-line customer support 41
opening Destination Manager 15
operating systems, supported 2
overview
Destination Manager 13
installation and setup 8
PhaserLink Remote Internet Printing
Software 1 to 6
printing 27
P
password
PhaserLink Printing Job 11
POP3 10
printer 19
PhaserLink Printer Management Software
URL for the printer 9
PhaserLink Remote Internet Printing
Enabled field 11
Job Password field 11, 19
Server, configuring 9 to 11
Server, definition 3
Software, uninstalling 14
PhaserShare Series B
10/100 Mbps Ethernet Card 7
Ethernet Interface 7
Token Ring Card 7
polling interval 11
Index-46
PhaserLink Remote Internet Printing Software
Page 51

POP3
email protocol definition 2
Password field 10
Polling Interval field 11
Server IP Address field 10
User Name field 10
Post Office Protocol 2
print jobs, large 27
print jobs, tracing 29, 37
printer
adding Internet-connected 17 to 21
adding to group 23
configuring 8 to 11
deleting 24
description 19
email account 3
gateway address 3
modifying properties of 32 to??
name 17
network interface requirements 6, 7
password 19
polling interval 11
renaming 35
requesting status from 25
restricting access to specific hosts 11
restricting access to specific users 11
SMTP email server 10
status messages 10, 36
viewing properties of 32 to 34
printer driver
choosing for new printer 18
incompatible warning 23
installing new 18
Printer Name field 10
Printer Properties dialog box 32
Printers folder 21, 23, 35
printing
Destination Manager information 39
with PhaserLink Remote Internet Printing
Software 27 to 29
program group, Phaser Tools 14
properties
modifying printer 32 to??
viewing group and printer 32 to 34
protocols, email
POP3 2
SMTP 2
R
receiving
status messages 36
receiving email update notices 41
Recipient Location 19
registering your printer 41
registration, on-line 41
Rename dialog box 35
renaming printers and groups 35
requesting printer status 25
requirements, printer network interface 6, 7
S
server
definition 2
email 2, 3
PhaserLink Remote Internet Printing 3
sharing Destination Manager information 37 to 39
Simple Mail Transfer Protocol 2
SMTP
Domain Name field 10
email protocol definition 2
email server for client 14
email server for printer 10
Reverse Path field 10
Server IP Address field 10
split mails, tracing 29, 37
status
messages, types of 29, 36
receiving messages from printer 10, 36 to??
requesting printer 25 to??
status bar, suppressing in Destination Manager 25
status messages
receiving from printer ?? to 36
status, requesting printer ?? to 25
subgroups, adding 31
System Contact field 11
System Location field 11
system requirements 7
User Manual
Index-47
Page 52

T
TCP/IP parameters, setting 3
technical support, see customer support
toolbar, suppressing in Destination Manager 25
Trace Job email message 29, 37
trailer page
definition 19
Required 19
U
uninstalling PhaserLink Remote Internet Printing
Software 14
URL (Uniform Resource Locator)
PhaserLink Printer Management Software 9
URL, View and Configure PhaserLink Printing
Settings web page 9
user list for printer 11
V
Validation Password field 11
View and Configure PhaserLink Printing Settings
web page 9 to 11
optional fields 11
required fields 10
status message fields 10
URL 9
viewing printer and group properties 32 to 34
W
web page
on-line support 41
View and Configure PhaserLink Printing
Settings 9 to 11
Windows Printers folder 21, 23, 35
Index-48
PhaserLink Remote Internet Printing Software
 Loading...