

Page 1

Contents
Contents 1
Tektronix supplies and accessories 9
The front panel 14
Key 15
Printing a Menu Map 15
Print quality modes 16
TekColor™ color corrections 17
Paper tips 18
Supported page sizes and print area 19
Manual-feed printing 21
Supported media 21
Using the manual-feed slot for single-sided
printing 22
Manual-feed
Printing on envelopes 26
Guidelines for envelope printing 27
Printing envelopes from a Macintosh 27
Printing envelopes from Windows 30
Loading the Standard Paper/ Transparency Tray 31
Supported media 31
Loading the tray 32
Loading the High-Capacity Paper Tray Assembly 33
Supported media 33
Loading the tray 33
Loading the optional High-Capacity
Transparency/Label Tray 35
Supported media 35
Loading the tray 36
Printing on High Resolution Photo Paper 37
Printing on labels 38
39
special
ity media overview 24
Combined User and Troubleshooting Manuals
1
Page 2

Guidelines for printing on labels 39
Automatic two-sided printing 40
Binding preference 41
Loading letterhead paper for two-sided printing 42
Adding ink 44
Emptying the waste tray 46
Replacing the Maintenance Kit 48
Removing paper jams 50
Media Jam — Open Exit Cover to Clear 50
Media Jam — Open front cover to clear 53
Media Jam — Retry manual feed
54
Media Jam — Remove media (or upper) tray
to clear 55
Media Jam — Remove middle tray to clear 56
Media Jam — Remove lower tray to clear 56
Troubleshooting print quality 57
Light stripes or missing colors 57
Oil or ink smears 59
Ink streaks 60
Ink smears 62
Moving the printer 63
All moves 63
Preparing the printer for shipment 64
Getting help 65
Printer CD-ROM 65
Windows driver help system 65
Color Connection 66
Printer’s front panel 66
Internal printer pages 66
PhaserLink™ Software 67
Tektronix web site 67
TekSMART™ Knowledge Base 67
Other online services 68
2
Phaser 850 Color Printer
Page 3

Customer Support Centers 68
Printer Management 69
PhaserLink Printer Management software 69
Job Accounting 69
TekSMART™ Knowledge Base 69
Usage Profile 70
Fonts 71
Resident typefaces (PostScript) 71
Resident typefaces (PCL5C) 71
Downloading fonts 72
Downloading fonts from a Macintosh 73
Printing a list of resident fonts 74
From a Macintosh 74
From a PC or workstation 74
Image Smoothing 75
Quick Collate 76
Requirements 76
Separation Pages 77
PANTONE Colors 78
Methods of printing PANTONE Colors 78
PANTONE Colors from color selection books 78
Printer-specific PANTONE Colors 78
Installing the PANTONE Color files 79
From the Web 79
Printing the PANTONE Color Chart 80
Macintosh 80
PC 81
PhaserPrint Plug-in for Photoshop 82
Combined User and Troubleshooting Manuals
3
Page 4

Installing the plug-in: Macintosh 82
Installing the plug-in: Windows 83
Using the plug-in 84
Selecting options in the PhaserPrint dialog box 85
Number of copies 85
Print using (Macintosh) 85
Print using (Windows) 86
Printer model 86
Media size (selection) 86
Color Correction 86
Media 87
Quality 87
Rendering Intent 87
Compress Image Data 87
Fast preview 87
1st Page Preview 88
Image Smoothing 88
Stylized representation of the page 88
Scaling an image 89
Landscape orientation 89
Center images 89
Replicate images 89
Image size 89
Image separation 90
Number of images 90
Image layout 90
Media size (display) 90
Show color preview of image 90
Printer Utilities 91
Locating the files on the printer’s CD-ROM 92
Installing the utility files for Macintosh 92
Installing the files for PC 92
Locating files on the Tektronix World Wide Web site
93
4
Phaser 850 Color Printer
Page 5

Locating files on the Tektronix FTP server 94
Downloading files to the printer from a Macintosh 95
Using the Apple Printer Utility to download files
95
Using the Apple Printer Utility to perform other
tasks 96
Downloading files to the printer from a PC 97
Downloading files from Windows 3.1 97
Downloading files from Windows 95 / Windows
98 97
Downloading files from Windows NT 97
Downloading files if your printer is connected to a
Novell Netware network 98
Downloading files if your printer is connected
through PhaserPort 99
Downloading files if your printer is connected to
Windows NT 99
Advanced Printing Features for Phaser 850 Printers 100
Previewing with 1st Page Preview 100
Requirements 100
Use 1st Page Preview 100
Reset the timeout 101
Automatic tray switching 102
Front Panel Intensity 102
Intelligent Ready mode 102
Color Sampler Charts for Phaser 850 Printers 103
Overview 103
Color charts 104
Printing a color sampler chart from the Phaser 850
printer’s front panel 105
Printing the desired colors from an application 105
Printing the color sampler charts with utility files 106
From a Macintosh 106
Combined User and Troubleshooting Manuals
5
Page 6

From a PC or workstation 106
Troubleshooting Phaser 850 Printers 107
Useful tools 107
Printer CD-ROM 107
Windows driver help system 107
Color Connection 107
Printer’s front panel 107
Internal printer pages 108
PhaserLink™ Software 108
Tektronix web site 108
TekSMART™ Knowledge Base 108
Other online services 108
Front panel messages 109
Problems with automatic two-sided printing 113
Problems printing on labels 114
Labels are printed on the wrong side 114
Printing labels from Microsoft Word 114
Print Quality Problems 115
Printing problems 117
Preventing media jams 118
Turning the Startup Page on or off 119
From the printer’s front panel 119
From PhaserLink Printer Management software
119
From utility files 119
Protected mode for the front panel menu 120
Turning Sys/Start Job execution on or off 121
Using the front panel 121
Using utility files 121
Cleaning Phaser 850 Printers 122
Selecting the source for cleaning pages 122
Cleaning supplies 122
Light stripes on prints 123
6
Phaser 850 Color Printer
Page 7

Cleaning for oily streaks 126
Cleaning for ink smears: internal paper path 127
Cleaning for ink smears: paper-feed rollers 129
Cleaning for ink smears: paper-exit path 133
Cleaning for media tray jams 136
Cleaning the media-pick roller 136
Cleaning the separator pad 138
Cleaning for lower tray jams: paper-feed rollers 139
Regulatory Information for Phaser 850 Printers 141
Canadian EMC (Electromagnetic Compatibility)
regulatory standards 141
Declaration of conformity 142
FCC Class B device 143
Phaser 850 Printer Material Safety Data Sheets 144
MSDS for Silicone Oil 145
MSDS for Ink Sticks 147
MSDS for CleanTex® Alcopad 149
151
Specifications for Phaser 850 Printers 152
Index 155
Combined User and Troubleshooting Manuals
7
Page 8

8
Phaser 850 Color Printer
Page 9

Tektronix supplies and accessories
To order supplies and accessories, contact your local dealer or visit the
Tektronix web site:
www.tek.com/Color_Printers/products/supplies.html
ColorStix Ink
Item Part Number
3 Free Black sticks 016-1831-00
5 Cyan sticks plus 2 Free Black sticks 016-1825-00
5 Magenta sticks plus 2 Free Black sticks 016-1826-00
5 Yellow sticks plus 2 Free Black sticks 016-1827-00
2 Cyan sticks plus 1 Free Black stick 016-1828-00
2 Magenta sticks plus 1 Free Black stick 016-1829-00
Supplies
2 Yellow sticks plus 1 Free Black stick 016-1830-00
Tektronix Paper
Item Size Description Part Number
Premium Color
Printing Paper
Premium Color
Printing Paper
High Resolution
Photo Paper
High Resolution
Photo Paper
Premium Cover A/Letter (U. S.)
Premium Cover A4 (Metric)
A/Letter (U. S.)
8.5 x 11 in.
A4 (Metric)
210 x 297 mm
A/Letter (U. S.)
8.5 x 11 in.
A4 (Metric)
210 x 297 mm
8.5 x 11 in.
210 x 297 mm
500 sheets
24-lb. bond, 90 g/m
500 sheets
24-lb. bond, 90 g/m
25 sheets
170 g/m
25 sheets
170 g/m
100 sheets
60-lb. cover, 160 g/m
100 sheets
60-lb. cover, 160 g/m
2
2
016-1368-00
2
016-1369-00
2
016-1808-00
016-1809-00
016-1823-00
2
016-1824-00
2
User Guide
9
Page 10

Transparencies
Item Size Description Part Number
Premium A/Letter (U. S.)
Premium A4 (Metric Letter)
Supplies
Standard A/Letter (U. S.)
Standard A4 (Metric Letter)
8.5 x 11 in.
210 x 297 mm
8.5 x 11 in.
210 x 297 mm
50 sheets 016-1724-00
50 sheets 016-1725-00
50 sheets 016-1720-00
50 sheets 016-1721-00
Color Printing Labels
Size Description Part Number
A/Letter (U. S.)
8.5 x 11 in.
A/Letter (U. S.)
8.5 x 11 in.
A4 (Metric Letter)
210 x 297 mm
A4 (Metric Letter)
210 x 297 mm
100 sheets / 30 labels per sheet
(each 1 x 2-5/8 in.)
100 sheets / 6 labels per sheet
(each 3-1/3 x 4 in.)
100 sheets / 14 labels per sheet
(each 38.1 x 99.1 mm)
100 sheets / 8 labels per sheet
(each 67.1 x 99.1 mm)
Maintenance Kit
016-1812-00
016-1813-00
016-1814-00
016-1815-00
Item Part Number
Extended replacement maintenance roller and counter
(Life: up to 45,000 images or two years, which ever comes
first.)
Standard replacement maintenance roller and counter
(Life: up to 10,000 images or two years, which ever comes
first.)
10
Phaser 850 Color Printer
016-1834-00
016-1822-00
Page 11

Replacement items
Item Part Number
Maintenance Waste Tray (replacement) 436-0370-01
Maintenance Drawer (replacement) 436-0383-00
Rapid Release Guide 650-4153-00
Additional memory
Features Part Numbers
Improved performance
■
■
Up to 256 Mbytes maximum
The printer has two memory slots. When adding memory, you can use
64-Mbyte and 128-Mbyte DIMMs in combination.
64 Mbytes: ZMB64
■
■
128 Mbytes: ZMB128
Trays
Size Description Part Number
Standard Paper/Transparency Tray A/Letter (U. S.) 436-0330-00
Standard Paper/Transparency Tray A4 (Metric Letter) 436-0332-00
High-Capacity Transparency/
Label Tray
High-Capacity Transparency/Label
Tray
A/Letter (U. S.) 436-0336-00
A4 (Metric Letter) 436-0338-00
Cleaning Kit
Item Part Number
Package of 5 alcohol wipes 016-1845-00
User Guide
11
Page 12

High-Capacity Paper Tray Assembly
Features Part Numbers
■
Increased paper-printing capacity
■
Increased printing versatility and
convenience
■
Up to two High-Capacity Paper Tray
Assemblies can be used
Printer Station
Features Part Number
Ergonomic surface height
■
■
Provides storage for supplies
Internal IDE Hard Drive
■
U. S.: Z840LTA
■
Metric: Z840LTA Option 01
ZCARTA
Features Part Number
■
Required for collation
Extends font capacity
■
Z850HD
DP Feature Set
Features Part Number
High Resolution / Photo print-quality
■
mode, 1200 x 600 dpi
Automatic two-sided printing
■
capability
■
Adds 32 Mbytes of memory (64 Mbytes
total)
1st Page Preview functionality
■
■
Quick Collate functionality (requires a
hard drive)
■
Page Pipelining
12
Z850FP
Phaser 850 Color Printer
Page 13

PhaserShare® Network Card
Features Part Number
■
Easy to install
■
Increases shareability
■
High-performance network connectivity
Token Ring: ZNBTR
User Guide
13
Page 14

The front panel
Provides access to printer settings (tray, print-quality mode,
■
network settings, etc.).
Displays the printer’s operating status (Ready to Print, Printing).
■
Alerts you to replace consumables, load paper, and clear jams.
■
43
2
Phaser 850 DX
READY TO PRINT
Menu
About my Printer
Help
Printer Demo
?
Help
Select
1
6
7
0643-79A.ai
5
14
Phaser 850 Color Printer
Page 15

Key
Error indicator
Power indicator
Printer model and current status
Display
■
Menu: Accesses printer setup menus
■
About My Printer: Displays current printer settings and
information
■
Help: Accesses information and tools for solving printer
problems
Printer Demo: Prints sample images and color charts
■
Navigation arrows. Use the arrows to scroll the front panel menus.
1.
2.
3.
4.
5.
6.
7.
1.
2.
Select button. Selects highlighted settings.
Help button. Press at any time for additional information on
displayed menu options or status messages.
Printing a Menu Map
The Menu Map shows you where features such as the help pages, are
located in the front panel’s menu structure.
Scroll to Menu, press Select.
Scroll to Print Menu Map, press Select.
Front Panel
User Guide
15
Page 16

Print quality modes
Print quality modes selectable from a
printer driver or the front panel
Fast Color
■ Fastest full-color output.
■ Useful for many images and previewing
work.
■ Produces good peer-level documents.
■ Useful for rush jobs when saturated
colors are not necessary.
Standard
■ General-purpose mode for
full-color printing.
■ Best quality mode for printing
transparencies.
■ Suitable for most office uses.
■ Produces vibrant, saturated prints with
smooth color transitions.
Enhanced**
Features
■ Superior text resolution and
very smooth light colors.
■ Balance of high quality and fast speed.
■ Smoothest and brightest large-area fills.
■ Useful for printing paper copies of
overhead presentations.
High Resolution/Photo**
■ Highest-quality color prints.
■ Near-photographic detail.
■ 1200 x 600 dpi.
■ Requires DP or DX Feature Set.
Maximum speed*
14 ppm Paper
6.5 ppm Transparency
8 ppm Paper
3.5 ppm Transparency
4 ppm Paper
2 ppm Paper
*Approximate number of pages per minute; does not include image
processing time. Based on prints with margins of .5 in. or greater.
**Transparencies are printed in Standard mode.
16
Phaser 850 Color Printer
Page 17

TekColor™ color corrections
Color corrections
selectable from a
printer driver or the
front panel
Automatic
None
Vivid Color
sRGB Display
SWOP Press
Euroscale Press
Commercial Press
SNAP Press
DIC
Toyo
FujiProof
Black and White
Description
■ Automatically applies the best color correction
mode to each element on the page
■ No color correction made to colors
■ Used with the PANTONE
PANTONE
■ Produces the brightest possible colors and makes
®
Color matching
®
Color Chart for
blues appear less purple
■ Closely approximates the colors on a standard
display screen
■ Specification for Web Offset Publications. Used
to match U. S. press standards
■ Used to match equivalent Imation Matchprint
®
proofs
■ Used to match commercial Imation Matchprint
®
proofs
■ Specifications for Non-Heat Advertising Printing
■ Used to match standards for printing on uncoated
and newsprint papers
■ Used to match Dai Nippon printing inks on
coated paper
■ Used to match commercial Toyo printing inks on
coated paper
■ Used to match the Fuji Color Art System for
commercial North American proofs
■ Grayscale printing
■ Used to print page masters for photocopying in
black-and-white
User Guide 17
Page 18

Paper tips
■ Print the Paper Tips Page from the printer’s front panel for a
detailed list of paper types and sizes.
■ When you select a tray by location (Upper, Middle, Lower) from a
printer driver, the printer feeds from that tray.
■ Always keep stored paper, transparencies, and labels, in sealed
packages to avoid the effects of moisture which can affect feed
reliability.
■ Always use the manual-feed slot for heavy paper and envelopes.
■ Handle transparencies by the edges and with both hands to avoid
fingerprints and creases, which can result in poor print quality.
■ Do not use three-hole punched paper, perforated paper, or an
unsupported paper size.
18 Phaser 850 Color Printer
Page 19
Supported page sizes and print area
The image area of a print is a bit smaller than the paper size. You may
need to adjust the page margins in your application software to match
the print area.
To print from a supported driver, select Print. Select Page Size.
Choose one of the following sizes.
Paper* Page size Print area Top/
Bottom
margins
1. Letter 8.5 x 11 in. 8.112 x 10.612 in. .2 in. .2 in.
2. Executive 7.25 x 10.5 in. 6.85 x 9.95 in. .275 in. .2 in.
3. A4 210 x 297 mm 200 x 287 mm 5 mm 5 mm
4. A5 148 x 210 mm 138 x 196 mm 7 mm 5 mm
Left/
Right
margins
*Transparencies available in Letter- and A4-sizes only.
4321
0643-65.ai
Paper Tips
User Guide 19
Page 20

Caution
Never use envelopes with windows or metal clasps; they will
damage the printer. Use only the recommended envelope
sizes. Envelopes must always be placed with the flap
face-up.
For better results, use light-weight, laser-quality envelopes.
Envelopes Page size Print area Top/
#10 (U. S.) 4.13 x 9.5 in. 3.73 x 8.95 in. .2 in. .275 in.
3
#6
⁄4 (U. S.) 3.65 x 6.5 in. 3.25 x 5.95 in. .2 in. .275 in.
Monarch (U.
S.)
C5 162 x 229 mm 152 x 197 mm 5 mm 7 mm
DL 110 x 220 mm 100 x 206 mm 5 mm 7 mm
Choukei 3 Gou 120 x 235 mm 110 x 221 mm 5 mm 7 mm
Choukei 4 Gou 90 x 205 mm 80 x 191 mm 5 mm 7 mm
3.875 x 7.5 in. 3.475 x 6.95 in. .2 in. .275 in.
A
CD
CD
Bottom
margins
(A/B)
A
Paper Tips
B
B
Left/
Right
margins
(C/D)
25 mm
0643-155
20 Phaser 850 Color Printer
Page 21

Manual-feed printing
Supported media
See page 9 for supplies ordering information.
Paper
■ Sizes:
■ A/Letter
■ Executive
■ A4
■ A5
■ Bond or equivalent, 60 - 150 g/m
■ Heavy papers 150 - 216 g/m
216 g/m2 or 80-lb., and index stock 110-lb.; single-sided
printing only
■ Coated or Glossy papers, single-sided printing only
■ Short-grained paper, at least 105 g/m
28 - 40 lb. bond
■ Tektronix Premium Cover, single-sided printing only
■ Tektronix High Resolution Photo, single-sided printing only
2
; 16 - 40 lb.
2
: for example, cover stock
2
and up to 150 g/m2;
Manual-Feed
Transparencies
■ Sizes: A/Letter and A4
■ Use only Phaser 850 printer transparencies
Labels
■ Sizes: A/Letter and A4
■ Use only Phaser 850 printer Color Printing Labels
User Guide 21
Page 22

Envelopes
For better results, use light-weight, laser-quality envelopes.
■ #10 (U. S.)
■ #6 3/4 (U. S.)
■ Monarch (U. S.)
■ C5
Manual-Feed
■ DL
■ Choukei 3 Gou
■ Choukei 4 Gou
Using the manual-feed slot for single-sided printing
To use the manual-feed slot for single-sided printing, follow these
steps. To use the manual-feed slot for two-sided printing, see
Automatic two-sided printing on page 40.
Note
Refer to page 42 for instructions on loading letterhead for
two-sided printing.
1. In a supported printer driver, select Manual Feed Paper or
Manual Feed Transparency.
■ Make sure that two-sided printing is turned off in the
printer driver.
2. To send the job to the printer, click Print.
22 Phaser 850 Color Printer
Page 23
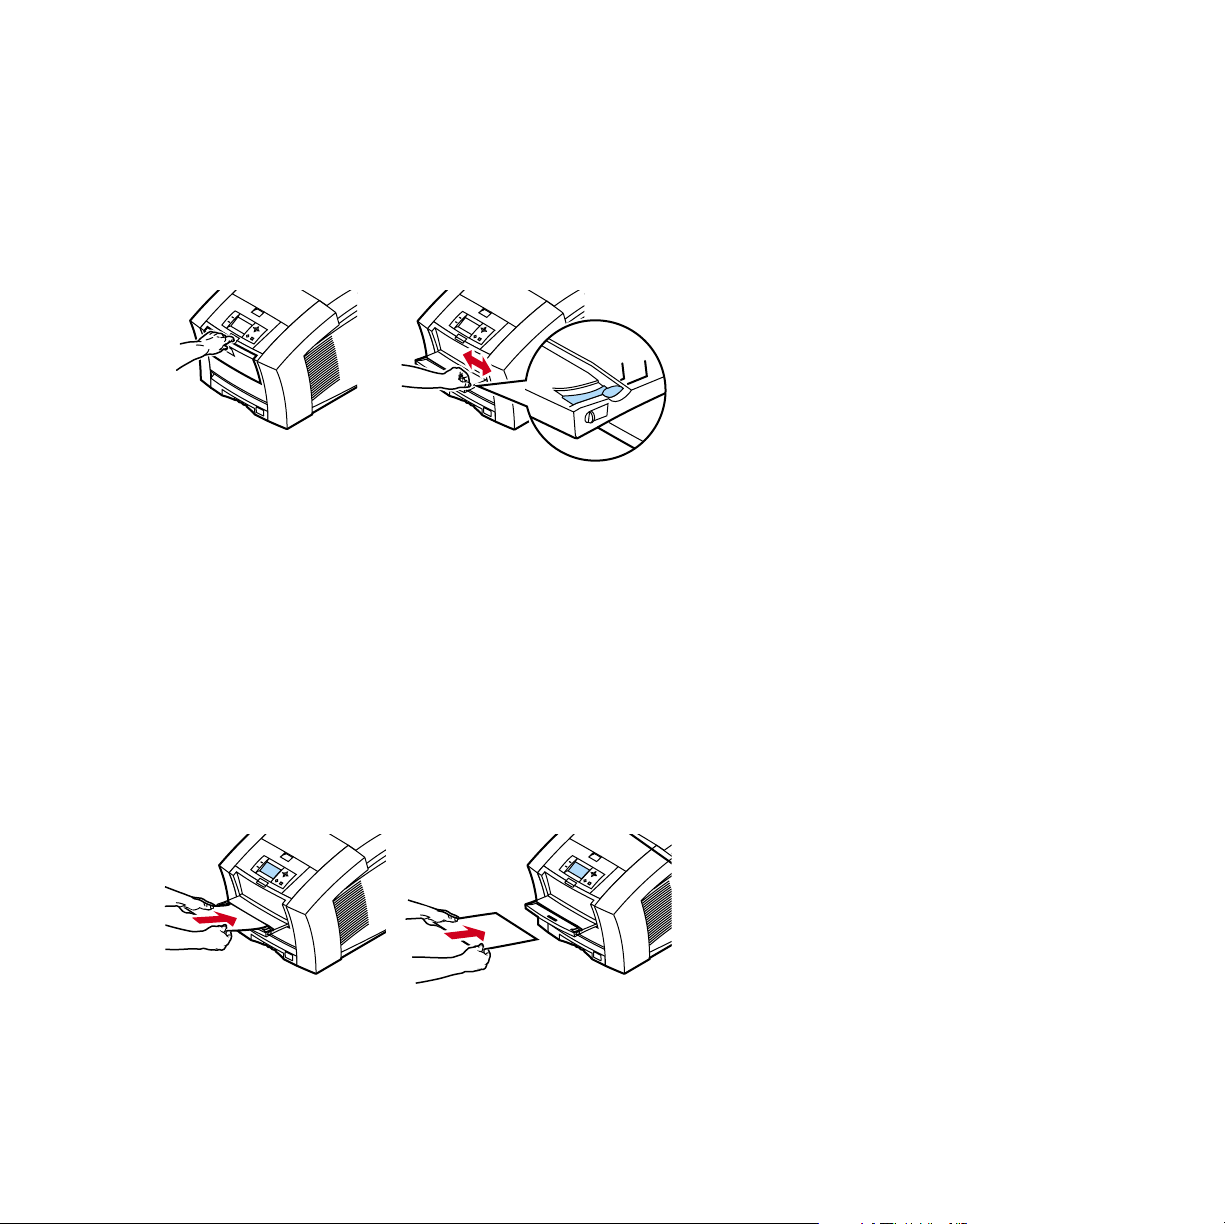
3. Open the manual-feed slot.
LETTE
R
A
4
4. Align the paper, transparency, or envelope, with the left side of
the slot. For either Letter- or A4-size, adjust the guides on the
right side of the slot.
34
A
4
0643-160
5. When the front panel reads Waiting for Manual Feed, insert one
sheet or envelope until the printer pulls it in:
■ Top of the page enters first.
■ Side to be printed is face-down.
■ To avoid jams, make sure the sheet or envelope is properly
aligned as it enters the printer
■ Check the first print to make sure the image placement is
correct.
6. Wait for the front panel’s prompt before inserting
additional sheets.
56
0643-67
User Guide 23
Page 24
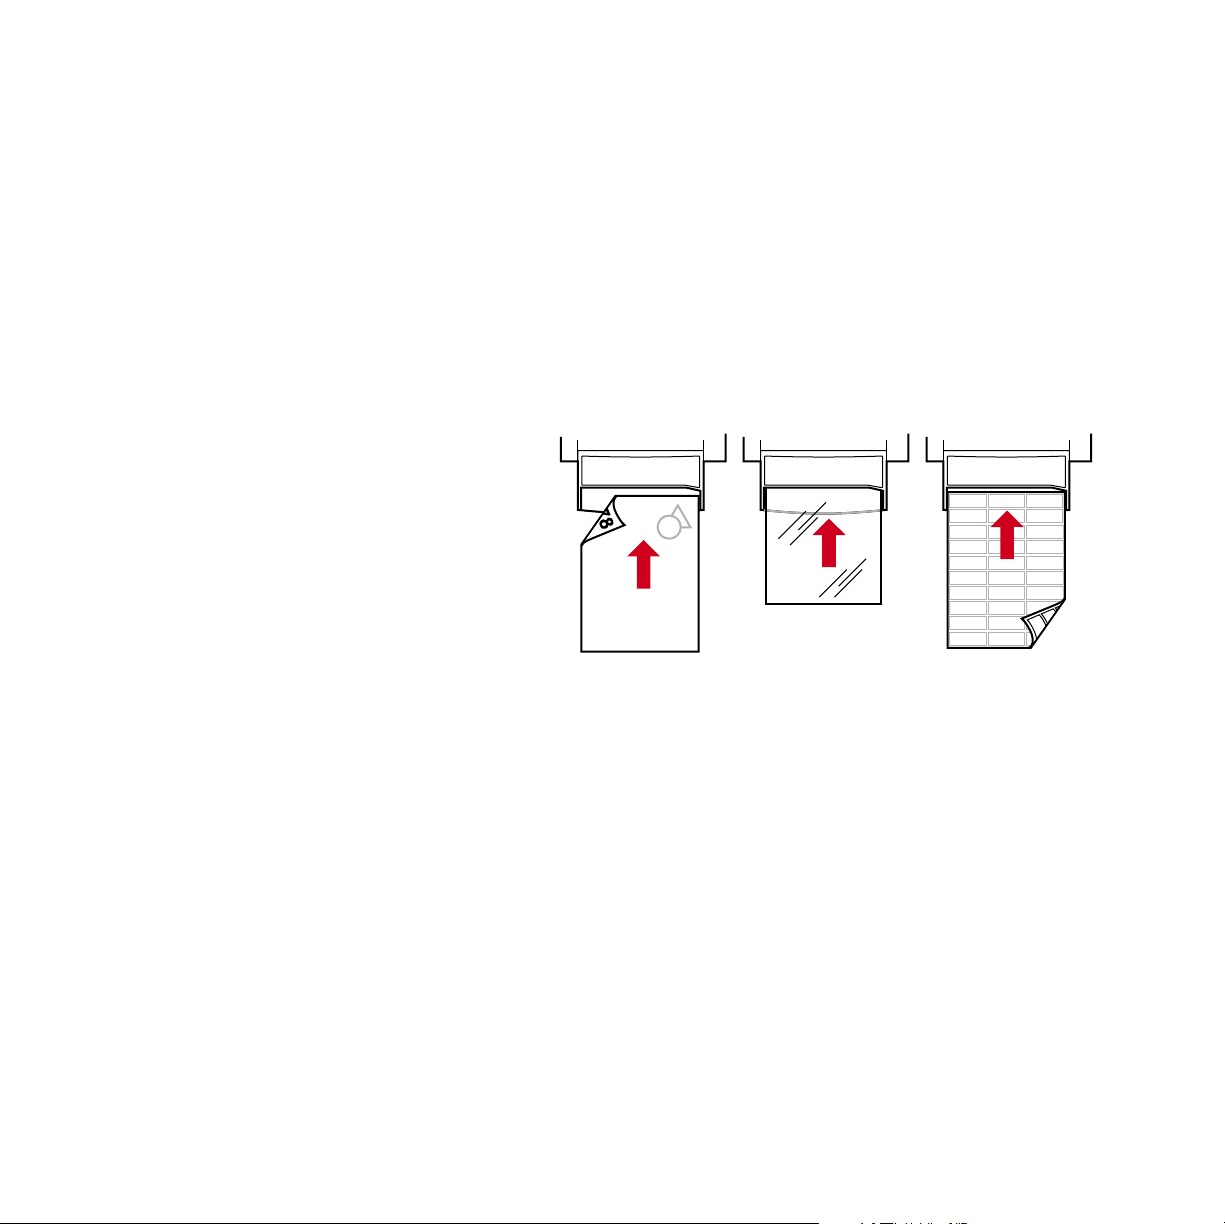
Manual-feed speciality media overview
1. Letterhead or High-Resolution Photo
See Loading letterhead paper for two-sided printing on page 42
and Printing on High Resolution Photo Paper on page 37 for more
information.
2. Transparencies
3. Labels
See Printing on labels on page 38 for more information.
123
1234
0643-68
24 Phaser 850 Color Printer
Page 25
1. Envelopes
See Printing on envelopes on page 26 for more information.
2. Executive/A5 small papers
12
Caution
Never use envelopes with windows or metal clasps; they will
damage the printer. Only use the recommended envelope
sizes. Envelopes must always be placed with the flap
face-up.
0643-149
User Guide 25
Page 26
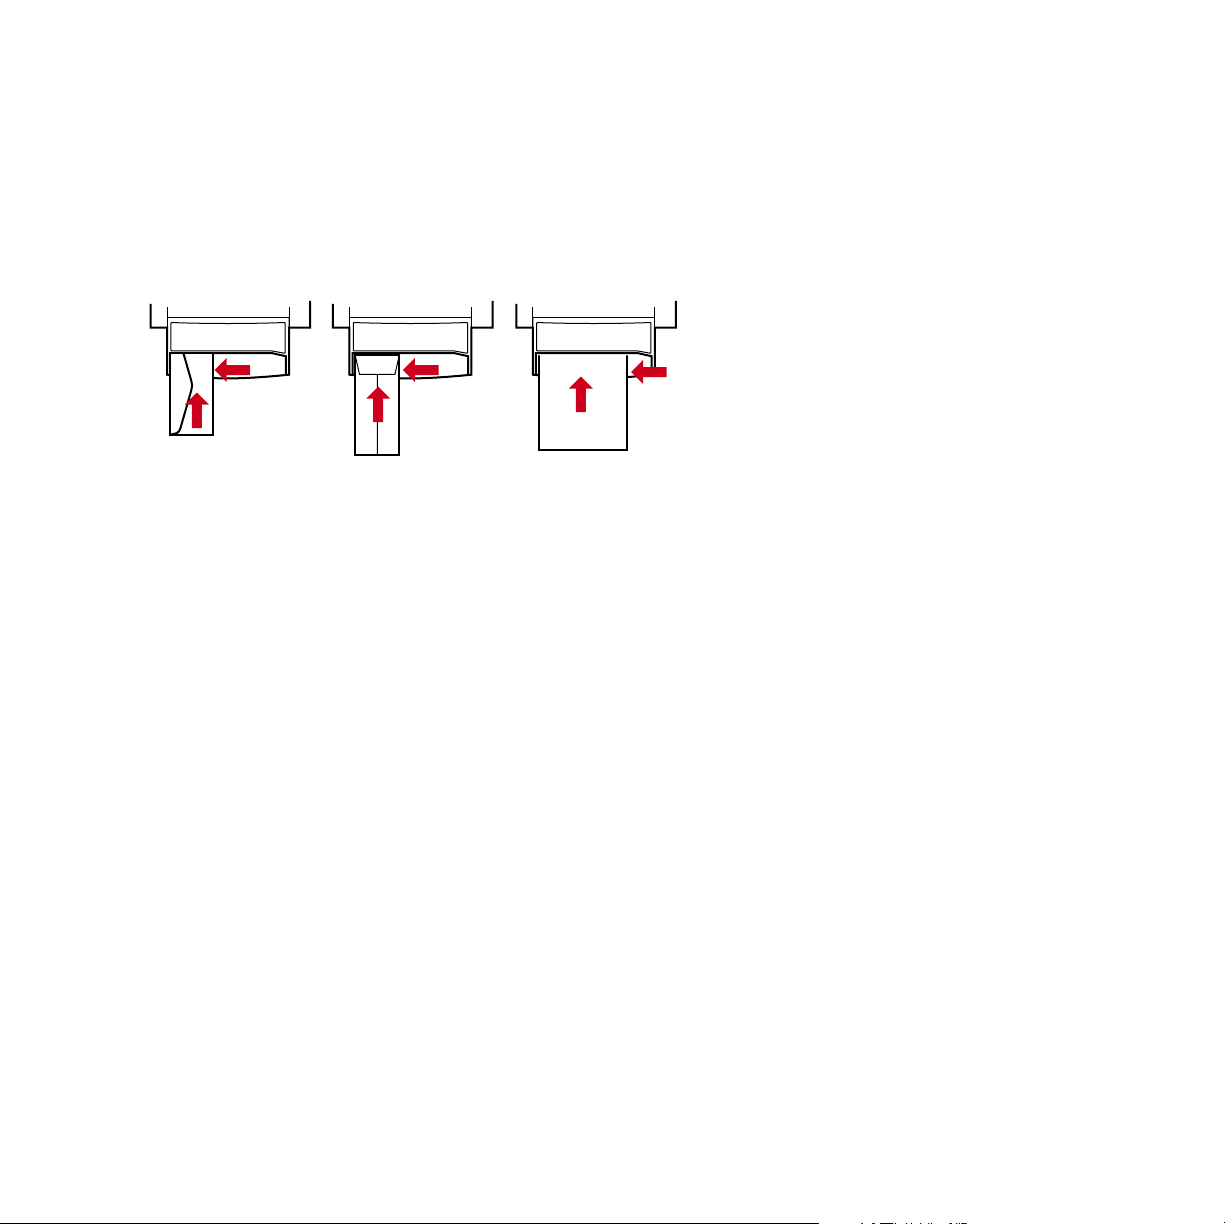
Printing on envelopes
1. In your application, create a document matching the
measurements of the envelope (see page 19 for dimensions).
2. From your application, make these selections and send the job to
the printer:
■ Set the orientation to Landscape.
■ Select your envelope size.
■ Select Manual Feed Paper as the Paper Source.
■ If your application has a tool for creating envelopes, select
the feed method that matches the illustration in Step 4.
3. Wait for the front panel prompt before loading an envelope.
4. Insert one envelope into the manual-feed slot:
■ Short end enters first.
■ Side with the flap is face-up.
■ Flap is closed.
■ For side-flap envelopes: Flap end is on the left.
For end-flap envelopes: Flap end enters first.
0643-97
26 Phaser 850 Color Printer
Page 27
Guidelines for envelope printing
■ Use the recommended envelope sizes (see page 19)
■ For better results, use light-weight, laser-quality envelopes.
■ No windows or metal clasps
■ No exposed gummed surfaces
■ Single-sided printing only
■ Keep unused envelopes in their original packaging to avoid dust
■ Many applications include a tool for creating an envelope. Refer
to your application’s documentation.
Printing envelopes from a Macintosh
To print envelopes from Microsoft WORD on a Macintosh, follow
these steps:
1. From the Tools menu, select Envelopes and Labels.
2. In the Envelopes and Labels dialog box, click the Envelopes tab.
3. In the Envelopes tab, type in delivery and return addresses.
4. Click the Feed icon.
Envelopes
5. In the Printing Options tab, select all of the following:
■ Face Down
■ Clockwise Rotation
■ Use Envelope Feeder
■ Left envelope feed icon:
0643-148.ai
User Guide 27
Page 28

6. Click the Envelope Options tab.
7. In the Envelope size drop-down list, select your envelope size.
8. Click OK.
9. In the Envelopes and Labels dialog box, click Print to open the
Page Setup dialog box.
10. In the Page Setup dialog box, select all of the following
Page Attributes:
■ Paper: select your envelope size.
■ Orientation: select Landscape.
11. From the drop-down list, select PostScript Options, and make the
following selections:
■ Flip Horizontal
■ Flip Vertical
12. Click OK; the Print dialog box opens.
13. In the Print dialog box, in General options, for Paper Source
select Manual Feed Paper.
14. Click Print.
Envelopes
15. The printer’s front panel prompts you to insert the envelope.
28 Phaser 850 Color Printer
Page 29

From other Macintosh applications: If the envelope address prints
upside-down, change the Page Setup settings in your printer driver
before printing:
1. From the File menu, select Page Setup.
2. Select the following Page Attributes:
■ Paper: select your envelope size.
■ Orientation: select Landscape.
3. From the drop-down list, select PostScript Options, and make the
following selections:
■ Flip Horizontal
■ Flip Vertical
4. Click OK.
5. From the File menu, select Print.
6. For Paper Source, select Manual Feed Paper.
7. To print, click Print.
User Guide 29
Page 30
Printing envelopes from Windows
To print envelopes from Microsoft WORD for Windows, follow
these steps:
1. From the Tools menu, select Envelopes and Labels.
2. In the Envelopes and Labels dialog box, click the Envelopes tab.
3. In the Envelopes tab, type in delivery and return addresses.
4. Click the Feed icon.
5. In the Printing Options tab, select all of the following:
■ Face Down
■ Clockwise Rotation
■ For Feed From, select Manual Feed Paper.
■ Left envelope feed icon:
0643-148.ai
6. Click the Envelope Options tab.
7. In the Envelope size drop-down list, select your envelope size.
8. Click OK.
9. In the Envelopes and Labels dialog box, click Print.
10. The printer’s front panel prompts you to insert the envelope.
30 Phaser 850 Color Printer
Page 31

Loading the Standard Paper/ Transparency Tray
Supported media
See page 9 for supplies ordering information.
Paper
■ 200-sheet capacity
■ Bond or equivalent, 60 - 150 g/m
■ Heavy papers 150 - 176 g/m
176 g/m2 or 65-lb.; single-sided printing only
■ Coated or glossy papers, single-sided printing only
■ Short-grained paper, 105 - 150 g/m
■ Tektronix Premium Cover, single-sided printing only
■ Tektronix High Resolution Photo, single-sided printing only
■ Set tray switch to Paper.
Transparencies
2
, 16 - 40 lb.
2
, 40 - 65-lb.; for example, cover stock
2
, 28 - 40 lb. bond
■ 50-sheet capacity
■ Use only Phaser 850 printer transparencies
■ Set tray switch to Transparency.
Labels
■ 50-sheet capacity
■ Use only Phaser 850 printer Color Printing Labels
■ Set tray switch to Paper.
User Guide 31
Trays
Page 32

Loading the tray
0643-66.ai
Paper
Transparency
1
3
5
234567
2
4
T
r
a
n
s
p
a
r
e
n
c
y
P
a
p
e
r
1. Use the tray’s maximum-capacity label to determine how much
paper or transparency to load.
2. Load paper with the side to be printed face-up.
■ For single-sided printing, load letterhead paper with the top
of the page at the front of the tray.
■ For two-sided printing on letterhead, refer to page 42.
3. Place the paper snugly against the inside left front wall of the tray.
4. Set the switch on the side of the tray for Paper or Transparency to
match the loaded media. If you are loading labels in the
Paper/Transparency tray, set the tray switch to Paper.
5. Insert the tray into the printer.
Trays
32 Phaser 850 Color Printer
Page 33

Loading the High-Capacity Paper Tray Assembly
Supported media
See page 9 for supplies ordering information.
Paper only
■ 500-sheet capacity
■ Bond or equivalent, 63 - 120 g/m
■ You can use up to two High-Capacity Paper Tray Assemblies with
your printer.
Loading the tray
1. Angle the paper stack to match the angle of the tray.
2. Use the tray’s maximum-capacity label to determine how much
paper to load.
3. Load paper with the side to be printed face-up.
■ For single-sided printing, load letterhead paper with the top
of the page at the front of the tray.
■ For two-sided printing on letterhead, refer to page 42.
4. Place the paper snugly against the inside left back wall of the tray.
2
, 17 - 32 lb.
User Guide 33
Page 34

5. Insert the tray into the printer.
0389-19
34 Phaser 850 Color Printer
Page 35

Loading the optional High-Capacity
Transparency/Label Tray
Supported media
See page 9 for supplies ordering information.
Transparencies
■ 175-sheet capacity
■ Use only Phaser 850 printer transparencies
■ Set tray switch to Transparency.
Labels
■ 100-sheet capacity
■ Use only Phaser 850 printer Color Printing Labels
■ Set tray switch to Label.
User Guide 35
Page 36

Loading the tray
T
r
a
n
s
p
a
r
e
n
c
y
L
a
b
e
l
1. Use the tray’s maximum-capacity label to determine how much
media to load.
2. Load media with the side to be printed face-up.
3. Place the media snugly against the inside left back wall of
the tray.
4. Set the switch on the side of the tray for Transparency or Label to
match the loaded media.
5. Insert the tray into the printer.
T
r
a
n
s
p
a
r
e
n
c
y
L
a
b
e
l
0643-62
6. In the printer driver, make these selections:
■ Select the appropriate tray.
■ Turn off the two-sided printing option.
36 Phaser 850 Color Printer
Page 37

Printing on High Resolution Photo Paper
The Tektronix High Resolution Photo Paper is printable on one side
only, and has a Tektronix logo on the reverse.
See page 9 for supplies ordering information.
1. Insert the paper into the appropriate tray:
Standard Paper/Transparency tray: 50 sheets
■ Load paper face-up
■ Set tray switch to Paper.
Manual-feed slot: 1 sheet
■ Load paper face-down
2. In the printer driver, make these selections:
■ Select the appropriate tray.
■ Turn off the two-sided printing option.
■ Select High-Resolution Photo as the TekColor color
correction.
3. Send the job to the printer.
Photo Paper
User Guide 37
Page 38

0643-96.ai
Printing on labels
1. Insert the label sheets into the appropriate tray:
Standard Paper/Transparency tray: 50 sheets
■ Face-up
■ Set tray switch to Paper.
Labels
Letter-size
Transparency
Paper
High-Capacity Transparency/Label tray: 100 sheets
■ Face-up
■ Set tray switch to Label.
Letter-size
Transparency
Label
0643-159
0643-99.ai
Manual-feed slot: 1 sheet
■ Face-down
38 Phaser 850 Color Printer
Page 39

2. If your application has a setting for labels, use it as a template.
Otherwise, for margin settings, refer to the instructions included
with the labels.
3. In the printer driver, make these selections:
■ Select the appropriate tray.
■ Turn off the two-sided printing option.
4. Send the job to the printer.
See page 9 for supplies ordering information.
Guidelines for printing on labels
■ Use only Phaser 850 printer Color Printing Labels.
■ If any of the labels on a sheet are missing, do not use that sheet; it
may damage printer components.
Caution
Keep labels in a cool, dry place. Never store labels in a
high-humidity environment. Labels stored under such
conditions will jam in the printer. Store unused labels flat in
their containers. Rotate stock frequently. Long periods of
storage can cause the labels to curl and will jam the printer.
Labels
User Guide 39
Page 40

Automatic two-sided printing
Automatically make two-sided prints using the paper trays or the
manual-feed slot. In the Print dialog box, select the two-sided printing
option and a binding preference (how the page turns).
To automatically make two-sided prints:
■ Do not place paper that was printed on one side back into the
printer to print on the second side. Pre-printed pages may stick
together.
■ Make sure the Paper/Transparency switch on the tray is set
to Paper.
■ Use only Letter- or A4-size paper.
■ When the printer operates in automatic two-sided printing mode,
the paper partially exits before printing the second side. To avoid
paper jams, do not touch the paper before it completely exits the
printer.
Caution
2-sided Prints
Two-sided printing is supported only for Letter- and A4-size
papers within the 16 - 32 lb. range. Make sure two-sided
printing is off in the printer driver for all other paper types.
Macintosh Drivers
LaserWriter 8.6 ■ From the File menu, select Print.
■ From the pull-down menu, select Layout.
■ Select Print on Both Sides.
■ Select a binding preference.
LaserWriter 8.3.4
■ From the File menu, select Print.
■ Click the Options button.
■ Select 2-Sided Printing.
■ Select Short-Edge Binding or Long-Edge Binding.
40 Phaser 850 Color Printer
Page 41

PC Drivers
Windows 95
Windows 98
Windows NT4
■ From the File menu, select Print.
■ Click Properties.
■ Click the Setup tab.
■ Select Print on 2 sides.
■ Check or uncheck Bind on top edge.
■ Start/Settings/Printers.
■ Right-mouse-button-click on your printer’s icon.
■ From the pop-up menu, select Document
Defaults.
■ Click the Advanced tab.
■ Under Paper/Output, select Print on Both Sides.
■ Select Long Side or Short Side.
Binding preference
0643-126.ai
User Guide 41
Two-sided Prints
Page 42

Loading letterhead paper for two-sided printing
0643-69
1234567
To load letterhead paper for two-sided printing, follow these
additional steps.
Caution
Do not place paper that was printed on one side back into the
printer to print on the second side. Pre-printed pages may
stick together.
1. Load the paper in the paper tray or the manual-feed slot:
■ Paper tray
Letterhead side is face-down.
Place the top of the page at the back of the tray.
1234
0643-98
■ Manual-feed slot
Letterhead side is face-up.
Top of the page enters the printer last.
Two-sided Prints
42 Phaser 850 Color Printer
Page 43

2. In your printer driver, in the Print dialog box, select the tray by
location:
■ Upper
■ Middle
■ Lower
■ Manual Feed Paper
Note
When the printer operates in automatic two-sided printing
mode, the paper partially exits before printing the second
side. To avoid paper jams, do not touch the paper before it
completely exits the printer.
User Guide 43
Page 44

Adding ink
Caution
Use only Phaser 850 printer ColorStix® ink; the use of other
ink may affect print quality and reliability. Tektronix
warranties and service contracts do not cover damage,
malfunction or degradation of performance caused by the use
of non-Tektronix supplies or consumables or the use of
Tektronix supplies not specified for use with this printer.
See page 9 for supplies ordering information.
Ink tips:
■ Keep ink in its packaging until you are ready to use it.
■ To avoid ink jams, never insert broken ink sticks into the
ink-loading bins.
Loading ink:
To load ink any time the printer is Idle, or when the front panel
displays Ink low or Ink out, follow this procedure.
1. Open the top cover. A color-coded label inside the top cover
corresponds to the color of each ink-loading bin.
2. Remove the ink stick from its packaging.
44 Phaser 850 Color Printer
Page 45

3. Place the appropriate color ink stick into the ink-loading bin that
appears low. Do not force the ink sticks into the ink-loading bins.
Each ink stick is uniquely shaped to fit into the correct
ink-loading bin. Insert the ink stick’s narrow end first.
0643-141.ai
4. Close the top cover.
The front panel may read Processing until the printer is ready for
printing.
Adding Ink
User Guide 45
Page 46

Emptying the waste tray
When the front panel displays Empty Waste Tray, follow this
procedure.
See page 9 for supplies ordering information.
Caution
Waste Tray
The printer’s interior may be hot. Do not reach into the
printer while the maintenance drawer is removed.
1. Open the front cover.
2. Grasp the maintenance drawer, labeled as A, and pull it out of the
printer.
Note
The maintenance drawer may be locked while the ink
cools after the front panel troubleshooting routine,
Eliminate Light Stripes. Make sure all covers are
closed. Wait 15 minutes before trying to remove the
maintenance drawer. The maintenance drawer may
also be locked during the warm up cycle whenever the
printer is turned on.
46 Phaser 850 Color Printer
Page 47

3. The waste tray may be hot; handle it carefully.
Lift the waste tray, labeled as B, from the maintenance drawer.
123
0643-157
4. Empty the waste tray by gently twisting the tray or tapping it on
the sides of a waste container. Ink is non-toxic and can be
discarded as normal office waste.
5. Replace the waste tray in the maintenance drawer. Make sure the
waste tray is seated flat in the maintenance drawer.
6. Reinsert the maintenance drawer into the printer and close the
front cover.
456
0643-156
User Guide 47
Page 48

Replacing the Maintenance Kit
The Maintenance Kit is a consumable that consists of the maintenance
roller and counter. The kit is located in the Maintenance Drawer,
labeled as A, behind the printer’s front cover.
Detailed, illustrated instructions are included with each new
Maintenance Kit. See page 9 for supplies ordering information.
The front panel displays these messages:
Front panel message Action
Maintenance Kit is low Order a replacement maintenance
Replace Maintenance Kit Replace the Maintenance Kit to
Maintenance Kit Missing Reinstall the counter or
Preventative Maintenance: Replace
Maintenance Kit
■ The Standard Maintenance Kit has a life of 10,000 prints or
2 years, whichever comes first.
kit; replace the Maintenance Kit
soon.
continue printing.
Make sure the new counter is
installed.
maintenance drawer.
Press the Help button on the front
panel for details.
■ The Extended Maintenance Kit has a life of up to 45,000 prints
(depending on ink coverage) or 2 years, whichever comes first.
48 Phaser 850 Color Printer
Page 49

Caution
The printer may be hot. Do not reach into the printer
while the maintenance drawer is removed.
0643-125.ai
Maintenance Kit
User Guide 49
Page 50

Removing paper jams
The front panel message indicates the jam location and information on
how to clear the jam. Check the front panel for Troubleshooting Jams
information.
To prevent jams, use only the recommended papers, transparencies,
and labels (see page 18), and clean the printer’s rollers if visibly dirty.
For complete cleaning instructions, refer to the printer’s CD-ROM or
on the Tektronix web site.
Media Jam — Open Exit Cover to Clear
0643-71.ai
Jams
Solution 1
If the paper has partially exited the printer at the exit slot, follow these
steps. Otherwise, refer to Solution 2 on page 51.
1. Open the exit cover.
2. Using both hands, remove the jammed paper.
3. Remove the entire sheet of paper; any pieces of paper left in the
printer may cause more jams.
50 Phaser 850 Color Printer
Page 51

Solution 2
If paper gets caught under the Rapid Release Guide, follow these steps.
Caution
Handle the Rapid Release Guide carefully to avoid bending
or damaging the clear plastic edge.
1. Open the exit cover.
2. Lift the blue paper guide.
1
2
0643-150
3. Lift up on the blue tabs and remove the Rapid Release Guide. Do
not use any sharp objects in this area of the printer.
3
0643-151
User Guide 51
Jams
Page 52

4
4. Remove the jammed paper.
0643-152
5. Make sure the thin, white dust shield is lying on top of the metal
shaft. Then, reinstall the Rapid Release Guide, pressing down on
the blue tabs to snap the guide into place.
5
0643-153
Jams
52 Phaser 850 Color Printer
Page 53

Media Jam — Open front cover to clear
0643-72.ai
1. Open the front cover.
2. Using both hands, remove the jammed paper.
3. If there is any resistance to removing the jammed paper, turn the
blue thumbwheel to help feed the paper.
4. Remove the entire sheet of paper; any pieces of paper left in the
printer may cause more jams.
User Guide 53
Page 54

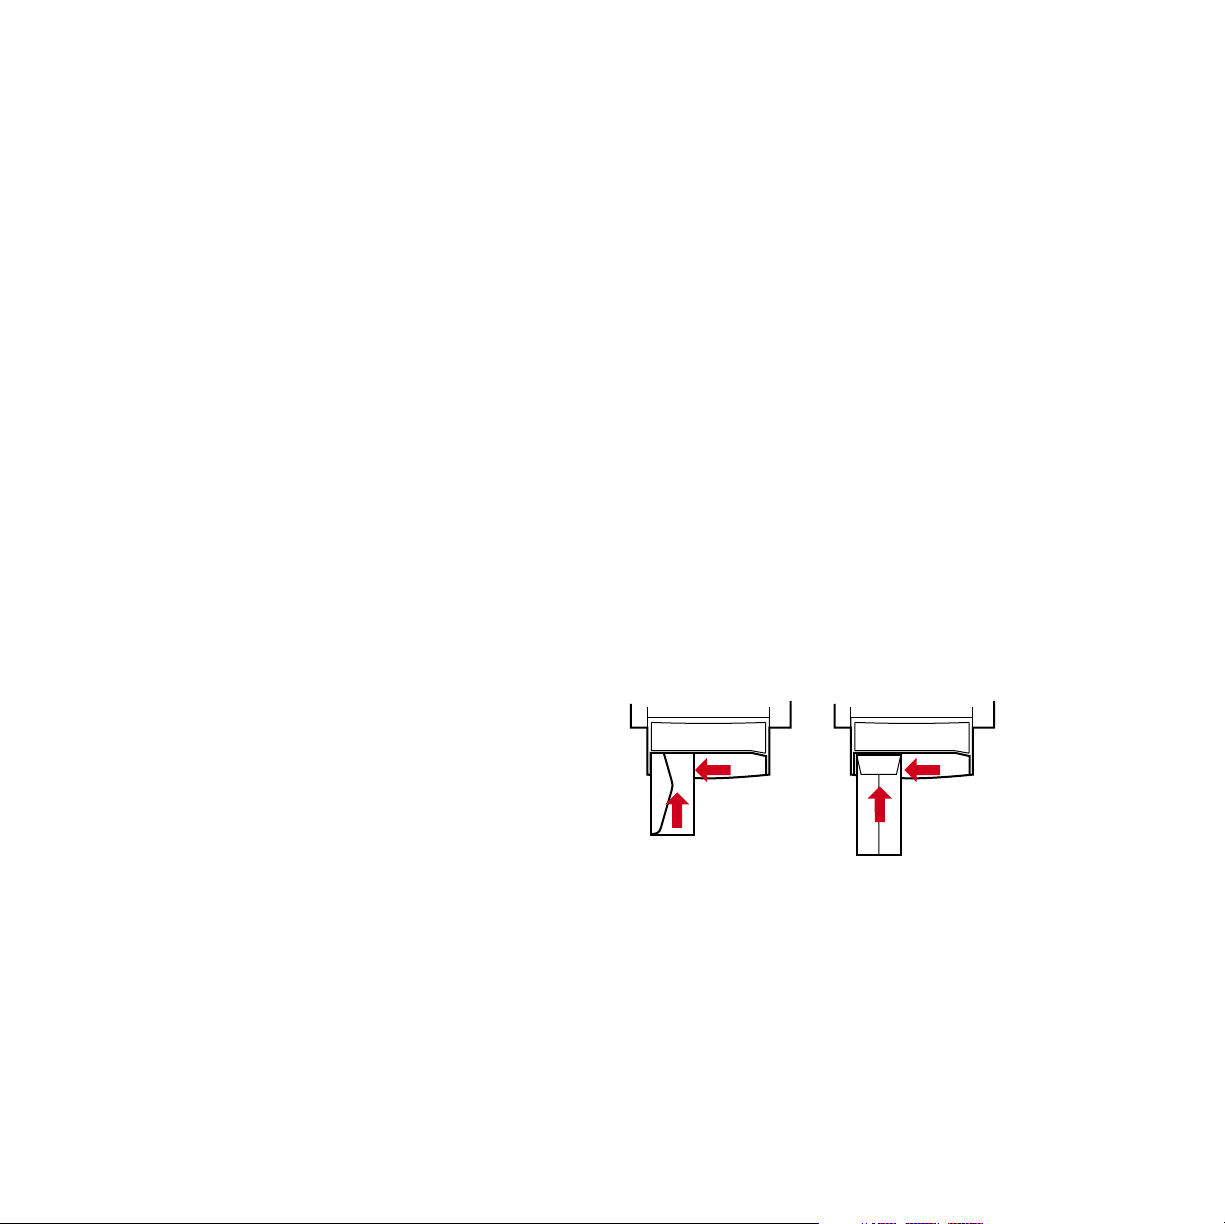
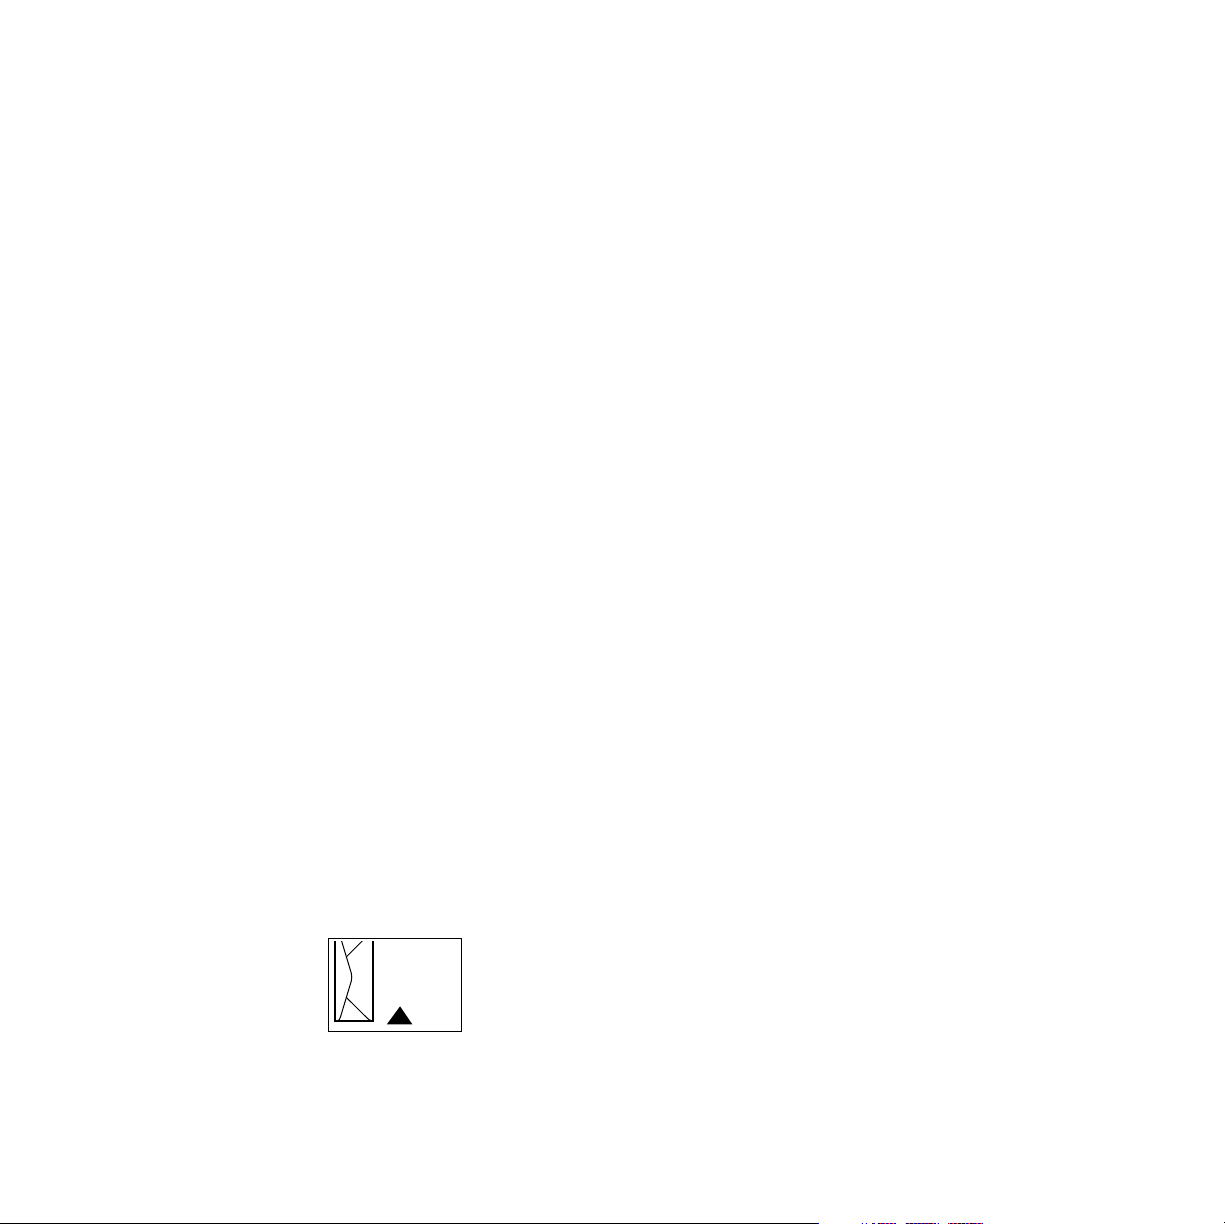
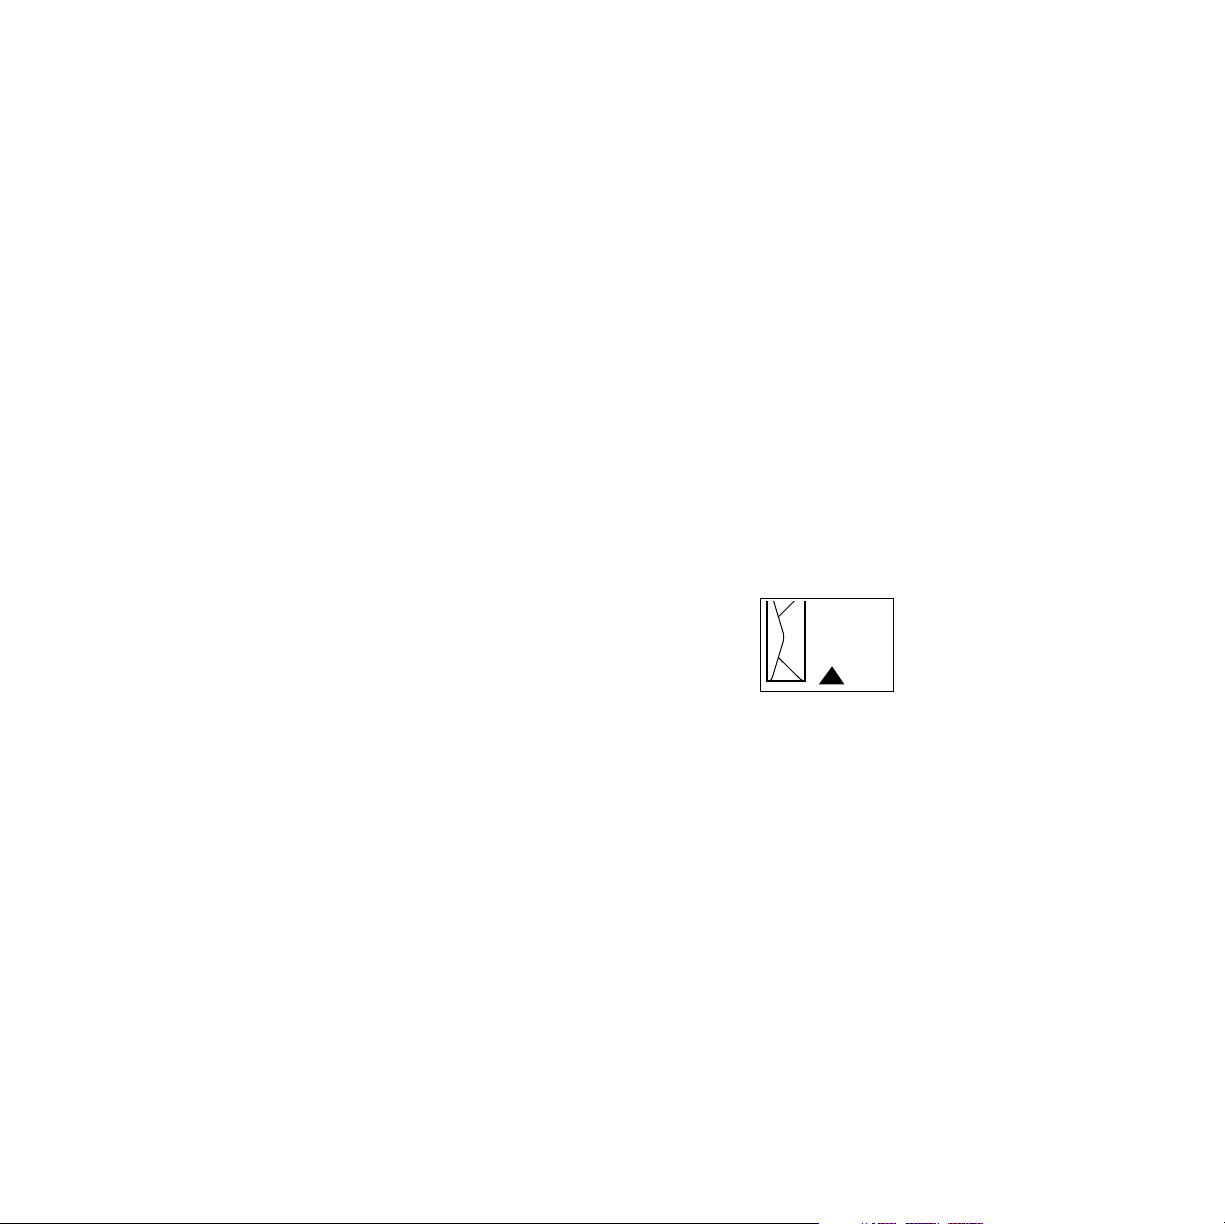
Media Jam — Retry manual feed
0643-158
1. Using both hands, remove the jammed paper, transparency, or
label sheet.
2. When prompted by the display message, reinsert the sheet using
both hands.
Make sure you insert the sheet properly, so it enters the printer
straight and evenly. Be especially careful to properly line up
envelopes and small-size papers.
0643-143.ai
54 Phaser 850 Color Printer
Page 55

Media Jam — Remove media (or upper) tray to clear
0643-74.ai
1. Remove the paper tray (if your printer has more than one tray,
pull out the upper tray).
2. Using both hands, remove the jammed paper.
User Guide 55
Page 56

Media Jam — Remove middle tray to clear
Media Jam — Remove lower tray to clear
0643-75.ai
1. Remove the paper tray named in the front panel display.
2. Using both hands, carefully remove the jammed paper.
56 Phaser 850 Color Printer
Page 57

Troubleshooting print quality
6 7 8 9 1011 1213
6 7 8 10111213
Light stripes or missing colors
Clean the printhead with the printer’s front panel troubleshooting
routine.
0643-56.ai
1. On the front panel, scroll to Menu. Press Select.
2. Scroll to Troubleshooting; press Select.
3. Scroll to Print Diagnostic Test Page; press Select. These
illustrations show a correct Test Page and an example of a
Test Page with a missing color bar.
A. Correct test page B. Missing color bar
Print Quality
1 2 3 4 6 7 8 91011 12131415 16171819 20212223 242526 27282930 31323334 35363738 39404142 43444546 47484950 51525354 55565758 59606162 63646566 67686970717273747576777879808182838485868788
5
123456 7 8 91011 12131415 16171819 20212223 242526 27282930 31323334 35363738 39404142 43444546 47484950 51525354 55565758 59606162 63646566 67686970 717273747576777879808182838485868788
123456 7 8 91011 12131415 16171819 20212223 242526 27282930 31323334 35363738 39404142 43444546 47484950 51525354 55565758 59606162 63646566 67686970 717273747576777879808182838485868788
123456 7 8 91011 12131415 16171819 20212223 242526 27282930 31323334 35363738 39404142 43444546 47484950 51525354 55565758 59606162 63646566 67686970 717273747576777879808182838485868788
1 2 3 4 6 7 8 91011 12131415 16171819 20212223 242526 27282930 31323334 35363738 39404142 43444546 47484950 51525354 55565758 59606162 63646566 67686970717273747576777879808182838485868788
5
123456 7 8 91011 12131415 16171819 20212223 242526 27282930 31323334 35363738 39404142 43444546 47484950 51525354 55565758 59606162 63646566 67686970 717273747576777879808182838485868788
1234567 8 1011121314151617181920212223242526272829303132333435363738394041424344454647484950515253545556575859606162636465666768697071727374 75767778 79808182 83848586 8788
123456 7 8 91011 12131415 16171819 20212223 242526 27282930 31323334 35363738 39404142 43444546 47484950 51525354 55565758 59606162 63646566 67686970 717273747576777879808182838485868788
User Guide 57
0643-135.ai
Page 58

4. If the test print looks like example B in the illustration, go on to
Step 5.
5. Scroll to Eliminate Light Stripes; press Select.
6. Check the test print that prints automatically, to confirm that the
problem is corrected.
7. Repeat Step 5 as necessary. If light stripes persist after three
Print Quality
consecutive clean cycles, turn off the printer for 4 hours to allow
the ink to cool and solidify. Then turn on the printer and repeat
the clean cycles, if necessary.
For more details, refer to the troubleshooting information on the
printer’s CD-ROM or on the Tektronix web site.
58 Phaser 850 Color Printer
Page 59

Oil or ink smears
Oil (drum fluid) on a print or ink smears on the front, back or
edges of a page.
0643-59.ai
Clean the printer’s internal paper path using the front panel
troubleshooting routine.
1. Load the upper tray with sheets of clean, high-grade paper,
preferably 120 g/m2; 32-lb. This cleaning routine uses several
sheets of paper.
2. On the front panel, scroll to Menu. Press Select.
3. Scroll to Troubleshooting; press Select.
4. Scroll to Remove Ink Smears; press Select.
5. If the problem persists, additional cleaning may be necessary. For
complete cleaning instructions, refer to the printer’s CD-ROM or
on the Tektronix web site.
User Guide 59
Page 60

Ink streaks
Ink streaks or marks on the top edge, front or back of a page.
0643-60.ai
Clean the printer’s paper-exit path:
■ To clean the exit rollers, use a pre-soaked alcohol cloth.
■ To turn the rollers, use the blue thumbwheel.
0643-94.ai
60 Phaser 850 Color Printer
Page 61

Clean the Rapid Release Guide:
1. Follow the steps in Solution 2 on page 51 to remove the Rapid
Release Guide.
2. Gently wipe the clear plastic Rapid Release Guide with a
pre-soaked alcohol cloth.
0643-154
3. Reinstall the Rapid Release Guide, pressing down on the blue tabs
to snap the guide into place.
User Guide 61
Page 62

Ink smears
Ink smears on the bottom edge of a page.
0643-57.ai
Clean the paper-feed rollers.
1. From the front panel, run the Remove Ink Smears routine; see
page 59 for instructions.
2. If smears remain, open the front cover and remove the
maintenance drawer.
3. To clean rollers in rows 1, 2, and 3, use a pre-soaked alcohol
cloth.
4. To turn the rollers in rows 1 and 3, use the blue thumbwheel.
1
2
3
0643-100.ai
5. Clean any ink from the polished metal guide located between
rollers 1 and 2, using a presoaked alcohol wipe.
62 Phaser 850 Color Printer
Page 63

Moving the printer
All moves
Follow these guidelines when moving the printer within the office and
preparing it for shipment:
1. The printer must be cool before moving it; otherwise, ink spills
may damage the printer. Use this method:
a. Close all of the printer’s covers and doors.
b. Turn off the printer. Before the front panel goes blank (you
have only 4 seconds), select Shut Down For Moving Printer.
c. The printer takes about 15 minutes to cool; during that time,
the front panel reports its progress. When the cool-down is
complete, the front panel goes blank. It is now safe to move
the printer.
2. Removing the upper paper tray provides a place for your hands
when lifting the printer.
3. Always move the printer separately from its High-Capacity Paper
Tray Assembly.
Moving
36 kg
79 lb.
0643-116.ai
User Guide 63
Page 64

Preparing the printer for shipment
Caution
Parts of the printer may be hot; to avoid personal injury,
allow the printer to cool and use caution when handling it.
■ Always repack the printer properly to ensure its safe shipment;
refer to the instructions on the printer’s CD-ROM or on the
Tektronix web site.
■ Always remove the maintenance drawer (A) before shipment to
avoid damage to the printer. Place the drawer in a plastic bag for
storage. Never ship the printer with the maintenance drawer
installed.
Moving
0643-125.ai
64 Phaser 850 Color Printer
Page 65

Getting help
The printer's auto-running CD-ROM guides you to the various
resources available for installing and learning more about your
Tektronix color printer. Use the CD-ROM to install your printer driver
software, view and print user documentation, and watch "how to"
videos. Live Internet links on the CD-ROM let you access the
Tektronix Color Connection web site, your single source for color
education, interactive tutorials, free templates and support
information.
Printer CD-ROM
■ Advanced Features and Troubleshooting Manual
■ Consumables instructions
■ Setup Guide poster
■ Video help
■ Networking manuals
■ Cleaning instructions
■ Repacking instructions
■ Printer drivers
■ Material Safety Data Sheets (MSDS)
Windows driver help system
Install the driver from the printer’s CD-ROM and use the embedded
help system.
■ Troubleshooting information
■ Access to installed manuals and videos
■ Live links to the Tektronix web site
User Guide 65
Getting Help
Page 66

Color Connection
colorconnection.tektronix.com
Color resource for tools and information to help you get the most out of
your color printer:
■ Customized support and automatic driver update notification.
■ Color education with interactive tutorials and helpful hints.
■ Free templates and promotions.
■ Online supplies ordering
■ Online documentation.
Printer’s front panel
■ Help menu: Accesses information and tools for solving printer
problems.
■ Help button: Press at any time for additional information on
displayed menu options or status messages.
■ Troubleshoot Jams menu: Appears when paper jams, provides
additional information.
Internal printer pages
The printer has several help pages available; refer to the Menu Map for
their locations.
■ Connection Setup: connecting to a computer or network
■ Diagnostic Test Page: how to solve print problems, such as
smudges or light stripes
■ Help Guide: Provides specific help resources.
Getting Help
■ Paper Tips Page: what papers, transparencies, or labels to use
■ Supplies Page: part numbers and descriptions
66 Phaser 850 Color Printer
Page 67

PhaserLink™ Software
www.tek.com/Color_Printers/products/ phaserlink.html
■ View printer status using any web browser
■ Control printer settings
■ Link to online documentation via the World Wide Web
■ Requires network connection via TCP/IP
Tektronix web site
www.tek.com/Color_Printers/
■ Product and supplies information
■ Finding your local reseller
TekSMART™ Knowledge Base
www2.tek.com/TekSMART/
■ Application issues
■ Networking issues
■ Printer errors
■ Print quality issues
■ Troubleshooting
■ Latest tips from technical support
User Guide 67
Page 68

Other online services
Anonymous ftp server ftp.tek.com/Color_Printers/
Subscribe to email
update notices
www.tektronix.com/Color_Printers/support/
subscribe.html
Customer Support Centers
Australia
1-800-811-177
Austria
0660 5804
Belgium
02 720 9602
Brazil
0800 16 0220
Canada
1-800-835-6100
China
10-6235-1230
Denmark
(44) 533 444
Eastern Europe and
the Middle East
+44 1908 68187
Finland
0203 206 30
France
01 69 86 8137
Germany
0180 525 3535
Hong Kong
2585-6655
India (South Asia)
(91) 80-227-5577
Italy
02 45 287 000
Japan
81 3 3448 4872
Korea
2-528-4661
Luxembourg
400 847
Netherlands
(040) 267 0440
New Zealand
+61 2 9888 0100
Norway
22 723 801
Singapore (ASEAN)
1-800-356-5565
Spain
902 239 272
Sweden
(08) 299 071
Switzerland
01 212 2212
Taiwan
(02) 2757-1571
Thailand
2-645-4407
U. K.
(01) 908 681 707
U. S.
1-800-835-6100
68 Phaser 850 Color Printer
Page 69

Printer Management
Printer Management
PhaserLink Printer Management software
PhaserLink Printer Management software is a printer management tool that uses World
Wide Web technology to provide printer information and functionality:
■ Job status
■ Job accounting
■ Printer usage
■ Routine troubleshooting
■ Configuration of printer settings
PhaserLink requires a TCP/IP connection. To access PhaserLink information, enter your
printer’s IP address in a web browser. The PhaserLink interface appears on your
computer’s screen.
For detailed information on PhaserLink Printer Management software, refer to
“PhaserLink Printer Management software: The Printer’s Information Link” on the
printer’s CD-ROM or web site. Or enter this address in your web browser:
www.tektronix.com/Color_Printers/products/phaserlink.html
Job Accounting
The printer stores a log file containing information about jobs printed. The file is a list of
job accounting records. Each record contains fields such as user name, job name, pages
printed, job times, and ink used. Job accounting is available through the PhaserShare
Administrator and PhaserLink Printer Management software.
For more information on Job Accounting, see the PhaserShare Networking Manual on the
printer’s CD-ROM or web site.
TekSMART™ Knowledge Base
www2.tek.com/TekSMART/
■ Application issues
■ Networking issues
■ Printer errors
■ Print quality issues
■ Troubleshooting
■ Latest tips from technical support
Advanced Features and Troubleshooting Manual 69
Page 70

Printer Management
Usage Profile
Usage Profile provides a proactive strategy for service, maintenance, and administration of
your printer. With Usage Profile, you can keep track of most printer parameters in detail.
Information in the Usage Profile Report includes:
■ Remaining life of consumables
■ Paper versus transparency usage
■ Number and location of media jams
■ Media tray usage
■ Number of pages printed
Print the Usage Profile report from your printer’s front panel. Refer to the Menu Map for
location and instructions.
In addition, you can easily arrange electronic mail notification so that your system
administrator or supplies-ordering agent receives timely information on error conditions
or supplies status. This feature allows you to predict the ordering needs of customerreplaceable consumables for remote locations. These types of error conditions are
reported:
■ For the designated operator, system administrator or service provider
■ Supplies (customer-replaceable consumables) low or out
■ Empty media tray
■ For the system administrator
■ Printer configuration
■ For the service provider
■ Error conditions requiring hardware service repair
For detailed information about the Usage Profile report, refer to the Tektronix web site.
70 Phaser 850 Color Printer
Page 71

Fonts
Fonts
Resident typefaces (PostScript)
The printer accepts Adobe Type 1 and Type 3 downloadable fonts, TrueType fonts, PCL5,
and a variety of user-defined fonts.
To extend font capability, the printer supports an optional internal IDE hard drive for
storage of additional fonts. Refer to the printer’s user guide, or the Tektronix web site, for
ordering information.
ATM (Adobe Type Manager) software (provided on the printer’s CD-ROM) helps your
computer to display these fonts on screen as they will appear in your prints.
All printer configurations are shipped with 136 resident fonts. To print a sample of the
printer’s fonts, see page 74.
Resident typefaces (PCL5C)
For PCL5C (Printer Command Language) printing, the printer supports Courier, Times,
and Universe typefaces in medium, bold, italic medium, and italic bold. In addition,
there are 46 PCL fonts. The printer port must be set to AutoSelect (which is the default)
for the printer to accept PCL data.
Advanced Features and Troubleshooting Manual 71
Page 72

Fonts
Downloading fonts
Printer-resident fonts are always available for printing. Additional downloadable fonts
can be sent from your computer and stored in the printer’s memory or on a hard disk.
Adding more printer memory expands the number of fonts that can be stored on your
printer.
Downloading fonts saves print time when printing large, or several documents, that use
those fonts.
The printer accepts these (and other) downloadable fonts:
■ Type 1
■ Type 3
■ Adobe
■ Agfa
■ Bitstream
■ Microsoft
■ Apple
■ TrueType (scalable to any point size; look the same on-screen and printed).
Before printing, make sure that the fonts specified in your document are installed in the
printer or are set up correctly. If you request a font in an application that is not resident in
the printer, or is not correctly installed, the text is printed in Courier typeface.
Refer to the printer’s user guide, or the Tektronix web site, for information on ordering a
hard drive for font storage.
72 Phaser 850 Color Printer
Page 73

Fonts
Downloading fonts from a Macintosh
1. Refer to Downloading files to the printer from a Macintosh on page 95 to locate the
Apple Printer Utility on the printer’s CD-ROM.
2. Within the Apple Printer Utility, click Open Printer; a dialog box appears.
3. Click the arrow next to Printer Preferences.
4. For a list of installed fonts and locations, click the arrow next to Fonts.
5. Click Add.
6. Select your font folder, then select the font you want to download.
7. Under Destination, select the download location: either the printer’s memory or an
internal hard disk.
8. Click Add for one font or click Add All for all fonts in the folder.
9. Click Send; the font(s) appear in the list.
Note
To remove downloaded fonts, click Remove.
Advanced Features and Troubleshooting Manual 73
Page 74

Fonts
Printing a list of resident fonts
From a Macintosh
1. Refer to Downloading files to the printer from a Macintosh on page 95 to install and
use the Apple Printer Utility.
2. Within the Apple Printer Utility, from the File menu, select Print Font Samples.
From a PC or workstation
1. Insert the printer’s CD-ROM into the CD-ROM drive.
■ If the Windows autorun feature is enabled, the CD-ROM launches automatically.
■ If the Windows autorun feature is disabled, double-click My Computer, then
double-click the CD icon to launch the CD-ROM.
2. For Setup Type, select Custom.
3. Click Next until the Choose Components and Sub-components dialog box appears.
Make the following selections:
■ Components: Graphics Arts Files
■ Sub-components: Samplers
4. Follow the on-screen instructions to complete the installation.
5. Locate the files in the folder you selected during the installation; the default is:
C:Program Files\Tektronix\Phaser xxx, where xxx is your printer’s name.
6. Refer to Downloading files to the printer from a PC on page 97 for file downloading
instructions.
74 Phaser 850 Color Printer
Page 75

Image Smoothing
Image Smoothing
Image Smoothing blends adjacent colors in low-resolution images for smoother color
transitions. For example, use Image Smoothing to improve the appearance of a 72-dpi
image downloaded from the World Wide Web. Image Smoothing is not recommended for
300-dpi or higher images.
There are four ways of selecting Image Smoothing (driver selections override all other
settings):
1. In a supported driver, locate the Image Smoothing option:
■ LaserWriter 8.3.4 driver:
In the Print dialog box, click Options.
■ LaserWriter 8.5.1 driver:
In the Print dialog box, from the pull-down menu (General) select Printer
Specific Options.
■ Windows 95 / Windows 98 PostScript driver:
Start/Settings/Printers, then select Properties for your printer. In the Setup tab,
select Expert Options.
■ Windows 2000 driver:
From the Layout tab or Paper/Quality tab, click Advanced.
■ Windows NT driver:
From the Properties tab, select the Advanced tab. From the Document Options
tab, select Printer Features.
■ Adobe PS3 driver for Windows 3.1:
Select the Features tab options.
2. Through the printer’s front panel; see the Menu Map for location.
3. Through PhaserLink Printer Management software.
4. Through one of the following PostScript utility files (see Printer Utilities on page 91
for instructions):
Macintosh
■ Image Smoothing On
■ Image Smoothing Off
PC
■ SMOOTHON.PS
■ SMOOTHOFF.PS
Advanced Features and Troubleshooting Manual 75
Page 76

Quick Collate
Quick Collate
Requirements
■ DP or DX Feature Set
■ Hard drive (internal)
Quick Collate speeds the collation and printing of large print jobs and multiple sets of
documents. The collate function in some software applications repeatedly sends each
page in sequence to the printer until the requested number of copies is printed. With the
Quick Collate option, the job is sent only once and then multiple collated sets are
produced by the printer, allowing much faster processing time.
The number of pages that can be collated at one time depends on the size of the hard disk
installed in the printer.
Note
Make sure that you turn off the collate function in your application, because the
printer’s Quick Collate option is faster than the collate function in software
applications.
In a supported driver, locate the Quick Collate option:
■ LaserWriter 8.3.4 driver:
In the Print dialog box, click Options.
■ LaserWriter 8.5.1 driver:
In the Print dialog box, from the pull-down menu (General) select Printer
Specific Options.
■ Windows 95 / Windows 98 PostScript driver:
Start/Settings/Printers, then select Properties for your printer. In the Setup tab,
select Advanced Paper Options.
■ Windows 2000 driver:
From the Layout tab or Paper/Quality tab, click Advanced.
■ Windows NT driver:
From the Properties tab, select the Advanced tab. From the Document Options
tab, select Printer Features.
■ Adobe PS3 driver for Windows 3.1:
Select the Features tab options.
Quick Collate and 1st Page Preview
When you use the printer’s Quick Collate option with 1st Page Preview, only the first page
of the first set is printed before pausing for your review.
76 Phaser 850 Color Printer
Page 77

Separation Pages
Separation Pages
You can have the printer insert a separation page, or divider page, to separate print jobs,
multiple copies of a single print job, or individual pages of a print job.
There are two selections to make in your printer driver.
1. In a supported driver, locate the Separation Page options:
■ LaserWriter 8.3.4 driver:
In the Print dialog box, click Options.
■ LaserWriter 8.5.1 driver:
In the Print dialog box, from the pull-down menu (General) select Printer
Specific Options.
■ Windows 95 / Windows 98 PostScript driver:
Start/Settings/Printers, then select Properties for your printer. In the Setup tab,
select Advanced Paper Options.
■ Windows 2000 driver:
From the Layout tab or Paper/Quality tab, click Advanced.
■ Windows NT driver:
From the Properties tab, select the Advanced tab. From the Document Options
tab, select Printer Features.
■ Adobe PS3 driver for Windows 3.1:
Select the Features tab options.
2. Select one of the following for Separation Page:
■ Off: Turns off the Separation Page feature.
■ End of Job: Inserts a separation page between individual print jobs.
■ End of Set: Inserts a separation page between copies, or sets, of a multi-copy
print job.
■ End of Page: Inserts a separation page between every page of a print job.
3. Select one of the following for Separation Page Source:
■ Upper Tray: Takes paper for the separation page from the upper media tray.
■ Middle Tray: Takes paper for the separation page from the middle media tray, if
you have optional paper trays installed.
■ Lower Tray: Takes paper for the separation page from the lower media tray, if
you have optional paper trays installed.
Advanced Features and Troubleshooting Manual 77
Page 78

PANTONE Colors
PANTONE Colors
For the latest information on color libraries, visit the Tektronix web site at:
www.tektronix.com/Color_Printers/
or contact your local Tektronix reseller.
PANTONE Color files for your printer include printer-specific color library files for some
specific applications and a file to print the PANTONE Color sampler chart.
Methods of printing PANTONE Colors
PANTONE Colors from color selection books
In some applications, you can select colors from PANTONE Color selection books. These
colors can be proofed on your Phaser printer before final output on a printing press. For
this method, the printer-specific PANTONE Color files are not required.
1. From an application, select and apply PANTONE Colors; use individual color values
from a PANTONE Colors selection book.
2. Print your document; from a supported driver, select the Commercial Press color
correction. (Proof colors may not be completely accurate, but PANTONE Colors will
be printed correctly on a printing press.)
3. When you are satisfied with the proof, the file can be separated for printing press
plates without adjustment to the file.
Printer-specific PANTONE Colors
Your printer can produce process color simulations of PANTONE Spot Colors.
1. Print a copy of the PANTONE Color chart. Refer to Printing the PANTONE Color
Chart on page 80.
2. Within an application, define the desired color in your document by using the
individual CMYK values which appear on the sampler chart.
3. Print your document. For best results, use the same printer settings for color
correction and print quality, and the same type of paper that you used to print the
PANTONE Color chart.
For final output on a color printing press
For colors to be printed as a process color (no spot colors), follow these steps:
1. Open the application.
2. Before separating the file for printing press plates, replace the printer’s PANTONE
process Colors with standard PANTONE Colors.
78 Phaser 850 Color Printer
Page 79

PANTONE Colors
Installing the PANTONE Color files
From the Web
1. Download the appropriate PANTONE Color file for your printer from the Tektronix
web site:
www.tektronix.com/Color_Printers/
2. Choose a directory location, and extract the file.
Advanced Features and Troubleshooting Manual 79
Page 80

PANTONE Colors
Printing the PANTONE Color Chart
Macintosh
Printing individual pages from Acrobat Reader
1. You will need to install Acrobat Reader if you want to print individual pages from the
PANTONE Color chart. Insert the printer’s CD-ROM in your computer’s drive, go to
the Utilities folder, and install Acrobat Reader onto your computer’s hard disk; follow
on-screen instructions.
2. After Acrobat Reader is installed, locate the Pantone files you downloaded from the
web site. Double-click the desired PDF file.
3. View and print pages from the PDF file. For best results, print on paper.
Note
Print only with the None Color Correction setting; other settings cause
PANTONE Colors to print differently than expected.
Printing the entire chart
■ Use the Apple Printer Utility to download to the printer the desired PANTONE Color
PostScript file, refer to page 91 for instructions. This PostScript file contains
necessary color correction and print quality settings.
■ For best results and truest color:
■ Print the chart on paper that is similar to the paper that will be used on the
printing press.
■ Turn off two-sided printing when printing the color chart in order to reduce the
effects of color show-through.
80 Phaser 850 Color Printer
Page 81

PANTONE Colors
PC
Printing individual pages from Acrobat Reader
1. You will need to install Acrobat Reader if you want to print individual pages from the
PANTONE Color chart. Insert the printer’s CD-ROM in your computer’s drive, go to
the Utility directory, and install Acrobat Reader onto your computer’s hard disk;
follow on-screen instructions.
2. Click Start, then Programs, then the program folder you selected; the default is the
printer’s name.
3. Select the PDF file.
4. View and print pages from the PDF file. For best results, print on paper.
Note
Print only with the None Color Correction setting; other settings cause
PANTONE Colors to print differently than expected.
Printing the entire chart
Print the PANTONE Color chart by sending the PANTONE PostScript file to the printer.
Refer to page 91 for downloading instructions.
■ For best results and truest color:
■ Print the chart on paper that is similar to the paper that will be used on the
printing press.
■ Turn off two-sided printing when printing the color chart in order to reduce the
effects of color show-through.
Advanced Features and Troubleshooting Manual 81
Page 82

PhaserPrint Plug-in for Photoshop
PhaserPrint Plug-in for Photoshop
The PhaserPrint™ plug-in, included on the printer’s CD-ROM, operates within the
Photoshop application. With PhaserPrint, you can improve image transfer time and gain
easy access to Tektronix printer features and other media features.
PhaserPrint software produces correct output only on supported Tektronix printers.
Note
If you use this plug-in with a printer not listed in the PhaserPrint dialog box, the
image may be placed incorrectly on the page, or colors may look incorrect, or
your file may not print.
Installing the plug-in: Macintosh
Note
The PhaserPrint Plug-in is automatically installed with the software installation
option Easy Install.
Compatibility requirements
■ Photoshop 2.5.1 and higher
■ System 7.0 and higher
Installing the plug-in
1. From the printer’s CD-ROM, run the Installer application. Select Custom Install.
2. Select PhaserPrint plug-in for Photoshop. Click Install; the file is installed in the
Photoshop application’s Plug-ins folder on your computer’s hard disk.
82 Phaser 850 Color Printer
Page 83

PhaserPrint Plug-in for Photoshop
Installing the plug-in: Windows
Compatibility requirements
■ Photoshop 4.0 and higher
■ Windows 95/Windows 98 or Windows NT
■ (optional) TCP/IP support requires proper installation of IP networking software and
cards
Installing the plug-in
1. Insert the printer’s CD-ROM into the CD-ROM drive.
■ If the Windows autorun feature is enabled, the CD-ROM launches automatically.
■ If the Windows autorun feature is disabled, double-click My Computer, then
double-click the CD icon to launch the CD-ROM.
2. For Setup Type, select Custom.
3. Click Next until the Chose Components and Sub-components dialog box appears.
Make the following selections:
■ Components: Printer Driver
■ Sub-components: Photoshop plug-in
4. Follow the on-screen instructions to complete the installation.
Advanced Features and Troubleshooting Manual 83
Page 84

PhaserPrint Plug-in for Photoshop
Using the plug-in
1. If you don’t already have a default printer selected, do the following:
■ Macintosh:
a. Open the Chooser.
b. Select a PostScript driver (such as the Apple LaserWriter 8); select your printer.
PhaserPrint software works like a printer driver, and prints to the printer you
selected in the Chooser.
■ Windows:
a. Click Start, then Settings, then Printers.
b. Right-mouse-button-click on your printer’s icon.
c. In the pop-up menu, select Set as Default.
d. Within the PhaserPrint software, select your printer and port, as described in
Print using (Windows) on page 86.
2. Open Photoshop. Open an image file.
3. From the File menu, select Export. Select PhaserPrint; the PhaserPrint dialog box
appears.
4. In the Printer Model field, select your printer.
5. PhaserPrint software supports the following image modes selected from Photoshop’s
Mode menu. If you select a mode not listed here, an error message appears and your
image is not printed.
■ Bitmap
■ Grayscale
■ Indexed Color
■ RGB Color
■ CMYK Color
■ Lab Color
84 Phaser 850 Color Printer
Page 85

PhaserPrint Plug-in for Photoshop
Selecting options in the PhaserPrint dialog box
Settings you make in the PhaserPrint plug-in remain in effect until you change them. The
exception is Number of Copies, which defaults to 1 each time you start the plug-in.
Note
You can get information on any of the plug-in’s features or printer-specific
options with the online Help function.
Number of copies
Enter the number of copies to print, from 1 to 1000.
Print using (Macintosh)
The Print using pop-up menu lets you choose between printing an image or saving the
image to disk.
■ AppleTalk: Prints the image to the printer currently selected in the Chooser; the
currently selected printer name is displayed in the Printer model field. If the selected
printer is not a PostScript printer, this option is unavailable (grayed-out).
■ PostScript file: Saves an image to disk as a PostScript file. Click Save; a dialog box
lets you choose a new or existing file for saving the PostScript code.
When selected, the File format pop-up menu becomes available. This pop-up menu
has two options: ASCII base-85 and Binary.
■ ASCII base-85: Image data is encoded using an ASCII base-85 filter during file
output, making the resulting PostScript file portable, and downloadable through
interface ports that don’t support binary data. Note that the file may be up to
25% larger.
■ Binary: Image data is output in binary format.
Advanced Features and Troubleshooting Manual 85
Page 86

PhaserPrint Plug-in for Photoshop
Print using (Windows)
The Print using pop-up menu lets you choose between printing an image or saving the
image to disk. It has two to four options, depending on your system configuration:
■ TCP/IP: Available if a TCP/IP stack is installed and running. From Printer model,
choose a printer. Add and delete printers in the list, and edit the printer
configurations. TCP/IP is the fastest printing method; it prints jobs in much less time
than the Local Port or Printer Driver methods, and is the recommended method if it is
available for the printer you are using.
■ Local Port: Available if you have local ports installed in your PC. From the Port
Name, choose the desired printer port.
■ Printer Driver: Prints the image through the selected printer driver. From Driver
Name, choose a printer.
■ PostScript file: Saves an image to disk as a PostScript file. Click Save; a dialog box
lets you choose a new or existing file for saving the PostScript code.
When selected, the File format pop-up menu becomes available. This pop-up menu
has two options: ASCII base-85 and Binary.
■ ASCII base-85: Image data is encoded using an ASCII base-85 filter during file
output, making the resulting PostScript file portable so that it can be downloaded
through interface ports that don’t support binary data. Note that the file may be
up to 25% larger.
■ Binary: Image data is output in binary format. Recommended for network
printing only (not for the parallel port).
Printer model
■ Displays the currently selected printer.
■ Lists all printers supported by PhaserPrint software.
■ When you select your printer model, PhaserPrint displays the correct options for your
printer.
Media size (selection)
■ Paper sizes are printer-specific; refer to the online Help for your printer’s options.
Before selecting a paper size, select your printer in the Printer model field.
Color Correction
■ Color Corrections are not available if Lab is the selected Mode in Photoshop.
■ If RGB is the selected Mode in Photoshop, the Calibrated RGB option is also
available.
86 Phaser 850 Color Printer
Page 87

PhaserPrint Plug-in for Photoshop
Media
■ The setting remains in effect until you change it.
Quality
■ The setting remains in effect until you change it.
Rendering Intent
■ Available in the following cases:
■ If the Mode in Photoshop is RGB, and you select Calibrated RGB as the Color
Correction in PhaserPrint.
■ If the Mode in Photoshop is Lab.
■ Calibrated RGB and Lab modes take longer to print than other modes because the
printer must convert CIE colors to RGB or CMYK colors before printing.
Compress Image Data
■ Compresses image data so that less data is sent to the printer or stored in a file.
■ Useful if your network connection is slow, for example, if you are connected to a busy
network or if you are using a parallel port. For fast networks, printing may be faster
without using this option.
■ The setting remains in effect until you change it.
■ Default is On.
Fast preview
■ Quick print of your image with slightly reduced image quality.
■ Reflects the printer color correction you selected.
■ For the fastest printing, use the None color correction option.
■ Default is Off.
Advanced Features and Troubleshooting Manual 87
Page 88

PhaserPrint Plug-in for Photoshop
1st Page Preview
■ Available only with the printer’s DP or P, and DX Feature Set options.
■ When sending a multiple-copy print job to the printer through the driver, you can
select 1st Page Preview to preview the first page of the job, and determine if the job is
printing as expected before proceeding with the remainder of the job. This option is
especially useful when printing many copies.
a. Click the 1st Page Preview check box.
b. Check your first print. At the 1st Page Preview message on the printer’s front
panel, select one of the following:
■ Reprint: Reprints the first page, the printer pauses again for the duration of the
selected timeout, or until you press one of the buttons.
■ Cancel: Cancels the print job.
■ Continue: Continues printing the entire job.
■ At the printer’s front panel, set the 1st Page Preview timeout.
■ Default is Off.
Image Smoothing
■ Blends adjacent colors so that color transitions are less noticeable.
■ Use this option when the image being printed was scanned at a lower resolution than
the printer’s output resolution. For example, printing an image scanned at 72 dpi
using the printer’s Standard print quality mode.
■ Images printed using Image Smoothing appear with less sharp detail but with
smoother color transitions.
■ Default is Off.
Stylized representation of the page
■ The lower left area of the dialog box displays a stylized representation of the page as it
would look when printed using the current selections in the Scale, Scale to fit,
Printer model, Media size (selection), Landscape orientation, Replicate images,
Center images, and Image separation options. When you change any of these
selections, the representation of the page is redrawn to reflect the new selection.
■ If Show color preview of image is On, an approximate color image is displayed.
88 Phaser 850 Color Printer
Page 89

PhaserPrint Plug-in for Photoshop
Scaling an image
■ Scale to fit
■ Scales an image to the largest size that fits the image area of the currently
selected page size or orientation.
■ Automatically updates the Scale field value.
■ Scale
■ Type the percentage the image should be scaled, from 10 percent to
2000 percent.
■ Use with the Replicate images option to produce multiple copies of an image on
a single page.
■ Alert message: Image clipping will occur.
This message appears in the PhaserPrint dialog box whenever a scaled image will not
fit within the image area of the currently selected page size or orientation option.
Landscape orientation
■ Prints the image horizontally (landscape) on the page. Leave this box unchecked to
print the image vertically (portrait) on the page.
■ Refer to the Stylized representation of the page, in the lower left corner of the dialog
box, to see how your selection will look when printed.
Center images
■ Centers the image in the page’s image area.
■ If this box is not checked, the lower left corner of the image is aligned with the lower
left corner of the printable area of the page.
■ If the Center images box is checked and the Replicate images box is checked, the set
of replicated images are centered in the image area of the page.
Replicate images
■ Fills the page’s image area with as many copies of the image as will fit.
■ The size of each replicated image is determined by the setting in the Scale text box.
■ If the size of each replicated image (shown as black rectangles in the stylized
representation of the page) is too small to display, the total image area of the printed
page is shown as a single gray rectangle.
Image size
■ Reflects the dimensions, in inches or millimeters, of the image.
■ If the value in the Scale box is out-of-range, the image dimensions are displayed with
question marks.
Advanced Features and Troubleshooting Manual 89
Page 90

PhaserPrint Plug-in for Photoshop
Image separation
■ Only available if the Replicate images box is checked.
■ Type an amount, in inches or millimeters (depending on your measurement
standard), to specify the amount of separation between
each replicated image.
■ A larger amount reduces the number of images that can be printed at one time.
■ Minimum allowed separation value is 0.
■ Maximum separation value is 100 mm (4 inches).
■ Default separation value is 3.175 mm (0.125/one-eighth inch).
■ Valid characters for this field are 0 to 9 and a period (or decimal point).
■ As you type a value, the stylized representation of the page, and Number of
images and Image layout values are dynamically updated. If the value entered in
the Image separation field is out-of-range, the values in these other fields are
replaced by question marks, and no images are shown in the stylized
representation of the page. If the value is out-of-range, and you click Print or
Save, the following alert is displayed:
The value for Image separation is out of range. It will be replaced with the
closest allowed value.
Number of images
■ Displays the number of scaled images that will fit in the image area of the currently
selected Media size (selection) and Landscape orientation options.
■ Number of images reflects the current Image separation value.
■ If the Replicate images box is not checked, this number is set to 1.
■ If either Scale or Image separation values are out-of-range, a question mark is
displayed.
Image layout
■ Shows how the scaled images will fit horizontally and vertically in the image area of
the currently selected Media and Landscape orientation options.
■ Image layout reflects the current Image separation value.
■ If the Replicate images box is not checked, this number is set
to 1 x 1.
■ If either Scale or Image separation values are out-of-range, question marks
are displayed.
Media size (display)
Reflects the dimensions, in inches or millimeters, of the selected media size.
Show color preview of image
Displays an approximate color image, rather than a black box, in the Stylized
representation of the page field.
90 Phaser 850 Color Printer
Page 91

Printer Utilities
Printer Utilities
In addition to using the printer’s front panel or the options in a supported driver, the
printer’s utility files offer another method for changing the way the printer operates.
In some cases, a selection can only be made with a utility file.
Utility files control print features such as color correction and enabling or disabling the
Startup Page. However, printer features that are selected from a driver override utility file
settings and front panel settings.
There are three places to locate utility files:
■ The printer’s CD-ROM
■ Tektronix’ ftp site
■ Tektronix’ World Wide Web site
■ Phaser Hard Drive (if internal IDE Hard Disk is installed)
Files can be downloaded to the printer:
■ From a Macintosh
■ From a PC
Advanced Features and Troubleshooting Manual 91
Page 92

Printer Utilities
Locating the files on the printer’s CD-ROM
Installing the utility files for Macintosh
To install the Apple Printer Utility and the Samplers (color charts):
1. From the printer’s CD-ROM, run the Installer application. Select Easy Install.
2. In the PhaserTools folder on your computer’s hard disk, locate the Samplers (color
charts) and the Apple Printer Utility.
To install the printer’s utility files:
1. On the printer’s CD-ROM, locate the PhaserTools folder, then the Printer Utilities
folder.
2. Copy the Printer Utilities folder, or individual files, to your computer’s hard disk, or
use the files from the CD-ROM.
Installing the files for PC
Locating the printer’s utility files:
1. Insert the printer’s CD-ROM into the CD-ROM drive.
■ If the Windows autorun feature is enabled, the CD-ROM launches automatically.
At the opening screen, click Exit.
2. In the taskbar on your screen, click Start, then Programs, then Windows Explorer.
Select the CD-ROM.
3. Locate the utility files on the CD-ROM in the phsrxxx folder inside the utility folder
(where phsrxxx is your printer’s name). Use the files on the CD-ROM or copy the files
to your computer’s hard disk.
Installing the Sampler (color charts and font sampler) files:
1. Insert the printer’s CD-ROM into the CD-ROM drive.
■ If the Windows autorun feature is enabled, the CD-ROM launches automatically.
■ If the Windows autorun feature is disabled, double-click My Computer, then
double-click the CD icon to launch the CD-ROM.
2. For Setup Type, select Custom.
3. Click Next until the Choose Components and Sub-components dialog box appears.
Make the following selections:
■ Components: Graphics Arts Files
■ Sub-components: Samplers
4. Follow the on-screen instructions to complete the installation.
5. Locate the files in the folder you selected during the installation; the default is:
C:Program Files\Tektronix\Phaser xxx, where xxx is your printer’s name.
92 Phaser 850 Color Printer
Page 93

Printer Utilities
Locating files on the Tektronix World Wide Web site
Tektronix has a site on the World Wide Web that you can reach from a web browser, at the
following address:
www.tek.com/Color_Printers/
At the Tektronix Color Printer home page, explore options such as customer support
documents and new product information. New and updated information is always being
added, so check the web site frequently.
Use a web browser such as Netscape Navigator, and follow these steps.
1. Start your web browser and enter the following address:
www.tek.com/Color_Printers/support/software.html
2. From the pull-down menus, select your printer, computer, and type of file.
3. Select the files you need; they are downloaded to your computer.
Advanced Features and Troubleshooting Manual 93
Page 94

Printer Utilities
Locating files on the Tektronix FTP server
Utility files included on the printer’s CD-ROM let you set up the printer from UNIX and
VMS workstations to select between media trays, print quality modes, color correction
modes and other features. If you don’t have the means to transfer these files from the
CD-ROM, you can request files from the Tektronix anonymous ftp server.
If you can exchange electronic mail with other Internet sites, you can access the Tektronix
ftp server. From this server you can retrieve driver and utility files and color printer
information either with a web browser or command prompt.
From a web browser:
1. Start your web browser application.
2. Type this address:
ftp://ftp.tek.com/
3. From the pull-down menus, select your printer, computer, and type of file.
4. Select the files you need; they are downloaded to your computer.
From the command line:
1. At the system prompt, type the following: ftp ftp.tek.com
The system responds: Name (ftp.tek.com:<login name>):
2. Type: anonymous. Press Return.
The system responds: Guest login ok, send your complete e-mail address as
password.
3. Enter your e-mail address. Press Return.
4. Change directories to your printer-specific directory:
cd Color_Printers/UNIX/Phaser_850/utilities
5. Download the utility files; type: mget *
The system prompts you for each file in the directory, to which you respond y (yes)
or n (no).
6. Exit the ftp session: type quit or bye; press Return.
94 Phaser 850 Color Printer
Page 95

Printer Utilities
Downloading files to the printer from a Macintosh
Using the Apple Printer Utility to download files
All PostScript utility files on the printer’s CD-ROM can be downloaded to the printer with
the Apple Printer Utility.
To download PostScript utility files, follow this procedure:
1. From the PhaserTools folder on your computer’s hard disk, double-click Apple
Printer Utility.
2. In the Printer Selector dialog box, make the following selections:
■ Under AppleTalk Zones, select your printer’s zone.
■ Under Printers, select your Phaser printer.
■ Click Open Printer.
3. From the File menu, select Send PostScript File; the Select the PostScript files to
download dialog box appears.
4. Select the folder location of the PostScript file(s) that you want to download. The
printer’s PostScript utility files are located on the CD-ROM in the Printer Utilities
folder inside the Phaser Tools folder.
5. Select a utility file. Click Add.
6. Click Send.
7. At the prompt Save PostScript output as, you are asked for a file name for saving
printer output. Use the default name given in the edit box or type a new name.
(Printer output includes status messages generated by the printer reporting such
conditions as out of paper.)
8. Click Save.
9. If no output is returned by the printer, the Apple Printer Utility displays a dialog box;
click Continue. If output is returned by the printer, you won't see this dialog box.
Check your computer’s hard disk for the message file created by the utility.
To download fonts, see page 73 for additional information.
To print a font sampler, see page 74 for additional information.
To download color sampler charts, see page 106 for additional information.
Advanced Features and Troubleshooting Manual 95
Page 96

Printer Utilities
Using the Apple Printer Utility to perform other tasks
In addition to downloading PostScript files and fonts, you can use the
Apple Printer Utility to perform the following specialized tasks.
Note
If your printer is connected through a print server, you can only use the Apple
Printer Utility to download PostScript utility files.
Turning on/off the Startup Page
1. Double-click Apple Printer Utility.
2. In the Printer Selector dialog box, make the following selections:
■ Under AppleTalk Zones, select your printer’s zone.
■ Under Printers, select your Phaser printer.
■ Click Open Printer.
3. Click the arrow next to Printer Preferences; a list of options appears.
4. Click the arrow next to Startup Page.
5. Click one of the following:
■ On: Prints a Startup Page each time the printer is turned on or reset.
■ Off: Stops the Startup Page from automatically printing.
6. Click Send.
Changing the printer’s AppleTalk name
1. Double-click Apple Printer Utility.
2. In the Printer Selector dialog box, make the following selections:
■ Under AppleTalk Zones, select your printer’s zone.
■ Under Printers, select your Phaser printer.
■ Click Open Printer.
3. Click the arrow next to Printer Preferences; a list of options appears.
4. Click the arrow next to Name.
5. In the text box, type the new printer name.
6. Click Send.
96 Phaser 850 Color Printer
Page 97

Printer Utilities
Downloading files to the printer from a PC
Downloading files from Windows 3.1
1. Select the utility file you want to send to the printer, for example RESET.PS.
2. From the File menu, select Copy; the Copy dialog box appears with the utility file you
selected listed in the From field.
3. In the To field, type the port your printer is connected to. For example, type LPT1:
for a parallel port connection. Click OK.
4. If the Confirm File Replace dialog box appears, click Yes to continue; the file is
downloaded to the printer.
Downloading files from Windows 95 / Windows 98
1. Select the utility file you want to send to the printer, for example RESET.PS.
2. In the taskbar on your screen, click Start, then Programs, then MS-DOS Prompt.
■ Change directory to the location of the utility files.
■ If your printer is connected to the parallel (LPT) port, type the following
command (where x is 1, 2, or 3): COPY RESET.PS LPTx:
Downloading files from Windows NT
1. Select the utility file you want to send to the printer, for example RESET.PS.
2. In the taskbar on your screen, click Start, then Programs, then MS-DOS Prompt.
■ Change directory to the location of the utility files.
■ If your printer is connected to a network, type the following command:
lpr -S <IP Address> -P PS RESET.PS
Advanced Features and Troubleshooting Manual 97
Page 98

Printer Utilities
Downloading files if your printer is connected to a Novell Netware network
This procedure lets you redirect (capture) LPT ports in Novell NetWare. NetWare queues
can be captured from the DOS Prompt or captured directly from Windows. To find out if
an LPT port is already captured, type the following command from the DOS Prompt:
capture show
This will list the current capture data for each virtual port.
Note
If an ad command or file name error occurs, run the command from the file
servers Public directory.
■ For NetWare 3.xx and Netware 4.xx bindery queues:
capture q=[queue_name] l=[port] nb nff nt
where queue_name is the name of the queue to be captured, and port is the virtual
port to capture to, such as LPT3.
Also, nb is no banners, nff is no form feeds, and nt is no tabs.
For example: capture q=phaser_350 l=3 nb nff nt
Note
For NetWare 4.xx NDS queues, the queue name needs to start with a period. For
example: capture q=.phaser_350_q.nds.printers.support l=2 nb nff nt.
■ For Windows 95 / 98 environments follow these guidelines:
1. From the Details tab of your printer’s driver, select the Capture Printer Port button.
2. Select the appropriate virtual port under the Device field.
■ For bindery queues, enter the path as \\server_name\queue_name and select
OK. For example: \\nw_server\Phaser_350
■ For NDS queues, enter the path as \\Tree\queue_name.context and select OK.
For example: \\Tek\.Phaser_350_Q.nds.printers
■ For Windows 3.1x environments follow these guidelines:
1. From the Windows Control Panel, select Printers.
2. Select the Connect button, then select the Network button.
3. Choose a Port to capture, then locate the appropriate queue.
Note
If the appropriate file server is not listed, click the Attach button and select the
desired file server. Login and click OK. Within the Operation section, check the
box next to the word Permanent, then click Connect. The port should then be
captured.
98 Phaser 850 Color Printer
Page 99

Printer Utilities
Downloading files if your printer is connected through PhaserPort
This procedure lets you create the printer and then redirect the port, turning client #1 into
a print server.
1. On Client #1, create a printer using the LPT1 port.
2. Share the printer to the network.
3. Install Phaserport and switch the LPT1 port to the Phaserport port.
4. On client #2, browse the network and install the shared printer.
5. Open the printer's Properties.
a. Click Start, select Settings, and then select Printers.
b. Right-mouse-click on the printer's icon.
c. In the pop-up dialog box, select Properties.
d. In the Details tab, click Capture Port and enter the path.
Downloading files if your printer is connected to Windows NT
This procedure lets you redirect (capture) LPT Ports
Under Windows NT print spooler, you create Ports based on their physical location:
■ Local ports = Lpt1 / Lpt2, etc.
■ IPX Port = \\NW_SERVER\Phaser
■ Appletalk Ports = WV Net 36:Phaser
■ TCP/IP Ports = 162.36.62.151:PS or [AUTO]
However, if you’re at a command prompt (DOS Prompt) and want to print, or copy, a
PostScript file to a port that is a network port, you can do the following:
■ TCP/IP Ports:
lpr -S [printers IP Address] -P [print queue] filename
For xxample: lpr -S 134.62.36.70 -P PS test.ps
■ IPX and Appletalk ports require the redefinition of the LPTX port to the network path
through the use of the NET USE command.
NET USE LPT1 \\Server_Name\Queue_Name
For example: NET USE LPT1 \\NW_SERVER\Phaser
or: NET USE LPT2 \\NT_SERVER_NT\Phaser
After redirecting the port using the NET USE command you can use the COPY
command to print the postscript file.
eg. C:\> COPY TEST.PS LPT1:
When finished, end the redirect with the command:
NET USE LPT1 /delete
Advanced Features and Troubleshooting Manual 99
Page 100

Advanced Printing Features for Phaser 850 Printers
Advanced Printing Features for
Phaser 850 Printers
Previewing with 1st Page Preview
When printing multiple pages through the driver (either multiple copies of a single page or
a multiple-page file), select 1st Page Preview to preview the first page of the job before
proceeding with the remainder of the job; this feature is useful when printing a large job.
You can set the timeout in the printer’s front panel (timeout is the amount of time the
printer waits after sending the first page of a file before it continues with the remainder of
the job). The default timeout is 5 minutes.
Requirements
■ DP or DX Feature Set
■ Turn on the feature in the printer driver
Use 1st Page Preview
1. In a supported driver, select 1st Page Preview:
■ LaserWriter 8.3.4 driver:
In the Print dialog box, click Options.
■ LaserWriter 8.5.1 driver:
In the Print dialog box, from the pull-down menu (General) select Printer
Specific Options.
■ Windows 95 / Windows 98 PostScript driver:
Start/Settings/Printers, then select Properties for your printer. In the Setup tab,
select Expert Options.
■ Windows 2000 driver:
From the Layout tab or Paper/Quality tab, click Advanced.
■ Windows NT driver:
Under the Properties tab, select the Advanced tab. In the Document Options tab,
select Printer features.
■ Adobe PS3 driver for Windows 3.1:
Select the Features tab options.
2. Check your first print. At the printer’s front panel 1st Page Preview message, choose
one of these options:
■ Reprint: Reprints the first page, pauses for the duration of timeout or until you
press a button.
■ Cancel: Cancels the print job.
■ Continue: Prints the rest of the print job.
3. Press Select.
100 Phaser 850 Color Printer
 Loading...