

Page 1

TM
Phaser
laser printer
4500
Reference Guide
Guide de référence
Guida di riferimento
Referenzhandbuch
Guía de referencia
Guia de referência
Naslaggids
Referensguiden
®
www.xerox.com/office/4500support
Page 2

Copyright © 2004, Xerox Corporation. All Rights Reserved. Unpublished rights reserved under the copyright laws of the United
States. Contents of this publication may not be reproduced in any form without permission of Xerox Corporation.
Copyright protection claimed includes all forms of matters of copyrightable materials and information now allowed by statutory
or judicial law or hereinafter granted, including without limitation, material generated from the software programs which are
displayed on the screen such as styles, templates, icons, screen displays, looks, etc.
®
XEROX
PhaserSMART
, The Document Company®, the stylized X®, CentreWare®, infoSMART®, Made For Each Other®, and
®
are registered trademarks of Xerox Corporation. Phaser™, PhaserPort™, and PhaserTools™are trademarks of
Xerox Corporation.
®
Reader®, Illustrator®, PageMaker®, Photoshop®, PostScript®, ATM®, Adobe Garamond®, Birch®, Carta®, Mythos®,
Adobe
®
, and Tekton® are registered trademarks and Adobe Jenson™, Adobe Brilliant Screens™ technology, and IntelliSelect™
Quake
are trademarks of Adobe Systems Incorporated or its subsidiaries which may be registered in certain jurisdictions.
®
Apple
, LaserWriter®, LocalTalk®, Macintosh®, Mac® OS, AppleTalk®, TrueType2®, Apple Chancery®, Chicago®, Geneva®,
®
Monaco
Marigold
Ave ry
PCL
, and New York® are registered trademarks, and QuickDraw™ is a trademark of Apple Computer Incorporated.
™
and Oxford™ are trademarks of AlphaOmega Typography.
™
is a trademark of Avery Dennison Corporation.
®
and HP-GL® are registered trademarks of Hewlett-Packard Corporation.
Hoefler Text was designed by the Hoefler Type Foundry.
®
ITC Avant Guard Gothic
ITC Zapf Dingbats
Bernhard Modern
™
Garamond
Windows
Wingdings
, Times™, and Univers™ are trademarks of Linotype-Hell AG and/or its subsidiaries.
®
and Windows NT® are registered trademarks of Microsoft Corporation.
™
in TrueType® format is a product of Microsoft Corporation. WingDings is a trademark of Microsoft Corporation and
, ITC Bookman®, ITC Lubalin Graph®, ITC Mona Lisa®, ITC Symbol®, ITC Zapf Chancery®, and
®
are registered trademarks of International Typeface Corporation.
™
, Clarendon™, Coronet™, Helvetica™, New Century Schoolbook™, Optima™, Palatino™, Stempel
TrueType is a registered trademark of Apple Computer, Inc.
™
Albertus
Antique Olive
Eurostile
Novell
Distributed Print Services
Sun
of SPARC International, Incorporated. SPARCstation
, Arial™, Gill Sans™, Joanna™, and Times New Roman™ are trademarks of Monotype Corporation.
®
is a registered trademark of M. Olive.
™
is a trademark of Nebiolo.
®
, NetWare®, NDPS®, NDS®, and Novell Directory Services® are registered trademarks, and IPX™ and Novell
®
and Sun Microsystems® are registered trademarks of Sun Microsystems, Incorporated. SPARC® is a registered trademark
™
are trademarks of Novell, Incorporated.
™
is a trademark of SPARC International, Incorporated, licensed exclusively
to Sun Microsystems, Incorporated.
®
UNIX
is a registered trademark in the US and other countries, licensed exclusively through X/Open Company Limited.
NERGY STAR
As an E
efficiency. The E
®
partner, Xerox Corporation has determined that this product meets the ENERGY STAR guidelines for energy
NERGY STAR name and logo are registered U.S. marks.
This product uses code for SHA-1 written by John Halleck, which is being used with his permission.
This product includes an implementation of LZW licensed under U.S. Patent 4,558,302.
Other marks are trademarks or registered trademarks of the companies with which they are associated.
Page 3

Contents
1 Features
Printer Tour . . . . . . . . . . . . . . . . . . . . . . . . . . . . . . . . . . . . . . . . . . . . . . . . . . . . . . . . . . . . . . 1-2
Printer Features . . . . . . . . . . . . . . . . . . . . . . . . . . . . . . . . . . . . . . . . . . . . . . . . . . . . . . 1-2
Available Configurations . . . . . . . . . . . . . . . . . . . . . . . . . . . . . . . . . . . . . . . . . . . . . . 1-2
Front View . . . . . . . . . . . . . . . . . . . . . . . . . . . . . . . . . . . . . . . . . . . . . . . . . . . . . . . . . 1-3
Rear View . . . . . . . . . . . . . . . . . . . . . . . . . . . . . . . . . . . . . . . . . . . . . . . . . . . . . . . . . . 1-3
Printer Options and Upgrades . . . . . . . . . . . . . . . . . . . . . . . . . . . . . . . . . . . . . . . . . . . 1-4
Resources . . . . . . . . . . . . . . . . . . . . . . . . . . . . . . . . . . . . . . . . . . . . . . . . . . . . . . . . . . 1-4
Front Panel. . . . . . . . . . . . . . . . . . . . . . . . . . . . . . . . . . . . . . . . . . . . . . . . . . . . . . . . . . . . . . . 1-5
Front Panel Features . . . . . . . . . . . . . . . . . . . . . . . . . . . . . . . . . . . . . . . . . . . . . . . . . . 1-5
Front Panel Layout . . . . . . . . . . . . . . . . . . . . . . . . . . . . . . . . . . . . . . . . . . . . . . . . . . . 1-6
Error and Warning Messages . . . . . . . . . . . . . . . . . . . . . . . . . . . . . . . . . . . . . . . . . . . 1-7
Print Icon. . . . . . . . . . . . . . . . . . . . . . . . . . . . . . . . . . . . . . . . . . . . . . . . . . . . . . . . . . . 1-7
Menu Map . . . . . . . . . . . . . . . . . . . . . . . . . . . . . . . . . . . . . . . . . . . . . . . . . . . . . . . . . . 1-7
Information Pages . . . . . . . . . . . . . . . . . . . . . . . . . . . . . . . . . . . . . . . . . . . . . . . . . . . . 1-7
Sample Pages . . . . . . . . . . . . . . . . . . . . . . . . . . . . . . . . . . . . . . . . . . . . . . . . . . . . . . . 1-8
Printer Drivers . . . . . . . . . . . . . . . . . . . . . . . . . . . . . . . . . . . . . . . . . . . . . . . . . . . . . . . . . . . . 1-9
Available Printer Drivers . . . . . . . . . . . . . . . . . . . . . . . . . . . . . . . . . . . . . . . . . . . . . . 1-9
Printer Driver Features . . . . . . . . . . . . . . . . . . . . . . . . . . . . . . . . . . . . . . . . . . . . . . . 1-10
Managing Your Printer . . . . . . . . . . . . . . . . . . . . . . . . . . . . . . . . . . . . . . . . . . . . . . . . . . . . 1-11
Printer’s IP Address . . . . . . . . . . . . . . . . . . . . . . . . . . . . . . . . . . . . . . . . . . . . . . . . . 1-11
CentreWare Internet Services (IS) . . . . . . . . . . . . . . . . . . . . . . . . . . . . . . . . . . . . . . 1-11
PhaserSMART . . . . . . . . . . . . . . . . . . . . . . . . . . . . . . . . . . . . . . . . . . . . . . . . . . . . . 1-12
PrintingScout. . . . . . . . . . . . . . . . . . . . . . . . . . . . . . . . . . . . . . . . . . . . . . . . . . . . . . . 1-12
Printer Settings . . . . . . . . . . . . . . . . . . . . . . . . . . . . . . . . . . . . . . . . . . . . . . . . . . . . . . . . . . 1-13
Accessing the Startup Page . . . . . . . . . . . . . . . . . . . . . . . . . . . . . . . . . . . . . . . . . . . . 1-13
Accessing Power Saver. . . . . . . . . . . . . . . . . . . . . . . . . . . . . . . . . . . . . . . . . . . . . . . 1-14
Preventing Access to Front Panel Settings . . . . . . . . . . . . . . . . . . . . . . . . . . . . . . . . 1-14
File Security System . . . . . . . . . . . . . . . . . . . . . . . . . . . . . . . . . . . . . . . . . . . . . . . . . 1-15
Accessing Load Paper Timeout . . . . . . . . . . . . . . . . . . . . . . . . . . . . . . . . . . . . . . . . 1-15
Selecting Tray Settings . . . . . . . . . . . . . . . . . . . . . . . . . . . . . . . . . . . . . . . . . . . . . . . 1-16
Adjusting Front Panel Brightness . . . . . . . . . . . . . . . . . . . . . . . . . . . . . . . . . . . . . . . 1-17
Adjusting Front Panel Contrast. . . . . . . . . . . . . . . . . . . . . . . . . . . . . . . . . . . . . . . . . 1-18
Changing Printer Language . . . . . . . . . . . . . . . . . . . . . . . . . . . . . . . . . . . . . . . . . . . 1-18
Fonts . . . . . . . . . . . . . . . . . . . . . . . . . . . . . . . . . . . . . . . . . . . . . . . . . . . . . . . . . . . . . . . . . . 1-19
Types of Fonts. . . . . . . . . . . . . . . . . . . . . . . . . . . . . . . . . . . . . . . . . . . . . . . . . . . . . . 1-19
Resident Printer Fonts. . . . . . . . . . . . . . . . . . . . . . . . . . . . . . . . . . . . . . . . . . . . . . . . 1-19
Viewing a List of Available Fonts . . . . . . . . . . . . . . . . . . . . . . . . . . . . . . . . . . . . . . 1-19
Printing a List of Available Fonts . . . . . . . . . . . . . . . . . . . . . . . . . . . . . . . . . . . . . . . 1-20
Downloading Fonts . . . . . . . . . . . . . . . . . . . . . . . . . . . . . . . . . . . . . . . . . . . . . . . . . . 1-21
Phaser™ 4500 Laser Printer
i
Page 4

Contents
Registering Your Printer . . . . . . . . . . . . . . . . . . . . . . . . . . . . . . . . . . . . . . . . . . . . . . . . . . . 1-24
2Printing
Changing Paper . . . . . . . . . . . . . . . . . . . . . . . . . . . . . . . . . . . . . . . . . . . . . . . . . . . . . . . . . . . 2-2
Guidelines . . . . . . . . . . . . . . . . . . . . . . . . . . . . . . . . . . . . . . . . . . . . . . . . . . . . . . . . . . 2-2
Tray Setup . . . . . . . . . . . . . . . . . . . . . . . . . . . . . . . . . . . . . . . . . . . . . . . . . . . . . . . . . . 2-2
Supported Papers . . . . . . . . . . . . . . . . . . . . . . . . . . . . . . . . . . . . . . . . . . . . . . . . . . . . . . . . . . 2-6
Paper Weights . . . . . . . . . . . . . . . . . . . . . . . . . . . . . . . . . . . . . . . . . . . . . . . . . . . . . . . 2-7
Paper Usage Guidelines . . . . . . . . . . . . . . . . . . . . . . . . . . . . . . . . . . . . . . . . . . . . . . . 2-9
Paper Storage Guidelines . . . . . . . . . . . . . . . . . . . . . . . . . . . . . . . . . . . . . . . . . . . . . . 2-9
Paper that May Damage Your Printer. . . . . . . . . . . . . . . . . . . . . . . . . . . . . . . . . . . . 2-10
Basic Printing . . . . . . . . . . . . . . . . . . . . . . . . . . . . . . . . . . . . . . . . . . . . . . . . . . . . . . . . . . . 2-11
Loading Paper in Tray 1 . . . . . . . . . . . . . . . . . . . . . . . . . . . . . . . . . . . . . . . . . . . . . . 2-11
Loading Paper in Trays 2-4. . . . . . . . . . . . . . . . . . . . . . . . . . . . . . . . . . . . . . . . . . . . 2-15
Factors Affecting Printer Performance . . . . . . . . . . . . . . . . . . . . . . . . . . . . . . . . . . . 2-18
Adjusting Printing Options . . . . . . . . . . . . . . . . . . . . . . . . . . . . . . . . . . . . . . . . . . . . . . . . . 2-19
Setting Printing Options . . . . . . . . . . . . . . . . . . . . . . . . . . . . . . . . . . . . . . . . . . . . . . 2-19
Selecting Properties for an Individual Job (Mac) . . . . . . . . . . . . . . . . . . . . . . . . . . . 2-23
Selecting Print-Quality Modes . . . . . . . . . . . . . . . . . . . . . . . . . . . . . . . . . . . . . . . . . 2-25
2-Sided Printing. . . . . . . . . . . . . . . . . . . . . . . . . . . . . . . . . . . . . . . . . . . . . . . . . . . . . . . . . . 2-26
Automatic 2-Sided Printing . . . . . . . . . . . . . . . . . . . . . . . . . . . . . . . . . . . . . . . . . . . 2-26
Binding Preferences . . . . . . . . . . . . . . . . . . . . . . . . . . . . . . . . . . . . . . . . . . . . . . . . . 2-26
Transparencies . . . . . . . . . . . . . . . . . . . . . . . . . . . . . . . . . . . . . . . . . . . . . . . . . . . . . . . . . . . 2-28
Guidelines . . . . . . . . . . . . . . . . . . . . . . . . . . . . . . . . . . . . . . . . . . . . . . . . . . . . . . . . . 2-28
Printing Transparencies from Trays 1-4 . . . . . . . . . . . . . . . . . . . . . . . . . . . . . . . . . . 2-28
Envelopes. . . . . . . . . . . . . . . . . . . . . . . . . . . . . . . . . . . . . . . . . . . . . . . . . . . . . . . . . . . . . . . 2-31
Guidelines . . . . . . . . . . . . . . . . . . . . . . . . . . . . . . . . . . . . . . . . . . . . . . . . . . . . . . . . . 2-31
Printing Envelopes from Trays 1-4. . . . . . . . . . . . . . . . . . . . . . . . . . . . . . . . . . . . . . 2-32
Labels, Index Cards, and Greeting Cards . . . . . . . . . . . . . . . . . . . . . . . . . . . . . . . . . . . . . . 2-34
Guidelines . . . . . . . . . . . . . . . . . . . . . . . . . . . . . . . . . . . . . . . . . . . . . . . . . . . . . . . . . 2-34
Printing Index Cards from Tray 1. . . . . . . . . . . . . . . . . . . . . . . . . . . . . . . . . . . . . . . 2-34
Printing Labels from Trays 1-4. . . . . . . . . . . . . . . . . . . . . . . . . . . . . . . . . . . . . . . . . 2-36
Printing Greeting Cards from Trays 1-4 . . . . . . . . . . . . . . . . . . . . . . . . . . . . . . . . . . 2-37
Custom Size Paper. . . . . . . . . . . . . . . . . . . . . . . . . . . . . . . . . . . . . . . . . . . . . . . . . . . . . . . . 2-39
Loading Custom Size Paper in Tray 1-4. . . . . . . . . . . . . . . . . . . . . . . . . . . . . . . . . . 2-39
Phaser™ 4500 Laser Printer
ii
Page 5

Contents
Advanced Options . . . . . . . . . . . . . . . . . . . . . . . . . . . . . . . . . . . . . . . . . . . . . . . . . . . . . . . . 2-42
Printing Separation Pages . . . . . . . . . . . . . . . . . . . . . . . . . . . . . . . . . . . . . . . . . . . . . 2-42
Printing Multiple Pages on a Single Sheet (N-Up) . . . . . . . . . . . . . . . . . . . . . . . . . . 2-43
Printing Negative and Mirror Images . . . . . . . . . . . . . . . . . . . . . . . . . . . . . . . . . . . . 2-44
Scaling. . . . . . . . . . . . . . . . . . . . . . . . . . . . . . . . . . . . . . . . . . . . . . . . . . . . . . . . . . . . 2-45
Printing Watermarks . . . . . . . . . . . . . . . . . . . . . . . . . . . . . . . . . . . . . . . . . . . . . . . . . 2-46
Printing Cover Pages. . . . . . . . . . . . . . . . . . . . . . . . . . . . . . . . . . . . . . . . . . . . . . . . . 2-47
Printing or Deleting Proof, Saved, and Secure Print Jobs . . . . . . . . . . . . . . . . . . . . 2-48
Supplies and Recycling . . . . . . . . . . . . . . . . . . . . . . . . . . . . . . . . . . . . . . . . . . . . . . . . . . . . 2-50
Supplies. . . . . . . . . . . . . . . . . . . . . . . . . . . . . . . . . . . . . . . . . . . . . . . . . . . . . . . . . . . 2-50
Recycling . . . . . . . . . . . . . . . . . . . . . . . . . . . . . . . . . . . . . . . . . . . . . . . . . . . . . . . . . 2-50
3 Connections and Networks
Connections and IP Address . . . . . . . . . . . . . . . . . . . . . . . . . . . . . . . . . . . . . . . . . . . . . . . . . 3-2
Printer Setup . . . . . . . . . . . . . . . . . . . . . . . . . . . . . . . . . . . . . . . . . . . . . . . . . . . . . . . . 3-2
Connection Setup . . . . . . . . . . . . . . . . . . . . . . . . . . . . . . . . . . . . . . . . . . . . . . . . . . . . 3-6
Printer Management Software. . . . . . . . . . . . . . . . . . . . . . . . . . . . . . . . . . . . . . . . . . . . . . . 3-10
Using CentreWare Software . . . . . . . . . . . . . . . . . . . . . . . . . . . . . . . . . . . . . . . . . . . 3-10
Using Printer Management Features. . . . . . . . . . . . . . . . . . . . . . . . . . . . . . . . . . . . . 3-12
Windows 2000, Windows XP, and Windows Server 2003. . . . . . . . . . . . . . . . . . . . . . . . . 3-15
Preliminary Steps . . . . . . . . . . . . . . . . . . . . . . . . . . . . . . . . . . . . . . . . . . . . . . . . . . . 3-15
Quick CD-ROM Install Steps . . . . . . . . . . . . . . . . . . . . . . . . . . . . . . . . . . . . . . . . . . 3-15
Other Methods of Installation . . . . . . . . . . . . . . . . . . . . . . . . . . . . . . . . . . . . . . . . . . 3-16
Windows 2000, Windows XP, Windows Server 2003 Troubleshooting (TCP/IP) . 3-18
Windows NT 4.x . . . . . . . . . . . . . . . . . . . . . . . . . . . . . . . . . . . . . . . . . . . . . . . . . . . . . . . . . 3-20
Preliminary Steps . . . . . . . . . . . . . . . . . . . . . . . . . . . . . . . . . . . . . . . . . . . . . . . . . . . 3-20
Quick CD-ROM Install Steps . . . . . . . . . . . . . . . . . . . . . . . . . . . . . . . . . . . . . . . . . . 3-20
Other Methods of Installation . . . . . . . . . . . . . . . . . . . . . . . . . . . . . . . . . . . . . . . . . . 3-21
Windows NT 4.x Troubleshooting (TCP/IP) . . . . . . . . . . . . . . . . . . . . . . . . . . . . . . 3-23
Windows 98 and Windows Me . . . . . . . . . . . . . . . . . . . . . . . . . . . . . . . . . . . . . . . . . . . . . . 3-25
Preliminary Steps . . . . . . . . . . . . . . . . . . . . . . . . . . . . . . . . . . . . . . . . . . . . . . . . . . . 3-25
Quick CD-ROM Install Steps . . . . . . . . . . . . . . . . . . . . . . . . . . . . . . . . . . . . . . . . . . 3-26
Other Methods of Installation . . . . . . . . . . . . . . . . . . . . . . . . . . . . . . . . . . . . . . . . . . 3-26
Windows 98 and Windows Me Troubleshooting . . . . . . . . . . . . . . . . . . . . . . . . . . . 3-28
Macintosh . . . . . . . . . . . . . . . . . . . . . . . . . . . . . . . . . . . . . . . . . . . . . . . . . . . . . . . . . . . . . . 3-30
Requirements . . . . . . . . . . . . . . . . . . . . . . . . . . . . . . . . . . . . . . . . . . . . . . . . . . . . . . 3-30
Quick CD-ROM Install Steps . . . . . . . . . . . . . . . . . . . . . . . . . . . . . . . . . . . . . . . . . . 3-30
Enabling and Using EtherTalk for Mac OS 9.x . . . . . . . . . . . . . . . . . . . . . . . . . . . . 3-30
Enabling and Using TCP/IP for Mac OS 9.x . . . . . . . . . . . . . . . . . . . . . . . . . . . . . . 3-31
Enabling or Using TCP/IP or AppleTalk for Mac OS X, Version 10.1 or Higher. . 3-33
Macintosh Troubleshooting (Mac OS 9.x, Mac OS X, Versions 10.1 and 10.2) . . . 3-34
Phaser™ 4500 Laser Printer
iii
Page 6

Contents
Novell NetWare. . . . . . . . . . . . . . . . . . . . . . . . . . . . . . . . . . . . . . . . . . . . . . . . . . . . . . . . . . 3-36
Configuration Software for NetWare Networks . . . . . . . . . . . . . . . . . . . . . . . . . . . . 3-36
Quick Setup. . . . . . . . . . . . . . . . . . . . . . . . . . . . . . . . . . . . . . . . . . . . . . . . . . . . . . . . 3-36
Advanced Setup . . . . . . . . . . . . . . . . . . . . . . . . . . . . . . . . . . . . . . . . . . . . . . . . . . . . 3-36
NetWare 4.x, NetWare 5.x, and NetWare 6.x Print Server Setup . . . . . . . . . . . . . . 3-37
Novell NetWare Troubleshooting. . . . . . . . . . . . . . . . . . . . . . . . . . . . . . . . . . . . . . . 3-37
UNIX (Linux) . . . . . . . . . . . . . . . . . . . . . . . . . . . . . . . . . . . . . . . . . . . . . . . . . . . . . . . . . . . 3-41
Quick Install Steps . . . . . . . . . . . . . . . . . . . . . . . . . . . . . . . . . . . . . . . . . . . . . . . . . . 3-41
Additional Resources . . . . . . . . . . . . . . . . . . . . . . . . . . . . . . . . . . . . . . . . . . . . . . . . 3-42
4 Troubleshooting
Automatic Diagnostic Tools . . . . . . . . . . . . . . . . . . . . . . . . . . . . . . . . . . . . . . . . . . . . . . . . . 4-2
PhaserSMART Technical Support . . . . . . . . . . . . . . . . . . . . . . . . . . . . . . . . . . . . . . . 4-2
Front Panel i Button . . . . . . . . . . . . . . . . . . . . . . . . . . . . . . . . . . . . . . . . . . . . . . . . . . 4-2
PrintingScout. . . . . . . . . . . . . . . . . . . . . . . . . . . . . . . . . . . . . . . . . . . . . . . . . . . . . . . . 4-2
Paper Jams . . . . . . . . . . . . . . . . . . . . . . . . . . . . . . . . . . . . . . . . . . . . . . . . . . . . . . . . . . . . . . . 4-3
Jam at the Exit and Jam at the Rear . . . . . . . . . . . . . . . . . . . . . . . . . . . . . . . . . . . . . . 4-3
Jam at the Exit and Jam at the Rear (with Duplex Unit). . . . . . . . . . . . . . . . . . . . . . . 4-5
Jam at the Exit - Open Top Cover to Clear. . . . . . . . . . . . . . . . . . . . . . . . . . . . . . . . . 4-7
Jam at the Tray . . . . . . . . . . . . . . . . . . . . . . . . . . . . . . . . . . . . . . . . . . . . . . . . . . . . . 4-10
Jam at the Top Cover . . . . . . . . . . . . . . . . . . . . . . . . . . . . . . . . . . . . . . . . . . . . . . . . 4-14
Jam at the Duplex Unit . . . . . . . . . . . . . . . . . . . . . . . . . . . . . . . . . . . . . . . . . . . . . . . 4-18
Jam at the Stacker . . . . . . . . . . . . . . . . . . . . . . . . . . . . . . . . . . . . . . . . . . . . . . . . . . . 4-19
Paper Size Jam . . . . . . . . . . . . . . . . . . . . . . . . . . . . . . . . . . . . . . . . . . . . . . . . . . . . . 4-20
Print-Quality Problems . . . . . . . . . . . . . . . . . . . . . . . . . . . . . . . . . . . . . . . . . . . . . . . . . . . . 4-24
Diagnosing Print-Quality Problems . . . . . . . . . . . . . . . . . . . . . . . . . . . . . . . . . . . . . 4-24
Repeating Defects . . . . . . . . . . . . . . . . . . . . . . . . . . . . . . . . . . . . . . . . . . . . . . . . . . . 4-29
Maintenance. . . . . . . . . . . . . . . . . . . . . . . . . . . . . . . . . . . . . . . . . . . . . . . . . . . . . . . . . . . . . 4-30
Cleaning the Outside of the Printer. . . . . . . . . . . . . . . . . . . . . . . . . . . . . . . . . . . . . . 4-30
Front Panel Messages . . . . . . . . . . . . . . . . . . . . . . . . . . . . . . . . . . . . . . . . . . . . . . . . . . . . . 4-31
Status Messages . . . . . . . . . . . . . . . . . . . . . . . . . . . . . . . . . . . . . . . . . . . . . . . . . . . . 4-31
Error and Warnings. . . . . . . . . . . . . . . . . . . . . . . . . . . . . . . . . . . . . . . . . . . . . . . . . . 4-31
Moving and Repacking the Printer . . . . . . . . . . . . . . . . . . . . . . . . . . . . . . . . . . . . . . . . . . . 4-36
Precautions for Moving the Printer. . . . . . . . . . . . . . . . . . . . . . . . . . . . . . . . . . . . . . 4-36
Moving the Printer Within the Office. . . . . . . . . . . . . . . . . . . . . . . . . . . . . . . . . . . . 4-37
Preparing the Printer for Shipment . . . . . . . . . . . . . . . . . . . . . . . . . . . . . . . . . . . . . . 4-37
Additional Resources. . . . . . . . . . . . . . . . . . . . . . . . . . . . . . . . . . . . . . . . . . . . . . . . . . . . . . 4-38
Support . . . . . . . . . . . . . . . . . . . . . . . . . . . . . . . . . . . . . . . . . . . . . . . . . . . . . . . . . . . 4-38
infoSMART . . . . . . . . . . . . . . . . . . . . . . . . . . . . . . . . . . . . . . . . . . . . . . . . . . . . . . . 4-38
Web Links . . . . . . . . . . . . . . . . . . . . . . . . . . . . . . . . . . . . . . . . . . . . . . . . . . . . . . . . . 4-38
Phaser™ 4500 Laser Printer
iv
Page 7

A User Safety
BWarranty
C Printer Specifications (English Only)
D Regulatory Information
(English Only)
E Material Safety Data Sheet (English Only)
F Product Recycling and Disposal (English Only)
Index
Contents
Phaser™ 4500 Laser Printer
v
Page 8

Features
This section includes:
■ "Printer Tour" on page 1-2
■ "Front Panel" on page 1-5
■ "Printer Drivers" on page 1-9
■ "Managing Your Printer" on page 1-11
■ "Printer Settings" on page 1-13
■ "Fonts" on page 1-19
■ "Registering Your Printer" on page 1-24
Phaser™ 4500 Laser Printer
Copyright © 2004 Xerox Corporation. All Rights Reserved.
1-1
Page 9

Phaser™ 4500 Laser Printer
Printer Tour
This topic includes:
■ "Printer Features" on page 1-2
■ "Available Configurations" on page 1-2
■ "Front View" on page 1-3
■ "Rear View" on page 1-3
■ "Printer Options and Upgrades" on page 1-4
Printer Features
The Phaser 4500 Laser Printer embodies many features to meet your printing needs:
■ Great performance and superior print quality
■ 36 pages per minute (ppm) (Letter)
■ 34 ppm (A4)
■ Up to 256 MB of RAM
■ Flexible paper handling
■ Standard 150-Sheet Tray
■ Standard 550-Sheet Tray
■ Two optional 550-Sheet Feeders
■ Optional 500-Sheet Stacker
■ Total paper capacity of 1800 sheets
■ Accommodates a wide range of media types
■ Wide variety of productivity features
■ PhaserSMART online troubleshooting
■ CentreWare IS provides an embedded web server to help manage, configure, and
troubleshoot the printer from your computer.
■ Usage Analysis Tool provides cost tracking that logs each job and the cost for each
page.
■ PrintingScout provides on-screen notification and guidance if the printer needs help.
Available Configurations
The Phaser 4500 Laser Printer has four configurations:
Configurations
Features Printer Configuration
Maximum Print Speed (Pages Per Minute) 36 36 36 36
Hard Drive Optional Optional Optional Standard
PostScript and PCL Fonts Standard Standard Standard Standard
Copyright © 2004 Xerox Corporation. All Rights Reserved.
4500B 4500N 4500DT 4500DX
1-2
Page 10
Printer Tour
2
Configurations (Continued)
Features Printer Configuration
4500B 4500N 4500DT 4500DX
550-Sheet Feeder Optional Optional Standard Standard
500-Sheet Stacker Optional Optional Optional Standard
Automatic 2-Sided Printing (Duplex) Optional Optional Standard Standard
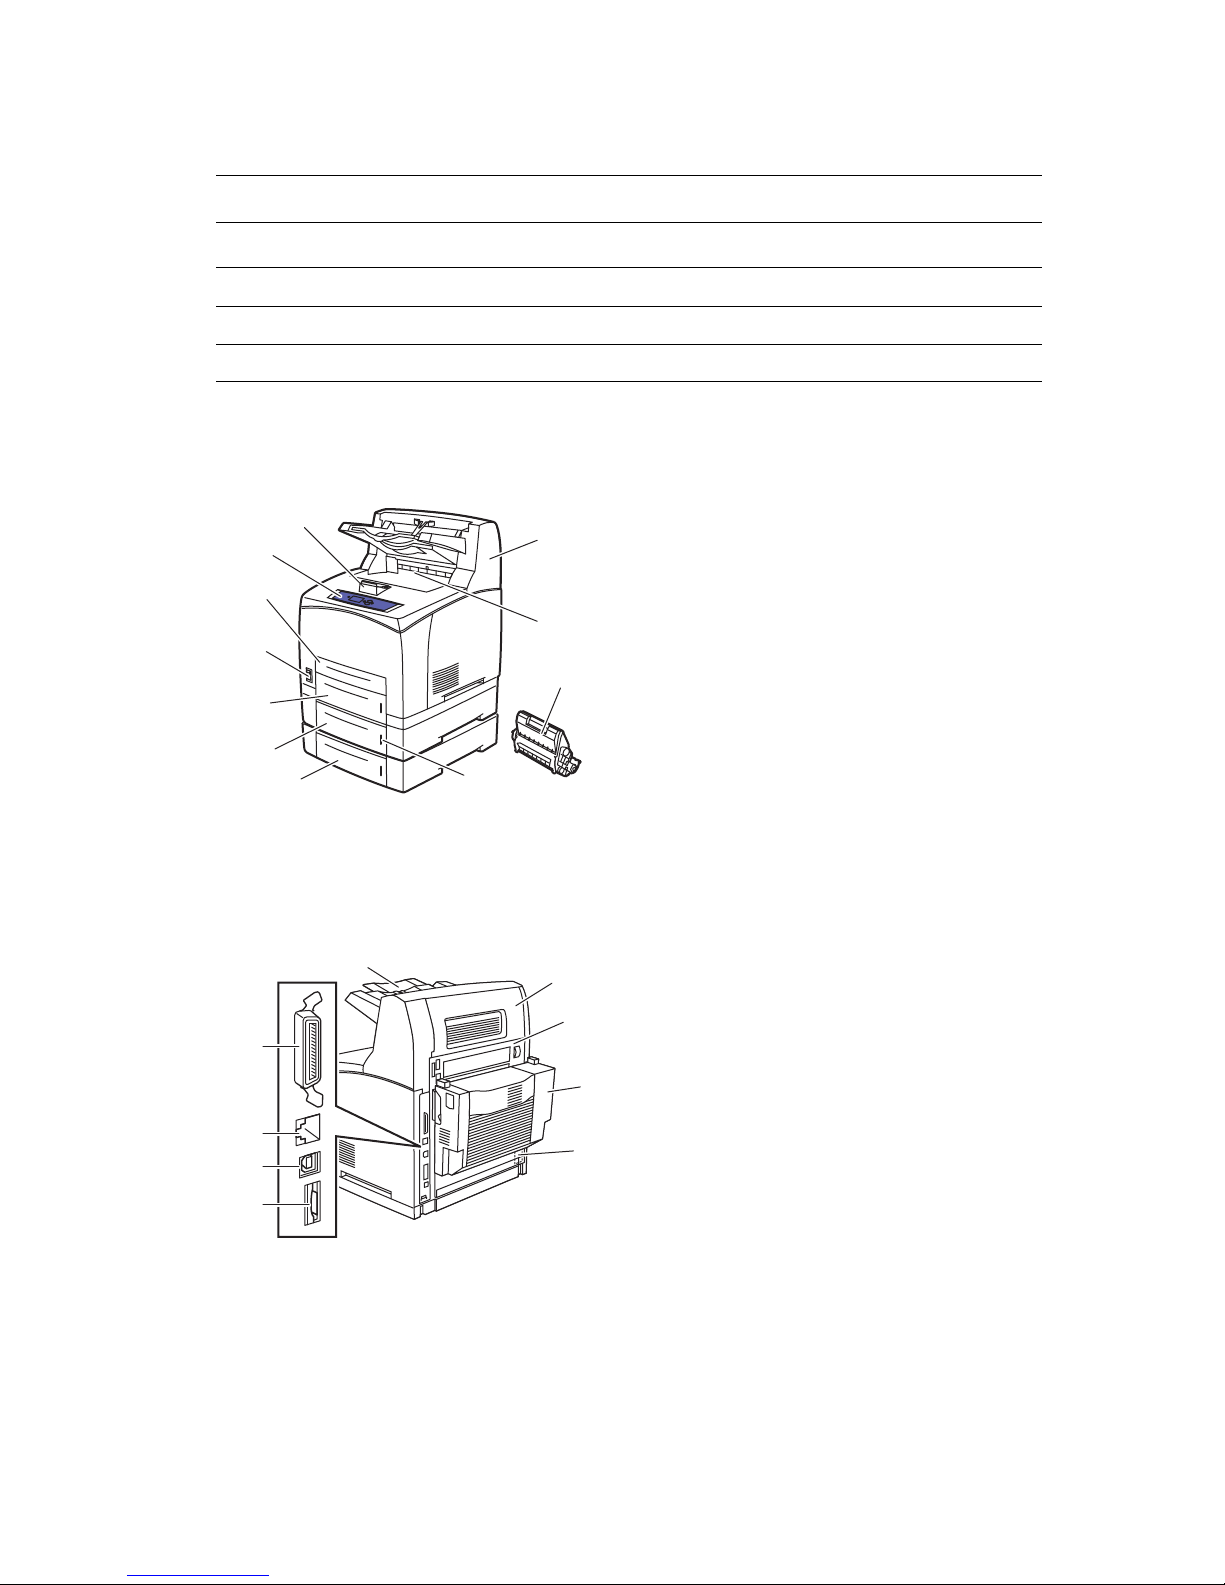
Front View
1. Paper stop
1
2
11
3
10
4
9
5
6
7
8
4500-07
2. Front panel
3. Tray 1
4. On/Off switch
5. Tray 2
6. Optional Tray 3
7. Optional Tray 4
8. Paper gauge
9. Print cartridge
10. Standard output tray
11. Optional 500-Sheet stacker
Rear View
1
2
3
4
9
8
7
4500-073
1. Parallel cable connection
2. Ethernet 10/100 Base-T connection
3. USB connection
4. Configuration card
5. Power receptacle
6. Duplex unit
6
7. Rear cover
8. Stacker rear cover
5
9. Stacker extension
Phaser™ 4500 Laser Printer
1-3
Page 11

Printer Tour
Printer Options and Upgrades
Options and upgrades are available for the Phaser 4500 Laser Printer.
Note
Print a “Configuration Page” after installing an option to confirm that the option has been
installed correctly.
Upgrades
■ Phaser 4500B to 4500N
Options
■ 64 MB memory card, 128 MB memory card
■ Up to two 550-Sheet feeders
■ 500-Sheet stacker
■ Internal hard drive with additional PostScript fonts
■ 16 MB Flash memory
■ Duplex unit
■ 550-Sheet tray
■ Upgrade kit
For more information on printer options and upgrades, go to www.xerox.com/office/
4500supplies.
Resources
You can obtain information regarding your printer and its capabilities from the following
sources:
Information Source
Setup Guide
Quick Reference Guide
Warranty
Reference Guide Packaged with printer
Printer Management Tools www.xerox.com/office
infoSMART Knowledge Base www.xerox.com/office/infoSMART
PhaserSMART www.phaserSMART.com
Technical Support www.xerox.com/office/4500support
Information Pages ■ Front panel
Packaged with printer
Packaged with printer
Packaged with printer
(User Documentation CD-ROM)
■ CentreWare IS
■ Printer Driver
Phaser™ 4500 Laser Printer
1-4
Page 12

Phaser™ 4500 Laser Printer
Front Panel
This topic includes:
■ "Front Panel Features" on page 1-5
■ "Front Panel Layout" on page 1-6
■ "Error and Warning Messages" on page 1-7
■ "Print Icon" on page 1-7
■ "Menu Map" on page 1-7
■ "Information Pages" on page 1-7
■ "Sample Pages" on page 1-8
Front Panel Features
The front panel:
■ Displays the printer’s operating status (for example, Printing, Ready to Print, printer
errors and warnings).
■ Prompts you to load paper, replace supplies, and clear jams.
■ Enables you to access tools and information pages to help resolve problems.
■ Enables you to change printer and network settings.
Go to Reference/Features/Printer Settings on the User Documentation CD-ROM for details
about front panel settings.
Copyright © 2004 Xerox Corporation. All Rights Reserved.
1-5
Page 13
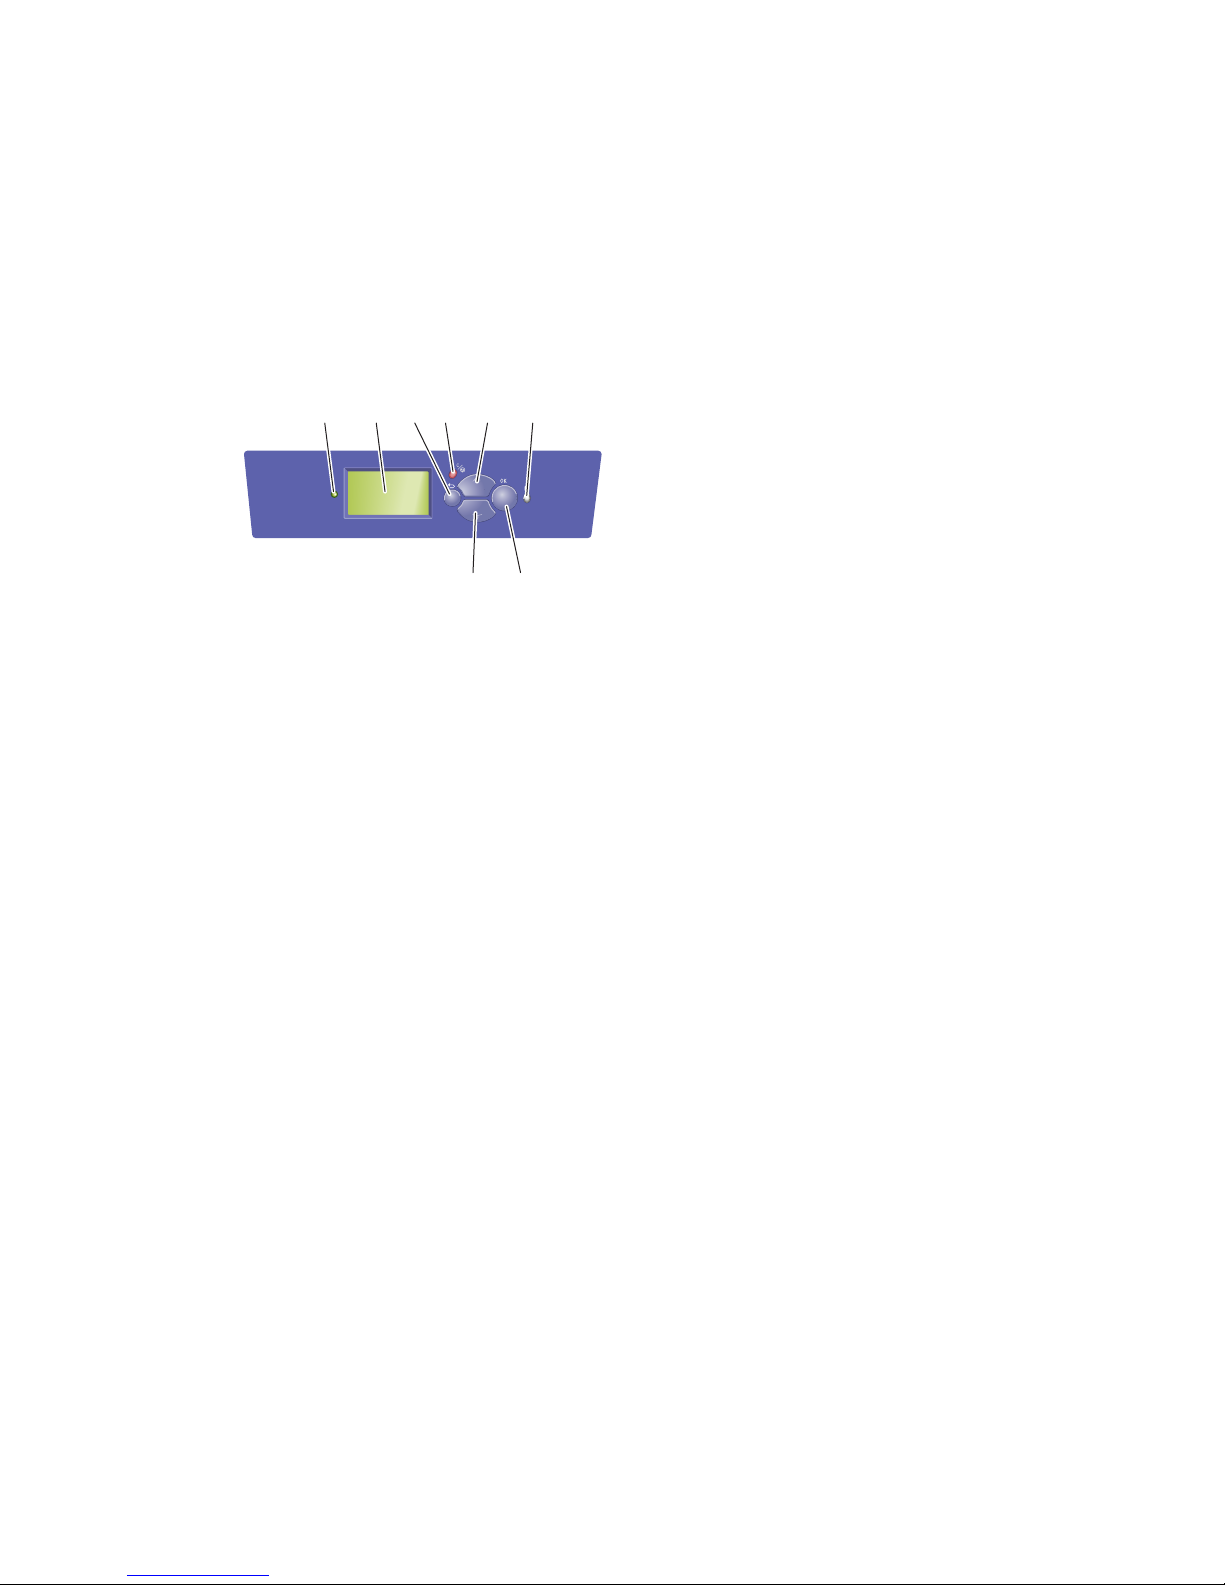
Front Panel Layout
The front panel on your printer has three components:
■ Multi-colored LED
■ Graphic display
■ Six button cluster
1. Status Indicator LED:
4 5
31 2
Phaser 4500
6
78
4500-074
Blinking green = Printer is busy or in Standby
mode
Steady green = Ready to print or Power Saver
mode
Blinking yellow = Warning, continues to print
Blinking red = Error condition
Steady red = Startup sequence
2. Graphic display shows status messages and
menus.
3. Back button
Returns to the previous menu item.
4. Cancel button
Cancels the current print job.
5. Up Arrow button
Scrolls upward through the menus.
6. Information (i) button
Displays a help message with information
about the printer, such as printer status, error
messages, and maintenance information.
7. Down Arrow button
Scrolls downward through the menus.
8. OK button
Accepts the setting selected.
Front Panel
The Graphic Display has two sections:
■ The top section displays status messages and titles for the printer.
■ The bottom section displays the front panel menus and information text.
Phaser™ 4500 Laser Printer
1-6
Page 14

Front Panel
Error and Warning Messages
When there is a problem with the printer, the front panel displays (1) an error or warning
message. Press the i
ways to solve the problem.
button (2) for more information about the error or warning message and
12
Phaser 4500
4500-075
Print Icon
There are a number of information pages accessible through the front panel.
When the print icon appears before a title on the front panel display, press
the OK button to print that page.
Menu Map
The “Menu Map” is a visual representation of the front panel Menu Map structure. To print the
“Menu Map”:
1. At the printer’s front panel, select Information, then press the OK button.
2. Select Menu Map, then press the OK button to print.
Note
Print the “Menu Map” to see other information pages available for printing.
Information Pages
Your printer comes with a set of information pages that helps you solve printing problems and
obtain the best results from your printer. Access these pages from the printer’s front panel.
To print information pages:
1. At the printer’s front panel, select Information, then press the OK button.
2. Select Information Pages, then press the OK button.
Phaser™ 4500 Laser Printer
1-7
Page 15

Front Panel
3. Select the appropriate information page, then press the OK button to print.
Note
Print the “Menu Map” to see other information pages available for printing.
Sample Pages
Your printer comes with a set of sample pages which demonstrate different printer functions.
To print sample pages:
1. At the printer’s front panel, select Information, then press the OK button.
2. Select Sample Pages, then press the OK button.
3. Select the desired sample page, then press the OK button to print.
Phaser™ 4500 Laser Printer
1-8
Page 16

Phaser™ 4500 Laser Printer
Printer Drivers
This topic includes:
■ "Available Printer Drivers" on page 1-9
■ "Printer Driver Features" on page 1-10
Printer drivers enable your computer and printer to communicate and provide access to your
printer features. Xerox makes driver installation easy with its Walk-Up Technology. For more
information about printer drivers, see the video at
Available Printer Drivers
Xerox provides drivers for a variety of page description languages and operating systems. The
following drivers are available:
Driver Source* Description
www.xerox.com/office/drivers.
Windows PostScript Driver CD-ROM and
Web
Windows PCL Driver CD-ROM and
Web
Xerox Walk-Up Printing Driver
(Windows)
Macintosh OS Driver CD-ROM and
UNIX Driver (Linux, Solaris) Web only This driver enables printing from a UNIX
* You can access the printer drivers listed above on the Printer Installer and Utilities CD-ROM that
came with your printer or go to
Web only This driver enables printing from a PC to any
Web
www.xerox.com/office/drivers as indicated.
The PostScript driver is recommended to take
full advantage of your printer's custom
features and genuine Adobe® PostScript®.
(Default driver)
The Printer Command Language driver can
be used for applications requiring PCL.
Xerox PostScript-enabled printer. This is
especially helpful for mobile professionals
who travel to multiple locations and need to
print to different printers.
This driver enables printing from a Macintosh
OS 9.x or OS X, version10.1 or higher.
operating system.
For more information about driver features, go to Reference/Printing/Adjusting Printing
Options on the User Documentation CD-ROM.
Copyright © 2004 Xerox Corporation. All Rights Reserved.
1-9
Page 17

Printer Drivers
Printer Driver Features
The following table displays the Xerox driver features that are available with specific
operating systems.
Note
All features shown are both PCL and PostScript unless noted.
Feature
Separation Pages ●●●●●
Cover Pages ●●●●●
Pages per Sheet (N-Up) ●●●●●
Booklet ■■■ ––
2-Sided Printing ■■■■■
Edge-to-Edge Printing ●●●●●
Image Smoothing
Scaling ●●●●●
Mirror Images ●●●● –
Watermarks ● – ● ––
Negative Images ● ––● –
Job Completion Notification ▲ – ▲ ––
Secure Print ◆◆◆◆◆
Windows
98, Me
1
●
Windows
NT4
1
●
Windows,
2000, XP,
Server
2003
1
●
Macintosh
1
OS 9.x
1
●
Macintosh
OS 10.x
1
1
●
Proof Print ◆◆◆◆◆
Saved Print ◆◆◆◆◆
Collation ◆◆◆◆◆
Job Offset (Jogging) ▼▼▼▼▼
1 PostScript only
● =
■ = Must have duplex unit (DT or DX configuration)
◆ = Must have hard drive
▲ =
▼ = Must have 500-Sheet stacker
Supported
Only available when your printer is connected to your computer via a network
Phaser™ 4500 Laser Printer
1-10
Page 18

Phaser™ 4500 Laser Printer
Managing Your Printer
This topic includes:
■ "Printer’s IP Address" on page 1-11
■ "CentreWare Internet Services (IS)" on page 1-11
■ "PhaserSMART" on page 1-12
■ "PrintingScout" on page 1-12
There are a number of resources available to help you get the best quality prints from your
printer.
Note
The information in this section applies only to network printers.
Printer’s IP Address
You need your printer’s IP address to change printer settings through CentreWare IS. Follow
these steps to identify your printer’s IP address:
1. At the printer’s front panel, select Information, then press the OK button.
2. Select Printer Identification, then press the OK button.
3. Note the printer’s IP Address.
CentreWare Internet Services (IS)
CentreWare IS is a printer management tool that helps users and administrators accomplish
many tasks. It is available on all networked printers. With CentreWare
■ Configure and manage multi-vendor printers.
■ Access remote diagnostics and troubleshooting information for printer problems.
■ Monitor printer and supply status.
■ Link to software updates and Technical Support.
CentreWare IS uses TCP/IP (your printer’s IP address) to communicate directly with an
embedded web server on the printer. CentreWare
IS runs on any TCP/IP enabled computer
with a web browser.
Launching CentreWare IS
To launch CentreWare IS:
IS you can:
1. Launch your web browser.
2. Enter your printer's IP address in the browser’s Address field (http://xxx.xxx.xxx.xxx).
3. For detailed information about CentreWare IS software, click HELP on the upper right of
the CentreWare IS screen.
For more information about “CentreWare IS” go to Reference/Connections & Networks/
Printer Management Software on the User Documentation CD-ROM.
Copyright © 2004 Xerox Corporation. All Rights Reserved.
1-11
Page 19

Managing Your Printer
PhaserSMART
PhaserSMART Technical Support is an automated, Internet-based support system. Use your
default web browser to send diagnostic information from your printer to our web site for
analysis. PhaserSMART Diagnostic Tool examines the information, diagnoses the problem,
and proposes a solution. If the problem is not resolved with the solution, PhaserSMART
Technical Support assists you in opening a Service Request with Xerox Customer Support.
Launching PhaserSMART from CentreWare IS
To access PhaserSMART Technical Support through CentreWare IS:
1. Launch your web browser.
2. Enter your printer’s IP address in the browser’s Address field (http://xxx.xxx.xxx.xxx).
3. Select Support.
4. Click the PhaserSMART Diagnostic Tool link to access PhaserSMART technical
support.
PrintingScout
PrintingScout, installed with your printer driver and available only with Windows,
automatically checks the printer status and sends instant notification to your computer if the
printer needs attention.
Whenever the printer is unable to print your document, the printer automatically sends an onscreen message that provides helpful text and illustrations showing how to fix the printer.
Phaser™ 4500 Laser Printer
1-12
Page 20

Phaser™ 4500 Laser Printer
Printer Settings
This topic includes:
■ "Accessing the Startup Page" on page 1-13
■ "Accessing Power Saver" on page 1-14
■ "File Security System" on page 1-15
■ "Selecting Tray Settings" on page 1-16
■ "Adjusting Front Panel Brightness" on page 1-17
■ "Adjusting Front Panel Contrast" on page 1-18
■ "Changing Printer Language" on page 1-18
Accessing the Startup Page
The printer automatically produces a “Startup Page” each time the printer is turned on or reset.
You can turn off the automatic printing of the “Startup Page” and later print it from the
information pages menu.
To turn on/off the “Startup Page” use either:
■ The printer’s front panel
■ CentreWare IS
Using the Printer’s Front Panel
To turn on/off the Startup Page:
1. Select Printer Setup, then press the OK button.
2. Select Printer Controls, then press the OK button.
The Startup Page is highlighted. The end of the line displays the setting (On or Off).
3. Press the OK button to change the setting.
Using CentreWare IS
To turn on/off the automatic printing of the “Startup Page”:
1. Launch your web browser.
2. Enter your printer’s IP address in the browser’s Address field (http://xxx.xxx.xxx.xxx).
3. Select Properties.
4. Select the General folder on the left sidebar.
5. Select Printer Defaults.
6. Select Off or On from the Printer Startup Page drop-down list to change the setting.
7. Click Save Changes at the bottom of the page.
Copyright © 2004 Xerox Corporation. All Rights Reserved.
1-13
Page 21

Printer Settings
Printing the Startup Page
To print the “Startup Page”:
1. Select Information, then press the OK button.
2. Select Information Pages, then press the OK button.
3. Select Startup Page, then press the OK button to print.
Accessing Power Saver
To save energy, the printer enters a Power Saver, low-energy consumption mode after a predefined period of time since its last activity. In this mode, most printer electrical systems are
shut down. When a print job is sent to the printer, the printer enters Warmup Mode. You can
also warm up the printer by pressing the OK button on the front panel.
If you find that the printer is going into Power Saver mode too often and you do not want to
wait while the printer warms up, increase the length of time before the printer goes into Power
Saver mode. Change the timeout value as follows:
1. At the printer’s front panel, select Printer Setup, then press the OK button.
2. Select Printer Controls, then press the OK button.
3. Select Power Saver Timeout, then press the OK button.
4. Press the Down Arrow or Up Arrow button to scroll to a selected Power Saver timeout
value. Select a larger value if you want to extend the length of time before the printer goes
into Power Saver mode.
5. Press the OK button.
Preventing Access to Front Panel Settings
To prevent access to front panel settings, you can lock the front panel
settings from CentreWare
panel that cannot be accessed by users.
Using CentereWare IS
To set front panel menu preferences:
1. Launch your web browser.
2. Enter your printer’s IP address in the browser’s Address field (http://xxx.xxx.xxx.xxx).
3. Select Properties.
4. Select the General folder on the left sidebar.
5. Select Printer Defaults.
6. Select On or Off from the Front Panel Menu drop-down list.
■ Select On to have all menus available.
■ Select Off to limit the printer setup items.
IS. A lock icon appears next to items in the front
Phaser™ 4500 Laser Printer
1-14
Page 22

Printer Settings
7. Click Save Changes at the bottom of the page.
File Security System
If your printer has a hard drive, your system administrator can use the front panel’s File
Security menu to:
■ Make removed files unrecoverable
■ Remove old Proof and Secure Job Print files
Accessing Load Paper Timeout
When your print job is formatted for a type or size of paper that is not loaded in the printer, the
printer’s front panel displays a message requesting you to load the appropriate paper. The
Load Paper Timeout controls the amount of time the printer waits before printing on another
type or size of paper.
To change the load paper timeout, use either:
■ The printer’s front panel
■ CentreWare IS
Using the Printer’s Front Panel
To change the load paper timeout:
1. Select Printer Setup, then press the OK button.
2. Select Paper Handling Setup, then press the OK button.
3. Select Load Paper Timeout, then press the OK button.
4. Scroll to the desired timeout value. The values (None, 1, 3, 5, or 10 minutes, 1 hour or
24 hours) indicate the length of time you want the printer to wait for you to load paper
before printing. If you select a value of None, the printer does not wait for paper to be
inserted and immediately picks paper from the default tray.
5. Press the OK button to save the change.
Using CentreWare IS
To change the load paper timeout:
1. Launch your web browser.
2. Enter your printer’s IP address in the browser’s Address field (http://xxx.xxx.xxx.xxx).
3. Select Properties.
4. Select the General folder on the left sidebar.
5. Select Printer Defaults.
6. Scroll to the desired Load Paper Timeout value in Timeout Settings. The values (None,
1, 3, 5, or 10 minutes, 1 or 24 hours) indicate the length of time you want the printer to
wait for you to load paper before printing. If you select a value of None, the printer does
not wait for paper to be inserted and immediately picks paper from the default tray.
Phaser™ 4500 Laser Printer
1-15
Page 23

Printer Settings
7. Click Save Changes at the bottom of the screen.
Selecting Tray Settings
You can select trays by two different methods:
■ The printer’s front panel
■ CentreWare IS
Using the Front Panel
To specify tray selection:
1. At the printer’s front panel, select Printer Setup, then press the OK button.
2. Select Paper Handling Setup, then press the OK button.
3. Select Paper Source, then press the OK button.
4. Scroll to the desired tray or Auto Select.
5. Press the OK button to save the changes.
Note
The driver overrides the front panel settings and CentreWare IS for tray selection.
Using CentreWare IS
To select a default tray:
1. Launch your web browser.
2. Enter your printer’s IP address in the browser’s Address field (http://xxx.xxx.xxx.xxx).
3. Select Properties.
4. Select the General folder on the left sidebar.
5. Select Printer Defaults.
6. Scroll to Print Mode Settings, then select the tray from the Paper Source drop-down list.
7. Click Save Changes at the bottom of the screen.
Tray Switching
Tray switching is the printer’s ability to switch between trays that have the same paper type
and size when a tray runs out of paper.
Tray switching is controlled by the printer driver, front panel, or CentreWare IS.
PCL jobs always use tray switching, but PostScript jobs disable tray switching when a specific
tray has been selected as the paper source.
Phaser™ 4500 Laser Printer
1-16
Page 24

Printer Settings
Tray Sequence
The tray sequence can be set to a particular order, including all or fewer than all trays in the
printer. When fewer than all trays are set and a job specifies a tray not in the list, tray switching
from that tray does not occur, even when otherwise enabled.
The tray sequence called Off uses a default sequence which is determined by the number of
installed trays and the current Paper Source set in the front panel or CentreWare IS. This
default sequence starts as 2-3-4-1, then removes the not-installed trays, and then moves the
current Paper Source tray to the front if a specific tray is selected.
You can specify the sequence the printer uses to select trays containing the correct paper type
and size for a print job. The tray sequence can be specified using two different methods:
■ The printer’s front panel
■ CentreWare IS
Using the Front Panel
To specify the tray sequence:
1. At the printer’s front panel, select Printer Setup, then press the OK button.
2. Select Paper Handling Setup, then press the OK button.
3. Select Tray Sequence, then press the OK button.
4. Scroll to the desired tray sequence.
5. Press the OK button to save the changes.
Using CentreWare IS
To specify the tray sequence:
1. Launch your web browser.
2. Enter your printer’s IP address in the browser’s Address field (http://xxx.xxx.xxx.xxx).
3. Click the Properties tab.
4. Select Printer Defaults in the left sidebar.
5. Select the desired tray sequence from the Tray Sequence drop-down list.
6. Click the Save Changes button at the bottom of the screen.
Adjusting Front Panel Brightness
To adjust the brightness of the front panel’s background lighting:
1. At the printer’s front panel, select Printer Setup, then press the OK button.
2. Select Front Panel Setup, then press the OK button.
3. Select Front Panel Brightness, then press the OK button.
4. Press the Down Arrow or Up Arrow button to increase or decrease the front panel
brightness value. The brightness values range from 0 (no background light) to 10
(brightest background light).
5. Press the OK button to save your change.
Phaser™ 4500 Laser Printer
1-17
Page 25

Printer Settings
Adjusting Front Panel Contrast
To adjust the contrast between the text and the background to make the front panel text more
readable:
1. At the printer’s front panel, select Printer Setup, then press the OK button.
2. Select Front Panel Setup, then press the OK button.
3. Select Front Panel Contrast, then press the OK button.
4. Press the Down Arrow or Up Arrow button to increase or decrease the front panel
contrast value. The contrast values range from 1 (brightest background light) to 10 (no
background light).
5. Press the OK button to save your change.
Changing Printer Language
To change the language used for the text on the front panel, CentreWare IS, and some
information pages:
1. At the printer’s front panel, select Printer Setup, then press the OK button.
2. Select Front Panel Setup, then press the OK button.
3. Select Front Panel Language, then press the OK button.
4. Select the desired language, then press the OK button.
Phaser™ 4500 Laser Printer
1-18
Page 26

Phaser™ 4500 Laser Printer
Fonts
This topic includes:
■ "Types of Fonts" on page 1-19
■ "Resident Printer Fonts" on page 1-19
■ "Viewing a List of Available Fonts" on page 1-19
■ "Printing a List of Available Fonts" on page 1-20
■ "Downloading Fonts" on page 1-21
Types of Fonts
Your printer uses the following types of fonts:
■ Resident fonts
■ Fronts downloaded into printer memory
■ Fonts downloaded with your print job from the application
Adobe Type Manager (ATM) software enables your computer to display these fonts on your
computer screen as they will appear in your prints.
If you do not have ATM on your computer:
1. Install it from the Printer Installer and Utilities CD-ROM.
2. Install the printer’s screen fonts for your computer from the ATM folder.
Resident Printer Fonts
Printer-resident PostScript and PCL fonts are always available for printing. Print a sample of
the resident PostScript or PCL fonts at the front panel. See “Information Pages” in this section
for information on how to print the sample.
Viewing a List of Available Fonts
To view a list of available PCL or PostScript fonts, use CentreWare IS:
1. Launch your web browser.
2. Enter your printer’s IP address in the browser’s Address field (http://xxx.xxx.xxx.xxx).
3. Select Properties.
4. Select the Web Server folder on the left sidebar.
5. Select Font Files.
Copyright © 2004 Xerox Corporation. All Rights Reserved.
1-19
Page 27

Printing a List of Available Fonts
To print a list of available PostScript or PCL fonts, use:
■ The printer’s front panel
■ CenterWare IS
■ The printer driver
Using the Printer’s Front Panel
To print either a PostScript or PCL font list at the front panel:
1. Select Information, then press the OK button.
2. Select Information Pages, then press the OK button.
3. Select either PCL Font List or PostScript Font List, then press the OK button to
print.
Using CentreWare IS
To print either a PostScript or PCL font list from CenterWare IS:
Fonts
1. Launch your web browser.
2. Enter your printer’s IP address in the browser’s Address field (http://xxx.xxx.xxx.xxx).
3. Select Properties.
4. Select the Web Server folder on the left sidebar.
5. Select Font Files.
6. Click the Printer icon to print the list of fonts.
Using a PC Printer Driver
To print either a PostScript or PCL font list from your printer driver:
1. Select Start, select Settings, then select Printers.
2. Right-click the 4500 printer, then select Properties.
3. Select the Troubleshooting tab.
4. Click the drop-down arrow in the Printer Information field to view the list of options.
5. Select PostScript Font List or PCL Font List from the drop-down list.
6. Click Print.
Phaser™ 4500 Laser Printer
1-20
Page 28

Fonts
Listing the Fonts from a Mac
Use the Apple Printer Utility to list the fonts available on your printer.
1. If you do not have the Apple Printer Utility on your computer, install it from the Printer
Installer and Utilities CD-ROM.
2. Double-click the Apple Printer Utility icon (in the PhaserTools folder on your
computer’s hard drive) to launch the utility.
3. In the Printer Selector dialog box:
a. Under AppleTalk Zones, select your printer’s zone.
b. Under Printers, select your printer.
c. Click Open Printer.
4. From the File menu, select Print Font Samples.
Downloading Fonts
To supplement the resident fonts (which are always available for printing), downloadable fonts
can be sent from your computer and stored in the printer’s memory or on the printer’s hard
drive.
Note
If you turn the printer off, the fonts you download to memory are deleted. You must
download them again when you turn the printer on.
Before printing, verify that the fonts specified in your document are installed in the printer or
are set up to download correctly. If your document has a font not currently in your printer, or
downloaded with your print job, a different font will be used.
The printer accepts the following downloadable fonts:
PCL Font Type Support:
■ Type 0
■ Type 10
■ Type 11
■ Type 15
■ Type 20
Postscript Font Type Support:
■ Type 1
■ Type 3
■ Adobe
■ Agfa
■ Bitstream
■ Microsoft
■ Apple
TrueTy pe (Scalable to any point size; looks the same on-screen and printed)
Phaser™ 4500 Laser Printer
1-21
Page 29

Fonts
To list the fonts available on your printer, install the font management utility from the Xerox
web site at
www.xerox.com/office/support.
1. Select your printer from the Network Printers drop-down list.
2. Select the platform you are running from the drop-down list, “Which files for your printer
would you like?”
3. Select Printer Utilities from the drop-down list.
4. Click Go.
5. Select the CentreWare Font Management Utility.
6. Save the .exe file to your desktop.
7. Double-click the .exe file icon on your desktop to install the font manager.
Downloading Fonts from CentreWare Font Management Utility
The CentreWare Font Management Utility (FMU) is a Windows application that helps manage
fonts, macros and forms on a printer’s hard drive. Downloading fonts to a printer can improve
printing performance and reduce network traffic. You can list, print, and download PostScript
and PCL fonts using the Font Management Utility. To download the Font Management Utility,
www.xerox.com/office/drivers and use the Key word search FMU.
go to
Downloading Fonts from a Mac (9.x only)
Use the Apple Printer Utility to download fonts to the printer.
Note
If you do not have the Apple Printer Utility on your computer, install it from Printer
Installer and Utilities CD-ROM.
1. Double-click the Apple Printer Utility icon (in the PhaserTools folder on your
computer’s hard disk) to launch the utility.
2. In the Printer Selector dialog box:
a. Under AppleTalk Zones, select your printer’s zone.
b. Under Printers, select your printer.
c. Click Open Printer.
3. Click the arrow next to Printer Preferences.
4. Click the arrow next to Fonts to display the list of installed fonts and their locations, then
click Add.
5. Select the folder containing the font you want to download, select the font, then click Add.
The font is listed as ready to download.
Note
To add all of the fonts in the folder to the list of fonts to download, click the Add All
button. If you decide not to download a font, highlight the font in the list of fonts to
download, then click Remove.
6. Select either the printer’s memory or hard drive for Destination.
Phaser™ 4500 Laser Printer
1-22
Page 30

7. Click Send to download the fonts in the list.
Note
To remove downloaded fonts from the printer, follow Steps 2 through 4. Click the Fonts
drop-down list, select the font you want to remove, then click Remove.
Fonts
Phaser™ 4500 Laser Printer
1-23
Page 31

Phaser™ 4500 Laser Printer
Registering Your Printer
Registering your printer is quick and easy. You can register your printer using one of the
following methods:
■ Registration card that came with your printer
■ Online form at www.xerox.com/office/4500support
■ Web link from the Printer Installer and Utilities CD-ROM
Registering your printer gives you access to Color Connection, a great source for the latest
printing hints and tips, and new ideas to promote your business. Color Connection has
everything you need to help you look great in print.
Registering your printer also provides you with updates and news about your printer.
Copyright © 2004 Xerox Corporation. All Rights Reserved.
1-24
Page 32

Printing
This section includes:
■ "Changing Paper" on page 2-2
■ "Supported Papers" on page 2-6
■ "Basic Printing" on page 2-11
■ "Adjusting Printing Options" on page 2-19
■ "2-Sided Printing" on page 2-26
■ "Transparencies" on page 2-28
■ "Envelopes" on page 2-31
■ "Labels, Index Cards, and Greeting Cards" on page 2-34
■ "Custom Size Paper" on page 2-39
■ "Advanced Options" on page 2-42
■ "Supplies and Recycling" on page 2-50
Phaser™ 4500 Laser Printer
Copyright © 2004 Xerox Corporation. All Rights Reserved.
2-1
Page 33

Phaser™ 4500 Laser Printer
Changing Paper
This topic includes:
■ "Guidelines" on page 2-2
■ "Tray Setup" on page 2-2
The paper trays adjust to accommodate most sizes and types of paper, transparencies, or other
specialty media. For more information about loading paper, go to Reference/Printing/Basic
Printing on User Documentation CD-ROM.
Caution
If you change the type of paper in a tray, you must change the paper type and size on the
front panel to match the paper that you loaded. If you fail to do this, print-quality
problems can occur and the fuser can be damaged.
Guidelines
After loading any tray and adjusting the paper guides, set the paper type and size as required at
the front panel. All trays require front panel settings for both paper type and size.
■ Do not overload the paper tray. See the tray label for the maximum fill line indicators.
■ If excessive jams occur, turn the paper or media over. If jams continue to occur, use paper,
transparencies, or other specialty media from a new package.
■ Use only paper envelopes. Do not use envelopes with plastic windows or metal clasps.
Tra y Se tup
1. When loading paper, transparencies, or other specialty media in a tray, pull the tray
completely out of the printer.
4500-001
Copyright © 2004 Xerox Corporation. All Rights Reserved.
2-2
Page 34

Changing Paper
2. If loading paper having a different width or length, adjust the width and length guides.
4500-024
Paper Length Guide Side Paper Guides
4500-023
3. Extend the tray to accommodate legal or US Folio (legal 13) paper by moving the release
tabs to the sides of the tray and pulling out on the front of the tray. Contract the tray by
moving the release tabs to the sides of the tray and pushing in the front of the tray.
4500-059
Extending Tray Contracting Tray
4500-060
Phaser™ 4500 Laser Printer
2-3
Page 35

Changing Paper
4. Load the paper, transparencies, or other specialty media in the tray. Do not load paper
above the fill line inside the tray.
4500-003
Paper and Transparency Fill Lines
5. Slide the side guide firmly against the paper or other specialty media.
4500-023
Phaser™ 4500 Laser Printer
2-4
Page 36

Changing Paper
6. Insert the tray into the printer slot and push it completely to the back of the printer.
4500-040
7. Set the paper size and type when prompted by the front panel.
Phaser 4500
4500-020
Caution
Damage caused by using unsupported paper, transparencies, and other specialty media is
not covered by the Xerox warranty, service agreement, or Total Satisfaction Guarantee.
The Total Satisfaction Guarantee is available in the United States and Canada. Coverage
may vary outside these areas; please contact your local representative for details.
For online support information, go to www.xerox.com/office/4500support.
Phaser™ 4500 Laser Printer
2-5
Page 37

Phaser™ 4500 Laser Printer
Supported Papers
This topic includes:
■ "Paper Weights" on page 2-7
■ "Paper Usage Guidelines" on page 2-9
■ "Paper Storage Guidelines" on page 2-9
■ "Paper that May Damage Your Printer" on page 2-10
Follow the guidelines in these tables to ensure the best print quality and avoid printer jams. For
best results, use only Xerox Printing Media specified for your printer; they are guaranteed to
produce excellent results with your Phaser
Paper and Media Sizes
Paper Size Tray 1 Trays 2–4 Standard Tray
Letter (8.5 x 11 in.)
A4 (210 x 297 mm)
A5 (148 x 210 mm)
A6 (105 x 148 mm) ■ ■ ▲ ▲
ISO B5 (176 x 250 mm) ■■▲▲
B5 JIS (182 x 257 mm)
Index Card (3 x 5 in.)
Statement (5.5 x 8.5 in.) ■ ■ ▲
Executive (7.25 x 10.5 in.)
US Folio (legal 13) (8.5 x 13 in.)
Legal (8.5 x 14 in.)
Envelopes
#10 Commercial (4.12 x 9.5 in.)
Monarch (3.87 x 7.5 in.)
DL (110 x 220 mm)
C5 (162 x 229 mm)
B5 (176 x 250 mm)
Capacity
● = Auto-Sensed size
■ = User-Selected size
▲ = Output
* = Option
1 = 1-Sided printing only
2 = Maximum capacity at 75 g/m2 (20 lb.) paper stock. Capacity is reduced for heavier/thicker stock.
2
4500 Laser Printer.
Input Output
500-Sheet
Stacker*
●●
● ●
●●▲▲
● ●
1
■
●●
● ●
●●
1
■
1
■
1
■
1
■
1
■
– ▲ –
1
■
1
■
1
■
1
■
1
■
150 550 500 500
▲▲
▲ ▲
▲ ▲
▲
▲▲
▲ ▲
▲▲
▲▲
▲ ▲
▲▲
▲ ▲
▲▲
Copyright © 2004 Xerox Corporation. All Rights Reserved.
2-6
Page 38

For online support information, go to www.xerox.com/office/infoSMART.
Simplex and Duplex Sizes
Input Output
Tray 1 Trays 2–4 Standard Tray
Simplex (1-Sided
Printing)
Width
Height
Duplex (2-Sided
Printing)
Width
Height
76 – 216 mm
3.0 – 8.5 in.
127 – 356 mm
5.0 – 14.0 in.
90 – 216 mm
3.5 – 8.5 in.
140 – 356 mm
5.5 – 14.0 in.
98 – 216 mm
3.9 – 8.5 in.
148 – 356 mm
5.8 – 14.0 in.
98 – 216 mm
3.9 – 8.5 in.
148 – 356 mm
5.8 – 14.0 in.
76 – 216 mm
3.0 – 8.5 in.
127 – 356 mm
5.0 – 14.0 in.
Same as Input
Same as Input
Paper Weights
Supported Papers
500-Sheet
Stacker
90 – 216 mm
3.5 – 8.5 in.
140 – 356 mm
5.5 – 14.0 in.
The Phaser 4500 Laser Printer supports the following paper types and weights:
Paper and Media Types and Weights
Paper/Media Type Weight
Bond
Labels*
Transparency*
Greeting Cards
Index Card Stock
Tag Ca r d S t o c k
Cover Card Stock
* 1-Sided printing only
60-216 g/m2 (16-58 lb.)
Xerox A4 24-Up Label
Xerox Multipurpose 30-Up Label
Xerox Clear Transparency
190 g/m2 (70 lb. Cover)
60-216 g/m2 (33-120 lb.)
60-216 g/m2 (37-133 lb.)
60-216 g/m2 (37-133 lb.)
Phaser™ 4500 Laser Printer
2-7
Page 39

Supported Papers
Xerox Pri nting Media
Xerox Professional Printing Paper Size Description Part Number
Xerox Premium Multipurpose 4024
Xerox Business Multipurpose 4200
Xerox Premium Multipurpose 4024
Xerox Premium Multipurpose 4024
Xerox Premier Paper
Xerox Business Paper
Xerox Cover and Index Stock
Xerox Premium Multipurpose 4024 Cover
Xerox Premium Multipurpose 4024 Index
Xerox Recycled Paper
Xerox Multipurpose Recycled - 30% PCW
Xerox Recycled Paper - 100% PCW
Xerox Pre-Punched Paper
Xerox Premium Multipurpose 4024 - 3Hole
Xerox Premium Multipurpose 4200 - 3Hole
Xerox Premium Multipurpose 4024 - 3Hole
Xerox Business Paper - 4Hole
Xerox Labels
Xerox High Speed Labels
Xerox Clear High Speed Labels
Xerox High Speed Labels
Xerox Transparency Film
Xerox Clear - No Strip
Xerox Paper-backed - Clear
Xerox Type C, Plain
Xerox Carbonless Media
2 - Part (White/Canary)
2 - Part (White/Pink)
2 - Part (White/Canary)
3 - Part (White/Canary/Pink)
3 - Part (White/Canary/Pink)
3 - Part (White/Canary/Pink)
Letter 8.5 x 11 in.
Letter 8.5 x 11 in.
Legal 8.5 x 14 in.
Letter 8.5 x 11 in.
A4 210 x 297 mm
A4 210 x 297 mm
Letter 8.5 x 11 in.
Letter 8.5 x 11 in.
Letter 8.5 x 11 in.
A4 210 x 297 mm
Letter 8.5 x 11 in.
Letter 8.5 x 11 in.
Letter 8.5 x 11 in.
A4 210 x 297 mm
Letter 8.5 x 11 in. 33 labels per sheet 3R3139
Letter 8.5 x 11 in. 33 labels per sheet 3R5139
A4 210 x 297 mm 24 labels per sheet 3R96178
Letter 8.5 x 11 in. 3R3117
Letter 8.5 x 11 in. 3R4173
A4 210 x 297 mm 3R96002
Letter 8.5 x 11 in. Straight/Reverse
Letter 8.5 x 11 in. Straight/Reverse
Legal 8.5. x 14 in. Straight/Reverse
Legal 8.5 x 14 in. Straight Collation 3R12137
Letter 8.5 x 11 in. Straight Collation 3R12135
A4 210 x 297 mm Straight Collation 3R97108
20 lbs. (75 g/m
20 lbs. (75 g/m2)
20 lbs. (75 g/m
20 lbs. (75 g/m2)
80 g/m
80 g/m
65 lbs. (243 g/m2)
90 lbs. (243 g/m
20 lbs. (75 g/m
80 g/m
20 lbs. (75 g/m2)
20 lbs. (75 g/m
24 lbs. (90 g/m2)
80 g/m
Collation
Collation
Collation
2
)
2
)
2
2
2
)
2
)
2
2
)
2
3R721
3R2047
3R727
3R2531
3R91720 or
3R91805
3R91820
3R3041
3R3004
3R6296
3R91165
3R2193
3R2641
3R3317
3R91823
3R12130
3R12132
3R12133
Phaser™ 4500 Laser Printer
2-8
Page 40

Supported Papers
Paper Usage Guidelines
The printer accommodates most sizes and types of paper, transparencies, or other specialty
media. Only Tray 1 accommodates 3 x 5 in. index cards.
■ Use only paper envelopes. Do not use padded envelopes.
■ Do not use envelopes with windows, metal clasps, or adhesives with release strips.
Paper Storage Guidelines
Providing a good environment, and safe handling and storage conditions for your paper,
contributes to ultimate print quality.
■ Store paper in dark, cool, relatively dry locations. Most paper items are susceptible to
damage from ultraviolet (UV) and visible light. UV radiation, which is emitted by the sun
and fluorescent bulbs, is particularly damaging to paper items. The intensity and length of
exposure to visible light on paper items should be reduced as much as possible.
■ It is recommended that you maintain constant temperatures and relative humidity.
■ Avoid light, heat, and dampness.
■ Avoid attics, kitchens, garages, and basements for storing paper. Inside walls are drier than
outside walls where moisture can collect.
■ Store paper flat. Paper should be stored on pallets, cartons, shelves, or in cabinets.
■ Avoid having food or drinks in the area where paper is stored or handled.
■ Do not open sealed packages of paper until you are ready to load them into the printer.
Leave paper in the original packaging, and leave the packages in the shipping carton. For
most commercial cut-size grades, the ream wrapper contains an inner lining that protects
the paper from moisture loss or gain.
Phaser media is sold with appropriate packaging to prevent transportation problems and to
promote positive customer results. Leave the media inside the packaging until you are ready to
use it; reinsert unused media in the original packaging and reseal it for protection.
Phaser™ 4500 Laser Printer
2-9
Page 41

Supported Papers
Paper that May Damage Your Printer
Your printer is designed to be used with a variety of paper types. For more information about
supported papers, go to Reference/Printing/Supported Papers on the User Documentation CD-
ROM.
Other media types can cause poor print quality, increased paper jams, or damage to your
printer.
Following are examples of unacceptable paper:
■ Rough or porous media
■ Paper that has been photocopied
■ Paper with cutouts or perforations
■ Paper with staples inserted
■ Envelopes with windows, metal clasps, adhesives with release strips, or side seams.
Warning
Use only Xerox clear transparency film. Other types of transparency film may melt and
damage the printer.
Phaser™ 4500 Laser Printer
2-10
Page 42

Phaser™ 4500 Laser Printer
Basic Printing
This topic includes:
■ "Loading Paper in Tray 1" on page 2-11
■ "Loading Paper in Trays 2-4" on page 2-15
■ "Factors Affecting Printer Performance" on page 2-18
Follow these steps to print jobs:
1. Load paper in the tray.
2. Adjust the tray guides.
3. If prompted by the front panel, confirm the paper type and/or size and change it as
required.
4. Select File/Print to adjust the printing options in the printer driver.
5. Send the job to the printer from the application’s Print dialog box.
For more information on paper types, weights, and sizes, go to Reference/Printing/Supported
Papers on the User Documentation CD-ROM.
Loading Paper in Tray 1
Tray 1 can be used for all paper, transparencies, and specialty media, as well as 3 x 5 in. index
cards.
Caution
If you change the type of paper in a tray, you
must change the paper type and size on the
front panel to match the paper that you
loaded. If you fail to do this, print-quality
problems can occur and the fuser can be
damaged.
For more information on paper types, weights, and sizes, go to Reference/Printing/Supported
Papers on the User Documentation CD-ROM.
Phaser 4500
4500-020
Copyright © 2004 Xerox Corporation. All Rights Reserved.
2-11
Page 43

Basic Printing
1. Pull the tray completely out of the printer.
4500-001
2. If loading paper having a different width or length, adjust the width and length guides.
4500-024
4500-023
3. Extend the tray to accommodate legal or US Folio (legal 13) paper by moving the release
tabs to the sides of the tray and pulling out on the front of the tray. Contract the tray by
moving the release tabs to the sides of the tray and pushing in the front of the tray.
4500-0
4500-060
Phaser™ 4500 Laser Printer
2-12
Page 44

4. Load the paper, transparencies, or other specialty media in the tray.
4500-016
Note
Do not load paper, transparencies, or specialty media above the fill lines inside the
tray. Only use flat paper, transparencies, or specialty media. If frequent jamming
occurs with card stock or heavier paper that is less than 175 mm (7 in.) long, reduce
the number of sheets in the tray.
Basic Printing
4500-003
5. Slide the side guide firmly against the paper or other specialty media.
4500-023
Phaser™ 4500 Laser Printer
2-13
Page 45

Basic Printing
6. Insert the tray into the printer slot and push it completely to the back of the printer.
4500-040
7. Confirm or change the paper size and type when prompted by the front panel.
Phaser 4500
4500-020
Phaser™ 4500 Laser Printer
2-14
Page 46

Basic Printing
Loading Paper in Trays 2-4
Use Trays 2-4 for all paper, transparencies, and specialty media except 3 x 5 in. index cards.
Caution
If you change the type of paper in a tray, you
must change the paper type on the front panel
to match the paper that you loaded. If you fail
to do this, print-quality problems can occur
and the fuser can be damaged.
1. Pull the tray completely out of the printer.
Phaser 4500
4500-020
4500-078
2. If loading paper having a different width or length, adjust the width and length guides.
4500-089
4500-088
Phaser™ 4500 Laser Printer
2-15
Page 47

Basic Printing
3. Extend the tray to accommodate legal or US Folio (legal 13) paper by moving the release
tabs to the sides of the tray and pulling out on the front of the tray. Contract the tray by
moving the release tabs to the sides of the tray and pushing in the front of the tray.
4500-090
4. Load the paper, transparencies, or other specialty media in the tray.
Note
Do not load paper, transparencies, or specialty media above the fill lines inside the
tray. Only use paper, transparencies, or specialty media that are flat. If frequent
jamming occurs with card stock or heavier paper that is less than 175 mm (7 in.) long,
reduce the number of sheets in the tray.
4500-087
4500-091
4500-086
Phaser™ 4500 Laser Printer
2-16
Page 48

Basic Printing
5. Slide the side guide firmly against the paper or other specialty media.
4500-088
6. Insert the tray into the printer slot and push it completely to the back of the printer.
4500-077
7. Set the paper size and type when prompted by the front panel.
Phaser 4500
4500-020
Note
For more information about printing options and other selections, click the Help button on
the printer driver tab to view the online help.
Phaser™ 4500 Laser Printer
2-17
Page 49

Basic Printing
Factors Affecting Printer Performance
Many factors affect a print job. They include the print speed (stated in number of pages per
minute), the media used, download time, and printer processing time.
The computer download time and printer processing time are affected by several factors
including:
■ Printer memory
■ Connection type (network, parallel or USB)
■ Network operating system
■ Printer configuration
■ File size and type of graphics
■ Computer speed
Note
Additional printer memory (RAM) may improve overall printer functions, but will not
increase the pages per minute (ppm) ability of the printer.
Phaser™ 4500 Laser Printer
2-18
Page 50

Phaser™ 4500 Laser Printer
Adjusting Printing Options
This topic includes:
■ "Setting Printing Options" on page 2-19
■ "Selecting Properties for an Individual Job (Mac)" on page 2-23
■ "Selecting Print-Quality Modes" on page 2-25
Setting Printing Options
Many printing options are available with the Xerox printer driver.
Selecting Printing Preferences in Windows
Printer preferences control all of your jobs, unless you overwrite them specifically for your
job. For example, if you want to use automatic 2-sided printing for most jobs, set this option in
printer settings.
1. Click Start, select Settings, then click Printers.
2. In the Printers folder, right-click the icon for your printer.
3. From the popup menu, select Printer Preferences or Properties.
4. Make selections from the driver tabs. See the “Windows PostScript Driver Settings” and
“Windows PCL Driver Settings” tables for specific printing options.
5. Click the OK button to save your selections.
Selecting Properties for an Individual Job (Windows)
If you want to use special settings for a particular job, change the driver settings before
sending the job to the printer. For example, if you want to use True 1200 x 1200 dpi print-
quality mode for a particular graphic, select this setting in the driver before printing that job.
1. With the document or graphic open in your application, access the Print dialog box.
2. Select the Phaser 4500 printer for use and click the Properties button to open the printer
driver.
3. Make selections from the driver tabs. See the following tables for specific printing
options.
4. Click the OK button to save your selections.
5. Print the job.
Copyright © 2004 Xerox Corporation. All Rights Reserved.
2-19
Page 51

Windows PostScript Driver Settings
Adjusting Printing Options
Operating
System
Windows 2000,
Windows XP, or
Windows Server
2003
Driver Tab/Dialog Box Printing Options
Layout tab
Advanced dialog box
■ Orientation
■ Print on Both Sides (Duplex)
■ Pages Per Sheet
■ Graphics (Scaling and True Type Font)
■ Document Options (PostScript Options, Offset
Collated Sets, Edge-to-Edge Printing, Image
Smoothing, Draft Mode, and Watermark)
Paper/Quality tab
Output Options tab
Troubleshooting tab
■ Paper Type
■ Paper Size
■ Tray Selection
■ Cover Pages
■ Print Quality
■ Paper Destination
■ Separation Pages
■ Proof, Saved, Secure Printing
■ End of Job Notification
■ PrintingScout
■ Printer Information Pages
■ Helpful Web Links
Windows NT Page Setup tab
Advanced tab
Paper/Quality tab
Output Options tab
Troubleshooting tab
■ Orientation
■ Print on Both Sides (Duplex Printing)
■ Scaling
■ Page Layout (N-Up Option)
■ Allow Mirrored and Negative Output
■ Printer Features (Edge-to-Edge Printing, Image
Smoothing, Separation Page Source, Separation
Page)
■ Paper Type
■ Paper Size
■ Tray Selection
■ Cover Pages
■ Print Quality
■ Paper Destination
■ Separation Pages
■ Proof, Saved, Secure Printing
■ Printer Information Pages
■ Helpful Web Links
Phaser™ 4500 Laser Printer
2-20
Page 52

Windows PostScript Driver Settings (Continued)
Adjusting Printing Options
Operating
System
Windows 98 or
Windows Me
Driver Tab/Dialog Box Printing Options
Setup tab ■ Paper Type
■ Paper size
■ Tray Selection
■ Orientation
■ Print on 1 Side or Print on 2 Sides
■ Print Quality
Output Options tab
■ Separation Pages
■ Cover Pages
■ Proof, Saved, Secure Printing
Phaser™ 4500 Laser Printer
2-21
Page 53

Windows PCL Driver Settings
Adjusting Printing Options
Operating
System
Windows 2000,
Driver Tab Printing Options
Layout tab
Windows XP, or
Windows Server
2003
Paper/Quality tab
Output Options tab
Troubleshooting tab
Windows NT Page Setup tab
■ Orientation
■ Print on Both Sides (Duplex)
■ Pages Per Sheet
■ Paper Type
■ Paper Size
■ Tray Selection
■ Cover Pages
■ Print Quality (Not present in PCL5e)
■ Paper Destination
■ Notify Me When My Job Completes
■ Proof, Saved, Secure Printing
■ Separation Pages
■ PrintingScout
■ Printer Information Pages
■ Helpful Web Links
■ Orientation
■ Print on Both Sides (Duplex)
Paper/Quality tab
Output Options tab
Troubleshooting tab
Windows 98, Me Setup tab
Output Options tab
Troubleshooting tab
■ Paper Type
■ Paper Size
■ Tray Selection
■ Cover Pages
■ Paper Destination
■ Proof, Saved, Secure Printing
■ Separation Pages
■ Information Pages
■ Web Links
■ Page Layout
■ Print Quality
■ Paper Destination
■ Separation Pages
■ Cover Pages
■ Proof, Saved, Secure Printing
■ PrintingScout
■ Printer Information Pages
■ Helpful Web Links
Phaser™ 4500 Laser Printer
2-22
Page 54

Adjusting Printing Options
Note
For more information about printing options and other selections, click the Help button on
the printer driver tab to view the online help.
Selecting Properties for an Individual Job (Mac)
To select print settings for a particular job, change the driver settings before sending the job to
the printer.
1. With the document open in your application, click File, then click Print.
2. Select the desired printing options from the menus and drop-down lists that are displayed.
Note
In Macintosh OS X, click Save Preset on the Print menu screen to save the current
printer settings. You can create multiple presets and save each with its own distinctive
name and printer settings. To print jobs using specific printer settings, click the
applicable saved preset in the Presets list.
3. Click Print to print the job.
Macintosh PostScript Driver Settings
Operating System Driver Drop-Down Title Printing Options
Mac OS 10.x and
higher
Copies & Pages
Layout
Output Options
Printer Features
Image Quality
Error Handling
Paper Feed
■ Copies
■ Pages
■ Pages Per Sheet
■ Layout Direction
■ Border
■ Save as File
■ Format
■ Separation Page Source
■ Separation Page (On/Off)
■ Feature Sets
■ Print Quality
■ PostScript Errors
■ Tray Switching
■ All pages from
■ First page from
■ Remaining from
Summary Summary of all printer driver settings
Phaser™ 4500 Laser Printer
2-23
Page 55

Macintosh PostScript Driver Settings (Continued)
Operating System Driver Drop-Down Title Printing Options
Mac OS 9.x General ■ Copies
■ Pages
■ Paper Source
Adjusting Printing Options
Background Printing
Color Matching
Cover Page
Font Settings
Job Logging
Layout
Save as File
■ Print in
■ Print Time
■ Print Color
■ Intent
■ Printer Profile
■ Print Cover Page
■ Cover Page Paper Source
■ Font Documentation
■ Font Downloading
■ If there is a PostScript error
■ Job Documentation
■ Job Documentation Folder
■ Pages per Sheet
■ Border
■ Print on Both Sides
■ Format
■ PostScript Level
■ Data Format
■ Font Inclusion
Print Quality
Job Type
Advanced Options 1
Advanced Options 2
Phaser™ 4500 Laser Printer
■ 600 x 600 dpi
■ True 1200 x 1200 dpi
■ Image Smoothing
■ Normal
■ Proof Print
■ Saved Priint
■ Secure Print
■ Paper Destination
■ Paper Types
■ Offset Collated Sets
■ Edge-to-Edge Printing
■ Media Mismatch Policy
■ Separation Page Source
■ Separation Page
■ Last Page Paper Source
■ Draft Mode
2-24
Page 56

Adjusting Printing Options
Selecting Print-Quality Modes
Type of Print Job Print-Quality Mode
Best general-purpose mode for high-speed printing. Produces crisp, bright
prints.
Highest-quality prints with best detail. Recommended for photo prints.
Produces superior text resolution. This mode takes longer to process and
print than 600 x 600 dpi.
600 x 600 dpi
True 1200 x 1200 dpi
To select the print-quality mode in a supported driver:
■ Windows 98, Windows Me PostScript driver:
On the Setup tab, select a print-quality mode.
■ Windows 2000, Windows XP, Windows Server 2003, Windows NT PostScript driver:
On the Paper/Quality tab, select a print-quality mode.
■ Mac OS 9 driver:
In the Print dialog box, select Print Quality from the drop-down list, then select a print
quality mode.
■ Mac OS X (version 10.1 and higher) driver:
In the Print dialog box, select Image Quality from the drop-down list, then select a print
quality mode from the Print Quality drop-down list.
Phaser™ 4500 Laser Printer
2-25
Page 57

Phaser™ 4500 Laser Printer
2-Sided Printing
This topic includes:
■ "Automatic 2-Sided Printing" on page 2-26
■ "Binding Preferences" on page 2-26
Automatic 2-Sided Printing
Guidelines
■ A duplex unit must be installed on your printer to perform automatic 2-sided printing. The
4500B and 4500N configurations may be upgraded to include this feature.
■ To print a 2-sided document, verify that you are using the following ranges:
Tray 1 Trays 2–4
Width 90 – 216 mm
3.5 – 8.5 in.
Length 140 – 356 mm
5.5 – 14 in.
Paper Weight
60 – 216 g/m
2
(16 – 130 lb.) 60 – 216 g/m2 (16 – 130 lb.)
98 – 216 mm
3.9 – 8.5 in.
148 – 356 mm
5.8 – 14 in.
Binding Preferences
Use the printer driver to select Portrait or Landscape orientation for the images on the page.
When you print 2-sided jobs, select the binding preference which determines how the pages
turn.
Portrait
Bind on Side Edge
Flip on Long Edge
Portrait
Bind on Top Edge
Flip on Short Edge
Landscape
Bind on Side Edge
Flip on Short Edge
Landscape
Bind on Top Edge
Flip on Long Edge
To perform automatic 2-sided printing:
1. Insert paper into the tray. For more information, go to Reference/Printing/Basic Printing
on the User Documentation CD-ROM.
Copyright © 2004 Xerox Corporation. All Rights Reserved.
2-26
Page 58

2. In the printer driver:
■ Select either Portrait or Landscape orientation.
■ Select 2-sided printing as described in the table below.
3. Click OK to accept the printer driver settings, then click OK to print.
Setting the Printer Driver for 2-Sided Printing
Operating System Steps
2-Sided Printing
Windows 98 or
Windows Me
Windows 2000,
Windows XP, or
Windows Server 2003
Windows NT 1. Select File, then select Print.
Mac OS 9 1. Select File, then select Print.
Mac OS X, version
10.1 (and higher)
1. Select File, then select Print.
2. Click Properties.
3. On the Setup tab, then select Print on 1 Side or Print on 2 Sides.
4. Select or deselect Bind On Top Edge.
1. Select File, then select Print.
2. Click Properties.
3. On the Layout tab in Print On Both Sides (Duplex), select Flip on
Long Edge or Flip on Short Edge.
4. Select number of pages in the Pages Per Sheet drop-down list.
2. Click Properties.
3. On the Page Setup tab in Print On Both Sides (Duplex), select Flip
on Long Edge or Flip on Short Edge.
2. Select Layout.
3. Select Print on Both Sides.
4. Click the Binding icon that matches the edge to bind.
1. Select File, then select Print.
2. Select Duplex.
3. Select Print on Both Sides.
4. Click the Binding icon that matches the edge to bind.
Phaser™ 4500 Laser Printer
2-27
Page 59

Phaser™ 4500 Laser Printer
Transparencies
This topic includes:
■ "Guidelines" on page 2-28
■ "Printing Transparencies from Trays 1-4" on page 2-28
Xerox Clear Transparencies can be printed from any tray. They should be printed on one side
only. To order Xerox Clear Transparencies, contact your local reseller.
Videos are available with instructions for loading transparencies. Videos are
located on the User Documentation CD-ROM and at www.xerox.com/office/
4500support.
Guidelines
■ Remove all paper before loading transparencies in the tray.
■ Do not load transparencies above the fill line; it may cause the printer to jam.
■ Handle transparencies by the edges using both hands to avoid fingerprints and creases
which can cause poor print quality.
■ Do not use transparencies with stripes on the side.
■ Change the paper type at the front panel for all trays.
■ Use Xerox Clear Transparencies; print quality may vary with other transparencies.
For more information on paper types, weights, and sizes, go to Reference/Printing/Supported
Papers on the User Documentation CD-ROM.
Printing Transparencies from Trays 1-4
1. Pull the tray completely out of the printer.
4500-001
Copyright © 2004 Xerox Corporation. All Rights Reserved.
2-28
Page 60

2. Insert the transparencies into the tray.
Note
Do not load transparencies above the transparency fill line; it may cause the printer to
jam.
Transparencies
4500-081
3. Adjust the width and length paper guides to match the size of the transparencies.
4500-092
4500-093
Phaser™ 4500 Laser Printer
2-29
Page 61

Transparencies
8
4. Insert the tray into the printer tray slot and push it completely to the back of the printer.
4500-09
5. At the printer’s front panel, press the OK button to accept the paper size and type
highlighted on the Front Panel.
Follow these steps if the paper size and type loaded is different than the paper size and
type highlighted on the Front Panel:
a. Select Change Paper Size, then press the OK button.
b. Select Auto-Sensed Letter (8.5 x 11 in.), then press the OK button.
c. Press the Back button.
d. Select Change Paper Type, then press the OK button.
e. Select Transparency, then press the OK button to save your selection.
6. In the printer driver, select the appropriate tray or paper type.
For more information, go to Reference/Printing/Basic Printing on the User Documentation
CD-ROM.
Phaser™ 4500 Laser Printer
2-30
Page 62

Phaser™ 4500 Laser Printer
Envelopes
This topic includes:
■ "Guidelines" on page 2-31
■ "Printing Envelopes from Trays 1-4" on page 2-32
Guidelines
Buying and Storing Envelopes
■ Use only paper envelopes specified in the Supported Papers table. Successful envelope
printing is highly dependent on the quality and construction of the envelopes. Use
envelopes made specifically for laser printers.
■ It is recommended that you maintain constant temperatures and relative humidity.
■ Store unused envelopes in their packaging to avoid the effects of moisture and dryness
which can affect print quality and cause wrinkling. Excessive moisture can cause the
envelopes to seal before or during printing.
■ Avoid padded envelopes; purchase envelopes that lie flat on a surface.
■ Remove air “bubbles” from the envelopes before loading by setting a heavy book on top
of the envelopes.
■ If wrinkling or embossing problems occur, use a different brand of envelopes made
specifically for laser printers.
■ For more information, go to Reference/Printing/Supported Papers on the User
Documentation CD-ROM.
Preparing to Print
Follow these guidelines to prevent wrinkling problems:
■ Load envelopes faceup with the envelope flap to the left as you view the tray from the
front.
■ Print only on the front of the envelope.
■ Load a maximum of 10 envelopes in Tray 1 and 75 envelopes in Trays 2-4 at any time.
Caution
Never use envelopes with windows or metal clasps; they can damage the printer. Damage
caused by using non-Xerox envelopes is not covered under the Xerox warranty, service
agreement, or Total Satisfaction Guarantee. The Total Satisfaction Guarantee is available
in the United States and Canada. Coverage may vary outside these areas, please contact
your local representative for details.
Copyright © 2004 Xerox Corporation. All Rights Reserved.
2-31
Page 63

Envelopes
Printing Envelopes from Trays 1-4
1. Pull the tray completely out of the printer.
4500-001
2. Insert the envelopes into the tray, faceup with the flap of the envelope toward the left side
of the tray.
3. Adjust the paper guides to match the size of the envelopes.
Note
Do not load envelopes above the fill line inside the tray.
4500-082
Phaser™ 4500 Laser Printer
2-32
Page 64

Envelopes
4. Insert the tray into the printer tray slot and push it completely to the back of the printer.
4500-104
5. At the printer’s front panel, press the OK button to accept the paper size and type
highlighted on the Front Panel.
Follow these steps if the paper size and type loaded is different than the paper size and
type highlighted on the Front Panel:
a. Select Change Paper Size, then press the OK button.
b. Select [Type of envelope] (w x h), then press the OK button.
c. Press the Back button.
d. Select Change Paper Type, then press the OK button.
e. Select Envelope, then press the OK button to save your selection.
6. In the printer driver, select the appropriate tray or paper type.
For more information, go to Reference/Printing/Basic Printing on the User Documentation
CD-ROM.
Phaser™ 4500 Laser Printer
2-33
Page 65

Phaser™ 4500 Laser Printer
Labels, Index Cards, and Greeting Cards
This topic includes:
■ "Guidelines" on page 2-34
■ "Printing Index Cards from Tray 1" on page 2-34
■ "Printing Labels from Trays 1-4" on page 2-36
Xerox labels can be printed from any tray. They should be printed on one side only. Index
cards (3 in. x 5 in.) can be printed from Tray 1 only. They should be printed on one side only.
To order labels, index cards, greeting cards, or other paper or specialty media, contact your
local reseller.
Guidelines
■ Do not use vinyl labels.
■ Do not use any labels or cards on a sheet where items are missing; it may damage printer
components.
■ Store unused labels or cards flat in their original packaging. Leave the product inside the
original packaging until ready to use. Return any unused product to the original packaging
and reseal it for protection.
■ Do not store labels or cards in extremely dry or humid conditions or extremely hot or cold
conditions. Storing them in extreme conditions may cause print quality problems or cause
them to jam in the printer.
■ Rotate stock frequently. Long periods of storage in extreme conditions can cause the
labels or cards to curl and jam the printer.
■ Print only on one side of the sheet of labels.
Printing Index Cards from Tray 1
1. Pull the tray completely out of the printer.
Copyright © 2004 Xerox Corporation. All Rights Reserved.
4500-001
2-34
Page 66

Labels, Index Cards, and Greeting Cards
2. Insert the 3 x 5 in. index cards into the tray with the side to be printed faceup with the top
of the card toward the back of the tray.
Note
Do not load paper above the fill line inside the tray.
4500-102
3. Adjust the paper guides to fit against the index cards.
4. Insert the tray into the printer tray slot and push it completely to the back of the printer.
5. At the printer’s front panel, press the OK button to accept the paper size and type
highlighted on the Front Panel.
Follow these steps if the paper size and type loaded is different than the paper size and
type highlighted on the Front Panel:
a. Select Change Paper Size, then press the OK button.
b. Select Index Card (3.0 x 5.0 in.), then press the OK button.
c. Press the Back button.
d. Select Change Paper Type, then press the OK button.
e. Select Card Stock, then press the OK button to save your selection.
6. In the printer driver, select the appropriate tray or paper type.
For more information, go to Reference/Printing/Basic Printing on the User Documentation
CD-ROM.
4500-105
Phaser™ 4500 Laser Printer
2-35
Page 67

Labels, Index Cards, and Greeting Cards
Printing Labels from Trays 1-4
1. Pull the tray completely out of the printer.
4500-001
2. Insert the labels into the tray with the side to be printed faceup with the top of the page
toward the back of the tray.
4500-083
3. Adjust the width and length paper guides to match the size of the paper.
4. Insert the tray into the printer tray slot and push it completely to the back of the printer.
4500-103
Phaser™ 4500 Laser Printer
2-36
Page 68

Labels, Index Cards, and Greeting Cards
5. At the printer’s front panel, press the OK button to accept the paper size and type
highlighted on the Front Panel.
Follow these steps if the paper size and type loaded is different than the paper size and
type highlighted on the Front Panel:
a. Select Change Paper Size, then press the OK button.
b. Select Auto-Letter (8.5 x 11.0 in.), then press the OK button.
c. Press the Back button.
d. Select Change Paper Type, then press the OK button.
e. Select Labels, then press the OK button to save your selection.
6. In the printer driver, select the appropriate tray or paper type.
For more information, go to Reference/Printing/Basic Printing on the User Documentation
CD-ROM.
Printing Greeting Cards from Trays 1-4
1. Pull the tray completely out of the printer.
2. Insert the greeting cards into the tray with the side to be printed faceup with the top of the
page toward the back of the tray.
3. Adjust the width and length paper guides to match the size of the paper.
4. Insert the tray into the printer tray slot and push it completely to the back of the printer.
4500-001
4500-016
Phaser™ 4500 Laser Printer
2-37
Page 69

Labels, Index Cards, and Greeting Cards
5. At the printer’s front panel, press the OK button to accept the paper size and type
highlighted on the Front Panel.
Follow these steps if the paper size and type loaded is different than the paper size and
type highlighted on the Front Panel:
a. Select Change Paper Size, then press the OK button.
b. Select Auto-Letter (8.5 x 11.0 in.), then press the OK button.
c. Press the Back button.
d. Select Change Paper Type, then press the OK button.
e. Select Card Stock, then press the OK button to save your selection.
6. In the printer driver, select the appropriate tray or paper type.
Phaser™ 4500 Laser Printer
2-38
Page 70

Phaser™ 4500 Laser Printer
Custom Size Paper
Print custom size paper, within the following ranges, from the trays listed.
Input Output
500-Sheet
Tray 1 Trays 2–4 Standard Tray
Simplex (1-Sided
Printing)
Width
Height
76 – 216 mm
3.0 – 8.5 in.
127 – 356 mm
5.0 – 14.0 in.
98 – 216 mm
3.9 – 8.5 in.
148 – 356 mm
5.8 – 14.0 in.
76 – 216 mm
3.0 – 8.5 in.
127 – 356 mm
5.0 – 14.0 in.
Duplex (2-Sided Printing)
Width
Height
90 – 216 mm
3.5 – 8.5 in.
140 – 356 mm
5.5 – 14.0 in.
98 – 216 mm
3.9 – 8.5 in.
148 – 356 mm
5.8 – 14.0 in.
Same as Input
Same as Input
For more information on paper types, weights, and sizes, go to Reference/Printing/Supported
Papers on the User Documentation CD-ROM.
Stacker
90 – 216 mm
3.5 – 8.5 in.
140 – 356 mm
5.5 – 14.0 in.
Loading Custom Size Paper in Tray 1-4
1. Pull the tray completely out of the printer.
4500-078
Copyright © 2004 Xerox Corporation. All Rights Reserved.
2-39
Page 71

2. Insert custom size paper into Tray 1, 2, 3, or 4.
Note
Do not load paper, transparencies, or specialty media above the fill lines inside the
tray. Only use flat paper, transparencies, or specialty media. If frequent jamming
occurs with card stock or heavier paper that is less than 175 mm (7 in.) long, reduce
the number of sheets in the tray.
Custom Size Paper
4500-086
3. Adjust the width and length paper guides to match the size of the paper.
4500-088
4500-089
Phaser™ 4500 Laser Printer
2-40
Page 72

Custom Size Paper
4. Insert the tray into the printer tray slot and push it completely to the back of the printer.
4500-077
5. At the printer’s front panel:
a. Select Change Paper Size, then press the OK button.
b. Select Custom, then press the OK button.
c. Custom Width is highlighted. Press the OK button, press the Down Arrow button
to change the width, then press the OK button to save your change.
d. Select Custom Height, then press the OK button.
e. Press the Down Arrow button to change the height, then press the OK button to save
your change.
f. Press the Back button.
g. Select Paper Type, then press the OK button.
h. Select the type of paper loaded in the tray, then press the OK button to save your
selection.
6. In the printer driver, select the appropriate tray or paper type.
For more information, go to Reference/Printing/Basic Printing on the User Documentation
CD-ROM.
Phaser™ 4500 Laser Printer
2-41
Page 73

Phaser™ 4500 Laser Printer
Advanced Options
This topic includes:
■ "Printing Separation Pages" on page 2-42
■ "Printing Multiple Pages on a Single Sheet (N-Up)" on page 2-43
■ "Printing Negative and Mirror Images" on page 2-44
■ "Scaling" on page 2-45
■ "Printing Watermarks" on page 2-46
■ "Printing Cover Pages" on page 2-47
■ "Printing or Deleting Proof, Saved, and Secure Print Jobs" on page 2-48
Printing Separation Pages
A separation page (a divider page or slipsheet) can be inserted after a print job, between
copies of a print job, or between individual pages of a print job. Specify the tray to use as the
source for the separation pages.
To specify separation pages in a supported driver:
■ Windows 98, Windows Me PostScript driver:
On the Output Options tab, select the location of the separation pages and the tray source.
■ Windows 2000, Windows XP, Windows Server 2003, Windows NT PostScript driver:
On the Output Options tab, select the location of the separation pages and the tray source.
■ Mac OS 9 driver:
In the Print dialog box, select Advanced Options 1 from the drop-down list, select the
paper source from the Separation Page Source drop-down list, then select On from the
Separation Page drop-down list.
■ Mac OS X (version 10.1 and higher) driver:
In the Print dialog box, select the Printer Features drop-down list, select Separation
Page and Source from the drop-down list, then select On from the Separation Page drop-
down list.
Copyright © 2004 Xerox Corporation. All Rights Reserved.
2-42
Page 74

Advanced Options
Printing Multiple Pages on a Single Sheet (N-Up)
When printing a multiple-page document, you can print more than one page on a single sheet
of paper. Print one, two, four, six, nine, or 16 pages per side.
To print multiple pages on a single sheet of paper in a supported driver:
■ Windows 98, Windows Me PostScript driver:
On the Setup tab, click the More Layout Options button, then select the number of pages
per sheet from the drop-down list. When you print more than one page on a sheet, you can
also print a border around each page.
■ Windows 2000, Windows XP, Windows Server 2003 PostScript driver:
On the Layout tab, select the number of pages per sheet from the drop-down list.
■ Windows NT PostScript driver:
On the Advanced tab under Document Options, select the desired Page Layout (N-up)
Option.
■ Mac OS 9 driver:
In the Print dialog box, select Layout from the drop-down list, then select the number of
Pages Per Sheet and Layout direction.
■ Mac OS X (version 10.1 and higher) driver:
In the Print dialog box, select Layout from the drop-down list, then select the number of
Pages Per Sheet and Layout direction.
Phaser™ 4500 Laser Printer
2-43
Page 75

Advanced Options
Printing Negative and Mirror Images
You can print pages as a negative image (reverses the light and dark areas in your printed
image) or mirror image (flips images horizontally on pages when printed).
M
B
M
Negative Image
B
Mirror Image
To select negative or mirror images in a supported driver:
■ Windows 98, Windows Me PostScript driver:
On the Setup tab, click More Layout Options, then select Print as a Negative Image or
Print as a Mirror Image.
■ Windows 2000, Windows XP, Windows Server 2003 PostScript driver:
From the Layout tab, click Advanced. Under Document Options and PostScript
Options, select Ye s for Mirrored Output or Negative Output.
■ Windows NT PostScript driver:
On the Advanced tab, under Document Options and PostScript Options, select Ye s for
Mirrored Output or Negative Output.
Phaser™ 4500 Laser Printer
2-44
Page 76

Advanced Options
■ Mac OS 9 driver:
From the File menu, select Page Setup, choose PostScript Options from the drop-down
list, then select Invert Image (to print a negative image) or Flip Horizontal (to print a
mirror image).
Scaling
You can reduce or enlarge your page images when they are printed by selecting a scaling value
between 25 and 400 percent. The default is 100 percent.
50% 100% 200%
To select scaling in a supported driver:
■ Windows 98, Windows Me PostScript driver:
On the Setup tab, click More Layout Options, then specify the percentage to scale in the
Percentage box.
■ Windows 2000, Windows XP, Windows Server 2003 PostScript driver:
From the Layout tab, click Advanced, select Graphic, then select the desired percentage
for Scaling.
■ Windows NT driver:
On the Advanced tab, select Graphic, then select the desired percentage for Scaling.
■ Mac OS 9, Mac OS X (version 10.1 and higher) driver:
From the File menu, select Page Setup, then specify the percentage in the box for Scale.
Phaser™ 4500 Laser Printer
2-45
Page 77

Advanced Options
Printing Watermarks
A watermark is additional text that can be printed across one or more pages. For example,
terms like Draft, Confidential, Date, Version that you might stamp on a page before
distribution, can be inserted with a watermark.
In some Windows drivers you can:
■ Create a watermark
■ Edit an existing watermark’s text, color, location, and angle
■ Place a watermark on either the first page or every page in a document
■ Print the watermark in the background
■ Print the text of the watermark as an outline (instead of filled text)
Note
Not all applications support watermark printing.
To select, create, and edit watermarks using a supported Windows driver:
■ Windows 98, Windows Me PostScript driver:
On the Setup tab, click More Layout Options, then click Waterma rk to display the
Watermarks dialog box.
■ Windows 2000, Windows XP, Windows Server 2003 PostScript driver:
From the Layout tab, click the Advanced button. In the box under Document Options
and Printer Features, select Watermarks, then select Modify for the desired watermark.
Phaser™ 4500 Laser Printer
2-46
Page 78

Advanced Options
Printing Cover Pages
A cover page is the first or last page of a document. The printer enables you to choose a
different paper source for the cover page than for the body of a document. For instance, use
your company letterhead for the first page of a document, or use card stock for the first and last
pages of a report.
■ Use any applicable paper tray as the source for printing cover pages.
■ Verify that the cover page is the same size as the paper used for the rest of your document.
If you specify a different size in the driver than the tray you select as a cover pages source,
your cover(s) print on the same paper as the rest of your document.
You have several choices for cover pages:
■ None - Prints the first and last pages of your document from the same tray as the rest of
your document.
■ First - Prints the first page on paper from the specified tray.
■ First and Last - Prints the first and last pages on paper from the specified tray.
Cover Page Print Option Pages Printed on Cover
First 1-sided printing Page 1
2-sided printing Pages 1 and 2
Last 1-sided printing Last page
2-sided printing
(odd-numbered pages)
2-sided printing
(even-numbered pages)
Last page
Last two pages
For the back of your front cover to remain blank when 2-sided printing, page two of your
document must be blank. For the back cover of your document to remain blank, see the
following table for inserting blank pages.
Print Option Last Page of Text Blank Pages
1-sided printing Add one blank page at the end of the
document.
2-sided printing Odd-numbered Add two blank pages at the end of the
document.
Even-numbered Add one blank page at the end of the
document.
To select cover pages in a supported driver:
■ Windows 98, Windows Me PostScript driver:
On the Output Options tab, select First Page Only or First and Last Pages, then select
the tray to use for the covers from the Source drop-down list.
Phaser™ 4500 Laser Printer
2-47
Page 79

Advanced Options
■ Windows 2000, Windows XP, Windows Server 2003, Windows NT PostScript driver:
On the Paper/Quality tab under Cover Pages, select First Page Only or First and Last
Page, then select the tray to use for the covers from the Source drop-down list.
■ Mac OS 9 driver:
In the Print dialog box, select Cover Page from the drop-down list, select Before
Document or After Document, then select Cover Page papeer Source from the drop-
down list.
■ Mac OS X (version 10.1 and higher) driver:
a. In the Print dialog box, select Paper Feed, then select First Page From.
b. In the Printer Features dialog box, select Remaining from: paper source from the
drop-down list.
Printing or Deleting Proof, Saved, and Secure Print Jobs
Note
These features are available if your printer has an internal hard drive. These jobs are stored
on the hard drive and remain in the printer even when it is turned off.
Choose one of the following special job types:
■ Secure Print: Prints confidential documents. Your four-digit numeric password-protected
jobs are stored on the printer’s hard drive. The jobs print only after the user name, fourdigit password number, and job name are entered at the printer's front panel. The jobs are
automatically deleted from the hard drive after printing.
■ Proof Print: Prints only one copy of a multiple copy job in order to proof the copy. To
print the remaining copies, select the job name at the printer's front panel. The job is
automatically deleted from the hard drive after printing. If you do not want to print the
remaining copies, delete the job at the front panel.
■ Saved Print: Stores the job on the printer’s hard drive so you can print it on demand. The
job is not deleted after printing. This is useful for any document you frequently print, such
as tax forms, personnel forms, or requisition forms.
Note
Protected Jobs are jobs that have been copied or moved from the Public Jobs group in
CentreWare IS. For more information on Protected Jobs, go to CentreWare IS Online
Help.
Sending Proof, Saved, and Secure Print Jobs to the Printer
Use a supported driver to specify a job as a secure print, proof print, or saved print job:
■ Windows 98, Windows Me PostScript driver:
On the Output Options tab, choose the job type under Walk-Up Features. For a secure
print job, enter a 4-digit password to assign to this job. For a proof print or saved print job,
enter the name you want to give this job.
Phaser™ 4500 Laser Printer
2-48
Page 80

Advanced Options
■ Windows 2000, Windows XP, Windows Server 2003, Windows NT PostScript driver:
On the Output Options tab, choose the job type under Walk-Up Features. For a secure
print job, enter a 4-digit password to assign to this job. For a proof print or saved print job,
enter the name you want to give this job.
■ Mac OS 9 driver:
In the Print dialog box, select Job Type from the pull-down list, select Normal (default),
Proof Print, Saved Print, or Secure Print. For a saved print job, enter the document
name. For a secure print job, enter a 4-digit password to assign to this job.
■ Mac OS X (version 10.1 and higher) driver:
In the Print dialog box, select the Printer Features pull-down menu, select Job Type
from the Features Sets drop-down list, then select Proof Print, Saved Print, or Secure
Print from the Job Type drop-down list.
Printing or Deleting Secure Print Jobs
To print a secure print job, specify the four-digit password at the printer's front panel:
1. Select Walk-Up Printing, then press the OK button.
2. Select Secure Print Jobs, then press the OK button.
3. Scroll to your User Name, then press the OK button.
4. Scroll to the number for the first digit of the numeric password, then press the OK button
to accept that digit.
5. Repeat Step 4 for the second, third, and fourth digits.
Note
If you entered less than four digits in the driver’s Password field, enter zeros before
your password so that there are four digits entered in the front panel. For example, if
222 is entered in the driver, enter 0222 at the front panel. Use the Back button to
return to a previous digit.
6. If more than one secure print job is entered with a password, select the desired job to print
or select All of Them, then press the OK button.
7. Select Print and Delete or Delete, then press the OK button to print.
Printing or Deleting Proof and Saved Print Jobs
To print a saved print job or the remaining copies of a proof print job, select the job name at
the printer's front panel:
1. Select Walk-Up Printing, then press the OK button.
2. Select Proof Print Jobs or Saved Print Jobs, then press the OK button.
3. Scroll to the job name, then press the OK button.
4. Select Print and Delete (for proof prints) or Print and Save (for saved prints), then
press the OK button.
5. Scroll to the desired number of copies, then press the OK button to print the job.
Phaser™ 4500 Laser Printer
2-49
Page 81

Phaser™ 4500 Laser Printer
Supplies and Recycling
This topic includes:
■ "Supplies" on page 2-50
■ "Recycling" on page 2-50
Supplies
The printer’s front panel displays status messages and warnings as the supply nears its
replacement time. When the front panel prompts you that a supply is low or needs to be
replaced, verify that you have replacements on hand. It is important to order these supplies
when the messages first appear to avoid interruptions to your printing.
To order supplies, contact your local reseller or visit the Xerox web site at www.xerox.com/
office/4500supplies.
Consumables
The only consumables for this printer are the Xerox print cartridges. To order print cartridges,
contact your local reseller or visit the Xerox web site at
www.xerox.com/office/4500supplies.
Caution
If you attempt to use a non-Xerox print cartridge, it may not fit properly in the printer. If
the cartridge does not fit properly, the printer will not function.
Routine Maintenance Items
Routine maintenance items are printer parts or assemblies that have a limited life requiring
periodic replacement. Replacements may be in the form of parts or kits. Routine Maintenance
Items are typically customer replaceable.
The only routine maintenance item for the Phaser 4500 Laser Printer is the maintenance kit.
Access the “Supplies Info” menu from the printer’s front panel to see the remaining life for the
maintenance kit.
Access the “Supplies Usage Page” from the printer’s front panel, from CentreWare IS, or print
the “Usage Profile” from the printer’s front panel.
Recycling
For information on Xerox supplies recycling programs, go to www.xerox.com/office/recycle.
Copyright © 2004 Xerox Corporation. All Rights Reserved.
2-50
Page 82

Phaser™ 4500 Laser Printer
Connections and
Networks
This section includes:
■ "Connections and IP Address" on page 3-2
■ "Printer Management Software" on page 3-10
■ "Windows 2000, Windows XP, and Windows Server 2003" on page 3-15
■ "Windows NT 4.x" on page 3-20
■ "Windows 98 and Windows Me" on page 3-25
■ "Macintosh" on page 3-30
■ "Novell NetWare" on page 3-36
■ "UNIX (Linux)" on page 3-41
Copyright © 2004 Xerox Corporation. All Rights Reserved.
3-1
Page 83

Phaser™ 4500 Laser Printer
Connections and IP Address
This topic includes:
■ "Printer Setup" on page 3-2
■ "Connection Setup" on page 3-6
Printer Setup
The information in this section is also stored as an information page in your printer.
Use the front panel to quickly print this information in the future.
Ethernet Connection (Recommended)
An Ethernet connection is recommended because it is faster than a USB cable connection. It
also allows the user direct access to CentreWare
IS.
Network Connection
Use an Ethernet connection with two twisted-pair (Category 5/RJ-45) cables and an Ethernet
hub. Connect the computer to the hub with one cable, then connect the printer to the hub with
the second cable. Connect to any port on the hub except the uplink port. TCP/IP and EtherTalk
are the most common protocols used with Ethernet cables. To print using TCP/IP, each
computer and printer requires a unique IP address. Go to “Setting an IP Address” in this
section.
Standalone (Cable or DSL) Network Connection
For information about setting up a cable or DSL connection for your printer, go to
www.xerox.com/office/infoSMART to view Document # 33188, entitled Basic TCP/IP
Tutorial and Home Networking Guidelines.
Setting an IP Address
If your computer is on a large network, contact your network administrator for the appropriate
TCP/IP addresses and additional configuration information.
If you are creating your own small Local Area Network or connecting the printer directly to
your computer over Ethernet, follow the procedure for automatically setting the printer’s IP
address.
The printer and computer(s) must have unique IP addresses. It is important that the addresses
are similar, but not the same. For example, your printer can have the address 192.168.1.2 while
your computer has the address 192.168.1.3. Another device can have the address 192.168.1.4.
For more information, go to www.xerox.com/office/infoSMART to view Document # 18545.
Copyright © 2004 Xerox Corporation. All Rights Reserved.
3-2
Page 84

Connections and IP Address
Automatically Setting the Printer’s IP Address
Use the Phaser installer on the Printer Installer and Utilities CD-ROM to detect and/or assign
an IP address to your printer. For further instructions, insert the Printer Installer and Utilities
CD-ROM into your computer’s CD-ROM, launch the installer, then follow the prompts for
installation.
Note
For the automatic installer to function, the printer must be connected to a TCP/IP network.
Manua lly Setting the Printer's IP Address
1. At the printer's front panel, select Printer Setup, then press the OK button.
2. Select Connection Setup, then press the OK button.
3. Select Network Setup, then press the OK button.
4. Select TCP/IP Setup, then press the OK button.
5. Select DHCP/BootP, then press the OK button to select Off.
6. Select TCP/IP Address, then press the OK button.
7. Enter your printer’s IP address, then press the OK button.
Setting a Static IP Address on Your Computer
Windows 2000, Windows XP, and Windows Server 2003
1. On the desktop, right-click My Network Places, then click Properties.
2. Right-click Local Area Connection, then click Properties.
3. If you do not have TCP/IP available, click Add, then click Protocol.
4. Click Add, then click Internet Protocol TCP/IP.
5. Select the General tab, select the TCP/IP protocol for your network card, then click
Properties.
6. Select the General tab, then click Use the following IP address.
7. Enter an IP address and Subnet mask, then click OK.
8. If prompted, click OK to restart Windows.
Windows NT 4. x
1. On the desktop, right-click Network Neighborhood, then click Properties.
2. On the Protocols tab, click TCP/IP Protocol, then click Properties.
3. Select the IP Address tab, then click Specify an IP Address.
4. Enter an IP Address and Subnet mask, then click OK.
5. If prompted, click OK to restart Windows.
Windows 98 and Windows Me
1. On the desktop, right-click Network Neighborhood or My Network Places, then click
Properties.
2. On the Configuration tab, select the TCP/IP protocol for your network card, then click
Properties.
Phaser™ 4500 Laser Printer
3-3
Page 85

Connections and IP Address
3. Select the IP Address tab, then click Specify an IP address.
4. Enter an IP address and Subnet mask, then click OK.
5. If prompted, click OK to restart Windows.
Macintosh OS 9. x TCP/IP
1. Click the Apple icon, then select the Controls Panel folder.
2. Double-click TCP/IP, then verify that Ethernet is the connection type.
3. Enter an IP address and Subnet mask, then click OK.
4. If prompted, click OK to restart.
Macintosh OS X (10. 1 and higher) TCP/IP
1. Click the Apple icon, click System Preferences, then click the Network icon.
2. In the Network control panel, click the TCP/IP tab.
3. Under Location, click Automatic.
4. Under Show, click Built-in Ethernet.
5. Under Configure, click Manually.
6. Enter the IP Address, Subnet Mask, and Router (Gateway).
7. Click Apply Now to activate the changes.
USB Connection
The USB connection requires a standard USB cable. This cable is not included with your
printer and must be purchased separately. Verify that you are using the correct USB cable for
your connection.
Windows 98 or Later and Windows 2000 or Later
Connect the USB cable to the PC and follow the Add New Hardware Wizard to create the
USB port. Follow the Add Printer Wizard to install the printer driver from the Printer
Installer and Utilities CD-ROM. For more information go to
infoSMART to view these documents:
■ Windows 98: Document # 18215
■ Windows 2000: Document # 22701
■ Windows XP: Document # 53543
Macintosh OS 9. x
A USB-connected printer does not display in the Chooser. Install the printer driver from the
Printer Installer and Utilities CD-ROM. Use the Desktop Printer Utility (version 1.2 or later)
to create a desktop USB printer. The utility is located in the PhaserTools folder which is
created during the software installation. For more information go to
infoSMART to view Document # 33225.
www.xerox.com/office/
www.xerox.com/office/
Phaser™ 4500 Laser Printer
3-4
Page 86

Connections and IP Address
Macintosh OS X (10. 1 and Higher)
1. Install the printer driver from the Printer Installer and Utilities CD-ROM.
2. Open the Print Center utility. (On the Macintosh hard drive, open the Applications
folder, then open the Utilities folder.)
3. Click the Add button.
4. Select USB from the top drop-down list.
5. Select the printer in the printers window.
6. Verify that your printer is set to Auto Select.
7. Click the Add button.
The printer is displayed as an available printer in the Print Center. For more information, go
www.xerox.com/office/infoSMART to view Document # 49355.
to
Phaser™ 4500 Laser Printer
3-5
Page 87

Connections and IP Address
Connection Setup
Installing the Printer Driver
To download the latest printer drivers, go to www.xerox.com/office/support.
Windows 98 or Later and Windows 2000 or Later
Install the printer driver from the Printer Installer and Utilities CD-ROM. The Printer
Installer and Utilities CD-ROM automatically installs and identifies the printer during the
installation process. For more information go to
these documents:
■ Windows 98 and Windows Me: Document # 9840
■ Windows 2000, Windows XP, and Windows Server 2003: Document # 36894
■ Windows NT: Document # 11338
Macintosh OS 9. x EtherTalk
If you use EtherTalk, Macintosh computers do not require IP addresses.
www.xerox.com/office/infoSMART to view
1. Open the AppleTalk Control Panel.
2. Verify that the Ethernet port is the selected network port.
3. Double-click the installer on the Printer Installer and Utilities CD-ROM to install the
printer driver.
4. Open the Chooser, then click the LaserWriter driver.
5. From the right column of the Chooser, select the printer, then click Create to create the
desktop printer.
For more information go to www.xerox.com/office/infoSMART to view Documents # 2562
and # 1886.
Macintosh OS X (10. 1 and Higher)
Macintosh OS X supports TCP/IP as the default protocol, as well as AppleTalk. For a TCP/IP
installation, follow the instructions provided to set an IP address in the printer.
1. Install the printer driver from the Printer Installer and Utilities CD-ROM.
2. Open the Print Center utility. (On the Macintosh hard drive, open the Applications
folder, then open the Utilities folder.)
3. Click the Add Printer button.
4. Choose the connection type you desire.
■ For LPR, enter the IP address of the printer that you set previously. The Queue Name
field remains blank if the Use default queue on server box is checked (by default).
Other options are PS or AUTO. Select the appropriate PPD for the printer model
under the Printer Model drop-down list.
■ For AppleTalk, select the appropriate printer from the list that is displayed. The
configuration process continues until configuration is complete. If AppleTalk is not
available in the Print Center drop-down list, the AppleTalk protocol is disabled and
must be installed on the Macintosh. If the AppleTalk protocol is enabled, but is not
Phaser™ 4500 Laser Printer
3-6
Page 88

Connections and IP Address
available in the drop-down window, it is recommended that you contact your system
administrator or Apple Computer Incorporated for assistance.
■ For Rendezvous, select the appropriate printer from the list that is displayed.
For more information go to www.xerox.com/office/infoSMART to view Documents # 48704,
# 50080, and # 49814.
Dynamic Methods of Setting the Printer’s IP Address
An Internet Protocol (IP) address is required to identify your printer on a network. Set the
printer’s IP address by any of the following methods:
■ DHCP
■ CentreWare Internet Services
■ Auto IP (Host Names)
Information Required for IP Addressing
Information Comments
Internet (IP) address for the printer Format is xxx.xxx.xxx.xxx, where xxx represents
a decimal number from 0–255.
Network Mask If you are unsure, leave this blank; the printer
chooses an appropriate mask.
Default Router/Gateway address If you want to communicate with the printer from
anywhere other than the local network segment,
you need the router address.
Enabling DHCP on the Printer
Verify that the printer’s DHCP protocol is enabled by setting the front panel or using
CentreWare
IS.
Note
To determine your printer’s IP address, select Printer Identification at the front panel.
For information about the front panel, go to Reference/Features on the User
Documentation CD-ROM.
Phaser™ 4500 Laser Printer
3-7
Page 89

Connections and IP Address
Changing or Modifying the IP Address Using CentreWare Internet Services (IS)
CentreWare IS is a printer administration and support tool using web technology. With
CentreWare
network using a web browser. For more information, go to Explore/CentreWare
IS software, you can access printer status and manage your printer over a TCP/IP
IS on the User
Documentation CD-ROM.
After setting the printer’s IP address, you can modify the TCP/IP using CentreWare IS.
1. Launch your web browser.
2. Enter your printer's IP address in the browser’s Address field (http://xxx.xxx.xxx.xxx).
3. Select Properties.
4. Select the Protocols folder on the left sidebar.
5. Select TCP/IP.
6. Enter or modify your printer’s settings, then click Save Changes at the bottom of the
page.
Using Host Names with the Domain Name Service (DNS)
The printer supports DNS through an embedded DNS resolver. The DNS resolver protocol
communicates with one or more DNS servers to resolve the IP address for a given host name
or the host name for a given IP address.
To use an IP host name for the printer, the system administrator must configure one or more
DNS servers and a local DNS domain name space database.
To set up the printer for DNS, supply a maximum of two DNS name server IP addresses.
There are two ways to set up the printer:
■ TCP/IP–Go to “DNS Setup Using CentreWare Internet Services.”
■ DHCP–Go to “Dynamic Domain Name Service (DDNS).”
DNS Setup Using CentreWare Internet Services
Set up the printer for DNS using CentreWare IS after setting the printer’s IP address.
1. Launch your web browser.
2. Enter your printer's IP address in the browser’s Address field (http://xxx.xxx.xxx.xxx).
3. Select Properties.
4. Select the Protocols folder on the left sidebar.
5. Select TCP/IP.
6. In the DNS Settings section, enter your domain server’s IP address in these fields:
■ Primary Name Server IP Address (required)
■ Second Name Server IP Address (optional)
7. Click Save Changes when you are finished entering the settings.
Dynamic Domain Name Service (DDNS)
This printer supports Dynamic DNS through DHCP. You must have DHCP enabled on the
printer for DDNS to function. Your network’s DHCP server must also support Dynamic DNS
updates through option 12 or option 81 support. See your network administrator for details.
1. Launch your web browser.
Phaser™ 4500 Laser Printer
3-8
Page 90

Connections and IP Address
2. Enter your printer's IP address in the browser’s Address field (http://xxx.xxx.xxx.xxx).
3. Select Properties.
4. Select the Protocols folder on the left sidebar.
5. Select TCP/IP.
6. In the BOOT/DHCP Settings section, set the BOOTP/DHCP option to ON.
7. To enable DDNS, enter the following DDNS/WINS settings information:
■ DDNS - Set to ON.
■ Release Host Name - Set to NO.
■ DDNS/WINS Name - Use the default name provided by Xerox or enter another
name.
■ Primary WINS Server (optional)
■ Secondary WINS Server (optional)
8. Click Save Changes when you are finished entering the settings.
Other Resources
For more information about network setup and troubleshooting, go to Reference/Connections
& Networks on the User Documentation CD-ROM.
Phaser™ 4500 Laser Printer
3-9
Page 91

Phaser™ 4500 Laser Printer
Printer Management Software
This topic includes:
■ "Using CentreWare Software" on page 3-10
■ "Using Printer Management Features" on page 3-12
Using CentreWare Software
CentreWare Internet Service (IS)
CentreWare IS is a printer administration and support tool using web technology. With
CentreWare
network using a web browser.
CentreWare IS enables you to:
■ Receive printer status and manage printers independent of network servers and operating
systems.
■ Define a link to your local web server’s support page.
■ Access online manuals and technical support information by using built-in links to the
Xerox web site.
IS software, you can access printer status and manage your printer over a TCP/IP
CentreWare IS provides an easy-to-use, consistent interface that you can use for most
configuration tasks.
CentreWare IS requires only a web browser and a TCP/IP connection between the printer and
the network (in Windows, Macintosh, or UNIX environments). TCP/IP and HTTP must be
enabled in the printer.
For complete information about CentreWare IS, see the CentreWare IS Online Help.
Copyright © 2004 Xerox Corporation. All Rights Reserved.
3-10
Page 92

Printer Management Software
CentreWare DP for NetWare
CentreWare DP is easy-to-use printer management software that runs on Windows 98 or later
and Windows 2000 or later. Through point-and-click navigation you can install, connect, and
configure the printer quickly and easily on a network . It provides network administrators with
setup procedures and management of networked printers.
The following table lists CentreWare DP key features and benefits.
Feature Benefit
Setup Wizard Provides a step-by-step guide to install your printer on the network.
Advanced Setup Provides a tool to service multiple file servers and queues.
Instant Status Enables you to select a printer from the Printer List to monitor the
printer at any given time.
Remote Configuration and
Management
Printer Upgrades Enables you to upgrade your printer from your workstation (if
Enables you to do most configuration and monitoring tasks from your
workstation.
available for your printer model).
For more information go to www.xerox.com/office to view the CentreWare DP User Guide.
CentreWare MC (Microsoft Management Console)
CentreWare MC allows IP discovery of printers equipped with an embedded web server. The
embedded web server in Xerox printers is called CentreWare
Internet Services.
For installing or managing multiple printers on a Windows NT 4.x (Service Pack 6 or higher),
Windows 2000, or Windows XP network with the TCP/IP protocol enabled, use the Xerox
CentreWare
MC snap-in to Microsoft Management Console. For more information go to
www.xerox.com/office to view the CentreWare MC User Guide.
CentreWare Web
CentreWare Web is a multi-vendor printer management, installation, and troubleshooting
application that can remotely manage, install, and troubleshoot printers on your network using
a web browser. Printers are found through network or print server discovery and managed over
TCP/IP networks using RFC-1759 SNMP (Simple Network Management Protocol).
Some of the features provided by CentreWare Web:
■ Remotely add ports, queues, and drivers to Windows 2000, XP, and NT4.x SP6 print
servers.
■ Install, troubleshoot, upgrade, and clone wizards to aid all users in performing
administrative tasks.
■ Install CentreWare Web on a server for availability to all clients on the network that have
Internet access with a browser.
■ Support multiple users and provide for different levels/privileges of user access, such as
administrators or guests.
Phaser™ 4500 Laser Printer
3-11
Page 93

Printer Management Software
■ Discover printers on local and remote subnets.
■ Automatically discover printers as scheduled.
■ Generate reports.
■ Connect to printer web servers for additional printer-specific features, including help.
For more information go to www.xerox.com/office to view the CentreWare Web User Guide.
Using Printer Management Features
Job Accounting
The printer stores information about print jobs in a log file. The log file is stored either in the
printer’s memory or on an optional hard disk if one is installed in the printer. If the log file is
stored in the printer’s memory, it is lost when the printer is reset. It is recommended that a hard
disk be used for job accounting.
The log file lists job records. Each record contains fields such as user name, job name, pages
printed, job times, and toner and ink used. Not all fields are supported by all printers. For
information go to CentreWare
IS online help or CentreWare Web online help.
The job accounting values reported vary depending on the protocol and print command used
when each job was printed. For example, using NPRINT over NetWare provides the printer
with the most information about the job being printed. When using Windows and NetWare, the
job name is often LST: or LST:BANNER. Other jobs from other ports may provide less
information about the job.
Job accounting is available through CentreWare IS and CentreWare We b.
Using CentreWare IS
1. Launch your web browser.
2. Enter your printer's IP address in the browser’s Address field (http://xxx.xxx.xxx.xxx).
3. On the right side of the main CentreWare IS page, click Jobs.
The “Job Accounting Links” page provides links that enable you to browse, download, and
clear job accounting records.
For complete information on CentreWare IS job accounting, including clearing job
information, downloading job information to a file, and job accounting file formats, go to
CentreWare
IS Online Help.
MaiLinX Alerts
MaiLinX alerts allow the printer to automatically send email to the system administrator and
others under the following conditions:
■ When printer errors, warnings, and alerts occur.
■ When the printer requires attention (for example, when service is required or supplies
need to be replenished).
Phaser™ 4500 Laser Printer
3-12
Page 94

Printer Management Software
■ When a reply to a CentreWare IS Remote Internet Printing message is desired. For more
information about CentreWare IS Remote Internet printing, go to CentreWare IS Online
Help.
Three designated users can receive messages:
■ SysAdmin
■ Service
■ Key
Printer messages reporting errors, alerts, and warnings can be individually assigned to any of
these users. You can customize the message text and the subject line in the Status Notification
messages.
Status Notification is supplied by the printer’s Simple Mail Transport Protocol (SMTP) client.
Setti ng Up CentreWare IS Status Notification
1. Launch your web browser.
2. Enter your printer's IP address in the browser’s Address field (http://xxx.xxx.xxx.xxx).
3. Select Properties.
4. Select Mail Alerts on the left sidebar. Follow the instructions on the page to select mail
alert options.
5. Click Save Changes.
For complete information about CentreWare IS Status Notification, go to CentreWare IS
Online Help.
Usage Profile Reports
The printer generates reports accessed through CentreWare IS that detail printer usage. Usage
profile reports track multiple items, including:
■ Printer information, such as printer name, date installed, total pages printed, options
installed, and network ID.
■ Supplies usage data, such as toner or ink. By tracking supplies usage, you can order
supplies before they reach their end of life.
■ Media and tray information, such as how often prints are made on paper compared to
transparencies, and how often each tray is used.
■ Job characteristics, such as size and timing of jobs.
Setting Up Usage Profile Reporting
1. Launch your web browser.
2. Enter your printer's IP address in the browser’s Address field (http://xxx.xxx.xxx.xxx).
3. Select Jobs.
4. Select Usage Profile Reports on the left sidebar.
5. Click the Usage Profile Properties link. Follow the instructions on the page to set up
reports.
6. Click Save Changes.
Phaser™ 4500 Laser Printer
3-13
Page 95

Printer Management Software
For complete information about Usage Profile reporting, including descriptions of each field
in the report, go to CentreWare
Using CentreWare IS
IS Online Help.
Note
To send usage profile reports using email, the MaiLinX must be properly set up using
"MaiLinX Alerts" on page 3-12.
1. Enter your printer’s IP address into the browser to connect to the printer using
CentreWare IS.
2. Select Jobs.
3. Select Usage Profile Reports on the left sidebar.
4. Enter the desired email address in the Send to Specific Address field.
5. Click Send Usage Profile Report.
Xerox Usage Analysis Tool
The Xerox Usage Analysis Tool is a Windows client/server application that allows system
administrators to automatically track Xerox printer usage and obtain job accounting records.
The tool supports large networks with many users and printers.
Job accounting and printer usage data is stored in a database. The application can be run on
multiple clients using a single server. The data can be exported to a spreadsheet for viewing,
analysis, and billing.
Go to www.xerox.com/office for complete information about using the Xerox Usage Analysis
Tool provided by the application’s online help system.
System Requirements
■ IP network
■ Xerox Phaser printers with Ethernet interface (optional hard disk recommended)
■ A PC with at least 32 MB of RAM. At least 1 GB of hard drive space is recommended for
the server.
■ Supported operating systems: Windows 98 or later and Windows 2000 or later
■ Microsoft Excel 97 or Excel 2000 for export to spreadsheet (for graphing, billing, data
analysis)
Phaser™ 4500 Laser Printer
3-14
Page 96

Phaser™ 4500 Laser Printer
Windows 2000, Windows XP, and Windows Server
2003
This topic includes:
■ "Preliminary Steps" on page 3-15
■ "Quick CD-ROM Install Steps" on page 3-15
■ "Other Methods of Installation" on page 3-16
■ "Windows 2000, Windows XP, Windows Server 2003 Troubleshooting (TCP/IP)" on
page 3-18
Preliminary Steps
These preliminary steps must be performed for all printers:
1. Verify that the printer is plugged in, turned on, and connected to an active network.
2. Verify that the printer is receiving network traffic by monitoring the LED’s on the back of
the printer or on the CentreDirect External Print Server. When the printer is connected to a
functioning network and receiving traffic, its link LED is green, and its amber traffic LED
is flashing rapidly.
3. Proceed to “Quick CD-ROM Install Steps” or “Other Methods of Installation” for the
installation method desired.
4. Print the “Configuration Page” and keep it for reference.
Quick CD-ROM Install Steps
1. Insert the Printer Installer and Utilities CD-ROM into the computer’s CD-ROM drive. If
your PC is set to autorun, the installer launches automatically. If it does not launch, do the
following:
a. Click Start, then click Run.
b. In the Run window, type: <CD drive>:\INSTALL.EXE.
2. Select your desired language from the list.
3. Select Install Printer Driver.
4. Click I Agree to accept the Xerox Software License Agreement.
5. In the Select Printer dialog box, the default Use Walk-Up Technology (recommended
for network printers) is selected. Click Next.
6. Follow the Use Walk-Up Technology instructions displayed.
7. Click Exit Program.
Note
If the Walk-Up Technology dialog box remains onscreen after you have completed Steps
1–6, click the Back button, then click Select from the following discovered printers.
Follow the onscreen prompts to complete the installation procedure.
Copyright © 2004 Xerox Corporation. All Rights Reserved.
3-15
Page 97

Windows 2000, Windows XP, and Windows Server 2003
Other Methods of Installation
Your printer can also be installed on a Windows 2000, Windows XP, or Windows Server 2003
network using one of these methods:
■ Microsoft TCP/IP Protocol
■ Xerox TCP/IP Port Monitor
■ Microsoft IPP Port
The following methods can also be used to monitor or configure your printer:
■ A web browser using CentreWare IS if your printer is connected to a Windows 2000,
Windows XP, or Windows Server 2003 network with the TCP/IP protocol enabled.
■ The Xerox CentreWare MC snap-in to Microsoft Management Console for installing or
managing multiple printers on a Windows 2000, Windows XP, or Windows Server 2003
network with TCP/IP protocol enabled. See the CentreWare MC User Guide at
www.xerox.com/office
Note
The CentreWare methods are not discussed in this section. For more information
concerning CentreWare IS, CentreWare DP, or CentreWare MC, go to Reference/
Connections & Networks/Printer Management Software on the User Documentation
CD-ROM.
.
Microsoft TCP/IP Protocol
Note
For Windows XP, select Classic Look or the Windows XP procedures will not match the
steps below. To select Classic Look, click Start, then Settings, then Taskbar and Start
Menu. Select the Start Menu tab, then select the Classic Start menu. Click OK.
1. Right-click the My Network Places icon on the desktop, then click Properties.
2. Right-click Local Area Connection, then click Properties.
3. Click the General tab to verify that Internet Protocol (TCP/IP) is installed.
■ If the Internet Protocol (TCP/IP) box is checked, the software is installed.
■ If the Internet Protocol (TCP/IP) box is not checked, the software is not installed.
Install TCP/IP software using the documentation provided by Microsoft, then return to
this document.
Adding the Printer
1. On the desktop click Start, then click Settings.
2. Select one of these options:
■ For Windows 2000 click Printers, double-click Add Printer to launch the Add
Printer Wizard, then click Next.
■ For Windows XP and Windows Server 2003, click Printers and Faxes. Double-click
Add Printer to launch the Add Printer Wizard, then click Next.
3. Click the Local Printer button, then click Next.
Phaser™ 4500 Laser Printer
3-16
Page 98

Windows 2000, Windows XP, and Windows Server 2003
4. Click the Create a New Port button.
5. Select Standard TCP/IP Port from the New Port Type pull-down menu, then click Next.
6. Click Next.
7. Click in the Printer Name or IP Address edit box and enter the IP Address of the printer
you want to use. Click Next.
8. Select one of these options:
■ Click Finish in the Confirmation window if the data is correct.
■ Click the Back button to correct the data if incorrect, then click Finish in the
Confirmation window when the data is correct.
Configuring the Printer
1. Insert the Printer Installer and Utilities CD-ROM into the computer’s CD-ROM drive and
click Have Disk.
2. Click the Browse button, then select the directory which contains the Windows 2000 or
Windows XP drivers.
3. Select the *.INF file, then click Open.
4. Verify that the path and filename are correct, then click OK.
5. Enter a name for the printer and select whether you want that printer to be the default.
Click Next.
6. Select one of these options:
■ If the printer is not shared, click Next.
■ If the printer is shared, enter a Share Name, check the Share box, then click Next.
Printing a Test Page
You are prompted to print a test page.
1. Select one of these options:
■ Click Ye s to print a test page, then click Next.
■ Click No if you do not want to print a test page, then click Next.
2. Select one of these options in the Completing the Add Printer Wizard screen:
■ Click the Finish button if the data presented is correct. Proceed to step 3.
■ Click the Back button to correct the data if incorrect, then click Finish in the Add
Printer Wizard when the data is correct. Proceed to Step 3.
3. If you printed a test page, you are prompted to confirm that the test page printed:
■ Click Ye s if the test page printed successfully.
■ Click No if the test page did not print or printed incorrectly. Proceed to step 4.
4. Note the print-quality of the print job. If print-quality problems exist, or if the job does not
print, go to Reference/Troubleshooting on the User Documentation CD-ROM for more
information.
Microsoft IPP Port
Follow these steps to obtain the printer’s URL and create an Internet Printing Protocol (IPP)
printer.
Phaser™ 4500 Laser Printer
3-17
Page 99

Windows 2000, Windows XP, and Windows Server 2003
Obtaining the Printer’s URL (Network Path)
1. Launch your web browser.
2. Enter your printer's IP address in the browser’s Address field (http://xxx.xxx.xxx.xxx).
3. Select Properties.
4. Select the Protocols folder on the left sidebar.
5. Select IPP. The Network Path field on the IPP (Internet Printing Protocol) Settings page
displays the printer’s URL.
Creating an IPP Printer
1. On the desktop, click Start, click Settings, then click Printers.
2. Double-click Add Printer to launch the Microsoft Add Printer Wizard.
3. Select Network Printer, then click Next.
4. When prompted for Network Path (Windows 9x) or URL (Windows NT, Windows 2000,
Windows XP), enter the printer’s URL in the following format:
http://printer-ip-address/ipp
5. Click Next.
6. Substitute your printer’s IP address or DNS name for printer-ip-address. The printer’s
URL is displayed on the CentreWare IS IPP page in the Network Path field.
Windows 2000, Windows XP, Windows Server 2003
Troubleshooting (TCP/IP)
Note
For Windows XP, select Classic Look or the Windows XP procedures will not match the
steps below. To select Classic Look, click Start, then Settings, then Taskbar and Start
Menu. Select the Start Menu tab, then select Classic Start menu. Click OK.
This troubleshooting section assumes you have completed the following tasks:
■ Loaded a Phaser printer PCL or PostScript printer driver.
■ Printed and kept a current copy of the “Configuration Page”.
Printing the Configuration Page
You can print the “Configuration Page” to help you solve printing problems and obtain the
best results from your printer. Access this page from the printer’s front panel.
To print the “Configuration Page”:
1. At the printer’s front panel, select Printer Setup, then press the OK button.
2. Select Configuration Page, then press the OK button to print.
Note
Print “Menu Map” to see other information pages available for printing.
Phaser™ 4500 Laser Printer
3-18
Page 100

Windows 2000, Windows XP, and Windows Server 2003
Verifying Settings
1. Verify the settings on the “Configuration Page”.
■ IP Address Source is set to: DHCP, Front Panel, BOOTP, or Auto IP (depending
on your network configuration).
■ Current IP Address is set correctly. (Note this address if it is assigned by Auto IP,
DHCP, or BOOTP.)
■ Subnet Mask is set correctly (if used).
■ Default Gateway is set correctly (if used).
■ LPR is enabled. Verify that the LPR and AppSocket settings are set as desired.
■ Interpreters: Auto, PCL, or PostScript (depending on your driver).
2. Verify that the client is logged into the network and printing to the correct print queue. The
user should also have access to the Phaser printer queue.
Verifying Driver Installation
1. Right-click My Network Places on the desktop, then click Properties.
2. Right-click Local Area Connection, then click Properties.
3. Click the General tab. View the list of installed network protocols to verify that TCP/IP is
installed. (For more information, contact your network administrator.)
4. Click Install to install any components not listed, then restart your computer.
5. Click Start, click Settings, then click Printers.
6. Right-click the printer icon, then click Properties.
7. Click the Advanced tab. Verify that the correct printer driver is installed.
8. Click the Ports tab. Verify that the IP Address in the Print to the Following Ports list is
identical to the one on the “Configuration Page.” You may need to click the Configure
Port button to see the IP address. If necessary, re-select the TCP/IP number used for the
printer.
Printing a Test Page
1. Click the General tab.
2. Click Print Test Page. If the printer does not print, do one of the following:
■ Select PhaserSMART Technical Support on the Troubleshooting tab of your
Windows printer driver to access PhaserSMART Technical Support.
■ Go to www.xerox.com/office/support.
Phaser™ 4500 Laser Printer
3-19
 Loading...