

Page 1

Service Manual
W
701P45760
Phaser 4500/4510
Laser Printers
arning
The following servicing instructions are for use by qualified service
personnel only. To avoid personal injury, do not perform any servicing
other than that contained in the operating instructions, unless you are
qualified to do so.
Page 2

Prepared By:
Xerox Corporation
XOG Worldwide Product Training and Information
26600 SW Parkway
Wilsonville, OR 97070
Copyright © 2007 Xerox Corporation. All Rights Reserved. Unpublished rights reserved under the copyright laws of the United States. Contents
of this publication may not be reproduced in any form without permission of Xerox Corporation.
Copyright protection claimed includes all forms of matters of copyrightable materials and information now allowed by statutory or judicial law or
hereinafter granted, including without limitation, material generated from the software programs which are displayed on the screen such as
styles, templates, icons, screen displays, looks, etc.
Xerox technical training materials and service manuals are intended for use by authorized Xerox service technicians and service partners only
and are not for resale. These materials may not be distributed, copied or otherwise reproduced without prior written consent from Xerox
Corporation.
®
XEROX
PhaserSMART
Acrobat
Adobe Garamond
, The Document Company®, the digital X®, CentreWare®, infoSMART®, Made For Each Other®, PagePack™, Phaser®,
®
, and Walk-Up™ are trademarks of Xerox Corporation in the United States and/or other countries.
®
, Adobe® Reader®, Adobe Type Manager®, ATM™, Illustrator®, PageMaker®, Photoshop®, PostScript®, Adobe Brilliant® Screens,
®
, Adobe Jenson™, Birch®, Carta®, IntelliSelect®, Mythos®, Quake®, and Tekton® are trademarks of Adobe Systems
Incorporated in the United States and/or other countries.
®
, AppleTalk®, Bonjour®, EtherTalk®, LaserWriter®, LocalTalk®, Macintosh®, Mac OS®, TrueType®, Apple Chancery®, Chicago®,
Apple
®
Geneva
HP-GL
IBM
Windows
Novell
, Monaco®, New York®, and QuickDraw® are trademarks of Apple Computer, Inc. in the United States and/or other countries.
®
, HP-UX®, and PCL®are trademarks of Hewlett-Packard Corporation in the United States and/or other countries.
®
and AIX® are trademarks of International Business Machines Corporation in the United States and/or other countries.
®
, Vista™, Windows Server™, and Wingdings® are trademarks of Microsoft Corporation in the United States and/or other countries.
®
, NetWare®, NDPS®, NDS®, Novell Directory Services®, IPX™, and Novell Distributed Print Services™are trademarks of Novell,
Incorporated in the United States and/or other countries.
SM
, Sun Microsystems™, and Solaris™ are trademarks of Sun Microsystems, Incorporated in the United States and/or other countries.
Sun
®
SWOP
UNIX
As an E
guidelines for energy efficiency. The E
is a trademark of SWOP, Inc.
®
is a trademark in the United States and other countries, licensed exclusively through X/Open Company Limited.
NERGY STAR
®
partner, Xerox Corporation has determined that this product, when equipped with a duplex unit, meets the ENERGY STAR
NERGY STAR name and logo are registered U.S. marks.
®
PANTONE
PANTONE
Colors generated may not match PANTONE-identified standards. Consult current PANTONE Publications for accurate color.
®
and other Pantone, Inc. trademarks are the property of Pantone, Inc. © Pantone, Inc., 2000.
This product uses code for SHA-1 written by John Halleck, which is being used with his permission.
This product includes an implementation of LZW licensed under U.S. Patent 4,558,302.
Other marks are trademarks or registered trademarks of the companies with which they are associated.
ii Phaser 4500/4510 Service Manual
Page 3

Contents
Service Terms . . . . . . . . . . . . . . . . . . . . . . . . . . . . . . . . . . . . . . . . . . . . . . . . . . . . . . . . . . . . . . . . . . . . . . . . . . . . . . . . xi
Product Terms. . . . . . . . . . . . . . . . . . . . . . . . . . . . . . . . . . . . . . . . . . . . . . . . . . . . . . . . . . . . . . . . . . . . . . . . . . . . . . . .xii
Power Safety Precautions . . . . . . . . . . . . . . . . . . . . . . . . . . . . . . . . . . . . . . . . . . . . . . . . . . . . . . . . . . . . . . . . . . . . . . xiii
Electrostatic Discharge (ESD) Precautions . . . . . . . . . . . . . . . . . . . . . . . . . . . . . . . . . . . . . . . . . . . . . . . . . . . . . . . . . xiv
Service Safety Summary . . . . . . . . . . . . . . . . . . . . . . . . . . . . . . . . . . . . . . . . . . . . . . . . . . . . . . . . . . . . . . . . . . . . . . . .xv
Regulatory Specifications . . . . . . . . . . . . . . . . . . . . . . . . . . . . . . . . . . . . . . . . . . . . . . . . . . . . . . . . . . . . . . . . . . . . . . xvii
1 General Information
Printer Introduction and Overview. . . . . . . . . . . . . . . . . . . . . . . . . . . . . . . . . . . . . . . . . . . . . . . . . . . . . . . . . . . . . . . . 1-2
Technical Support Information . . . . . . . . . . . . . . . . . . . . . . . . . . . . . . . . . . . . . . . . . . . . . . . . . . . . . . . . . . . 1-2
Printer Configurations . . . . . . . . . . . . . . . . . . . . . . . . . . . . . . . . . . . . . . . . . . . . . . . . . . . . . . . . . . . . . . . . . . . . . . . . .1-3
Parts of the Printer. . . . . . . . . . . . . . . . . . . . . . . . . . . . . . . . . . . . . . . . . . . . . . . . . . . . . . . . . . . . . . . . . . . . . . . . . . . . 1-4
Control Panel. . . . . . . . . . . . . . . . . . . . . . . . . . . . . . . . . . . . . . . . . . . . . . . . . . . . . . . . . . . . . . . . . . . . . . . . . . . . . . . .1-5
Image Processor Board (Phaser 4500) . . . . . . . . . . . . . . . . . . . . . . . . . . . . . . . . . . . . . . . . . . . . . . . . . . . . . . . . . . . . 1-7
Image Processor Board (Phaser 4510) . . . . . . . . . . . . . . . . . . . . . . . . . . . . . . . . . . . . . . . . . . . . . . . . . . . . . . . . . . . . 1-8
Consumables and Routine Maintenance Items . . . . . . . . . . . . . . . . . . . . . . . . . . . . . . . . . . . . . . . . . . . . . . . . . . . . . . 1-9
Supply Life Counters. . . . . . . . . . . . . . . . . . . . . . . . . . . . . . . . . . . . . . . . . . . . . . . . . . . . . . . . . . . . . . . . . . 1-10
Printer Specifications. . . . . . . . . . . . . . . . . . . . . . . . . . . . . . . . . . . . . . . . . . . . . . . . . . . . . . . . . . . . . . . . . . . . . . . . .1-11
Physical Dimensions and Clearances . . . . . . . . . . . . . . . . . . . . . . . . . . . . . . . . . . . . . . . . . . . . . . . . . . . . . 1-11
Functional Specifications. . . . . . . . . . . . . . . . . . . . . . . . . . . . . . . . . . . . . . . . . . . . . . . . . . . . . . . . . . . . . . . 1-12
Electrical Specifications. . . . . . . . . . . . . . . . . . . . . . . . . . . . . . . . . . . . . . . . . . . . . . . . . . . . . . . . . . . . . . . . 1-13
Environmental Specifications . . . . . . . . . . . . . . . . . . . . . . . . . . . . . . . . . . . . . . . . . . . . . . . . . . . . . . . . . . .1-13
Media and Tray Specifications. . . . . . . . . . . . . . . . . . . . . . . . . . . . . . . . . . . . . . . . . . . . . . . . . . . . . . . . . . . 1-14
Memory Requirements . . . . . . . . . . . . . . . . . . . . . . . . . . . . . . . . . . . . . . . . . . . . . . . . . . . . . . . . . . . . . . . . 1-15
Contents
2 Theory of Operation
Overview of the Phaser 4500/4510 Laser Printer. . . . . . . . . . . . . . . . . . . . . . . . . . . . . . . . . . . . . . . . . . . . . . . . . . . . . 2-2
Summary of the Printing Process . . . . . . . . . . . . . . . . . . . . . . . . . . . . . . . . . . . . . . . . . . . . . . . . . . . . . . . . . 2-2
Paper Path of the Printer . . . . . . . . . . . . . . . . . . . . . . . . . . . . . . . . . . . . . . . . . . . . . . . . . . . . . . . . . . . . . . . . . . . . . . .2-4
Layout of Paper Transport Path. . . . . . . . . . . . . . . . . . . . . . . . . . . . . . . . . . . . . . . . . . . . . . . . . . . . . . . . . . . 2-5
Sensors . . . . . . . . . . . . . . . . . . . . . . . . . . . . . . . . . . . . . . . . . . . . . . . . . . . . . . . . . . . . . . . . . . . . . . . . . . . . . . . . . . . . 2-7
Major Assemblies and Functions. . . . . . . . . . . . . . . . . . . . . . . . . . . . . . . . . . . . . . . . . . . . . . . . . . . . . . . . . . . . . . . . 2-11
Paper Tray. . . . . . . . . . . . . . . . . . . . . . . . . . . . . . . . . . . . . . . . . . . . . . . . . . . . . . . . . . . . . . . . . . . . . . . . . . 2-11
Paper Feeder . . . . . . . . . . . . . . . . . . . . . . . . . . . . . . . . . . . . . . . . . . . . . . . . . . . . . . . . . . . . . . . . . . . . . . . .2-15
Control of Paper Size. . . . . . . . . . . . . . . . . . . . . . . . . . . . . . . . . . . . . . . . . . . . . . . . . . . . . . . . . . . . . . . . . . 2-17
Xerographics. . . . . . . . . . . . . . . . . . . . . . . . . . . . . . . . . . . . . . . . . . . . . . . . . . . . . . . . . . . . . . . . . . . . . . . .2-18
Fuser . . . . . . . . . . . . . . . . . . . . . . . . . . . . . . . . . . . . . . . . . . . . . . . . . . . . . . . . . . . . . . . . . . . . . . . . . . . . . . 2-21
Fuser Control. . . . . . . . . . . . . . . . . . . . . . . . . . . . . . . . . . . . . . . . . . . . . . . . . . . . . . . . . . . . . . . . . . . . . . . .2-23
Paper Exit Assembly . . . . . . . . . . . . . . . . . . . . . . . . . . . . . . . . . . . . . . . . . . . . . . . . . . . . . . . . . . . . . . . . . .2-27
Drive . . . . . . . . . . . . . . . . . . . . . . . . . . . . . . . . . . . . . . . . . . . . . . . . . . . . . . . . . . . . . . . . . . . . . . . . . . . . . . 2-28
Electrical . . . . . . . . . . . . . . . . . . . . . . . . . . . . . . . . . . . . . . . . . . . . . . . . . . . . . . . . . . . . . . . . . . . . . . . . . . . 2-29
Printer Options. . . . . . . . . . . . . . . . . . . . . . . . . . . . . . . . . . . . . . . . . . . . . . . . . . . . . . . . . . . . . . . . . . . . . . . . . . . . . . 2-33
Duplex Unit . . . . . . . . . . . . . . . . . . . . . . . . . . . . . . . . . . . . . . . . . . . . . . . . . . . . . . . . . . . . . . . . . . . . . . . . . 2-33
Stacker . . . . . . . . . . . . . . . . . . . . . . . . . . . . . . . . . . . . . . . . . . . . . . . . . . . . . . . . . . . . . . . . . . . . . . . . . . . . 2-36
Optional 550-Sheet Feeder . . . . . . . . . . . . . . . . . . . . . . . . . . . . . . . . . . . . . . . . . . . . . . . . . . . . . . . . . . . . . 2-39
Phaser 4500/4510 Laser Printer Service Manual iii
Page 4

Contents
3 Error Messages and Codes
Introduction. . . . . . . . . . . . . . . . . . . . . . . . . . . . . . . . . . . . . . . . . . . . . . . . . . . . . . . . . . . . . . . . . . . . . . . . . . . . . . . . . 3-2
Servicing Instructions . . . . . . . . . . . . . . . . . . . . . . . . . . . . . . . . . . . . . . . . . . . . . . . . . . . . . . . . . . . . . . . . . . . . . . . . .3-2
Using the Troubleshooting Procedures . . . . . . . . . . . . . . . . . . . . . . . . . . . . . . . . . . . . . . . . . . . . . . . . . . . . .3-4
General Notes on Troubleshooting . . . . . . . . . . . . . . . . . . . . . . . . . . . . . . . . . . . . . . . . . . . . . . . . . . . . . . . . 3-4
Accessing Fault Histories. . . . . . . . . . . . . . . . . . . . . . . . . . . . . . . . . . . . . . . . . . . . . . . . . . . . . . . . . . . . . . . .3-5
Entry Level Fault Isolation Procedure. . . . . . . . . . . . . . . . . . . . . . . . . . . . . . . . . . . . . . . . . . . . . . . . . . . . . . . . . . . . . . 3-6
Service Diagnostics . . . . . . . . . . . . . . . . . . . . . . . . . . . . . . . . . . . . . . . . . . . . . . . . . . . . . . . . . . . . . . . . . . . . . . . . . . . 3-7
Service Diagnostics Menu Map. . . . . . . . . . . . . . . . . . . . . . . . . . . . . . . . . . . . . . . . . . . . . . . . . . . . . . . . . . . 3-8
Service Diagnostic Control Panel Button Descriptions . . . . . . . . . . . . . . . . . . . . . . . . . . . . . . . . . . . . . . . . . 3-9
Using Service Diagnostics. . . . . . . . . . . . . . . . . . . . . . . . . . . . . . . . . . . . . . . . . . . . . . . . . . . . . . . . . . . . . . . 3-9
System Start-Up and POST . . . . . . . . . . . . . . . . . . . . . . . . . . . . . . . . . . . . . . . . . . . . . . . . . . . . . . . . . . . . . . . . . . . . 3-15
Power On Self Test (POST) . . . . . . . . . . . . . . . . . . . . . . . . . . . . . . . . . . . . . . . . . . . . . . . . . . . . . . . . . . . . .3-15
POST Faults. . . . . . . . . . . . . . . . . . . . . . . . . . . . . . . . . . . . . . . . . . . . . . . . . . . . . . . . . . . . . . . . . . . . . . . . .3-16
LED Blink Patterns. . . . . . . . . . . . . . . . . . . . . . . . . . . . . . . . . . . . . . . . . . . . . . . . . . . . . . . . . . . . . . . . . . . . 3-16
POST Diagnostic Test Descriptions. . . . . . . . . . . . . . . . . . . . . . . . . . . . . . . . . . . . . . . . . . . . . . . . . . . . . . . 3-17
Operating System and Application Problems. . . . . . . . . . . . . . . . . . . . . . . . . . . . . . . . . . . . . . . . . . . . . . . . . . . . . . .3-19
Macintosh Printing Problems . . . . . . . . . . . . . . . . . . . . . . . . . . . . . . . . . . . . . . . . . . . . . . . . . . . . . . . . . . . 3-19
Windows Printing Problems . . . . . . . . . . . . . . . . . . . . . . . . . . . . . . . . . . . . . . . . . . . . . . . . . . . . . . . . . . . . 3-19
Network Problems. . . . . . . . . . . . . . . . . . . . . . . . . . . . . . . . . . . . . . . . . . . . . . . . . . . . . . . . . . . . . . . . . . . .3-20
Troubleshooting Procedures for Error Messages and Codes. . . . . . . . . . . . . . . . . . . . . . . . . . . . . . . . . . . . . . . . . . .3-21
Main Motor Failure . . . . . . . . . . . . . . . . . . . . . . . . . . . . . . . . . . . . . . . . . . . . . . . . . . . . . . . . . . . . . . . . . . . 3-28
Laser Unit Failure. . . . . . . . . . . . . . . . . . . . . . . . . . . . . . . . . . . . . . . . . . . . . . . . . . . . . . . . . . . . . . . . . . . . .3-29
Fuser Failure . . . . . . . . . . . . . . . . . . . . . . . . . . . . . . . . . . . . . . . . . . . . . . . . . . . . . . . . . . . . . . . . . . . . . . . . 3-30
Fan Failure. . . . . . . . . . . . . . . . . . . . . . . . . . . . . . . . . . . . . . . . . . . . . . . . . . . . . . . . . . . . . . . . . . . . . . . . . . 3-31
Engine Logic Board NVRAM Failure. . . . . . . . . . . . . . . . . . . . . . . . . . . . . . . . . . . . . . . . . . . . . . . . . . . . . . . 3-33
Jam At Tray N . . . . . . . . . . . . . . . . . . . . . . . . . . . . . . . . . . . . . . . . . . . . . . . . . . . . . . . . . . . . . . . . . . . . . . . 3-34
Jam at Tray N . . . . . . . . . . . . . . . . . . . . . . . . . . . . . . . . . . . . . . . . . . . . . . . . . . . . . . . . . . . . . . . . . . . . . . .3-37
Jam At Top; Open Top Cover To Clear. . . . . . . . . . . . . . . . . . . . . . . . . . . . . . . . . . . . . . . . . . . . . . . . . . . . .3-40
Jam At Exit; Open Rear/Top Cover To Clear. . . . . . . . . . . . . . . . . . . . . . . . . . . . . . . . . . . . . . . . . . . . . . . . .3-43
Jam At Rear; Open Rear Cover To Clear . . . . . . . . . . . . . . . . . . . . . . . . . . . . . . . . . . . . . . . . . . . . . . . . . . . 3-45
Jam At Stacker; Open Rear Stacker Cover To Clear. . . . . . . . . . . . . . . . . . . . . . . . . . . . . . . . . . . . . . . . . . .3- 4 7
Jam At Rear; Open Duplex And Rear Cover To Clear. . . . . . . . . . . . . . . . . . . . . . . . . . . . . . . . . . . . . . . . . . 3-49
Jam At Duplex; Open Duplex To Clear. . . . . . . . . . . . . . . . . . . . . . . . . . . . . . . . . . . . . . . . . . . . . . . . . . . . .3-51
Duplex Unit Error. . . . . . . . . . . . . . . . . . . . . . . . . . . . . . . . . . . . . . . . . . . . . . . . . . . . . . . . . . . . . . . . . . . . . 3-52
Stacker Error. . . . . . . . . . . . . . . . . . . . . . . . . . . . . . . . . . . . . . . . . . . . . . . . . . . . . . . . . . . . . . . . . . . . . . . . 3-53
Tray 3 Failure/Tray 3 or 4 Failure. . . . . . . . . . . . . . . . . . . . . . . . . . . . . . . . . . . . . . . . . . . . . . . . . . . . . . . . . 3-54
Paper Size Jam . . . . . . . . . . . . . . . . . . . . . . . . . . . . . . . . . . . . . . . . . . . . . . . . . . . . . . . . . . . . . . . . . . . . . .3-56
Close Top Cover/Close Rear Cover . . . . . . . . . . . . . . . . . . . . . . . . . . . . . . . . . . . . . . . . . . . . . . . . . . . . . . . 3-58
Close Duplex Unit Cover . . . . . . . . . . . . . . . . . . . . . . . . . . . . . . . . . . . . . . . . . . . . . . . . . . . . . . . . . . . . . . . 3-59
Close Stacker Cover. . . . . . . . . . . . . . . . . . . . . . . . . . . . . . . . . . . . . . . . . . . . . . . . . . . . . . . . . . . . . . . . . . .3-60
Install or Reseat Print Cartridge. . . . . . . . . . . . . . . . . . . . . . . . . . . . . . . . . . . . . . . . . . . . . . . . . . . . . . . . . . 3-61
Replace Print Cartridge . . . . . . . . . . . . . . . . . . . . . . . . . . . . . . . . . . . . . . . . . . . . . . . . . . . . . . . . . . . . . . . . 3-62
No Paper in Tray 1/No Paper in Tray 2 . . . . . . . . . . . . . . . . . . . . . . . . . . . . . . . . . . . . . . . . . . . . . . . . . . . .3-63
Tray 2 Paper Is Low. . . . . . . . . . . . . . . . . . . . . . . . . . . . . . . . . . . . . . . . . . . . . . . . . . . . . . . . . . . . . . . . . . .3-64
No Paper in Tray 3/No Paper in Tray 4 . . . . . . . . . . . . . . . . . . . . . . . . . . . . . . . . . . . . . . . . . . . . . . . . . . . .3-65
Tray 3 Paper Is Low/Tray 4 Paper Is Low . . . . . . . . . . . . . . . . . . . . . . . . . . . . . . . . . . . . . . . . . . . . . . . . . .3-66
Insert Tray 1/Insert Tray 2. . . . . . . . . . . . . . . . . . . . . . . . . . . . . . . . . . . . . . . . . . . . . . . . . . . . . . . . . . . . . . 3-67
Insert Tray 3/Insert Tray 4. . . . . . . . . . . . . . . . . . . . . . . . . . . . . . . . . . . . . . . . . . . . . . . . . . . . . . . . . . . . . . 3-68
Stacker Is Full, Unload Paper. . . . . . . . . . . . . . . . . . . . . . . . . . . . . . . . . . . . . . . . . . . . . . . . . . . . . . . . . . . . 3-69
Standard Output Tray Is Full, Unload Paper. . . . . . . . . . . . . . . . . . . . . . . . . . . . . . . . . . . . . . . . . . . . . . . . .3-70
Replace Maintenance Kit . . . . . . . . . . . . . . . . . . . . . . . . . . . . . . . . . . . . . . . . . . . . . . . . . . . . . . . . . . . . . . . 3-71
Inoperable Printer . . . . . . . . . . . . . . . . . . . . . . . . . . . . . . . . . . . . . . . . . . . . . . . . . . . . . . . . . . . . . . . . . . . . 3-72
No Recognition of Duplex Unit . . . . . . . . . . . . . . . . . . . . . . . . . . . . . . . . . . . . . . . . . . . . . . . . . . . . . . . . . . 3-73
No Recognition of Stacker. . . . . . . . . . . . . . . . . . . . . . . . . . . . . . . . . . . . . . . . . . . . . . . . . . . . . . . . . . . . . . 3-75
iv Phaser 4500/4510 Service Manual
Page 5

4 General Troubleshooting
Introduction. . . . . . . . . . . . . . . . . . . . . . . . . . . . . . . . . . . . . . . . . . . . . . . . . . . . . . . . . . . . . . . . . . . . . . . . . . . . . . . . . 4-2
Control Panel Troubleshooting . . . . . . . . . . . . . . . . . . . . . . . . . . . . . . . . . . . . . . . . . . . . . . . . . . . . . . . . . . . . . . . . . .4-3
LCD/LED Display Error/Inoperable Buttons. . . . . . . . . . . . . . . . . . . . . . . . . . . . . . . . . . . . . . . . . . . . . . . . . . 4-3
DC Power Supply Troubleshooting . . . . . . . . . . . . . . . . . . . . . . . . . . . . . . . . . . . . . . . . . . . . . . . . . . . . . . . . . . . . . . . 4-4
LVPS (Low Voltage Power Supply). . . . . . . . . . . . . . . . . . . . . . . . . . . . . . . . . . . . . . . . . . . . . . . . . . . . . . . .4-4
DC-DC Converter (P4500 only) . . . . . . . . . . . . . . . . . . . . . . . . . . . . . . . . . . . . . . . . . . . . . . . . . . . . . . . . . . . 4-5
AC Power Supply Troubleshooting . . . . . . . . . . . . . . . . . . . . . . . . . . . . . . . . . . . . . . . . . . . . . . . . . . . . . . . . . . . . . . . 4-7
No AC Power. . . . . . . . . . . . . . . . . . . . . . . . . . . . . . . . . . . . . . . . . . . . . . . . . . . . . . . . . . . . . . . . . . . . . . . . .4-7
Print Engine Troubleshooting . . . . . . . . . . . . . . . . . . . . . . . . . . . . . . . . . . . . . . . . . . . . . . . . . . . . . . . . . . . . . . . . . .4-11
Main Motor . . . . . . . . . . . . . . . . . . . . . . . . . . . . . . . . . . . . . . . . . . . . . . . . . . . . . . . . . . . . . . . . . . . . . . . . . 4-11
Laser Unit Assembly . . . . . . . . . . . . . . . . . . . . . . . . . . . . . . . . . . . . . . . . . . . . . . . . . . . . . . . . . . . . . . . . . . 4-12
Fuser Assembly. . . . . . . . . . . . . . . . . . . . . . . . . . . . . . . . . . . . . . . . . . . . . . . . . . . . . . . . . . . . . . . . . . . . . .4-15
Registration Sensor. . . . . . . . . . . . . . . . . . . . . . . . . . . . . . . . . . . . . . . . . . . . . . . . . . . . . . . . . . . . . . . . . . . 4-17
No Paper Sensor . . . . . . . . . . . . . . . . . . . . . . . . . . . . . . . . . . . . . . . . . . . . . . . . . . . . . . . . . . . . . . . . . . . . . 4-19
Low Paper Sensor. . . . . . . . . . . . . . . . . . . . . . . . . . . . . . . . . . . . . . . . . . . . . . . . . . . . . . . . . . . . . . . . . . . . 4-21
Toner Sensor. . . . . . . . . . . . . . . . . . . . . . . . . . . . . . . . . . . . . . . . . . . . . . . . . . . . . . . . . . . . . . . . . . . . . . . .4-22
Output Tray Full Sensor. . . . . . . . . . . . . . . . . . . . . . . . . . . . . . . . . . . . . . . . . . . . . . . . . . . . . . . . . . . . . . . . 4-23
24 V Interlock . . . . . . . . . . . . . . . . . . . . . . . . . . . . . . . . . . . . . . . . . . . . . . . . . . . . . . . . . . . . . . . . . . . . . . .4-24
5 V Interlock, Interlock Switch Assembly . . . . . . . . . . . . . . . . . . . . . . . . . . . . . . . . . . . . . . . . . . . . . . . . . .4-25
Rear Cover Switch. . . . . . . . . . . . . . . . . . . . . . . . . . . . . . . . . . . . . . . . . . . . . . . . . . . . . . . . . . . . . . . . . . . . 4-26
Interlock Switch Assembly (P4500 only). . . . . . . . . . . . . . . . . . . . . . . . . . . . . . . . . . . . . . . . . . . . . . . . . . .4-26
Exit Motor PWBA. . . . . . . . . . . . . . . . . . . . . . . . . . . . . . . . . . . . . . . . . . . . . . . . . . . . . . . . . . . . . . . . . . . . . 4-27
Exit Motor Assembly . . . . . . . . . . . . . . . . . . . . . . . . . . . . . . . . . . . . . . . . . . . . . . . . . . . . . . . . . . . . . . . . . . 4-28
Registration Clutch . . . . . . . . . . . . . . . . . . . . . . . . . . . . . . . . . . . . . . . . . . . . . . . . . . . . . . . . . . . . . . . . . . . 4-29
Feed Clutches . . . . . . . . . . . . . . . . . . . . . . . . . . . . . . . . . . . . . . . . . . . . . . . . . . . . . . . . . . . . . . . . . . . . . . . 4-30
Left Tray Guide . . . . . . . . . . . . . . . . . . . . . . . . . . . . . . . . . . . . . . . . . . . . . . . . . . . . . . . . . . . . . . . . . . . . . . 4-31
HVPS/Engine Logic Board. . . . . . . . . . . . . . . . . . . . . . . . . . . . . . . . . . . . . . . . . . . . . . . . . . . . . . . . . . . . . . 4-32
Image Processor Isolation. . . . . . . . . . . . . . . . . . . . . . . . . . . . . . . . . . . . . . . . . . . . . . . . . . . . . . . . . . . . . . 4-33
Image Processor Board. . . . . . . . . . . . . . . . . . . . . . . . . . . . . . . . . . . . . . . . . . . . . . . . . . . . . . . . . . . . . . . . 4-34
RAM DIMM Fault Isolation . . . . . . . . . . . . . . . . . . . . . . . . . . . . . . . . . . . . . . . . . . . . . . . . . . . . . . . . . . . . . 4-35
Electrical Noise . . . . . . . . . . . . . . . . . . . . . . . . . . . . . . . . . . . . . . . . . . . . . . . . . . . . . . . . . . . . . . . . . . . . . . 4-37
Optional 550-Sheet Feeder PWBA (Tray 3) . . . . . . . . . . . . . . . . . . . . . . . . . . . . . . . . . . . . . . . . . . . . . . . . . 4-39
Optional 550-Sheet Feeder PWBA (Tray 4) . . . . . . . . . . . . . . . . . . . . . . . . . . . . . . . . . . . . . . . . . . . . . . . . . 4-40
Optional 550-Sheet Feeder No Paper Sensor. . . . . . . . . . . . . . . . . . . . . . . . . . . . . . . . . . . . . . . . . . . . . . . .4-41
Optional 550-Sheet Feeder Low Paper Sensor . . . . . . . . . . . . . . . . . . . . . . . . . . . . . . . . . . . . . . . . . . . . . . 4-43
Optional Feeder Paper Size Switch Assembly . . . . . . . . . . . . . . . . . . . . . . . . . . . . . . . . . . . . . . . . . . . . . . . 4-45
Optional 550-Sheet Feeder Feed Clutch Assembly. . . . . . . . . . . . . . . . . . . . . . . . . . . . . . . . . . . . . . . . . . . . 4-46
Optional 550-Sheet Feeder Turn Roller Clutch. . . . . . . . . . . . . . . . . . . . . . . . . . . . . . . . . . . . . . . . . . . . . . .4-48
Duplex Unit PWBA. . . . . . . . . . . . . . . . . . . . . . . . . . . . . . . . . . . . . . . . . . . . . . . . . . . . . . . . . . . . . . . . . . . . 4-49
Duplex Unit Motor. . . . . . . . . . . . . . . . . . . . . . . . . . . . . . . . . . . . . . . . . . . . . . . . . . . . . . . . . . . . . . . . . . . . 4-50
Duplex Unit Sensor . . . . . . . . . . . . . . . . . . . . . . . . . . . . . . . . . . . . . . . . . . . . . . . . . . . . . . . . . . . . . . . . . . . 4-51
Duplex Unit Switch . . . . . . . . . . . . . . . . . . . . . . . . . . . . . . . . . . . . . . . . . . . . . . . . . . . . . . . . . . . . . . . . . . .4-53
Stacker PWBA. . . . . . . . . . . . . . . . . . . . . . . . . . . . . . . . . . . . . . . . . . . . . . . . . . . . . . . . . . . . . . . . . . . . . . . 4-54
Stacker Motor Assembly . . . . . . . . . . . . . . . . . . . . . . . . . . . . . . . . . . . . . . . . . . . . . . . . . . . . . . . . . . . . . . . 4-55
Offset Motor Assembly . . . . . . . . . . . . . . . . . . . . . . . . . . . . . . . . . . . . . . . . . . . . . . . . . . . . . . . . . . . . . . . . 4-56
Gate Solenoid Assembly . . . . . . . . . . . . . . . . . . . . . . . . . . . . . . . . . . . . . . . . . . . . . . . . . . . . . . . . . . . . . . . 4-57
Stacker Rear Cover Switch . . . . . . . . . . . . . . . . . . . . . . . . . . . . . . . . . . . . . . . . . . . . . . . . . . . . . . . . . . . . . 4-58
Stacker Sensor . . . . . . . . . . . . . . . . . . . . . . . . . . . . . . . . . . . . . . . . . . . . . . . . . . . . . . . . . . . . . . . . . . . . . . 4-59
Stacker Full Sensor (On Stacker PWBA) . . . . . . . . . . . . . . . . . . . . . . . . . . . . . . . . . . . . . . . . . . . . . . . . . . .4-60
Offset Sensor (On Stacker PWBA). . . . . . . . . . . . . . . . . . . . . . . . . . . . . . . . . . . . . . . . . . . . . . . . . . . . . . . . 4-61
Contents
Phaser 4500/4510 Laser Printer Service Manual v
Page 6

Contents
5 Print-Quality Troubleshooting
Print-Quality Problems Overview. . . . . . . . . . . . . . . . . . . . . . . . . . . . . . . . . . . . . . . . . . . . . . . . . . . . . . . . . . . . . . . . . 5-2
Analyzing Test Prints . . . . . . . . . . . . . . . . . . . . . . . . . . . . . . . . . . . . . . . . . . . . . . . . . . . . . . . . . . . . . . . . . . . . . . . . . . 5-3
Deletions (Line, Band, Spots) . . . . . . . . . . . . . . . . . . . . . . . . . . . . . . . . . . . . . . . . . . . . . . . . . . . . . . . . . . . . 5-6
Fusing . . . . . . . . . . . . . . . . . . . . . . . . . . . . . . . . . . . . . . . . . . . . . . . . . . . . . . . . . . . . . . . . . . . . . . . . . . . . . .5-7
Resolution. . . . . . . . . . . . . . . . . . . . . . . . . . . . . . . . . . . . . . . . . . . . . . . . . . . . . . . . . . . . . . . . . . . . . . . . . . .5-8
Registration (Side-to-Side) . . . . . . . . . . . . . . . . . . . . . . . . . . . . . . . . . . . . . . . . . . . . . . . . . . . . . . . . . . . . . . 5-9
Registration (Lead Edge-to-Trail Edge) . . . . . . . . . . . . . . . . . . . . . . . . . . . . . . . . . . . . . . . . . . . . . . . . . . . . 5-10
Skips/Smears . . . . . . . . . . . . . . . . . . . . . . . . . . . . . . . . . . . . . . . . . . . . . . . . . . . . . . . . . . . . . . . . . . . . . . . 5-11
Spots. . . . . . . . . . . . . . . . . . . . . . . . . . . . . . . . . . . . . . . . . . . . . . . . . . . . . . . . . . . . . . . . . . . . . . . . . . . . . .5-12
Skew . . . . . . . . . . . . . . . . . . . . . . . . . . . . . . . . . . . . . . . . . . . . . . . . . . . . . . . . . . . . . . . . . . . . . . . . . . . . . .5-13
Other Print Defects . . . . . . . . . . . . . . . . . . . . . . . . . . . . . . . . . . . . . . . . . . . . . . . . . . . . . . . . . . . . . . . . . . . 5-14
Print-Quality Troubleshooting . . . . . . . . . . . . . . . . . . . . . . . . . . . . . . . . . . . . . . . . . . . . . . . . . . . . . . . . . . . . . . . . . . 5-15
Light (Undertoned) Print . . . . . . . . . . . . . . . . . . . . . . . . . . . . . . . . . . . . . . . . . . . . . . . . . . . . . . . . . . . . . . . 5-15
Blank Print (No print) . . . . . . . . . . . . . . . . . . . . . . . . . . . . . . . . . . . . . . . . . . . . . . . . . . . . . . . . . . . . . . . . .5-17
Black Prints. . . . . . . . . . . . . . . . . . . . . . . . . . . . . . . . . . . . . . . . . . . . . . . . . . . . . . . . . . . . . . . . . . . . . . . . . 5-19
Vertical Deletions. . . . . . . . . . . . . . . . . . . . . . . . . . . . . . . . . . . . . . . . . . . . . . . . . . . . . . . . . . . . . . . . . . . . . 5-20
Horizontal Deletions . . . . . . . . . . . . . . . . . . . . . . . . . . . . . . . . . . . . . . . . . . . . . . . . . . . . . . . . . . . . . . . . . . 5-22
Vertical Streaks . . . . . . . . . . . . . . . . . . . . . . . . . . . . . . . . . . . . . . . . . . . . . . . . . . . . . . . . . . . . . . . . . . . . . .5-25
Horizontal Streaks. . . . . . . . . . . . . . . . . . . . . . . . . . . . . . . . . . . . . . . . . . . . . . . . . . . . . . . . . . . . . . . . . . . . 5-27
Spots. . . . . . . . . . . . . . . . . . . . . . . . . . . . . . . . . . . . . . . . . . . . . . . . . . . . . . . . . . . . . . . . . . . . . . . . . . . . . .5-29
Unfused Image . . . . . . . . . . . . . . . . . . . . . . . . . . . . . . . . . . . . . . . . . . . . . . . . . . . . . . . . . . . . . . . . . . . . . .5-31
Damaged Print. . . . . . . . . . . . . . . . . . . . . . . . . . . . . . . . . . . . . . . . . . . . . . . . . . . . . . . . . . . . . . . . . . . . . . .5-34
Resolution. . . . . . . . . . . . . . . . . . . . . . . . . . . . . . . . . . . . . . . . . . . . . . . . . . . . . . . . . . . . . . . . . . . . . . . . . .5-35
Spot Deletions. . . . . . . . . . . . . . . . . . . . . . . . . . . . . . . . . . . . . . . . . . . . . . . . . . . . . . . . . . . . . . . . . . . . . . . 5-36
Repeating Defects . . . . . . . . . . . . . . . . . . . . . . . . . . . . . . . . . . . . . . . . . . . . . . . . . . . . . . . . . . . . . . . . . . . . 5-38
Residual Image . . . . . . . . . . . . . . . . . . . . . . . . . . . . . . . . . . . . . . . . . . . . . . . . . . . . . . . . . . . . . . . . . . . . . . 5-39
Background. . . . . . . . . . . . . . . . . . . . . . . . . . . . . . . . . . . . . . . . . . . . . . . . . . . . . . . . . . . . . . . . . . . . . . . . . 5-41
Uneven Density . . . . . . . . . . . . . . . . . . . . . . . . . . . . . . . . . . . . . . . . . . . . . . . . . . . . . . . . . . . . . . . . . . . . . .5-42
Skewed Image. . . . . . . . . . . . . . . . . . . . . . . . . . . . . . . . . . . . . . . . . . . . . . . . . . . . . . . . . . . . . . . . . . . . . . . 5-43
Registration. . . . . . . . . . . . . . . . . . . . . . . . . . . . . . . . . . . . . . . . . . . . . . . . . . . . . . . . . . . . . . . . . . . . . . . . . 5-46
Skips and Smears . . . . . . . . . . . . . . . . . . . . . . . . . . . . . . . . . . . . . . . . . . . . . . . . . . . . . . . . . . . . . . . . . . . . 5-48
6 Adjustments and Calibrations
Service Test Prints. . . . . . . . . . . . . . . . . . . . . . . . . . . . . . . . . . . . . . . . . . . . . . . . . . . . . . . . . . . . . . . . . . . . . . . . . . . .6-2
Test Prints. . . . . . . . . . . . . . . . . . . . . . . . . . . . . . . . . . . . . . . . . . . . . . . . . . . . . . . . . . . . . . . . . . . . . . . . . . . 6-2
Engine Test Print. . . . . . . . . . . . . . . . . . . . . . . . . . . . . . . . . . . . . . . . . . . . . . . . . . . . . . . . . . . . . . . . . . . . . .6-4
Adjustments. . . . . . . . . . . . . . . . . . . . . . . . . . . . . . . . . . . . . . . . . . . . . . . . . . . . . . . . . . . . . . . . . . . . . . . . . . . . . . . . .6-5
Adjusting Laser Power (Image Density) . . . . . . . . . . . . . . . . . . . . . . . . . . . . . . . . . . . . . . . . . . . . . . . . . . . .6-5
Checking Registration (Margins). . . . . . . . . . . . . . . . . . . . . . . . . . . . . . . . . . . . . . . . . . . . . . . . . . . . . . . . . . 6-5
Adjusting Simplex Registration (Margins). . . . . . . . . . . . . . . . . . . . . . . . . . . . . . . . . . . . . . . . . . . . . . . . . . . 6-7
Adjusting Duplex Registration (Margins). . . . . . . . . . . . . . . . . . . . . . . . . . . . . . . . . . . . . . . . . . . . . . . . . . . . 6-8
Adjusting Fuser Temperature. . . . . . . . . . . . . . . . . . . . . . . . . . . . . . . . . . . . . . . . . . . . . . . . . . . . . . . . . . . . . 6-8
Resetting Fuser Life. . . . . . . . . . . . . . . . . . . . . . . . . . . . . . . . . . . . . . . . . . . . . . . . . . . . . . . . . . . . . . . . . . . . . . . . . . . 6-9
Resetting Printer Values to the Factory Default Values . . . . . . . . . . . . . . . . . . . . . . . . . . . . . . . . . . . . . . . . . . . . . . .6-10
Resetting Connection Setup Values. . . . . . . . . . . . . . . . . . . . . . . . . . . . . . . . . . . . . . . . . . . . . . . . . . . . . . . 6-10
Resetting Paper Handling Setup Values. . . . . . . . . . . . . . . . . . . . . . . . . . . . . . . . . . . . . . . . . . . . . . . . . . . . 6-11
Resetting PostScript Setup Values . . . . . . . . . . . . . . . . . . . . . . . . . . . . . . . . . . . . . . . . . . . . . . . . . . . . . . . 6-11
Resetting PCL Setup Values . . . . . . . . . . . . . . . . . . . . . . . . . . . . . . . . . . . . . . . . . . . . . . . . . . . . . . . . . . . . 6-11
Resetting General Setup Values. . . . . . . . . . . . . . . . . . . . . . . . . . . . . . . . . . . . . . . . . . . . . . . . . . . . . . . . . . 6-11
Resetting Control Panel Setup Values . . . . . . . . . . . . . . . . . . . . . . . . . . . . . . . . . . . . . . . . . . . . . . . . . . . . . 6-12
Resetting Printer Controls Setup Values . . . . . . . . . . . . . . . . . . . . . . . . . . . . . . . . . . . . . . . . . . . . . . . . . . . 6-12
Resetting File Security Setup Values . . . . . . . . . . . . . . . . . . . . . . . . . . . . . . . . . . . . . . . . . . . . . . . . . . . . . . 6-12
Resetting All Printer Default Settings (PostScript NVRAM). . . . . . . . . . . . . . . . . . . . . . . . . . . . . . . . . . . . . 6-13
vi Phaser 4500/4510 Service Manual
Page 7

7 Cleaning and Maintenance
Service Preventive Maintenance Procedure. . . . . . . . . . . . . . . . . . . . . . . . . . . . . . . . . . . . . . . . . . . . . . . . . . . . . . . . . 7-2
Recommended Tools. . . . . . . . . . . . . . . . . . . . . . . . . . . . . . . . . . . . . . . . . . . . . . . . . . . . . . . . . . . . . . . . . . . . . . . . . . 7-2
Cleaning. . . . . . . . . . . . . . . . . . . . . . . . . . . . . . . . . . . . . . . . . . . . . . . . . . . . . . . . . . . . . . . . . . . . . . . . . . . . . . . . . . . . 7-2
8 FRU Disassembly
Overview . . . . . . . . . . . . . . . . . . . . . . . . . . . . . . . . . . . . . . . . . . . . . . . . . . . . . . . . . . . . . . . . . . . . . . . . . . . . . . . . . . . 8-2
Standard Orientation of the Printer . . . . . . . . . . . . . . . . . . . . . . . . . . . . . . . . . . . . . . . . . . . . . . . . . . . . . . . . 8-2
General Notes on Disassembly . . . . . . . . . . . . . . . . . . . . . . . . . . . . . . . . . . . . . . . . . . . . . . . . . . . . . . . . . . . . . . . . . . 8-3
Preparation . . . . . . . . . . . . . . . . . . . . . . . . . . . . . . . . . . . . . . . . . . . . . . . . . . . . . . . . . . . . . . . . . . . . . . . . . . 8-3
Notations in the Disassembly Text. . . . . . . . . . . . . . . . . . . . . . . . . . . . . . . . . . . . . . . . . . . . . . . . . . . . . . . . . 8-3
Print Engine: Covers . . . . . . . . . . . . . . . . . . . . . . . . . . . . . . . . . . . . . . . . . . . . . . . . . . . . . . . . . . . . . . . . . . . . . . . . . . 8-4
Paper Exit Cover . . . . . . . . . . . . . . . . . . . . . . . . . . . . . . . . . . . . . . . . . . . . . . . . . . . . . . . . . . . . . . . . . . . . . .8-4
Paper Exit Rear Door. . . . . . . . . . . . . . . . . . . . . . . . . . . . . . . . . . . . . . . . . . . . . . . . . . . . . . . . . . . . . . . . . . .8-5
Rear Cover. . . . . . . . . . . . . . . . . . . . . . . . . . . . . . . . . . . . . . . . . . . . . . . . . . . . . . . . . . . . . . . . . . . . . . . . . . .8-6
Right Cover . . . . . . . . . . . . . . . . . . . . . . . . . . . . . . . . . . . . . . . . . . . . . . . . . . . . . . . . . . . . . . . . . . . . . . . . . . 8-7
Left Cover . . . . . . . . . . . . . . . . . . . . . . . . . . . . . . . . . . . . . . . . . . . . . . . . . . . . . . . . . . . . . . . . . . . . . . . . . . .8-8
Top Cover Assembly, Control Panel . . . . . . . . . . . . . . . . . . . . . . . . . . . . . . . . . . . . . . . . . . . . . . . . . . . . . . .8-9
Front Cover . . . . . . . . . . . . . . . . . . . . . . . . . . . . . . . . . . . . . . . . . . . . . . . . . . . . . . . . . . . . . . . . . . . . . . . . . 8-11
Interlock Switch Assembly (P4500 only). . . . . . . . . . . . . . . . . . . . . . . . . . . . . . . . . . . . . . . . . . . . . . . . . . .8-12
Print Engine: 150- or 550-Sheet Paper Cassette . . . . . . . . . . . . . . . . . . . . . . . . . . . . . . . . . . . . . . . . . . . . . . . . . . . . 8-13
Retard Roller and Holder. . . . . . . . . . . . . . . . . . . . . . . . . . . . . . . . . . . . . . . . . . . . . . . . . . . . . . . . . . . . . . . 8-13
Print Engine: 150-Sheet Feeder . . . . . . . . . . . . . . . . . . . . . . . . . . . . . . . . . . . . . . . . . . . . . . . . . . . . . . . . . . . . . . . . . 8-15
150-Sheet Feeder Assembly . . . . . . . . . . . . . . . . . . . . . . . . . . . . . . . . . . . . . . . . . . . . . . . . . . . . . . . . . . . . 8-15
Nudger Roller, Feed Roller. . . . . . . . . . . . . . . . . . . . . . . . . . . . . . . . . . . . . . . . . . . . . . . . . . . . . . . . . . . . . . 8-16
Nudger One-way Clutch. . . . . . . . . . . . . . . . . . . . . . . . . . . . . . . . . . . . . . . . . . . . . . . . . . . . . . . . . . . . . . . .8-17
Nudger Gear . . . . . . . . . . . . . . . . . . . . . . . . . . . . . . . . . . . . . . . . . . . . . . . . . . . . . . . . . . . . . . . . . . . . . . . . 8-18
Feed Clutch, Registration Clutch . . . . . . . . . . . . . . . . . . . . . . . . . . . . . . . . . . . . . . . . . . . . . . . . . . . . . . . . . 8-19
Registration Sensor. . . . . . . . . . . . . . . . . . . . . . . . . . . . . . . . . . . . . . . . . . . . . . . . . . . . . . . . . . . . . . . . . . . 8-20
No Paper Sensor . . . . . . . . . . . . . . . . . . . . . . . . . . . . . . . . . . . . . . . . . . . . . . . . . . . . . . . . . . . . . . . . . . . . . 8-21
Toner Sensor Assembly. . . . . . . . . . . . . . . . . . . . . . . . . . . . . . . . . . . . . . . . . . . . . . . . . . . . . . . . . . . . . . . . 8-23
Print Engine: 550-Sheet Paper Feeder . . . . . . . . . . . . . . . . . . . . . . . . . . . . . . . . . . . . . . . . . . . . . . . . . . . . . . . . . . . .8-24
550-Sheet Feeder Assembly . . . . . . . . . . . . . . . . . . . . . . . . . . . . . . . . . . . . . . . . . . . . . . . . . . . . . . . . . . . . 8-24
Nudger Roller, Feed Roller. . . . . . . . . . . . . . . . . . . . . . . . . . . . . . . . . . . . . . . . . . . . . . . . . . . . . . . . . . . . . . 8-25
Nudger One-way Clutch. . . . . . . . . . . . . . . . . . . . . . . . . . . . . . . . . . . . . . . . . . . . . . . . . . . . . . . . . . . . . . . .8-26
Nudger Gear . . . . . . . . . . . . . . . . . . . . . . . . . . . . . . . . . . . . . . . . . . . . . . . . . . . . . . . . . . . . . . . . . . . . . . . . 8-27
Feed Clutch . . . . . . . . . . . . . . . . . . . . . . . . . . . . . . . . . . . . . . . . . . . . . . . . . . . . . . . . . . . . . . . . . . . . . . . . . 8-29
No Paper Sensor . . . . . . . . . . . . . . . . . . . . . . . . . . . . . . . . . . . . . . . . . . . . . . . . . . . . . . . . . . . . . . . . . . . . . 8-30
Right Tray Guide . . . . . . . . . . . . . . . . . . . . . . . . . . . . . . . . . . . . . . . . . . . . . . . . . . . . . . . . . . . . . . . . . . . . .8-31
Left Tray Guide . . . . . . . . . . . . . . . . . . . . . . . . . . . . . . . . . . . . . . . . . . . . . . . . . . . . . . . . . . . . . . . . . . . . . . 8-33
Low Paper Sensor/Actuator. . . . . . . . . . . . . . . . . . . . . . . . . . . . . . . . . . . . . . . . . . . . . . . . . . . . . . . . . . . . . 8-34
Print Engine: Xerographics . . . . . . . . . . . . . . . . . . . . . . . . . . . . . . . . . . . . . . . . . . . . . . . . . . . . . . . . . . . . . . . . . . . . 8-35
Vacuum Duct (P4510). . . . . . . . . . . . . . . . . . . . . . . . . . . . . . . . . . . . . . . . . . . . . . . . . . . . . . . . . . . . . . . . . 8-35
Front Duct, Sub Fan. . . . . . . . . . . . . . . . . . . . . . . . . . . . . . . . . . . . . . . . . . . . . . . . . . . . . . . . . . . . . . . . . . . 8-36
Laser Unit Assembly . . . . . . . . . . . . . . . . . . . . . . . . . . . . . . . . . . . . . . . . . . . . . . . . . . . . . . . . . . . . . . . . . . 8-38
Laser Unit Shield Plate . . . . . . . . . . . . . . . . . . . . . . . . . . . . . . . . . . . . . . . . . . . . . . . . . . . . . . . . . . . . . . . . 8-39
Print Cartridge Left Guide . . . . . . . . . . . . . . . . . . . . . . . . . . . . . . . . . . . . . . . . . . . . . . . . . . . . . . . . . . . . . . 8-40
Fuser Harness Assembly. . . . . . . . . . . . . . . . . . . . . . . . . . . . . . . . . . . . . . . . . . . . . . . . . . . . . . . . . . . . . . . 8-42
Link Lever, Gear 3 Link . . . . . . . . . . . . . . . . . . . . . . . . . . . . . . . . . . . . . . . . . . . . . . . . . . . . . . . . . . . . . . . . 8-43
Fuser Assembly. . . . . . . . . . . . . . . . . . . . . . . . . . . . . . . . . . . . . . . . . . . . . . . . . . . . . . . . . . . . . . . . . . . . . .8-44
Transfer Roller Assembly . . . . . . . . . . . . . . . . . . . . . . . . . . . . . . . . . . . . . . . . . . . . . . . . . . . . . . . . . . . . . . 8-45
Transfer Chute. . . . . . . . . . . . . . . . . . . . . . . . . . . . . . . . . . . . . . . . . . . . . . . . . . . . . . . . . . . . . . . . . . . . . . .8-46
Print Cartridge Right Guide Assembly. . . . . . . . . . . . . . . . . . . . . . . . . . . . . . . . . . . . . . . . . . . . . . . . . . . . . 8-47
Duplex Unit Opening Cover . . . . . . . . . . . . . . . . . . . . . . . . . . . . . . . . . . . . . . . . . . . . . . . . . . . . . . . . . . . . .8-48
Contents
Phaser 4500/4510 Laser Printer Service Manual vii
Page 8

Contents
Print Engine: Paper Exit . . . . . . . . . . . . . . . . . . . . . . . . . . . . . . . . . . . . . . . . . . . . . . . . . . . . . . . . . . . . . . . . . . . . . . . 8-49
Paper Exit Assembly . . . . . . . . . . . . . . . . . . . . . . . . . . . . . . . . . . . . . . . . . . . . . . . . . . . . . . . . . . . . . . . . . .8-49
Upper Exit Chute, Lower Exit Chute. . . . . . . . . . . . . . . . . . . . . . . . . . . . . . . . . . . . . . . . . . . . . . . . . . . . . . . 8-50
Exit Motor Assembly . . . . . . . . . . . . . . . . . . . . . . . . . . . . . . . . . . . . . . . . . . . . . . . . . . . . . . . . . . . . . . . . . . 8-51
Output Tray Full Sensor. . . . . . . . . . . . . . . . . . . . . . . . . . . . . . . . . . . . . . . . . . . . . . . . . . . . . . . . . . . . . . . . 8-52
Stack Full Actuator. . . . . . . . . . . . . . . . . . . . . . . . . . . . . . . . . . . . . . . . . . . . . . . . . . . . . . . . . . . . . . . . . . . .8-53
Print Engine: Frame and Drive . . . . . . . . . . . . . . . . . . . . . . . . . . . . . . . . . . . . . . . . . . . . . . . . . . . . . . . . . . . . . . . . . . 8-54
Motor Cover . . . . . . . . . . . . . . . . . . . . . . . . . . . . . . . . . . . . . . . . . . . . . . . . . . . . . . . . . . . . . . . . . . . . . . . . 8-54
Main Motor . . . . . . . . . . . . . . . . . . . . . . . . . . . . . . . . . . . . . . . . . . . . . . . . . . . . . . . . . . . . . . . . . . . . . . . . . 8-55
Gear Assembly Housing . . . . . . . . . . . . . . . . . . . . . . . . . . . . . . . . . . . . . . . . . . . . . . . . . . . . . . . . . . . . . . . 8-56
Gear Assembly Plate . . . . . . . . . . . . . . . . . . . . . . . . . . . . . . . . . . . . . . . . . . . . . . . . . . . . . . . . . . . . . . . . . . 8-58
Print Engine: Electrical. . . . . . . . . . . . . . . . . . . . . . . . . . . . . . . . . . . . . . . . . . . . . . . . . . . . . . . . . . . . . . . . . . . . . . . . 8-60
LVPS Shield Plate . . . . . . . . . . . . . . . . . . . . . . . . . . . . . . . . . . . . . . . . . . . . . . . . . . . . . . . . . . . . . . . . . . . .8-60
Exit Motor PWBA. . . . . . . . . . . . . . . . . . . . . . . . . . . . . . . . . . . . . . . . . . . . . . . . . . . . . . . . . . . . . . . . . . . . . 8-61
Low Voltage Power Supply (LVPS) (P4500) . . . . . . . . . . . . . . . . . . . . . . . . . . . . . . . . . . . . . . . . . . . . . . . . 8-62
DC-DC Converter (P4500). . . . . . . . . . . . . . . . . . . . . . . . . . . . . . . . . . . . . . . . . . . . . . . . . . . . . . . . . . . . . . 8-63
Low Voltage Power Supply (LVPS) (P4510) . . . . . . . . . . . . . . . . . . . . . . . . . . . . . . . . . . . . . . . . . . . . . . . . 8-64
Power Switch, AC Power Harness Assembly. . . . . . . . . . . . . . . . . . . . . . . . . . . . . . . . . . . . . . . . . . . . . . . .8-65
Rear Cover Switch. . . . . . . . . . . . . . . . . . . . . . . . . . . . . . . . . . . . . . . . . . . . . . . . . . . . . . . . . . . . . . . . . . . . 8-67
Main Fan (P4500) . . . . . . . . . . . . . . . . . . . . . . . . . . . . . . . . . . . . . . . . . . . . . . . . . . . . . . . . . . . . . . . . . . . . 8-68
Main Fan (P4510) . . . . . . . . . . . . . . . . . . . . . . . . . . . . . . . . . . . . . . . . . . . . . . . . . . . . . . . . . . . . . . . . . . . . 8-69
Image Processor Shield Assembly . . . . . . . . . . . . . . . . . . . . . . . . . . . . . . . . . . . . . . . . . . . . . . . . . . . . . . . 8-70
I/P Shield Window. . . . . . . . . . . . . . . . . . . . . . . . . . . . . . . . . . . . . . . . . . . . . . . . . . . . . . . . . . . . . . . . . . . . 8-71
HVPS Shield Plate . . . . . . . . . . . . . . . . . . . . . . . . . . . . . . . . . . . . . . . . . . . . . . . . . . . . . . . . . . . . . . . . . . . . 8-72
HVPS/Engine Logic Board. . . . . . . . . . . . . . . . . . . . . . . . . . . . . . . . . . . . . . . . . . . . . . . . . . . . . . . . . . . . . . 8-73
Image Processor (I/P) Board. . . . . . . . . . . . . . . . . . . . . . . . . . . . . . . . . . . . . . . . . . . . . . . . . . . . . . . . . . . . 8-75
Options: 550-Sheet Paper Feeder . . . . . . . . . . . . . . . . . . . . . . . . . . . . . . . . . . . . . . . . . . . . . . . . . . . . . . . . . . . . . . .8-78
550-Sheet Paper Feeder Removal . . . . . . . . . . . . . . . . . . . . . . . . . . . . . . . . . . . . . . . . . . . . . . . . . . . . . . . . 8-78
Right Cover Plate. . . . . . . . . . . . . . . . . . . . . . . . . . . . . . . . . . . . . . . . . . . . . . . . . . . . . . . . . . . . . . . . . . . . . 8-79
Left Cover Plate. . . . . . . . . . . . . . . . . . . . . . . . . . . . . . . . . . . . . . . . . . . . . . . . . . . . . . . . . . . . . . . . . . . . . .8-81
Option Paper Size Switch Assembly . . . . . . . . . . . . . . . . . . . . . . . . . . . . . . . . . . . . . . . . . . . . . . . . . . . . . .8-82
Optional Feeder Drive Assembly . . . . . . . . . . . . . . . . . . . . . . . . . . . . . . . . . . . . . . . . . . . . . . . . . . . . . . . . . 8-83
550-Sheet Feeder PWBA . . . . . . . . . . . . . . . . . . . . . . . . . . . . . . . . . . . . . . . . . . . . . . . . . . . . . . . . . . . . . . .8-85
550-Sheet Feeder . . . . . . . . . . . . . . . . . . . . . . . . . . . . . . . . . . . . . . . . . . . . . . . . . . . . . . . . . . . . . . . . . . . . 8-86
Nudger Roller, Feed Roller. . . . . . . . . . . . . . . . . . . . . . . . . . . . . . . . . . . . . . . . . . . . . . . . . . . . . . . . . . . . . . 8-87
Nudger One-way Clutch. . . . . . . . . . . . . . . . . . . . . . . . . . . . . . . . . . . . . . . . . . . . . . . . . . . . . . . . . . . . . . . .8-88
Nudger Gear . . . . . . . . . . . . . . . . . . . . . . . . . . . . . . . . . . . . . . . . . . . . . . . . . . . . . . . . . . . . . . . . . . . . . . . . 8-89
Feed Clutch Assembly . . . . . . . . . . . . . . . . . . . . . . . . . . . . . . . . . . . . . . . . . . . . . . . . . . . . . . . . . . . . . . . . .8-91
Turn Roller Clutch . . . . . . . . . . . . . . . . . . . . . . . . . . . . . . . . . . . . . . . . . . . . . . . . . . . . . . . . . . . . . . . . . . . . 8-92
Retard Roller. . . . . . . . . . . . . . . . . . . . . . . . . . . . . . . . . . . . . . . . . . . . . . . . . . . . . . . . . . . . . . . . . . . . . . . . 8-93
Options: Duplex Unit . . . . . . . . . . . . . . . . . . . . . . . . . . . . . . . . . . . . . . . . . . . . . . . . . . . . . . . . . . . . . . . . . . . . . . . . .8-95
Duplex Unit Removal. . . . . . . . . . . . . . . . . . . . . . . . . . . . . . . . . . . . . . . . . . . . . . . . . . . . . . . . . . . . . . . . . . 8-95
Left Cover . . . . . . . . . . . . . . . . . . . . . . . . . . . . . . . . . . . . . . . . . . . . . . . . . . . . . . . . . . . . . . . . . . . . . . . . . .8-96
Right Cover . . . . . . . . . . . . . . . . . . . . . . . . . . . . . . . . . . . . . . . . . . . . . . . . . . . . . . . . . . . . . . . . . . . . . . . . . 8-97
Top Cover . . . . . . . . . . . . . . . . . . . . . . . . . . . . . . . . . . . . . . . . . . . . . . . . . . . . . . . . . . . . . . . . . . . . . . . . . .8-98
Upper Assembly Housing . . . . . . . . . . . . . . . . . . . . . . . . . . . . . . . . . . . . . . . . . . . . . . . . . . . . . . . . . . . . . .8-99
Duplex Unit Lower Housing. . . . . . . . . . . . . . . . . . . . . . . . . . . . . . . . . . . . . . . . . . . . . . . . . . . . . . . . . . . . 8-100
Duplex Unit PWBA. . . . . . . . . . . . . . . . . . . . . . . . . . . . . . . . . . . . . . . . . . . . . . . . . . . . . . . . . . . . . . . . . . . 8-102
Duplex Unit Fan (P4500). . . . . . . . . . . . . . . . . . . . . . . . . . . . . . . . . . . . . . . . . . . . . . . . . . . . . . . . . . . . . . 8-104
Duplex Unit Fan (P4510). . . . . . . . . . . . . . . . . . . . . . . . . . . . . . . . . . . . . . . . . . . . . . . . . . . . . . . . . . . . . . 8-105
Duplex Unit Sensor . . . . . . . . . . . . . . . . . . . . . . . . . . . . . . . . . . . . . . . . . . . . . . . . . . . . . . . . . . . . . . . . . . 8-106
Duplex Unit Roller . . . . . . . . . . . . . . . . . . . . . . . . . . . . . . . . . . . . . . . . . . . . . . . . . . . . . . . . . . . . . . . . . . . 8-107
Duplex Unit Motor. . . . . . . . . . . . . . . . . . . . . . . . . . . . . . . . . . . . . . . . . . . . . . . . . . . . . . . . . . . . . . . . . . . 8-109
Duplex Unit Switch . . . . . . . . . . . . . . . . . . . . . . . . . . . . . . . . . . . . . . . . . . . . . . . . . . . . . . . . . . . . . . . . . .8 -110
viii Phaser 4500/4510 Service Manual
Page 9

Options: Stacker . . . . . . . . . . . . . . . . . . . . . . . . . . . . . . . . . . . . . . . . . . . . . . . . . . . . . . . . . . . . . . . . . . . . . . . . . . . 8-111
Stacker Removal . . . . . . . . . . . . . . . . . . . . . . . . . . . . . . . . . . . . . . . . . . . . . . . . . . . . . . . . . . . . . . . . . . . .8-111
Stacker Rear Cover . . . . . . . . . . . . . . . . . . . . . . . . . . . . . . . . . . . . . . . . . . . . . . . . . . . . . . . . . . . . . . . . . . 8-112
Stacker Cover . . . . . . . . . . . . . . . . . . . . . . . . . . . . . . . . . . . . . . . . . . . . . . . . . . . . . . . . . . . . . . . . . . . . . . 8-113
Stacker Front Cover. . . . . . . . . . . . . . . . . . . . . . . . . . . . . . . . . . . . . . . . . . . . . . . . . . . . . . . . . . . . . . . . . . 8-115
Stacker Tray Assembly . . . . . . . . . . . . . . . . . . . . . . . . . . . . . . . . . . . . . . . . . . . . . . . . . . . . . . . . . . . . . . . 8-116
Stack Full Actuator. . . . . . . . . . . . . . . . . . . . . . . . . . . . . . . . . . . . . . . . . . . . . . . . . . . . . . . . . . . . . . . . . . .8-117
Stacker PWBA. . . . . . . . . . . . . . . . . . . . . . . . . . . . . . . . . . . . . . . . . . . . . . . . . . . . . . . . . . . . . . . . . . . . . . 8-119
Offset Motor Assembly . . . . . . . . . . . . . . . . . . . . . . . . . . . . . . . . . . . . . . . . . . . . . . . . . . . . . . . . . . . . . . . 8-120
Gate Solenoid Assembly . . . . . . . . . . . . . . . . . . . . . . . . . . . . . . . . . . . . . . . . . . . . . . . . . . . . . . . . . . . . . . 8-121
Stacker Sensor and Actuator. . . . . . . . . . . . . . . . . . . . . . . . . . . . . . . . . . . . . . . . . . . . . . . . . . . . . . . . . . . 8-122
Stacker Rear Cover Interlock Switch . . . . . . . . . . . . . . . . . . . . . . . . . . . . . . . . . . . . . . . . . . . . . . . . . . . . . 8-123
Lower Stacker Roller. . . . . . . . . . . . . . . . . . . . . . . . . . . . . . . . . . . . . . . . . . . . . . . . . . . . . . . . . . . . . . . . . 8-124
Upper Stacker Roller . . . . . . . . . . . . . . . . . . . . . . . . . . . . . . . . . . . . . . . . . . . . . . . . . . . . . . . . . . . . . . . . .8-126
Stacker Motor Assembly . . . . . . . . . . . . . . . . . . . . . . . . . . . . . . . . . . . . . . . . . . . . . . . . . . . . . . . . . . . . . .8-128
9 Parts Lists
Serial Number Format . . . . . . . . . . . . . . . . . . . . . . . . . . . . . . . . . . . . . . . . . . . . . . . . . . . . . . . . . . . . . . . . . . . . . . . . . 9-2
Using the Parts List . . . . . . . . . . . . . . . . . . . . . . . . . . . . . . . . . . . . . . . . . . . . . . . . . . . . . . . . . . . . . . . . . . . . . . . . . . . 9-3
Print Engine Parts . . . . . . . . . . . . . . . . . . . . . . . . . . . . . . . . . . . . . . . . . . . . . . . . . . . . . . . . . . . . . . . . . . . . . . . . . . . . 9-4
Parts List 1.1 Covers. . . . . . . . . . . . . . . . . . . . . . . . . . . . . . . . . . . . . . . . . . . . . . . . . . . . . . . . . . . . . . . . . . . 9-4
Parts List 2.1 150-Sheet Paper Cassette . . . . . . . . . . . . . . . . . . . . . . . . . . . . . . . . . . . . . . . . . . . . . . . . . . . . 9-6
Parts List 4.1 550-Sheet Paper Cassette . . . . . . . . . . . . . . . . . . . . . . . . . . . . . . . . . . . . . . . . . . . . . . . . . . . . 9-9
Parts List 5.1 150-Sheet Paper Feeder . . . . . . . . . . . . . . . . . . . . . . . . . . . . . . . . . . . . . . . . . . . . . . . . . . . .9-12
Parts List 7.1 550-Sheet Paper Feeder . . . . . . . . . . . . . . . . . . . . . . . . . . . . . . . . . . . . . . . . . . . . . . . . . . . .9-15
Parts List 8.1 Xerographics. . . . . . . . . . . . . . . . . . . . . . . . . . . . . . . . . . . . . . . . . . . . . . . . . . . . . . . . . . . . . 9-18
Parts List 10.1 Paper Exit (1/2). . . . . . . . . . . . . . . . . . . . . . . . . . . . . . . . . . . . . . . . . . . . . . . . . . . . . . . . . .9-21
Parts List 10.2 Paper Exit (2/2). . . . . . . . . . . . . . . . . . . . . . . . . . . . . . . . . . . . . . . . . . . . . . . . . . . . . . . . . .9-23
Parts List 11.1 Frame and Drive . . . . . . . . . . . . . . . . . . . . . . . . . . . . . . . . . . . . . . . . . . . . . . . . . . . . . . . . . 9-25
Parts List 12.1 Electrical (P4500) . . . . . . . . . . . . . . . . . . . . . . . . . . . . . . . . . . . . . . . . . . . . . . . . . . . . . . . . 9-27
Parts List 12.1 Electrical (P4510) . . . . . . . . . . . . . . . . . . . . . . . . . . . . . . . . . . . . . . . . . . . . . . . . . . . . . . . . 9-28
Options . . . . . . . . . . . . . . . . . . . . . . . . . . . . . . . . . . . . . . . . . . . . . . . . . . . . . . . . . . . . . . . . . . . . . . . . . . . . . . . . . . . 9-31
Parts List 20.1 550-Sheet Paper Feeder (1/2) . . . . . . . . . . . . . . . . . . . . . . . . . . . . . . . . . . . . . . . . . . . . . . . 9-31
Parts List 20.2 550-Sheet Paper Feeder (2/2) . . . . . . . . . . . . . . . . . . . . . . . . . . . . . . . . . . . . . . . . . . . . . . . 9-34
Parts List 20.3 Optional 550-Sheet Paper Cassette. . . . . . . . . . . . . . . . . . . . . . . . . . . . . . . . . . . . . . . . . . . 9-36
Parts List 21.1 Duplex Unit (P4500) . . . . . . . . . . . . . . . . . . . . . . . . . . . . . . . . . . . . . . . . . . . . . . . . . . . . . . 9-39
Parts List 21.1 Duplex Unit (P4510) . . . . . . . . . . . . . . . . . . . . . . . . . . . . . . . . . . . . . . . . . . . . . . . . . . . . . . 9-40
Parts List 23.1 Stacker . . . . . . . . . . . . . . . . . . . . . . . . . . . . . . . . . . . . . . . . . . . . . . . . . . . . . . . . . . . . . . . . 9-43
Xerox Supplies and Accessories . . . . . . . . . . . . . . . . . . . . . . . . . . . . . . . . . . . . . . . . . . . . . . . . . . . . . . . . . . . . . . . . 9-46
Contents
10 Wiring Diagrams
Introduction. . . . . . . . . . . . . . . . . . . . . . . . . . . . . . . . . . . . . . . . . . . . . . . . . . . . . . . . . . . . . . . . . . . . . . . . . . . . . . . . 10-2
Print Engine Plug/Jack Locator . . . . . . . . . . . . . . . . . . . . . . . . . . . . . . . . . . . . . . . . . . . . . . . . . . . . . . . . . . . . . . . . . 10-3
550-Sheet Feeder Plug/Jack Locator . . . . . . . . . . . . . . . . . . . . . . . . . . . . . . . . . . . . . . . . . . . . . . . . . . . . . . . . . . . . 10-12
Duplex Unit Plug/Jack Locator. . . . . . . . . . . . . . . . . . . . . . . . . . . . . . . . . . . . . . . . . . . . . . . . . . . . . . . . . . . . . . . . .1 0-14
Stacker Plug/Jack Locator . . . . . . . . . . . . . . . . . . . . . . . . . . . . . . . . . . . . . . . . . . . . . . . . . . . . . . . . . . . . . . . . . . . . 10-16
Notations Used in Wiring Diagrams. . . . . . . . . . . . . . . . . . . . . . . . . . . . . . . . . . . . . . . . . . . . . . . . . . . . . . . . . . . . . 10-17
Phaser 4500/4510 Laser Printer Service Manual ix
Page 10

Contents
Print Engine Wiring Diagrams . . . . . . . . . . . . . . . . . . . . . . . . . . . . . . . . . . . . . . . . . . . . . . . . . . . . . . . . . . . . . . . . . 10-19
P4500: General Wiring Diagram . . . . . . . . . . . . . . . . . . . . . . . . . . . . . . . . . . . . . . . . . . . . . . . . . . . . . . . .10-19
P4510: General Wiring Diagram . . . . . . . . . . . . . . . . . . . . . . . . . . . . . . . . . . . . . . . . . . . . . . . . . . . . . . . .10-20
P4500: 24 V Interlock, Rear Cover Switch, Main Motor, Sub Fan, Exit Motor Assembly. . . . . . . . . . . . . . 10-21
P4510: 24 V Interlock, Rear Cover Switch, Main Motor, Sub Fan, Exit Motor Assembly. . . . . . . . . . . . . . 10-23
Fuser Assembly, Power Switch . . . . . . . . . . . . . . . . . . . . . . . . . . . . . . . . . . . . . . . . . . . . . . . . . . . . . . . . .10-25
Print Cartridge, Transfer Roller Assembly. . . . . . . . . . . . . . . . . . . . . . . . . . . . . . . . . . . . . . . . . . . . . . . . . 10-26
150-Sheet Feeder, 550-Sheet Feeder, Main Fan . . . . . . . . . . . . . . . . . . . . . . . . . . . . . . . . . . . . . . . . . . . . 10-27
Laser Unit, 5 V Interlock, Interlock Switch Assembly . . . . . . . . . . . . . . . . . . . . . . . . . . . . . . . . . . . . . . . . 10-29
Paper Exit . . . . . . . . . . . . . . . . . . . . . . . . . . . . . . . . . . . . . . . . . . . . . . . . . . . . . . . . . . . . . . . . . . . . . . . . .10-30
Image Processor Board, DC-DC Converter (P4500), Control Panel. . . . . . . . . . . . . . . . . . . . . . . . . . . . . . 10-31
Optional 550-Sheet Feeder. . . . . . . . . . . . . . . . . . . . . . . . . . . . . . . . . . . . . . . . . . . . . . . . . . . . . . . . . . . . . . . . . . . . 10-32
550-Sheet Feeder General Wiring Diagram . . . . . . . . . . . . . . . . . . . . . . . . . . . . . . . . . . . . . . . . . . . . . . . . 10-32
550-Sheet Feeder Signal Diagram. . . . . . . . . . . . . . . . . . . . . . . . . . . . . . . . . . . . . . . . . . . . . . . . . . . . . . .10-33
Duplex Unit . . . . . . . . . . . . . . . . . . . . . . . . . . . . . . . . . . . . . . . . . . . . . . . . . . . . . . . . . . . . . . . . . . . . . . . . . . . . . . . 10-34
Duplex Unit General Wiring Diagram. . . . . . . . . . . . . . . . . . . . . . . . . . . . . . . . . . . . . . . . . . . . . . . . . . . . .10-34
Duplex Unit Signal Diagram. . . . . . . . . . . . . . . . . . . . . . . . . . . . . . . . . . . . . . . . . . . . . . . . . . . . . . . . . . . . 10-35
Stacker. . . . . . . . . . . . . . . . . . . . . . . . . . . . . . . . . . . . . . . . . . . . . . . . . . . . . . . . . . . . . . . . . . . . . . . . . . . . . . . . . . .10-36
Stacker General Wiring Diagram . . . . . . . . . . . . . . . . . . . . . . . . . . . . . . . . . . . . . . . . . . . . . . . . . . . . . . . . 10-36
Stacker Signal Diagram. . . . . . . . . . . . . . . . . . . . . . . . . . . . . . . . . . . . . . . . . . . . . . . . . . . . . . . . . . . . . . . 10-37
A Appendix
Phaser 4500 Menu Map. . . . . . . . . . . . . . . . . . . . . . . . . . . . . . . . . . . . . . . . . . . . . . . . . . . . . . . . . . . . . . . . . . . . . . . .A-2
Phaser 4510 Menu Map. . . . . . . . . . . . . . . . . . . . . . . . . . . . . . . . . . . . . . . . . . . . . . . . . . . . . . . . . . . . . . . . . . . . . . . .A-4
Service Code Table . . . . . . . . . . . . . . . . . . . . . . . . . . . . . . . . . . . . . . . . . . . . . . . . . . . . . . . . . . . . . . . . . . . . . . . . . . .A-6
Index
x Phaser 4500/4510 Service Manual
Page 11

Service Terms
Not
W
Manual Terms
Various terms are used throughout this manual to either provide additional
information on a specific topic or to warn of possible danger present during a
procedure or action. Be aware of all symbols and terms when they are used,
and always read NOTE, CAUTION, and WARNING statements.
Consumable: Ink, toner, or print cartridge that is consumed. Customer is
expected to replace once consumed.
Routine Maintenance Item: Supply item or kit that has a limited life. Customer is
expected to replace at end-of-life.
Accessory: A single component or assembly that may be added to a printer;
howev er, it is NOT an option to the product.
Throughout this manual any pieces of information that pertain to just the
Phaser 4500 are indicated with P4500, and those that pertain to just the
Phaser 4510 are indicated with P4510. Those that apply to both models do
not have either label.
Common Acronyms:
FRU: Field Replaceable Unit
PL: Corresponds to the FRU Parts List.
CRU: Customer Replaceable Unit
ESD: Electrostatic Discharge
e
A note indicates an operating or maintenance procedure, practice or
condition that is necessary to efficiently accomplish a task.
A note can provide additional information related to a specific subject or
add a comment on the results achieved through a previous action.
Caution
A caution statement indicates an operating or maintenance procedure,
practice or condition that, if not strictly observed, results in damage to, or
destruction of, equipment.
arning
A warning statement indicates an operating or maintenance procedure,
practice or condition that, if not strictly observed, results in injury or loss of
life.
Phaser 4500/4510 Laser Printer Service Manual xi
Page 12
Product Terms
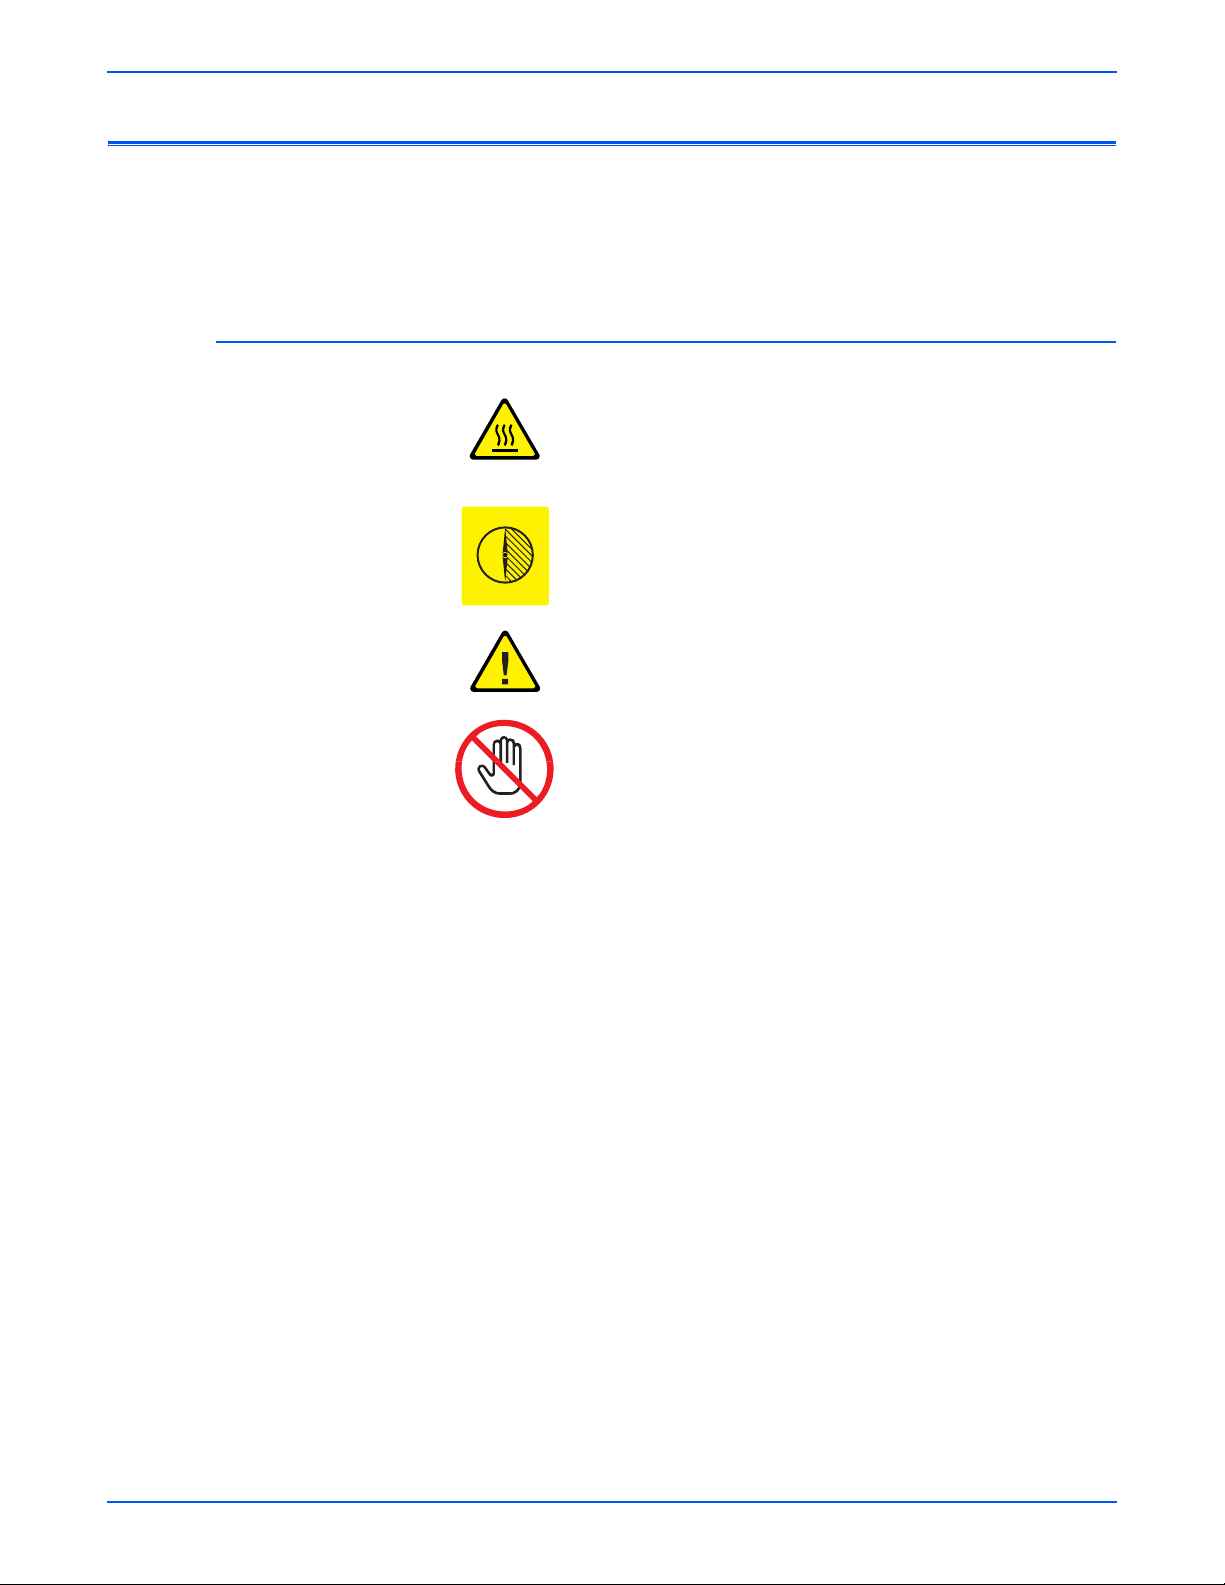
Symbols Marked on the Product
Caution: A personal injury hazard exists that may not be apparent. For
example, a panel may cover the hazardous area.
Danger: A personal injury haz ar d exists in the area where you see the sign.
Hot surface on or in the printer. Use caution to avoid personal
injury.
0
30 min.
The surface is hot while the printer is running. After turning off
the power, wait 30 minutes.
Use caution (or draws attention to a particular component). Refer
to the manual(s) for information.
Do not touch the item.
xii Phaser 4500/4510 Service Manual
Page 13

Power Safety Precautions
Power Source
Disconnecting Power
For 110 VAC printers, do not apply more than 135 volts RMS between the
supply conductors or between either supply conductor and ground. Use only
the specified power cord and connector. F or 220 VAC printers, do not apply
more than 254 volts RMS betwe en the supply conductors or between either
supply conductor and ground. Use only the specified po wer cord. This man ual
assumes that the reader is a Xerox-certified service technician.
Plug the three-wire power cor d (with grounding prong) into a grounded AC
outlet only. If necessary, contact a licensed electrician to install a properly
grounded outlet. If the product loses it s ground connection, contact with
conductive parts may cause an electrical shock.
Turning the power off using the On/Off switch does not completely deenergize the printer . You must also disconnect the printer pow er cord f rom the
AC outlet. Position the power cord so that it is easily accessible during
servicing so that you may power down the printer during an emergency.
■ Disconnect the power plug by pulling the plug, not the cord.
■ Disconnect the power cord in the following cases:
■ if the power cord or plug is frayed or otherwise damaged
■ if any liquid or foreign material is spilled into the case
■ if the printer is exposed to any excess moisture
■ if the printer is dropped or damaged
■ if you suspect that the product needs servicing or repair
■ whenever you clean the product
Phaser 4500/4510 Laser Printer Service Manual xiii
Page 14

Electrostatic Discharge (ESD) Precautions
Some semiconductor components, and the respective sub-assemblies that
contain them, are vulnerable to damage by Electrostatic discharge (ESD).
These components include Integrated Circuits (ICs), Large-Scale Integrated
circuits (LSIs), field-effect transistors and other semiconductor chip
components. The following techniques will reduce the occurrence of
component damage caused by static el ectricity.
Be sure the power is off to the chassis or circuit board, and observe all other
safety precautions.
■ Immediately before handling an y semiconductor componen ts assemblies ,
drain the electrostatic charge from your body. This can be accomplished
by touching an earth ground source or by w earing a wrist strap device
connected to an earth ground source. Wearing a wrist strap will also
prevent accumulation of additional bodily static charges. Be sure to
remove the wrist strap before applying power to the unit under test to
avoid potential shock.
■ After removing a static sensitive assembly from its anti-static bag, place it
on a grounded conductiv e surf ace . If the ant i-static bag is condu ctiv e , yo u
may ground the bag and use it as a conductive surface.
■ Do not use freon-propelled chemicals . These can generate electrical
charges sufficient to damage some devices.
■ Do not remove a re placement component or e lectrical sub-assemb ly from
its protective package unt il you are ready to install it.
■ Immediately before removing the protective material from the leads of a
replacement device, touch the protective material to the chassis or circu it
assembly into which the device will be installed.
■ Minimize body motions when handling unpackaged replacement devices.
Motion such as your clothes brushing together, or lifting a foot from a
carpeted floor can generate enough static electricity to damage an
electro-statically sensitive device
■ Handle ICs and EPROMs carefully to avoid bending pins.
■ Pa y attention to the direction o f parts when mounting or inserting them on
Printed Circuit Boards (PCB’s).
xiv Phaser 4500/4510 Service Manual
Page 15

Service Safety Summary
General Guidelines
For Xerox-certified service personnel only: Refer also to the preceding Power
Safety Precautions.
Avoid servicing alone: Do not perform intern al se rvice or adjustment of this
product unless another person capabl e of rendering first aid or resuscitation is
present.
Use care when servicing with power: Dangerous voltages may exist at several
points in this product. To avoid personal injury, do not touch exposed
connections and components while power is on. Disconnect power before
removing the power supply shield or replacing components.
Do not wear jewelry: Remove jewelry prior to servicing. Rings, necklaces and
other metallic objects could come into contact with dangerous voltages and
currents.
Power source: This product is intended to operate from a power source that
will not apply more then 264 volts rms for a 220 volt A C outlet or 140 vo lts rms
for a 110 volt AC outlet betwee n the su pp ly con d uct or s or betwe en either
supply conductor and ground. A protective ground connection by way of the
grounding conductor in the power cord is essential for safe operation.
Warning Labels
Read and obey all posted warning labels. Throughout the printer, warning
labels are display ed on potentially dangerous compon ents. As y ou service the
printer, check to make certain that all warning labels remain in place.
Safety Interlocks
Make sure all covers and the printer’s control panel are in place and all
interlock switches are functioning correctly af ter you have completed a printer
service call. If you bypass an interlock switch during a service call, use
extreme caution when working on or around the printer.
CLASS 1 LASER PRODUCT
The Phaser 4500/4510 Laser Printer is certified to comply with Laser Product
Performance Standards set by the U.S. Department of Health and Human
Services as a Class 1 Laser Product. This means that this is a class of laser
product that does not emit hazardous laser radiation; this is possible only
because the laser beam is totally enclosed during all modes of customer
operation. When servicing the printer or laser unit, follow the procedures
specified in this manual and there will be no hazards from the laser.
Phaser 4500/4510 Laser Printer Service Manual xv
Page 16
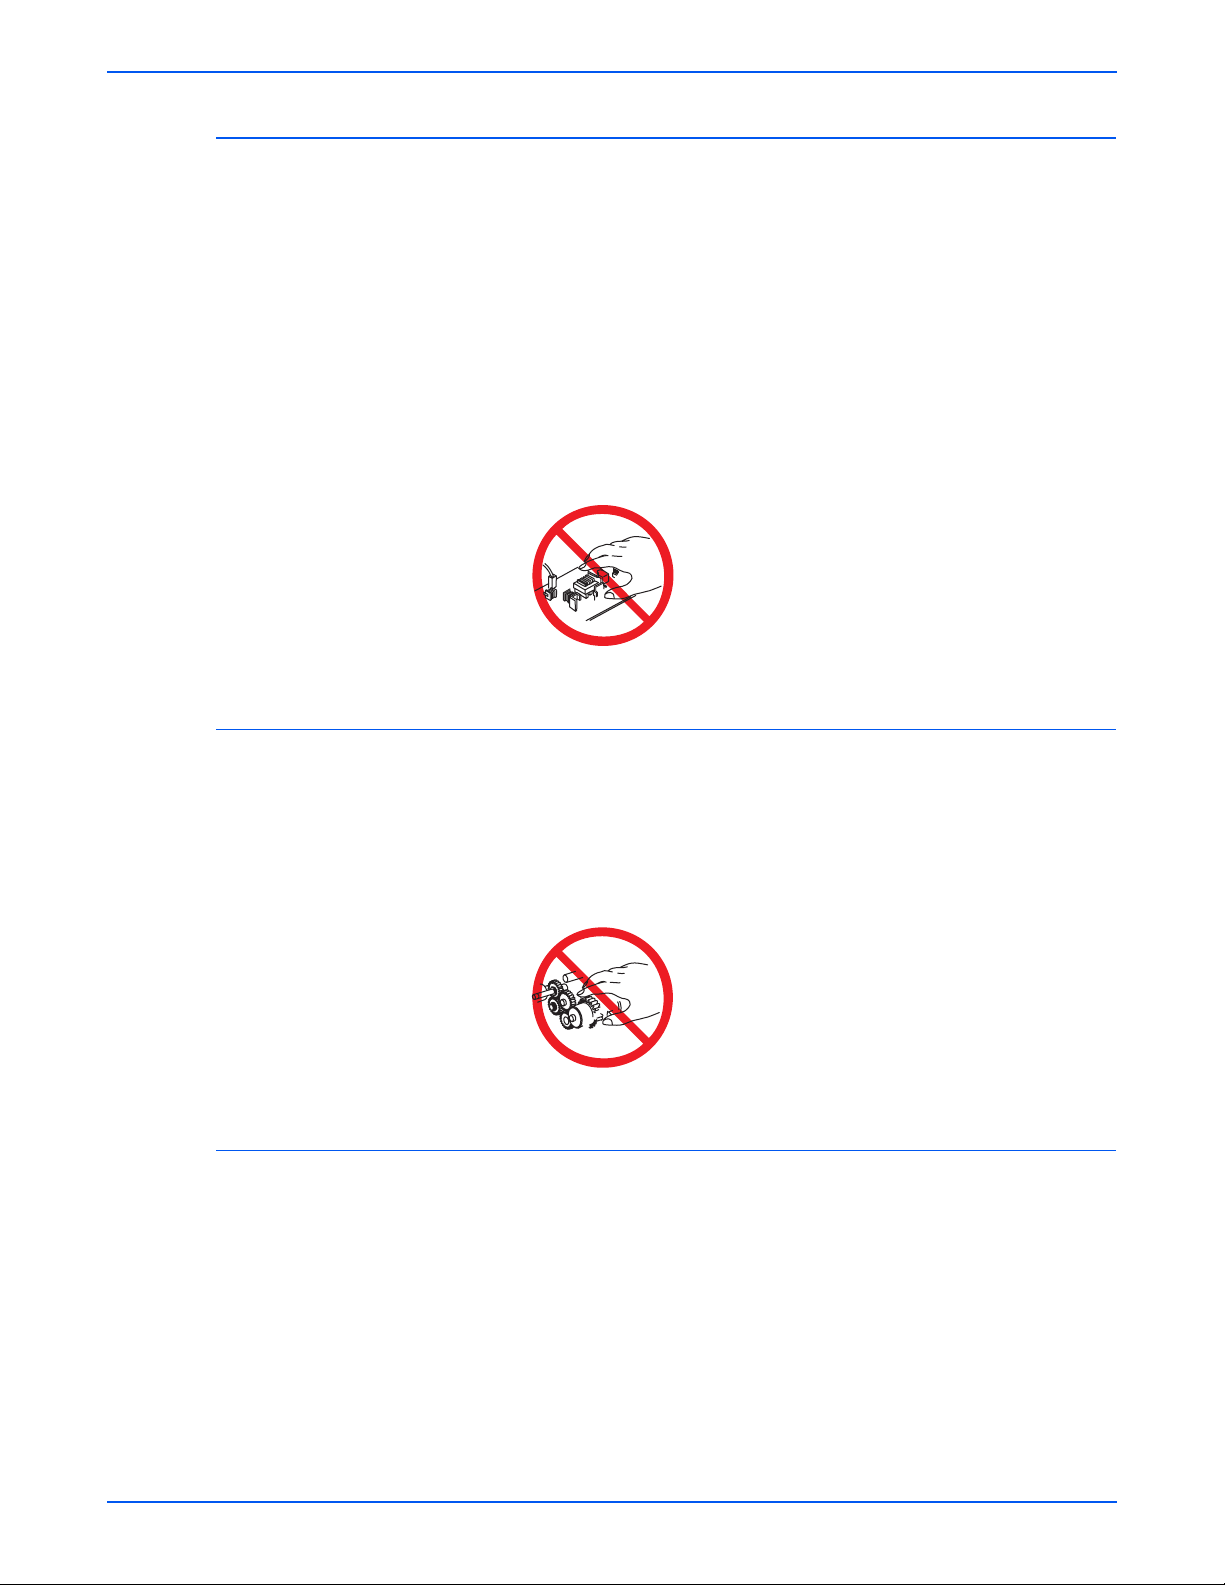
Servicing Electrical Components
W
W
W
W
Before starting any service procedure, s witch off th e printer pow er and unplug
the power cord from the wall outlet. If you must service the printer with power
applied, be aware of the potential for electrical shock.
arning
Turning the power off by using the On/Off switch does not completely deenergize the printer . You must also d isconnect the printer power cord from
the AC outlet. P osition the powe r cord so that it is easily accessibl e during
servicing.
arning
Do not touch any electrical component unless yo u are inst ructed to do so
by a service procedure.
S7300-02
Servicing Mechanical Components
When servicing mechanical components within the printer, manually rotate
drive assemblies, rollers, and gears.
arning
Do not try to manually rotate or manually stop the drive assemblies while
any printer motor is running.
Servicing Fuser Components
arning
This printer uses heat to fuse the toner ima g e to med ia. The fuser
assembly is VERY HOT. Turn the printer power off and wait at least 5
minutes for the Fuser to cool before you attempt to service the fuser
assembly or adjacent components.
S7300-03
xvi Phaser 4500/4510 Service Manual
Page 17

Regulatory Specifications
United States (Federal Communications Commision
The equipment described in this manual generates and uses radio frequency
energy. If it is not installed properly in strict accordance with Xerox
instructions, it may cause interference with radio and television reception or
may not function properly due to interference from another device. However,
there is no guarantee that interference will not occur in a particular
installation. If this equipment does cause harmful interference to radio or
television reception, which can be determined by turning the equipment off
and on, the user is encouraged to try to correct the interference by one or
more of the following measures:
■ Reorient or relocate the receiver (device being interfered with).
■ Increase the separation between the printer and the receiver.
■ Connect the printer into an outlet on a circuit differe nt fr om t hat which th e
receiver is connected.
■ Route the interface cables on the printer away from the receiver
■ Consult the dealer, Xerox service, or an experienced radio/television
technician for help.
Canada
Changes or modifications not expressly approved by Xerox can affect the
emission and immunity compliance and could void the user's authority to
operate this product. To ensure compliance, use shielded interface cables. A
shielded parallel cable can be purchased directly from Xerox at
www.xerox.com/office/4500supplies
Xerox has tested this product to internationally accepted electromagnetic
emission and immunity standards. These standards are designed to mitigate
interference caused or received by this product in a normal office
environment. This product is a lso suit ab le for use in a residential environment
based on the levels tested.
In the United States this product complies with the requirements of an
unintentional radiator in part 15 of the FCC rules. Operation is subject to the
following two conditions: (1) this device may not cause harmful interference;
(2) this device must accept any interference received, including interference
that may cause undesired operation.
This Class B digital apparatus complies with Canadian ICES-003.
Cet appareil numérique de la classe B est comforme à la norme NMB-003 du
Canada.
.
Phaser 4500/4510 Laser Printer Service Manual xvii
Page 18

European Union
January 1, 1995: Low Voltage Directive 73/23/EEC as amended by 98/68/
January 1, 1996: Electromagnetic Compatibility Directive 89/336/EEC
March 9, 1999: Radio & Telecommunications T erminal Equipment Directiv e
This product, if used properly in accordance with the user's instructions, is
neither dangerous for the consumer nor for the environment.
To ensure compliance with European Union regulations, use shielded
interface cab les.
A signed copy of the Declaration of Conformity for this product can be
obtained from Xerox.
The CE mark applied to this product symbolizes Xerox’s
declaration of conformity with the following applicable Directives of
the European Union as of the dates indicated:
EEC
1999/5/EC
xviii Phaser 4500/4510 Service Manual
Page 19

General Information
In this chapter...
■ Printer Introduction and Overview
■ Printer Configurations
■ Parts of the Printer
■ Control Panel
■ Image Processor Board (Phaser 4500)
■ Image Processor Board (Phaser 4510)
■ Consumables and Routine Maintenance Items
■ Printer Specifications
Chapter
1
Page 20
General Information
Printer Introduction and Overview
The Xerox Phaser 4500/4510 Laser Printer Service Manual is the primary
document used for repairing, maintain ing, and troubleshooting the printer.
To ensure complete understanding of this product, participation in Xerox
Phaser 4500/4510 Service Training is strongly recommended. To service this
product, Xerox certification for this product is required.
Technical Support Information
For updates to the Service Manual, Service Bulletins, knowledge base, etc.,
go to www.office.xerox.com/partners
For further technical support, contact your assigned Xerox Technical Support
for this product.
s4500-001
.
1-2 Phaser 4500/4510 Service Manual
Page 21

Printer Configurations
General Information
A replaceable configuration card holds configuration information that enables
or disables the network features shown in the following table.
Printer Configurations
Printer Configuration
Features
B N DT DX
Maximum print speed (letter-size
paper)
P4500:
P4510:
Memory
P4500:
P4510:
PostScript fonts 39 39 39 39 + 97
36 ppm
45 ppm
48 MB
128 MB
36 ppm
45 ppm
64 MB
128 MB
36 ppm
45 ppm
64 MB
128 MB
36 ppm
45 ppm
64 MB
128 MB
on hard
drive
PCL5e/PCL6 Yes Yes Yes Yes
Job pipelining Standard Standard Standard Standard
PDF direct print Yes Yes Yes Yes
Resolutions 600 dpi,
T rue 1200
dpi
USB, Parallel Yes Yes Yes Yes
10/100BaseTX Ethernet capabilities Optional Standard Standard Standard
550-sheet feeder (tray 3) Optional Optional Standard Standard
550-sheet feeder (tray 4) Optional Optional Optional Optional
Automatic 2-sided printing
(requires duplex unit)
Hard drive Optional Optional Optional Standard
Job collation
(Requires a hard drive)
Proof Print, Secure Print, Saved
Jobs (Requires a hard drive)
500-sheet stacker Optional Optional Optional Standard
Optional Optional Standard Standard
Optional Optional Optional Standard
Optional Optional Optional Standard
600 dpi,
True 1200
dpi
600 dpi,
True 1200
dpi
600 dpi,
True
1200 dpi
Phaser 4500/4510 Service Manual 1-3
Page 22
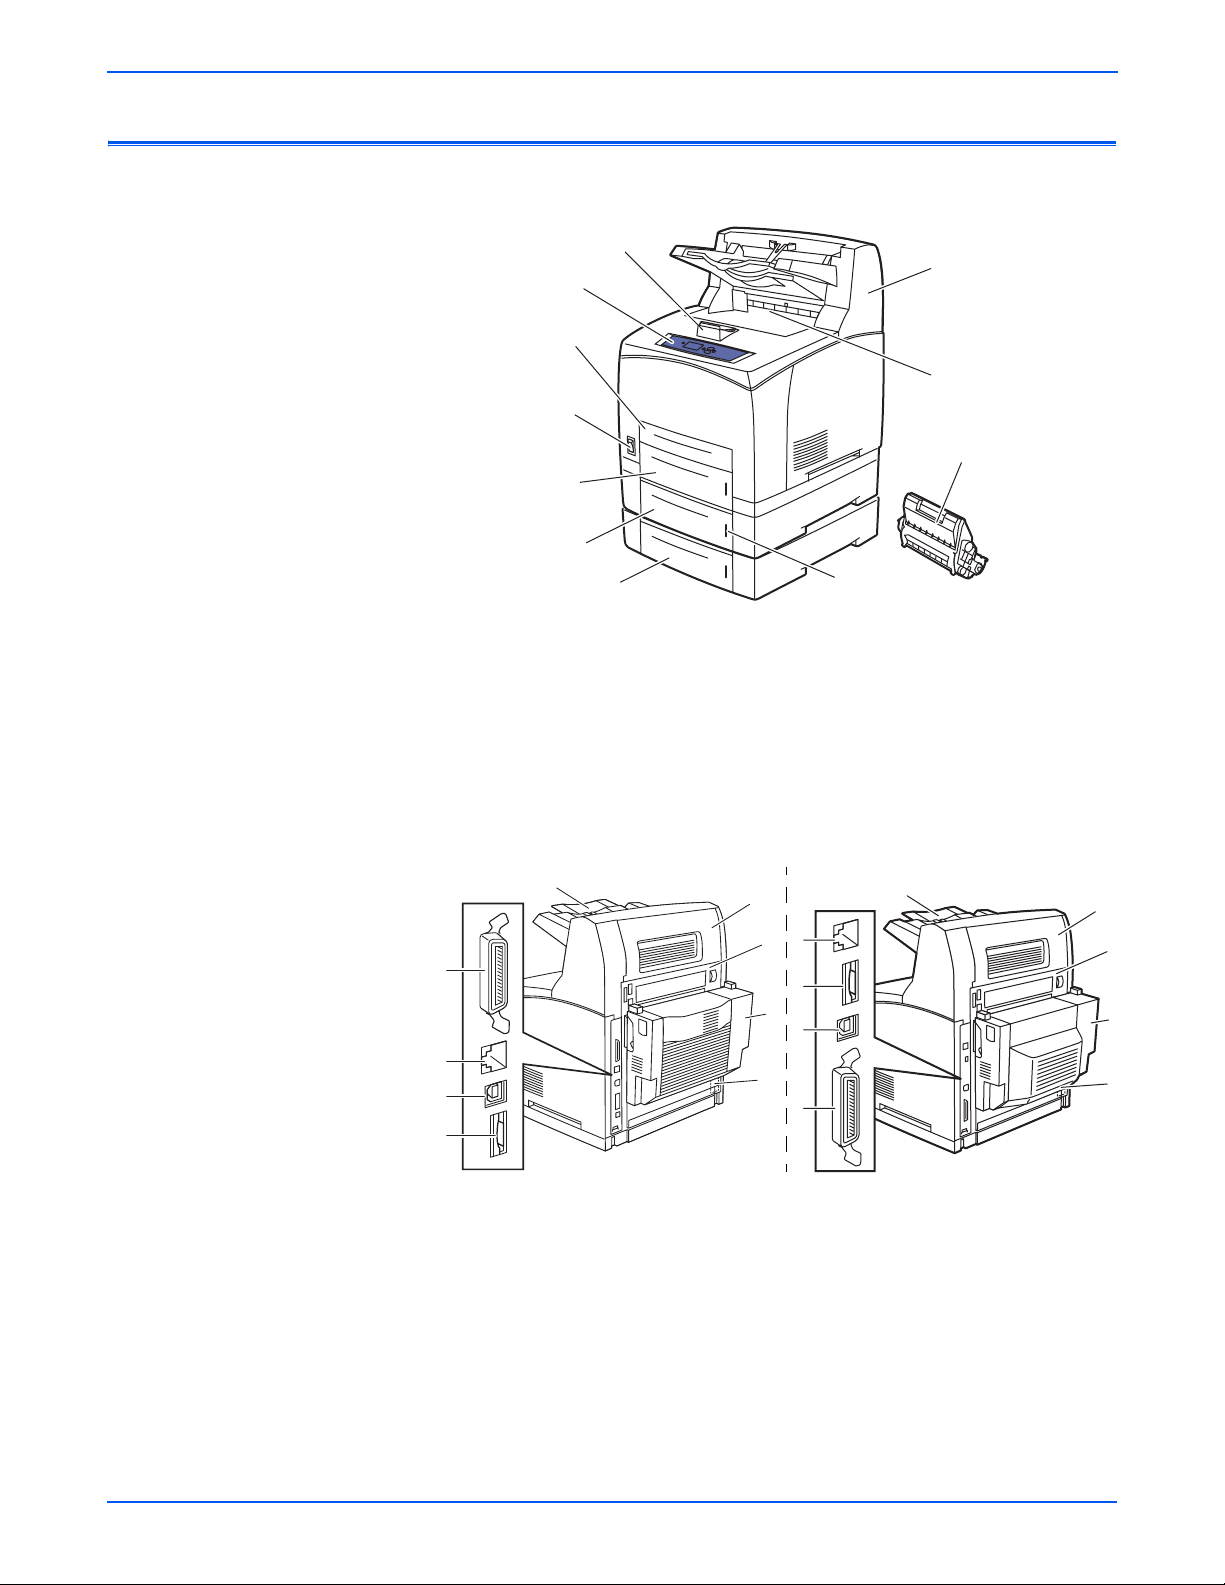
General Information
4510-067
8
9
6
5
7
1
2
3
4
P4510
Parts of the Printer
Front View
1
2
11
3
10
4
9
5
6
1.Paper stop
2.Control panel
3.Tray 1
4.On/Off switch
5.Tray 2
6.Optional tray 3
Rear View
P4500
4
1
3
2
7
8
4510-072
7.Optional tray 4
8.Paper gauge
9.Print cartridge
10.Standard output tray
11.Optional 500-Sheet stacker
9
8
7
6
5
4510-073
Items 1 - 4 are mounted on the image
processor board.
1.Ethernet 10/100 Base-T connector
2.Configuration card
3.USB connector
5.Power receptacle
6.Optional duplex unit
7.Rear cover
8.Stacker rear cover
9.Stacker extension
4.Parallel cable connector
1-4 Phaser 4500/4510 Service Manual
Page 23
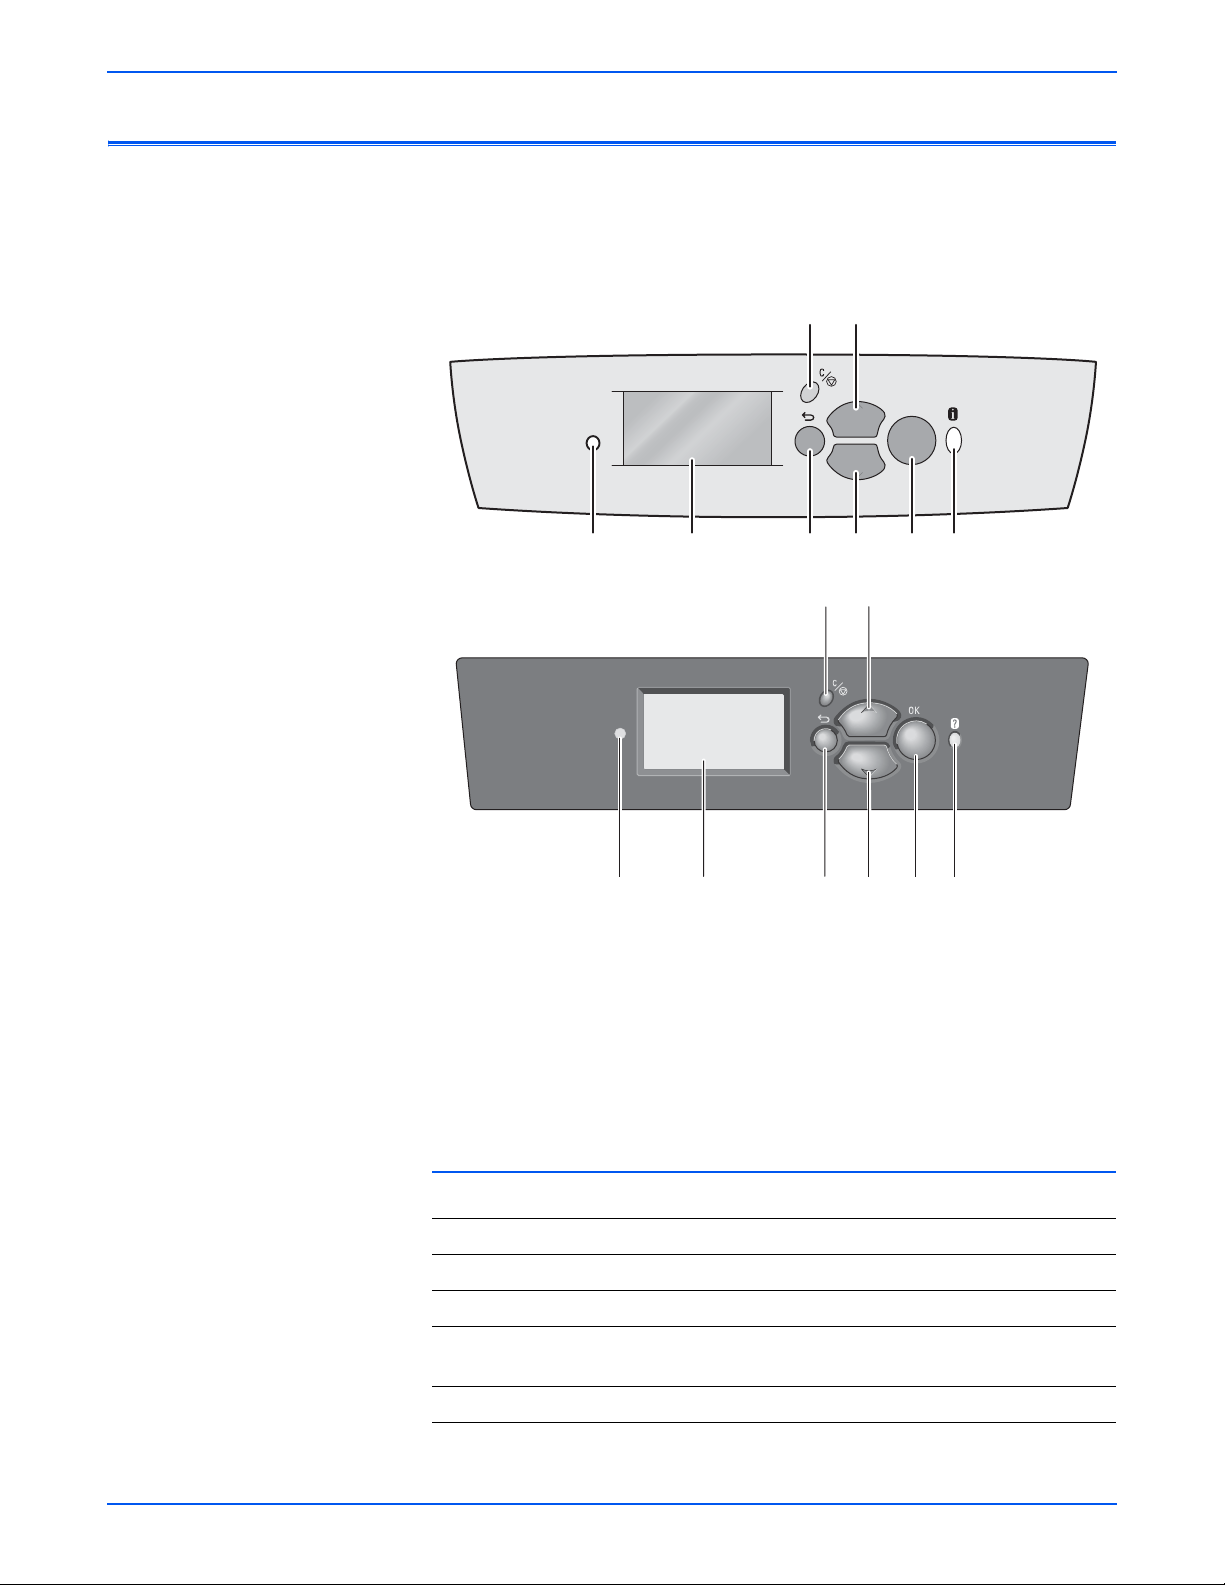
Control Panel
6
3
8
General Information
The control panel consists of one tricolor LED, a display window, and six
functional buttons.
45
Phaser 4500
OK
12
36 78
s4500-003
4 5
Phaser 4510
1 2
7
s4510-003
1.Status indicator LED 5.Up Arrow button - scrolls up the menu system
2.Graphic control panel
display
6.Down Arrow button - scrolls down the menu
system
3.Back button 7.OK (select) button
4.Cancel button 8.Information (i) (P4500) or Help (?) (P4510)
button - for additional explanation or help
LED States
LED State Printer State
Green Ready to Print or in Power Saver mode
Flashing Yellow Warning (but can still print)
Flashing Green In Standby mode or busy (receiving data, processing data,
printing)
Flashing Red Error; cannot print
Phaser 4500/4510 Service Manual 1-5
Page 24

General Information
Control Panel Shortcuts
Mode Buttons Pressed at Power On
Skip execution of POST
diagnostics
Print Service Diagnostics Map Information
Reset PostScript NVRAM Back + OK
Password Bypass Up Arrow + Down Arrow
Enter Service Diagnostics Back + Information
OK
1-6 Phaser 4500/4510 Service Manual
Page 25
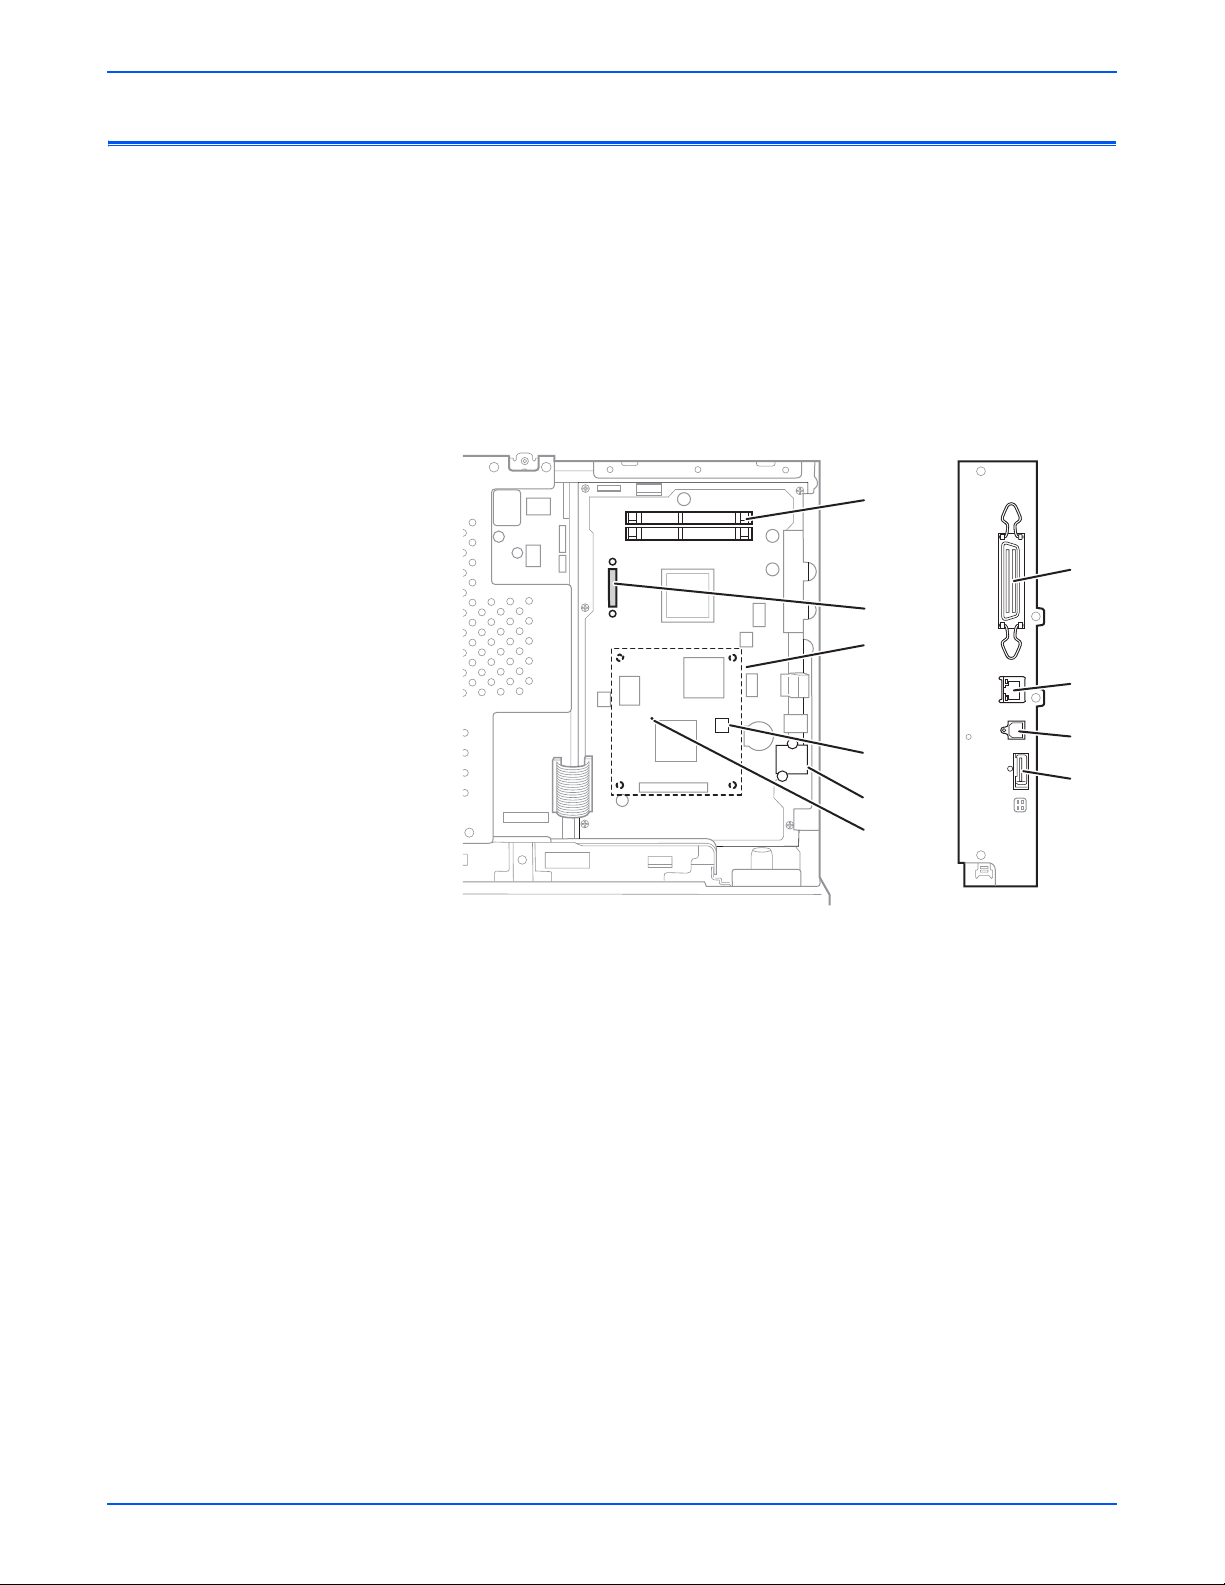
Image Processor Board (Phaser 4500)
When installing a new image processor board in the printer, you must transfer
the following parts from the old board:
■ Memory DIMMs
■ Hard drive (if installed)
■ NVRAM
■ Configuration card
General Information
1
6
2
3
4
5
9
1.Memory (RAM) DIMM 1 and DIMM 2 6.Parallel connector
2.Flash memory (optional) 7.Ethernet connector
3.Hard drive (optional) 8.USB connector
4.NVRAM 9.Health LED
5.Configuration card
7
8
5
s4500-251
Phaser 4500/4510 Service Manual 1-7
Page 26
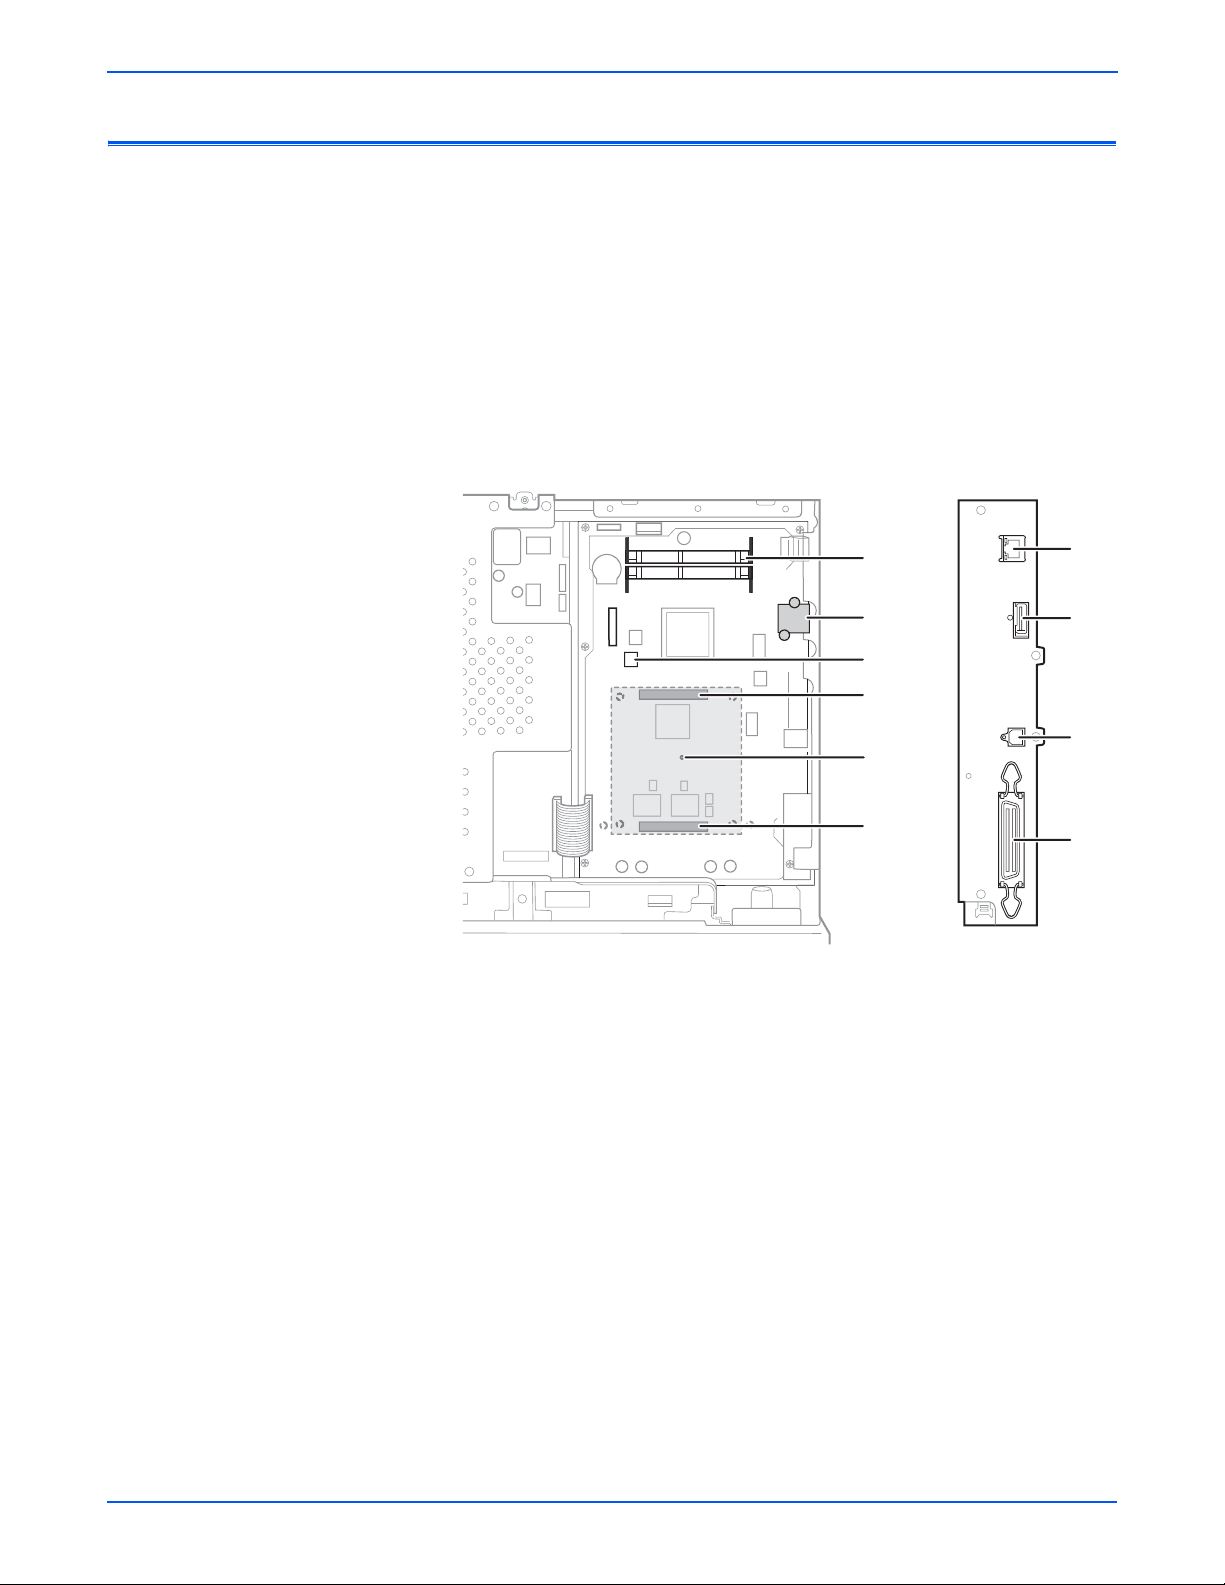
General Information
Image Processor Board (Phaser 4510)
When installing a new image processor board in the Phaser 4510 printer, y ou
must transfer the following parts from the old board:
■ Memory DIMMs
■ Configuration card
■ NVRAM
■ Hard drive (if installed)
■ Flash memory (if installed)
1
5
4
3
9
2
1.Memory (RAM) DIMM 1 and DIMM 2 6.Parallel connector
2.Flash memory (optional) 7.Ethernet connector
3.Hard drive (optional) 8.USB connector
4.NVRAM 9.Health LED
7
5
8
6
s4510-251
5.Configuration Card
1-8 Phaser 4500/4510 Service Manual
Page 27
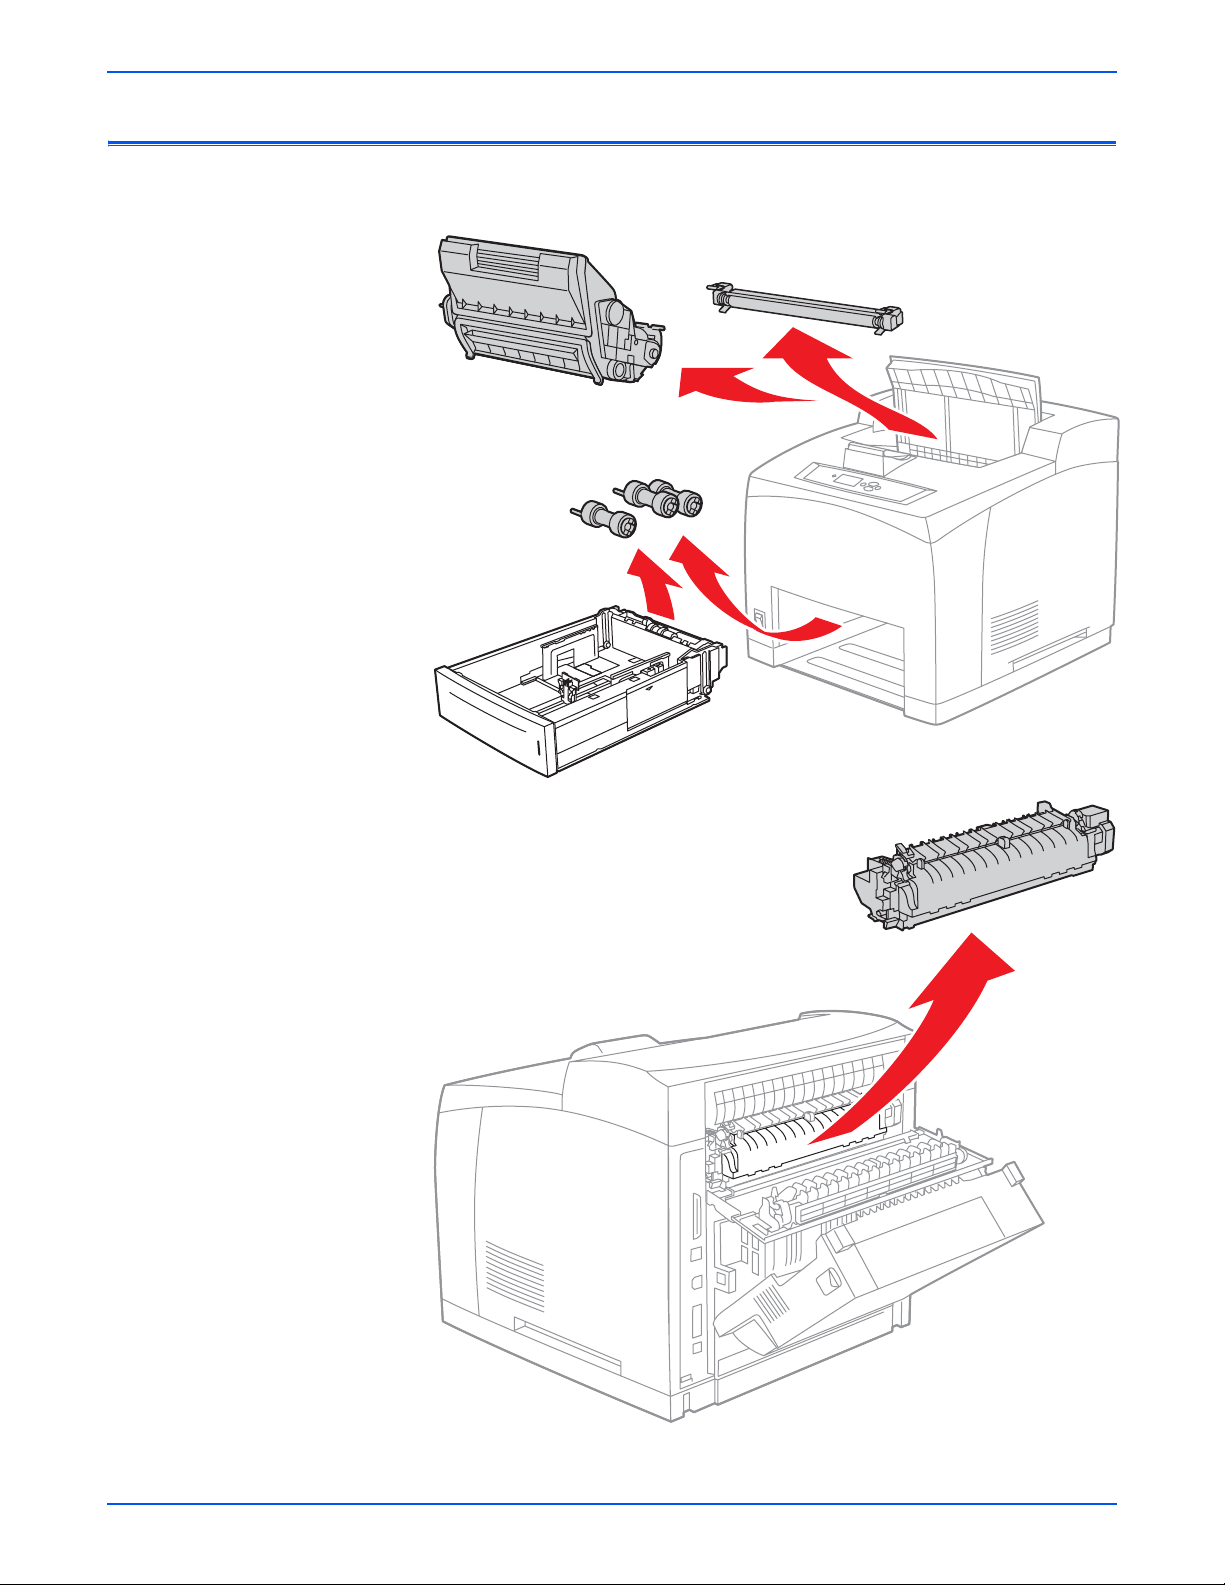
Consumables and Routine Maintenance Items
Print Cartridge
Transfer Roller
Feed Rollers
3 per Paper Tray
General Information
Fuser
s4510-267
s4510-268
Phaser 4500/4510 Service Manual 1-9
Page 28

General Information
Supply Life Counters
Internal counters track the usage of the Consumables and Routine
Maintenance Items and store the values in NVRAM. The image pr ocessor
board monitors these counters in order to displa y th e near end-of-life and endof-life messages.
Print life ratings are based on 5% coverage and an average job length of 4
pages.
Supply Print Life (Number of Images)
Consumables
Print cartridge, standardcapacity
Print cartridge, high-capacity 19,000
Routine Maintenance Items
Maintenance kit (consists of
fuser, transfer roller, and 12
feed rollers)
10,000
200,000
1-10 Phaser 4500/4510 Service Manual
Page 29

Printer Specifications
Physical Dimensions and Clearances
General Information
Print Engine Dimensions Value
Height 404 mm (15.9 in.)
Width 422 mm (16.6 in.)
Depth
Depth with paper cassette extended
Weight (with 10-K print cartridge) 20.5 kg (45.2 lbs.) (P4500)
Clearances Value
Top 400 mm (16 in.)
Left 210 mm (8 in.)
Right 300 mm (12 in.)
Front 480 mm (19 in.)
Rear (with duplex unit installed) 230 mm (9 in.)
Total Height requirement 820 mm (32 in.)
Mounting surface level tolerance ± 5°
550-Sheet Feeder Dimensions Value
Height (to top of feeder assembly) 143 mm (5.6 in.)
Width 422 mm (16.6 in.)
Depth
Depth with paper cassette extended
465 mm (18.3 in.)
524 mm (20.7 in.)
23.2 kg (51.0 lbs.) (P4510)
Add 9.6 cm (3.75 in.) for
each 550-sheet feeder
452 mm (17.8 in.)
510 mm (20.1 in.)
Weight 6.3 kg (13.9 lbs.)
Duplex Unit Dimensions Value
Height 219 mm (8.6 in.) (P4500)
238 mm (9.4 in.) (P4510)
Width 352 mm (13.8 in.)
Depth 96 mm (3.8 in.) (P4500)
146 mm (5.8 in.) (P4510)
Weight 1.9 kg (4.2 lbs.)
Stacker Dimensions Value
Height 226 mm (8.9 in.)
Width 418 mm (16.4 in.)
Depth
Depth with stacker tray extended
Weight 2.6 kg (5.7 lbs.)
Phaser 4500/4510 Service Manual 1-11
312 mm (12.3 in.)
382 mm (15.1 in.)
Page 30

General Information
Functional Specifications
Characteristic Specification
Printing process: Recording System: Electrophotography (roller charging,
magnetic monocomponent toner development)
Exposure System: Semiconductor laser beam scanning
Transfer System: Roller transfer system
Fusing System: Thermal fixing using a heat roller
Resolution /
Addressability
Print-Quality Modes Two choices: 600 x 600 dpi
Phaser 4500
Continuous operating
printing speed
Phaser 4510
Continuous operating
printing speed
Phaser 4500
First Print-Out
from READY state
(in seconds);
Short Edge Feed
Phaser 4510
First Print-Out
from READY state
(in seconds);
Short Edge Feed
600/1200 dpi
True 1200 x 1200 dpi
36 pages per minute for plain Letter paper, one-sided printing
34 pages per minute for A4 paper, one-sided printing
21 images per minute for Letter paper, 2-sided printing
21 images per minute for A4 paper, 2-sided printing)
45 pages per minute for plain Letter paper, one-sided printing
43 pages per minute for A4 paper, one-sided printing
27 images per minute for Letter paper, 2-sided printing
26 images per minute for A4 paper, 2-sided printing)
Paper Size
Letter
A4
Paper Size
Letter
A4
Mode
Simplex
Duplex
Simplex
Duplex
Mode
Simplex
Duplex
Simplex
Duplex
Tray 1
8.7
12.5
8.7
12.7
Tray 1
7.9
11.1
7.9
11.2
Tray 2
8.7
12.5
8.7
12.7
Tray 2
7.9
11.1
7.9
11.2
Tray 3
8.7
12.5
8.7
12.7
Tray 3
7.9
11.1
7.9
11.2
Tray 4
8.9
12.8
9.0
13.0
Tray 4
8.2
11.3
8.2
11.4
Phaser 4500
First Print-Out
from sleep mode
(in seconds);
Short Edge Feed
Phaser 4510
First Print-Out
from sleep mode
(in seconds);
Short Edge Feed
Warm-Up Time 17 seconds
1-12 Phaser 4500/4510 Service Manual
Paper Size
Letter
A4
Paper Size
Letter
A4
Mode
Simplex
Duplex
Simplex
Duplex
Mode
Simplex
Duplex
Simplex
Duplex
Tray 1
24.0
27.8
24.0
28.0
Tray 1
24.9
28.1
24.9
28.2
Tray 2
24.0
27.8
24.0
28.0
Tray 2
24.9
28.1
24.9
28.2
Tray 3
24.0
27.8
24.0
28.0
Tray 3
24.9
28.1
24.9
28.2
Tray 4
24.2
28.1
24.3
28.3
Tray 4
25.2
28.3
25.2
28.4
Page 31

Electrical Specifications
Characteristic Specification
Primary Line Voltages 120 VAC nominal, min. 98 V, max. 140 V
General Information
220/240 VAC nominal, min. 198 V, max. 264 V
Primary Line Voltage
Frequency Range
Maximum Power
Consumption
Environmental Specifications
Characteristic Specification
Temperature:
Operating
Optimal Performance
Range
Transportation
Humidity (%RH)
Operating
Transportation
50/60 Hz ± 3 Hz
P4500: 985 W @ 120 V
985 W @ 220/240 V
P4510: 1210 W @ 120 V
1270 W @ 220/240 V
5 to 35° C (41 to 95° F)
10 to 32° C (50 to 89.6° F)
-20 to 40° C (-4 to 104° F)
15 to 85
5 to 85
Altitude
Operating
Transportation*
Acoustic Noise L
Idle
Printing
* Air transportation in pressurized cargo space
WA(B)
0 to 3,500 meters (11,500 feet)
0 to 15,000 meters (49,200
feet)
Engine only
P4500: 4.00 B
P4510: 5.00 B
P4500: 6.62 B
P4510: 6.95 B
With all options
—
—
7.30 B
7.50 B
ENERGY STAR qualified printer
Phaser 4500/4510 Service Manual 1-13
Page 32

General Information
Media and Tray Specifications
Trays Specifications
Printable
Area
Supported
Media Sizes
Supported
Media
Types and
Weights
Supported
Envelopes
All Within 4 mm of paper edge guaranteed.
Edge-to-edge printing supported.
Tray 1
Trays 2-4
Tray 1
Trays 2-4
Stacker
Width: 76.2 mm (3.0 in.) ~ 215.9 mm (8.5 in.)
Width: 98.4 mm (3.9 in.) ~ 215.9 mm (8.5 in.)
Length: 127.0 mm (5.0 in.) ~ 355.6 mm (14 in.)
Length: 148.0 mm (5.8 in.) ~ 355.6 mm (14 in.)
Width: 88.9 mm (3.5 in.) ~ 215.9 mm (8.5 in.)
Length: 139.7 mm (5.5 in.) ~ 355.6 mm (14 in.)
All
All
All
All
Tray 1
All
All
Bond (P4500) 60-216 g/m
(P4510) 64-216 g/m
Labels
Transparency
Greeting Cards 190 g/m
Index Card Stock 60-216 g/m
Tag Stock 60-216 g/m
Cover Stock 60-216 g/m
2
(70 lb. Cover)
2
(33-120 lb.)
2
(37-133 lb.)
2
(22-80 lb.)
All #10 Commercial (4.12 x 9.5 in.)
Monarch (3.87 x 7.5 in.)
DL (110 x 220 mm)
C5 (162 x 229 mm)
B5 (176 x 250 mm) (P4500 only)
2
(16-58 lb.)
2
(17.1-58 lb.)
Input Tray
Capacity
Tray 1
Trays 2-4
150 sheets
550 sheets
Based on 75 g/m
Capacity is reduced for heavier/thicker stock.
Output Tray
Capacity
Standard
Stacker
500 sheets
500 sheets
Duplex Unit Media Specifications
Input Tray Specifications
Width Tray 1
Trays 2-4
Height Tray 1
Trays 2-4
Supported
All
90 - 216 mm (3.5 - 8.5 in.)
98 - 216 mm (3.9 - 8.5 in.)
140 - 356 mm (5.5 - 14.0 in.)
148 - 356 mm (5.8 - 14.0 in.)
Bond P4500: 60-216 g/m
Media
Types and
Weights
Greeting Cards 190 g/m
Index Card Stock 60-216 g/m
Tag Card Stock 60-216 g/m
Cover Stock 60-216 g/m
2
(20 lb. bond) paper stock.
P4510: 64-216 g/m
2
(70 lb. Cover)
2
(33-120 lb.)
2
(37-133 lb.)
2
(22-80 lb.)
2
(16-58 lb.)
2
(17.1-58 lb.)
1-14 Phaser 4500/4510 Service Manual
Page 33

Memory Requirements
Phaser 4500
Characteristic Specification
General Information
Minimum
required
Maximum
supported
Supported type PC133 SDRAM in 144-pin SO-DIMM form
Phaser 4510
Characteristic Specification
Minimum
required
Maximum
supported
Supported type PC2700 DDR in 200-pin SO-DIMM form
64 MB – The Phaser 4500 B configuration reports 48 MB
256 MB – accepts modules of 64 or 128 MB in combinations
to a total of 256 MB
128 MB
512 MB – accepts modules of 128 or 256 MB only in
combinations to a total of 512 MB
Phaser 4500/4510 Service Manual 1-15
Page 34

General Information
1-16 Phaser 4500/4510 Service Manual
Page 35

Theory of Operation
In this chapter...
■ Overview of the Phaser 4500/4510 Laser Printer
■ Paper Path of the Printer
■ Sensors
■ Major Assemblies and Functions
■ Printer Options
Chapter
2
Page 36

Theory of Operation
Overview of the Phaser 4500/4510 Laser Printer
Summary of the Printing Process
The Phaser 4500/4510 print process consists of the following steps:
1. Charge – The print cartridge contains a bias charge roller that uniformly
distributes a negative electrical charge over the photoconductive drum
surface.
2. Exposure – The laser assembly scans the surf a ce of th e photocondu ctiv e
drum, which is located inside the print cartridge. The laser diode
assembly produces a laser beam which is turned on and off according to
a data signal. A 12-sided polygonal mirror in the scanner assembly is
rotated at a specified speed. The laser beam is reflected off of the mirror
and onto the drum surface through a series of lenses and mirrors. The
laser beam scans the drum surface from o ne end to the other , neutralizing
the negative charge to create one line of a latent image on the surface.
The drum is rotated and the scan process is repeated to form an image
on the drum surface.
3. Development – A magnetic roller in the print cartridge carries a thin layer
of toner supplied by an agit ator in the cartridge's toner compartment. The
charging and metering (CM) blade inside the cartridge applies a negative
charge to the toner and spreads the toner onto the magnetic roller. The
negatively charged toner is transferred to the areas of the drum surface
that have be en discharged.
4. Paper transport – Paper size sensors determine the length of the media.
Four tabs (one fix e d, three mo vable) located in the paper tray indicat e the
location of the length guide and thereby identify the media size. Switches
located in the left tray guides detect the position of four tabs located on
the paper tray. The printer uses a three-roller system to pick paper. Two
springs raise the tray's lift plate, along with the paper stack, against the
nudger roller of the paper feeder assembly. To pick paper, the nudger
roller advances the top sheet t o the fee d roller and retard roller. The retard
roller prevents multi-picks. The feed roller advances the paper to the turn
pinch rollers, which feed it to the registration rollers. The registration
sensor is the first sensor to detect paper.
5. Transfer – The transfer roller is driv en b y a gear on the print cartridge. The
pressure of the transf er roller against the drum assists in driving the paper
through the transfer area. The transfer roller applies a positive charge to
the rear surface of the paper. The negatively charged toner image on the
drum is attracted to the positive charge on the rear surface of the paper,
causing the image to be transferred from the surface of the drum onto the
paper.
6. Discharge – The detack saw, located on the transfer roller assembly,
helps to separate the paper by partially neutralizing the ch arge holding
the paper to the drum.
7. Fusing – The paper is driven into the f user, which uses heat and pressure
rolls to melt and bond the toner onto the surface of the paper. Heat roller
fingers inside the fuser peel off the leading edge of the paper from the
Heat roller to prevent the paper from becoming wound around it. An exit
sensor detects paper exiting from the fuser.
8. Cleaning – A cleaning blade in the print cartridge scrapes off toner
remaining on the drum surface after transfer has occurred. Then, the
latent charge pattern remaining on the photoconductive drum is
neutralized to prepare the drum for the next exposure cycle.
9. Paper exit – The paper is then advanced upward into the exit rollers and
into the selected output tray.
2-2 Phaser 4500/4510 Service Manual
Page 37

10. Two-sided printing reverses the direction of the exit rollers to route the
T
paper through the duplex unit rollers and back to the registration roller. A
sensor in the duplex unit detects the presence of paper.
Block Diagram of the Print Cycle
The block diagram of the print cycle shows the sequence of events for the
xerographic process (dashed lines) and the paper flow (solid lines) into and
out of the printer.
1
Charge
2
Exposure
3
Xerographic Cycle
Cycle Repeats for the Next Print
Development
4
Transport
Paper Enters
5
Transfer
Paper
6
Discharge
8
Cleaning
Theory of Operation
10
Two-sided
Printing
7
Fusing
9
Paper Exit
s4500-007
Components Associated with the Xerographic Process
This cut-away side view of the printer shows the location of individual
components within the printer, and the major components that are directly
related to the print cycle and to the paper path.
Paper
ransport
Pressure
Roller
7. Fusing
6. Discharge
Detack Saw
Transfer Roller
5. Transfer
Print Cartridge
Heat Roller
Fuser Assembly
8. Cleaning
Cleaning
Blade
Drum
Magnetic Roller
1. Charging
BCR
2. Exposure
Charge Metering Blade
3. Development
Laser Beam
Paper
s4500-008
Phaser 4500/4510 Service Manual 2-3
Page 38

Theory of Operation
Paper Path of the Printer
Paper is supplied from Trays 1 and 2 or th e optional Trays 3 and 4, and is
transported into the printer along the paper path shown below.
Optional 550-Sheet Feeder
(Tray 4)
550-Sheet Tray
Nudger Roller
Feed Roller
Retard Roller
Turn Roller
Turn Pinch Roller
Optional 550-Sheet Feeder
(Tray 3)
550-Sheet Tray
Nudger Roller
Feed Roller
Retard Roller
Turn Roller
Turn Pinch Roller
Rubber Registration Roller
Metal Registration Roller
Transfer Roller Assembly
Drum
Tray 2 Tray 1
Nudger Roller
Feed Roller
Retard Roller
Lower Stacker Roller
Pinch Roller
Upper Stacker Roller
Stacker Pinch Roller
Optional Stacker
Print Exit
Heat Roller
Pressure Roller
Fuser Assembly
Exit Roller
Exit Pinch Roller
500-sheet Exit Assembly
Duplex Roller
Pinch Roller
Optional Duplex Unit
s4500-017
2-4 Phaser 4500/4510 Service Manual
Page 39

Layout of Paper Transport Path
This cross section of the printer shows the main components directly
associated with the paper path and transport in the engine only.
3
4
6
7
Theory of Operation
1
2
5
13
14
8
12
9
10
11
1.Exit roller 8.Rubber registration roller
2.Exit pinch roller 9.Metal registration roller
3.Fuser assembly 10.Feed roller assemblies
4.Pressure roller 11.Retard roller assemblies
5.Heat roller 12.Nudger roller assemblies
6.Drum 13.Print cartridge
7.Transfer roller assembly 14.Laser assembly
s4500-018
Phaser 4500/4510 Service Manual 2-5
Page 40

Theory of Operation
This cross section shows the additional components associated with paper
transport when the 550-sheet feeders, the duplex unit, and the stacker are
installed.
1
3
2
4
5
6
8
7
9
10
13
11
12
4500-019
1.Stacker pinch roller 8.Duplex pinch rollers
2.Lower stacker roller 9.Turn pinch rollers
3.Upper stacker roller 10.Turn roller assemblies
4.Upper stacker pinch roller 11.Feed roller assemblies
5.Exit roller 12.Retard roller assemblies
6.Exit pinch roller 13.Nudger roller assemblies
7.Duplex rollers
2-6 Phaser 4500/4510 Service Manual
Page 41

Sensors
Theory of Operation
The printer contains a number of sensors of various types that perform a
variety of functions. One group of sensors track the progress of the paper
along the paper path, and detect if a paper jam occurs. Other sensors detect
the presence of the print cartridge, stop printer activity if a door is open, and
monitor the fusing temperature. The basic printer has 18 sensors, while a
fully-optioned printer has 30 sensors.
The types of sensors in use vary with their function. In general, there are four
basic type in use:
■ Photo
■ Microswitch
■ Soft Touch Sensors (STS)
■ Magnetic
Most of the photo sensors consist of a LED in one arm of a U-shaped holder,
and a photo-transistor in the other arm. When nothing is betw een the arms of
the sensor, light from the LED falls on the photo-receptor, turning it on. If the
light is interrupted, the photo-transistor turns off. The on- or off-state of the
transistor is used as a signal.
The microswitches are used primarily as interlocks in the printer. They are in a
normally open state, and close when actuated. A bank of switches in a holder
is used for detecting the size of paper in use in a tray. Cams in the tray close
the switches in various combinations (see “Control of Paper Size” on
page 2-17) to send a size signal to the controller.
The Soft Touch Sensor has a known value of resistance whose sensitivity
varies with temperature.
The magnetic sensor detects the magnetic properties of the toner in the print
cartridge.
A fifth sensor in use in the printer is the antenna used to communicate with
the CRUM in the print cartr i dg e.
The list of Sensors and interlocks that follows gives each sensor by its name,
lists which of the types it is, and briefly describes its function in the printer.
The reference column lists manual pages where illustrations show the
location of the sensor.
List of Sensors and interlocks
Name Type Function Reference
Paper low Mechanically
actuated photo
sensor
Detects low paper condition
in 550-Sheet trays 2, 3, and
4 (there is no low-paper
page 2-10
page 2-16
sensing in tray 1).
No paper Mechanically
actuated photo
Detects no paper condition
in all trays.
Page 2-16
sensor
Paper size
switches
Microswitch bank Detects the presence of a
tray and the paper size
Page 2-16
Page 2-41
setting of the tray.
Phaser 4500/4510 Service Manual 2-7
Page 42

Theory of Operation
List of Sensors and interlocks
Name Type Function Reference
Registration
sensor
Toner sensor Magnetic sensor Detects the presence of
Exit sensor Mechanically
Output tray full
sensor
Temperature
sensor
Rear cover
switch
24 V interlock Microswitch Interrupts +24 V to the main
Mechanically
actuated photo
sensor
actuated photo
sensor
Mechanically
actuated photo
sensor
Soft Touch Sensor Two of these monitor the
Microswitch Interrupts +24 V to the main
Detects the paper as it
reaches the registration
rollers.
toner in the print cartridge.
Detects paper as it leaves
the fuser.
Detects when the standard
output tray is full.
temperature of the Heat
roller.
motor when the rear exit
cover is open; in series with
24 V interlock.
motor when the top cover is
open; in series with rear
cover switch.
Page 2-10
Page 2-16
Page 2-16
Page 2-22
Page 2-27
Page 2-22
Page 2-30
Page 2-30
T op cover switch
(P4500 only)
Laser interlock
(P4500 only)
5 V interlock Microswitch Interru pts +5 V to laser
Start of scan
sensor
Fuser
thermostat(s)
Stacker rear
cover switch
Stacker sensor Mechanically
Microswitch Interrupts INTERLOCK BEF
to indicate the top cover is
open.
Microswitch Interrupts +5 V to laser
diode; in series with 5 V
interlock switch.
diode. In series with laser
interlock.
Photo Detects the laser beam at the
start of a scan.
Thermostatic
switche(s)
Microswitch Signals the HVPS/engine
actuated photo
sensor
Interrupt AC power to the
fuser heater in overtemp
condition; P4500: two
switches in series; P4510:
single switch.
logic board that the stacker
rear cover is open.
Senses the presence of
paper in the stacker.
Page 2-30
Page 2-30
Page 2-30
Page 2-20
Page 2-22
Page 2-38
Page 2-38
2-8 Phaser 4500/4510 Service Manual
Page 43

Theory of Operation
List of Sensors and interlocks
Name Type Function Reference
Stacker offset
sensor
Duplex unit
switch
Duplex unit
sensor
Stacker full
sensor
Optional feeder
paper size switch
assembly
CRUM antenna Inductive magnetic
Mechanically
actuated photo
sensor
Microswitch Signals the HVPS/engine
Mechanically
actuated photo
sensor
Mechanically
actuated photo
sensor
Microswitch bank Detects the presence of a
code reader
Senses the position of the
stacker offset chute.
logic board that the duplex
unit rear cover is open.
Detects the presence of
paper in the duplex unit.
Detects when the stacker
output tray is full.
tray and the paper size
setting of the tray.
Communicates with the print
cartridge CRUM.
Page 2-38
Page 2-35
Page 2-35
Page 2-38
Page 2-41
Phaser 4500/4510 Service Manual 2-9
Page 44

Theory of Operation
Sensors in the Paper Path
5
4
3
2
6
1
7
8
9
10
11
12
13
1.Registration sensor 8.Tray 2 no paper sensor
2.Fuser exit sensor 9.Tray 2 low paper sensor
3.Output tray full 10.Tray 3 no paper sensor
4.Stacker sensor 11.Tray 3 low paper sensor
5.Stacker full 12.Tray 4 no paper sensor
s4500-270
6.Duplex unit sensor 13.Tray 4 low paper sensor
7.Tray 1 no paper sensor
2-10 Phaser 4500/4510 Service Manual
Page 45

Major Assemblies and Functions
The functions of the main components of the Phaser 4500/4510 printer are
described in the following sections:
■ Paper tr ay
■ Paper feeder
■ Print cartridge
■ Transfer roller assembly
■ Laser assembly
■ Fuser
■ 500-sheet paper exit
■ Drive
■ Electrical
Theory of Operation
Paper Tray
Paper trays include the 150-sheet and 550-sheet trays. Since they are
functionally equivalent, only the 150-sheet tray is described here.
The trays adjust to a ccept various paper sizes. The end and side guides
adjust to match paper sizes shorter than A4, or narrower than Letter. To
accept paper longer than A4, the tray extension must be unlocked and pulled
out, and the end and side guides adjusted to match the size.
Phaser 4500/4510 Service Manual 2-11
Page 46

Theory of Operation
Paper Tray Functional Assemblies
2
1
3
4
5
7
6
s4500-021
1.Left-side paper guide assembly 5.R ight-side paper guide assembly
2.Bottom plate assembly 6.Extension lock
3.Bottom lock lever 7.End guide
4.Gear stopper
Left- and right-side paper guide assemblies The left and right paper guides
adjust to fit different paper widths . The guides hold th e paper in position in the
tray.
Bottom plate assembly The bottom plate assembly is pushed up by the bottom
lift spring. The bottom plate is released b y unloc king th e bottom lo ck le v er and
stopper gear . When the bottom plate assembly is pushed up, the supplied
paper contacts the nudger roller.
Bottom lock lever and gear stopper These are at the rear of the tray (i.e., the
front end in the direction of travel of paper). How these components work is
explained in “Paper Lift Mechanism” on page 2-14.
2-12 Phaser 4500/4510 Service Manual
Page 47

Front
Theory of Operation
s4500-020
Extension lock The 150-sheet tray extends to accommodate different paper
lengths. The extension lock holds the extension in position.
End guide The end guide can be adjusted to different paper siz es by making a
forward or backward adjustment. It makes contact with the rear end of th e
paper, an d holds the paper in position front-to-back in the paper tray.
Through the cam action of the sector gear and size rack, the position of the
end guide is conve rted to up and down combinations of the three size switch
links on the side of the tray. The links, when in contact with the paper size
switches in the left tray guide, turn the switches on or off in combinations that
correspond to the paper size.
Phaser 4500/4510 Service Manual 2-13
Page 48

Theory of Operation
The paper sizes that can be automatically detected are as follows:
Type Size (mm × mm)
LETTER SEF 215.9 mm × 279.4 mm (8.5" x 14")
LEGAL 14" SEF 215.9 mm × 355.6 mm (8.5" x 13")
LEGAL 13" SEF 215.9 mm × 330.2 mm (8.5" x 11")
EXECUTIVE SEF 184.2 mm × 266.7 mm (7.25" x 10.5")
A4 SEF 210.0 mm × 297.0 mm (8.27" x 11.69")
B5 (JIS) SEF 182.0 mm × 257.0 mm (7.17" x 9.44")
A5 SEF 149.0 mm × 210.0 mm (5.83" x 8.27")
Paper Lift Mechanism
The Phaser 4500/4510 printer paper trays utilize a unique mechanical paper
lift mechanism that eliminates the need for paper lift motors. The mechanism
consists of a spring-loaded bottom plate assembly that lifts the paper stack
upward to the paper feeder assembly.
When the tray is removed from the printer, a channel in the right tray guide
pushes the bottom lock gear downward, lowering the bottom plate assembly
until it is locked into place by a spring-loaded gear stopper, one-way loc k gear ,
and the bottom rack lock. The gear stopper engages the bottom lock gear,
and the bottom rack lock engages the one-way lock gear, which prevents the
bottom plate assembly from rising upward.
The gear stopper is released from the bottom lock gear when the tray is
inserted into the printer. Once the gear stopper releases the bottom lock gear,
the bottom rack lock holds the bottom plate assembly in place. Then, a metal
tab located on the paper feeder assembly presses down on the bottom lock
lever. This releases the bottom rack lock and allows the bottom plate
assembly to raise the paper stack upward until it contacts the nudger roller
and lifts the feeder assembly.
Once the feeder assemb ly is lifted b y the pa per stac k, the met al tab no longer
contacts the lock lever. As paper is fed from the stack, the feeder assembly
gradually lowers . When the tab contacts the bot tom lock le v er , the pap er stack
raises. This process repeats until the tray is empty.
2-14 Phaser 4500/4510 Service Manual
Page 49

Paper Feeder
Theory of Operation
Tray 1 and tray 2 are functionally equivalent in terms of the paper size switch
assembly, no paper actuator, and no paper sensor. The component
descriptions given here apply to both trays.
Since the low paper actuator and low pap er sensor are not part of tray 1, the
description of these components applies to tray 2 only.
150-sheet/550-sheet feeder assembly This mechanism moves paper from the
paper tray into th e printer . The driving force fro m the main motor is transmitted
via the feed clutch assembly to the feed roller and nudger roller, transporting
paper from the tray into the printer.
No paper actuator This actuator is kept in a raised position by the paper in the
tray. If the tray runs out of paper, the no paper actuator drops and the flag of
the no paper actuator moves from between the sensor ar m s, allowing the
sensor to turn on.
No paper sensor This is a photo sensor that remains in the OFF state when
paper is present in the tra y. The sensor turns on when there is no paper in the
tray and the flag on the no paper actuator moves out of the sensor.
Registration sensor The registration sensor is a photo sensor that detects
paper as it arrives at the registration rollers. The paper transported from the
paper tray pushes up the actuator of the registration sensor, moving the flag
out of the sensor.
Registration clutch This electromagnetic clutch turns on and off to drive the
rubber and metal registration rollers, which place the paper in position at the
appropriate time for transfer of the developed image from the drum.
Low paper actuator When paper is low in the paper tra y installed in tray 2, the
arm of the low paper actuator is pushed up by the bottom plate assembly,
moving the actuator flag out of the sensor. Low paper sensing occurs only in
the 550-sheet feeders, which includes tray 2 and if installed, trays 3 and 4.
Low paper sensor This photo sensor remains in an OFF state until the paper
level in the tray drops sufficiently to move the low paper actuator flag out of
the sensor.
Phaser 4500/4510 Service Manual 2-15
Page 50

Theory of Operation
4
5
6
3
7
2
1
12
1.Paper size switch assembly 7.Metal registration roller
2.Feed clutch assembly 8.No paper sensor
3.Registration clutch 9.No paper actuator
4.Rubber registration roller 10.Low paper sensor
5.Feed roller 11.Low paper actuator
6.Registration sensor 12.Nudger roller
8
9
10
11
s4500-022
2-16 Phaser 4500/4510 Service Manual
Page 51

Control of Paper Size
Not
Paper size switch assembly The switches in this assembly send signals that
indicates the paper size setting of the tray. Cams in the bottom of the tray are
positioned by the tray’s end guide. At pre-define d pap er lengt hs, actuators on
the side of the tray close or open th e switches in a pattern that is defined in
the printer to correspond to one of the pre-set media sizes.
The following table provides the ON (1) or OFF (0) states of the switches in
the paper size switch assembly, corresponding to the paper sizes of the paper
tray.
Theory of Operation
e
The switches in the paper size switch assembly are denoted by “SW1”,
“SW2”, “SW3”, and “SW4”, respectively, from the front side.
Paper Size Switch Assembly
Paper size
SW1 SW2 SW3 SW4
No cassette 0000
Executive SEF 0001
B5(JIS) SEF 0011
A5 SEF 0101
Legal14”SEF0111
Letter SEF 1001
A4 SEF 1101
Legal13”SEF1111
Phaser 4500/4510 Service Manual 2-17
Page 52

Theory of Operation
Xerographics
Print Cartridge
The print cartridge is a customer-replaceable item that consists of the
following components:
Drum The drum is an aluminum cylinder coated with a layer of
photoconductive material that retains electrical charges on its surface until
exposed to light, when electrical conduction occurs.
Bias charge roller (BCR) The BCR uniformly distributes electrical charges over
the drum surface, and erases a charge pattern remaining from the previous
cycle.
Magnet roller A thin layer of toner, supplied by the agitator in the toner
compartment, adheres to the surface of this roller, which transports the toner
into the gap between the drum and magnet roller.
Charging and metering (CM) blade The CM blade spreads toner into a thin layer
over the magnet roller, and applies negative charges to the toner
triboelectrically.
Cleaning blade The cleaning blade scrapes off toner remaining on the drum
surface after the transfer step.
2
1
1.Print cartridge 2.Transfer roller
2-18 Phaser 4500/4510 Service Manual
s4500-010
Page 53

Laser Assembly
The laser assembly scans the surface of the drum with a laser beam. The
laser assembly consists of three components: the laser diode (LD) assembly,
the scanner assembly, and the start of scan (SOS) board.
Laser diode (LD) assembly The LD assembly produces a laser beam that is
turned on and off according to the print data signal. A single LD is used for
600 dpi, and a dual LD is used for 1200 dpi, generating one beam for 600 dpi
and two beams for 1200 dpi.
Scanner assembly This assembly consists of a 12-sided polygonal mirror
mounted on the shaft of the scanner motor. As this mirror rotates, it reflects
the beam onto the drum surface throu gh lenses and mirror s to scan the beam
across the drum.
Start of scan (SOS) board When the laser beam strikes the sensor on the SOS
board, the signal generated indicates the initial po sition of the scan. The initial
position where a scan is started on each line is detected. Depending on the
print resolution selected, either one beam creates one line, or two beams
create two lines at a time.
When the laser beam scans from one end of the drum surface to the other
while being turned off and on, one line of a latent image is created. The
resolution in the scanning direction (from right to left) is determined by the
rotational speed of the scanner motor and by the speed at which the laser is
modulated. The resolution in the process direction (from top to bottom) is
determined by the number of the scan beams and the rotational speed of the
print drum.
Conceptual Diagram of Image Creation by Scanning
Theory of Operation
Paper Path
600 Dots/Inch
600 Scans/Inch
s4500-011
Phaser 4500/4510 Service Manual 2-19
Page 54

Theory of Operation
Laser Assembly Functional Parts
Laser Control
The scanner motor turns on when it receives a signal from the controller, and
turns off after printing ends. The motor remains off in the standby and powersaving states.
There are two faults associated with the scanner motor speed: U2-1 Laser
fails at warm-up, and U2-2, Laser fails motor speed.
Two other laser unit faults, U2-3 and U2-4, are associated with LD power. U23 occurs when LD power is too high, and U2-4 occurs when LD power is too
low.
1
2
1.Start of scan PWB 3.Laser diode assembly
2.Scanner assembly
3
s4500-012
Transfer Roller Assembly
The transfer roller is held in conta ct with the drum of the print cartridge, and is
driven by the drum gear. When the paper moves between the transfer roller
and drum, the transfer roller applies a posit ive charge to the rear surface of
the paper. The negatively charged toner image is attracted by the positive
charge on the rear surface of the paper. Thus, the image is transferred from
the surface of the drum to the surface of the paper.
The detack saw, located on the transf er roller assembly , h elps to se par ate t he
paper from the drum surface.
2-20 Phaser 4500/4510 Service Manual
Page 55

Fuser
Not
Theory of Operation
Heat roller The heat roller is a metal tube with a coated surface and a heater
assembly inside. As paper pa sses between the heat ro ller and pressure rolle r ,
the heat that is applied to the paper melts the toner and fuses it to the paper.
Pressure roller The pressure roller is a metal shaft coated with sponge rubber.
It maintains pressure on the paper passing between it and the heat roller. This
pressure presses the melted toner against the paper.
Heater assembly
The heater assembly consists of two halogen lamps locat ed in the heat r oller.
One lamp heats the entire length of heat roller, while the other, shorter rod
heats the center . The lamps are controlled b y switching the neutral side of the
power to each lamp; the lamps use a common hot line.
Temperature sensors These are Soft Touch Sensors (STS) having a known
value of resistance that varies with temperature. There are two temper ature
sensors in the fuser. One is located at the center of heat roller, the other is
located where the edge of a letter size sheet of paper comes through. The
sensors monitor the temperature of each location to control lighting of the
heater rods. The sensors are mounted in contact with the surface of the heat
roller. Power to the heater rod is turned on and off using the signals from
these sensors, so that the surface temperature of the heat roller can be
maintained within a specified range. Thes e signals are also used to pro vide a
first stage of overheat protection.
Thermostats The thermostats are connected in series with the heat roller
assembly, and provide a second level of overheat protection. If the first stage
of overheat pr otection does not prevent the fuser from overheating, the
thermostats cut off the power-supply circuit for the heater rod. If the paper
type is set incorrectly, the pressure roller may melt and adhere. As a
countermeasure against this, if the STS detect the higher temperature, but
can not prevent the overheat, the thermostats cut power to prevent the
pressure roller from melting and adhering.
e
The fuser in the Phaser 4510 uses a single thermostat switch instead of
two to perform the same function.
Heat roller fingers These fingers peel off the leading edge of the paper from
the Heat roller to pre vent the paper from getting wound around the heat roller.
Heat roller diode The negative charge accumulated on the heat roller may
deteriorate the toner image on the paper during fixing . The heat roller diode
discharges the charge to the frame ground.
Exit sensor This sensor detects the arrival of the paper at a detection point in
the exit area positioned behind the fuser. This sensor also detects the
discharge of the paper from this point. When the sensor receives light (i.e.,
paper is present), the signal /EXIT is low.
Phaser 4500/4510 Service Manual 2-21
Page 56
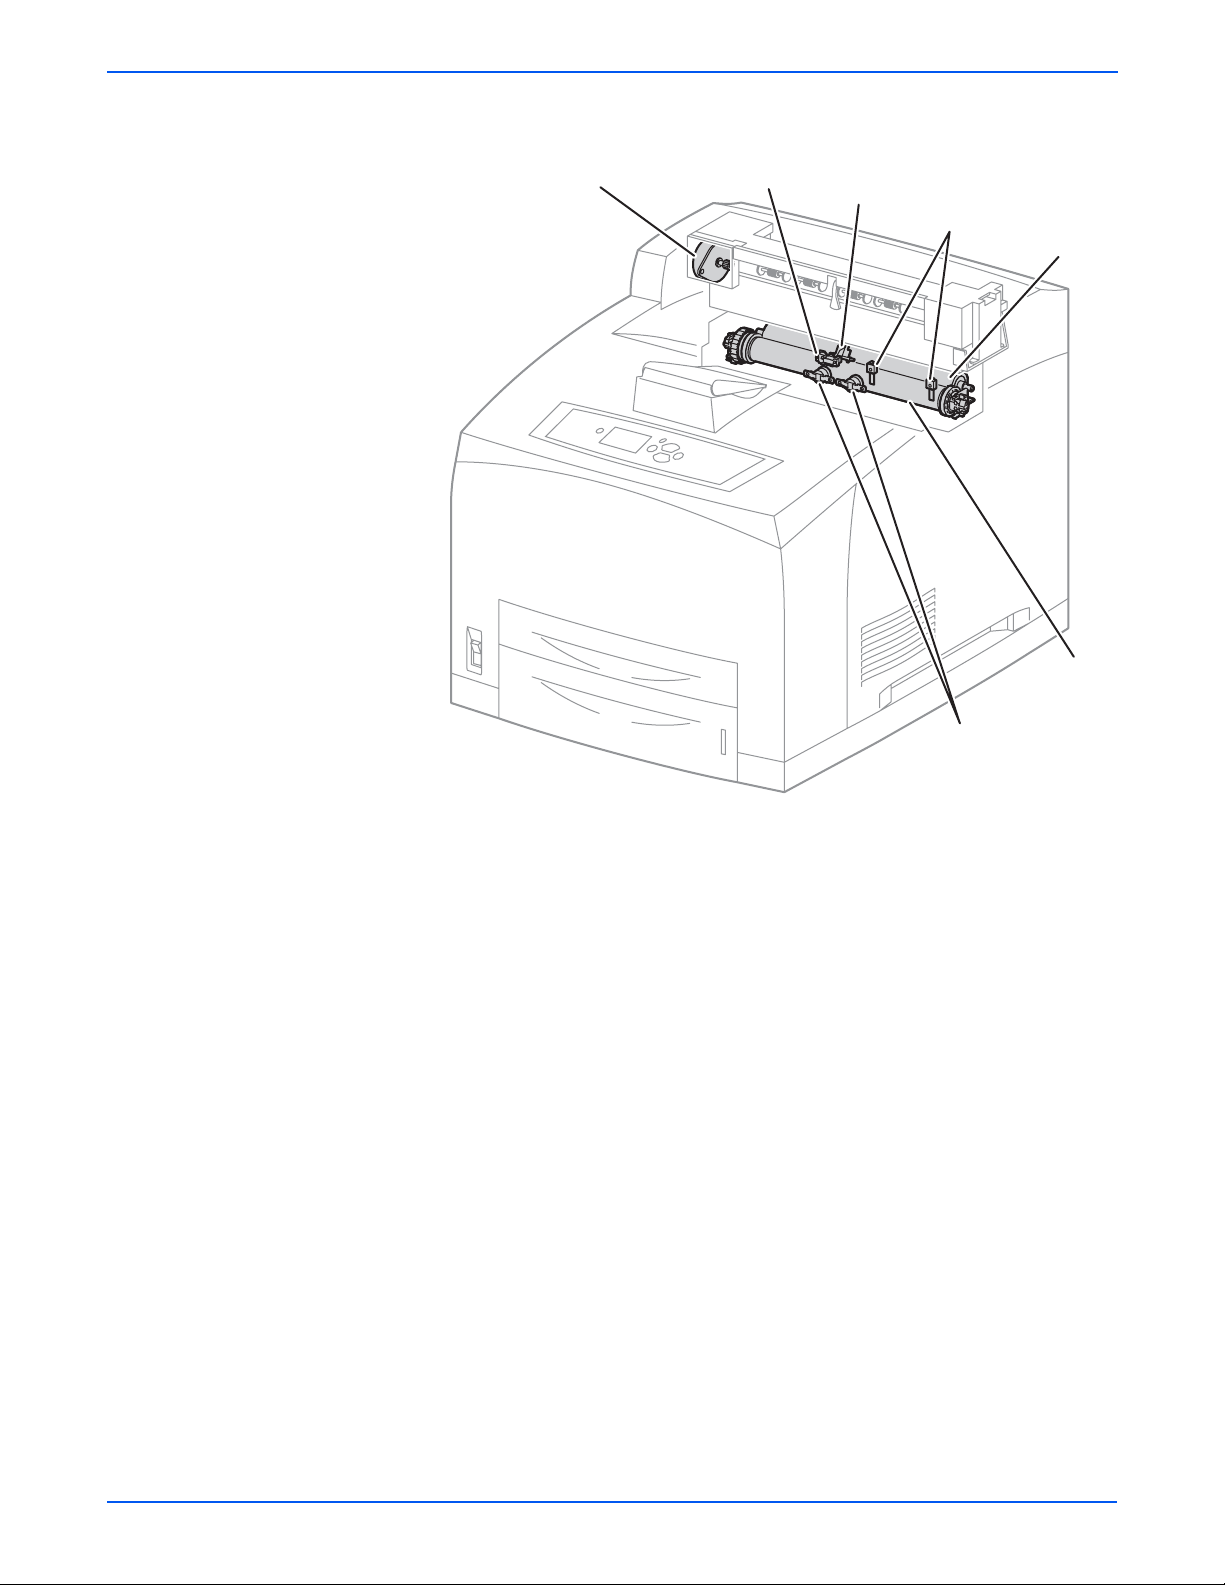
Theory of Operation
1
2
3
4
5
6
7
s4500-023
1.Exit motor assembly 5.Pressure roller
2.Exit sensor 6.Heat roller
3.Actuator 7.Thermostats (P4510 uses only one)
4.Temperature sensors
2-22 Phaser 4500/4510 Service Manual
Page 57

Fuser Control
Temperature Control
Theory of Operation
The fuser heater control maintains the fuser at a pre-determined control
temperature by turning the halogen lamp in the heat roller ON and OFF. The
control temperature varies depending on whether or not the printer is at the
Ready state, and whether the main motor is operating.
The fuser temperature is considered abnormal when the detected
temperature exceeds 250° C, or falls below 130° C.
At the start of warm-up and when the main motor is at rest, the standby
temperature is used as the fuser control temper ature . When the main mot or is
operating except at warm-up, the running temperature is used as the fuser
control temperature.
The running temperature and print speed depen d on t he med ia t ype sele ct ed
for printing. The Phaser 4 500 uses f our tem perature set tings while the Ph aser
4510 uses six. Print speed slows down f or hea vy me dia such as card stoc k or
envelopes, and specialty media such as transparencies. The following tables
show the default assignments of temperature setting to media type. The
temperature setting assignment for a media type can be changed as
explained in “Adjusting Fuser Temperature” on page 6-8.
Phaser 4500 Fuser Temperature Default Settings
Media Type Name
Extra High
215°
High
210° C
Plain Paper X
Letterhead
Transparency
Labels
Colored Paper
Card Stock
Envelope
Special
Phaser 4510 Fuser Temperature Default Settings
Media Type Name
Extra High
187° C
Very High
215° C
High
212° C
Medium
205° C
Plain Paper X
Transparency
Card Stock
Envelope
Labels
X
X
X
Letterhead
Preprinted
Prepunched
Colored Paper
Medium
205° C
Low
185° C
X
X
X
X
X
X
X
Low
190° C
Very Low
170° C
X
X
X
X
X
Phaser 4500/4510 Service Manual 2-23
Page 58

Theory of Operation
Fuser Warm-Up
The halogen lamp is turned on when the fuser warm-up begins. When the
surface temper ature of the hea t roller (detect ed by t he thermistor) reaches the
fuser control temperature (standby temperature), the fuser warm-up is ended.
Fuser Temperature Cycling
The fuser temperature does not remain at a single, constant value, but varies
within a temperature range. The re are several ranges, which are summarized
in the table. Except for Standby, the setting is determined by the media type
selection.
Phaser 4500 Fuser Cycling Temperatures
Setting
Standby Lamp ON 180° C
Medium 1-100 pages:
High Lamp ON 210° C
Extra High Lamp ON 215° C
Low Lamp ON 185° C
Phaser 4510 Fuser Cycling Temperatures
Setting
Standby Lamp ON 180° C
Low 1-50 pages:
Medium 1-50 pages:
High Lamp ON 212° C
Very High Lamp ON 214° C
Extra High Lamp ON 187° C
Very Low Lamp ON 185° C
Temperature
Lamp OFF 185° C
Lamp ON 205° C
Lamp OFF 206° C
Lamp OFF 211° C
Lamp OFF 216° C
Lamp OFF 186° C
Temperature
Lamp OFF 185° C
Lamp ON 190° C
Lamp OFF 191° C
Lamp ON 210° C
Lamp OFF 211° C
Lamp OFF 213° C
Lamp OFF 215° C
Lamp OFF 188° C
Lamp OFF 186° C
101-120 pages:
Lamp ON 205° C
Temp. decreases
by.2 5°C per page
51-62 pages:
Lamp ON 190° C
T emp. decreases by
.25° C per page
51-70 pages:
Lamp ON 210° C
T emp. decreases by
.25° C per page
120 + pages:
Lamp ON 200° C
Lamp OFF 201° C
63 + pages:
Lamp ON 187° C
Lamp OFF 188° C
71 + pages:
Lamp ON 205° C
Lamp OFF 206° C
2-24 Phaser 4500/4510 Service Manual
Page 59

Temperature Stabilization
The fuser automatically enters a stabilization process under two
circumstances:
■ When the printer is processing thick paper.
After 50 impressions of continuous printing on thick paper (Thick Paper 1
mode), the fuser lamp turns off, the main motor stops, and the fans rotate
at full speed until the temperature of both temperature sensors drops to
190° C or below. Then the printer continues printing the job. The process
for Thick P aper 2 is the same, except that it occurs after 30 impressions of
continuous printing on thick paper.
■ When the side fuser temperature sensor (STS) detects an abnormally
high temperature (over 245° C), the printer stops the print job and enters
the cool-down process consisting of:
■ Clearing the paper path of all paper
■ Continuing to run the main motor (Time-out 200 sec.)
■ Running the fans at full speed
■ Controlling fuser temperature with short lamp
Theory of Operation
This process continues until the target control temperature of 180° C 185° C (Standby) is reached.
Fuser Problems (U4 Error Code)
Major causes of a U4 error include the following:
■ Warm-up failure – Fuser warm-up not complete within 110 seconds after
starting.
■ Cool-down error – Cool-down process not complete within 200 seconds.
■ Low trouble tempe rature – The fuser temper ature drop s to the lo w troub le
temperature (approximately current control temperature, minus
approximately 25°C).
■ High trouble temper ature – The fuse r temperature rise s to the high troub le
temperature (approximately current control temperature, plus
approximately 35°C).
■ STS circuit open
■ STS failure – The heat rod remains on for at least 10 seconds after warm-
up has completed.
Phaser 4500/4510 Service Manual 2-25
Page 60

Theory of Operation
Power Shutoff to the Fuser
The printer shuts off power to the Fuser for the following reasons:
■ Fuser abnormality (U4)
■ Paper jam
■ Cover open — top, rear, duplex unit, stacker
■ Laser assembly (ROS) abnormality (U2)
■ CPU or NVRAM abnormality (U6)
■ Main motor assembly abnormality (U1)
■ Fan abnormality (U5)
■ Fuser Pause command issued
■ Xerographics failure
■ Duplex unit failure
■ Stacker failure
■ Option tray unit failure
2-26 Phaser 4500/4510 Service Manual
Page 61

Paper Exit Assembly
The paper exit assembly discharges the printed paper out of the printer,
sending it either to the standard output tray or to the optional stacker.
Exit motor assembly This motor drives the exit roller that conveys pap er to
each output tray. If the optional duplex unit is installed, this motor also
reverses and inserts paper into the duplex unit.
Exit roller This roller transports the printed paper sent out from the Fuser, to
the standard output tray.
Output tray full sensor This sensor detects that the standard output tray is full,
using the stack full actuator.
Stacker exit gate This gate switches the paper transport path interlocking with
the stacker gate link. When the gate solenoid assembly installed in the
optional stacker o per ates , the st ac ker gate link is pushed down by the spindle
of the solenoid assembly. The gate blocks the normal paper output path and
switches the output direction to the stacker output tray.
Theory of Operation
2
1
3
4
1.Output tray full sensor 3.Stacker exit gate
2.Exit roller 4.Exit motor assembly
s4500-024
Phaser 4500/4510 Service Manual 2-27
Page 62

Theory of Operation
Drive
Gear assembly housing The gears in this housing transmit power from the main
motor to various parts of the printer.
Gear assembly plate This transmits power from the main motor to the print
cartridge.
Link lever This connects and disconnects the drive force from the main motor
to the fuser assembly. When the top cover is opened, the link lev er pushes up
gear 8 in the gear assemb ly hou sing di sconne cting ge ar 9 and t hus , the fuser
assembly. As the link lever moves up and down, gear 4 in the gear assembly
plate moves right and left via g ear lin k 3, a nd d rive to the print cartridge drum
is connected or disconnected.
4
3
2
1
1.Main motor 3.Gear assembly housing
2.Gear assembly plate 4.Link lever
s4500-025s4500-025
2-28 Phaser 4500/4510 Service Manual
Page 63

Electrical
Theory of Operation
24 V interlock This safety switch interrupts 24 VDC from the LVPS to the
HVPS/engine logic board and main motor when the top cover is open. This
switch operates in series with the rear cov er switch. See “Schematic Diagram
of Phaser 4500 P ower Distribution and Interlocks” on page 2-31, or
“Schematic Diagram of Phaser 4510 Power Distribution and Interlocks” on
page 2-32.
5 V interlock This safety interrupts 5 VDC power from the LVPS to the LD
assembly of the laser assembly when the top cover is open. This interlock
works in series with the laser interlock. See “Schematic Diagram of Phaser
4500 Po wer Distrib ution and I nterlocks” on page 2-31, or “Schematic Diagr am
of Phaser 4510 P ower Distribution and Interlocks” on page 2-32.
Rear cover switch This safety switch interrupts 24 VDC from the LVPS to the
HVPS/engine logic board and main motor when the rear cover is open. This
switch operates in series with the 24 V interlock. See “Schematic Diagram of
Phaser 4500 Power Distribution and Interlocks” on page 2-31, or “Schematic
Diagram of Phaser 4510 Power Distribution and Interloc ks” on page 2-32.
Main fan This vents air inside the printer to prevent an excessive rise in the
inside temperature.
Sub fan This fan takes outside air into the printer to prevent an excessive rise
in the inside temperature. This is mounted near the laser assembly in the
center on the front side.
LVPS The low voltage power supply provides 5 V and 3.3 V for logic circuits,
5 V for the laser diode, and 24 V for motors and clutches. P4510: The LVPS
board includes the DC-DC converter (described below) as an integral part.
HVPS/engine logic board The functions of the HVPS and engine controller are
brought together on a single circuit board. The HVPS provides high AC and
DC voltages to the BCR (charging), magnet roller (development), tran sfer
roller (transfer), and detack saw (peeling). The engine logic controls the
printing operation according to the information obtained through
communications with the image processor and from sensors an d switches.
Image processor board This receives data from the host computer, performs
printing, and controls the whole printer.
Exit motor PWBA This controls the exit motor assembly according to a signal
from the HVPS/engine logic board.
Interlock switch assembly This assembly consists of the following two safety
switches. See “Schematic Diag ram of Phaser 4500 Power Distribution and
Interlocks” on page 2-31.
Top cover switch P4500: This safety interlock interrupts the INTERLOCK BEF
signal between the LVPS and the HVPS/engine logic board to indicate
that the top cover is open.
Laser interlock P4500: This safety s witch interrupts 5 VDC from the LVPS to
the LD assembly of the laser assembly when the top cover is open. This
switch operates in series with the 5 V interlock.
DC-DC converter The DC-DC converter uses 24 V and 3.3 V from the LVPS to
supply 5 V and 3.3 V to the image processor board. By using the 24 V, the
DC-DC converter supplies additional power for the optional hard drive and
several other subcircuits.
P4500: The DC-DC converter is on a separate circuit board from the LVPS.
P4510: The DC-DC converter is an integral part of the LVPS.
Phaser 4500/4510 Service Manual 2-29
Page 64

Theory of Operation
P4500P4510
3
8
7
1
2
4
1
12
11
1.LVPS (includes DC-DC converter in
7.5 V interlock
P4510)
2.Exit motor PWBA 8. 24 V interlock
5
6
9
10
s4510-026
3.Rear cover switch 9.Image processor board
4.Laser interlock (P4500 only) 10.HVPS/engine logic board
5.Top cover switch (P4500 only) 11.Sub fan
6.Main fan 12.DC-DC converter (separate board in
P4500; integrated into LVPS in
P4510)
2-30 Phaser 4500/4510 Service Manual
Page 65

Theory of Operation
Opt. 550-Sheet
Feeder
n
Front Panel
Scanner
Laser
Motor
Unit
LDD
5V
Interlock
Interlock
Switch
Assembly
Laser
Interlock
Top Cover
Switch
Fuser Assembly
Temperature
Sensor Assembly
Thermostat
Heater Rod(850W)
Heater Rod(650W)
TEMP.
L
INTERLOCK BEF
N
N
Image
Processor
Data and Control
Converter
Scanner Motor
Control
Fuser
Control
SG
/HEAT ON (650W)
5VDC
3.3VDC
DC-DC
A
B
SG
Interlock
/HEAT ON (800W)
24VDC
5VDC
Power Save
Control
24V
Opt. 550-Sheet
Feeder
PWBA
Feeder 550
24VDC
3.3VDC
Opt. 550-Sheet
Opt. 550-Sheet
Feeder
Feeder
PWBA
Feeder 550
24VDC
3.3VDC
Fuse
Rear Cover
Switch (24V)
24VDC AFT
5VDC
24VDC
Duplex Cover
Open Switch
Optional
Duplex Unit
Duplex
PWBA
24VDC
3.3VDC
BA
3.3VDC
Rear Cover
Open Switch
3.3VDC
HVPS Circuit
Main Motor
Control
Main Motor
Motor
RTNRTN
24VDC AFT
Optional
Stacker
Stacker
PWBA
24VDC
3.3VDC
MAIN MOTOR ON
MAIN MOTOR ALM
Fan
Control
3.3VDC
Exit
Motor
PWBA
24VDC AFT
Main Fan
RTN
24VDC
FAN MAIN ALARM
SG
Exit Motor
Control
HVPS/
Engine
Logic
CRU A, CRU B,
INA, INB, /INA,
A, B, /A, /B,
24VDC AFT
Exit
Motor
RTN
Sub Fa
RTN
24VDC
/INB
FAN SUB ALARM
LVPS
Heater
Control
AC N
AC L
Fuse
Power
Switch
Fuse
Low Voltage
Generation
24VDC
Supply
5VDC
Supply
24VDC
Inlet
FG
FG SG
3.3VDC
Supply
Fuse
SG
s4500-027
Schematic Diagram of Phaser 4500 Power Distribution and Interlocks
Phaser 4500/4510 Service Manual 2-31
Page 66

Theory of Operation
Front Panel
Laser
Unit
Fuser Assembly
Temperature
Sensor Assembly
Heater Rod(850W)
Heater Rod(650W)
Scanner
Motor
LDD
5V
Interlock
Thermostat
TEMP.
L
N
N
Image
Processor
Data and Control
Scanner Motor
Control
Fuser
Control
SG
INTERLOCK BEF
/HEAT ON (650W)
5VDC
3.3VDC
A
B
SG
5VDC
Interlock
/HEAT ON (800W)
24VDC
Power Save
Control
24V
Opt. 550-Sheet
Feeder
PWBA
Feeder 550
24VDC
3.3VDC
Opt. 550-Sheet
Feeder
PWBA
Feeder 550
24VDC
3.3VDC
Fuse
Rear Cover
Switch (24V)
24VDC AFT
Duplex Cover
Open Switch
Duplex Unit
5VDC
24VDC
3.3VDC
Optional
Duplex
PWBA
3.3VDC
24VDC
3.3VDC
Main Motor
Motor
24VDC AFT
Rear Cover
Open Switch
Optional
Stacker
Stacker
PWBA
24VDC
3.3VDC
HVPS Circuit
Main Motor
Control
MAIN MOTOR ON
RTNRTN
Main Fan
RTN
FAN MAIN ALARM
24VDC
Fan
Control
SG
Exit Motor
Control
HVPS/
Engine
Logic
3.3VDC
CRU A,CRU B, INA,INB
PWBA
RTN
24VDC AFT
24VDC AFT
Motor
Exit Motor
MAIN MOTOR ALM
Sub Fan
RTN
24VDC
/INA,/INB
A,B,/A,/B,
Exit
FAN SUB ALARM
LVPS
Heater
Control
AC N
AC L
Fuse
Power
Switch
Fuse
Low Voltage
Generation
24VDC
Supply
24VDC
3.3VDC
24VDC
5VDC
Supply
Inlet
FG
FG SG
3.3VDC
Supply
Fuse
SG
Schematic Diagram of Phaser 4510 Power Distribution and Interlocks
BA
DC-DC
Converter
s4510-027
2-32 Phaser 4500/4510 Service Manual
Page 67

Printer Options
Duplex Unit
Theory of Operation
Three options are available for the Phaser 4500/4510 printer:
■ Duplex unit
■ Stacker
■ 550-sheet feed er
Paper transport information for the option s is discussed earlier in this chapter.
The duplex unit used on the Phaser 4510 differs from the one used on the
Phaser 4500. While the two units fun ction e xactl y the same , the y use dif f erent
motors due to the difference in speed, and they are shaped differently due to
the change in the location of the cooling fan.
Drive Transmission Path
The rotating force of the duplex unit motor is transmitted by various gears to
components requiring mechanical drive as shown in this flow chart and the
gear layout that follows.
$UPLEX5NIT-OTOR
)DLE'EAR
2OLLER'EAR
)DLE'EAR
)DLE'EAR
)DLE'EAR
2OLLER'EAR
)DLE'EAR
2OLLER'EAR
S
Phaser 4500/4510 Service Manual 2-33
Page 68

Theory of Operation
Gear Layout
2
3
4
5
1
6
1.Roller gears 4.Idle gear 77
2.Idle gear 29 5.Duplex unit motor
3.Idle gear 47 6.Idle gear 57/37
Functional Components
Two-sided printing is enabled by mounting the duplex unit on the rear side of
the base engine.
Duplex unit switch This switch detects that the duplex unit lower housing and
duplex unit housing cover are closed.
Duplex unit sensor This sensor detects the presence or absence of paper in the
duplex unit.
Duplex unit fan This fan vents air within the duple x unit an d takes in out side air ,
to prevent abnormal temperature rise in the duplex unit.
Duplex roller This roller feeds the paper having the printed first surface back
into the printer through the duplex unit, to pr int on the seco n d sur face.
Duplex unit PWBA The CPU on the duplex unit PWBA receives instructions
from the HVPS/engine logic board and information from sensors and
switches, and controls paper transport through the duplex unit.
Duplex unit motor This motor drives the three duplex rollers, which transport
the paper through the duplex unit.
s4500-029
2-34 Phaser 4500/4510 Service Manual
Page 69

Phaser 4500 and 4510 Duplex Units
Theory of Operation
P4500
1
P4510
2
3
4
5
6
s4500-030
2
1
3
1.Duplex unit rollers 4.Duplex unit PWBA
2.Duplex unit sensor 5.Duplex unit switch
3.Duplex unit fan 6.Duplex unit motor
4
5
6
s4510-030
Phaser 4500/4510 Service Manual 2-35
Page 70

Theory of Operation
Stacker
Drive Transmission Path
The rotating force of the stacker motor assembly is transmitted by various
gears to components requiring mechanical driving force as shown in this flow
chart and the gear layout that follows.
Gear Layout
Gear 45
Gear 19
Lower OCT Roller
1
OCT Motor Assy
Gear 19/37
Offset Motor Assy
Cam Gear
Gear 45
Gear 19
Upper OCT Roller
s4500-031
2
3
4
5
s4500-032
1.Gear 45 4.Stacker motor assembly
2.Gear 19 5.Gear 19
3.Gear 19/37
2-36 Phaser 4500/4510 Service Manual
Page 71

Paper Transport Path
When the stacker is inst alled on the printer , the pap er is transported as shown
in the illustration on page 2-6. The main components that transport paper
through the stacker are shown in the diagram on page 2-4
Functional Components
Offset output is enabled by mounting the stacker on top of the 500-sheet
paper exit.
Stacker motor assembly This motor drives the lower stacker roller and upper
stacker roller, which transport printed paper to the stacker tray.
Offset motor assembly This motor drives the offset chute assembly via the gear
cam.
Gate solenoid assembly This solenoid switches the output paper path between
the standard and stacker paper output trays. When the gate solenoid
assembly activates, the solenoid armature pushes the stacker Gate Link to
operate the stacker exit gate, which reroutes the paper to the stacker paper
output tray.
Stacker PWBA The CPU on the stacker PWBA receives instructions from the
HVPS/engine logic board and information from sensors and switches, and
controls paper transport through the stacker.
Stacker rear cover switch This switch detects when the stacker rear cover is
open.
Stacker sensor This sensor detects the presence or absence of paper in the
stacker.
Stacker full sensor This sensor is located on the stacker PWBA, and detects
when the stacker output tray is full, using the stack full actuator.
Offset Sensor This sensor is located on the stacker PWBA, and detects an
offset operation, using the actuator in the Offset Chute.
Lower stacker roller This roller transports the printed paper coming out of the
Fuser to the Upper stacker roller.
Upper stacker roller This roller discharges the printed paper sent from the
Lower stacker roller into the stacker paper output tray.
Offset chute assembly This assembly is driven by the offset motor assembly
and Cam gear to mov e right and left during pap er output to off set the output of
the printer.
Theory of Operation
Phaser 4500/4510 Service Manual 2-37
Page 72

Theory of Operation
2
1
3
10
11
9
8
1.Stacker motor assembly 7.Offset motor assembly
4
5
6
7
s4500-033
2.Upper stacker roller 8.Gate solenoid assembly
3.Rear cover switch 9.Offset chute assembly
4.Full Stack Sensor 10.Stacker sensor
5.Offset Sensor 11.Lower stacker roller
6.Stacker PWBA
2-38 Phaser 4500/4510 Service Manual
Page 73
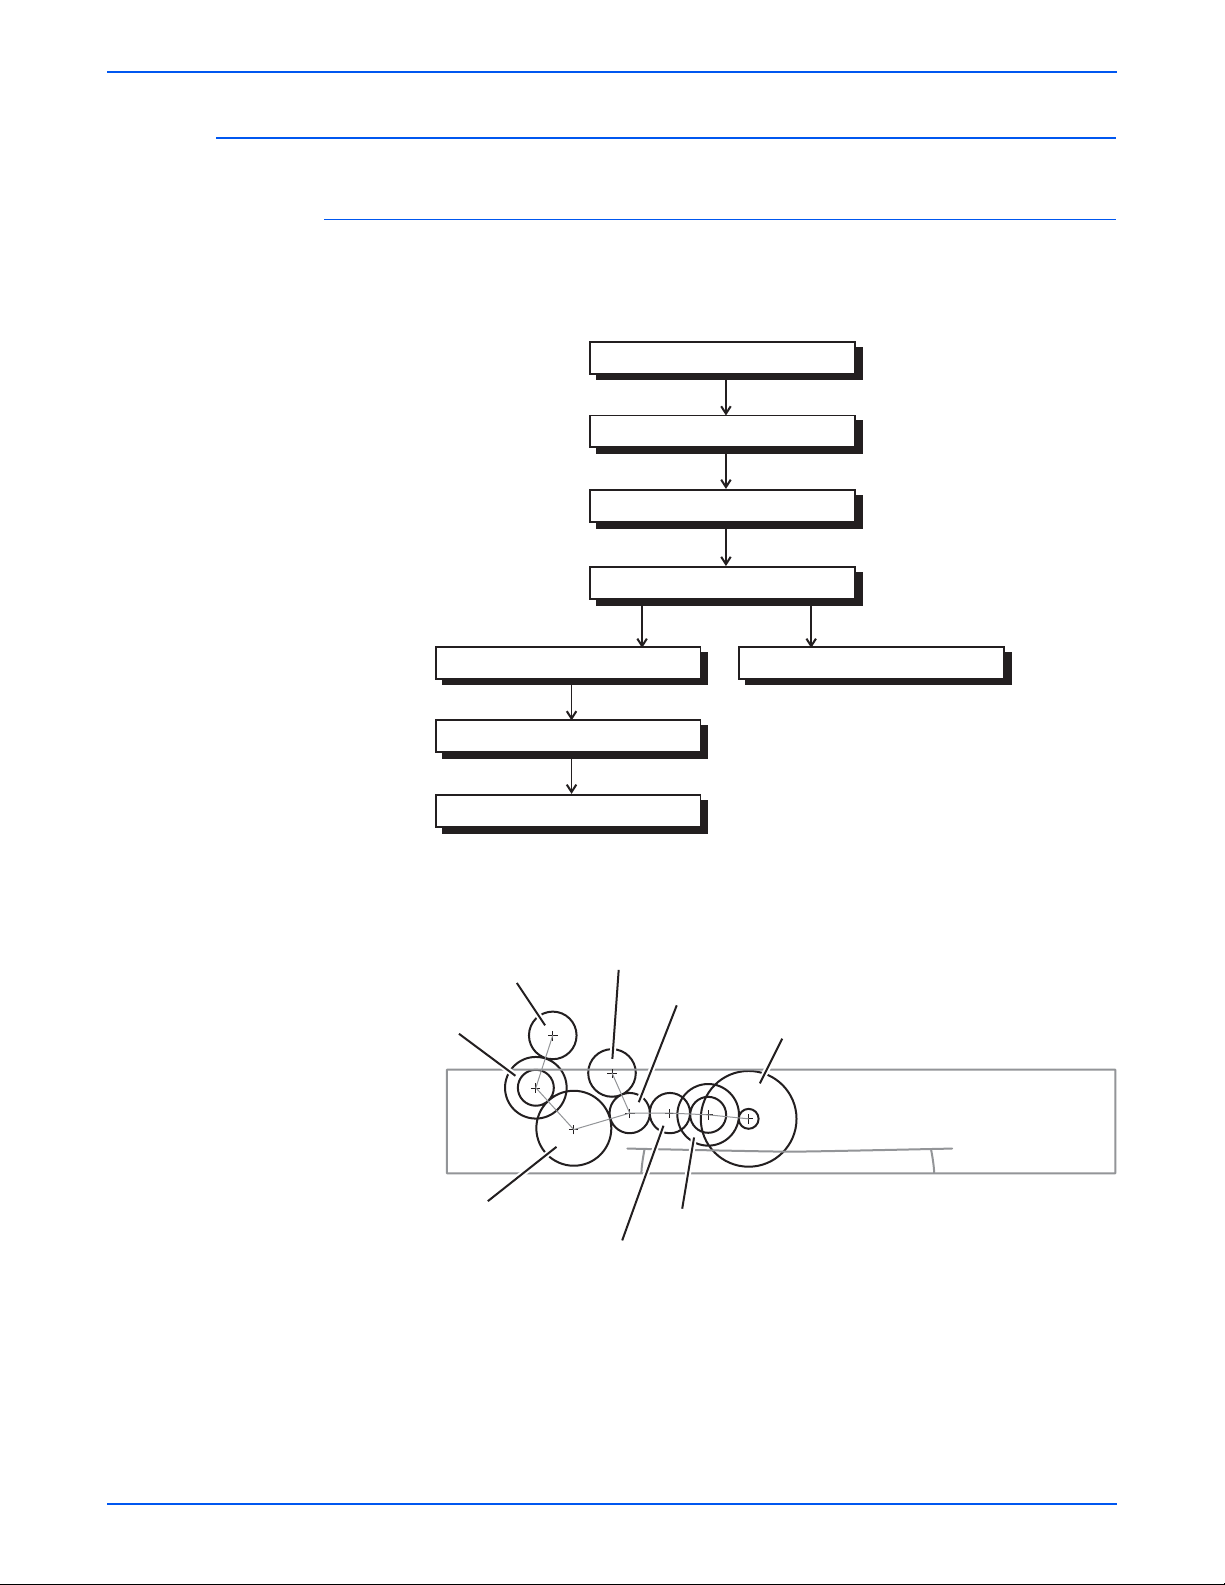
Optional 550-Sheet Feeder
Drive Transmission Path
The rotating force of the feeder motor is transmitted by various gears to
components requiring mechanical driving force as shown in this flow chart
and the gear layout that follows.
Theory of Operation
Feeder Motor
Optional Feeder Gear 2
Optional Feeder Gear 3
Optional Feeder Gear 4
Optional Feeder Gear 5 Feed Clutch Assembly
Optional Feeder Gear 6
Turn Roll Clutch
Gear Layout
2
3
4
1
8
6
5
7
s4500-034
s4500-035
1.Optional feeder gear 6 5.Feeder motor
2.Turn roller clutch 6.Optional feeder gear 2
3.Feed clutch 7.Optional feeder gear 3
4.Optional feeder gear 4 8.Optional feeder gear 5
Phaser 4500/4510 Service Manual 2-39
Page 74

Theory of Operation
Functional Components
The paper tray used in the optional feeder is identical to the 550-Sheet paper
tray used by the base engine, so the description of the paper tray is omitte d
here.
Option paper size switch assembly A bank of switches for setting the size of
paper supplied from each paper tray is mounted in the left tray gu ide . A signal
indicating the paper size is transmitted as a voltage to the HVPS/engine logic
board.
No paper actuator This actuator is kept in a raised position by the paper in the
tray. If the paper tray runs out of paper, the no paper actuator drops and the
flag of the no paper actuator moves from between the sensor arms, allowing
the sensor to turn on.
No paper sensor This is a photo sensor that remains in the OFF state when
paper is present in the tra y. The sensor turns on when there is no paper in the
tray and the flag on the no paper actuator moves out of the sensor.
Low paper actuator When paper is low in the paper tray, the arm of the low
paper actuator is pushed up by the bottom plate assembly, moving the
actuator flag out of the sensor.
Low paper sensor This photo sensor remains in an OFF state until the paper
level in the tray drops sufficiently to move the low paper actuator flag out of
the sensor.
Optional 550-sheet feeder This is a mechanism for supplying paper from the
paper tray into the printer. The driving force from the feeder motor is
transmitted via the feed clutch assembly to the feed roller and nudger roller,
transporting paper from the tray into the printer.
As the nudger roller picks up paper and t he paper level lowers, the position of
the nudger roller drops accordingly. The lowered nudger roller pushes down
the lock lever of the bottom plate assembly, releasing it. The spring below the
bottom plate assembly pushes it up and lifts the paper, which lifts the nudger
support assembly off of the lock lever of the bottom plate assembly stopping
its upward motion.
Turn roller This roller, working with the turn pinch roller, advances the paper
picked b y the n udger and feed rollers into the printer. The feeder motor drives
the turn roller through the turn roller clutch.
550-sheet feeder PWBA A CPU installed in the 550-sheet feeder PWBA
receives instructions from the HVPS/engine logic board and from sensors and
switches; the CPU controls feeding operation in the 550-sheet feeder.
2-40 Phaser 4500/4510 Service Manual
Page 75

Theory of Operation
2
1
3
8
1.Optional 550-sheet feeder 5.Low paper sensor
2.Turn roller 6.Low paper actuator
4
5
6
7
s4500-036
3.No paper actuator 7.550-sheet feeder PWBA
4.No paper sensor 8.Option paper size switch assembly
Phaser 4500/4510 Service Manual 2-41
Page 76

Theory of Operation
2-42 Phaser 4500/4510 Service Manual
Page 77

Error Messages and Codes
In this chapter...
■ Introduction
■ Servicing Instructions
■ Entry Level Fault Isolation Procedure
■ Service Diagnostics
■ System Start-Up and POST
■ Operating System and Application Problems
■ Troubleshooting Procedures for Error Messages and Codes
■ Inoperable Printer
Chapter
3
Page 78

Error Messages and Codes
Introduction
Servicing Instructions
This chapter covers troubleshooting procedures for problems in the
Phaser 4500/4510 that generate error messages or fault codes or both that
appear on the control panel or in the Service Usage Profile report, and serves
as the entry point into the troubleshooting process. Troubleshooting of
problems not directly indicated b y or associated with an er ror message or f ault
code is covered in “General Troubleshooting” on page 4-1. Print quality
problems are covered in “Print-Quality Troubleshooting” on page 5-1.
This set of instructions is an overview of the path a service technician should
take, using this man ual, t o se rvice the print engine and options . If y ou choose
not to use the instructions, it is recommended that you start at the appropriate
troubleshooting table and proceed from there.
Always follow the safety measures detailed in “Service Safety Summary” on
page xv when servicing the printer.
Step 1: Identify the Problem:
1.Verify the reported problem does exist.
2.Check for any error codes and write them down.
3.Print normal customer prints and service test prints.
4.Make note of any print-quality problems in the test prints.
5.Make note of any mechanical or electrical abnormalities present.
6.Make note of any unusual noise or smell coming from the printer.
7.Print a Service Usage Profile, if the printer is able to print.
8.View the Engine Error and Jam Histories under the Service Tools Menu
9.Verify the AC input power supply is within proper specifications by
measuring the voltage at the electric outlet while the printer is running.
3-2 Phaser 4500/4510 Service Manual
Page 79

Error Messages and Codes
Step 2: Inspect and Clean the Printer:
1.Switch OFF printer power.
2.Disconnect the AC power cord from the wall outlet.
3.Verify the power cord is free from damage or short circuit and is connected
properly.
4.Remove the print cartridge and protect it from light.
5.Inspect the printer interior and remove any foreign matter such as paper
clips, staples, pieces of paper, dust or loose toner.
6.Do not use solvents or chemical cleaners to clean the printer interior.
7.Do not use any type of oil or lubricant on printer parts.
8.Use only an approved toner vacuum.
9.Clean all rubber rollers with a lint-free cloth, dampened slightly with cold
water and mild detergent.
10.Inspect the interior of the printer for damaged wires, loose connections,
toner leakage, and damaged or obviously worn parts.
11.If the print cartridge appears obviously damaged, replace with a new one.
Step 3: Find the Cause of the Problem:
1.Use the Error Messages and Codes and troubleshooting procedures to find
the cause of the problem.
2.Use Service Diagnostics to check the printer and optional components.
3.Use the Wiring Diagrams and Plug/Jack Locator to locate test points.
4.Take voltage readings as instructed in the appropriate troubleshooting
procedure.
Step 4: Correct the Problem:
1.Use the Parts List to locate a part number
2.Use the FRU Disassembly procedures to replace the part.
Step 5: Final Checkout
T est the printer to be sure you have corrected the initial problem and there are
no additional problems present.
Phaser 4500/4510 Service Manual 3-3
Page 80

Error Messages and Codes
Using the Troubleshooting Procedures
1. Each Step in a Troubleshooting Procedure instructs you to perform a
certain action or procedure. Follow the steps sequentially in the order
given until the problem is fixed or resolved.
2. The Actions and Questions box contains additional information and/or
additional procedures you must follow to isolate the problem.
3. When a procedure instructs you to test a component using service
diagnostics, see “Service Diagnostics” on page 3-7 for the detailed steps
and functions for testing p arts of the printer.
4. The action is followed by a question. If your response to the questio n is
“Yes”, then follow the instructions for a “Yes” reply . If y our respo nse to the
question is “No”, then follo w the instructions for a “No” reply.
5. Troubleshooting Procedures frequently ask you to take voltage readings
or test for continuity at certain test points within the printer. For detailed
diagrams, see chapter 10, Wiring Diagrams for complete information on
test point locations and signal names.
6. Troubleshooting Procedures often ask you to replace a printer
component. Chapter 8 FRU Disassembly provides detailed steps for
removing and replacing all major parts of the printer. Chapter 9, Parts
Lists details the location and part number for all spared parts of the
printer.
General Notes on Troubleshooting
1. Unless indicated otherwise, the instruction “switch ON printer main
power” means f or you to switch ON printer power and let the printer
proceed through POST to a ‘Ready’ condition.
2. When instructed to take voltage, continuity or resistance readings on
wiring harness, proceed as follows; Check P/J 232–1 to P/J 210–5 by
placing the red probe (+) of your met er on pin 1 of P/ J 232 , a nd pla ce th e
black probe (–) of your meter on pin 5 of P/J 210.
3. When you are instructed to take resistance readings between
“P/J 232 <=> P/J 210” (without specified pin numbers), check all pins. See
“Wiring Diagrams” on page 10-1 for the location of all wiring harnesses
and pins.
4. When you are instructed to take a voltage reading, the black probe (–) is
generally connected to a pin that is either RTN (Return) or SG (Signal
Ground). You can substitute any RTN pin or test point in the printer, and
you can use FG (frame gr ound) in place of any SG pin or test point. To
locate connectors or test points, see “Wiring Diagrams” on page 10-1 for
more information.
5. Before measuring vo ltages make su re the printer is swit ched ON, the print
cartridge and the paper trays are in place, and the interlock switches are
actuated, unless a troubleshooting procedure instructs otherwise.
6. All voltage value s given in the troubleshooting procedures are
approximate values. The main purpose of voltage readings is to
determine whether or not a component is receiving the correct voltage
value from the power supply and if gating (a voltage drop) occurs during
component actuation. Gating signals may be nothing more than a pulse,
resulting in a momentary drop in voltage that may be difficult or
impossible to read on the average multi-meter.
3-4 Phaser 4500/4510 Service Manual
Page 81

Unless otherwise specified, the following voltage tolerances are used
within this section:
Stated Measured
+3.3 VDC +3.135 to +3.465 VDC
+5.0 VDC +4.75 to +5.25 VDC
+24.0 VDC +21.6 to +26.4 VDC
0.0 VDC Less than +0.5 VDC
7. When a troubleshooting procedure instructs you to replace a non-spared
component and that component is part of a parent assembly, you should
replace the entire parent assembly.
Accessing Fault Histories
■ Print (if possible) the Service Usage Profile.
a. At the printer’s control panel, go to the Troubleshooting Menu and
b. From the Service Tools menu select Service Usage Profile. The
Or...
Error Messages and Codes
select Service Tools.
fault histories are detailed in this report log.
■ View the printer’s fault history on the control panel.
■ Go to Troubleshooting Menu --> Service Tools --> Engine Error
History or Jam History.
Refer to the Error Message Summary tables that begin on page 3-21 to
interpret the numeric codes that appear in the printed or displayed fault
histories.
Phaser 4500/4510 Service Manual 3-5
Page 82

Error Messages and Codes
Entry Level Fault Isolation Procedure
Use this procedure to quickly determine the general area of the printer in
which the problem is located.
Troubleshooting Procedure
Steps Actions and Questions Yes No
1 Switch the printer OFF then ON.
Does the printer display READY TO
PRINT on the control panel within 1
minute?
2 Does the printer display an error
message or code?
3 Is the control panel LCD/LED Display
defective, or the buttons inoperable?
4 Run Test Prints from all input trays:
1.In the Main Menu, select
Troubleshooting and press the OK
button.
2.Select Print Quality Problems and
press the OK button.
3.Select Test Prints and press the OK
button.
Does the printer display an error
message or code while printing?
Go to Step 4 Go to step 2
Go to the
procedure for
that error
message or
code.
Go to Control
panel
Troubleshooting
procedure
Go to the
procedure for
that error
message or
code.
Go to step 3
Go to step 4
Go to step 5
5 Does the printer produce the test
prints?
6 Evaluate the test prints.
Does the print quality meet or exceed
the print quality specifications?
7 Enter Service Diagnostics and
generate Print Engine Test Prints from
all input trays.
Does the printer produce the test
prints?
8 Request the customer to send a print
job from their application.
Did the job print successfully?
3-6 Phaser 4500/4510 Service Manual
Go to step 6 Go to step 7
Go to step 8 Go to “Print-
Quality
Troubleshooting
” on page 5-1
Go to “Image
Processor
Isolation” on
page 4-33
Problem solved;
return to Final
Checkout in the
“Servicing
Instructions” on
page 3-2.
Go to
“Inoperable
Printer” on
page 3-72
Go to
“Operating
System and
Application
Problems” on
page 3-19
Page 83

Service Diagnostics
Entering without rebooting the printer:
Error Messages and Codes
The Phaser 4500/4510 Laser Printer has built-in diagnostics to aid in
troubleshooting problems with the printer. The Service Diagnostics Menu
provides a means to test sensors, motors, switches, clutches, fans and
solenoids. Diagnostics also contain built-in test prints , printer status and some
NVRAM access.
Service Diagnostics are to be executed through the control panel by a
certified service technician only. Service Diagnostics can be entered one of
two ways:
1. From the printer’s main menu, scroll to Troubleshooting and press the
OK button, then scroll to Service Tools and press the OK button.
2. Hold down both the Up and Down arrow b uttons f or ab out three seconds .
When the hidden Service Diagnostics menu appears, scroll to Run
Service Diagnostics and press the OK button.
Entering by rebooting the printer:
1. Turn the printer power OFF.
2. Hold down the Back and Information (P4500) or Help (P4510) buttons
simultaneously and turn the printer back ON.
3. Continue to hold the buttons until the following message is displayed on
the control panel: Entering Service Diagnostics, and then release the
buttons.
4. The control panel displays the Service Diagnostics Menu.
You can print a Service Diagnostics Menu Map by highlighting
Menu Map, and pressing the OK button. The printer will run through POST
and return to Ready. You will need to re-enter service diagnostics.
Print Service
Phaser 4500/4510 Service Manual 3-7
Page 84

Error Messages and Codes
Service Diagnostics Menu Map
Print Service Menu Map Prints this page.
General Status
Engine ROM Version
Engine Print Counter
Engine Configuration
Print Resolution
Read Fuser Temperature
Provides current print engine status.
Engine Test Print Configures print parameters and initiates the
test print.
Print Test Pattern
Input Tray
Output Tray
Duplex
Print Quantity
Print Resolution
Engine NVRAM Adjustments Perform NVRAM Adjustments
essential to the performance of the printer.
Laser Power
Tray 1 Process Direction
Tray 2 Process Direction
Tray 3 Process Direction
Tray 4 Process Direction
Tray 1 Scan Direction
Tray 2 Scan Direction
Tray 3 Scan Direction
Tray 4 Scan Direction
Duplex Process Direction
Duplex Scan Direction
Motors/Fans Tests Tests the functionality of motors/fans.
Duplex Motor High
Duplex Motor Low
Exit Motor Forward
Exit Motor Reverse High
Exit Motor Reverse Low
Main Motor
Fan Motors High Speed
Fan Motors Stop
Laser Scan Motor
Stacker Motor
Stacker Offset Motor
Tray 3 Feed Motor
Tray 4 Feed Motor
Main Motor+Clutch/Sol Tests Runs main drive motor with
each individual clutch.
Motor + Registration Roll
Motor + Tray 1 Feed
Motor + Tray 2 Feed
Motor + Tray 3 Feed
Motor + Tray 4 Feed
Motor + Tray 3 Turn Roll
Motor + Tray 4 Turn Roll
Sensor Tests Tests the functionality of sensors/switches/
options by manually toggling each sensor or installing an
option.
Top Cover Switch
Rear Cover Switch
Duplex Cover Switch
Stacker Cover Switch
Paper Tray Size Read
Tray 1 Size
Tray 2 Size
Tray 3 Size
Tray 4 Size
Print Cartridge Switch
Toner Sensor
Registration Sensor
Exit Sensor (Fuser)
Duplex Sensor
Stacker Sensor
Stacker Full Sensor
Output Tray Full Sensor
Tray 2 Low Paper
Tray 3 Low Paper
Tray 4 Low Paper
Tray 1 No Paper
Tray 2 No Paper
Tray 3 No Paper
Tray 4 No Paper
Duplex Unit Presence
Stacker Unit Presence
Solenoid Tests Tests the functionality of printer solenoids.
Stacker Gate Solenoid
Clutch Tests Tests the functionality of printer clutches.
Registration Roll
Tray 1 Feed
Tray 2 Feed
Tray 3 Feed
Tray 4 Feed
Tray 3 Turn Roll
Tray 4 Turn Roll
Controller NVRAM Access Resets the PS NVRAM locations
to factory defaults.
Reset PostScript NVRAM
Factory Reset NVRAM
Exit Exits service diagnostics and reboots the printer.
For Authorized Service Personnel Use Only. Service Menu
functions are to be used by Xerox service personnel and
authorized service providers only. The printer can be damaged by
improper use of the built-i
n service tests.
3-8 Phaser 4500/4510 Service Manual
Page 85

Service Diagnostic Control Panel Button Descriptions
Button Function
BACK Returns to the prior higher level menu structure, if available.
If help text is displayed on the control panel, pressing BACK will
restore the current menu item and remove the help text.
CANCEL Terminates the current test.
Cancels current INFO display.
Error Messages and Codes
INFO (P4500)
or
HELP (P4510)
UP Scrolls up one menu item within a menu list. This control does not
DOWN Scrolls down one menu item within a menu list.
OK Enters the highlighted menu. Executes the current test item.
Using Service Diagnostics
Most of the diagnostic tests are straightforward and require no additional
explanation, b ut there are some t hat r equire t hat specific cond itions b e met to
achieve meaningful results. These instructions cover each of the test groups,
listing special instructions, conditions, or other information necessary to
successfully interpret the results of the diagnostic tests.
Provides help information, if available.
Pressing again restores the current menu item and removes the help
text.
‘wrap’.
Used to increment data in tests requiring user input.
This control does not ‘wrap’, the end of a menu list is designated by
three asterisks.
Used to decrement data in tests requiring user input.
Used to select a data value entered by the user.
General Status
The General Status tests provide information about the current status of the
printer. These values are read-only and cannot be changed.
Engine ROM Version Lists the version number of the code stored in the engine
ROM and its checksum value.
Engine Print Count Lists the printer’s life count, th e number of prints made since
the printer’s activation. This page count is reset if the HVPS/engine logic
board is replaced.
Engine Configuration Lists the configurations set for the engine . This report is of
very limited use to the service technician; it is mainly intended for
manufacturing use.
Print Resolution Reports the current print resolution setting for the engine test
print. The default setting when entering diagn ostics is 1200 dpi.
Read Fuser Temperature Shows the current fuse r temperature in degrees C.
Reports the fuser temperature only in the Standby mode.
Phaser 4500/4510 Service Manual 3-9
Page 86

Error Messages and Codes
Engine Test Print
You can use Engine Test Print (see “Engine Test Print” on page 6-4) to
identify, repair, and validate the operability of printer Xerographics and paper
handling from all paper sources, options, and output destinations.
Print Test Pattern Starts the print.
Input Tray Lets you select the tray used as paper source.
Output Tray Lets you select the output location.
Duplex Turns two-sided printing on or off if the duplex unit is installed.
Print Quantity Allows you to select the number of test prints to run. Use the OK
button to select which digit to change, use the UP or DOWN buttons to
change the value of the digit, and use the Back button to set the selection. If
Duplex is set to ON, the quantity selected indicat es the number of two-sided
prints.
Print Resolution Allows you to select either 600 or 1200 dpi as the print
resolution for engine test prints . The default setting when entering diagnostics
is 1200.
Engine NVRAM Adjustments
These adjustments allow you to change printer settings th at control the po wer
of the laser beam, and that control the registration of the image on the paper.
Laser Power Adjusts the power of the laser beam. Adjustment is done on a
scale of 0-8, with 4 being the factory def ault.
Tray 1/2/3/4 Process Direction Adjusts the image registration in the process
direction on paper coming from one of the paper trays. Increasing or
decreasing the set value by one number moves the leading edge of the print
area 0.5 mm closer to or farther from the edge of the paper.
Tray 1/2/3/4 Scan Direction Adjusts the image registration in the scan direction
on paper coming from one of the paper tr a ys. In creasing or decreasing t he set
value by one number moves the side edge of the print area 0.5 mm closer to
or farther from the edge of the paper.
Duplex Process Direction Adjusts the image registration in the process direction
on paper coming from the duplex unit. Increasing or decreasing the set value
by one number moves the leading edge of the print area 0.5 mm closer to or
farther from the edge of the pape r.
Duplex Scan Direction Adjusts the image registration in the scan direction on
paper coming from the duplex unit. Increasing or decreasing the set value by
one number moves the leading edge of the print area 0.5 mm closer to or
farther from the edge of the pape r.
Motors/Fan Test
Individually turns on each drive motor or fan. In each case except the stacker
offset motor, the sound of the motor running is the indication that the ite m
passed or failed the test. In the case of the stac ker offset motor, the motion of
the offset chute is the indicator.
Duplex Motor (All tests) The test runs the motor about three seconds, then
stops it. The test runs the motor e ven when the duple x u nit is open or a printer
cover is open.
3-10 Phaser 4500/4510 Service Manual
Page 87

Error Messages and Codes
Not
Exit Motor (All tests) The test runs the motor about three seconds, then stops
it. Print engine top and rear covers m ust be closed and print cartridge must be
installed for the motor to run.
Main Motor The test runs the motor for one minute or until you press the Back
button to stop it. Print engine top and rear covers must be closed and print
cartridge must be installed for the motor to run.
Fan Motor High Speed The test runs the main and sub fans for about three
seconds, then returns them to low speed. The test runs with covers open.
Fan Motor Stop The test stops the main and sub fans for about three seconds,
then turns them on again at low speed. The test runs with covers open.
Laser Scan Motor The test runs the motor about three seconds, then stops it.
The test runs with covers open.
Stacker Motor The test runs the motor about three seconds, then stops it. The
test runs with print engine covers open.
Stacker Offset Motor The test runs the motor to move the chute once in each
direction. The test runs with covers open.
Tray 3/4 Feed Motor The test runs the motor about three seconds, then stops it.
The test runs with print engine covers open. Atte mpting to test a tray that is
not installed results in an “Option Not Installed” message.
Main Motor + Clutch/Sol Tests
Runs the main motor and activates the clutch selected to test the drive.
Tray 1/2/3/4 Feed Tests the drive to the feeder in the selected tray.
Tray 3/4 Turn Roller Tests the drive to the turn roller in the selected tray.
e
These tests feed a sheet of paper into the registration roller nip that must
be cleared following the test.
Sensor Tests
Tests the functionality of sensors/switches/options when the sensor or switch
is manually toggled, or when either the duplex unit or stacker is installed.
Top Cover Switch Tests the circuit (not just a single swit ch) affected by opening
the top cover. The prin t ca rtridge must be installe d an d the re ar cover closed
for this test to be effective. Toggle the switch by opening and closing the top
cover. “Open” or “Closed” indications appear on the control panel.
Rear cover switch Tests the circuit (not just a single switch) aff ected b y opening
the rear cover. The print cartridge must be installed and the top cover closed
for this test to be effective. Toggle the switch by opening and closing the rear
cover. “Open” or “Closed” indications appear on the control panel.
Duplex Cover Switch Tests the circuit affected by opening the duplex unit.
Toggle the switch by opening the duplex unit rear cover.
Stacker Cover Switch Tests the circuit affected by opening the stacker rear
cover.
Paper Tray Size Read Displays the paper size selected by the position of the
paper end guide in the paper tray. This test only tests the operation of the
paper size switch assembly. It does not recognize custom paper sizes.
Phaser 4500/4510 Service Manual 3-11
Page 88

Error Messages and Codes
Print Cartridge Switch Checks for the presence of the print cartridge. Toggle the
switch by partially removing the print cartridge. Displays “Installed” or “Not
installed”
Toner Sensor Checks that there is toner in the print cartridge. Displays “Toner
Normal” when the print cartridge with toner is in place, and displays “Toner
Low” when the print cartridge is partially removed or the toner quantity is low.
Registration Sensor Reports the status of the registration sensor. Reports
“Without paper” when the actuator is in the resting position, an d reports “With
paper” when the actuator is moved by paper in transport.
Exit Sensor (Fuser) Reports the status of the exit sensor in the fuser. Reports
“Without paper” when the actuator is in the resting position, an d reports “With
paper” when the actuator is moved by paper in transport. You can manually
toggle the sensor by opening the exit gate on the fuser and pushing the
actuator near the center of the fuser.
Duplex Sensor Reports the status of the duplex sensor. Reports “Without
paper” when the actuator is in the resting position, and reports “With paper”
when the actuator is moved by paper in the duplex unit. You can manually
toggle the sensor by remo ving the inner chute (b lac k plastic) and pressing the
actuator, which is just right of center.
Stacker Sensor Reports the status of the stacker sensor. Reports “Without
paper” when the actuator is in the resting position, and reports “With paper”
when the actuator is moved by paper in the stacker. You can manually toggle
the sensor by opening the stacker rear cover and pressing the actuator.
Stacker Full Sensor Reports the status of the stacker full sensor in the stacker.
Reports “Not Full” when the actuator is in the resting position, and reports
“Full” when the actuator is raised by paper accumu lating on the stac ker outpu t
tray. You can manually toggle the sensor by lifting the actuator bail at the
stacker exit slot.
Output Tray Full Sensor Reports the status of the output tray full sensor in the
standard output tra y. Reports “Not Full” when the actuator is in the resting
position, and reports “Full” when the actuator is raised by p aper accum ulating
on the standard output tray. You can manually toggle the sensor by lifting the
actuator bail at the standard output exit slot.
Tray 2/3/4 Low Paper Tests the operation of the Low Paper sensor in the 550-
sheet feeders. Reports “Not Low” in the resting position, and “Low” when
lifted. You can test the sensor by removing all but three or f our sheet s of paper
from the cassette in that tray and reinserting it. Or you can remove the
cassette, reach into the tray cavity, and operate the actuator manually. The
actuator is located near the top and rear of the cavity on right side.
Tray 1/2/3/4 No Paper Tests the operation of the No Paper sensor in each tray.
Reports “Without Paper” in the resting position, and “With Paper” when lifted.
You can test the sensor by removing all paper from the cassette in that tray
and reinserting it. Or you can remove the cassette, reach into the tray cavity,
and operate the actuator manually. The actuator is located at the top and rear
of the cavity in the center.
Duplex Unit Presence Reports whether the duplex unit is “Installed” or “Not
Installed.” You can test by removing or installing the duplex unit and restarting
the printer, then running the Duplex Unit Presence test.
Stacker Unit Presence Repor ts wh et he r th e sta cker is “Installed” or “Not
Installed.” You can test by removing or installing the stacker and restarting the
printer, then running the stacker Unit Presence test.
3-12 Phaser 4500/4510 Service Manual
Page 89

Sensor Locations in the Paper Path
4
2
6
Error Messages and Codes
5
3
1
7
8
9
10
11
12
13
1.Registration sensor 8.Tray 2 no paper sensor
2.Fuser exit sensor 9.Tray 2 low paper sensor
3.Output tray full 10.Tray 3 no paper sensor
4.Stacker sensor 11.Tray 3 low paper sensor
5.Stacker full 12.Tray 4 no paper sensor
s4500-270
6.Duplex unit sensor 13.Tray 4 low paper sensor
7.Tray 1 no paper sensor
Phaser 4500/4510 Service Manual 3-13
Page 90

Error Messages and Codes
Not
Solenoid Test
Tests the functionality of the printer’s only solenoid.
Stacker Gate Solenoid This test is available at all times, but runs only when a
stacker is installed. Attempting to run the test without a stacker results in the
“Option not installed.” message. You can view the stacker Gate operation by
opening the rear cover.
Clutch tests
Tests the functionality of the printer clutches. The audible click of the clutch
engaging is the only indicator of success. The feed and turn roller clutches
listed here can be tested in conjunction with the main motor.
Registration Roller Tests the clutch that couples drive power to the registration
roller.
Tray 1/2/3/4 Feed Tests the clutch that couples drive power to the feed roller for
the selected tray.
Tray 3/4 Turn Roller Tests the clutch that couples drive power to the turn roller
for the selected tray.
Controller NVRAM Access (NVRAM Reset)
This menu allows you to reset the PostScript NVRAM locations to factory
defaults.
e
Refer to “Resetting All Printer Default Set tings (PostScript NVRAM)” on
page 6-13 for more details.
Reset PostScript NVRAM Resets the PS NVRAM. Yo u ar e pr om p te d to conf irm
your decision to perform a reset operation.
Factory Reset NVRAM Allows you to reset the PS NVRAM locations to factory
defaults. This tests is password protected to allow access only to certified
Service Personnel. The password to access the reset functions is 4370. To
enter the password, you use the OK button to move from digit to digit on the
display, you use the Up and Down Arrow buttons the change the value of the
digit, and when the password is correct, you use the Back button to enter the
selection. After you enter the password, you are prompted to confirm your
decision to perform a reset operation.
Exit
Reboots the Printer out of Service Diagnostics
3-14 Phaser 4500/4510 Service Manual
Page 91

System Start-Up and POST
Power On Self Test (POST)
The following tests are performed when the printer is powered on, after the
boot loader runs, and before the operating system is loaded and initialized.
POST diagnostics are intended to provide a quick means of isolating a
defective subsystem associated with the image processor board and SDRAM.
POST returns control to the boot loader and the operating system is loaded.
The operating system then loads the imaging processing software. If POST
detected any soft err ors , a messa ge is printed in a g r ay box on the start page.
If POST detects any hard errors, both the control panel and health LED blink
the error code pattern, see “LED Blink Patterns” on page 3-16.
POST Startup indications
■ At power-on the hardware default is to turn on the IP board ‘health’ LED.
Error Messages and Codes
■ The image processor board ‘health’ LED is turned off.
■ The control panel display is reset (addressable area becomes “gray”).
■ The Red LED turns on.
■ The backlight is turned on (normal intensity), with nominal contrast
display for 1/4 second.
■ The control panel display ar ea is turned on, dark black for 1/4 second.
■ The control panel display is cleared for 1/4 second.
■ The backlight is turned off with nominal intensity for 1/4 second.
■ The POST Vn.nn message appears, and tests are quickly executed.
■ If any tests fa il, the co ntro l pa nel scr een f r eezes with the name of the test
displayed and the line posted is “Call Customer Service”.
■ After the POST tests have finished running, the Xerox ‘splash screen’ is
posted to the control panel and PostScript begins initialization.
Phaser 4500/4510 Service Manual 3-15
Page 92

Error Messages and Codes
POST Faults
There are two kinds of faults: soft and hard.
A soft fault is any fault that is discovered by POST, but does not prevent the
operating system from initializing and becoming available as a tool for
troubleshooting. These POST faults do not stop execution and are reported
on the Start Page in a gray box after the system is running.
A hard fault is any fault discovered by POST that prevents the operating
system from initializing successfully. A hard fault prevents the system from
further execution and is halted with blinking LEDs (control panel and health
LED). The test name of the test that failed is displayed on the control panel.
Fault Reporting Devices
There are four fault presentation devices.
■ All soft faults are printed on the StartPage.
For hard faults:
■ The health LED flashes according to the fault code.
LED Blink Patterns
■ The control panel LED flashes in unison with the health LED.
■ The last posted message to the graphic control panel is present.
For faults identified as hard faults, the POST firmware causes the PS health
LED to blink in a particular pattern to identify the fault. There are short and
long blinks. A long blink is worth 5 and a short blink is worth 1. If a fault blink
pattern is flashed as long, long, short, short, this is fault code 5+5+1+1=12,
which indicates a failure in the CPU interrupt test. See “POST Diagnostic T est
Descriptions” on page 3-17.
The exception to the abov e pattern is a RAM test error. The RAM tests hav e a
special blink pattern and the control panel displa ys “RAM Error”. During pow er
up the control panel LED is on. If the RAM tests fail, the image processor
board health LED is turned off, and the control panel LED is red. At 1/2second intervals, the health LED and the control panel LED toggle
continuously.
3-16 Phaser 4500/4510 Service Manual
Page 93

POST Diagnostic Test Descriptions
Fault
Test
Code Description
Error Messages and Codes
SDRAM
Real Time
Clock
I/O ASIC
Memory
EEPROM
Ethernet
CPU
Interrupts
USB
Real Time
Clock
14
10
11
12
13
14
(Hard) This test fails if the boot loader finds no RAM
present or faulty RAM.
1
Boot loader posts the message “RAM ERROR” to
the control panel and blinks the control panel LED at
an even rate.
(Soft) Synchronizes an internal counter to the
rollover of the seconds count in the Real Time Clock
chip.
3
4
(Hard) This test determines if the I/O chip is
functioning properly.
(Hard) This test checks 64-bit reads and writes to
memory.
(Hard) This test checks addressing of the EEPROM.
(Hard) This test checks the ethernet core.
(Hard) This test checks that each interrupt source to
the CPU is functioning.
(Hard) This test checks that the USB core is
functioning properly.
(Soft) Ensures that the Real Time Clock is
functionally tested.
RAM DIMM
Presence
Install more
RAM
Too much
RAM
IDE Disk
Engine
Command
Real Time
Clock
15
16
17
20
22
14
(Soft) This test examines bad or incompatible RAM
DIMMs.
(Soft) Checks that there is at least 64 MB of memory
installed and ignores more than 512 MB.
(Soft) Checks that there is no more than 512 Mbytes
of memory installed.
(Soft) Checks the disk controller core, and runs a
DIAGNOSE command on the hard drive.
(Hard) Checks communication between the image
processor board and the HVPS/engine logic board
(Soft) Checks to ensure that the seconds count in
the Real Time Clock chip is incrementing at onesecond intervals +/-2%.
Phaser 4500/4510 Service Manual 3-17
Page 94

Error Messages and Codes
POST Error Code Table
LED Blink
Code
1 RAM ERROR No RAM present, or faulty RAM. Continuous 1/2
1+1+1 3: I/O ASIC Image processor board ASIC failure. Go to “Image
1+1+1+1 4: MEMORY Checks installed memory: walking ones address,
5+5 10: EEPROM 1.Switch off printer power.
5+5+1 11: ETHERNET
5+5+1+1 12: CPU
Control Panel
Message Comment
second interval LED blink.
Processor Isolation” on page 4-33.
walking one and complement data. Tests RAM
memory above diagnostics code and data
addresses. Go to “RAM DIMM Fault Isolation” on
page 4-35.
2.Remove and re-install the NVRAM EEPROM.
3.Switch on printer power.
4.If the error message persists, first replace the
NVRAM EEPROM, then the image processor
board (Go to page 4-34).
Image processor E-Net port failure.
PHY
INTERRUPTS
Replace image processor board (page 8-75).
Replace image processor board (page 8-75).
5+5+1+1+1 13: USB Image processor USB port failure.
Replace image processor board (page 8-75).
5+5+1+1+1+1 14: REAL TIME
CLOCK
5+5+5 15: RAM
DIMM
5+5+5+1 16: INSTALL
MORE RAM
5+5+5+1+1 17:TOO MUCH
RAM
5+5+5+5 20: IDE DISK Hard disk failure.
5+5+5+5+1+1 22: ENGINE
COMMAND
Image processor board timer failure. Remove and
reinstall the configuration card. If the problem
persists, replace the image processor board
(page 8-75).
RAM DIMM failure. Go to “RAM DIMM Fault
Isolation” on page 4-35.
Not enough valid memory installed to support
operation. Install additional RAM. Go to “RAM
DIMM Fault Isolation” on page 4-35.
T oo much RAM can excessively load the processor
bus, causing system failure. Remove some RAM.
Go to “RAM DIMM Fault Isolation” on page 4-35.
Replace the hard disk (part of image processor
removal on page 8-75).
Replace the image processor board (page 8-75).
Communication with print engine has failed. Check
ribbon cable to HVPS/engine logic board. Go to
“Image Processor Isolation” on page 4-33.
3-18 Phaser 4500/4510 Service Manual
Page 95

Operating System and Application Problems
Troubleshooting tips and more information are also available on the Xerox
web site at: www.xerox.com/office/support
Macintosh Printing Problems
Image Never Prints
1. Printer acts as if it is receiving data, but nothing comes out of the printer
or it goes back to “Ready” mode without printing. The most lik ely cause is
a PostScript error occurred in the printer.
2. Po wer cycle the printer and try printing again.
3. Make sure that the cor rect Ph aser 4500/4510 printer icon w as selected in
the Chooser. Try printing the job again.
4. In the Chooser or the print dialog, switch background printing to off. Try
printing the job again.
5. If the error returns, turn ON the PostScript error handler through the
control panel P ostScript Error Inf o in the Support menu, or CentreWare IS
and print the document again. Take note of the information on the error
page that just printed.
6. Select the appropriate Phaser 4500/4510 PPD with the LaserWriter
Driver or application. Not selecting the appropriate PPD can cause
PostScript errors.
7. Select a different document from the application and try to print. If the
PostScript error does not occur, then the original document may be
causing the problem.
8. Image is rotated 90 degrees.
9. In the application's Page Setup, make sure that the image is selected to
print in portrait or landscape orientation to match the document. Also,
ensure the selected paper size is correct.
Error Messages and Codes
.
Windows Printing Problems
Image Never Prints
1. Try printing a test page from the printer driver’s properties dialog box.
2. Try printing from another application.
3. Try printing to another printer.
4. Try printing from another computer.
5. If the error returns, turn ON the PostScript error handler through the
control panel PostScript Error Info in the Support menu, or CWIS and
print the document again. Take note of the information on the error page
that just printed.
Phaser 4500/4510 Service Manual 3-19
Page 96

Error Messages and Codes
Network Problems
The printer maintains four (P4510) or six (P4500) logs in memory detailing
network functions. The logs contain TCP/IP, NetWare (P4500 only) and
AppleTalk initialization events. The logs can also be accessed remotely via
CentreWare.
The logs list events chronologically. The log is limited in length; when the log
is full the printer stops recording data to the log. The logs are stored on the
hard drive so only new data is stored each time the printer’s power is cycled.
There is a Connection Setup Page, Configuration Page and a network reset
available for troubleshooting Network problems.
To Print an Event Log or Runtime Log:
1. P4500: From the main menu, select the Troubleshooting Menu, then
select Network Log Pages.
P4510: From the main menu, select the Troubleshooting Menu, then
Network Problems, then Network Log Pages.
2. Highlight the appropriate menu item from the list and select the OK
button.
3. The page should now print.
3-20 Phaser 4500/4510 Service Manual
Page 97

Troubleshooting Procedures for Error Messages and Codes
The Error Message Summary tables that follow are the lead-ins to the
procedures that follow in subsequent pages. There are two tabl es because
the Engine Error and Jam Error codes are no t the same for both printers. The
Control Panel Message column lists the error message that appears on the
control panel when the error occurs during normal operation. The Diagnostic
Message column lists the error message that appears when the error occurs
during use of Service Diagnostics. The Engine Errors column lists the code
number that appears in fault histories, either on the control panel display
when you view Engine Error History or in the Service Usage Profile at line
262 Engine Error Log. The Jam Errors column lists the code that appears on
the control panel display when you view Jam History for the Phaser 4500 or
the Printer Status page for the Phaser 4510. The Procedure to Use column
lists the page number of the troubleshooting procedure for that error.
For the Phaser 4510 printer, refer to the “Service Code Table” on page A-6,
which maps the engine error and jam error codes to specific error messages.
The procedures that follow the table are named with the messages that
appear on the control panel when an error occurs. The error codes listed in
the procedure are the fault codes displayed in Service Diagnostics along with
the fault condition that produced the code.
Error Messages and Codes
Phaser 4500 Error Message Summary
Control Panel Message Diagnostic Message
“Engine Logic Board
NVRAM Failure\
Press i”
“Main Motor Failure\
Press i”
“Laser Unit Failure\
Press i”
“Laser Unit Failure\
Press i”
“Laser Unit Failure\
Press i”
“Laser Unit Failure\
Press i”
U6: NVM Fail 3 — Go to
U1: Motor Fail/Power
Off
Laser Fails at warm-up
U2-1: Laser Fail/Power
Off
Laser Fails Motor
Speed
U2-2: Laser Fail/Power
Off
LD Power is high
U2-3: Laser Fail/Power
Off
LD Power is low
U2-4: Laser Fail/Power
Off
Engine
Errors
Jam
Errors
2—Go to
5—Go to
5—Go to
5—Go to
5—Go to
Procedure
to Use
page 3-33.
page 3-28.
page 3-29
page 3-29
page 3-29
page 3-29
“Fuser Failure\ Press i” Fuser High Temp
U4-1: Fuser Fail/Power
Off
Phaser 4500/4510 Service Manual 3-21
1—Go to
page 3-30
Page 98

Error Messages and Codes
Phaser 4500 Error Message Summary
Engine
Control Panel Message Diagnostic Message
“Fuser Failure\ Press i” Fuser Low Temp
U4-2: Fuser Fail/Power
Off
“Fuser Failure\ Press i” Fuser Overheat in
Stand-by
U4-3: Fuser Fail/Power
Off
“Fuser Failure\Press i” Fuser Fails at warm-up
U4-4: Fuser Fail/
Power Off
“Fuser Failure\Press i” Fuser Thermistor
Failure
U4-5: Fuser Fail/
Power Off
“Toner Is Low\ Press i” J5: Toner Low — — Go to
“Fan Failure\ Power Off
Now\ Press i”
U5: Fan Fail/ Power Off 0 — Go to
Errors
Jam
Errors
1—Go to
1—Go to
1—Go to
1—Go to
Procedure
to Use
page 3-30.
page 3-30.
page 3-30.
page 3-30.
“Toner
Sensor” on
page 4-22
page 3-31.
“Install Or Reseat print
cartridge\ Press i”
“Replace Print Cartridge\
Press i”
“Close Top Cover\
Press i”
“Close Rear Cover\
Press i”
“Jam At Tray N; Remove
Trays And Open Top
Cover To Clear\ Press i “
“Jam At Tray N; Remove
Trays And Open Top
Cover To Clear\ Press i “
“Jam At T op; Open Top
Cover To Clear\ Press i”
“Jam At Exit; Open Rear
Cover To Clear\ Press i”
“Jam At Exit; Open Rear
Cover To Clear\ Press i”
J3: Missing Print
Cartridge
— — — Go to
Top Cover Open — — Go to
Rear cover open — — Go to
E2-01 Feed Jam
E2-02 Feed Jam
E2-03 Feed Jam
E2-04 Feed Jam
E2-11 Feed Jam
E2-12 Feed Jam
E2-13 Feed Jam
E2-14 Feed Jam
E3-1 Reg. Jam
E3-2 Reg. Jam
E4-2 Exit Jam — 5 Go to
E4-3 Exit Jam — 5 Go to
——Go to
page 3-61.
page 3-62.
page 3-58.
page 3-58.
2
3
4
2
3
4
Go to
page 3-34.
Go to
page 3-37.
page 3-40.
page 3-43.
page 3-43.
—1
—1
—6Go to
“Jam At Exit; Open T op
Cover To Clear\ Press i”
3-22 Phaser 4500/4510 Service Manual
E4-0 Exit Jam — 5 Go to
page 3-43.
Page 99

Phaser 4500 Error Message Summary
Error Messages and Codes
Control Panel Message Diagnostic Message
“Jam At Duplex; Open
Duplex To Clear\ Press i “
“Jam At Rear; Open
Duplex And Rear Cover
To Clear\ Press i “
“Jam At Duplex; Open
Duplex To Clear\ Press i “
“Jam At Duplex; Open
Duplex To Clear\ Press i “
“Jam At Rear; Open Rear
Cover To Clear\ Press i “
“Jam At Stacker; Open
Rear Stacker Cover To
Clear\
Press i “
“Paper Size Jam; Check
Paper Tray Guides And
Open Rear Cover To
Clear\
Press i”
E7-0 Duplex Jam — 7 Go to
E7-1 Duplex Jam — 7 Go to
E7-2 Duplex Jam — 7 Go to
E7-3 Duplex Jam — 7 Go to
E6-1 Stacker jam — 8 Go to
E6-2 Stacker Jam — 9 Go to
PSE-1 Paper Size Error — 10 Go to
Engine
Errors
Jam
Errors
Procedure
to Use
page 3-51.
page 3-49.
page 3-49.
page 3-49.
page 3-45.
page 3-47.
page 3-56.
“Insert Tray 1\ Press i” Tray 1 Out — — Go to
page 3-67
“Insert Tray 2\ Press i” Tray 2 Out — — Go to
page 3-67
“Insert Tray 3\ Press i” Tray 3 Out — — Go to
page 3-68
“Insert Tray 4\ Press i” Tray 4 Out — — Go to
page 3-68
“Tray 2 Paper Is Low\
Press i”
“Tray 3 Paper Is Low\
Press i”
“Tray 4 Paper Is Low\
Press i”
“No Paper in Tray 1\
Press i”
“No Paper in Tray 2\
Press i”
“No Paper in Tray 3\
Press i”
N/A — — Go to
page 3-64
N/A — — Go to
page 3-66
N/A — — Go to
page 3-66
Tray 1 empty — — Go to
page 3-63.
Tray 2 empty — — Go to
page 3-63.
Tray 3 empty — — Go to
page 3-65.
“No Paper in Tray 4\
Press i”
Phaser 4500/4510 Service Manual 3-23
Tray 4 empty — — Go to
page 3-65.
Page 100

Error Messages and Codes
Phaser 4500 Error Message Summary
Engine
Control Panel Message Diagnostic Message
“Maintenance Kit is Near
End of Life\ Press i”
“Replace Maintenance
Kit”
“Stacker Is Full, Unload
Paper\ Press i”
“Standard Output Tray Is
Full, Unload Paper\
Press i”
“Tray 3 Failure\ Press i” E11-1 Tray 3 unit fail — 6 Go to
“Tray 3 or 4 Failure\
Press i”
“Duplex Unit Failure\
Press i”
“Stacker Unit Failure\
Press i”
“Close Duplex Unit
Cover\ Press i”
N/A — — —
N/A — — Go to
Stacker output tray full — — Go to
Output tray full — — Go to
E11-2 Tray 3 or 4 unit
fail
E9-1 Duplex unit fail — 8 Go to
E9-2 Stacker unit fail — 4 Go to
Duplex cover open — — Go to
Errors
Jam
Errors
—7Go to
Procedure
to Use
page 3-71.
page 3-69
page 3-70
page 3-54
page 3-54
page 3-52.
page 3-53.
page 3-59.
“Close Stacker cover\
Press i”
“Invalid Configuration
Card\ Press i”
“Configuration Card
Missing\ Press i”
Stacker cover open — — Go to
page 3-60.
N/A — — —
N/A — — —
3-24 Phaser 4500/4510 Service Manual
 Loading...