

™
Phaser
Laserprinter
4400
Installatie-
handleiding

Copyright © 2002, Xerox Corporation. Alle rechten voorbehouden. Niet-gepubliceerde rechten voorbehouden op basis van de
auteursrechten in de Verenigde Staten. De inhoud van deze publicatie mag in geen enkele vorm worden gereproduceerd zonder
toestemming van Xerox Corporation.
De auteursrechtelijke bescherming waarop aanspraak wordt gemaakt, geldt voor alle materialen en vormen van informatie die
momenteel wettelijk zijn erkend als vallend onder het auteursrecht of die in het navolgende als zodanig worden aangemerkt,
inclusief, maar niet beperkt tot materiaal dat wordt gegenereerd door softwareprogramma’s die op het scherm worden
weergegeven, zoals stijlen, sjablonen, pictogrammen, schermweergaven, enzovoort.
®
XEROX
, The Document Company®, de gestileerde X, CentreWare®, DocuPrint® en Workset® zijn gedeponeerde
handelsmerken van Xerox Corporation. infoSMART™, Phaser™, PhaserPort™, PhaserSMART™ en PhaserTools™ zijn
handelsmerken van Xerox Corporation.
®
, Acrobat®, Acrobat® Reader®, Illustrator®, PageMaker®, Photoshop® en PostScript®, ATM®, Adobe Garamond®,
Adobe
®
, Carta®, Mythos®, Quake® en Tekton® zijn gedeponeerde handelsmerken en Adobe Jenson™, Adobe Brilliant Screens™
Birch
technology en IntelliSelect™ zijn handelsmerken van Adobe Systems Incorporated of haar dochterondernemingen die mogelijk
in bepaalde rechtsgebieden zijn gedeponeerd.
®
, LaserWriter®, LocalTalk®, Macintosh®, Mac® OS, AppleTalk®, TrueType2®, Apple Chancery®, Chicago®, Geneva®,
Apple
®
Monaco
en New York® zijn gedeponeerde handelsmerken en QuickDraw™ is een handelsmerk van Apple Computer
Incorporated.
Marigold™ en Oxford™ zijn handelsmerken van AlphaOmega Typography.
Avery™ is een handelsmerk van Avery Dennison Corporation.
®
en HP-GL® zijn gedeponeerde handelsmerken van Hewlett-Packard Corporation.
PCL
Hoefler Text is ontworpen door de Hoefler Type Foundry.
®
ITC Avant Guard Gothic
Zapf Dingbats
®
zijn gedeponeerde handelsmerken van International Typeface Corporation.
, ITC Bookman®, ITC Lubalin Graph®, ITC Mona Lisa®, ITC Symbol®, ITC Zapf Chancery® en ITC
Bernhard Modern™, Clarendon™, Coronet™, Helvetica™, New Century Schoolbook™, Optima™, Palatino™, Stempel
Garamond™, Times™ en Univers™ zijn handelsmerken van Linotype-Hell AG en/of haar dochterondernemingen.
®
MS-DOS
Wingdings™ in TrueType
en Windows® zijn gedeponeerde handelsmerken van Microsoft Corporation.
®
-indeling is een product van Microsoft Corporation. WingDings is een handelsmerk van Microsoft
Corporation en TrueType is een gedeponeerd handelsmerk van Apple Computer, Inc.
Albertus™, Arial™, Gill Sans™, Joanna™ en Times New Roman™ zijn handelsmerken van Monotype Corporation.
®
Antique Olive
is een gedeponeerd handelsmerk van M. Olive.
Eurostile™ is een handelsmerk van Nebiolo.
®
en NetWare® zijn gedeponeerde handelsmerken van Novell, Incorporated.
Novell
®
en Sun Microsystems® zijn gedeponeerde handelsmerken van Sun Microsystems, Incorporated.
Sun
®
SPARC
is een gedeponeerd handelsmerk van SPARC International, Incorporated. SPARCstation™ is een handelsmerk van
SPARC International, Incorporated, waarvoor een exclusieve licentie is verleend aan Sun Microsystems, Incorporated.
®
is een gedeponeerd handelsmerk in de Verenigde Staten en andere landen, waarvoor een exclusieve licentie is verleend
UNIX
door X/Open Company Limited.
ENERGY STAR
Als een
efficiënt energiegebruik. De naam en het logo van
®
-partner heeft Xerox Corporation vastgesteld dat dit product voldoet aan de
ENERGY STAR
zijn gedeponeerde handelsmerken in de Verenigde Staten.
ENERGY STAR
-richtlijnen voor
Voor dit product wordt code voor SHA-1 gebruikt die is geschreven door John Halleck. De code wordt gebruikt met zijn
toestemming.
Dit product bevat een implementatie van LZW onder licentie van Amerikaans patent 4.558.302.
Andere merknamen zijn handelsmerken of gedeponeerde handelsmerken van de betrokken bedrijven.

Inhoudsopgave
Installatie- en referentiehandleiding
Raadpleeg de Installatie- en referentiehandleiding die bij de printer wordt geleverd, met
instructies voor het uitpakken en installeren van de printer. Op de interactieve
documentatie-cd-rom treft u ook een PDF-bestand aan met de Installatie- en
referentiehandleiding.
P4400-114
Invoerlade voor 550 vel . . . . . . . . . . . . . . . . . . . . . . . . . . . . . . . . . . . . . . . .1
Stapeleenheid voor 500 vel . . . . . . . . . . . . . . . . . . . . . . . . . . . . . . . . . . . . . 3
Enveloplader . . . . . . . . . . . . . . . . . . . . . . . . . . . . . . . . . . . . . . . . . . . . . . . . .5
Eenheid voor dubbelzijdig afdrukken . . . . . . . . . . . . . . . . . . . . . . . . . . . . .7
Interne vaste schijf . . . . . . . . . . . . . . . . . . . . . . . . . . . . . . . . . . . . . . . . . . . .9
Upgrade van 4400B naar 4400N. . . . . . . . . . . . . . . . . . . . . . . . . . . . . . . . .11
Geheugen toevoegen . . . . . . . . . . . . . . . . . . . . . . . . . . . . . . . . . . . . . . . . . 13
Verbindingsinstellingen . . . . . . . . . . . . . . . . . . . . . . . . . . . . . . . . . . . . . . . 15
Verplaatsen . . . . . . . . . . . . . . . . . . . . . . . . . . . . . . . . . . . . . . . . . . . . . . . . .16
Toebehoren
Druk de
toebehoren en accessoires voor de Phaser™ 4400-laserprinter.
handleiding Ondersteuning
op de interactieve documentatie-cd-rom af voor een volledige lijst van
Copyright © 2002, Xerox Corporation. Alle rechten voorbehouden. i
Invoerlade voor 550 vel
Phaser™ 4400-laserprinter
Copyright © 2002, Xerox Corporation. Alle rechten voorbehouden. 1
Invoerlade voor 550 vel
Phaser™ 4400-laserprinter 2
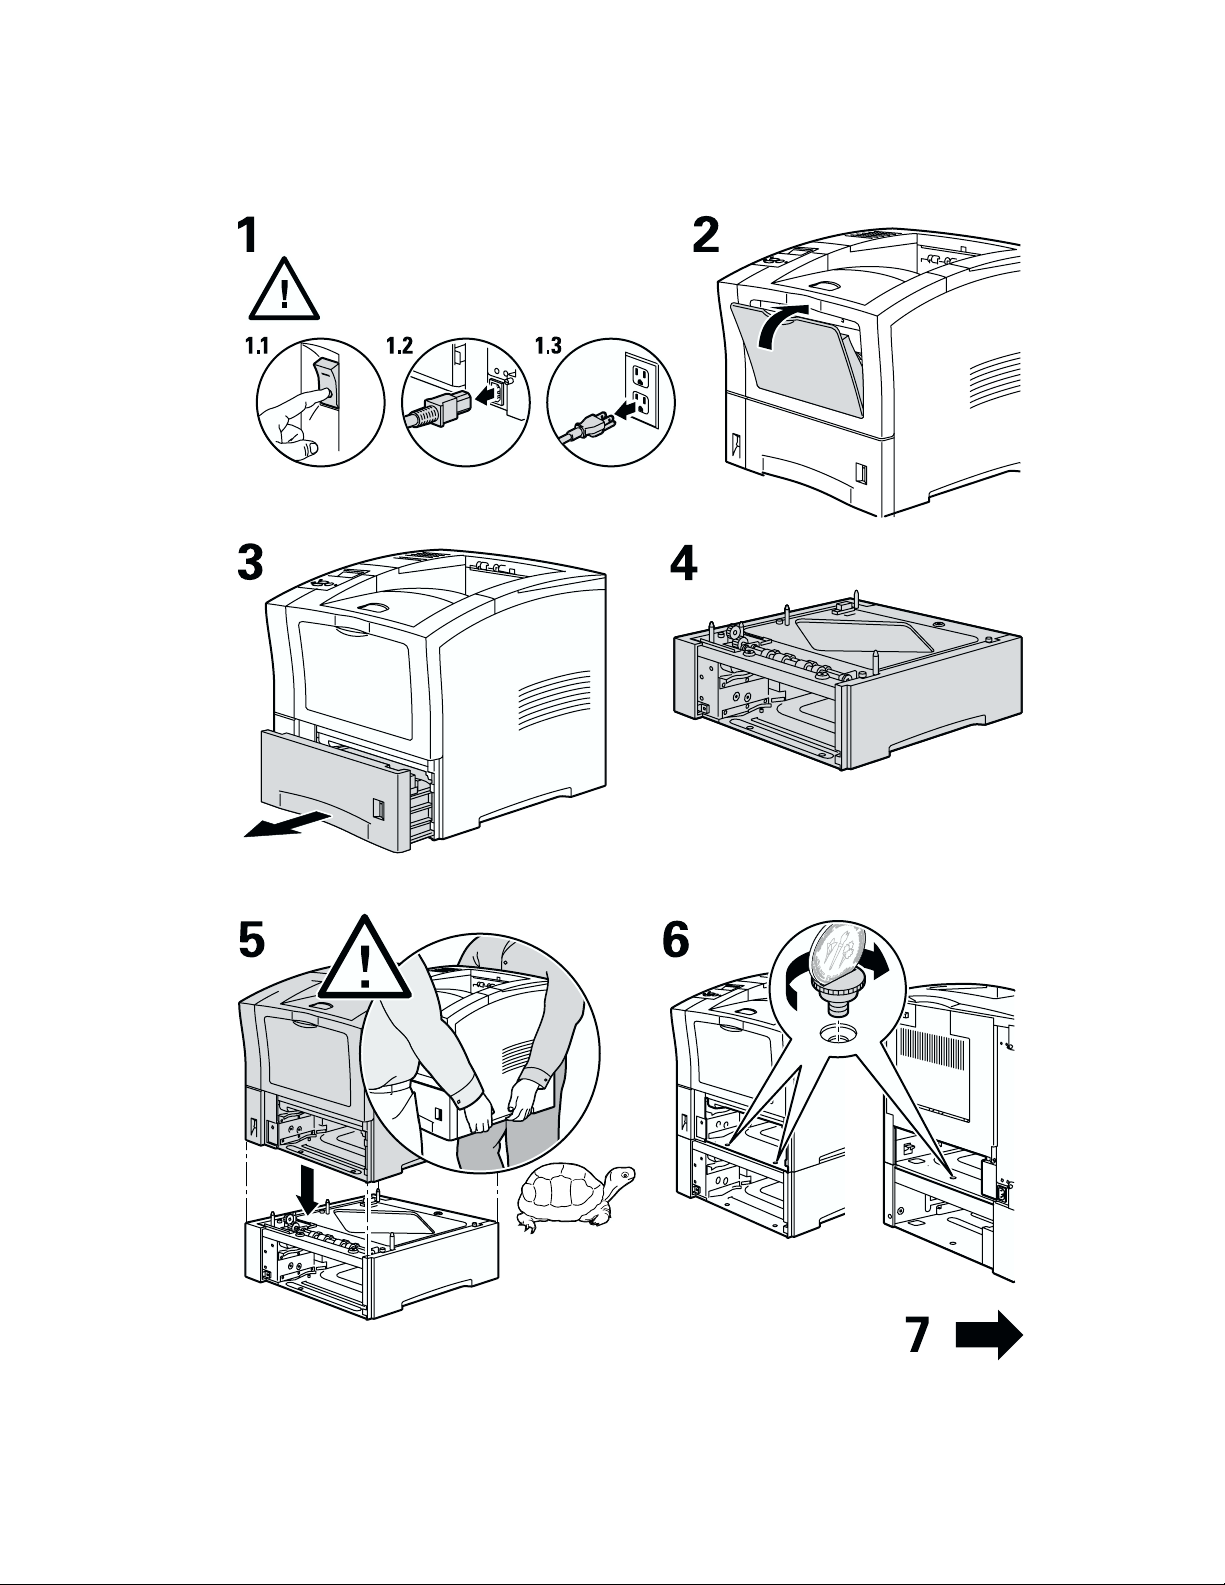
Stapeleenheid voor 500 vel
Stapeleenheid voor 500 vel
Phaser™ 4400-laserprinter 3
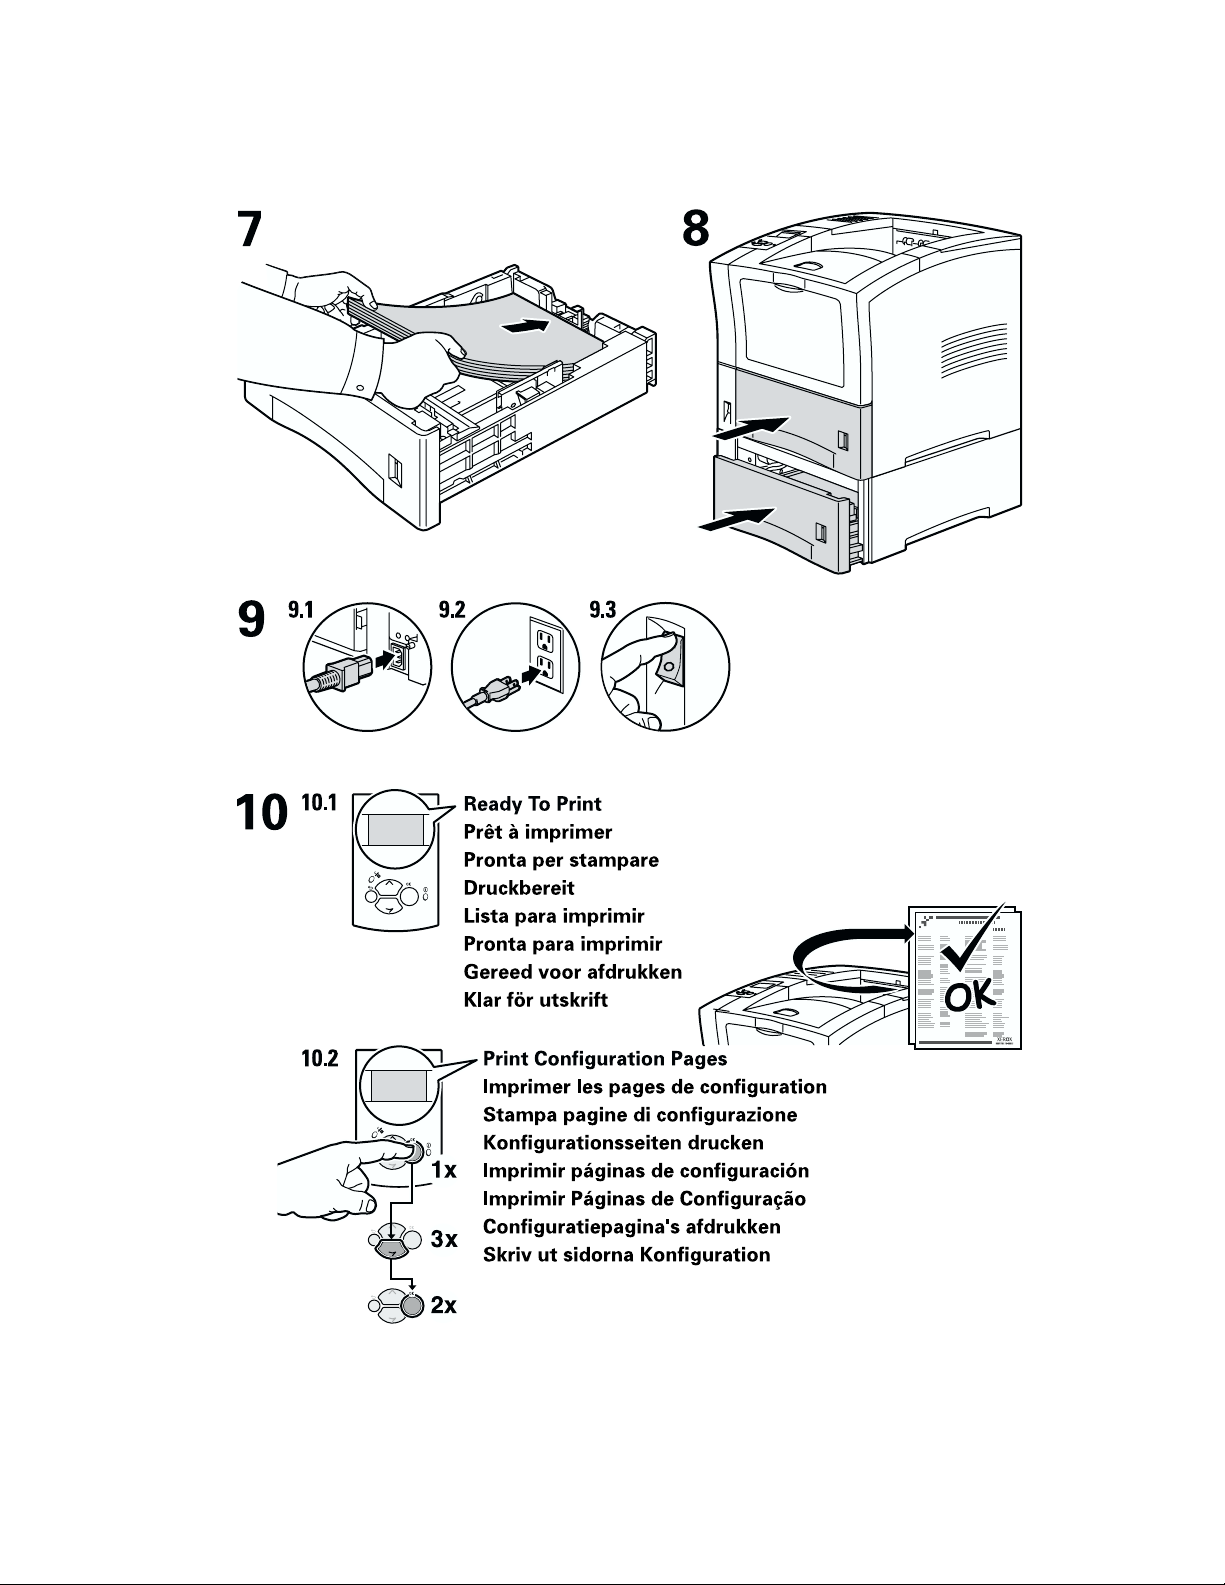
Stapeleenheid voor 500 vel
Phaser™ 4400-laserprinter 4

Enveloplader
Enveloplader
Phaser™ 4400-laserprinter 5

Enveloplader
Phaser™ 4400-laserprinter 6

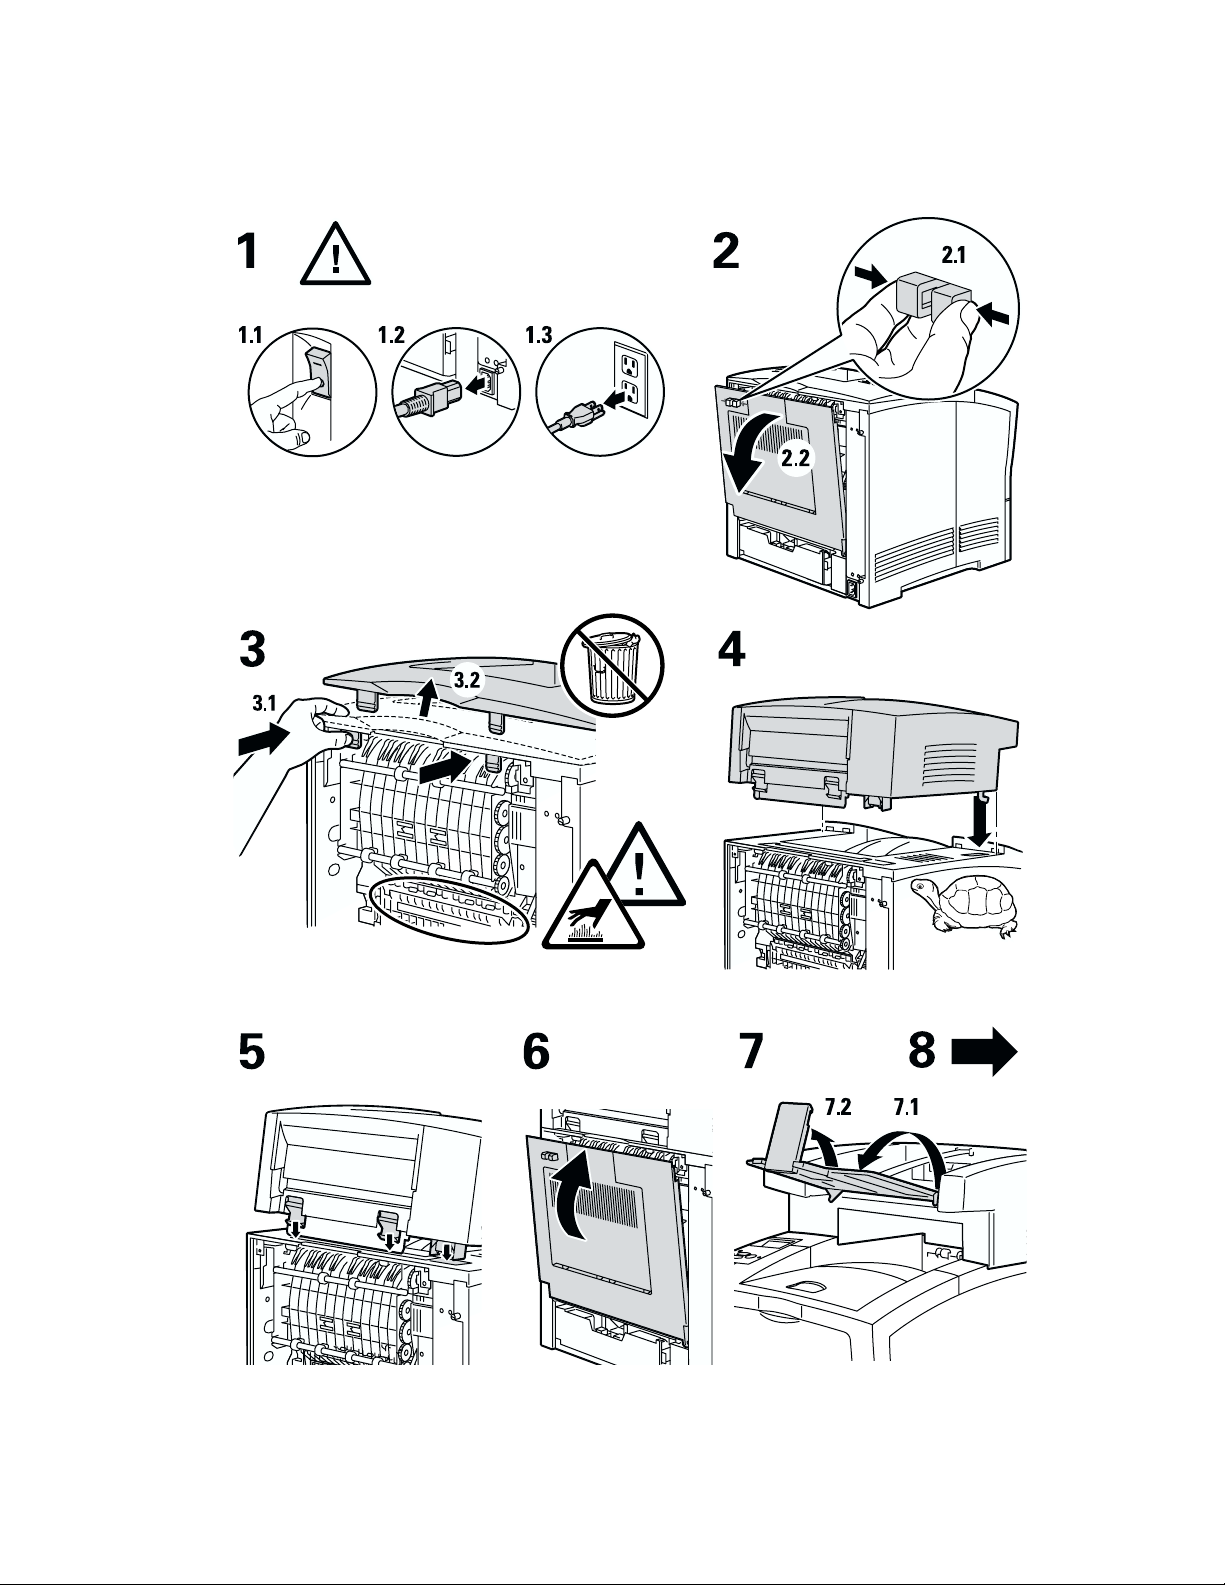
Eenheid voor dubbelzijdig afdrukken
Eenheid voor dubbelzijdig afdrukken
Phaser™ 4400-laserprinter 7
Eenheid voor dubbelzijdig afdrukken
Phaser™ 4400-laserprinter 8

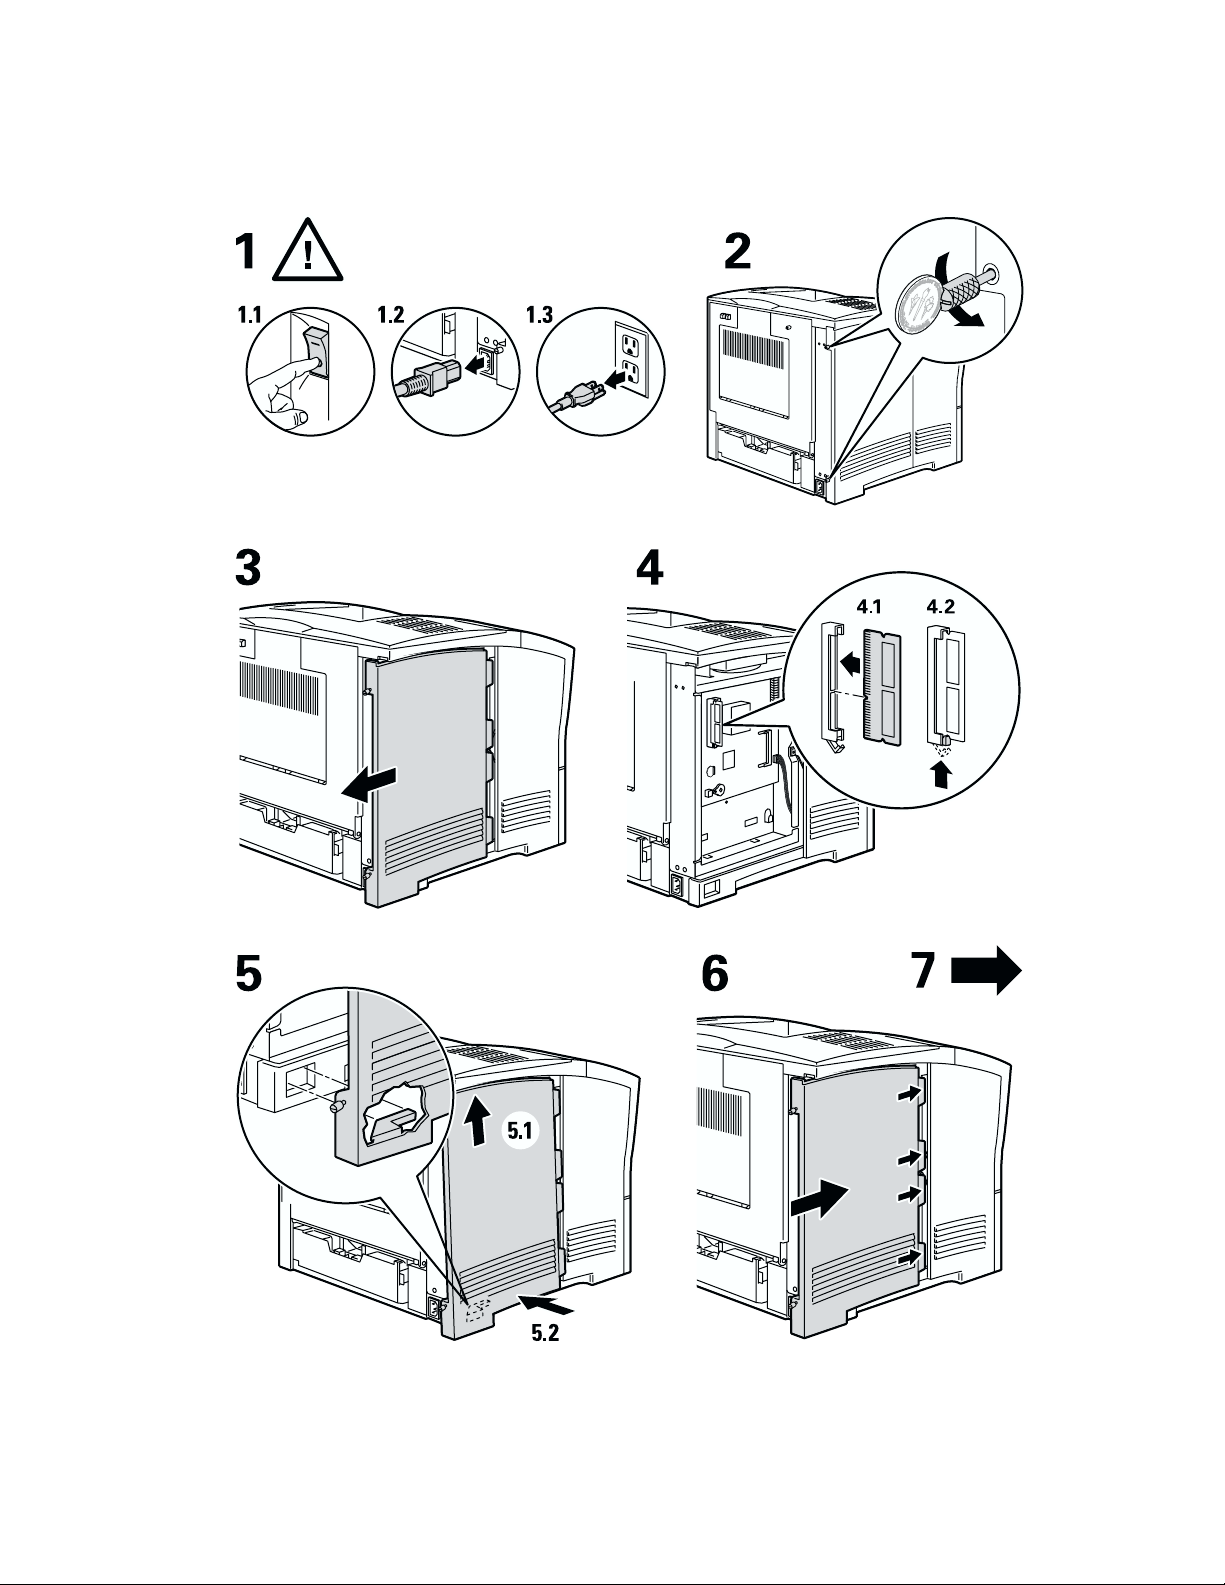
Interne vaste schijf
Phaser™ 4400-laserprinter
1
1.1 1.2 1.3
3
2
4
567
6.1
6.2
Copyright © 2002, Xerox Corporation. Alle rechten voorbehouden. 9

Interne vaste schijf
Phaser™ 4400-laserprinter 10

Upgrade van 4400B naar 4400N
Upgrade van 4400B naar 4400N
Phaser™ 4400-laserprinter 11

Upgrade van 4400B naar 4400N
Phaser™ 4400-laserprinter 12
Geheugen toevoegen
Phaser™ 4400-laserprinter
Copyright © 2002, Xerox Corporation. Alle rechten voorbehouden. 13
Geheugen toevoegen
Phaser™ 4400-laserprinter 14
Phaser™ 4400-laserprinter
Verbindingsinstellingen
U kunt de printer op een van de volgende manieren op uw computer aansluiten.
USB
■
Parallel (IEEE 1284 compatibel)
■
Ethernet (optioneel voor Phaser 4400B)
■
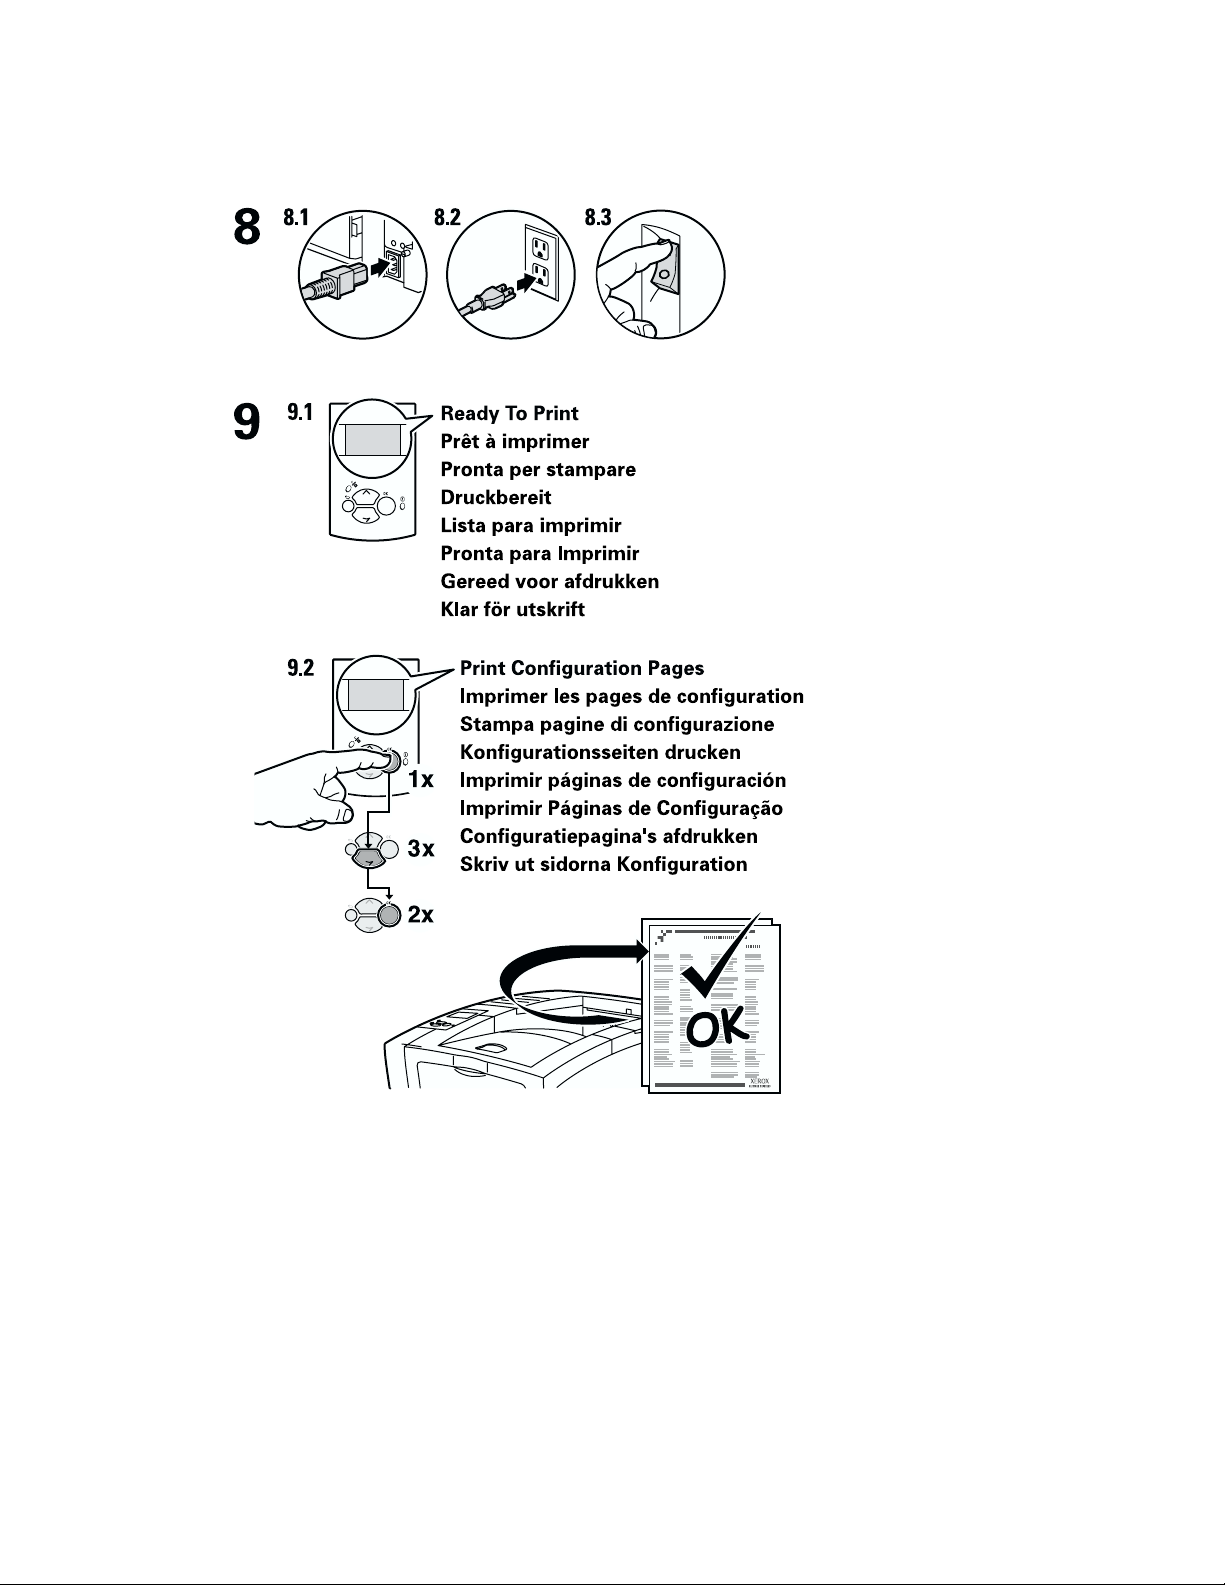
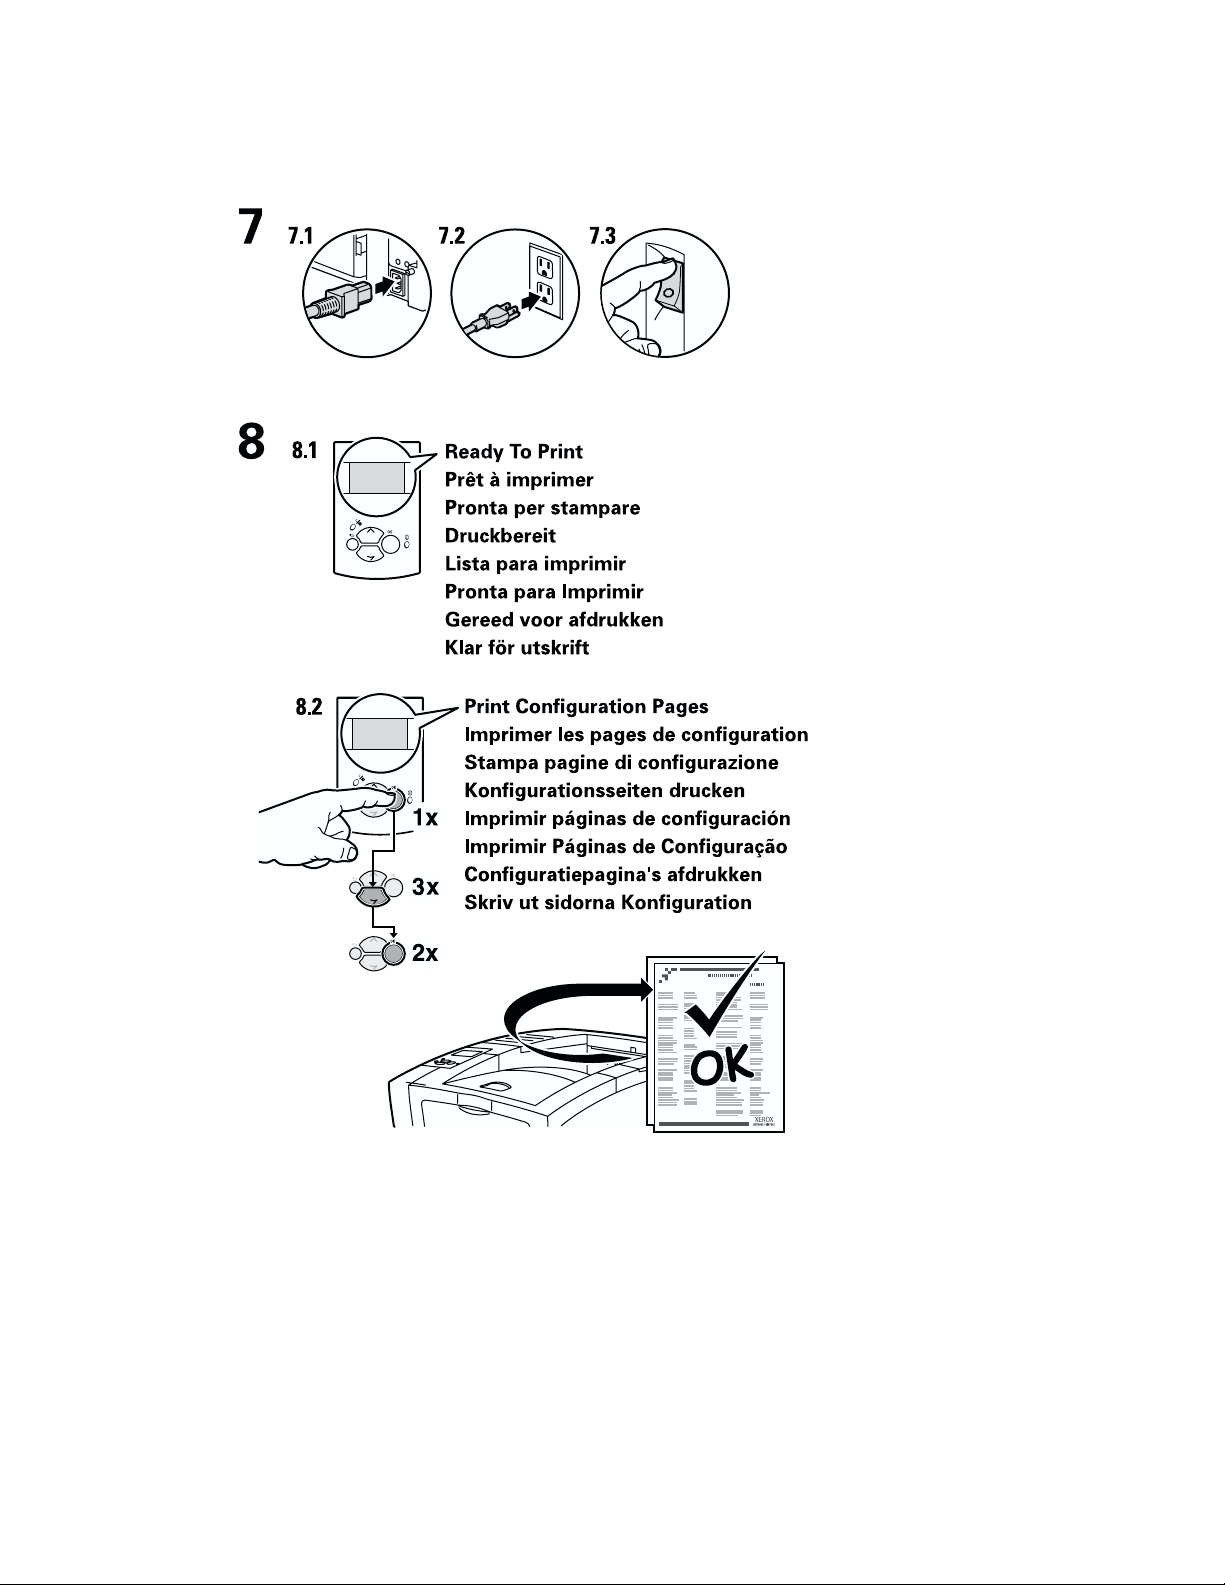
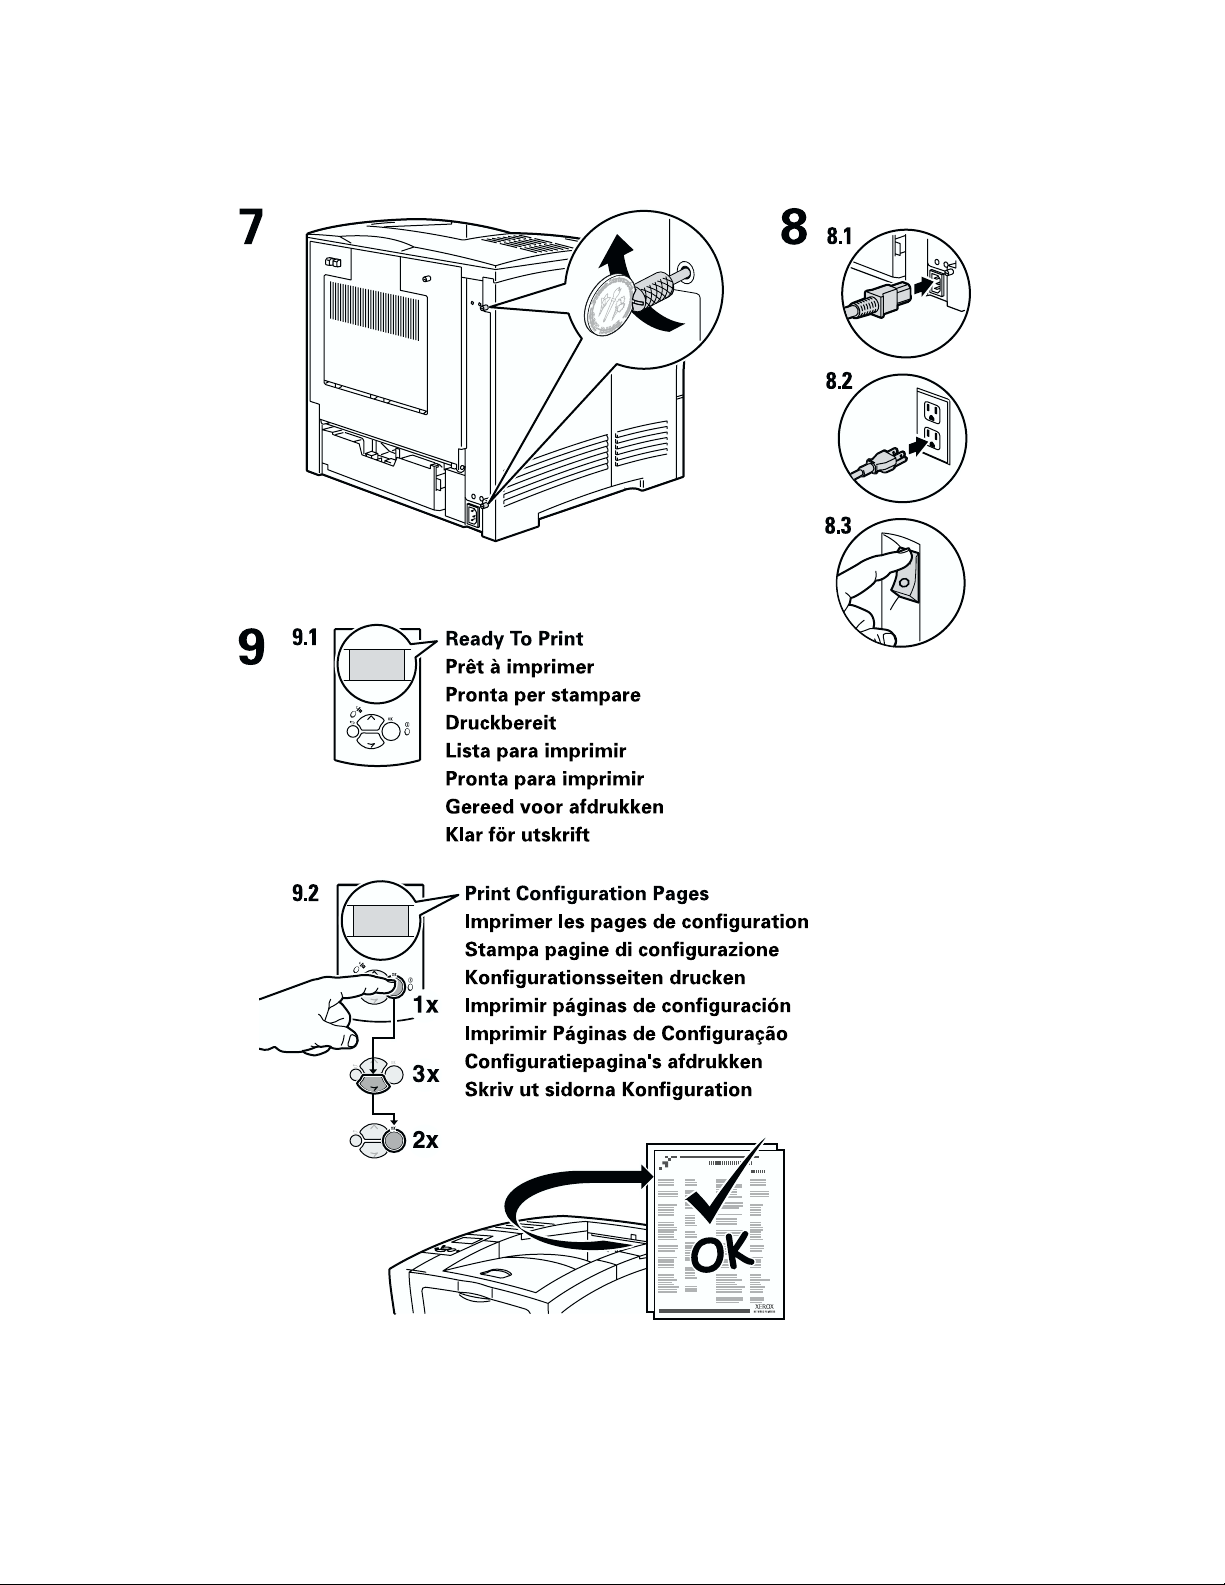
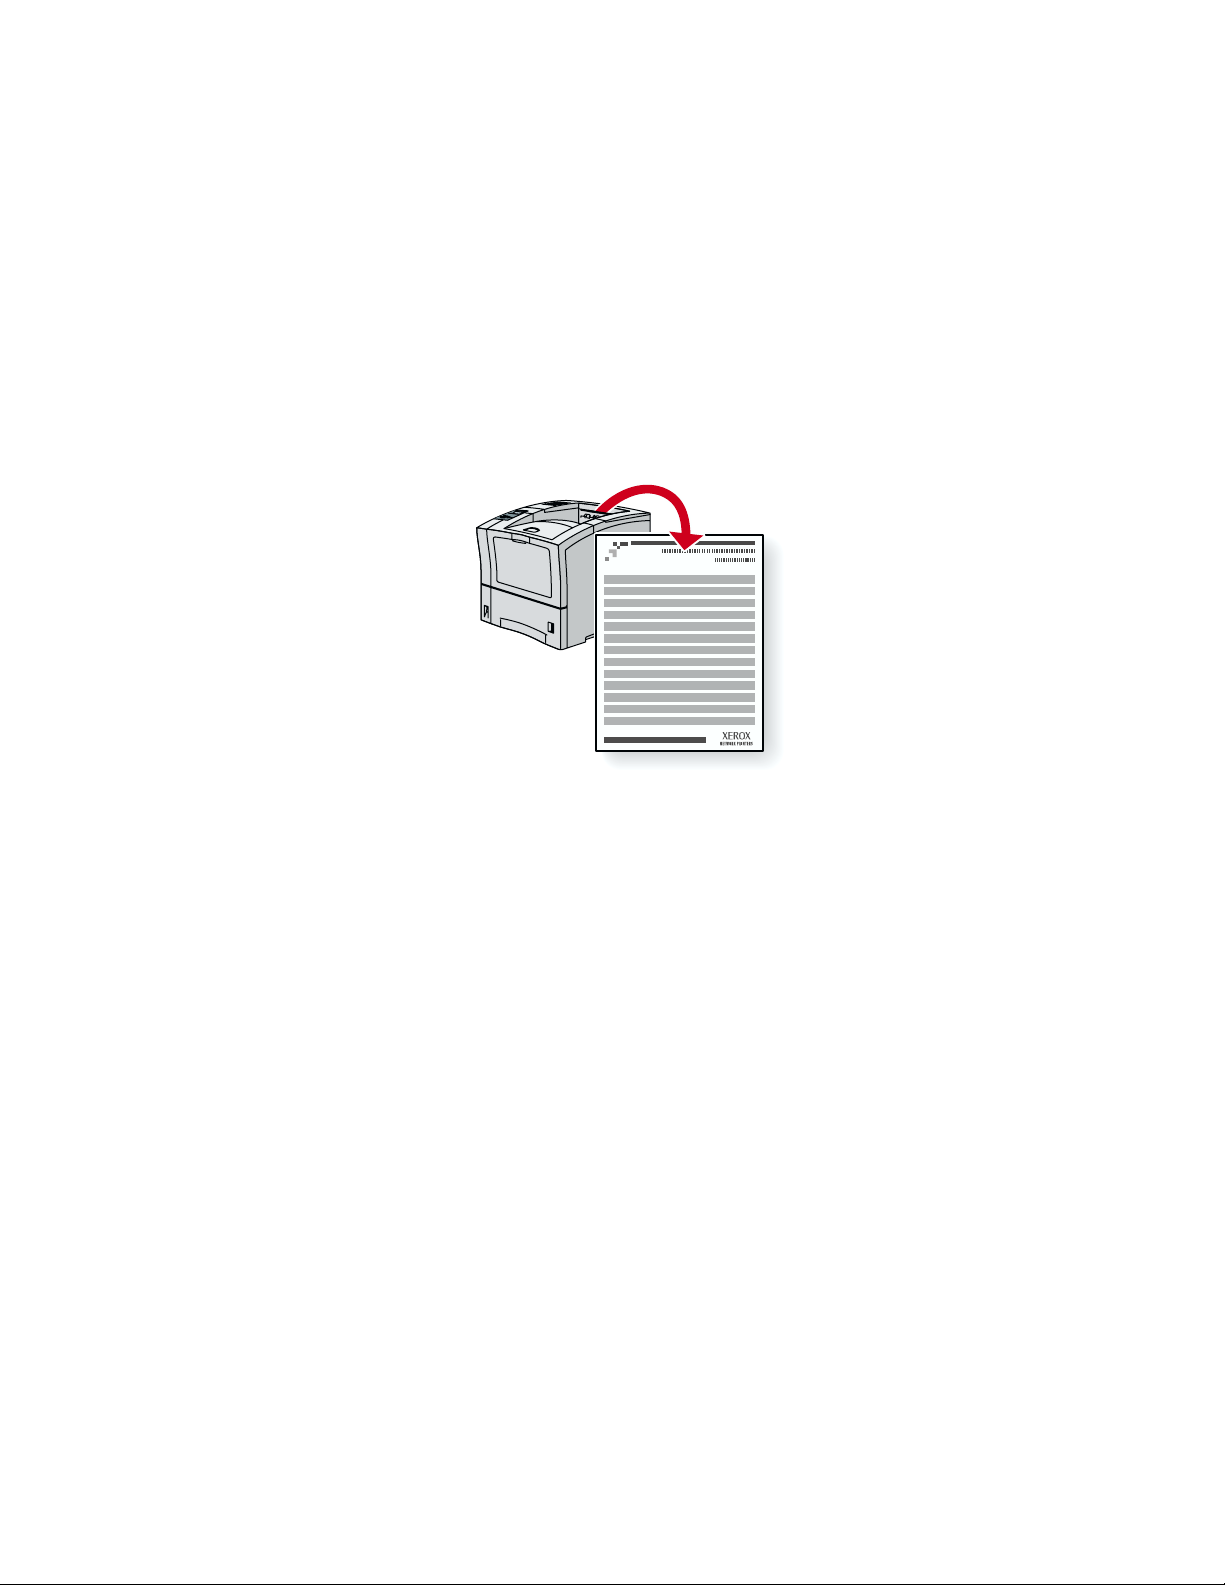
Raadpleeg de afdrukbare pagina Verbindingsinstellingen, die samen met andere handige afdrukbare
pagina’s in uw printer is opgeslagen. Op de volgende pagina’s wordt de afdrukbare pagina
Verbindingsinstellingen weergegeven.
P4400-77
Alle afdrukbare pagina’s hebben deze opmaak met balken boven en onder aan de pagina. Druk deze
pagina’s af via het voorpaneel van de printer.
Raadpleeg de handleiding Netwerk op de interactieve documentatie-cd-rom.
De pagina Verbindingsinstellingen weergeven
U krijgt toegang tot de pagina Verbindingsinstellingen via het Menu Afdrukbare pagina’s:
1. Schuif op het voorpaneel met de toets Pijl-omlaag of Pijl-omhoog naar het Menu Afdrukbare
pagina’s en druk op de toets OK.
2. Schuif naar Verbindingsinstellingen met de toets Pijl-omlaag of Pijl-omhoog en druk
op de toets OK.
Menuschema
Druk het menuschema af voor een volledige lijst met afdrukbare pagina’s:
1. Selecteer Menu’s op het voorpaneel en druk op de toets OK.
2. Selecteer Menuschema afdrukken en druk op de toets OK.
Copyright © 2002, Xerox Corporation. Alle rechten voorbehouden. 15

PHASERTM 4400 LASER PRINTER
Connection Setup
USB Connection
The USB connection requires a standard A/B USB cable. The "A" end of the cable connects to the computer's USB port;
the "B" end connects to the printer's USB port.
Windows 98 or later
Connect the USB cable to the PC and follow the Add New Hardware Wizard to create the USB port. Follow the Add
Printer Wizard to install the printer driver from your printer's software CD-ROM. For more details, refer to the infoSMART
Knowledge Base at www.xerox.com/officeprinting/infoSMART, Document # 18215.
Macintosh (requires OS 9.0.4 or later)
A USB-connected printer will not show in the Chooser. Install the printer driver from your printer's software CD-ROM.
Use the Desktop Printer Utility (version 1.2 or later) to create a desktop USB printer. The utility is located in the
PhaserTools folder created during the software install. For more details, refer to the infoSMART Knowledge Base at
www.xerox.com/officeprinting/infoSMART, Document # 33225.
Parallel Connection
The printer's parallel connection uses a parallel cable to connect your computer's parallel port to the printer's parallel
port. Install the printer driver from your printer's software CD-ROM. Select the appropriate LPT parallel port.
Ethernet Connection (recommended)
Network
Use an Ethernet connection with two twisted-pair (Category 5/RJ-45) cables and an Ethernet hub. Connect the computer
to the hub with one cable and connect the printer to the hub with the second cable. Use any port on the hub except the
uplink port. TCP/IP and EtherTalk are the most common protocols used with Ethernet cables. To print using TCP/IP, each
computer and the printer requires a unique IP address. See Setting IP Addresses.
Standalone Use
Use a crossover cable to connect the printer directly to the computer via the Ethernet port.
Setting an IP address
If your computer is on a large network, contact your network administrator for the appropriate TCP/IP addresses and
additional configurations.
If you are creating your own small Local Area Network, or connecting the printer directly to your computer over Ethernet,
use this basic procedure. The printer and computer(s) should have unique IP addresses. It is important that the
addresses are similar, but not the same. For example, your printer can have the address 192.168.1.2 while your
computer has the address 192.168.1.3. Another device can have the address 192.168.1.4, and so on.
For more details, refer to the infoSMART Knowledge Base at www.xerox.com/officeprinting/infoSMART,
Document # 18545.
Page 1 of 3

Note: If you use the installer from your printer's software CD-ROM, the IP Address is set automatically.
To manually set the printer's IP address:
1. At the printer's front panel, select Menus and press OK.
2. Scroll to the Connection Setup Menu and press OK.
3. Scroll to TCP/IP Address Menu and press OK.
4. Scroll to DCHP/BootP and press OK until it displays OFF.
5. Scroll to TCP/IP Address and press OK.
6. Enter an IP address like the example above.
7. Scroll to TCP/IP Network Mask and press OK.
8. Enter a network (subnet) address. (If you use the IP address in the above example,
set a Subnet Mask of 255.255.255.0)
9. Scroll to TCP/IP Gateway and press OK.
10. Enter a Gateway (router) address. (If you use the IP address in the above example,
set a Gateway address of 192.168.1.1)
11. Scroll to Exit and press OK.
To set a static IP address on your computer:
Windows 95/98/Me
1. From the Start menu, right-click Network Neighborhood and select Properties.
2. On the Configuration tab, select the TCP/IP protocol for your network card, then select Properties.
3. On the IP Address tab, select Specify an IP address. Enter an IP address and Subnet Mask, and click OK.
(If you use the IP address noted above, set a Subnet Mask of 255.255.255.0).
4. Click OK and restart Windows.
Windows 2000/XP
1. From the Start menu, right-click My Network Places and select Properties.
2. Right-click Local Area Connection and select Properties.
3. If you do not have TCP/IP available, you should first click Add and select Protocol. Click Add and select
Internet Protocol TCP/IP.
4. On the General tab, select the TCP/IP protocol for your network card. Click Properties.
5. On the General tab, select Use the following IP address. Enter an IP address and Subnet Mask, and then click
OK. (If you use the IP address in the above example, set a Subnet Mask of 255.255.255.0).
6. Click OK and restart Windows, if prompted.
Windows NT 4.x
1. From the start menu, right-click Network Neighborhood and select Properties.
2. On the Protocols tab, select TCP/IP Protocol and click Properties.
3. On the IP Address tab, select Specify an IP Address. Enter an IP Address and Subnet Mask in the field and
click OK. (If you use the IP address noted above, set a Subnet Mask to 255.255.255.0.)
4. Click OK and restart Windows.
Page 2 of 3

Installing the Printer Driver
To download the latest printer drivers, access the Xerox web site at: www.xerox.com/officeprinting/support.
Windows 95/98/Me, Windows 2000/XP, and Windows NT 4.x
Install the printer driver from your printer's software CD-ROM. The software CD-ROM installer automatically installs
and identifies the printer during the installation process.
For more details, refer to the infoSMART Knowledge Base at www.xerox.com/officeprinting/infoSMART, Document
# 9178 for Windows 95/98/Me, Document # 36894 for Windows 2000, and Document # 11338 for Windows NT.
Macintosh
EtherTalk
If you use EtherTalk, Macintosh computers do not require IP addresses.
1. Open the AppleT alk Control Panel.
2. Verify that the Ethernet port is the selected network port.
3. To install the printer driver, double-click the installer on your printer's software CD-ROM.
4. Open the Chooser, select the LaserWriter driver.
5. From the right column of the Chooser, select the printer. Click Create to create the desktop printer.
For more details, refer to the infoSMART Knowledge Base at www.xerox.com/officeprinting/infoSMART,
Document # 2562.
Macintosh OS X
Macintosh OS X supports TCP/IP as the default protocol, as well as AppleTalk. For a TCP/IP installation,
follow the instructions provided to set an IP address in the printer.
1. Open the Print Center Utility.
2. Select the Add Printer... button.
3. Choose the connection type you desire.
For LPR, enter the IP address of the printer that you set previously. The Queue Name field can remain blank if the Use
default queue on server box is checked (by default). Other options are PS, or AUTO. Select the appropriate PPD for
the printer model under the Printer Model pull-down menu.
For AppleTalk, select the appropriate printer from the list that is displayed. The printer should autoconfigure at this point.
Note: You may need to enable AppleTalk via the Network Control Panel. Follow the onscreen instructions provided.
Other Resources
For more information on network setup and troubleshooting, refer to the Networking section of the
Interactive Documentation CD-ROM.
Page 3 of 3

Phaser™ 4400-laserprinter
Verplaatsen
Volg de onderstaande richtlijnen als u de printer binnen het kantoor wilt verplaatsen of als u de printer
voor verzending wilt voorbereiden.
Voorzorgsmaatregelen bij het verplaatsen van de printer
Waarschuwing
Volg de onderstaande richtlijnen om te voorkomen dat u zich verwondt of dat de printer
beschadigd raakt:
Til de printer altijd met ten minste twee mensen op.
■
Zet de printer altijd uit met de schakelaar.
■
Als de printer voor verzending niet goed wordt ingepakt, kan de printer beschadigd raken.
■
Deze schade valt niet onder de garantie van de printer.
Beschadigingen aan de printer die het gevolg zijn van ondeskundig vervoer, vallen niet onder
■
de garantie van de printer.
De printer binnen het kantoor verplaatsen
U kunt de printer binnen een kantoor altijd veilig van de ene naar de andere locatie verplaatsen, mits u
de printer rechtop houdt en voorzichtig en over een effen oppervlak vervoert. Door schokkende
bewegingen, die kunnen ontstaan als de printer bijvoorbeeld over een drempel of een parkeerterrein
wordt geduwd, kan de printer beschadigd raken.
De printer voorbereiden voor verzending
Om de printer in een voertuig te kunnen transporteren moet de printer volgens een speciale procedure
worden verpakt. Bovendien moet de printer opnieuw worden ingepakt in een geschikte verzenddoos. De
printercassette moet uit de printer worden gehaald en in een aparte afgesloten zak worden bewaard om
te voorkomen dat er toner wordt gemorst.
Als u de oorspronkelijke verpakking niet meer hebt, kunt u een verpakkingspakket bestellen via
www.xerox.com/officeprinting/4400supplies
Xerox-vertegenwoordiger. In het verpakkingspakket en in de
op de interactieve documentatie-cd-rom vindt u aanvullende instructies voor het opnieuw verpakken
van de printer. Kunt u de printer niet opnieuw inpakken, neem dan contact op met uw plaatselijke
Xerox-vertegenwoordiger voor informatie over onze inpakdienst.
. U kunt ook contact opnemen met de plaatselijke
Richtlijnen voor probleemoplossing
Copyright © 2002, Xerox Corporation. Alle rechten voorbehouden. 16
 Loading...