

Page 1
TM
Phaser
Laser Printer
3450
Reference Guide
Guide de référence
Guida di riferimento
Referenzhandbuch
Guía de referencia
Guia de referência
Naslaggids
Referensguiden
Page 2

Copyright © 2004, Xerox Corporation. All Rights Reserved. Unpublished rights reserved under the copyright laws of the United
States. Contents of this publication may not be reproduced in any form without permission of Xerox Corporation.
Copyright protection claimed includes all forms of matters of copyrightable materials and information now allowed by statutory
or judicial law or hereinafter granted, including without limitation, material generated from the software programs which are
displayed on the screen such as styles, templates, icons, screen displays, looks, etc.
®
XEROX
PhaserSMART
, The Document Company®, the stylized X®, CentreWare®, infoSMART®, Made For Each Other®, and
®
are registered trademarks of Xerox Corporation. Phaser™, PhaserPort™, and PhaserTools™are trademarks of
Xerox Corporation.
®
Reader®, Illustrator®, PageMaker®, Photoshop®, PostScript®, ATM®, Adobe Garamond®, Birch®, Carta®, Mythos®,
Adobe
®
, and Tekton® are registered trademarks and Adobe Jenson™, Adobe Brilliant Screens™ technology, and IntelliSelect™
Quake
are trademarks of Adobe Systems Incorporated or its subsidiaries which may be registered in certain jurisdictions.
®
Apple
, LaserWriter®, LocalTalk®, Macintosh®, Mac® OS, AppleTalk®, TrueType2®, Apple Chancery®, Chicago®, Geneva®,
®
Monaco
Marigold
Avery
PCL
, and New York® are registered trademarks, and QuickDraw™ is a trademark of Apple Computer Incorporated.
™
and Oxford™ are trademarks of AlphaOmega Typography.
™
is a trademark of Avery Dennison Corporation.
®
and HP-GL® are registered trademarks of Hewlett-Packard Corporation.
Hoefler Text was designed by the Hoefler Type Foundry.
®
ITC Avant Guard Gothic
ITC Zapf Dingbats
Bernhard Modern
™
Garamond
Windows
Wingdings
, Times™, and Univers™ are trademarks of Linotype-Hell AG and/or its subsidiaries.
®
and Windows NT® are registered trademarks of Microsoft Corporation.
™
in TrueType® format is a product of Microsoft Corporation. W ingDin gs is a trademark of Microsoft Corpo ration and
, ITC Bookman®, ITC Lubalin Graph®, ITC Mona Lisa®, ITC Symbol®, ITC Zapf Chancery®, and
®
are registered trademarks of International Typeface Corporation.
™
, Clarendon™, Coronet™, Helvetica™, New Century Schoolbook™, Optima™, Palatino™, Stempel
TrueType is a registered trademark of Apple Computer, Inc.
™
Albertus
Antique Olive
Eurostile
Novell
Distributed Print Services
Sun
of SP ARC International, Incorporated. SPARCstation
, Arial™, Gill Sans™, Joanna™, and Times New Roman™ are trademarks of Monotype Corporation.
®
is a registered trademark of M. Olive.
™
is a trademark of Nebiolo.
®
, NetWare®, NDPS®, NDS®, and Novell Directory Services® are registered trademarks, and IPX™ and Novell
®
and Sun Microsystems® are registered trademarks of Sun Microsystems, Incorporated. SPARC® is a registered trademark
™
are trademarks of Novell, Incorporated.
™
is a trademark of SPARC International, Incorporated, licensed ex clusiv ely
to Sun Microsystems, Incorporated.
®
UNIX
is a registered trademark in the US and other countries, licensed exclusively through X/Open Company Limited.
NERGY STAR
As an E
efficiency. The E
®
partner, Xerox Corporation has determined that this product meets th e ENERGY STAR guidelines for energy
NERGY STAR name and logo are registered U.S. marks.
This product uses code for SHA-1 written by John Halleck, which is being used with his permission.
This product includes an implementation of LZW licensed under U.S. Patent 4,558,302.
Other marks are trademarks or registered trademarks of the companies with which they are associated.
Page 3

Contents
58
For instructions on how to unpack and set up your printer, see the Setup Guide that
shipped with your printer. Basic information about using your printer and clearing
jams can be found on the Quick Reference Guide.The Quick Reference Guide and
Setup Guide can also be found on the Software and Documentation CD-ROM and at
www.xerox.com/office/3450support
3450-0
Features
Printer Tour. . . . . . . . . . . . . . . . . . . . . . . . . . . . . . . . . . . . . . . . . . . . . . . . . . . . . . . . . . 1
Printer Features . . . . . . . . . . . . . . . . . . . . . . . . . . . . . . . . . . . . . . . . . . . . . . . . . . 1
Available Configurations . . . . . . . . . . . . . . . . . . . . . . . . . . . . . . . . . . . . . . . . . . 1
Front View. . . . . . . . . . . . . . . . . . . . . . . . . . . . . . . . . . . . . . . . . . . . . . . . . . . . . . 2
Rear View . . . . . . . . . . . . . . . . . . . . . . . . . . . . . . . . . . . . . . . . . . . . . . . . . . . . . . 2
Printer Options and Supplies. . . . . . . . . . . . . . . . . . . . . . . . . . . . . . . . . . . . . . . . 2
Front Panel Layout . . . . . . . . . . . . . . . . . . . . . . . . . . . . . . . . . . . . . . . . . . . . . . . 3
Error and Warning Messages . . . . . . . . . . . . . . . . . . . . . . . . . . . . . . . . . . . . . . . 3
Menu Map. . . . . . . . . . . . . . . . . . . . . . . . . . . . . . . . . . . . . . . . . . . . . . . . . . . . . . 3
Print Icon. . . . . . . . . . . . . . . . . . . . . . . . . . . . . . . . . . . . . . . . . . . . . . . . . . . . . . . 4
Information Pages . . . . . . . . . . . . . . . . . . . . . . . . . . . . . . . . . . . . . . . . . . . . . . . . 4
.
Printer Drivers. . . . . . . . . . . . . . . . . . . . . . . . . . . . . . . . . . . . . . . . . . . . . . . . . . . . . . . . 4
Available Printer Drivers . . . . . . . . . . . . . . . . . . . . . . . . . . . . . . . . . . . . . . . . . . 4
Printer Driver Features . . . . . . . . . . . . . . . . . . . . . . . . . . . . . . . . . . . . . . . . . . . . 5
Remote Control Panel. . . . . . . . . . . . . . . . . . . . . . . . . . . . . . . . . . . . . . . . . . . . . . . . . . 5
Installing the Remote Control Panel . . . . . . . . . . . . . . . . . . . . . . . . . . . . . . . . . . 6
Changing Settings with the Remote Control Panel. . . . . . . . . . . . . . . . . . . . . . . 6
Managing Your Printer. . . . . . . . . . . . . . . . . . . . . . . . . . . . . . . . . . . . . . . . . . . . . . . . . 6
Printer’s IP Address . . . . . . . . . . . . . . . . . . . . . . . . . . . . . . . . . . . . . . . . . . . . . . 6
CentreWare Internet Services (IS) . . . . . . . . . . . . . . . . . . . . . . . . . . . . . . . . . . . 7
Status Monitor. . . . . . . . . . . . . . . . . . . . . . . . . . . . . . . . . . . . . . . . . . . . . . . . . . . 7
Printer Settings . . . . . . . . . . . . . . . . . . . . . . . . . . . . . . . . . . . . . . . . . . . . . . . . . . . . . . . 7
Tray Settings . . . . . . . . . . . . . . . . . . . . . . . . . . . . . . . . . . . . . . . . . . . . . . . . . . . . 7
Changing Front Panel Language Display . . . . . . . . . . . . . . . . . . . . . . . . . . . . . . 8
Fonts . . . . . . . . . . . . . . . . . . . . . . . . . . . . . . . . . . . . . . . . . . . . . . . . . . . . . . . . . . . . . . . 8
Resident PostScript Fonts . . . . . . . . . . . . . . . . . . . . . . . . . . . . . . . . . . . . . . . . . . 8
Resident PCL6 Fonts. . . . . . . . . . . . . . . . . . . . . . . . . . . . . . . . . . . . . . . . . . . . . . 8
Phaser™ 3450 Laser Printer
i
Page 4

Contents
Registering Your Printer. . . . . . . . . . . . . . . . . . . . . . . . . . . . . . . . . . . . . . . . . . . . . . . . 8
Printing
Supported Papers . . . . . . . . . . . . . . . . . . . . . . . . . . . . . . . . . . . . . . . . . . . . . . . . . . . . . 9
Basic Printing . . . . . . . . . . . . . . . . . . . . . . . . . . . . . . . . . . . . . . . . . . . . . . . . . . . . . . . 10
Changing Paper Type and Size at the Front Panel . . . . . . . . . . . . . . . . . . . . . . 10
Factors Affecting Printer Performance . . . . . . . . . . . . . . . . . . . . . . . . . . . . . . . 11
Adjusting Printing Options. . . . . . . . . . . . . . . . . . . . . . . . . . . . . . . . . . . . . . . . . . . . . 11
Setting Printing Options . . . . . . . . . . . . . . . . . . . . . . . . . . . . . . . . . . . . . . . . . . 11
Using the Manual Feed Mode. . . . . . . . . . . . . . . . . . . . . . . . . . . . . . . . . . . . . . . . . . . 13
2-Sided Printing . . . . . . . . . . . . . . . . . . . . . . . . . . . . . . . . . . . . . . . . . . . . . . . . . . . . . 15
Automatic 2-Sided Printing. . . . . . . . . . . . . . . . . . . . . . . . . . . . . . . . . . . . . . . . 15
Manual 2-Sided Printing . . . . . . . . . . . . . . . . . . . . . . . . . . . . . . . . . . . . . . . . . . 16
Transparencies . . . . . . . . . . . . . . . . . . . . . . . . . . . . . . . . . . . . . . . . . . . . . . . . . . . . . . 17
Guidelines . . . . . . . . . . . . . . . . . . . . . . . . . . . . . . . . . . . . . . . . . . . . . . . . . . . . . 17
Printing Transparencies from Tray 1 (MPT). . . . . . . . . . . . . . . . . . . . . . . . . . . 17
Printing Transparencies from Trays 2 or 3 . . . . . . . . . . . . . . . . . . . . . . . . . . . . 18
Envelopes . . . . . . . . . . . . . . . . . . . . . . . . . . . . . . . . . . . . . . . . . . . . . . . . . . . . . . . . . . 19
Guidelines . . . . . . . . . . . . . . . . . . . . . . . . . . . . . . . . . . . . . . . . . . . . . . . . . . . . . 19
Preparing to Print . . . . . . . . . . . . . . . . . . . . . . . . . . . . . . . . . . . . . . . . . . . . . . . 19
Printing Envelopes . . . . . . . . . . . . . . . . . . . . . . . . . . . . . . . . . . . . . . . . . . . . . . 20
Labels . . . . . . . . . . . . . . . . . . . . . . . . . . . . . . . . . . . . . . . . . . . . . . . . . . . . . . . . . . . . . 21
Guidelines . . . . . . . . . . . . . . . . . . . . . . . . . . . . . . . . . . . . . . . . . . . . . . . . . . . . . 21
Printing Labels . . . . . . . . . . . . . . . . . . . . . . . . . . . . . . . . . . . . . . . . . . . . . . . . . 21
Custom Size Paper . . . . . . . . . . . . . . . . . . . . . . . . . . . . . . . . . . . . . . . . . . . . . . . . . . . 22
Loading Custom Size Paper in Tray 1 (MPT). . . . . . . . . . . . . . . . . . . . . . . . . . 22
Advanced Options. . . . . . . . . . . . . . . . . . . . . . . . . . . . . . . . . . . . . . . . . . . . . . . . . . . . 23
Printing Multiple Pages to a Single Sheet (N-Up) . . . . . . . . . . . . . . . . . . . . . . 23
Scaling. . . . . . . . . . . . . . . . . . . . . . . . . . . . . . . . . . . . . . . . . . . . . . . . . . . . . . . . 24
Printing Booklets. . . . . . . . . . . . . . . . . . . . . . . . . . . . . . . . . . . . . . . . . . . . . . . . 25
Printing Posters . . . . . . . . . . . . . . . . . . . . . . . . . . . . . . . . . . . . . . . . . . . . . . . . . 25
Printing Negative and Mirror Images . . . . . . . . . . . . . . . . . . . . . . . . . . . . . . . . 25
Cover Pages. . . . . . . . . . . . . . . . . . . . . . . . . . . . . . . . . . . . . . . . . . . . . . . . . . . . 26
Phaser™ 3450 Laser Printer
ii
Page 5

Contents
Supplies and Recycling. . . . . . . . . . . . . . . . . . . . . . . . . . . . . . . . . . . . . . . . . . . . . . . . 27
Supplies. . . . . . . . . . . . . . . . . . . . . . . . . . . . . . . . . . . . . . . . . . . . . . . . . . . . . . . 27
Configuration Page . . . . . . . . . . . . . . . . . . . . . . . . . . . . . . . . . . . . . . . . . . . . . . 27
Recycling. . . . . . . . . . . . . . . . . . . . . . . . . . . . . . . . . . . . . . . . . . . . . . . . . . . . . . 27
Connections and Networks
Choosing a Connection. . . . . . . . . . . . . . . . . . . . . . . . . . . . . . . . . . . . . . . . . . . . . . . . 28
Network Connection . . . . . . . . . . . . . . . . . . . . . . . . . . . . . . . . . . . . . . . . . . . . . 28
Direct Connection . . . . . . . . . . . . . . . . . . . . . . . . . . . . . . . . . . . . . . . . . . . . . . . 28
Standalone (Cable or DSL) Network Connection. . . . . . . . . . . . . . . . . . . . . . . 28
Setting an IP Address . . . . . . . . . . . . . . . . . . . . . . . . . . . . . . . . . . . . . . . . . . . . . . . . . 28
Automatically Setting the Printer’s IP Address . . . . . . . . . . . . . . . . . . . . . . . . 29
Manually Setting the Printer's IP Address . . . . . . . . . . . . . . . . . . . . . . . . . . . . 29
USB Connection . . . . . . . . . . . . . . . . . . . . . . . . . . . . . . . . . . . . . . . . . . . . . . . . . . . . . 29
Windows 98 and Me . . . . . . . . . . . . . . . . . . . . . . . . . . . . . . . . . . . . . . . . . . . . . 29
Parallel Connection. . . . . . . . . . . . . . . . . . . . . . . . . . . . . . . . . . . . . . . . . . . . . . . . . . . 30
Installing the Printer Driver . . . . . . . . . . . . . . . . . . . . . . . . . . . . . . . . . . . . . . . . . . . . 30
Windows 98 or Later and Windows 2000 or Later. . . . . . . . . . . . . . . . . . . . . . 30
Macintosh, Novell, and UNIX . . . . . . . . . . . . . . . . . . . . . . . . . . . . . . . . . . . . . 30
Troubleshooting
Print Quality Problems . . . . . . . . . . . . . . . . . . . . . . . . . . . . . . . . . . . . . . . . . . . . . . . . 31
Cleaning the Outside of the Printer. . . . . . . . . . . . . . . . . . . . . . . . . . . . . . . . . . . . . . . 31
Front Panel Messages . . . . . . . . . . . . . . . . . . . . . . . . . . . . . . . . . . . . . . . . . . . . . . . . . 31
LED Descriptions . . . . . . . . . . . . . . . . . . . . . . . . . . . . . . . . . . . . . . . . . . . . . . . 32
Errors and Warnings . . . . . . . . . . . . . . . . . . . . . . . . . . . . . . . . . . . . . . . . . . . . . 32
Moving and Repacking the Printer. . . . . . . . . . . . . . . . . . . . . . . . . . . . . . . . . . . . . . . 33
Precautions for Moving the Printer. . . . . . . . . . . . . . . . . . . . . . . . . . . . . . . . . . 33
Moving the Printer Within the Office. . . . . . . . . . . . . . . . . . . . . . . . . . . . . . . . 33
Preparing the Printer for Shipment . . . . . . . . . . . . . . . . . . . . . . . . . . . . . . . . . . 34
Additional Resources . . . . . . . . . . . . . . . . . . . . . . . . . . . . . . . . . . . . . . . . . . . . . . . . . 34
Support . . . . . . . . . . . . . . . . . . . . . . . . . . . . . . . . . . . . . . . . . . . . . . . . . . . . . . . 34
InfoSMART Knowledge Base . . . . . . . . . . . . . . . . . . . . . . . . . . . . . . . . . . . . . 34
Web Links. . . . . . . . . . . . . . . . . . . . . . . . . . . . . . . . . . . . . . . . . . . . . . . . . . . . . 34
Phaser™ 3450 Laser Printer
iii
Page 6

Contents
Appendices
A–User Safety. . . . . . . . . . . . . . . . . . . . . . . . . . . . . . . . . . . . . . . . . . . . . . . . . . . . . . . 35
Electrical Safety . . . . . . . . . . . . . . . . . . . . . . . . . . . . . . . . . . . . . . . . . . . . . . . . 35
Laser Safety. . . . . . . . . . . . . . . . . . . . . . . . . . . . . . . . . . . . . . . . . . . . . . . . . . . . 36
Maintenance Safety. . . . . . . . . . . . . . . . . . . . . . . . . . . . . . . . . . . . . . . . . . . . . . 36
Operational Safety. . . . . . . . . . . . . . . . . . . . . . . . . . . . . . . . . . . . . . . . . . . . . . . 36
Printing Safety Guidelines . . . . . . . . . . . . . . . . . . . . . . . . . . . . . . . . . . . . . . . . 37
Symbols Marked on the Product. . . . . . . . . . . . . . . . . . . . . . . . . . . . . . . . . . . . 38
B–Warranty. . . . . . . . . . . . . . . . . . . . . . . . . . . . . . . . . . . . . . . . . . . . . . . . . . . . . . . . . 38
C–Printer Specifications (English Only) . . . . . . . . . . . . . . . . . . . . . . . . . . . . . . . . . . 38
Physical Specifications . . . . . . . . . . . . . . . . . . . . . . . . . . . . . . . . . . . . . . . . . . . 38
Environmental Specifications . . . . . . . . . . . . . . . . . . . . . . . . . . . . . . . . . . . . . . 38
Electrical Specifications . . . . . . . . . . . . . . . . . . . . . . . . . . . . . . . . . . . . . . . . . . 39
Performance Specifications. . . . . . . . . . . . . . . . . . . . . . . . . . . . . . . . . . . . . . . . 39
Controller Specifications. . . . . . . . . . . . . . . . . . . . . . . . . . . . . . . . . . . . . . . . . . 39
D–Regulatory (English Only). . . . . . . . . . . . . . . . . . . . . . . . . . . . . . . . . . . . . . . . . . . 40
United States . . . . . . . . . . . . . . . . . . . . . . . . . . . . . . . . . . . . . . . . . . . . . . . . . . . 40
Canada. . . . . . . . . . . . . . . . . . . . . . . . . . . . . . . . . . . . . . . . . . . . . . . . . . . . . . . . 40
European Union. . . . . . . . . . . . . . . . . . . . . . . . . . . . . . . . . . . . . . . . . . . . . . . . . 41
E–Material Safety Data Sheet (English Only) . . . . . . . . . . . . . . . . . . . . . . . . . . . . . . 42
F–Product Recycling and Disposal (English Only) . . . . . . . . . . . . . . . . . . . . . . . . . . 46
Phaser™ 3450 Laser Printer
iv
Page 7

Contents
Phaser™ 3450 Laser Printer
v
Page 8

Printer Tour
Features
Printer Tour
Printer Features
The Phaser 3450 Laser Printer embodies many features to meet your printing needs:
■ Great performance and superior print quality
■ Letter: 25 pages per minute (ppm) with 600 dpi full speed resolution
■ A4: 24 ppm with 600 dpi full speed resolution
■ Up to 160 Mbytes RAM memory
■ Flexible paper handling
■ Optional 500-Sheet Feeder (including tray)
■ Duplex printing with 3450D and 3450DN configurations to automatically print on
both sides
■ Wide variety of productivity features
■ Easy to replace print cartridge
■ CentreWare IS provides an embedded web server to help manage, configure, and
troubleshoot the printer from your computer
■ Status Monitor provides on-screen notification and guidance if the printer needs help
Available Configurations
The Phaser 3450 Laser Printer is available in three configurations:
Features Printer Configuration
3450B 3450D 3450DN
Maximum Print Speed Monochrome 25 25 25
Memory (Standard)
Up to 160 Mbytes Optional
PostScript and PCL Fonts Yes Yes Yes
Automatic 2-Sided Printing No Yes Yes
Default Resolutions (dpi) 600x600 dpi 600x600 dpi 600x600 dpi
500-Sheet Feeder Optional Optional Optional
Network Interface Optional Optional Standard
32 Mbytes 32 Mbytes 32 Mbytes
Phaser™ 3450 Laser Printer
1
Page 9
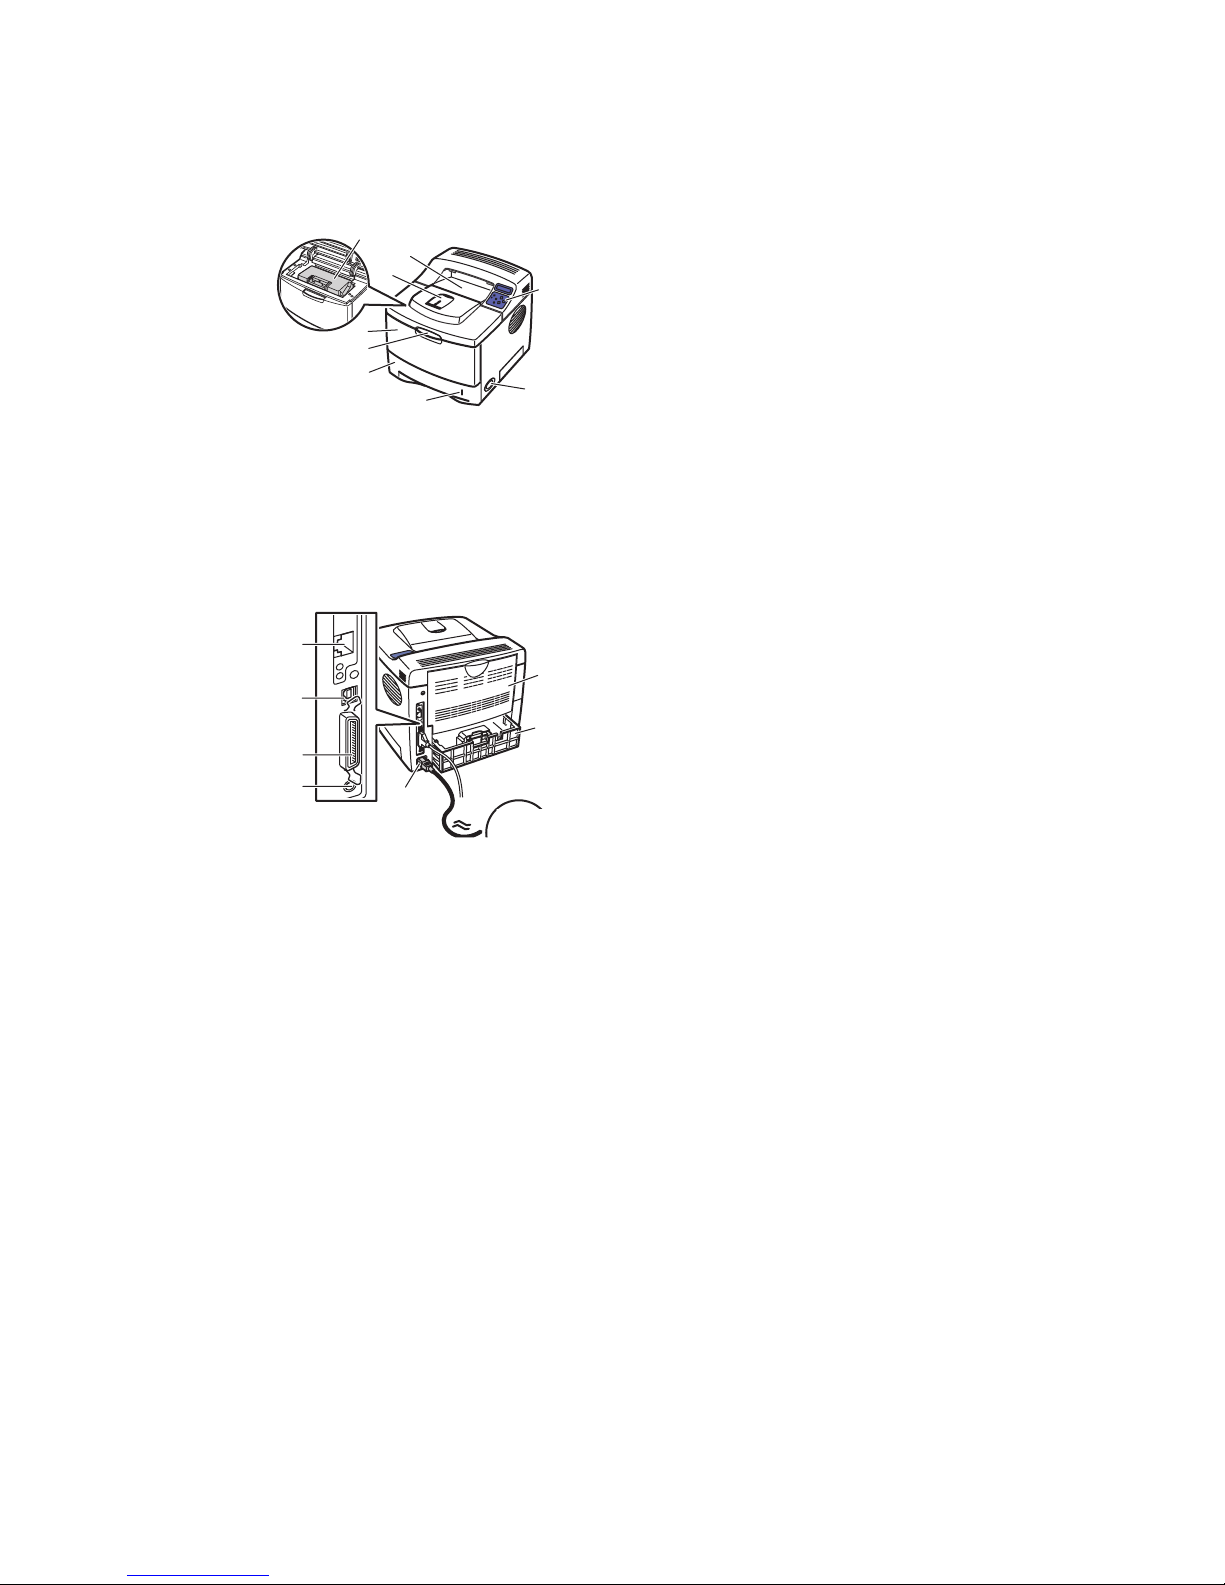
Front View
36
1
3
Printer Tour
Rear View
7
6
5
4
9
8
7
2. On/Off Switch
3. Paper Gauge
4. Tray 2
1. Front Panel
6
5
4
3450-0
2
5. Tray 1 (MPT) Release
6. Tray 1 (MPT)
7. Paper Output Support
8. Output Tray
9. Print Cartridge
1. Rear Door
2. Legal Paper Adjustment
3. Power cord receptacle
4. Optional Tray 3 Cable Connector
1
2
3
3450-037
5. IEEE 1284 Parallel Port
6. USB Port
7. Network Port (optional)
Printer Options and Supplies
The following printer options and supplies are available for Phaser 3450 printers:
Options and Supplies
Item Part Number
32 Mbytes additional RAM memory 097S03132
64 Mbytes additional RAM memory 097S03133
128 Mbytes additional RAM memory 097S03136
8 Mbytes Flash memory 097S03134
Network Interface Card (NIC) 097S03130
500-Sheet Feeder (includes tray) 097S03131
Standard-Capacity Print Cartridge (5,000 pages @ 5% area coverage) 106R00687
High-Capacity Print Cartridge (10,000 pages @ 5% area coverage) 106R00688
Phaser™ 3450 Laser Printer
2
Page 10
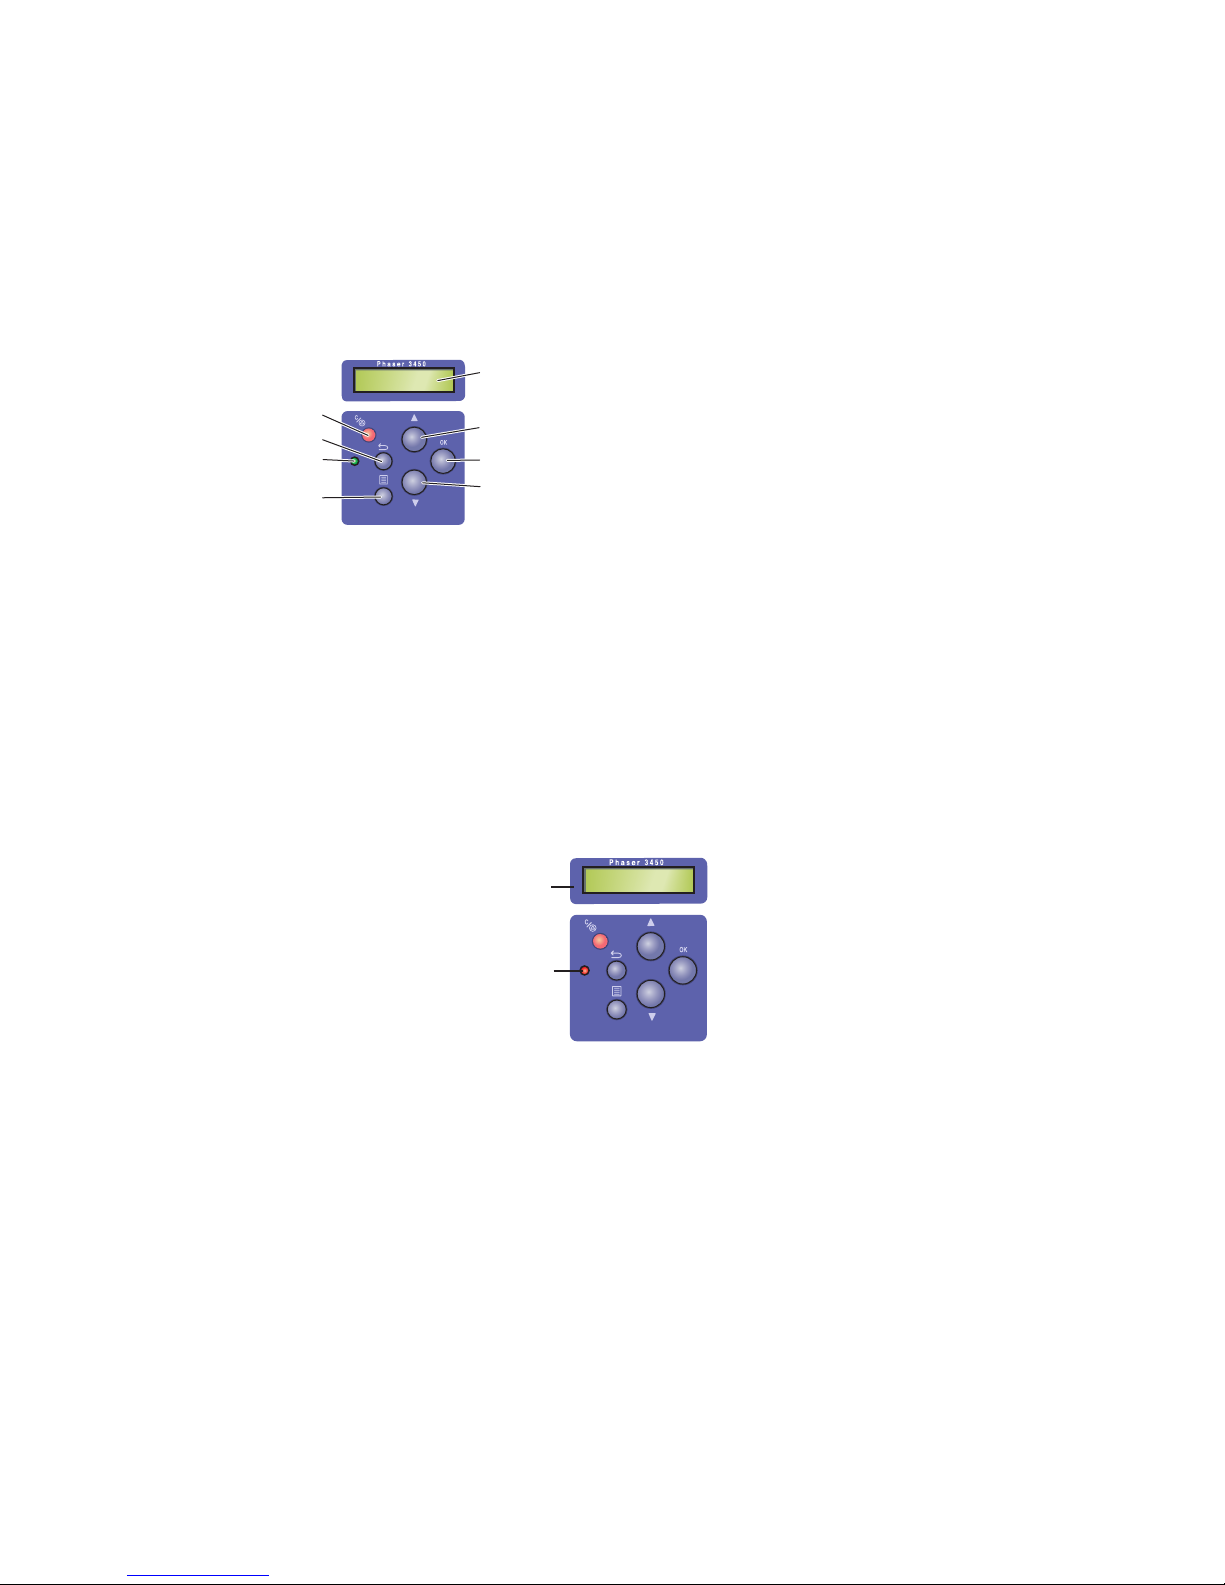
Front Panel Layout
38
1
2
3
4
5
1
2
The front panel on your printer has three components:
■ Multi-colored Light Emitting Diode (LED) light
■ Alphanumeric display
■ Six button cluster.
1. Cancel button
Ready
The Alphanumeric Display displays status messages and front panel menus.
5
2. Return button
3. On-line/Data/Error LED
6
7
8
4. Menu button
5. Status/Error Messages and Menus
6. Up Arrow button
7. OK button
3450-0
8. Down Arrow button
Printer Tour
Error and Warning Messages
When there is a problem with the printer, the front panel LED (2) blinks red for an error and
yellow for a warning. An error or warning message is displayed in the Alphanumeric
Display (1).
Ready
3450-04
Menu Map
The “Menu Map” is a visual representation of the front panel settings and information pages.
To print the “Menu Map”:
1. At the printer’s front panel, press the Menu button, then press the OK button.
2. Press the OK button to print the Menu Map.
Phaser™ 3450 Laser Printer
3
Page 11

Printer Drivers
Note
Print Icon
There are a number of information pages accessible through the front panel. When
the print icon appears before a title in the Menu Map:
1. Select that title at the front panel.
2. Press the OK button to print the page.
Information Pages
Your printer comes with a set of information pages that helps you solve printing problems and
obtain the best results from your printer. Access these pages from the printer’s front panel.
To print information pages:
1. At the printer’s front panel, press the Menu button, then press the OK button.
2. Select Info Pages, then press the OK button.
3. Select the appropriate information page, then press the OK button to print.
Print the “Menu Map” to see other information pages available for printing.
Printer Drivers
Printer drivers enable your computer and printer to communicate and provide access to your
printer features. Xerox makes driver installation easy with its Walk-Up Technology. For more
information about printer drivers, see the video at www.xerox.com/office/drivers
Available Printer Drivers
Xerox provides drivers for a variety of page description languages and operating systems. The
following drivers are available:
Driver Source Description
PCL6 Driver CD-ROM and
Web
Windows PostScript Driver CD-ROM and
Web
The Printer Command Language driver can
be used for applications requiring PCL.
(Default driver)
The PostScript driver is recommended to take
full advantage of PostScript. Available for
Windows 2000, Windows XP, and Windows
Server 2003.
.
Macintosh OS Driver CD-ROM and
This driver enables printing from a Macintosh
Web
OS 9.x or higher.
Phaser™ 3450 Laser Printer
4
Page 12

Remote Control Panel
Driver Source Description
Xerox Walk-Up Printing Driver
(Windows)
UNIX Driver (Linux, Solaris) Web only This driver enables printing from a UNIX
Web only This driver enables printing from a PC to any
Xerox PostScript-enabled printer. This is
especially helpful for mobile professionals
who travel to multiple locations and need to
print to different printers.
operating system.
Printer Driver Features
The following chart displays the Xerox driver features that are available with specific
operating systems.
Windows 2000,
Feature
Print-Quality Modes Both Both PostScript PostScript
2-Sided Printing Both Both PostScript PostScript
N-Up Both PCL6 PostScript PostScript
Booklet Both PCL6 — —
Windows XP,
Windows Server 2003
Windows 98
Windows Me Mac OS 9 Mac OS X
Poster Printing PCL6 PCL6 — —
Fit to Page Both Both PostScript PostScript
Mirrored Output PostScript PostScript PostScript —
Negative Output PostScript PostScript PostScript —
Scaling Both Both PostScript PostScript
Watermarks PCL6 PCL6 — —
Cover Page PCL6 PCL6 PostScript —
Remote Control Panel
The Remote Control Panel is a Windows utility that enables you to:
■ Set printer-specific settings in the printer
■ Download fonts and macros to your printer
The Remote Control Panel can be used for all Windows operating systems with a nonnetworked printer when connected with either the parallel interface or USB interface.
Phaser™ 3450 Laser Printer
5
Page 13

Managing Your Printer
Note
Note
Installing the Remote Control Panel
The Remote Control Panel utility can be installed from the Software and Documentation CDROM or at www.xerox.com/office/3450support
.
Changing Settings with the Remote Control Panel
To change settings using the Remote Control Panel:
1. Click Start, select Programs, select Xerox Phaser 3450 Utility, then click Remote
Control Panel.
2. Make changes to the Remote Control Panel settings on the Printing, Config, Job, Test
PCL, Flash Font and Macro, and PS 3 tabs.
For information about the settings on these tabs, access the online help by clicking the
Help button.
3. Send the settings to the printer by clicking the Send button.
Settings selected in the printer driver override settings selected in the Remote Control
Panel.
Managing Your Printer
There are a number of resources available to help you get the best quality prints from your
printer.
Printer’s IP Address
You need your printer’s IP address to change printer settings through CentreWare IS. Follow
these steps to identify your printer’s IP address:
1. At the printer’s front panel, press the Menu button, select Information, then press the
OK button.
2. Select Printer Ident, then press the OK button.
3. Select IP Address, then press the OK button.
Phaser™ 3450 Laser Printer
6
Page 14

Printer Settings
CentreWare Internet Services (IS)
CentreWare IS a printer management tool that helps users and administrators accomplish
many tasks. It is available on all networked printers. With CentreWare IS you can:
■ Access remote diagnostics and troubleshooting information for printer problems.
■ Monitor printer and supply status.
■ Link to software updates and Technical Support.
CentreWare IS uses TCP/IP (your printer’s IP address) to communicate directly with an
embedded web server on the printer. CentreWare IS runs on any TCP/IP enabled computer
with a web browser.
Launching CentreWare IS
To launch CentreWare IS:
1. Launch your web browser.
2. Enter your printer's IP address in the browser’s Address field (http://xxx.xxx.xxx.xxx).
3. For detailed information about CentreWare IS software, click HELP on the upper right of
the CentreWare IS screen.
Status Monitor
Status Monitor, installed with your printer driver and available only with Windows on a
network enabled printer, automatically checks the printer status and sends instant notification
to your computer if the printer needs attention.
Whenever the printer is unable to print your document, the printer automatically sends an onscreen message that provides helpful text and illustrations showing how to fix the printer.
Printer Settings
Tray Settings
Tray Sequence
You can specify the sequence the printer uses to select trays containing the correct paper type
and size for a print job. When a tray runs out of the correct paper during printing, the printer
selects the next tray in the sequence containing the correct paper type and size to continue
printing the job.
Phaser™ 3450 Laser Printer
7
Page 15

Fonts
Changing Front Panel Language Display
To change the language used for the text on the front panel, CentreWare IS, and some
information pages:
1. At the printer’s front panel, press the Menu button, select Printer Setup, then press the
OK button.
2. Select General Setup, then press the OK button.
3. Select FP Language, then press the OK button.
4. Select the desired language, then press the OK button.
Fonts
Your printer uses the following types of fonts:
■ Resident fonts
■ Fonts downloaded into printer memory
■ Fonts downloaded with your print job from the application
■ Fonts downloaded into printer optional flash
Resident PostScript Fonts
Printer-resident fonts are always av ailable for printing. All printers are shipped with PostScript
resident Roman fonts. Print a sample of the resident PostScript fonts at the front panel.
Resident PCL6 Fonts
For PCL printing, the printer includes many typefaces, including Courier, Times, and Univers
typefaces in medium, bold, italic medium, and italic bold. Print a sample of resident PCL6
fonts at the front panel.
Registering Your Printer
Registering your printer is quick and easy. You can register your printer using one of the
following methods:
■ Registration card that came with your printer
■ Online form at www.xerox.com/office/support
Registering your printer provides you with updates and news about your printer.
Phaser™ 3450 Laser Printer
8
Page 16

Supported Papers
Note
Printing
Supported Papers
Follow the guidelines in these tables to ensure the best print quality and avoid printer jams.
Xerox highly recommends that you print transparencies and other specialty media from
Tray 1 (MPT) for best results.
Supported Papers, Transparencies, and Other Specialty Media
Tray 1 (MPT) Weight: 60–163 g/m2 (16–43 lb.)
Tray 2 and 3 Weight: 60–105 g/m
Duplex Weight: 75–90 g/m
Paper Type/Size Dimensions
Letter 8.5 x 11 in. ●●●●
Legal 8.5 x 14 in.
US Folio 8.5 x 13 in. ●●●●
A4 210 x 297 mm
B5-JIS 182 x 257 mm
ISO-B5 176 x 250 mm ●●●
A5 148 x 210 mm
Executive 7.25 x 10.5 in.
Statement 5.5 x 8.5 in. ●
US Postcard 3.5 x 5.5 in. ●
Index Card 3 x 5 in. ●
A6 Postcard 105 x 148 mm ●
Envelopes
Monarch
#10 Commercial
C5
C6
DL
Transparencies
Letter
A4
Labels
Letter
A4
3.88 x 7.5 in.
4.13 x 9.5 in.
162 x 229 mm
114 x 162 mm
110 x 220 mm
8.5 x 11 in.
210 x 297 mm
8.5 x 11 in.
210 x 297 mm
2
(16–28 lb.)
2
(20–24 lb.)
T r ay 1 (MPT)
Tray 2
Tray 3
2-Sided Printing
●●●●
●●●●
●●●
●●●
●●●
●
●
●
●
●
●
●
●
●
●
●
●
●
Phaser™ 3450 Laser Printer
9
Page 17

Basic Printing
Note
Tray 1 (MPT) Weight: 60–163 g/m2 (16–43 lb.)
Tray 2 and 3 Weight: 60–105 g/m
Duplex Weight: 75–90 g/m
Paper Type/Size Dimensions
Custom Width = 76.2 ~ 215.9 mm (3 ~ 8.5 in.);
Length = 127 ~ 355.6 mm (5 ~ 14 in.)
2
(16–28 lb.)
2
(20–24 lb.)
Tray 1 (MPT)
Tra y 2
Tra y 3
2-Sided Printing
●
Basic Printing
For information about how to load paper in Tray 1 (MPT), Tray 2, or Tray 3, see the Quick
Reference Guide that came with your printer . The Quic k Refer ence Guide can also be found on
the Software a nd Documenta tion CD-ROM that came with your printer, or at www.xerox.com/
office/3450support.
A minimum clearance of 32 mm (12.6 in.) must be maintained at the rear of the printer.
See the Setup Guide that came with your printer for minimum clearances.
Changing Paper Type and Size at the Front Panel
If you have changed the paper size, at the printer’s front panel:
1. Press the Menu button, select Printer Setup, then press the OK button.
2. Select Paper Handling, then press the OK button.
3. Select Tray [1, 2, or 3] Size, then press the OK button.
4. Scroll to the paper size loaded, then press the OK button.
5. Press the Cancel button to return to the main menu.
If you have changed the paper type at the printer’s front panel:
1. Press the Menu button, select Printer Setup, then press the OK button.
2. Select Paper Handling, then press the OK button.
3. Select Tray [1, 2, or 3] Type, then press the OK button.
4. Scroll to the paper type loaded, then press the OK button.
5. Press the Cancel button to return to the main menu.
Phaser™ 3450 Laser Printer
10
Page 18

Adjusting Printing Options
Note
Factors Affecting Printer Performance
Many factors affect a print job. They include the print speed (stated in number of pages per
minute), the media used, download time, and printer processing time.
The computer download time and printer processing time are affected by several factors
including:
■ Printer memory
■ Connection type (network or USB)
■ Network operating system
■ Printer configuration
■ File size and type of graphics
■ Computer speed
Additional printer memory (RAM) may improve ov er all printer functions, but will not
increase the pages per minute (ppm) ability of the printer.
Adjusting Printing Options
Setting Printing Options
Many printing options are available with the Xerox printer driver.
Selecting Printing Preferences in Windows
Printer preferences control all of your jobs, unless you overwrite them specifically for your
job. For e xample, if you w ant to use automatic 2-sided printing for most jobs, set this option in
printer settings.
1. Click Start, select Settings, then click Printers.
2. In the Printers folder, right-click the icon for your printer.
3. From the popup menu, select Printer Preferences or Properties.
4. Make selections from the driver tabs. See the “PCL Printer Driver Options for Windows
Operating Systems” table or “PostScript Printer Driver Options for Windows Operating
Systems” table for specific printing options.
5. Click the OK button to save your selections.
Phaser™ 3450 Laser Printer
11
Page 19

Adjusting Printing Options
Selecting Properties for an Individual Job
If you want to use special settings for a particular job, change the driver settings before
sending the job to the printer. For example, if you want to use the 1200 dpi Quality mode for
a particular graphic, select this setting in the driver before printing that job.
1. With the desired document or graphic open in your application, access the Print dialog
box.
2. Select the Phaser 3450 printer and click the Properties button to open the printer driver.
3. Make selections from the driver tabs. See the following table for specific printing options.
4. Click the OK button to save your selections.
5. Print the job.
PCL6 Printer Driver Options for Windows Operating Systems
Operating
System
Windows 2000,
Windows XP, or
Windows Server
2003
Driver Tab Printing Options
Layout tab
Paper tab
Image Options tab
Output Options tab
Watermark tab
T roubleshooting tab
■ Orientation
■ 2-Sided Printing
■ Multiple Pages Per Sheet (N-Up)
■ Reduce/Enlarge
■ Paper Size
■ Custom Size
■ Paper Type
■ Paper Source
■ Cover Page
■ Print Quality
■ Print All Text Black
■ TrueType Options
■ Print Order
■ Use Printer Fonts
■ Watermarks
■ Print Information Pages
■ Web Links
Phaser™ 3450 Laser Printer
12
Page 20

PostScript Printer Driver Options for Windows Operating Systems
Note
7
Using the Manual Feed Mode
Operating
System
Windows 2000,
Windows XP, or
Windows Server
2003
PostScript Driver Tab Printing Options
Layout tab
Paper/Quality tab
Advanced Options Dialog
Box
T roubleshooting tab
■ Orientation
■ 2-Sided Printing
■ Page Order
■ Pages Per Sheet
■ Booklet
■ Tray Selection
■ Paper Size
■ Scaling
■ Mirrored Output
■ Negative Output
■ Fit to Page
■ Paper Type
■ Print Quality
■ Web Links
■ Printer Information Pages
For more information about printing options and other selections, click the Help button on
the printer driver tab to view the online help.
Using the Manual Feed Mode
Follow these steps to print a manual print job from Tray 1 (MPT):
1. At your computer, select Print, select Properties, select Paper, select Paper Source,
select Manual, then click OK to send the job to the printer.
2. Open Tray 1 (MPT) by pushing the handle down and out.
3450-02
Phaser™ 3450 Laser Printer
13
Page 21

Using the Manual Feed Mode
28
3450-048
3. Slide the extender toward you until it locks into place.
3450-0
4. Adjust the paper guides to match the size of the paper, transparency, or other specialty
media.
5. When prompted at the front panel, insert enough sheets of the paper , transparency, or other
specialty media for your print job into the tray. Place the side to be printed faceup with the
top of the page entering the printer first.
6. If necessary, press the guides inward to match the size of the paper.
7. Press the OK button.
Tray 1 (MPT) detects the paper and prints the page.
Phaser™ 3450 Laser Printer
14
Page 22

2-Sided Printing
2-Sided Printing
Automatic 2-Sided Printing
Guidelines
■ Printer must be a 3450D or 3450DN configuration to perform automatic 2-sided printing.
■ Use only letter, legal, A4, US Folio, or custom paper with dimensions and weights listed
for automatic 2-sided printing in "Supported Papers” on page 1-9.
■ Use paper with a weight range between 75–90 g/m
Binding Preferences
Use the printer driver to select Portrait or Landscape orientation for the images on the page.
When you print 2-sided jobs, select the binding preference which determines how the pages
turn.
2
(20–24 lb.)
Portrait
Flip on Long Edge
Portrait
Flip on Short Edge
Landscape
Flip on Short Edge
Landscape
Flip on Long Edge
Printing 2-sided Jobs
To print on both sides of the sheet in a supported driver:
Windows 2000, Windows XP, and Windows Server2003 PostScript driver:
1. Insert paper into the tray. For information see the Quick Reference Guide that came with
your printer. The Quick Reference Guide can also be found on the Software and
Documentation CD-ROM that came with your printer, or at www.xerox.com/office/
3450support.
2. In the printer driver, under Print on Both Sides (Duplex), select Flip on Long Edge or
Flip on Short Edge.
3. Click OK to accept the printer driver settings, then click OK to print.
Windows 2000, Windows XP, or Windows Server 2003 PCL6 driver:
1. Insert paper into the tray. For information see the Quick Reference Guide that came with
your printer. The Quick Reference Guide can also be found on the Software and
Documentation CD-ROM that came with your printer, or at www.xerox.com/office/
3450support.
Phaser™ 3450 Laser Printer
15
Page 23

2-Sided Printing
2. In the printer driver, under 2-Sided Printing, select None, Long Edge, or Short Edge.
Mac OS 9.x PostScript driver:
1. Insert paper into the tray. For information about how to load paper, see the Quick
Reference Guide.
2. Go to Orientation in Page Setup and select Portrait, Landscape, or Rotated
Landscape.
3. Click OK to save your settings.
4. In the printer driver:
a. Click Options.
b. In the Print Options dialog box, click the pull-down menu for Double-sided
Printing then
5. Click OK to accept the Print Options settings, the click Print to print your job.
Mac OS X or Higher PostScript driver:
1. Insert paper into tray. For information about how to load paper, see the Quick Reference
Guide.
2. Go to Orientation in Page Setup and select Portrait, Landscape, or Rotated Landscape.
3. Click OK to save your settings.
4. In the printer driver:
a. Click on the left pull-down menu and select Duplex.
b. Check the Print on Both Sides checkbox, then select Long Edge or Short Edge
Binding option.
5. Click Print to print your job.
select Printer’s Default, None, Long Edge, or Short Edge.
Manual 2-Sided Printing
Manual 2-sided printing is supported for paper with dimensions and weights listed in
"Supported Papers" on page 1-9. Print manual 2-sided jobs from Tray 1 (MPT).
1. Load paper into Tray 1 (MPT).
2. At your computer, select odd numbered pages to print. Set the paper type and size
according to the steps listed in "Changing Paper Type and Size at the Front Panel" on
page 1-10.
3. Remove the pages from the output tray and place the printed side facedown in Tray 1
(MPT) with the top of the page entering the printer first.
4. At your computer, select even numbered pages to print. Set the paper type and size
according to the steps listed in "Changing Paper Type and Size at the Front Panel" on
page 1-10.
Phaser™ 3450 Laser Printer
16
Page 24

Transparencies
3450-057
41
Transparencies
Transparencies can be printed from any tray; however, Tray 1 (MPT) is recommended.
Guidelines
Place no more than 50 transparencies at one time in Tray 1 (MPT), Tray 2, or Try 3.
■ Handle transparencies by the edges using both hands to avoid fingerprints and creases
which can cause poor print quality.
■ Use transparencies intended for monochrome laser printers.
Printing Transparencies from Tray 1 (MPT)
1. Fan the transparencies to release sheets that may stick together.
2. Insert the transparencies into Tray 1 (MPT). For information about how to load paper in
Tray 1 (MPT), see the Quick Reference Guide that came with your printer. The Quick
Reference Guide can also be found on the Software and Documentation CD-ROM that
came with your printer, or at www.xerox.com/office/3450support
3450-0
.
3. At the printer’s front panel:
a. Press the Menu button, select Printer Setup, then press the OK button.
b. Select Paper Handling, then press the OK button.
c. Select Tray 1 Size, then press the OK button.
d. Select Letter or A4, then press the OK button.
e. Press the Cancel button to return to the main menu.
Phaser™ 3450 Laser Printer
17
Page 25

Transparencies
Note
3450-057
4. At the printer’s front panel:
a. Press the Menu button, select Printer Setup, then press the OK button.
b. Select Paper Handling, then press the OK button.
c. Select Tray 1 Type, then press the OK button.
d. Select Transparency, then press the OK button.
e. Press the Cancel button to return to the main menu.
5. In the printer driver, select Tray 1 (MPT) as the paper source.
Printing Transparencies from Trays 2 or 3
Do not print paper-backed transparencies from T ray 3. Xerox highly recommends that y ou
print transparencies and other specialty media from Tray 1 (MPT) for best results.
1. Remove all paper from the tray.
2. Fan the transparencies to release sheets that may stick together.
3. Insert the transparencies into the tray. For information about how to load paper in Trays 2
or 3, see the Quick Reference Guide that came with your printer. The Quick Reference
Guide can also be found on the Software and Documentation CD-ROM that came with
your printer, or at www.xerox.com/office/3450support
.
4. At the printer’s front panel:
a. Press the Menu button, select Printer Setup, then press the OK button.
b. Select Paper Handling, then press the OK button.
c. Select [Tray 2 Type or Tray 3 Type], then press the OK button.
d. Select Transparency, then press the OK button.
e. Press the Cancel button to return to the main menu.
5. In the printer driver, select Tray 2 or Tray 3 as the paper source.
Phaser™ 3450 Laser Printer
18
Page 26

Envelopes
Caution
Envelopes
Guidelines
Buying and Storing Envelopes
■ Use only paper envelopes specified in "Supported Papers" on page 1-9. Successful
envelope printing is highly dependent on the quality and construction of the envelopes.
Use env e lo pe s ma de spe c ifically for laser printers.
■ It is recommended that you maintain constant temperatures and relative humidity.
■ Store unused envelopes in their packaging to avoid the effects of moisture and dryness
which can affect print quality and cause wrinkling. Excessive moisture can cause the
envelopes to seal before or during printing.
■ Avoid padded envelopes; purchase envelopes that lie flat on a surface.
■ You may remove air “bubbles” from the envelopes before loading by setting a heavy book
on top of the envelopes.
Preparing to Print
Follow these guidelines to prevent wrinkling problems:
■ Use only Tray 1 (MPT) to print envelopes.
■ Print only on the front of the envelope.
■ Perform these steps when using an application that includes a tool for creating an envelope
document:
■ Select faceup.
■ Select the feed method with the image centered.
■ Clear Clockwise Rotation.
■ Load a maximum of 10 envelopes at a time. This printer is not designed to handle
high-capacity production envelope printing.
Never use envelopes with windows or metal clasps; they can damage the printer. Damage
caused by using unsupported envelopes is not covered under the Xerox warranty, service
agreement, or Total Satisfaction Guarantee.
Phaser™ 3450 Laser Printer
19
Page 27

Envelopes
Note
2
Printing Envelopes
Some wrinkling or embossing may occur when printing envelopes.
1. Insert the envelopes faceup with the top of the en v elope to the left as you view the front of
the tray. Adjust the guides to match the size of the envelopes. Maximum capacity is 10
envelopes.
3450-03
2. At the printer’s front panel:
a. Press the Menu button, select Printer Setup, then press the OK button.
b. Select Paper Handling, then press the OK button.
c. Select Tray 1 Size, then press the OK button.
d. Select envelope size, then press the OK button.
e. Press the Cancel button to return to the main menu.
3. At the printer’s front panel:
a. Press the Menu button, select Printer Setup, then press the OK button.
b. Select Paper Handling, then press the OK button.
c. Select Tray 1 Type, then press the OK button.
d. Select Envelope, then press the OK button.
e. Press the Cancel button to return to the main menu.
4. In the printer driver, select Tray 1 (MPT) as the paper source.
5. Print a test envelope from your application to confi rm that the orientation of your en velope
is correct.
For information, see the Quick Reference Guide that came with your printer. The Quick
Reference Guide can also be found on the Software and Documentation CD-ROM that came
with your printer, or at www.xerox.com/office/3450support
.
Phaser™ 3450 Laser Printer
20
Page 28

Labels
40
Labels
Labels can be printed only from Tray 1 (MPT). The maximum number of sheets that can be
loaded in Tray 1 (MPT) is 25.
Guidelines
■ Use only labels recommended for laser printers.
■ Do not use vinyl labels.
■ Verify that the labels’ adhesive material can tolerate fusing temperature of 200° C (392° F)
for 0.1 second.
■ Do not use any sheets where labels are missing; it may damage printer components.
■ Store unused labels flat in their original packaging. Leave the labels inside the original
packaging until ready to use. Return any unused labels to the original packaging and reseal
it for protection.
■ Do not store labels in extremely dry or humid conditions or extremely hot or cold
conditions. Storing them in extreme conditions may cause print quality problems or cause
them to jam in the printer.
■ Rotate stock frequently . Long periods of storage in extreme conditions can cause the labels
to curl and jam the printer.
■ Print only on one side of the sheet of labels.
Printing Labels
If your application has a setting for labels, use it as a template.
1. Insert the labels into Tray 1 (MPT). Place the labels faceup with the top of the sheet
entering the printer first. Adjust the guides to match the size of the labels.
3450-0
2. At the printer’s front panel:
a. Press the Menu button, select Printer Setup, then press the OK button.
b. Select Paper Handling, then press the OK button.
c. Select Tray 1 Size, then press the OK button.
d. Select Letter or A4, then press the OK button.
e. Press the Cancel button to return to the main menu.
Phaser™ 3450 Laser Printer
21
Page 29

3. At the printer’s front panel:
52
a. Press the Menu button, select Printer Setup, then press the OK button.
b. Select Paper Handling, then press the OK button.
c. Select Tray 1 Type, then press the OK button.
d. Select Labels, then press the OK button.
e. Press the Cancel button to return to the main menu.
4. In the printer driver, select Tray 1 (MPT) as the paper source.
Custom Size Paper
Print custom size paper or specialty media in Tray 1 (MPT).
You can print on custom size paper within these dimensions:
1-sided Manual 2-sided
■ Width = 76.2~215.9 mm (3~8.5 in.)
■ Length = 127~355.6 mm (5~14 in.)
■ Width = 76.2~215.9 mm (3~8.5 in.)
■ Length = 127~355.6 mm (5~14 in.)
Custom Size Paper
Loading Custom Size Paper in Tray 1 (MPT)
1. Insert the custom size paper into Tray 1 (MPT). Adjust the guides to match the size of the
paper. Place the side to be printed faceup with the top of the page enteriing the printer
first.
3450-0
2. At the printer’s front panel:
a. Press the Menu button, then select Printer Setup.
b. Select Paper Handling, then press the OK button.
c. Select Tray 1 Size, then press the OK button.
d. Select Custom, then press the OK button.
Phaser™ 3450 Laser Printer
22
Page 30

Advanced Options
55
60
e. Select Custom X, then press the OK button.
Y
X
3450-0
f. Press the Down Arrow or Up Arrow buttons to set the paper size, then press the OK
button.
g. Select Custom Y, then press the OK button.
h. Press the Down Arrow or Up Arrow buttons to set the paper size, then press the OK
button.
i. Press the Cancel button to return to the main menu.
3. In the printer driver, select Tray 1 (MPT) as the paper source.
Advanced Options
Printing Multiple Pages to a Single Sheet (N-Up)
When printing a multiple-page document, you can print more than one page on a single sheet
of paper. Print one, two, four, six, nine, or 16 pages per sheet.
6100-0
To print multiple pages on a single sheet of paper in a supported driver:
■ Windows 2000, or Windows XP, or Windows Server 2003 PostScript driver:
On the Layout tab, select Pages Per Sheet from the drop-down list, then click the OK
button to save your choice.
■ Windows 2000, Windows XP, or Windows Server 2003 PCL6 driver:
On the Layout tab, select Multiple Pages per Side, select Pages per Side from the drop-
down list, then click the OK button to save your choices.
Phaser™ 3450 Laser Printer
23
Page 31

Advanced Options
■ Mac OS 9.x PostScript driver:
In Page Setup, click the pull-down menu for Layout and select the number of pages per
sheet.
■ Mac OS X or Higher PostScript driver:
In the printer driver, click on the left pull-down menu and select Layout. Click the Pages
per Sheet pull-down menu and select the number of pages per sheet. Click the Border pulldown menu and select the type of border desired for each page on the sheet.
Scaling
You can reduce or enlarge your page images when they are printed by selecting a scaling
value. The default is 100 percent. To select scaling in a supported driver:
50% 100% 200%
■ Windows 2000, Windows XP, or Windows Server 2003 PostScript driver:
On the Layout tab, click the Advanced button, select Scaling, select a percen tag e
between 1 and 1000 for your print job, then click the OK button to save your choices.
■ Windows 2000, Windows XP, or Windows Server 2003 PCL6 driver:
Fit to Page:
On the Layout tab, click the More Lay out Options button, select Fit to P age, then set the
size of the Target Page from the drop-down list, then click the OK button to save your
choices.
Reduce/Enlarge:
On the Layout tab, click the More Layout Options button, select Reduce/Enlarge, then
specify a percentage between 25 and 400 for your print job, then click the OK button to
save your choices.
■ Mac OS 9.x PostScript Driver:
In Page Setup, select Enlarge/Reduce, then specify a percentage for your print job.
Phaser™ 3450 Laser Printer
24
Page 32

Advanced Options
Note
Printing Booklets
With two-sided printing, you can print a document in the form of a small book. Create
booklets for any paper size that is supported for 2-sided (duplex) printing. For more
information on paper types, weights, and sizes, see "Supported Papers" on page 1-9.
Your printer must be a 3450D or 3450DN configuration to perform automatic 2-sided
printing.
To print booklets in a supported driver:
■ Windows 2000, or Windows XP, or Windows Server 2003 PostScript driver:
On the Layout tab, select Portrait or Landscape, select Flip on Long Edge or Flip on
Short Edge, select Front to Back or Back to Front, then click the OK button to save
your choices.
■ Windows 2000, Windows XP, or Windows Server 2003 PCL6 driver:
On the Layout tab, click the More Layout Options button, select Booklet Printing, then
click the OK button to save your choice.
Printing Posters
Poster printing allows you to print large, multiple-sheet versions of your page.
To print posters in a supported driver:
■ Windows 2000, Windows XP, or Windows Server 2003 PCL6 driver:
On the Layout tab, click the More Layout Options button, select Poster, set the Page Layout
and Overlap values, then click the OK button to save your choices.
Printing Negative and Mirror Images
You can print pages as a negative image (reverses the light and dark areas in your printed
image) or mirror image (flips images horizontally on pages when printed).
M
M
Negative Image
Phaser™ 3450 Laser Printer
25
Page 33

Advanced Options
B
Mirror Image
B
To print negative images or mirror images in a supported driver:
■ Windows 2000, Windows XP, or Windows Server 2003 PostScript driver:
On the Layout tab, click the Advanced button, select Document Options, select
PostScript Options, select Yes or No for Mirrored Output or Negative Output, then
click the OK button to save your choice.
■ Mac OS 9.x PostScript driver:
■ In Page Setup, click Options.
■ In the PSPrinter Options dialog box, under Visual Effects, select Flip Horizontal,
Flip Vertical, or Invert Image.
Cover Pages
A cover page is the first page of a document. The printer enables you to choose a different
paper source for the cover page than for the body of a document. For instance, use your
company letterhead or colored paper for the first page of a document or report.
Guidelines
■ Use any paper tray, within the weight ranges listed in "Supported Papers" on page 1-9, as
the source for printing cover pages.
■ Verify that the cover page is the same size as the paper used for the rest of your document .
If you specify a different size in the driv er than the tray you select as a cov er pages source,
your cover prints on the same paper as the rest of your document.
Printing Cover Pages
To print cover pages in a supported driver:
■ Windows 98, Windows 2000, Windows XP, or Windows Server 2003 PCL6 driver:
On the Paper tab, under Cover Page, select Tray 1 (MPT), Tray 2, or Tray 3 from the
drop-down list, then click the OK but ton to save your choice.
Phaser™ 3450 Laser Printer
26
Page 34

Supplies and Recycling
■ Mac OS 9.x PostScript driver:
■ Click Options.
■ In the Print Options dialog box, under Cover Page, select None, Before, or After
Document, then click the OK button to save your choice.
■ Under Paper Source, select First fr om:, then click the pull-down menu and select the
paper source for the cover page. Select Remaining from:, then click the pull-down
menu and select the paper source for the remaining pages.
Supplies and Recycling
Supplies
The printer’s front panel displays status messages and warnings as the print cartridge nears its
replacement time. When the front panel prompts that toner is low or needs to be replaced,
verify that you have replacements on hand.
To order supplies, go to www.xerox.com/office/3450supplies
.
Configuration Page
The “Configuration Page” shows the status of the remaining toner in the print cartridge. To
print the “Configuration Page”:
1. At the front panel, press the Menu button, select Information, then press the OK button.
2. Select Info Pages, then press the OK b utton.
3. Select Config Page, then press the OK button to print the page.
Recycling
For information on Xerox supplies recycling programs, go to www.xerox.com/office/recycle.
Phaser™ 3450 Laser Printer
27
Page 35

Choosing a Connection
Note
Connections and Networks
Choosing a Connection
Network Connection
Use an Ethernet connection with two twisted-pair (Category 5/RJ-45) cables and an Ethernet
hub. Connect the computer to the hub with one cable, then connect the printer to the hub with
the second cable. Connect to any port on the hub except the uplink port. TCP/IP and EtherTalk
are the most common protocols used with Ethernet cables. To print using TCP/IP, each
computer and printer requires a unique IP address. See “Setting an IP Address.”
Connecting your printer to a network requires the optional Network Interface Card (NIC).
Network connection is standard on the 3450DN configuration.
Direct Connection
Connect your printer directly to a computer using the USB cable provided or an IEEE 1284
parallel cable. For more information see the Setup Guide that came with your printer. You can
also view it on the Software and Documentation CD-ROM or on the web at www.xerox.com/
office/3450support.
Standalone (Cable or DSL) Network Connection
For details on setting up a Cable or DSL connection for your printer, see the infoSMART
Knowledge Base at www.xerox.com/office/infoSMART
TCP/IP Tutorial and Home Networking Guidelines.
, Document # 33188, entitled Basic
Setting an IP Address
If your computer is on a large network, contact your network administrator for the appropriate
TCP/IP addresses and additional configuration information.
If you are creating your own small Local Area Network or connecting the printer directly to
your computer over Ethernet, follow the procedure for automatically setting the printer’s IP
address.
The printer and computer(s) must have uniqu e IP addresses. It is important that the addresses
are similar, b ut not the same. Fo r example, your pri nter can hav e the address 192.168.1.2 while
your computer has the address 192.168.1.3. Another device can have the address 192.168.1.4.
For more details, see the infoSMART Knowledge Base at www.xerox.com/office/infoSMART
Document # 18545.
,
Phaser™ 3450 Laser Printer
28
Page 36

USB Connection
Note
Automatically Setting the Printer’s IP Address
Use the automatic installer on the Software and Documentation CD-ROM to detect and/or
assign an IP address to your printer. For further instructions, insert the Software and
Documentation CD-ROM into your computer’s CD-ROM, launch the installer , then follow the
prompts for installation.
For the automatic installer to succeed, the printer must be connected to a TCP/IP network.
Manually Setting the Printer's IP Address
1. At the printer's front panel, press the Menu button, select Connection, then press the
OK button.
2. Select Network Setup, then press the OK button.
3. Select TCP/IP Setup, then press the OK button.
4. Select BootP/DHCP, select Off, press the OK button, then press the Back button.
5. Select IP Address, then enter each of the four groups of numbers in your printer’s IP
Address, pressing the OK button after each group.
6. Select Network Mask, then enter each of the four groups of numbers in your printer’s
Network Mask, pressing the OK button after each group.
7. Select Gateway, then enter each of the four groups of numbers i n your printer’s Gateway ,
pressing the OK button after each group.
8. Press the Back button four (4) times to return to Ready.
9. Reboot your printer by cycling on the power.
USB Connection
The USB connection requires a standard USB cable. This cable is included with your printer.
Verify that you are using the correct USB cable for your connection.
Windows 98 and Me
Connect the USB cable to the PC and follow the Add New Hardware Wizard to create the
USB port. Follow the Add Printer Wizard to install the printer driver from the Software and
Documentation CD-ROM. For more details see the infoSMART Knowledge Base at
www.xerox.com/office/infoSMART
■ Windows 98: Document # 18215
■ Windows 2000: Document # 22701
■ Windows XP: Document # 53543.
, and review the applicable document:
Phaser™ 3450 Laser Printer
29
Page 37

Parallel Connection
Note
Parallel Connection
Use an IEEE 1284 parallel printer cable—maximum length 3 meters (10 feet)—to connect
your computer’s and printer’s parallel ports. The parallel cable is not included with your
printer and must be purchased separately. Install the printer driver from the Software and
Documentation CD-ROM. Select the appropriate LPT parallel port.
Installing the Printer Driver
To download the latest printer drivers, go to www.xerox.com/office/3450support.
Windows 98 or Later and Windows 2000 or Later
Install the printer driver from the Software and Documentation CD-ROM. The Software and
Documentation CD-ROM automatically installs and identifies the printer during the
installation process. For more details, see the infoSMART Knowledge Base at
www.xerox.com/office/infoSMART
, and review the applicable document:
■ Windows 98: Document # 9840
■ Windows 2000, XP, Server 2003: Document # 36894
■ Windows NT: Document # 11338
Macintosh, Novell, and UNIX
For installation or troubleshooting assistance with Macintosh, Novell or UNIX environments
please go to www.xerox.com/office/infoSMART
■ USB: Document # .33225
■ Parallel: Document # 48535
You can load the PostScript driver for the Mac OS 9 and OS X or higher from the Software
and Documentation CD-ROM.
, and review the applicable document:
Phaser™ 3450 Laser Printer
30
Page 38

Print Quality Problems
Warning
5
1
2
Troubleshooting
Your printer is designed to produce consistently high-quality prints. If you observe printquality problems, use the information on these pages to troubleshoot the problem.
For detailed, online support information, go to www.xerox.com/office/infoSMART
.
Print Quality Problems
If you experience problems with print quality, go to www.xerox.com/office/3450support.
Cleaning the Outside of the Printer
You can clean the outside of the printer with a soft, damp, cloth. You can use a cloth moistened
with a mild neutral detergent to remove stains; do not spray detergent directly onto the printer.
To prevent electric shock, turn the printer off and unplug the power cord from the
electrical outlet before cleaning the printer.
Do not use a vacuum cleaner to clean the printer. Do not lubricate the printer with oil.
Front Panel Messages
Your printer’s front panel provides you with information and troubleshooting help.
Ready
The front panel is divided into two sections. The upper section (1) displays printer menu and
error messages; the lower section (2) controls the front panel.
1. Alphanumeric display
2. On-line/Data/Error LED
3450-04
Phaser™ 3450 Laser Printer
31
Page 39

Front Panel Messages
Some of the LED descriptions and error messages that appear in the front panel are listed
below.
LED Descriptions
The LED indicates the different functioning states of the printer:
LED Behavior Description
Green Blinking
Steady Green Ready to print
Blinking Yellow Warning exists but printing can proceed
Blinking Red Error exists that prev ents further printing without
LED is off
■ Warming up
■ Power Saver mode
■ Displaying menus
■ Canceling a job
■ Waiting for more data
■ Processing data
■ Printing pages
user attention
■ Power is off
■ Intermittently during the startup sequence
Errors and Warnings
The printer displays error or warning messages in the front panel display.
Hardware or software failures that may require service support are presented as errors. When
the printer’s front panel displays an error message, the LED blinks red. An error message
replaces the status lines.
When an error occurs, Status Monitor, available only with Windows on a network enabled
printer, displays an instant notification on your computer screen that the printer needs
attention.
Phaser™ 3450 Laser Printer
32
Page 40

Moving and Repacking the Printer
Warning
Caution
Caution
3450-056
Moving and Repacking the Printer
Follow these guidelines to avoid injuring yourself or damaging the printer.
For safety information, go to “Appendices A—User Safety” in this guide.
Follow these guidelines to move the printer within the office or to prepare the printer for
shipment.
Precautions for Moving the Printer
Remove the print cartridge prior to moving the printer. Failure to do so can result in
damage to the printer.
■ Use one or two people to lift the printer.
■ Always turn off the printer using the
power switch and unplug all cables and
cords.
■ Disconnect and remove the optional
500-Sheet Feeder if present.
■ Always lift the printer from the
designated lift points.
■ Do not place any food or liquids on the
printer.
■ Failure to repackage the printer properly
for shipment can result in damage to the
printer not covered by the warranty,
service agreement, or Total Satisfaction
Guarantee.
■ Damage to the printer caused by
improper moving is not covered by the
Xerox warranty, service agreement, or
Total Satisfaction Guarantee.
33 lbs.
15 kg
Moving the Printer Within the Office
The printer can be safely moved from one location within an office to another as long as it
travels in an upright position, gently over smooth surfaces. Any jarring movement, such as
pushing the printer over a raised door threshold or across a parking lot, can damage the printer.
Remove the print cartridge prior to moving the printer. Failure to do so can result in
damage to the printer.
Phaser™ 3450 Laser Printer
33
Page 41

Additional Resources
Preparing the Printer for Shipment
To transport the printer by vehicle, the printer must be repackaged in the original packaging or
a repackaging kit.
If you do not have the original packaging, order the repackaging kit from www.xerox.com/
office/3450supplies. Instructions for repackaging the printer are provided in the repackaging
kit. If you are unable to repackage the printer, contact your local Xerox service representative.
Additional Resources
Support
There is additional help available at www.xerox.com/office/support. You can access
infoSMART Knowledge Base and Technical Support via email, driver downloads, and much
more.
A set of Xerox links is installed in your web browser’s Favorites folder when you install the
printer drivers on your comput er. The Troubleshooting tab in your W indo ws printer dri v er also
includes useful links.
InfoSMART Knowledge Base
This is the same troubleshooting knowledge base used by Xerox Customer Support.
infoSMART Knowledge Base provides solutions for printer issues such as error codes, print
quality, media jams, software installation, networking, and more. Go to www.xerox.com/
office/infoSMART.
Web Links
Xerox provides many resources to help you learn more about your Xerox printer. Use these
web sites to obtain information about your printer.
Resource Link
To link to product and supplies information,
download printer drivers, view documents, and
access support information:
To access the troubleshooting knowledge base
used by Xerox Customer Support staff:
To view technical support information: www.xerox.com/office/3450support
www.xerox.com/office
www.xerox.com/office/infoSMART
To order Xerox supplies: www.xerox.com/office/3450supplies
To find your local sales and support center: www.xerox.com/office/contacts
Phaser™ 3450 Laser Printer
34
Page 42

A–User Safety
Warning
Warning
Appendices
A–User Safety
Your printer and the recommended supplies have been designed and tested to meet strict safety
requirements. Attention to the following information will ensure the continued safe operation
of your printer.
Electrical Safety
■ Use the power cord supplied with your printer.
■ Plug the power cord directly into a properl y grounded electrical outlet. If you do not kno w
if an outlet is grounded, ask an electrician to check the outlet.
■ Do not use a ground adapter plug to connect the printer to an electrical outlet that does not
have a ground connection terminal.
■ Do not use an extension cord or power strip.
Avoid the potential of electrical shock by ensuring that the printer is properly grounded.
Electrical products may be hazardous if misused.
■ Do not place the printer in an area where people might step on the power cord.
■ Do not place objects on the power cord.
■ Do not block the ventilation openings. These openings are provided to prevent o verheating
of the printer.
■ Do not drop paper clips or staples into the printer.
Do not push objects into slots or openings on the printer. Making contact with a voltage
point or shorting out a part could result in fire or electrical shock.
If you notice unusual noises or odors:
1. Turn off the printer immediately
2. Disconnect the power cord from the electrical outlet
3. Call an authorized service representative to correct the problem.
The power cord is attached to the printer as a plug-in device at the back of the printer. If it is
necessary to disconnect all electrical power from the printer, disconnect the power cord from
the electrical outlet.
Phaser™ 3450 Laser Printer
35
Page 43

A–User Safety
Note
Do not remove the covers or guards that are fastened with screws unless you are installing
optional equipment and are specifically instructed to do so. Power should be OFF when
performing these installations. Except for user-installable options, there are no parts that you
can maintain or service behind these covers.
Leave the printer on for optimum performance; it does not pose a safety hazard.
The following are hazards to your safety:
■ The power cord is damaged or frayed.
■ Liquid is spilled into the printer.
■ The printer is exposed to water.
If any of these conditions occur:
1. Turn off the printer immediately.
2. Disconnect the power cord from the electrical outlet.
3. Call an authorized service representative.
Laser Safety
With specific regard to lasers, this printer complies with laser product performance standards
set by governmental, national, and international agencies and is certified as a Class 1 Laser
Product. The printer does not emit hazardous light because the beam is totally enclosed during
all modes of customer operation and maintenance.
Maintenance Safety
■ Do not attempt any maintenance procedure that is not specifically described in the
documentation supplied with your printer.
■ Do not use aerosol cleaners. The use of supplies that are not approved may cause poor
performance and could create a hazardous condition.
■ Do not burn any of the supplies (such as a toner cartridge, fuser, or transfer roller). Fo r
information on Xerox supplies recycling programs, go to www. xerox.com/office/recycle
Operational Safety
Your printer and supplies were designed and tested to meet strict safety requirements. These
include safety agency examination, appro val, and compliance with established environmental
standards.
.
Your attention to the following safety guidelines helps to ensure the continued, safe operation
of your printer.
Phaser™ 3450 Laser Printer
36
Page 44

A–User Safety
Printer Supplies
■ Use the supplies specifically designed for your printer. The use of unsuitable materials
may cause poor performance and a possible safety hazard.
■ Follow all warnings and instructions marked on, or supplied with, the printer, options and
supplies.
Printer Location
■ Place the printer in a dust-free area where the temperature range is 50 degrees F to
86 degrees F (10 degrees C to 30 degrees C) and the relative humidity range of 20 percent
to 80 percent.
■ Place the printer in an area where there is adequate space for ventilation, operation, and
servicing. The recommended minimal spacing is 32 cm (12.6 in.) behi nd and 10 cm (4 in.)
on each side of the printer.
■ Do not block or cover the slots and openings on the printer. The printer may overheat
without adequate ventilation.
■ For altitudes under 2,050 meters (6,726), use the Low Altitude setting. For altitudes over
2,050 meters (6,726), use the High Altitude setting.
■ Do not place the printer near a heat source.
■ Do not place the printer in direct sunlight.
■ Do not place the printer in line with the cold air flow from an air conditioning system.
■ Place the printer on a level, solid surface with adequate strength for the weight of the
printer. The base printer weight without any packaging materials is approximately 15 kg
(33.1 lbs.).
Moving the Printer
Refer to "Moving and Repacking the Printer" on page 1-33.
Printing Safety Guidelines
■ Wait 10-15 seconds between turning the printer off and on.
■ Keep hands, hair, neckties, etc., away from the exit and feed rollers.
■ Do not remove the paper source tray that you selected in either the printer driver or front
panel.
■ Do not open the doors.
■ Do not move the printer.
Phaser™ 3450 Laser Printer
37
Page 45

Symbols Marked on the Product
Hot surface on or in the printer. Us e caution to avoid personal injury.
Use caution (or draws attention to a particular component).
B–Warranty
B–Warranty
For warranty information regarding your Xerox Phaser 3450 Laser Printer, see the Warranty
booklet in the World Kit that came with your printer, or go to www.xerox.com/office/
3450warranty.
C–Printer Specifications
Physical Specifications
Width: 380 mm (14.96 in.)
Depth: 447 mm (17.6 in.)
Height: 320 mm (12.6 in.)
Top Clearance: 254 mm (10 in.)
Weight: 15 kg (33.1 lbs.)
Environmental Specifications
Temperature
■ Storage (in original packaging): -20° to 40° C / -4° to 104° F
■ Operating: 10° to 32° C / 50° to 89° F
Phaser™ 3450 Laser Printer
38
Page 46

Relative Humidity
■ Storage (in original packaging): 10% to 90%
■ Operating: 20% to 80%
Electrical Specifications
Available in two models:
■ 110-127 VAC, 50/60 Hz
■ 220-240 VAC, 50/60 Hz
E
NERGY STAR qualified printer
Performance Specifications
Resolution
■ 300 x 300 dpi
■ 600 x 600 dpi
■ 1200 dpi Image Quality
C–Printer Specifications
Print Speed
■ Up to 25 pages per minute (ppm)
Controller Specifications
266 MHz processor
Memory
■ 32 Mbytes standard on all printers
Page Description Languages (PDL)
■ PCL6
■ PostScript
Resident Fonts
■ PostScript Type 1
■ PCL6
Interfaces
■ USB
Phaser™ 3450 Laser Printer
39
Page 47

D–Regulatory
■ IEEE 1284 parallel
■ Ethernet 10BaseT and 100BaseTx
D–Regulatory
United States
The equipment described in this manual generates and uses radio frequency energy. If it is not
installed properly in strict accordance with Xerox's instructions, it may cause interference with
radio and television reception or may not function properly due to interference from another
device. However, there is no guarantee that interference will not occur in a particular
installation. If this equipment does cause harmful interference to radio or television reception,
which can be determined by turning the equipment off and on, the user is encouraged to try to
correct the interference by one or more of the following measures:
■ Reorient or relocate the receiver (device being interfered with).
■ Increase the separation between the printer and the receiver.
■ Connect the printer into an outlet on a circuit different from that which the receiver is
connected.
■ Route the interface cables on the printer away from the receiver
■ Consult the dealer, Xerox service, or an experienced radio/television technician for help.
Changes or modifications not expressly approved by Xerox can affect the emission and
immunity compliance and could void the user's authority to operate this product. To ensure
compliance, use shielded interface cables. A shielded parallel cable can be purchased directly
from Xerox at www.xerox.com/office
.
Xerox has tested this product to internationally accepted electromagnetic emission and
immunity standards. These standards are designed to mitigate interference caused or received
by this product in a normal office environment. This product is also suitable for use in a
residential environment based on the levels tested.
In the United States this product complies with the requirements of an unintentional radiator in
part 15 of the FCC rules. Operation is subject to the following two conditions: (1) this device
may not cause harmful interference; (2) this device must accept any interference received,
including interference that may cause undesired operation.
Canada
This digital apparatus does not exceed the Class B limits for radio noise emissions from digital
apparatus set out in the Radio Interference Regulations of the Canadian Department of
Communications, ICES-003.
Le présent appareil numérique n'émet pas de bruits radioélectrique dépassant les limits
applicables aux appareils numériques de la classe B prescrites dans le Réglement sur le
brouillage radioélectrique édicté par le ministere des Communications du Canada, NMB-003.
Phaser™ 3450 Laser Printer
40
Page 48

D–Regulatory
European Union
Xerox Corporation declares, under our sole responsibility, that the printer to which this
declaration relates is in conformity with the following standards and other normative
documents:
Following the provisions of the Low Voltage Directive 73/23/EEC and its amendments:
EN 60950 (IEC 60950) "Safety of Information Technology Equipment including Electrical Business
Equipment"
Following the provisions of the Electromagnetic Compatibility Directive 89/336/EEC and its
amendments:
EN 55022:1998
(CISPR 22)
EN 61000-3-2:1995
+A1:1998+A2:1998.
(IEC61000-3-2)
EN 61000-3-3:1995
(IEC61000-3-3)
EN 55024:1998
(CISPR 24)
CISPR 24 Immunity Phenomena Basic Standard Test Specification
Electrostatic Discharge IEC 61000-4-2:1995 6 kV Contact, 10 kV Air
Radio-Frequency Electromagnetic
Field (radiated)
Fast Burst Transients IEC 61000-4-4:1995 5/50 Tr/Th ns, 5kHz Rep. Freq
Line Surge IEC 61000-4-5:1995 Combination wave
Radio-Frequency Electromagnetic
Field (Conducted)
Line voltage dips IEC 61000-4-11:1994 >95% dip for ½ cycle @ 50 Hz
"Limits and Methods of measurement of radio interference characteristics
of Information Technology Equipment." Class B.
"Part 3: Limits - Section 2: Limits for harmonic current emissions
(equipment input current less than or equal to 16A per phase)."
"Part 3: Limits - Section 3: Limitation of voltage fluctuations and flicker in
low-voltage supply systems for equipment with rated current less than or
equal to 16A."
"Information technology equipment - Immunity characteristics - Limits and
methods of measurement. "
IEC 61000-4-3:1995 80-1000 MHz, 3V/m, 80% AM
@1KHz
0.5 kV Signal Lines
1 kV AC Mains
2.0 kV Common mode
2.0 kV Differential mode
IEC 61000-4-6:1996 0.15 - 80 MHz, 3 V, 80% AM @ 1 kHz
30% dip for 25 cycles @ 50 Hz
Line voltage drop-out IEC 61000-4-11:1994 >95% dropout for 250 cycles @ 50 Hz
This product, if used properly in accordance with the user's instructions, is neither dangerous
for the consumer nor for the environment.
A signed copy of the Declaration of Conformity for this product can be obtained from Xerox.
Phaser™ 3450 Laser Printer
41
Page 49

E–Material Safety Data Sheet
E–Material Safety Data Sheet
Section I—Product Identification
Product NamesPart Numbers
Phaser ® 3450 Black Toner Cartridges
Standard Capacity106R00687
High Capacity106R00688
Product Use: XEROX Phaser ® 3450 Laser printers
SECTION 2 - INFORMATION ON INGREDIENTS
Ingredients (% by weight)CAS number
Polyester resin (>81%)186397-54-6
Carbon Black (<8%)1333-86-4
Iron oxide (<4%)1309-38-2
Wax (<3%)9010-79-1
Amorphous silica (<2%)68909-20-6
Charge control resin (<2%)51121-85-8
SECTION 3 - HAZARDS IDENTIFICATION
ROUTES OF EXPOSURE: Toner powders are encased in a cartridge. Minimal exposure
through inhalation or skin contact is expected when used as intended.
POTENTIAL HEALTH EFFECTS: Health effects from this product are expected to be
negligible, when product is used as intended. See Section 11, Toxicology Information.
Immediate Effects:
Inhalation: Minimal irritation to respiratory tract, as for any non-toxic dust
Skin: Not expected to cause skin irritation
Eye: Not expected to cause eye irritation
Ingestion: Not an expected route of exposure
Phaser™ 3450 Laser Printer
42
Page 50

E–Material Safety Data Sheet
Chronic Effects: None known
SIGNS AND SYMPTOMS OF EXPOSURE: Minor irritation to respiratory tract.
MEDICAL CONDITIONS AGGRAVATED BY EXPOSURE: None known.
SECTION 4 - FIRST AID MEASURES
INHALATION: Remove person to fresh air. Seek medical attention if symptoms occur.
EYES: If particles get into eye, flush thoroughly with water. Seek medical attention if
symptoms occur.
SKIN: Wash thoroughly with soap and water. Seek medical attention if symptoms occur.
INGESTION: Dilute stomach contents with several glasses of water. Seek medical attention if
symptoms occur.
SECTION 5 - FIRE FIGHTING MEASURES
FLASH POINT: Not applicable
FIRE & EXPLOSION HAZARDS: Toner is a combustible powder. Like most organic
powders, it can form explosive mixtures when dispersed in air.
EXTINGUISHING MEDIA: Water, dry chemical, carbon dioxide, or foam.
FIRE FIGHTING INSTRUCTIONS: Avoid inhalation of smoke. As for any fire, wear
protective clothing and self-contained breathing apparatus.
SECTION 6 - ACCIDENTAL RELEASE MEASURES
SPILL OR LEAK: Sweep up or vacuum spilled materials and carefully transfer into sealable
waste container. Sweep slowly to minimize generation of dust during clean up. If a vacuum is
used, the motor must be rated as dust tight. A conductive hose bonded to the machine should
be used to reduce static buildup. Clean up residue if necessary with soap an d cold w ater. Wash
or dry clean garments after removing loose toner.
SECTION 7 - HANDLING AND STORAGE
HANDLING: No special precautions, when used as intended.
Phaser™ 3450 Laser Printer
43
Page 51

E–Material Safety Data Sheet
STORAGE: Avoid high temperatures.
SECTION 8 - EXPOSURE CONTROL - PERSONAL PROTECTION
No special personal protection indicated, when used as intended in Xerox Phaser Ò laser
printers.
THRESHOLD LIMIT VALUE (TLV): 10 mg/m3 (total dust)
PERMISSIBLE EXPOSURE LIMIT (PEL): 15 mg/m3 (total dust); 5 mg/m3 (respirable dust)
SHORT TERM EXPOSURE LIMIT (STEL): None established
CEILING LIMIT: None established
XEROX EXPOSURE LIMIT (XEL): 2.5 mg/m3 (total dust); 0.4 mg/m3 (respirable dust)
SECTION 9 - PHYSICAL AND CHEMICAL PROPERTIES
APPEARANCE/ODOR: Black powder/faint odor
BOILING POINT: Not applicable
SOLUBILITY IN WATER: Insoluble
EVAPORATION RATE: Not applicable
VAPOR DENSITY (Air = 1): Not applicable
VOLATILE: Not applicable
SOFTENING RANGE: Not available
MELTING POINT: Not available
SPECIFIC GRAVITY (Water = 1): Approximately 1.2
VAPOR PRESSURE (mm Hg): Not applicable
pH: Not applicable
SECTION 10 - STABILITY AND REACTIVITY
STABILITY: Stable.
INCOMPATIBILITY WITH OTHER MATERIALS: Strong oxidizers
HAZARDOUS POLYMERIZATION: Will not occur
Phaser™ 3450 Laser Printer
44
Page 52

E–Material Safety Data Sheet
HAZARDOUS DECOMPOSITION PRODUCTS: During a fire, toxic ga ses may be generated
by thermal decomposition or combustion. Avoid breathing smoke.
SECTION 11 - TOXICOLOGICAL INFORMATION
This material has been ev aluated by Xerox Corp oration. The toxicity data noted belo w is based
on test results of similar toners.
Oral LD50: >5 g/kg (rats), practically non-toxic
Dermal LD50: > 5 g/kg (rabbits), practically non-toxic
Inhalation LC50: > 2 mg/l (rats; 4 hour exposure), practically non-toxic
Eye Irritation: Not an irritant
Skin sensitization: Not a sensitizer
Skin irritation: Not an irritant
Human Patch: Non-irritating, non-sensitizing
Mutagenicity: No mutagenicity detected in Ames assay
Carcinogens: None present
Additional Information: The results obtained from a Xerox sponsored Chronic Toner
Inhalation Study demonstrated no lung changes in rats for the lowest (1 mg/m3) exposure le vel
(ie., the level most relevant to potential human exposure). A very slight degree of fibrosis was
noted in 25% of the animals at the middle (4 mg/m3) exposure level, while a slight degree of
fibrosis was noted in all the animals at the highest (16 mg/m3) exposure level. The findings
are attributed to “lung overloading”, a generic response to excessive amounts of any dust
retained in the lungs for a prolonged period. This study was conducted using a special test
toner to comply with EPA testing protocol. The test toner was ten times more respirable than
commercially available Xerox toner and would not be functionally suitable for Xerox
equipment.
SECTION 12 - ECOLOGICAL INFORMATION
Aquatic LC50: > 1000 mg/l (fathead minnows); non-toxic
SECTION 13 - DISPOSAL CONSIDERATIONS
Phaser™ 3450 Laser Printer
45
Page 53

F–Product Recycling and Disposal
This material is not a RCRA hazardous waste as specified in 40 CFR 261. State and local
waste disposal requirements, howev er , may be more restrictive. Dispose in accordance with all
federal, state, and local regulations. Incinerate only in a closed container.
SECTION 14 - TRANSPORTATION INFORMATION
DOT: Not regulated.
SECTION 15 - REGULATORY INFORMATION
TSCA: All components of these toners have been manufactured in compliance with TSCA.
RCRA: TCLP metals below hazardous waste levels set by EPA.
CANADIAN WHMIS: These toners are not regulated as controlled products under the
Workplace Hazardous Material Information System (WHMIS).
SECTION 16 - OTHER INFORMATION
NFPA 704: Health-0, Fire-1, Reactivity-0
Original preparation date: 6/13/03
Xerox Corporation
Office Group
Environmental, Health & Safety
P.O. Box 1000
Mail Stop 7063-512
Wilsonville, Oregon 97070
Safety Information: 503-685-4093
Health Emergency: 585-422-2177
Transportation Emergency (Chemtrec): 800-424-9300
F–Product Recycling and Disposal
Xerox operates a worldwide equipment takeback and reuse/recycle program. Contact your
Xerox sales representative (1-800-ASK-XEROX) to determine whether this Xerox product is
part of the program. For more information about Xerox environmental programs, visit
www.xerox.com/environment.html
.
Phaser™ 3450 Laser Printer
46
Page 54

F–Product Recycling and Disposal
If your product is not part of the Xerox program and you are managing its disposal, please note
that the product may contain lead and other materials whose disposal may be regulated due to
environmental considerations. For recycling and disposal information, contact your local
authorities. In the United States, you may also refer to the Electronic Industries Alliance at
www.eiae.org
.
Phaser™ 3450 Laser Printer
47
Page 55

Index
Numerics
2-sided printing, 15
automatic, 15
binding preference, 15
booklets, 25
manual, 16
A
advanced options
printing booklets
printing mirror images, 25
printing multiple pages to a single sheet
(N-up)
printing negative images, 25
printing posters, 25
reduce/enlarge, 24
scaling, 24
appendices
material safety data sheet
printer specifications, 38
product recycling and disposal, 46
regulatory, 40
user safety, 35
warranty, 38
automatic 2-sided printing
printing booklets
, 23
, 25
, 42
, 25
B
binding preferences, 15
booklet printing, 25
C
cable connection, 28
CentreWare IS, 6, 7
launching, 7
printer language, 8
printer management tool, 7
cleaning the printer, 31
configuration page
toner status
configurations, 1
, 27
connections
cable or DSL
direct with USB or parallel cable, 28
network, 28
parallel, 30
USB, 29
cover pages, 26
custom size paper, 22
loading Tray 1 (MPT), 22
, 28
D
direct connection, 28
driver
features
installation, 4
installing, 30
select paper orientation, 15
DSL connection, 28
, 5
E
electrical safety, 35
envelopes
buying and storing
guidelines, 19
printing, 20
error messages, 32
extension cord, 35
, 19
F
fonts
, 8
PCL6
PostScript, 8
front panel
changing paper type and size
error and warning messages, 32
LED descriptions, 32
Menu Map, 3
messages, 31
print icon, 4
printer language, 8
status messages, 32
, 10
Phaser™ 3450 Laser Printer
Index – 1
Page 56

Index
G
ground adapter plug, 35
ground connection terminal, 35
H
hardware failures, 32
I
information pages, 3, 4
printer language, 8
infoSMART Knowledge Base, 34
IP address, 6
setting automatically, 29
setting manually, 29
L
labels
guidelines
printing, 21
laser safety, 36
LED descriptions, 32
lifting the printer, 33
, 21
M
maintenance safety, 36
Menu Map, 3
messages
front panel
status, 27, 32
warning, 27, 32
mirror images, 25
moving the printer, 33
shipping, 34
within the office, 33
multiple-page document, 23
, 31
N
negative images, 25
network connection, 28
networked printers, 7
N-Up (printing mulitple pages on a single
sheet)
, 23
options, 2
P
paper
custom sizes
parallel connection, 30
PCL6 printing, 8
performance specifications
printer speed
resolution, 39
poster printing, 25
print cartridge
ordering
print icon, 4
printer
cleaning the outside
configurations, 1
damage and warranty, 33
electrical safety, 35
failure to repackage properly, 33
features, 1
help, 13
language, 8
lifting, 33
location, 37
moving, 33
moving within the office, 33
preferences, 11
preparing for shipment, 33
registering, 8
safety, 35
safety requirements, 35
specifications, 38
supplies, 37
unusual noises or odors, 35
ventilation, 37
printer driver
features
installation, 4
installing, 30
printer specifications
controller specifications
environmental, 38
performance, 39
physical, 38
, 22
, 39
, 27
, 31
, 5
, 39
O
operational safety, 36
Phaser™ 3450 Laser Printer
Index – 2
Page 57

Index
printing
booklets
cover pages, 26
custom size paper from Tray 1 (MPT), 22
envelopes, 20
labels, 21
manual 2-sided, 16
manual feed mode, 13
mirror images, 25
negative images, 25
options, 13
posters, 25
safety guidelines, 37
several pages on a single sheet of paper,
supported papers, 9
transparencies, 17
printing options, 12
individual jobs, 11
PCL6 print driver, 12
PostScript driver, 13
setting, 11
Windows, 11
print-quality problems, 31
product symbols, 38
, 25
23
R
recycling, 27
reduce/enlarge, 24
registering your printer, 8
remote control panel, 5
changing settings, 6
installing, 6
resources, 34
CentreWare IS, 6, 7
infoSMART Knowledge Base, 34
local sales and support, 34
web links, 34
S
safety
altitude
electrical safety, 35
hazards, 36
laser, 36
maintenance, 36
operational, 36
printing, 37
requirements, 35
scaling, 24
service agreement, 33
software failures, 32
status messages, 27
Status Monitor, 7
supplies, 2, 27, 37
supported papers, 9
, 37
T
TCP/IP, 7
toner
, 27
low
status messages, 27
Total Satisfaction Guarantee, 33
transparencies
guidelines
printing from Tray 1 (MPT), 17
printing from Tray 2 or 3, 18
Tray 1 (MPT)
manual 2-sided printing
manual feed mode, 13
printing custom size paper, 22
printing transparencies, 17
tray sequence, 7
troubleshooting
cleaning the printer
error and warning messages, 32
front panel messages, 31
infoSMART Knowledge Base, 34
LED descriptions, 32
moving and repacking the printer, 33
preparing the printer for shipment, 34
print quality problems, 31
Status Monitor, 7
typefaces, 8
, 17
, 16
, 31
U
USB connection, 29
Phaser™ 3450 Laser Printer
Index – 3
Page 58

Index
user safety
, 35
W
Walk-Up technology, 4
warning messages, 3, 27, 32
warranty, 38
Windows
printing options
, 11
X
Xerox warranty, 33
Phaser™ 3450 Laser Printer
Index – 4
 Loading...