


PHASER™ 3400
PERSONAL LASER PRINTER
Reference Guide

Xerox Phaser™ 3400
Personal Laser Printer
Reference Guide
June 2001

Copyright © 2001, Xerox Corporation. All Rights Reserved. Unpublished rights reserved under the copyright laws
of the United States. Contents of this publication may not be reproduced in any form without permission of
Xerox Corporation.
Copyright protection claimed includes all forms of matters of copyrightable materials and information now
allowed by statutory or judicial law or hereinafter granted, including without limitation, material generated from
the software programs which are displayed on the screen such as styles, templates, icons, screen displays, looks,
etc.
Ethernet
infoSMART™ are trademarks of Xerox Corporation.
Adobe
registered trademarks and Adobe Jenson™, Adobe Brilliant Screens™ technology, and IntelliSelect™ are
trademarks of Adobe Systems Incorporated or its subsidiaries which may be registered in certain jurisdictions.
Apple
trademarks, and QuickDraw™ is a trademark of Apple Computer Incorporated.
EPSON FX-850™ is a trademark of Epson America, Inc.
IBM ProPrinter™ is a trademark of International Business Machines.
Avery™ is a trademark of Avery Dennison Corporation.
PCL
MS-DOS
The X-Window System™ is a trademark of the Massachusetts Institute of Technology.
Wingdings™ in TrueType
Corporation and TrueType is a registered trademark of Apple Computer, Inc.
Novell
Sun
Microsystems, Incorporated.
SPARC
SPARC International, Incorporated, licensed exclusively to Sun Microsystems, Incorporated.
UNIX
Limited.
Other marks are trademarks or registered trademarks of the companies with which they are associated.
®
, the stylized X, and XEROX® are registered trademarks of Xerox Corporation. Phaser ™ and
®
, Acrobat®, Acrobat® Reader, Illustrator®, PageMaker®, Photoshop®, and PostScript®, and ATM® are
®
, LaserWriter®, LocalTalk®, Macintosh®, Mac® OS, AppleTalk®, and TrueType2® are registered
®
and HP-GL® are registered trademarks of Hewlett-Packard Corporation.
®
and Windows® are registered trademarks of Microsoft Corporation.
®
format is a product of Microsoft Corporation. WingDings is a trademark of Microsoft
®
and NetWare® are registered trademarks of Novell, Incorporated.
®
, Sun Microsystems®, and Sun Microsystems Computer Corporation® are registered trademarks of Sun
®
is a registered trademark of SPARC International, Incorporated. SPARCstation™ is a trademark of
®
is a registered trademark in the US and other countries, licensed exclusively through X/Open Company
ii Phaser 3400 Personal Laser Printer

Contents
Loading the optional trays . . . . . . . . . . . . . . . . . . . . . . . . . . . . . . . . . . . . . . . . . . 1
Loading the optional A5/A6 tray . . . . . . . . . . . . . . . . . . . . . . . . . . . . . . . . . . . . . . . . . . . . . . 1
Loading optional Tray 2 . . . . . . . . . . . . . . . . . . . . . . . . . . . . . . . . . . . . . . . . . . . . . . . . . . . . . 3
Printing two-sided jobs. . . . . . . . . . . . . . . . . . . . . . . . . . . . . . . . . . . . . . . . . . . . . 5
Linux Printing. . . . . . . . . . . . . . . . . . . . . . . . . . . . . . . . . . . . . . . . . . . . . . . . . . . . . 6
Installing the printer driver . . . . . . . . . . . . . . . . . . . . . . . . . . . . . . . . . . . . . . . . . . . . . . . . . . . 6
Printing in the X-Window System . . . . . . . . . . . . . . . . . . . . . . . . . . . . . . . . . . . . . . . . . . . . . 6
Printing from the Linux Shell or Terminal Window within the X-Window System . . . . . . 7
Remote Control Panel . . . . . . . . . . . . . . . . . . . . . . . . . . . . . . . . . . . . . . . . . . . . . 8
Troubleshooting Printing Problems. . . . . . . . . . . . . . . . . . . . . . . . . . . . . . . . . . . 9
Print Quality. . . . . . . . . . . . . . . . . . . . . . . . . . . . . . . . . . . . . . . . . . . . . . . . . . . . . 12
Maintenance and Cleaning . . . . . . . . . . . . . . . . . . . . . . . . . . . . . . . . . . . . . . . . 13
Replacing the laser print cartridge . . . . . . . . . . . . . . . . . . . . . . . . . . . . . . . . . . . . . . . . . . . . . . . 13
Cleaning . . . . . . . . . . . . . . . . . . . . . . . . . . . . . . . . . . . . . . . . . . . . . . . . . . . . . . . . . . . . . . . . . . . . 13
Material Safety Data Sheet . . . . . . . . . . . . . . . . . . . . . . . . . . . . . . . . . . . . . . . . . 15
Certifications . . . . . . . . . . . . . . . . . . . . . . . . . . . . . . . . . . . . . . . . . . . . . . . . . . . . 19
Laser Safety. . . . . . . . . . . . . . . . . . . . . . . . . . . . . . . . . . . . . . . . . . . . . . . . . . . . . . . . . . . . . . . . . . 19
Radio Frequency Emissions. . . . . . . . . . . . . . . . . . . . . . . . . . . . . . . . . . . . . . . . . . . . . . . . . . . . . 20
Ozone Safety. . . . . . . . . . . . . . . . . . . . . . . . . . . . . . . . . . . . . . . . . . . . . . . . . . . . . . . . . . . . . . . . . 20
Reference Guide iii

iv Phaser 3400 Personal Laser Printer
Loading the optional trays
Loading the optional trays
Loading instructions are also located on the labels inside the tray.
Caution
Do not remove a tray while printing; this may cause paper jams.
For information on loading the standard tray, refer to the Phaser 3400 Personal Laser
Printer User Guide on the printer CD-ROM.
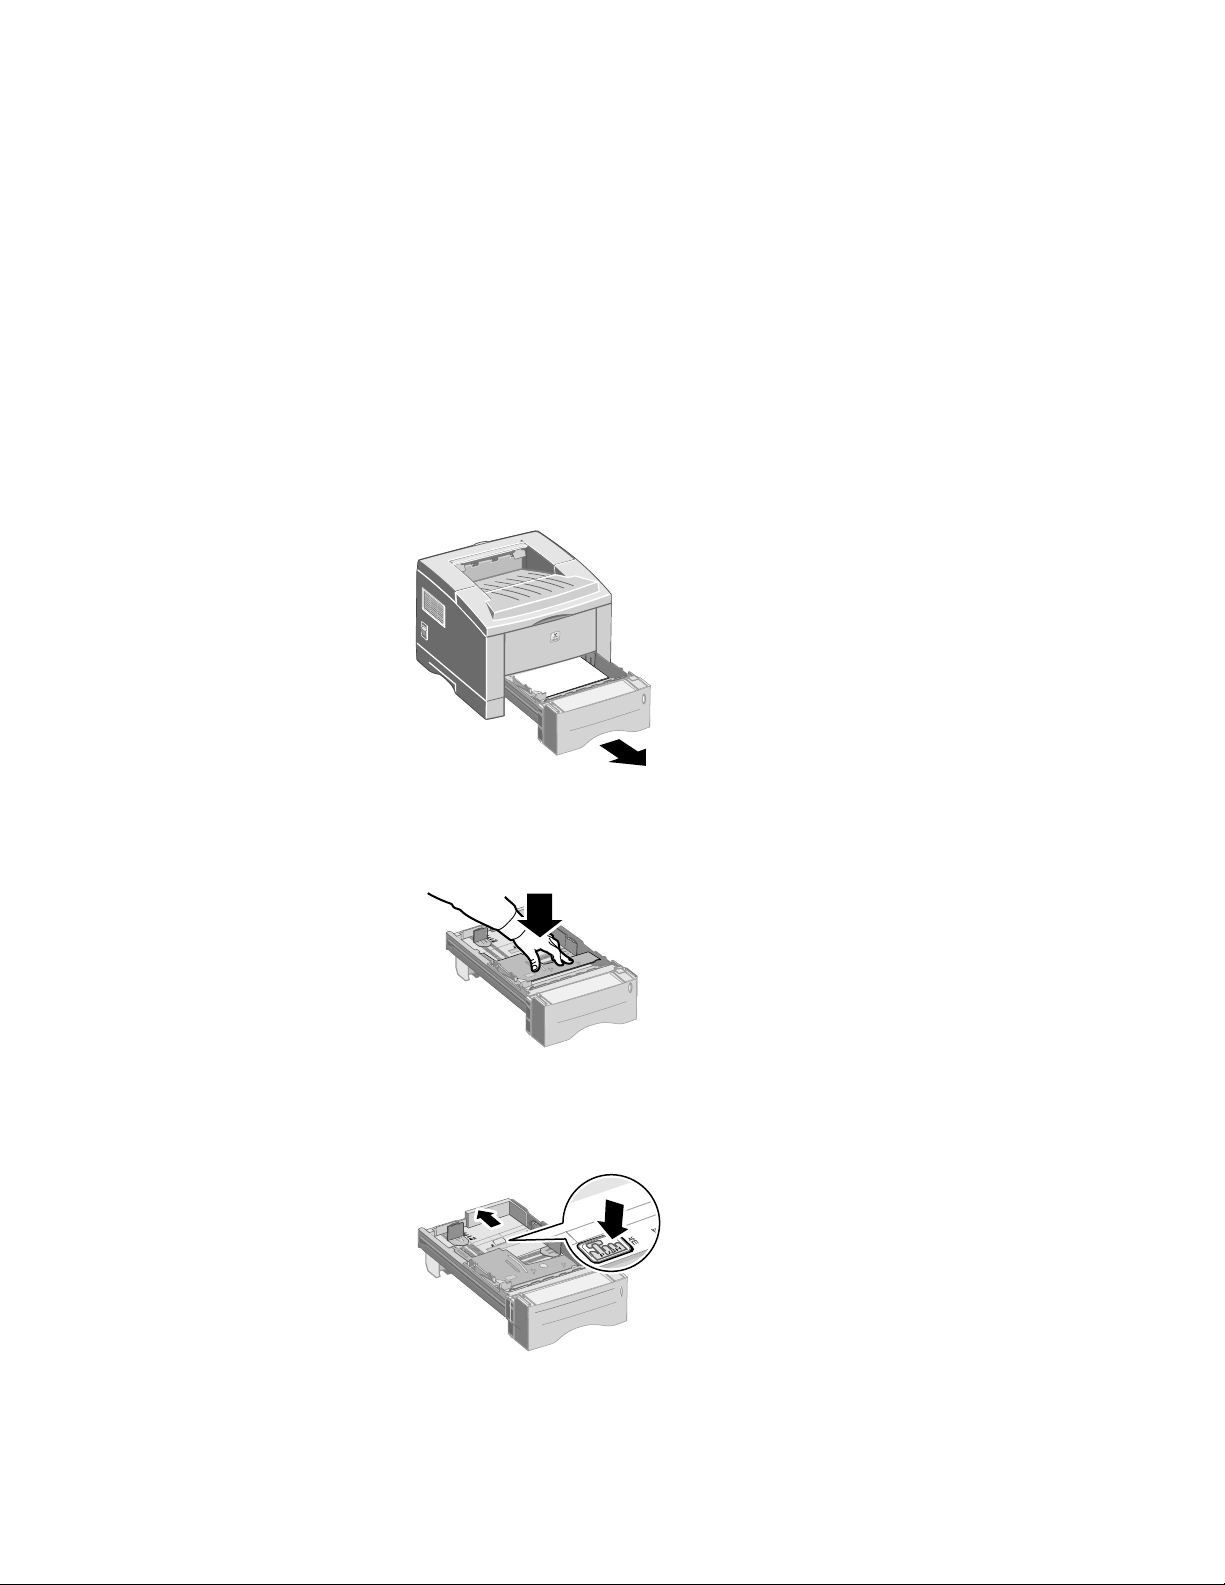
Loading the optional A5/A6 tray
1. Remove the tray.
1710-52
2. Push the metal (bottom) plate down until it locks into place.
1710-04
3. If necessary, adjust the tray length. For legal or folio size paper, press the tab down
and pull the rear wall all the way out.
1710-27
Reference Guide 1

Loading the optional trays
Note
For a list of supported media types, sizes, and weights for this tray, see the
Phaser 3400 Personal Laser Printer User Guide.
4. Load the paper.
■
Make sure that you place the paper under the corner tab in the left-front corner of
the tray.
■
Load letterhead face down with the top of the page toward the front of the tray.
■
Don't load paper above the fill line. Don’t load over 250 sheets.
1710-05
5. If necessary, adjust the side and rear guides to lightly touch the paper.
1710-06
6. Slide the tray back into the printer.
1710-53
2 Phaser 3400 Personal Laser Printer

Loading optional Tray 2
1.
Remove the tray.
Loading the optional trays
1710-59
2. Push the metal (bottom) plate down until it locks into place.
1710-60
3.
If necessary, adjust the tray length to match the length of the paper. Pull up on the tab
on the back of the tray, then pull the back of the tray to the desired length.
1710-61
Reference Guide 3

Loading the optional trays
4. Load the paper.
■
Make sure that you place the paper up against the left-front corner of the tray.
■
Make sure that you place the paper under the tab at the back of the tray.
■
Load letterhead face down with the top of the page toward the front of the tray.
■
Don't load paper above the fill line. Don’t load over 550 sheets.
1710-63
5. If necessary, adjust the side guides to lightly touch the paper.
6. Slide the tray back into the printer.
1710-64
1710-65
4 Phaser 3400 Personal Laser Printer

Printing two-sided jobs
Printing two-sided jobs
Note
Do not print two-sided jobs on transparencies, labels, envelopes, or heavy paper.
To print a two-sided job using the PCL 6 driver (Windows):
1. Select manual two-sided printing in the driver:
a. From the File menu, select Print.
b. Select the PCL 6 driver and click the Properties button.
c. Click the Page Layout tab, then select Manual 2-sided Printing.
d. Choose a binding preference.
e. If desired, check the Instruction page checkbox to print instructions for printing
the second side of the job.
f. Click the OK button to save the driver settings for this job.
2. If the rear face-up output tray is open, close it.
3. Print the job.
The printer prints the even-numbered pages only.
4. To print the back sides (odd-numbered pages), insert the prints face down in the
multi-purpose tray. The direction you load the paper depends on the orientation and
the binding preference.
Portrait
Bind - Long Edge
Top of the page
entering the
printer first
Portrait
Bind - Short Edge
Bottom of the
page entering the
printer first
Landscape
Bind - Short Edge
Left edge of the
page entering the
printer first
Landscape
Bind - Long Edge
Right edge of the
page entering the
printer first
5. When the message to print the second side appears in the PCL driver dialog box, click
the OK button.
The printer prints the back sides of the pages (odd-numbered pages).
To print a two-sided job using another driver, first print the even-numbered pages, then
insert the printed pages face down in the multi-purpose tray and print the odd-numbered
pages.
Reference Guide 5

Linux Printing
Linux Printing
You can use your Phaser 3400 printer with a PC running Red Hat Linux 6.0 or higher.
You must install the Linux printer utility provided on the CD-ROM, then use the
X-Window System’s “printtool” to install and set up the printer driver. Do not use the root
user or manual installation to install the driver. The Phaser 3400 printer driver is
dependent upon the native driver shipped with your Linux RedHat OS.
Installing the printer driver
1. Log in to Linux as Super User (root) account.
2. Insert the Phaser 3400 printer’s CD-ROM into your computer’s CD-ROM drive.
3. Open a terminal window. For Gnome interface users, from Utilities, select GNOME
terminal.
4. Mount your CD-ROM and run a script file:
mount -t iso9660 /dev/cdrom /mnt/ cdrom cd /mnt/cdrom/en/linux ./install.sh
5. Setup your print driver using printtool.
a. Run the printtool program. From program, select printtool, and select Run. If
you get an error message regarding ncpfs, click Ignore to continue installing a
local printer.
b. From the RedHat Linux Print System Manager, select Add, place a check mark in
the Local printer box under Printer type, then click OK.
c. When the Auto-detection device dialog box indicates that /dev/1p0 is Detected,
click OK.
d. In the Edit Local Print Entry dialog box, use the defaults and click Select.
e. For printer type, select Xerox DocuPrint Series PCL5e Compatible and click OK.
f. In the Edit Local Printer Entry dialog box, click OK.
6. At the end of installation, close RedHat's printtool by clicking the X in the upper
right-hand corner of the windows.
Your Xerox Printer will be the default printer (lp) for printing.
Printing in the X-Window System
A majority of the X-Window System’s applications offer the standard GUI interface of
File : Print for the menu bar at the top of the active window. This will then spool the
document to the default printer — usually dev/lp — and the printer will then carry out the
job. More advanced printer controls are available via the terminal window in the
X-Window System or directly from the Linux shell.
6 Phaser 3400 Personal Laser Printer

Linux Printing
Printing from the Linux Shell or Terminal Window within the X-Window System
The Linux environment has the ability to directly interface with the devices attached to
the computer. There are three basic commands to initiate, view, and delete print jobs:
■
LPR
■
LPQ
■
LPRM
LPR sends the document to the designated printer; this is the format:
$ lpr [ options ] [ filename ... ]
Example: $ lpr thesis.txt prints the file named thesis.txt
Options:
-#x = number of copies
Example: $ lpr -#2 thesis.txt prints 2 copies
-Pprintername = specific printer name (if you have multiple printers installed)
Example: $ lpr -P3400 thesis.txt prints on the printer named 3400
LPQ displays all the documents that are in the printer queue waiting to be printed; this is
the format:
$ lpq
Example: $ lpq at the shell would return:
Rank Owner Job Files Total Size
Active mwf
31
thesis.txt 682048 bytes
LPRM deletes pending print jobs; this is the format:
$ lprm -
Example: $ lprm 31 would delete print job #31 (thesis.txt) from the queue.
Reference Guide 7

Remote Control Panel
Remote Control Panel
The Remote Control Panel is a Windows utility that enables you to:
■
Set printer-specific settings in the printer.
■
Set up the printer to work with DOS applications that run inside the Windows
MS-DOS Command Prompt window.
The Remote Control Panel can be used when the printer is connected via the parallel
interface for all Windows operating systems. The Remote Control Panel can also be used
through the USB port for Windows 98, Windows Me, and Windows 2000.
Install the Remote Control Panel utility from the Xerox Phaser 3400 printer CD-ROM.
To change settings using the Remote Control Panel:
1. Click Start, select Programs, select Xerox Phaser 3400 Utility, and then click Remote
Control Panel.
2. Make changes to the Remote Control Panel settings on the Printing, Config, Job, Test,
PCL 5e, and/or PS 3 tabs.
For information about the settings on these tabs, access the online help by clicking the
Help button.
3. Send the changed settings to the printer by pressing the Send button.
Note
Settings selected in the print driver override settings selected in the Remote
Control Panel.
8 Phaser 3400 Personal Laser Printer

Troubleshooting Printing Problems
Troubleshooting Printing Problems
For more information, access the troubleshooting knowledge base at
www.xerox.com/officeprinting/infoSMART/
For general things to check and information about the indicator lights on the control panel,
refer to the Phaser 3400 Personal Laser Printer User Guide on the printer CD-ROM.
The printer name does not appear in the Chooser (Macintosh only)
■
Make sure that the printer is powered on.
■
Make sure that the printer cable is connected properly.
■
If the printer is connected through Ethernet, check that the Appletalk control panel is
set to Ethernet.
■
If the printer is connected with a USB cable, it will not show up in the Chooser. To set
up the printer using USB, you must use the Desktop Printer Utility to create a desktop
printer. Refer to the Phaser 3400 Personal Laser Printer User Guide for more
information about Setting up the printer when using a USB cable.
The printer prints an error sheet
■
Make sure that the printer cable is connected properly.
■
Try printing a simple document that doesn’t contain graphics. If that document prints
fine, the incomplete job either contains a corrupt graphic or is too complex.
■
The printer may have run out of memory for that job:
■
Reduce the complexity of the print job.
■
Do not send the entire job to the printer at once. Print it in sections instead, such
as pages 1-5, pages 6-10, etc.
■
Reduce the print resolution, such as from 1200 dpi to 600 dpi.
■
Add additional memory.
The printer prints an error sheet stating that the job contains binary data
■
Since the pure binary data option is not set by default in the PostScript driver, you
must set this option in the PostScript printer driver’s properties. Click the Advanced
button and check the box next to Pure Binary Data.
Reference Guide 9

Troubleshooting Printing Problems
Half of the page is blank
■
Check the page orientation setting in the application program.
■
Make sure that the paper size in the tray and the software paper-size settings match.
■
The printer may have run out of memory for that job:
■
Reduce the complexity of the print job.
■
Do not send the entire job to the printer at once. Print it in sections instead, such
as pages 1-5, pages 6-10, etc.
■
Reduce the print resolution, such as from 1200 dpi to 600 dpi.
■
Add additional memory.
The printer ejects blank pages
■
Make sure that the file doesn’t contain unwanted blank pages.
■
The laser print cartridge may be defective or out of toner. Replace the laser print
cartridge with a new one.
■
If the laser print cartridge is new, the sealing tape may still be in the laser print
cartridge. Remove the laser print cartridge, pull out the sealing tape, and then
reinstall the cartridge.
The computer displays an error message
■
There may be a software problem. Save your work, reboot your computer, and
re-submit the print job.
■
If the message occurs again, write down the error and look it up on infoSMART:
www.xerox.com/officeprinting/infoSMART/
Paper is not fed into the printer
■
Make sure that the paper is loaded correctly by removing the paper tray and reloading
the paper; refer to the Phaser 3400 Personal Laser Printer User Guide for more
information.
■
If paper is above the fill line, remove the extra paper.
■
If printing on heavy paper or special media, only use the multi-purpose tray. Be sure
to use paper supported by the printer; refer to the Phaser 3400 Personal Laser Printer
User Guide for more information.
Printing is too slow
■
The job may be very complex. If possible, reduce the complexity of the page or adjust
the print-quality setting.
■
The computer may need more memory if jobs frequently contain complex images.
10 Phaser 3400 Personal Laser Printer

Troubleshooting Printing Problems
The printer prints the wrong data or incorrect characters
■
Make sure that your computer is connected to the printer with the right cable and is
connected properly. Test whether the cable is defective by swapping the cable with
one known to work.
■
Make sure that you selected the correct printer driver.
■
Test whether the software application is malfunctioning by printing a job from
another application.
■
Make sure that the parallel port setting is set to one of these supported modes:
Compatible, Nibble, Byte, or ECP.
■
If there is still a problem, reboot your computer and the printer, then re-submit the
job.
Cannot select the optional Tray 2 in the driver
■
Configure the printer driver to recognize the optional tray.
■
From the PCL 6 printer driver’s properties, select the Paper tab and place a check
in the Paper tray 2 installed check box.
■
From the PostScript printer driver’s properties, select the Device Options tab,
select Change settings for Paper Tray 2, and change the setting from
Not installed to Installed.
Reference Guide 11

Print Quality
Print Quality
Irregular faded patches of print
■
Be sure to use paper supported by the printer; refer to the Phaser 3400 Personal Laser
Printer User Guide for more information.
■
Toner may be unevenly distributed. Remove the laser print cartridge, shake it gently
to evenly distribute the toner, then reinsert the cartridge into the printer.
Graphics faded
■
Toner may be low. Remove the laser print cartridge, shake it gently to evenly
distribute the toner, then reinsert the cartridge in the printer.
■
If the problem persists, insert a new laser print cartridge.
Black stains
■
Be sure to use paper supported by the printer; refer to the Phaser 3400 Personal Laser
Printer User Guide for more information.
■
The printer may require a print-quality adjustment. Press and hold the control panel's
Print button for 10 seconds (until all lights remain steadily lighted) then release the
button. The printer performs the print-quality adjustment and prints a cleaning sheet.
Character voids
■
The paper may be too dry. Try printing with paper from a new package.
Background scatter
■
The paper may be too damp. Try printing with a different batch of paper. Do not open
packages of paper until needed so that the paper does not absorb moisture from the
air.
■
The printing surface may be uneven. For example, if printing on envelopes, try
changing the layout of the image to avoid printing over areas that have overlapping
seams on the reverse side.
Missing characters or data
■
The paper may be too damp. Try printing with a different batch of paper. Do not open
packages of paper until needed so that the paper does not absorb moisture from the
air.
■
This may be due to differences in vector mode versus raster mode. Try changing the
graphics mode in the printer driver before re-printing the job.
Back of the printout is dirty
■
The transfer roller may be dirty. Print a few blank pages to clean the transfer roller.
12 Phaser 3400 Personal Laser Printer

Maintenance and Cleaning
Maintenance and Cleaning
Replacing the laser print cartridge
For replacement instructions, refer to the illustrated instructions included with the new
laser print cartridge. You can also access the Phaser 3400 Laser Print Cartridge Installation
instruction sheet on the Phaser 3400 printer’s CD-ROM.
Cleaning
Caution
Do not use ammonia-based sprays or volatile solvents such as thinner to clean
the printer; they can damage the printer surface.
Cleaning the outside
Keep the covers and trays closed. Wipe the outside surfaces of the printer with a soft,
clean, lint-free cloth. If needed, dampen the cloth slightly with water, but be careful not to
let any water drip inside the printer.
Cleaning the inside
When paper jams occur, unfused toner on the paper can fall off the paper and build up
inside the printer.
1. Unplug the power cord and wait 10 to 15 minutes for the hot surfaces to cool.
2. Open the top cover and remove the laser print cartridge.
1710-08
Caution
Do not expose the laser print cartridge to heat or direct sunlight.
3. Use a soft cloth to wipe away any dust and spilled toner. If needed, dampen the cloth
slightly with water but be careful not to let any water drip inside the printer.
Reference Guide 13

Maintenance and Cleaning
4. Using the handle, insert the laser print cartridge into the printer until it clicks into
place, then close the top cover.
1710-58
1710-02
14 Phaser 3400 Personal Laser Printer

Material Safety Data Sheet
Article No: A28
Date: 4/28/00
Revision: N.A.
Distributor: Xerox Corporation, Rochester, NY 14644
Telephone #(s): Safety Information: (800) 828-6571
Health Emergency: (716) 422-2177
Transportation Emergency(Chemtrec): (800) 424-9300
Section I - Product Identification
Trade Names/Synonyms: Xerox Phaser 3400 printer CRU
Part No.: 106R00462, 106R00461
Chemical Name: None
WHMIS Status: This is not a WHMIS controlled product.
Ingredients (% by wt.) CAS No.
Toner:
Material Safety Data Sheet
Polyester resin (85-95%) 186397-54-6
Carbon Black (5-10%) 1333-86-4
Chromium(III)-azo complex (1-3%) 31714-55-3
Iron oxide (1-3%) 1309-38-2
Photoreceptor:
Substrate ( > 95%)
Polymer Coating and Photosensitive materials (<5%) Trade Secret
Section II - Emergency and First Aid
Primary Route of Entry: Inhalation
Eyes: Flush with water.
Skin: Wash with soap and water.
Inhalation: Remove from exposure.
Ingestion: Dilute stomach contents with several glasses of water.
Symptoms of Overexposure: Minimal respiratory tract irritation may occur as with
exposure to large amounts of any non-toxic dust.
Medical Conditions Generally Aggravated by Exposure: None when used as
described by product literature.
Additional Information: None.
Reference Guide 15

Material Safety Data Sheet
Section III - Toxicology and Health Information
This toner material has been evaluated by Xerox Corporation. The toxicity data noted
below is based on test results of similar reprographic toner materials
Oral LD
Dermal LD
Inhalation LC
: >5 g/kg (rats) practically non-toxic.
50
: >5 g/kg (rabbits) practically non-toxic.
50
: >5 mg/l (rats, 4 hr exposure) practically non-toxic.
50
>20 mg/l (rats, calculated 1 hr exposure) non-poisonous,
Eye Irritation: Not an irritant.
Skin Sensitization: Not a sensitizer.
Skin Irritation: Not an irritant.
Human Patch: Non-irritating/non-sensitizing.
Mutagenicity: No evidence of mutagenicity detected in Ames Assay.
Carcinogens: None present
Aquatic LC
TLV: 10mg/m
PEL: 15 mg/m
: >1000 mg/l (fathead minnows/rainbow trout) non-toxic.
50
3
(total dust)
3
(total dust)
3
5 mg/m
(respirable dust)
STEL N.E.
Ceiling: N.E.
1
XEL
2.5 mg/m3 (total dust)
0.4 mg/m
3
(respirable dust)
Additional Information: The results obtained from a Xerox-sponsored Chronic Toner
Inhalation Study demonstrated no lung change in rats for the lowest (1 mg/m
3
)
exposure level (i.e. the level most relevant to potential human exposure). A very
slight degree of fibrosis was noted in 25 percent of the animals at the middle
(4 mg/m
animals at the highest (16 mg/m
3
) exposure level, while a slight degree of fibrosis was noted in all the
3
) exposure level. These findings are attributed to
"lung overloading," a generic response to excessive amounts of any dust retained in
the lungs for a prolonged period. This study was conducted using a special test toner
to comply with EPA testing protocol. The test toner was ten times more respirable
than commercially available Xerox toner, and would not be functionally suitable for
Xerox equipment.
1
XEL - Xerox Exposure Limit
N.A. - Not Applicable
N.E. - None Established
N.D. - Not Determined
16 Phaser 3400 Personal Laser Printer

Section IV - Physical Data
Appearance/Odor: black powder/ faint odor
Softening Range: 43.3 to 60.0 degrees C (110 to 140 degrees F)
Boiling Point: N.A.
Melting Point: N.A.
Solubility in Water: insoluble
Material Safety Data Sheet
Specific Gravity (H
Evaporation Rate: N.A.
Vapor Pressure (mm Hg): N.A.
Vapor Density (Air=1): N.A.
pH: N.A.
Volatile: N.D.% (Wt.) N.D. % (Vol.)
O=1): ~3.5
2
Section V - Fire and Explosion Data
Flash Point (Method Used): N.A.
Flammable Limits: LEL: N.A., UEL: N.A.
NFPA 704: Health – 0, Fire –1, Reactivity - 0
Extinguishing Media: Water spray, foam, dry powder.
Special Fire Fighting Procedures: Avoid inhalation of smoke. Wear protective clothing
Fire and Explosion Hazards: Toner is a combustible powder. Like most organic
and self-contained breathing apparatus.
materials in powder form, it can form explosive
mixtures when dispersed in air.
Section VI -Reactivity Data
Stability: Stable
Hazardous Polymerization: Will not occur.
Hazardous Decomposition Products: CO, CO
Avoid breathing smoke.
Incompatibility (Materials to Avoid): None known.
and other toxic products of combustion.
2
Section VII - Special Protection Information
Respiratory Protection: None required when used as intended in Xerox equipment.
Eye Protection: None required when used as intended in Xerox equipment.
Protective Gloves: None required when used as intended in Xerox equipment.
Other: For use other than normal customer - operating procedures (such
as in bulk toner processing facilities), goggles and respirators may
be required. For more information, contact Xerox.
Reference Guide 17

Material Safety Data Sheet
Section VIII - Special Precautions
Handling and Storage: None
Conditions to Avoid: Avoid prolonged inhalation of excessive dust.
Section IX - Spill, Leak, and Disposal Procedures
For Spills or Leakage: Sweep up or vacuum spilled toner and carefully transfer into
sealable waste container. Sweep slowly to minimize generation
of dust during clean-up. If a vacuum is used, the motor must be
rated as dust tight. A conductive hose bonded to the machine
should be used to reduce static buildup (See Section V). Residue
can be removed with soap and cold water. Garments may be
washed or dry cleaned, after removal of loose toner.
Waste Disposal Method: This material is not a hazardous waste according to Federal
Regulation 40 CFR 261 when disposed. State and Local waste
disposal requirements may be more restrictive. Consult with the
appropriate State and Local waste disposal authorities for
additional information. Incinerate only in a closed container.
Section X - Transportation Information
DOT Proper Shipping Name: N.A. (Not Regulated)
ID Number: N.A.
Hazard Classification: N.A.
Packing Group: N.A.
18 Phaser 3400 Personal Laser Printer

Certifications
Certifications
The Xerox Phaser 3400 printer and its supplies are designed and tested to meet strict
safety requirements. Follow all warnings and instructions marked on or supplied with the
product. Refer to the "User Safety Summary" section in the Phaser 3400 Personal Laser
Printer User Guide for operational safety instructions.
Laser Safety
The Xerox Phaser 3400 printer complies with safety standards, and is certified as a Class 1
Laser product under the U.S. Department of Health and Human Services (DHHS)
Radiation Performance Standard according to the Radiation Control for Health and Safety
Act of 1968. The printer does not emit hazardous laser radiation. The use of controls,
adjustments, or procedures other than those specified in the documentation might result
in hazardous exposure to laser light.
(European Union) Declaration of Conformance
The CE marking applied to this product symbolizes Xerox Ltd. Declaration of Conformity
with the following applicable Directives of the European Union as of the dates indicated:
■
January 1, 1995: Council Directive 73/23/EC amended by Council Directive 93/68/EC,
on the harmonization of the laws of the Member States related to equipment
designated for use within certain voltage limits.
■
January 1, 1996: Council Directive 89/336/ED, approximation of the laws of the
member states related to electromagnetic compatibility.
■
March 9, 1999: Council Directive 99/5/EC, on the harmonization of the laws of the
Member States related to radio and telecommunications terminal equipment.
A full declaration, defining the relevant Directives and referenced standards, can be
obtained from your Xerox Ltd. representative.
WARNING: Changes or modifications to this equipment not specifically approved by
Xerox Europe may void the user’s authority to operate this equipment. Shielded cables
must be used with this equipment to maintain compliance with the EMC Directive
(89/336/EEC).
WARNING: In order to allow this equipment to operate in proximity to Industrial,
Scientific, and Medical (ISM) equipment, the external radiation from ISM equipment may
have to be limited or special mitigation measures taken.
Australia and New Zealand
Changes or modifications to this equipment not specifically approved by Fuji Xerox
Australia Pty. Limited may void the user’s authority to operate this equipment. Shielded
cables must be used with this equipment to maintain compliance with the
Radiocommunications Act 1992.
Reference Guide 19

Certifications
Radio Frequency Emissions
United States and Canada
This equipment has been tested and found to comply with the limits for a Class B digital
device, pursuant to Part 15 of the FCC Rules. These limits are designed to provide
reasonable protection against harmful interference in a residential installation. This
equipment generates, uses, and can radiate radio frequency energy and, if not installed and
used in accordance with the instructions, may cause harmful interference to radio
communications. However, there is no guarantee that interference will not occur in a
particular installation. If this equipment does cause harmful interference to radio or
television reception, which can be determined by turning the equipment off and on, the
user is encouraged to try to correct the interference by one or more of the following
measures:
■
Reorient or relocate the receiving antenna.
■
Increase the separation between the equipment and receiver.
■
Connect the equipment into an outlet on a circuit different from that to which the
receiver is connected.
■
Consult the dealer or an experienced radio/TV technician for help.
Changes or modifications to this equipment not specially approved by Xerox Corporation
may void the authority granted by the FCC to operate this equipment. Shielded cables
must be used with this equipment to maintain compliance with FCC regulations. In order
to allow this equipment to operate in proximity to Industrial, Scientific, and Medical
(ISM) equipment, the external radiation from ISM equipment may have to be limited or
special migration measures taken.
Ozone Safety
During normal operation, the Xerox Phaser 3400 printer produces ozone. The ozone
produced does not present a hazard to the operator, however, it is advisable that the
machine be operated in a well-ventilated area.
20 Phaser 3400 Personal Laser Printer

609T14497
 Loading...