

Page 1
Phaser 3200MFP
User Guide
604E39320
Page 2

©2007 by Xerox Corporation. All rights reserved.
Copyright protection claimed includes all forms and matters of copyrighted material and information now allowed by
statutory or judicial law or hereinafter granted, including without limitations, material generated from the software
programs which are displayed on the screen, such as icons, screen displays, looks etc.
All Xerox products mentioned in this publication are trademarks of Xerox Corporation. Product names and trademarks of
other companies are hereby acknowled
The information in this document is correct at the time of publication. Xerox reserves the right at any time to change the
information without notice. Changes and technical updates will be added in subsequent editions of the documentation.
For the latest information go to www.xerox.com.
ged.
Page 3

1 Welcome
About This Guide . . . . . . . . . . . . . . . . . . . . . . . . . . . . . . . . . . . . . . . . . . . . . . . . . . . . .1-2
Getting to know your machine . . . . . . . . . . . . . . . . . . . . . . . . . . . . . . . . . . . . . . . . . . .1-3
Control Panel Functions . . . . . . . . . . . . . . . . . . . . . . . . . . . . . . . . . . . . . . . . . . . . . . . .1-5
Special Features . . . . . . . . . . . . . . . . . . . . . . . . . . . . . . . . . . . . . . . . . . . . . . . . . . . . . .1-7
Customer Support. . . . . . . . . . . . . . . . . . . . . . . . . . . . . . . . . . . . . . . . . . . . . . . . . . . . .1-9
Safety Notes . . . . . . . . . . . . . . . . . . . . . . . . . . . . . . . . . . . . . . . . . . . . . . . . . . . . . . . .1-10
Regulatory Information . . . . . . . . . . . . . . . . . . . . . . . . . . . . . . . . . . . . . . . . . . . . . . . .1-15
Table of Contents
Component location . . . . . . . . . . . . . . . . . . . . . . . . . . . . . . . . . . . . . . . . . . . . .1-3
WARNING - Electrical Safety Information . . . . . . . . . . . . . . . . . . . . . . . . . . . .1-11
Laser Safety Information . . . . . . . . . . . . . . . . . . . . . . . . . . . . . . . . . . . . . . . . .1-12
Operational Safety Information . . . . . . . . . . . . . . . . . . . . . . . . . . . . . . . . . . . .1-12
Maintenance Information . . . . . . . . . . . . . . . . . . . . . . . . . . . . . . . . . . . . . . . . .1-13
Ozone Safety Information . . . . . . . . . . . . . . . . . . . . . . . . . . . . . . . . . . . . . . . .1-13
For Consumables . . . . . . . . . . . . . . . . . . . . . . . . . . . . . . . . . . . . . . . . . . . . . .1-14
Radio Frequency Emissions . . . . . . . . . . . . . . . . . . . . . . . . . . . . . . . . . . . . . .1-14
Product Safety Certification . . . . . . . . . . . . . . . . . . . . . . . . . . . . . . . . . . . . . . .1-14
CE Mark . . . . . . . . . . . . . . . . . . . . . . . . . . . . . . . . . . . . . . . . . . . . . . . . . . . . .1-15
For Fax Function . . . . . . . . . . . . . . . . . . . . . . . . . . . . . . . . . . . . . . . . . . . . . . .1-15
Environmental Compliance . . . . . . . . . . . . . . . . . . . . . . . . . . . . . . . . . . . . . . .1-19
Illegal Copies . . . . . . . . . . . . . . . . . . . . . . . . . . . . . . . . . . . . . . . . . . . . . . . . . .1-20
Product Recycling and Disposal . . . . . . . . . . . . . . . . . . . . . . . . . . . . . . . . . . .1-23
2 Getting Started
Unpacking the machine . . . . . . . . . . . . . . . . . . . . . . . . . . . . . . . . . . . . . . . . . . . . . . . .2-2
Selecting a Location . . . . . . . . . . . . . . . . . . . . . . . . . . . . . . . . . . . . . . . . . . . . .2-3
Clearance Space . . . . . . . . . . . . . . . . . . . . . . . . . . . . . . . . . . . . . . . . . . . . . . . .2-3
Installing the Print Cartridge . . . . . . . . . . . . . . . . . . . . . . . . . . . . . . . . . . . . . . . . . . . . .2-4
Loading Paper. . . . . . . . . . . . . . . . . . . . . . . . . . . . . . . . . . . . . . . . . . . . . . . . . . . . . . . .2-6
Making Connections . . . . . . . . . . . . . . . . . . . . . . . . . . . . . . . . . . . . . . . . . . . . . . . . . . .2-8
Switching On the Machine . . . . . . . . . . . . . . . . . . . . . . . . . . . . . . . . . . . . . . . . . . . . . 2-11
Installing Printer Software . . . . . . . . . . . . . . . . . . . . . . . . . . . . . . . . . . . . . . . . . . . . . .2-12
System Requirements . . . . . . . . . . . . . . . . . . . . . . . . . . . . . . . . . . . . . . . . . . .2-13
Printer Driver Features . . . . . . . . . . . . . . . . . . . . . . . . . . . . . . . . . . . . . . . . . .2-14
Changing the Display Language and Country . . . . . . . . . . . . . . . . . . . . . . . .2-15
Setting the Machine ID . . . . . . . . . . . . . . . . . . . . . . . . . . . . . . . . . . . . . . . . . .2-15
Entering Characters Using the Number Keypad . . . . . . . . . . . . . . . . . . . . . . .2-16
Setting the Date and Time . . . . . . . . . . . . . . . . . . . . . . . . . . . . . . . . . . . . . . . .2-17
Changing the Clock Mode . . . . . . . . . . . . . . . . . . . . . . . . . . . . . . . . . . . . . . . .2-18
Changing the Dial Mode . . . . . . . . . . . . . . . . . . . . . . . . . . . . . . . . . . . . . . . . .2-19
Setting the Paper Size and Type . . . . . . . . . . . . . . . . . . . . . . . . . . . . . . . . . . .2-19
Setting Sounds . . . . . . . . . . . . . . . . . . . . . . . . . . . . . . . . . . . . . . . . . . . . . . . .2-20
Using the Save Modes . . . . . . . . . . . . . . . . . . . . . . . . . . . . . . . . . . . . . . . . . .2-21
Using ControlCentre . . . . . . . . . . . . . . . . . . . . . . . . . . . . . . . . . . . . . . . . . . . . . . . . . .2-22
The Scan Settings Tab . . . . . . . . . . . . . . . . . . . . . . . . . . . . . . . . . . . . . . . . . .2-23
The Phonebook Tab . . . . . . . . . . . . . . . . . . . . . . . . . . . . . . . . . . . . . . . . . . . .2-24
The Printer Tab . . . . . . . . . . . . . . . . . . . . . . . . . . . . . . . . . . . . . . . . . . . . . . . .2-25
The Firmware Update Tab . . . . . . . . . . . . . . . . . . . . . . . . . . . . . . . . . . . . . . . .2-25
Xerox Phaser 3200MFP Table of Contents-1
Page 4

1 Table of Contents
3 Network Setup
Introduction. . . . . . . . . . . . . . . . . . . . . . . . . . . . . . . . . . . . . . . . . . . . . . . . . . . . . . . . . .3-2
Via the control panel . . . . . . . . . . . . . . . . . . . . . . . . . . . . . . . . . . . . . . . . . . . . .3-2
Supported operating systems . . . . . . . . . . . . . . . . . . . . . . . . . . . . . . . . . . . . . . . . . . . .3-2
Configuring TCP/IP . . . . . . . . . . . . . . . . . . . . . . . . . . . . . . . . . . . . . . . . . . . . . . . . . . . . 3-3
Dynamic addressing (BOOTP/DHCP) . . . . . . . . . . . . . . . . . . . . . . . . . . . . . . .3-3
Static addressing . . . . . . . . . . . . . . . . . . . . . . . . . . . . . . . . . . . . . . . . . . . . . . . .3-3
Configuring EtherTalk . . . . . . . . . . . . . . . . . . . . . . . . . . . . . . . . . . . . . . . . . . . . 3-4
Restoring the network configuration . . . . . . . . . . . . . . . . . . . . . . . . . . . . . . . . .3-4
Printing a network configuration page . . . . . . . . . . . . . . . . . . . . . . . . . . . . . . . .3-4
Resetting the network interface . . . . . . . . . . . . . . . . . . . . . . . . . . . . . . . . . . . .3-4
4 Paper Handling
Selecting Print Materials . . . . . . . . . . . . . . . . . . . . . . . . . . . . . . . . . . . . . . . . . . . . . . . .4-2
Paper Type, Input Sources, and Capacities . . . . . . . . . . . . . . . . . . . . . . . . . . .4-2
Guidelines for Paper and Special Materials . . . . . . . . . . . . . . . . . . . . . . . . . . .4-3
Loading Paper . . . . . . . . . . . . . . . . . . . . . . . . . . . . . . . . . . . . . . . . . . . . . . . . . . . . . . .4-5
Using the Paper Tray . . . . . . . . . . . . . . . . . . . . . . . . . . . . . . . . . . . . . . . . . . . . 4-5
Using the Manual Tray . . . . . . . . . . . . . . . . . . . . . . . . . . . . . . . . . . . . . . . . . . .4-5
Copy Output Tray. . . . . . . . . . . . . . . . . . . . . . . . . . . . . . . . . . . . . . . . . . . . . . . . . . . . . 4-6
5 Copying
Making Copies . . . . . . . . . . . . . . . . . . . . . . . . . . . . . . . . . . . . . . . . . . . . . . . . . . . . . . .5-2
Selecting Copy Options . . . . . . . . . . . . . . . . . . . . . . . . . . . . . . . . . . . . . . . . . . . . . . . .5-5
Copy Setup . . . . . . . . . . . . . . . . . . . . . . . . . . . . . . . . . . . . . . . . . . . . . . . . . . . . . . . . . 5-11
6 Printing
Installing Printer Software in Windows . . . . . . . . . . . . . . . . . . . . . . . . . . . . . . . . . . . . .6-2
Printing a Document . . . . . . . . . . . . . . . . . . . . . . . . . . . . . . . . . . . . . . . . . . . . . . . . . . . 6-6
Advanced Printing. . . . . . . . . . . . . . . . . . . . . . . . . . . . . . . . . . . . . . . . . . . . . . . . . . . .6-16
Loading Paper for Copying . . . . . . . . . . . . . . . . . . . . . . . . . . . . . . . . . . . . . . . .5-2
Preparing a Document . . . . . . . . . . . . . . . . . . . . . . . . . . . . . . . . . . . . . . . . . . . 5-2
Making Copies on the Document Glass . . . . . . . . . . . . . . . . . . . . . . . . . . . . . . 5-3
Making Copies from the Automatic Document Feeder . . . . . . . . . . . . . . . . . . .5-4
Basic Copy Features . . . . . . . . . . . . . . . . . . . . . . . . . . . . . . . . . . . . . . . . . . . . . 5-5
Special Copy Features . . . . . . . . . . . . . . . . . . . . . . . . . . . . . . . . . . . . . . . . . . .5-7
Changing the Default Settings . . . . . . . . . . . . . . . . . . . . . . . . . . . . . . . . . . . . 5-11
Setting the Time Out Option . . . . . . . . . . . . . . . . . . . . . . . . . . . . . . . . . . . . . . 5-11
Installing Printer Software . . . . . . . . . . . . . . . . . . . . . . . . . . . . . . . . . . . . . . . . . 6-2
. . . . . . . . . . . . . . . . . . . . . . . . . . . . . . . . . . . . . . . . . . . . . . . . . . . . . . . . . . . . .6-6
Basic Printing . . . . . . . . . . . . . . . . . . . . . . . . . . . . . . . . . . . . . . . . . . . . . . . . . . 6-6
Printer Settings . . . . . . . . . . . . . . . . . . . . . . . . . . . . . . . . . . . . . . . . . . . . . . . . . 6-7
Canceling a Print Job . . . . . . . . . . . . . . . . . . . . . . . . . . . . . . . . . . . . . . . . . . .6-15
Printing Multiple Pages on One Sheet of Paper (N-Up Printing) . . . . . . . . . .6-16
Printing Posters . . . . . . . . . . . . . . . . . . . . . . . . . . . . . . . . . . . . . . . . . . . . . . . . 6-17
Printing a Reduced or Enlarged Document . . . . . . . . . . . . . . . . . . . . . . . . . .6-18
Fitting Your Document to a Selected Paper Size . . . . . . . . . . . . . . . . . . . . . .6-19
Table of Contents-2 Xerox Phaser 3200MFP
Page 5

Table of Contents
Using Watermarks . . . . . . . . . . . . . . . . . . . . . . . . . . . . . . . . . . . . . . . . . . . . . .6-20
Using Overlays . . . . . . . . . . . . . . . . . . . . . . . . . . . . . . . . . . . . . . . . . . . . . . . .6-23
Sharing the Printer Locally . . . . . . . . . . . . . . . . . . . . . . . . . . . . . . . . . . . . . . . . . . . . .6-27
Setting Up a Host Computer . . . . . . . . . . . . . . . . . . . . . . . . . . . . . . . . . . . . . .6-27
Setting Up a Client Computer . . . . . . . . . . . . . . . . . . . . . . . . . . . . . . . . . . . . .6-27
Using Windows PostScript Driver (Phaser 3200MFP/N Only) . . . . . . . . . . . . . . . . . .6-28
Printer Settings . . . . . . . . . . . . . . . . . . . . . . . . . . . . . . . . . . . . . . . . . . . . . . . .6-28
Advanced . . . . . . . . . . . . . . . . . . . . . . . . . . . . . . . . . . . . . . . . . . . . . . . . . . . .6-29
Using Help . . . . . . . . . . . . . . . . . . . . . . . . . . . . . . . . . . . . . . . . . . . . . . . . . . . .6-29
Using Status Monitor . . . . . . . . . . . . . . . . . . . . . . . . . . . . . . . . . . . . . . . . . . . . . . . . . .6-30
Opening the Troubleshooting Guide . . . . . . . . . . . . . . . . . . . . . . . . . . . . . . . .6-31
Changing the Status Monitor Program Setting . . . . . . . . . . . . . . . . . . . . . . . .6-31
Using Your Printer in Linux . . . . . . . . . . . . . . . . . . . . . . . . . . . . . . . . . . . . . . . . . . . . .6-32
Getting Started . . . . . . . . . . . . . . . . . . . . . . . . . . . . . . . . . . . . . . . . . . . . . . . .6-32
Installing the Unified Linux Driver . . . . . . . . . . . . . . . . . . . . . . . . . . . . . . . . . .6-32
Using the Unified Driver Configurator . . . . . . . . . . . . . . . . . . . . . . . . . . . . . . .6-35
Configuring Printer Properties . . . . . . . . . . . . . . . . . . . . . . . . . . . . . . . . . . . . .6-39
Printing a Document . . . . . . . . . . . . . . . . . . . . . . . . . . . . . . . . . . . . . . . . . . . .6-40
Scanning a Document . . . . . . . . . . . . . . . . . . . . . . . . . . . . . . . . . . . . . . . . . . .6-42
Using Your Machine with a Macintosh (Phaser 3200MFP/N only) . . . . . . . . . . . . . . .6-46
Installing Software for Macintosh . . . . . . . . . . . . . . . . . . . . . . . . . . . . . . . . . .6-46
Setting Up the Printer . . . . . . . . . . . . . . . . . . . . . . . . . . . . . . . . . . . . . . . . . . .6-48
Printing . . . . . . . . . . . . . . . . . . . . . . . . . . . . . . . . . . . . . . . . . . . . . . . . . . . . . .6-49
Scanning . . . . . . . . . . . . . . . . . . . . . . . . . . . . . . . . . . . . . . . . . . . . . . . . . . . . .6-52
7 Scanning
Scanning Basics . . . . . . . . . . . . . . . . . . . . . . . . . . . . . . . . . . . . . . . . . . . . . . . . . . . . . .7-2
8 Faxing
Setting Up the Fax System . . . . . . . . . . . . . . . . . . . . . . . . . . . . . . . . . . . . . . . . . . . . . .8-2
Sending a Fax. . . . . . . . . . . . . . . . . . . . . . . . . . . . . . . . . . . . . . . . . . . . . . . . . . . . . . . .8-4
Scanning From the Control Panel to an Application . . . . . . . . . . . . . . . . . . . . .7-2
Scanning Process with TWAIN-enabled Software . . . . . . . . . . . . . . . . . . . . . .7-3
Scanning Using the WIA Driver . . . . . . . . . . . . . . . . . . . . . . . . . . . . . . . . . . . . .7-4
Scanning using a network connection
(Phaser 3200MFP/N only) . . . . . . . . . . . . . . . . . . . . . . . . . . . . . . . . . . . . . . . .7-5
Changing the settings for each scan job . . . . . . . . . . . . . . . . . . . . . . . . . . . . . .7-9
Changing the default scan settings . . . . . . . . . . . . . . . . . . . . . . . . . . . . . . . . . .7-9
Enabling network scan . . . . . . . . . . . . . . . . . . . . . . . . . . . . . . . . . . . . . . . . . .7-10
Setting up Address Book . . . . . . . . . . . . . . . . . . . . . . . . . . . . . . . . . . . . . . . . .7-10
Changing the Fax Setup options . . . . . . . . . . . . . . . . . . . . . . . . . . . . . . . . . . . .8-2
Available Fax Setup Options . . . . . . . . . . . . . . . . . . . . . . . . . . . . . . . . . . . . . . .8-2
Loading a Document . . . . . . . . . . . . . . . . . . . . . . . . . . . . . . . . . . . . . . . . . . . . .8-4
Adjusting the Document Resolution . . . . . . . . . . . . . . . . . . . . . . . . . . . . . . . . .8-5
Sending a Fax Automatically . . . . . . . . . . . . . . . . . . . . . . . . . . . . . . . . . . . . . . .8-6
Sending a Fax Manually . . . . . . . . . . . . . . . . . . . . . . . . . . . . . . . . . . . . . . . . . .8-7
Redialing the Last Number . . . . . . . . . . . . . . . . . . . . . . . . . . . . . . . . . . . . . . . .8-7
Confirming Transmission . . . . . . . . . . . . . . . . . . . . . . . . . . . . . . . . . . . . . . . . . .8-8
Automatic Redialing . . . . . . . . . . . . . . . . . . . . . . . . . . . . . . . . . . . . . . . . . . . . .8-8
Xerox Phaser 3200MFP Table of Contents-3
Page 6

1 Table of Contents
Receiving a Fax . . . . . . . . . . . . . . . . . . . . . . . . . . . . . . . . . . . . . . . . . . . . . . . . . . . . . .8-9
About Receiving Modes . . . . . . . . . . . . . . . . . . . . . . . . . . . . . . . . . . . . . . . . . .8-9
Loading Paper for Receiving Faxes . . . . . . . . . . . . . . . . . . . . . . . . . . . . . . . . .8-9
Receiving Automatically in Fax Mode . . . . . . . . . . . . . . . . . . . . . . . . . . . . . . .8-10
Receiving Manually in Tel Mode . . . . . . . . . . . . . . . . . . . . . . . . . . . . . . . . . . .8-10
Receiving Automatically in Ans/Fax Mode . . . . . . . . . . . . . . . . . . . . . . . . . . .8-10
Receiving Manually Using an Extension Telephone . . . . . . . . . . . . . . . . . . . . 8-11
Receiving Faxes Using the DRPD Mode . . . . . . . . . . . . . . . . . . . . . . . . . . . . 8-11
Receiving Faxes in the Memory . . . . . . . . . . . . . . . . . . . . . . . . . . . . . . . . . . .8-12
Automatic Dialing . . . . . . . . . . . . . . . . . . . . . . . . . . . . . . . . . . . . . . . . . . . . . . . . . . . .8-13
Speed Dialing . . . . . . . . . . . . . . . . . . . . . . . . . . . . . . . . . . . . . . . . . . . . . . . . .8-13
Group Dialing . . . . . . . . . . . . . . . . . . . . . . . . . . . . . . . . . . . . . . . . . . . . . . . . .8-14
Searching for a Number in Memory . . . . . . . . . . . . . . . . . . . . . . . . . . . . . . . .8-16
Printing a Phonebook List . . . . . . . . . . . . . . . . . . . . . . . . . . . . . . . . . . . . . . . .8-17
Other Ways to Fax . . . . . . . . . . . . . . . . . . . . . . . . . . . . . . . . . . . . . . . . . . . . . . . . . . .8-18
Sending Broadcast Faxes . . . . . . . . . . . . . . . . . . . . . . . . . . . . . . . . . . . . . . . .8-18
Sending a Delayed Fax . . . . . . . . . . . . . . . . . . . . . . . . . . . . . . . . . . . . . . . . . .8-19
Sending a Priority Fax . . . . . . . . . . . . . . . . . . . . . . . . . . . . . . . . . . . . . . . . . . .8-20
Adding Documents To a Scheduled Fax . . . . . . . . . . . . . . . . . . . . . . . . . . . . . 8-21
Canceling a Scheduled Fax . . . . . . . . . . . . . . . . . . . . . . . . . . . . . . . . . . . . . .8-22
Additional Features. . . . . . . . . . . . . . . . . . . . . . . . . . . . . . . . . . . . . . . . . . . . . . . . . . .8-22
Using Secure Receiving Mode . . . . . . . . . . . . . . . . . . . . . . . . . . . . . . . . . . . .8-22
Printing Reports . . . . . . . . . . . . . . . . . . . . . . . . . . . . . . . . . . . . . . . . . . . . . . .8-23
Using Advanced Fax Settings . . . . . . . . . . . . . . . . . . . . . . . . . . . . . . . . . . . . .8-25
Forwarding faxes . . . . . . . . . . . . . . . . . . . . . . . . . . . . . . . . . . . . . . . . . . . . . . 8-26
Sending a fax from a PC. . . . . . . . . . . . . . . . . . . . . . . . . . . . . . . . . . . . . . . . . . . . . . .8-28
Installing PC-Fax Software . . . . . . . . . . . . . . . . . . . . . . . . . . . . . . . . . . . . . . .8-28
9 Maintenance
Clearing the Memory . . . . . . . . . . . . . . . . . . . . . . . . . . . . . . . . . . . . . . . . . . . . . . . . . .9-2
Cleaning Your Machine. . . . . . . . . . . . . . . . . . . . . . . . . . . . . . . . . . . . . . . . . . . . . . . . .9-3
Cleaning the Outside . . . . . . . . . . . . . . . . . . . . . . . . . . . . . . . . . . . . . . . . . . . . .9-3
Cleaning the Inside . . . . . . . . . . . . . . . . . . . . . . . . . . . . . . . . . . . . . . . . . . . . . .9-3
Cleaning the Scan Unit . . . . . . . . . . . . . . . . . . . . . . . . . . . . . . . . . . . . . . . . . . .9-5
Maintaining the Print Cartridge . . . . . . . . . . . . . . . . . . . . . . . . . . . . . . . . . . . . . . . . . . .9-6
Print Cartridge Storage . . . . . . . . . . . . . . . . . . . . . . . . . . . . . . . . . . . . . . . . . . .9-6
Expected Cartridge Life . . . . . . . . . . . . . . . . . . . . . . . . . . . . . . . . . . . . . . . . . .9-6
Redistributing Print Cartridge Toner . . . . . . . . . . . . . . . . . . . . . . . . . . . . . . . . .9-6
Replacing the Print Cartridge . . . . . . . . . . . . . . . . . . . . . . . . . . . . . . . . . . . . . .9-7
Printing continuously when the Toner Empty Replace Toner message appears 9-8
Setting the Notify Toner Option . . . . . . . . . . . . . . . . . . . . . . . . . . . . . . . . . . . . .9-8
Cleaning the Drum . . . . . . . . . . . . . . . . . . . . . . . . . . . . . . . . . . . . . . . . . . . . . .9-9
Consumables Parts. . . . . . . . . . . . . . . . . . . . . . . . . . . . . . . . . . . . . . . . . . . . . . . . . . .9-10
Replacement Parts . . . . . . . . . . . . . . . . . . . . . . . . . . . . . . . . . . . . . . . . . . . . . . . . . . .9-10
Replacing the ADF Rubber Pad . . . . . . . . . . . . . . . . . . . . . . . . . . . . . . . . . . . 9-11
Table of Contents-4 Xerox Phaser 3200MFP
Page 7

10 Troubleshooting
Clearing Document Jams . . . . . . . . . . . . . . . . . . . . . . . . . . . . . . . . . . . . . . . . . . . . . .10-2
Input Misfeed . . . . . . . . . . . . . . . . . . . . . . . . . . . . . . . . . . . . . . . . . . . . . . . . . .10-2
Exit Misfeed . . . . . . . . . . . . . . . . . . . . . . . . . . . . . . . . . . . . . . . . . . . . . . . . . . .10-3
Clearing Paper Jams . . . . . . . . . . . . . . . . . . . . . . . . . . . . . . . . . . . . . . . . . . . . . . . . .10-4
In the Tray . . . . . . . . . . . . . . . . . . . . . . . . . . . . . . . . . . . . . . . . . . . . . . . . . . . .10-4
In the Manual Tray . . . . . . . . . . . . . . . . . . . . . . . . . . . . . . . . . . . . . . . . . . . . .10-5
In the Fuser Area or Around the Print Cartridge . . . . . . . . . . . . . . . . . . . . . . .10-5
In the Paper Exit Area. . . . . . . . . . . . . . . . . . . . . . . . . . . . . . . . . . . . . . . . . . .10-6
Tips for Avoiding Paper Jams . . . . . . . . . . . . . . . . . . . . . . . . . . . . . . . . . . . . .10-8
Clearing LCD Error Messages . . . . . . . . . . . . . . . . . . . . . . . . . . . . . . . . . . . .10-9
Toner cartridge-related messages . . . . . . . . . . . . . . . . . . . . . . . . . . . . . . . . .10-13
Solving Other Problems . . . . . . . . . . . . . . . . . . . . . . . . . . . . . . . . . . . . . . . . . . . . . .10-14
Paper Feeding Problems . . . . . . . . . . . . . . . . . . . . . . . . . . . . . . . . . . . . . . .10-14
Printing Problems . . . . . . . . . . . . . . . . . . . . . . . . . . . . . . . . . . . . . . . . . . . . .10-15
Printing Quality Problems . . . . . . . . . . . . . . . . . . . . . . . . . . . . . . . . . . . . . . .10-18
Copying Problems . . . . . . . . . . . . . . . . . . . . . . . . . . . . . . . . . . . . . . . . . . . . .10-22
Scanning Problems . . . . . . . . . . . . . . . . . . . . . . . . . . . . . . . . . . . . . . . . . . . .10-23
Network Scan Problems (Phaser 3200MFP/N Only) . . . . . . . . . . . . . . . . . .10-23
Fax Problems . . . . . . . . . . . . . . . . . . . . . . . . . . . . . . . . . . . . . . . . . . .10-24
Common Windows Problems . . . . . . . . . . . . . . . . . . . . . . . . . . . . . . . . . . . .10-25
Common PostScript Problems (Phaser 3200MFP/N Only) . . . . . . . . . . . . . .10-26
Common Linux Problems . . . . . . . . . . . . . . . . . . . . . . . . . . . . . . . . . . . . . . .10-27
Common Macintosh Problems (Phaser 3200MFP/N Only) . . . . . . . . . . . . . .10-30
Table of Contents
11 Specifications
General Specifications . . . . . . . . . . . . . . . . . . . . . . . . . . . . . . . . . . . . . . . . . . . . . . . .11-2
Scanner and Copier Specifications. . . . . . . . . . . . . . . . . . . . . . . . . . . . . . . . . . . . . . . 11-3
Printer Specifications . . . . . . . . . . . . . . . . . . . . . . . . . . . . . . . . . . . . . . . . . . . . . . . . . 11-4
Facsimile Specifications . . . . . . . . . . . . . . . . . . . . . . . . . . . . . . . . . . . . . . . . . 11-5
Paper Specifications . . . . . . . . . . . . . . . . . . . . . . . . . . . . . . . . . . . . . . . . . . . . . . . . . .11-6
Overview . . . . . . . . . . . . . . . . . . . . . . . . . . . . . . . . . . . . . . . . . . . . . . . . . . . . . 11-6
Supported Sizes of Paper . . . . . . . . . . . . . . . . . . . . . . . . . . . . . . . . . . . . . . . .11-7
Guidelines for Using Paper . . . . . . . . . . . . . . . . . . . . . . . . . . . . . . . . . . . . . . . 11-8
Paper Specifications . . . . . . . . . . . . . . . . . . . . . . . . . . . . . . . . . . . . . . . . . . . .11-9
Paper Output Capacity . . . . . . . . . . . . . . . . . . . . . . . . . . . . . . . . . . . . . . . . .11-10
Paper Storage Environment . . . . . . . . . . . . . . . . . . . . . . . . . . . . . . . . . . . . .11-10
Envelopes . . . . . . . . . . . . . . . . . . . . . . . . . . . . . . . . . . . . . . . . . . . . . . . . . . . 11-11
Labels . . . . . . . . . . . . . . . . . . . . . . . . . . . . . . . . . . . . . . . . . . . . . . . . . . . . . .11-13
Transparencies . . . . . . . . . . . . . . . . . . . . . . . . . . . . . . . . . . . . . . . . . . . . . . . 11-13
Xerox Phaser 3200MFP Table of Contents-5
Page 8

1 Table of Contents
Table of Contents-6 Xerox Phaser 3200MFP
Page 9

1Welcome
1 Welcome
Thank you for choosing the Xerox Phaser 3200MFP. This product has been
designed for ease of use, but to use your machine to its fullest potential take
some time to read this User Guide.
• About This Guide – page 1-2
• Getting to know your machine – page 1-3
• Control Panel Functions – page 1-5
• Special Features – page 1-7
• Customer Support – page 1-9
• Safety Notes – page 1-10
• Regulatory Information – page 1-15
Xerox Phaser 3200MFP 1-1
Page 10
1Welcome
About This Guide
This User Guide provides information you need for setting up your machine. It
also provides all the detailed instructions for using your machine as a printer,
scanner, copier and facsimile and information for maintaining and
troubleshooting the machine.
Throughout this User Guide some terms are used interchangeably:
• Paper is synonymous with media.
• Document is synonymous with original.
• Page is synonymous with sheet.
• Xerox Phaser 3200MFP is synonymous with the machine.
The following table offers further information about the conventions used
within this Guide.
Convention Description Example
Italic Typeface Used to emphasize a word or
phrase. In addition,
references to other
publications are displayed in
Italic typeface.
Bold Typeface Used to emphasize the
selection of a feature mode or
button.
Notes Provides additional
information relating to the
procedure.
Caution Cautions are statements that
may cause mechanical
damage to the machine as a
result of an action.
Warning Used to alert users to the
possibility of personal injury.
Xerox Phaser 3200MFP.
Select the resolution
required by pressing
Resolution.
NOTE: For instructions on
loading paper, refer to
Loading Paper on page 2-6.
CAUTION: DO NOT use
organic or strong
chemical solvents or
aerosol cleaners.
WARNING: This product
must be connected to a
protective earthing
circuit.
Related Information Sources
Information available for the product consists of:
-This User Guide
-The
Quick Install Guide
- The Xerox website http://www.xerox.com
1-2 Xerox Phaser 3200MFP
Page 11
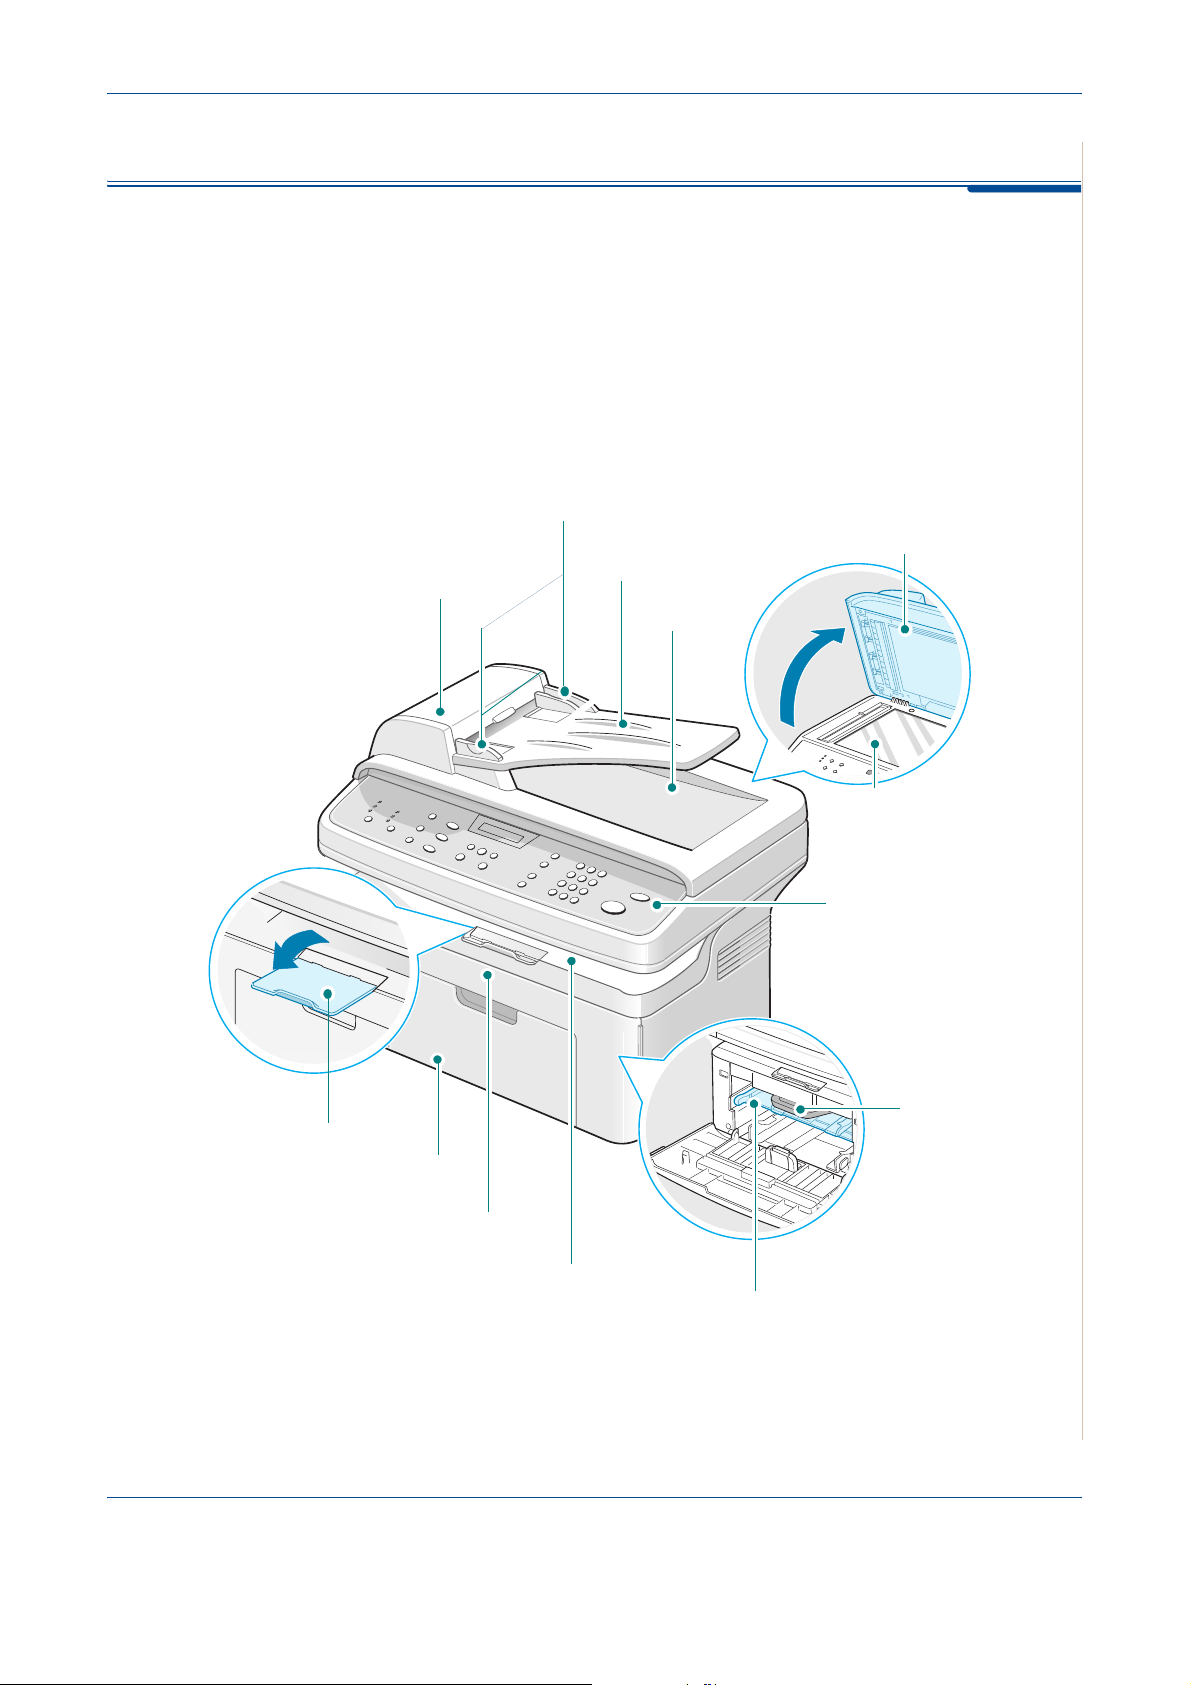
Getting to know your machine
Component location
These are the main components of your machine:
Front View
Document
Guide
Automatic
Document Feeder
Document
Input Tray
1Welcome
Document
Cover
Document
Output Tray
Paper Output
Extension
Paper Input
Tray
Front Door
Output Tray
(Face Down)
Document Glass
Control Panel
Print Cartridge
Manual Tray
Xerox Phaser 3200MFP 1-3
Page 12

1Welcome
Rear View
Rear Cover
Power
Switch
AC Power Cord
Connector
NOTE: If your country has a different telephone connection
system, this socket may be blocked.
* Phaser 3200MFP/N Only
EXT. Jack
Line Jack
USB port
Network port*
1-4 Xerox Phaser 3200MFP
Page 13
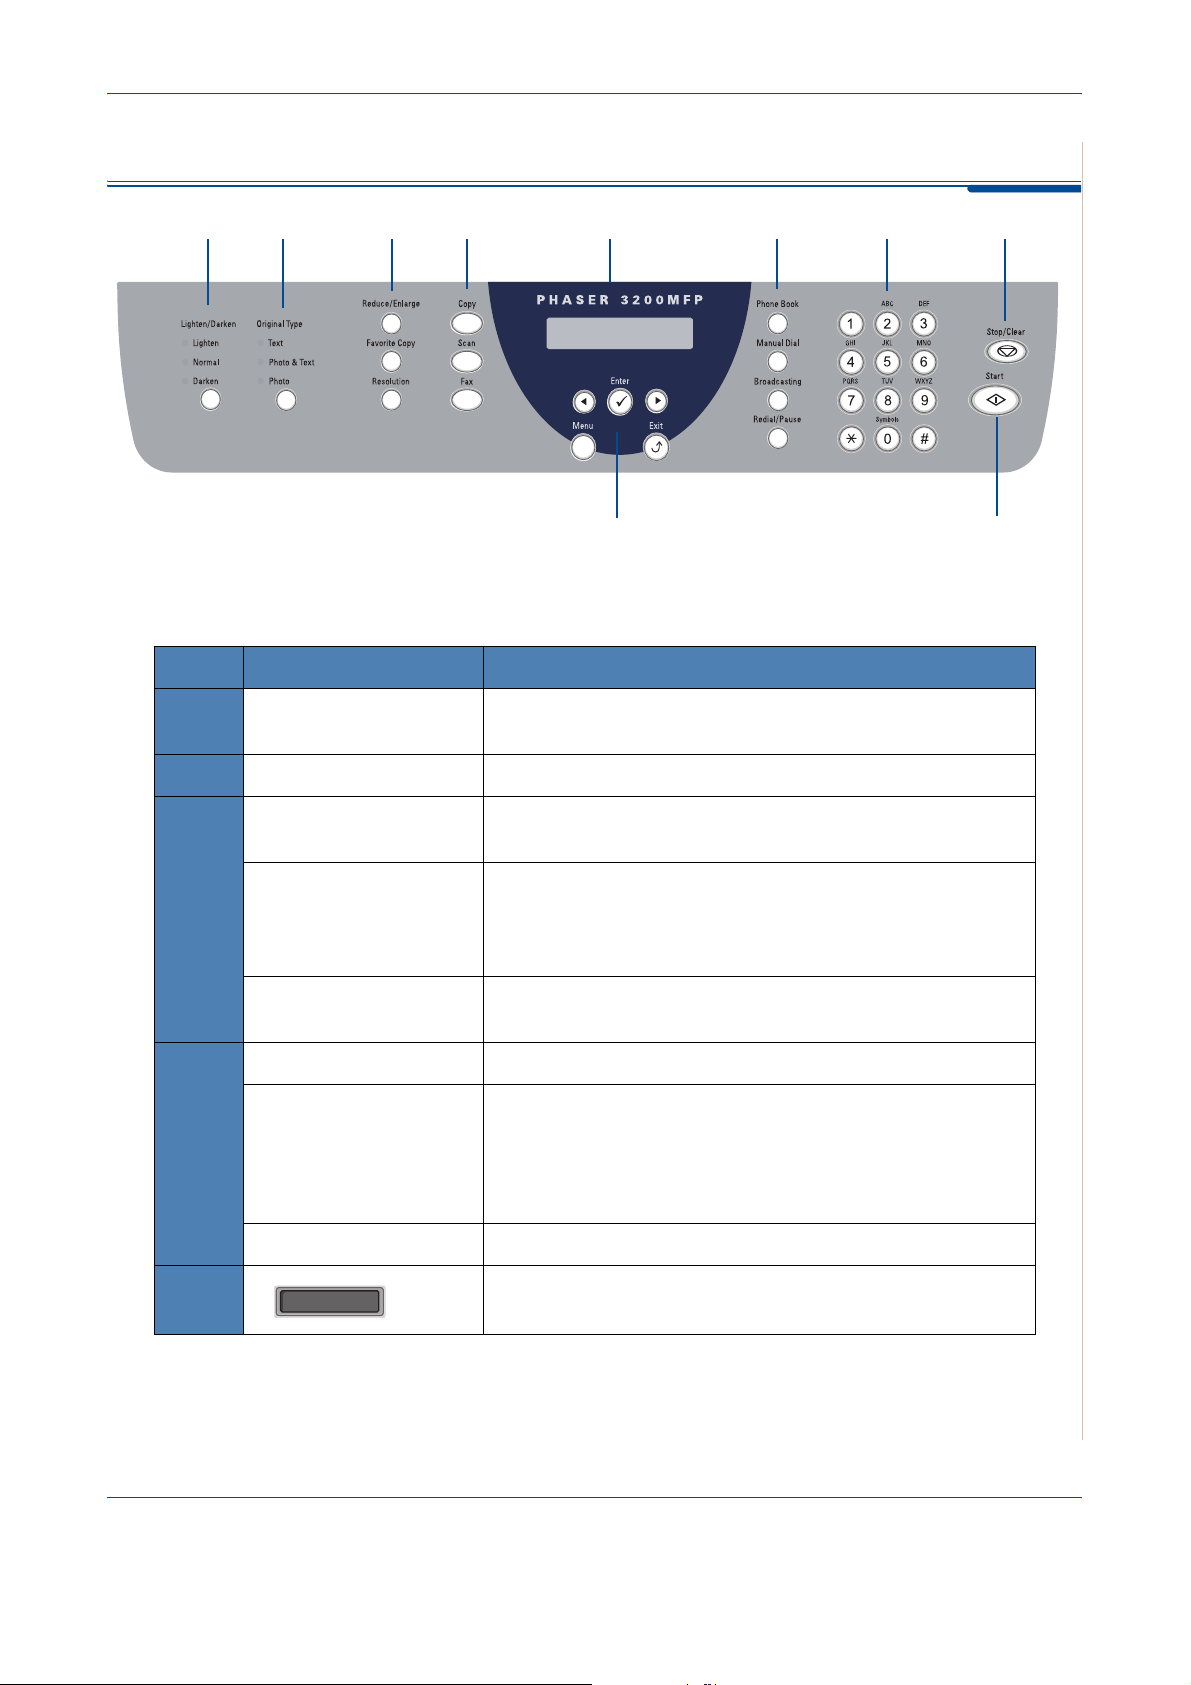
Control Panel Functions
12 34 5 6 7 8
1Welcome
910
Feature Description
1
2
3
4
Lighten/Darken Adjusts the brightness of the image for the current copy and
e-mail job.
Original Type
Reduce/Enlarge Makes the image on the copy smaller or larger than the
Favorite Copy Allows you to use one of the special copy features, such as
Resolution Adjusts the resolution of the documents for the current fax
Copy Select to Activate the Copy Mode.
Scan Allows you to access a list of your PC software programs
Selects the document type for the current copy and e-mail job.
original.
Clone, Collation, Auto Fit, ID Card Copy, 2/4 Up (multiple
pages on a sheet), and Poster copying after assigning it. For
details, refer to
job.
that an image can be scanned to. You must create the scan
list using the Xerox software (ControlCentre) provided with
this machine. For details see
Special Copy Features on page 5-7.
Using ControlCentre on
page 2-22
Fax Select to Activate the Fax Mode.
5
Xerox Phaser 3200MFP 1-5
Displays the special features, current status and prompts
during an operation.
Page 14
1Welcome
Feature Description
Phone Book Allows you to store frequently-dialed fax numbers and e-mail
addresses in memory or search for stored fax numbers and
e-mail addresses.
6
7
8
9
10
Manual Dial Engages the telephone line.
Broadcasting Allows you to send a fax to multiple destinations.
Redial/Pause In Standby mode, redials the last number or in Edit mode,
inserts a pause into a fax number.
Number Keypad Dials a number or enters alphanumeric characters for Fax
and Copy functions. Also allows you to edit e-mail
addresses.
Stop/Clear Stops an operation at any time.
In Standby mode, clears/cancels the copy options, such as
the brightness, the document type setting, the copy size,
and the number of copies.
Start Starts a job.
Used to scroll through the available options for the selected
menu items on the display.
Enter Confirms the selection on the display.
Menu Enters Menu mode and scrolls through the menus available.
Exit Sends you back to the upper menu level. Used to Exit menu
functions.
1-6 Xerox Phaser 3200MFP
Page 15
Special Features
Your new machine is equipped with special features that improve the print
quality. You can:
Print with excellent quality and high speed
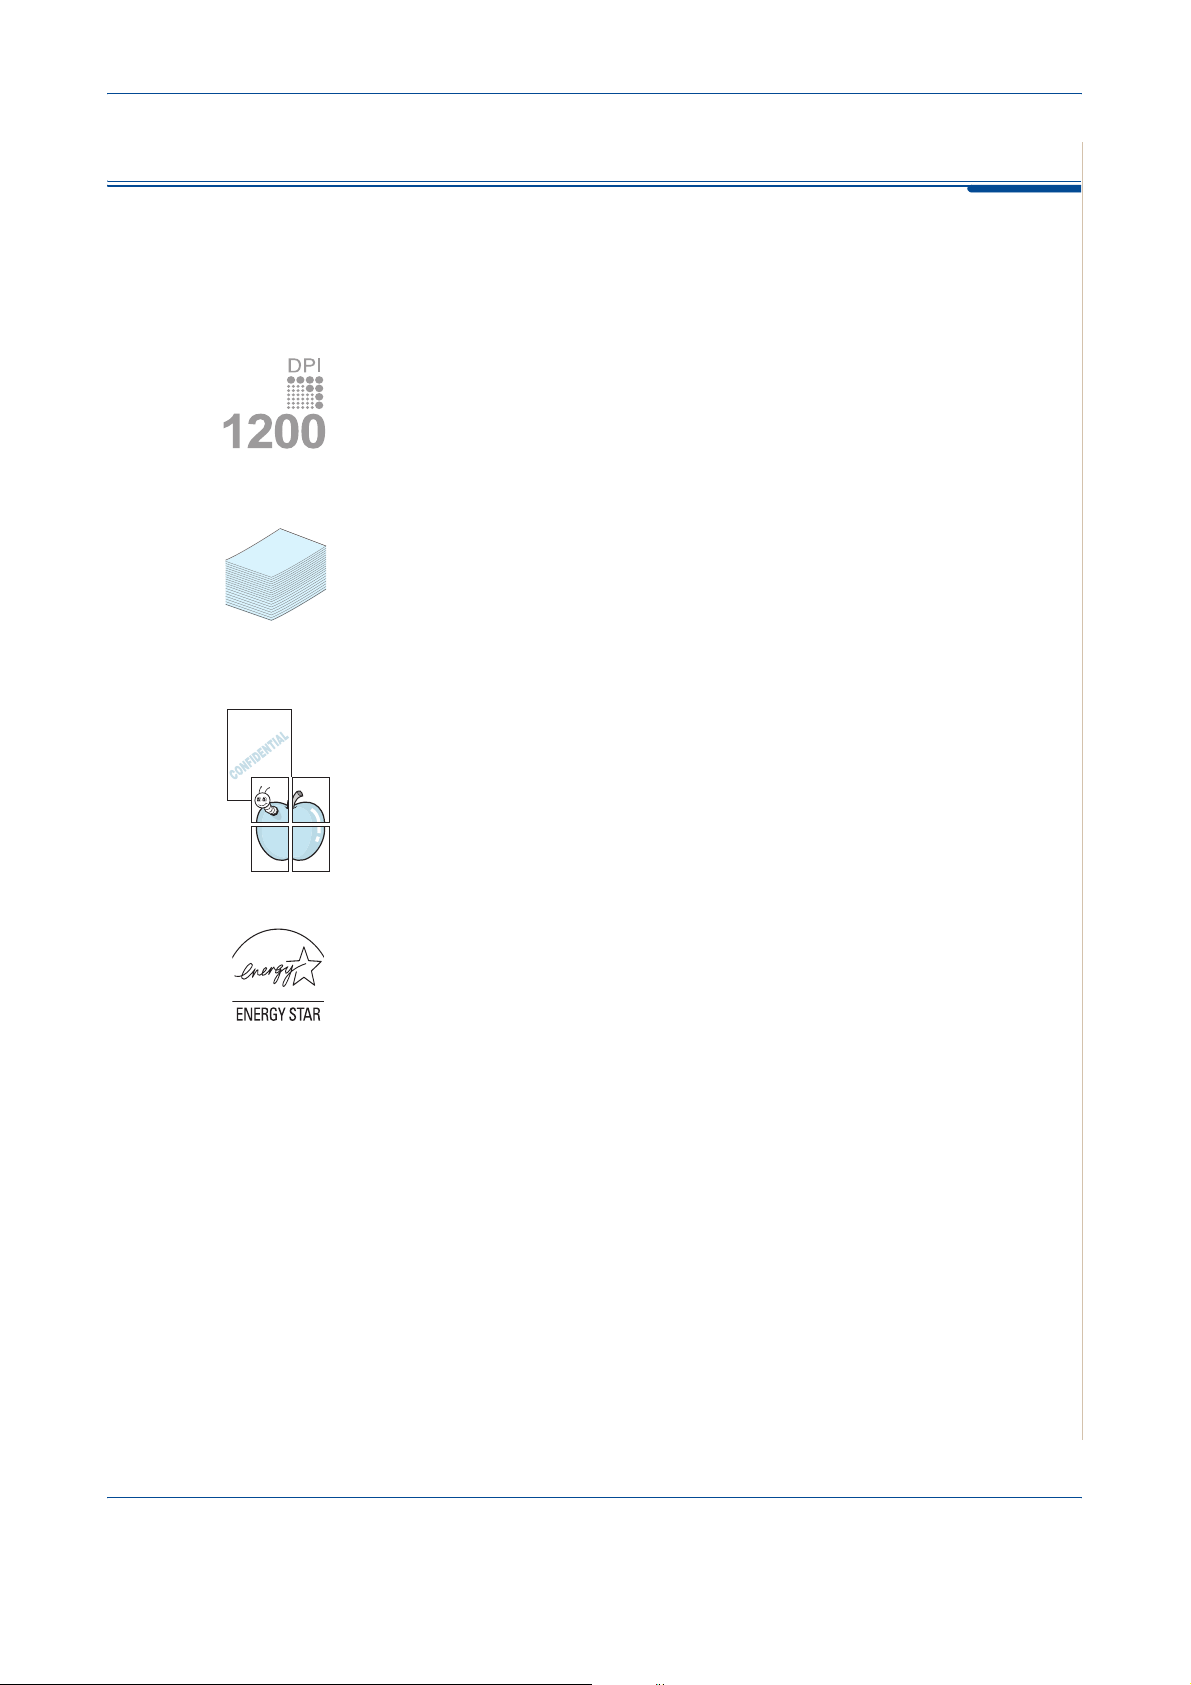
1Welcome
250
• You can print up to
•Up to
24 pages per minute in A4, Letter
1200 dots per inch
(dpi).
.
Paper tray capacity and media recommendations
•
Manual tray
custom-sized materials, postcards and heavy paper.
Standard 250-sheet tray
•
standard tray supports one sheet of special materials.
• 100-sheet output tray supports convenient access.
supports one sheet of envelopes, labels, transparencies,
supports standard type and size of paper. Also,
Create professional documents
•Print
•Print
Watermarks
as “Confidential”. For details, see
Posters
enlarged and printed across the sheet of paper and taped together to form
a poster. For details, see
. You can customize your documents with words, such
Chapter 6, Printing
. The text and pictures of each page of your document are
Chapter 6, Printing
.
.
Save time and money
• Allows you to use the Toner Save mode to save the toner. For details, see
Chapter 6, Printing.
• You can print multiple pages on one single sheet of paper to save paper.
• You can use preprinted forms and letterhead on plain paper.
• This machine automatically
reducing power consumption when not printing.
• This machine meets
Xerox Phaser 3200MFP 1-7
Energy Star
conserves electricity
guidelines for energy efficiency.
by substantially
Page 16
1Welcome
Print in various environments
• You can print in
• Compatible with
Windows 98/Me/2000/XP(32/64bit)/2003(32/64bit)/Vista
Linux
and
Macintosh (
Phaser 3200MFP/N only).
• Zoran IPS Emulation* is compatible with PostScript 3 (PS) and enables
PS printing (Phaser 3200MFP/N only).
* Zoran IPS Emulation is compatible with PostScript 3
• © Copyright 1995-2005, Zoran Corporation.
All rights reserved. Zoran, the Zoran logo,
IPS/PS3 and OneImage are trademarks of
Zoran Corporation.
* 136 PS3 fonts
Contains UFST and MicroType from Monotype Imaging Inc.
.
1-8 Xerox Phaser 3200MFP
Page 17
Customer Support
If you need assistance during or after product installation, please visit the
Xerox website for online solutions and support:
If you require further assistance, call our experts at the Xerox Welcome
Center, or contact your local representative. When telephoning please quote
the machine serial number. Use the space below to make a note of the
machine serial number:
# ____________________________________________
1Welcome
http://www.xerox.com
Serial Number
The Xerox Welcome Center or local representative telephone number is
provided when the machine is installed. For convenience and future
reference, please record the telephone number in the space below:
Xerox Welcome Center or local representative telephone number:
# __________________________________________________
Xerox US Welcome Center:1-800-821-2797
Xerox Canada Welcome Center:1-800-93-XEROX (1-800-939-3769)
Xerox Phaser 3200MFP 1-9
Page 18
1Welcome
Safety Notes
Read these safety notes carefully before using this product to ensure you
operate the equipment safely.
Your Xerox product and recommended supplies have been designed and
tested to meet strict safety requirements. These include safety agency
approval, and compliance to established environmental standards. Please
read the following instructions carefully before operating the product and refer
to them as needed to ensure the continued safe operation of your product.
The safety and environment testing and performance of this product have
been verified using Xerox materials only.
WARNING: Any unauthorized alteration, which may include the
addition of new functions or connection of external devices, may impact
the product certification. Please contact your authorized local dealer for
more information
Warning Markings
All warning instructions marked on or supplied with the product should be
followed.
WARNING: This WARNING alerts users to areas of the
product where there is the possibility of personal injury.
WARNING: This WARNING alerts users to areas of the
product where there are heated surfaces, which should not be
touched.
Electrical Supply
This product shall be operated from the type of electrical supply indicted on
the product’s data plate label. If you are not sure that your electrical supply
meets the requirements, please consult your local power company for advice.
WARNING: This product must be connected to a protective
earth circuit.
This product is supplied with a plug that has a protective earth pin.
This plug will fit only into an earthed electrical outlet. This is a safety feature.
To avoid risk of electric shock, contact your electrician to replace the electrical
outlet if you are unable to insert the plug into it. Never use an earthed adapter
plug to connect the product to an electrical outlet that lacks an earth
connection terminal.
1-10 Xerox Phaser 3200MFP
Page 19

Operator Accessible Areas
This equipment has been designed to restrict operator access to safe areas
only. Operator access to hazardous areas is restricted with covers or guards,
which would require a tool to remove. Never remove these covers or guards.
Maintenance
Any operator product maintenance procedures will be described in the user
documentation supplied with the product. Do not carry out any maintenance
on this product which is not described in the customer documentation.
Cleaning Your Product
Before cleaning this product, unplug the product from the electrical outlet.
Always use materials specifically designated for this product. The use of other
materials may result in poor performance and may create a hazardous
situation. Do not use aerosol cleaners, they may be explosive and flammable
under certain circumstances.
WARNING - Electrical Safety Information
1Welcome
• Only Use the power cord supplied with this equipment.
• Plug the power cord directly into a grounded electrical outlet. Do not use
an extension cord. If you do not know whether or not an outlet is
grounded, consult a qualified electrician.
• Improper connection of the equipment-grounding conductor can result in
electrical shock.
• Do not place this equipment where people might step on or trip on the
power cord.
• Do not override or disable electrical or mechanical interlocks.
• Do not obstruct the ventilation openings.
• Never push objects of any kind into slots or openings on this equipment
• If any of the following conditions occur, switch off the power to the
machine immediately and disconnect the power cord from the electrical
outlet. Call an authorized local service representative to correct the
problem.
– The equipment emits unusual noise or odors.
– The power cord is damaged or frayed.
– A wall panel circuit breaker, fuse, or other safety device has been
tripped.
– Liquid is spilled into the copier/printer.
– The equipment is exposed to water.
– Any part of the equipment is damaged.
Xerox Phaser 3200MFP 1-11
Page 20

1Welcome
Laser Safety Information
Operational Safety Information
Disconnect Device
The power cable is the disconnect device for this equipment. It is attached to
the back of the machine as a plug-in device. To remove all electrical power
from the equipment, disconnect the power cable from the electrical outlet.
CAUTION: Use of controls, adjustments or performance of procedure
other than those specified herein may result in hazardous light
exposure.
With specific regard to laser safety, the equipment complies with performance
standards for laser product set by government, national and international
agencies as a Class 1 laser product. It does not emit hazardous light, as the
beam is totally enclosed during all phases of customer operation and
maintenance.
To ensure the continued safe operation of your Xerox equipment, follow these
safety guidelines at all times.
Do These:
• Always connect equipment to a correctly grounded power outlet. If in
doubt, have the outlet checked by a qualified electrician.
• This equipment must be connected to a protective earth circuit.
This equipment is supplied with a plug that has a protective earth pin. This
plug will fit only into an earthed electrical outlet. This is a safety feature.
To avoid risk of electric shock, contact your electrician to replace the
electrical outlet if you are unable to insert the plug into it. Never use a plug
that lacks an earth connection terminal to connect the product to an
electrical outlet.
• Always follow all warnings and instructions that are marked on or supplied
with the equipment.
• Always locate the equipment in an area that has adequate ventilation, and
the room for servicing. For minimum dimensions see Clearance Space on
page 2-3.
• Always use materials and supplies specifically designed for your Xerox
equipment. Use of unsuitable materials may result in poor performance.
• Always unplug this equipment from the electrical outlet before cleaning.
Do Not Do These:
• Never use a plug that lacks an earth connection terminal to connect the
product to an electrical outlet.
1-12 Xerox Phaser 3200MFP
Page 21

• Never attempt any maintenance function that is not specifically described
in this documentation.
• This equipment should not be placed in a built-in installation unless proper
ventilation is provided. Please contact your Authorized local dealer for
further information.
• Never remove covers or guards that are fastened with screws. There are
no operator serviceable areas within these covers.
• Never locate the equipment near a radiator or any other heat source.
• Never push objects of any kind into the ventilation openings.
• Never override or "cheat" any of the electrical or mechanical interlock
devices.
• Never operate the equipment if you notice unusual noises or odors.
Disconnect the power cord from the electrical outlet and contact your local
Xerox Service Representative or Service Provider immediately.
Maintenance Information
1Welcome
Do not attempt any maintenance procedure that is not specifically described
in the documentation that is supplied with your printer.
• Do not use aerosol cleaners. The use of cleaners that are not approved
may cause poor performance of the equipment, and could create a
dangerous condition.
• Use supplies and cleaning materials only as directed in this manual. Keep
all of these materials out of the reach of children.
• Do not remove covers or guards that are fastened with screws. There are
no parts behind these covers that you can maintain or service.
• Do not perform any maintenance procedures unless you have been
trained to do them by an authorized local dealer or unless a procedure is
specifically described in the user manuals.
Ozone Safety Information
This product will produce ozone during normal operation. The ozone
produced is heavier than air and is dependent on copy volume. Providing the
correct environmental parameters as specified in the Xerox installation
procedure will ensure that the concentration levels meet safe limits.
If you need additional information about ozone, please request the Xerox
publication Ozone by calling 1-800-828-6571 in the United States and
Canada. In other markets please contact your authorized local dealer or
Service Provider.
Xerox Phaser 3200MFP 1-13
Page 22

1Welcome
For Consumables
Radio Frequency Emissions
Store all consumables in accordance with the instructions given on the
package or container.
• Keep all consumables away from the reach of children.
• Never throw toner, print cartridges or toner containers into an open flame.
FCC Information to the User
This device complies with Part 15 of the FCC Rules. Operation is subject to
the following two conditions:
– This device may not cause harmful interference, and
– This device must accept any interference received, including
interference that may cause undesired operation.
This equipment has been tested and found to comply with the limits for a Class
B digital device, pursuant to Part 15 of the FCC Rules. These limits are
designed to provide reasonable protection against harmful interference in a
residential installation. This equipment generates, uses and can radiate radio
frequency energy and, if not installed and used in accordance with the
instructions, may cause harmful interference to radio communications.
However, there is no guarantee that interference will not occur in a particular
installation. If this equipment does cause harmful interference to radio or
television reception, which can be determined by turning the equipment off
and on, the user is encouraged to try to correct the interference by one or more
of the following measures:
– Reorient or relocate the receiving antenna.
– Increase the separation between the equipment and receiver.
– Connect the equipment into an outlet on a circuit different from that to
which the receiver is connected.
– Consult the dealer or experienced radio TV technician for help.
NOTE: Change or modifications not expressly approved by the
manufacturer responsible for compliance could void the user's authority to
operate the equipment.
Product Safety Certification
This product is certified by the following Agency using the Safety standards
listed.
Agency Standard
Underwriters Laboratories Inc. UL60950-1 1st (2003) (USA/
Intertek ETL Semko IEC60950-1 Edition 1 (2001)
Canada)
This product was manufactured under a registered ISO9001 Quality system.
1-14 Xerox Phaser 3200MFP
Page 23

Regulatory Information
CE Mark
The CE mark applied to this product symbolizes Xerox's declaration of
conformity with the following applicable Directives of the European Union as
of the dates indicated:
December 12, 2006: Council Directive 2006/95/EEC amended by Council
Directive 93/68/EEC, approximation of the laws of the member states related
to low voltage equipment.
January 1, 1996: Council Directive 89/336/EEC, approximation of the laws of
the member states related to electromagnetic compatibility.
March 9, 1999: Council Directive 99/5/EC, on radio equipment and
telecommunications terminal equipment and the mutual recognition of their
conformity.
A full declaration of conformity, defining the relevant directives and referenced
standards, can be obtained from your Authorized local dealer.
1Welcome
WARNING: In order to allow this equipment to operate in proximity to
Industrial Scientific and Medical (ISM) equipment, the external radiation
from the ISM equipment may have to be limited or special mitigation
measures taken.
WARNING: Shielded interface cables must be used with this product to
maintain compliance with Council Directive 89/336/EEC.
For Fax Function
USA
FAX Send Header Requirements:
The telephone Consumer Protection Act of 1991 makes it unlawful for any
person to use a computer or other electronic device, including a Fax machine,
to send any message unless such message clearly contains in a margin at the
top or bottom of each transmitted page or on the first page of the transmission,
the date and time it is sent and an identification of the business or other entity,
or other individual sending the message and the telephone number of the
sending machine or such business, other entity or individual. (The telephone
number provided may not be a 900 number or any other number for which
charges exceed local or long distance transmission charges.)
In order to program this information into your FAX machine refer to Setting the
Machine ID – page 2-15 and follow the steps provided. To enter the date and
time, please refer Setting the Date and Time – page 2-17.
Xerox Phaser 3200MFP 1-15
Page 24

1Welcome
Data Coupler Information:
This equipment complies with Part 68 of the FCC rules and the requirements
adopted by the Administrative Council for Terminal Attachments (ACTA). On
the rear of this equipment is a label that contains, among other information, a
product identifier in the format US:AAAEQ##TXXXX. If requested, this
number must be provided to the Telephone Company.
A plug and jack used to connect this equipment to the premises wiring and
telephone network must comply with the applicable FCC Part 68 rules and
requirements adopted by the ACTA. A compliant telephone cord and modular
plug is provided with this product. It is designed to be connected to a
compatible modular jack that is also compliant. See installation instructions
for details.
You may safely connect the machine to the following standard modular jack:
USOC RJ-11C using the compliant telephone line cord (with modular plugs)
provided with the installation kit. See installation instructions for details.
The Ringer Equivalence Number (or REN) is used to determine the number of
devices that may be connected to a telephone line. Excessive RENs on a
telephone line may result in the devices not ringing in response to an incoming
call. In most but not all areas, the sum of RENs should not exceed five (5.0).
To be certain of the number of devices that may be connected to a line, as
determined by the total RENs, contact the local Telephone Company. For
products approved after July 23, 2001, the REN for this product is part of the
product identifier that has the format US:AAAEQ##TXXXX. The digits
represented by ## are the REN without a decimal point (e.g., 03 is a REN of
0.3). For earlier products, the REN is separately shown on the label.
If this Xerox equipment causes harm to the telephone network, the Telephone
Company will notify you in advance that temporary discontinuance of service
may be required. But if advance notice isn't practical, the Telephone Company
will notify the customer as soon as possible. Also, you will be advised of your
right to file a complaint with the FCC if you believe it is necessary.
The Telephone Company may make changes in its facilities, equipment,
operations or procedures that could affect the operation of the equipment. If
this happens the Telephone Company will provide advance notice in order for
you to make necessary modifications to maintain uninterrupted service.
If trouble is experienced with this Xerox equipment, for repair or warranty
information, please contact the appropriate service center; details of which are
displayed either on the machine or contained within the user guide. If the
equipment is causing harm to the telephone network, the Telephone
Company may request that you disconnect the equipment until the problem is
resolved.
Repairs to the machine should be made only by a Xerox representative or an
authorized Xerox service agency. This applies at any time during or after the
service warranty period. If unauthorized repair is performed, the remainder of
the warranty period is null and void. This equipment must not be used on party
lines. Connection to party line service is subject to state tariffs. Contact the
state public utility commission, public service commission or corporation
commission for information.
1-16 Xerox Phaser 3200MFP
Page 25

1Welcome
If your office has specially wired alarm equipment connected to the telephone
line, ensure the installation of this Xerox equipment does not disable your
alarm equipment. If you have questions about what will disable alarm
equipment, consult your Telephone Company or a qualified installer.
CANADA
NOTE: The Industry Canada label identifies certified equipment. This
certification means that the equipment meets certain telecommunications
network protective, operational and safety requirements as prescribed in the
appropriate Terminal Equipment Technical Requirements document(s). The
Department does not guarantee the equipment will operate to the users
satisfaction.
Before installing this equipment, users should ensure that it is permissible to
be connected to the facilities of the local telecommunications company. The
equipment must also be installed using an acceptable method of connection.
The customer should be aware that compliance with the above conditions may
not prevent degradation of service in some situations.
Repairs to certified equipment should be coordinated by a representative
designated by the supplier. Any repairs or alterations made by the user to this
equipment, or equipment malfunctions, may give the telecommunications
company cause to request the user to disconnect the equipment.
Users should ensure for their own protection that the electrical ground
connections of the power utility, telephone lines and internal metallic water
pipe systems, if present, are connected together. This precaution may be
particularly important in rural areas.
CAUTION: Users should not attempt to make such connections
themselves, but should contact the appropriate electric inspection
authority, or electrician, as appropriate.
NOTE: The Ringer Equivalence Number (REN) assigned to each terminal
device provides an indication of the maximum number of terminals allowed to
be connected to a telephone interface. The termination on an interface may
consist of any combination of devices subject only to the requirement that the
sum of the Ringer Equivalent Numbers of all of the devices does not exceed
5.
Xerox Phaser 3200MFP 1-17
Page 26

1Welcome
Europe
Certification to 1999/5/EC Radio Equipment &
Telecommunications Terminal Equipment Directive
This Xerox product has been self-certified by Xerox for pan-European single
terminal connection to the analogue public switched telephone network
(PSTN) in accordance with Directive 1999/5/EC.
The product has been designed to work with the national PSTNs and
compatible PBXs of the following countries:
Austria
Belgium Greece Netherlands Switzerland
Denmark Iceland Norway United Kingdom
France Ireland Portugal
Italy Spain Czech Republic Poland
Bulgaria Romania Hungary
In the event of problems, you should contact your local Xerox representative
in the first instance.
This product has been tested to and is compliant with TBR21, a technical
specification for terminal equipment for use on analogue-switched telephone
networks in the European Economic Area.
The product may be configured to be compatible with other country networks.
Please contact your Xerox representative if it needs to be reconnected to
another country's network.
Germany Luxembourg Sweden
Finland
NOTE: Although this product can use either loop disconnect (pulse) or
DTMF (tone) signaling it is recommended that it is set to use DTMF signaling.
DTMF signaling provides reliable and faster call setup.
Modification, connection to external control software or to external control
apparatus not authorized by Xerox, will invalidate its certification.
1-18 Xerox Phaser 3200MFP
Page 27
Environmental Compliance
USA
ENERGY STAR
As an ENERGY STAR® partner, Xerox Corporation has determined that (the
basic configuration of) this product meets the ENERGY STAR guidelines for
energy efficiency.
The ENERGY STAR and ENERGY STAR MARK are registered United States
trademarks.
The ENERGY STAR Imaging Equipment Program is a team effort between
U.S., European Union and Japanese governments and the office equipment
industry to promote energy-efficient copiers, printers, fax, multifunction
machine, personal computers, and monitors. Reducing product energy
consumption helps combat smog, acid rain and long-term changes to the
climate by decreasing the emissions that result from generating electricity.
Xerox ENERGY STAR equipment is preset at the factory. Your machine will
be delivered with the timer for switching to Power Save Mode from the last
copy/print out, set at 15 minutes. A more detailed description of this feature
together with instructions on changing the default time to suit your work
pattern can be found in the Machine Setup Section of this guide.
1Welcome
Canada
Environmental Choice
Terra Choice Environmental Serviced, Inc. of Canada has verified that this
product conforms to all applicable Environmental Choice EcoLogo
requirements for minimized impact to the environment.
As a participant in the Environmental Choice program, Xerox Corporation has
determined that this product meets the Environmental Choice guidelines for
energy efficiency.
Environment Canada established the Environmental Choice program in 1988
to help consumers identify environmentally responsible products and
services. Copier, printer, digital press and fax products must meet energy
efficiency and emissions criteria, and exhibit compatibility with recycled
supplies. Currently, Environmental Choice has more than 1600 approved
products and 140 licensees. Xerox has been a leader in offering EcoLogo
approved products.
Xerox Phaser 3200MFP 1-19
Page 28

1Welcome
Illegal Copies
USA
Congress, by statute, has forbidden the reproduction of the following subjects
under certain circumstances. Penalties of fine or imprisonment may be
imposed on those guilty of making such reproductions.
1. Obligations or Securities of the United States Government, such as:
Certificates of Indebtedness National Bank Currency
Coupons from Bonds Federal Reserve Bank Notes
Silver Certificates Gold Certificates
United States Bonds Treasury Notes
Federal Reserve Notes Fractional Notes
Certificates of Deposit Paper Money
Bonds and Obligations of certain agencies of the government, such as
FHA, etc
Bonds. (U.S. Savings Bonds may be photographed only for publicity
purposes in connection with the campaign for the sale of such bonds.)
Internal Revenue Stamps. (If it is necessary to reproduce a legal
document on which there is a canceled revenue stamp, this may be done
provided the reproduction of the document is performed for lawful
purposes.)
Postage Stamps, canceled or uncanceled. (For philatelic purposes,
Postage Stamps may be photographed, provided the reproduction is in
black and white and is less than 75% or more than 150% of the linear
dimensions of the original.)
Postal money Orders.
Bills, Checks, or Draft of money drawn by or upon authorized officers of the
United States.
Stamps and other representatives of value, of whatever denomination,
which have been or may be issued under any Act of Congress.
2. Adjusted Compensation Certificates for Veterans of the World Wars.
3. Obligations or Securities of any Foreign Government, Bank, or
Corporation.
4. Copyrighted materials, unless permission of the copyright owner has
been obtained or the reproduction falls within the "fair use" or library
reproduction rights provisions of the copyright law. Further information of
these provisions may be obtained from the Copyright Office, Library of
Congress, Washington, D.C. 20559. Ask for Circular R21.
5. Certificates of Citizenship or Naturalization. (Foreign Naturalization
Certificates may be photographed.)
6. Passports. (Foreign Passports may be photographed.)
1-20 Xerox Phaser 3200MFP
Page 29

1Welcome
7. Immigration Papers.
8. Draft Registration Cards.
9. Selective Service Induction Papers that bear any of the following
Registrant's information:
Earnings or Income
Dependency Status
Court Record
Previous military service
Physical or mental condition
Exception: United States military discharge certificates may be
photographed.
10. Badges, Identification Cards, Passes, or Insignia carried by military
personnel, or by members of the various Federal Departments, such as
FBI, Treasury, etc. (unless photograph is ordered by the head or such
department or bureau.)
Reproducing the following is also prohibited in certain states:
Automobile Licenses - Drivers' Licenses - Automobile Certificates of Title.
The above list is not all-inclusive, and no liability is assumed for its
completeness or accuracy. In case of doubt, consult your attorney.
Canada
Parliament, by statute, has forbidden the reproduction of the following
subjects under certain circumstances. Penalties of fine or imprisonment may
be imposed on those guilty of making such reproductions.
1. Current bank notes or current paper money.
2. Obligations or securities of a government or bank.
3. Exchequer bill paper or revenue paper.
4. The public seal of Canada or of a province, or the seal of a public body or
authority in Canada, or of a court of law.
5. Proclamations, orders, regulations or appointments, or notices thereof
(with intent to falsely cause same to purport to have been printed by the
Queen's Printer for Canada, or the equivalent printer for a province).
6. Marks, brands, seals, wrappers or designs used by or on behalf of the
Government of Canada or of a province, the government of a state other
than Canada or a department, board, Commission or agency established
by the Government of Canada or of a province or of a government of a
state other than Canada.
7. Impressed or adhesive stamps used for the purpose of revenue by the
Government of Canada or of a province or by the government of a state
other than Canada.
Xerox Phaser 3200MFP 1-21
Page 30

1Welcome
8. Documents, registers or records kept by public officials charged with the
duty of making or issuing certified copies thereof, where the copy falsely
purports to be a certified copy thereof.
9. Copyrighted material or trademarks of any manner or kind without the
consent of the copyright or trademark owner.
The above list is provided for your convenience and assistance, but it is not
all-inclusive, and no liability is assumed for its completeness accuracy. In
case of doubt, consult your solicitor.
Other countries
Copying certain documents may be illegal in your country. Penalties of fine or
imprisonment may be imposed on those found guilty of making such
reproductions.
Currency notes
Bank notes and cheques
Bank and government bonds and securities
Passports and identification cards
Copyright material or trademarks without the consent of the owner
Postage stamps and other negotiable instruments
This list is not inclusive and no liability is assumed for either its completeness
or accuracy. In case of doubt, contact your legal counsel.
1-22 Xerox Phaser 3200MFP
Page 31

Product Recycling and Disposal
If you are managing the disposal of your Xerox product, please note that the
product may contain lead, mercury, perchlorate and other materials whose
disposal may be regulated due to environmental considerations. The presence
of lead, mercury and perchlorate is fully consistent with regulations applicable
at the time that the product was placed on the market. For disposal information,
contact your local authorities. Perchlorate Material - This product may contain
one or more Perchlorate-containing devices, such as batteries. Special
handling may apply.
Please see www.dtxc.ca.gov/hazardouswasteperchlorate
Xerox operates an equipment takeback and reuse/recycle program. Contact
your Xerox sales representative ( 1-800-ASK-XEROX ) to determine whether
this Xerox product is part of the program. For more information about Xerox
environmental programs, visit www.xerox.com/environment
disposal information, contact your local authorities. In the United States, you
may also refer to the Electronic Industries Alliance web site: www.eiae.org
European Union
1Welcome
for more information.
or for recycling and
.
WEEE Directive 2002/96/EC
Some equipment may be used in both a domestic/household and a
professional/business application.
Domestic/Household Environment
Application of this symbol on your equipment is confirmation that you should
not dispose of the equipment in the normal household waste stream.
In accordance with European legislation, end of life electrical and electronic
equipment subject to disposal must be segregated from household waste.
Private households within EU member states may return used electrical and
electronic equipment to designated collection facilities free of charge. Please
contact your local disposal authority for information.
In some member states, when you purchase new equipment, your local
retailer may be required to take back your old equipment free of charge.
Please ask you retailer for information.
Professional/Business Environment
Application of this symbol on your equipment is confirmation that you must
dispose of this equipment in compliance with agreed national procedures.
In accordance with European legislation, end of life electrical and electronic
equipment subject to disposal must be managed within agreed procedures.
Prior to disposal, please contact your local dealer or Xerox representative for
end of life takeback information.
Xerox Phaser 3200MFP 1-23
Page 32

1Welcome
1-24 Xerox Phaser 3200MFP
Page 33

2 Getting Started
2 Getting Started
Before you start to use your machine, there are a number of tasks to perform.
Using the instructions provided in this chapter, unpack and setup your
machine.
This chapter includes:
• Unpacking the machine – page 2-2
• Selecting a Location – page 2-3
• Loading Paper – page 2-6
• Making Connections – page 2-8
• Switching On the Machine – page 2-11
• Installing Printer Software – page 2-12
• Using ControlCentre – page 2-22
Xerox Phaser 3200MFP 2-1
Page 34

2 Getting Started
Unpacking the machine
1. Remove the machine and all accessories from the packing carton. Make
sure that the machine has been packed with the following items:
NOTE: The appearance of the power cord and the telephone line cord may
differ depending on your country’s specifications. The Power Cord must be
plugged into a grounded power socket.
NOTE: The CD-ROMs contain the Xerox printer driver, scan drivers,
software, Network Scan, User Guide, Status Monitor and ControlCentre.
NOTE: Components may differ from country to country. You should use the
telephone line cord which is supplied with your machine. If you are replacing
it with another vendor’s, it should be AWG #26 or larger telephone line cord.
2-2 Xerox Phaser 3200MFP
Page 35

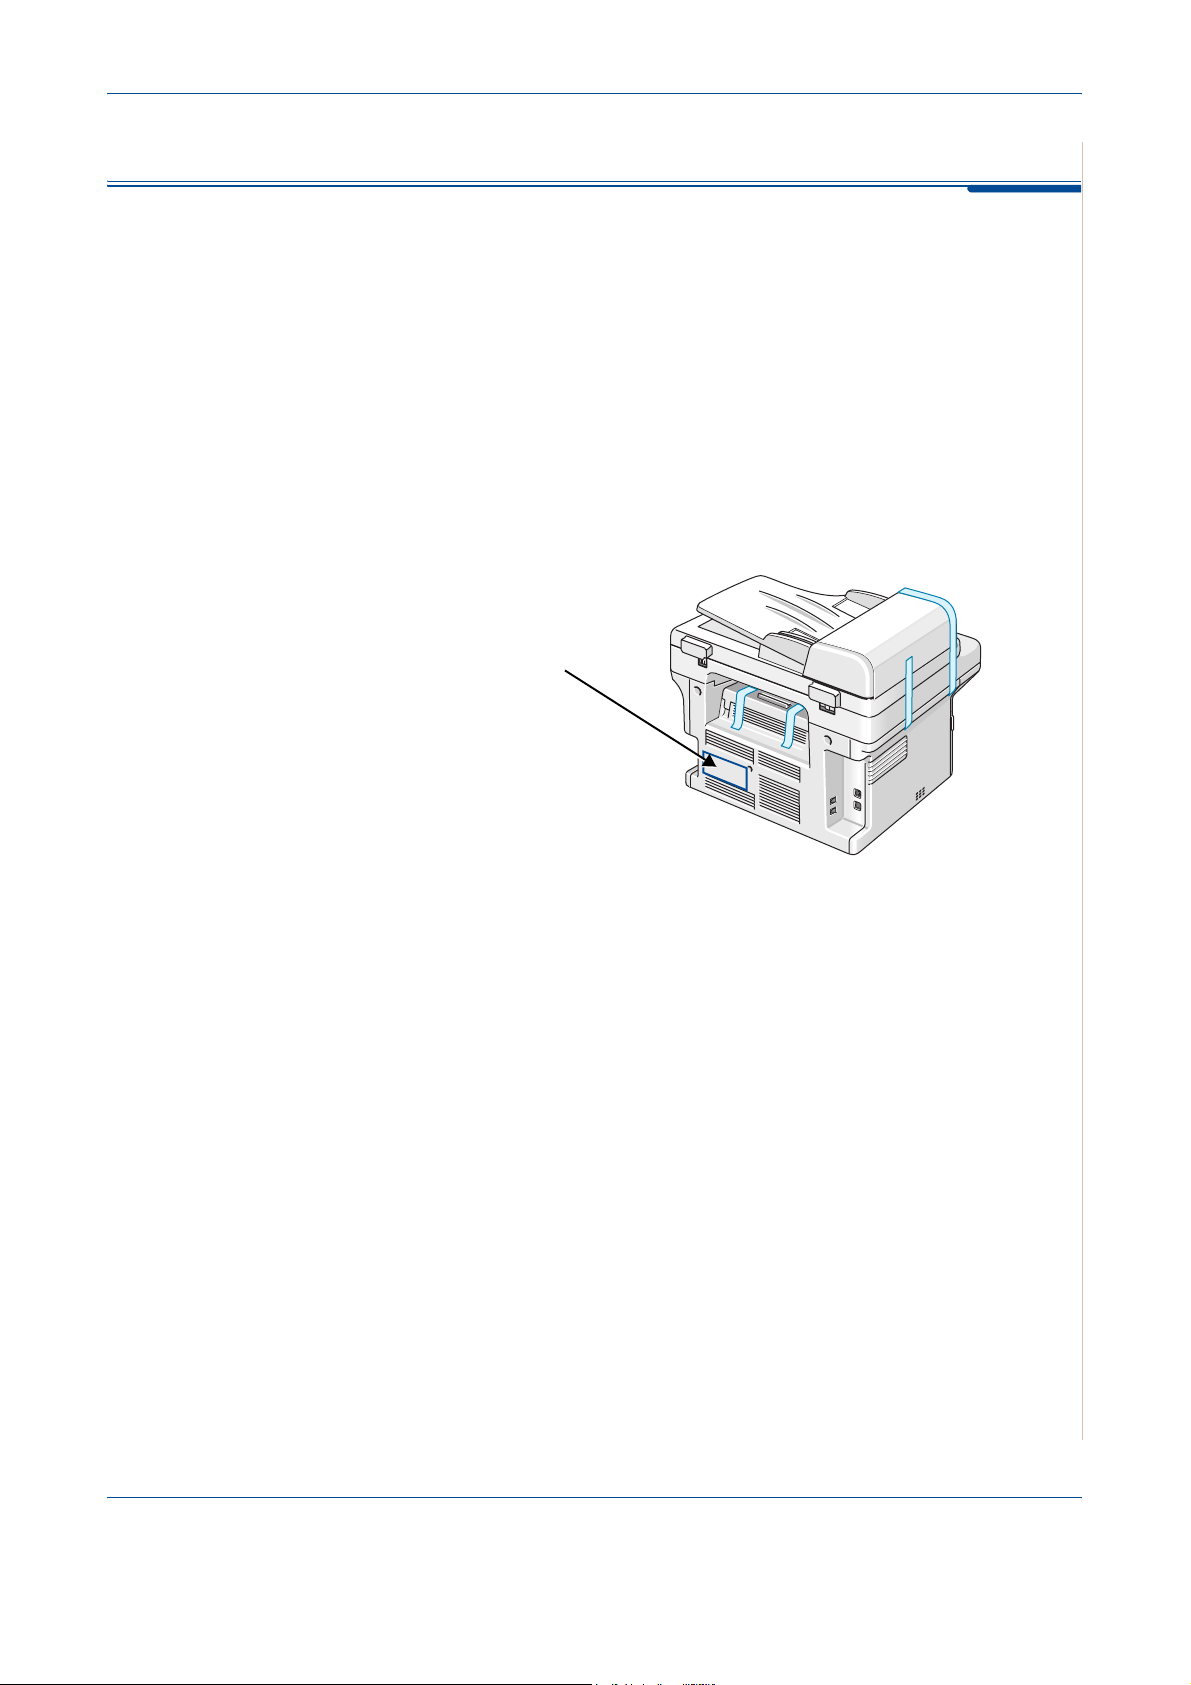
2. Remove the packing tape from the front, back, and sides of the machine.
Selecting a Location
Select a level, stable place with adequate space for air circulation around the
machine. Allow extra space for opening doors and trays.
The area should be well-ventilated and away from direct sunlight or sources
of heat, cold, and humidity. Do not set the machine close to the edge of a desk
or table.
2 Getting Started
Tape
Clearance Space
The diagram shows the space that
should be left around the machine for
access and ventilation.
Xerox Phaser 3200MFP 2-3
Page 36

2 Getting Started
Installing the Print Cartridge
1. Open the front door.
2. Remove the Print Cartridge
from its bag and remove the paper
protecting the cartridge by pulling the
packing tape.
3. Thoroughly rock the cartridge 5 or 6
times to distribute the toner. This will
loosen the toner and make sure that
you get the maximum copies from the
cartridge.
NOTE: If toner gets on your clothing, wipe it
off with a dry cloth and wash clothing in cold
water. Hot water sets toner into fabric.
CAUTION: To prevent damage, do not expose the Print Cartridge to
light for more than a few minutes. Cover it with a piece of paper if left
exposed for more than a few minutes.
CAUTION: Do not touch the green underside of the Print Cartridge. Use
the handle on the cartridge when lifting the cartridge to avoid touching
this area.
2-4 Xerox Phaser 3200MFP
Page 37

4. Unfold the Print Cartridge
handle. Hold the handle and
insert the cartridge into the
machine until it snaps into
place.
NOTE: When inserting or
removing the Print Cartridge
take care not to scratch it
against the machine frame. This
will damage the cartridge and
may produce marks on the
copies.
5. Close the front door. If the
door is not firmly closed,
printing errors may occur.
2 Getting Started
NOTE: When printing text at 5%
coverage, you can expect a print
cartridge life of approximately
2,000/3,000 pages. (1,500
pages for the print cartridge that
is shipped with the machine.)
Xerox Phaser 3200MFP 2-5
Page 38

2 Getting Started
Loading Paper
The tray can hold a maximum of 250 sheets of 20 lb (75 g/m2) plain paper.
1. Pull the tray toward you to open.
2. Squeeze the rear guide and pull
it out to extend the tray.
3. Fan the edges of the paper stack
to separate the pages. Gently tap
the stack on a flat surface to
even up the edges.
4. Load paper into the tray to
register at the rear, left corner of
the tray. Make sure that all four
corners lay flat in the tray.
NOTE: Do not put too much paper in
the tray. Over filling the tray may
cause paper jams.
2-6 Xerox Phaser 3200MFP
Page 39
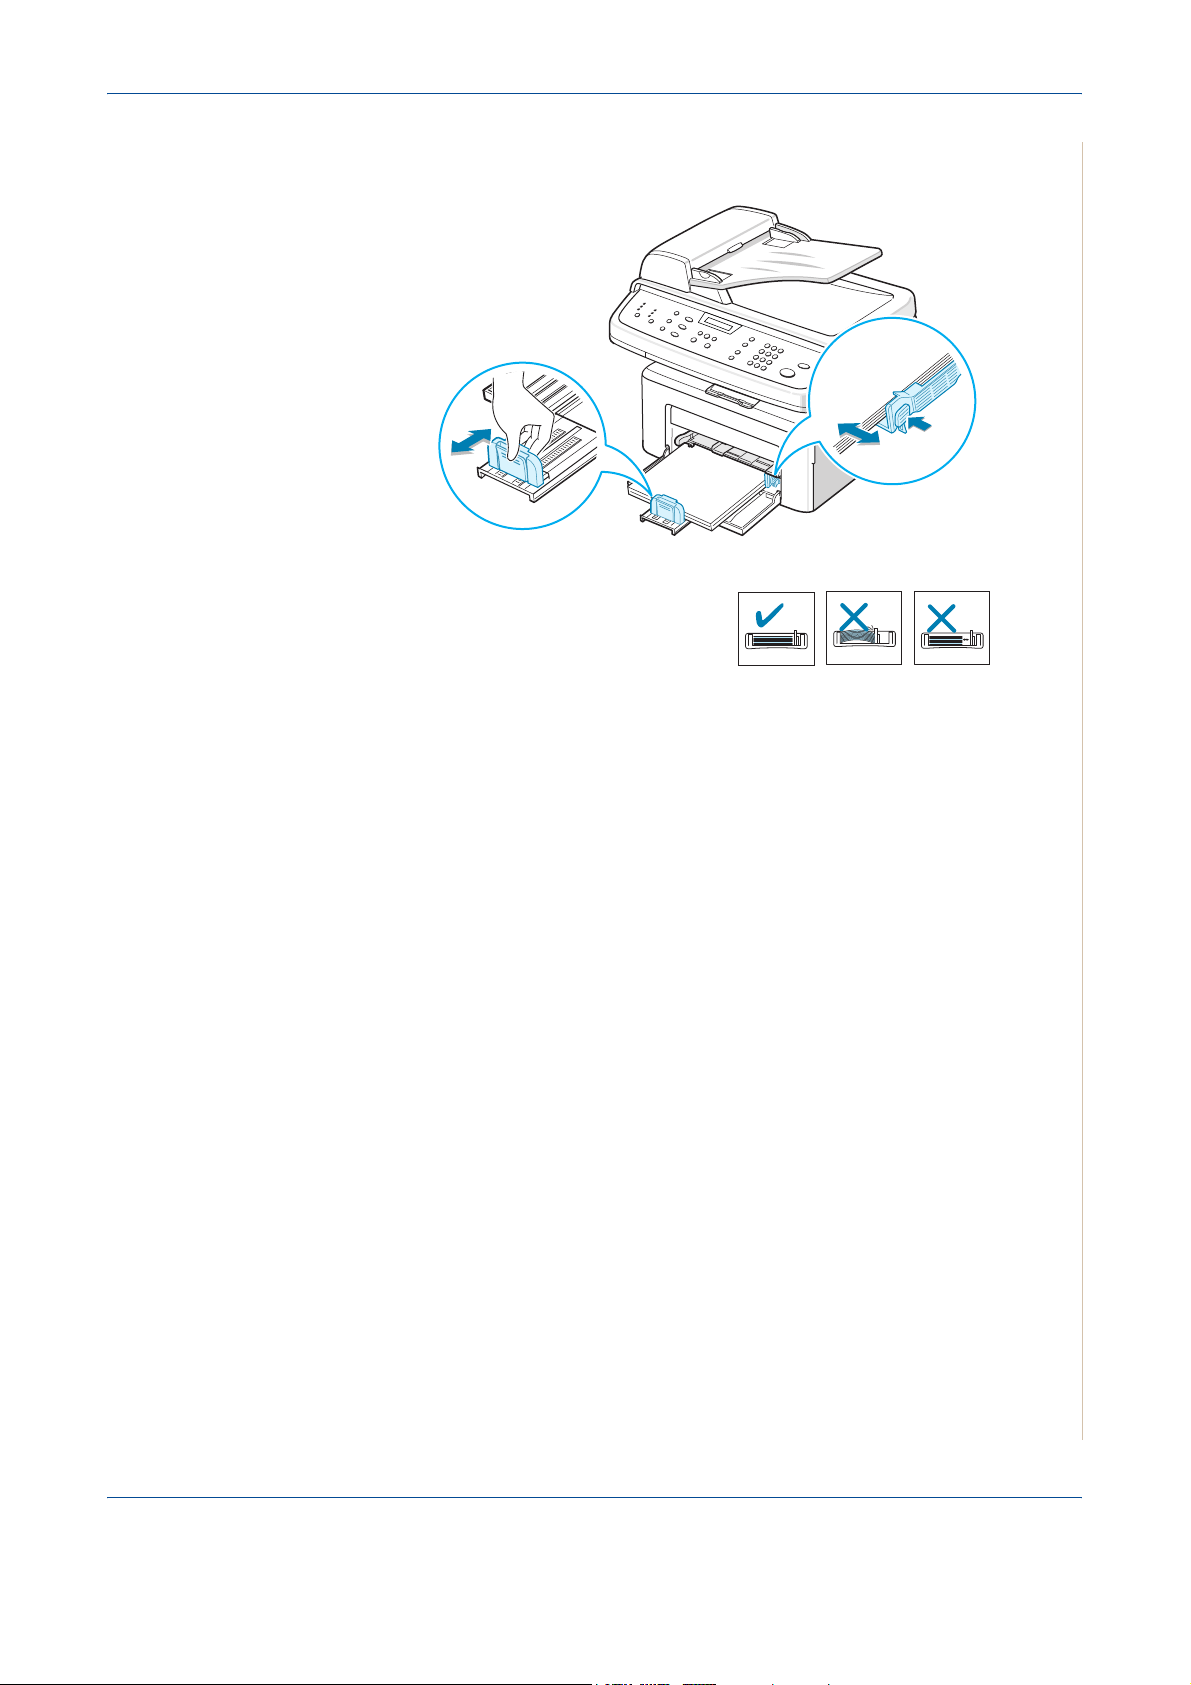
2 Getting Started
5. Squeeze the rear guide and side guide and move them so that they just
touch the edge of the paper stack.
NOTE: Do not push the guides hard
against the paper stack to cause the
stack to bend. If you do not adjust the
paper side guide correctly, paper jams
may occur.
Xerox Phaser 3200MFP 2-7
Page 40

2 Getting Started
Making Connections
1. Plug one end of the supplied
telephone line cord into the LINE
jack on the machine and the
other end into the telephone wall
socket.
2. Plug the cord of your extension
phone or answering machine into
the EXT. jack.
To the wall socket
NOTE: If you want to use your
machine to receive both faxes and
voice calls, you will need to connect
a telephone and/or answering
machine to your machine.
For Users in the UK:
UK users should plug the cord of
the extension phone into the
supplied TAM lead and plug the
cord of the TAM lead into the
EXT. jack on the back of the
machine.
NOTE: Use the TAM lead and the
telephone line cord supplied with
your machine.
To an extension phone or
answering machine
In the United Kingdom, if a three-wire
type (SHUNT-wire, older equipment)
telephone or answering machine is
2-8 Xerox Phaser 3200MFP
TAM lead
Page 41

2 Getting Started
connected to the EXT. jack on the machine, the external equipment will fail to
ring when receiving an incoming call as the machine is designed to operate
with the latest technology. To prevent this incompatibility, use two-wire (newer
equipment) telephones or answering machines.
For Users in Germany
For Users in France
Xerox Phaser 3200MFP 2-9
Page 42
2 Getting Started
3. Connect a USB cable to the USB port on your machine. Connect to the
USB port on your computer.
4. If you want to use a LAN cable, purchase LAN cable and connect it to the
LAN connector on your machine.(Phaser 3200MFP/N only)
2-10 Xerox Phaser 3200MFP
Page 43

Switching On the Machine
1. Plug one end of the supplied
power cord into the AC socket
on the machine and the other
end into a properly grounded AC
outlet.
2. Press the power switch to turn
the machine on. “Warming Up
Please Wait” appears on the
display indicating that the
machine is now on.
To view your display text in
another language, see Changing
the Display Language and
Country – page 2-15.
2 Getting Started
To the AC outlet
WARNING: The fusing area
inside the machine is hot. Be careful not to touch hot surfaces when
accessing this area.
CAUTION: Do not disassemble the machine with power on. If you do,
you may receive an electric shock.
Xerox Phaser 3200MFP 2-11
Page 44

2 Getting Started
Installing Printer Software
NOTE: You must install software using the supplied CD-ROM after you have
set up your machine and connected it to your computer. For details, see
Chapter 6, Printing.
The CD-ROM provides you with the following software:
Programs for Windows
To use your machine as a printer and scanner in Windows, you must install
the MFP driver. You can install some or all the following components:
Printer driver
•
features.
•
Scan driver
available for scanning documents on your machine.
•
ControlCentre- Use this program to create phonebook entries and configure
the destination of the scan button. You can also update the firmware of the
machine.
• Status Monitor- This program appears when printing error occurs.
Network Scan
•
machine and save it to a network-connected computer
(Phaser 3200MFP/N only).
- Use this driver to take full advantage of your printer’s
- TWAIN and Windows Image Acquisition (WIA) driver is
: This program allows you to scan a document on your
Macintosh Driver (Phaser 3200MFP/N only)
You can print and scan to and from Macintosh operating systems using your
machine.
Linux Driver
You can print and scan to and from Linux operating systems using your
machine. (Direct and Network)
2-12 Xerox Phaser 3200MFP
Page 45

System Requirements
Your machine supports following operating system.
2 Getting Started
Windows
98/Me/2000/XP
(32/64bit)/2003(32/64bit)/Vista
The following table shows Windows requirements.
Item Requirements Recommended
CPU Windows 98/Me/2000 Pentium II 400 MHz
or higher
Windows XP(32/64bit)/
2003(32/64bit)/Vista
RAM Windows 98/Me/2000 64 MB or higher 128 MB
Windows XP(32/64bit)/
2003(32/64bit)
Windows Vista 512 MB or higher 1 GB
Free disk
space
Internet
Explorer
Windows 98/Me/2000 300 MB or higher 1 GB
Windows XP(32/64bit)/
2003(32/64bit)
Windows Vista 15 GB 15 GB or more
Windows 98/Me/2000/
XP(32/64bit)/2003(32/64bit)
Pentium III 933 MHz
or higher
128 MB or higher 256 MB
1 GB or higher 5 GB
5.0 or higher
Pentium III 933
MHz
Pentium IV 1
GHz
Windows Vista
7.0 or higher
Macintosh 10.3 ~ 10.4 - See Installing Software for Macintosh – page 6-46
Various Linux - See Installing the Unified Linux Driver – page 6-32.
Xerox Phaser 3200MFP 2-13
Page 46

2 Getting Started
Printer Driver Features
Your printer drivers support the following standard features:
• Paper source selection
• Paper size, orientation and media type
• Number of copies
The following table lists the features supported by your printer drivers.
Feature
Toner Save Y Y N Y
Print quality option Y Y Y Y
Poster printing Y N N N
Multiple pages per
sheet (N-up)
Fit to page printing Y Y Y N
Scale printing Y Y Y N
Watermark Y N N N
Overlay Y N N N
PCL6
Windows Windows Macintosh Linux
YYYY(2,4)
(Phaser 3200MPF/N only)
PostScript
NOTE: For details about installing software and using its features, see
Chapter 6, Printing.
2-14 Xerox Phaser 3200MFP
Page 47

Changing the Display Language and Country
Setting Language
To change the language that displays on the control panel, follow these steps:
1. Press Menu until “Machine Setup” appears on the top line of the display.
2 Getting Started
2. Press
the scroll button ( or ) until “Language” appears on the bottom
line of the display.
3. Press Enter. The current setting appears on the bottom line of the
display.
4. Press
the scroll button ( or ) until the language you want appears on
the display.
5. Press Enter to save the selection.
6. To return to Standby mode, press Stop/Clear.
Setting the Machine ID
In some countries, you are required by law to indicate your fax number on any
fax you send. The Machine ID, containing your telephone number and name
(or company name), will be printed at the top of each page sent from your
machine.
1. Press Menu until “Machine Setup” appears on the top line of the display.
The first available menu item, “Machine ID”, displays on the bottom line.
2. Press Enter. The display asks you to enter the fax number.
3. If there is a number already set, the number appears.
4. Enter your fax number using the number keypad.
NOTE: If you make a mistake while entering numbers, press the button to
delete the last digit.
5. Press Enter when the number on the display is correct. The display asks
you to enter an ID.
6. Enter your name or the company name using the number keypad.
7. You can enter alphanumeric characters using the number keypad, and
include special symbols by pressing the 0 button.
8. For details on how to use the number keypad to enter alphanumeric
characters, see Entering Characters Using the Number Keypad – page
2-16.
9. If you want to enter the same letter or number in succession (e.g. SS,
AA, 777), enter one digit, move the cursor by pressing the
enter the next digit.
Xerox Phaser 3200MFP 2-15
button and
Page 48

2 Getting Started
Entering Characters Using the Number Keypad
10. If you want to insert a space in the name, you can also use the button
to move the cursor to skip the position.
11. Press Enter when the name on the display is correct.
12. To return to Standby mode, press Stop/Clear.
As you perform various tasks, you need to enter names and numbers. For
example, when you set up your machine, you enter your name (or your
company’s name) and telephone number. When you store one or two digit
speed dial or group dial numbers, you may also enter the corresponding
names.
To enter alphanumeric characters:
1. When you are prompted to enter a letter, locate the button
labeled with the character you want. Press the button until
the correct letter appears on the display.
For example, to enter the letter O, press 6, labeled with
“MNO”.
Each time you press 6, the display shows a different letter,
M, N, O, and finally 6.
You can enter special characters, such as space, plus sign, and etc. For
details, see Keypad Letters and Numbers on page 17.
2. To enter additional letters, repeat step 1.
If the next letter is printed on the same button, move the cursor by
pressing the
want. The cursor will move to the right and the next letter will appear on
the display.
You can enter a space by pressing 1 once, and by using the cursor button.
button and then press the button labeled with the letter you
3. When you finish entering letters, press Enter.
2-16 Xerox Phaser 3200MFP
Page 49
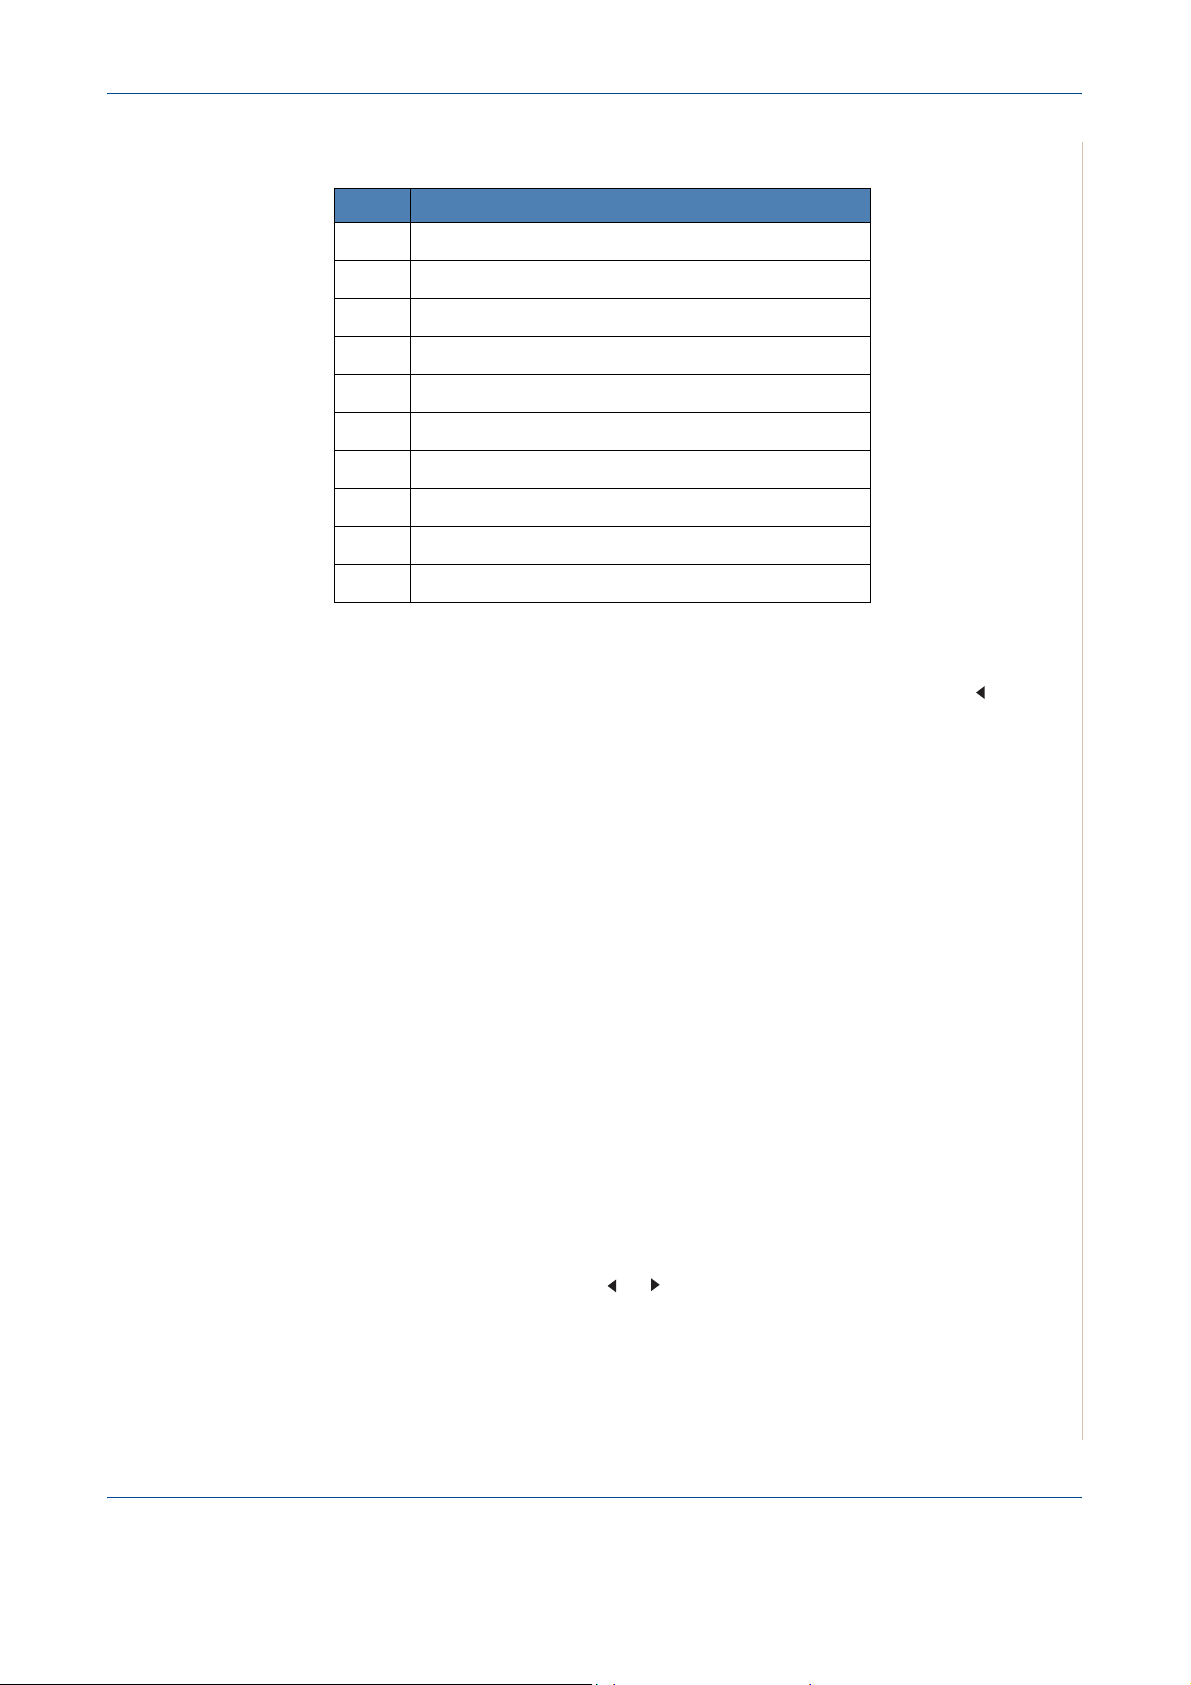
Keypad Letters and Numbers
Key Assigned numbers, letters, or characters
1 Space 1
2 A B C 2
3 D E F 3
4 G H I 4
5 J K L 5
6 M N O 6
7 P Q R S 7
8 T U V 8
9 W X Y Z 9
0 . @ _ - + , ‘ / * # & 0
Changing Numbers or Names
2 Getting Started
If you make a mistake while entering a number or name, press the button to
delete the last digit or character. Then enter the correct number or character.
Inserting a Pause
With some telephone systems, you must dial an access code (9, for example)
and listen for a second dial tone. In such cases, you must insert a pause in the
telephone number.
To insert a pause, press Redial/Pause at the appropriate place while entering
the telephone number. A “−” appears on the display at the corresponding
location.
Setting the Date and Time
When you turn the machine on for the first time, the display prompts you to
enter the current date and time. After entering, it will not appear again.
NOTE: When turning on the machine after it has been off for a long time
(Approx. 72 hours), you need to reset date and time.
1. Press Menu until “Machine Setup” appears on the top line of the display.
2. Press the scroll button ( or ) to display “Date & Time” on the bottom
line and press Enter.
Xerox Phaser 3200MFP 2-17
Page 50

2 Getting Started
3. Enter the correct time and date using the number keypad.
Unit Range
Month 01 - 12
Day 01 - 31
Year Required four digits
Hour 01 - 12 (12 hour mode)
00 - 23 (24 hour mode)
Minute 00 - 59
NOTE: The date format may differ from country to country.
You can also use the scroll button ( or ) to move the cursor under the
digit you want to correct and enter a new number.
4. To select “AM” or “PM” for 12-hour format, press the or button.
5. When the cursor is not under the AM or PM indicator, pressing the or
button immediately moves the cursor to the indicator.
6. You can change the clock mode to 24-hour format (e.g. 01:00 PM as
13:00). For details, see Changing the Clock Mode – page 2-18.
7. Press Enter when the time and date on the display is correct.
8. To return to Standby mode, press Stop/Clear.
Changing the Clock Mode
You can set your machine to display the current time using either a 12-hour or
24-hour format.
1. Press Menu until “Machine Setup” appears on the top line of the display.
2. Press the scroll button ( or ) until you see “Clock Mode” on the bottom
line and press Enter.
3. The clock mode currently set for the machine displays.
4. Press the scroll button ( or ) to select the other mode and then press
Enter to save the selection.
5. To return to Standby mode, press Stop/Clear.
2-18 Xerox Phaser 3200MFP
Page 51

Changing the Dial Mode
This setting may not be available depending on your country. If you cannot
reach this option, your machine does not support this feature.
You can set the dial mode for your machine to either tone dialling or pulse
dialling. If you have a public telephone system or a private branch exchange
(PBX) system, you may need to select Pulse. Contact your local telephone
company if you are not sure which dial mode to use. If you select Pulse, some
phone system features might not be available. It can also take longer to dial a
fax or phone number.
1. Press Menu until “Machine Setup” appears on the top line of the display.
1. Press the scroll button ( or ) until you see “Dial Mode” on the bottom
line and press Enter.
2. The dial mode currently set for the machine displays.
3. Press the scroll button ( or ) until the desired status appears and press
Enter.
2 Getting Started
To return to Standby mode, press Stop/Clear.
Setting the Paper Size and Type
After loading paper in the tray, you need to set the paper size and type using
the control panel buttons. These settings will apply to copy and fax modes. For
PC-printing, you need to select the paper size and type in the print driver you
use on your PC.
1. Press Menu. The display shows “Paper Setting” on the top line of the
display.
2. Press the scroll button ( or )
and press Enter to access the menu item.
3. Use
the scroll button ( or ) to find the paper size you are using and
press Enter to save it.
4. Press the button to scroll to “Paper Type” and press Enter to access
the menu item.
5. Use
the scroll button ( or ) to find the paper type you are using and
press Enter to save it.
6. To return to Standby mode, press Stop/Clear.
to display “Paper Size” on the bottom line
Xerox Phaser 3200MFP 2-19
Page 52

2 Getting Started
Setting Sounds
You can control the following sounds:
• Speaker: You can turn on or off the
the speaker, such as the dial tone or a fax tone
“Comm.” the speaker is on until the remote machine answers.
• Ringer: You can adjust the ringer volume.
• Key Sound: With this option set to “On” a key tone sounds each time a
key is pressed.
• Alarm Sound: You can turn the alarm sound on or off. With this option set
to “On” an alarm tone sounds when an error occurs or fax communication
ends.
• You can adjust the volume level using the Manual Dial button.
sounds from the telephone line through
. With this option set to
Speaker, Ringer, Key Sound, and Alarm Sound
1. Press Menu until “Sound/Volume” appears on the top line of the display.
2. Press the scroll button ( or ) to scroll through the options. Press Enter
when you see the desired sound option.
3. Press the scroll button ( or ) to display the desired status or volume for
the option you have selected.
You will see the selection on the bottom line of the display.
For the ringer volume, you can select “Off”, “Low”, “Med”, and “High”.
Setting “Off” means that the ringer does not sound. The machine works
normally even if the ringer is turned off.
4. Press Enter to save the selection. The next sound option appears.
5. If necessary, repeat steps 2 through 4.
6. To return to Standby mode, press Stop/Clear.
Speaker Volume
1. Press Manual Dial. A dial tone sounds from the speaker.
2. Press the scroll button ( or ) until you hear the volume you want. The
display shows the current volume level.
3. Press Manual Dial to save the change and return to Standby mode.
NOTE: You can adjust the speaker volume only when the telephone line is
connected.
2-20 Xerox Phaser 3200MFP
Page 53
Using the Save Modes
Toner Save Mode
Toner Save mode allows your machine to use less toner on each page.
Activating this mode extends the life of the Print Cartridge beyond what one
would experience in the normal mode, but it reduces print quality.
NOTE: When PC-printing, you can also turn on or off the toner save mode in
the printer properties. For details, see Chapter 6, Printing.
Power Save Mode
Power Save mode allows your machine to reduce power consumption when it
is not in use. You can turn this mode on and select a length of time for which
the machine waits after a job is printed before it switches to a reduced power
state.
1. Press Menu until “Machine Setup” appears on top line of the display.
2 Getting Started
2. Press the scroll button ( or )
line. Press Enter.
until “Power Save” appears on the bottom
3. Press the scroll button ( or ) to display “On” on the bottom line and
press Enter.
Selecting “Off” means that the power save mode is deactivated.
4. Press the scroll button ( or ) until the time setting you want appears.
The available options are 5, 10, 15, 30, 60 and 120 (minutes).
5. Press Enter to save the selection.
6. To return to Standby mode, press Stop/Clear.
Xerox Phaser 3200MFP 2-21
Page 54

2 Getting Started
Using ControlCentre
Using ControlCentre, you can create and edit Phonebook entries from your
computer and configure the destination launches when you use the
corresponding button on the control panel. You can also update the firmware
of the machine.
1. To install the Xerox ControlCentre, insert the supplied Xerox Drivers CD.
2. The CD-ROM should automatically run, and an installation window
appears.
If the installation window does not appear, click Start and then Run. Type
X:\Setup.exe, replacing "X" with the letter of your CD-ROM drive and
click OK.
3. When the language selection window appears, select the appropriate
language and then click Continue.
4. Choose ControlCentre (if not already selected) and then click Continue.
5.
At the next screen accept your choice by clicking Continue and then click
Finish
. ControlCentre is now installed.
2-22 Xerox Phaser 3200MFP
Page 55

2 Getting Started
To open ControlCentre:
1. Start your Windows.
2. Click the Start button on your desktop computer.
3. From the Programs or All Pro-
grams, select your printer driver
name and then ControlCentre.
The ControlCentre window opens.
The ControlCentre window
provides the following tabs: Scan
Settings, Phonebook, Printer,
and Firmware Update.
4. To exit, click the Exit button at the
bottom of each tab.
NOTE: Use the help feature by
referring to the window which appears when you click the Help button.
The Scan Settings Tab
Click the Scan Settings tab to configure the scan destination list. Scan the
image to any of the software programs in the destination list.
You can also configure the scan
settings, such as the output type and
resolution.
1
Select the program from the
Available Scan Destinations and click
to add it to the Front Panel
Destination List. To delete the selected
program, click .
2
Restore Defaults
Click to restore the default settings.
3
Send
Downloads the settings made in the
ControlCentre to your machine.
1
2
3
Xerox Phaser 3200MFP 2-23
Page 56

2 Getting Started
The Phonebook Tab
Click the tab to configure print system settings.
1
2
3
7
1
Read.
4
5
6
Reads the Phonebook entries from the machine for use in the ControlCentre.
2
Write
Downloads the Phonebook entries from the ControlCentre to the machine.
3
Phonebook entries.
4
Edit
Allows you to edit a selected Phonebook entry in a separate Edit window.
5
Delete
Deletes a selected Phonebook entry.
6
Delete All
Deletes all Phonebook entries.
7
Group dial...
Allows you to set up group dial numbers.
When you click Group dial, the following
window opens.
1
1
Enter a name for the group
2
Shows the numbers included in the group.
To remove a number, select it and click
.
2
3
Remove.
3
Shows the Phonebook entries you can
include in the group. Select a number and
4
click Add to move it to the Included numbers
list.
4
OK
Click to save the group dial number after adding or removing numbers for the
group.
2-24 Xerox Phaser 3200MFP
Page 57

The Printer Tab
Click the tab to configure print system settings.
2 Getting Started
1
1
Orientation
Allows you to select the default orientation of print image on the page.
2
Margins
Allows you to set the margin of print materials.
3
PCL Settings
Allows you to set the PCL emulation configuration.
4
Apply
Downloads the settings made in the ControlCentre to your machine.
The Firmware Update Tab
2
3
4
Click the Firmware Update tab to
update the firmware of your machine.
Xerox Phaser 3200MFP 2-25
Page 58

2 Getting Started
2-26 Xerox Phaser 3200MFP
Page 59

3 Network Setup
3 Network Setup
Connecting your machine to a network is available only on the
Phaser 3200MFP/N. This chapter gives you step-by-step instructions for
setting up your machine for network connections.
This chapter includes:
• Introduction – page 3-2
• Supported operating systems – page 3-2
• Configuring TCP/IP – page 3-3
Xerox Phaser 3200MFP 3-1
Page 60
3 Network Setup
Introduction
Once you have connected your machine to a network with an RJ-45 Ethernet
cable, you can share the machine with other network users.
You need to set up the network protocols on the machine to use it as your
network printer. Protocols can be set up by the following method:
Via the control panel
You can set up the following basic network parameters through the machine’s
control panel:
• Configure TCP/IP
• Configure EtherTalk
Supported operating systems
The following table shows the network environments supported by the
machine:
Item Requirements
Network interface • 10/100 Base-TX
Network
operating system
Network
protocols
Dynamic
addressing server
• TCP/IP: Transmission Control Protocol/Internet Protocol
• DHCP: Dynamic Host Configuration Protocol
• BOOTP: Bootstrap Protocol
• Windows 98/Me/NT 4.0/2000/XP(32/64bit)/2003(32/
64bit)/Vista
• Various Linux OS (refer to Installing the Unified Linux
Driver on page 32)
• Macintosh OS 10.3~10.4
• TCP/IP on Windows
• EtherTalk
• DHCP, BOOTP
3-2 Xerox Phaser 3200MFP
Page 61
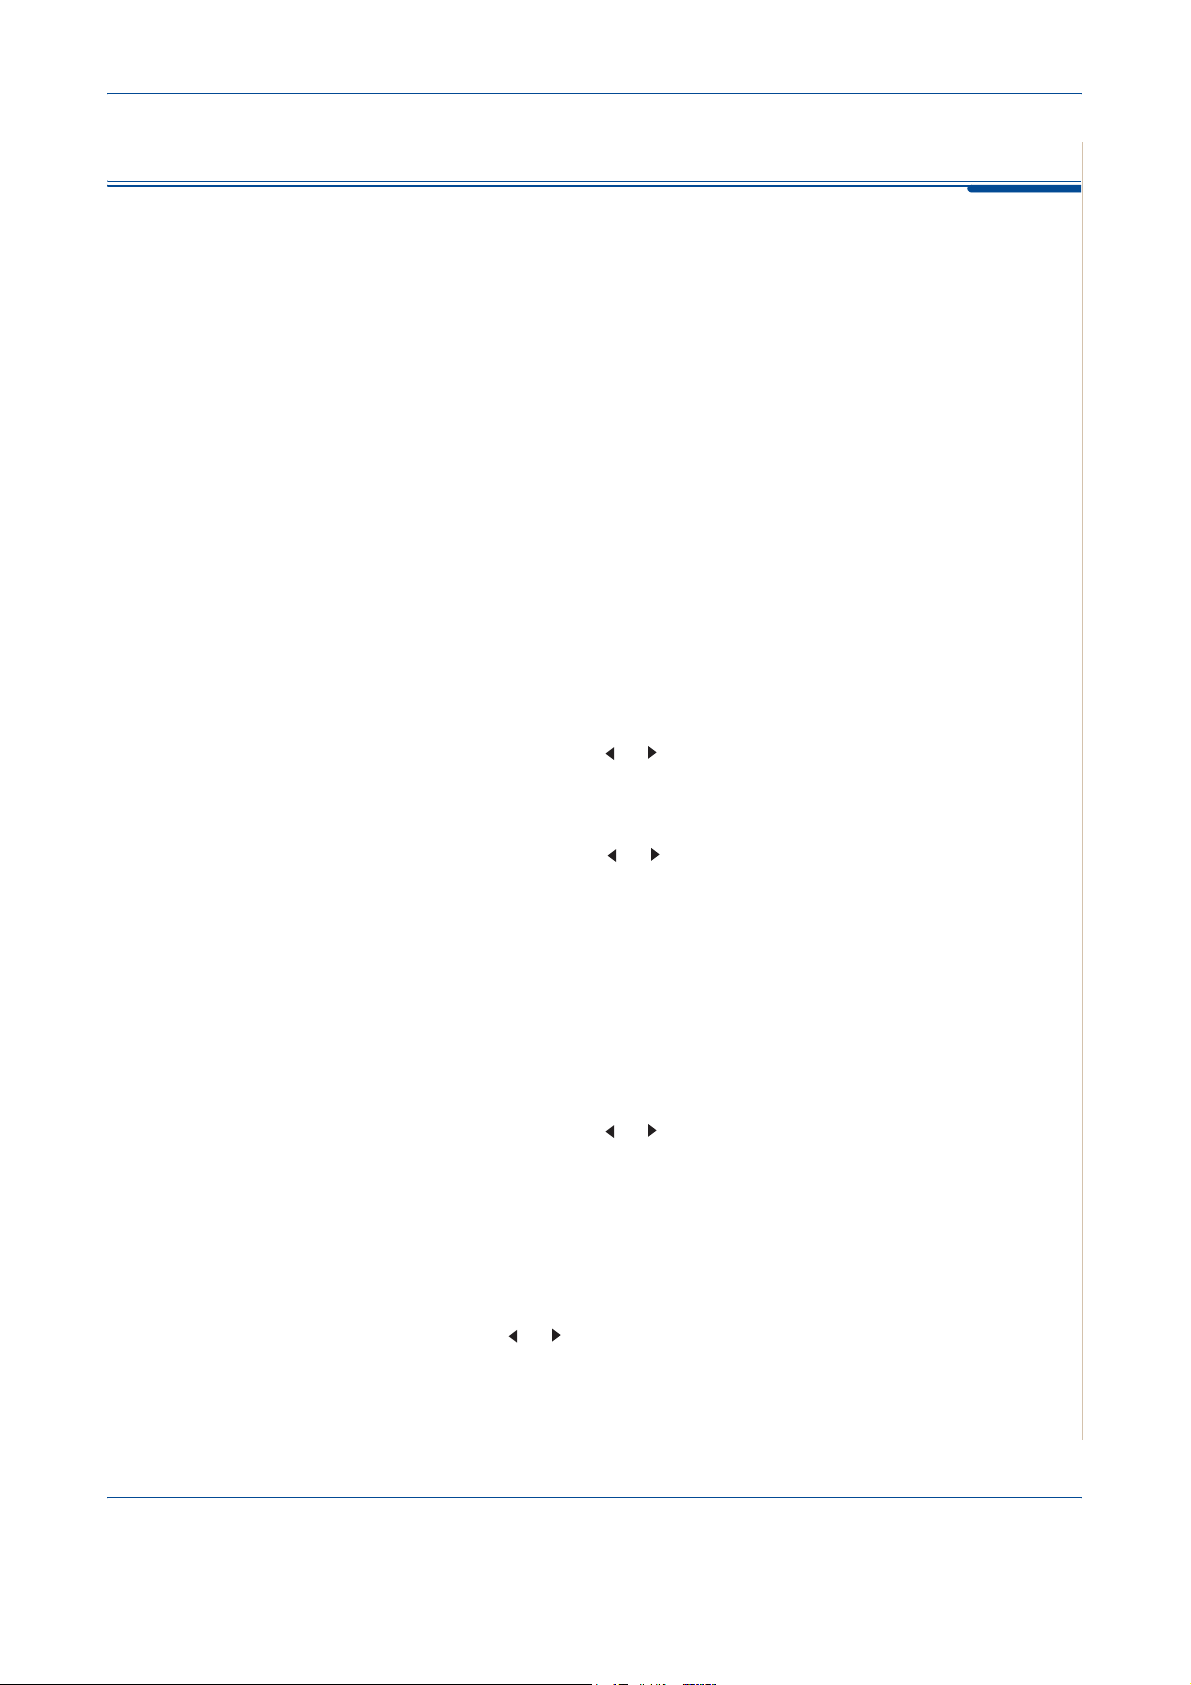
Configuring TCP/IP
Your machine can be set up with a variety of TCP/IP network information, such
as an IP address, a subnet mask, and a gateway. There are several ways in
which your machine can be assigned a TCP/IP address, depending on your
network.
• Dynamic addressing via BOOTP/DHCP (default): A TCP/IP address is
assigned automatically by the server.
• Static addressing: A TCP/IP address is assigned manually by the system
administrator.
NOTE: Before configuring TCP/IP, you need to set the network protocol to
TCP/IP.
Dynamic addressing (BOOTP/DHCP)
To have a TCP/IP address assigned automatically by the server, take the
following steps:
3 Network Setup
1. Press Menu until Network Setup appears on the top line of the display.
2. Press the scroll button ( or ) until "Config Network" appears and press
Enter.
3. Press Enter when "TCP/IP" appears.
4. Press the scroll button ( or ) until "DHCP" or "BOOTP" appears and
press Enter.
5. Press Stop/Clear to return to Standby mode.
Static addressing
To enter a TCP/IP address from your machine’s control panel, take the
following steps:
1. Press Menu until "Network Setup" appears on the top line of the display.
2. Press the scroll button ( or ) until "Config Network" appears and press
Enter.
3. Press Enter when "TCP/IP" appears.
4. Press Enter when "Manual" appears.
5. Press Enter when "IP Address" appears.
6. Enter a byte between 0 and 255 using the number keypad and press the
scroll button ( or ) to move between bytes.
7. Repeat this to complete the address from the 1st byte to the 4th byte.
8. When you have finished, press Enter.
Xerox Phaser 3200MFP 3-3
Page 62

3 Network Setup
Configuring EtherTalk
9. Repeat steps 6 and 7 to configure the other TCP/IP parameters: subnet
mask and gateway address.
10. Press Stop/Clear to return to Standby mode.
EtherTalk is AppleTalk used in an Ethernet network. This protocol is widely
used in Macintosh network environments. To use EtherTalk, take the following
steps:
1. Press Menu until "Network Setup" appears on the top line of the display.
2. Press the scroll button ( or ) until "Config Network" appears and press
Enter.
3. Press the scroll button ( or ) until "EtherTalk" appears and press
Enter.
4. Press the scroll button ( or ) until "On" appears and press Enter.
5. Press Stop/Clear to return to Standby mode.
Restoring the network configuration
You can return the network configuration to its default settings.
1. Press Menu until "Network Setup" appears on the top line of the display.
2. Press the scroll button ( or ) until "Set To Default" appears and press
Enter.
3. Press Enter when "Yes" appears to restore the network configuration.
4. Power the machine off and back on.
Printing a network configuration page
The network configuration page shows how the network interface on your
machine is configured.
1. Press Menu until "Network Setup" appears on the top line of the display.
2. Press the scroll button ( or ) until "Print Net CFG" appears and press
Enter.
3. Press Enter when "Yes" appears.
The network configuration page prints out.
Resetting the network interface
You can reset the embedded network interface when a network problem
occurs.
1. Press Menu until "Network Setup" appears on the top line of the display.
2. Press Enter when "Reset Network" appears.
3. The machine resets the network interface.
3-4 Xerox Phaser 3200MFP
Page 63

4 Paper Handling
4 Paper Handling
This chapter explains how to select print materials and load them into your
machine.
This chapter includes:
• Selecting Print Materials – page 4-2
• Loading Paper – page 4-5
• Copy Output Tray – page 4-6
Xerox Phaser 3200MFP 4-1
Page 64

4 Paper Handling
Selecting Print Materials
You can print on a variety of print materials, such as plain paper, envelopes,
labels, and transparencies. Always use print materials that meet the
guidelines for use with this machine. See Paper Specifications on page 11-9.
To get the best possible print quality, use only high-quality copier-grade paper.
When you choose print materials, consider the following:
• Size: See Supported Sizes of Paper on page 11-7 for paper size
specifications.
• Weight: 16 ~ 24 lb (60 to 90 g/m
pages, and 16 ~ 43 lb (60 to 165 g/m
when feeding a single page.
• Brightness: Some papers are whiter than others and produce sharper,
more vibrant images.
• Surface smoothness: The smoothness of the paper affects how crisp the
printing looks on the paper.
2
) for the tray when feeding multiple
2
) for the manual tray and the tray
CAUTION: Using print materials that do not conform to the
specifications listed on page 11-9 may cause problems that may require
service. This service is not covered by the warranty or service
agreements.
Paper Type, Input Sources, and Capacities
Input Tray/Capacity
Paper Type
Tray Manual Tray
Plain paper 250 1
Envelopes 1 1
Labels 1 1
Transparencies 1 1
Card stock 1 1
NOTE: If you experience excessive jamming, load one sheet at a time
through the tray or manual tray.
NOTE: Maximum capacity may differ depending on media weight, thickness,
and environmental conditions.
4-2 Xerox Phaser 3200MFP
Page 65

Guidelines for Paper and Special Materials
When selecting or loading paper, envelopes, or other special material, keep
these guidelines in mind:
• Always use paper and other materials that conform with the specifications
listed under Paper Specifications on page 11-9.
• Attempting to print on damp, curled, wrinkled, or torn paper can cause
paper jams and poor print quality.
• Use only high quality copier grade paper for the best print quality.
• Avoid paper with embossed lettering, perforations, or a texture that is too
smooth or too rough. Paper jams may occur.
• Store paper in its wrapper until you are ready to use it. Place cartons on
pallets or shelves, not on the floor. Do not place heavy objects on top of
the paper, whether it is packaged or unpackaged. Keep it away from
moisture, or other conditions that can cause it to wrinkle or curl.
• Store unused materials at temperatures between 59
and 30
o
C). The relative humidity should be between 10 % and 70 %.
4 Paper Handling
o
F to 86 oF (15 oC
• During storage, you should use a moisture-proof wrap, such as a plastic
container or bag, to prevent dust and moisture from contaminating your
paper.
• Load special paper types one sheet at a time through the manual tray or
the paper tray to avoid paper jams.
• Only use materials specifically recommended for use in laser printers.
• To prevent special materials, such as transparencies and label sheets
from sticking together, remove them as they print out.
• For envelopes:
– Use only well-constructed envelopes with sharp and well creased folds.
– Do not use envelopes with clasps and snaps.
– Do not use envelopes with windows, coated lining, self-adhesive seals,
or other synthetic materials.
– Do not use damaged or poorly made envelopes.
– Only use envelopes recommended for laser printers.
– Do not feed stamped envelopes.
• For transparencies:
– Place them on a flat surface after removing them from the machine.
– Do not leave a transparency in the tray for long periods of time. Dust and
dirt may accumulate, resulting in spotty printing.
– To avoid smudging caused by fingerprints, handle them carefully.
– To avoid fading, do not expose printed transparencies to prolonged
sunlight.
– Only use transparencies recommended for use in laser printers.
– Ensure that transparencies are not wrinkled, curled, or have any torn
edges.
Xerox Phaser 3200MFP 4-3
Page 66

4 Paper Handling
• For labels:
– Verify that their adhesive material can tolerate a fusing temperature of
o
392
F (200 oC) for 0.1 second.
– Make sure that there is no exposed adhesive material between them.
Exposed areas can cause labels to peel off during printing, which can
cause paper jams. Exposed adhesive can also cause damage to
machine components.
– Do not load a sheet of labels through the machine more than once. The
adhesive backing is designed for one pass through the machine.
– Do not use labels that are separating from the backing sheet or are
wrinkled, bubbled or otherwise damaged.
– Only use labels recommended for laser printers.
• For Card Stock or Custom-sized materials:
– Postcards, 3.5 x 5.8 in. (89 x 148 mm) cards and other custom-sized
materials can be printed with this printer. The minimum size is 3 x 5 in.
(76 x 127 mm) and the maximum size is 8.5 x 14 in. (216 x 356 mm)
– Always insert the short-edge into the tray first. If you want to print in
landscape mode, make this selection through your software. Inserting
paper long-edge first may cause a paper jam.
– Do not print on media smaller than 3 in. (76 mm) wide or 5 in. (127 mm)
long.
• For preprinted paper:
– Letterheads must be printed with heat-resistant ink that will not melt,
vaporize, or release hazardous emissions when subjected to the
printer’s fusing temperature of 392 °F (200 °C) for 0.1 second.
– Ink on letterheads must be non-flammable and should not adversely
affect any printer rollers.
– Forms and letterheads should be sealed in a moisture-proof wrapping to
prevent changes during storage.
– Before you load preprinted paper as forms and letterheads, verify that
the ink on the paper is dry. During the fusing process, wet ink can come
off preprinted paper.
• Do not use
Carbonless
paper and
Tracing
paper. Use of these types of
paper could result in chemical smells and could damage your machine.
4-4 Xerox Phaser 3200MFP
Page 67

Loading Paper
Proper paper loading helps prevent paper jams and ensure trouble-free
printing. Do not remove the paper in the tray while a job is printing. Doing so
may cause a paper jam. See Paper Type, Input Sources, and Capacities on
page 4-2 for acceptable paper size and capacity for the tray.
Using the Paper Tray
The paper tray holds 250 sheets of paper.
For details about loading paper in the tray, see Loading Paper on page 2-6.
To use the special material like envelope, label or card, remove the stack of
plain paper and load one sheet of special material into the tray.
Using the Manual Tray
When you print a document using your PC and want to check the print quality
after each page is printed, load the paper in the manual tray and select
Manual Feeder for Source from the print driver.
4 Paper Handling
1. Load the print material into the
tray. If there is a print side to the
paper it should be face up.
Push the print material firmly into
the manual tray.
2. Adjust the paper guide against
the print material without bending
the material.
3. Select Manual Feeder for
Source from the software
application, and then select the
correct paper size and type. For
details, see Printing a Document
on page 6-6.
4. Send the job to the printer.
5. On the machine the display shows “Add Paper & Press Start”. Press
Start on the machine to start feeding. Printing is started.
6. If you have multiple pages to be printed, the display shows “Add Paper &
Press Start” again. Load the next sheet and press Start.
Repeat this step for every page to be printed.
Xerox Phaser 3200MFP 4-5
Page 68

4 Paper Handling
NOTE:
• If you experience jams with card stock feeding, turn the paper over and try
again.
• Manually loading paper and pressing Start to start feeding is only
available with PC printing.
• Because the Manual Feed mode does not print jobs automatically and
continuously, incoming faxes are stored in memory instead of printing
immediately.
• When you press Stop/Clear in the Manual Feed mode, the print job in
progress is canceled.
Copy Output Tray
The machine has a paper output tray
that holds 100 sheets of 20lb (
75 g/m
2
paper. The output tray collects printed
paper face down, in the order in which
the sheets were printed.
NOTE: Pull the paper output
extension out so that the output does
not drop out of the tray.
)
Paper
output extension
4-6 Xerox Phaser 3200MFP
Page 69

5 Copying
5 Copying
This chapter gives you step-by-step instructions for copying documents.
This chapter includes:
NOTE: The machine defaults to Copy mode.
• Making Copies – page 5-2
• Selecting Copy Options – page 5-5
• Copy Setup – page 5-11
Xerox Phaser 3200MFP 5-1
Page 70

5 Copying
Making Copies
Loading Paper for Copying
The instructions for loading copy materials are the same whether you are
printing, faxing, or copying. For further details, see Loading Paper on page 2-6
NOTE: For copying, you can only use Letter, A4, Legal, Folio, Executive, B5,
A5, or A6 sized print materials.
Preparing a Document
You can use the document glass or the Automatic Document Feeder (ADF) to
load an original document for copying, scanning, and sending a fax. Using the
ADF, you can load up to 30 sheets (20 lb, 75 g/m
course, place only one sheet at a time on the document glass.
2
) for one job. You can, of
NOTE:
When you use the ADF:
• Do not load documents smaller than 5.6 x 5.8 inches (142 x 148 mm) or
• Do not attempt to feed the following types of documents:
• Remove all staples and paper clips before loading documents.
• Make sure any glue, ink, or correction fluid on the paper is completely dry
• Do not load documents that include different sizes or weights of paper.
• Do not load booklets, pamphlets, transparencies, or documents having
If you wish to copy any of the documents listed here, use the Document Glass.
Only letter, A4 sized print materials can be placed in the Document Glass.
larger than 8.5 x 14 inches (216 x 356 mm).
– carbon-paper or carbon-backed paper
– coated paper
– onion skin or thin paper
– wrinkled or creased paper
– curled or rolled paper
– torn paper
before loading documents.
other unusual characteristics.
5-2 Xerox Phaser 3200MFP
Page 71

Making Copies on the Document Glass
1. Lift and open the document cover.
2. Place the document face down
on the document glass and align it
at the top left corner of the glass.
NOTE:
5 Copying
• Make sure that no documents are
in the ADF (Automatic Document
Feeder). If a document is detected
in the ADF, the machine gives it
priority over the document on the
document glass.
• Only letter, A4 sized print materials
can be placed in the Document
Glass.
3. Close the document cover.
NOTE:
• Lower the document cover gently to avoid damage to the machine or
personal injury.
• If you leave the cover open while copying you may affect copy quality and
toner consumption.
• If you are copying a page from a book or magazine, leave the cover open.
4. Press the Copy button to enter the copy mode.
5. Select the copy settings including number of copies, copy size,
brightness, and original type, by using the control panel buttons. See
Selecting Copy Options on page 5-5.
To clear the settings, use the Stop/Clear button.
6. If necessary, you can use special copy features, such as Poster, Auto Fit,
Clone, and ID Card copying. See Special Copy Features on page 5-7
7. Press Start to begin copying. The display shows the copy processing.
Xerox Phaser 3200MFP 5-3
Page 72

5 Copying
NOTE:
• You can cancel the copy job during an operation. Press Stop/Clear, and
the copying will stop.
• Dust on the document glass may cause black spots on the printout.
Always keep it clean. See Cleaning the Scan Unit on page 9-5.
• To get the best scan quality, especially for colored or gray-scaled images,
use the document glass.
Making Copies from the Automatic Document Feeder
1. Load the document face up
into the ADF (Automatic
Document Feeder). You can
insert up to 30 sheets at a
time. Make sure that the
bottom of the document
stack matches the paper
size marked on the
document tray.
NOTE: Copies up to 8.5 x 14
can be made from the ADF
(Automatic Document Feeder)
2. Adjust the document guides
to the document size.
3. Select the copy settings
including number of copies,
copy size, brightness, and
original type, by using the
control panel buttons. See
Selecting Copy Options on
page 5-5.
4. To clear the settings, use
the Stop/Clear button.
5. If necessary, you can use
special copy features, such
as Collate and 2 or 4 Up
copying.
6. Press Start to begin copying.
The display shows the copy processing.
NOTE: Dust on the ADF glass may cause black lines on the printout. Always
keep the ADF glass clean. See Cleaning the Scan Unit on page 9-5.
5-4 Xerox Phaser 3200MFP
Page 73

Selecting Copy Options
Basic Copy Features
The buttons on the control panel let you select all basic copy options:
brightness, document type, copy size, and copy quantity. Set the following
options for the current copy job before pressing Start to make copies.
NOTE: If you press Stop/Clear while setting the copy options, all of the
options you have set for the current copy job will be canceled and returned to
their default status. The settings will automatically return to their default
status after the machine completes the copy job in progress.
Lighten/Darken
If you have an original document containing faint markings or dark images,
you can adjust the brightness to make a copy that is easier to read.
To adjust the brightness, press Lighten/Darken.
5 Copying
You can choose from the following contrast modes:
• Lighten: will make the copies lighter than the original document. This
works well with dark print.
• Normal: will make the copies look the same as the original document.
This works well with standard typed or printed documents.
• Darken: will make the copies darker than the original document. This
works well with light print or faint pencil markings.
Original Type
The Original Type setting is used to improve the copy quality by selecting the
document type for the current copy job.
To select the document type, press Original Type.
You can choose from the following image modes:
• Text: Use for documents containing mostly text.
• Photo & Text: Use for documents with mixed text and photographs.
• Photo: Use when the originals are photographs.
NOTE: When you copy a document containing color on the background,
such as a newspaper or a catalog, the background will appear on your copy.
If you want to reduce the background, change the Lighten/Darken setting to
Lighten and/or the Original Type setting to Text.
Xerox Phaser 3200MFP 5-5
Page 74

5 Copying
Reduce/Enlarge
Using the Reduce/Enlarge button will reduce or enlarge the size of a copied
image from 25% to 400% when you copying from the document glass or from
25% to 100% from the ADF.
To select from the predefined copy sizes:
1. Press Reduce/Enlarge.
The default setting appears on the bottom line of the display.
2. Press Reduce/Enlarge or the scroll buttons ( or ) to find the size
setting you want.
3. Press Enter to save the selection.
To fine-tune the size of copies:
1. Press Reduce/Enlarge.
2. Press Reduce/Enlarge or the scroll buttons ( or )
until “Custom:25-100%” or “Custom:25-400%” displays on the bottom
line. Press Enter.
3. Press the scroll button ( or ) until the copy size you want appears on
the display.
Pressing and holding the button allows you to quickly scroll to the number
you want.
You can also enter the value using the number keypad.
4. Press Enter to save the selection.
NOTE: When you make a reduced copy, black lines may appear at the
bottom of your copy.
Copy Quantity
You can select the number of copies from 1 to 99.
1. Press Menu on the control panel until “Copy Setup” appears on the top
line of the display.
The first menu item, “Default-Change”, appears on the bottom line.
2. Press Enter.
3. Press the scroll button ( or ) to access the menu item, "Copy
Quantity". It appears on the bottom line, then press Enter.
4. Press the number you want to enter on the display:
You can press and hold the button to quickly scroll the number you want
to enter.
You can also enter the value using the number keypad.
5. Press Enter to save the selection.
5-6 Xerox Phaser 3200MFP
Page 75

Special Copy Features
You can use the following copy features by pressing Favorite Copy button:
• Off: Prints in normal mode.
5 Copying
• Clone:
page. The number of images is automatically determined by the original image
and paper size. See Clone Copying on page 5-7.
• Copy Collate:
page document, one complete 3 page document will print followed by the
second complete document. See Collation Copying on page 5-8.
• Auto Fit: A
paper currently loaded in the machine. See Auto Fit Copying on page 5-8.
• ID Card Copy:
Copying on page 5-9.
•
2/4 Up
See 2 Up or 4 Up Copying on page 5-9.
• Poster: Prints an image onto 9 sheets of paper (3x3). You can paste the
printed pages together to make one poster-sized document. See Poster
Copying on page 5-10.
Prints multiple image copies from the original document on a single
Sorts the copy job. For example, if you make 2 copies of a 3
utomatically reduces or enlarges the original image to fit on the
Prints 2-sided ID cards on one sheet of paper. See ID Card
: Prints 2 or 4 original images reduced to fit onto one sheet of paper.
NOTE: Some features may not be available depending on where you loaded
the document, on the document glass or in the Automatic Document Feeder.
Clone Copying
This special copy feature can be applied only when you place a document on
the document glass. If a document is detected in the ADF, Clone copying
feature does not work.
1. Place the document to be copied on the document glass, and close the
cover.
2. Press Favorite Copy until “Clone” appears on the bottom line of the
display and press Enter.
3. If necessary, customize the copy settings, including Lighten/Darken and
original type, by using the control panel buttons. See “Selecting Copy
Options” on page 5-5.
4. Press Start to begin copying.
NOTE: You cannot adjust the copy size using the Reduce/Enlarge button
while making a clone copy.
Xerox Phaser 3200MFP 5-7
Page 76

5 Copying
1
2
3
Collation Copying
1
2
3
This special copy feature is available only when you load documents in the
ADF.
1. Load the documents to be copied in the ADF.
2. Press Favorite Copy until “Copy Collate” appears on the bottom line of
the display and press Enter.
3. If necessary, customize the copy settings, including Lighten/Darken and
original type, by using the control panel buttons. See “Selecting Copy
Options” on page 5-5.
4. Press Start to begin copying.
Auto Fit Copying
A
This special copy feature can be applied only when you place a document on
the document glass. If a document is detected in the ADF, Auto Fit copying
does not work.
1. Place the document to be copied on the document glass, and close the
cover.
2. Press Favorite Copy until “Auto Fit” appears on the bottom line of the
display and press Enter.
3. If necessary, customize the copy settings, including Lighten/Darken and
original type, by using the control panel buttons. See “Selecting Copy
Options” on page 5-5.
4. Press Start to begin copying.
NOTE: You cannot adjust the copy size using the Reduce/Enlarge button
while Auto Fit copying is enabled.
5-8 Xerox Phaser 3200MFP
Page 77
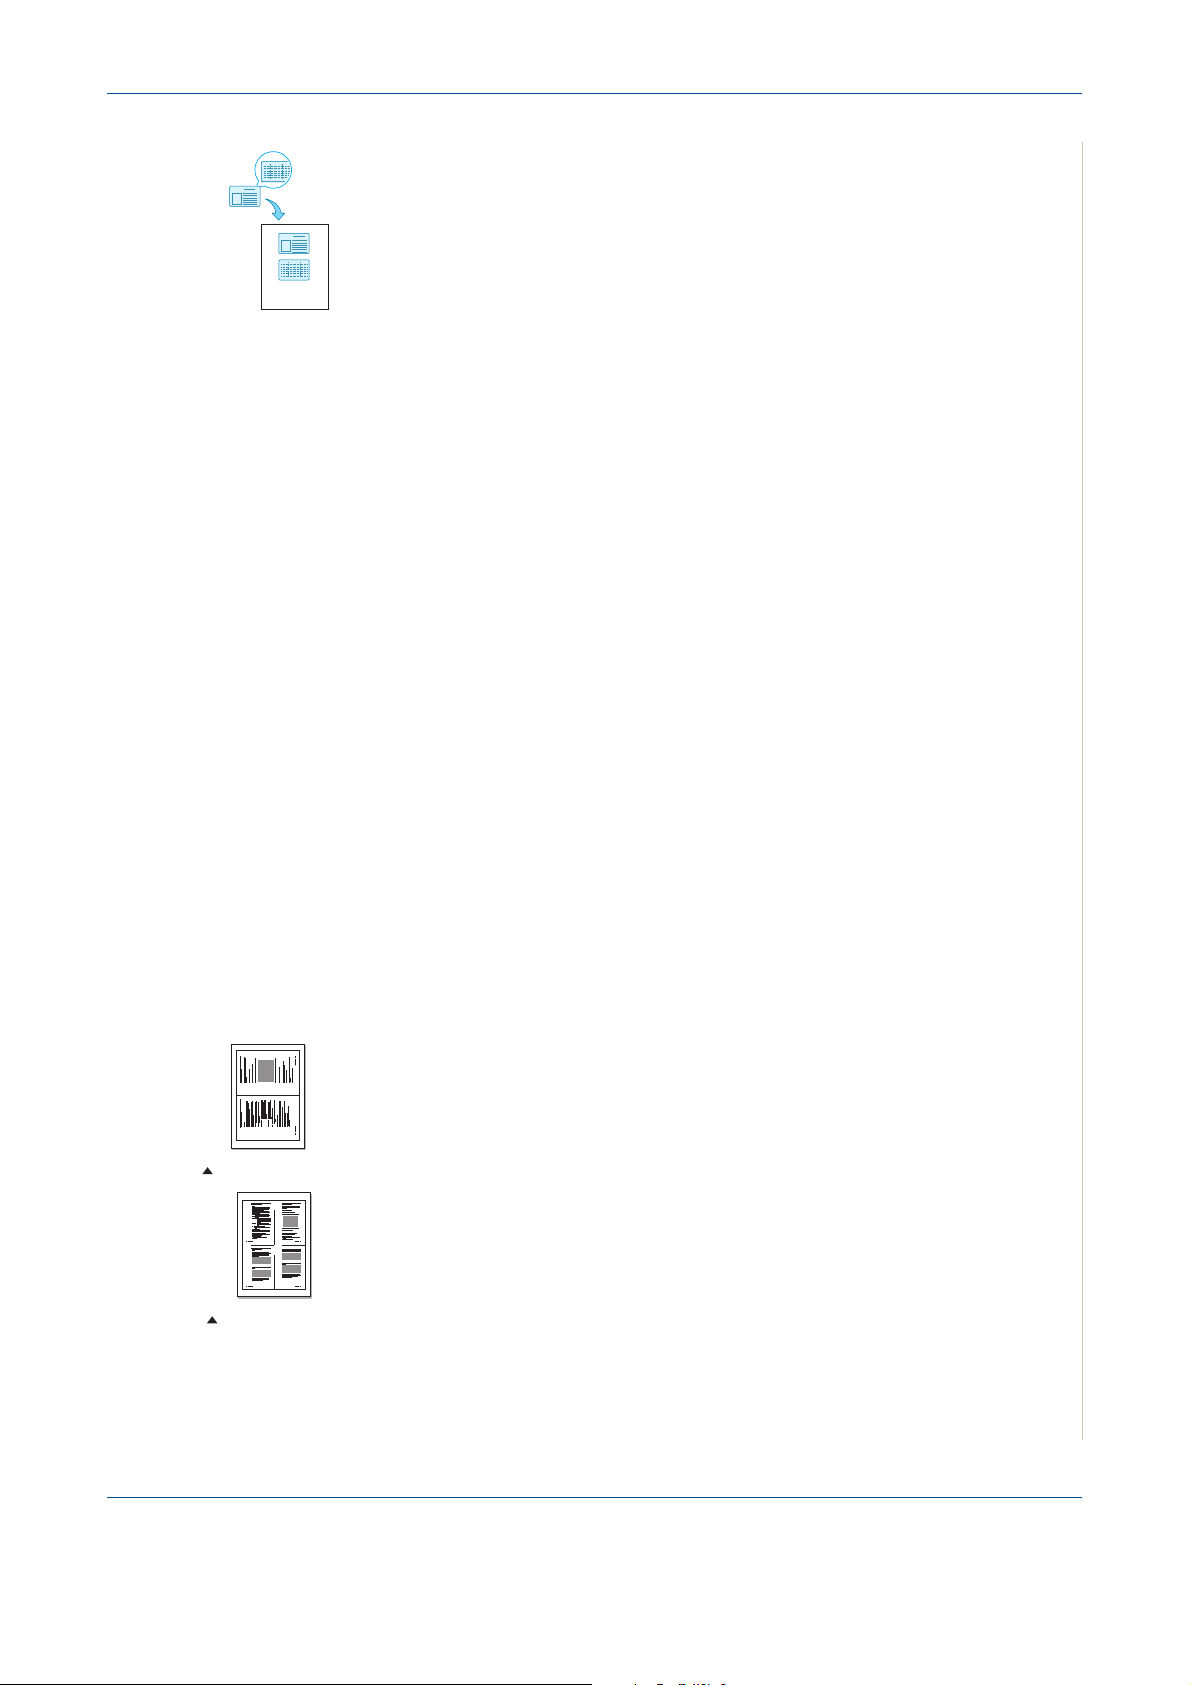
5 Copying
ID Card Copying
You can copy both sides of the ID Card to a single side of paper.
When you copy using this feature, the machine prints one side of the card on
the upper half of the paper and the other side on the lower half without
reducing the size of the original.
If the original is larger than the printable area, some portions may not be
printed.
This special copy feature can be applied only when you place a document on
the document glass. If a document is detected in the ADF, ID Card copying
feature does not work.
1. Place the ID Card to be copied on the document glass and close the
cover.
2. Press Favorite Copy until “ID Card Copy” appears on the bottom line of
the display and press Enter.
3. If necessary, customize the copy settings, including Lighten/Darken and
original type, by using the control panel buttons. See “Selecting Copy
Options” on page 5-5.
1 2
2-up copying
1 2
3 4
4-up copying
4. Press Start to begin copying.
Your machine begins scanning the front side.
5. When “Set Backside” displays on the bottom line, open the document
cover and turn the card over. Close the cover.
6. Press Start again.
NOTE: If you press the Stop/Clear button or if no buttons are pressed for
approximately 30 seconds, the machine cancels the copy job and returns to
Standby mode.
2 Up or 4 Up Copying
This copy feature is available only when you load documents in the ADF.
1. Load the documents to be copied in the ADF.
2. Press Favorite Copy until “2 UP” or “4 UP” appears on the bottom line of
the display and press Enter.
3. If necessary, customize the copy settings, including Lighten/Darken and
original type, by using the control panel buttons. See “Selecting Copy
Options” on page 5-5.
4. Press Start to begin copying.
NOTE: You cannot adjust the copy size using the Reduce/Enlarge button
for making a 2 or 4 Up copy.
Xerox Phaser 3200MFP 5-9
Page 78

5 Copying
Poster Copying
This special copy feature can be applied only when you place a document on
the document glass. If a document is detected in the ADF, the Poster copying
feature does not work.
1. Place the document to be copied on the document glass and close the
cover.
2. Press Favorite Copy until “Poster” appears on the bottom line of the
display and press Enter.
3. If necessary, customize the copy settings, including Lighten/Darken and
original type, by using the control panel buttons. See “Selecting Copy
Options” on page 5-5.
4. Press Start to begin copying.
Your original document is divided into 9 portions. Each
portion is scanned and printed one by one in the following
order:
NOTE: You cannot adjust the copy size using the Reduce/
Enlarge button when making a poster.
5-10 Xerox Phaser 3200MFP
Page 79
Copy Setup
Changing the Default Settings
5 Copying
The copy settings on the machine can be customized to suit your copying
requirements.
The copy options, including lighten/darken, original type, copy size and copy
quantity, can be set to the most frequently used modes. When you copy a
document, the default settings are used unless they are changed by using the
corresponding buttons on the control panel.
To c
reate your own default settings:
1.
Press
Menu
on the control panel until “Copy Setup” appears on the top line of the
display.
The first menu item, “Default-Change”, appears on the bottom line.
2.
Press
Enter
to access the menu item. The first setup option, “Lighten/Darken”,
appears on the bottom line.
3.
Press the scroll button ( or ) to scroll through the setup options.
4.
When the option you want to set appears, press
5.
Change the setting using the scroll button ( or ).
Values can be entered using the number keypad.
6.
Press
Enter
to save the selection.
7.
Repeat steps 3 through 6, as needed.
8.
To return to Standby mode, press
NOTE:
changed settings and restores their default status.
While you are setting copy options, pressing
Setting the Time Out Option
You can set th
after a selection has been made.
1.
Press
display.
2.
Press the scroll button ( or ) to display “Timeout” on the bottom line.
3.
Press
e time the machine waits before it restores the default copy settings
Menu
on the control panel until “Copy Setup” appears on the top line of the
Enter
to access the menu item.
Stop/Clear
Enter
.
Stop/Clear
to access the option.
cancels the
4.
Press the scroll button ( or ) until the status you want appears on the display.
You can select from 15, 30, 60, 120 and 180 (seconds). Selecting “Off” means that
the machine does not restore the default settings until you press
copying, or
5.
Press
6.
To return to Standby mode, press
Xerox Phaser 3200MFP 5-11
Stop/Clear
Enter
to make your selection.
to cancel.
Stop/Clear
.
Start
to begin
Page 80

5 Copying
5-12 Xerox Phaser 3200MFP
Page 81

6Printing
6 Printing
This chapter includes:
• Installing Printer Software in Windows – page 6-2
• Printing a Document – page 6-6
• Advanced Printing – page 6-16
• Sharing the Printer Locally – page 6-27
• Using Windows PostScript Driver (Phaser 3200MFP/N Only) – page 6-28
• Using Your Printer in Linux – page 6-32
• Using Your Machine with a Macintosh (Phaser 3200MFP/N only) – page 6-46
Xerox Phaser 3200MFP 6-1
Page 82

6Printing
Installing Printer Software in Windows
This chapter includes:
• Installing Printer Software – page 6-2
NOTE: For Windows 2000/XP(32/64bit)/2003(32/64bit)/Vista, the system
administrator should install the software.
Installing Printer Software
All applications should be closed on your PC before beginning installation.
Installing Xerox Drivers using the USB port
1. Plug the USB cable into the Printer and connect it to your Personal
Computer (PC). Start your PC and turn on the Printer.
2. Insert the Xerox Drivers CD into the CD-ROM drive.
If you use Windows Vista, when you are asked to allow the installation,
click Continue.
The CD-ROM should automatically run, and an installation window
appears.
If the installation window does not appear, click Start and then Run. Type
X:\Setup.exe, replacing "X" with the letter of your CD-ROM drive and
click OK.
If you use Windows Vista, click Start All Programs Accessories
Run, and type X:\Setup.exe
NOTE: If the "New Hardware Wizard" window appears during the installation
procedure, click
or click Cancel.
in the upper right corner of the box to close the window,
3. When the language selection window appears, select the appropriate
language and then click Next.
6-2 Xerox Phaser 3200MFP
Page 83

4. Choose the components you want to install and then click Next.
5. Click Next.
6. Click Finish. The driver installation is now complete.
6Printing
Installing Xerox Drivers using the Network
(Phaser
3200MFP/N only)
When you connect your printer to a network, you must first configure the TCP/
IP settings for the printer. See Configuring TCP/IP on page 3-3
After you have assigned and verified the TCP/IP settings, you are ready to
install the software on each computer on the network.
1. Make sure that the printer is connected to your network and powered on.
For details about connecting to the network, see Making Connections on
page 2-8
2. Insert the Xerox Drivers CD into the CD-ROM drive.
If you use Windows Vista, when you are asked to allow the installation,
click Next.
The CD-ROM should automatically run, and an installation window
appears.
If the installation window does not appear, click Start and then Run. Type
X:\Setup.exe, replacing "X" with the letter of your CD-ROM drive and
click OK.
If you use Windows Vista, click Start All Programs Accessories
Run, and type X:\Setup.exe
NOTE: If the "New Hardware Wizard" window appears during the installation
procedure, click
or click Cancel.
Xerox Phaser 3200MFP 6-3
in the upper right corner of the box to close the window,
Page 84

6Printing
3. When the language selection window appears, select the appropriate
language and then click Next.
4. Choose the components you want to install and then click Next.
5. Click Next.
Click Finish. The driver installation is now complete.
6-4 Xerox Phaser 3200MFP
Page 85

6Printing
Selecting the Xerox Network Printer Port
To print to the Xerox Network Printer port, you need to select it in the printer
driver.
1. From the Windows Start menu, selecting Settings and then Printer to
open the Printer folder.
In Windows XP(32/64bit)/2003(32/64bit), select Start and then Printers
and Faxes.
For Windows Vista, select Start Control Panel Hardware and
Sound Printers.
2. Right-click on the your printer name icon and select Properties from
the pop-up menu.
3. In Windows 98/Me, click the Details tab.
In Windows 2000/XP(32/64bit)/2003(32/64bit)/Vista, click the Ports tab.
4. Click Add Port.
5. In Windows 98/Me, click Other, and select Standard TCP/IP Port. Click
OK.
In Windows 2000/XP(32/64bit)/2003(32/64bit)/Vista, select Standard
TCP/IP Port and click New Port.
6. The Network Printer Port Wizard window appears. Select the method for
detecting the network interface card of your machine and enter the associated address, if necessary. Click Next.
You can find a print server by entering the printer’s IP address, MAC
address, or IPX/SPX address. To search through all of the interface cards
connected to the network, select Auto Detection on the network.
7. If you selected Auto Detection on the network, the system detects all of
the print servers and displays a list. Select your printer you want to use
then click Next.
8. Type a port name to identify the new printer and click Finish.
9. The selected port displays on the print port list. Click OK or Close.
10. You are finished. To send a job to the network printer, select the printer
from the application programme.
NOTE: The printer that has been installed will become the default printer.
Xerox Phaser 3200MFP 6-5
Page 86

6Printing
Printing a Document
This machine allows you to print in various Windows applications, a Macintosh
computer, or a Linux system. The exact steps for printing a document may
vary depending on the application you use.
Basic Printing
NOTE: Your printer driver Properties window that appears in this User
Guide may differ depending on the printer in use. However the composition of
the printer properties window is similar.
NOTE: Check the Operating System(s) that are compatible with your printer.
Please refer to the OS Compatibility section of Printer Specifications in your
Printer User Guide.
NOTE: If you need to know the exact name of your printer, you can check
the supplied CD-ROM.
The following procedure describes the general steps required for printing from
various Windows applications. The exact steps for printing a document may
vary depending on the application program you are using. Refer to the User
Guide of your software application for the exact printing procedure.
1. Open the document you want to print.
2. Select Print from the File menu. The Print window is displayed. It may
look slightly different depending on your application.
The basic print settings
are selected within the
Print window. These
settings include the
number of copies and
print range.
3. Select your printer
driver from the Name
drop-down list.
Make sure that
your printer is
selected.
6-6 Xerox Phaser 3200MFP
Page 87

4. To take advantage of the printer features provided by your printer driver,
click Properties or Preferences in the application’s Print window. For
details, see Printer Settings on page 6-7.
If you do not have Properties or Preferences, select either Setup,
Printer, or Options in your Print window. Then click Properties on the
next screen.
5. Click OK to close the printer properties window.
6. To start the print job, click OK or Print in the Print window.
Printer Settings
You can use the printer properties window, which allows you to access all of
the printer options you need when using your printer. When the printer
properties are displayed, you can review and change the settings needed for
your print job.
Your printer properties window may differ, depending on your operating
system. This User Guide shows the Properties window for Windows XP.
Your printer driver Properties window that appears in this User Guide may
differ depending on the printer in use.
If you access printer properties through the Printers folder, you can view
additional Windows-based tabs (refer to your Windows User Guide).
6Printing
NOTE: Most Windows applications will override settings you specify in the
printer driver. Change all print settings available in the software application
first, and change any remaining settings using the printer driver.
NOTE: The settings you change remain in effect only while you are using the
current program. To make your changes permanent, make them in the
Printers folder.
NOTE: The following procedure is for Windows XP. For other Windows OS,
refer to the corresponding Windows User's Guide or online help.
1. Click the Windows Start button.
2. Select Printers and Faxes.
3. Select your printer driver icon.
4. Right-click on the printer driver icon and select
Printing Preferences.
5. Change the settings on each tab, click OK.
Xerox Phaser 3200MFP 6-7
Page 88

6Printing
Layout Tab
The Layout tab provides
options to adjust how the
document appears on the
printed page. The Layout
Options includes Multiple
Pages per Side and Poster
Printing. See Basic Printing
on page 6-6 for more
information on accessing
printer properties.
Paper Orientation
1
1
2
Paper Orientation
allows you
to select the direction in
which information is printed
on a page.
Portrait prints across the width of the page, letter style.
Landscape prints across the length of the page, spreadsheet style.
Rotate allows you to rotate the page
the selected degrees.
2
Layout Options allows you to select
advanced printing options. You can
Portrait
Landscape
choose Multiple Pages per Side and
Poster Printing.
For details, see
Printing Multiple Pages on One Sheet of Paper (N-Up Printing)
on page 6-16.
For details, see
Printing Posters on page 6-17.
6-8 Xerox Phaser 3200MFP
Page 89

6Printing
Paper Tab
Use the following options to set the basic paper handling specifications when
you access the printer properties. See Basic Printing on page 6-6 for more
information on accessing printer properties.
Click the Paper tab to access various paper properties.
1
2
3
4
5
Copies
1
Copies
allows you to choose the number of copies to be printed. You can
select 1 to 999 copies.
Size
2
Size allows you to set the size of paper you loaded in the tray.If the required
size is not listed in the Size box, click Custom. When the Custom Paper
Setting window appears, set the paper size and click OK. The setting appears
in the list so that you can select it.
Enter the custom name
you want to use.
Enter the paper size.
Xerox Phaser 3200MFP 6-9
Page 90

6Printing
Source
3
Make sure that Source is set to the corresponding paper tray.
Use the Manual Feeder
source when printing to special material. You need to
load one sheet at a time into the manual tray.
If the paper source is set to Auto Selection, the machine automatically picks
up print material in the following order: the manual tray and the paper tray.
Layout Type
4
Make sure that Type is set to Printer Default. If you load a different type of
print material, select the corresponding paper type. If you use cotton paper,
set the paper type to Thick Paper for best printing. To use recycled paper,
with weighs from 20lb to 24lb (75~90g/m
2
), or colored paper, select Color
Paper.
Scaling Printing
5
Scaling Printing
allows you to automatically or manually scale your print job
on a page. You can choose from None, Reduce/Enlarge, and Fit to Page.
For details, see
•
For details, see
•
Printing a Reduced or Enlarged Document on page 6-18.
Fitting Your Document to a Selected Paper Size on
page 6-19.
6-10 Xerox Phaser 3200MFP
Page 91

6Printing
Graphics Tab
Use the following Graphic options to adjust the print quality for your specific
printing needs. See Basic Printing on page 6-6 for more information on
accessing printer properties.
Click the Graphics tab to display the properties shown below.
Resolution
1
The Resolution options you
can select may vary
depending on your printer
model. The higher the setting,
the sharper the clarity of
printed characters and
graphics. The higher setting
also may increase the time it
takes to print a document.
Toner Save Mode
2
Image Mode
The available options are
Normal and Text Enhancement.
Printer Setting: This setting is for normal documents.
1
2
3
4
Normal: This setting is for bolder line widths or darker gray-scale images.
Text Enhancement: This setting is for finer line width, higher definition in
graphics, and lighter gray-scale images.
3
Toner Save Mode
Selecting this option extends the life of your print cartridge and reduces your
cost per page without a significant reduction in print quality.
Printer Setting: If you select this option, this feature is determined by the
setting you’ve made on the control panel of the printer.
On: Select this option to allow the printer to use less toner on each page.
Off: If you don’t need to save toner when printing a document, select this
option.
Xerox Phaser 3200MFP 6-11
Page 92

6Printing
Advanced Options
4
You can set advanced settings by
clicking the Advanced Options button.
TrueType Options: This option
determines what the driver tells the
printer about how to image the text in
your document. Select the appropriate
setting according to the status of your
document. This option is available only
when you use Windows 9x.
Download as Outline
: When this option is
selected, the driver will download any TrueType fonts that are used in your document
not already stored (resident) on your printer. If, after printing a document, you find that
the fonts did not print correctly, choose Download as bit image and resubmit your print
job. The Download as bit image setting is often useful when printing Adobe.
This
feature is available only when you use the PCL printer driver.
Download as Bitmap: When this option is selected, the driver will download
the font data as bitmap images. Documents with complicated fonts, such as
Korean or Chinese, or various other fonts, will print faster in this setting.
Print as Graphics:
When this option is selected, the driver will download any
fonts as graphics. When printing documents with high graphic content and
relatively few TrueType fonts, printing performance (speed) may be enhanced
in this setting.
Print All Text Black: When the
Print All Text Black
option is selected, all text
in your document prints solid black, regardless of the color it appears on the
screen.
6-12 Xerox Phaser 3200MFP
Page 93

6Printing
Extras Tab
You can select output options for your document. See Basic Printing on
page 6-6 for more information about accessing the printer properties.
Click the Extras tab to access the following feature:
1
2
3
Watermark
1
You can create a background text image to be printed on each page of your
document.
For details, see
Using Watermarks on page 6-20
Overlay
2
Overlays are often used to take the place of preprinted forms and letterhead
paper.
For details, see
Using Overlays on page 6-23
Output Options
3
Print Sebset: You can set the sequence in which the pages print. Select the
print order from the drop-down list.
Normal (1,2,3): Your printer prints all pages from the first page to the last
page.
Reverse All Pages (3,2,1): Your printer prints all pages from the last page to
the first page.
Print Odd Pages: Your printer prints only the odd numbered pages of the
document.
Print Even Pages: Your printer prints only the even numbered pages of the
document.
Xerox Phaser 3200MFP 6-13
Page 94

6Printing
Use Printer Fonts
are stored in its memory (resident fonts) to print your document, rather than
downloading the fonts used in your document. Because downloading fonts takes time,
selecting this option can speed up your printing time. When using Printer fonts, the
printer will try to match the fonts used in your document to those stored in its memory.
If, however, you use fonts in your document that are very different from those resident
in the printer, your printed output will appear very different from what it looks like on the
screen.
This feature is available only when you use the PCL printer driver.
: When Use Printer Fonts is checked, the printer uses the fonts that
About Tab
Use the About tab to display the copyright notice and the version number of
the driver. If you have an Internet browser, you can connect to the Internet by
clicking on the web site icon. See Basic Printing on page 6-6 for more
information about accessing printer properties.
Using a Favorite Setting
The Favorites option, which is visible on each properties tab, allows you to
save the current properties settings for future use.
To save a Favorites item:
1. Change the settings as needed on each tab.
2. Enter a name for
the item in the
Favorites input
box.
3. Click Save.
When you save
Favorites, all
current driver
settings are saved.
To use a saved setting,
select the item from the
Favorites drop down
list. The printer is now
set to print according to
the Favorites setting
you selected.
To delete a Favorites item, select it from the list and click Delete.
You can also restore the printer driver’s default settings by selecting Printer
Default from the list.
Using Help
Your printer has a help screen that can be activated by clicking the Help
button in the printer properties window. These help screens give detailed
information about the printer features provided by the printer driver.
You can also click from the upper right corner of the window, and then click
on any setting.
6-14 Xerox Phaser 3200MFP
Page 95

Canceling a Print Job
If the print job is waiting in a print queue or print spooler, such as the Printer
group in Windows, delete the job as follows:
1. Click the Windows Start button.
2. For Windows 98/Me/2000, select Settings and then Printers.
For Windows XP(32/64bit)/2003(32/64bit), select Printers and Faxes.
For Windows Vista, select Control Panel Hardware and Sound
Printers.
3. Double-click the printer driver for this printer.
4. From the Document menu, select Cancel Printing (Windows 98/Me) or
Cancel (Windows 2000/XP(32/64bit)/2003(32/64bit)/Vista).
NOTE: You can also access this window by simply double-clicking the
printer icon at the bottom right corner of the Windows desktop.
6Printing
You can also cancel the current job by pressing the Stop/Clear button on the
control panel of your printer.
Xerox Phaser 3200MFP 6-15
Page 96

6Printing
Advanced Printing
This section explains printing options and advanced printing tasks.
NOTE: Your printer driver Properties window that appears in this User
Guide may differ depending on the printer in use. However the composition of
the printer properties window is similar.
NOTE: If you need to know the exact name of your printer, you can check
the supplied CD-ROM.
Printing Multiple Pages on One Sheet of Paper (N-Up
Printing)
1 2
3 4
You can select the number of pages to print on a single sheet of paper. To print
more than one page per sheet, the pages will be reduced in size and arranged
in the order you specify. You can print up to 16 pages on one sheet.
1. To change the print settings from your software application, access
printer properties. See Basic Printing on page 6-6
2. From the Layout tab, choose Multiple Pages per Side in the Layout
Type drop-down list.
3. Select the number of pages you want to print per sheet
(1, 2, 4, 6, 9, or 16) in the Pages per Side drop-down list.
6-16 Xerox Phaser 3200MFP
Page 97

6Printing
4. If necessary, select the page order from the Pages Order drop-down list.
Select Print Page Border to print a border around each page on the
sheet.
5. Click the Paper tab, select the paper source, size, and type.
6. Click OK and print the document.
Printing Posters
This feature allows you to print a single-page document onto 4, 9, or 16 sheets
of paper, for the purpose of pasting the sheets together to form one postersize document.
1. To change the print settings from your software application, access
printer properties. See Basic Printing on page 6-6.
2. Click the Layout tab, select Poster Printing in the Layout Type drop-
down list.
Xerox Phaser 3200MFP 6-17
Page 98

6Printing
3. Configure the poster option:
can select the page layout from
the output will be automatically stretched to cover 4 physical pages. If the
option is set to Custom, you can enlarge the original from 150% to 400%.
Depending on the level of the enlargement, the page layout is automatically
adjusted to
Specify an overlap in millimeters or inches to make it easier to paste the
sheets together.
2x2, 3x3, 4x4
.
2x2
2x2, 3x3, 4x4
3x3
0.15 inches
or
Custom
. If you select
0.15 inches
2x2
,
4. Click the Paper tab, select the paper source, size, and type.
5. Click OK and print the document. You can complete the poster by pasting
the sheets together.
Printing a Reduced or Enlarged Document
You can change the size of a page’s content to appear larger or smaller on the
printed page.
1. To change the print settings from your software application, access
printer properties. See Basic Printing on page 6-6.
2. From the Paper tab, select Reduce/Enlarge in the Printing Type drop-
down list.
6-18 Xerox Phaser 3200MFP
Page 99

3. Enter the scaling rate in the Percentage input box.
You can also click the or button.
6Printing
4. Select the paper source, size and type in the Paper Options section.
5. Click OK and print the document.
Fitting Your Document to a Selected Paper Size
This printer feature allows you to scale your print job to any selected paper
A
size regardless of the digital document size. This can be useful when you want
to check fine details on a small document.
1. To change the print settings from your software application, access
printer properties. See Basic Printing on page 6-6.
2. From the Paper tab, select Fit to Page in the Printing Type drop-down
list.
Xerox Phaser 3200MFP 6-19
Page 100

6Printing
3. Select the correct size from the Output size drop-down list.
4. Select the paper source, size, and type in Paper Options.
5. Click OK and print the document.
Using Watermarks
The Watermark option allows you to print text over an existing document.
There are several predefined watermarks that come with the printer, and they
can be modified, or you can add new ones to the list. See Creating a
Watermark on page 6-21.
Using an Existing Watermark
1. To change the print settings from your software application, access
printer properties. See Basic Printing on page 6-6.
6-20 Xerox Phaser 3200MFP
 Loading...