

Page 1
P H A S E R® 2 1 3 5
COLOR PRINTER
Advanced Features
and Troubleshooting Guide
Page 2

Phaser® 2135 Color Printer Advanced Features and Troubleshooting Manual
March 2001
Page 3

Copyright © Xerox Corporation. Unpublished rights reserved under the copyright laws of
the United States. Contents of this publication may not be reproduced in any form without
permission of Xerox Corporation.
®
Phaser
DocuPrint
, PhaserShare®, ColorStix®, the TekColor® icon, Made For Each Other®,
®
, WorkSet®, Ethernet®, the stylized X, and XEROX® are registered trademarks
of Xerox Corporation. PhaserLink™, PhaserPort™, PhaserPrint™, PhaserSym™,
PhaserTools™, InfoSMART™, and the TekColor™ name are trademarks of Xerox
Corporation. TekColor Care
SM
and RealSUPPORTSM are service marks of Xerox
Corporation.
®
Adobe
PostScript
, Acrobat®, Acrobat® Reader, Illustrator®, PageMaker®, Photoshop®, and
®
, ATM®, Adobe Garamond®, Birch®, Carta®, Mythos®, Quake®, and Tekton®
are registered trademarks and Adobe Jenson™, Adobe Brilliant Screens™ technology, and
IntelliSelect™ are trademarks of Adobe Systems Incorporated or its subsidiaries which
may be registered in certain jurisdictions.
®
Apple
Apple Chancery
, LaserWriter®, LocalTalk®, Macintosh®, Mac® OS, AppleTalk®, TrueType2®,
®
, Chicago®, Geneva®, Monaco®, and New York® are registered
trademarks, and QuickDraw™ is a trademark of Apple Computer Incorporated.
Marigold™ and Oxford™ are trademarks of AlphaOmega Typography.
Avery™ is a trademark of Avery Dennison Corporation.
®
FTP
Software is a registered trademark of FTP Software, Incorporated.
®
PCL
and HP-GL® are registered trademarks of Hewlett-Packard Corporation.
Hoefler Text was designed by the Hoefler Type Foundry.
ITC Avant Guard Gothic
Symbol
®
, ITC Zapf Chancery®, and ITC Zapf Dingbats® are registered trademarks of
®
, ITC Bookman®, ITC Lubalin Graph®, ITC Mona Lisa®, ITC
International Typeface Corporation.
Bernhard Modern™, Clarendon™, Coronet™, Helvetica™, New Century Schoolbook™,
Optima™, Palatino™, Stempel Garamond™, Times™, and Univers™ are trademarks of
Linotype-Hell AG and/or its subsidiaries.
MS-DOS
Wingdings™ in TrueType
®
and Windows® are registered trademarks of Microsoft Corporation.
®
format is a product of Microsoft Corporation. WingDings is a
trademark of Microsoft Corporation and TrueType is a registered trademark of Apple
Computer, Inc.
Albertus™, Arial™, Gill Sans™, Joanna™, and Times New Roman™ are trademarks of
Monotype Corporation.
Antique Olive
®
is a registered trademark of M. Olive.
Eurostile™ is a trademark of Nebiolo.
Novell
Sun
trademarks of Sun Microsystems, Incorporated.SPARC
®
and NetWare® are registered trademarks of Novell, Incorporated.
®
, Sun Microsystems®, and Sun Microsystems Computer Corporation® are registered
®
is a registered trademark of
SPARC International, Incorporated. SPARCstation™ is a trademark of SPARC
International, Incorporated, licensed exclusively to Sun Microsystems, Incorporated.
®
UNIX
is a registered trademark in the US and other countries, licensed exclusively
through X/Open Company Limited.
Other marks are trademarks or registered trademarks of the companies with which they are
associated.
Phaser 2135 Color Printer
Page 4

®
PANTONE
Colors generated by the Phaser 850 Color Printer are four- and/or three-color
process simulations and may not match PANTONE-identified solid color standards. Use
current PANTONE Color Reference Manuals for accurate colors.
PANTONE Color simulations are only obtainable on this product when driven by qualified
Pantone-licensed software packages. Contact Pantone, Inc. for a current list of qualified
licensees.
All trademarks noted herein are either the property of Xerox Corporation, Pantone, Inc., or
their respective companies.
© Pantone, Inc., 1988.
Advanced Features and Troubleshooting Manual
Page 5

Warranty
Printer Warranty
Xerox warrants that the Phaser 2135 Printer will be free from defects in materials and
workmanship for a period of one (1) year from the date of shipment. If the product proves
defective during the warranty period, Xerox, at its option, will:
(1) repair the product by means of telephone support or on-site service at no charge for
parts or labor,
(2) replace the product with a comparable product, or
(3) refund the amount paid for the product, less a reasonable allowance for usage, upon its
return.
Under this product warranty, Customer must notify Xerox or its authorized service
representative of the defect before the expiration of the warranty period. To obtain service
under this warranty, the Customer must first contact Xerox Telephone Support personnel
or that of its authorized service representative. Telephone Support personnel will work to
resolve issues professionally and quickly, however the Customer must reasonably assist
Xerox or its authorized representative.
If telephone support is unsuccessful, Xerox or its authorized service representative will
provide warranty repair at Customer's site without charge as provided below.
Service is available within the customary on-site service area in the United States and
Canada for products purchased in the United States and Canada.
Inside the European Economic Area, service is available within the customary on-site
service area for products purchased in the EEA
Outside the US, Canada, & EEA, service is available within the customary on-site service
area in the country of purchase
A description of the customary on-site service area may be obtained from the local Xerox
Customer Support Center or authorized Xerox distributor. On-site service is at Xerox or its
authorized service representative’s sole discretion and is considered an option of last
resort.
If the Customer’s product contains features that enable Xerox or its authorized service
representative to diagnose and repair problems with the product remotely, Xerox may
request that Customer allow such remote access to the product.
In the maintenance of the product, Xerox may use new or equivalent to new parts or
assemblies for equal or improved quality. All defective parts and assemblies become the
property of Xerox. Xerox, at its option, may request the return of these parts.
Phaser 2135 Color Printer
Page 6

Consumables Warranty
Xerox warrants that toner cartridges will be free from defects in materials and
workmanship for a period of one (1) year from date of installation. All other Customer
Replaceable Consumables (CRCs) will be covered for a period of ninety (90) days (six (6)
months where longer periods are required by law) from the date of installation, but not
more than one (1) year from date of shipment. Under this warranty, the Customer must
notify Xerox or its authorized service representative of the defect before the expiration of
the warranty period. XEROX MAY REQUIRE THAT THE DEFECTIVE CRC BE RETURNED
TO A DESIGNATED XEROX DEPOT OR THE XEROX REPRESENTATIVE FROM WHICH
THE CRC WAS ORIGINALLY PURCHASED. Claims will be handled according to the
current Xerox procedure.
These warranties shall not apply to any defect, failure or damage caused by improper use
or improper or inadequate maintenance and care. Xerox shall not be obligated under these
warranties:
a) to repair damage resulting from attempts by personnel other than Xerox representatives
to install, repair or service the product unless directed by a Xerox representative;
b) to repair damage, malfunction, or degradation of performance resulting from improper
use or connection to incompatible equipment or memory;
c) to repair damage, malfunction, or degradation of performance caused by the use of
non-Tektronix/Xerox printer supplies or consumables or the use of Tektronix/Xerox
supplies not specified for use with this printer;
d) to repair a product or CRC that has been modified or integrated with other products
when the effect of such modification or integration increases the time or difficulty of
servicing the product or CRC;
e) to perform user maintenance or cleaning or to repair damage, malfunction, or
degradation of performance resulting from failure to perform user maintenance and
cleaning as prescribed in published product materials;
f) to repair damage, malfunction, or degradation of performance resulting from use of the
product in an environment not meeting the operating specifications set forth in the user
manual;
g) to repair this product after the limit of its duty cycle has been reached; all service
thereafter shall be billed on a time and material basis;
h) to replace CRCs that have been refilled, are used up, abused, misused, or tampered with
in any way.
THE ABOVE WARRANTIES ARE GIVEN BY XEROX WITH RESPECT TO THIS PRODUCT
AND ITS CUSTOMER REPLACEABLE CONSUMABLES IN LIEU OF ANY OTHER
WARRANTIES, EXPRESS OR IMPLIED. XEROX AND ITS VENDORS DISCLAIM ANY
IMPLIED WARRANTIES OF MERCHANTABILITY OR FITNESS FOR A PARTICULAR
PURPOSE OR ANY SIMILAR STANDARD IMPOSED BY APPLICABLE LEGISLATION.
XEROX' RESPONSIBILITY TO REPAIR, REPLACE, OR OFFER A REFUND FOR
DEFECTIVE PRODUCTS AND CUSTOMER REPLACEABLE CONSUMABLES IS THE
SOLE AND EXCLUSIVE REMEDY PROVIDED TO THE CUSTOMER FOR BREACH OF
THESE WARRANTIES. XEROX AND ITS VENDORS WILL NOT BE LIABLE FOR ANY
INDIRECT, SPECIAL, INCIDENTAL OR CONSEQUENTIAL DAMAGES (INCLUDING
LOSS OF PROFITS) IRRESPECTIVE OF WHETHER XEROX OR THE VENDOR HAS
ADVANCE NOTICE OF THE POSSIBILITY OF SUCH DAMAGES.
Advanced Features and Troubleshooting Manual
Page 7

For the software warranty please see the end user license agreement included with the
software.
If you are an Australian consumer, you should be aware that the Trade Practices Act 1974
and equivalent State and Territory legislation (collectively "the Acts") contain special
provisions designed to protect Australian consumers. Nothing in any Fuji Xerox warranty
material excludes or limits the application of any provision of any of the Acts, where to do
so would contravene the Acts or cause any part of this warranty to be void. In this
warranty material, an implied condition or warranty, the exclusion of which from a
contract with a "Consumer" (as defined in the Acts) would contravene any provision of the
Acts or cause any part or all of this warranty to be void, is called a "Non-excludable
Condition". To the full extent permitted by law, Fuji Xerox’s sole and total liability to the
customer for a breach of any Non-excludable Condition (including for any consequential
loss suffered by the customer) is limited, except as otherwise stated herein, to (at Fuji
Xerox’ option) replacing or repairing the goods, or resupplying, or paying the cost of the
resupply of, the services, in respect of which the breach occurred. Subject to the above, all
conditions and warranties which would or might otherwise be implied in a Consumer
contract, whether by operation of statute, inference from circumstances, industry practice
or otherwise, are excluded.
Phaser 2135 Color Printer
Page 8

User safety summary
Your printer and the recommended consumable supplies have been designed and tested to meet strict safety
requirements. Attention to the following notes will ensure the continued safe operation of your printer.
Electrical Safety
■
Use the power cord supplied with your printer.
■
Do not use a ground adapter plug to connect the printer to a power source receptacle that lacks a ground
connection terminal.
Plug the power cord directly into a properly grounded electrical outlet. Do not use an extension cord. If you
■
do not know whether an outlet is grounded, ask an electrician to check the outlet.
Warning
Avoid the potential of severe electrical shock by ensuring the printer is properly grounded.
Do not place the printer where people may step on the power cord.
■
Do not place objects on the power cord.
■
Do not obstruct the ventilation openings. These openings are provided to prevent overheating of the
■
printer.
Warning
Do not push objects into slots and openings on the printer. Making a contact
shorting out a part could result in fire or electrical shock.
If you notice unusual noises or odors, switch off the printer power immediately. Disconnect the power cord
■
from the electrical outlet. Call an authorized service representative to correct the problem.
The power cord is attached to the printer as a plug-in device at the back of the printer. In the event it is
■
necessary to remove all electrical power from the printer, disconnect the power cord from the power
receptacle.
If any of the following conditions occur, switch off the printer power immediately, disconnect the power
■
cord, and call an authorized service representative.
The power cord is damaged or frayed.
■
Liquid is spilled into the printer.
■
The printer is exposed to water.
■
Any part of the printer is damaged.
■
with a voltage point or
Maintenance Safety
Do not attempt any maintenance procedure that is not specifically described in the documentation
■
supplied with your printer.
Do not use aerosol cleaners. The use of supplies that are not approved may cause poor performance and
■
could create a dangerous condition.
Do not remove the covers or guards that are fastened with screws unless you are installing optional
■
equipment and are specifically instructed to do so. Power should be OFF when performing these
installations. Except for user installable options, there are no parts that you can maintain or service behind
these covers.
Operational Safety
Your printer and supplies were designed and tested to meet strict safety requirements. These include safety
agency examination, approval, and compliance with established environmental standards.
Your attention to the following safety guidelines will help to ensure the continued safe operation of your printer.
Use the material and supplies specifically designed for your printer. The use of unsuitable materials may
■
result in poor performance and possibly a hazardous situation.
Follow all warnings and instructions marked on, or supplied with, the printer, options and supplies.
■
Page 9
Place the printer in a dust free area where the temperature range is 50 degrees F to 90 degrees F (10 degrees
■
C to 32 degrees C) and the relative humidity is 10 percent to 85 percent.
Place the printer in an area where there is adequate space for ventilation, operation and servicing. The
■
recommended minimal spacing is 100 cm (39 in.) in front of the printer, 70 cm (28 in.) above the printer,
20 cm (8 in.) behind the printer, and 60 cm (24 in.) on each side of the printer. Do not block or cover the
slots and openings on the printer. Without adequate ventilation, the printer may overheat.
■
For optimum performance, use the printer at elevations below 2,000 meters (6,560 ft.). Performance may
diminish at elevations between 2,000 meters (6,560 ft.) and 3,000 meters (9,840 ft.). Use at elevations above
3,000 meters (9,840 ft.) exceeds operability limits.
Do not place the printer near a heat source.
■
Do not place the printer in direct sunlight.
■
Do not place the printer in line with the cold air flow from an air conditioning system.
■
■
Place the printer on a level, solid surface with adequate strength for the weight of the machine. The base
printer weight without any packaging materials is 68 kg (149 pounds).
The printer is heavy, and must be lifted by three people. The illustration below shows the proper technique
■
for lifting the printer.
68 kg
149 lbs.
0748-01
Follow the recommended procedure when moving the printer from one location to another. Refer to the
■
Phaser 2135 Setup Poster.
Do not place any liquids on the printer.
■
Warning
Be careful when working in areas inside the printer identified with a warning symbol. These areas
may be very hot and could cause personal injury
Wait 10-15 seconds between switching the printer off and on.
■
Keep hands, hair, neckties, etc., away from the exit feed rollers.
■
Do not remove the media source tray that you have selected in the driver or front panel while printing.
■
Do not remove any trays above the currently selected media source tray
■
.
Page 10
Do not open the covers while printing.
■
Do not switch off the printer power while printing.
■
0748-02
0748-03
Symbols as marked on product:
DANGER high voltage:
Protective ground (earth) terminal:
Page 11
Hot surface on or in the printer. Use caution to avoid personal injury
Use caution. Refer to the manual(s) for information:
0730-10
Warning
If the product loses the ground connection, usage of knobs and controls (and other conductive parts)
can cause an electrical shock. Electrical product may be hazardous if misused.
Warning
For your protection, do not defeat any interlocks.
Page 12

Contents
Introduction . . . . . . . . . . . . . . . . . . . . . . . . . . . . . . . . . . . . . . . . . . . . . . . . . . . . . . . . . . . . . . . . . . 1
Printer Components . . . . . . . . . . . . . . . . . . . . . . . . . . . . . . . . . . . . . . . . . . . . . . . 2
Base Configuration. . . . . . . . . . . . . . . . . . . . . . . . . . . . . . . . . . . . . . . . . . . . . . . . . . . . . . . . . . . . . 2
Internal Components. . . . . . . . . . . . . . . . . . . . . . . . . . . . . . . . . . . . . . . . . . . . . . . . . . . . . . . . . . . 4
Printer Options . . . . . . . . . . . . . . . . . . . . . . . . . . . . . . . . . . . . . . . . . . . . . . . . . . . . . . . . . . . . . . . . 5
Printer Features. . . . . . . . . . . . . . . . . . . . . . . . . . . . . . . . . . . . . . . . . . . . . . . . . . . 7
Media Handling . . . . . . . . . . . . . . . . . . . . . . . . . . . . . . . . . . . . . . . . . . . . . . . . . . . . . . . . . . . . . . . 7
Convenience Features . . . . . . . . . . . . . . . . . . . . . . . . . . . . . . . . . . . . . . . . . . . . . . . . . . . . . . . . . 10
Selecting Print Media . . . . . . . . . . . . . . . . . . . . . . . . . . . . . . . . . . . . . . . . . . . . .12
Supported Media Types. . . . . . . . . . . . . . . . . . . . . . . . . . . . . . . . . . . . . . . . . . . . . . . . . . . . . . . . 14
Automatic Two-Sided Printing . . . . . . . . . . . . . . . . . . . . . . . . . . . . . . . . . . . . . . . . . . . . . . . . . . 14
Storing Print Media . . . . . . . . . . . . . . . . . . . . . . . . . . . . . . . . . . . . . . . . . . . . . . . . . . . . . . . . . . . 15
Printing Options . . . . . . . . . . . . . . . . . . . . . . . . . . . . . . . . . . . . . . . . . . . . . . . . .16
Printer Drivers . . . . . . . . . . . . . . . . . . . . . . . . . . . . . . . . . . . . . . . . . . . . . . . . . . .17
Installing the Printer Drivers . . . . . . . . . . . . . . . . . . . . . . . . . . . . . . . . . . . . . . . . . . . . . . . . . . . . 17
Configuring the Printer Drivers . . . . . . . . . . . . . . . . . . . . . . . . . . . . . . . . . . . . . . . . . . . . . . . . . . 18
Printer Driver Features. . . . . . . . . . . . . . . . . . . . . . . . . . . . . . . . . . . . . . . . . . . . . . . . . . . . . . . . . 19
Managing Printer Usage . . . . . . . . . . . . . . . . . . . . . . . . . . . . . . . . . . . . . . . . . . .30
The Front Panel . . . . . . . . . . . . . . . . . . . . . . . . . . . . . . . . . . . . . . . . . . . . . . . . . . . . . . . . . . . . . . 30
Front Panel Operations . . . . . . . . . . . . . . . . . . . . . . . . . . . . . . . . . . . . . . . . . . . . . . . . . . . . . . . . 33
Front Panel Menus . . . . . . . . . . . . . . . . . . . . . . . . . . . . . . . . . . . . . . . . . . . . . . . . . . . . . . . . . . . 40
Special Operating Modes . . . . . . . . . . . . . . . . . . . . . . . . . . . . . . . . . . . . . . . . . . . . . . . . . . . . . . 66
Front Panel Locks. . . . . . . . . . . . . . . . . . . . . . . . . . . . . . . . . . . . . . . . . . . . . . . . . . . . . . . . . . . . . 68
Using Printer Management Software . . . . . . . . . . . . . . . . . . . . . . . . . . . . . . . . . . . . . . . . . . . . . 69
Regular Printer Maintenance . . . . . . . . . . . . . . . . . . . . . . . . . . . . . . . . . . . . . . .71
Adjusting Color Density and Balance . . . . . . . . . . . . . . . . . . . . . . . . . . . . . . . .72
Printing a Test Page . . . . . . . . . . . . . . . . . . . . . . . . . . . . . . . . . . . . . . . . . . . . . . . . . . . . . . . . . . . 72
Making Adjustments . . . . . . . . . . . . . . . . . . . . . . . . . . . . . . . . . . . . . . . . . . . . . . . . . . . . . . . . . . 73
Troubleshooting . . . . . . . . . . . . . . . . . . . . . . . . . . . . . . . . . . . . . . . . . . . . . . . . .76
Before You Begin Troubleshooting . . . . . . . . . . . . . . . . . . . . . . . . . . . . . . . . . . . . . . . . . . . . . . 76
Front Panel Messages . . . . . . . . . . . . . . . . . . . . . . . . . . . . . . . . . . . . . . . . . . . . . . . . . . . . . . . . . 78
Printer Management
Status Messages . . . . . . . . . . . . . . . . . . . . . . . . . . . . . . . . . . . . . . . . . . . . . . . . . . . . . . . 86
Solving Printing Problems. . . . . . . . . . . . . . . . . . . . . . . . . . . . . . . . . . . . . . . . . . . . . . . . . . . . . . 94
Page 13

Installation Precautions . . . . . . . . . . . . . . . . . . . . . . . . . . . . . . . . . . . . . . . . . . . 97
Hard Drive . . . . . . . . . . . . . . . . . . . . . . . . . . . . . . . . . . . . . . . . . . . . . . . . . . . . . . . . . . . . . . . . . . . 98
Memory . . . . . . . . . . . . . . . . . . . . . . . . . . . . . . . . . . . . . . . . . . . . . . . . . . . . . . . . . . . . . . . . . . . .101
Auto Duplex Unit Replacement . . . . . . . . . . . . . . . . . . . . . . . . . . . . . . . . . . . . . . . . . . . . . . . . .103
Networking . . . . . . . . . . . . . . . . . . . . . . . . . . . . . . . . . . . . . . . . . . . . . . . . . . . . 108
Connecting to Your Network . . . . . . . . . . . . . . . . . . . . . . . . . . . . . . . . . . . . . . . . . . . . . . . . . . .108
Novell NetWare Setup. . . . . . . . . . . . . . . . . . . . . . . . . . . . . . . . . . . . . . . . . . . . . . . . . . . . . . . . . 112
Windows Troubleshooting . . . . . . . . . . . . . . . . . . . . . . . . . . . . . . . . . . . . . . . . . . . . . . . . . . . . .117
Macintosh Network Setup . . . . . . . . . . . . . . . . . . . . . . . . . . . . . . . . . . . . . . . . . . . . . . . . . . . . .121
Macintosh Troubleshooting . . . . . . . . . . . . . . . . . . . . . . . . . . . . . . . . . . . . . . . . . . . . . . . . . . . .124
UNIX Network Setup. . . . . . . . . . . . . . . . . . . . . . . . . . . . . . . . . . . . . . . . . . . . . . . . . . . . . . . . . .125
OS/2 Network Setup. . . . . . . . . . . . . . . . . . . . . . . . . . . . . . . . . . . . . . . . . . . . . . . . . . . . . . . . . . 126
OS/2 Software Installation . . . . . . . . . . . . . . . . . . . . . . . . . . . . . . . . . . . . . . . . . . . . . . . . . . . . .129
OS/2 Troubleshooting . . . . . . . . . . . . . . . . . . . . . . . . . . . . . . . . . . . . . . . . . . . . . . . . . . . . . . . .130
Printer Specifications . . . . . . . . . . . . . . . . . . . . . . . . . . . . . . . . . . . . . . . . . . . . 132
Physical Specifications . . . . . . . . . . . . . . . . . . . . . . . . . . . . . . . . . . . . . . . . . . . . . . . . . . . . . . . .132
Environmental Specifications. . . . . . . . . . . . . . . . . . . . . . . . . . . . . . . . . . . . . . . . . . . . . . . . . . .132
Performance Specifications . . . . . . . . . . . . . . . . . . . . . . . . . . . . . . . . . . . . . . . . . . . . . . . . . . . . 132
Controller Specifications. . . . . . . . . . . . . . . . . . . . . . . . . . . . . . . . . . . . . . . . . . . . . . . . . . . . . . .133
Notices and Certifications . . . . . . . . . . . . . . . . . . . . . . . . . . . . . . . . . . . . . . . . 134
FCC Notices…USA. . . . . . . . . . . . . . . . . . . . . . . . . . . . . . . . . . . . . . . . . . . . . . . . . . . . . . . . . . . .134
Certifications…Canadian . . . . . . . . . . . . . . . . . . . . . . . . . . . . . . . . . . . . . . . . . . . . . . . . . . . . . . 135
European Markets. . . . . . . . . . . . . . . . . . . . . . . . . . . . . . . . . . . . . . . . . . . . . . . . . . . . . . . . . . . .135
Index . . . . . . . . . . . . . . . . . . . . . . . . . . . . . . . . . . . . . . . . . . . . . . . . . . . . . . . . .136
Page 14

Introduction
In this section, you will become familiar with the features of your printer and learn where
to locate specific printer parts.
Before you use your printer, be sure to perform all the steps outlined in the Phaser 2135
setup poster and connect the necessary cables.
Your printer may also have one or more of the optional features installed. First verify your
exact equipment options before proceeding further. All optional features described in this
manual are available for your printer and are user installable. For more information, refer
to the User Guide provided with your printer.
Advanced Features and Troubleshooting Manual 1
Page 15
Printer Components
Printer Components
Base Configuration
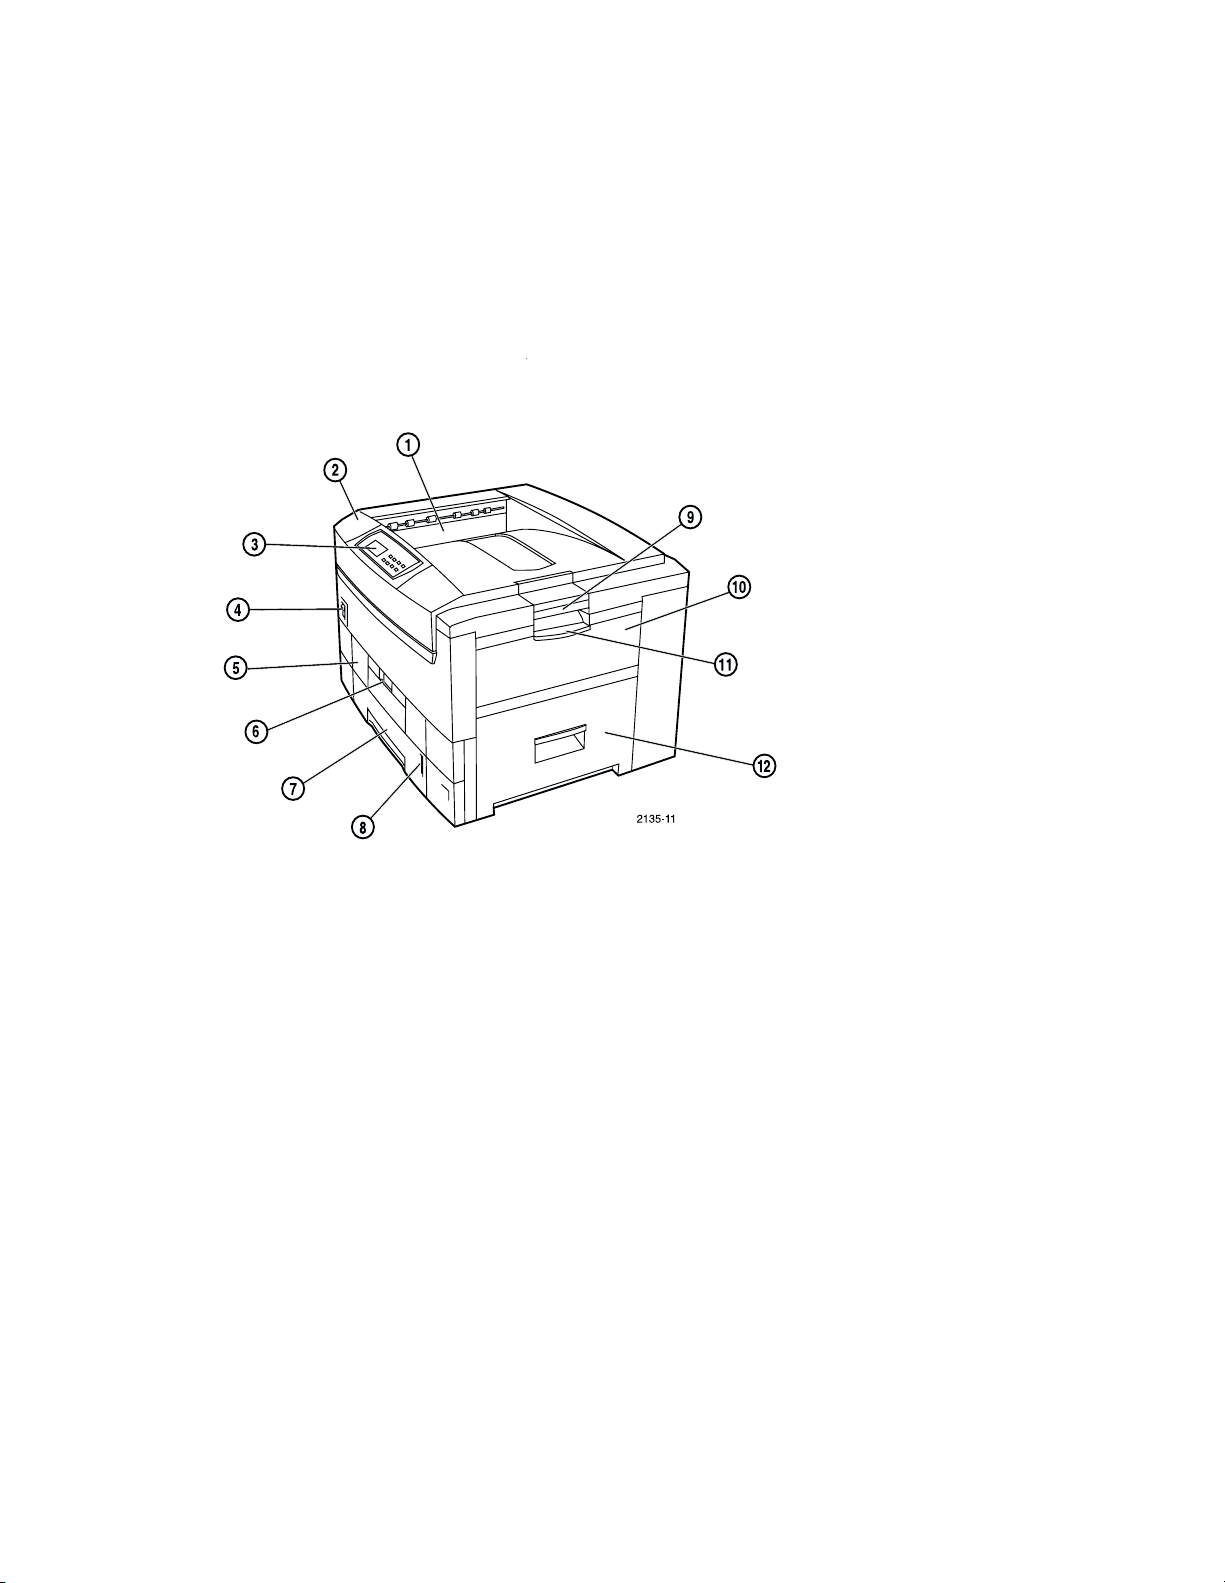
Printer Components, Front View
Front View
1. Top output tray
(media delivered face down)
2. Top cover
3. Front panel
4. On/Off switch
5. Duplex unit (optional)
(shown closed)
6. Duplex unit release
7. Universal tray
8. Media level gauge
9. Top cover release
10. Multi-Sheet Bypass Feeder (MBF)
11. Multi-Sheet Bypass Feeder (MBF) release
12. Right Door A
2 Phaser 2135 Color Printer
Page 16
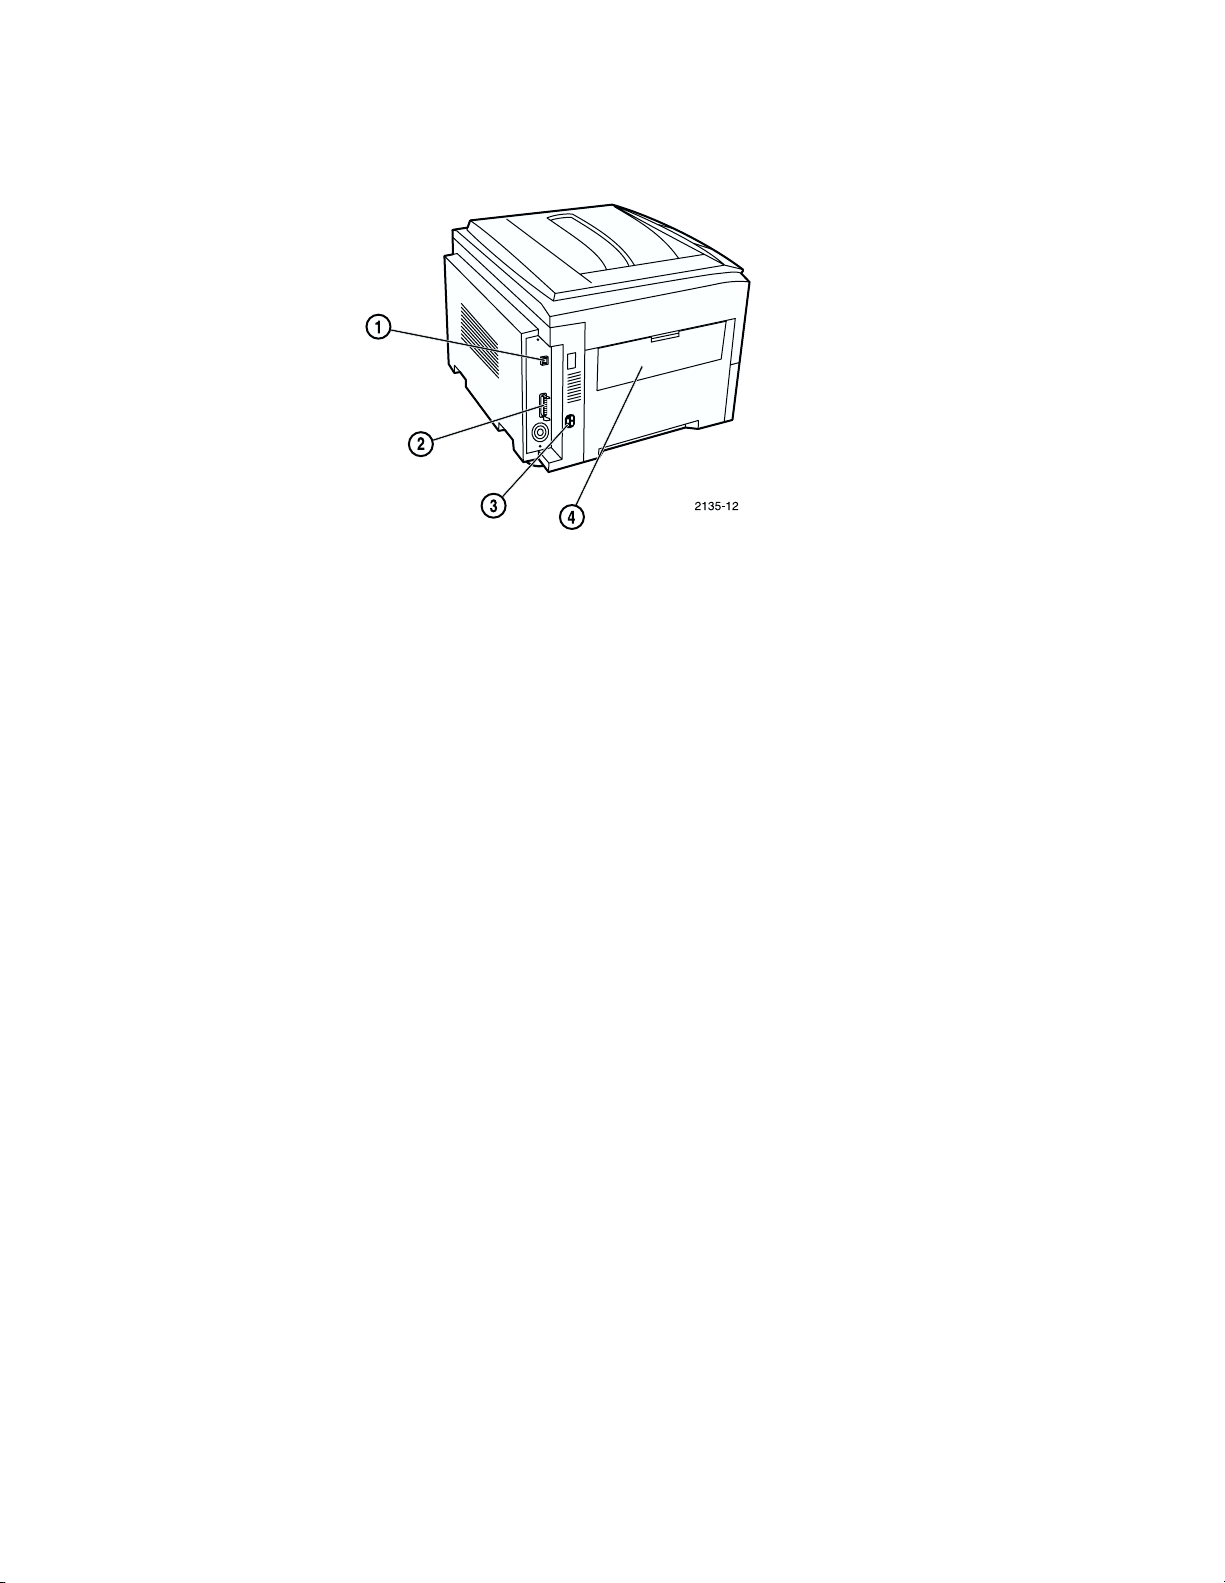
Printer Components, Rear View
Left-Side View
1. Ethernet UTP connector
Printer Components
2. Parallel connector
3. Power cord receptacle
4. Side output tray
(shown closed)
Advanced Features and Troubleshooting Manual 3
Page 17
Printer Components
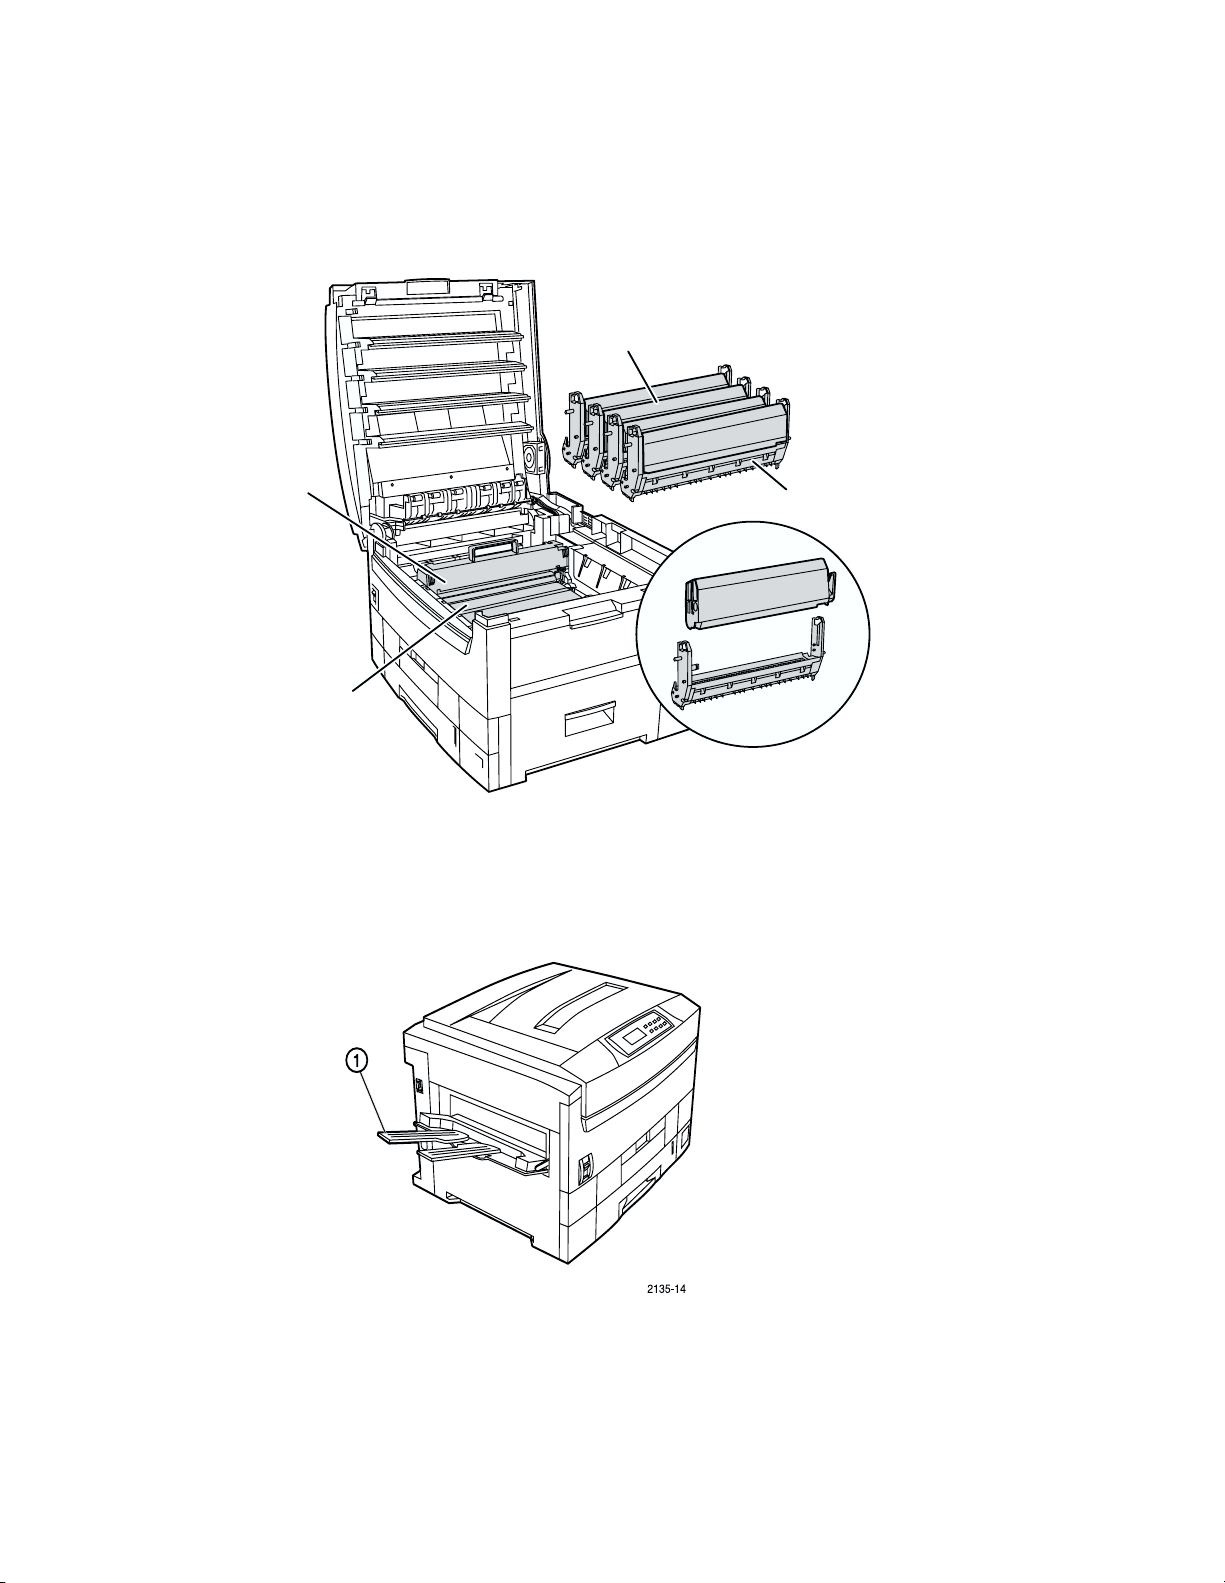
Internal Components
Internal Components, Top View
Toner Cartridges (4)
Fuser
Transfer Belt
Internal Components, Side View
Imaging Drums (4)
0748-10
Side View
1. Side output tray
(shown open)
4 Phaser 2135 Color Printer
Page 18
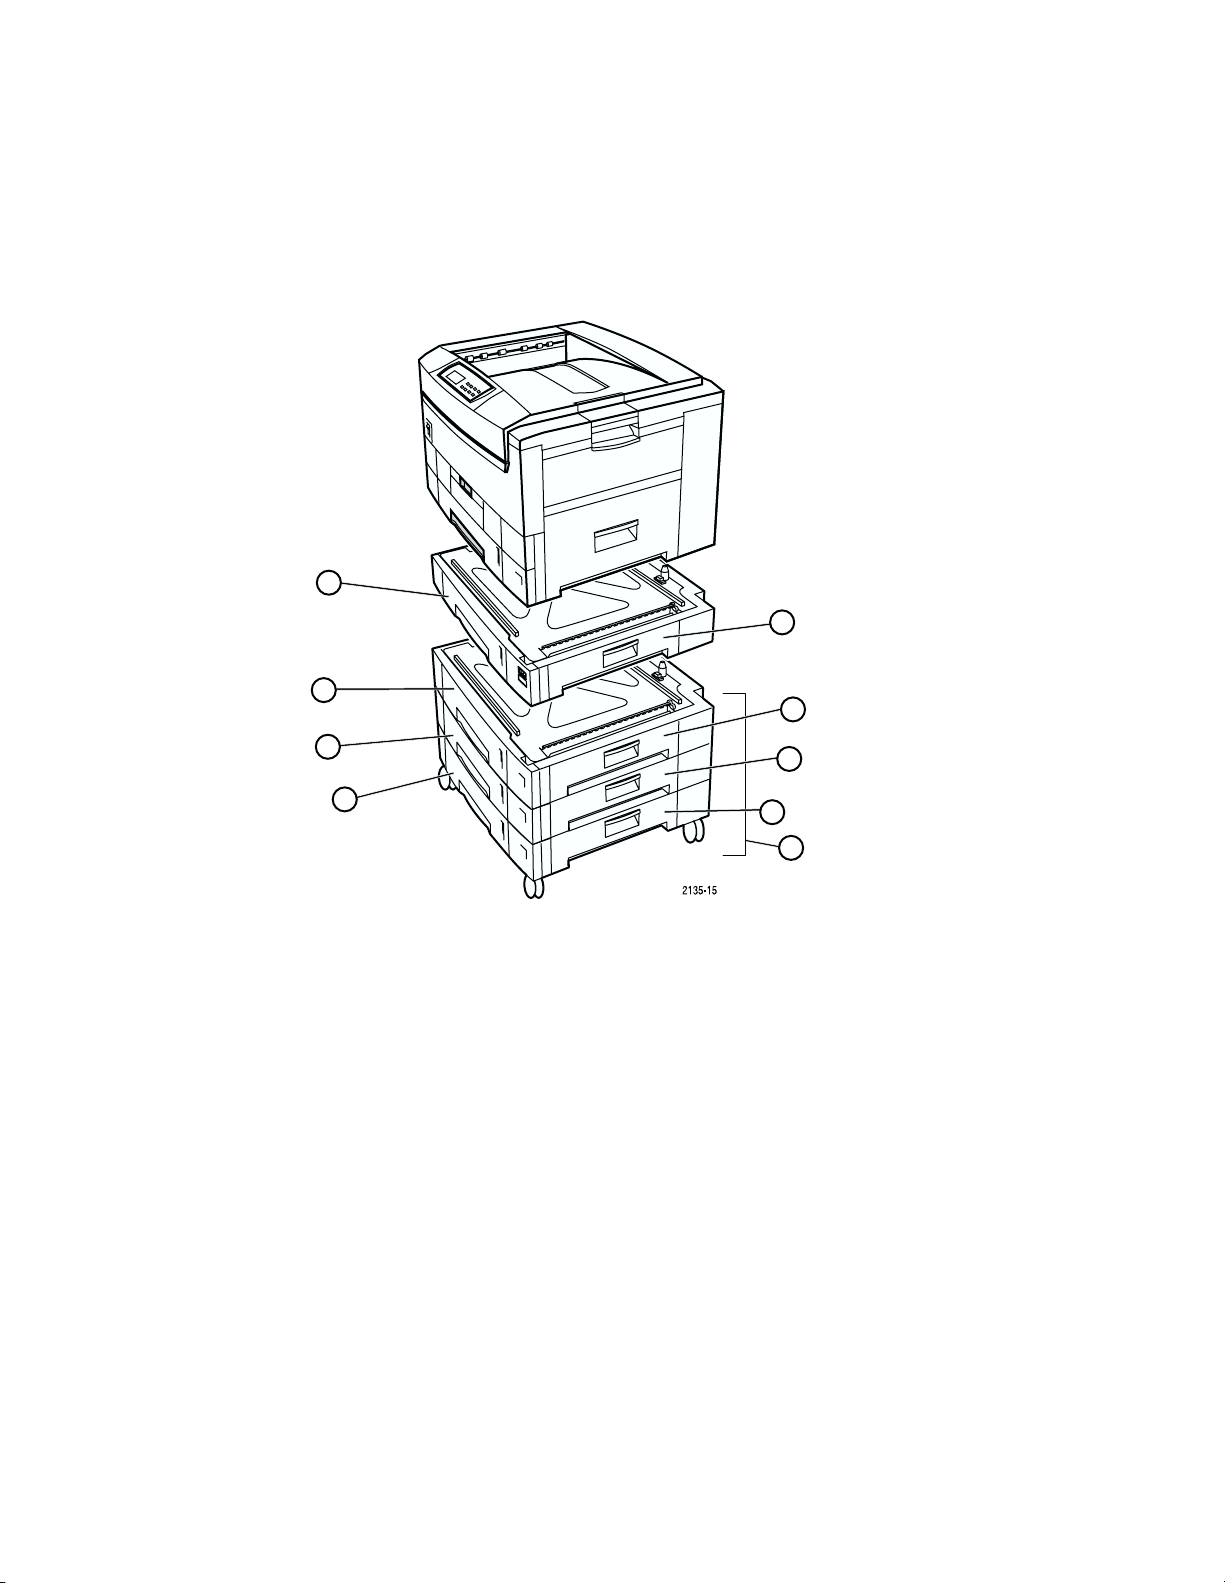
Printer Options
Optional Paper Trays
1
Printer Components
5
2
3
4
Optional Paper Tray
1. Tray 2 (550-sheet feeder)
2. Tray 3 (550-sheet feeder)
3. Tray 4 (550-sheet feeder)
4. Tray 5 (550-sheet feeder)
5. Right Door B
6. Right Door C
7. Right Door D
6
7
8
9
8. Right Door E
9. Lower Tray Deck Option
Advanced Features and Troubleshooting Manual 5
Page 19
Printer Components
Duplex Option
Duplex Option
1. Duplex option
(shown partially pulled out)
6 Phaser 2135 Color Printer
Page 20

Printer Features
Printer Features
Your printer has many special features that enable you to achieve the results you need for
your specific print job. Features vary according to the options installed on your printer.
This section will help you become familiar with your printer's features and capabilities.
Media Handling
Your printer has several media input sources and output destinations as described below.
Input Sources
The standard Multi-Sheet Bypass Feeder (MBF) holds up to 100 sheets of standard
■
75 g/m
sheets of special media).
Tray 1 is the standard input tray that holds up to 550 sheets of 75 g/m
■
paper or 250 standard or 200 premium transparencies.
Trays 2-5 are the optional input trays installed below Tray 1. They hold up to
■
550 sheets of 75 g/m
the thickness of the paper. Transparencies and glossy paper are not supported from
these trays.
2
(20 lb. bond) paper (up to 50 transparency sheets or a smaller number of
2
(20 lb. bond)
2
(20 lb. bond) paper. The capacity of these trays varies based on
Trays 1, 2, 3, 4 and 5 all have paper-size sensing, low-paper sensing, and tray-empty
sensing. Paper levels are indicated on a gauge visible at the front of the tray. When the
level reaches approximately 40 sheets, the front panel displays the low paper warning.
The Multi-Sheet Bypass Feeder (MBF) has tray-empty sensing but not paper-size sensing.
Refer to Selecting Print Media on page 12 for information on supported media.
Output Destinations
The top output tray holds up to 500 sheets of 75 g/m2 (20 lb. bond) and receives prints
■
face-down. It has tray-full detection.
The side output tray holds up to 100 sheets of 75 g/m2 (20 lb. bond) paper and
■
receives prints face up (at the left hand side of the printer).
Advanced Features and Troubleshooting Manual 7
Page 21
Printer Features
2-Sided Printing*
A duplex (2-sided) option is available for your printer that enables 2-sided printing on
specific media types and sizes. For information on supported media, refer to Supported
Media Types on page 14.
Duplex (2-Sided) Option
Connectivity
Your printer contains the following interfaces for connecting to a host computer or
network:
IEEE 1284 bi-directional parallel port (built-in)
■
Ethernet 10BaseT and 100BaseTX (built-in)
■
The following network operating systems are supported:
NetWare 3.1x, 4.1x, 5.0, NDPS
■
Windows 2000, NT 4.0
■
Windows 95/Windows 98/Windows Millennium peer-to-peer
■
OS/2 Warp/LAN Server
■
Mac OS 7.61+, 8.x, 9.x, OSX
■
UNIX (SCO, Red Hat Linux, Solaris, HP-UX, IBM/AIX, SGI, DEC)
■
For more detailed information about supported network environments and protocols, refer
to the Phaser 2135 Quick Network Install Guide on your Printer Management
Software CD-ROM.
*These features are also available in the Printer Driver. For additional information about
these features, see the Printer Driver Features section on page 19. Settings in the driver
override the settings in the front panel.
8 Phaser 2135 Color Printer
Page 22

Printer Features
PDLs and Fonts
Your printer includes the following Page Description Languages (PDLs):
Adobe PostScript 3 with 136 resident Adobe Type 1 fonts
■
An emulation of HP PCL5C with 46 resident fonts
■
PDF (requires optional hard disk drive)
■
TIFF (requires optional hard disk drive)
■
The printer automatically detects a print job’s PDL and switches to the appropriate PDL
interpreter for processing.
Resolution
Your printer can print at the following imaging resolutions:
600 x 600 dpi (dots per inch)
■
600 x 1200 dpi
■
Print Speed
The print speed depends on the model and configuration of your printer and the
complexity of your print jobs. Maximum rated print speeds:
26 ppm (pages per minute) for black-only printing (based on A4-size long-edge feed)
■
21 ppm for color printing (based on A4-size long-edge feed)
■
The following host-based color management systems can be used with the printer:
PANTONE™ Matching System
■
Apple ColorSync 2.5
■
Image Color Matching (ICM) for Windows 95/Windows 98 and Windows
■
2000/Windows Millennium
ICC
■
Advanced Features and Troubleshooting Manual 9
Page 23

Printer Features
Convenience Features
Automatic Color*
The Automatic Color feature provides the optimum settings for documents with both
graphics and text. This produces the best output for most documents.
Fax Friendly*
The Fax Friendly feature changes your color document to patterns of black and white so
that it can be used as a fax original or for black and white copying.
Automatic Image Correction*
Optimizes printing of photographs or bitmapped images. It enhances RGB images if the
exposure level, color balance, sharpness, brightness, or contrast settings in the original
image have not been optimized.
Smooth Low-Resolution Images*
Enhances low-resolution graphics. Ideal for images from the World Wide Web.
Automatic Transparency Detection
The printer detects transparencies to avoid printing on the wrong media when the paper
tray is incorrectly loaded. This allows the printer setup to be corrected to ensure the best
possible print quality. Transparencies can only be printed from Tray 1 or the Multi-Sheet
Bypass Feeder (MBF).
Front Cover*
Prints the first page of your document from a different paper tray than the remaining
pages. This permits you to specify the media type for the front cover page of a document.
Separator Pages*
Insert a blank separator sheet after each page, print job, or copy of a multi-copy collated
print job. Separation pages can be taken from a different paper tray from the printed pages.
Job Offset
Separates each print job from the previous print job in the output tray. It also separates
each copy of a multiple-copy collated job.
*These features are also available in the Printer Driver. For additional information about
these features, see the Printer Driver Features section on page 19. Settings in the driver
override the settings in the front panel.
10 Phaser 2135 Color Printer
Page 24

Printer Features
Secure Print*
Prints confidential and sensitive documents. This feature requires installation of the
optional hard disk drive. It automatically holds your password-protected document within
the hard drive. When you're ready to print or delete your job, enter the corresponding
four-digit numeric password on the front panel to release the job. Once the file is printed,
it is automatically deleted from the hard drive.
Proof Print*
Print and proof a single copy of a document before printing the remaining document
sets/copies. Requires installation of the optional hard drive. The remaining sets are held in
the printer's hard disk drive until you release the job at the front panel by entering the
corresponding four-digit numeric password.
Event Notification by Email
Sends an email message to your workstation when the printer requires attention (low/no
paper, low/no toner, etc.) To use this feature, establish a mail account for the printer and
configure the Xerox MaiLinX feature via CentreWare Internet Services. For more
information, see Networking on page 108 and the CentreWare Internet Services User Guide
on the Printer Management Software CD ROM.
Remote Printing by Email
Enables remote submission of print jobs to a printer by email. Business travellers can use
this feature. To use this feature, establish a mail account for the printer and configure the
Xerox MaiLinX Feature via CentreWare Internet Services. Finally, install and configure the
Xerox Mail Port Monitor on the client workstation/PC. For more information, see
Networking on page 108 and the CentreWare Internet Services User Guide located on the
Printer Management Software CD-ROM.
*These features are also available in the Printer Driver. For additional information about
these features, see the Printer Driver Features section on page 19. Settings in the driver
override the settings in the front panel.
Advanced Features and Troubleshooting Manual 11
Page 25

Selecting Print Media
Selecting Print Media
This chapter will help you understand what kinds of paper and other print media to use
with the printer.
The printer supports a variety of media types and sizes. Supported Media Types on
■
page 14 lists the sizes of paper, envelopes, and other print media for use with the
printer’s paper trays. The printer supports paper weights as follows:
60-163 g/m2 (16-43 lb. bond) via the standard and optional paper trays
■
60-203 g/m2 (16-54 lb. bond) via the Multi-Sheet Bypass Feeder
■
75-120 g/m2 (20-32 lb. bond) for automatic 2-sided printing
■
Media especially sensitive to curl (transparencies, labels, etc.) should be output to the
■
side output tray at the left-side of the printer instead of to the top output tray.
To use the printer’s automatic 2-sided printing capability:
■
The optional duplex module must be installed.
■
Only media with a weight from 75 to 120 g/m2 (20-32 lb. bond) should be used.
■
All other media weights must be manually duplexed.
The paper tray must be one of the 550 sheet trays (Trays 1-5). If paper is fed from
■
the Multi-Sheet Bypass Feeder, it will not be printed 2-sided automatically, but
may be printed 2-sided manually.
Automatic 2-sided printing is only allowed when the Media Type is set to "Plain
■
Paper" (75-90 g/m
2
, 20-24 lb. bond) or "Heavy Paper" (90-120 g/m2 24-32 lb.
bond). Do not attempt automatic 2-sided printing on any other type of media.
Use only Xerox Phaser 2135 Transparencies.
■
Caution
Other transparencies may cause damage to the fuser. Any damage caused due to
the use of unsupported media may not be covered by your printer’s warranty.
Note
Using media not recommended for laser printers may result in paper jams, print
quality problems or printer damage.
Do not use the following media in the printer:
Wrinkled, torn, or bent paper
■
Moist or wet paper
■
Curled paper
■
Paper with an electrostatic charge
■
Glued paper, or paper with gummed surfaces
■
Paper with special coating
■
Paper unable to withstand a temperature of 165º C (302º F)
■
12 Phaser 2135 Color Printer
Page 26

Selecting Print Media
Thermal paper
■
Carbon paper
■
Carbonless paper
■
Paper with paper fasteners, ribbons, tape, staples, etc. attached
■
Heavily textured paper
■
Label sheets that have previously been run through the printer and from which
■
printed labels have been removed
Paper with high rag content
■
Transparencies other than those specifically recommended for the Phaser 2135
■
printer
Advanced Features and Troubleshooting Manual 13
Page 27

Selecting Print Media
Supported Media Types
Input Source: Output Source:
Media Type
Plain, Heavy and Light Paper
Letter
Legal
11 x 17
8.5 x 13 in.
8 x 13 in.
215 x 315 mm
A4
A3
SRA3
A3 Nobi
JIS B5
JIS B4
A5
Executive
Statement
8 x 10 in.
12 x 18 in.
A6
Tray 1 Tray 2, 3,
•
•
•
•
•
•
•
•
•
•
•
•
•
4, or 5
•
•
•
•
•
•
•
•
•
•
•
•
Multi-Sheet
Bypass
Feeder
•
•
•
•
•
•
•
•
•
•
•
•
•
•
•
•
•
•
Top
Output
Tray
•
•
•
•
•
•
•
•
•
•
•
•
•
•
•
•
•
Side
Output
Tray
•
•
•
•
•
•
•
•
•
•
•
•
•
•
•
•
•
Phaser 2135 Transparencies •••
Glossy Paper ••••
Thick Card Stock ••
Thin Card Stock •••••
Labels ••
Envelopes ••
Business Cards ••
Automatic Two-Sided Printing
Automatic 2-sided printing is available from all trays but not from the Multi-Sheet Bypass
Feeder (MBF). The duplex option must be installed before you can use automatic 2-sided
printing. Automatic 2-sided printing is available for all paper sizes that are supported by
trays 1-5, except A6, and only when the media type is set to either "Plain Paper" or "Heavy
Paper".
The following media types cannot be automatically duplexed:
Phaser 2135 Transparencies
■
Glossy Paper
■
Thick Card Stock
■
Thin Card Stock
■
Labels
■
14 Phaser 2135 Color Printer
Page 28

Selecting Print Media
Envelopes
■
Business Cards
■
Light Paper
■
Manual Two-Sided Printing
You can manually duplex from the Multi-Sheet Bypass Feeder (MBF) or Tray 1. You can
manually duplex the following media types.
Plain Paper
■
Heavy Paper
■
Glossy Paper
■
Thick Card Stock
■
Thin Card Stock
■
See the User Guide for more information about manually duplexing.
Storing Print Media
Print quality is optimized when paper and other print media are properly stored. Proper
storage ensures optimum print quality and reduces the frequency of paper jams.
Store the paper in its original packaging on a flat surface, in a relatively low humidity
■
environment.
Avoid storing paper in a way that will cause wrinkling, bending, curling, etc.
■
Do not unwrap paper until you are ready to use it, and rewrap any paper you are not
■
using.
Do not expose paper to direct sunlight or high humidity.
■
Advanced Features and Troubleshooting Manual 15
Page 29

Printing Options
Printing Options
The following table displays a variety of options for submitting a file for printing,
depending upon your environment and preferences.
Method Options Description
Print directly from
application.
Through a direct connection The port is set to LPT1: (or
equivalent).
Through a network The port is set to a network queue.
Print via a print file
submission
Through the mail port
monitor
CentreWare DP Send the print file to the printer using
CentreWare for Solaris Send the print file to the printer using
CentreWare TTY for UNIX Send the print file to the printer using
CentreWare Internet
Services
Attachment to email Send the print file (PostScript, PCL,
The port is set to the Xerox Mail Port
Monitor and the printer has an email
address.
TCP/IP networks only).
CentreWare for Solaris.
CentreWare TTY for supported UNIX
platforms.
Send the print file to the printer using
CentreWare Internet Services
(embedded web server).
PDF, TIFF) to the printer as an
attachment to a mail note (This option
requires that the printer has an email
address).
16 Phaser 2135 Color Printer
Page 30

Printer Drivers
Printer Drivers
A printer driver is software that you load on your workstation or server. To achieve the
best results from your color printer, it is essential that you use the proper printer driver for
your operating system and printer configuration.
Printer drivers provide access to features unique to your printer. Although there are many
print options and features that are a part of the software applications, your printer also
contains many distinctive features of its own. For example, your custom printer drivers
enable you to use the Automatic Color feature that is available in your printer.
You may use either the Adobe PostScript printer driver (recommended) or the PCL 5C
printer driver. The PostScript printer driver allows access to more of the exclusive and
powerful Xerox printing features.
The table below lists the supported drivers by PDL (Page Description Language) along with
supported operating systems.
Note
Your Phaser 2135 was shipped with the latest drivers available at the time of
manufacture. You can check for newer drivers from
www.xerox.com/officeprinting/drivers.
PDL Platform/Environment Operating System
Adobe PostScript 3 Windows Windows 95/98/Millennium
IBM OS/2
Macintosh System 7.6.1, 8.x, 9.x
UNIX CenterWare Services for UNIX
a
PCL5C
a. Must be downloaded from www.xerox.com/officeprinting/drivers
Windows Windows 95/98/Millennium
a
Windows NT 4.0 Service Pack 4+
Windows 2000
OS/2 WARP
Systems
UNIX TTY Services
Windows NT 4.0 Service Pack 4+
Windows 2000
Installing the Printer Drivers
Instructions on how to load the printer drivers are on the Phaser 2135 Product CD-ROM for
this. In addition, your System Administrator can download drivers directly to each
workstation on the network.
Advanced Features and Troubleshooting Manual 17
Page 31

Printer Drivers
Configuring the Printer Drivers
Be sure to properly configure the printer driver for your printer and its installed options,
such as additional media trays, the hard drive, duplex module, etc. If the printer driver is
not properly configured, optional features such as 2-Sided Printing, Proof Printing, Secure
Printing, Tray 2, 3, 4 and 5 sources, etc. may not be accessible.
To check the printer’s configuration, print the Configuration Page:
1. On the front panel, press the Menu Up or Menu Down key (labeled 1 or 5) to scroll
through the available menus until you locate the Printer Setup Menu.
Menus
Printer Setup Menu
2. Press the Item Up or Item Down key (labeled 2 or 6) to scroll until you see Print
Configuration Page.
Printer Setup Menu
Print Configuration Page
3. Press the Enter key (labeled 4) to print that report.
To change the printer’s configuration in the Windows 9x printer driver:
Note
The Windows 9x printer driver is automatically configured.
1. At your computer, click Start, select Settings, and click Printers.
2. Open the printer driver properties by right-clicking on the printer icon and clicking
Properties.
3. On the Setup tab, click the Expert Options button.
4. In the Installable Options area of the Expert Options dialog box, highlight an option
that you want to change and select the configuration in the drop-down list.
5. Click OK to close the Expert Options dialog box.
6. Click OK to close the printer driver properties.
To specify the printer’s configuration in other printer drivers:
1. At your computer, open the printer driver properties.
2. Click the Printer Configuration tab.
3. Enable (check) the items in the driver dialog that are listed on the Configuration Page.
4. Click OK to close the printer driver properties.
18 Phaser 2135 Color Printer
Page 32

Printer Drivers
Printer Driver Features
The following table shows the features available in each type of printer driver:
Features of the Drivers
Feature Windows
9X
PostScript
2-sided printing
(Duplex)
Automatic Image
Correction
Black and white
printing
(Grayscale or
Color Appearance)
Black overprint
Booklet printing
Collation
Color mode
Cover page (first
page different)
Font substitution
table
Image Quality
(Print Mode)
Media Type
Mirror image
Multiple pages per
side (n-up)
Negative image
Orientation
Paper size
Process Grayscale
graphics
Proof print
Scaling
Secure print
Separation pages
(Transparency
separators)
Smooth LowResolution Images
TrueType options
Watermarks
•••••
••
••••••
•• • •
•• •
••••••
••••••
••
•• ••a•
••• • •
•• • •
•• •b•
•• • •
•••• •a •
••••••
•• • •
• ••••
•• • •
• ••••
•••• •
•• •
••••
Macintosh
PostScript
Windows
9X/
Millennium
PCL/5C
Windows
Millennium
PS
Windows
NT
4.0/2000
PCL/5C
a
b
Windows
NT
4.0/2000
PS
•
b
•
•••••
a
a
•
a
a
a
••
a
b
•
•
a.
Windows NT 4.0 only
b. Windows 2000 only
Advanced Features and Troubleshooting Manual 19
Page 33

Printer Drivers
The exact words used in the printer driver and the implementation of the features vary
slightly based on your operating system. For detailed information on the features of your
printer driver, refer to the online help in the driver software.
2-Sided Printing (Duplex Printing)
Prints images on both sides of the physical sheet of paper. To use this feature, the printer
must have the optional Duplex Module. Automatic 2-sided printing can only be done
when paper is input from the trays, not from the Multi-Sheet Bypass Feeder (you can
manually duplex from the Multi-Sheet Bypass Feeder).
When you pick 2-sided printing, you also pick the binding edge. The end result depends
upon the orientation of the print job.
Bind on side edge (or Flip on short edge)
■
Landscape
Bind on top edge (or Flip on long edge)
■
Landscape
Portrait
Portrait
20 Phaser 2135 Color Printer
Page 34

Printer Drivers
Black and White printing
Black and white printing options include:
Grayscale
■
Transforms all color data to equivalent gray levels, with an attempt to preserve color
differences as gray density differences. Use this mode for producing the best possible
black and white version of a color document.
Fax Friendly
■
Transforms colors to black and white patterns in such a way that the information is
preserved and the resulting patterns remain visible when copied or transmitted via
fax. Use this mode for printing a version of a color document that is to be photocopied
or faxed in black and white.
Black Overprint
Reduces thin white outlines that may appear around black text edges on color
backgrounds.
Booklet Creation
Prints your document in the form of a small book. To use this feature, the printer must
have the optional Duplex Module.
It is available for any paper size that is supported for automatic 2-sided (duplex)
■
printing (see Automatic Two-Sided Printing on page 14).
Your booklet can have any number of page images, and the driver prints it on
■
one-fourth that number of sheets of paper.
If the number of page images is an exact multiple of four, there will be no blank pages
■
in the final book. If the number of pages in the book is not in multiples of four, the last
page, last two pages, or last three pages may be blank.
The driver reduces each page image by fifty percent, and prints two images on each
■
side of a sheet of paper. You have to fold the pages and staple them after they print.
The 2-Sided option must be selected to use booklet printing.
■
Advanced Features and Troubleshooting Manual 21
Page 35

Printer Drivers
On a folded sheet of paper with two page images, the horizontal distance from the
■
fold to the page image is called the gutter. You can set the gutter to zero, 50, 100, or
150 points.
When you fold several pages into a booklet, the thickness of the paper forces the page
■
image of the inner pages to shift slightly outward. The Creep control allows you to
choose a number of tenths of points by which to shift the page images inward to
compensate for the thickness of the paper. You can choose any value from zero to 20.
22 Phaser 2135 Color Printer
Page 36

Printer Drivers
Collation
Allows job collation (for multiple-copy jobs only). The options are:
Uncollated (default)
■
For example, five uncollated copies of a three-page job results in five copies of page 1,
then five copies of page 2, and finally five copies of page 3; that is: 1, 1, 1, 1, 1, 2, 2, 2,
2, 2, 3, 3, 3, 3, 3.
Collated
■
Use this option when you want to print two or more separate sets of a job that
contains two or more pages. For example, five collated copies of a three-page job
results in one set of all three pages in order, then a second set of all three pages in
order, then a third set of all three pages in order, and so on; that is: 1, 2, 3, 1, 2, 3, 1, 2,
3, 1, 2, 3, 1, 2, 3.
Certain print jobs are always collated, such as Proof Print jobs (see page 21) or jobs
with Separator sheets (see page 27).
Advanced Features and Troubleshooting Manual 23
Page 37

Printer Drivers
Color Modes
The modes are:
Automatic
■
Use this mode for most color printing. It provides the best results for documents with
a mixture of graphics, text and pictures. This is the default mode.
None
■
Use this mode for printing from applications that do all their own color management
and transformation. It provides no color correction.
ICC Saturation
■
Use this mode for documents where the primary content is business graphics.
This mode follows ICC guidelines for saturation color matching.
ICC Perceptual
■
Use this mode for documents in which the primary content is photo-realistic images.
This mode follows ICC guidelines for perceptual color matching.
ICC Colorimetric
■
Use this mode for specialized applications that can make use of actual colorimetric
color correction. This mode follows ICC guidelines for colorimetric color matching.
CMYK Simulation
■
Use this mode for printing pre-press proofs. This mode simulates the print effect of
offset press CMYK printing according to standards such as SWOP.
Cover page (Front cover different)
Prints a front cover (the first page of a print job) on media different from the rest of the
printed document.
Font Substitution Table
The options are:
TrueType Font/Printer Font
■
Lists the TrueType fonts on your computer and the printer font that is the closest
match. To change the default selections for the comparable printer fonts, select any
font in the list of printer resident fonts.
Printer Font Substituted For: <font name>
■
This feature enables you to select which PostScript printer font you want to substitute
for the selected TrueType font.
24 Phaser 2135 Color Printer
Page 38

Printer Drivers
Automatic Image Correction
Optimizes printing of photographs or bitmapped images. It enhances RGB images if the
exposure level, color balance, sharpness, brightness, or contrast settings in the original
image have not been optimized. If an image is already optimized (i.e., properly balanced,
high resolution image, etc.), it will not be affected by this setting. The default mode is Off.
Smooth Low-Resolution Images
Enhances low-resolution graphics. Ideal for images from the World Wide Web.
Image Quality (Print Mode)
The modes are:
Standard
■
Sets the resolution to 600 x 600 dpi.
Enhanced (default)
■
Sets the resolution to 1200 x 600 dpi.
Mirror Image
Flips the image across the vertical axis 180 degrees, thereby reversing the image and all
associated text.
Multiple Pages Per Side (N-Up Pages)
By default, the printer prints one page image on the sheet of paper. You can select two,
four, six, nine or sixteen page images per side of paper. The printer shrinks the page
images as needed and arranges them on the paper most appropriately for the paper size
and orientation.
12
1
1up 2up 4up 6up 9up 16up
You can also choose to print black borders (draw outlines) around each page. The default
is to not print borders.
12
34
11223
44556
3
6
789
Advanced Features and Troubleshooting Manual 25
Page 39

Printer Drivers
Negative Image
Converts the black image areas in the original to white, the white image areas to black, and
any dark gray image areas to light gray. Printing a negative image may be useful for
documents that have a substantial amount of dark background and/or light text and
images. Color images are not changed by this option. It should only be used on black and
white images.
Orientation
Specifies the direction of print on the page.
The options are:
Portrait
■
A Portrait page is taller than it is wide. This is the default setting.
Landscape
■
A Landscape page is wider than it is tall.
Rotated Landscape
■
A Rotated Landscape page is wider than it is tall and the image on the page is rotated
180 degrees (upside down).
26 Phaser 2135 Color Printer
Page 40

Printer Drivers
Process Grayscale Graphics
This feature prints black and white images using cyan, magenta, and yellow toner and
excludes black toner.
Proof Print
Use this job type for multi-copy jobs when you want to check the first copy before printing
all of the copies. You must assign a password (a four-digit value from 0000 to 7777, using
only the digits 0 through 7) and a copy count in the driver before submitting the print job.
The printer processes, queues and prints the first copy immediately. You must then enter
the corresponding password on the printer's front panel to print the rest of the copies. If
the first copy is not acceptable, you can delete the print job. For more information, refer to
Printing Secure Print and Proof Print Jobs on page 37 and Deleting Secure Print and Proof
Print Jobs on page 38. Proof print jobs remain in the printer through power cycles (off/on).
Note
To use this feature, the printer must have the optional hard drive. You must
configure the driver before using Proof Print.
Secure Print
Use this job type when you want to print confidential jobs. You must assign a password (a
four-digit value from 0000 to 7777, using only the digits 0 through 7) in the printer driver
before submitting the print job. The printer processes and queues the job, but does not
print it until you enter the corresponding password on the printer's front panel. For more
information, refer to Printing Secure Print and Proof Print Jobs on page 37 and Deleting
Secure Print and Proof Print Jobs on page 38. Secure print jobs remain in the printer
through power cycles (off/on).
Note
To use this feature, the printer must have the optional hard drive. You must
configure the driver before using Secure Print.
Separation Sheets
With this feature, the printer inserts a separation (slip) sheet at the designated locations (as
set in the printer driver) for the print job. You can select slip sheets after each page, print
job, or copy of a multi-copy collated print job. You can also designate the source for the
separator paper. No printing is done on the separator sheet.
Advanced Features and Troubleshooting Manual 27
Page 41

Printer Drivers
TrueType Options
In the printer driver, you can select one of the following options associated with the use
and printing of TrueType fonts:
Download as TrueType (default)
■
The whole character set for each TrueType font contained on the page is sent down to
the printer in an outline form. Use this option if the document uses only a small
number of TrueType fonts and you want to optimize text-printing performance.
Download as Bit Image
■
Each TrueType character is sent as an individual bitmap download font on a
least-recently-used basis. As the printer driver builds up the page, new font bitmaps
are sent down. When a character is used again, the bitmap is automatically selected
from the one previously downloaded to printer memory. From the memory setting,
the driver monitors the amount of available memory to determine when to delete font
bitmaps that have not been used for some time.
Download as graphics and device fonts
■
This option is useful if you want to print graphic images over TrueType text. Unless
you select this option, TrueType text is sent to the printer last, so it always appears on
top of any graphics. Selecting this option sends your TrueType images to the printer
as graphic images, so the text can be obscured by graphic objects.
Use Printer TrueType fonts
■
Specifies whether to use the TrueType fonts that reside on the printer or to download
TrueType fonts from the computer. If enabled (the default setting), the driver uses the
TrueType fonts resident on the printer, and if your document uses fonts that do not
reside on the printer, the driver downloads the fonts with the job. If disabled, the
driver always downloads TrueType fonts to the printer with each job, even if the fonts
reside on the printer already.
28 Phaser 2135 Color Printer
Page 42

Watermark
Prints background text across the first page or every page of a document.
This driver feature is independent from features provided by the application.
■
The driver enables you to specify the text, font, size, position on the page, and
■
rotation angle of the watermark.
Printer Drivers
You can create and save unique watermarks for use on any document.
■
You may also select a default watermark from a list of predefined watermarks, such as
■
CONFIDENTIAL, COPY, or DRAFT.
Advanced Features and Troubleshooting Manual 29
Page 43

Managing Printer Usage
Managing Printer Usage
This section provides information on the features of the printer’s front panel, which is
used to manage printer usage, set default values, and generate printer reports (such as the
Configuration Page).
This section also briefly discusses remote printer management software available for use
with your printer.
The Front Panel
The printer’s front panel:
Displays information about the status of the printer or the job in process.
■
Enables you to cancel the print job currently printing (by using the
■
Item Down/Cancel
key).
Enables you to change printer settings that control how the printer operates.
■
Enables you to specify the paper type in a tray.
■
Enables you to print reports.
■
Enables you to print password-protected print jobs stored on the optional hard drive.
■
Front Panel Layout
The front panel contains:
Two indicator lights
■
A two-line display screen (24 characters per line)
■
Eight front panel keys
■
Your printer’s front panel will either have icons and text, or icons only
d
a
c
h
f
j
b
a On-line indicator light g Menu Down button
b Fault indicator light h Item Up button
c Two-line display i Item Down/Cancel button
d On-line button j Value Up button
e Enter button k Value Down button
f Menu Up button
g
e
C/
i
k
0748-16
30 Phaser 2135 Color Printer
Page 44

Indicator lights
The front panel contains two indicator lights.
Indicator Light Meaning
Light is on (Green) — The printer is online.
On Line (Green)
Fault (Red)
■
Light flashes two times per second — The printer is going from online to
■
offline.
Light flashes one time per second — The printer is processing a print job.
■
Light is off — The printer is offline.
■
Light is off — Normal operation.
■
Light is on (Red) — The printer stopped because operator intervention is
■
needed, such as closing an open door or clearing a paper jam. Read the
message shown on the front panel display screen. Refer to the Front
Panel Messages section starting on page 78 for information on the
problem and corrective actions.
Display screen
The front panel’s display screen:
Managing Printer Usage
Provides access to a hierarchy of menus to configure and control the printer. Access
■
the menus by pressing the Menu Up or Menu Down keys. For more information on
the menu structure, refer to page 40.
Displays information about the status of the printer (or the job in process):
■
Examples:
The printer is online and ready to accept print jobs.
■
Phaser 2135xx
Ready
Where xx is the model number.
The printer is processing data.
■
Processing...
A supply is empty; in this case, the magenta toner cartridge is empty and must be
■
replaced immediately to continue printing.
Magenta Toner Empty
Replace Magenta Toner
A tray is empty; in this case, Tray 2 is empty and is no longer being used to print.
■
Tray 2 Empty
Advanced Features and Troubleshooting Manual 31
Page 45

Managing Printer Usage
There is a problem; in this case, a paper jam inside the top cover.
■
Jam Inside Top Cover
Open Cover, See Labels
Refer to the Front Panel Messages section (starting on page 78) for a complete table of
display screen messages and what action you need to perform to solve the problem.
Front panel keys
The front panel keypad consists of eight keys, identified with international symbols and
labeled in English. The keys are also numbered 0 through 7 for use when entering
passwords.
Using the keys for bringing the printer online/taking the printer offline
When the printer is online (and not in the menu system), press the
■
to take the printer offline. All pages currently in the paper path are printed and
0)
then printing pauses until the printer is brought online again.
On Line
key
(labeled
When the printer is in the menu system, press the
■
On Line
key
(labeled 0)
menu system. The printer is brought online again.
When the printer is offline, press the
■
On Line
key
(labeled 0)
to bring the printer online.
Using the keys for menus
1. Press the
Menu Up
key
(labeled 1)
and scroll through the menus.
2. Press the
Item Up
key
(labeled 2)
items for the selected menu.
3. If the menu item has a value, use the
to scroll through the values of the selected menu item.
7)
key
4. Press the
Enter
(labeled 4)
item doesn’t take a value, perform the action specified by the menu item (such as
printing the PCL Font List from the Print menu).
5. Press the
On Line
key
(labeled 0)
Note
The printer automatically exits the menu system if no keystrokes are detected for
60 seconds.
or
Menu Down
or
Item Down
Value Up
key
key
key
(labeled 5)
(labeled 6)
(labeled 3)
to enter the menu system
to scroll through the menu
or
Value Down
to enter the current value for a menu item, or if the menu
to exit the menu system.
to exit the
key
(labeled
For more information on the menus, refer to the Front Panel Menus section starting on
page 40.
32 Phaser 2135 Color Printer
Page 46

Managing Printer Usage
Front Panel Operations
Using the Front Panel Menus
For a description of the menus, menu items, and values, refer to the Front Panel Menus
section starting on page 40.
1. Press the
menus until you locate the one you want.
The following sample front panel screen shows the Printer Setup Menu.
2. Press the
you are in the Password Menu, you must first press the Item Up or Item Down key
(labeled 2 or 6) to access the password prompt and type the password using the front
panel keys.
The following sample front panel screen shows the Language menu item of the
Printer Setup Menu.
For some menus, the menu item indicates the action to be taken. Other menu items
require a value.
3. If the menu item doesn’t need a value, press the
menu item.
Menu Up
Item Up
or
Menu Down
or
Item Down
key (labeled 1 or 5) to scroll through the available
Menus
Printer Setup Menu
key (labeled 2 or 6) to scroll through the menu items. If
Printer Setup Menu
Language
key (labeled 4) to select that
Enter
4. If a value is needed for the menu item, press the
or 7) to select the appropriate value for the menu item.
The following sample front panel screen shows the Italiano value for the
Language menu item (of the Printer Setup Menu).
Language =
Italiano
If the list of values is long, you can scroll quickly by holding down the Value Up or
Value Down key.
key (labeled 4) to select that value for the menu item.
5. Press the
Enter
Value Up
or
Value Down
key (labeled 3
Advanced Features and Troubleshooting Manual 33
Page 47

Managing Printer Usage
6. Exit the menu system:
After 60 seconds of inactivity (no key has been pressed), the printer
■
automatically exits the menu system.
or
■
Press the
On Line
key (labeled 0).
The front panel screen displays Ready.
Phaser 2135xx
Ready
The xx represents the model number.
Note
If you press the
On Line
key (labeled 0) before pressing the
key (labeled 4), in
Enter
Step 5, the new value will not be saved.
Front panel menu indicators
The two menu indicators = and * are used to provide information about menu items and
values.
The = indicator only appears after options which can have a value — it indicates that
■
a value or setting follows the option.
In the following sample front panel screen, Language is a menu item (on the
Printer Setup Menu) that takes a specific value; the value currently shown is
Italiano. Another value is English. When you press the
Value Up
or
Value Down
(labeled 3 or 7), the available values are displayed one at a time on the second line of
the display.
key
Language =
Italiano
The * indicator identifies the current value.
■
In the following example, the Language is currently set to English.
Language
English *
34 Phaser 2135 Color Printer
Page 48

Managing Printer Usage
Selecting Paper Size and Type
Whenever you load paper in the Multi-sheet Bypass Feeder, the printer prompts you for
the paper type and size.
Whenever you load paper in a tray, the printer prompts you only for the paper type. The
trays have paper size sensing, and are therefore automatically configured for paper size
when media is properly loaded.
To specify the paper type in the newly-loaded tray:
1. When prompted on the front panel, press the
Value Up
or
Value Down
key (labeled 3 or
7) to scroll to the correct paper type; the choices are shown in the following table.
2. Press the
Tray 1 Types Plain Paper
Tray N Type
(where N is the tray
number — Tray 2,
3, 4, or 5, if
installed)
key (labeled 4).
Enter
Heavy Paper
Phaser 2135 Transparency
Plain Paper
Heavy Paper
Glossy Paper
Thin Card Stock
Light Paper
Thin Card Stock
Light Paper
To specify the paper type and size in the Multi-sheet Bypass Feeder (MBF):
1. When prompted on the front panel, press the
Value Up
or
Value Down
key (labeled 3 or
7) to scroll to the correct paper type; the choices are shown in the following table.
2. Press the
3. Press the
key (labeled 4).
Enter
Value Up
or
Value Down
key (labeled 3 or 7) to scroll to the correct paper size;
the choices are shown in the following table.
key (labeled 4).
4. Press the
Enter
MBF Type
Plain Paper
Heavy Paper
Phaser 2135 Transparency
Glossy Paper
Thick Card Stock
Thin Card Stock
Labels
Envelopes
Business Cards
Light Paper
Advanced Features and Troubleshooting Manual 35
Page 49

Managing Printer Usage
MBF Size 11 x 8.5" Letter LEF
8.5 x 11" Letter SEF
8.5 x 14" Legal
11 x 17" Ledger/Tabloid
7.25 x 10.5" Executive
8.5 x 13" Folio
12 x 18" Tabloid Plus
10 x 8" Quatro
8 x 13"
5.5 x 8.5" Statement
A4 LEF 297 x 210 mm
A4 SEF 210 x 297 mm
A3 297 x 420 mm
A5 148 x 210 mm
Note
It is strongly recommended that you use long-edge feed (LEF) for Letter, A4, and
JIS B4 paper sizes, except for business cards, which must be fed short-edge feed
(SEF).
A6 105 x 148 mm
JIS B4 257 x 364 mm
JIS B5 LEF 257 x 182 mm
JIS B5 SEF 182 x 257 mm
SRA3 320 x 450 mm
A3 Nobi 328 x 450 mm
SP Folio 215 x 315 mm
No. 10 Env 9.5 x 4.13"
DL Env 220 x 110 mm
Monarch Env 7.5 x 3.88"
C4 Env 324 x 229 mm
C5 Env 229 x 162 mm
B5 Env 250 x 179 mm
12 x 9" Envelope
36 Phaser 2135 Color Printer
Page 50

Managing Printer Usage
Printing the Printer’s Internal Pages
The following list contains examples of pages that can be printed:
Configuration Page
■
Menu Map
■
Supplies Usage Page
■
Connection Setup Page
■
Paper Tips Page
■
Print Quality Tips Page
■
Warranty Page
■
Diagnosing Print Quality Problems Page
■
Help Guide
■
Office and Graphics Demos
■
For information on specific reports, refer to the Print Menu section on page 55, the
Supplies Info Menu section on page 42, the section on page 56, and the Ethernet Menu
section on page 43.
To print a report:
1. On the front panel, press the
Menu Up
or
Menu Down
key (labeled 1 or 5) to scroll
through the available menus until you locate the appropriate menu. For example, to
print the Configuration Page, scroll to the Printer Setup Menu.
Menus
Printer Setup Menu
2. Press the
Item Up
or
Item Down
key (labeled 2 or 6) to scroll until you see the report you
want to print (such as Print Configuration Page).
Printer Setup Menu
Print Configuration Page
3. Press the
key (labeled 4) to print that report.
Enter
Printing Secure Print and Proof Print Jobs
If the printer has the optional hard drive, you can store print jobs in the printer using a
password. When the corresponding password is entered on the front panel, they are
printed. Once the job is printed, it is automatically deleted from the printer’s hard disk
drive.
There are two types of password-controlled jobs:
Secure printing — the printer will not print the job until you enter the password on
■
the front panel
Advanced Features and Troubleshooting Manual 37
Page 51

Managing Printer Usage
Proof printing — the printer only prints one copy of the job so that you can proof it; to
■
print the remaining copies, enter the password on the front panel
To send a password-controlled job to the printer, select either Secure Print or Proof Print
in the printer driver and enter a 4-digit numeric password, where each digit of the
password is a numeric value from 0 to 7. Numbers 8 and 9 are not allowed.
To release the secure job or the remaining copies of the proof job for printing, enter the
password on the printer’s front panel:
1. Press the
2. Press the
Menu Up
Item Up
or
Menu Down
or
Item Down
key (labeled 1 or 5) to scroll to the Password Menu.
key (labeled 2 or 6) to scroll to the password prompt.
3. Use the number keys to enter the 4-digit password for the job(s) you want to access.
key (labeled 4).
4. To print all of the jobs with this password, press the
5. Press the
On Line
key (labeled 0) to exit the menus.
Enter
Deleting Secure Print and Proof Print Jobs
Secure print and proof print jobs remain on the printer’s hard drive even when you turn
off the printer.
To delete a secure print or proof print job sent to the printer and stored on the optional
hard drive:
1. Press the
2. Press the
Menu Up
Item Up
or
Menu Down
or
Item Down
3. Use the number keys to enter the 4-digit password for the job(s) you want to access.
4. Press the
Value Up or Value Down
5. To delete all of the jobs with this password, press the
key (labeled 1 or 5) to scroll to the Password Menu.
key (labeled 2 or 6) once.
key (labeled 3 or 7) to scroll to Delete.
key (labeled 4).
Enter
Note
If you only want to delete a specific job, press the
scroll to the job you want to delete, then press the
6. Press the
On Line
Item Up
Enter
key (labeled 0) to exit the menus.
or
key.
Item Down
key to
Setting Network Addresses
The procedure for setting Ethernet and Novell addresses requires a different keying
technique than does the basic menu navigation to set values for other menu items. Use this
procedure for setting any of the following:
Ethernet Menu:
■
IP Address
■
Subnet Mask
■
Default Gateway
■
Novell Menu:
■
38 Phaser 2135 Color Printer
Page 52

Primary Server
■
NDS Context
■
PServer Name
■
NDS Tree
■
To set an address:
Managing Printer Usage
1. Press the
Menu Up
or
Menu Down
key (labeled 1 or 5) to scroll to the desired menu.
The following sample front panel screen shows the Ethernet Menu.
Menus
Ethernet Menu
2. Press the
Item Up
or
Item Down
key (labeled 2 or 6) to scroll to the address that you
want to set.
The following sample front panel screen shows the IP Address menu item of the
Ethernet Menu.
Ethernet Menu
IP Address
3. Press the
Value Up
or
Value Down
key (labeled 3 or 7) to see the current address or zeros
(if no address has been assigned). The underline indicates the position of the cursor,
which starts at the first digit.
IP Address
000.000.000.000
4. To change the value of the first digit, press the Value Up or
Value Down
key (labeled 3
or 7) until you have set the correct value for that digit.
5. Press the Item Up key (labeled 2) to move the cursor to the next digit.
IP Address
200.000.000.000
6. To change the value of the underlined digit, press the Value Up or
Value Down
key
(labeled 3 or 7) until you have set the correct value for that digit.
7. Continue to use the Item Up key (labeled 2) to move to the next digit to the right and
use the Value Up or
Value Down
key (labeled 3 or 7) to change the value of the
underlined digit.
8. When you have completed the address, press the Enter key (labeled 4), then press the
On Line key (labeled 0).
9. For the new value to take effect, you need to power the printer off and on again.
Advanced Features and Troubleshooting Manual 39
Page 53

Managing Printer Usage
Front Panel Menus
The front panel’s menu system is a hierarchy of menus, menu items, and menu item
values. The menus are used to configure the printer for your environment.
The front panel provides access to the following menus:
Print Menu Map — see page 41
■
Printer Identification Menu — see page 41
■
Supplies Info Menu — see page 42
■
Ethernet Menu — see page 43
■
Novell Menu — see page 46
■
Printer Setup Menu — see page 50
■
Print Menu — see page 55
■
Support Menu — see page 56
■
Color Adjust Menu — see page 59
■
PostScript Menu — see page 61
■
PCL Menu — see page 62
■
Parallel Menu — see page 64
■
Password Menu1 — see page 65
■
Reset Menu2 — see page 66
■
Press either the
Menu Up
or
Menu Down
key (labeled 1 and 5) to access the menus.
The following tables list the menu items and values for each of the menus. They are
organized in the order that they appear when scrolling through the display.
Note
When you submit your print jobs for printing, the printer settings selected in
your application or printer driver override the settings on the front panel.
1. Appears only when the Hard Drive is installed.
2. Appears only when printer is powered on while holding down specific front panel keys.
40 Phaser 2135 Color Printer
Page 54

Print Menu Map
Managing Printer Usage
When you press the
key (labeled 4), a report showing the structure of the front panel
Enter
menus prints.
Printer Identification Menu
Displays the selected printer identification information when you press the
(labeled 3), the
Value Down
key (labeled 7), or the
key (labeled 4).
Enter
Printer ID Menu Items
Menu Items Description
Model Displays the model of the printer, such as 2135 DX.
Printer Name Displays the name that your System Administrator has given the printer.
Printer Server Displays the name of the Novell print server name.
IP Address Displays the IP address assigned to the printer
Serial Number Displays the serial number of the printer.
First Usage Date Displays the installation date of the printer.
Value Up
key
Advanced Features and Troubleshooting Manual 41
Page 55

Managing Printer Usage
Supplies Info Menu
Displays or prints the selected printer supplies information when you press the
(labeled 4). Use the
Value Up
or
Value Down
keys (labeled 3 and 7) to change between the
Enter
key
status or installation of each item.
Supplies Info Menu Items
Menu Items Description
Print Supplies Page Prints a report showing the status and installation dates of the toner
Black Toner On the front panel, displays the status (OK, Low, or Empty) and installation
Cyan Toner On the front panel, displays the status (OK, Low, or Empty) and installation
Magenta Toner On the front panel, displays the status (OK, Low, or Empty) and installation
Yellow Toner On the front panel, displays the status (OK, Low, or Empty) and installation
Black Imaging
Drum
Cyan Imaging
Drum
Magenta Imaging
Drum
Yellow Imaging
Drum
Fuser On the front panel, displays the status (percentage remaining) and
Transfer Belt On the front panel, displays the status (percentage remaining) and
Total Print Count On the front panel, displays the total number of prints made and the
cartridges, imaging drums, fuser, and transfer belt and the installation date of
the printer.
date of the black toner cartridge.
date of the cyan toner cartridge.
date of the magenta toner cartridge.
date of the yellow toner cartridge.
On the front panel, displays the status (percentage remaining) and
installation date of the black imaging drum.
On the front panel, displays the status (percentage remaining) and
installation date of the cyan imaging drum.
On the front panel, displays the status (percentage remaining) and
installation date of the magenta imaging drum.
On the front panel, displays the status (percentage remaining) and
installation date of the yellow imaging drum.
installation date of the fuser.
installation date of the transfer belt.
installation date of the printer.
42 Phaser 2135 Color Printer
Page 56

Ethernet Menu
Sets options for the Ethernet port connection.
Ethernet Menu Items
Menu Items Description
Managing Printer Usage
Print Connect
Setup Page
Print Configuration
Page
IP Address
Resolution
IP Address Sets the four byte IP address. (This menu item only appears if IP Address
Prints a page that provides instructions for connecting the printer to a
computer or network.
Prints the Configuration Page which shows the printer's current information
and menu settings. It lists the printer name, software revision level,
communication parameter settings, options installed, current option settings
in the front panel’s menu system, and print counts.
Sets the method used to assign the IP address, including Subnet mask and
default gateway.
Values:
Static
BOOTP
DHCP (default)
Resolution is set to static.)
Values:
xxx.xxx.xxx.xxx
where xxx = 000 to 255
Note
Once the front panel shows IP Address on the top line, use the
Value Up or Value Down key (labeled 3 and 7) to scroll to the
desired value at the cursor location. To move the cursor, use the
Item Up or Item Down key (labeled 2 and 6). Thus, you can change
characters within the address rather than having to re-enter the
entire address. The printer must be turned off and on before the
changes will take effect.
For more information, refer to the Setting Network Addresses
section on page 38.
Subnet Mask Sets the four byte Subnet Mask address. (This menu item only appears if IP
Address Resolution is set to static.)
Values:
xxx.xxx.xxx.xxx
where xxx = 000 to 255
Note
Once the front panel shows
use the
Value Up
or
Value Down
Subnet Mask
on the top line,
key (labeled 3 and 7) to scroll
to the desired value at the cursor location. To move the
cursor, use the
Item Up
or
Item Down
key (labeled 2 and 6).
Thus, you can change characters within the address rather
than having to re-enter the entire address. The printer must
be turned off and on before the changes will take effect.
For more information, refer to the Setting Network
Addresses section on page 38.
Advanced Features and Troubleshooting Manual 43
Page 57

Managing Printer Usage
Ethernet Menu Items (cont'd.)
Menu Items Description
Default Gateway Sets the four byte Default Gateway address. (This menu item only appears if
LPR Enable Sets the Ethernet LPR protocol.
LPR Banner Sets the LPR banner sheet.
LPR PDL Sets the default page description language interpreter for the Ethernet LPR
IP Address Resolution is set to static.)
Values:
xxx.xxx.xxx.xxx
where xxx = 000 to 255
Note
Once the front panel shows Default Gateway on the top line,
Values:
On (default)
Off
Values:
On
Off (default)
protocol.
Values:
Auto (default)
PCL
PostScript
use the
the desired value at the cursor location. To move the cursor, use
the Item Up or Item Down keys (labeled 2 and 6). Thus, you can
change characters within the address rather than having to re-enter
the entire address. The printer must be turned off and on before
the changes will take effect.
For more information, refer to the Setting Network Addresses
section on page 38.
Value Up
or
Value Down
keys (labeled 3 and 7) to scroll to
Note
To submit TIFF and PDF files to the printer, this value must be
Auto.
AppSocket Enable Sets the Ethernet AppSocket interface.
Values:
On (default)
Off
44 Phaser 2135 Color Printer
Page 58

Ethernet Menu Items (cont'd.)
Menu Items Description
Managing Printer Usage
AppSocket PDL Sets the default page description language interpreter for the Ethernet
EtherTalk Enable Sets the Ethernet EtherTalk protocol.
HTTP Enable Sets the Ethernet HTTP Server protocol.
IPP Enable Sets the Ethernet IPP protocol.
SMB Enable Sets the Ethernet SMB protocol.
AppSocket interface.
Values:
Auto (default)
PCL
PostScript
Note
To submit TIFF and PDF files to the printer, this value must be
Auto.
Values:
On (default)
Off
Values:
On (default)
Off
Values:
On (default)
Off
Values:
On (default)
Off
SMB PDL Sets the default page description language interpreter for the Ethernet SMB
Port Timeout Sets the time for determining when to end an incomplete print job and poll
protocol.
Values:
Auto (default)
PCL
PostScript
Note
To submit TIFF and PDF files to the printer, this value must be
Auto.
the next port in the polling sequence. This menu item also causes an implicit
job end (such as Control D in PostScript or <ESC> E in PCL) and invokes the
emulation functions associated with this action (e.g., formfeed, reset, etc.).
Values (in seconds):
5 - 300
The value changes by 1 each time you press either the Value Up or
Value Down key (labeled 3 and 7). Hold down either key to scroll quickly
through the values.
(default is 60)
Advanced Features and Troubleshooting Manual 45
Page 59

Managing Printer Usage
Ethernet Menu Items (cont'd.)
Menu Items Description
Speed Sets the speed of the 100 Mbit Ethernet interface.
Values:
(default)
Auto
10/HALF
10/FULL
100/HALF
100/FULL
Reset Network
Setup
where
Resets network parameters (including the Novell PServer Name, the TCP/IP
Address, and other associated Ethernet parameters) to factory default values.
Values:
= half duplex and
HALF
FULL
= full duplex
Yes
(default)
No
46 Phaser 2135 Color Printer
Page 60

Novell Menu
Sets Novell parameters.
Novell Menu Items
Menu Items Description
Managing Printer Usage
Print Connect
Setup Page
Print Configuration
Page
Novell Enable Sets the Novell protocol.
NDS Tree Sets the NDS Tree character string (from 0 to 63 characters in length).
Prints a page that provides instructions for connecting the printer to a
computer or network.
Prints the Configuration Page showing the printer's current information and
menu settings. It lists the printer name, software revision level,
communication parameter settings, options installed, current option settings
in the front panel’s menu system, and print counts.
Values:
On (default)
Off
Values:
Null (default)
A - Z, 0 - 9, hyphen (
Note
Once the front panel shows NDS Tree on the top line, use the
Value Up or Value Down key (labeled 3 and 7) to scroll to the
desired value at the cursor location. To move the cursor, use the
Item Up or Item Down key (labeled 2 and 6). Thus, you can change
characters within the string rather than having to re-enter the
entire string.
From any cursor position, you can null out (delete) to the end of
the string by selecting the space character with the Value Up or
Value Down key (labeled 3 and 7) and then pressing the Enter key
(labeled 4).
), and underscore (_)
-
If you make a change in this menu item, turn off the printer, wait
15 seconds, then turn on the printer.
Advanced Features and Troubleshooting Manual 47
Page 61

Managing Printer Usage
Novell Menu Items (cont'd.)
Menu Items Description
NDS Context Sets the NDS context string (from 0 to 127 characters in length).
Values:
Null (default)
A - Z, 0 - 9, hyphen (
Note
Once the front panel shows NDS Context on the top line, use the
Value Up or Value Down key (labeled 3 and 7) to scroll to the
desired value at the cursor location. To move the cursor, use the
Item Up or Item Down key (labeled 2 and 6). Thus, you can change
characters within the string rather than having to re-enter the
entire string.
From any cursor position, you can null out (delete) to the end of
the string by selecting the space character with the
Value Down key and then pressing the Enter key (labeled 4).
If you make a change in this menu item, turn off the printer, wait
15 seconds, then turn on the printer.
), period (.), and underscore (_)
-
Value Up
or
Frame Type Sets the frame type used for the Novell protocol.
Values for Ethernet:
Auto (default)
802.2
802.3
SNAP
Ethernet II
Polling Interval Sets the rate (in seconds) at which the PServer issues polling requests for
assigned queues.
Values (in seconds):
1 - 29
The value changes by 1 each time you press either the Value Up or
Value Down key (labeled 3 and 7). Hold down either key to scroll quickly
through the values.
(default is 2)
48 Phaser 2135 Color Printer
Page 62

Novell Menu Items (cont'd.)
Menu Items Description
Managing Printer Usage
Primary Server Sets the name of the Primary file server (a name of 2 to 47 characters in
Novell PDL Sets the default page description language interpreter for the Novell
length).
Values:
Null (default)
A - Z, 0 - 9, hyphen (
Note
Once the front panel shows Primary Server on the top line, use
the Value Up or Value Down key (labeled 3 and 7) to scroll to the
desired value at the cursor location. To move the cursor, use the
Item Up or Item Down key (labeled 2 and 6). Thus, you can change
characters within the server name rather than having to re-enter
the entire server name.
From any cursor position, you can null out (delete) to the end of
the string by selecting the space character with the
Value Down
If you make a change in this menu item, turn off the printer, wait
15 seconds, then turn on the printer.
interface.
Values:
Auto (default)
PCL
PostScript
), and underscore (_)
-
key and then pressing the
key (labeled 4).
Enter
Value Up
or
Note
To submit TIFF and PDF files to the printer, this value must be
Auto.
PServer Mode Sets the PServer mode for the Novell protocol.
Values:
NDS
BEM
NDS/BEM (default)
Advanced Features and Troubleshooting Manual 49
Page 63

Managing Printer Usage
Novell Menu Items (cont'd.)
Menu Items Description
PServer Name Sets the name of the PServer in this printer (a name of 2 to 47 characters in
Reset Network
Setup
length).
Values:
XRX_<MAC address>
A - Z, 0 - 9, hyphen (
Note
Once the front panel shows PServer Name on the top line, use
the Value Up or Value Down key (labeled 3 and 7) to scroll to the
desired value at the cursor location. To move the cursor, use the
Item Up or Item Down key (labeled 2 and 6). Thus, you can change
characters within the Pserver name rather than having to re-enter
the entire name.
From any cursor position, you can null out (delete) to the end of
the string by selecting the space character with the
Value Down
Resets network parameters (including the Novell PServer Name, the TCP/IP
Address, and other associated Novell parameters) to factory default values.
Values:
Yes
No (default)
(default)
), and underscore (_)
-
key and then pressing the
key (labeled 4).
Enter
Value Up
or
50 Phaser 2135 Color Printer
Page 64

Printer Setup Menu
Sets general printer features.
Printer Setup Menu Items
Menu Items Description
Managing Printer Usage
Print Configuration
Page
Language Sets the language used for front panel display messages and generated reports.
Power Saver Specifies the number of minutes of inactivity before the printer enters a
Prints the Configuration Page which shows the printer's current information
and menu settings. It lists the printer name, software revision level,
communication parameter settings, options installed, current option settings
in the front panel’s menu system, and print counts.
Values:
English
Português
Français
Italiano
Deutsch
Español
Nederlands
Svensk
Note
English is the initial value, which is used when the printer is
powered up for the first time. However, even when you perform a
“Factory Default” reset, the language setting will change back to
English.
low-power state.
Values:
15
30
60 (default)
90
120
180
240
Note
If you never want the printer to enter Power Saver Mode, use the
Disable Power Saver menu item, see page 54.
Startup Page Enable Specifies whether a startup page prints each time the printer restarts.
Values:
On (default)
Off
Advanced Features and Troubleshooting Manual 51
Page 65

Managing Printer Usage
Printer Setup Menu Items (cont'd.)
Menu Items Description
Paper Loading
Timeout
Color Mode Sets the color mode.
Specifies how long the printer should wait and prompt the user on the front
panel when a requested size/type/tray combination does not exist on the
printer. If media is not loaded as requested, the printer will timeout and
automatically print the job using paper from another tray. Once the timeout
expires, the printer attempts to match the size and type as closely as possible.
Finally, it will use whatever tray is available, starting with Tray 1.
Values:
Immediate
30 seconds
1 minute
2 minutes
3 minutes (default)
5 minutes
2 minutes
10 minutes
Never
Values:
Automatic (default)
GrayScale
None
Fax Friendly
ICC Perceptual
ICC Saturation
ICC Colorimetric
CMYK Simulation
For more information on color modes, see page 24.
Print Mode Sets the print quality.
Values:
Standard (600 x 600 dpi)
Enhanced (1200 x 600 dpi) (default)
2-Sided Printing Enables/disables 2-sided printing for PostScript and PCL jobs. (This menu
item only appears if the printer has the Duplex Module installed.)
Values:
Off (default)
Long Edge (bind on long edge)
(bind on short edge)
Short Edge
Note
Job Offset Enables/disables offsetting of jobs in the top output tray.
Values:
Off
On (default)
Note
For more information on duplex printing and choosing Long Edge
or Short Edge, see page 20.
This setting does not affect the side output tray.
52 Phaser 2135 Color Printer
Page 66

Printer Setup Menu Items (cont'd.)
Menu Items Description
Managing Printer Usage
Default Paper Size Sets the default paper size used in all print jobs that do not have page size
Default Paper Type Sets the default paper type used in PostScript and PCL.
information.
Values:
11 x 8.5" Letter*
8.5 x 14" Legal
11 x 17" Ledger/Tabloid
7.25 x 10.5" Executive
8.5 x 13" Folio
12 x 18" Tabloid Plus
10 x 8" Quatro
8 x 13"
5.5 x 8.5" Statement
A4 297 x 210 mm*
A3 297 x 420 mm
A5 148 x 210 mm
A6 105 x 148 mm
* When Inches is set as the Default Units value, the default size is
11 x 8.5" Letter. When Millimeters is set as the Default Units
value and the default size is A4 297 x 210 mm in the Printer Setup
Menu.
Values:
Plain Paper (default)
Heavy Paper
Phaser 2135 Transparency
Glossy Paper
Thick Card Stock
JIS B4 257 x 364 mm
JIS B5 257 x 182 mm
SRA3 320 x 450 mm
A3 Nobi 328 x 450 mm
SP Folio 215 x 315 mm
No. 10 Env 9.5 x 4.13"
DL Env 220 x 110 mm
Monarch Env 7.5 x 3.88"
C4 Env 324 x 229 mm
C5 Env 229 x 162 mm
B5 Env 250 x 179 mm
12 x 9" Envelope
Thin Card Stock
Labels
Envelopes
Light Paper
Default Units Specifies the type of factory defaults to use when a “Reset System Menu” is
performed.
Values:
Inches
Millimeters
Note
When set to Inches, the default Paper Size value is
11 x 8.5" Letter; the default Multi-Sheet Bypass Feeder (MBF)
Size is set to 11 x 8.5" Letter; the default Form Length is set to
60.
When set to Millimeters, the default Paper Size value is set to
A4 297 x 210 mm; the default Multi-Sheet Bypass Feeder (MBF)
Size is set to A4 297 x 210 mm; the default Form Length is set to
64.
Print Quantity Sets multiple copies of each page when specified in the driver (not collated
sets).
Values:
1 - 999
Note
(default is 1)
The number changes incrementally by 1 each time you press either
the Value Up or Value Down key (labeled 3 and 7). To scroll quickly
through the numbers, hold down either key.
Advanced Features and Troubleshooting Manual 53
Page 67

Managing Printer Usage
Printer Setup Menu Items (cont'd.)
Menu Items Description
Disable Power
Saver
Reset Printer Setup
Menu
Sets the Power Saver Timeout to an infinite value, so the power saver never
turns on.
Values:
Yes (Power Saver disabled)
(default)
No
Resets the printer operating parameters to factory default values. (Doesn’t
reset the consumable counters, the installation dates, or the network settings.)
Values:
Yes
No (default)
54 Phaser 2135 Color Printer
Page 68

Print Menu
Generates printer reports.
Print Menu Items
Menu Items Description
Managing Printer Usage
Graphics
Demonstration
Office
Demonstration
2-Sided
Demonstration
Print CMYK
Sampler Pages
Print RGB Sampler
Pages
Print Menu Map Prints a report showing the structure of the front panel menus.
Prints a sample page demonstrating the printer's graphics capabilities. This
page contains primarily graphics.
1 - 999
Note
Prints a sample page demonstrating the printer's office printing capabilities.
This page contains both text and graphics.
1 - 999
Note
Prints a sample page demonstrating 2-sided printing. The Graphics
Demonstration is on one side and the Office Demonstration is on the other.
1 - 999
Note
Prints sample pages using CMYK color palette.
Prints sample pages using RGB color palette.
(default is 1)
The number changes incrementally by 1 each time you press
either the
quickly through the numbers, hold down either key.
The number changes incrementally by 1 each time you press
either the Value Up or Value Down key (labeled 3 and 7). To scroll
quickly through the numbers, hold down either key.
The number changes incrementally by 1 each time you press
either the Value Up or Value Down key (labeled 3 and 7). To scroll
quickly through the numbers, hold down either key.
Value Up
(default is 1)
(default is 1)
or
Value Down
key (labeled 3 and 7). To scroll
Print Quality Tips
Page
Print Startup Page Prints the page that is automatically printed on startup, if not disabled.
Print Configuration
Page
Print PS Font List Prints a complete list of all PostScript language typefaces currently loaded,
Print PCL Font List Prints a list of PCL fonts currently loaded, including resident fonts and fonts
Print Disk Directory Prints a copy of the disk directory, which lists disk statistics and the disk
Prints a report giving print quality tips.
Prints the Configuration Page which shows the printer's current information
and menu settings. It lists the printer name, software revision level,
communication parameter settings, options installed, current option settings
in the front panel’s menu system, and print counts.
including printer resident fonts and fonts stored on the hard disk.
stored on the hard disk.
space used and remaining, including fonts, forms, and macros.
Advanced Features and Troubleshooting Manual 55
Page 69

Managing Printer Usage
Print Menu Items (cont'd.)
Menu Items Description
Select Tray Selects the source tray from which reports are printed.
Values:
Tray 1 (default)
Tray 2
Tray 3
Tray 4
Tray 5
Multi-Sheet Bypass Feeder
56 Phaser 2135 Color Printer
Page 70

Support Menu
Provides tools and information to help troubleshoot problems.
Support Menu Items
Menu Items Description
Managing Printer Usage
Print Help Guide Prints a report giving helpful hints for solving printer problems. It also
Print Diagnostic
Pages
Print Warranty
Page
Remove Print
Smears
Print Paper Tips
Page
Print Quality Tips
Page
Print Test Patterns Prints the system test patterns:
directs you to the appropriate resources.
Prints the Diagnosing Print Quality Problems Page to help solve print-quality
problems.
Prints a copy of the printer warranty.
Prints three blank pages to clean off extra toner.
Prints a report giving paper tips to ensure the best print quality and to avoid
paper jams.
Prints a report giving print quality tips.
Values:
100% Stripe
PS Pattern A
PS Pattern A Large
Color Balance
Gray Halftone
Blank
Black Step
Cyan Step
Magenta Step
Yellow Step
Print Artifact Scale
Print All Patterns (default)
Adjust Left Margin Increases the left margin on the printed page by moving the image the
Adjust Top Margin Increases the top margin on the printed page by moving the image the
specified number of millimeters to the right.
Values (in millimeters):
(default is 0, no change)
-10 - +10
Note
specified number of millimeters downward.
Values (in millimeters):
-10 - +10
Note
A negative value moves the image towards the left on the printed
page.
(default is 0, no change)
A negative value moves the image upward on the printed page.
Advanced Features and Troubleshooting Manual 57
Page 71

Managing Printer Usage
Support Menu Items (cont'd.)
Menu Items Description
Show S/W Levels On the front panel, displays the current software versions (or levels):
Adobe PostScript
Boot Date
Engine Version
Use the Value keys (labeled 3 and 7) to scroll through the displayed values.
Show Active Faults On the front panel, displays all active (current) faults, from highest priority
to lowest priority.
Use the Value keys (labeled 3 and 7) to scroll through the displayed values.
Show Event History On the front panel, displays the last 50 printer events.
Use the
recent is displayed first.
keys (labeled 3 and 7) to scroll through the events. The most
Value
Print Service Pack Prints the system test patterns and configuration pages used by the Xerox
Reset NVRAM Resets all printer and network operating parameters to factory default values.
service organization:
Printer Diagnostics Page
Configuration Page
Network Diagnostics Page
System Event Log
This doesn’t reset the consumable counters or the installation dates.
Values:
Yes
No (default)
Note
This is the same as performing both the Reset Factory
Defaults and Reset Network Defaults menu items from the
Reset menu.
58 Phaser 2135 Color Printer
Page 72

Managing Printer Usage
Color Adjust Menu
Allows you to make fine adjustments to the printer’s color rendering. When you scroll to
Color Adjust Menu, press the Item Up or Item Down key (labeled 2 or 6) to scroll to the
Print Color Adjustment Test Page and press Enter to print. Use this print to determine the
settings to adjust. After you make the adjustments, use the Exit menu item (instead of the
On Line
Color Adjust Menu Items
key) to exit the Color Adjust menu.
Menu items Description
Print Color
Adjustment Test
Page
Black Density Specifies a fine adjustment of black density.
Color Density Specifies a fine adjustment of color density.
Prints the Color Balance page.
Values:
-3K
-2K
-1K
0 (current state)
+1K
+2K
+3K
The value zero (0) represents the current state (i.e., no change will be made).
When you change the value, the printer prints another test print for your
evaluation.
Values:
-3CMY
-2CMY
-1CMY
(current state)
0
+1CMY
+2CMY
+3CMY
The value zero (0) represents the current state (i.e., no change will be made).
When you change the value, the printer prints another test print for your
evaluation.
Color Balance Specifies a fine adjustment of color balance (i.e., no change will be made).
Values:
0, 1, 2, 3, 4, 5, 6, 7, 8, 9, 10, 11, 12
The value zero (0) represents the current state.
When you change the value, the printer prints another test print for your
evaluation.
Advanced Features and Troubleshooting Manual 59
Page 73

Managing Printer Usage
Color Adjust Menu Items (cont'd.)
Menu items Description
Exit and Accept
Changes
Color Defaults Resets all color adjustment items to their factory default values.
Saves all changes made to color adjustment values during the current session
and exits the Color Adjust menu.
Values:
Yes
No
(default)
Note
Once in the Color Adjust menu, if you press the On Line
(labeled 0) key or a Menu key, you automatically go to this menu
item. You must press the Value Up or Value Down key
(labeled 3 or 7) to choose yes then press the Enter key to save and
exit.
Values:
Yes
No
(default)
When you choose to reset the values to factory defaults, the printer prints
another test print based on those factory default values.
60 Phaser 2135 Color Printer
Page 74

PostScript Menu
Sets options for the parallel port connection.
PostScript Menu Items
Menu Items Description
Color Mode Sets the color mode.
Values:
Automatic (default)
GrayScale
None
Fax Friendly
ICC Perceptual
ICC Saturation
ICC Colorimetric
CMYK Simulation
For more information on color modes, see page 24.
Print Mode Sets the print quality.
Values:
Standard (600 x 600 dpi)
Enhanced
(1200 x 600 dpi) (default)
Managing Printer Usage
Black Overprint Enables/disables the Black Overprint function.
Values:
On (default)
Off
Process Grayscale Enables/disables the Process Grayscale graphics function.
Values:
On
Off (default)
Print PS Errors Specifies whether to use PostScript’s built-in error handler/debugger.
Values:
On (default)
Off
Advanced Features and Troubleshooting Manual 61
Page 75

Managing Printer Usage
PCL Menu
Sets the default configuration for the printer when printing PCL emulation jobs.
PCL Menu Items
Menu Items Description
Font Number Sets the ID for the default font in PCL.
Values:
(default is 0)
0 - 46
Note
Pitch Sets the pitch of the default font in PCL when the default font is a scalable
fixed-pitch font.
Values:
00.44 - 99.99 (default is 10.0)
These value numbers are assigned by the printer and should not
be confused with the user-defined ID numbers associated with
font downloading (creation).
To scroll quickly through the font values, hold down the Value Up
or
Value Down
key (labeled 3 and 7).
Note
The pitch changes incrementally by .01 each time you press either
the Value Up or Value Down key (labeled 3 and 7). To scroll
quickly through the pitch values, hold down either key.
Point Size Sets the point size of the default font in PCL when the default font is a
scalable proportional-spaced font.
Values:
4.00 - 999.75 (default is 12.00)
Note
The point size changes incrementally by .25 each time you press
either the
down either key to scroll quickly through the point sizes.
Value Up
or
Value Down
key (labeled 3 and 7). Hold
62 Phaser 2135 Color Printer
Page 76

Managing Printer Usage
PCL Menu Items (cont'd.)
Symbol Set Sets the default font symbol set used in PCL. The symbol set is a collection of
characters available for a font, including uppercase and lowercase alphabets,
punctuation marks, and special characters (such as open and close quotation
marks or international characters).
Values:
Desktop
ISO L1
ISO L2
ISO L5
ISO-4
ISO-6
ISO-11
ISO-15
ISO-17
ISO-21
ISO-60
ISO-69
Legal
Math-8
Ms Publ.
PC-8 (default)
PC-8 DN
Orientation Sets the default orientation used in PCL.
Values:
Portrait (default)
Landscape
Form Length Sets the default number of lines per page used in PCL. This value is linked to
paper size. Whenever the paper size is changed, the Form Length is
recalculated using the formula:
Form Length = ((logical page length in inches - 1 inch)*6)
Values:
005 - 128 (default is 60 in USA, 64 in Europe)
PC-8 Tk
PC-850
PC-852
Pi Font
PS Math
PS Text
Roman-8
Vn Int’l.
Vn Math
Win 3.0
Win L1
Win L2
Win L5
ISO Latin Cyrillic
PC Cyrillic
Note
The form length changes incrementally by 1 each time you press
either the Value Up or Value Down key (labeled 3 and 7). To scroll
quickly through the lengths, hold down either key.
Line Termination Causes an additional carriage return after every Line Feed that appears in the
PCL text (<LF>=<CR><LF> line termination mode).
Values:
Off (default)
On
Advanced Features and Troubleshooting Manual 63
Page 77

Managing Printer Usage
Parallel Menu
Sets options for the parallel port connection.
Parallel Menu Items
Menu Items Description
Port Enable Sets the parallel port.
Values:
On (default)
Off
Port Timeout Sets the time for determining when to end an incomplete print job and poll
Parallel PDL Sets the default page description language interpreter for the parallel port.
Bidirectional Sets bi-directional communications through the parallel port.
the next port in the polling sequence. This menu item also causes an implicit
job end (such as Control D in PostScript or <ESC> E in PCL) and invokes the
emulation functions associated with this action (e.g., formfeed, reset, etc.).
Values (in seconds):
5 - 300 (default is 30)
The value changes by 1 each time you press either the Value Up or
Value Down
through the values.
Values:
Auto (default)
PCL
PostScript
Note
Values:
On (default)
Off
key (labeled 3 and 7). Hold down either key to scroll quickly
To submit TIFF and PDF files to the printer, this value must be
Auto.
64 Phaser 2135 Color Printer
Page 78

Managing Printer Usage
Password menu
Prints or deletes proof print or secure print jobs. (This menu is only available when the
optional hard disk drive is installed in the printer.)
When you see Password Menu and press either the
Item Up
or
Item Down
key (labeled 2
and 6), you are prompted to enter the password:
Enter Password
xxxx
Using the front panel key, type the four-digit password you assigned to the print job(s).
Then, press the
Item Up
or
Item Down
key
(labeled 2 or 6)
to select the job that you want to
print. See Printing Secure Print and Proof Print Jobs on page 37.
Password Menu Items
Menu items Description
All Jobs Prints or deletes all jobs sent with that specific password.
Values:
Print (default)
Delete
Filename n Prints or deletes the job with that filename and that specific password.
Values:
Print (default)
Delete
Note
If there are no jobs stored under the password that you typed, a No Jobs message
displays.
Advanced Features and Troubleshooting Manual 65
Page 79

Managing Printer Usage
Special Operating Modes
You can place the printer in a special operating mode, which includes the Reset menu, by
turning on the printer while simultaneously holding down two keys on the front panel.
Keys 0 and 4 — Enables access to the Reset Menu on the front panel. The Reset Menu
■
is not normally shown, since it contains menu items that format devices and reset
values to the factory default values.
To exit this mode (and remove access to the Reset Menu), turn off the printer and turn
it on again.
Note
You should use the CRC (customer replaceable consumables) Reset menu item
on the Reset menu only if the printer did not correctly reset the life of a newly
installed CRC.
Reset Menu
Resets certain printer settings. To access this menu, you must power on the printer while
holding down the
On Line
and
keys (labeled 0 and 4).
Enter
Reset Menu Items
Menu Items Description
Factory Defaults Resets the printer operating parameters to factory default values. (This
Network Defaults Resets certain network parameters (including the Novell PServer Name, the
Delete All Jobs Deletes all Secure Print and Proof Print jobs from the hard disk.
doesn’t reset the consumable counters, the installation dates, or the network
settings.)
Values:
Yes
No (default)
TCP/IP Address, and other associated Ethernet parameters) to factory default
values.
Values:
Yes
No (default)
Values:
Yes
No (default)
Note
This menu item appears only if the optional hard drive is
installed.
66 Phaser 2135 Color Printer
Page 80

Reset Menu Items (cont'd.)
Menu Items Description
Disk Initialize Initializes the directory on the hard drive.
Values:
Yes
No (default)
Note
This menu item appears only if the optional hard drive is
installed.
Managing Printer Usage
Disk Format Performs a complete format of the hard drive. This is only necessary if the
CRC Reset Changes the counter values back to zero for the selected Customer
hard disk was not previously formatted.
Values:
Yes
No (default)
Note
This menu item appears only if the optional hard drive is
installed.
Replaceable Consumables (CRC).
Values:
Black Imaging Drum
Cyan Imaging Drum
Magenta Imaging Drum
Yellow Imaging Drum
Fuser
Transfer Belt
Advanced Features and Troubleshooting Manual 67
Page 81

Managing Printer Usage
Front Panel Locks
Using CentreWare Internet Services or CentreWare DP, you can lock some of the menus on
the front panel. When the front panel is locked, users can browse but not change the front
panel settings on certain menus.
You can lock the following menus:
Ethernet Menu
■
Novell Menu
■
Parallel Menu
■
PCL Menu
■
PostScript Menu
■
Printer Setup Menu
■
You cannot lock the following menus. Users can browse and change values on these front
panel menus:
Color Adjust Menu
■
Password Menu
■
Print Menu
■
Print Menu Map
■
Printer Identification
■
Reset Menu
■
Supplies Info Menu
■
Support Menu
■
68 Phaser 2135 Color Printer
Page 82

Managing Printer Usage
Using Printer Management Software
Network Printer Services
Three print service utilities are available for the installation and management of your
printer:
CentreWare DP
■
CentreWare Internet Services
■
CentreWare MC
■
Each of these services provides you with the capability to easily and quickly accomplish
the following tasks with your printer from your workstation:
Check printer status.
■
Remotely configure, monitor, and manage the printer.
■
Set printer defaults.
■
Perform printer maintenance diagnostics remotely.
■
Upgrade the software on your printer.
■
CentreWare DP
CentreWare DP is network print management software designed for the network
administrator. It provides a single point of administration for all Xerox desktop and
network printers, including your Phaser 2135 printer. You can quickly install, connect,
and configure the printer on a network. It simplifies setup procedures and the
management of network printers is virtually effortless. CentreWare DP supports a number
of key network environments, including NetWare and Windows NT.
For more information on the operation and use of CentreWare DP, refer to the
CentreWare DP User Guide (on the Printer Management Software CD-ROM).
CentreWare MC
CentreWare MC enables you to find all web-enabled printers on the network. It also
enables you to remotely manage and configure the printer. The web server for Xerox
printers is CentreWare Internet Services.
CentreWare Internet Services
CentreWare Internet Services is an interactive service that extends the capabilities of
CentreWare DP using internet technology. It provides another method for installing,
configuring, and managing your printer. You can access the features in CentreWare
Internet Services through Netscape Navigator, Microsoft Internet Explorer, or any other
enabled web browser by using the printer’s IP address as the URL. You can then monitor
the status of the printer and access context-sensitive on-line assistance.
Advanced Features and Troubleshooting Manual 69
Page 83

Managing Printer Usage
For system administrators, CentreWare Internet Services provides a faster and more
productive way to install and upgrade software on the printer. It also provides a wide
range of printer support information via links to Internet web sites.
Setup
To set up your printer for internet/intranet access, you need to configure an IP address for
the printer on your network. For more information, refer to IP Address Resolution (on
page 43) for connecting to an Ethernet network.
To use the Mail Send/Receive feature set, you must:
Create a mail account for the printer.
■
Configure the printer’s MaiLinX feature to use that mail account via CentreWare
■
Internet Services. (To launch CentreWare, enter the printer’s IP Address as the URL in
your browser).
Install and configure the Xerox Mail Port Monitor on client workstations.
■
Note
For more information on the operation and user of CentreWare Internet Services,
refer to the CentreWare Internet Services User Guide on the Printer Management
Software CD-ROM.
70 Phaser 2135 Color Printer
Page 84

Regular Printer Maintenance
Regular Printer Maintenance
Your printer is designed to need very little ongoing maintenance other than periodic
cleaning of the LED bars and replacement of Customer Replaceable Consumables (CRCs):
Toner cartridges (black, cyan, magenta and yellow)
■
Imaging drums (black, cyan, magenta and yellow)
■
Transfer belt
■
Fuser cartridge
■
LED bars need to be cleaned at each toner cartridge replacement, and cleaning instructions
are included with the replacement toner cartridge.
Note
To avoid unnecessary printer downtime, order extra CRC’s when the "near end of
life" warnings display on the front panel. You must replace the CRC when the
"end of life" warning messages display. Instructions for replacing the CRCs
accompany each item.
Caution
For optimum performance, keep the printer and customer replaceable
consumables (CRCs) out of direct sunlight. Faded images, light areas or dark
bands may result. Do not place the printer near vents or dust-producing
equipment.
Cleaning the Printer
Although not necessary for printer performance, you may wish to clean the outside of the
printer with a damp cloth.
Note
Power off the printer before cleaning the external surfaces at the rear of the
printer.
Caution
Do not use detergents or solvents when cleaning the printer.
Advanced Features and Troubleshooting Manual 71
Page 85

Adjusting Color Density and Balance
Adjusting Color Density and Balance
Over the life of the printer, colors may change. For example, reds may begin to take on a
purple cast, or blues may take on a green cast. This happens during the normal use of a
color printer and can be easily remedied by using the color adjustment procedure
described in this section.
Caution
Use caution when making adjustments. Once you have made an adjustment, you
cannot undo the changes. You can return the values to the factory defaults.
Note
Perform this procedure monthly to help correct any color shifts.
This front panel procedure involves printing a test page and adjusting the densities and
colors based on the appearance of the test page. You may need to repeat this procedure
and test your adjustments until you achieve the desired effect.
Note
At any time, you can reset the printer to the factory defaults by selecting Color
Defaults from the Color Adjust Menu.
Refer to the Front Panel Menus section on page 40 for more information about the front
panel.
Printing a Test Page
1. Press Menu Up or Menu Down until you see:
Menus
Color Adjust Menu
2. Press Item Up or Item Down.
You will see:
Color Adjust Menu
Print Color Balance Page
3. Press Enter.
The printer prints the Color Balance test page.
72 Phaser 2135 Color Printer
Page 86

Adjusting Color Density and Balance
Interpreting the Test Print
The Color Balance test print contains numbered images that indicate possible adjustments
that can be made. You can choose to make an adjustment to the Black Density, the Color
Balance, or the Color Density.
The Black Density Images, numbered -3K...0,...+3K, show a lightness/darkness range
■
using black only.
The Color Balance Images, numbered 0,1,2,...12, show variations of three-color gray.
■
Each of these circles contains gray with tints of other colors.
The Color Density Images, numbered -3CMY...0,...+3CMY, show a lightness/darkness
■
range using three colors (cyan, magenta, yellow).
C/
Front Panel Keys used to make Color and
Color and Density Adjustment Test Page Graphics
Density adjustments.
Making Adjustments
Use the following procedures to make adjustments to the color density and balance:
Black Density Adjustment
1. Identify the square where the bar and background patterns blend together. If this
square is the Current (0) square, no adjustment is needed. Continue to Color Balance
Adjustment.
Advanced Features and Troubleshooting Manual 73
Page 87

Adjusting Color Density and Balance
2. Press Item Up or Item Down (labeled 2 and 6) until you see:
Color Adjust Menu
Black Density
3. Press Value Up or Value Down (labeled 3 and 7) until the Value is equal to the
number of the square identified in step 1.
Black Density =
New Value
4. Press Enter (labeled 4). The Color Adjust Page prints showing you the changes that
resulted from the previous steps and the front panel displays:
Color Adjust Menu
Black Density
5. Repeat Steps 3 and 4 above until the bar and background patterns in the Current (0)
square blend together.
Color Balance Adjustment
1. Identify the numbered circle that most closely matches the gray of the background. If
this square is the Current (0) square, no adjustment is needed. Continue to Color
Density Adjustment.
2. Press Item Up or Item Down (labeled 2 and 6) until you see:
Color Adjust
Color Balance
3. Press Value Up or Value Down (labeled 3 and 7) until you see the number of the
circle that you identified in step 1.
Color Balance =
New Value
4. Press Enter (labeled 4). The Color Adjust Page prints showing you the changes that
resulted from the previous steps and the front panel displays:
Color Adjust Menu
Color Density
5. Repeat Steps 3 and 4 above until the bar and background patterns in the Current (0)
square blend together.
74 Phaser 2135 Color Printer
Page 88

Adjusting Color Density and Balance
Color Density Adjustment
1. Identify the square where the bar and background patterns blend together. If this
square is the Current (0) square, no adjustment is needed. Continue to Exiting the
Menu.
2. Press Item Up or Item Down (labeled 2 and 6) until you see:
Color Adjust Menu
Color Density
3. Press Value Up or Value Down (labeled 3 and 7) until he Value is equal to the number
of the square identified in step 1:
Color Density =
New Value
4. Press Enter (labeled 4). The Color Adjust Page prints showing you the changes that
resulted from the previous steps and the front panel displays:
Color Adjust Menu
Color Density
5. Repeat Steps 3 and 4 above until the bar and background patterns in the Current (0)
square blend together.
Adjustment Recovery
While in the color adjustment routine you can choose to return the values to the factory
default values by using the Color Adjust menu’s Color Defaults item.
The printer will be restored to the factory default values.
Exiting the Menu
Using the item keys (labeled 2 and 6), scroll to "Exit and Accept Changes", use the Value
Keys (labeled 3 and 7) to scroll to Yes. If you press the On-line Key or a Menu key (labeled
1 or 5), while you are in the Color Adjust menu, you automatically go to this Menu item.
You must then use the Value keys (labeled 3 and 7) to scroll to "Yes" and press the Enter
(labeled 4) key to save and exit.
Note
Once you have made an adjustment, you cannot undo the changes. You can
return the values to the factory defaults.
Advanced Features and Troubleshooting Manual 75
Page 89

Troubleshooting
Troubleshooting
Before You Begin Troubleshooting
If it becomes necessary for you to take corrective actions, note the following safety tips and
then begin your troubleshooting by checking for possible hardware, software, and printer
maintenance issues.
Caution
Do not use tools or sharp objects to clear paper jams since this may damage the
printer
Caution
Do not touch the bottom surface of the imaging drum. Touching these surfaces
may damage them.
2135-18
76 Phaser 2135 Color Printer
Page 90

Troubleshooting
Caution
Avoid contact with the printer’s fuser rollers, which may be hot.
°F
°C
0
32
2135-19
Also, be sure to observe the safety guidelines and recommendations provided in the User
safety summary.
If your printer is not operating properly, make sure that the following hardware and
software issues have been considered.
Hardware
Is the printer plugged in?
■
Is the printer switched on?
■
Is the printer on-line?
■
Does the printer have proper clearance? For further information, refer to the User
■
safety summary.
Is the printer operating within the specified environmental conditions (i.e.,
■
temperature and humidity)? For further information, refer to the User safety
summary.
Is the printer connected to a computer or network?
■
Software
Is the correct printer driver installed on the workstation?
■
Is your driver properly configured for the destination printer? For further information,
■
refer to Printing Options on page 16.
Printer Maintenance
An improperly seated tray or an open cover will prevent printing. You can avoid these
problems by regularly taking the following precautions.
Insert media trays properly and securely.
■
Keep covers securely closed.
■
Advanced Features and Troubleshooting Manual 77
Page 91

Troubleshooting
Customer Replaceable Consumables (CRCs)
Expended consumables (toner cartridges, imaging drums, fuser, transfer belt) will prevent
printing.
Maintain a supply of consumables (especially toner cartridges).
■
Replace consumables when prompted by the printer
■
Note
Specific instructions for replacing each consumable are included with the
individual replacement packages.
Front Panel Messages
Your printer displays messages on the front panel when operator intervention is required.
The two-line display of the front panel provides information about the condition of the
printer and the suggested or required course of action.
There are two types of messages that require action:
Fault messages appear when the printer stops due to a malfunction, such as a paper
■
jam. Action must be taken to resolve the fault.
Attention messages do not stop the printer, but warn of action that should be taken to
■
avert a shutdown.
The following table lists fault and attention messages in alphabetical order, along with an
explanation and corrective action.
Front Panel Messages
Message Type Explanation/Corrective Action
Check Tray
[Check Tray 1]
[Check Tray 2]
[Check Tray 3]
[Check Tray 4]
[Check Tray 5]
No Tray Present
Control Panel Error U15
Power Off/On
Engine PU Fan Error U8
Power Off/On
Fault The specified tray is not installed. Make sure the
tray is fully inserted.
Fault An error has been detected with the front panel
interface and communication path. Turn off the
printer, wait 15 seconds, then turn on the printer. If
the problem persists, check the support links at:
www.xerox.com/officeprinting/infoSMART.
Fault An error has been detected with a cooling fan. Turn
off the printer, wait 15 seconds, then turn on the
printer. If the problem persists, check the support
links at:
www.xerox.com/officeprinting/infoSMART.
78 Phaser 2135 Color Printer
Page 92

Front Panel Messages (cont'd.)
Troubleshooting
Disk Read [Write] Error
Press Enter To Clear
Drum Error
[Black Drum Error U29]
[Cyan Drum Error U28]
[Magenta Drum Error U27]
[Yellow Drum Error U26]
Reseat Drum
Imaging Drum Missing
[Black Imaging Drum Missing]
[Cyan Imaging Drum Missing]
[Magenta Imaging Drum
Missing]
[Yellow Imaging Drum
Missing]
Reseat Drum
Drum
[Black Drum]
[Cyan Drum]
[Magenta Drum]
[Yellow Drum]
Near End Of Life
Duplex I/F Error U12
Power Off/On
Engine Control Error U5
Power Off/On
Attention There was a hard disk read error that prevented the
data from being read. Press the Enter button to clear
the message. Turn off the printer, wait 15 seconds,
then turn on the printer. If the problem persists,
check the support links at:
www.xerox.com/officeprinting/infoSMART.
Fault The imaging drum is either missing or must be
reseated to be recognized by the printer. Turn off the
printer, make sure the imaging drum is properly
installed, then turn on the printer. If the problem
persists, replace the corresponding imaging drum. If
you need more help, check the support links at:
www.xerox.com/officeprinting/infoSMART.
Fault The imaging drum is either missing or must be
reseated to be recognized by the printer. Turn off the
printer, make sure the imaging drum is properly
installed, then turn on the printer. If the problem
persists, install a new imaging drum. For further
assistance, visit the support links at:
www.xerox.com/officeprinting/infoSMART.
Attention The imaging drum is near its end of life. Printing
can continue until the printer determines that the
imaging drum is at its end of life, however some
degradation of image quality may occur. The
message will remain until interrupted by other
messages or until the imaging drum is replaced.
Fault An error has been detected with the duplex module
interface and communication path. Turn off the
printer, wait 15 seconds, then turn on the printer. If
the problem persists, be sure the duplex unit is
properly installed. If you need more help, check the
support links at:
www.xerox.com/officeprinting/infoSMART.
Fault During the printer’s self-diagnostics there was a
problem with the internal control logic. Turn off the
printer, wait 15 seconds, then turn on the printer. If
the problem persists, check the support links at:
www.xerox.com/officeprinting/infoSMART.
Engine EPROM Error U2
Power Off/On
Fault During the printer’s self-diagnostics there was a
problem reading the engine EPROM. Turn off the
printer, wait 15 seconds, then turn on the printer. If
the problem persists, check the support links at:
www.xerox.com/officeprinting/infoSMART.
Advanced Features and Troubleshooting Manual 79
Page 93

Troubleshooting
Front Panel Messages (cont'd.)
Engine EPROM Missing U3
Power Off/On
Engine RAM Error U1
Power Off/On
Engine ROM Error U0
Power Off/On
Engine SRAM Error U4
Power Off/On
Feeder Home Error U7
Power Off/On
Fuser Lower Error T2
Power Off/On
Fault During the printer’s self-diagnostics there was a
problem detecting the engine EPROM. Turn off the
printer, wait 15 seconds, then turn on the printer. If
the problem persists, check the support links at:
www.xerox.com/officeprinting/infoSMART.
Fault During the printer’s self-diagnostics there was a
problem reading the engine RAM. Turn off the
printer, wait 15 seconds, then turn on the printer. If
the problem persists, check the support links at:
www.xerox.com/officeprinting/infoSMART.
Fault During the printer’s self-diagnostics there was a
problem reading the engine ROM. Turn off the
printer, wait 15 seconds, then turn on the printer. If
the problem persists, check the support links at:
www.xerox.com/officeprinting/infoSMART.
Fault During the printer’s self-diagnostics there was a
problem reading the engine SRAM. Turn off the
printer, wait 15 seconds, then turn on the printer. If
the problem persists, check the support links at:
www.xerox.com/officeprinting/infoSMART.
Fault An error has been detected with the home position
of the front paper feeder. Turn off the printer, wait
15 seconds, then turn on the printer. If the problem
persists, check the support links at:
www.xerox.com/officeprinting/infoSMART.
Fault An error in the lower fuser Thermistor was
discovered. Turn off the printer, wait 15 seconds,
then turn on the printer. If the problem persists,
install a new fuser. For further assistance, visit the
support links at:
www.xerox.com/officeprinting/infoSMART.
Fuser Missing
Reseat Fuser
Fault The fuser is either missing or must be reseated to be
recognized by the printer. Turn off the printer, make
sure the fuser is properly installed, and turn on the
printer. If the problem persists, install a new fuser.
For further assistance, visit the support links at:
www.xerox.com/officeprinting/infoSMART.
80 Phaser 2135 Color Printer
Page 94

Front Panel Messages (cont'd.)
Troubleshooting
Fuser Upper Error T1
Power Off/On
Fuser
Near End Of Life
Hard Disk Formatting
Please Wait
Hard Disk Full
Press Enter To Clear
Hard Disk Initializing
Please Wait
Jam Inside Top Cover
Open Cover, See Labels
Jam Inside Top Cover
Open Cover, See Labels
Fault An error in the upper fuser Thermistor was
discovered. Verify that the clearances around the
printer are consistent with the recommendations in
the User safety summary. Turn off the printer, wait
15 seconds, then turn on the printer. Be sure you
have the proper voltage fuser installed. A 220 volt
fuser in a 110 volt printer will cause this fault. If the
problem persists, install a new fuser. For further
assistance, visit the support links at:
www.xerox.com/officeprinting/infoSMART.
Attention The fuser is near its end of life. Printing can
continue until the printer determines that the fuser
is at its end of life, however, some degradation of
image quality may occur. The message will remain
until interrupted by other messages or until the
fuser is replaced.
Attention The hard disk is being formatted. Data cannot be
written to the disk until the formatting is completed.
Attention There was a hard disk full error that prevented the
data from being written. Press the Enter button to
clear the message. Print or delete Secure Print and
Proof Print jobs to free up disk space.
Attention The hard disk is being initialized. Data cannot be
written to the disk until the initializing is
completed.
Fault Paper did not exit the printer or fuser properly,
causing a paper jam. Open the Top Cover and refer
to the labels on the printer to clear the jam. For more
information, see the sections Front Panel Messages
on page 78.
Fault Paper did not enter the transport area correctly,
causing a paper jam. Open Cover A and refer to the
labels on the printer to clear the jam. For more
information, see the sections Front Panel Messages
on page 78.
Jam Inside Top Cover
Open Cover, See Labels
Jam Inside Top Cover
Open Cover, See Labels
Fault Paper did not exit the paper feed area correctly,
causing a paper jam. Open the Top Cover and refer
to the labels on the printer to clear the jam. For more
information, see the sections Front Panel Messages
on page 78.
Fault Paper did not exit the Multi-Sheet Bypass Feeder
properly, causing a paper jam. Open Top Cover and
refer to the labels on the printer to clear the jam. For
more information, see the sections Front Panel
Messages on page 78.
Advanced Features and Troubleshooting Manual 81
Page 95

Troubleshooting
Front Panel Messages (cont'd.)
Jam Inside Top Cover
Open Cover, See Labels
Jam Inside Duplex Unit
Open Unit, See Labels
Jam Inside Right Door A
Open Right Door A, See Labels
Jam Inside Duplex Unit
Open Unit, See Labels
LED Error
[Black LED Error U21]
[Cyan LED Error U20]
[Magenta LED Error U19]
[Yellow LED Error U18]
Power Off/On
Fault Paper did not enter the duplex module properly,
causing a paper jam. Open the duplex unit and refer
to the labels on the printer to clear the jam. For more
information, see the sections Front Panel Messages
on page 78.
Fault Paper did not exit the duplex module correctly,
causing a paper jam. Open right door A and refer to
the labels on the printer to clear the jam. For more
information, see the sections Front Panel Messages
on page 78.
Fault Paper did not exit the transport area correctly,
causing a paper jam. Open right door A and refer to
the labels on the printer to clear the jam. For more
information, see the sections Front Panel Messages
on page 78.
Fault Paper did not enter the duplex module properly,
causing a paper jam. Open right door A and refer to
the labels on the printer to clear the jam. For more
information, see the sections Front Panel Messages
on page 78.
Fault The LED bar is not recognized by the printer. Turn
off the printer, wait 15 seconds, then turn on the
printer. If the problem persists, check the support
links at:
www.xerox.com/officeprinting/infoSMART.
LED Over Temperature T32
Power Off/On
Load Size, Type, Tray # Fault The specified paper size and type requested by the
Power Supply Error U6
Power Off/On
Fault One of the LED bars is reporting a temperature error.
Verify that the clearances around the printer are
consistent with the recommendations in the User
safety summary. Turn off the printer, wait 15
seconds, then turn on the printer. If the problem
persists, check the support links at:
www.xerox.com/officeprinting/infoSMART.
print job is not available in the specified tray. Load
the specified paper or press Enter to print using the
paper loaded in the tray.
Fault During the printer’s self-diagnostics it was detected
that the power supply voltage is out of specification.
Turn off the printer, wait 15 seconds, then turn on
the printer. If the problem persists, check the
support links at:
www.xerox.com/officeprinting/infoSMART.
82 Phaser 2135 Color Printer
Page 96

Front Panel Messages (cont'd.)
Troubleshooting
Replace Drum
[Replace Black Drum]
[Replace Cyan Drum]
[Replace Magenta Drum]
[Replace Yellow Drum]
Replace Fuser Fault The fuser has reached its end of life. Install a new
Replace Transfer Belt Fault The transfer belt has reached its end of life. Install a
RH Sensor Error T30
Power Off/On
Roller Over Temp T31
Power Off/On
Roller Position Error U10
Power Off/On
Fault The imaging drum has reached its end of life. Install
a new imaging drum.
fuser.
new transfer belt.
Fault The relative humidity sensor is either not
communicating or reporting invalid data. Turn off
the printer, wait 15 seconds, then turn on the
printer. If the problem persists, check the support
links at:
www.xerox.com/officeprinting/infoSMART.
Fault The fuser temperature sensor is reporting a
temperature error. Turn off the printer, wait 15
seconds, then turn on the printer. If the problem
persists, install a new fuser. For further assistance,
visit the support links at:
www.xerox.com/officeprinting/infoSMART.
Fault An error has been detected with the fuser error
rollers being in an incorrect position. Turn off the
printer. Pull the green roller release lever, located
on the left side of the printer, forward and then push
backward to return the lever to its home position.
Then turn on the printer. If the problem persists,
check the support links at:
www.xerox.com/officeprinting/infoSMART.
Toner Missing
[Black Toner Missing U25]
[Cyan Toner Missing U24]
[Magenta Toner Missing U23]
[Yellow Toner Missing U22]
Reseat Toner
Fault The toner is either missing or must be reseated to be
recognized by the printer. Turn off the printer, wait
15 seconds, then turn on the printer. If the problem
persists, check the support links at:
www.xerox.com/officeprinting/infoSMART.
Advanced Features and Troubleshooting Manual 83
Page 97

Troubleshooting
Front Panel Messages (cont'd.)
Supply Fan Error U9
Power Off/On
Temp Sensor Error T29
Power Off/On
Toner Empty
[Black Toner Empty]
[Cyan Toner Empty]
[Magenta Toner Empty]
[Yellow Toner Empty]
Replace Toner
Toner Low
[Black Toner Low]
[Cyan Toner Low]
[Magenta Toner Low]
[Yellow Toner Low]
Top Cover Open
Close Top Cover
Fault An error has been detected with the power supply
cooling fan. Turn off the printer, wait 15 seconds,
then turn on the printer. If the problem persists,
check the support links at:
www.xerox.com/officeprinting/infoSMART.
Fault The temperature sensor is either not communicating
or reporting invalid data. Turn off the printer, wait
15 seconds, then turn on the printer. If the problem
persists, check the support links at:
www.xerox.com/officeprinting/infoSMART.
Fault The toner cartridge has reached its end of life.
Install a new toner cartridge.
Attention The level of toner in the toner cartridge is low, and
should be replaced soon, as it is near its end of life.
Printing can continue until the toner cartridge is
empty; however, some degradation of image quality
may occur. The message will remain until
interrupted by other messages or until the toner
cartridge is replaced.
Fault The Top Cover is open. Close the cover so that
printing can continue.
Top Output Tray Full
Remove Outputs
Transfer Belt Missing
Reseat Belt
Fault The top (face down) tray is full, and cannot accept
any more prints until it is emptied. Once emptied,
printing will continue where it left off.
Fault The transfer belt is either missing or must be
reseated to be recognized by the printer. Turn off the
printer, make sure the transfer belt is properly
installed, and turn on the printer. If the problem
persists, install a new transfer belt. For further
assistance, visit the support links at:
www.xerox.com/officeprinting/infoSMART.
84 Phaser 2135 Color Printer
Page 98

Front Panel Messages (cont'd.)
Troubleshooting
Transfer Belt
Near End Of Life
Tray I/F Error
[Tray 2 I/F Error U14]
[Tray 3 I/F Error U13]
[Tray 4 I/F Error U13]
[Tray 5 I/F Error U13]
Power Off/On
Tray Misfeed
[Tray 1 Misfeed]
[Tray 2 Misfeed]
[Tray 3 Misfeed]
[Tray 4 Misfeed]
[Tray 5 Misfeed]
Open Rt Door x & Tray x
Tray Paper Low
[Tray 1 Paper Low]
[Tray 2 Paper Low]
[Tray 3 Paper Low]
[Tray 4 Paper Low]
[Tray 5 Paper Low]
Attention The transfer belt is near its end of life. Printing can
continue until the printer determines that the
transfer belt is at its end of life; however, some
degradation of image quality may occur. The
message will remain until interrupted by other
messages or until the transfer belt is replaced.
Fault An error has been detected with the indicated tray’s
interface and communication path. Turn off the
printer, wait 15 seconds, then turn on the printer. If
the problem persists, check the support links at:
www.xerox.com/officeprinting/infoSMART.
Fault Paper did not exit the indicated tray properly,
causing a paper jam. Pull out the tray, retrieve and
discard the misfed paper and reinsert the tray. Open
Cover B to search for additional paper. You must
open Cover B to clear the misfeed message on the
front panel.
Attention The printer has detected that the paper level in the
indicated tray is low. Printing can continue until the
tray runs out of paper. Reload the tray as soon as
possible to avoid printing interruptions.
Advanced Features and Troubleshooting Manual 85
Page 99

Troubleshooting
Printer Management Status Messages
Your printer management software displays alert messages on your workstation when
operator intervention is required at the printer. The message provides information about
the condition of the printer and the suggested or required course of action. (Similar
messages are displayed on the printer’s front panel, as described in the section Front Panel
Messages on page 78.)
There are two types of messages that require action:
Fault messages appear when the printer stops due to a malfunction, such as a paper
■
jam. Action must be taken to resolve the fault.
Attention messages do not stop the printer, but warn of action that should be taken to
■
avert a shutdown.
The following table lists fault and attention messages in alphabetical order, along with an
explanation and corrective action.
Printer Management Status Messages
Message Type Explanation/Corrective Action
A6-Jam Inside Top Cover Fault Paper did not exit the Multi-Sheet Bypass Feeder
properly, causing a paper jam. Open the Top
Cover and refer to the labels on the printer to clear
the jam.
A7-Jam Inside Top Cover Fault Paper did not exit the Multi-Sheet Bypass Feeder
properly, causing a paper jam. Open the Top
Cover and refer to the labels on the printer to clear
the jam.
A8-Jam Inside Duplex Unit Fault Paper did not enter the duplex module properly,
causing a paper jam. Open the Duplex Unit and
refer to the labels on the printer to clear the jam.
A10-Jam Inside Top Cover Fault Paper did not exit the printer or fuser properly,
A11-Jam Inside Top Cover Fault Paper did not exit the printer or fuser properly,
A22-Jam Inside Top Cover Fault Paper did not exit the printer or fuser properly,
B8-Jam Inside Duplex Unit Fault Paper did not enter the duplex module properly,
causing a paper jam. Open the Top Cover and refer
to the labels on the printer to clear the jam.
causing a paper jam. Open the Top Cover and refer
to the labels on the printer to clear the jam.
causing a paper jam. Open the Top Cover and refer
to the labels on the printer to clear the jam.
causing a paper jam. Open Cover B and refer to the
labels on the printer to clear the jam.
B13-Jam Inside Duplex Unit Fault Paper did not exit the duplex module correctly,
causing a paper jam. Open the Duplex Unit and
refer to the labels on the printer to clear the jam.
86 Phaser 2135 Color Printer
Page 100

Troubleshooting
Printer Management Status Messages (cont'd.)
B21-Jam Inside Door A Fault Paper did not exit the transport area correctly,
causing a paper jam. Open Door A and refer to the
labels on the printer to clear the jam.
Cn-Close Tray
[C1-Close Tray 1]
[C2-Close Tray 2]
[C3-Close Tray 3]
[C4-Close Tray 4]
[C5-Close Tray 5]
En-Tray Misfeed
[E1-Open Rt Door A & Tray 1]
[E2-Open Rt Door B & Tray 2]
[E3-Open Rt Door C & Tray 3]
[E4-Open Rt Door D & Tray 4]
[E5-Open Rt Door E & Tray 5]
E9-Top Cover Open Fault The top cover is open. Close the cover so that
E12-Top Output Tray Full Fault The top (face-down) tray is full, and cannot accept
E14-Close Duplex Unit Fault The duplex unit is open. Close the duplex unit so
En-Right Door Open
[E18-Right Door A Open]
[E20-Right Door B Open]
[E21-Right Door C Open]
[E22-Right Door D Open]
[E23-Right Door E Open]
E19-Open Side Output Tray Fault The paper that you have loaded requires that the
Fault The tray is not installed. Make sure the tray is
fully inserted.
Fault Paper did not exit the tray properly, causing a
paper jam. Open the right door, pull out the tray,
retrieve and discard the misfed paper, close the
right door and reinsert the tray.
printing can continue.
any more prints until it is emptied. Once emptied,
printing will continue where it left off.
that printing can continue.
Fault The right door is open. Close the right door so that
printing can continue.
side output tray be open (for example cardstock,
envelopes, etc.) or you have selected side output
tray in the driver.
Ea-Imaging Drum Missing
[EA-Black Imaging Drum]
[EB-Cyan Imaging Drum]
[EC-Magenta Imaging Drum]
[ED-Yellow Imaging Drum]
Fault The imaging drum is either missing or must be
reseated to be recognized by the printer. Turn off
the printer, make sure the imaging drum is
properly installed, and turn on the printer. If the
problem persists, install a new imaging drum. For
further assistance, check the support links at:
www.xerox.com/officeprinting/infoSMART.
Advanced Features and Troubleshooting Manual 87
 Loading...