

Page 1
DP 820
projector
user's guide
Page 2

Xerox DP 820
projector
user’s guide
Page 3

C
opyright ©
2004 Visi
Reproduction, adaptation, or translation without prior written permission is prohibited, except as allowed under the
copyright laws.
Xerox ® is a registered trademark of Xerox Corporation in the United States and/or other countries and is used under
license. All other Xerox product names and product numbers mentioned in this publication are trademarks of Xerox
Corporation.
Apple, the Apple logo, and Macintosh are trademarks of Apple Computer, Inc., registered in the U.S. and other countries.
The Visioneer brand name and logo are registered trademarks of Visioneer, Inc.
Microsoft is a U.S. registered trademark of Microsoft Corporation. Windows is a trademark of Microsoft Corporation. All
Rights Reserved. All other products mentioned herein may be trademarks of their respective companies.
Information is subject to change without notice and does not represent a commitment on the part of Visioneer. The
software described is furnished under a licensing agreement. The software may be used or copied only in accordance with
the terms of such an agreement. It is against the law to copy the software on any medium except as specifically allowed in
the licensing agreement. No part of this document may be reproduced or transmitted in any form or by any means,
electronic or mechanical, including photocopying, recording, or information storage and retrieval systems, or translated to
another language, for any purpose other than the licensee's personal use and as specifically allowed in the licensing
agreement, without the express written permission of Visioneer.
Part Number: 05-0661-200
Restricted Rights Legend
Use, duplication, or disclosure is subject to restrictions as set forth in contract subdivision (c)(1)(ii) of the Rights in
Technical Data and Computer Software Clause 52.227-FAR14. Material scanned by this product may be protected by
governmental laws and other regulations, such as copyright laws. The customer is solely responsible for complying with all
such laws and regulations.
oneer, Inc.
Page 4

Table of Contents
Welcome
Precautions
Do’s and Don’ts . . . . . . . . . . . . . . . . . . . . . . . . . . . . . . . . . . . . . . . . . . . . . . . . . . . . . . . . . . . . . . . . . . 3
The Xerox DP 820 Projector
What’s in the Box . . . . . . . . . . . . . . . . . . . . . . . . . . . . . . . . . . . . . . . . . . . . . . . . . . . . . . . . . . . . . . . . . 4
The Xerox DP 820 Features and Controls . . . . . . . . . . . . . . . . . . . . . . . . . . . . . . . . . . . . . . . . . . . . . . 5
Interface Connector . . . . . . . . . . . . . . . . . . . . . . . . . . . . . . . . . . . . . . . . . . . . . . . . . . . . . . . . . . . 6
Connecting the Projector
Connecting the Projector to a Computer . . . . . . . . . . . . . . . . . . . . . . . . . . . . . . . . . . . . . . . . . . . . . . . 7
Connecting the Projector to an S-Video Source . . . . . . . . . . . . . . . . . . . . . . . . . . . . . . . . . . . . . . . . . .8
Connecting the Projector to a Composite Video Source . . . . . . . . . . . . . . . . . . . . . . . . . . . . . . . . . . . 9
Connecting the Projector to an HDTV Video Source . . . . . . . . . . . . . . . . . . . . . . . . . . . . . . . . . . . . . 10
Powering On/Off the Projector . . . . . . . . . . . . . . . . . . . . . . . . . . . . . . . . . . . . . . . . . . . . . . . . . . . . . . 11
LED Indicators . . . . . . . . . . . . . . . . . . . . . . . . . . . . . . . . . . . . . . . . . . . . . . . . . . . . . . . . . . . . . . . . . . 13
Adjusting the Projected Image . . . . . . . . . . . . . . . . . . . . . . . . . . . . . . . . . . . . . . . . . . . . . . . . . . . . . . 14
Adjusting the Projector Zoom/Focus . . . . . . . . . . . . . . . . . . . . . . . . . . . . . . . . . . . . . . . . . . . . . . . . . . 15
Adjusting Projection Image Size . . . . . . . . . . . . . . . . . . . . . . . . . . . . . . . . . . . . . . . . . . . . . . . .15
User Controls
Panel Control and Remote Control . . . . . . . . . . . . . . . . . . . . . . . . . . . . . . . . . . . . . . . . . . . . . . . . . . . 16
Panel Control . . . . . . . . . . . . . . . . . . . . . . . . . . . . . . . . . . . . . . . . . . . . . . . . . . . . . . . . . . . . . . . 16
Remote Control . . . . . . . . . . . . . . . . . . . . . . . . . . . . . . . . . . . . . . . . . . . . . . . . . . . . . . . . . . . . . 17
On-Screen Display (OSD) Menus . . . . . . . . . . . . . . . . . . . . . . . . . . . . . . . . . . . . . . . . . . . . . . . . . . . . 19
Displaying the OSD Main Menu and Selecting Settings . . . . . . . . . . . . . . . . . . . . . . . . . . . . . . 19
Image Menu . . . . . . . . . . . . . . . . . . . . . . . . . . . . . . . . . . . . . . . . . . . . . . . . . . . . . . . . . . . . . . . . 20
Language Menu . . . . . . . . . . . . . . . . . . . . . . . . . . . . . . . . . . . . . . . . . . . . . . . . . . . . . . . . . . . . . 24
Advanced Menu . . . . . . . . . . . . . . . . . . . . . . . . . . . . . . . . . . . . . . . . . . . . . . . . . . . . . . . . . . . . . 25
Audio Menu . . . . . . . . . . . . . . . . . . . . . . . . . . . . . . . . . . . . . . . . . . . . . . . . . . . . . . . . . . . . . . . . 26
Maintenance
Cleaning the Lens . . . . . . . . . . . . . . . . . . . . . . . . . . . . . . . . . . . . . . . . . . . . . . . . . . . . . . . . . . . 27
Cleaning the Projector . . . . . . . . . . . . . . . . . . . . . . . . . . . . . . . . . . . . . . . . . . . . . . . . . . . . . . . . 27
Changing the Lamp . . . . . . . . . . . . . . . . . . . . . . . . . . . . . . . . . . . . . . . . . . . . . . . . . . . . . . . . . . . . . . 28
Precautions When Changing a Lamp . . . . . . . . . . . . . . . . . . . . . . . . . . . . . . . . . . . . . . . . . . . . 28
To Change the Lamp Module . . . . . . . . . . . . . . . . . . . . . . . . . . . . . . . . . . . . . . . . . . . . . . . . . . . 29
Troubleshooting . . . . . . . . . . . . . . . . . . . . . . . . . . . . . . . . . . . . . . . . . . . . . . . . . . . . . . . . . . . . . . . . . 30
Xerox DP 820 Projector Specifications . . . . . . . . . . . . . . . . . . . . . . . . . . . . . . . . . . . . . . . . . . . . . . . . 33
Preset Signals . . . . . . . . . . . . . . . . . . . . . . . . . . . . . . . . . . . . . . . . . . . . . . . . . . . . . . . . . . . . . . . . . . . 34
Xerox DP 820 User’s Guide iii
Page 5

Notices . . . . . . . . . . . . . . . . . . . . . . . . . . . . . . . . . . . . . . . . . . . . . . . . . . . . . . . . . . . . . . . . . . . . . . . . . . 37
Federal Communications Commission (FCC) for USA . . . . . . . . . . . . . . . . . . . . . . . . . . . . . . . . . . . . 37
Product Recycling and Disposal for USA . . . . . . . . . . . . . . . . . . . . . . . . . . . . . . . . . . . . . . . . . . . . . . 37
Xerox DP 820 User’s Guide iv
Page 6

Welcome
Your new Xerox DP 820 projector is a high-performance, optical
projector with these outstanding features:
• Single chip 0.55” Texas Instruments DLP™ (Digital Light
Processing) technology
• SVGA (800 x 600 pixels)
• 4.5 lbs (2.0 kgs) compact design, lightweight for portability
• 1.2x manual zoom lens
• Auto image re-sizing (auto-sync) to 800 x 600 full screen
with scaling compression compatibility for VGA, SVGA,
XGA, and SXGA (the XGA and SXGA designate
compression)
• State-of-the-art motion adaptive hardware deinterlacing
with 3:2 pull down
• 200 Watt, user-replaceable lamp
• Compatible with IBM-compatible PCs and Apple Macintosh
computers
• Compatible with NTSC, PAL, SECAM, and HDTV
• Multi-function remote control that can function as a laser
pointer
• D-Sub 15-pin cable for analog video connectivity
• User-friendly multilingual on-screen display menu
• Advanced electronic keystone correction
Xerox DP 820 User’s Guide 1
Page 7
Precautions
Precautions
Follow all warnings, precautions and maintenance as
recommended in this user’s guide to avoid injury, fire, electric
shock, and to maximize the life of your projector.
Warning—Do not look into the projector’s lens when the lamp is
on. The bright light may hurt your eyes. Never let children look
directly into the lens when the light is on.
Warning—Do not look into the laser beam or shine it into others’
eyes when using the remote control as a laser pointer. Laser light
seriously damage eyes.
can
Warning—Make sure that the projector is grounded properly by
connecting the power cord to a grounded electric AC outlet. Always
use the power cord that comes with your projector. Do not use an
ungrounded adapter with the grounded plug.
Warning—Except for the lamp cover, never open or disassemble
the product as this may cause electric shock. Dangerous electrical
voltages inside the projector can cause severe injury.
Warning—Do not overload wall outlets, extension cords, or multiplug receptacles as this can result in a risk of fire or electric shock.
Place the unit near an easily accessible wall socket. Do not place
the cord where it may be stepped on or become a tripping hazard.
Warning—To reduce the risk of fire or electric shock, do not
expose this product to rain or moisture. Do not place drinks on top
of the projector. Spilled drinks can cause an electric shock hazard
and can also damage the projector. If liquid or any solid object falls
into the cabinet, have the projector checked by a qualified
technician before operating it further.
Warning—Do not place your hands or objects near the ventilation
slots. The air coming out of the slots is hot. Do not block the
ventilation slots or place anything near these slots that may block
the free flow of air. Blocked ventilation may cause internal heat
build-up and cause picture degradation or damage to the projector.
Warning—The ventilation fan continues to operate after the
projector is powered off and until the projector is sufficiently cooled
down. Do not unplug the power cord until the fan stops.
Warning—Keep the plastic packaging material away from children,
especially small children. The plastic bags may result in death by
suffocation.
2 Xerox DP 820 User’s Guide
Page 8

Do’s and Don’ts
Precautions
Do:
• Operate the projector in a well-ventilated room to avoid a
buildup of ozone from the projector’s high-performance lamp.
• Turn off the projector before cleaning.
• Use a dampened soft cloth to clean the display housing.
• Disconnect the power plug from AC outlet if the projector is not
being used for a long period of time.To disconnect the cord, pull
it out by the plug. Do not pull on the cord.
• Use lint-free gloves or finger cots when changing the lamp.
Never touch a lamp with your bare hands. The invisible residue
from the natural oil on your hands may shorten the lamp life.
Don’t:
• Place the projector on an unstable cart, stand, or table. If the
projector falls, it may be seriously damaged.
• Operate the projector near paper, cloth, or other combustible
material, or in proximity to inflammable substances, such as
paint thinner. Never operate the projector if covered with
combustible materials. The projector gets hot and combustible
and inflammable materials may catch fire.
• Use abrasive cleaners, waxes or solvents to clean the
projector.
• Use under the following conditions:
— In extremely hot, cold or humid environment.
— In areas susceptible to excessive dust and dirt.
— Near any appliance generating a strong magnetic field.
— In direct sunlight.
— Near any heat source, such as radiators, heat registers,
stoves, or other products (including amplifiers) that produce
heat.
— In a smoky area. Smoke residue may cause buildup on
critical parts, including the lens.
Attempt to service the projector yourself. Opening or removing
the coverings of the internal components may damage them
and void your warranty.
Xerox DP 820 User’s Guide 3
Page 9
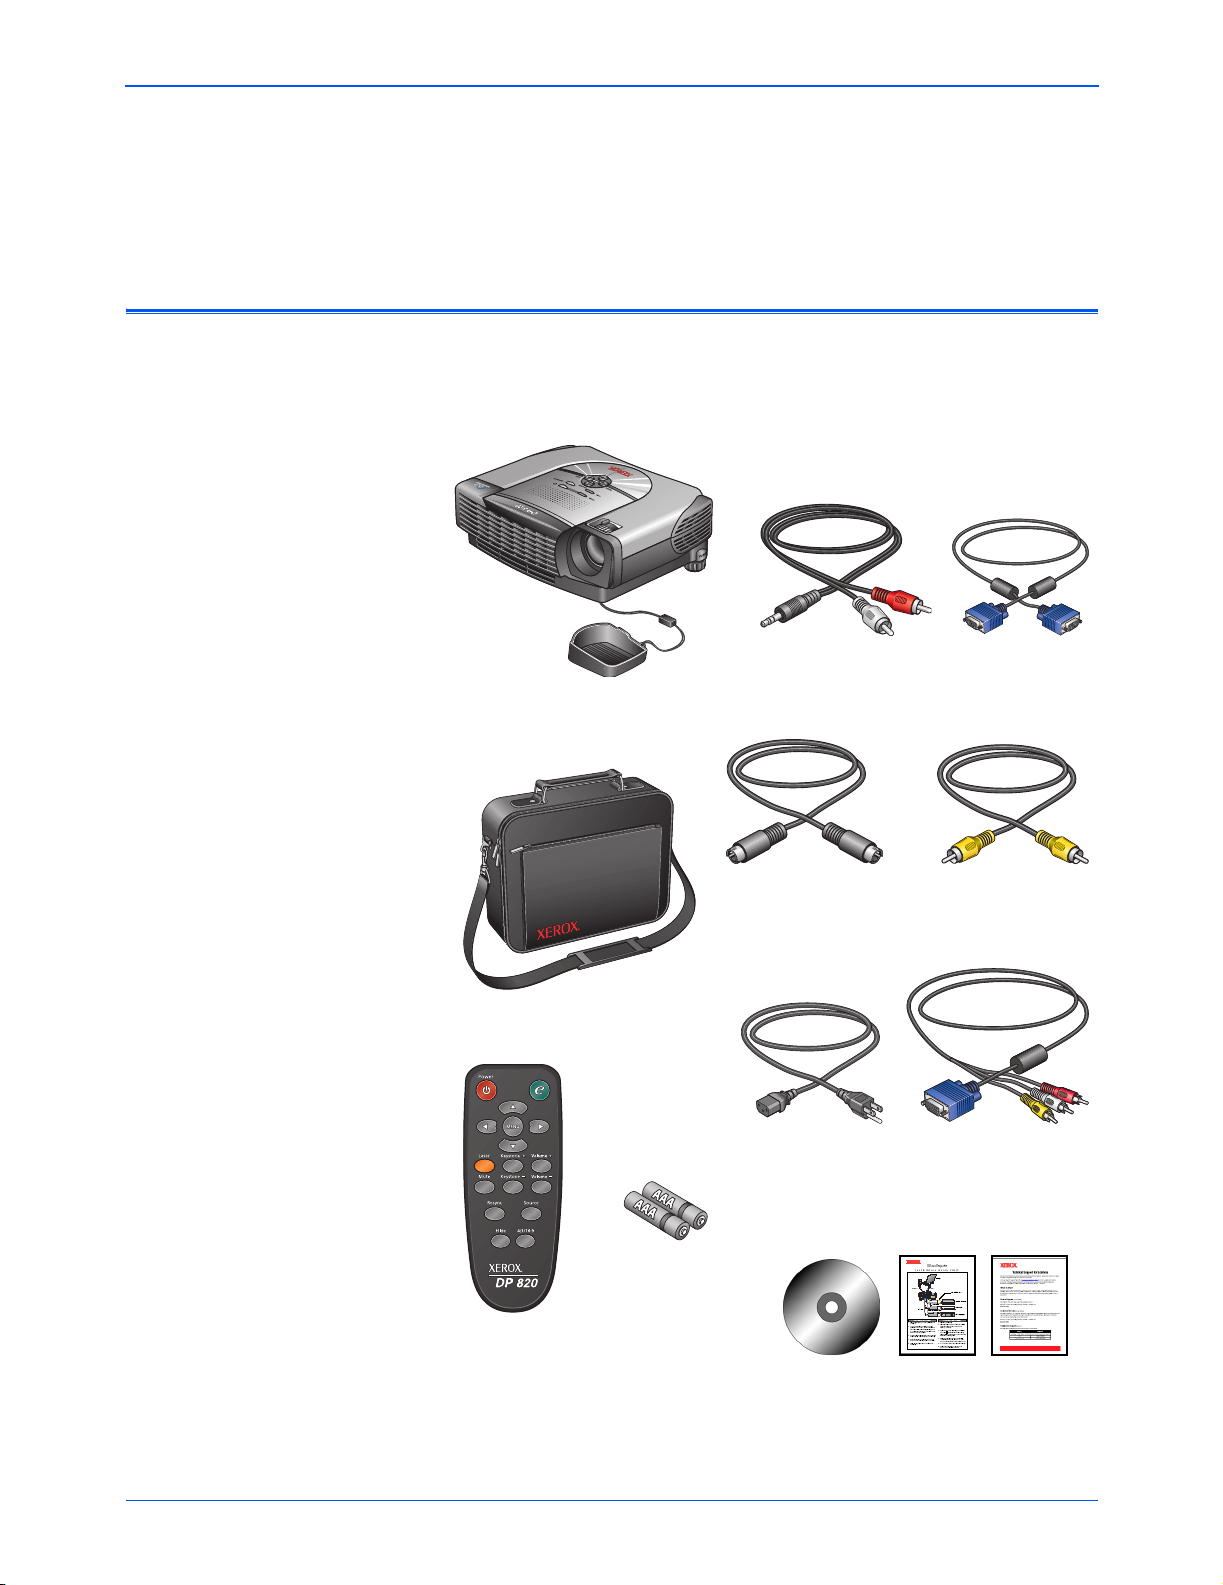
The Xerox DP 820 Projector
What’s in the Box
The Xerox DP 820 Projector
Before proceeding, check the contents of the box. If items are
missing or damaged, contact the dealer where you purchased the
projector.
Projector with lens cap
Carrying Case with Shoulder Strap
Audio Cable
Power Cord
VGA Cable
Composite Video CableS-Video Cable
VGA (D-SUB) to HDTV
Cable (RCA Jack)
(Optional Accessory Not Included in Box)
Batteries for
Remote Control
Remote Control
User’s Guide CD, Quick Installation Card,
and Technical Support Card
4 Xerox DP 820 User’s Guide
Page 10
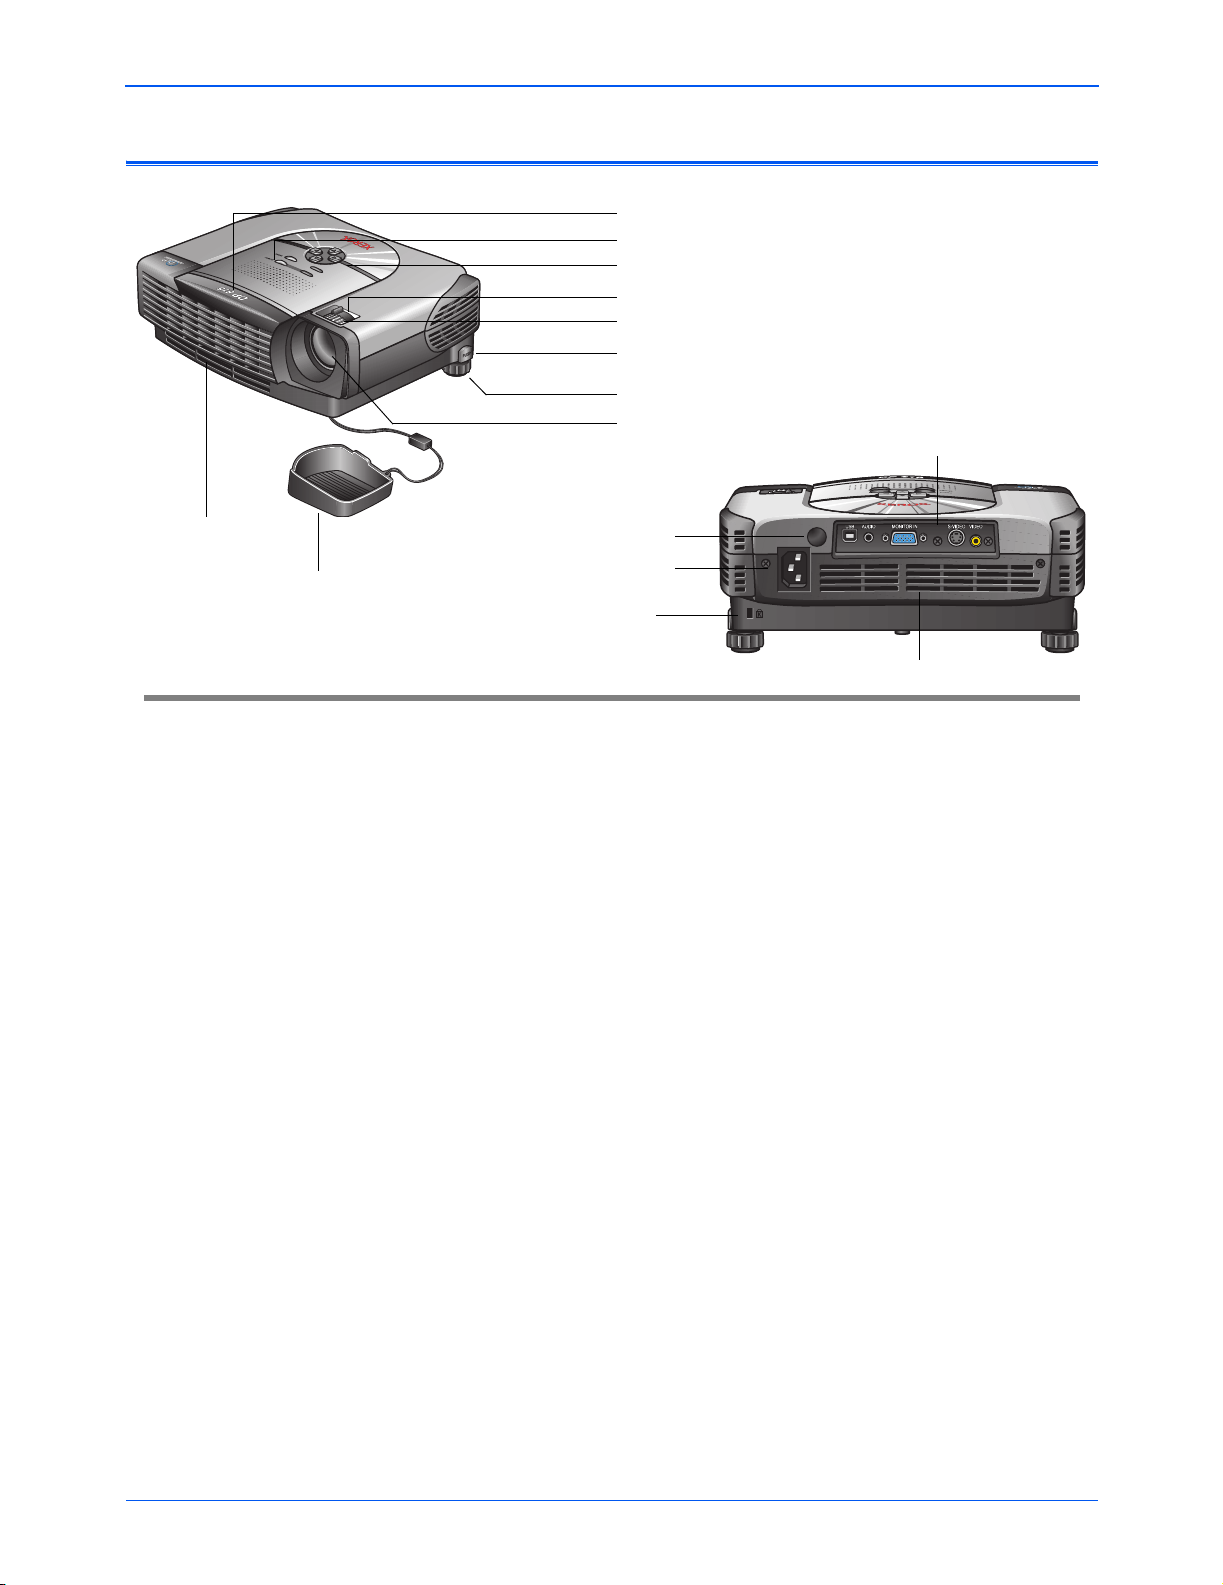
The Xerox DP 820 Features and Controls
Front Infrared Remote Sensor
Audio Speaker
Control Panel
Zoom Wheel
Focus Ring
Foot Adjustor Release Button
(on either side, next to both foot adjustors)
Foot Adjustor
Projection Lens
The Xerox DP 820 Projector
Interface Connector
Ventilation Slots
(exhaust)
Rear Infrared Remote Sensor
Power Connector
Lens Cap
Kensington™ Lock Slot
Ventilation Slots (intake)
Front and Rear Infrared Remote Sensors—Infrared receivers
that receive signals from the remote control pointed at the front or
back of the projector. Do not cover or block these sensors.
Audio Speaker—Provides audio output.
Control Panel—Control buttons and Indicator LEDs. See “Panel
Control” on page 16 for a description of the Control Panel.
Zoom Wheel—Rotate to zoom the image in or out.
Focus Ring—Rotate to manually adjust the focus of the image.
Foot Adjustor Release Button(s)—Press to release the foot
adjustors on both sides of the projector to lower or raise it.
Foot Adjustors—Turn left or right for fine leveling adjustments.
Projection Lens—Projects the image onto the screen.
Lens Cap—Protective cap to keep the lens from dirt or damage.
Always attach the cap when the projector is not in use.
Ventilation Slots—Intake and exhaust slots for ventilation. Do not
block these slots. Careful: Exhaust slots can be HOT.
Interface Connector—Provides connection ports for video and
audio devices. See “Interface Connector” on page 6 for a
description of these ports.
Kensington™ Lock Slot—Slot for inserting a Kensington cable
and lock to protect your projector from theft.
Power Connector—Plug the power cord into this connector.
Xerox DP 820 User’s Guide 5
Page 11

The Xerox DP 820 Projector
Interface Connector
USB Port—Provides a connection for engineering purposes. Not
used for connecting video devices.
Audio Input Port—Plug an audio output from the video device into
this port.
Computer In (VGA) Port—Plug the VGA cable into this port, then
plug the other end into the video port on your computer. Also use
this port to connect an HDTV device to your projector.
S-Video Port—Plug your S-Video source in here, such as a
professional-quality DVD player or VCR with S-Video output.
Video Port (Yellow)—Plug your composite video source in here,
such as a DVD player or VCR. Connect the yellow (video) plug to
your video source and to this video port.
NOTE: When connecting the cables, make sure they are plugged
in securely. If the cables are not connected properly, or are loose,
the projector will not project an image or play audio.
6 Xerox DP 820 User’s Guide
Page 12
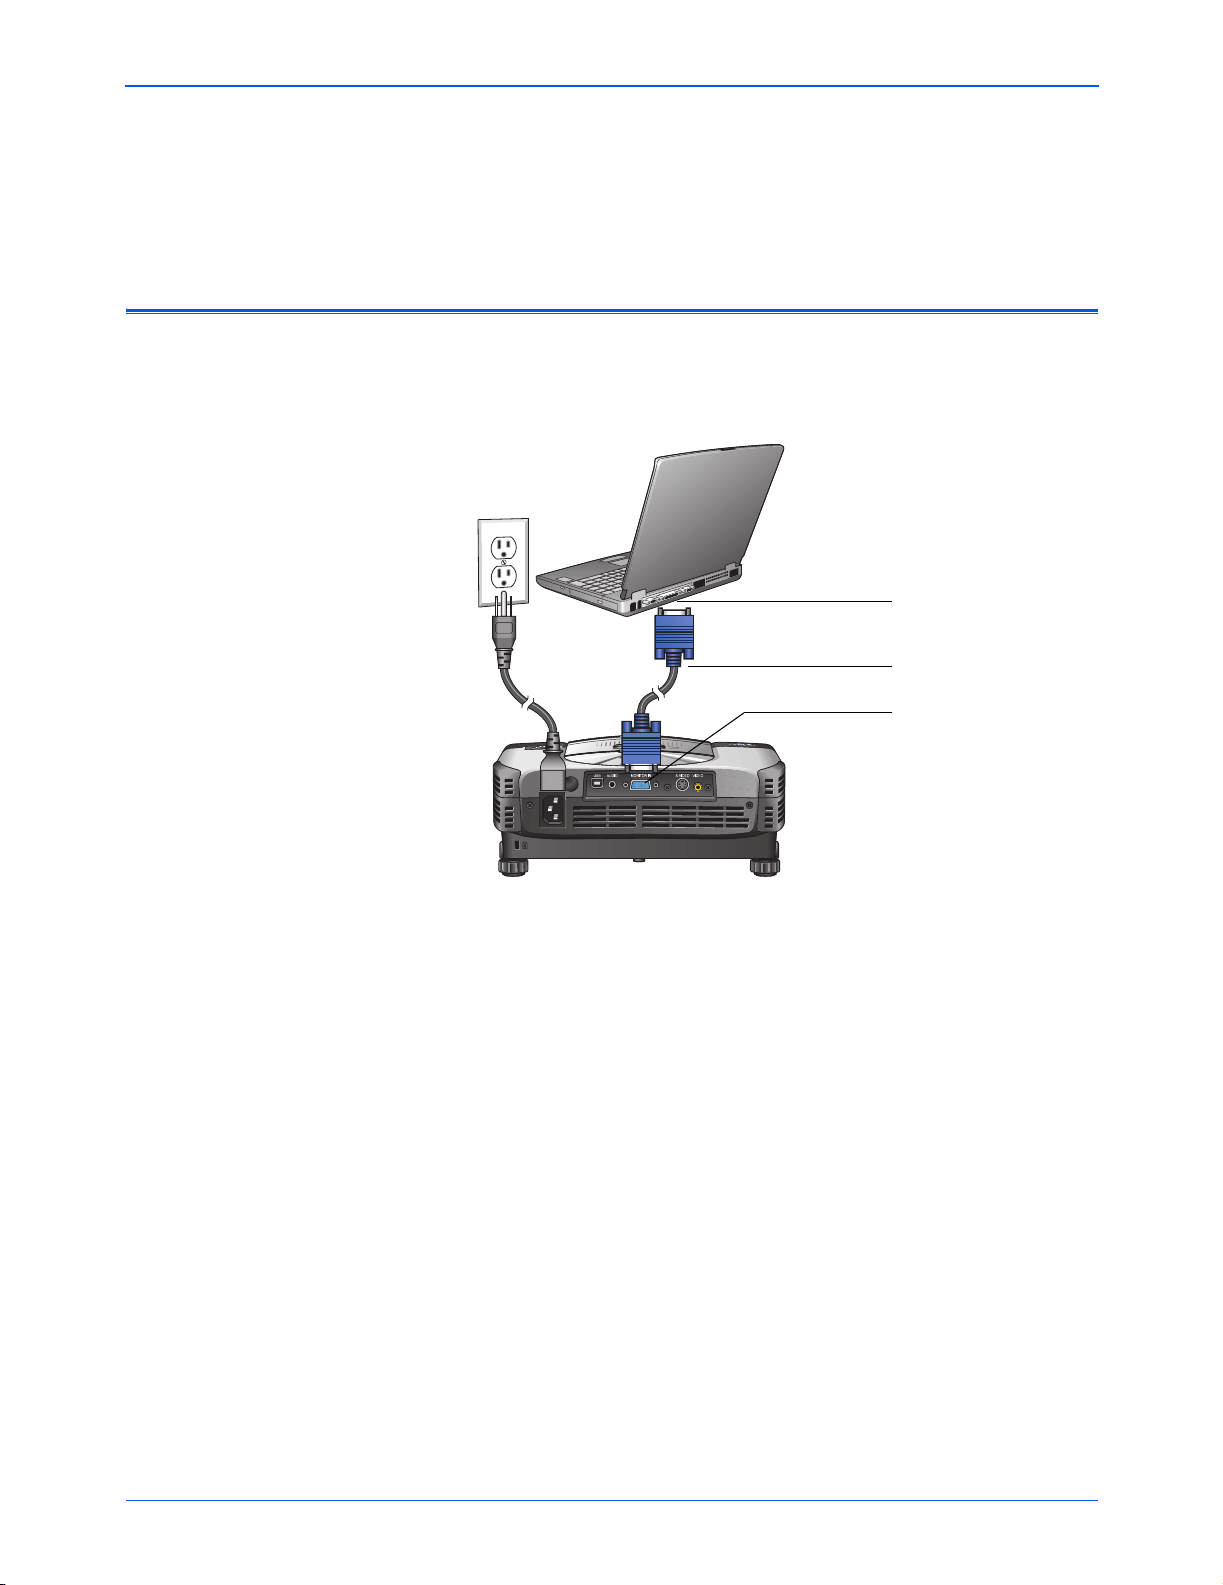
Connecting the Projector
Connecting the Projector to a Computer
In this configuration, the projector displays the images from your
computer’s screen. This is the configuration to use to project a
presentation from your computer.
Connecting the Projector
VGA Connector
VGA Cable
Computer In Connector
1. Make sure the projector and computer are turned off.
2. Connect one end of the VGA connector to the VGA port on the
computer.
3. Connect the other end of the VGA cable to the Computer In
port on the back of the projector.
4. Plug the power cord into the projector and then into an
electrical outlet.
5. Turn on the projector first, and then the computer.
6. If you don’t see an image, or if you have multiple video sources
connected to the projector simultaneously, press the Source
button on the projector’s control panel, or remote control, to
switch to the input source.
NOTE: Your DP 820 projector works best when the computer
screen resolution is set to 800 x 600.
Xerox DP 820 User’s Guide 7
Page 13

Connecting the Projector
Connecting the Projector to an S-Video Source
The typical connection for an S-Video source is a professionalquality DVD, Video Disc, or Videotape player with an S-Video
output port.
S-Video Cable
Audio Cable
1. Make sure the projector and video source device are turned off.
2. Plug the S-Video cable into the S-Video port on the video
source device, and then into the S-Video port on the projector.
3. Plug the red and white connectors on the Audio cable into the
corresponding red and white ports on the video source. Then
plug the other single end of the cable into the Audio port on the
projector.
4. Do NOT plug the yellow connector into the projector or the
video source device.
The audio will play through the projector’s built-in audio
speaker.
5. Plug the power cord into the projector and then into an
electrical outlet.
6. Turn on the projector first, and then the video source.
7. If you don’t see an image, or if you have multiple video sources
connected to the projector simultaneously, press the Source
button on the projector’s control panel, or remote control, to
switch to the input source.
8 Xerox DP 820 User’s Guide
Page 14
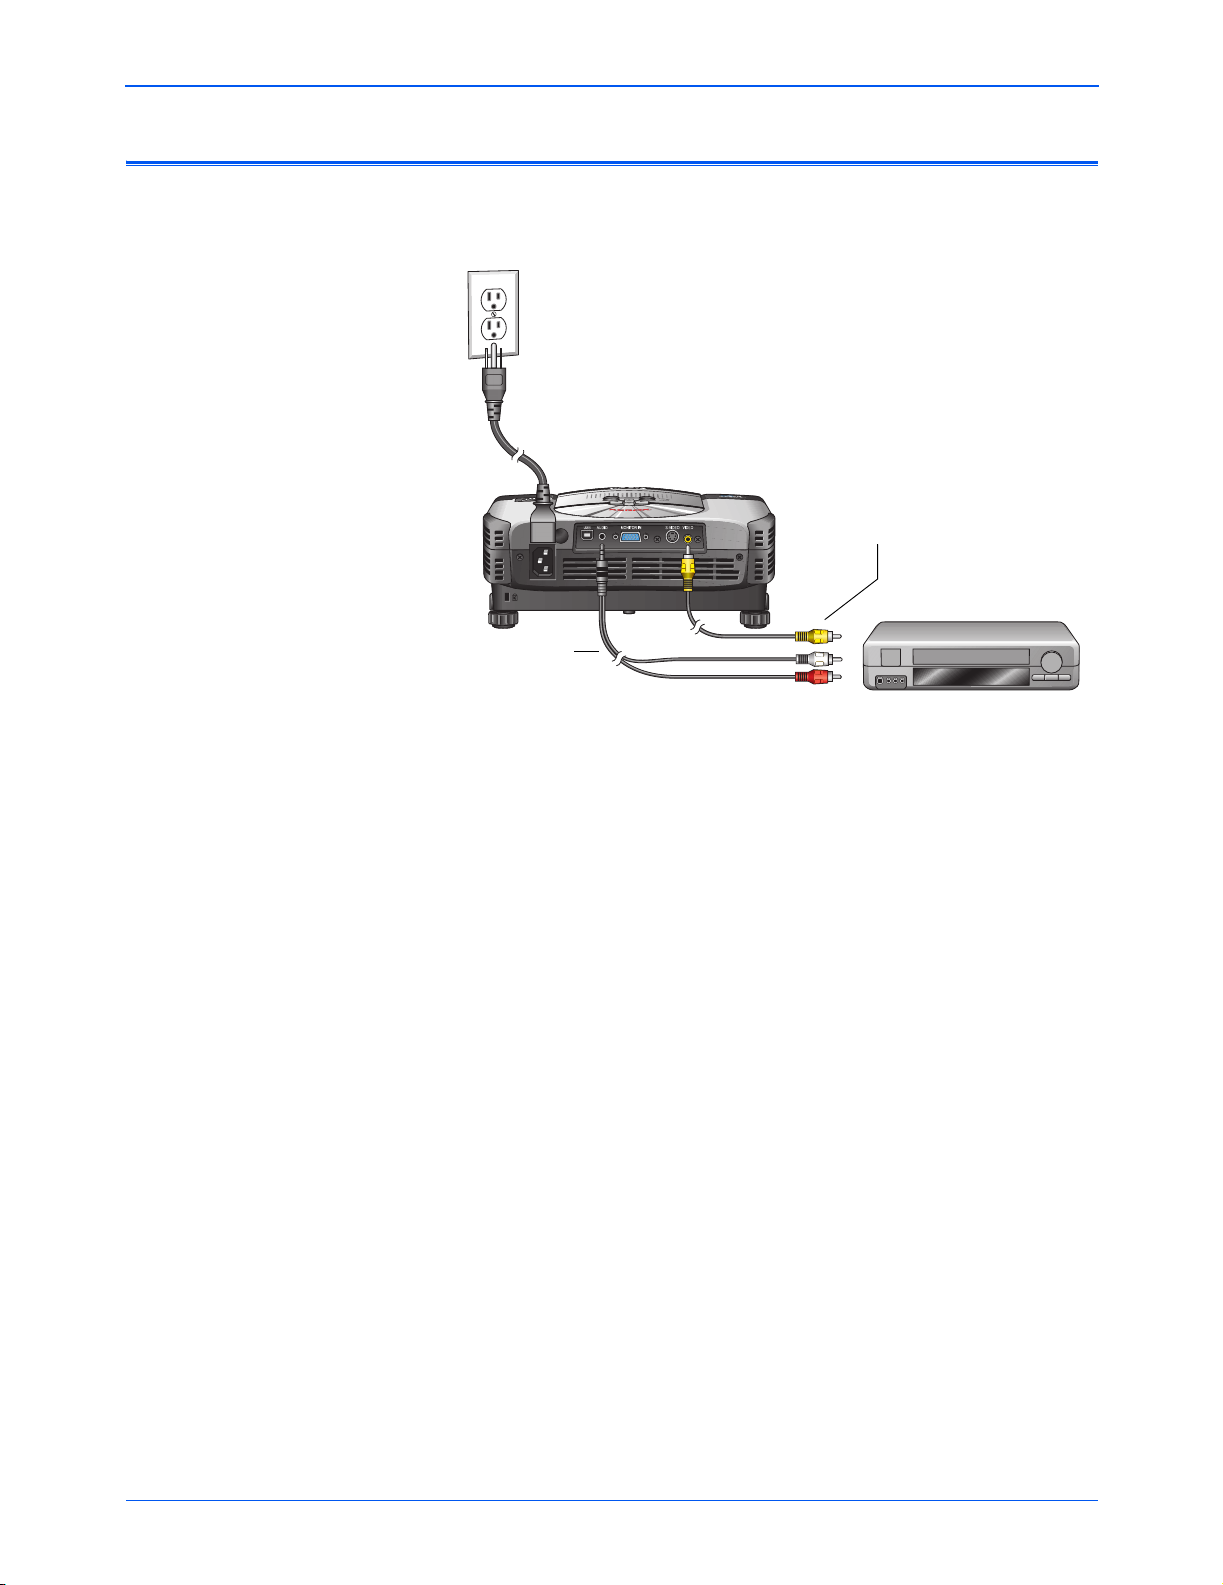
Connecting the Projector
Connecting the Projector to a Composite Video Source
The typical connection for a Composite Video source is a DVD
player or VCR.
Composite Video Cable
Audio Cable
1. Make sure the projector and video source device are turned off.
2. Plug the yellow Composite Video cable into the yellow video
port on the video source device.
3. Plug the other end of the yellow video cable into the yellow
Video port on the back of the projector.
4. Plug the red and white connectors on the Audio cable into the
corresponding red and white ports on the video source. Then
plug the other single end of the cable into the Audio port on the
projector.
5. Plug the power cord into the projector and then into an
electrical outlet.
6. Turn on the projector first, and then the video source.
7. If you don’t see an image, or if you have multiple video sources
connected to the projector simultaneously, press the Source
button on the projector’s control panel, or remote control, to
switch to the input source.
Xerox DP 820 User’s Guide 9
Page 15

Connecting the Projector
Connecting the Projector to an HDTV Video Source
The typical connection for an HDTV Video source is an HDTV
digital tuner.
NOTE: Connecting to an HDTV Video Source requires the
optional VGA to HDTV Cable. Please see your retailer where you
purchased the projector for the optional cable.
Computer In Port
VGA to HDTV Cable
Audio Cable
1. Make sure the projector and video source device are turned off.
2. Plug the VGA end of the VGA to HDTV cable into the
Computer In port on the back of the projector.
3. Plug the three connectors on the other end of the cable into the
corresponding color-coded ports on the HDTV device.
4. Plug the red and white connectors on the Audio cable into the
corresponding red and white ports on the HDTV device. Then
plug the other end of the cable into the projector’s Audio port.
5. Plug the power cord into the projector and then into an
electrical outlet.
6. Turn on the projector first, and then the HDTV device.
7. If you don’t see an image, or if you have multiple video sources
connected to the projector simultaneously, press the Source
button on the projector’s control panel, or remote control, to
switch to the input source.
10 Xerox DP 820 User’s Guide
Page 16

Powering On/Off the Projector
To turn on the projector’s power
1. Remove the lens cap.
2. Make sure that the power cord and the cables from the video
and audio sources are securely connected to the projector.
When you plug in the power cord, the Power LED flashes
green.
3. Turn on the lamp by pressing the Power button on the
remote control or the Power button on the control panel.
The Power and Lamp LEDs turns green, indicating the lamp is
in good condition and is projecting at maximum brightness.
4. Turn on all the other connected components.
The projector then automatically detects the type of
components attached to it.
Connecting the Projector
If the message “Searching for source” appears, check the
cables to make sure they are securely connected.
After about 30 seconds, the image for your projection appears.
5. If you don’t see an image, or if you have multiple video sources
connected to the projector simultaneously, press the Source
button on the projector’s control panel, or remote control, to
switch to the input source.
6. (Optional, but recommended) Press the Auto button on the
control panel or the Resync button on the remote control to
automatically adjust the frequency and phase for the attached
components.
NOTE: Turn the projector on first, then the computer and other
components.
Power
Lens cap
Xerox DP 820 User’s Guide 11
Page 17

Connecting the Projector
To turn off the projector power
1. Press the Power button on the remote control or
the Power button on the control panel to turn off the
projector lamp.
An on-screen message appears asking if you’re sure you want
to turn off the power.
2. Press the Power button again to turn off the power.
NOTE: If you don’t press the button within a few seconds, the
message disappears and the lamp remains lit. This convenient
design is in case you accidently press the Power button in the
middle of a show and do not want to turn off the projector.
When you press the Power button a second time, the
Lamp LED indicator flashes green. This indicates that the lamp
has turned off, but the fan is still running to cool the lamp.
3. Do NOT turn off the power or unplug the power cable before
the Lamp LED turns off.
The fan must continue to run to cool the lamp. This protects the
lamp from overheating and possible damage.
4. Do not turn on the projector again for at least five minutes.
Faster on/off cycles will damage the lamp and reduce lamp life.
5. After about two minutes, disconnect the power cord.
12 Xerox DP 820 User’s Guide
Page 18

LED Indicators
Connecting the Projector
Power LED
Lamp LED
LED Color Status Description
Power Green Flashing
Normal operation. The projector
is powered and ready.
The fan has problems or has
Amber Solid
malfunctioned. The projector will
not start.
Normal operation. The lamp is in
Lamp Green Solid
good condition and is projecting
at maximum brightness.
Normal operation. The lamp is
shutting down. Do not turn off or
Green Flashing
unplug the power until the LED
turns off. The fan will turn off
when the lamp has cooled.
Warning: The lamp has reached
the end of its life and must be
changed soon. If running, the
Red Solid
lamp will continue to operate
until it fails. If not running, the
lamp will not operate. Change
the lamp.
Warning: The temperature is too
high. The lamp will turn off. Do
Amber Flashing
not turn off or unplug the power
until the LED turns off. The fan
will turn off when the lamp has
cooled.
Xerox DP 820 User’s Guide 13
Page 19

Connecting the Projector
Adjusting the Projected Image
NOTE: The projector is equipped with two “foot adjustors” for
adjusting the projector height.
To raise the projector
1. Lift the projector up and press the two foot adjustor release
buttons on each side of the projector.
The foot adjustors pop out.
Foot Adjustor
Release Button
Foot Adjustor
2. Keeping pressing the foot adjustor release buttons while raising
the projector to the display angle you want, then release the
buttons to lock the feet into position.
3. Turn the foot adjustors to make fine adjustments to the height.
To lower the projector
1. Hold the projector with both hands, then press and hold down
both foot adjustor release buttons.
2. Lower the projector, then release the foot adjustor release
buttons to lock the foot in position.
NOTE: When placing the projector in its carrying case, please
first retract both foot adjustors to avoid breakage.
14 Xerox DP 820 User’s Guide
Page 20

Adjusting the Projector Zoom/Focus
You adjust the focus and zoom in/out with the focus ring and zoom
wheel. Rotate the focus ring and zoom wheel.
Adjusting Projection Image Size
Use the following figure and table to select the best projection
distance and screen size. Maximum and minimum screen sizes are
diagonal measurements. The table is for reference only.
Connecting the Projector
Maximum Screen Size
Minimum Screen Size
1.2m 2.0m 4.0m 6.0m 10.0m
4:3 Screen Size Diagonal
Projection Distance
Wide Screen Television Wide Screen Television
1.2m (47") 33.0 27.5 30.2 25.2
1.5m (59") 41.2 34.3 37.8 31.5
2m (79") 55.0 45.8 50.4 42.0
2.2m (86") 60.5 50.4 55.5 46.2
3m (118") 82.5 68.7 75.7 63.1
4m (157") 110.0 91.6 100.9 84.1
5m (197") 137.5 114.5 126.2 105.1
(inches)
16:9 Screen Size Diagonal
(inches)
6m (236") 165.0 137.5 151.4 126.2
7m (275") 192.5 160.4 176.6 147.2
8m (314") 220.0 183.3 201.9 168.2
9m (354") 247.5 206.2 227.1 189.3
10m (393") 275.0 229.1 252.4 210.3
Xerox DP 820 User’s Guide 15
Page 21

User Controls
User Controls
Panel Control and Remote Control
Panel Control
Control Description
Power (LED)
Lamp (LED)
Power
Menu/Enter Press to display and activate the OSD menu. If
Keystone ( )
Auto ( )
Directional Selection
Buttons
( )
Source ( )
Indicates status of projector power and lamp.
See “LED Indicators” on page 13 for details.
Turns projector power on and off. See
“Powering On/Off the Projector” on page 11 for
the specific power on/off sequences.
the menus are displayed, confirms your
selection of items on the menus.
Adjusts image distortion caused by tilting the
projector. Images are wider at the top or
bottom due to tilting the projector.
Not recommended for spreadsheets or text
displays to avoid text distortion.
Automatically adjusts the frequency and phase
for the connected components to produce the
optimum projected image.
When the OSD menus are displayed, scrolls
through menus and selects items or adjusts
settings.
Manually selects an input source.
16 Xerox DP 820 User’s Guide
Page 22

Remote Control
Laser Beam Pointer
User Controls
Button Description
Power
(Enter)
Directional Selection
Buttons
( )
Menu Press to display the OSD menus. Press again
Laser Press to activate a laser beam for use as a
Keystone ( + – ) Adjusts image distortion caused by tilting the
Volume ( + – ) Adjusts volume level. Press Volume + to
Turns projector power on and off.
When the OSD menus are displayed, selects
OSD option.
When the OSD menus are displayed, scrolls
through menus and selects items or adjusts
settings.
to exit the OSD menus.
pointer. Warning—Do not look into the laser
beam or shine it into others’ eyes when using
the remote control as a laser pointer. Laser
light can seriously damage eyes.
projector. Images are wider at the top or
bottom due to tilting the projector.
Not recommended for spreadsheets or text
displays to avoid text distortion.
increase the volume. Press
decrease the volume.
Volum e – to
Mute Turns off sound. Press one of the Volume
buttons to resume sound.
Resync ( )
Source ( )
Hide Hides image being displayed and displays a
4:3/16:9 Toggles the image aspect ratio to 4:3 or 16:9.
Adjust the frequency and phase for the
connected components to produce the
optimum projected image.
Manually selects an input source.
blank screen. Press again to resume display of
image. Typically used to pause a presentation.
NOTE: The battery compartment for the remote control is on
the back. The instructions on the compartment show how to
install the batteries properly.
Xerox DP 820 User’s Guide 17
Page 23

User Controls
Remote Control Operation
The infrared emitter is at the top of the remote control next to the
laser pointer. The infrared emitter has a range of about 3m (about
10 feet) at an angle of about 20° from the center of the sensors
(both front and back).
Do not block the infrared emitter. If the projector does not pick up
the signals from the remote control, make sure the emitter and
sensors on the projector are not blocked and that the emitter is
within range.
You can operate the remote control when pointed at either the front
or the back of the projector.
20°
3m
20°
20°20°
3m
Notes about the remote control:
• The remote control may not operate in strong sunlight or
when other strong lights, such as fluorescent lighting, are
shining on the sensors.
• The remote control may not operate well in unusual areas
or in particular locations or surroundings. If that occurs,
change the direction of the remote control with respect to
the projector.
• Do not drop, jolt, or disassemble the remote control.
• Do not get the remote control wet, or place wet objects on
it.
• Keep the remote control out of locations with excessively
high temperature or humidity.
18 Xerox DP 820 User’s Guide
Page 24

On-Screen Display (OSD) Menus
The On-Screen Display (OSD) menus provide the options to make
image adjustments and change a variety of settings.
The menus can be displayed only when an input source is
connected to the projector. If the source is a computer, you can
make changes to the Display settings, and if the source is a video
device you can make changes to the Video settings. The projector
automatically detects the type of input source.
Displaying the OSD Main Menu and Selecting Settings
1. To display the OSD Main Menu, press the Menu button on the
remote control, or the Menu/Enter button on the projector’s
control panel.
User Controls
2. To close the OSD Main Menu, press the Menu or Menu/Enter
button again.
The OSD Main Menu closes after a few seconds if you don’t
select from one of the menus. Use the OSD Timeout setting on
the Advanced menu to set how long the menu remains on the
screen before automatically closing.
3. To select one of the menus on the OSD Main menu, press
the buttons.
4. To view a selected menu press the button.
5. Press the buttons to toggle through the options on a
menu.
6. Press the buttons to adjust the selected option.
7. To accept a new setting from the projector’s control panel,
press the button to go back to the OSD Main Menu and then
press the Menu/Enter button again.
To accept a new setting from the remote control, press the
Menu button.
The OSD Main Menu closes and your new settings are in
effect.
NOTE: The menus in this section show typical settings, but the
actual settings you see may differ.
Xerox DP 820 User’s Guide 19
Page 25

User Controls
Image Menu
Contrast—Controls the degree of difference between the lightest
and darkest parts of the image. Adjusting the contrast changes the
amount of black and white in the image. The higher the number the
greater the contrast.
• Press the button to decrease the contrast.
• Press the button to increase the contrast.
Brightness—Lightens or darkens the image. The higher the
number, the lighter the image.
• Press the button to darken the image.
• Press the button to lighten the image.
You may need to readjust the Brightness after the projector warms
up.
Keystone—Adjusts image distortion caused by tilting the projector.
• Press the button to reduce the upper width.
• Press the button to reduce the lower width.
Do not change this setting when displaying text or spreadsheets.
Changing the Keystone setting may distort the displayed text.
Aspect Ratio—Adjusts the length-to-width aspect ratio of the
image to be 1:1, 16:9, or 4:3.
The 1:1 setting is available only for a computer connection (with
the VGA cable) with a resolution of less than SVGA (800 x 600). If
the input signal is a computer signal greater than SVGA, or
component 1080i/720p, only the 16:9 or 4:3 aspect ratios are
available.
20 Xerox DP 820 User’s Guide
Page 26

User Controls
The correct aspect ratio to select is based on the type of video
source you are using. If the image seems to be distorted or
stretched, change the setting.
• Press the buttons to select one of the aspect ratios.
1:1—The image is displayed without scaling.
16:9—The input source is displayed in wide screen mode
without scaling. The source is scaled to fit the width of the
screen.
4:3—The input source is scaled to fit the screen.
Blank Screen—Blanks the screen temporarily and selects the
screen color for when the Blank Screen is active.
• Press the buttons to select one of the screen colors.
The options are: White, Black, Blue, Gray, Red, Green, Yellow,
Cyan, and Magenta.
Gamma—Adjusts the Gamma Mode for the image.
Film—Dark video image mode
Photographic—Computer photo mode
RGB—Computer text mode
Video—Common video mode
White Peaking—Sets the white peaking for brightness or color
reproduction quality.
• Press the buttons to set the white peaking.
Setting 10 maximizes brightness.
Setting 0 maximizes color reproduction quality.
Color Temperature—Adjusts the color temperature range. Higher
temperatures make the screen look colder, lower temperatures
make the screen look warmer.
To adjust the color temperatures individually, select User.
• Press the buttons to select the temperature range.
Hi—Warmest color temperature
Mid—Medium color temperature
Low—Coolest color temperature
User—Activates the Red/Green/Blue color temperature
settings
Red/Green/Blue Color Temperatures—Adjusts the color
temperatures individually.
• Press the button to decrease the color temperature.
• Press the button to increase the color temperature.
Xerox DP 820 User’s Guide 21
Page 27

User Controls
Video Menu
[
Saturation—Adjusts the image from black and white to fully
saturated color. The higher the number, the greater the color
saturation.
• Press the button to decrease the amount of color in the
image.
• Press the button to increase the amount of color in the
image.
Tint—Adjusts the balance between the red and green colors in the
image. Increasing the Tint increases the amount of red in the
image. Decreasing the Tint increases the amount of green in the
image.
• Press the button to increase the amount of green in the
image.
• Press the button to increase the amount of red in the
image.
Sharpness—Adjusts the sharpness of the image. The higher the
number, the sharper the image.
• Press the button to decrease the sharpness.
• Press the button to increase the sharpness.
22 Xerox DP 820 User’s Guide
Page 28

Display Menu
Phase—Synchronizes the signal timing of the display with the
timing of your computer’s graphics card. If the image flickers or is
unstable, adjust the phase until the image is stable.
• Press the button to decrease the phase.
• Press the button to increase the phase.
Tracking—Changes the display data frequency to match the
frequency of your computer’s graphics card. If vertical flickering
lines appear on the image, adjust the frequency until they
disappear.
User Controls
• Press the button to decrease the frequency.
• Press the button to increase the frequency.
H. Position—Moves the image left and right on the screen.
• Press the button to move the image left.
• Press the button to move the image right.
V. Position—Moves the image up and down on the screen.
• Press the button to move the image up.
• Press the button to move the image down.
Xerox DP 820 User’s Guide 23
Page 29

User Controls
Language Menu
Selects the language for the menus and messages displayed on
the screen.
1. Use the keys to select the language you want.
2. Press the Menu/Enter button on the projector control panel or
the button on the remote control.
The menus will be displayed in the selected language.
24 Xerox DP 820 User’s Guide
Page 30

Advanced Menu
User Controls
Auto Source Select—The projector automatically scans the
connected input sources and selects the type that is connected.
• To activate this option, select it, then press the Menu/Enter
button on the projector control panel or the button on the
remote control.
Rear—Projects a reversed image so you can project from behind a
translucent screen.
• To activate this option, select it, then press the Menu/Enter
button on the projector control panel or the button on the
remote control.
Ceiling—Projects an image upside down for a ceiling-mounted
projection.
• To activate this option, select it, then press the Menu/Enter
button on the projector control panel or the button on the
remote control.
ECO Mode—Dims the projector’s lamp output to lower power
consumption and increase lamp life.
• Press the buttons to select this mode.
ON—The lamp output is reduced
OFF—The lamp output is not reduced
Lamp Hours—Displays the lamp’s elapsed operating time (in
hours) since the lamp timer was reset. The lamp hours counter that
tells you the elapsed operating time cannot be manually adjusted.
Color Space—Selects the type of input signal.
• Press the buttons to select the color space.
RGB
YCbCr
YPbPr
Xerox DP 820 User’s Guide 25
Page 31

User Controls
Auto Shutdown—Sets the projector lamp to automatically shut
down if it doesn’t receive an input signal within 30 minutes.
• Press the buttons to select this option.
ON—The lamp will automatically shut down in 30 minutes if
it doesn’t receive a signal
OFF—The lamp will remain lit, even if no signal is received
OSD Timeout—Sets the duration the OSD menus remain on the
screen before automatically closing if you don’t make a selection.
• Press the buttons to increase or decrease the OSD
Timeout duration.
Menu Position—Sets the position of the OSD menus on the
screen.
• Press the buttons to select the menu position as
indicated by the icons.
OSD Transparency—Sets the amount of transparency of the OSD
menus on the screen. As transparency increases, the image
underneath the menus becomes more visible. At the setting of 4,
the menus are at maximum transparency; at 16 the menus are
opaque.
Audio Menu
• Press the button to increase the transparency.
• Press the button to decrease the transparency.
Factory Reset—Resets the projector’s settings to their default
factory settings.
• Press the buttons to select the Factory Reset, then
press the Menu button on the projector’s control panel or
the button on the remote control to confirm the reset.
Volum e—Adjusts the overall volume.
• Press the button to decrease the volume.
• Press the button to increase the volume.
Mute—Mutes the audio.
• Press the buttons to mute the audio.
ON—The audio is muted.
OFF—The audio plays normally.
26 Xerox DP 820 User’s Guide
Page 32

Maintenance
Maintenance
The projector needs proper maintenance. Keep the lens clean
because dust, dirt, or spots will project on the screen and diminish
image quality.
Keep the projector housing clean to maintain its appearance.
Before cleaning the lens or housing, always turn off the power first
and unplug the power cord.
Note that only the lamp is replaceable. If any other parts need
replacing, contact your dealer or qualified service personnel.
Warning—Never open any of the covers on the projector except
the lamp cover. Dangerous electrical voltages inside the projector
can cause serious injury. Do not attempt to service the projector
yourself. Refer all servicing to qualified service personnel.
Cleaning the Lens
1. Turn off the projector and let it cool down. Make sure the lens is
also cool.
2. Wipe the lens in a circular motion with lens cleaning paper.
Do not touch the lens with your hands.
Always keep the lens cap on the lens when the projector is not
in use.
Cleaning the Projector
1. Turn off the projector and let it cool down.
2. Unplug the power cord.
3. Using a soft cloth, clean the projector’s case, and then carefully
remove any dust blocking the projector’s ventilation vents.
If dirt and stains are not easily removed, dampen the cloth with
water, or water and a neutral detergent.
4. Wipe dry with a soft, dry cloth.
Never use abrasive cleanser, detergents, or cleaning solvent
on the case or the vents. Never use benzene, thinners, or
chemical sprays.
Do not try to clean dust from the inside the projector’s case.
Xerox DP 820 User’s Guide 27
Page 33

Maintenance
Changing the Lamp
Precautions When Changing a Lamp
The projector automatically monitors the lamp life. As the lamp
reaches the end of its life, the image becomes darker and the color
hues weaker. The projector’s Lamp LED turns red to let you know
that the lamp must be changed soon before it fails completely.
When you see the red Lamp LED, please change the lamp as soon
as possible.
Note that lamp lifetimes vary according to the operating
environment and type of use. Lamp lifetimes are not guaranteed
and some lamps may end their lifetimes earlier than others.
NOTE: To order a new replaceable lamp module, please go to
www.xeroxprojectors.com.
• The lamp module is the only user-replaceable part in the
projector. To prevent electric shock, do not open the projector
case.
• Always wear protective gloves and eyeglasses when fixing or
replacing the lamp. Lamp contains mercury.
• To reduce the risk of personal injury, do not drop the lamp
module or touch the lamp bulb at any time. The lamp module
may explode if handled incorrectly, and may shatter and cause
injury if dropped.
• The lamp is hot! If you touch the lamp, you may scald your
fingers. Allow the projector to cool down at least 45 minutes
before opening the lamp compartment or changing the lamp.
• In the event that the lamp is dropped or broken, and explodes
or bursts, please leave the area immediately and ventilate it for
at least 30 minutes.
• Do not operate the projector with the lamp cover removed.
• Do not attempt to reuse an old lamp. An old lamp may explode
if reused.
28 Xerox DP 820 User’s Guide
Page 34

To Change the Lamp Module
1. Turn off the projector’s power.
2. Disconnect the power cord.
3. Let the projector lamp cool completely, at least 45 minutes.
4. Place a protective cloth beneath the projector and turn it over
so you can access the lamp cover.
NOTE: Wear lint-free gloves or finger cots when changing the
lamp.
5. Remove the lamp cover screws and lift it off.
Maintenance
6. Remove the screws holding the lamp in place, then grasp the
lamp handle and lift the lamp directly up and out of the
projector.
7. Hold the new lamp by its handle and carefully slide it down into
the projector. Make sure it properly seats in place.
NOTE: Handle the lamps carefully to avoid breaking or
scratching the glass.
8. Replace the lamp screws and screw the lamp into the projector.
9. Replace the panel cover and screw it onto the projector. Make
sure all screws are tightened properly.
10. Dispose of the lamp properly. Please see the section “Product
Recycling and Disposal for USA” on page 37 for information
about the Xerox worldwide equipment takeback and reuse/
recycle program.
Xerox DP 820 User’s Guide 29
Page 35

Maintenance
Troubleshooting
If you try the troubleshooting procedures described in this section
and the problem persists, you may have a malfunctioning projector.
Refer to the technical support card that you received with your
projector or contact the retailer where you purchased your
projector. Also visit our web site at www.xeroxprojectors.com for
additional technical information.
Problem: No image appears on the screen.
Check for one of these possible problems:
• Are the cables loose or not plugged in securely? Inspect
the cable connections. Make sure the cables are plugged in
securely.
• Are any of the pins on the cables bent or broken? Inspect
the pins on the cable plugs to make sure none of the pins are
bent or broken.
• Is the projection lamp securely installed? Check that the
projection lamp is securely installed, especially if you just
changed it. See the section “Changing the Lamp” on page 28
for details about the lamp installation.
• Is the power on? Check that the projector’s power switch is
turned on and that the power cord is plugged in securely to a
working power outlet. If you are using a power strip, make sure
it is turned on and plugged in.
• Is the lens cap still on? Make sure you have removed the
lens cap from the lens at the front of the projector.
• Are the Brightness and Contrast set incorrectly? Adjust the
Brightness and Contrast until a picture appears. See “Image
Menu” on page 20.
Problem: The screen of your Notebook or PowerBook
computer is not displaying your presentation
If you are using a Notebook PC:
Some Notebook PCs deactivate their own screens when a second
display device is attached. Please see the user’s manual that you
received with your Notebook PC to reactivate its screen.
If you are using an Apple PowerBook:
1. From the Apple menu, choose Control Panels/PowerBook
Display.
2. Turn on Video Mirroring.
3. Click the Close box.
30 Xerox DP 820 User’s Guide
Page 36

Maintenance
Problem: The image is flickering or otherwise unstable
Try one of these possible solutions:
• Change the Phase setting on the OSD Display menu. See
“Display Menu” on page 23.
• Change the number of colors that your computer displays on its
monitor. See the documentation that you received with your
computer for the steps to change the number of colors its
monitor can display.
Problem: Image has vertical flickering stripes.
Try one of these possible solutions:
• Change the Tracking setting on the OSD Display menu. See
“Display Menu” on page 23.
• Reset the display mode of your computer’s graphic card to
make it compatible with the projector. See “Preset Signals” on
page 34 for the settings.
Problem: Image is out of focus.
Try one of these possible solutions:
• Adjust the focus ring on the projector. Turn the focus ring until
the image comes into focus.
• Make sure the distance between the projector and the screen is
between 1.2m and 10.0m. See “Adjusting Projection Image
Size” on page 15 for details.
Problem: When the projector is connected to a DVD
player, playing a film with a 16:9 aspect ratio makes the
image looks stretched out.
Try one of these possible solutions:
• Reset your DVD player to display at a 4:3 aspect ratio. See the
DVD player user’s guide for the steps to adjust its aspect ratio.
• Using the OSD Menus, go to the Image Menu and select a new
Aspect Ratio. Change it to 4:3.
Problem: The colors of the projected image look different
than the colors of the image on the computer screen.
Use the OSD Image and Video menus to adjust the colors.
Xerox DP 820 User’s Guide 31
Page 37

Maintenance
Problem: Image is reversed or inverted.
Use the OSD Advanced Menu to change the Rear or Ceiling option
to display the image properly.
Problem: No sound.
Make sure the audio cables and other cables are connected
properly.
Problem: Remote control does not work.
Check for one of these possible problems:
• Are you too far from the projector? The remote control has a
range of about 10ft (3m) and needs to be within 20° of the
sensor. Move closer to the projector and try again.
• Is anything blocking the infrared sensors on the projector?
Make sure the infrared sensors are not covered or blocked
from receiving signals from the remote control.
• Are the batteries in the remote control dead? Replace the
batteries in the remote control.
Problem: Lamp burns out or makes a popping sound.
When the lamp reaches its end of life, it may burn out and may
make a loud popping sound. If this happens, do not attempt to turn
on the projector until the lamp module has been replaced. See
“Changing the Lamp” on page 28 to replace the lamp.
32 Xerox DP 820 User’s Guide
Page 38

Maintenance
Xerox DP 820 Projector Specifications
Projection System Single panel 0.55” DLP™ projector
Native Resolution 48,000 dot x 1 (800 x 600 x 1)
Image Brightness 1600 ANSI lumens (typical)
Uniformity 80% (typical)
Lens Manual Zoom (1.2X)
Focal Length 20.2 - 24.2mm
Contrast Ratio 1500:1 (Full on/off) (typical)
Aspect Ratio 1:1, 16:9, 4:3
Screen Size 30 - 200 inches
Lamp 200W
Projection Type Front, Rear Ceiling
Video Input PAL, NTSC, SECAM
Input Source Computer, HDTV, S-Video, Video
Scanning Frequency
Horizontal Frequency
Vertical Frequency
Pixel Rate
Digital Keystone Correction Vertical: +/- 15 degrees
Analog RGB (input signal) D-Sub connector
HDTV Display 720p (60 Hz), 720p (50 Hz), 1080i (60 Hz), 1080i (50 Hz)
Integrated Speaker 2W x 1
Audio Noise 34 dB
Remote Control Multifunctional
OSD Language Multi-language
Operational Ambient Temperature: 5° ~ 35° C (41° ~ 95° F)
Certification UL, CE, FCC Class B, VCCI, C-Tick, CCC
Power Supply AC 100 - 240V, 50 - 60Hz
Power Consumption 250W
Dimensions (W x D x H) 254 x 202 x 98 mm
Weight 2.0 kg (4.5 pounds)
31 - 79 KHz
50 - 85 Hz
108 MHz
Note: Design and Specifications are subject to change without
notice.
Xerox DP 820 User’s Guide 33
Page 39

Maintenance
Preset Signals
The following tables describe the projector’s preset signals.
Preset Signal fH (kHz) fV (Hz) Sync Size
640 X 480 VGA MODE 3 31.469 59.940 H(-), V(-) 800
VGA VESA 72 H
VGA VESA 75 H
VGA VESA 85 H
800
X 600 SVGA VESA 56 HZ 35.156 56.250 H(+), V(+) 1024
SVGA VESA 60 H
SVGA VESA 72 H
SVGA VESA 75 H
SVGA VESA 85 H
X 768 XGA VESA 60 HZ 48.363 60.004 H(+), V(-) 1344
1024
XGA VESA 70 H
XGA VESA 75 H
XGA VESA 85 H
115 2
X 864 SXGA VESA 70 HZ 63.995 70.016 H(+), V(+) 1472
SXGA VESA 75 H
SXGA VESA 85 H
1280
X 960 SXGA VESA 60 HZ 60.000 60.000 H(+), V(+) 1800
SXGA VESA 75 H
X 1024 SXGA VESA 60 HZ 63.981 60.020 H(+), V(+) 1688
1280
Z 37.861 72.809 H(-), V(-) 832
Z 37.500 75.500 H(-), V(-) 840
Z 43.269 85.008 H(-), V(-) 832
Z 37.879 60.317 H(+), V(+) 1056
Z 48.077 72.188 H(+), V(+) 1040
Z 46.875 75.000 H(+), V(+) 1056
Z 53.674 85.061 H(+), V(+) 1048
Z 56.476 70.069 H(+), V(-) 1328
Z 60.023 75.029 H(+), V(+) 1312
Z 68.677 84.997 H(+), V(+) 1376
Z 67.500 75.000 H(+), V(+) 1600
Z 77.487 85.057 H(+), V(+) 1568
Z 75.000 75.000 H(+), V(+) 1680
34 Xerox DP 820 User’s Guide
Page 40

HDTV Preset Signals
Maintenance
Horizontal
Frequency
Preset Signals
480I 15.8 kHz 60 Hz
480
P 31.5 kHz 60 Hz
I 15.6 kHz 50 Hz
576
P 31.3 kHz 50 Hz
576
720
P 45.0 kHz 60 Hz
P 37.5 kHz 50 Hz
720
I 33.8 kHz 60 Hz
1080
1080
I 28.1 kHz 50 Hz
(kHz)
Vertica l
Frequency
(Hz)
Xerox DP 820 User’s Guide 35
Page 41

Maintenance
36 Xerox DP 820 User’s Guide
Page 42

Appendix A Notices
Federal Communications Commission (FCC) for USA
This equipment has been tested and found to comply with the limits
for the class B digital device, pursuant to part 15 of the FCC Rules.
These limits are designed to provide reasonable protection against
interference in a residential installation. This equipment generates,
uses and can radiate radio frequency energy and if not installed,
and used in accordance with the instructions, may cause harmful
interference to radio communications. However, there is no
guarantee that interference will not occur in a particular installation.
If this equipment does cause harmful interference to radio or
television reception, which can be determined by turning the
equipment off and on, the user is encouraged to try and correct the
interference by one or more of the following measures:
Reorient or relocate the receiving antenna.
Increase the separation between the equipment and receiver.
Connect the equipment into an outlet on a circuit different from that
to which the receiver is connected.
Consult the dealer or an experienced radio/TV technician for help.
This equipment has been certified to comply with the limits for a
class B computing device, pursuant to FCC Rules. In order to
maintain compliance with FCC regulations, shielded cables must
be used with this equipment. Operation with non-approved
equipment or unshielded cables is likely to result in interference to
radio and TV reception. The user is cautioned that changes and
modifications made to the equipment without the approval of
manufacturer could void the user's authority to operate this
equipment.
This device complies with part 15 of the FCC Rules. Operation is
subject to the following two conditions: (1) This device may not
cause harmful interference, and (2) this device must accept any
interference received, including interference that may cause
undesired operation.
Product Recycling and Disposal for USA
Xerox operates a worldwide equipment takeback and reuse/
recycle program. Contact your Xerox sales representative (1-800ASK-XEROX) to determine whether this Xerox product is part of
the program.
Xerox DP 820 User’s Guide 37
Page 43

If your product is not part of the Xerox program and you are
managing its disposal, please note that the product contains lead
and mercury whose disposal may be regulated due to
environmental considerations. For recycling and disposal
information, contact your local authorities.
38 Xerox DP 820 User’s Guide
Page 44

05-0661-200
 Loading...