

Page 1

Chapter 1
Introduction Chapter1
Overview ............................................................................... 1-3
Document Conventions ........................................................ 1-3
The XNIC-ENET .................................................................... 1-4
The XNIC-TRING .................................................................. 1-4
Before You Begin .................................................................. 1-6
Important Information ......................................................... 1-7
Locating the Ethernet Hardware Address .............................. 1-7
Ethernet Hardware Address ............................................... 1-8
Serial Number ................................................................... 1-8
XNIC-ENET Server Name ................................................... 1-8
Locating the Token Ring Hardware Address .......................... 1-9
Token Ring Hardware Address ........................................ 1-10
Serial Number ................................................................. 1-10
Token Ring Speed ........................................................... 1-10
XNIC-TRING Server Name ............................................... 1-10
Chapter 1: Introduction ❖ 1-1
Page 2

Introduction
Installation of the XNIC ...................................................... 1-11
Configuration Sheets .......................................................... 1-11
Printing the Network Interface Configuration ..................... 1-11
Default Configuration ......................................................... 1-12
1-2 ❖ XNIC-ENET/TRING Configuration Guide
Page 3
Introduction
Overview
Note
Document
Conventions
Congratulations on using the Xerox Network Interface Card
(XNIC) to connect your Xerox DocuPrint 4517 and/or 4520,
4510, and 4505 laser printers to your network environment.
This guide describes the XNIC-ENET and XNIC-TRING
and tells you how to configure either one on your network for
remote printing.
It is not the purpose of this guide to provide instruction in the
general design, configuration, and use of local area networks.
Use of this guide requires a working knowledge of networks
and is therefore intended primarily for network
administrators.
This guide uses the following typographical conventions:
Text that is displayed on the screen is presented in
bold typeface, in English only. For example,
node_name.
Keywords that you enter via the keyboard are presented
in
computer typeface. For example, define
server.
Variables that you enter via the keyboard are presented
in italic typeface. For example, fileserver.
Function keys are shown in brackets. For example,
<Esc> represents the Escape key and <Ctrl> represents
the Control key.
Names of pull down screens and menus are capitalized
and printed in a bold typeface. For example, Available
Options menu
Throughout this document, XNIC pertains to both
XNIC-ENET and XNIC-TRING. We have included
examples for both Ethernet and Token Ring users.
Chapter 1: Introduction ❖ 1-3
Page 4

Introduction
The XNIC-ENET
The XNIC-TRING
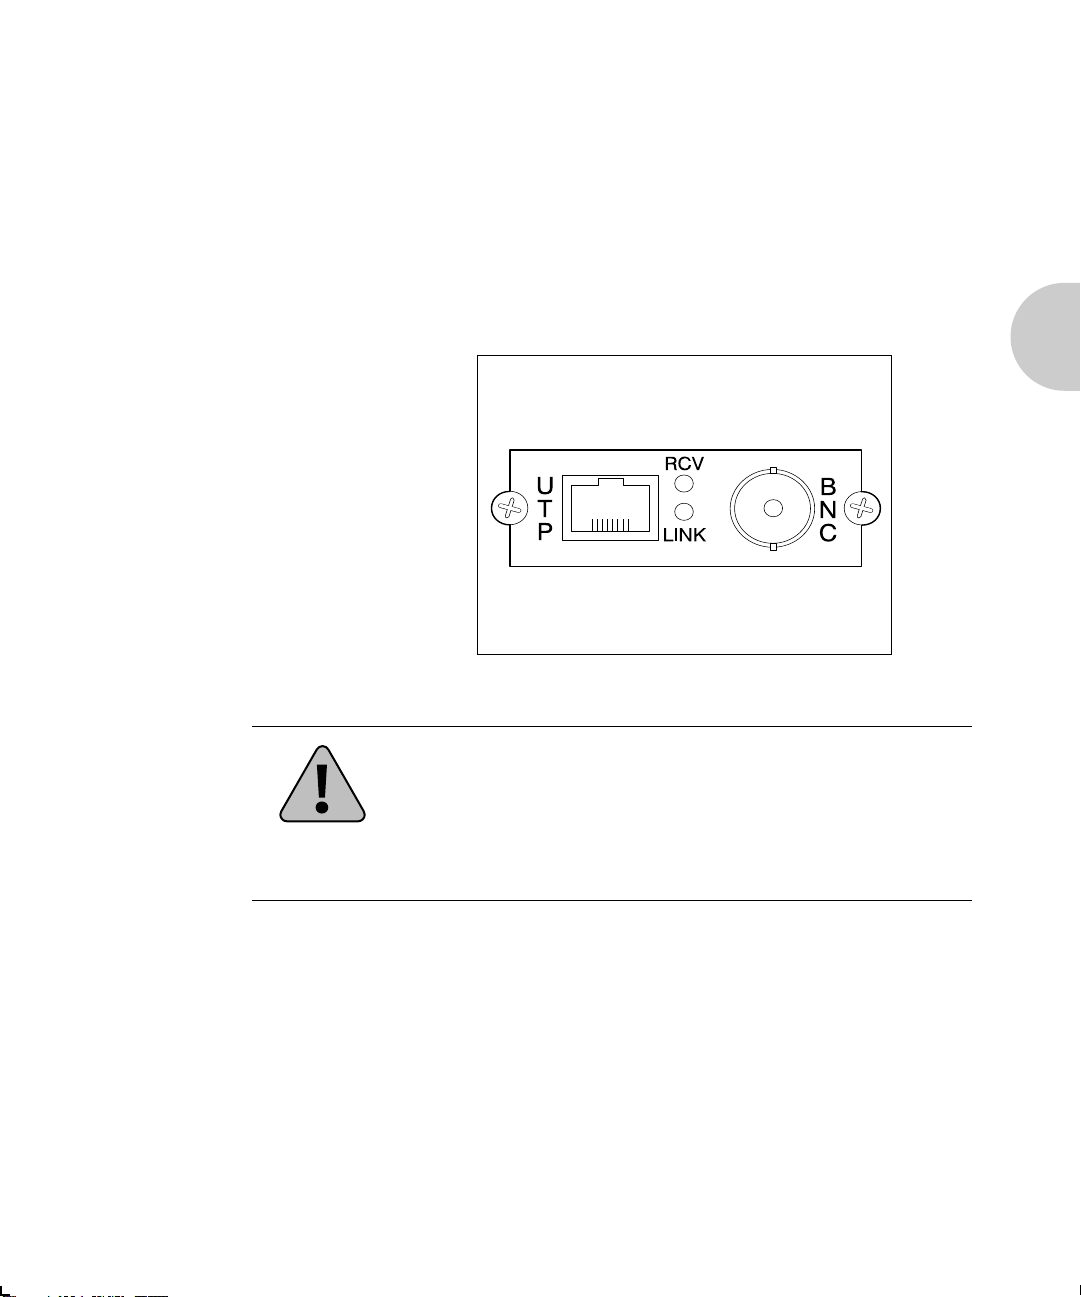
The XNIC-ENET is an Ethernet interface card that plugs
directly into the printer. Connection to the Ethernet network
may be made using either Thinnet (10base2) cable (which
uses a BNC connector), or unshielded twisted-pair
(UTP/10baseT) cable (which uses an RJ-45 connector). Two
LEDs on the connection panel are visual indicators of network
activity.
The XNIC-TRING is a Token Ring interface card that plugs
directly into the printer. Connection to the Token Ring
network may be made using either shielded twisted pair
(STP) cable (which uses a DB-9 connector), or unshielded
twisted pair (UTP) cable (which uses an RJ-45 connector).
When your printer is attached to a network with the XNIC, it
may be used from virtually any computer on the network. If
more than one system requests a print job at the same time,
the XNIC ensures that each job is printed in the order that it
is received at the XNIC. However, the priority that the XNIC
services print jobs from the different networks can be
changed.
1-4 ❖ XNIC-ENET/TRING Configuration Guide
Page 5

Overview
The XNIC can currently be used with these popular
operating systems and protocols:
Table 1.1 XNIC Operating Systems and Protocols
Network Operating System Protocol
Novell NetWare IPX/SPX, TES
UNIX TCP/IP, LPD, Telnet
AppleTalk EtherTalk, TokenTalk
VAX/VMS (XNIC-ENET only) DECnet LAT
Microsoft LAN Manager TCP/IP, LPD, NetBIOS
IBM LAN Server TCP/IP, LPD, NetBIOS
Microsoft Windows NT TCP/IP, LPD, NetBIOS
The procedures described in this manual are the most
common and direct approaches for each task. Because many
networks have local modifications or run third-party print
control software, the proper procedures for your specific
network may differ. Also, some of the procedures in this
manual may require the expertise and access privileges of a
system administrator.
Chapter 1: Introduction ❖ 1-5
Page 6

Before You Begin
Before You
Begin
Before you begin installation, take a moment to verify that
you have received everything listed below:
XNIC-ENET or XNIC-TRING board in an antistatic bag
XNIC-ENET/TRING Configuration Guide (this book)
Three 3.5 inch diskettes:
Utilities for: LAN Server, LAN Manager, Novell
NetWare (TES). Three separate utilities on one DOS
formatted diskette.
UNIX Installation Utility diskette (tar format)
Xerox Port Monitor for Windows NT
DS/P Kit
Three 3.5 inch diskettes
DS/P Guide
The Xerox 4505/4505ps, 4510/4510ps, 4520/4520mp
Desktop Laser Printers Installation Supplement.
Instructions on how to install the XNIC on the Xerox 4517
printer are included in the 4517 User Guide.
1-6 ❖ XNIC-ENET/TRING Configuration Guide
Page 7

Important Information
Important
Information
Locating the
Ethernet Hardware
Address
A Serial number
B Ethernet hardware address
C JX1 pins
It is important that you write down the unique Ethernet or
Token Ring hardware address of your XNIC, its serial
number, and server name. You will need this information
during the installation and if you contact Xerox for assistance
or upgrades.
Figure 1.1 shows the location of the Ethernet hardware
address and serial number on the XNIC-ENET.
Figure 1.1 Location of Ethernet hardware address
and serial number
Caution
Pins 2 and 3 on JX1 must be strapped together for proper
operation of the XNIC-ENET.
Chapter 1: Introduction ❖ 1-7
Page 8
Important Information
Note
Once the XNIC-ENET is installed, the numbers will not be
easily accessible. We suggest you note them here and on the
back of this guide for later reference.
Ethernet Hardware Address
00-00-C9-_____ _____-_____ _____-_____ _____
Serial Number
_____ _____ _____ _____ _____ _____ _____ _____ _____
XNIC-ENET Server Name
Next, enter the last six characters of the Ethernet hardware
address, but without the dashes, in the spaces below. This is
the XNIC-ENETs default print server name:
XNE _____ _____ _____ _____ _____ ______
If your printer came with XNIC-ENET already installed, you
can find the Ethernet Hardware Address on either the Printer
Configuration Sheet or the Network Interface Configuration
For Ethernet sheet. Refer to page 1-11 for instructions on
printing the configuration sheets.
1-8 ❖ XNIC-ENET/TRING Configuration Guide
Page 9
Important Information
Locating the
Token Ring
Hardware Address
A Serial number
B Token Ring hardware address
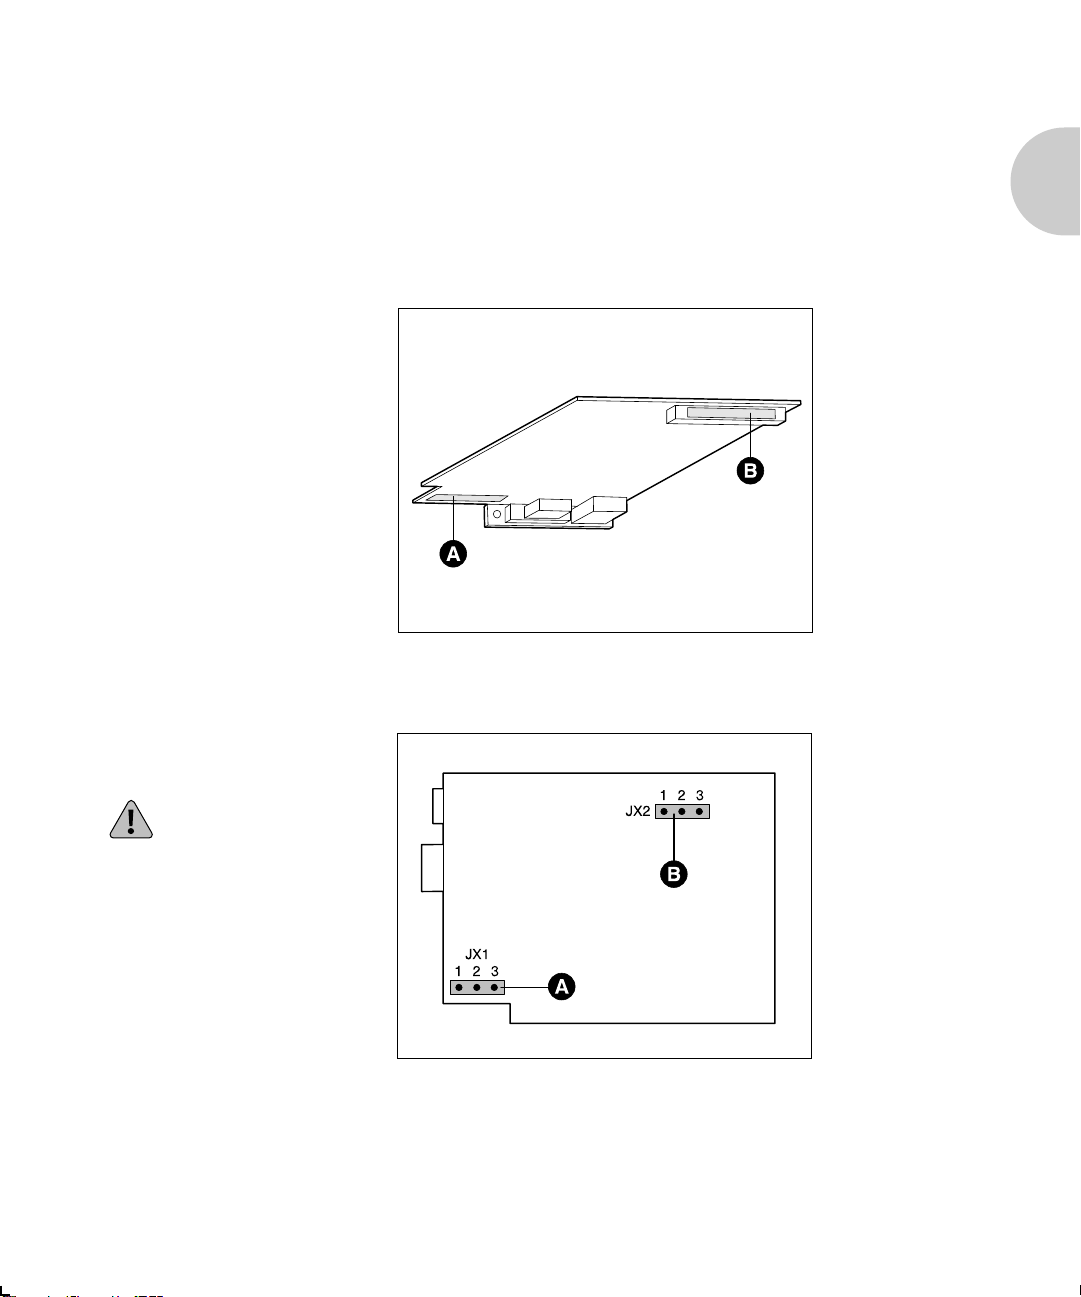
Figures 1.2 and 1.3. show the location of the Token Ring
hardware address, serial number and speed of the
XNIC-TRING.
Figure 1.2 Location of Token Ring hardware address
and serial number
Figure 1.3 Location of JX1 and JX2 pins
A JX1 pins
Pins 2 and 3 on JX1 must
be strapped together for
proper operation of the
XNIC-TRING.
B JX2 pins (Token Ring speed)
Pins 1 and 2 are strapped
together for 4 mbps.
Pins 2 and 3 are strapped
together for 16 mbps.
This is the default setting.
Chapter 1: Introduction ❖ 1-9
Page 10

Important Information
Once the XNIC-TRING is installed, the numbers will not be
easily accessible. We suggest you note them here and on the
back of this guide for later reference.
Token Ring Hardware Address
00-00-93-_____ _____-_____ _____-_____ _____
Serial Number
_____ _____ _____ _____ _____ _____ _____ _____ _____
Token Ring Speed
_____ mbps (4 or 16)
XNIC-TRING Server Name
Next, enter the last six characters of the Token Ring hardware
address, but without the dashes, in the spaces below. This is
the XNIC-TRINGs default print server name:
XNT _____ _____ _____ _____ _____ _____
1-10 ❖ XNIC-ENET/TRING Configuration Guide
Page 11

Important Information
Installation of the
XNIC
Configuration
Sheets
Printing the
Network Interface
Configuration
Before you begin the physical installation of the XNIC, make
sure you have the proper cabling and software available.
If your printer is a Xerox 4517, refer to Appendix C of the
4517 User Guide for installation instructions.
If your printer is either a Xerox 4505, 4510, or 4520, refer
to the instructions in the Installation Supplement.
Complete the installation and return to this book to proceed
with network configuration.
To verify that the XNIC has been properly installed, and to
obtain a list of the XNIC settings, you can print either one, or
both, of these configuration sheets:
Printer Configuration Sheet. Refer to your printers user
guide for instructions on printing this.
Network Interface Configuration for (Ethernet or Token
Ring) sheets. Refer to the next section for instructions on
printing them.
The Network Interface Configuration sheets verify that the
XNIC has been properly installed and list the settings of the
XNIC-ENET or XNIC-TRING. If this is a first-time
installation, the default settings will be listed.
These configuration sheets print automatically when the
printer is powered on without a network cable being
connected to the XNIC. To print these sheets:
Begin with your printer turned off.
1
Make sure the network cable is not attached to the XNIC.
2
Power on the printer.
3
Within approximately two minutes, two Network Interface
4
Configuration sheets will print automatically.
Chapter 1: Introduction ❖ 1-11
Page 12

Important Information
If the configuration sheets do not print, verify that the XNIC is
properly installed, and that the printer control panel displays
the Online Ready message.
Note
Default
Configuration
If DS/P is enabled on the XNIC, the Network Interface
Configuration sheets will not print. Make sure you print the
configuration sheets before enabling DS/P. The default DS/P
setting on the XNIC is disabled.
The XNIC is preconfigured with all protocols enabled using
the default settings. The default configuration is applicable
for most systems. It may be modified from a host that remotely
logs in to the XNIC through a virtual port.
In Novell, run the NetWare (TES) utility that is on the
Utilities for: LAN Server, LAN Manager, Novell NetWare
(TES) diskette provided with the XNIC.
In TCP/IP, run Telnet that is available generically in the
host operating system.
In DEC LAT use NCP that is available generically in the
host operating system.
Refer to each chapter in this guide for details on using these
utilities to modify the default settings.
Now you are ready to move on to Chapter 2, Connecting the
XNIC.
1-12 ❖ XNIC-ENET/TRING Configuration Guide
Page 13

Chapter 2
Connecting the XNIC Chapter2
Overview ............................................................................... 2-2
Connecting XNIC-ENET to the Network ............................. 2-3
Thinnet (10base2) Connection .............................................. 2-4
Twisted-pair (10baseT) Connection ....................................... 2-5
Network Indicator LEDs ........................................................ 2-5
Connecting XNIC-TRING to the Network ........................... 2-6
UTP (RJ-45) Connection ........................................................ 2-7
STP (DB-9) Connection ......................................................... 2-7
Initial Testing ........................................................................ 2-8
Using Multiple Network Cards ............................................ 2-9
Next Steps ........................................................................... 2-10
Chapter 2: Connecting the XNIC ❖ 2-1
Page 14
Connecting the XNIC
Overview
Caution
This chapter discusses connecting the XNIC to the network
after you have installed it in the printer.
Before connecting to the network, power the printer off.
2-2 ❖ XNIC-ENET/TRING Configuration Guide
Page 15
Connecting the XNIC
Connecting
XNIC-ENET to
the Network
The XNIC-ENET may be connected to your network using
Thinnet (10base2) cable with a BNC connector, or UTP
(Unshielded Twisted Pair, 10baseT) cable with an RJ-45
connector. Figure 2.1 shows the location of the ports on the
XNIC-ENET.
Figure 2.1 XNIC-ENET Connection Panel
Caution
Never connect network cables to both the BNC and UTP ports
on the XNIC-ENET at the same time.
If you are connecting to an active Ethernet network, the
connection must be performed quickly to avoid interrupting
the network for a long period.
Chapter 2: Connecting the XNIC ❖ 2-3
Page 16
Connecting XNIC-ENET to the Network
Thinnet (10base2)
Connection
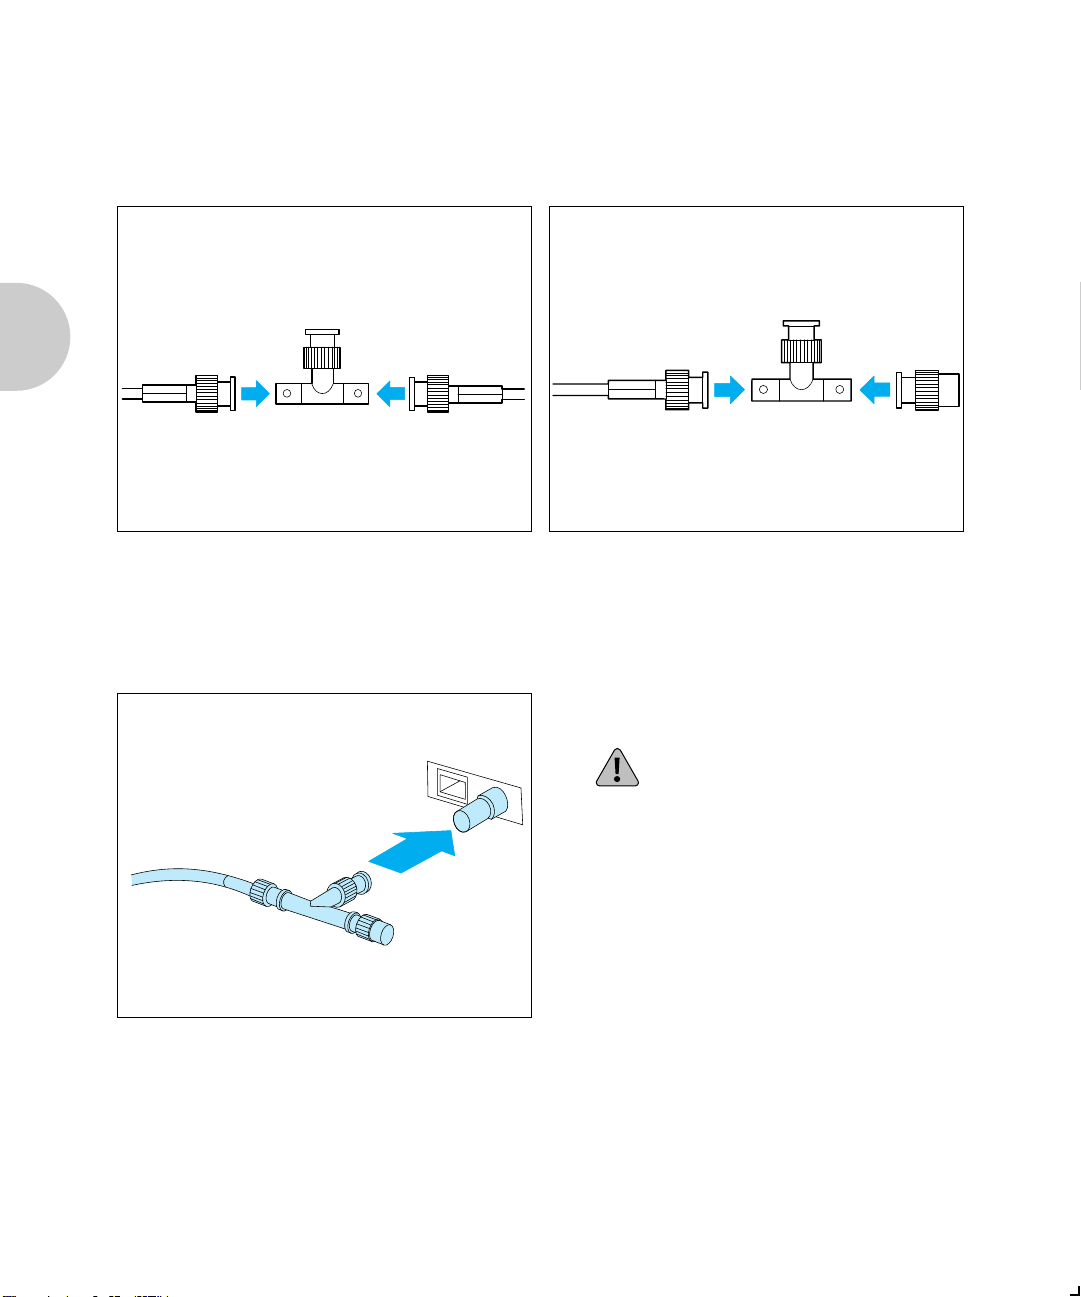
If you are patching into the middle of the
1
cable, use a BNC T-adapter to connect to
the Ethernet cable.
If you are connecting to the end of a cable
2
segment, connect the Ethernet cable to
one side of the BNC T-adapter and
connect a 50 Ohm Ethernet terminator to
the other side.
Attach the BNC T-adapter to the BNC
3
port on the XNIC-ENET.
Do not attach anything to the port
marked UTP.
2-4 ❖ XNIC-ENETT/TRING Configuration Guide
Page 17
Twisted-pair
(10baseT)
Connection
Connecting XNIC-ENET to the Network
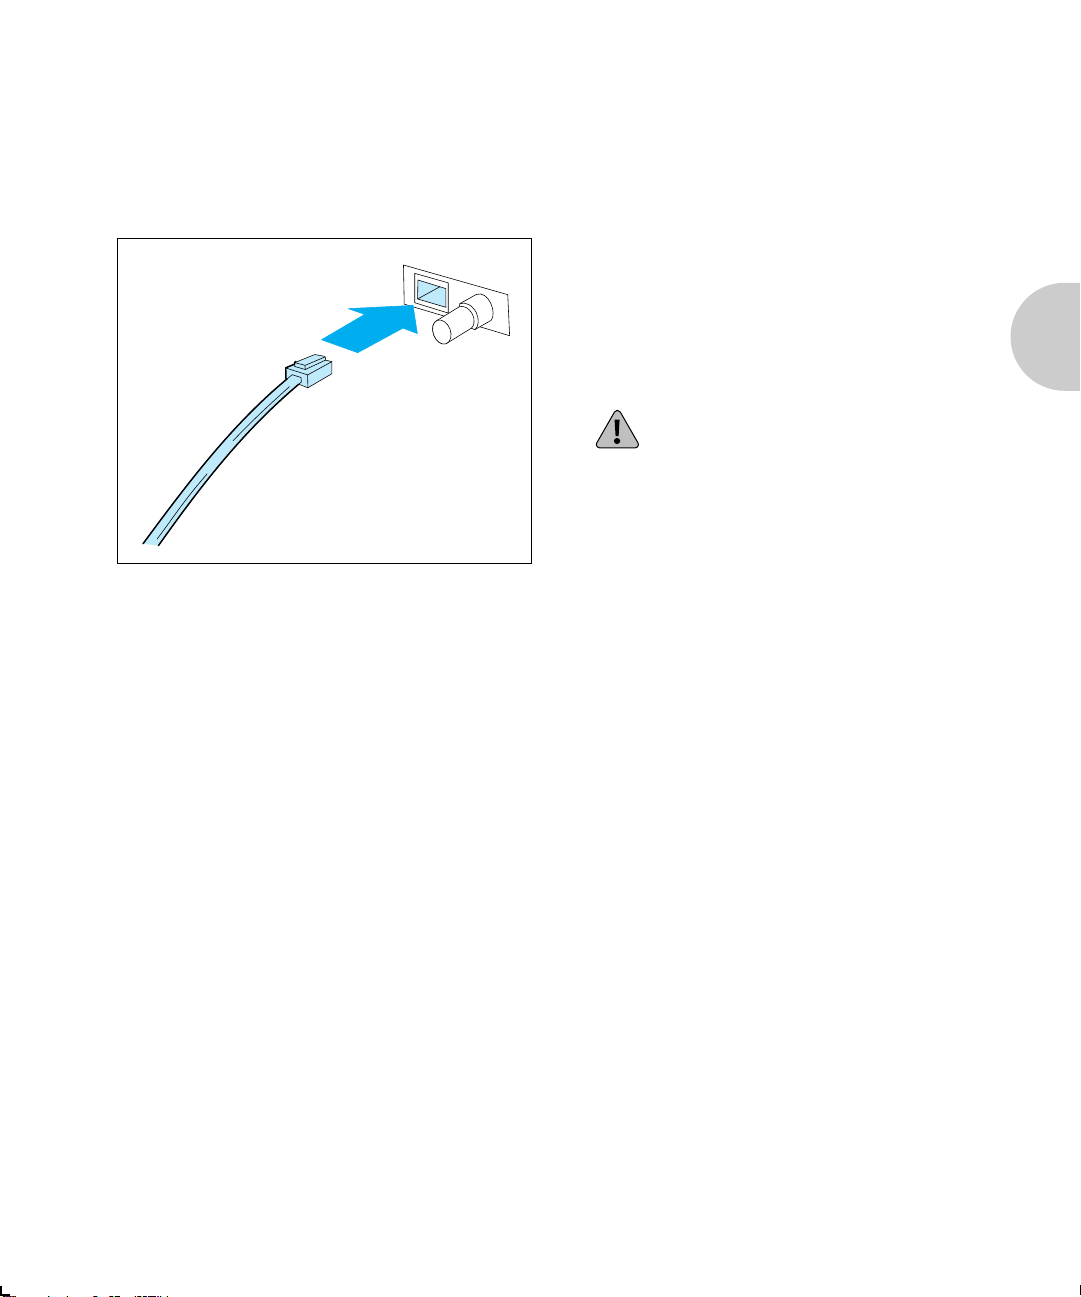
Attach one end of the twisted-pair cable
1
to the UTP port on the XNIC-ENET,
using a standard RJ-45 connector.
Attach the other end of the cable to a UTP
2
wall outlet adapter, or other 10baseT
Ethernet source.
Do not attach anything to the port
marked BNC.
Network Indicator
LEDs
The XNIC-ENET has two LEDs on the connection panel that
are visual indicators of network activity. The LEDs operate as
follows.
Green LED (LINK)
When the XNIC-ENET is properly installed, the printer is
powered on, and the XNIC is connected to a live network via
the UTP, this LED will be lit. If the XNIC-ENET is connected
via BNC, this LED will be off.
Yellow LED (RCU)
When the XNIC-ENET is properly installed, the printer is
powered on, and the XNIC is connected to a live network,
this LED will flash in accordance with network activity.
Chapter 2: Connecting the XNIC ❖ 2-5
Page 18
Connecting the XNIC
Connecting
XNIC-TRING
to the
Network
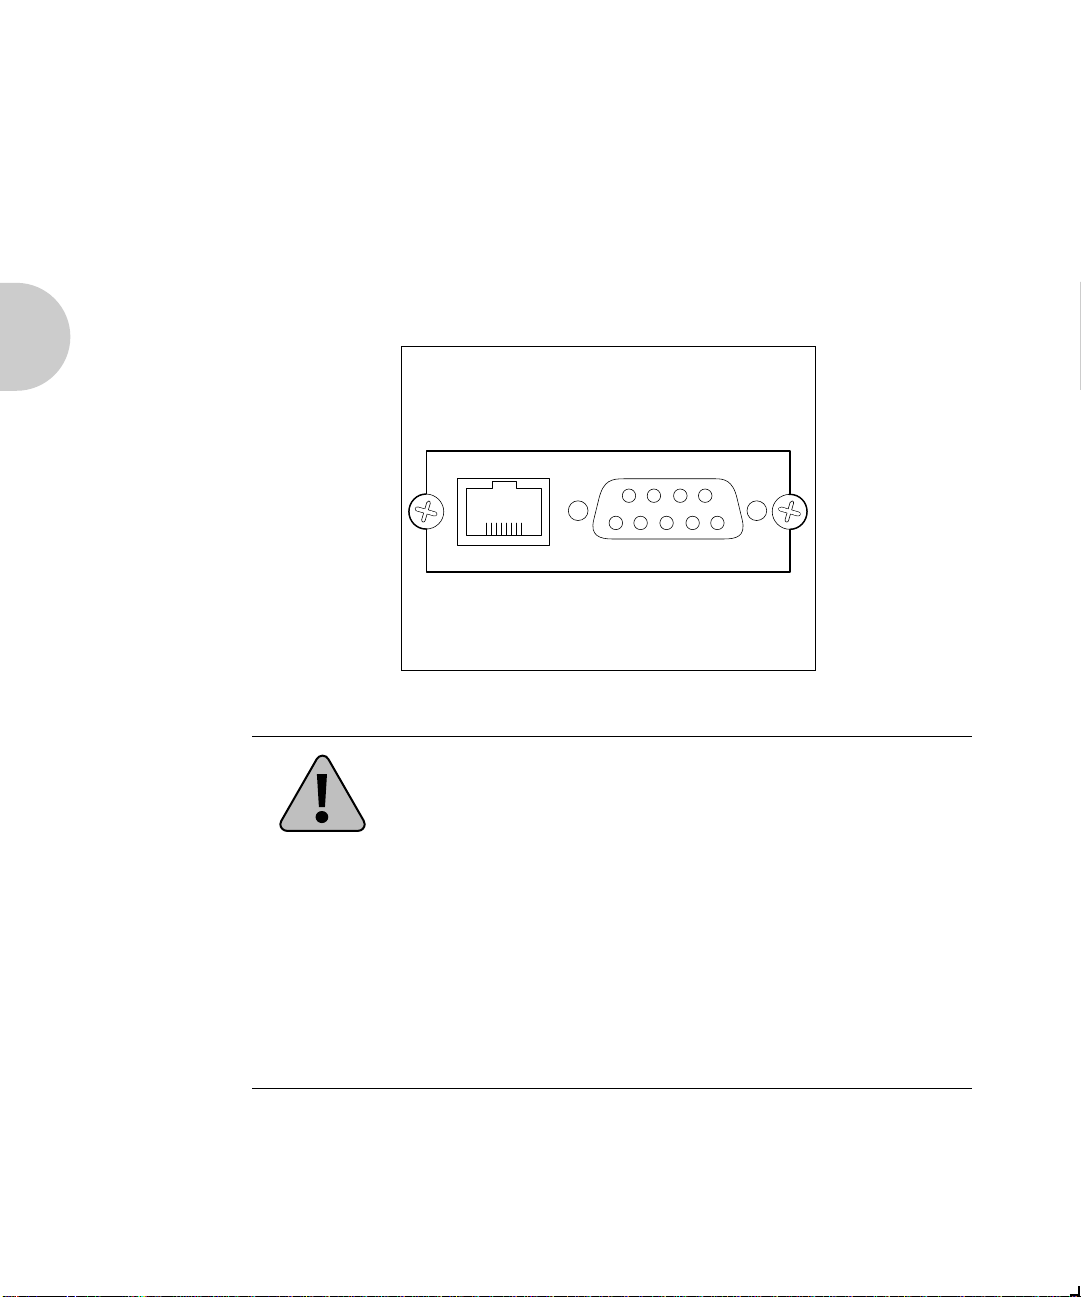
The XNIC-TRING may be connected to your network using
shielded twisted pair (STP) cable with a DB-9 connector, or
unshielded twisted pair (UTP) cable with an RJ-45 connector.
Figure 2.2 shows the location of the ports on the
XNIC-TRING.
Figure 2.2 XNIC-TRING Connection Panel
UTP STP
Never connect network cables to both the STP and UTP ports
on the XNIC-TRING at the same time.
If you are connecting to an active Token Ring network, the
Caution
2-6 ❖ XNIC-ENET/TRING Configuration Guide
connection must be performed quickly to avoid interrupting
the network for a long period.
A Token Ring MAU (Multistation Attachment Unit)
connection is required to connect the XNIC-TRING to a Token
Ring network. The MAU connection must match the speed
selected on the XNIC-TRING. Refer to Figure 1.3 Location of
JX1 and JX2 pins (page 1-9) for the speed of the
XNIC-TRING.
Page 19
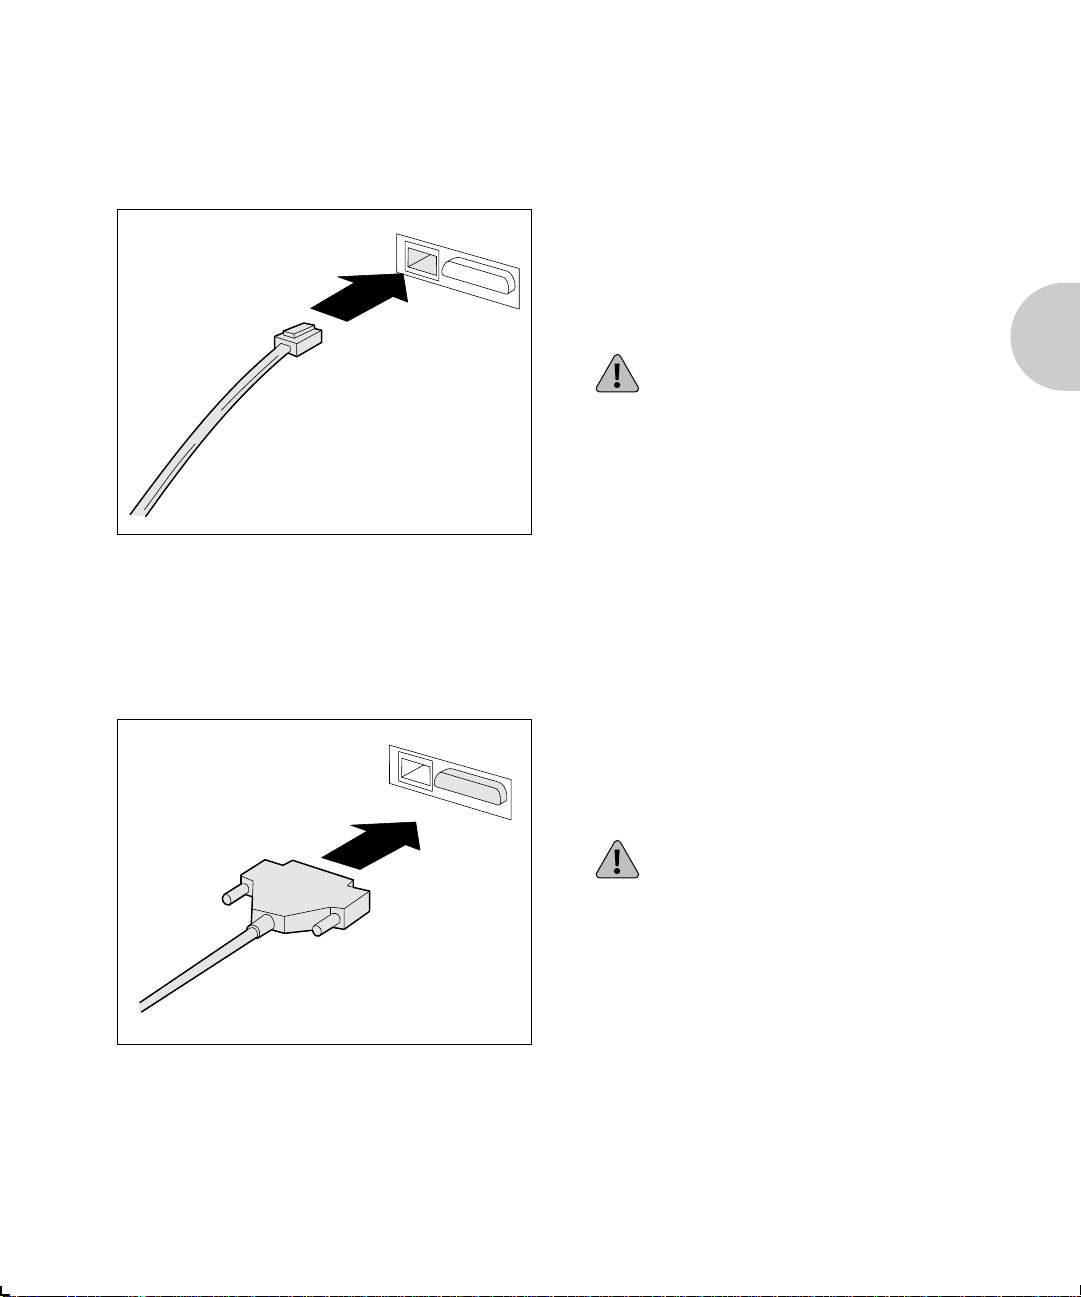
UTP (RJ-45)
Connection
Connecting XNIC-TRING to the Network
Attach one end of the twisted-pair cable
1
to the UTP port on the XNIC-TRING,
using a standard RJ-45 connector.
Attach the other end of the cable to a
2
Token Ring MAU with the correct speed.
Do not attach anything to the port
marked STP.
STP (DB-9)
Connection
Attach the DB-9 end cable to the STP port
1
on the XNIC-TRING.
Attach the other end of the cable to a
2
Token Ring MAU with the correct speed.
Do not attach anything to the port
marked UTP.
Chapter 2: Connecting the XNIC ❖ 2-7
Page 20

Initial Testing
Initial Testing
After installing the XNIC and connecting the network cable,
you are ready to power on the printer and test the system as
follows:
Verify that the network cable is connected to only one port:
1
For Ethernet: BNC or UTP
For Token Ring: UTP or STP.
Power ON the printer.
2
Wait for the printer to complete its self-tests and display
Online Ready.
Move to Step 4 if you are installing an XNIC-TRING.
3
Follow this step if you are installing an XNIC-ENET:
If the XNIC-ENET powers on properly and is connected to
the network via UTP (10baseT), the green LED (LINK) on the
XNIC-ENETs connection panel will be lit (for BNC
connection the green LED will be off).
The yellow LAN LED (RCU) will flash in accordance with
any network activity. If the yellow LED is not flashing and
you know there is network activity, verify that the
XNIC-ENET is properly connected to the network and the
printer is powered on.
Now continue with Step 5.
If the XNIC-TRING powers on properly and is connected to
4
the network, the LED on the Token Ring MAU will be lit.
Print a copy of the Printer Configuration Sheet. Then check
5
to see that the card is listed on the Configuration Sheet.
Refer to your printers user guide for instructions on printing a
configuration sheet, if necessary.
Configure your XNIC as described in the following chapters.
6
(The table onNext Steps (page 2-10) will help you
determine what chapters you need to read.)
2-8 ❖ XNIC-ENETT/TRING Configuration Guide
Page 21

Using Multiple Network Cards
Using
Multiple
Network Cards
Caution
Depending on the model of your printer, combinations of
optional network cards may be installed (i.e., Ethernet, Token
Ring, and LocalTalk). Refer to your printers user guide for
details.
For information about the XNIC-LTALK, refer to the
XNIC-LTALK Xerox Network Interface Card for LocalTalk
Configuration Guide.
When both Ethernet and Token Ring cards are being used in
the same printer and the cabling type is twisted pair, special
care should be taken to ensure that the appropriate cable is
connected to the appropriate wall socket or hub. Inserting an
XNIC-TRING into an Ethernet hub, or an XNIC-ENET into a
Token Ring hub, may result in physical damage to the units or
can cause excessive errors on the network.
Chapter 2: Connecting the XNIC ❖ 2-9
Page 22

Next Steps
Next Steps
You are now ready to configure your printer for your network.
This table will help you decide what chapter(s) to read to do
this
.
If your network is Then go to
Novell NetWare Chapter 3: Using the
Printer with Novell
NetWare
AppleTalk Chapter 4: Using the
Printer with EtherTalk or
TokenTalk
UNIX TCP/IP Chapter 5: Using the
Printer with UNIX TCP/IP
DEC LAT
(XNIC-ENET only)
LAN Manager via TCP/IP
or NetBIOS/NetBEUI
Chapter 6: Using the
Printer with LAT
Chapter 7: Using the
Printer with LAN Manager
LAN Server via TCP/IP or
NetBIOS/NetBEUI
Windows NT via TCP/IP or
NetBIOS/NetBEUI
SNMP Chapter 10: Using the
2-10 ❖ XNIC-ENETT/TRING Configuration Guide
Chapter 8: Using the
Printer with LAN Server
Chapter 9: Using the
Printer with Windows NT
Printer with SNMP
Page 23

Chapter 3
Using the Printer with
Novell NetWare
Overview ............................................................................... 3-4
Available Utilities.................................................................... 3-5
Network Considerations ....................................................... 3-6
PServer and RPrinter/NPrinter Modes .................................... 3-7
Configuring the XNIC as a Print Server
(NetWare 2.x/3.x) .................................................................. 3-8
Adding the Print Server and Printer ....................................... 3-9
Creating the Print Queue .................................................... 3-10
Assigning the Print Queue .................................................. 3-11
Restarting the XNIC ............................................................ 3-12
Linking File Servers to Each Other (If Queues Are from
More Than One File Server) .................................................. 3-13
Defining the Print Job Configuration (Optional) .................. 3-14
Configuring the XNIC as a Print Server
(Netware 4.x NDS) ............................................................... 3-15
NDS Mode Considerations .................................................. 3-15
Chapter3
Chapter 3: Using the Printer with Novell NetWare ❖ 3-1
Page 24

Using the Printer with Novell NetWare
Using PConsole ................................................................... 3-16
Creating the Print Queue .................................................... 3-16
Adding the Print Server ...................................................... 3-17
Adding the Printer .............................................................. 3-18
Selecting the Print Queue ................................................... 3-18
Linking the Print Server to the Printer ................................ 3-19
Restarting the XNIC ............................................................ 3-20
Using NWAdmin ................................................................. 3-22
Logging into the NetWare File Server .................................. 3-22
Establishing the Context ..................................................... 3-23
Creating the Print Queue .................................................... 3-23
Adding the Print Server ...................................................... 3-23
Adding the Printer .............................................................. 3-24
Assigning the Print Queue to the Printer ............................. 3-25
Linking the Print Server to the Printer ................................. 3-25
Restarting the XNIC ............................................................ 3-26
Changing the Polling Interval (Optional) .......................... 3-28
Configuring the XNIC as a Remote Printer
(NetWare 2.x/3.x) ................................................................ 3-27
Network Considerations ..................................................... 3-29
Creating the Print Queue .................................................... 3-30
Adding the Remote Printer ................................................. 3-30
Assigning and Restarting the Print Queue ........................... 3-31
Defining the Print Job Configuration (Optional) .................. 3-32
Configuring the XNIC as a Remote Printer
(NetWare 4.x NDS) .............................................................. 3-33
Network Considerations ..................................................... 3-33
3-2 ❖ XNIC-ENET/TRING Configuration Guide
Page 25

Using the Printer with Novell NetWare
Using PConsole ................................................................... 3-34
Creating a Print Queue ....................................................... 3-34
Adding the Printer .............................................................. 3-35
Adding the Print Server ...................................................... 3-36
Associating the Printer with the Novell PServer ................... 3-36
Linking the Print Queue to the Printer ................................. 3-37
Restarting the Novell PServer .............................................. 3-38
Using NWAdmin ................................................................. 3-39
Logging into the NetWare File Server .................................. 3-39
Logging into the NetWare File Server .................................. 3-39
Creating the Print Queue .................................................... 3-40
Creating the Print Queue .................................................... 3-40
Adding the Printer .............................................................. 3-40
Linking the Print Queue to the Printer ................................. 3-41
Associating the Printer with the Novell PServer ................... 3-42
Restarting the Novell PServer .............................................. 3-42
XNIC Configuration Options .............................................. 3-43
1. Disabling Specific Protocols on the XNIC (Optional) ......... 3-43
2. Setting Frame Type (Optional) ........................................ 3-44
3. Disabling RPrinter/NPrinter Mode (Optional) ................... 3-45
4. Setting/Required Preferred File Server Name
(Required for Large Networks)............................................. 3-45
5. Disabling PServer Mode (Required for Large Networks) ... 3-46
6. Setting the Remote PServer Name for NPrinter/RPrinter
(Recommended for Large Networks)..................................... 3-47
7. Setting NDS Context
(Recommended for Large Networks)..................................... 3-47
8. Setting the NDS Tree
(Recommended for Large Networks)..................................... 3-48
9. Disabling 3x/BEM or NDS Discovery
(Recommended for Large Networks)..................................... 3-49
Chapter 3: Using the Printer with Novell NetWare ❖ 3-3
Page 26

Using the Printer with Novell NetWare
Setting Optional Configurations ....................................... 3-50
Remote Logging into the XNIC via TES ................................ 3-50
Basic XNIC Commands ........................................................ 3-53
3-4 ❖ XNIC-ENET/TRING Configuration Guide
Page 27

Overview
Overview
Note
This chapter provides an overview and step-by-step
procedures for setting up the printer on a Novell NetWare
network. These procedures require that you have the
NetWare access privileges of the system supervisor.
While the instructions in this section are complete, you may
need to consult your system supervisor or network
administrator, or refer to Chapter 11: Troubleshooting.
To avoid confusion, you should remember that the XNIC is a
printer server, while Print Server or PServer is Novell
software that manages the operation of printers on the
NetWare network.
The default Print Server (PServer) name is:
XNExxxxxx for XNIC-ENET
XNTxxxxxx for XNIC-TRING
where xxxxxx
hardware address.
The default Printer name is:
is the last six characters of the XNIC
XNExxxxxx_1 for XNIC-ENET
XNTxxxxxx_1 for XNIC-TRING.
The Printer name is the Print Server name followed by an
underscore _ and a 1.
Before you begin the installation, print a Printer
Configuration Sheet or the Network Interface Configuration
sheets to obtain the necessary Novell settings on the XNIC.
Refer to page 1-11 for instructions on printing configuration
sheets.
Chapter 3: Using the Printer with Novell NetWare ❖ 3-5
Page 28

Using the Printer with Novell NetWare
Available Utilities
In the Novell NetWare environment, you have the option of
using the utilities in Table 3.1 to configure your printer. These
utilities are provided with your XNIC.
Table 3.1 XNIC Utilities
Document Services for
Printing (DS/P)
3 diskettes On Utilities for: LAN Server, LAN
DOS/Windows-based DOS-based command language
Used for:
PConsole operations for
NetWare 3.x and 4.x BEM
Printer management
Refer to Document Services for
Printing Guide
Novell NetWare TES Utility
Manager, and Novell NetWare
(TES) diskette
Used for:
Setting XNIC optional
configuration
Refer to Remote Logging into the
XNIC via TES section in this chapter
Network
Considerations
To allow communication between the XNIC and Novell file
servers across routers, the routers must be configured to pass
through the Service Advertising Protocol (SAP) packets
generated by the XNIC.
The following are the SAP values from the XNIC in
hexadecimal:
0x0621 Xerox SAP
0x0047 PServer SAP
0x007A TES SAP
0x0622 DS/P SAP
3-6 ❖ XNIC-ENET/TRING Configuration Guide
Page 29
Overview
PServer and
RPrinter/NPrinter
Modes
The XNIC as shipped from the factory allows both PServer
and RPrinter modes in NetWare 2.x/3.x to be active.
In NetWare 4.x NDS, the XNIC allows either PServer or
NPrinter mode to be active at a given time.
Refer to Setting Optional Configurations (page 3-50) for
additional information.
If you are running in NetWare with Bindery Emulation Mode,
refer to the Novell documentation to configure PServer and
queues on the 4.x file server in BEM.
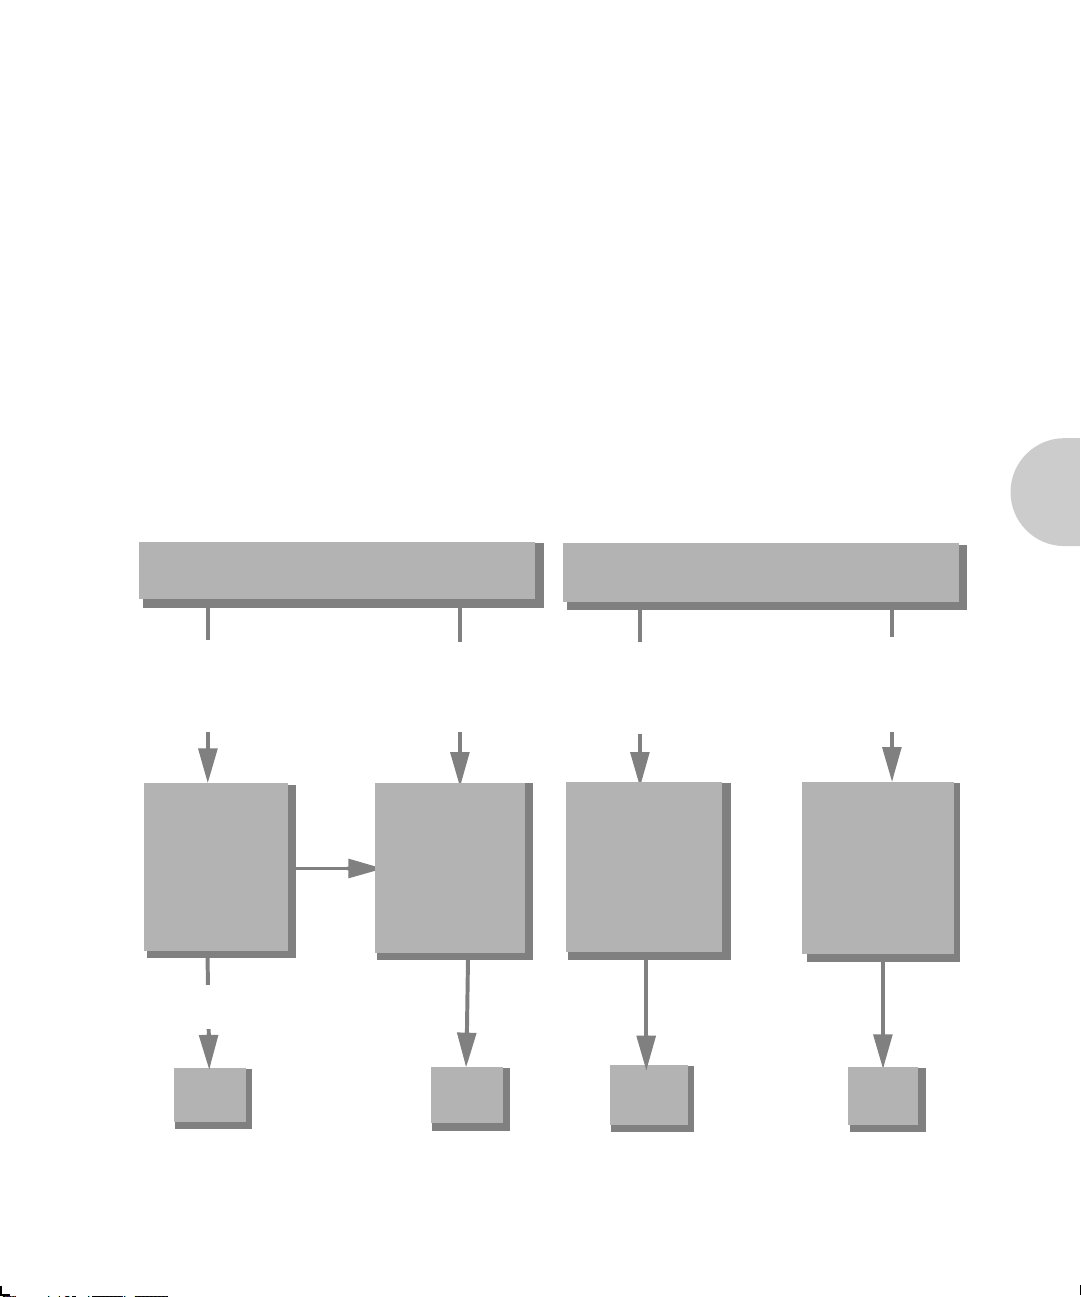
The figure below guides you through the options for
configuring the XNIC for PServer and/or RPrinter/NPrinter.
Figure 3.1 PServer and RPrinter/NPrinter Modes
If you are running NetWare 2.x/3.x
For
Print Server
Mode or
Both Modes
For
Remote
Printer Mode
only
If you are running NetWare 4.x NDS
For
Print Server
Mode
only
Remote
Printer Mode
For
only
Go to the section
Configuring the
XNIC as a Print
Server
(NetWare 2.x/3.x)
(page 3-8)
If Print Server
Mode only
Done
If
Both
Modes
Chapter 3: Using the Printer with Novell NetWare ❖ 3-7
Go to the section
Configuring the
XNIC as a Remote
Printer
(NetWare 2.x/3.x)
(page 3-29)
Done
Go to the section
Configuring the
XNIC as a Print
Server
(NetWare 4.x NDS)
(page 3-15)
Done
Go to the section
Configuring the
XNIC as a Remote
Printer
(NetWare 4.x NDS)
(page 3-33)
Done
Page 30
Configuring the XNIC as a Print Server (NetWare 2.x/3.x)
Configuring
the XNIC as a
Print Server
(NetWare 2.x/
3.x)
Note
Note
To configure your XNIC as a Print Server under NetWare
2.x/3.x, complete each of the procedures in this section as
follows:
Adding the Print Server and Printer
Creating the Print Queue
Assigning the Print Queue
Restarting the XNIC
Linking File Servers to Each Other (if queues are from
more than one file server)
Defining the Print Job Configuration(optional).
DS/P provides an automatic set-up procedure for configuring
the printer in PSERVER mode. You may find it much easier to
use this utility rather than to configure the printer manually.
Refer to the DS/P Guide for details.
After configuring your XNIC as a Print Server, if your network
has more than 25 file servers, go to 4. Setting Required /
Preferred File Server Name (Recommended for Large
Networks) (page 3-45).
3-8 ❖ XNIC-ENET/TRING Configuration Guide
Page 31

Configuring the XNIC as a Print Server (NetWare 2.x/3.x)
Adding the
Print Server
and Printer
These procedures use the commands for Novell NetWare 2.x
or 3.x. Unless noted, commands can be upper or lower case.
Typed commands should be entered by pressing the
<Enter> key.
Log in to the Novell file server so that you have supervisor
1
privileges. At the prompt, enter:
LOGIN
At the prompt, enter the password.
At the system prompt, enter:
2
PCONSOLE
Select Print Server Information from the Available
3
Options menu.
To select an item from a menu in PCONSOLE, use the arrow
keys to highlight the item, then press <Enter>.
Press <Insert>.
4
Enter the print server name as:
5
XNE
or as:
fileserver
xxxxxx
(for XNIC-ENET)
\SUPERVISOR
XNT
xxxxxx
where xxxxxx is the last six characters of the XNIC hardware
address.
Select the print server name you just defined.
6
Select Print Server Configuration from the menu.
7
Select Printer Configuration from the menu.
8
Select one of the Not Installed printers from the list of
9
printers displayed.
Chapter 3: Using the Printer with Novell NetWare ❖ 3-9
(for XNIC-TRING),
Page 32

Configuring the XNIC as a Print Server (NetWare 2.x/3.x)
Enter the XNIC printer name as:
10
XNE
xxxxxx
or as:
XNT
xxxxxx
The printer name is the print server name followed by an
underscore _ and a 1. Upper and lower case letters arent
important. For example, a valid name would be:
XNE
1076E3
Press the <Down-arrow> key to select Typ e, and press
11
<Enter> to display the printer types.
Select the printer type Defined Elsewhere.
12
Save your changes by pressing <Esc> and selecting Yes to
13
confirm the save.
_1 (for XNIC-ENET)
_1 (for XNIC-TRING),
_1 or XNT
If the printer name has been changed using the DS/P
utility, then print the Printer Configuration Sheet to
verify the printers name.
88E829
_1
Press <Esc> several times until the Available Options
14
menu is redisplayed.
Creating the
Print Queue
3-10 ❖ XNIC-ENET/TRING Configuration Guide
Select Print Queue Information from the Available
1
Options menu.
To select an item from a menu in PCONSOLE, use the arrow
keys to highlight the item, then press <Enter>.
Create a new Print Queue:
2
Press <Insert> and a dialog box opens.
Enter a name for the print queue.
Press <Esc> until you redisplay the Available Options
menu.
Page 33

Configuring the XNIC as a Print Server (NetWare 2.x/3.x)
Assigning the
Print Queue
Select Print Server Information from the Available
1
Options menu.
Select the print server from the list.
2
Select Print Server Configuration from the menu.
3
Select Queues Serviced by Printer from the Print Server
4
Configuration menu.
Select the Xerox printer name.
5
For example, XNE1076E3_1.
Press <Insert> to display the list of available queues.
6
Select the queue to be serviced by the Xerox printer.
Enter a Priority level number for the printer (default is 1,
7
highest) and press <Enter>.
If you wish to service several queues with the Xerox printer,
8
repeat Steps 6 and 7 for each additional queue.
Press <Esc> sev e r a l time s until the Available Options
9
menu is displayed.
If your network has more than 25 file servers, before
continuing to the next section Restarting the XNIC, it is
recommended to configure the XNIC. Refer to 4. Setting
Note
Chapter 3: Using the Printer with Novell NetWare ❖ 3-11
Required / Preferred File Server Name (Recommended for
Large Networks) (page 3-45).
Setting the file server name on the XNIC will automatically
reset the XNIC. Therefore, you can skip the next section
Restarting the XNIC and proceed on.
Page 34

Using the Printer with Novell NetWare
Restarting the
XNIC
After you complete the setup in PConsole, the XNIC needs to
be restarted so it can read the new configuration in the
NetWare file server. Power the printer off and power it on to
restart the XNIC.
The following procedure is an alternative method to restart
the XNIC.
Select Print Server Information from the Available
1
Options menu.
Select your XNIC Print Server name.
2
Select Print Server Status and Control.
3
This option appears only if the XNIC is powered on and
connected to the network and the configuration was
successful. Refer to the note on page 3-11 if your
network has more than 25 file servers.
If there is no response, check the network connection of
the printer and verify that the configuration of the print
server and queues on the file server is correct.
Select Server Info.
4
Select the Current Server Status field.
5
Select Going Down after Current Jobs.
6
3-12 ❖ XNIC-ENET/TRING Configuration Guide
Page 35

Configuring the XNIC as a Print Server (NetWare 2.x/3.x)
Linking File Servers
to Each Other
(If Queues Are
from More Than
One File Server)
Note
Follow the steps below when queues on multiple Novell file
servers are configured for the same XNIC. This procedure
will cross link the file servers to ensure the XNIC will service
all the print queues.
The menu names in these steps may differ for the 4.x file
server, depending on from where you logon to it. For
example, from PConsole.
Log in as supervisor to the File Server that has an existing
1
Print Server created on it and enter:
PCONSOLE
Select Print Server Information (Print Servers Information in
2
4.x) from the Available Options menu.
Select the Print Server (PServer) already created for the
3
target XNIC from the Print Servers menu.
Select Print Server Configuration (Serviced NetWare
4
Servers in 4.x) from the Print Server Information menu.
(Skip this step if you are using NetWare 4.x.)
5
Select File Servers To Be Serviced from the Print Server
Configuration menu.
Press <Insert> from the File Servers To Be Serviced (Serviced
6
NetWare Servers in 4.x) menu.
Select the File Server that should be cross linked from the
7
Available File Servers (Available NetWare Servers) menu.
Repeat Steps 6 and 7 for all other File Servers.
8
Chapter 3: Using the Printer with Novell NetWare ❖ 3-13
Page 36

Using the Printer with Novell NetWare
Repeat steps 1 to 8 again on every File Server in the cross
9
link pool.
The Available File Servers (Available NetWare Servers
in 4.x) list should be the same on all File Servers that
will have the same common Print Server.
For example if File Servers A, B, and C on the network
need to be cross linked, perform steps 1 to
8 on Server A.
Then log in File Server B, and repeat steps 1 to 8.
Next log in File Server C and again repeat steps 1 to 8.
Power the printer off and power it on to restart the XNIC.
10
Refer to Restarting the XNIC (page 3-12) for detailed
instructions.
Defining the Print
Job Configuration
(Optional)
The last task is to define a print job for special configuration
for the printer. There are many utility and add-on programs
that do this. Refer to your documentation for those programs
for further information.
If you also wish to configure the XNIC for Remote Printer
mode, go to the section Configuring the XNIC as a Remote
Printer (NetWare 2.x/3.x) (page 3-29).
3-14 ❖ XNIC-ENET/TRING Configuration Guide
Page 37

Configuring the XNIC as a Print Server (NetWare 4.x NDS)
Configuring
the XNIC as a
Print Server
(NetWare 4.x
NDS)
Note
When Novell NetWare is configured to use the XNIC printer
server, up to 128 file servers (the default is 16) may service
the printer server with a maximum of 256 queues.
This section includes procedures for configuring the XNIC as
PServer in NetWare 4.x NDS network using either PConsole
in a DOS environment or NetWare Administrator (NWAdmin)
in a Windows environment.
NDS objects can also be defined and administered using
NetAdmin
For the Print Server name, use XNExxxxxx for
XNIC-ENET and XNTxxxxxx for XNIC-TRING.
For the Printer name use XNExxxxxx_1 for XNIC-ENET
and XNTxxxxxx_1 for XNIC-TRING
where
hardware address. Upper and lower case are not
important.
TM
in DOS environments.
xxxxxx
is the last six characters of the XNIC
NDS Mode
Considerations
Chapter 3: Using the Printer with Novell NetWare ❖ 3-15
Before you begin, make sure these conditions are present:
An NDS server containing an NDS partition replica with
the 4.x PServer object must be no more than two routers
(hops) away from the XNIC printer server.
Printer objects must be in the same context as the PServer
object that references the printer objects.
Define only one PServer object for each XNIC printer
server.
The Public Trustee, which is created by default during
NetWare 4.1 installation, must exist on the root of the
NDS tree.
Spaces and trailers in the NDS tree name will be
converted to underscores to form a 32 byte field length.
Page 38

Using PConsole
Using
PConsole
To configure your XNIC as Print Server using PConsole in
NetWare 4.x, complete each of the procedures in this section
as follows:
Creating the Print Queue
Adding the Print Server
Adding the Printer
Selecting the Print Queue
Linking the Print Server to the Printer
Restarting the XNIC
After configuring the PServer and queues for the XNIC on
the NDS File Server, and if your network has more than 25
file servers, it is recommended to configure the XNIC as
follows:
7. Setting NDS Context, (page 3-47)
8. Setting the NDS Tree, (page 3-48)
9. Disabling 3.x/BEM or NDS Discovery, (page 3-49).
Creating the
Print Queue
3-16 ❖ XNIC-ENET/TRING Configuration Guide
Login to the NDS file server as user Admin under the correct
1
context.
At the prompt, enter:
LOGIN cn=admin
o
= the organization name. For example if the
organization name is printing, the Novell login is:
LOGIN cn=admin
If you are prompted to do so, enter your password.
2
At the DOS prompt, enter:
3
PCONSOLE
To select an item from a menu in PCONSOLE, use the arrow
keys to highlight the item, then press <Enter>.
.o
.printing
Page 39

Using PConsole
Select Change Context from the Available Options menu.
4
Enter the desired context name or press <Insert> to
5
browse for available contexts.
The context name defines the location of the print
queue in the NDS tree.
Select Print Queues from the Available Options menu.
6
Press <Insert> to create a new print queue.
7
Enter the Queue name.
8
Enter the volume where the queue will be located.
9
If you are unsure, press
available volumes.
<Insert>
to display a list of the
Adding the Print
Server
Highlight the desired
10
Press <Esc> until the Available Options menu is
11
redisplayed.
Select Print Servers from the Available Options menu and
1
press <Enter>.
Press <Insert>.
2
Enter the Print Server name as:
3
XNE
xxxxxx
or as:
XNT
xxxxxx
where xxxxxx is the last six characters of the XNIC hardware
address.
(for XNIC ENET)
(for XNIC TRING)
volume name
and press <Enter>.
Chapter 3: Using the Printer with Novell NetWare ❖ 3-17
Page 40

Using the Printer with Novell NetWare
Adding the Printer
Select Printers from the Available Options menu and press
1
<Enter>.
An error message may pop up indicating a mode
mismatch. Ignore this message and continue with the
next step.
Press <Insert>.
2
Enter the Printer name as:
3
XNE
xxxxxx_1
or as:
XNT
xxxxxx_1
The printer name is the print server name followed by an
underscore _ and a 1. Upper and lower case letters arent
important. For example, a valid name would be:
XNE
1076E3
If the printer name has been changed using the DS/P
utility, print the Printer Configuration Sheet to verify
the printers name.
(for XNIC ENET)
(for XNIC TRING)
_1 or XNT
88E829
_1
Selecting the
Print Queue
3-18 ❖ XNIC-ENET/TRING Configuration Guide
Select Printers from the Available Options menu and press
1
<Enter>.
Select your newly defined printe r and press <Enter>.
2
Select Printer Type from the Printer Configuration menu
3
and press <Enter>.
Select Other/Unknown from the list and press <Enter>.
4
Select Print Queues Assigned, then press <Enter>.
5
Press <Insert>.
6
This will display a list of available print queues.
Page 41

Linking the Print
Server to the
Printer
Using PConsole
Select a print queue from the list.
7
Once you select a queue, press <Enter> to change the
8
priority or to designate it as the default queue.
Press <Esc> to save the changes.
9
Press <Esc> repeatedly until the Available Options menu is
10
displayed.
Select Print Servers from the Available Options menu and
1
press <Enter>.
Choose the print server to link and press <Enter>.
2
Select Printers and press <Enter>.
3
An error message may pop up indicating that there is a
mode mismatch. Ignore this message and continue with
the next step.
Press <Insert>.
4
Select the Printer that you wish to link to the server.
5
Press <Esc> until the Available Options menu is
6
redisplayed.
Chapter 3: Using the Printer with Novell NetWare ❖ 3-19
Page 42

Using the Printer with Novell NetWare
If your network has more than 25 file servers, it is
recommended to configure the XNIC as follows before
continuing on to the next section Restarting the XNIC:
Note
Restarting the
XNIC
7. Setting NDS Context, (page 3-47)
8. Setting the NDS Tree, (page 3-48)
9. Disabling 3.x/BEM or NDS Discovery, (page 3-49).
Setting the above parameters on the XNIC will automatically
reset the XNIC. Therefore you can skip the next section
Restarting the XNIC and proceed on.
After you complete the setup in PConsole, the XNIC needs to
be restarted so it can read the new configuration in the NDS
file server. Power the printer off and power it on to restart the
XNIC.
The following procedure is an alternative method to restart
the XNIC.
Select Print Server Information from the Available
1
Options menu.
Select your XNIC Print Server name.
2
Select Information and Status from the Printer
3
Configuration menu and press <Enter>.
This option appears only if the XNIC is powered on and
connected to the network and the configuration was
successful. Refer to the note above if your network has
more than 25 file servers.
If there is no response, check the network connection of
the printer and verify that the configuration of the print
server and queues on the file server is correct.
Verify that the current server is running by checking to see if
4
Running is highlighted.
3-20 ❖ XNIC-ENET/TRING Configuration Guide
Page 43

Using PConsole
Select Going Down After Current Print Jobs if any jobs are in
5
the queue or
select Down to restart the server immediately.
Then press <Enter>.
This brings the print server down.
Press <Esc> repeatedly until you exit PCONSOLE.
6
You have completed PServer and print queue configuration
using PConsole in a DOS environment. You can skip the next
section Using NWAdmin and continue with the section
Changing the Polling Interval (Optional) (page 3-28).
Chapter 3: Using the Printer with Novell NetWare ❖ 3-21
Page 44

Using NWAdmin
Using
NWAdmin
Logging into the
NetWare File
Server
To configure your XNIC as a print server under NetWare 4.x
NDS, using the NetWare Administrator tool, complete each of
the procedures in this section as follows:
Logging into the NetWare File Server
Establishing the Context
Creating the Print Queue
Adding the Print Server
Adding the Printer
Assigning the Print Queue to the Printer
Linking the Print Server to the Printer
Restarting the XNIC
Login to the NDS file server as user Admin under the correct
1
context.
At the prompt, enter:
LOGIN cn=admin
o
= the organization name. For example if the
organization name is printing, the Novell login is:
LOGIN
.o
cn=admin.printing
If you are prompted to do so, enter your password.
2
At the DOS prompt, enter:
3
WIN
Select the NetWare Tools icon from the Windows Program
4
Manager.
Select NWAdmin.
5
3-22 ❖ XNIC-ENET/TRING Configuration Guide
Page 45

Establishing the
Context
Creating the Print
Queue
Using NWAdmin
Select Set Context from the View menu on the title bar.
1
If the current context is correct, go to the next section,
Creating the Print Queue.
The context name defines the location of the print
queue in the NDS tree.
Select the desired context from the displayed list.
2
Use the right mouse button to click the context to which the
1
queue will be created.
Select Create from the displayed menu.
2
Select Print Queue.
3
In the Create Print Queue window, enter the queue name in
4
the select Print Queue Name field.
Adding the Print
Server
Chapter 3: Using the Printer with Novell NetWare ❖ 3-23
Select the volume from the Print Queue Volume pull down
5
list on the Select Object window.
Click OK.
6
Click the Create button on the Create Print Queue window.
7
Use the right mouse button to click the context to which the
1
XNIC Print Server will be added.
Select Create from the displayed menu.
2
Select Print Server and click OK.
3
Page 46

Using NWAdmin
Adding the Printer
Enter the Print Server name as:
4
XNE
xxxxxx
or as:
XNT
xxxxxx
where xxxxxx is the last six characters of the XNIC hardware
address.
Click the Create button.
5
Use the right mouse button to click the context to which the
1
XNIC Print Server will be added.
Select Create from the displayed menu.
2
Select the Printer object and click OK.
3
Enter the Printer name as:
4
XNE
xxxxxx_1
(for XNIC ENET)
(for XNIC TRING)
(for XNIC ENET)
or as:
XNT
xxxxxx_1
The printer name is the print server name followed by an
underscore _ and a 1. Upper and lower case letters arent
important. For example, a valid name would be:
XNE
1076E3
If the printer name has been changed using the DS/P
Utility, print the Printer Configuration Sheet to verify
the printers name.
Click the Create button.
5
3-24 ❖ XNIC-ENET/TRING Configuration Guide
(for XNIC TRING)
_1 or XNT
88E829
_1
Page 47

Assigning the
Print Queue to the
Printer
Linking the Print
Server to the
Printer
Using NWAdmin
Double click the Printer icon for your newly created printer.
1
Click the Assignments button.
2
Click the Add... button.
3
Select a print queue. The name becomes the selected object.
4
The selected printer is automatically set as the default.
Click OK.
5
Click OK.
6
Double click on the Print Server icon on the main NWAdmin
1
screen.
The XNIC Print Server name is entered as
XNExxxxxx (for XNIC ENET) or as
XNTxxxxxx (for XNIC TRING).
The XNIC Printer name is entered as
XNExxxxxx_1(for XNIC ENET) or as
XNTxxxxxx_1 (for XNIC TRING).
From the Print Server window, click the Assignments button.
2
Select Add.
3
Select Printer.
4
Select OK.
5
Select OK at the Print Server window.
6
Chapter 3: Using the Printer with Novell NetWare ❖ 3-25
Page 48

Using NWAdmin
If your network has more than 25 file servers, it is
recommended to configure the XNIC as follows before
continuing on to the next section Restarting the XNIC:
Note
Restarting the
XNIC
7. Setting NDS Context, (page 3-47)
8. Setting the NDS Tree, (page 3-48)
9. Disabling 3.x/BEM or NDS Discovery, (page 3-49).
Setting the above parameters on the XNIC will automatically
reset the XNIC. Therefore you can skip the next section
Restarting the XNIC and proceed on.
After you complete the setup in NWAdmin, the XNIC needs
to be restarted so it can read the new configuration in the
NDS file server. Power the printer off and then power it on to
restart the XNIC.
The following procedure is an alternative method to restart
the XNIC.
Exit NWAdmin and return to the DOS prompt.
1
Access PConsole.
2
Select Print Server Information from the Available
3
Options menu.
Select your XNIC Print Server name.
4
3-26 ❖ XNIC-ENET/TRING Configuration Guide
Page 49

Using NWAdmin
Select Information and Status from the Printer
5
Configuration menu and press <Enter>.
This option appears only if the XNIC is powered on and
connected to the network and the configuration was
successful. Refer to the note on page 3-26 if your
network has more than 25 file servers.
If there is no response, check the network connection of
the printer and verify that the configuration of the print
server and queues on the file server is correct.
Verify that the current server is running by checking to see if
6
Running is highlighted.
Select Going Down After Current Print Jobs if any jobs are in
7
the queue or
select Down to restart the server immediately.
Then press <Enter>.
This brings the print server down.
Press <Esc> repeatedly until you exit PCONSOLE.
8
You have completed PServer and print queue configuration
using NWAdmin in a Windows environment. You can
continue with the next section.
Chapter 3: Using the Printer with Novell NetWare ❖ 3-27
Page 50

Changing the Polling Interval (Optional)
Changing the
Polling
Interval
(Optional)
The default polling interval for the XNIC to pull print jobs is
set at 10 seconds for 3.x/bindery mode and five seconds for
NDS mode. This interval gauges the frequency that the XNIC
polls the file server to determine if jobs are available. Once
the XNIC determines that jobs are available, all the jobs in
the queue may be called at the network bandwidth.
The polling interval cannot be changed in NetWare versions
3.x/BEM. However, the user can change the polling interval
for a print queue in Netware 4.x NDS. The procedure below
lets you change the polling interval using PConsole.
Login to the File Server in NDS mode and press <Enter>.
1
At the DOS prompt, enter:
2
PCONSOLE
Select Print Servers from the Available Options menu.
3
Select the
4
Servers.
For example:
Print_Server
XNE
1076E3 or
for your printer from the Print
XNT
88E829
Select Printers from the Print Server Information menu.
5
Select the
6
For example:
Select Sampling Interval from Printer
7
XNT88E829_1 Configuration.
Replace the existing number by entering the required value.
8
Restart the XNIC, either by:
9
Powering the Printer off and powering it on, or by
Using PConsole to bring down the Print Server.
Refer to Restarting the XNIC (page 3-20) for detailed
instructions.
3-28 ❖ XNIC-ENET/TRING Configuration Guide
Printer_Name
XNE
1076E3_1 or
from the Serviced Printers list.
XNT
88E829_
XNE1076E3_1 or
1
Page 51

Configuring the XNIC as a Remote Printer (NetWare 2.x/3.x)
Configuring
the XNIC as a
Remote
Printer
(NetWare 2.x/
3.x)
Note
To configure your XNIC as a remote printer under NetWare
2.x/3.x, complete each of the procedures in this section as
follows:
Creating the Print Queue
Adding the Remote Printer
Assigning and Restarting the Print Queue
Defining the Print Job Configuration (optional)
These procedures use the commands for Novell NetWare 2.x
or 3.x. Unless noted, commands can be upper or lower case,
and typed commands should be entered by pressing the
<Enter> key.
After configuring the XNIC RPrinter mode, and if your printer
has more than 25 file servers, it is recommended that you
configure the XNIC with the PServer name that will remotely
attach to the XNIC.
Refer to 6. Setting the Remote PServer Name for
RPrinter/NPrinter (Recommended for Large Networks)
(page 3-47).
Network
Considerations
Chapter 3: Using the Printer with Novell NetWare ❖ 3-29
Novell NetWare RPrinter mode requires one of the following:
PSERVER.VAP for Version 2.x NetWare file servers
PSERVER.NLM for NetWare file servers
PSERVER.EXE for a stand-alone PC-based print server.
Page 52

Configuring the XNIC as a Remote Printer (NetWare 2.x/3.x)
Creating the
Print Queue
Login to the Novell file server with supervisor privileges.
1
At the DOS prompt, enter:
LOGIN
fileserver
\SUPERVISOR
Adding the
Remote Printer
At the prompt, enter the
At the DOS prompt, enter:
2
PCONSOLE
Select Print Queue Information from the Available
3
Options menu.
To create a new queue, press <Insert>, which opens a
4
dialog box.
Enter in a name and press <Enter> and the new queue
name will appear on the list.
Press <Esc> until the Available Options menu is
5
redisplayed.
Select Print Server Information from the Available
1
Options menu.
If several Print Servers are displayed, select the one you
2
want to service the Xerox printer.
password
.
For example, an existing Print Server name might be
remote_mode. You may also create a new Print Server and
select it.
Select Print Server Configuration from the Print Server
3
Information menu.
Select Printer Configuration.
4
Select one of the Not Installed printers from the list of
5
printers displayed.
3-30 ❖ XNIC-ENET/TRING Configuration Guide
Page 53

Configuring the XNIC as a Remote Printer (NetWare 2.x/3.x)
Enter the XNIC printer name as:
6
XNE
xxxxxx
or as:
XNT
xxxxxx
Where xxxxxx is the last six characters of the XNIC hardware
address. Upper and lower case letters arent important. For
example, a valid name would be: XNE
XNT
88E829
Press the <Down-arrow> key to select Typ e, and press
7
<Enter> to display the printer types.
Select Remote Other/Unknown from the list.
Save your changes by pressing <Esc> and selecting Yes to
8
confirm the save.
Press <Esc> to redisplay the Print Server Configuration
9
menu.
_1 (for XNIC-ENET)
_1 (for XNIC-TRING),
1076E3
_1
_1 or
Assigning and
Restarting the
Print Queue
Chapter 3: Using the Printer with Novell NetWare ❖ 3-31
Select Queues Serviced by Printer from the Print Server
1
Configuration menu.
Select the XNIC printer name.
2
For example: XNE1076E3_1
Press <Insert> to display the list of available queues.
3
Select the queue to be serviced by the Xerox printer.
Enter a Priority level number for the printer (default is 1,
4
highest) and press <Enter>.
Press <Esc> until the Available Options menu is displayed.
5
If you wish to service several queues with the Xerox printer,
6
repeat Steps 3 and 4 for each additional queue.
Page 54

Configuring the XNIC as a Remote Printer (NetWare 2.x/3.x)
Press <Esc> until the message Exit PCONSOLE appears.
7
Select Yes to exit PCONSOLE.
Follow Novell procedures to load PServer from the NetWare
8
file server console.
For example:
Defining the Print
Job Configuration
(Optional)
load pserver
Power the printer off and power it on.
9
There are many utility and add-on programs that define
special printer configurations. Refer to each respective
programs documentation for further information.
remote_mode
3-32 ❖ XNIC-ENET/TRING Configuration Guide
Page 55

Configuring the XNIC as a Remote Printer (NetWare 4.x NDS)
Configuring
the XNIC as a
Remote
Printer
(NetWare 4.x
NDS)
Note
This section includes procedures for configuring the XNIC as
NPrinter in NetWare 4.x NDS network using either PConsole
in a DOS environment or NetWare Administrator (NWAdmin)
in a Windows environment.
NDS objects can also be defined and administered using
NetAdmin
For the Print Server name, use XNExxxxxx for
XNIC-ENET and XNTxxxxxx for XNIC-TRING.
For the Printer name use XNExxxxxx_1 for XNIC-ENET
and XNTxxxxxx_1 for XNIC-TRING where
the last six characters of the XNIC hardware address.
Upper and lower case are not important.
TM
in DOS environments.
xxxxxx
is
Network
Considerations
Note
Chapter 3: Using the Printer with Novell NetWare ❖ 3-33
Novell NetWare NPrinter mode requires one of the following:
PSERVER.NLM for NetWare file servers
PSERVER.EXE for a stand-alone PC-based print server
To ensure optimal performance when running Remote Printer
mode in NDS, make sure PServer is disabled on the XNIC.
Refer to 5. Disabling PServer Mode (Required for Large
Networks) (page 3-46).
After configuring the XNIC RPrinter mode, and if your printer
has more than 25 file servers, it is recommended that you
configure the XNIC with the PServer name that will remotely
attach to the XNIC. Refer to 6. Setting the Remote PServer
Name for RPrinter/NPrinter (Recommended for Large
Networks) (page 3-47).
Page 56

Using PConsole
Using
PConsole
Creating a Print
Queue
To configure your XNIC as an NPrinter under NetWare 4.x
using PConsole, complete the procedures in this section as
follows:
Creating a Print Queue
Adding the Print Server
Adding the Printer
Associating the Printer with Novell PServer
Linking the Print Queue to the Printer
Restarting the Novell PServer
These procedures use the commands for Novell NetWare 4.x
NDS. Unless noted, commands can be upper or lower case.
Typed commands should be entered by pressing the
<ENTER> key.
Login to the NDS file server as user Admin under the correct
1
context.
At the prompt, enter:
LOGIN cn=admin
.o
o
= the organization name. For example if the
organization name is printing, the Novell login is:
LOGIN cn=admin
If you are prompted to do so, enter your password.
2
At the DOS prompt, enter:
3
PCONSOLE
Select Change Context from the Available Options menu.
4
3-34 ❖ XNIC-ENET/TRING Configuration Guide
.printing
Page 57

Using PConsole
Enter the desired context name or press <Insert> to
5
browse for available contexts.
The context name defines the location of the print
queue in the NDS tree.
Select Print Queues from the Available Options menu.
6
Press <Insert> to create a new print queue.
7
Enter the printer queue volume name, or
8
Press <Insert> to view a list of volumes.
This is the name of the file servers volume where the
print queue will be created.
Select the volume name.
9
Press <Esc> until the Available Options menu is
10
redisplayed.
Adding the Printer
Chapter 3: Using the Printer with Novell NetWare ❖ 3-35
Select Printers from the Available Options menu.
1
Press <Insert>.
2
Enter the XNIC printer name as:
3
XNE
xxxxxx
or as:
XNT
xxxxxx
where xxxxxx represents the last six characters of the XNIC
hardware address. For example, a valid name would be:
XNE1076E3_1 or XNT88E829_1
Press <Esc> to redisplay the Available Options menu.
4
_1 (for XNIC-ENET)
_1 (for XNIC-TRING)
If the printer name has been changed using the DS/P
utility, print a Printer Configuration Sheet to verify the
printers name. The printers name is the print servers
name followed by _1.
Page 58

Using PConsole
Adding the Print
Server
Associating the
Printer with the
Novell PServer
If a print server does not exist, one must be created. Follow
this procedure.
Select Print Server from the Available Options menu.
1
Press <Insert> and enter a new print server name.
2
For example: remote_mode
Press <Esc> to return to the Available Options menu.
3
Select Print Server from the Available Options menu.
1
Select the Print Server.
2
For example: remote_mode
Select Printers from the Print Server Information menu.
3
This displays the Serviced Printers menu.
Press <Insert>.
4
Select the XNIC Printer name.
5
For example: XNE1076E3_1 or XNT88E829_1
Verify that the XNIC printer name appears in the Serviced
6
Printers menu.
Select the XNIC printer name.
7
Select Printer Type from the Printer Configuration menu.
8
Select Other/Unknown from the Printer Type menu.
9
3-36 ❖ XNIC-ENET/TRING Configuration Guide
Page 59

Linking the Print
Queue to the
Printer
Using PConsole
Select Print Queues from the Available Options menu.
1
Select Print Queues to link.
2
Select Print Servers from the Print Queue Information.
3
Press <Insert> and select the Print Server from the list.
4
For example:
Press <Esc> three times.
5
Select Printers from the Available Options menu.
6
Select the defined Printer.
7
Select Print Queues Assigned.
8
Press <Insert> and select the print queue from the list.
9
Press <Esc> three times.
10
remote_mode
Before continuing with the next section, Restarting the
Novell PServer, refer to the notes under Network
Considerations (page 3-33).
Note
Chapter 3: Using the Printer with Novell NetWare ❖ 3-37
Page 60

Using PConsole
Restarting the
Novell PServer
Follow Novell procedure to load PServer from the NetWare
1
file server console.
Power off the printer and power it on.
2
You have completed NPrinter configuration on the XNIC
using PConsole in a DOS environment. You can skip the next
section, Using NWAdmin and continue with the section
XNIC Configuration Options (page 3-43).
3-38 ❖ XNIC-ENET/TRING Configuration Guide
Page 61

Using NWAdmin
Using
NWAdmin
Logging into the
NetWare File
Server
To configure your XNIC as a print server under NetWare 4.x
NDS, using the NetWare Administrator tool, complete each of
the procedures in this section as follows:
Logging into the NetWare File Server
Establishing the Context
Creating the Print Queue
Adding the Printer
Linking the Print Queue to the Printer
Associating the Printer with the Novell PServer
Restarting the Novell PServer
Login to the NDS file server as user Admin under the correct
1
context.
At the prompt, enter:
LOGIN cn=admin
o
= the organization name. For example if the
organization name is printing, the Novell login is:
LOGIN
.o
cn=admin.printing
If you are prompted to do so, enter your password.
2
At the DOS prompt, enter:
3
WIN
Select the NetWare Tools icon from the Windows Program
4
Manager.
Select NWAdmin.
5
Chapter 3: Using the Printer with Novell NetWare ❖ 3-39
Page 62

Using NWAdmin
Establishing the
Context
Creating the Print
Queue
Select Set Context from the View menu on the title bar.
1
If the current context is correct, go to the next section
Creating the Print Queue.
The context name defines the location of the print
queue in the NDS tree.
Select the desired context from the displayed list.
2
Use the right mouse button to click the context to which the
1
queue will be created.
Select Create from the displayed menu.
2
Select Print Queue.
3
In the Create Print Queue window, enter the queue name in
4
the Print Queue Name field.
Select the volume from the Print Queue Volume pull down
5
list on the Select Object window.
Click OK.
6
Click the Create button on the Create Print Queue window.
7
Adding the Printer
Use the right mouse button to click the context to which the
1
printer will be added.
Select Create from the displayed menu.
2
Select Printer Object.
3
3-40 ❖ XNIC-ENET/TRING Configuration Guide
Page 63

Using NWAdmin
Enter the Printer name as:
4
XNE
xxxxxx_1
or as:
XNT
xxxxxx_1
where xxxxxx is the last six characters of the XNIC hardware
address. Upper and lower case letters arent important. For
example, a valid name would be: XNE
XNT
88E829
If the printer name has been changed using the DS/P
utility, print the Printer Configuration Sheet to verify
the printers name.
Click the Create button.
5
Double-click the printer icon for the printer you created.
6
Click the Configuration button.
7
Select Other/Unknown from the Printer Type window.
8
(for XNIC ENET)
(for XNIC TRING).
_1
1076E3
_1 or
Linking the Print
Queue to the
Printer
Chapter 3: Using the Printer with Novell NetWare ❖ 3-41
Click OK.
9
Double click the Printer icon for your newly created printer.
1
Click the Assignments button.
2
Click the Add... button.
3
Select a print queue. The name becomes the selected object.
4
The selected printer is automatically set as the default.
Click OK.
5
Click OK.
6
Page 64

Using NWAdmin
Associating the
Printer with the
Novell PServer
Double click on the NetWare native PServer that exists in the
1
context on the main NWAdmin window.
The PServer must already exist.
From the Print Server window, click the Assignments button.
2
Select Add.
3
Select Printer.
4
Select OK.
5
Select OK at the Print Server window.
6
Before continuing with the next section, Restarting the
Novell PServer, refer to the notes under Network
Considerations (page 3-33)
Note
Restarting the
Novell PServer
3-42 ❖ XNIC-ENET/TRING Configuration Guide
Follow Novell procedure to load PServer from the NetWare
1
file server console.
Power off the printer and power it on.
2
You have completed NPrinter configuration on the XNIC
using NWAdmin. You can continue with the next section.
Page 65

XNIC Configuration Options
XNIC
Configuration
Options
When the XNIC is shipped from the factory, it is ready to
operate in most NetWare environments without customizing.
However, depending upon your network needs, you can
configure the XNIC with other optional settings.
The optional XNIC configuration procedures will enhance
the performance of the XNIC and help reduce unnecessary
traffic on the network.
Use the TES commands to customize your XNIC on NetWare.
Refer to Setting Optional Configurations (page 3-50) and
Table 3.2 XNIC Tasks and Commands (page 3-55) for
details.
To verify XNIC settings, print the Network Interface
Configuration sheets. Refer to page 1-11 for instructions on
printing the configuration sheet.
The XNIC configuration options follow. You may want to
perform one or more of them depending upon your network
requirements.
The >init delay 0 command is always the last command
when either a single define TES command or a string of
TES define commands is issued.
1. Disabling
Specific Protocols
on the XNIC
(Optional)
Chapter 3: Using the Printer with Novell NetWare ❖ 3-43
The default is: All protocols enabled.
To reduce network traffic, you can disable any unused
protocols on the XNIC.
Issue this command from TES:
>define server authorize
>init delay 0
For example:
>define server authorize
>init delay 0
protocol
TCP
disabled
disabled
Page 66

XNIC Configuration Options
2. Setting Frame
Type (Optional)
The default is: Automatic.
The frame type options for Ethernet are:
802.2
Ethernet II
802.3
SNAP
The frame type options for Token Ring are:
802.2
SNAP
When the printer is powered on, the XNIC will begin the
process of discovering a Novell file server. The default
operation is to search for an 802.2 frame type first.
If the XNIC finds any file server with an 802.2 frame type, it
will automatically attach to it and the XNIC will be locked to
this frame type as long as the printer remains powered on.
If the XNIC does not find a file server with an 802.2 frame
type, it will automatically restart the discovery process by
looking for the next frame type in the priority order listed
above.
At any given time, the XNIC will be locked into only one
frame type.
Note
To permanently lock the XNIC to a specific frame type,
instead of letting the procedure occur automatically, issue this
command from TES:
>define server netware
>init delay 0
3-44 ❖ XNIC-ENET/TRING Configuration Guide
frame_type
Page 67

XNIC Configuration Options
3. Disabling
RPrinter/NPrinter
Mode (Optional)
4. Setting
Required /
Preferred File
Server Name
(Recommended
for Large
Networks)
The default is: Both RPrinter/NPrinter and PServer modes
enabled.
If the XNIC will be running in PServer mode only, you can
reduce network traffic caused by the XNIC initiating periodic
autodiscovery for RPrinter/NPrinter mode, by disabling the
RPrinter/NPrinter mode. You can do this by issuing this
command from TES:
>define server netware rprinter disabled
>init delay 0
The default is: No name.
If the XNIC is running in PServer mode and it will service
queues from Netware 3.x/BEM file servers, and if the
network has 25 file servers or more, it is recommended to set
either a required or a preferred file server name on the
XNIC. This will reduce the time and traffic for the first job to
print after the printer is powered on. Otherwise the XNIC will
search the entire network for a file server with PServer
configuration.
If the intended file server name is set as preferred, in the
XNIC, the XNIC will attempt to connect to it. If that file server
is unavailable, for any reason, the XNIC will fall back to the
discovery process on the entire network until it finds another
target file server.
If the intended file server name is set as required in the
XNIC, the XNIC will attempt to connect to it. If that file server
is unavailable, for any reason, the XNIC will stop the
discovery process and will not communicate with any other
file server on the network.
Chapter 3: Using the Printer with Novell NetWare ❖ 3-45
Page 68

XNIC Configuration Options
Issue these commands from TES to set a preferred file
server name (preferred is the recommended option) in the
XNIC.
>define server netware required disabled
>define node
>init delay 0
Issue these commands from TES to set a required file
server name in the XNIC.
>define server netware required enabled
>define node
>init delay 0
Issue these commands to verify the required or preferred file
server setting on the XNIC.
>show node
The show node command will display a list of values
including name. Name gives the name of the required
or preferred file server.
>show server netware
The show server netware command will display a list of
values including NFServer. NFServer indicates if the
file server has been set as required or preferred.
server_name
server_name
nfserver
nfserver
5. Disabling
PServer Mode
(Required for
Large Networks)
3-46 ❖ XNIC-ENET/TRING Configuration Guide
The default is: Both PServer and RPrinter/NPrinter modes
enabled.
If XNIC is running as an RPrinter/NPrinter only, you have the
choice of disabling PServer on the XNIC.
Issue this command from TES:
>define server netware pserver disabled
>init delay 0
Page 69

XNIC Configuration Options
6. Setting the
Remote PServer
Name for
RPrinter/NPrinter
(Recommended
for Large
Networks)
7. Setting NDS
Context
(Recommended
for Large
Networks)
The default is: No name.
When the XNIC is running RPrinter/NPrinter in large
networks (over 25 file servers) it is recommended to set the
XNIC with the PServer name that will remotely attach to the
XNIC. This setting will reduce the waiting time for the first
job to print after the printer is powered on.
Issue this command from TES to set a PServer name to attach
to the remote printer:
>define node
>init delay 0
The default is: No name.
If running in NetWare 4.x NDS in large networks (over 25 file
servers), it is recommended to set the NDS context name
where the PServer object exists.
Issue this command from TES to set the context name on the
XNIC:
>define server netware context
pserver_name
npserver
“context_name”
>init delay 0
Follow these examples to determine the context_name.
If the PServer object is created in the Marketing organization,
then the context_name is marketing.
If the PServer object is created in a unit under the Marketing
organization called as Printing, then the context_name is
marketing.printing.
Issue this command from TES to verify the context name
setting on the XNIC:
>list server netware
Do not use the show server netware command for this
purpose.
Chapter 3: Using the Printer with Novell NetWare ❖ 3-47
Page 70

XNIC Configuration Options
8. Setting the NDS
Tree
(Recommended
for Large
Networks)
The default is: No name.
If running in NetWare 4.x NDS in large networks (over 25 file
servers) it is recommended to set the XNIC with the NDS tree
name where the PServer object exists. This setting will
reduce the waiting time for the first job to print after the
printer is powered on.
Issue this command from TES to set the tree name in the
XNIC:
>define server netware nds
Issue this command from TES to verify the tree name setting
on the XNIC:
>list server netware
Do not use the show server netware command for this
purpose.
“tree_name”
3-48 ❖ XNIC-ENET/TRING Configuration Guide
Page 71

XNIC Configuration Options
9. Disabling
3.x/BEM or NDS
Discovery
(Recommended
for Large
Networks)
The default is: Both 3.x/BEM and NDS discovery enabled.
When the printer is powered on, the XNIC discovers the
PServer definition intended for the XNIC through the NDS
file servers.
If the XNIC does not find PServer definitions on NDS file
servers within two routers reach, it stops NDS discovery
and starts the discovery process through the 3.x/BEM file
servers.
If it finds the PServer definition during the NDS discovery
process, it attaches to it and gathers information about
other Novell file servers that hold PServer definitions for
the XNIC.
If running in NDS mode only, it is recommended to disable
3.x/BEM discovery on the XNIC. Disabling BEM discovery
will expedite the completion of the overall search process by
the XNIC.
Issue this command from TES:
>define server netware pserver 4.x
>init delay 0
If running in 3.x/BEM mode only, it is recommended to
disable NDS discovery on the XNIC.
Issue this command from TES:
>define server netware pserver 3.x
>init delay 0
Chapter 3: Using the Printer with Novell NetWare ❖ 3-49
Page 72

Setting Optional Configurations
Setting
Optional
Configurations
Remote Logging
into the XNIC via
TES
This section describes procedures for communicating with the
XNIC to monitor system parameters or to change the
parameters from their factory defaults, as discussed in the
previous section.
To monitor or change configuration parameters on the XNIC,
you must first login to the XNIC from your Novell
workstation.
Novell workstations require the terminal emulation program,
TES, and the Kermit protocol to access the XNIC remotely.
Both of these are furnished on the Utilities for: LAN Server,
LAN Manager, Novell NetWare (TES) diskette.
TES is a terminate-and-stay-resident (TSR) program that
requires about 35K of base RAM. It can be loaded either from
the DOS prompt or at boot up from the AUTOEXEC.BAT file.
Loading TES from the DOS prompt is the preferred method.
Windows must not be running. Do not load TES into higher
memory since unpredictable results may occur.
TES must be loaded after NetWare client software is installed
and before starting Kermit. If TES is already present, do not
repeat the installation.
Note
3-50 ❖ XNIC-ENET/TRING Configuration Guide
Page 73

Setting Optional Configurations
This procedure installs the TES/Kermit software on your
Novell workstation and establishes a connection with the
XNIC.
Insert the Utilities for: LAN Server, LAN Manager, Novell
1
NetWare (TES) diskette into your floppy disk drive and enter
the following command to install the files from the floppy
diskette in drive A: to hard drive C on your system:
a:\tes\ install a:\tes c:
Run TES by entering:
2
cd c:\tes-krmt
tes
To display information about TES commands, at the
DOS prompt, enter: tes help
Run Kermit by entering:
3
kermit
The MS-Kermit> prompt will appear.
You can optionally enter the following command to view a
listing of the XNIC cards on the network:
tes names
For example, you will see:
XNTxxxxxx for XNIC-TRING, where xxxxxx is the last six
characters of the XNIC address.
Specify which XNIC to use. Enter:
4
set port tes XNExxxxxx (for XNIC-ENET)
or
set port tes XNTxxxxxx (for XNIC-TRING)
For example:
set port tes XNE1076E3
Chapter 3: Using the Printer with Novell NetWare ❖ 3-51
XNEx
xxxxx
for XNIC-ENET or
Page 74

Setting Optional Configurations
To connect to the XNIC, enter:
5
connect
When the Kermit connection screen appears, press
6
<Enter> until the XNIC login banner is displayed.
At the Enter username, or HELP> prompt, enter
first_name
At the Server> prompt enter su
At the Password>> prompt, enter system
On certain hosts, you need to enter a Backspace
keystroke before you enter the password.
For example: <Backspace> system.
The Server> prompt is redisplayed and you can now enter
XNIC commands. See the section Basic XNIC Commands
(page 3-53).
To end the TES connection, press:
7
<Alt><X>
To exit from the Kermit program, enter:
8
exit
3-52 ❖ XNIC-ENET/TRING Configuration Guide
Page 75

Basic XNIC Commands
Basic XNIC
Commands
The basic XNIC commands are as follows:
SHOW displays the XNICs current information. Display
screens vary according to the specific SHOW parameter.
The syntax is:
show parameter
MONITOR is the same as SHOW, except that the display
screen is updated every 10 seconds (every 1 second in
privileged mode). Press any key to exit the display. The
syntax is:
monitor parameter
LIST displays the XNICs NVRAM (non-volatile RAM)
parameter settings. Display screens vary according to the
specific LIST parameter. The syntax is:
list parameter
SET temporarily changes a parameter to a given value.
The change is valid until you log out from the XNIC or
turn OFF the printer. The syntax is:
set parameter value
DEFINE permanently changes an NVRAM parameter to
a given value. You must reinitialize the XNIC for the
changes to take place. Use one of the following methods
to reinitialize the XNIC:
Use the Reset All, Reset Ethernet command (for
XNIC-ENET), or Reset Token Ring command (for
XNIC-TRING) on the printer control panel.
(DocuPrint 4517 printer only)
Power off the printer and then turn it back on.
Issue an init delay 0 command remotely.
The syntax is:
define parameter value
Chapter 3: Using the Printer with Novell NetWare ❖ 3-53
Page 76

Basic XNIC Commands
CHANGE is a combination of SET and DEFINE. It
immediately changes a parameter and permanently
updates it in the NVRAM as well. Reinitializing the XNIC
is not needed for the changes to take effect. The syntax is:
change parameter value
HELP displays instructions on the use of the various
commands. The syntax is:
help commandname
In XNIC, Version 5.x, the Help command is not available.
Refer to the table which begins on the next page for
information about the commands.
3-54 ❖ XNIC-ENET/TRING Configuration Guide
Page 77

Table 3.2 XNIC Tasks and Commands
Task Command
Basic XNIC Commands
Table 3.2 XNIC Tasks and Commandslists the most
useful XNIC commands, organized by task.
Display information about the XNIC
characteristics.
Display Document Services for Printing
(DS/P) parameters. (Refer to the Document
Services for Printing Guide.)
Display the XNIC node parameters.
Display the overall network configuration,
including the XNIC hardware address and
the protocols currently supported.
Print Network Interface Configuration for
Ethernet or Token Ring sheets
Change the privileged password from the
default of system at the prompt
showing password>.
Disable protocols on the XNIC.
show server characteristics
Each parameter displayed may be altered using the appropriate
SET/CHANGE/DEFINE command.
If you have a VT100-compatible terminal, the show server
characteristics command displays a stack of overlapping
screens which can be cycled for display with the arrow keys.
show server dsp
show node
show server network
show config port 1
If DS/P is enabled this command is disabled on the XNIC.
define server privilege password password_2
(where password_2 is the new privileged password)
This command changes the SU user password.
define server authorize protocol disabled
(where protocol is one of the following: NetWare, AppleTalk,
TCP/IP, LAT, NetBIOS, All, or None.)
Enable protocols on the XNIC.
Chapter 3: Using the Printer with Novell NetWare ❖ 3-55
define server authorize protocol enabled
(where protocol is one of the following: NetWare, AppleTalk,
TCP/IP, LAT, NetBIOS, All, or None.)
Page 78

Basic XNIC Commands
Table 3.2 XNIC Tasks and Commands (continued)
Task Command
Change the frame type.
Reset the XNIC remotely (soft reset).
Reset the XNIC to factory defaults.
Display network configuration parameters.
Display NDS tree and context settings on
the XNIC.
define server netware frame_type
(where Ethernet
default IPX will try 802.2, Ethernet II, 802.3, and
802.2 snap in order. The first one found will be
selected.
802.2 IPX will only look for Ethernet 802.2 frames.
snap IPX will only look for Ethernet snap frames.
802.3 IPX will only look for Ethernet 802.3 frames.
ethernet_II IPX will only look for Ethernet II frames.
(where Token Ring
default IPX will try 802.2 and snap in order. The first
one found will be selected.
802.2 IPX will only look for Token Ring 802.2
frames.
snap IPX will only look for Token Ring snap frames)
This command sets the frame type for the XNIC. The default is
default.
frame_type
frame_type
is one of the following:
is one of the following:
init delay 0
init delay 0 default
show server netware
list server netware
Disable PSERVER.
Enable PSERVER.
Disable RPRINTER.
Enable RPRINTER.
Define the PServer that will attach to the
XNIC RPrinter.
3-56 ❖ XNIC-ENET/TRING Configuration Guide
define server netware pserver disabled
define server netware pserver enabled
define server netware rprinter disabled
define server netware rprinter enabled
define node pserver_name npserver
(where: pserver_name Is the name of the PServer that will
remotely attach to the XNIC)
More than one npserver node may be defined.
Page 79

Table 3.2 XNIC Tasks and Commands (continued)
Task Command
Basic XNIC Commands
Enable/disable Bindery Emulation or NDS
modes.
Define a preferred or required NetWare file
server for the XNIC.
Define the file server as required.
Define the file server as preferred.
Specify the NDS context where PServer
object exists.
define server netware pserver mode
(where mode is one of the following:
auto
Discovers through both NDS and bindery. This
is the default.
disabled
3.x
4.x
Disables PServer mode printing.
Only discovers through bindery.
Only discovers through NDS.)
define node server_name nfserver
(where server_name is the Novell server name to be set as either
preferred or required)
define server netware required enabled
The printers XNIC will only operate if the required file server is
available for connection. When the required file server is down,
the printers XNIC will not come up.
define server netware required disabled
The printers XNIC will first try to connect to the preferred file
server. If it is down, the XNIC will connect to the first available file
server.
define server netware context context_name
Enclose the context_name where the PServer object exists in
quotes. The default is no context. To clear, enter in its place.
Specify the NDS tree where PServer object
exists.
Disable the NetWare Forms feature.
Chapter 3: Using the Printer with Novell NetWare ❖ 3-57
define server netware nds tree_name
Enter the NDS tree_name where the printer server is located,
enclosed in quotes. The default is no NDS tree name. To clear,
enter in its place.
define service netware forms disabled
The default is enabled
If the NetWare Forms on the file server is set to other than the
default value of 0 for your printer, it is recommended to disable
this feature on the XNIC for optimal operation.
Page 80

Basic XNIC Commands
Table 3.2 XNIC Tasks and Commands (continued)
Task Command
Define the printers IP address for TCP/IP.
Redefine the subnet mask
Define gateway address.
define server ip ddd.ddd.ddd.ddd
(where
ddd.ddd.ddd.ddd
printer.)
is the new IP address of the
define server subnet mmm.mmm.mmm.mmm
(where mmm.mmm.mmm.mmm is the subnet mask for the
network.)
define node ip ggg.ggg.ggg.ggg gateway default
(where ggg.ggg.ggg.ggg is the address of the default router for
the printers network segment)
3-58 ❖ XNIC-ENET/TRING Configuration Guide
Page 81

Using the Printer with EtherTalk or TokenTalk
Installing the
Printer Driver
Your printer requires the installation of two types of software
before printing can begin. The first is a PostScript printer
driver that is optimized for use with many different Xerox
printers. The second is known as a PostScript Printer
Description (PPD) file and is written to take advantage of your
printers unique printing capabilities.
To install the printer driver, follow the steps below.
Insert the OnPage II for Xerox Printers diskette into your
1
Macintosh.
When the window appears, double-click on the OnPAGE II
2
installation icon.
The credits screen will appear.
Click the Continue button to enter the installer section.
3
An installation Notes screen will appear describing the
various installation options available along with any late
breaking news about the installation procedure.
Click the Continue button.
4
The software install screen appears.
For a complete installation, select All Software from the
5
menu.
Click the Install button.
6
The following automatic sequence takes place:
The OnPAGE II driver and the OnPAGE FAX (and
OnPAGE II/s if available) module(s) are placed in the
Extensions folder in the System folder.
A PPD Folder is created in the System folder.
An OnPAGE Extras folder is created on the desktop.
Contained in this folder are the OnPAGE Printer
Utility, the OnPAGE FAX Utility, the (optional)
Echo (serial) configuration utility, OnPAGE
Addendum files (late breaking news) and any vendor
(printer specific Notes).
Chapter 4: Using the Printer with EtherTalk or TokenTalk ❖ 4-3
Page 82

Installing the Printer Driver
If you wish to rename your printer, it should be done before
selecting the driver in the Chooser. See Customizing a
Printer Service (page 4-7).
Note
The default name of your printer in an AppleTalk
environment can be changed only from a Macintosh. You can
not use Xerox DS/P, TES, or Telnet to rename an AppleTalk
printer.
4-4 ❖ XNIC-ENET/TRING Configuration Guide
Page 83

Using the Printer with EtherTalk or TokenTalk
Accessing a
Remote
Printer
The XNIC is preconfigured with AppleTalk services. Use the
following procedure to access your printer on an AppleTalk
network.
If your Macintosh is connected to more than one type of
network, you may need to select the appropriate network
before you can access your printers XNIC card.
Select Control Panels from the Apple menu.
1
Double-click the Network icon.
2
If the EtherTalk or TokenTalk icon isnt already selected,
3
click on the appropriate icon.
Click OK.
4
If your network administrator has divided your AppleTalk
5
network into zones, another dialog box will appear. Select
the appropriate zone for your computer.
Verify that you are connected to a Phase 2 AppleTalk
6
network and that PostScript is installed in the printer.
Select Chooser from the Apple menu.
7
Click the OnPage icon (or the LPS equivalent).
8
If the AppleTalk Active button isnt already on, click the
9
Active button to turn AppleTalk ON, and restart your
computer.
If your network administrator has divided your AppleTalk
10
network into zones, click the zone that includes your printer.
All of the AppleTalk printers that are on your network (or in
the current zone) will appear in a list box. Select the name of
your printer.
Click the Setup button.
11
Chapter 4: Using the Printer with EtherTalk or TokenTalk ❖ 4-5
Page 84

Accessing a Remote Printer
12
13
14
Choose the PostScript Printer Definition (PPD) utility that
corresponds to your printer.
Close the Chooser and return to your application.
The computer will indicate that you have changed your
current printer.
Click OK to return to your application.
4-6 ❖ XNIC-ENET/TRING Configuration Guide
Page 85

Using the Printer with EtherTalk or TokenTalk
Customizing a
Printer Service
Caution
To change the AppleTalk configuration of your printer server,
use the OnPage utility. This utility is in a folder named
OnPage Extras and can be installed when the OnPage
driver is installed. The utility has the following functions:
Receive printer information
Retrieve the printers font list
Download a PostScript file
Download PostScript fonts to the printer
Rezone a printer on an AppleTalk network
Rename a printer
The instructions for these functions are contained in the
OnPage documentation which comes with the driver.
If combinations of network interface cards are installed in the
printer, be aware that any changes to the printer name,
printer device type and zone name will propagate through all
AppleTalk capable cards (i.e., Ethernet, LocalTalk and
Token Ring). However, the change may not propagate to the
other installed XNICs until the printer is powered on.
EtherTalk or
TokenTalk
Problems
Installing a
Macintosh Printer
on Ethernet or
Token Ring
Chapter 4: Using the Printer with EtherTalk or TokenTalk ❖ 4-7
If your Macintosh jobs will not print and an Out of memory
message is displayed on the Mac screen, an incorrect printer
type was selected under the Chooser menu. The OnPage or
LaserWriter printer type should be selected.
To install a Macintosh printer on your network, select
EtherTalk or TokenTalk from the Chooser, then set up the
printer.
Page 86

Selecting
EtherTalk or
TokenTalk
Setting up the
Printer
Select the Apple Icon from the menu bar at the top of the
1
screen.
Select the Control Panel option.
2
Select Network.
3
Select EtherTalk or TokenTalk.
4
Select Chooser from the Apple menu.
1
Click the OnPage icon (or the LPS equivalent).
2
If the AppleTalk Active button isnt already on, click the
3
Active button to turn AppleTalk ON, and restart your
computer.
If your network administrator has divided your AppleTalk
4
network into zones, click the zone that includes your printer.
All of the AppleTalk printers that are on your network (or in
the current zone) will appear in a list box.
Select the name of your printer.
5
Click the Setup button.
6
Choose the PostScript Printer Definition (PPD) utility that
7
corresponds to your printer.
Close the Chooser and return to your application.
8
The computer will indicate that you have changed your
current printer.
Click OK to return to your application.
9
4-8 ❖ XNIC-ENET/TRING Configuration Guide
Page 87

Using the Printer with UNIX TCP/IP
Overview
The UNIX operating system comes in many different varieties.
The following environments are supported:
AT&T SYSTEM V releases 3.2 and 4.0
Hewlett-Packard HP-UX releases 8.05 and 9.0
IBM AIX releases 1.0, 3.1, 3.2.5, and 4.1
INTERACTIVE UNIX System V/386 release 3.2
SCO UNIX release 3.2
SOLARIS releases 1.1, 2.2, 2.3, and 2.4
SunOS releases 4.0, 4.1, 4.1.1, and 4.1.3
DEC ULTRIX-32 releases 3.0, 4.0, and 4.3
UNIXWare 2.01
Chapter 5: Using the Printer with UNIX TCP/IP ❖ 5-3
Page 88

Overview
Installation
Installing a networked printer in the UNIX environment under
TCP/IP requires these operations:
1. Setting up an IP address on the XNIC
2. Setting up print queues on the host system.
These procedures are discussed below.
Setting up an IP Address on the XNIC
The IP address can be set by one of these methods:
Automatic installation: Performed by using the user-friendly
Enstall program contained on the UNIX Installation Utility
diskette.
Manual installation: Performed using one of these programs:
ARP/PING (from UNIX, LAN Server, and Windows NT)
BootP (from UNIX)
DHCP (from UNIX and Windows NT)
RARP (from UNIX)
Telnet to change an existing IP address (from UNIX, LAN
Manager, LAN Server, and Windows NT)
The TES utility, available on the Utilities for: LAN Server,
LAN Manager, Novell NetWare (TES) diskette, if Novell
co-exists with the networks
The NCP utility if DEC LAT co-exists with the networks.
Refer to the appropriate network chapters in this manual for
specific instructions on using these programs in your printing
environment.
The XNIC is shipped from the factory with these defaults:
IP address = none
Subnet mask = none (computed and saved dynamically once
the IP address is assigned)
Gateway = none
5-4 ❖ XNIC-ENET/TRING Configuration Guide
Page 89

Overview
XNIC Version 5.x no longer supports the pre-configured
default IP addresses of 138.239.254.253 for Ethernet and
138.239.254.252 for Token Ring.
Note
Note
When the printer is powered on without the network cable
attached to the XNIC, the IP address will remain at none or
at a previously set value.
If, for some reason, the XNIC has an IP address that can not
be accessed remotely from the network (for example, maybe
you moved the printer to another location), the XNIC IP
address can be reset to the factory default of none, using
one of these methods:
Before the printer is moved, Telnet to the XNIC and set the
IP address to None. Refer to Table 5.2 XNIC tasks and
commands (page 5-39).
Issue an init delay 0 default command remotely via TES
in Novell (refer to Table 3.2 on page 3-55) or via NCP in
DEC LAT (refer to Table 6.1 on page 6-9).
Reset via a hardware jumper switch on the XNIC. Refer to
Resetting the XNIC to the Factory Defaults (page 11-7).
Chapter 5: Using the Printer with UNIX TCP/IP ❖ 5-5
Page 90

Overview
Setting up Print Queues on the Host System
Print queues can be configured on the host system using one of
the following methods:
Automatic installation: Performed with the user-friendly
Enstall program contained on the UNIX Installation Utility
diskette.
Manual installation: Performed by using one of these two
methods:
The lpd print protocol that is native on BSD hosts
The rprint program supplied on the UNIX Installation
Utility diskette for either BSD or System V hosts.
The XNIC does not support UNIX FTP (File Transfer Protocol).
Note
We recommend that you use the Enstall program both to
automatically set the IP address on the XNIC and to set up print
queues on the host. Refer to Automatic Installation Procedure
(page 5-8).
However, if you prefer to set the IP address on the XNIC and to
set up print queues on the host manually, refer to Manual
Installation Procedure (page 5-12).
Network Considerations
UNIX TCP/IP systems require:
Support for lpd or rprint (Xerox-supplied)
Client support of TCP/IP, TELNET, and UDP.
5-6 ❖ XNIC-ENET/TRING Configuration Guide
Page 91

XNIC Requirements
XNIC versions 4.x, 5.x, or above
The UNIX Installation Utility diskette.
Printer Language Settings
Refer to Table 5.1 for the correct printer language settings.
Table 5.1 Printer language settings
Overview
If your system
is
AIX PCL hpjl-3si PCL or PostScript
HP PCL PCL1 PCL or PostScript
Solaris 2.3 PCL none PCL or PostScript
And you want to
print
PostScript PostScript PCL or PostScript
PostScript PostScript PCL or PostScript
PostScript none PCL or PostScript
At the host, set
the printer model
to
At the printer, set System
Language to
(Do not send header or trailer
pages if set to PCL.)
Chapter 5: Using the Printer with UNIX TCP/IP ❖ 5-7
Page 92

Using the Printer with UNIX TCP/IP
Automatic
Installation
Procedure
Note
Automatic installation is performed by a program called Enstall.
The user-friendly Enstall program automatically:
Installs the required files on your UNIX system,
Allows you to enter an IP address for your XNIC, if the XNIC
does not already have one, and
Configures the print queues on the host for network printing.
Enstall will not work if the printer and the workstation on
which Enstall is running are on different network segments.
A minimum of five to ten megabytes of disk space is required
on the UNIX system to accommodate the Enstall software and
spool queues.
Enstall supports installation of pre-compiled host utilities for the
following UNIX systems making the installation quicker and less
sensitive to system variations:
AT&T SYSTEM V releases 3.2 and 4.0
IBM AIX release 4.1
SCO UNIX release 3.2
SOLARIS releases 2.2, and 2.3
SunOS releases 4.0, 4.1, 4.1.1, and 4.1.3.
If your system is not listed above, the system is required to have a
C compiler to enable Enstall to compile the RPRINT.C and
TELRCF.C files also included on the UNIX Installation Utility
diskette.
If you are unsure of whether or not your UNIX host is 100%
hardware and software compatible with the supplied
pre-compiled host utilities, you should compile the utilities
Caution
5-8 ❖ XNIC-ENET/TRING Configuration Guide
on your host.
Page 93

Note
Note
Automatic Installation Procedure
Do not install the Xerox printer drivers that are supplied with
your printer before finishing the Enstall installation for
network printing.
For complete installation procedures for the SUN
environment, refer to Appendix B, at the back of this
configuration guide.
Initial
Installation
The following procedures allow you to install the Enstall program
and to use it to create a print queue on your host spooling system
the first time:
Log on as root at the system prompt.
1
Insert the UNIX Installation Utility diskette into your floppy
2
drive.
Change to the working directory where you wish to install
3
the files.
At the system prompt, enter the command:
4
tar xvf
where
diskette is inserted, and
the files are to be installed.
For example:
tar xvf /dev/fd0 ./xrx
Or:
tar xvf /dev/rdiskette ./xrx
device_name
device_name
./
xrx
refers to the drive in which the
xrx
is the subdirectory into which
This installs the files in the xrx subdirectory of the current
working directory.
Chapter 5: Using the Printer with UNIX TCP/IP ❖ 5-9
Page 94

Automatic Installation Procedure
Enter the commands:
5
cd
./enstall -s
Read and follow the instructions on the screen.
6
When you are asked to enter the device full path and file
7
specification of your distribution medium, type the name of
your floppy drive.
For example:
/dev/fd0, /dev/rdiskette
When you are asked to which LAN Hardware Interface the
8
Xerox servers will be connected, enter your Ethernet or
Token Ring device name.
For example:
le0, tr0, hm0
If your XNIC has not been assigned an IP address, enter a
9
new IP address when asked to do so.
xrx
When asked to enter the printer model, refer to Table 5.1 to
10
find the correct value.
After completing the installation of a print queue on your
11
host spooling system, the XNIC is ready for use on the UNIX
TCP/IP network.
If necessary, you can now install the Xerox printer driver
12
supplied with your printer.
If necessary, repeat this procedure for each UNIX system that
13
requires access to the printer.
5-10 ❖ XNIC-ENET/TRING Configuration Guide
Page 95

Automatic Installation Procedure
Adding or
Removing Print
Queues
After the initial installation of the Enstall program, follow these
instructions either to add another print queue to the same host
system or to delete an existing one:
Log on as root at the system prompt.
1
Go to the xrx directory on your hard disk.
2
Enter:
3
cd./xrx
./enstall -m
Read and follow the instructions on the screen.
4
Chapter 5: Using the Printer with UNIX TCP/IP ❖ 5-11
Page 96

Using the Printer with UNIX TCP/IP
Manual
Installation
Procedure
If you wish to install the Xerox printer manually, you must assign
the IP address, configure some system files, and then configure
the print queue.
Assigning the IP address is easiest if you have the BootP
(Bootstrap Protocol), DHCP (Dynamic Host Configuration
Protocol), or RARP (Reverse Address Resolution Protocol) daemon
running on your network.
You may also use the standard UNIX ARP command to assign the
IP address. Figure 5.1 shows the options for manual installation.
5-12 ❖ XNIC-ENET/TRING Configuration Guide
Page 97

Figure 5.1 Manual installation procedures
1. Assign the IP address on the XNIC using one of the following seven options:
Manual Installation Procedure
IP Address Option 1
Using BootP
(page 5-15)
IP Address Option 5
Using Telnet*
(page 5-24)
2. Configure the print queue on the host, using one of the following three options:
Print Queue Option 1
Setting Up lpd
(page 5-27)
IP Address Option 2
Using DHCP
(page 5-19)
IP Address Option 6
Using TES
(page 3-50)
Print Queue Option 2
Setting Up RPRINT on
IP Address Option 3
BSD Hosts
(page 5-30)
Using RARP
(page 5-20)
IP Address Option 4
Using ARP
(page 5-22)
IP Address Option 7
Using NCP
(page 6-5)
Print Queue Option 3
Setting Up RPRINT on
System V Hosts
(page 5-32)
*Telnet requires an initial IP address, and can be used to change an existing IP address.
.
Chapter 5: Using the Printer with UNIX TCP/IP ❖ 5-13
Page 98

Manual Installation Procedure
In the following procedures, if the /etc/ethers or /etc/hosts file
on your host is administered by NIS (formerly, Yellow Pages),
you must update the appropriate NIS master hosts database
Note
instead.
BootP, DHCP,
and RARP
Parameters
When the printer is powered on, the default sequence of IP
address acquisition is to attempt BootP first. If BootP fails, attempt
DHCP. If DHCP fails, attempt RARP.
Using the following three commands will define how many times
the XNIC printer server will attempt BootP, DHCP, and RARP.
define server bootp n m
define server dhcp n m
define server rarp n m
These commands can also be used to disable BootP, DHCP, or
RARP on the XNIC. They are detailed in Table 5.2 on page 5-39.
These commands can be issued remotely by:
Telnet. Refer to page 5-39.
TES in Novell. Refer to Remote Logging into the XNIC via
TES (page 3-50)
NCP in DEC LAT (Refer to Logging into the XNIC
(page 5-35).
5-14 ❖ XNIC-ENET/TRING Configuration Guide
Page 99

Manual Installation Procedure
IP Address
Option 1:
Using BootP
Overview
BootP (Bootstrap Protocol) is a service provided under TCP/IP.
XNIC versions 4.14 and above support BootP with the default
being enabled.
When the printer is powered on, the XNIC attempts BootP
requests as follows:
Two requests are attempted if the IP address is unknown on
the XNIC
No requests are attempted if the IP address is known on the
XNIC.
If a BootP server on the network is configured to accept BootP
requests from a target XNIC, the following information can be
sent from the BootP server to the XNIC:
Server IP Address
Server Subnet Mask
Server Network Load Path Name and File Name
Host IP Address
Gateway IP Address
Time Server IP Address
Domain Name Server IP Address
Server Node Name
Server Domain Name
No initial configuration settings are required to enable BootP on
the XNIC.
To configure the BootP server on your network, and to edit the
BootPTAB file with the appropriate information, refer to your
UNIX documentation.
Note
Chapter 5: Using the Printer with UNIX TCP/IP ❖ 5-15
To begin the BootP procedure, the IP address on the XNIC
must be none.
Page 100

Manual Installation Procedure
Installing the BootP Server on the Same Segment
Identify which UNIX platform will be the BootP server.
1
Check to be sure that TCP/IP is running on the server:
2
ps -ef | grep inetd
If TCP/IP is not running do not continue until you have
TCP/IP running. BootP will not work until TCP/IP is running,
as it is activated by the inetd (internet daemon).
Check to see if the BootPd is running:
3
ps -ef | grep BootPd
If the BootPd is not running, you need to uncomment a line in
the /etc/inetd.conf file. There will be a line with the beginning
string of BootPd or BootPs. Uncomment that line.
Add entries into the BootPTAB file. Use an editor and edit
4
the /etc/BootPTAB file.
An example of what a BootPTAB file may look like on your
UNIX System under the /etc directory follows:
ClientName:ht=ether:ha=000812342A7B:ip=13.241.4.10:
PrinterName:ht=tr:ha=00012A3B4D22:ip=13.241.4.22:
XeroxPrinter:ht=ether:ha=1234567890AB:ip=13.241.4.44:\
:hd=/usr/tftpboot:bf=XNE10068:
The first field is the name that you want the BootP client (the
XNIC) to be called. The colon separates each identifier and
the slash is a line continuation.
The XNIC hardware address is listed on the Printer
Configuration Sheet. Refer to page 1-11 for instructions on
printing the configuration sheet.
Add the XNIC hardware address to the /etc/BootPTAB file
with an IP address that you want to assign. Also include the
hardware type as ether or tr.
5-16 ❖ XNIC-ENET/TRING Configuration Guide
 Loading...