

Page 1

The Xerox
DocuPrint 4512
Network Interface Card
User Guide
/4512N
Page 2

Xerox Corporation Xerox Canada, Limited
701 South Aviation Blvd. 5650 Yonge Street
El Segundo, CA North York, Ontario
90245 Canada
USA M2M 4G7
Americas Operations Support Rank Xerox, Limited
800 Long Ridge Road Parkway
Stamford, CT Marlow
06904-1600 Buckinghamshire
USA SL7 1YL
United Kingdom
Copyright © 1995, 1996 Xerox Corporation. All Rights Reserved.
Copyright protection claimed includes all forms of matters of copyrightable
materials and information now allowed by statutory or judicial law or
hereinafter granted, including without limitation, material generated from
the software programs which are displayed on the screen such as styles,
templates, icons, screen displays, looks, etc.
XEROX®, The Document Company®, the stylized X, DocuPrint, 4512 and
Ethernet are trademarks of Xerox Corporation or its subsidiaries.
PostScript® is a trademarks of Adobe Systems Incorporated.
AppleTalk is a trademark of Apple Computer Inc.
HP, HP UNIX and LaserJet are trademarks of Hewlett Packard Company.
JETXPrint 1000 is a trademark of DPI, Inc.
Microsoft, Windows and Windows NT are trademarks of Microsoft
Corporation.
Novell, NetWare and UNIX are trademarks of Novell, Inc.
IBM, PC and Token Ring are trademarks of International Business
Machines Corporation.
SCO UNIX is a trademark of The Santa Cruz Operation, Inc.
SUN and Solaris are trademarks of SUN Microsystems, Inc.
ULTRIX is a trademark of Digital Equipment Corporation.
NIManage is a trademark of Digital Products, Inc.
All other product names are trademarks/tradenames of their respective
owners.
PCL and PCL 5e are trademarks of Hewlett-Packard Company. This printer
contains an emulation of the Hewlett-Packard PCL 5e command language,
recognizes HP PCL 5e commands, and processes these commands in a
manner comparable with Hewlett-Packard LaserJet printer products.
Notice
Specifications described in this publication are subject to change without
notice. Use of some features may be limited by your hardware or software
configuration. Contact your dealer, Xerox, or Rank Xerox for details.
Page 3

Table of Contentsi
Chapter 1 Introduction ........................................................................... 1-1
Overview ............................................................................... 1-2
Whats in Your Package ....................................................... 1-3
Requirements ........................................................................ 1-4
Chapter 2 Installing the Network Interface Card ............................. 2-1
Preparing the Printer ............................................................ 2-2
Powering Up the Printer ...................................................... 2-3
Chapter 3 NetWare Configuration ....................................................... 3-1
Overview ............................................................................... 3-3
Configuring NetWare 2.15 and 3.1x .................................... 3-4
Configuring NetWare 4.0x Bindery Emulation ............. 3-13
Configuring the NIC in NetWare
Directory Services ................................................................ 3-17
Configuration ...................................................................... 3-19
Using the NIManage Utility ................................................ 3-28
Using the Novell PCONSOLE Utility ................................... 3-33
DocuPrint 4512/4512N Network Interface Card User Guide ❖ i
Page 4

Table of Contents
Chapter 4 EtherTalk Configuration ...................................................... 4-1
Chapter 5 TCP/IP Configuration ............................................................ 5-1
Chapter 6 Operation and Troubleshooting ........................................ 6-1
Overview ............................................................................... 4-2
Choosing the Printer ............................................................. 4-3
Loading the NIManage for AppleTalk Program ................. 4-5
Configuring the NIC .............................................................. 4-7
Overview ............................................................................... 5-2
Installation in a Windows Environment .............................. 5-3
UNIX Printing ...................................................................... 5-17
Running TELNET .................................................................. 5-47
Overview ............................................................................... 6-2
LED Status Indicator .............................................................. 6-3
Status Report ......................................................................... 6-4
Resetting the NIC to Factory Default ................................... 6-6
How to Diagnose Problems ................................................. 6-7
Troubleshooting Checklists .................................................. 6-9
Appendix A Jumper Settings .................................................................. A-1
Overview ............................................................................... A-2
Print Server Board and Jumper Locations ........................... A-3
Ethernet Jumpers .................................................................. A-4
Reset to Factory Default ....................................................... A-7
Address Select ....................................................................... A-7
BUS Handshake ..................................................................... A-7
Appendix B Specifications ....................................................................... B-1
Network Interface Card ........................................................ B-2
Appendix C NIC MIB Definition ................................................................ C-1
Appendix D Environmental Specifications ........................................... D-1
ii ❖ DocuPrint 4512/4512N Network Interface Card User Guide
Page 5

Chapter 1
Introduction Chapter1
Overview ............................................................................... 1-2
Whats in Your Package ....................................................... 1-3
Requirements ........................................................................ 1-4
Chapter 1: Introduction ❖ 1-1
Page 6

Introduction
Overview
The Network Interface Card is a Network Interface Controller
that you install into compatible printers to provide Ethernet
network connectivity. The Network Interface Card has the
following features:
Automatic selection of 10Base2 (Thinnet) or 10BaseT
Ethernet connection
Fully transparent EtherTalk printing support for the
Macintosh, including support for bindery printing
Novell NetWare PSERVER on both bindery based and
Novell Directory Services (DNS)
lpd/lpr over TCP/IP for UNIX platforms, Microsofts
Windows NT, and Windows 95
Raw sockets support over selectable TCP/IP port with
filters for selected UNIX environments
IP and IPX SNMP support of MIB-2 and DPI proprietary
NIC MIB
SNMP support of standard MIB and proprietary printer
MIBs on compatible printers
Flash memory to allow field upgrades (an OTP version is
also available)
1-2 ❖ DocuPrint 4512/4512N Network Interface Card User Guide
Page 7

Introduction
Whats in
Your Package
The package contains the following:
Network Interface Card
This manual
Three 3 1/2" diskettes which contain the following:
NetWare NIManage for Windows Utility Diskette
EtherTalk NIManage for Macintosh Utility Diskette
TCP/IP Utility Diskette
The NetWare diskette also contains the ASN.1 coded SNMP
MIB for the Network Interface Card (NIC). This MIB can be
loaded into a standard SNMP console to provide SNMP
access to all NIC parameters. The MIB is included in this
manual as NIC MIB Definition, NIC MIB Definition.
DOS formatted versions of the BOOTP Lite program for
Windows (to assist entering IP parameters in a Windows
environment) are also included on the NetWare NIManage
diskette.
The diskettes may contain a README file containing the
latest information about the installation and operation. Check
for these files before going any further with installation.
Instructions and software to perform flash downloads are
provided with any update or upgrade package and are not
included in this manual.
Chapter 1: Introduction ❖ 1-3
Page 8

Introduction
Requirements
The Network Interface Card hardware and software require
the following:
Table 1.1 Print Server requirements
Version of Protocol or NOS
Software
Hardware
Novell NetWare Version 2.15, 3.1x, or 4.0x
Macintosh System 7
UNIX, Windows, or LAN Server systems supporting LPR over TCP/IP
DEC ULTRIX 4.3 or 4.4, DEC OSF/1 2.0 or 3.0, Solaris 1.1.3 or 2.3,
(SUNOS 4.1.3 or 5.3),
System V Release 4, HP-UX 9.01, IBM AIX 3.2.5, or SCO UNIX 2 for DPI
TCP/IP port 10001
Novell NetWare printing requires NetWare Capture, NPRINT or
PCONSOLE (later than 1.0) utilities.
The NIManage for Windows utility requires Windows 3.1 or later;
Windows for Workgroups 3.11; or Windows NT 3.5 or later.
EtherTalk printing requires printer PPD appropriate to the printer.
NIManage for Macintosh is provided for setup and maintenance.
TCP/IP setup and maintenance requires Telnet.
Support for 10 megabit Ethernet networks: either 10Base2 (also known
as ThinWire or Thinnet) or 10BaseT (twisted pair) cables and hardware.
3 1/2" diskette drive on the workstation to accept Windows, Macintosh
or UNIX utilities.
1-4 ❖ DocuPrint 4512/4512N Network Interface Card User Guide
Page 9

Chapter 2
Installing the Network
Interface Card
Preparing the Printer ............................................................ 2-2
Powering Up the Printer ...................................................... 2-3
Chapter2
Chapter 2: Installing the Network Interface Card ❖ 2-1
Page 10
Installing the Network Interface Card
Preparing the
Printer
Note
If the printer can generate a test or status page, you should
generate one before you begin.
1. Make sure that the printer is operating properly. Check to
see that paper is in the paper tray and toner cartridge is
full. If the printer handles multiple printer languages,
make sure it is set up for automatic emulation sensing or
PCL or ASCII mode.
2. Turn off the printer and remove the power cord.
3. Install the Network Interface Card in the option port,
according to the printer manufacturer instructions.
Handling Precautions for Static Sensitive Devices:
The Network Interface Card is designed to protect sensitive
components from damage due to electrostatic discharge
(ESD) during normal operation. When performing installation
procedures, however, take proper static control precautions to
prevent damage to equipment.
2-2 ❖ DocuPrint 4512/4512N Network Interface Card User Guide
Page 11

Installing the Network Interface Card
Powering Up
the Printer
Use the following procedures to power up the printer:
1. Plug in the power cord.
2. Turn on the power and wait for the printer to warm up.
The printer may print out a status or start-up page (if this
option is not disabled). The Network Interface Card then
provides a print job to the printer which contains the
Network Interface Card status information. Refer to
Status Report (page 6-4) for more information.
3. Check the Network Interface Card status report. Record
the serial number and the Ethernet address or save the
status report. You need this information when you
configure the printer for your network.
4. Power down the printer.
5. Connect the Ethernet cable between the Network
Interface Card and a network drop.
Go to one or more of the appropriate chapters for instructions
on configuring the network for the Network Interface Card.
Chapter 2: Installing the Network Interface Card ❖ 2-3
Page 12

2-4 ❖ DocuPrint 4512/4512N Network Interface Card User Guide
Page 13

Chapter 3
NetWare Configuration Chapter3
Overview ............................................................................... 3-3
Configuring NetWare 2.15 and 3.1x .................................... 3-4
Start PCONSOLE and Select File Server .................................. 3-5
Create Print Queues ............................................................. 3-5
Enter the Print Server Name .................................................. 3-6
Configure the Print Server .................................................... 3-7
Assign Print Queues to the Printer ........................................ 3-8
Set Up Notify Options for the Printer (Optional) .................... 3-9
Install the Print Server on Multiple File Servers .................... 3-11
Installing the Printer on Multiple File Servers ....................... 3-11
Primary File Server .............................................................. 3-12
Configuring NetWare 4.0x Bindery Emulation ............ 3-13
Confirm Bindery Context .................................................... 3-13
Configure in Bindery Mode with PCONSOLE ....................... 3-14
Configuring the NIC in NetWare Directory Services ........ 3-17
Chapter 3: NetWare Configuration ❖ 3-1
Page 14

NetWare Configuration
Configuration ...................................................................... 3-19
Configure Printer in NIManage ........................................... 3-19
Configure Printer in NWADMIN .......................................... 3-20
Assign Printer Object .......................................................... 3-23
Assign Print Server Object ................................................... 3-25
Check Assignments ............................................................ 3-26
Power Cycle the Printer ...................................................... 3-27
Using the NIManage Utility ............................................... 3-28
Installing NIManage ............................................................ 3-28
Hints to Running NIManage ............................................... 3-29
Using the Novell PCONSOLE Utility ................................... 3-33
Changing the File Server ..................................................... 3-33
Changing Print Queues ....................................................... 3-34
How to Set Up Notify ......................................................... 3-35
3-2 ❖ DocuPrint 4512/4512N Network Interface Card User Guide
Page 15

NetWare Configuration
Overview
Use this chapter if you will be printing from a Novell NetWare
NOS. This chapter is divided into the following sections:
Configuring NetWare 2.15 and 3.1x describes how to
configure the Network Interface Card (NIC) for use with
Versions 2.15 or 3.1x. Use PCONSOLE to set up the print
server function.
Configuring NetWare 4.0x in Bindery Emulation
describes how to configure the NIC for use with Version
4.0x Bindery Services. Use PCONSOLE to set up the
print server function.
Configuring the NIC in NetWare Directory Services
describes how to configure the NIC for use with Version
4.0x Directory Services. Use NWADMIN to set up the
print server function.
Using the NIManage Utility describes the NIC
management utility that configures the print server and
troubleshoots problems.
Using NetWare Utilities explains how to use standard
Novell NetWare utilities to make changes to the
configuration of the Print Server function.
Chapter 3: NetWare Configuration ❖ 3-3
Page 16

NetWare Configuration
Configuring
NetWare 2.15
and 3.1x
Before configuring the NIC for NetWare, you must determine
if the NIC has its desired name. If you want to change the
name, use NIManage to change the name. Refer to Using
the NIManage Utility (page 3-28) for more details.
The following steps are the general procedure for configuring
the NIC. You must have supervisor privileges to do this
configuration. These steps are covered in detail in the
following paragraphs:
1. Start PCONSOLE and select the file server you want to
use.
2. Create the print queues.
3. Specify the <print server> card as a print server.
4. Configure the print server and printer.
5. Assign the print queues.
6. Set up the NOTIFY options.
7. Repeat the procedure for other file servers.
When you are finished, turn the printer off and on again. The
printer creates a status report that indicates the fileservers to
which the unit is attached and the queues which it services.
Before you begin:
Verify that you have supervisor privileges on the file
servers on which the NIC print server is to be entered.
Verify that your version of PCONSOLE is later than 1.0.
3-4 ❖ DocuPrint 4512/4512N Network Interface Card User Guide
Page 17

Configuring NetWare 2.15 and 3.1x
Start PCONSOLE
and Select File
Server
Create Print
Queues
Follow these steps to start PCONSOLE:
1. Log in to the network, type PCONSOLE and press .
2. Choose Change Current File Server from the Available
Options menu. A list of file servers is displayed.
3. Select the file server on which you want to install the
print server and press . If the name of the file server
you want is not displayed, press the key to get a list of
file servers.
4. Log in to the file server.
5. Press the key to return to the Available Options menu.
The print server must be assigned to at least one print queue
on the file server.
If the print queue that you want the <print server> card to
service already exists, and you know the name of this
queue, go to Enter the Print Server Name (page 3-6).
If you do not know the name of the queue, or it does not
exist, use the following procedure:
1. Choose Print Queue Information from the Available
Options menu, and press . A list of existing queues is
displayed.
2. To create a new queue, press . Enter the name of the
queue and press . You do not need to enter any more
information at this time.
3. Press the key to return to the Available Options menu.
Chapter 3: NetWare Configuration ❖ 3-5
Page 18
Configuring NetWare 2.15 and 3.1x
Enter the Print
Server Name
A print server takes the print jobs from queues and sends
them to the printer. Use this procedure to specify the name of
the print server:
1. Choose Print Server Information from the Available
Options menu, and press . A list of existing print
servers is displayed.
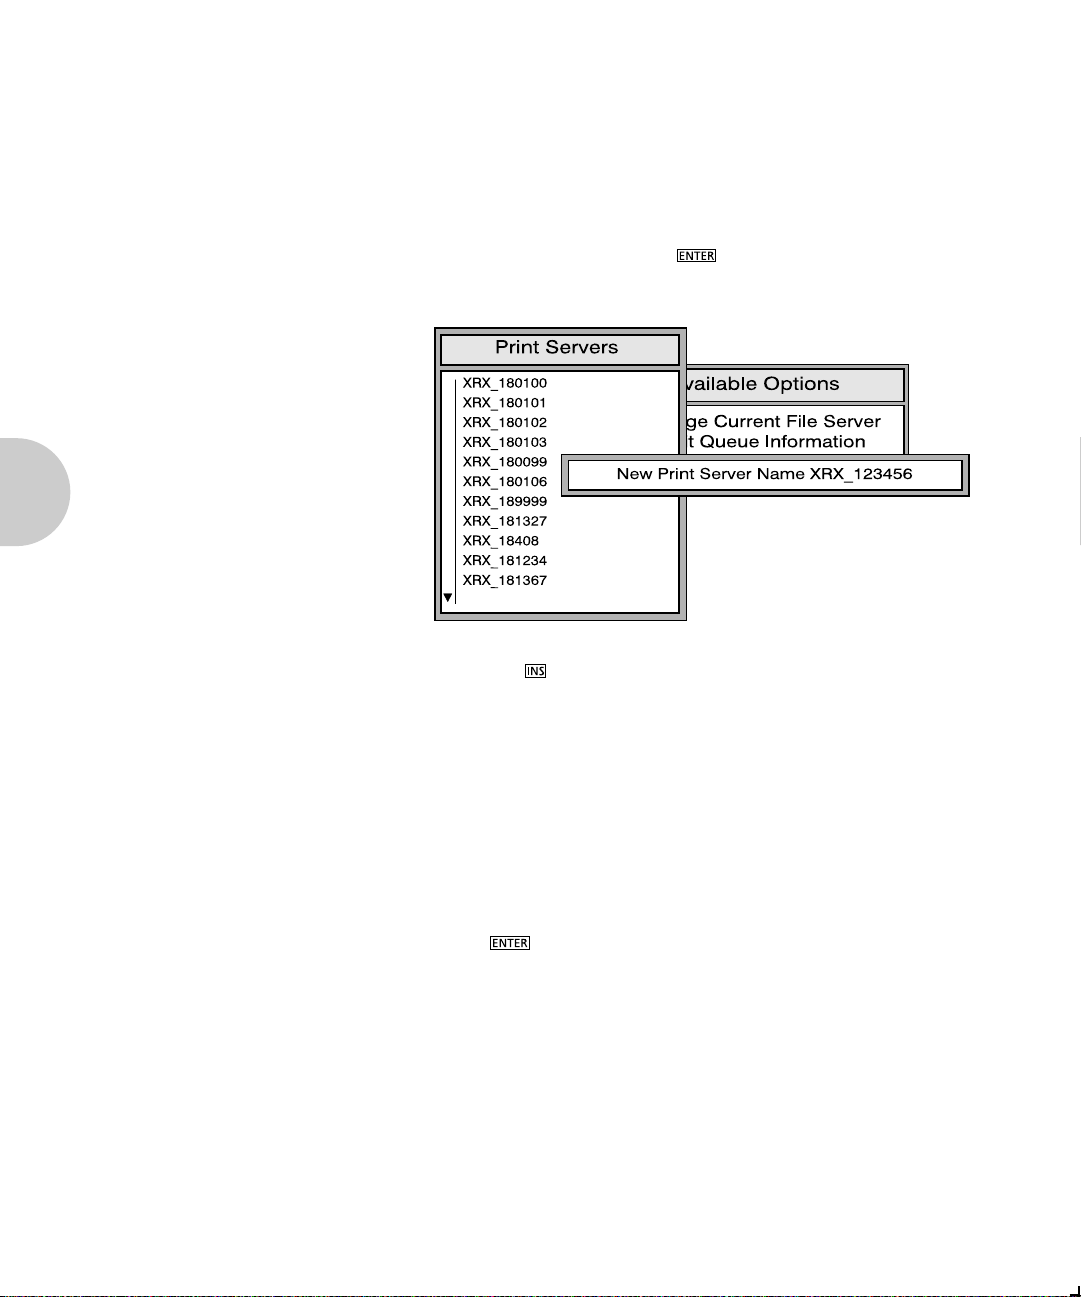
2. Press the key. The New Print Server Name box is
displayed.
3. Type the name of the print server into the entry box. The
Novell print server name is printed under Novell
NetWare information on the Print Server status sheet.
Note, if desired, this name can be changed using
NIManage. The screen example shows how to enter the
print server name for a print server with a serial number
of XRX_123456.
4. Press to add the print server name to the Print
Servers list.
3-6 ❖ DocuPrint 4512/4512N Network Interface Card User Guide
Page 19
Configuring NetWare 2.15 and 3.1x
Configure the
Print Server
Use the following procedures to configure the Print Servers
function:
1. Choose the print server name from the Print Servers list
and press .
The Print Server Information menu appears.
2. Choose Print Server Configuration from the menu and
press .
3. Choose Printer Configuration from the menu and press
. The Configured Printers menu appears. Since this
is a new Print Server entry, all printers are labeled Not
Installed.
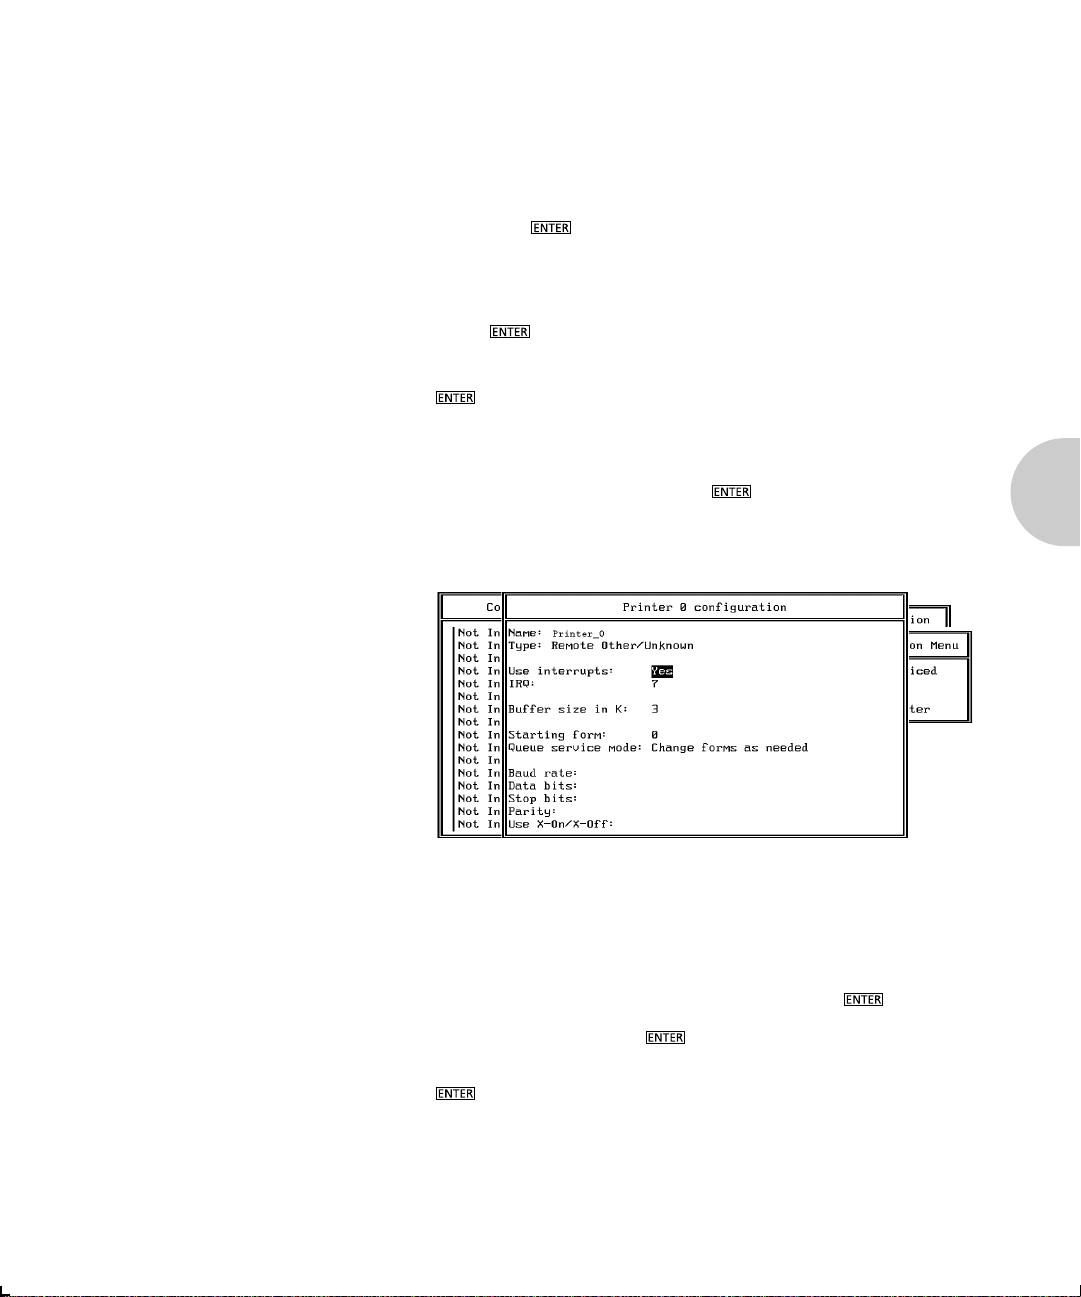
4. Choose the printer and press . The Printer 0
Configuration screen appears with a title of Printer 0, as
shown in the following example.
5. If you choose to, change default in the Name field on this
form to something that helps you identify the printer, for
example, LASER_PRINTER. The print server uses this
name in its message back to the users on the Notify list.
Select Name, enter a name, and then press .
6. Select Type and press . A list of printer types is
displayed. Choose Remote Other/Unknown and press
. This creates default entries in the other fields.
These defaults are usually optimal, so do not change
them without specific knowledge of the effects.
Chapter 3: NetWare Configuration ❖ 3-7
Page 20

Configuring NetWare 2.15 and 3.1x
7. Press the key. At the prompt, choose to save your
changes.
8. Press the key to return to the Print Server
Configuration menu.
Assign Print
Queues to the
Printer
Note
When you assign queues to the defined printer, you authorize
the print server to service these queues.
Do not assign the same queue to two different print servers. If
a queue is assigned to multiple print servers, print jobs may
not go to the intended printer.
1. Choose Queues Serviced By Printer from the Print Server
Configuration menu.
2. Select the printer name from the list of defined printers.
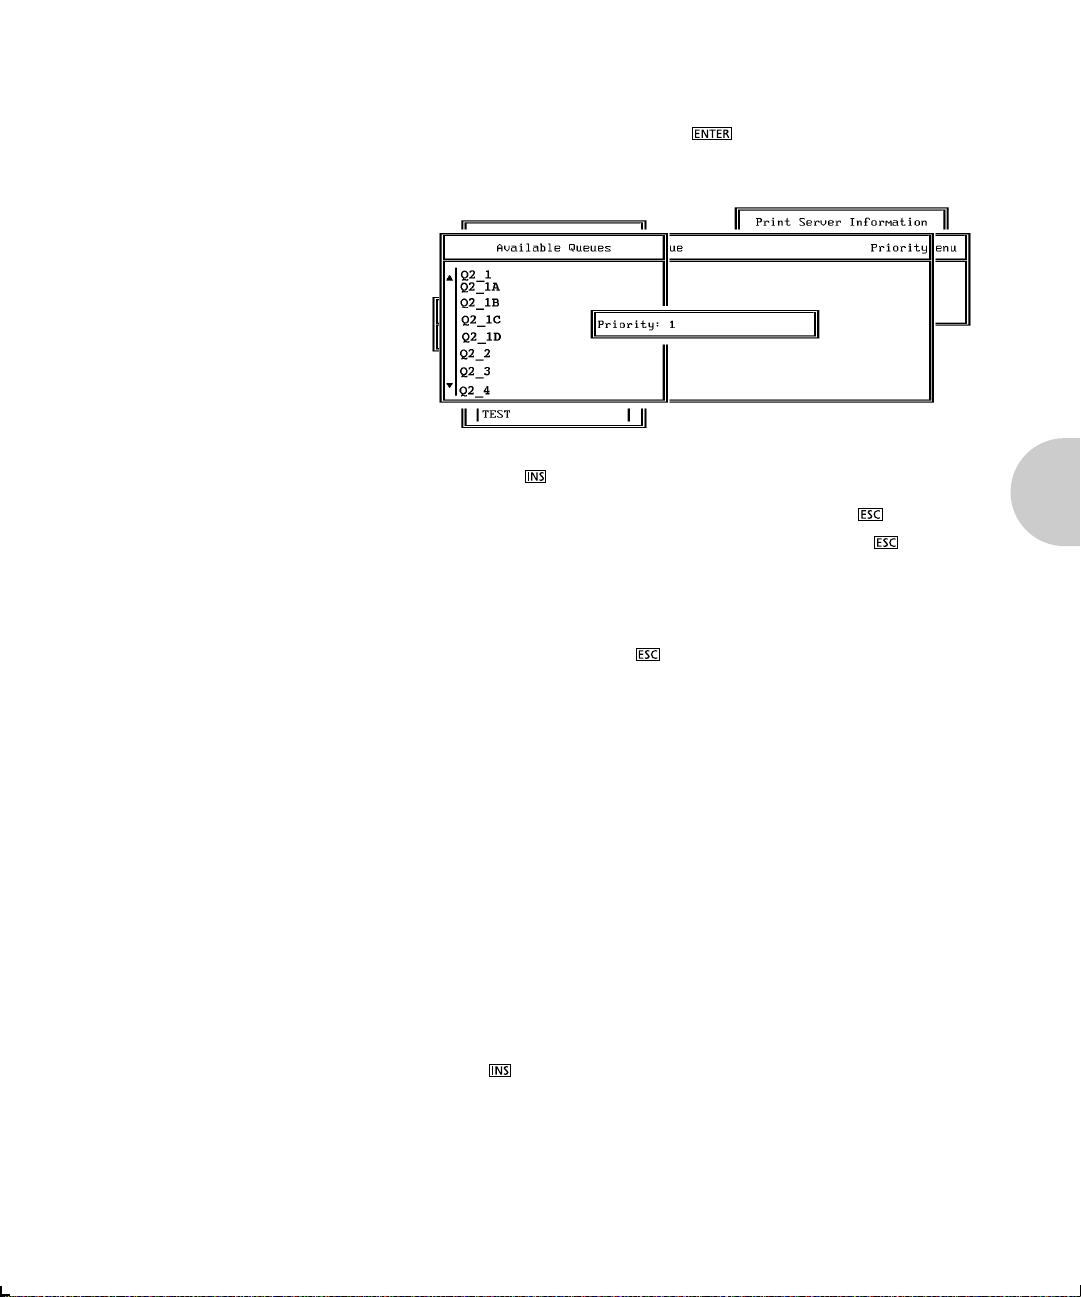
3. Press to display the Available Queues list for the
printer.
4. Select the queue you want and then assign a priority level
from 1 to 10. It is recommended that you accept the
3-8 ❖ DocuPrint 4512/4512N Network Interface Card User Guide
Page 21
Configuring NetWare 2.15 and 3.1x
default priority level. Press . The queue appears on
the list for the printer.
Press the key again to assign additional queues.
5. When you finish assigning queues, press the key and
then save your changes. Continue to press the key to
return to the Print Server Configuration menu. If you
want to set Notify options, go to Set Up Notify Options
for the Printer (Optional) below. If you are finished,
continue to press the key and then save your changes.
Set Up Notify
Options for the
Printer (Optional)
To enable the print server to notify users or user groups if a
problem occurs with the printer, set up the Notify options.
The print server supports the enhanced NOTIFY options for
printers, including informing users when the printer:
Is off-line, jammed, opened, or out of paper
Requires a manual paper feed or a form change
Has had an engine failure
1. Choose Notify List for Printer on the Print Server
Configuration menu.
2. Select the printer from the Defined Printers list. The
screen appears (which is blank for an initial installation).
Press to view a list of Notify Candidates.
3. Select the user or group from the list.
Chapter 3: NetWare Configuration ❖ 3-9
Page 22

Configuring NetWare 2.15 and 3.1x
4. Set the First and Next intervals in the Notify Intervals
screen. It is recommended that you use the defaults. The
First interval is the number of seconds the network waits
before it notifies candidates about a print job problem.
The Next interval specifies how often in seconds
candidates are notified. Enter a number for each interval
and press .
5. Press the key and then choose Save Changes. Press
the key at each screen until you reach the Print Server
Configuration menu. If you have finished the
configuration, press the key and then save the
changes.
3-10 ❖ DocuPrint 4512/4512N Network Interface Card User Guide
Page 23

Configuring NetWare 2.15 and 3.1x
Install the Print
Server on Multiple
File Servers
When the NIC comes up, it automatically searches for and
attaches to the file servers that are no more than four hops
and have no more than eight ticks propagation delay. For
extremely large or complex networks, this allows a bounded
search time on start-up. If the print server must attach to file
servers beyond this range, or, if you wish to accelerate
start-up by eliminating the need to search all file servers in
the four hops/eight ticks radius, the file servers with which
the print server is to operate may be entered into the Print
Server Configuration of a primary file server. The primary
file server can be any file server within the four hops/eight
ticks propagation time limits, but ideally is as close as
possible to the print server. Once the print server locates the
primary file server and the list of file servers to be serviced,
the automatic search is dropped and the print server will go
directly to those file servers listed (and to no others).
The NIManage for Windows program also allows the operator
to identify a preferred file server, which is identified within
the NIC itself. If a preferred file server is listed, the NIC will
first attach to this identified file server before initiating the
automatic search. If the preferred file server is also a primary
file server (for example, has file servers listed under file
servers to be serviced), the NIC will connect directly to these
file servers and will bypass any automatic search.
Installing the
Printer on
Multiple File
Servers
To install the print server on more than one file server,
perform the procedures for each file server. You must use the
same name and password for the print server (or no
password) on all file servers. You set the password for the NIC
using the NIManage program. Refer to Configuring the NIC
in NetWare Directory Services (page 3-17). If you use a
password, specify it on each file server using the Change
Password option on the Print Server Information menu of the
PCONSOLE utility.
Chapter 3: NetWare Configuration ❖ 3-11
Page 24

Configuring NetWare 2.15 and 3.1x
If you assign a preferred file server via NIManage or SNMP, the
print server on coming up will try to locate that file server without
doing any general search and, if listed as a print server device on
Note
that file server, will remain attached to that file server.
If you have identified other file servers to be serviced for that
print server, and the appropriate file exists, the print server will
attempt to attach to each of the other file servers listed, up to the
maximum capacity of the print server.
If you assign a primary (preferred) file server and it contains no
additional file servers in its list (i.e., contains no file listing file
servers to be serviced), and the (preferred) file server is up, then
the NIC should stop after finding that file server and not perform
the general file server discovery process.
If the primary (preferred) file server is assigned and unavailable
(e.g., server down or the print server is not configured on the file
server, or due to network conditions, the file server was not
located), the Novell portion of the print server will sleep for 5 (or
so) minutes and then retry to establish the connection. Any other
protocols configured should run normally. This retry will continue
indefinitely; there will be no search.
Primary File Server
To use the primary file server option, use the following
procedure on a file server close to the printer:
1. List the file servers to be serviced by the primary file
server by selecting File Server To Be Serviced option
from the Print Server Configuration Menu.
2. Press the Insert key to display the Available File Servers
list.
3. Select the name if each file server to be serviced and
press to add it to the File Servers To Be Serviced list.
4. When the list is complete, press the key to return to
the menu.
5. Install the NIC on each of the primary file servers.
3-12 ❖ DocuPrint 4512/4512N Network Interface Card User Guide
Page 25
NetWare Configuration
Configuring
NetWare 4.0x
Bindery
Emulation
Note
Confirm Bindery
Context
Novells NetWare 4.0x can operate in two modes NetWare
Directory Services (NDS) and Bindery Services Emulation.
For Directory Services, see Configuring the NIC in NetWare
Directory Services (page 3-17). These services run
simultaneously and transparently to each other. The NIC may
be configured to operate with Bindery Services mode only
(this section), or to operate under NDS (Configuring the NIC
in NetWare Directory Services). When configured under
NDS, the NIC will also service older fileservers operating in
bindery mode.
If the NIC is not properly set up for NDS and the Bindery
Services mode is not running, the NIC can not find its file
servers, and the status page indicates the Novell NetWare
protocol is not active.
Disable Bindery if operating only in the NDS mode.
Before installing the NIC on a Novell NetWare 4.x server in
Bindery Emulation mode, check that the server has a Bindery
Context (name for the server under Bindery Services mode).
If the server does not have Bindery Context, it may be
preferable to install in NDS mode. If the NIC must be
installed in the Bindery Emulation mode, the server must
have Bindery Context. Perform the following steps to confirm
the server has Bindery Context:
1. Go to the 4.0x server and at the system console type: load
install
2. Select Maintenance/Selective Install from the menu.
3. Select NCF Files Options from the menu.
4. Select Edit AUTOEXEC.NCF from the menu.
Chapter 3: NetWare Configuration ❖ 3-13
Page 26
Configuring NetWare 4.0x Bindery Emulation
5. Search the file to see if you have a statement similar to the
following included:
SET BINDERY CONTEXT=0U=ENG
Where =0U=ENG is an example of a name for the file
server context. Use your own file server context in place
of =0U=ENG.
6. At the console prompt, type the SET BINDERY
CONTEXT statement that you entered in the
autoexec.ncf file.
The command at the console prompt takes effect
immediately. The definition in the file takes effect when the
server is shut down and then restarted.
Note
Configure in
Bindery Mode with
PCONSOLE
Once you confirm the server has Bindery Context, use the
following procedures to configure the NIC.
1. Log into the network as ADMIN.
2. Type PCONSOLE and press . The following screen
appears.
Available Options
Print Queues
Printers
Print Drivers
Quick Setup
Change Context
3. When the Available Options menu appears, press the
key (for the Bindery Mode).
3-14 ❖ DocuPrint 4512/4512N Network Interface Card User Guide
Page 27

Note
Configuring NetWare 4.0x Bindery Emulation
If you receive a message asking you to login to a server with
Bindery connections, the server you are attached to does not
have Bindery Mode enabled. Follow the procedures in
Confirm Bindery Context (page 3-13) or log onto a server
with Bindery Services activated.
4. From the Available Options screen, select Quick Setup
and press .
Use Quick Setup to connect your print server, print queue
and printer correctly. You can modify these later if you
need to.
5. Select Print server and press the key to modify the
entry.
6. Enter the name of the print server in the Print server field
and press .
Chapter 3: NetWare Configuration ❖ 3-15
Page 28

Configuring NetWare 4.0x Bindery Emulation
Unless the name has been changed with the NIManage
utility, the name is the factory default serial number (the
6-digit number on the first line of the Status and
Note
Configuration report that prints each time you power-up the
printer.)
7. Press the key to move to the New printer field. Enter a
name and press .
8. Press the key to move to the New print queue field.
Enter a name and press .
9. Press the key to move to the Printer type field and
press . From the list of printer types, select Other/
Unknown and press .
10. When you are finished, press the key to save the
configuration.
Repeat steps 5 through 10 for each file server that the
printer server services.
11. To view, add, delete, or modify print servers or queues
after the initial setup, select either the Print Queues or
Print Servers option on the Available Options screen.
3-16 ❖ DocuPrint 4512/4512N Network Interface Card User Guide
Page 29

NetWare Configuration
Configuring
the NIC in
NetWare
Directory
Services
Note
NetWare Directory Services (NDS) offers a different, more
advanced approach to network management than previous
NetWare versions. Generally, it stores and tracks all network
objects. As a rule, all 4.x servers must have NDS loaded in
order to function. In this way, every NetWare 4.x server is a
Directory server, because it services named Directory objects
such as printers, print servers and print queues. With the
appropriate privileges, you can create a print server object,
which, once configured in its context (or location) on the
network, eliminates the cumbersome setup of print servers on
every network server. NDS provides true enterprise
networking based on a shared network database rather than
a individually defined physical sites. The result is greatly
improved print server setup and management.
NetWare 4.x also provides backward compatibility for 2.x, 3.x
and 4.x print service in Bindery emulation.
The Directory Information Base (DIB) is used to store
information about servers and services, users, printers,
gateways, etc. It is a distributed database, allowing access to
data anywhere on the network wherever it is stored.
Pre-4.x NetWare versions provide the same data found in the
DIB but the data is stored in the NetWare Bindery. The DIB
was designed with more flexible access, more specific
security, and, since it is distributed, it was designed to be
partitioned. The Directory uses an object-oriented structure
rather than the flat-file structure of the Bindery, and offers
network-oriented access, rather than server-oriented access
found in the Bindery.
The Directory is backward-compatible with the NetWare
Bindery through Bindery emulation mode. When Bindery
emulation is enabled, Directory Services will accept Bindery
requests and respond just as if a Bindery existed on the
NetWare server being accessed.
Chapter 3: NetWare Configuration ❖ 3-17
Page 30

Configuring the NIC in NetWare Directory Services
Be aware that information obtained from the Bindery query
may not be stored in the server since the Directory is a
partitioned and distributed database. Even though the
NetWare 4.x server is not operating from a Bindery, the
applications making Bindery requests will not know the
difference.
3-18 ❖ DocuPrint 4512/4512N Network Interface Card User Guide
Page 31

NetWare Configuration
Configuration
Configure Printer
in NIManage
The NIManage program provided with the NIC is used to
configure the context of the print server. The Novell
NWADMIN program is used to create the directory tree, print
server, printer and print queue objects within the tree.
Follow the steps below to complete the configuration in
NIManage.
1. If you haven't done so already, install the NIManage for
Windows utility on your system. For directions, see
Using the NIManage Utility (page 3-28). Make sure the
printer with the NIC is powered up and connected to the
network.
2. Start NIManage on a Windows station. At the Select
Novell Based Device window, choose the desired print
server from the list provided and click on the OK button. At
the unit verification screen, again click on the OK button.
3. Select P
from the choices offered.
4. Select Novell NetWare and click on the OK button (an A
appears before enabled protocols).
rotocols from the main menu and Setup Protocols
5. At the Novell NetWare screen, type in values for Print
Server Name. Password may also be entered (and
reentered) in the fields provided. Since the NIC has a
single port, nothing needs to be done in the Setup Port
box. Click on the D
Chapter 3: NetWare Configuration ❖ 3-19
irectory Services dialog box.
Page 32

Configuration
6. At the Novell Directory Services Configuration screen,
type in a Context entry and P
Tre e entry in the open fields. Be sure to give the whole
context, whether typed or typeless, and do not begin your
context path with a trailing period (.). You do not need to
write a container name (Print Server Name) because it
was provided in the previous Novell NetWare window. If
you don't know your tree, type: whoami at the DOS
command line. A typed context name example is:
ou=standard.ou=organization_1
referred Directory Services
Configure Printer
in NWADMIN
You can also Disable B
you wish by clicking on that box. If you disable Bindery,
The NIC will not support print servers on a Bindery file
server. Now click on the OK button to conclude
configuration in NIManage for Windows. If you change
any default values, you must power cycle the unit or, reset
the NIC from NIManage.
See the steps below to complete NWADMIN configuration.
You will create printer, print server and print queue objects.
Then, you will assign, or associate, those objects with each
other. If you wish to keep Bindery resources on any server,
you can under NetWare 4.x if you declare a SET statement in
your AUTOEXEC.NCF file.
For those who prefer, NetWare does offer PCONSOLE as an
alternative to NWADMIN. PCONSOLE can be used to set up
static information about print servers such as: which queues
to service, and whom to notify in the event of a problem. See
Novell NetWare documentation for more information about
the use of PCONSOLE for NDS.
indery mode on the print server if
3-20 ❖ DocuPrint 4512/4512N Network Interface Card User Guide
Page 33

Configuration
Create Printer Object
1. Click on the NWADMIN icon in the NetWare Tools group
in Windows. The NetWare Administrator window will
appear. To bring up your Directory Tree, open a Browser
window by clicking on the T
B
rowse item.
2. Highlight the Organizational Unit or Organization where
you want to create the print service in the Directory Tree,
select the O
Create...
bject item from the main menu and choose
ools menu item and, the
Note
If you wish, you can create objects another way in
NWADMIN by: selecting an Organizational Unit, clicking on
the right mouse button (which produces a pop-up menu), and
clicking on Create... use the left mouse button to bring up the
New Object window). From this point, the procedure
continues as described.
3. When the New Object window appears, scroll down the
C
lass of New Object icon list, select the Printer icon and
click on the OK button.
Chapter 3: NetWare Configuration ❖ 3-21
Page 34

Configuration
4. When the Create Printer window appears, type a value in
the Printer N
ame field and click on the Create button.
Create Print Server Object
1. Again, highlight the Organizational Unit, select the
O
bject item from the menu and choose Create...
2. At the New Object window, scroll down the C
Object icon list, select the Print Server icon, and click on
the OK button.
3. At the Create Print Server window, type a value in the
Print Server N
ame field and click on the Create button.
lass of New
Create Print Queue Object
1. Once again, highlight the Organizational Unit, select the
O
bject item from the menu and choose Create.
2. At the New Object window, scroll down the C
Object icon list, select the Print Queue icon, and click on
the OK button.
3. At the Create Print Queue screen, click on the Directory
Service Queue button, then type in values for Print Queue
N
ame and Print Queue Volume and click on the Create
button. If you don't know the Print Queue V
3-22 ❖ DocuPrint 4512/4512N Network Interface Card User Guide
lass of New
olume name
Page 35

Configuration
(the hard drive you will be accessing), click on the icon to
the right of the volume field. The Select Object window
will appear with the volume listed in O
is not listed, scroll the D
find the volume where you want the queue to reside.
Click on the object (hard drive) of your choice and it will
appear in the Selected Object: field. Click on the OK
button. The full volume will now appear in the Print
Queue V
olume field. Finally, click on the Create button.
irectory Context items until you
bjects. If the volume
Assign Printer
Object
1. Go to the Directory Tree. Double click on the printer
object just created and bring up the Printer window. See
Chapter 3: NetWare Configuration ❖ 3-23
Page 36

Configuration
below. Find the Assignments button on the right-side of
the window and click on the A
dd button.
2. When the Select Object window appears, find the print
queue object just created among the choices listed in the
O
bjects box and select it.
Click on the OK button and the print queue just created is
added to the Print Queues: box in the Printer: window.
Click on the OK button again.
3-24 ❖ DocuPrint 4512/4512N Network Interface Card User Guide
Page 37

Configuration
Assign Print
Server Object
1. At the Directory Tree, double click on the print server
object you just created and bring up the Print Server
window.
2. At the Print Server: window, click on the Assignments
button and A
window. Select the printer object just created from the
O
bjects: box and click on the OK button. Now the printer
dd button to bring up the Select Object
Chapter 3: NetWare Configuration ❖ 3-25
Page 38

Configuration
(with its context) appears in the Printers: box of the Print
Server window. Click on the OK button.
Check
Assignments
At the Directory Tree, double click on the Print Queue object
you just created. At the Print Queue window, click on the
Assignments button.
If you configured the print queue and printer correctly they
will appear in the proper boxes on the Print Queue window.
Press the Cancel button.
3-26 ❖ DocuPrint 4512/4512N Network Interface Card User Guide
Page 39

Configuration
Power Cycle the
Printer
NWADMIN configuration is complete. Before you can begin
printing, though, be sure to power cycle the printer or use
NIManage to save the configuration and reset the unit.
Chapter 3: NetWare Configuration ❖ 3-27
Page 40

NetWare Configuration
Using the
NIManage
Utility
Note
Installing
NIManage
NIManage is a Windows-based program for managing the
NIC. Use NIManage to do the following:
Configure the NetWare print server and IP parameters.
Enable and disable protocols or the Configuration and
Status Report.
Troubleshoot the NIC.
Software upgrade to the NIC.
The NIManage utility includes a context-sensitive help menu
that explains its features.
To have full use of NIManage, you need Supervisor or
Administrator privileges.
To install the NIManage utility, use the following procedures:
1. Start Windows on your PC or workstation.
2. Insert the NIManage diskette into the disk drive.
3. In the Windows Program Manager, select the File menu.
4. Select RUN from the menu.
5. In the RUN command line field, type A:\INSTALL.EXE or
B:\INSTALL.EXE and click on the OK button.
6. Follow the installation instructions on the screen.
7. Remove the NIManage diskette when complete. Use the
on-line help for information on the program.
3-28 ❖ DocuPrint 4512/4512N Network Interface Card User Guide
Page 41

Using the NIManage Utility
Hints to Running
NIManage
NIManage includes extensive help screens. The features of
this utility are not explicitly covered in this manual. However,
this section provides some information about the significance
of certain provisions and the ramifications of certain settings.
Startup
NIManage is started up like any Windows program. It first
checks the NetWare connectivity. Any problems with the
NetWare driver are immediately displayed. It then checks the
administrative level of the user and reports this on the screen.
If you do not have supervisor or administrator level
permissions on the file server to which you are attached,
NIManage access will be restricted to read-only access and
non state-changing tests. If you have supervisor level access,
you may modify the setup of any accessible print server.
Select Device
The program then prompts you to select a print server NIC
(NIC) to be accessed from a list of compatible print servers.
The print servers are listed by their SAP identification string
derived from their serial number. The identification string
appear in the form XRX_123456. You can find this
identification name on the Print Server status sheet. Since this
list is derived from the SAP broadcasts of each unit, even
units that are not installed as NetWare print servers will
appear.
Show Detail will access the highlighted unit to obtain print
server characteristics including assigned name and firmware
revision. Show All will access all units on a network with
many compatible print servers. Show All may take a long
time to complete. If the print server has not been assigned a
new name, its default name is not displayed.
A print server is selected by double-clicking on the
corresponding entry, or by highlighting the entry and clicking
on OK. When it is accessed, a product description string is
displayed. Click on OK. After a print server device has been
Chapter 3: NetWare Configuration ❖ 3-29
Page 42

Using the NIManage Utility
selected, the main menu string and the icon tool bar is
displayed. Selecting a menu header will bring down a
specific set of options, most of which are self explanatory.
Options that are grayed out are not accessible.
File
Under File, the Execute NSUpdate operation is displayed.
This operation permits launch of the utility to download
updated executable code to the flash memory in the print
servers. An installable version of this program is distributed,
with the flash image to be downloaded, only when an update
is provided. Attempting to launch the program if it has not
been loaded will produce an explanatory message to the
effect that the program could not be found.
Protocols
The Setup Protocols operations allows setting up NetWare
print server options, and AppleTalk and TCP/IP parameters.
Setup Protocols provides extensive access to NetWare print
server parameters, both for bindery and NDS-based systems.
Setup also allows you to disable/enable AppleTalk and TCP/
IP, and to setup IP parameters (IP address, subnet mask, and
default gateway).
Novell parameters include:
Print Server Name This allows a more descriptive
name to be given to the print server. If a name is entered
here, this newly assigned name must be the one by which
the print server is installed in file servers or contexts
(using PCONSOLE or NW Admin). However, NIManage
will continue to locate the print server by the NIC name:
XRX_123456.
Preferred File Server Name The operator may enter
the name of the file server to which the NIC should attach
to first. This name can be keyed in directly, or can be
chosen from a pulled-down list of accessible file servers.
The pull-down list is limited to 1200 entries, and only the
3-30 ❖ DocuPrint 4512/4512N Network Interface Card User Guide
Page 43

Using the NIManage Utility
first 1200 file servers located will be listed. Therefore, if
there are more than 1200 file servers accessed and the
desired one is not listed, the name should be typed in.
The ability to define a Preferred File Server is useful in
large systems where the NIC file-server-search process is
time consuming, and in systems where the file server to
be serviced is beyond the 4-hop/8 tick search radius.
Once the NIC attaches to the preferred file server, it will
start the search process for other file servers unless the
preferred file server has been set up as a primary file
server.
A primary file server is one which contains a file
indicating the file servers to be serviced by the print
server. If a NIC locates such a file (either in a preferred
file server or in a file server found via a search), the NIC
will attach directly to the listed file server(s) (and only the
listed file servers), and will not search for any others. The
combination of preferred and primary file servers is
effective in minimizing the time for a NIC to come up on a
Novell network. The preferred and primary file server
concepts are applicable only to bindery-based systems
and will have no effect on NDS setup.
Password The password can be assigned here, and
must be used consistently in all file servers or contexts in
which the print server is installed.
Ethernet Frame Type If the subject NIC is an Ethernet
card, part of its startup is an automatic search to
determine the frame type used for NetWare on the
subject LAN. It will sequentially try 802.3, Ethernet II,
and so on until it finds a NetWare frame type in use, and
will then lock onto that frame type. If the network has
multiple frame types being used, setting this parameter to
the desired frame type will cause the search to start with
the selected frame type. If that frame type is found, there
is no search.
Chapter 3: NetWare Configuration ❖ 3-31
Page 44

Using the NIManage Utility
Scan Rate Once during a scan process, the NIC will
check all assigned queues for new print products to be
extracted and printed (provided it is not currently
servicing a queue). A slow scan rate will increase the
latency of a job sitting in the queue. A fast scan rate will
increase background network traffic.
3-32 ❖ DocuPrint 4512/4512N Network Interface Card User Guide
Page 45

NetWare Configuration
Using the
Novell
PCONSOLE
Utility
Note
Changing the File
Server
This section explains how to use the PCONSOLE utility to
perform the following tasks:
Attach and select a file server
Select or delete queues for the print server
Set-up the Notify function
See the NetWare Print Server Manual for detailed
information on this utility.
You must have Supervisor privileges to perform many
PCONSOLE operations.
You can specify a file server as the current one. To change the
file server, use the following procedures:
1. Log into the current file server and start the PCONSOLE
utility.
2. Select Change Current File Server from the Available
Options menu.
3. Press the Insert key to display the available file servers.
4. Select the file server you want as the current one and
press .
5. Enter your username and press . If the username
requires a password, the Password screen is displayed.
Enter the password and press .
6. Select Change Current File Server from the Available
Options menu. A list of the attached file servers is
displayed.
7. Select the current file server from the File Server/
Username screen.
Chapter 3: NetWare Configuration ❖ 3-33
Page 46

Using the Novell PCONSOLE Utility
Changing Print
Queues
When you print a file, your system sends the file to a print
queue. The print server assigned to that queue extracts the
print job and sends it to the assigned printer. If a print server
is servicing queues on multiple file servers, you must assign
queues to the printer on each file server. To change the print
queues, use the following procedures:
1. Start the PCONSOLE utility.
2. Select Print Server Information from the Available
Options menu.
3. Select the print server from the list.
4. Select Print Server Configuration from the menu.
5. Select Queues Serviced by Printer from the menu.
6. Select a printer from the Defined Printers list.
7. Press at the File Server/Queue/Priority screen. The
Available Queues list appears.
8. Select a queue from the list.
9. Press at the Priority screen to leave the priority
setting at 1.
The highest priority queue is 1; 10 is the last. To change
the priority of a queue, press at the File Server/
Queue/Priority screen to display the Priority setting
screen. Press the back-arrow key to delete the current
setting. Type a new number from 1 to 10 and press .
Repeat steps 7, 8, and 9 to assign additional queues to the
printer.
10. Press the key and save all changes.
3-34 ❖ DocuPrint 4512/4512N Network Interface Card User Guide
Page 47

Using the Novell PCONSOLE Utility
How to Set Up
Notify
You can specify users or groups of users that are notified if a
problem occurs when a print job is sent to the printer. If the
print server is servicing queues on multiple file servers, you
must set up a NOTIFY list for each file server. To set up
NOTIFY, use the following procedures:
1. Start the PCONSOLE utility.
2. Select Print Server Information from the Available
Options menu.
3. Select the print server from the menu.
4. Select Print Server Configuration from the menu.
5. Select Notify List for Printer from the menu.
6. Select the printer from the Defined Printers menu.
7. Press the key at the File Server/Notify Name/Notify
Type/First/Next screen. The Notify Candidates screen
appears.
8. Select the user or user group from the Notify Candidates
screen. The Notify Intervals screen displays.
9. Set the First and Next intervals for notifying users about
printer problems. The First interval is the number of
seconds the network waits before it notifies users about a
print job problem. The Next interval specifies how often
in seconds users are notified. Enter a number for each
interval and press .
10. Press the key and save all changes.
11. Press the key until you see the prompt to exit
PCONSOLE. Select Yes and then press .
Chapter 3: NetWare Configuration ❖ 3-35
Page 48

3-36 ❖ DocuPrint 4512/4512N Network Interface Card User Guide
Page 49

Chapter 4
EtherTalk Configuration Chapter4
Overview ............................................................................... 4-2
Choosing the Printer ............................................................ 4-3
Loading the NIManage for AppleTalk Program ................. 4-5
Configuring the NIC .............................................................. 4-7
Configuration ....................................................................... 4-7
Error Log .............................................................................. 4-8
Protocol Setup ...................................................................... 4-9
Options .............................................................................. 4-10
Chapter 4: EtherTalk Configuration ❖ 4-1
Page 50

EtherTalk Configuration
Overview
Use this chapter if you will be printing from a Macintosh. This
chapter explains how to configure the NIC using EtherTalk
and how to use the NIManage for AppleTalk program.
4-2 ❖ DocuPrint 4512/4512N Network Interface Card User Guide
Page 51

EtherTalk Configuration
Choosing the
Printer
To choose the printer, use the following procedure:
1. Make sure you have loaded the print driver and file
drivers appropriate to your printer.
2. Select the EtherTalk link for AppleTalk by clicking on the
Apple icon in the Macintosh menu bar.
3. Select Control Panel.
4. Click on Networks.
5. Choose EtherTalk as the AppleTalk connection, as shown
in the example.
6. Click on the Apple icon.
7. Select Chooser to display the Chooser screen.
Chapter 4: EtherTalk Configuration ❖ 4-3
Page 52

Choosing the Printer
Note
The screen shown above will not show AppleTalk zones if
your network does not have more than one zone.
8. Select the AppleTalk Zone containing the printer from the
list at the lower left of the screen. Select the appropriate
print driver from those indicated at the upper left of the
screen. A list of printers will appear in the Select a
Postscript Printer display panel at the right of the screen.
9. From the display panel at the right of the screen, choose
the name of the print server from the list of printers. The
factory default name stored in the card is:
Xerox Printer
10. Select SETUP. Then select AUTO SETUP. There will be a
series of messages as the Chooser communicates with the
printer and locates the proper PPD. The setup screen will
return, listing the PPD file selected. Select OK. Then exit
from Chooser.
4-4 ❖ DocuPrint 4512/4512N Network Interface Card User Guide
Page 53

EtherTalk Configuration
Loading the
NIManage for
AppleTalk
Program
The NIManage for AppleTalk program has the following
functions:
View and modify the names of the printer or printer zone.
Enable or disable the Status/Configuration report.
View the error log.
Enable or disable other protocols and view or modify the
TCP/IP address, subnet mask, and default gateway
address.
Use the following procedure to get access to NIManage for
AppleTalk program:
1. Copy the files from the Macintosh NIManage for
AppleTalk program diskette to a folder.
2. When the NIManage for AppleTalk program icon
displays on the desktop, double-click on it. The Zone and
Device screen is displayed.
3. For each zone, the Device display panel shows the
available NICs. If your network has no zones, the screen
shows only the Device display panel. Select the name of
your network zone.
Chapter 4: EtherTalk Configuration ❖ 4-5
Page 54

Loading the NIManage for AppleTalk Program
If you have one zone, the above screen will not display.
Note
4. From the Device display panel, select the NIC. After you
select the device, a menu of options is added to the menu
bar at the top of your screen.
4-6 ❖ DocuPrint 4512/4512N Network Interface Card User Guide
Page 55

EtherTalk Configuration
Configuring
the NIC
Configuration
You use the options added to the menu bar to configure the
print server. Depending on your printer, certain operations
may not be available. These functions will be grayed out
and cannot be selected.
Use the Configuration function to change the names of the
device and AppleTalk Zone. These changes are stored only in
the print server and are not passed on to the PostScript
interpreter. When you choose this function, the following
screen is displayed:
1. To change the print server device name, click on the
name displayed and then enter the new name.
2. To change the AppleTalk Zone, click on the zone
displayed. A menu displays all available zones.
3. Select the new zone from the menu.
4. Click on OK when you have finished viewing this screen
or when you are done making changes.
5. Turn off the printer and then turn it on again to make the
changes take effect. The status sheet should identify the
new printer name and the new zone preference.
Chapter 4: EtherTalk Configuration ❖ 4-7
Page 56

Configuring the NIC
Error Log
Note
The Error Log function is used to view a log of events that the
NIC has registered. The log contains information as well as
errors. Customer Support may need the information on this
screen if your NIC encounters problems.
When you choose this function, a screen containing the text of
the log is displayed. You can print the error log contents by
using the Print option under the File menu. To save the
contents of the error log, do one of the following:
Use the Save As option from the File menu to save the
entire log file.
Use the Edit option to cut, copy, and paste some or all of
the log file.
This does not enter data into the error log itself. The data is
cleared each time the printer is power cycled.
4-8 ❖ DocuPrint 4512/4512N Network Interface Card User Guide
Page 57

Configuring the NIC
Protocol Setup
Use the Protocol Setup option to configure network protocols
other than AppleTalk. When you select the Protocol Setup
function, the following screen is displayed:
The default values for the IP address and Subnet Mask are
shown as zeros. However, this represents a no IP address
condition, not an IP address.
Note
1. Click the protocols to On if you want them to be active.
Click those protocols that you do not want to use to Off.
The utility will not let you make active any protocol that
the NIC does not support or cannot handle because of
active protocol limitations.
2. Enter the IP address and subnet mask if you have enabled
TCP/IP. Enter the default gateway address, if you have
one.
3. Click on OK when you have finished using this screen.
Chapter 4: EtherTalk Configuration ❖ 4-9
Page 58

Configuring the NIC
4. You must power the printer off and on to make the
changes take effect.
Options
Click on Enable to send a status report to the printer each
time you power it on, or click on Disable to cancel this option.
The change takes effect the next time you power on the
printer.
4-10 ❖ DocuPrint 4512/4512N Network Interface Card User Guide
Page 59

Chapter 5
TCP/IP Configuration Chapter5
Overview ............................................................................... 5-2
Installation in a Windows Environment ............................. 5-3
Windows for Workgroups .................................................... 5-3
Windows NT Instructions .................................................... 5-12
UNIX Printing ...................................................................... 5-17
Configuring the IP Address on the NIC ................................ 5-18
lpd Printing ........................................................................ 5-24
Installing TCP/IP for NIC If Not Running lpd ......................... 5-31
Running TELNET .................................................................. 5-47
Making Connection and Main Menu .................................. 5-47
Configure IP Parameters ..................................................... 5-48
Select Printer Languages ..................................................... 5-50
Enable/Disable Network Protocols ....................................... 5-51
Restore Factory Defaults ..................................................... 5-51
Change Password ............................................................... 5-52
Chapter 5: TCP/IP Configuration ❖ 5-1
Page 60

Overview
Overview
This chapter explains how to configure the Network Interface
Card (NIC) and your network for use with TCP/IP
communication in various environments. Independent setup
and installation procedures are provided for Windows
systems and for most popular UNIX systems. The NIC TCP/IP
capability will also operate with lpr spoolers on other systems,
and with spooler/supervisor capabilities that communicate
raw print jobs to the Print Server TCP/IP Port. This port
number defaults to 10001, but may be changed to any desired
number using the Telnet utility or SNMP. The section
Running TELNET (page 5-47) describes the interactive
setup capability accessible through the Telnet utility on any
TCP/IP platform, and is equally applicable to Windows,
UNIX, and other TCP/IP environments.
5-2 ❖ DocuPrint 4512/4512N Network Interface Card User Guide
Page 61

Installation in a Windows Environment
Installation in
a Windows
Environment
Windows for
Workgroups
The several versions and variations of Microsoft Windows
may be used on a NetWare and/or TCP/IP networks, as well
as in a native Microsoft Windows network. This flexibility
allows various options for setting up the network printing
system even though this NIC does not support Netbeui. If the
Windows workstations are connected to a NetWare network,
configure the printer interfaces for NetWare, and use
standard Windows/NetWare utilities to provide access to the
printer. If NetWare is not to be used, the users may access the
printer using TCP/IP. The following sections describe
installation using TCP/IP under Windows for Workgroups,
Windows 95, and Windows NT.
Printing with TCP/IP requires that the workstation have TCP/
IP capability and the corresponding spooler, lpr; or that the
workstation can share an lpr queue on a Windows NT server
(for example) that has one. In general, if printers are not
shared, an lpr queue must be created on each workstation
from which printing is initiated. See the Windows
documentation about sharing printers.
Windows for Workgroups does not normally come with TCP/
IP. However, various TCP/IP facilities are available for
Windows for Workgroups workstations, including a free TCP/
IP provided by Microsoft. There are third party lpr spoolers
available. The following instructions are based on the
Microsoft TCP/IP and a shareware lpr application that is
available from various sources, including the NIC
manufacturer. You will need the files WFWTCP32.zip and
WFWTCP32.txt for the TCP/IP, and wlprs41.zip and
wlprspl.txt for the lpr.
You will need the BOOTPL.exe file if you wish to use the
BOOTP Lite program to set up IP parameters. The
BOOTPL.exe file is provided with the NIC on the NIManage
for Windows diskette.
Chapter 5: TCP/IP Configuration ❖ 5-3
Page 62

Installation in a Windows Environment
Installing TCP/IP
Follow the instructions in the text file for the TCP/IP stack to
set up TCP/IP on the workstations. These instructions are
copyright by Microsoft and cannot be included here.
Loading the lpr Spooler
The Windows lpr Spooler Version 4.1 - Users Guide
(wlprspl.txt), provides detailed instructions for
decompressing and installing the shareware lpr spooler.
Setting up the NIC
The NIC must be given IP address and routing information to
be used with TCP/IP. This can be done with NIManage for
Windows if you have a NetWare connection on your network,
or with NIManage for Macintosh if there is an Apple
Macintosh on the network. Follow the instructions for these
programs which are documented elsewhere. If you cannot
use these programs, you can use either the ARP procedure or
the BOOTP Lite program.
Prior to running these programs, install the NIC in your
printer.
Power -up the printer. Keep the status sheet handy for the
Ethernet (MAC) address. It should show that TCP/IP is
enabled, but that the Protocol address is not configured. If the
unit already has an IP address, these procedures will not
work. However, you can Telnet to the unit to change the IP
parameters.
Assigning IP Address with ARP
This procedure uses the BOOTP protocol. The NIC must be
on the same network segment as the workstation that you are
using to configure it. The TCP/IP stack must be installed and
operating.
5-4 ❖ DocuPrint 4512/4512N Network Interface Card User Guide
Page 63

Installation in a Windows Environment
Use the procedures in Assigning IP Address with BOOTP Lite
if you need to use BootP Lite to configure the IP address
instead of ARP:
1. From Windows, enter the MS/DOS box.
2. At the command prompt enter:
ping [any valid IP address on your network - not the
print server]; the identified unit should reply
arp -s [IP address of NIC] [MAC Address of NIC]; the
entry should be accepted
ping [IP address of NIC]; request should time out
3. Recycle the power on the printer, or let the NIC reset
itself. The NIC will produce a status page that should
include the entered IP address.
4. When the NIC is up again, type the following at the
command prompt:
ping [IP address of NIC] (continue until you get a
reply)
Note
This this only enters the IP address; you must use the Telnet
facility. See Running TELNET (page 5-47) for instructions
on how to enter the other IP parameters.
Assigning IP Address with BOOTP Lite
This program uses the BOOTP protocol. The NIC must be on
the same network segment as the workstation that you are
using to configure it. The TCP/IP stack must be installed and
operating.
Chapter 5: TCP/IP Configuration ❖ 5-5
Page 64

Installation in a Windows Environment
The BOOTPL.exe program will work with a 16 Bit TCP/IP
Stack (FTP, NetManage, B&W, or WFWG).
1. Copy the BOOTPL.exe file to the Windows directory of
your workstation.
2. Reset the printer.
The NIC issues the BOOTP request for a finite period of time.
The print server must be freshly reset for this program to
work.
Note
3. From Program Manager under File, select Run \windows\
BOOTPL.exe.
4. Pull down the Admin menu to Configure option.
5. Enter the IP address that you want to assign to the NIC,
its Subnet Mask (make sure it matches what you are
using on your subnet), the Default Gateway (your routers
IP address), and the MAC address of the NIC (Hardware
Address, listed on the Status sheet as Ethernet Address).
Use colons as delimiters as shown on the status sheet
rather than the dashes that Windows uses.
6. Click on Go. You will get a message that the program is
Verifying, and then it will tell you whether the unit is
active or not.
7. Wait for about five minutes for the NIC to reset. The
Status sheet should report the newly entered IP
information.
8. Enter the MS/DOS box. At the command prompt enter:
ping [IP address of NIC] (continue until you get a
reply)
5-6 ❖ DocuPrint 4512/4512N Network Interface Card User Guide
Page 65

Installation in a Windows Environment
If it does not respond, verify that TCP/IP is enabled on the
status sheet. If the status sheet does not show the IP
information, then repeat the above procedures.
Setting up IP and lpr Parameters
The NIC provides for a setup connection via the standard
Telnet port. To be able to make changes to a unit with factory
default settings, you must logon as sysadm. The default
password is also sysadm (This password can be changed
from the Telnet utility). The section Running TELNET
(page 5-47) describes the use of the Telnet utility.
1. Telnet to the NIC (the login and password are both
sysadm).
2. Turn off the protocols that you are not utilizing (option 3).
3. Setup the subnet mask and default gateway for the NIC if
applicable (menu option 1). (If you used BOOTP, this will
already have been done).
4. Exit, Save and Reset the NIC
Creating an lpr Queue on the Workstation
Once you install the spooler onto the workstation, the setup
program will create a group and icon.
1. Double click on the spooler icon.
2. Click on setup, and define a new queue.
3. At the Remote Host Name prompt:
Enter the NIC IP Address, and enter PORT1 for the
Remote Printer Name
4. Go to Control Panel, Printers, and choose Connect.
5. Select your driver and click on Next.
At this point, you should see an entry for your Windows lpr
Spoolers printer in the Available ports listing. For example,
C:\SPOOL\PRINTER_NAME.
Chapter 5: TCP/IP Configuration ❖ 5-7
Page 66

Installation in a Windows Environment
Microsoft Windows 95
Windows 95 comes with a TCP/IP stack. To print with this
protocol, a client also requires an lpr utility. This program is
available from various sources. The lpr queue can be created
on each workstation or the lpr queue can be created on one
workstation and shared on the network. Windows 95
workstations can also share a lpr printer installed on an
Windows NT server on the network.
The following instructions are based on the a shareware lpr
application that is available from various sources, including
the NIC manufacturer. You will need the wlprs41.zip and
wlprspl.txt for the lpr.
If you wish to use the Bootp Lite program, you will also need
the NTBOOTP.exe and NTBOOTP.txt file provided with this
NIC on the NIManage for Windows diskette.
Loading the lpr Spooler
The Windows lpr Spooler Version 4.1 - Users Guide
(wlprspl.txt) provides detailed instructions for decompressing
and installing the shareware lpr spooler.
Setting up the NIC
The NIC must be given IP address and routing information to
be used with TCP/IP. This can be done with NIManage for
Windows if you have a NetWare connection on your network,
or with NIManage for Macintosh if there is an Apple
Macintosh on the network. Follow the instructions for these
programs which are documented elsewhere. If you cannot
use these programs, you can use either the ARP procedure, or
the ntBOOTP program.
1. Install the NIC in your printer.
2. Power-up the printer.
Keep the status sheet handy for the Ethernet (MAC) address.
It should show that TCP/IP is enabled but that the Protocol
address is not configured.
5-8 ❖ DocuPrint 4512/4512N Network Interface Card User Guide
Page 67

Installation in a Windows Environment
If the unit already has an IP address, these procedures will
not work. However, you can Telnet to the unit to change the
IP parameters.
Assigning IP Address with ARP
This procedure uses the BOOTP protocol. The NIC must be
on the same network segment as the workstation that you are
using to configure it. The TCP/IP stack must be installed and
operating.
You can use NTBOOTP Lite to configure the IP address
instead of ARP.
1. From Windows, enter the MS/DOS box. At the command
prompt enter:
ping [any valid IP address on your network - not the
print server]. The identified unit should reply.
arp -s [IP address of the NIC] [MAC Address of the
NIC]. The entry should be accepted
Note
ping [IP address of the NIC]. Request should time out.
2. Recycle the power on the printer, or let the NIC reset
itself. The NIC will produce a status page that should
include the entered IP address.
3. When the NIC is up again, at the command prompt, enter:
ping [IP address of NIC] (continue until you get a
reply).
This this only enters the IP address. You must use the Telnet
facility, as described in the section Running TELNET
(page 5-47), to enter the other IP parameters.
Chapter 5: TCP/IP Configuration ❖ 5-9
Page 68

Installation in a Windows Environment
Assigning IP Address with ntBOOTP
You may provide the IP address and other IP parameters to
the printer NIC on 32 Bit TCP/IP Stack (Windows NT &
Windows 95) using the NTBOOTP.exe program. You will
have to store the ntBOOTP.exe file in the Windows directory.
This program uses the BOOTP protocol. The NIC must be on
the same network segment as the workstation that you are
using to configure it. The TCP/IP stack must be installed and
operating.
1. Reset the printer.
The NIC issues the BOOTP request for a finite period of time.
The print server must be freshly reset for this program to
work.
Note
2. From Program Manager under File, select Run
ntBOOTP.exe.
3. Pull down the Admin menu to Configure option.
4. Enter the IP address that you want to assign to the NIC,
its Subnet Mask (make sure it matches what you are
using on your subnet), Default Gateway (your routers IP
address), and the MAC address of the NIC (Hardware
Address, listed on the Status sheet as Ethernet Address).
Use colons as delimiters as shown on the status sheet
rather than the dashes Windows uses.
5. Click on Go.
6. Wait about five minutes. The NIC should recycle and
produce a status sheet showing the IP parameters you
have just entered.
7. Pull down Admin menu to Verify. You should get a
message back stating that the Unit is Active. If you do not
5-10 ❖ DocuPrint 4512/4512N Network Interface Card User Guide
Page 69

Installation in a Windows Environment
get this message, verify that TCP/IP is enabled on the
status sheet.
8. When you get a response that your unit is active, you
should be able to ping and Telnet to the NIC.
Setting up IP and lpr Parameters
The NIC provides for a setup connection via the standard
Telnet port. To be able to make changes to a unit at factory
default settings, you must logon as sysadm. The default
password is also sysadm. (This password can be changed
from the Telnet utility.) See Running TELNET (page 5-47)
for instructions on using Telnet.
1. Telnet to the NIC (the login and password are both
sysadm).
2. Turn off the protocols that you are not utilizing (option 3).
3. Setup the subnet mask and default gateway for the NIC if
applicable
(option 1).
4. Exit, Save, and Reset the NIC.
Setting up lpr on the Workstation
Once you install the spooler onto the workstation; the setup
program will create a group and icon.
1. Double click on the spooler icon.
2. Click on setup, define new queue.
3. At the Remote Host Name prompt:
Enter the NICs IP Address, and for the Remote Printer
Name enter PORT1.
4. Go to Settings.
5. Select Printers.
6. Choose Add Printer.
7. Click on Next.
Chapter 5: TCP/IP Configuration ❖ 5-11
Page 70

Installation in a Windows Environment
8. Select your driver and click on Next.
At this point, you should see an entry for your Windows lpr
Spoolers printer in the Available Ports listing. For example,
C:\SPOOL\PRINTER_NAME.
Windows NT
Instructions
Note
Windows NT (version 3.5 or higher) does come with TCP/IP
and lpr capabilities, although these must be installed when
the unit is configured. You must install the TCP/IP Protocol,
Simple TCP/IP Services, and Microsoft TCP/IP Printing prior
to entering the network printer on the workstation.
Once you have lpr installed on an Windows NT Server
workstation and have allowed printer sharing, other
workstations may use the printer through the Microsoft
Windows Network without having to have separate lpr
queues installed on each workstation.
If you wish to use ntBOOTP, you will need the ntBOOTP.exe
file. This file is on the NIManage for Windows diskettes
supplied with the NIC.
Setting Up the NIC
The NIC must be given an IP address and routing information
to be used with TCP/IP. This can be done with NIManage for
Windows if you have a NetWare connection on your network,
or with NIManage for Macintosh if there is an Apple
Macintosh on the network. Follow the instructions for these
programs which are documented elsewhere. If you cannot
use these programs, you can use either the ARP procedure or
the ntBOOTP program.
1. Install the NIC in your printer.
2. Power-up the printer.
5-12 ❖ DocuPrint 4512/4512N Network Interface Card User Guide
Page 71

Installation in a Windows Environment
Keep the status sheet handy for the Ethernet (MAC) address.
It should show that TCP/IP is enabled but that the Protocol
address is not configured.
If the unit already has an IP address, these procedures will
not work. However, you can TELNET to the unit to change
the IP parameters.
Assigning IP Address with ARP
This procedure uses the BOOTP protocol. The NIC must be
on the same network segment as the workstation that you are
using to configure it. The TCP/IP stack must be installed and
operating.
You can use ntBOOTP Lite to configure the IP address instead
of ARP.
1. From Windows, enter the MS/DOS box. At the command
prompt enter:
ping [any valid IP address on your network - not the
print server]. The identified unit should reply
Note
arp -s [IP address of the NIC] [MAC Address of the
NIC]. The entry should be accepted
ping [IP address of the NIC]. Request should time out
2. Recycle the power on the printer or let the NIC reset
itself. The NIC will produce a status page that should
include the entered IP address.
3. When the NIC is up again, at the command prompt, enter:
ping [IP address of NIC] (continue until you get a
reply).
This only enters the IP address; you must use the Telnet
facility. See Running TELNET (page 5-47) to enter the other
IP parameters.
Chapter 5: TCP/IP Configuration ❖ 5-13
Page 72
Installation in a Windows Environment
Assigning IP Address with ntBOOTP
You may provide the IP address and other IP parameters to
the printer NIC on 32 Bit TCP/IP Stack (Windows NT &
Windows 95) using the ntBOOTP.exe program.
This program uses the BOOTP protocol. The NIC must be on
the same network segment as the workstation that you are
using to configure it. The TCP/IP stack must be installed and
operating.
1. Reset the NIC.
The NIC issues the BOOTP request for a finite period of time.
The print server must be freshly reset for this program to
work.
Note
2. From Windows Program Manager under File, select Run
ntBOOTP.exe.
3. Pull down the Admin menu to Configure option.
4. Enter the IP address that you want to assign to the NIC,
its Subnet Mask (make sure it matches what you are
using on your subnet), Default Gateway (your routers IP
address), and the MAC address of the NIC (Hardware
Address, listed on the Status sheet as Ethernet Address).
Use colons as delimiters as shown on the status sheet
rather than the dashes Windows uses.
5. Click on Go.
6. Wait about five minutes. The NIC should recycle and
produce a status sheet showing the IP parameters you
have just entered.
7. Pull down Admin menu to Verify. You should get a
message back stating that the Unit is Active. If you do not
5-14 ❖ DocuPrint 4512/4512N Network Interface Card User Guide
Page 73

Installation in a Windows Environment
get this message, check that TCP/IP is enabled on the
status sheet
8. When you get a response that your unit is active, you
should be able to ping and Telnet to the NIC.
Setting up IP and lpr Parameters
The NIC provides for a setup connection via the standard
Telnet port. To be able to make changes to a unit at factory
default settings, you must logon as sysadm. The default
password is also sysadm (this password can be changed
from the Telnet utility). The use of the Telnet utility is
described elsewhere.
1. Telnet to the NIC (the login and password are both
sysadm).
2. Turn off the protocols that you are not utilizing (option 3).
3. Setup the subnet mask and default gateway for the NIC if
applicable (option 1).
4. Exit, Save, and Reset the NIC
Setting up lpr on the Workstation
The following procedure is used to set up the lpr spooler on
the Windows NT server.
1. Open Control Panel.
2. Go to Printers.
3. Choose Printer Menu.
4. Choose Create Printer.
5. Enter a printer name (For example, lprprinter).
6. Select the proper printer driver.
7. Enter a description. This is optional.
8. In the Print To dialog, choose Other.
9. In Print Destinations window, select lpr port. This leaves
you with add lpr compatible printer window.
Chapter 5: TCP/IP Configuration ❖ 5-15
Page 74

Installation in a Windows Environment
10. Line 1: Address of host providing lpd (Print server); enter
IP address.
11. Line 2: Name of printer on that machine - enter PORT1
(the word PORT MUST be in uppercase format followed
by the number 1).
12. Choose OK to exit.
Your NIC is now configured to operate Windows NT. You may
print from any application by the following the normal print
instructions for that application.
5-16 ❖ DocuPrint 4512/4512N Network Interface Card User Guide
Page 75

UNIX Printing
UNIX Printing
The NIC can support UNIX TCP/IP printing in two modes:
Host-based lpd where a supplied line printer daemon is
run on one or more workstations and print data is
communicated to the NIC via a TCP/IP port or,
Printer-based lpd where the printer appears as a host
running a line printer daemon.
In general, printer-based lpd is easiest to use on BSD
UNIX systems, requiring an entry in the printcap file once
the NIC has its IP information. Some UNIX System V
systems have restrictions on support of remote LPD
printers, requiring that the host-based LPD approach be
used. For many operating systems, you have the option of
using host-resident printing or print server-resident
printing. Each mode has certain advantages.
The host-resident method can print the username and
filename on its banner page; the print server-resident
method prints a banner page with the host's name.
The print server-resident method requires you to
configure the printer only one time, when you install the
print server. The host-resident method requires that a
printing daemon be installed on every host that you want
to be able to print jobs.
Note
The NIC will also operate with other host-resident print
supervisor/spooler programs that present a print image to the
printer over a TCP/IP port. See Running TELNET
(page 5-47) for instructions on how to change the port number
to that used by such applications.
Chapter 5: TCP/IP Configuration ❖ 5-17
Page 76

UNIX Printing
Between the host-based and printer-based TCP/IP printing
capabilities, the NIC works with:
All UNIX systems that support lpd
System V Rel. 4 (on 386 platforms)
DEC ULTRIX RISC Versions 4.3 and 4.4
DEC OSF/1 Versions 2.0 and 3.0
Solaris:
Version 1.1.3 (SunOS 4.1.3),
Version 2.3 (SunOS 5.3),
Version 2.4, and
Version 2.5
HP-UX Series 700 and 800 Version 9.01 and Version 10.0
IBM AIX Version 3.2.5
SCO UNIX Version 3.2
AS400
The TCP/IP diskette also includes source code that you can
recompile host-based code for configuring on other System V
platforms.
Configuring the IP
Address on the NIC
5-18 ❖ DocuPrint 4512/4512N Network Interface Card User Guide
Regardless of the printing mode selected, the NIC must be
given IP address and routing parameters. You can configure
the IP address for the NIC in one of the following ways:
Use NIManage for Windows, as described in
Chapter 3: NetWare Configuration.
Use NIManage for Macintosh, as described in
Chapter 4: EtherTalk Configuration.
Use the Internet Boot Protocol (BOOTP).
Use the reverse ARP (rarp) capability (Ethernet II frame
type only).
Use a reverse ping capability.
Page 77

UNIX Printing
For each method, you provide the Ethernet address of the
NIC. The Ethernet address is the 12-character code that is
printed on the configuration status report each time the
printer is turned on.
You can use the BOOTP, rarp, or ping procedures only when
the print server is in its factory default state (no IP information
entered.) After the print server has an IP address, you must
use the Telnet utility or, the NIManage utility and the
NIManage for the Macintosh to change an IP address, Subnet
Mask and Default Gateway.
Using BOOTP
The BOOTP daemon is a native TCP/IP option for configuring
the IP address of a diskless network device. To communicate
the IP address, use the following procedure:
1. Turn off the printer.
2. Log in as superuser on a host on the same subnet as the
print server. However, if the server resides on another
subnet, complete this procedure to store the IP address in
the print server. Reconnect the print server anywhere on
the network, and then use the Telnet utility to change the
IP address. See Running TELNET (page 5-47) for
instructions on using Telnet.
3. Find the Ethernet address of the NIC. The address is
printed on the configuration status report each time you
turn the printer on.
4. Edit the hosts file (usually /etc/hosts) or use NIS or DIS to
add the IP address and NIC's node name. See the
network administrator for the IP address. For example, a
NIC named printfast with an IP address of 192.9.200.200
has the following entry:
192.9.200.200 printfast
5. Stop the BOOTP daemon if it is running.
Chapter 5: TCP/IP Configuration ❖ 5-19
Page 78

UNIX Printing
6. Edit the /etc/BOOTPtab file and add the following
information:
nic_host:\
:ht = hardware type:\
:ha = ethernet address:\
:ip = IP address:\
:sm = subnet mask:\
:gw = gateway address:
For example, for an RFC 1048 system:
printfast:\
:ht = ether:\
:ha = 0040AF03AF6E:\
:ip = 192.9.200.200:\
:sm = 255.0.0.0:\
:gw = 192.9.200.10:\
If running with a more recent BOOTP implementation, such
as with SCO UNIX, add:
:vm = rfc1048:
The same information uses the following format on an RFC
951 system:
host htype haddr iaddr bootfile
printfast 1 00:40:af:03:af:6e 192.9.200.200 defaultboot
7. Start the BOOTP daemon by typing:
bootpd -s
8. Check the printer to verify that the NIC is connected to
the network. Turn on the printer.
9. Wait until the printer powers up and finishes initializing
to allow enough time for the IP address to become known
5-20 ❖ DocuPrint 4512/4512N Network Interface Card User Guide
Page 79

UNIX Printing
and to be saved in non-volatile memory. The NIC should
reinitialize itself.
10. After the NIC has reinitialize, send a ping command to
verify that the print server obtained its IP address. For
example:
ping 192.9.200.200
If the print server has the address, the result is a
confirmation message:
192.9.200.200 is alive
11. Remove, or comment out, your changes to the /etc/
BOOTPtab file.
12. Stop the BOOTP daemon and, if you want it to run, restart
it.
Using rarp
The Reverse Address Resolution Protocol (rarp) allows
network devices to query a server for their IP addresses on
start-up. For this procedure, there needs to be a workstation
with a rarp server. To store the IP address, use the following
procedure:
1. Turn off the printer.
2. Log in as superuser on the rarp server. However, if the
server resides on another subnet, complete this procedure
to store the IP address in the print server. Reconnect the
print server anywhere on the network, and then use the
Telnet procedure (See Running TELNET (page 5-47) for
instructions on using Telnet) to adjust the IP parameters
for the subnet on which the NIC is to operate.
3. Find the Ethernet address of the NIC. The address is
printed on the configuration status report when you
power on the printer.
4. Edit the hosts file (usually /etc/hosts) or use NIS or DIS to
add the IP Address and NICs node name. See the
Chapter 5: TCP/IP Configuration ❖ 5-21
Page 80

UNIX Printing
network administrator for the IP address. For example, a
print server with the name of printfast has the following
entry:
192.9.200.200 printfast
5. Edit the /etc/ethers file or use NIS or DIS to add the
Ethernet address. To continue the example, for the
printfast card with an Ethernet address of
00:40:c8:00:00:ff, make the following entry:
0:40:c8:0:0:ff printfast
6. If the rarp daemon is running, stop it and restart it. Verify
that the daemon is running.
7. Check the printer to see that the print server is connected
to the network. Turn on the printer.
8. Wait until the printer powers up and finishes initializing
to allow enough time for the IP address to become known
and to be saved in non-volatile memory. The NIC should
then reset itself.
9. After the NIC has reset, send a ping command to verify
that the print server obtained its IP address. For example:
ping 192.9.200.200
If the print server has the address, the result is a confirmation
message:
192.9.200.200 is alive
10. Remove, or comment out, your changes to the /etc/ethers
file.
11. Stop the rarp daemon and, if you want it to run, restart it.
Using ping
Use the following procedure to enter the IP Address:
1. Turn off the printer.
2. Log in as superuser on a host on the same subnet as the
print server. However, if the server resides on another
5-22 ❖ DocuPrint 4512/4512N Network Interface Card User Guide
Page 81

UNIX Printing
subnet, complete this procedure to store the IP address in
the print server. Reconnect the print server anywhere on
the network, and then use Telnet to change the IP
address. See Running TELNET (page 5-47) for
instructions on using Telnet.
3. Find the Ethernet address of the NIC. The address is
printed on the configuration status report each time you
turn the printer on.
4. Edit the hosts file (usually /etc/hosts) or use NIS or DIS to
add the IP address and [print server's node name. See the
network administrator for the IP address. For example, a
print server with a name of printfast and an IP address of
192.9.200.200 has the following entry:
192.9.200.200 printfast
5. Add an entry to the arp cache for the print server's IP
address and Ethernet address. For example:
arp -s 192.9.200.200 0:40:c8:0:0:ff
6. Check the printer to see that the print server is connected
to the network. Turn on the printer.
7. Send a ping command the NIC to verify it is running on
the network. For example:
ping 192.9.200.200 or
ping printfast
The NIC will not respond to this ping command but it will
read its IP address from the packets.
8. Turn the printer off and back on again and then send the
ping command again to verify that the print server
obtained its IP address. If the print server has the address,
the result is a confirmation message:
192.9.200.200 is alive
Chapter 5: TCP/IP Configuration ❖ 5-23
Page 82

UNIX Printing
9. Remove the entry from the arp cache using the following
command. Specify the print server either by its IP address
or by its name. For example:
arp -d printfast
lpd Printing
lpd is an implementation of the standard UNIX line printer
daemon which lets you print across a TCP/IP network without
the need to install software on your workstation with all
filtering and banners done by NIC. Remote printing uses the
same commands (lpr, lpq, lpc) as local printing.
The process begins when the lpr call finds a printer on a
remote system by looking at the remote (rm) entry in the /etc/
printcap file for that printer. lpr handles a print job for a
remote printer by opening a connection with the lpd process
on the remote system and sending the data file (followed by
the control file containing control information for this job) to
the remote system. The printer-based lpd then filters the data
and prints the job according to information contained in the
control file and its own printcap file.
NIC lpd recognizes the format of a certain printer emulations
and filters the data, if possible, so it can be printed on the
printer type you specify. You can indicate to the NIC lpd what
type of printer is attached to by either:
1. Accepting the default port setting (PCL, PostScript and
other), or
2. Changing the listed emulations via the Telnet utility.
The following sections give specifics lpd setup instructions for
various systems.
Setting Up a BSD Remote Printer to Use lpd
To set up a remote printer on the host that sends jobs to NIC
using printer resident lpd, add an entry to the /etc/printcap
file on your host for each printer you use. The steps are
described below.
5-24 ❖ DocuPrint 4512/4512N Network Interface Card User Guide
Page 83

UNIX Printing
1. Open the /etc/printcap file. Make an entry naming the
NIC as the remote host and PORT1 as the remote printer
name. A typical printcap entry is shown below:
<printer_name>\ (for example, lprprinter)
:lp=:\
:rm=<remote_host>:\ (for example, name as entered in
/etc/hosts)
:rp=PORT1:\
:sd=/usr/spool/lpd/<printer_name>: (for example,
spool directory on system used to spool data and
control files)
This entry will send jobs spooled at /usr/spool/lpd/
<printer_name> to the printer designated <printer_name> to
be printed at port 1 (the internal connection to the printer) of
the NIC designated as <remote_host>.
2. Create the spooling directory. For example, type:
mkdir /usr/spool/lpd/<printer_name>
3. To print via the spooler, use the lpr command. Type:
lpr-P <printer_name>< file_name>
Installation and testing is done. You are now ready to print.
Setting Up an AIX Version 2.5 Remote Printer to
Use lpd
Set up a remote printer on the host that sends jobs to the NIC
using the NICs lpd. Use the following procedures to do this:
1. At the prompt, type:
#smit spooler <cr>
2. When a window appears, select Manage Remote
Printers.
3. When a menu appears, select Client Services.
4. Another menu appears, select Remote Printer Queues.
Chapter 5: TCP/IP Configuration ❖ 5-25
Page 84

UNIX Printing
5. Another menu appears, select Add a Remote Queue.
6. When a window appears, change the values shown to
configure the NIC. The values displayed are default
values. You must replace the short and long form filter
values with the values shown on the next page.
Requested Information
Inputted Data
Name of queue to add print1 Name of local printer
queue Destination Host printfast NIC IP hostname
Short Form Filter /usr/lpd/bsdshort Required value
Long Form Filter /usr/lpd/bsdlong Required value
Name of remote printer queue PORT1 NIC
Name of device to add print1 Name of local queue
Example Description of Inputted Data
1. After you have supplied all values, press .
You can now print.
Setting Up an AIX 4.0 System
Use the following procedures to install a NIC in an AIX 4.0
system:
1. Run SMIT Printer.
2. Select Print Spooling.
3. Select Add a Print Queue
4. Select Remote.
5. Use Standard Processing.
6. Assign a queue name.
7. Use the host address of the NIC for the Remote System.
8. Use PORT1 for the queue on the remote system.
9. Add a description (optional).
5-26 ❖ DocuPrint 4512/4512N Network Interface Card User Guide
Page 85

UNIX Printing
10. Press to generate.
Installation is complete. Test your printer by executing the
following command:
lp -d<queue_name> <file_name>
Setting Up an HP/UX Remote Printer to Use lpd
Set up a remote printer on the host that sends jobs to a NIC
using the NIC lpd. To do this:
1. At the prompt, type: sam
2. When a window appears, select Printer/Plotter Manager.
3. When the menu appears, select List printer and plotters.
4. When a list appears, select Actions in the title bar.
5. From the pull-down menu, select Add Remote Printer.
6. When a window appears, add values to configure NIC.
See the following example.
Printer Name myprinter name to be used in lp command
Remote System Name fastprint NIC hostname as in /etc/hosts
Remote printer Name PORT1 lpd queue name
1. At the bottom of the screen, select Remote Printer is on
BSD system from the three choices available.
2. Click on the OK button.
3. Ping the unit to test communications. Type:
ping <NIC IP address>
4. Ping should confirm your IP address with the message:
<NIC IP address> is alive
5. If the connection is confirmed, you can now print.
Chapter 5: TCP/IP Configuration ❖ 5-27
Page 86

UNIX Printing
Setting Up an AS/400 Systems to Use lpd
When working with the output queue description
(WORKOUTQD), there are several fields that must be defined
for the NIC to function properly as a remote printer device.
Use the following procedures to do this:
1. When prompted for the remote system, type INTNETADR
so the AS/400 recognizes the device as an IP device.
2. Type PORT1 for parallel port 1. Type PORT2 for parallel
port 2, etc.
3. Connection type must be IP.
4. Internet address must be the IP address of the NIC
device.
5. Destination type must be OTHER.
6. When prompted for transforming SCS to ASCII, type YES
to allow the AS/400 do the character translation.
7. Manufacturer type and model must be the print driver
that goes with your printer. For example, OKI320IBM.
Setting Up a DEC ULTRIX 4.3 RISC or OSF1/ALPHA
Remote Printer
Set up a remote printer on the host that sends jobs to a NIC.
1. At the prompt, type:
lprsetup
2. Select add.
3. Enter a name for your printer and press .
4. "Do you want more information on specific printer types?
" Press e.
5. A list of ULTRIX-supported printers is listed. Type remote
and press .
6. Enter a printer synonym (alias) and press .
5-28 ❖ DocuPrint 4512/4512N Network Interface Card User Guide
Page 87

UNIX Printing
7. Designate a spooler directory and press , or accept
the default spooler directory displayed and press .
8. Designate a remote system name and press .
9. Designate PORT1 as the remote system printer name and
press .
10. You are asked to enter the name of a printcap symbol
from a displayed list. Type Q and press .
11. Your configuration is displayed. You are asked whether
these values are final. Type Y or N and press . An
example is shown on the next page.
lp (line printer) STR
rm (remote host) STR Printer Server Card_host
rp (remote printer) STR PORT1
sd (spooler directory) STR /usr/spool/lpd7
Note
1. Add comments to the printcap file. For example, you can
type:
Dick's printer down the hall
2. Select exit to save your configuration and press .
You are now prepared to print.
Setting Up a SCO UNIX Remote Printer to Use lpd
Set up a remote printer on the host that sends jobs to a NIC
using lpd. Use the following procedures to do this:
1. At the prompt, type: mkdev rlp
You cannot run mkdev rlp twice. If you have additional
printers to be configured, use the rlpconf command.
Chapter 5: TCP/IP Configuration ❖ 5-29
Page 88

UNIX Printing
2. You will now be asked a series of questions. Respond as
follows. Do you want to install or remove a remote
printer? Type: I
3. Do you want to change printer description file /etc/
printcap? Type: Y
4. Write a printer name. For example, type: lprprinter1
5. Is lprprinter1 a remote printer or a local printer? Type: R
6. Enter remote host name: type host name entered in
printcap for NIC. For example, type: lprprinter
7. Confirm the information you have entered. Type: Y
8. Confirm the preceding connection as your system default.
Type: Y
9. Enter another printer name or quit setup. Type: Q
10. Do you want to start the remote daemon now? Type: Y
11. Using a line editor of your choice, edit the /etc/printcap
file by changing the :rp= entry to PORT1. For example,
printer1:\
:lp=:\ (used to specify the device name for a local
printer; this field must be empty)
:rm=lprprinter:\ (remote machine name or network
name of the print server)
:rp=PORT1:\ (remote printer name or the name of the
print server)
:sd=/usr/spool/lpd/printer1: (name of the spool
directory on the client)
Setting Up System V Release 4 and Solaris 2.X to
Use lpd
If your system recognizes the LPSYSTEM command, you can
use lpd. Another option is the admintool if your system
supports it.
5-30 ❖ DocuPrint 4512/4512N Network Interface Card User Guide
Page 89

Note
UNIX Printing
LPSYSTEM Installation
Use the following procedures to install LPSYSTEM:
The following must be executed from the Bourne Shell. Type:
SH to enter the Bourne Shell program.
1. lpsystem -t bsd
Enter NIC host name in /etc/hosts file. Your system
may want its IP address instead of the remote host
name.
2. lpadmin -p <local printername> -s <remote host name or
IP address>!PORT#
Note
Installing TCP/IP
for NIC If Not
Running lpd
There is no space after the remote host name. The #
represents the port number for that printer. For example,
PORT1.
3. Enable <local printername>
4. Accept <local printername>
The TCP/IP diskette provided with the NIC includes install
scripts for various UNIX systems. This section describes how
to install TCP/IP printing to the NIC on any of the following
operating systems:
DEC ULTRIX 4.3 RISC
System V Rel. 4
Solaris (Ver. 1.x, 2.x)
SCO UNIX
Chapter 5: TCP/IP Configuration ❖ 5-31
Page 90

UNIX Printing
OSF1/ALPHA
IBM AIX
HP/UX
Once the NIC has its IP information loaded, the following
steps are necessary for Host-Side TCP/IP printing:
1. Load the print server software on your workstation. It is
presented as a tar file on the TCP/IP diskette.
2. Run the appropriate installation script, if available.
3. Complete the configuration for your operating system.
Loading the Software
The following procedures are only necessary when using the
supplied host-based lpr capability. Loading the software is
not necessary if printer-based lpr is used.
1. Log in as superuser to the system that spools directly to
the print server.
2. Insert the print server's TCP/IP diskette in the host drive.
3. Go to or create the directory in which you want to install
the software. For example:
mkdir /usr/PSC_install
If you already have a NIC printer at your site and you are now
installing another one, delete the files in the installation
directory (not /usr/nic). If these files remain, they can prevent
Note
5-32 ❖ DocuPrint 4512/4512N Network Interface Card User Guide
the installation of a subsequent print server.
4. Use the tar command to load the software from the
diskette. Choose your UNIX version from the example
Page 91

Note
UNIX Printing
from the following table, or if not shown, consult the man
page for your system:
BSD/ULTRIX/AIX/SCO tar -xvf/dev/rfd0
System V tar -xvf/dev/rdsk/f13ht
System V/Solaris 2.3 tar -xvf/dev/rdiskette
The device name varies depending on the computer and its
peripheral designations. The first BSD floppy device is often
called rfd0.
1. After performing the tar, the system will display a list of
NIC files copied by the tar. At this point, go to the specific
section for your system for instructions on running the
installation script.
Script Selection of Filters
There will be certain options in executing the script for
various systems. The installation script can create an entry in
the /etc/printcap file for your printer:
ASCII, PCLfiles
One of the questions posed by the install script is whether the
printer is a PostScript printer. If you answered no to this
question, the install script uses an input filter (infilter) that
supplies CR/LF translation to print ASCII files on a PCL
printer. If you answered yes to this question, your printcap file
will reference psfilter which offers easy ASCII-to-PostScript
conversion. Normal PostScript format files are not affected.
Proprietary and public domain filters are available for
broader filtering capabilities.
Chapter 5: TCP/IP Configuration ❖ 5-33
Page 92

UNIX Printing
Manual Selection of Filters
The NIC ships with an input filter called psfilter and an
output filter called psbanner to print PostScript banners.
You may wish to change infilter or outfilter entries in the /
etc/printcap file. The following is a sample printcap entry
using these filters:
<print_name> | NIC printer:\
:lp=/dev/nic/<printer_name>:\
:if=/usr/nic/psfilter:\
:of=/usr/nic/psbanner:\
:sd=/usr/spool/<printer_name>:
Installing and Printing on Ver. 1 Solaris and OSF1
Systems
1. Run the Installation script by typing: nicinst.
The script automatically downloads the correct NIC
utilities for your particular system and prompts you for
information as needed.
2. What is the node name of the Print Server unit?
Type the node name entered in /etc/hosts. For
example: printfast and press .
3. What is the printer name?
Type the desired printer name and press .
4. Your screen will now display the information you
provided to the install script. For example:
Node name of the NIC: printfast
Printer name to be used: <printer_name>
The printer is attached on: PORT 1
You are asked to OK this configuration. Type yes or no
and press .
5-34 ❖ DocuPrint 4512/4512N Network Interface Card User Guide
Page 93

UNIX Printing
5. Is this printer PostScript?
Type yes or no and press .
6. The script creates a printcap entry for the printer just
configured. The screen displays the entry and asks if you
want the script to append it to your /etc/printcap file. See
below for a sample printcap file. Type yes or no and press
. If you type no, you may perform manual edits.
In your /etc/printcap file, be sure not to change the name
of the device given NIC in Step 2. You must reference the
same lp: entry you wrote on the lp command line of the
printcap file. For example:
<printer_name> | NIC printer:\
:lp=/dev/<printer_name>:\
:if=/usr/nic/infilter:\
:sd=/usr/spool/<printer_name>:
All printcap entries must be prefaced with a tab except
for the entry on the first line.
7. The script creates a spool directory in /usr/spool and
starts the daemon for the newly configured printer. It also
displays the path used if you ever need to restart the
daemon. For example:
/usr/nic/lpr_print /dev/nic/<printer_name> printfast
10001 &
8. Run the ps command so that you can view all your lpd
processes.
Type: ps -ax | grep lpd
9. Kill all of your lpd processes. Type: kill -9 <Process ID>
(this will stop ALL
printing).
10. Restart the daemon.
Type: /use/lib/lpd
Chapter 5: TCP/IP Configuration ❖ 5-35
Page 94

UNIX Printing
11. Installation for the system is done. You are prompted to
configure any more printers.
Type yes or no and press . We also suggest you
ping the NIC to test communications.
Installing & Printing on an DEC ULTRIX 4.3 System
1. Run the Installation script by typing: nicinst.
The script automatically downloads the correct NIC
utilities for your particular system and prompts you for
information as needed.
2. What is the node name of the Print Server unit?
Type the node name entered in /etc/hosts. For
example, printfast and press .
3. What is the printer name?
Type the desired printer name and press .
4. Your screen will now display the information you
provided to the install script. For example:
Node name of the NIC: printfast
Printer name to be used: <printer_name>
The printer is attached on: PORT 1
You are asked to OK this configuration. Type yes or no
and press .
5. Is this printer PostScript?
Type yes or no and press .
6. The script creates a printcap entry for the printer just
configured. The screen displays the entry and asks if you
want the script to append it to your /etc/printcap file. See
5-36 ❖ DocuPrint 4512/4512N Network Interface Card User Guide
Page 95

UNIX Printing
below for a sample printcap file. Type yes or no and press
. If you type no, you may perform manual edits.
<printer_name> | NIC printer:\
:lp=/dev/<printer_name>:\
:if=/usr/nic/infilter:\
:sd=/usr/spool/<printer_name>:
7. Installation for the system is done. The program prompts
you to configure any more printers. Type yes or no and
press . We suggest pinging the NIC to test
communications.
Like all BSD systems, ULTRIX uses the /etc/printcap file to
configure a printer. The interface to the installation script is
the same for all BSD systems, however, the printcap entry is
different.
If you use the printcap entry generated automatically by the
installation script, this will be transparent to you.
Installing and Printing on the HP/UX System
1. Run the Installation script by typing: nicinst.
The script automatically downloads the correct NIC
utilities for your particular system and prompts you for
information as needed.
2. What is the node name of the Print Server unit?
Type the node name entered in /etc/hosts. For
example, printfast and press .
3. What is the printer name?
Type the desired printer name and press .
Chapter 5: TCP/IP Configuration ❖ 5-37
Page 96

UNIX Printing
4. Your screen will now display the information you
provided to the install script. For example:
Node name of the NIC: printfast
Printer name to be used: <printer_name>
The printer is attached on: PORT 1
You are asked to OK this configuration. Type yes or no
and press .
5. Is this printer PostScript?
Type yes or no and press .
6. The script starts the daemon for the newly configured
printer automatically. It also displays the path used should
you ever need to restart the daemon. In the following
example, the path would be:
/usr/nic/lpr_print /dev/nic/printer_name printfast
10001 &
This example reflects names supplied to the script
earlier.
When the installation script is complete, you must configure
the printer and make it known to the lp system. The HP/UX
lp system uses the lpadmin maintenance command to
configure a printer (there is not a /etc/printcap file). The
specific commands to do this are:
lpadmin -p printer_name -v /dev/nic/printer_name
enable printer_name
accept printer_name
You can also use other options for the lpadmin command. See
your system documentation for details.
5-38 ❖ DocuPrint 4512/4512N Network Interface Card User Guide
Page 97

Note
UNIX Printing
The printer name must be the same as the one you entered
during the NIC installation. HP supplies the sam program as
an alternative to configure the printer.
When using sam, specify everything as if the printer were
directly connected to /dev/lprprinter/printer_name.
The software installed with your HP system can satisfy most
of your printing needs. HP supplies ASCII-to-PostScript filters
and the system will invoke them automatically if you define
the content type of the printer as PostScript. The HP/UX lp
system also supplies interface scripts that produce PostScript
banners. Use the lpfilter command to define new filters and
content types if necessary. The full power and flexibility of
the lp print service is now available to you. The fact that you
are printing across the network is completely transparent.
Installing and Printing on a System V
(Solaris Ver. 2)/System V Rel. 4 386-based Machine
Installation and setup is exactly the same for System V Solaris
and SVR4 i386-based machines. Solution uses a network
direct filter called nicfilter. The system invokes nicfilter
directly from the printer interface file.
After completing software download in the section Loading
the Software (page 5-32) you must configure the printer and
make it known to the lp system.
1. Run the Installation script by typing: nicinst.
The script automatically downloads the correct NIC
utilities for your particular system and prompts you for
information as needed.
Chapter 5: TCP/IP Configuration ❖ 5-39
Page 98

UNIX Printing
2. Select your system. Choose one from these options:
1) AT&T/SVR4; 386
2) SCO UNIX System V
3) None of the above
Type 1, 2, or 3 and press .
3. You have now installed TCP/IP on the NIC. Copy your
interface file (/usr/nic is a good place to keep your copy).
4. You must edit the printer interface program this printer
uses to redirect output to the NIC. You can then configure
your printer using lpadmin.
In most cases you will use the default interface script named
standard (usually found in the /usr/spool/lp/admins/lp/model
directory). Sometimes you may wish to use an interface tuned
to a specific printer. You must have a copy of the of the
interface file for the port you want to initialize. For example:
cp /usr/spool/lp/model/standard /usr/nic/port1_interface
Most Version 2 Solaris machines have a shell variable called
FILTER that you can changed to invoke nicfilter. A typical
example is:
FILTER="/usr/nic/infilter | /usr/nic/nicfilter \
PSC_name 10001 ${nobanner} \
${user_name} ${request_id} ${files}"
You must specify the NIC name (PSC_name) and NIC port
(10001) for nicfilter to connect to the NIC unit. The name
must be the same one that you entered in /etc/hosts for this
NIC.
The remaining arguments are optional. nicfilter uses them to
produce a high quality banner. The lp print service user
name, request id, file names and options always passes to the
interface file. They will be available in any interface script as
shell variables, although they may have different names.
5-40 ❖ DocuPrint 4512/4512N Network Interface Card User Guide
Page 99

Note
UNIX Printing
If you disable banners in the lp command, the system will set
the ${nobanner} option to yes. This will suppress the NIC
banner generation.
If you don't define the FILTER shell variable in your interface
file, you can usually modify it to pipe data to nicfilter. The
simplest way to accomplish this is to enclose the entire script
in parentheses and pipe it to nicfilter, using the arguments
described above.
If you wish to use the banner generated by the interface file,
simply omit the last four arguments.
These arguments are shell variables from the interface file.
They may have different names (names used above are from
the standard interface file supplied with most Version 2 and
i386 systems).
Installing & Printing on a SCO UNIX System
Installation and setup is similar for HP/UX and SCO UNIX
systems. The NIC solution uses a network direct filter called
nicfilter. The system invokes nicfilter directly from the
printer interface file.
After completing software download in the section Loading
the Software (page 5-32) you must configure the printer and
make it known to the lp system. Follow the steps below:
1. Run the Installation script by typing: nicinst.
The script automatically downloads the correct NIC
utilities for your particular system and prompts you for
information as needed.
Chapter 5: TCP/IP Configuration ❖ 5-41
Page 100

UNIX Printing
2. Select your system. Choose one from these options:
1) AT&T/SVR4; 386
2) SCO UNIX System V
3) None of the above
Type 1, 2, or 3 and press .
3. What is the node name of the NIC?
Type the name assigned in the /etc/hosts file and press
. For example, printfast
4. What is the printer name for this NIC-linked printer?
Type a printer name and press .
5. Your screen will now display the information you
provided the install script. For example:
Node name of the NIC: printfast
Printer name to be used: <printer_name>
The printer is attached on: PORT1
Do you want to accept this configuration? Type yes or
no and press .
6. Is this printer PostScript?
Type yes or no and press .
7. The script automatically starts the daemon for the newly
configured printer . It also displays the path used should
you ever need to restart the daemon. In the preceding
example, the path would be:
/usr/nic/lpr_print /dev/nic/printer_name printfast
10001 &
This example reflects names supplied the script earlier.
When the installation script is complete, you must still
configure the printer and make it known to the lp system.
The SCO UNIX lp system uses the lpadmin maintenance
command to configure a printer (there is no /etc/printcap file).
5-42 ❖ DocuPrint 4512/4512N Network Interface Card User Guide
 Loading...