

Page 1

DocuSP IPS Gateway
User’s Guide
Version 1.0
May 2002
720P16890
Page 2

Xerox welcomes your suggestions and feedback on this document. You
can contact us by e-mail or FAX at:
E-mail: USA.3260.TechDoc@Orlando.so.xerox.com
FAX: 407-869-2098 (Attention: Documentation)
©2002 by XEROX CORPORATION. All rights reserved.
Copyright protection claimed includes all forms and matters of
copyrightable material and information now allowed by statutory or
judicial law or hereinafter granted, including without limitation, material
generated from the software programs that are displayed on the screen,
such as icons, screen displays, looks, etc.
Produced in the United States of America.
XEROX®, The Document Company®, the digital X®, and the identifying
product names and numbers herein are trademarks of XEROX
CORPORATION.
All non-Xerox brands and product names are trademarks or registered
trademarks of their respective companies.
Companies, names, and data used in examples herein are fictitious
unless otherwise noted.
Changes are periodically made to this document. Changes, technical
inaccuracies, and typographic errors are corrected in subsequent
editions.
This document was created using FrameMaker document publishing
software. The typefaces are Arial and Monotype.com.
Page 3

Table of contents
1. Getting started
Printing the IPS Gateway User’s Guide...............................................................................1-2
IPS Gateway overview......................................................................................................1-3
Printer emulation ..................................................................................................1-3
Host environments................................................................................................1-3
Host connectivity options.......................................................................................1-3
The IPDS data stream...........................................................................................1-4
Gateway communications......................................................................................1-4
PostScript Decomposer.........................................................................................1-4
IPS Gateway graphical interface.............................................................................1-4
Display language..................................................................................................1-4
Processing considerations.................................................................................................1-5
Media selection ....................................................................................................1-5
Spooling versus streaming queue...........................................................................1-5
Spooling queue.........................................................................................1-5
Streaming queue ...................................................................................... 1-5
IPDS job recovery.................................................................................................1-6
Segmentation.......................................................................................................1-7
Spooled versus streaming queue................................................................1-7
First In/First Out (FIFO) .............................................................................1-7
Banner pages ...........................................................................................1-7
Offset stacking for unfinished jobs ..............................................................1-7
Customer job accounting ...........................................................................1-8
Resolution and performance..................................................................................1-8
Specifying margins ...............................................................................................1-8
Gray scale printing................................................................................................1-9
Printer error reporting............................................................................................1-9
Specifying edge treatment .....................................................................................1-9
2. Installation and setup
Requirements ..................................................................................................................2-2
Installation requirements........................................................................................2-2
Licensing requirements .........................................................................................2-2
Contents of the installation CD...........................................................................................2-3
Installing the software .......................................................................................................2-4
Verifying access and establishing passwords ......................................................................2-6
User access levels................................................................................................2-6
Licensing and configuring the software and features ............................................................2-7
Licensing and enabling IPS Gateway......................................................................2-7
Licensing and enabling the PostScript Decomposer .................................................2-8
Licensing and enabling the SNMP Gateway ............................................................2-8
Licensing and configuring TCP/IP Socket Gateway ..................................................2-8
Setting the DocuSP VPS option .............................................................................2-9
Licensing and enabling IPS/NPS............................................................................2-9
IPS Gateway User’s Guide (5/2002) iii
Page 4

Table of contents
Defining the IPS Gateway queue .....................................................................................2-10
Managing the print queue ....................................................................................2-10
Setting the TCP/IP Socket Gateway port number in DocuSP ..............................................2-11
Setting up media ............................................................................................................2-12
Setting up media in DocuSP ................................................................................2-12
Setting stock name preferences in DocuSP...........................................................2-12
Loading IBM AFP resident outline fonts ............................................................................2-13
Enhanced font support ........................................................................................2-13
OS/400 (iSeries) setup ............................................................................2-14
Installing and setting up font support.....................................................................2-14
Removing resident outline fonts ...........................................................................2-15
Defining a logical printer..................................................................................................2-16
Verifying the installation ..................................................................................................2-16
Printing a trace job within IPS Gateway.................................................................2-17
Printing a test job from the host............................................................................2-17
Uninstalling IPS Gateway................................................................................................2-18
3. IPS Gateway operation
Starting IPS Gateway from DocuSP ...................................................................................3-1
IPS Gateway window elements..........................................................................................3-2
Operating IPS Gateway ....................................................................................................3-3
System menu options............................................................................................3-3
Logging on to IPS Gateway........................................................................3-3
Logging off IPS Gateway ...........................................................................3-4
Resetting IPDS.........................................................................................3-4
Exiting IPS Gateway..................................................................................3-4
Pausing and resuming IPDS processing .................................................................3-4
Setup menu options..............................................................................................3-5
Obtaining and updating licenses .................................................................3-5
Changing passwords.................................................................................3-6
Help facility ..........................................................................................................3-7
Displaying DocuSP and SunOS release numbers.........................................3-7
Setting up and managing IPS Gateway...............................................................................3-8
Important setup instructions...................................................................................3-8
Default values ......................................................................................................3-9
IPDS Setup tab ..................................................................................................3-10
IPDS Resolution .....................................................................................3-10
IPDS Connection .................................................................................... 3-11
Socket Gateway Connection .................................................................... 3-13
Enhanced Font Support...........................................................................3-13
Output Setup tab ................................................................................................3-14
Output Resolution...................................................................................3-14
Stapling .................................................................................................3-15
Segmentation .........................................................................................3-16
Rotation .................................................................................................3-16
Media Setup tab .................................................................................................3-17
Setting up media in DocuSP.....................................................................3-18
Mapping IPDS trays to media definitions ...................................................3-18
Diagnostics tab...................................................................................................3-20
Capturing a trace ....................................................................................3-21
Playing back a trace................................................................................3-22
Using Debug mode .................................................................................3-22
IPS Gateway User’s Guide (5/2002) iv
Page 5

Table of contents
4. Messages
Fault messages................................................................................................................4-1
IPDS messages ...............................................................................................................4-4
Trace messages...............................................................................................................4-7
Printer messages .............................................................................................................4-8
Exception messages.........................................................................................................4-9
G. Glossary
Index
IPS Gateway User’s Guide (5/2002) v
Page 6

Table of contents
IPS Gateway User’s Guide (5/2002) vi
Page 7

1. 1 Getting started
IPS Gateway operates as a feature of the Document Services Printing
(DocuSP) software. It enables Xerox DocuPrint 2000 Series 75 EPS and
90 EPS printers to print jobs received from IBM host computers that use
IBM’s Print Services Facility (PSF) to convert Advanced Function
Presentation (AFP) data to Intelligent Printer Data Streams (IPDS).
Instructions for installing, setting up, and using IPS Gateway are
provided. Information is intended for users who process jobs through IPS
Gateway and for the system administrator responsible for system security
and license information.
NOTE: Clicking on the light blue text within the body of this PDF file
takes you to the named section or feature.
It is assumed that you:
• Have a working knowledge of a Sun workstation and the Common
Desktop Environment (CDE), including how to use a mouse and
standard menus and commands
• Know how to open, save, and close files
• Are familiar with SunOS release 5.8 or higher
• Have a basic understanding of the DocuSP software and how your
DocuPrint printer operates
Refer to the DocuSP System Guide for detailed information about
DocuSP and the DocuPrint printer series.
For help with Sun workstation questions, refer to the SunOS/Solaris
documentation.
IPS Gateway User’s Guide (5/2002) 1-1
Page 8

Printing the IPS Gateway User’s Guide
English, French, German, and Italian versions of the IPS Gateway User’s
Guide are included in Portable Document Format (PDF) on the installation
CD. You can print the User’s Guide on the Sun workstation or from any
PC/workstation using Adobe Acrobat Reader.
To print the User’s Guide on the Sun workstation:
Step 1. Place the installation CD into the CD-ROM drive.
A window labeled “File Manager - cdrom” appears on the desktop if
Volume Manager is running on your workstation.
If a File Manager - cdrom window does not appear automatically on the
desktop, Volume Manager is not running. To open a File Manager - cdrom
window:
a. Right-click on the desktop to display the Workspace Menu.
b. On the Workspace Menu, right-click on Programs>File Manager to
display the File Manager - cdrom window.
If the File Manager window appears instead, select the File menu on
the File Manager window and then select the Open CD-ROM option
to display the File Manager - cdrom window.
Getting started
Step 2. Right-click on one of these icons in the File Manager - cdrom window:
• User_Guide_English.pdf
• User_Guide_French.pdf
• User_Guide_German.pdf
• User_Guide_Italian.pdf
A menu opens.
Step 3. Select the Print option on the menu to open the Print window.
Step 4. On the Print window, enter the name of the queue you want to use in the
Printer box and select Print.
NOTE: Before selecting Print, check the Extended Options on the
Queue Properties window for the specified queue. Ensure that the
Paper Stock option is set to either US Letter or A4.
Step 5. Once the User’s Guide finishes printing, close the File Manager - cdrom
window.
Step 6. Remove the installation CD from the CD-ROM drive and store it in a
secure area.
IPS Gateway User’s Guide (5/2002) 1-2
Page 9

IPS Gateway overview
IPS Gateway is a feature of the Document Services Printing (DocuSP)
system.
IPS Gateway enables the Xerox DocuPrint printer to print jobs received
from IBM host computers that use IBM’s PSF/AFP/IPDS. IPS Gateway
receives IPDS data, formats it as a PostScript print job, and submits it to
a print queue established on DocuSP.
IPS Gateway operates as a separate task under the SunOS/Solaris
operating system, receiving the IPDS data stream via TCP/IP or channel
connectivity.
Printer emulation
IPS Gateway emulates the IBM 3935 Advanced Function Printer.
Host environments
Getting started
IPS Gateway operates in these IBM PSF operating system environments:
•AIX
•OS/2
•OS/390
• OS/400 (TCP/IP connectivity only)
•VM
•VSE
NOTE: Although PSF/VSE does not support TCP/IP directly, a
printing system with an intermediate device running PSF can attach
to a PSF/VSE system, and the intermediate device can furnish the
TCP/IP support for the printer.
Host connectivity options
IPS Gateway can receive data from a host in one of two ways:
• Through a channel card with bus and tag connectivity
• Through a Token Ring or Ethernet interface using TCP/IP
If you require host connectivity using either a channel or Token Ring
interface, contact your local Xerox representative to obtain the additional
hardware.
For more information on IBM host connectivity, refer to the IBM 3130,
3160, and 3935 Advanced Function Printers Attachment Configuration
Handbook.
IPS Gateway User’s Guide (5/2002) 1-3
Page 10

The IPDS data stream
All AFP resources (print data sets, page definitions, form definitions, page
segments, fonts, and overlays) supported by the emulated printer are
supported by IPS Gateway. Additionally, there are several IBM data
architectures supported within the AFP environment that are fully
supported by IPS Gateway, to the level supported by the emulated
printer’s capabilities:
• MO:DCA-P: Mixed Object Document Content Architecture for
Presentation
• PTOCA PT1 and PT2: Presentation Text Object Content Architecture
• IOCA: Image Object Content Architecture
• GOCA: Graphics Object Content Architecture
• BCOCA: Bar Code Object Content Architecture
Each of the data objects follow the same object rule of containing
delimited fields within the structure fields describing each object.
Gateway communications
Getting started
Simple Network Management Protocol (SNMP) Gateway and TCP/IP
Socket Gateway connections are required for running IPS Gateway. Each
must be licensed and enabled in DocuSP.
PostScript Decomposer
The PostScript Decomposer is the module that enables PostScript jobs to
be printed. This must be licensed and enabled in DocuSP to run IPS
Gateway.
IPS Gateway graphical interface
IPS Gateway is a feature of DocuSP with a window similar in design to the
DocuSP window. IPS Gateway provides drop-down menus, tabs, and
icons. Windows, tabs, and menus are used for specifying print job
parameters, displaying messages, and performing system administration
and trace functions.
Display language
IPS Gateway is provided in four languages: English, French, German, and
Italian. You are prompted to choose the user interface (UI) language
during installation of the IPS Gateway software. To change the language,
you must reinstall the software.
IPS Gateway User’s Guide (5/2002) 1-4
Page 11

Processing considerations
Note the considerations in this section before installing and setting up IPS
Gateway.
Media selection
IPS Gateway allows you to map trays (specified by AFP/IPDS resources
within the host application) to the physical media available in the printer.
The Media Setup tab in IPS Gateway allows you to associate each logical
IPDS (host) tray with a physical media definition in the printer. See “Media
Setup tab” for instructions on defining and mapping media.
Spooling versus streaming queue
You can define the IPS Gateway queue as either a spooling queue or a
streaming queue. To determine the best setting for your printing
environment, review the sections below and the “Segmentation” section.
Getting started
Spooling queue
A spooling queue completely spools an IPDS job from IPS Gateway to the
DocuSP queue before printing begins. This results in a delay between the
submission of the job and the printing of the first page. The delay may be
significant for large jobs.
To help improve processing and print time for large jobs sent to a spooled
queue, IPS Gateway provides the Segmentation option, which segments
large jobs into multiple smaller jobs.
For normal job processing, job segmentation should be disabled.
However, Xerox recommends using job segmentation when using a
spooled queue for any job over 500 pages. Although possible within the
software setup, segmentation to a streaming queue is not necessary
since pages are printed as soon as they are received.
Because only one streaming queue can be active at a given time
(depending on your other printing applications), you may elect to run IPS
Gateway to a spooled queue.
Streaming queue
A streaming queue prints pages as they are received, which results in
minimal delay between the time the job is submitted and when printing
begins.
Only one streaming queue can be active in DocuSP at a given time. If a
non-IPS Gateway streaming queue is active when IPS Gateway submits
a job to its streaming queue on DocuSP, IPS Gateway stops processing
and posts an “IPDS Not Ready” message until the other streaming queue
has completed.
Streaming offers a benefit of being more reliable in the area of IPDS job
recovery. See “IPDS job recovery” for more information.
IPS Gateway User’s Guide (5/2002) 1-5
Page 12

IPDS job recovery
In order to understand IPDS job recovery (the completion of an IPDS job
after a fault condition), it is important to understand that IPS Gateway
marks pages as committed/stacked once they are successfully written to
the DocuSP queue socket connection. If the segmentation feature is in use,
IPS Gateway marks all the pages in the segment as committed/stacked
once the last page in that segment is written to the socket. At this point, the
IPDS host considers the pages printed and DocuSP is responsible for
printing all pages in the job. The IPDS host software is responsible for
recovering up to the last page reported as stacked by IPS Gateway.
Therefore, the combination of host recovery and DocuSP recovery is
designed to ensure the integrity of each IPDS job when standard printer
problems (such as paper jams or supply shortages) occur.
If there is an unexpected or catastrophic error (such as a power failure,
operating system crash, or unrecoverable software problem) in either
DocuSP or IPS Gateway, IPDS job recovery depends on whether you are
using a spooled or streaming queue for printing IPS Gateway jobs.
Whether you are using spooling or streaming queues, jobs (or segments)
written in their entirety to the DocuSP queue are recoverable by DocuSP
after a DocuSP restart or system boot.
If an unexpected error occurs during the time that IPS Gateway is
processing a job and writing pages to the DocuSP queue socket, pages
written to a streaming queue will be recoverable by DocuSP. However,
when a spooling queue is in use, jobs or segments partially written to the
DocuSP queue are not recoverable.
In both cases, pages being processed by IPS Gateway but not yet written
to the DocuSP queue are recoverable from the host, which typically
resumes printing from the last checkpoint/restart page (see your PSF
documentation for more information).
Xerox recommends using a streaming queue without segmentation to
optimize IPDS job recovery.
Getting started
IPS Gateway User’s Guide (5/2002) 1-6
Page 13

Segmentation
Spooled versus streaming queue
First In/First Out (FIFO)
Getting started
Before specifying job segmentation, review the job processing
considerations described below.
Segmentation is meant to be used with a spooling queue (not a streaming
queue). When using a spooled queue, IPS Gateway normally requires
that the entire IPDS data stream be received prior to processing and
releasing the data stream to the printer. Segmentation creates a series of
small jobs, allowing the printer to begin printing as soon as the specified
number of pages is received.
Although it is possible to specify segmentation for a streaming queue, it
is not necessary since a streaming queue provides shorter job processing
and print time, and segmentation lengthens the print time.
The IPS Gateway installation software enables the DocuSP First In/First
Out (FIFO) feature. Enabling FIFO ensures that segmented jobs are
printed in segment sequence by the printer. However, if the printer uses
multiple print queues, all queues use FIFO. Therefore, if you segment a
large job into multiple smaller jobs, your output may be interleaved with
jobs submitted to other queues on the printer.
If the segment order of the output for a segmented job appears to be
incorrect, check the FIFO Job Scheduling setting. An intermittent DocuSP
problem has been observed where the FIFO Job Scheduling setting has
been changed to “off” for no apparent reason. See the DocuSP System
Guide for instructions to verify and change the FIFO Job Scheduling
setting.
Banner pages
If you enable job segmentation and your printer is set up to generate a
banner page for each job, then the printer generates a banner page each
time a segment of the job is printed. To prevent banner pages from
printing between each segment, turn off the Banner Page option; refer to
the DocuSP System Guide for instructions.
Offset stacking for unfinished jobs
If you enable job segmentation and your printer is set up to use the Offset
Stacking option for unfinished jobs, then the printer offsets the stack of
pages each time a segment of a job is printed. To prevent offset stacking
for each segment of a job, disable the Offset Stacking option. Refer to the
DocuSP System Guide for instructions.
NOTE: If you disable Offset Stacking, no jobs will be stacked offset.
IPS Gateway User’s Guide (5/2002) 1-7
Page 14

Getting started
Customer job accounting
When using job segmentation, the printer tracks each segment as a
separate job in the Customer Accounting Log. For example, if you have a
5000 page job and specify a value of 50 in the Segmentation option, the
printer records 100 entries in the Customer Accounting Log.
If the Customer Accounting Log reaches the maximum log size value, the
oldest record is deleted for each new record added. The minimum log size
is 282 and the maximum size is 1000. The log is set to a default of 400
entries at DocuSP installation.
Because job segmentation can cause the log to fill up, you may want to
print or export the log data more frequently if your site uses the data for
billing purposes.
Before using segmentation, review the log size for your printer and
increase the value, if necessary, to help ensure that the log does not fill.
You must be logged onto the printer as System Administrator to make any
changes to the log size.
To change the log size:
Step 1. Select the Administration icon from the DocuSP window, then select the
Accounting tab.
Step 2. In the Accounting tab, select Options to display the Accounting Options
window.
Step 3. In the Logging area, specify the desired maximum log size.
Resolution and performance
IPS Gateway allows documents to be printed at either 300 or 600 dots per
inch (dpi) using the Output Resolution option. See “IPDS Setup tab” and
“Output Setup tab” for instructions on setting resolution.
Selecting 600 dpi output may improve print quality but may reduce system
throughput for complex applications that require scaling.
NOTE:
Gateway matches the resolution on the PostScript/PDF tab under the
queue properties in DocuSP. Otherwise, performance may be impacted.
Ensure that the output resolution on the IPDS Setup tab in IPS
Specifying margins
When migrating applications from other Xerox or IBM IPDS devices, there
may be small differences in page positioning due to differences in the
imaging hardware.
Use the Image Shift option in DocuSP to make small adjustments to the
page image position, for example to match pre-printed forms. Refer to the
DocuSP System Guide for information on shifting images.
IPS Gateway User’s Guide (5/2002) 1-8
Page 15

Gray scale printing
Gray scale printing through IPS Gateway may appear different than that
of the IBM IPDS printer being emulated.
Printer error reporting
All IPS Gateway error conditions (such as “Not authorized” and “IPDS Not
Ready”) and detected printer error conditions (such as “Out of Paper” and
“Printer Door Open”) are reported to the host as “printer-not-ready”
intervention required exceptions. For example, if the printer is in a “Printer
needs attention” state, IPS Gateway presents the printer-not-ready
exception to the host, preventing the host from sending additional pages
until the printer is operational again.
Specifying edge treatment
The DocuSP Edge Treatment option lightens the leading edge of a sheet
to prevent too much toner from being placed on that edge, which may
cause printer jams. The default setting for this option is On. If the IPDS
job being printed requires data on the leading edge of the page, you may
want to turn edge treatment off, provided the density of the output along
that edge is not excessive. For more information on the Edge Treatment
option, refer to the DocuSP System Guide.
To switch edge treatment off:
Getting started
Step 1. Select Switches from the Printer menu on the DocuSP window.
Step 2. On the Switches window, select Off under Edge Treatment, then click OK
to close the window.
Step 3. Close the Printer Manager window.
IPS Gateway User’s Guide (5/2002) 1-9
Page 16

Getting started
IPS Gateway User’s Guide (5/2002) 1-10
Page 17

2. 2 Installation and setup
The requirements and instructions for installing the IPS Gateway software
and setting up the printing environment are documented below. Review
this entire section before proceeding with the installation. Instructions for
removing the IPS Gateway software are also included.
Some setup tasks are performed on the DocuSP window and some are
performed on the IPS Gateway window. The main installation and setup
tasks are:
• Installing the software
• Verifying access and establishing passwords
• Licensing and configuring the software and features
• Defining the IPS Gateway queue
• Setting the TCP/IP Socket Gateway port number in DocuSP
• Setting up media
• Loading IBM AFP resident outline fonts
• Defining a logical printer
• Verifying the installation
IPS Gateway User’s Guide (5/2002) 2-1
Page 18

Requirements
Installation requirements
Installation and setup
This section describes IPS Gateway installation and software licensing
requirements.
The following hardware and software is required to install IPS Gateway:
• 650 MHz Sun Blade™ workstation with 512MB of memory
• One of these Xerox printers:
— DocuPrint 2000 Series 75 EPS
— DocuPrint 2000 Series 90 EPS
• DocuSP, version 3.5 or higher
IPS Gateway does not require any printer memory in addition to that
already installed on your DocuPrint printer.
If your IPDS configuration requires a channel connection, you will need
an online channel board. Contact your local Xerox representative for more
information.
Licensing requirements
This feature must be licensed in IPS Gateway for IPS Gateway to function:
• IPS/NPS
These features must be activated and enabled in DocuSP for IPS
Gateway to function:
• IPS Gateway
• PostScript Decomposer
•SNMP Gateway
• TCP/IP Socket Gateway
Licenses are provided by your local Xerox representative prior to
installation. The license string and expiration date for each are entered
immediately following the software installation.
IPS Gateway User’s Guide (5/2002) 2-2
Page 19

Contents of the installation CD
The installation CD contains the files identified in the table below. None
of these files are copied to the printer controller disk as part of the
installation; access the PDF files and readme.txt file from the CD.
View the PDF versions of the IPS Gateway User’s Guide on any system
using Adobe Acrobat Reader. If not already installed, the latest version of
Acrobat Reader can be downloaded at no cost from Adobe Systems
Incorporated’s web site at: http://www.adobe.com.
File Contents
install.sh This script file contains the installation
readme.txt This text file contains a description of the
Installation and setup
program for the IPS Gateway software.
files on the CD and instructions for printing
the IPS Gateway User’s Guide. It also
contains instructions for installing and
removing the IPS Gateway software.
uninstall.sh This script file contains a program to
remove the IPS Gateway software.
User_Guide_English.pdf This PDF file contains the English version
of the IPS Gateway User’s Guide.
User_Guide_French.pdf This PDF file contains the French version of
the IPS Gateway User’s Guide.
User_Guide_German.pdf This PDF file contains the German version
of the IPS Gateway User’s Guide.
User_Guide_Italian.pdf This PDF file contains the Italian version of
the IPS Gateway User’s Guide.
IPSGwPkgs.tar.Z This compressed tar file contains the IPS
Gateway software.
IPS Gateway User’s Guide (5/2002) 2-3
Page 20

Installing the software
This section provides instructions for installing IPS Gateway on a
DocuPrint controller workstation. The installation program removes any
previously installed version of this software before it installs the new
version.
To install the IPS Gateway software:
Step 1. Place the IPS Gateway CD into the CD-ROM drive.
Step 2. If Volume Manager is running on your workstation, a window labeled “File
Manager - cdrom” appears on the desktop. Close the File Manager cdrom window.
Installation and setup
NOTE: If installing over any version of IPS Gateway, document your
IPS Gateway settings and passwords. They will not be saved when
the software is removed.
Step 3. Open a terminal window and change to this directory, or to wherever your
CD-ROM directory resides, by entering this command:
cd /cdrom/cdrom0
Step 4. Enter this command to start the installation program:
./install.sh
Step 5. You are asked if you want to continue with the installation. Enter y to
continue with the installation or n to cancel the installation procedure.
If you enter “n,” the installation stops and you are returned to a command
prompt on the terminal window. IPS Gateway is not installed.
Step 6. When prompted, enter the root password.
Step 7. If a previous version of the software is installed, the program asks you to
confirm that you want to remove the currently installed version. Enter y to
remove the previous version and install the new version. The program
begins installing the IPS Gateway packages.
NOTE: Any previous IPS/NPS license is retained in the newly
installed version.
If you enter “n,” the installation stops and you are returned to a command
prompt on the terminal window. The new version of IPS Gateway is not
installed.
IPS Gateway User’s Guide (5/2002) 2-4
Page 21

Installation and setup
Step 8. After the IPS Gateway packages are successfully installed, you are asked
to choose the language for the IPS Gateway user interface. Enter 1 for
English, 2 for French, 3 for German, or 4 for Italian.
NOTE: To change the language of the IPS Gateway user interface,
reinstall the IPS Gateway software.
Step 9. A message appears on the terminal window indicating that the installation
of IPS Gateway is complete. You are prompted to reboot your workstation.
Enter y for the installation program to reboot your workstation or n to end
the installation.
If you enter “n,” IPS Gateway installation is not complete until you reboot
your workstation. Refer to the DocuSP System Guide for system reboot
procedures.
Step 10. Remove the installation CD and store it in a secure area. The IPS
Gateway software is installed.
IPS Gateway is not accessible through the DocuSP menu until the IPS
Gateway feature license is activated and DocuSP is restarted.
IPS Gateway User’s Guide (5/2002) 2-5
Page 22

Verifying access and establishing passwords
When IPS Gateway is first installed, the default user access level is Walk
Up User. The initial passwords are:
• Trusted User: trust
• System Administrator: administ
Passwords are case-sensitive.
If the installation is being performed by a Xerox Customer Services
Analyst or Engineer, ensure that your system administrator has access to
IPS Gateway before the analyst or engineer leaves the site. Your system
administrator should also change the initial passwords for security
reasons; to do this, follow the procedure in “Changing passwords.”
User access levels
There are three user levels available to access IPS Gateway, each with
its own level of feature access.
Walk Up User The Walk Up User has limited access rights to IPS Gateway. This is the
access level assigned when IPS Gateway is first started. The Walk Up
User can do the following:
• Log on to IPS Gateway
• Access the Help facility
• Pause and resume IPS printing
• Minimize the IPS Gateway window
This user cannot change any IPS Gateway settings.
Installation and setup
Trusted User The Trusted User requires a password and can perform the same
System Administrator The System Administrator requires a password and can perform the same
functions as the Walk Up User. Additionally, the Trusted User can:
• Change and save IPS Gateway settings
• Use the diagnostic functions
• Exit IPS Gateway
functions as the Trusted User. Additionally, the System Administrator can:
• Change passwords
• Enter and change software licenses
IPS Gateway User’s Guide (5/2002) 2-6
Page 23

Installation and setup
Licensing and configuring the software and features
This section provides instructions for licensing and configuring these
features/functions:
• IPS Gateway
• PostScript Decomposer
•SNMP Gateway
• TCP/IP Socket Gateway
• DocuSP VPS option
• IPS/NPS
NOTE: After licensing/configuring the first five features in the bulleted
list above, you must restart DocuSP to enable the features before
licensing the IPS/NPS software.
Licensing and enabling IPS Gateway
When IPS Gateway is installed, it is added to the DocuSP list of features
available for licensing and use. Until a valid license string and expiration
date are entered, IPS Gateway cannot be started.
To license IPS Gateway:
Step 1. Log on to DocuSP as System Administrator using the Logon option on the
System menu.
Step 2. From the Setup menu, click Feature Licenses and then double-click the
IPS Gateway feature option.
Step 3. On the Properties window enter the software license string and expiration
date for IPS Gateway.
Step 4. In the License area, select Activate.
Step 5. In the Feature area, select Enable and click OK.
IPS Gateway User’s Guide (5/2002) 2-7
Page 24

Installation and setup
Licensing and enabling the PostScript Decomposer
The PostScript Decomposer is the module that enables PostScript jobs to
be printed. The PostScript Decomposer must be both licensed and
enabled in DocuSP for IPS Gateway to function. Refer to the DocuSP
System Guide for instructions.
Licensing and enabling the SNMP Gateway
The SNMP Gateway provides the means to access available media
selections as well as printer status reporting to the host. SNMP allows IPS
Gateway to provide a status indication when the printer is not ready to
receive data from the host due to a standard printer error condition, such
as the printer being out of paper.
The SNMP Gateway license feature must be valid and enabled in DocuSP
for IPS Gateway to function. Refer to the DocuSP System Guide for
licensing instructions.
To enable the SNMP Gateway:
Step 1. On the DocuSP window, log on as Trusted User or System Administrator.
Step 2. Select Gateways from the Setup menu.
Step 3. Select the SNMP tab.
Step 4.
Step 5. Select the Enabled box.
Step 6. Click OK to save the settings.
Verify that the Read Community String value is
public
, which is the default.
Licensing and configuring TCP/IP Socket Gateway
A TCP/IP socket connection is required for IPS Gateway to submit print
jobs to the DocuSP queue. The TCP/IP Socket Gateway must be both
licensed and enabled in DocuSP for IPS Gateway to function. Refer to the
DocuSP System Guide for instructions.
IPS Gateway User’s Guide (5/2002) 2-8
Page 25

Setting the DocuSP VPS option
The DocuSP VPS option must be set to NONVPS for the IPS Gateway
software to function properly.
CAUTION: If you keep the default setting of VPS, you will experience
problems with your print jobs.
The VTAM Printer Support (VPS) option allows you to configure the ports
of the TCP/IP Socket Gateway to either remove the echo commands
(VPS) or leave the data unaltered (NONVPS). This option defaults to VPS.
Reset this option to NONVPS each time you install or upgrade DocuSP;
refer to the DocuSP System Guide for instructions.
Licensing and enabling IPS/NPS
You must restart DocuSP and start IPS Gateway before licensing and
enabling the IPS/NPS software.
Restart DocuSP by selecting Restart from the System menu on the
DocuSP window. Then start IPS Gateway by selecting IPS Gateway from
the System menu on the DocuSP window. (The IPS Gateway window
opens in Walk Up User mode.)
To license the IPS/NPS software (XRX_IPS_NPS_software):
Installation and setup
Step 1. Log on to IPS Gateway as a System Administrator using the Logon option
on the System menu. The initial password is administ; passwords are
case-sensitive.
Step 2. From the Setup menu, choose the License option.
Step 3. Enter your software license string and expiration date for the
XRX_IPS_NPS_software feature and click OK.
Step 4. A window opens stating that the license has been validated. Click OK.
IPS Gateway User’s Guide (5/2002) 2-9
Page 26

Defining the IPS Gateway queue
This section provides instructions on:
• Naming a printer queue on DocuSP to receive the PostScript file
generated by IPS Gateway
• Defining the queue as either a spooling or a streaming queue
To define the queue:
Step 1. On the DocuSP window, log on as Trusted User or System Administrator.
Step 2. Select the Queue Manager icon.
Step 3. In the lower right corner of the Queue Manager window, select New
Queue to display the New Queue window.
Step 4. In the Queue area of the New Queue window, enter the Queue Name to
be used for IPS Gateway jobs.
Installation and setup
Step 5. In the Input area, choose Streaming or Spooling for the queue type. See
“Spooling versus streaming queue” for more information.
Step 6. Leave all other parameters as the defaults. Click Add to add the queue,
then Close to close the New Queue window.
Managing the print queue
The IPDS data streams processed by IPS Gateway are sent to the IPS
Gateway print queue established on DocuSP. Use the Queue Manager on
the DocuSP window to view the queue and to manage and release jobs
sent from IPS Gateway. For more information on how to use the Queue
Manager, refer to the DocuSP System Guide.
IPS Gateway User’s Guide (5/2002) 2-10
Page 27

Installation and setup
Setting the TCP/IP Socket Gateway port number in DocuSP
A TCP/IP socket connection is required for IPS Gateway to submit print
jobs to the DocuSP queue. This socket connection (or port) value must be
associated with the DocuSP queue created for IPS Gateway.
To associate the port value:
Step 1. On the DocuSP window, log on as Trusted User or System Administrator.
Step 2. Select Gateways from the Setup menu.
Step 3. Select the Socket tab.
Step 4. Double-click the first or second row to define the port to be used for IPS
Gateway printing. The Socket Properties window opens.
Step 5. In the Port Number drop-down box, specify the port number you will
specify in IPS Gateway for the TCP/IP Socket Gateway connection. The
port number specified cannot be used for any other DocuSP or IPS
Gateway connection. The default value in IPS Gateway to 9100.
Step 6. In the Select Queue drop-down box, specify the name of the queue you
created on DocuSP for IPS Gateway. Click OK to return to the Socket tab.
Step 7. Select the same row as above, right-click, and select Enable.
Step 8. Click OK to save your settings.
IPS Gateway User’s Guide (5/2002) 2-11
Page 28

Setting up media
Setting up media in DocuSP
Installation and setup
In DocuSP, you must define the media using the Printer Manager, assign
each media definition to a specific physical printer tray, and load the
media in the trays.
These media definitions are communicated to IPS Gateway for mapping
to IPDS trays through the Media Setup tab. In IPS Gateway you will map
a specific media definition to each IPDS Tray Selection Value expected
from the IPDS data stream.
Each media definition includes these attributes:
•Size
•Type
• Color
• Weight
In DocuSP, define and load the following media in order to run the
installation verification jobs provided with IPS Gateway:
• US Letter (any tray)
• A4 (any tray)
Refer to the DocuSP System Guide for instructions on defining media in
DocuSP.
Setting stock name preferences in DocuSP
The DocuSP stock name preferences settings must be changed to Allow
duplicate names for DocuSP to honor IPS Gateway media definitions.
When IPS Gateway submits a job, the job submission uses the paper size,
type, weight, and color.
If the Allow duplicate names setting is not set, DocuSP forces each stock
name to be unique within the Program Manager, causing jobs to go
ineligible. By allowing duplicate names, DocuSP ignores stock names and
selects the media based on the size, type, color, and weight specified.
To set the Allow duplicate names setting in DocuSP:
Step 1. Select Preferences from the Setup menu.
Step 2. Select the Stocks and Trays tab.
Step 3. In the Stock Names area, select Allow duplicate names and click OK. A
message stating DocuSP must be restarted displays.
Step 4. Select either Auto Generate Name Extension or Manually Generate
Name Extension.
Step 5. Click OK and then restart DocuSP.
IPS Gateway User’s Guide (5/2002) 2-12
Page 29

Loading IBM AFP resident outline fonts
IPS Gateway provides the ability to load and use printer-resident AFP
scalable outline fonts. These fonts are loaded from the IBM AFP font
collection CD, which is purchased separately. The AFP font collection
product number for AIX and OS/2 is 5648-B45.
NOTE: The AFP font collection product number for AIX and OS/2
changed from 5648-113 to 5648-B45. IPS Gateway supports both of
these product numbers (both CDs contain the correct set of fonts).
Fonts are converted for use with IPDS jobs and stored on the printer when
they are loaded. Although they reside on the printer, they cannot be viewed
using the DocuSP Font Manager. A sample job is provided to verify that
resident outline font support is properly installed on the printer controller. (To
remove the fonts, see “
A default resident outline font is provided for instances where the
requested AFP font is not resident or the default is specifically requested.
This default font cannot be changed.
Enhanced Font Support can be enabled for host environments that expect
resident outline font substitution for raster fonts.
Removing resident outline fonts
Installation and setup
.”)
Enhanced font support
The Enhanced Font Support feature is an extension of the printer-resident
outline font support in IPS Gateway. Most hosts download required raster
fonts. This feature is most beneficial when using the OS/400 (iSeries) host
environment with resident outline fonts. The OS/400 expects resident
outline font support to include all font types and expects the printer to
resolve font substitution requirements; there is no distinction between
raster font and outline font requests. This feature may also be beneficial
to other host environments for solving font errors. See “OS/400 (iSeries)
setup” for specific host setup instructions.
When the AFP resident outline fonts are loaded, this feature defaults to
Enabled in the IPS Gateway IPDS Setup tab. Use this information to
decide whether or not to disable the feature:
• Enabled — When Enhanced Font Support is enabled, if the host
requests a raster font, IPS Gateway substitutes an equivalent
resident outline font if one is available. If the host requests a font for
which there is no resident outline font match or equivalent, the
default resident outline font is used.
• Disabled — When Enhanced Font Support is disabled, no font
substitution occurs. Requests for fonts that are resident are honored;
all other fonts will be downloaded by the host. The default resident
outline font is used only when explicitly requested by the host.
IPS Gateway User’s Guide (5/2002) 2-13
Page 30

OS/400 (iSeries) setup
You must set several OS/400 parameters for resident outline font support.
If you do not set these parameters properly, jobs submitted from OS/400
expecting resident outline fonts may fail or print blank pages. If your host
is an AS/400 and you require resident outline font support, the
recommended setup is:
• On the OS/400 host, set the Resident Font parameter in the PSF
Configuration object to *YES.
• In IPS Gateway, ensure Enhanced Font Support is set to Enabled.
• In IPS Gateway, load the AFP fonts.
Installing and setting up font support
To load AFP fonts and enable Enhanced Font Support:
Step 1. Open a Solaris terminal window.
Installation and setup
Step 2. Insert the IBM AFP font collection CD. The CD should mount as:
/cdrom/cdrom0
Step 3. Enter this command on the command line of the terminal window:
/opt/XRXdocuprint/ipds/loadfont
Or, if the CD mount path is different than the path specified in step 2, enter
this command:
/opt/XRXdocuprint/ipds/loadfont -c mount_path
The fonts are loaded on the printer controller and converted for use by
IPDS jobs. A message should appear verifying that the fonts have been
loaded from the CD. If a message does not appear, verify the mount path
of the CD.
Step 4. Exit IPS Gateway by selecting Exit from the IPS Gateway System menu.
Step 5. Restart IPS Gateway by selecting IPS Gateway from the DocuSP System
menu.
IPS Gateway Enhanced Font Support is now Enabled, which is required
to run the sample provided to verify correct installation of font support. If
you will not be using Enhanced Font Support, disable it after running the
verification job.
IPS Gateway User’s Guide (5/2002) 2-14
Page 31

Removing resident outline fonts
To remove the AFP resident outline fonts and Enhanced Font Support
from your printer:
Step 1. Open a Solaris terminal window.
Step 2. On the command line of the terminal window, enter this command:
/opt/XRXdocuprint/ipds/removefont
The fonts are removed from the printer controller and Enhanced Font
Support is not selectable on the IPDS Setup tab.
Step 3. Exit IPS Gateway by selecting Exit from the IPS Gateway System menu.
Step 4. Restart IPS Gateway by selecting IPS Gateway from the DocuSP System
menu.
Installation and setup
IPS Gateway User’s Guide (5/2002) 2-15
Page 32

Defining a logical printer
Before using IPS Gateway to process IPDS data streams, the host must
have a logical printer defined for IPS Gateway with these requirements:
• For TCP/IP connectivity, the Internet Protocol (IP) address and port
number of the logical printer must match the IP address and port
number of the printer.
• For channel connectivity, the unit address specified for the host
printer definition must be a unique value and must match the unit
address specified for IPS Gateway. For MVS, the logical printer must
be defined as an AFP-type device.
For more information on setting up logical printers, refer to the IBM 3130,
3160, and 3935 Advanced Function Printers Attachment Configuration
Handbook.
Verifying the installation
These elements are in place upon a successful installation of the IPS
Gateway software and proper queue and printer setup:
• The IPS Gateway software resides in the /opt/XRXdocuprint
directory on the printer controller.
Installation and setup
• A print queue is defined on DocuSP for your system. You can view this
queue by using the DocuSP Queue Manager. This print queue initially
has an Accept value of Yes and a Release value of Yes.
• Because of the IPS Gateway segmentation feature, which can be used
for large jobs, the installation software enables the FIFO feature.
Enabling FIFO ensures that segmented jobs are printed in segment
sequence by the printer. However, if the printer uses multiple print
queues, all queues use FIFO. For more information on the impact of the
FIFO feature, refer to the DocuSP System Guide.
To verify that the installation and initial setup were successful, print both
a host job and either the US Letter or A4 sample job. If both print
successfully, installation verification is complete.
In addition, if you installed the IBM AFP resident outline fonts, print the
scfont.trc sample job to verify that the fonts were loaded correctly.
IPS Gateway User’s Guide (5/2002) 2-16
Page 33

Printing a trace job within IPS Gateway
During the installation process, three sample IPDS trace jobs are
provided. These jobs can be used either to verify printer operability after
the IPS Gateway software is installed or for diagnostic purposes:
• afptrace.let — prints a sample IPDS job formatted for US Letter paper
• afptrace.a4 — prints a sample IPDS job formatted for A4 paper
• scfont.trc — prints a sample IPDS job using resident outline fonts
formatted for either US Letter or A4 paper
In order for the trace scfont.trc to print correctly, the IBM AFP fonts must
be loaded on the printer and Enhanced Font Support must be enabled.
NOTE: These jobs test only IPS Gateway processing on the printer.
“Printing a test job from the host” describes how to test host-to-printer
transmission.
These traces are set up to use the installation default parameters. However,
if you plan to run the A4 trace instead of the US Letter trace, change the
Media Definition
must map a medium to each IPDS tray specified in the IPDS data stream.
For the installation verification jobs, use US Letter or A4 media. See “
Setup tab
To run a trace job:
” for instructions on mapping media to IPDS trays.
for IPDS Tray 1 from US Letter to A4. In IPS Gateway, you
Installation and setup
Media
Step 1. Ensure IPS Gateway is started and is reporting “IPDS Idle” status.
Step 2. Select the Diagnostics tab on the IPS Gateway window.
Step 3. In the Directory section, select the /var/db/samplejobs directory.
Step 4. In the Files section, choose the desired trace file. and click Playback
Trace.
Step 5. When the IPDS message “Ripping Trace Complete... Job Queued for
Printing” displays, click Tracing OFF.
Printing a test job from the host
To verify host-to-printer communications, perform these steps to print a
test job from the host:
Step 1. Ensure IPS Gateway is running and is reporting “IPDS Idle” status.
Step 2. Start the logical printer from the host and verify that it is active.
Step 3. Send an IPDS print data stream from the host.
IPS Gateway User’s Guide (5/2002) 2-17
Page 34

Uninstalling IPS Gateway
At some point you may need to remove the IPS Gateway software (for
example, if you have a trial version of the software installed on your
workstation and the temporary license has expired). Use the uninstall
program on the installation CD to remove all IPS Gateway files from the
printer controller. These components are removed:
• IPS Gateway license
• IPS Gateway packages (application and configuration files)
This program does not remove the IPS Gateway print queue. If you no
longer need the queue, use the DocuSP Queue Manager to delete it.
Refer to the DocuSP System Guide for instructions on deleting a queue.
Once uninstalled, if you want to use IPS Gateway again, reinstall it from
the CD.
To run the uninstall program:
Installation and setup
Step 1.
Step 2. Log on as root.
Step 3. Place the IPS Gateway installation CD into the CD-ROM drive.
Step 4. If Volume Manager is running on your workstation, a window labeled “File
Step 5. Open a terminal window and change to this directory, or to wherever your
Step 6. Enter this command to start the uninstall program:
Exit IPS Gateway if it is running; see “
Manager - cdrom” appears on the desktop asking for the path to your
CDROM driver. Close the File Manager - cdrom window.
CD-ROM directory resides, by entering this command:
cd /cdrom/cdrom0
./uninstall.sh
NOTE: The uninstall program terminates any IPS Gateway services
or jobs that are running.
Exiting IPS Gateway
” for instructions.
Step 7. You are asked to confirm that you want to remove the IPS Gateway
software. Enter y to confirm the removal operation or n to cancel the
procedure.
If you enter “n,” the program stops and returns you to a command prompt
on the terminal window. IPS Gateway remains unchanged.
IPS Gateway User’s Guide (5/2002) 2-18
Page 35

Installation and setup
Step 8. You are prompted to supply the root password. After correctly entering the
password, the program removes the IPS Gateway software components.
Step 9. When the program successfully completes, a message appears informing
you that the packages have been removed. You are prompted to restart
the printer controller. Enter y for the uninstall program to reboot the printer
controller or n to end the uninstall now.
If you enter “n,” the uninstall changes do not take effect until you reboot
the workstation. Refer to the DocuSP System Guide for system restart
procedures.
Step 10. Remove the IPS Gateway CD and store it in a secure area.
IPS Gateway User’s Guide (5/2002) 2-19
Page 36

Installation and setup
IPS Gateway User’s Guide (5/2002) 2-20
Page 37

3. 3 IPS Gateway operation
The IPS Gateway operating procedures and configuration setup
parameters are described here. It is assumed that you have successfully
installed and set up IPS Gateway according to the instructions in
“Installation and setup.”
Starting IPS Gateway from DocuSP
IPS Gateway does not automatically start when powering up or rebooting
your printer. To start IPS Gateway, select IPS Gateway from the System
menu on the DocuSP window, shown below.
NOTE: Only one instance of IPS Gateway can run at a time. If you
attempt to start IPS Gateway a second time, an error message
displays on the console window.
Upon normal startup, IPS Gateway:
• Displays the IPDS message “IPDS Idle”
• Activates the red Pause button
• Is ready to receive IPDS data from the host
IPS Gateway User’s Guide (5/2002) 3-1
Page 38

IPS Gateway window elements
The IPS Gateway window, shown below, consists of the following
elements.
Title bar
Menu bar
Printer messages
IPDS messages
Fault messages
Trace messages
IPDS Manager tabs
IPS Gateway operation
Pause
Resume
Title bar Displays the product name and user access level.
Menu bar Provides access to the IPS Gateway menus (System, Setup, and Help),
Resume/Pause buttons Pauses and resumes IPDS data stream processing.
Printer messages Messages pertaining to the operational status of the printer.
IPDS messages Informational messages pertaining to IPDS processing.
Fault messages IPS Gateway fault messages. Place the mouse pointer over a displayed
Trace messages Displays the current trace mode and the trace file name.
IPDS Manager tabs Provides access to the options for managing and configuring IPDS.
depending on your user access level.
fault message for instructions on clearing that fault.
NOTE:
See “
Messages
” for more information on IPS Gateway messages.
IPS Gateway User’s Guide (5/2002) 3-2
Page 39

Operating IPS Gateway
This section documents the operating functions available from these
drop-down menus on the IPS Gateway menu bar:
• System — Provides options used to operate and control IPS
Gateway, including logging on and off, and resetting IPDS
• Setup — Provides options used to specify licensing and change
passwords used by IPS Gateway
• Help — Provides access to the IPS Gateway help facility
System menu options
These options are available from the System drop-down menu:
• Logon
• Logoff
• Reset IPDS
•Exit
IPS Gateway operation
NOTE: You must be logged on as Trusted User or System
Administrator to access the System menu options.
Logging on to IPS Gateway
Logging on to IPS Gateway as a specific user type allows you to access
particular features that the Walk Up User cannot access. Before you log
on, know your user access level and the password.
To log on to IPS Gateway:
Step 1. Select System>Logon from the IPS Gateway menu bar. The Logon
window opens.
Step 2. Select the desired user level (Trusted User or System Administrator). The
Trusted User level is automatically selected as the default following a
restart of IPS Gateway. Otherwise, the last user access level activated is
shown each time this option is accessed. See “User access levels” for
more information on user access levels.
Step 3. In the Password field, enter the password for the chosen user access
level. Passwords are case-sensitive.
Step 4. Click OK. If the logon is successful, you are returned to the IPS Gateway
window. Your user access level displays on the title bar. You now have
access to the features determined by your user access level.
IPS Gateway User’s Guide (5/2002) 3-3
Page 40

Logging off IPS Gateway
Logging off IPS Gateway prevents other users from accessing and
performing unauthorized functions.
To log off IPS Gateway, select System>Logoff from the IPS Gateway
menu bar. The user access level returns to the Walk Up User level.
Resetting IPDS
After saving changed options within the various IPDS Manager setup
tabs, you are prompted to reset IPDS processing.
To reset IPDS, select System>Reset IPDS from the IPS Gateway menu
bar. A “Resetting IPDS” message appears on the IPS Gateway window.
Exiting IPS Gateway
Use the Exit option to shut down IPS Gateway. You must be logged on as
a Trusted User or System Administrator in order to do this.
To exit IPS Gateway:
IPS Gateway operation
Step 1. Select System>Exit from the IPS Gateway menu bar, or select Close on
the IPS Gateway window. A window opens asking for confirmation.
Step 2. Click Yes to terminate IPS Gateway. One of these events occurs:
• If IPS Gateway is not actively processing an IPDS data stream, it
terminates and the IPS Gateway window closes.
• If IPS Gateway is actively processing an IPDS data stream, a dialog
window appears. Select one of these buttons on the dialog window:
— Cancel to return to the IPS Gateway window. You can attempt to
exit at a later time.
— Force Exit to stop processing and exit IPS Gateway.
Pausing and resuming IPDS processing
To pause IPDS processing, press the red Pause button on the IPS
Gateway window; an “IPDS Not Ready” message displays in the IPDS
message area.
To resume IPDS processing, press the green Resume button to the left
of the Pause button; an “IPDS Idle” message displays in the IPDS
message area.
DocuSP continues to print any jobs remaining in the DocuSP queue after
IPS Gateway is paused or exited. If necessary, use the DocuSP Queue
Manager to hold (stop) the jobs from printing.
IPS Gateway User’s Guide (5/2002) 3-4
Page 41

Setup menu options
These options are available from the Setup drop-down menu:
• License
• Security
NOTE: You must be logged on as System Administrator to access the
Setup menu options.
Obtaining and updating licenses
When obtaining new software licenses, be prepared to provide the printer
controller (Sun workstation) host ID number and printer engine serial
number. To retrieve the 8-character hexadecimal hostid number, open a
terminal window and enter hostid at the prompt.
These licenses are required for IPS Gateway to operate:
• IPS Gateway
• PostScript Decomposer
•SNMP Gateway
• TCP/IP Socket Gateway
• IPS/NPS
The IPS Gateway and IPS/NPS software licenses are normally delivered
with the IPS Gateway software. Enter or change your license if IPS
Gateway is operating in a disabled mode (no license is loaded) or if your
IPS Gateway and/or IPS/NPS software license has expired.
IPS Gateway operation
NOTE: Sixty days prior to your IPS/NPS software license expiring, a
daily message displays in the IPS Gateway fault message area
showing the number of days to expiration. Contact your local Xerox
representative to obtain a valid license.
Until a valid license string and expiration date are entered, IPS Gateway
cannot receive IPDS data from the host. You can access and perform
tasks such as specifying setup parameters, but IPS Gateway remains in
an “IPDS Not Ready” state.
For instructions on entering or changing a license, go to the appropriate
section or document listed in the table below.
License Go to
IPS Gateway Licensing and enabling IPS Gateway
IPS/NPS Licensing and enabling IPS/NPS
SNMP Gateway
TCP/IP Socket Gateway
PostScript Decomposer
DocuSP System Guide
IPS Gateway User’s Guide (5/2002) 3-5
Page 42
IPS Gateway operation
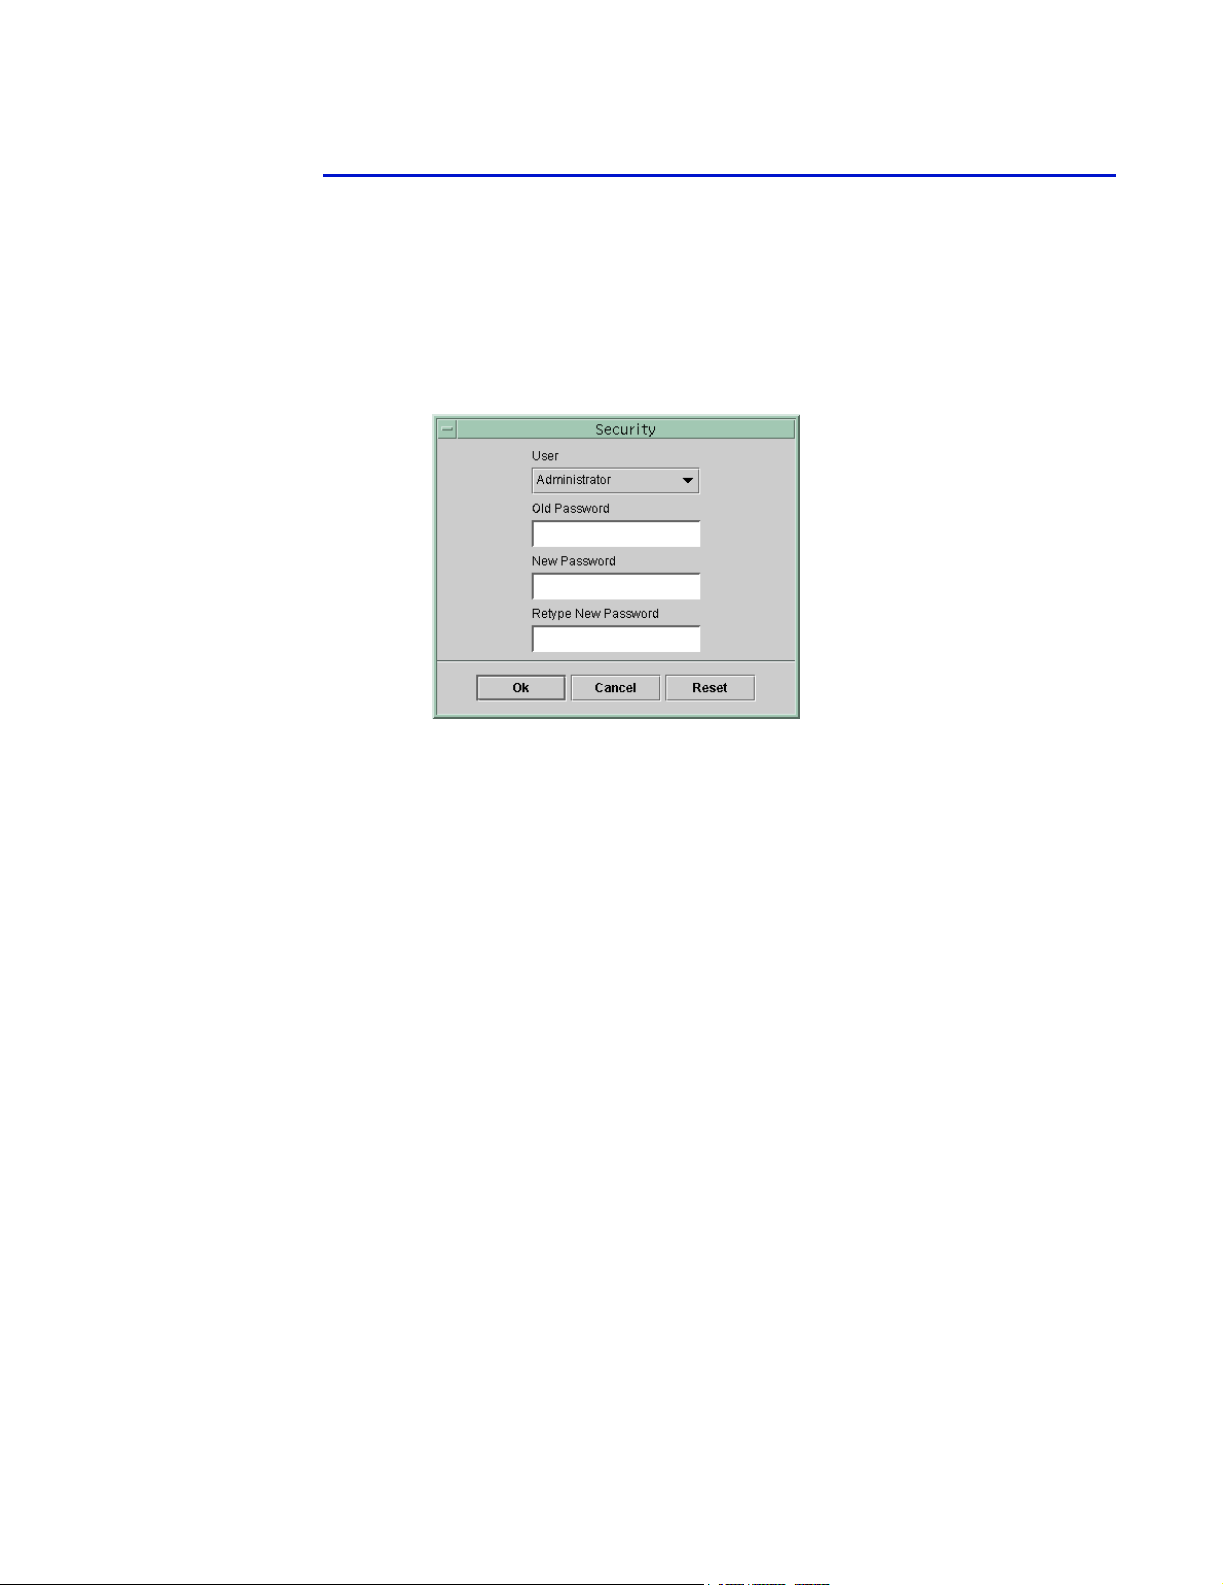
Changing passwords
The Security option allows you to change the password for the IPS
Gateway Trusted User and System Administrator. If you make a mistake
while changing a password and want to begin again, click Reset. All three
entry fields clear for reentry. You must be logged on as System
Administrator to use this option.
To change a password:
Step 1. Select the Security option from the Setup menu to open the Security
window.
Step 2. Select the user access level (Trusted User or System Administrator) for
the password you want to change.
Step 3. In the Old Password field, enter the current password that matches the
selected access level. All characters entered appear as asterisks.
Step 4. In the New Password field, enter the replacement password. All
characters entered appear as asterisks. Passwords must consist of 3 to 8
alphanumeric characters and are case-sensitive.
Step 5. In the Retype New Password field, re-enter the new password and click
OK. The password for the specified User type has been changed.
IPS Gateway User’s Guide (5/2002) 3-6
Page 43

Help facility
Displaying DocuSP and SunOS release numbers
IPS Gateway operation
IPS Gateway has a help facility to assist you when using the options
provided. To access this facility, select Online Documentation from the
Help menu, or select Help on the IPDS Setup, Output Setup, and Media
Setup tabs.
To display the software version and copyright information for IPS
Gateway, select About IPS Gateway on the Help menu.
This section provides instructions for displaying the DocuSP and
SunOS/Solaris software release numbers.
DocuSP
To display the DocuSP software release number, select Help>About
DocuSP on the DocuSP window.
SunOS/Solaris
To display the SunOS/Solaris software release number:
Step 1. Right-click on the desktop to open the Workspace Menu.
Step 2. From the Workspace Menu, right-click on Tools>Terminal to open a
terminal window. The SunOS/Solaris release number displays in the first
line of the window.
If the release number does not appear, type uname -a at the prompt on
the terminal window.
IPS Gateway User’s Guide (5/2002) 3-7
Page 44

Setting up and managing IPS Gateway
This section documents the setup options available from these IPDS
Manager tabs located on the IPS Gateway window:
• IPDS Setup — Provides options for managing IPDS
• Output Setup — Provides options for controlling the generated
PostScript output sent to the queue
• Media Setup — Provides options for mapping IPDS trays to printer media
• Diagnostics — Provides access to the trace and diagnostic functions
The setup options allow you to enter the parameters used by IPS Gateway
to compose the page specified by the IPDS data stream. IPS Gateway
retains all parameter values on the printer controller during shutdown and
restores the settings the next time you start IPS Gateway.
The values that you specify remain in effect until you change them. If you
change these values to process a specific IPDS data stream, make sure you
restore the values to the original settings once your job completes.
Otherwise, all subsequent IPDS data streams may be processed incorrectly.
IPS Gateway operation
Important setup instructions
Read this information before changing options on the setup tabs.
• You must be logged on as Trusted User or System Administrator to
save changes to the setup tab options.
• After changing settings on any tab, click Save before leaving that
tab; otherwise your new settings will not be saved.
• After clicking Save on any setup tab, you are prompted to reset
IPDS. You only need to reset IPDS after all setup tab settings are
saved. Your settings will not take effect until the IPDS reset is
performed.
IPS Gateway User’s Guide (5/2002) 3-8
Page 45

Default values
The default values listed in the table below are active in IPS Gateway
upon installation. Change any of these values from the specified tab.
Setup option Initial value Tab location
IPDS Resolution 300 dpi
IPDS Connection (channel or TCP/IP) TCP/IP port 5001
Socket Gateway Connection (TCP/IP) 9100
Enhanced Font Support Enabled (if resident AFP outline
fonts are loaded)
Output Resolution 300 dpi
Stapling None
Segmentation Disabled
IPS Gateway operation
IPDS Setup
Output Setup
Rotation Disabled
Media Definition(s) (all IPDS trays) US Letter (216 x 279):Plain:White:75 Media Setup
IPS Gateway User’s Guide (5/2002) 3-9
Page 46
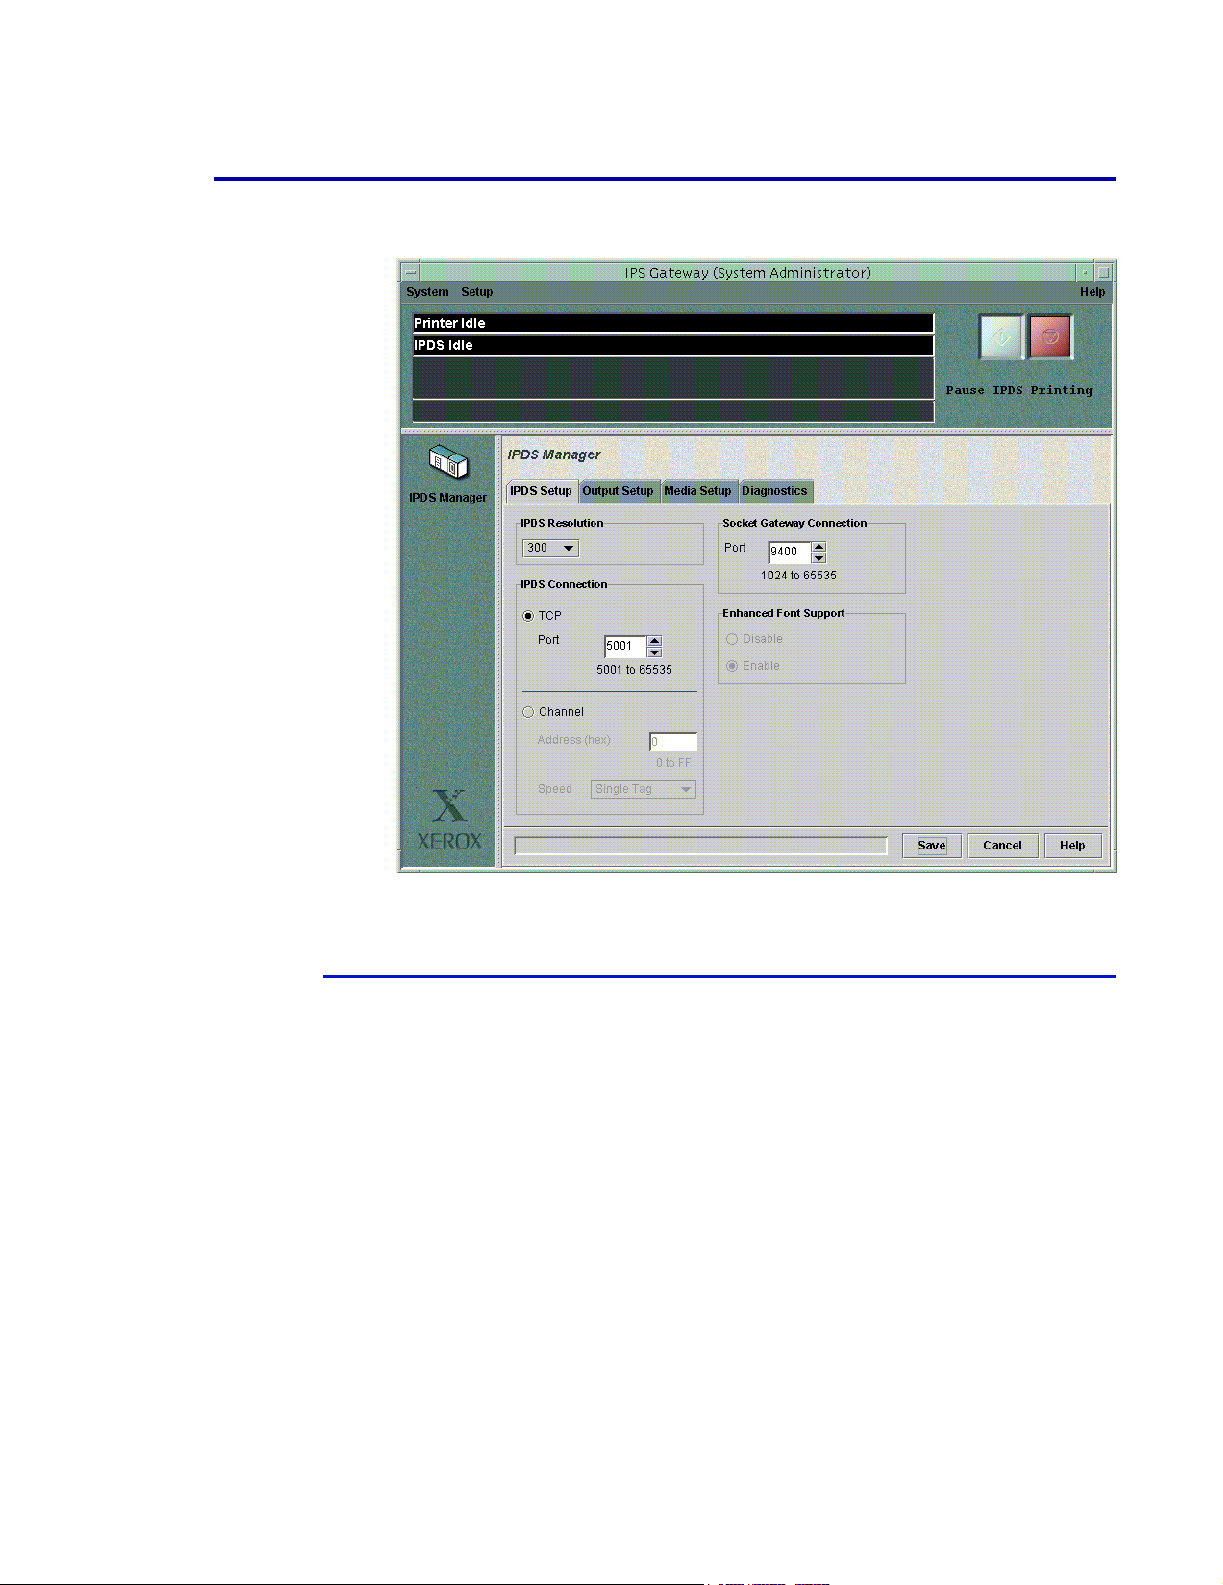
IPDS Setup tab
This section describes the options on the IPDS Setup tab (shown below).
These options allow you to manage IPDS.
IPS Gateway operation
IPDS Resolution
The IPDS Resolution option allows you to specify the dots per inch (dpi)
input resolution of the data and resources sent by the host.
To specify the input resolution:
Step 1. From the drop-down box in the IPDS Resolution area, select the dots per
inch (dpi) resolution that matches your host printer setup and job
resources. Valid values are 240, 300, and 600.
Step 2. Click Save to save your setting and reset IPDS as indicated; see
“Important setup instructions” for more information.
Step 3. Drain and restart the printer at the host for the change to take effect.
IPS Gateway User’s Guide (5/2002) 3-10
Page 47

IPDS Connection
The IPDS Connection option allows you to select and configure the IPS
Gateway connection method to the host, either TCP/IP or channel-attached.
TCP/IP and channel-attached connectivity are mutually exclusive; the UI
does not allow both to be selected. Both methods are described below.
Configuring TCP/IP connection
The TCP area allows you to identify the number of the TCP/IP port used
in conjunction with the TCP/IP address assigned to the printer controller
to send data to IPS Gateway from your host computer(s).
NOTE: PSF defaults to port number 5001 if the port number is not
changed in the printer definition.
To configure TCP/IP:
Step 1. In the IPDS Connection area, select TCP.
IPS Gateway operation
Step 2. In the Port drop-down box, enter or select the port number. The value you
enter must match the port number specified at the host for the logical
printer. Valid values are 5001 through 65535.
Step 3. Click Save to save your settings and reset IPDS as indicated; see
“Important setup instructions” for more information.
Step 4. Drain and restart the printer at the host for the changes to take effect.
IPS Gateway User’s Guide (5/2002) 3-11
Page 48

IPS Gateway operation
Configuring channel connection
The Channel area allows you to identify the unit address and set the
channel speed used in conjunction with the controller to send data to IPS
Gateway from your host computer(s).
To configure channel:
Step 1. In the IPDS Connection area, select Channel.
Step 2. Enter your two-character unit address in the Address (hex) field.
Step 3. In the Speed drop-down box, select one of these speeds:
• Single tag
• High speed
• Data Streaming 1.5
• Data Streaming 3
• Data Streaming 4.5
NOTE: Channel speeds are dictated by the host, host channel
extenders, and other properties of the bus and tag network. See your
systems programmer to determine the appropriate channel speed.
Step 4. Click Save to save your settings and reset IPDS as indicated; see
“Important setup instructions” for more information.
Step 5. Drain and restart the printer at the host for the changes to take effect.
IPS Gateway User’s Guide (5/2002) 3-12
Page 49

IPS Gateway operation
Socket Gateway Connection
The Socket Gateway Connection area displays the TCP/IP Socket
Gateway port that IPS Gateway uses when submitting jobs to DocuSP.
To specify the TCP/IP Socket Gateway port:
Step 1. From the Port drop-down box in the Socket Gateway Connection area,
select the port number that matches the port number assigned to the
queue on DocuSP where IPDS jobs will be spooled. Valid values are 1024
through 65535.
NOTE: For information on specifying the port in DocuSP, see
“Defining the IPS Gateway queue.”
Step 2. Click Save to save your setting and reset IPDS as indicated; see
“Important setup instructions” for more information.
Enhanced Font Support
Enhanced Font Support is an extension of the printer-resident outline font
support in IPS Gateway. It provides support for host environments that
expect resident outline font substitution for raster fonts.
When you load supported resident outline fonts on the printer, this feature
is enabled. It can be disabled if you need resident outline font support but
do not need raster font substitution.
When enabled, if the host requests a raster font, IPS Gateway substitutes
an equivalent resident outline font if one is available. If the host requests
a font for which there is no resident outline font match or equivalent, the
default resident outline font is used.
When disabled, no font substitution occurs. Requests for fonts that are
resident are honored; all other fonts must be downloaded. The default
resident outline font is used only when specifically requested by the host.
See “Loading IBM AFP resident outline fonts” for a complete description
of resident outline font and raster font substitution support.
To enable or disable Enhanced Font Support:
Step 1. In the Enhanced Font Support area, select either Enable or Disable,
according to your resident outline font requirements.
NOTE: The Enhanced Font Support area is only accessible when
resident outline fonts are loaded.
Step 2. Click Save to save your setting and reset IPDS as indicated; see
“Important setup instructions” for more information.
Step 3. Drain and restart the printer at the host for the change to take effect.
IPS Gateway User’s Guide (5/2002) 3-13
Page 50

Output Setup tab
This section describes the options on the Output Setup tab (shown below).
These options control the generated PostScript output sent to the queue.
IPS Gateway operation
Output Resolution
The Output Resolution option allows you to specify the dots per inch (dpi)
resolution of the PostScript output to be sent to the printer.
To specify the output resolution:
Step 1. From the drop-down box in the Output Resolution area, select the dots
per inch (dpi) resolution of the PostScript output to be printed.
NOTE: Running at 600 dpi may add additional processing overhead.
You must weigh performance against your printing needs.
The output resolution must match the resolution set on the
PostScript/PDF tab under the queue properties in DocuSP.
Otherwise, performance may be impacted.
Step 2. Click Save to save your setting and reset IPDS as indicated; see
“Important setup instructions” for more information.
IPS Gateway User’s Guide (5/2002) 3-14
Page 51

IPS Gateway operation
Stapling
The Stapling option allows you to specify stapling for your print jobs. By
selecting a stapling mode, all jobs between 2 and 50 pages are stapled.
Not all IPDS finishing options may be available for your printer. In
addition, it you use this option, DocuSP must also have stapling enabled.
For available finishing options and to enable stapling on DocuSP, refer to
the DocuSP System Guide.
NOTE: Offset job stacking is not supported when using the Stapling
option.
To specify stapling:
Step 1. From the drop-down box in the Stapling area, select one of these stapling
options:
• None — Indicates no stapling.
• StackerOffset — Staples when an IPDS XOA Alternate Offset
Stacker command is received. When printing multiple copies, a job
containing three copies of a five page job staples each of the five
page sets individually.
• MarkForm — Staples at the MarkForm page boundary. When printing
multiple copies, a job containing three copies of a five page job is
stapled as one set.
• Defined Group Boundary — Staples based upon host controlled
finishing specified within the group boundary orders of the IPDS job.
Select this option to give the host control of all stapling options for
your jobs. Job-specified stapling is honored.
Step 2. Click Save to save your setting and reset IPDS as indicated; see
“Important setup instructions” for more information.
IPS Gateway User’s Guide (5/2002) 3-15
Page 52

IPS Gateway operation
Segmentation
The Segmentation option allows you to divide a large job into a series of
smaller jobs or segments. For normal job processing, job segmentation
should be inactive. However, Xerox recommends that you use job
segmentation for any spooled job over 500 pages. Before using this
option, review the “Segmentation” processing considerations.
To enable job segmentation:
Step 1. In the Segmentation area, select Enable.
Step 2. In the drop-down box, specify a value from 50 to 500 for the number of
pages that you want each job segment to contain.
Step 3. Click Save to save your settings and reset IPDS as indicated; see
“Important setup instructions” for more information.
Rotation
Use the Rotation option when migrating continuous forms jobs to IPS
Gateway. Enabling this option tells IPS Gateway to print jobs that were
designed for a continuous form printer on cut-sheet paper, with the
orientation rotated 90 degrees.
For normal cut-sheet or non-continuous form job processing, set this
option to Disable.
If you are sending a mixture of continuous form and cut-sheet jobs to IPS
Gateway, this option must be reset between jobs, or you can batch the
jobs into separate print classes to be controlled by the operator.
Refer to the Xerox manual Solutions Guide for IPDS Printing for details on
continuous form to cut sheet conversion of print jobs for IPS/NPS
applications.
To enable rotation:
Step 1. In the Rotation area, select Enable.
Step 2. Click Save to save your setting and reset IPDS as indicated; see
“Important setup instructions” for more information.
IPS Gateway User’s Guide (5/2002) 3-16
Page 53
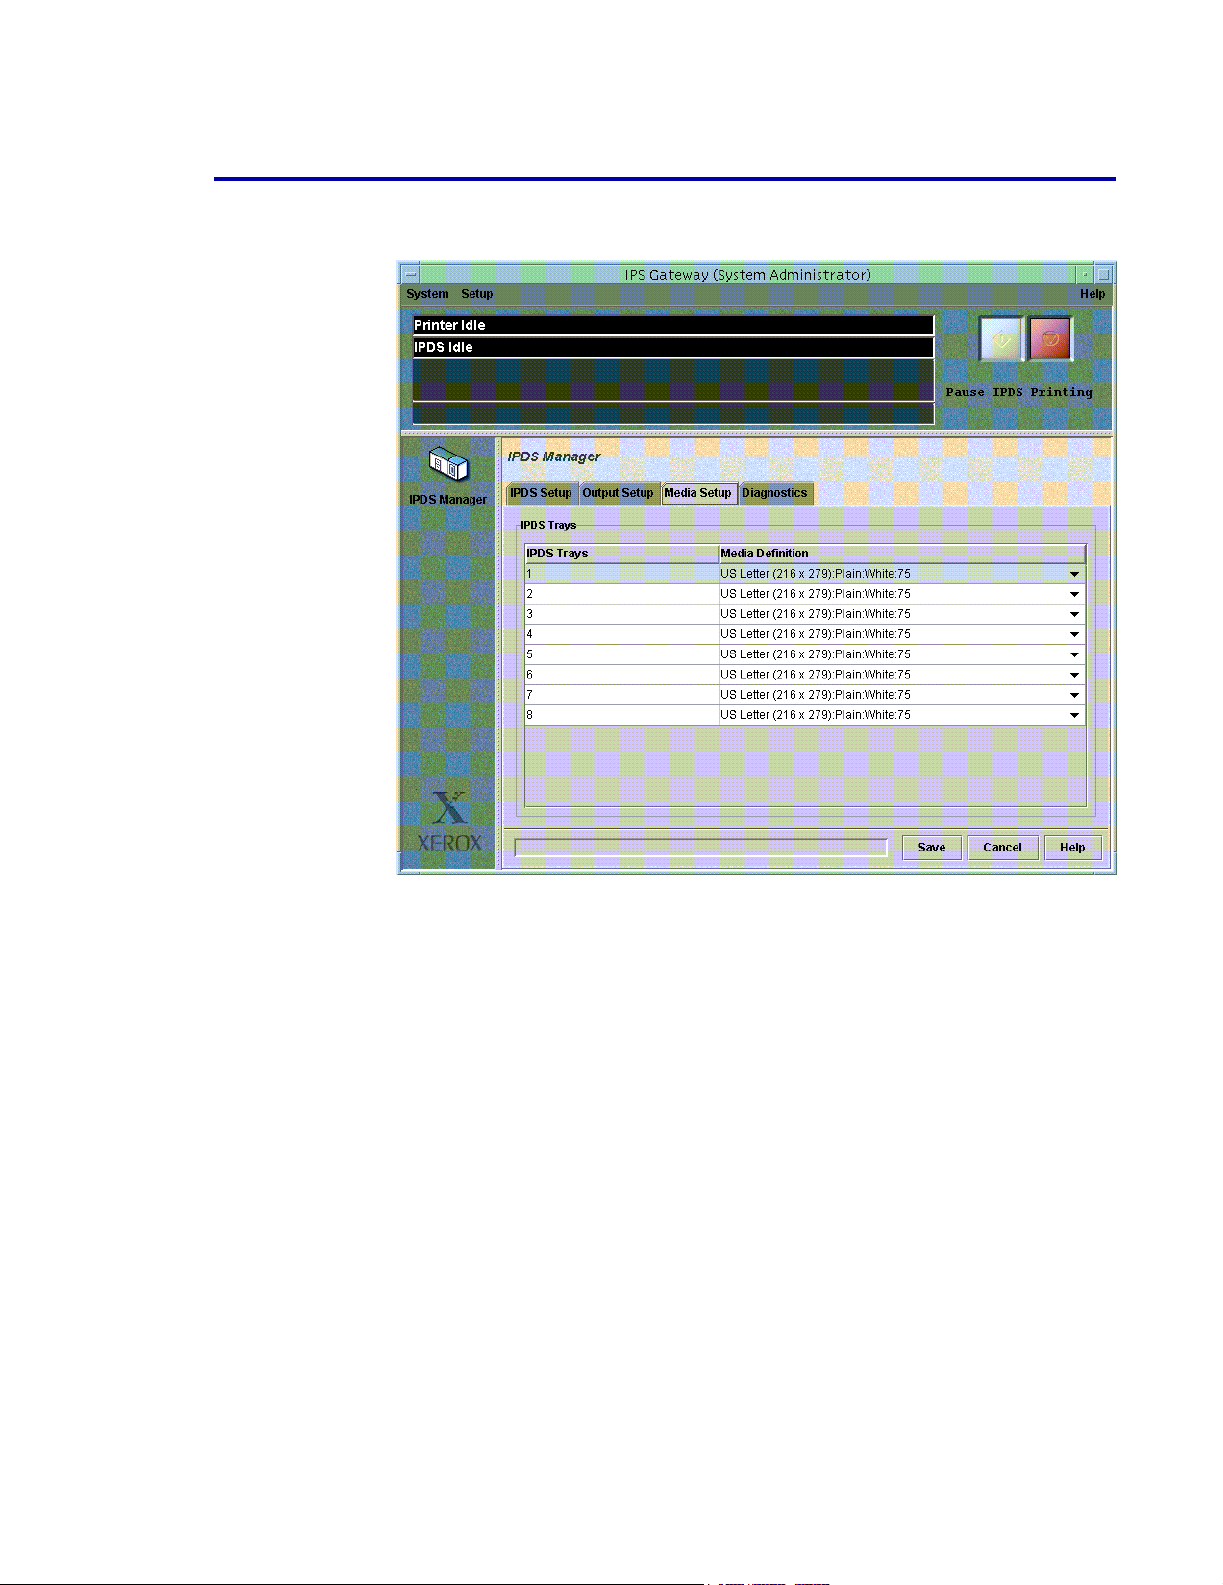
Media Setup tab
The options on the Media Setup tab (shown below) allow you to map the
IPDS trays to the printer media.
IPS Gateway operation
The Printer Manager in DocuSP is used to define media, assign each
medium to a specific physical printer tray, and load the media in the trays.
These media definitions are communicated to IPS Gateway for mapping
to IPDS trays through the IPS Gateway Media Setup tab. In IPS Gateway
you map a specific medium to each IPDS Tray Selection Value expected
from the IPDS data stream. Each media definition includes these
attributes:
•Size
•Type
• Color
• Weight
After IPS Gateway installation, the default media definition for all IPDS
trays is: US Letter (216 x 279):Plain:White:75
IPS Gateway User’s Guide (5/2002) 3-17
Page 54

Setting up media in DocuSP
In DocuSP, define and load the media required to run your job(s). Refer
to the DocuSP System Guide for instructions on defining media. All media
defined in DocuSP, including custom sizes, are supported by IPS
Gateway.
Mapping IPDS trays to media definitions
The Media Setup tab allows you to map a specific medium to each
possible IPDS Tray Selection Value in the IPDS data stream. Each
specified IPS Gateway medium must already be defined correctly in the
DocuSP Printer Manager and loaded in that tray. For IPS Gateway, there
are eight possible IPDS Tray Selection Values (1 through 8).
When IPS Gateway receives the IPDS Tray Selection Value for the IPDS
page it is composing, it sends the medium specification currently defined
for that IPDS tray to DocuSP, which uses the stock specification to
determine which physical tray to pull from.
For an IPS Gateway job, if the requested IPDS tray is mapped to medium
not assigned to a physical tray in DocuSP:
• The job displays as ineligible in DocuSP and does not print
• The invalid media definition displays in red on the IPS Gateway
Media Setup tab
IPS Gateway operation
NOTE: If media is changed in the DocuSP Printer Manager, the IPDS
media setup in IPS Gateway must be updated to reflect the valid
media definition(s).
If you define custom paper sizes in DocuSP, the actual dimension is listed
in the Media Definition drop-down in the IPS Gateway Media Setup tab,
instead of the Size name. This table provides the dimensions for some
common paper sizes.
Paper size Inches Millimeters
US Letter 8.50 x 11.00 216 x 279
US Legal 8.50 x 14.00 216 x 356
US Ledger 17.00 x 11.00 432 x 279
A3 16.54 x 11.69 420 x 297
A4 8.27 x 11.69 210 x 297
US Statement 5.50 x 8.50 140 x 216
IPS Gateway User’s Guide (5/2002) 3-18
Page 55

IPS Gateway operation
To map IPDS trays to available media definitions.
Step 1. Select the IPS Gateway Media Setup tab:
Step 2. For each IPDS Tray, select a Media Definition to use when that IPDS Tray
Selection Value is encountered in the IPDS data stream. For example, if
the IPDS data stream requests IPDS tray 3, and you want the job to print
on legal paper, then the Media Definition for IPDS Tray 3 should be
“US Legal (216 x 356):Plain:White:75.” Only media assigned to and
loaded in physical trays on DocuSP are available in the drop-down lists.
Step 3. Once you specify the paper size for each IPDS tray, click Save to save
your settings and reset IPDS as indicated; see “Important setup
instructions” for more information.
Step 4. Drain and restart the printer at the host for the changes to take effect.
IPS Gateway User’s Guide (5/2002) 3-19
Page 56

Diagnostics tab
Diagnostic information is useful when diagnosing and correcting problems
encountered with IPS Gateway. Access the diagnostic options on the
Diagnostics tab (shown below).
IPS Gateway operation
NOTE: If you experience any problem with IPS Gateway, such as a
channel connectivity problem, that you are not able to correct, contact
your local Xerox representative for help in diagnosing and resolving
the issue.
The IPS Gateway diagnostic trace functions allow you to capture or replay
a diagnostic trace of your IPDS data stream, or to capture diagnostic
messages within the IPS Gateway log files while IPS Gateway is
processing a data stream. Typically, your Xerox Customer Service
Engineer performs these functions. However, you may be asked to
perform one or more of these functions in preparation for a service call.
IPS Gateway User’s Guide (5/2002) 3-20
Page 57

You must be logged on as Trusted User or System Administrator to
access and use the trace functions. These trace functions are available:
• Capture Trace — Used to capture IPDS data in a file as it is being
received from the host.
• Playback Trace — Used to play back a previously captured trace file.
• Debug — Used to enable IPDS diagnostic information. Xerox
recommends turning this option on when you are experiencing
problems and need to gather information for a customer problem log.
NOTE: During a trace capture or playback, the IPDS Setup, Output
Setup, and Media Setup tab options are not accessible and cannot be
changed until the trace capture or playback is stopped.
Capturing a trace
Capture Trace writes the IPDS data being received from the host to a file
as it is processed by IPS Gateway. The trace file also includes any replies
that IPS Gateway has sent to the host.
If you have an IPDS data stream that experienced a printing problem, use
this option to recreate the problem for further analysis by Xerox personnel.
To capture a trace:
IPS Gateway operation
Step 1. Drain the printer at the host to ensure that the trace includes information
from when the printer is first started. Otherwise, the host may download
information to the printer that is not captured.
Step 2. Select the Diagnostics tab on the IPS Gateway window.
Step 3. In the Directory area, select the /var/db/ipdstraces directory.
Step 4. Select an existing file in the Files box or enter a new file name in the Trace
File Selection field at the bottom of the window. If you select an existing
file, the information in that file will be overwritten.
Step 5. Once the Trace File Selection field contains the directory path and name
of the trace file, click Capture Trace. The message “Capture Trace”
appears in the trace message area on the IPS Gateway window.
Step 6. Start the printer at the host.
Step 7. Submit the job for which you need to recreate the problem. IPS Gateway
continues to capture trace information until you stop the trace.
Step 8. Once your job completes, drain the printer at the host.
Step 9. Click Tracing OFF on the Diagnostics tab.
IPS Gateway User’s Guide (5/2002) 3-21
Page 58

IPS Gateway operation
Playing back a trace
Playback Trace allows you to playback a trace file previously captured
and print that trace as if it is being received from the host. This option is
used during installation verification or by Xerox personnel when
performing problem determination and resolution.
To play back a trace:
Step 1. Drain the printer at the host.
Step 2. Select the Diagnostics tab on the IPS Gateway window.
Step 3. In the Directory area, select the /var/db/ipdstraces directory or the
directory where the trace is located.
Step 4. Select an existing file in the Files box or enter an existing file name in the
Trace File Selection field at the bottom of the window.
Step 5. Click Playback Trace. On the IPS Gateway window, the message
“Ripping Trace...” appears in the IPDS message area and “Playback
Trace” appears in the trace message area.
If the playback trace is successful, the message “Ripping Trace
Complete... Job Queued for Printing” appears in the IPDS message area.
If the playback is not successful, “Ripping of Trace Complete... Trace
Ended with Error” appears.
Step 6. Click Tracing OFF on the Diagnostics tab.
Using Debug mode
The Debug option writes additional information to the IPS Gateway log
files while an IPDS data stream is being processed by IPS Gateway.
These messages are usually indications of the IPDS command currently
being processed and are helpful with problem determination.
To start debug mode:
Step 1. Select the Diagnostics tab.
Step 2. Select Debug On to enable the debug function.
Step 3. Reset IPS Gateway by clicking System>Reset IPDS on the IPS Gateway
window.
Step 4. Submit your job from the host.
Step 5. When the desired data is received, select Debug Off to disable the debug
function.
Step 6. Reset IPS Gateway by clicking System>Reset IPDS on the IPS Gateway
window.
IPS Gateway User’s Guide (5/2002) 3-22
Page 59

4. 4 Messages
The following types of IPS Gateway messages are documented below.
When issued, these messages display on the IPS Gateway window (as
shown on the window in the “IPS Gateway window elements” section).
• Fault messages
• IPDS messages
• Trace messages
• Printer messages
IPS Gateway exception handling messages are also documented.
Fault messages
Place the mouse pointer over a displayed fault message for instructions
on clearing that fault.
System fault.
Explanation: An unrecoverable error has occurred.
System response: IPS Gateway disables UI functions.
User action: Exit and restart IPS Gateway. If the problem persists, contact Xerox
technical support.
IPS Gateway communication fault.
Explanation: IPS Gateway was not able to communicate with the required IPS Gateway
services.
System response: IPS Gateway disables UI functions.
User action: Exit and restart IPS Gateway.
Not authorized.
Explanation: The IPS Gateway license could not be found or contains invalid
information.
System response: IPS Gateway disables processing.
User action: Select License from the IPS Gateway Setup menu and verify that the
XRX_IPS_NPS_software license information is entered and is not
expired. If a valid license is entered, cancel the License window and
select Resume to start IPDS processing. If the license information is not
valid, contact your Xerox customer service representative.
IPS Gateway User’s Guide (5/2002) 4-1
Page 60

Messages
SNMP communication fault.
Explanation: IPS Gateway was not able to communicate with the printer SNMP services.
System response: IPS Gateway disables UI functions on the Media Setup tab.
User action: Ensure that the printer SNMP services are licensed and active and that
DocuSP is active.
Unable to establish socket gateway connection to printer.
Explanation: IPS Gateway could not connect to the printer using the socket gateway
information provided in the IPDS Setup tab.
System response: IPS Gateway reattempts to make a socket gateway connection using the
information in the IPDS Setup tab.
User action: Ensure that the socket gateway is correctly defined and active on the printer.
Job in progress error: Unable to initiate socket gateway connection.
Explanation: IPS Gateway could not establish a socket gateway connection for the
IPDS job in progress.
System response: IPS Gateway reattempts to make a socket gateway connection using the
information in the IPDS Setup tab.
User action: Ensure that the socket gateway is correctly defined and active on the printer.
Media mismatch detected. Check Media Setup tab.
Explanation: IPS Gateway detected that an IPDS tray is using a media definition that
either no longer exists or is no longer loaded on the printer.
System response: The IPS Gateway Media Setup tab highlights (in red) each row of IPDS
trays using an invalid media definition.
User action: Correct and save the IPDS tray mappings to prevent jobs from becoming
ineligible.
IPDS configuration change(s) detected. Reset IPDS is required.
Explanation: IPS Gateway detected changes that require an IPDS reset.
System response: IPDS processing continues. Any configuration changes made do not take
effect until IPDS is reset.
User action: Select Reset IPDS from the IPS Gateway System menu for the changes
to take effect.
IPS Gateway User’s Guide (5/2002) 4-2
Page 61

Messages
Warning: The IPS Gateway license expires at midnight.
Explanation: IPS Gateway detected that the XRX_IPS_NPS license expires at
midnight.
System response: If a valid license is entered before midnight, IPS Gateway continues
processing without interruption. If a valid license is not entered, IPS
Gateway discontinues processing at midnight.
User action: Contact your Xerox customer service representative for a new license.
Warning: The IPS Gateway license expires in number day(s).
Explanation: The IPS Gateway detected that the XRX_IPS_NPS license expires in the
specified number of days.
System response: IPS Gateway displays this warning and continues processing.
User action: Contact your Xerox customer service representative for a new license.
IPS Gateway User’s Guide (5/2002) 4-3
Page 62

IPDS messages
IPDS Idle
Explanation: IPDS is ready to receive jobs.
System response: None.
User action: None.
IPDS Not Ready
Explanation: IPS Gateway is not ready to receive jobs.
System response: None.
User action: Review the other message windows for error indication.
Ripping Job... Pages Outstanding: number
Messages
Explanation: IPDS has the specified number of pages left to rip.
System response: None.
User action: None.
Starting IPDS Services... Please Wait
Explanation: The IPDS services are being initiated.
System response: None.
User action: None.
Ending IPDS Services... Please Wait
Explanation: The IPDS services are being terminated.
System response: None.
User action: None.
Initializing IPDS...
Explanation: The IPDS services are in the process of initializing.
System response: IPS Gateway disables UI functions while IPDS initializes.
User action: None.
IPS Gateway User’s Guide (5/2002) 4-4
Page 63

Resetting IPDS...
Explanation: The operator selected the Reset IPDS option on the System menu.
System response: IPS Gateway disables UI functions while IPDS resets.
User action: None.
Pausing IPDS...
Explanation: The operator selected the pause IPDS button on the IPS Gateway window
or IPS Gateway detected that the printer is not ready.
System response: IPS Gateway pauses IPDS processing.
User action: None.
Resuming IPDS...
Explanation: The operator selected the resume IPDS button on the IPS Gateway
window or IPS Gateway detected that the printer is ready.
Messages
System response: IPS Gateway resumes IPDS processing.
User action: None.
Checking for NPS Services... Please Wait
Explanation: IPS Gateway services are being initiated.
System response: IPS Gateway processing is initiated.
User action: None.
Ending NPS Services... Please Wait
Explanation: IPS Gateway services are being terminated.
System response: IPS Gateway processing is terminated.
User action: None.
Contacting SNMP Agent... Please Wait
Explanation: IPS Gateway services are being initiated.
System response: IPS Gateway processing is initiated.
User action: None.
IPS Gateway User’s Guide (5/2002) 4-5
Page 64

Shutting Down IPS Gateway... Please Wait
Explanation: IPS Gateway services are being terminated.
System response: IPS Gateway processing is terminated.
User action: None.
IPDS State Unknown
Explanation: IPS Gateway is unable to determine the IPDS state.
System response: IPS Gateway disables UI functions.
User action: None.
Ripping Trace...
Explanation: IPDS is playing back a trace file.
System response: None.
Messages
User action: None.
Ripping Trace Complete... Job Queued for Printing
Explanation: IPS Gateway successfully completed the trace playback.
System response: IPS Gateway submits job for printing.
User action: None.
Ripping of Trace Complete... Trace Ended with Error
Explanation: IPS Gateway encountered a problem while playing back the trace or the
Trace OFF button was pressed before ripping completed.
System response: IPS Gateway submits for printing any portion of the job that processed
successfully.
User action: Verify the integrity of the trace file.
IPS Gateway User’s Guide (5/2002) 4-6
Page 65

Trace messages
Playback Trace: trace_file_name
Explanation: IPS Gateway is playing back the specified trace file. All other trace
System response: IPS Gateway disables UI functionality.
User action: None.
Capture Trace: trace_file_name
Explanation: IPS Gateway is writing trace information to the specified trace file. All
System response: IPS Gateway disables UI functionality.
User action: None.
Messages
functions are disabled until Tracing OFF is selected.
other trace functions are disabled until Tracing OFF is selected.
IPS Gateway User’s Guide (5/2002) 4-7
Page 66

Printer messages
Printer Idle
Explanation: The printer is ready to receive jobs.
System response: IPS Gateway detects that the printer is idle and resumes IPDS
User action: None.
Printer Not Ready
Explanation: The printer is not ready to receive jobs.
System response: IPS Gateway detects that the printer is not ready and pauses IPDS
User action: None.
Messages
IPS Gateway is notified of these printer states.
processing, unless the operator selected Pause.
processing, unless the operator selected Pause.
Printer Printing
Explanation: A job is currently printing.
System response: IPS Gateway detects that the printer is printing and resumes IPDS
processing, unless the operator selected Pause.
User action: None.
Printer State Unknown
Explanation: IPS Gateway is unable to determine the printer state.
System response: IPS Gateway cannot determine the printer state and pauses IPDS
processing.
User action: Verify that DocuSP is active and that the SNMP Gateway is activated and
enabled.
Printer Warming Up
Explanation: The printer is warming up.
System response: IPS Gateway detects that the printer is warming up and resumes IPDS
processing.
User action: None.
IPS Gateway User’s Guide (5/2002) 4-8
Page 67

Exception messages
If an unexpected exception handling error occurs, a message window
(shown below) opens describing the error and the required user action.
The error dump that appears on the window is also written to the
tipsGUI.log file in the /var/log directory. When reporting this error to your
Xerox customer service representative, provide a copy of this log file for
problem determination.
Messages
IPS Gateway User’s Guide (5/2002) 4-9
Page 68

Messages
IPS Gateway User’s Guide (5/2002) 4-10
Page 69

G Glossary
This glossary contains terms and definitions related to the operation and
use of IPS Gateway. For a complete list of terms and definitions related
to your DocuPrint printer, refer to the DocuSP System Guide.
Advanced Function
Presentation (AFP)
case-sensitive Treating lowercase and uppercase characters differently.
channel A commonly used network connectivity method consisting of a channel
code page An IBM translation table that maps an EBCDIC code point to a character
Document Services Platform
(DocuSP)
dots per inch (dpi) The units of resolution of a resource or a page.
Ethernet A network standard consisting of a coaxial cable or twisted pair and
An IBM family of software products that enables you to place text and
images at any point on a page.
card with a bus and tag cable. This communication system directly
connects workstations to each other, to file servers, and to peripherals.
identifier.
A Xerox hardware/software interface between client systems and the
printer that accepts a document as a page description language file,
converts the file to a bitmap image, and sends the data through a
dedicated electrical connection to a DocuPrint printer.
associated components for connecting workstations to each other, to file
servers, and to peripherals. This communication system enables
workstation users to share information and services.
Extended Binary-Coded
Decimal Interchange Code
(EBCDIC)
fault A condition that prevents proper processing of a print job and requires
First In/First Out (FIFO) The printing of jobs in the same order as which they are submitted.
font global identifier (FGID) A unique font identifier that is specified within the global resource
Intelligent Printer Data
Stream (IPDS)
Internet Protocol (IP)
address
A method of encoding alphabetic and symbolic characters in a format for
electronic storage and data communication.
user intervention.
identifier (GRID) found in an IBM MCF-2 structured field.
IBM’s System Application Architecture host-to-printer data stream for AFP
subsystems. It provides an interface to all-points-addressable printers.
Refers to an address of any host that uses the TCP/IP network protocol.
IPS Gateway User’s Guide (5/2002) G-1
Page 70

IPS A print system that processes IPDS data streams.
logical page The area on the physical page where data can be printed.
Glossary
MarkForm An end-of-job marker in the IPDS data stream that appears on the trailer
Overlay Generation
Language (OGL)
Print Services Facility (PSF) An IBM software product that controls all-points-addressable printers.
Printer Control Language
(PCL)
Random Access Memory
(RAM)
resident fonts The fonts that are loaded on the server at the time of installation and
spooling The process of storing data temporarily until another device is ready to
Token Ring A network topology in which a control packet or token is passed from
page of the job.
An IBM product used to create electronic forms in the IBM AFP
environment.
A printer description language defined by the Hewlett-Packard Company.
PCL describes the input (type, format, and characteristics), performs the
processing functions (logical processing), and describes the output (type,
format, font selection, accounting options) of a print job.
Volatile memory used for temporary storage of data and software
commands. Used by programs for immediate task processing.
remain permanently on the server.
accept it.
station to station in sequential order. Stations needing access must wait
for the token before transmitting data. In a Token Ring, the next logical
station receiving the token is also the next physical station.
trace A routine record providing a list of historical events (execution) of a
program.
Transmission Control
Protocol/Internet Protocol
(TCP/IP)
A commonly used network communications protocol supported by the
DocuSP system. It is a set of data communications protocols or a type of
“language” that the devices use to “speak” with each other.
IPS Gateway User’s Guide (5/2002) G-2
Page 71

Index
A
AFP resident outline fonts, 2-13
B
banner page, 1-7
C
changing passwords, 3-6
channel connection, 3-12
considerations, processing, 1-5
customer job accounting, 1-8
D
default user access, 2-6
default values, 3-9
diagnostic trace functions, 3-20
display language, 1-4
E
edge treatment, 1-9
enhanced font support, 2-13, 3-13
exception handling messages, 4-9
exiting, 3-4
F
fault messages, 4-1
FIFO job scheduling, 1-7
font installation and setup, 2-14
font removal, 2-15
G
gray scale printing, 1-9
H
help facility, 3-7
host connectivity options, 1-3
host environments, 1-3
I
IBM AFP resident outline fonts, 2-13
Image Shift, 1-8
initial passwords, 2-6
installation
CD contents, 2-3
requirements, 2-2
verification, 2-16
IPDS data stream
AFP resources supported, 1-4
IBM data architectures supported, 1-4
IPDS job recovery, 1-6
spooling queue, 1-6
streaming queue, 1-6
IPDS messages, 4-4
IPDS processing
pausing and resuming, 3-4
IPDS Setup options, 3-10
IPDS trace jobs, 2-17
IPS Gateway, 1-4
exiting, 3-4
licensing and enabling, 2-7
logging off, 3-4
logging on, 3-3
operating, 3-3
overview, 1-3
setup and management, 3-8
software installation, 2-4
starting, 3-1
uninstalling, 2-18
window elements, 3-2
IPS Gateway queue, 1-5
defining, 2-10
IPS/NPS
licensing and enabling, 2-9
J
job segmentation, 1-5, 1-7
Customer Accounting Log, 1-8
IPS Gateway User’s Guide (5/2002) I-1
Page 72

Index
L
licenses
obtaining new, 3-5
required, 3-5
updating, 3-5
licensing requirements, 2-2
logging off, 3-4
logging on, 3-3
logical printer
defining, 2-16
M
management options, 3-8
margin specification, 1-8
media selection, 1-5
media setup, 2-12
DocuSP, 2-12
stock name preferences, 2-12
Media Setup options, 3-17
menu options
setup, 3-5
system, 3-3
messages
exception handling, 4-9
fault, 4-1
IPDS, 4-4
printer, 4-8
trace, 4-7
O
offset stacking
unfinished jobs, 1-7
OS/400 (iSeries) setup, 2-14
output resolution, 1-8
Output Setup options, 3-14
resolution, 3-14
rotation, 3-16
segmentation, 3-16
stapling, 3-15
P
passwords
changing, 3-6
establishing, 2-6
pausing IPDS processing, 3-4
PostScript Decomposer
licensing and enabling, 2-8
print queue management, 2-10
printer emulation, 1-3
printer error reporting, 1-9
printer messages, 4-8
processing considerations, 1-5
R
removing resident outline fonts, 2-15
resetting IPDS, 3-4
resident outline fonts, 2-13, 2-15
resolution, 3-10, 3-14
resuming IPDS processing, 3-4
rotation, 3-16
S
segmentation, 1-5, 1-7, 3-16
spooled versus streaming queue, 1-7
setup menu options, 3-5
setup options, 3-8
channel connection, 3-12
enhanced font support, 3-13
resolution, 3-10
Socket Gateway, 3-13
TCP/IP connection, 3-11
SNMP Gateway
licensing and enabling, 2-8
Socket Gateway, 3-13
software release numbers
displaying, 3-7
spooling queue, 1-5, 1-7
stapling, 3-15
streaming queue, 1-5, 1-7
T
TCP/IP connection, 3-11
TCP/IP Socket Gateway
licensing and configuring, 2-8
test job
printing from host, 2-17
trace functions, 3-20
capture, 3-21
debug mode, 3-22
playback, 3-22
trace jobs, 2-17
trace messages, 4-7
I-2 IPS Gateway User’s Guide (5/2002)
Page 73

Index
U
user access levels, 2-6
System Administrator, 2-6
Trusted User, 2-6
Walk Up User, 2-6
V
VPS option, 2-9
VTAM printer support, 2-9
W
window elements, 3-2
IPS Gateway User’s Guide (5/2002) I-3
Page 74

Index
I-4 IPS Gateway User’s Guide (5/2002)
 Loading...