

Page 1
System
Requirements
Page 2
Chapter 1
Intr oduction
Welcome!
Where to find helpful information
Introduction to the Document WorkCentre 450c
WorkCentre features
Control panel keys
How to navigate the WorkCentre menus
Using the numeric keypad
2
Understanding the document flow icons
Using the ControlCentre software
Setting the ControlCentre properties
Selecting and Ordering Supplies
WorkCentre 450c Specific ations
Keypad Character Assign ments
Keypad character assignments for North and South
America
Keypad character assignments for Europe
Page 3

Welcome!
Thank you for choosing the Xerox Document WorkCentr e
450c, the dependable and efficient multi-function device
that handles your office tasks with ease. The WorkCentre
works the way you do, performing more than one job at a
time.
Using the WorkCentre, you can:
• Send and receive paper and electronic faxes
• Print color and black-and-white documents
• Copy, collate, reduce, and enlar ge documents
• Scan paper documents and convert them to fully
3
editable electronic docume nts
The WorkCentre CD-ROM includes Xerox Pagis™ Pro 97
and TextBridge™ Pro software. Using Pagis Pro you can
scan, organize, and retrieve the documents in your office.
TextBridge optical character recognition software lets you
easily convert your paper documents to electronic
documents, while retaining text formatting and pictures.
Page 4

Where to fin d h elp fu l infor mation
Document W orkCentre 450c Quick Installation &
Quick Reference Guide
Step-by-step instructions explain how to set up the
WorkCentre, install the ControlCentre™ software,
and perform frequently used tasks.
Document W orkCentre 450c Guided Tour
An online introduction to the WorkCentre 450c and
its ControlCentre software. To run the guided tour,
click the Help button in the WorkCentre Status
window and then double-click the W orkCentre 450c
4
Guided T our.
Document W orkCentre 450c Online Help
Concise explanations and procedures on
WorkCentre tasks and features. To open Help, click
the Help button in the WorkCentre Status window.
Document W orkCentre 450c User Guide
This online guide provides complete instructions on
how to use the WorkCentre, descriptions of
maintenance and troubleshooting tasks, and
reference information.
Page 5

To obtain a printed version of the guide, use the
order form included with the WorkCentre.
Pagis Pro Multimedia Tutorial
A comprehensive and entertaining summary of the
features and benefits of Pagis Pro 97. T o run the
tutorial, insert the WorkCentre 450c CD-ROM,
open the folders (directories):
Engl ish\P agis\ Tutor ial
Double-click Tutorial. exe. For best results, your PC
should be equipped with a sound card and
5
multimedia speakers.
http://www . teamxrx.com
Visit the Document WorkCentre 450c Web Site for
product and technical information.
1-800-TEAM XRX
(United States and Canada only)
For technical help, call the Xerox Customer Support
Center .
Page 6

Introduct i on to the Document
WorkCentre 450c
The Document WorkCentre 450c features an easy-to-use
control panel that simplifies your routine tasks. With the
press of a few keys, you fax, print, copy, and scan
documents.
Paper tray extension
Paper tray
Printer output tray
Document tray
Scanner cover
6
Control panel
Document output tray
Page 7

Using the ControlCentre software, you can efficiently
y
monitor the WorkCentre’s status from your PC, change any
of the default settings, and set up a Phonebook of speed dial
numbers.
WorkCentre features
The WorkCentre 450c’s advanced design lets you easily
access its components. Its compact size allows the
WorkCentre to fit into any office environment.
The control panel includes function keys, a numeric
keypad, document flow icons, and a liquid crystal display
(LCD) that shows menus and system messages.
7
Control panel keys
Press this ke
SCAN Automaticall y r un the scanning application on
MODE Switch among the print modes: print & fax,
FEED Load a single sheet of paper into the pr inter,
To do this
your PC.
offline, pr inter only.
or clear a jam m ed page from the printer.
Page 8

8
y
Press this ke
CART RIDGE Switch among the cartri dge maintenance
COPY Start a copy job.
SIZE Switch among the resize options for copies:
JOB STATUS Display the WorkCentre’s active and pending
CO VER PAGE Toggle the fa x cover page option on and off .
CONFIRM Toggle the fax confirmation report feature on
CONTRAST Switch among the contrast settings for outgo-
To do this
options: change, clean, replace color head.
95%, 100% (same size), enlarge 125%,
enlarge 150% , 75%, 80%, 85%, 90%.
jobs.
and off.
ing fax es and copies: light en, nor mal, darke n,
photo lighten, photo normal, photo darken.
RESOLUTION Switch among the resoluti on settings for out-
going faxes: standard, fine, superfine.
LEFT ARROW Display the previous m enu or option, or when
entering text, move the cursor one position to
the left.
RIGHT ARROW Display the next menu or option, or when
entering text, move the cursor one position to
the right.
Page 9

9
y
Press this ke
EXIT/CLEAR Display the previous menu. When entering
To do this
text, delete the blinking character or, if the
cursor is to the right of the text, delete the last
character.
or
Clear a document from the scanner.
ENTER Choose a menu and display its submenu or
options, or choose the option or text you
entered.
MENU Display the first top-level menu.
SPEED D IAL E nter a speed dial number from your P hone-
book.
PAUSE Insert a timed interval in the dialing sequence.
REDIAL Redial the last fax num ber dialed, combine
several numbers during a single dialing
sequence, or add a plus (+) to a speed dial
entry in a Phonebook.
HELP Print the WorkCentre menus and the current
default settings.
STOP Halt a process or exit the menu system.
START Begin the specified job.
Page 10

How to navigat e the
WorkCentre menus
Using control panel keys and the numeric keypad, you c an
easily navigate the WorkCentre menus. As you navigate the
menus, the LCD displays the options you can choose and
provides helpful prompts to guide you.
To access the WorkCentre menu system, press the MENU
key. The first top-level menu displays:
Menu (1-6)
1 Fax job
10
To display the second top-level menu, press the RIGHT
ARROW key or the 2 key:
Menu (1-6)
2 Reports
Press the ENTER key to choose the Reports menu and
display the first Reports menu:
Reports (1-2)
1 Print report
Page 11
Press ENTER to choose the Print report menu and display
the first Print report option:
P rint repor t (1-6)
1 Activity
Press ENTER to choose Activity.
At any time you can press the EXIT/CLEAR key to display
the previous menu or press the STOP key to exit the
menus.
Note: To print a diagram of the WorkCentre menus,
press the HELP key.
11
Using the num eri c keypa d
You use the numeric keypad to enter numbers, letters, and
symbols. Most WorkCentre tasks require a numeric entry,
for example, a fax number. To enter a number at the control
panel, press the number key you want.
The primary letters corresponding to each number key are
shown above the key. Additional characters and symbols
are also assigned to each key on the numeric keypad.
Page 12
To enter a letter or symbol, you repeatedly press the
appropriate key until the character you want displays on the
LCD. For example, to enter the letter “C,” press the 2 key
three times.
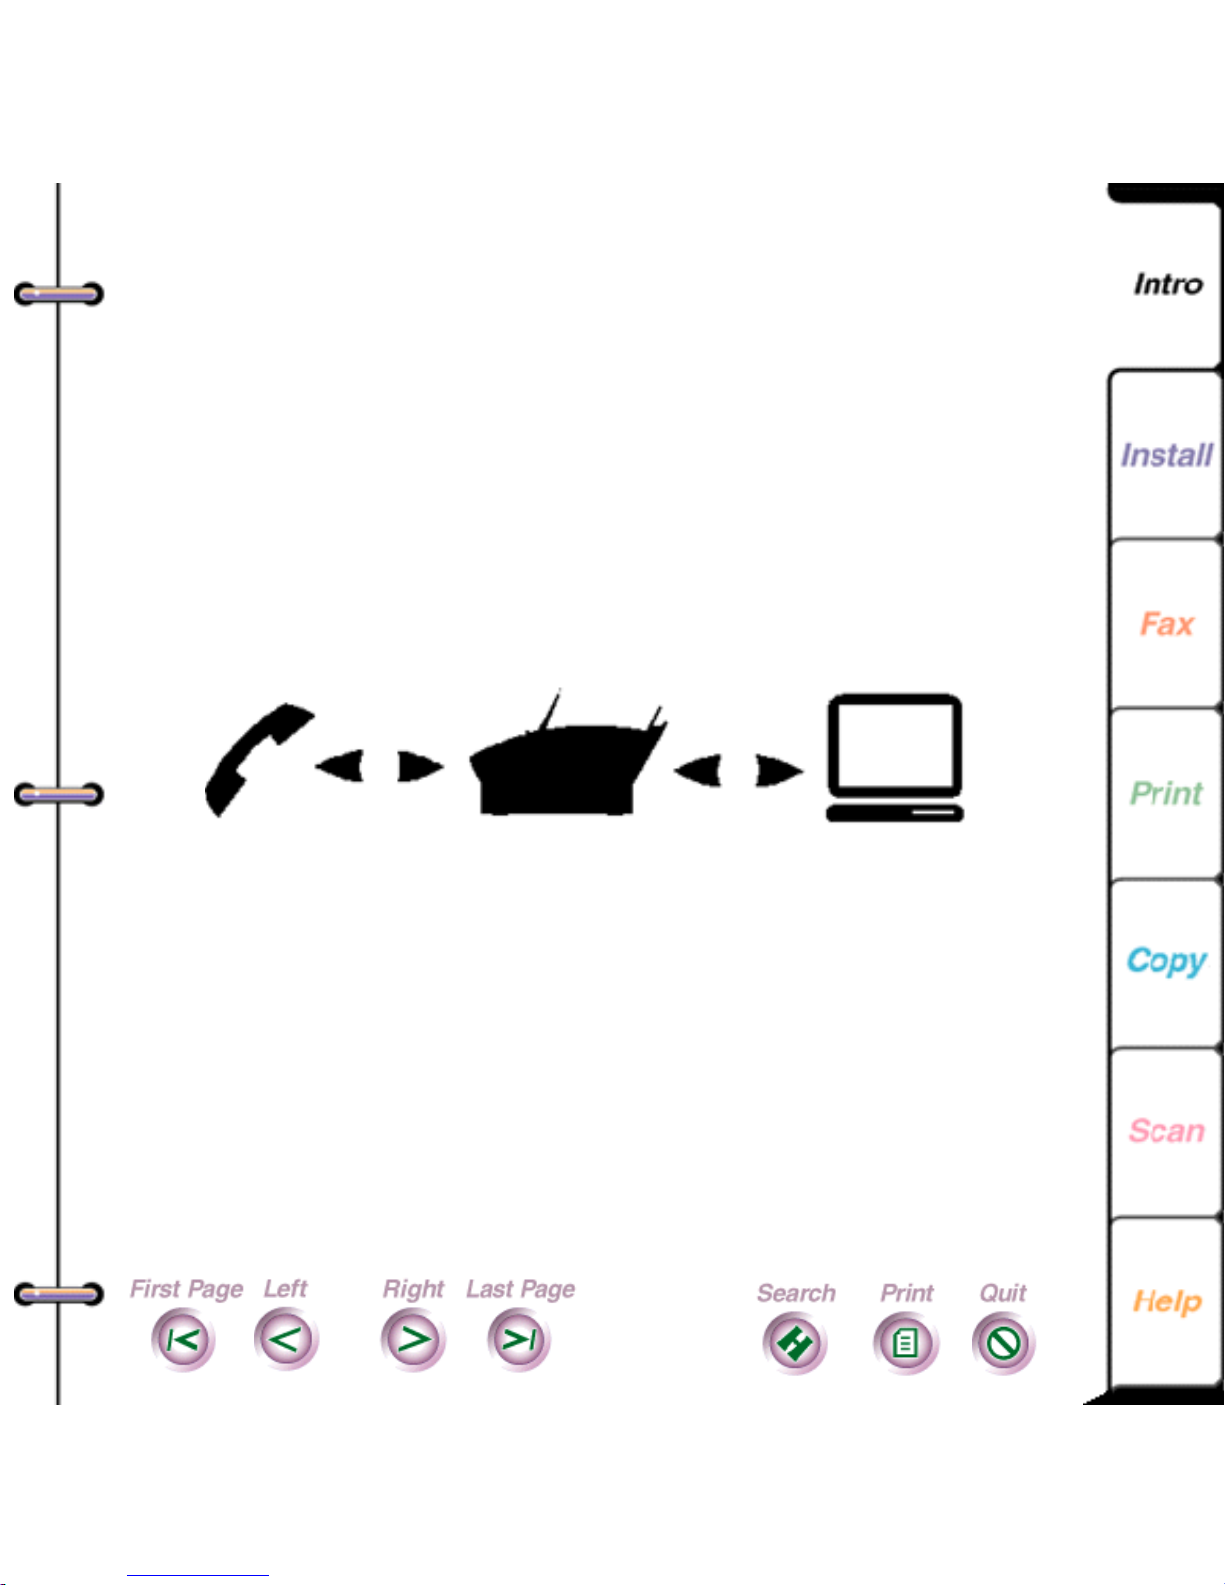
Unders ta nding the
docume nt flow icons
Document flow icons indicate when the WorkCentre is
receiving and sending information.
12
Indicator lights between the telephone and WorkCentre
icons illuminate when a fax is being sent or received. When
you’re printing or scanning, the indicator lights between the
PC and the WorkCentre icons illuminate.
Page 13
Using the ControlC entre so ftware
The ControlCentre software on your PC enables you to
easily view the WorkCentre’s status and change any of the
WorkCentre’s default setting s. For faster dialing when
sending faxes, you can use the ControlCentre to set up your
Phonebook of speed dial numbers. You can also get help
quickly on a particular task or dialog box from the
ControlCentre.
When you start Windows, the WorkCentre 450c icon
automatically displays in the notification area on the
taskbar. (In Windows 3.1/3.11, the icon displays on the
desktop.)
13
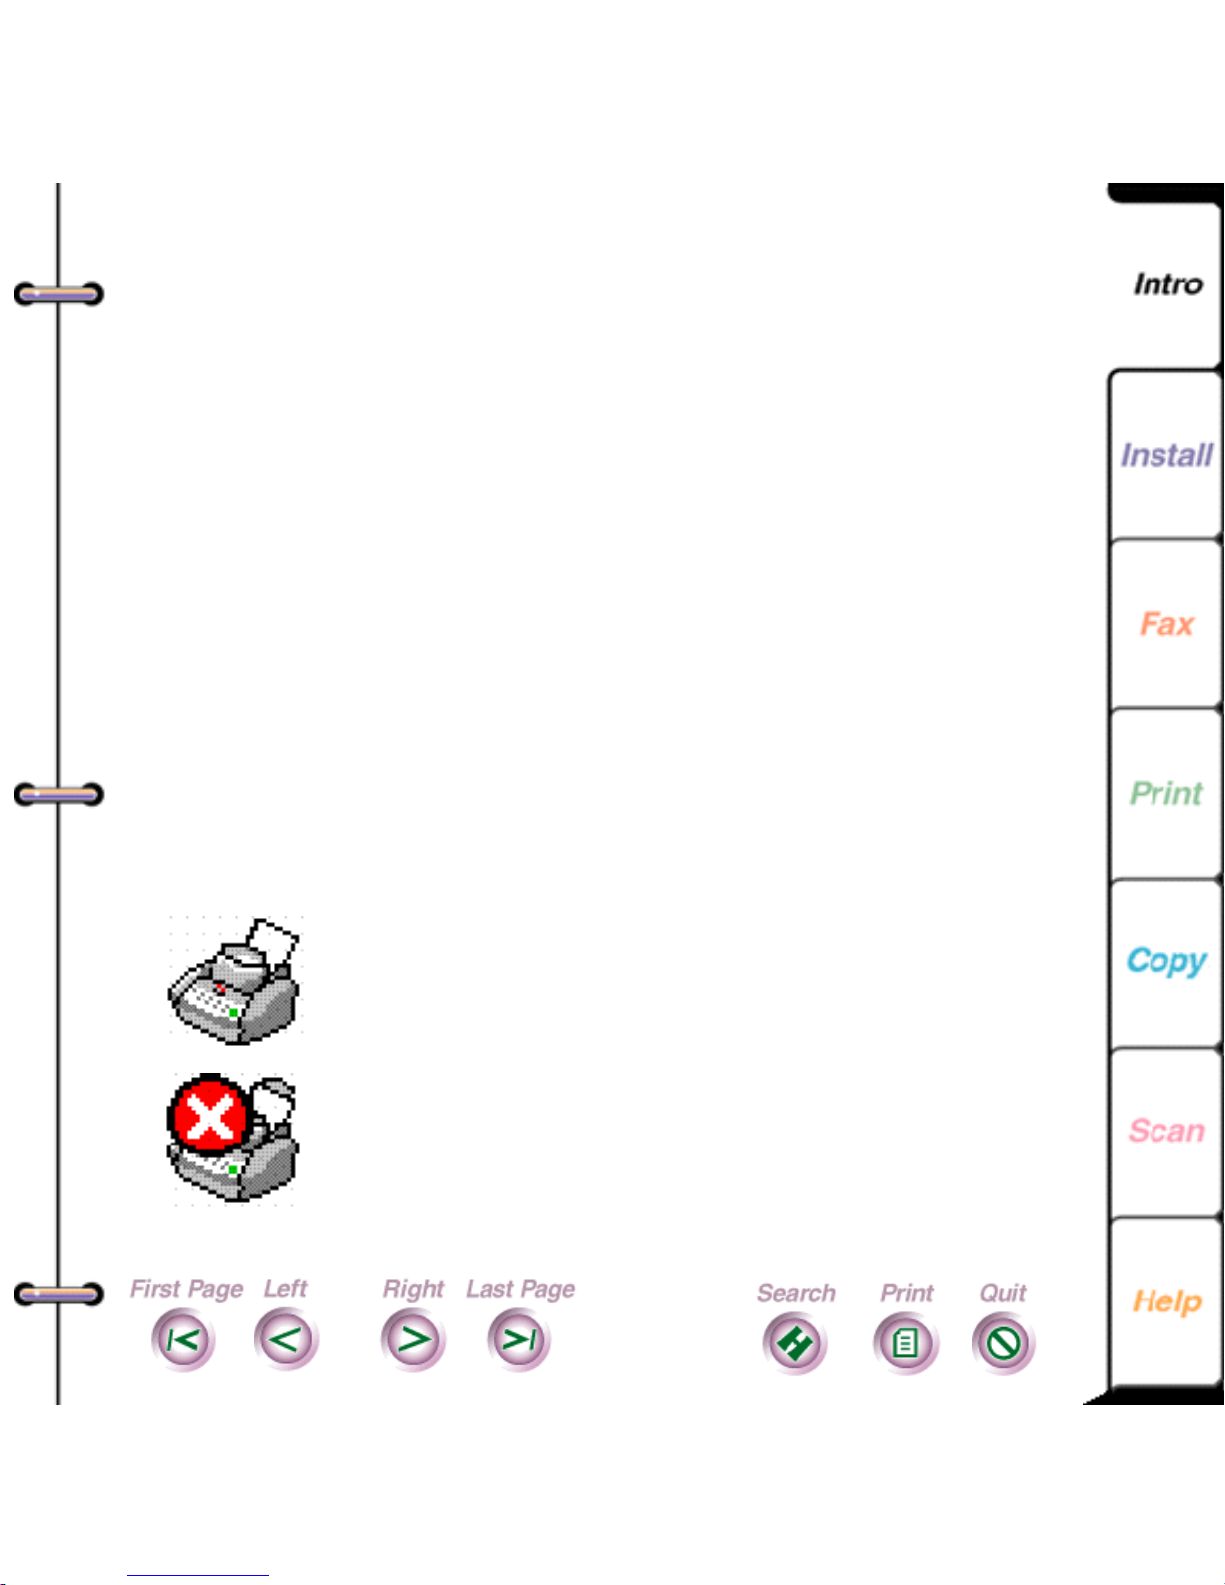
The icon’s appearance indicates the WorkCentre’s
condition.
T he WorkC en tre is ready t o use. Y ou can fax , cop y ,
print, or scan a document.
The WorkCentre is not operational and requires
your immediate attention. For example, you might
need to load paper or clear a jam.
Page 14
T he WorkC e ntre is opera t ional, but wil l soon ne ed a
replacement part. For example, the ink supply may
be running low and you’ll need to install a new ink
cartridge.
14
Note
When you move the mouse pointer over the
WorkCentre icon in Windows 95, a ToolTip window
displays. The ToolTip provides a brief description of
the WorkCentre’s status.
To open the ControlCentre on your PC, do one
of the
following:
• In Windows 95, double-click the WorkCentre icon
in the notification area on the taskbar.
• In W indows 3.1 or 3.1 1, double-click the
WorkCentre icon on your desktop.
Note
You can also find the WorkCentre icon in the
WorkCentre 450c program folder (program group)
and Windows Control Panel.
Page 15
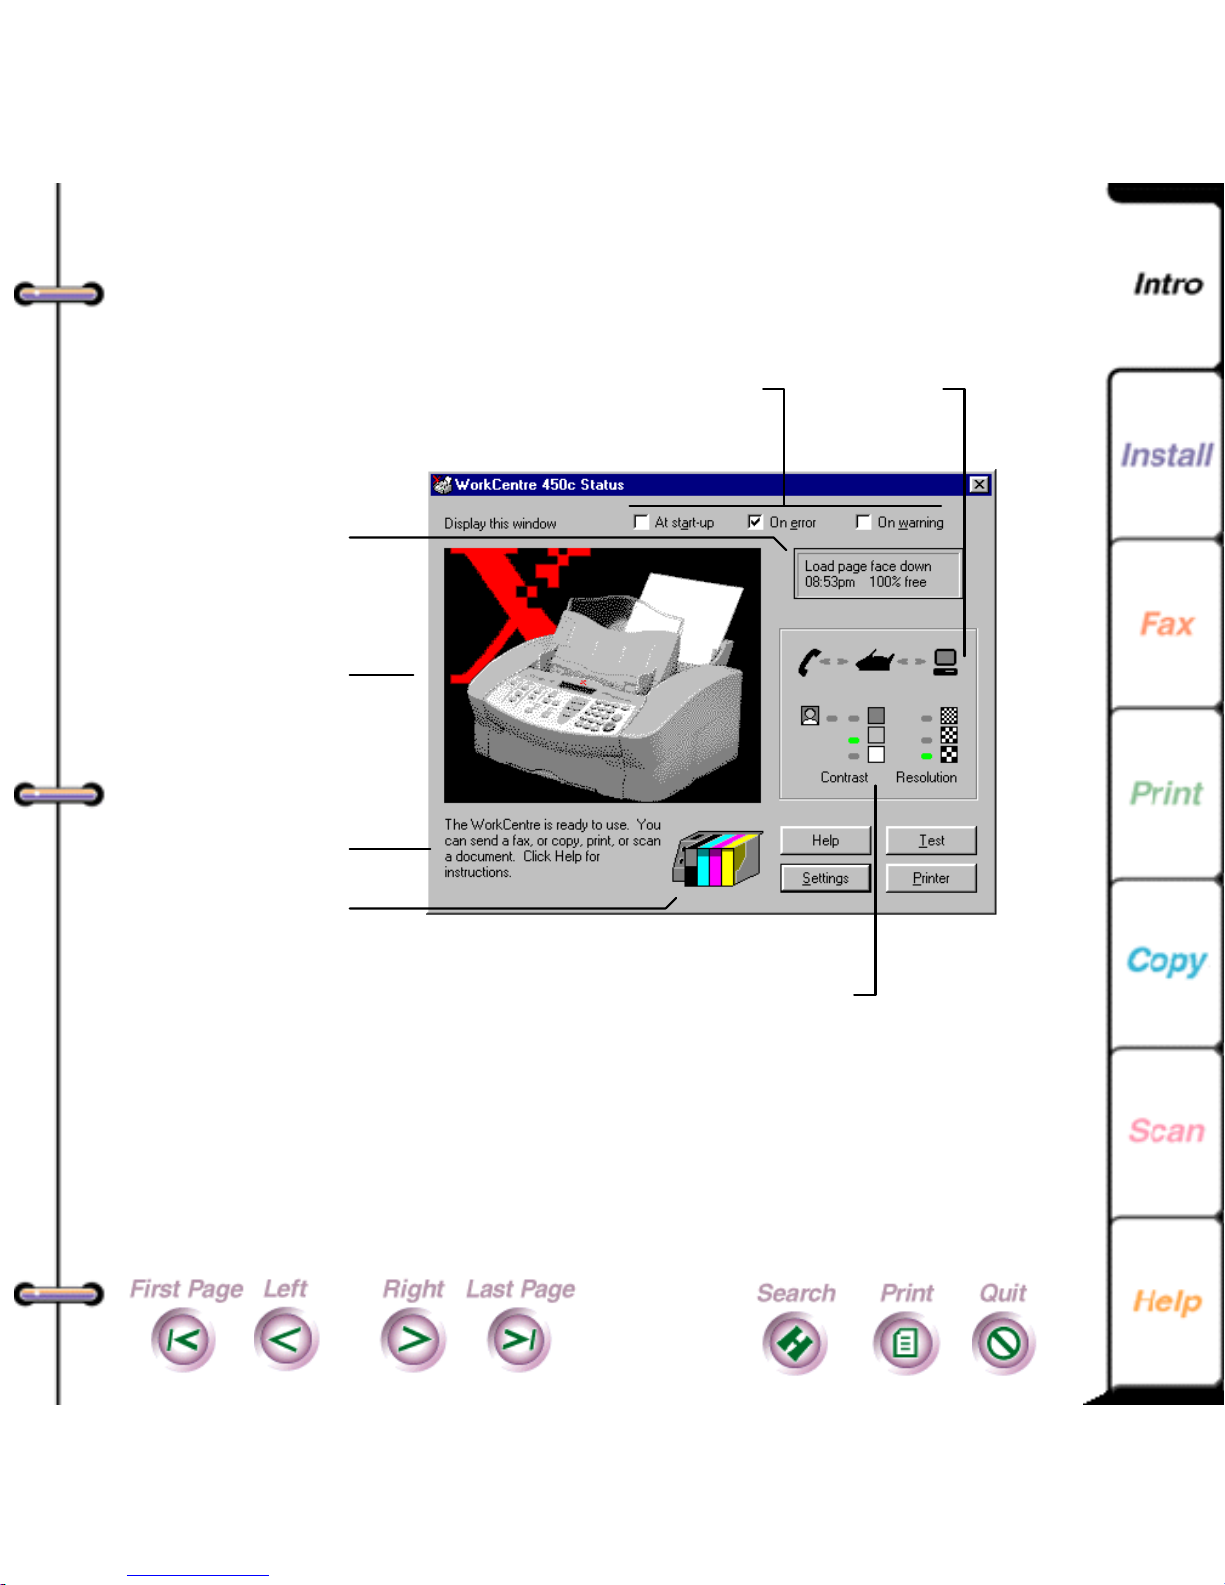
The WorkCentre Status window displays, which provides
the information shown below.
15
Message displayed on
the c ontrol panel LCD
WorkC entre 450c
graphic that changes ,
depending on its status
He lpful status message
I nk level gauges
Condition s under whic h the
WorkC entre 450c Status window
opens on your desktop
Doc ument
flow ic ons
Photo, contrast, and
resolution settings
When the WorkCentre’s status changes, the graphic
indicates the condition and a helpful message appears in the
window. You can find out more about the WorkCentre’s
status, including how to correct a problem, by clicking the
Help button.
Page 16

Setting the Contro lC ent r e
properties
Using the ControlCentre Properties dialog box, you can
change the conditions under which the WorkCentre Status
window automatically opens on your desktop. For
example, you can set the window to open any time an error
occurs, such as when the WorkCentre is out of paper or ink.
You also use the dialog box to choose which scanning
application to run when you press the SCAN key on the
WorkCentre control panel.
16
1. At your PC, do one
• In Windows 95, click the WorkCentre icon on the
taskbar with the right mouse button and then click
Properties.
• In W indows 3.1 or 3.1 1, click the W orkCentre icon
on the desktop with the left mouse button and then
click Properties.
of the following:
Page 17
The ControlCentre Properties dialog box displays.
Co ntrols the display of t he
Work Centre 450c Status
win dow
Displ ays the WorkCentre icon
on the task bar ( or desktop)
Runs the specified scanning
application when you press the
SCAN key
17
2. Under Display status window, click one of the
following:
• At start-up, to open the WorkCentre Status window
when you run W indows.
• On error , to open the W orkCentre Status window
when an error occurs.
• On warning to open the WorkCentre Status window
when a warning condition occurs.
Page 18
18
Note
: You can also click one or more of the Display
status window check boxes in the WorkCentre 450c
Status window to change the condition under which
the window opens.
3. To not display the WorkCentre icon on your taskbar or
desktop, do one
of the following:
• In Windows 95, click Show icon on the taskbar to
remove the check mark.
• In W indows 3.1 or 3.1 1, click Show icon on the
desktop to remove the check mark.
You can access the WorkCentre icon from the
WorkCentre 450c program folder (group) and
W indows Control Panel.
4. To choose the scanning application to run
automatically when you press the SCAN key on the
WorkCentre, do the following:
• Click Run scanning application.
• Click the Browse button to find the scanning
application’ s location.
Page 19
• Click the application and then click Open.
The application’ s location displays in the Run
scanning application box.
5. Click OK
19
Page 20

Select i ng and Or dering Suppl ies
You can purchase supplies from your local Xerox retailer.
To find the location nearest you, call 1-800-832-6979. If
your retailer is out of stock, you can order supplies through
Xerox:
• In the United States, call 1-800- 822-2200
• In Canada, call 1-800-668-0199 (English) or
1-800-668-0133 (French).
Reorder
Item Description
number
Color ink cartridges
20
Black Black ink cartridg e 8R7660
Cyan Cyan ink cartridge 8R7661
Magenta Magenta ink cartridge 8R7662
Yellow Yell o w ink ca r tri d g e 8R7663
Color print head Black housing that holds the
color ink cartridges
High capacity ink
jet cartridge
Storage box St or age b ox for t he col or print
Fast, black-only ink cartridge 8R7638
head or high capacity ink jet
cartridge, when not in use.
8R7659
60K01010
Page 21

Plain paper and media
Most types of paper will work well in the WorkCentre,
although some variables in paper composition may affect
print quality. Most high-grade photocopying papers and
cotton bond papers produce good results. You should fully
test a paper before purchasing large quantities.
You can order plain paper and media from your local Xerox
retailer. To find the location nearest you, call 1-800-832-
6979. If your retailer is out of stock, you can order supplies
through Xerox:
• In the United States, call 1-800- 822-2200
• In Canada, call 1-800-668-0199 (English) or
21
1-800-668-0133 (French).
Page 22
Region Description
North America
22
Reorder
number
United States Xerox Image Series LX
(8 .5 x11 in, 24 lb)
Xerox Select Ink Jet Paper
(8 .5 x11 in, 24 lb)
Canada Xerox Image Series LX
(8 .5 x11 in, 24 lb)
Xerox Select Ink Jet Paper
(8 .5 x11 in, 24 lb)
South America
Brazil Papel Xer ox
(216x279 m m, 75 g/m
2
Papel Xer ox
(210x297 m m, 75 g/m2)
Papel Xer ox
(210x297 m m, 90 g/m2)
3R3874
3R5433
3R4284
3R5433
3R70024
)
3R70033
3R70355
Europe
Xerox Laserpr int
(210x297 m m, 80 g/m2)
Xerox Colote ch
(210x297 m m, 90 g/m
3R93556
3R93022
2
)
Page 23
23
Xerox Colote ch
2
(210x297 m m, 100 g/m
Other Countries Contact Xerox for correct
reorder numbers
)
3R91290
Specialty print media
Xerox offers a wide range of specialty print media:
transparency film, high resolution paper, photogloss paper,
and a fabric transfer sheet.
For best results, use only specialty media designed for the
WorkCentre. Avoid extremely thin paper, thick paper, or
chemically processed pape r such as thermal fax paper, as
frequent paper misfeeds may occur.
With all specialty media, read and follow the instructions
for proper loading into the document feeder tray.
You can order specialty print media from your local Xerox
retailer.
To find the location nearest you, call 1-800-832-6979.
Page 24
If your retailer is out of stoc k, you can order supplies
through Xerox:
• In the United States, call 1-800- 822-2200
• In Canada, call 1-800-668-0199 (English) or
1-800-668-0133 (French).
Reorder
Size Description
number
24
L etter
(8.5x11 in)
A4
(210x297
mm)
Ink Jet Transparency
(4 .2 mil, 20 sheets)
Ink Jet High Resolution Paper
(28 lb, 200 sheets)
double-sided, matte-coated paper
Ink Jet Photo Glossy Paper
(6 mil, 10 sheets)
Ink Jet Fabric Transfer
(10 sheets)
Ink Jet Transparency
(4 .2 mil, 20 sheets)
Ink Jet High Resolution Paper
(104 g/m
double-sided, matte-coated paper
2
, 200 sheets)
3R5813
3R5814
3R5877
3R5878
3R93880
3R93881
Page 25

25
Color Ink Jet
(100 g/m
2
, 100 sheets)
3R93312
single-sided, matte- coated paper
Ink Jet Photo Glossy Paper
3R93882
(6 mil, 10 sheets)
Ink Jet Fabric Transfer (10 sheets) 3R93883
Page 26

WorkCentre 450c Specifications
General Specifications
Power 110/220 VAC; 50/60 Hz
Power consumption 14 watts, in idle mode
Size and weight Height (with tr a ys): 11 .5 in (292 mm)
Width: 16.5 in (419 mm)
Depth: 17.25 in ( 438 mm)
Weight: 18 lbs (8.2 kgs)
Environm ent Temperature range: 50(F (10(C) to 90(F
(32(C)
Humidity range: 20% to 80%, non-condensing
26
Fax Specifications
Transmission speed 6 seconds per page (CCITT Document
#1; 14,400 bps, standard resolution)
Memory 23 pages (CCITT Document #1, stan-
dard resolution)
Speed dialing 94 individual entries; 5 group entries
Gr oup dial One-time transmission and pre-pro-
grammed
Distinctive ring detection Up to th ree different ring patterns
Page 27
Fax Specifications (Continued
)
Security Confidential send and r eceive
Resolution 300 x 300 dpi
27
Document sizes
(for docum ent tray)
Letter: 8.5x11 in (216x279 mm)
Legal: 8.5x14 in (216x356 mm)
A4: 8.3x11.7 in (210x297 mm)
Document tray capacity 20 pages
Modem speed 14400, 9600, and 4800 bps
Compatibility CCITT Group 3, Error Correction Mode
Data compression MH, MR, and M MR
U nprintable area
(Incoming faxes)
Top, left, and right margins: 5 mm
Bottom margin: 10 mm with high
capacity ink jet cartridge; 12.7 mm with
color print head with black ink cartridge
Page 28
Printer Specifications
Technology Thermal ink jet dr op-on-demand
Compatibility Windows 3.1/3.11, Windows 95, DOS
Print speed B lack and w hite High cap ac ity in k jet cart ridg e:
Up to 6 pages per minute
Col o r pri nt head wit h bla ck ink cartr idge: Up to
4 pages per minute
Color: Up to 1 page per minute
Resolution Black and white: 600 x 600, 600 x 300, and
300 x 300 dpi
Color: 600 x 600 and 300 x 300 dpi
Fax (black and white only): 300 x 300 dpi
28
Media sizes (for
paper tr ay)
Letter: 8.5x11 in (216x279 mm)
Legal: 8.5x14 in (216x356 mm)
A4: 8.3x11.7 in (210x297 mm)
U.S. card stock: 4x6 in, 5x8 in
U.S. No. 10 envelope: 4.12x9.5 in
European DL envelope: 110x220 mm
Paper tray capacity
150 sheets of paper, 20 lb (75 g/m2)
10 sheets of transparency film
10 envelopes
Printer output tray
50 sheets of paper, 20 lb (75 g/m2)
capacity
Emulation PCL3c
Page 29
Printer Specifications (Continued
)
Resident fonts Courier (portrait and landscape)
Pitch: 5, 10, 16.67, 20 cpi
Point size: 6, 12, 24 p t
Univers (portrait and landscape)
Pitch: Proportional
Point size: 6, 12, 24 p t
CG Times (portrait and landscape)
Pitch: P roportional
Point size: 6, 12, 24 p t
Chara cter Se ts HP PC-8, HP Roman-8 , PC-8 Dan/Nor ISO 21,
PC-850, ECMA-94 Latin 1 IS O 8859/1, Germa n ISO 21, French ISO 69, Italian ISO 15,
Spain ISO 17, Swedish Names ISO 11, Swed-
29
U nprintable area
(PC printing)
ish ISO 10, Norwegian 1 ISO 60, Norwegian 2
ISO 61, Portuguese ISO 16, UK ISO 4, ANSI
ASCII ISO 6, HP-Lega l, ISO IRV ISO 2, HP
PC-852, Latin 2 ISO 8859/2, Latin 5 ISO 8859/
9, HP PC-8 Turkish , Cyrillic 3R, Cyr illic 10N
Top, left, and right margins: 5 mm
Bottom margin: 12.7 mm
Page 30
Copier Specifications
Copy speed Up to 3 pages per minute
Multiple c opies Up to 99 copies of multi-page originals
Resolution 300 x 300 dpi
Im age quali ty Normal: Bi-level and 4 levels of gray
Halftone: E rror diffusion (10 perceptible levels
of gray)
Contras t Normal, lighten, darken, photo-normal, photo-
lighten, photo-darken
Red uction 100% to 75%, in 5% increments
Enlargement 125% and 150%
Collatio n Yes, user selectabl e
30
Paper sizes (for
document tray, 2 0
sheets maximum)
U nprintable area
(Copying)
Letter: 8.5x11 in (216x279 mm)
Legal: 8.5x14 in (216x356 mm)
A4: 8.3x11.7 in (210x297 mm)
Top, left, and right margins: 5 mm
Bottom margin: 10 mm with high cap acity ink
jet ca rtridg e; 12.7 mm w ith col or pri nt head wi th
black ink cartridge
Page 31

Scanner Specifications
Scanner speed 10 seconds per page
Resolution 300 x 300 dpi
Compatibility TWAIN-compliant
Scan to PC 300 x 300 and 200 x 200 spi, single-bit, uncom-
pressed, compressed MH
300 x 300 and 200 x 200 spi, 4-bit, uncom-
pressed
31
Page 32

Keypad Chara cter Assignm ents
Alphabetic characters and symbols are assigned to the keys
on the numeric keypad, which enables you to enter words
at the control panel. For exa mple, if you are adding a
Phonebook entry at the control panel, you can enter the
name that you want to assign to the speed dial number.
This appendix includes the keypad character assignments
for North and South America, and Europe.
32
Page 33

Keypad character assignments for North and
y
(
)
South America
The following table shows the characters assigned to each
numeric key for North and South America. Press the
appropriate key several times until the character you want
displays on the control panel LCD.
Assigned characters
Ke
North and South America
1 1
2 A B C 2 a b c Á Â À Ç á â à ã ç
3 D E F 3 d e f É é ê è ë
4 G H I 4 g h i Í Î í î ï
33
5 J K L 5 j k l
6 M N O 6 m n o Ñ ó ô õ ñ ó ô ò õ Œ
7 P Q R S 7 p q r s
8 T U V 8 t u v Ú Ü ú ü
9 W X Y Z 9 w x y z
* ! “ ‘ ( ) * + $ % & { } ( (
0 0 , - . / : ; = ? [ ] ( _
# # @ space
Page 34

Keypad character assignments for Europe
y
)
The following table shows the characters assigned to each
numeric key for Europe. Press the appropriate key seve ral
times until the character you want displays on the control
panel LCD.
34
Ke
1 1 Å Ä À Â Á Ã Æ å ä à â á ã æ
2 A B C 2 a b c ( ( Ç ( ( ( ( ç ( (
3 D E F 3 d e f ( ( È ( Ê ( ( ( ( ë è é ê ( (
4 G H I 4 g h i Ï Î Í Ì ï î í ì
5 J K L 5 j k l ( (
6 M N O 6 m n o Ñ ( ( ö ô ó ò õ Ø ñ ( ( ö ô
7 P Q R S 7 p q r s (
8 T U V 8 t u v ( ( Ü Ù Û Ú Ù ( ü ú ù
9 W X Y Z 9 w x y z ( (
* ! “ ‘ ( ) * + $ % & { } ( (
0 0 , - . / : ; = ? [ ] ( _ Π( (
# space # @
Assigned characters (Europe
ó ò õ ø
Page 35
Chapter 2
Installation, setup an d
maintenance
Connecting the telephone lines
Connecting the power and parallel cables
Using the Setup Wizard to select your fax options
Customizing the Control Panel
Changing the control panel default settings
Maintenance Procedures
35
Cleaning a color print head or high capacity ink jet
cartridge
Installing a high capacity (black only) ink jet cartridge
Installing the color ink cartridges
Installing a color print head
Replacing the automatic document feed pad
Cleaning the WorkCentre
Page 36
Connecting the tel ephone lines
There are three telephone line jacks at the rear of the
WorkCentre. To connect the telephone lines properly,
decide how you will use the WorkCentre and then follow
the appropriate steps.
I will receive fax calls only on the telephone line
(dedicated fax machine).
Insert one end of the telephone cord supplied with the
WorkCentre into the Line jack at the rear of the
WorkCentre, and insert the other end into your
telephone wall plug.
36
Page 37
I will receive both fax and voice calls on the telephone
line, and I will not use an answering machine.
1. Insert one end of the telephone cord supplied with the
WorkCentre into the Line jack at the rear of the WorkCentre, and insert the other end into your telephone
wall plug.
2. Insert your telephone’ s cord into the T el 1 jack at the
rear of the W orkCentre.
37
Page 38
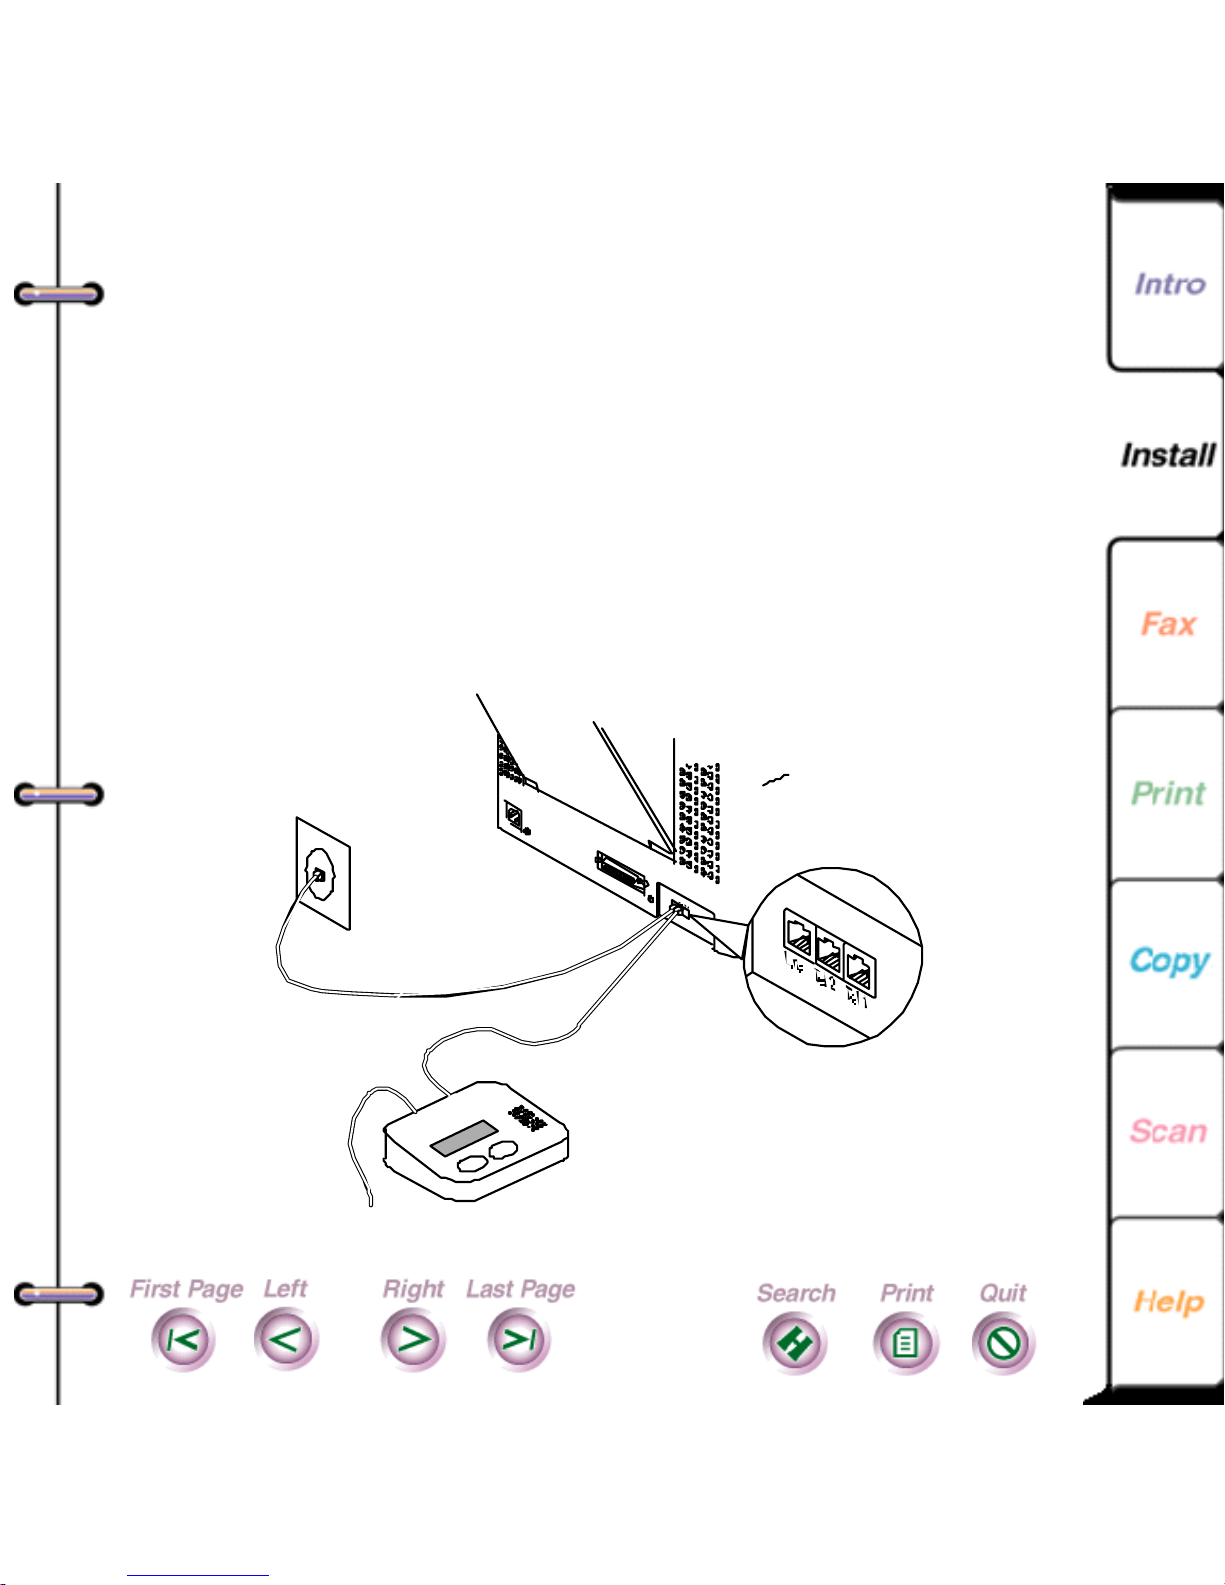
I will receive both fax and voice calls on the telephone
line, and I will use an answering machine.
1. Insert one end of the telephone cord supplied with the
WorkCentre into the Line jack at the rear of the WorkCentre, and insert the other end into your telephone
wall plug.
2. Insert your answering machine’ s cord into the Tel 2
jack at the rear of the WorkCentre. If your answering
machine does not include a telephone, connect your
telephone to the answering machine.
38
To phone
Hint: Be sure to set your
WorkCentre “answer mode”
to “answering machine”
Page 39

I also want to use a data modem with my PC and
WorkCentre 450c.
Use a phone cord “Y” cable, or splitter at the wall jack.
A splitter has one connector that plugs into your wall
jack, and two jacks that accept phone cables.
Connect a phone cord from your modem’ s Line jack to
one jack on the Y cable, and another phone cord from
the W orkCentre’s Line jack to the other jack on the Y
cable. Plug the Y cable connector into your wall jack.
39
Note
Be sure your data modem is
set to “auto
not
answer”, otherwise it may answer incoming calls
before the WorkCentre 450c. See your modem’s
documentation for more information.
Page 40
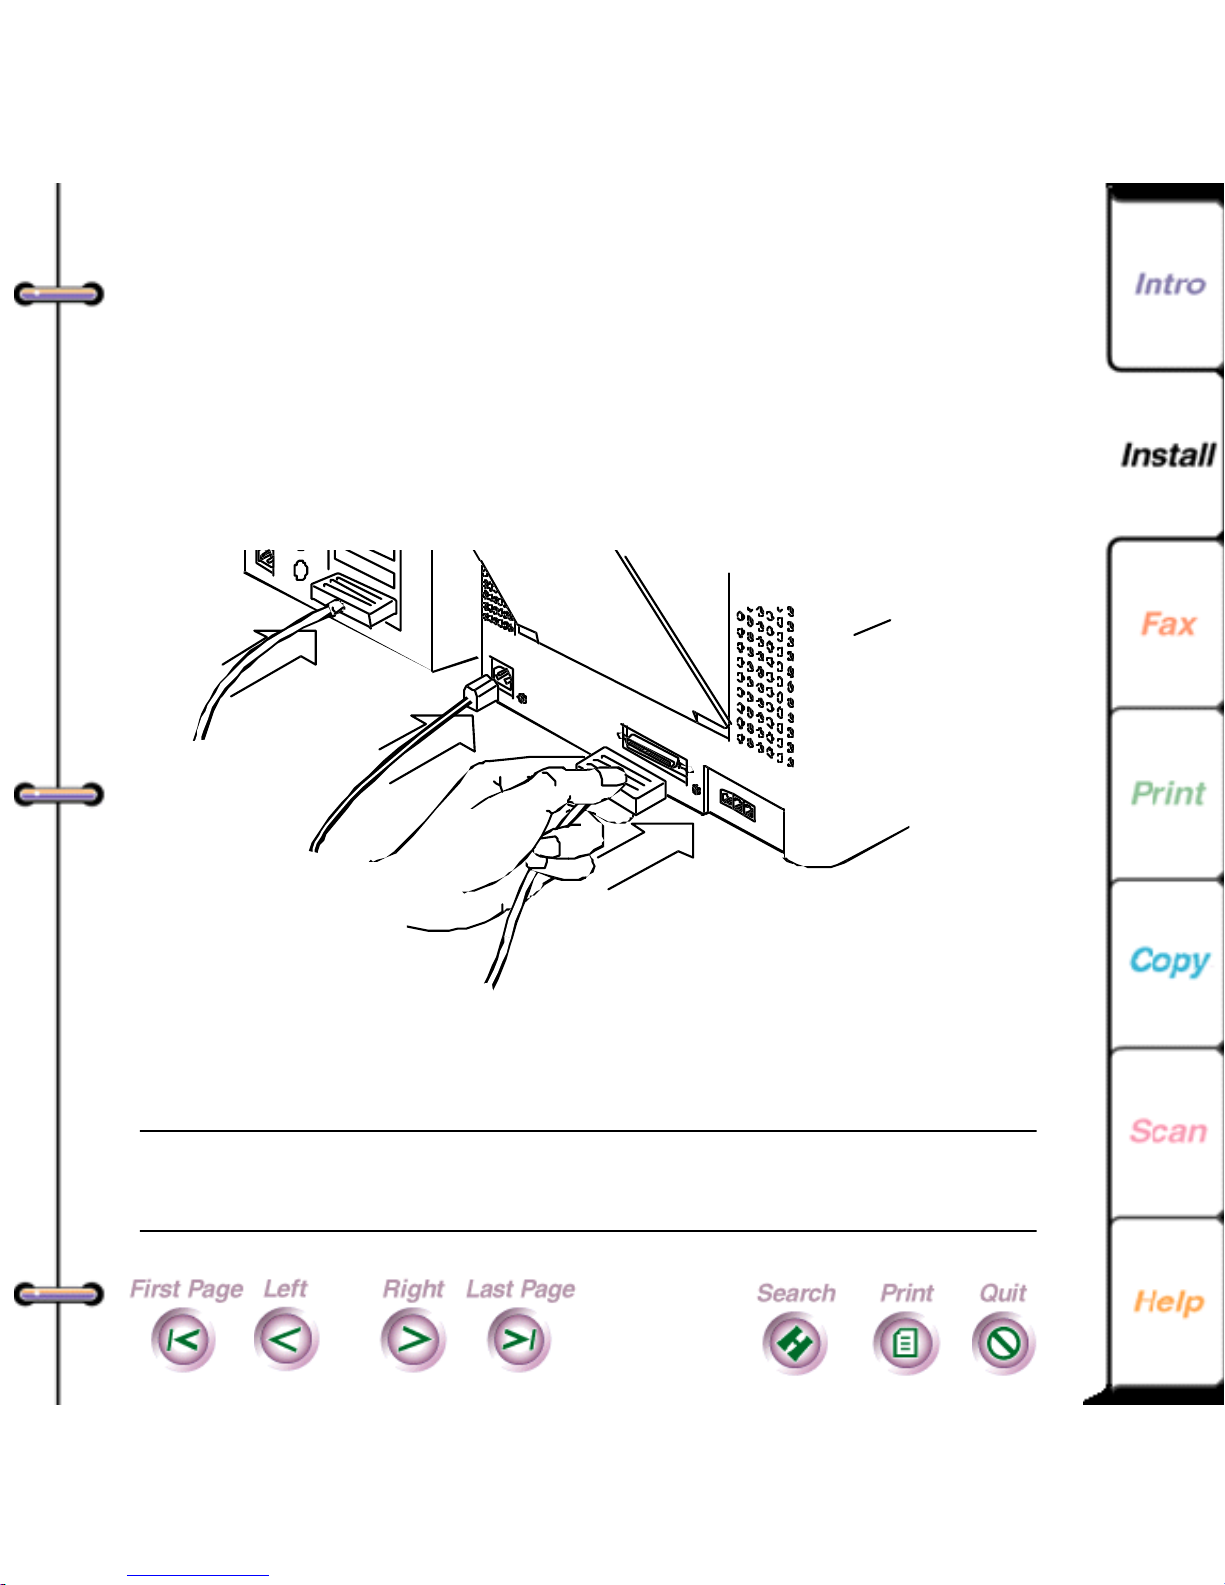
Connecting the power
and paral l el ca bl es
The WorkCentre 450c includes a parallel cable and a power
cord. The parallel cable connects the WorkCentre to your
PC and the power cord connects the WorkCentre to an
electrical outlet.
40
Power
cord to a
grounded
electrical
outlet
Note
Before connecting the cables, make sure your
PC is turned
Off
Parallel cable connects the WorkCentre
to a free parallel (printer) port on
your PC
.
Page 41

1. Attach the parallel cable to the parallel port at the rear
of the WorkCentre, securing it with the wire clips, and
then to a free parallel (printer) port on your PC.
2. Attach the power cord to the power connector at the
rear of the W orkCentre.
3. Plug the cord into a grounded electrical outlet.]
Note In the United States and Canada, use a UL listed and
CSA labeled detachable power cord, 3-conductor, 18
AWG, SJT or SVT type, plug grounding type parallel
blade, cord connector body IEC 320 style to connect to the
WorkCentre. Make sure the electrical outlet is near the
WorkCentre and easily accessible.
41
The power cord is used as the main disconnect device.
Page 42

Using th e Setu p Wizard to select
your fax opt io ns
The Setup Wizard helps you select basic options for
sending and receiving faxes. You may have run the wizard
after you installed your software to select your fax options.
You can run the Setup Wizard at any time to change your
fax options.
Note FCC and Communications Canada regulations
require you to enter the WorkCentre’s fax number. Make
sure you provide the number before using the WorkCentre.
1. Turn on your PC.
42
2. Do one
• In Windows 95, double-click the W orkCentre icon
on the taskbar . Click the WorkCentre icon located in
the upper left corner and then click Setup Wizard.
• In Windows 3.1 or 3.11, double-click the
WorkCentre icon on the desktop with the left mouse
button and then click Setup Wizard.
3. Follow the instructions on your screen to select the fax
options you want.
of the following:
Page 43
Cust om izing the Cont r ol Panel
After you’ve been using the WorkCentre for a while, you
may want to change the control panel’s default settings. For
example, you can specify the types of sounds the
WorkCentre makes and the settings for some of the keys on
the control panel.
43
Page 44

Changing the control panel default settings
1. At your PC, double-click the WorkCentre icon.
2. In the WorkCentre Status window, click Settings.
3. Click the Panel tab.
Specif ies lan guage
used to displ ay m enus
Defines s ounds to acti vate
and volume levels
44
Sets defaults for
control panel key s
Automatically collates
copie s
Returns options to their
default settings
Page 45

4. Change the defaults for any of these options:
Language
Sets the language used to display the menus on the
WorkCentre’ s LCD. The options vary , depending on
the country in which you reside.
Volume
Sets the volume level for the a larm, button, and dial
tone sounds. Options are Low , Medium, and High.
Alarm sound
Sounds an alert tone when an error occurs.
Button sound
45
Activates a sound each time you press a key.
Listen to dial
Activates an audible dial tone at the start of a call.
Resolution
Sets the sharpness of the outgoing faxes. Options are
standard (200 x 100 dpi), fine (200 x 200 dpi), and
superfine (300 x 300 dpi).
Page 46

Contrast
Adjusts the lightness and darkness of your copies
and outgoing faxes. Options are lighten, normal,
darken, photo lighten, photo normal, and photo
darken.
Size
Reduces or enlarges copies by the percentage you
choose. Options are 95%, 100% (same size),
enlarge 125%, enlarge 150%, 75%, 80%, 85%,
and 90%.
Pause
Defines how the PAUSE key is used. Options are
46
pause only and dial options. Pause only inserts a
timed interval in a dialing sequence. Dial options
lets you enter a pause, enter a charge code, and
switch to touch-tone dialing if your telephone is set
to pulse (rotary) dialing.
You define the pause length on the Phone Line
property page
Collate copies
Arranges, in sequential order, multiple copies of the
same document.
Page 47

5. Do one of the following:
• Click OK to change the options at the WorkCentre
and close the W orkCentre Settings window.
• Click Apply to change the options at the
WorkCentre and keep the WorkCentre Settings
window open.
47
Note
To use the factory defaults, click the Restore
Defaults button.
M aintenance Procedures
To keep your WorkCentre in good operating condition, you
need to perform periodic maintenance tasks.
Cleaning a color print head or high capacity ink jet
cartridge
When you notice streaks or lines on your printed pages, you
should clean the color print head or high capacity ink jet
cartridge. If cleaning the head or cartridge two or three
times does not improve your print quality, then you should
replace the color print head or high capacity ink jet
cartridge.
Page 48

1. At the WorkCentre 450c, press the CARTRIDGE key
twice to display [clean] on the LCD.
2. Press ENTER.
A message displays on the LCD while the W orkCentre
is cleaning. When cleaning is complete, you can run a
printer test to check
your print quality .
3. Press the MENU key .
4. Press 6 [Printer] and ENTER.
5. Press 5 [Make test print] and ENTER.
6. Check the test print. If you notice breaks in the ink
48
coverage, clean the color print head or high capacity
ink jet cartridge again.
Page 49

Installing a high capacity (black only) ink jet
cartridge
The WorkCentre 450c Status window on your PC includes
an ink level gauge which indicates your ink supply. When
the ink supply runs low, the WorkCentre displays a
message in the WorkCentre 450c Status window and on the
control panel LCD. If your print quality is good, press the
START key on the control panel and continue using the ink
jet cartridge.
If you need to replace the high capacity ink jet cartridge,
use the following procedure. You can also use the
procedure to install an ink jet cartridge for the first time,
and to reinstall a previously used ink jet cartridge when
49
changing from color to black-and-white printing.
Note
If you run out of ink while printing faxes or
documents stored to memory, any pages printed
before you change the ink cartridge are lost.
1. At the WorkCentre 450c, press the CARTRIDGE key
to display [change] on the LCD.
Page 50
2. Press ENTER.
The W orkCentre moves the high capa city ink jet
cartridge to the center of the printer so you can you
remove it.
50
Note
If the high capacity ink jet cartridge does not
move to the center of the printer, unplug the
WorkCentre’s power cord, wait a few seconds, and
then reconnect it.
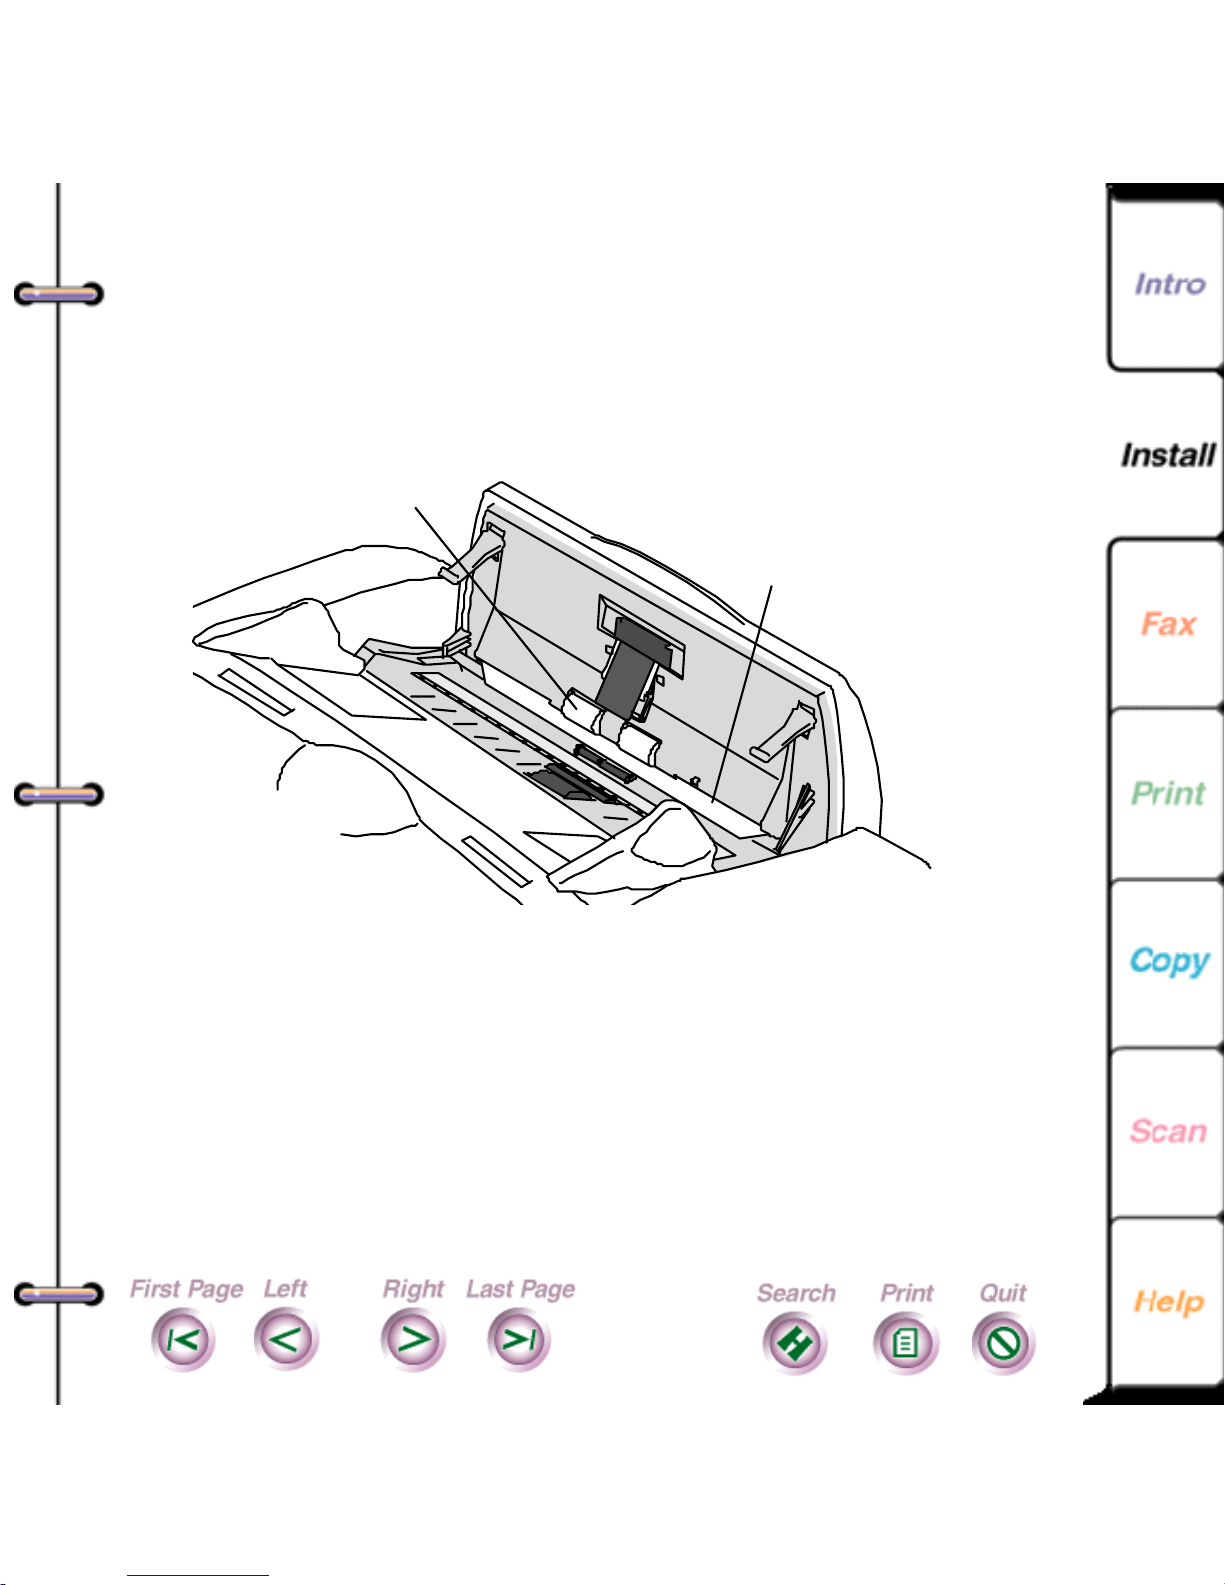
3. Remove the document tray and open the printer cover.
Page 51
4. Pull the green carriage lock lever forward and remove
the cartridge.
51
Note
If you are changing from color to black-andwhite printing, place the color print head in the print
head storage box. This prevents the ink from drying
out and clogging the ink jets.
5. If you are installing a new cartridge, remove the ink jet
cartridge from the box, peel back the foil cover, and lift
out the cartridge. Remove the green nozzle protector
tab and the tape from the c artridge.
Page 52
6. W ith the green carriage lock lever still in the forward
position, install the cartridge by aligning the hole in the
cartridge with the green post on the printer carriage.
Gently lower the cartridge into position.
52
Page 53
7. Push the green carriage lock lever backward to secure
the cartridge. Do not force the lever backward.
8. Close the printer cover and replace the document tray .
53
9. Do one of the following:
• If yo u installed a new high capacity ink jet cartridge,
press START .
• If you reinstalled a previously used high capacity
ink jet cartridge, press STOP.
The cartridge returns to the home position (far left side of
printer) and the WorkCentre cleans the cartridge. After a
few moments, the printer returns to normal print mode.
If the cartridge does not return to the home position, try
removing and reinstalling the ink jet cartridge.
Page 54
Installing the color ink cartridges
For co lo r printing, the WorkCentre uses four ink cartridges:
magenta, cyan, yellow, and black. The four cartridges are
housed in the color print head. You can replace individual
ink cartridges as needed.
The WorkCentre 450c Status window on your PC includes
ink level gauges which indicate the ink supply in each
cartridge. When the ink supply runs low in a cartridge, the
WorkCentre displays a message in the WorkCentre 450c
Status window and on the control panel LCD. You should
replace the black ink cartridge as soon as possible to ensure
your incoming faxes will continue to print.
54
Note
If you run out of ink while printing faxes or
documents stored to memory, any pages printed
before you change the ink cartridge are lost.
Caution
Keep the ink cartridges out of the reach of
children. Do not get the ink near your eyes or mouth.
1. At the WorkCentre 450c, press the CARTRIDGE key
to display [change] on the LCD.
2. Press ENTER.
Page 55
The W orkCentre moves the color print head to the
center of the printer so you can access the color ink
cartridges.
55
Note
If the color print head does not move to the
center of the printer, unplug the WorkCentre’s power
cord, wait a few seconds, and then reconnect it.
3. Remove the document tray and open the printer cover.
4. W ith the color print head installed in the printer,
remove the empty ink cartridge from the color print
head by lifting it up and out.
Page 56
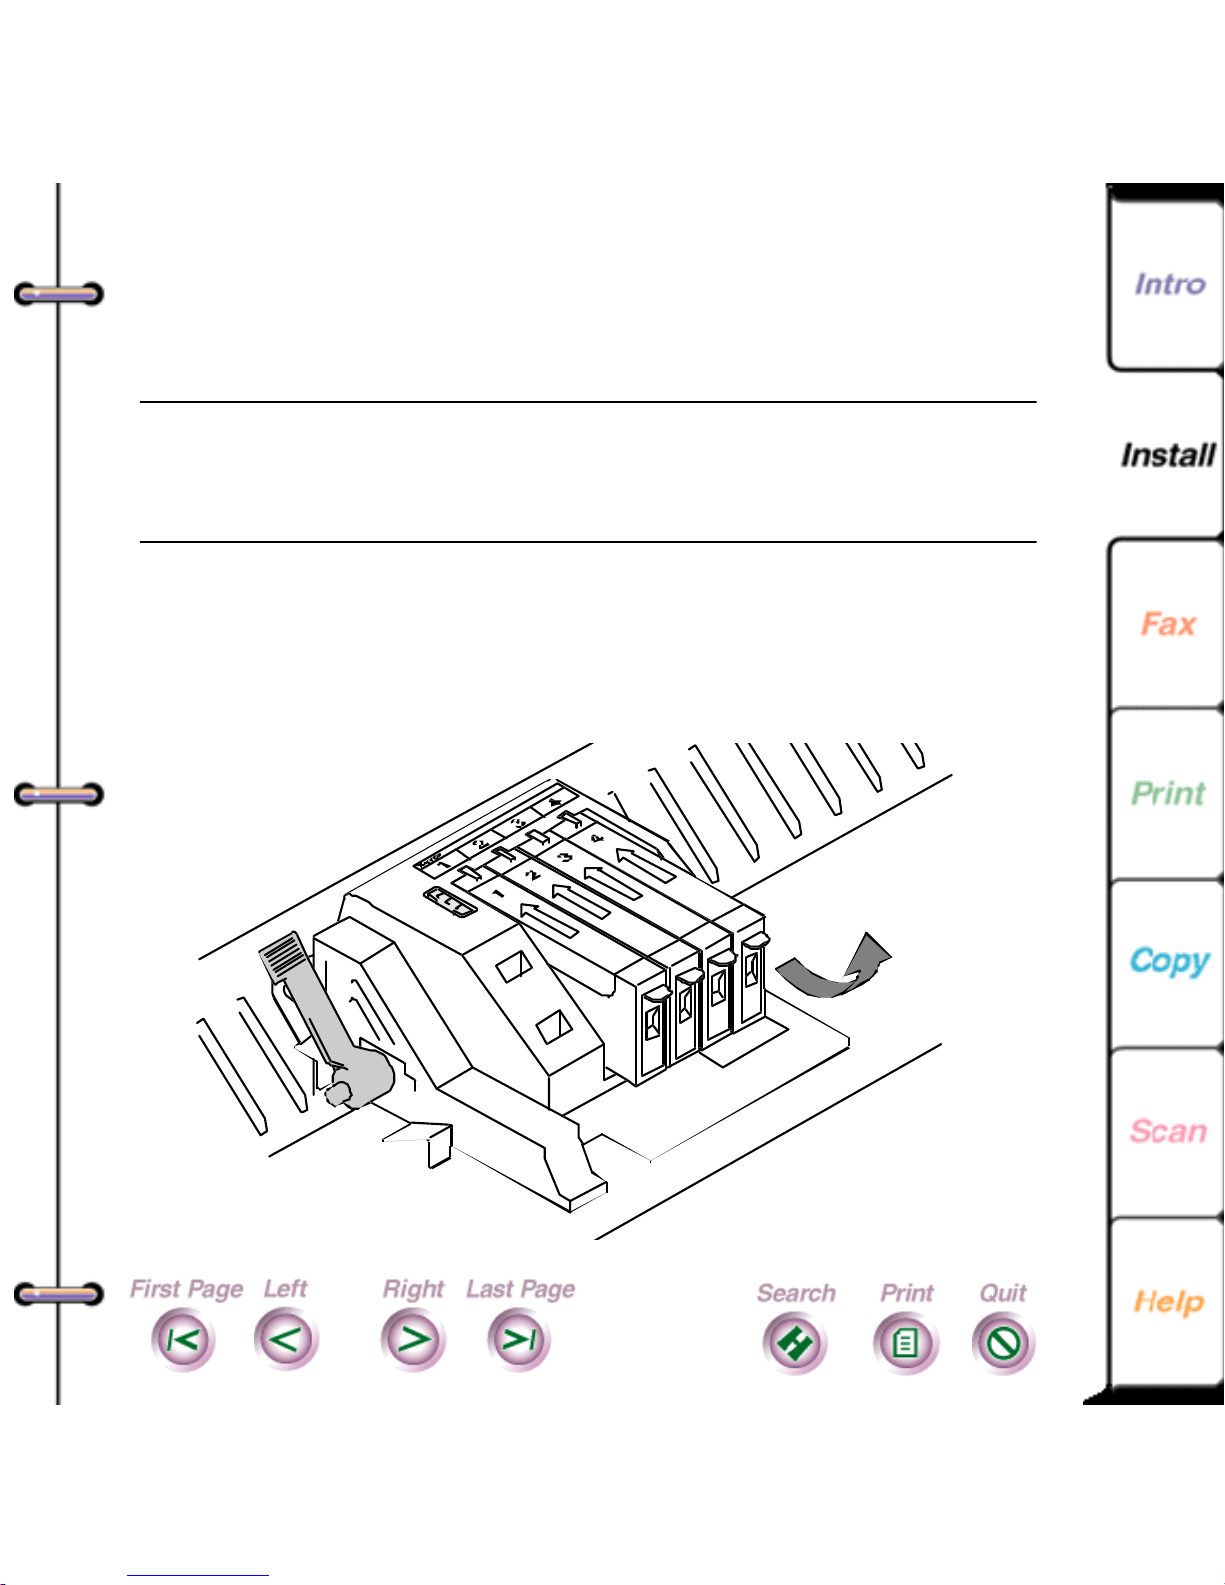
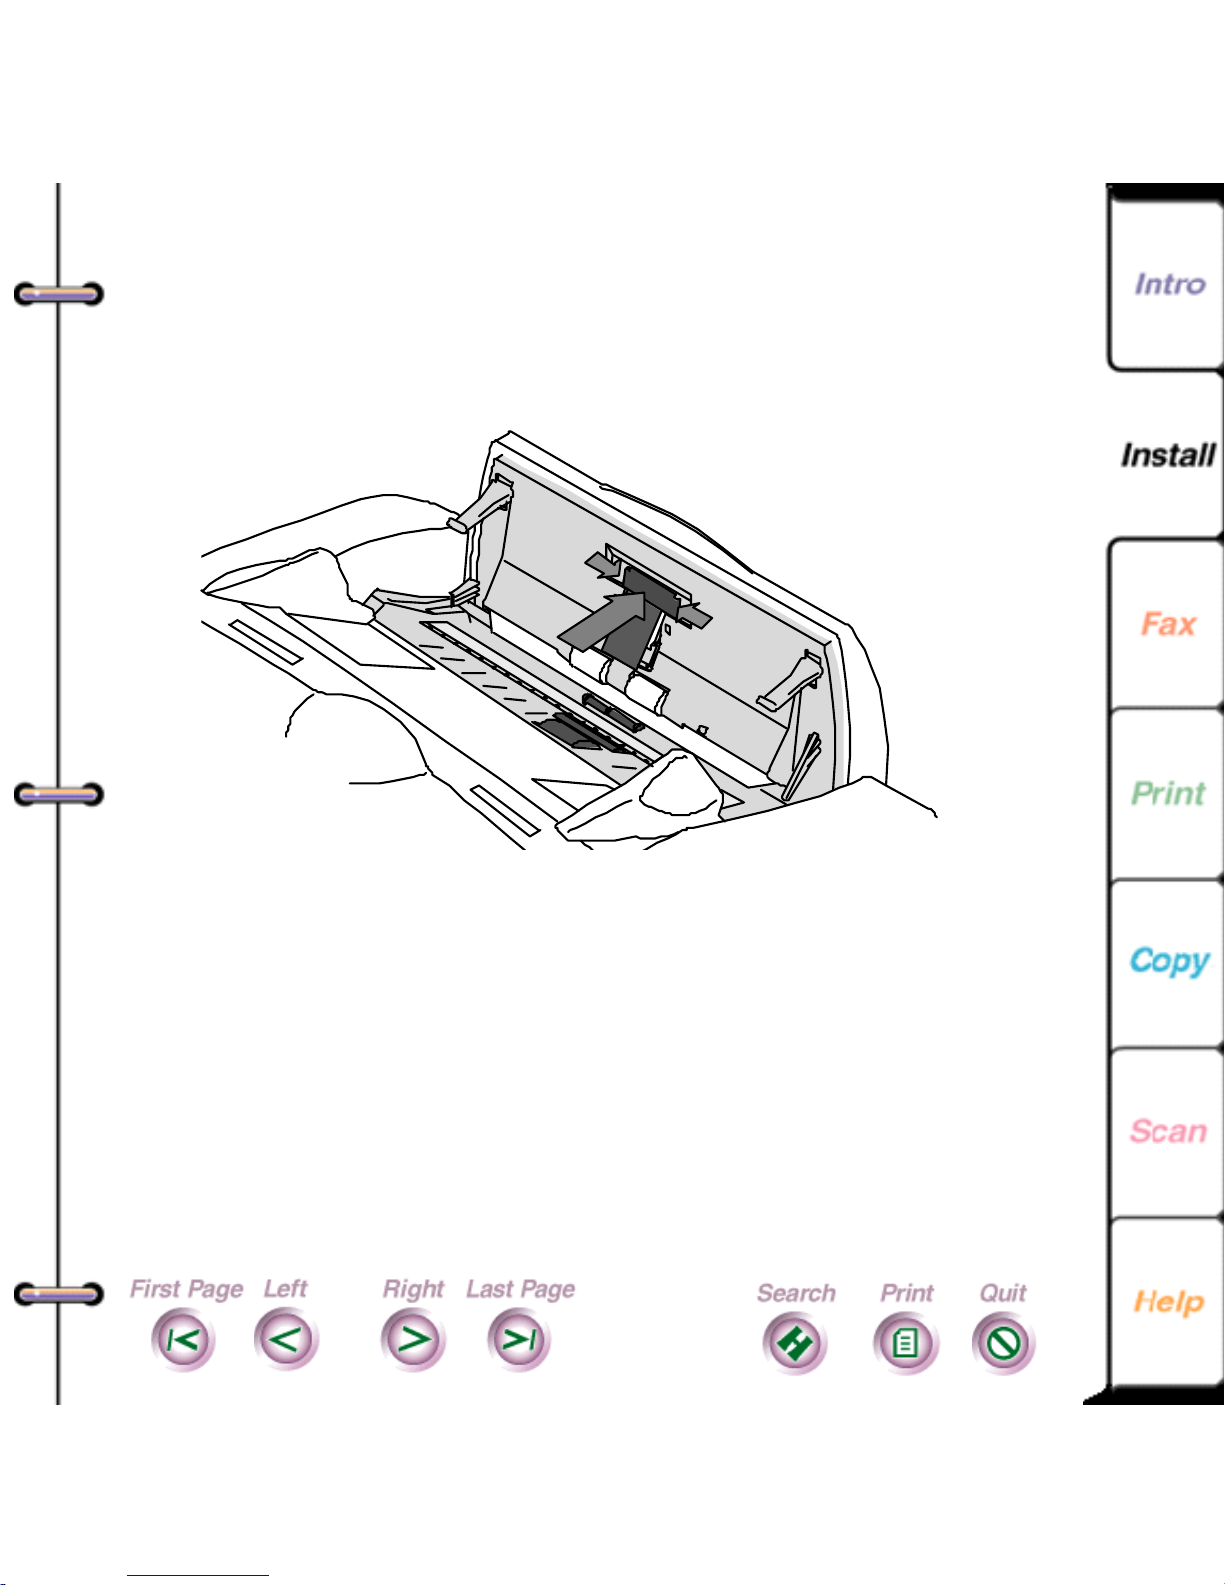
5. Remove the new ink cartridge from its package.
Slowly remove the protective strip from the cartridge
in the direction of the arrow.
56
Note
Do not touch the uncovered hole in the ink
cartridge, as ink will get on your hands.
6. Insert the ink cartridge into the correct location on the
color print head as shown. The ink cartridges and
corresponding locations are color coded and
numbered.
Page 57
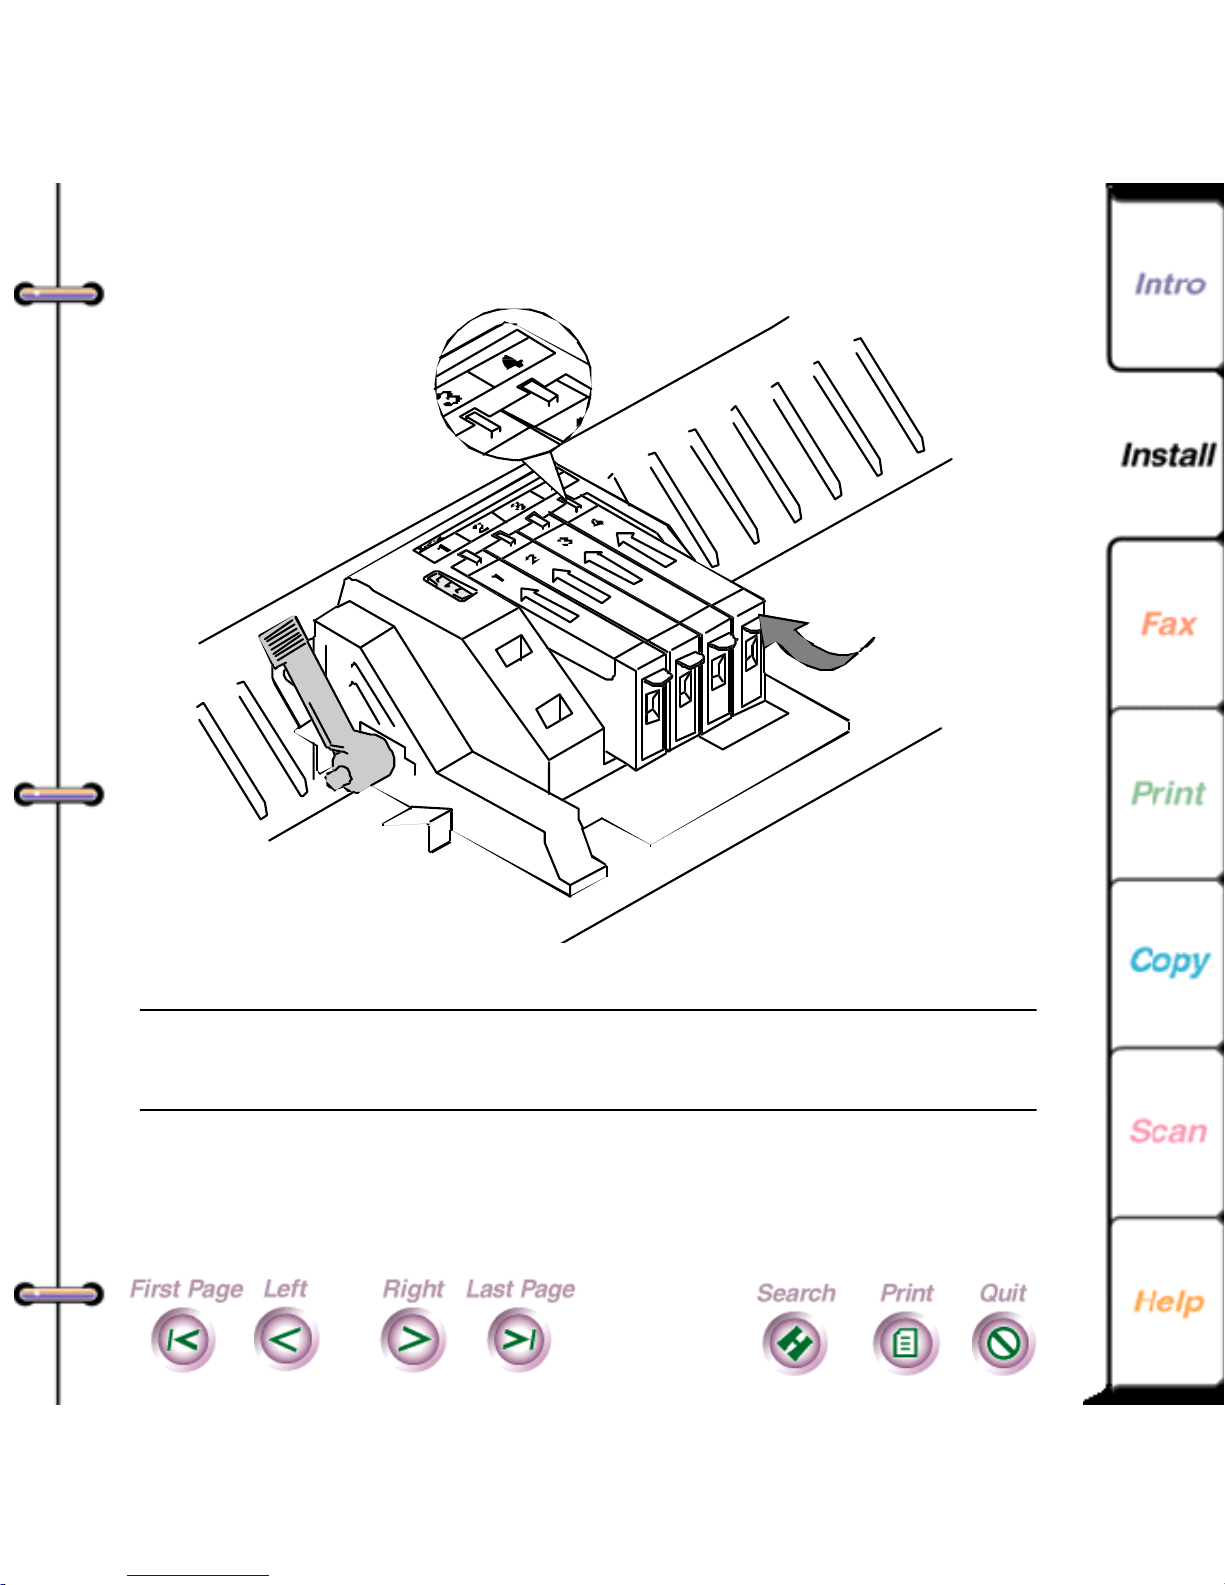
57
7. Snap the ink cartridge into position.
Caution
Do not force the ink cartridge into the print
head.
8. Close the printer cover and replace the document tray .
9. Press the START key .
Page 58

The color print head returns to the home position (far left
side of printer) and the WorkCentre cleans the head. After
a few moments, the printer returns to normal print mode.
If the color print head does not return to the home position,
try removing and reinstalling the head.
Installing a color print head
The WorkCentre displays a graphic in the WorkCentre
450c Status window on your PC and a message on the
control panel LCD when it is time to install a new color
print head. T he color print head is the black plastic housing
that contains the color ink cartridges. You can reuse the
58
same ink cartridges if they still contain ink.
Use the following procedure to replace the color print head.
You can also use the procedure to install a color print head
for the first time, and to reinstall a previously used color
print head when changing from black-and-white to color
printing.
1. At the WorkCentre 450c, press the CARTRIDGE key
three times to display [replace color head] on the LCD.
Page 59

2. Press ENTER.
The W orkCentre moves the color print head to the
center of the printer so you can you remove it.
59
Note
If the color print head does not move to the
center of the printer, unplug the WorkCentre’s power
cord, wait a few seconds, and then reconnect it.
3. Remove the document tray and open the printer cover.
4. Pull the green carriage lock lever forward and remove
the color print head.
Page 60

60
Note
If you are changing from black-and-white to
color printing, place the high capacity ink jet cartridge
in the print head storage box. This prevents the ink
from drying out and clogging the ink jets.
5. If you are installing a new color print head, remove the
color ink cartridges from the print head.
Page 61

6. Insert the ink cartridges into the new print head as
shown. The ink cartridges and corresponding locations
are color coded and numbered.
61
Page 62

7. Reinstall the print head by aligning the hole in the print
head with the green post on the printer carriage. Gently
lower the print head into position.
62
Page 63

8. Push the green carriage lock lever backward to secure
the print head. Do not force the lever backward.
63
9. Close the printer cover and replace the document tray .
10. Do one of the following:
• If you installed a new color print head, press
START.
• If you reinstalled a previously used color print head,
press STOP.
Page 64

The color print head returns to the home position (far left
side of printer) and the WorkCentre cleans the head. After
a few moments, the printer returns to normal print mode.
If the print head does not re turn to the home position, try
removing and reinstalling the head.
Replacing the automatic
docume nt fe ed pad
The WorkCentre displays a graphic in the WorkCentre
450c Status window and a message on the control panel
LCD when it’s time to replace the automatic document feed
(ADF) pad. Changes in paper feeding performance also
64
indicate that you should replace the ADF pad. The ADF pad
allows a single page to be scanned while any remaining
pages stay in the document tray.
To order an ADF pad:
• In the United States, call 1-800- 822-2200.
• In Canada, call 1-800-668- 0199 (English) or
1-800-668-0133 (French).
1. At the WorkCentre 450c, press the MENU key.
2. Press 5 [Setup] and ENTER.
Page 65
3. Press 9 [Maintenance] and ENTER.
4. Press ENTER to select [Replace ADF pad].
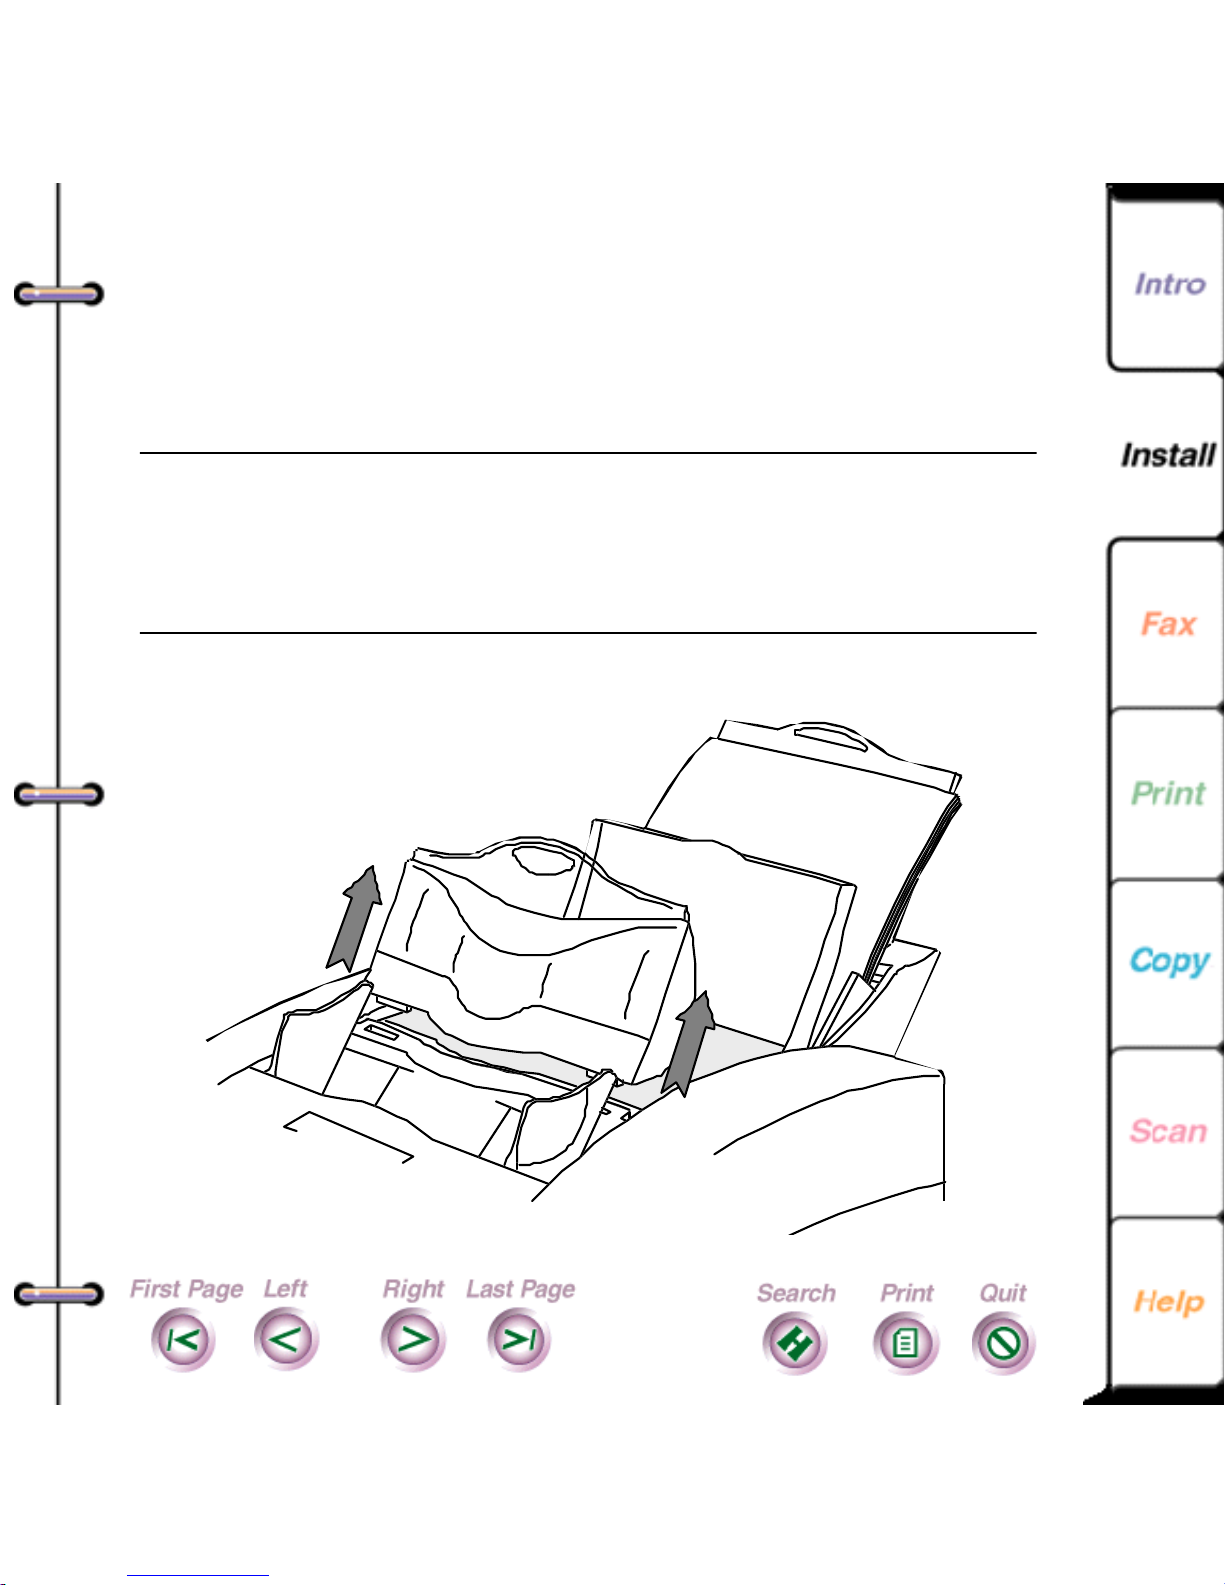
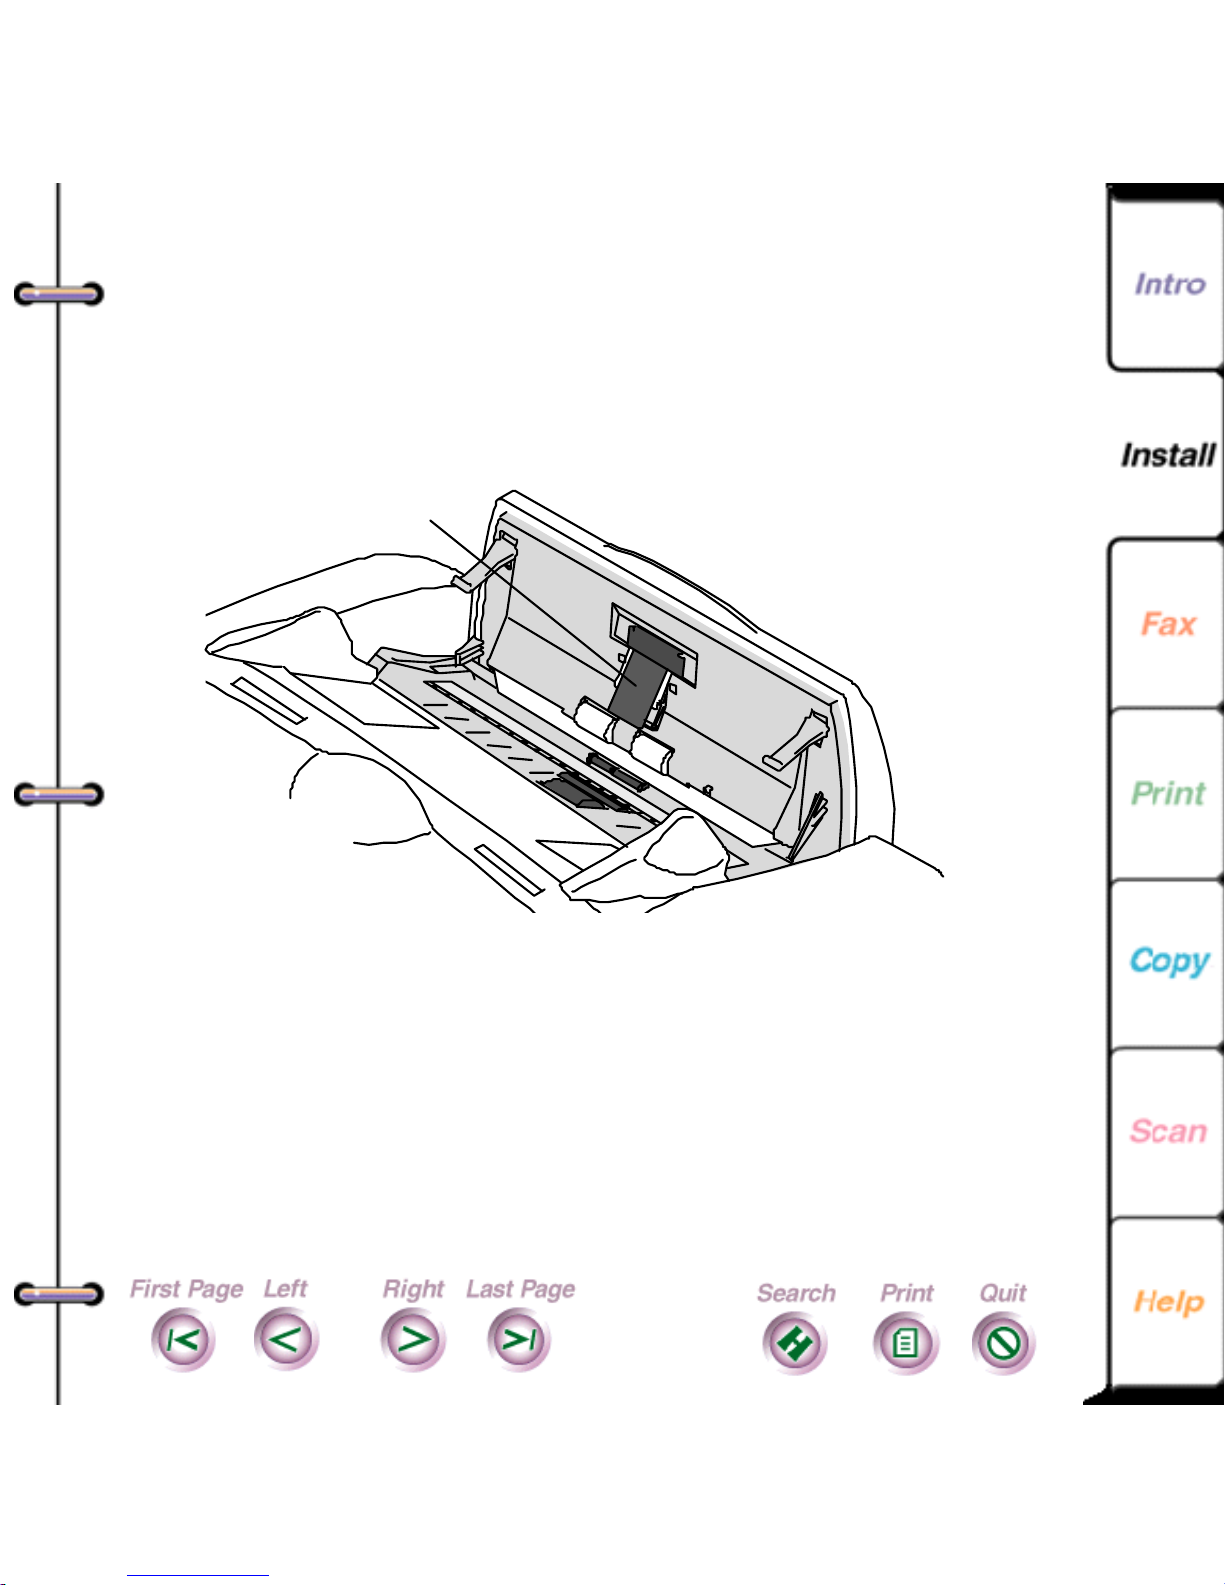
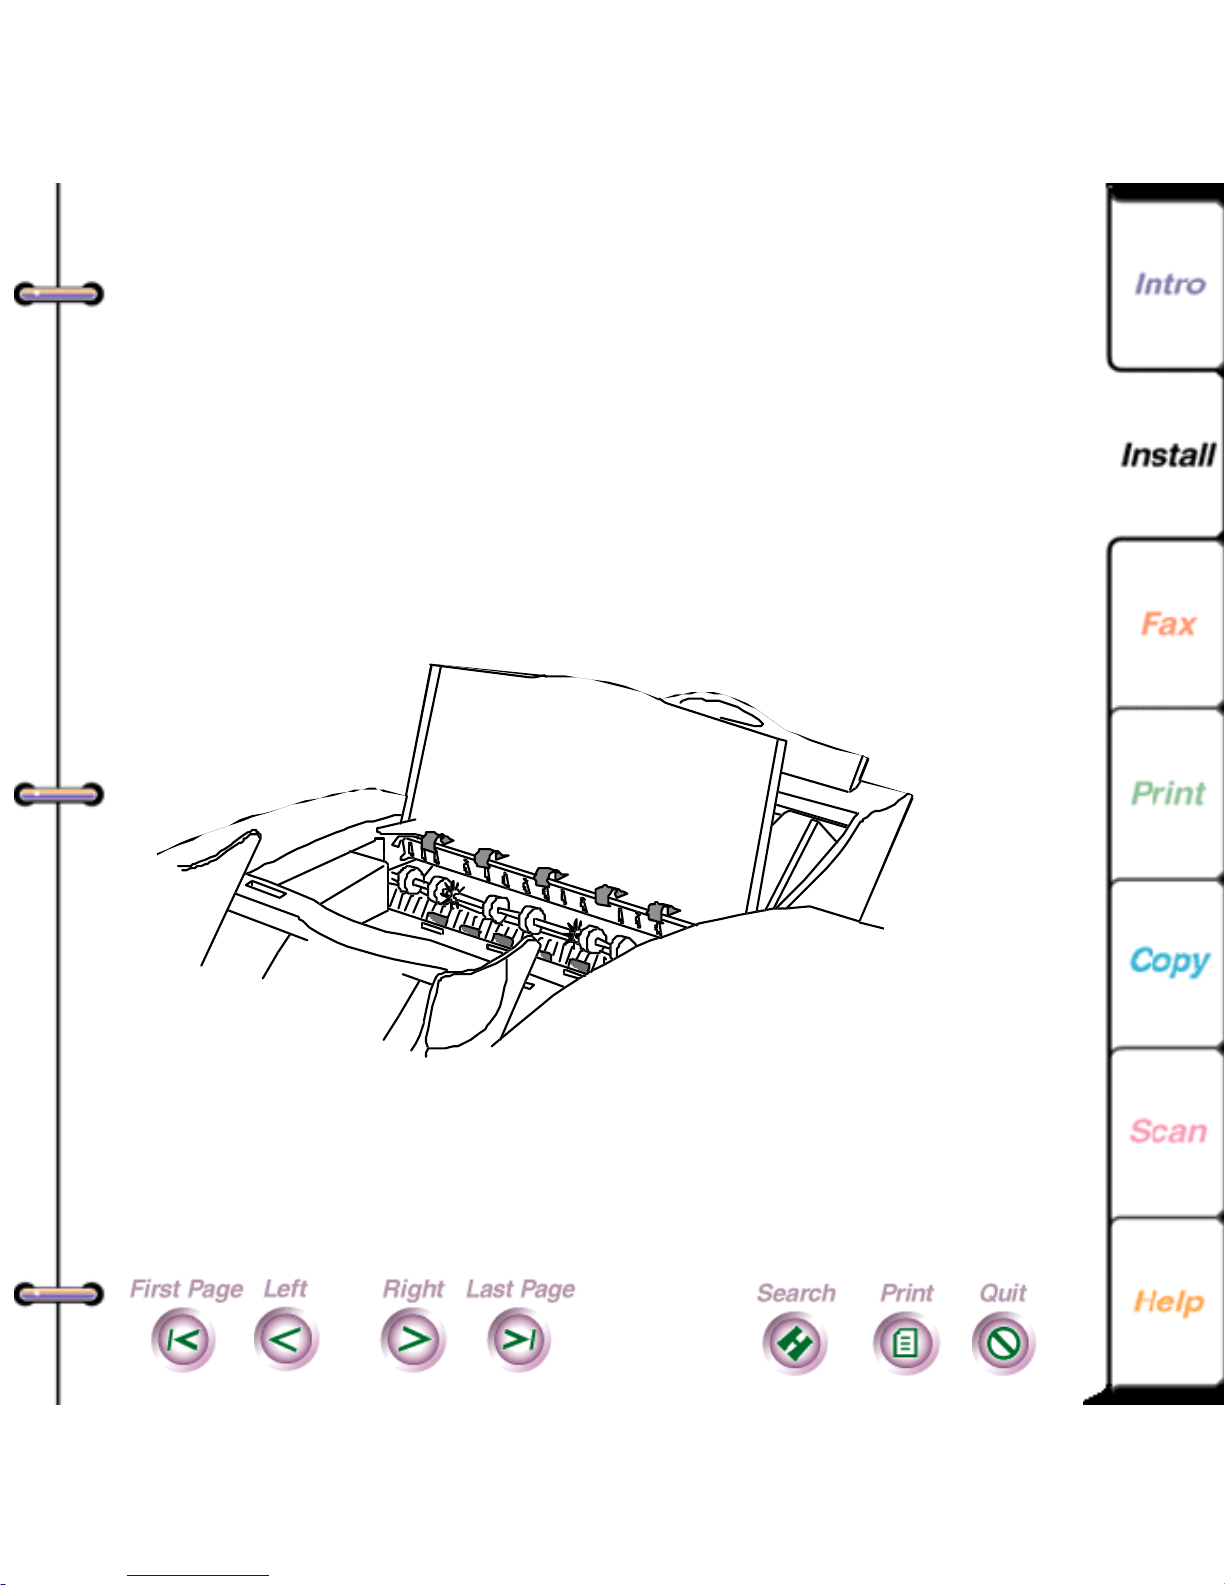
5. Open the scanner cover. The ADF pad is located on the
back side of the scanner cover.
ADF pad
65
Page 66

6. Squeeze the two sides of the plastic housing that holds
the pad and remove the housing with the pad.
66
Page 67
7. Replace the ADF pad by inserting the plastic tabs on
the housing into the slots in the back side of the
scanner cover and snapping the pad into place.
67
8. Close the scanner cover .
9. Do one of the following:
• If you installed a new ADF pa d, press ST AR T.
• If you reinstalled a previously used ADF pad, press
STOP.
Page 68
Cl eani ng the WorkCentre
Dirt and dust can accumulate in the WorkCentre, which can
cause paper misfeeds. When frequent misfeeds occur, you
should clean the paper exit and automatic document feed
rollers. Use a lint-free cloth dampened with water to clean
the rollers.
1. Remove the document tray and open the printer cover.
2. Open the paper exit roller cover.
68
Page 69
3. W ipe the paper exit rollers.
Paper ex it roller s
69
4. Close the paper exit roller cover firmly to snap the
corner latches into place.
5. Close the printer cover and replace the document tray .
6. Open the scanner cover.
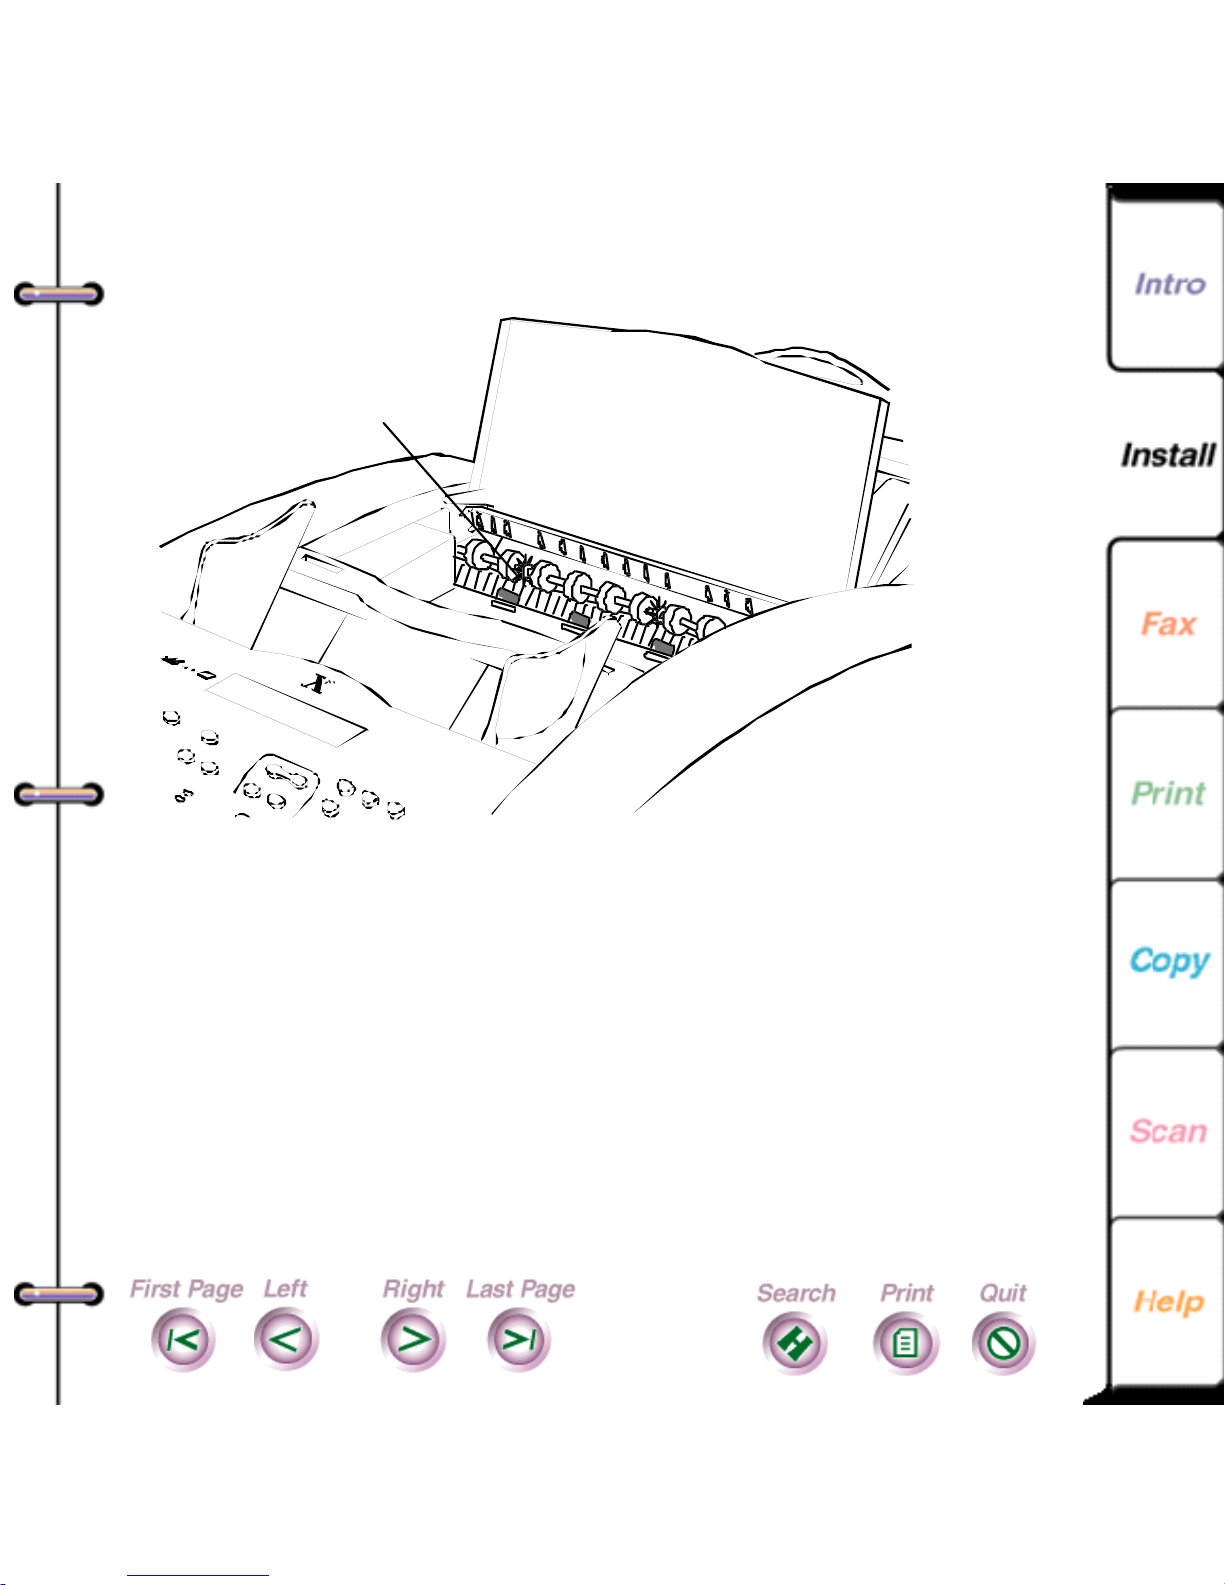
Page 70
7. W ipe the rollers located on the back side of the scanner
cover and opposite the back side of the scanner cover.
8. W ipe the white plastic platen cover located under the
two white rollers.
ADF rollers
Platen cover
70
9. Close the scanner cover .
Page 71
Chapter 3
Fax Operations
Sending a Fax
Changing fax settings before sending a fax
Sending a fax to more than one fax number
Sending a fax at a later time
Using a confidential charge code when sending a fax
Switching from pulse to touch-tone dialing during a dialing
sequence
71
Combining several numbers during a single dialing
sequence
Faxing long documents
Sending confidential faxes
Faxing documents from your PC
Changing the default settings for sending faxes
Changing telephone line dialing options
Using a document carrier
More entries on the following page...
Page 72
Creating a phonebook of speed dial entries
Creating an individual speed dial entry
Creating a group speed dial entry
Editing a speed dial entry
Deleting speed dial entries
Saving a Phonebook file to your PC
Opening a Phonebook file
Printing a Phonebook of speed dial entries
Receiving Faxes
Receiving an incoming fax
Receiving a fax to memory
72
Printing a fax stored to memory
Manually receiving a fax
Receiving confidential faxes in mailboxes
Retrieving your faxes and printing them on another fax
machine
Automatically forwarding your faxes
Distributing copies of your faxes to a Phonebook grou p
More entries on the following page...
Page 73
Retrieving documents from another fax machine to the
WorkCentre
Receiving faxes to your PC
Changing the default settings for receiving faxes
Changing telephone line answer options
Changing the fax in options
Checking the status of your fax jobs
Canceling a fax job
73
Page 74

Sending a Fax
You send a fax at the WorkCentre using the keys on the
control panel. By default, the WorkCentre uses standard
resolution and normal contrast.
When sending a fax, you c an use the following dialing
methods:
74
Direct dial
Speed dial
Man ual dial
Note
Make sure the document you want to fax is free
Enter the fax number using the numer ic keypad.
Pres s SPE ED D IAL and enter the s peed dial num -
ber. To use speed dial, you need to create a
Phonebook.
If your tel eph one is con nected to the W orkCe ntre,
dial the fax number using the telephone handset.
of rips, wrinkles, folds, staples, paper clips, and sticky
notes.
At any time before sending the fax, you can press the EXIT/
CLEAR key to remove the document from the
WorkCentre.
1. At the WorkCentre 450c, load up to 20 pages face
down in the document tray.
Page 75

2. Do one of the following:
• Using the numeric keypad, enter the fax number .
• To change the fax number, press the LEFT
ARROW key to move the cursor to the left, press
the RIGHT ARROW key to move the cursor to the
right, and press the EXIT/CLEAR key to delete a
highlighted number .
• Press SPEED DIAL and enter the speed dial
number .
75
Note
Depending on your phone system, you may
need to enter a prefix (for example, 8 or 9) and press
the PAUSE key to add a timed interval before entering
the fax number.
3. Press START.
The WorkCentre dials the fax number, sends the fax, and
sounds a confirmation beep when the transmission is
complete. By default, the WorkCentre prints a report if the
fax could not be sent.
To cancel the transmission before the WorkCentre sends
the fax, press the STOP key and then the ENTER key.
Page 76

Changing fax settings bef ore
se nding a fax
Before sending a fax, you can change the contrast and
resolution of your document. You can also choose to
include the cover page the WorkCentre provides, and print
a confirmation report after the fax is sent.
You change fax settings using the keys on the WorkCentre
control panel. The settings you c hange affect the fax you
are sending. After the fax is sent, the WorkCentre returns to
its default settings.
76
Note
press the EXIT/CLEAR key to remove the document
from the WorkCentre.
1. At the WorkCentre, load up to 20 pages face down in
2. To include a cover page with the fax, press the
At any time before sending the fax, you can
the document tray.
COVER PAGE key to display [yes] and then press
ENTER.
Page 77

3. To print a confirmation report after the fax is sent,
press the CONFIRM key to display [yes] and then
press ENTER.
4. Press the CONTRAST key several times to switch
among these options:
77
Normal
Lighten
Darken
Photo normal
Photo lighten
Photo darken
F or docum ents w ith g ood dark and li ght values .
For documents that are too dark.
For documents that are too light.
For photographs and documents that contain
different shades of gray.
For photographs and grayscale documents
that are too dark.
For photographs and grayscale documents
that a re too ligh t.
When you choose a photo setting, the W orkCentre
automatically sets the resolution to fine if it was
previously set to standard.
5. Press the RESOLUTION key several times to switch
among these options:
Standar d
Fine
Superfine
200 x 100 dots per inch.
200 x 200 dots per inch.
300 x 300 dots per inch.
Page 78

78
Note
Fine and superfine assure you of a better quality
fax. However, the fax transmission time is longer,
which may increase your telephone cost. Generally,
standard resolution is good for documents with font
sizes of 10 points and larger; fine and superfine
improve readability of documents with font sizes
smaller than 10 points.
6. Do one
of the following:
• Using the numeric keypad, enter the fax number .
To change the fax number, press the LEFT
ARROW key to move the cursor to the left, press
the RIGHT ARROW key to move the cursor to the
right, and press the EXIT/CLEAR key to delete a
highlighted number .
• Press SPEED DIAL and enter the speed dial
number .
7. Press START to begin the fax transmission.
8. If you chose to include a cover page with your fax,
enter the number of pages in the document and then
press ENTER.
To cancel the transmission before the W orkCentre sends
the fax, press the STOP key and then the ENTER key.
Page 79

Sending a fax to more than one fax
number
You can send the same fax to more than one fax number.
You can use a combination of both direct and speed dialing.
79
Note
fax numbers, you can create a group entry in your
Phonebook. Then you can use the SPEED DIAL key
to send the fax quickly to the group of fax numbers.
1. At the WorkCentre 450c, load up to 20 pages face
2. Do one
If you routinely send faxes to the same group of
down in the document tray.
of the following:
• Using the numeric keypad, enter the fax number .
To change the fax number, press the LEFT
ARROW key to move the cursor to the left, press
the RIGHT ARROW key to move the cursor to the
right, and press the EXIT/CLEAR key to delete a
highlighted number .
• Press SPEED DIAL and enter the speed dial
number .
Page 80
3. Press ENTER.
4. Repeat step 2 to enter the next fax number.
80
5. Do one
of the following:
• Press ENTER and enter another fax number. The
maximum number of entries is ten.
• Press START to begin the fax transmission.
Sending a fax at a lat er tim e
You can set up a fax at the WorkCentre and have it sent at
a later time. You might want to delay a fax transmission to
take advantage of the lower telephone rates available
during certain time periods.
1. At the WorkCentre 450c, load up to 20 pages face
down in the document tray.
2. Press the MENU key.
3. Press ENTER to select [Fax job].
4. Press 2 [Dial later] and ENTER.
Page 81
5. Using the numeric keypad, enter the time.
y
y
To change the time, press the LEFT ARROW key to
move the cursor to the left, press the RIGHT ARROW
key to move the cursor to the right, and press the EXIT/
CLEAR key to delete a highlighted number.
6. If you are using a 12-hour clock, press RIGHT
ARROW to switch between am and pm.
7. Press ENTER.
8. Enter the fax number and press START.
The W orkCentre stores the document to memory until it
sends the fax at the specified time.
81
Note
the
If your document remains in the document tray,
Alwa
s send from memor
option is not selected
on the ControlCentre’s Fax Out property page. To
select the option, see “Changing the fax out options”
later in this chapter.
Page 82
Using a confidential charge code
when sendi ng a fax
Depending on your telephone system, you might need to
use a charge code when sending a fax to a number outside
your local area. A charge code could be your calling card
number or some other number your long-distance service
provides. To keep the charge code confidential, the
WorkCentre does not display the code on the control panel
LCD or print the code on any reports.
82
Note
requires a charge code, you can create an individual
speed dial entry in your Phonebook that includes your
charge code. Using speed dialing, you can quickly
enter both the fax number and charge code with the
press of one key.
1. At the WorkCentre 450c, press the MENU key.
2. Press 5 [Setup] and ENTER.
3. Press 7 [Control panel] and ENTER.
4. Press 4 [Pause key] and ENTER.
If you frequently send faxes to a fax number that
Page 83

5. Press RIGHT ARROW to display [dial options] and
ENTER.
The W orkCentre sounds a confirmation beep.
6. Press STOP to exit the menus.
7. Load up to 20 pages face down in the document tray .
8. Enter the fax number .
83
Note
If you need to add a pause (timed interval) in the
fax number, press PAUSE and then ENTER. A
comma displays for each pause you add.
9. When you need to enter a charge code, press the
PAUSE key to display the dial options menu.
Dial options
pause
10. Press RIGHT ARROW to display [charge code] and
ENTER.
11. Enter the charge code. A dollar sign ($) displays for
each number in the charge code. The dollar signs
display after the fax number.
Page 84
12. When you are done entering the charge code, press
p
y
p
y
PAUSE. Any additional numbers you might enter will
display on the LCD.
13. Do one of the following:
• Press START to begin the fax transmission.
• Press ENTER, add another fax number, and then
press START .
84
Note
After the fax is sent, you may want to change
the PAUSE key setting to
1 through 5 and choose
ause onl
ause onl
. Repeat steps
in step 5.
Page 85

Switc hi ng from pul se to t oucht one dialing during
a dialing se quence
If your phone line uses pulse (rotary) dialing, you can
switch from pulse to touch-tone dialing when sending a fax.
Depending on your telephone system, you may need to use
touch-tone dialing to enter the access number for your longdistance service.
To switch from pulse to touch-tone dialing, you need to
change the PAUSE key setting from pause only (the
default) to dial options. This procedure describes how to
85
change the PAUSE key setting.
1. At the WorkCentre 450c, press the MENU key.
2. Press 5 [Setup] and ENTER.
3. Press 7 [Control panel] and ENTER.
4. Press 4 [Pause key] and ENTER.
5. Press RIGHT ARROW to display [dial options] and
ENTER.
The W orkCentre sounds a confirmation beep.
6. Press STOP to exit the menus.
Page 86
7. Load up to 20 pages face down in the document tray .
p
y
p
y
8. Begin dialing the fax number.
9. When you need to switch to touch-tone dialing, press
the PAUSE key to display the dial options.
10. Press the RIGHT ARROW key twice to display [tone
dialing] and then press ENTER. The letter “T”
displays on the LCD, which indica tes that the next
number you enter will use touch-tone dialing.
1 1. Enter the next fax number .
12. Do one of the following:
• Press START to begin the fax transmission.
86
• Press ENTER, add another fax number, and then
press START .
Note
the PAUSE key setting to
1 through 5 and choose
After the fax is sent, you may want to change
ause onl
ause onl
. Repeat steps
in step 5.
Page 87
Combining seve r al numbers
durin g a sin g le d ialin g se que n ce
You can combine a fax number, speed dial numbers, and
access numbers during a single dialing sequence. For
example, you may have created a speed dial number for
your long-distance service and another speed dial number
for your charge code your company provides. You could
dial all the numbers at one time to send a fax to a number
that requires the long-distance service.
1. At the WorkCentre 450c, load up to 20 pages face
down in the document tray.
87
2. To enter the first number, do one
• Using the numeric keypad, enter the number .
• Press SPEED DIAL and enter the speed dial
number .
3. Press REDIAL to add another number.
4. To enter the next number, do one
• Using the numeric keypad, enter the number .
• Press SPEED DIAL and enter the speed dial
number .
of the following:
of the following:
Page 88

5. Repeat steps 3 and 4 to until you’ve entered the
complete number .
6. Press START .
Faxi ng long doc uments
If the document you want to fax is longer than 40 inches,
you must use the WorkCentre’s long original feature. This
feature lets you fax a long document without causing a
paper jam or an error condition. After you’ve faxed the
document, the long original feature is turned off.
If you do not use the long original feature to fax a long
document, the WorkCentre stops scanning the document
88
and sounds an alarm. Press the START key to continue
scanning the document.
1. At the WorkCentre, load up to 20 pages face down in
the document tray.
2. Press MENU.
3. Press ENTER to select [Fax job].
4. Press 5 [Advanced] and ENTER.
5. Press ENTER to select [Long original].
6. Press RIGHT ARROW to display [yes] and ENTER.
7. Enter the fax number and then press START .
Page 89

Sending confi dent ial faxes
To keep faxes confidential, you can fax them to a mailbox
on a remote WorkCentre, or you can store them to memory
on your WorkCentre. This allows the fax recipient to
retrieve and print the fax when needed.
Sending a fax to a mailbox on a remote
WorkCentre
A WorkCentre 450c can provide up to five mailboxes to
which you can send faxes. To send a fax to a mailbox on
another user’s WorkCentre, a telephone must be connected
to your WorkCentre, and you need to know the remote
89
user’s mailbox number. After sending the fax, it remains in
the mailbox until the recipient prints it.
See “Receiving faxes,” later in this chapter to learn how to
create and use mailboxes on your WorkCentre.
1. At the WorkCentre 450c, load up to 20 pages face
down in the document tray.
2. Using the telephone connected to your WorkCentre,
lift the handset and dial the fax number.
After the remote W orkCentre answers, you hear a fax
tone sequence.
Page 90

3. When you hear a pause in the tone sequence, press #
and wait for three confirmation tones.
4. Press **1# and the mailbox number.
5. Press ##.
For example, the complete key sequence is as follows:
#**1#mailbox number##
6. After you hear three confirmation tones, press
START.
7. Hang up the telephone.
90
Note
You can send the fax to more than one mailbox
on the same WorkCentre by separating each mailbox
number with the # character. For example, you would
press the following keys to send a fax to mailboxes 1
and 2: #**1#1#2##.
Page 91

Storing documents to memory for retrieval by a
remote fax machine
You can store a document to the WorkCentre’s memory to
have another fax machine retrieve it later. This capability,
called being polled or poll out, lets another fax user choose
when to retrieve the document.
1. At the WorkCentre 450c, load up to 20 pages face
down in the document tray.
2. At the control panel, press STAR T.
3. Press RIGHT ARROW to display [Be polled].
4. Press ENTER.
91
5. Do one
of the following:
• If you will not require the remote user to enter a
password, press ENTER.
• If you will require the remote user to enter a
password ( for security), press RIGHT ARROW and
ENTER. Type the password and press ENTER.
Inform the remote user of this password.
6. Press START.
See “Retrieving documents from another fax machine to
the WorkCentre” later in this chapter for information on
how to retrieve a document to the WorkCentre.
Page 92

Faxing documents from your P C
The WorkCentre 450c provides a CCITT-compatible Class
2 interface for sending and receiving fax documents using
your PC. To use the WorkCentre as a fax modem for your
PC, a fax application must be installed on your computer.
If you are running Windows 95, you can install Microsoft
Fax or Symantec Winfax Pro 7.5. If you are running
Windows 3.1/3.11, install Symantec WinFax Lite 4.0
(provided with the WorkCentre 450c) or Symantec WinFax
Pro 4.0.
When sending faxes, you can fax a paper document from
the WorkCentre, or an electronic document using your
92
PC’s fax software.
Setting up Microsoft Fax to send faxes
from your PC
Before you can fax a document using Microsoft Fax, you
need to set up the WorkCentre 450c as your fax modem.
1. Click the Start button, point to Programs, and then
click Microsoft Exchange. The Inbox window for
Microsoft Exchange opens.
Page 93

2. Click T ools, point to Microsoft Fax Tools, then click
Options.
3. Click the Modem tab.
4. In the Available Fax Modems box, click Xerox
WC450c Class 2 Fax Modem and then click the Set as
Active Fax Modem button.
93
Note
The WorkCentre 450c supports MR
compression. However, the Enable MR compression
option in the Microsoft Fax Advanced dialog box does
not work.
5. Click OK.
6. In the Inbox window , click File and then click Exit.
Sending a fax using Microsoft Fax
You fax a document directly from the software application
you used to create it.
1. Open the document in your software application. For
example, open a document in Microsoft Word.
2. Click the application’ s File menu and then click Print.
3. In the Name box, select Mic rosoft Fax and then click
OK. The Compose New Fax wizard opens.
Page 94

4. Use the Compose New Fax wizard to specify the fax
information and send the fax.
94
Note
If you experience problems using your current
version of Microsoft Fax, you can download Windows
Messenging (a newer version of Microsoft Ex change)
from the Microsoft Web site:
http://www.microsoft.com
Page 95

Changing th e defa u lt settings for
se nding fa xes
Using the ControlCentre software on your PC, you can
easily change the default settings for sending faxes. The
WorkCentre 450c is configured with the following factory
defaults for sending faxes:
Option Default setting
Fax Out
Options
Add cover page No
Include send header Yes
Include cover page and send header No
Retry failed faxes Yes
Always send from memory Yes
95
Setup/Comm
Options
Phone Line
Dialing Options
If memory fills Continue fax job
Fax number
Name
Date format MM/DD/YY
Time format 12-hour
Maximum fax speed 14400 bps
ECM (error correct mode) Yes
Redia ls 5
Redial interval (min) 5
Pause length (secs) 2
Dial mode Tone
Detect dial tone Yes
User specified
User specified
Page 96
Ch anging the f ax out option s
1. At your PC, double-click the WorkCentre icon.
2. In the WorkCentre Status window, click Settings.
3. Click the Fax Out tab.
Faxes a separate
cover page, prints a
send header on each
faxed page, or does
Resends a fax
whose transmission
96
Sends the fax from
memory
Continues or ends the
fax job if there isn’t
enou gh memo ry
Returns optio ns to
their d efault settings
Page 97

4. Change the defaults for any of these options:
Add cover page
Faxes a separate page that includes the
WorkCentre’ s name and fax number , the date and
time of the fax transmission, the recipient’s name (if
specified in your Phonebook) and fax number (from
your Phonebook or entered using the numeric
keypad), and the number of pages being faxed. The
cover page is the first faxed page.
Include send header
Prints the WorkCentre’ s name and fax number , the
date and time of the fa x transmission, the recipient’s
97
fax number , and the page number at the top of each
faxed page.
Include cover page and send header
Faxes a separate cover page and prints header
information at the top of each faxed page.
Retry failed faxes
Resends a fax whose transmission failed.
Page 98
Always send from memory
Scans the document and stores it to memory until
the fax is sent. This lets you remove your document
from the WorkCentre once it’s scanned.
If memory fills
When sending a fax at a later time or to more than
one fax number, instructs the WorkCentre to either
continue fax job or end fax job if there is not
enough memory to store the entire document. If you
choose continue fax job, the document remains in
the document tray and is sent as memory becomes
available.
98
5. Do one
of the following:
• Click OK to change the options at the WorkCentre
and close the W orkCentre 450c Settings window .
• Click Apply to change the options at the
WorkCentre and keep the W orkCentre 450c Settings
window open.
Note
To use the factory defaults, click the Restore
Defaults button.
Page 99
Ch anging the set up and
com m unica tion options
1. At your PC, double-click the WorkCentre icon.
2. In the WorkCentre 450c Status window, click Settings.
3. Click the Setup/Comm tab.
WorkCentre fax
number and nam e
99
Spec i fies the form at
used to dis play t he
date and ti m e
S et s maximum fax
speed and error correct
Retur ns options to
their d efault settings
Page 100

4. Change the defaults for any of these options:
Fax number
Displays the number specified using the Setup
Wizard. If your fax number changes, you can edit
the number. Do not include parentheses or hyphens
in the number .
Your fax number is included on the send header and
cover page, and displays on the fax machine
receiving your fax.
Name
Type a name for the W orkCentre (optional). The fa x
name is included on the send header and cover page.
100
Date format
Sets the format used for displaying the date on the
control panel LCD and in the WorkCentre 450c
Status window .
Time format
Sets the format used for displaying the time on the
control panel LCD and in the WorkCentre 450c
Status window .
 Loading...