


Xerox Document Centre ColorSeries 50
Digital Colour Printer/Copier
User Guide

Prepared by:
Xerox Europe T echnical Centre
Global Knowledge & Language Services
Bessemer Road
Welwyn Garden City
Hertfordshire
AL7 1HE
ENGLAND
©
1999 Xerox Corporation. All rights reserved.
Copyright protect i on clai m ed includes all forms and m at t er s of
copyrightable mater ia l an d info rmation now allowed by statutor y or
judicial law or hereinafter granted, including without limitation,
material genera te d from the sof t w ar e pr ogr am s that are displayed
on the screen suc h as st yl es, templates, icon s, scr een displays,
looks, etc.
®
Xerox
, The Document Com pan y®, the stylized X, and all Xerox
product names and product numbers m ent i oned in this publication
are registered tradem arks of Xerox Corporat i on. O ther com pany
brands and produ ct nam es may be trademarks or r egist er ed
trademarks of the ir respective companies and are also
acknowledg ed.
®
PANTONE
* Colours generated by the Document Centre
ColorSeries 50 are four-colour process simulations and may not
match PANTONE identified solid colour standar ds. U se c urr en t
PANTONE Colour Reference Manuals for accurate colour.
PANTONE Colou r sim ulat i ons are only obtainable on this product
when driven by qua lifie d Pantone-licensed so ftw ar e pack ages.
Contact Pantone, Inc. for a cur re nt list of qual i fied licensees.
*Pantone, Inc. ’s che ck- stan dar d t ra demark for colour.
©Pantone, Inc., 1988.
Changes are periodically made to this document. Technical updates
will be included in subsequent editions.
Printed in the United Kingd om .
Part Number: 708P8379 9


Safety Notes
1
The Xerox Document Centre ColorSeries 50
copier/printer and the recommended maintenance
supplies have been designed and test ed to m eet
strict safety requir em ents. Att ent ion t o th e
following notes wi ll ens ur e th e continued safe
operation of you r cop ier/pr i nt er.
Electrical safety
• Use only the po w er cor d supplied with this
equipment.
• Plug the power cord directly into a correctly
grounded elec trical out let . Do
extension cord. If you do not know whether or
not an outlet is grounded, consult a qualified
electrician
• Do not use a ground adapter plug to connect
this equipment to an electrical outlet that lacks
a ground connect ion t erm inal.
WARNING: You may get a severe el ect r ic al shock if the outlet is not correctly grounded.
not
use an
2
3
4
• Do not place the copi er /p rint er wher e people
may step on or trip on the power cord. Do not
place objects on the power cord.
• Do not override or disable electrical or
mechanical in te rlocks.
• Do not obstruct th e ventilation openings.
These openings are provided to preve nt
overheating of the mac hi ne.
DOCUMENT CE NTRE CS 50 USER GUIDE IV
5
6
7

WARNING: Never push obj ects o f an y kind i nt o
slots or openings on this equipment. Making a
1
contact with a voltage point or shor t ing out a part
could result in fire or electrical shock.
• If any of the following conditions occur, switch
off the power to the machine immediately and
disconnect the power cord from the electrical
outlet. Call an aut hor i zed Xerox service
representative to correct the problem.
2
3
– The machine emits unusual noises or
odors.
– The power cord is damaged or fraye d.
– A wall panel circuit breaker, fuse, or other
safety device has been tripped.
– Liquid is spilled into the copier/printer.
– The machine is exposed to water.
– Any part of the machine is damaged.
Disconnect Device
The power cable is th e di sconnect device for this
equipment. It is attached t o th e back of the
4
machine as a plug- in device. To remove all
electrical power fr om the machine, disconnect the
power cable from the electrical outlet.
5
6
7
V DOCUMENT CENTRE CS 50 USER GUIDE

Laser safety
CAUTION: Use of controls, adj us tments, or
procedures other th an those specified in this
documentation may res ul t in a haz ar dous
exposure to laser radiation.
This equipment com plies with international saf et y
standards. With specific regard to laser safety, the
equipment complies with performance standards
for laser products set by government, national,
and internationa l ag encies as a Class 1 laser
product. It does not em i t haz ar dous light, as the
beam is totally enclosed during all phases of
customer opera tion and maintenance.
1
2
Maintenance safety
• Do not attempt any maintenance procedure
that is not specifical ly described in the
documentation that is supplied with your
copier/printer.
• Do not use aerosol cleaners. The use of
supplies that are not approved may cause
poor performance of the copier/printer, and
could create a dangerous condition.
• Use the supplies and cleaning materials only
as directed in this ma nual. Keep all of these
materials out of the rea ch of chi ldr en.
• Do not remove the covers or guards that are
fastened with screw s . Ther e ar e no parts
behind these cover s t hat you can maintain or
service.
Do not perform any maintenance procedures
unless you have be en t ra in ed t o do them by a
Xerox representativ e or unless a procedure is
specifically descr i bed in one of the copier/prin ter
manuals.
3
4
5
DOCUMENT CE NTRE CS 50 USE R GUIDE VI
6
7

Operational safety
1
Your Xerox equipm ent and supplies were
designed and te st ed t o m eet st rict saf et y
requirements. The se incl ude safety agency
examination, ap pr oval, and compliance w ith
established enviro nm ental standards.
Your attention to the foll owi ng safety guidelines
2
will help ensure the continued safe operation of
your copier/printer:
• Use the materials and suppl i es s pecifically
designed for your copier/printer. The use of
unsuitable materials may result in poor
performance of th e m achine and possibly a
hazardous situation.
3
• Follow all warnings and instructions that are
marked on or supplied with the machine.
• Place the machine in a room tha t prov id es
adequate space for ventilation and servicing.
• Place the machi ne on a lev el , solid surface
(not on a thick pile carp et ) that has adequate
strength to support th e w eight of the machine.
4
• Do not attempt to move the machine. A
leveling device that was lowered when your
machine was installed may damage the
carpet or floor.
• Do not locate the machine near a heat source.
• Do not locate the machine in direct su nl i ght .
5
• Do not locate t he machine in line with the cold
air flow from an air conditioning system.
• Do not place containers of coffee or other
liquid on the machine.
• Do not block or cover the slots and openings
on the machine. Without adequate ventilation,
6
the machine may overheat.
• Do not attempt to override any electrical or
mechanical inte rlock devices.
WARNING:Be careful when working in areas
identified with this warning symbol. These areas
may be very hot and could cause personal injury.
7
If you need any additional safety information
concerning the machine or materials, contact your
Xerox representativ e .
VII DOCUMENT CENTRE CS 50 USER GUIDE

Ozone safety
This product produces ozone during nor m al
operation. The ozone is heavier than air, and the
quantity is dependent on copy volume. Providing
the correct environmental parameters, as
specified in the Xerox installation procedures,
ensures that conc ent r a tio n le vel s m eet safe limits.
1
If you need addition al infor m at i on about ozone,
request the Xerox publi cat ion,
600P83222, by call i ng 1- 800-828-6571 in the
USA. For a French langu age version, call 1-800828-6571 in the USA, the n pre ss 2.
OZONE
,
2
3
4
DOCUMENT CENTRE CS 50 USER GUIDE VIII
5
6
7

1
2
3
4
5
6
7
IX DOCUMENT CENTRE CS 50 USER GUIDE

Notices
This equipment has been tested and found to comply with
the limits for a Class B digital device, pursuant to Part 15 of
the FCC Rules. These limits are designed to prov id e
reasonable prot ecti on against harmful interf er ence in a
residential installation. This equipment generates, uses,
and can radiate radio frequency energy and, if not installed
and used in accor dance with the instruc tions, may cause
harmful interfer ence to radio communications. However,
there is no guarantee that interference will not occur in a
particular installation. If this equipment does cause harmful
interference to radi o or te le vi si on r eception, which ca n be
determined by tur ni ng the equipment off and on, the user
is encouraged to try to co rrect th e in terference by one or
more of the followin g m easures:
• Reorient or relocat e the receiving antenna.
1
2
Radio Frequency Emissions
3
FCC
4
5
• Increase the separation between the
equipment and re cei v er.
• Connect the equipment into an outlet on a
circuit different from that to which the receiver
is connected.
• Consult the dealer or an experienced radio/TV
technician for help.
Changes or modi f icat io ns to th is equipm ent not
specifically appro ved by the Xerox Corpor at ion ma y void
the authority grante d by t he FC C to operate this
equipment.
DOCUMENT CE NTRE CS 50 USE R GUIDE X
6
7

Shielded cables mu st be used with this equipment to
maintain compliance with FCC regulations.
1
In Canada
This digital apparatus does not exceed the Class
B limits for radio noise emissions from digital
apparatus as defined i n th e R adio i nt er fe ren ce
regulations of In dustry Canada.
2
FCC
The following app lies to the pr oduct when
equipped with the Token Ring or Banyan Vines
connectivity options:
3
4
5
This equipment has been tested and found t o
comply with the limits for a Class A digital device,
pursuant to Part 15 of the FCC Rules. These limits
are designed to pro vide reasonable protect ion
against harmful in te rfer enc e w hen the equipment
is operated in a comm e rcial en vi ron m ent . T his
equipment generates, uses, and can radiate radio
frequency ene rgy and, i f not install ed and used in
accordance w ith t he i nst r uct i on m anual, may
cause harmful inter fe re nce to radio
communications. Operation of this equipment in a
residential area is likely to cause harmful
interference in which case the user will be
required to correc t the int er fe ren ce at hi s/her own
expense.
Changes or modi f icat io ns to th is equipm ent not
specifically appro ved by the Xerox Corpor at ion
may void the user’s authority to opera te this
equipment.
Shielded cables must be used with this equipment
to maintain compliance with FCC regulations.
In Canada
6
This digital apparatus does not exceed the Class
A limits for radio noise emissions from digital
apparatus as defined i n th e R adio i nt er fe ren ce
regulations of In dustry Canada.
7
XI DOCUMENT CENTRE CS 50 USER GUIDE

Safety Extra Low Voltage Approval
The Xerox Document Centre ColorSeries 50
copier/printer is in com pli ance with various
governmental age nci es and national safety
regulations. All sy stem ports meet the Safety
Extra Low Voltage (SELV) circuits for connection
to customer-o w ned devices and netw or ks.
Additions of custo m er-ow ned or third-party
accessories that are attached to the copier/printer
must meet or exceed the requirements listed
above. All modules that require external
connection mus t be ins talled per th e Document
Centre ColorSe ries 50 in stallat i on pr ocedure.
1
2
3
4
5
6
7
DOCUMENT CENTRE CS 50 USER GUIDE XII

Certifications . . . in Europe
1
The CE marking that is appl i ed to th is pro duc t
symbolizes Xerox Europe’s Declaration of
Conformity with the following applicable Directives
of the European Un ion as of th e dat es ind i cat ed :
January 1, 1995 : - Council Directive 73/23/EEC
amended by Council Directive 93/68/EEC,
2
3
4
approximation of the l aws of th e m em ber states
related to low voltage equipment.
January 1, 1996 : - Council Directive 89/336/EEC,
approximation of the l aws of th e m em ber states
related to electromagnetic compatibility.
Changes or modi f icat io ns to th is equipm ent not
specifically appro ved by Xerox Europe may voi d
the user ’s autho rit y to operate the equipment.
Shielded cables must be used with this equipment
to maintain complia nce with the EMC Directive 89/
336/EEC.
This equipment is not primarily intended for use in
a domestic environment.
A full declaration, defi ni ng t he re levant Directives
and referenced stan dar ds, can be obtained from
your Xerox Europe re pr esentative.
WARNING: In order to allow this equip me nt to
operate in proxim ity to Indus t rial , Scie nt ific and
Medical (ISM) equi pm ent, the external radiation
from ISM equipment may have to be limited or
5
special mitigation measures taken.
6
7
XIII DOCUMENT CENTRE CS 50 USER GUIDE

The following app lies to the pr oduct when
equipped with Token Ring or Banyan Vines
connectivity options:
WARNING:This is a Class A product. In a
domestic environment, this product may cause
radio interference, in which case the user may be
required to take adequate measures.
Changes or modi f icat io ns to th is equipm ent not
specifically appro ved by Xerox Europe may voi d
the user ’s autho rit y to operate the equipment.
Shielded cables must be used with this equipment
to maintain complia nce with the EMC Directive 89/
336/EEC.
1
2
3
4
5
6
7
DOCUMENT CENTRE CS 50 USER GUIDE XIV

It’s Illegal . . . in the USA
1
Congress, by statute, has forbidden the copying of
the following subjects under certain
circumstances. Pen al tie s of fine or impr isonment
may be imposed on those guilty of making su ch
copies.
1. Obligations or Securities of the United States Govern-
2
3
4
ment, such as:
Certificates of Indebt edness National Bank Curr ency
Coupons from Bonds Federal Reserve Bank Notes
Silver Certificates Gold Certificates
United States Bonds Treasury Notes
Federal Reserv e Not es Fractional Notes
Certificates of Deposi t Paper Money
Bonds and Obliga tions of certain agencies of the
government, such as FHA, etc.
Bonds. (U.S. Savings Bonds may be photo-
graphed only for publicity purposes in connection with the campaign for the sale of such
bonds.)
Internal Revenue Stamps. (If necessary to
copy a legal document on which there is a
canceled revenue stamp, this may be done,
provided the reproduction of the document is
performed for legal pur poses.)
5
Postage Stamps, canceled or uncanceled.
(For philatelic purposes, Postage Stamps may
be photographed, provided the reproduction is
in black and white and is le ss t han 75% or
more than 150% of th e linear dimensions of
the original. )
Postal Money Order s.
6
Bills, Checks, or Drafts of money drawn by or
upon authorized officers of the U ni te d States.
Stamps and other representatives of value, of
whatever denominatio n, which ha ve been or
may be issued un der any Act of Congress.
7
XV DOCUMENT CENTRE CS 50 USER GUIDE

2. Adjusted Compensat i on Cer t ifi cates for Veterans of the World Wars.
3. Obligations or Securities of any Foreign Go vernment, Bank, or Corp ora tion .
4. Copyrighted material, unless permission of
the copyright owner has been obtained or the
copying falls within the “fair use” or library
reproduction rights provisions of the copyright
law. Further information of these pro visi ons
may be obtained fro m the Co pyr i ght O ffice ,
Librar y of Co ngre ss, W ashi ngt on, D.C. 205 59.
Ask for Circular R21.
5. Certificates of Citizenship or Naturalization.
(Foreign Naturalization Certificates may be
photographed.)
6. Passports. (Foreign Passports may be photographed.)
7. I m m i grati on Papers .
8. Draft Registrat io n Cards.
9. Selective Service Induction Paper s t hat bear any of the following Registrant’s information:
Earnings or Income Dependency Status
1
2
3
Court Record Previous military service
Physical or mental condi ti on
Exception: U.S. Army and Navy discharge
certificates may be photographed.
10. Badges, Identification Cards, Passes, or
Insignia carried by Milita ry or Naval personnel,
or by members of the various Federal Departments, such as FBI, Treasury, etc. (unless
photograph is ord er ed by the head of such
department or bureau .)
Copying the following is also prohibited in
certain states:
Automobile Lice nses - Drivers’ Licenses -
Automobile Certificates of Title.
The above list is not all inc lusi ve, and no
liability is assumed for its completeness or
accuracy. In case of doubt, consult your
attorney.
4
5
6
DOCUMENT CE NTRE CS 50 USE R GUIDE XVI
7

It’s Illegal . . . in Canada
1
Parliament, by statute , ha s fo rb idden the copying
of the following subj ects under certain
circumstances. Penalties of fines or imprisonment
may be imposed on those guilty of making su ch
copies.
1. Current bank notes or curr ent paper money.
2
3
4
2. Obligations or secu rit ie s of a government or bank .
3. Exchequer bill paper or revenue paper.
4. The public seal of Canada or of a province, or the seal
of a public body or authority in Canada, or of a court of
law.
5. Proclamations, orders, regulations or appointments, or
notices thereof (w ith int ent to false ly caus e same to
purport to have bee n pr in ted by t he Q ueen’s Printer
for Canada, or the eq uivalent printer for a provinc e).
6. Marks, brands, seals, wrappers or designs used by or
on behalf of the Gove rn m ent of Canada or of a province, the government of a state other than Canada or
a department, board , Com m ission or agency established by the Gover nm ent of Canada or of a province
or of a government of a state other tha n C anada.
7. Impressed or adhesiv e stamps used for the purpose
of revenue by the Government of Canada or of a province or by the governm ent of a state other th an C anada.
8. Documents, registers or r ecords kept by public offi-
5
6
cials charged with the duty of making or issuing certified copies thereof, wh er e the copy false ly pur por ts to
be a certified copy ther eof.
9. Copyrighted material or tra dem arks of any manner or
kind without the consent of the copyright or trademark
owner.
10. The above list is prov ided f or your convenience and
assistance, but it is not all inclusive, and no liability is
assumed for its comp l et eness or accuracy. In case of
doubt, consult your sol ici to r.
7
XVII DOCUMENT CENTRE CS 50 USER GUIDE

Environmental Notices . . . in the USA and Europe
As an ENERGY STAR® part ner, Xe rox
Corporation has determined that this copier/printer
®
model meets the ENER GY STAR
energy efficiency .
®
ENERGY STAR
is a US registered trademark.
guidelines for
1
The ENERGY STAR program is a team effort
between the Environment Protection Agency and
the office equipment industry to promote ener gyefficient personal computers, monitors, printers,
fax machines and copi er s. Reducing the energy
consumption of this equipment will help combat
smog, acid rain and lon g-ter m changes to the
climate by decreasing the emissio ns t hat re sul t
from generating electricity.
Environmental Notices . . . in Canada
As a participant in the Environmental Choice
program, Xerox C orp or at ion has determined that
this copier/printer model meets the Environmental
Choice guideli nes for ener gy efficiency.
Environment Can ada established the
Environmental Choi ce pr ogram in 1988 to help
consumers iden tif y env ironmentally responsib le
products and services . Copier, printer and fax
products must meet energy efficiency and
emissions crit er ia , an d exhibit compatibility wi th
recycled supplies. Currently , Environmental
Choice has mor e th an 16 00 approved products
and 140 licensees. Xer ox has been a leader in
offering EcoLogo app ro ved products. In 1996,
Xerox became the f irst com pany licensed to use
the Environmen tal Choi ce EcoLogo for its copiers
printers, and fax machines.
2
3
4
5
DOCUMENT CENTRE CS 50 USER GUIDE XVIII
6
7

1
2
3
4
5
6
7
XIX DOCUMENT CENTRE CS 50 USER GUIDE

Contents
Safety Notes........................................................................................ IV
Notices...... ................... ................................................................ ......... X
Electrical safety............................ ............... ....................................... .....IV
Disconnect Device.................. ....................................... ............... ............V
Laser safety............................ ............... ............... ............... ............... .....VI
Maintenance safety................ ............... ............... ...................................VI
Operational safety ..................................................................................VII
Ozone safety.........................................................................................VIII
Radio Frequency Emissions.....................................................................X
FCC ............................................................................X
In Canada......................... ............... ............... ...........XI
FCC ................... ............... ............... ..........................XI
In Canada......................... ............... ............... ...........XI
Safety Extra Low Voltage Approval........................................................XII
Certifications . . . in Europe...................................................................XIII
It’s Illegal . . . in the USA........................................................................ XV
It’s Illegal . . . in Canada.......................................................................XVII
Environmental Notices . . . in the USA and Europe.............................XVIII
Environmental Notices . . . in Canada.................................................XVIII
1
2
3
4
1. About this manual.......................... .......... ........... ........... .......... .....1-1
Manual contents......... ....................................... ............... ............... ...... 1-2
2. Getting to know your Document Centre ColorSeries 50
1-2
3. Making copies......................................................1-2
4. Basic Copying......................................................1-3
5. Added Features...................................................1-4
6. Image Quality.......................................................1-4
7. Output Formats................... ............... ............... ...1-5
8. Job Assembly......................................................1-5
9. Paper......................... ............... ............... ............1-5
10. Duplex Automatic Document Feeder.................1-6
11. Sorter/Mailbox....................................................1-6
12. Problem Solving................................................. 1-6
13. Technical Information ........................................ 1-7
For more information............................. ............... ...1-7
Conventions used in this manual...........................................................1-8
.............................................................................................................. 2-1
Introduction........................................................................................... 2-1
Control Panel................. ............... ............... ............... ............... ............2-2
Control Panel Buttons............................................................................ 2-3
Touch Screen........................................................................................2-7
Message area....................................................... ...2-7
Copy quantity................................ ............... ............2-7
Feature tabs............................................................. 2-8
5
6
7
DOCUMENT CE NTRE CS 50 USER GUIDE XX

Touch Screen button types and functions ...............2-9
Using the Touch Screen............... ............... ..........2-11
Audio tones............ .............. ............... ....................................... .......... 2-12
Document Feeder and D o cument Glass . ...... ...... ...... ...... ...... ...... ...... .. 2-13
Duplex Automatic Document Feeder (DADF)........2-13
Document Glass.................................................... 2-14
Auto Image Rotation............................................................................ 2-15
Paper Trays and Paper Path............................................................... 2-16
Paper Trays...........................................................2-16
Paper Path Areas.................................................. 2-17
Output delivery.......................................................2-18
Dry ink (Toner)........................ ............... ............... ............................... 2-19
White border edges on copies .............................................................2-20
Ground fault protection........................................................................2-21
Connectivity.........................................................................................2-22
Moving the Copier/Printer............................ ............... ............... .......... 2-23
Options and accessories.....................................................................2-24
.............................................................................................................. 3-1
Power on and off...................................................................................3-2
Switching the power off............................................ 3-2
Switching the power on............................................3-2
Loading Paper.......................................................................................3-4
Paper Trays 1, 2, 3, or 4..........................................3-4
Paper Tray 5............................................................ 3-5
Quick copy................................. ............... ............... ............... ...............3-6
Making copies using features............. ............... ............... ............... ...... 3-8
Preserving your colour output..............................................................3-15
Adhesive tapes and adhesives..............................3-15
PVC and colour output...........................................3-15
Overview............................................................................................... 4-1
Output Colour..........................................................4-1
Copy Output......................... ............... ............... ...... 4-1
Reduce/Enlarge............................ ...........................4-2
Paper Supply...........................................................4-2
Output Colour........................................................................................ 4-3
Auto Colour.............................................................. 4-4
Full Colour .................................... ............... ............ 4-5
3 Pass Colour..........................................................4-5
Black........................................................................4-6
Single Colour...........................................................4-6
Selecting Output Colour...................... ............... ...... 4-7
Selecting a Single Output Colour............................. 4-7
Copy Output ................................. ............... ............... ............... ............4-8
Reduce/Enlarge....................................................... ............... ...............4-9
Percentage options..................................................4-9
Auto%.................................................................... 4-10
Setting basic options.............................................. 4-10
Advanced options for Reduce/Enlarge................................................ 4-11
Preset%................................................................. 4-12
Variable% .............................................................. 4-13
Independent X - Y%............................................... 4-15
Independent X - Y%: Variable%............................4-16
Independent X - Y%: Auto%..................................4-17
Paper Supply....................................................................................... 4-18
Auto Tray Switching............................................... 4-19
Selecting the Paper Supply...................................4-20
Programming the Paper Supply for Tray 5............ 4-21
1
2
3
4
5
6
7
DOCUMENT CE NTRE CS 50 USER GUIDE XXI

2. Added Features .............................................................................5-1
Overview............................................................................................... 5-1
2 Sided Copying ......................................................5-1
Bound Originals....................................................... 5-1
Margin Shift..............................................................5-2
Edge Erase.............................................................. 5-2
Original Size............................................................5-2
Mixed Size Originals ................................................5-3
2 Sided Copying....................................................................................5-4
Using the 2 Sided Copying feature..........................5-4
Manual 2 Sided copying .......................................... 5-6
Bound Originals..................................................................................... 5-7
Bound Originals Off.................................................5-9
Normal Bound O rigi nals.................................... ..... 5-10
Right to Left Format...............................................5-12
Calendar Format.................................... ................ 5-14
Margin Shift......................................................................................... 5-16
No Shift..................................................................5-17
Auto Centre............................................................5-18
Corner Shift............................................................5-20
Variable Shift......................................................... 5-22
Edge Erase.......................................................................................... 5-25
No Erase................................................................ 5-26
Variable Erase for edges.......................................5-27
Original Size........................................................................................ 5-29
Mixed Size originals............................................................................. 5-31
Overview............................................................................................... 6-1
Original Type........................................................... 6-1
Preset Colour Balance.............................................6-2
Lighten/Darken........................................................6-2
Colour Shift/Saturation.............................................6-2
Sharpness................................................................6-2
Variable Colour Balance ..........................................6-2
Original Type......................................................................................... 6-3
Photo & Text............................................................ 6-4
Text.......................................................................... 6-6
Photo .......................................................................6-7
Graphics & Maps.......................... ............... ............6-9
Preset Colour Balance.........................................................................6-10
Normal................................................................... 6-10
Lively...................................................................... 6-11
Bright .....................................................................6-12
Warm..................................................................... 6-13
Cool .......................................................................6-14
Background Suppression....................................... 6-15
Auto Suppression..................................................6-15
Lighten/Darken....................................................................................6-17
Colour Shift/Saturation ........................................................................6-19
Colour Shift............................................................ 6-19
Saturation.............................................................. 6-20
Sharpness ........................................................................................... 6-22
Variable Colour Balance...................................................................... 6-24
Overview............................................................................................... 7-1
Multiple-Up...............................................................7-1
Repeat Image................................................. ......... 7-1
Transparency Separators........................................7-2
1
2
3
4
5
6
7
DOCUMENT CE NTRE CS 50 USER GUIDE XX II

Invert image............................ ............... ............... ...7-2
Multiple-Up............................. ............... ............... ............... ............... ...7-3
2 Pages Up.............................................................. 7-4
4 Pages Up and 8 Pages Up................................... 7-5
Number of images per page....................................7-6
Repeat Image................ ............... ............... ............... ............... ............7-8
Single Image............................................................7-8
Auto Image Repeat..................................................7-8
Variable Image Repeat............................................7-8
Transparency Separators.................................................................... 7-11
No Separators........................................................ 7-11
Blank Separators.................................................. 7-11
Invert Image...................... ............... ....................................... .............7-14
Mirror image...........................................................7-14
Negative Image...................................................... 7-16
Overview............................................................................................... 8-1
Stored jobs...............................................................8-1
Stored Jobs ...........................................................................................8-2
Store a job ......... ............... ............... ........................8-3
Retrieve a job...........................................................8-4
Delete a job..............................................................8-5
Overview............................................................................................... 9-1
Paper Trays 1, 2, 3, and 4.......................................9-2
Paper Tray 5............................................................ 9-3
Auto Tray Switching................................................. 9-4
Loading stock........................................................................................ 9-5
Using paper .................................. ............... ............ 9-5
Using transparencies.......................... ............... ...... 9-7
Loading paper into trays 1, 2, 3, and 4................ .... 9-8
Loading stock into Paper Tray 5............................9-10
Using 12 x 18 inch or SRA3 paper ........................ 9-14
Paper Usage........................................................................................9-16
Overview............................................................................................. 10-1
Component names and functions ........................................................ 10-3
Document path.................................................................................... 10-3
Document specifications......................................................................10-4
Standard DADF doc um ent specifications.............. 10-4
Documents not recommended...............................10-6
Loading the documents.......................................................................10-7
Clearing a document jam.....................................................................10-9
Overview............................................................................................. 11-1
Using the Sorter/Mailbox................................... ............... ............... .... 11-3
Clearing a paper jam........................................................................... 11-5
1
2
3
4
5
3. Problem Solving............................. ................... ................... .......12-1
Overview............................................................................................. 12-1
Paper Jam Clearance.......................................................................... 12-3
Resolving hardware problems...........................................................12-12
Resolving programming problems.....................................................12-13
Resolving Processor problems ..........................................................12-14
DOCUMENT CENTRE CS 50 USER GUIDE XXIII
Preventing paper jams........................................... 12-4
Paper jam behind the Left Door.............................12-5
Paper jam behind the Right Door .......................... 12-6
Paper jam behind the Front Door .......................... 12-7
Paper jam inside a paper tray..............................12-10
Paper jam inside Paper Tray 5............................ 12-11
6
7

Resolving output quality problems using the Basic Copying, Added
Features, or Image Quality Tabs.......................................................12-17
Original Type selection and output....................................................12-22
Overview............................................................................................. 13-1
Specifications...................................................................................... 13-2
Electrical Power Requirements (115 VAC - 60 Hz)13-2
Electrical Power Requirements (220-240 VAC - 50 Hz)
13-3
Environmental Requirements............................ .... 13-4
Health and Safety Information............................... 13-4
Capabilities............................................................13-5
Physical Dimensions..............................................13-6
System Modes of Operation.................................. 13-7
Copy rates for Paper Trays 1, 2, 3, and 4: Normal Paper
13-8
Copy rates for Paper Tray s 2, 3, an d 4:
Limited Heavyweight Paper................................... 13-9
Copy rates for Tray 5...........................................13-10
Duplex Automatic D ocu ment Feeder
(DADF Specifications).......................................................................13-11
Sorter/Mailbox Specifica tio n s................... ............... ............... ........... 13-12
Metric Conversion Chart....................................................................13-13
Index................................................................................................ 14-1
1
2
3
4
5
6
7
DOCUMENT CE NTRE CS 50 USER GUIDE XXIV

1
2
3
4
5
6
7
XXV DOCUMENT CENTRE CS 50 USER GUIDE
1. About this manual
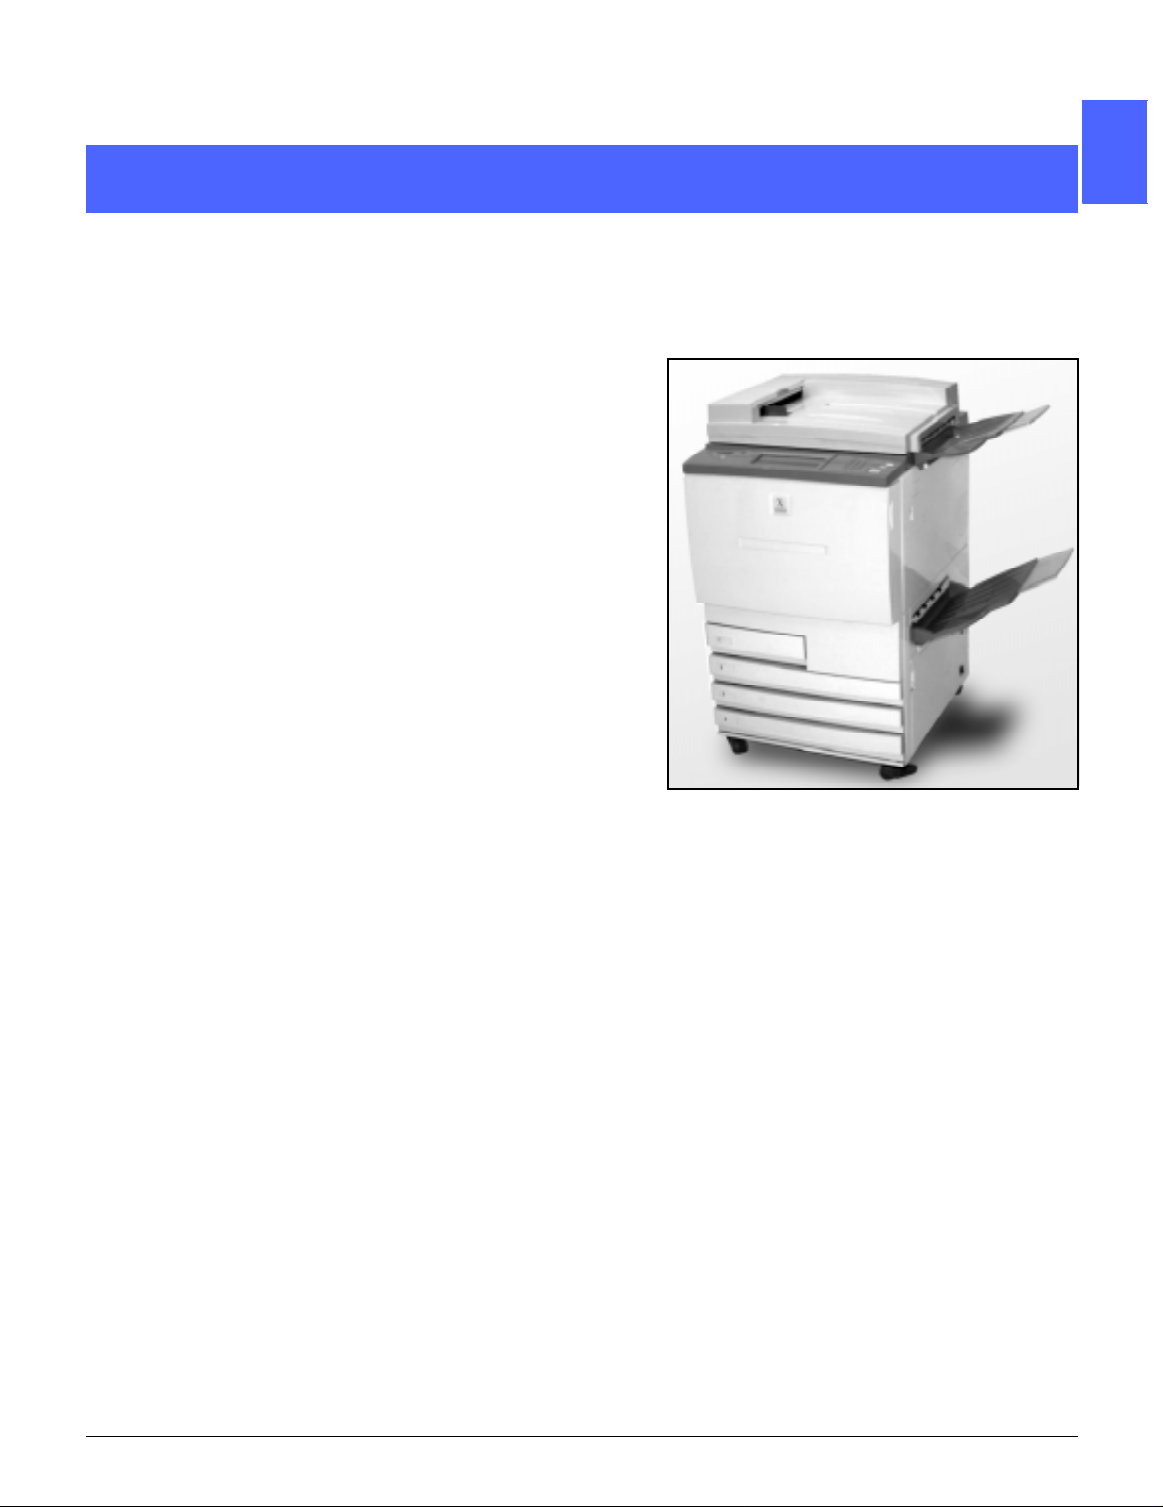
1
The Document Centre ColorSeries 50 may be
used as a standalon e copier, as illustrated in
Figure 1, or it may be combined with an external
Digital Front End to function as a copier/printer.
Therefore, this man ual re fe rs to th e unit as ei ther
the “Documen t Cen tre C ol or Ser i es 50,” the
“Document Cen tre C ol or Ser i es 50 copier/printer,”
or simply the “copie r/pr in te r.”
For more informati on a bou t h o w th e unit functions
as a printer, refer to the
ColorSeries Digital Copier/Printer User Guide
This chapter introduces the organization,
contents, and conventions of this manual.
Document Centre
.
2
3
4
Figure 1: The Document Centre ColorSeries
50
DOCUMENT CE NTRE CS 50 USER GUIDE 1–1 ABOUT THIS M A NUAL
5
6
7

Manual contents
1
This manual is divide d in to 12 chapters, as
described below.
KEY POINT : Features and options di scussed in
each chapter reflect the factory default settings.
Y ou may see different settings, depending on the
option s y o ur Sy st em Adm i ni st ra to r has s el ect ed i n
2
Tool s m ode.
2. Getting to know your Document Centre ColorSeries 50
Chapter 2 provide s basic information about th e
Document Centre ColorSeries 50. It includes an
introduction to the Co ntrol Panel, Touch Screen,
3
Duplex Automat ic Document Feeder and
Document Glas s, and Paper Trays and Paper
Path.
It also reviews such topics as audio tones, dry ink
(toner), white border edges, ground fault
protection, conn ect ivi ty and options and
accessories .
4
3. Making copies
Chapter 3 provide s th e pro cedures for powering
the copier/printer on and off. It also includes a
brief overview of the process of making copies.
5
6
7
ABOUT THIS MANUAL 1–2 DOCUMENT CENTRE CS 50 USER GUIDE

The overview serves a two-fold purpose :
• It reviews the basic process of making copies,
including select ing f eat ur es and options,
placing the original on the Document Glass or
in the DADF, pushing the START button, and
removing your ou tp ut .
Information such as positioning the origi nal
document on the D oc um ent Glass or in the
DADF is not repe at ed in lat er sections unless
the feature requires special attention to such
details.
• It reviews a number of commonly selected
output settings.
For explanations of th e var io us fea tu res of the
copier/printer or more detailed procedures, turn to
the appropriate section in later chapters.
4. Basic Copying
Chapter 4 includes information and procedures for
the features that display on the Basic Copying tab:
• Output Colour
• Copy Output
1
2
3
4
• Reduce/Enlarge
• Paper Supply
5
6
7
DOCUMENT CE NTRE CS 50 USE R GUIDE 1–3 ABOUT THIS M A NUAL

5. Added Features
1
Chapter 5 includes information and procedures for
the factory default features that display on the
Added Features tab:
• 2 Sided Copying
• Bound Originals
2
• Margin Shift
• Edge Erase
• Original Size
• Mixed Size Orig in al s
3
6. Image Quality
Chapter 6 includes information and procedures for
the factory default features that determine output
quality. These features display on the Image
Quality tab:
• Original Type
4
• Preset Colour Balance
• Lighten/Darken
• Colour Shift and Saturation
• Sharpness
• Variable Colour Balance
5
6
7
ABOUT THIS MANUAL 1–4 DOCUMENT CENTRE CS 50 USER GUIDE

7. Output Formats
Chapter 7 includes information and procedures for
the four factory def ault features that affect special
copy requireme nts. The se f eat ur es display on the
Output Formats tab:
• Multiple-Up
• Repeat Image
• Transparency Separators
• Invert Image
8. Job Assembly
Chapter 8 includes information and procedures for
storing, retrieving, and deleting jobs.
9. Paper
Chapter 9 provide s in fo rmat ion about paper trays
and auto tray swit chi ng. It also includes th e
correct procedures for loading stock into the paper
trays and specific information regarding the paper
to use in the Docum ent Centre ColorS eries 50.
1
2
3
4
For more general information about paper, refer to
Colour Materials Usa ge G ui de
the
information about paper s te st ed f or use wi th the
Document Centre ColorSeries 50, refer to the
Recommended Materials for the Document
Centre ColorSeries 50
.
. For specific
5
6
7
DOCUMENT CE NTRE CS 50 USE R GUIDE 1–5 ABOUT THIS M A NUAL

10. Duplex Automatic Document Feeder
1
2
3
Chapter 10 descr i bes the Du plex Automatic
Document Feeder by providing component names
and functions, document specificat io ns, and an
overview of the document path. Safety
precautions and instructions for document loading
and jam clearan ce ar e al so prov i ded.
11. Sorter/Mailbox
Chapter 11 describes the optional Sorter/Mailbox
by providing component names and functions,
safety precautio ns, and instructions for use and
jam clearance.
12. Problem Solving
Chapter 12 provides instructions for clearing
paper jams, and analyz i ng and solving hardware,
programming, and pr ocessor problems. It also
provides a number of solutions for improving
output quality.
4
5
6
7
ABOUT THIS MANUAL 1–6 DOCUMENT CENTRE CS 50 USER GUIDE

13. Technical Information
Chapter 13 provides the specifications,
requirements, capab ilities , ph ysical
characteristi cs, est i m at ed copy rates, and healt h
and safety informat i on f or the copier/printer.
Specifications for th e D AD F and Sorter/Mailbox,
as well as a metric conver si on chart, are also
included.
For more information
This guide should be used in conjunction with
Document Centre ColorSeries 50 System
the
Administration Guide
Mate rials for the Do cu ment Centre C olorSeries
.
50
For more information about the Document Centre
ColorSeries 50 with a Tier I Digital Front End
(DFE) refer to the
50 Printer User Guide
For site planning information, refer to the
Document Centre ColorSeries 50 Customer Site
Planning Guide
and the
Document Centre ColorSeries
.
.
Recommended
1
2
3
4
DOCUMENT CE NTRE CS 50 USE R GUIDE 1–7 ABOUT THIS M A NUAL
5
6
7

Conventions used in this manual
1
Descriptions of fe at ur es and options generally
precede proced ur e st eps. You may need to
combine several procedures to achiev e your
desired results.
This man ual uses a nu m ber of symbols to hel p
you identify various ki nds of information. These
2
3
symbols are desc ribed below.
The 1, 2, 3 symbol indicates the beginning of a
procedure. Be sure to follow steps carefully in the
order given.
NOTE: Notes provide extra information that may
be helpful to your und ers tand ing or performance
of procedures.
KEY POINT : The key symbol draw s your
attention to important additional information, hints,
or tips.
4
WARNING:This symbol alerts you to an operating
or maintenance procedure, practice, or condition,
that, if not strictly obs erved, could result in inj ur y
or loss of life.
WARNING:This Hot Surface symbol warns you of
5
6
an area that may be very hot and would cause
personal injury if touc hed.
CAUTION:This symbo l aler ts yo u to an operating
or maintenance procedure, practice, or condition
that, if not strictly obs erved, could result in
damage to or destruction of equipment or loss of
data.
7
ABOUT THIS MANUAL 1–8 DOCUMENT CENTRE CS 50 USER GUIDE

2.Getting to know your Copier / Printer
Introduction
1
2
The Documen t Cen tre C ol or Ser i es 50 copier/
printer, Figure 1, provides full-colour, digital
imaging at approx imately 12 copies per m inut e,
depending upon the paper size and the feedi ng
orientation of the paper. It includes an anticounterfeit funct ion as sta ndard equipment.
3
4
5
Figure 1: The Document Centre ColorSeries
50 Copier/Printer
DOCUMENT CE NTRE CS 50 USER GUIDE 2–1 GETTING TO KNOW YOUR COPIER / PRINTER
6
7

Control Panel
1
Use the Control Panel to program the copie r/
printer for individual jobs.
A
B
C
2
3
Figure 2: Control Panel
As illustrated in Figure 2, you will use the Contrast
dial (A) on the left side of the Touch Screen (B) to
make the Touch Screen brighter or darker. Turning
the dial clockwise darkens the screen and turning
it anti-clockwise lightens the screen.
4
The buttons on the righ t side of the Control Panel
(C) and the electronic buttons on the T ouch
Screen are used to ent er the jo b req ui re m ents .
5
6
7
GETTING TO KNOW YOUR COPIER / PRINTER 2–2 DOCUMENT CENTRE CS 50 USER GUIDE

Control Panel Buttons
The function of the Control Panel hard buttons i s
described below. The numbers before the
descriptions correspond to the numbered call-outs
in Figure 3.
1 Numeric Keypad - Buttons 0 to 9 are used to
select a copy quant ity up to the value set in the
Tools mode. These buttons are also used to enter
an access number.
2 Administration - This button is used by the
System Administrator.
23
1
Figure 3: Control Panel buttons
5
7
8
1
4
6
2
3
3 Access - The copier/printer can be activated in
either the normal copying mode (withou t an
access num ber ) or in the A ccess Number mo de.
If the copier/printer is in the Ac ces s N um ber
mode, use the Access button to bring up the
Access screen and enter your access num ber
before trying to m ake any copies. Press the
Access button aft er you complete your job to exit
the user screens and ensur e tha t no one else can
make copies us in g your access numb er.
4
5
6
7
DOCUMENT CE NTRE CS 50 USER GUIDE 2–3 GETTING TO KNOW YOUR COPIER / PRINTER

4 Low Power button - Press this button to initiate
the Low Power mode. The Document Cent r e
1
2
ColorSeries 50 will also go into Low Power mode
automatically if it is not used for a length of time
specified by the System Administrator in the Tools
Mode.
The Low Power mode enables the Document
Centre ColorSe ries 50 to use l es s pow er than
when it is in Ready mode. Press the Low Power
button again to bring t he copier/printer into a
warm-up cycle.
5Interrupt - Press this button to stop the copier/
printer during the copy process. The copier/printer
will complete the copy in process and then stop.
There are two indications the job has been
interrupted:
3
• The copier/printer displays a message
indicating that Job Int er ru pt has been
selected, and it is rea dy t o copy.
• The indicator light flashes to acknowledge that
the Interrupt button has been pressed. It
continues to flash unt il the copier/printer
interrupts the job in proce ss. W hen the
4
5
Interrupt indicator lig ht is on continuously (not
flashing), a new job can be programmed.
After all interrupting jobs have been completed,
press the Interrupt button again to exit the
Interrupt mode and to return to the first job.
NOTE: Interrupt should not be used when the
machine is in a fault co ndit i on (e xcept for Image
Quality faults, alerts, or when a message indicates
the job is incomplete) or with the following types of
jobs:
• Repeat Image
• Multiple-Up
Interrupt should als o not be used when you are
using the Stored Jobs feature or when you are on
6
the Access Number Entry screen or in Tools
mode.
7
GETTING TO KNOW YOUR COPIER / PRINTER 2–4 DOCUMENT CENTRE CS 50 USER GUIDE

6
Clear
All - Press t his button to clear all
programming, including the copy quantity. All
features are reset to their res pective default
settings. When the C l ear All but ton i s selected in
Interrupt mode, default settings are applied only to
the interrupting job.
NOTE: Clear All is not applied if a job is in
progress or if the m achine is displayin g a Jam or
Interlock Open screen.
7Stop - When you select the Stop button , the
copier/printer com p le te s th e copy in process and
then stops. A message asking if you want to
continue the job (Press the Clear button to
change options for the job) is displayed on the
Touch Screen.
8Start - Press this button to start a copy job or to
continue the copy process.
The copier/printer starts the first job automatically
if the Start button is pressed during warm- up. An
indicator lamp lights and t he Touch Screen
displays a message to indicate tha t the copier/
printer will start automatically .
1
2
3
To cancel the Automatic Start feature before the
copier/printer is done warming up, press the Stop
button.
4
5
6
7
DOCUMENT CE NTRE CS 50 USER GUIDE 2–5 GETTING TO KNOW YOUR COPIER / PRINTER

9Clear (C) - When a screen with numeric entry is
displayed, pr essing the Clear (C) button cancels
1
all th e info rma tion prev io usly ente red and d ispla ys
the default value. Use t hi s bu tton in the following
cases:
C
• To clear the copy quant ity t hat wa s sel ect ed
and to reset the quantity to 1.
• To restore the copier/printer to the
2
programming condition when a fault or a jam
occurs and a mes sage displays on the Touch
Screen. Further pro gr am m in g sel ec t io ns can
be entered withou t clearing the previous
selections. (O nl y th e copy quantity that was
selected is rese t to 1. )
• To cancel all the informatio n pr evi ously
3
entered and display blank fields ready for new
data entry on the Access N um ber Entry
screen.
When the Clear button is selected while the
copier/printer is in Interrupt mode, it is applied
only to the interrupting job.
When the Clear button is selected with the
Stored Job feature, it is applied only to th e
4
selected job.
NOTE: Clear is not applied if a job is incomplete
or the machine i s displ aying a Jam or Interlock
Open screen.
5
6
7
GETTING TO KNOW YOUR COPIER / PRINTER 2–6 DOCUMENT CENTRE CS 50 USER GUIDE

Touch Screen
M
C
The Touch Screen can be us ed t o select features
and options that specify what kind of copy output
you desire.
It also displays mes sages that indicate the co pi er /
printer status during idle, ru n, or faul t conditions.
1
Message area
The message area at the top of the screen, Figure
4, contains space for messa ges concerning the
copier/printer status , programming conflicts, and
errors. The messages may also provide
instructions for the op erator.
Copy quantity
The copy quanti ty ent er ed using the keypad
appears in the uppe r- right corner of the message
area, Figure 4.
essage area
Figure 4: Touch Screen with
Basic Copying Tab displayed
2
opy quantity
3
4
5
6
7
DOCUMENT CE NTRE CS 50 USER GUIDE 2–7 GETTING TO KNOW YOUR COPIER / PRINTER

Feature tabs
1
The Touch Screen displa ys five f eature tabs you
use to program the copier/printer:
• Basic Copyi n g
• Added Features
• Image Quality
2
• Output Formats
• Job Assemb ly
The five feature tabs on the Touch Screen contain
the programmable selections for each feature.
Figure 5 illustrates the default configuration for the
3
4
Basic Copying tab .
KEY POINT : Features and options di scussed in
each chapter follow the factory default settings.
Y ou may see different settings, depending on the
option s y o ur Sy st em Adm i ni st ra to r has s el ect ed i n
Tool s m ode.
Ask your System A dm i ni st ra to r for more
information regar ding these selections ,
the “T ools Mode” chapter of the
ColorSeries 50 System Administrator Guide
Document Centre
or refer to
.
Figure 5: Basic Copying Tab
5
6
7
GETTING TO KNOW YOUR COPIER / PRINTER 2–8 DOCUMENT CENTRE CS 50 USER GUIDE

Touch Screen button types and functions
Touch Screen buttons are selectable and
shadowed. These buttons change appearance
when selected. The standard button types are
described and illustrated below:
Some buttons contain a feature name or feature
choice.
Option
buttons
Icon buttons Som e feat ur e and option buttons displ ay icons.
Some features have more options associated with
them than can be di splayed on one screen.
Touching a More... button displays options on
another screen or simply displays a screen with all
relevant options wh en the button is pressed.
Some of these option buttons may have words on
them, as illust rated in Figure 6.
Other option butto ns ar e bl ank with words or
graphics to the side , as illustrated in Figure 7.
Touch the button to select the op tion described.
Figure 6: Sample labeled feature
and option buttons
Icon buttons
1
2
3
4
Blank buttons
Figure 7: Sample icon and blank f eat ur e
and option buttons
DOCUMENT CE NTRE CS 50 USER GUIDE 2–9 GETTING TO KNOW YOUR COPIER / PRINTER
5
6
7

Arrow
buttons
1
Arrow buttons allow you to change values on th e
Control Panel for feat ur es such as Variable
Reduce/Enlarge, as illustrated in Figure 8.
Touch the up or right arrow to increase the value;
touch the down or left arrow to dec rea se t he
value.
Changes are displayed in the value box es .
Figure 8: Arrow buttons
2
Fixed
selection
buttons
Fixed value selection buttons allow you to select
preset increm enta l ch anges for features, such as
Lighten/Darke n, as illustrated in Figure 9.
3
Cancel
and Save
buttons
The Cancel button, Figure 10, allows you to
cancel a feature or se le ct ed f eatur e opt i ons
without saving t hem .
The Save button, Figur e 10, al l ows you to save a
selected feature or options.
Figure 9: Fixed selection butt ons
Figure 10: Cancel and Save buttons
4
5
6
7
GETTING TO KNOW YOUR COPIER / PRINTER 2–10 DOCUMENT CE NTRE CS 50 USE R GUIDE

Using the Touch Screen
Figure 11: The Touch Screen
The copier/printer def aul ts to the Basi c Co pyi ng
tab, as illustrated in Figure 11. Touch the visible
part of the tab to access the feature s fo r Add ed
Features, Image Q ua lit y, Output Formats, or Job
Assembly.
NOTE: The features available i n eac h tab are
assigned by your System Administrator using the
T ools mode. Therefore, the features in the tabs on
your copier/printer may vary from the screen
samples shown in this m anual.
Touch the desired button or icon to select a
feature. The selected button is highlighted .
Selecting some of the fea ture buttons causes
another screen to displ ay. These screens con tain
additional info rmation and selectio ns f or that
feature. Selecting som e of th e opt i ons on th ese
screens displays additional detail scre e ns.
1
2
3
4
DOCUMENT CE NTRE CS 50 USER GUIDE 2–11 GETTING TO KNOW YOUR COPIER / PRINTER
5
6
7

Audio tones
1
The copier/printer provides three types of audio
tones to assist the operator in selectin g fe at ur es
and functions. The System Administrator can
adjust the volume of some of the audio t ones
using Tools mode.
• When a selection is made, the copier/printer
2
beeps once when a but ton i s to uched to
acknowledge th e in put .
• A triple beep tone soun ds w hen a conflict
occurs between the selections already made
and the one being attempted. A triple beep
also occurs when a fea tu re is not av aila bl e.
• The attention tone c onsists of a series of
3
longer beeps. The attention tone sounds
when the copier/printer warm-up cycle is
complete.
4
5
6
7
GETTING TO KNOW YOUR COPIER / PRINTER 2–12 DOCUMENT CE NTRE CS 50 USE R GUIDE

Document Feeder and Document Glass
Duplex Automatic Document Feeder (DADF)
The Duplex Automatic Document Feeder (DADF),
Figure 12, acts like a Document Cover by
shielding the Scanner from external light.
1
This is especially important when you select the
Auto Colour option. The copier/printer does not
operate with the Du pl ex Au to m at ic Docum ent
Feeder open whe n th e Auto C ol our option is
selected.
KEY POINT :
• Do not use excessive force to press down on
the Duplex Autom at ic Docum ent Feeder.
• If the Duplex Autom at ic Docum ent Feeder
must be open during the scanning, the Output
Colour feature cannot be set to Auto Colour.
You must make a differen t sele ct io n.
After you place docum ents face up in the Duplex
Automatic Docu m ent Feeder, ensure that the
paper guide is against the document, and press
the Start button to begin the scan operation.
2
3
Figure 12: Duplex Automatic Document
Feeder
4
DOCUMENT CE NTRE CS 50 USER GUIDE 2–13 GETTING TO KNOW YOUR COPIER / PRINTER
5
6
7

Document Glass
1
2
3
After you have select ed the desired features, you
should place the ori ginal document onto the
Document Glas s. R aise t he D up le x Aut om atic
Document Feeder and place (register ) the
document in the correct orientation on the
Document Glas s fo r long edge feed or short edge
feed, as illustrated in Fi gur e 13.
NOTE: Y ou can set the orientation on a number of
user screens or the Syst em Adm i ni strator can
change the defaul t ori entation in Tool s M ode.
The document must be face down and in the
upper-left corner of the Document G lass.
Lower the Duplex Aut om at i c Document Feeder
and press the Start button to begin the scan
operation.
KEY POINT :
Figure 13: Registering a document
on the Document Glass
• When a document is scanned short edge first,
but the requested paper tray holds paper so it
will print long edge first, the Auto Rotation
feature will cause a document to be rotated
4
90°. If the output is to be 2-sided, the second
side will be rotated 270° to maintain head-tohead output.
• The maximum sc anned image size is 11 x 17
inches or A3. To copy an image of this size
onto 12 x 17.7 inch or SRA3 paper, you must
select 102% enlargement.
5
6
7
GETTING TO KNOW YOUR COPIER / PRINTER 2–14 DOCUMENT CE NTRE CS 50 USE R GUIDE

Auto Image Rotation
The Document Centre ColorSeries 50 offers an
automatic rotation feature for A4 inch original
documents input from both the Duplex Automatic
Document Feeder and the Document Gl ass.
KEY POINT : The following information only
applies when th e Aut o Tray is sele ct ed. If th e
copier/printer detects that the image area of a
document that is bein g scanned short edge fe ed
will not fit on the paper, it will automatically rotate
the image 90° t o ens ur e th at the ent ire ima ge
appears on the output (long edge feed).
Therefore, if you are scanning an A4 inch original
document and you have requested 11 x 8.5 inch
long edge feed pape r, the image will be rotated
90° to provide the entire image on the output.
If you request 2 Sided output, Side 1 will be
rota t ed 90° and Side 2 will be rotated 270° to
ensure head-to-head output.
KEY POINT : Auto Rotation is not perform ed for
documents that are scanned long edge first.
1
2
3
4
5
6
7
DOCUMENT CE NTRE CS 50 USER GUIDE 2–15 GETTING TO KNOW YOUR COPIER / PRINTER

Paper Trays and Paper Path
1
Paper Trays
Paper Trays 1, 2, 3, and 4 are located at the lower
front of the copier/print er, as illustrated in Figur e
14. Paper Tray 5 is on the left of the copier/printer,
as illustrated in Figure 14 and Figure 15.
2
Paper Tray 1 can accommodate 8.5 x 11 inch, A4,
A5, or B5 paper.
Paper Trays 2, 3, and 4 can accomm odate an
assortment of standard paper sizes, from 8 x 10
inch through 11 x 17 inch, and B5 through A3.
3
4
NOTE: Paper Trays 2, 3, and 4 can also
accommodate 12 x 18 inch (305mm x 457mm)
paper through a speci al, op tional tray setup
procedure performed by a Xerox service
representative. If you ar e in teres t ed i n this opt io n,
contact your Xerox serv ic e re pre sentative.
Paper Tray 5 (sometimes cal le d th e Bypass Tray
or Multiple Sheet Inserter) is locate d on th e left
side of the copier/printer. Tray 5 can
accommodate non-standard pape r sizes up to
12 x 18 inches (3 05m m x 457mm) or 12.6 x 17.7
inches (SRA3). Tray 5 can also accommodate
special materi al s such as transparenci es and
heavy weight paper.
Figure 14: Paper Trays 1, 2, 3, 4
5
5
6
Figure 15: Paper Tray 5
7
GETTING TO KNOW YOUR COPIER / PRINTER 2–16 DOCUMENT CE NTRE CS 50 USE R GUIDE

Paper Path Areas
1 Paper Tray 1
2 Paper Tray 2
3 Paper Tray 3
4 Paper Tray 4
5 Paper Tray 5
6 Preregistration Ar ea
7 Transfer Belt
8 Fuser
9 Output Tray or Sorter/Mailbox
10 Duplex path (1 0a, 10b, 10c)
As illustrated in Figure 16, the paper is fed from
the selected paper tray (1-5) to the Paper
Transport rollers.
The Paper Transport rollers de liver the paper to
the Preregistration Area ( 6) in the Paper Path
Module.
1
2
3
Figure 16: Paper Path
4
From the Preregistrat io n Area, the paper is
registered onto the Transfer Belt (7), and the
image is transferred.
The paper proceeds to the Post Transfer Area and
into the Fuser (8), where the image is fixed to the
paper permanently.
From the Fuser, the paper passes either thro ugh
the Post Fuser Area an d in to the Sorter / M ai lbox
(9) or into the duplex path (10 a, 10b, 10c).
5
6
7
DOCUMENT CE NTRE CS 50 USER GUIDE 2–17 GETTING TO KNOW YOUR COPIER / PRINTER

Output delivery
1
Output is delivere d differen tly, depending on the
configuration of your system and on the jo b
options you cho ose.
If you use the Document Glass to input the original
document, the requested number of copies will be
delivered, face up, to the Output Tray or Offset
Catch Tray on the right side of the copier/printer.
2
If you use the Duplex A ut om ati c D ocument
Feeder to input the or igin al document, the output
will be delivered in one of th e followin g ways. ( The
example uses a three-page job.)
• Basic, single-co py output is delivered face
down in 1, 2, 3 order.
3
• Multiple-copy output is delivered to the Output
Tray face up with copies of the first page on
the bottom and the last page on t op, as, fo r
example, in 3/3/3, 2/2 /2, 1/1/ 1 or der.
• For a multiple-copy job in a configuration wi th
a Sorter/Mailbox, one set of output is
delivered, face do w n, to each of th re e
4
separate bins in 1, 2 , 3 or der.
5
6
7
GETTING TO KNOW YOUR COPIER / PRINTER 2–18 DOCUMENT CE NTRE CS 50 USE R GUIDE

Dry ink (Tone r)
The Documen t Cen tre C ol or Ser i es 50 copier/
printer has a four-colour devel opment s ystem that
uses a combination of dry inks (toners) to produce
the output colours. The dr y i nk (toner) colours are
magenta, cyan, yellow, and black.
Each dry ink (toner) is co ntaine d in a car tridge.
When dry ink (ton er ) is runni ng l ow in a partic ular
cartridge, the Touch Screen displays a message
indicating that it is time to reor der that toner
colour. When a cartridge is empty, the Touch
Screen displays a message indicating that the
cartridge should be rep la ced. The Document
Centre ColorSeries 50 will not make copies using
that colour until the car t ridge has been replaced.
Refe r to the
System Administration Guide
about replacing th e dry in k (toner) cartridges.
Document Centr e Col orSeries 50
for information
1
2
3
4
5
6
7
DOCUMENT CE NTRE CS 50 USER GUIDE 2–19 GETTING TO KNOW YOUR COPIER / PRINTER

White border edges on copies
1
All copies made on th e D ocument Centre
ColorSeries 50 hav e w hi t e bor der edges on four
sides of the copy, as illustrated in Figure 17. The
default No Erase feat ur e re m oves 2 mm from the
lead edge image and the trail edge image.
If the white border edges result in image loss on
2
3
your copies, select the C opy All option in the
Reduce/Enlarge f eat ur e t o m in imize the image
loss.
Refer to the Edge Eras e f eatur e in the “Add ed
Features” chapt er for mo re infor m at i on ab out
edge erase.
Figure 17: Copy with white border edges
4
5
6
7
GETTING TO KNOW YOUR COPIER / PRINTER 2–20 DOCUMENT CE NTRE CS 50 USE R GUIDE

Ground fault protection
The Documen t Cen tre C ol or Ser i es 50 copier/
printer is equipped w i th a saf et y feat ur e cal l ed a
Ground Fault Protector, Figure 18. This device
removes all electrical power to the copier/printer if
a fault is detected in the po w er supply to the
copier/printer.
1
If power is interrupted to the copier/printer,
perform the following:
Locate the Grou nd Fault Protector on the back of
1
the copier/printer in the low er lef t corner.
Flip the switch up if the devi c e has been tripped
2
and the switch is in the O ff (down) pos iti on.
If the device interrupts power to the copier /p rint er
again, or if power has not been restored by the
above procedure, call your Xerox service
representative.
CAUTION: The Fuser Roll remains in a cammedup position if power to the co pi er /p rinter is
interrupted while t he copier/printer is in use. If the
Fuser Roll remains in the cammed-up position for
a prolonged perio d of time, the Fuser Roll can be
damaged and copy quality defects can occu r. To
prevent any damage, the copier/printe r sh oul d be
powered on and a copy/print made as soon as the
power is restored. Th e Fuser Roll will not be
released from the cammed-up position until the
power is restored, the Power Switch is in the On
position, and the Start button is pressed agai n.
Figure 18: Ground Fault Protector
2
3
4
5
DOCUMENT CE NTRE CS 50 USER GUIDE 2–21 GETTING TO KNOW YOUR COPIER / PRINTER
6
7

Connectivity
1
Your Document Centre ColorSeries 50 copier can
be used as a printer when connected to an
external Digital Front End (DFE). Ther ef or e, the
Document Centre ColorSerie s 50 is re fe rred to as
a copier/printer throughout this manual
Document Centre ColorSeries 50 System
Administration Guid e.
2
3
Contact your Xerox representative for more
information on the be nef i ts of using a DF E to
network your Document Centre ColorSeries 50.
If your Document Centre ColorSeries 50 is already
connected to a DFE, re fe r to th e documentation
that was supplied with the DF E for ins tallation
instructions, setup pr ocedures, and featur e
descriptions for your Document Centre
ColorSeries 50 copier/printer.
and the
4
5
6
7
GETTING TO KNOW YOUR COPIER / PRINTER 2–22 DOCUMENT CE NTRE CS 50 USE R GUIDE

Moving the Copier/Printer
The Documen t Cen tre C ol or Ser i es 50 copier/
printer should not be m oved after it has been
installed. Improperly m ov i ng th e copier/printer
may damage the equipment, carpet or floor.
lf you must move the copier/printer, please ask
your Xerox represe ntati ve t o ass i st you.
1
2
3
4
5
6
7
DOCUMENT CE NTRE CS 50 USER GUIDE 2–23 GETTING TO KNOW YOUR COPIER / PRINTER

Options and accessories
1
Tabl e 1 lis ts the opti onal equipment that is
available for the Document Centre ColorSeries 50
copier/printer.
Option Comment For more information
2
Offset Catch Tray (OCT) The OCT can hold up to 500 sheets of 20 lb
(80 gsm) paper.
Document Glass Cover Replaces the Dupl ex Autom atic Document
Feeder.
Sorter/Mailbox The Sorter/Mailbox can function as a 10-bin
sorter on the Document Centre ColorSeries
3
Work Surfac e
Extension
4
Table 1: Document Centre ColorSeries 50 Op t ion s and Accessories
50 (copier only) or as a m ai lb ox on the Document Centre ColorS er i es 50 wit h an ex te rnal Digital Front End (printer on ly). It can be
used as either a mailbox or a sor te r on the
copier/printer configuration.
A Work Surface Extension ca n be added to
the Document Centr e C ol or Ser ie s 50 i f it
does not have a Duplex Aut om at i c Document Feeder (DADF) or Sorter/Mailbox.
Contact your Xerox representative.
Contact your Xerox representative.
Contact your Xerox representative.
Contact your Xerox representative.
5
6
7
GETTING TO KNOW YOUR COPIER / PRINTER 2–24 DOCUMENT CE NTRE CS 50 USE R GUIDE

1
2
3
4
5
6
7
GETTING TO KNOW YOUR COPIER / PRINTER 2–25 DOCUMENT CE NTRE CS 50 USE R GUIDE

1
2
3
4
5
6
7
GETTING TO KNOW YOUR COPIER / PRINTER 2–26 DOCUMENT CE NTRE CS 50 USE R GUIDE

3.Making copies
This chapter includes instructions for
powering on and off the Do cum ent Centre
ColorSeries 50. It also incl udes a procedure
that leads you qui ckl y through a number of
features you may want to use in m aki ng
copies.You can find detailed information about
the features and options referred to in this
chapter in the chapt ers th at foll ow.
1
2
3
4
DOCUMENT CE NTRE CS 50 USER GUIDE 3–1 MAKING COPIES
5
6
7
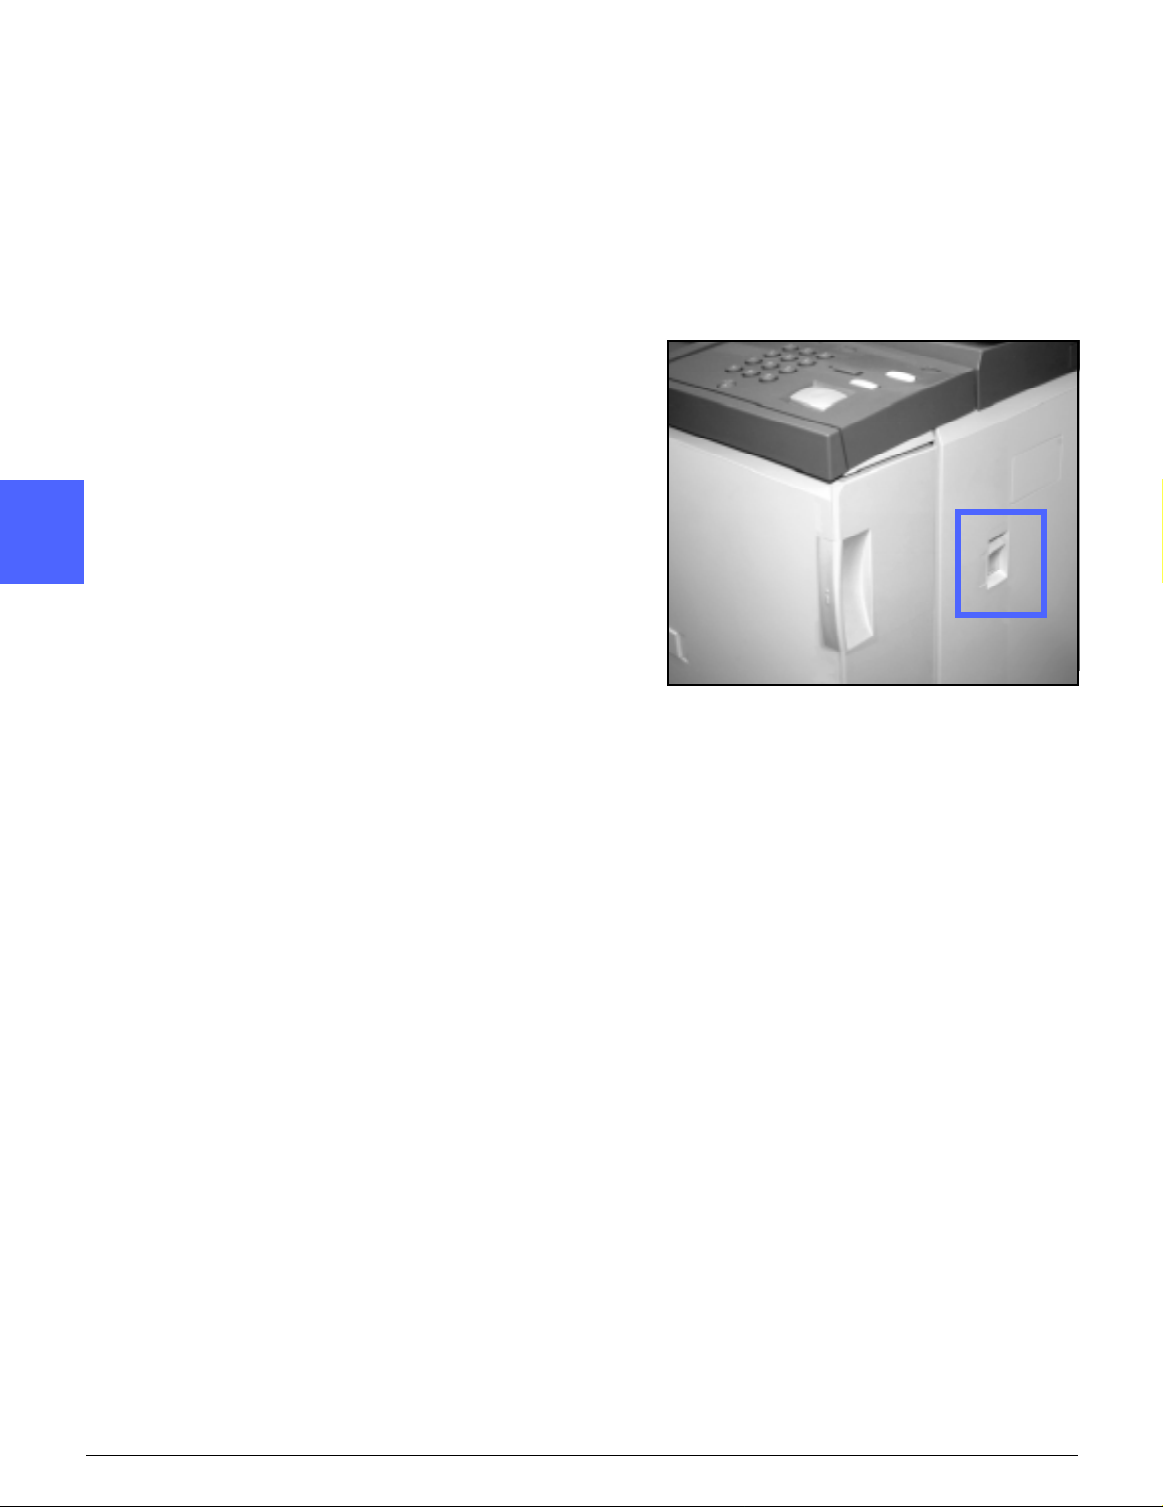
Power on and off
1
Swit chin g the power off
Press the Power Swit ch t o th e Off position t o
switch the copier/printer off, as in Figure 2. The
Touch Screen will go dark.
2
Allow the copier/p rinter to remain off for
approximately 30 seconds if you will be switching
it on again immediately.
Swit chin g the power on
3
4
Press the Power Swit ch t o th e On position to
switch the copier/printer on. A message will
display asking you to wait.
After the Power Switch is pressed to On, the
copier/printer takes approximatel y ei ght m in ut es
to come to a Ready to Make Copies condition.
The copier/printer produces colour copies at a rate
of approximately t w elve copies per minute,
depending on the paper size and the feeding
orientation of the paper.
Figure 2: Power Switch - Off Position
5
6
7
MAKING COPIES 3–2 DOCUMENT CENTRE CS 50 USER GUIDE

NOTE: The copier/printer starts automatically
after it comes to the Ready state if the Start button
is pre ssed dur ing war m-up. A me ssag e di spla ys t o
indicate that the automatic start feature is
activated. Press the Stop button to canc el the
automatic start feature.
CAUTION: The Fuser Roll remains in a cammedup position if power to the co pi er /p rinter is
interrupted while t he copier/printer is in use. If the
Fuser Roll remains in the cammed-up position for
a prolonged perio d of time, the Fuser Roll can be
damaged and copy quality defects can occu r. To
prevent any damage, the copier/printe r sh oul d be
powered on and a copy made as soon as the
power is restored. Th e Fuser Roll will not be
released from the cammed-up position until the
power is restored, the Power Switch is in the On
position, and the Start button is pressed agai n.
1
2
3
4
5
6
7
DOCUMENT CE NTRE CS 50 USER GUIDE 3–3 MAKING COPIES

Loading Paper
1
Paper Trays 1, 2, 3, or 4
2
Pull out the paper tray.
1
Place the appropr iate paper int o the tray, as
2
illus t rated in Figure 3. Adjust the paper guides.
The paper level must not be above the MAX fill
line, as indicated in th e tray.
3
Close the paper tray slo wly to avoi d skewing the
3
paper stack. Ensure that the paper tra y is fully
closed.
Refer to the section, “Paper and Paper Trays,” for
more detailed information.
4
KEY POINT :
Figure 3: Loading a Pape r Tray
• For the best results, use only the paper sizes
and paper weights indicat ed in the section,
“Paper and Paper Trays.”
• Adjusting the paper guides indicates the
paper size to the copier/printer.
• It is important that you straight en the paper
5
stack each time the Pape r Tray is opene d.
Close the Paper Tray slowly to avoid having to
reposition the paper stack. This ensures that
the paper is in the correct position when the
paper tray is in the operatin g pos iti on.
6
7
MAKING COPIES 3–4 DOCUMENT CENTRE CS 50 USER GUIDE

Paper Tray 5
Paper Tray 5 is located on the left side of th e
copier/printer. Paper Tray 5 is used for
transparencies, hea vy weight papers, and nonstandard size paper. A maximum of 100 sheets of
20 lb (80 gsm) paper may be loaded into Paper
Tray 5.
To access Paper Tray 5, open the cover and
1
extend the tray.
Place the paper on the tray. Ensure that the paper
2
is all the way in and adjust th e paper guides, as
illustrated in Figure 4.
Do not fill Paper Tray 5 above the fill line on the
paper guide.
NOTE: Remove all copy stock from Paper Tray 5
when the job is comp le te. Dust and moisture can
affect stock, causing copy quality defects.
1
2
3
Figure 4: Loading Pape r Tray 5
4
DOCUMENT CE NTRE CS 50 USER GUIDE 3–5 MAKING COPIES
5
6
7

Quick copy
1
The procedure be lo w helps you m ake simple
copies without changing any options.
2
Press the Clear All (CA) button to clear any
1
previous programming.
Perform one of the follow ing:
2
• Raise the Duple x Automatic Document
Feeder (DADF) or Doc um ent Glass Cover
3
and place the docum ent face down onto the
Document Glas s, as in Fig ur e 5.
Make sure the document lies against the
registration area at th e le ft re ar corn er of the
glass. The Registration area is identified with
an arrow.
Lower the Duplex Automatic Document
Feeder (DADF) or Doc um en t Glass Cover.
4
Figure 5: Placing a documen t on th e
Document Glass
• If you have a Duplex Aut om a tic D oc um ent
Feeder, place the document face up in to the
5
DADF Tray, as in Figure 6. The Document
Feed Lamp lights when the document is in the
correct position. Ensur e t hat th e paper gui de
is against the origin al document.
Document Feed Lamp
6
Figure 6: Placing a document in the
DADF Feeder Tray
7
MAKING COPIES 3–6 DOCUMENT CENTRE CS 50 USER GUIDE

Press the Start button.
3
When copying is completed, perform t he
4
following:
• Remove the copies from th e O ut put Tray or
Sorter/Mailbox on the right side of the copier/
printer.
1
• Remove the original do cum ent(s) from the
Document Glass or Original Catch Tray of the
DADF.
2
3
4
DOCUMENT CE NTRE CS 50 USER GUIDE 3–7 MAKING COPIES
5
6
7

Making copies using features
1
The feature tabs on the Touch Screen (Figure 7)
enable you to configure the copier/printer to sui t
your copying needs.
The procedure be lo w leads you quickly through a
number of features you may want to use in making
copies. It assume s th at the fea tu re tabs ar e in the
2
default configurat ion. You can find detailed
information about the features and options
referred to in this section in the chapters that
follow.
Figure 7: Touch Screen with Basic Copying
tab in Default Configuration
3
Press the Clear All (CA) button to clear any
1
previous programming.
Use any of steps 2 throug h 11 that apply to your
job and desired output.
Select the required quantity.
2
4
• Use the Keypad to enter the quantity.
• Press the Clear (C) but ton on t he N um eric
Keypad to clear an incorr ec t qu ant i ty.
5
Figure 8: Keypad and Clear Key
6
7
MAKING COPIES 3–8 DOCUMENT CENTRE CS 50 USER GUIDE

Select an option in the O utput Colour feature if a
3
setting other than the default, Auto Colour, is
desired. Auto Colour enables the copier /print er to
select either Full Colour or Black and White to use
for the output.
Perform one of the follow ing:
• T ouch the desired Output Colour option on the
Basic Copying tab .
• Touch More... to see additional options, as
illustrated in Figure 9.
Touch the desired option and touch the Save
button to return to the Basic Copying screen.
1
2
If there is a Sorter/Mailbox, touch the appropria te
4
Copy Output option:
• Touch Auto Outp ut to dire ct co ll ated out put to
the Offset Catch Tray.
• Touch Collated to direct up to 10 sets of
collated output to the Sorter/Mailbox Bins.
• Touch Uncollated to direct uncollated out put
to the lower Offset Catch Tray.
If the job has more than 10 original
documents, production will pause after th e
tenth set has been delivered until yo u clear
the bins of all output and pr ess Start.
KEY POINT :
• Transparencies may not be used for two-sided
copying.
• Transparencies cannot be de liv ere d to the
Sorter/Mailbox bins. They must be directed to
the Catch Tray.
Figure 9: Output Colour screen
Figur e 10: Copy Outpu t f eature
3
4
5
DOCUMENT CE NTRE CS 50 USER GUIDE 3–9 MAKING COPIES
6
7

Select an option in the Reduce/Enlarge feature if a
5
setting other than th e def ault (100%) is desired.
1
Perform one of the follow ing:
• Touch the desired Reduce/Enlarge option on
the Basic Copying tab.
• Touch More... to see additional options, as
illustrated in Figure 11.
2
Touch the desired option and touch the Save
button to return to the Basic Copying screen.
Select an option in the Paper Suppl y fea tu re if a
6
tray other than the defau lt (Auto Paper) is desired.
3
Perform one of the follow ing:
Figure 11: Reduce/Enlarge screen
• Touch the desired Paper Supply option on the
Basic Copying tab .
• Touch More... to see additional options, as
illustrated in Figure 12.
4
Touch the desired option and touch the Save
button to return to the Basic Copying screen.
Figure 12: Paper Supply screen
5
6
7
MAKING COPIES 3–10 DOCUMENT CE NTRE CS 50 USE R GUIDE

Touch the Added Feature s tab and to uch the
7
Original Size icon to display the Original Size
screen, Figure 13.
Touch a standard option for Origi nal Size or use
the horizontal and vertical arrows to set a nonstandard size if a setting other than the default
(Auto Detected) is desi re d.
Touch the Save button to return to th e Added
Features tab.
On the Added Features tab, touch the 2 Sided
8
Copy button and perfor m on e of the follow ing.
• If you have a DADF, touch the desired option
from those illustrated in Figure 14:
– 1 to 1 Sided icon for default one-sided
copies
– 1 to 2 Sided icon f or two-si ded copies
from one-sided in put, as i llus trated in
Figure 15. Touch Flip on Long Edge for
two-sided, head -to- head output, as for
books. Touch Flip on Short Edge for twosided, head-to-toe output, as for
calendars.
1
Figure 13: Original Size screen
2
3
Figure 14: 2 Sided Copying opti ons
4
Figure 15: 1 to 2 Sided Copying optio n
DOCUMENT CE NTRE CS 50 USER GUIDE 3–11 MAKING COPIES
5
6
7

– 2 to 2 Sided icon for two- sided copies
from two-sided input.
1
Select the Side 2 Rotate button to display
the Side 2 Rotate screen, illust ra ted in
Figure 16. Touch Right/Left open for
two-sided, head-t o- head output, as for
books. Touch Top/Bottom open for two-
sided, head-to-toe output, as for
calendars.
Figure 16: Side 2 Rotate scree n
2
– 2 to 1 Sided icon for one-sided cop ie s
from two-side d or ig in als, ill ust r at ed i n
Figure 17. Touch Flip on Long Edge if
your original docu m ents are t w o- si ded,
head-to-head. Touch Flip on Short Edge
if your original documents are two-sided,
3
head-to-toe output.
Figure 17: 2 to 1 Sided Copying optio n
• If you not have a DADF, perform one of the
following:
– Touch the 1 Sided icon for default one-
sided copies.
– Touch the 2 Sided icon to display the 2
Sided Copy screen. Under Side 2 Rotate,
4
perform one of the fol low ing:
Touch Flip on Long Edge for two-sided,
head-to-head out put , as for bo oks.
Touch Flip on Short Edge f or two- sided,
head-to-toe output , as f or ca le ndars.
Touch the icon that most cl osely resembles th e
5
Original Orientation fo r the document on the
Document Glass.
6
7
MAKING COPIES 3–12 DOCUMENT CE NTRE CS 50 USE R GUIDE

Touch the Image Quality tab an d to uch the
9
Original Type icon to display the Orig in al Type
screen, Figure 18.
Touch an option for Original Type if a setting other
than the default (Ph oto & Text) is desired.
Touch the Save button to return to th e Image
Quality tab.
1
Figure 18: Original Type screen with Text
option selected
10
11
12
On the Image Quali ty tab, touch t he Light en/
Darken icon to display the Lighten/Darken screen,
as illustrated in Figure 19.
Perform one of the follow ing:
• Touch the Auto Contrast icon to ha ve t he
copier/printer deter m i ne t he darkness or
lightness of the or ig in al document and adjust
the output darkness or lightness automatically.
• Using the illustrated bar as a guide, touch the
button under the se cti on t hat bes t reflects the
desired degre e of dar kness or lightness.
Touch the Save button to return to th e Image
Quality tab.
On the Image Quali ty tab, touch t he Pr ese t
Colour Balance icon to display the Preset Colour
Balance screen, illustrated in Figure 20.
Touch the appropriate bu tton for th e desired
colour balance.
Touch the Save button to return to th e Image
Quality tab.
If other features are desi r ed, sel ec t the
appropriate feat ur e tab and fe at ure but to n on t he
Touch Screen. Refer to the following chapters for
more information.
2
Figure 19: Lighten/Darken screen
3
4
Figure 20: Preset Colour Balance screen
5
DOCUMENT CE NTRE CS 50 USER GUIDE 3–13 MAKING COPIES
6
7

13
Perform one of the follow ing:
1
2
3
• Raise the Duple x Autom at i c Document
Feeder (DADF) or Doc um en t Glass Cover
and place the docum ent, face down, on the
Document Glas s, as in Fig ur e 21.
Ensure that the document lies against the registration area at the le ft rear co rn er of th e
glass. The Registration area is identified with
an arrow.
Lower the Duplex Automatic Document
Feeder (DADF) or Doc um en t Glass Cover.
Figure 21: Placing a document on the
Document Glass
• If you have a Duplex Aut om a tic D oc um ent
Feeder, place the document face up in to the
DADF Tray, as in Figure 22. The Do cum e nt
Feed Lamp lights when the document is in the
correct position. Ensur e t hat th e paper gui de
is against the origin al document.
Document Feed Lamp
4
14
15
Press the Start button.
When copying is completed, perform t he
following:
• Remove the copies from th e O ut put Tray or
Sorter/Mailbox on the right side of the copier/
printer.
5
• Remove the original do cum ent(s) from the
Document Glass or Original Catch Tray of the
DADF.
Figure 22: Placing a document in the
DADF Feeder Tray
• If you used Paper Tray 5, remove the copy
stock from Tray 5 and store it prop erly.
6
7
MAKING COPIES 3–14 DOCUMENT CE NTRE CS 50 USE R GUIDE

Preserving your colour output
1
Colour output, like black and white output, should
be handled and st or ed carefully to preserve its
appearance and usability. Your colour output,
which is made fro m col our dry in ks ( to ners),
requires a little special attention. To help preserve
the fidelity of your colour out put, Xerox
recommends th at you c onsider the following:
2
Adhesive tapes and adhesives
Some adhesive tapes and adhesives (glues)
contain solvents that may soften or dissolve the
colour dry ink (toner) . Adhesive tapes and
adhesives should be tested on sample output
3
before being appl i ed to your valuable copies or
prints. Adhesive tape may also pull off the dry ink
(toner) when the tape is removed.
PVC and colour output
If your output comes i n contact with PVC and
PVC-type (vinyl) plastics, the dry ink (toner) m ay
4
soften and transfer to the plastic. Use
polypropylene and polyethylene plastics for any
covers or binders that come in contact with the
colour output.
5
6
7
MAKING COPIES 3–15 DOCUMENT CE NTRE CS 50 USE R GUIDE

1
2
3
4
5
6
7
MAKING COPIES 3–16 DOCUMENT CE NTRE CS 50 USE R GUIDE

4.Basic Copying
Overview
1
2
3
Figure 12: Basic Copyi ng Tab
The Basic Copyin g tab, illust r ated i n Fi gur e
12, displays frequ ent ly used features.
Output Colour
The Output Colou r feat ur e al lo ws you to
select the colou rs to be used for copying.
Copy Output
The Copy Output fe at ur e enables you to
select the destination of the output. Available
options differ, based on whether the
Document Centre ColorSeries 50 uses the
Output Catch Tray or has a Sorter/ Ma ilbox.
4
5
6
7
DOCUMENT CE NTRE CS 50 USER GUIDE 4–1 BASIC COPY ING

Reduce/Enlarge
1
The Reduce/En la rg e fe atur e al lo w s you to s el ect
the size of the output ima ge f ro m pr es et val ues ,
and the automatic reduction/enlargement or
variable independent ratios for the image le ngt h
and width.
Paper Supply
2
The Paper Supply feature allows you to select the
tray that contains the correct output paper size
and type.
Y our System Administrator may have added other
features. Descriptions of features other than those
listed here may be found in other chapters.
3
KEY POINT :
• When you select the More... button, you see
additional options on another screen. If you
choose an option from this secondary screen,
save your selection and return to the tab. The
selected optio n is di spl ay ed beside the word
More....
4
• Features and options discussed in this
chapter follow the factory default settings. Y ou
may see different settin gs, depending on the
options your Syst em A dm i nist rator has
selected in Tools mode.
5
6
7
BASIC COPYING 4–2 DOCUMENT CENTRE CS 50 USER GUIDE

Output Colour
The Output Colou r feat ur e, Fig ur e 23, allo w s you
to select the desir ed output colour.
The output colour opt io ns displayed on the Basic
Copying tab are Auto Colour, Full Colour, 3 Pass
Colour, and Black.
1
If you select the More... button, the screen also
displays the Singl e Col our opt i on. Touching the
Single Colour butt on displays the options of Red,
Green, Blue, Yellow, Magenta and Cyan, as
illustrated in Figure 24.
NOTE: Gold, silver, and fluorescent colo urs
cannot be copied accurately on this copier/printer.
The dry inks (toners) do not contain the metallic
particles necessary to accurately reproduce gold
and silver colours or the f lu ore sc ent pro per t ie s
that are required to reproduce fluorescent colours.
Figure 23: Output Colour opt ions on th e
Basic Copying Tab
Figure 24: Output Colour Screen
2
3
4
DOCUMENT CE NTRE CS 50 USER GUIDE 4–3 BASIC COPY ING
5
6
7

Auto Colour
1
2
3
The Auto Colour option enables the copier/printer
to determine auto m atic al ly if th e doc um ent is
black and white or colour. If the document is black
and white, the Black option is selected
automatically. If the document is coloured, the Full
Colour option is selected.
NOTE: Th e D uplex Automatic Doc um ent Feeder
or Documen t Glass Cover must be closed for the
Auto Colour option to function. If the Duplex
Automatic Docu m ent Feed er or Document Glass
Cover cannot be closed, an Output Colo ur other
than Auto Colour must be selected.
For the scanner to accurately sen se the pres enc e
of colour on a document during the prescan cycle,
the colour area on the do cument must be great er
2
than 50 mm
If the colour area is less than 50 mm
Full Colour option.
With the Auto Colour opt ion, som e very dark
colours may be sensed as black and theref or e
copied as black. In these cases, select the Fu ll
Colour option.
(approximately 2 inches squared) .
2
, select the
4
5
6
7
BASIC COPYING 4–4 DOCUMENT CENTRE CS 50 USER GUIDE

Full Colour
The Full Colour option combines all four dry ink
(toner) colours (bl ack, cyan, magenta, and
yellow). You should select the Full Colour option
when the document contains colour and black, as
in Figure 25. In this mode, output is produced at
approximately 12 copies/prints per minute.
KEY POINT : Gold, silver, and fluorescent colours
cannot be copied accurately on this copier/printer.
The dry inks (toners) do not contain the metallic
particles necessary to accurately reproduce gold
and silver colours or the f lu ore sc ent pro per t ie s
that are required to r epr oduce fluorescent col ours.
3 Pass Colour
The 3 Pass Colour opti on combines the three
colours of dry ink (ton er) (c yan, magenta, and
yellow), as illustrated in Figure 26. You should
select the 3 Pass Colour opt i on w he n th e
document contains very little black, or w hen
Process Black is ac ceptable over a true
reproduction black, such as is used w i th
photographs. Process Black is a combination of
equal amounts of the th ree dry inks (toners) .
1
2
Figure 25: Example of Full Colour
3
4
Figure 26: Example of 3 Pass Colour
5
6
7
DOCUMENT CE NTRE CS 50 USER GUIDE 4–5 BASIC COPY ING

Black
1
2
3
4
The Black option sh oul d be selected when the
desired output is a black and white copy. Black
and white copies can be made from any
document. Whe n you select Black, the copi er /
printer will use black dry ink (toner) only, as in
Figur e 27.
With the Black option, the copier/printer produces
50 copies per minute when it uses 8.5 x 11 inch
(A4) paper that is fed long ed ge first .
Figure 27: Example of Bl ack
Single Colour
The Single Colour op tion, accessed through t he
More... button, changes the image and/or text on
a document to one colour other than black. Single
colour copies, as illustrated in Figure 28, can be
made from any colour or black and white
document. The Touch Screen directs you to select
one of six preset co lour s (Red, Green, Blue,
Yellow, Magenta, or Cyan).
NOTE: Using this option will not cr eate a colour
separation. Close examination will reveal t hat
multiple colours are used to create the output that
appears to be a “single” colour.
5
Figure 28: Example of Single Colour
6
7
BASIC COPYING 4–6 DOCUMENT CENTRE CS 50 USER GUIDE

Selecting Output Colour
On the Basic Copying tab, select the desired
Output Colour option.
Selecting a Single Output Colour
1
2
On the Basic Copyi ng tab, touch the Output
1
Colour More... option to display the Output Colour
screen, as in Figure 29 .
Touch Single Colour.
2
Touch the desired colour.
3
Touch Save to return to the Basic Copying tab.
4
3
Figure 29: Output Colour Scre en with
Single Colour Options
4
5
DOCUMENT CE NTRE CS 50 USER GUIDE 4–7 BASIC COPY ING
6
7

Copy Output
1
The Copy Output feature enables you to select the
destination of the output and determine whether it
is to be collated or uncollated. For example, three
copies of a three-page co llated job will result in
three sets of copies in 1, 2, 3 order. Three copies
of a three-page uncollated job will result in output
in the order 1, 1, 1, 2, 2, 2, 3, 3, 3.
2
3
If the Document Ce nt re Co lorSeries 50 does not
have a Sorter/Mai lb ox, onl y one output tray is
listed, as illustrated in Figure 30. No other option
is available.
Figure 30: Copy Output
without optional Sorter/Mailbox
If the Document Centre ColorSeries 50 has a
Sorter/Mailbox, out put may be directed to th e
Sorter/Mailbox Bins or Offset Catc h Tray. Use the
following procedure to make your choi ce.
4
On the Basic Copyi ng tab, touch the appropriate
Copy Output option, as illustrated in Figure 31:
• Touch Auto Outp ut to dire ct co ll ated out put to
5
the Offset Catch Tray.
• Touch Collated to direct up to 10 sets of
collated output to the Sorter/Mailbox Bins.
Figure 31: Copy Output options
with optional Sorter/Mailbox
• Touch Uncollated to direct uncollated out put
to the Sorter/Mailbox Bins.
If the job has more than 10 original
documents, production will pause after th e
6
tenth set has been delivered until yo u clear
the bins of all output and pr ess Start.
7
BASIC COPYING 4–8 DOCUMENT CENTRE CS 50 USER GUIDE

Reduce/Enlarge
The Reduce/En la rg e fe atur e al lo w s you to c opy
the image at different magni f icat i ons.
Y ou can select one of the following options on the
Basic Copying tab, as illustrated in Figure 32.
1
Percentage options
Depending on what the System Administrator has
selected, you see several percentage options for
reduction/enlargement.
For example, use the 1 00% option to ensure
copies are the same size as the original
document.
Copies may be re duc ed t o 25% or enl ar ged to
400%.
KEY POINT : If the image on the document
extends to the edges of the paper, select the Copy
All option to avoid imag e lo ss on the copies.
Figure 32: Reduce/Enlar ge options on the
2
Basic Copying Tab
3
4
DOCUMENT CE NTRE CS 50 USER GUIDE 4–9 BASIC COPY ING
5
6
7

Auto%
1
The Auto% option aut om ati cal l y reduces or
enlarges the copy, based on the size and
orientation of the document and the paper supply
select ed. This op t ion is applied only to stan dard
size documents.
KEY POINT : Select Auto% when the docum ent
and the copy paper ar e di fferen t sizes.
2
The copy image will be reduced or enlarged in the
same proportions for X (horizo ntal) and Y
(vertical) direct ions.
KEY POINT : The X and Y directions are alway s
3
4
determined in reference to the registration arrow,
located around the D ocument Glass, Figu re 33.
The X direction is always along the long edge of
the Document Glass, and theY direction is along
the short edge of the Document Glass. The X and
Y direction referenc es on the Document Glas s
remain the same, regardless of the document
orientation (long edge registration or short edge
registration).
NOTE: The Auto Paper option in Paper Supply is
not available when Auto% is selected.
Y Direction
X Direction
Figure 33: Document Glass directions
Setting basic options
5
On the Basic Copyi ng Tab, select the desired
Reduce/Enlarge option, as in Figure 34.
6
Figure 34: Reduce/Enlar ge options on the
Basic Copying Tab
7
BASIC COPYING 4–10 DOCUMENT CE NTRE CS 50 USER GUIDE

Advanced options for Reduce/Enlarge
Touching the Reduce/E nl ar ge More... button on
the Basic Cop ying tab e nables you to set
reduction or enlargement according to the
following options illustrated in Figure 35:
• Preset%
1
• Variable%
• Independent X-Y%
2
Figure 35: Additional Options
for Reduce/Enlarge
3
4
DOCUMENT CE NTRE CS 50 USER GUIDE 4–11 BASIC COPY ING
5
6
7

Preset%
1
2
3
4
When you selec t the Pr eset% option, the
percentages that display on the Basic Copying tab
are supplement ed by additional preset
percentages. The selected percentage displays in
the value box on the Reduce/Enlarge sc re en.
Select the Copy All option to s elect an automatic
93% reduction. Thi s en sur es that the entire
original docume nt image is copied to the edges
and placed onto the output despite normal edge
deletion.
Under Reduce/E nlarge on the Basic Copy in g tab,
1
touch the More... button.
On the Reduce/Enl ar ge screen, select the
2
Preset% option, as illustrated in Figure 36.
Perform one of the follow ing:
3
• Touch a preset percentage.
• Touch Copy All to scan the original document
image to its edges, reduce it automatically,
and produce output that includes the whole
image. Touch Copy All again to return to
normal copying.
Touch Save to return to the Basic Copying tab.
4
Figure 36: Preset% Reduce/Enlarge
5
6
7
BASIC COPYING 4–12 DOCUMENT CE NTRE CS 50 USER GUIDE

Variable%
Select the Variable% option to enter the des ired
percentage for Reduce/Enlarge. Use either the up
and down arrow s or the nu mber buttons that
display on the Touch Screen. Copies may be
reduced to 25% or en la rg ed t o 400%.
Tabl e 1 lis ts some common percen tage
conversions for di fferen t paper sizes:
Percentage Paper sizes
64% 11 x 17 inch to 8.5 x 11 inch
129% 8.5 x 11 inch to 11 x 17 inch
70% A3 to A4
78% 8.5 x 14 inch to 8.5 x 11 inch
141% A4 to A3
154% 5.5 x 8.5 inch to 8.5 x 11 inch
220% 5.5 x 8.5 inch to 11 x 17 inch
Table 2: Percentage convers ion s
1
2
3
4
5
6
7
DOCUMENT CE NTRE CS 50 USER GUIDE 4–13 BASIC COPY ING

1
Under Reduce/E nlarge on the Basic Copy in g tab,
1
touch the More... button.
On the Reduce/Enl ar ge screen, select the
2
Variable% option, as in Figure 37.
2
Perform one of the follow ing:
3
• Touch the up arrow to increase the
percentage value in in cr em ents of 1.
• Touch the down arrow to decrease the
percentage value in decrements of 1.
3
• Use the Numeric Keypad on the Touch Screen
to enter a specific per centage, from 25
through 400.
The values increa se or decrease in the displayed
value box accor di ng t o your entries.
Touch Save to return to the Basic Copying tab.
4
Figure 37: Variable% Reduce/Enlarg e screen
4
5
6
7
BASIC COPYING 4–14 DOCUMENT CE NTRE CS 50 USER GUIDE

Independent X - Y%
Select the Independent X - Y% option to copy the
image at different, independent magnifications
from 25% to 400% for the X an d Y direc tion s.
For example, you can enlarge the image to 129%
in the X direction and red uce it to 64% in the Y
direction.
Selecting the Independent X - Y% option on the
Reduce/Enlarge screen displays an additional
screen. This screen, illustrated in Figure 38,
enables you to se le ct var ia bl e reduction/
enlargement op tion s:
• Variable%
• Auto%
NOTE:
• The Auto% option is ap plie d onl y t o standard
size documents.
• The X and Y directions are always determined
in reference to the r egi st r at io n ar row, located
around the Docum ent Glass, Figure 39. The
X direction is always al ong the long edge of
the Document Glas s, and the Y di r ect i on is
along the short ed ge of th e D ocument Glass.
The X and Y direction refer ences on the
Document Glass rema in t he same, re gardles s
of the document orientation (long edge
registration or short edge registration).
All of the Independent X-Y options require you
to enter the original orientation that most
closely resem bl es how the document is
placed on the Document Glass.
1
2
3
Figure 38: Independent X - Y% O ptions for
Reduce/Enlarge
4
X Direction
Y Direction
5
Figure 39: The X and Y Directions on th e
Document Glass
DOCUMENT CE NTRE CS 50 USER GUIDE 4–15 BASIC COPY ING
6
7

Independent X - Y%: Variable%
1
The Variable% option enables you to sele ct
different percentages for r edu ct io n and
enlargement in either the X or Y direction by using
Touch Screen arrows. You can also indicate the
orientation of the original on t he D ocument Glass.
2
Under Reduce/E nlarge on the Basic Copy in g tab,
1
touch the More... button.
On the Reduce/Enl ar ge screen, select the
2
Independent X - Y% option to disp l ay the
3
Independent X - Y% scre en.
Select the Variable% option, as in Figure 40.
3
Perform one of the follow ing:
• Touch the up arrow to increase the
percentage value for the Length - Y, X & Y, or
Width - X.
4
• Touch th e dow n ar ro w to decrease the
percentage value for the Length - Y, X & Y, or
Width - X.
The values increase or decrease in the displayed
value box accor di ng t o your entries.
Figure 40: Variable% Reduce/Enlarg e screen
Touch the icon that most cl osely resembles th e
4
orientation of the original document on the
Document Glass.
5
Touch Save to return to the previous Reduce/
5
Enlarge screen.
Touch Save to return to the Basic Copying tab.
6
6
7
BASIC COPYING 4–16 DOCUMENT CE NTRE CS 50 USER GUIDE

Independent X - Y%: Auto%
The Auto% option enables the copier/print er to
calculate the redu ct ion and enlargement
automatically based on the original document size
and on the output paper size.
KEY POINT : This option is applied on ly to
standard size docum ents.
Under Reduce/E nlarge on the Basic Copy in g tab,
1
touch the More... button.
On the Reduce/Enl ar ge screen, select the
2
Independent X - Y% option to display the
Independent X - Y% scre en.
Touch the Auto% option, as in Figure 41.
3
Notice that the values in both the Length - Y and
Width - X boxes display as Auto.
1
2
3
4
Touch the icon that most cl osely resembles th e
4
orientation of the original document on the
Document Glass.
Touch Save to return to the previous Reduce/
5
Enlarge screen.
Touch Save to return to the Basic Copying tab.
6
Figure 41: Auto% Reduce/Enlarge screen
5
6
7
DOCUMENT CE NTRE CS 50 USER GUIDE 4–17 BASIC COPY ING

Paper Supply
1
The Paper Supply op tio n enables you to select
output paper size and ty pe.
The Basic Copyin g tab disp la ys t he Au to Paper
selection option. This option enables the copier/
printer to automat ical ly det ect the original
document size and select appropr i at e stan dar d-
2
3
size paper in Paper Trays 1, 2, 3 or 4.
The Basic Copying tab also displays the contents
of three other trays, enabling you to specify your
selection for output size, as i n Figur e 42. The
Paper Supply More... button enables you to
access the Paper Supply screen.
The paper size displayed for Paper Trays 1, 2, 3,
and 4 is set when you ad j ust th e paper gui des as
part of the process of loading paper. The System
Administrator sets paper type for the trays in the
Tool s m ode.
You may select both the paper size and paper
type on the detail screen when loading paper into
Paper Tray 5.
Figure 42: Paper Supply on the
Basic Copying Tab
4
NOTE: If you want to change the weight of paper
loaded in Paper Tray 1, 2, 3, or 4, contact you r
System Administr at or or use the Tools Mode to
change the paper weight for the specified tray
before loading paper.
5
6
7
BASIC COPYING 4–18 DOCUMENT CE NTRE CS 50 USER GUIDE

Auto Tray Switching
The Auto Tray Switching option enables the
copier/printer to sw itc h aut om atically to another
tray when a tray runs out of pape r, providing that
the trays are loaded wi t h the sam e size paper in
the same orientation (lo ng edge feed or short
edge feed).
You can reload paper in em pt y trays while the
copier/printer is run ni ng t o ens ur e continuous
production.
Auto Tray Switching is enabled in t he Tools mode
only for Paper Trays 1, 2, 3 and 4. Tray 5 can not
be enabled for Auto Tray Switching.
The factory default for Auto Tray Switching is ON
with Paper Trays 1, 2, 3, and 4 enable d.
T o use Auto Tray Switching with the factory default
settings, load the tray s you want to use with the
same size paper in the same orientation.
For example, if you lo ad trays 2 and 3 with the
same size paper in the same orientation, select
the Tray 2 paper supply button on the Touch
Screen. The copier/ printer draws paper from Tray
2 until it is depleted, then swi tches automatically
to Tray 3.
1
2
3
4
DOCUMENT CE NTRE CS 50 USER GUIDE 4–19 BASIC COPY ING
5
6
7

Selecting the Paper Supply
1
On the Basic Copying Tab, review the displayed
1
paper trays under Pape r Su ppl y t o see if the
desired paper size and type is displayed .
2
Perform one of the follow ing:
2
• Touch the Auto Paper option. The copier/
printer selects the appropriate paper
automatically.
• Touc h th e tray tha t displays the appropri ate
3
paper. The copier/printer will use paper from
this tray.
• Touc h th e More... button to display the Paper
Supply screen, Figur e 43, with the five paper
tray options.
Touch the appropriate tra y icon. The copier/
printer will use paper from t his tray.
4
NOTE: If you select Paper Tray 5, go to the
procedure “Programming the Paper Supply for
Tray 5.”
Figure 43: Paper Supply screen
Notice that the copi er /print er ic on highlights the
location of the paper tray th at is select ed.
Touch Save to display the Basi c C opy in g tab.
3
5
6
7
BASIC COPYING 4–20 DOCUMENT CE NTRE CS 50 USER GUIDE

Programming the Paper Supply for Tray 5
You must select the paper s iz e and paper type
when loading paper into Tray 5.
On the Basic Copying tab under Paper Supply,
1
touch the More... button to display the Pape r
Supply screen, Figure 44.
T ouch the Tray 5 icon to display the Tray 5 screen,
2
Figur e 45.
1
2
Figure 44: Paper Supply screen
3
Figure 45: Tray 5 screen
4
5
6
7
DOCUMENT CE NTRE CS 50 USER GUIDE 4–21 BASIC COPY ING

Perform one of the fol low in g to sel ect paper size:
3
1
• Touch International and selec t on e of the
preset interna tional sizes, such as A 3 or A4 ,
as illustrated in Figure 46.
KEY POINT : You must select Internati ona l to
access the Po st card size option.
Figure 46: Tray 5 International Paper Sizes
2
• Touch Inch Sizes and select one of the
standard US sizes, such as 8.5 x 11 or 1 1 x 17
inches, as illustrated in Figure 47.
3
Figure 47: Tray 5 Inch Sizes
• Touch Non Standard Sizes and enter the X
(width) and Y (length) dimensions by using the
arrows, as illustrated in Figu re 48.
Touch the left or right arrows to decrease or
4
increase the X (width) dimensions. Touch the
down or up arrows to decrease or increase
the Y (length) dimens io ns.
Figure 48: Tray 5 Non Standard Sizes
Touch the appropriate Pa per Type.
4
Touch Save to return to the Paper Supply screen.
5
5
Touch Save to return to the Basic Copying tab.
6
6
7
BASIC COPYING 4–22 DOCUMENT CE NTRE CS 50 USER GUIDE

2. Added Features
1
Overview
Figure 1: Added Features Tab
Use the Added Featu re s tab (Fig ur e 1) to
select options for th e feat ur es described
below.
2 Sided Copying
2
3
4
The 2 Sided Copying feature specifies 1 to 1,
1 to 2 (head-to-head), and 1 to 2 (head-to-toe)
copying.
Bound Originals
The Bound Origin als f eature splits the image
of an open bound original into pages to enable
copying of each page.
DOCUMENT CE NTRE CS 50 USER GUIDE 2–1 ADDED FEATURES
5
6
7

Margin Shift
1
The Margin Shift featur e enables you to centre a
document ima ge, shif t the i m age to one edge
slightly, or move the image to a specified ed ge of
the output copy.
Edge Erase
2
The Edge Erase featur e all ow s you to erase any
undesired ima ges around the border of a
document. Edge Er ase may begin at the image
and go out to the edge of th e origi nal document.
Edge Erase may be als o app lied to any centre
streaks cause d by a gap between the spine of a
bound document and the Document G la ss.
3
Original Size
The Original Size feature enables you to sp ecify
the size of the original document to be copied. You
may select a standa rd international, standar d U S
paper size, or a non-standard size. The Auto
Detected feature enables the copier/printer to
identify the size of the ori gi nal aut om atically.
4
5
6
7
ADDED FEA TURES 2–2 DOCUMENT CENTRE CS 50 USER GUIDE

Mixed Size Originals
When the Duplex Aut om ati c D ocument Feeder
(DADF) is present, you can place documen ts of
mixed sizes into t he D AD F for copying. When t he
Mixed Size Origin al s fe atur e and Auto paper tray
are selected, the co pi er /p rinter automatically
identifies the docum ent size and selects the
correct paper supply.
KEY POINT :
• When you select a feat ur e opt i on other than
the default, save your selection and th en
return to the tab, a check mar k di spl ay s near
the feature name, and the selected value or
option displays under the feature name.
• Features and options di scussed in this
chapter follow the factory default settings. Y ou
may see different settin gs, depending on the
options your Syst em A dm i nist rator has
selected in Tools mode.
1
2
3
4
5
6
7
DOCUMENT CE NTRE CS 50 USER GUIDE 2–3 ADDED FEATURES
 Loading...