

Xerox Document Centre C250, Document Centre C360, Document Centre C450 Quick Reference Guide
Page 1

Document Centre C450/C360/C250
Quick Reference Guide
Page 2

All product/brand names are trademarks or registered trademarks of the respective holders.
Loss of Data on the Hard Disk Drive
Saved data may be lost if hard disk of the machine breaks down due to external shocks or if the power is
accidentally cut off in a manner not following the methods listed in manuals or other documentations. Fuji Xerox
is not responsible for such data loss and any consequence caused by such data loss.
Damage related to computer virus
Fuji Xerox is not responsible for any breakdown of machines due to infection of computer virus.
Important
(1) This manual is copyrighted with all rights reserved. Under the copyright laws, this manual may not be copied or
modified in whole or part, without the written consent of the publisher.
(2) Parts of this manual are subject to change without prior notice.
(3) We welcome any comments on ambiguities, errors, omissions, or missing pages.
(4) Never attempt any procedure on the machine that is not specifically described in this manual. Unauthorized
operation can cause faults or accidents. Fuji Xerox is not liable for any problems resulting from unauthorized
operation of the equipment.
An export of this product is strictly controlled in accordance with Laws concerning Foreign Exchange and Foreign
Trade of Japan and/or the export control regulations of the United States.
Xerox, The Document Company and Ethernet are registered trademarks.
DocuWorks and CentreWare are trademarks.
Page 3

Table of Contents
1 Before Using the Machine ........................................................................................3
Preface........................................................................................................................3
Related Information Sources.......................................................................................4
Guides Supplied......................................................................................................4
Using This Guide.........................................................................................................5
Prerequisite Knowledge..........................................................................................5
Organization of this Guide ...................................................................................... 5
Conventions............................................................................................................6
2 Product Overview...................................................................................................... 7
Machine Components.................................................................................................. 7
Control Panel.............................................................................................................11
Table of Contents
3 Loading Paper.......................................................................................................... 13
Loading Paper in Trays 1 to 4 ................................................................................... 13
Loading Paper in Tray 5 (Bypass)............................................................................. 14
4 Basic Operation.......................................................................................................17
Copying Procedure.................................................................................................... 17
Step 1 Loading Documents...................................................................................17
Step 2 Selecting Features..................................................................................... 18
Step 3 Entering the Quantity................................................................................. 19
Step 4 Starting the Copy Job................................................................................19
Step 5 Confirming the Copy Job in the Job Status............................................... 20
Stopping the Copy Job..........................................................................................20
Fax Procedure...........................................................................................................21
Step 1 Loading Documents...................................................................................21
Step 2 Selecting Features..................................................................................... 22
Step 3 Specifying the Destination.........................................................................23
Step 4 Starting the Fax Job .................................................................................. 23
Step 5 Confirming the Fax Job in the Job Status..................................................24
Stopping the Fax...................................................................................................24
Printing ...................................................................................................................... 26
Scanning Procedure..................................................................................................27
Step 1 Loading Documents...................................................................................27
Step 2 Selecting Features..................................................................................... 28
Step 3 Starting the Scan Job................................................................................ 29
Step 4 Confirming the Scan Job in the Job Status............................................... 30
Step 5 Saving the Scanned Data.......................................................................... 30
Stopping the Scan Job..........................................................................................30
1
Page 4

Registering Mailboxes................................................................................................32
System Settings Procedure........................................................................................34
5 Maintenance..............................................................................................................35
Replacing Toner Cartridges .......................................................................................35
Executing Auto Gradation Adjustment .......................................................................37
6 Paper Jams...............................................................................................................39
Paper Jams in Top Left Cover....................................................................................39
Paper Jams in Middle Left Cover...............................................................................40
Paper Jams in Lower Left Cover................................................................................41
Paper Jams in Trays 1 to 4 ........................................................................................42
Paper Jams in Tray 5 (Bypass Tray)..........................................................................43
Paper Jams in the Duplex Module .............................................................................44
2
Page 5
1 Before Using the Machine
Preface
Thank you for selecting the Fuji Xerox Document Centre C450/C360/C250.
This guide provides all the necessary copy/print/scan/fax operating procedures,
maintenance information like how to clear paper jams, daily care, setting various items,
and precautions.
Please read this guide thoroughly to obtain the best performance on this product. After
reading this guide, be sure to keep it handy for quick reference. It will be useful in case
you forget how to perform operations or if a problem occurs with the machine.
For instructions on configuring your network environment, refer to the Network
Administrator Guide. For information about optional accessories for the printer
functionality, also refer to the guide provided with each optional accessory.
Since the machine is equipped with anti-counterfeit features, in some rare cases,
certain kinds of documents may be unable to copy.
Before Using the Machine
1
In this manual, safety instructions are preceded by the symbol . Always read and
follow the instructions before performing the required procedures.
As a member of the International Energy Star Program, Fuji Xerox confirms
this product satisfies the requirements for International Energy Star Progra m
standards.
Fuji Xerox shares the global concern about environmental conservation and has
integrated that concern in its business activities–from research and development to
disposal. We have implemented a number of programs to lessen the burden on the
environment. For example, we have totally eliminated ozone-depleting
chlorofluorocarbons from our manufacturing facilities.
We are committed to leadership in the conservation of resources by reusing and
recycling post-consumer waste material such as paper, cartridges, and parts from our
customer's copiers and printers. Along with our efforts to make environmental values
a part of the Fuji Xerox culture, Document Centre C450/C360/C250 adopts recycled
components that satisfy our strict quality standards.
Important Note:
This equipment will be inoperable when main power fails.
3
Page 6

1 Before Using the Machine
Related Information Sources
Before Using the Machine
1
This section describes the guides provided for the machine.
Guides Supplied
We provide the following guides for optimum usage of the machine.
Included Manuals
Several manuals are included with this product. They are referred to as accompanying
manuals.
These accompanying manuals include descriptions on configurations and operation of
the product.
The below manuals are included with the machine.
User Guide
This guide describes all the necessary steps for copy/print/scan/fax, clearing paper
jams, daily care, setting the various items and safety information.
Network Administrator Guide
This document is aimed toward network administrators, as a guide to setting up the
network environment.
Quick Reference Guide (This Document)
Introduces the main features of the machine, as well as simple operating instructions.
Manual (HTML)
A guide to installing print driver, configuring the printer environment, etc. This manual
is included in the CentreWare Utilities CD-ROM.
Guides for Optional Accessories
Optional accessories are also available for the machine. User Guides are provided with
the optional accessories exclusively for the Document Centre C450/C360/C250. These
User Guides are referred to as "guides for optional accessories". Guides for optional
accessories are provided in two forms, printed or as On-line Help.
Guides for optional accessories describe all the necessary steps for operating option al
accessories and installing software.
4
Page 7

Using This Guide
Using This Guide
This section describes the organization of this guide.
This guide has been produced for people who operate the Document Centre C450/
C360/C250 on a regular daily basis. When reading this guide, read the chapter that is
of particular relevance to the operation you are performing.
Prerequisite Knowledge
This guide assumes that the operator has a basic knowledge of the operating
environment of the personal computer in use, networking environments, and how to
operate a personal computer.
For information about the environment of the personal computer in use, basic
knowledge of networking environments, and how to operate a personal computer, refer
to the manuals provided with the personal computer, operating system, and network
system.
Organization of this Guide
This guide consists of the following chapters.
1 Before Using the Machine
Before Using the Machine
1
Describes how to use this document.
2 Product Overview
Describes basic information such as identifying the major components, how to switch
the machine on and off, how to use the touch screen, and how to set the power saver
feature.
3 Loading Paper
Describes how to load paper in trays.
4 Basic Operation
Describes how to use copy / fax / print / scan features.
5 Maintenance
Describes procedures for replacing consumables and auto gradation adjustment.
6 Paper Jams
Describes how to clear paper jams.
5
Page 8

Before Using the Machine
1
1 Before Using the Machine
Conventions
z
In this document, "Computer" refers to a personal computer or workstation.
z
The following icons are used in this guide.
Important Indicates important information which you should read.
Note Indicates additional information on operations or features.
z
The following conventions are used in this guide:
" " :The cross-reference is within this manual.
" " :Refers to names of features, and touch screen messages and input text.
[ ] :Refers to folders, files, applications, button or menu names displayed in
< > button:Indicates a hardware button on the control panel.
< > key :Indicates a key on the keyboard of the computer.
z
For radio buttons, the checked item is the selected item.
the touch screen, as well as the names of menus, commands, windows,
or dialog boxes displayed on the computer screen and their button and
menu names.
6
Page 9
2 Product Overview
Machine Components
This section describes the main components and their functions of the Document
Centre C450/C360/C250 (hereinafter called "the machine").
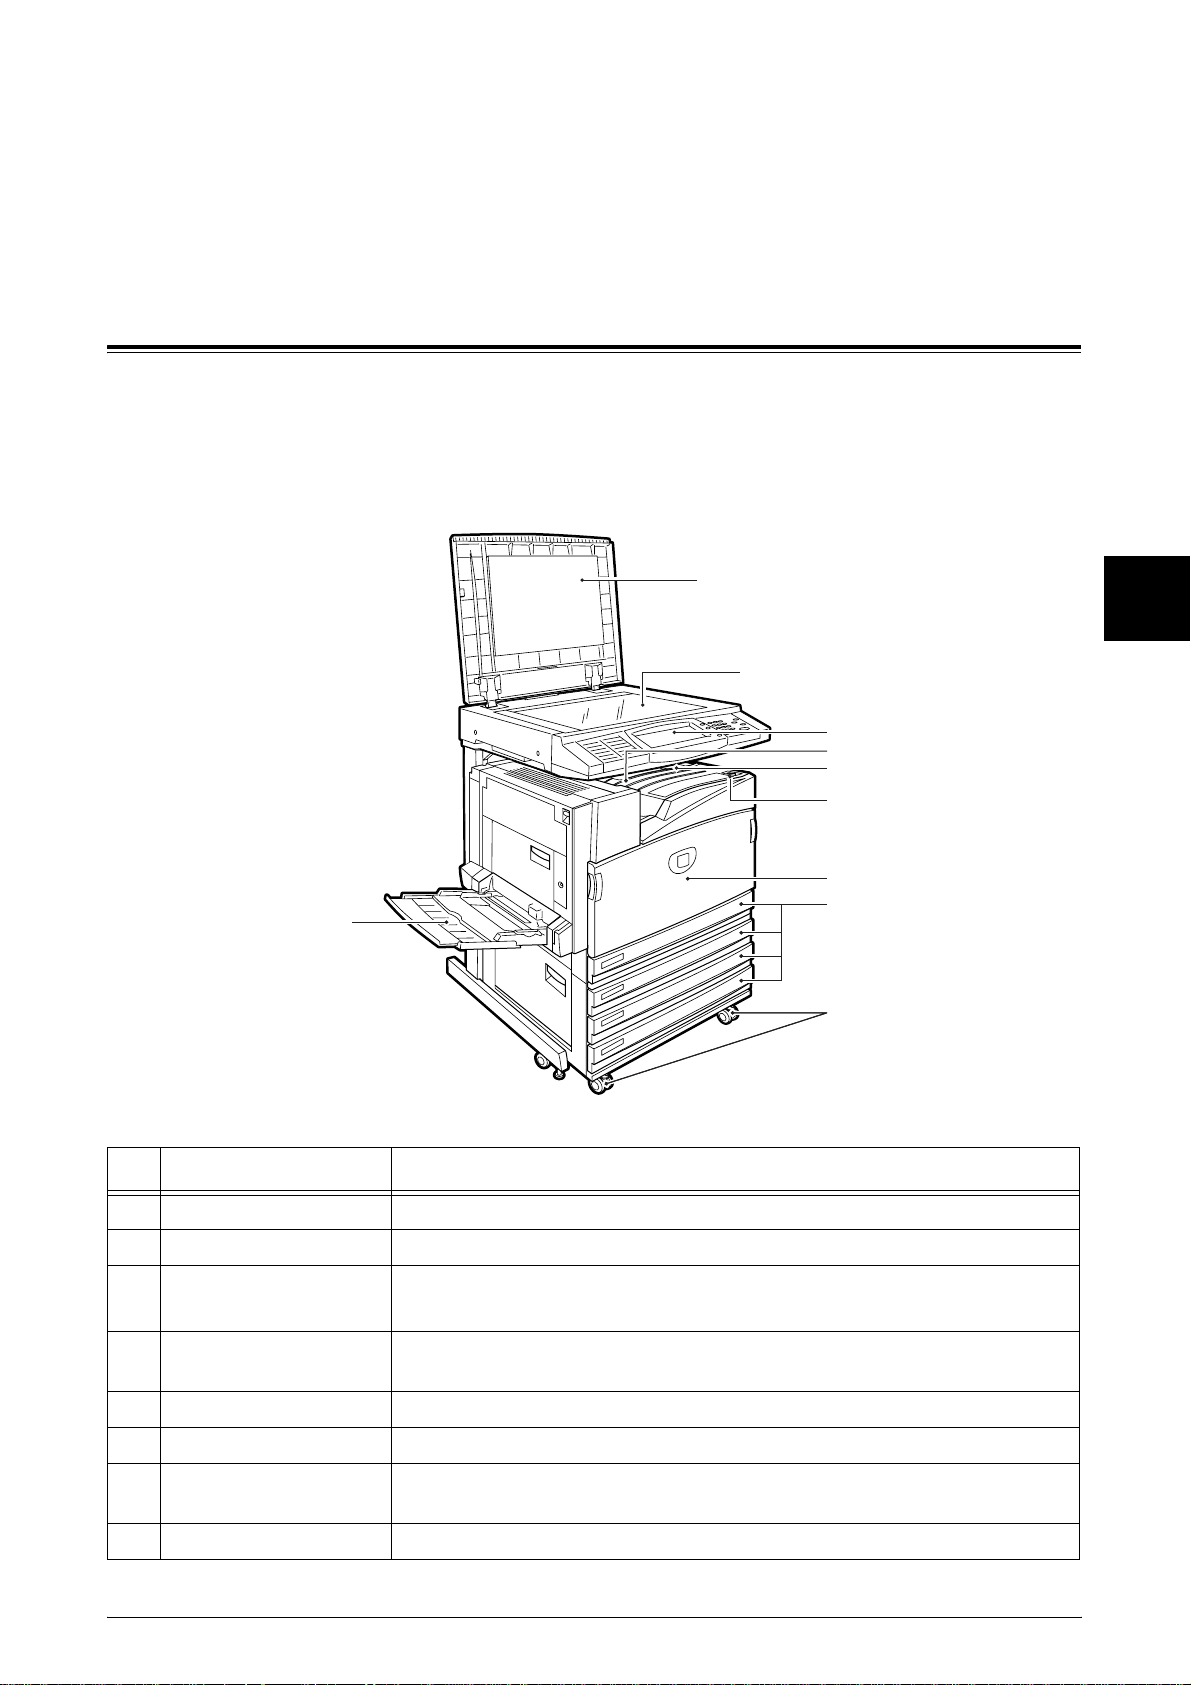
4 Tray Model
Product Overview
1
2
2
3
4
5
6
7
9
No. Component Function
1 Document cover Holds the document down.
2 Document glass Load documents here.
3 Control panel It consists of operation buttons, LED indicators and a touch screen.
Refer to "Control Panel" (P.11).
8
10
4 Center output tray
(Output tray)
5 Paper stopper Set upright for use when making copies or prints.
6 Power switch Switches the power of the machine on/off.
7 Front cover Open this cover to access the insides of the machine to repla ce
8 Tray 1, 2, 3, 4 Load papers here for copying.
Copies and prints are delivered here facing down.
consumables.
7
Page 10
2 Product Overview
No. Component Function
9 Tray 5 (Bypass) Used for loading non-standard paper (thick-stock paper, and other special
10 Locking casters Used for locking the wheels of the machine. Lock these casters after moving
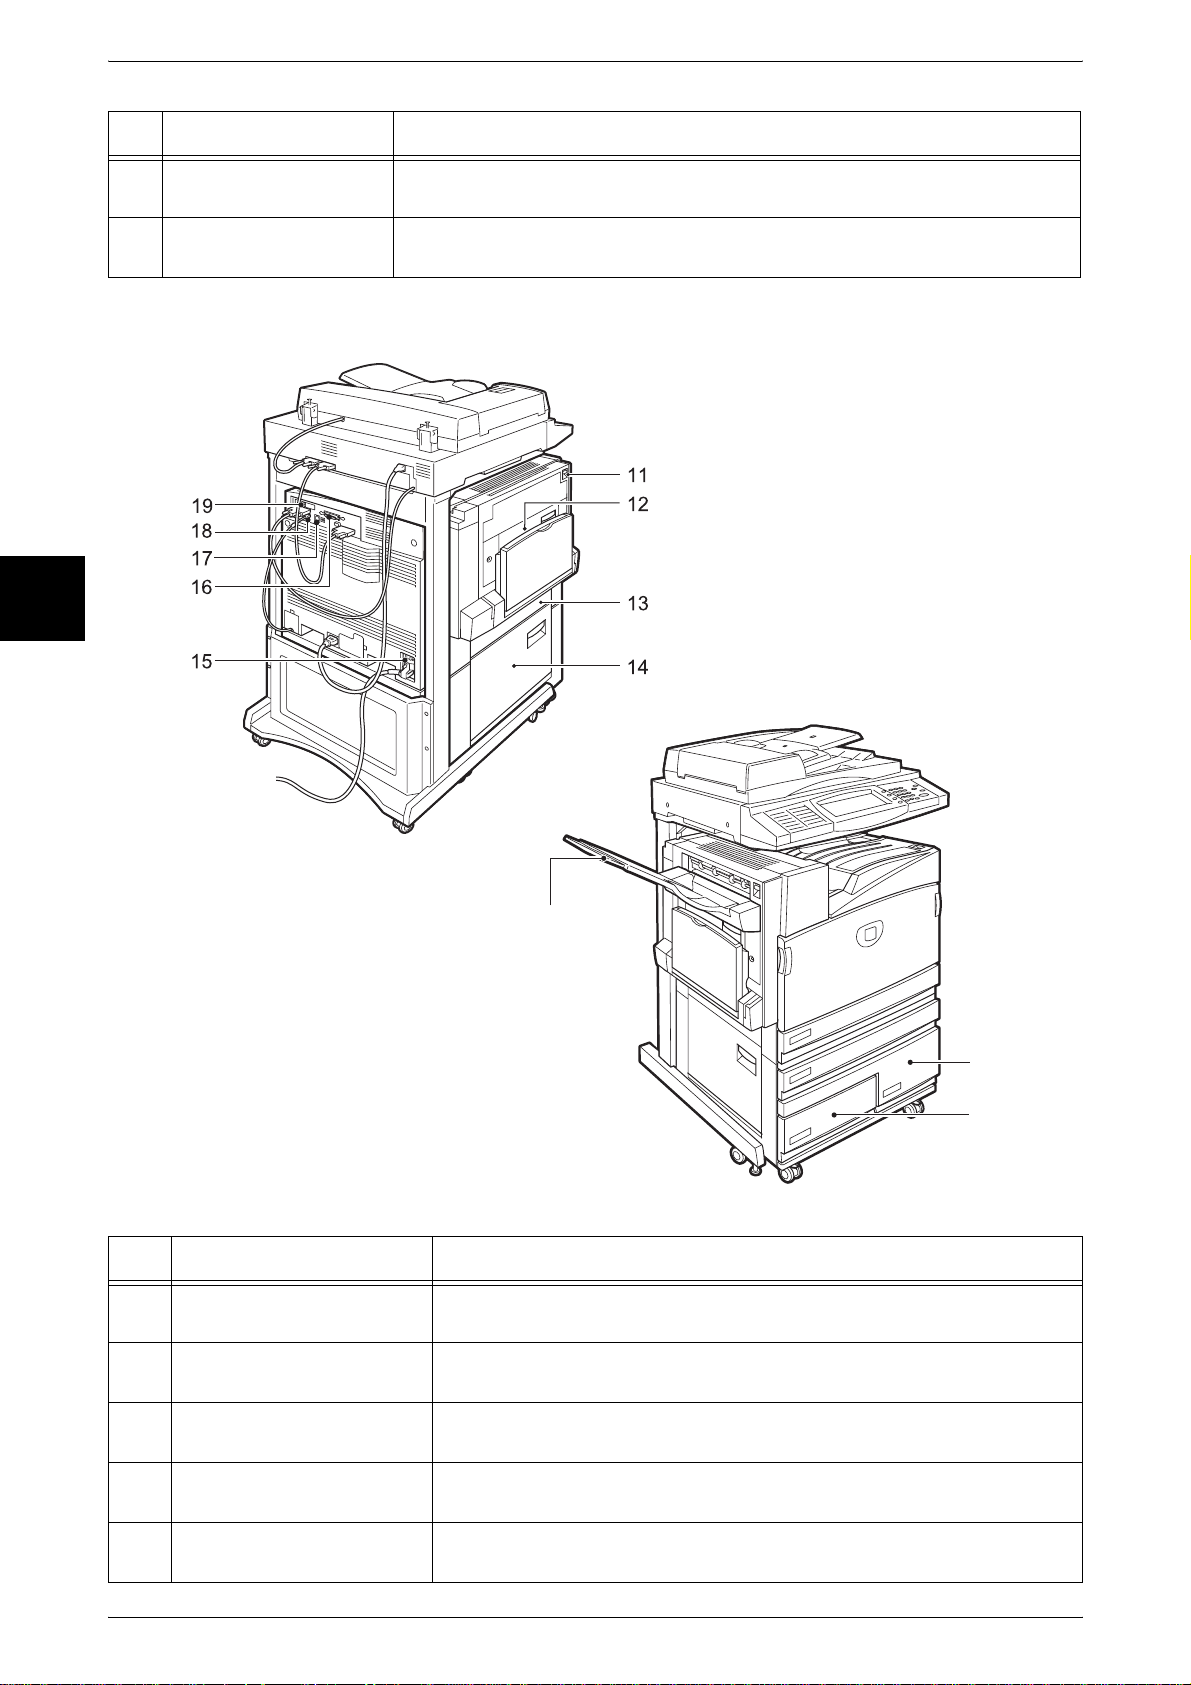
Left Side and Back
Product Overview
2
media) that cannot be loaded in Trays 1 to 4.
the machine to its installation site.
Tandem Tray Model + Side Output Tray
20
*
The tandem tray model is available for the Document Centre C450 only.
No. Component Function
Tray 4
(high capacity)
Tray 3
(high capacity)
11 Top left cover Push up the unlock lever to access the insides of the machine to clear
paper jams and replace consumables.
12 Duplex module cover Open this cover to access the insides of the machine to clear paper
jams when the duplex module is installed.
13 Left center cover Open this cover to access the insides of the machine to clear paper
jams.
14 Bottom left cover Open this cover to access the insides of the machine to clear paper
jams.
15 RESET button This button automatically turns the machine off when a current leakage
is detected.
8
Page 11
Machine Components
No. Component Function
16 Parallel interface connector Use this interface to connect to a computer using a centronics standard
interface cable.
17 10Base-T/100Base-TX
connector
18 Fax interface connector Use this interface to connect to the fax kit
19 USB2.0 Interface
Connector (optional)
20 Side output tray Copies and prints are delivered here facing up.
Use to connect a network cable.
Use to connect a USB cable.
The side output tray is an optional accessory.
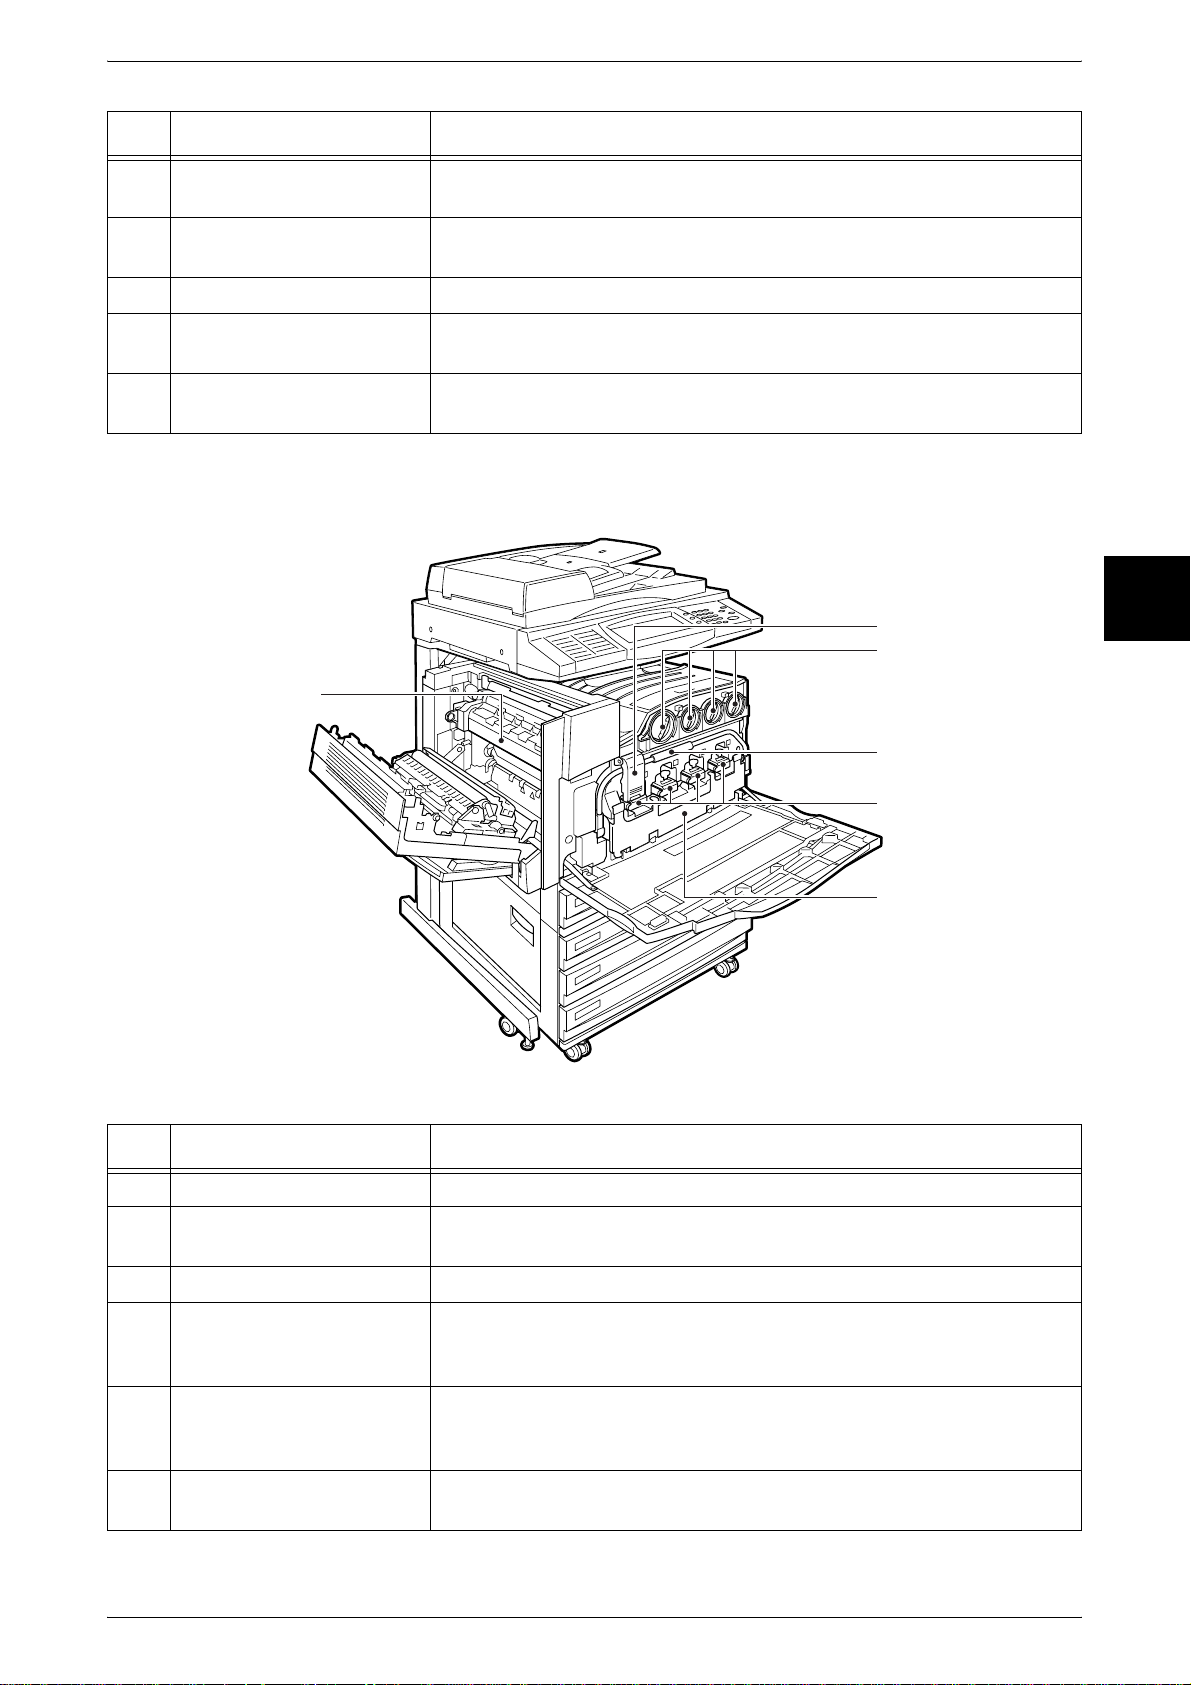
Internal Components
26
Product Overview
2
21
22
23
24
25
No. Component Function
21 Stopper Fastens the handle in place.
22 Toner cartridges Four toner (image forming powder) cartridges are provided, Black (K),
Cyan (C), Magenta (M) and Yellow (Y).
23 Handle Unlock stopper and press this down when replacing the drum cartridges.
24 Drum cartridges
(A1, A2, A3, A4)
25 Toner collection bottle
cover
A drum cartridge comprises of photosensitive elements.
Drum cartridges are arranged in order A1, A2, A3 and A4 from the left
as you face the main body.
Toner collection bottles (B) for collecting use d tone r ar e loc at ed on th e
other side of this cover. Open this cover to access the insides of the
machine to replace the toner collection bottles.
26 Fuser (E) Fuses the printed image on the paper by fusing the toner. Do not touch
this unit as it is extremely hot.
9
Page 12
2 Product Overview
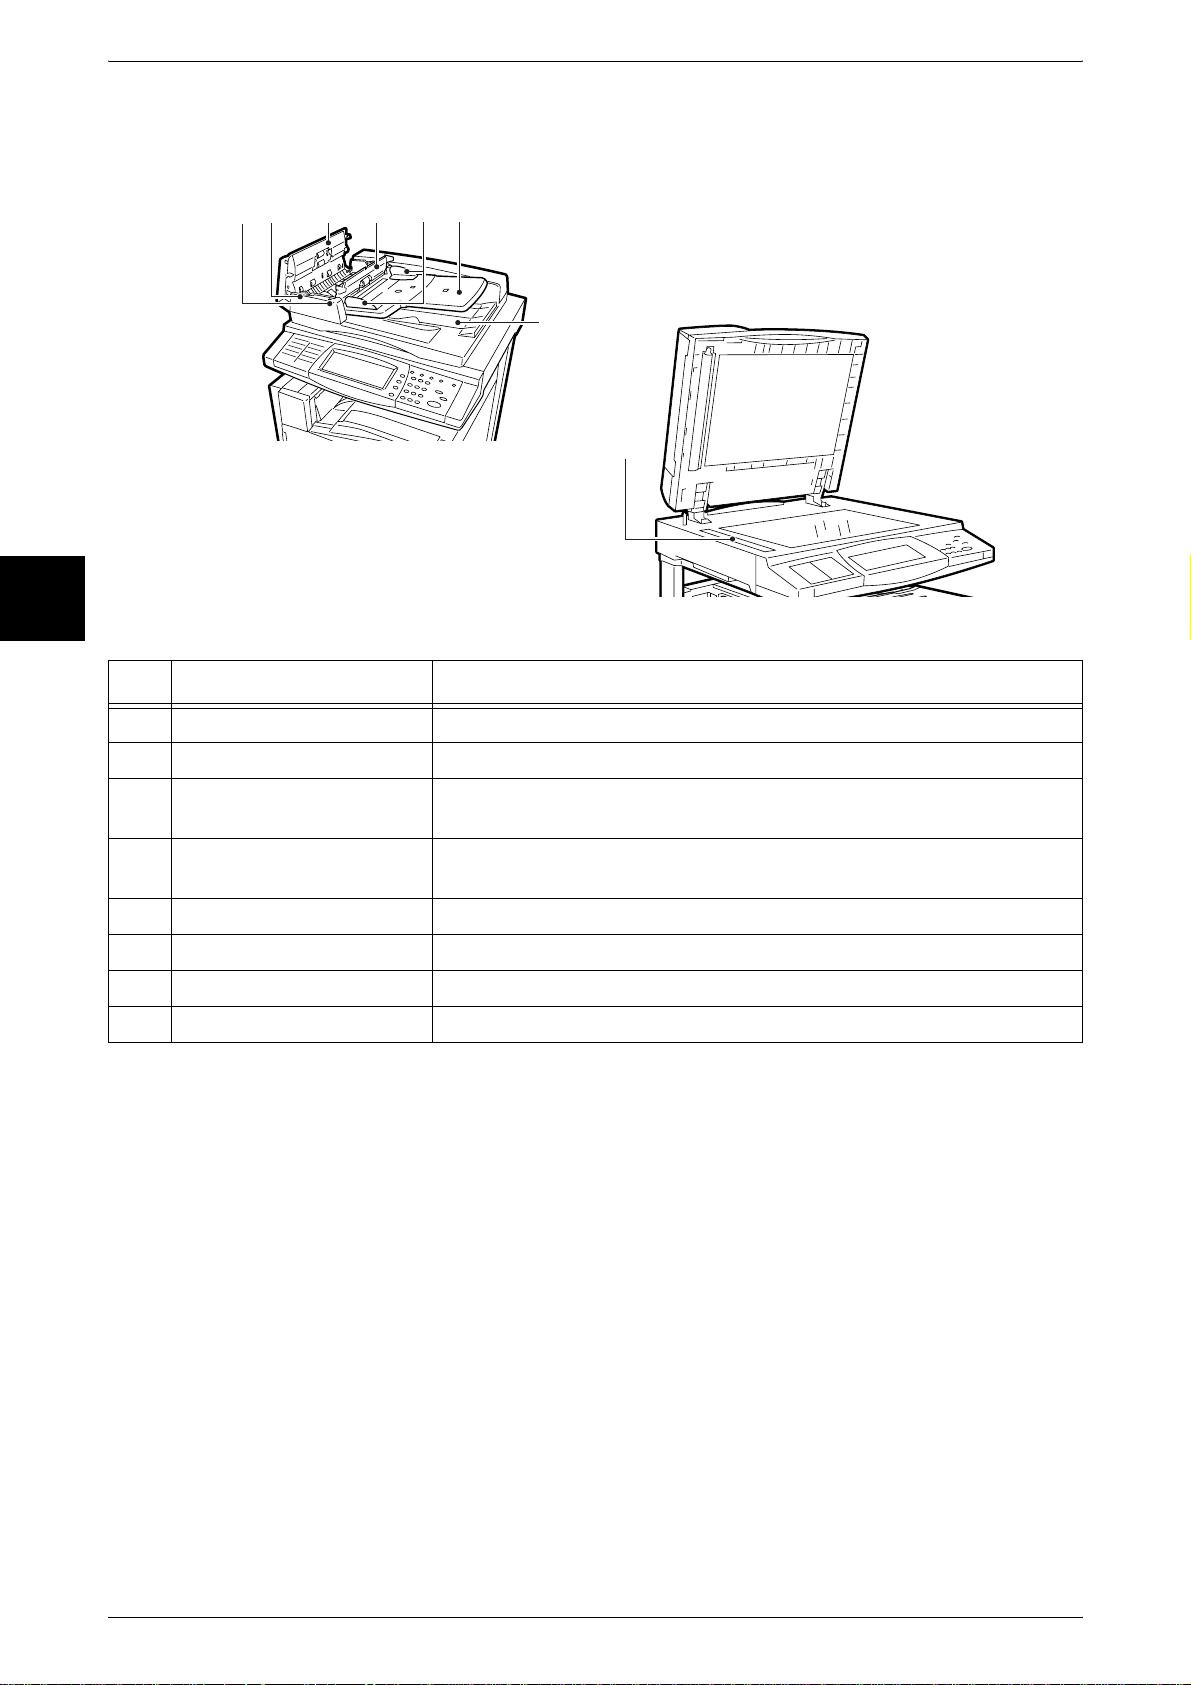
Duplex Automatic Document Feeder
Product Overview
2
12 3
5
4
6
7
8
No. Component Function
1 <Confirmation> indicator This indicator lights to confirm that the document is loaded correctly.
2 Wheel Turn this wheel to clear paper jams.
3 Left cover Open this cover to access the insides of the machine to clear paper
jams.
4 Inner cover Open this cover to access the insides of the machine to clear paper
jams.
5 Document guides Use this guides to align the edges of the document.
6 Document feeder tray Load documents here.
7 Document output tray Receives scanned documents.
8 Document feeder glass This part scans the document.
Note • In text descriptions, the Duplex Automatic Document Feeder is abbreviated as "Document
Feeder".
10
Page 13
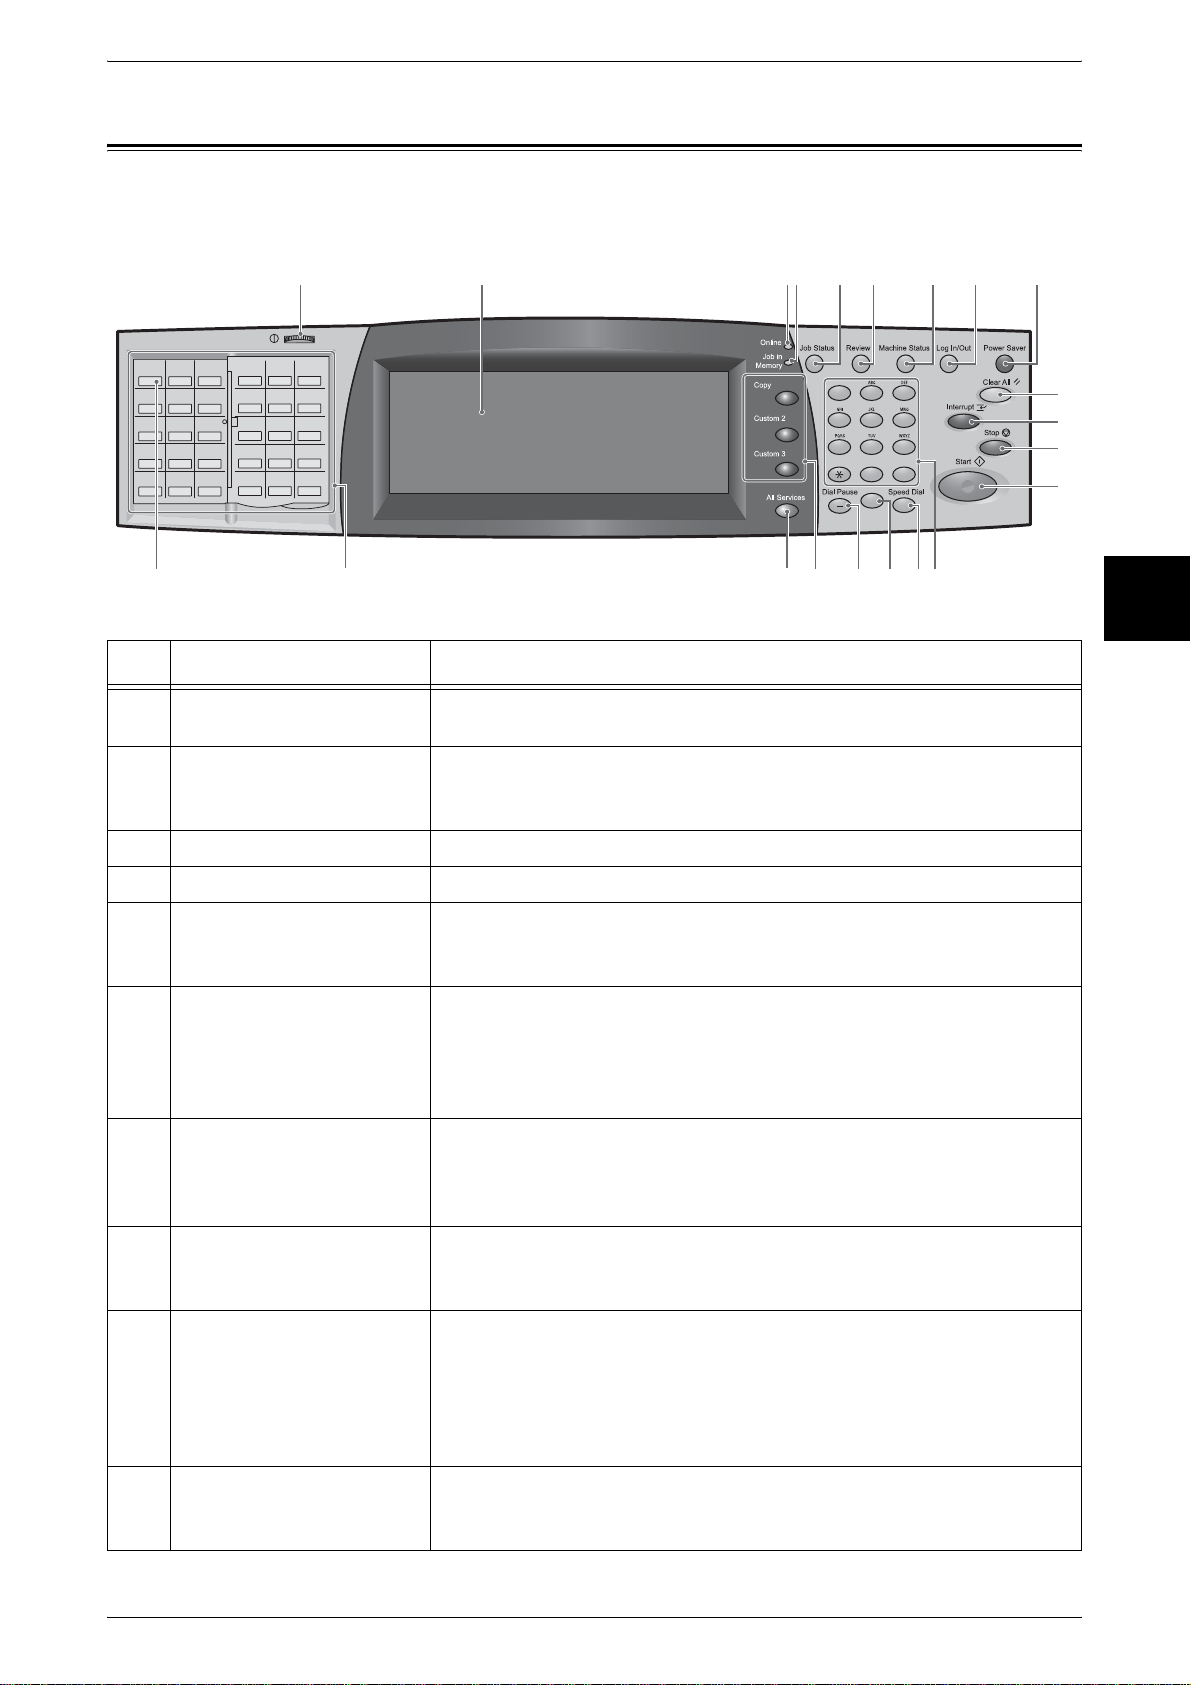
Control Panel
The following describes the names and functions of components on the control panel.
Control Panel
2 3
5 6 7 8
123
456
78
9
0
#
C
16
1517 141819
001 002 003
004 005 006
007 008 009
010 011 012
013 014 015
1 4
016 017 018
019 020 021
022 023 024
025 026 027
028 029
030
2021
No. Component Function
1 Brightness dial Adjusts the brightness of the touch screen. Use this dial to adjust the
brightness of touch screen when it is too dark to read.
2 Touch screen This touch screen displays messages required for operation and buttons
for various features. You can directly touch the touch screen to instruct
operations in screens and set features.
3 <Online> indicator This indicator lights when data is being received from a client.
9
Product Overview
10
11
12
13
2
4 <Job in Memory> indicator This indicator lights when data is stored in the machine's memory.
5 <Job Status> Pressing this button allows you to confirm or cancel currently executing
or completed jobs, or to confirm or print saved documents.
In text descriptions, this button is indicated as the <Job Status> button.
6 <Review> Press this button to open the Review screen. In this screen, you can
check a list of the status of copy, fax, and scan features whose settings
have changed from the defaults. You can also check the destination
information for sending faxes and e-mail.
In text descriptions, this button is indicated as the <Review> button.
7 <Machine Status> Pressing this button allows you to confirm the machine status and
meters, check the state of consumables, and print reports.
In text descriptions, this button is indicated as the <Machine Status>
button.
8 <Log In/Out> When this button is pressed, the UserID input screen is displayed for
System Administration mode or Login Setup/Auditron Administration.
In text descriptions, this button is indicated as the <Log In/Out> button.
9 <Power Saver> If the machine is not operated for a while, the machine's power
consumption is lowered to enter the Power Saver mode. In the Power
Saver mode, this button is lit. To cancel the Power Saver mode, press
this button again.
In text descriptions, this button is indicated as the <Power Saver>
button.
10 <Clear All> Returns the statuses of all displayed services to their default values.
The machine will be reset to this state after it is turned on.
In text descriptions, this button is indicated as the <Clear All> button.
11
Page 14

2 Product Overview
No. Component Function
11 <Interrupt> Select this button to temporarily stop a continuous copy job or pr inting to
12 <Stop> Pre ss this button to stop the current copy job or communications.
Product Overview
13 <Start> Press this button to start copying or scanning.
14 Numeric keypad Press these buttons to enter the number of copies, passwords and other
15 <Speed Dial> Used to specify a destination phone number for fax or e-mail.
give another job higher priority. During an interrupt,
the Interrupt indicator is lit. Pressing the Interrupt button again cancels
the interrupt and the previous operation is resumed.
In text descriptions, this button is indicated as the <Interrupt> button.
In text descriptions, this button is indicated as the <Stop> button.
In text descriptions, this button is indicated as the <Start> button.
numerical values.
In text descriptions, these buttons are indicated as the "numeric
keypad".
In text descriptions, this button is indicated as the <Speed Dial>.
2
16 <C> (Clear) Press this button if you have entered the wrong numerical value with the
numeric keypad.
In text descriptions, this button is indicated as the <C> button.
17 <Dial Pause> Used to insert a pause into a destination number.
In text descriptions, this button is indicated as the <Dial Pause> button.
18 <Copy>
<Custom 2>
<Custom 3>
19 <All Services> Used to display the menu screen.
20 One touch button panels The one touch button panels.
21 One touch buttons Specify a recipient with one touch. Registered preset recipient numbers
Used to call a custom feature.
In text descriptions, this button is indicated as the <All Services> button.
You can leaf through panels to display 001 to 030, 031 to 060, 061 to
070.
M01 to M20 are reserved for job memory. These correspond to
registered jobs 01 to 20.
001 to 070 are supported.
12
Page 15
3 Loading Paper
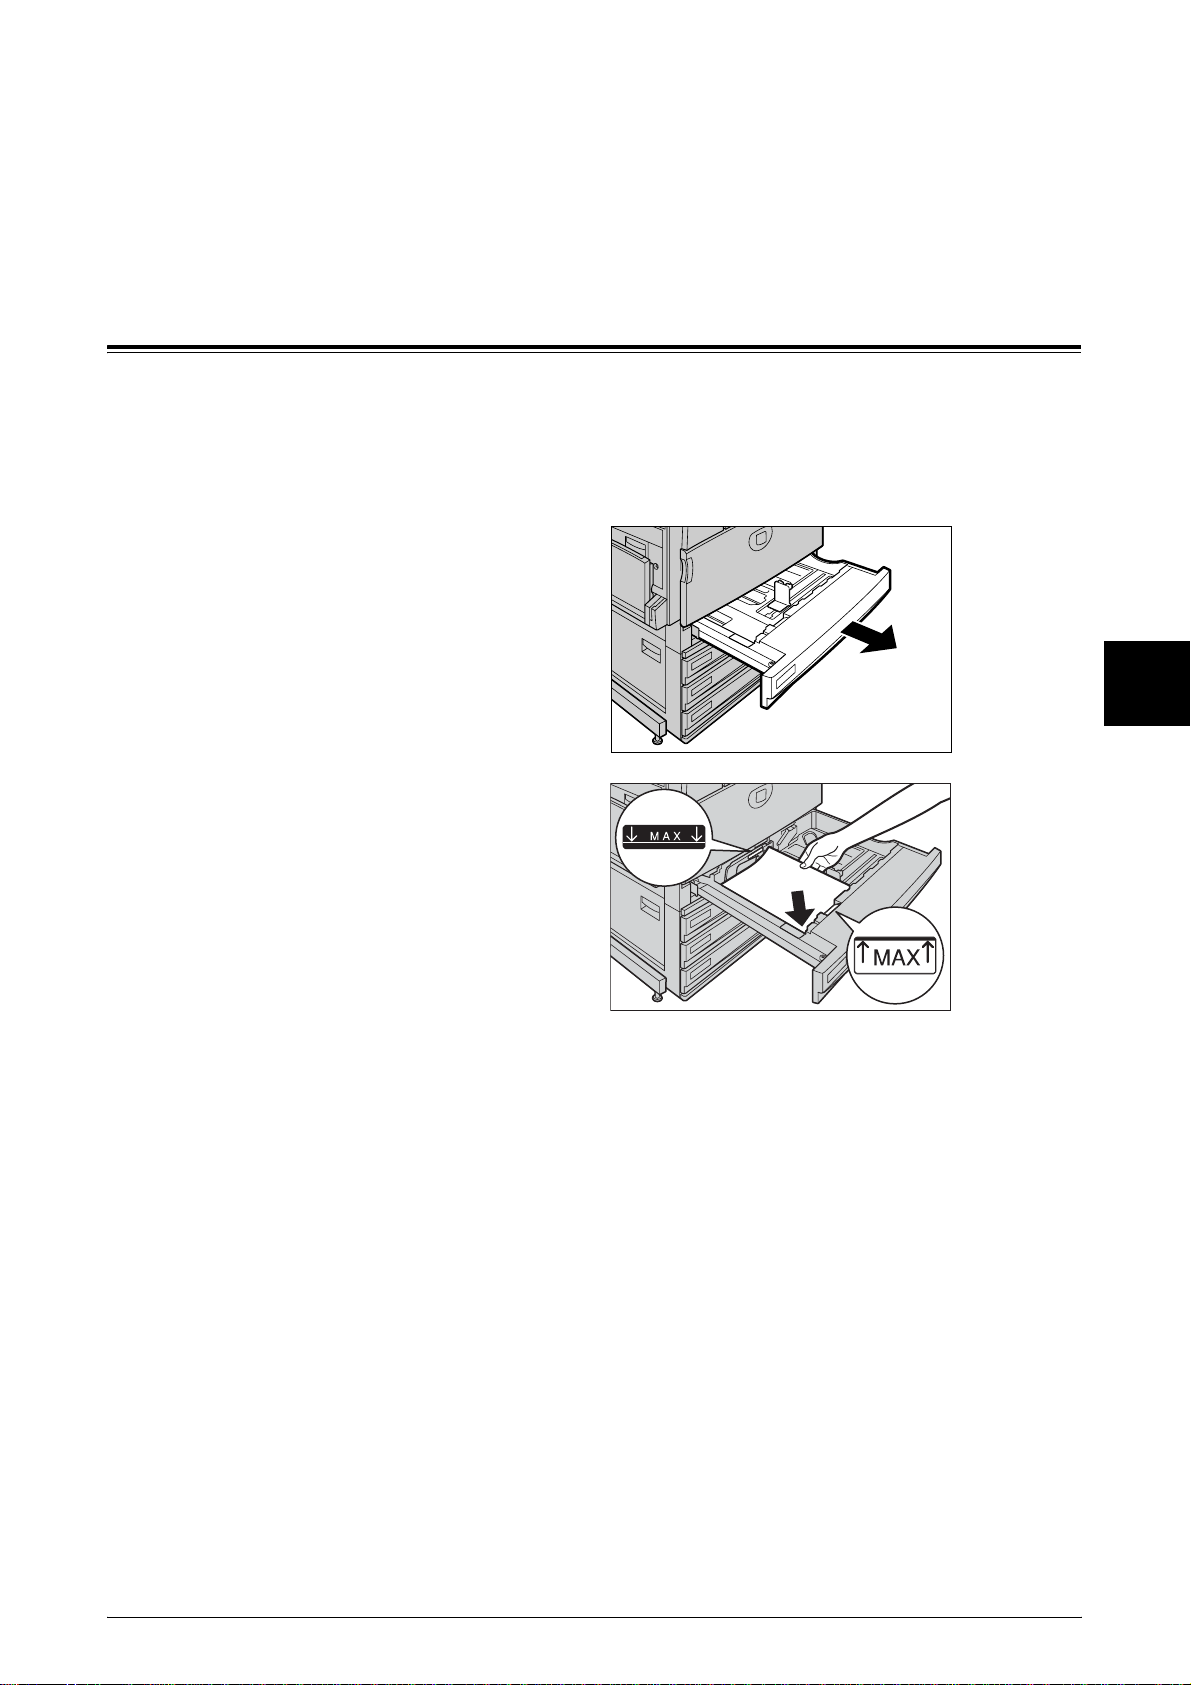
Loading Paper in Trays 1 to 4
The following describes the procedure for loading paper in Trays 1 to 4.
When the machine runs out of paper during copying or printing, a message is displayed
on the control panel display. Add paper according to the displayed instructions.
Copying or printing is automatically resumed when paper is added.
1 Pull out the tray towards you until it
stops.
Loading Paper
3
2 Load and align the edge of the
paper against the left edge of the
tray with the side to be copied or
printed on facing up.
Important • Do not load paper exceeding
the maximum fill line. Doing so
might cause paper jams or
machine trouble.
3 Push the tray in gently until it comes
to a stop.
13
Page 16

3 Loading Paper
Loading Paper in Tray 5 (Bypass)
When printing or copying with paper sizes or types that cannot be set in Trays 1 to 4,
use Tray 5 (bypass). The following describes how to load paper into Tray 5 (bypass).
To make detailed instructions during printings, specify the instructions using the [Tray/
Output] tab in the print driver. When doing this, also specify the type of paper to load.
1 Open Tray 5 (bypass).
Note • If necessary, extend the
extension flap. The extension
flap can be extended in two
stages. When pulling out the
extension flap, do it gently.
Loading Paper
2 Check the position of the paper
guides at the front side of Tray 5
(bypass).
3
3 Load paper with the side to be
copied or printed on facing down,
and insert the paper lightly along
the paper guide on the front side of
the machine until it comes to a stop.
Important • Do not load mixed paper types
into the tray.
• Do not load paper exceeding
the maximum fill line. Doing so
might cause paper jams or
machine trouble.
• When making copies or
printing on thick-stock paper
such as postcards, and the
paper is not fed into the
machine, apply a curl to the
leading edge of the paper as
shown in the figure on the
right. Note, however, that
excessively bending or folder
the paper might cause paper
jams.
14
Page 17

4 Lightly push the paper guide
against the paper you loaded.
5 Select copying or printing.
Loading Paper in Tray 5 (Bypass)
Loading Paper
3
15
Page 18

Page 19

4 Basic Operation
Copying Procedure
This section describes the basic copy operations.
Step 1 Loading Documents
There are two methods of loading documents.
Document Feeder
z
Single sheet
z
Multiple sheets
Document Glass
z
Single sheet
z
Bound documents, such as books
Document Feeder
The document feeder supports single sheet and multiple sheet documents, with sizes
ranging from 148.6 × 210mm (A5, A5 ) to a maximum of 297 × 432mm
(A3, 11 × 17 inches).
1 Remove any clips and staples
before loading the document.
2 In the center of the document
feeder, set the document with the
side to be copied (top side if 2
sided document) facing upwards.
Note • The <Confirmation> indicator
Basic Operation
4
lights when the document is
loaded correctly.
3 Adjust the movable document
guides to just touch the edge of the
document stack.
17
Page 20

4 Basic Operation
Document Glass
Basic Operation
On the document glass, you can place a single sheet, or a book or other similar
document, up to 297 × 432 mm (A3, 11 × 17 inches).
1 Open the document cover.
2 Place the document face down,
and align it against the top left
corner of the document glass.
3 Close the document cover.
4
Note • When a standard size
document is placed on the
document glass, the size of
the document is displayed in
the message area.
Step 2 Selecting Features
You can select the features from the [Copy] tab.
Note • The features displayed depend on the configuration of the machine.
• To use the Login Setup feature or Auditron Administration feature, you need a UserID and
Password, or just a UserID. For information about UserIDs and Passwords, contact the
System Administrator.
1 Press the <All Services> button.
123
456
789
0 #
C
<All Services>
button
18
2 Select [Copy].
Page 21

3 Select the features to set from each
tab as necessary.
Step 3 Entering the Quantity
You can enter up to 999 for the number of copies.
1 Enter the number of copies using
the numeric keypad. The number
of copies entered appears on the
upper right of the touch screen.
123
456
789
0 #
C
Copying Procedure
Numeric keypad
Basic Operation
2 If you enter an incorrect value,
press the <C> button and enter the
correct value.
Step 4 Starting the Copy Job
1 Press the <Start> button.
Important • When using the document
feeder, do not hold the
document while it is being fed
into the machine.
Note • If a problem occurs, an error
message appears on the
touch screen. Solve the
problem in accordance with
the message.
• You can set the next job during copying.
123
456
789
0 #
C
123
456
789
0 #
C
4
<C> button
<Start> button
19
Page 22

4 Basic Operation
Step 5 Confirming the Copy Job in the Job Status
1
Press the <Job Status> button.
Basic Operation
4
2 Confirm the job status.
Note • Select [ ] to display the
previous screen and select
[ ] to display the next screen.
Stopping the Copy Job
To cancel copying, follow the procedure below.
1 Select [Stop] on the touch screen
or press the <Stop> button on the
control panel.
123
456
789
0 #
C
123
456
789
0 #
C
<Job Status>
button
<Stop> button
20
2 Select [Stop].
3 If the screen of step 1 does not
appear, press the <Job Status>
button.
4 Select the job to cancel, and then
select [Stop].
123
456
789
0 #
C
<Job Status>
button
Page 23

Fax Procedure
This section describes the basic fax operations.
Step 1 Loading Documents
There are two methods of loading documents.
Document Feeder
z
Single sheet
z
Multiple sheets
Document Glass
z
Single sheet
z
Bound documents, such as books
Fax Procedure
Basic Operation
Document Feeder
The document feeder supports single sheet and multiple sheet documents, with sizes
ranging from 148.6 × 210mm (A5, A5 ) to a maximum of 297 × 600 mm (long) (A3 , 11
× 17 inches).
1 Remove any paper clips and
staples before loading the
documents.
2 In the center of the document
feeder, set the document with the
surface to be faxed (top side if 2
sided document) facing upwards.
Note • The <Confirmation> indicator
3 Adjust the movable document
guides to just touch the edge of the
document stack.
4
lights when the document is
loaded correctly.
21
Page 24

4 Basic Operation
Document Glass
Basic Operation
The document glass accepts single-sheet or book form documents of sizes up to 297
× 432mm (A3, 11 × 17 inches).
1 Open the document cover.
2 Place the document face down,
and align it against the top left
corner of the document glass.
3 Close the document cover.
Note • When a standard size
document is placed on the
document glass, the size of
the document is displayed in
the message area.
4
Step 2 Selecting Features
You can select features from the [Fax/Internet Fax] screen.
Note • The features displayed depend on the configuration of the machine.
• To use the [Login Setup] feature or [Auditron Administration] feature, you need a UserID and
Password, or just a UserID. For information about UserIDs and Passwords, contact our
Customer Support Center.
1 Press the <All Services> button.
2 Select [Fax/Internet Fax].
123
456
789
0 #
C
<All Services>
button
22
Page 25

3 Select the features to set from each
tab as necessary.
Step 3 Specifying the Destination
You can specify the recipient using the Phone Number, Address Number, or Group
Number method.
This section describes specifying a recipient using the numeric keypad.
1 Enter the fax number using the
numeric keypad.
123
456
789
0 #
C
Fax Procedure
Basic Operation
Numeric keypad
2 To specify multiple recipients,
select [Next Recipient] on the touch
screen.
Note • If you enter an incorrect value,
press the <C> button and
enter the correct value.
Step 4 Starting the Fax Job
1
Press the <Start> button.
Important • When using the document
feeder, do not hold the
document while it is being fed
into the machine.
Note • If a problem occurs, an error
message appears on the
touch screen. Solve the
problem in accordance with
the message.
• You can set the next job during faxing.
123
456
789
0 #
C
4
<Start> button
23
Page 26

4 Basic Operation
Step 5 Confirming the Fax Job in the Job Status
1
Press the <Job Status> button.
Basic Operation
4
2 Confirm the job status.
Note • Select [ ] to display the
Stopping the Fax
To cancel faxing, follow the procedure below.
1 Select [Stop] on the screen or
press the <Stop> button on the
control panel.
previous screen and select
[ ] to display the next
screen.
123
456
789
0 #
C
123
456
789
0 #
C
<Job Status>
button
<Stop> button
24
2 Select [Stop].
3 If the screen of step 1 does not
appear, press the <Job Status>
button.
123
456
789
0 #
C
<Job Status>
button
Page 27

4 Select the job to cancel, and then
select [Stop].
Fax Procedure
Basic Operation
4
25
Page 28

4 Basic Operation
Printing
Basic Operation
Describes print procedures.
Print procedures vary depending on the application software you are using. For more
information, refer to the documentation provided with each application.
1 Select [Print] from the application’s [File] menu.
2 Confirm the [Printer Name] and click [Properties] if necessary.
3 Configure the properties if
necessary.
4 Click [OK].
5 Click [OK] in the [Print] dialog box.
4
26
Page 29

Scanning Procedure
This section describes basic scan operations.
Step 1 Loading Documents
There are two methods for loading documents:
Document Feeder
z
Single sheet
z
Multiple sheets
Document Glass
z
Single sheet
z
Bound documents, such as books
Scanning Procedure
Basic Operation
Document Feeder
The document feeder supports single sheet and multiple sheet documents, with sizes
ranging from 148.6 × 210mm (A5, A5 ) to a maximum of 297 × 432mm
(A3, 11 × 17 inches).
1 Remove any paper clips and
staples before loading documents.
2 Set the document to be scanned
face up (front-side up for 2 sided
documents) in the document feeder
in the direction of the arrow.
Note • Documents should normally
3 Adjust the movable document
guides to just touch the edge of the
document stack.
4
be set with [Head to Left].
When viewing scanned
documents on a computer, the
document is imported as
[Head to Top].
• The <Confirmation> indicator lights when the document is loaded correctly.
Document Glass
The document glass accepts single-sheet or book form documents of sizes up to 297
× 432mm (A3, 11 × 17 inches).
27
Page 30

4 Basic Operation
Basic Operation
1 Open the document cover.
2 Place the document face down,
and align it against the top left
corner of the document glass.
3 Close the document cover.
4
Step 2 Selecting Features
You can select features from the [Basic Scanning] tab.
From the [Menu] tab, you can select from 4 scan modes: E-mail, Scan to Mailbox, Job
Template, and Scan to FTP/SMB.
E-mail
Scans a document and sends the scanned data as an e-mail attachment.
Scan to Mailbox
Scans a document and saves the scanned data to the machine’s mailbox.
Job Template
Scans a document after specifying the file (job template) set with scanning conditions,
information about the transfer destination server and other information.
Scan to FTP/SMB
Scans a document and sends the scanned data to a network computer via the FTP or
SMB protocols.
28
Page 31

Below is an explanation of how to use the Scan to Mailbox feature.
1 Press the <All Services> button.
123
456
789
0 #
C
2 Select [Scan to Mailbox].
3 Specify the mailbox to save to.
Scanning Procedure
<All Services>
button
Basic Operation
4 If appropriate, select features to
configure from each tab.
Step 3 Starting the Scan Job
1 Press the <Start> button.
Important • If a document has been set in
the document feeder, do not
press the document while it is
being conveyed.
Note • If a problem occurs, an error
message appears in the touch
screen. Remedy this by
following the message.
• The following job
configurations can be
performed while scanning.
123
456
789
0 #
C
4
<Start> button
29
Page 32

4 Basic Operation
Step 4 Confirming the Scan Job in the Job Status
1
Press the <Job Status> button.
Basic Operation
4
2 Check job status.
Note • Select [ ] button to display
the previous screen and
select [ ] button to display
the next screen.
Step 5 Saving the Scanned Data
When scanning to mailbox, you import the document that is stored on the machine’s
mailbox into your computer. Importing can be done in the following ways:
Import from an Application
123
456
789
0 #
C
<Job Status>
button
Use a network scan driver.
Import Using Mailbox Viewer 2
You can import using Fuji Xerox’s application software, Mailbox Viewer 2.
Import Using CentreWare Internet Services
Uses CentreWare Internet Services to import.
Stopping the Scan Job
Follow the procedure below to cancel a scan.
1 Press either [Stop] on the touch
screen or the <Stop> button on the
Control Panel.
123
456
789
0 #
C
<Stop> button
30
Page 33

2 Select [Stop].
3 If the screen in procedure 1 does
not appear, press the <Job Status>
button.
4 Select the job to cancel, and then
select [Stop].
Note • When a scan is cancelled,
scan data already stored to
the mailbox is deleted.
Scanning of the current page
completes before the job is
cancelled.
123
456
789
0 #
C
Scanning Procedure
<Job Status>
button
Basic Operation
4
31
Page 34

4 Basic Operation
Registering Mailboxes
You register mailboxes in order to stored scanned documents, or carry out mailbox
communications, and when assigning received documents to mailboxes. You can
register up to 200 mailboxes.
1 Press the <Log In/Out> button.
Basic Operation
4
2 Enter the system administrator
UserID with the numeric keypad,
and select [Confirm].
Note • The default UserID value is
"11111". When using the
Authentication feature, a
password is required. The
default password value is "xadmin".
3 Select [System Settings].
123
456
789
0 #
C
<Log In/Out>
button
4 Select [Setup Menu].
5 Select [Mailbox].
6 Select the mailbox to be registered,
and select [Create/Delete].
Note • Select [ ] to display the
previous screen and select
[ ] to display the next screen.
• By entering a three-digit
number with the numeric keypad,
you can specify the mailbox directly.
32
Page 35

7 When creating a new mailbox, a
password setting screen appears.
z
If not setting a password
1) Select [Off], and select [Save].
z
When setting a password
1) Select [On], and enter the password.
2) Select [Save].
8 Select the item to be set, and
select [Change Settings].
Registering Mailboxes
9 Select the setting value.
10 Select [Save].
Basic Operation
4
33
Page 36

4 Basic Operation
System Settings Procedure
To make or change the system settings, it is necessary to be in System Administration
mode.
This section describes the basic procedure for system settings.
1 Press the <Log In/Out> button.
Basic Operation
4
2 Enter the system administrator
UserID with the numeric keypad,
and select [Confirm].
Note • The default UserID value is
"11111". When using the
Authentication feature, a
password is required. The
default password value is "xadmin".
3 Select [System Settings].
123
456
789
0 #
C
<Log In/Out>
button
4 Select the item to be set.
5 Set any feature.
6 After setting the feature, select [Save].
7 When the settings are completed,
select [Close] until the [System
Settings] screen appears.
8 Select [Exit].
34
Page 37

5 Maintenance
Replacing Toner Cartridges
1 Make sure that the machine has
stopped before opening the front
cover.
2 Turn the toner cartridge of the color
indicated in the message
anticlockwise to the unlocked
position.
Note • "Y" is for yellow, "M" is for
magenta, "C" is for cyan, and
"K" is for black.
Maintenance
5
3 Remove the toner cartridge by
gently pulling it towards you.
Important • Pull out the toner cartridge
gently. Otherwise, toner may
fly out of the cartridge.
• Return used toner cartridges
to our Customer Support
Center for disposal.
35
Page 38

5 Maintenance
4 Prepare a new toner cartridge of
5 Insert the toner cartridge as far as
the same color as the cartridge that
you removed and gently tilt the
cartridge three or four times up,
down, left, and right as shown in
the figure on the right.
possible with the arrow (K) on the
cartridge facing upwards.
Maintenance
5
6 Turn the toner cartridge clockwise
to the locked position.
7 Close the front cover.
Note • A message will be displayed and the machine will not operate if the front cover is even
slightly open.
36
Page 39

Executing Auto Gradation Adjustment
The machine can automatically adjust gradation when the reproducibility of density or
color in copies and prints has deteriorated. The machine can adjust the gradation for
each screen type.
1 Select [Auto Gradation
Adjustment].
2 Load A4 plain paper into Tray 5
(bypass) and move the paper guide
to gently touch the edge of the
paper.
Executing Auto Gradation Adjustment
3 Select the screen type for
gradation adjustment and select
[Start].
Note • The example described here
is for the [Copy Job-Text]
screen.
Note • The message "Printing the
Gradation Adjustment Chart.
[Copy Job-Text]" appears and
the document for gradation
adjustment (Gradation
Adjustment Chart) is printed.
4 Align the magenta color patch of
the Gradation Adjustment Chart
that was printed against the left
side of the document glass.
Note • Place the Gradation
Adjustment Chart on the
document glass.
Maintenance
5
37
Page 40

5 Maintenance
5 Place at least five sheets of white
6 Select [Start].
paper on top of the Gradation
Adjustment Chart and close the
document cover.
Maintenance
5
38
Page 41

6 Paper Jams
Paper Jams in Top Left Cover
The following describes how to clear paper jams that occur at the top left cover of the
body.
1 Gently open the top left cover while
lifting up the release lever.
2 If the edge of the jammed paper
can be reached at the output tray,
pull out the jammed paper in the
direction of the feed-out area.
Paper Jams
3 Remove the jammed paper.
Note • If paper is torn, check for any
torn pieces of paper inside the
machine.
4 If paper is jammed inside the fuser
unit, lift up the green lever and
remove the jammed paper.
Note • After you have removed the
jammed paper, return the
lever to its original position.
5 Press the center section of the top left cover to gently close the cover, and lift up Tray
5 (bypass tray).
6
39
Page 42

6 Paper Jams
Paper Jams in Middle Left Cover
The following describes how to clear paper jams that occur at the middle left cover of
the body.
1 Gently open the left center cover
while pulling the release lever.
2 Remove the jammed paper.
Note • Paper can become jammed in
hard to find upper regions.
Look carefully for jams.
• If paper is torn, check for any
torn pieces of paper inside the
machine.
Paper Jams
6
3 Gently close the left center cover.
40
Page 43

Paper Jams in Lower Left Cover
The following describes how to clear paper jams that occur at the lower left cover of the
body.
1 Gently open the lower left cover
while pulling the release lever.
2 Remove the jammed paper.
Note • If paper is torn, check for any
torn pieces of paper inside the
machine.
Paper Jams in Lower Left Cover
3 Gently close the bottom left cover.
Paper Jams
6
41
Page 44

6 Paper Jams
Paper Jams in Trays 1 to 4
The following describes how to clear paper jams that occur on trays 1 to 4.
1 Pull out the tray where the paper
jam occurred.
Important • Paper is sometimes torn and
remains inside the machine if
you draw out a tray without
checking the paper jam
position. This may cause
machine malfunction. Check
where the paper jam occurred
before remedying the
problem.
2 Remove the jammed paper.
Note • If paper is torn, check for any
torn pieces of paper inside the
machine.
Paper Jams
6
3 Push the tray in gently until it comes to a stop.
42
Page 45

Paper Jams in Tray 5 (Bypass Tray)
The following describes how to clear paper jams that occur on Tray 5 (bypass tray).
1 Inspect the inside part (paper feed
entrance) of Tray 5 (bypass tray),
and remove any jammed paper.
Important • When two or more sheets of
paper are loaded, remove all
of the sheets from the tray.
Note • If paper is torn, check for any
torn pieces of paper inside the
machine.
2 Fan the paper you removed making sure that all four corners are neatly aligned.
3 Insert the paper into the tray with
the printing side facing down until
its leading edge lightly comes up
against the paper feed entrance.
Paper Jams in Tray 5 (Bypass Tray)
Paper Jams
6
43
Page 46

6 Paper Jams
Paper Jams in the Duplex Module
This describes remedies for paper jams in the duplex module, if the model you are
using supports 2 sided printing.
1 Open the Tray 5 (bypass tray) and
gently open the duplex module
cover.
2 Remove the jammed paper.
Note • If paper is torn, check for any
torn pieces of paper inside the
machine.
1
2
Paper Jams
6
3 Close the duplex module cover, and lift up Tray 5 (bypass tray).
44
Page 47

Customer Response Sheet
Document Centre C450/C360/C250 Quick Reference Guide (DE3255E2-1)
To improve our publications, we would appreciate your feedback regarding this guide. Please take a
few moments to complete and return this form to us.
●
About Yourself
1. How often do you use this guide?
[ ] Daily [ ] Weekly [ ] Monthly [ ] Infrequently
2. When do you usu ally refer to the guide?
[ ] Doing a usual operation [ ] Using unfamiliar features
[ ] Solving a problem
3. Which part of the guide do you read frequently?
Chapter/Section/Page:
4. Where do you ke ep this guide?
5. (Optional)
Your Name: Occupation:
Company or organization:
Address:
About the Guide
●
Strongly
agree
1. It is handy. 1 2 3 4 5
2. It is easy to read. 1 2 3 4 5
3. Titles of chapters and sections make sense. 1 2 3 4 5
4. Information is logically placed. 1 2 3 4 5
5. Referencing is easy. 1 2 3 4 5
6. Content is easy to understand. 1 2 3 4 5
7. The step-by-step instructions are easy to follow. 1 2 3 4 5
8. All necessary information is included. 1 2 3 4 5
9. Illustrations aid in the understanding of content. 1 2 3 4 5
10. The use of color is effective. 1 2 3 4 5
Other comments:
After completing this form, detach and send it to the address below.
(Please use your own envelope and postage stamp.)
Thank you for your cooperation.
Fuji Xerox Co., Ltd.
KSP R&D 2D7
3-2-1, Sakado, Takatsu-ku
Kawasaki-shi, Kanagawa-ken
JAPAN 213-0012.
Neutral Strongly
disagree
Page 48

Page 49

Document Centre C450/C360/C250 Quick Reference Guide
Human Interface Design Development
Fuji Xerox Co., Ltd.
Copyright
DE3255E2-1 (Edition 1)
July 2004
©
2004 by Fuji Xerox Co., Ltd.
Page 50

 Loading...