

Page 1

Page 2

Microsoft, MS-DOS, Windows, Windows NT, Windows Server, Windows Vista, and Microsoft Network are
either trademarks or registered trademarks of Microsoft Corporation in the United States and/or other countries.
Novell, NetWare, IntranetWare and NDS are
registered trademarks of Novell, Inc. in the United States and other countries.
Adobe, Acrobat, PostScript, Adobe PostScript 3, and PostScript Logo are
trademarks of Adobe Systems Incorporated.
Apple, AppleTalk, EtherTalk, LocalTalk, Macintosh, MacOS and TrueType are
registered trademarks of Apple Inc.
HP, HPGL, HPGL/2, and HP-UX are registered trademarks of Hewlett-Packard Corporation.
BMLinkS is the registered trademark of the Japan Business Machine and Information System Industries Association.
All product/brand names are trademarks or registered trademarks of the respective holders.
In this manual, safety instructions are preceded by the symbol . Always read and follow the
instructions before performing the required procedures.
The data saved in the hard disk of the machine may be lost if there is any problem in the hard disk. Fuji
Xerox is not responsible for any direct and indirect damages arising from or caused by such data loss.
Fuji Xerox is not responsible for any breakdown of machines due to infection of computer virus or
computer hacking.
Important
(1) This manual is copyrighted with all rights reserved. Under the copyright laws, this manual may not be copied or
modified in whole or part, without the written consent of the publisher.
(2) Parts of this manual are subject to change without prior notice.
(3) We welcome any comments on ambiguities, errors, omissions, or missing pages.
(4) Never attempt any procedure on the machine that is not specifically described in this manual. Unauthorized
operation can cause faults or accidents. Fuji Xerox is not liable for any problems resulting from unauthorized
operation of the equipment.
An export of this product is strictly controlled in accordance with Laws concerning Foreign Exchange and Foreign
Trade of Japan and/or the export control regulations of the United States.
XEROX, THE DOCUMENT COMPANY, PDF Bridge, ContentsBridge, Ethernet, CentreWare, and the stylized
X are registered trademarks of Xerox Corporation and Fuji Xerox Co., Ltd.
DocuWorks is a trademark of Fuji Xerox Co., Ltd.
All Xerox and Fuji Xerox product names are either registered trademarks or trademarks of
Xerox Corporation and Fuji Xerox Co., Ltd.
Page 3

Table of Contents
1 Before Using the Machine ........................................................................................ 5
Preface ........................................................................................................................ 6
About This Guide ......................................................................................................... 7
Guides Supplied...................................................................................................... 7
Organization of this Guide ...................................................................................... 8
Conventions ............................................................................................................ 8
2 Product Overview ...................................................................................................... 9
Machine Components................................................................................................ 10
Main Body ............................................................................................................. 10
Power On / Off........................................................................................................... 14
Powering On ......................................................................................................... 14
Powering Off ......................................................................................................... 14
About the Circuit Breaker .......................................................................................... 15
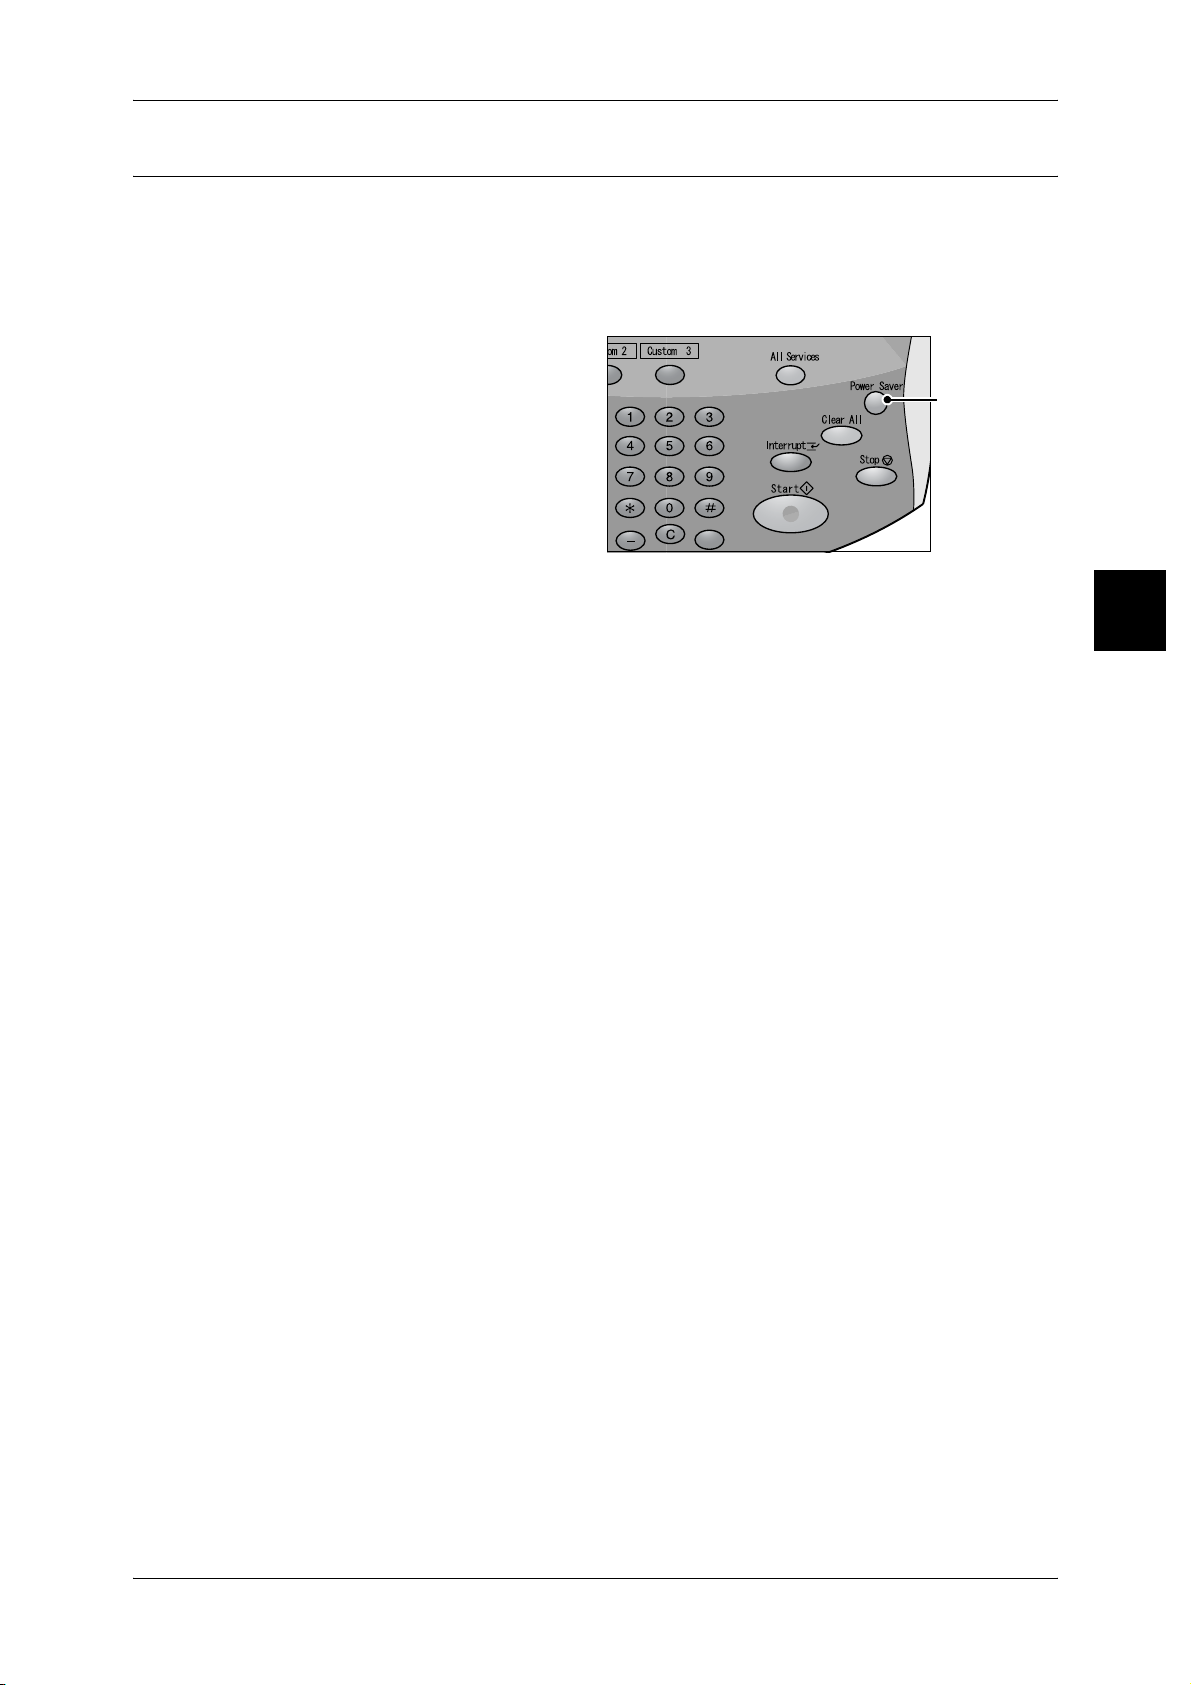
Power Saver Mode .................................................................................................... 16
Changing the Power Saver Mode Change Interval............................................... 16
Exiting the Power Saver Mode.............................................................................. 19
Control Panel............................................................................................................. 20
3 Basic Operation ....................................................................................................... 23
Copying Procedure.................................................................................................... 24
Step1 Loading Documents.................................................................................... 24
Step2 Selecting Features...................................................................................... 26
Step3 Entering the Quantity .................................................................................. 27
Step4 Starting the Copy Job ................................................................................. 28
Step5 Confirming the Copy Job in the Job Status ................................................ 28
Stopping the Copy Job.......................................................................................... 29
Saving Scanned Documents ..................................................................................... 30
Printing ...................................................................................................................... 32
Scanning Procedure .................................................................................................. 33
Step1 Loading Documents ................................................................................... 33
Step2 Selecting Features...................................................................................... 35
Step3 Starting the Scan Job ................................................................................. 36
Step4 Confirming the Scan Job in the Job Status ................................................ 37
Step5 Saving the Scanned Data ........................................................................... 37
Stopping the Scan Job .......................................................................................... 38
Printing Copy & Print Jobs Document Procedure...................................................... 39
Step1 Opening the [Check Mailbox] Screen ......................................................... 39
Step2 Selecting Box Type..................................................................................... 40
Step3 Selecting a Box........................................................................................... 40
Step4 Printing Documents .................................................................................... 40
1
Page 4

Registering Mailboxes ................................................................................................41
System Settings Procedure........................................................................................43
4 Paper and Other Media ............................................................................................45
Paper Type.................................................................................................................46
Paper Size .............................................................................................................46
Weights of Usable Paper .......................................................................................46
Paper type .............................................................................................................47
Loading Paper ............................................................................................................49
Loading Paper in Trays 1 to 2................................................................................49
Loading Paper in Trays 3 to 4................................................................................50
Loading Paper in tray 5 (bypass)...........................................................................51
Loading Paper in Trays 6 to 7................................................................................52
Loading Paper in Interposer ..................................................................................52
Loading Tab Paper ................................................................................................53
Changing the Size of Paper in Trays..........................................................................55
Changing the Size of Paper in Trays 3 to 4 ...........................................................55
Changing the Size of Paper in Trays 6 to 7 ...........................................................56
5 Maintenance..............................................................................................................57
Replacing Toner Cartridges .......................................................................................58
Replacing the Waste Toner Container .......................................................................61
Replacing the Staple Cartridge ..................................................................................64
Replacing The Staple Scrap Container ......................................................................66
Replacing the Staple Cartridge for Booklet ................................................................68
Emptying Punch Scrap Container ..............................................................................70
6 Problem Solving .......................................................................................................71
Fault Clearance Procedure ........................................................................................72
Image Quality Problems .............................................................................................73
Paper Jams ................................................................................................................74
Paper Jams in Trays 1 to 4 ....................................................................................75
Paper Jams in Transport Unit 4 .............................................................................75
Paper Jams in Duplex Module[3]...........................................................................76
Paper Jams in Tray 5 (Bypass Tray) .....................................................................77
Paper Jams in Trays 6 to 7 (High Capacity Feeder Tray) .....................................78
Paper Jams in the Interposer.................................................................................78
Paper Jams in Lower Left Cover ...........................................................................79
Paper Jams inside body ........................................................................................80
Paper Jams Inside Finisher Left Cover..................................................................83
Paper Jams Inside Finisher Right Cover ...............................................................85
Paper Jams at Z Folding Unit ................................................................................88
Paper Jams at Output Area of Finisher .................................................................92
Paper Jams at High Capacity Tray Unit.................................................................94
2
Page 5

Document Jams......................................................................................................... 98
Stapler Faults .......................................................................................................... 101
Staple Jams in the Staple Cartridge ................................................................... 102
Staple Jams at staple cartridge for booklet ......................................................... 103
Solving Curled Output ............................................................................................. 104
Index........................................................................................................................ 107
3
Page 6

Page 7

1 Before Using the Machine
This chapter contains descriptions about how to use this document.
z
Preface .........................................................................................................6
z
About This Guide .......................................................................................... 7
Page 8

1 Before Using the Machine
Preface
Before Using the Machine
1
Thank you for selecting our DocuCentre 9000 and Document Centre 1100/900.
This guide provides all the necessary copy/print/scan operating procedures,
maintenance information like how to clear paper jams, daily care, setting various items,
and precautions.
This guide assumes that you are familiar with your personal computer’s operating
system, as well as its operating and networking environment.
Please read this guide thoroughly to obtain the best performance on this product. After
reading this guide, be sure to keep it handy for quick reference. It will be useful in case
you forget how to perform operations or if a problem occurs with the machine.
For instructions on configuring your network environment, refer to the Network
Administrator Guide. For information about optional accessories for the printer
functionality, also refer to the guide provided with each optional accessory.
Since the machine is equipped with anti-counterfeit features, in some rare cases,
certain kinds of documents may be unable to copy.
Fuji Xerox shares the global concern about environmental conservation and has integrated
that concern in its business activities–from research and development to disposal. We have
implemented a number of programs to lessen the burden on the environment. For example,
we have totally eliminated ozone-depleting chlorofluorocarbons from our manufacturing
facilities.
We are committed to leadership in the conservation of resources by reusing and recycling
post-consumer waste material such as paper, cartridges, and parts from our customer's
copiers and printers.
Important Note:
This equipment will be inoperable when main power fails.
6
Page 9

About This Guide
About This Guide
This section describes the organization of this guide.
Guides Supplied
We provide the following guides for optimum usage of the machine.
Included Manuals
Several manuals are included with this product. They are referred to as accompanying
manuals.
These accompanying manuals include descriptions on configurations and operation of
the product.
The below manuals are included with the machine.
User Guide
This guide provides information about copying/printing/scanning procedures, clearing
paper jams, making daily maintenance, programming various settings and features, as
well as precautions for use.
Network Administrator Guide
This document is aimed toward network administrators, as a guide to setting up the
network environment.
Before Using the Machine
1
Quick Reference Guide (This Document)
Introduces the main features of the machine, as well as simple operating instructions.
Manual (HTML)
A guide to installing print driver, configuring the printer environment, etc. This manual
is included in the CentreWare Utilities or Driver CD Kit CD-ROM.
Guides for Optional Accessories
Optional accessories are also available for the machine. User Guides are provided with
the optional accessories exclusively for the DocuCentre 9000 and Document Centre
1100/900. These User Guides are referred to as "guides for optional accessories".
Guides for optional accessories are provided in two forms, printed or as On-line Help.
Guides for optional accessories describe all the necessary steps for operating optional
accessories and installing software.
7
Page 10

1 Before Using the Machine
Organization of this Guide
Before Using the Machine
1
This guide consists of the following chapters.
1 Before Using the Machine
Describes how to use this document, as well as cautions on using the product safely
and legally.
2 Product Overview
Describes basic information such as identifying the major components, how to switch
the machine on and off, how to use the touch screen, and how to set the power saver
feature.
3 Basic Operation
Contains information about loading paper and other types of media into the machine,
using the copy/print/scan features, and changing the default settings.
4 Paper and Other Media
Describes the types of paper that can be used on the machine, precautions when
handling paper, and how to load paper in trays.
5 Maintenance
Describes procedures for replacing consumables, cleaning the machine, and printing
reports/lists.
6 Problem Solving
Describes troubles that may occur with the machine and their solutions.
Conventions
z
z
z
z
In this document, "Computer" refers to a personal computer or workstation.
The following icons are used in this guide.
Important Indicates important information which you should read.
Note Indicates additional information on operations or features.
The following conventions are used in this guide:
" " :The cross-reference is within this manual.
" " :Refers to names of features, and touch screen messages and input text.
[ ] :Refers to button or menu names displayed in the touch screen.
:Refers to the names of menus, commands, windows, or dialog boxes
displayed on the computer screen and their button and menu names.
< > button:Indicates a hardware button on the control panel.
< > key :Indicates a key on the keyboard of the computer.
For radio buttons, the checked item is the selected item.
8
Page 11

2 Product Overview
This chapter describes basic operation about the machine, such as the names
of each component, switching on and off of the machine, and the operation of
the touch screen and power saving settings.
z
Machine Components ................................................................................. 10
z
Power On / Off ............................................................................................ 14
z
About the Circuit Breaker............................................................................ 15
z
Power Saver Mode ..................................................................................... 16
z
Control Panel .............................................................................................. 20
Page 12

Product Overview
5
6
2
2 Product Overview
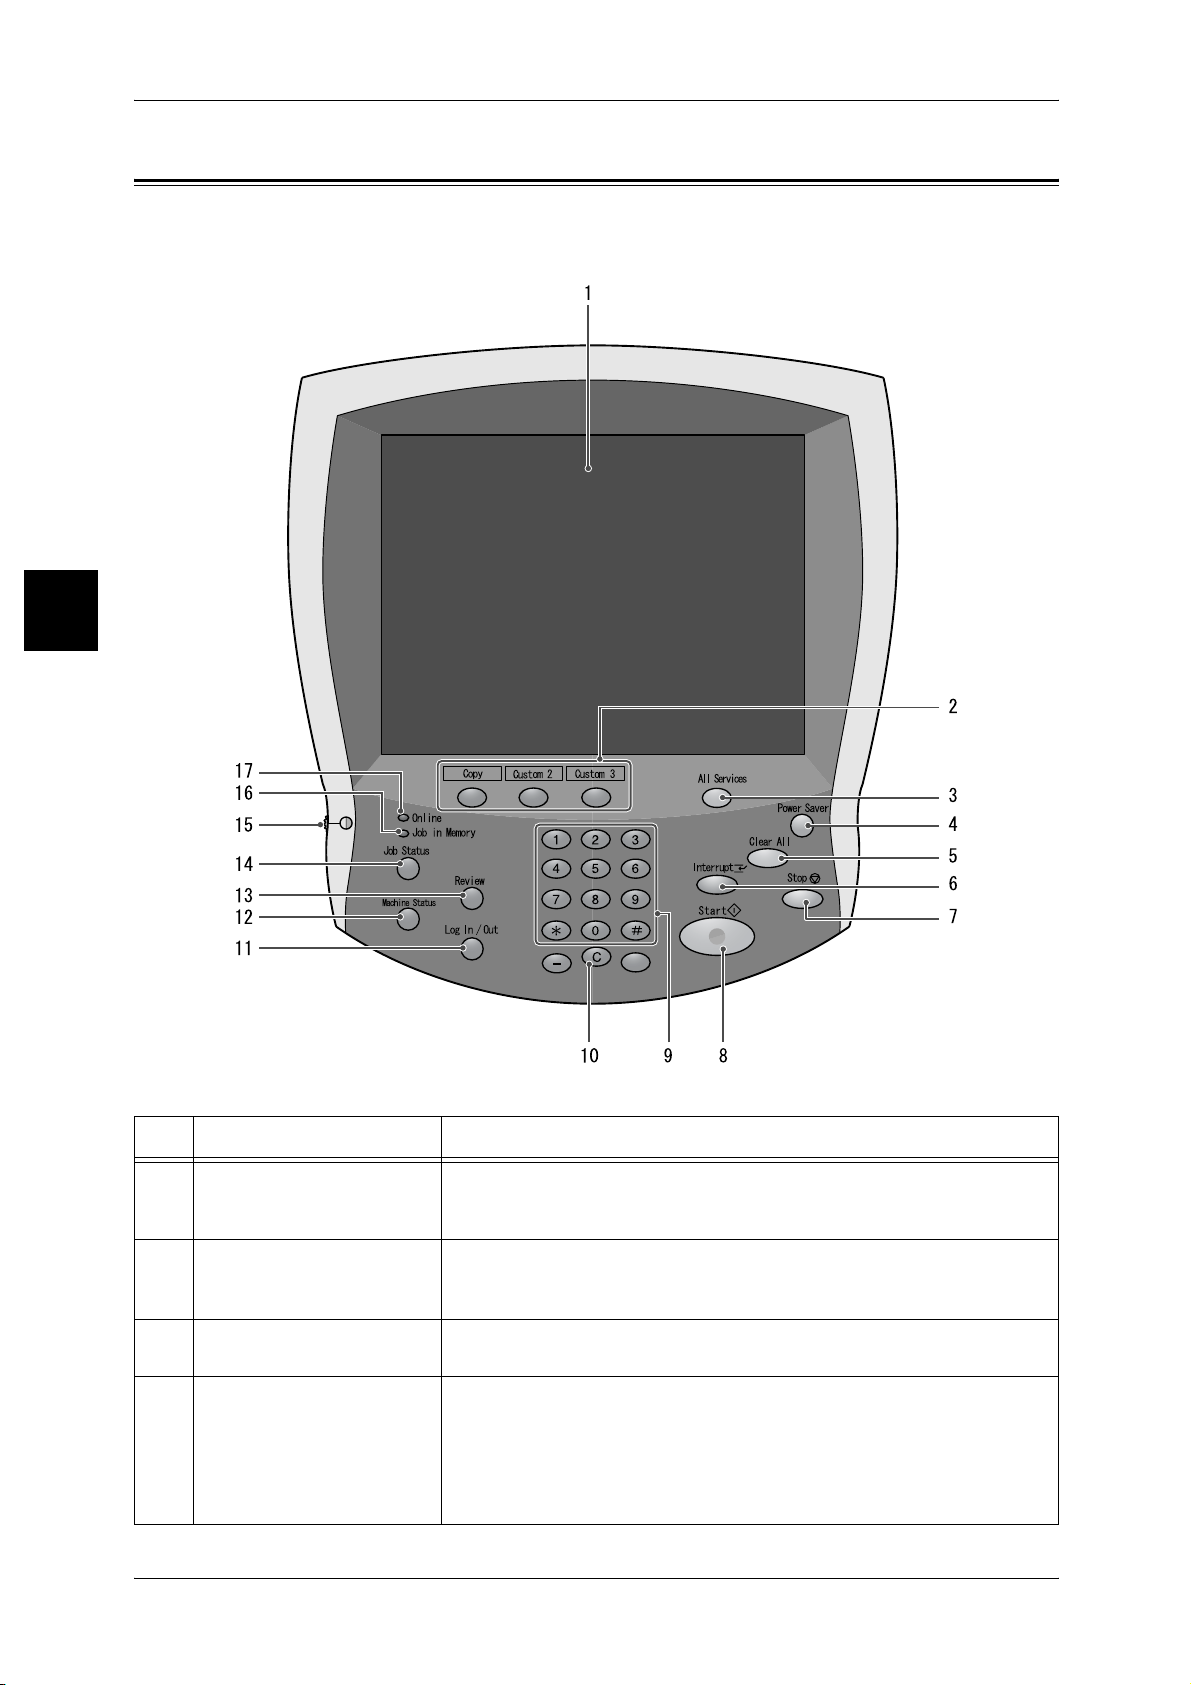
Machine Components
This section describes the main components and their functions of the DocuCentre
9000 and Document Centre 1100/900 (hereinafter called "the machine").
Main Body
1
12
2
4
3
11
10
8
9
7
No. Component Function
1 Document cover Holds the document down.
2 Control panel It consists of operation buttons, LED indicators and a touch screen.
Refer to "Control Panel" (P.20).
3 Document glass Load documents here.
4 Power switch Switches the power of the machine on/off.
5 Front cover Open this cover to clear paper jams and to replace the waste toner
bottles.
6 Toner cover Open this cover to replace the toner cartridge.
7 Tray 1, 2, 3, 4 Load papers here for copying.
8 Locking casters Used for locking the wheels of the machine. Lock these casters after
moving the machine to its installation site.
9 Bottom left cover Open this cover to access the insides of the machine to remove the
jammed paper.
10 Front cover for high
capacity tray unit.
Open this cover to access the bottom left cover of the machine to remove
the jammed paper.
11 Tray 6, 7 Load papers here for copying.
12 Tray 5 (Bypass) Used for loading non-standard paper (thick-stock paper, and other
special media) that cannot be loaded in trays 1 to 4.
10
Page 13
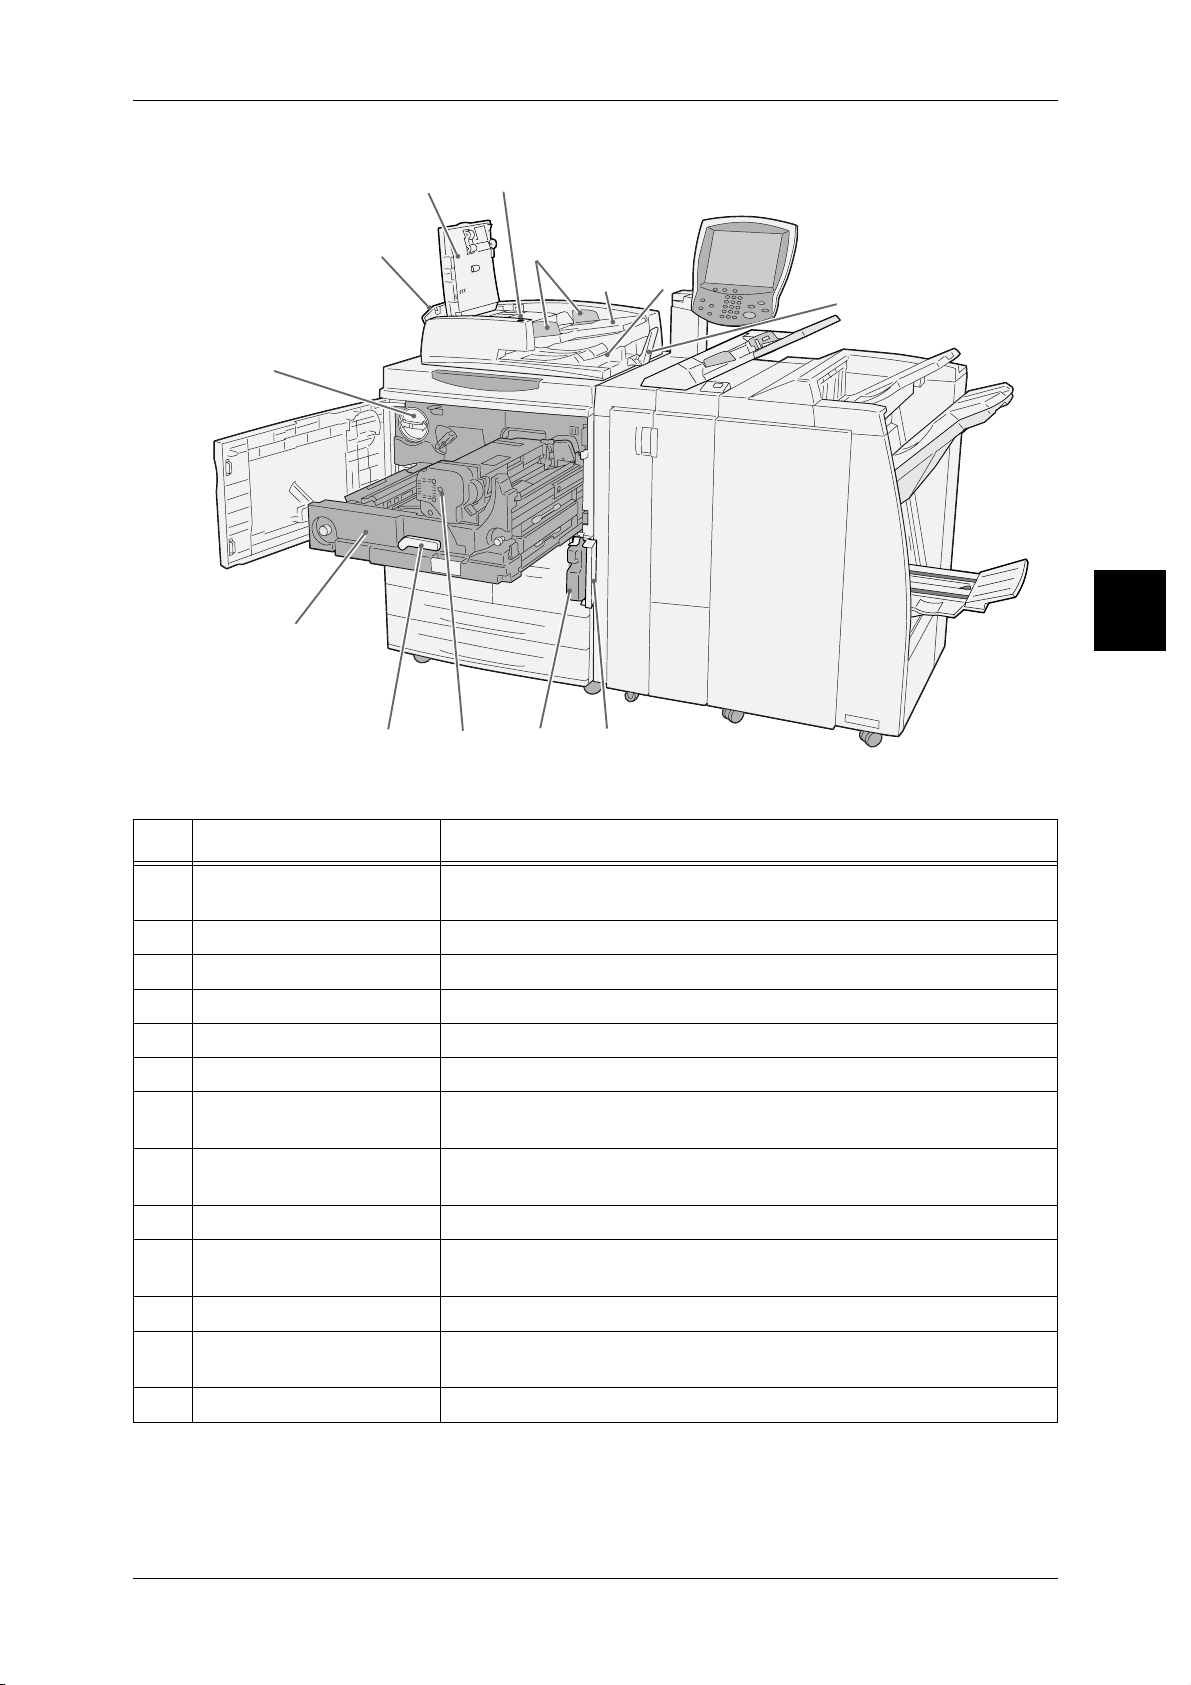
Machine Components
25
24
13
23
14
22
15
16
21
17
18
19
Product Overview
2
20
No. Component Function
13 Left cover Opens slightly just when opening the top cover. Open widely when
removing the jammed paper.
14 Front cover Open this cover to remove the jammed paper.
15 <Confirmation> indicator This indicator lights to confirm that the document is loaded correctly.
16 Document guides Use this guides to align the edges of the document.
17 Document feeder tray Load documents here.
18 Document output tray Receives scanned documents.
19 Document Stopper Holds large document, such as A3, in place. Set upright for use when
making copies.
20 Waste toner container
cover
21 Waste toner container Collects used toner.
22 Fuser (E) Fuses the printed image on the paper by fusing the toner. Do not touch
23 Lever Lever for pulling out the transfer module.
24 Transfer module Copies the image from the drum to the paper. Open this just when
25 Toner cartridge Toner (image forming powder) cartridge is provided.
Open this cover when removing the waste toner bottle.
this unit as it is extremely hot.
removing the jammed paper.
Note • In text descriptions, the Duplex Automatic Document Feeder is abbreviated as "Document
Feeder".
11
Page 14
2 Product Overview
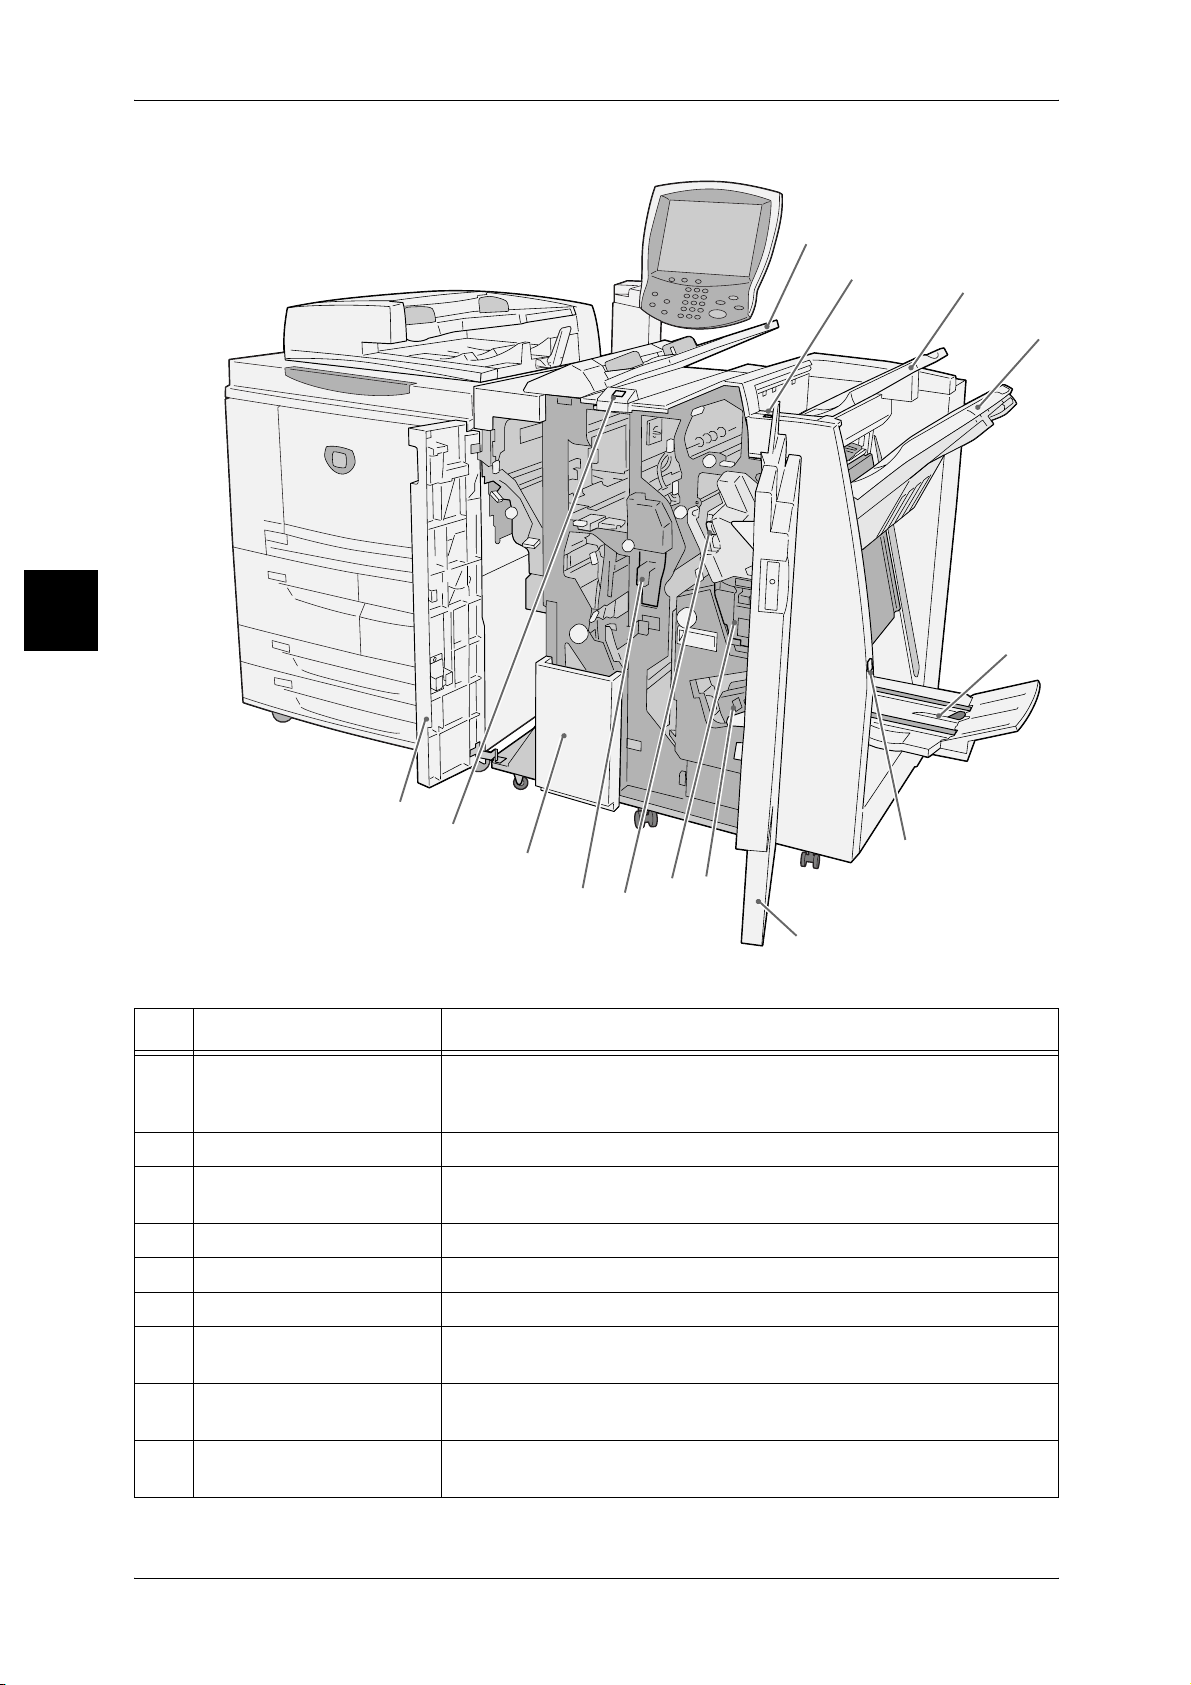
29
Finisher D2, Booklet finisher D2
26
Product Overview
2
39
38
37
36
35
34
33
27
28
30
31
32
No. Component Function
26 Interposer (Cover/
Transparency separator
tray)
27 De-curl button Press this button to decurl copied paper.
28 Output tray Receives copies when you select [Automatic sorting], [Collated],
29 Finisher tray Receives copies when you select stapled, punched and Z-folded copies.
30
Booklet output tray
31
Booklet output tray button
32 Right cover Open to clear paper jam; replace staples or clear jammed staples; or
33
Staple cartridges for
booklet
34 Staple Scrap Container Collects the scraps from the stapler. Remove this cartridge to replace
*1
*1
Load papers for covers or transparency separators. Papers loaded here
will not be used for copying or printing.
[Uncollated] or normal copy.
Receives copies when you select Bi-Fold or Bi-Fold + Stapling.
*1
Press this button to deliver booklets to removal position.
replace the scraps from the puncher.
There are two staple cartridges for booklet. Remove these cartridges to
replace staples and clear staple jams.
the staple scrap container.
12
Page 15

Machine Components
No. Component Function
35 Staple cartridge This cartridge contains staples. Remove this cartridge to replace staples
and clear staple jams.
36 Punch scrap container Collects the scraps from the puncher. Open throw away the scraps.
37
38
39 Left cover Open this cover to access the inside of the machine to clear paper jams.
*1 Only available when Booklet Finisher D2 is installed.
*2 Only available when Folding unit (Z and C) is installed.
Tri-Fold output tray
Tri-Fold output tray button
Note • Finisher and Booklet finisher D2 are optional. In text descriptions, finisher and booklet
*2
finisher D2 may be called finisher.
Receives copies when you select Tri-Fold In or Tri-Fold out.
*2
Press this button to open Tri-Fold output tray.
Product Overview
2
13
Page 16

2 Product Overview
Power On / Off
Switch on the power before operating the machine. After the power is on, it will take
about 6 minutes for DocuCentre 9000 and Document Centre 900 or about 5 minutes
for Document Centre 1100 to warm up before you can start making copies.
This may take more time due to image quality adjustment depending on the status of
the machine.
Product Overview
Powering On
Turn the machine off at the end of the day or when it is not in use for a long period of
time. Also, use [Power Saving] feature when not in use for a while to reduce the power
consumption.
Important • Switching off the power of the machine may cause loss of data being processed.
For information about power saving feature, refer to "Power Saver Mode" (P.16).
2
The procedure for turning on the power is as follows.
1 Open the cover and press the
power switch to the [|] position to
turn the power on.
Note • The "Please wait..." message
indicates that the machine is
warming up. The machine
cannot be used while it is
warming up.
Powering Off
The procedure for turning the power off is as follows.
Important • if you turn the power off while data is being stored in the memory, the data may be erased.
1 Before turning the power off, make sure that all copy or print jobs have completely
finished.Also, make sure that the <Online> indicator is not lit.
Important • Never turn the power off in the following instances:
• While data is being received
• While data is being sent (FTP/SMB/e-mail)
• While jobs are being printed.
• While jobs are being copied
• While a scan is being executed
• While data is being imported from computer
14
Press the power switch to the [ ] side.
2
Important • Power off processing is performed internally on the machine for a while after the power
switch is turned off. Therefore, do not unplug the power cord from the power outlet
immediately after turning the power switch off.
Note • Before you turn the power back on after turning it off, first make sure that the display and the
<Job in Memory> indicator have gone out.
Page 17

About the Circuit Breaker
The machine is provided with a
circuit breaker.
In the event of a current leakage,
the breaker will automatically cut off
the power circuit to prevent any
leakage or fire from occurring.
The circuit breaker is normally On
("l") position as shown in the figure.
If the breaker is Off ("O") position,
contact your Customer Support
Center as there might be some unusual conditions.
About the Circuit Breaker
Product Overview
2
15
Page 18

2 Product Overview
Power Saver Mode
The machine is installed with a Power Saver feature that will automatically cut off the
electricity to the machine if no copy or print data is received for a certain duration.
The Power Saver feature has two modes, a [Low Power mode] and [Sleep mode].
The machine enters the [Low Power mode] after the preset time has elapsed if the
machine is left unused for a fixed period of time.
Product Overview
The machine then enters the [Sleep mode] if a further preset time elapses.
Low Power Mode
In this mode, the power to the control panel and fuser unit is lowered to save power.
The display goes out, and the <Power Saver> button on the control panel lights. To use
the machine, press the <Power Saver> button. The <Power Saver> button goes out to
indicate that the Power Saver feature is canceled.
Sleep Mode
2
In this mode, the power is lowered more than in the Low Power mode.
The display goes out, and the <Power Saver> button on the control panel lights. To use
the machine, press the <Power Saver> button. The <Power Saver> button goes out to
indicate that the Power Saver feature is canceled.
Changing the Power Saver Mode Change Interval
The procedure for setting the Power Saver feature is as follows.
To activate the Power Saver feature, set the Sleep Mode button to Enabled, and set
both the times up to migration to the Low Power Mode and migration to the Sleep
Mode.
Note • The time to migration to Low Power Mode and Sleep Mode can each be specified in 1
minute increments, from 1 to 240 minutes.
1 Press the <Log In/Out> button.
<Log In/Out>
button
16
2 Enter the system administrator ID
with the numeric keypad or a
keyboard displayed by pressing
[Keyboard], and select [Confirm].
Note • The default UserID value is
11111. When using the
authentication manager
feature, a password is
required. The default
password value is "x-admin".
Page 19
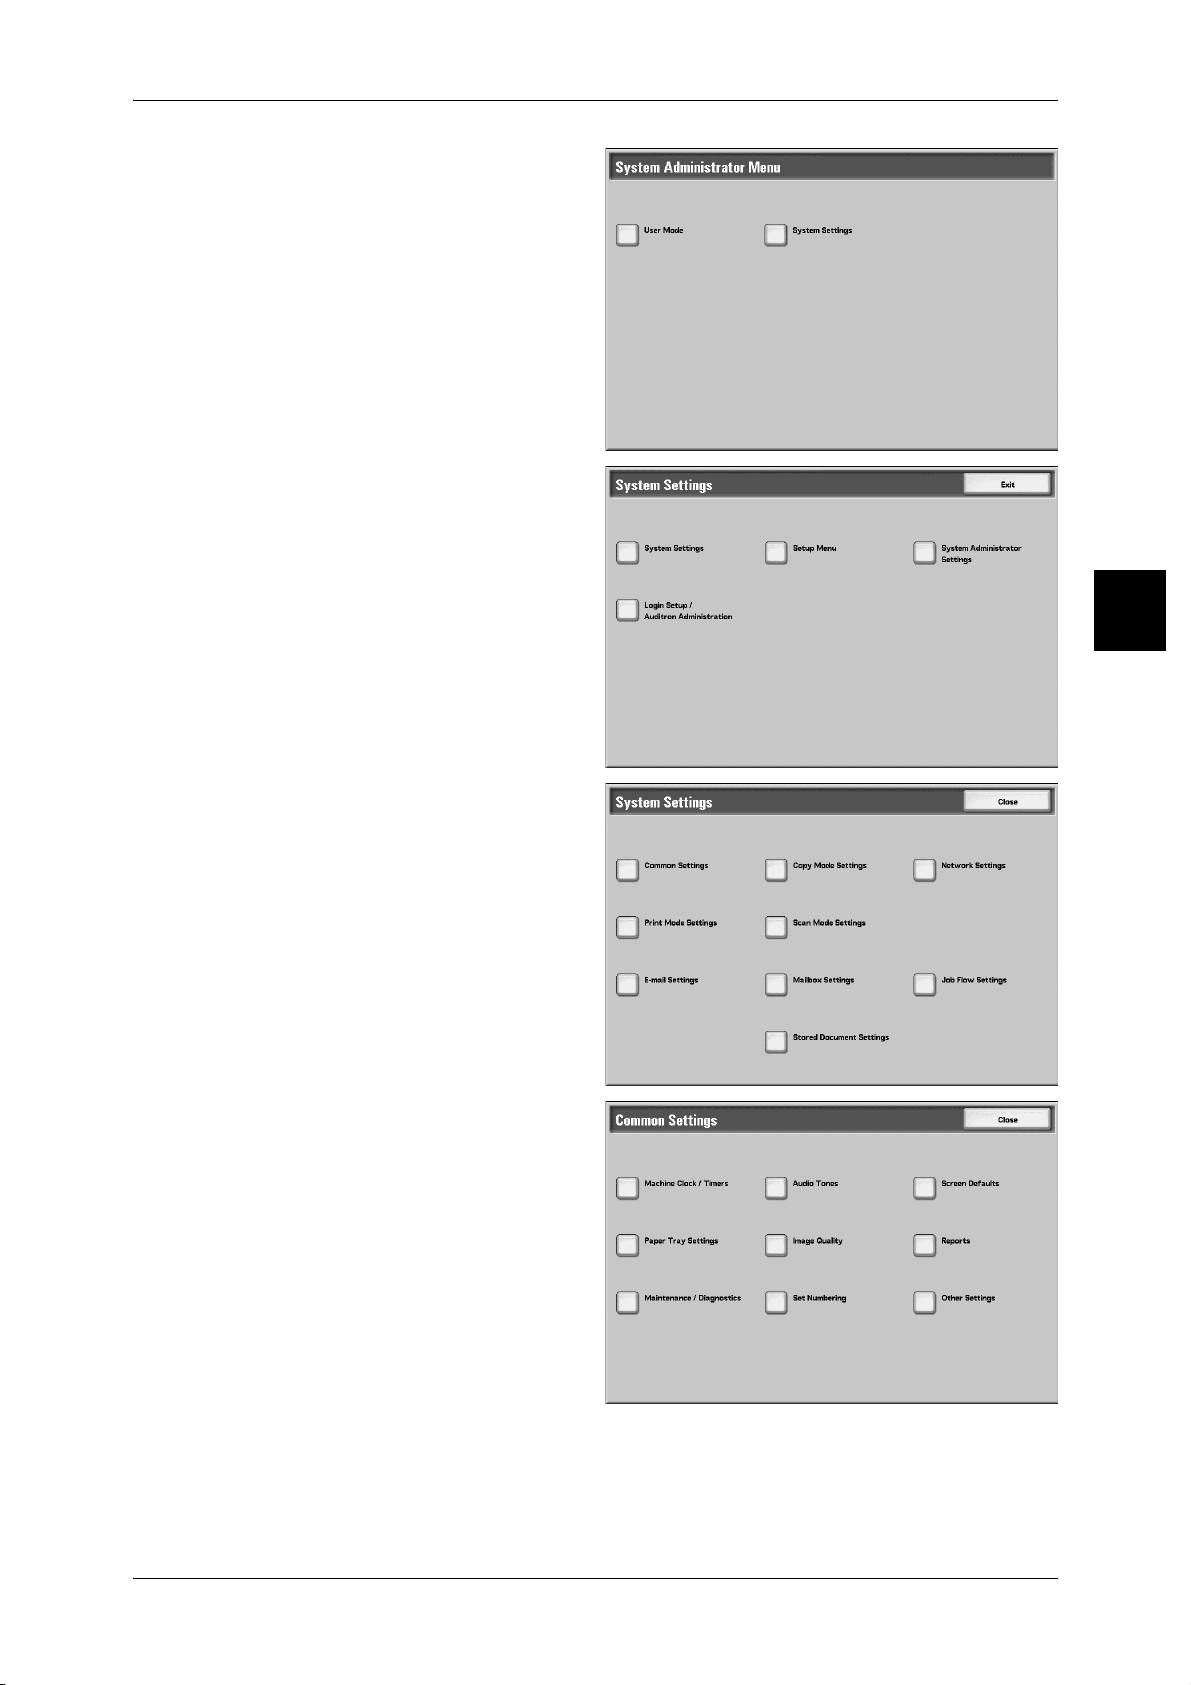
3 Select [System Settings].
4 Select [System Settings].
Power Saver Mode
Product Overview
2
5 Select [Common Settings].
6 Select [Machine Clock/Timers].
17
Page 20
Product Overview
2
2 Product Overview
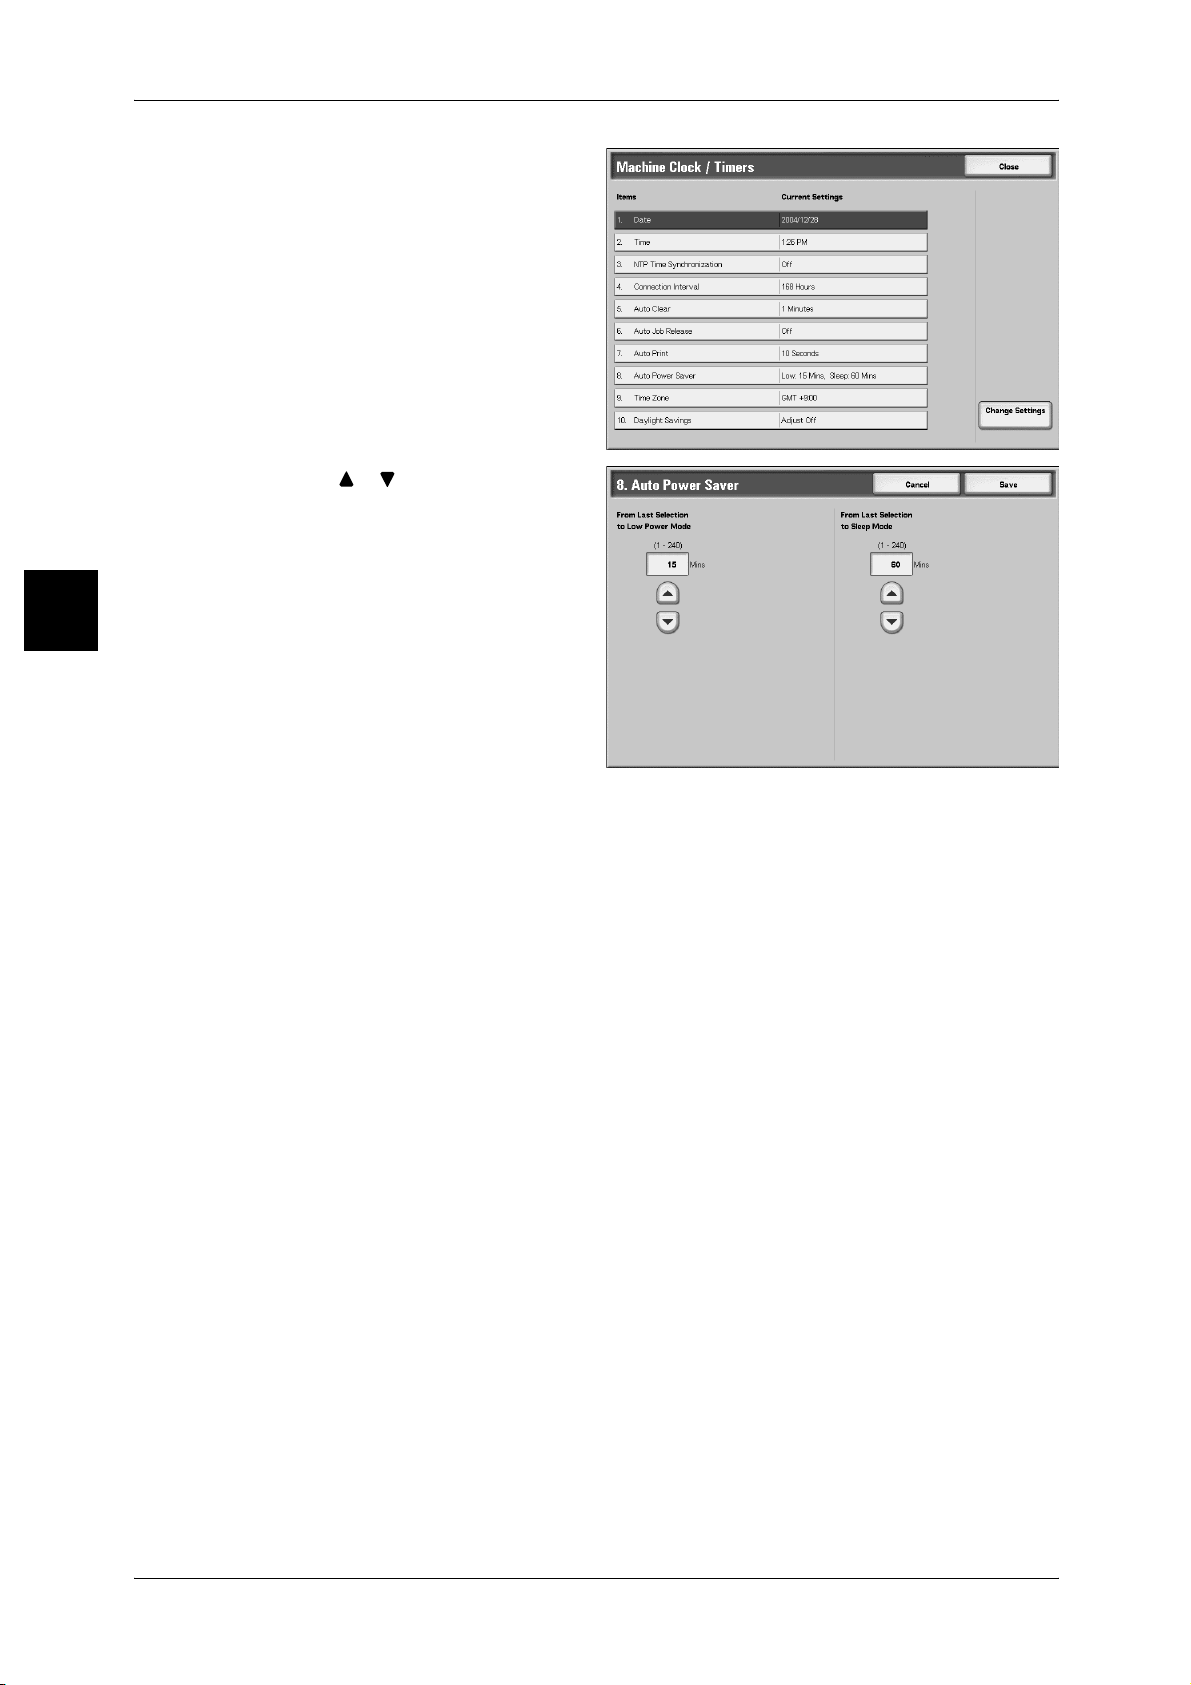
7 Select [8. Auto Power Saver], and
select [Change Settings].
8 Using [ ] [ ], configure a power
saver mode migration time from 1
to 240 minutes, in 1 minute
increments.
From Last Selection to Low Power Mode
Set the time to move to the [Low Power Mode] after the last operation.
Note • The default for [From Last Selection to Low Power Mode] is [15] minutes.
From Last Selection to Sleep Mode
Set the time to move to the [Sleep Mode] after the last operation.
Note • The default for [From Last Selection to Sleep Mode] is [60] minutes. Configure the [From
Last Selection to Sleep Mode] time to be longer than the [From Last Selection to Low Power
Mode] time.
9 Press [Save].
10 Select [Close] repeatedly until the [System Settings/Registration] screen is displayed.
11 Select [Exit] to exit the System Administration mode.
18
Page 21
Exiting the Power Saver Mode
The following describes how to exit the Power Saver mode.
The Power Saver mode is exited in the following instances:
z
By pressing the <Power Saver> button
z
Receiving jobs
1 Press the <Power Saver>
button.
Power Saver Mode
<Power Saver>
button
Product Overview
2
19
Page 22
Product Overview
2
2 Product Overview
Control Panel
The following describes the names and functions of components on the control panel.
No. Component Function
1 Touch screen This display displays messages required for operation and buttons for
various features. You can directly touch the touch screen to instruct
operations in screens and set features.
2 <Copy>
<Custom 2>
<Custom 3>
3 <All Services> Used to display the [All Services] screen.
4 <Power Saver> If the machine is not operated for a while, the machine's power
Used to call a custom feature.
In text descriptions, this button is indicated as the <All Services> button.
consumption is lowered to enter the Power Saver mode. In the Power
Saver mode, this button is lit. To cancel the Power Saver mode, press
this button again.
In text descriptions, this button is indicated as the <Power Saver>
button.
20
Page 23

Control Panel
No. Component Function
5 <Clear All> Returns the statuses of all displayed services to their default values.
The machine will be reset to the state after it is turned on.
In text descriptions, these buttons are indicated as the <Clear All>
button.
6 <Interrupt> Select this button to temporarily stop a continuous copy job or printing to
give another job higher priority. During an interrupt,
the Interrupt indicator is lit. Pressing the Interrupt button again cancels
the interrupt and the previous operation is resumed.
In text descriptions, this button is indicated as the <Interrupt> button.
7 <Stop> Press this button to stop the current copy job or communications.
In text descriptions, this button is indicated as the <Stop> button.
8 <Start> Press this button to start copying or scanning.
In text descriptions, this button is indicated as the <Start> button.
9 Numeric keypad Press these buttons to enter the number of copies, passwords and other
numerical values.
In text descriptions, these buttons are indicated as the "numeric
keypad".
10 <C> (Clear) Press this button if you have entered a wrong numerical value with the
numeric keypad.
In text descriptions, this button is indicated as the <C> button.
Product Overview
2
11 <Log In/Out> When this button is pressed, if in System Administration mode, or Login
Setup/Auditron Administration is in effect, the UserID input screen is
displayed.
In text descriptions, this button is indicated as the <Log In/Out> button.
12 <Machine Status> Pressing this button allows you to confirm the machine status, meters
and the state of consumables, and print reports.
In text descriptions, this button is indicated as the <Machine Status>
button.
13 <Review> Press this button to open the Review screen. In this screen, you can
check a list of the status of copy and scan features whose settings have
changed from the defaults. You can also check the destination
information for sending e-mail.
In text descriptions, these buttons are indicated as the <Review> button.
14 <Job Status> Pressing this button allows you to confirm or cancel currently executing
or completed jobs, or to confirm or print saved documents.
In text descriptions, this button is indicated as the <Job Status> button.
15 Brightness dial Adjusts the brightness of the touch screen. Use this dial to adjust the
brightness of touch screen when it is too dark to read.
16 <Job in Memory> indicator This indicator lights when data is stored in the machine's memory.
17 <Online> indicator This indicator lights when data is being transmitted from this machine or
received from a client.
21
Page 24

Page 25

3 Basic Operation
This chapter describes basic operation about the machine.
z
Copying Procedure ..................................................................................... 24
z
Printing........................................................................................................ 32
z
Scanning Procedure ................................................................................... 33
z
Printing Copy & Print Jobs Document Procedure.......................................39
z
Registering Mailboxes ................................................................................41
z
System Settings Procedure ........................................................................ 43
Page 26

3 Basic Operation
Copying Procedure
This section describes the basic copy operations. The following shows the copy flow
and reference sections.
Step1 Loading Documents..........................................................................................................24
Step2 Selecting Features .............................................................................................................26
Step3 Entering the Quantity........................................................................................................27
Step4 Starting the Copy Job........................................................................................................28
Step5 Confirming the Copy Job in the Job Status ......................................................................28
Basic Operation
3
Step1 Loading Documents
There are two methods for loading documents:
Document feeder
z
Single sheet
z
Multiple sheets
Document Glass
z
Single sheet
z
Bound documents, such as books
Document feeder
The document feeder supports single sheet and multiple sheet documents, with sizes
ranging from 140 × 210mm (A5, A5 , 5.5 × 8.5inches, 5.5 × 8.5inches ) to a
maximum of 297 × 432mm (A3, 11 × 17 inches).
The document feeder can auto-detect only documents of standard sizes. For
documents that of not of a standard size, input the size in the [Original Size] field.
The document feeder can accept the following number of sheets.
Document type (weight)
Number of
sheets
24
Lightweight paper (38-49 g/m2) 250 sheets
Plain paper (50-80g/m
Heavyweight paper (81-128g/m
Heavyweight paper (129-200g/m
Important • Place folded or creased documents on the document glass because they may cause paper
jams.
2
) 250 sheets
2
) 150 sheets
2
) 100 sheets
Page 27
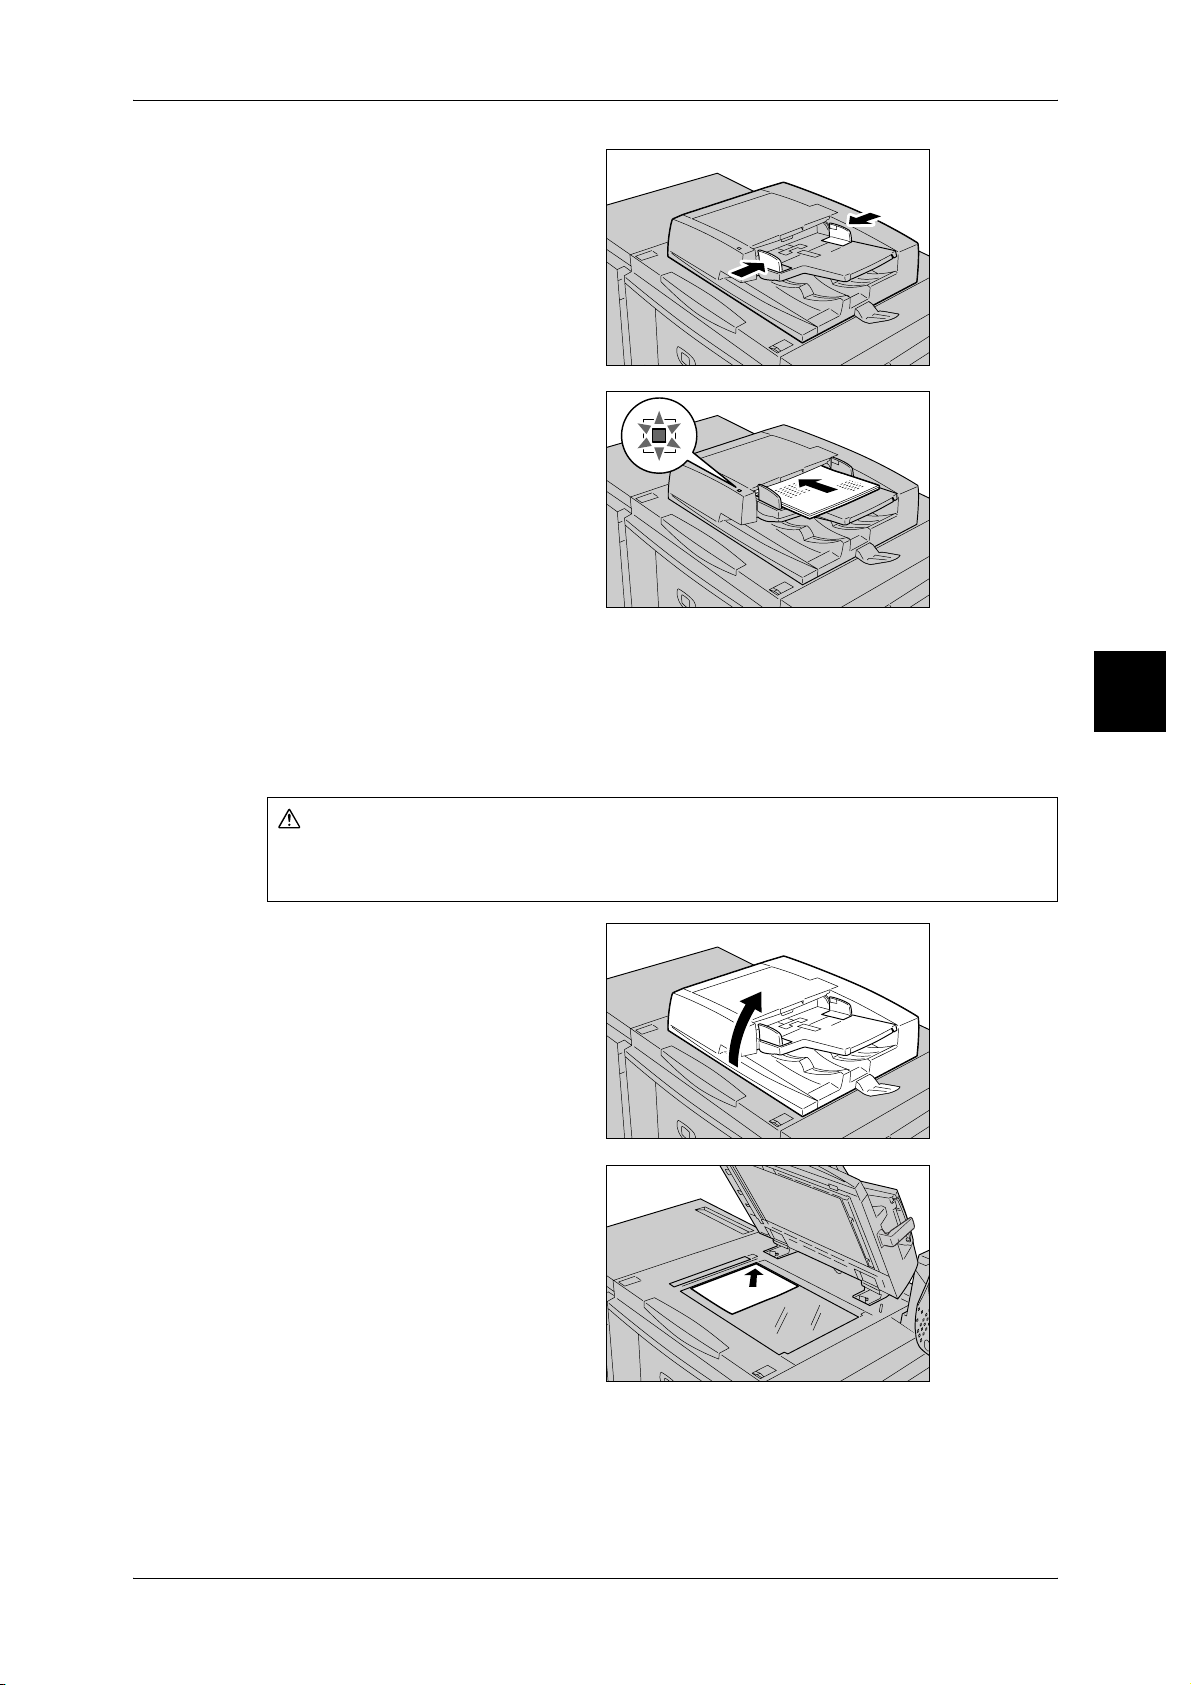
1 Remove any paper clips and
Caution
staples before loading documents.
2 Shift the document guide gently to
touch the document edges.
3 Adjust the movable document
guides to just touch the edge of the
document stack.
Note • The <Confirmation> indicator
When placing the document in the
DADF, you can set timing for lifting
up the document feeder tray.
Document Glass
Copying Procedure
Basic Operation
lights when the document is
loaded correctly.
On the document glass, you can place a single sheet, or a book or other similar
document, up to 297 × 432 mm (A3, 11 × 17 inches).
The document feeder can auto-detect only documents of standard sizes. For
documents that of not of a standard size, input the size in the [Original Size] field.
Do not apply excessive force to hold thick document on the platen glass. It may break
the glass and cause injuries.
1 Open the document cover.
2 Place the document face down,
and align it against the inside left
corner of the document glass.
3 Close the document cover.
Note • When a standard size
document is loaded on the
document glass, the size of
the document is displayed in
the message area.
3
25
Page 28
3 Basic Operation
Step2 Selecting Features
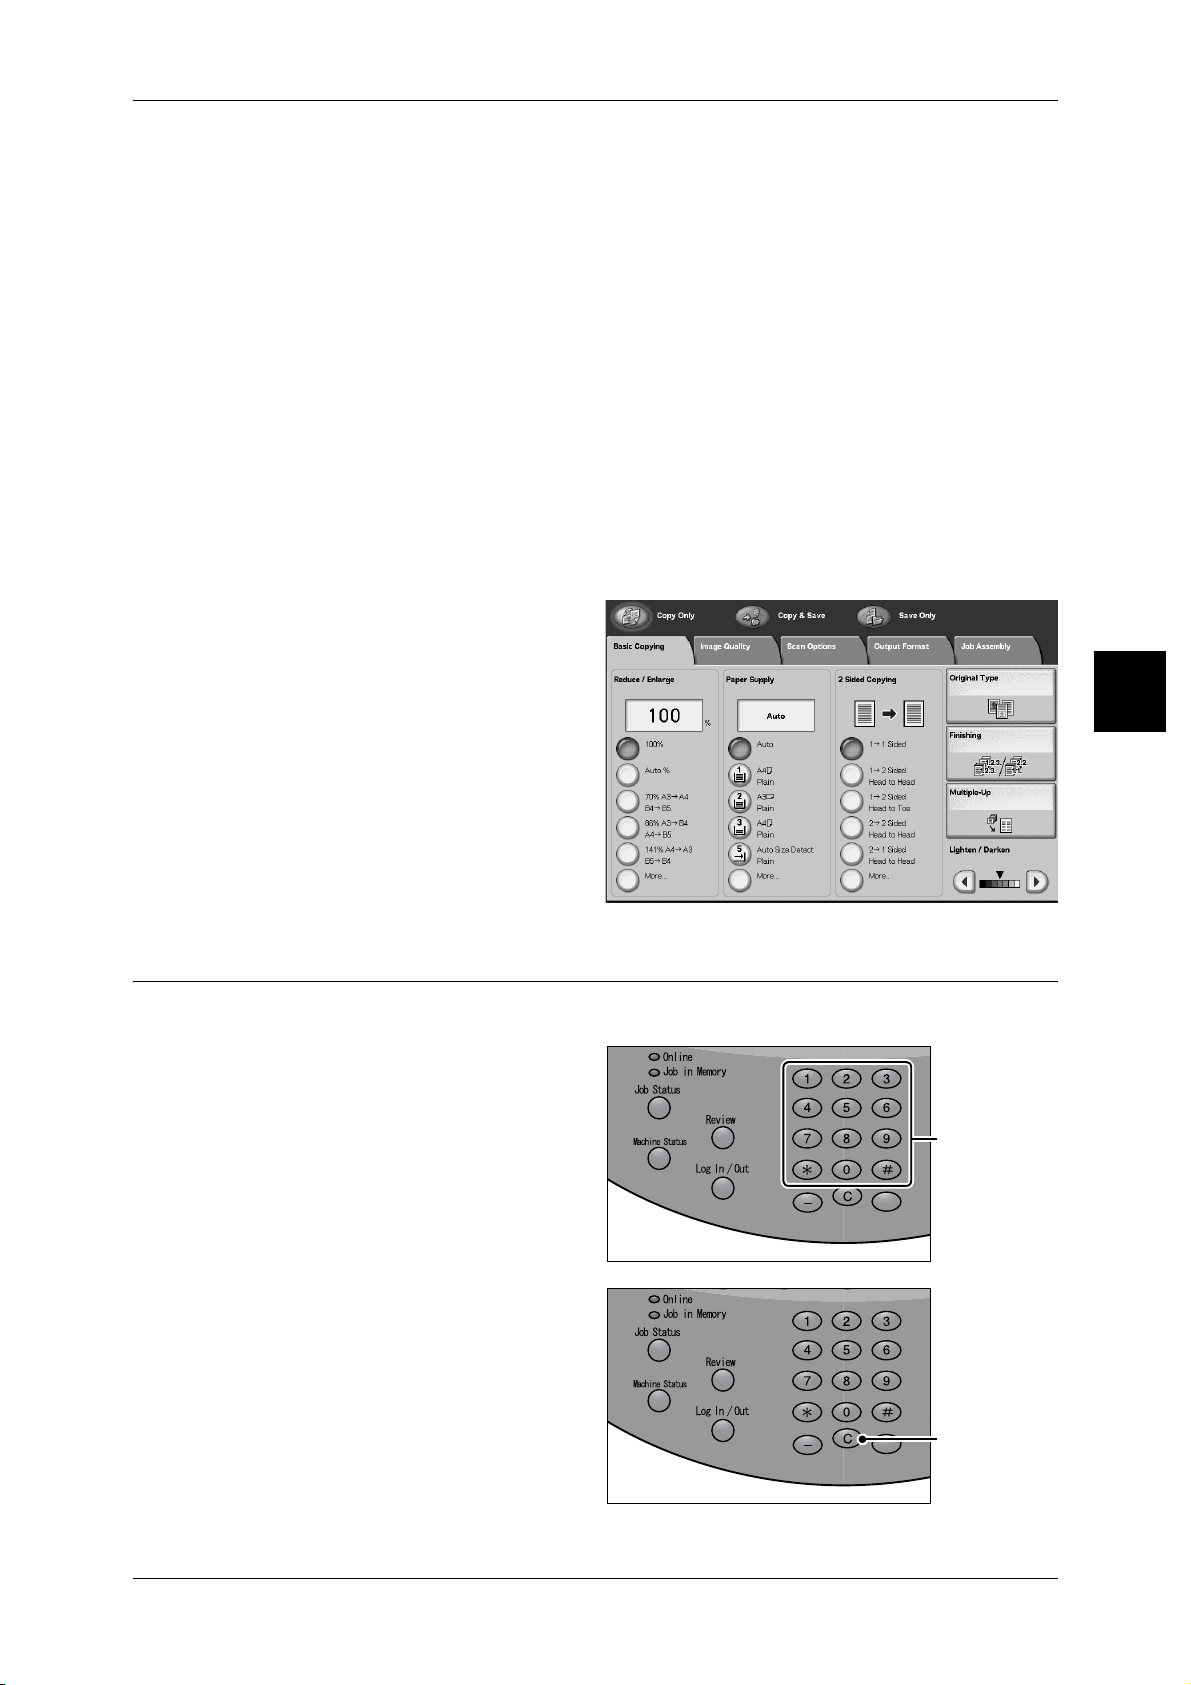
You can select the features from the [Copy] tab.
Note • The features displayed depend on the configuration of the machine.
• To use the [Login Setup] feature or [Auditron Administration] feature, you need a UserID and
Password, or just a UserID. For information about UserIDs and Passwords, contact the
System Administrator.
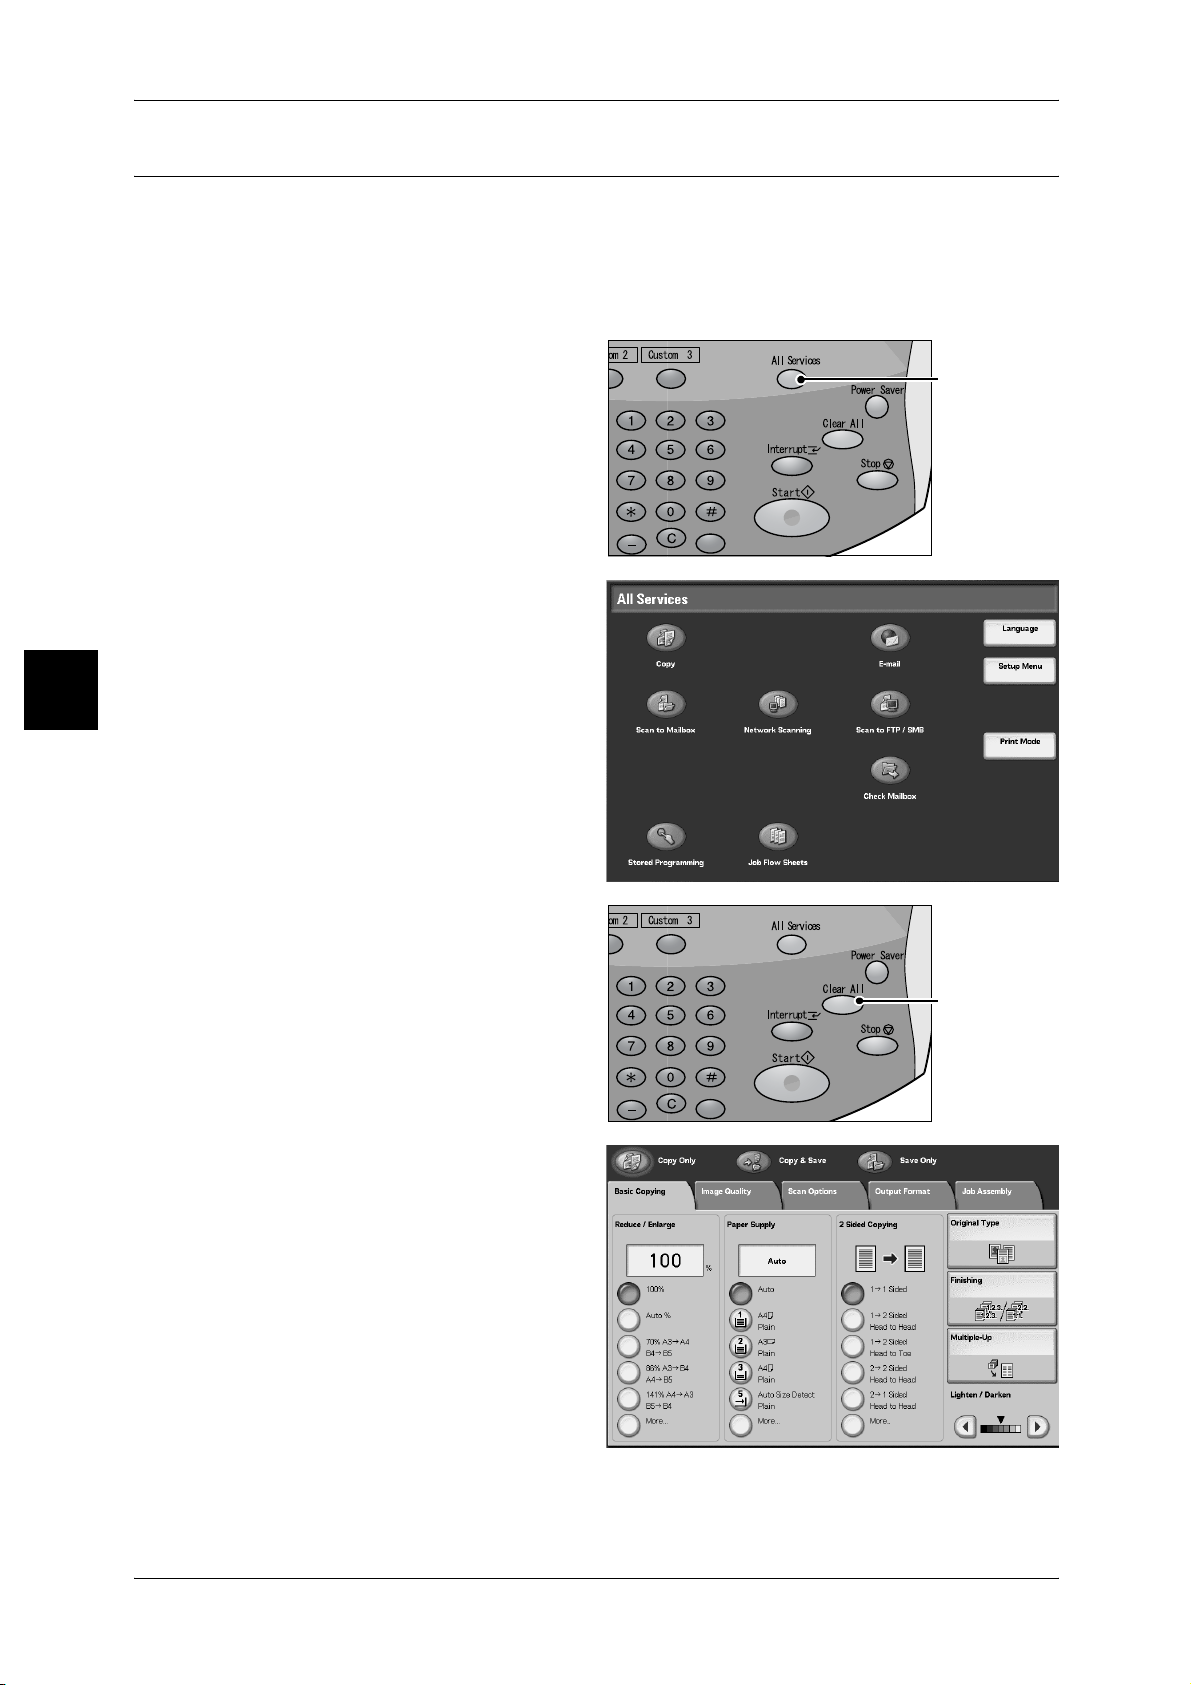
1 Press the <All Services> button.
<All Services>
button
Basic Operation
3
2 Select [Copy].
3 If the previous settings still remain,
press the <Clear All> button.
<Clear All>
button
26
4 Select one of the [Copy Only],
[Copy & Save] or [Save Only].
Page 29
Copying Procedure
Copy
Copies scanned documents.
Copy & Save
Copies scanned documents and then save them as a data to the mailbox on the
machine.You can print saved data from the Mailbox or change settings.
Save Only
Save scanned documents as a data to the mailbox on the machine. You can print
saved data from the Mailbox or change settings.
For details about [Copy & Save] and [Save Only], refer to"Saving Scanned Documents" (P.30). Also,
refer to "Printing Copy & Print Jobs Document Procedure" (P.39) for details about check mailbox.
Note • The features displayed are different according to the machine structure.
• To use the [Login Setup] feature or [Auditron Administration] feature, you need a UserID and
Password, or just a UserID. Ask the System Administrator for the UserID and Password.
5 Select the features to set from each
tab as necessary.
Basic Operation
Step3 Entering the Quantity
You can enter up to 9999 for the number of copies.
1 Enter the number of copies using
the numeric keypad.The number of
copies entered appears on the
upper right of the display.
3
Numeric keypad
2 If you enter an incorrect value,
press the <C> button and enter the
correct value.
<C> button
27
Page 30
Basic Operation
3
3 Basic Operation
Step4 Starting the Copy Job
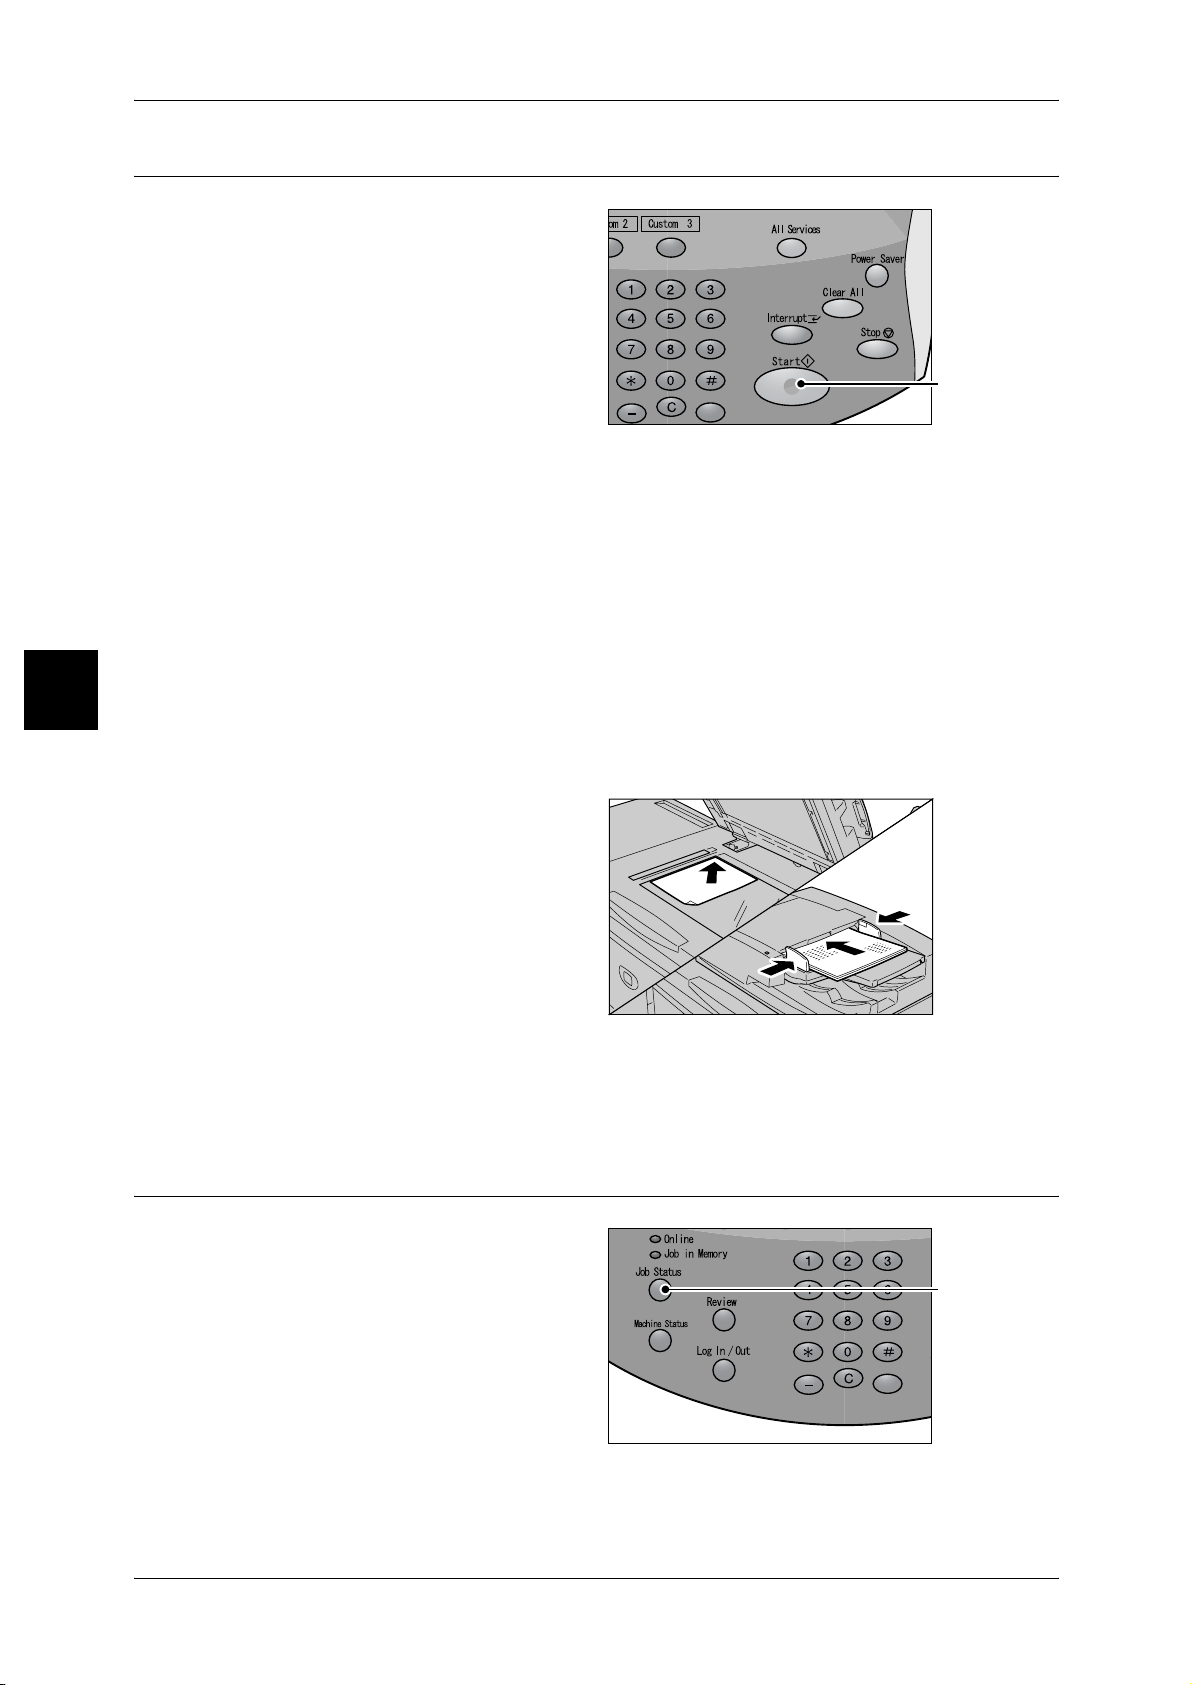
Press the <Start> button.
1
Important • If a document has been set in
the document feeder, do not
press the document while it is
being conveyed.
Note • If a problem occurs, an error
message appears in the
display. Remedy this by
following the message on the
display.
• You can set the next job
during copying.
If you have Another document
If you have another document, select the [Next Original] on the touch screen while the
current document is being scanned.You can copy multiple documents together.
2 Select [Next Original] while scanning is in progress.
Note • When using the document feeder, load the next document after the machine has finished
scanning the first document.
• When the above screen is displayed and no operation is performed during a certain period
of time, the machine automatically assumes that there are no more documents and performs
an automatic reset.
<Start> button
3 Load the next document.
4 Press the <Start> button.
If you have more documents, repeat the procedure 3 and 4.
5 When all documents have been scanned, select [Last Original].
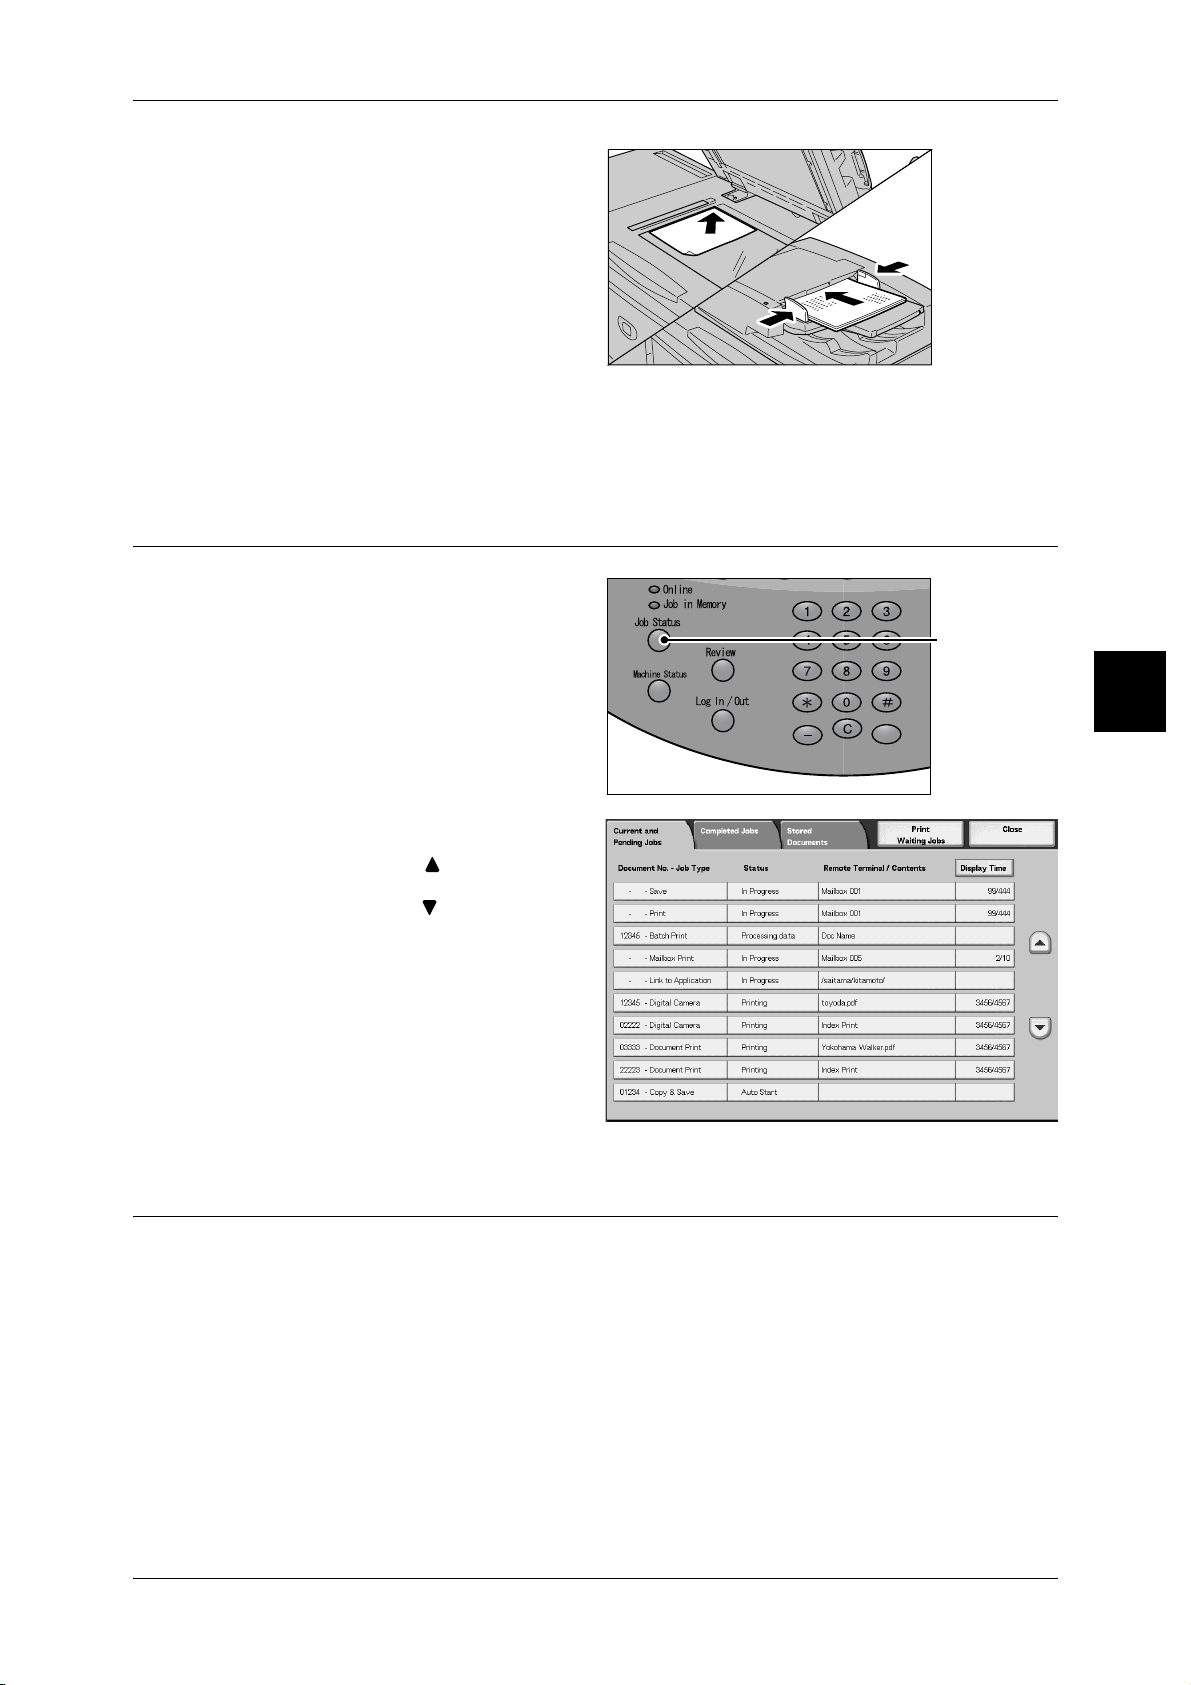
Step5 Confirming the Copy Job in the Job Status
Press the <Job Status> button.
1
<Job Status> button
28
Page 31

2 Confirm the job status.
Note • Select [ ] to display the
previous screen and select
[ ] to display the next screen.
Stopping the Copy Job
To cancel copying, follow the procedure below.
1 Select [Stop] on the touch screen
or press the <Stop> button on the
Control Panel.
Copying Procedure
Basic Operation
2 Select [Stop].
Note • You can also stop the copy job by pressing the <C> button or the <Clear All> button.
3 If the screen of step 1 does not
appear, press the <Job Status>
button.
4 Select the job to cancel, and then
select [Stop].
3
<Stop> button
<Job Status> button
29
Page 32

Basic Operation
3
3 Basic Operation
Saving Scanned Documents
Save scanned documents as a data to the mailbox on the machine.
To use mailbox, select [Copy & Save] or [Save Only].
Note • The maximum pages stored in the machine is about 35,000 pages for the A4 portrait. This
figure could be used only as a guide, since the maximum scanned pages depend on the
types, sizes, and direction of the document.
• Up to 100 copied and printed documents can be stored altogether.
Refer to "Printing Copy & Print Jobs Document Procedure" (P.39) for details about check mailbox.
1 On the [All Services] screen, select
[Copy].
2 Select the feature to be configured
from respective tabs as necessary.
3 Select [Copy & Save] or [Save
Only].
The mailbox must be registered
beforehand. For information about
registering mailboxes, refer to
"Registering Mailboxes" (P.41).
4 Specify the box to save data.
Note • If a password is set for the
box, the password entry
screen appears.Enter the
password and select
[Confirm]. If you have
forgotten the password,
reconfigure the box password
in System Administration
mode.
5 Press the <Start> button.
Box
This box saves data. Select [ ] to display the previous screen and select [ ] to display
the next screen. Also, select [ ] to display the head screen and select [ ] to display
the last screen.
Document name.
Set the document name for saving.
Using the displayed keyboard and the numeric keypad, you can enter up to 28
characters.
30
Go to
Use the numeric keypad to enter a 3 digit mailbox number. That mailbox then appears
at the top of the list.
Page 33

No. of Documents
When a mailbox is selected, and it contains documents, the number of stored
documents is displayed.
Document List
Select a box and press this button to check or delete documents stored within.
Document List
Check or delete documents stored within a mailbox.
1 Select [Document List].
Saving Scanned Documents
2 Select the document to confirm or
delete.If the scanned data is not
displayed, select [Refresh].
• Select [ ] to display the
previous screen and select
[ ] to display the next screen.
• Select [ ] to display the head
screen and select [ ] to
display the last screen.
• You can sort documents in
ascending or descending
order by pressing either
[Document Name] or [Stored
Date].
No. of Documents
When a mailbox is selected, and it contains documents, the number of stored
documents is displayed.
Select All
Select when selecting all documents stored in the mailbox.
Delete
Used to delete selected documents.
Basic Operation
3
Document Details
Used to check the content of a selected document. Select only one document when
using this feature.
31
Page 34

3 Basic Operation
Printing
1 Select [Print] from the application’s [File] menu.
2 Confirm the [Printer Name] and click [Properties] if necessary.
3 Configure the properties if
Describes print procedures.
Print procedures vary depending on the application software you are using.For more information, refer
to the documentation provided with each application.
necessary.
Basic Operation
3
4 Click [OK].
5 Click [OK] in the [Print] dialog box.
32
Page 35

Scanning Procedure
This section describes basic scan operations.The following shows the scan flow and
reference sections.
Step1 Loading Documents .........................................................................................................33
Step2 Selecting Features ............................................................................................................ 35
Step3 Starting the Scan Job........................................................................................................ 36
Step4 Confirming the Scan Job in the Job Status....................................................................... 37
Step5 Saving the Scanned Data.................................................................................................. 37
Scanning Procedure
Step1 Loading Documents
There are two methods for loading documents:
Document feeder
z
Single sheet
z
Multiple sheets
Document Glass
z
Single sheet
z
Bound documents, such as books
Document feeder
The document feeder supports single sheet and multiple sheet documents, with sizes
ranging from 140 × 210mm (A5, A5 , 5.5 × 8.5 inches, 5.5 × 8.5 inches ) to a
maximum of 297 × 432mm (A3, 11 × 17 inches).
The document feeder can auto-detect only documents of standard sizes.For
documents that of not of a standard size, input the size in the [Scan Size] field.
The document feeder accept the following number of sheets.
Document Type (weight)
Basic Operation
3
Number of
Sheets
Lightweight paper (38-49g/m2) 250 sheets
Plain paper (50-81g/m
Heavyweight paper (81-128g/m
Heavyweight paper (129-200g/m
Important • Place folded or creased documents on the document glass because they may cause paper
jams.
2
) 250 sheets
2
) 150 sheets
2
) 100 sheets
33
Page 36

3 Basic Operation
Caution
1 Remove any paper clips and
staples before loading documents.
2 Adjust the movable document
guides to just touch the edge of the
document.
Note • When loading a large
document, such as A3, open
the document stopper
rightward.
3 Set the document facing up (side 1
for 2 sided document) in the
document feerder.
Basic Operation
Note • The <Confirmation> indicator
lights up when the document
is loaded correctly.
When placing the document in the
DADF, you can set timing for lifting
up the document feeder tray.
3
Document Glass
The document glass accepts single-sheet or book form documents of sizes up to 297
× 432mm (A3, 11 × 17 inches).
The document glass can auto-detect only documents of standard sizes. For documents
that of not of a standard size, input the size in the [Scan Size] field.
Do not apply excessive force to hold thick document on the platen glass. It may break
the glass and cause injuries.
1 Open the document cover.
2 Place the document face down,
and align it against the inside left
corner of the document glass.
3 Close the document cover.
34
Page 37

Step2 Selecting Features
You can select features from the [Basic Scanning] tab.
From the [Menu] tab, you can select from 4 scan modes:E-mail, Scan to Mailbox, Job
Template, and Scan to FTP/SMB.
E-mail
Scans a document and sends the scanned data as an e-mail attachment.
Scan to Mailbox
Scans a document and saves the scanned data to the machine’s mailbox.
Create a Mailbox in advance. For information about Mailbox creation, refer to "Registering Mailboxes"
(P.41).
Job Template
Scans a document after specifying the file (job template) set with scanning conditions,
information about the transfer destination server and other information.
Scan to FTP/SMB
Scans a document and sends the scanned data to a network computer via the FTP or
SMB protocols.
Scanning Procedure
Basic Operation
3
Note • Features displayed may vary depending on the model you are using.
• When using the Auditron mode, a UserID and password might be required. Ask the machine
administrator for the UserID and password.
• The machine’s network settings must be configured in order to use the scan features. For
information about network settings, refer to the Network Administrator Guide.
The following is an explanation of how to use the Scan to Mailbox feature.
1 Press the <All Services> button.
2 Select [Scan to Mailbox].
<All Services> button
35
Page 38

3 Basic Operation
3 If the previous settings still remain,
press the <Clear All> button.
<Reset> button
4 Specify the mailbox to save to.
5 If appropriate, select features to
Basic Operation
configure from each tab.
Note • The screen at right is from
DocuCentre 9000.
3
Step3 Starting the Scan Job
Press the <Start> button.
1
Important • If a document has been set in
the document feeder, do not
press the document while it is
being conveyed.
Note • If a problem occurs, an error
message appears in the
display.Remedy this by
following the message on the
display.
• The following job configurations can be performed while scanning.
If you have more documents
If you have more than one stack of documents to scan, select the [Next Original] button
on the touch screen while the current stack of documents is being scanned. This allows
you to scan several documents as one set of data.
Up to 999 pages can be stored.
Note • If the number of document pages exceeds this maximum, then scanning stops. Follow the
displayed message, and either abort the operation, or save the scanned document data.
2 While documents are being scanned, select [Next Original].
Note • When using the 2 sided document feeder, the machine waits for the next sets of documents
after it has finished scanning the first set.
• When the above screen is displayed and no operation is performed during a certain period
of time, the machine automatically assumes that there are no more documents.
<Start> button
36
Page 39
3 Load the next document.
4 Press the <Start> button.
If you have more documents, repeat the procedure 3 to 4.
5 When all documents have been scanned, select [Last Original].
Step4 Confirming the Scan Job in the Job Status
Press the <Job Status> button.
1
Scanning Procedure
Basic Operation
<Job Status> button
2 Check job status.
Note • Select [ ] button to display
the previous screen and
select [ ] button to display
the next screen.
Step5 Saving the Scanned Data
When scanning to mailbox, you import the document that is stored on the machine's
mailbox into your computer. Importing can be done in the following ways:
3
Import from an Application
Network scan driver is used.
Import using Mailbox Viewer 2.
Fuji Xerox’s application software, Mailbox Viewer 2 is used.
Import using CentreWare Internet Services
CentreWare Internet Services is used.
37
Page 40

3 Basic Operation
Importing Using WebDAV
WebDAV is used.
Stopping the Scan Job
Follow the procedure below to cancel a scan.
1 Press either [Stop] on the touch
screen or the <Stop> button on the
Control Panel.
Basic Operation
3
2 Select [Stop].
Note • You can also stop the scan job by pressing the <C> button or the <Clear All> button.
3 If the screen in procedure 1 does
not appear, press the <Job Status>
button.
4 Select the job to cancel, and then
select [Stop].
Note • When a scan is cancelled,
scan data already stored to
the mailbox is deleted.
<Stop> button
<Job Status> button
38
Page 41

Printing Copy & Print Jobs Document Procedure
Printing Copy & Print Jobs Document Procedure
Print Copy Documents procedure steps and their references are listed below.
Step1 Opening the [Check Mailbox] Screen.............................................................................. 39
Step2 Selecting Box Type.......................................................................................................... 40
Step3 Selecting a Box ................................................................................................................ 40
Step4 Printing Documents.......................................................................................................... 40
Box has to be registered beforehand. For how to register it, refer to "Registering Mailboxes"(P.41).
Step1 Opening the [Check Mailbox] Screen
Follow the procedure below to open the [Check Mailbox] screen.
Note • Features displayed may vary according to the machine’s configuration.
1 Press the <All Services> button.
Basic Operation
<All Services> button
2 Select [Check Mailbox].
3
39
Page 42

3 Basic Operation
Step2 Selecting Box Type
Select [Copy & Print Jobs].
1
Basic Operation
Step3 Selecting a Box
Access to the selected box may be restricted, depending on authorization settings.
1 Select a Box.
3
Step4 Printing Documents
Select a Copy & Print Jobs
1
document to be printed and select
[Change Settings/Print].
Note • Up to 100 copied, printed and
scanned documents can be
stored altogether.
2 Select any item.
3 Select [Print].
40
Page 43

Registering Mailboxes
Register mailboxes to store copied and scanned documents. Up to 500 mailboxes can
be registered.
It is convenient to make separate mailboxes, for example for copied documents and for
scanned documents, according to the purpose.
You can decide which mailbox to use according to your purpose as each mailbox can
be used for copied documents or scanned documents.
1 Press the <All Services> button.
2 Select [Setup Menu].
Registering Mailboxes
<All Services> button
Basic Operation
3 Select [Mailbox].
4 Select the Box to be registered,
and select [Create/Delete].
Note • Select [ ] to display the
previous screen and select
[ ] to display the next screen.
• By entering a three-digit
number with the numeric
keypad, you can specify the
Mailbox directly
3
41
Page 44
3 Basic Operation
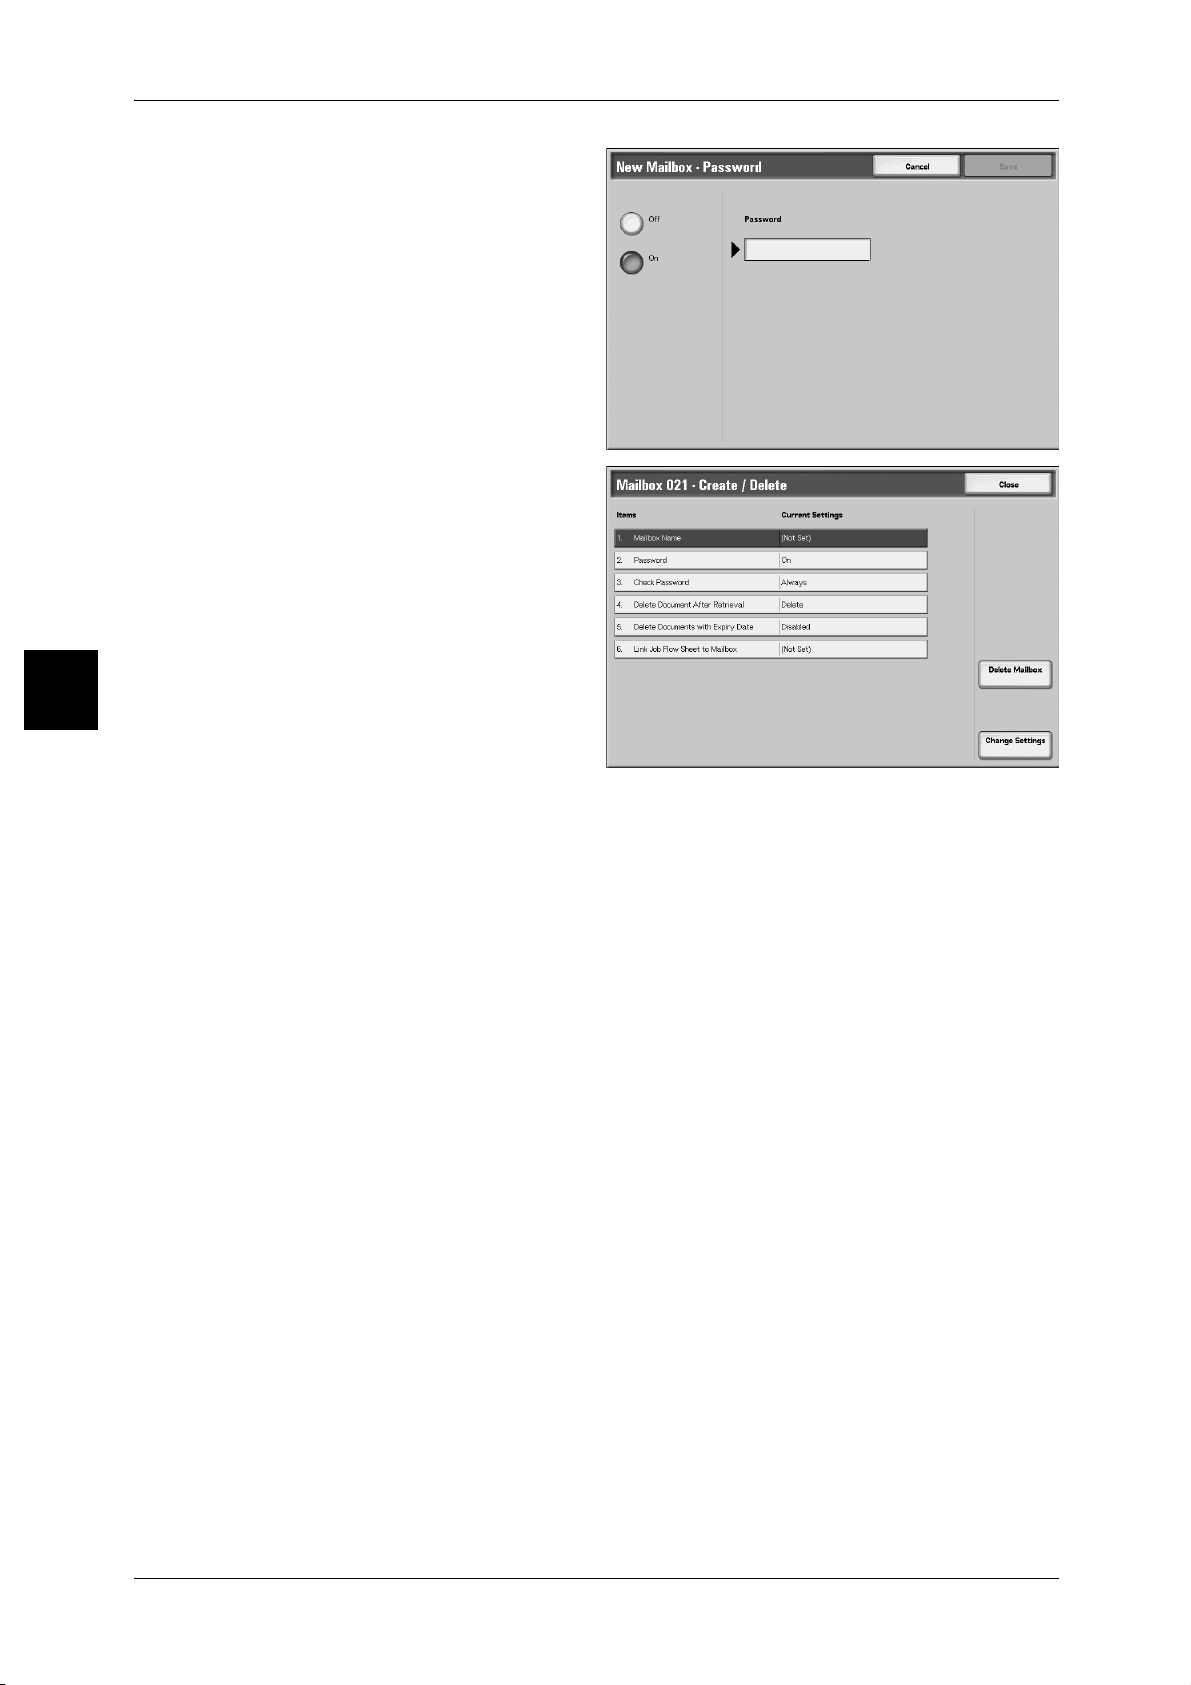
5 When creating a new Mailbox, a
password setting screen appears.
z
1) Select [Off], and select [Save].
z
1) Select [On], and enter the
2) Select [Save].
If not setting a password
When setting a password
password.
Basic Operation
3
6 Select the item to be set, and
select [Change Settings].
7 Select the setting value.
8 Select [Save].
42
Page 45

System Settings Procedure
To make or change the system settings, it is necessary to be in System Administration
mode.
This section describes the basic procedure for system settings.
1 Press the <Log In / Out> button.
System Settings Procedure
2 Enter the system administrator ID
with the numeric keypad or a
keyboard displayed by pressing
[Keyboard], and select [Confirm].
Note • The default UserID value is
"11111". When using the
Authentication feature, a
password is required. The
default password value is "xadmin".
3 Select [System Settings].
< Log In / Out >
button
Basic Operation
3
User Mode
While still in System Administration mode, you can still carry out normal operations
such as copying and scanning.
Note • To exit a mode entered from [User Mode], use the following procedure.
(1) Press the <Log In/Out> button.
(2) In the [Log In] screen, select [Cancel].
System Settings
You can set or register the system settings.
43
Page 46

3 Basic Operation
4 Select the item to be set.
Basic Operation
3
5 Set any features.
6 After settings the feature, select [Save].
7 When the settings are completed,
select [Close] until the [System
Settings] screen appears.
8 Select [Exit].
44
Page 47

4 Paper and Other Media
Describes the types of paper that can be used on the machine, precautions
when handling paper, and how to load paper in trays
z
Paper Type ................................................................................................. 46
z
Loading Paper ............................................................................................49
z
Changing the Size of Paper in Trays .......................................................... 55
Page 48

Paper and Other Media
Warning
4 Paper and Other Media
Paper Type
This section describes the kinds of paper available for this device.
Use of inappropriate paper may result in paper jams, cause reduced print quality,
malfunctions and other trouble. To make full and effect use of the machine's
performance, we recommend using only paper recommended by Fuji Xerox.
If you want to use paper not recommended by Fuji Xerox, contact our Customer
Support Center.
Do not use conductive paper such as carbonic paper or coated paper. When paper
jam occurs, it may cause short-circuit and eventually a fire accident.
Important • The printed image may fade due to moisture such as water, rain or vapor. For more
information, contact our Customer Support Center.
Paper Size
4
PaperTray Weight
Papertray1‑2 A4
Papertray3‑4 A5,A4,A4 ,A3,SRA3,B5,B5 ,B4
Tray5(Bypass) A6,A5,A4,A4 ,A3,SRA3,B6,B5,B5 ,B4
Papertray6‑7 A4 ,B5
Papertray8
(Interposer)
Weights of Usable Paper
PaperTray Weight Loadablequantity
8.5 × 11",8.5× 11" ,8.5× 13",8.5 × 14",11 × 17",12.6×
19.2",16K,tab paper(A4 )
Non-standard Sizes: Width140to330mm,Length182to488mm
8.5 × 11", 8.5 × 11" ,8.5 × 13",8.5 × 14",11 × 17",12 ×
18",13 × 19"
Postcard,Envelope,tab paper(A4 ), tab paper(8.5 × 11" )
Non-standard Sizes: Width100to330mm,Length148to488mm
A4,A4 ,A3,B5,B5 ,B4
7.25 × 10.5" ,8.5 × 11" ,8.5 × 13",11 × 17",8K,16K,tab
paper(A4 ), tab paper(8.5 × 11" )
46
Papertray1 52‑216g/m2/Reamweight:45‑186kg 1,200(FXPpape)
2
Papertray2 52‑216g/m
Papertray3‑4 52‑216g/m
Tray5(Bypass) 52‑253g/m
Papertray6 52‑216g/m
Papertray7 52‑216g/m
/Reamweight:45‑186kg 1,800(FXPpaper)
2
/Reamweight:45‑186kg 600(FXPpaper)
2
/Reamweight:45‑217kg Upto27mm280(FXP
paper)
2
/Reamweight:45‑186kg 2,300(FXPpaper)
2
/Reamweight:45‑186kg 2,300(FXPpaper)
Page 49

Paper Type
PaperTray Weight Loadablequantity
Paper type
Standard
Usable paper
Papertray8
(Interposer)
Note • GSM is a measure of the substance of paper expressed in grams per square.
• Ream weight is the weight of a 788
60‑220g/m2/Reamweight:52‑172kg 200(FXPpaper)
× 1,091 mm ream consisting of 1,000 sheets.
Recommended paper
Paper GSM
FX P Paper 64g/m
FXK-X 75g/m
Business 80g/m
2
2
2
Paper stock that can be used
GSM
Paper
(Unit : g/m
2
) and
Paper type
Paper and Other Media
4
Special Media
Copy or print can be made on the following paper by using tray 5 (bypass). These
papers are called Special Media. The types of the special media that can be used are
as follows.
Note • For more information about other heavyweight or special media, contact our Customer
Green Wrap recycled 80 : Plain paper
Performer 80 : Plain paper
H 75 : Plain paper
Paper Paper Type
Labells 3R97408 Label
Tabs Index
Label 3R96296 Label
TransparencyType C(OHP) OHP
Support Center.
47
Page 50

Paper and Other Media
4 Paper and Other Media
Storing and Handling Paper
Please Keep the Following Points in Mind When Storing Paper
z
Store paper inside a cabinet or other dry place. Paper that has absorbed moisture
can cause paper jams and image quality defects.
z
After opening a package of paper, wrap up the remaining paper to store it. It is
recommended that you include moisture prevention packets.
z
Paper should be stored flat, to prevent bends or warping.
Please Adhere to the Following When Setting Paper into the Tray
z
Align the stack of paper neatly before setting it in the tray.
z
Do not use paper that is folded, creased, or heavily warped.
z
Do not use waved or curled paper.
z
Do not load paper of mixed size together into the tray.
z
Transparency paper and label paper can cause paper jams, and multiple sheets can
be fed to the printer at once. Be sure to carefully fan these types of paper.
z
When continuously outputting onto transparencies, transparency sheets sometimes
will stick to each other. Remove transparencies from the output tray every 20 or so
sheets, and fan them to cool them down.
4
48
Page 51

Loading Paper
Warning
This section describes how to load paper.
About types of paper loaded in trays
The machine automatically detects the size and orientation of loaded paper in trays.
The paper type, however, must be set.Normally, plain paper is set to each of the trays.
Change the paper type settings if you load other paper types, Paper can also be
named, and set as user-defined paper. Up to five paper types can be set as userdefined paper.
About automatic tray selection
Loading Paper
Automatic tray selection is active if [Auto] is selected for [Paper Select]. If the machine
judges that there are two or more corresponding trays in automatic tray selection, the
machine gives higher priority to the tray having the highest [Paper Type Priority] set at
[Tray Paper Type]. During automatic tray selection, trays whose [Paper Type Priority]
setting is set to [Off] are not targeted in [Automatic Tray Selection]. Also, if the [Paper
Priority] setting is exactly the same, automatic tray selection is determined by [Tray
Priority]
Note • Tray 5 (manual feed) cannot be selected in automatic tray selection.
• When the machine runs out of paper during copying or printing, select the tray containing the
paper of the same size and orientation that was being used for copying or printing, and
continue copying or printing (Auto Tray Switch feature). During this operation, a tray
containing paper of type whose [Paper Priority] setting is set to [Off] cannot be switched to.
Loading Paper in Trays 1 to 2
Following describes the procedure for loading paper in trays 1 to 2.
When the machine runs out of paper during copying or printing, a message is displayed
on the control panel display. Add paper according to the displayed instructions.
Copying or printing is automatically resumed when paper is added.
1 Pull out the tray towards you until it
stops.
Paper and Other Media
4
When pulling out the paper tray,
do it slowly. If pulled out with too
much force, the tray can hit and
injure your knees.
2 Load and align the edge of the
paper against the left edge of the
tray with the side to be copied or
printed on facing down.
Important • Do not load paper exceeding
the maximum fill line. Doing so
might cause paper jams or
machine trouble.
MAX
49
Page 52

Paper and Other Media
Warning
4
4 Paper and Other Media
3 Push the tray in gently until it comes to a stop.
Loading Paper in Trays 3 to 4
Following describes the procedure for loading paper in trays 3 to 4.
1 Pull out the tray towards you until it
stops.
When pulling out the paper tray,
do it slowly. If pulled out with too
much force, the tray can hit and
injure your knees.
2 Align the paper stack and load it
with the side to be copied or printed
facing up
Important • Do not load paper exceeding
the maximum fill line.Doing so
might cause paper jams or
machine trouble.
• Do not put paper or anything
on the empty space on the
right side of the trays 3 to 4.
Doing so might cause paper
jams or machine trouble.
• Make sure that the paper guide
is adjusted to the size of the
paper loaded.
3 Push the tray in gently until it comes to a stop.
MAX
50
Page 53

Loading Paper in tray 5 (bypass)
When printing or copying with paper that does not match the sizes or types in trays 1
to 4 and the optional trays 6 to 7, use tray 5 (bypass). Following describes how to load
paper into tray 5 (bypass).
To make detailed instructions during printings, specify the instructions using the [Tray/
Output] tab in the print driver. When doing this, also specify the type of paper to load.
Note • When adding paper to tray 5 (bypass), remove any paper remaining in the tray, add it to the
stack of paper to be added, then load all of the paper into the tray at once.
1 Open tray5 (bypass) as necessary.
Note • If necessary, extend the
extension flap. The extension
flap can be extended in two
stages. When pulling out the
extension flap, do it gently.
2 Hold the center of the paper guides
and slide them to the desired paper
size.
Loading Paper
Paper and Other Media
3 Load paper with the side to be
copied or printed on facing up, and
insert the paper lightly along the
paper guide on the front side of the
machine until it comes to a stop.
Important • Do not load mixed size paper
into the tray.
• Do not load paper exceeding
the maximum fill line. Doing so
might cause paper jams or
machine trouble.
4 When loading a non-standard paper size from tray 5 (bypass), move the paper guides
to accommodate the paper.
5 Select copying or printing.
4
51
Page 54

4 Paper and Other Media
Warning
Loading Paper in Trays 6 to 7
Following describes the procedure for loading paper in the optional trays 6 to 7.
1 Pull out the tray towards you until it
stops.
When pulling out the paper tray,
do it slowly. If pulled out with too
much force, the tray can hit and
injure your knees.
Paper and Other Media
4
Important • While the machine processes
a job, do not pull the tray out
that the job uses.
2 Load and align the edge of the
paper against the right edge of the
tray with the side to be copied or
printed on facing up.
Important • Do not load paper exceeding
the maximum fill line. Doing so
might cause paper jams or
machine trouble.
3 Push the tray in gently until it comes to a stop.
Loading Paper in Interposer
Following describes the procedure for loading paper in interposer.
Interposer is meant for loading paper (blank, copied paper, etc.) to be used as
separators and covers, so it cannot copy.
Note • When adding paper to interposer, remove any paper remaining in the tray, add it to the stack
of paper to be added, then load all of the paper into the interposer at once.
MAX
52
1 Hold the center of the paper guides
and slide them to the desired paper
size.
2 Load the paper, aligning to the front
side of the tray.
Page 55

Loading Tab Paper
Warning
Following describes the procedure for loading a tab paper in trays 3 to 4, tray 5 (bypass)
and the interposer.
Loading tab papers in trays 3 to 4
1 Pull out the tray towards you until it
stops.
When pulling out the paper tray,
do it slowly. If pulled out with too
much force, the tray can hit and
injure your knees.
Important • While the machine processes
a job, do not pull the tray out
that the job uses.
2 Push in both sides of the paper
guide levers, and slide them to their
new positions to accommodate the
size of index paper.
Loading Paper
Paper and Other Media
3 Make sure that the levers are
positioned correctly, and release
them.
4 Load and align the edge of the tab
paper against the right edge of the
tray with the side to be copied or
printed on facing down.
Important • Do not load paper exceeding
the maximum fill line (MAX in
the figure). It may cause paper
jams or machine malfunctions.
• Do not place any paper or
things in the empty space on
the right side of the tray. It may
cause paper jams or machine malfunctions.
Note • When copying or printing on multiple set of tab paper of a set with which tab positions differ,
load each tab paper with the side to be copied or printed on facing down to set the first paper
coming on top.
MAX
5 Move the two paper guide levers
while holding their grips so that they
lightly contact the edges of the
paper.
4
53
Page 56

Paper and Other Media
4 Paper and Other Media
Loading tab paper in tray 5 (bypass)
1 Open tray 5 (bypass).
Note • If necessary, extend the
extension flap.The extension
flap can be extended in two
stages.When pulling out the
extension flap, do it gently.
2 Hold the center of the paper guides
and slide them to the desired paper
size.
4
3 Place the paper with the side to be
copied or printed facing up, align
the tab positions to left, and place
the bottom side to be fed first. Insert
the paper slowly to the end along
the paper guide.
Loading Paper in Tray 8 (Interposer).
1 Hold the center of the paper guides
and slide them to the desired paper
size.
2 If the paper in already printed on,
load the paper with the printed side
facing up and with the tab side to be
fed first.
Important • Do not load paper exceeding
the maximum fill line (MAX in
the figure). It may cause paper
jams or machine malfunctions.
A
A
54
Page 57

Changing the Size of Paper in Trays
Warning
This section describes how to change the paper size for the Trays 3 to 4 and the
optional trays 6 and 7.
Note • If you need to change the paper size for trays 1 and 2, contact our Customer Support
Center.
• The paper quality for Paper Trays is configured.Normally, plain paper is set. When changing
the setting to a different paper quality, change the paper quality settings to match the type of
paper to be loaded to maintain high print quality.
Changing the Size of Paper in Trays 3 to 4
Changing the Size of Paper in Trays
Following describes how to change the paper size on trays 3 to 4.
1 Pull out the tray towards you until it
stops.
When pulling out the paper tray,
do it slowly. If pulled out with too
much force, the tray can hit and
injure your knees.
Important • While the machine processes
a job, do not pull the tray out
that the job uses.
2 Remove any paper if loaded on the tray.
3 Push in both sides of the paper
guide levers, and slide them to their
new positions.
4 heck the position of the paper
guides and then release them.
Paper and Other Media
4
5 Align the paper stack and load it
into the paper tray.
Important • Make sure that the paper guide
is adjusted to the size of the
paper loaded.
6 Push the tray in gently until it comes
to a stop.
Note • Affix the paper size label to the
front of the paper tray.
55
Page 58
Paper and Other Media
Warning
4 Paper and Other Media
Changing the Size of Paper in Trays 6 to 7
Following describes how to change the paper size on trays 6 to 7.
Note • When changing the paper size to non-standard size loaded in trays 6 and 7, contact your
Customer Support Center. If doing so, it never returns to the original setting.
1 Pull out the tray towards you until it
stops.
When pulling out the paper tray,
do it slowly. If pulled out with too
much force, the tray can hit and
injure your knees.
Important • While the machine processes
a job, do not pull the tray out
that the job uses.
2 Remove any paper loaded on the tray.
4
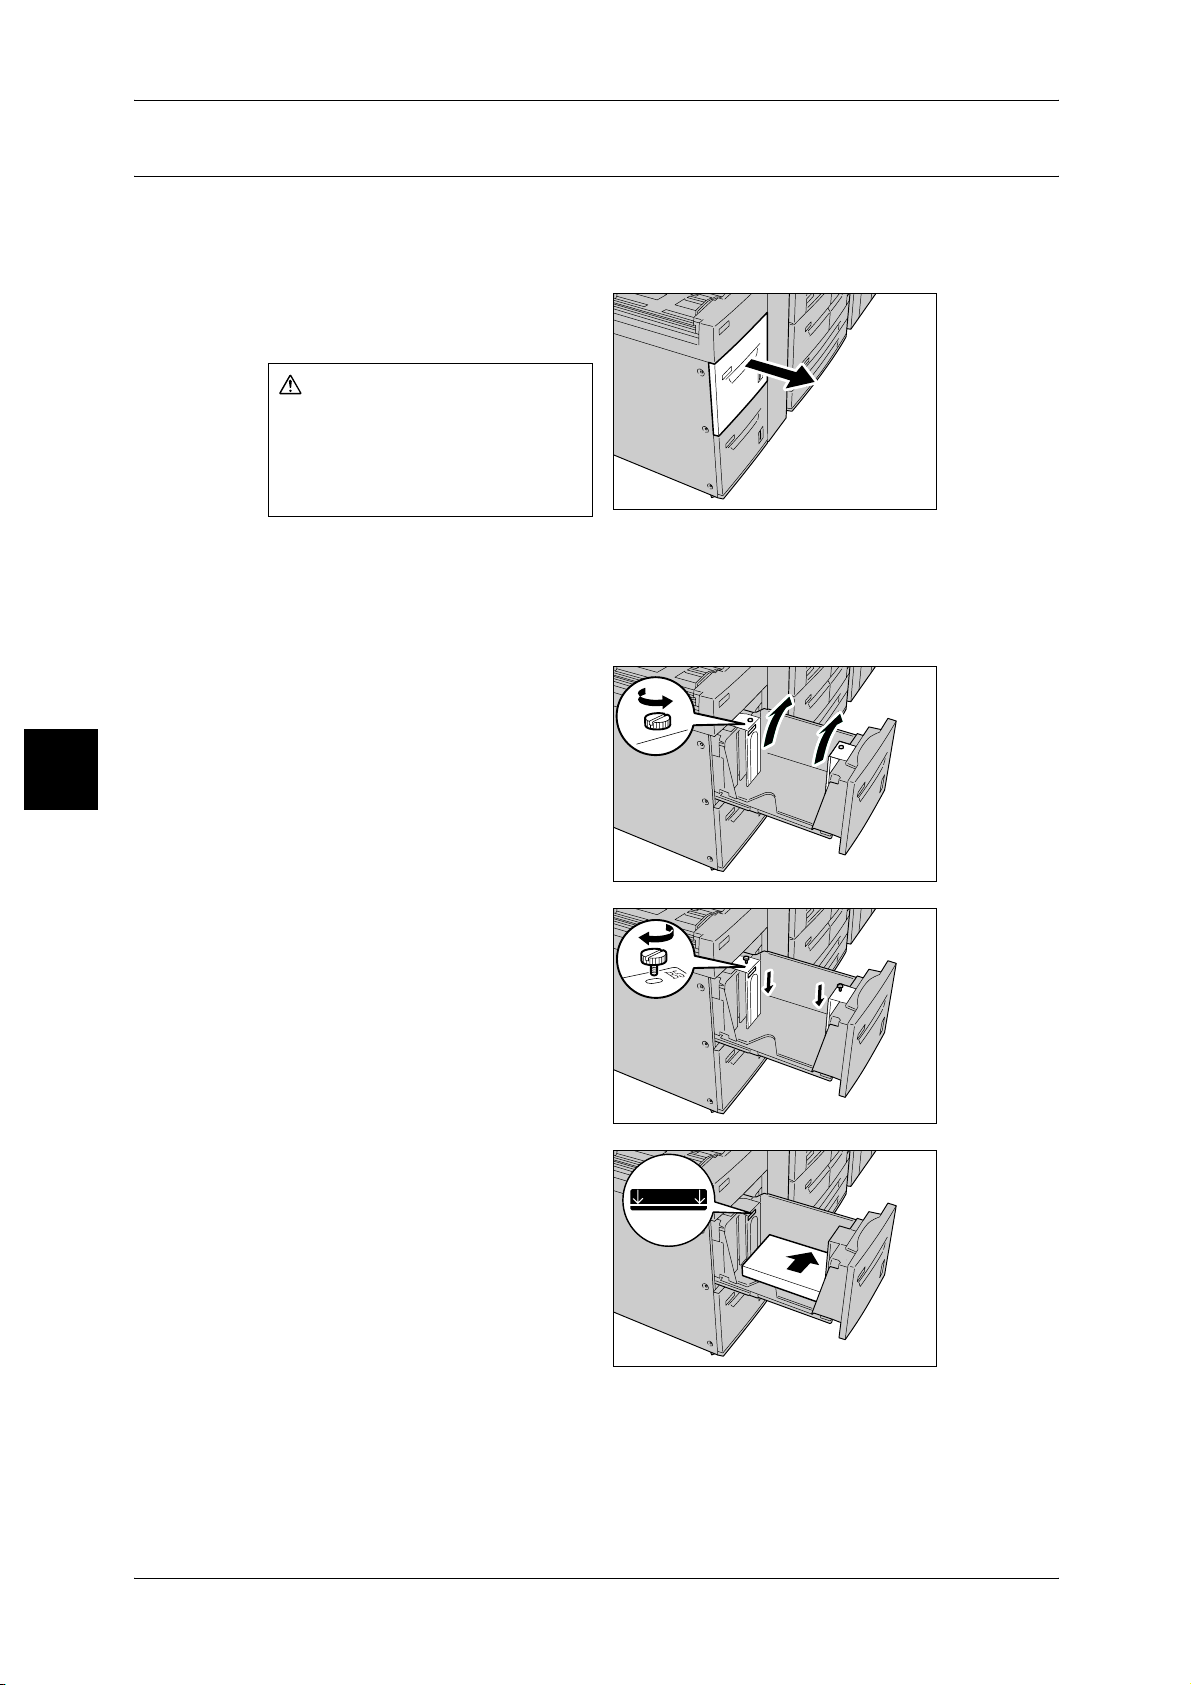
3 Loose the screw on the right to
remove your side and the other side
guide.
4 Attach the guides according to the
hole of the paper size to change,
and tighten the screws.
5 Load and align the edge of the
paper against the right edge of the
tray with the side to be copied or
printed on facing up.
Important • Do not load paper exceeding
the maximum fill line.Doing so
might cause paper jams or
machine trouble.
MAX
6 Push the tray in gently until it comes to a stop.
Note • Affix the paper size label to the front of the paper tray.
56
Page 59

5 Maintenance
This chapter describes how to replace consumables.
z
Replacing Toner Cartridges ........................................................................ 58
z
Replacing the Waste Toner Container........................................................ 61
z
Replacing the Staple Cartridge................................................................... 64
z
Replacing The Staple Scrap Container ...................................................... 66
z
Replacing the Staple Cartridge for Booklet................................................. 68
z
Emptying Punch Scrap Container............................................................... 70
Page 60

5 Maintenance
Warning
Caution
Replacing Toner Cartridges
When it is time to replace a toner, a message appears on the display.
If you continue copying or printing without replacing the waste toner container, a
message appears and the machine stops after copying or printing about 5,000 pages.
Moreover, even if the machine is operating, toner replacement is possible.
Note • The page yield after each message is displayed is for when A4 paper LEF is used. The
value is an estimate and varies depending on the conditions such as the print content, dot
coverage (area coverage), paper size, paper type, copy density, input image type, and the
machine usage environment.
z
Use a broom or a wet cloth to wipe off spilled toner. Never use a vacuum cleaner
for the spills. It may catch fire by electric sparks inside the vacuum cleaner and
cause explosion. If you spill a large volume of toner, contact your local Fuji Xerox
representative.
z
Never throw a toner cartridge into an open flame. Remaining toner in the cartridge
may catch fire and cause burn injuries or explosion. If you have a used toner
Maintenance
cartridge no longer needed, contact your local Fuji Xerox representative for its
disposal.
5
z
Keep the toner cartridge out of the reach of children. If a child accidentally
swallows toner, spit it out, rinse mouth with water, drink water and consult a
physician immediately.
z
When replacing the toner cartridge, be careful not to spill the toner. In case of any
toner spills, avoid contact with clothes, skin, eyes and mouth as well as inhalation.
z
If toner spills onto your skin or clothing, wash it off with soap and water.
z
If you get toner particles in your eyes, wash it out with plenty of water for at least 15
minutes until irritation is gone. Consult a physician if necessary.
z
If you inhale toner particles, move to a fresh air location and rinse your mouth with water.
z
If you swallow toner, spit it out, rinse your mouth with water, drink plenty of water and
consult a physician immediately.
Important • When replacing toner cartridges, toner may spill and dirty the floor. We recommend laying
paper on the floor beforehand.
• The use of toner cartridges not recommended by Xerox may impair quality and
performance. Use only toner cartridges recommended by Xerox for the machine.
• When only a small amount of toner remains in a toner cartridge, the machine may stop
during printing and display a message.
• Replace toner cartridges while the machine is on.
• If a partially used toner cartridge is used, the number of pages that you can copy or print
after the "Please order a new xxx" message appears may differ considerably.
58
Page 61

1 Make sure that the machine has
Warning
stopped, and open the toner cover.
2 Turn the toner cartridge to the left
until it aligns with the unlock sign.
3 Remove the toner cartridge by
holding the bottom of the cartridge
while gently pulling out it.
Replacing Toner Cartridges
Maintenance
Never throw a toner cartridge into
an open flame. Remaining toner
in the cartridge may catch fire
and cause burn injuries or
explosion.
If you have a used toner cartridge
no longer needed, contact your
local Fuji Xerox representative
for its disposal.
Important • Pull out the toner cartridge gently. Otherwise, toner may fly out of the cartridge.
• Proper disposal of unwanted toner cartridges is required. Toner cartridge containers should
not be opened with force and must be returned to our Customer Support Center.
4 Remove the new cartridge from the
box and shake the toner cartridge
to the left and right before removing
it from the bag.
5
59
Page 62
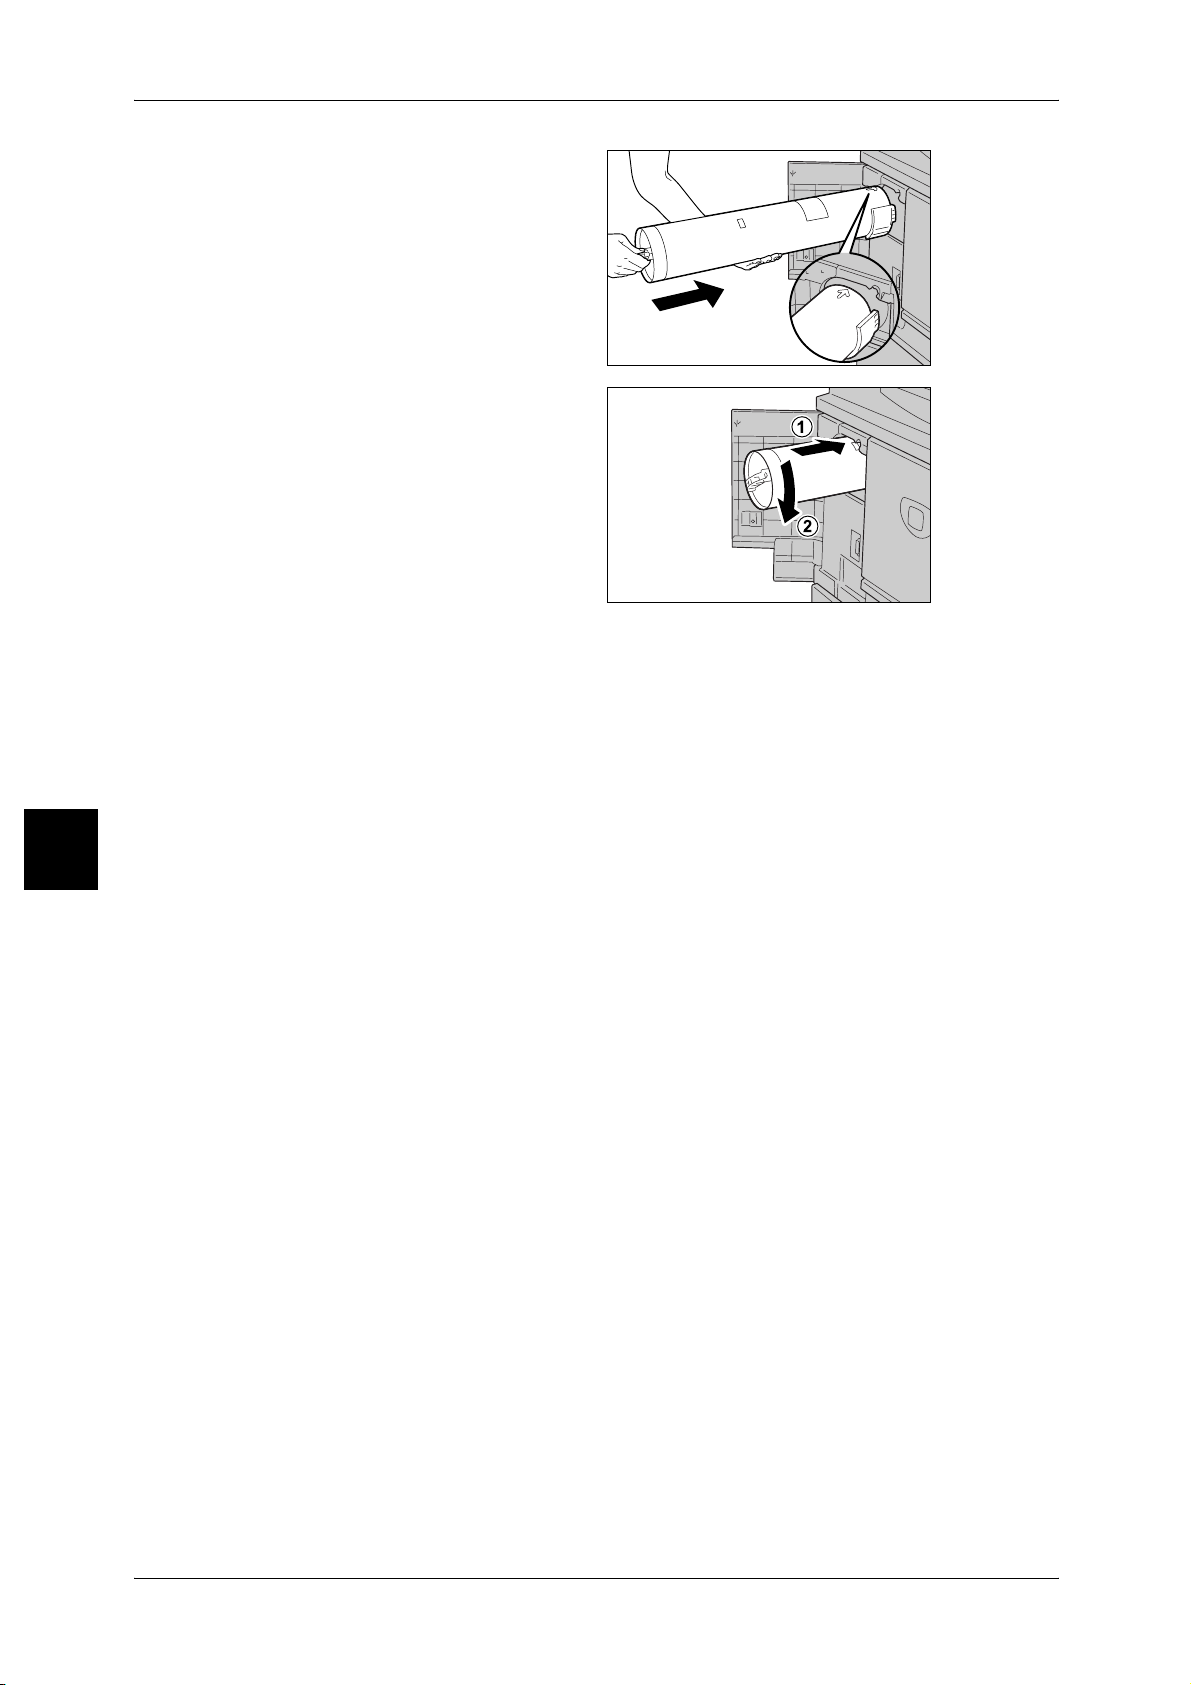
5 Maintenance
5 Hold the toner cartridge with the
arrow mark facing up
6 Push the toner cartridge slowly to
the end and turn the right until it
aligns with the lock sign.
7 Close the left cover of the body.
Maintenance
5
60
Page 63

Replacing the Waste Toner Container
Warning
Caution
When the waste toner container is full, a message appears on the display.
If you continue copying or printing without replacing the waste toner container, a
message appears and the machine stops after copying or printing about 18,000
pages..
z
Use a broom or a wet cloth to wipe off spilled toner. Never use a vacuum cleaner
for the spills. It may catch fire by electric sparks inside the vacuum cleaner and
cause explosion. If you spill a large volume of toner, contact your local Fuji Xerox
representative.
z
Never throw a waste toner container into an open flame. Remaining toner in the
waste toner container may catch fire and cause burn injuries or explosion. If you
have a used waste toner container no longer needed, contact your local Fuji Xerox
representative for its disposal.
Replacing the Waste Toner Container
z
Keep the waste toner container out of the reach of children. If a child accidentally
swallows toner, spit it out, rinse mouth with water, drink water and consult a
physician immediately.
z
When replacing the waste toner container, be careful not to spill the toner. In case
of any toner spills, avoid contact with clothes, skin, eyes and mouth as well as
inhalation.
z
If toner spills onto your skin or clothing, wash it off with soap and water.
z
If you get toner particles in your eyes, wash it out with plenty of water for at least 15
minutes until irritation is gone. Consult a physician if necessary.
z
If you inhale toner particles, move to a fresh air location and rinse your mouth with water.
z
If you swallow toner, spit it out, rinse your mouth with water, drink plenty of water and
consult a physician immediately.
Important • When replacing the waste toner container, toner may spill and dirty the floor. We
recommend laying paper on the floor beforehand.
• The use of waste toner containers not recommended by Xerox may impair quality and
performance. Use only waste toner containers recommended by Xerox for the machine.
• Replace the waste toner container while the machine is on.
Note • The number of pages is for when A4 ( ) paper is used.
• The number of pages that you can copy or print is only an estimate and varies depending on
conditions such as the content, paper size, paper type, and the computer environment.
Maintenance
5
1 Make sure that the machine has
stopped before opening the front
cover.
61
Page 64

5 Maintenance
Warning
2 Open the waste toner container
cover and then push the lever.
3 Grip the handle of the waste toner
bottle and pull out about half of it.
4 Hold the center part on the top of
Maintenance
the bottle (as shown in the
diagram), and then use both hands
to remove the bottle.
5
5 Hold the used waste toner
container firmly with both hands
and put it into the provided plastic
bag.
Never throw a waste toner
container into an open flame.
Remaining toner in the waste
toner container may catch fire
and cause burn injuries or
explosion.
If you have a used waste toner
container no longer needed,
contact your local Fuji Xerox
representative for its disposal.
Important • Proper disposal of unwanted toner container is required. Toner cartridge containers should
not be opened with force and must be returned to our Customer Support Center.
• Place the used bottle into the special bag and then close it firmly using ring rubber provided
with the bag. If the zipper is left open, the toner may leak out during disposal.
62
Page 65

Replacing the Waste Toner Container
6 Hold the center part on the top of
the bottle and insert it as far as
possible.
Important • When inserting the waste
toner container, do not hold
the grip.
7 Close the waste toner bottle cover.
8 Close the front cover.
Note • A message will be displayed and the machine will not operate if the front cover is even
slightly open.
Maintenance
5
63
Page 66

5 Maintenance
Replacing the Staple Cartridge
When it is time to replace a staple cartridge, a message appears on the display. When
this message appears, replace the staple cartridge with a new one.
Important • The use of staple cartridges not recommended by Xerox may impair quality and
performance. Use only staple cartridges recommended by Xerox for the machine.
• The shape of the staple cartridge is different in Finisher D and Finisher D2. Use the staple
cartridge that suits each Finisher. The following describes the procedure of replacing the
staple cartridge for Finisher D2.
Note • To order a staple cartridge, contact our Customer Support Center.
1 Make sure that the machine has
stopped, and then open the right
cover on the light finisher.
Maintenance
5
2 Hold the R1 at the position shown
in the diagram.
3 Pull out the unit.
4 Hold the positions indicated by an
arrow to remove the staple
cartridge from the unit.
64
Page 67

5 Push a new staple cartridge into
the unit.
6 Push the removed unit back to the
original position.
Replacing the Staple Cartridge
7 Close the Finisher right cover.
Note • A message will be displayed and the machine will not operate if the Staple Finisher's right
cover is even slightly open.
Maintenance
5
65
Page 68

5 Maintenance
Replacing The Staple Scrap Container
A message is displayed when the staple scrap container is full. Follow the displayed
instruction and replace the staple scrap container.
Important • Replace the staple scrap container while the machine is on.
Note • A Staple Scrap Container is included in a Staple Cartridge
1 Make sure that the machine has
stopped, and then open the right
cover on the light finisher.
2 Slide the lever shown in the
diagram to the left until it aligns
Maintenance
with the unlock sign.
for 100 sheets XF.
5
3 Remove the staple scrap container
by holding the R5 firmly.
4 Put the used staple scrap container
into the provided plastic bag.
Important • Proper disposal of unwanted
staple scrap container is
required. Staple scrap
container should not be
opened with force and must
be returned to our Customer
Support Center.
66
Page 69

5 Push the staple scrap container
from its bottom by holding the R5.
Important • Never put your fingers onto
the top end surface of the
staple scrap container when
pushing it.
6 Push the R5 until the lever aligns
with the lock sign.
Replacing The Staple Scrap Container
7 Close the Finisher right cover.
Note • A message will be displayed and the machine will not operate if the Staple Finisher's right
cover is even slightly open.
Maintenance
5
67
Page 70

5 Maintenance
Replacing the Staple Cartridge for Booklet
When a Finisher is installed and it is time to replace the staple cartridge for booklet, a
message appears on the display. When this message appears, replace the staple
cartridge with a new one.
Important • The use of staple cartridges not recommended by Xerox may impair quality and
performance. Use only staple cartridges recommended by Xerox for the machine.
Note • To order a staple cartridge, contact our Customer Support Center.
1 Make sure that the machine has
stopped, and then open the right
cover on the light finisher.
Maintenance
5
2 Pressing the lever to the right, pull
out the cartridge.
3 Holding the tabs of the booklet
staple cartridge, and then lift to
remove it.
4 Holding the tabs of a new booklet
staple cartridge, return the
cartridge to the original position
and gently push it until it clicks.
R3
R2
68
Page 71

Replacing the Staple Cartridge for Booklet
5 Return the unit to its original
position.
6 Close the Finisher right cover.
Note • A message will be displayed and the machine will not operate if the Staple Finisher's right
cover is even slightly open.
Maintenance
5
69
Page 72

5 Maintenance
Emptying Punch Scrap Container
The message will be displayed, when it is time to empty the punch scrap container.
Discard the scraps according to the message.
When pulling the punch scrap container out to dispose the punch scraps, ensure that
all scraps are discarded. If there are scraps remaining, the container may be full before
the next message is displayed, and this may cause machine breakdown.
Important • Remove the container while the power is on. If you switch off the power when emptying the
scrap container, the machine will not be able to detect that the scraps have been disposed.
1 Make sure that the machine has
stopped, and then open the right
cover on the light finisher.
Maintenance
5
2 Pull out the punch scrap container
R4.
3 Discard all the scraps.
4 Insert the empty punch scrap
container as far as possible.
70
5 Close the Finisher right cover.
Note • A message will be displayed and the machine will not operate if the Staple Finisher's right
cover is even slightly open.
Page 73

6 Problem Solving
This section describes troubles that may occur with the machine and their
solutions.
z
Fault Clearance Procedure .........................................................................72
z
Image Quality Problems .............................................................................73
z
Paper Jams.................................................................................................74
z
Document Jams .......................................................................................... 98
z
Stapler Faults............................................................................................101
z
Solving Curled Output............................................................................... 104
Page 74

6 Problem Solving
Fault Clearance Procedure
If a fault or problem occurs, there are several ways in which you can identify the type
of fault. Once a fault or problem is identified, establish the probable cause, and then
apply the appropriate solution.
z
If a fault occurs, first refer to the screen messages and animated graphics and clear
the fault in the order specified.
z
If the problem is not solved by following the screen messages and graphics, contact
the System Administrator for assistance.
z
Alternatively, contact the System Administrator for assistance.
z
In some cases, it may be necessary to switch the machine off and then on. "Power
On / Off" (P.14)
Problem Solving
6
72
Page 75

Image Quality Problems
Various situations can affect the quality of the output. Check the following conditions to
ensure optimum copy performance. If you still cannot resolve the problem, contact the
System Administrator.
z
Do not locate the machine in direct sunlight or near a radiator.
z
Follow regular maintenance schedules for cleaning areas, such as the document
glass and output trays.
Image Quality Problems
Problem Solving
6
73
Page 76

Problem Solving
Warning
6
6 Problem Solving
Paper Jams
When paper jams inside the machine, the machine stops and an alarm sounds. A
message also is displayed on the display. Follow the instructions displayed and remove
the jammed paper.
Gently remove the paper taking care not to tear it. If paper is torn while it is being
removed from the machine, remove all torn pieces making sure that none remain inside
the machine.
If a paper jam message is displayed again after you have remedied the paper jam,
paper is probably jammed at another location. Remedy this by following the message
on the display.
When you have finished remedying a paper jam, printing is automatically resumed from
the state before the paper jam occurred.
If a paper jam occurred during copying, press the <Start> button. Copying is resumed
from the state before the paper jam occurred.
Do not attempt to remove a paper jammed deeply inside the product, particularly a
paper wrapped around a fuser or a heat roller. Otherwise, it may cause injuries or
burns. Switch off the product promptly and contact your local Fuji Xerox
representative.
This section describes how to remedy paper jams that occur at the following locations:
The references are described below.
Paper Jams in Trays 1 to 4..........................................................................................................75
Paper Jams in Transport Unit 4...................................................................................................75
Paper Jams in Duplex Module[3]................................................................................................76
Paper Jams in Tray 5 (Bypass Tray)...........................................................................................77
Paper Jams in Trays 6 to 7 (High Capacity Feeder Tray)...........................................................78
Paper Jams in the Interposer .......................................................................................................78
Paper Jams in Lower Left Cover.................................................................................................79
Paper Jams inside body...............................................................................................................80
Paper Jams Inside Finisher Left Cover.......................................................................................83
Paper Jams Inside Finisher Right Cover .....................................................................................85
Paper Jams at Z Folding Unit......................................................................................................88
Paper Jams at Output Area of Finisher .......................................................................................92
Paper Jams at High Capacity Tray Unit......................................................................................94
Important • When a paper jam occurs, paper is sometimes torn and remains inside the machine if you
draw out a paper tray without checking the paper jam position. This may cause machine
malfunctions. Check where the paper jam occurred before remedying the problem.
• If a piece of jammed paper remains inside the machine, the paper jam message will not
disappear from the display.
• Paper jams can be remedied with the machine still on. When the power is turned off, all
information stored to the machine's memory will be erased.
• Do not touch components inside the machine. This can cause print defects.
74
Page 77

Paper Jams in Trays 1 to 4
Following describes how to remedy paper jams that occur on trays 1 to 4.
1 Pull out the tray where the paper
jam occurred.
Important • Paper is sometimes torn and
remains inside the machine if
you draw out a tray without
checking the paper jam
position. This may cause
machine malfunction. Check
where the paper jam occurred
before remedying the
problem.
2 Remove the jammed paper.
Important • If paper is torn, check for any
torn pieces of paper inside the
machine.
Paper Jams
3 Push the tray in gently until it comes to a stop.
Paper Jams in Transport Unit 4
Following describes how to remedy paper jams that occur on the Transport Unit[4].
1 Make sure that the machine has
stopped before opening the front
cover.
2 Pull out tray 1.
Problem Solving
6
75
Page 78

6 Problem Solving
3 Pull out transport unit [4].
4 Lift up the lever [4a], and then
remove the jammed paper.
Note • If paper is torn, check for any
5 Return lever [4a] to the original position.
torn pieces of paper inside the
machine.
Problem Solving
6
6 Push the tray 2 in gently until it comes to a stop.
Note • When tray 2 is pushed, transport unit [4] will be inserted in simultaneously.
7 Push the tray 1 in gently until it comes to a stop.
8 Close the front cover.
Note • A message will be displayed and the machine will not operate if the front cover is even
slightly open.
Paper Jams in Duplex Module[3]
Following describes how to remedy paper jams that occur on the duplex module [3].
1 Make sure that the machine has
stopped before opening the front
cover.
2 Pull out duplex module [3]
76
Page 79

3 Move the release lever [3a] to
remove the jammed paper.
Note • If paper is torn, check for any
torn pieces of paper inside the
machine.
4 Open the lever and then remove
the jammed paper.
Note • If paper is torn, check for any
torn pieces of paper inside the
machine.
5 Push the duplex module in gently
until it comes to a stop.
6 Close the front cover.
Note • A message will be displayed and the machine will not operate if the front cover is even
slightly open.
Paper Jams
Paper Jams in Tray 5 (Bypass Tray)
Following describes how to remedy paper jams that occur on tray 5 (bypass tray).
1 When high capacity feeder tray is
not installed, open the top cover of
paper tray 5 (bypass tray).
2 Remove the jammed paper and all
paper loaded in paper tray 5
(bypass tray).
Important • When two or more sheets of
paper are loaded, remove all
of the sheets from the tray.
Note • If paper is torn, check for any
torn pieces of paper inside the
machine.
Problem Solving
6
3 Fan the paper you removed making sure that all four corners are neatly aligned.
77
Page 80

Problem Solving
6 Problem Solving
4 Insert the paper into the tray with
the printing side facing up until its
leading edge lightly comes up
against the paper feed entrance.
Paper Jams in Trays 6 to 7 (High Capacity Feeder Tray)
Following describes how to remedy paper jams that occur on trays 6 to 7.
1 Pull out the tray where the paper
jam occurred.
Important • Paper is sometimes torn and
remains inside the machine if
you draw out a tray without
checking the paper jam
position.This may cause
machine malfunction. Check
where the paper jam occurred
before remedying the
problem.
2 Remove the jammed paper.
Note • If paper is torn, check for any
torn pieces of paper inside the
machine.
6
3 Push the tray in gently until it comes to a stop.
Paper Jams in the Interposer
Following describes how to remedy paper jams that occur on the Interposer.
1 Press <Cover> button.
78
Page 81

Paper Jams
2 Open the cover [1e], and then
remove the jammed paper and all
paper loaded in the Interposer.
Important • When two or more sheets of
paper are loaded, remove all
of the sheets from the tray.
Note • If paper is torn, check for any
torn pieces of paper inside the
machine.
3 Fan the paper you removed making sure that all four corners are neatly aligned, and
then load them again.
4 Push the cover [1e] until you hear it
click into place and the close it.
Note • A message will be displayed
and the machine will not
operate if the cover is even
slightly open.
Paper Jams in Lower Left Cover
The following describes how to remedy paper jams that occur at the left cover of the
body.
1 Open the lower left cover while
gripping the release lever.
2 Remove the jammed paper.
Note • If paper is torn, check for any
torn pieces of paper inside the
machine.
Problem Solving
6
3 Close the lower left cover.
Note • A message will be displayed and the machine will not operate if the lower left cover is even
slightly open.
79
Page 82

6 Problem Solving
Warning
Paper Jams inside body
The following describes how to remedy paper jams that occur at the transfer module of
the body.
1 Make sure that the machine has
stopped before opening the front
cover.
2 Turn the green lever at the center
of the transfer module to the right
until it is in the horizontal position
and then pull the transfer module
out to the end.
Problem Solving
6
3 Lift up the lever [2b] to remove the
jammed paper. Turn the knob [2b]
to remove the jammed paper as
necessary.
Never touch a labeled area
(found on the fuser unit or
nearby) indicating "High
Temperature" and "Caution".
Contact can lead to burns.
80
Page 83

4 If the jammed paper occurs at the
Warning
Warning
Warning
top of the transfer module or inside
the fuser unit, remove the jammed
paper by pulling it out towards the
left.
If the jammed paper cannot be
removed, lift up the lever [2c] and
then remove the jammed paper.
Important • Never touch six protrusion
which are visible when you lift
up the lever [2c].
Never touch a labeled area
(found on the fuser unit or
nearby) indicating "High
Temperature" and
"Caution".Contact can lead to
burns.
5 Lift up the lever [2c] as necessary,
shift the lever [2d], and then
remove the jammed paper.
Important • Never touch six protrusion
which are visible when you lift
up the lever [2c].
Paper Jams
Problem Solving
Never touch a labeled area
(found on the fuser unit or
nearby) indicating "High
Temperature" and "Caution".
Contact can lead to burns.
6 Turn the knob [2f] as necessary,
and then remove the jammed
paper.
Never touch a labeled area
(found on the fuser unit or
nearby) indicating "High
Temperature" and "Caution".
Contact can lead to burns.
6
81
Page 84

Problem Solving
Warning
6 Problem Solving
7 Shift the lever [3b] on the right of
the fuser unit as necessary and
then remove the jammed paper.
Important • If the jammed paper remains
inside and it is difficult to
remove, pull out the duplex
module after returning the
transfer module to the original
position. Then try again.
Never touch a labeled area
(found on the fuser unit or
nearby) indicating "High
Temperature" and "Caution".
Contact can lead to burns.
8 Insert the transfer module
completely and turn the green lever
[2] to the left.
Note • If the lever cannot be turned,
pull out the transfer module
halfway and push it in again.
6
9 Close the front cover.
Note • A message will be displayed and the machine will not operate if the front cover is even
slightly open.
82
Page 85

Paper Jams Inside Finisher Left Cover
This section describes how to remedy paper jams that occur at the following
locations:The references are described below.
Paper jams at lever 1a and Knob1c............................................................................................ 83
Paper jams at lever 1d ................................................................................................................ 84
Paper jams at lever 1b ................................................................................................................ 84
Note • Remedy differs according to the paper jam location. Follow the instructions displayed and
remove the jammed paper.
Paper jams at lever 1a and Knob1c
1 Make sure that the machine has
stopped, and then open the left
cover on the light finisher.
Paper Jams
Move lever [1a] downwards and
2
turn knob [1c] anti-clockwise.
Remove the jammed paper.
Note • If paper is torn, check for any
torn pieces of paper inside the
machine.
3 Return lever [1a] to the original
position.
4 Close the Finisher left cover.
Note • A message will be displayed and the machine will not operate if the Staple Finisher's left
cover is even slightly open.
Problem Solving
6
83
Page 86

6 Problem Solving
Paper jams at lever 1d
1 Make sure that the machine has
stopped, and then open the left
cover on the light finisher.
2 Move lever [1d] upwards and
remove the jammed paper.
Note • If paper is torn, check for any
torn pieces of paper inside the
machine.
Problem Solving
6
3 Return lever [1d] to the original
position.
4 Close the Finisher left cover.
Note • A message will be displayed and the machine will not operate if the Staple Finisher's left
cover is even slightly open.
Paper jams at lever 1b
1 Make sure that the machine has
stopped, and then open the left
cover on the light finisher.
84
2 Move lever [1b] rightwards and
remove the jammed paper.
Note • If paper is torn, check for any
torn pieces of paper inside the
machine.
Page 87
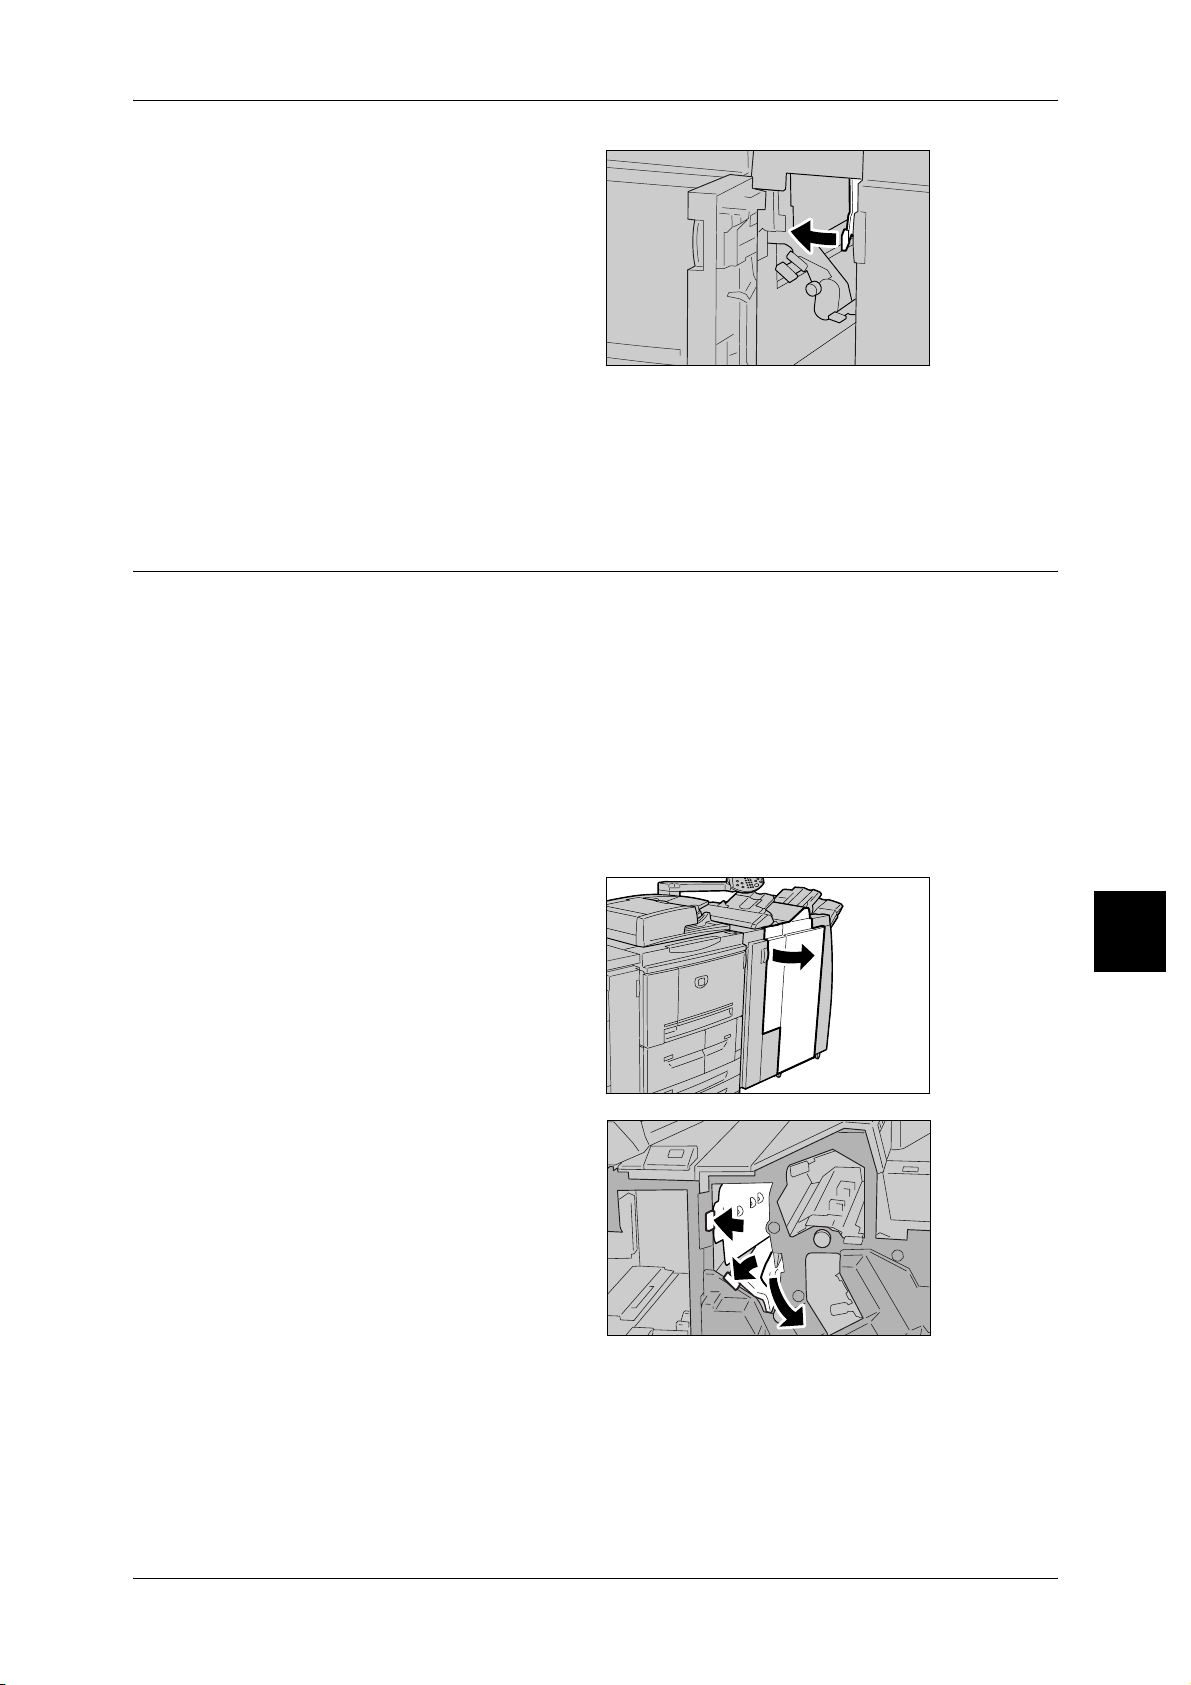
3 Return lever [1b] to the original
position.
4 Close the Finisher left cover.
Note • A message will be displayed and the machine will not operate if the Staple Finisher's left
cover is even slightly open.
Paper Jams Inside Finisher Right Cover
This section describes how to remedy paper jams that occur at the following
locations:The references are described below.
Paper jams at lever 3b and 3d..................................................................................................... 85
Paper jams at lever 3e and Knob3c............................................................................................ 86
Paper jams at lever 3g and Knob3f ............................................................................................ 87
Paper jams at lever 4b and Knob3a............................................................................................ 87
Note • Remedy differs according to the paper jam location. Follow the instructions displayed and
remove the jammed paper.
Paper Jams
Problem Solving
Paper jams at lever 3b and 3d
1 Make sure that the machine has
stopped, and then open the right
cover on the light finisher.
2 Move levers [3b] and [3d], and
remove the jammed paper.
Note • If paper is torn, check for any
torn pieces of paper inside the
machine.
6
85
Page 88

6 Problem Solving
3 Return lever [3b] and [3d] to the
original position.
4 Close the Finisher right cover.
Note • A message will be displayed and the machine will not operate if the Staple Finisher's right
cover is even slightly open.
Paper jams at lever 3e and Knob3c
1 Make sure that the machine has
stopped, and then open the right
cover on the light finisher.
Problem Solving
6
2 Move lever [3e] and turn knob [3c]
to the right. Remove the jammed
paper.
Note • If paper is torn, check for any
torn pieces of paper inside the
machine.
3 Return lever [3e] to the original
position.
86
4 Close the Finisher right cover.
Note • A message will be displayed and the machine will not operate if the Staple Finisher's right
cover is even slightly open.
Page 89
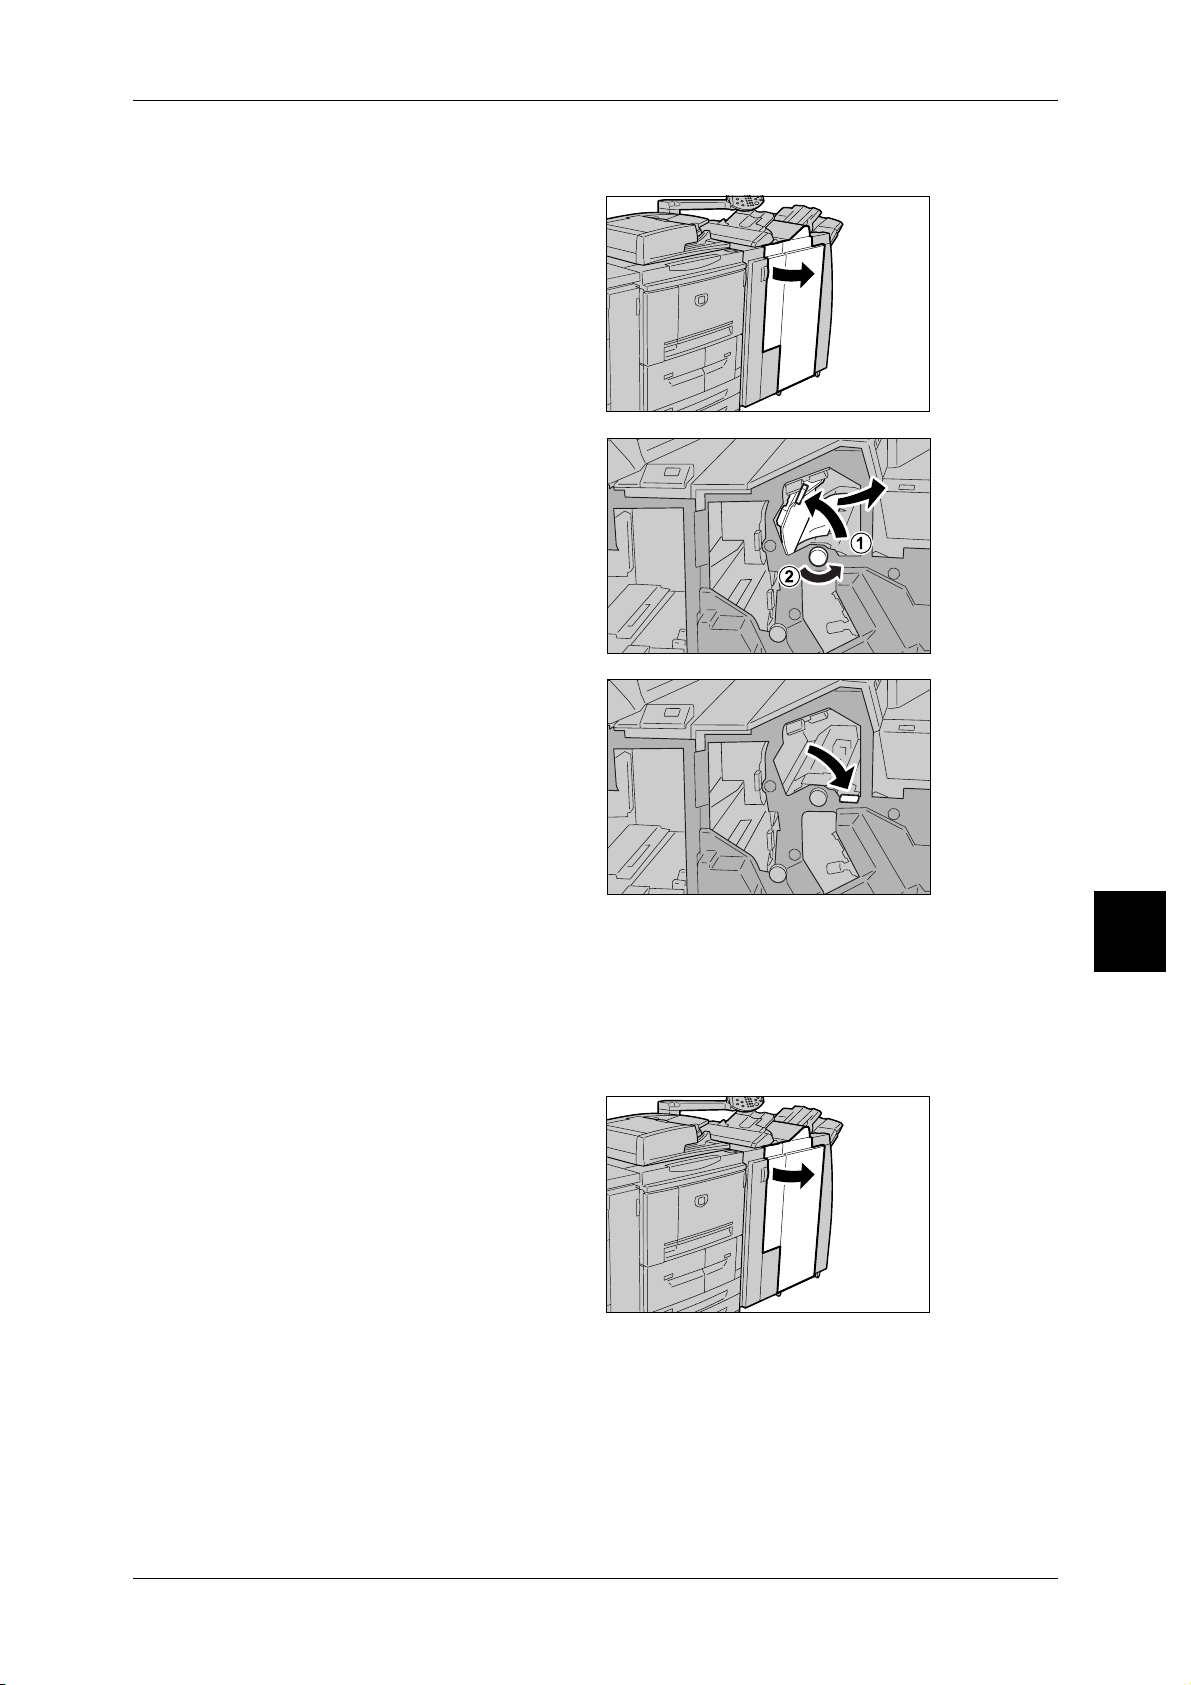
Paper jams at lever 3g and Knob3f
1 Make sure that the machine has
stopped, and then open the right
cover on the light finisher.
2 Move lever [3g] and turn knob [3f]
to the left. Remove the jammed
paper.
Note • If paper is torn, check for any
torn pieces of paper inside the
machine.
Paper Jams
3 Return lever [3g] to the original
position.
4 Close the Finisher right cover.
Note • A message will be displayed and the machine will not operate if the Staple Finisher's right
cover is even slightly open.
Paper jams at lever 4b and Knob3a
1 Make sure that the machine has
stopped, and then open the right
cover on the light finisher.
Problem Solving
6
87
Page 90
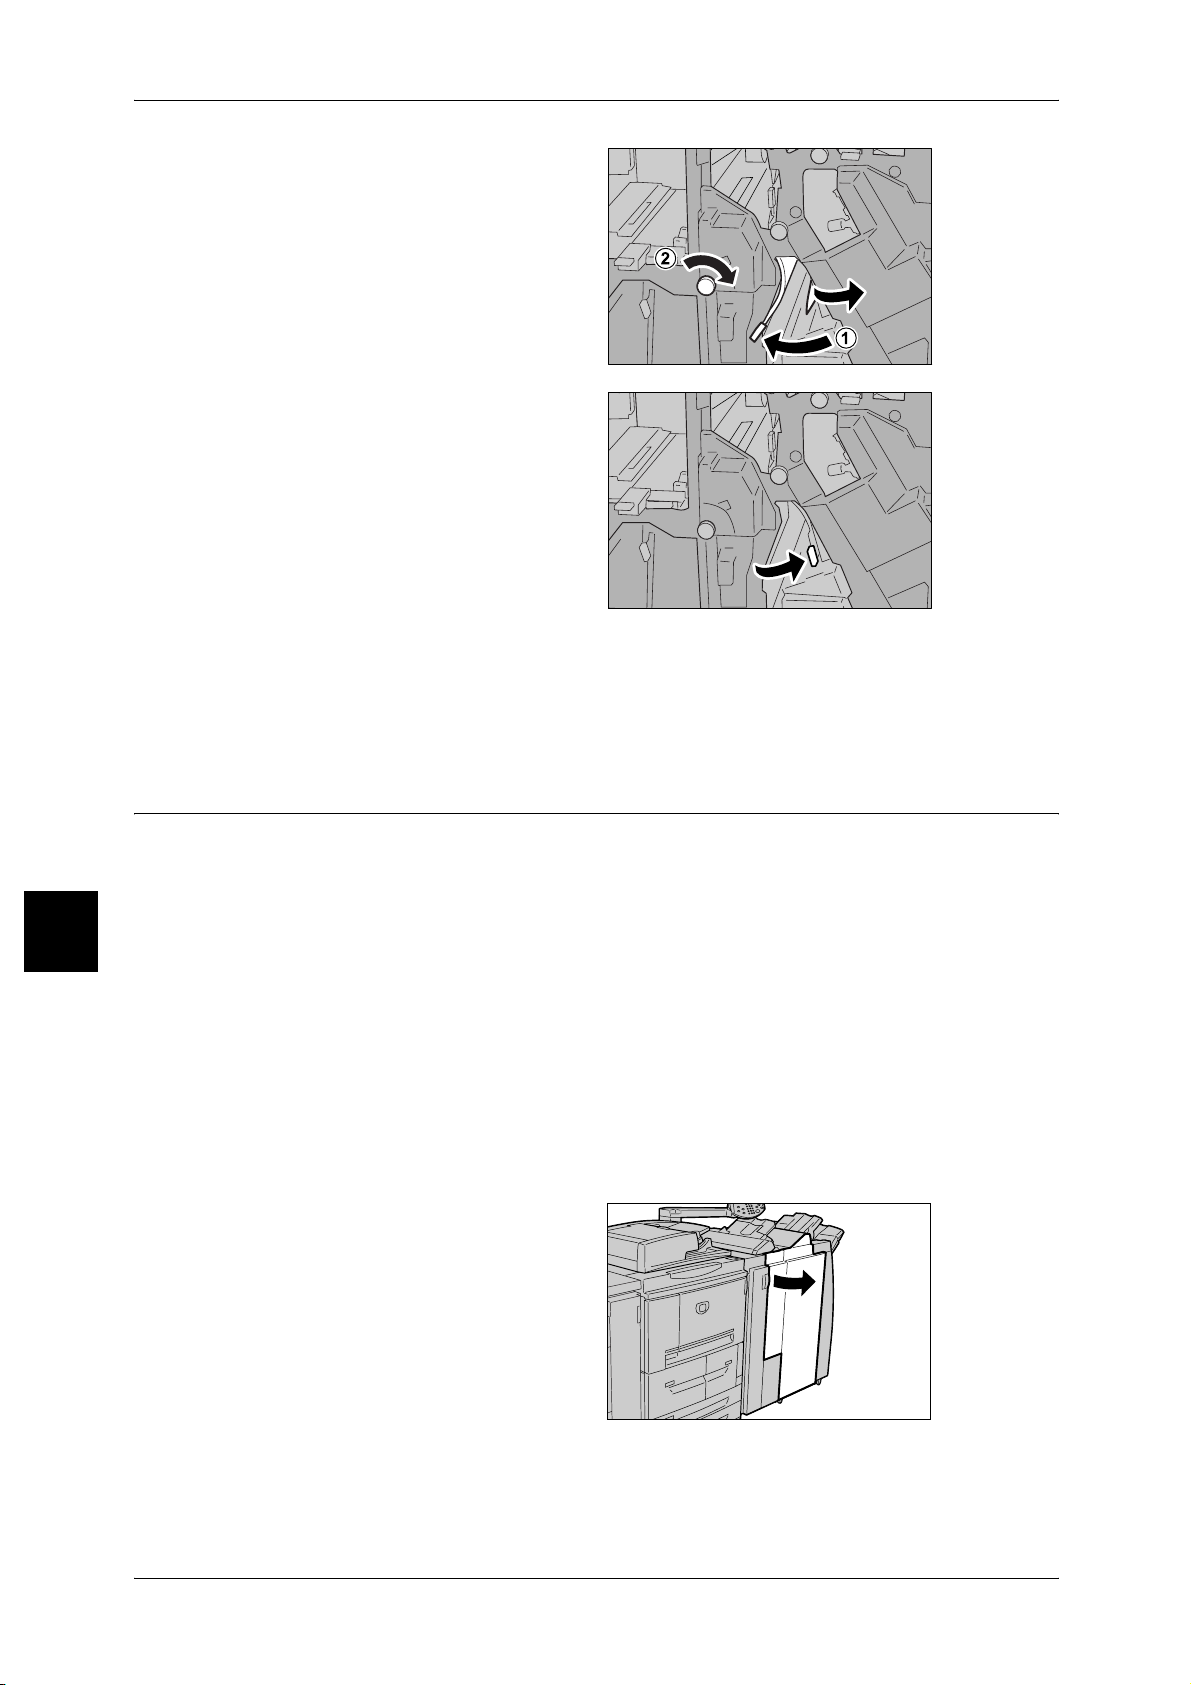
Problem Solving
6 Problem Solving
2 Move lever [4b], turn knob [3a] to
the right, and remove the jammed
paper.
Note • If paper is torn, check for any
torn pieces of paper inside the
machine.
3 Return lever [4b] to the original
position.
4 Close the Finisher right cover.
Note • A message will be displayed and the machine will not operate if the Staple Finisher's right
cover is even slightly open.
6
Paper Jams at Z Folding Unit
This section explains how to remove jammed paper from inside the Z folding unit when
this optional unit is installed in a finisher D or a booklet maker finisher.
This section describes how to remedy paper jams that occur at the following
locations:The references are described below.
Paper jams at lever 2a and Knob3a.............................................................................................88
Paper jams at lever 2b and Knob2c.............................................................................................89
Paper jams at knob 2c, levers 2e/2f and tri-fold output tray 2d..................................................90
Paper jams at tri-fold output tray 2d and lever 2g.......................................................................91
Paper jams at unit 4 and Knob4a ................................................................................................91
Note • Remedy differs according to the paper jam location. Follow the instructions displayed and
remove the jammed paper.
Paper jams at lever 2a and Knob3a
1 Make sure that the machine has
stopped, and then open the right
cover on the light finisher.
88
Page 91

2 Move lever [2a] and turn knob [3a]
anti-clockwise. Remove the
jammed paper.
Note • If paper is torn, check for any
torn pieces of paper inside the
machine.
3 Return lever [2a] to the original
position.
4 Close the Finisher right cover.
Note • A message will be displayed and the machine will not operate if the Staple Finisher's right
cover is even slightly open.
Paper Jams
Problem Solving
Paper jams at lever 2b and Knob2c
1 Make sure that the machine has
stopped, and then open the right
cover on the light finisher.
2 Move lever [2b], turn knob [2c] to
the right, and remove the jammed
paper.
Note • If paper is torn, check for any
torn pieces of paper inside the
machine.
3 Return lever [2b] to the original
position.
6
89
Page 92

6 Problem Solving
4 Close the Finisher right cover.
Note • A message will be displayed and the machine will not operate if the Staple Finisher's right
cover is even slightly open.
Paper jams at knob 2c, levers 2e/2f and tri-fold output tray 2d.
1 Make sure that the machine has
stopped, and then open the right
cover on the light finisher.
2 Pull out the tri-fold output tray [2d],
swing lever [2e], and remove the
jammed paper.
Note • If paper is torn, check for any
torn pieces of paper inside the
machine.
Problem Solving
6
3 If you cannot remove the paper in
Step 2, return lever [2e] to the
original position. Swing lever [2e],
turn knob [2c] to the right, then
remove the jammed paper.
Note • If paper is torn, check for any
torn pieces of paper inside the
machine.
4 Swing back the opened lever ([2f]
or [2e]), and push back the tri-fold
output tray [2d].
5 Close the Finisher right cover.
Note • A message will be displayed and the machine will not operate if the Staple Finisher's right
cover is even slightly open.
90
Page 93
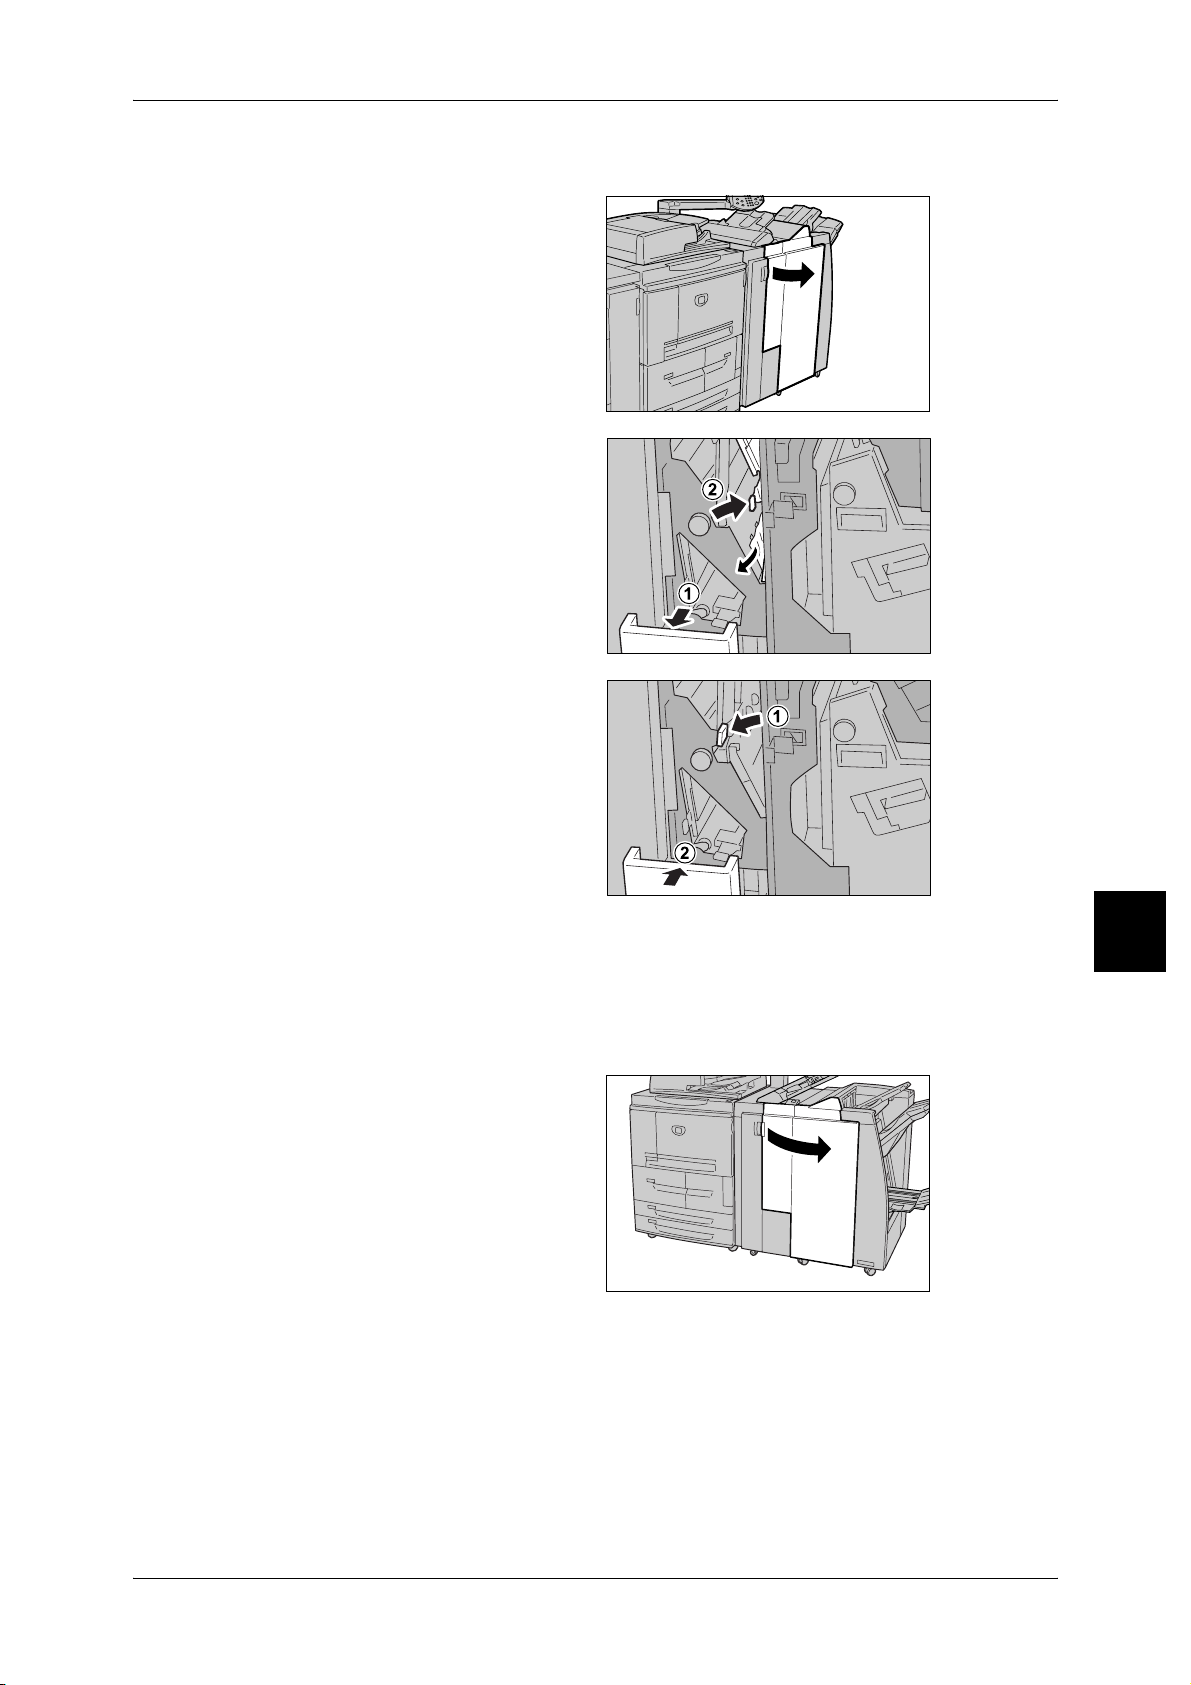
Paper jams at tri-fold output tray 2d and lever 2g
1 Make sure that the machine has
stopped, and then open the right
cover on the light finisher.
2 Pull out the tri-fold output tray [2d],
swing lever [2g], and remove the
jammed paper.
Note • If paper is torn, check for any
torn pieces of paper inside the
machine.
Paper Jams
3 Return lever [2g] to the original
position and push back the tri-fold
output tray [2d].
4 Close the Finisher right cover.
Note • A message will be displayed and the machine will not operate if the Staple Finisher's right
cover is even slightly open.
Paper jams at unit 4 and Knob4a
1 Make sure that the machine has
stopped, and then open the right
cover on the light finisher.
Problem Solving
6
91
Page 94

6 Problem Solving
2 Pull out unit 4.
3 Turn knob [4a] to the left to remove
all the jammed paper from the left
side of the unit 4.
Note • If paper is torn, check for any
4 Return unit 4 to the original position.
torn pieces of paper inside the
machine.
Problem Solving
6
5 Close the Finisher right cover.
Note • A message will be displayed and the machine will not operate if the Staple Finisher's right
cover is even slightly open.
Paper Jams at Output Area of Finisher
This section describes how to remedy paper jams that occur at the following locations:
Following are place to refer.
Paper jams at output tray.............................................................................................................92
Paper jams at finisher tray...........................................................................................................93
Paper jams at booklet output tray................................................................................................93
Note • Remedy differs according to the paper jam location. Follow the instructions displayed and
remove the jammed paper.
Paper jams at output tray
1 Remove jammed paper from the
output tray.
Note • If paper is torn, check for any
torn pieces of paper inside the
machine.
92
2 Close and open the right cover of the finisher.
Note • A message will be displayed and the machine will not operate if the Staple Finisher's right
cover is even slightly open.
Page 95

Paper jams at finisher tray
1 Remove jammed paper from the
finisher tray.
Note • If paper is torn, check for any
torn pieces of paper inside the
machine.
2 Close and open the right cover of the finisher.
Note • A message will be displayed and the machine will not operate if the Staple Finisher's right
cover is even slightly open.
Paper jams at booklet output tray
1 Make sure that the machine has
stopped, and then open the right
cover on the light finisher.
Paper Jams
2 Turn knob 4a to the right to remove
the jammed paper at the booklet
output tray.
Note • If paper is torn, check for any
torn pieces of paper inside the
machine.
3 Close the Finisher right cover.
Note • A message will be displayed and the machine will not operate if the Staple Finisher's right
cover is even slightly open.
Problem Solving
6
93
Page 96

6 Problem Solving
Paper Jams at High Capacity Tray Unit
This section describes how to remedy paper jams that occur at the following locations:
The references are described below.
Paper jams in Lower Left Cover.................................................................................................94
Paper jams at lever 1a and Knob1c.............................................................................................95
Paper jams at lever 1d .................................................................................................................96
Paper jams at lever 1b .................................................................................................................95
Note • Remedy differs according to the paper jam location. Follow the instructions displayed and
remove the jammed paper.
Paper jams in Lower Left Cover
1 Open the front cover of the high
capacity tray unit.
Problem Solving
6
2 Open the lower left cover while
gripping the release lever 1.
3 Remove the jammed paper.
Note • If paper is torn, check for any
torn pieces of paper inside the
machine.
4 Close the lower left cover 1.
5 Close the front cover of the high capacity tray unit.
Note • A message will be displayed and the machine will not operate if the High Capacity Tray
Unit’s front cover is even slightly open.
94
Page 97

Paper jams at lever 1a and Knob1c
1 Open the front cover of the high
capacity tray unit.
2 Move lever 1a to the rightward and
turn knob 1c to the right. Remove
the jammed paper.
Note • If paper is torn, check for any
torn pieces of paper inside the
machine.
Paper Jams
3 Return lever [1a] to the original
position.
4 Close the front cover of the high capacity tray unit.
Note • A message will be displayed and the machine will not operate if the High Capacity Tray
Paper jams at lever 1b
1 Open the front cover of the high
capacity tray unit.
Problem Solving
6
Unit’s front cover is even slightly open.
95
Page 98

6 Problem Solving
2 Move lever [1b] to the rightwards
and turn knob [1c] to the right.
Remove the jammed paper.
Note • If paper is torn, check for any
3 Return lever [1b] to the original
position.
torn pieces of paper inside the
machine.
Problem Solving
6
4 Close the front cover of the high capacity tray unit.
Note • A message will be displayed and the machine will not operate if the High Capacity Tray
Unit’s front cover is even slightly open.
Paper jams at lever 1d
1 Open the front cover of the high
capacity tray unit.
2 Move lever [1d] upwards and
remove the jammed paper.
Note • If paper is torn, check for any
torn pieces of paper inside the
machine.
96
Page 99

3 Return lever [1d] to the original
position.
4 Close the front cover of the high capacity tray unit.
Note • A message will be displayed and the machine will not operate if the High Capacity Tray
Unit’s front cover is even slightly open.
Paper Jams
Problem Solving
6
97
Page 100

6 Problem Solving
Document Jams
If a document jams on the document feeder, the machine stops, and an error message
is displayed on the display. Remedy the document jam according to the instructions
displayed, and then load the document again on the document feeder.
This section describes how to remedy paper jams that occur at the following locations:
Document jams at cover..............................................................................................................98
Document jams at output area...................................................................................................100
Note • Remedy differs according to the document jam location.Follow the instructions displayed
and remove the jammed document.
Document jams at cover
1 Lift the latch of the DADF top
cover, until it is completely open.
Note • Unlatch the document
scanner cover completely to
stabilize it. Gently open the
covers.
Problem Solving
6
2 Open the left cover until it comes to
a stop.
3 If the document is not caught in the
input section, you can remove it.
4 If there are instructions to open the
inner cover, lift up the lever with the
green seal on it, and open the inner
cover. Remove the jammed
document.
98
 Loading...